

Page 1
Denver MAXX
Electronic Precision Scales/Balances
Elektronische Präzisionswaagen
Balances électroniques d’analyse et de précision
Balanzas electrónicas de precisión
Operating Instructions/Betriebsanleitung/
Mode d’emploi/Manual de instrucciones
Page 2

English page 3
In cases involving questions of
interpretation, the German-language
version shall prevail.
Deutsch Seite 20
Im Auslegungsfall ist die
deutsche Sprache maßgeblich.
Français page 37
En cas de questions concernant
l’interprétation, la version
en langue allemande fera autorité.
Español página 54
En caso de interpretación,
la versión en lengua alemana
será determinante.
2
Page 3

3
Contents
Page
Warnings and Safety Precautions . . . . . . . . . . . . . . . . . . . . . . . . . . . . . . . . . . . . . 4
Getting Started. . . . . . . . . . . . . . . . . . . . . . . . . . . . . . . . . . . . . . . . . . . . . . . . . . . . . 5
Operation . . . . . . . . . . . . . . . . . . . . . . . . . . . . . . . . . . . . . . . . . . . . . . . . . . . . . . . . . 8
Basic Weighing Function. . . . . . . . . . . . . . . . . . . . . . . . . . . . . . . . . . . . . . . . . . . . 8
Description of the Keys. . . . . . . . . . . . . . . . . . . . . . . . . . . . . . . . . . . . . . . . . . . . . 8
Application Programs . . . . . . . . . . . . . . . . . . . . . . . . . . . . . . . . . . . . . . . . . . . . . . . 9
Toggling between Weight Units . . . . . . . . . . . . . . . . . . . . . . . . . . . . . . . . . . . . . 9
Counting . . . . . . . . . . . . . . . . . . . . . . . . . . . . . . . . . . . . . . . . . . . . . . . . . . . . . . . . . 10
Weighing in Percent. . . . . . . . . . . . . . . . . . . . . . . . . . . . . . . . . . . . . . . . . . . . . . . . 11
“Hold” Display. . . . . . . . . . . . . . . . . . . . . . . . . . . . . . . . . . . . . . . . . . . . . . . . . . . . 12
Totalizing. . . . . . . . . . . . . . . . . . . . . . . . . . . . . . . . . . . . . . . . . . . . . . . . . . . . . . . . . 13
Specific Gravity . . . . . . . . . . . . . . . . . . . . . . . . . . . . . . . . . . . . . . . . . . . . . . . . . . . 14
Calibration/Span Adjustment . . . . . . . . . . . . . . . . . . . . . . . . . . . . . . . . . . . . . . . . . 15
Configuration (Setup Menu). . . . . . . . . . . . . . . . . . . . . . . . . . . . . . . . . . . . . . . . . . 16
Error Codes. . . . . . . . . . . . . . . . . . . . . . . . . . . . . . . . . . . . . . . . . . . . . . . . . . . . . . . . 17
Overview. . . . . . . . . . . . . . . . . . . . . . . . . . . . . . . . . . . . . . . . . . . . . . . . . . . . . . . . . . 18
Specifications. . . . . . . . . . . . . . . . . . . . . . . . . . . . . . . . . . . . . . . . . . . . . . . . . . . . . 18
Accessories (Options) . . . . . . . . . . . . . . . . . . . . . . . . . . . . . . . . . . . . . . . . . . . . . . 19
C Marking . . . . . . . . . . . . . . . . . . . . . . . . . . . . . . . . . . . . . . . . . . . . . . . . . . . . . . . 19
Page 4

4
Installation
– It is recommended to connect
Denver accessories and options,
as these are optimally designed
for use with your balance/scale.
– Do not open the balance/scale
housing as this will void the
manufacturer’s warranty.
Warnings and Safety Precautions
Safety Information
l To prevent damage to the equip-
ment, please read these operating
instructions carefully before using
your balance/scale.
! Do not use this equipment in
hazardous areas.
! Make sure the voltage rating print-
ed on the power supply is identical
to your local line voltage.
! Use only commercially available
9V batteries (not included).
If desired, you can use a rechargeable battery.
– The balance/scale is energized at
all times unless you disconnect the
AC adapter and, if connected,
the battery.
– Protect the AC adapter from con-
tact with liquid
! Exposure to excessive electromag-
netic interference can cause the
readout value to change. Once the
disturbance has ceased, the instrument can be used again in accordance with its intended purpose.
Page 5
5
Getting Started
Equipment Supplied
– Balance/scale
– Weighing pan
– Plug-in AC adapter
Additional equipment with models
MXX-612, MXX-412, MXX-212,
MXX-601:
– Calibration weight
Additional equipment with model
MXX-123:
– Calibration weight
– Round glass draft shield
– Level indicator and adjustable feet
Installation
Choose a location that is not subject
to the following negative influences:
– Heat (heater or direct sunlight)
– Drafts from open windows and
doors
– Extreme vibrations during
weighing
– Excessive moisture
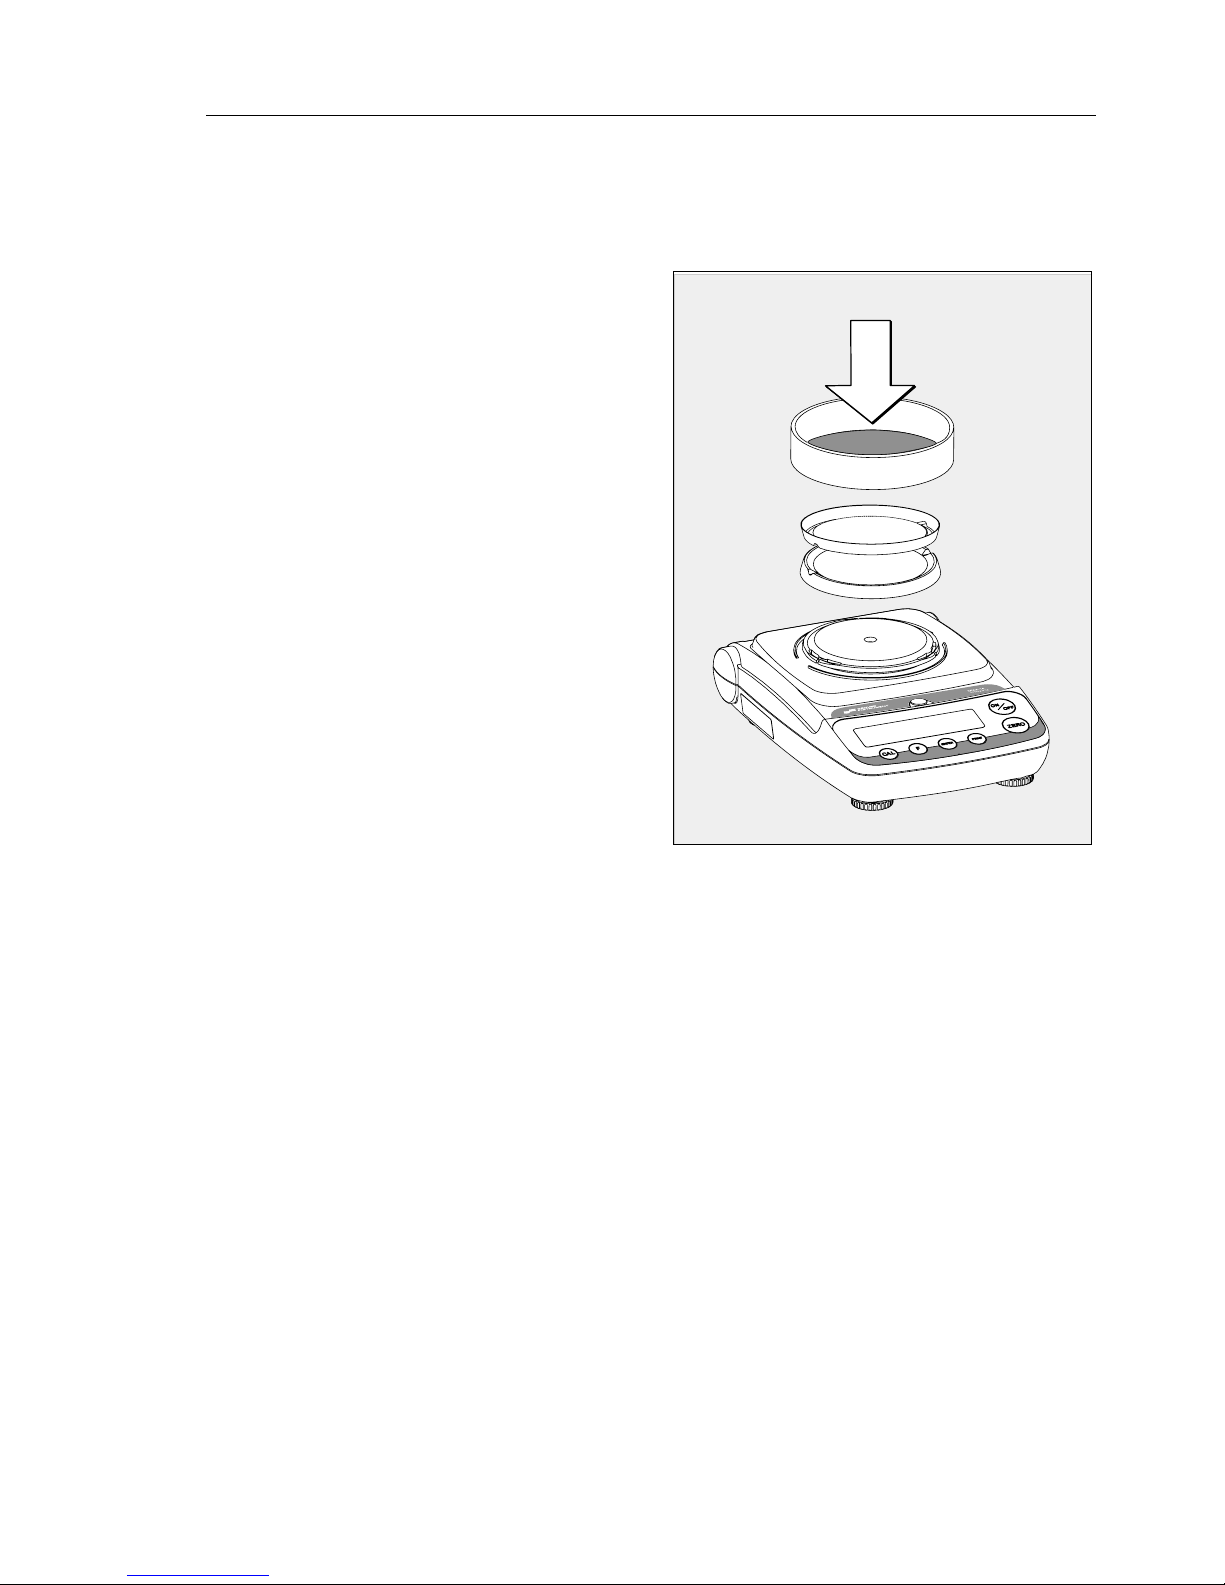
Setting Up the Balance/Scale
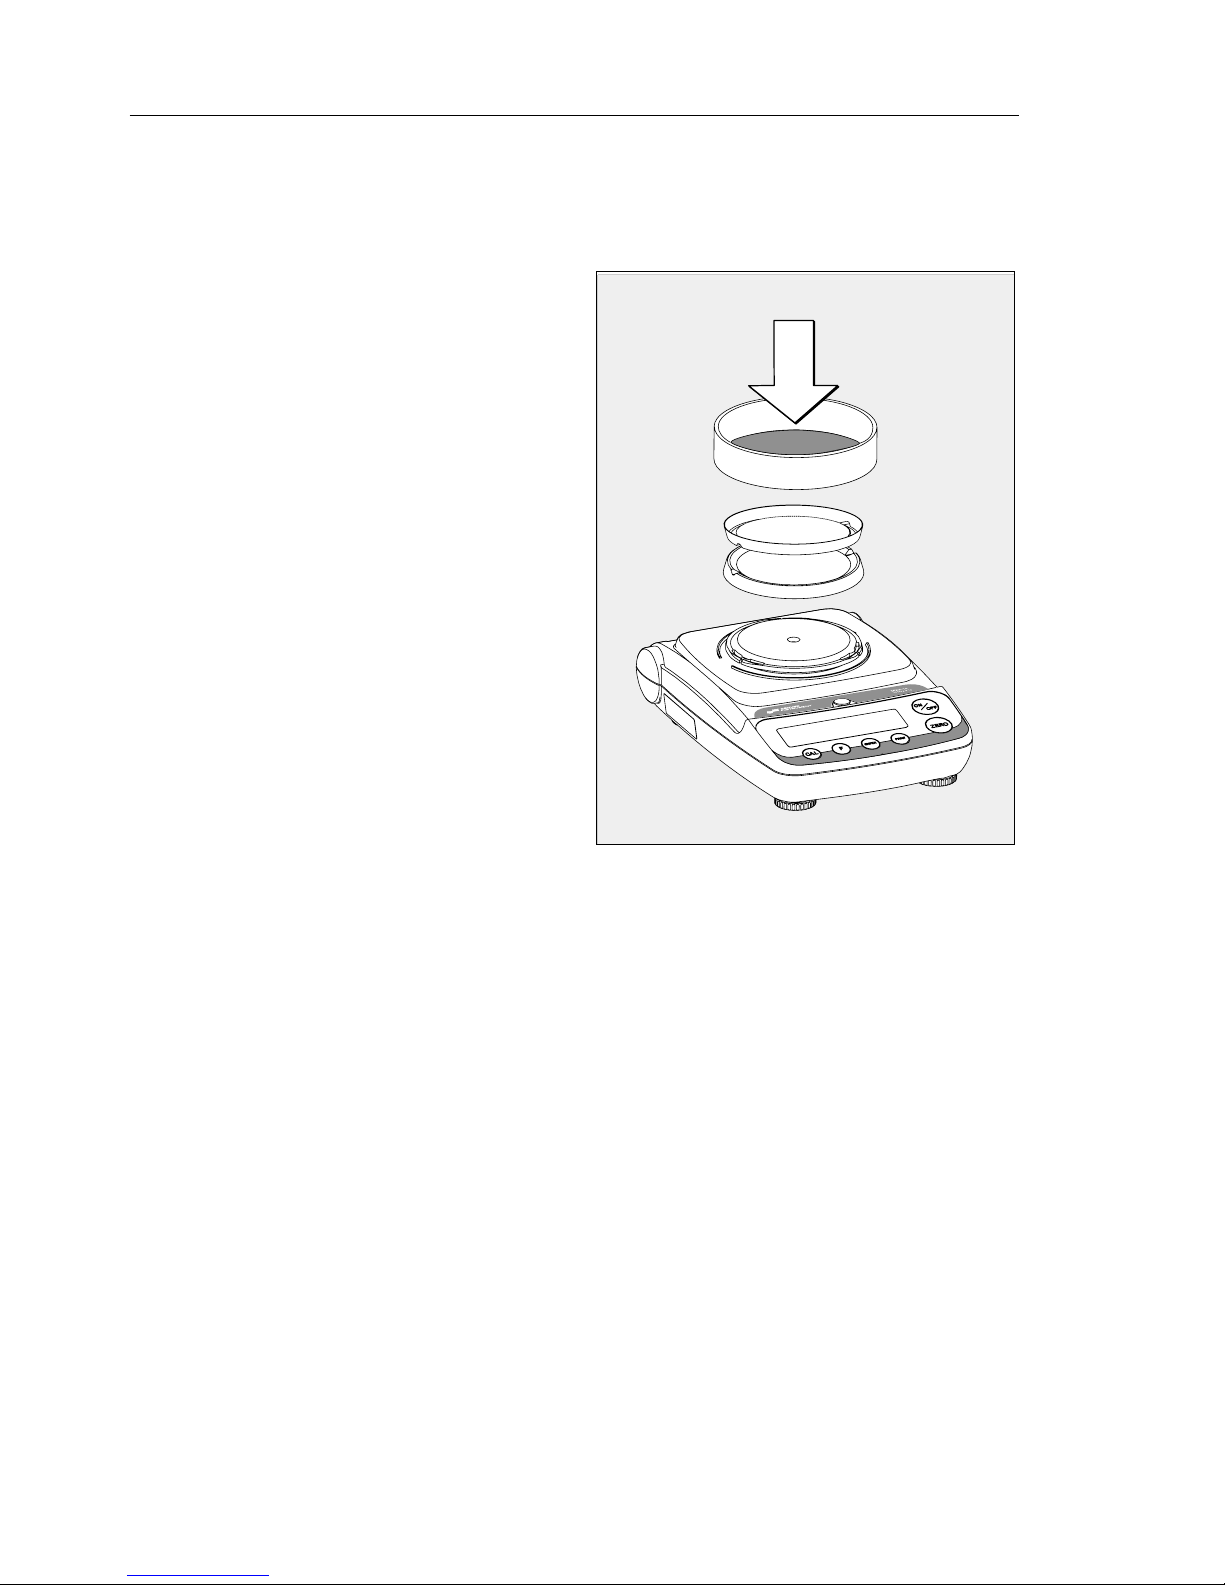
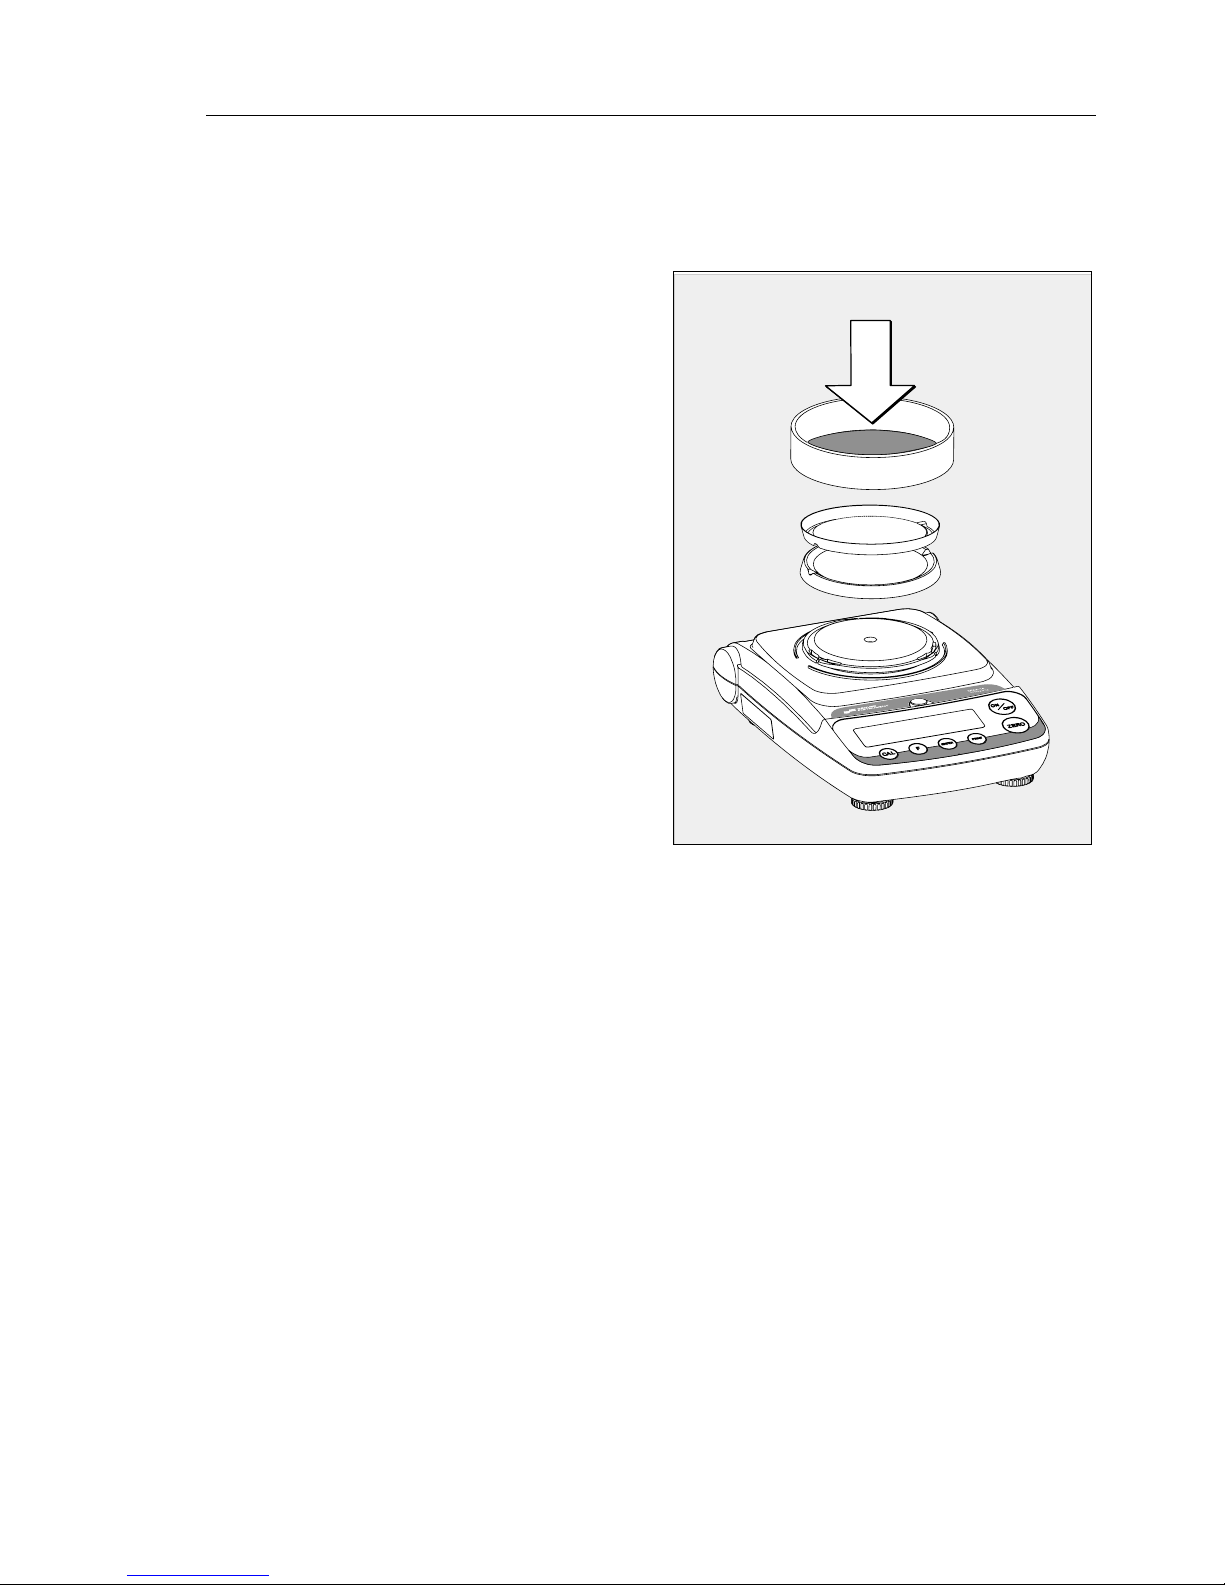
l Place the components on the
balance/scale in the following
order:
– Reversible round weighing pan
– Round glass draft shield on model
MXX-123
Page 6
6
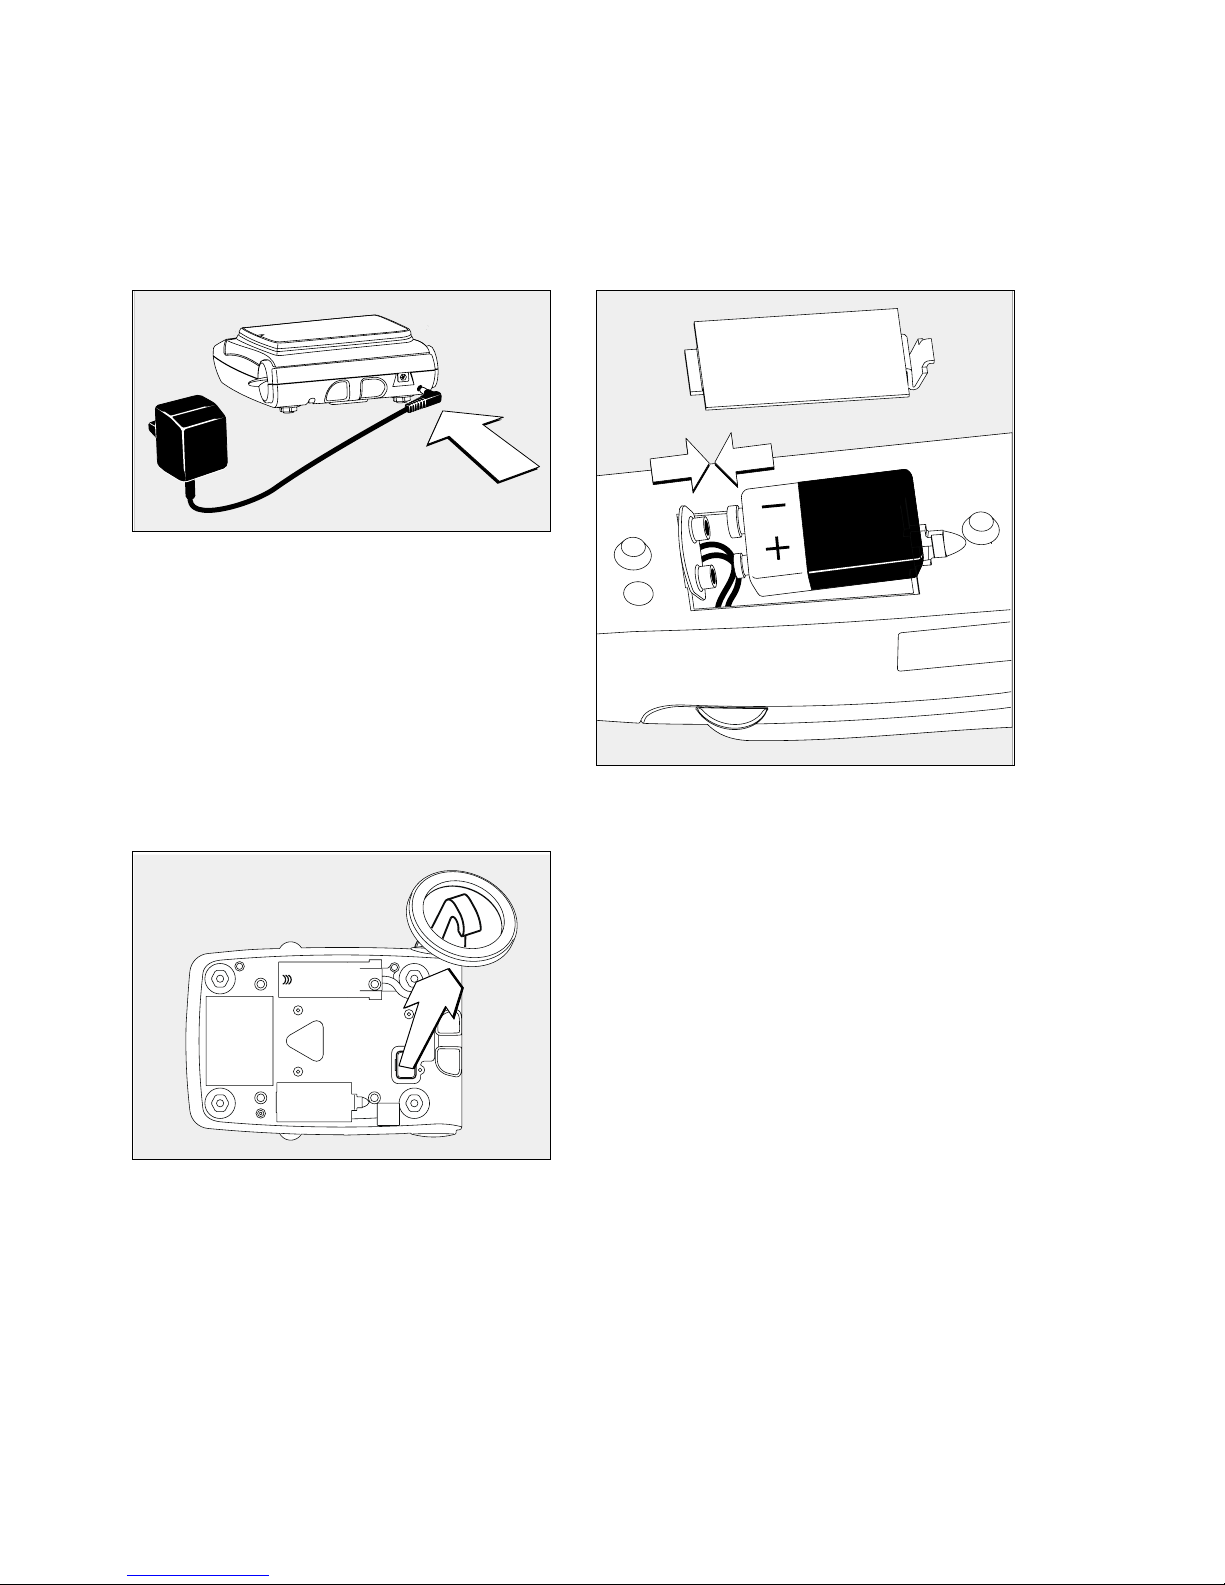
Connecting the Balance/Scale
to AC Power
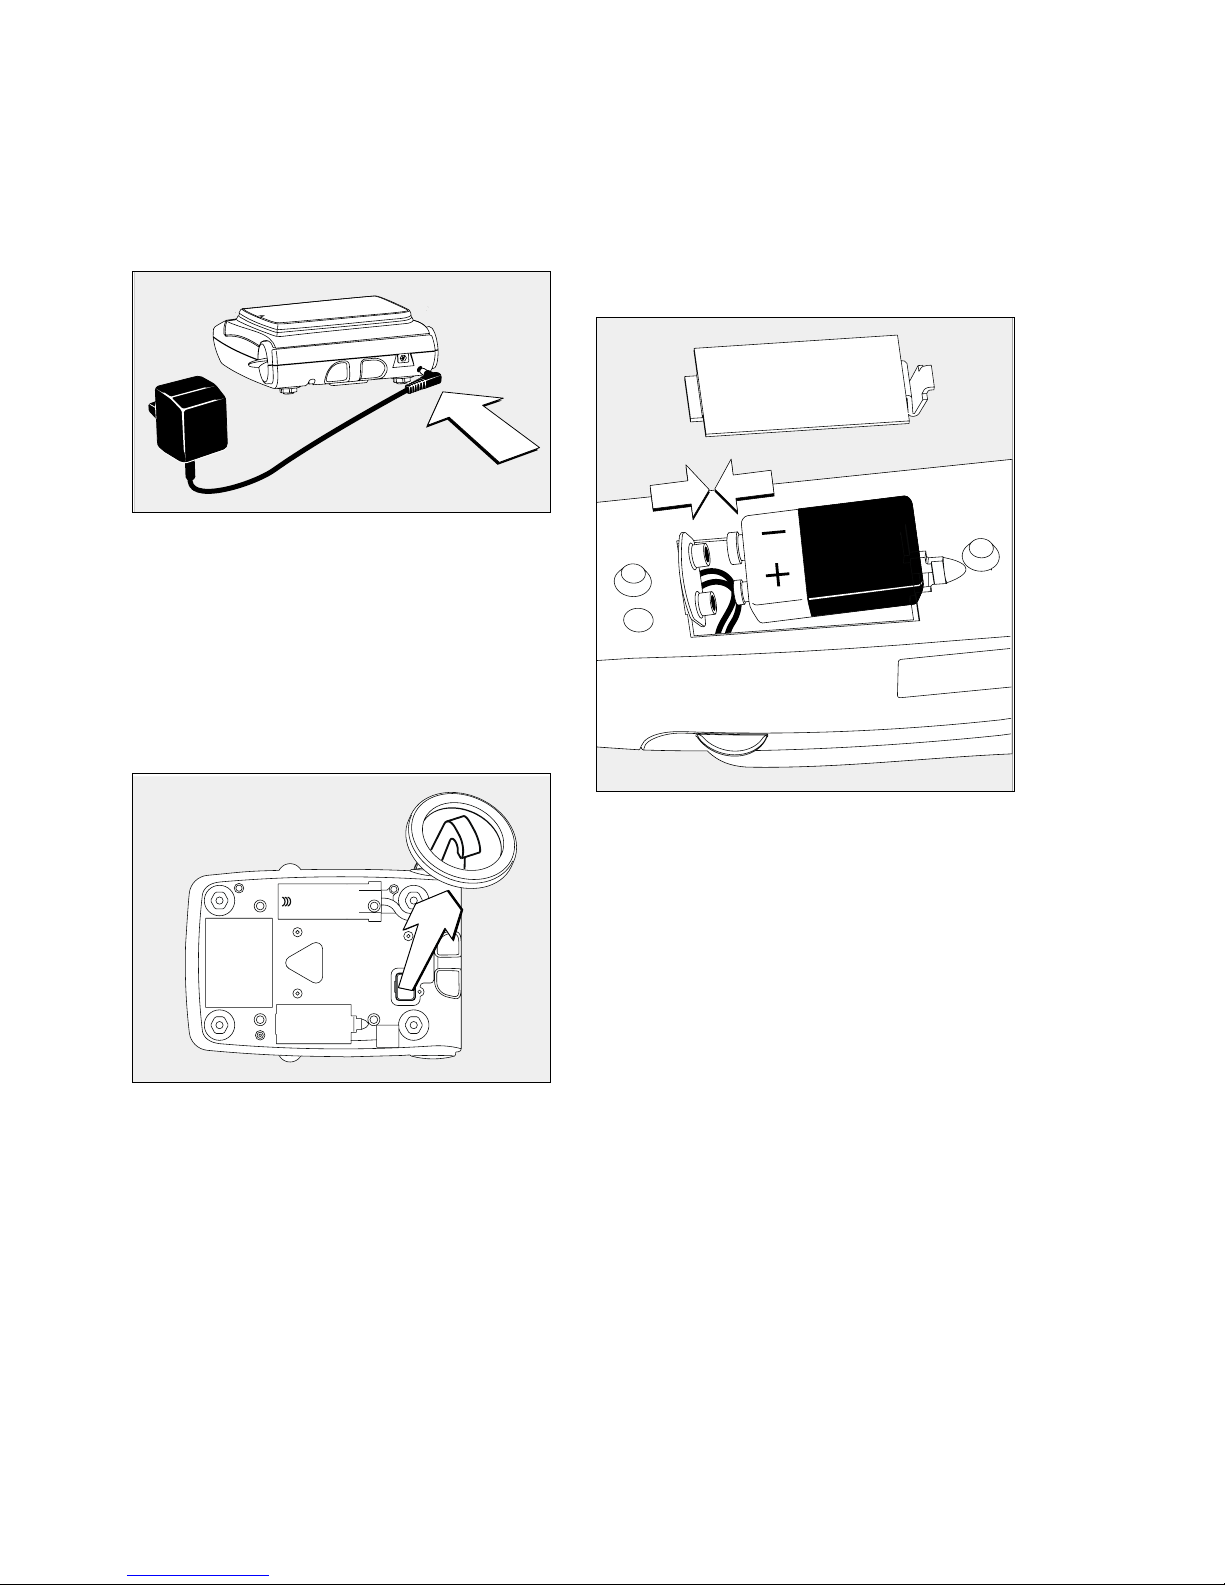
! Use only the AC adapter for
optimal performance and safety.
§ Insert plug into the jack
(located on back of balance/scale)
§ Plug the AC adapter into an electrical outlet
! LISTED power supply 11 V–21 V
compliant with NEC Class 2 output.
Below-Balance/Under-Scale Weighing
A port for a below-balance weighing
hanger is located on the bottom of
the balance/scale.
§ Open the cover plate on the
bottom of the balance/scale.
§ Attach the sample (e.g., using
a suspension wire) to the hanger.
$ Install a shield for protection
against drafts if necessary.
Installing the Battery
(not for model MXX-123)
$ Batteries are not included with the
equipment supplied
! Use only commercially available
9V batteries.
! If you use a rechargeable battery,
recharge it with an external battery
charger.
§ Lay the balance/scale on its side
§ Open the battery compartment:
remove the compartment cover
§ Install the battery in the compartment
$ Make sure the polarity is correct.
! Close the battery compartment:
slide the cover into position until it
snaps into place
! Do not throw away used batteries
with normal household waste.
Rechargeable batteries contain
toxic materials and must be disposed of in accordance with local
waste disposal regulations.
Page 7
7
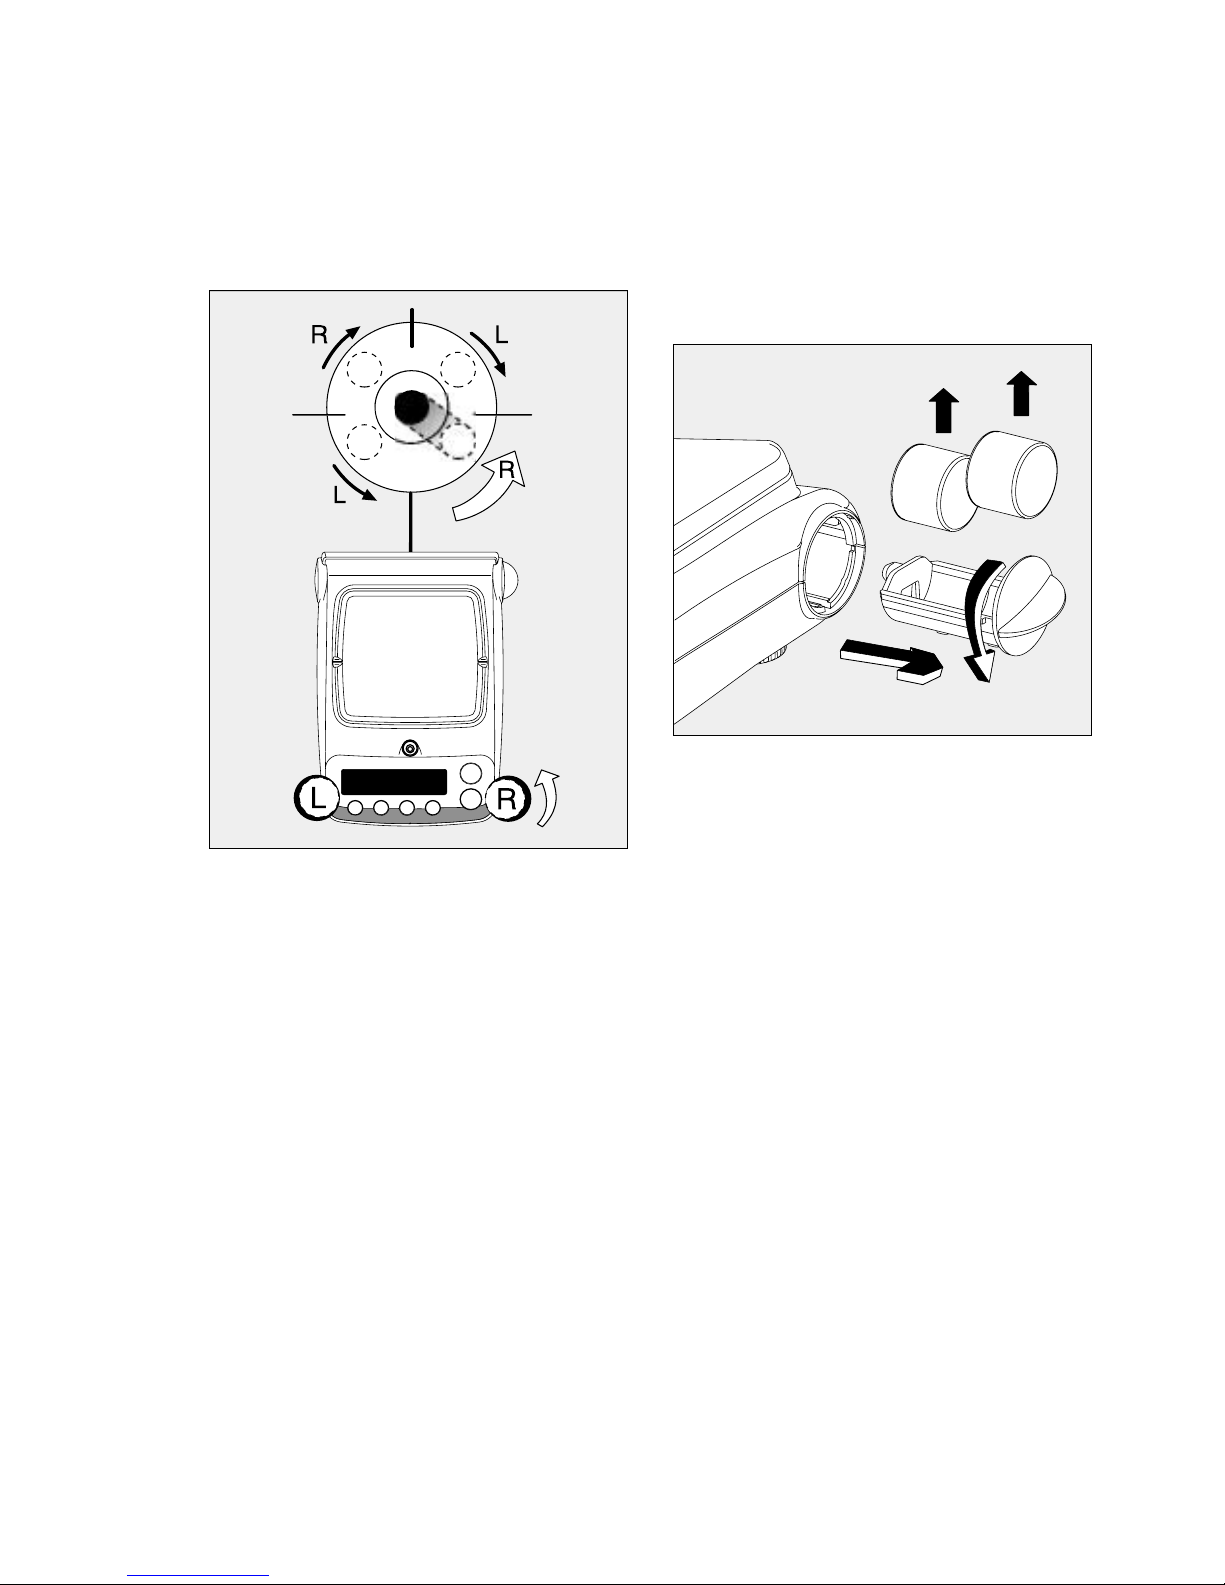
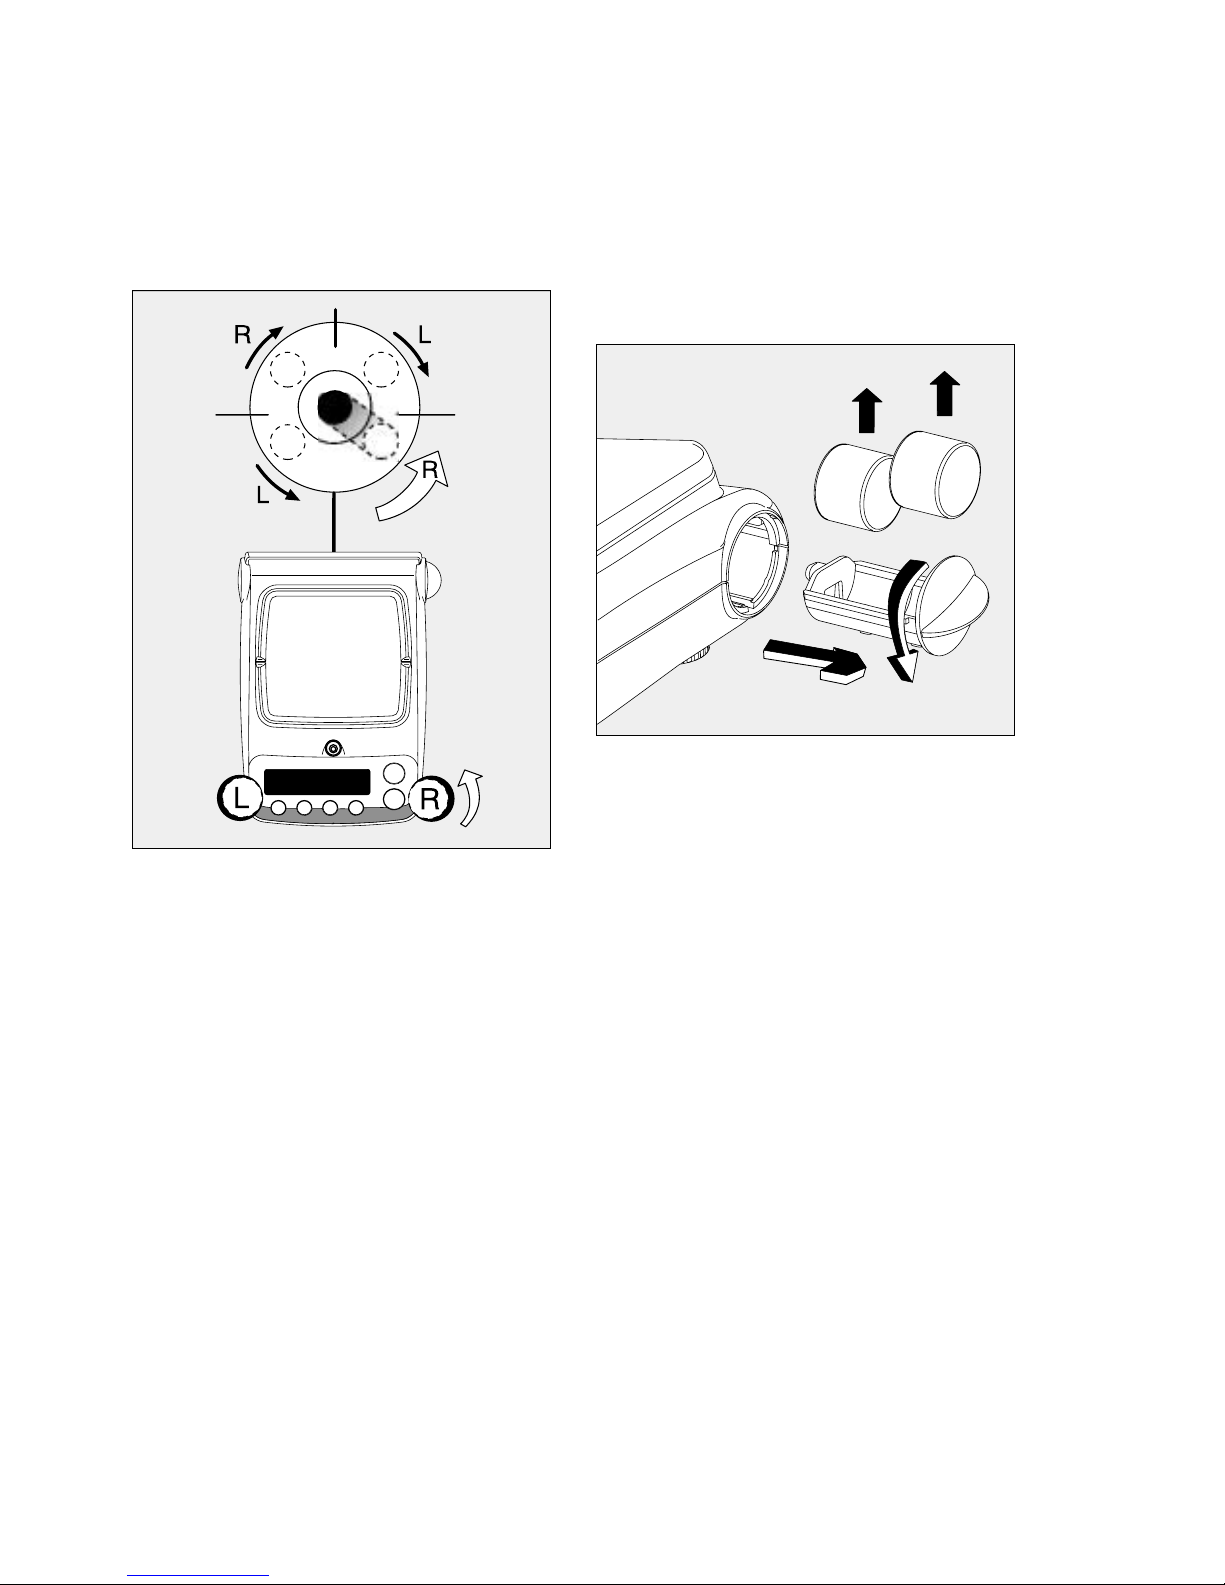
Leveling the Balance/Scale
(only for model MXX-123)
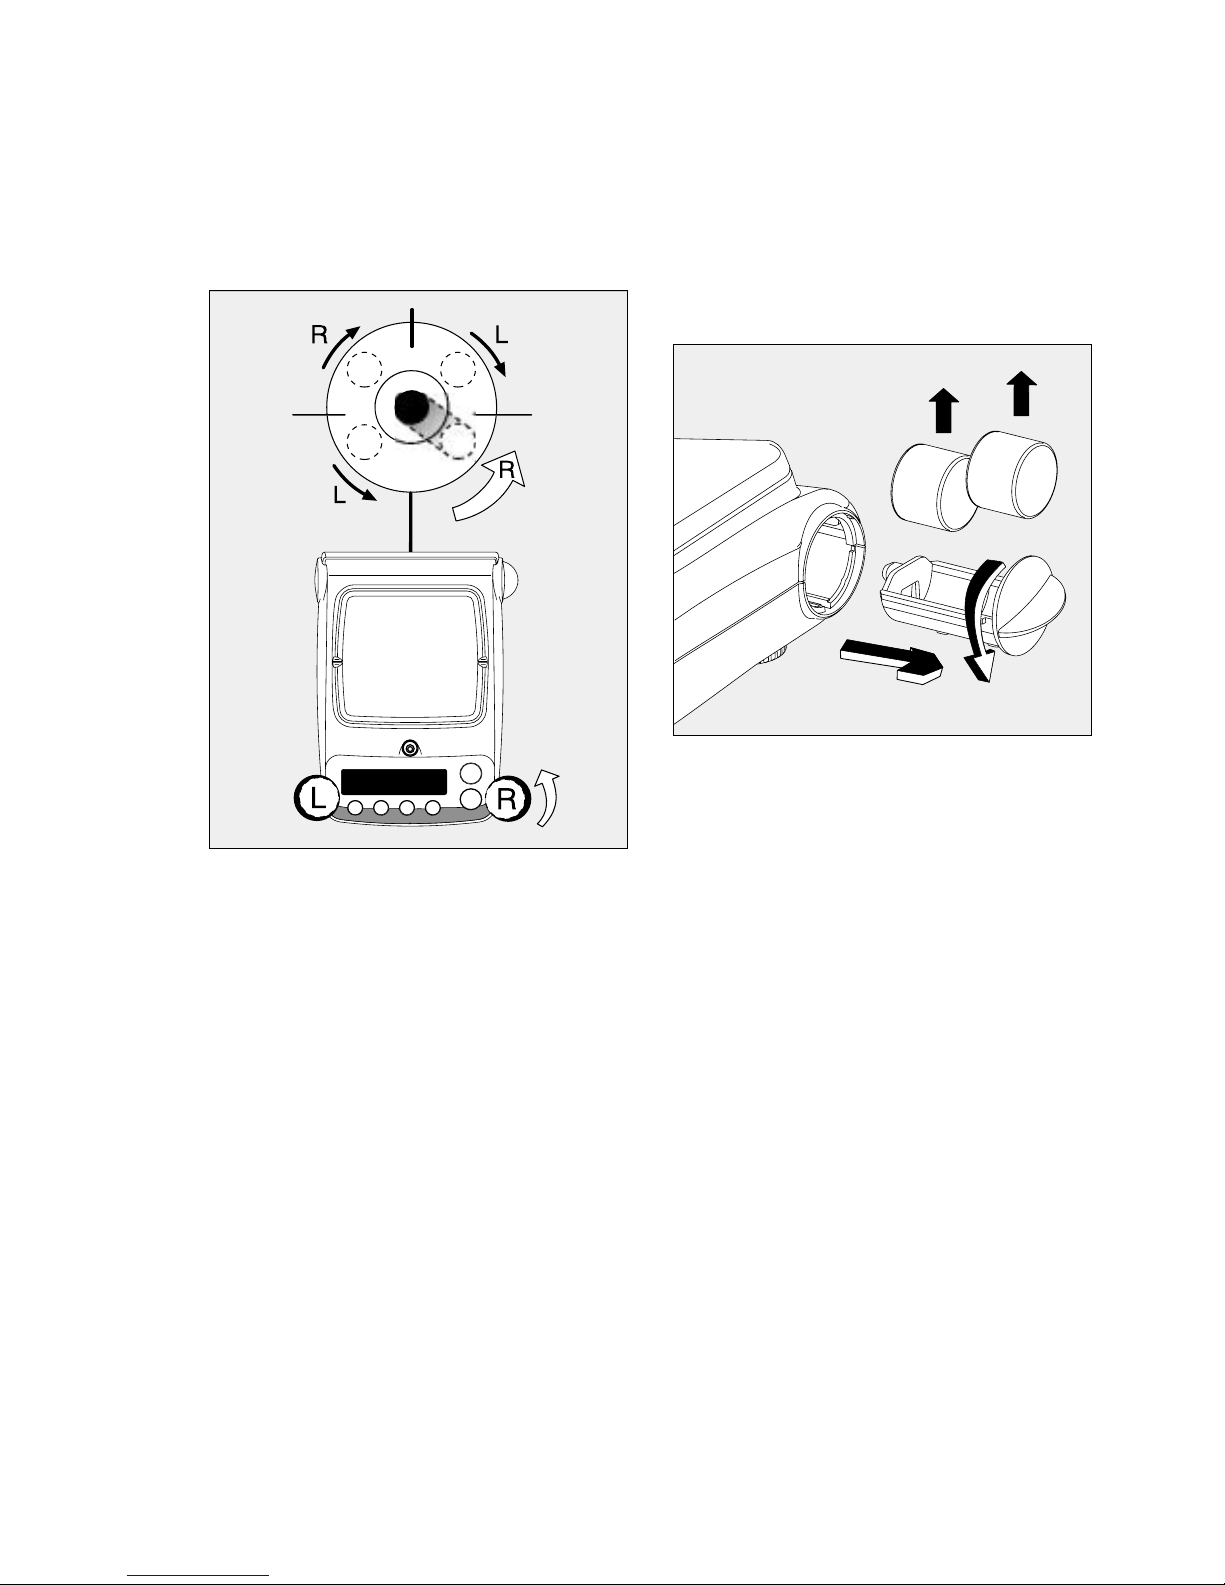
§ Always level the balance/scale
again any time after it has been
moved to a different location.
Example: moving bubble from
R to L
§ Turn the feet as shown in the
diagram until the air bubble is centered within the circle of the level
indicator.
> In most cases this will require
several adjustment steps.
Removing Weights for
Calibration/Span Adjustment
(only for models MXX-612, MXX-412,
MXX-212, MXX-601, MXX-123)
§ Grasp the tab to turn and pull out
the weight compartment.
$ Follow instructions on page 15 for
calibration/span adjustment.
Warmup Time for Model MXX-123:
To ensure accurate results, the scale
must warm up for 1 hour before
operation. Only after this time will
the scale have reached the required
operating temperature.
Page 8
Operation
Basic Weighing Function
Features
– Zeroing the balance/scale
You can zero the balance/scale within
the entire weighing range, up to the
maximum capacity.
Preparation
§ Switch on the balance/scale:
press the (ON/OFF) key
§ If necessary, zero the balance/
scale: press the (ZERO) key
$ If necessary, change the configura-
tion settings: see the chapter
entitled “Configuration”
$ If desired, load the factory settings:
see the chapter entitled
“Configuration,” menu item 9.– 1
Additional functions:
$ Switching off the balance/scale:
press the (ON/OFF) key
$ Battery operation: automatic shut-off
after 2, 5 or 10 minutes; see chapter
on configuration. Example: 2 minutes. If the weight readout remains
unchanged and no keys are pressed
for at least two minutes, the battery
symbol “ “ starts flashing.
After another 2 seconds, the
balance/scale shuts off automatically, unless a key is pressed.
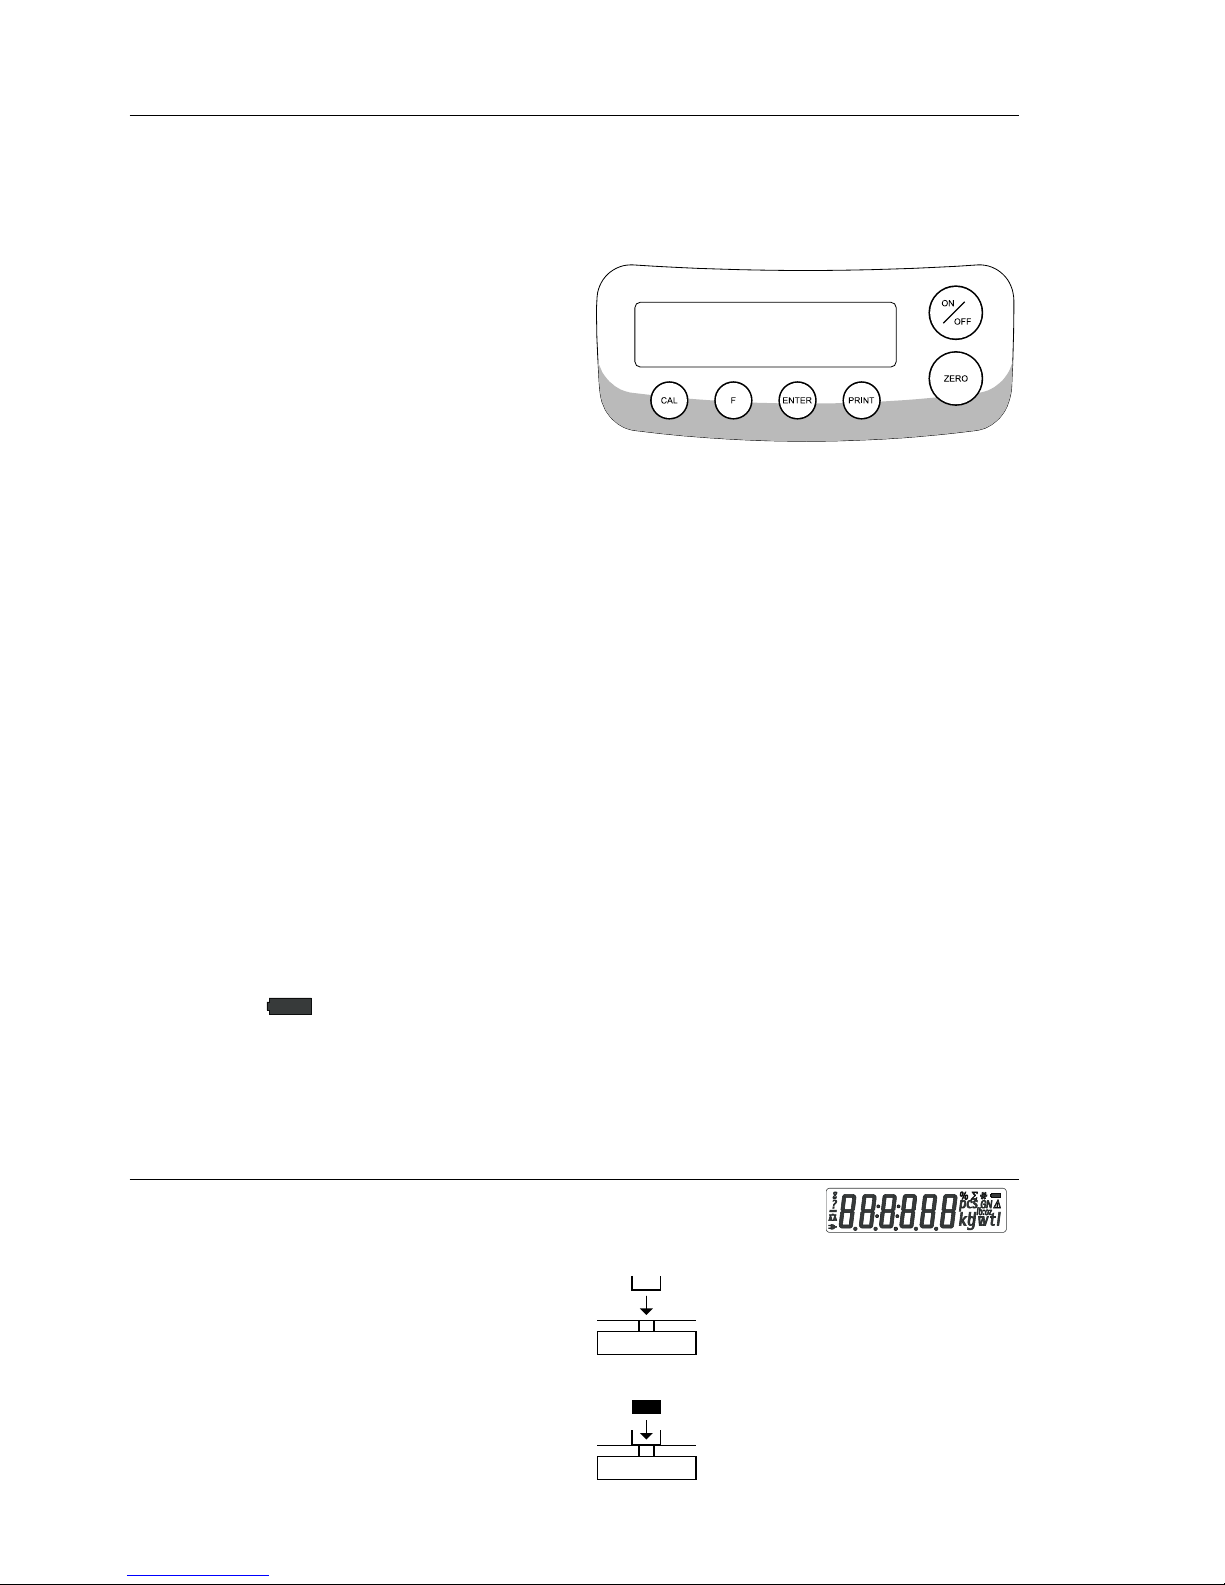
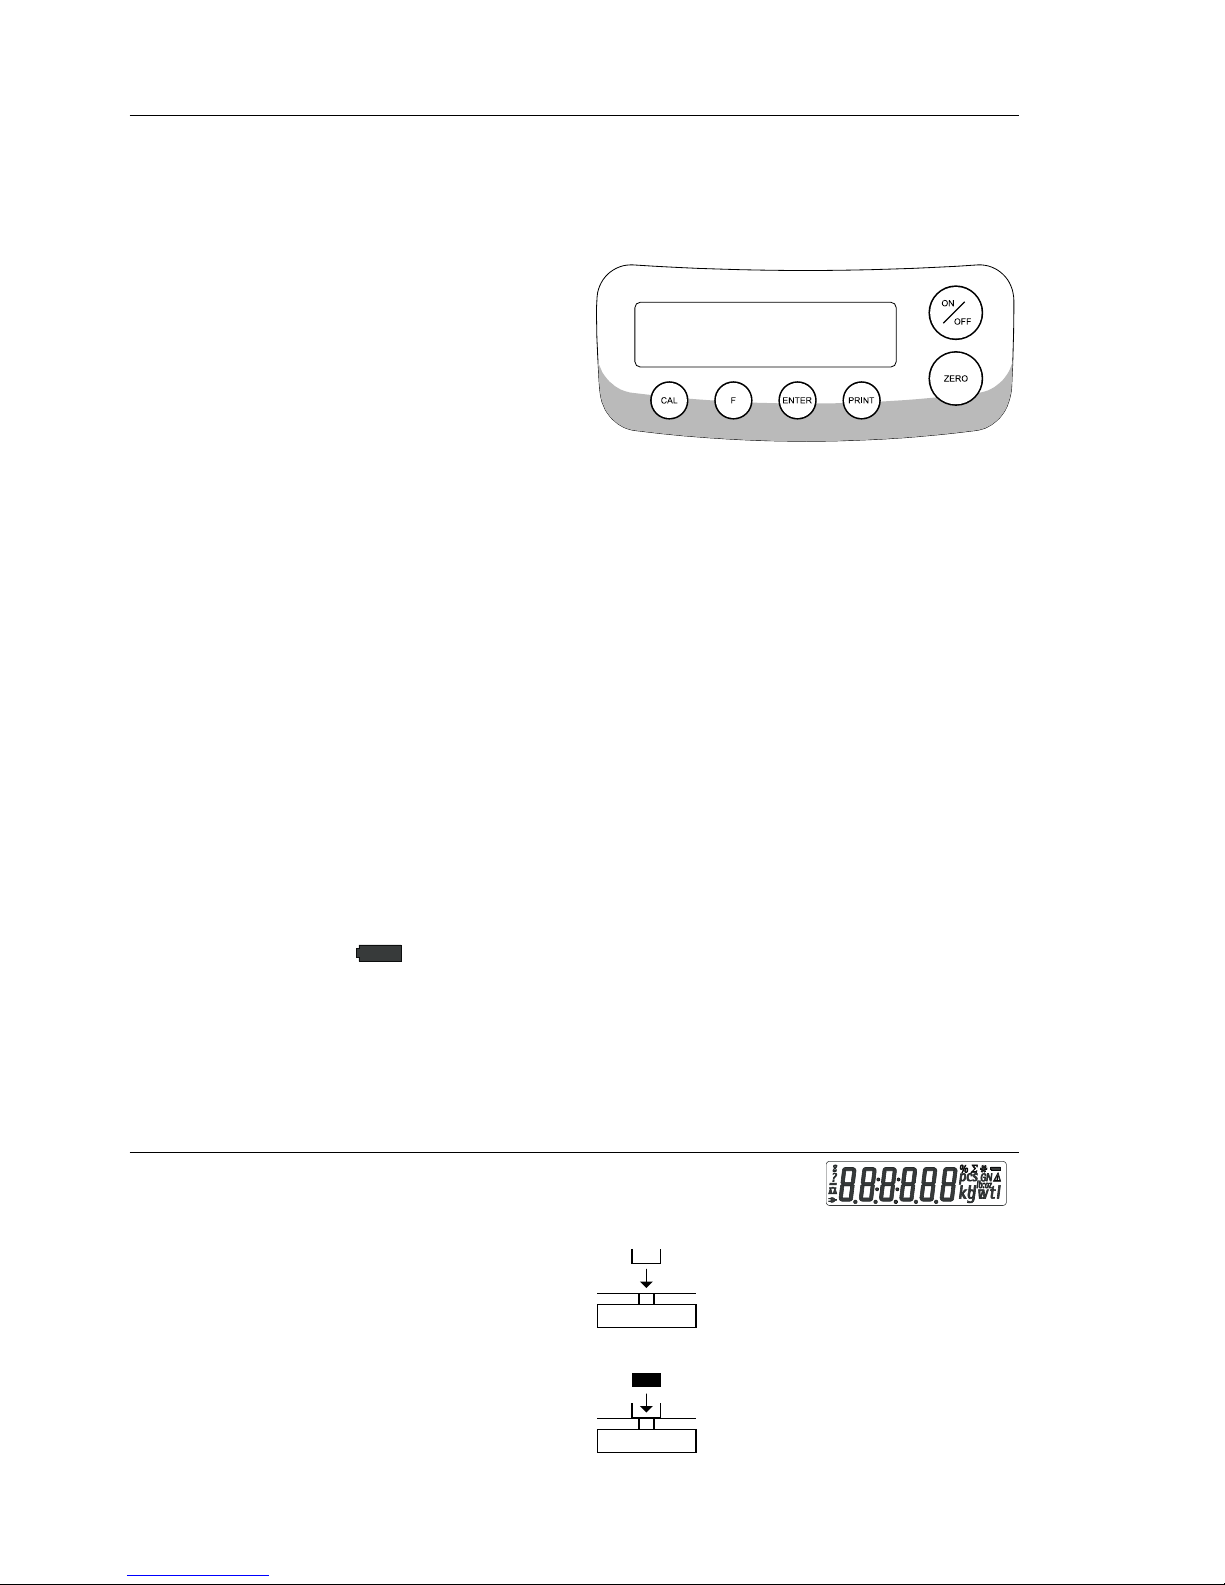
Description of the Keys
(ON/OFF) On/off key: switches the
balance/scale on and off or
switches it to the standby
mode.
Battery operation: on;
turns backlight on; off
(ZERO) Zeros the balance/scale;
press and hold 2 seconds:
opens the application menu
(CAL) Starts calibration/adjust-
ment
(F) Starts an application pro-
gram; scrolling in application menu, configuration
menu and calibration menu
(ENTER) Confirms the selected
setting; exits application,
configuration & calibration
menu if key is pressed
and held for at least
2 seconds.
(PRINT) Generates a printout or
data output
Example: Determine weight of sample
Step Key (or instruction) Display
1. Switch on the balance/scale (ON/OFF)
Self-test runs
Display: Software version r 31.01 g
2. Place container on the balance/scale 52.0 g
(in this example, 52 g)
3. Zero the balance/scale (ZERO) 0.0 g
4. Place sample in container on 150.2 g
balance/scale (in this example, 150.2 g).
8
Page 9
9
Application Programs
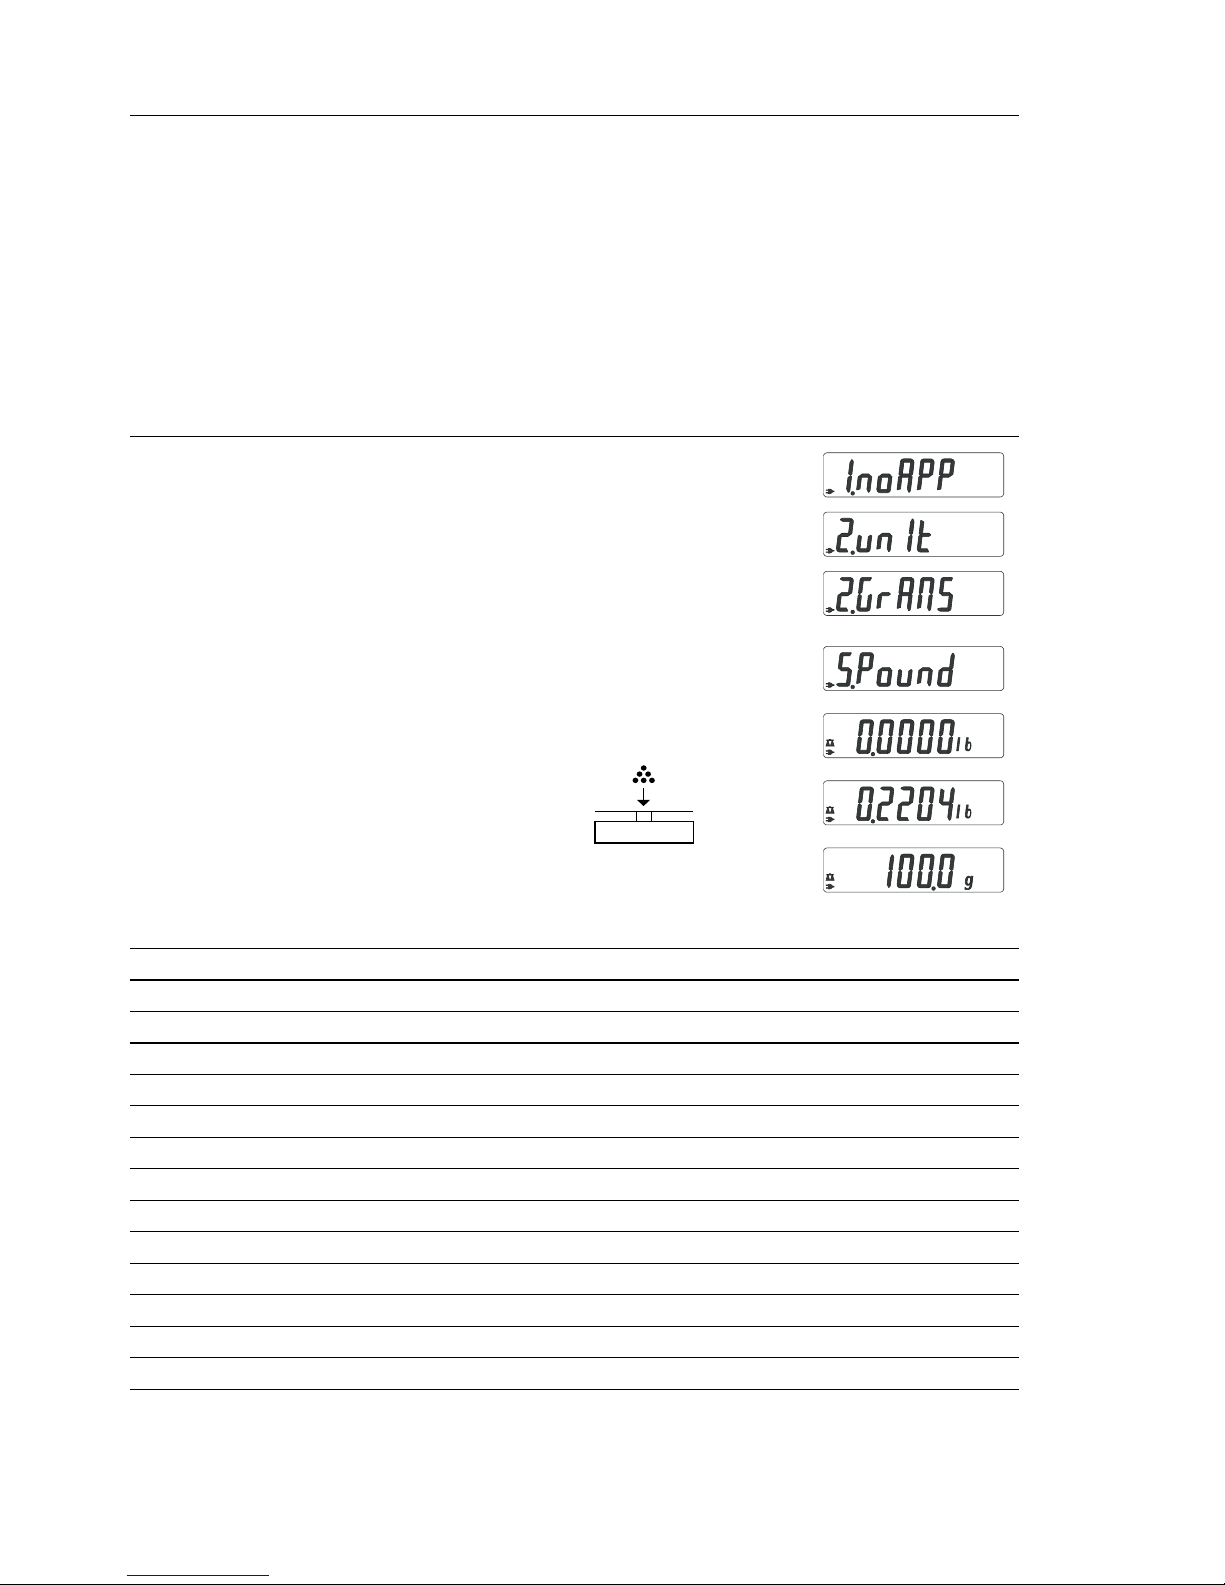
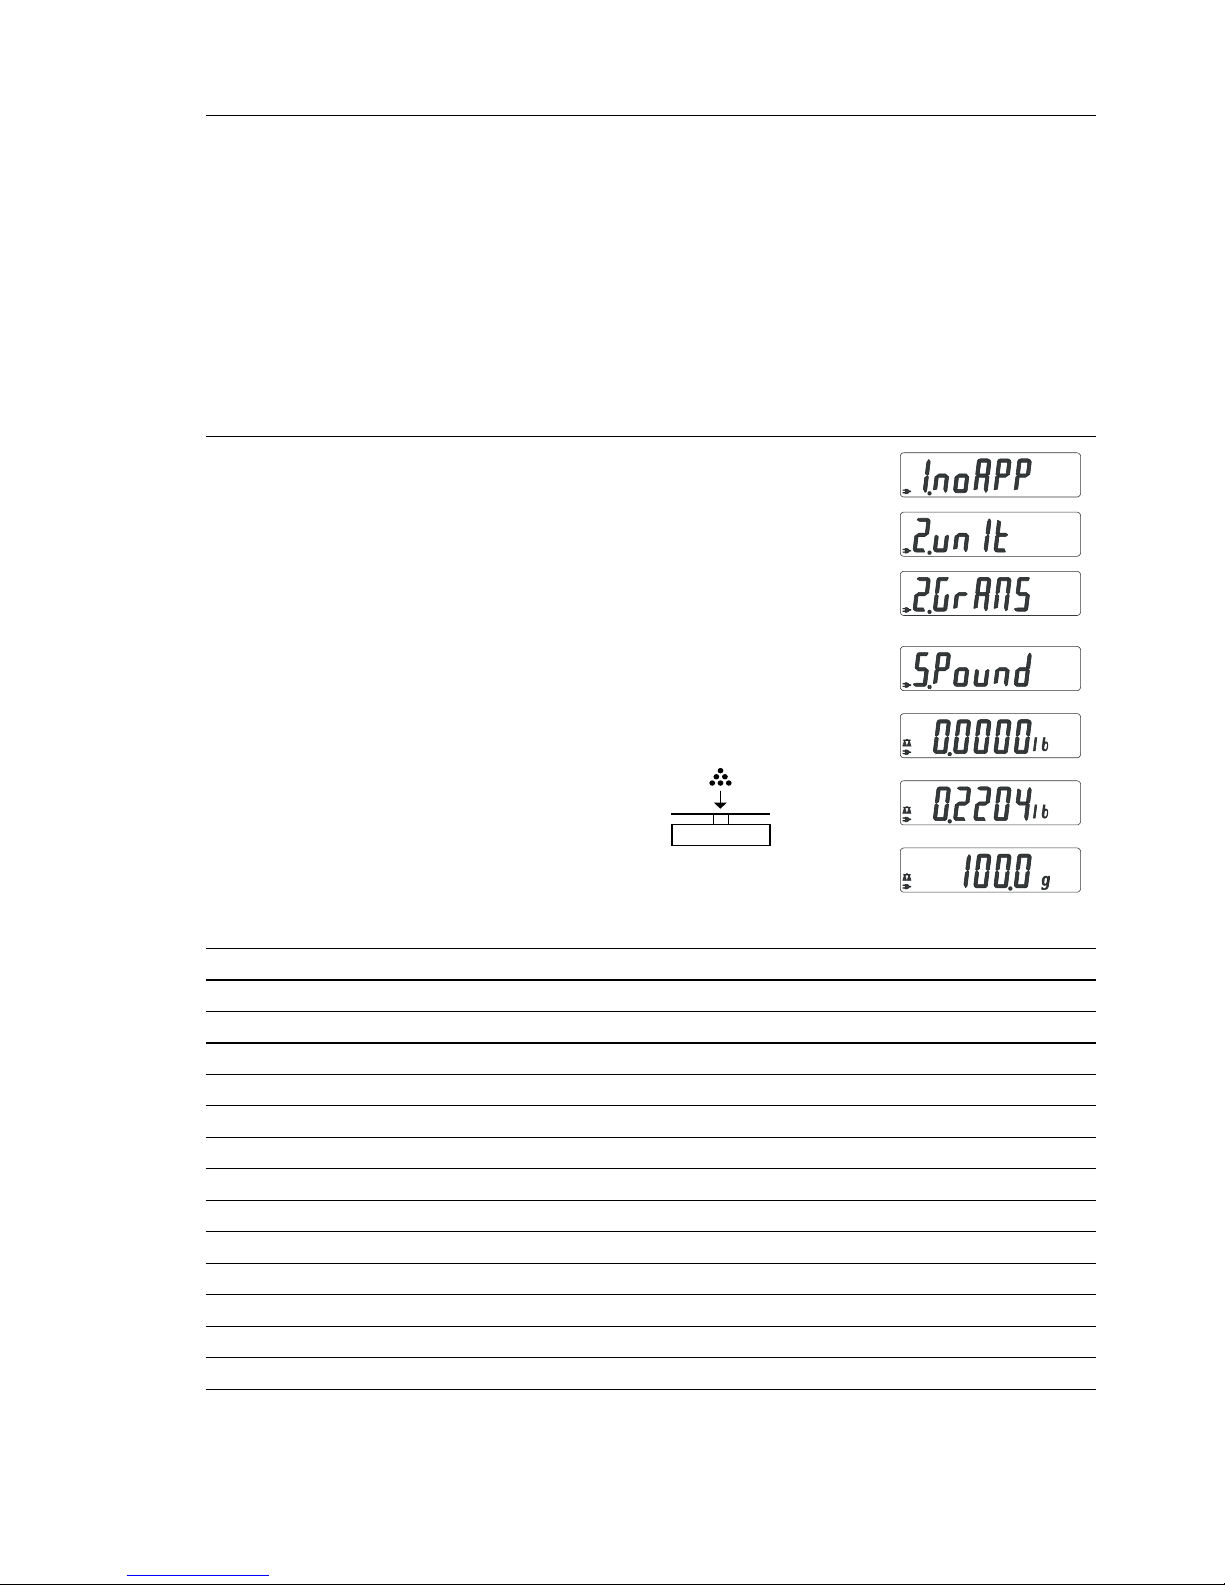
Toggling between Weight Units
With this application program you can toggle the display of a weight value
back and forth between two weight units (see table below).
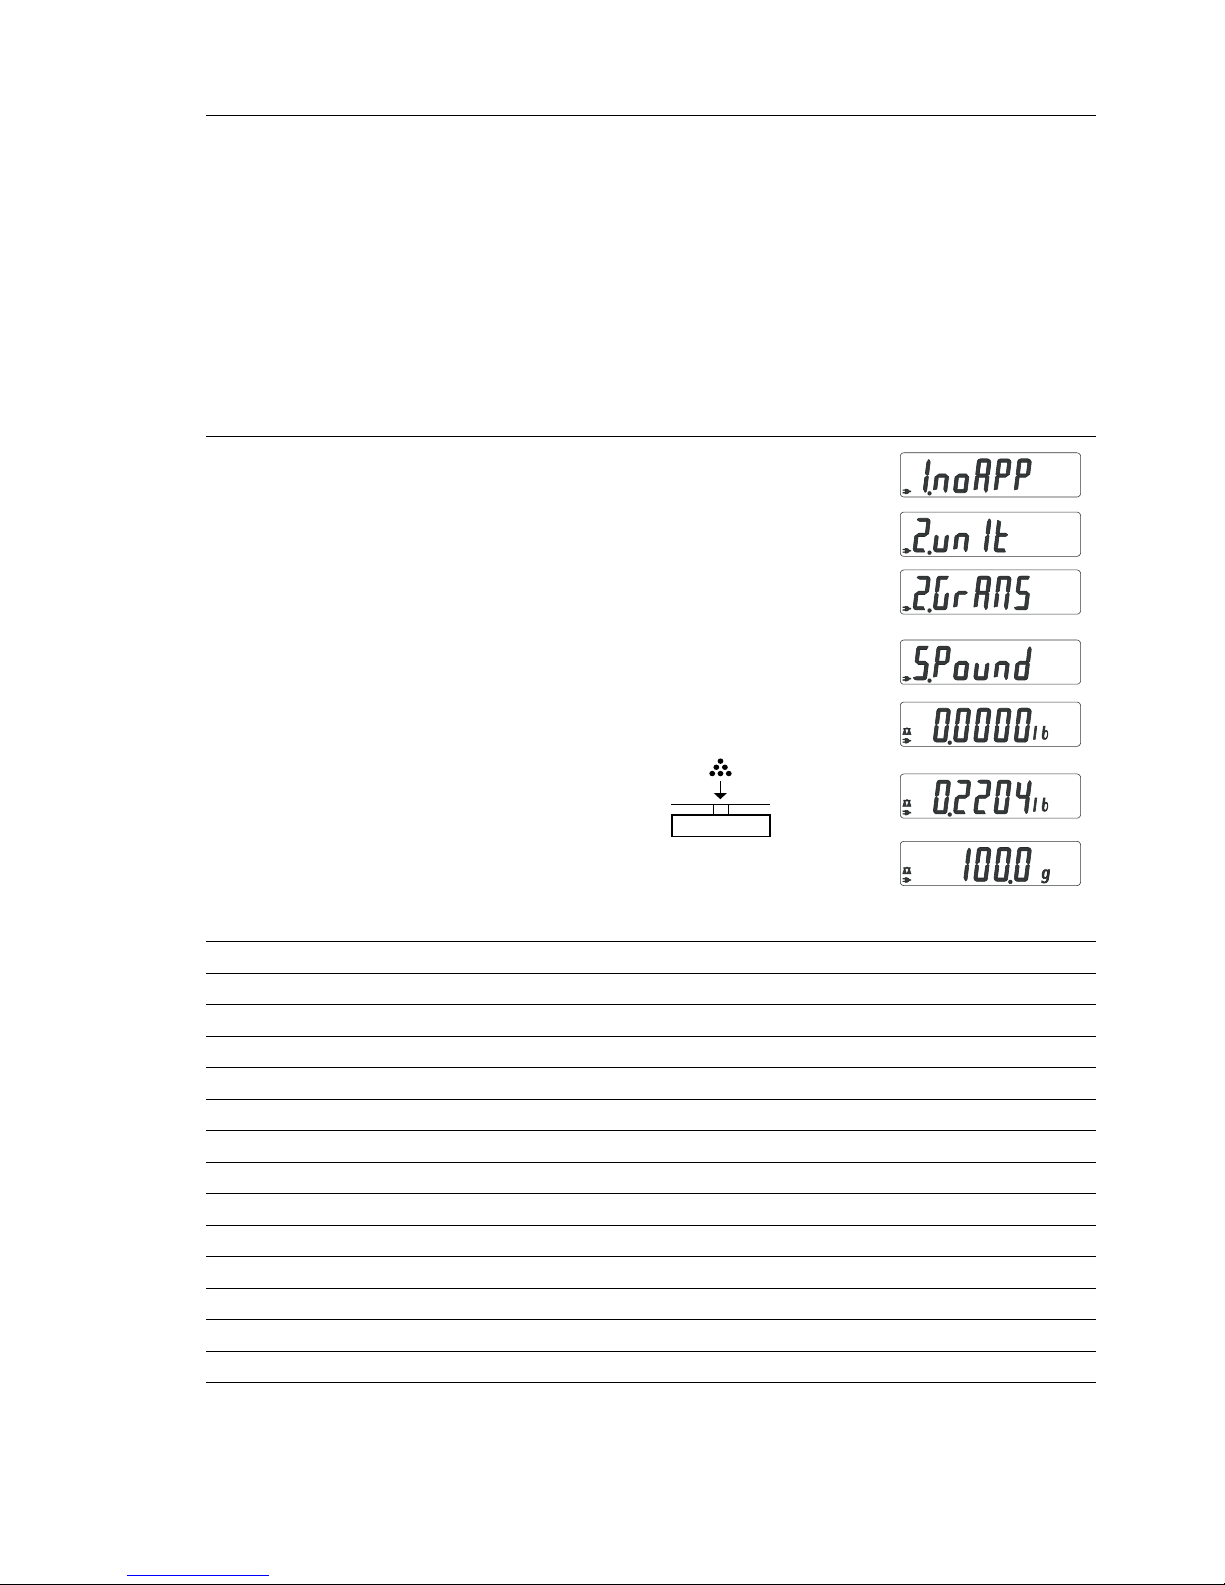
Example: Toggle weight unit from pounds [lb] (application) to grams [g]
(basic unit)
Step Key (or instruction) Display
1. Select application program (ZERO) ≥ 2 sec
2. Select Toggling between Weight Units (F)
3. Confirm unit (ENTER)
4. Select weight unit; in this example: (F) repeatedly
“5. Pounds” (see table below)
5. Confirm weight unit (pounds) (ENTER)
6. Place sample on balance/scale
7. Toggle weight unit (F)
Menu code Unit Conversion factor Display
1. user* Grams 1.00000000000 o
2.grams (factory setting) Grams 1.00000000000 g
4.carat Carats 5.00000000000 o
5.Pound Pounds 0.00220462260 lb
6.ounce Ounces 0.03527396200 oz
7.tryo Troy ounces 0.03215074700 ozt
8.tl.hon Hong Kong taels 0.02671725000 tlk
9.tl.sin Singapore taels 0.02645544638 tl
10.tl.ta Taiwanese taels 0.02666666000 tl
11.grai Grains 15.4323583500 GN
12.peny Pennyweights 0.64301493100 dwt
15.tl.ch Chinese taels 0.02645547175 tl
22.pdoz lb/oz 0.03527396200 lb:oz
23.newt Newtons 0.00980665000 N
* User-defined conversion can be loaded in balance/scale with RS-232 or USB program
option.
Page 10
10
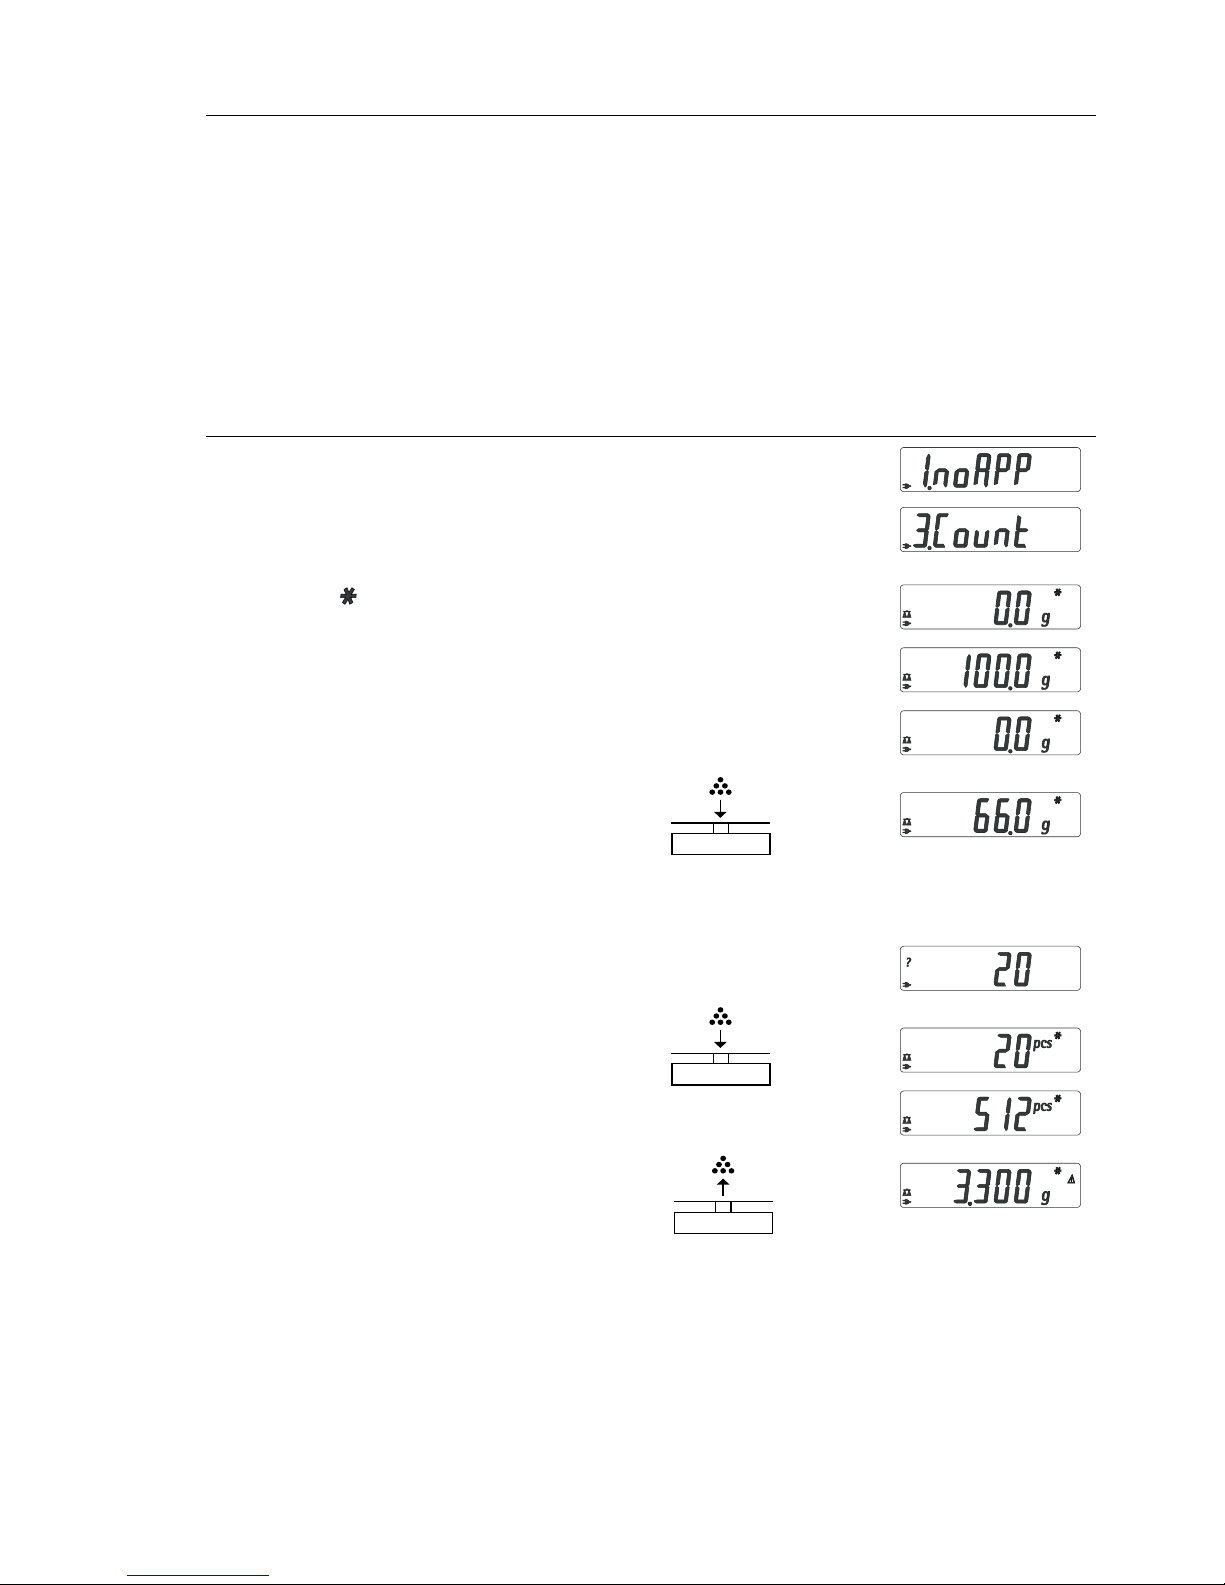
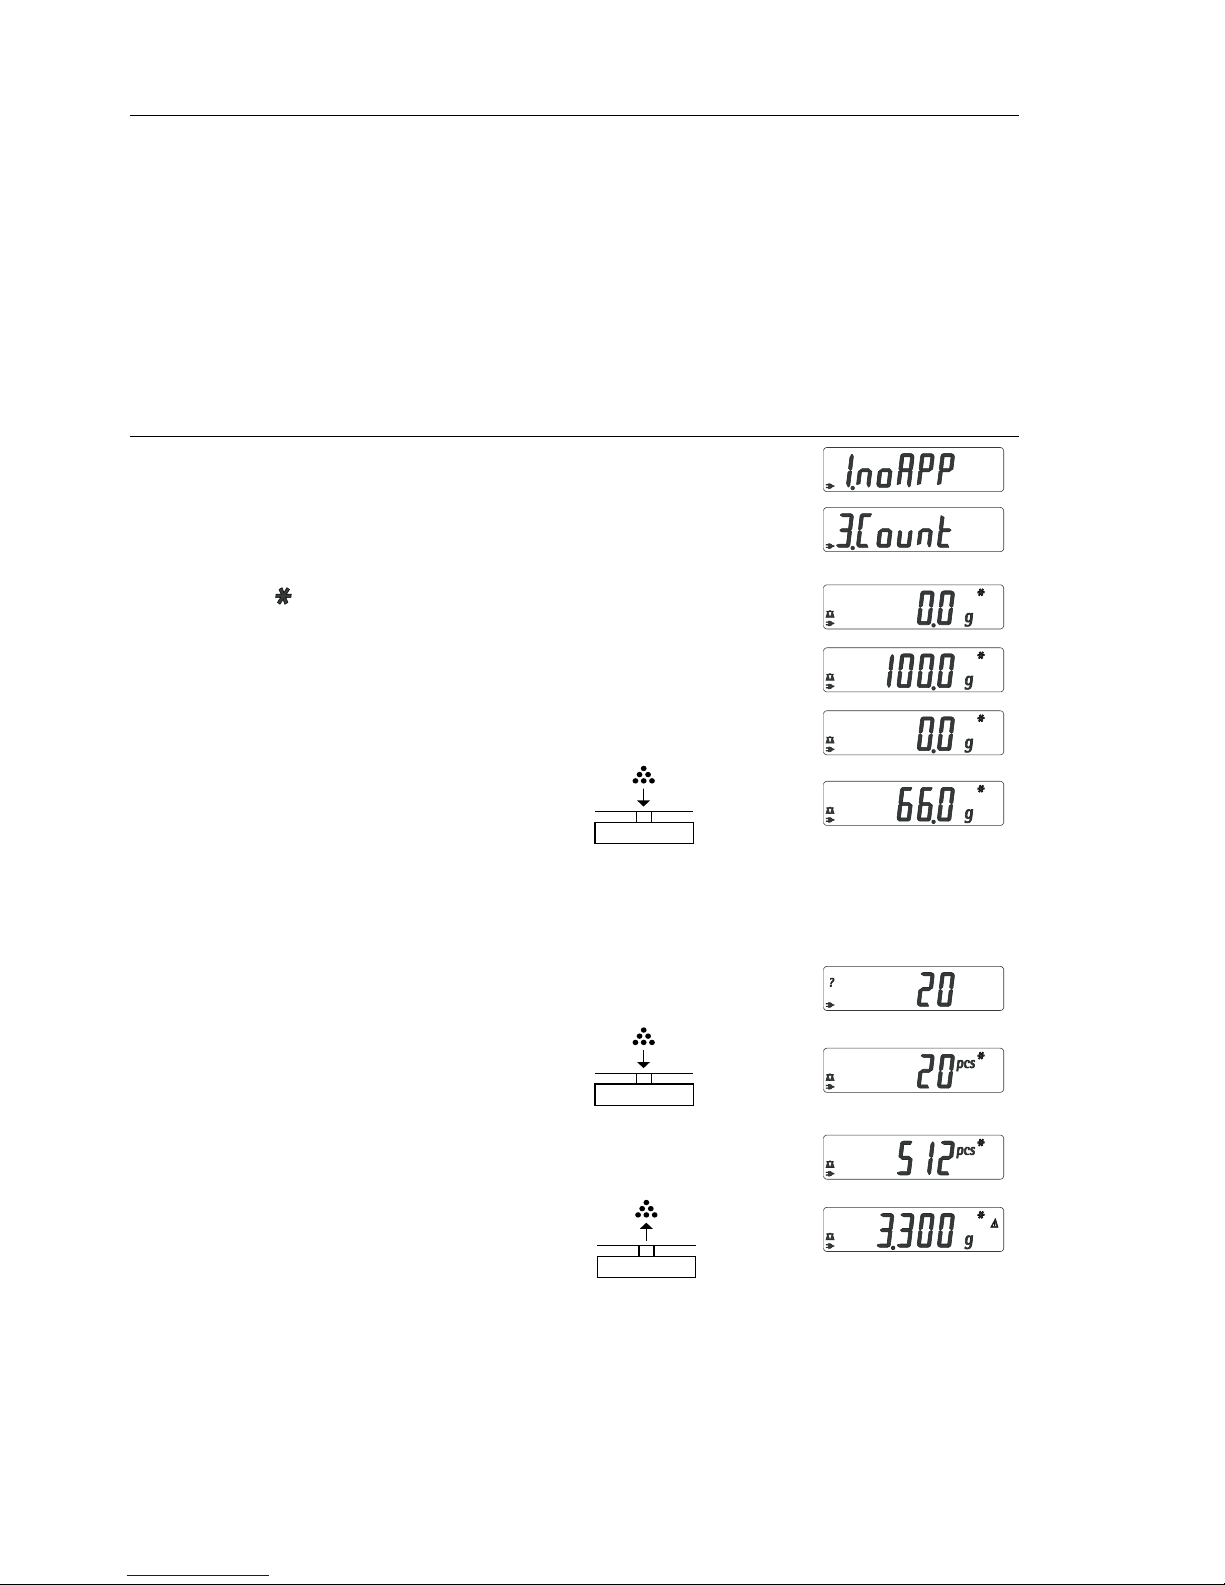
Counting
Purpose
With the Counting program you can determine the number of parts or items
by weighing.
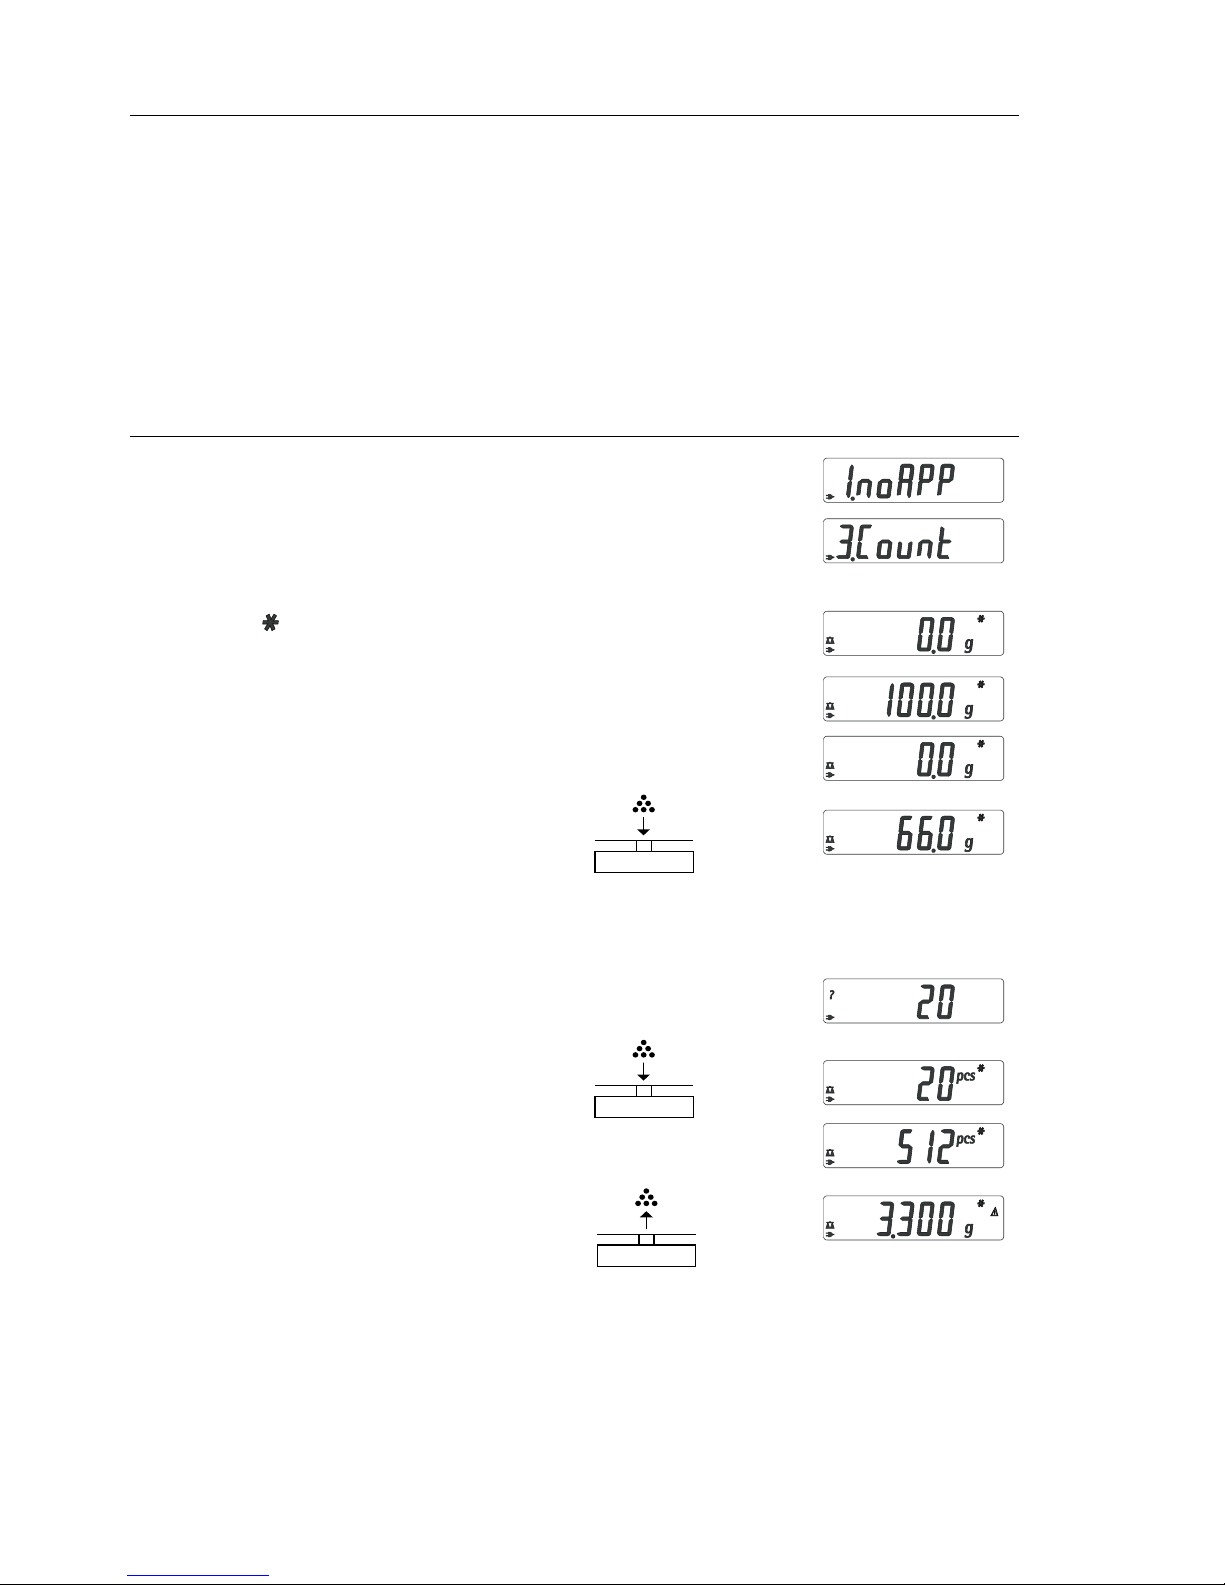
Example: Determine the number of uncounted parts; weigh in the selectable
reference sample quantity (in this example: 20)
Step Key (or instruction) Display
1. Select application program (ZERO) ≥ 2 sec
2. Select Counting (F) repeatedly
3. Confirm setting (ENTER)
Symbol “ “ on the display:
application is active
4. Place empty container on the
balance/scale
5. Zero the balance/scale (ZERO)
6. Place reference sample quantity (20)
on the balance/scale
7. Select reference sample quantity:
in increments of 1 (1, 2, 3, ..., 99) or (F) repeatedly (briefly) or
in increments of 10 (10, 20, 30, ...,100) (F) ≥ 2 sec.
8. Confirm selected reference sample
quantity (ENTER)
9. Place uncounted parts on balance/scale
10. Toggle display between mean
piece weight, total weight, and quantity (F) repeatedly
11. Unload the balance/scale
12. Counting application:
clear the reference value (ENTER) ≥ 2 sec
13. Reactivate Counting (if no other (F)
application program has been selected)
14. Repeat procedure starting from Step 5.
Page 11
11
Purpose
This application program allows you to obtain weight readouts in percent
which are in proportion to a reference weight.
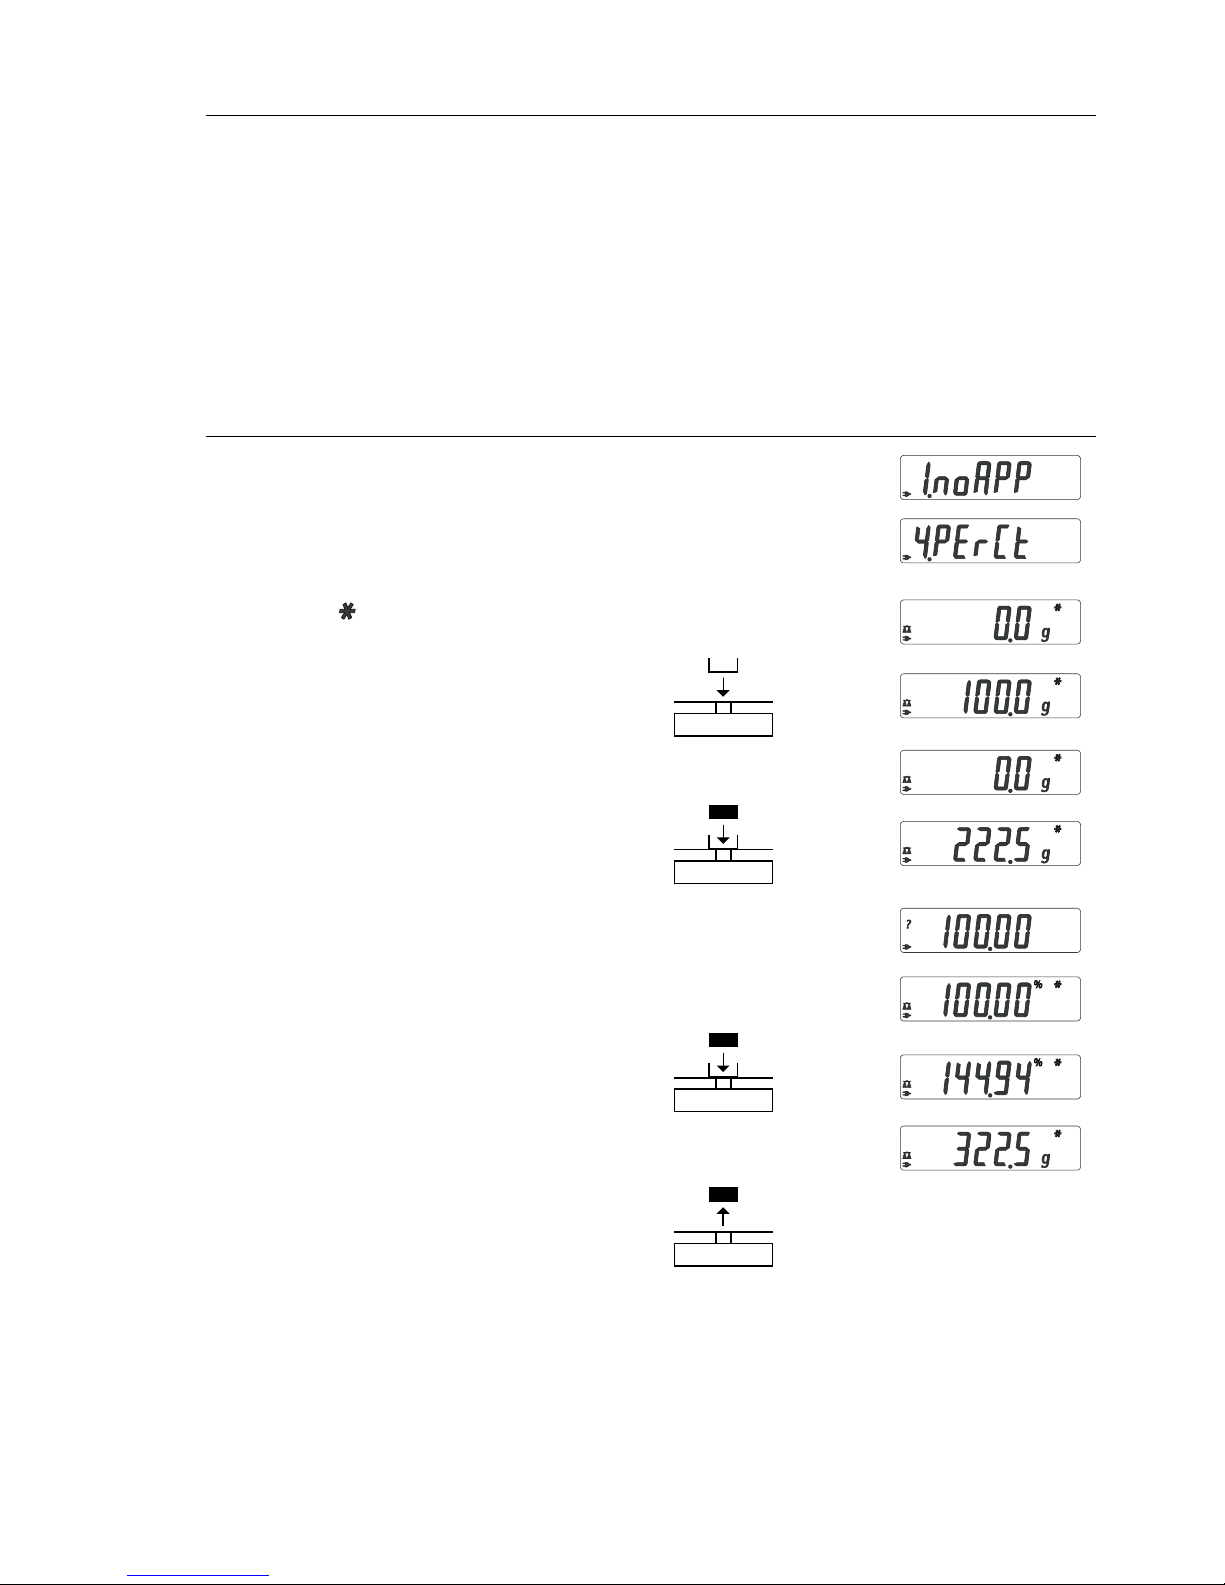
Example: Determine an unknown percentage; store the weight on the
balance/scale as the reference percentage (100%)
Step Key (or instruction) Display
1. Select application program (ZERO) ≥ 2 sec
2. Select Weighing in Percent (F) repeatedly
3. Confirm setting (ENTER)
Symbol “ “ on the display:
application is active
4. Place empty container on the
balance/scale
5. Zero the balance/scale (ZERO)
6. Place the reference weight
for 100% on the balance/scale
7. If desired, change the number
of decimal places displayed: 100.0%,
100.00% or 100% (factory setting) (F) repeatedly
8. Confirm selected no. of decimal places (ENTER)
9. Place unknown weight on the
balance/scale
10. Toggle display between weight
and percentage (F) repeatedly
11. Unload the balance/scale
12. Weighing in Percent application:
clear the reference percentage (ENTER) ≥ 2 sec
13. Reactivate Weighing in Percent
(if no other application program
has been selected) (F)
14. Repeat procedure starting from Step 5
.
Weighing in Percent
Page 12
12
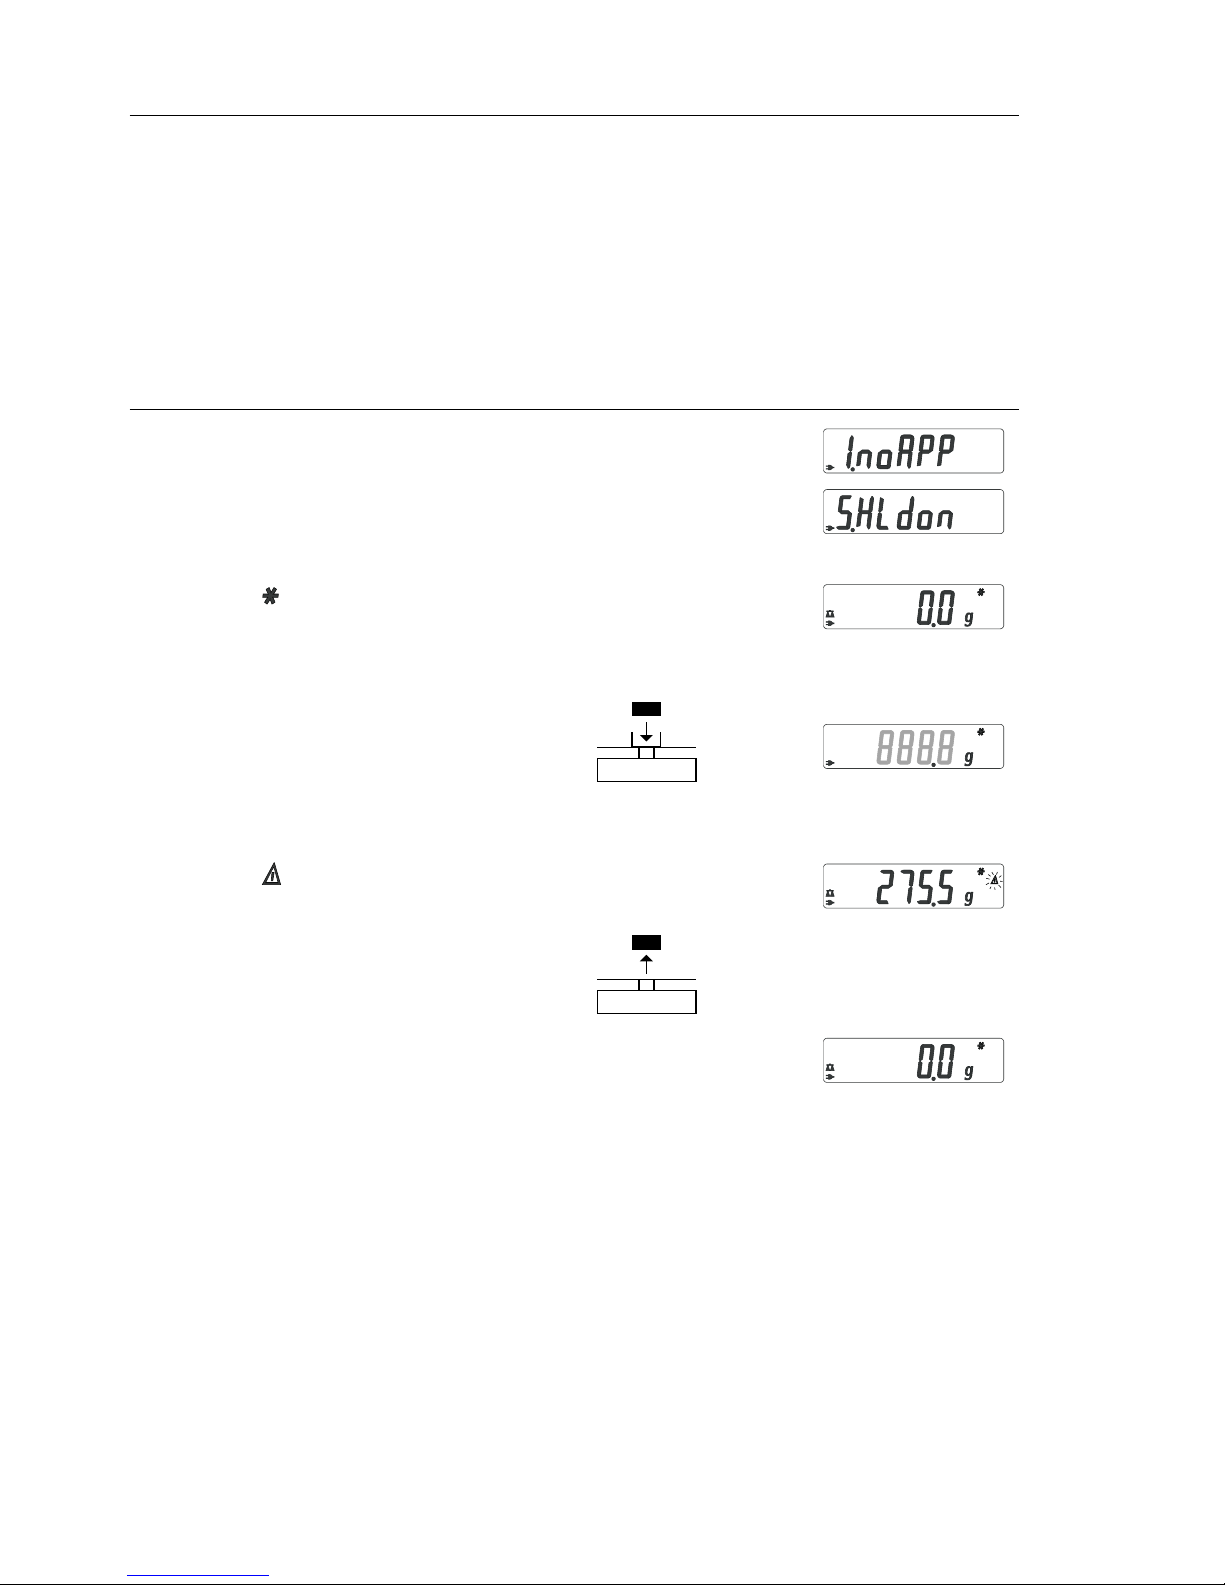
“Hold” Display
Purpose
The last stable value remains displayed for 5 seconds after removing the
sample from the pan.
Example: Determine weight of oversized sample
Step Key (or instruction) Display
1. Select application program (ZERO) ≥ 2 sec
2. Select Display Hold (“
HLdon”) (F) repeatedly
3. Confirm setting (ENTER)
Symbol “ ” on the display:
application is active
4. If necessary: zero the balance/scale (ZERO)
5. Place sample on balance/scale
6. Start application program (F)
Symbol “ ” flashes on the display:
the weight value is locked
7. Unload the balance/scale:
the weight value remains displayed
for a further 5 seconds; or
8. Zero the balance/scale (ZERO)
9. End the Display Hold application (ENTER) ≥ 2 sec
10. Reactivate Display Hold (if no other (F)
application program has been selected)
11. Repeat procedure starting from Step 5.
Page 13
13
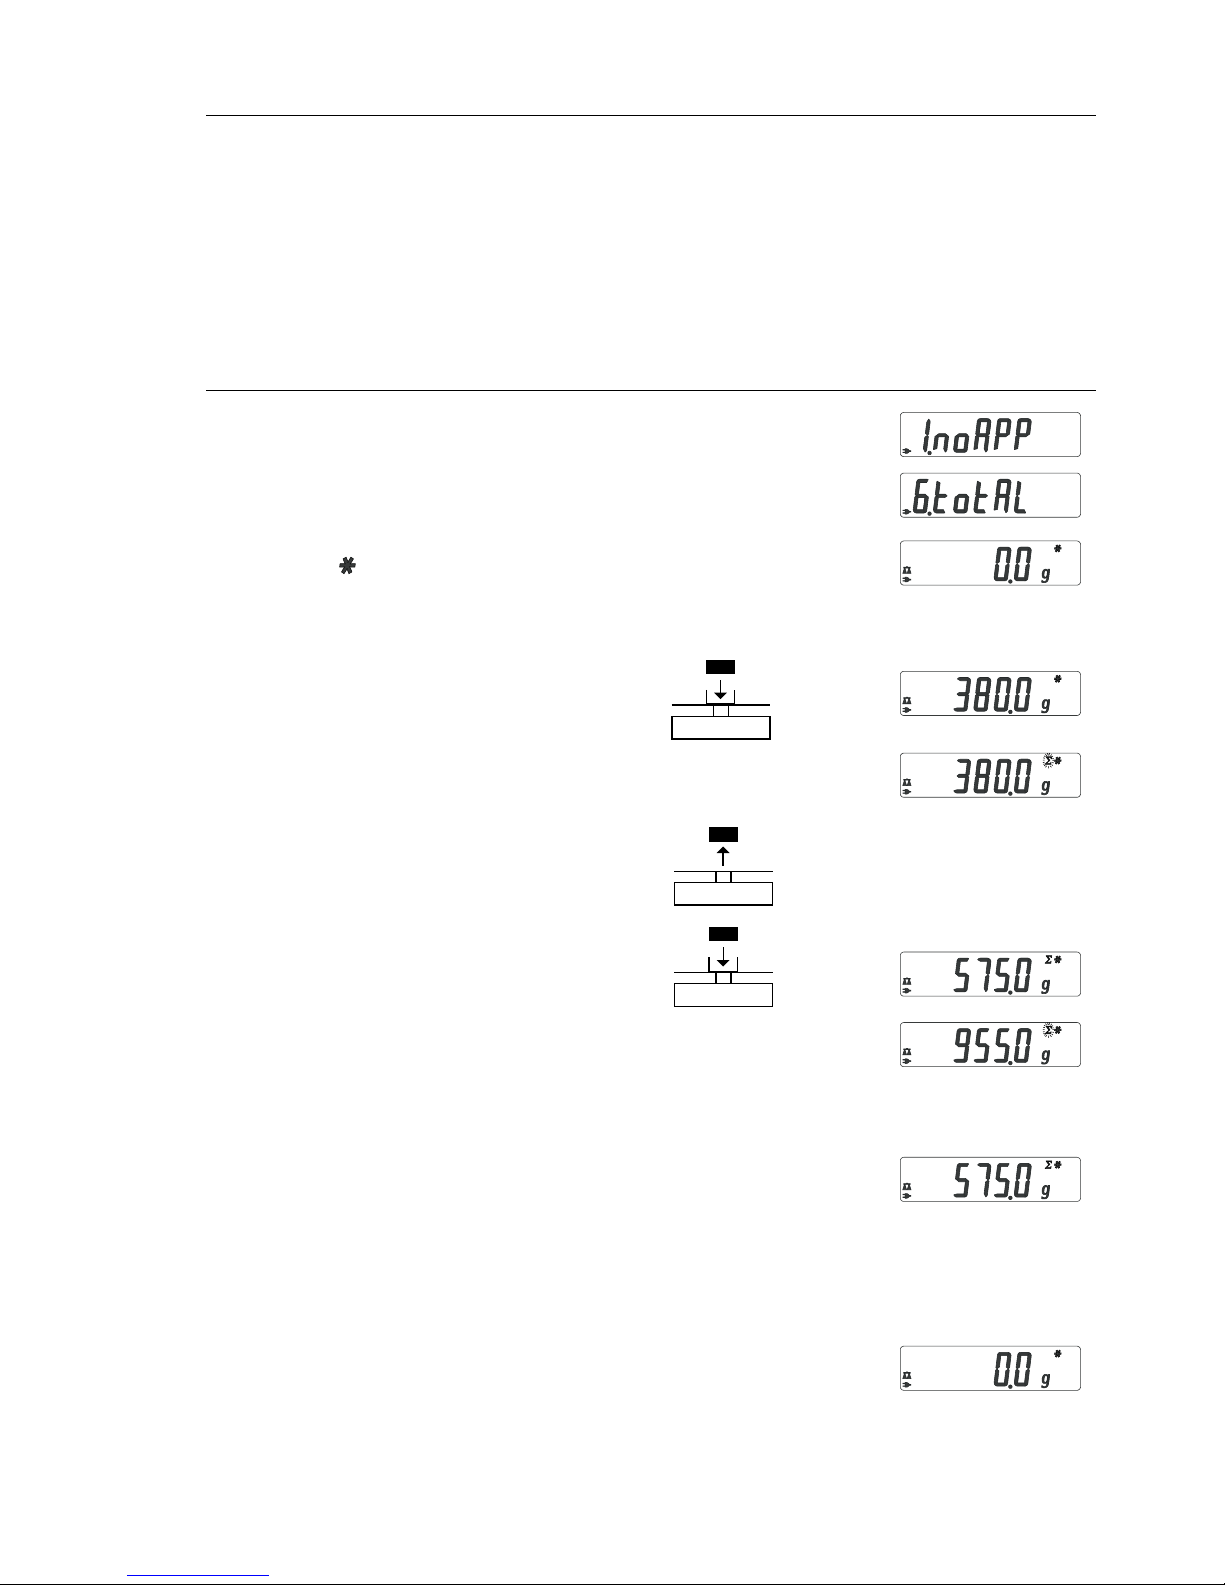
Purpose
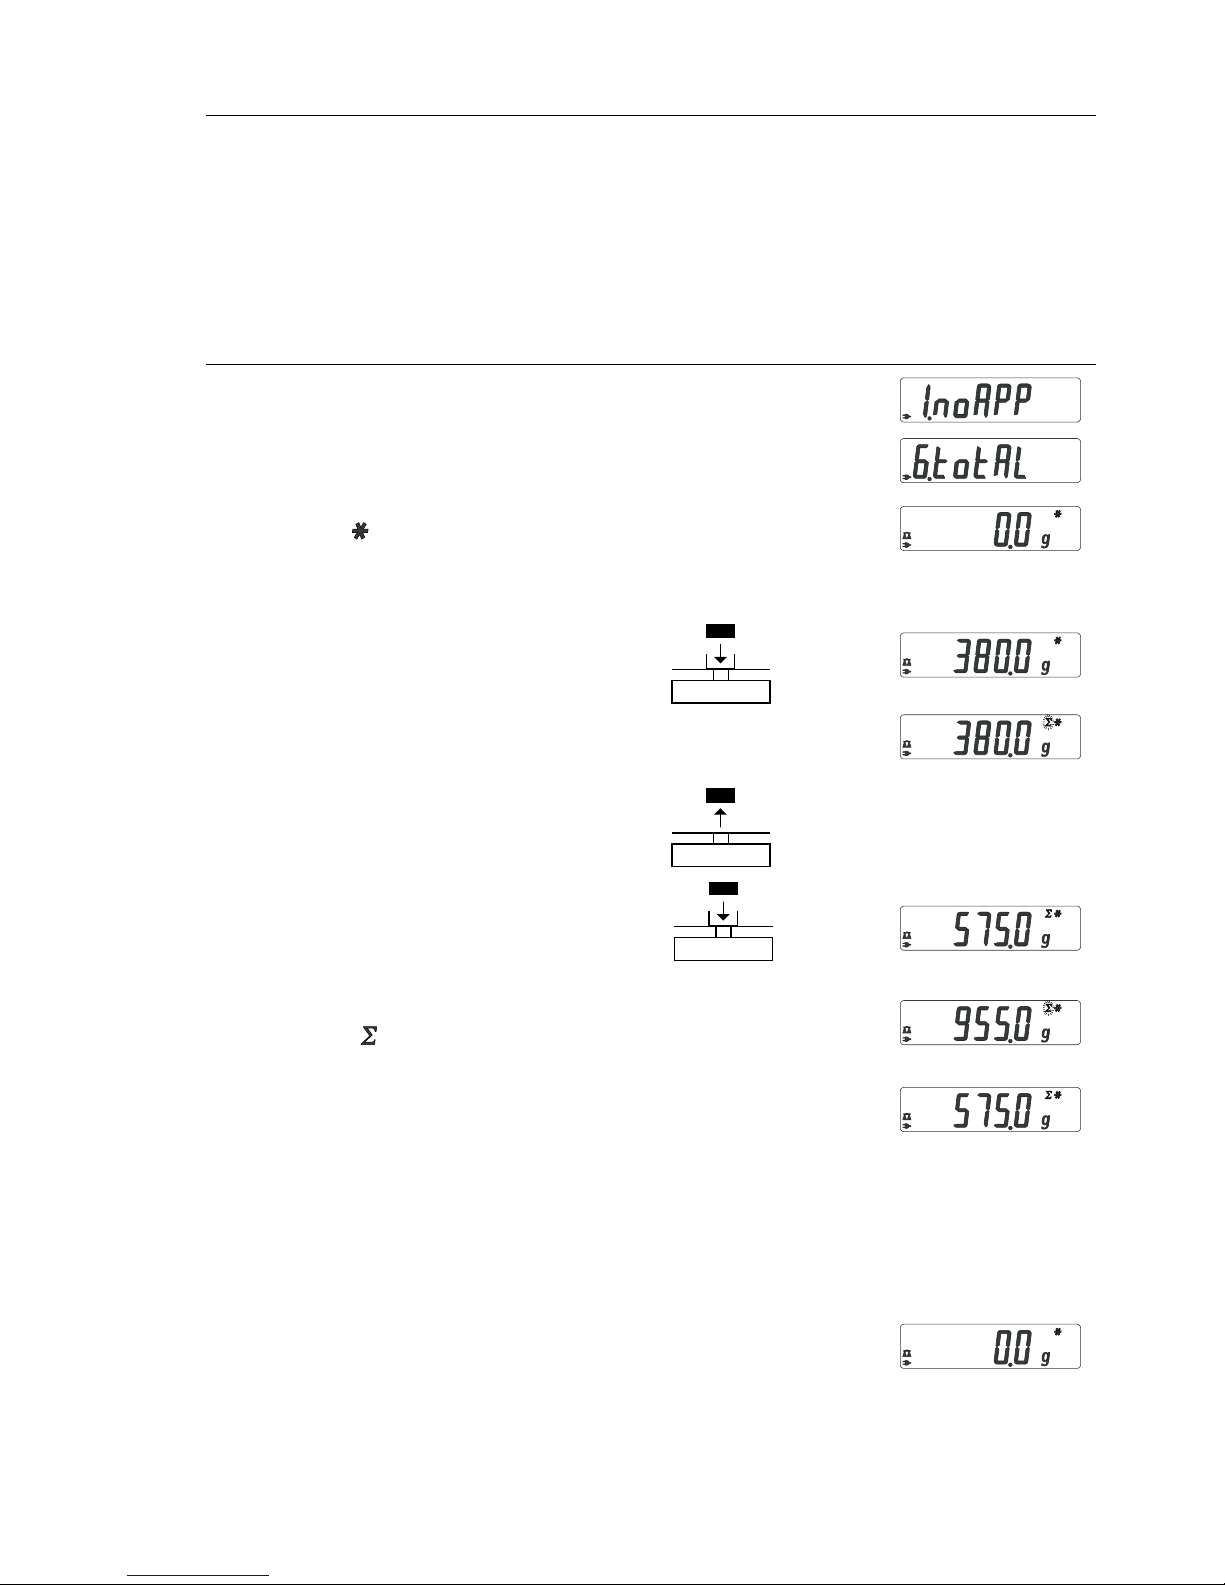
With this application program you can add up successive weight values
exceeding the capacity of the balance/scale.
Example:Totalizing weight values
Step Key (or instruction) Display
1. Select application program (ZERO) ≥ 2 sec
2. Select Totalizing (F) repeatedly
3. Confirm setting (ENTER)
Symbol “ “ on the display:
application is active
4. If necessary: zero the balance/scale (ZERO)
5. Place sample on balance/scale
(in this example, 380 g)
6. Store value in memory. (ENTER)
Total weight is displayed
steadily;
∑ symbol flashes.
7. Remove sample from balance/scale
8. Place the next sample
on the balance/scale
(in this example, 575 g)
9. Store value in memory. Totalized stored (ENTER)
weight is displayed; symbol
∑ flashes.
Note: ∑ symbol remains on indicating
stored value in memory until cleared
10. To view the current weight for 2 seconds (F)
(if a printer is connected, a printout
is generated)
11. Clear totalizing memory (F) ≥ 2 sec
(if a printer is connected, total is printed)
12. End Totalizing (ENTER) ≥ 2 sec
13. Reactivate Totalizing (if no other (F)
application program has been selected)
(if a printer is connected, total is printed).
14. Repeat procedure starting from Step 6.
Totalizing
Page 14
14
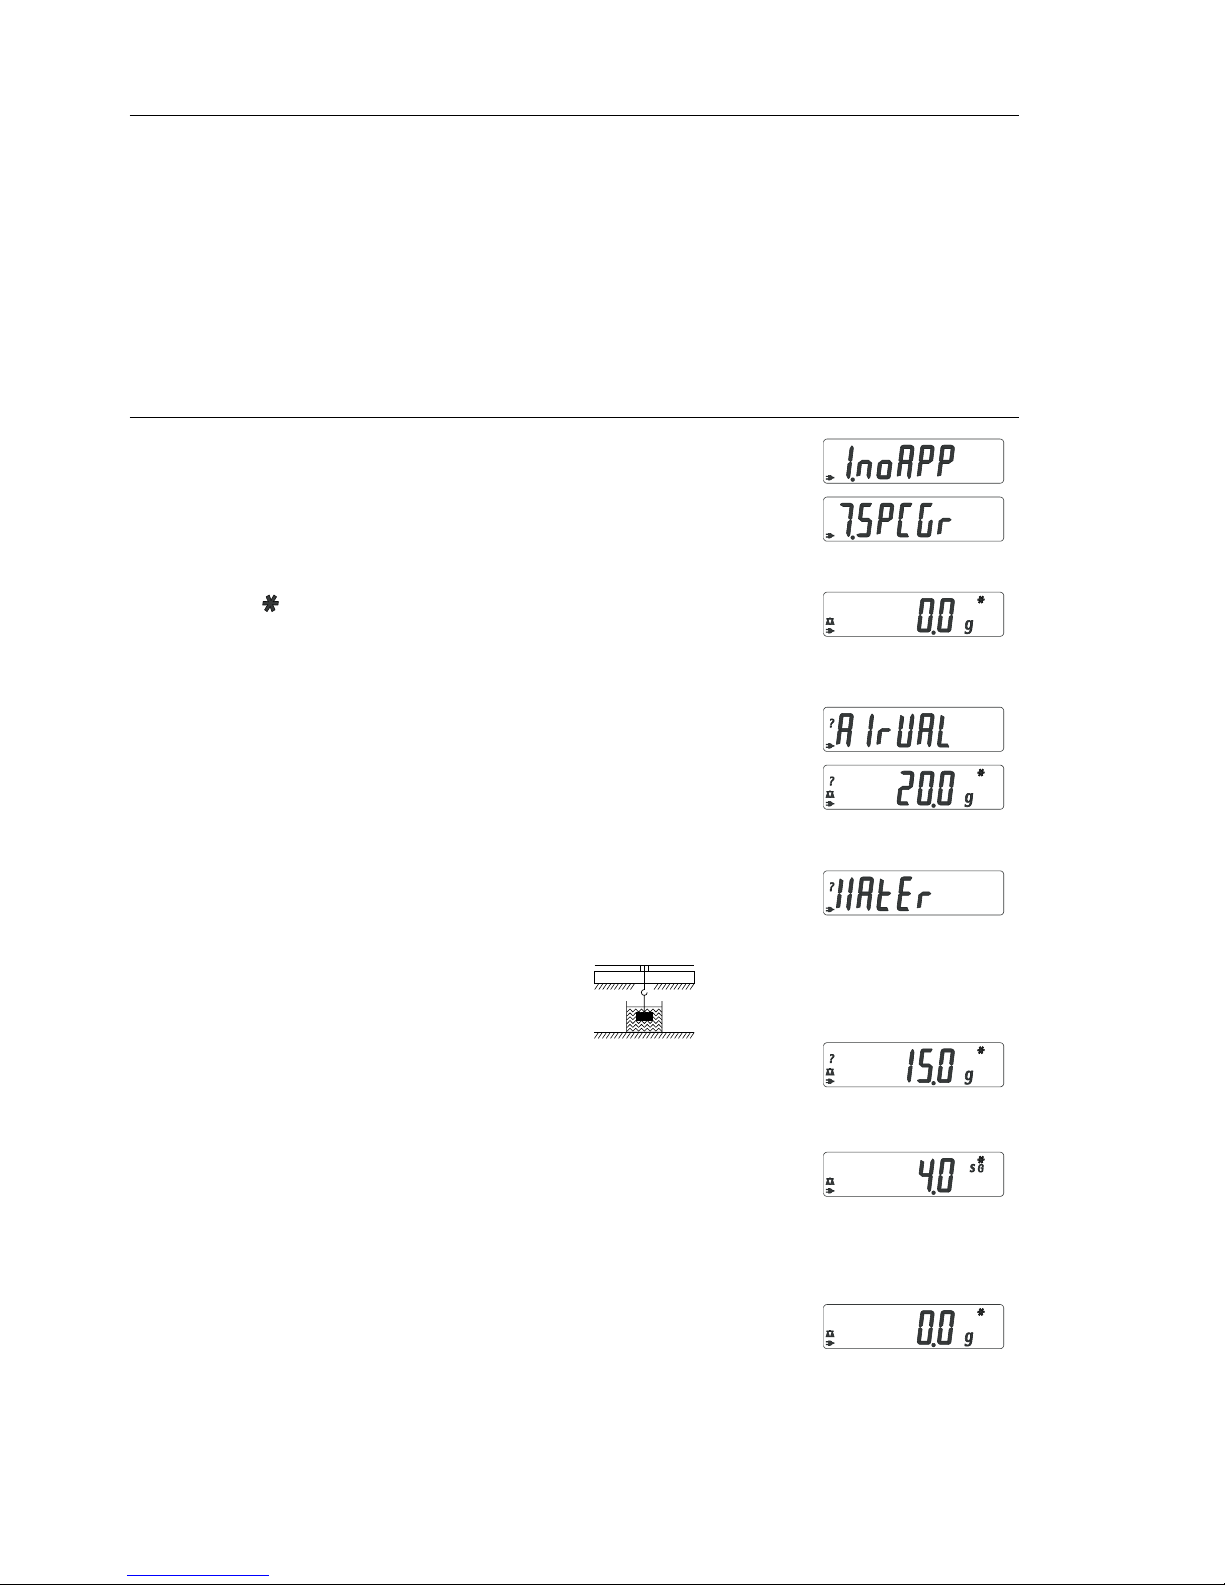
Purpose
Use this application program to determine the specific gravity of a sample.
The result is displayed with one decimal place.
Beaker and wire not included with balance/scale.
Example: Determine the specific gravity of a solid.
Step Key (or instruction) Display
1. Select application program (ZERO) ≥ 2 sec
2. Select Specific Gravity (F) repeatedly
3. Confirm setting (ENTER)
Symbol “ “ on the display:
application is active
4. If necessary, zero the balance/scale (ZERO)
5. Start application program (F)
6. Confirm the display, “
airval” (ENTER)
7. Determine weight of the sample in air:
place sample on the balance/scale
8. Store weight-in-air value (ENTER)
9. Remove sample from balance/scale
10. Determine weight of sample in liquid:
connect wire and set up beaker
11. Confirm the display “Water” (ENTER)
12. Place sample in liquid
13. Store the weight-in-liquid value
and view the result (ENTER)
14. Clear the display (ZERO)
15. Exit the Specific Gravity application (ENTER) ≥ 2 sec
16. Reactivate Specific Gravity (if no other (F)
application program has been selected)
17. Repeat procedure starting from Step 5.
Specific Gravity
Page 15

15
Calibration/Span Adjustment
Calibration is recommended after initial installation and each time the balance/scale is moved.
The weight required for calibration/
span adjustment is displayed.
Standard calibration weights for
selected models: to remove, see
instructions on page 7.
Press (F) to select a different weight
value.
To cancel the procedure: press and
hold the (ENTER) key (≥ 2 sec.).
Features
Calibration/adjustment can be
performed only when:
– there is no load on the balance/scale,
– the scale is zeroed, and
– the internal signal is stable.
If these conditions are not met, an
error message is displayed.
Example: Calibrate/adjust span of the balance/scale (here: model MXX-5001)
Step Key (or instruction) Display
1. Switch on the balance/scale (ON/OFF)
2. Zero the balance/scale (ZERO)
3. Start calibration (CAL)
The preset calibration weight
is displayed without the weight unit
(in this example, 5000 g)
4. To select a different calibration
weight value (F) repeatedly
5. Confirm calibration weight value and (ENTER) start
calibration/span adjustment
After the zero point is stored, the required
calibration weight flashes on the display.
6. Place the required calibration
weight on the balance/scale
The readout stops flashing if the weight
is applied within the defined time limit and
tolerance. If the weight value is accepted,
the display stops flashing and the stability
symbol appears on the display.
7. Remove the calibration weight
8. Calibration/span adjustment has
been completed
Page 16
16
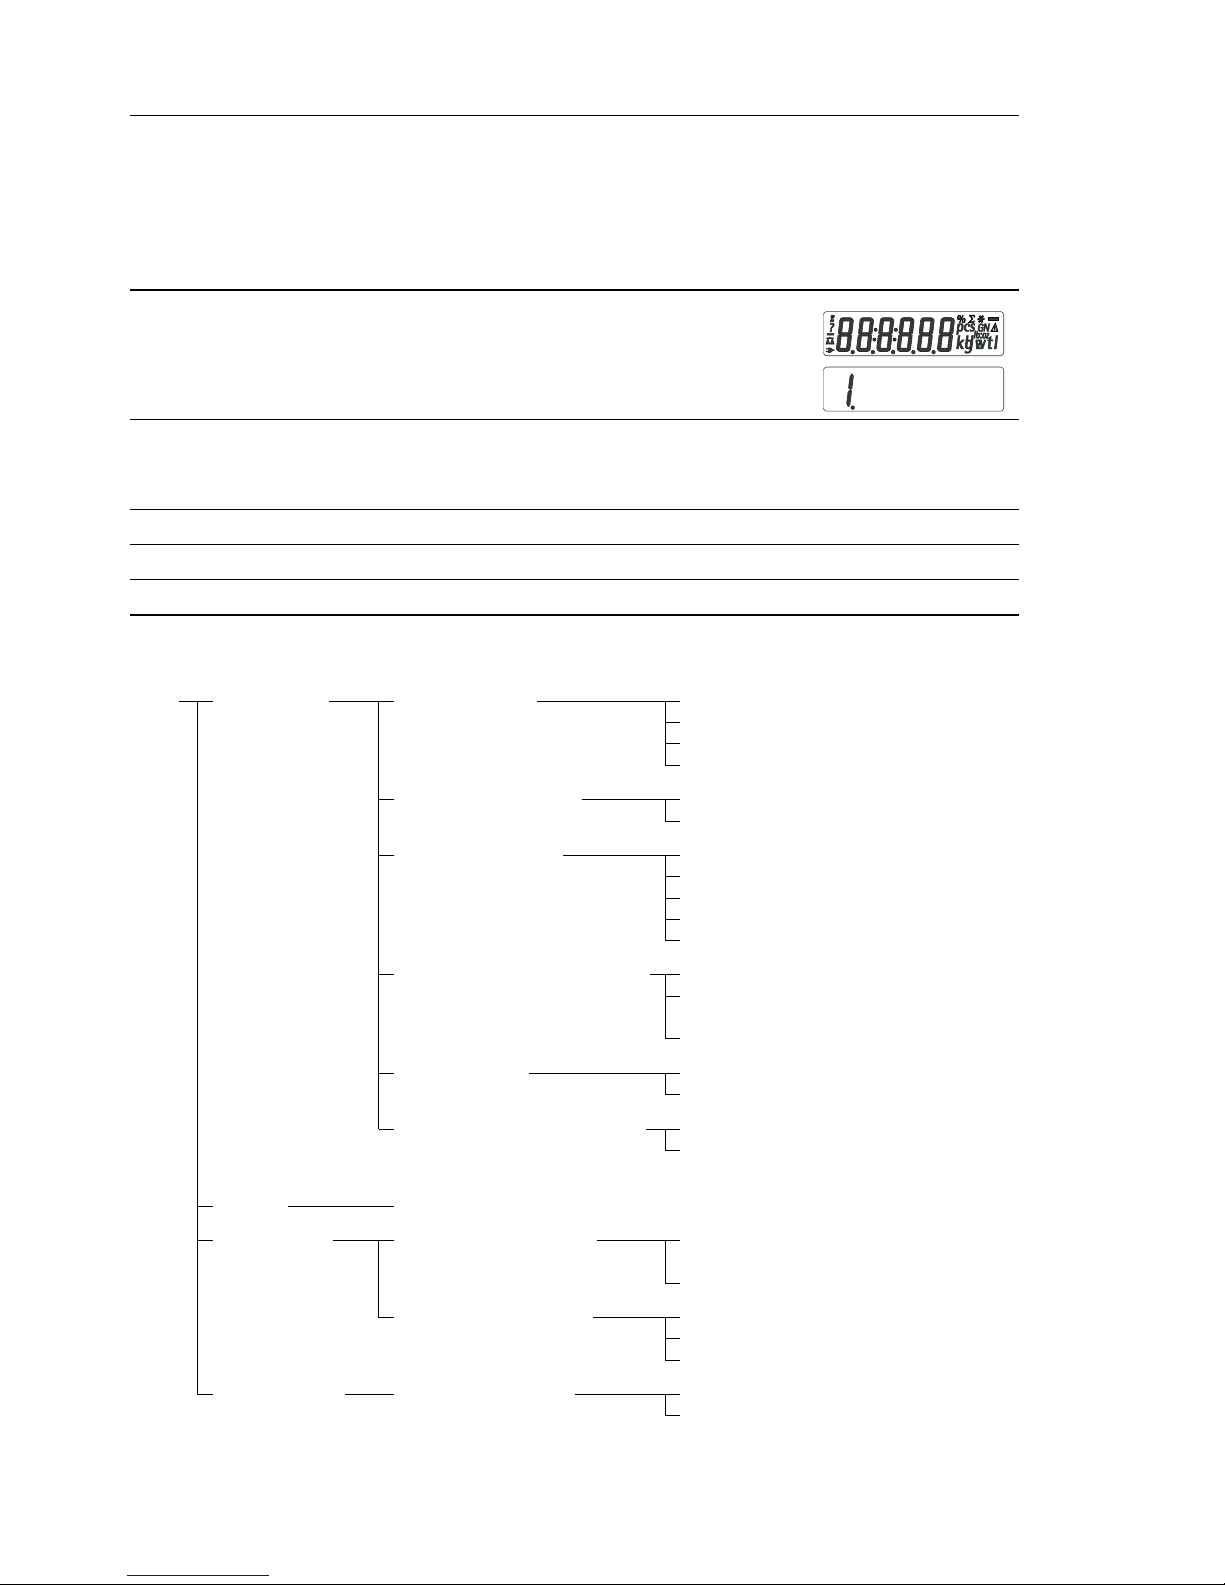
To configure the scale; i.e., adapt the balance/scale to individual requirements.
Step Key (or instruction) Display
1. Switch off the balance/scale (ON/OFF)
2. Switch on the balance/scale and (ON/OFF)
while all segments are displayed (ZERO) briefly
Navigation in the Setup Menu
Key Press briefly Press and hold
(ENTER) Menu level: Move to the right (cyclical) Confirm setting
(F) Menu item: Scrolling –
(ZERO) Menu level: Move to the left Save settings and exit Setup
Parameter Settings (Overview) ο Factory setting
√ User-defined setting
Setup 1 Weighing 1.1. Adapt filter 1.1.1 Very stable conditions
menu 1.1.2
ο Stable conditions
1.1.3 Unstable conditions
1.1.4 Very unstable conditions
1.2. Application filter 1.2.1
ο Final readout
1.2.2 Filling
1.3. Stability range 1.3.1 1/4 digit
1.3.2 1/2 digit
1.3.3 1 digit
1.3.4
ο 2 digits
1.3.5 4 digits
1.5. Calib./adjust./linearization: 1.5.1
ο Calibration/span adjustment
Function of the (CAL) key 1.5.2 Linearization: for service
personnel only
1.5.3 Key blocked
1.6. Auto zero 1.6.1
ο On
1.6.2 Off
1.7. 1st weight unit, or 2nd unit 1.7.1 User-defined unit: see
in Toggle Weight Units app. to 1.7.23 “Toggling between Weight
Units”
5. and 6. Only relevant with built-in data interface: see corresponding interface description
8. Additional 8.1. Block key functions 8.1.1 All keys blocked except
functions for (ON/OFF) and (ZERO)
8.1.2
ο All keys unblocked
8.2. Automatic shut-off 8.2.1
ο After 2 minutes
8.2.2 After 5 minutes
8.2.3 After 10 minutes
9. Reset menu 9.1. Factory settings 9.1.1 Restore
9.1.2
ο Do not restore
Configuration (Setup Menu)
Page 17

17
Error codes are shown on the main display for approx. 2 seconds.
The program then returns automatically to the previous mode.
Display/Problem Cause Solution
No segments appear No power available Check the power supply
on the display
The AC adapter is not plugged in Plug in the AC adapter
Battery is drained Replace battery; recharge
battery using external
charger
oL The load exceeds the Unload the balance/scale
balance/scale capacity
UL Weighing pan not in place Place the weighing pan
on the balance/scale
Something is touching Move the object that is
the weighing pan touching the weighing pan
disErr Display overflow: Reduce load on the
Value cannot be shown balance/scale
on the display
calErr Calibration parameter not met; e.g.: Calibrate only when zero
is displayed
– Balance/scale not zeroed Press (ZERO) to tare the
balance/scale
– Balance/scale is loaded Unload the balance/scale
appErr Weight is too light or there is Increase the weight
no sample on the balance/scale on the balance/scale
with application in use
PrtErr Data interface for Contact the Denver
printing is blocked customer service center
Bal.Err Balance/scale loaded or defective Unload balance/scale before
when power was turned on switching on or contact
Denver customer service
Sep.Err Balance/scale defective Contact Denver customer
service
Max. weighing capacity The balance/scale was Place the weighing pan
is less than indicated switched on without on the balance/scale and
under “Specifications” the weighing pan in place press (ON/OFF)
The weight readout The balance/scale was not Calibrate/adjust the
is obviously wrong calibrated/adjusted before weighing balance/scale
Balance/scale not zeroed Zero the balance/scale
If any other errors occur, contact your local Denver customer service center.
Error Codes
Page 18

18
Overview
Specifications
Model MXX-123 MXX-612 MXX-412 MXX-212
Weighing capacity g 120 610 410 210
Readability g 0.001 0.01 0.01 0.01
Tare range (subtractive) g 120 610 410 210
Linearity ≤± g 0.003 0.03 0.03 0.03
Operating temperature range 10°C to 30°C (273°K to 303°K; 50°F to 86°F)
Response time (average) s 2.5 2 2 2
Adaptation to ambient conditions By selection of 1 of 4 optimized filter levels; display update:
0.1–0.8 (depends on filter level selected)
Calibration weight g 100 (F1) 200 (F2) 200 (F2) 200 (M1)
Net weight, approx. kg 1.2 1.35 1.35 1.2
Pan size mm 97 d 142 + 130 142 + 130 97 d
Power source/voltage/frequency AC adapter, 230 V or 115 V, +15% to – 20%, 48–60 Hz
Power consumption (average) W 1 0.75 0.75 0.75
Hours of operation w/ 9V battery:
– Alkaline (approx.) h – 11 11 14
– Rechargeable, fully ch.
(NiMH), avg. h – 2.5 2.5 4
Model MXX-5001 MXX-2001 MXX-601 MXX-10 MXX-5
Weighing capacity g 5000 2000 600 10000 5000
Readability g 0.1 0.1 0.1 1 1
Tare range (subtractive) g 5000 2000 600 10000 5000
Linearity ≤± g 0.2 0.2 0.2 2 2
Operating temperature range 10°C to 30°C (273°K to 303°K; 50°F to 86°F)
Response time (average) s 2 2 1.5 1.5 1.5
Adaptation to ambient conditions By selection of 1 of 4 optimized filter levels; display update:
0.1–0.8 (depends on filter level selected)
Calibration weight kg 5 (F2) 2 (F2) 0.2 (M2) 5 (M1) 5 (M2)
Net weight, approx. kg 1.1 1.1 1.25 1.1 1.1
Pan size mm 142+130
Power source/voltage/frequency AC adapter, 230 V or 115 V, +15% to – 20%, 48–60 Hz
Power consumption (average) W 1 1 0.75 0.75 0.75
Hours of operation w/ 9V battery:
– Alkaline (approx.) h 11 11 14 14 14
– Rechargeable, fully ch.
(NiMH), avg. h 2.5 2.5 4 4 4
Page 19

19
Accessories (Options)
C Marking
The balance/scale complies with the
following EC Directives and European
Standards:
Council Directive 89/336/EEC
“Electromagnetic compatibility
(EMC)”
Applicable European Standards:
Limitation of emissions:
In accordance with product standard
EN 61326-1 Class B (residential area)
Defined immunity to interference:
in accordance with product standard
EN 61326-1
(minimum test requirements,
non-continuous operation)
Important Note:
The operator shall be responsible
for any modifications to Denver equipment and must check and, if necessary, correct these modifications.
On request, Denver will provide information on the minimum operating
specifications (in accordance with the
Standards listed above for defined
immunity to interference).
73/23/EEC “Electrical equipment
designed for use within certain
voltage limits”
Applicable European Standards:
EN 60950
Safety of information technology
equipment including electrical business equipment
EN 61010
Safety requirements for electrical
equipment for measurement,
control and laboratory use
Part 1: General requirements
If you use electrical equipment
in installations and under ambient
conditions requiring higher safety
standards, you must comply with
the provisions as specified in the
applicable regulations for installation
in your country.
Product Order No.
Data interface, mounting kit
– RS-232 interface with cable YADAP-RS
– USB interface with cable YADAP-USB
Data printer 901042-1
Lock-down capability LC-1
(for anti-theft locking device)
Calibration weights
– for MXX-5001 (5 kg; F2) YCW6548-00
– for MXX-2001 (2 kg; F2) YCW6248-00
– for MXX-10 (5 kg; M1) YCW655-00
– for MXX-5 (5 kg; M2) YCW626-00
Page 20

20
Inhalt
Seite
Inhalt . . . . . . . . . . . . . . . . . . . . . . . . . . . . . . . . . . . . . . . . . . . . . . . . . . . . . . . . . . . . . 20
Warn- und Sicherheitshinweise . . . . . . . . . . . . . . . . . . . . . . . . . . . . . . . . . . . . . . . 21
Inbetriebnahme . . . . . . . . . . . . . . . . . . . . . . . . . . . . . . . . . . . . . . . . . . . . . . . . . . . . 22
Betrieb. . . . . . . . . . . . . . . . . . . . . . . . . . . . . . . . . . . . . . . . . . . . . . . . . . . . . . . . . . . . 25
Grundfunktion Wägen. . . . . . . . . . . . . . . . . . . . . . . . . . . . . . . . . . . . . . . . . . . . . . 25
Tastenbeschreibung . . . . . . . . . . . . . . . . . . . . . . . . . . . . . . . . . . . . . . . . . . . . . . . 25
Anwendungsprogramme . . . . . . . . . . . . . . . . . . . . . . . . . . . . . . . . . . . . . . . . . . . . 26
Einheitenwechsel. . . . . . . . . . . . . . . . . . . . . . . . . . . . . . . . . . . . . . . . . . . . . . . . . . 26
Zählen . . . . . . . . . . . . . . . . . . . . . . . . . . . . . . . . . . . . . . . . . . . . . . . . . . . . . . . . . . . 27
Prozentwägen . . . . . . . . . . . . . . . . . . . . . . . . . . . . . . . . . . . . . . . . . . . . . . . . . . . . 28
Statische Anzeige. . . . . . . . . . . . . . . . . . . . . . . . . . . . . . . . . . . . . . . . . . . . . . . . . . 29
Summieren. . . . . . . . . . . . . . . . . . . . . . . . . . . . . . . . . . . . . . . . . . . . . . . . . . . . . . . 30
Spezifisches Gewicht. . . . . . . . . . . . . . . . . . . . . . . . . . . . . . . . . . . . . . . . . . . . . . . 31
Justieren . . . . . . . . . . . . . . . . . . . . . . . . . . . . . . . . . . . . . . . . . . . . . . . . . . . . . . . . . . 32
Voreinstellungen (Setup-Menü). . . . . . . . . . . . . . . . . . . . . . . . . . . . . . . . . . . . . . . 33
Fehlermeldungen. . . . . . . . . . . . . . . . . . . . . . . . . . . . . . . . . . . . . . . . . . . . . . . . . . . 34
Übersicht. . . . . . . . . . . . . . . . . . . . . . . . . . . . . . . . . . . . . . . . . . . . . . . . . . . . . . . . . . 35
Technische Daten. . . . . . . . . . . . . . . . . . . . . . . . . . . . . . . . . . . . . . . . . . . . . . . . . . 35
Zubehör (Optionen). . . . . . . . . . . . . . . . . . . . . . . . . . . . . . . . . . . . . . . . . . . . . . . . 36
C -Kennzeichnung. . . . . . . . . . . . . . . . . . . . . . . . . . . . . . . . . . . . . . . . . . . . . . . . . 36
Page 21

21
Warn- und Sicherheitshinweise
Sicherheit
§ Diese Betriebsanleitung vor Inbetriebnahme aufmerksam durchlesen. So können Schäden vermieden werden.
! Das Gerät nicht in explosionsge-
fährdeten Bereichen einsetzen.
! Der auf dem Netzgerät aufgedruck-
te Spannungswert muss mit der
lokalen Netzspannung übereinstimmen.
! Nur handelsübliche 9 Volt-Block
Batterie oder Akku verwenden.
– Waage kann nur durch Ziehen des
Netzgerätes und ggf. der Batterie
spannungslos geschaltet werden.
– Netzgerät vor Nässe schützen.
! Unter extremen elektromagneti-
schen Einflüssen kann der Anzeigewert beeinflusst werden. Nach
Ende des Störeinflusses ist das
Produkt wieder bestimmungsgemäß benutzbar.
Installation
– Zubehör und Optionen von Denver
verwenden, diese sind optimal auf
die Waage abgestimmt.
– Die Waage nicht öffnen. Bei ver-
letzter Sicherungsmarke entfällt
der Gewährleistungsanspruch.
Page 22
22
Inbetriebnahme
Lieferumfang
– Waage
– Waagschale
– Steckernetzgerät
Zusätzlich bei MXX-612, MXX-412,
MXX-212, MXX-601:
– Justiergewicht
Zusätzlich bei MXX-123:
– Justiergewicht
– Glasring-Windschutz
– Libelle und höhenverstellbare
Füße
Aufstellung
Bei der Aufstellung Standorte mit den
folgenden ungünstigen Einflüssen
vermeiden:
– Hitze (Heizung, Sonnenein-
strahlung)
– Direkter Luftzug durch offene
Fenster und Türen
– Erschütterungen während des
Wägens
– Extreme Feuchtigkeit
Waage aufstellen
§ Folgende Teile nacheinander auf
die Waage setzen:
– Waagschale mit der Unter- oder
Oberseite (180° drehbar)
– Glasring-Windschutz bei Modell
MXX-123
Page 23

23
Netzanschluss
! Verwenden Sie nur Originalnetz-
gerät.
§ Stecker an der Rückseite der
Waage einsetzen
§ Netzgerät an Steckdose anschließen
Unterflurwägung
Für Wägungen unterhalb der Waage
steht eine Unterflurwägeeinrichtung
zur Verfügung.
§ Verschlussplatte am Waagenboden
herausheben.
§ Wägegut z.B. mit einem Draht an
dem Haken einhängen.
$ Ggf. Abschirmung gegen Luftzug
installieren.
Batterie/Akku einsetzen
(nicht bei Modell MXX-123)
$ Batterie oder Akku gehören nicht
zum Lieferumfang der Waage
! Nur handelsübliche 9 Volt-Block
Batterie oder Akku verwenden
! Akku nur mit externem Ladegerät
laden
§ Waage auf die Seite drehen
§ Batteriefach öffnen:
Batteriefachabdeckung anheben
§ 9 Volt-Block Batterie oder Akku in
die Batteriehalterung einsetzen
$ Polarität beachten
! Batteriefach schließen: Batterie-
fachabdeckung herunterdrücken
und einrasten lassen
! Verbrauchte Batterien oder Akkus
sind Sondermüll (kein Hausmüll):
Akkus gemäß Abfallwirtschaftsgesetz als Sondermüll speziell
entsorgen
Page 24
24
Waage nivellieren
(nur bei Modell MXX-123)
§ Die Waage nach jedem Stellplatzwechsel neu nivellieren (Beispiel:
Luftblase von rechts nach links).
§ Stellfüße gemäß Abbildung so
drehen, bis die Luftblase der
Libelle in der Kreismitte steht.
> In der Regel sind mehrere Nivellier-
schritte nötig.
Gewichte zum Justieren entnehmen
(nur bei Modellen MXX-612,
MXX-412, MXX-212, MXX-601,
MXX-123)
§ Griff vom Fach drehen und herausziehen
$ Justierablauf siehe Seite 32.
Anwärmzeit bei Modell MXX-123:
Um genaue Resultate zu liefern,
braucht das Gerät eine Anwärmzeit
von 1 Stunde. Erst dann ist die notwendige Betriebstemperatur erreicht.
Page 25

25
Betrieb
Grundfunktion Wägen
Merkmale
– Waage nullstellen:
Das Nullstellen kann innerhalb des
gesamten Wägebereichs der Waage
erfolgen.
Vorbereitung
§ Waage einschalten:
Taste (ON/OFF) drücken
§ Ggf. Waage nullstellen:
Taste (ZERO) drücken
$ Ggf. Voreinstellungen ändern:
siehe Kapitel »Voreinstellungen«
$ Ggf. Werksvoreinstellungen laden:
siehe Kapitel »Voreinstellungen«,
Parameter 9. – 1
Weitere Funktion:
$ Waage ausschalten:
Taste (ON/OFF) drücken
$ Batteriebetrieb:
Autom. Ausschalten nach 2, 5 oder
10 Minuten (5 oder 10 Minuten
siehe Kapitel Voreinstellungen).
Beispiel 2 Minuten:
Ändert sich der Gewichtswert mindestens 2 Minuten nicht und wird
keine Taste gedrückt, dann blinkt
das Batteriesymbol » «. Nach
Ablauf weiterer 10 Sekunden schaltet sich die Waage selbständig aus,
wenn keine Taste betätigt wird.
Tastenbeschreibung
(ON/OFF) Ein-/Ausschalten: Schaltet
das Gerät ein, aus oder in
den Standby-Betrieb
Batterie-Betrieb: Einschalten, Hinterleuchtung einschalten, Ausschalten
(ZERO) Waage nullstellen; Taste
2 Sekunden lang drücken:
Anwendungsmenü starten
(CAL) Justieren starten
(F) Anwendungsprogramme
starten; Im Anwendungs-,
Konfigurationsmenü und
beim Justieren Parameter
wählen (scrollen)
(ENTER) Gewählte Parameterein-
stellung bestätigen;
– Anwendungen
– Konfiguration
– Justieren
Anwendung beenden:
Taste 2 Sek. lang drücken
(PRINT) Drucken/Datenausgabe
Beispiel: Wägewert ermitteln
Schritt Taste drücken Anzeige
1. Waage einschalten (ON/OFF)
Selbsttest wird durchgeführt (ggf.)
Anzeige: Software-Version r 31.01 g
2. Behälter für Wägegut auflegen 52.0 g
(hier z.B. 52 g)
3. Waage nullstellen (ZERO) 0.0 g
4. Wägegut in Behälter legen 150.2 g
(hier z.B. 150,2 g)
Page 26
26
Einheitenwechsel
Mit diesem Anwendungsprogramm kann ein Wägewert in einer ausgewählten
Einheit (siehe Tabelle) und in Gramm angezeigt werden.
Beispiel: Einheit wechseln von Pound [lb] (Applikation) nach Gramm [g]
(Basiseinheit)
Schritt Taste drücken Anzeige
1. Anwendungsprogramm wechseln (ZERO) lang
2. Einheitenwechsel wählen (F)
3. Einheit bestätigen (ENTER)
4. Gewichtseinheit wählen; hier »5. Pound« mehrmals (F)
(siehe Tabelle unten)
5. Gewichtseinheit Pound bestätigen (ENTER)
6. Wägegut auflegen
7. Gewichtseinheit wechseln (F)
Menüpunkt Einheit Umrechnung Anzeige
1. user* Gramm 1,00000000000 o
2.grams (Werksvoreinstellung) Gramm 1,00000000000 g
4.carat Carat 5,00000000000 o
5.Pound Pound 0,00220462260 lb
6.ounce Ounce 0,03527396200 oz
7.tryo Troy ounce 0,03215074700 ozt
8.tl.hon Tael Hongkong 0,02671725000 tlk
9.tl.sin Tael Singapur 0,02645544638 tl
10.tl.ta Tael Taiwan 0,0266666600 0 tl
11.grai Grain 15,4323583500 GN
12.peny Pennyweight 0,64301493100 dwt
15.tl.ch Tael China 0,02645547175 tl
22.pdoz lb/oz 0,03527396200 lb:oz
23.newt Newton 0,00980665000 N
* = Vom Anwender definierte Einheit mit PC-Programm in die Waage ladbar über
optionale Schnittstelle RS-232 oder USB.
Anwendungsprogramme
Page 27
27
Zweck
Mit diesem Anwendungsprogramm kann die Anzahl von Teilen ermittelt
werden.
Beispiel: Ermittlung einer unbekannten Stückzahl: Einstellbare Referenzstückzahl wiegen (Referenzstückzahl 20)
Schritt Taste drücken Anzeige
1. Anwendungsprogramm wechseln (ZERO) lang
2. Zählen wählen 2x (F)
3 Einstellung bestätigen (ENTER)
Symbol » « in der Anzeige:
Anwendung ist aktiv
4 Behälter auf die Waage stellen
5 Nullstellen (ZERO)
6. Referenzstückzahl auflegen (20 Stück)
7. Referenzstückzahl wählen:
In Einer-Schritten (1, 2, 3, ..., 99) mehrmals (F) kurz oder
In Zehner-Schritten (10, 20, 30, ..., 100) (F) gedrückt halten
8. Gewählte Referenzstückzahl bestätigen (ENTER)
9. Unbekannte Stückzahl auflegen
10. Anzeige umschalten zwischen mittlerem
Stückgewicht, Gewicht, Stückzahl mehrmals (F)
11. Waage entlasten
12. Anwendung Zählen:
Refenzwert löschen (Enter) lang
13. Zählen wieder aktivieren, wenn kein
anderes Anwendungsprogramm
inzwischen angewählt wurde. (F)
14. Ggf. weiter bei 5.
Zählen
Page 28
28
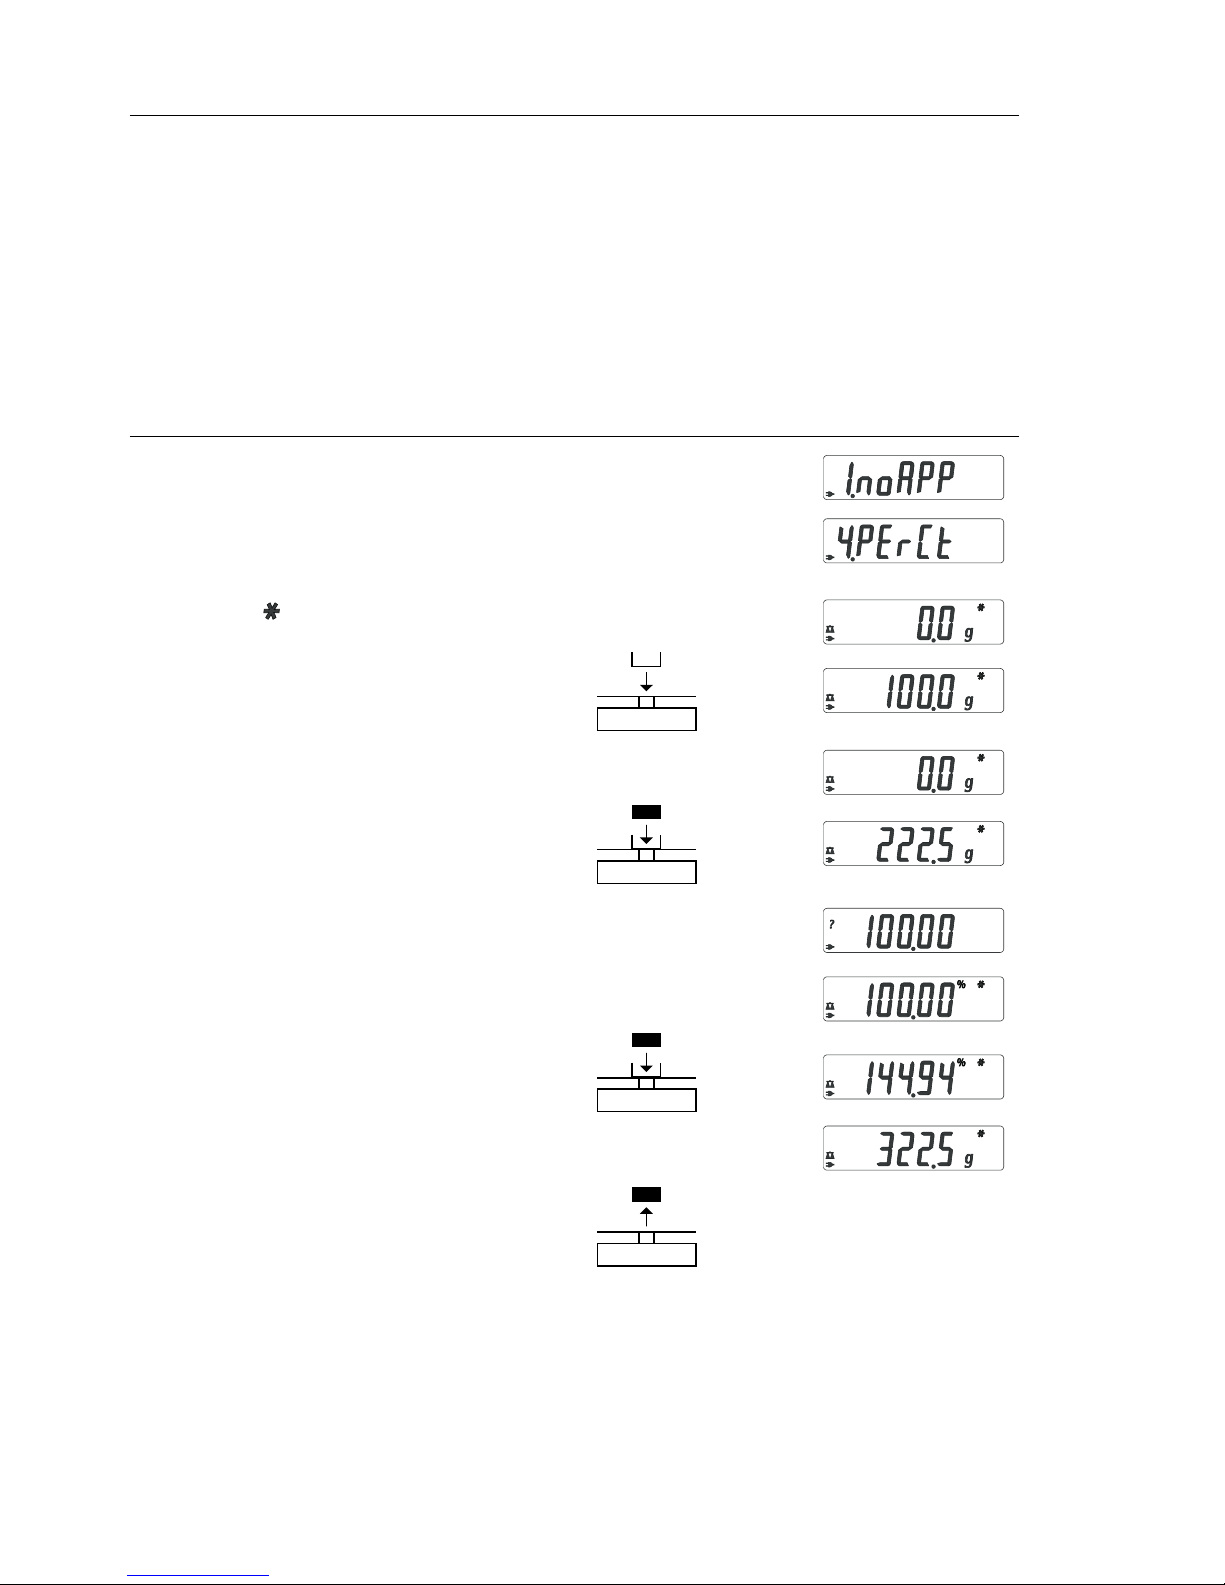
Prozentwägen
Zweck
Mit diesem Anwendungsprogramm kann der prozentuale Anteil eines
Wägegutes bezogen auf ein Referenzgewicht ermittelt werden.
Beispiel: Prozentwert messen mit: Referenzgewicht übernehmen durch
aufgelegtes Gewicht, Referenzprozentzahl 100 %
Schritt Taste drücken Anzeige
1. Anwendungsprogramm wechseln (ZERO) lang
2. Prozentwägen wählen mehrmals (F)
3. Einstellung bestätigen (ENTER)
Symbol » « in der Anzeige:
Anwendung ist aktiv
4. Behälter auf die Waage stellen
5. Nullstellen (ZERO)
6. Referenzgewicht für 100 % auflegen
7. Ggf. Nachkommastellen für die
Prozentanzeige ändern: 100,0 %, 100,00 %
oder 100 % (Werksvoreinstellung) mehrmals (F)
8. Gewählte Nachkommastellen bestätigen (ENTER)
9. Unbekanntes Gewicht auflegen
10. Anzeige umschalten zwischen
Gewicht und Prozentzahl mehrmals (F)
11. Waage entlasten
12. Anwendung Prozentwägen:
Referenzprozentzahl löschen (Enter) lang
13. Prozentwägen wieder aktivieren, wenn
kein anderes Anwendungsprogramm
inzwischen angewählt wurde. (F)
14. Ggf. weiter bei 5.
Page 29
29
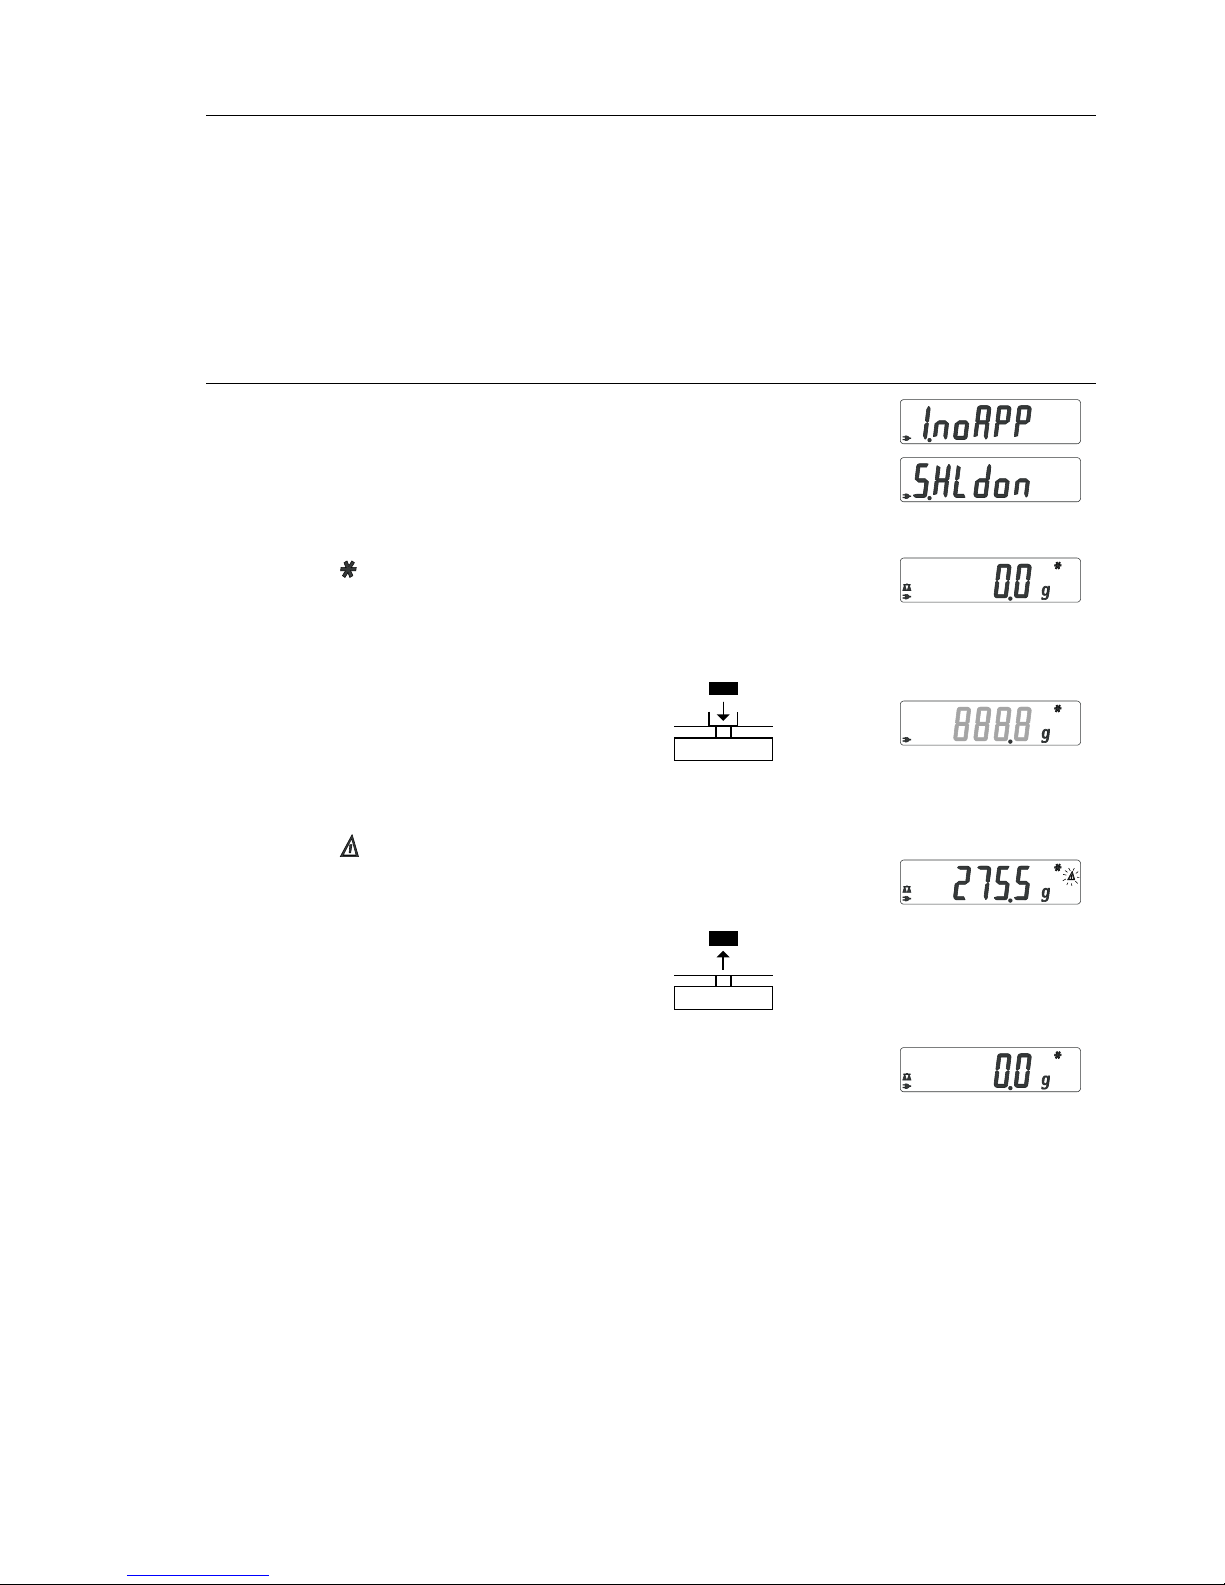
Statische Anzeige
Zweck
Letzten Wert mit Stillstand für 5 Sekunden lang nach Entlastung anzeigen.
Beispiel: Überdimensioniertes Wägegut bestimmen
Schritt Taste drücken Anzeige
1. Anwendungsprogramm wechseln (ZERO) lang
2. »Statische Anzeige« wählen mehrmals (F)
3. Einstellung bestätigen (ENTER)
Symbol » « in der Anzeige:
Anwendung ist aktiv
4. Ggf. Nullstellen (ZERO)
5. Wägegut auflegen
6. Anwendung starten (F)
Symbol » « blinkt in der Anzeige:
Der stabile Gewichtswert steht fest
in der Anzeige.
7. Waage entlasten:
Der stabile Gewichtswert steht noch
für 5 Sekunden fest in der Anzeige.
8. Oder Waage nullstellen und
stabilen Anzeigewert löschen (ZERO)
9. Anwendung »Statische Anzeige« (Enter) lang
beenden
10. »Statische Anzeige« wieder aktivieren, (F)
wenn kein anderes Anwendungsprogramm inzwischen angewählt wurde.
11. Ggf. weiter bei 5.
Page 30
30
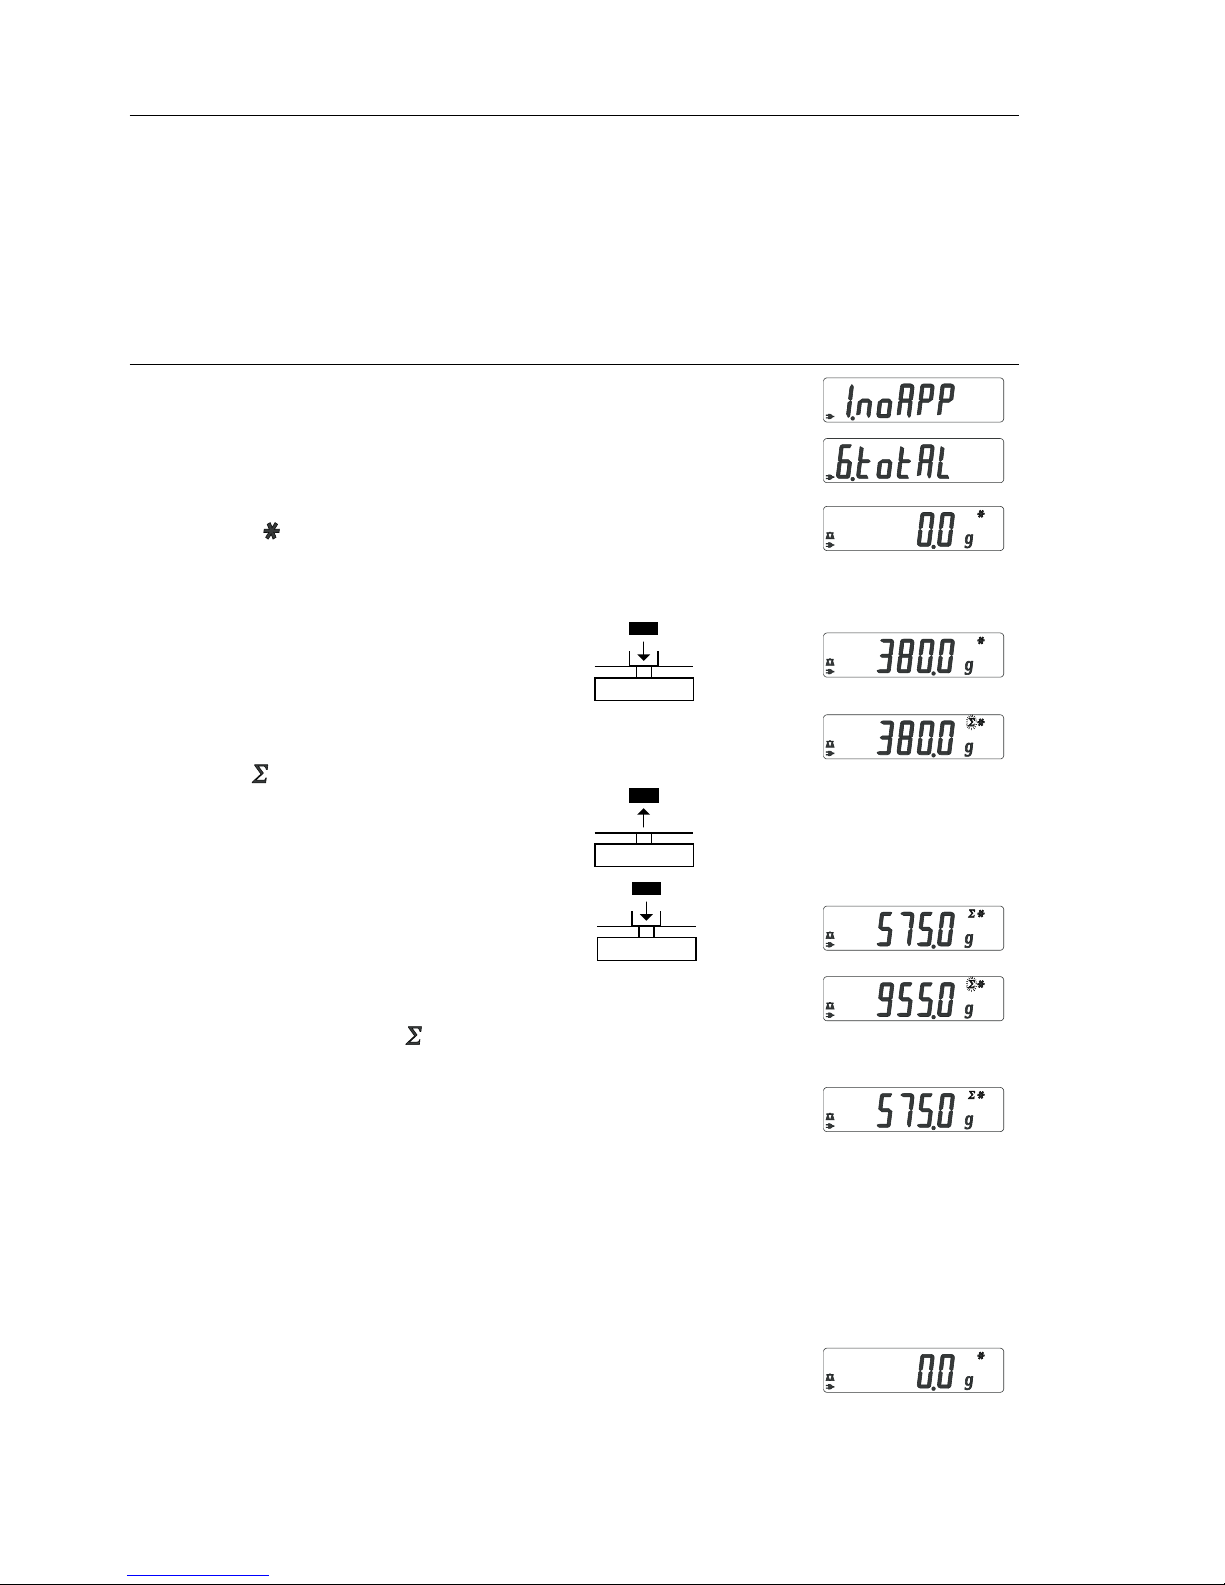
Zweck: Mit diesem Anwendungsprogramm können Wägewerte in einem
Speicher summiert werden, die den Wägebereich der Waage überschreiten.
Beispiel: Wägewerte summieren
Schritt Taste drücken Anzeige
1. Anwendungsprogramm wechseln (ZERO) lang
2. Summieren wählen mehrmals (F)
3. Einstellung bestätigen (ENTER)
Symbol » « in der Anzeige:
Anwendung ist aktiv
4. Ggf. Waage nullstellen (ZERO)
5. Wägegut auf die Waage legen
(hier z.B. 380 g)
6. Wert in Speicher übernehmen. (ENTER)
Summe steht fest in der Anzeige:
Symbol blinkt.
7. Wägegut herunternehmen
8. Nächstes Wägegut auf die
Waage legen
(hier z.B. 575 g)
9. Wert in Speicher übernehmen. (ENTER)
Gespeicherte Summe steht fest
in der Anzeige: Symbol blinkt,
bis der gespeicherte Wert gelöscht wird.
10. Aktuelle Komponente für 2 Sekunden (F)
ansehen (Falls Drucker angeschlossen:
gleichzeitig Ausdruck)
11. Summenspeicher löschen (F) lang
(Falls Drucker angeschlossen:
Summe ausdrucken)
12. Summieren beenden (Enter) lang
13. Summieren wieder aktivieren, wenn (F)
kein anderes Anwendungsprogramm
inzwischen angewählt wurde (Falls Drucker
angeschlossen: Summe ausdrucken).
14. Ggf. weiter bei 6.
Summieren
Page 31
31
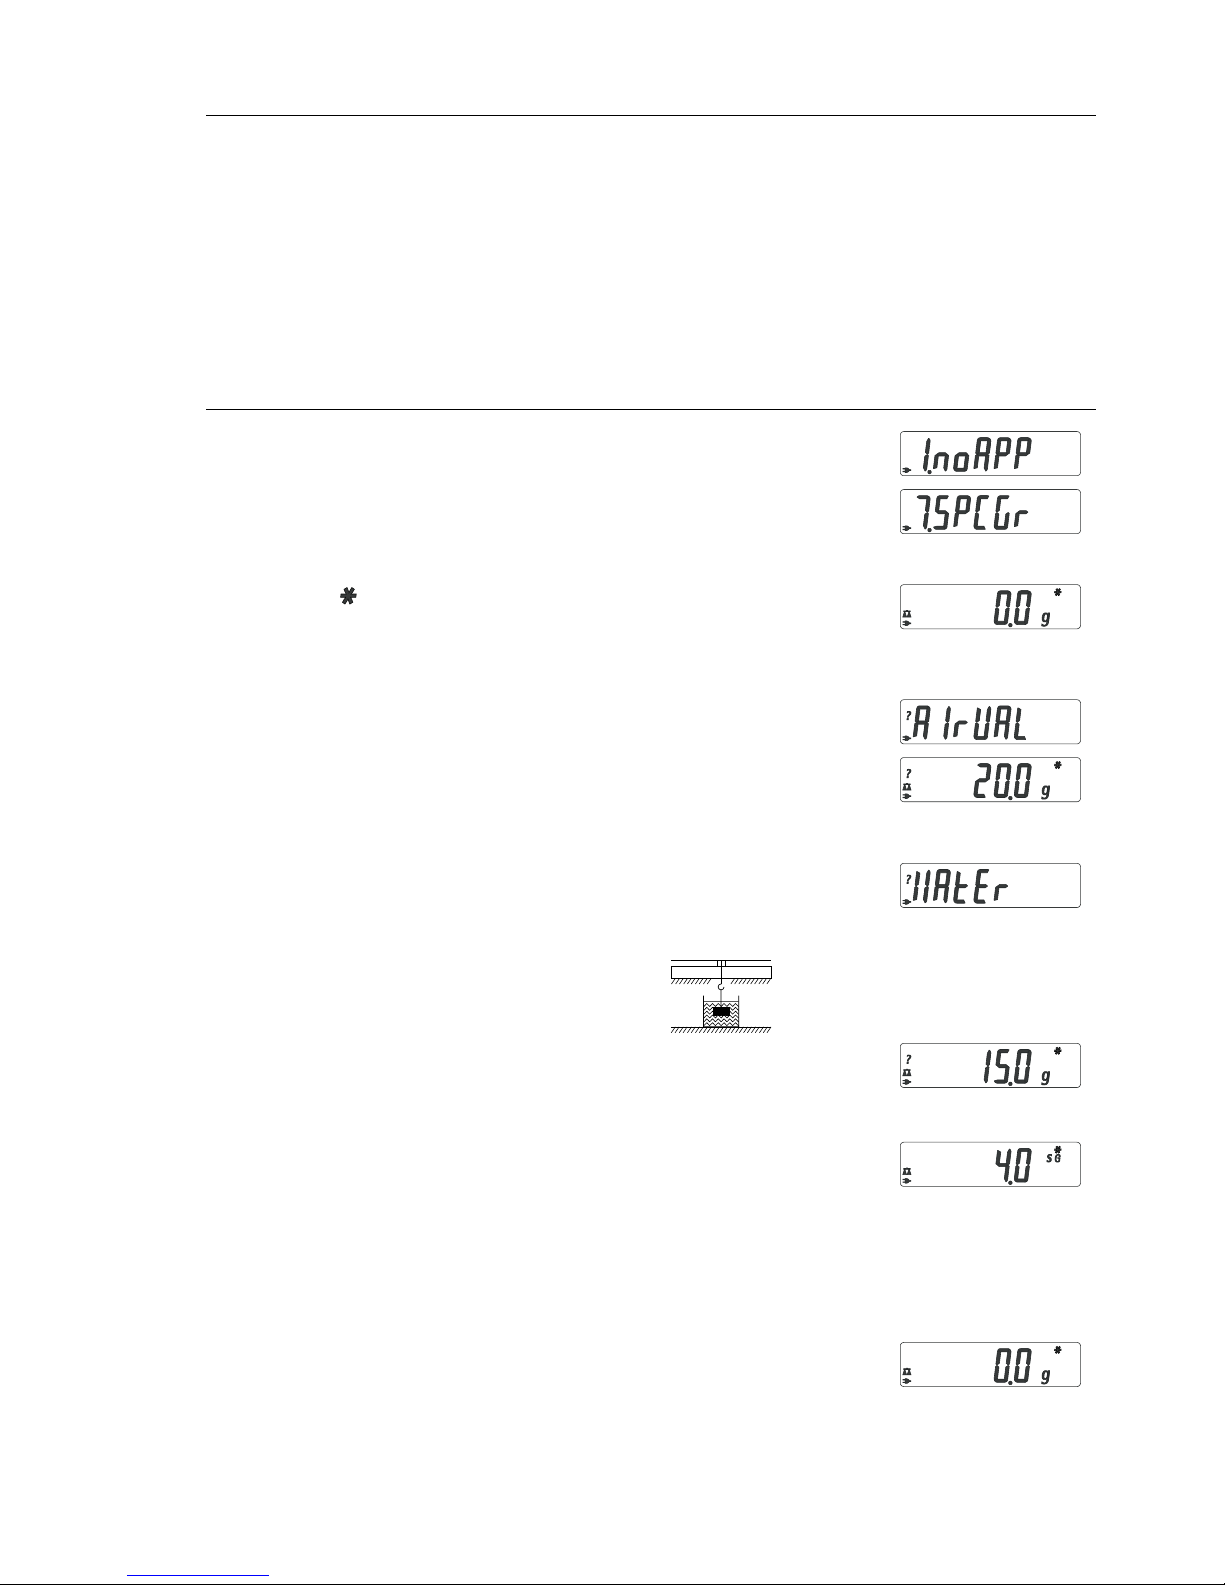
Spezifisches Gewicht
Zweck: Mit diesem Anwendungsprogramm kann das spezifische Gewicht einer
Probe bestimmt werden. Das Ergebnis wird mit einer Nachkommastelle angezeigt. Nicht im Lieferumfang: Becherglas und Draht.
Beispiel: Spezifisches Gewicht eines festen Wägegutes bestimmen.
Schritt Taste drücken Anzeige
1. Anwendungsprogramm wechseln (ZERO) lang
2. »Spezifisches Gewicht« wählen mehrmals (F)
3. Einstellung bestätigen (ENTER)
Symbol » « in der Anzeige:
Anwendung ist aktiv
4. Ggf. Waage nullstellen (ZERO)
5. Anwendung starten (F)
6. Anzeige »airval« bestätigen (ENTER)
7. Gewicht des Wägegutes in Luft bestimmen:
Wägegut auf die Waage legen
8. Wägewert in Luft übernehmen (ENTER)
9. Wägegut von der Waage nehmen
10. Wägewert in Flüssigkeit bestimmen:
Wägegut an einen Haken hängen und
Becherglas aufstellen
11. Anzeige »water« bestätigen (ENTER)
12. Wägegut in Flüssigkeit tauchen
13. Wägewert in Flüssigkeit übernehmen (ENTER)
und Ergebnis anzeigen
14. Ergebnis löschen (ZERO)
15. Anwendung »Spezifisches Gewicht«
beenden (ENTER) lang
16. »Spezifisches Gewicht« wieder aktivieren, (F)
wenn kein anderes Anwendungsprogramm inzwischen angewählt wurde.
17. Ggf. weiter bei 5.
Page 32
32
Justieren
Merkmale
Der Justiervorgang kann nur gestartet
werden, wenn
– die Waage unbelastet ist
– die Waage tariert ist
– das interne Wägesignal stabil ist
Sind diese Voraussetzungen nicht erfüllt,
erscheint eine Fehlermeldung.
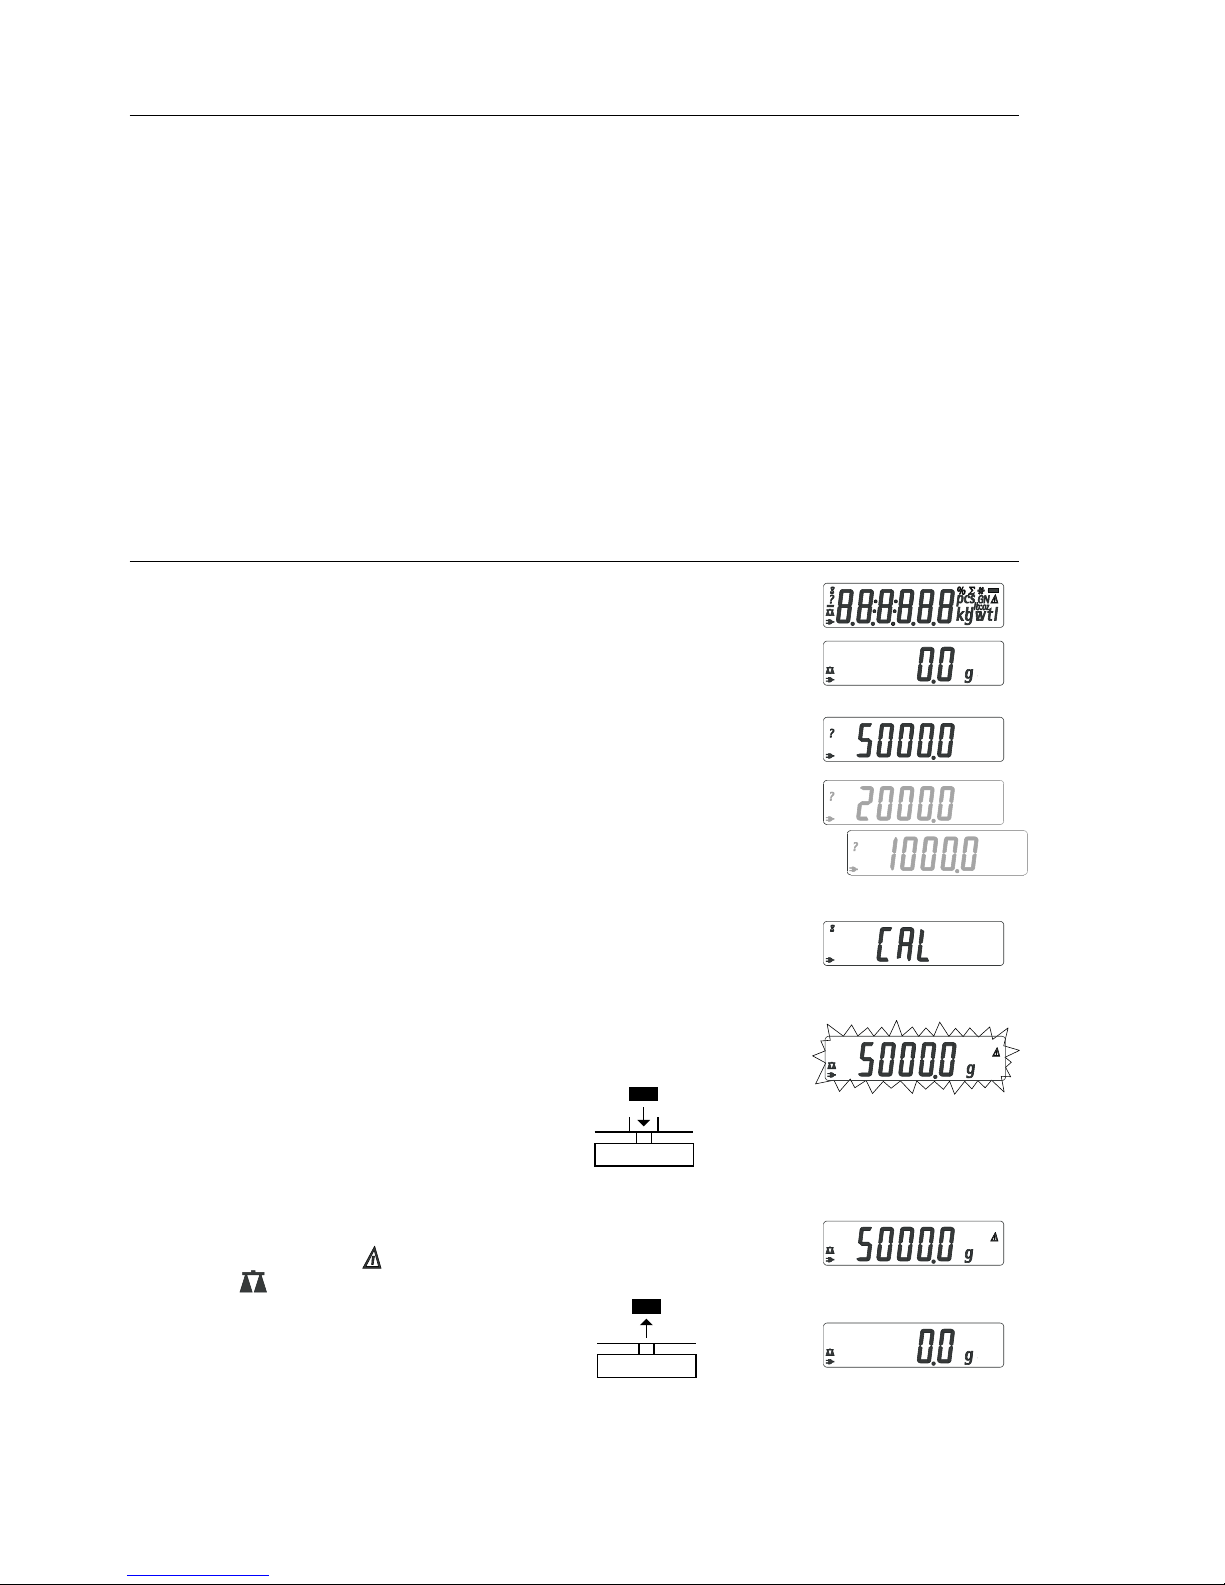
Das zur Justierung erforderliche Gewicht
wird angezeigt.
Standard-Justiergewichte bei ausgewählten Modellen: Entnahme siehe Seite 24.
Weitere Gewichtswerte über Taste (F)
wählbar. Ggf. Justiervorgang
abbrechen: Taste (ENTER) länger als
2 Sekunden gedrückt halten.
Die Waage nach der Installation am Aufstellort oder nach jedem Transport justieren.
Beispiel: Waage justieren (hier Modell MXX-5001)
Schritt Taste drücken Anzeige
1. Waage ggf. einschalten (ON/OFF)
2. Waage nullstellen (ZERO)
3. Justiervorgang starten (CAL)
Voreingestelltes Justiergewicht wird
ohne Einheit angezeigt (hier z.B. 5000 g)
4. Ggf. anderen Justiergewichtswert
wählen mehrmals (F)
5. Justiergewichtswert bestätigen und (ENTER)
Justieren starten
Nach Übernahme des Nullpunkts wird
das aufzulegende Justiergewicht
blinkend angezeigt.
6. Angezeigtes Justiergewicht jetzt
auflegen
Blinken endet, wenn das Justiergewicht
innerhalb der vorgegebenen Grenzen liegt.
Bei Übernahme des Justiergewichtes
erlischt das Symbol und das Stillstandssymbol erscheint in dre Anzeige.
7. Justiergewicht abnehmen
8. Justieren beendet.
Page 33

33
Voreinstellungen (Setup-Menü)
Konfiguration der Waage, d.h. Anpassung an die Anforderungen der Benutzer.
Schritt Taste drücken Anzeige
1. Waage ausschalten (ON/OFF)
2. Waage einschalten und (ON/OFF)
während der Anzeige aller Segmente kurz (ZERO)
Tastenfunktionen im Setup-Menü:
Taste Kurz drücken Lang drücken
(ENTER) Menüebene: Nach rechts bewegen; rotierend Einstellung bestätigen
(F) Menüpunkt: Aufwärts bewegen –
(ZERO) Menüebene: Nach links bewegen Einstellung speichern und
Setup-Menü verlassen
Parametereinstellungen (Übersicht) ο Werksvoreinstellung;
√ Einstellung Benutzer
Setup- 1 Wägen 1.1. Filteranpassung 1.1.1 Sehr ruhige Umgebung
Menü 1.1.2
ο Ruhige Umgebung
1.1.3 Unruhige Umgebung
1.1.4 Sehr unruhige Umgebung
1.2. Anwendungsfilter 1.2.1
ο Auswägen
1.2.2 Dosieren
1.3. Stillstandsbereich 1.3.1 1/4 Ziffernschritt
1.3.2 1/2 Ziffernschritt
1.3.3 1 Ziffernschritt
1.3.4
ο 2 Ziffernschritte
1.3.5 4 Ziffernschritte
1.5. Justieren/Linearisieren: 1.5.1
ο Justieren
Funktion der Taste (CAL) 1.5.2 Linearisieren: nur für Service
1.5.3 Taste gesperrt
1.6. Autozero 1.6.1
ο Eingeschaltet
1.6.2 Ausgeschaltet
1.7. 1. Gewichtseinheit oder 1.7.1 Wählbare Einheit siehe
2. bei Anwendung bis 1.7.23 Kapitel »Einheitenwechsel«
»Einheitenwechsel«
5. und 6. Nur relevant mit eingebauter Datenschnittstelle:
siehe zugehörige Schnittstellenbeschreibung
8. Zusatz- 8.1. Tastenfunktionen sperren 8.1.1 Alle gesperrt bis auf (ON/OFF)
funktionen und (ZERO)
8.1.2
ο Alle frei
8.2. Waage automatisch 8.2.1
ο Nach 2 Minuten
abschalten 8.2.2 Nach 5 Minuten
8.2.3 Nach 10 Minuten
9. Menü-Reset 9.1. Werkseinstellung 9.1.1 wiederherstellen
9.1.2
ο nicht wiederherstellen
Page 34

34
Fehlermeldungen werden in der Hauptanzeige für ca. 2 Sekunden dargestellt.
Danach kehrt das Programm automatisch in den Wägezustand zurück.
Anzeige Ursache Abhilfe
keine Anzeigesegmente Keine Betriebsspannung Stromversorgung überprüfen
erscheinen
Netzgerät nicht Netzgerät an die
eingesteckt Stromversorgung anschließen
Batterie oder Akku ist leer Batterie wechseln Akku
aufladen mit externem Ladegerät
oL Wägebereich überschritten Waagschale entlasten
UL Waagschale nicht aufgelegt Waagschale korrekt auflegen
Berührung zwischen Waagschale darf umgebende
Waagschale und Umgebung Teile nicht berühren
disErr Anzeigeüberlauf: Wägegut verringern
Auszugebender Wert in
der Anzeige nicht darstellbar
calErr Justierbedingung wurde Waage entlasten
nicht eingehalten, z.B.: Tarieren mit Taste (ZERO)
– Nullstellen Erst nach Nullanzeige justieren
– Waagschale belastet
appErr Gewicht zu gering oder kein Gewicht erhöhen
Wägegut auf der Waagschale
bei Anwendungsprogrammen
PrtErr Datenschnittstelle für Denver-Kundendienst
Druckausgabe gesperrt ansprechen
Bal.Err Gerät beim Einschalten belastet Vor dem Einschalten:
oder defekt Waage entlasten oder Denver
Kundendienst ansprechen
Sep.Err Gerät defect Denver Kundendienst
ansprechen
Max. Wägebereich kleiner Waage ohne aufgelegte Waagschale auflegen
als im Abschnitt »Tech- Waagschale eingeschaltet Aus- und wieder Einschalten
nische Daten« angegeben mit Taste (ON/OFF)
Offensichtlich falsches Waage nicht justiert Justieren
Wägeergebnis Vor dem Wägen nicht tariert Tarieren
Falls andere Fehlermeldungen auftreten, Denver-Kundendienst anrufen!
Fehlermeldungen
Page 35

35
Übersicht
Technische Daten
ModelL MXX-123 MXX-612 MXX-412 MXX-212
Wägebereich g 120 610 410 210
Ablesbarkeit g 0,001 0,01 0,01 0,01
Tarierbereich (subtraktiv) g 120 610 410 210
Linearitätsabweichung ≤± g 0,003 0,03 0,03 0,03
Einsatz-Temperaturbereich +10… +30°C (273 ... 303 K, 50° ... 86°F)
Einschwingzeit (typisch) s 2,5 2 2 2
Anpassung an Einsatz- und 4 optimierte Filterstufen;
Aufstellbedingungen Anzeigefolge: 0,1–0,8 (je nach eingestellter Filterstufe)
Justiergewichtswert g 100 (F1) 200 (F2) 200 (F2) 200 (M1)
Nettogewicht, ca. kg 1,2 1,35 1,35 1,2
Waagschalenabmessung mm 97 d 142+130 142+130 97 d
Netzanschluss,
-spannung, -frequenz über Steckernetzgerät 230 V oder 115 V, +15%…– 20%, 48–60 Hz
Leistungsaufnahme (typisch) W 1 0,75 0,75 0,75
Betriebsdauer mit 9 Volt-Block
– Batterie (Alkali), ca. h – 11 11 14
– Akku bei voller Aufl. (NiMH), typ. h – 2,5 2,5 4
Modell MXX-5001 MXX-2001 MXX-601 MXX-10 MXX-5
Wägebereich g 5000 2000 600 10000 5000
Ablesbarkeit g 0,1 0,1 0,1 1 1
Tarierbereich (subtraktiv) g 5000 2000 600 10000 5000
Linearitätsabweichung ≤± g 0,2 0,2 0,2 2 2
Einsatz-Temperaturbereich 10°C to 30°C (273°K to 303°K; 50°F to 86°F)
Einschwingzeit (typisch) s 2 2 1,5 1,5 1,5
Anpassung an Einsatz- und 4 optimierte Filterstufen;
Aufstellbedingungen Anzeigefolge: 0,1–0,8 (je nach eingestellter Filterstufe)
Justiergewichtswert kg 5 (F2) 2 (F2) 0.2 (M2) 5 (M1) 5 (M2)
Nettogewicht, ca. kg 1,1 1,1 1,25 1,1 1,1
Waagschalenabmessung mm 142+130
Netzanschluss,
-spannung, -frequenz über Steckernetzgerät 230 V oder 115 V, +15%…– 20%, 48–60 Hz
Leistungsaufnahme (typisch) W 1 1 0,75 0,75 0,75
Betriebsdauer mit 9 Volt-Block
– Batterie (Alkali), ca. h 11 11 14 14 14
– Akku bei voller Aufl. (NiMH), typ. h 2,5 2,5 4 4 4
Page 36

36
Zubehör (Optionen)
C – Kennzeichnung
Das Gerät erfüllt die Anforderungen
der Richtlinien des Rates der Europäischen Union:
89/336/EWG »Elektromagnetische
Verträglichkeit (EMV)«
Zugehörige Europäische Normen:
Störaussendung:
nach Produktnorm EN 61326-1 Kl.B
(Wohnbereich)
Störfestigkeit:
nach Produktnorm EN 61326-1
(Mindestprüfanforderungen, nicht
kontinuierlicher Betrieb)
Hinweis:
Modifikationen der Geräte sowie
der Anschluss von nicht von Denver
gelieferten Kabeln oder Geräten
unterliegen der Verantwortung des
Betreibers und sind von diesem
entsprechend zu prüfen und falls
erforderlich zu korrigieren.
Denver stellt auf Anfrage Angaben zur
Betriebsqualität zur Verfügung (gemäß
den o.g. Normen zur Störfestigkeit).
73/23/EWG »Elektrische Betriebsmittel zur Verwendung innerhalb
bestimmter Spannungsgrenzen«
Zugehörige Europäische Normen:
EN 60950
Sicherheit von Einrichtungen der Informationstechnik, einschließlich elektrischer Büromaschinen
EN61010
Sicherheitsanforderungen an elektrische Mess-, Steuer-, Regel- und Laborgeräte
Teil 1: Allgemeine Anforderungen
Bei Verwendung elektrischer Betriebsmittel in Anlagen und Umgebungsbedingungen mit erhöhten Sicherheitsanforderungen sind die Auflagen
gemäß den zutreffenden Errichtungsbestimmungen zu beachten.
Artikel Bestell-Nr.
Datenschnittstelle, Einbausatz
– RS-232-Schnittstelle mit Kabel YADAP-RS
– USB-Schnittstelle mit Kabel YADAP-USB
Messwertdrucker 901042-1
Diebstahlsicherung LC-1
Justiergewichte
– für MXX-5001 (5 kg; F2) YCW6548-00
– für MXX-2001 (2 kg; F2) YCW6248-00
– für MXX-10 (5 kg; M1) YCW655-00
– für MXX-5 (5 kg; M2) YCW626-00
Page 37

37
Page
Sommaire . . . . . . . . . . . . . . . . . . . . . . . . . . . . . . . . . . . . . . . . . . . . . . . . . . . . . . . . . 37
Conseils de sécurité. . . . . . . . . . . . . . . . . . . . . . . . . . . . . . . . . . . . . . . . . . . . . . . . . 38
Mise en service . . . . . . . . . . . . . . . . . . . . . . . . . . . . . . . . . . . . . . . . . . . . . . . . . . . . 39
Fonctionnement. . . . . . . . . . . . . . . . . . . . . . . . . . . . . . . . . . . . . . . . . . . . . . . . . . . . 42
Pesée simple . . . . . . . . . . . . . . . . . . . . . . . . . . . . . . . . . . . . . . . . . . . . . . . . . . . . . 42
Description des touches . . . . . . . . . . . . . . . . . . . . . . . . . . . . . . . . . . . . . . . . . . . . 42
Programmes d’application . . . . . . . . . . . . . . . . . . . . . . . . . . . . . . . . . . . . . . . . . . . 43
Commutation d’unités . . . . . . . . . . . . . . . . . . . . . . . . . . . . . . . . . . . . . . . . . . . . . 43
Comptage . . . . . . . . . . . . . . . . . . . . . . . . . . . . . . . . . . . . . . . . . . . . . . . . . . . . . . . . 44
Pesée en pourcentage. . . . . . . . . . . . . . . . . . . . . . . . . . . . . . . . . . . . . . . . . . . . . . 45
Affichage statique . . . . . . . . . . . . . . . . . . . . . . . . . . . . . . . . . . . . . . . . . . . . . . . . . 46
Totalisation . . . . . . . . . . . . . . . . . . . . . . . . . . . . . . . . . . . . . . . . . . . . . . . . . . . . . . . 47
Poids spécifique. . . . . . . . . . . . . . . . . . . . . . . . . . . . . . . . . . . . . . . . . . . . . . . . . . . 48
Ajustage . . . . . . . . . . . . . . . . . . . . . . . . . . . . . . . . . . . . . . . . . . . . . . . . . . . . . . . . . . 49
Réglages (menu) . . . . . . . . . . . . . . . . . . . . . . . . . . . . . . . . . . . . . . . . . . . . . . . . . . . 50
Messages d’erreur . . . . . . . . . . . . . . . . . . . . . . . . . . . . . . . . . . . . . . . . . . . . . . . . . . 51
Données techniques de l’appareil . . . . . . . . . . . . . . . . . . . . . . . . . . . . . . . . . . . . . 52
Caractéristiques techniques. . . . . . . . . . . . . . . . . . . . . . . . . . . . . . . . . . . . . . . . . 52
Accessoires (options) . . . . . . . . . . . . . . . . . . . . . . . . . . . . . . . . . . . . . . . . . . . . . . 53
Marque C. . . . . . . . . . . . . . . . . . . . . . . . . . . . . . . . . . . . . . . . . . . . . . . . . . . . . . . . 53
Sommaire
Page 38

38
Conseils de sécurité
Sécurité
§ Veuillez lire attentivement ce mode
d’emploi avant d’utiliser votre
nouvelle balance afin d’éviter tout
dommage.
! N’utilisez pas votre balance dans
des domaines à risques d’explosions.
! Veillez à ce que la tension indiquée
sur le bloc d’alimentation corresponde à la tension d’alimentation
secteur sur votre lieu d’installation.
! Utilisez uniquement des piles
monoblocs de 9 volts ou des
accumulateurs en vente dans le
commerce. L’utilisation d’un type
de piles non adaptées peut
provoquer une explosion.
– La balance n’est plus sous tension
uniquement lorsque le bloc
d’alimentation est débranché et,
le cas échéant, lorsque la pile est
enlevée.
– Protégez le bloc d’alimentation de
l’humidité.
! Des charges électromagnétiques
extrêmes peuvent influer sur la
valeur affichée. Après les interférences, l’appareil peut à nouveau
être utilisé normalement.
Installation
– Veuillez utiliser les accessoires et
options d’origine Denver ; ils ont
été adaptés de façon optimale à la
balance.
– N’ouvrez pas la balance ! Si vous
endommagez la bande de sécurité,
vous perdez tout droit à la garantie.
Page 39
39
Mise en service
Contenu de la livraison
– balance
– plateau de pesée
– bloc d’alimentation
En plus avec les modèles MXX-612,
MXX-412, MXX-212, MXX-601 :
– poids d’ajustage
En plus avec les modèles MXX-123 :
– poids d’ajustage
– paravent cylindrique en verre
– niveau à bulle et pieds de réglage
Installation
Lors de l’installation, choisir un
emplacement adéquat afin de ne pas
exposer la balance aux influences
externes suivantes :
– chaleur due à un radiateur ou aux
rayons du soleil,
– courants d’air directs causés
par des fenêtres ou des portes
ouvertes,
– vibrations pendant la pesée,
– humidité extrême.
Montage de la balance
§ Installer successivement les
éléments suivants sur la balance :
– Plateau de pesée rond avec
face inférieure ou supérieure
(pivotant sur 180°)
– Paravent cylindrique en verre sur
les modèles MXX-123
Page 40
40
Raccordement au secteur
! N’utilisez que des blocs
d’alimentation d’origine Denver
§ Insérez la fiche coudée dans la
balance.
§ Raccordez le bloc d’alimentation
à une prise secteur.
Pesée en dessous du socle
Un dispositif de pesée en dessous
du socle est à votre disposition pour
toutes vos pesées sous le socle de la
balance.
§ Retirer la plaque de fermeture
sous le socle de la balance.
§ Accrocher l’échantillon au crochet
par exemple à l’aide d’un fil
métallique.
$ Si nécessaire, installer un écran
contre les courants d’air.
Mise en place de la pile/de
l’accumulateur
(pas sur le modèle MXX-123)
$ La pile ou l’accumulateur ne font pas
partie de la livraison.
! Utiliser uniquement une pile monobloc
de 9 volts ou un accumulateur en vente
dans le commerce.
! Charger l’accumulateur uniquement à
l’aide d’un chargeur de pile externe.
§ Tourner la balance sur le côté.
§ Ouvrir le compartiment à pile : soule-
ver le cache du compartiment à pile.
§ Placer la pile monobloc de 9 volts ou
l’accumulateur dans le support à pile.
$ Respecter la polarité.
! Fermer le compartiment à pile en
appuyant dessus jusqu’à ce qu’il s’enclenche.
! Les piles ou accumulateurs usagés
sont des ordures spéciales (pas des
ordures ménagères) :
ils doivent être traités en conformité
avec la loi sur les ordures industrielles.
Page 41
41
Mise à niveau de la balance
(uniquement sur le modèle MXX-123)
§ Remettre la balance à niveau après
chaque changement du lieu de
travail.
§ Tourner les pieds de réglage, selon
le schéma ci-contre, jusqu’à ce que
la bulle d’air du niveau à bulle soit
centrée.
> En général, plusieurs étapes sont
nécessaires à la mise à niveau.
Retirer les poids d’ajustage
(uniquement sur les modèles
MXX-612, MXX-412, MXX-212,
MXX-601, MXX-123)
§ Tourner la poignée du logement et
la tirer.
$ Déroulement de l’ajustage :
vor page 49.
Temps de préchauffage pour
modèle MXX-123:
Pour fournir des résultats précis,
l’appareil a besoin d’un temps de
préchauffage de 1 heure. La balance
atteint la température de fonctionnement nécessaire seulement après
ce laps de temps.
Page 42
42
Fonctionnement
Pesée simple
Caractéristiques
– Tarer la balance. Le tarage peut
avoir lieu à l’intérieur de l’étendue de
pesée tout entière de la balance.
Opérations préliminaires
§ Mettre la balance en marche :
appuyer sur la touche (ON/OFF).
§ Tarer la balance si nécessaire :
appuyer sur la touche (ZERO).
$ Modifier les réglages si nécessaire :
voir le chapitre «Réglages».
$ Charger les réglages d’usine si
nécessaire :
voir le chapitre «Réglages»,
paramètre 9.– 1
Autres fonctions :
$ Eteindre la balance : appuyer sur la
touche (ON/OFF).
$ Fonctionnement par pile :
arrêt automatique de la balance
au bout de 2 minutes. Si la valeur
pondérale ne change pas pendant
au moins 2 minutes et si aucune
touche n’est activée, le symbole
de pile clignote « ». Au bout de
10 secondes, la balance s’éteint
automatiquement.
Description des touches
(ON/OFF) Marche/Arrêt : met la balance
sous tension, l’éteint ou la met
en mode de veille.
Fonctionnement par pile : mise
sous tension, rétroéclairage,
arrêt.
(ZERO) Tarer la balance ; pour démarrer
le menu d’application, appuyer
sur la touche pendant
2 secondes.
(CAL) Démarrer l’ajustage.
(F) Démarrer les programmes
d’application ; dans le menu
d’application et lors de l’ajustage : sélectionner les paramètres
(les faire défiler).
(ENTER) Confirmer les réglages de para-
mètres sélectionnés ; pendant
l’application : commuter vers
la valeur pondérale/terminer
l’application (appuyer sur la
touche pendant 2 secondes).
(PRINT) Impression/Sortie des données.
Exemple : calcul de la valeur de pesée
Etape Appuyer sur la touche Affichage
1. Mettre la balance sous tension (ON/OFF)
Un test automatique est effectué
Affichage : version du logiciel r 31.01 g
2. Poser le récipient pour l’échantillon 52.0 g
(ici par ex. 52 g)
3. Tarer la balance (ZERO) 0.0 g
4. Déposer l’échantillon dans le récipient 150.2 g
(ici par ex. 150,2 g)
Page 43
43
Programmes d’application
Commutation d’unités
Grâce à ce programme d’application, il est possible d’afficher une valeur
de pesée dans une unité sélectionnée (voir tableau) et en grammes.
Exemple : commuter de l’unité Livres [lb] (application) à Grammes [g]
(unité de base)
Etape Appuyer sur la touche Affichage
1. Changer de programme d’application (ZERO) longuement
2. Sélectionner la commutation d’unités (F)
3. Confirmer le réglage (ENTER)
4. Sélectionner l’unité de poids ; plusieurs fois (F)
ici « 5. Pound » (voir tableau ci-dessous)
5. Confirmer l’unité de poids Pound (ENTER)
6. Poser l’échantillon à peser
7. Commuter l’unité de poids (F)
Option du menu Unité Facteur de conversion Affichage
1. user* Grammes 1,00000000000 o
1. user* (réglage d’usine) Grammes 1,00000000000 g
4.carat Carats 5,00000000000 o
5.Pound Livres 0,00220462260 lb
6.ounce Onces 0,03527396200 oz
7.tryo Onces de Troy 0,03215074700 ozt
8.tl.hon Taels Hongkong 0,02671725000 tl
9.tl.sin Taels Singapour 0,02645544638 tl
10.tl.ta Taels Taïwan 0,0266666600 0 tl
11.grai Grains 15,4323583500 GN
12.peny Pennyweights 0,64301493100 dwt
15.tl.ch Taels chinois 0,02645547175 tl
22.pdoz lb/oz 0,03527396200 lb:oz
3.newt Newtons 0,00980665000 N
* = L’unité définie par l’opérateur peut être chargée dans la balance avec le programme
PC via l’interface RS232 ou USB optionelle.
Page 44
44
Fonction
Ce programme d’application permet de déterminer le nombre de pièces ayant
pratiquement le même poids.
Exemple : Calcul d’un nombre de pièces inconnu en pesant le nombre de
pièces de référence prédéfini (nombre de pièces de référence 20).
Etape Appuyer sur la touche Affichage
1. Changer de programme d’application (ZERO) longuement
2. Sélectionner le comptage 2x (F)
3. Confirmer le réglage (ENTER)
Symbole « » à l’affichage :
l’application est active
4. Poser le récipient sur la balance
5. Tarer (ZERO)
6. Poser le nombre de pièces
de référence (20 pièces)
7. Sélectionner le nombre de pièces appuyer plusieurs
de référence : fois brièvement sur
par échelons de 1 (1, 2, 3, ..., 99) (F) ou maintenir (F)
par échelons de 10 (10, 20, 30, ..., 100) enfoncé
8. Confirmer le nombre de pièces
de référence sélectionné (ENTER)
9. Poser le nombre de pièces inconnu
10. Commuter l’affichage entre le poids
moyen d’une pièce, le poids et le
nombre de pièces plusieurs fois (F)
11. Décharger la balance
12. Application de comptage :
effacer la valeur de référence (Enter) longuement
13. Activer à nouveau le comptage si aucun (F)
autre programme d’application n’a été
sélectionné entre-temps.
14. Le cas échéant, continuer au point 5.
Comptage
Page 45

45
Pesée en pourcentage
Fonction
Ce programme d’application permet de déterminer le pourcentage d’un échantillon par rapport à un poids de référence.
Exemple : Mesurer la valeur en pourcentage par rapport à un poids de référence mémorisé, pourcentage de référence 100 %.
Etape Appuyer sur la touche Affichage
1. Changer de programme d’application (ZERO) longuement
2. Sélectionner la pesée en pourcentage plusieurs fois (F)
3. Confirmer le réglage (ENTER)
Symbole « » à l’affichage :
l’application est active
4. Poser le récipient sur la balance
5. Tarer (ZERO)
6. Poser le poids de référence pour 100 %
7. Le cas échéant, modifier les décimales
pour l’affichage en pourcentage : 100,0 %,
100,00 % ou 100 % (réglage d’usine) plusieurs fois (F)
8. Confirmer les décimales sélectionnées (ENTER)
9. Poser le poids inconnu
10. Commuter l’affichage entre
le poids et le pourcentage plusieurs fois (F)
11. Décharger la balance
12. Application de pesée en pourcentage :
effacer le pourcentage de référence (Enter) longuement
13. Activer à nouveau la pesée en (F)
pourcentage si aucun autre programme
d’application n’a été sélectionné entre-temps.
14. Le cas échéant, continuer au point 5.
Page 46

46
Fonction
Afficher la dernière valeur avec stabilité pendant 5 secondes (après décharge).
Exemple : déterminer une valeur de pesée dans un environnement extrêmement instable
Etape Appuyer sur la touche Affichage
1. Changer de programme d’application (ZERO) longuement
2. Sélectionner l’affichage statique plusieurs fois (F)
3. Confirmer le réglage (ENTER)
Symbole « » à l’affichage :
l’application est active
4. Tarer la balance si nécessaire (ZERO)
5. Poser l’échantillon à peser
6. Démarrer l’application (F)
Le symbole « » clignote à l’affichage :
la valeur pondérale stable est fixe
à l’affichage.
7. Décharger la balance :
la valeur pondérale stable reste
encore affichée pendant 5 secondes.
8. Ou tarer la balance et (ZERO)
effacer la valeur d’affichage stable
9. Terminer l’application (Enter) longuement
«Affichage statique»
10. Activer à nouveau l’affichage statique (F)
si aucun autre programme d’application
n’a été sélectionné entre-temps.
11. Le cas échéant, continuer au point 5.
Affichage statique
Page 47
47
Totalisation
Fonction : Grâce à ce programme d’application, il est possible de totaliser des
valeurs de pesée dans une mémoire.
Exemple : totaliser des valeurs de pesée
Etape Appuyer sur la touche Affichage
1. Changer de programme d’application (ZERO) longuement
2. Sélectionner la totalisation plusieurs fois (F)
3. Confirmer le réglage (ENTER)
Symbole « » à l’affichage :
l’application est active
4. Tarer la balance si nécessaire (ZERO)
5. Poser l’échantillon à peser
(ici par ex. 380 g)
6. Mémoriser la valeur dans la mémoire. (ENTER)
Le total est fixe à l’affichage :
le symbole clignote.
7. Retirer l’échantillon
8. Poser l’échantillon suivant
sur la balance
(ici par ex. 575 g)
9. Mémoriser la valeur dans la mémoire. (ENTER)
Le total est fixe à l’affichage :
le symbole clignote.
10. Afficher les composants actuels pendant (F)
3 secondes (si une imprimante est
connectée : impression simultanée)
11. Effacer la mémoire de totalisation (F) longuement
(si une imprimante est connectée :
imprimer le total)
12. Terminer la totalisation (Enter) longuement
13. Activer à nouveau la totalisation si aucun (F)
autre programme d’application n’a été
sélectionné entre-temps (si une imprimante
est connectée : imprimer le total).
14. Le cas échéant, continuer au point 6.
Page 48

48
Fonction : Grâce à ce programme d’application, il est possible de déterminer le poids
spécifique d’un échantillon. Le résultat est toujours affiché avec une décimale. Installation : poser un récipient en verre sous la balance. Accrocher une corbeille immergée
dans de l’eau au crochet de pesée en dessous du socle (pas livrée avec la balance).
Exemple : déterminer le poids spécifique d’un échantillon solide.
Etape Appuyer sur la touche Affichage
1. Changer de programme d’application (ZERO) longuement
2. Sélectionner « Poids spécifique » plusieurs fois (F)
3. Confirmer le réglage (ENTER)
Symbole « » à l’affichage :
l’application est active
4. Tarer la balance si nécessaire (ZERO)
5. Démarrer l’application (F)
6. Confirmer l’affichage « airval » (ENTER)
7. Déterminer le poids de l’échantillon
dans l’air :
poser l’échantillon sur la balance
8. Mémoriser la valeur de pesée
déterminée dans l’air (ENTER)
9. Retirer l’échantillon de la balance
10. Déterminer la valeur de pesée
dans le liquide :
mettre l’échantillon dans la corbeille
11. Immerger l’échantillon dans le liquide
12. Confirmer l’affichage « water » (ENTER)
13. Mémoriser la valeur de pesée déterminée (ENTER)
dans le liquide et afficher le résultat
14 Effacer le résultat (ZERO)
15. Terminer l’application «Poids spécifique» (ENTER) longuement
16. Activer à nouveau le «poids spécifique» (F)
si aucun autre programme d’application
n’a été sélectionné entre-temps.
17. Le cas échéant, continuer au point 5.
Poids spécifique
Page 49

49
Ajustage
Exemple : ajuster la balance (ici modèle MXX-5001)
Etape Appuyer sur la touche Affichage
1. Mettre la balance sous tension,
si nécessaire (ON/OFF)
2. Tarer la balance (ZERO)
3. Démarrer le processus d’ajustage (CAL)
Le poids d’ajustage réglé est
affiché sans unité (ici par ex. 5000 g)
4. Le cas échéant, sélectionner plusieurs fois (F)
d’autres valeurs
5. Confirmer la valeur du poids (ENTER)
d’ajustage et démarrer l’ajustage
Une fois le point zéro mémorisé, le poids
d’ajustage à poser clignote à l’affichage.
6. Déposer le poids d’ajustage
affiché
L’affichage arrête de clignoter lorsque
le poids d’ajustage se trouve à l’intérieur
des limites définies. Après l’ajustage,
le symbole disparaît et le symbole
de stabilité apparait.
7. Retirer le poids d’ajustage
8. Terminer l’ajustage
Caractéristiques
Le processus d’ajustage ne peut être
démarré que lorsque
– la balance est déchargée,
– la balance est tarée,
– le signal de pesée interne est stable.
Si ces conditions ne sont pas remplies, un
message d’erreur apparaît.
Le poids nécessaire à l’ajustage s’affiche.
Poids d’ajustage standard sur les modèles
sélectionnés :
voir page 41.
D’autres valeurs de poids peuvent être
sélectionnées à l’aide de la touche (F).
Interrompre le processus d’ajustage,
si nécessaire : appuyer sur la touche
(ENTER) pendant plus de 2 secondes.
Ajuster la balance sur son lieu d’installation.
Page 50

50
La configuration de la balance peut être adaptée aux exigences de l’utilisateur.
Etape Appuyer sur la touche Affichage
1. Mettre la balance hors service (ON/OFF)
2. Mettre la balance sous tension et (ON/OFF)
pendant l’affichage de tous les segments (ZERO) brièvement
Fonction des touches dans le menu setup :
Touche Appuyer brièvement Appuyer longuement
(ENTER) Niveau du menu : se déplacer vers la droite ;
de manière rotatoire Confirmer le réglage
(F) Option du menu : se déplacer vers le haut –
(ZERO) Niveau du menu : se déplacer ver la gauche Mémoriser le réglage
et quitter le menu setup
Réglages des paramètres (vue d’ensemble) ο Réglage d’usine ;
√ Réglage de l’opérateur
Menu 1 Pesée simple 1.1. Adaptation filtre 1.1.1 Environnement très stable
setup 1.1.2 o Environnement stable
1.1.3 Environnement instable
1.1.4 Environnement très instable
1.2. Filtre d’application 1.2.1 o Lecture finale
1.2.2 Doser
1.3. Etendue de stabilité 1.3.1 1/4 digit
1.3.2 1/2 digit
1.3.3 1 digit
1.3.4 o 2 digits
1.3.5 4 digits
1.5. Ajustage/linéarisation : 1.5.1 o Ajustage
fonction de la touche (CAL) 1.5.2 Linéarisation :
uniquement pour le service technique
1.5.3 Touche bloquée
1.6. Zéro automatique 1.6.1 o En service
1.6.2 Hors service
1.7. Unité de poids 1 ou 2 lors de 1.7.1 Unité sélectionnable, voir
l’application «Commutation d’unités» à 1.7.23 chapitre «Commutation d’unités»
5. et 6. Important uniquement avec une interface de données intégrée : voir description de l’interface correspondante
8. Fonctions 8.1. Condamnation des fonctions 8.1.1 Toutes bloquées sauf (ON/OFF) et (ZERO)
diverses des touches 8.1.2 o Toutes libres
8.2. Arrêt automatique 8.2.1 o Au bout de 2 minutes
de la balance 8.2.2 Au bout de 5 minutes
8.2.3 Au bout de 10 minutes
9. Reset du menu 9.1. Réglage d’usine 9.1.1 Restaurer les réglages
9.1.2 o Ne pas restaurer les réglages
Réglages (menu)
Page 51

51
Messages d’erreur
Les messages d’erreur apparaissent sur l’afficheur principal pendant environ
2 secondes. Ensuite le programme repasse automatiquement en mode de pesée.
Affichage Cause Remède
Aucun segment d’affichage Pas de tension d’alimentation Vérifier l’alimentation en courant
n’apparaît
Le bloc d’alimentation Brancher le bloc d’alimentation
n’est pas branché à l’alimentation en courant
La pile ou l’accumulteur est vide Changer la pile. Recharger
l’accumulateur avec un chargeur
externe
oL
L’étendue de pesée a été dépassée Décharger le plateau de pesée
UL
Le plateau de pesée n’est pas posé Poser le plateau de pesée
correctement
Le plateau de pesée Le plateau de pesée ne doit pas
touche quelque chose toucher les objets alentours
disErr
Dépassement de l’affichage : Diminuer l’échantillon
la valeur à afficher n’est
pas représentable
calErr
Une des conditions d’ajustage Décharger la balance
n’a pas été respectée, par ex. : Tarer avec la touche (ZERO)
– pas mise à zéro Ajuster seulement après
– le plateau est chargé l’affichage du zéro
appErr
Le poids est trop petit ou aucun Augmenter le poids
échantillon n’est posé sur le plateau
lors des programmes d’application
PrtErr
L’interface de données est bloquée Adressez-vous au service
pour l’impression après-vente Denver
Bal.Err
L’appareil est chargé lors Avant la mise sous tension :
de la mise sous tension décharger la balance
ou est défectueux ou s’adresser au service
après-vente Denver
SYS.Err
Appareil défectueux Adressez-vous au service
après-vente Denver
L’étendue de pesée max. est La balance a été mise en Poser le plateau de pesée.
inférieure à l’étendue de pesée s
ervice san
s que le plateau Eteindre la balance puis la remettre
max. indiquée au paragraphe de pesée ne soit posé en service en appuyant sur la touche
«Caractéristiques techniques» (ON/OFF)
Le résultat de pesée La balance n’est pas ajustée Ajuster
est manifestement faux La balance n’a pas été tarée avant la pesée Tarer
Si d’autres erreurs survenaient, veuillez contacter le service après-vente Denver !
Page 52

52
Caractéristiques techniques
Modèle MXX-123 MXX-612 MXX-412 MXX-212
Etendue de pesée g 120 610 410 210
Précision de lecture g 0,001 0,01 0,01 0,01
Etendue de tarage (soustractive) g 120 610 410 210
Ecart de linéarité ≤±g 0,003 0,03 0,03 0,03
Gamme de température +10… +30°C (273 ... 303 K, 50° ... 86°F)
Temps de mesure (typique) s 2,5 2 2 2
Adaptation 4 échelons de filtrage optimisés ;
à l’environnement cycle d’affichage : 0,1–0,8 (selon l’échelon de filtrage réglé)
Valeur de poids d’ajustage g 100 (F1) 200 (F2) 200 (F2) 200 (M1)
Poids net, env. kg 1,2 1,35 1,35 1,2
Dimensions du plateau de pesée mm 97 d 142+ 130 142+ 130 97 d
Raccordement au réseau, par l’intermédiaire d’un bloc d’alimentation 230 V ou 115 V,
tension, fréquence +15%…– 20%, 48–60 Hz
Consommation (typique) W 1 0,75 0,75 0,75
Durée de fonctionnement avec
bloc de 9 volts
– pile (alcali), env. h – 11 11 14
– accumulateur en cas de charge
totale (NiMH), typ. h – 2,5 2,5 4
Modèle MXX-5001 MXX-2001 MXX-601 MXX-10 MXX-5
Etendue de pesée g 5000 2000 600 10000 5000
Précision de lecture g 0,1 0,1 0,1 1 1
Etendue de tarage (soustractive) g 5000 2000 600 10000 5000
Ecart de linéarité ≤±g 0,2 0,2 0,2 2 2
Gamme de température +10… +30 °C (273 ... 303 K, 50° ... 86 °F)
Temps de mesure (typique) s 2 2 1,5 1,5 1,5
Adaptation 4 échelons de filtrage optimisés ;
à l’environnement cycle d’affichage : 0,1–0,8 (selon l’échelon de filtrage réglé)
Valeur de poids d’ajustage kg 5 (F2) 2 (F2) 0.2 (M2) 5 (M1) 5 (M2)
Poids net, env. kg 1,1 1,1 1,25 1,1 1,1
Dimensions du plateau de pesée mm 142+130
Raccordement au réseau, par l’intermédiaire d’un bloc d’alimentation 230 V ou 115 V,
tension, fréquence +15%…– 20%, 48–60 Hz
Consommation (typique) W 1 1 0,75 0,75 0,75
Durée de fonctionnement avec
bloc de 9 volts
– pile (alcali), env. h 11 11 14 14 14
– accumulateur en cas de charge
totale (NiMH), typ. h 2,5 2,5 4 4 4
Données techniques de l’appareil
Page 53

53
Accesssoires (options)
Article Référence
Interface, kit de montage
– Interface RS232 avec câble YADAP-RS
– Interface USB avec câble YADAP-USB
Imprimante 901042-1
Système antivol LC-1
Poids d’ajustage
– pour MXX-5001 (5 kg ; F2) YCW6548-00
– pour MXX-2001 (2 kg ; F2) YCW6248-00
– pour MXX-10 (5 kg ; M1) YCW655-00
– pour MXX-5 (5 kg ; M2) YCW626-00
Marque C
L’appareil répond aux exigences des directives du Conseil de l’Union
Européenne :
89/336/ CEE «Compatibilité
électromagnétique (CEM)»
Normes européennes applicables :
Emissions parasites :
selon la norme du produit EN 61326-1
cl. B (résidentiel)
Immunité à ces émissions :
selon la norme du produit EN 61326-1
(exigences minimales d’essai, fonctionnement non continu)
Remarque :
L’utilisateur engage sa propre responsabilité concernant toutes modifications et
tout raccordement de câbles ou d’appareils non livrés par Denver. C’est à lui de
vérifier et, si nécessaire, de corriger ces
modifications. Sur simple demande,
Denver met à disposition une documentation concernant les caractéristiques de
fonctionnement minimales des appareils
(conformément aux normes concernant la
définition de l’immunité aux émissions
parasites ci-dessus mentionnées).
73/23/ CEE «Matériel électrique destiné
à être employé dans certaines limites
de tensions»
Normes européennes applicables :
EN 60950
Sécurité de matériels de traitement de
l’information, y compris les matériels de
bureau électriques
EN61010
Règles de sécurité pour appareils électriques de mesurage, de régulation et de
laboratoire
Partie 1 : Prescriptions générales
En cas d’utilisation de matériel électrique
dans des installations et des conditions
d’environnement exigeant des mesures
de sécurité accrues, vous devez respecter
les instructions conformément aux
consignes d’installation correspondantes.
Page 54

54
Contenido
Seite
Contenido . . . . . . . . . . . . . . . . . . . . . . . . . . . . . . . . . . . . . . . . . . . . . . . . . . . . . . . . . 54
Advertencias de seguridad. . . . . . . . . . . . . . . . . . . . . . . . . . . . . . . . . . . . . . . . . . . 55
Puesta en marcha
Funcionamiento . . . . . . . . . . . . . . . . . . . . . . . . . . . . . . . . . . . . . . . . . . . . . . . . . . . . 59
Función básica: Pesar . . . . . . . . . . . . . . . . . . . . . . . . . . . . . . . . . . . . . . . . . . . . . . 59
Descripción de teclas . . . . . . . . . . . . . . . . . . . . . . . . . . . . . . . . . . . . . . . . . . . . . . 59
Programas de aplicación . . . . . . . . . . . . . . . . . . . . . . . . . . . . . . . . . . . . . . . . . . . . 60
Conmutación de unidades . . . . . . . . . . . . . . . . . . . . . . . . . . . . . . . . . . . . . . . . . . 60
Contaje . . . . . . . . . . . . . . . . . . . . . . . . . . . . . . . . . . . . . . . . . . . . . . . . . . . . . . . . . . 61
Pesada en porcentaje . . . . . . . . . . . . . . . . . . . . . . . . . . . . . . . . . . . . . . . . . . . . . . 62
Lectura estática . . . . . . . . . . . . . . . . . . . . . . . . . . . . . . . . . . . . . . . . . . . . . . . . . . . 63
Totalización. . . . . . . . . . . . . . . . . . . . . . . . . . . . . . . . . . . . . . . . . . . . . . . . . . . . . . . 64
Peso específico . . . . . . . . . . . . . . . . . . . . . . . . . . . . . . . . . . . . . . . . . . . . . . . . . . . 65
Calibración . . . . . . . . . . . . . . . . . . . . . . . . . . . . . . . . . . . . . . . . . . . . . . . . . . . . . . . . 66
Ajustes previos (menú Setup) . . . . . . . . . . . . . . . . . . . . . . . . . . . . . . . . . . . . . . . . 67
Mensajes de error . . . . . . . . . . . . . . . . . . . . . . . . . . . . . . . . . . . . . . . . . . . . . . . . . . 68
Sinopsis . . . . . . . . . . . . . . . . . . . . . . . . . . . . . . . . . . . . . . . . . . . . . . . . . . . . . . . . . . 69
Especificaciones técnicas . . . . . . . . . . . . . . . . . . . . . . . . . . . . . . . . . . . . . . . . . . . 69
Accesorios (opciones). . . . . . . . . . . . . . . . . . . . . . . . . . . . . . . . . . . . . . . . . . . . . . 70
Marca C . . . . . . . . . . . . . . . . . . . . . . . . . . . . . . . . . . . . . . . . . . . . . . . . . . . . . . . . 70
Page 55

55
Advertencias de seguridad
Seguridad
§ Leer con atención este manual
de instrucciones antes de poner en
marcha el aparato. De esta manera
se evitarán daños.
! No usar el aparato en zonas con
riesgo de explosión.
! El valor de tensión impreso en
el alimentador tiene que coincidir
con la tensión de red local.
! Usar solamente pila o batería
monoblock de 9 V, adquirible
en el comercio; el uso de otro tipo
de pila/batería puede causar
explosión!
– La balanza puede ser conectada
solamente después de desenchufar
el alimentador o desactivar la
batería, es decir exenta de tensión.
– Proteger el alimentador contra la
humedad.
! Perturbaciones electromagnéticas
extremas pueden influir en la
lectura de los valores de peso.
Después de eliminarse las perturbaciones, el producto funcionará
nuevamente en la forma prevista.
Instalación
– Usar accesorios y opciones de
Denver, que están óptimamente
adaptados a la balanza.
– No abrir la balanza. Al violarse
los sellos (marcas) de seguridad
caducan los derechos de garantía.
Page 56
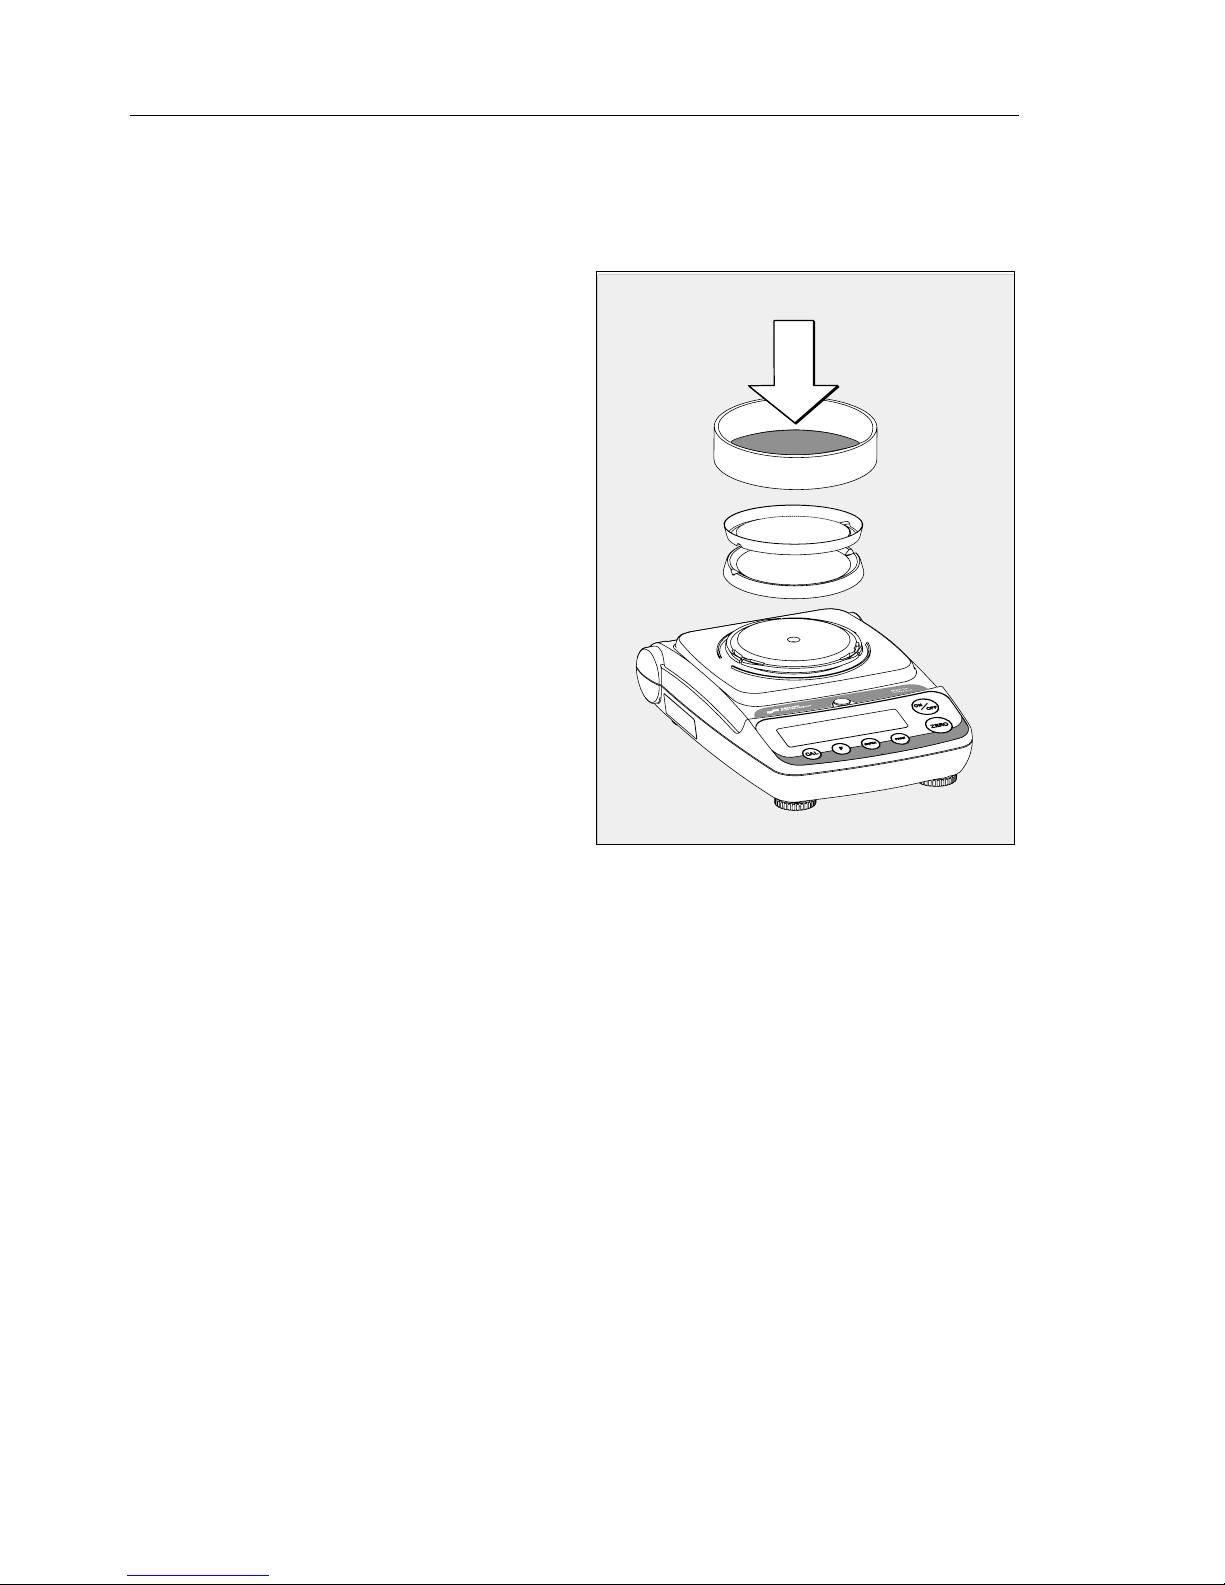
56
Puesta en marcha
Suministro
– balanza con cubierta protectora
transparente
– plato de carga
– alimentador
Adicional en MXX-612, MXX-412,
MXX-212, MXX-601:
– pesa de calibración
Adicional en MXX-123:
– pesa de calibración
– protector contra corrientes de aire
– anillo de vidrio
– nivel de burbuja y patas de regula-
ción
Instalación
En la instalación, evitar lugares con
las siguientes influencias negativas:
– calor (calefacción, rayos solares)
– corrientes de aire directas, debido
a puertas y ventanas abiertas
– vibraciones durante el pesaje
– humedad extrema
Instalar la balanza
§ Montar los siguientes componentes en la balanza:
– plato de carga redondo con la cara
inferior o superior
– Protectores contra corrientes
de aire-anillo de vidrio en los
modelos: MXX-123
Page 57
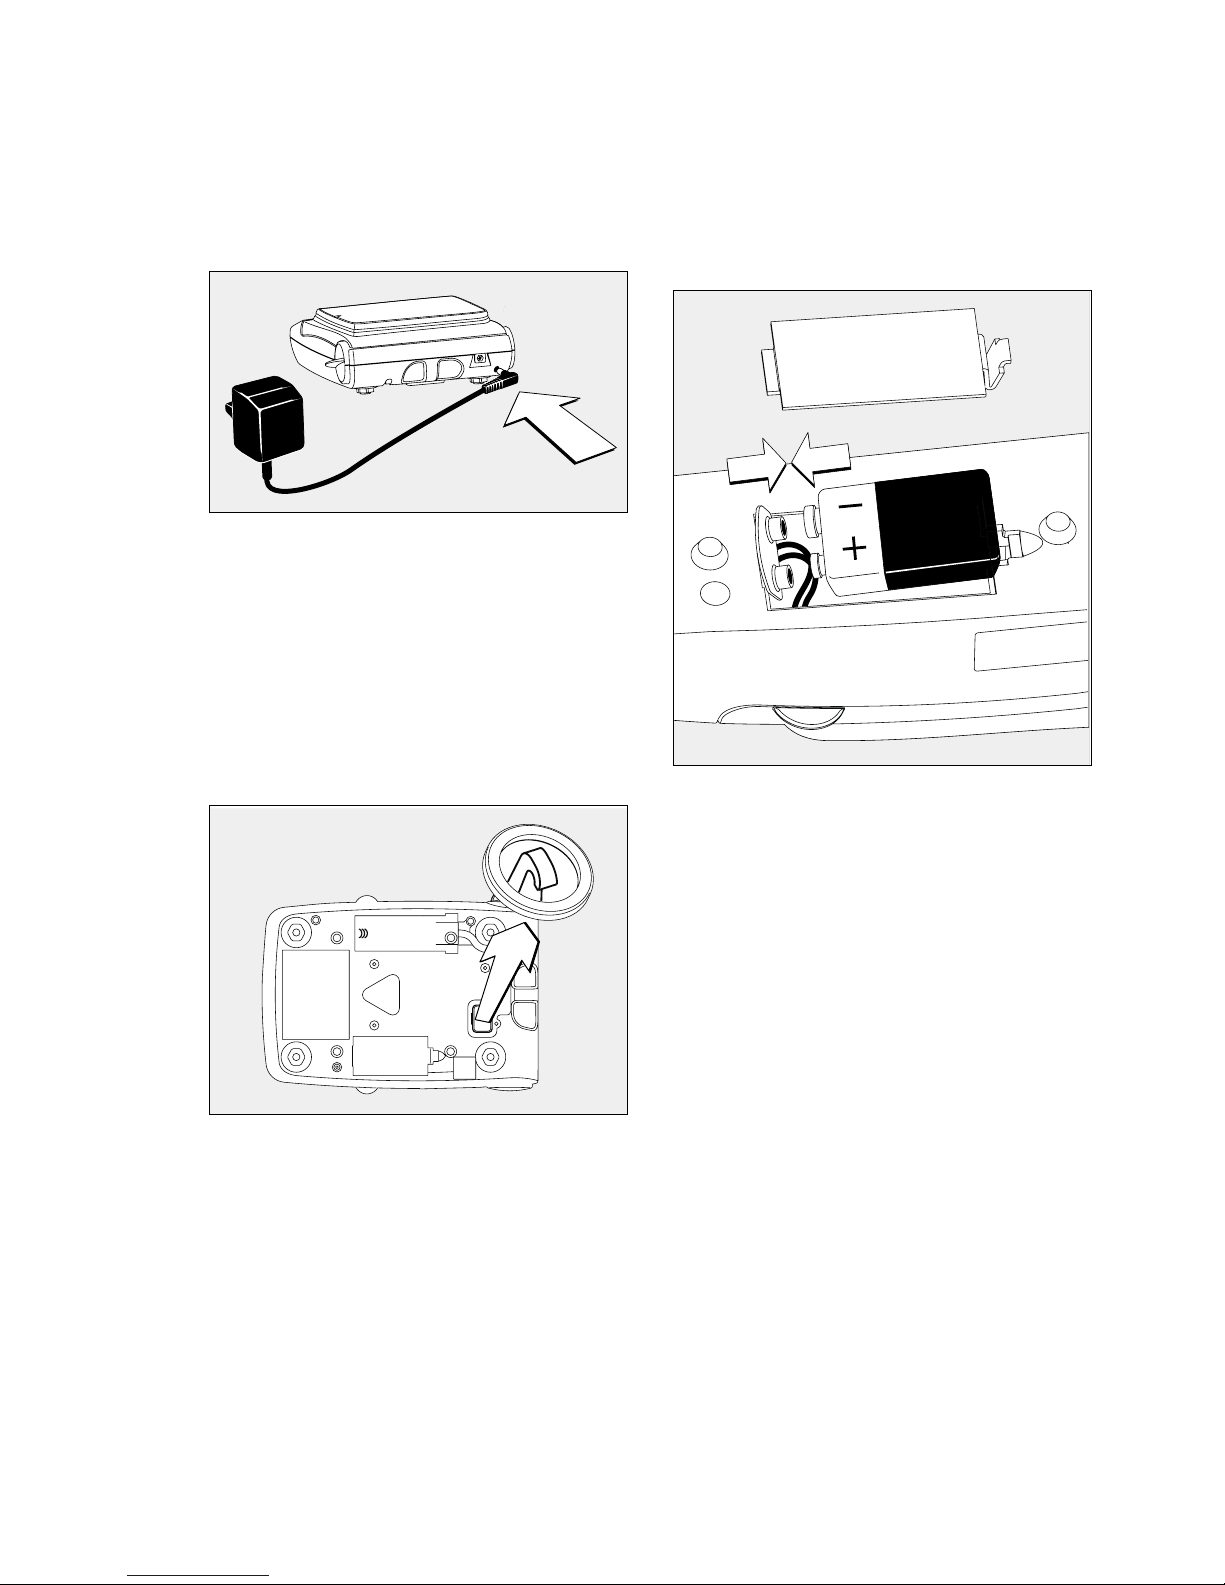
57
Conexión a la red
! Utilizar solamente alimentador
original.
§ Insertar conector en la parte trasera de balanza
§ Enchufar el alimentador a la red
Pesaje por debajo de la balanza
Para los pesajes por debajo de
la balanza existe un dispositivo en
la base de la balanza.
§ Desatornillar la placa de cierre de
la base de la balanza.
§ Colgar la muestra, p. ej. con un
alambre, en el gancho.
$ En caso dado, montar protección
contra las corrientes de aire.
Instalar pila/batería
(excepto en los modelos MXX-123)
$ Pila o batería no forman parte del
suministro de la balanza
! Usar solamente pila o batería
monoblock de 9 V, adquirible en
el comercio.
! Cargar batería solamente con un
aparato recargador externo
§ Volcar la balanza
§ Abrir el compartimento de pila:
levantar la cubierta del compartimento
§ Colocar la pila o batería de 9 V
$ Observar la polaridad
! Cerrar el compartimento de pila:
presionar la cubierta del compartimento y encajar
! Pilas o baterías usadas son
desechos especiales (no es basura
domiciliaria):
eliminar las baterías según las
prescripciones sobre desechos
especiales.
Page 58
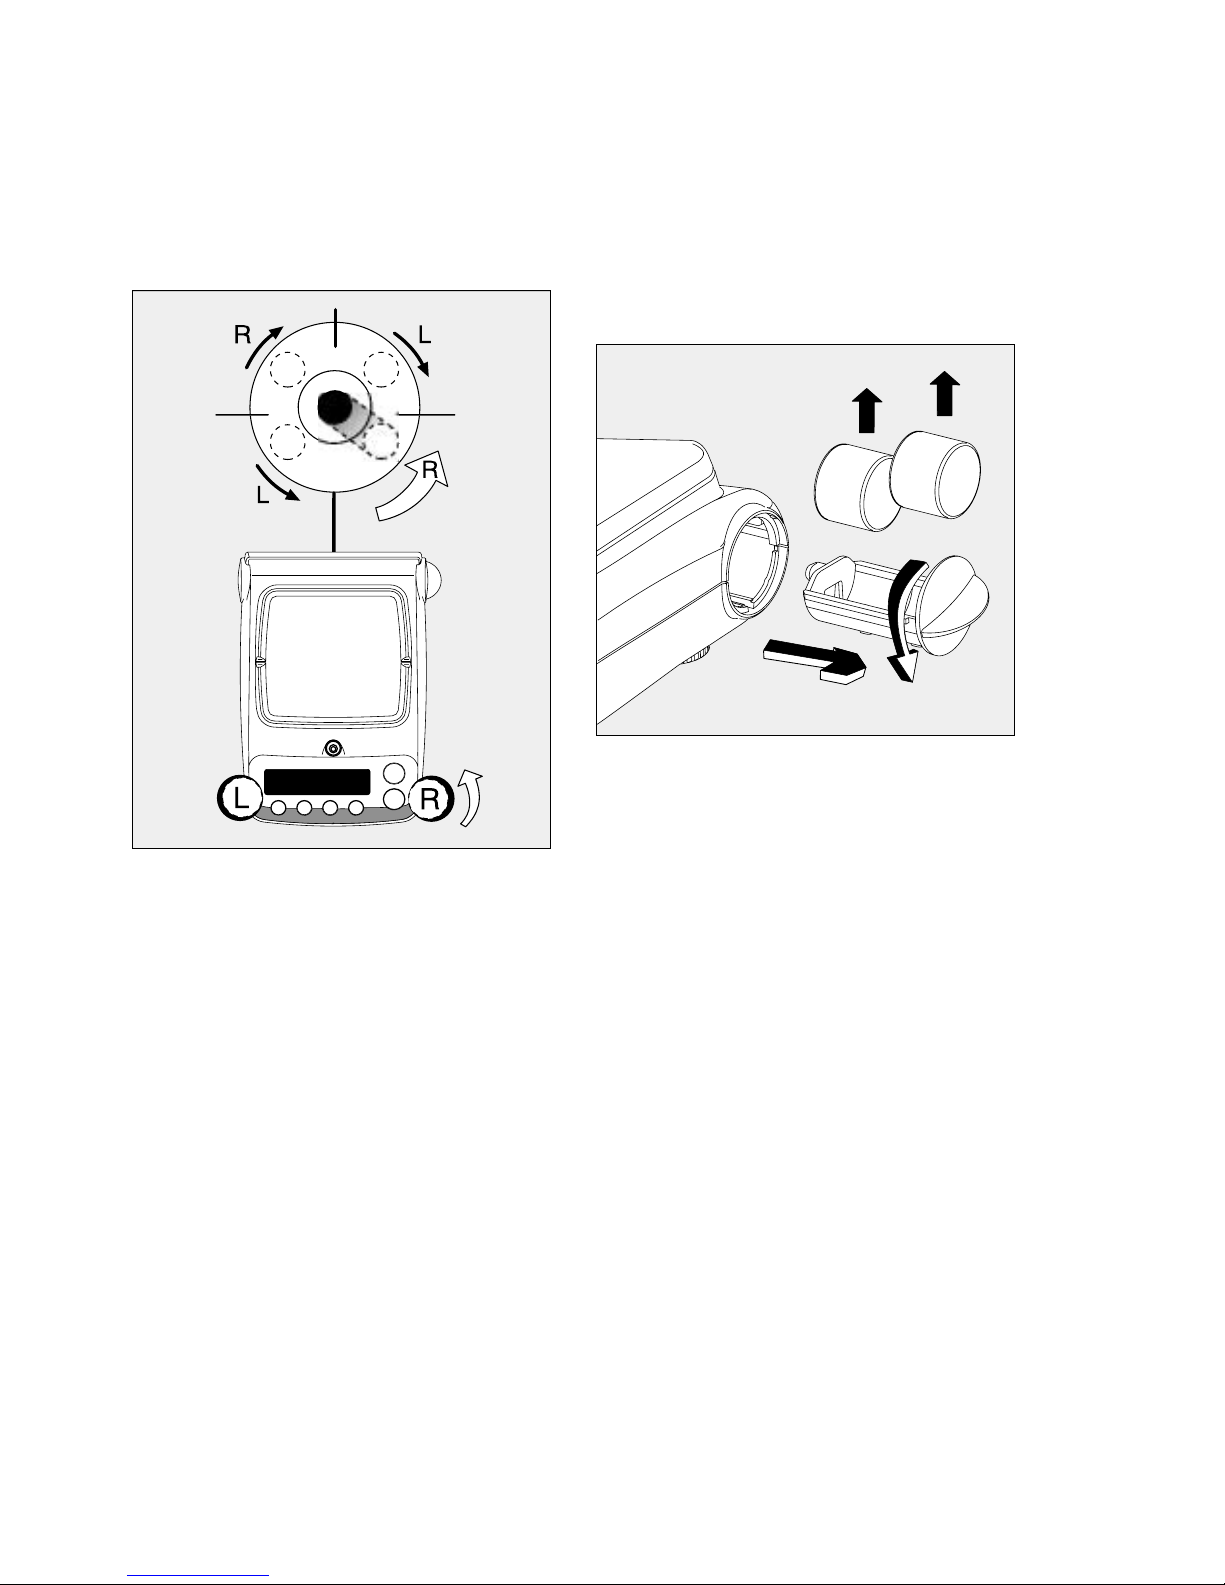
58
Nivelar la balanza
(sólo en los modelos MXX-123)
§ Nivelar la balanza después de cada
cambio del lugar de instalación
(p.ej. burbuja de aire de der. a izq.).
§ Girar las patas de regulación
según la ilustración adjunta, hasta
que la burbuja de aire del nivel
esté en el centro del círculo.
> Por lo general se necesitan
algunos pasos más para nivelar.
Desalojar las pesas
(sólo en los modelos MXX-612,
MXX-412, MXX-212, MXX-601,
MXX-123)
§ Girar el compartimento mediante
el asidero y tirar
$ Proceso de calibración, ver pág. 66
Calentamiento previo para modelo
MXX-123:
Para suministrar resultados exactos,
el aparato necesita un tiempo de
calentamiento previo de 1 hora.
Recién entonces se ha alcanzado la
temperatura de régimen necesaria.
Page 59
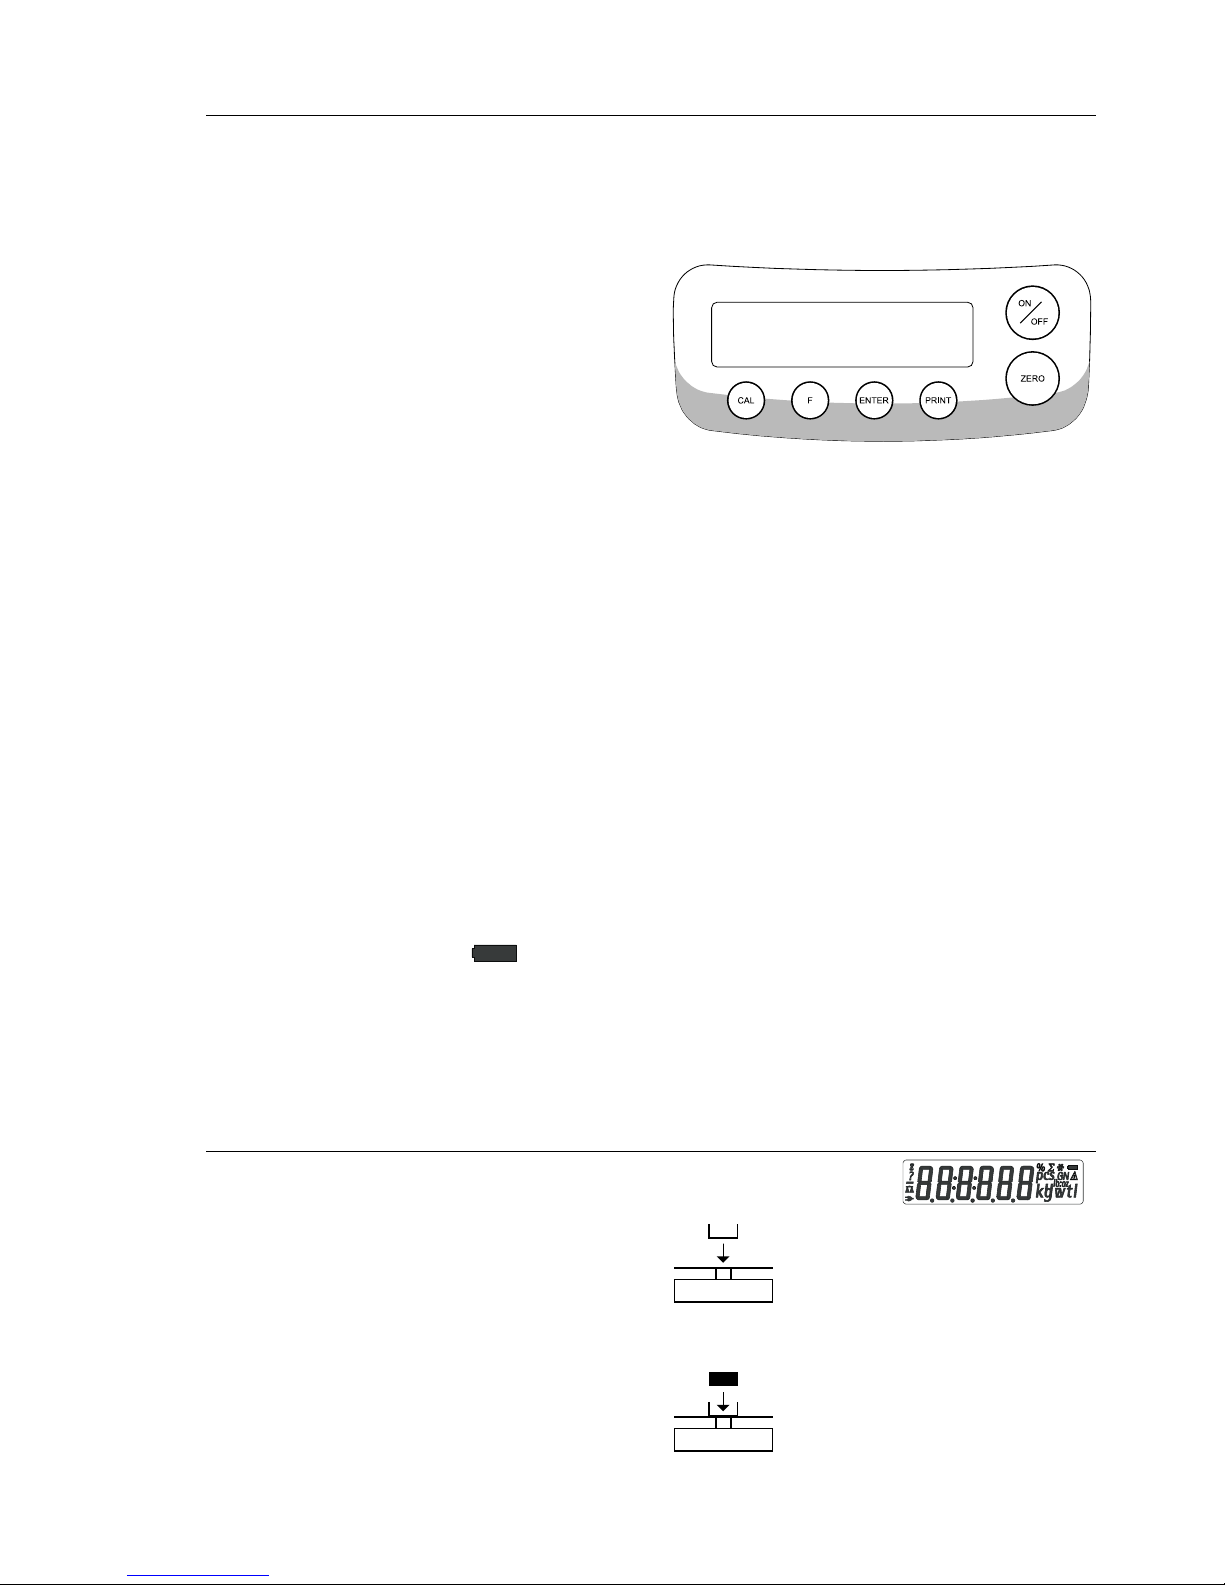
59
Funcionamiento
Función básica: Pesar
Características
– Tarar la balanza:
La tara puede realizarse dentro de
todo el rango de pesaje.
Preparación
§ Encender la balanza: pulsar tecla
(ON/OFF)
§ En caso dado, tarar: pulsar tecla
(ZERO)
$ En caso dado, modificar ajustes de
fábrica: ver en el capítulo “Ajustes
de fábrica”
$ En caso dado, cargar ajustes de
fábrica: ver en el capítulo “Ajustes
de fábrica”, parámetro 9.– 1
Otras funciones:
$ Apagar balanza: pulsar tecla
(ON/OFF)
$ Funcionamiento en modo batería:
apaga autom. después de 2, 5 ó 10
minutos.
Si el valor de peso no varía dentro
de 2 minutos, mínimo, y si no se
pulsa tecla alguna, parpadeará el
símbolo de batería » «.
Después de transcurrir otros 10
segundos, la balanza se apaga
automáticamente.
Descripción de teclas
(ON/OFF) Encender/apagar: el aparato
se enciende, se apaga, o bien
pasa al modo Standby
Modo batería: encender,
retroiluminación, apagar
(ZERO) Tarar balanza; mantener pul-
sada la tecla por 2 segundos:
iniciar el menú de aplicaciones
(CAL) Iniciar calibración
(F) Iniciar programas de aplica-
ción
En el menú de aplicaciones
y en calibración:
seleccionar parámetros
(scroll)
(ENTER) Confirmar ajustes de paráme-
tros seleccionados;
– aplicaciones
– configuración
– calibración
Finalizar aplicación:
mantener pulsada la tecla por
2 segundos
(PRINT) Imprimir/salida de datos
Ejemplo: determinar el valor de peso
Paso Pulsar tecla Lectura
1. encender balanza (ON/OFF)
se realiza autochequeo
Lectura: versión de Software r 31.01 g
2. colocar recipiente para la 52.0 g
muestra (aquí, p. ej. 52 g)
3. tarar balanza (ZERO) 0.0 g
4. poner muestra en recipiente 150.2 g
(aquí, p. ej. 150,2 g)
Page 60
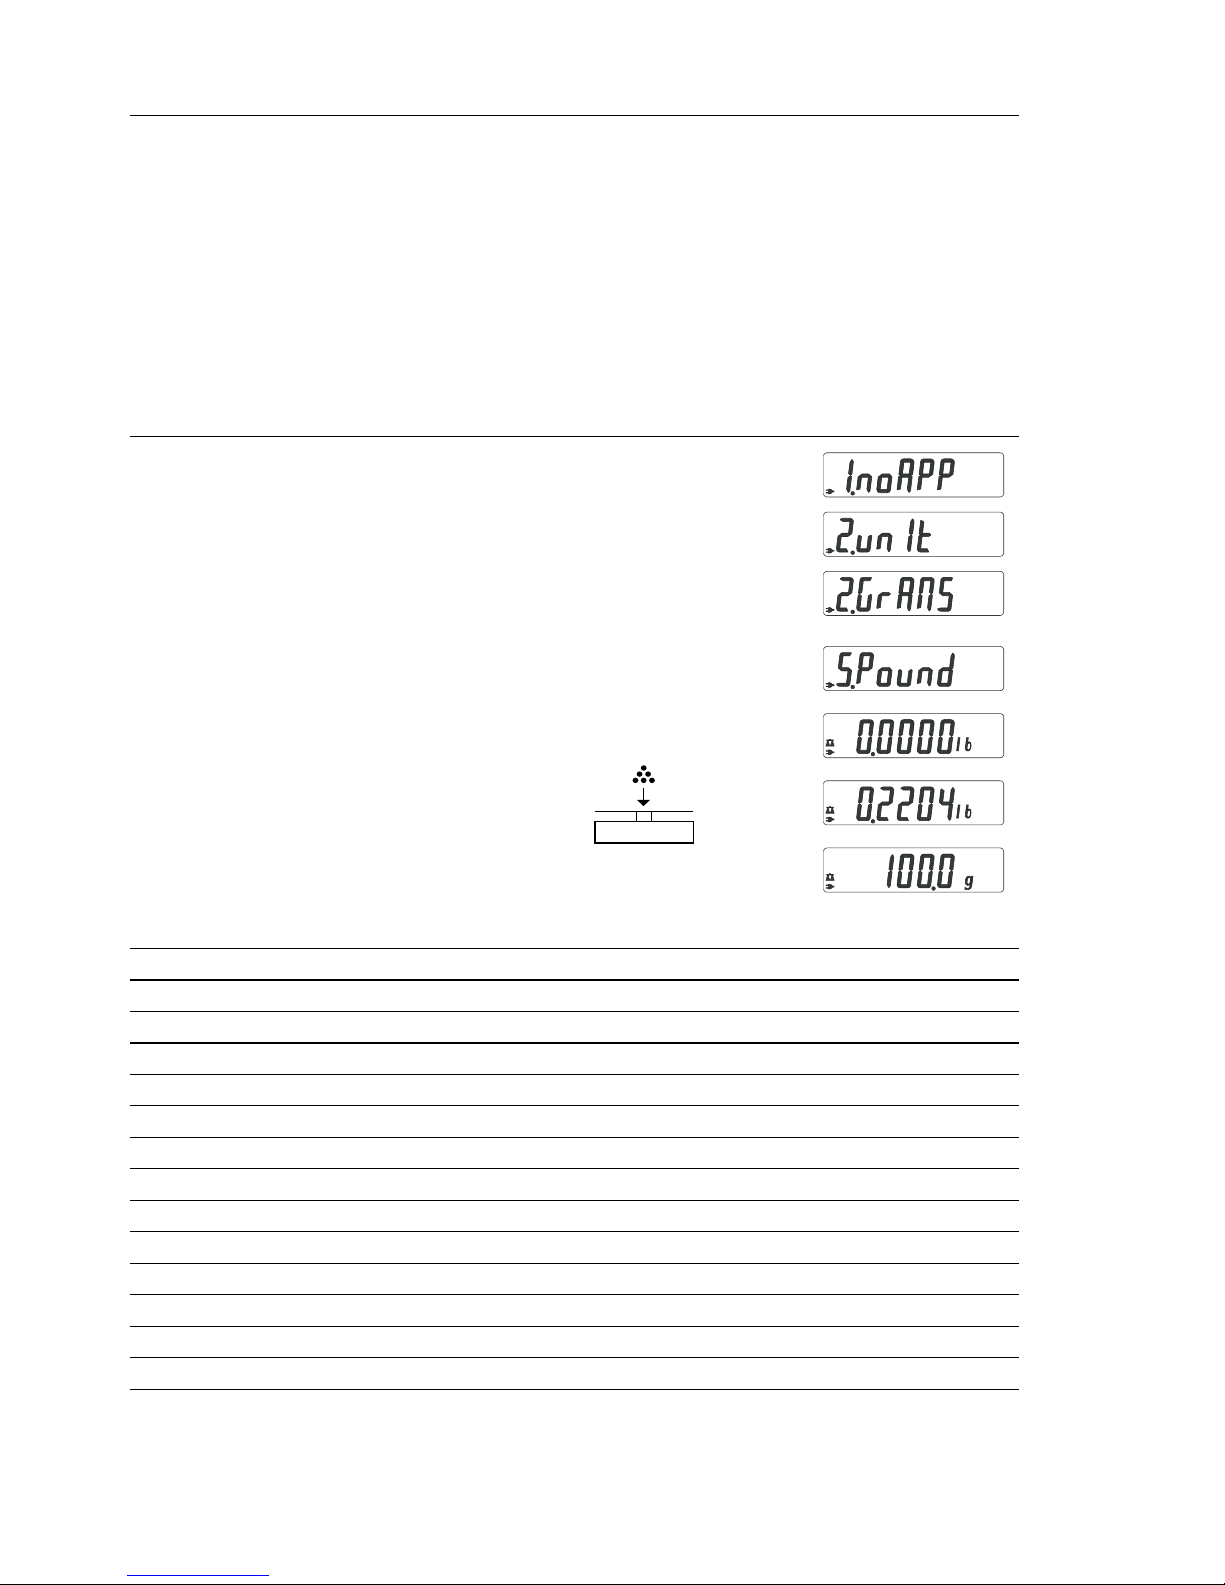
60
Conmutación de unidades
Con este programa de aplicación puede indicarse el valor de peso en una
unidad seleccionada (ver tabla) y en gramos.
Ejemplo: conmutar unidad: de libras [lb] (aplicación) a gramos [g] (unidad
básica)
Paso Pulsar tecla Lectura
1 conmutar programa aplicación (ZERO) pulsión larga
2. seleccionar unidad a conmutar (F)
3. confirmar ajuste (ENTER)
4. seleccionar unidad peso; aquí “5. libras” repetidam (F)
(ver tabla, abajo)
5. confirmar unidad libras (ENTER)
6. poner muestra
7. conmutar unidad peso (F)
Item de menú Unidad Conversión Lectura
1. user* Gramos 1,00000000000 o
2.grams (ajuste fábrica) Gramos 1,00000000000 g
4.carat Quilates 5,00000000000 o
5.Pound Libras 0,00220462260 lb
6.ounce Onzas 0,03527396200 oz
7.tryo Onzas Troy 0,0321507470 0 ozt
8.tl.hon Taeles Hongkong 0,02671725000 tl
9.tl.sin Taeles Singapur 0,02645544638 tl
10.tl.ta Taeles Taiwan 0,02666666000 tl
11.grai Granos 15,4323583500 GN
12.peny Pennyweights 0,64301493100 dwt
15.tl.ch Taeles China 0,02645547175 tl
22.pdoz lb/oz 0,03527396200 lb:oz
23.newt Newton 0,00980665000 N
* = Unidad definida por el usuario, cargable con progr. PC en la balanza mediante
interfaz opcional RS232, o bien USB.
Programas de aplicación
Page 61
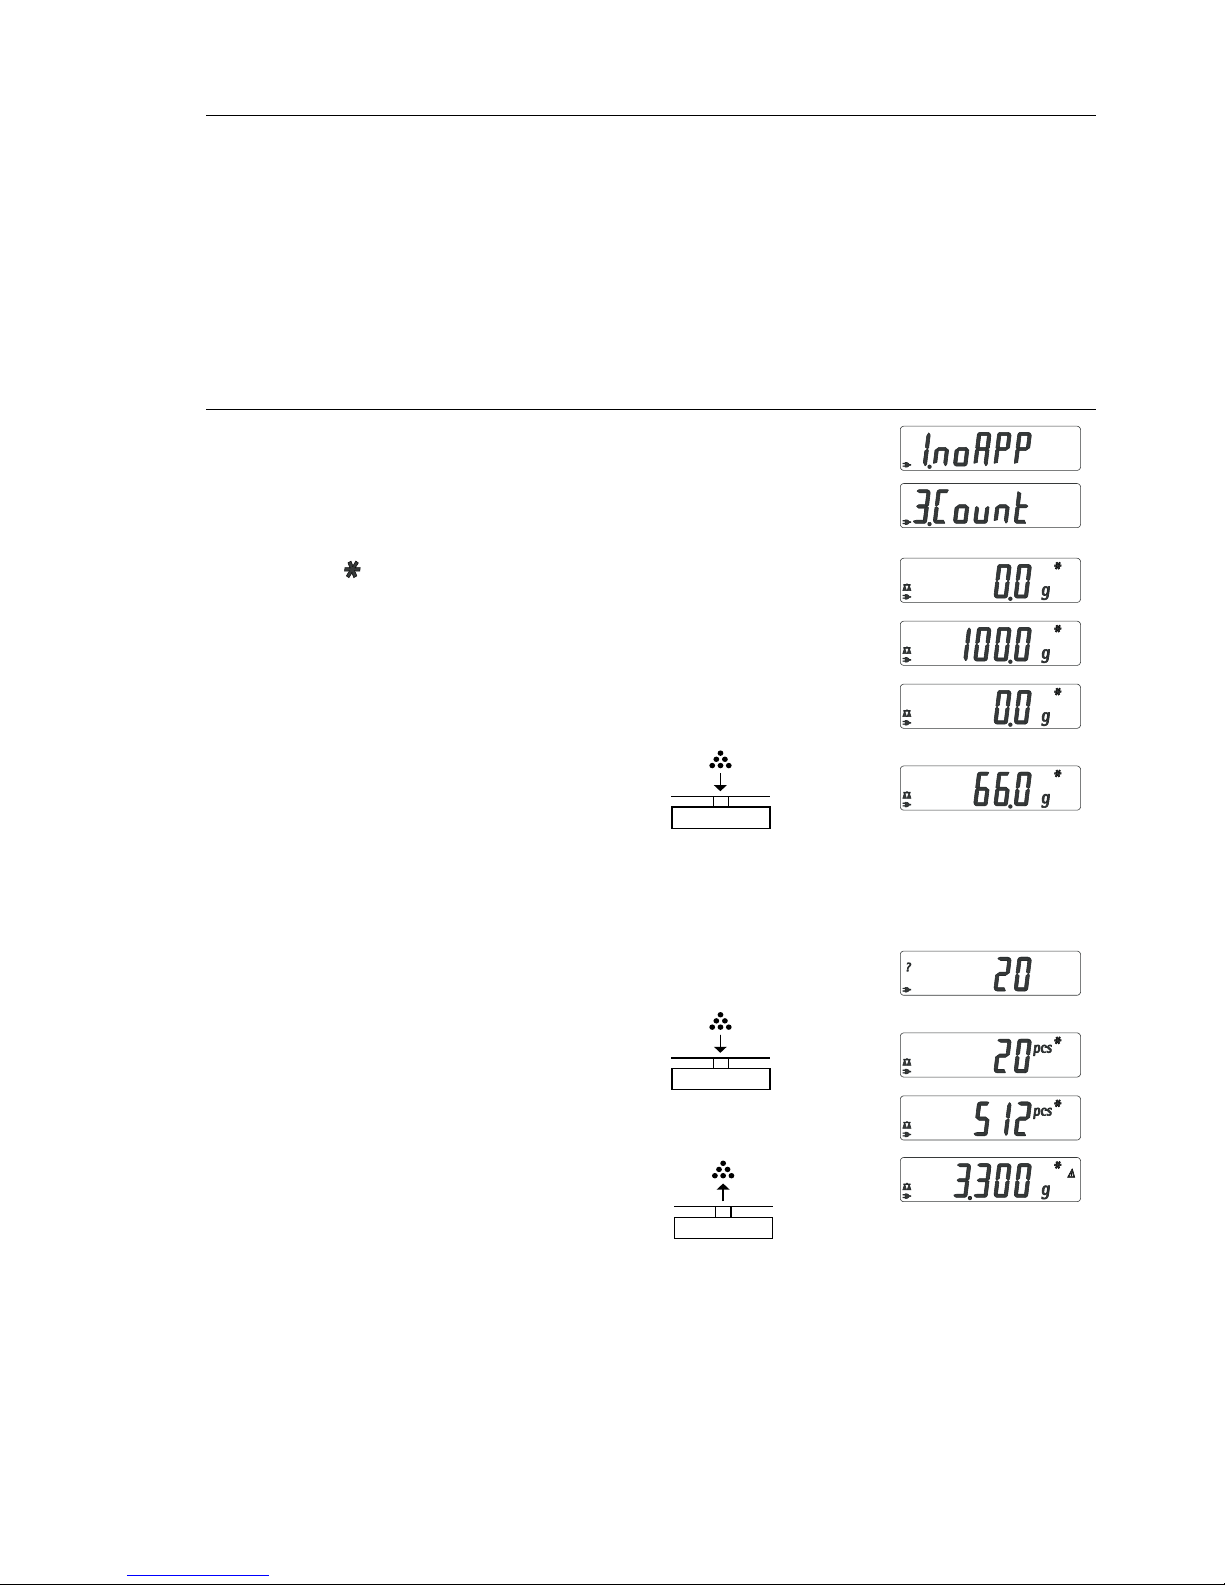
61
Objeto
Con este programa de aplicación puede determinarse la cantidad de piezas.
Ejemplo: determinación de una cantidad desconocida de piezas: pesar cantidad de referencia definida (cantidad de referencia 20)
Paso Pulsar tecla Lectura
1. conmutar programa aplicación (ZERO) pulsión larga
2. seleccionar Contaje 2x (F)
3. confirmar ajuste (ENTER)
símbolo » « en la lectura:
aplicación está activa
4. colocar recipiente en la balanza
5. tarar (ZERO)
6. colocar cantidad referencial (20 piezas)
7. seleccionar cant. referencia: repetidam.
en escalones de uno (1, 2, 3, ..., 99) (F) pulsión breve,
en escalones de diez (10, 20, 30, ..., 100) o bien mantenerla
(F) pulsada
8. confirmar cant. ref. seleccionada (ENTER)
9. poner cant. desconocida de piezas
10. conmutar lectura entre promedio
peso de pieza, peso, cant. piezas repetidam. (F)
11. descargar balanza
12. aplicación Contaje:
borrar valor ref. (Enter) pulsión larga
13. reactivar Contaje, si previamente no se (F)
ha seleccionado otro progr. aplicación
14. en caso dado, seguir desde paso 5.
Contaje
Page 62
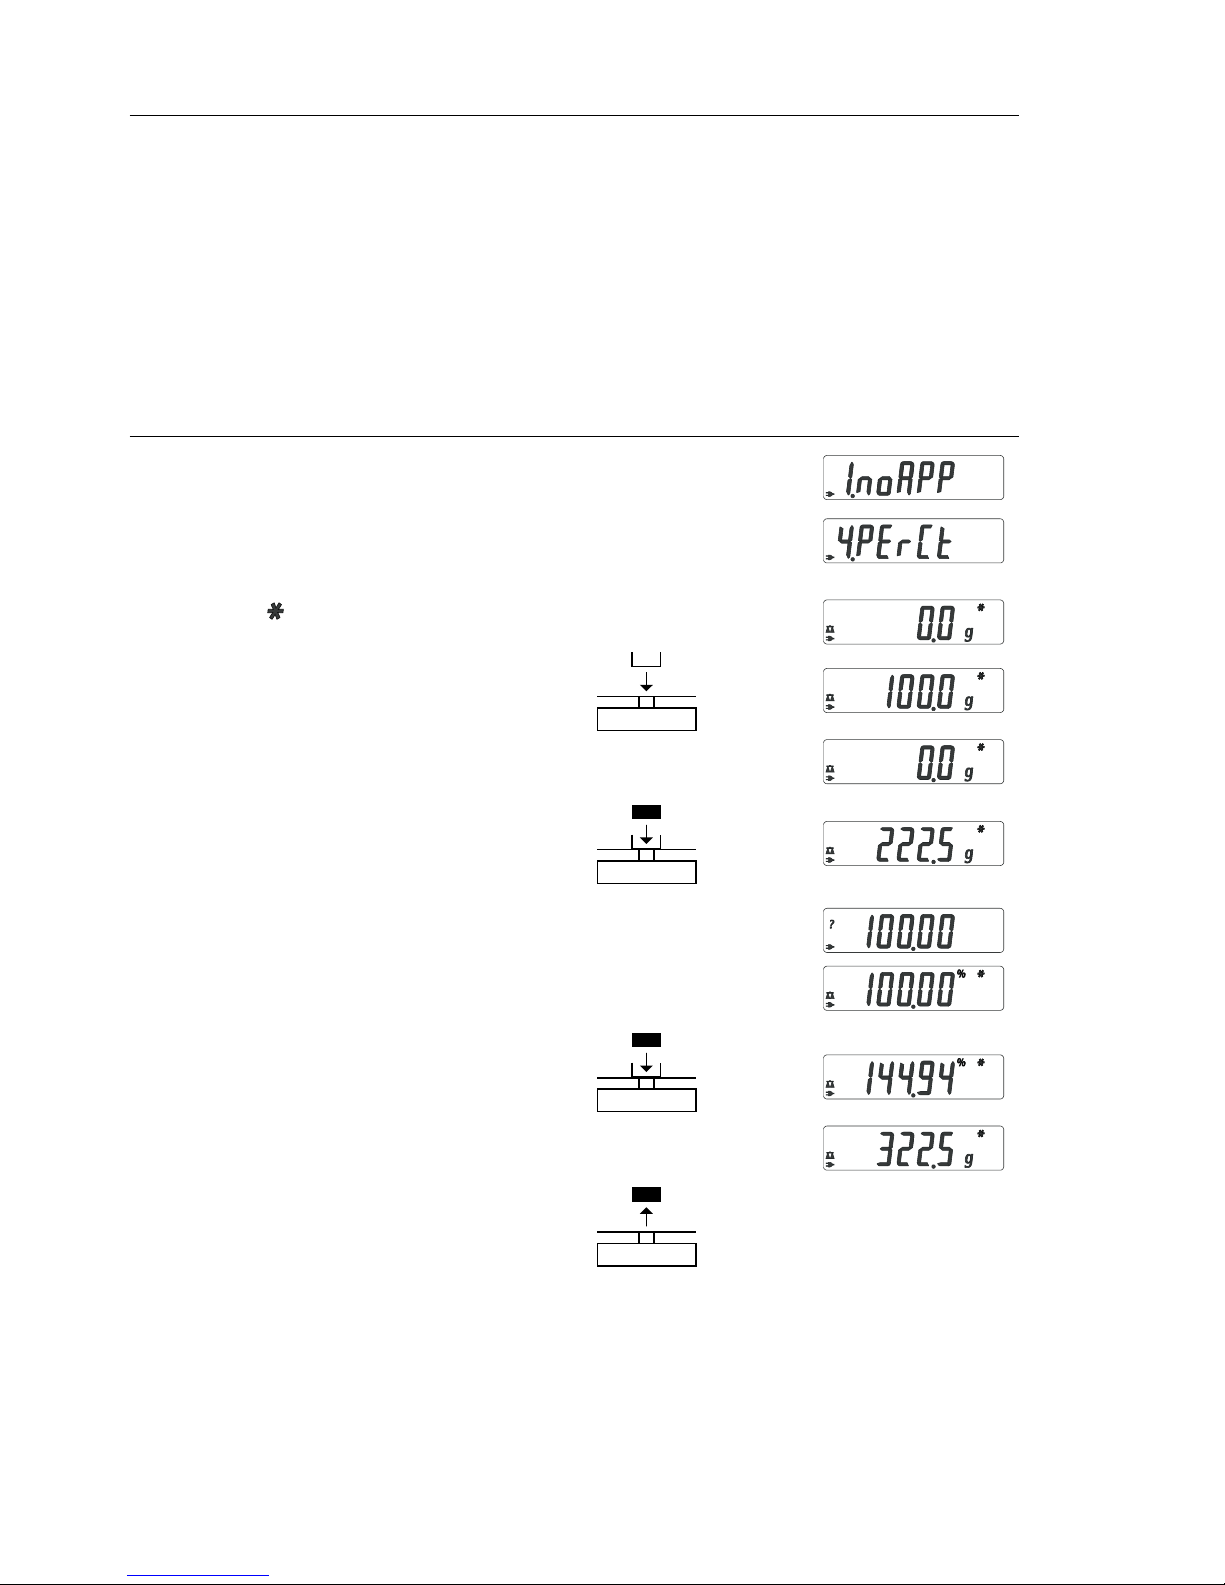
62
Pesada en porcentaje
Objeto
Con este programa de aplicación puede determinarse la proporción porcentual de una muestra, según un peso referencial.
Ejemplo: determinar valor porcentaje con: memorizar peso referencial colocando el peso en la balanza, cantidad porcentual de referencia 100 %
Paso Pulsar tecla Lectura
1. conmutar programa aplicación (ZERO) pulsión larga
2. seleccionar Pesada en porcentaje repetidam. (F)
3. confirmar ajuste (ENTER)
símbolo » « en la lectura:
aplicación está activa
4. colocar recipiente en la balanza
5. tarar (ZERO)
6. colocar peso referencial
para el 100 %
7. en caso dado, modificar decimal
para lectura porcentaje: 100,0 %,
100,00 % o bien 100 % (ajuste fábrica) repetidam. (F)
8. confirmar posic. decimal seleccionada (ENTER)
9. poner peso desconocido
10. conmutar lectura entre peso
y cantidad porcentaje repetidam. (F)
11. descargar balanza
12. aplicación Pesada porcentaje:
borrar cant. porcentaje ref. (Enter) pulsión larga
13. reactivar Pesada en porcentaje,
si previamente no se ha seleccionado
otro programa de aplicación (F)
14. en caso dado, seguir desde ítem 5.
Page 63
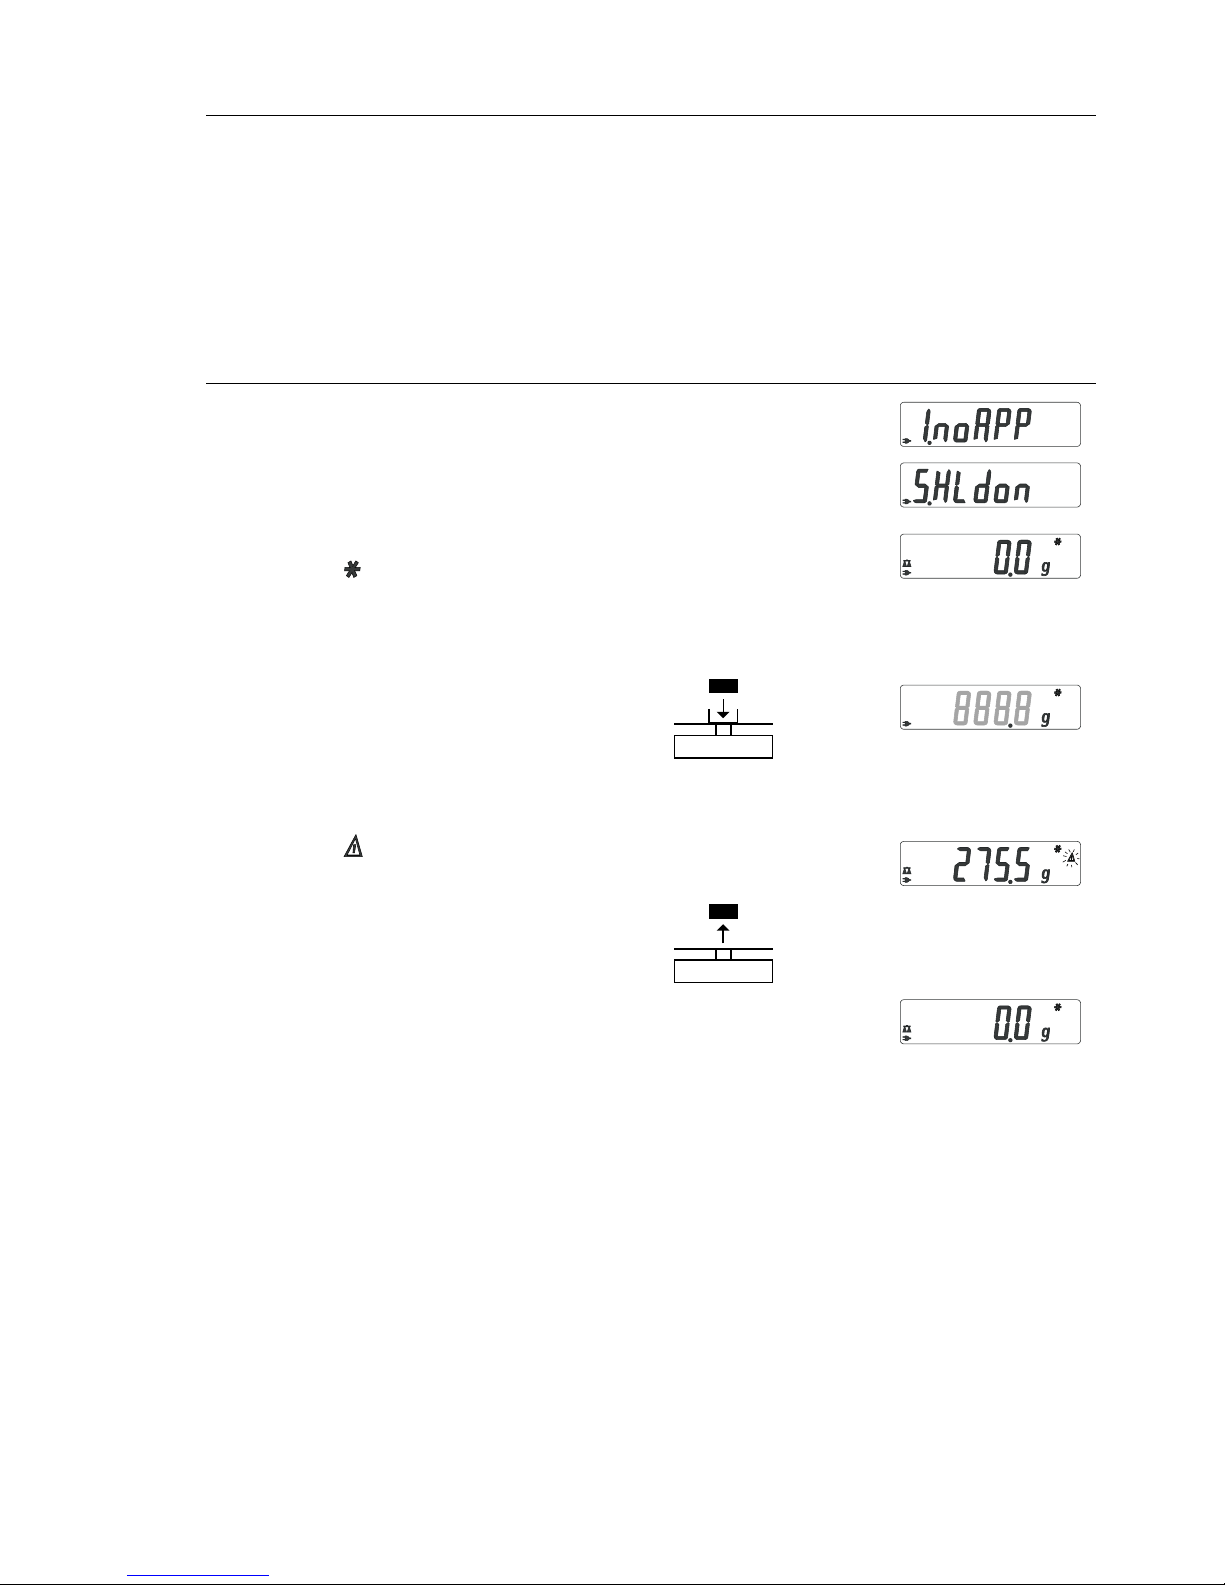
63
Objeto
Indicar último valor con estabilidad por 5 segundos (después de descargar).
Ejemplo: determinar muestra sobredimensionada
Paso Pulsar tecla Lectura
1. conmutar programa aplicación (ZERO) pulsión larga
2. seleccionar »Lectura estática« repetidam. (F)
3. confirmar ajuste (ENTER)
símbolo » « en la lectura:
aplicación está activa
4. en caso dado, tarar (ZERO)
5. poner muestra
6. iniciar aplicación (F)
símbolo » « parpadea en la lectura:
valor peso estable, fijo en la lectura
7. descargar balanza: valor peso estable
permanece aún 5 seg. en la lectura
8. o bien, tarar balanza y borrar
valor estable indicado (ZERO)
9. finalizar aplicación »Lectura estática« (Enter) pulsión larga
10. reactivar »Lectura estática«, (F)
si previamente no se ha seleccionado
otro programa de aplicación
11. en caso dado, seguir desde ítem 5.
Lectura estática
Page 64
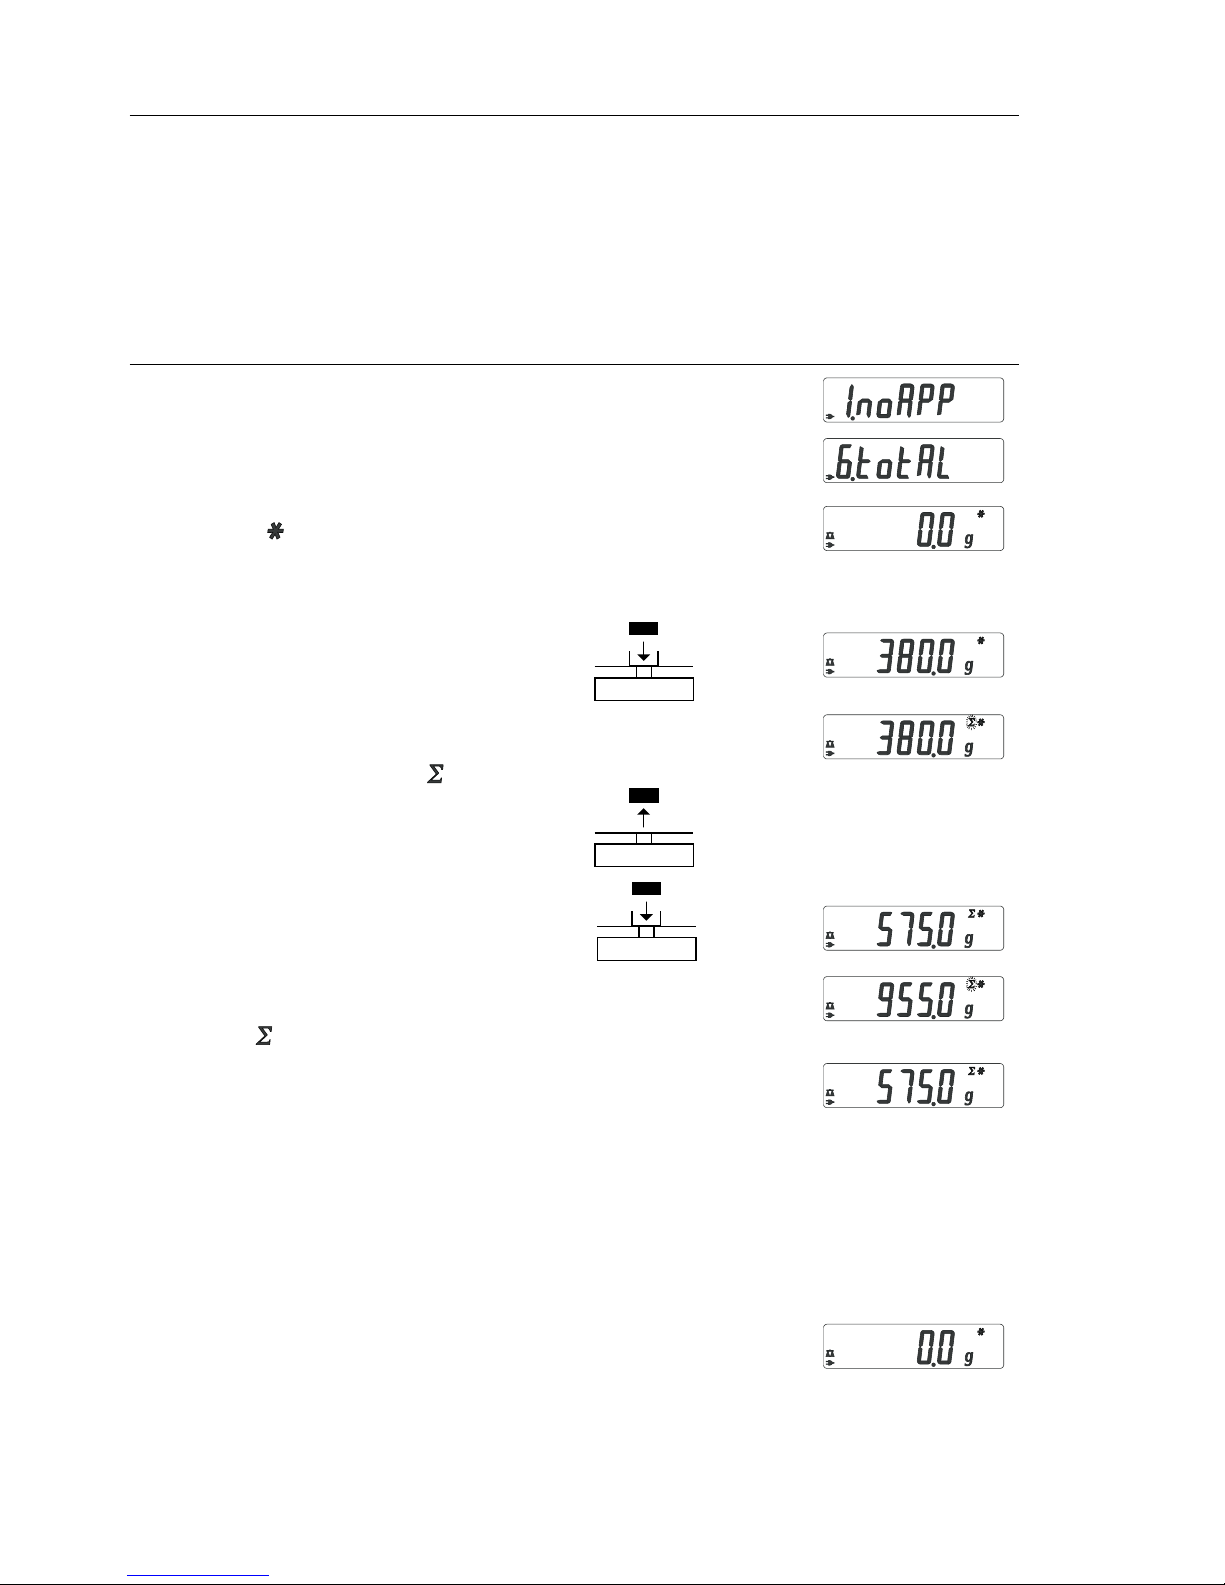
64
Totalización
Objeto: con este programa de aplicación pueden sumarse valores de peso
en una memoria, que rebalsan el rango de pesaje de la balanza.
Ejemplo: sumar valores de peso
Paso Pulsar tecla Lectura
1. conmutar programa aplicación (ZERO) pulsión larga
2. seleccionar Totalización repetidam. (F)
3. confirmar ajuste (ENTER)
símbolo » « en la lectura:
aplicación está activa
4. en caso dado, tarar balanza (ZERO)
5. poner muestra en la balanza
(aquí, p. ej. 380 g)
6. guardar valor en memoria; total (ENTER)
fijo en la lectura: símbolo parpadea
7. quitar muestra
8. poner siguiente muestra
en la balanza
(aquí, p. ej. 575 g)
9. guardar valor en memoria; (ENTER)
total fijo en la lectura:
símbolo parpadea
10. indicar componente actual por 3 seg. (F)
(con impresora conectada:
impresión simultánea
11. borrar memoria totalización (F) pulsión larga
(con impresora conectada:
imprimir totalización)
12. finalizar Totalización (Enter) pulsión larga
13. reactivar Totalización, si previamente (F)
no se ha seleccionado otro programa
aplicación (con impresora conectada:
imprimir Totalización).
14. en caso dado, seguir desde ítem 6.
Page 65
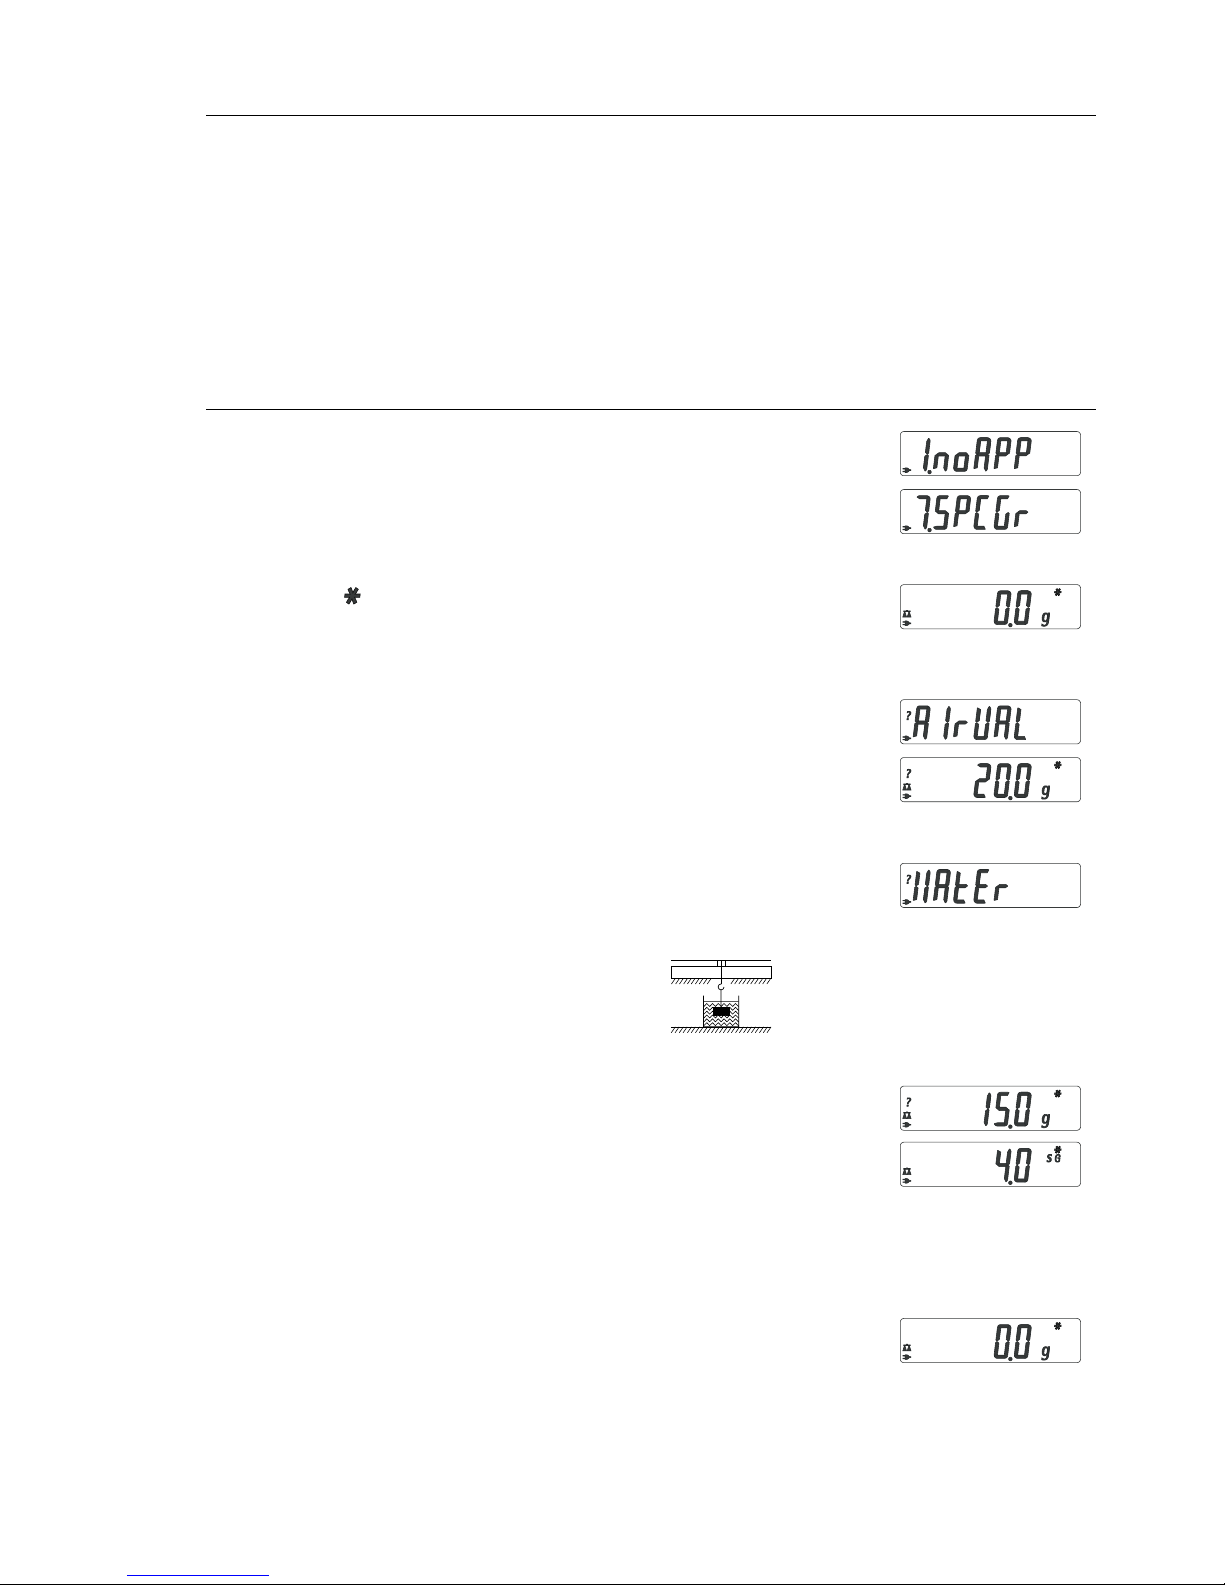
65
Objeto: con este programa de aplicación puede determinarse el peso específico de una muestra; el resultado se indica generalmente con una posición decimal. No suministrado: vaso medidor y alambre
Ejemplo: determinar el peso específico de una muestra sólida.
Paso Pulsar tecla Lectura
1. conmutar programa aplicación (ZERO) pulsión larga
2. seleccionar »Peso específico« repetidam. (F)
3. confirmar ajuste (ENTER)
símbolo » « en la lectura:
aplicación está activa
4. en caso dado, tarar balanza (ZERO)
5. iniciar aplicación (F)
6. confirmar lectura »airval« (ENTER)
7. determinar peso de muestra en el aire:
poner muestra en la balanza
8. memorizar valor peso en aire (ENTER)
9. Quitar muestra
10. determinar valor peso en líquido:
poner muestra en el canastillo
11. echar muestra en el líquido
12. confirmar lectura »water« (ENTER)
13. memorizar valor peso en líquido (ENTER)
e indicar resultado
14. borrar resultado (ZERO)
15. finalizar aplicación »Peso específico« (ENTER) pulsión larga
16. reactivar »Peso específico«, (F)
si previamente no se ha seleccionadootro
programa de aplicación
17. en caso dado, seguir desde ítem 5.
Peso específico
Page 66
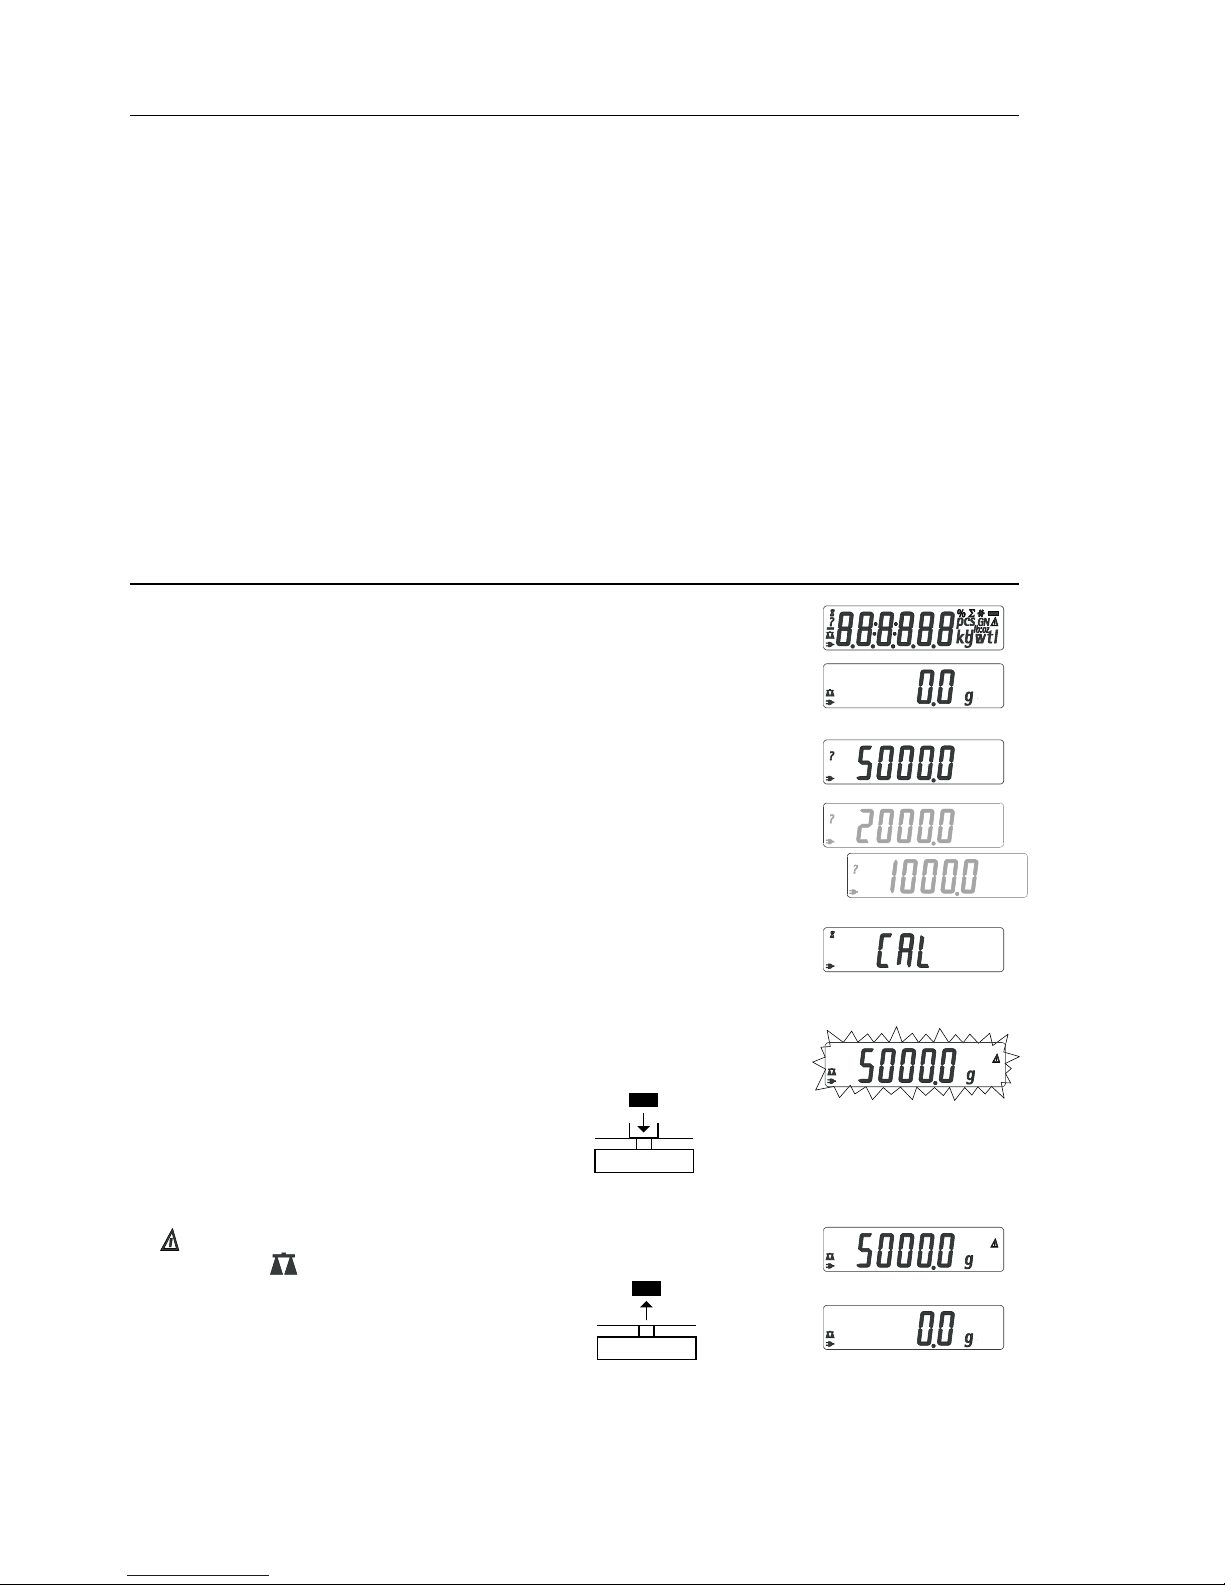
66
Calibración
Calibrar la balanza en el lugar, cada vez que se cambie de lugar de instalación.
Características
El proceso de calibración sólo puede iniciarse, si
– la balanza está descargada
– la balanza está tarada
– la señal interna del peso es estable
Si estas condiciones no se cumplen,
aparece un mensaje de error.
La pesa requerida para la calibración se
indica en la pantalla.
Pesas de calibr. estándares en los modelos seleccionados,
ver en la pág. 58
Otros valores de pesa seleccionables
mediante la tecla (F). En caso dado,
cancelar proceso de calibración:
pulsión larga de la tecla (ENTER) > 2 seg.
Ejemplo: calibrar balanza (aquí modelo MXX-5001)
Paso Pulsar tecla Lectura
1. en caso dado, encender bal. (ON/OFF)
2. tarar balanza (ZERO)
3. iniciar proceso calibración se indica (CAL)
pesa calibración predefinida, sin unidad
(aquí, p. ej. 5000 g)
4. en caso dado, seleccionar
valor pesa cal. repetidam. (F)
5. confirmar valor pesa cal. e iniciar (ENTER)
calibración
después de memorizar el punto cero,
se indica la pesa de calibración a aplicar
6. colocar ahora la pesa
de calibración
finaliza el parpadeo, si la pesa está
dentro de los límites predefinidos;
después de calibrar, desaparece
el símbolo .
7. quitar la pesa de calibración
8. calibración finalizada.
Page 67

67
Configuración de la balanza, es decir, adaptarla a los requerimientos del usuario.
Paso Pulsar tecla Lectura
1. apagar balanza (ON/OFF)
2. encender balanza y, (ON/OFF)
durante la indicación de todos
los segmentos pulsión breve (ZERO)
Funciones de teclas en el menú Setup:
Tecla Pulsión breve Pulsión larga
(ENTER) Nivel menú: mover hacia la derecha; rotando Confirmar ajuste
(F) Item de menú: mover avanzando –
(ZERO) Nivel menú: mover hacia la izquierda Memorizar ajuste
y abandonar menú Setup
Ajustes parámetros (sinopsis) ο ajuste fábrica; √ ajuste usuario
Menú 1 Pesar 1.1. Adapt. filtro 1.1.1 ambiente muy tranquilo
Setup 1.1.2
ο ambiente tranquilo
1.1.3 ambiente intranquilo
1.1.4 ambiente muy intranquilo
1.2. Filtro aplicación 1.2.1
ο pesar
1.2.2 dosificar
1.3. Rango estabilidad 1.3.1 1/4 de dígito
1.3.2 1/2 dígito
1.3.3 1 dígito
1.3.4
ο 2 dígitos
1.3.5 4 dígitos
1.5. Calibrar/linealizar: 1.5.1
ο calibrar
función tecla (CAL) 1.5.2
linealizar: sólo para el Sermxxio
1.5.3 tecla bloqueada
1.6. Auto-cero 1.6.1
ο activado
1.6.2 desactivado
1.7.
1. Unidad peso o 2. en
1.7.1 seleccionable, ver
aplicación »Conmutar unidad«
hasta
1.7.23 en »Conmutar unidad«
5. y 6. Relevante sólo con interfaz datos integrada:
ver en descripción de interfaz respectiva
8. Funciones 8.1. Bloquear func. teclas 8.1.1 todas, excepto (ON/OFF)
adicionales y (ZERO)
8.1.2 o todas accesibles
8.2. Apagar bal. autom. 8.2.1 o después de 2 minutos
8.2.2 después de 5 minutos
8.2.3 después de 10 minutos
9. Reset menú 9.1. Ajuste fábrica 9.1.1 reponer
9.1.2 o no reponer
Ajustes previos (menú Setup)
Page 68

68
Mensajes de error
Mensajes de error aparecen en la lectura principal de pantalla por 2 seg. aprox.
A continuación, el programa retorna automáticamente al modo de pesada.
Lectura Causa Ayuda/solución
No aparecen segmentos No hay tensión Controle alimentación de
corriente de lectura
Alimentador no está enchufado Enchufe alimentador
Pila/batería descargadas Recambie pila, recargue
batería con aparato externo
oL Desborde cap. pesada Quite la carga del plato
UL Plato no está colocado Coloque el plato correctamente
Roce entre el plato Plato de carga no debe
y su entorno rozar piezas adyacentes
disErr Desborde de lectura: Reduzca la carga
valor salida en pantalla no es representable
calErr No se observó condición Quite carga de la balanza
para calibrar, p. ej.: Tare con tecla (ZERO)
– puesta a cero Calibre recién con lectura cero
– plato aún con carga
appErr Peso muy liviano, o bien plato Aumente el peso
sin carga en programas aplicación
PrtErr Interfaz de datos para Comunique al sermxxio técnico
imprimir, bloqueada Denver
Bal.Err Aparato con carga al encender, Antes de encender:
o bien defectuoso descargue bal., o bien
comunique al sermxxio técnico
Denver
Sep.Err Aparato defectuoso Comunique al sermxxio técnico
Denver
Rango pesaje máx. Balanza encendida Coloque el plato
< lo predefinido en las sin plato colocado Apague y vuelva a encender
especif. técnicas balanza con tecla (ON/OFF)
Resultado de pesada Balanza no calibrada Calibre
obviamente erróneo No se taró antes de pesar Tare
¡En caso de aparecer otros mensajes de error, comunicarse con el servicio
técnico Denver!
Page 69

69
Especificaciones técnicas
Modelo MXX-123 MXX-612 MXX-412 MXX-212
Rango de pesada g 120 610 410 210
Legibilidad g 0,001 0,01 0,01 0,01
Rango tara (substract.) g 120 610 410 210
Desv. Linealidad £±g 0,003 0,03 0,03 0,03
Rango temp. de uso 10°C – 30°C (273°K – 303°K; 50°F – 86°F)
Tiempo estabilización (típico) s 2,5 2 2 2
Adaptación a las condic. 4 escalas optimizadas de filtro;
de uso e instalación secuencia de lectura: 0,1–0,4 (según escala de filtro ajustada)
Valor pesa calibración g 100 (F1) 200 (F2) 200 (F2) 200 (M1))
Peso neto aprox. kg 1,2 1,35 1,35 1,2
Dimensiones plato carga mm 97 d 142+130 142+130 97 d
Conexión, tensión y frecuencia
de red vía alimentador 230 V, o bien 115 V, +15%…– 20%, 48–60 Hz
Consumo eléctrico (típico) W 1 0,75 0,75 0,75
Tiempo funcionam. con
– pila monobloque 9 V (alcalina),
aprox. h – 11 11 14
– batería carga compl. (NiMH),
típico h – 2,5 2,5 4
Modelo MXX-5001 MXX-2001 MXX-601 MXX-10 MXX-5
Rango de pesada g 5000 2000 600 10000 5000
Legibilidad g 00,1 0,1 0,1 1 1
Rango tara (substract.) g 5000 2000 600 10000 5000
Desv. linealidad ≤± g 0,2 0,2 0,2 2 2
Rango temp. de uso 10°C – 30°C (273°K – 303°K; 50°F – 86°F)
Tiempo estabilización (típico) s 2 2 1,5 1,5 1,5
Adaptación a las condic. 4 escalas optimizadas de filtro; secuencia de lectura:
de uso e instalación 0,1–0,8 (según escala ajustada de filtro)
Valor pesa calibración kg 5 (F2) 2 (F2) 0,2 (M2) 5 (M1) 5 (M2)
Peso neto aprox. kg 1,1 1,1 1,25 1,1 1,1
Dimensiones plato carga mm 142 +130
Conexión, tensión, frecuencia de red vía alimentador 230 V, o bien 115 V, +15%…– 20%, 48–60 Hz
Consumo eléctrico (típico) W 1 1 0,75 0,75 0,75
Tiempo funcionam. con
– pila monobloque 9 V (alcalina),
aprox. h1111141414
– batería carga compl. (NiMH),
típico h 2,5 2,5 4 4 4
Sinopsis
Page 70

70
Accesorios (opciones)
Marca C
El aparato cumple los requisitos de las
Directivas del Consejo de la Unión
Europea:
89/336/CEE »Compatibilidad
electromagnética (CEM)«
Normas Europeas aplicables:
Limitación de las fuentes de distorsión:
según norma de producto EN 61326-1
clase B (residencial)
Inmunidad definida:
según norma de producto EN 61326-1
(requisitos mínimos de control, funcionamiento no continuo)
Advertencia:
Modificaciones en el aparato, así como
también la conexión de cables o aparatos no suministrados por Denver es de
responsabilidad del usuario y deben ser
controladas por él mismo, y en caso
dado corregidas.
Denver pone a disposición según
consultas informaciones sobre la calidad
de funcionamiento (según las normas
sobre inmunidad definida más arriba
mencionadas).
73/23/CEE »Material eléctrico a utilizarse
con determinados límites de tensión«
Normas Europeas aplicables:
EN 60950
Seguridad de los equipos de tratamiento
de la información, incluyendo los equipos eléctricos de oficina
EN61010
Requisitos de seguridad de equipos
eléctricos de medida, control y uso en
laboratorio
Parte 1: Requisitos generales
Al utilizarse equipo eléctrico en instalaciones, bajo condiciones ambientales
que requieren altas medidas de seguridad, han de observarse las prescripciones correspondientes para la instalación.
Artículo Referencia Nr.
Interfaz de datos, kit de montaje
– RS 232 con cable YADAP-RS
– USB con cable YADAP-USB
Impresora 901042-1
Seguro antirrobo LC-1
Pesas calibración
– para MXX-5001 (5 kg; F2) YCW6548-00
– para MXX-2001 (2 kg; F2) YCW6248-00
– para MXX-10 (5 kg; M1) YCW655-00
– para MXX-5 (5 kg; M2) YCW626-00
Page 71

Page 72

W1A000 · KT
Publication No. WMX6001-n05072
98648-012-82
Copyright by Denver Instrument GmbH, Goettingen, Germany.
All rights reserved. No part of this publication may be reprinted
or translated in any form or by any means without the prior
written permission of Denver Instrument GmbH.
The status of the information, specifications and illustrations in
this manual is indicated by the date given below. Denver Instrument
GmbH reserves the right to make changes to the technology, features, specifications, and design of the equipment without notice.
Status: July 2005, Denver Instrument GmbH, Goettingen,
Germany.
Europe, Asia and Australia: Denver Instrument GmbH
Robert-Bosch-Breite 10
37079 Goettingen, Germany
Tel: +49-551-20977-30
Fax: +49-551-20977-39
Internet: www.denverinstrument.com
U.K. and Ireland: Denver Instrument Company
Denver House, Sovereign Way
Trafalgar Business Park
Downham Market
Norfolk PE38 9SW England
Tel: +44-136-63862-42
Fax: +44-136-63862-04
North and South America: Denver Instrument Company
6542 Fig Street
Arvada, Colorado 80004
1-800-321-1135
Tel: +1-303-431-7255
Fax: +1-303-423-4831
 Loading...