

Page 1
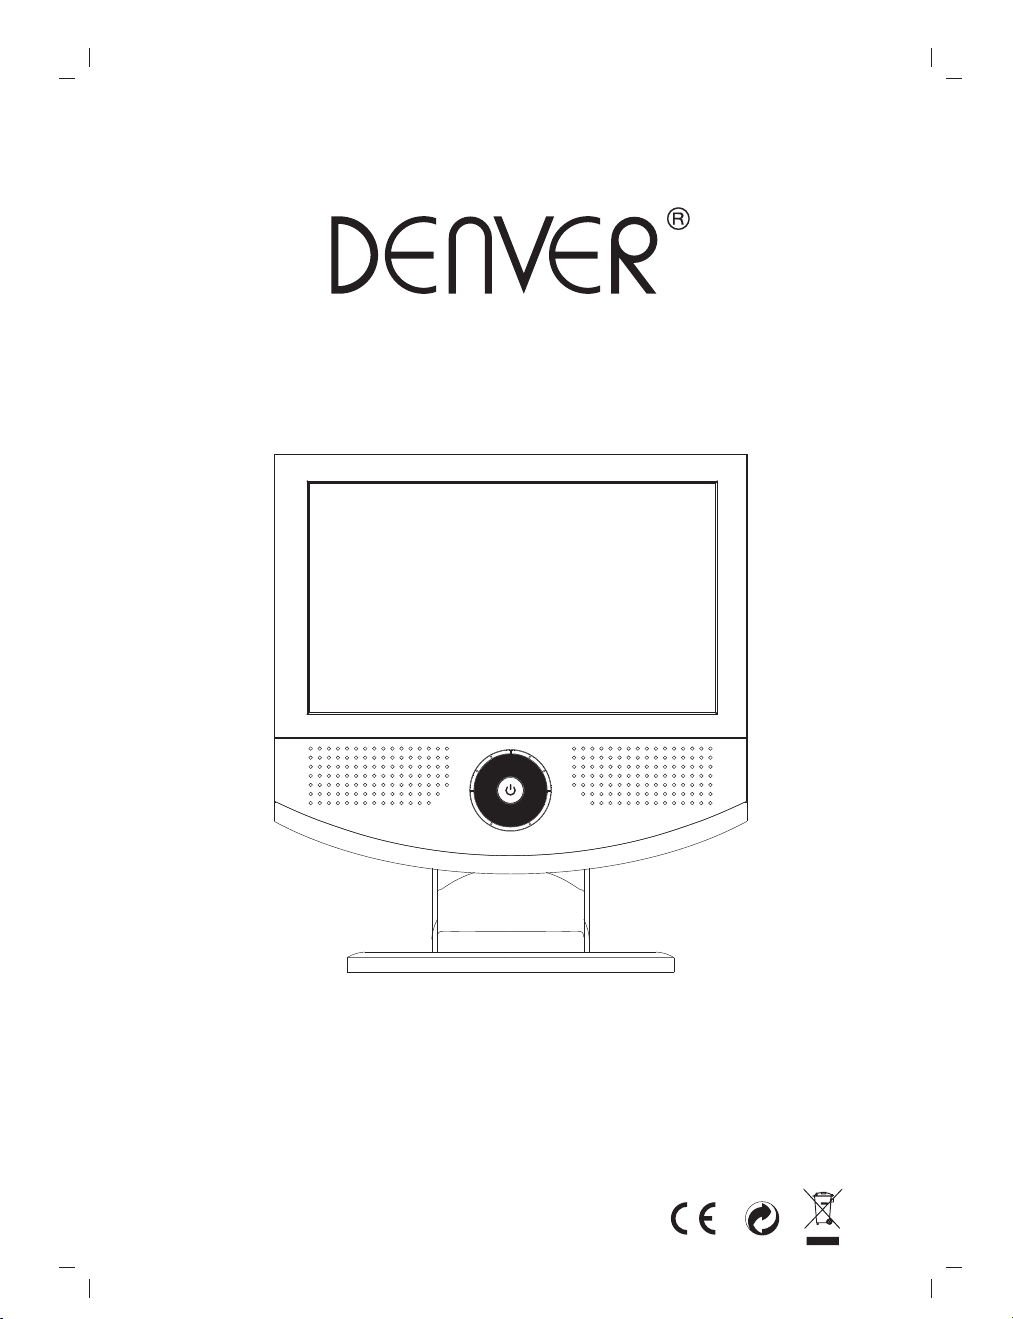
LED-1030DVBT
INSTRUCTION MANUAL
MINI DVB-T TV
Page 2
TO R E D U C E THE R I S K O F F I RE O R E L E C T R I C SHOCK,
DO N O T EXP O S E T H I S A P P L IA N C E T O R A I N OR M O I S T U R E
Use of controls or adjustments or performance of procedures other than
those specified herein may result in hazardous radiation exposure.
1. Do not damage the mains lead.
When not in use, disconnect the mains lead from th e outlet. Gras p the plug, not the main lead,
when disconnecting the unit.
2. If water should enter the unit, electrical shoc k or a malfunction may result. Use in an area where
there is low humidity and little dust.
3. Do not disassemble or alter the unit in any wa y.
4. Do not use the unit in areas where extremes in temperature occur (below 5℃or exceeding 35℃ ),
or where it may be exposed to direct sunlight.
5. This unit must be operated in a horizontal posi tio n.
To prevent fire or shock hazard, do not expose this appliance to dripping or splashing.
No objects filled with liquids, such as vases, shall be placed on the apparatus.
THIS U NIT SHOULD NO T BE ADJUS TED OR REPAIRED BY ANYONE EXCE PT
PROP ERLY QUALIF IED SERVICE PER SONNEL.
GB- 1
Page 3
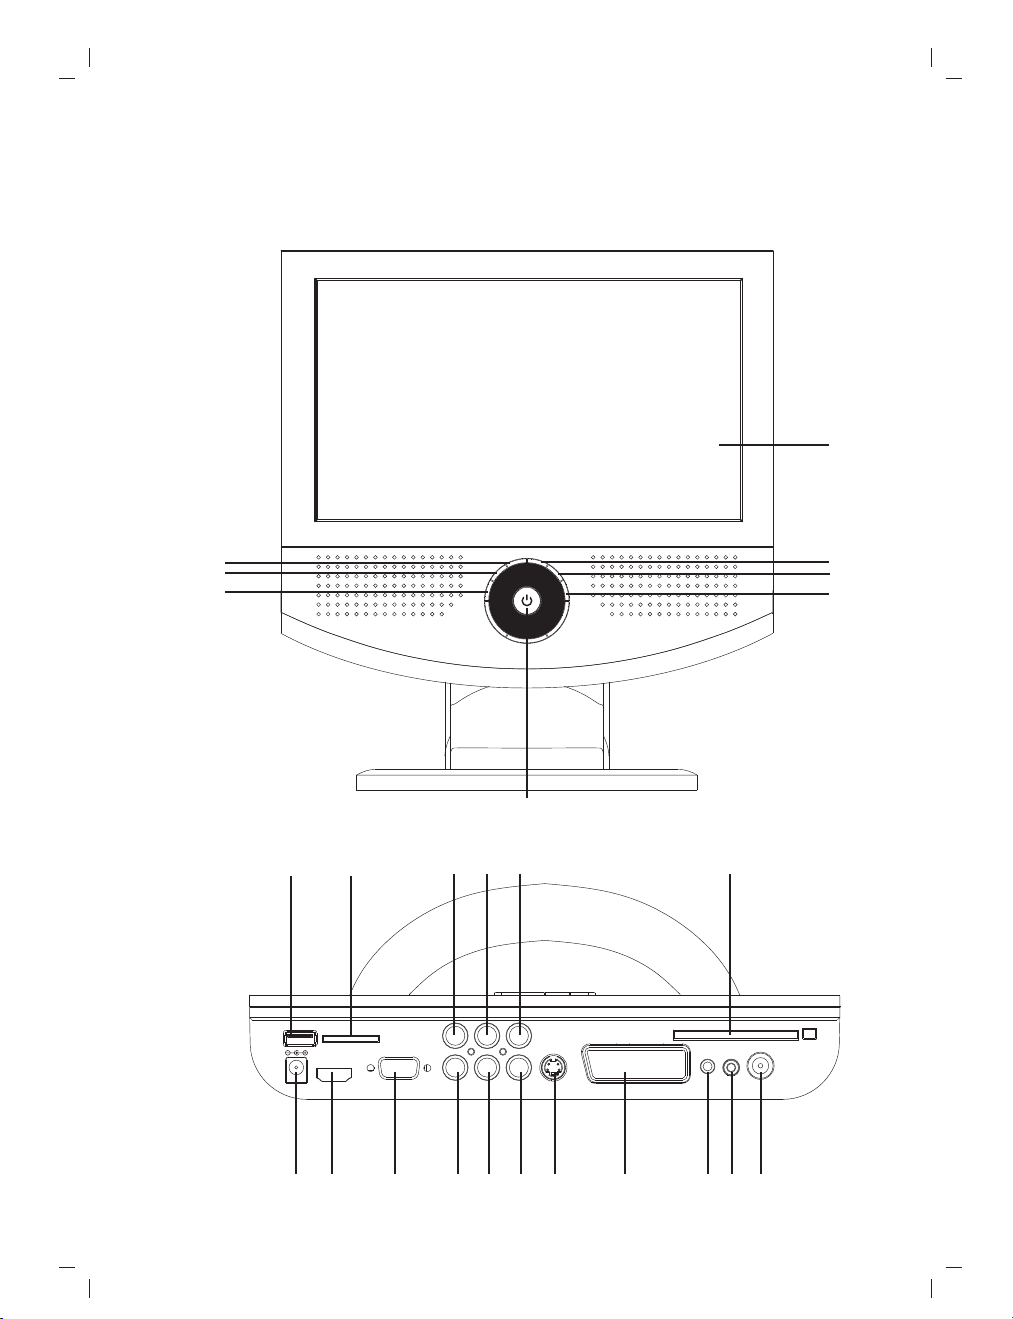
1 Platform and IR remote introduce
1.1 The function parts of the unit
8
1
2
3
4
5
6
7
9 10
11 12
13
14
15 16
17
18 1 9 20
GB- 2
21 22
23
24
25
Page 4
Names of the parts
SOURCE/EXIT Button
1.
2. CH+/UP Button
CH-/DOWN Button
3.
MENU/ENTER Button
4.
VOL+ /RIGHT Button
5.
6. VOL-/LEFT Button
IR/ LED POWER ON/OFFButton
..
7
TFT SCREEN
8.
USB SOLT
9.
CARD SOLT
10.
VIDEO INPUT
11.
AUDIO_L INP UT
12.
1.2 Remote control
AUDIO_R INPUT
13.
CI CARD SOLT
14.
DC IN(12V) INPUT
15.
HDMI INPUT
16.
VGA INPUT
17.
Y INPUT
18.
Pb INPUT
19.
Pr INPUT
20.
S-VIDEO INPUT
21.
SCART INP UT
22.
.VGA AUDIO INPUT
23
PHONE OUTPUT
24.
ANT INPUT
25.
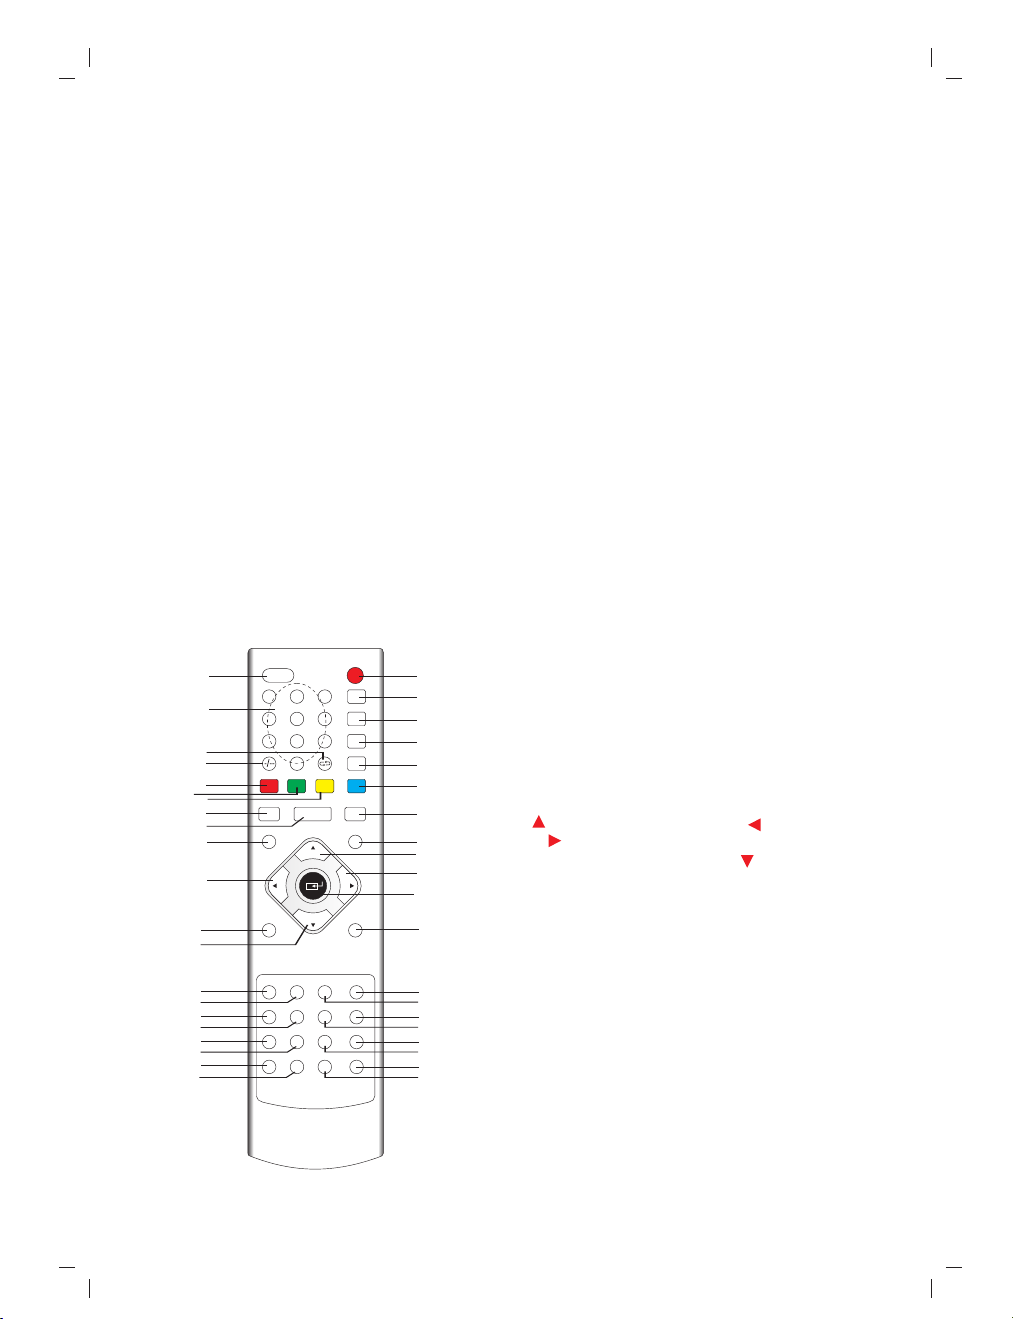
20
21
22
23
24
25
26
27
28
29
30
31
32
33
34
35
36
37
38
39
40
MUTE POWER
3
1 2
5
6
4
7
8 9
0
GREEN
YELLOW
RED
16:9 TXT/C C
PICTURE
CH
VOL
SOUND
CH
EPG PAGE+
FAV
DVB/MENU
RADIO PAUSE PAGE-
LIST
LUCIDITY SIZE SUBPAGE
INDEX
HOLD SUBTITLE
CANCEL
SLEEP
NICAM/A2
DVB
TV/AV
CYAN
DISPLAY
MENU
L
OV
EXIT
REVEAL
1
2
3
4
5
6
7
8
9
10
41
11
12
13
14
15
16
17
18
19
1. POWER ON/OFF
SLEEP
2.
3. NICAM/A2
4.DVB
5.TV/AV
6.CYAN
7. DISPLAY
8. MENU
CH
9.
VOL
10.
11. EXIT
PAGE+
12.
13. EPG
PAGE-
14.
Pause
15.
SUBPAGE
16.
SIZE
17.
18.
REVEAL
19. SUBTITLE
MUTE
20.
NUMBER 0~9
21.
22.Channel Swap
23.
-/--
24. RED
25.
GREEN
26.
YELLOW
27. 16:9
28. TXT/CC
29. PICTURE
30. VOL
31. SOUND
32. CH
33. DVB/MEUN
34. FAV
35. LIST
36. RADIO
37. INDEX
38. LUCIDITY
39. CANCEL
40. HOLD
41. ENTER
GB- 3
Page 5

Instruc tion to keys trokes of re mote contr olle
1.POWER: power ON/OFF
2. SLEEP:TV sleep time setting.
3. NICAM/A2: NICAM /DUAL se tt in g
4. DVB : DTV mode setting.
5.TV/AV: Switch between TV and AV mod e.
24
6/ / 25 /2 6: CYA N/ R ED /G RE EN /Y EL LO
1).Adjust teletext in ATV.
2).Adjust EPG in DTV
3).Adjust FF/FR/PREV/NEXT in USB/SD
CARD Media play.
7. DISPLAY: display the source information.
8. MENU :Enter/exit into main menu.
9/32. CH+/ CH-
1).Adjust the channel in TV mode
2).Control high light up or down to select
option in menu setup mode.
10/30. VOL+/ VOL-:
1)adjust up/down the volume
2).Control high left or right to select option in
menu setup mode.
11.EXIT Bu tt on : re tu rn t o th e pr ev io us
program played.
12/14.PAGE+/ PAGE - :S el ec t up wa rd /
downward page.
13. EPG Go to electron program guide.
15.Pause: when playing DTV、MMC/SD card
and USB
media , Switch between Play and
Pause.
16. SUBPAGE. search the next page and
display
17. SIZE Press this key to select different
image sizes
18.REVEAL:when in ATV mode, can hide teltext .
19. SUBTITLE :enter into title and display.
20.MUTE: mute control.
21. NUMBER 0~9 :elect number input
22. Channel Swap: return to first channel.
23. -/-- press this keys to select one-digit
27. ASPECT : Select inverse proportion of screen
28.TXT/CC:TXT,CC function setting.
29. PICTURE: picture mode setting
31. SOUND: sound mode setting
33.DVB/MEUN
34. FAV: Go to favorites programmers.
35.LIST:Go to program list.
36. RADIO: Switch to Radio
37. INDEX: (Channel List)program list
38. LUCIDITY:in teltext mode,adjust definition
and brightness.
39. CANCEL:in teltext ,press it, Return to upper
menu and played.
40. HOLD :in ATV mode,select one page
41. ENTER Button : Press to enter an item in the
menu or to confirm and execute a selection
1).Adjust the channel in TV mode
2).Control high light up or down to select option in
2. Functions introduce
2.1 Basic functions
Please check up whet her it is good connection with power, whether the voltage is st able,
whether the antennae is connected, and whether there is any physical damage to the circuit board.
Power on/off :
When the power co rd plugged in outlet, press “power on/off” key on the unit to power on.
When it is runnin g, press “power on/off” key on the unit into “standby” mode.
Source input:
Use the source key to choose which input you nee ded then press “Enter”.
(ATV、 、AV 、S-VIDED、SCART、YPbPr、HDMI、VGA、USB/CARD)
DTV
GB- 4
Page 6
Sl eep fu nction:
yo u can u se sl eep k ey to se t the T V sle ep se tt ing , suc h as : ,30 Min s, 45 Mi ns, 6 0Mi ns,
90 Min s, 12 0M ins,1 80M ins,
24 0Mi ns
OF F
Dis pla y s ett ing :
En ter t he di spl ay ke y to sh ow th e sou rce i nfo rm ati on .
Mu te fun ction:
En ter t he mu te ke y to mu te or the soun d.
ha ve
Pic tur e m ode s etti ng:
An y sou rce ,e nte r pic tu re ke y t o cha ng e t he br ig htn ess , con tr ast ,sa tu rat ion ,s har pne ss , c ol or
te mp se tti ng .
Sou nd mode set ting:
En ter s oun d key t o cha nge s oun d set ti ng.
BA SS/ TR EBL E/B AL ANC E/AV L/ EQ
( )
Nic am set tin g:
Wh en TV s our ce us e nic am /a2 k ey ch ang e nic am/ a2 se tt ing .
Num eri c k ey:
En ter t his k ey ca n tur n the c han nel y ou wa nt.
Volume ad just men t:
Pr ess “ Vol / ”ke y to ad jus t vol um e w he n s ys tem i s i n nor ma l p la yin g mod e; an d it wi ll sh ow
vo lum e bar o n the i mag e.
Cha nne l a dju stm ent:
Pr ess “ CH / ”k ey to ad ju st Ch ann el up a nd do wn.
2.2 M ainly me nu sett ing:
En ter m enu k ey yo u can s ee th e p ic tur e:AV/S -v ide o/S ca rt/ YPb Pr /HD MI ma inl y men u lik e 2-0,
ATV s our ce li ke 2- 1, D TV so urce like 2-2, s our ce li ke 2- 3。
VG A
Fig . 2-0 AV mainl y men
Fig. 2 -1 ATV main ly menu
GB- 5
Page 7
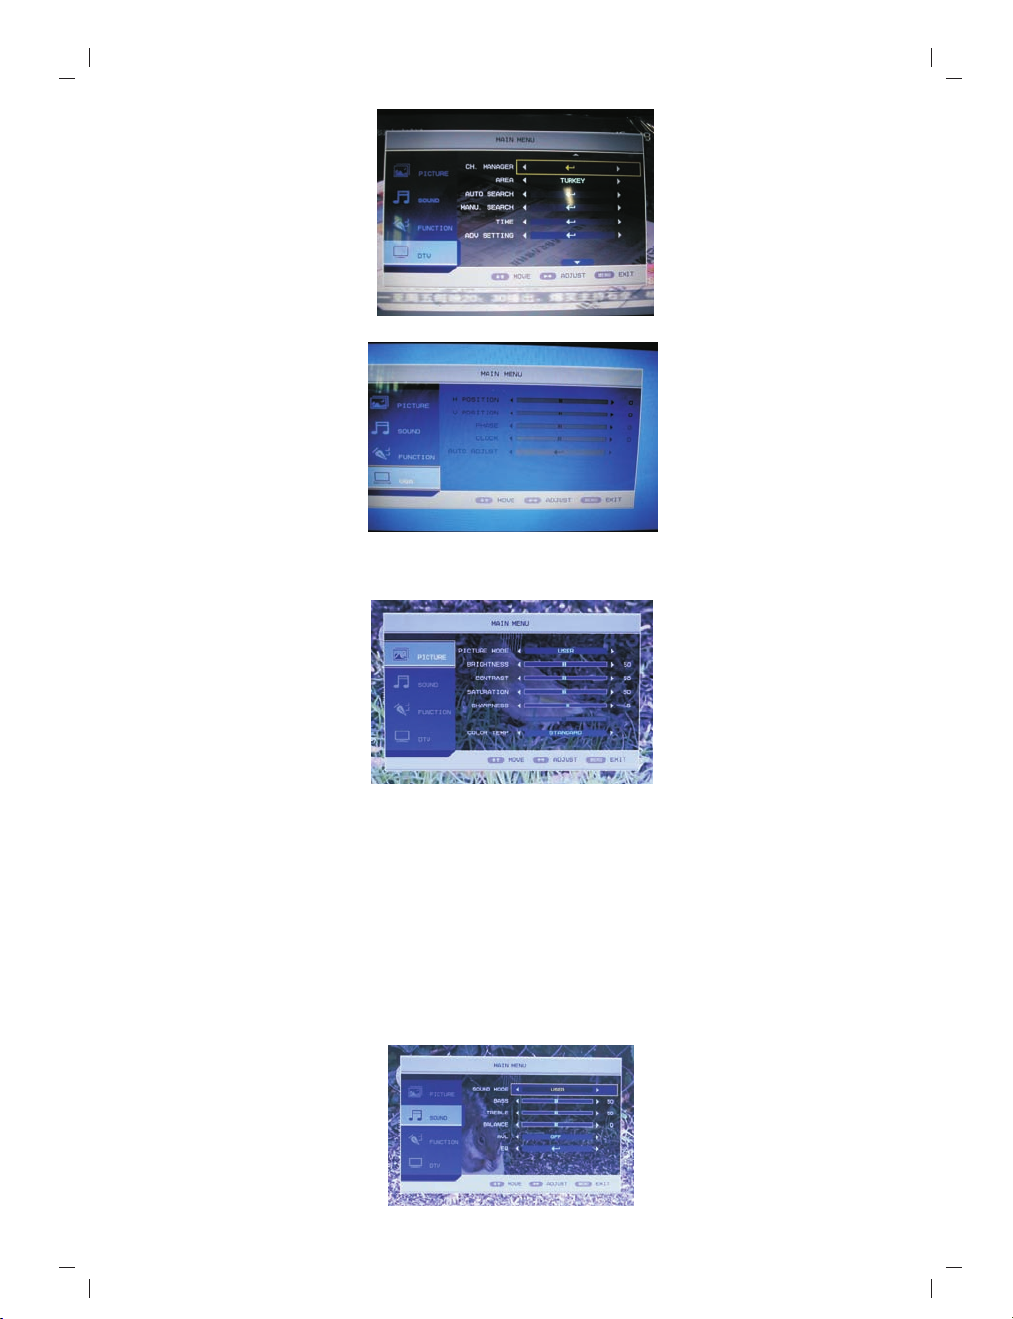
Fig. 2 -2 DTV ma inly me nu
Fig . 2-3 VGA mai nly men u
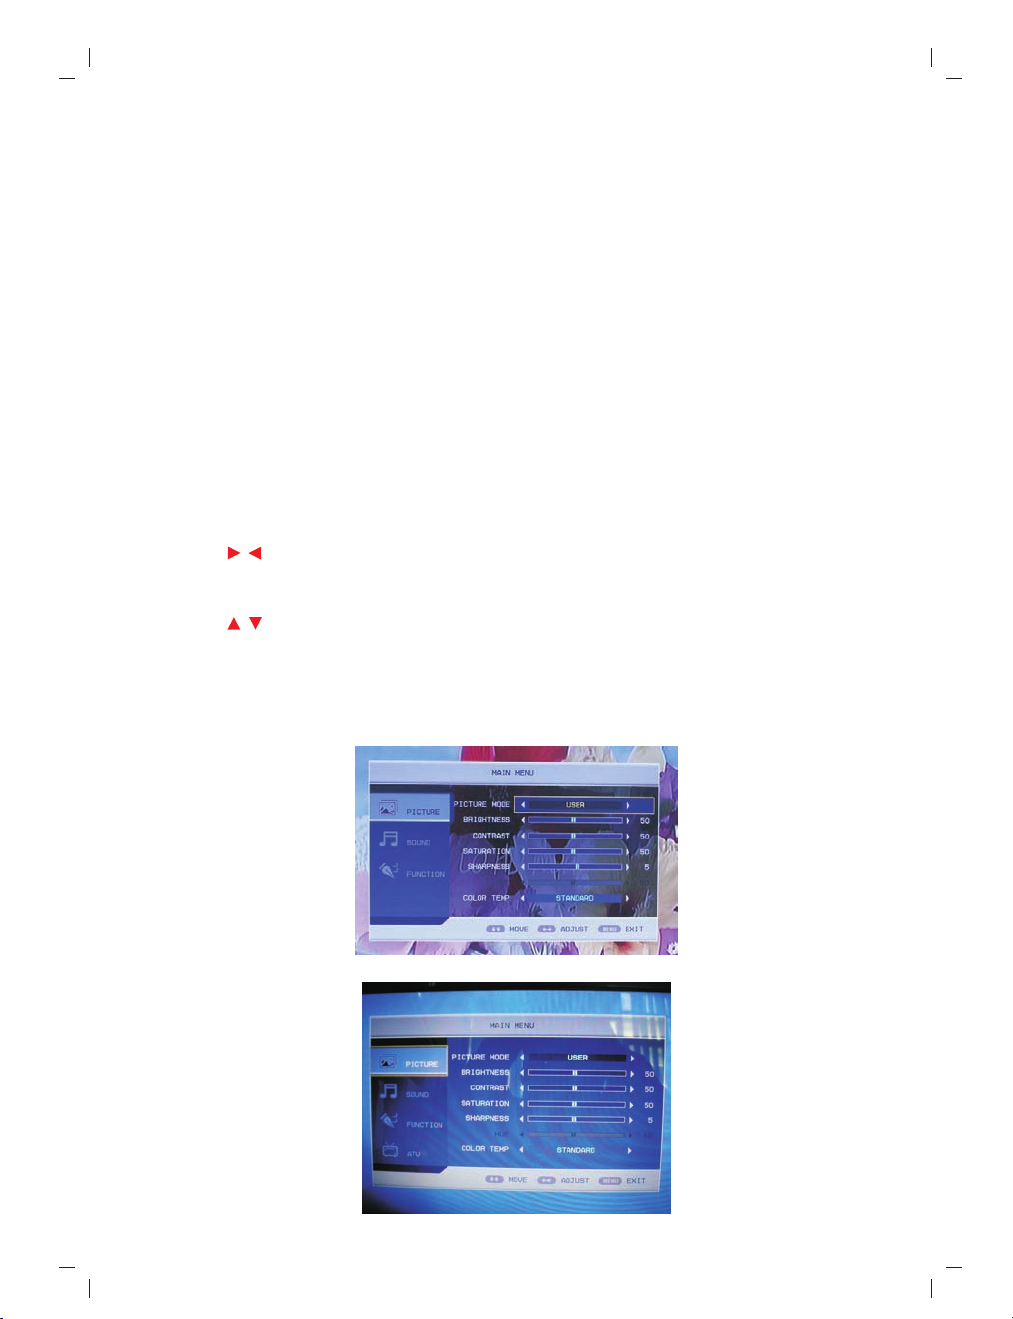
2.2.1 Pic ture mode se tting
Fig. 2 -4 Pict ure set ting
A: enter the menu ,then use up or down key to choose the Picture setting Fig. 2-4。
B: enter ►key choose PICTURE MODE menu,then enter▲▼key choose which you want
change,then enter►◄key change this value setting。
C:PICTURE menu can change action such as blow:
PICTURE MODE: Standard / /Soft /Optimal/ user. choose PICTURE Mode to USER Mode,
you can change current mode value such as: Brightness, Contrast, Saturation,Sharpness
D:COLOR TEMP: Standard/Warm /Cool
Vivid
.
2.2.2 Sou nd mode sett ing
Fig . 2-5 Sou nd sett ing
GB- 6
Page 8

A: enter th e menu ,then us e up or down key to c hoose the sou nd s etting Fig. 2 -5。
B: enter ►k ey choose SOUND M ODE menu,then ent er▲▼key choos e which you wan t ch ange,
then en te r►◄key change t his value set ti ng。
C: Sound me nu can change act ion such as blo w:
SOUND MOD E: Standard/ Mu sic / Speech/ M ov ie / user. cho os e Sound Mode to U SER Mode,
you can c ha nge current m od e value such as : bass,treble,bal an ce,
EQ.
ALV: ON/ OF F
EQ:Enter “E Q” setting,you ca n see the pictu re as 2-6
Fig . 2-6 EQ set ting
2.2.3 System setting
Fig . 2-7 Sys tem set ting
A: Pres s the MEN U key to en te r OSD men u. “▲▼” keys to sele ct the menu se tting as
mainly
Fig. 2-7
B: Pres s “►”,and use “▲▼” to highlight the sele ction, an d then use “►◄” to cha nge the setting.
C: In thi s page, t he follow ing can be adjusted:
Langu age: set the langu age menu, t he system supports English / Deutsch / Spanish / French
/ Por tuguese /
Dansk/I talian/ Suomi.
OSD DURATIO N :the OSD duration after men u and signa l operati on,( NEVE R/5 SECON DS/
10SEC ONDS/30 S ECONDS/ 60SECONDS .)
ASPEC T RATI O : FULL, 4:3 ,AUTO
Reset : This op er ation wil l delete all the use r setting s and eve ry parame ter will go back to
defau lt;
D: Pres s MENU or E XIT key to exit OSD menu.
2.2.4 ATV set ting
A: ATV setting in ATV mode as Fig. 2-8
B: Press MENU key, and ▲▼to highlight ATV th e ch an ne l mo de .
C: Press ► to enter channel mode menu, use ▲▼ to highlight the item(page up and page down
enable), then use ►◄ to change the setting.
GB- 7
Page 9

D: In this page, the following can be adjusted:
CHANNEL: use” ►◄ “to change the setting
ARE A: n ow i t su pp or ts :G er ma ny,England,Italy,France,Spain,Holland,Norway,S we de n,
Finland
,Greece,Australia,Russia,Ireland,Denmark,Portugal,Poland,Tu rk ey.
ATUO SEARCH: please refer to ATV signal detail introduction!
MANU.SEARCH: please refer to ATV signal detail introduction!
FINE TUNE: please refer to ATV signal detail introduction!
COLOR SYSTEM: please refer to ATV signal detail introduction!
SOUND SYSTEM: please refer to ATV signal detail introduction!
SKIP:ON , OFF
CHANNEL EDIT: edit title.
Fig . 2-8 cha nnel ed it
E: Press MENU or EXIT key to exit OSD menu.
Fig. 2-9 ATV S ettin g
2.2.5 DTV setting
A: DTV setting as Fig. 2-9.
B: Press MENU key, and ▲▼to highlight the DTV channel mode.
C: Press ► to enter DTV channel mode menu, use ▲▼ to highlight the item(page up and page
down enable), then use ►◄ to change the setting. Press ENTER key to enter the current set.
The details will be introduced in the following.
D: In this page, the following can be adjusted:
CH.MANAGE: please refer to DTV signal detail introduction!
AREA: now it supports: ,Ge rm an y,England,Italy,France,Spain,Holland,Norway,Sw ed en ,
Finland
, Greece, Australia, Russia, Ireland, Denmark, Portugal, Poland.
Tur ke y
ATUO SEARCH: please refer to DTV signal detail introduction!
MANU.SEARCH: please refer to DTV signal detail introduction!
TIME: please refer to DTV signal detail introduction!
ADV S ET TI NG : pl ea se r ef er t o DT V si gn al d et ai l in tr od uc ti on!
E: Press MENU or EXIT key to exit OSD menu.
GB- 8
Page 10

Fig. 2- 10 DTV Se tting
3. Functions
3.1 ATV signa l introduc tion
3.1.1 Aut o- se ar ch
When the input is TV, press MENU key to enter ATV setting, select Auto Search, as Fig. 3-1,
TV system will search the entire exits program from the whole channel scope and conserve
automatically. After done, it will enter to channel 1 automatically.
Fig. 3- 1 ATV AUTO-SE ARCH
3.1.2 Manual search
ATV
In m od e, p re ss M EN U to s ta rt ATV setting. Select Manual Search press ►, the TV system will
search upward the nearest channel until to the maximum and exit, and press ◄, the TV system
will search downward the nearest channel until to the minimum and exit, no matter upward or
downward, once a program is searched, it will stop searching and play
3.1.3 Fine-tuning
In ATV mode, press MENU key to set the ATV, select FINE TUN E to a dj us t th e fr eq ue nc y of
current channel, press ► to increase and ◄ to decrease. After finished, the system will hold the
frequency.
3.1.4 System standard setting
In ATV model, press MENU to set ATV color standard and so un d st an da rd . No w th e co lo r sy st em
support PAL/SECAM/AUTO . If s el ec t AUTO, the system will AUTO identification the current
standard. The sound system supports DK/BG/I/L'/Auto.
GB- 9
Page 11

3.1.5 Teletext
A: If you want to watch teletext, please press “ ” on the remote controller to enter into EPG
TXT/CC
page. As shown in the figure below:
B: Press “HOLD” key : Switch Text lock.
C: Press “LUCIDITY” key : The switch of mix the Text and cu rr en t TV.
D: Press “INDEX” key : Text search, show Main Page.
E: Press “SIZE” key : change Text TV as pe ct r at io ;
F: Press “REVEAL” key : switch of hide the characters
G: Press “SUBPAGE” key :8268;
H: RED/GREEN/YELLOW/ : the function as the display on the bottom of screen
CYAN
Fig. 3 -2 ATV Telete xt
3.2 DTV sig nal introd uction
3.2.1 Aut o- se ar ch
A: When the input source is DTV, pre ss M EN U ke y to s et t he D TV m en u. S el ec t AUTO SEARCH,
it will search program automatically as Fig. 3-3.
Fig. 3 -3 DTV AUT O-SEA RCH
B: Before search, you need to set the AREA based on your location. Area search is an intelligent
mode; it will search all the channel of potential marketing. Current system supports areas
including /Germany/ England/ Italy/ France/ Spain/Holland/Norway/Sweden/Finland/
Greece/ Australia/ Russia/ Ireland/Denmark/Portugal/Poland;
Tur ke y
C: After enter to search menu, the system will search all the program of the whole frequency point
in the selected countries and areas, in the process of auto-search, press Exit to stop searching
and exit, after finished and any channel has been searched, the system will exit searching
programs automatically and preserve the information searched and play the program.
GB- 10
Page 12

3.2.2 Quick select
A: In normal play mode and DTV input, press LIST key to enter QUICK SELECT me nu a s Fi g. 3 -4 :
B: Quick select menu: The left and right keys are to highlight the program group. The g ro up s ar e
classified news, science, sports, movie, kids, , music, fashion and favorite .press up or down
key to the channel which you want to watch, press Enter, press Channel List again or press
Exit to exit quick select mode.
Fig. 3 -4 QUIC K SELEC T
3.2.3 Favorite list
A: In DTV mode, press FAV to select the favorite list as the Fig 3-5.
B: Press up or down key to the channel which you want to watch, press Enter, press FAV again
or press Exit to exit quick select mode.
Fig. 3 -5 FAVOUR ITE LIS T
3.2.4 Information
In DTV mode, presses “DISPLAY” twice, it will display the details of the program as Fig. 3-6
Fig. 3 -6 PROG RAM INF ORMATI ON
GB- 11
Page 13

3.2.5 Multi audio
In DTV mode, press”NICAM/A2” key to do Multi audio setting. LEFT and RIGHT ke ys i s to s el ec t
Stereo-->Left-->Right sequentially,in the panel center, there are audio languages, press UP
and DOWN to select the language you need and press ENTER. Press MTS/DUAL ag ai n or p re ss
Exit to exit the program as Fig. 3-7
Fig . 3-7 MUlT I AUDio
3.2.6 Electronic programs guide (EPG)
A: If you want to know the program information soon, press EPG to come to read the electronic
program guide. The date and time will be shown in the top left corner of the menu; the left is
the list of current programs and the right are the programs in different time. Th e ri gh t an d le ft
key are to select the list focus and the up and down keys are to select the different programs
or EPG information.
B: Four types of EPG:
(1)Daily mode: press the red key to enter into Daily mode, according to the daily form to show
the program.
Fig . 3.8 EPG Da ily men u
(2)Weekly mode: press green key to enter into weekly mode;
Fig . 3.9 EPG We ekly ME NU
GB- 12
Page 14

(3)Extended mode: press the yellow key to enter into extended mode, press EPG again or
press Exit to go to previous menu.
Fig. 3 .10 EPG E xtend ed Menu
C: In EPG mode, press “EPG” or “EXIT” to exit EPG mode
3.2.7 Switchover between TV and Radio
In normal, press “RADIO”, to switch TV and RADIO
3.2.8 Subtitle
A: Press “subtitle” to enter Subtitle menu, as below.
B: In subtitle menu, press the LEFT or RIGHT ke y to o pe n or c lo se t he s ub ti tl e. I n th e op en m od el ,
you can choose the language and number of the subtitle on bottom of the menu.
Fig. 3 .12 Sub title m enu
3.2.9 Teletext
A: If you want to watch teletext, please press “ ” on the remote controller to enter into EPG
TXT/CC
page. As shown in the figure below:
Figu re 3.13 Tel etext p age
GB- 13
Page 15

B: Input three digits to go to corresponding page you want;
C: Press “CH ” to g o to t he p re vi ou s pa ge , wh il e pr es s “C H ” to g o to t he n ex t pa ge ;
▼
D: Press “VOL ” to ba ck f or 1 00 pa ge s, w hi le p re ss “ VO L ” to advance for 100 pages.
E: Press “TEXT” to exit from teletext.
3.2.10 Program Edit
In this system, you can edit the program, skip, knock, delete, sequence or group.Press “MENU”
to enter DTV mode, select “CH.MANAGE” and press “ENTER” to go into the channel edit as below
Fig . 3.14 DTV M ENU
3.2.10.1 CH. ORGN.
A: In channel edit mode, press “▲▼” to select the item and press “ENTER”.
B: Channel Organizer When the property of Fav/move/Lock/Del was modified, press “Exit” to
cancel, or press “Enter” to conserve. At the same time, there will be a reminder “Successfully
updated…” If setting two or more properties at once, the system will deal with it as the
sequence of delete, lock, skip, favorite
Fig . 3.15 CHA NNEL OR GANIZ ER
3.2.10.2 H. SORT.
A: Press “▲▼” in channel edit mode to sort the program.
The first item is sort by area,the supporting areas including: Germany,E ng la nd ,I ta ly,France ,
Holland,Norway,Sweden,Finlang,Greece,Australia,Russia,Ireland,Denmark,Portugal,Poland,
Turkey,All Area, and the default is
England
B: The second item is sort by whether encrypted, included all/Free/Scramble, the default is all
C: There are five options in the third item: All/From A to Z/From Z to A/LCN-/LCN+, press the left
or right key to select and “ENTER” to conserve
GB- 14
Page 16

Fig. 3 .16 Cha nnel S orting
3.2.10.3 CH. GROUP.
In Channel group, press “▲▼” to set the channel group. In the left is the channel number and
name, the third column tells us whether the channel is favorite or not, and from the last column,
we will know the channel belong to which group.
Now there are eight groups: 1 None; 2 News; 3 Science; 4 Sports; 5 ; 6 ; 7 Music;
8
Fashion.
Fig . 3.17 Cha nnel G roup
movies kids
3.2.10.4 DEL TV CH. & DEL RAD IO C H
A: Press “▲▼” , select delete function.
B: Delete all TV Channels: press “ENTER” , there will pop-up a dialog box for sure, press “YES”
and all the TV channels will be deleted.
C: Delete all Radio Channels:press “ENTER” , there will pop-up a dialog box for sure, press
“YES” and all the radio channels will be deleted.
3.2.11 TIME
A: In DTV mode, press “MENU” and go into DTV setting, select “TIME”, press “ENTER” again.
Use “▲▼” to select the item which need to modify, and “Right” or “Left” key to modify the
setting.
B: Setting items include: Two modes to time: AUTO a nd M AN UA L:
(1)In manual mode, we can set the date and the time. If select the date, press the right or left
key to enter calendar setting.
Time: Select the time item, press the right or left key to the number location, and press the
numeric keys to set the time.
GB- 15
Page 17

Fig. 3.18 TI ME
(2)In auto mode, we can set Time Area and Daylight Saving Time
Time area: select the area item, press the right key to time area option, and press the up or
down key
to select the time area and then press “ENTER”
Daylight Saving Time: can be set to open or close
3.2.12 AD V SE TT IN G
There is an “ADV SETTING” in ATV menu, press “▲▼” to select this option and press “ENTER”
for sure. It is to set audio language and the subtitle language (that needs the supplier's support.).
Also, it can be used to set the CI, CA, parent lock and the channel rate and so on.
AUDIO: in current program, if there is multi-language audio, have a certain one as the priority.
SUBTITEL: in current program, if there is multi-language subtitle, have a certain one as the
priority.
CI: to set the CI operation.
CA: to conserve the Encrypt channel or not.
PARENT LOCK: In DTV mode, press “MENU” , select “ADV SETTING” and press “ENTER” to go
into the “ADV SETTING”, and select “PARENT LOC K” t o ch an ge t he p as sw or d as t he f ol lo wi ng :
①The default password is 8268,
②Firstly, you h av e to i np ut t he o ld p as sw or d co rr ec tl y, an d th en i np ut t he n ew p as sw or d, a t la st
input the new one again for sure.
③Press “EXIT” to cancel the current setting. Or “ENTER” to conserve. If set successfully,
conserve the setting, it works at once
Fig . 3.19 Adv se tting
GB- 16
Page 18

Fig . 3.20 Cha nge pa sswor d
RATING: In DTV mode, highlight “ADV SETTING”, select “RATIN G” a s be lo w
Fig. 3 .21 SYS TEM SET UP
After press the password, press “►” to go into set the channel rate, and press “▲▼” to select
the rate. The larger of the number, the higher of the rate.
3.3 Introduction of USB/CARD Multi-media function
In this system, there is a powerful USB/CARD interface function. Through the interface, we can
connect the external USB/CARD device and browse multimedia files. It supports and .
DAT
avi video file, .jpg format picture and mp3 audio file.
We can enjoy the music, picture and film through the external USB/CARD device. If no file or no
USB device, it will give the reminder of “No device” and return to previous menu. It supports four
modes: fast forward, fast backward, pause and play.
3.3.1 Film
A: When the input source is USB/CARD, press “►◄” key to select Movie
Fig. 3 .22 fil m
GB- 17
Page 19

B: Enter to the sub menu and select the file you want to play, as below
Fig . 3.23 fil m
C: It will show the name, format and play state of the film. Press►◄ key ,“Fast Forward”,
“Fast Backward”, “Next song” and “ previous song” can be selected.
supports media play format as below: (Video)
File Type Encod ing F ormat
*MPG * DAT
*AVI * D ivx
MPEG- 1/2
(1)IS O MPE G4
(2)Xv id
3.3.2 Music
A: When the input source is USB/CARD, press “►◄” key to select Music. as below:
Fig . 3.24 mui se
B: Enter to the sub menu and select the file you want to play, as below:
Fig . 3.25 MUS IC
GB- 18
Page 20

C: In Music mode, it will display the name of music, play progress, artist, and record collecting
and so on. press the" " key enter Fast Forward; Long press " "key enter Fast Backward;
Once press " " b ot to n is n ex t so ng ; on ce p re ss " " botton is previous song.
CYNA YELLOW
GREEN RED
supports media play format as below: (audio)
File Type
*mp3
*wav
*wma
format
Support
Support
Support
3.3.3 Picture
When the input source is USB/CARD, press “►◄” key to select Photo and press “ENTER” to
enjoy the picture. In the file list mode, press the green key to preview the pictures six in one .
Fig . 3.26 PRE VIEW PI CURE
supports media play format: JPEG,BMP.
3.4 signalVGA
Fig . 3.27 PC SE TTIN
GB- 19
Page 21

3.4.1 When the signal input to VGA, we can set the VGA menu as 3-35.
3.4.2 Press the remote MENU key to enter OSD menu.
“▲▼” to select the item. Press “►◄” again to change the value.
3.4.3
3.4.4 The following options can be set:
H POSITION:Adjust the horizon position, press”►◄” to move the display left and right;
V POSITION:Adjust the vertical position, press”►◄” to move the display up and down;
PHASE:Adjust the phase to display normally;
CLOCK:Tri m th e sa mp li ng f re qu en cy t o di sp la y no rm al ly ;
AUTO ADJUST:Select “auto adjust” and press “ENTER” to adjust the horizon and vertical
position, phase and so on to made the display is on the middle.
3.4.5 Press “MENU” key or “EXIT” to exit the OSD setting.
3.5 HOTELMODE MENU
3.5.1 HOTELMODE is designed for hotel specially. Press “ ” and input “4588”, it will go
TV/AV
into this mode.
Fig. 3 .28 HOT EL MODE
3.5.2 HOTELMODE options:
Fig . 3.29 HOT EL MOD
HOTEL GENERAL LOC K: H OT EL GENERAL LOCK is the switch of HOTELMODE;
ASPECT RATIO LOCK: it is to lock the aspect ratio. Press “ON”, the default is 16:9;
POWER ON SOURCE SET: it is to lock the power on source set;
DEFAULT VOLUME SET: to set the default volume;
MAXIMAL VOLUME SET: to set the maximal volume;
CHANNEL SCAN LOCK: to lock the channel scan function;
PICTURE USER LOCK: to lock part of the picture setting;
POWER ON STANDBY: sel ec t “O N” , if p ow er o n, i t wi ll g o to s ta nd by m od e au to ma ti ca ll y;
KEYPAD LOCK: to lock the keypad.
GB- 20
Page 22

Specifications
GENERAL:
1 Power Source…………………………………………………………..AC Adapter, Output: 12V,2. 5A;
2.Standby power <1W.
3. ATV Suppor: PAL BG,PAL DK,PAL I,SECAM L/L' ,NICAM ,TeleText, CC, V-Chip
4. CVBS input support: PAL ,NTSC ,SECAM
5. SCART input support : CVBS or RGB mode,support 16:9 or 4:3 mode
6 HDMI input support:480i,480P,576i,576P,720P50/60Hz,1080i50/60Hz,1080P50/60Hz
7. YPbPr input support:480i,480P,576i,576P,720P50/60Hz,1080i50/60Hz,1080P50/60Hz
8. PC input support: 640x480@60Hz / 72 Hz / 75 Hz / 800x600@56Hz / 60Hz / 72 Hz / 75 HZ
1024x768@60Hz / 70 Hz / 75 Hz
Weight…………………………about 1.9kg
UNIT Dimensions………… about 260X210X45 MM
10.1 Inch TFT Res ol ut io n… …… …… 1 02 4 x
576
Specifications are subject to change without notice.
GB- 21
Page 23

Instructions on environment protection
Electric and electronic equipment and included batteries contains
materials, components and substances that can be hazardous to your
health and the environment, if the waste material (discarded electric
and electronic equipment and batteries) is not handled correctly.
Electric and electronic equipment and batteries is marked with the
crossed out trash can symbol, seen below. This symbol s ignifies t hat
electric and electronic equipment and batteries should not be disposed
of with other household waste, but should be disposed of separately.
As the end user it is important that you submit your used batteries to
the approriate and designated facility. In this manner you make s ure
that the ba tteries are recycled in accordance with legislature and will
not harm th e environment.
All cities have established collection points, where electric and
electronic equipment and batteries can either be submitted free of
charge at recycling stations and other collection sites, or be collected
from the ho useholds. Additional information is available at the
technical department of your city.
ALL RIGHTS RESE RV ED
COPY RIGHT DEN VER ELECT RONICS A/S
www.denver-electronics.com
 Loading...