

Page 1
KIDS CAMERA
KCA-1320
GREEN 5 GAMES
Page 2
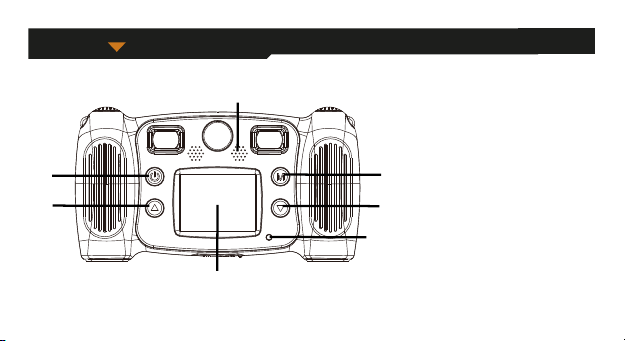
Appearance
7
1
2
4
6
5
1. Power Button
2. Page Up Button
3. LCD
4. Busy indicator light
5. Page Down Button
6. Mode Button
7. Speaker
3
_
_
ENG 01
Page 3
12
8
9
10
15
13
14
11
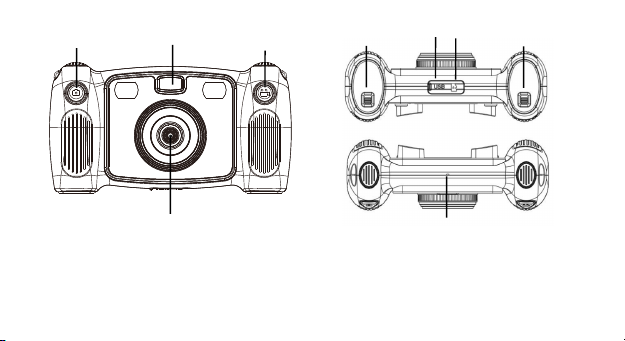
8. Take Photo Button 9. Fill Light
10. Recording Button 11. The Rear Lens
16
12. Micro USB 13. Micro SD Card
14. Battery Door switch 15. Battery Door switch
16. Microphone
_
_
ENG 02
Page 4

Load battery
1. Open the battery door with the Battery door switch, then insert 4 AA alkaline batteries.
2. Close the battery door with the Battery door switch.
Load a SD card
The camera has no internal memory. Before you use the camera, insert a SD card to store photos and videos.
1. Remove the rubber cover located at the bottom of the camera to find the SD card slot, then insert a SD card properly.
To remove the SD card, press slightly the SD card to unlock the card, then take it out.
Turn on/off the camera
1. Press and hold until the welcome message is displayed on the camera screen.
_
_
ENG 03
Page 5

2. To turn off the camera, press and hold for 3 seconds.
To save power, the screen turns off automatically when there is three-minute inactivity on the camera.
Take photo
1. In the main menu, select .
2. Press to enter the photo taking mode.
3. To take a photo, press the Photo button on the top of the camera.
4. To exit the mode, press .
It returns to the main menu.
To set a timer
A photo can be shot after five seconds you press the shutter.
1. In the photo taking mode, press and hold for about 3 seconds.
The photo is shot after five seconds countdown.
Main menu Photo mode
To select a photo frame
The camera offers 10 types of predefined photo frames.
1. Press the Up and Down button to select a photo frame.
_
ENG 04
_
Page 6

Record video
1. In the main menu, select .
2. Press to enter the video recording mode.
3. To record a video, press the Video button on the top of the camera.
4. To stop recording, press the Video button again.
5. To exit the mode, press .
It returns to the main menu.
Main Menu Video Mode
Record sound
1. In the main menu, select .
2. Press to enter the sound recording mode.
3. To record sound, press .
4. To stop recording, press again .
The list for the recorded sound files is displayed.
5. To playback a recorded sound file, press . To select a file, press the UP and Down button.
6. To shift from the playback mode to sound recording mode, press the Video button on the top of the camera.
7. To exit playback mode or sound recording mode, and return to the main menu, press .
_
ENG 05
_
Page 7

Playback video/photo
1. In the main menu, select .
2. Press to enter the playback mode.
3. Press the Up and Down button to select a video or photo for playback.
4. To playback, press .
5. To stop playback, press again .
6. To exit the mode and return to the main menu, press .
Play Game
The camera offers five built-in games.
1. In the main menu, select .
2. Press to enter the game mode.
3. Press the UP and Down button to select a game.
4. To confirm selection or start a game, press .
_
ENG 06
_
Main Menu Game
Page 8

5. To exit the game and return to the main menu, press .
Change system settings
1. In the main menu, select .
2. Press to enter the system setting mode
3. Press the Up and Down button to select a setting option.
4. To confirm selection, press .
You may set audio volume, time and date, and format SD card.
To format a SD card
1. In the system setting mode, press the Up and Down button to select .
2. Press to confirm the selection.
3. Press and hold for about 3 seconds.
The message prompts whether or not to format the SD card.
Note: Formatting a SD card erases all the stored data.
_
ENG 07
_
Main Menu System Settings
Page 9

Transfer files to PC and Webcam Function
1. Use the USB cable to connect the camera to your PC.
is displayed on the camera screen.
2. Press the Up and Down button to select , then press to confirm.
The files from the camera are transferred to the computer.
3. On the computer, the following 4 folders from are displayed.
MUSIC folder: store the recorded sound files from the camera.
PHOTO folder: store the photos taken from the camera.
STICKER folder: store the photos made with a predefined photo frame.
VIDEO folder: store the videos recorded from the camera.
Use as Webcam
1. Use the USB cable to connect the camera to your PC.
is displayed on the camera screen.
2. Press the Up and Down button to select , then press to confirm.
Webcam is activated on your PC.
You may use the webcam function operated in Windows 7 and Windows 10.
_
ENG 08
_
Page 10

ALL RIGHTS RESERVED, COPYRIGHT
DENVER ELECTRONICS A/S
_
_
ENG 09
Page 11

Electric and electronic equipment and included batteries contains materials, components and substances that can be hazardous
to your health and the environment, if the waste material (discarded electric and electronic equipment and batteries) is not handled correctly.
Electric and electronic equipment and batteries is marked with the crossed out trash can symbol, seen below. This symbol signifies
that electric and electronic equipment and batteries should not be disposed of with other household waste, but should be disposed
of separately.As the end user it is important that you submit your used batteries to the appropriate and designated facility. In this
manner you make sure that the batteries are recycled in accordance with legislature and will not harm the environment. All cities
have established collection points, where electric and electronic equipment and batteries can either be submitted free of charge
at recycling stations and other collection sites, or be collected from the households. Additional information is available at the
technical department of your city.
DENVER ELECTRONICS A/S
Omega 5A,Soeften
DK-8382 Hinnerup
Denmark
www.facebook.com/denverelectronics
_
ENG 10
_
 Loading...