

Page 1
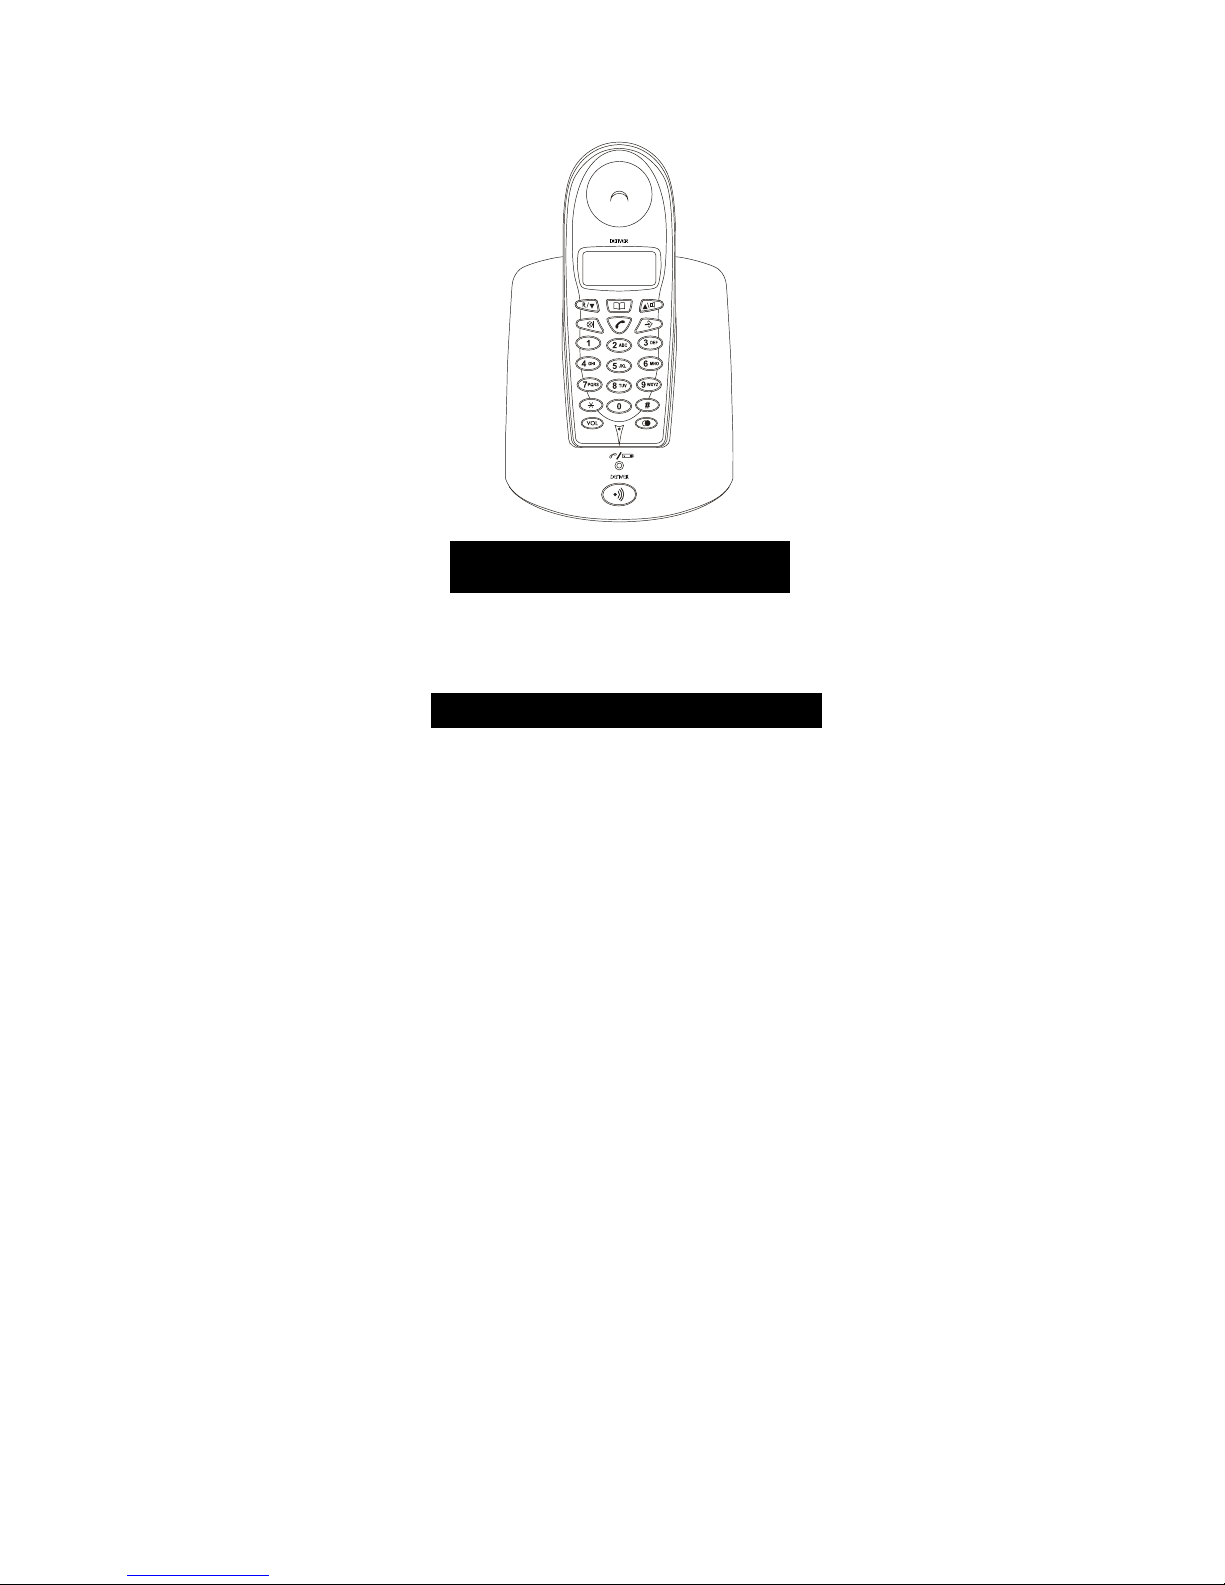
Digital Cordless Telephone (DECT) with Caller ID &
Speakerphone Function
DENVER DDP-300
USER’S MANUAL
Please read before use and save
Page 2

Before use
Please refer to installation for details
Important- emergency dialing
This equipment is not designed for making emergency telephone
calls when power fails. Alternative arrangements should be made
for access to emergency services.
Caller ID
Caller ID available only user subscribes caller Id service and incoming
call with caller ID display
2 Model:DDP-300
Page 3

INDEX
1 Introduction
1.1 Brief
1.2 Safety Instructions
1.3 Packing List
2 INSTRUCTION
2.1 Handset / Base station
2.2 Display (LCD) Symbol
3
INSTALLATION
3.1 Base installation
3.2 Handset installation
3.3 Handset charger
3.4 Low battery warning
3.5 Battery information
3.6 Out of Range Warning
4 OPERATION
4.1 Turning the handset on/off
4.2 External Call
4.3 Number preparation
4.4 Receiving incoming call
4.5 To hang up a call
4.6 Redialling the last number dialed
4.7 Redial one of the last 5 numbers dialed
4.8 Turning off the microphone (mute)
4.9 Activate/deactivate hands free function
6
6
6
6
7
7
8
10
10
10
10
11
11
11
12
12
12
12
12
12
13
13
13
13
3 Model:DDP-300
4.10 Recall
4.11 Call Duration Indicator on the Display
4.12 Locating a misplaced handset (paging)
5 THE PHONE BOOK
5.1 Using the alphanumeric keypad
5.2 Adding a number and a name to the Phone Book
5.3 Looking up a number in the Phone Book
5.4 Calling a programmed number from the Phone Book
14
14
14
15
15
15
16
16
Page 4

5.5 Changing a name or number in the Phone Book
5.6 Deleting name and number from the Phone Book
6 HANDSET SETUP
6.1 General Use
6.2 Turning key click on/off
6.3 Locking the key pad
6.4 Setting the speaker volume
6.5 Setting the ring volume level
6.6 Setting the melody
6.7 Setting the language
6.8 The R/
key (flash)
6.9 Barring outgoing calls
6.10 Changing the PIN code
6.11 Direct Call
6.12 Default settings (reset) of the parameters
7 CALLER ID/CLIP
7.1 Setting the date and time
7.2 Store 30 call in a Call List
7.3 The Call List
7.4 Calling a number from the Call List
7.5 Storing a number from the Call List in the Phone Book
7.6 Deleting numbers from the Call List
7.7 Delete all numbers
8 MULTIPLE HANDSET AND BASE OPERATION
8.1 Subscribing a handset to a base unit
8.2 Removing subscription of a handset to a base unit
8.3 An internal call: calling another handset
8.4 Receiving an internal call
8.5 Transferring a call to another handset
8.6 Receiving an external call during an internal call
8.7 Conference call (two internal DECT handsets and one
external caller)
8.8 Selecting a base unit
8.9 Automatic / Manual Selecting a base unit
16
17
18
18
19
19
19
20
20
21
21
21
22
23
24
25
25
25
25
26
26
26
26
27
27
28
28
28
29
29
29
30
30
4 Model:DDP-300
Page 5

9 TROUBLE SHOOTING 31
10 TECHNICAL CHARACTERISTICS 32
11 WARRANTY 33
5 Model:DDP-300
Page 6

Important tips: Please study the instruction manual before use and keep the
instruction manual for future use.
1.2 Safety Instructions
1 Only use the charger plug supplied. Do not use other chargers, as this may
damage the battery cells.
2 Only insert rechargeable batteries of the same type. Never use ordinary,
non-rechargeable batteries. Insert rechargeable batteries so they are connected
to the right poles (indicated in the battery compartment of the handset).
3 Do not touch the charger and plug contacts with sharp or metal objects.
4 The operation of some medical devices may be affected.
5 The handset may cause an unpleasant buzzing sound in hearing aids.
6 Do not place the basic unit in a damp room or at a distance of less than 1.5 m
away from a water source. Keep water away from the handset.
7 Do not use the telephone in environments where there is a risk of explosions.
8 Dispose of the batteries and maintain the telephone in an environment-friendly
manner.
9 As this telephone cannot be used in case of a power cut, you should use a
mains-independent telephone for emergency calls, e.g. a m obile phone.
10 Clean the telephone with a slightly damp cloth or with an anti-static cloth.
Never use cleaning agents or abrasive solvents.
1.3 Packing List
Handset
Base Station
Adaptor
Line Cord
2 PCS Battery 600mAH
Manual
6 Model:DDP-300
1 Introduction
1.1 Brief
Thank you for buying telecom equipment with 1.8GHz(DECT) technology. You
can enjoy high sound quality multi handset function (up to 5 handsets).
Additional Handset will be optional purchase.
Page 7
2 INSTRUCTION
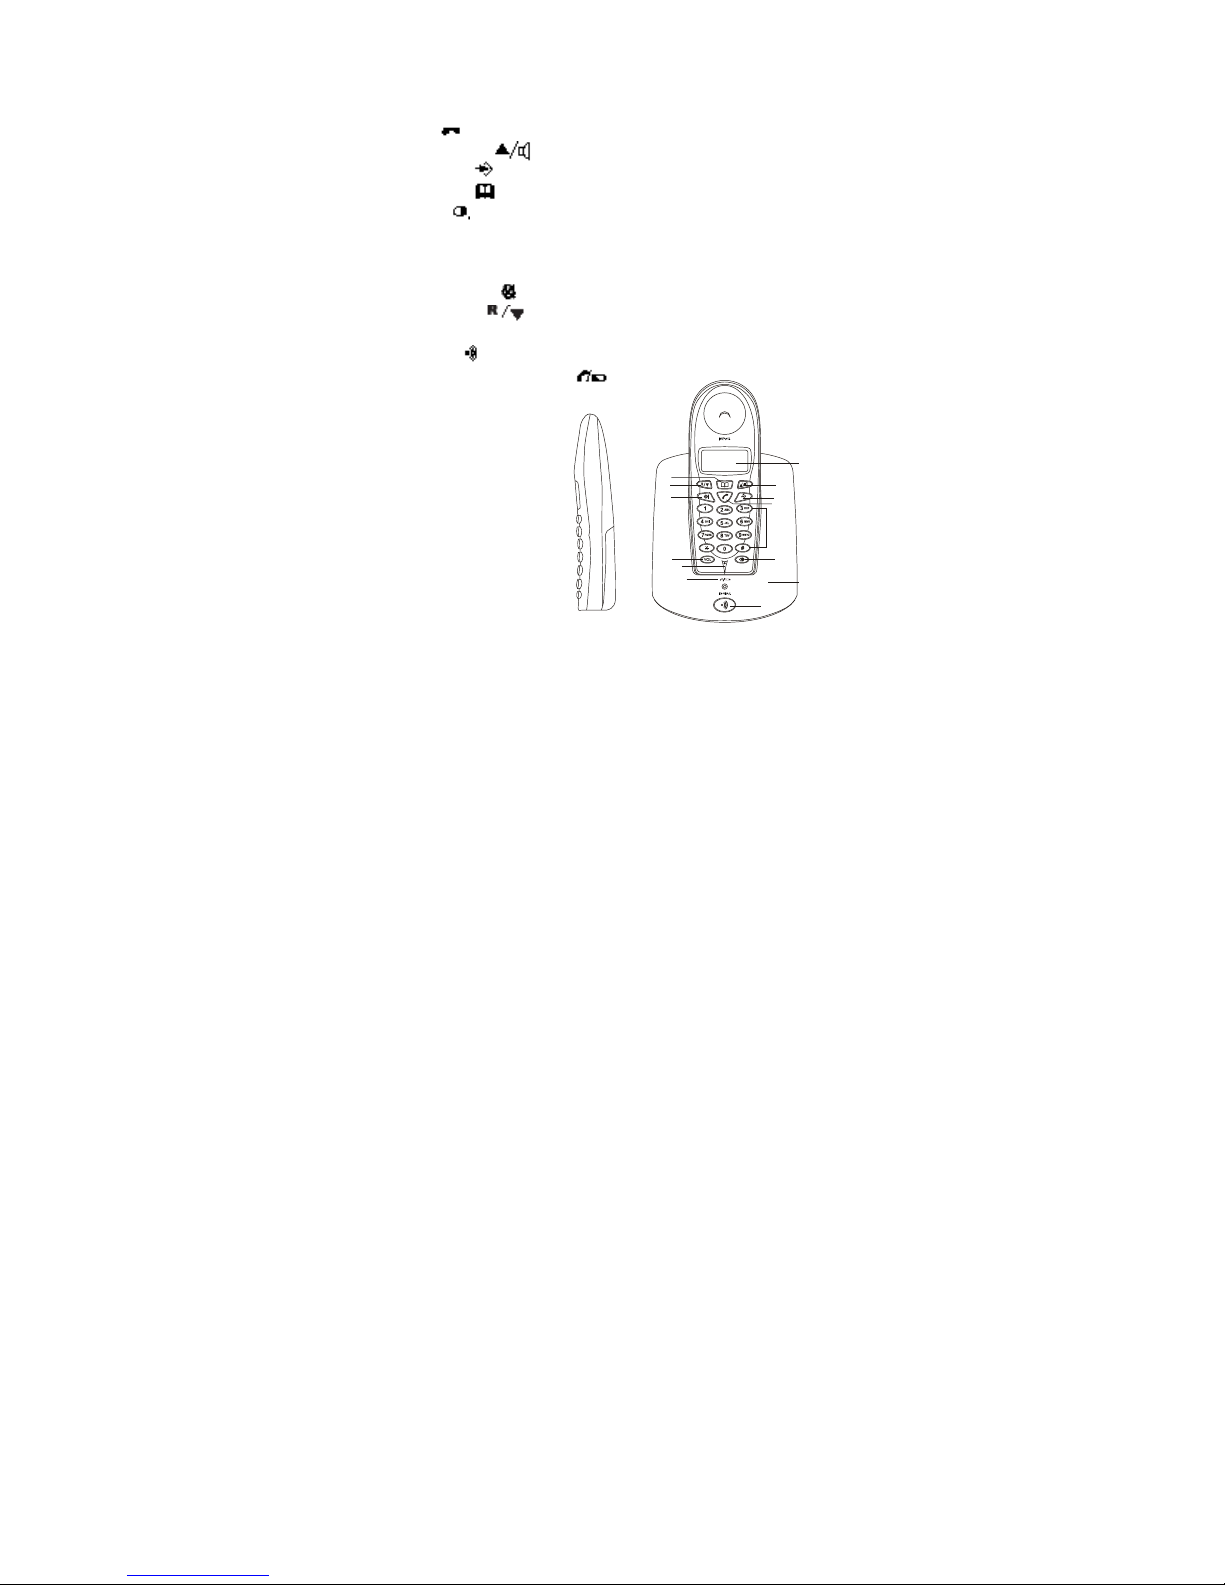
2.1 Handset / Base station
1 Display
2 Line key
3 Up/Hands free key
4 Programming
5 Phonebook key
6 Redial key
7 Microphone
8
Volume/Ringer key VOL
9 Alphanumeric keys
10 Delete/Mute key
11 Down/Flash key
12 Base
13 Paging key base
7 Model:DDP-300
14 Line/Charge indicator (LED)
1
3
2
9
6
11
13
14
8
10
11
5
4
7
Page 8

2.2 Display (LCD) Symbol
1 Number of calls received.
2 Date (day/month) of calls received.
3 Time (hour: minutes) of calls received.
4 Call information.
5 Symbol display (
):
- this symbol means that the handset is located within the range of the base
unit.
- when this symbol starts blinking, this means you are beyond the range of the
base unit.
Move closer to the base unit so that the connection between the base unit and
the handset can be restored.
6 Symbol display (
):
- this symbol means that the handsfree function is activated. You can now talk
without having to pick up the handset.
7 Symbol display (
):
- this symbol means that the telephone has received calls that are automatically
stored in the Call List.
8 Symbol display (
):
- this symbol means that the mute function is activated, the microphone is
turned off during a conversation.
9 Symbol display (
):
- this symbol appears on the display when one makes or receives a call.
10 Symbol display (
):
- this symbol means that the ringer is turned off. When one receives a call, the
telephone does not ring. The telephone will ring when one receives an internal
all.
8 Model:DDP-300
4
3
1
2
5
678
9
10
11
12
13
14
1
Page 9

11 Symbol display ( ):
- this symbol is the battery indicator.
12 Symbol display (
):
- this symbol means you are in the menu.
13 Symbol display ( ):
- this symbol appears when you browse the numbers in the Phone Book.
14 Symbol display (
):
- this symbol appears when you have received a voice mail message (this
function will work only if supported by your voice mail company).
9 Model:DDP-300
Page 10
3 INSTALLATION
3.1 Base installation
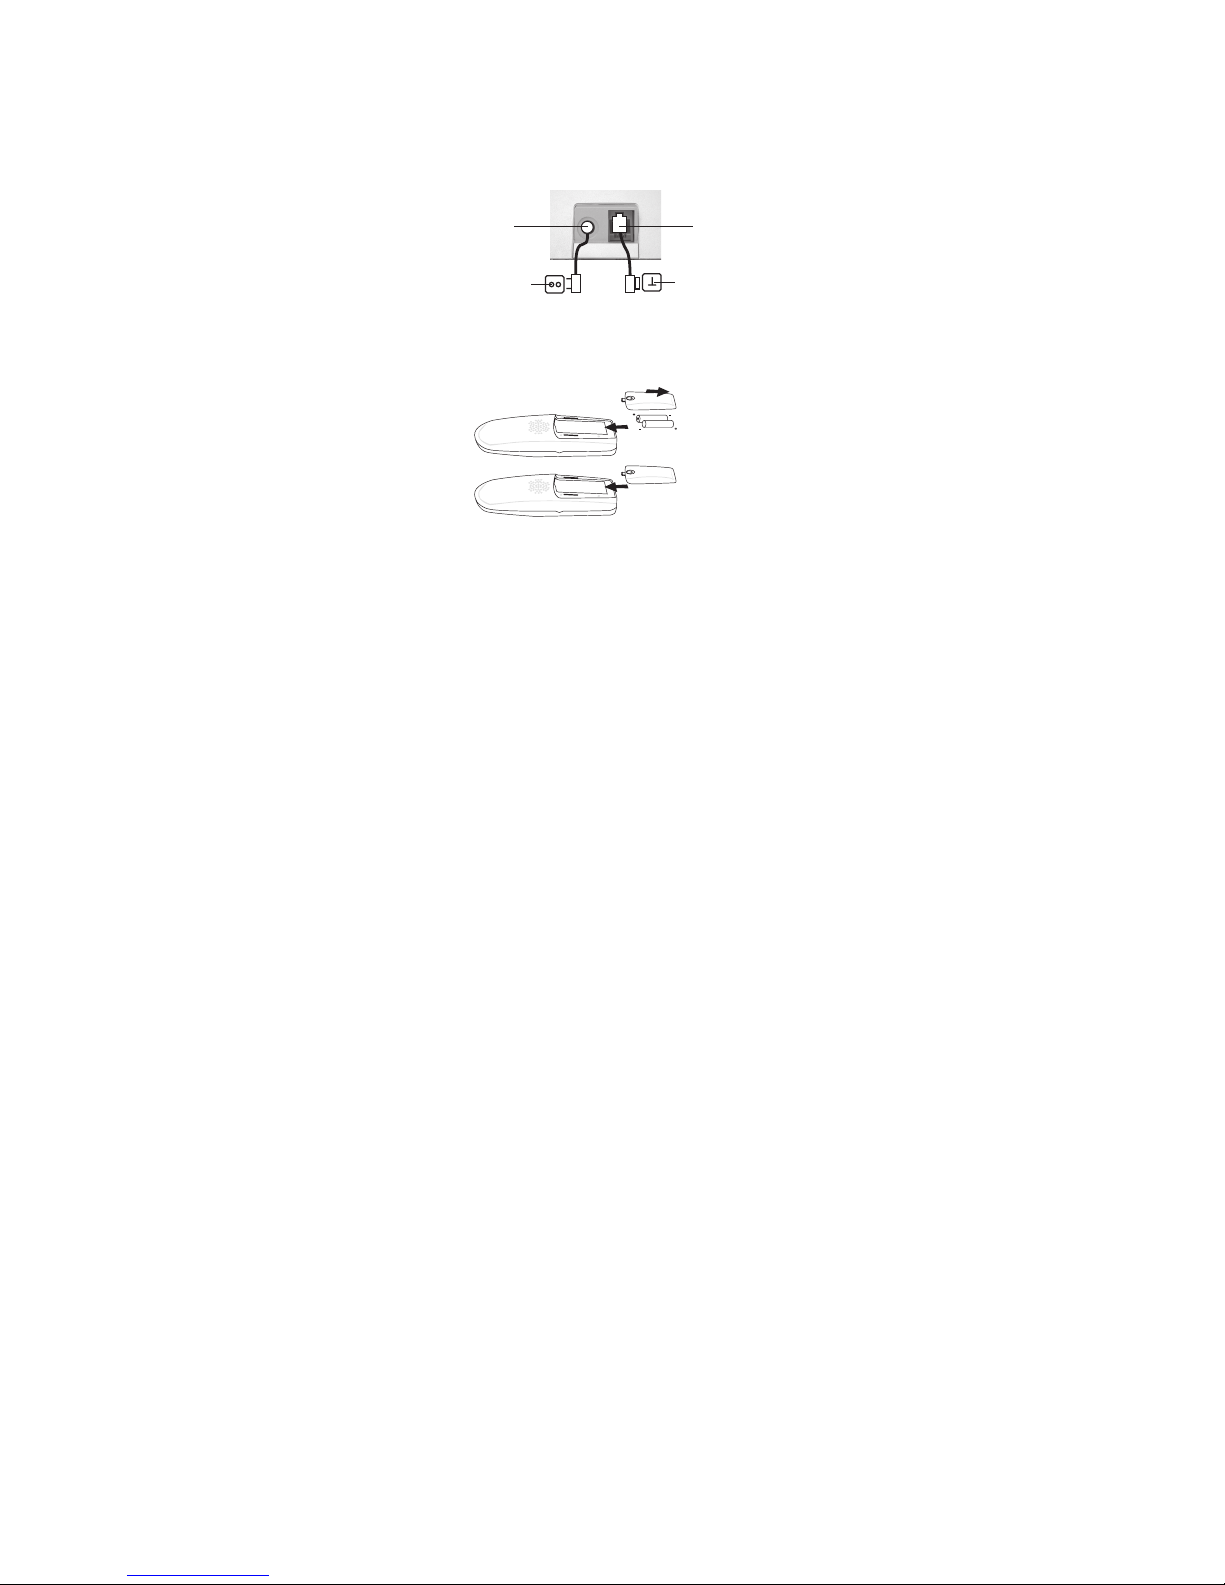
For installation, do the following:
1 Plug one end of the adaptor into the outlet and the other end into the adapter
jack on the bottom of the telephone.
2 Connect one end of the telephone cord with the wall phone jack and the other
end to the bottom of the telephone.
3.2 Handset installation
1 Open the battery compartment (see below).
2 Insert the batteries respecting the (+ and -) polarity.
3 Close the battery compartment.
Put the battery in the compartment, handset subscribe the base unit. Handset unit
number and base unit number appear on LCD display. With one handset and one
base unit the indicator is "1".
3.3 Handset charger
1 Put the handset on the base unit for 15 hours. The Line/Charge indicator (LED)
on the base unit will light up.
2 adapter jack
1 telephone connection
3 adapter outlet
4 wall phone jack
10 Model:DDP-300
Page 11

2 Before you use the telephone for the first time, you must first make sure the
battery is charged for 15 hours. If you do not do this, the telephone will not
work optimally.
Important Note:
During the battery charge period, handset may feel warm and this is normal
After the battery is fully charged the first time next charge period will be
shorten
Battery is fully charged, talk time 6 hours; standy time 4 days.
3.4 Low battery warning
When the battery is low, you will hear warning signals and the battery
symbol on the display will blink.
3.5 Battery Information
Battery use may vary, if the battery over discharge the battery capacity will
be decreased.
Battery indicator:
The battery is fully charged.
The battery is half drained (50%)
The battery is low.
Please recharge again by placing on cradle.
3.6 Out of Range Warning
If the handset is out of range of the base unit, a warning signal will sound.
'SEARCHING' appears on the display and the symbol blinks on the
display.
Move closer to the base unit.
As soon as you are back within range of the base unit, a signal sounds and the
symbol
stops blinking.
11 Model:DDP-300
Page 12

4 Operation
4.1 Turning the handset on/off
Turning the handset on
1 Press the Programming key
. The telephone turns itself on.
Turning the handset off
1 Press the Programming key
.
2 Press the Up or Down key
repeatedly until 'POWER OFF' appears on the
display.
3 Press the Programming key
. The telephone turns itself off. You cannot dial
any more numbers, nor receive any calls.
4.2 External Call
1 Press the Line key .
2 The Line/Charge indicator
(LED) on the base unit will blink. 'EXT' and
the Call symbol
appear on the display.
3 You will hear the dial tone. Dial the telephone number you wish to call.
4 The number appears on the display and is dialled. After finishing your call,
Press the Line key
to hang up or put the handset back on the base unit.
4.3 Number preparation
1 Dial the telephone number you wish to call. You can correct the number by
pressing Delete/mute key
.
2 The Line/Charge indicator
(LED) on the base unit will blink. 'EXT' and
the Call symbol
appear on the display.
3 The telephone number is dialled automatically. After finishing your call, pr ess
the Line key
to hang up or put the handset back on the base unit.
4.4 Receiving incoming call
Press the Line key .
4.5 To hang up a call
After finishing your call, press the Line key to hang up or put the
handse back on the base unit.
12 Model:DDP-300
Page 13

4.6 Redialling the last number dialled
1 Press the Line key .
2 The Line/Charge indicator
(LED) on the base unit will blink. 'EXT' and
the Call symbol
appear on the display. You will hear the dial tone.
3 Press the Redial key
. The number you last called is dialled automatically
without having to re-enter the number.
4.7 Redial one of the last 5 numbers dialled
1 Press the Redial key . The number you last called appears on the display. If
you would like to dial one of the last 5 numbers dialled, press the Redial key
a few times until the desired number appears on the display.
2 Press the Line key
. After finishing your call, press the Line key to
hang up or put the handset back on the base unit.
4.8 Turning off the microphone (mute)
It is possible to turn off the microphone during a call by pressing the Delete/Mute
key . Now you can speak freely without the caller being able to hear you.
1. Press the Delete/Mute key
to turn off the microphone.
2. The symbol 'X' appears on the display ( X ).
3. When you want to resume the conversation, press the Delete/Mute
key
again.
4. The symbol 'X' disappears from the display ( X ). The person on the other end
of the line can hear you again.
4.9 Activate/deactivate handsfree function
This function allows you to communicate without having to pick up the handset.
When you are on the phone, press the Up/Handsfree
key and the symbol
appears on the display to activate the handsfree function. Press the same
button to deactivate the handsfree function.
Note : When you are calling in handsfree mode and you want to change the
volume, press the Volume button .
13 Model:DDP-300
Page 14

4.10 Recall
You can press key to toggle between 2 external call, if you subscribe to
call waiting service.
4.11 Call Duration Indicator on the Display
As soon as you press the Line key the call duration appears on the display
(minutes-seconds). E.g. " 01-20 " for 1 minute and 20 seconds. The call duration
remains visible on the display for 5 seconds after each call.
4.12 Locating a misplaced handset (paging)
If you cannot find the handset, briefly press the Paging key on the base unit.
All handsets subscribed with the base unit will sound a signal so you can locate
them is placed handset. To stop the signal, briefly press the Line key
on the
handset.
9 Model:DDP-300
Page 15
5 THE PHONE BOOK
5.1 Using the alphanumeric keypad
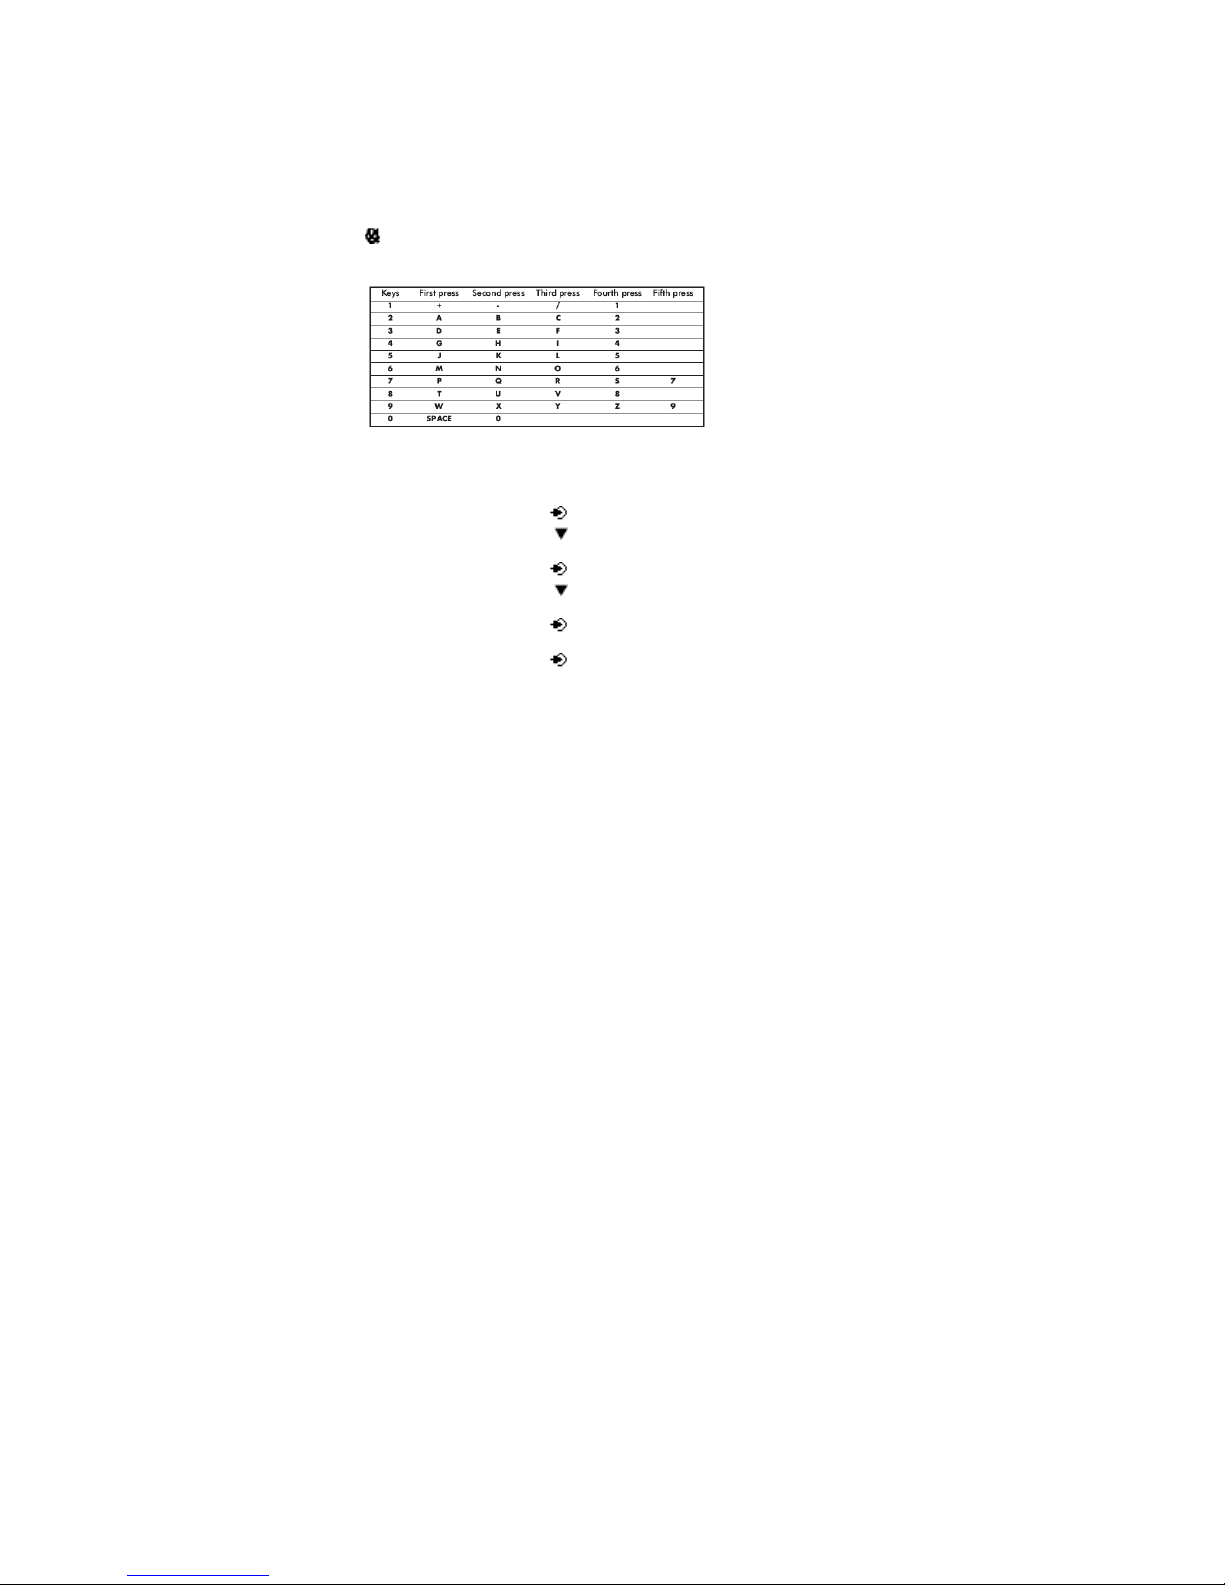
Use the alphanumeric keypad to type text. To select a letter, press the
corresponding key.
E.g. if you press the alphanumeric key '5', the first character (J) appears on the
display.
Press it repeatedly to select other characters from this key.
Press the '2' key twice to select the letter 'B'. If you would like to select both 'A'
and 'B' after each other, first press the '2' key once to select 'A', wait 2 seconds
until the cursor moves to the next position and then press the '2' key twice to
select 'B'. You can delete characters mistakenly typed by using the Delete key
. The character in front of the cursor will be deleted.
Available characters
Press the right keys to get the following characters:
5.2 Adding a number and a name to the Phone Book
You can store up to 20 entries in the phone book. Each entry can be up to 25
digitals long number and 10 characters long name.
Storing a phone book entry:
1 Press the Programming key
.
2 Press the Up or Down key
repeatedly until 'PHONE BOOK' appears on
the display.
3 Press the Programming key
. 'SEARCH' appears on the display.
4 Press the Up or Down key
repeatedly until 'ADD NEW' appears on the
display.
5 Press the Programming key
. 'NAME' appears on the display.
6 Enter the name. Use the alphanumeric keys.
7 Press the Programming key
.
15 Model:DDP-300
Page 16

8 Enter the telephone number. Use the alphanumeric keys.
9 Press the Programming key
.
10 You will hear a long beep. The name and the number are stored in the Phone
Book.
5.3 Looking up a number in the Phone Book
1 Press the Programming key .
2 Press the Up or Down key repeatedly until 'PHONE BOOK' appears on
the display.
3 Press the Programming key
.
4 'SEARCH' appears on the display.
5 Press the Programming key
.
6 Enter the first letters of the desired name.
7 Press the Programming key
.
8 The first name, corresponding with these letters appears on the display.
9 Press the Up or Down key to browse for other numbers in the Phone
Book.
10 Once the desired number appears on the display, the number will be
automatically dialed once the Line key
is pressed.
5.4 Calling a programmed number from the Phone Book
The telephone has a Phone Book in which you can program the telephone
number of calls received by name. If you would like to call a number from the
Phone Book, do the following:
1 Press the Phone Book key
. The first number of the Phone Book appears
on the display.
2 Press the Up or Down key repeatedly to select the telephone number
you wish to call.
3 Press the Line key
.
4 The number shown on the display, is dialled automatically without you having
to re-enter the number.
5 After finishing your call, press the Line key
to hang up or put the handset
back on the base unit.
5.5 Changing a name or number in the Phone Book
1 Press the Programming key .
16 Model:DDP-300
Page 17

2 Press the Up or Down key repeatedly until 'PHONE BOOK' appears on
the display.
3 Press the Programming key
.
4 'SEARCH' appears on the display.
5 Press the Up or Down key repeatedly until 'EDIT' appears on the
display.
6 Press the Programming key
.
7 The first number in the Phone Book appears on the display.
8 Press the Up or Down key until the desired number appears on the
display.
9 Press the Programming key
to change the selected number programmed
into the memory.
10 Press the Delete key
to delete each letter of the name and use the
alphanumeric keypad to enter the correct name.
11 Press the Programming key
.
12 Press the Delete key
to delete each digit of the num ber and use the
alphanumeric keypad to enter the correct number.
13 Press the Programming key
to save the changes made.
5.6 Deleting name and number from the Phone Book
1 Press the Programming key .
2 Press the Up or Down key repeatedly until 'PHONE BOOK' appears on
the display.
3 Press the Programming key
.
4 'SEARCH' appears on the display.
5 Press the Up or Down key repeatedly until 'DELETE' appears on the
display.
6 Press the Programming key
.
7 The first number in the Phone Book appears on the display.
8 Press the Up or Down key until the number you want to delete appears
on the display.
9 Press the Delete key
.
10 'DELETE ' appears on the display.
11 Press the Programming key
to confirm that you want to delete it.
17 Model:DDP-300
Page 18

6 HANDSET SETUP
6.1 General Use
Programming Choice
Handset setup
LEVEL1 LEVEL2 LEVEL3
HANDSET INTERCOM
LOCK
KEY LOCK
UNLOCK
CLICK ON
KEY SETUP
KEY CLICK
CLICK OFF
SEARCH
ADD NEW
EDIT
PHONE BOOK
DELETE
MELODIES
INTERNAL
VOLUME
MELODIES
RING SEL
EXTERNAL
VOLUME
DIRECT
YEAR
MONTH
DAY
HOURS
DATE/TIME
MINUTES
TONE
DIAL MODE
PULSE
ENGLISH
SWEDISH
FINNISH
NORWEIGAN
LANGUAGE
ITALIAN
AUTO
BASE SEL
MANUAL
REMOVE HS
RECALL
BARRING BAR NUM
PIN CODE
SETTING
RESET
BASE SUB
POWER OFF
18 Model:DDP-300
Page 19

6.2 Turning key click on/off
You can set the telephone to make a sound whenever you press a key.
1 Press the Programming key
.
2 Press the Up or Down key repeatedly until 'KEY SETUP' appears on
the display.
3 Press the Programming key
.
4 Press the Up or Down key repeatedly until 'KEY CLICK' appears on the
display.
5 Press the Programming key
.
6 The current status appears on the display: - 'CLICK ON': turn on key click or
'CLICK OFF': turn off key click
7 Press the Up or Down key to make your selection.
8 Press the Programming key
to confirm your selection.
6.3 Locking the key pad
If you lock the alphanumeric keypad, it is impossible to dial a telephone number.
Only the Programming key
can still be used. 'KEY LOCKED' will be
displayed on the display.
1 Press the Programming key
.
2 Press the Up or Down key repeatedly until 'KEY SETUP' appears on
the display.
3 Press the Programming key
.
4 KEY LOCK' appears on the display.
5 Press the Programming key .
6 The current status of the keypad appears on the display:
- 'LOCK': the keypad is locked or 'UNLOCK': the keypad is not locked
7 Press the Up or Down key to make your selection.
8 Press the Programming key
to confirm your selection.
6.4 Setting the speaker volume
Use the Volume/Ringer key VOL to set the volume of the speaker (handset).
You can choose from 5 levels. The telephone is set to level '3' by default.
During a call, you can change the volume as follows:
1 Press the Volume/Ringer key VOL .
2 The volume level currently set appears on the display.
19 Model:DDP-300
Page 20

3 Use the number keys to set the desired level (1-5).
4 Press the Volume/Ringer key VOL to confirm your selection.
Note : You have 8 seconds to set the desired volume; if you do not, the
telephone returns to standby mode and the volume rema ins unchanged.
6.5 Setting the ring volume level on the handset
If you want, you can change the ring volume of an incoming call. You have 10
levels. You can set the ring volume of internal and external calls separately so
you can hear a difference.
If you select level '0', the symbol
appears on the display and you no longer
hear the phone ring when an external call is received (you still hear it ring for
internal calls). Level '9' is the highest level. The telephone is set to level '5' by
default.
1 Press the Programming key
.
2 Press the Up or Down key repeatedly until 'RING SEL' appears on the
display.
3 Press the Programming key
. 'EXTERNAL' appears on the display.
4 Press the Up or Down key repeatedly until 'INTERNAL' appears on the
display.
5 Press the Programming key
.
6 Press the Up or Down key repeatedly until 'VOLUME' appears on the
display.
7 Press the Programming key
.
8 The current volume level used appears on the display.
9 Enter a number between 0 and 9 to select the desired ringer volume. Use the
number keypad to do this.
10 Press the Programming key
to confirm your selection.
6.6 Setting the ring melody on the handset
If you want, you can change the ringer melody for an incoming call. You have 9
ringer melodies to choose from (1-9). By default, the ringer melody is set to '5'.
1 Press the Programming key
.
2 Press the Up or Down key repeatedly until 'RING SEL' appears on the
display.
20 Model:DDP-300
Page 21

3. Press the Programming key . 'EXTERNAL' appears on the display.
4 Press the Up or Down key repeatedly until 'EXTERNAL' or
INTERNAL' appears on the display.
5 Press the Programming key
.
6 'MELODIES' appears on the display.
7 Press the Programming key
.
8 The currently set ringer melody appears on the display.
9 Enter a number between 1 and 9 to select he desired ringer melody.
10. Press the Programming key
to confirm your selection.
6.7 Setting the language
The telephone has 5 display languages: see display languages table on
packaging!! To set the language, do the following:
1 Press the Programming key
.
2 Press the Up or Down key repeatedly until 'SETTING' appears on the
display
3 Press the Programming key
. 'LANGUE' appears on the display.
4 Press the Programming key
.
5 The language set appears on the display.
6 Press the Up or Down key repeatedly to select the language you would
like to use.
7 Once the desired language appears on the display, press the Programming key
to confirm your selection or repeatedly press the Mute/Delete key to leave
the menu.
6.8 The key (flash)
Press the Flash key “R” to use certain services such as "call waiting" (if your
telephone company offers this feature); or to transfer calls if you use a telephone
exchange (PABX). The Flash key “R” is a brief interruption of the line.
6.9 Barring outgoing calls
You can program the handsets to bar calls to certain telephone numbers so that
for instance '00' international numbers cannot be called. Up to 5 numbers (of max.
5 digits) can be barred. To do this, do the following:
21 Model:DDP-300
Page 22

1 Press the Programming key .
2 Press the Up or Down key repeatedly until 'SETTING' appears on the
display.
3 Press the Programming key
.
4 Press the Up or Down key repeatedly until 'BARRING' appears on the
display.
5 Press the Programming key
. PIN' appears on the display.
6 Enter your PIN code
7 Press the Programming key
. 'BAR NUM ' appears on the display.
8 Press the Up or Down key to select one of the 5 memories. Enter the
number (max. 5 digits) to be barred, e.g. 01486.
9 Press the Programming key
. 'HS _ _ _ _ _' appear on the display.
10 Enter the numbers of the handsets from which the barred numbers cannot be
called. e.g. Press the number key 2, 3 and 5. On the display, this will appear:
HS _2 3_5 01486. These handsets can no longer dial numbers beginning with
'01486'.
11 Press the Programming key
to confirm your selection. You hear a
confirmation tone.
6.10 Changing the PIN code
Certain functions are only available if you know the PIN code of the telephone.
Thanks to this secret code, settings are displayed that only you can change. The
PIN code has 4 digits.
The default PIN code setting is '0000'. If you would like to change the default
PIN code and set your own secret code, do the following:
1 Press the Programming key
.
2 Press the Up or Down key repeatedly until 'SETTING' appears on the
display.
3 Press the Programming key
.
4 Press the Up or Down key repeatedly until 'PIN CODE' appears on the
display.
5 Press the Programming key
. 'OLD CODE' appears on the display.
6 Enter the old PIN code. Use the number keys.
7 Press the Programming key
. 'NEW CODE' appears on the display.
22 Model:DDP-300
Page 23

8 Enter the new PIN code in. Use the number keys.
9 Press the Programming key . 'AGAIN' appears on the display.
10 Enter the new PIN code again. Use the number keys.
11 Press the Programming key
. You hear a confirmation tone.
Caution : Do not forget your personal PIN code. If you do, you have to restore
the default settings (reset - see section 6.12).
6.11 Direct Call
By setting a Direct Call number, the phone will automatically take the line and
dial out this number. This function is useful to use the phone as a emergency
phone.
6.11.1 To program the Direct Call number
1 Press the Programming key
.
2 Press the up or down key until 'DIRECT' appears on the display.
3 Press the Programming key
.
4 If necessary, delete the existing number by pressing the Delete-key
a few
times.
5 Enter the direct number. Press the Programm i ng key
.
6.11.2 Turn the Direct Call function ON/OFF
To turn it ON:
1 Press the Programming key
.
2 Press the up or down key until 'DIRECT' appears on the display.
3 Press the mute-key
for 2 seconds
4 DIRECT ON' appears on the display
To turn if OFF:
Quick press the Programming key
twice
23 Model:DDP-300
Page 24

6.12 Default settings (reset) of the parameters
You can reset the standard (default) settings in the telephone so that they are the
same they were when you bought the telephone. You need the PIN code to do
this.
To restore the default settings, do the following:
1 Press the Programming key
.
2 Press the Up or Down key repeatedly until 'SETTING' appears on the display.
3 Press the Programming key
.
4 Press the Up or Down key repeatedly until 'RESET' appears on the
display.
5 Press the Programming key
. 'PIN' appears on the display.
6 Enter your PIN code. Press the Programming key
.
.
The default settings are:
Keypad not locked
Key clicks active
Speaker volume level 3
Ringer melody 1
Ringer volume 5
Selection base unit automatic
Flash time LONG(250ms)
24 Model:DDP-300
Page 25

7 CALLER ID/CLIP
(This service only works when you have a Caller ID/Clip subscription. Contact
your telephone company). When you receive a call, the telephone number of the
caller, the date and time appears on the handset display. The telephone can
receive calls in both FSK and DTMF. If the name is programmed in the Phone
Book, the name in the Phone Book is displayed!
7.1 Setting the date and time
When you receive an incoming call (FSK system only), the date and time are sent
together with the telephone number, this means that the date and the time will not
be shown on the display. To set year, please do it manually.
1 Press the Programming key
.
2 Press the Up or Down key
a few times until ‘SETTING’ appears on the
display.
3 Press the Programming key
.
4 ‘DATE/TIME’ appears on the display.
5 Press the Programming key
again.
6 When ‘YEAR’ appears on the display, enter the 2 last numbers of the year
(02=2002, 03=2003,…) and press the Programming key
to confirm.
7 When ‘MONTH’ appears on the display, enter the month (01=January,
02=February,…) and press the Programming key
to confirm.
8 When ‘DAY’ appears on the display, enter the day of the month and press the
Programming key
to confirm.
9 When ‘HOUR’ appears on the display, enter the current hour in 24h format)
and press the Programming key
to confirm.
10 When ‘MINUTES’ appears on the display, enter the minutes and press the
Programming key
to confirm.
11 The date and time are now set.
7.2 The telephone can store 30 calls in a Call List that can be reviewed later.
The telephone never stores the same call twice. When the memory is full, the
new calls automatically replace the oldest calls in the memory. The symbol
on the display blinks if the call is not read or not answered. If the Call List is
empty and you press the Up key
, three beep tones will sound.
7.3 The Call List
The calls received are stored in the Call List (max. 30 numbers).
25 Model:DDP-300
Page 26

1 Briefly press the Up key to view the most recent call.
2 The date and time the call was received are linked to each call.
3 Briefly press the Down key to view the telephone number of the call.
4 Briefly press the Down key to browse other numbers on the list.
7.4 Calling a number from the Call List
1 Press the Up key to go to the Call List
2 Press the Up key to look up the desired call. Press the Down key to
view the telephone number.
3 Once the number is on the display, press the Line key
and the number is
dialed automatically. (The symbols
and 'EXT' appear on the display and the
call timer starts.)
7.5 Storing a number from the Call List in the Phone Book
1 Press the Up key to go to the Call List.
2 Press the Up key to look up the desired number.
3 Press the Phone Book key
twice. 'STORE' appears on the display.
4 The number is stored in the Phone Book. The telephone returns to
standby-modus.
7.6 Deleting numbers from the Call List
1 Press the Up key to go to the Call List.
2 Press the Up key to find the call you would like to delete.
3 Press the Delete key
once . 'DELETE' appears on the display.
4 Press the Programming key to confirm y our selection or the Delete key
to
cancel.
7.7 Delete all numbers
1 Press the Up key to go to the Call List.
2 Keep the Delete key
pressed until 'DELETE ALL' appears on the display.
3 Press the Programming key to confirm y our selection or the Delete key
to
cancel.
4 All calls are deleted.
26 Model:DDP-300
Page 27

8 MULTIPLE HANDSET AND BASE OPERATION (OPTIONAL
PURCHASE)
In order to be able to make and receive telephone calls, a new handset has to be
subscribed to the base unit. You can subscribe 5 handsets to one base unit. By
default, each handset is subscribed as handset 1 on the base unit upon delivery
(base unit 1). !!! You only need to subscribe the handset if: !!!
the handset subscription has been removed from the base unit (e.g. for
reinitialisation)
you want to subscribe a different handset to this base unit.
8.1 Subscribing a handset to a base unit
Keep the Paging key on the base unit pressed for 20 seconds until the
Line/Charge Indicator
on the base unit begins to blink rapidly. The
Line/Charge indicator
will blink rapidly for one minute. During this
minute, the base unit is in subscribing mode and you must do the following to
subscribe the handset:
1 Press the Programming key
.
2 Press the Up or Down key
repeatedly until 'BASE SUB' appears on the
display.
3 Press the Programming key
. 'BASE _' appears on the display.
4 Enter a number of the base unit you would like to subscribe the handset to
(1-4).
Note: Each handset can be subscribed to 4 different DECT base units. Each
base unit is assigned a number from 1 to 4 in the handset. When you
subscribe a new handset, you can assign a base unit number. It is best to
use '1' .
5 'SEARCHING' and the symbol
appears on the display.
6 The RFPI code (each base unit has a unique RFPI code) appears on the display
and a signal sounds when the handset has found the base unit.
7 Press the Programming key
. 'PIN' appears on the display.
8 Enter the 4-digit PIN code of the base unit in (default PIN code is '0000').
9 Press the Programming key . The handset is subscribed to the base unit.
27 Model:DDP-300
Page 28

8.2 Removing subscription of a handset to a base unit
It is possible to cancel subscription of a handset to a base unit. You would do this
if a handset is damaged and has to be replaced by a new one.
Caution: You can only cancel subscription of another handset, not the handset
you are using to do the cancellation procedure.
1 Press the Programming key
.
2 Press the Up or Down key
repeatedly until 'SETTING' appears on the
display.
3 Press the Programming key
.
4 Press the Up or Down key
repeatedly until 'REMOVE HS' appears on the
display.
5 Press the Programming key
. 'PIN' appears on the display.
6 Enter your 4-digit PIN code in (default PIN code is '0000'). Use the number
keypad.
7 Press the Programming key
. 'REMOVE HS' appears on the display.
8 Dial the number of the handset you want to remove (1 -5). Use the number
keypad.
9 Press the Programming key
.
10 'REMOVE HS' appears on the display and the handset is removed
8.3 An internal call: calling another handset
This function only works if multiple handsets are subscribed to the base unit !
1 Press the Programming key
.
2 Press the Up or Down key repeatedly until 'INTERCOM' appears on the
display.
3 Press the Programming key
. 'INT' appears on the display
4 Dial the number of the handset you would like to call.
5 After finishing your call, press the Line key
to hang up or put the handset
back on the base unit.
8.4 Receiving an internal call
This function only works if multiple handsets are subscribed to the base unit!
1 Press the Line key
to accept the internal call.
2 During the call, 'INT', the handset number of the caller and the symbol
28 Model:DDP-300
Page 29

appear on the display. The call timer starts running.
3 After finishing your call, press the Line key
to hang up or put the handset
back on the base unit.
8.5 Transferring a call to another handset
1 Press the Programming key . 'INTERCOM' appears on the display.
2 Press the Programming key
.
3 The external call is now on hold. 'INT' appears on the display.
4 Dial the number of the handset to which you would like to transfer the call.
5 If the handset dialled is answered, you can have an internal conversation. Press
the Line key
and the external call is transferred.
If the handset dialled is not answered, press the Down key to speak to the
external caller again.
8.6 Receiving an external call during an internal call
If you receive an external call during an internal call, you will hear a call waiting
tone (double beep) on both handsets being used for an internal call.
1 Press the Line key
twice to accept the external call.
2 After finishing your call, press the Line key
to hang up or put the handset
back on the base unit.
8.7 Conference call (two internal DECT handsets and one external
caller)
You can have a telephone conversation with one internal and one external caller
at the same time.
1 While on the line with an external caller, press the Programming key
.
2 'INTERCOM' appears on the display.
3 Press the Programming key
.
4 The external call is now on hold. 'INT' appears on the display.
5 Dial the number of the handset you would like to include in the call.
6 Once the handset dialled is answered, keep the '#' key pressed for 2 seconds.
7 'CONFERENCE' appears on the display.
8 Now you are connected to one external and one internal caller (conference
call).
29 Model:DDP-300
Page 30

8.8 Selecting a base unit
If your handset is subscribed to several base unit stations (max. 4) , you must
select a base unit because the handset can only communicate with one base unit
at a time. There are two possibilities.
8.9 Automatic / Manual selecting a base unit
If you set the handset to 'automatic selection', the handset will automatically
choose the closest base unit in standby. Other you set the handset to 'manual
selection', the handset will only choose the base unit you have set.
1 Press the Programming key
.
2 Press the Up or Down key repeatedly until 'SETTING' appears on the
display.
3 Press the Programming key
.
4 Press the Up or Down key repeatedly until 'BASE SEL' appears on the
display.
5 Press the Programming key
.
6 Press the Up or Down key repeatedly until 'AUTO' or 'MANUAL'
appears on the display.
7 If you set the handset to 'MANUAL' selection.
8 Press the Programming key
. 'BASE -' appears on the display.
9 Enter the number of the base unit you want to select (1-4). Use the number
keypad.
10 Press the Programming key
. 'SEARCHING' and the symbol appear on the
display.
11 A signal sounds once the selected base unit has been found.
Notes :
Before you can select a base unit, the base unit must be subscribed to the
handset first.
If 'NOT SUB' appears on the display, this means the selected base unit does
not exist or thehandset has not been subscribed.
30 Model:DDP-300
Page 31

9 TROUBLE SHOOTING
symptom Possible cause Solution
No display Batteries uncharged Check the position of the batteries
Recharge the batteries
Handset turned OFF Turn ON the handset
No tone Telephone cord badly
connected
Check the telephone
Cord connection
The line is occupied
By another handset
Wait until the other handset hangs
up
The icon flashes Handset out of range Bring the handset closer to the
base
The base has no power
supply
Check the mains connection to the
base
The handset is not
registered to the base
Register the handset to the base
Handset do
not ring
The ringing volume is zero
or low
Adjust the ringing volume
Tone is good, but
there is no
communication
The dialing mode is wrong Adjust the dialing mode
(pulse/tone)
Telephone does not
react to pressing the
keys
Manipulation error Remove the batteries and but
them back in place
Keypad lock ON Turn OFF the Keypad lock
Flash(R) Key does
not work
Wrong Flash time Change the flash time
31 Model:DDP-300
Page 32

10 TECHNICAL CHARACTERISTICS
Standard DECT ( Digital Enhanced Cordless
Telecommunications )
GAP ( Generic Access Profile )
Frequency range 1880 MHZ to 1900 MHz
Number of channels 120 duplex channels
Modulation GFSK
Speech coding 32 kbit/s
Emission power 10 mW ( average power per channel )
Range 300 m in open space /50 m maximum
in house
Base power supply 220 V / 50 Hz for the base
Handset Batteries 2 rechargeable batteries AAA, NiMh
600mAh
Handset autonomy 100 hours in standby
Talk time: 6 hours
Charging time 15 hours
Normal conditions of use +5
C to +45
C
Dialling mode Pulse / Tone
32 Model:DDP-300
0
0
Page 33

11 WARRANTY
11.1 Warranty period
The units have a 12-month warranty period. The warranty period starts on the
day the new unit is purchased by the consumer.
The warranty has to be proven by presentation of the original bill or receipt, on
which the date of purchase and the model of unit are indicated.
11.2 Warranty handling
A faulty unit needs to be returned to a service centre including a valid purchase
note. If the unit develops a fault during the warranty period, or its officially
appointed service center will repair any defects caused by material or
manufacturing faults free of charge. We will at its discretion fulfil its warranty
obligations by either repairing or exchanging the faulty units or parts of the faulty
units. The initial purchase date shall determine the start of the warranty period.
The warranty period is not extended if the unit is exchanged or repaired by our or
its appointed service centres.
11.3 Warranty exclusions
Damage or defects caused by incorrect treatment or operation and damage
resulting from use of non-original parts or accessories not recommended by our
are not covered by the warranty.
The warranty does not cover damage caused by outside factors, such as lightning,
water and fire, nor any damage caused during transportation.
No warranty can be claimed if the serial number on the units has been changed,
removed or rendered illegible.
Any warranty claims will be invalid if the unit has been repaired, altered or
modified by the buyer or by unqualified, non-officially appointed service centres.
33 Model:DDP-300
 Loading...