

Page 1
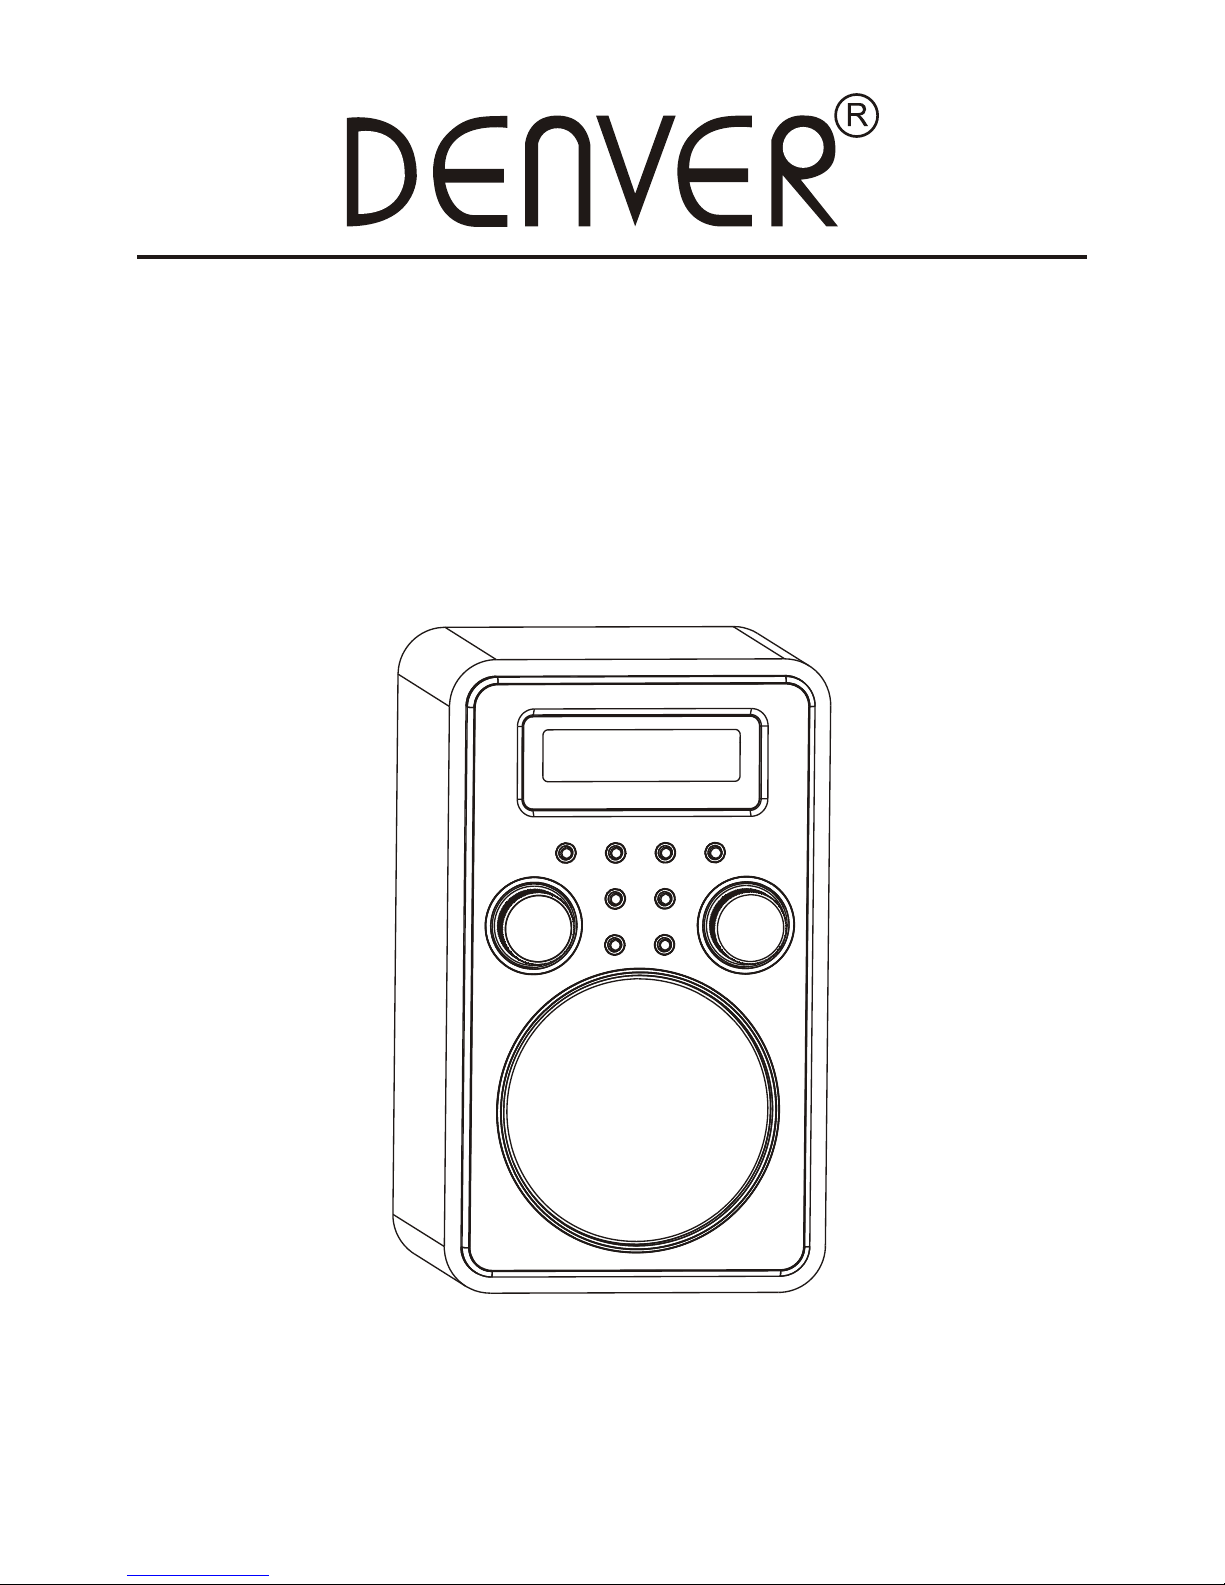
Opretstående DAB+/DAB/FM Digital Radio & Alarm Clock
Vertical DAB+/DAB/FM Digital Radio & Alarm Clock
BETJENINGSVEJLEDNING
INSTRUCTION MANUAL
www.facebook.com/denverelectronics
Page 2
SIKKERHEDSANVISNINGER
- Læs alle instruktioner omhyggeligt, inden du tager radioen i brug, og gem vejledningen, så du kan slå op i den senere.
- Kontrollér, at netspændingen i dit lokalområde matcher angivelserne på apparatets rating label.
Placering af apparatet
- Apparatet skal placeres på en plan, stabil overflade og bør ikke udsættes for vibrationer.
- Undlad at placere apparatet på en skrå eller ustabil overflade, da apparatet kan tippe eller falde ned.
- Placér apparatet nær den stikkontakt, det tilsluttes. Sørg for, at der altid er nem adgang til stikkontakten.
- Undgå ekstreme temperaturer, både med hensyn til kulde og varme. Placér apparatet på passende afstand af
varmekilder som f.eks. radiatorer eller gas-/elektriske kaminer. Undgå at udsætte apparatet for direkte sollys og andre
direkte varmekilder.
- Undlad at placere åben ild i form af f.eks. tændte stearinlys oven på eller nær apparatet.
- Nedsæt risikoen for brand, elektrisk stød eller beskadigelse af apparatet ved aldrig at udsætte det for regn, fugt, dryp
eller stænk. Undlad at placere væskefyldte beholdere som f.eks. vaser oven på apparatet.
- Hvis du spilder væske ned i apparatet, kan det medføre alvorlig skade. Sker det, bør du omgående slukke på
stikkontakten, tag stikket ud og dernæst kontakte forhandleren.
- Undgå risiko for elektrisk stød eller brand fra overophedning ved aldrig at lade gardiner eller andre lignende materialer
blokere apparatets ventilationsåbninger.
- Undlad at placere apparatet i en bogkasse, indbygge det i et skab eller på andet indelukket sted. Sørg for, at der altid
er mindst 10 cm frirum rundt om apparatet, således at ventilation kan finde sted.
Sikkerhed
- Tag altid stikket ud af stikkontakten, inden du tilslutter eller frakobler andre enheder eller flytter apparatet.
- Tag stikket ud af stikkontakten i tordenvejr.
- Dette apparat bliver varmt efter lang tids brug. Dette er normalt og betyder ikke, at der er problemer med apparatet.
FARLIG STRØMSTYRKE
Apparatet indeholder strømførende dele, hvis strømstyrke er tilstrækkelig til at udgøre en fare for
elektrisk stød, hvis bruger kommer i kontakt med dem.
OBS
Betjeningsvejledningen indeholder vigtige oplysninger om betjening og vedligeholdelse. Af
sikkerhedshensyn bør du følge anvisningerne i manualen.
Netl
edningen
- Kontrollér, at apparatet ikke står oven på netledningen, da apparatets vægt kan beskadige ledningen og dermed
udgøre en sikkerhedsrisiko.
- Hvis netledningen bliver beskadiget, skal den udskiftes af producenten, dennes agent eller andet kvalificeret
servicepersonale.
Interferens
- Apparatets funktionsevne kan påvirkes af stærk elektromagnetisk interferens. Sker det, skal du blot nulstille produktet
som beskrevet i manualen. Hvis normal drift ikke genoprettes, bør du forsøge dig med at anbringe apparatet på et
andet sted under brugen.
- Dette apparat indeholder mikro-processorer, de r kan gå ned på grund af ekstern elektrisk interferens/ støj eller
elektromagnetisk udladning. Hvis apparatet ikke fungerer korrekt, skal du tage stikket ud af stikkontakten og sætte det i
igen for at nulstille radioen.
Overvågning
- Hold øje med børn, lad dem ikke lege med dette apparat.
- Lad aldrig nogen, især børn, stikke ting ind i apparatets sprækker, huller eller andre åbninger, da de derved udsætter
sig for risiko for potentielt dræbende elektrisk stød.
Service/ Vedligeholdelse
- Nedsæt risikoen for elektrisk stød ved aldrig at fjerne apparatets skruer. Apparatet indeholder ingen dele, som bruger
selv kan servicere. Overlad alt reparationsarbejde til kvalificeret servicepersonale.
- Fjern ikke apparatets faste dæksler/ kabinet, da du derved udsætter dig for risiko for elektrisk stød.
- Tag stikket ud af stikkontakten, inden du rengør apparatet.
- Brug aldrig rengøringsmidler med skureeffekt eller krasse rengøringsmidler ved rengøring af apparatet, da disse vil
beskadige appar ate ts ove rfl a de.
- Brug ikke væske til rengøring af apparatet.
DK-1
FORSIGTIG
RISIKO FOR ELEKTRISK STØD
MÅ IKKE ÅBNES
Page 3
KNAPPER OG KONTROLLER
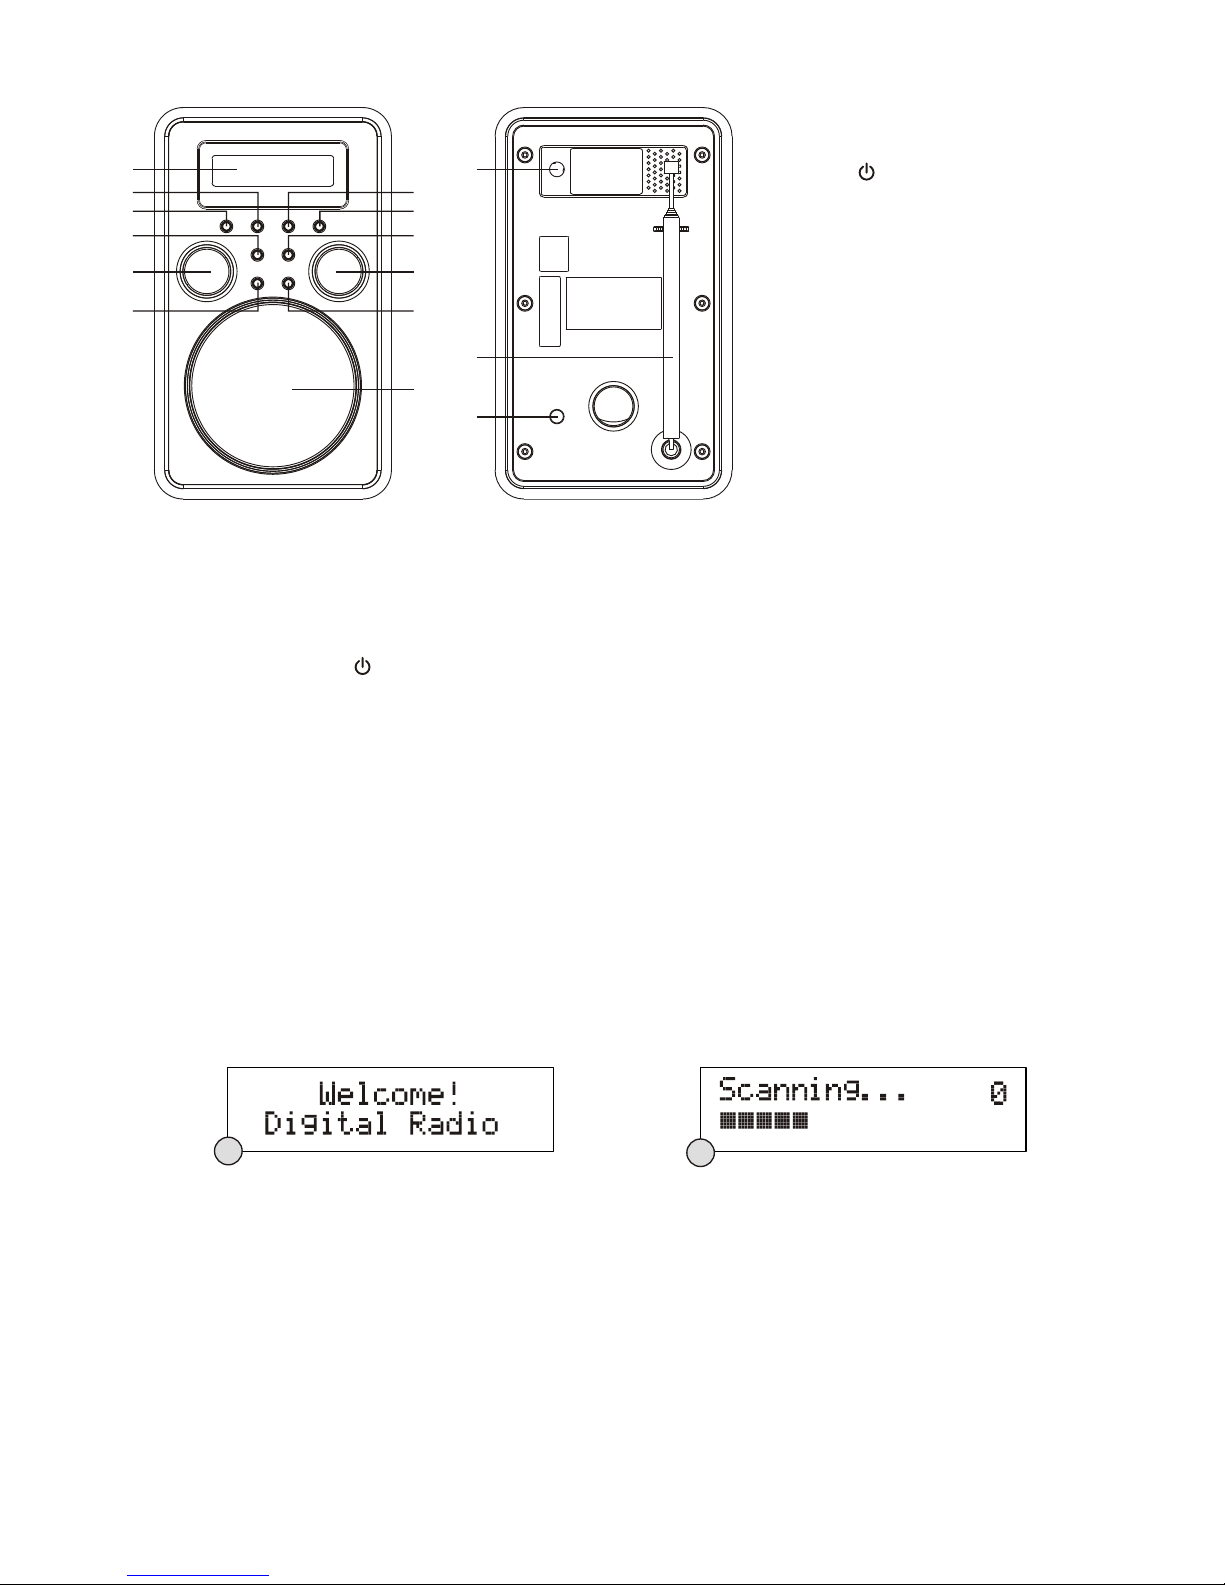
1. LCD DISPLAY
2. K
nappen MODE (funktion)
3. Knappen (tænd/ sluk)
4. Knappen INFO
5. DREJE- & TRYKKNAP OK
6. Knappen MEMOR Y (fast e stationer)
7. Knappen MENU
8. Knappen ALARM/SNOOZE
9. BAGGRUNDSLYS TIL/ FRA
10. VOLUMEN +/-
11. Knappen SLEEP (forsinket slukning)
12. HØJTTALER
13. STIK TIL HOVEDTELEFONER
14. TELESKOP-ANTENNE
15. DC IN TERMINAL
NÅR
DU T
ÆNDER RADIOEN FØRSTE GANG
Når radioen første ga ng for bi n des til lys nett et (vi a de n medfølgende AC/DC adapter), starter den op i standby modus.
Displayets baggrundslys tænder i nogle få sekunder, hvorefter displayet viser velkomstdisplayet og dernæst uret.
1. Forbind DC-stikket på AC/DC adapteren til terminalen DC IN på radioens bagpanel.
2. Forbind AC/DC adapteren til en stikkontakt.
3. Tryk én gang på knappen for at tænde radioen.
Indstilling af uret
Uret bliver kun indstillet og opdateret automatisk, hvis du kan modtage DAB-signaler hvor du befi nder dig. For at
synkronisere uret til lokale forhold kræves det, at du stiller ind på en DAB-station og bliver der i et kort øjeblik. Manuel
indstilling af uret er ikke påkrævet.
NÅR DU VIL LYTTE TIL RADIO
Tips til bedre m od t a ge l se
Denne radio er udstyret med en enkelt DAB/FM antenne. Du opnår den bedst mulige modtagelse, når du strækker
antennen helt ud og justerer dens position, indtil du finder den ret nin g, hvor modtagelsen er bedst . F or at opn å den
bedste modtagelse af DAB-signaler anbefales det stærkt, at du altid lader antennen st å lod ret op i luften.
DAB modus
Når du forbinder radioen til lysnettet og tænder første gang, starter den automatisk op i DAB-modus og gennemfører en
automatisk kanalsøgning. Under søgningen viser displayet meddelelsen "Scanning.." sammen med en bjælke, der viser
hvor langt søgningen er nået og antallet af fundne stationer indtil videre. (F1) (F2)
Når søgningen er gennemført, stiller radioen automatisk ind på den først fundne station i alfanumerisk rækkefølge. Hvis
du vil bladre gennem de fundne stationer, skal du dr eje på knappen OK, og når du finder en station, du vil lytte til, skal
du trykke på knappen OK for at stille ind på stationen.
Bemærk: Hvis der ingen stationer findes under autosøgningen, skifter radioen til menuen Tune Select, og du kan nu
dreje på knappen OK for at vælge mellem "Manual tune" (manuel kanalsøgning) og "Autoscan" (autosøgning) for at
søge efter stationer. Tryk på knappen OK for at bekræfte dit valg.
DK-2
1
2
3
4
5
6
7
8
9
10
11
12
13
14
15
F1
F2
Page 4
DAB automatisk kanalsøgning
Den automatiske kanalsøgning gennemsøger hele DAB Bånd III for kanaler. Når søgningen er gennemført, stiller
radioen automatisk ind på den først fundne station i alfanumerisk rækkefølge.
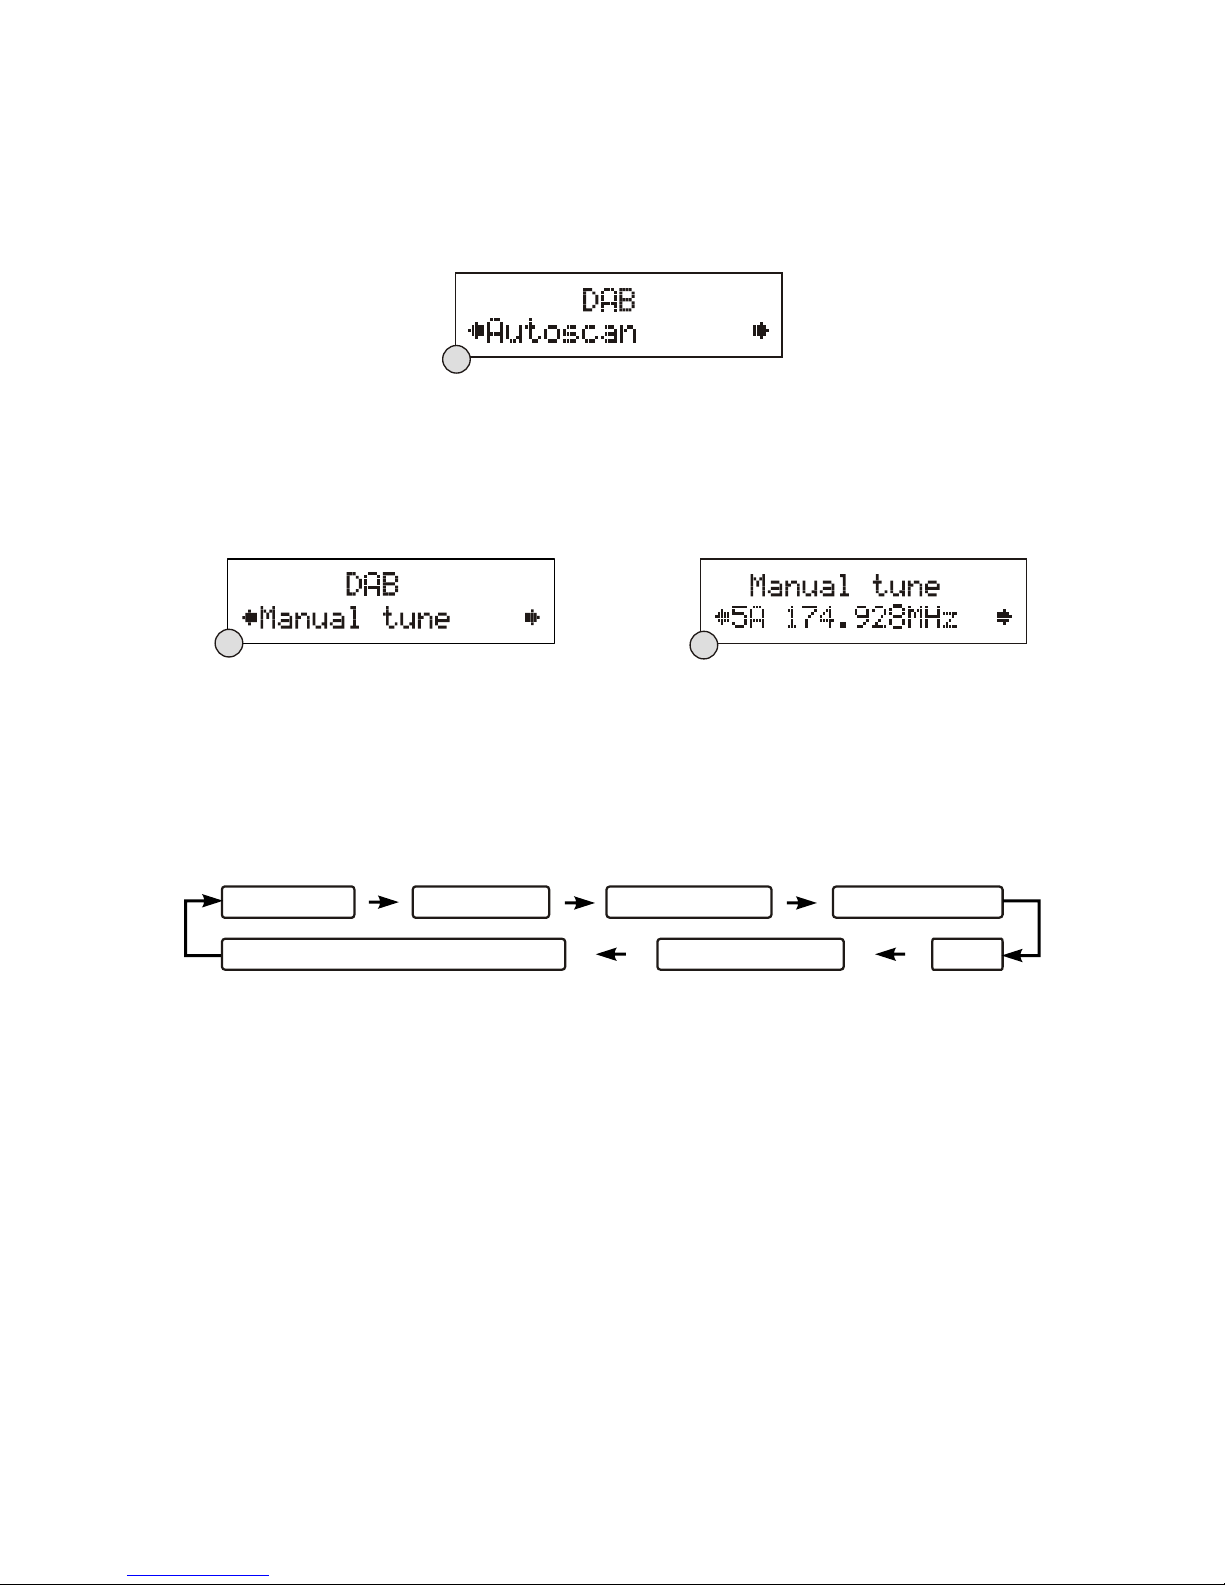
1. Hvis du vil aktivere den automatiske kanalsøgning, skal du først trykk e på knappen MENU for at åbne menuen Tune
Select, dernæst dreje på knappen OK og vælge "Autoscan" og endelig trykke på knappen OK for at bekræfte.
Displayet viser nu "Scanning..." samt en skydebjælke over søgningen. (F3)
2. Alle fundne stationer lagres automatisk i radioens hukommelse, og du kan bladre gennem dem og lytte til stationerne
ved at dreje på knappen OK for at bladre og trykke på knappen OK for at stille ind på en station.
DAB manuel kanalsøgning
1. Hvis du vil søge manuelt efter stationer, skal du først trykke på knappen MENU for at åbne menuen Tune Select og
dernæst trykke på knappen OK for at vælge punktet "Manual tune". (F4)
2. Drej på knappen OK for at gennemgå DAB-kanalerne. Displayet viser "5A til 13F" og de tilhørende frekvenser. (F5)
3. Når den ønskede frekvens vises på displayet, skal du trykke på knappen OK for at bekræfte. Navnet på den gruppe
stationer (ensemble/ multiplex) stationen tilhører vises på displayet.
4. Tryk på knappen OK igen for at stille ind på den valgte station.
DAB se k un dær e services
Af og til vil du kunne se symbolet ">" direkte efter navnet på en station. Dette angiver, at stationen tilbyder sekundære
services. Disse sekundære services indeholder ekstra materiale i forhold til den primære station. Det kan f.eks. være
sportskanaler, der har tilføjet ekstra (f.eks. flersproget) kommentatorlyd. De sekundære services er indsat direkte efter
den primære station. Hvis du vil vælge en sekundær station, skal du trykke én gang på knappen OK.
DAB displayet
For hver gang, du trykker på knappen INFO, skifter displayet i den rækkefølge, der vises herunder:
Ur og Da
to
Uret og datoen opdateres automatisk ud fra de oplysninger, der modtages via radiosignalerne, det er ikke nødvendigt at
indstille uret manuelt. Skulle det alligevel forekomme, at der ikke modtages tidsoplysninger, viser displayet i stedet
"<TIME/DATE>".
Frekvens
Viser frekvensen for den aktuelle station.
Audio bitrate
Displayet viser den digitale audio bitrate for programmet, der modtages.
Signalstyrke
Displayet viser en skydebjælke, der angiver signalstyrken. Jo stærkere signalet er, jo længere er skydebjælken fra
venstre mod højre.
DLS
DLS står for Dynamisk Label Segment, som er en rulletekst, udbyderen kan udsende sammen med udsendelsen.
Rulleteksten vil som oftest indeholde oplysninger om det aktuelle program etc.
Programtype
Her kan du se typen på det program, der udsendes. Hvis denne oplysning ikke er tilgængelig, viser displayet i stedet
"<Programme Type>".
DK-3
F3
F4
F5
Ur/ Dato Signalstyrke
Frekvens Audio Bitrate
Ensemble/ Multiplex (Gruppenavn)
Programtype
DLS
Page 5
Ensemble/ Multiplex (Gruppenavn)
Ensemble/ Multiplex dækker over en gruppe radiostationer, der er bundlet og sendes sammen på en enkelt frekvens.
Der findes nationale og lokale multiplexer, de lokale indeholder stationer, der udelukkende udsendes i det aktuelle
lokalområde.
Bemærk: Tryk på knappen INFO i mindst 2 sekunder, hvis du vil have radioens software version vist på displayet.
FM-radio
1. Tryk på knappen MODE, hvis du vil vælge FM, hvorefter displayet viser FM og den aktuelle frekvens.
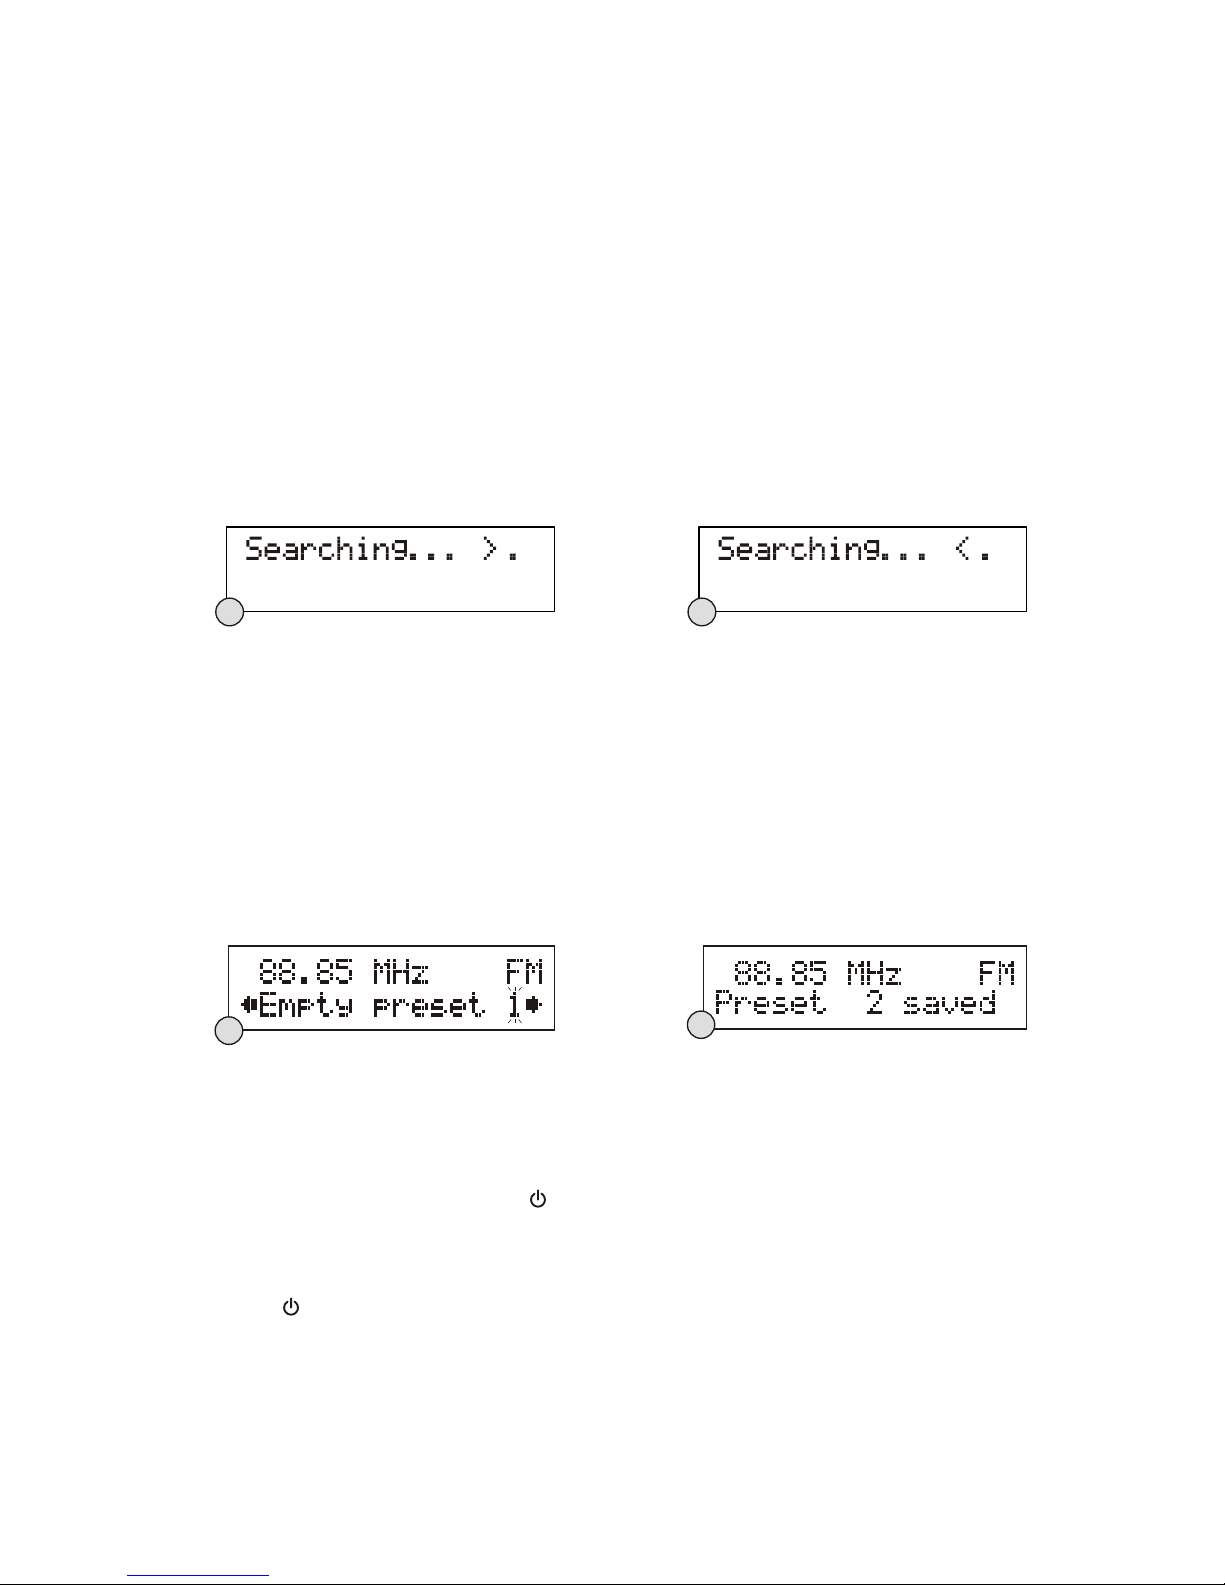
2. Hvis du vil aktivere automatisk kanalsøgning, skal du trykke på knappen OK og holde den inde, indtil søgningen på
frekvensbåndet starter, og displayet viser "Searching ... >" eller "Searching ... <". Søgningen afbrydes automatisk, når
en station findes. (F6) (F7)
3. Hvis du vil aktivere manuel kanalsøgning, skal du dreje på knappen OK.
4. Hvis du vil skifte mellem modtagelse af FM i stereo og mono, skal du trykke på knappen OK for at skifte mellem
"Auto" og "Mono".
Bemærk: Radioen skifter automatisk mellem modtagelse i stereo og mono, men du kan slå den automatiske omskifter
fra og selv vælge manuelt, hvilket er nyttigt, hvis signalet går svagt igennem. Under modtagelse i stereo kombineres
lyden fra venstre og højre kanal automatisk til en enkelt kanal, således at de passer til denne radios
enkelthøjttalersystem.
LAGRING OG GENKALD AF FASTE STATIONER
I både DAB og FM modus kan du lagre op til 10 faste stationer. Dette gør det nemt at få direkte adgang til dine
yndlingsstationer.
1. Hvis du vil gemme en station som fast station, skal du først stille ind på stationen og dernæst trykke på knappen
MEMORY og holde den inde, indtil displayet viser "Empty preset 1" (tom programplads 1), og nummeret på den faste
station blinker på disp l a yet . (F8 )
2. Drej knappen OK for at vælge den ønskede programplads til den faste station.
3. Tryk på knappen OK for at bekræfte dit valg, hvorefter displayet viser "Preset # saved" (fast station # gemt). (F9)
4. Når du vil genkalde en fast station, skal du først trykke én gang på knappen MEMORY og dernæst dreje knappen OK
for at bladre gennem de faste stationer, der er gemt i radioen. Når displayet viser nummeret på den ønskede station,
skal du slippe knappen. Hvis der ikke er gemt nogen station på den valgte programplads, viser displayet meddelelsen
"Empty preset #" (tom programplads #).
GENDANNELSE AF STANDARDINDSTILLINGER
Hvis du flytter radioen til en anden del af landet, kan det være at dine faste DAB-stationer ikke længere kan modtages.
Hvis det sker, vil det være nø dvendigt at gendanne radioens oprindelige standardindstillinger. Dette gøres på følgende
måde:
1. Forbind radioen til lysnettet og tryk på knappen for at tænde radioen.
2. Tryk på knappen MENU og hold den inde, indtil displayet viser meddelelsen "Press SELECT to confirm reset" (tryk på
SELECT for at bekræfte nulstilling).
3. Slip knappen MENU og tryk én gang på knappen OK, hvorefter displayet nu viser meddelelsen "Restarting.."
(genstarter). Når nulstillingen er gennemført, går radioen på standby.
4. Tryk på knappen for at tænde radioen igen, hvorefter den automatisk starter op i DAB modus og gennemfører en
automatisk kanalsøgning. Når søgningen er gennemført, stiller radioen ind på den først fundne station i alfanumerisk
rækkefølge.
Bemærk: Alle faste DAB- og FM-stationer slet tes, når du gennemfører en nuls ti ll ing.
DK-4
F6 F7
F8
F9
Page 6

ALARM-FUNKTIONEN
Denne radio kan anvendes som standard "Radio Alarm Clock". Du kan anvende alarm-funktionen til vækning med enten
elektronisk buzzer eller din yndlingsradiostation (DAB/FM). Alarmen kan indstilles både mens radioen står på standby og
mens den er tændt.
Sådan indstilles vækketidspunkt og vækkemåde
1. Tryk på knappen ALARM og hold den inde, indtil displayet viser meddelelsen "Alarm Setting".
2. Drej på knappen OK for at indsætte tidspunktet og bekræft indstillingen ved at trykke på samme knap. Først indsættes
timetallet og dernæst minuttallet. (F10)
3. Til sidst skal du igen trykke på knappen OK for at bekræfte, hvorefter vækketidspunktet er indstillet, og radioen går
videre til indstilling af vækkemåde.
4. Drej på knappen OK for at vælge vækkemåde og bekræft indstillingen ved at trykke på samme knap. Radioen viser
først de faste DAB-stationer (1-10), dernæst de faste FM-stationer (1 -10), så Buzzertone (1 eller 2) og til sidst vises
lydstyrke for vækning (niveau 1-20). (F11)
5. Når du har valgt lydstyrke for vækningen, er opsætning af vækkefunktionen gennemført, og du kan nu aktivere
alarmen.
Såd
an aktiveres al ar m-funktionen
1. Når du vil aktivere alarm-funktionen, skal du trykke gentagne gange på knappen ALARM, hvorefter de tilgængelige
vækkemåder vises på displayet i følgende rækkefølge:
2. Når
displayet viser den ønskede vækkemåde, skal du slippe knappen, hvorefter alarmen er aktiveret, og ikonet for
alarm vises på displayet.
3. Når vækketidspunktet nås, starter vækningen med den valgte vækkemåde, og alarm-ikonet på displayet blinker som
angivelse af, at alarmen er i gang. Hvis du vil afbryde alarmen før tid, skal du trykke på knappen .
4. Hvis du vil kontrollere alarm-status, skal du trykke én gang på knappen ALARM, hvorefter status vises på displayet.
Bemærk: Hvis du har aktiveret alarm-funktionen, og den valgte vækkemåde er DAB eller FM, skal du sikre dig, at
lydstyrken er indstillet til et niveau, du kan høre.
Automatisk gentagelse af vækning
Alarmen starter automatisk på samme tidspunkt hver dag, så længe alarm ikonet vises på displayet. Hvis du vil annullere
funktionen, skal du trykke gentagne gange på knappen ALARM, indtil displayet viser "Alarm Off".
FUNKTIONEN SNOOZE
Når alarmen lyder, k an du tr ykke på knappen SNOOZE, hvis du vil slå alarmen fra i 5 minutter. Der vises et lille ikon med
et "z" på displayet ved siden af alarm ikonet som angivelse af, at snooze er aktiveret. Dette kan gentages i op til en time.
FUNKTIONEN SLEEP
Denne funktion gør det muligt at indstille radioen til at slukke efter et givet tidsrum.
1. Hvis du vil aktivere funktionen sleep, skal du trykke gentagne gange på knappen SLEEP, indtil displayet viser
meddelelsen "Sleep Timer", hvorefter tidsdisplayet skifter for hvert tryk på knappen, som vist herunder:
2. Når det ønskede tidsrum vises på displayet, skal du slippe knappen, hvorefter aktivering af funktionen bekræftes efter
2 sekunder. Et lille ikon med et "s" vises på displayet som angivelse af, at sleep timeren er aktiveret. Når timeren har
talt ned til 0, slukker radioen automatisk.
3. Hvis du vil deaktivere funktionen sleep, skal du trykke på knappen SLEEP igen, indtil det lille ikon "s" forsvinder fra
displayet.
4. Hvis du vil kontrollere sleep timerens status, skal du trykke gentagne gange på knappen INFO, indtil informationerne
for sleep timeren vises på displayet.
DK-5
F10
fra fast DAB-station fast FM-station Buzzertone #
Page 7

DISPLAYETS BAGGRUNDSLYS
Du kan vælge mellem fire niveauer for lysstyrke, der kan indstilles individuelt for henholdsvis standby og drift.
Hvis du vil indstille lysstyrken, skal du trykke gentagne gange på knappen BACKLIGHT, hvorefter lysstyrken på
displayet ændres i den herunder viste rækkefølge for hvert tryk på knappen:
Backlight off (fra) → Backlight 1 → Backlight 2 → Backlight 3 → Backlight off →
Under standby vil lysstyrken på displayet blive skruet op til fuld lysstyrke i 5 sekunder hver gang, du trykker på en knap.
Bemærk: Som standard er displayets baggrundslys indstillet til "Backlight 1" i standby og til "Backlight 3" under drift.
Disse indstillinger gendannes også, hvis du gennemfører en nulstilling af radioen.
STIK TIL HOVEDTELEFONER
Du finder et 3,5 mm stereo stik til hovedtelefoner på radioens bagpanel. Tilslut et sæt stereo hovedtelefoner (medfølger
ikke) til dette stik, hvis du vil kunne høre radio uden at forstyrre andre. Højttaleren slås automatisk fra, når der er tilsluttet
hovedtelefoner til radioen.
VIGTIGT: Når du vil anvende hovedtelefoner, skal du altid skrue ned for lyden, inden du tager hovedtelefonerne på.
Tilslut hovedtelefonerne og skru gradvist op for lyden, indtil du finder et komfortabelt lytteniveau.
SPECIFIKATIONER
STRØMFORSYNING: AC/DC ADAPTER INDGANGSSPÆNDING: AC 100-240V~60/50Hz
UDGANGSSPÆNDING: DC 12V 1,5A
UDGANGSEFFEKT: 5W
FREKVENSOMRÅDE: DAB 174 - 240 MHz
FM 87,5 - 108 MHz
YDRE MÅL: 115 (L) X 128 (B) X 190 (H) mm
VÆGT: 1,17 kg
RET TIL ÆNDRING I DESIGN OG SPECIFIKATIONER FORBEHOLDES.
DK-6
Page 8

ALLE RETTIGHEDER FORBEHOLDES, COPYRIGHT DENVER ELECTRONICS A/S
DENVER®
www.denver-electronics.com
El
ektrisk og elektronisk udstyr samt medfølgende batterier indeholder materialer, komponenter og stoffer, der kan være
skadelige for menneskers sundhed og for miljøet, hvis affaldet (kasseret elektrisk og elektronisk udstyr og batterier) ikke
håndteres korrekt.
Elektrisk og elektronisk udstyr og batterier er mærket med nedenstående overkrydsede skraldespand. Den symboliserer,
at elektrisk og elektronisk udstyr og batterier ikke må bortskaffes sammen med usorteret husholdningsaffald, men skal
indsamles særskilt.
Som slutbruger er det vigtigt, at du afleverer dine udtjente batterier til de ordninger, der er etablerede. På denne måde er
du med til at sikre, at batterierne genanvendes i overensstemmelse med lovgivningen og ikke unødigt belaster miljøet.
Alle kommuner har etableret indsamlingsordninger, hvor kasseret elektrisk og elektronisk udstyr samt bærbare batterier
gratis kan afleveres af borgerne på genbrugsstationer og andre indsamlingssteder eller bliver afhentet direkte fra
husholdningerne. Nærmere information kan fås hos kommunens tekniske forvaltning.
Importeret af:
Inter Sales A/S
Stavneagervej 22
8250 Egå
Danmark
www.facebook.com/denverelectronics
DK-
7
Page 9

UK-1
SA F ETY P REC AU T ION S
- Read a ll the in structions car efully before us ing the u nit and keep them fo r future referen ce.
- Chec k that th e voltage marked o n the rating label m atche s your mains volta ge.
Loca tion of Unit
- The unit m ust be pl aced on a flat stabl e surface and shou ld not be subjecte d to vibr ations.
- Do not p lace th e unit on sloped or un stable surface s as the un it may fall off o r tip ove r.
- The main s socke t must be loc ated ne ar the unit and shou ld be easily acces sible .
- Avoid ext reme de grees of tempera ture, either hot o r cold. Place the un it well a way from heat sour ces
such as radia tors or gas/elec tric fires. Avoid exp osure to direct su nligh t and other source s of heat.
- Neve r place a ny type of candle or n aked flame on the to p of or nea r the unit.
- To re duce the ri sk of fir e, electric shoc k or product damag e, do not expose thi s unit to r ain, moisture,
dripping or s plashing. No obj ects filled with l iquid s, such as vases, sh ould be placed on th e unit.
- If you s pill an y liquid into the un it, it can cause ser ious da mage. Switch it off at t he mains immedia tely.
With draw th e mains plug and con sult your dealer.
- To pr event the r isk of el ectric shock or fi re hazard due to ove rheating, ensu re that c urtains and othe r
materials d o not obstruct the v entilation ven ts.
- Do not i nstal l or place this unit i n a bookcase, buil t-in ca binet or in anothe r confined space , ensure that
a minimum of 10 cm should be kept ar ound the apparat us for ve ntilation.
Safety
- Alwa ys disc onnect the unit fr om the mains suppl y befor e connecting/d isconnecting o ther devices or
moving the un it.
- Unpl ug the un it from the mains so cket during a ligh tning s torm.
- This uni t will be come warm when use d for a long period of t ime. This is normal an d does no t indicate a
problem wit h the unit.
DANGEROUS VOLTAGE
Conductor d angerous volta ge, that may be of suffi cient magnitud e to cons titute a risk of
electric sh ock to persons is pr esent within thi s produ ct's enclosure .
ATTENTI ON
The owner's m anual contains i mportant opera ting an d maintenance in structions, fo r your
safety, it is necessary to re fer to th e manual.
Main s Cable
- Make s ure the u nit is not resting o n top of the mains cab le, as the weight of t he unit m ay damage the
mains cable a nd create a safety h azard.
- If the m ains ca ble is damaged it mu st be replaced by th e manuf acturer, i ts serv ice agent, or simi larly
qualified p ersons in order to a void a hazard.
Inte rfere nce
- The norm al func tion of the p roduc t may be disturbed b y Strong Electro M agnet ic Interf erenc e. If so,
simply rese t the product to res ume normal opera tion by f ollowing the ins truction manua l. In case the
function co uld not resume, pl ease use the produ ct in oth er location.
- This uni t inclu des micro-proc essors which may m alfunction as a re sult of e xternal electr ical
interfere nce/noise or ele ctrostatic dis charg e. If the unit is not wo rking properly, dis connect the powe r
source and th en reconnect it.
Supe rvision
- Chil dren sh ould be supervis ed to ensure that th ey do not p lay with the unit.
- Neve r let any one especially c hildren push any thing i nto the holes, slo ts or any other open ings in t he
case - this cou ld result in a fatal e lectric shock.
Service/M aintenance
- To re duce the ri sk of ele ctric shock, do no t remove screws. The u nit does not conta in any us erserviceab le parts. Please l eave all mainten ance wo rk to qualified pe rsonnel.
- Do not o pen any f ixed covers as thi s may expose dange rous vo ltages.
- Ensu re to unp lug the unit from th e mains socket bef ore cle aning.
- Do not u se any ty pe of abrasive pad o r abrasive clean ing sol utions as these ma y damage the unit' s
surface.
- Do not u se liqu ids to clean the uni t.
CA UTI O N
RISK OF ELECTRIC SHOCK
DO NOT OPEN
Page 10

UK-2
SW I TC HIN G YO UR R A DIO O N FOR T H E FI R ST TI ME
When the radio i s connected to the AC pow er (via t he AC/DC ad aptor) for t he first tim e, it w ill be in st andby
mode. The d ispla y back light will be on for a fe w seconds, the d isplay will first sho w the greeti ngs and
finally the c lock.
1. Ins ert the D C power jack of the AC/ DC adaptor to the DC i nput socket loca ted at th e back of the unit.
2. Plug the AC/DC Ad aptor to the AC mains o utlet.
3. Press the but ton once to turn the r adio on.
Cloc k setting
The clock will only set and be updated if you can re ceive DA B s ignals i n y our location. In orde r for the
clock t o synchron ise to the current lo cal time you must lea ve it one D AB station fo r a shor t p eriod. Man ual
clock setti ng is not required .
LI S TEN ING TO YOU R R ADI O
Hint s for better reception
This r adio ca rries a sin gle DAB /FM teles copic a ntenna, t o obtai n the best pe rform ance, you s hould f ully
extend the a ntenna and adjust it s pos ition as w ell as the direction until you fi nd th e bes t receptio n. Fo r
ideal DAB rec eption, always m aintain the ante nna in an u pright vertica l position is high ly reco mmended.
DAB mode
If the radio is pow ered up an d swit ched on for the first time, it will a utomatically enter int o the DAB m ode
and perfor m auto scan function . During the sc an the display will s how “S canning …” tog ether with a slide
bar th at indicates the progress o f the scan an d the amoun t of statio ns that hav e been found so far. (F.1)
(F.2)
Once the scan ha s fin ished, the r adio wi ll se lect th e fir st alph anume rically foun d station. To ex plore t he
found s tatio ns, rotate th e OK control, an d w hen you find a stat ion that you wou ld like to liste n t o, press on
the OK contro l.
Note: If there i s no stations fou nd afte r auto scan, t he ra dio w ill the n enter into t he Tun e Select Men u, you
can no w ro tate the OK con trol foll owed by pressing the con trol to selec t “Manual tune” or “Auto scan” for
stations.
F1
F2
FE AT URE S AND C O NT ROL S
1. LCD D ISPLAY
2. MOD E BUTTON
3. BUT TO N
4. INF O BUTTON
5. SCR OLL CO NTROL
& OK BUT TO N
6. MEM ORY BU TTON
7. MEN U BUTTON
8. ALAR M/SNO OZE BUTTON
9. BAC KLIGH T BUTTON
10. VO LUME +/ - CONTROL
11. SLEEP BUT TO N
12. SP EAKER
13. HE ADPHO NE JACK
14.
15. DC I N JACK
TELESCOPI C ANTENNA
1
2
3
4
5
6
7
8
9
10
11
12
13
14
15
Page 11

UK-3
DAB auto scan
The auto sca n wil l search for the entire DAB Band III chan nels. After the scan has fini shed, the first
alphanume rically found st ation will be auto matic ally selected.
1. To activ ate auto scan, f irst p ress t he MENU bu tton t o ente r into the Tune Select Menu, then rotat e
the OK con trol to select “ Autos can”, fina lly press on the OK co ntrol to confirm, the di splay will sh ow
“Scanning … ” and a progressin g slide bar. (F. 3)
2. All the stations t hat have b een found will be stored automatical ly, to explor e and sele ct listenin g to
the fo und sta tions, rotate th e OK control follo wed by pr essing on the same c ontrol.
DAB manual tune
1. To select m anual t une, firs t press t he MENU button to en ter into the Tune Sel ect Men u, then pre ss
on the OK contr ol to select “Manu al tune”. (F. 4)
2. Rotate the OK co ntrol t o move throu gh the DAB channels, the d ispla y will show “5A to 1 3F” and thei r
associate d frequencies. ( F. 5)
3. When your desired f requency appe ars in th e displa y, p ress on t he OK con trol to c onfir m. The name
of the s tatio n group (ensembl e/multiplex) w ill be di splayed.
4. To listen to the st ation selected , press on the OK cont rol aga in.
DAB seconda ry services
On some occasions you will see a “>” s ymbol d irect ly afte r the nam e of the station , this indicat es that t here
are second ary se rvices available to tha t station. These secondary servic es con tain e xtra s ervices that
relate to the prima ry st ation. E.g. a s ports statio n may want to a dd ex tra c ommentaries. T he se conda ry
services are in serte d directl y after the primary st ation. To select th e secondary station, pres s on t he OK
control onc e.
DAB display modes
Every time yo u press the INFO but ton, the display w ill cycle throug h the fol lowing display m odes:
Time and d ate
The time an d date will be a utomatically update d by the broadcasted information; it is no n eed to set the
clock manually. In the unlikely event that no clock informati on is receiv ed, th e disp lay wi ll sho w
“<TI ME/DATE>”.
Frequency
The fr equen cy of the present st ation will be disp layed .
Audi o bit rate
The display w ill show the digit al audio bit rate be ing rec eived.
Sign al strength
The dis play will show a sl ide bar to indic ate the signa l s trength, t he stronger the signa l, the l onger the bar
will be from le ft to right.
DLS
DLS stands for Dynamic Label Segme nt which is a scrollin g messag e t hat the bro adcas ter may inc lude in
their trans missions. The mess age usually incl udes in formati on such a s programme deta ils …etc.
Programme t ype
This des cribes the styl e of the progr amme that is b eing broadc ast. If th e in formation i s no t available , the
display wil l show “<Program me Type>”.
F3
F4
F5
Ense mble/Multipl ex(Group name)
Time/Date
Sign al strength
DLS
Audio Bit Rate
Prog ramme Type
Frequency
Page 12
UK-4
Ensemble/Multiplex (Gro up name)
The E nsemb le/Multiplex is a collectio n of radio stat ions tha t are bundled a nd transmitte d together in a
single frequ ency. Th ere are national and local multiple xes, loc al ones con tain sta tions th at are spec ific to
that area.
Note: Press and h old the INF O button fo r l onger th an 2 second s, the soft ware ver sion num ber will be
displayed .
FM radio
1. To select F M, press the MODE bu tton, t he display will sh ow FM and the freque ncy.
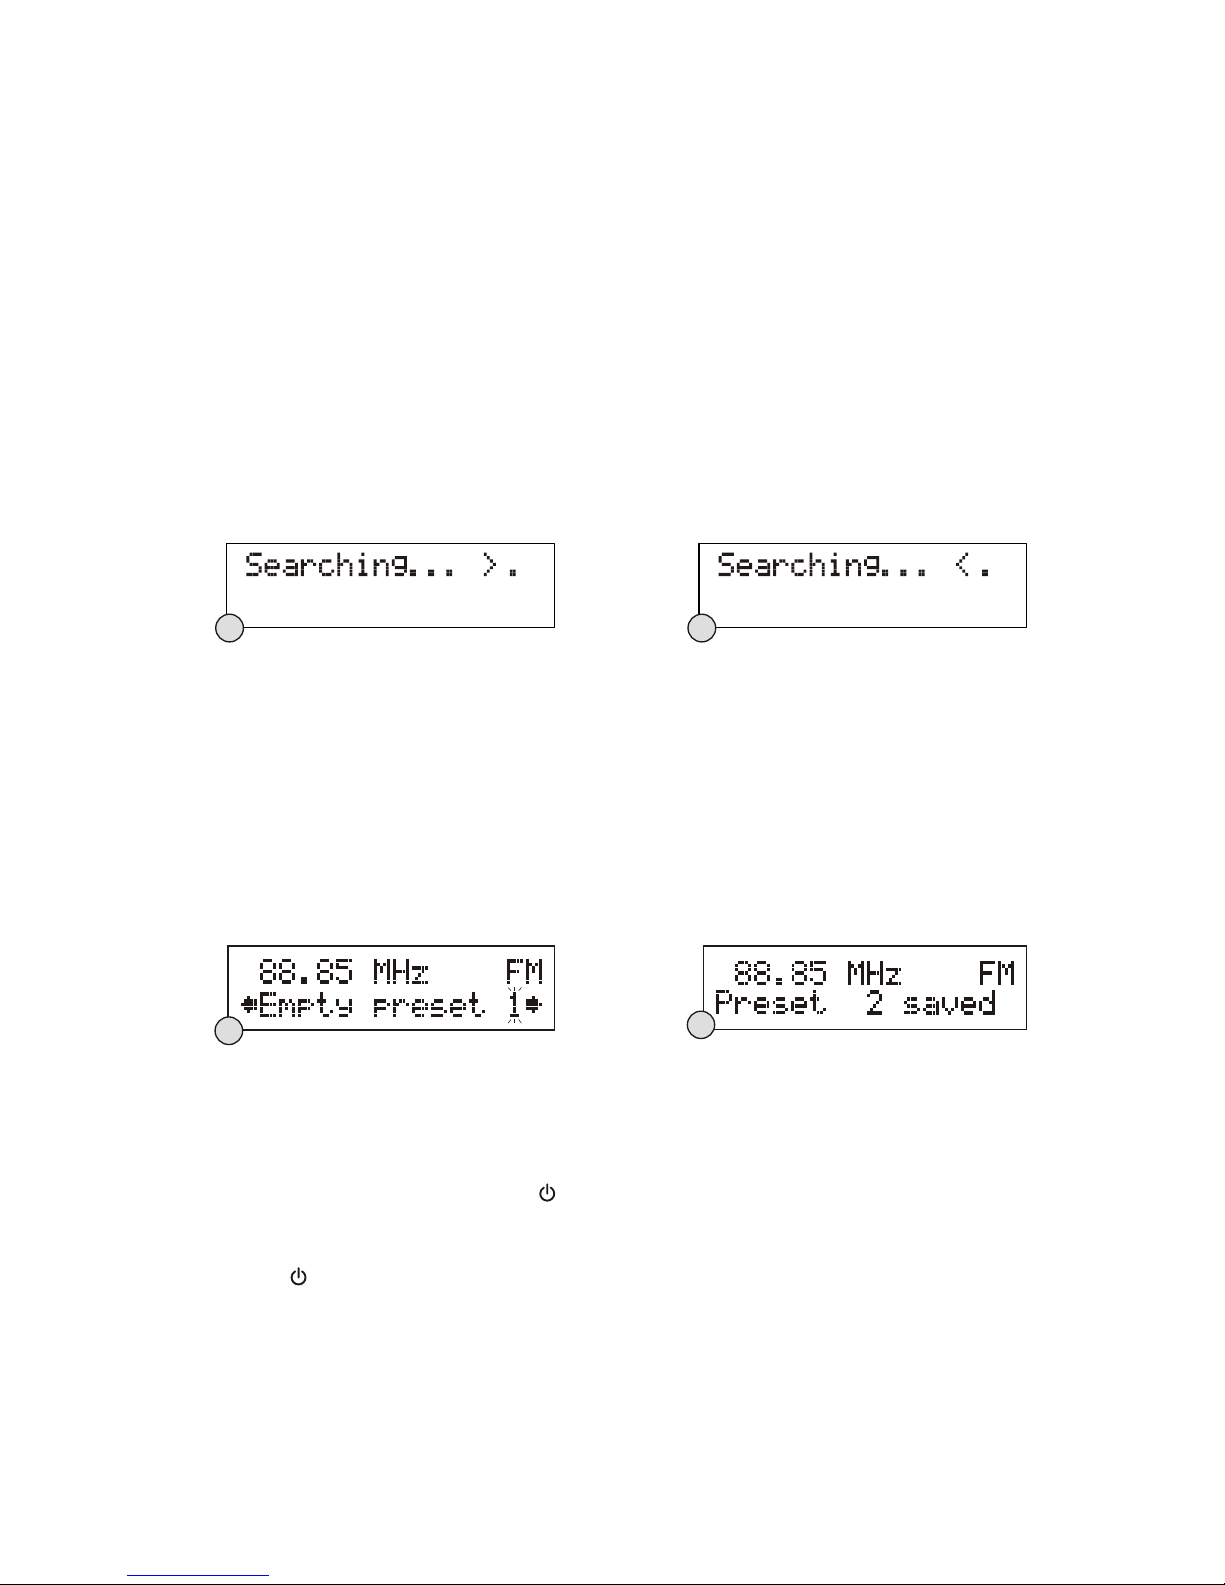
2. To activate au to search, pres s and ho ld th e OK con trol until it starts to scan the fre quency ban d, th e
display w ill show “Se arching … > .” or “Searc hing … < .”, and it will stop automa tical ly once a st ation
has been foun d. (F. 6) (F. 7)
3. To activate man ual tuning, rota te the OK control.
4. To select the FM stereo/mon o receptio n m ode, press the OK control to toggle bet ween the “Auto” or
“Mono” sele ction.
Note: Th e radio wil l automaticall y switch between t he stereo and mono receptio n, but you can overr ide
this and switch th is function man ually which is helpfu l for poor sig nal recepti on. During stereo rec eptio n,
the received L/R st ereo soun d will be aut omatica lly com bined to one si ngle chan nel to suit the s ingle
speaker des ign of this radio.
ST OR I NG AN D REC A LL I NG STOR E D STAT I ONS
In either D AB or FM mode, you can store up to 10 statio ns to the favou rite p resets; this w ill en able you to
get direct ac cess to your favou rite stations.
1. To store a preset, first tune to your des ired station, then press and hold the MEMORY button, the
display wil l show “Empty pres et 1”, and the prese t numbe r will flash. (F. 8)
2. Rotate the OK c ontrol to select y our desired stat ion pre set numbe r.
3. Press on the OK c ontrol to confir m your selection , the dis play will show “Pr eset # saved” (F. 9)
4. To recall a preset statio n, first press the MEMORY b utton onc e, then rotate the OK contro l to s croll
up or do wn the pres ets that yo u have stor ed. When th e display s hows your d esired pr eset number,
stop your rotation of the control. If the preset has n't bee n alloc ated a st ation , the dis play wi ll show
“Empty pres et #”.
FACTORY RES E T
When you mov e th e radio to another part of the countr y, your pre -tuned and stor ed D AB s tations may no
longer be avail able. If th is is the case th en you will ne ed to reset your radio back to its original facto ry
settings; t o perform a factor y reset, please do t he following:
1. Plug the radi o to mains and press t he button to turn th e radio o n.
2. Press and hol d the MENU button un til the display sh ows “Pr ess SELECT to c onfir m reset”.
3. Release the MENU but ton and press on the OK control once, the dis play will fir st show “Restarting
…” and after th e reset is complet ed, the radio will g o to stan dby.
4. Press the butt on to tur n the radio on a gain, i t will then automatic ally en ter int o the DAB mode a nd
perform auto scan function. After the s can has finis hed, the radio wil l s elect and display the first
alphanume rically found st ation.
Note: All of your sto red DAB & FM presets w ill be lost once the r eset has taken pla ce.
F6 F7
F8
F9
Page 13

UK-5
AL A RM FU NCT I ON
This radio ca n be used as a s tandard “Radio Al arm Cloc k”. You can use the ala rm funct ion to wake you to
an ele ctronic buzzer tone or to yo ur f avour ite radio (DA B/FM). The alar m can be set in eithe r st andby or
during oper ation.
Setting the alarm time and wake -up mode
1. Dep ress an d hold the ALARM bu tton un til the dis play sh ows “Alarm Setti ng”.
2. Rotate the OK c ontrol followe d by pressing on the s ame con trol to adjust you r desired alarm ti me -
first set the h our and then the min ute. (F. 10)
3. Finally pr ess th e OK control to confi rm and the al arm time is set and you will enter into t he wake-up
mode settin gs.
4. Rotate the OK con trol follo wed b y pressing on the same contr ol to adjust the w ake-up mod e set tings
- f irst s et the DAB Prese t (1-10) a nd the FM P reset (1-10 ), the n the Buzz er Tone ( 1 or 2), fi nally the
Alarm Volume L evel (1-20). (F.11)
5. Afte r the s etting of the a larm volume le vel, the wake- up mode settin gs are complet ed and the alarm
function is r eady for you to acti vate.
Activatin g the alarm functi on
1. To activa te the al arm funct ion, re peatedly press t he ALARM button, t he alarm wake-up m ode wil l be
displayed a nd change in the bel ow sequ ence on every pres s:
2. Wh en th e dis play shows your desi red a larm wake-up mode, release the button, the alarm function is
now activat ed and the alarm ico n will be displaye d.
3. When th e alarm time arrives, the selected wake-up m ode will be on and the alarm icon i n the di splay
will flash to i ndicate the alar m is triggered. To stop th e alarm sooner, pre ss the bu tton.
4. To check the alar m status, press th e ALARM button onc e and the a larm status will b e displayed.
Note: If you have acti vated the alarm fun ction and the wake-up mode is DAB or FM , ma ke s ure that the
alarm volum e level is set at a suffic ient level for you t o hear.
Automatic Alarm Repeat
The alar m wi ll automati cally repeat ea ch d ay a t the sele cted time as long as t he alarm icon is d isplayed.
To cancel this fu nction, repeat edly press the ALA RM butt on until the displ ay shows “Alarm off” .
SN O OZE F UNC T IO N
When the alarm has t riggered, pres s the SNOOZE but ton wil l tempo rary sw itch off th e alarm f or 5 minutes.
A small “ z” icon wil l appear by t he side of th e alarm ico n to indica te snooze o n. T his is repe atable in t he
one hour alar m duration.
SL E EP FU NCT I ON
This functi on allows you to pro gram the radio to sw itch off itself afte r a set per iod of time .
1. To activa te the sleep funct ion, re peatedly press t he SLEEP button, t he display will sh ow “Sle ep
Timer” and t he time will chang e in the be low sequence on ev ery press:
2. When your desired sleep time appears in the di splay, relea se the button, the sleep f unction w ill be
confirmed i n two s econd s. A small “s” icon will appear in the di splay t o indicate s leep ti mer on. W hen
the sleep tim e counts to zero, th e unit will go off.
3. To p ut the sleep fun ction off, press the SLEEP button again and the “s ” icon in the display wi ll
disappear.
4. To che ck the sl eep timer status, repeatedly press the INFO button until you see the sl eep timer
informati on appears in the di splay.
F10
F11
Alarm Off
DAB Preset # FM Preset # Buzzer Tone #
90 8 0 7 0 60 30 1 0
Page 14

UK-6
DI S PLAY BAC KL I GHT
There are fou r backlight leve ls for you to set indi vidua lly in standby and o peration.
To set the backlight, repeatedly pr ess the BACKLI GHT bu tton and the br ightness of th e display will
change in the b elow sequence on e very pr ess:
Backlight off > Backlight 01 > Ba cklight 02 > Backl ight 03 > Backligh t off >……
During stan dby, the backlight wi ll be turned on to ful l brightness for 5 s econd s on every key press .
Note: The display bac klight level is defaul ted to “Backli ght 01” in standby and “Backlight 03” during
operation . Th is is resumed only w hen the factory re set has taken plac e.
HE A DPH ONE J AC K
A 3. 5mm type stereo head phone jack is locate d at the back of the unit. Connect a set of s tereo
headphone s (not in cluded) to this jack for private listening with out dist urbing others . The speaker is
automatic ally disconnec ted when the headp hones a re in use.
IMPO RTANT: Whe n us ing headp hones alw ays set the volume to a low level before you put the
headphone s on. The n insert the h eadphones and graduall y increase t he volume to a comf ortable list ening
level.
SP E CIF ICAT I ON
OUTP UT POWER : 5 W
FREQUENCY RAN GE : DAB 174 - 24 0 MHz
FM 87. 5 - 108 MHz
UNIT DIM ENSIO N : 115 (L) x 128 (W) x 19 0 (H) mm
WEIG HT: 1.17kg
SPECIFICATION SUBJECT TO CH ANGE WITHOUT FUR THER NOTICE.
POWE R SUPPLY: AC/DC ADAPTOR INPU T: AC 100-240V ~60/50Hz OUTPU T: DC 12V 1.5A
Page 15

ALL RIGHTS RESERVED, COPYRIGHT DENVER ELECTRONICS A/S,
www.denver -electronics .com
www.facebo ok.com/denve relectronics
Electric an d electronic equ ipment and inclu ded bat teries contain s materials, com ponen ts and substance s
that can be haz ardous to your hea lth and the enviro nment , if the waste mater ial (discarded e lectric and
electroni c equipment and ba tteries) is not ha ndled c orrectly.
Electric an d electronic equ ipment and batte ries is m arked with the cro ssed out trash can s ymbol, seen
below. Th is symb ol signifies tha t electric and ele ctronic equipm ent and b atteries shoul d not be disposed
of with other h ousehold waste , but should be disp osed of s eparately.
As the e nd user i t is important tha t you submit your us ed batteries to th e appro riate and design ated
facility. In this manner yo u make su re that the batter ies are recycled i n accor dance with legis lature and
will not harm t he environment .
All cities ha ve established c ollection poin ts, whe re electric and el ectronic equip ment an d batteri es can
either be sub mitted free of cha rge at recycling s tatio ns and other colle ction sites, or be c ollected from th e
household s. Additional inf ormation is avai lable a t the technical de partment of your c ity.
Imported by :
Inte r Sales A/ S
Stavneage rvej 22
8250 Egaa
Denmark
UK-7
Page 16

DAB Radio Signal
Please notice that DAB signal can be weaken MUCH depending on the type of
building you are living in. (fx. It can be hard to catch proper signal when being in a
concrete building.)
Signal can also be different in different areas of the country. Please check your local
transmitter to get the best signal in your area.
Vær opmærks om på at det kan påvirke DAB signalet MEGET hvilken type bygning
man bor i. Det kan f.eks. være svært at få et ordentligt signal hvis man bor i beton
byggeri.
Der er også forskel på hvor god dækningen er i forskellige områder. Tjek nyeste
dækningskort på
www.dabradio.dk under ”hvad er digital radio”.
 Loading...