

Denver CRI-820 Instruction Manual
MODEL : CRI-820
www.denver-electronics.com

DENVER
PLL CLOCK RADIO
with iPOD docking
Model : CRI-820
INSTRUCTION MANUAL
Note: Please read and follow these instructions before using your unit.
WARNING
TO PREVENT ELECTRIC SHOCK; DO NOT USE THIS PLUG WITH AN EXTENSION CORD RECEPTACLE
OR OTHER OUTLET UNLESS THE BLADES CAN BE FULLY INSERTED TO PREVENT BLADES
EXPLOSURE.
TO PREVENT FIRE OR SHOCK HAZARD; DO NOT EXPOSE THIS APPLIANCE TO RAIN OR MOISTURE.
CAUTION
RISK OF ELECTRIC SHOCK
DO NOT OPEN
The lighting flash with
arrowhead symbol, with an
equilateral triangle is
intended to alert the user to
the presence of uninsulated
dangerous voltage within the
products enclosure that may
be of sufficient magnitude to
constitute a risk of electric
shock to persons.
CAUTION: TO REDUCE THE
RISK OF ELECTRIC SHOCK,
DO NOT REMOVE COVER
(OR BACK). NO USER
SERVICEABLE PARTS
INSIDE REFER SERVICING
TO QUALIFIED SERVICE
PERSONNEL.
The exclamation point within
an equilateral triangle is
intended to alert the user to
the presence of important
operating and maintenance
(servicing) instruction in the
literature accompanying the
appliance.
- EN 1 -
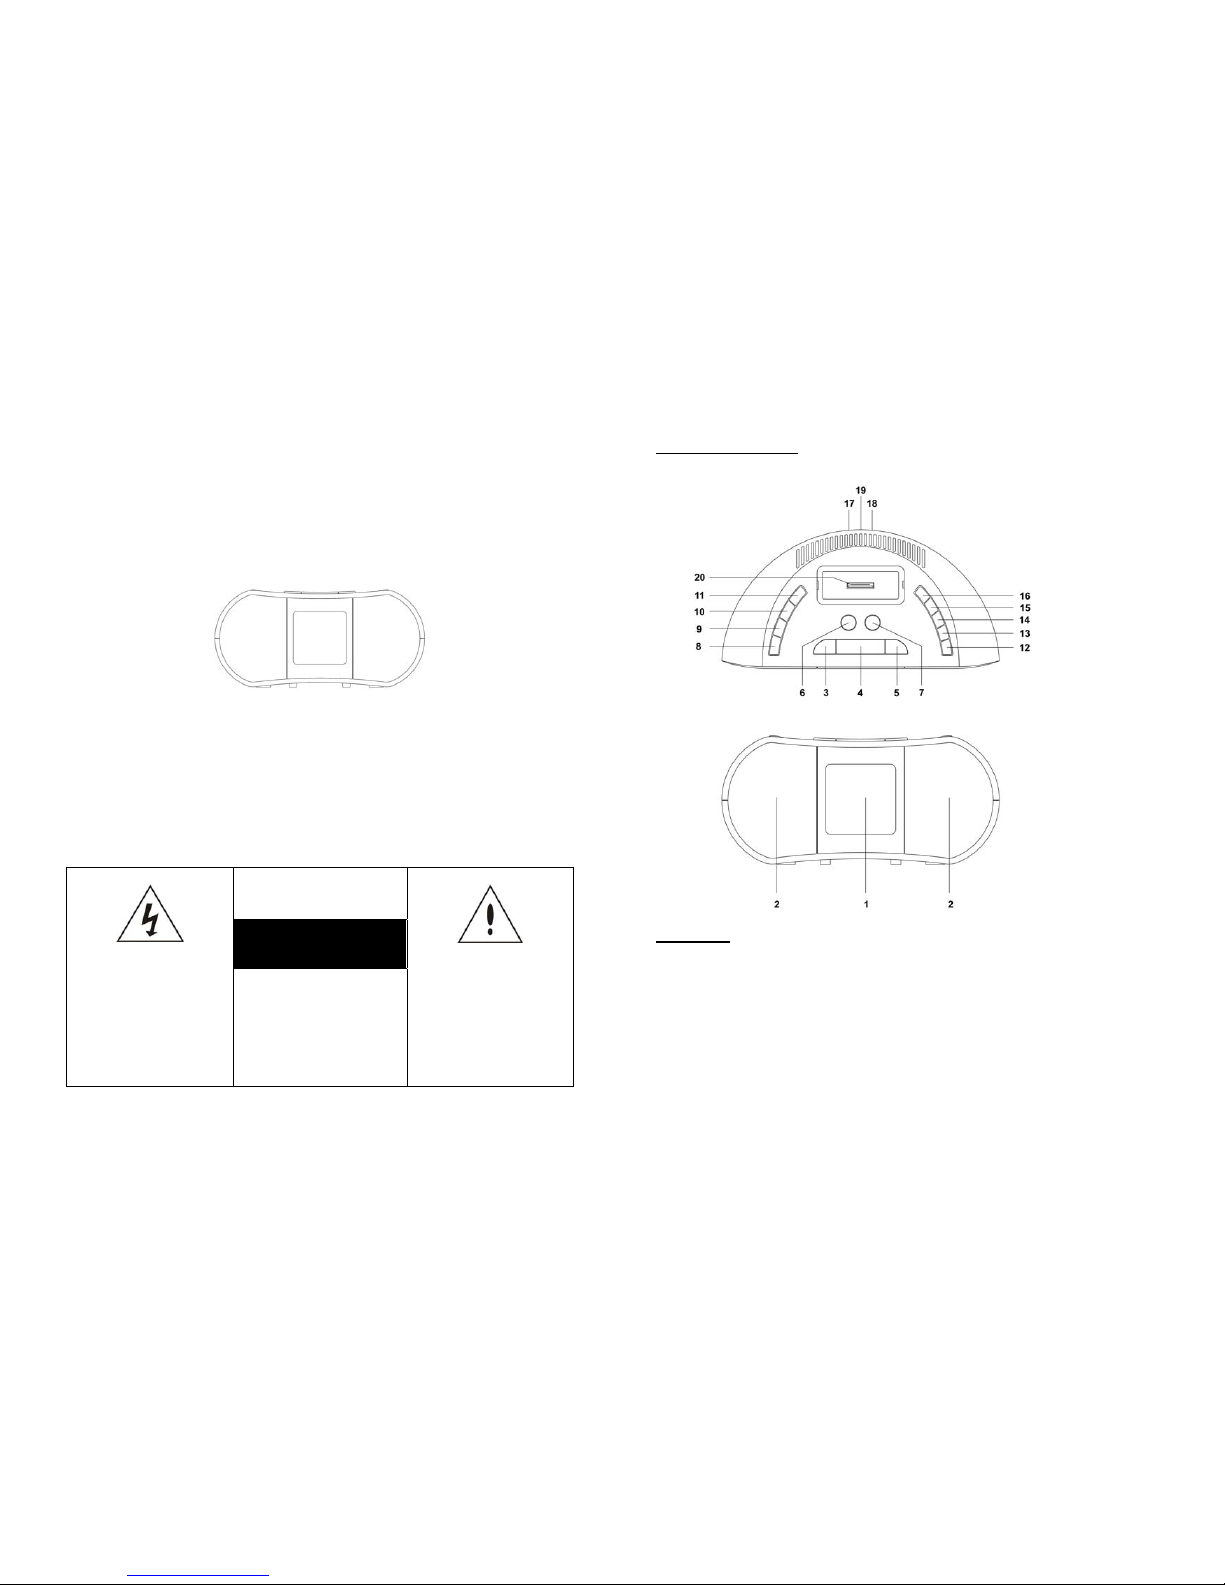
LOCATION OF CONTROLS
QUICK REFERENCE
1. LCD DISPLAY
y Display the time and the current information.
2. SPEAKERS
y Sound output.
3. MENU
y In iPod mode, use this button to go to the iPod Menu Page.
4. SNOOZE/SLEEP
y Use this button to delay the ALARM for 10 additional minute after the ALARM sound.
y Use this button to set the SLEEP timer between 10 and 90 minutes in 10 minutes
increments.
- EN 2 -

5. SELECT BUTTON
y In iPod mode, use this button to confirm the selection.
6. VOLUME -
y Use this button to decrease the volume.
7. VOLUME +
y Use this button to increase the volume.
8. MEMORY/TIME
y In Radio mode, use this button to store the radio stations in the memory
y In Clock mode, use this button to adjust the clock.
9. BAND
y In Radio mode, use this button to select AM or FM broadcasting.
y In Clock mode, use this button to select 12 hours or 24 hours time mode.
10. FUNCTION/DIM
y Use this button to select the radio, aux-in or iPod docking.
y Use this button to change the brightness of the display.
11. POWER/ON OFF
y Use this button to turn on or turn off the unit.
12. PLAY/PAUSE
y In iPod mode, use this button to play or pause the iPod.
13. TUN+/SKIP+
y In Radio mode, use this button to search the radio station in upward direction.
y In iPod mode, use this button to go to the next track.
14. TUN-/SKIP-
y In Radio mode, use this button to search the radio station in backward direction.
y In iPod mode, use this button to go back to the beginning of the track being played or go
back to the previous track.
15. MEM+/AL1/SCROLL+
y In Radio mode, use this button to select the memory station upward.
y In Clock mode, use this button to set the Alarm 1.
y In iPod mode, use this button to scroll the menu upward.
16. MEM-/AL2/SCROLL-
y In Radio mode, use this button to select the memory station backward.
y In Clock mode, use this button to set the Alarm 2.
y In iPod mode, use this button to scroll the menu backward.
17. AUX-IN JACK
y Connect the unit to the other audio devices.
18. DC JACK
y Terminal for connecting the unit to a standard AC outlet via the AC/DC adaptor.
19. RESET BUTTON
y Press this button by using a paper clip or like object to restore the unit to its default
settings.
20. iPOD DOCKING
y Connection to the iPod.
- EN 3 -
CONNECTING THE UNIT TO POWER
Plug one end of the AC adaptor into the DC power Input, and then plug the other end into AC
wall outlet. Before switching on the unit, make sure that the voltage of your electricity supply is
the same as that indicated on the rating plate.
BATTERY BACKUP
Insert two AA size batteries into the battery compartment of the unit. Be sure to observe the
proper polarity (the "+" and "-" signs) as indicated inside the battery compartment.
In case of power failure or interrupted AC power, the current time and alarm time settings, the
stored radio stations are preserved in the memory of the unit by means of battery back-up
function.
SETTING THE CLOCK
1. With the unit powered off, press and hold the MEMORY/TIME button. The hour digit will
begin to flash on the LCD display.
2. Use the TUN+/SKIP+ button or the TUN-/SKIP- button to adjust the hour.
3. When the correct hour is selected, press the MEMORY/TIME button again, the minute digit
will begin to flash.
4. Use the TUN+/SKIP+ button or the TUN-/SKIP- button to adjust the minute.
5. When the correct time is selected, press the MEMORY/TIME button again
SETTING THE ALARMS
1. With the unit powered off, press and hold the AL1 or AL2 button. The alarm time hour digit
will begin to flash on the LCD display.
2. Use the TUN+/SKIP+ button or the TUN-/SKIP- button to adjust the hour.
3. When the correct hour is selected, press the AL1 or AL2 button again, the alarm time
minute digit will begin to flash.
4. Use the TUN+/SKIP+ or TUN-/SKIP- button to set AL2 button to adjust the minute.
5. When the correct minute is selected, press AL1 or AL2 button again to confirm the alarm
time set.
WAKE UP TO RADIO
1. With the unit powered off, press the AL1 or AL2 button until the following icon appears on
the LCD display.
2. At the alarm time set, the alarm will activate by radio.
3. To stop the alarm temporary, press the snooze button.
4. The alarm will activate again after 9 minutes.
5. To turn off the alarm, press the POWER ON/OFF button.
- EN 4 -

WAKE UP TO BUZZER
1. With the unit powered off, press the AL1 or AL2 button until the following icon appears on
the LCD display.
2. At the alarm time set, the alarm will activate by buzzer.
3. To stop the alarm temporary, press the snooze button.
4. The alarm will activate again after 9 minutes.
5. To turn off the alarm, press the POWER ON/OFF button.
WAKE UP TO iPOD
1. With the unit powered off, press the AL1 or AL2 button until the following icon appears on
the LCD display.
2. Connect the iPod to the docking connector and turn off the iPod
3. At the alarm time set, the alarm will activate by iPod.
4. To stop the alarm temporary, press the snooze button.
5. The alarm will activate again after 9 minutes.
6. To turn off the alarm, press the POWER ON/OFF button.
LISTENING TO THE AM/FM RADIO
1. Press the POWER ON/OFF button to turn on the unit.
2. Press the BAND button to select AM or FM band.
3. Press the TUN+
or TUN- buttons step by step to tune to the desired radio stations.
4. Press and hold the TUN+ or TUN- button for approx. 1 second, it will start to search the next
radio station in the direction of the search. The search operation simply finds stations with
strong signals. Stations with weak reception can only be tuned in manually.
SAVING A RADIO STATION TO THE MEMORY
1. Tune the radio to the desired station.
2. Press the MEM/TIME button, then MEM+ or MEM- button to select a memory slot for the
current station. Press the MEM/TIME button after the desired memory slot is chosen.
3. Press the MEM+ or MEM- buttons to cycle through the saved radio stations on the unit.
4. Up to 20 radio stations can be stored in the memory.
LISTENING TO iPOD WITH DOCKING CONNECTOR
Warning : Turn off your iPod before docking on the unit
1. Press the FUNCTION button to select iPOD mode.
2. Connect the iPod to the docking connector.
3. You can use the PLAY/PAUSE button, MENU button, SELECT button, SKIP+ button, SKIPbutton, SCROLL+ and SCROLL- button on the unit to operate your iPod.
4. Your iPod recharges (until fully charged) while it is docked in the unit and the unit is
connected to AC or battery power.
Warning : Please make sure you are using the correct adaptor for your iPod and that it is properly
docked into the unit. Failure to do so may damage your iPod.
- EN 5 -
AUX-IN CONNECTION
1. Insert one side of the audio cable into the Line-Out or Phone jack on your MP3 Player or
audio device and the other side into the AUX-IN jack.
2. Use the FUNCTION button to select the AUX mode.
3. Turn on your MP3 player or audio device and follow the component’s instructions.
Specifications
Dimension : 232 (W) x 105 (H) x 116 (D) mm
Frequency Range: AM 520 - 1650 KHz
FM 88 - 108 MHz
Power Supply: Input : AC 230V ~ 50 Hz
Output : DC12V 700mA
Specifications are subject to change without prior notice.
Instructions on environment protection
Do not dispose of this product in the usual household garbage at the end of
its lifecycle; hand it over at a collection point for the recycling of electrical and
electronic appliances. The symbol on the product, the instructions for use or
the packing will inform about the methods for disposal.
The materials are recyclable as mentioned in this marking. By recycling,
material recycling or other forms of re-utilization of old appliances, you are
making an important contribution to protect our environment.
Please inquire at the community administration for the authorized disposal
location.
ALL RIGHTS RESERVED
DENVER ELECTRONICS A/S
www.denver-electronics.com
- EN 6 -
DENVER
PLL-KELLORADIO
iPod-telakointiasemalla
Malli: CRI-820
KÄYTTÖOHJE
Huom: Lue nämä ohjeet ennen laitteen käyttöä ja noudata niitä.
VAROITUS
SÄHKÖISKUVAARA: PISTOTULPPAA EI SAA KÄYTTÄÄ SELLAISEN JATKOJOHDON TAI
PISTORASIAN KANSSA, JOHON PISTOTULPPA EI MAHDU KOKONAAN JA TAPIT JÄÄVÄT
NÄKYVIIN.
ÄLÄ ALTISTA LAITETT A SATEELLE T AI KOSTEUDELLE TULIPALO- TAI SÄHKÖISKUV AARAN
VÄLTTÄMISEKSI.
VA ARA
SÄHKÖISKUVAARA
ÄLÄ AVAA
Symboli, jossa on salama
kolmion sisällä, varoittaa
käyttäjää suojaamattomasta,
vaarallisesta
sähköjännitteestä laitteen
sisällä. Tämä sähköjännite
on tarpeeksi suuri
aiheuttamaan
sähköiskuvaaran.
VAARA: ÄLÄ POISTA KOTELOA
(TAI TAKAPANEELIA)
SÄHKÖISKUVAARAN
VÄLTTÄMISEKSI. SISÄLLÄ EI
OLE KÄYTTÄJÄN
HUOLLETTAVISSA OLEVIA OSIA.
LAITTEEN HUOLTO TULEE
OHJATA PÄTEVÄLLE
HUOLTOHENKILÖKUNNALLE.
Symbolilla, jossa on
huutomerkki kolmion sisällä,
kiinnitetään käyttäjän huomio
tärkeisiin käyttö- ja
huolto-ohjeisiin laitteen
mukana tulevissa
dokumenteissa.
Virtakaapelin/pistotulpan on oltava helposti käytettävissä/irrotettavissa.
- FN 1 -
HALLINTAPAINIKKEET
PIKAOHJEET
1. LCD-NÄYTTÖ
y Näyttää ajan ja nykyiset tiedot.
2. KAIUTTIMET
y Äänen ulostulo
3. VALIKKO
y Avaa iPodin valikko iPod-tilassa.
4. TORKKU/UNIAJASTUS
y Viivytä painikkeella HERÄTYSTÄ 10 minuutin ajan HERÄTYKSEN alettua.
y Aseta painikkeella UNIAJASTUS 10 minuutin väliajoin 10 - 90 minuutin ajaksi.
5. VALITSE
y Vahvista valinnat iPod-tilassa.
- FN 2 -

6. ÄÄNENVOIMAKKUUS -
y Pienennä äänenvoimakkuutta.
7. ÄÄNENVOIMAKKUUS +
y Pienennä äänenvoimakkuutta.
8. MUISTI/AIKA
y Tallenna radioasemat muistiin radiotilassa
y Säädä kellonaikaa kellotilassa.
9. TAAJUUS
y Valitse radiotilassa AM- tai FM-taajuus.
y Valitse kellotilassa 12 tai 24 tunnin kellonajan näyttö.
10. TOIMINTO/HIMMENNYS
y Valitse radio, ulkoinen lisälaite (aux-in) tai iPod-telakointiasema.
y Muuta näytön kirkkautta.
11. VIRTAKYTKIN
y Kytke laite päälle ja pois päältä.
12. TOISTO/TAUKO
y Aloita toisto tai keskeytä se iPod-tilassa.
13. VIRITYS+/OHITA+
y Etsi radioasemia taajuusalueella ylöspäin radiotilassa.
y Siirry seuraavaan raitaan iPod-tilassa.
14. VIRITYS-/OHITA-
y Etsi radioasemia taajuusalueella alaspäin radiotilassa.
y Siirry toistettavan raidan alkuun tai edelliseen raitaan iPod-tilassa.
15. MUISTI+/HERÄTYS1/VIERITÄ+
y Valitse radiotilassa seuraava muistiin tallennettu radioasema.
y Aseta herätys 1 kellotilassa.
y Vieritä valikkoa ylöspäin iPod-tilassa.
16. MUISTI-/HERÄTYS2/VIERITÄ-
y Valitse radiotilassa edellinen muistiin tallennettu radioasema.
y Aseta herätys 2 kellotilassa.
y Vieritä valikkoa alaspäin iPod-tilassa.
17. AUX-IN-LIITIN
y Liitä laite muihin äänilaitteisiin.
18. DC-LIITIN
y Liitä laite normaaliin AC-pistorasiaan AC/DC-adapterin kautta.
19. NOLLAUS
y Palauta oletusasetukset painamalla tätä painiketta paperiliittimellä tai vastaavalla
esineellä.
20. iPod-TELAKOINTIASEMA
y Liitä iPod laitteeseen.
- FN 3 -
LAITTEEN LIITTÄMINEN VIRTALÄHTEESEEN
Liitä AC/DC-adapterin toinen pää DC-liittimeen. Liitä sitten pistotulppa AC-pistorasiaan. Varmista
ennen laitteen käynnistämistä, että sähkönsyöttö vastaa arvokilvessä määriteltyä sähkönsyöttöä.
PARISTOJEN KÄYTTÖ VARAVIRTANA
Pane laitteen paristokoteloon kaksi AA-paristoa. Varmista, että paristojen navat (”+” ja ”-”) ovat
paristokotelon sisällä olevien merkintöjen mukaisesti.
Sähkökatkon sattuessa tai AC-virran katketessa nykyinen aika, herätysasetukset sekä tallennetut
radioasemat jäävät muistiin paristojen toimiessa varavirtalähteenä.
KELLONAJAN ASETTAMINEN
1. Paina ja pidä alhaalla painiketta MUISTI/AIKA laitteen ollessa sammutettuna. Tunnit alkavat
vilkkua LCD-näytössä.
2. Valitse tunnit painikkeella VIRITYS+/OHITA+ tai VIRITYS-/OHITA-.
3. Kun oikea tunti on valittu, paina uudelleen painiketta MUISTI/AIKA. Minuutit alkavat vilkkua.
4. Valitse minuutit painikkeella VIRITYS+/OHITA+ tai VIRITYS-/OHITA-.
5. Kun oikea aika on valittu, paina uudelleen painiketta MUISTI/AIKA.
HERÄTYSTEN ASETTAMINEN
1. Paina ja pidä alhaalla painiketta HERÄTYS1 tai HERÄTYS2 laitteen ollessa sammutettuna.
Herätysajan tunnit alkavat vilkkua LCD-näytössä.
2. Valitse tunnit painikkeella VIRITYS+/OHITA+ tai VIRITYS-/OHITA-.
3. Kun oikea tunti on valittu, paina uudelleen painiketta HERÄTYS1 tai HERÄTYS2.
Herätysajan minuutit alkavat vilkkua.
4. Valitse minuutit painikkeella VIRITYS+/OHITA+ tai VIRITYS-/OHITA-.
5. Kun oikeat minuutit on valittu, vahvista herätysaika painamalla uudelleen painiketta
HERÄTYS1 tai HERÄTYS2.
HERÄÄMINEN RADIOON
1. Kun laite on sammuksissa, paina painiketta HERÄTYS1 tai HERÄTYS2, kunnes seuraava
symboli näkyy LCD-näytössä.
2. Kun herätysaika asetetaan, radio alkaa soida herätysajan koittaessa.
3. Pysäytä herätys toistaiseksi painamalla torkkupainiketta.
4. Herätys alkaa soida jälleen 9 minuutin päästä.
5. Sammuta herätys painamalla VIRTAKYTKINTÄ.
- FN 4 -

HERÄÄMINEN SUMMERIIN
1. Kun laite on sammuksissa, paina painiketta HERÄTYS1 tai HERÄTYS2, kunnes seuraava
symboli näkyy LCD-näytössä.
2. Kun herätysaika asetetaan, summeri alkaa soida herätysajan koittaessa.
3. Pysäytä herätys toistaiseksi painamalla torkkupainiketta.
4. Herätys alkaa soida jälleen 9 minuutin päästä.
5. Sammuta herätys painamalla VIRTAKYTKINTÄ.
HERÄÄMINEN iPodiin
1. Kun laite on sammuksissa, paina painiketta HERÄTYS1 tai HERÄTYS2, kunnes seuraava
symboli näkyy LCD-näytössä.
2. Pane iPod telakointiasemaan ja sammuta iPodin virta.
3. Kun herätysaika asetetaan, iPod alkaa soida herätysajan koittaessa.
4. Pysäytä herätys toistaiseksi painamalla torkkupainiketta.
5. Herätys alkaa soida jälleen 9 minuutin päästä.
6. Sammuta herätys painamalla VIRTAKYTKINTÄ.
AM-/FM-RADION KUUNTELEMINEN
1. Kytke laitteen virta päälle VIRTAKYTKIMELLÄ.
2. Valitse AM- tai FM-taajuus painikkeella TAAJUUS.
3. Viritä haluttu radioasema pykälä kerrallaan painamalla painiketta VIRITYS+ tai VIRITYS-.
4. Kun painat ja pidät alhaalla painikkeita VIRITYS+ tai VIRITYS- noin 1 sekunnin ajan, laite
etsii automaattisesti seuraavan radioaseman hakusuunnasta. Hakutoiminto hakee
radioasemia, joiden lähetyssignaali on vahva. Asemat, joilla on heikko lähetyssignaali,
voidaan virittää vain manuaalisesti.
RADIOASEMAN TALLENTAMINEN MUISTIIN
1. Viritä haluttu radioasema.
2. Paina painiketta MUISTI/AIKA. Valitse sitten aseman muistipaikka painikkeella MUISTI+ tai
MUISTI-. Kun muistipaikka on valittu, paina MUISTI/AIKA.
3. Valitse laitteeseen tallennetut radioasemat painikkeilla MUISTI+ tai MUISTI-.
4. Muistiin voidaan tallentaa jopa 20 radioasemaa.
iPodin KUUNTELEMINEN TELAKOINTIASEMAN KAUTTA
Varoitus: Sammuta iPod ennen sen panemista telakointiasemaan
1. Paina painiketta TOIMINTO ja valitse iPod-tila.
2. Pane iPod telakointiasemaan.
3. Käytä iPodia laitteen painikkeilla TAUKO/TOISTO, VALIKKO, VALITSE, OHITA+, OHITA-,
VIERITÄ+ ja VIERITÄ-.
4. iPod lataantuu (kunnes se on täysin latautunut), kun se on kiinni laitteen telakointiasemassa
ja laitteen virtalähteenä toimii AC-virta tai paristot.
Varoitus: Varmista, että käytät oikeaa iPodin adapteria ja että iPod on kunnolla kiinni
telakointiasemassa. Ohjeiden noudattamatta jättäminen voi vahingoittaa iPodia.
- FN 5 -
AUX-IN-LIITIN
1. Liitä audiokaapelin toinen pää MP3-soittimen tai äänilaitteen linjaulostulo- tai
kuulokeliittimeen ja toinen pää AUX-IN-liittimeen.
2. Paina painiketta TOIMINTO ja valitse AUX-tila.
3. Kytke MP3-soittimen tai äänilaitteen virta päälle ja seuraa laitteen ohjeita.
Tekniset tiedot
Mitat: 232 (L) x 105 (K) x 116 (S) mm
Taajuusalue: AM 520 - 1 650 KHz
FM 88 - 108 MHz
Virtalähde: AC 230 V - 50 Hz
Tekniset tiedot voivat muuttua ilman ennakkoilmoitusta.
Ympäristönsuojeluohjeet
Laitetta ei saa hävittää sen elinkaaren päätyttyä kotitalousjätteiden
mukana. Vie laite sähkö- ja elektroniikkalaitteiden keräyspisteeseen
kierrätettäväksi. Tuotteessa oleva merkintä, käyttöohjeet tai pakkaus
sisältävät lisäohjeita tuotteen hävittämistä varten.
Tuotteen materiaalit ovat kierrätettäviä, kuten tämä merkintä osoittaa.
Kierrättämällä materiaaleja tai käyttämällä vanhoja laitteita muutoin
uudestaan suojelet merkittävästi ympäristöä.
Lisätietoja keräyspisteistä saat kunnalta.
KAIKKI OIKEUDET PIDÄTETÄÄN
TEKIJÄNOIKEUS: DENVER ELECTRONICS A/S
www.denver-electronics.com
- FN 6 -
 Loading...