

Page 1
ACG-8050W Quick Start Guide
ENG 1
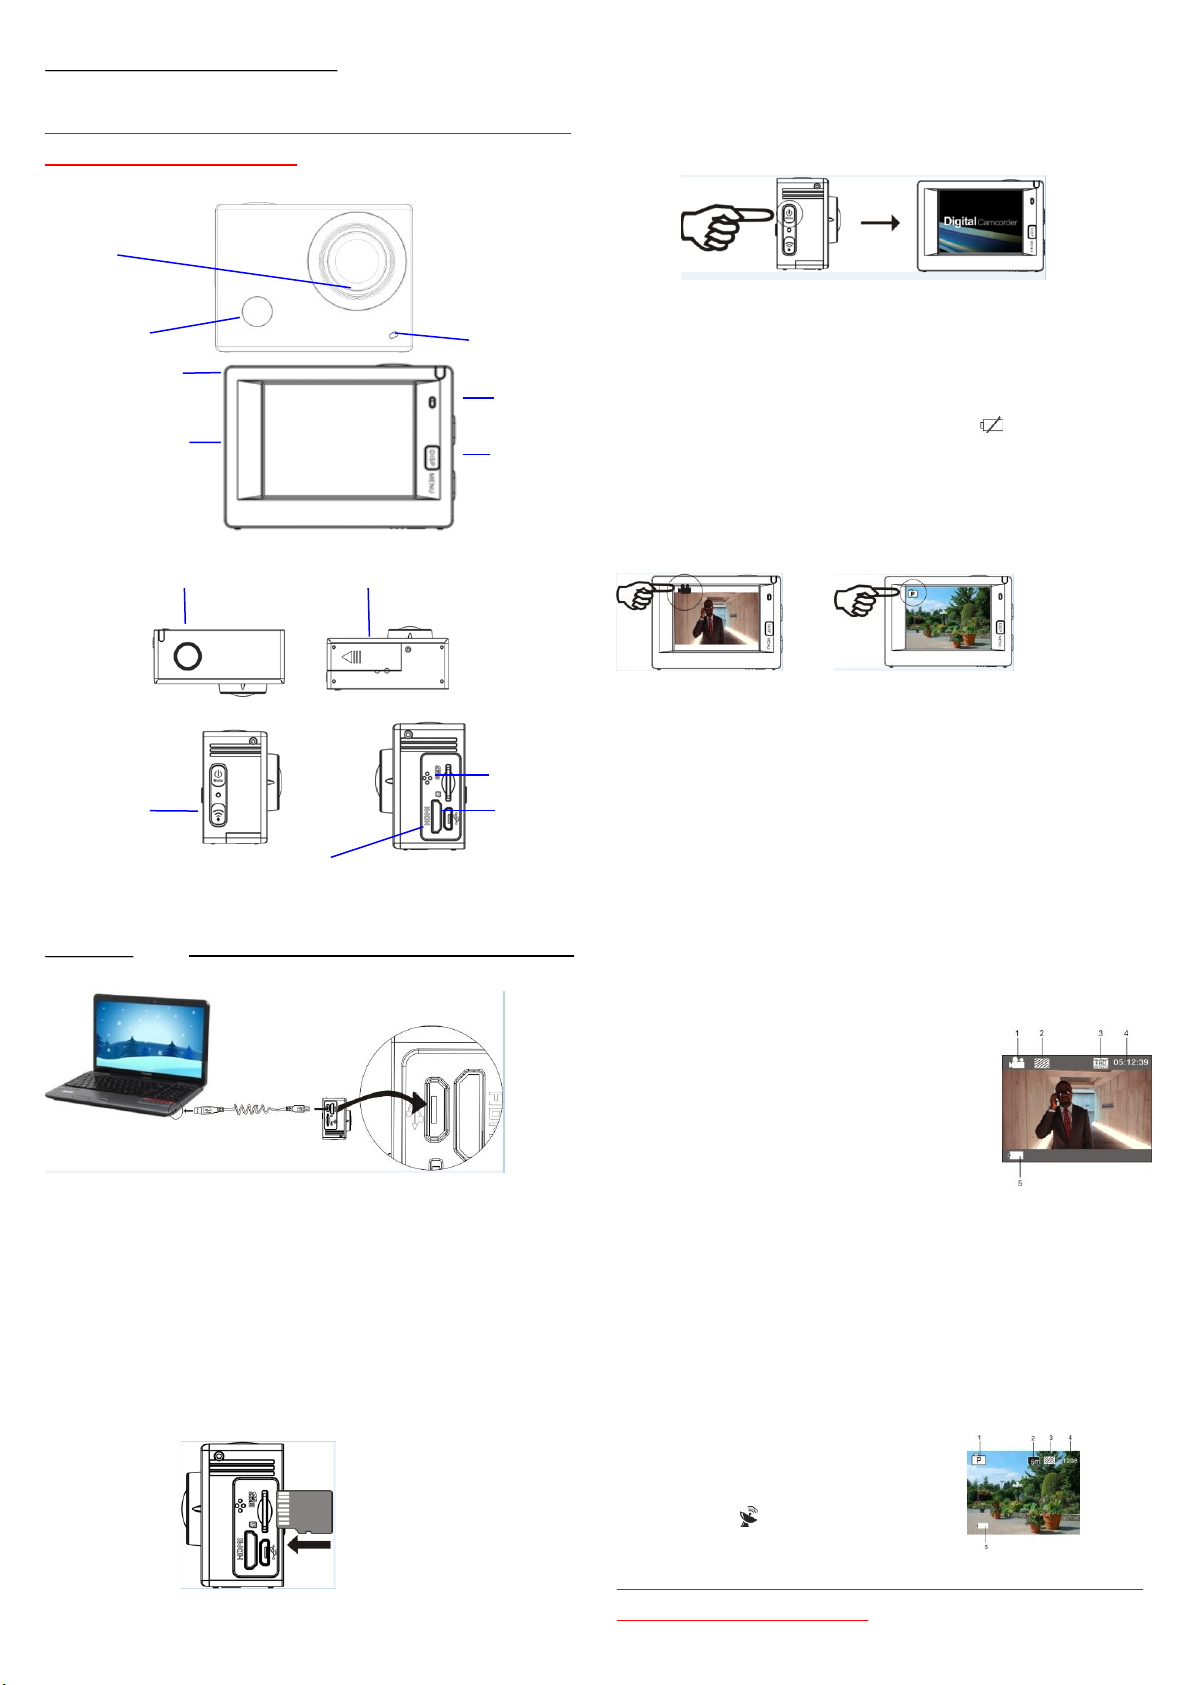
IInnttrroodduuccttiioonn ttoo aappppeeaarraannccee aanndd kkeeyyss
SSttaarrtt uussiinngg ___
_
__________
Microphone
2.0’’ HD LCD
Lens
Infrared remote
control lamp
Charging /Busy indicator
Wifi/Down key
HDMI port
Battery door
Micro SD Card
Shutter/OK key
USB cable
Micro USB port
Busy indicator
Display/Menu
key
PC software:
http://www.denver-electronics.com/pc-software-for-denveracg-8050w-gps-action-cam/
1. Charge the built-in lithium battery
Connect the camera to the computer for charging, at this time, the
charging indicator will be in blue , and it will be off after charging.
Generally, it takes 2-4 hours to charge the battery.
2. Use the storage card
2.1. Push the Micro SD card into the slot till it is in place as per the
instruction in concavely engraved words by the storage card slot.
2.2. To take out the Micro SD card, press the tail of the storage card
inwardly softly and it will be popped out.
Please notice: UHS (ultra highspeed) cards doesn’t work, as they are not
100% backward compatible
Note: There’s no built-in memory unit in the camera, so make sure to
insert a storage card into it prior to use (it is recommended that a Micro
SD card of better quality be used).
3. Power on/off
3.1 Power on: Press Power key for 3 seconds, the screen will be on and
the camera will be started.
3.2. Power off: Hold on Power key for 3 seconds when the camera is in
the idle state to turn it off.
3.3. Auto screen off: The screen will be turned off automatically when
the time that the camera is in the idle state for automatic screen off to
save power. After that, the lamp for screen off will be on.
3.4. Power off when the camera is lack of electricity. When electrical
quantity of the battery is very low, an icon of will be displayed
on the LCD screen, prompting you to charge it in time. When the icon
turns red and flickers, the camera will be turned off automatically.
4. Shift among functional modes
The camera has 3 modes, namely video recording mode, shooting mode
and replay mode. After power is on, press Power key to shift among
them.
Video recording mode Shooting mode
5. Indicator
Busy indicator (red): When the camera is busy such as recording
videos, shooting photos and turning off screen automatically, the work
indicator will flicker.
Charging indicator (blue): When it is on, the user is prompted that the
camera is being charged and it will be off after charging is completed.
6. Video recording mode
After power is on, the video camera will enter video recording mode
directly and in preview mode, press Shutter key to start video recording;
Press it again to stop shooting. If the memory card is full or electrical
quantity is low, it will also stop shooting:
Taking a photo while recording: press the Power button during recording
to take a photo. When a photo is taken, the texts “CAPTURE DONE”
will display on the screen.
1. Icon of mode, indicating video recording mode;
2. Indicate quality of video;
3. Indicate size of video, and FHD 1080P (60FPS)
/ FHD 1080P (30FPS) / HD 720P (120FPS)
/ HD 720P (60FPS) / HD 720P (30FPS) is optional;
4. Recording time, indicating recordable length of time;
5. Icon of battery, indicating current electrical quantity;
( With maximum 29 minutes video recording and then stop.Must be
started manually on the camera again.)
7. Shooting mode
After power is on, press Power key twice to enter shooting mode, and
in preview state, press Shutter key to take a photo:
1. Icon of mode, indicating the current is shooting mode;
2. Size of video, and 5M/8M//12M/16MP is optional;
3. Icon of quality of pictures;
4. Counter, indicating number of photos to be taken;
5. Icon of electrical quantity of battery.
8.GPS Mode( )use introductions:
PC software:
http://www.denver-electronics.com/pc-software-for-denveracg-8050w-gps-action-cam/
Page 2
ACG-8050W Quick Start Guide
ENG 2
Choose folder to
find your file
When start GPS function,all the video will include GPS
information:Shooting time and date, move distance, local altitude
information, calorie data, active speed, you can see all these
informations by player on PC. You can also see location in the
GPS PC Player including Google Maps.This function works only
for video.
8.1 Enter GPS mode
When you power on camera it will automatically start searcing for GPS
signal. .( )
GPS signal searching Finish GPS signal search
If the camera cannot find GPS signal, please press shutter
button,you can see the screen show ”GPS OFF”.
8.2 Recording and view
When GPS OK, press shutter button to start recording. Now you
can see the timer will start work in the top right screen(As below
picture).If you need to stop recording please press shutter again.
After finishing recording, all the GPS information will be saved
into your SD card, You can view this by GPS PC Player .
If GPS OFF, your recording files will not include GPS
information.
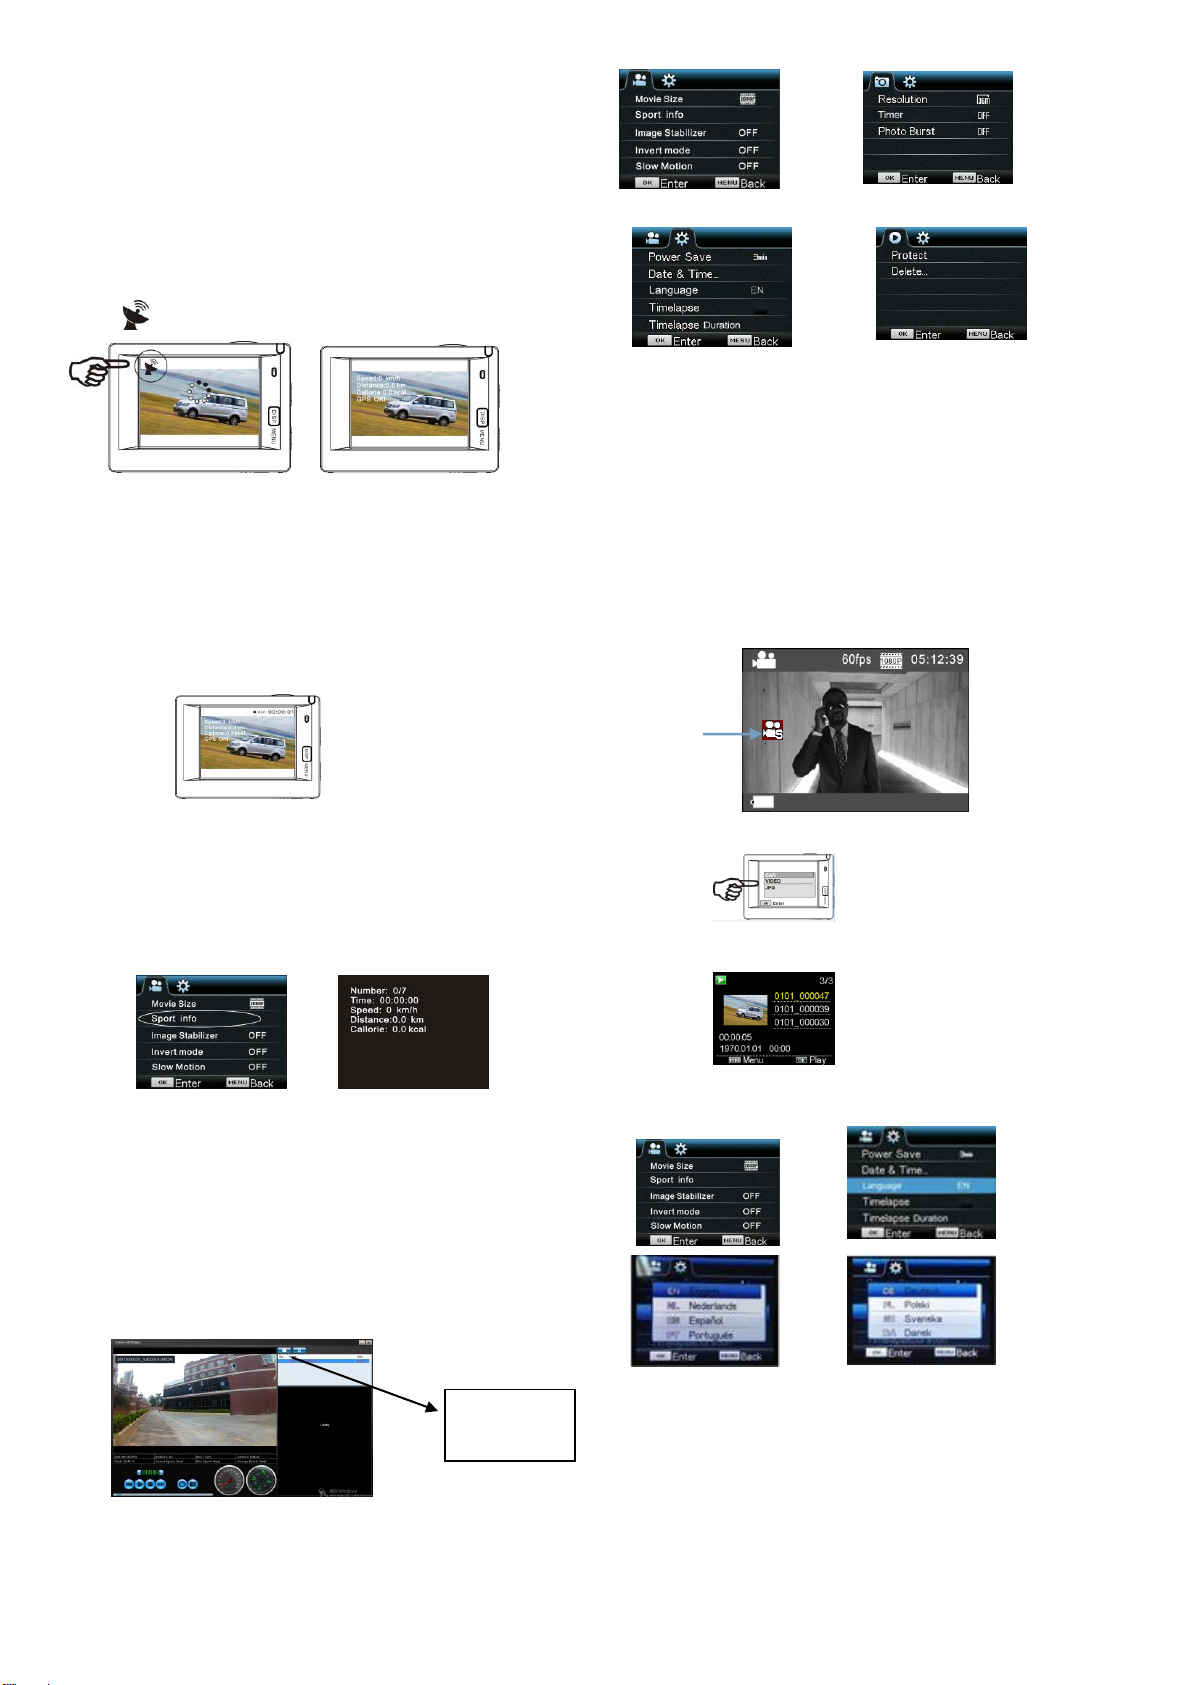
To view GPS info on camera, Please press DISP/MENU,then
choose “Sport info”,press Shutter key :
Number:Files quantities;
Time:Recording time;
Speed:Recording speed
Distance:Acftive distance
Callorie:Active expend energy data.
View video from computer.
After recording,connect camera to PC,it will enter MSDC
mode,then turn on GPS player(Please download and setup this
firmware to PC from website first)as below picture:
Note: GPS satellites is easiest to find under open sky with no tall
trees or buildings around you.
9.Menu operation
There is a different menu in each working mode as shown in the
following figures:
Menu for video recording Menu for shooting mode
Menu for setting mode Menu for replay mode
Operation: Press Menu key, the menu for this mode will be displayed on the LCD. At this time, press
Power key to move the cursor leftward or rightward and select on the menu, and press WIFI key to
move the cursor upward or downward and select on the menu in a circulating way. Press OK key to
confirm and press Menu key to return or exit from menu mode.
Description of “Slow Motion” function
Slow-Motion refers to record at normal FPS and play at lower down FPS. For example, to record a
video at 60fps, and then play the video at 30fps, you will see a slow motion.
Operation: in the menu, select “Slow Motion” and press OK to enter the sub-menu, move the cursor to
select On, then press OK to conform. You will see the following display:
Slowmotion Icon
Press the Shutter to start recording, and press Shutter again to stop;Play the slow-motion video:
Press the Power button to switch to Playback mode; select Video
Press OK to play the video in a slow-motion effect, as shown in the right picture.
10, How to change the language?
Please press the “menu” button, and then press the “power” button, you will go into the menu for
settingmode, please press “wifi ” button and then choose the “Language” , click “ok
Description of “timelapse” function
Time Lapse function is mainly used to shoot cityscape, natural scenery, astronomical
phenomena, and biological evolution. This function allows the device to take a photo
automatically according to the pre-set time interval, then create a video by collecting,
analyzing the processing these taken photos; the playing speed of the video is adjustable
through changing the interval of the frames (photos), thus to finally create a special video
effect.
Operation:
1 In the menu, select “Timelapse” and press OK to enter the sub-menu, then move the cursor to select time
Page 3
ACG-8050W Quick Start Guide
ENG 3
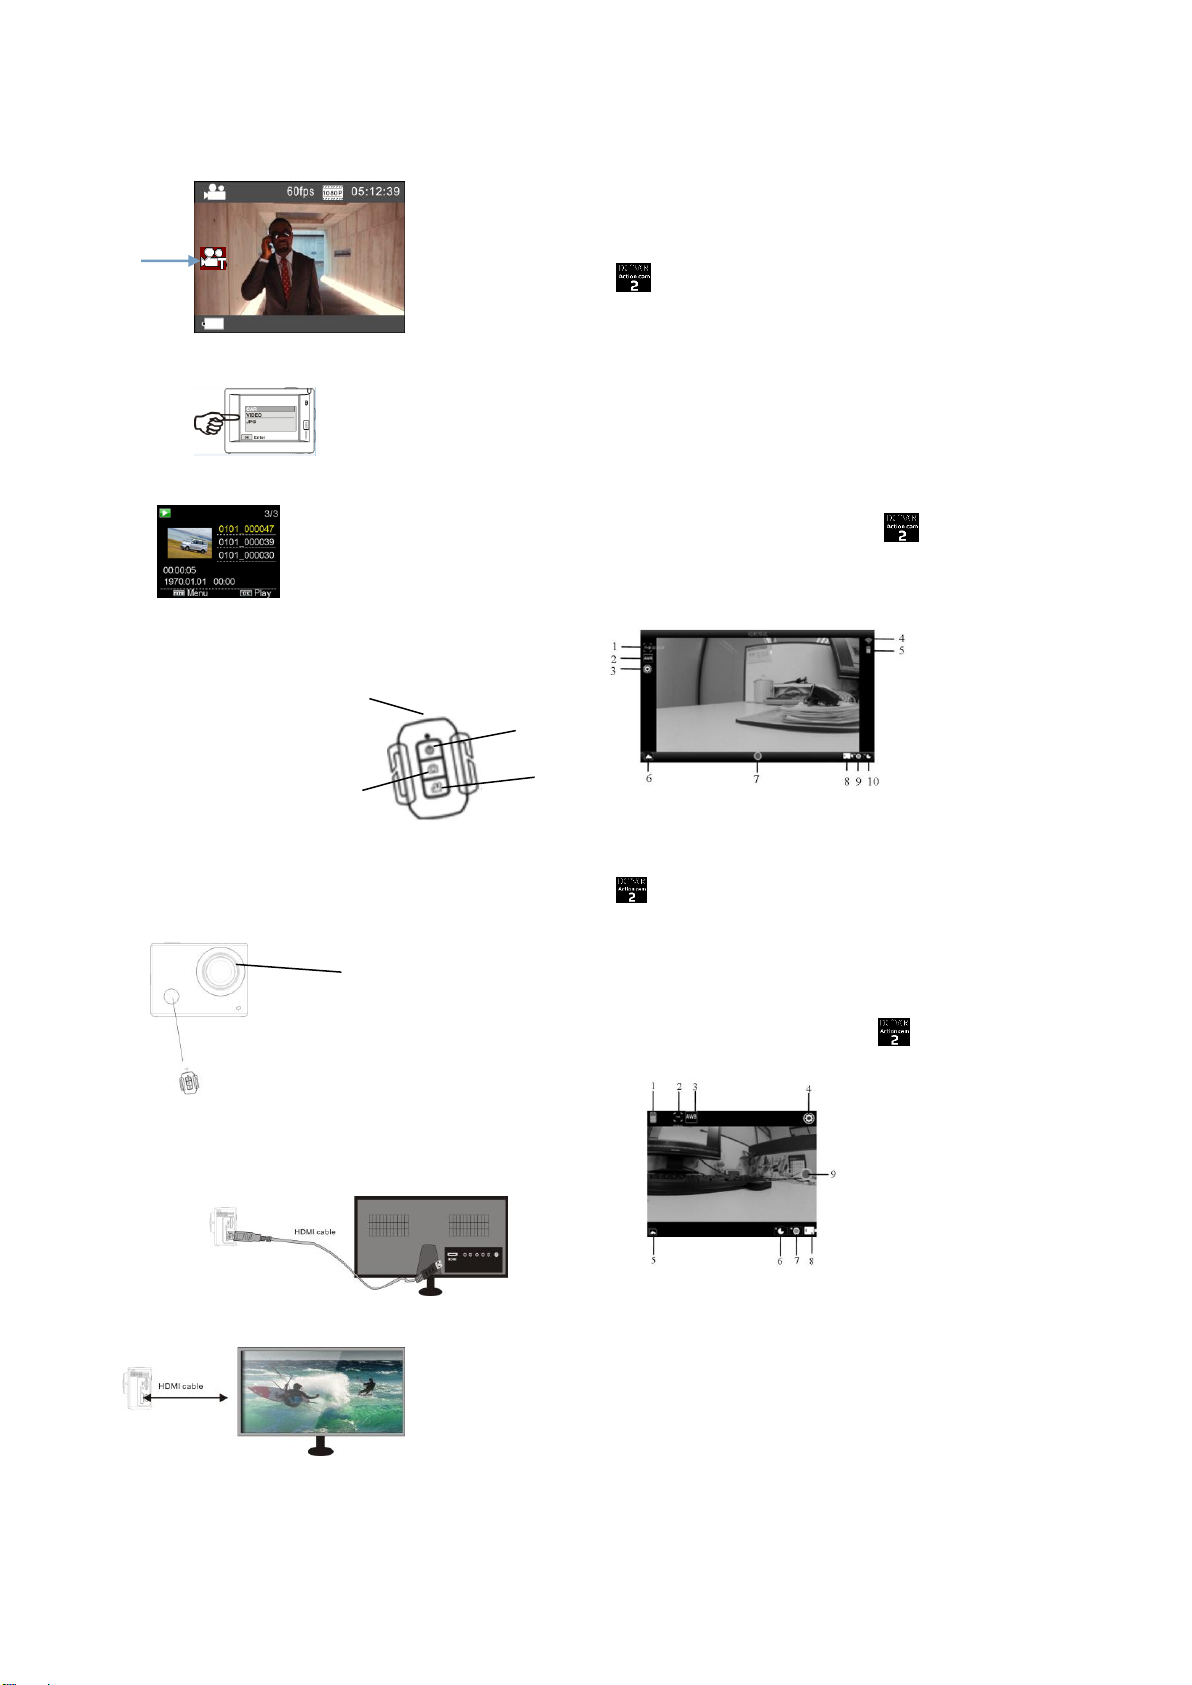
Diagram of connection
Signal transmission
Power on/off key
Video recording key
Shooting key
Signal transmission port
Infrared remote control lamp
1. Resolution
2. White Balance
3. Settings (Enter Settings Menu)
4. Wi-Fi Signal Icon
5. Camera’s Battery Status Icon
6. Enter the Playback Mode
7. Shutter Button
8.Video Mode
9. Photo Mode
10. Timelapse Mode
1. DV battery icon
2. Video resolution
3. White balance
4. Setup (enter setup menu)
5. Enter Playback mode
6. Timelapse Mode
7. Photo mode
8. Video mode
9. Shutter button
interval among 3s/5s10s30s/1min, and then press OK to confirm.
2 In the menu, select “Timelapse Duration” and press OK to enter the sub-menu, then move the cursor to
select the duration among 5min/10min/15min/20min/30min/60min/Unlimited, and the press OK to
confirm. You will see the following display:
Timelapse icon
Press the Shutter to start the Timelapse recording, and press Shutter again to stop;
Play the recorded video: press the Power button to switch to Playback mode; select Video
Press OK to play the video in a timelapse effect, as shown in the right picture.
Note: If Timelapse funcion is activated under Photo mode, the device will only take photos according to the
pre-set time interval, and will stop when reaching the set duraion. The operation is similar to Video mode.
Application of remote controller
1. Definition of keys of remote controller
Keys of remote controller are as shown
in the right figure:
2. Use of remote controller:
Using the remote controller, you can achieve functions of power on, video recording, shooting and
power off without operating on the camera. Just point the signal transmission port of the remote
controller at IR signal receiving lamp of the camera, and press corresponding keys to achieve
functions of power on, video recording, shooting and power off.
Connect device to HDTV:
Connect the video camera to an HDTV with a HD cable as shown in the following figure, display
signals in the camera will be output into the HDTV automatically, and you can browse HD videos
and photos that are recorded or taken in the HDTV.
APP (for Android and iOS System)
I. How to Obtain the APP Installation Program
1. For the Android System, you can search “DENVER ACTION CAM 2” in the Play Store to obtain
corresponding installation programs, and then you can install them according to the indicated steps .
2. For the IOS System, you can search “DENVER ACTION CAM 2” in the APP Store to obtain
corresponding installation programs, and then you can install them according to the indicated steps.
II. Camera WIFI and System Applications
Android Applications
1. Please install the DENVER ACTION CAM 2 application program (provided by the Supplier or the
Internet) for the Android mobile phone or tablet PC, and then the Display Screen will show the Icon
;
2. Insert a Storage Card into the Camera and then power it on. Press the WIFI key to conduct WIFI
connection, and the Screen of the Camera will show the WIFI signal Icon with the external screen
revealing WIFI Connecting.
3. Enable the WIFI function of the Android mobile phone or tablet PC, and try to find the AP Name
ACT-8030W; please conduct connection between them till the system reveals a successful
connection;
if you are conducting WIFI connection for the first time, please input the password: 1234567890.
4. Tap and enable the Application Program Icon on the Android mobile phone or tablet PC;
you can directly view the preview picture transmitted by the Camera (see the following picture), and
then conduct relevant operations.
IOS Applications
1. Please install the DENVER ACTION CAM 2 application program (provided by the Supplier or the
Internet) for the IOS mobile phone or tablet PC, and then the Display Screen will show the Icon
;
2. Insert a Storage Card into the Camera and then power it on. Press the WIFI key to conduct WIFI
connection, and the Screen of the Camera will show the WIFI signal Icon with the external screen
revealing WIFI Connecting.
3. Enable the WIFI function of the IOS mobile phone or tablet PC, and try to find the AP Name
DENVER ACT-8030W; please conduct connection between them till the system reveals a successful
connection;
if you are conducting WIFI connection for the first time, please input the password: 1234567890.
4. Tap and enable the Application Program Icon on the IOS mobile phone or tablet PC; you
can directly view the preview picture transmitted by the Camera (see the following picture), and then
conduct relevant operations.
Page 4
ENG 4
Warning
• Lithium battery inside!
• Do not try to open the product!
• Do not expose to heat, water, moisture, direct
sunlight!
CAUTION!
ALL RIGHTS RESERVED, COPYRIGHT
DENVER ELECTRONICS A/S
ACG-8050W Quick Start Guide
Electric and electronic equipment and included batteries contains materials, components and
substances that can be hazardous to your health and the environment, if the waste material (discarded
electric and electronic equipment and batteries) is not handled correctly.
Electric and electronic equipment and batteries is marked with the crossed out trash can symbol, seen
below. This symbol signifies that electric and electronic equipment and batteries should not be
disposed of with other household waste, but should be disposed of separately.
As the end user it is important that you submit your used batteries to the approriate and designated
facility. In this manner you make sure that the batteries are recycled in accordance with legislature
and will not harm the environment.
All cities have established collection points, where electric and electronic equipment and batteries
can either be submitted free of charge at recycling stations and other collection sites, or be collected
from the households. Additional information is available at the technical department of your city.
Hereby, Inter Sales A/S, declares that this product (ACT-8030W) is in compliance with the essential
requirements and other relevant provisions of Directive 1999/5/EC. A copy of the Declaration of
conformity may be obtained at:
Inter Sales A/S
Stavneagervej 22,
DK-8250 Egaa
Denmark
Imported by:
DENVER ELECTRONICS A/S
Stavneagervej 22
DK-8250 Egaa
Denmark
www.facebook.com/denverelectronics
 Loading...