

Page 1

Operator’s Guide
™
PowerScout
3037 Power Meter
Includes:
ViewPoint™ 4.0 Software
March 12, 2015
Find Quality Products Online at: sales@GlobalTestSupply.com
www.GlobalTestSupply.com
Page 2

Operator’s Guide: PowerScout™ Power Meters ©2015 DENT Instruments, Inc. All rights reserved.
This manual may not be reproduced or distributed without written permission from DENT Instruments.
PowerScout™, ViewPoint™, and PhaseChek™ are trademarks of DENT Instruments, Inc. Windows®,
Windows® Vista, Windows® 7, Windows® 8, Windows® XP, and Notepad® are registered trademarks of
Microsoft Corporation.
ii
Find Quality Products Online at: sales@GlobalTestSupply.com
www.GlobalTestSupply.com
Page 3

Table of Contents
INTRODUCTION .......................................................................................................................... 6
PowerScout 3037 Serial/ PowerScout 3037 Ethernet ........................................................................................6
Unpacking the Unit .................................................................................................................................. 6
Meter Anatomy ....................................................................................................................................... 8
PowerScout™ Meter Safety Summary and Specifications ....................................................................... 9
Symbols on Equipment ............................................................................................................................ 9
PowerScout™ Résumé de Sécurité et Spécifications ............................................................................. 12
Symboles des Equipements ................................................................................................................... 12
PowerScout 3037 Technical Specifications ............................................................................................ 15
PREPPING FOR FIELD INSTALLATION .............................................................................................. 17
Installing the ViewPoint Software ......................................................................................................... 17
Connecting a Communication Cable...................................................................................................... 18
Connecting and Communicating via a USB or RS-485 Adapter ........................................................................18
Connecting and Communicating via an Ethernet (TCP/IP) Connection ...........................................................23
Communications LEDs ........................................................................................................................... 26
PS3037 Serial ....................................................................................................................................................26
PS3037 Ethernet ...............................................................................................................................................26
Meter Setup ........................................................................................................................................... 27
Entering Wiring Information for an Element ...................................................................................................28
Selecting a Scalar ..............................................................................................................................................30
Comms Setup ......................................................................................................................................... 32
RS-485 Settings.................................................................................................................................................33
BACnet Device Settings ....................................................................................................................................33
Ethernet Settings ..............................................................................................................................................33
Connecting the Ports ............................................................................................................................. 33
Establishing Communication Protocol ................................................................................................... 34
Switching between BACnet and Modbus Mode ..............................................................................................34
FIELD INSTALLATION .................................................................................................................. 37
Mounting a PowerScout 3037 ............................................................................................................... 37
Wiring Connections on the PowerScout 3037 ....................................................................................... 38
Completing the Field Installation ........................................................................................................... 39
Using the Pulse Output Port Function ................................................................................................... 39
Modbus Output Port Registers ........................................................................................................................40
BACnet Output Port Objects ............................................................................................................................40
iii
Find Quality Products Online at: sales@GlobalTestSupply.com
www.GlobalTestSupply.com
Page 4

Wiring CTs .............................................................................................................................................. 41
Connecting Split-Core Style Millivolt CTs to a Load .........................................................................................42
Connecting RōCoil CTs to a Load ......................................................................................................................43
CT Wire Lead Polarity .......................................................................................................................................45
Connecting Voltage ................................................................................................................................ 45
Powering the Meter .........................................................................................................................................46
PowerScout Single-Phase Connections ............................................................................................................46
PowerScout 3037 Wiring Diagrams ....................................................................................................... 48
Three-wire Delta ..............................................................................................................................................48
Four-wire Wye ..................................................................................................................................................49
Two-wire Single Phase .....................................................................................................................................50
Three-wire Single Phase ...................................................................................................................................51
Verifying Installation with PhaseChek ................................................................................................... 52
Verifying Installation with the ViewPoint Software .............................................................................. 54
Real-Time Values ..............................................................................................................................................54
Read/Write Registers—Read/Set Objects ........................................................................................................56
Firmware ..........................................................................................................................................................58
ALL THINGS MODBUS ................................................................................................................ 60
Device Registers ...............................................................................................................................................60
Configuration Registers ....................................................................................................................................60
Pulse Output/Input Registers ...........................................................................................................................62
Absolute Measurement Registers ....................................................................................................................62
Positive Power/Energy Measurement Registers ..............................................................................................66
Negative Power/Energy Measurement Registers ............................................................................................70
Net Measurement Registers ............................................................................................................................75
Protocol Commands .........................................................................................................................................77
ALL THINGS BACNET ................................................................................................................ 81
Meter Specific Objects .....................................................................................................................................81
Configuration Objects ......................................................................................................................................81
Pulse Output/Input Objects .............................................................................................................................83
Absolute/Net Value Measurement Objects .....................................................................................................83
Positive Power/Energy Measurement Objects ................................................................................................86
Negative Power/Energy Measurement Objects ...............................................................................................87
iv
Find Quality Products Online at: sales@GlobalTestSupply.com
www.GlobalTestSupply.com
Page 5

APPENDICES ............................................................................................................................ 88
Appendix A—Additional Wiring Diagrams ............................................................................................. 88
2-CT, 3-Wire Delta ............................................................................................................................................89
3-Phase Delta with a “Wild” Leg ......................................................................................................................90
Appendix B—Connecting Multiple PowerScouts to an RS-485 Network .............................................. 91
Communication Protocol .................................................................................................................................91
Daisy Chain Layout for RS-485 Network ...........................................................................................................91
Networking Using the BACnet MS/TP/Modbus RTU Protocol .........................................................................91
Appendix C—Firmware Updates ........................................................................................................... 92
Installing Firmware Updates for the PowerScout ............................................................................................92
Downloading and Installing Firmware .............................................................................................................92
Appendix D—VERIS H8035/H8036 Emulation ....................................................................................... 93
VERIS Modbus Integer Registers ......................................................................................................................94
VERIS Multipliers ..............................................................................................................................................95
VERIS Modbus Floating Point Registers ...........................................................................................................97
Appendix E—Conversion Table............................................................................................................ 100
Decimal to Hexadecimal Conversion Table ................................................................................................... 100
Appendix F—The PS3037 Optional Visual Display ............................................................................... 102
Appendix G—Troubleshooting ............................................................................................................ 103
Troubleshooting Communication Issues ....................................................................................................... 103
FREQUENTLY ASKED QUESTIONS ................................................................................................ 105
GLOSSARY ............................................................................................................................ 107
v
Find Quality Products Online at: sales@GlobalTestSupply.com
www.GlobalTestSupply.com
Page 6
6
INTRODUCTION
PowerScout meters monitor the voltage, current, power, energy, and many other electrical parameters
on single- and three-phase electrical systems. A PowerScout meter uses direct connections to each
phase of the voltage, and uses current transformers to monitor each phase of the current. Information
on energy use, demand, power factor, line frequency, and more are derived from the voltage and
current inputs.
The communications interface to the meters is an RS-485 serial or Ethernet connection that uses the
BACnet Master Slave Token Passing (MS/TP) protocol or Modbus protocol for sending commands and
retrieving data. A separate remote terminal unit (RTU), Data Logger, or Building Management and
Control System is usually connected to the PowerScout to provide data recording and trend logging plus
a human interface or display.
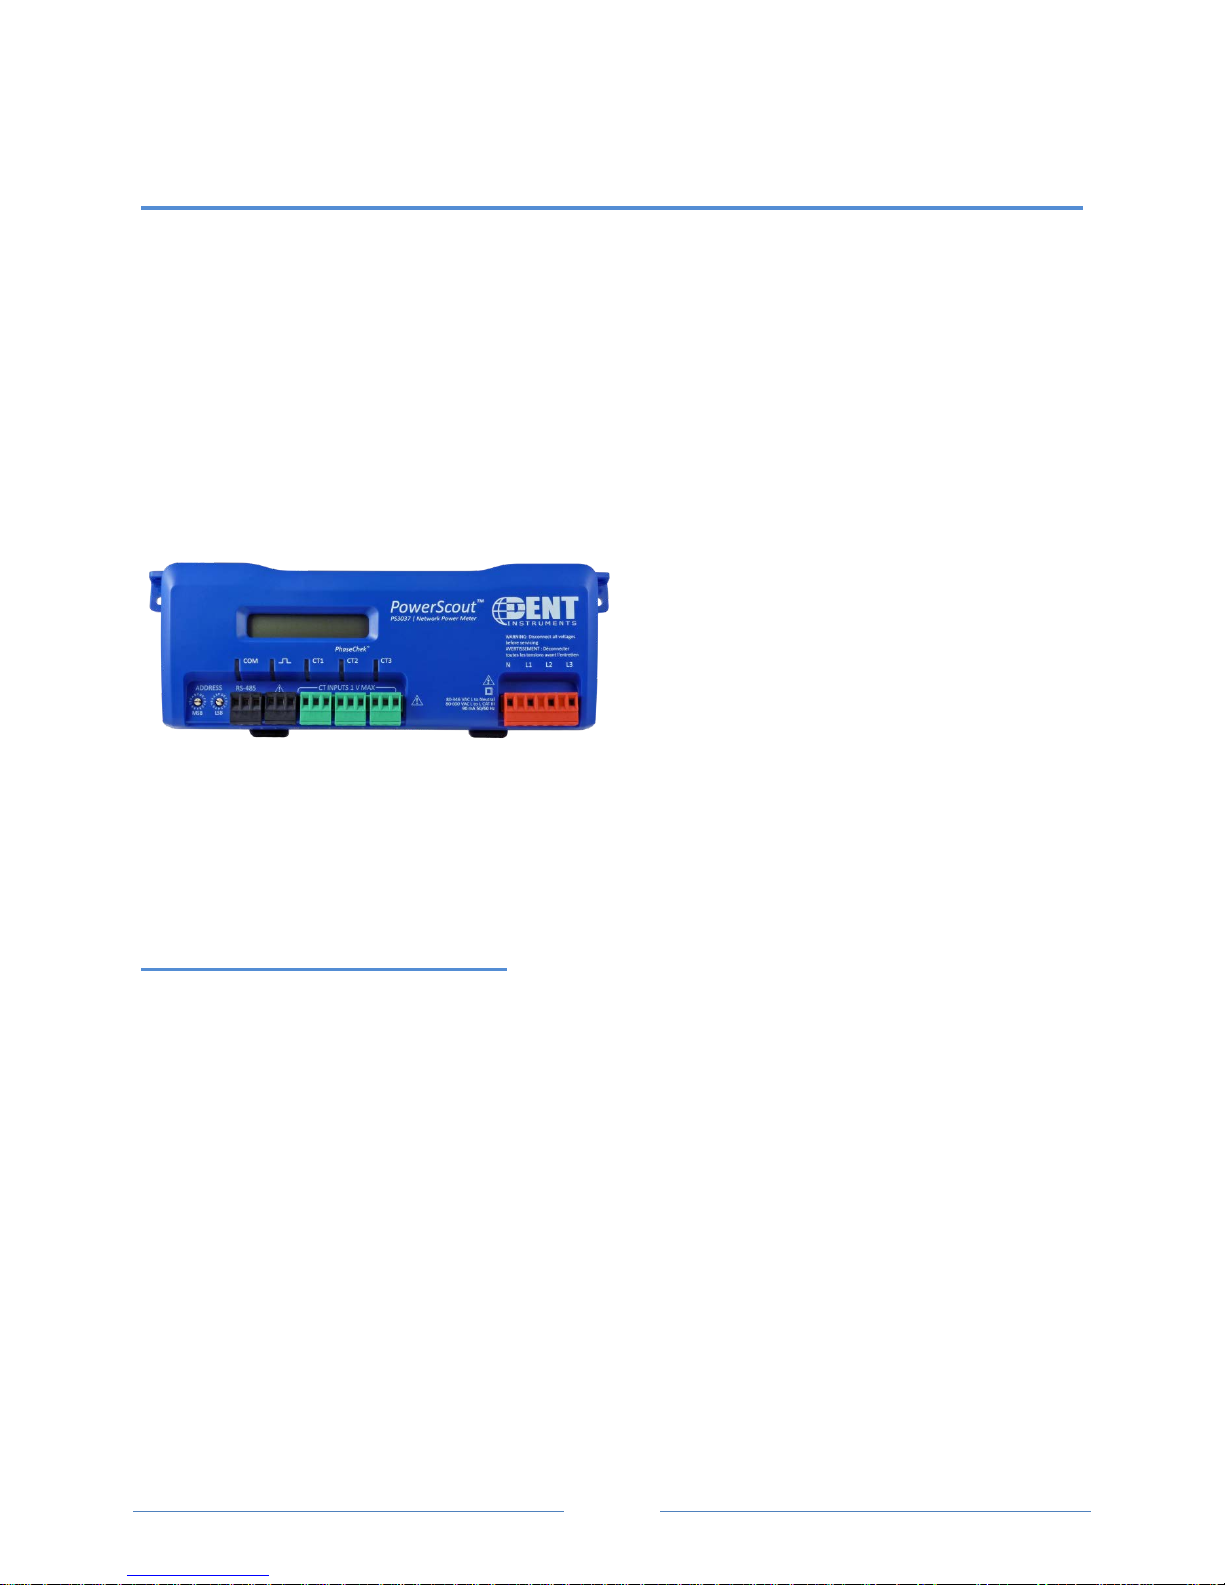
POWERSCOUT 3037 SERIAL/ POWERSCOUT 3037 ETHERNET
The PowerScout 3037 is light-weight and
compact enough to mount within an electrical
panel. It is used for long-term monitoring of
electrical systems.
Up to 127 PowerScout 3037 serial meters may be
connected to a single BACnet MS/TP network for
monitoring and recording power usage at
multiple locations within a single site. Up to 247 serial meters may be connected to a Modbus RTU
network. You may connect as many Ethernet units as equal to the amount of available IP Addresses.
There is a configurable digital pulse output port on the PowerScout 3037 that can be used to output
kWh, kVARh, or kVAh pulses to external devices, or to toggle on and off to control a remote device or
relay.
PowerScout 3037 Optional Digital
Display
An optional visual display is available on the PS3037 which cycles through meter information and realtime values of Volts, Amps, KW, KVA, KVAR, etc. See Appendix.
Unpacking the Unit
Your PowerScout meter comes with documents such as the Certificate of Calibration (COC) that has
information about the meter and is valuable for tech support. Be sure to set these documents aside in a
safe place when not in use.
If a Comm package was purchased as well, look for the ViewPoint software and the USB adapter. Verify
that all connectors are included (CT, voltage, comm, pulse).
Find Quality Products Online at: sales@GlobalTestSupply.com
www.GlobalTestSupply.com
Page 7

7
xample of a COC for a PowerScout 3037
E
Find Quality Products Online at: sales@GlobalTestSupply.com
www.GlobalTestSupply.com
Page 8
8
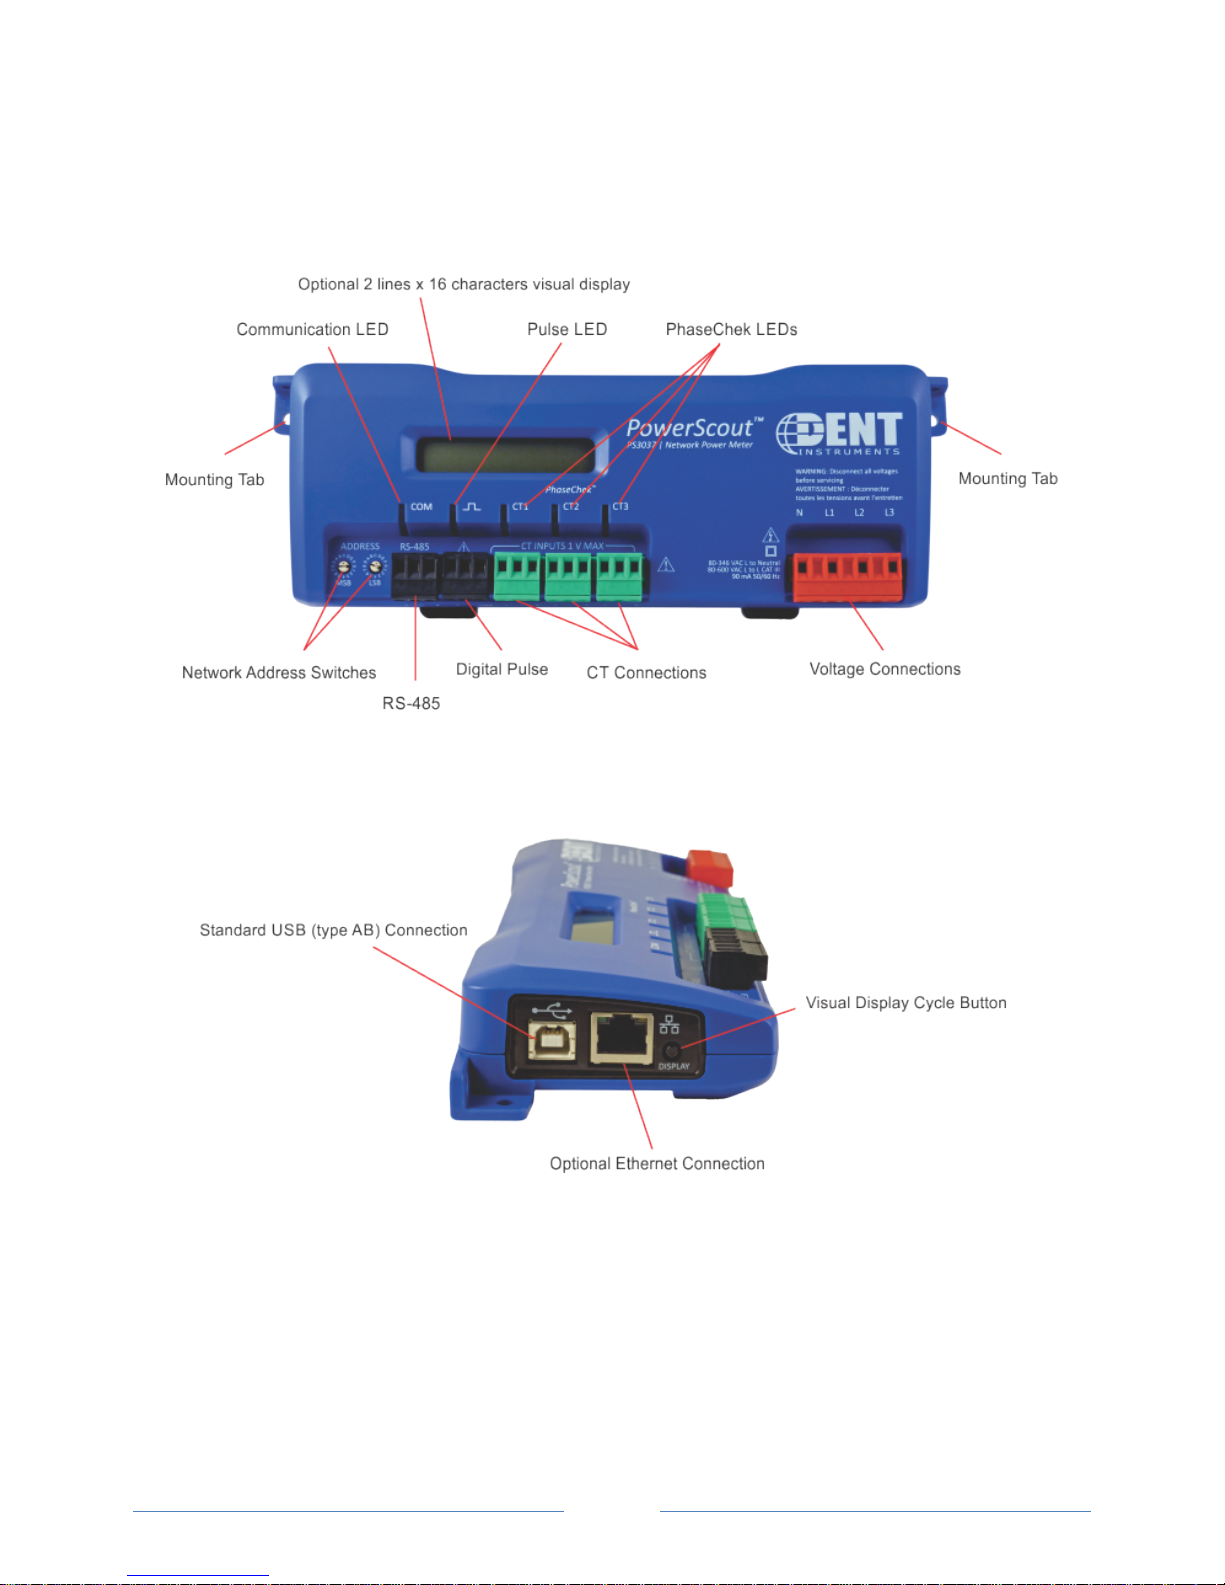
Meter Anatomy
Find Quality Products Online at: sales@GlobalTestSupply.com
www.GlobalTestSupply.com
Page 9

9
PowerScout™ Meter Safety Summary and Specifications
These items conform to the
following:
This general safety information is to
be used by both the Logger operator
and servicing personnel. DENT
Instruments, Inc. assumes no liability
for user’s failure to comply with these
safety guidelines.
The PowerScout is an Over-Voltage Category III device. Use approved rubber gloves with mechanical protection and
goggles when operating the device.
CAUTION: THIS METER MAY CONTAIN LIFE THREATENING VOLTAGES. QUALIFIED PERSONNEL MUST DISCONNECT
ALL HIGH VOLTAGE WIRING BEFORE USING OR SERVICING THE METER.
3037-S-N/PS3037-S-D/PS3037-E-N/
PS
PS3037-E-D
3037 Series:
PS
Conforms to UL Std 61010-1, 3rd
Edition & IEC 61010-2-030, 1
Edition
Certified to CSA Std C22.2 No.
61010-1, 3rd Edition
st
WARNING
Use of this device in a manner for which it is not intended may impair its means of protection.
Symbols on Equipment
Denotes caution. See manual for a description of the meanings.
When connecting the PowerScout to an AC load, follow these steps in sequence to prevent a shock hazard.
1. De-energize the circuit to be monitored.
2. Connect the CTs to the phases being monitored.
3. Connect the voltage leads to the different phases. Use proper safety equipment (gloves
and protective clothing) as required for the voltages monitored.
DENOTES HIGH VOLTAGE. RISK OF ELECTRICAL SHOCK. LIFE THREATENING VOLTAGES MAY BE PRESENT.
QUALIFIED PERSONNEL ONLY.
PS 3037 Hazardous voltage exist, there are no user serviceable parts inside. Do not open the enclosure.
DO NOT EXCEED 600V. This meter is equipped to monitor loads up to 600V. Exceeding this voltage will cause
damage to the meter and danger to the user. Always use a Potential Transformer (PT) for loads in excess of
600V. The PowerScout is a 600 Volt Over Voltage Category III device.
Find Quality Products Online at: sales@GlobalTestSupply.com
www.GlobalTestSupply.com
Page 10

10
PS3037 Pulse output: 30V max open voltage, 5mA max current.
undesired operation.
Factor) that should be ignored.
See Pulse Output.
SENSOR LIMITATIONS
USE ONLY SHUNTED CURRENT TRANSFORMERS (CTs).
Do not use other CTs. Only use shunted CTs with a 333mV maximum output only. Serious shock hazard and
logger damage can occur if unshunted CTs are used. The UL listing covers the use of the following DENT
Instruments CTs that are UL Recognized and have been evaluated to IEC 61010-1:
C
T-RGT12-XXXX-Y, CT-HSC-020-X (20A Mini), CT-HSC-050-X (50A Mini), CT
200
0
T
200A Midi), CT-Rxx-1310-U (RōCoil), CTRxx-A4-U (RōCoil), CT-CON-1000-X, and the CT-CON-0150EZ-X.
-X (
he use of any other CT will invalidate the UL Listing.
-HMC-0
100
-X (
100A Midi), CT
-HMC-
FCC COMPLIANCE
PS3037-S-N/PS3037-S-D/PS3037-E-N/PS3037-E-D
This device has been tested and found to comply with the limits for a Class A digital device, pursuant to
part 15 of the FCC Rules. These limits are designed to provide reasonable protection against harmful
interference when the equipment is operated in a commercial environment. This equipment generates,
uses, and can radiate radio frequency energy and, if not installed and used in accordance with the
instruction manual, may cause harmful interference to radio communications. Operation of this
equipment in a residential area is likely to cause harmful interference in which case the user will be
required to correct the interference at user’s own expense.
Operation is subject to the following two conditions: (1) This device may not cause harmful interference,
and (2) this device must accept any interference received, including interference that may cause
DC VOLTAGES
The PowerScout 3037 is designed to measure AC voltages for installations up to 600 VAC. The
PowerScout 3037 is also capable
of measuring DC voltages up to 600 VDC with the following caveats.
1) The internal fuse installed in the PowerScout 3037 is not a suitable disconnect for voltages above 80
VDC
. Customers using the PowerScout 3037 for high voltage DC systems must
install a UL listed inline
600 volt DC fuse with a rating of 1 amp or less. These fuses are commonly available in the solar power
market.
2) UL and ANSI testing of the PowerScout 3037 was conducted on AC systems only. DC results are
comparable but not tested.
3) DENT Instruments VIEWPOINT software does not currently have a configuration or registers that are
specific to DC systems. Values reported for voltage, current, KW, KWH will be correct however it should
be noted that the meter will also report values that pertain to AC systems (such as VARs and Power
Eq
uipment protected throughout by double insulation (IEC 536 Class II).
Find Quality Products Online at: sales@GlobalTestSupply.com
www.GlobalTestSupply.com
Page 11

11
MAINTENANCE
There is no required maintenance with the PowerScout. Abide by the following items:
Cleaning: No cleaning agents, including water, shall be used on the PowerScout.
Battery Life: (If equipped) The lithium battery is only used to maintain the date and clock settings during power
failure and has a life expectancy of greater than 10 years. Contact DENT Instruments for service.
No accessories are approved for use with the PowerScout other than those specified in the DENT Instruments
product literature and price sheets.
If the logger appears damaged or defective, first disconnect all power and sensors. Call or email technical support
for assistance.
Find Quality Products Online at: sales@GlobalTestSupply.com
www.GlobalTestSupply.com
Page 12
12
PowerScout™ Résumé de Sécurité et Spécifications
Tous les articles sont conformes à
ce qui suit:
Cette information de sécurité est
destinée à être utilisée à la fois
par l'opérateur de l'enregistreur
et le personnel de service. DENT
Instruments, Inc n'assume aucune
responsabilité pour l'utilisateur
qui ne respecte pas les directives
en matière de sécurité.
Le PowerScout est un appareil de surtension de catégorie III. Utiliser des gants en caoutchouc approuvé avec protection
mécanique et des lunettes lors de l'utilisation de l'appareil.
ATTENTION: CE METER PEUT CONTENIR DE HAUTES TENSIONS QUI PEUVENT ÊTRE DANGEREUSES. UN PERSONNEL
QUALIFIÉ DOIT DÉBRANCHER TOUS LES CÂBLES À HAUTE TENSION AVANT D’UTILISER OU DE RÉPARER
DU METER.
PS
3037-S-N/PS3037-S-D/PS3037-E-N/
PS3037-E-D
PS
3037 Série:
Conforme à UL Std 61010-1, 3rd
Edition & IEC 61010-2-030, 1
Certifié CSA Std C22.2 No. 61010-1,
3rd Edition
st
Edition
TTENTION
A
L'utilisation de cet appareil d'une manière pour laquelle il n'est pas destiné peut annuler ses moyens de
protection.
Symboles des Equipements
Signifie prudence. Voir le manuel pour une description de la signification.
En faisant la connexion du PowerScout à une prise de courant alternatif, suivez ces étapes en ordre pour
empêcher un risque de choc.
1. Décharger le circuit à contrôler.
2. Connectez le TC aux phases à surveiller.
3. Connectez les fils de tension à des phases différentes. Utiliser des équipements de sécurité (gants et des
vêtements de protection) qui sont nécessaires pour les tensions surveillées.
INDIQUE HAUTE TENSION. RISQUE DE CHOC ÉLECTRIQUE. HAUTES TENSIONS PEUVENT ÊTRE PRÉSENTES
QUI METTENT LA VIE EN DANGER. PERSONNEL QUALIFIÉ UNIQUEMENT.
PS 3037 tension dangereuse existent, il n'y a aucune pièce réparable par l'utilisateur n'ouvrez pas le boîtier.
Find Quality Products Online at: sales@GlobalTestSupply.com
www.GlobalTestSupply.com
Page 13

13
NE PAS DEPASSER 600V. Ce compteur peut contrôler les charges jusqu'à 600V. Le dépassement de cette
doit être ignoré.
tension peut causer des dommages à l'appareil et du danger pour l'utilisateur. Utiliser toujours le potentiel
transformateur (PT) pour des charges de plus de 600V. Le PowerScout est un appareil à 600 V de surtension
de catégorie III.
PS3037 sortie d'impulsion: 30V max tension ouverte, 5 mA courant maxi. Voir sortie par impulsion.
LIMITATIONS DE DÉTECTEUR
UTILISEZ SEULEMENT TRANSFORMATEURS DE COURANT (TC) SHUNTÉE.
N’utilisez pas d'autres TC. Utilisez seulement des TC shuntée avec une puissance maximale 333mV. Un sérieux
risque de décharge électrique et des dommages à l'enregistreur peut se produire si des TC pas shuntée sont
utilisés. Utiliser seulement les CTs des DENT Instruments suivants qui sont énumérés jusqu'au 600V/CATIII.
T-RGT12-XXXX-Y, CT-HSC-020-X (20A Mini), CT-HSC-050-X (50A Mini), CT
C
200
0
L'utilisation de tout autre CT annulera la certification UL.
200A Midi), CT-Rxx-1310-U (RōCoil), CTRxx-A4-U (RōCoil), CT-CON-1000-X, et le CT-CON-0150EZ-X.
-X (
TENSIONS C. C.
La PowerScout 3037 est conçu pour mesurer tensions c. a. pour les installations jusqu'à 600 V c. a. Le
PowerScout 3037 est également capable de mesurer les tensions c. c. jusqu'à 600 V c. c. avec les
avertissements suivants.
1)Le fusible interne installé dans le PowerScout 3037 n'est pas un dispositif de désaccouplage adéquat
pour des tensions supérieures à 80 V c. c. Les clients utilisant la PowerScout 3037 pour haute tension DC
systèmes doivent installer un UL inline 600 volts DC fusible avec une valeur nominale de 1 amp ou
moins. Ces fusibles sont couramment disponibles dans le marché des piles solaires.
2)UL ANSI et tests du PowerScout 3037 a été menée sur systèmes CA uniquement. DC résultats sont
comparables, mais pas testé.
3) Impact Instruments logiciel VIEWPOINT ne dispose actuellement pas de configuration ou de registres
qui sont spécifiques aux systèmes à courant continu. Les valeurs rapportées pour la tension, le courant,
en KW, KWH sera correct mais il convient néanmoins de noter que le compteur sera également rapport
valeurs qui se rapportent aux systèmes à courant alternatif (tels que VARs et facteur de puissance) qui
-HMC-0
100
-X (
100A Midi), CT
-HMC-
'équipement protégé en double isolation (IEC 536 Classe II)
L
Entretien
Il n'y a aucun entretien requis avec le PowerScout. Respectez les points suivants:
Nettoyage: Aucun agents de nettoyage, y compris l'eau, doit être utilisé sur le PowerScout.
Espérance de Vie de la Batterie: La pile au lithium est utilisée uniquement pour maintenir les paramètres de date
et d'heure en cas de coupure de le courant et a une espérance de vie de plus de 10 ans. Contactez DENT
Instruments pour le service.
Pas d'accessoires approuvés pour une utilisation avec le PowerScout sauf ceux spécifiés par DENT Instruments
dans ses documentations sur les produits et également sur les prix.
Si le compteur semble endommagé ou défectueux, tout d'abord déconnecter le pouvoir de l'appareil. Alors s'il
vous plaît appelez 541.388.4774 ou contacter par courriel l'assistance technique pour obtenir de l'aide.
Find Quality Products Online at: sales@GlobalTestSupply.com
www.GlobalTestSupply.com
Page 14

14
PowerScout 3037 Technical Specifications
Specification Description
Service Types Single Phase, Three Phase-Four Wire (WYE), Three Phase-Three Wire (Delta)
3 Voltage Channels 80-346 Volts AC Line-to-Neutral, 600V Line-to-Line, CAT III
Current Channels
Maximum Current Input
Measurement Type True RMS using high-speed digital signal processing (DSP)
Line Frequency 50/60Hz
Power
Power Out Unregulated 5VDC output, 140 mA max
Waveform Sampling 12 kHz
Parameter Update Rate .5 seconds
Measurements
Accuracy 0.2% (<0.1% typical) ANSI, C12.20-2010 Class 0.2
Resolution
Indicators
3 channels, 0.525 VAC max, 333 mV CTs, 0-4,000+ Amps depending on current
transducer
158% of current transducer rating (mv CTs) to maintain accuracy. Measure up to 4000
Amps RōCoil CTs
From L1 Phase to L2 Phase. 80-600VAC CAT III 50/60Hz, 90mA Max. Non-user
replaceable .5 Amp internal fuse protection
Volts, Amps, kW, kWh, kVAR, kVARh, kVA, kVAh, Apparent Power Factor (aPF),
Displacement Power Factor (dPF). All parameters for each phase and for system total.
0.01 Amp, 0.1 Volt, 0.01 watt, 0.01 VAR, 0.01 VA, 0.01 Power Factor depending on
scalar setting
Bi-color LEDs (red and green): 1 LED to indicate communication, 3 LEDs for correct
phasing (PhaseChek™: Green when voltage and current on the same phase; Red when
incorrectly wired.) Pulse output LED.
Pulse Output Open Collector, Optically Isolated , 5mA max current, 30V max open voltage
Communication
Direct
Max Communication
Length
RS-485 Loading 1/8 unit
Communication Rate
(baud)
Data Bits 8
Serial Meters
Parity None, Even, Odd
Stop Bit 2, 1
Data Formats
User Selectable Modbus RTU or BACnet Master Slave Token Passing protocol (MS/TP)
RS-485 or Ethernet
1200 meters with Data Range of 100K bits/second or less
Modbus: 9600 (Default), 19200, 38400, 57600, 76800, 115200
BACnet: 9600, 19200, 38400, 76,800 (Default)
Modbus Protocol
-orBACnet Master Slave / Token Passing (MS/TP) protocol
Find Quality Products Online at: sales@GlobalTestSupply.com
www.GlobalTestSupply.com
Page 15

15
Mechanical
Mounting Rail
Compatible with a TS35/7 DIN Rail Channel
Digital Display
An optional 2 x 16 character display which auto-cycles between informational screens every
2-3 seconds, with real-time values updated every second.
Operating Temperature -7 to + 60⁰ C (-20 to 140⁰ F)
Humidity 5% to 95% non-condensing
Enclosure ABS plastic, 94-V0 flammability rating
Weight 340 g (12 ounces), exclusive of CTs
Dimensions 24.2 x 8.5 x 4.0 cm (9.5” x 3.3” x 1.6”)
Accessories
ViewPoint™ Minimum System Requirements
Operating System Windows® 7 (32 or 64 bit), Windows® 8 Pro, Vista (32 or 64 bit), XP
Communications Port One USB port or serial port
Hard Drive 50 MB minimum available
Processor Pentium Class 1 GHz or more recommended
Safety
The following are UL listed:
PS3037-S-N/PS3037-S-D/PS3037-E-N/PS3037-E-D
Serial/Ethernet Meters
T
he PS3037 Series:
Conforms to UL Std 61010-1, 3rd Edition & IEC 61010-2-030, 1st Edition
Certified to CSA Std C22.2 No. 61010-1, 3rd Edition
Table I-1: Technical Specifications
Find Quality Products Online at: sales@GlobalTestSupply.com
www.GlobalTestSupply.com
Page 16

PREPPING FOR FIELD INSTALLATION
There are multiple tasks that are typically completed before heading to the field, usually by your
technical support personnel. These include determining how to communicate with the meter, setting
address switches, installing ViewPoint, etc. Communication configuration must be set up in the
ViewPoint software even if you use a separate logger to record data. The more tasks completed before
installation means less time in the field.
These determinations figure into how you set up the PowerScout meter for operation:
BACnet vs. Modbus
Set the network address switches on the meter to either Modbus or BACnet
RS-485 vs. Ethernet
The type of connection is part of the configuration set up in the ViewPoint software
Laptop/PC for setup verification via USB
A convenient method for setup before going in the field, and once in the field, to easily read
real-time values
NOTE: Installation of the ViewPoint
tested with a meter prior to the field installation. A USB cable can be used when configuring the meter
in this manner.
software and a communication cable should be completed and
Installing the ViewPoint Software
The ViewPoint software is designed to let you easily configure
the PowerScout for different current transformers, check
readings, and verify correct setup. All of DENT Instruments PowerScout meters use ViewPoint software
to communicate with the meter. It needs to be installed on any computer talking to the PowerScout
3037. ViewPoint is compatible with Windows® 7 (32 or 64 bit), Windows® 8 Pro, Vista (32 or 64 bit), or
XP.
Insert the ViewPoint CD into the CD-ROM drive
e installer starts automatically. If it does not, browse to the CD and locate the ViewPointInstaller.exe
Th
program. Start the installer by double-clicking ViewPointInstaller.exe.
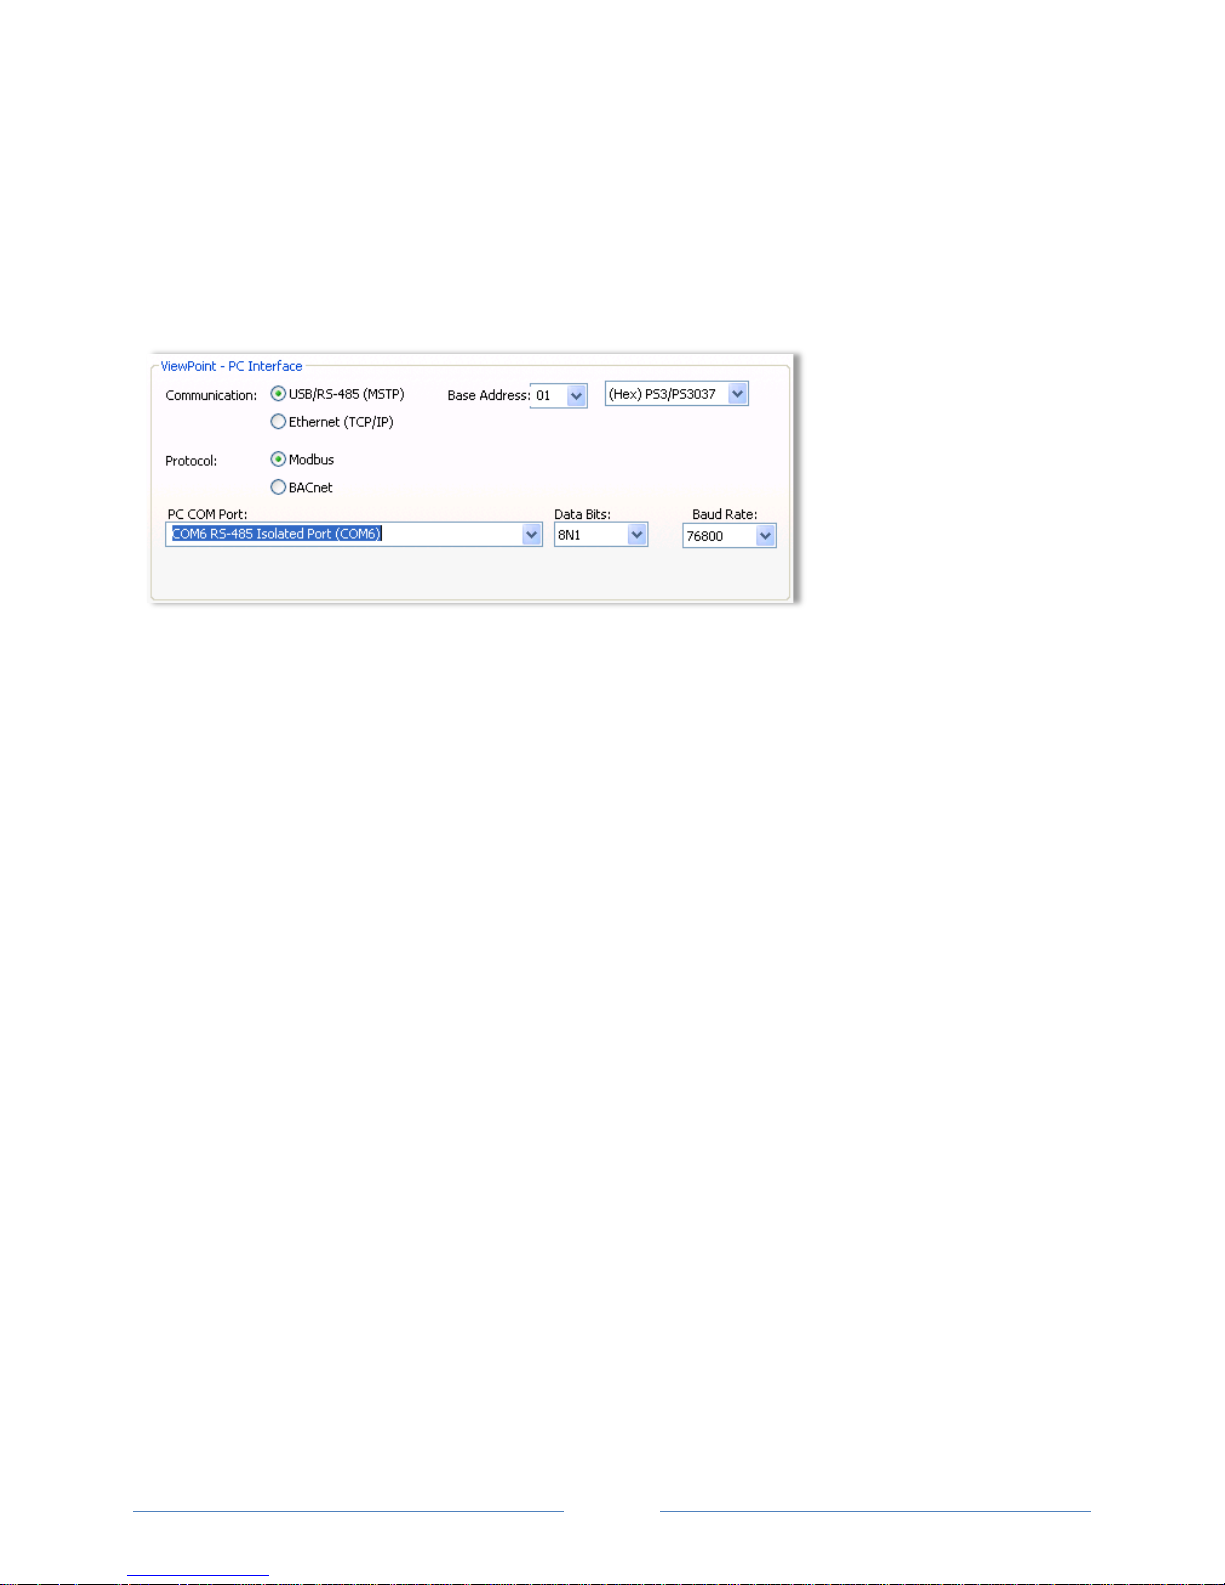
The Communication screen is displayed when ViewPoint is first started. This is where the software
networking parameters are entered to match the PowerScout networking configuration (meter type,
COM port, baud rate, base address, etc.). ViewPoint remembers your last connection and displays those
previous selections when opening the software once again.
NOTE: ViewPoint software serves several functions, such as setting up a meter, getting real-time values,
and read/write registers and objects, but for the purpose of prepping for field installation only three are
important to the process: Communications, Meter Setup, and Comms Setup. The other functions are
described later in this document.
.
DID YOU KNOW? ViewPoint may be
installed on multiple computers.
17
Find Quality Products Online at: sales@GlobalTestSupply.com
www.GlobalTestSupply.com
Page 17

Connecting a Communication Cable
There are various ways to communicate with a PowerScout meter and how you do so will determine
what type of cabling system you will use. To set up the meter, communication can be established with a
USB cable, an RS-485 adapter, or an Ethernet cable. Once in the field, communication between a
PowerScout meter and a logger is established with a RS-485 or an Ethernet connection. A RS-485
connection is limited in speed while an Ethernet connection is much faster.
NOTE: PowerScout meters are ordered from DENT Instruments based on the type of desired connection.
CONNECTING AND COMMUNICATING VIA A USB OR RS-485 ADAPTER
A type AB USB cable may be used between a PC and a PS3037 meter and is the preferred method for
setting up a PS3037 with Modbus protocols. The USB cable will also power the meter when connected
to a PC. When using a USB cable with a PC, each USB port on the PC generates a unique comm port in
the ViewPoint software, such as Com3 or Com4.
NOTE: A USB driver is installed when you install the ViewPoint software.
V
iewPoint can read information through a USB, an RS-485 isolated COM port, or an Ethernet
connection. When the RS-485 connection is selected a base address is required (the base address is the
rotary switch settings). Address switches are ignored by both USB and Ethernet. When the Ethernet
connection is selected an IP address is required. The screen display changes based on your connection
selection.
e USB connector on the PowerScout 3037 can be used to power the unit when configuring it using
Th
ViewPoint and Modbus protocols.
If connecting with a USB cable is not practical, the use of an RS-485 to USB adapter connected to your
PC may be used for communicating with your PowerScout. First, install the driver on the computer and
then complete the connection between the meter and the computer by plugging the RS-485 connector
into the meter.
18
Find Quality Products Online at: sales@GlobalTestSupply.com
www.GlobalTestSupply.com
Page 18

DID YOU KNOW? If an RS-485 adapter is used instead of a USB, an RS-485 driver must be installed
properly.
on your computer and power applied to the PowerScout meter before the software will function
Installing the RS-485 Adapter on a
Computer
NOTE: If ViewPoint was installed first, it needs to be restarted following an RS-485 driver installation. If
an RS-486 port does not appear in the drop-down list, the RS-485 was not installed correctly.
1) Insert the CD that came with the RS-485 adapter into your computer.
2) Insert one end of a USB cable into the RS-485 adapter and the other end into a USB port on the
computer.
3) The Found New Hardware Wizard window appears.
he window states “This wizard helps you install software for: Model USOPTL4,” and asks “What do
T
you want the wizard to do?”
4) Select Install the software automatically and click Next.
5) Click Finish when the installation is complete.
6) Remove the CD from your computer.
19
Find Quality Products Online at: sales@GlobalTestSupply.com
www.GlobalTestSupply.com
Page 19

Connecting the Adapter to the
Figure II-3: RS-485 Connector on PS3037
Meter
The three wires coming from the RS-485 adapter are plugged into the COM connector. Insert each white
ferrule into the appropriate slots on the connector. The red wire inserts in the left slot (+), the black wire
in the middle slot (-), and the green wire in the right slot (Shield), Figure II-1 and Figure II-3. Verify that
the dip switches on the back of the RS-485 adapter are set to RS-485, Echo Off, 2 Wire, 2 Wire as shown
in Figure II-2 before plugging the adapter into the PowerScout 3037.
Figure II-2: Dip switches on back of RS-485
Adapter
Fi
gure II-1: RS-485 Adapter
20
Find Quality Products Online at: sales@GlobalTestSupply.com
www.GlobalTestSupply.com
Page 20
N
OTE: USB is always active on the PS3037 (and the protocol is Modbus over the USB virtual
communications port).
NOTE: If ViewPoint was installed first, it needs to be restarted following a RS-485 driver installation. If a
RS-485 port does not appear in the drop-down list, the RS-485 was not installed correctly.
1) S
elect USB/RS-485 (MSTP) as your communication type.
2) Select PS/PS3037.
3) When connecting with an RS-485, enter a base address that matches the switches on the
owerScout. A USB connection ignores address switches. See Setting the Network Address Switches
P
below.
4) When connecting with an RS-485, select Modbus or BACnet as your communication protocol. When
communicating over USB, whether the PS3037 is configured for Modbus or BACnet mode, the
PS3037 will communicate over the Modbus protocol.
5) Select the PC COM Port from the drop-down list. For a USB connection, select “COMxx DENT USB”
in the field, where “xx” is the port number. For an RS-485 connection using an RS-485 adapter,
select COMxx RS-485 Isolated Port (COMxx) where "xx' is the COM port number.
Default settings are used for the two remaining fields: Data Bits is 8N1 and the Baud Rate is 9600. When
BACnet is selected as your protocol an additional read-only field appears displaying the BACnet Device
ID.
21
Find Quality Products Online at: sales@GlobalTestSupply.com
www.GlobalTestSupply.com
Page 21

Setting the Network Address
Reserved for resetting the PowerScout to Modbus mode with 9600 baud,
01-7F
Available (01/001 is the factory default setting).
80-FE
Reserved for BACnet slave devices.
The rotary switches can be used to configure the communication protocol
Reserved for resetting the PowerScout to Modbus mode with 9600 baud,
01-F7
Available for Modbus slave devices.
Reserved for network wide broadcast.
The rotary switches can be used to configure the communication protocol
Switches
There are two rotary network address switches on a serial PowerScout 3037, labeled MSB and LSB.
These two switches are used to select the BACnet/Modbus address the client uses to communicate with
the PowerScout.
The rotary switches are 16-position, hexadecimal switches. The default factory setting is hex 01. The
address is a hexadecimal (hex) value, represented by the digits 0 through 9 and letters A through F. For
example, a network address of 100 in decimal is converted to 64 hexadecimal and set on the
PowerScout 3037 by:
MSB switch—select 6
LSB switch—select 4
In some cases the hex value may need to be converted to decimal when entered into the RTU or data
logger. See the Appendix for a hexadecimal conversion table.
The BACnet MS/TP MAC and Modbus address is a decimal value, represented by three digits: 000
through 009, 010-090, and 100-999.
Note: BACnet MS/TP masters only support addresses 001–127.
Hexadecimal
Address
00
FF
Hexadecimal
Address
00
BACnet Address Availability
8 bit, 1 stop bit and no parity.
to BACnet or Modbus as well as changing the baud rate if unsure of the
current settings (PS3037 only).
Table II-4: BACnet Hexadecimal Address Availability
Modbus Address Availability
8 bit, 1 stop bit and no parity.
FF
to BACnet or Modbus as well as changing the baud rate if unsure of the
current settings (PS3037 only).
Table II-5: Modbus Hexadecimal Address Availability
Find Quality Products Online at: sales@GlobalTestSupply.com
www.GlobalTestSupply.com
22
Page 22

Communication Error
If ViewPoint is unable to communicate with the PowerScout, the Status window displays the following
message in the Status field:
“Unable to establish connection with meter, please check settings and try again.”
Try the following to resolve the communication error on a serial PowerScout:
No RS-485 option available in the PC COM Port drop-down list—indicates the PowerScout is not
properly connected or the required software driver is not installed.
Modbus Base Address Switch does not match the selected hex switch settings on th
PowerScout—change the switch settings.
The selected Baud Rate does not match the PowerScout baud rate—change the baud rate.
For more information, refer to the Appendix, Troubleshooting Communication Issues.
e
CONNECTING AND COMMUNICATING VIA AN ETHERNET (TCP/IP) CONNECTION
Connect one end of the Ethernet cable into the PowerScout and the other end into your computer or
network. To begin communicating via an Ethernet cable you must first set it up within the ViewPoint
software that came with the meter. See Ethernet (TCP/IP) Connection in the Communicating with a
PowerScout Meter section.
The meter will require power to communicate over Ethernet. Power can be supplied by connecting the
USB or voltage lines 1 and 2.
PowerScout 3037
Keep in mind that the Ethernet connection must have an IP Address in the ViewPoint software that can
either be set manually within the software with the Use Static IP address option (for a fixed address) or
obtained automatically from the router connected to the logger using the Use DHCP option (dynamic
address). Both options have advantages. See About IP Addresses further in this document.
NOTE: When Ethernet is connected, any RS-485 connection is inactivated. The PS3037 must be power
cycled with the Ethernet cable removed in order to activate the RS-485 interface.
23
Find Quality Products Online at: sales@GlobalTestSupply.com
www.GlobalTestSupply.com
Page 23

elect Ethernet (TCP/IP) to gather information via a network connection. When selected, the
1) S
Communications Setup screen changes and an IP Address is required as address switches are
ignored.
2) Select your mode of communication.
3) Enter the IP Address for the Ethernet connection of the meter or select one of the previously used
addresses from the drop-down list. See About IP Addresses on the following page.
-orUse the Scan Network or Setup buttons to acquire a new IP Address. See About IP Addresses on the
following page.
4) Enter the Port connected to the PowerScout. A checkbox is available to make the port the default.
Different networks may require different ports. See your network administrator.
About IP Addresses
The Ethernet connection must have an IP Address that is set manually in the IP Address: field or
obtained automatically from the router connected to the meter using the Use DHCP option (dynamic
address) found in the Logger Network Setup dialog box accessed via the Setup button. Both options
have advantages.
NOTE: A Static IP address of 192.168.1.10 is assigned in the factory to all Ethernet PowerScouts.
Static Connection: If you know an IP address that is not being used by another device on the
network, enter that address into the IP Address: field. This may require permission from
etwork administrator. With a static IP address it is easy to connect to the meter as there is no
n
a
doubt about what IP address to use.
Dynamic Connection: If you want the router to assign an IP address to the meter automatically,
select Use DHCP. This may avoid the need of a network administrator as the router will assign an
IP address that does not conflict with any other devices on the network. A disadvantage of the
DHCP option is that the “lease” of the IP address may expire after a period of time and th
e
router could assign a different IP address. A new IP address means that ViewPoint cannot
connect to the meter until the new IP address has been entered. (See below.)
An additional option is to set the meter to DHCP and go to the router and assign a specific IP address to
the MAC address that corresponds to the meter. In this way, if the lease does expire, the router will
24
Find Quality Products Online at: sales@GlobalTestSupply.com
www.GlobalTestSupply.com
Page 24

always assign the same IP number back to the meter. This option may also require a network
administrator.
The Scan Network button scans the network for possible meters and displays them in the Logger
Selection dialog box. Look for the serial number on the meter (found on the back of the meter) to
determine which connection point is yours.
elect the correct device from the list of IP Addresses and click OK.
S
The Setup button displays the Logger Network Setup dialog box where network address information is
entered. See your network administrator before making changes.
When you select the Use DHCP checkbox the Dynamic Host Configuration Protocol is used to populate
the IP Address, Subnet Mask, and Gateway Address fields automatically.
NOTE: Each meter connected to the network requires its own unique network IP address. An address is
provided automatically if the network allows DHCP (Dynamic Host Configuration Protocol) and the
meter is configured to request an address.
Click Update Logger after making your selections.
ViewPoint displays the following message when the connection is successful:
25
Find Quality Products Online at: sales@GlobalTestSupply.com
www.GlobalTestSupply.com
Page 25

Communications LEDs
Steady Green
Flashing Green
The PowerScout COM LEDs signal the following communication information.
PS3037 SERIAL
BACnet Modbus Description
Steady Green Power is applied to the meter.
Flashing Green The meter is communicating.
Steady Red Communications failure, or talking with BACnet while the meter is in
Modbus mode.
Flashing Red The meter is receiving communication on the bus for a meter at
another address.
Table II-6: PS3037 Serial COM LED Signals
PS3037 ETHERNET
The Ethernet cable has a Link LED on its connector that glows amber when connected to the network
and flashes green during Ethernet traffic.
BACnet/Modbus Description
Steady Green Power is applied to the meter.
Flashing Green The meter is communicating.
Table II-7: PS3037 Ethernet COM LED Signals
26
Find Quality Products Online at: sales@GlobalTestSupply.com
www.GlobalTestSupply.com
Page 26

Meter Setup
Once communications is established between the PC and the PowerScout, you are now ready to
configure the meter for the field. This is accomplished in the Meter Setup tab of ViewPoint.
e Meter Setup screen allows unique changes to an element on the 3037. Within the element, CT
Th
Phase, Type, Amps, and Phase Shift are entered, based on wiring connection, for CT1, CT2, and CT3. The
type of wiring connection and the Digital Output are also entered for the element. Overall, a Demand
Window of 1–60 minutes is available for the recording of values and a Line Frequency of 50 Hz or 60 Hz
is selectable.
NOTE: In PowerScout meters, Peak Demand is calculated using a moving window and is averaged across
the selected demand window size. Each minute the total consumption is recalculated and compared to
the last demand window. If the new window is larger than the last recorded value it is recorded. This
value is calculated during the sampling of the waveform.
The Meter Setup screen is blank when first accessed. Click Retrieve Meter Setup to view the current
status of the element. The Element Status dialog box displays while the element is read.
27
Find Quality Products Online at: sales@GlobalTestSupply.com
www.GlobalTestSupply.com
Page 27

ENTERING WIRING INFORMATION FOR AN ELEMENT
Begin setup by entering an amount of time (1-60 minutes) into the Demand Window and selecting a
Line Frequency from the drop-down list.
Use the following steps within an element:
1) Select WYE, DELTA, or Single Phase as the wiring connection.
NOTE: DENT Instruments recommends using 3 CTs in a WYE connection for Delta loads.
A WYE connection automatically displays all three CTs. Any changes made to CT1 also apply to
CT2 and CT3.
Wy
e Wiring Connection
A DELTA connection displays only the two available CTs. Any changes made to CT1 also apply to
CT3.
D
elta Wiring Connection
2) Depending on the wiring connection, make changes to CT1, CT2, and/or CT3.
CT Phase—Shows the voltage of the referenced CT
CT Type—Use the drop-down list to select the type of CT attached to the PowerScout.
CT Amps—Enter the amperage rating.
CT Phase Shift—Enter in degrees the phase shift of the CT. The default is 1.1.
Current Transformers Recommended CT Phase Shift Values
Clamp On CT-CON-0150EZ
CT-CON-1000
Split Core Small CT-SCS-0050
CT-SCS-0100
28
Find Quality Products Online at: sales@GlobalTestSupply.com
www.GlobalTestSupply.com
1.10°
0.20°
2.20°
2.20°
Page 28

Current Transformers Recommended CT Phase Shift Values
Split Core
Medium
Split Core Large CT-SCL-0600
Split Core High
Accuracy
Hinge Mini 20A
CT-SCM-0100
CT-SCM-0200
CT-SCM-0400
CT-SCM-0600
CT-SCL-1000
CT‐SHS‐0005 0.50°
Mini 50A
MIDI 100A
MIDI 200A
Table II-8: Recommended CT Phase Shift Value
3) S
elect a Digital Output from the drop-down list if being used
elect a Data/Digital Scalar from the drop-down list.
4) S
1.75°
1.50°
1.30°
1.30°
0.00°
0.00°
0.75°
0.75°
0.12°
0.30°
.
29
Find Quality Products Online at: sales@GlobalTestSupply.com
www.GlobalTestSupply.com
Page 29

SELECTING A SCALAR
0
.00001
.00001
.00001
.01
.01
.1 1 .001
.001
.001
.01
.1
.1
2
.01
.01
.01
.01
.1
.1
3
.1
.1
.1
.01
.1
.1 4 1 1 1
.01 1 1 5 10
10
10
.01 1 1
≥6
100
100
100
.01 1 1
DID YOU KNOW: The
The use of Modbus protocols limits the data registers to a maximum of two
bytes (16 bits) or a maximum decimal value of 65535. Modbus requires that
the data be unsigned (positive) integer values. To overcome these
limitations some measured (and stored) values must be scaled to fit into the Modbus registers. The raw
value read from the Modbus registers is multiplied by a scalar to convert the raw data. The following
table lists the data scalars and the respective values for the PowerScout.
Scalar Value
Data Scalar
kW/kWh
Demand
kVAR/kVARh kVA/kVAh
Power
Factor
register value must
be less than 65,535.
Amps Volts
Table II-9: Data Scalars and Values for Registers 44001 thru 44061
The data scalar is stored in register 44602.
When selecting a data scalar, the following guidelines need to be considered:
If the data scalar selected is too low, an incorrect data result is returned from the register.
If the data scalar selected is too high, the significant digits following the decimal point are
removed.
After selecting a data scalar, the formula for calculating the actual value is:
register value X scalar value = actual value
Or, another way to state this formula is:
actual value/scalar value = register value
30
Find Quality Products Online at: sales@GlobalTestSupply.com
www.GlobalTestSupply.com
Page 30

The following table is an example when selecting a data scalar for 3-phase loads based on the CT size or
maximum current. These are the minimum recommended scalar settings.
CT Size or
Max. Current
50 Scalar 1 Scalar 2
100 Scalar 2 Scalar 2
200 Scalar 2 Scalar 2
400 Scalar 2 Scalar 2
600 Scalar 2 Scalar 3
1000 Scalar 3 Scalar 3
3000 Scalar 3 Scalar 3
3-phase Loads
230 volts 460 volts
Table II-10: Data Scalar Selection
Examples Using a Data Scalar
The following examples use kW throughout.
For example 1, the following data is used:
Volts x amps = watts 480 volts x 100 amps = 48,000 watts
Watts x 3 = system watts 48,000 watts x 3 = 144,000 watts (144kW)
Check the register’s value using the data scalar 2 value of .01:
System kW / scalar value = register value 144kW/.01 = 14,400
Since 14,400 is less than 65,535, using data scalar 2 is a good choice for this example.
or example 2, the following data is used:
F
480 volts x 1000 amps = 480,000 watts
480,000 watts x 3 = 1,440,000 watts (1,440kW)
Check the register’s value using the data scalar 1 value of .001:
1,440kW/.001 = 1,440,000
Since 1,440,000 is greater than 65,535, using data scalar 1 returns an incorrect result. Data scalar 1 is
not an appropriate choice.
Reviewing this example using the data scalar 3 value of .1 provides the following result:
1,440kW/.1 = 14,400
Since 14,400 is less than 65,535, using data scalar 3 is a good choice for this example.
31
Find Quality Products Online at: sales@GlobalTestSupply.com
www.GlobalTestSupply.com
Page 31

Values Requiring Two Registers
Additionally, some values (e.g., kilowatt hours) may cover a dynamic range that is larger than 65535 and
require two Modbus registers. Any parameter in the Modbus Register Assignment tables that shows
two registers (identified by the terms MSW (Most Significant Word) and LSW (Least Significant Word))
are examples of this wide-ranging parameter.
To interpret the values contained in these registers, the steps are:
2) Multiply the MSW register by 65536.
3) Add the result to the value found in the corresponding LSW register.
4) Multiply the result by the appropriate scalar value from Table I-2.
For example, assume that System Total True Energy (kWh) is desired and the
value of 5013 is read from register 44001 (LSW) and 13 is read from register
44002 (MSW) and that the register 44602 data scalar is set to 3.
To calculate the total kWh recorded:
Multiply the MSW by 65536: 13 X 65536 = 851968
Add the LSW: 851968 + 5013 = 856981
Multiply by the scalar 3 value of 0.1: 856981 X 0.1 = 85698.1 kWh
Comms Setup
DID YOU KNOW?
When reading two
register values,
ViewPoint
automatically
calculates the total
value.
se this tab to change communication parameters for the meter, such as communication protocols and
U
how those communications are transferred. This screen displays the fields pertinent to your power
connection and communication protocol, so if you are connected by RS-485 then only those fields are
shown. However, if you are connected with a USB cable all fields are displayed. Changes to these fields
override any settings on the Communications tab.
32
Find Quality Products Online at: sales@GlobalTestSupply.com
www.GlobalTestSupply.com
Page 32

RS-485 SETTINGS
hange the Data Bits or Baud Rate on the meter by using these fields.
C
BACNET DEVICE SETTINGS
nter a new value into any field and click Send Setup to Meter to update the Device ID (meter
E
identification), Max Master (# of units on network), or MAX Info Frames (# of packets sent via MS/TP).
ETHERNET SETTINGS
Connecting the Ports
Once your communication mode is selected, click Connect to establish a connection between the
computer and the PowerScout meter.
When the PowerScout is in the process of connecting to the computer, the Communication
Status LED flashes briefly followed by a solid green.
If the PowerScout cannot connect to the computer, the Communication Status LED flashes red
and returns to a solid green. Change the ViewPoint hardware settings and click Connect again.
ViewPoint fills the Device Info fields when the computer communicates with the PowerScout.
PowerScout meter installation can be verified using the ViewPoint software. Refer to Using ViewPoint
Software further in this document for more information.
33
Find Quality Products Online at: sales@GlobalTestSupply.com
www.GlobalTestSupply.com
Page 33

Establishing Communication Protocol
The PowerScout communicates using the BACnet MS/TP or Modbus RTU protocols via the
RS-485/Ethernet interface. To establish communication with a RS-485, the settings must meet the
following requirements:
The Modbus/BACnet address on the PowerScout and in the ViewPoint software must be set to
the same value.
The PowerScout meter default serial parameters are:
Parameter
Defaults
Baud 9600 76800
Data bits 8 8
Parity None None
Stop Bit 1 1
Table II-11: Serial Communication Settings
he supported baud rates include 9600, 19200, 38400, 57600 (Modbus only), 76800, and 115200
T
(Modbus only).
NOTE: The baud rate on the user interface (ViewPoint) must match the PowerScout setting. If these
settings differ, the PowerScout cannot communicate. There are no baud rate settings when connected
via Ethernet.
Modbus
Settings
BACnet
Settings
SWITCHING BETWEEN BACNET AND MODBUS MODE
Changing Communication Mode
Using ViewPoint
Using the Comms Setup tab in ViewPoint is the preferred way to change communications modes
between Modbus and BACnet.
Note: The baud rate and serial settings may need to change between Modbus and BACnet. Setting
address switches to “00” will set the unit in Modbus protocol, 9600 baud rate.
If communication fails, see the section Changing Baud Rate or Communication Mode using Address
Switches (between Modbus and BACnet) on the next page.
34
Find Quality Products Online at: sales@GlobalTestSupply.com
www.GlobalTestSupply.com
Page 34
Changing the PowerScout from
Modbus to BACnet mode:
1) Connect to the PowerScout using ViewPoint.
2) Go to the Read/Write Registers tab in ViewPoint.
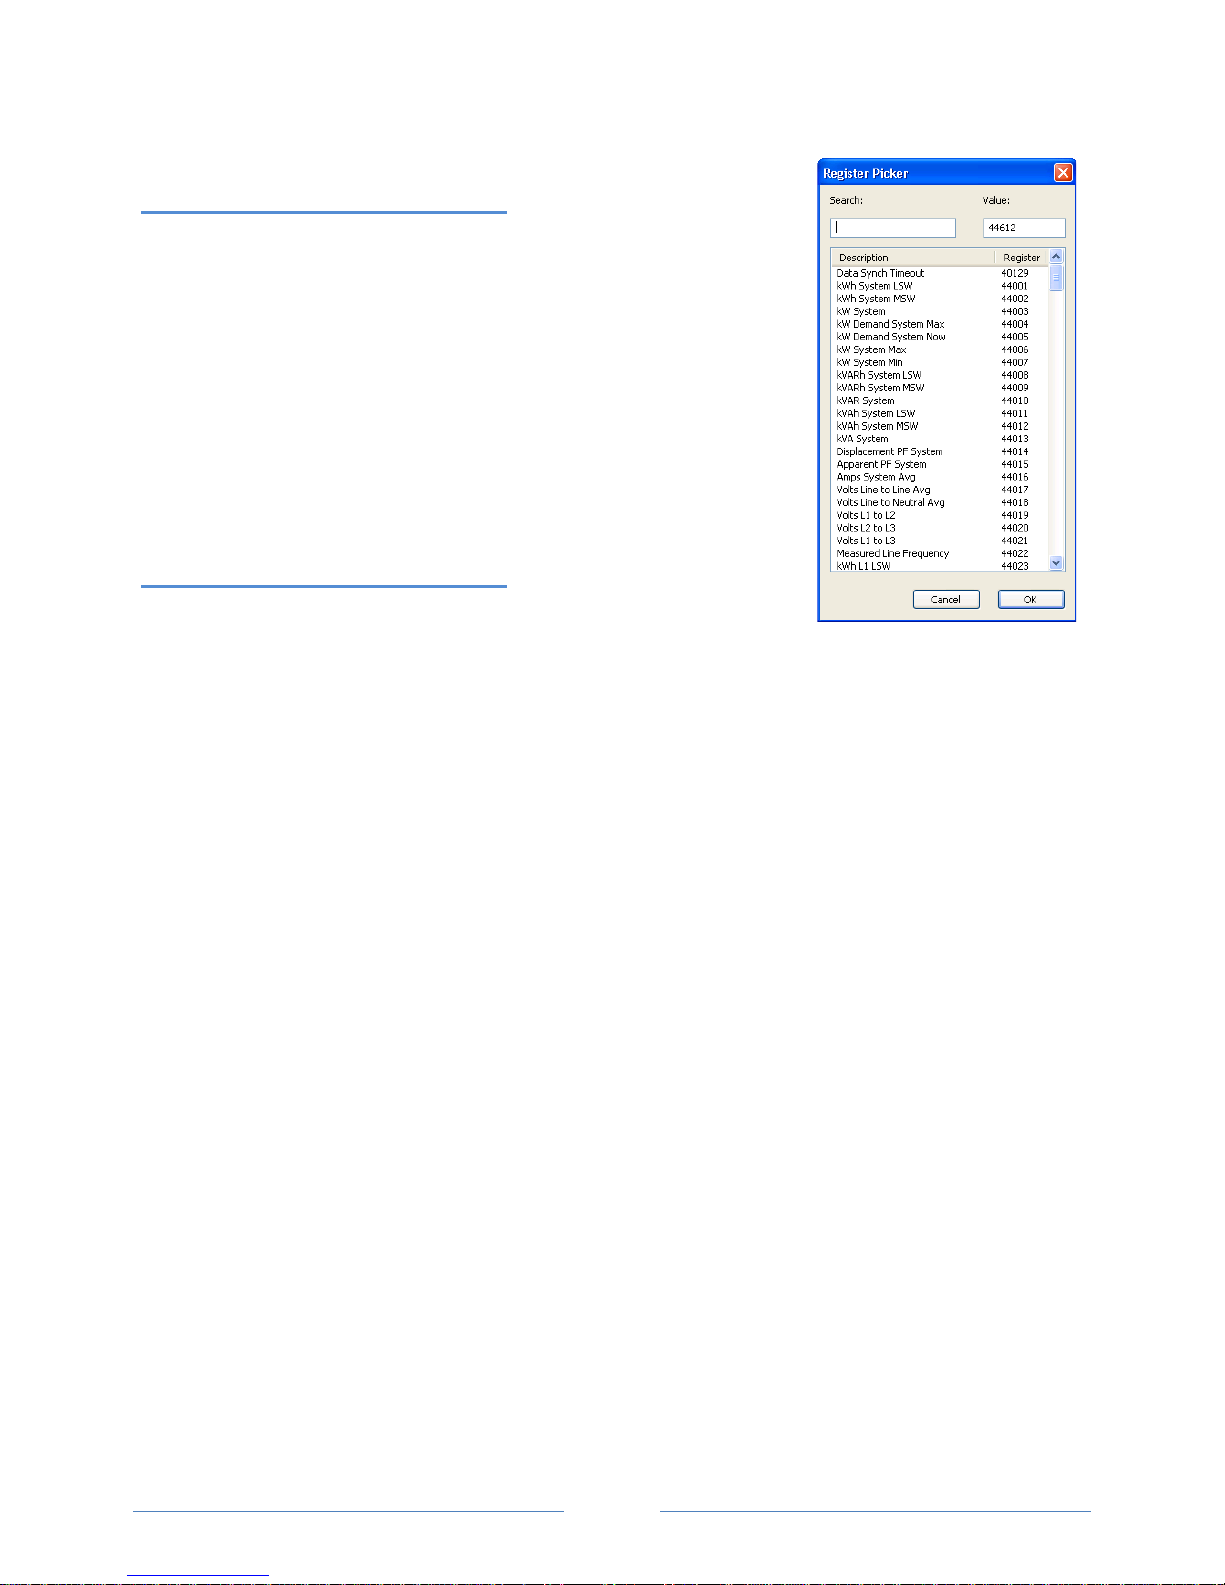
3) Enter 44612 into the Register field or click List to select from th
egister Picker List.
R
4) In the Value field, enter 1833 to change to BACnet mode.
5) Click OK.
The status should say “Writing Value…”
Return to the Communications tab and connect.
e
Changing the PowerScout from
BACnet to Modbus mode:
1) Connect to the PowerScout using ViewPoint.
2) Go to the Read/Set Objects tab in ViewPoint.
3) Enter 10190 into the Object field or click List to select from the Object Picker List.
4) In the Value field, enter 375 to change to Modbus mode.
5) Click OK.
The status should say “Writing Value…”
Return to the Communications tab and connect.
35
Find Quality Products Online at: sales@GlobalTestSupply.com
www.GlobalTestSupply.com
Page 35

Changing Baud Rate or
Communication Mode Using
Address Switches (between
Modbus and BACnet)
This procedure is only required if Changing Communication Mode using ViewPoint (between Modbus
and BACnet) fails and the PowerScout needs to be returned to a particular communications protocol and
baud rate.
1) Power down the PowerScout (disconnect all voltage leads or the USB cable).
2) Set the rotary Address switches to “F” and “F”.
3) Power up the PowerScout (connect the black & red voltage leads to power or connect the USB
cable).
4) Set LSB to one of the following communication modes:
LSB Address
Switch
1 Modbus* Red On Off
2 BACnet Red On Red On
Communication Mode RS-485 LED COM LED
*Factory Default
5) Next set MSB to one of the following baud rates:
MSB
Address
Baud Rate
Switch
1 9600* Off Off Green
2 19200 Off Green Off
3 38400 Off Green Green
4 57600 (Modbus only) Green Off Off
5 76800 Green Off Green
6 115200 (Modbus only) Green Green Off
PhaseChek
LED CT1
*Factory Default
PhaseChek
LED CT2
PhaseChek
LED CT3
A
fter powering up the PowerScout 3037, you will have 10 seconds to make changes. However, every
time a rotary switch is changed, the 10 second timer resets. After 10 seconds of no switch action, the
settings take effect and the switches revert to the Modbus Address selector if in Modbus mode or MAC
address if in BACnet mode.
FAILSAFE: If all address switches are “0,” the meter is placed in Modbus mode at 9600 baud rate.
Communication registers can be modified for baud rate and for mode.
36
Find Quality Products Online at: sales@GlobalTestSupply.com
www.GlobalTestSupply.com
Page 36

FIELD INSTALLATION
Mounting tabs,
PowerScout 3037 mounted
Handle with care
Once your PowerScout meter is set up for the desired communication method and protocol, it’s ready to
install out in the field.
Mounting a PowerScout 3037
ARNING! Remove the meter from all sources of voltage before mounting.
W
PowerScout meters must be installed in an approved electrical panel or enclosure using proper
installation practices according to the local electrical codes.
To mount the PowerScout 3037, use the two tabs provided at both ends of the case. Securely
mount the PowerScout near a dedicated circuit disconnect breaker.
located on each end
of meter case
within electrical panel
37
Find Quality Products Online at: sales@GlobalTestSupply.com
www.GlobalTestSupply.com
Page 37

The PowerScout 3037 can also be mounted on a 35 mm width DIN rail.
Wiring Connections on the PowerScout 3037
igh voltage MAY BE PRESENT. Risk of electric shock. Life threatening voltages may be present.
H
Qualified personnel only.
aute tension peut être présente. Risque de choc électrique. Tensions dangereuses peuvent
H
être présentes. Personnel qualifié uniquement.
Top hat rail EN 50022
PowerScout 3037 meters have the following connections:
USB port for powering the meter and communicating during setup, a three-wire connector fo
th
e RS-485 BACnet/Modbus link, and an Ethernet port (optional).
Digital output port. The port can be used to output kWh, kVARh, or kVAh pulses to external
devices, or to toggle on and off to control a remote device or relay.
Three CT inputs.
Four voltage connections. Voltage leads are customer supplied. PowerScout meters are self-
powered from L1 and L2.
r
38
Find Quality Products Online at: sales@GlobalTestSupply.com
www.GlobalTestSupply.com
Page 38
Completing the Field Installation
0
.00001
.00001
.00001
1
.001
.001
.001
2
.01
.01
.01
3
.1
.1
.1 4 1 1 1 5 10
10
10
≥6
100
100
100
Follow these steps to complete the field installation of your PowerScout meter:
Connect whatever communications cable you are using to the building network.
Connect your pulse output, if used. The port can be used to output kWh, kVARh, or kVAh pulses
to external devices, or to toggle on and off to control a remote device or relay. See Using the
Pulse Output Port Function.
Connect the CTs. See Wiring CTs.
Connect the voltage and power the meter. See Connecting Voltage.
Using the Pulse Output Port Function
ulse output is used to generate pulses for external devices such as data loggers that can accept pulses
P
but do not have BACnet or Modbus capability. The PowerScout 3037 can generate pulses based on
accumulated value(s) such as system kWh, system kVARh, and system kVAh. When a pulse is generated
by the meter, the pulse LED will briefly flash, otherwise it will remain dark.
When in Modbus, the pulse output is scaled by the Modbus data scalar register 44602. When in BACnet,
the pulse output is scaled by the CT Pulse Scalar object 12030. The pulse scalar table is the same as the
Modbus data scalar table. For example, when the data scalar is set to 3, each pulse will represent
.1kWh, .1kVAh and .1kVARh.
Pulse Scalar Value
Data Scalar
kWh kVAh kVARh
Table III-1: Pulse Scalar Values
39
Find Quality Products Online at: sales@GlobalTestSupply.com
www.GlobalTestSupply.com
Page 39

For system pulse output:
kWh pulse output—write 44001 into the pulse output configuration object.
kVAh pulse output—write 44011 into the pulse output configuration object.
kVARh pulse output—write 44008 into the pulse output configuration object.
MODBUS OUTPUT PORT REGISTERS
Modbus
Register
44402 4401/5301
45110 5109/5309
45111 5110/5310
Offset Register Name Detailed Description
Port 1 output control
when used as an on/off—
open/closed switch
Digital Port 1
Configuration
Turns pulses on/off
Port 1 pulse output relay
type
0 = output LOW (closed)
1 = output HIGH (open) [default]
Register 45110 must = 0 to use
0 = No pulses, Port may be used as an
on/off—
open/closed switch
44001 = System kWh pulses
44008 = System kVARh pulses
44011 = System kVAh pulses
0 = normally open (HIGH)
1 = normally closed (LOW)
Table III-2: Modbus Digital Port Pulse Output
BACNET OUTPUT PORT OBJECTS
Refer to the following two tables to configure the PowerScout output port when using the BACnet
protocol.
Object
Identifier
Object Name Detailed Description
13020
13100
13110 Port 1 pulse output relay type
Port 1 output control when used as an
on/off—open/closed switch
Digital Port 1 Configuration
Turns pulses on/off
0 = output LOW (closed) 1 = output HIGH
(open) [default]
Object 13100 present value must = 0 to use
0 = No pulses, Port may be used as an
on/off—
open/closed switch
44001 = System kWh pulses
44008 = System kVARh pulses
44011 = System kVAh pulses
0 = normally open (HIGH)
1 = normally closed (LOW)
Table III-3: BACnet Digital Port 1 Pulse Output
40
Find Quality Products Online at: sales@GlobalTestSupply.com
www.GlobalTestSupply.com
Page 40

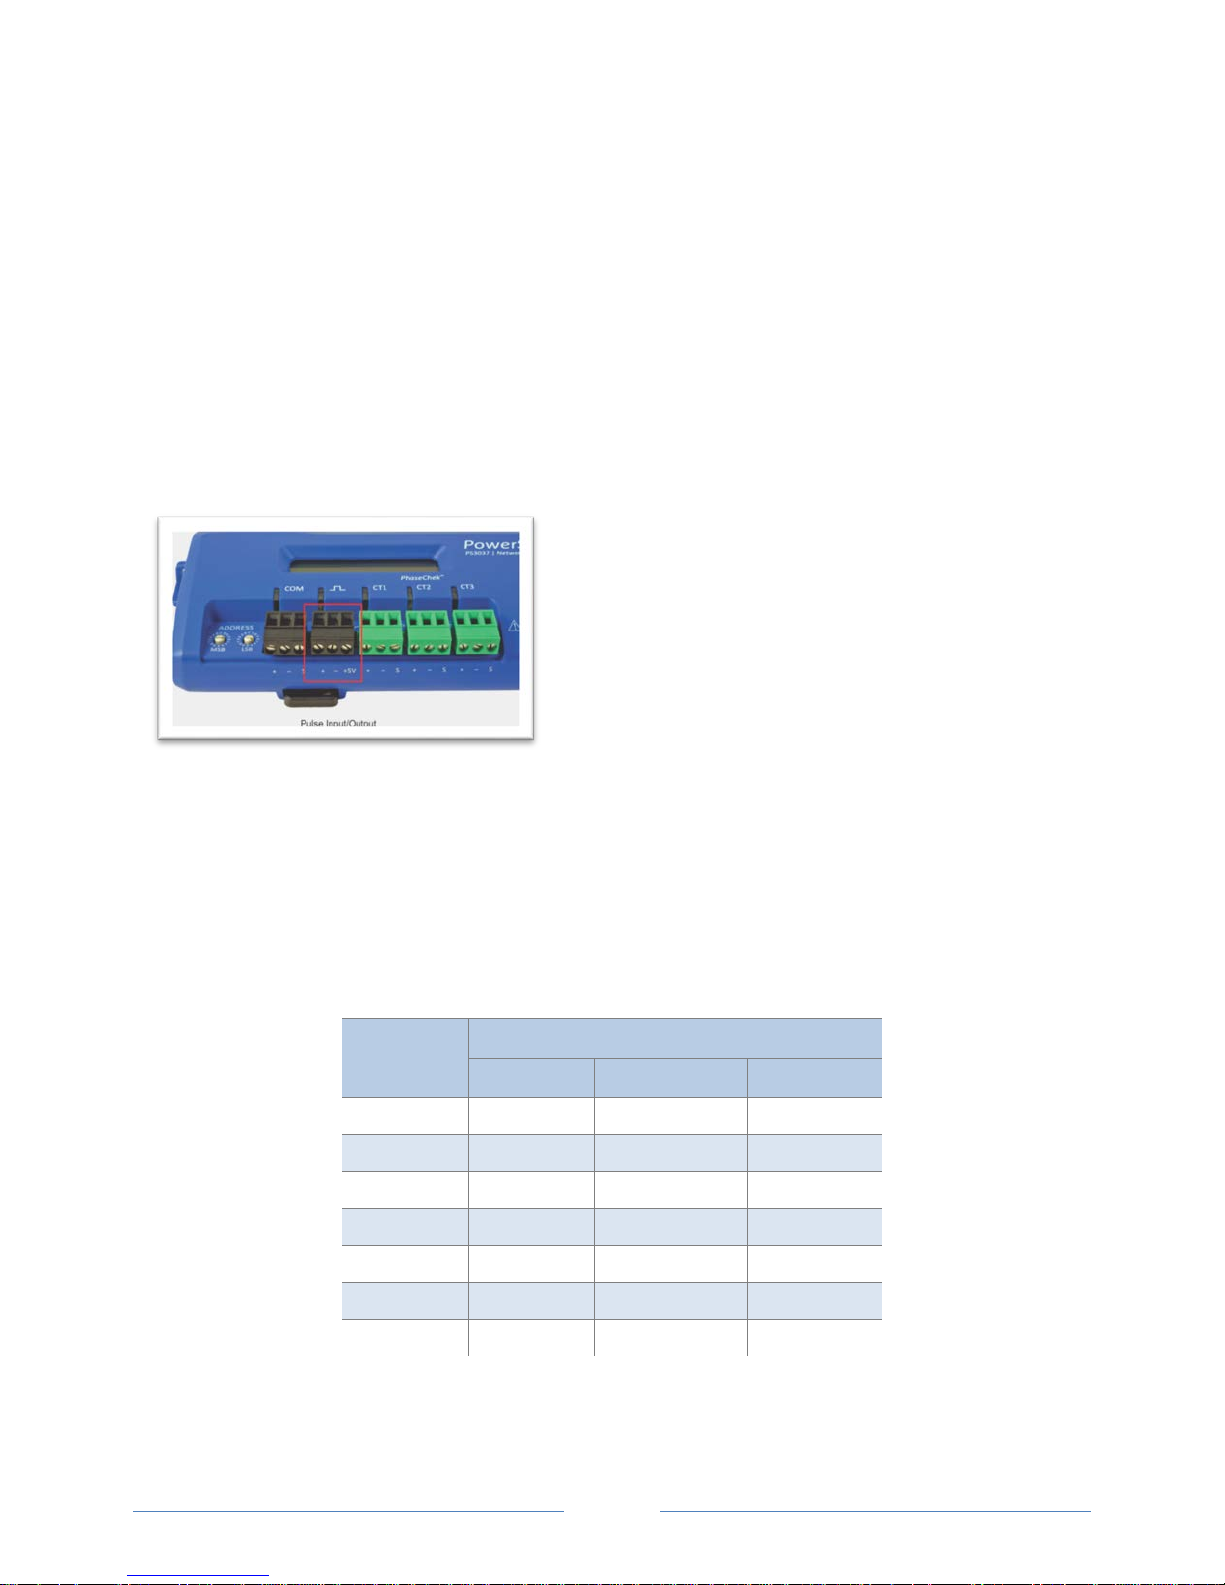
Wiring CTs
1) Insert the CT wires into the connector/s. See the following CT Type Wiring
Connections table for the correct wiring configuration.
CT Type Wiring Connections
Split-Core *2 wire (+, –) RōCoil *3-wire (+, –, shield)
PowerScout 3037
1) Attach the CTs onto the PowerScout connections labeled CT 1, CT 2 and CT 3.
2) Place the CTs on the phase wires of the load to be monitored and corresponding to the phase of the
voltage leads. The CT labeled CT 1 must be placed on L1 phase voltage wire, CT 2 must be on the L2
voltage and CT 3 on the L3 voltage. Refer to PhaseChek
the CT LEDs and verifying the CT installation.
™
later in this section for information about
41
Find Quality Products Online at: sales@GlobalTestSupply.com
www.GlobalTestSupply.com
Page 41

CONNECTING SPLIT-CORE STYLE MILLIVOLT CTS TO A LOAD
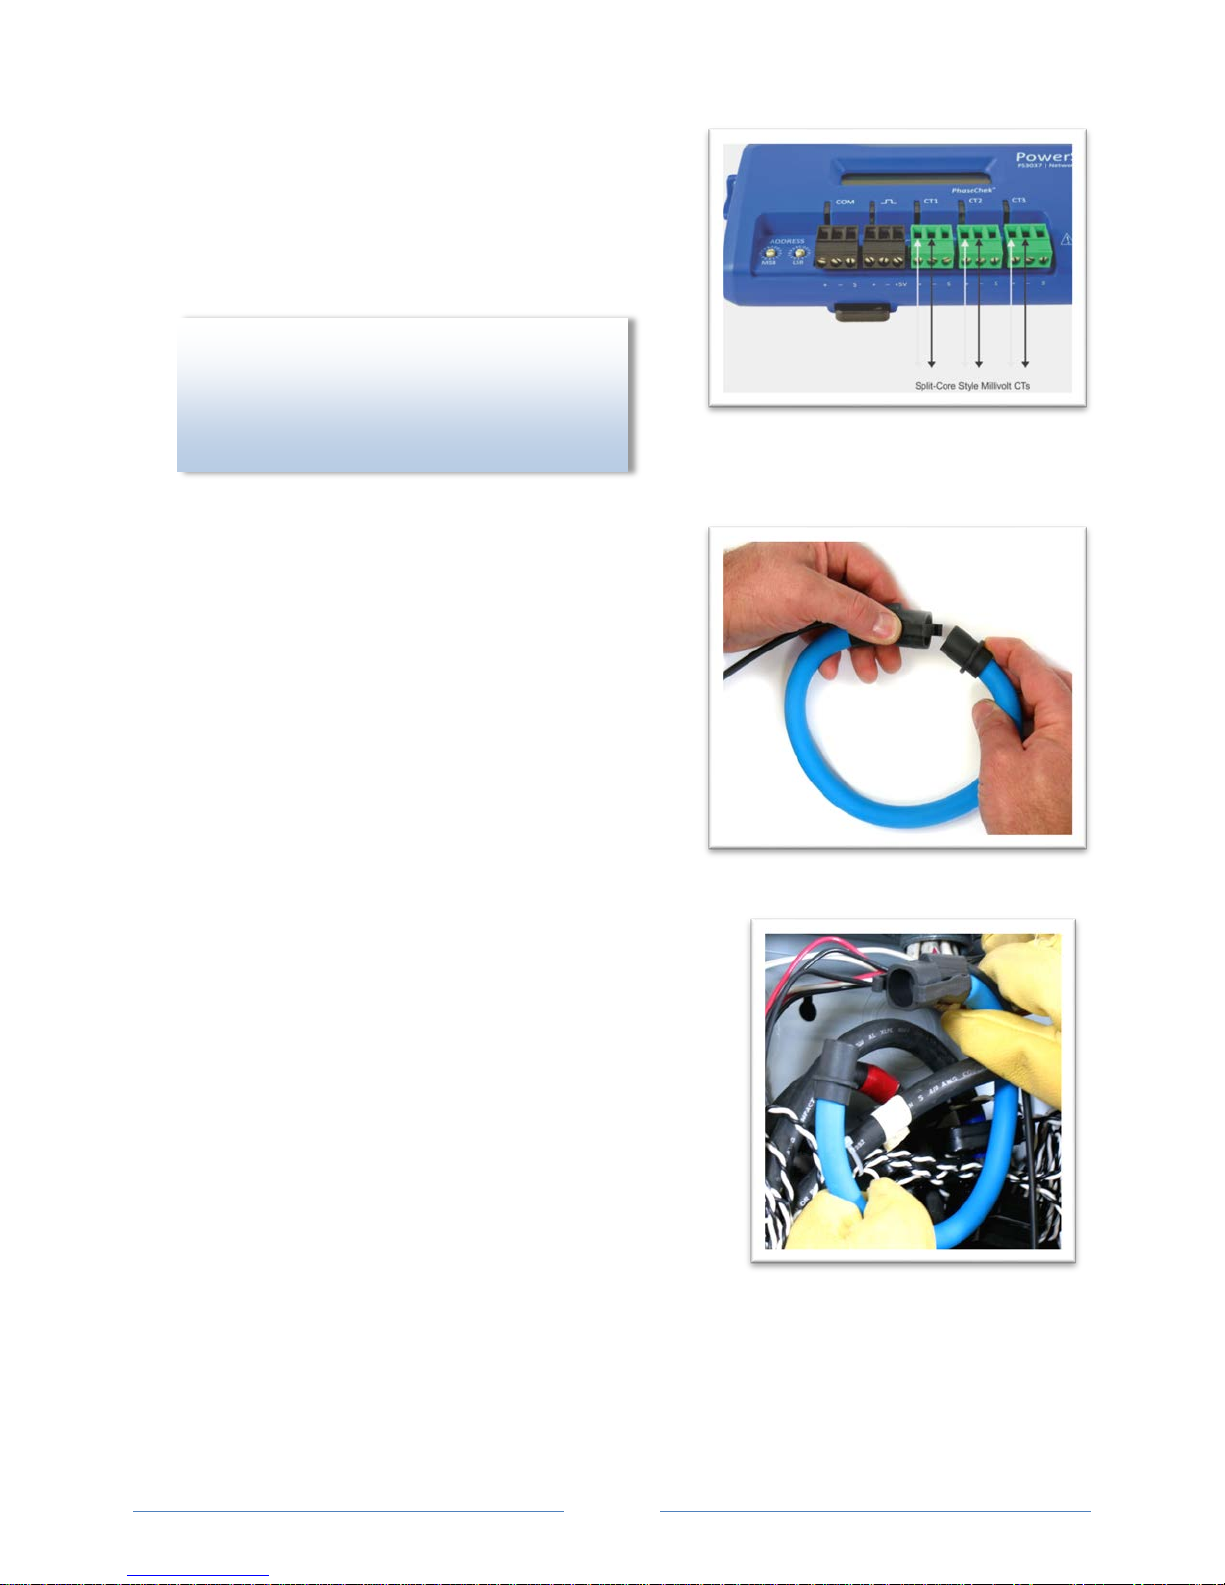
1) Open the CT by holding on to the removable leg and pulling it apart.
2) C
onnect CT around the load conductor to be measured. Make sure the maximum current of the
conductor does not exceed the maximum CT rating listed on the CT data sheet.
3) C
arefully re-connect the removable leg while ensuring the CT core alignment matches. The
conductor should be in the inside of the CT window.
4) Repeat Steps 1-3 if you are using more than one CT.
42
Find Quality Products Online at: sales@GlobalTestSupply.com
www.GlobalTestSupply.com
Page 42
5) Connect the white wire on the CT to the positive
D
? Correct orientation of a CT is
terminal on the measuring device.
6) Connect the black wire on the CT to the negative
terminal on the measuring device.
ID YOU KNOW
required to ensure proper measurement. If an
arrow is shown on the CT label, it should be
pointed toward the load. Otherwise, use the
instructions printed on the CT.
CONNECTING RŌCOIL CTS TO A LOAD
To install the RōCoil CT to the conductor(s):
1) Open the CT by squeezing the connector latch and
pulling it apart.
2) Connect the CT around the load conductor to be
measured. Orient the CT so that the arrow on the CT
case points towards the load. Make sure the maximum
current of the conductor does not exceed 5,000 amps.
3) Push the connector back together with the conductor
within the loop of the CT.
Repeat the above three steps if you are using more than
one RōCoil CT.
T
o connect the CTs wires to the terminals on the PowerScout:
1) Connect the CTs brown wire to the negative terminal on the
connector. See photo.
2) Connect the CTs white wire to the positive terminal on the
onnector.
c
3) Connect the bare shield wire from the RōCoil to the “S”
shield terminal that is part of the connector. This reduces
interference and improves accuracy of the CT.
43
Find Quality Products Online at: sales@GlobalTestSupply.com
www.GlobalTestSupply.com
Page 43

Negative
Positive
Shield
PowerScout 3037 w/RōCoil CTs
attached to load
Connecting RōCoil CTs
44
Find Quality Products Online at: sales@GlobalTestSupply.com
www.GlobalTestSupply.com
Page 44

CT WIRE LEAD POLARITY
D
? The PowerScout is rated
CT Type CT Lead + CT Lead -
Rogowski (RōCoil)* White Brown
Split Core mV White Black
Clamp On mV Red Black
Table III-4: CT Polarity
NOTE: The directionality for Rogowski CTs is the arrow points toward the load (e.g. motor).
* R
ōCoils have a shield wire which must be connected to the meter. This reduces interference and
improves accuracy of the CT.
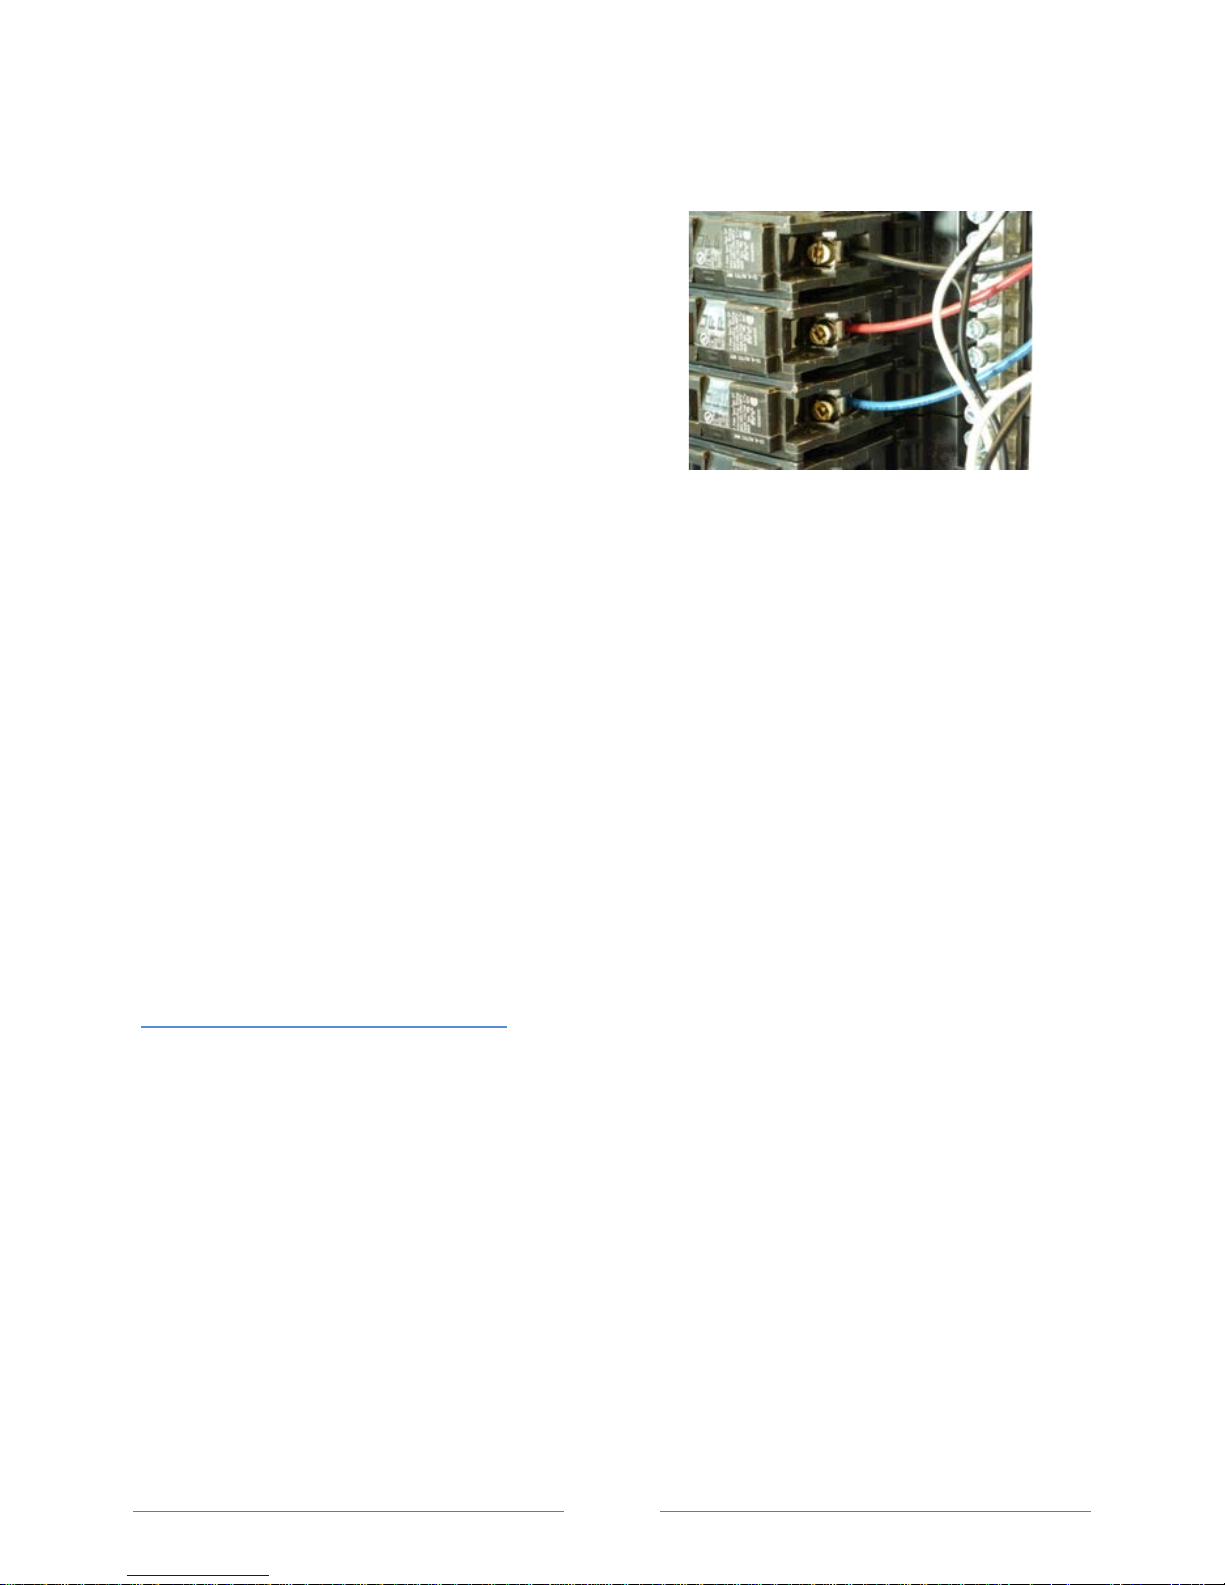
Connecting Voltage
1) Connect the voltage leads (L1, L2, L3, and N, as necessary) to the meter. A voltage lead of 14 AWG
HHN Minimum 600VAC rating (or equivalent in order to maintain 600VAC safety rating of the
T
device) is required.
2) Connect the leads to the circuit breaker.
a) Refer to the wiring diagrams in for wiring
connection specifics. Follow local electrical codes
during this installation.
b) IMPORTANT: Verify the breaker is marked as th
d
isconnect breaker for the meter
.
ID YOU KNOW
for 600V Over-Voltage Category III.
Cat III is for measurements performed in
the building. Examples are
measurements on distribution boards,
e
circuit-breakers, wiring including cables,
bus bars, junction boxes, switches, and
socket outlets in a fixed installation, and
equipment for industrial use. Other
equipment could include stationary
motors with a permanent connection to
the fixed installation.
Find Quality Products Online at: sales@GlobalTestSupply.com
45
www.GlobalTestSupply.com
Page 45
POWERING THE METER
Connect the PowerScout meter 14 AWG THHN
Minimum 600VAC rating (or equivalent in order to
maintain 600VAC safety rating of the device) voltage
leads as close as possible to a building-installed,
dedicated circuit disconnect breaker. Mark the breaker
as the “disconnect” for the PowerScout. Refer to the
wiring diagrams for specifics of the wiring connections.
Follow local electrical codes during this installation.
PowerScout meters are self-powered from the L1 and L2
lines. When 80–600VAC or DC is placed across the L1 and
L2 wires, the three phasing LEDs begin to flash in
sequence.
POWERSCOUT SINGLE-PHASE CONNECTIONS
The PowerScout meter can be used to monitor single-phase loads. There are several guidelines to keep
in mind about this type of connection:
1) The PowerScout is powered from a potential between L1 and L2. This can be phase-to-phase (230V)
or phase-to-neutral (115V). With a single-phase 230V panel, the L1 and L2 voltage leads are
connected between the L1 and L2 voltage sources. With a 115V circuit, the L1 voltage lead is
connected to the L1 “hot lead,” and the L2 voltage lead is connected to neutral.
2) Each CT must be paired with the correct voltage source. The current and voltage need to be in-
phase for accurate measurements. For instance, CT 1 would monitor branch circuit supplied by
voltage source L1, and so on.
3) The neutral must be connected because the PowerScout uses line-to-neutral measurements fo
c
alculations.
r all
A Typical 230V Single-Phase Panel
Setup (US Wire Colors)
Connect the Black L1 voltage lead to Voltage L1, Red L2 voltage lead to L2 voltage, White Neutral voltage
lead to neutral. CT1 would monitor L1 loads and CT2 would monitor L2 loads. Based on the above
guidelines, CT3 can be used if the Blue L3 voltage lead is connected to either L1 or L2. As long as voltage
lead L3 and CT3 are in-phase, the PowerScout meter will provide correct kW readings. If the Blue L3
voltage lead was connected to L2 voltage source, then CT3 could monitor any L2 branch circuit. Or, if the
Blue L3 voltage lead was connected to L1 voltage source, then CT3 could monitor any L1 branch circuit.
46
Find Quality Products Online at: sales@GlobalTestSupply.com
www.GlobalTestSupply.com
Page 46

A Typical 115V Single-Phase Panel
Setup
Connect the Black L1 voltage lead to Voltage L1 (hot), Red L2 voltage lead to Neutral, and White N
voltage lead to neutral. CT1 would monitor the L1 load. CT3 can be used if the Blue L3 voltage lead is
connected to L1. CT3 could then monitor any L1 branch circuit.
System Values
System values are the sum of L1 + L2 + L3 measurements. System values may not be meaningful since
two different devices or loads can be monitored by a single PowerScout element.
When paired with the right voltage phase, each CT provides individual kW/kWh readings for that CT
channel.
47
Find Quality Products Online at: sales@GlobalTestSupply.com
www.GlobalTestSupply.com
Page 47
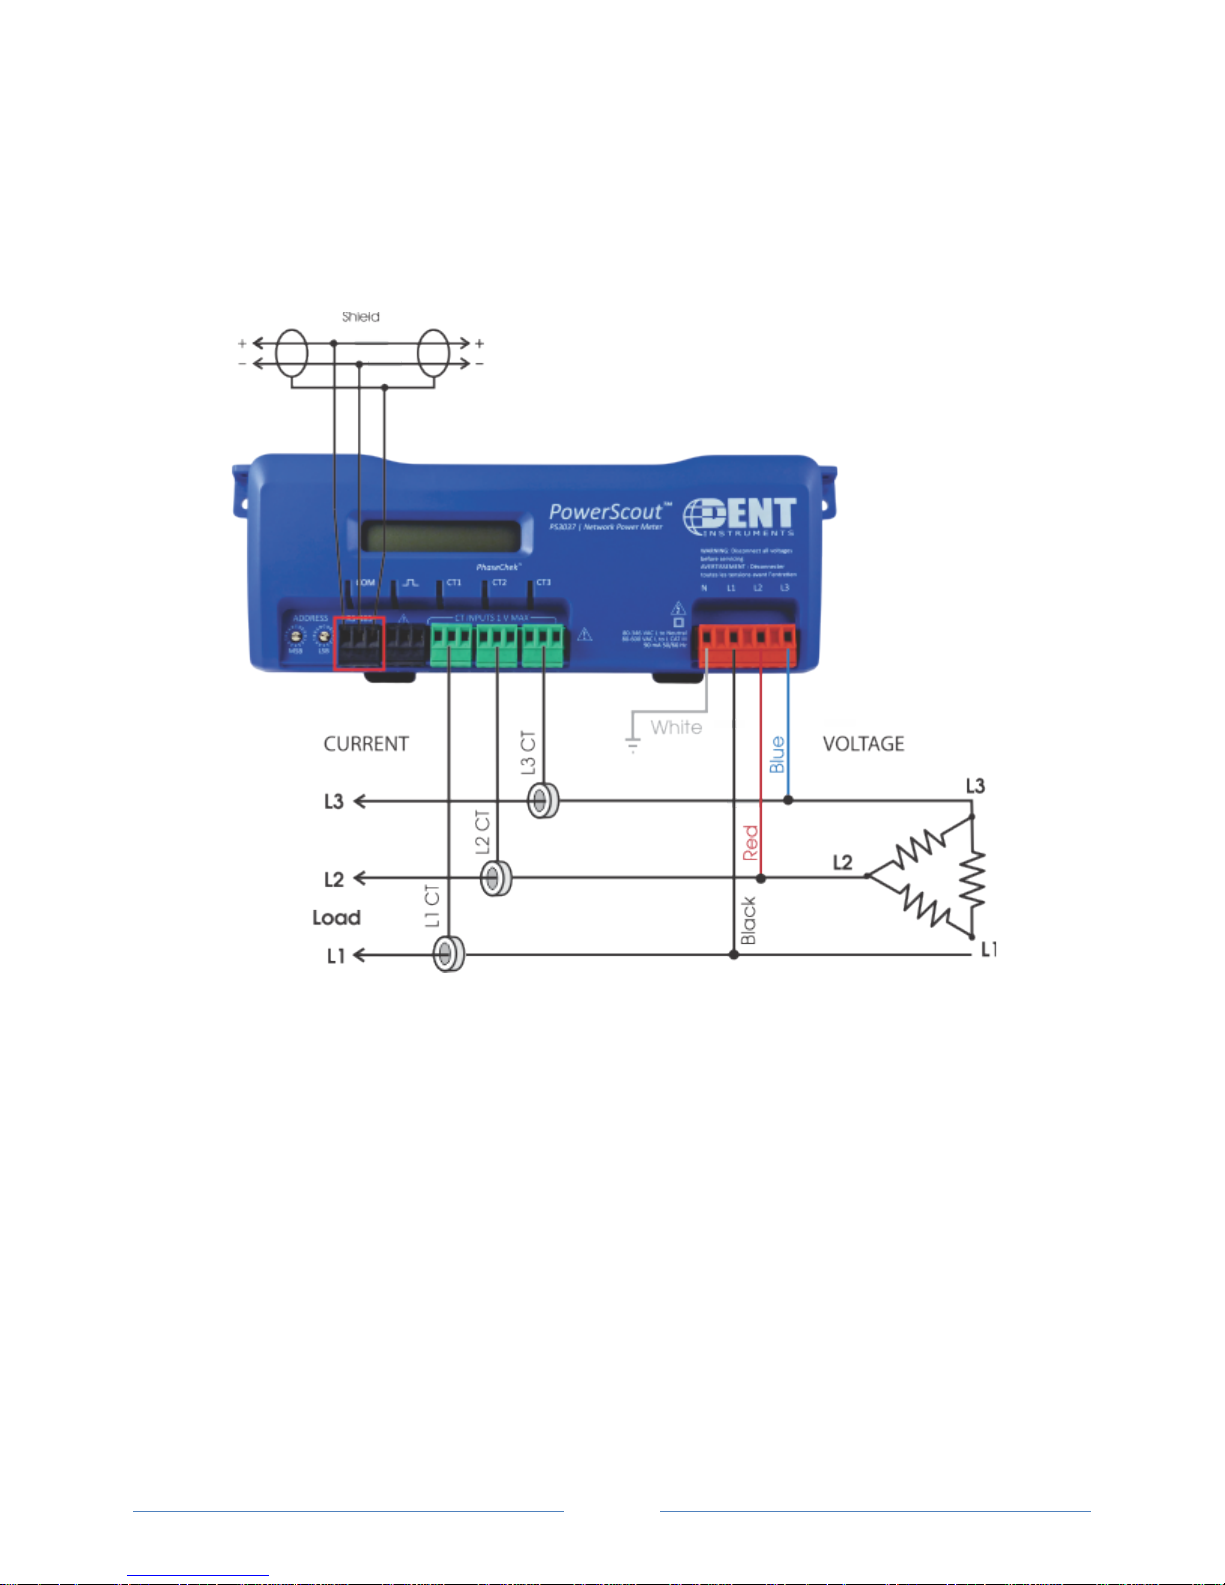
PowerScout 3037 Wiring Diagrams
THREE-WIRE DELTA
se a Service Type 0 (zero) value for BACnet Object 12080 or a 0 (zero) value for Modbus Register 44607
U
on this wire configuration. DENT Instruments recommends using the 3 CT Method (WYE) for delta loads.
48
Find Quality Products Online at: sales@GlobalTestSupply.com
www.GlobalTestSupply.com
Page 48

FOUR-WIRE WYE
U
se a Service Type 0 (zero) value for BACnet Object 12080 or a 0 (zero) value for Modbus Register 44607
on this wire configuration.
49
Find Quality Products Online at: sales@GlobalTestSupply.com
www.GlobalTestSupply.com
Page 49

TWO-WIRE SINGLE PHASE
se a Service Type 0 (zero) value for BACnet Object 12080 or a 0 (zero) value for Modbus Register 44607
U
on this wire configuration.
50
Find Quality Products Online at: sales@GlobalTestSupply.com
www.GlobalTestSupply.com
Page 50
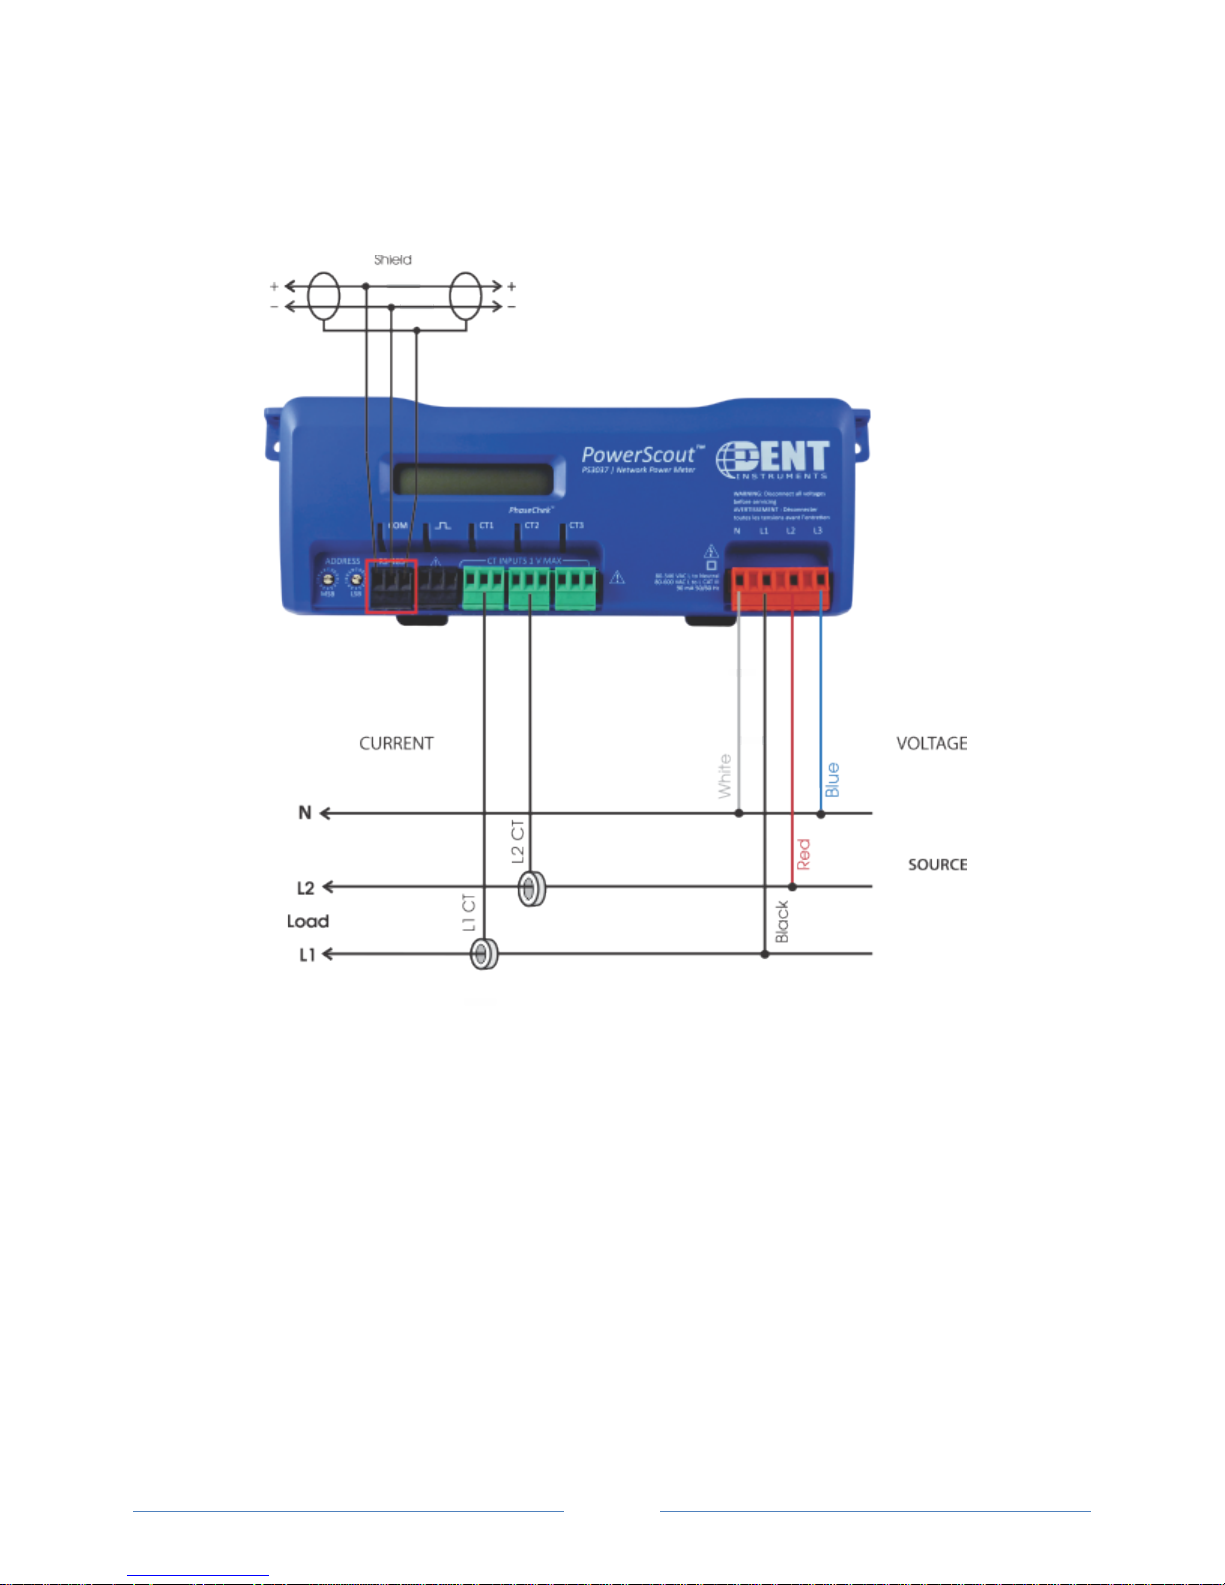
THREE-WIRE SINGLE PHASE
se a Service Type 0 (zero) value for BACnet Object 12080 or a 0 (zero) value for Modbus Register 44607
U
on this wire configuration.
51
Find Quality Products Online at: sales@GlobalTestSupply.com
www.GlobalTestSupply.com
Page 51

Verifying Installation with PhaseChek
Setup is correct and the system power factor
PhaseChek1 is a unique feature of the PowerScout series instruments that simplifies installation by
ensuring proper CT orientation and avoiding faulty data collection.
Verifying the PowerScout Meter
Setup Using the LEDs
The PowerScout 3037 uses three bi-color PhaseChek LEDs. These LEDs provide the following
information:
All LEDs are green—the system power factor is greater than 0.55 and the CTs are properly
placed on the corresponding voltage phases.
Any one LED is red—there is a phasing connection error.
Two LEDs are red and one is green—two CTs are reversed.
All three LEDs are red—all CTs are incorrectly connected.
DID YOU KNOW? If the total system
power factor is less than 0.55, the
LEDs will be red even if
connected properly. This
situation is rare but could occur
if, for example, the load to be
monitored is a lightly loaded
electric motor where it is
common for the power factor to
be less than 0.55 and the
corresponding LEDs will be red.
T
he following table describes the PhaseChek error conditions and the appropriate correction.
PhaseChek Error Table
CT1 CT2 CT3 Error Description Correction
1
Patent No. 7,612,552. U.S. Patent and Trademark Office.
is greater than 0.55.
-orAll CTs are disconnected.
All CTs are incorrectly connected,
-orThe system power factor is less than 0.55.
52
Connect the CTs.
Rotate the CT connections by one position by
move CT 1 to CT 2, CT 2 to CT 3 and CT 3 to
CT 1, until all LEDs are green.
The system power factor is less than 0.55 but
the CTs are connected properly indicating a
light load.
Find Quality Products Online at: sales@GlobalTestSupply.com
www.GlobalTestSupply.com
Page 52

CT1 CT2 CT3 Error Description Correction
CT 1 and CT 2 are reversed. Switch the position of the CTs flashing red.
CT 1 is swapped with either CT 2 or CT 3.
CT 2 is swapped with either CT 1 or CT 3.
CT 3 is swapped with either CT 1 or CT 2.
CT 1 and CT 3 are reversed. Switch the position of the CTs flashing red.
CT 2 and CT 3 are reversed. Switch the position of the CTs flashing red.
Switch CT 1 with CT 2.
-orSwitch CT 1 with CT 3.
Switch CT 2 with CT 1.
-orSwitch CT 2 with CT 3.
Switch CT 3 with CT 1.
-orSwitch CT 3 with CT 2.
Table III-5: PhaseChek LED Error Resolution
53
Find Quality Products Online at: sales@GlobalTestSupply.com
www.GlobalTestSupply.com
Page 53

Verifying Installation with the ViewPoint Software
In addition to verifying your connections with PhaseChek, you can also use the ViewPoint software to
check connections. Any computer running ViewPoint software, whether a laptop connected directly to
the meter, a smart phone, or a PC connected to the network can bring up the software and learn
information about the connection, the communication protocols, meter setup, real-time values, and
firmware version.
REAL-TIME VALUES
e Real-Time Values screen shows current readings to verify the system is configured properly. The
Th
tables display the real-time values of Volts, Amps, KW, KVA, KVAR, apparent power factor (aPF), and
displacement power factor (dPF) for Phase L1, Phase L2 and Phase L3. This screen also displays the CT
Type connected to the PowerScout and the CT Value.
Click Update to retrieve the values from the PowerScout.
-orSelect the Auto-Update checkbox to automatically update approximately every 20 seconds.
54
Find Quality Products Online at: sales@GlobalTestSupply.com
www.GlobalTestSupply.com
Page 54

Using Real-Time Values to Verify
Setup
Values displayed for Volts, Amps, KW, etc., should make sense, meaning the values in the table are
relevant for the service being measured. This indicates the PowerScout setup is correct.
It may also be useful to use a handheld amp meter to test the current and compare its readings to the
values provided on the Real-Time Values screen.
Using the Optional Visual Display to
Verify Real-Time Values
f your PS3037 meter has the optional visual display installed you can read real-time values directly from
I
the meter. It has 2 rows of 16 characters along with a push button at one end of the PS3037 that
controls the display scroll mode. When the display button is held down for 5 seconds the PS3037 will
switch between AUTO CYCLE mode (switch screens every 2 seconds) or MANUAL CYCLE (the button
must be pressed to switch screens). This change is saved to non-volatile memory.
When in auto cycle mode, the informational screens change every 2–3 seconds, with real-time values
updated every second. The “display” button will stop the cycle until it is pressed again or until 20
seconds is reached. Some information, such as protocol, CT type, volts, amps, kW, pf, etc., is displayed
during each cycle. See the Appendix for a chart showing complete cycle information.
Visual Display Cycle Button
55
Find Quality Products Online at: sales@GlobalTestSupply.com
www.GlobalTestSupply.com
Page 55
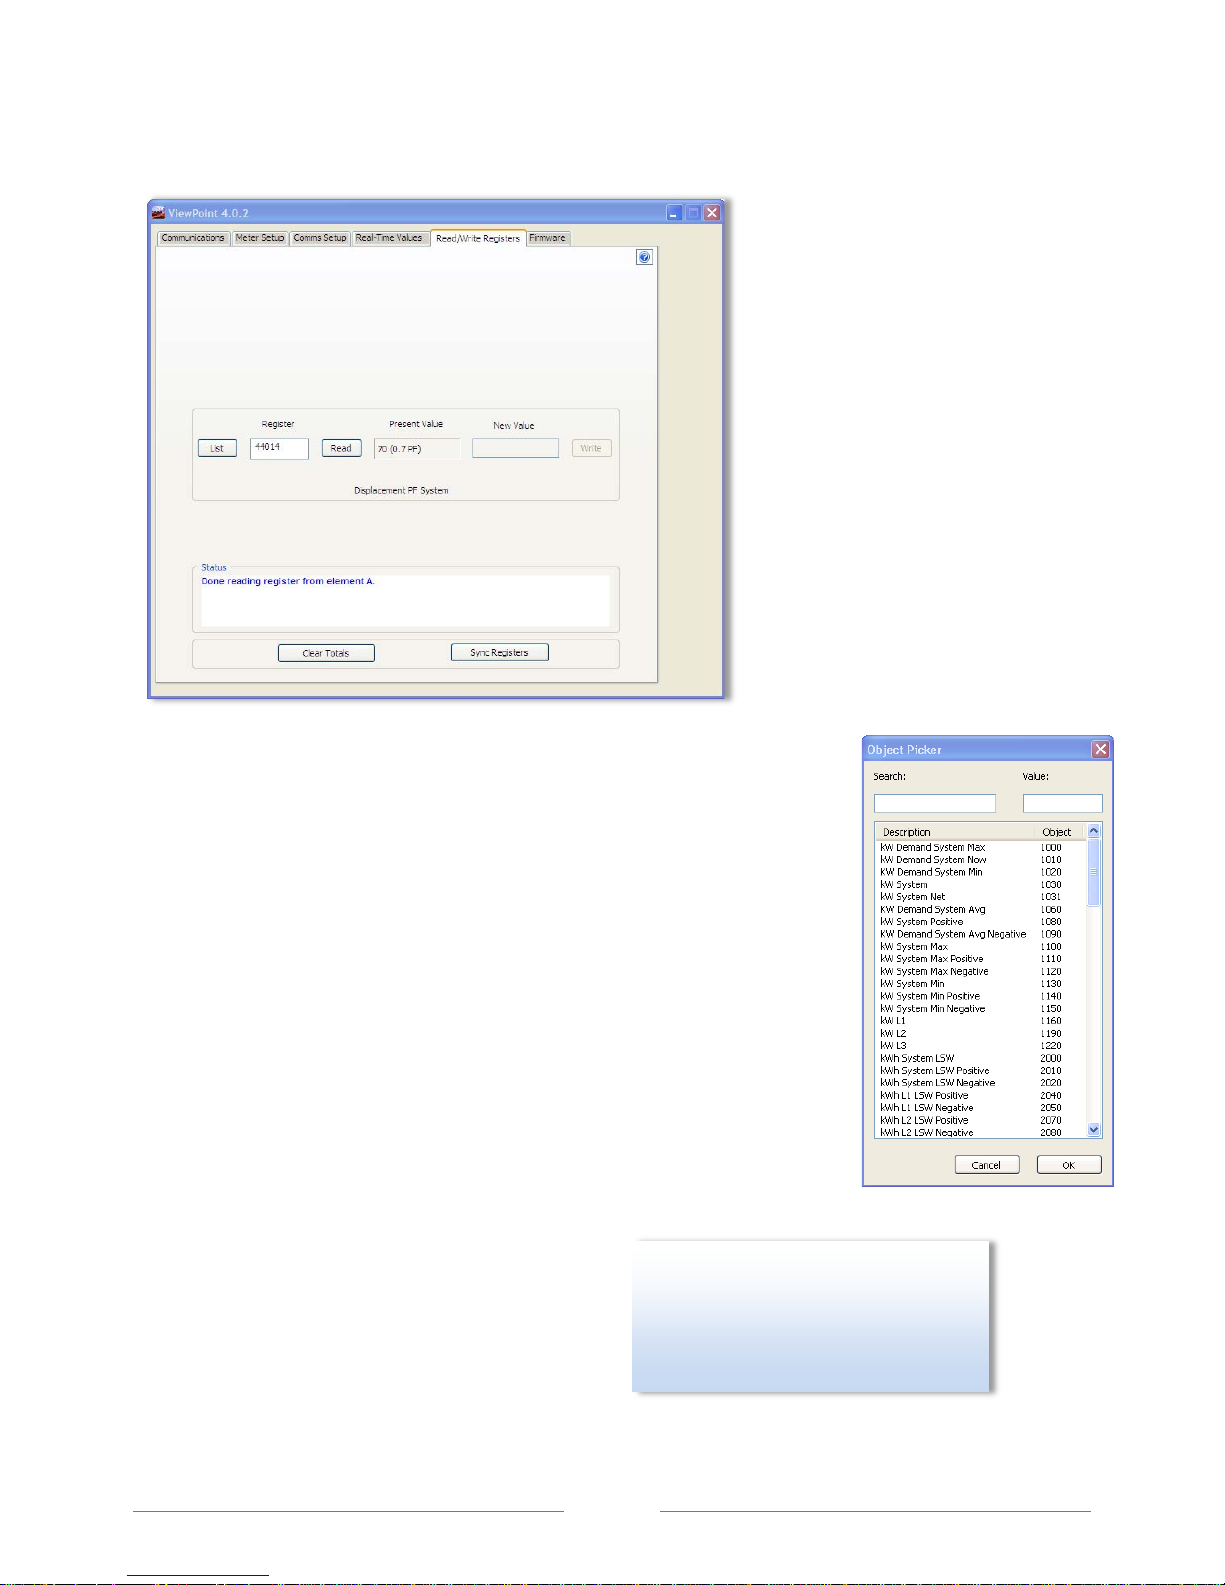
READ/WRITE REGISTERS—READ/SET OBJECTS
e Read/Write Registers, Read/Set Objects screen provides diagnostic and
Th
special configuration options, allowing the changing or viewing of the value of
any PowerScout register or object. The tab name changes depending on what
protocol (Modbus or BACnet) you are using. Its use is not required for a basic
setup.
1) Enter a register/object address. Refer to the Appendices, All Things
Modbus or BACnet Objects for a list of registers/objects and their
descriptions.
-orClick List to select a register/object from the Register/Object Picker dialog
box.
Use the Register/Object Picker dialog box to search for registers/objects
by name. The selected value is entered on the Read/Write Registers—
Read/Set Objects screen.
2) Click Read to see the current value.
3) Enter a new value in the New Value field.
4) Click Write to change to the new value.
5) Click Clear Totals to clear accumulated data.
DID YOU KNOW? Accumulated data is
registers/objects with a time
reference, such as time since reset,
kWh, demands, etc.
56
Find Quality Products Online at: sales@GlobalTestSupply.com
www.GlobalTestSupply.com
Page 56

Resetting BACnet Objects/Modbus
Registers
Many of the PowerScout objects/registers are real-time values such as instantaneous watts or power
factor. However, some objects are accumulated values such as kWh, kVARh, kVAh and various Peak
Demand (kW) values.
To reset all BACnet accumulated objects at once:
Write to object identifier 10140 “Clear Accumulated Values” current value 1234.0
reset all Modbus accumulated registers at once:
To
Write to register 44066 “Clear Accumulated Measurements” current value 1234.
In ViewPoint, accumulating objects/registers can be reset using the Read/Set or Read/Write tab.
Click Clear Totals at the bottom of the screen.
See the tables in the Appendices for a list all of the objects/registers available on the PowerScout
meters.
.
57
Find Quality Products Online at: sales@GlobalTestSupply.com
www.GlobalTestSupply.com
Page 57

D
DENT Instruments recommends
FIRMWARE
e Firmware screen verifies the current firmware version and updates the PowerScout internal
Th
firmware. Updating firmware is only supported in Modbus mode and is used to bring the software up to
date. See the appendix Firmware.
1) C
lick Show Version to see which version o
firm
ware is currently loaded in meter. If a
later version of firmware is available,
download it from the DENT Instruments
website.
f
ID YOU KNOW?
using 115,200 bps as the baud rate when
downloading firmware updates via a RS-485.
NOTE: There are no baud rate settings when
connected via USB or Ethernet.
2) Click Browse to access the Select a
Firmware Update File dialog box and select the .hex file downloaded from the website.
58
Find Quality Products Online at: sales@GlobalTestSupply.com
www.GlobalTestSupply.com
Page 58

3) Click Check for Updates Online to automatically determine if the connected meter has the latest
ersion of the firmware or software.
v
-orSelect the Don’t check online for firmware or ViewPoint updates checkbox to disable this feature.
e Meter Version Update Checking dialog screen displays. If there is a new version available, you
Th
will be shown the version number of the new release. Click the Download button to obtain the
latest firmware from the DENT website. Once downloaded, return to the Firmware tab and use the
Browse command button in Step 2 to select the file and download the new version to the meter.
nce you have new firmware on your computer, ViewPoint will let you install that firmware for each
O
meter connected of the same model without having to download it again. The firmware should be
saved in the DENT/ViewPoint/Firmware folder under the Documents folder on your computer.
ViewPoint also checks for new versions of the ViewPoint application. When ViewPoint starts, it can
automatically contact the DENT Instruments web site to get the latest versions available. It only
checks online when running for the first time, or if it has been 7 days since the last check. If there is
a new version, the version number of the new release is displayed.
4) Click Update to download the latest version.
-orClick Cancel Update to stop the download.
59
Find Quality Products Online at: sales@GlobalTestSupply.com
www.GlobalTestSupply.com
Page 59

ALL THINGS MODBUS
DEVICE REGISTERS
Modbus Offset Register Description
44201 4200 Model Number 1st 2 bytes Model Name 10 bytes (ASCII Alpha-Numeric)
44202 4201 Model 2 “
44203 4202 Model 3 “
44204 4203 Model 4 “
44205 4204 Model Number last 2 bytes “
44206 4205 Serial Number 1st 2 bytes Serial Number 10 bytes (ASCII Alpha-Numeric)
44207 4206 Serial 2 “
44208 4207 Serial 3 “
44209 4208 Serial 4 “
44210 4209 Serial Number last 2 bytes “
44511 4510 Hardware ID Hardware revisions.
44069 4068 Firmware Major Revision Major Revision Level (big software releases)
44070 4069 Firmware Minor Revision Minor Revision Level (small software changes)
CONFIGURATION REGISTERS
Modbus Offset Register Description
40129 0128 Synchronize Register Multiple PowerScout’s synchronization register
44066 4065 Clear Accumulated
Measurements
44525 4524 CT Type All Writes same type for all CTs: 1=MilliVolt, 2=Rogowski
44526 4525 Slave ID !1=DENT, 1=Veris; Sets SLAVE_ID to Veris or DENT
Writing 1234 resets all 'H' registers, accumulated
PowerScout data (kWh, kWh, etc) stored in flash to
CAM Default value
60
Find Quality Products Online at: sales@GlobalTestSupply.com
www.GlobalTestSupply.com
Page 60

Modbus Offset Register Description
44599 4598 CT Phase Shift All CT Phase Shift X 100 +/-
Writes same value to Registers 50199, 50299, &
50399
44600 4599 CT Integer All Integer value of all CTs, Writes same value to
Registers 50100, 50200, & 50300
44601 4600 CT Decimal All Decimal value of all CTs, Writes same value to
Registers 50100, 50200, & 50300
44602 4601 Data Scalar
44603 4602 Demand Window Size Demand window size in minutes; default is 15 min
44604 4603 Volts Multiplier Integer Multiply volts values by this scalar + Volts Multiplier
44616 4615 Volts Multiplier Decimal Multiply volts values by (this scalar/1000+Volts
44605 4604 Amps Multiplier Multiply amps value by this scalar. For use with x:5A
44606 4605 Communication Setting Baud: 900=9600, 1900=19200, 3800=38400,
44607 4606 Service Type A value of 0x0001 configures the meter for DELTA
A Value of 0-6 that changes the scaling of certain
registers
Decimal/1000. Use with Step-down Transformer.
Affects all parameters that use volts (i.e., kW)
Multiplier Integer). Use with Step-down Transformer.
Affects all parameters that use volts (i.e., kW)
CTs and single let monitoring of a three phase load.
Affects all parameters that use amps (i.e, kW)
5700=57600, 7600 =76800, 11500=115200
Parity: Add 00 = NO, Add 10 = ODD, Add 20 = EVEN
Stop bit: Add 0 = 1 (UART does not permit 0 stop bits),
Add 1 = 1, Add 2 = 2
E.g., 901 = 9600 baud, no parity, 1 stop bit
A value of 0x0000 configures the meter for WYE
44609 4608 Set Line Frequency Line frequency setting for metering: 50=50 Hz,
60=60Hz
44610 4609 Snap Rog Threshold “Snap to Zero” threshold Rogowski CTs. Register value
is:
44611 4610 Snap Volt Threshold “Snap to Zero” threshold for voltage. Register value is
1x:
44612 4611 Communications Settings Write 1833 to change to BACnet mode
50100 10099 CT1 Integer Integer part of CT1
50101 10100 CT1 Decimal Fractional part of NV_CT1
50125 10124 CT1 Type Select 1=mV or 2=Rogowski CT1s
50199 10198 CT1 Phase Shift Phase Shift X 100 +/-
61
Find Quality Products Online at: sales@GlobalTestSupply.com
www.GlobalTestSupply.com
Page 61

Modbus Offset Register Description
50200 10199 CT2 Integer Integer part of CT2
50201 10200 CT2 Decimal Fractional part of NV_CT2
50225 10224 CT2 Type Select 1=mV or 2=Rogowski CT2s
50299 10298 CT2 Phase Shift Phase Shift X 100 +/-
50300 10299 CT3 Integer Integer part of CT3
50301 10300 CT3 Decimal Fractional part of NV_CT3
50325 10324 CT3 Type Select 1=mV or 2=Rogowski CT3s
50399 10398 CT3 Phase Shift Phase Shift X 100 +/-
PULSE OUTPUT/INPUT REGISTERS
Modbus Offset Register Description
Port 1 output control when
44402 4401
45110 5109
45111 5110 Port 1 pulse output relay type
used as an on/off—open/closed
switch
Digital Port 1 Configuration
Turns pulses on/off
0 = output LOW (closed)
1 = output HIGH (open) [default]
Register 45110 must = 0 to use
0 = No pulses, Port may be used as an on/off—
open/closed switch
44001 = System kWh pulses
44008 = System kVARh pulses
44011 = System kVAh pulses
0 = normally open (HIGH)
1 = normally closed (LOW)
ABSOLUTE MEASUREMENT REGISTERS
Offset refers to a base of 40001.
Description
Modbus Offset Register
44001 4000 kWh System LSW System Total True Energy LSW (kWh)
44002 4001 kWh System MSW System Total True Energy MSW (kWh)
* System=sum of three phases
System Total True Power (kW). Unsigned absolute
44003 4002 kW System
(ABS) value of ABS (kW L1) + ABS (kW L2) + ABS (kW
L3)
62
Find Quality Products Online at: sales@GlobalTestSupply.com
www.GlobalTestSupply.com
Page 62

Description
Modbus Offset Register
44004 4003 kW Demand System Max System Maximum Demand (peak demand).
44005 4004 kW Demand System Now Average Power (kW) for most recent demand window
* System=sum of three phases
44006 4005 kW System Max
44007 4006 kW System Min
44008 4007 kVARh System LSW System Total Reactive Energy LSW (kVARh)
44009 4008 kVARh System MSW System Total Reactive Energy MSW (kVARh)
44010 4009 kVAR System
44011 4010 kVAh System LSW System Total Apparent Energy LSW (kVAh)
44012 4011 kVAh System MSW System Total Apparent Energy MSW (kVAh)
44013 4012 kVA System
System Maximum Instantaneous kW
(Highest kW sample measured)
System Minimum Instantaneous kW
(Lowest kW sample measured)
System Total Reactive Power (kVAR). Unsigned
absolute (ABS) value of ABS (kVAR L1) + ABS (kVAR L2)
+ ABS (kVAR L3)
System Total Apparent Power (kVA). Unsigned WYE =
(kVA L1) + (kVA L2) + (kVA L3) Delta = SQRT (kW
system ^2 + kVAR system ^2)
44014 4013 Displacement PF System
44015 4014 Apparent PF System
44016 4015 Amps System Avg Average of all phases.
44017 4016 Volts Line to Line Avg Voltage Line to line (Volts) Average.
44018 4017 Volts Line to Neutral Avg Voltage Line to neutral (volts) Average.
44019 4018 Volts L1 to L2 Individual Phase to Phase Voltages
44020 4019 Volts L2 to L3 “
44021 4020 Volts L1 to L3 “
44022 4021 Line Frequency Line Frequency (Hz)
System Displacement Power Factor (PF). Register is
100x actual value.
System Apparent Power Factor (PF). Register is 100x
actual value.
63
Find Quality Products Online at: sales@GlobalTestSupply.com
www.GlobalTestSupply.com
Page 63

Description
Modbus Offset Register
44023 4022 kWh L1 LSW Individual Phase True Energy LSW (kWh)
44024 4023 kWh L1 MSW Individual Phase True Energy MSW (kWh)
44025 4024 kWh L2 LSW “
44026 4025 kWh L2 MSW “
44027 4026 kWh L3 LSW “
44028 4027 kWh L3 MSW “
44029 4028 kW L1 Individual Phase True Powers (kW)
44030 4029 kW L2 “
44031 4030 kW L3 “
44032 4031 kVARh L1 LSW Individual Phase Reactive Energy LSW (kVARh)
* System=sum of three phases
44033 4032 kVARh L1 MSW Individual Phase Reactive Energy MSW (kVARh)
44034 4033 kVARh L2 LSW “
44035 4034 kVARh L2 MSW “
44036 4035 kVARh L3 LSW “
44037 4036 kVARh L3 MSW “
44038 4037 kVAR L1 Individual Phase Reactive Powers (kVAR)
44039 4038 kVAR L2 “
44040 4039 kVAR L3 “
44041 4040 kVAh L1 LSW Individual Phase Apparent Energy LSW (kVAh)
44042 4041 kVAh L1 MSW Individual Phase Apparent Energy MSW (kVAh)
44043 4042 kVAh L2 LSW “
44044 4043 kVAh L2 MSW “
44045 4044 kVAh L3 LSW “
64
Find Quality Products Online at: sales@GlobalTestSupply.com
www.GlobalTestSupply.com
Page 64

Description
Modbus Offset Register
44046 4045 kVAh L3 MSW “
44047 4046 kVA L1 Individual Phase Apparent Powers (kVA)
44048 4047 kVA L2 “
44049 4048 kVA L3 “
44050 4049 Displacement PF L1 Individual Phase displacement Power Factor (PF)
44051 4050 Displacement PF L2 “
44052 4051 Displacement PF L3 “
44053 4052 Apparent PF L1 Individual Phase apparent Power Factors (PF)
44054 4053 Apparent PF L2 “
44055 4054 Apparent PF L3 “
* System=sum of three phases
44056 4055 Amps L1 Individual Phase Currents (A)
44057 4056 Amps L2 “
44058 4057 Amps L3 “
44059 4058 Volts L1 to Neutral Individual Phase to Neutral Voltages (V)
44060 4059 Volts L2 to Neutral “
44061 4060 Volts L3 to Neutral “
44062 4061 Time Since Reset LSW Seconds since KWH register was reset. LSW
44063 4062 Time Since Reset MSW Seconds since KWH register was reset. MSW
Internal sample count (gets cleared every minute):
44064 4063 Data Tick Counter
44080 4079 kW System Average
may be used to determine if sample read is a newer
sample than last read.
Equals KWH_SYSTEM_L&M ÷ (TimeSinceReset_L&M
seconds /3600 seconds/Hr) (resettable)
44081 4080 kW Demand System Min System Minimum Demand (kW)
65
Find Quality Products Online at: sales@GlobalTestSupply.com
www.GlobalTestSupply.com
Page 65

Modbus Offset Register
44082 4081 kVA Demand System Max
44083 4082 kVA Demand System Now
44084 4083 kVAR Demand System Max
Description
* System=sum of three phases
System Maximum Instantaneous kVA Demand (kVA,
resettable). It displays the default value after a CAM
until 1 demand window elapses. After a power cycle or
CPU reset the value is not reset but it does not update
again until 1 demand window elapses.
System Average kVA Demand For the most recent
(current) Demand Window.(resettable) Displays the
default value after a CAM or reset, or power cycle.
Updates every min thereafter. True demand value
takes a demand period to get to actual value. Similar
to 44005
System Maximum kVAR Demand (kVAR, resettable). It
displays the default value after a CAM until 1 demand
window elapses. After a power cycle or CPU reset the
value is not reset but it does not update again until 1
demand window elapses.
POSITIVE POWER/ENERGY MEASUREMENT REGISTERS
Modbus Offset Register
* System=sum of three phases
46001 6000 Positive kWh System LSW System Positive True Energy LSW (kWh, resettable)
46002 6001 Positive kWh System MSW System Positive True Energy MSW (kWh, resettable)
46003 6002 Positive kW System System Positive Instantaneous Positive True Power
(kW) (net sum of all individual kWs, if sum is negative
value=0)
46004 6003 kW Demand System Max System Maximum Demand (peak demand).
46005 6004 kW Demand System Now Average Power (kW) for most recent demand window
46006 6005 Positive kW System Max System Net Highest Instantaneous Positive Draw
Since Reset (kW, resettable)
46007 6006 Positive kW System Min System Net Lowest Instantaneous Positive Draw Since
Reset (kW, resettable)
Description
46008 6007 Positive kVARh System LSW System Net Positive Reactive Energy LSW (kVARh,
resettable)
46009 6008 Positive kVARh System MSW System Net Positive Reactive Energy MSW (kVARh,
66
Find Quality Products Online at: sales@GlobalTestSupply.com
www.GlobalTestSupply.com
Page 66

Modbus Offset Register
resettable)
Description
* System=sum of three phases
46010 6009 Positive kVAR System System Net Instantaneous Positive Reactive Power
(kVAR) (net sum of all individual kVARs, if sum is
negative value=0)
46011 6010 kVAh System LSW System Apparent Energy, LSW (resettable)
46012 6011 kVAh System MSW System Apparent Energy, MSW (resettable)
46013 6012 kVA System System Instantaneous Apparent Power
46014 6013 Positive Displacement PF
System
46015 6014 Positive Apparent PF System System Positive Apparent Power Factor (aPF);
46016 6015 Amps System Avg Average of the current in all phases.
46017 6016 Volts Line to Line Avg Average of the system line to line voltages.
46018 6017 Volts Line to Neutral Avg Average of the system line to neutral voltages.
46019 6018 Volts L1 to L2 Individual phase to phase voltages.
System Positive Displacement Power Factor (dPF);
Register is 100x actual value (If the System dPF
(44014) is positive, this register will contain that value
else it will be zero)
Register is 100x actual value (If the System aPF
(44015) is positive, this register will contain that value
else it will be zero)
46020 6019 Volts L2 to L3 “
67
Find Quality Products Online at: sales@GlobalTestSupply.com
www.GlobalTestSupply.com
Page 67

Modbus Offset Register
Description
* System=sum of three phases
46021 6020 Volts L3 to L1 “
46022 6021 Measured Line Frequency Line frequency x 10 (e.g., 602 = 60.2 Hz). On startup,
20 point averaging array is filled with first frequency
read.
46023 6022 Positive kWh L1 LSW Individual Phase Positive True Energy LSW (kWh,
resettable)
46024 6023 Positive kWh L1 MSW Individual Phase Positive True Energy MSW (kWh,
resettable)
46025 6024 Positive kWh L2 LSW “
46026 6025 Positive kWh L2 MSW “
46027 6026 Positive kWh L3 LSW “
46028 6027 Positive kWh L3 MSW “
46029 6028 Positive kW L1 Individual Phase Instantaneous Positive True Powers
(kW)
46030 6029 Positive kW L2 “
46031 6030 Positive kW L3 “
46032 6031 Positive kVARh L1 LSW Individual Phase Positive Reactive Energy LSW
(kVARh, resettable)
46033 6032 Positive kVARh L1 MSW Individual Phase Positive Reactive Energy MSW
(kVARh, resettable)
46034 6033 Positive kVARh L2 LSW “
46035 6034 Positive kVARh L2 MSW “
46036 6035 Positive kVARh L3 LSW “
46037 6036 Positive kVARh L3 MSW “
46038 6037 Positive kVAR L1 Individual Phase Positive Instantaneous Reactive
Powers (kVAR)
68
Find Quality Products Online at: sales@GlobalTestSupply.com
www.GlobalTestSupply.com
Page 68

Modbus Offset Register
Description
* System=sum of three phases
46039 6038 Positive kVAR L2 “
46040 6039 Positive kVAR L3 “
46041 6040 kVAh L1 LSW Individual Phase Apparent Energy LSW (kVAh,
resettable)
46042 6041 kVAh L1 MSW Individual Phase Apparent Energy MSW (kVAh,
resettable)
46043 6042 kVAh L2 LSW “
46044 6043 kVAh L2 MSW “
46045 6044 kVAh L3 LSW “
46046 6045 kVAh L3 MSW “
46047 6046 kVA L1 Individual Phase Instantaneous Apparent Powers
(kVA)
46048 6047 kVA L2 “
46049 6048 kVA L3 “
46050 6049 Positive Displacement PF L1 Individual Phase Positive Displacement Power Factors
(dPF); Register is 100x actual value (If the Individual
dPF (44050) is positive, this register will contain that
value else it will be zero)
46051 6050 Positive Displacement PF L2 “
46052 6051 Positive Displacement PF L3 “
46053 6052 Positive Apparent PF L1 Individual Phase Positive Apparent Power Factors
(aPF); Register is 100x actual value (If the Individual
aPF(44053) is positive, this register will contain that
value else it will be zero)
46054 6053 Positive Apparent PF L2 “
46055 6054 Positive Apparent PF L3 “
46056 6055 Amps L1 Individual Phase Instantaneous Currents (A)
46057 6056 Amps L2 “
69
Find Quality Products Online at: sales@GlobalTestSupply.com
www.GlobalTestSupply.com
Page 69

Modbus Offset Register
Description
* System=sum of three phases
46058 6057 Amps L3 “
46059 6058 Volts L1 to Neutral Individual Instantaneous Phase to Neutral Voltages
(V)
46060 6059 Volts L2 to Neutral “
46061 6060 Volts L3 to Neutral “
46062 6061 Time Since Reset LSW (Seconds) Seconds since kWh, kVAh, kVARh and associated
Demand registers were reset. LSW (resettable)
46063 6062 Time Since Reset MSW
(Seconds)
46080 6079 Positive kW System Average Equals Positive KWH_SYSTEM_L&M ÷
46081 6080 kW Demand System Minimum Min Average power window (kW)
46082 6081 kVA Demand System Maximum Maximum Instantaneous kVA Demand (kW,
46083 6082 kVA Demand System Now System Average kVA Demand for the most recent
46084 6083 kVAR Demand System Max System Maximum kVAR Demand (kVAR, resettable). It
Seconds since CAM. MSW
(TimeSinceReset_L&M seconds /3600 seconds/Hr)
(resettable)
resettable).
(current) Demand Window (resettable).
displays the default value after a CAM until 1 demand
window elapses. After a power cycle or CPU reset the
value is not reset but it does not update again until 1
demand window elapses.
NEGATIVE POWER/ENERGY MEASUREMENT REGISTERS
Modbus Offset Register
47001 7000 Negative kWh System LSW System Negative True Energy LSW (kWh, resettable)
47002 7001 Negative kWh System MSW System Negative True Energy MSW (kWh, resettable)
47003 7002 Negative kW System System Negative Instantaneous Negative True Power
(kW) (net sum of all individual kWs, if sum is positive
70
Find Quality Products Online at: sales@GlobalTestSupply.com
www.GlobalTestSupply.com
Detailed Description
* System=sum of three phases
Page 70

Modbus Offset Register
value=0)
Detailed Description
* System=sum of three phases
47004 7003 kW Demand System Max System Maximum Demand (peak demand).
47005 7004 kW Demand System Now Average Power (kW) for most recent demand window
47006 7005 Negative kW System Max System Net Highest Instantaneous Negative Draw
Since Reset (kW, resettable)
47007 7006 Negative kW System Min System Net Lowest Instantaneous Negative Draw
Since Reset (kW, resettable)
47008 7007 Negative kVARh System LSW System Net Negative Reactive Energy LSW (kVARh,
resettable)
47009 7008 Negative kVARh System MSW System Net Negative Reactive Energy MSW (kVARh,
resettable)
47010 7009 Negative kVAR System System Net Instantaneous Negative Reactive Power
(kVAR) (net sum of all individual kVARs, if sum is
positive value=0)
47011 7010 kVAh System LSW System Apparent Energy LSW (kVAh, resettable)
47012 7011 kVAh System MSW System Apparent Energy MSW (kVAh, resettable)
47013 7012 kVA System System Instantaneous Apparent Power (kVA)
47014 7013 Negative Displacement PF
System
47015 7014 Negative Apparent PF System System Negative Apparent Power Factor (aPF);
47016 7015 Amps System Avg Average of the current in all phases.
System Negative Displacement Power Factor (dPF);
Register is 100x actual value (If the System dPF
(44014) is Negative, this register will contain that
value else it will be zero)
Register is 100x actual value (If the System aPF
(44015) is Negative, this register will contain that
value else it will be zero)
Find Quality Products Online at: sales@GlobalTestSupply.com
www.GlobalTestSupply.com
71
Page 71

Modbus Offset Register
Detailed Description
* System=sum of three phases
47017 7016 Volts Line to Line Avg Average of the system line to line voltages.
47018 7017 Volts Line to Neutral Avg Average of the system line to neutral voltages.
47019 7018 Volts L1 to L2 Individual phase to phase voltages.
47020 7019 Volts L2 to L3 “
47021 7020 Volts L3 to L1 “
47022 7021 Measured Line Frequency Line frequency x 10 (e.g., 602 = 60.2 Hz). On startup,
20 point averaging array is filled with first frequency
read.
47023 7022 Negative kWh L1 LSW Individual Phase Negative True Energy LSW (kWh,
resettable)
47024 7023 Negative kWh L1 MSW Individual Phase Negative True Energy MSW (kWh,
resettable)
47025 7024 Negative kWh L2 LSW “
47026 7025 Negative kWh L2 MSW “
47027 7026 Negative kWh L3 LSW “
47028 7027 Negative kWh L3 MSW “
47029 7028 Negative kW L1 Individual Phase Instantaneous Negative True Powers
(kW)
47030 7029 Negative kW L2 “
47031 7030 Negative kW L3 “
47032 7031 Negative kVARh L1 LSW Individual Phase Negative Reactive Energy LSW
72
Find Quality Products Online at: sales@GlobalTestSupply.com
www.GlobalTestSupply.com
Page 72

Modbus Offset Register
(kVARh, resettable)
Detailed Description
* System=sum of three phases
47033 7032 Negative kVARh L1 MSW Individual Phase Negative Reactive Energy MSW
(kVARh, resettable)
47034 7033 Negative kVARh L2 LSW “
47035 7034 Negative kVARh L2 MSW “
47036 7035 Negative kVARh L3 LSW “
47037 7036 Negative kVARh L3 MSW “
47038 7037 Negative kVAR L1 Individual Phase Negative Instantaneous Reactive
Powers (kVAR)
47039 7038 Negative kVAR L2 “
47040 7039 Negative kVAR L3 “
47041 7040 kVAh L1 LSW Individual Phase Apparent Energy LSW (kVAh,
resettable)
47042 7041 kVAh L1 MSW Individual Phase Apparent Energy MSW (kVAh,
resettable)
47043 7042 kVAh L2 LSW “
47044 7043 kVAh L2 MSW “
47045 7044 kVAh L3 LSW “
47046 7045 kVAh L3 MSW “
47047 7046 kVA L1 Individual Phase Instantaneous Apparent Powers
(kVA)
47048 7047 kVA L2 “
47049 7048 kVA L3 “
47050 7049 Negative Displacement PF L1 Individual Phase Negative Displacement Power
Factors (dPF); Register is 100x actual value (If the
Individual dPF(44050) is Negative, this register will
contain that value else it will be zero)
73
Find Quality Products Online at: sales@GlobalTestSupply.com
www.GlobalTestSupply.com
Page 73

Modbus Offset Register
Detailed Description
* System=sum of three phases
47051 7050 Negative Displacement PF L2 “
47052 7051 Negative Displacement PF L3 “
47053 7052 Negative Apparent PF L1 Individual Phase Negative Apparent Power Factors
(aPF); Register is 100x actual value (If the Individual
aPF (44053) is Negative, this register will contain that
value else it will be zero)
47054 7053 Negative Apparent PF L2 “
47055 7054 Negative Apparent PF L3 “
47056 7055 Amps L1 Individual Phase Instantaneous Currents (A)
47057 7056 Amps L2 “
47058 7057 Amps L3 “
47059 7058 Volts L1 to Neutral Individual Instantaneous Phase to Neutral Voltages
(V)
47060 7059 Volts L2 to Neutral “
47061 7060 Volts L3 to Neutral “
47062 7061 Time Since Reset LSW (Seconds) Seconds since kWh, kVAh, kVARh and associated
Demand registers were reset. LSW (resettable)
47063 7062 Time Since Reset MSW
(Seconds)
47080 7079 Negative kW System Average Equals Negative KWH_SYSTEM_L&M ÷
47081 7080 kW Demand System Minimum Min Average power window (kW)
47082 7081 kVA Demand System Maximum Maximum Instantaneous kVA Demand (kW,
47083 7082 kVA Demand System Now System Average kVA Demand for the most recent
Seconds since CAM. MSW
(TimeSinceReset_L&M seconds /3600 seconds/Hr)
(resettable)
resettable).
(current) Demand Window (resettable).
74
Find Quality Products Online at: sales@GlobalTestSupply.com
www.GlobalTestSupply.com
Page 74

Modbus Offset Register
Detailed Description
* System=sum of three phases
47084 7083 kVAR Demand System Max System Maximum kVAR Demand (kVAR, resettable). It
displays the default value after a CAM until 1 demand
window elapses. After a power cycle or CPU reset the
value is not reset but it does not update again until 1
demand window elapses.
NET MEASUREMENT REGISTERS
Description
Modbus Offset Register
44150 4149 KWh System NET LSW ABS of the NET System Total True Energy LSW (kWh)
44151 4150 KWh System NET MSW ABS of the NET System Total True Energy MSW (kWh)
44152 4151 KWh L1 NET LSW ABS of the NET L1 True Energy LSW (kWh)
44153 4152 KWh L1 NET MSW ABS of the NET L1 True Energy MSW (kWh)
44154 4153 KWh L2 NET LSW ABS of the NET L2 True Energy LSW (kWh)
* System=sum of three phases
44155 4154 KWh L2 NET MSW ABS of the NET L2 True Energy MSW (kWh)
44156 4155 KWh L3 NET LSW ABS of the NET L3 True Energy LSW (kWh)
44157 4156 KWh L2 NET MSW ABS of the NET L3 True Energy MSW (kWh)
46150 6149 KWh System NET POS LSW
46151 6150 KWh System NET POS MSW
46152 6151 KWh L1 NET POS LSW Positive of the NET L1 True Energy LSW (kWh)
46153 6152 KWh L1 NET POS MSW Positive of the NET L1 True Energy MSW (kWh)
46154 6153 KWh L2 NET POS LSW Positive of the NET L2 True Energy LSW (kWh)
46155 6154 KWh L2 NET POS MSW Positive of the NET L2 True Energy MSW (kWh)
46156 6155 KWh L3 NET POS LSW Positive of the NET L3 True Energy LSW (kWh)
46157 6156 KWh L3 NET POS MSW Positive of the NET L3 True Energy MSW (kWh)
Positive of the NET System Total True Energy LSW
(kWh)
Positive of the NET System Total True Energy MSW
(kWh)
75
Find Quality Products Online at: sales@GlobalTestSupply.com
www.GlobalTestSupply.com
Page 75

Modbus Offset Register
Description
* System=sum of three phases
47150 7149 KWh System NET NEG LSW
47151 7150 KWh System NET NEG MSW
47152 7151 KWh L1 NET NEG LSW Negative of the NET L1 True Energy LSW (kWh)
47153 7152 KWh L1 NET NEG MSW Negative of the NET L1 True Energy MSW (kWh)
47154 7153 KWh L2 NET NEG LSW Negative of the NET L2 True Energy LSW (kWh)
47155 7154 KWh L2 NET NEG MSW Negative of the NET L2 True Energy MSW (kWh)
47156 7155 KWh L3 NET NEG LSW Negative of the NET L3 True Energy LSW (kWh)
47157 7156 KWh L3 NET NEG MSW Negative of the NET L3 True Energy MSW (kWh)
Negative of the NET System Total True Energy LSW
(kWh)
Negative of the NET System Total True Energy MSW
(kWh)
76
Find Quality Products Online at: sales@GlobalTestSupply.com
www.GlobalTestSupply.com
Page 76

PROTOCOL COMMANDS
The Modbus messaging protocol used for communication follows the Modbus RTU protocol described in
this section. Each register read from or written to the PowerScout is a 16-bit unsigned, positive integer
value. The PowerScout supports the following commands.
Command Name
Read Holding Registers 03 Used to read the data values from the PowerScout.
Write Single Register 06 Used to write a single holding register to a PowerScout.
Report Slave ID 11 Used to read information from the identified PowerScout.
Command
Number (Hex)
Description
Table IV-1: Supported Modbus Commands
The following guidelines are used for these Modbus commands:
All values are hexadecimal, spaces are not included.
The address is the value of the address switch on the PowerScout. This must be different fo
e
ach PowerScout on a single Modbus network.
The register’s high-order and low-order bits are the 16-bit value of a single, or first, register to
be accessed for a read or write.
The CRC is the 16-bit CRC value. Note that the CRC's LSB and MSB are reversed in comparison to
those for the registers and data.
Read Holding Registers
r
This command reads the contents of a contiguous block of holding registers containing data values from
the PowerScout. When a read command is received, the PowerScout sends a response that includes the
values of the requested registers.
Command Information
PowerScout address nn 37
Command number 03 03
First register to read – high order bits xx 00
First register to read – low order bits xx 0C
Number of registers to read – high order bits xx 00
Number of registers to read – low order bits xx 01
CRC low order bits xx 41
CRC high order bits xx 9F
Command
Layout
Example
Command
Table IV-2: Format for Modbus Command 03
77
Find Quality Products Online at: sales@GlobalTestSupply.com
www.GlobalTestSupply.com
Page 77

Command Example
D
? The value sent as the
This command reads from a PowerScout with an address switch setting of 37 hex, reading one byte
starting at register offset 0C hex. Note that offset 12 corresponds to Modbus register 40013. All values
are hexadecimal.
Example Request
Field Name
PowerScout address 37 PowerScout address 37
Command 03 Command 03
Starting register address to read– high order bits 00 Byte count 02
Starting register address to read– low order bits 0C Register value –high order bits 00
Number of registers to read – high order bits 00 Register value – low order bits 00
Number of registers to read – low order bits 01 CRC low order bits 70
CRC low order bits 41 CRC high order bits 40
CRC high order bits 9F
Command
(Hex)
Response
Field Name
Response
(Hex)
Table IV-3: Format for Modbus Command 03
Command: 3703000C0001419F
Response: 37030200007040
The response is from the PowerScout at address 37. Two
bytes were read from the requested register, 000C. The
value of the registers read was 0000. The CRC value was
4070. The number of registers read must be between 1
and 125 inclusive.
ID YOU KNOW
register address in the read and write
Modbus commands is not the register
listed in the table, instead an
abbreviated version is sent. The
actual register address sent is the
Modbus register value minus 40001.
For example, the address sent in the
command message for register 40025
is actually 0024 (0018 hexadecimal),
and the address sent for register
44062 is actually 4061 (0FDD
hexadecimal).
78
Find Quality Products Online at: sales@GlobalTestSupply.com
www.GlobalTestSupply.com
Page 78

Write Single Register
This command writes to a single holding register of the PowerScout. The normal response is an echo of
the request, returned after the register contents are written.
Command Information
PowerScout address nn 37
Command number 06 06
Register to write – high order bits xx 00
Register to write – low order bits xx 00
Register value to write – high order bits xx 00
Register value to write – low order bits xx 00
CRC low order bits xx 8C
CRC high order bits xx 5C
Command
Layout
Example
Command
Table IV-4: Format for Modbus Command 06
Example Command
This command writes to a PowerScout with an address switch setting of 37 hex (55 in decimal), writing
one byte at register 000C, and writing a value of 00 to clear the KWH registers. The data value of 0 is
sent to register 0. Note that offset 0 corresponds to Modbus register 40001. The CRC is 5C8C. All values
are hexadecimal.
Example Request
Field Name
Command
(Hex)
Response
Field Name
Response
(Hex)
PowerScout address 37 PowerScout address 37
Command number 06 Command number 06
Register to write – high order bits 00 Register written to – high order bits 00
Register to write – low order bits 00 Register written to – low order bits 00
Register value to write – high order bits 00 Register value written – high order bits 00
Register value to write – low order bits 00 Register value written – low order bits 00
CRC low order bits 8C CRC low order bits 8C
CRC high order bits 5C CRC high order bits 5C
Table IV-5: Format for Modbus Command 03
Command: 3706000000018C5C
Response: 3706000000018C5C
The response is from the PowerScout at address 37. One byte was written to at the requested register,
0000. The value written was 0000. The CRC value was 5C8C. An echo of the original command after the
contents are written is a valid response.
79
Find Quality Products Online at: sales@GlobalTestSupply.com
www.GlobalTestSupply.com
Page 79

Error Response
If the first register in this write command is not in the valid range of registers, the PowerScout returns an
error message.
Report Slave ID
This command is used to read the description, the current status and other information specific to a
remote device. A normal response includes the data contents specific to the device.
Command Information
PowerScout address nn 37
Command number 11 11
Command
Layout
Example
Command
Table IV-6: Format for Modbus Command 11 (17 in decimal)
Example Command
Example Request
Field Name
PowerScout address 37 PowerScout address 37
Command number 11 Command number 11
CRC low order bits D7 Byte count
CRC high order bits 8C Slave ID
Command
(Hex)
Response
Field Name
Run indicator status
Additional data
Response
(Hex)
Table IV-7: Format for Modbus Command 11 (17 in decimal)
Slave ID
The PowerScout uses the following default format for the slave ID:
DENT Instruments Po werScout 3037, Serial Number, FW Rev Major Revision. Mino r Revision, Scalar X
Example:
DENT Instruments Po werScout 3037, PS3912001, FW Rev 1.0, Scalar 3
NOTE: See VERIS H8035/H8036 Emulation for slave ID structure while in Veris emulation.
80
Find Quality Products Online at: sales@GlobalTestSupply.com
www.GlobalTestSupply.com
Page 80

ALL THINGS BACNET
The PS3037 supports writable max_master and max_info_frames properties in the device object for
MS/TP networks. For best network performance, the max_master should be set to the highest MS/TP
MAC address on the network.
The max_info_frames does not need to be changed in most installations.
The device ID property of the BACnet device object is also writable. All device IDs on a BACnet network
must be unique.
METER SPECIFIC OBJECTS
Object
Identifier
10080 Hardware ID Hardware revisions
10090 Features New features
10150 PowerScout Element ID Used for ViewPoint to determine which element is being read & total
Name Description
number of elements available. Element index multiplied by 256 +
number of elements.
CONFIGURATION OBJECTS
Object
Identifier Name Description
10020 Data Acquisition Tick Internal sample count (gets cleared every minute): may be used to
determine if sample read is a newer sample than last read.
10140 Clear Accumulated
Measurements
10190 Communications protocol Used to change between BACnet and Modbus communications
12003 CT3 Phase Shift CT3 phase shift (degrees)
12011 CT1 Value CT1 Value
12012 CT2 Value CT2 Value
12013 CT3 Value CT3 Value
12030 CT Pulse Scalar Changes the scaling of the output pulses
Writing 1234 to the present value will reset all the accumulator
objects (kWh, kVAh, kVARh)
protocols.
81
Find Quality Products Online at: sales@GlobalTestSupply.com
www.GlobalTestSupply.com
Page 81

Object
Identifier Name Description
12040 Demand Window Demand window size in minutes; default is 15 min
12050 Volts Multiplier Multiply volts values by this scalar. For use with stepdown
transformer. Affects all parameters that use volts.
12061 CT1 Amps Multiplier Multiply CT1 amps values by this scalar. For use with stepdown
transformer. Affects all parameters that use amps.
12062 CT2 Amps Multiplier Multiply CT2 amps values by this scalar. For use with stepdown
transformer. Affects all parameters that use amps.
12063 CT3 Amps Multiplier Multiply CT3 amps values by this scalar. For use with stepdown
transformer. Affects all parameters that use amps.
12070 Com Settings Baud: 900=9600, 1900=19200, 3800=38400, 5700=57600,
7600=76800, 11500=115200
Parity: Add 00 = NO, Add 10 = ODD, Add 20 = EVEN
Stop bit: Add 0 = 1 (UART does not permit 0 stop bits), Add 1 = 1, Add
2 = 2
E.g., 901 = 9600 baud, no parity, 1 stop bit
12080 Service Type A value of 1 configures the meter for Delta.
A value of 0 configures the meter for Wye.
12090 Line Frequency Line frequency setting for metering. 50 = 50 Hz, 60 = 60 Hz
12110 Snap Rog Threshold “Snap to Zero” threshold Rogowski CTs. Register value is:
12120 Snap Volt Threshold “Snap to Zero” threshold for voltage. Register value is 1x:
12130 CT Type All Writes same type for all CTs: 1=MilliVolt, 2=Rogowski
12131 CT1 Type 1=MilliVolt, 2=Rogowski
12132 CT2 Type 1=MilliVolt, 2=Rogowski
12133 CT3 Type 1=MilliVolt, 2=Rogowski
82
Find Quality Products Online at: sales@GlobalTestSupply.com
www.GlobalTestSupply.com
Page 82

PULSE OUTPUT/INPUT OBJECTS
Object
Identifier Name Description
Port 1 output control when
13020
13100
13110 Port 1 pulse output relay type
used as an on/off—open/closed
switch
Digital Port 1 Configuration
Turns pulses on/off
0 = output LOW (closed) 1 = output HIGH (open) [default]
Object 13100 present value must = 0 to use
0 = No pulses, Port may be used as an on/off—
open/closed switch
44001 = System kWh pulses
44008 = System kVARh pulses
44011 = System kVAh pulses
0 = normally open (HIGH)
1 = normally closed (LOW)
ABSOLUTE/NET VALUE MEASUREMENT OBJECTS
System=sum of three phases.
Object
Identifier Name
1000 kW Demand System Maximum System Maximum Demand (peak demand) (Unsigned/Absolute)
1010 kW Demand System Now Average Power (kW) for most recent demand window
(Unsigned/Absolute)
* System=sum of three phases
Description
1020 kW Demand System Minimum Min Average power window (kW) (Unsigned/Absolute)
1030 kW System System True Power (kW). Unsigned absolute (ABS) value of
ABS (kW L1) + ABS (kW L2) + ABS (kW L3)
1031 kW System Net System Power (kW) Signed net value of (kW L1) + (kW L2) + (kW L3)
1060 kW System Average Equals kWh System / (Time Since Reset /3600 seconds/Hr)
(resettable)
1100 kW System Maximum System Highest Instantaneous Draw Since Reset (kW)
1130 kW System Minimum System Lowest Instantaneous Draw Since Reset (kW, resettable)
1160 kW L1 Individual Phase True Power (kW) (Signed)
1190 kW L2 “
83
Find Quality Products Online at: sales@GlobalTestSupply.com
www.GlobalTestSupply.com
Page 83

Object
Identifier Name
1220 kW L3 “
2000 kWh System Total System True Energy (kWh) (Unsigned/Absolute)
2021 kWh System Total Net System True Energy (kWh) (Net)
2051 kWh L1 Net Individual Phase True Energy (kWh) (Net)
2081 kWh L2 Net “
2111 kWh L3 Net “
3000 Volts Line to Line Average Voltage Line to line Average
3010 Volts Line to Neutral Average Voltage Line to neutral Average
3020 Volts L1 to L2 Individual Phase to Phase Voltages
3030 Volts L2 to L3 “
* System=sum of three phases
Description
3040 Volts L1 to L3 “
3050 Volts L1 to Neutral Individual Phase to Neutral Voltages (V)
3060 Volts L2 to Neutral “
3070 Volts L3 to Neutral “
4010 Amps System Average Average of all phases.
4020 Amps L1 Individual Phase Currents (A)
4030 Amps L2 “
4040 Amps L3 “
5000 kVAR System System Total Reactive Power (kVAR). Unsigned absolute (ABS) value
of ABS (kVAR L1) + ABS (kVAR L2) + ABS (kVAR L3)
5001 kVAR System Net System Total Reactive Power (kVAR). Signed net value of (kVAR L1)
+ (kVAR L2) + (kVAR L3)
5030 kVAR L1 Individual Phase Reactive Energy LSW (kVARh) (Signed)
5060 kVAR L2 “
84
Find Quality Products Online at: sales@GlobalTestSupply.com
www.GlobalTestSupply.com
Page 84

Object
Identifier Name
5090 kVAR L3 “
5120 kVAR Demand System Max System Maximum Instantaneous kVAR Demand (kVA, resettable). It
displays the default value after a CAM until 1 demand window
elapses. After a power cycle or CPU reset the value is not reset but
it does not update again until 1 demand window elapses.
(Unsigned/Absolute)
5130 kVAR Demand System Now Average kVAR demand for most recent window (resettable).
Displays the default value after a CAM or reset, or power cycle.
Updates every min thereafter. True demand value takes a demand
period to get to actual value. (Unsigned/Absolute)
6010 kVARh System System Total Reactive Energy (Unsigned/Absolute)
7000 kVAh System Total System Total Apparent Energy (Unsigned/Absolute)
8000 kVA System System Total Apparent Power (kVA). Unsigned absolute (ABS) value
of ABS (kVA L1) + ABS (kVA L2) + ABS (kVA L3)
* System=sum of three phases
Description
8001 kVA System Net System Net Apparent Power (kVA). Signed net value of (kVA L1) +
(kVA L2) + (kVA L3)
8010 kVA L1 Individual Phase Apparent Powers (kVA) (signed)
8020 kVA L2 “Sign is set to the sign of the kW
8030 kVA L3 “
8040 kVA Demand System Max System Maximum Instantaneous kVA Demand (kVA, resettable). It
displays the default value after a CAM until 1 demand window
elapses. After a power cycle or CPU reset the value is not reset but
it does not update again until 1 demand window elapses.
(Unsigned/Absolute)
8050 kVA Demand System Now Average kVA for most recent demand window (resettable). Displays
the default value after a CAM or reset, or power cycle. Updates
every min thereafter. True demand value takes a demand period to
get to actual value. (Unsigned/Absolute)
9000 Displacement PF System System Total Power Factor (PF) (Signed)
9030 Apparent PF System System Total Power Factor (PF) (Signed)
9060 Displacement PF L1 Individual Phase displacement Power Factor (PF)
9090 Displacement PF L2 “
85
Find Quality Products Online at: sales@GlobalTestSupply.com
www.GlobalTestSupply.com
Page 85

Object
Identifier Name
9120 Displacement PF L3 “
9150 Apparent PF L1 Individual Phase apparent Power Factors (PF)
9180 Apparent PF L2 “
9210 Apparent PF L3 “
10000 Measured Line Frequency Line Frequency (Hz)
10010 Time Since Reset Seconds since accumulator registers were reset.
* System=sum of three phases
Description
POSITIVE POWER/ENERGY MEASUREMENT OBJECTS
Object
Identifier
1080 kW System Average Positive Equals kWh System Positive / (Time Since Reset /3600 seconds/Hr)
1110 kW System Maximum Positive System Highest Instantaneous Positive Draw Since Reset (kW)
1140 kW System Minimum Positive System Lowest Instantaneous Positive Draw Since Reset (kW,
2010 kWh System Total Positive System True Energy (kWh) Positive (Signed Net)
2040 kWh L1 Positive
2070 kWh L2 Positive “
2100 kWh L3 Positive “
6010 kVARh System System Total Reactive Energy (Signed Net)
6020 kVARh System Total Positive
6050 kVARh L1 Positive
6080 kVARh L2 Positive “
Name
* System=sum of three phases
(resettable) (Signed Net)
(Signed Net)
resettable)
Individual Phase True Energy (kWh) (Signed)
System True Energy (kVARh) Positive (Signed Net)
Individual Phase Reactive Energy (kVAR) (Signed)
Description
6110 kVARh L3 Positive “
7001 kVAh System Total Positive System Total Positive Apparent Energy (kVAh) (Signed Net)
Accumulates only when kW is positive
7020 kVAh L1 Positive Individual Phase Apparent Energy (kVAh) (Signed)
7050 kVAh L2 Positive “
7080 kVAh L3 Positive “
86
Find Quality Products Online at: sales@GlobalTestSupply.com
www.GlobalTestSupply.com
Page 86

EGATIVE POWER/ENERGY MEASUREMENT OBJECTS
N
Object
Identifier
1090 kW System Average Negative Equals kWh System Negative / (Time Since Reset /3600 seconds/Hr)
1120 kW System Maximum Negative System Highest Instantaneous Negative Draw Since Reset (kW)
1150 kW System Minimum Negative System Lowest Instantaneous Negative Draw Since Reset (kW,
2020 kWh System Total Negative System True Energy (kWh) Negative (Signed Net)
2050 kWh L1 Negative Individual Phase True Energy (kWh) (Signed)
2080 kWh L2 Negative “
2110 kWh L3 Negative “
6030 kVARh Sys Negative System Total Reactive Energy (Signed Net)
6060 kVARh L1 Negative Individual Phase Reactive Energy (kVARh) (Signed)
6090 kVARh L2 Negative “
6120 kVARh L3 Negative “
7002 kVAh System Total Negative System Total Negative Apparent Energy (Signed Net)
7030 kVAh L1 Negative Individual Phase Apparent Energy (kVAh) (Signed)
Name
(resettable)
resettable)
Detailed Description
* System=sum of three phases
7060 kVAh L2 Negative “
7090 kVAh L3 Negative “
87
Find Quality Products Online at: sales@GlobalTestSupply.com
www.GlobalTestSupply.com
Page 87

APPENDICES
Appendix A—Additional Wiring Diagrams
Typically, the PowerScout can be wired using any one of the previous setups found in the PowerScout
3037 Wiring Diagrams. The following are less frequently used configurations and will assist you in
properly connecting your PowerScout meter for the desired setup. ALL WIRE COLORS ARE U.S.
STANDARD.
W
ARNING! DO NOT EXCEED 600VAC PHASE TO PHASE CAT III.
When complete, close the enclosure cover, if equipped.
Attention: Ne pas dépasser une phase à 600VAC CAT III.
Une fois terminé, fermer le covercle, s’il y en a un.
C
AUTION: THE POWERSCOUT
PERSONNEL. HAZARDOUS VOLTAGES EXIST.
TTENTION: LE POWERSCOUT ™ ne doit être branché QUE par un personnel qualifié.
A
TENSIONS DANGEREUSES sont présentEs.
DANGER! THE UNENCLOSED POWERSCOUT BOARD REQUIRES EXTRA CAUTION
WHEN CONNECTING. LIFE THREATENING VOLTAGES EXCEEDING 600 VOLTS MAY
EXIST ON THE BOARD.
UNDERESTIMATED.
D
ANGER! LA PLAQUETTE DE CIRCUITS IMPRIMES SANS COUVERCLE EXIGE UN
REDOUBLEMENT DE PRUDENCE QUAND ON FAIT LA CONNEXION. LES TENSIONS
DEPASSANT 600 VOLTS PEUVENT EXISTER SUR LA PLAQUETTE ET PEUVENT METTRE
LA VIE EN DANGER.
ETRE SOUS-ESTIME.
LE RISQUE DE BLESSURES GRAVES OU DE MORT NE DOIT PAS
™
METER SHOULD ONLY BE WIRED BY QUALIFIED
THE RISK OF SERIOUS INJURY OR DEATH SHOULD NOT BE
88
Find Quality Products Online at: sales@GlobalTestSupply.com
www.GlobalTestSupply.com
Page 88

2-CT, 3-WIRE DELTA
U
se a Service Type 1 (one) value for BACnet Object 12080 or a 1 (one) value for Modbus Register 44607
on this wire configuration.
89
Find Quality Products Online at: sales@GlobalTestSupply.com
www.GlobalTestSupply.com
Page 89

3-PHASE DELTA WITH A “WILD” LEG
U
se a Service Type 0 (zero) value for BACnet Object 12080 or a 0 (zero) value for Modbus Register 44607
on this wire configuration.
90
Find Quality Products Online at: sales@GlobalTestSupply.com
www.GlobalTestSupply.com
Page 90

Appendix B—Connecting Multiple PowerScouts to an RS-485 Network
This section describes setting up a network with multiple PowerScout instruments using the BACnet or
Modbus communication protocol. An RS-485 network can support up to 127 PowerScout 3037
instruments using the BACnet protocol and 247 PowerScout 3037 instruments using the Modbus
protocol.
COMMUNICATION PROTOCOL
BACnet MS/TP and Modbus RTU are standard communication protocols that allow for communication
between a client and multiple devices connected to the same network. RS-485 is the protocol standard
used by PowerScout meters as the hardware’s physical interface while BACnet or Modbus is the
networking protocol.
DAISY CHAIN LAYOUT FOR RS-485 NETWORK
When multiple devices are connected, the devices need to be connected in a daisy chain. A daisy chain
means that all plus (+) connections are chained together and all minus (-) connections are chained
together across the network.
A network containing multiple devices requires a unique address for each device. This allows the master
device to identify and communicate with each slave. The BACnet/Modbus network administrator must
assign a unique network address to each PowerScout 3037 using the rotary switches MSB and LSB.
Other network layouts, i.e., star, are not recommended when using the RS-485 standard.
NETWORKING USING THE BACNET MS/TP/MODBUS RTU PROTOCOL
1) Install the RS-485 cable on the RS-485 communications terminal block.
2) Set a unique address for each device using the table in Establishing Communication Protocol in the
Prepping for Field Installation section.
91
Find Quality Products Online at: sales@GlobalTestSupply.com
www.GlobalTestSupply.com
Page 91

Appendix C—Firmware Updates
D
? If
When connected via RS-485, select
the baud rate of 115200.
INSTALLING FIRMWARE UPDATES FOR THE POWERSCOUT
PowerScout firmware updates are available from DENT Instruments, typically contained in a zip file that
can be downloaded, unzipped and installed using ViewPoint. The PowerScout 3037 requires ViewPoint
4.1 or later.
Check the DENT Instruments website for the latest version of
firmware:
_meter_drivers_software.html
http://www.dentinstruments.com/downloads_data_logger_power
DOWNLOADING AND INSTALLING FIRMWARE
1) Download the zip file containing the firmware. Extract the zip file to a
older on the computer.
f
2) Connect the computer to the PowerScout meter. Refer to Firmware at
the end of the Field Installation section. If connectivity fails with the 9600
baud rate, refer to the Troubleshooting section in Appendix G
elect the baud rate for loading the firmware to the PowerScout meter. A baud rate of 9600
3) S
downloads the firmware to the PowerScout in approximately six minutes. A faster baud rate can be
selected to reduce the time by approximately 2.5 minutes. Change the baud rate using th
C
ommunications tab and selecting the desired baud rate. The baud rate is synchronized between
ViewPoint and the PowerScout meter by clicking the Connect button.
.
ID YOU KNOW
not using a USB
connection, the
PowerScout must be
in Modbus mode
before firmware can
be updated.
e
elect the Firmware tab in ViewPoint. Click Browse to locate the extracted firmware files. Click
4) S
Update to start the firmware update.
ViewPoint displays a message window confirming a successful update when the update completes.
5) If the baud rate was changed via an RS-485 for the firmware update, restore the baud rate to its
original setting.
Find Quality Products Online at: sales@GlobalTestSupply.com
92
www.GlobalTestSupply.com
Page 92

Appendix D—VERIS H8035/H8036 Emulation
The PowerScout meter can be used as a direct replacement for the Veris, Inc. H8035/H8036 series of
networked power meters. This mirroring of the Veris Modbus register assignments makes replacement
with a PowerScout meter simple. However, because the number of parameters that the Veris meters
measure is less than half of what the PowerScout
the table need to be used to utilize the additional capabilities of the PowerScout.
Writing a 1 to register 44526 sets the Slave ID to Veris mode and ViewPoint lists the Veris registers in the
ViewPoint Read/Write Registers tab.
When register 44526 contains a 1 for Veris mode, the Slave ID command format is:
91hFFh(Veris type), Full-Data, Modbus, (CT value) Amp
The following is an example command with CT set for 100A:
91hFFhVeris H8036-0100-2, Full-Data, Modbus, 100 Amp
Example command explanation:
91h = version control
FFh = standard for active
The 91h and FFh are 4 bytes in front of the string that are not displayed in the RTU.
can measure, the other Modbus registers described in
CT Amperage Rating Veris Model Number
CT ≤ 100A
100A < CT ≤ 300A
300A < CT ≤ 400A
400A < CT ≤ 800A
800A < CT ≤ 1600A
CT >1600A
Veris Type = H8036-0100-2
CT Value = 100A
Veris Type = H8036-0300-2
CT Value = 300A
Veris Type = H8036-0400-3
CT Value = 400A
Veris Type = H8036-0800-3
CT Value = 800A
Veris Type = H8036-1600-4
CT Value = 1600A
Veris Type = H8036-2400-4
CT Value = 2400A
Table D-1: CT Amp Rating to Veris Models
93
Find Quality Products Online at: sales@GlobalTestSupply.com
www.GlobalTestSupply.com
Page 93

VERIS MODBUS INTEGER REGISTERS
Modbus
Register
40001 0 kWh System LSW System True Energy (kWh, Resettable)
40002 1 kWh System MSW System True Energy (kWh, Resettable)
40003 2 kW System System True Power (kW)
40004 3 kVAR System System Reactive Power (kVAR)
40005 4 kVA System System Apparent Power (kVA)
40006 5 Apparent PF System System Apparent Power Factor (PF)
40007 6 Volts Line to Line Avg Average Line to Line Voltage
40008 7 Volts Line to Neutral Avg Average Line to Neutral Voltage
40009 8 Amps System Avg Average current of all phases
40010 9 kW L1 Individual Phase True Powers (kW, 3 values)
Offset ViewPoint Name Description
40011 10 kW L2 "
40012 11 kW L3 "
40013 12 Apparent PF L1 Individual Phase Apparent Power Factors (PF, 3 values)
40014 13 Apparent PF L2 "
40015 14 Apparent PF L3 "
40016 15 Volts L1 to L2 Individual Phase to Phase Voltages (Volts, Delta, 3 values)
40017 16 Volts L2 to L3 "
40018 17 Volts L1 to L3 "
40019 18 Volts L1 to Neutral Individual Phase to Neutral Voltages (Volts, Wye, 3 values)
40020 19 Volts L2 to Neutral "
40021 20 Volts L3 to Neutral "
40022 21 Amps L1 Individual Phase Currents (Amps, 3 values)
94
Find Quality Products Online at: sales@GlobalTestSupply.com
www.GlobalTestSupply.com
Page 94

Modbus
System Minimum Demand (kW, resettable), It displays the default
Register
40023 22 Amps L2 "
40024 23 Amps L3 "
Offset ViewPoint Name Description
40025 24 kW System Avg
40026 25 kW Demand System Min
40027 26 kW Demand System Max System Max Demand (kW, resettable). Behaves as 40026.
Equals KWH_SYSTEM_L&M ÷ (TimeSinceReset_L&M seconds
/3600 seconds/Hr) (resettable)
value after a CAM until 1 demand window elapses. After a power
cycle or CPU reset the value is not reset but it does not update
again until 1 demand window elapses.
Table D-2: ViewPoint Register Descriptions
VERIS MULTIPLIERS
Address Units ≤ 100A 101 – 400A 401 – 800A 801 – 1600A
40001 kWH LSB 7.8125exp-3 0.03125 0.0625 0.125 0.25
40002 kWH MSB 512 2048 4096 8192 16384
40003 kW 0.004 0.016 0.032 0.064 0.128
40004 kVAR 0.004 0.016 0.032 0.064 0.128
1601 – 32,000A
40005 kVA 0.004 0.016 0.032 0.064 0.128
40006 aPF 3.0518exp-5 3.0518exp-5 3.0518exp-5 3.0518exp-5 3.0518exp-5
40007 VOLTS L-L 0.03125 0.03125 0.03125 0.03125 0.03125
40008 VOLTS L-L 0.015625 0.015625 0.015625 0.015625 0.015625
40009 AMPS 3.9063exp-3 0.015625 0.03125 0.0625 0.125
40010 kW L1 0.001 0.004 0.008 0.016 0.032
40011 kW L2 0.001 0.004 0.008 0.016 0.032
40012 kW L3 0.001 0.004 0.008 0.016 0.032
40013 aPF L1 3.0518exp-5 3.0518exp-5 3.0518exp-5 3.0518exp-5 3.0518exp-5
95
Find Quality Products Online at: sales@GlobalTestSupply.com
www.GlobalTestSupply.com
Page 95

Address Units ≤ 100A 101 – 400A 401 – 800A 801 – 1600A
40014 aPF L2 3.0518exp-5 3.0518exp-5 3.0518exp-5 3.0518exp-5 3.0518exp-5
40015 aPF L3 3.0518exp-5 3.0518exp-5 3.0518exp-5 3.0518exp-5 3.0518exp-5
40016 VOLTS L1-L2 0.03125 0.03125 0.03125 0.03125 0.03125
40017 VOLTS L2-L3 0.03125 0.03125 0.03125 0.03125 0.03125
40018 VOLTS L3-L1 0.03125 0.03125 0.03125 0.03125 0.03125
40019 VOLTS L1-N 0.015625 0.015625 0.015625 0.015625 0.015625
40020 VOLTS L2- N 0.015625 0.015625 0.015625 0.015625 0.015625
40021 VOLTS L3- N 0.015625 0.015625 0.015625 0.015625 0.015625
40022 AMPS L1 3.9063exp-3 0.015625 0.03125 0.0625 0.125
40023 AMPS L2 3.9063exp-3 0.015625 0.03125 0.0625 0.125
40024 AMPS L3 3.9063exp-3 0.015625 0.03125 0.0625 0.125
1601 – 32,000A
40025 kW 0.004 0.016 0.032 0.064 0.128
40026 kW 0.004 0.016 0.032 0.064 0.128
40027 kW 0.004 0.016 0.032 0.064 0.128
Table D-3: Veris Multipliers for Integer Registers 40001-40027
Per the Veris implementation, to obtain true engineering units, the values returned from the registers in
Table G-2 must be multiplied by the scaling values listed in Table G-3.
For example, if the PowerScout has 100A CTs connected to it, the system reactive power (kVAR) is
calculated by:
Read register 40004
Multiply the value returned from register 40004 by 0.004
96
Find Quality Products Online at: sales@GlobalTestSupply.com
www.GlobalTestSupply.com
Page 96

VERIS MODBUS FLOATING POINT REGISTERS
Modbus
Register
40257 256 VERIS Float kWh System MSW System Net True Energy (kWh, Resettable)
40258 257 VERIS Float kWh System LSW System Net True Energy (kWh, Resettable)
40261 260 VERIS Float kW System MSW System Total True Power MSW
40262 261 VERIS Float kW System LSW System Total True Power LSW
40263 262 VERIS Float kVAR System MSW System Total Reactive Power MSW
40264 263 VERIS Float kVAR System LSW System Total Reactive Power LSW
40265 264 VERIS Float kVA System MSW System Total Apparent Power MSW
40266 265 VERIS Float kVA System LSW System Total Apparent Power LSW
40267 266 VERIS Float PF System MSW System Total Power Factor MSW
40268 267 VERIS Float PF System LSW System Total Power Factor LSW
Offset ViewPoint Name Description
40269 268 VERIS Float Volts Line to Line Avg MSW Voltage Line to Line Average MSW
40270 269 VERIS Float Volts Line to Line Avg LSW Voltage Line to Line Average LSW
40271 270
40272 271 VERIS Float Volts Line to Neutral Avg LSW Voltage Line to Neutral Average LSW
40273 272 VERIS Float Amps System Avg MSW Total Current in all Phases MSW
40274 273 VERIS Float Amps System Avg LSW Total Current in all Phases LSW
40275 274 VERIS Float kW L1 MSW Individual Phase True Power L1 MSW
40276 275 VERIS Float kW L1 LSW Individual Phase True Power L1 LSW
40277 276 VERIS Float kW L2 MSW Individual Phase True Power L2 MSW
40278 277 VERIS Float kW L2 LSW Individual Phase True Power L2 LSW
40279 278 VERIS Float kW L3 MSW Individual Phase True Power L3 MSW
VERIS Float Volts Line to Neutral Avg
MSW
Voltage Line to Neutral Average MSW
97
Find Quality Products Online at: sales@GlobalTestSupply.com
www.GlobalTestSupply.com
Page 97

Modbus
Register
40280 279 VERIS Float kW L3 LSW Individual Phase True Power L3 LSW
40281 280 VERIS Float Apparent PF L1 MSW Individual Phase Apparent Power Factor L1 MSW
40282 281 VERIS Float Apparent PF L1 LSW Individual Phase Apparent Power Factor L1 LSW
40283 282 VERIS Float Apparent PF L2 MSW Individual Phase Apparent Power Factor L2 MSW
40284 283 VERIS Float Apparent PF L2 LSW Individual Phase Apparent Power Factor L2 LSW
40285 284 VERIS Float Apparent PF L3 MSW Individual Phase Apparent Power Factor L3 MSW
40286 285 VERIS Float Apparent PF L3 LSW Individual Phase Apparent Power Factor L3 LSW
40287 286 VERIS Float Volts L1 to L2 MSW Phase to Phase Voltage L1 to L2 MSW
40288 287 VERIS Float Volts L1 to L2 LSW Phase to Phase Voltage L1 to L2 LSW
40289 288 VERIS Float Volts L2 to L3 MSW Phase to Phase Voltage L2 to L3 MSW
Offset ViewPoint Name Description
40290 289 VERIS Float Volts L2 to L3 LSW Phase to Phase Voltage L2 to L3 LSW
40291 290 VERIS Float Volts L1 to L3 MSW Phase to Phase Voltage L1 to L3 MSW
40292 291 VERIS Float Volts L1 to L3 LSW Phase to Phase Voltage L1 to L3 LSW
40293 292 VERIS Float Volts L1 to Neutral MSW Phase to Neutral Voltage L1 to N MSW
40294 293 VERIS Float Volts L1 to Neutral LSW Phase to Neutral Voltage L1 to N LSW
40295 294 VERIS Float Volts L2 to Neutral MSW Phase to Neutral Voltage L2 to N MSW
40296 295 VERIS Float Volts L2 to Neutral LSW Phase to Neutral Voltage L2 to N LSW
40297 296 VERIS Float Volts L3 to Neutral MSW Phase to Neutral Voltage L3 to N MSW
40298 297 VERIS Float Volts L3 to Neutral LSW Phase to Neutral Voltage L3 to N LSW
40299 298 VERIS Float Amps L1 MSW Phase Current L1 MSW
40300 299 VERIS Float Amps L1 LSW Phase Current L1 LSW
40301 300 VERIS Float Amps L2 MSW Phase Current L2 MSW
40302 301 VERIS Float Amps L2 LSW Phase Current L2 LSW
98
Find Quality Products Online at: sales@GlobalTestSupply.com
www.GlobalTestSupply.com
Page 98

Modbus
Register
40303 302 VERIS Float Amps L3 MSW Phase Current L3 MSW
40304 303 VERIS Float Amps L3 LSW Phase Current L3 LSW
40305 304 VERIS Float kW System Avg MSW System Average Power MSW
40306 305 VERIS Float kW System Avg LSW System Average Power LSW
Offset ViewPoint Name Description
40307 306
40308 307
40309 308
40310 309
VERIS Float Demand System Minimum
MSW
VERIS Float Demand System Minimum
LSW
VERIS Float Demand System Maximum
MSW
VERIS Float Demand System Maximum
LSW
System Minimum Demand MSW
System Minimum Demand LSW
System Maximum Demand MSW
System Maximum Demand LSW
Table D-4: VERIS Modbus Floating Point Registers
99
Find Quality Products Online at: sales@GlobalTestSupply.com
www.GlobalTestSupply.com
Page 99

Appendix E—Conversion Table
DECIMAL TO HEXADECIMAL CONVERSION TABLE
Some equipment use decimal Modbus addressing; the table below is useful for converting decimal
addressing to hexadecimal addressing.
Decimal Hex Decimal Hex Decimal Hex Decimal Hex Decimal Hex Decimal Hex
1 01 44 2C 87 57 130 82 173 AD 216 D8
2 02 45 2D 88 58 131 83 174 AE 217 D9
3 03 46 2E 89 59 132 84 175 AF 218 DA
4 04 47 2F 90 5A 133 85 176 B0 219 DB
5 05 48 30 91 5B 134 86 177 B1 220 DC
6 06 49 31 92 5C 135 87 178 B2 221 DD
7 07 50 32 93 5D 136 88 179 B3 222 DE
8 08 51 33 94 5E 137 89 180 B4 223 DF
9 09 52 34 95 5F 138 8A 181 B5 224 E0
10 0A 53 35 96 60 139 8B 182 B6 225 E1
11 0B 54 36 97 61 140 8C 183 B7 226 E2
12 0C 55 37 98 62 141 8D 184 B8 227 E3
13 0D 56 38 99 63 142 8E 185 B9 228 E4
14 0E 57 39 100 64 143 8F 186 BA 229 E5
15 0F 58 3A 101 65 144 90 187 BB 230 E6
16 10 59 3B 102 66 145 91 188 BC 231 E7
17 11 60 3C 103 67 146 92 189 BD 232 E8
18 12 61 3D 104 68 147 93 190 BE 233 E9
19 13 62 3E 105 69 148 94 191 BF 234 EA
20 14 63 3F 106 6A 149 95 192 C0 235 EB
21 15 64 40 107 6B 150 96 193 C1 236 EC
22 16 65 41 108 6C 151 97 194 C2 237 ED
23 17 66 42 109 6D 152 98 195 C3 238 EE
24 18 67 43 110 6E 153 99 196 C4 239 EF
25 19 68 44 111 6F 154 9A 197 C5 240 F0
26 1A 69 45 112 70 155 9B 198 C6 241 F1
27 1B 70 46 113 71 156 9C 199 C7 242 F2
28 1C 71 47 114 72 157 9D 200 C8 243 F3
29 1D 72 48 115 73 158 9E 201 C9 244 F4
1
00
Find Quality Products Online at: sales@GlobalTestSupply.com
www.GlobalTestSupply.com
Page 100

Decimal Hex Decimal Hex Decimal Hex Decimal Hex Decimal Hex Decimal Hex
30 1E 73 49 116 74 159 9F 202 CA 245 F5
31 1F 74 4A 117 75 160 A0 203 CB 246 F6
32 20 75 4B 118 76 161 A1 204 CC 247 F7
33 21 76 4C 119 77 162 A2 205 CD 248 F8
34 22 77 4D 120 78 163 A3 206 CE 249 F9
35 23 78 4E 121 79 164 A4 207 CF 250 FA
36 24 79 4F 122 7A 165 A5 208 D0 251 FB
37 25 80 50 123 7B 166 A6 209 D1 252 FC
38 26 81 51 124 7C 167 A7 210 D2 253 FD
39 27 82 52 125 7D 168 A8 211 D3 254 FE
40 28 83 53 126 7E 169 A9 212 D4 255 ---
41 29 84 54 127 7F 170 AA 213 D5
42 2A 85 55 128 80 171 AB 214 D6
43 2B 86 56 129 81 172 AC 215 D7
Table E-1: Decimal to Hexadecimal Conversion Table
1
01
Find Quality Products Online at: sales@GlobalTestSupply.com
www.GlobalTestSupply.com
 Loading...