

Page 1
Contents Setup Playback Troubleshooting Status LED Appendix
DENON HOME AMP
Wireless Streaming Amplifier
Owner’s Manual
1
Page 2
Contents Setup Playback Troubleshooting Status LED Appendix
Accessories
Part names and functions
Front panel
Rear panel
Connecting
Connecting
Connecting speakers
Connecting a subwoofer
Connecting a digital device
Connecting an analog device
Connecting a USB flash drive
Connecting an external control device
Connecting the power cord
Getting the HEOS app
Setup
Setting up the HEOS app for the first time with a HEOS Built-in
device
Adding the registration of HEOS Built-in devices in the HEOS
app
Adding wired HEOS Built-in devices
Adding wireless HEOS Built-in devices
HEOS account
Dirac Live Setup
4
Playback
5
Playing from streaming music services
5
Selecting a room/device
6
Selecting the music track or station from music sources
8
Listening to the same music in multiple rooms
8
Grouping rooms
8
Ungrouping rooms
9
Grouping all rooms
9
10
10
11
11
12
13
14
14
15
16
17
Ungrouping all rooms
Listening to Internet Radio
Playing music stored on your mobile
Playing back files stored on a PC or NAS
Playing music from an external device
Playing music from a USB flash drive
Playing music from a Bluetooth device
AirPlay function
Playing songs from your iPhone, iPod touch, iPad or Mac
Playing songs from Windows PC
Play a song from your iPhone, iPod touch, iPad or Mac on multiple
synced devices (AirPlay 2)
Spotify Connect function
Playing Spotify music with this unit
Quick Select function
18
18
19
20
20
21
22
23
24
24
24
25
25
26
27
28
28
29
30
30
31
2
Page 3
Contents Setup Playback Troubleshooting Status LED Appendix
Troubleshooting
Troubleshooting
Cannot connect this unit to the network
Cannot pair a Bluetooth mobile device with this unit
Cannot hear Bluetooth music
The Power is turned off and the status LED flashes in red (fast
blink)
Music cuts out or delays sometimes
Cannot connect to a network using an iOS device
I hear a delay when using the external input with my TV
Cannot connect to a WPS network
Resetting this unit
The HDMI control function does not work
Resetting the firmware to the default state
32
33
33
33
34
34
35
35
36
36
36
37
Status LED
Status LED table
38
Appendix
Power management
Supported file types and codecs
Supported audio formats (Optical)
About HDMI
Trademark information
Specifications
44
46
46
47
48
50
3
Page 4
Quick Start Guide Safety Instructions Notes on radio
Optical cable
Power cord
(for North America model)
Power cord
(for Europe model)
or
Warranty
(for North America model
only)
Contents Setup Playback Troubleshooting Status LED Appendix
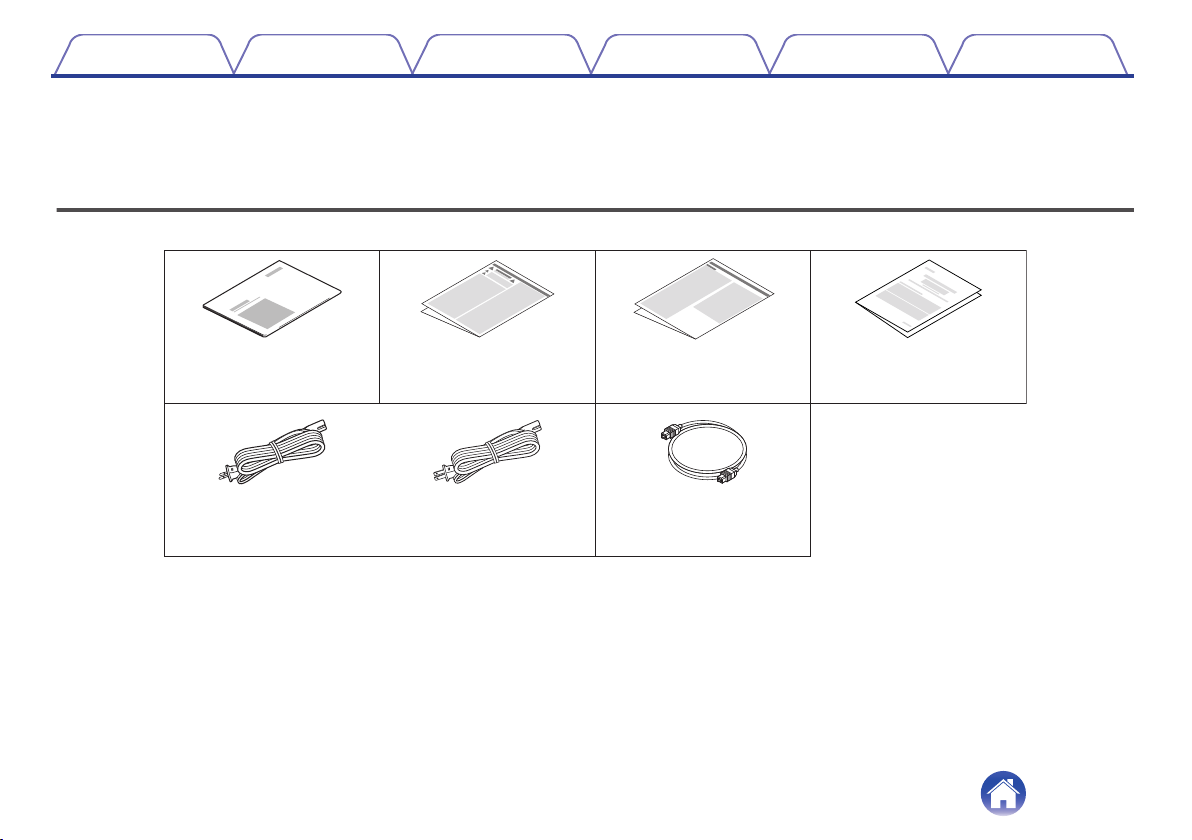
Thank you for purchasing this Denon product.
To ensure proper operation, please read this owner’s manual carefully before using the product.
After reading this manual, be sure to keep it for future reference.
Accessories
Check that the following parts are included with the product.
4
Page 5
we rq
Contents
Setup Playback Troubleshooting Status LED Appendix
Part names and functions
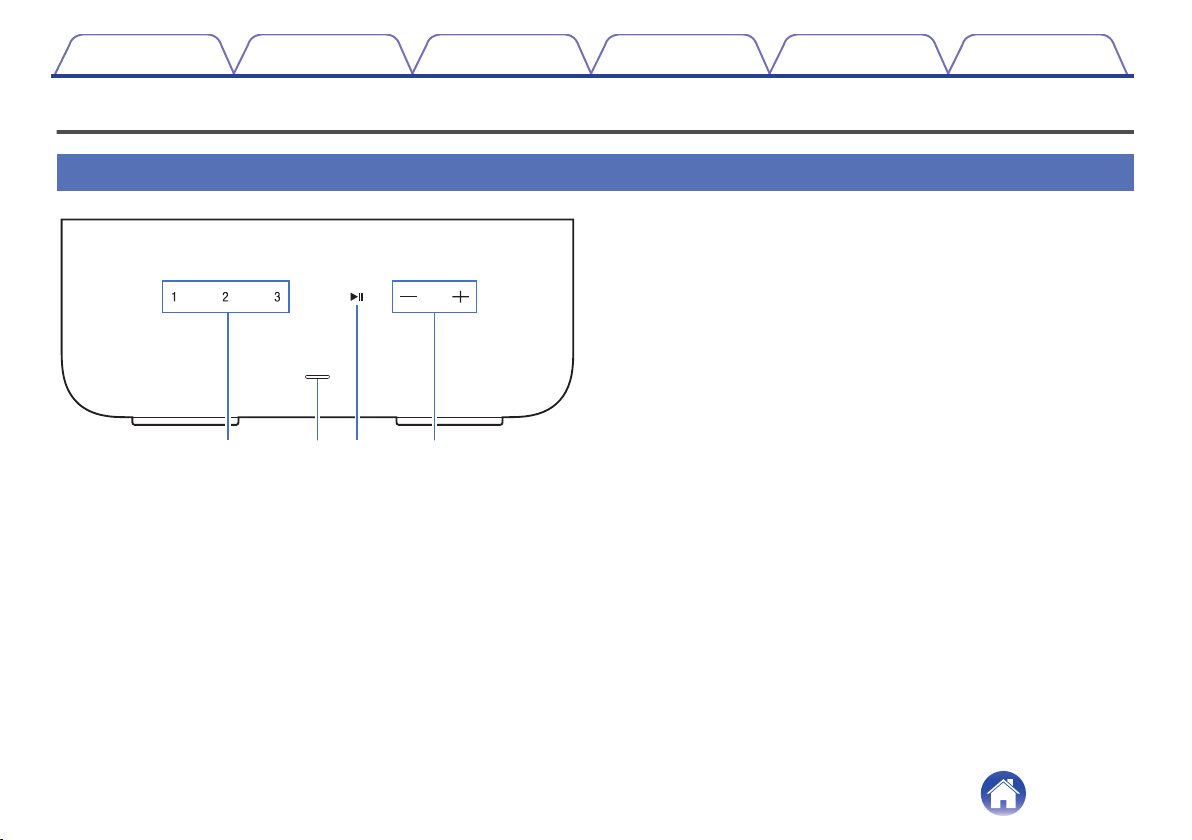
Front panel
Quick select buttons (1 - 3)
A
Register input source, volume and other settings to these buttons or
recall those settings. (v p. 31)
Status LED
B
Please refer to the “Status LED table” for LED color and state meaning.
(v p. 38)
Play/Pause key (1/3)
C
Press this key to pause during playback. If pressed while paused or
0
stopped, resumes playback from the last track played.
Double-tap the key to play the next track.
0
Triple-tap the key to restart the current track or play the previous
0
track.
Press and hold the key for about 5 seconds to enter Deep Standby
0
Mode. (v p. 45)
Volume keys (+, –)
D
These adjusts the volume level.
5
Page 6
o Q0 Q1 Q2
werty iuq
Contents Setup Playback Troubleshooting Status LED Appendix
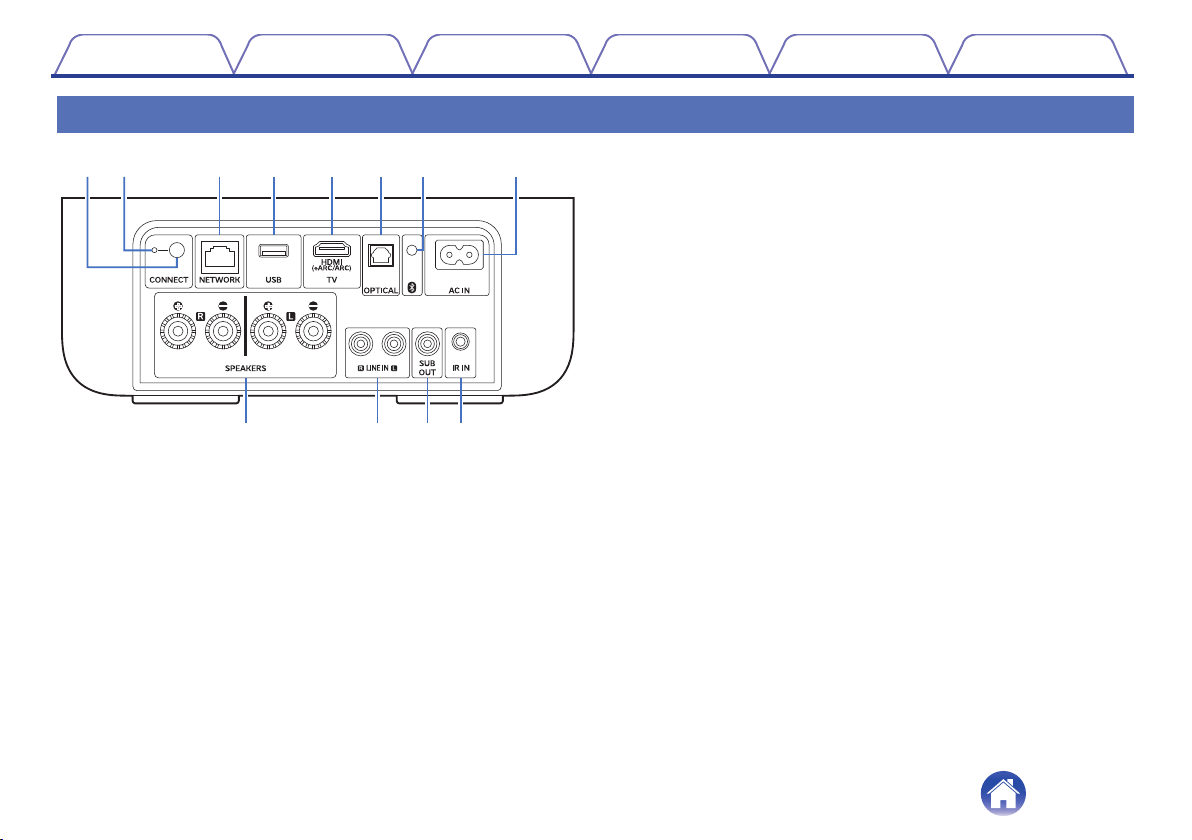
Rear panel
CONNECT button
A
Used for Wi-Fi setup. (v p. 15)
CONNECT LED
B
Indicates the status of this unit (v p. 38).
NETWORK connector
C
Used to connect this unit to a wired Ethernet network. (v p. 14)
USB port
D
Used to connect USB storage devices. (such as USB flash drives)
(v p. 10)
6
Page 7

Contents
TV connector (HDMI (eARC/ARC))
E
Used to connect an eARC/ARC function-compatible TV.
(v p. 9)
OPTICAL input connector
F
Used to connect audio devices equipped with optical audio output
connector. (v p. 9)
Bluetooth button (V)
G
Used in the Bluetooth pairing settings. (v p. 26)
AC inlet (AC IN)
H
Used to connect the power cord. (v p. 11)
Speaker terminals (SPEAKERS)
I
Used to connect speakers. (v p. 8)
LINE IN connectors
J
Used to connect audio devices equipped with analog audio output
connectors. (v p. 10)
Subwoofer connector (SUB OUT)
K
Used to connect a powered subwoofer. (v p. 9)
IR IN jack
L
Used to connect a control box, etc. (v p. 11)
Setup Playback Troubleshooting Status LED Appendix
7
Page 8
wq
(R)
wq
(L)
Contents Setup Playback Troubleshooting Status LED Appendix
Connecting
Connecting
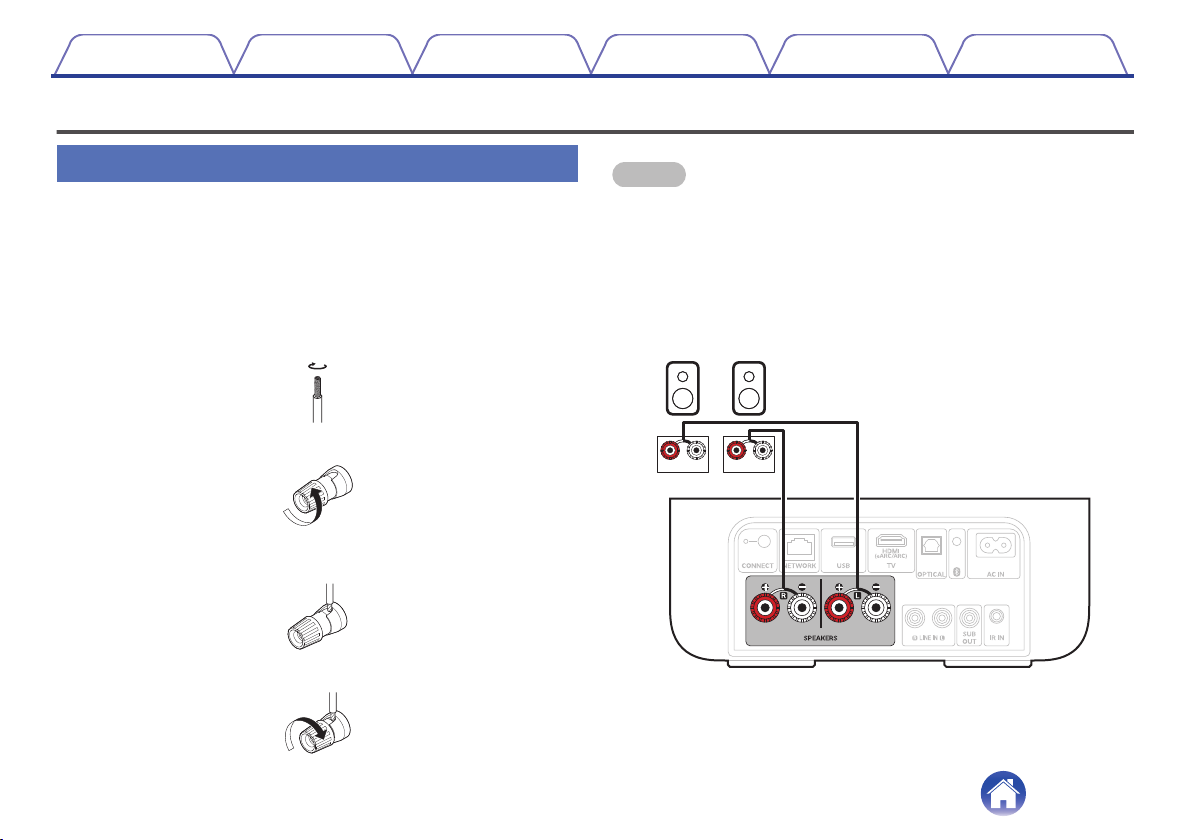
Connecting speakers
o
Carefully check the left (L) and right (R) channels and + (red) and –
(black) polarities on the speakers being connected to this unit, and be
sure to connect the channels and polarities correctly.
1
2
3
4
Peel off about 3/8 inch (10 mm) of sheathing from the
tip of the speaker cable, then either twist the core wire
tightly or terminate it.
Turn the speaker terminal counterclockwise to loosen it.
Insert the speaker cable’s core wire to the hilt into the
speaker terminal.
Turn the speaker terminal clockwise to tighten it.
NOTE
Disconnect this unit’s power plug from the power outlet before connecting the
0
speakers. Also, turn off any connected powered subwoofers.
Connect so that the speaker cable core wires do not protrude from the speaker
0
terminal. The protection circuit may be activated if the core wires touch the rear
panel or if the + and – sides touch each other.
Never touch the speaker terminals while the power cord is connected. Doing so
0
could result in electric shock.
Use speakers with an impedance of 4 – 16 Ω/ohms. The protection circuit may be
0
activated if speakers with an impedance other than specified are used.
8
Page 9
IN
Subwoofer
with built-in
amplifier
IN
HDMI
(eARC/ARC)
TV
or
Digital device
or
OPTICAL
OUT
OPTICAL
OUT
Contents Setup Playback Troubleshooting Status LED Appendix
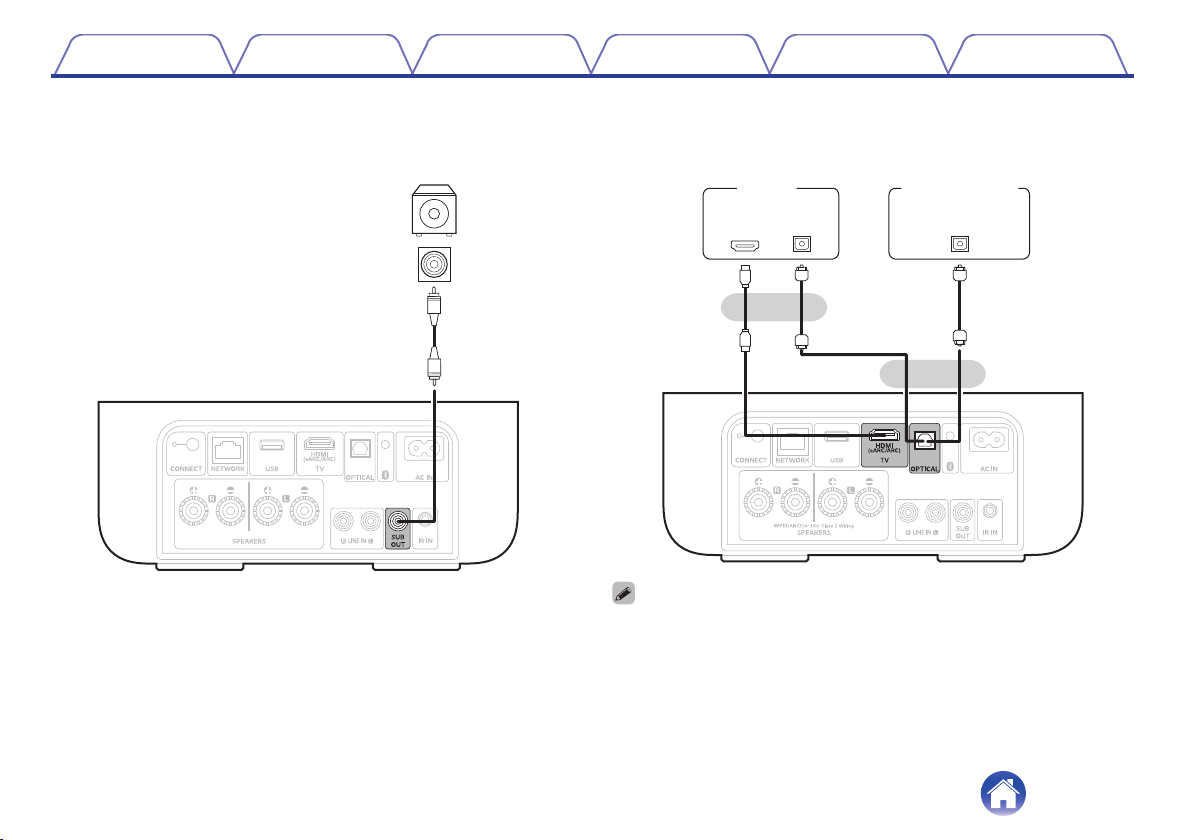
Connecting a subwoofer
o
Connect the SUB OUT connector to an input on your powered
subwoofer or your subwoofer amplifier.
Connecting a digital device
o
Connect this unit to a device with digital output connectors, such as a
TV.
When connecting a TV to this unit, turn off the audio output of the TV’s internal
0
speakers. See the owner’s manual of your TV for details.
When connecting the HDMI (eARC/ARC) terminal of this unit to your TV, connect it
0
to the HDMI input terminal of your TV that supports the eARC/ARC function.
When connecting to a TV that does not support the eARC/ARC function, use an
0
optical connection to play the TV audio.
9
Page 10
R
L
R
L
RL
AUDIO
OUT
Analog device
USB flash
drive
Contents Setup Playback Troubleshooting Status LED Appendix
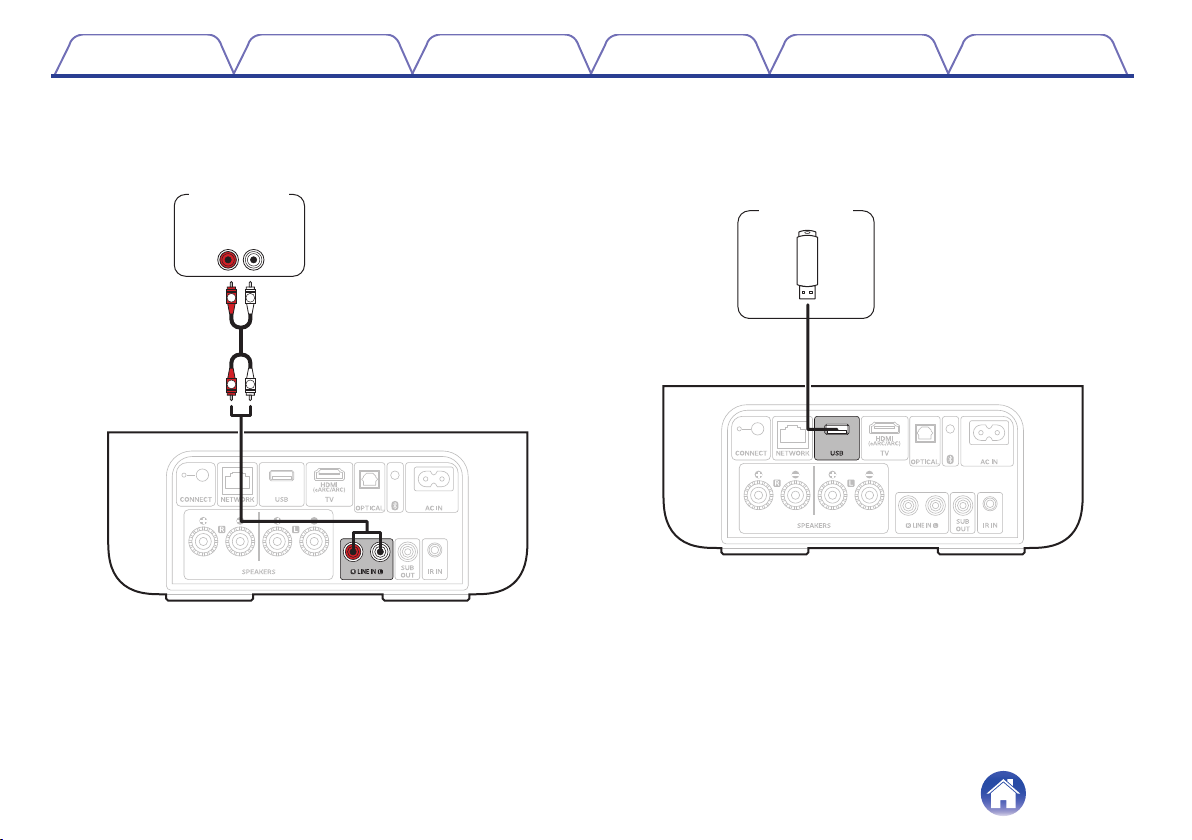
Connecting an analog device
o
Connect the LINE IN connectors to an audio playback device with
analog audio output.
Connecting a USB flash drive
o
Connect a FAT32 or NTFS formatted USB flash drive containing
digital music files to the USB port.
10
Page 11
Control box
or
control device
GND
Signal
Monaural mini-plug cable
(Sold separately)
for North America
(AC 120 V, 60 Hz)
for Europe
(AC 230 V, 50/60 Hz)
Contents Setup Playback Troubleshooting Status LED Appendix
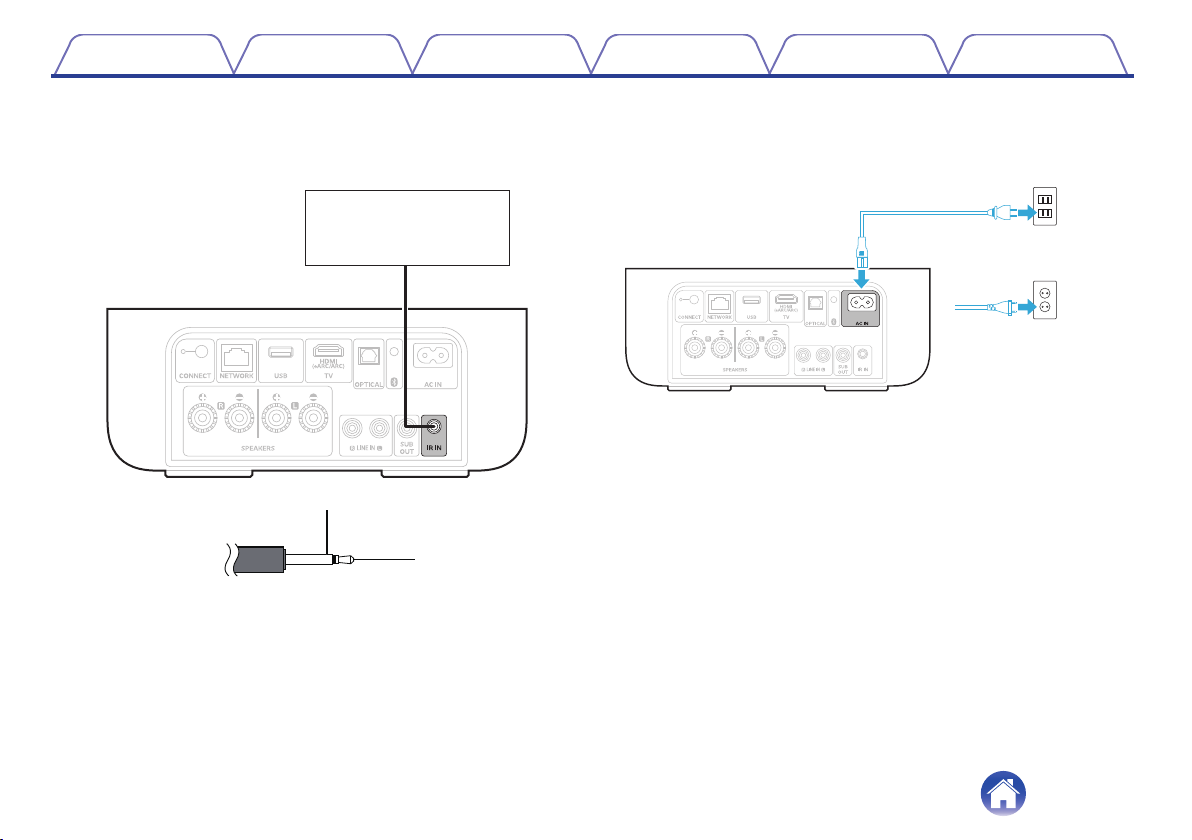
Connecting an external control device
o
This unit can be controlled by connecting a control box or other control
device to the IR IN jack of this unit.
Connecting the power cord
o
Connect the power cord included in the box to the back of this unit and
the plug to a wall outlet.
11
Page 12
Contents Setup Playback Troubleshooting Status LED Appendix
Getting the HEOS app
You can use many online music streaming services from the HEOS app. Depending upon your geographical location, there are several options to choose
from.
Download the HEOS app for iOS or Android by searching App Store®, Google Play™ store or Amazon App Store for “HEOS”.
For the purpose of improvement, the specifications and design are subject to change without notice.
12
Page 13
Contents Setup Playback Troubleshooting Status LED Appendix
Setting up the HEOS app for the first time with a HEOS Built-in device
Once you have placed this unit in your listening room and have downloaded the HEOS app, you are ready to configure this unit for music playback. This
involves following a few simple steps to get this unit connected to your existing home network:
DO NOT connect the Ethernet cable if you are connecting this unit to a wireless network. If you are connecting this unit to a wired network, use an Ethernet cable to connect
0
this unit to your network or router.
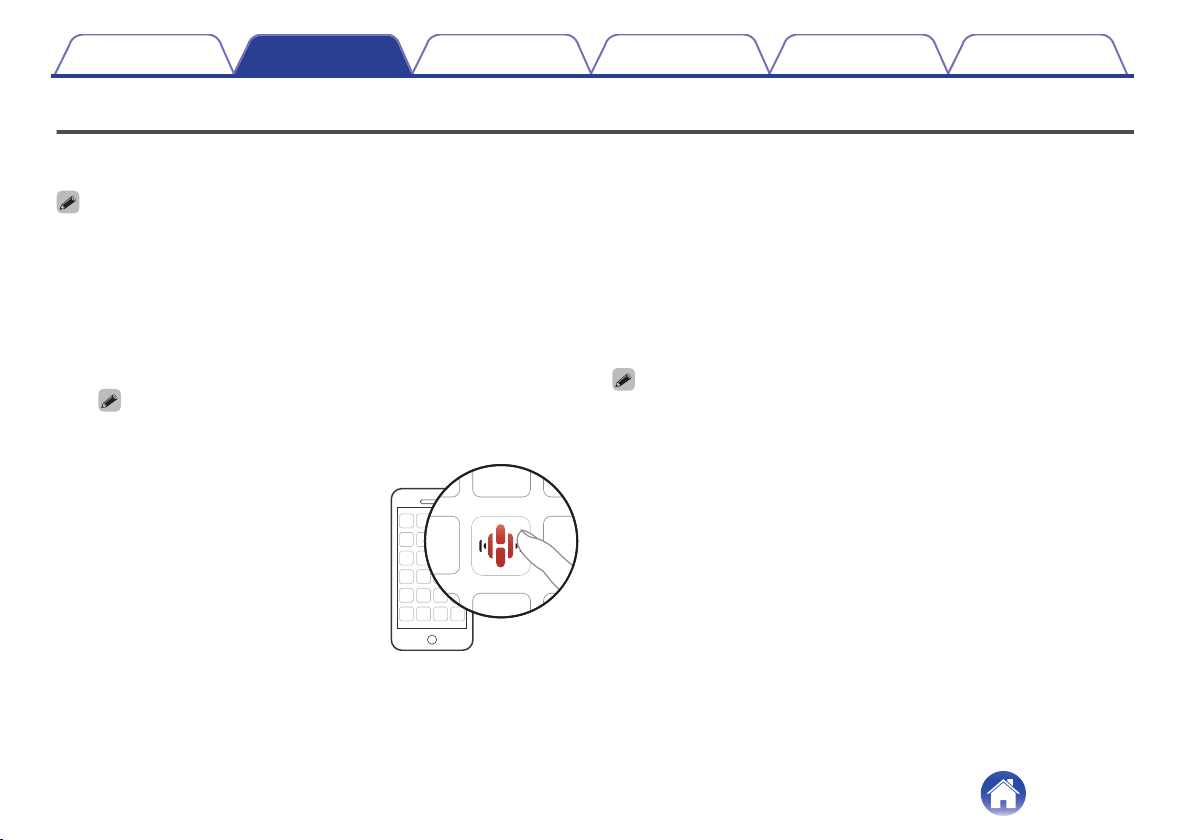
Make sure your mobile device is connected to your
1
wireless network (the same network you want this unit
connected to).
You can check this in the “Settings” - “Wi-Fi” menu of your iOS or
Android device.
If your wireless network is secure, make sure you know the password to join
0
your network.
Launch the HEOS app on your
2
mobile device.
Tap the “Setup Now” button at the top of the screen.
3
Follow the instructions to add this unit to your wireless
4
network.
If you have any problems connecting this unit, jump to the Troubleshooting section
0
(v p. 32).
13
Page 14
Contents
Setup Playback Troubleshooting Status LED Appendix
Adding the registration of HEOS Built-in devices in the HEOS app
The HEOS system is a true multi-room audio system that automatically synchronizes audio playback between multiple HEOS Built-in devices so that the
audio coming from different rooms is perfectly in sync and always sounds amazing! You can easily add up to 32 HEOS Built-in devices to your HEOS
system.
Adding wired HEOS Built-in devices
Just connect the HEOS Built-in devices to your home network using an Ethernet cable and the HEOS Built-in device will appear on your HEOS app as a
new room in the Rooms screen.
At your convenience, you can assign a name to the HEOS Built-in device to indicate which room you have it placed in.
Use only a shielded STP or ScTP LAN cable which is easily available at electronics stores (CAT-5 or greater recommended).
0
The normal shielded-type LAN cable is recommended. If a flat-type cable or unshielded-type cable is used, other devices could be affected by noise.
0
Do not connect a NETWORK connector directly to the LAN port/Ethernet connector on your computer.
0
14
Page 15
Home
Add Device
Settings
1
2
Contents Setup Playback Troubleshooting Status LED Appendix
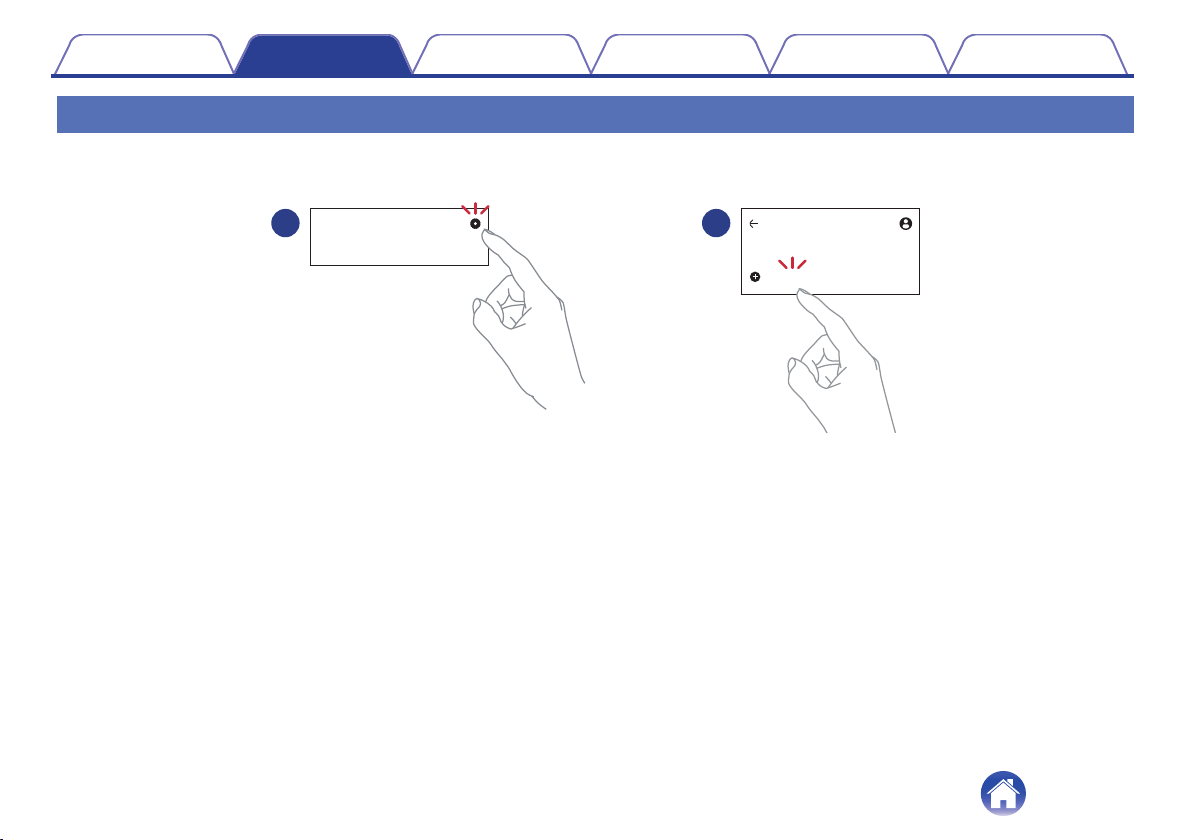
Adding wireless HEOS Built-in devices
You can add additional wireless HEOS Built-in devices to your HEOS system by selecting “Add Device” from the HEOS app’s settings menu and follow
the instructions:
15
Page 16
Contents Setup Playback Troubleshooting Status LED Appendix
HEOS account
o
What is a HEOS account?
A HEOS account is a master account or “keychain” for managing all of
your HEOS music services with one single username and password.
o
Why do I need a HEOS account?
With a HEOS account, you only need to enter your music services
login names and passwords once. This allows you to easily and
quickly use multiple controller apps on different devices. You just log
into your HEOS account on any device and you will have access to all
of your associated music services, play history and custom playlists,
even if you are at a friend’s house listening to music on their HEOS
system.
o
Signing up for a HEOS account
You will be instructed to signup for a HEOS account the first time you
try to access any music service from the “Home” screen of the HEOS
app.
o
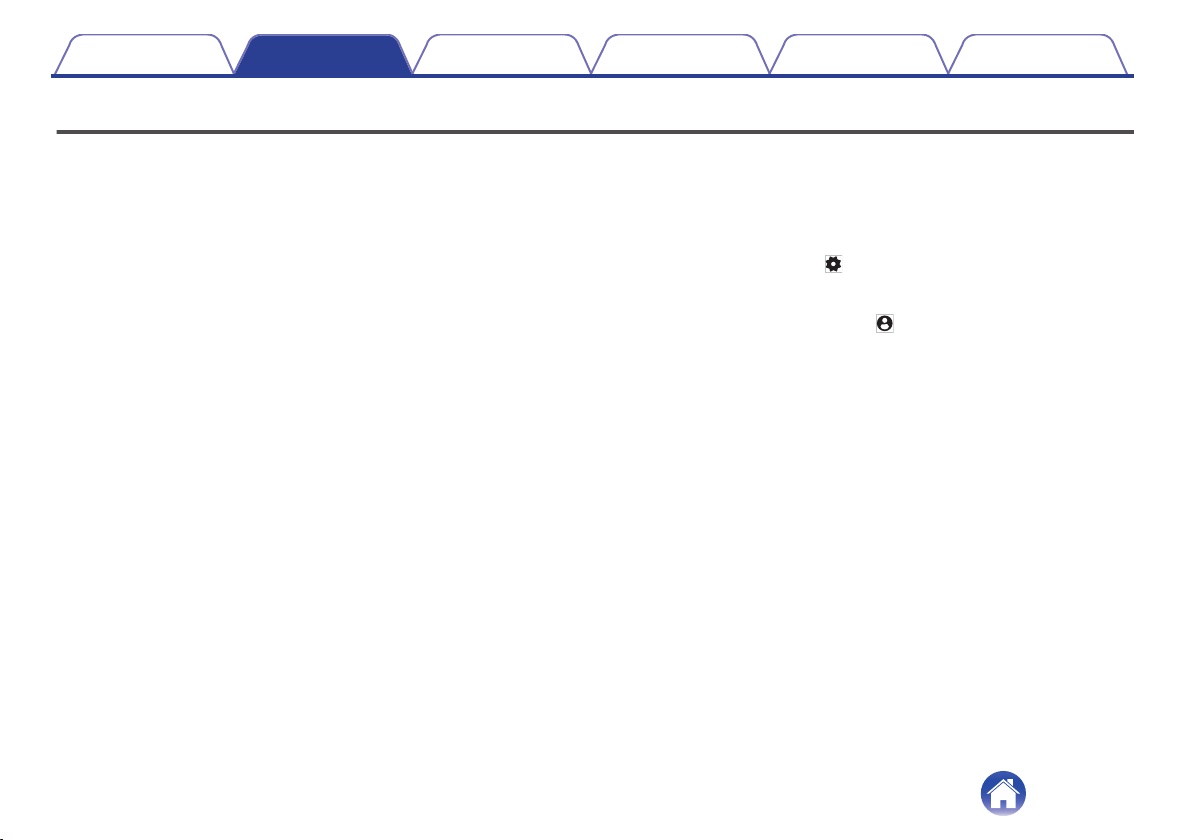
Changing your HEOS account
Tap the “Home” tab.
1
Select the Settings icon in the upper-right corner of
2
the screen.
Select the HEOS Account icon.
3
Change your location, change your password, delete
4
your account or sign out of your account.
16
Page 17
Contents
Setup Playback Troubleshooting Status LED Appendix
Dirac Live Setup
Dirac Live is a powerful solution that helps you get the best from your speakers.
Dirac Live and its various features use research-driven acoustic processing algorithms to analyze your room and reduce its impact on sound quality,
resulting in speaker performance that would be physically impossible otherwise.
You will need to create a Dirac Live account and purchase a license before running Dirac Live.
You can create an account and purchase a license on the website below.
www.dirac.com/denon/
See the Dirac Live Room Correction manual for details on Dirac Live.
https://manuals.denon.com/DiracLiveAmp/ALL/EN/
17
Page 18
Denon Home Amp
Song 3
Song 2
Drag one room into another to group them
Bedroom
Song 1
Kitchen
Song 1
Bedroom
Rooms
Rooms SearchHome
Edit
Contents Setup Playback Troubleshooting Status LED Appendix
Playing from streaming music services
A music service is an online music company that provides access to vast
music collections via free and/or paid subscriptions. Depending upon your
geographical location, there are several options to choose from.
NOTE
The HEOS app and brand is not affiliated with any manufacturer of any mobile
0
device. Availability of music services may vary by region. Not all services may be
available at time of purchase. Some services may be added or discontinued from
time to time based on decisions of the music service providers or others.
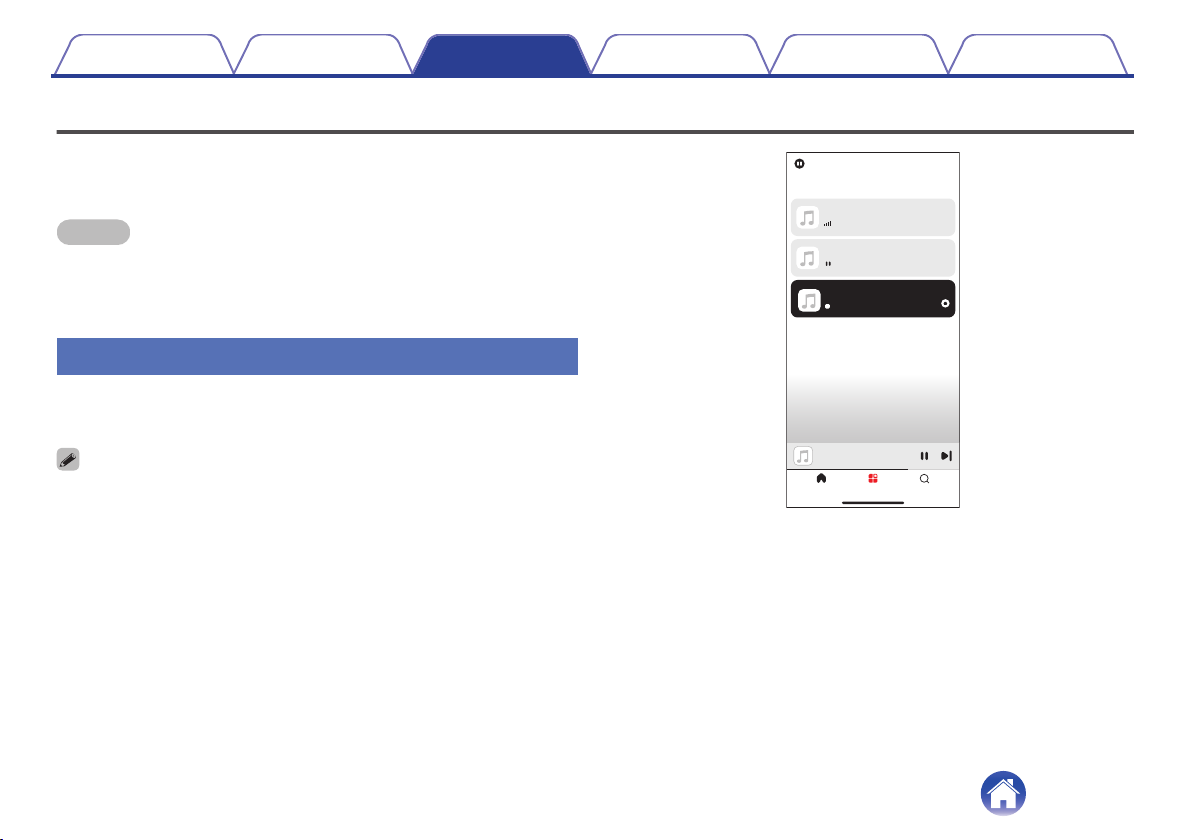
Selecting a room/device
Tap the “Rooms” tab. Select “Denon Home Amp” if
1
there are multiple HEOS built-in devices.
Tap “Edit” at the top right to switch edit mode. You can change the displayed
0
name.
18
Page 19
Rooms SearchHome
Living Room
Song 1
BluetoothTV
Music Services
Sources
Home
Edit
Edit
HEOS Favorite StationsRecent New Music
HD
55
0:51 -3:01
Living Room
LIVE
Station
Song
Living Room
Artist
Song
Audio file Streaming
Contents Setup Playback Troubleshooting Status LED Appendix
Selecting the music track or station from music sources
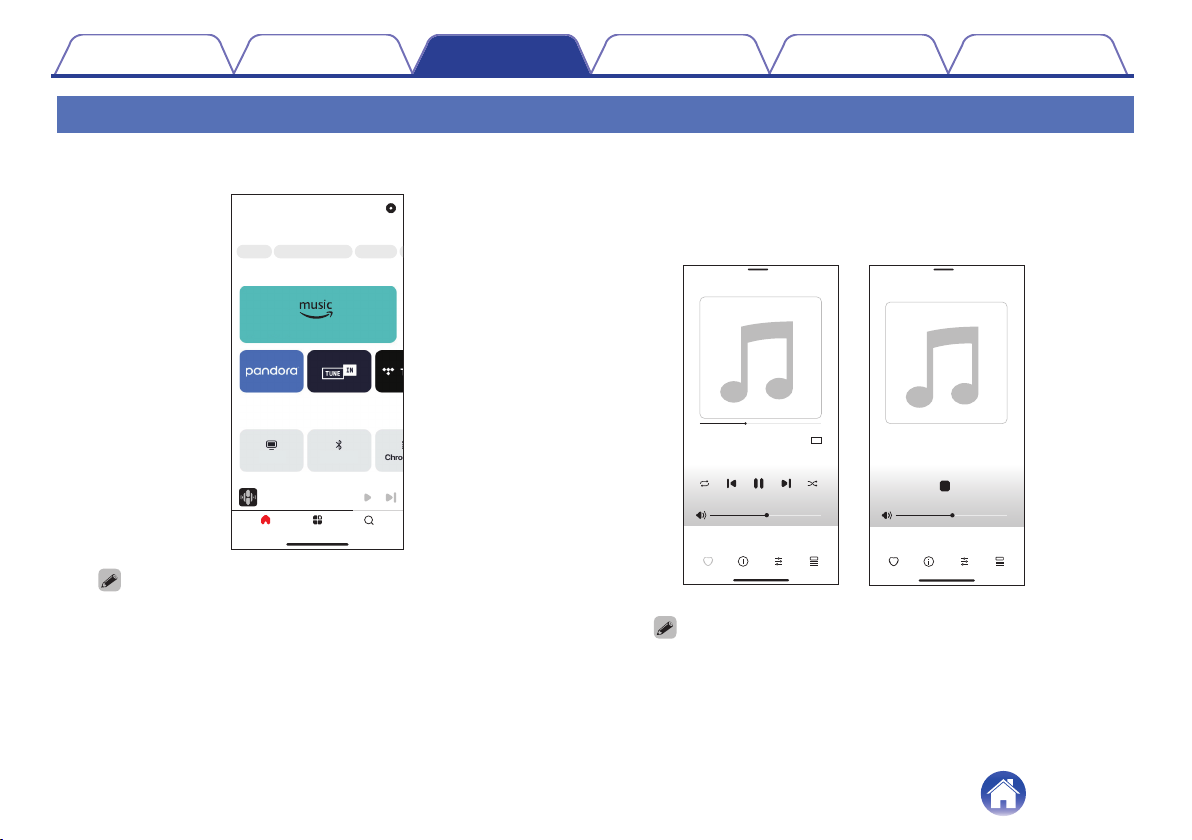
Tap the “Home” tab and select a music source.
1
All music services displayed may not be available in your location.
0
19
Browse the music to play.
2
After selecting a music track or radio station the app will
automatically change to the “Now Playing” screen.
The “Now Playing” banner appears on the “Home” screen, “Rooms” screen
0
and “Search” screen. You can check the song currently playing and perform
simple playback operations no matter which screen is displayed.
Page 20
STAY,THE KID LAROI & JUSTIN...
Kitchen + Living Room
Drag one room into another to group them
Bedroom
Song 1
Song 1
Living Room
Kitchen
Song 1
Bedroom
Rooms
Rooms SearchHome
Bedroom
Song 1
Rooms SearchHome
Edit
Rooms
Edit
Drag one room into another to group them
Song 1
Bedroom
Drag a room out of this group to ungroup it
Song 1
Kitchen
Living Room
2
1
Contents Setup Playback Troubleshooting Status LED Appendix
Listening to the same music in multiple rooms
This system is a true multi-room audio system. You can create one or
more HEOS groups to automatically synchronize audio playback between
multiple products with HEOS Built-in so that the music playing different
rooms is perfectly in sync and always sounds amazing! You can easily
add up to 32 products to your system in total. You can group up to 16
individual products to have them play the same song fully synchronized.
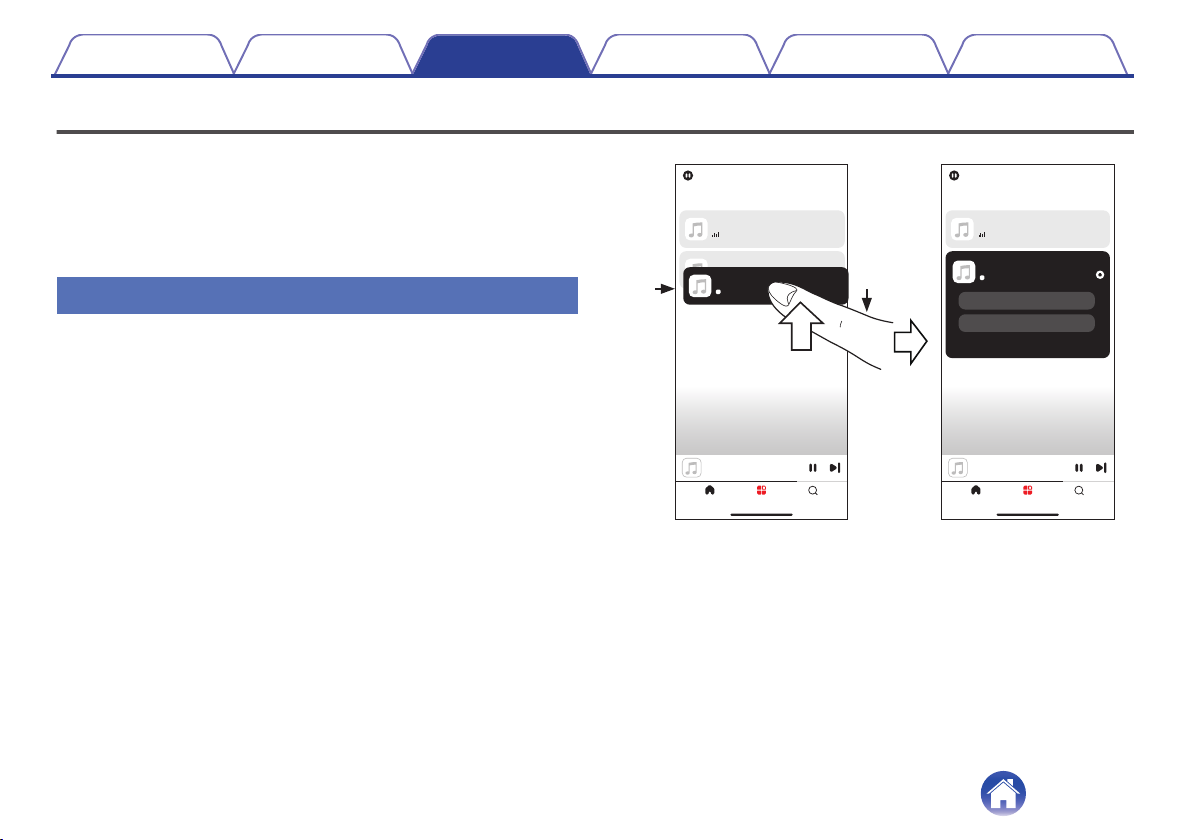
Grouping rooms
Press and hold your finger on room that is not playing
1
music.
Drag it into the room that is playing music and lift your
2
finger.
The two rooms will be grouped together into a single
3
device group and both rooms will be playing the same
music in perfect sync.
20
Page 21
Drag one room into another to group them
Bedroom
Song 1
Song 1
Bedroom
Rooms
Rooms SearchHome
Bedroom
Song 1
Rooms SearchHome
Edit
Rooms
Edit
Drag one room into another to group them
Song 1
Bedroom
Kitchen + Living Room
Song 1
Song 1
Kitchen
Living Room
Song 1
Living Room
Kitchen
2
1
Contents Setup Playback Troubleshooting Status LED Appendix
Ungrouping rooms
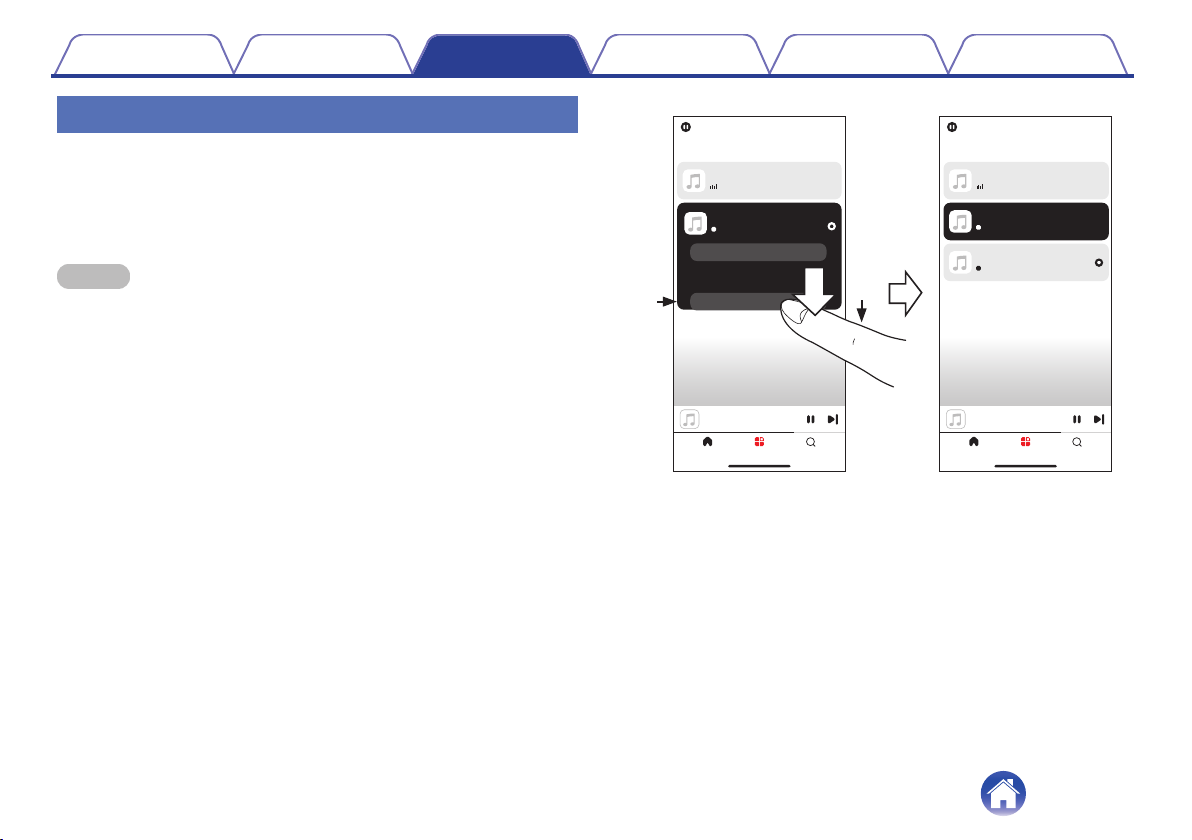
Press and hold your finger on room that you want to
1
remove from the group.
Drag it out of the group and lift your finger.
2
NOTE
You can not remove the first room that started playing the music before grouping.
0
21
Page 22
Drag one room into another to group them
Drag a room out of this group to ungroup it
Drag one room into another to group them
Bedroom
Song 1
Bedroom
Song 1
Song 1
Bedroom + Kitchen + Living..
Bedroom
Kitchen
Living Room
Song 1
Living Room
Song 1
Kitchen
Song 1
Bedroom
Rooms Rooms
Rooms SearchHome
Rooms SearchHome
Edit Edit
2
3
1
Contents Setup Playback Troubleshooting Status LED Appendix
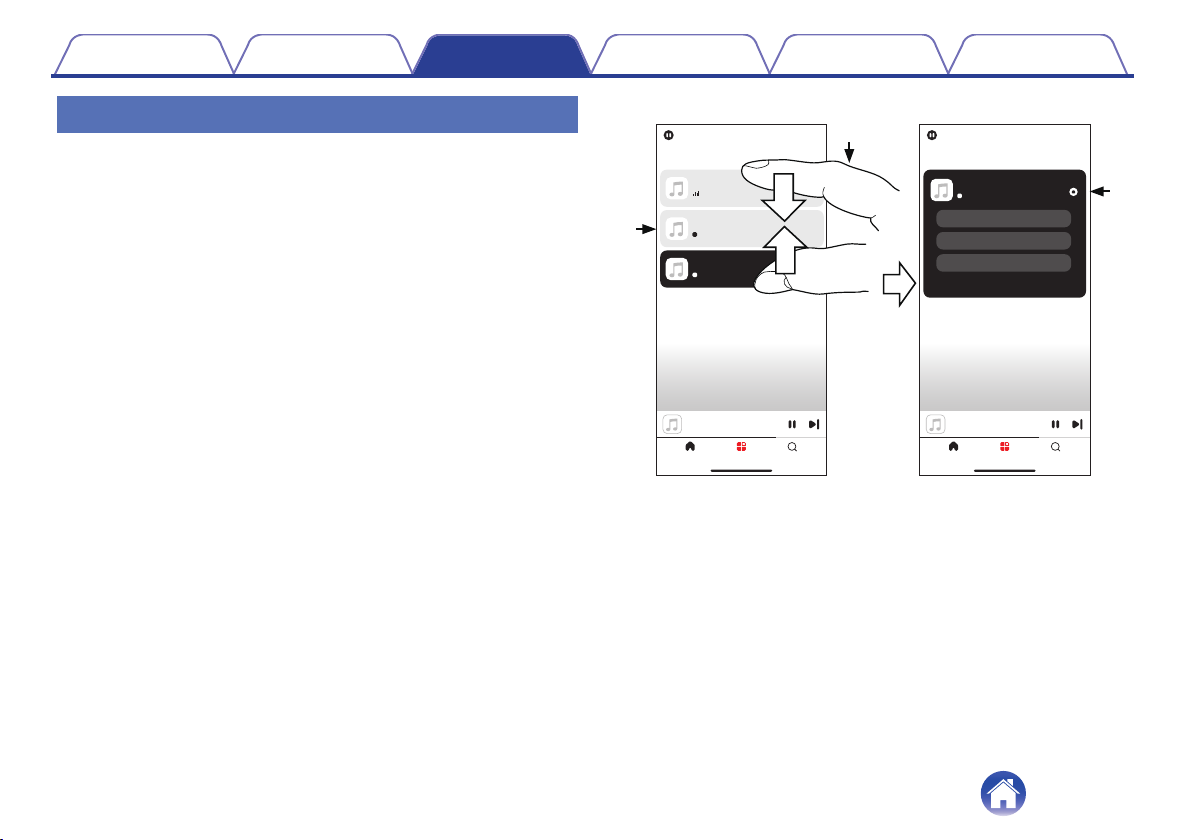
Grouping all rooms
You can easily group all rooms (up to 16 rooms) together by using a
“pinch” gesture.
Place two fingers on the screen over the list of rooms.
1
Quickly pinch your two fingers together and release.
2
All of your rooms will be joined together and begin
3
playing the same music in perfect sync.
22
Page 23
Drag one room into another to group them
Bedroom
Song 1
Song 1
Living Room
Song 1
Kitchen
Song 1
Bedroom
Rooms
Rooms SearchHome
Edit
Drag one room into another to group them
Drag a room out of this group to ungroup it
Bedroom
Song 1
Song 1
Bedroom + Kitchen + Living..
Bedroom
Kitchen
Living Room
Rooms
Rooms SearchHome
Edit
1
2
Contents Setup Playback Troubleshooting Status LED Appendix
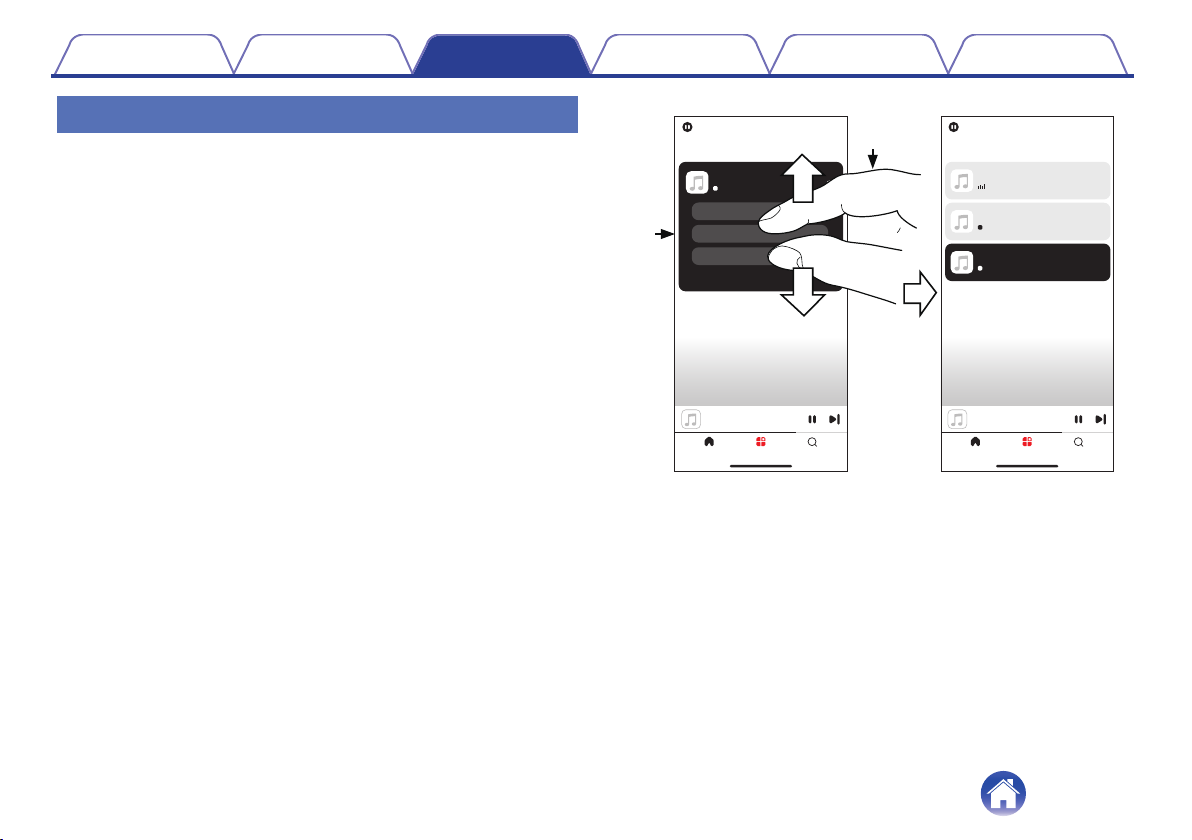
Ungrouping all rooms
You can easily ungroup all of your rooms by using a “spread” gesture.
Place two fingers close together on the screen over list
1
of rooms.
Quickly spread your two fingers apart from each other
2
and release.
All of your rooms will be ungrouped.
3
23
Page 24
Contents Setup Playback Troubleshooting Status LED Appendix
Listening to Internet Radio
The HEOS system includes access to more than 100,000 free internet
radio streams from all corners of the globe via the TuneIn radio service.
Just select the TuneIn logo from the “Home” screen and browse among
the 100,000 stations neatly organized into popular categories and select a
station that appeals to your mood.
If you have a TuneIn account, tap “Edit” from the “Music Services” section of the
0
“Home” screen, select “TuneIn” and sign in to the TuneIn service to access all “My
Favorites” TuneIn stations.
NOTE
The radio station database service may be suspended or be otherwise unavailable
0
without notice.
Playing music stored on your
mobile
Tap the “Home” tab.
1
Select “This Phone” from the “Sources” section.
2
Browse the local music on your phone and select
3
something to play.
Playing back files stored on a PC or
NAS
Tap the “Home” tab.
1
Select “Server” from the “Sources” section.
2
Select the name of your networked PC or NAS
3
(Network Attached Storage) server.
Browse the music on your PC/NAS and select
4
something to play.
24
Page 25
Contents
Setup Playback Troubleshooting Status LED Appendix
Playing music from an external
device
Connect an external device to the digital optical,
1
analog RCA stereo or HDMI input on the back of this
unit.
Tap the “Home” tab.
2
Select “Inputs” from the “Sources” section.
3
Select the name of this unit and which input to which
4
you connected the audio device in step 1.
Initiate playback on the audio device.
5
HDMI control function
o
Connect this unit to a TV that supports the HDMI control function with
an HDMI cable and enable the HDMI control setting on the TV to
perform basic operations on this unit (changing the input source,
turning the power on and off, adjusting the volume) with the remote
control of the TV.
Refer to “About HDMI” (v p. 47) for more information about the
HDMI control function.
Playing music from a USB flash
drive
Insert a FAT32 or NTFS formatted USB flash drive into
1
the USB port on the rear panel of this unit.
Tap the “Home” tab.
2
Select “USB” from the “Sources” section.
3
Select the name of this unit.
4
Browse the music on your USB flash drive and select
5
something to play.
NOTE
It may take several minutes for the name of this unit to appear in the “USB” list if
0
you have a large number of files on your USB flash drive.
It is not possible to connect and use a computer via the USB port of this unit using
0
a USB cable.
25
Page 26
Contents Setup Playback Troubleshooting Status LED Appendix
Playing music from a Bluetooth
device
Activate the Bluetooth setting on your mobile device.
1
Press and hold the Bluetooth button (V) located on the
2
back of this unit for 3 seconds and release the button
when you see a pattern of two green flashes on the
status LED.
Select “Denon Home Amp” from the list of available
3
Bluetooth devices.
In a few seconds, your mobile device will indicate that it is
connected to this unit.
Play music using any app on your device.
4
The sound will now play from this unit.
NOTE
If no sound is heard, disconnect and reconnect Bluetooth connections from your
0
Bluetooth device.
26
Page 27
Contents Setup Playback Troubleshooting Status LED Appendix
AirPlay function
Music files stored on your iPhone, iPod touch, iPad, Mac or Windows PC can be played on this unit via the network.
Input source will be switched to “AirPlay” when AirPlay playback is started.
0
You can stop AirPlay playback by choosing another input source.
0
The screen may differ depending on the OS and software versions.
0
This device supports AirPlay 2®.
Sync multiple AirPlay 2 compatible devices/speakers for simultaneous playback.
27
Page 28
AirPlay
rop:
ryone
AirPlay
[Example] iOS 15 or macOS 13
[Example] iOS 10
[Example] iTunes
Contents Setup Playback Troubleshooting Status LED Appendix
Playing songs from your iPhone, iPod
touch, iPad or Mac
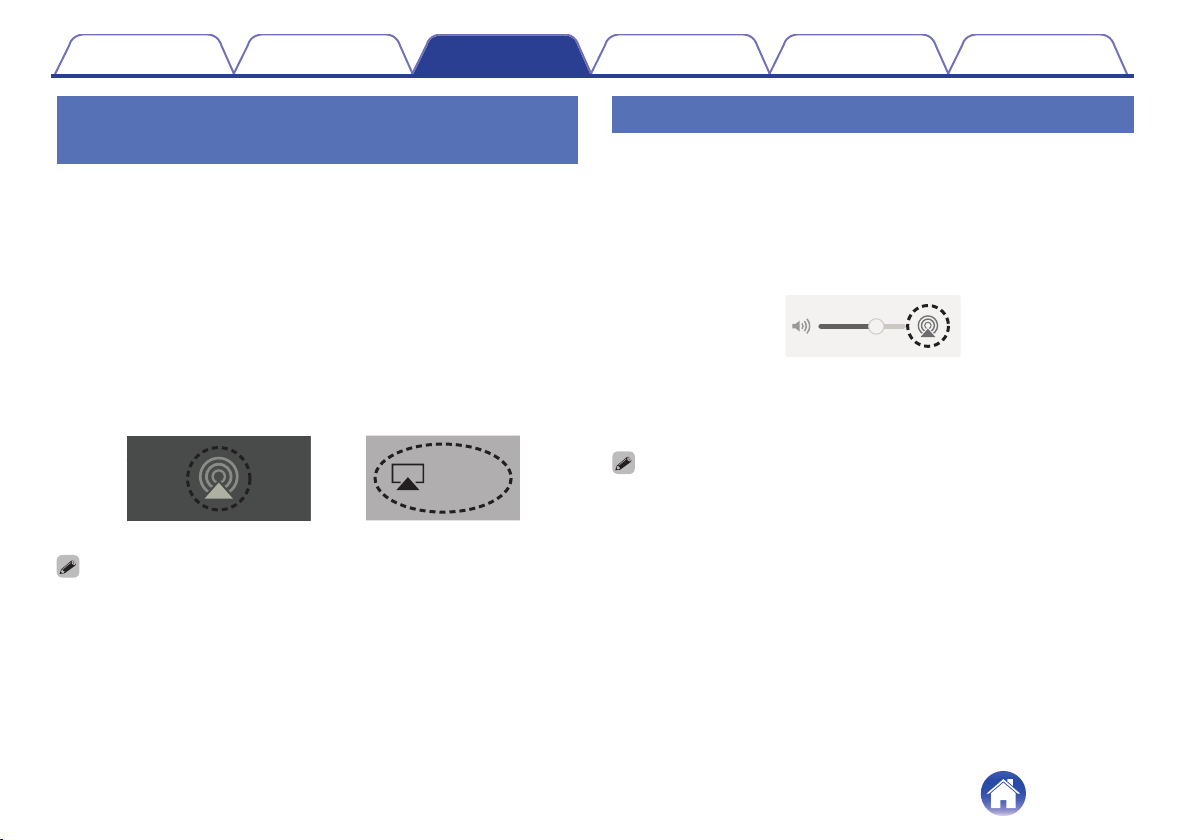
You can stream music stored in your “iPhone/iPod touch/iPad/Mac”
directly to this unit.
Connect your iPhone, iPod touch, iPad or Mac Wi-Fi to
1
the same network as this unit.
For details, see your device’s manual.
0
Open Apple Music and play music from your iPhone,
2
iPod touch, iPad or Mac.
Tap or click the AirPlay icon and select this unit.
3
You can also use AirPlay to stream music from other applications. Open the
0
Control Center, tap or click the AirPlay icon, then select this unit.
To use AirPlay, your iOS device must support iOS 10.0.2 or later, or OS X
0
Mountain Lion 10.8 or later.
Playing songs from Windows PC
Install iTunes 10, or later, on a Windows PC that is
1
connected to the same network as this unit.
Start iTunes and click the AirPlay icon to select this
2
unit.
Choose a song and click play in iTunes.
3
The music will stream to this unit.
For information about how to use iTunes, also see the Help for iTunes.
0
28
Page 29
iPhone
AirPlay
Living Room
Denon xxxxxxxx
Song - Artist
Bedroom
Speakers & TVs
iPhone
AirPlay
Living Room
Denon xxxxxxxx
Bedroom
Speakers & TVs
Contents Setup Playback Troubleshooting Status LED Appendix
Play a song from your iPhone, iPod
touch, iPad or Mac on multiple synced
devices (AirPlay 2)
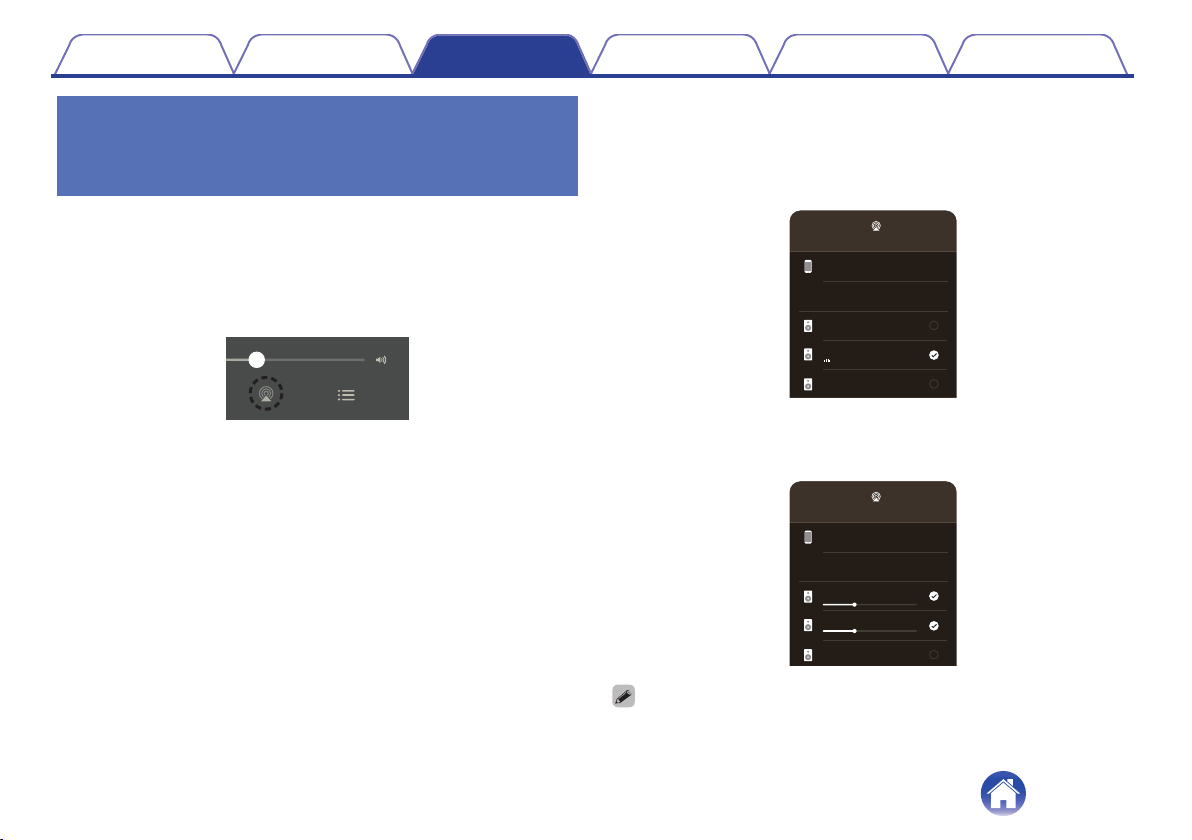
Songs from an iPhone, iPod touch, iPad or Mac can be synced with
multiple AirPlay 2 supported devices for simultaneous playback.
Play the song on your iPhone, iPod touch, iPad or Mac.
1
AirPlay icon is displayed on the iPhone, iPod touch, iPad or Mac
screen.
Tap or click the AirPlay icon and select this unit.
2
Displays a list of devices/speakers that can be played back on the
same network.
A circle is displayed to the right of AirPlay 2 compatible devices.
0
Select the devices/speakers you want to use.
3
Multiple AirPlay 2 compatible devices can be selected.
0
To use AirPlay 2, your iOS device must support iOS 11.4 or later, or macOS
0
Catalina or later.
29
Page 30
Contents Setup Playback Troubleshooting Status LED Appendix
Spotify Connect function
Spotify is all the music you’ll ever need. Millions of songs available
instantly. Just search for the music you love, or let Spotify play you
something great. Spotify works on your phone, tablet, computer and home
speakers. So you’ll always have the perfect soundtrack for whatever
you’re doing. Now you can enjoy Spotify with your free account as well as
a Premium account.
Use your phone, tablet or computer as a remote control for Spotify.
Go to www.spotify.com/connect to learn how.
The Spotify software is subject to third party licenses found here:
www.spotify.com/connect/third-party-licenses
Playing Spotify music with this unit
Download the “Spotify App” onto your iOS or Android device beforehand.
Connect the Wi-Fi settings of the iOS or Android device
1
in the same network as this unit.
Launch the Spotify App.
2
Play back a Spotify track.
3
Tap the Spotify icon to select the unit.
4
The music will stream to this unit.
30
Page 31
Contents Setup Playback Troubleshooting Status LED Appendix
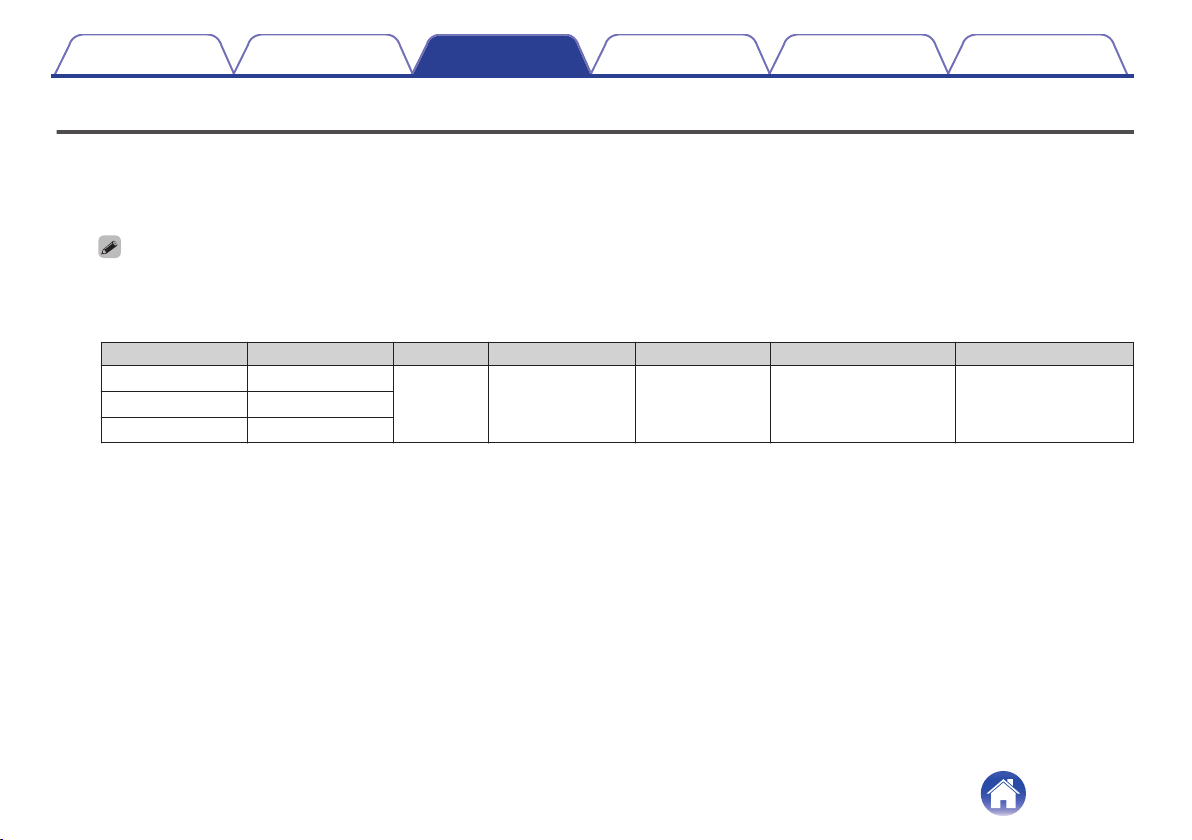
Quick Select function
Input source, volume level, sound mode, night mode, dialog enhancer and Dirac Live Filter settings can be registered to the Quick select buttons (1 - 3).
Press and hold down one of the Quick select buttons (1 - 3) on the front panel for 3 seconds.
1
The current settings are registered to the selected button.
The status LED on the main unit flashes once when registration is complete.
0
To recall the registered settings, press the Quick select button on the front panel.
0
[Default settings]
Button Input source Volume Sound mode Night mode Dialog enhancer Dirac Live Filter
Quick Select 1 TV
25 Stereo Off Off OffQuick Select 2 LINE IN
Quick Select 3 OPTICAL
31
Page 32
Contents Setup Playback Troubleshooting Status LED Appendix
Troubleshooting
If a problem should arise, first check the following:
1. Are the connections correct?
2. Is the set being operated as described in the owner’s manual?
3. Are the other devices operating properly?
If steps 1 to 3 above do not improve the problem, restarting the device may improve the problem. Remove and re-insert the power cord of the unit.
0
If this unit does not operate properly, check the corresponding symptoms in this section.
If the symptoms do not match any of those described here, consult your dealer as it could be due to a fault in this unit. In this case, disconnect the power
immediately and contact the store where you purchased this unit.
32
Page 33
Contents
Setup Playback Troubleshooting Status LED Appendix
Cannot connect this unit to the network
Make sure your mobile device is connected to your wireless network before setting up your device. (v p. 13)
0
Alternatively, you can connect this unit to your network router using an Ethernet cable sold separately. Once connected via Ethernet, the HEOS app
0
should recognize the device and you can manually move it to your wireless network using “Settings” - “My Devices” - (“Device Name”) - “Advanced” “NETWORK SETTINGS”. (v p. 14)
Cannot pair a Bluetooth mobile device with this unit
The connection from the Bluetooth mobile device is malfunctioning. Power cycle the mobile device, remove the pairing information and re-pair this unit
0
to the mobile device.
Cannot hear Bluetooth music
Your Bluetooth mobile device is not paired with this unit. Re-pair this unit to the mobile device.
0
This unit is Wi-Fi mode etc. Pair and connect Bluetooth device to this unit.
0
The Bluetooth mobile device is connected to another audio device. Make sure your Bluetooth device is connected to this unit.
0
The volume on your Bluetooth mobile device or your speaker is set too low. Check the volume on the Bluetooth mobile device. Check the volume on
0
this unit.
33
Page 34
Contents
Setup Playback Troubleshooting Status LED Appendix
The Power is turned off and the status LED flashes in red (fast blink)
The protection circuit has been activated due to a rise in temperature within this unit. Turn the power off, wait about an hour until this unit cools down
0
sufficiently, and then turn the power on again.
Check the speaker connections. The protection circuit may have been activated because speaker cable core wires came in contact with each other or a
0
core wire was disconnected from the connector and came in contact with the rear panel of this unit. After unplugging the power cord, take corrective
action such as firmly re-twisting the core wire or taking care of the connector, and then reconnect the wire. (v p. 8)
Music cuts out or delays sometimes
Make sure your Internet connection is operating correctly. If you are sharing your network with other users or devices, they may be using most of your
0
bandwidth (especially if they are streaming video).
Make sure this unit is within range of your wireless network.
0
Make sure this unit is not located near other electronic devices that could interfere with its wireless connectivity (like microwave ovens, cordless
0
phones, TVs, etc.).
34
Page 35
Contents
Setup Playback Troubleshooting Status LED Appendix
Cannot connect to a network using an iOS device
This unit supports Apple’s “WAC (Wireless Accessory Configuration)” setup mode. WAC setup mode allows you to connect this unit to your network
0
without requiring you to type in the network name and password.
1. The CONNECT LED on the rear of this unit will slowly blink amber to indicate that WAC setup mode is active. If the rear LED is not blinking amber,
press and hold volume down (-) and 13 buttons on this unit for 3 seconds until you see the LED blinking amber.
2. On your iOS device, go to the Wi-Fi menu under Settings.
3. Select “Denon Home Amp” under SET UP NEW AIRPLAY SPEAKER... at the bottom of the list.
4. Select the network you want this unit to connect to and select “Next”.
5. Follow the instructions on the screen to complete setup.
6. When the connection is complete, the status LED on the front of this unit will turn solid blue.
This unit will stay in WAC setup mode for 15 minutes. If this unit is not setup within 15 minutes, it will revert back to its previous network connection.
Press the 13 button on this unit if you want to cancel WAC setup mode.
I hear a delay when using the external input with my TV
If you are connecting the External input with your cable or satellite box for enjoying TV audio through multiple HEOS built-in devices, you may hear a
0
delay between when you see someone speak and when you hear the audio. This is because the HEOS system must buffer the audio before it sends it
out to the HEOS built-in devices so that it arrives at all devices at the same time.
You can avoid this delay by listening only to the device which is directly connected to the set top box.
0
35
Page 36
Contents
Setup Playback Troubleshooting Status LED Appendix
Cannot connect to a WPS network
If your wireless router support WPS (Wi-Fi Protected Setup™) this unit can optionally connect to your network using the “Push Button” method by
0
following these steps:
Wi-Fi Protected Setup™ is trademarks of Wi-Fi Alliance.
1. Press the WPS button on your router.
2. Within 2 minutes, press and hold the CONNECT button on the rear panel of this unit for 5 seconds.
3. The LED on the front of this unit will flash green for several seconds as it connects to your WPS router.
4. When the connection is complete, the LED on the front of this unit will turn solid Green.
Resetting this unit
Resetting this unit will clear out the wireless network info, EQ, and name but retain it’s current software. You will have to use Settings - Add Device to
0
reconnect this unit to your home network before it can be used.
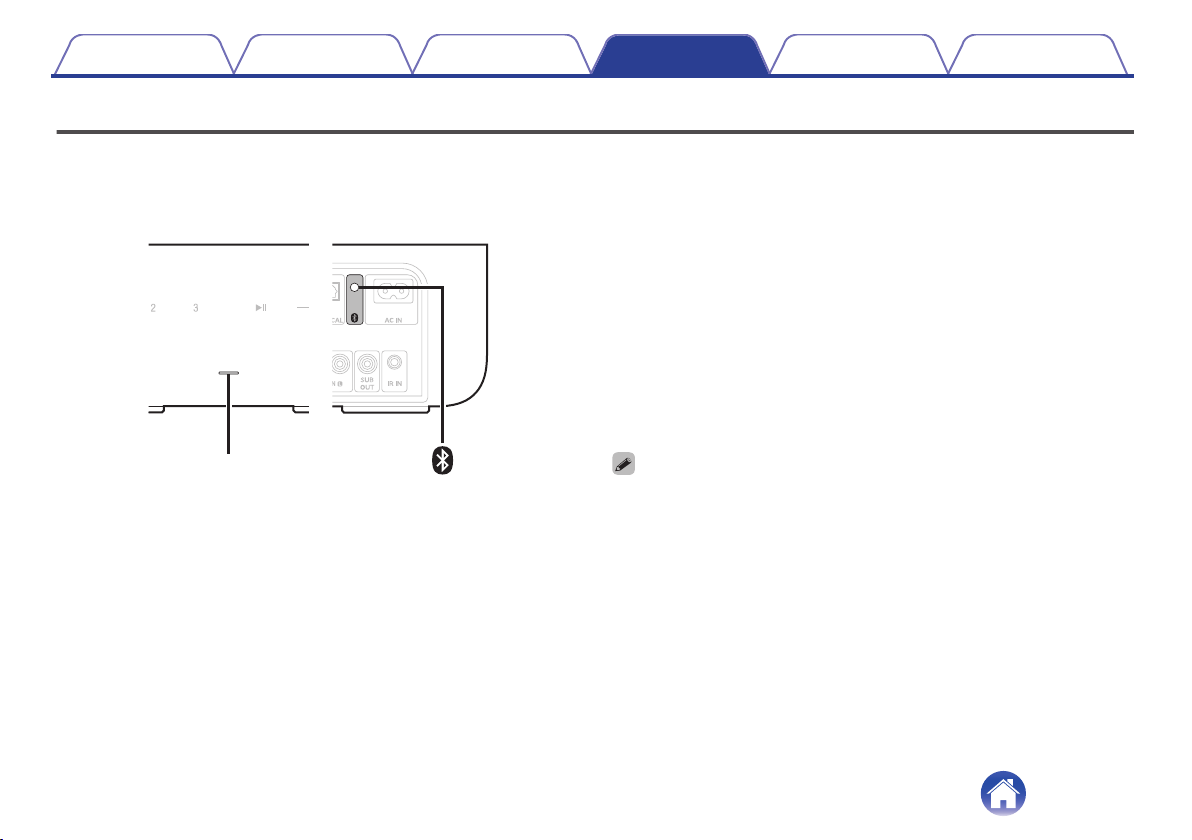
To reset this unit, press and hold the CONNECT and Bluetooth (V) buttons located on the back of this unit for 5 seconds until the front LED begins to
flash amber.
The HDMI control function does not work
The HDMI control function does not work.
You cannot operate devices that are not compatible with the HDMI control function. In addition, depending on the connected device or the settings, the
0
HDMI control function may not work. In this case, operate the external device directly.
Check that the HDMI control function setting is enabled on the TV connected to this unit.
0
36
Page 37
Status LED
Contents Setup Playback Troubleshooting Status LED Appendix
Resetting the firmware to the default state
When the network function or this unit does not operate correctly, the problem may be solved by resetting the firmware to the default state.
It is confirmed that the network connection has no problem, but the unit cannot connect to the Internet.
0
The solution described in “Resetting this unit” does not work. (v p. 36)
0
For such cases, perform the following operation:
Unplug the power cord from the power outlet.
1
Plug in the power cord while holding down the
2
Bluetooth(V) button.
Release the button after the status LED starts to blink
3
in orange.
When the status LED switches from blinking orange to solid, the
recovery process is complete.
Since this process includes a firmware recovery, it takes some time to complete.
0
This process will clear out all the information that you set.
0
After performing this RESET to default state, an update to actual firmware version
0
is needed.
Do not unplug the power cord until the entire process completes.
0
If the problem is not solved after performing this operation, contact our customer
0
service center.
37
Page 38
Contents Setup Playback Troubleshooting Status LED Appendix
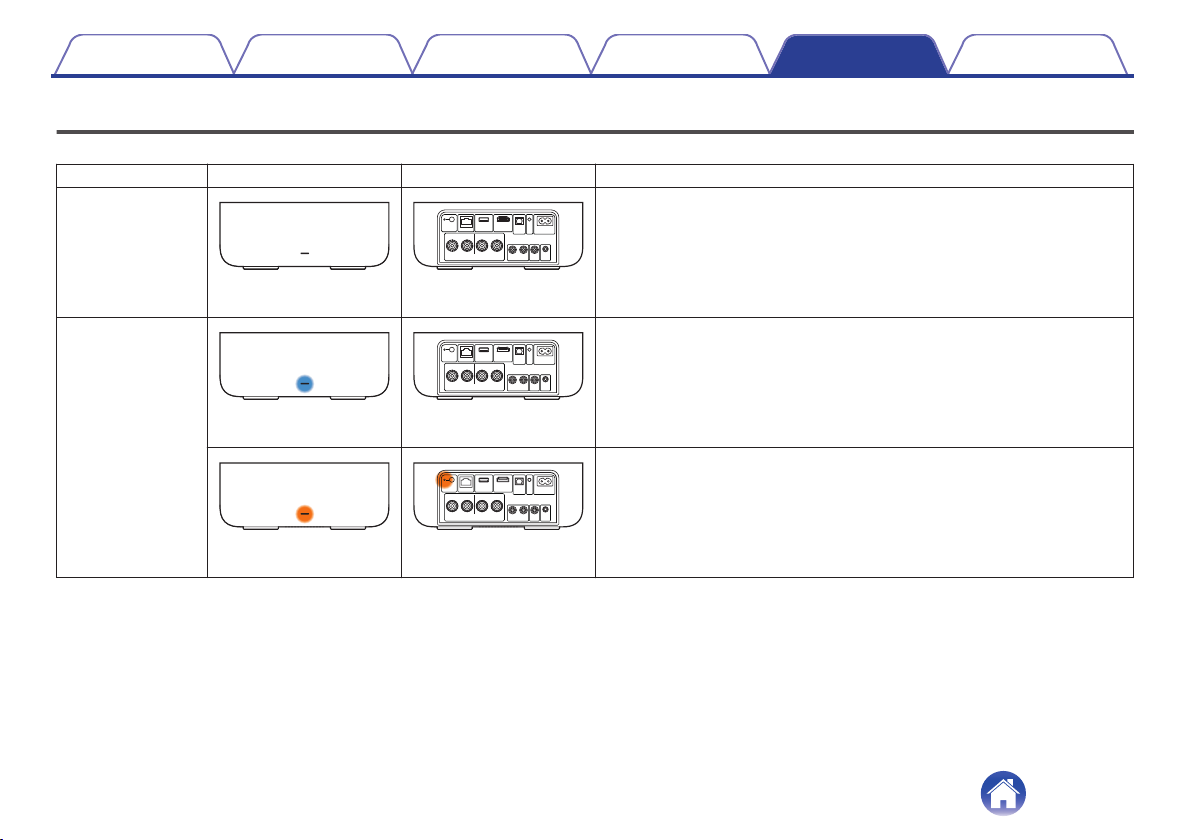
Status LED table
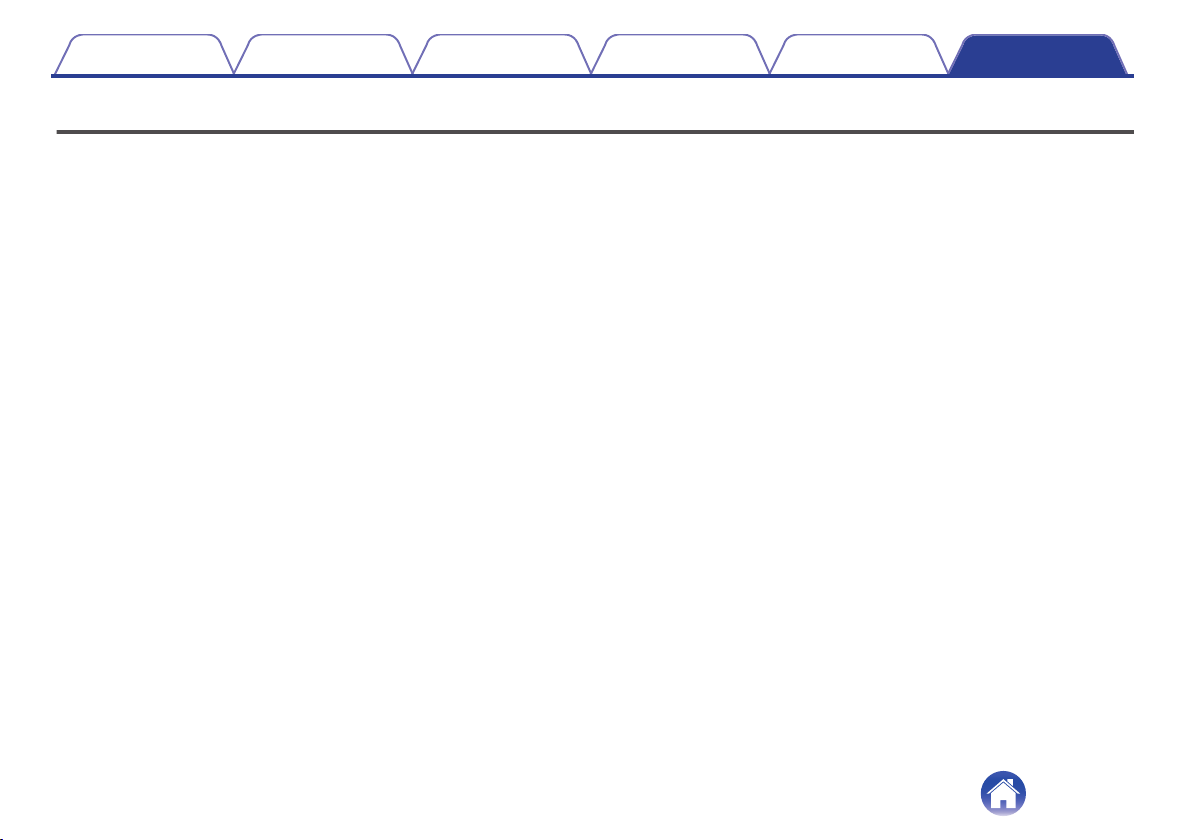
The LEDs on the front panel and rear panel change to indicate the current status.
Status Front LED action Rear LED action Description
Deep Standby
Mode
Quick Start Mode
Power is off, or this unit is in Deep Standby Mode. (v p. 45)
(off) (off)
This unit is in Quick Start Mode (Connected to your network). (v p. 44)
(dimmed solid) (off)
This unit is in Quick Start Mode (Not connected to your network).
(v p. 44)
(dimmed solid) (dimmed solid)
38
Page 39
Contents Setup Playback Troubleshooting Status LED Appendix
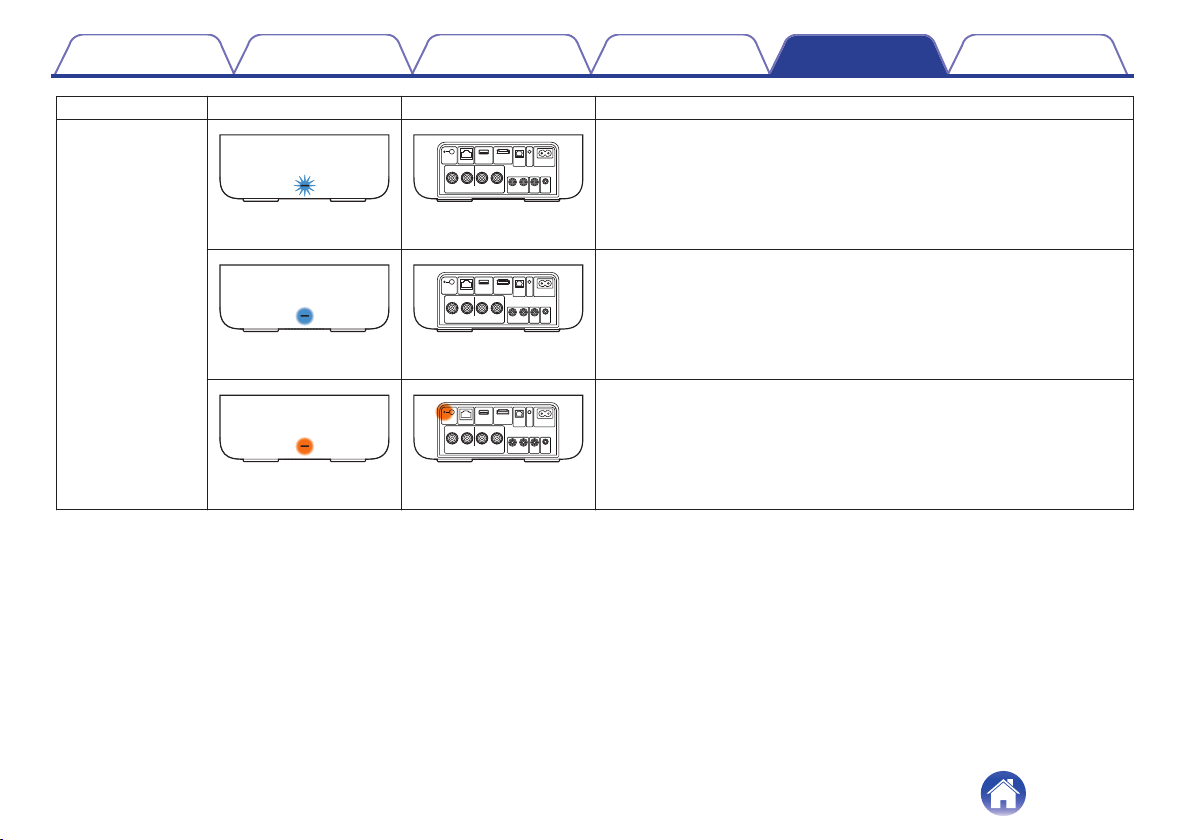
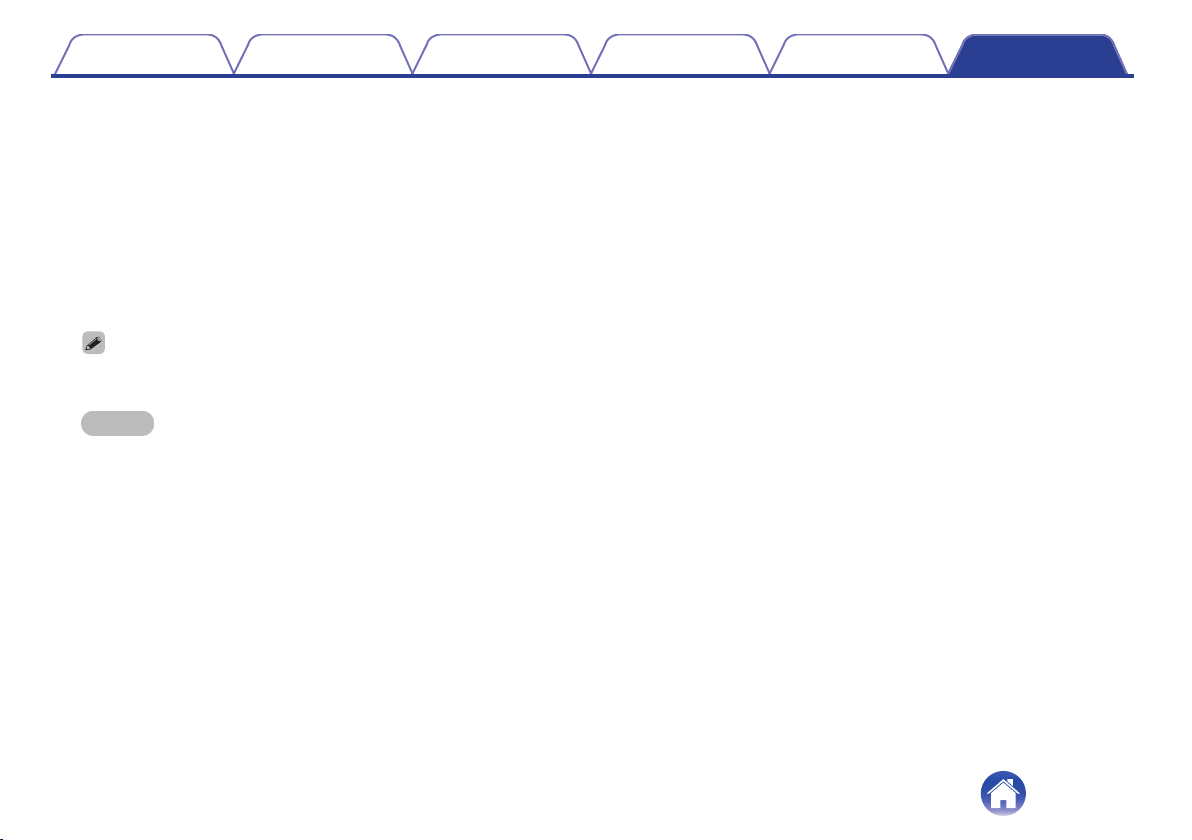
Status Front LED action Rear LED action Description
This unit is starting up or connecting to the network.
(blink) (off)
Power on
This unit is connected to the network.
(solid) (off)
This unit is unable to connect to the network. Try to connect this unit again.
(solid) (solid)
39
Page 40
Contents Setup Playback Troubleshooting Status LED Appendix
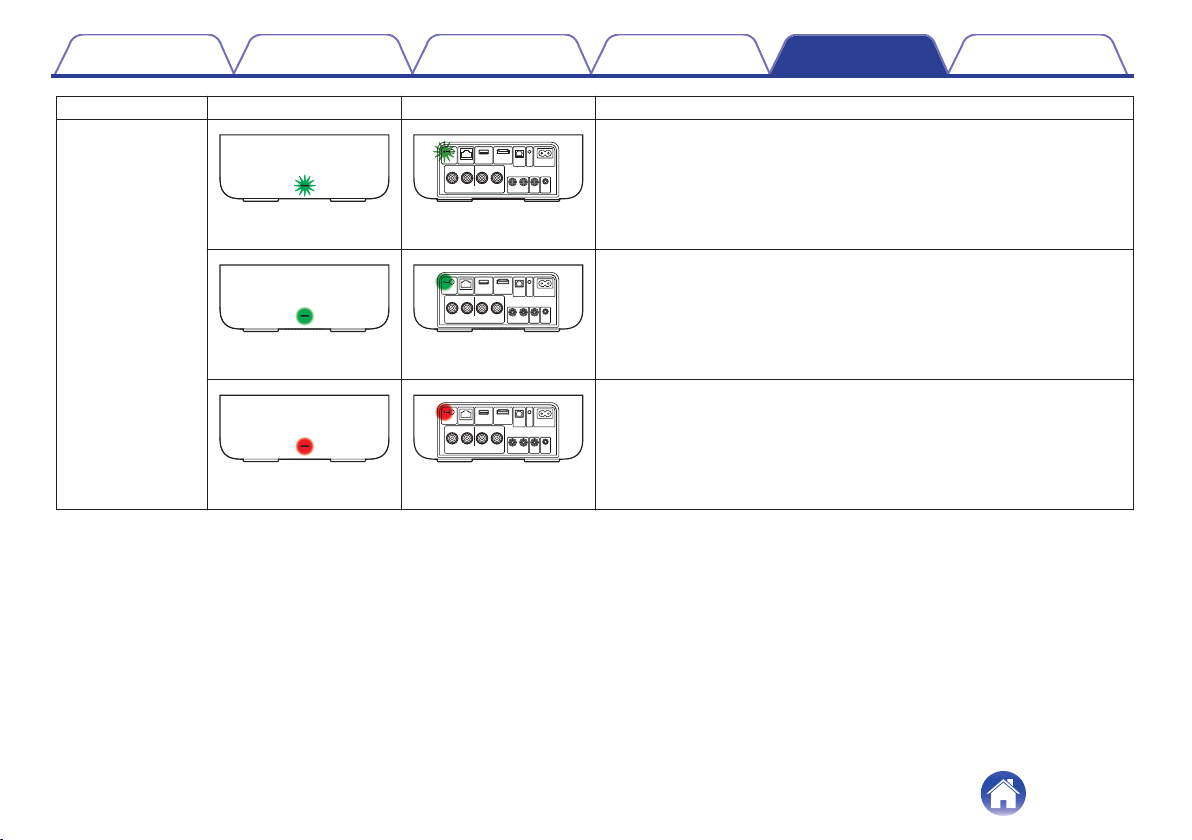
Status Front LED action Rear LED action Description
This unit is connecting to the network via WPS.
(fast blink) (fast blink)
WPS
This unit is connected to the network via WPS.
(for 3 sec. solid) (solid)
WPS has timed out.
(for 3 sec. solid) (solid)
40
Page 41
Contents Setup Playback Troubleshooting Status LED Appendix
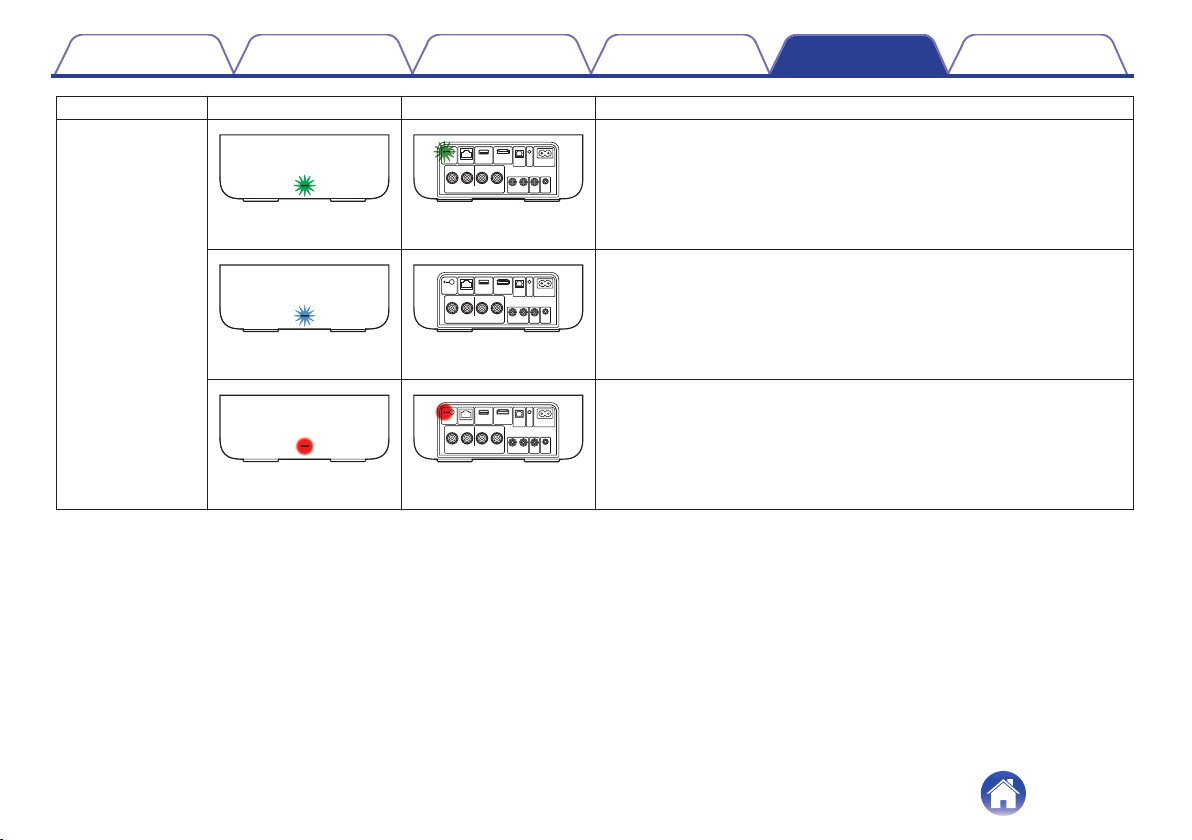
Status Front LED action Rear LED action Description
This unit is pairing via Bluetooth.
(two blinks) (two blinks)
Bluetooth
This unit is paired via Bluetooth.
(one blink) (off)
This unit failed to pair to the Bluetooth device. Try to pair again. (v p. 26)
(for 3 sec. solid) (for 3 sec. solid)
41
Page 42
Contents Setup Playback Troubleshooting Status LED Appendix
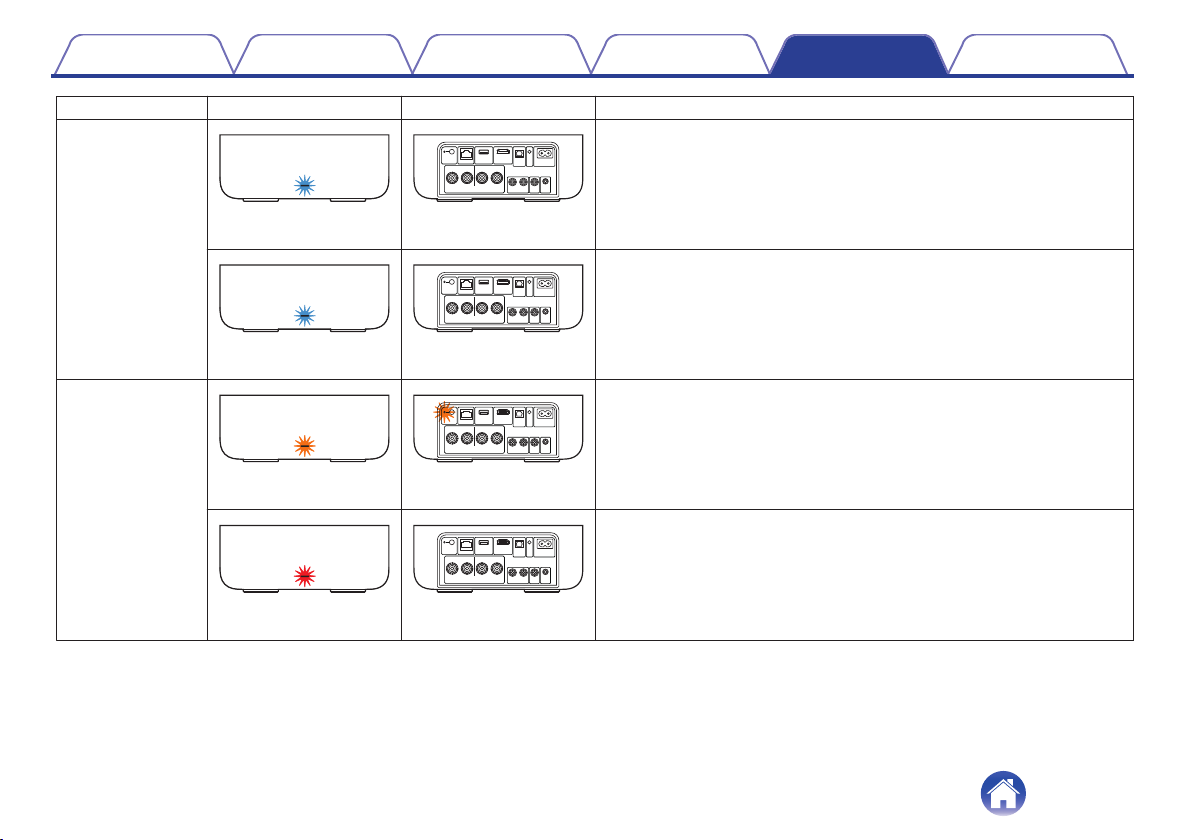
Status Front LED action Rear LED action Description
Volume is being adjusted.
Volume setting
Firmware update
(quick blink) (off)
This unit is muted.
(slow blink) (off)
Firmware is being updated.
(blink) (blink)
There is a firmware error. Check your Internet connection quality, relaunch
the app, then try to update the firmware again.
(slow blink (Not fade)) (off)
42
Page 43
Contents Setup Playback Troubleshooting Status LED Appendix
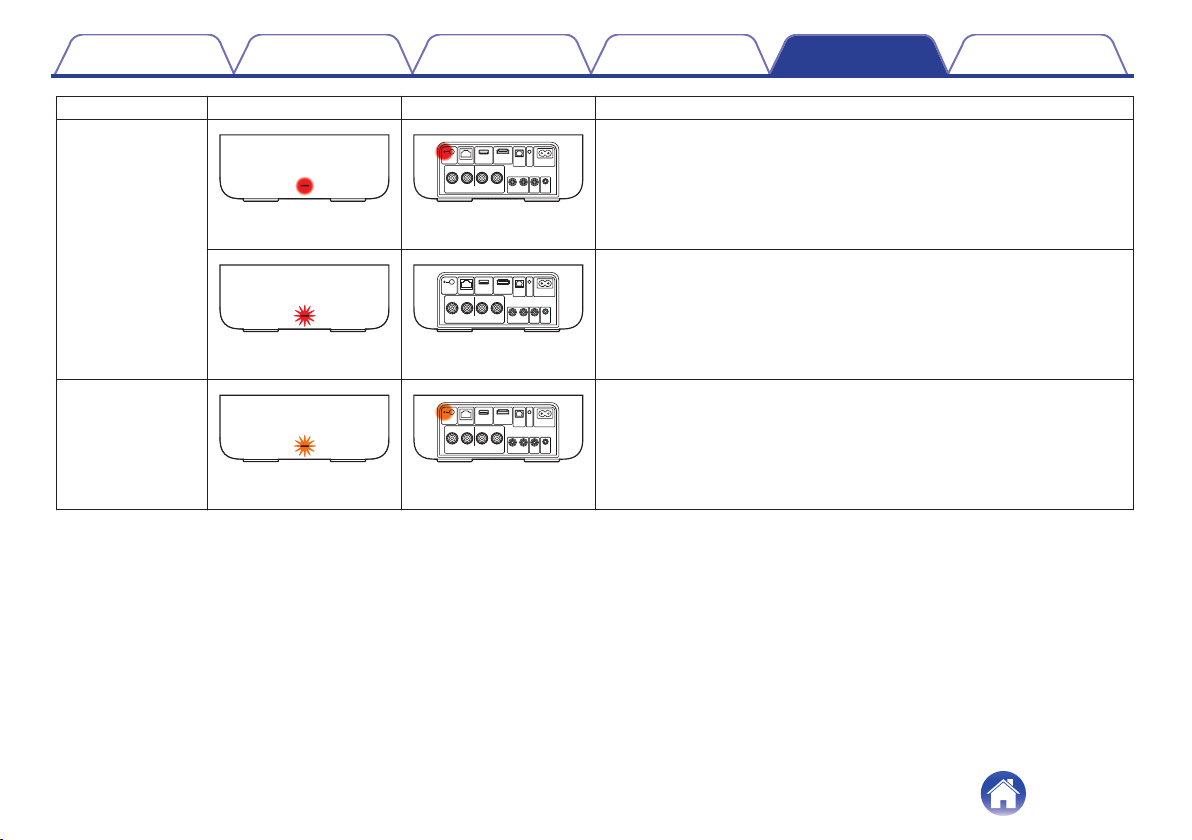
Status Front LED action Rear LED action Description
There was a setup error. Check your usage environment, then follow the
correct procedure to try setup again. If the error occurs again, restore
factory settings and try setup again. (v p. 37)
Error
(solid) (solid)
There is a hardware error. Unplug the power cord, wait about 30 seconds,
then plug the power cord back in.
(fast blink) (off)
Reset
Factory settings have been restored.
(fast blink) (solid)
43
Page 44
Contents Setup Playback Troubleshooting Status LED Appendix
Power management
Quick Start Mode
o
Optical input
This unit automatically enters “Quick Start Mode” to save power in the
following cases. This unit will automatically resume to full power
whenever the device is selected and playing music.
The status LED dims when the mode is switched to Quick Start Mode.
Ethernet
n
After 20 minutes of no operation and no network access after
playing music via Ethernet.
Wi-Fi
n
After 20 minutes of no operation and no network access after
playing music via Wi-Fi.
USB
n
After 20 minutes of no operation and no network access after
playing music from a USB flash drive.
Bluetooth
n
After the Bluetooth connection is disconnected and there is 20
minutes of no operation and no network access after playing music
via Bluetooth.
n
After 20 minutes of no operation after optical device is put into
standby.
TV HDMI (eARC/ARC)
n
Connect this unit and the eARC/ARC compatible TV with HDMI
cable and play TV. 20 minutes after TV is put into standby.
44
Page 45
Contents
o
Deep Standby
This unit also has the ability to automatically enter Deep Standby
Mode whenever the wired or wireless network connection is removed
for more than 60 minutes in Quick Start Mode. The front panel LED will
turn off during Deep Standby.
To wake this unit from Deep Standby,
Press any button on this unit.
0
Input audio signal to optical input.
0
CEC (Consumer Electronics Control) command over HDMI
0
eARC/ARC
You also press the 13 key for 5 seconds, the device enters the Deep
0
Standby.
NOTE
If “Power Saving” is set to “Quick Start” in the HEOS app, the unit will not
0
switch to Deep Standby Mode. (“Settings” - “My Devices” - (“Device Name”) “Power Saving”)
o
Off
To completely turn off the power to the device, you must remove the
mains plug from the power outlet.
Setup Playback Troubleshooting Status LED Appendix
45
Page 46
Contents
Setup Playback Troubleshooting Status LED Appendix
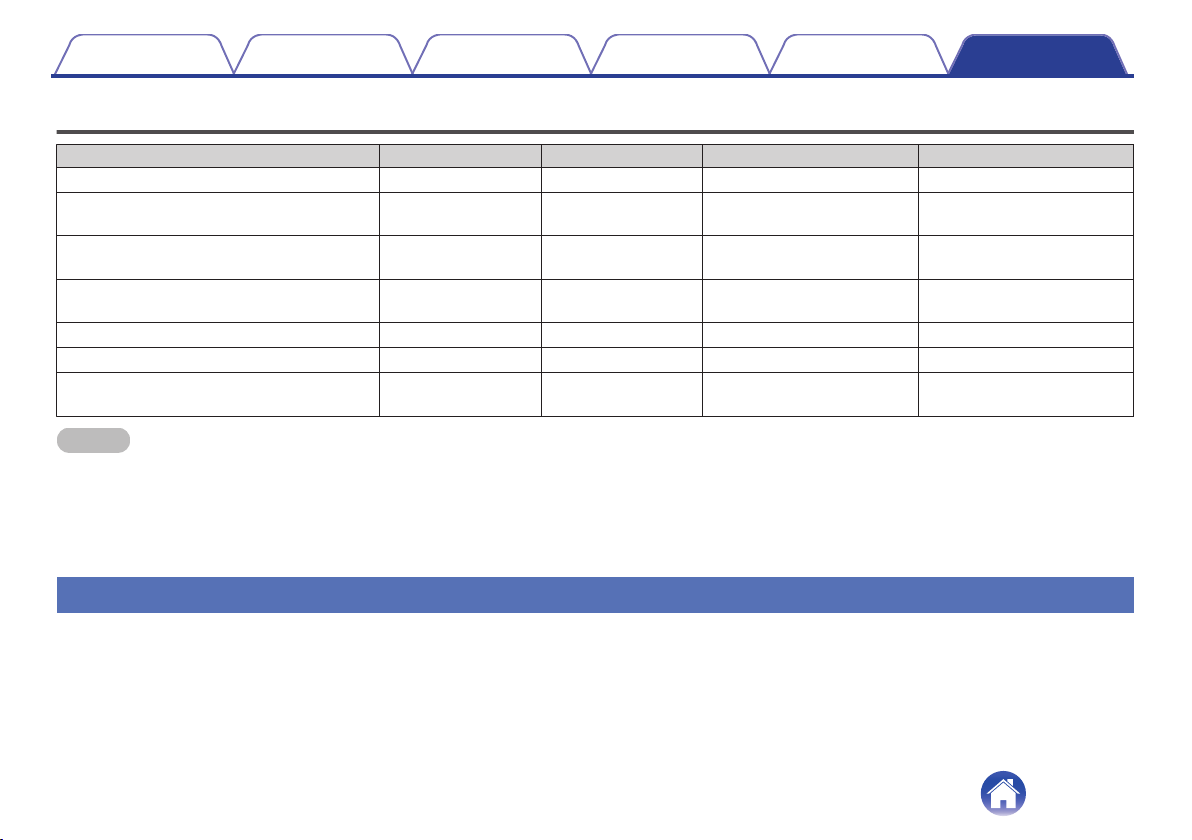
Supported file types and codecs
Sampling frequency Bit length File extension Codec Bit rates
32/44.1/48/88.2/96/176.4/192 kHz 16/24 bit wav PCM –
32/44.1/48 kHz 16 bit mp3
32/44.1/48 kHz 16 bit
32/44.1/48 kHz 16 bit wma
44.1/48/88.2/96/176.4/192 kHz 16/24 bit flac flac –
44.1/48/88.2/96/176.4/192 kHz 16/24 bit m4a ALAC –
2.8/5.6 MHz 1 bit
NOTE
For USB flash drive, the limited numbers of folders and files that can be played back on this unit are as follows.
0
Number of folder directory levels: 8 levels (The limited number includes the root folder.)
0
Number of folders: 500
0
Number of files: 5000 (The allowable number of files may differ according to the USB flash drive capacity and the file size.)
0
Files protected by DRM, such as Apple’s FairPlay DRM, are not supported.
0
The ALAC decoder is distributed under the Apache License, Version 2.0 (http://www.apache.org/licenses/LICENSE-2.0)
0
m4a
aac
dff
dsf
Supported audio formats (Optical)
2-channel Linear PCM:2-channel, 32 kHz – 192 kHz, 16/20/24 bit
Bitstream:Dolby Digital
MPEG-1 Audio Layer 3
CBR/VBR
AAC-LC 48 - 320 kbps
wma9
CBR
DSDIFF
DSF
32 - 320 kbps
CBR:48 - 192 kbps
–
46
Page 47
Contents Setup Playback Troubleshooting Status LED Appendix
About HDMI
This unit supports the following HDMI functions.
eARC (Enhanced Audio Return Channel)/ARC (Audio Return Channel) function
0
Enjoy movies, music, etc., on your TV simply by connecting an eARC/ARC function-compatible TV to this unit via HDMI.
HDMI control function
0
Connect an HDMI control-compatible TV and this unit via HDMI and enable the HDMI control to enable linked control from either device.
Input source switching
0
If the TV is turned on, this unit automatically powers on and switches the input source.
Power off link
0
The TV power off operation is linked so this unit also turns off.
Volume adjustment
0
The volume of this unit can be adjusted using the TV remote control.
Audio output destination switching
0
If this unit is turned on, TV audio is output from this unit. If this unit is turned off, TV audio is output from the speakers of the TV.
Some functions may not operate depending on the connected TV.
0
47
Page 48
Contents Setup Playback Troubleshooting Status LED Appendix
Trademark information
Manufactured under license from Dolby Laboratories. Dolby, Dolby
Apple, AirPlay, iPad, iPad Air, iPad Pro, iPhone and Mac are trademarks
of Apple Inc., registered in the U.S. and other countries.
The trademark “iPhone” is used in Japan with a license from Aiphone
K.K.
Use of the Works with Apple badge means that an accessory has been
designed to work specifically with the technology identified in the badge
and has been certified by the developer to meet Apple performance
standards.
The Bluetooth® word mark and logos are registered trademarks owned
by the Bluetooth SIG, Inc. and any use of such marks by DEI Sales, Inc.
is under license. Other trademarks and trade names are those of their
respective owners.
Audio, and the double-D symbol are trademarks of Dolby Laboratories
Licensing Corporation.
The terms HDMI, HDMI High-Definition Multimedia Interface, HDMI trade
dress and the HDMI Logos are trademarks or registered trademarks of
HDMI Licensing Administrator, Inc.
48
Page 49
Contents Setup Playback Troubleshooting Status LED Appendix
App Store® is registered in the U.S. and other countries.
The Wi-Fi CERTIFIED logo is a registered trademark of the Wi-Fi
Alliance.
Wi-Fi Certification provides assurance that the device has passed the
interoperability test conducted by the Wi-Fi Alliance, a group that certifies
interoperability among wireless LAN devices.
Being Roon Ready means that Denon uses Roon streaming technology,
for an incredible user interface, simple setup, rock-solid daily reliability,
and the highest levels of audio performance, without compromise.
Google Play and the Google Play logo are trademarks of Google LLC.
© 2018 Dirac Research AB. All rights reserved. Dirac, Dirac Live and the
Dirac logos are trademarks of Dirac Research AB.
49
Page 50
Contents Setup Playback Troubleshooting Status LED Appendix
Specifications
Audio section
o
Power amplifier
0
Rated output: 100 W + 100 W (8 Ω/ohms, 20 Hz - 20 kHz with 0.05 % T.H.D. LPF 20 kHz)
Output connectors: 4 – 16 Ω/ohms
S/N (IHF-A): OPTICAL IN, HDMI IN (ARC/eARC): 105 dB
Frequency response: 20 Hz - 40 kHz ±3 dB
Analog (LINE IN)
0
Input sensitivity/impedance: 200 mV/20 kΩ/kohms
Maximum allowable input level: 2.5 V
125 W + 125 W (4 Ω/ohms, 1 kHz with 0.05 % T.H.D.)
LINE IN: 91 dB
50
Page 51
Contents
Wireless LAN section
o
Network type (wireless LAN standard): Conforming to IEEE 802.11a/b/g/n/ac
Security: WEP 64 bit, WEP 128 bit
Used frequency range: 2.4 GHz, 5 GHz
z1
The Wi-Fi® CERTIFIED Logo and the Wi-Fi CERTIFIED On-Product Logo are registered trademarks of the Wi-Fi Alliance.
Bluetooth section
o
Communications system: Bluetooth Specification Version 4.2
Transmission power: Bluetooth Specification Power Class 1
Maximum communication range:
Used frequency range: 2.4 GHz
Modulation scheme: FHSS (Frequency-Hopping Spread Spectrum)
Supported profiles: A2DP (Advanced Audio Distribution Profile) 1.3.2
Corresponding codec: SBC
Transmission range (A2DP): 20 Hz – 20,000 Hz
The actual communication range varies depending on the influence of such factors as obstructions between devices, electromagnetic waves from microwave ovens,
z2
static electricity, cordless phones, reception sensitivity, antenna performance, operating system, application software etc.
Setup Playback Troubleshooting Status LED Appendix
(Wi-Fi® compliant) z1
WPA/WPA2-PSK (AES)
WPA/WPA2-PSK (TKIP)
WPA3-SAE (AES)
Approx. 98.4 ft/30 m in line of sight z2
AVRCP (Audio Video Remote Control Profile) 1.6.2
51
Page 52
Contents
General
o
Operating temperature: 41 °F - 95 °F (5 °C - 35 °C)
Power supply: AC 120 V, 60 Hz (for North America)
Power consumption: 70 W
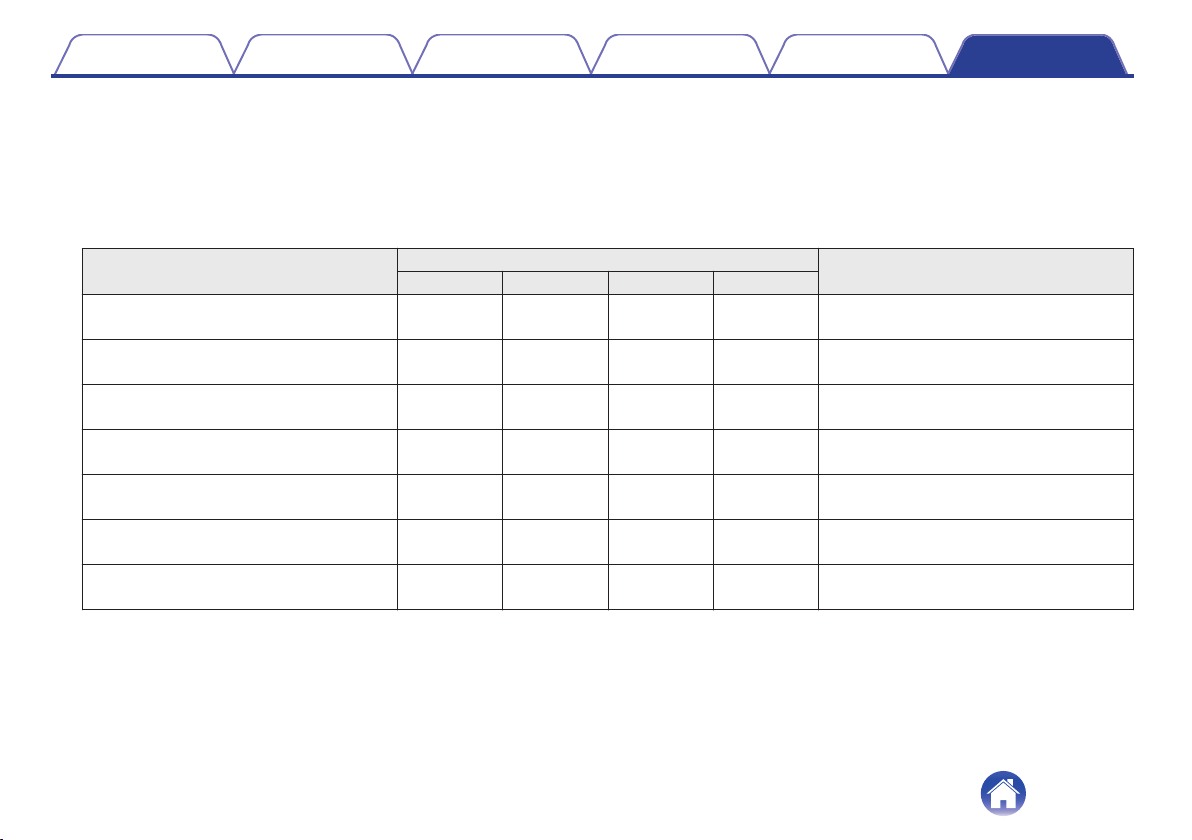
Power consumption in Quick Start Mode:
Standby modes
Normal standby None Off Off Off
Optical standby Optical On Off Off
CEC standby
Wi-Fi connect (5 GHz) None Off On Off
Bluetooth connect None Off Off On
Ethernet connect None Off Off Off
All standby
Setup Playback Troubleshooting Status LED Appendix
AC 230 V, 50/60 Hz (for Europe)
Setting items in the HEOS app
TV Input Auto-Play Wi-Fi Bluetooth
HDMI ARC/
eARC
HDMI ARC/
eARC
On Off Off
On On On
Power consumption
1.7 W (for North America)
1.9 W (for Europe)
1.7 W (for North America)
1.9 W (for Europe)
1.7 W (for North America)
1.9 W (for Europe)
1.8 W (for North America)
1.9 W (for Europe)
1.7 W (for North America)
1.9 W (for Europe)
1.7 W (for North America)
1.9 W (for Europe)
2.0 W (for North America)
2.2 W (for Europe)
Power consumption in Deep Standby Mode: 0.3 W (for North America)
For the purpose of improvement, the specifications and design are subject to change without notice.
0.4 W (for Europe)
52
Page 53
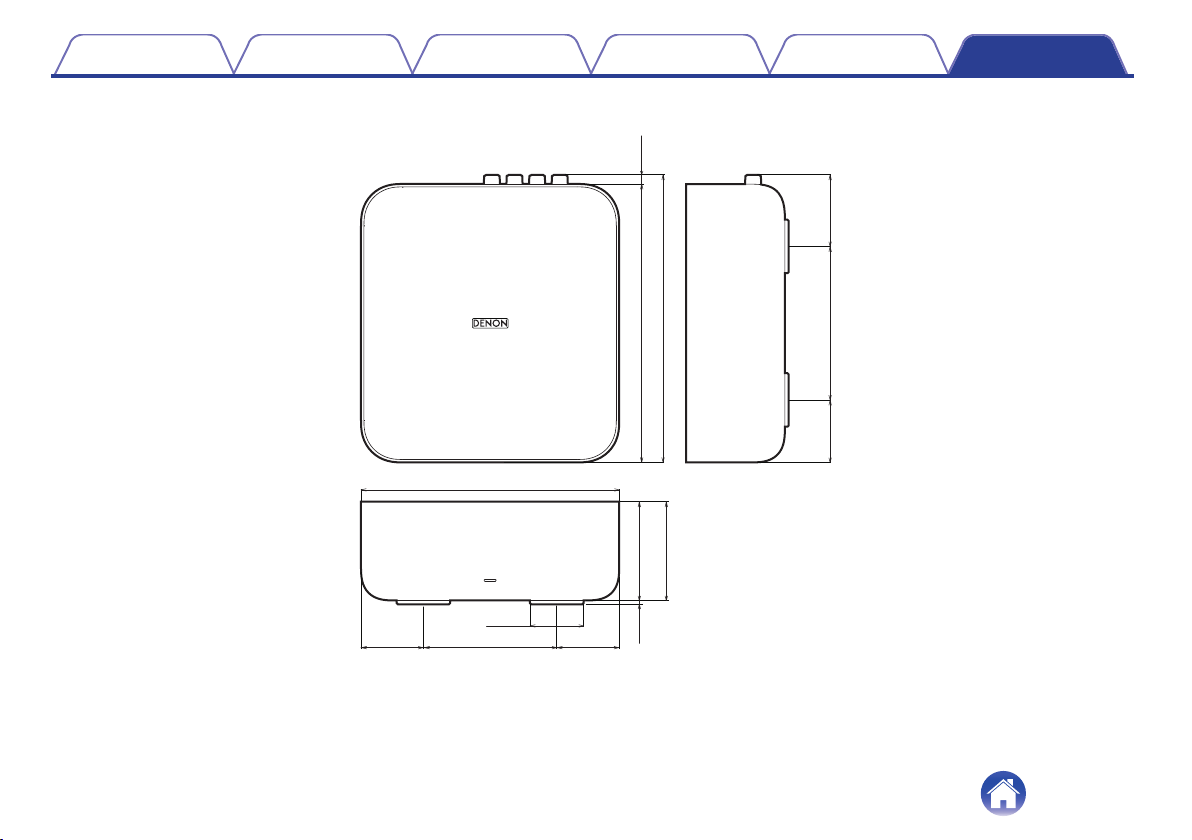
5.0 (129)
8.5(217)
3.4 (86)
0.1 (3)
2.1 (52)
9.2 (234)
3.3 (83)
2.4 (61)
9.5 (242)
4.5 (113)
1.8 (45)
2 (52)2 (52)
0.3 (8)
Contents Setup Playback Troubleshooting Status LED Appendix
Dimensions (Unit : in. (mm))
o
Weight : 4 lbs 10 oz (2.1 kg)
o
53
Page 54

www.denon.com
54
©2024 Masimo. All Rights Reserved.
3520 10972 00ASB
 Loading...