

Page 1

A
Envoi Receiver 2
User Guide
Guía del usuario
Guide d’utilisation
Guida per l’uso
Benutzerhandbuch
ppendix
English ( 2 – 8 )
Español ( 6 – 9 )
Français ( 10 – 13 )
Italiano ( 14 – 17 )
Deutsch ( 18 – 21 )
English ( 22 )
Page 2

Page 3

User Guide (English)
Introduction
Refer to the Operation chapter to start using Envoi Receiver 2.
Box Contents
Envoi Receiver 2
(2) Screws
User Guide
Safety & Warranty Manual
Support
For the latest information about this product (system
requirements, compatibility information, etc.) and product
registration, visit denonpro.com.
3
Page 4

Features
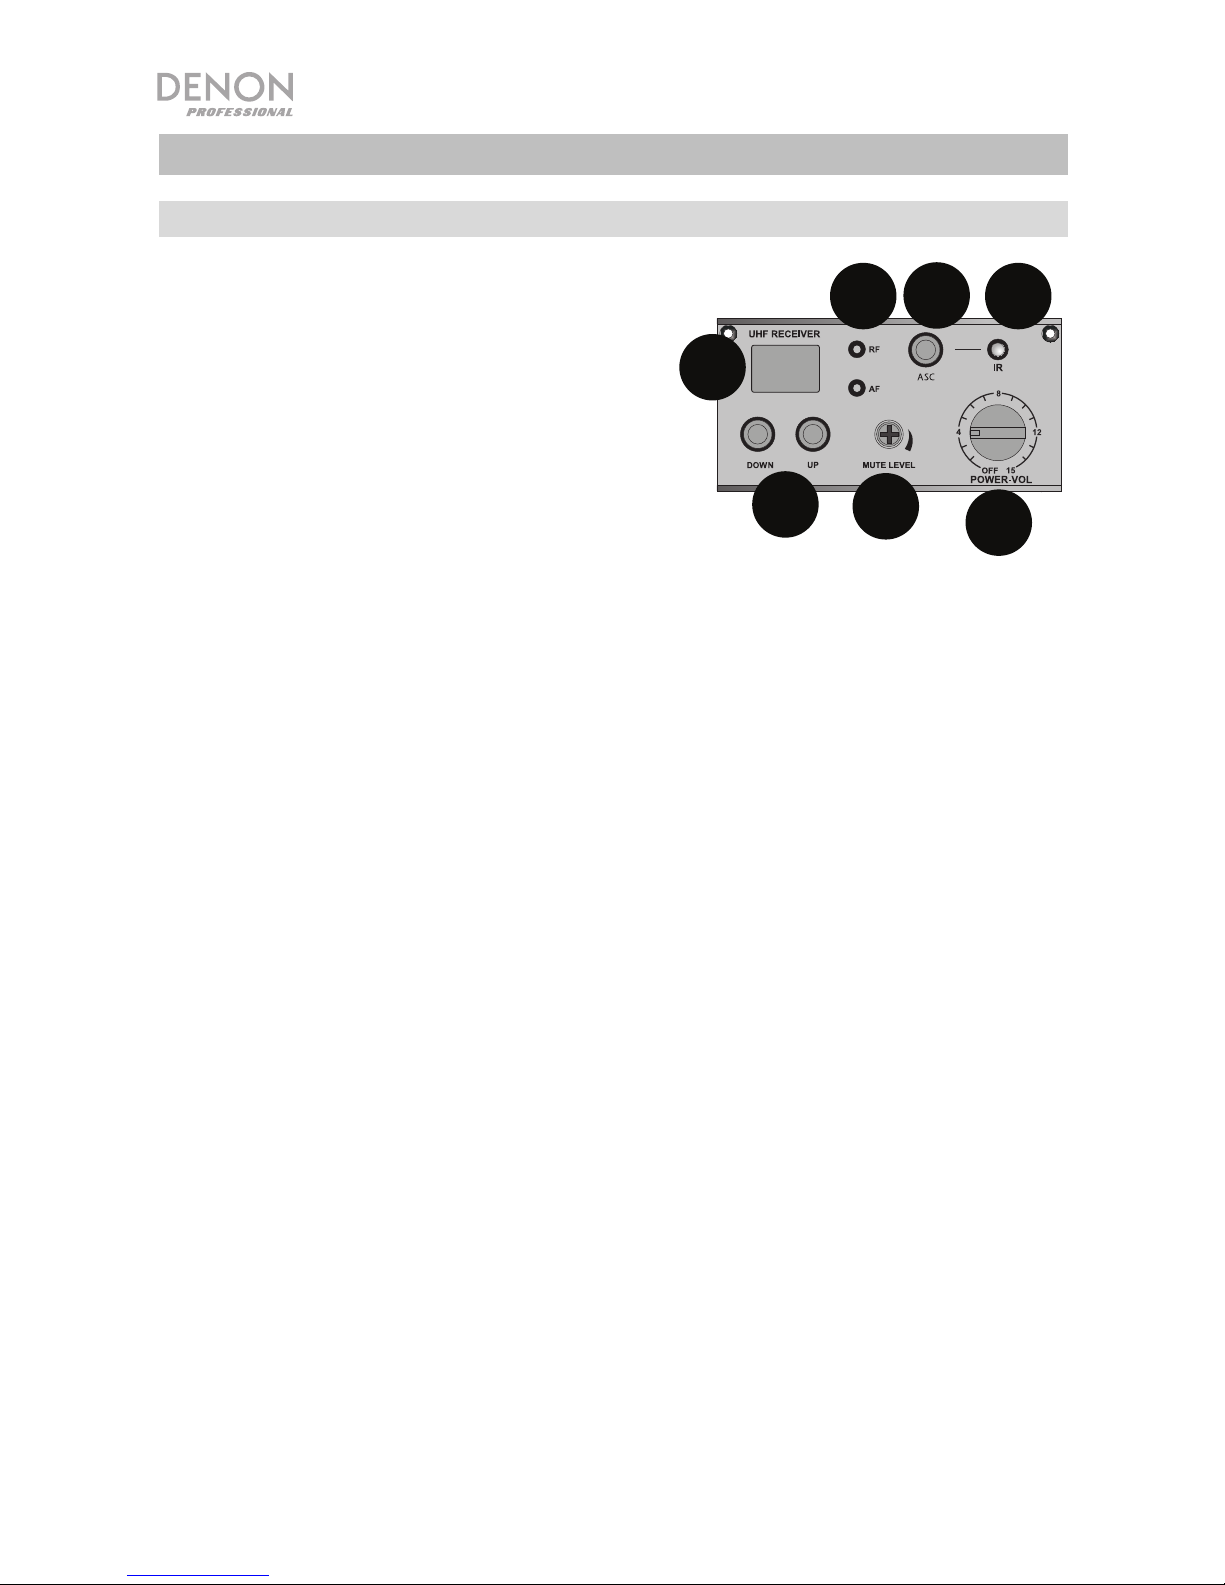
Front Panel
1. Display: Shows the selected
4
5
6
7
wireless mic channel.
3
2. Up/Down: Use these buttons to
select the wireless mic channel
1
that gives a strong signal.
3. RF/AF LEDs: The RF LED
illuminates when a wireless mic
frequency has been matched to
your transmitter. The AF LED
2
illuminates when an audio signal
is being received.
4. Mute Level: If the AF or RF LEDs flicker or stay on when the wireless
microphone is off, turn the Mute Level screw counter-clockwise until the
LEDs are off. When the Mute Level is properly adjusted, the
corresponding AF and RF LEDs will light up only when the wireless
microphone is being used.
5. ASC (Auto-Sync Channel): If you receive interference or if another
channel is needed, select another channel by pressing this button.
6. IR LED: This will illuminate when the ASC button is pressed and the
receiver pairs to your wireless mic.
7. Power-Vol: Turn this knob clockwise to power on Envoi Receiver 2 and
adjust the volume for the wireless microphone signal.
4
Page 5

Operation
Installing the Envoi Receiver 2 Module
To install the Envoi Receiver 2, follow these setup steps:
1. Make sure the power cable is disconnected and
Envoi is powered off.
2. Remove the two screws on the top right Envoi
Receiver blank plate covering the compartment
using a mini-screwdriver, type 000 (see figure
1).
3. Find the two ribbon cables grouped together
in the panel compartment and remove the clip
holding the cables together (see figure 2).
4. Connect the cable with red, gray, and black wires
to the top of the board on the Envoi Receiver 2
(see figure 3).
5. Connect the smaller cable with the gray wire to
the bottom of the board on the Envoi Receiver 2
(see figure 4).
Note: Make sure not to attach the cables
backwards.
6. Gently tuck the cables under the board and slide
the Envoi Receiver 2 downward into the panel
(see figure 5).
7. Attach the two screws to the Envoi Receiver 2
panel.
Figure 1
Figure 2
Figure 3
Figure 4
Figure 5
5
Page 6

Wireless Mic Setup
To use a wireless mic, follow these setup steps:
1. Ensure 2 new AA alkaline batteries are installed in the Envoi HL Transmitter.
2. Pair the wireless mic to the Envoi receiver.
a. Turn on the Envoi HL Transmitter and Envoi receiver.
b. Select the UHF channel on the receiver that you want to use with the
best reception.
c. Place the IR sensor (found above the battery compartment) near the
receiver’s IR LED and press the ASC button once on the receiver. Wait
for about 3 seconds until the IR LED stops flashing. When it finds an
interference-free channel the RF LED will illuminate on the receiver
showing the mic is matched to that channel.
3. To connect the mic to Envoi HL Transmitter, insert the connector into the input
and screw in the connector clockwise to lock it. To unplug, reverse this
process.
• If using a headset mic, position the mic about 3”
(76 mm) from your mouth, but away from the wind path to avoid breath
and “pop” sounds.
• If using a lavalier mic, clip this on your shirt at chest-height, up to 6”
(152 mm) away from your mouth.
4. Adjust the Power-Vol knob clockwise on Envoi Receiver 2.
5. As you speak, watch the AF indicator on the receiver to make sure a signal is
being received. The Gain Selector on the Envoi HL Transmitter can be
adjusted for more or less output signal.
6
Page 7

Guía del usuario (Español)
Introducción
Consulte el capítulo Funcionamiento para comenzar a usar el
Envoi Receiver 2.
Contenido de la caja
Envoi Receiver 2
(2) Tornillos
Guía del usuario
Manual sobre la seguridad y garantía
Soporte
Para obtener la información más reciente acerca de este producto
(requisitos de sistema, información de compatibilidad, etc.) y
registrarlo, visite denonpro.com.
7
Page 8
Características
Panel frontal
1. Pantalla: Muestra el canal de
4
5
6
7
micrófono inalámbrico seleccionado.
3
2. Subir/bajar: Utilice esos botones
para seleccionar un canal del
1
micrófono inalámbrico que brinde
una señal fuerte.
3. LED de RF/AF: El LED RF se ilumina
cuando se ha sintonizado una
2
frecuencia de micrófono inalámbrica
en su transmisor. El LED AF se
ilumina siempre que se reciba una señal de audio.
4. Nivel de silenciamiento: Si los LED de AF o RF parpadean o se
mantienen iluminados cuando el micrófono inalámbrico está apagado,
gire el tornillo del nivel de silenciamiento en sentido antihorario hasta
que los LED se apaguen. Cuando el nivel de silenciamiento está
ajustado correctamente, los LED de AF y RF se iluminarán solamente
cuando se esté utilizando el micrófono inalámbrico.
5. ASC (Canal de sincronización automática): Si recibe interferencia o si
necesita otro canal, seleccione un canal diferente pulsando este botón.
6. LED IR: Este LED se iluminará cuando se pulse el botón ASC y el
receptor se aparee con su micrófono inalámbrico.
7. Encendido-Volumen: Gire esta perilla en sentido horario para encender
el Envoi Receiver 2 y ajuste el volumen de la señal del micrófono
inalámbrico.
8
Page 9

Funcionamiento
Instalación del módulo Envoi Receiver 2
Siga estos pasos de configuración para instalar
el Envoi Receiver 2:
1. Asegúrese de que el cable encendido se
encuentre desconectado y que el Envoi esté
apagado.
2. Retire los dos tornillos de la placa protectora
superior derecha que cubre el compartimento del
Envoi Receiver utilizando un mini destornillador
de tipo 000 (vea la figura 1).
3. Localice los dos cables planos agrupados en el
compartimiento del panel y extraiga la presilla
que los sujeta (vea la figura 2).
4. Conecte el cable con los cables rojo, gris y negro
a la parte superior de la placa del Envoi Receiver
2 (vea la figura 3).
5. Conecte el cable mas pequeño con el cable gris a
la parte inferior de la placa del Envoi Receiver 2
(vea la figura 4).
Nota: Asegúrese de no conectar los cables al
revés.
6. Acomode con gentileza los cables debajo de la
placa y deslice el Envoi Receiver 2 en dirección
hacia abajo hacia el interior del panel (vea la figura
5).
7. Atornille ambos tornillos al panel del Envoi Receiver
2.
Figura 1
Figura 2
Figura 3
Figura 4
Figura 5
9
Page 10

Instalación del micrófono inalámbrico
Para utilizar un micrófono inalámbrico, siga estos pasos de instalación:
1. Asegúrese de instalar dos pilas alcalinas AA nuevas en el Envoi HL
Transmitter.
2. Aparee el micrófono inalámbrico con el receptor Envoi.
a. Encienda el Envoi HL Transmitter y el receptor Envoi.
b. Seleccione en el receptor el canal de UHF con la mejor recepción que
desea utilizar.
c. Coloque el sensor infrarrojo (el cual se encuentra por encima del
compartimiento de las pilas) cerca del LED infrarrojo del receptor y
pulse el botón ASC del receptor una vez. Espere aproximadamente 3
segundos hasta que el LED infrarrojo deje de parpadear. Cuando
encuentre un canal sin interferencia, el LED RF se encenderá en el
receptor para indicar que el micrófono quedó sintonizado en ese canal.
3. Para conectar el micrófono al Envoi HL Transmitter, inserte el conector en la
entrada y atornille el conector en sentido horario para bloquearlo. Para
desconectarlo, invierta este proceso.
• Si está usando un micrófono con auriculares, coloque el micrófono
aproximadamente a 76 mm (3 pulg.) de su boca, pero fuera del
recorrido de su respiración para evitar los ruidos causados por ella.
• Si está utilizando un micrófono de solapa/corbata, coloque el clip en
su camisa a la altura del pecho, a una distancia de hasta 152 mm (6
pulg.) de su boca.
4. Ajuste la perilla Power-Vol en sentido horario en el Envoi Receiver 2.
5. A medida que habla, observe el indicador de AF en el receptor para
asegurarse de que se esté recibiendo una señal. El selector de ganancia en el
Envoi HL Transmitter puede ajustarse para obtener una mayor o menor señal
de salida.
10
Page 11

Guide d’utilisation (Français)
Présentation
Veuillez consulter la section Fonctionnement pour commencer à
utiliser le Envoi Receiver 2.
Contenu de la boîte
Envoi Receiver 2
(2) Vis
Guide d'utilisation
Consignes de sécurité et informations concernant la garantie
Assistance technique
Pour les toutes dernières informations concernant la configuration
système requise, la compatibilité et l’enregistrement du produit,
veuillez visiter denonpro.com.
11
Page 12

Caractéristiques
Panneau avant
1. Écran d’affichage : Indique le
canal du microphone sans fil
sélectionné.
2. Touches de défilement :
3
Utilisez ces touches pour
sélectionner le canal du
1
microphone sans fil qui émet
un signal fort.
3. DEL RF/AF : Le DEL RF
s'allume lorsqu'une fréquence
de microphone sans fil est
2
4
jumelée à l’émetteur. La DEL
AF s'allume lorsqu'un signal
audio est capté.
4. Mute Level : Si la DEL AF ou RF clignote ou reste allumée lorsque le
microphone sans fil est hors tension, tournez la commande Mute Level
dans le sens antihoraire jusqu'à ce que les DEL s’éteignent. Lorsque la
commande Mute Level est correctement réglée, les DEL AF et RF
correspondantes s’allument uniquement lorsque le microphone sans fil
est utilisé.
5. ASC (Balayage automatique des canaux) : En présence
d’interférences, ou lorsqu’un autre canal est nécessaire, appuyez sur la
touche ASC pour sélectionner un autre canal.
6. DEL IR : Elle s'allume lorsque vous appuyez sur la touche ASC et que le
récepteur est jumelé au microphone sans fil.
7. Power-Vol : Tournez ce bouton dans le sens horaire afin de mettre
l’Envoi Receiver 2 sous tension et d’ajuster le volume du signal du
microphone sans fil.
5
6
7
12
Page 13

Fonctionnement
Installation du module du Envoi Receiver 2
Pour installer le microphone sans fil inclus,
veuillez suivre les étapes suivantes :
1. Assurez-vous que le câble d’alimentation n’est
pas branché et que l’Envoi est hors tension.
2. Retirez les deux vis du panneau recouvrant le
compartiment en haut à droite sur l'Envoi
Receiver à l'aide d'un mini-tournevis de type 000
(Figure 1).
3. Trouvez les deux câbles plats regroupés dans le
compartiment et retirez le clip qui retient les
câbles ensemble (Figure 2).
4. Branchez le câble avec des fils rouges, gris et noir
dans le haut de la carte du Envoi Receiver 2
(Figure 3).
5. Branchez le câble plus petit avec le fil gris dans le
bas de la carte du Envoi Receiver 2 (Figure 4).
Remarque : Assurez-vous de ne pas inverser les
câbles.
6. Rempliez doucement les câbles sous la carte et
glissez l’Envoi Receiver 2 vers le bas dans le
panneau (Figure 5).
7. Revissez les deux vis du panneau du Envoi
Receiver 2.
Figure 1
Figure 2
Figure 3
Figure 4
Figure 5
13
Page 14

Installation du microphone sans fil
Pour utiliser le microphone sans fil, veuillez suivre les étapes suivantes :
1. Vérifiez que deux nouvelles piles alcalines AA sont installées dans l’Envoi HL
Transmitter.
2. Jumelez le microphone sans fil au Envoi Receiver 2.
a. Mettez l’Envoi HL Transmitter et l’Envoi Receiver 2 sous tension.
b. Sélectionnez le canal UHF sur le récepteur avec la meilleure réception
possible.
c. Placez le capteur infrarouge (au-dessus du compartiment des piles) près
de la DEL IR du récepteur et appuyez une fois sur la touche ASC du
récepteur. Attendez environ 3 secondes, jusqu'à ce que la DEL IR arrête
de clignoter. Lorsqu'il détecte un canal sans interférence, la DEL IR
s’allume sur le récepteur indiquant que le microphone est connecté à ce
canal.
3. Pour brancher le microphone au Envoi HL Transmitter, insérez le connecteur
dans l'entrée et vissez le connecteur dans le sens horaire afin de fixer le câble.
Pour débrancher, inversez ce processus.
• Si vous utilisez un casque-micro, positionnez le microphone à environ
76 mm de votre bouche, à l’abri du vent afin d’éviter les bruits de
respiration et parasitaires.
• Si vous utilisez un micro-boutonnière, fixez-le à votre vêtement à
hauteur de la poitrine, à moins de 152 mm de votre bouche.
4. Réglez le bouton Power-Vol du Envoi Receiver 2 dans le sens horaire.
5. Parlez et observez l’indicateur AF afin de vous assurer que le signal est reçu.
Le sélecteur de gain sur l’Envoi HL Transmitter peut être ajusté pour
augmenter ou diminuer le niveau du signal de sortie.
14
Page 15

Guida per l'uso (Italiano)
Introduzione
Fare riferimento al capitolo Uso per iniziare a utilizzare l'Envoi
Receiver 2.
Contenuti della confezione
Envoi Receiver 2
2 viti
Guida per l'uso
Istruzioni di sicurezza e garanzia
Assistenza
Per le ultime informazioni in merito a questo prodotto (requisiti di
sistema, informazioni sulla compatibilità, ecc.) e per la
registrazione del prodotto, recarsi alla pagina denonpro.com.
15
Page 16

Caratteristiche
Pannello anteriore
1. Display: mostra il canale mic
4
5
6
7
wireless selezionato.
2. Up/Down (Su/Giù): servirsi di
questi tasti per selezionare il
1
3
canale mic wireless che offre un
segnale forte.
3. LED RF/AF: il LED RF si illumina
quando una frequenza del
microfono wireless viene abbinata
2
al trasmettitore. Il LED AF si
illumina quando viene ricevuto un
segnale audio.
4. Livello Mute: se i LED AF o RF sfarfallano o restano accesi quando il
microfono wireless è spento, la vite del livello Mute va girata in senso
antiorario fino a quando i LED non si spengono. Quando il livello Mute è
regolato adeguatamente, i LED AF ed RF corrispondenti si
accenderanno unicamente quando il microfono wireless è in uso.
5. ASC (Auto-Sync Channel): se si ricevono interferenze o qualora fosse
necessario un altro canale, selezionare un altro canale servendosi di
questo tasto.
6. LED IR: si illumina quando viene premuto il tasto ASC e il ricevitore si
collega al microfono wireless.
7. Power-Vol: girare questa manopola in senso orario per accendere
l'Envoi Receiver 2 e regolare il volume del segnale del microfono
wireless.
16
Page 17

Uso
Installazione del modulo Envoi Receiver 2
Per installare l'Envoi Receiver 2, procedere come
segue:
1. Assicurarsi che il cavo di alimentazione sia
scollegato e che l'Envoi sia spento.
2. Rimuovere le due viti dalla piastra superiore a
destra dell'Envoi Receiver che copre lo scomparto
servendosi di un mini cacciavite di tipo 000 (si
veda la figura 1).
3. Trovare i due cavi a nastro raggruppati insieme
all'interno dello scomparto del pannello e
rimuovere la clip che li fissa insieme (si veda la
figura 2).
4. Collegare il cavo con i fili rosso, grigio e nero alla
parte superiore del pannello dell'Envoi Receiver 2
(si veda la figura 3).
5. Collegare il cavo più piccolo con il filo grigio alla
parte inferiore del pannello dell'Envoi Receiver 2
(si veda la figura 4).
Nota bene: assicurarsi di non fissare i cavi al
contrario.
6. Infilare delicatamente i cavi sotto il pannello e far
scorrere l'Envoi Receiver 2 verso il baso nel
pannello (si veda la figura 5).
7. Fissare le
due viti al pannello dell'Envoi Receiver 2.
Figura 1
Figura 2
Figura 3
Figura 4
Figura 5
17
Page 18

Impostazione del microfono wireless
Per utilizzare un mic wireless, procedere come segue:
1. Inserire 2 nuove batterie alcaline AA nell'Envoi HL Transmitter.
2. collegare il microfono wireless al ricevitore Envoi.
a. Accendere l'Envoi HL Transmitter e il ricevitore Envoi.
b. Selezionare il canale UHF sul ricevitore che si desidera utilizzare con la
migliore ricezione.
c. Collocare il sensore IR (che si trova sopra lo scomparto batterie)
accanto al LED IR del ricevitore e premere una volta il tasto ASC sul
ricevitore. Attendere circa 3 secondi che il LED IR smetta di
lampeggiare. Quando trova un canale privo di interferenze, il LED RF si
illumina sul ricevitore mostrando che il microfono è collegato a quel
canale.
3. Per collegare il microfono all'Envoi HL Transmitter, inserire il connettore
nell'ingresso e avvitarlo in senso orario per fissarlo. Per scollegarlo, invertire il
procedimento.
• Se si utilizza un microfono a cuffia, posizionare il microfono a circa 76
mm dalla bocca, ma lontano dal percorso dell'aria per evitare il suono
del respiro e "schiocchi".
• Se
si utilizza un microfono lavalier, fissarlo alla camicia a livello del
petto, fino a 152 mm di distanza dalla bocca.
4. Regolare la manopola Power-Vol in senso orario sull'Envoi Receiver 2.
5. Guardare l'indicatore AF mentre si parla per assicurarsi che un segnale sia
ricevuto. Il selettore di guadagno Gain sull'Envoi HL Transmitter può essere
regolato per ottenere un segnale di uscita maggiore o minore.
18
Page 19

Benutzerhandbuch (Deutsch)
Einführung
Lesen Sie das Kapitel Betrieb, um den Envoi Receiver 2 in Betrieb
zu nehmen.
Lieferumfang
Envoi Receiver 2
(2) Schrauben
Benutzerhandbuch
Sicherheitshinweise und Garantieinformationen
Kundendienst
Für die neuesten Informationen zu diesem Produkt
(Systemanforderungen, Informationen zur Kompatibilität etc.) und
für die Produktregistrierung besuchen Sie denonpro.com.
19
Page 20

Funktionen
Vorderseite
1. Display: Zeigt den ausgewählten
Funkmikrofonkanal.
3
2. Aufwärts/Abwärts: Mit diesen
Tasten können Sie den
1
Funkmikrofonkanal mit starkem
Signal auswählen.
3. RF/AF-LEDs: Die RF-LED leuchtet,
wenn eine Funkmikrofonfrequenz auf
2
Ihren Sender abgestimmt wurde. Die
AF-LED leuchtet, wenn ein
Audiosignal empfangen wird.
4. Mute-Pegel: Wenn die AF- oder RF-LEDs flackern oder eingeschaltet
bleiben, wenn das Funkmikrofon ausgeschaltet ist, sollten Sie die MutePegel-Schraube gegen den Uhrzeigersinn drehen, bis sich die LEDs
ausschalten. Wenn der Mute-Pegel richtig eingestellt ist, werden die
entsprechenden AF- und RF-LEDs nur leuchten, wenn das Funkmikrofon
verwendet wird.
5. ASC (Auto-Sync-Kanal): Wenn es zu Störungen kommt oder ein
anderer Kanal benötigt wird, wählen Sie einen anderen Kanal, indem Sie
diese Taste drücken.
6. IR-LED: Diese leuchtet auf, wenn die ASC-Taste gedrückt ist und sich
der Empfänger mit Ihrem Funkmikrofon verbindet.
7. Power-Vol: Drehen Sie diesen Regler im Uhrzeigersinn, um Envoi
Receiver 2 einzuschalten und die Lautstärke für das Funkmikrofonsignal
einzustellen.
4
5
6
7
20
Page 21

A
A
Betrieb
Einrichten des Envoi Receiver 2-Moduls
Um den Envoi Receiver 2 einzurichten, führen Sie
bitte folgende Schritte aus:
1. Stellen Sie sicher, dass das Netzkabel getrennt
ist und Envoi ausgeschaltet ist.
2. Entfernen Sie die beiden Schrauben rechts oben
an der Envoi Receiver-Platte, die das Fach
abdeckt. Verwenden Sie dazu einen MiniSchraubendreher vom Typ 000 (siehe Abbildung
1).
3. Nehmen Sie die beiden Flachbandkabel, die im
Panel-Fach gebündelt sind und entfernen Sie den
Clip, der die Kabel zusammenhält (siehe
Abbildung 2).
4. Verbinden Sie das Kabel mit roten, grauen und
schwarzen Kabeln am oberen Teil der Platine am
Envoi Receiver 2 (siehe Abbildung 3).
5. Verbinden Sie das kleinere Kabel mit dem grauen
Draht an der Unterseite der Platine des Envoi
Receiver 2 (siehe Abbildung 4).
Hinweis: Stellen Sie sicher, dass Sie die Kabel
korrekt verbinden.
6. Bringen Sie die Kabel vorsichtig unter die Platine
und schieben den Envoi Receiver 2 nach unten in
das Panel (siehe Abbildung 5).
7. Bringen Sie die beiden Schrauben in das Envoi
Receiver 2-Panel.
Abbildung 1
Abbildung 2
Abbildung 3
bbildung 4
bbildung 5
21
Page 22

Einrichten des Funkmikrofons
Um ein Funkmikrofon zu verwenden, gehen Sie folgendermaßen vor:
1. Stellen Sie sicher, dass 2 neue AA-Alkaline-Batterien in den Envoi HL
Transmitter eingelegt sind.
2. Koppeln Sie das Funkmikrofon mit dem Envoi-Empfänger.
a. Schalten Sie den Envoi HL Transmitter und den Envoi-Empfänger ein.
b. Wählen Sie den gewünschten UHF-Kanal mit dem besten Empfang am
Empfänger aus.
c. Bringen Sie den IR-Sensor (über dem Batteriefach) in die Nähe der IR-
LED des Empfängers und drücken Sie einmal auf die ASC-Taste am
Empfänger. Warten Sie etwa 3 Sekunden, bis die IR-LED zu blinken
aufhört. Wenn ein störungsfreier Kanal gefunden wird, leuchtet die RFLED am Empfänger, um anzuzeigen, dass das Mikrofon mit diesem
Kanal verbunden ist.
3. Um das Mikrofon mit dem Envoi HL Transmitter zu verbinden, stecken Sie den
Stecker in den Eingang und drehen den Anschlussstecker im Uhrzeigersinn,
um ihn zu sichern. Beim Abstecken gehen Sie in umgekehrter Reihenfolge vor.
• Wenn Sie ein Headset-Mikrofon verwenden, positionieren Sie das
Mikrofon etwa in einem Abstand von 3" (76 mm) vom Mund abseits der
Atemrichtung, damit Atem- und Knackgeräusche vermieden werden.
• Wenn Sie ein Lavalier-Mikrofon verwenden, befestigen Sie dieses an
Ihrer Kleidung auf Brusthöhe in einem Abstand zum Mund von bis zu 6"
(152 mm).
4. Drehen Sie den Power-Vol-Regler am Envoi Receiver 2 im Uhrzeigersinn.
5. Achten Sie beim Sprechen auf die AF-Anzeige, um zu sehen, ob ein Signal
empfangen wird. Der Gain-Wahlschalter am Envoi HL Transmitter regelt die
Stärke des Ausgangssignals.
22
Page 23

Appendix (English)
Technical Specifications
Specifications are subject to change without notice.
Wireless reception and range are affected by walls, obstructions, and movement. For
optimal performance, place the product in the center of the room so it is unobstructed
by walls, furniture, etc.
Dimensions
3.6” x 2.6” x 0.06”
91 x 66 x 1.6 mm
Receiver Sensitivity
Receiver Frequencies
Audio Output Level
<15 dBu
EU/UK 863–865 MHz; US 584–608 MHz
250 mV ±10mV
Trademarks & Licenses
Denon is a trademark of D&M Holdings Inc., registered in the U.S. and other countries.
Denon Professional products are produced by inMusic Brands, Inc.
All other product names, company names, trademarks, or trade names are those of their
respective owners.
23
Page 24

denonpro.com
Manual Version 1.0
 Loading...