

Page 1

Envoi Go
User Guide
English ( 3 – 13 )
Guía del usuario
Español ( 14 – 24 )
Guide d’utilisation
Français ( 25 – 35 )
Guida per l’uso
Italiano ( 36 – 46 )
Benutzerhandbuch
Deutsch ( 47 – 57 )
A
ppendix
English ( 58 )
Page 2

Page 3

3
User Guide (English)
Introduction
• Built-in rechargeable battery
• 6.5" woofer, two 3" articulated full-range drivers per speaker
• Bluetooth connection for wireless audio streaming
• USB/SD MP3/WMA Player for unattended playback with LCD display
• 35mm pole-mount socket under the speakers and control unit
Please see this guide’s Setup chapter to learn how to integrate Envoi Go with your audio system, and then
refer to the Operation chapter to start using Envoi Go.
1. Make sure all items listed in the Box Contents are included in the box.
2. READ SAFETY INSTRUCTION BOOKLET BEFORE USING THE PRODUCT.
3. Study the connection diagram.
4. Make sure all input devices such as microphones, CD players, or digital media players are turned off
and volume settings are set at "zero."
5. Connect all devices as shown.
6. Switch everything on in the following order:
• audio input sources (i.e. microphones, instruments, CD players)
• Envoi Go
7. When turning off, always reverse this operation:
• Envoi Go
• any input devices
Box Contents
Envoi Go (Two speakers and one controller)
Power Cable
(2) Speaker Cables (15 feet; 4.5m)
User Guide
Safety & Warranty Manual
Support
For the latest information about this product (system requirements, compatibility information, etc.) and
product registration, visit denonpro.com.
The power cable and audio cables can be stored in the back panel compartment.
Page 4

4
Rechargeable Batteries
Rechargeable lead-acid batteries are the same type used in automobiles. As with your car battery, how you
use this battery has a significant impact on its lifespan. With proper use and treatment, a lead-acid battery
can last for years. Here are some recommendations for getting the longest life from the internal battery.
General Usage
Charge fully before use.
Charge fully before storing.
Storage
For best product longevity, do not store at exceedingly hot (greater than 90°F / 32°C) or
exceedingly cold (less than 32°F / 0°C) temperatures.
It is acceptable to leave your sound system plugged in. This will not overcharge the
battery.
If you leave the battery level low and do not charge it for 6 months, it may permanently
lose capacity.
Repair
Disposal
If the battery fails to charge, check the fuse near the power cable input. If the fuse is not
intact, please replace it.
The battery can be replaced.
For Warranty and Parts, visit denonpro.com.
Bring the unit to a recycling center or dispose of in accordance with local ordinances.
IMPORTANT: Never leave Envoi Go on
when not in use. Be sure to power this
product off during inactivity.
Page 5
5
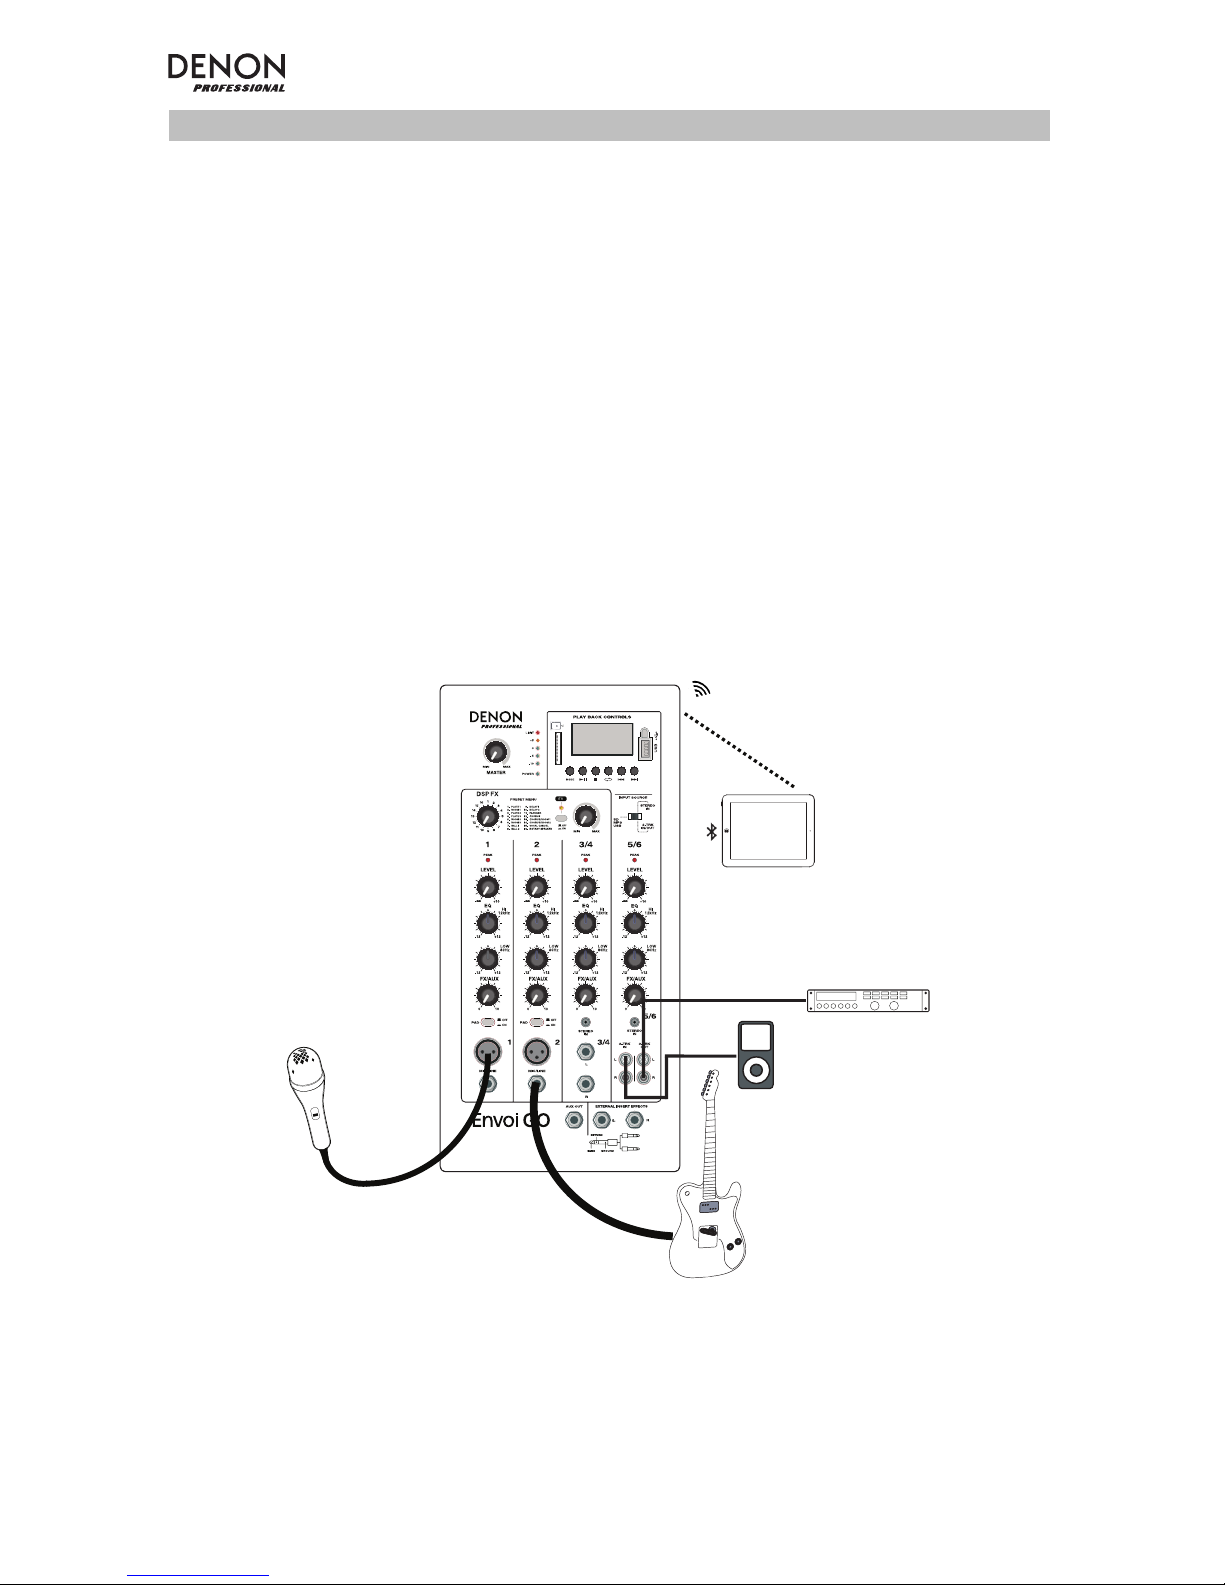
Setup
Items not listed under Introduction > Box Contents are sold separately.
Connect cables with all equipment powered off, and ensure that all main volume controls are turned down.
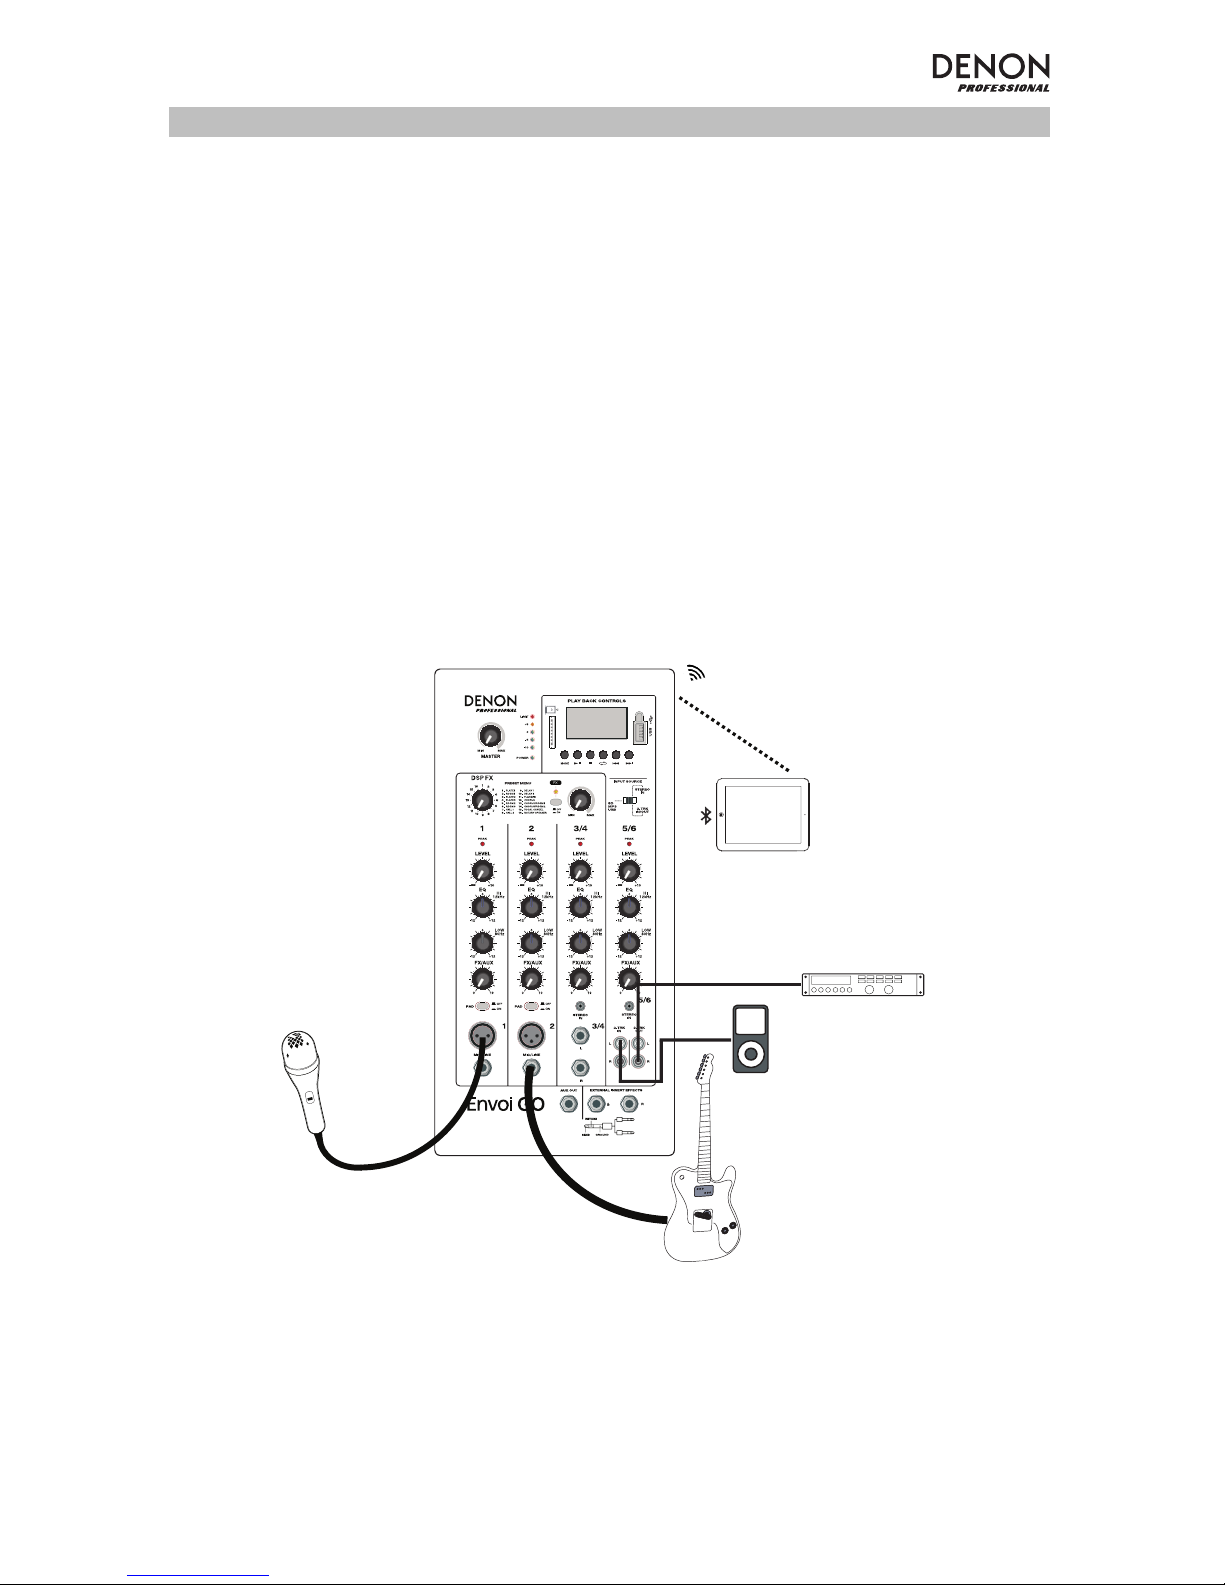
Follow the procedure below to have a signal processed for each channel:
1. Flip open the cabinet latches on top of Envoi Go and detach the speakers from the controller.
2. Open the rear panel storage compartment on the controller and remove the power cable and speaker
cables.
3. Position the controller in the middle of the two speakers, with enough distance between the speakers
for maximum stereo separation.
4. Plug the speaker cables into the left and right Speaker Output on the back of the controller.
5. Set all channel Level knobs to zero, set the Master knob to zero, and set EQ’s flat.
6. Connect your mic or instrument to the channel.
7. Connect the power cable to the controller and power on Envoi Go.
8. Set the Master knob to no more than 70%.
9. Adjust the channel Level knob. When the volume is properly adjusted, the channel LED as well as the
LIM (Limiter) LED should not light up.
Recorder
MP3 Player
Guitar
Microphone
Tablet
Page 6
6
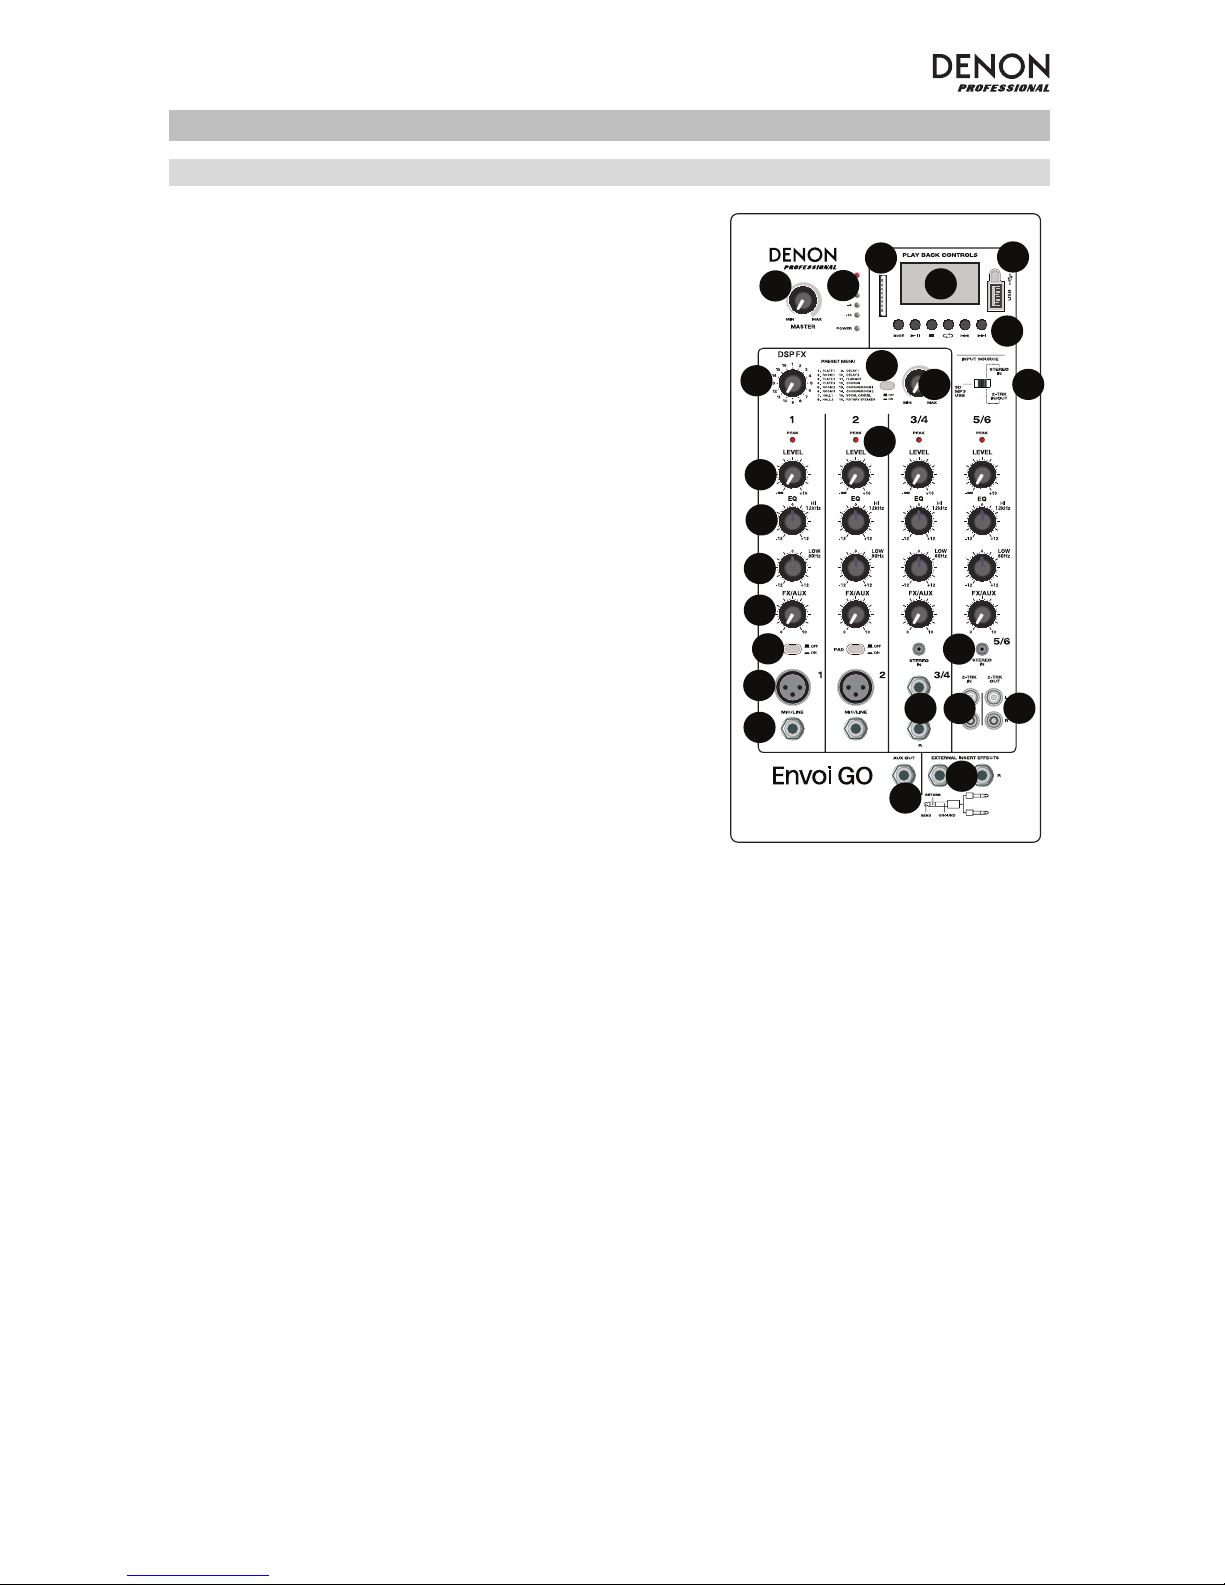
Features
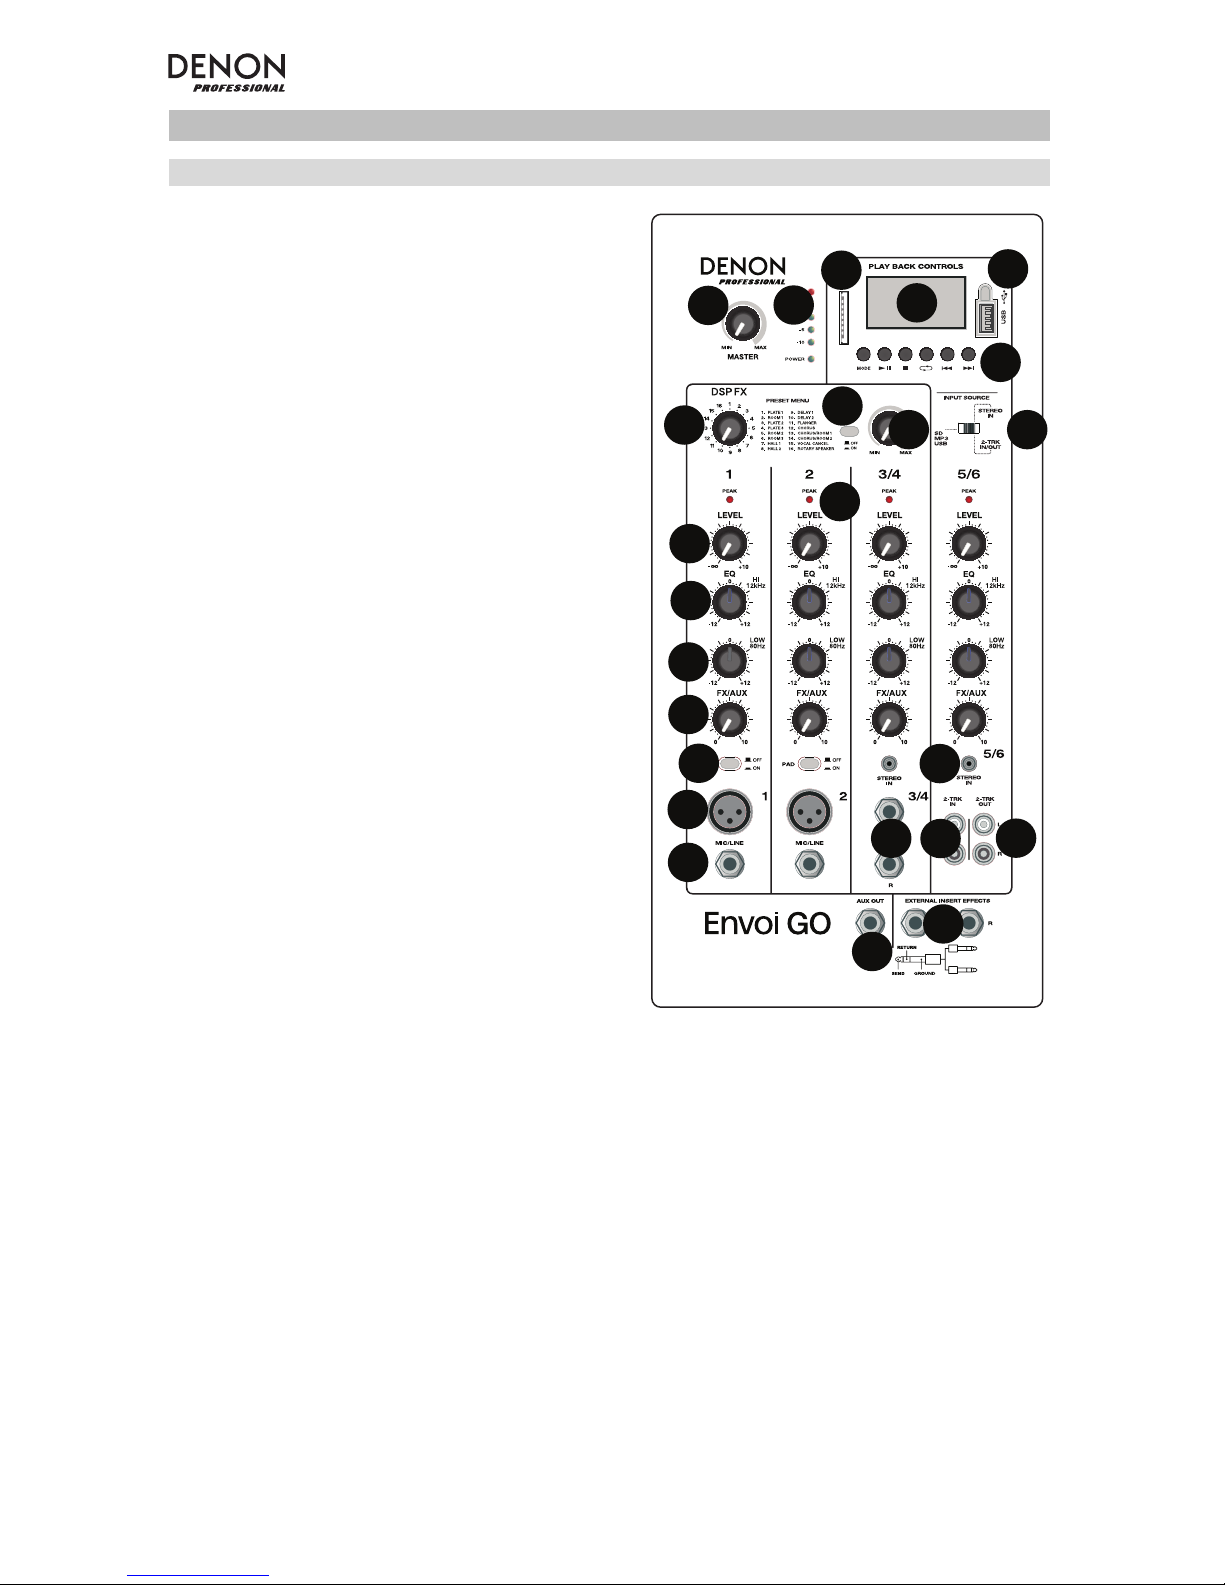
Front Panel
1. Display: Displays the Media Panel modes for
Bluetooth, USB, and SD.
2. USB Port: Connect your USB flash drive to play
MP3 and WMA music files.
3. SD Card Slot: Insert your SD card here to play
MP3 and WMA music files.
4. Media Panel: Controls for the Bluetooth, SD, and
USB sources. The Media Panel Mode source
symbol will illuminate when that source is playing.
5. Input Source Switch: Selects whether channel
5/6 will use SD/MP3/USB as the source or the
1/8” (3.5mm) / 2-Trk input.
6. Master Volume: This controls the overall level for
the channel inputs.
7. LED Meters: Shows the audio level of the
combined channel levels along with the Master
volume level. Turn the volume down if the LIM
(Limiter) LED lights up excessively.
8. FX On/Off: Press this button down to activate the
internal effects.
9. DSP Effects Knob: Select from the controller's
internal effects presets to apply to the channel
inputs.
10. FX Return: Adjusts the level of the signal being
sent from the internal DSP effects to the channels.
11. Level: Adjusts the signal gain for each channel.
12. Channel Peak LED: This LED will illuminate red if
the channel’s signal is clipping. If this occurs, turn
down the Level knob for that channel or press the
Pad button.
13. High EQ (Treble): Increases or decreases the high
(treble) frequencies at a range between -12dB to
+12dB.
14. Low EQ (Bass): Increases or decreases the low
(bass) frequencies at a range between -12dB to
+12dB.
15. FX/Aux: Controls the amount of the signal that is
sent to the internal effects processor and the Aux
Out.
16. Pad: Press this button in to reduce high input signals (such as from closely mic'ed instruments during
a performance) to avoid clipping the channel.
17. Mic Input (XLR): Connect dynamic microphones to the XLR inputs. Control the volume of these
inputs using the Level knob.
18. 1/4” (6.35mm) Line Input: Connect a line-level device here, such as a keyboard or drum machine.
19. Stereo 1/8” (3.5mm) Input: Connect a line-level device here, such as a CD player, computer
soundcard, smartphone, media device, etc.
20. L/Mono / Right: Connect a line-level device, such as a keyboard, drum machine, etc., to this stereo
channel. For mono sources, connect to only the L/Mono input.
21. 2-Trk In: Connect the outputs of an external device to these inputs using standard RCA cables. This
can be used to connect to a CD player or mobile device (laptop, tablet, mobile phone etc.).
22. 2-Trk Out: Route the signal into a tapedeck, computer soundcard, or a portable recorder.
23. Aux Out: Sends the FX/Aux signal to an outboard device.
24. External Insert Effects: Connect to an external equalizer or compressor using “Insert Y-cables”.
When an external processor is inserted into the jack, the stereo signal will be sent out after the Master
level and returned into the stereo mix before the amplifier.
11
11
13
13
14
14
15
15
16
16
17
17
18
18
20
20
21
21
22
22
23
23
24
24
12
12
8
1
4
5
6
7
9
10
10
19
19
2
3
8
Page 7
7
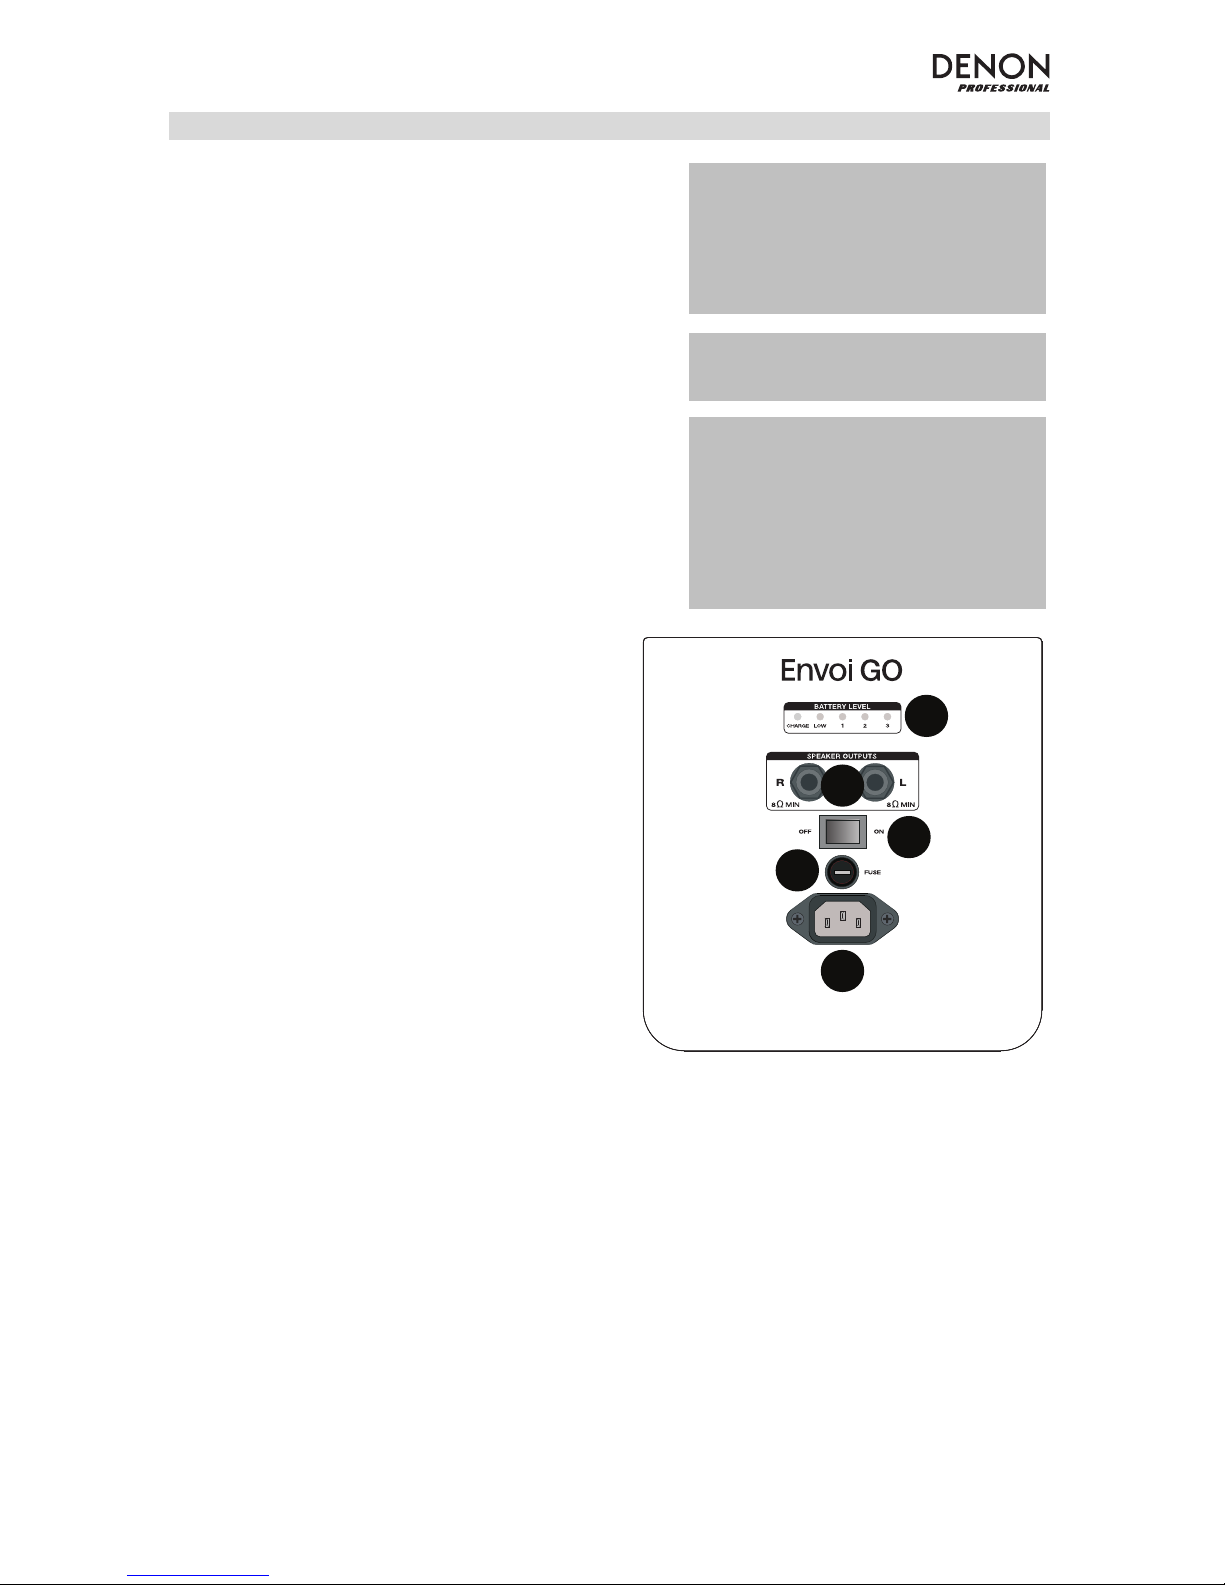
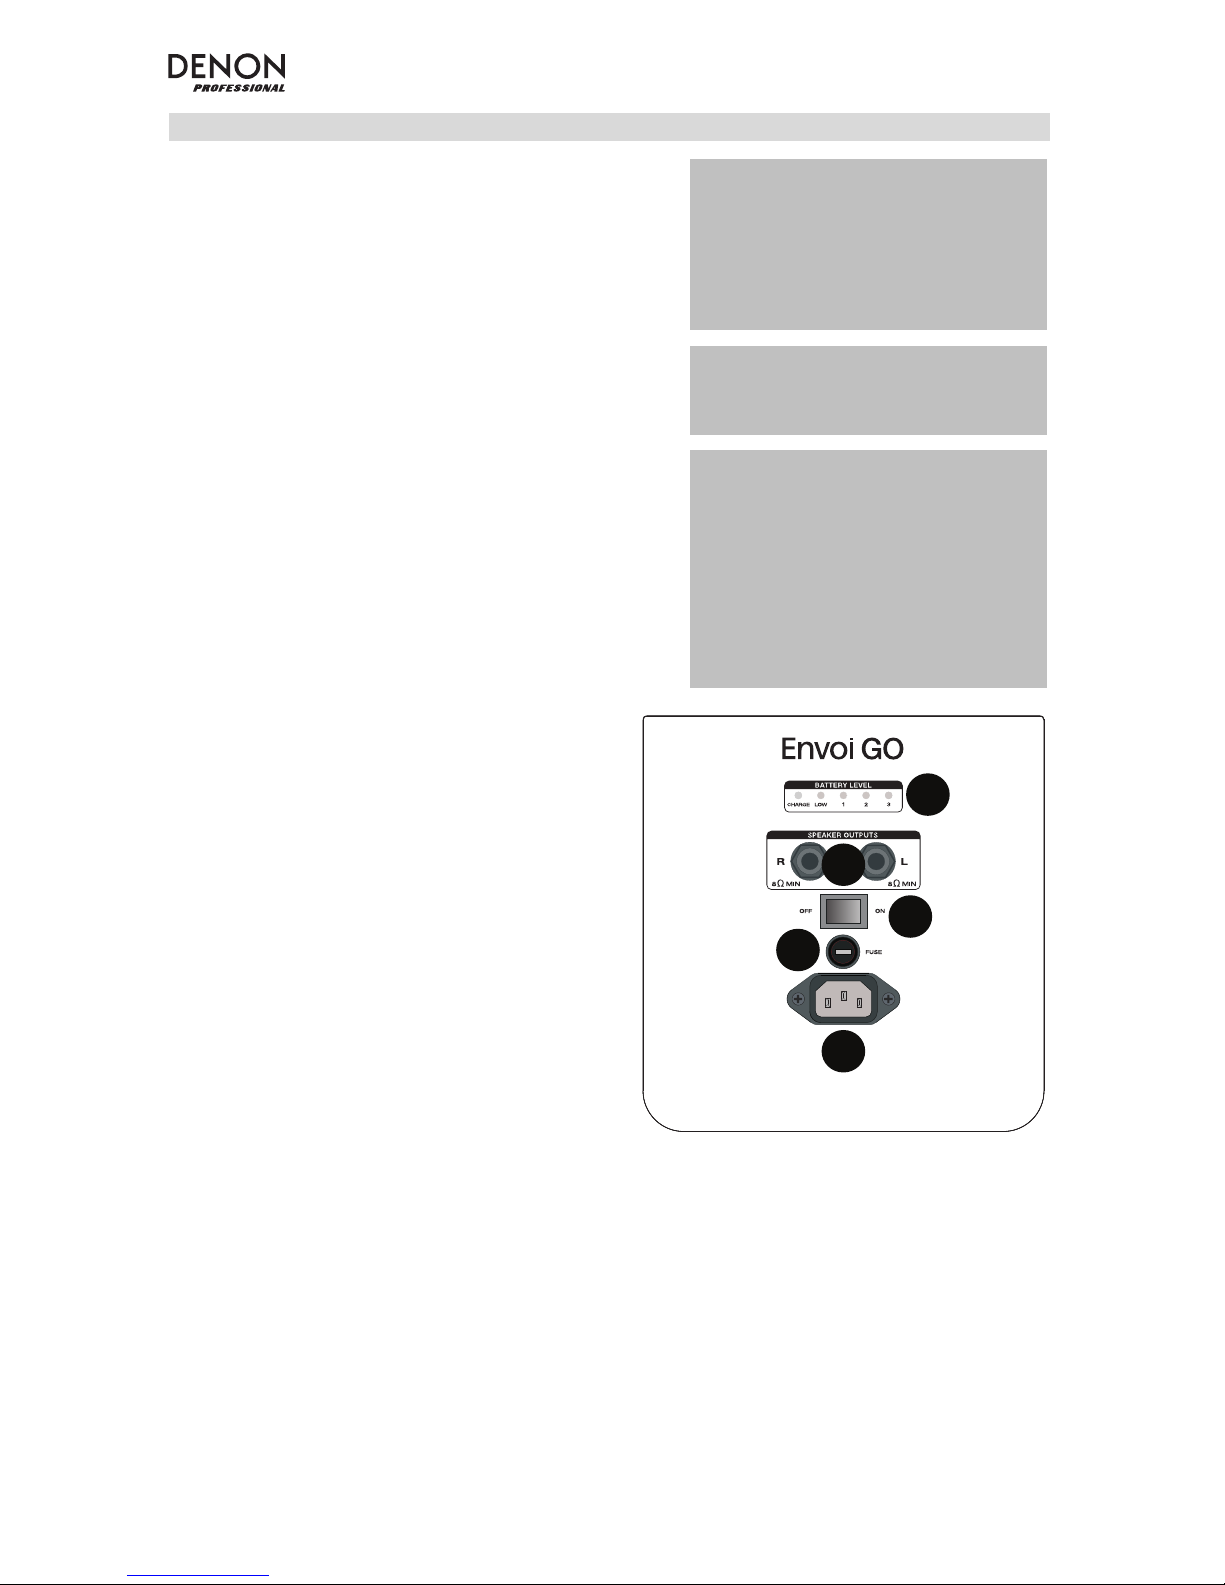
Rear Panel
1. Battery Level: These LEDs show the state of the
battery and when it needs to be recharged. Battery life
varies based on volume and usage.
2. Speaker Outputs: Connect these outputs to the Envoi
Go speakers with the included speaker cable.
3. Power Switch: Turns Envoi Go on or off.
4. Fuse: If the fuse needs replacing, use a fuse rated at
100~240V / T4AL 250V.
5. Power Cable (IEC): Connect the included power cable
here.
IMPORTANT: When the battery charge
light indicator illuminates, this indicates
that a charge is required. For a full
charge, turn off the device and charge for
6 hours, or until the green light indicates
a full charge.
IMPORTANT: To maximize battery life, it
is important to charge the unit regularly.
1
2
3
4
5
IMPORTANT: When the red LED above
the LOW battery level indicator is
illuminated, begin to charge immediately.
Never store Envoi Go with a low charge.
In addition, never store Envoi Go when
the power switch is in the ON position.
Ensure the unit is always turned off
before storage, for any length of time.
Page 8
8
Effects Chart
TO HEAR THE EFFECTS ON A CHANNEL INPUT: Adjust the FX/Aux knob for the channel and the adjust
FX Return knob. Press the FX on/off button down to turn on the effects. Use the DSP Effects knob to
choose one of the effects below:
# PRESET DESCRIPTION
1 PLATE 1 Simulates the reverb of a room with a long decay time.
2 ROOM 1
Simulates the ambience of natural room acoustics with
long decay.
3 PLATE 2 Simulates a plate reverb with medium decay.
4 PLATE 3 Simulates a plate reverb with short decay.
5 ROOM 2
Reproduces the ambience of natural room acoustics
with medium decay.
6 ROOM 3
Reproduces the ambience of natural room acoustics
with short decay.
7 HALL 1
Simulates the ambience of a grand concert hall with
medium decay.
8 HALL 2
Simulates the ambience of a grand concert hall with
long decay.
9 DELAY 1 Typical mono delay.
10 DELAY 2 Typical ping-pong stereo delay.
11 FLANGER
Classic stereo flanging effect, similar to a jet plane
taking off.
12 CHORUS
Modulation effect, provides a soft, ethereal sweeping
effect.
13 CHORUS/ROOM 1
Typical chorus and short decay reverb effect combined
together.
14 CHORUS/ROOM 2
Typical chorus and long decay reverb effect combined
together.
15 VOCAL CANCEL
Reduces the vocal in a recording.
Note: This effect works best to reduce vocals that were
originally recorded in mono and placed center in the
stereo mix.
16 ROTARY SPEAKER Simulates a typical 1960’s rotary speaker effect.
Page 9
9
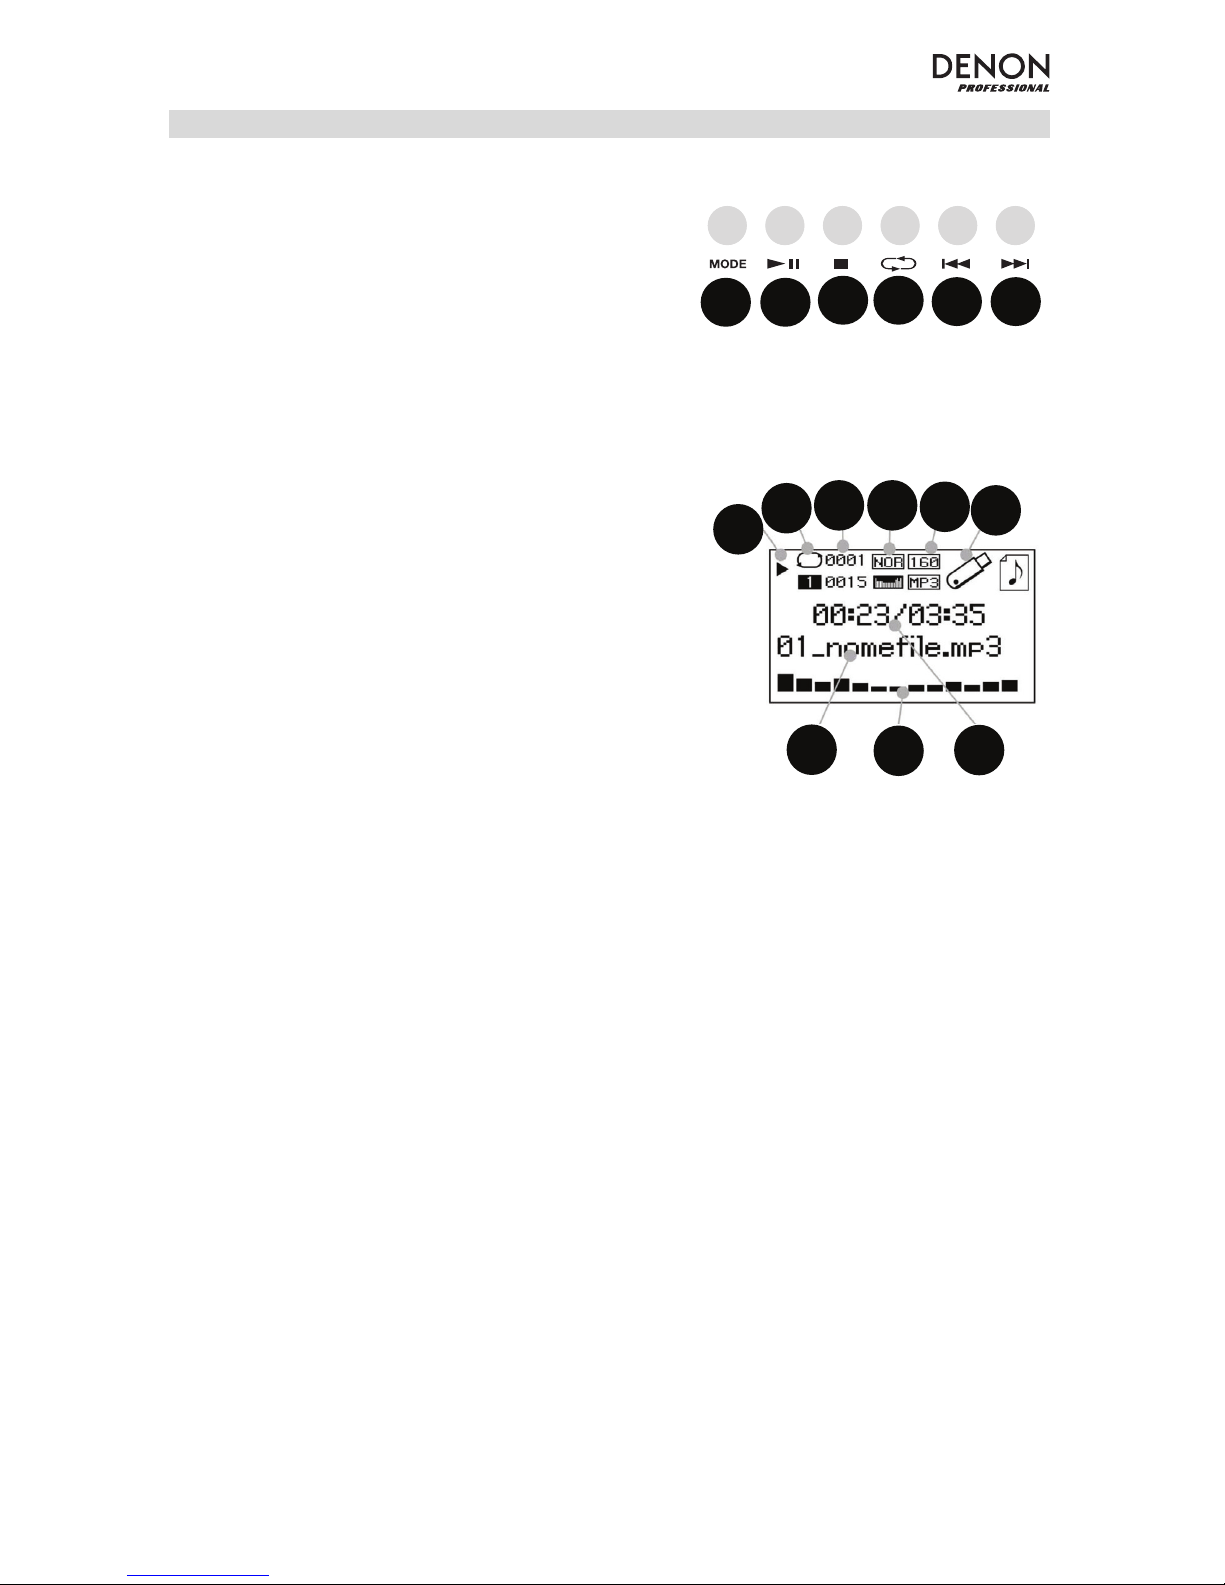
Media Panel
Media Panel functions:
1. USB/SD/BT/Menu/Mode: Selects the Media Panel
source: USB, SD, and Bluetooth. Press and release
to activate Bluetooth pairing mode. When
connected to Bluetooth, hold Mode to select from
the options for BT (Bluetooth) Disconnect, Select
EQ, Delete Paired Info, and Device Information.
When connected to SD or USB, hold Mode to
access EQ, Play Mode, or Change Device.
2. Play/Pause: Plays or pauses the USB, SD, or
Bluetooth Media Panel source. When in the Mode
settings, this functions as Select/Enter.
3. Stop: Stops the Media Panel source from playing.
4. Repeat: Cycles through the different repeat options
for USB and SD sources.
5. Previous Track/Volume Down: Goes to the
previous USB or SD card track. When in the Mode
settings, this functions as Left/Up. When listening to
Bluetooth sources, pressing Prev in some apps
may go to another playlist or music genre. Press
and hold this button to decrease the track volume.
6. Next Track/ Volume Up: Advances to the next
USB or SD card track. When in the Mode settings,
this functions as Right/Down. When listening to
Bluetooth sources, pressing Next in some apps
may go to another playlist or music genre. Press
and hold this button to increase the track volume.
7. The Play symbol illuminates when a track is being
played.
8. The Repeat symbol illuminates when a SD or USB
track has been set to repeat. The box below the
Repeat symbol shows the repeat option that is
selected. See Operation > USB Mode > Play
Mode for more information.
9. Displays the current song playing and the total
number of songs in the selected folder.
10. Displays the EQ preset type changed by holding the
Mode button when connected to Bluetooth, SD, or
USB sources, and selecting EQ.
11. Displays the bit rate and type of playing song.
Note: If the file uses a variable bit rate, this number
will change as the song plays.
12. SD or USB memory being played.
13. Name of the file being played.
14. Frequency spectrum analyzer.
15. Current time and total time of the playing song.
7
8
9
10
11
12
13
14
15
1 2
3 4
5
6
Page 10

10
Operation
Pairing a Bluetooth Device
1. Turn on your Bluetooth device.
2. Power on Envoi Go.
3. Press and release the Mode button to enter Bluetooth Mode.
4. Navigate to your Bluetooth device’s setup screen, select Envoi Go, and connect.
Note: If prompted for a passcode, enter 0000.
5. Play music from your Bluetooth device.
6. Adjust the volume from Envoi Go by holding down the |<< or >>| button to decrease or increase the
volume.
7. To disconnect pairing, turn off Bluetooth on your device or select “Delete paired info” from the Envoi Go
Bluetooth menu.
Bluetooth Mode
To access a paired Bluetooth device:
1. Press and release the Mode button until the Bluetooth icon appears on the screen. The previously
paired device will then connect automatically.
Note: When you connect a USB device, SD card, or Bluetooth device, Envoi Go will automatically
switch to the most recently connected source.
2. In Bluetooth mode, press and hold the Mode button for 2 seconds to see additional options.
3. Use the |<< and >>| buttons to scroll through and press Play/Pause to select one of the settings seen
below.
BT Disconnect: This function disables the connection from the Bluetooth audio source.
EQ: Envoi Go provides 7 optional equalizer presets to enhance music. You may select from these EQ
settings:
• Normal (Nor)
• Pop
• Rock
• Jazz
• Classic (Clas)
• Country (Cou)
• Low Bass (Bas)
Note: The digital EQ presets can only be applied to Bluetooth, SD, and USB sources.
Delete Paired Info: Select this to “forget” a previously paired Bluetooth device so that Envoi Go will not re-
connect when switching back to Bluetooth mode.
Device Information: Shows Envoi Go’s device name.
Exit: Leaves the Bluetooth menu.
Page 11

11
USB Mode
To access a connected USB device:
1. Press and release the Mode button until the USB device icon appears on the upper right hand of the
screen.
Note: When you connect a USB device, SD card, or Bluetooth device, Envoi Go will automatically
switch to the most recently connected source.
2. In USB mode, press and hold the Mode button for 2 seconds to see additional USB menu options.
3. Use the |<< and >>| buttons to scroll through and press Play/Pause to select one of the settings seen
below.
EQ: Envoi Go provides 7 optional equalizer presets to enhance music. You may select from these EQ
settings:
• Normal (Nor)
• Pop
• Rock
• Jazz
• Classic (Clas)
• Country (Cou)
• Low Bass (Bas)
Note: The digital EQ presets can only be applied to Bluetooth, SD, and USB sources.
Play Mode:
• All (A): Plays through and repeats all of the tracks on the USB device.
• Repeat One (1): Plays and repeats the current track.
• Repeat Folder (F): Plays through the tracks in the current folder and then restarts playback of the
tracks.
• Normal (N): Plays through the tracks on the USB device.
• Random (R): Selects a random track to play.
• Browse (I): Plays the first 10 seconds of each track on the USB device.
Change Device: Allows you to change from listening to the SD card or to a connected USB drive.
Exit: Leaves the USB Mode menu.
U-Disk Folder (seen in the menu when the USB track is paused): Select a track from a folder on the USB
drive. Use the |<< and >>| buttons to navigate up or down and press Play/Pause to open a folder or select
a track to play.
Delete File (seen in the menu when the USB track is paused): Deletes the currently selected track.
Delete All (seen in the menu when the USB track is paused): Deletes all tracks on the USB drive.
Exit: Leaves the Music options menu.
Page 12

12
SD Card Mode
To access an inserted SD card:
1. Press and release the Mode button until the SD card icon appears on the screen.
Note: When you connect a USB device, SD card, or Bluetooth device, Envoi Go will automatically
switch to the most recently connected source.
2. In SD Card mode, press and hold the Mode button for 2 seconds to see additional menu options.
3. Use the |<< and >>| buttons to scroll through and press Play/Pause to select one of the settings seen
below.
EQ: Envoi Go provides 7 optional equalizer presets to enhance music. You may select from these EQ
settings:
Note: The digital EQ presets can only be applied to Bluetooth, SD, and USB sources.
• Normal (Nor)
• Pop
• Rock
• Jazz
• Classic (Clas)
• Country (Cou)
• Low Bass (Bas)
Play Mode:
• All (A): Plays through and repeats all of the tracks on the SD card.
• Repeat One (1): Plays and repeats the current track.
• Repeat Folder (F): Plays through the tracks in the current folder and then restarts playback of the
tracks.
• Normal (N): Plays through the tracks on the SD card.
• Random (R): Selects a random track to play.
• Browse (I): Plays the first 10 seconds of each track on the SD card.
Change Device: Allows you to change from listening to the SD card or to a connected USB drive.
Exit: Leaves the SD Card Mode menu.
Card Folder (seen in the menu when the SD card track is paused): Select a track from a folder on the SD
card. Use the |<< and >>| buttons to navigate up or down and press Play/Pause
to open a folder or select a
track to play.
Delete File (seen in the menu when the SD card track is paused): Deletes the currently selected track.
Delete All (seen in the menu when the SD card track is paused): Deletes all tracks on the SD card.
Exit: Leaves the Music options menu.
Page 13

13
Troubleshooting
If you encounter a problem, try doing these things first:
• Make sure all cables and other connected devices are properly and securely connected.
• Make sure you are using Envoi Go as described in this User Guide.
• Make sure your other devices or media are working properly.
• If you believe Envoi Go is not working properly, check the following table for your problem and
solution.
Problem: Solution: Please see:
Power does not turn on.
Make sure Envoi Go’s power input is
properly connected to a power outlet using
the included power cable.
Setup
Envoi Go does not produce
any sound, or the sound is
distorted.
Make sure all cable and device connections
are secure and correct.
Make sure none of the cables are damaged.
Make sure the settings on your Bluetooth
device, loudspeaker, mixer, etc. are correct.
Setup
Audio from my Bluetooth
device does not play through
Envoi Go.
Make sure you have properly paired your
Bluetooth device.
NOTE: If your Bluetooth device does not
recognize Envoi Go, go to the Bluetooth
settings on your Bluetooth device and
"Forget" the Envoi Go from the list of
devices. If Bluetooth mode is activated,
Envoi Go will re-appear after 5 seconds.
Select it to reconnect.
Improve the Bluetooth signal reception by
moving your Bluetooth device closer to
Envoi Go. Also, remove obstacles (walls,
furniture, etc.) so there is a clear line of sight
between your Bluetooth device and Envoi
Go.
Setup and Operation
Pairing my Bluetooth device
to Envoi Go requires a PIN.
Enter 0000 as the PIN. (Some older
Bluetooth devices may require you to enter a
PIN.)
Operation
Page 14

14
Guía del usuario (Español)
Introducción
• Batería recargable integrada
• Woofer de 6,5 pulg., dos drivers de rango completo articulados de 3 pulg. por altavoz
• Conexión Bluetooth para transmitir audio de forma inalámbrica
• Reproductor USB/SD MP3/WMA con pantalla LCD que reproduce sin supervisión
• Zócalo para montaje en poste 35 mm bajo los altavoces y la unidad de control
Consulte el capítulo Instalación de esta guía para aprender a integrar el Envoi Go con su sistema de audio
y luego consulte el capítulo Operación para comenzar a utilizar el Envoi Go.
1. Asegúrese de que todos los artículos indicados en Contenido de la caja estén incluidos en ella.
2. LEA EL FOLLETO DE INSTRUCCIONES DE SEGURIDAD ANTES DE UTILIZAR EL PRODUCTO.
3. Estudie el diagrama de conexión.
4. Asegúrese de que todos los dispositivos de entrada tales como micrófonos y reproductores de CD o
reproductores de otros medios digitales estén apagados y con el control de volumen en “cero”.
5. Conecte todos los dispositivos como se muestra.
6. Encienda todo en el siguiente orden:
• fuentes de entrada de audio (por ejemplo, micrófonos, instrumentos, reproductores de CD)
• Envoi Go
7. Al apagar, realice siempre esta operación en forma inversa:
• Envoi Go
• cualquier otro dispositivo de entrada
Contenido de la caja
Envoi Go (Dos altavoces y un controlador)
Cable de corriente
(2) Cables para altavoz (15 pies; 4,5 m)
Guía del usuario
Manual sobre la seguridad y garantía
Soporte
Para obtener la información más completa acerca de este product (los requisitos del sistema,
compatibilidad, etc) y registro del producto, visite denonpro.com.
El cable de corriente y los cables de audio pueden almacenarse en el compartimiento del panel trasero.
Page 15

15
Baterías recargables
Las baterías de plomo-ácido recargables son del mismo tipo que se usa en los automóviles. Al igual que
con la batería del vehículo, la forma en que se usa tiene una influencia significativa en la duración de su vida
útil. Con un uso y tratamiento correctos, una batería de plomo-ácido puede durar varios años. He aquí
algunas recomendaciones para prolongar la vida útil de la batería interna.
Uso General
Cargar completamente antes de utilizar.
Cargar completamente antes de almacenar.
Almacenamiento
Para lograr la mayor longevidad del producto, no lo almacene a temperaturas muy altas
(superiores 90 °F / 32 °C) o muy frías (inferiores a 32 °F / 0°C).
Es aceptable dejar su sistema de sonido enchufado. No sobrecargará la batería.
Si deja que el nivel de la batería baje y no la carga durante 6 meses, puede perder
permanentemente su capacidad.
Reparación
Si la batería no se carga, compruebe el fusible cerca de la entrada del cable de
alimentación. Si el fusible no está intacto, remplácelo.
La batería puede reemplazarse.
Para la garantía y piezas, visite denonpro.com.
Disposición final
Lleve la unidad a un centro de reciclaje o deséchela de acuerdo a las ordenanzas
locales.
IMPORTANTE: Nunca deje el Envoi Go
encendido cuando no esté en uso.
Asegúrese de apagar este producto
durante la inactividad.
Page 16
16
Instalación
Los elementos que no se enumeran en Introducción > Contenido de la caja se venden por separado.
Conecte los cables estando todos los equipos apagados y asegúrese de que todos los controles de
volumen principal estén al mínimo. Siga el procedimiento indicado a continuación para procesar una señal
por cada canal:
1. Abra las trabas del gabinete en la parte superior del Envoi Go y separe los altavoces del controlador.
2. Abra el compartimiento de almacenamiento del panel trasero del controlador y extraiga el cable de
corriente y los cables del altavoz.
3. Ubique el controlador en el medio de ambos altavoces, con suficiente distancia entre los altavoces
para una máxima separación estéreo.
4. Enchufe los cables del altavoz en las salidas de altavoz izquierda y derecha en la parte posterior del
controlador.
5. Ajuste todas las perillas Level (nivel) de los canales a cero, la perilla Master (maestro) a cero y la
ecualización plana.
6. Conecte su micrófono o instrumento al canal.
7. Conecte el cable de corriente al controlador y encienda el Envoi Go.
8. Ajuste la perilla Master a no más de 70%.
9. Ajuste la perilla Level del canal. Cuando el volumen está ajustado correctamente, tanto el LED del
canal así como el LED LIM (limitador) no deberían encenderse.
Tableta
Grabadora
MP3
Reproductor
Guitar
Micrófono
Page 17
17
Características
Panel frontal
1. Pantalla: Muestra los modos del Media Panel (panel de
medios) para Bluetooth, USB y SD.
2. Puerto USB: Conecte su unidad flash USB para reproducir
archivos MP3 y WMA de música.
3. Ranura para tarjeta SD: Inserte su tarjeta SD aquí para
reproducir archivos MP3 y WMA de música.
4. Panel de medios: Controles para fuentes de Bluetooth, SD
y USB. El símbolo de fuente del modo Panel de medios se
iluminará cuando se esté reproduciendo esa fuente.
5. Interruptor selector de entrada: Determina si el canal 5/6
utilizará SD/MP3/USB cómo fuente o la entrada de 3,5 mm
(1/8 pulg) / 2-Trk.
6. Master Volume (Volumen maestro): Esto controla el nivel
general para los canales de entrada.
7. Medidores LED: Muestra el nivel de audio de los niveles de
los canales combinados junto con el nivel del volumen
maestro. Baje el volumen si el LED LIM (limitador) se
enciende excesivamente.
8. FX On/Off (Efectos encendidos/apagados): Pulse este
botón para activar los efectos internos.
9. Perilla DSP Effects (Efectos DSP): Seleccione uno de los
presets de efectos internos del controlador para aplicar a
las entradas del canal.
10. FX Return (Retorno de efectos): Ajuste el nivel de la señal
que se envía desde los efectos DSP internos hacia los
canales.
11. Level (Nivel): Ajusta la ganancia de la señal para cada
canal.
12. LED de pico de canal: Este LED se ilumina con luz roja si la
señal del canal se está recortando. Si esto ocurre,
disminuya la perilla Level para ese canal o pulse el botón Pad.
13. High EQ (Agudos del ecualizador): Aumenta o disminuye las frecuencias altas (agudos) dentro de un
rango entre -12dB y +12dB.
14. Low EQ (Graves del ecualizador):
Aumenta o disminuye las frecuencias bajas (graves) dentro de un
rango entre -12dB y +12dB.
15. FX/Aux (Efectos/auxiliar): Controla la cantidad de señal que se envía al procesador de efectos
internos y la salida auxiliar.
16. Pad: Pulse este botón para reducir las señales de entrada altas (tales como instrumentos
microfoneados de cerca durante una interpretación en vivo) para evitar el recorte del canal.
17. Mic Input (Entrada de micrófono) (XLR): Conecte micrófonos dinámicos a las entradas XLR. Controle
el volumen de estas entradas utilizando la perilla Level.
18. Line Input (Entrada de línea) de 6,35 mm (1/4 pulg.): Conecte aquí un dispositivo de nivel de línea,
como por ejemplo un teclado o una caja de ritmos.
19. Stereo Input (Entrada estéreo) de 3,5 mm (1/8 pulg.): Conecte aquí un dispositivo de nivel de línea,
como por ejemplo un reproductor de CD, una tarjeta de sonido de ordenador, un teléfono inteligente
(smartphone), un dispositivo de medios, etc.
20. L/Mono / Right (Izq/Mono / derecha): Conecte a este canal estéreo un dispositivo de nivel de línea,
como por ejemplo un teclado, caja de ritmos, etc. Para fuentes mono, conecte solamente a la entrada
L/Mono.
21. Entrada 2-Trk: Conecte a estas entradas las salidas de un dispositivo externo utilizando cables RCA
estándar. Estas entradas pueden utilizarse para conectar un reproductor de CD o dispositivo móvil
(ordenador portátil, tableta, teléfono móvil, etc.).
22. Salida 2-Trk: Encamine la señal hacia un reproductor de casetes, tarjeta de audio de ordenador o
grabador portátil.
23. Aux Out (Salida auxiliar): Envía la señal FX/Aux a un dispositivo externo.
24. Efectos de inserción externos: Conecte un ecualizador o compresor externo utilizando “Insert Y-
cables” (inserte cables en "Y"). Cuando se inserta un procesador externo en el conector, la señal
estéreo se enviará hacia afuera después del nivel maestro y se regresará a la mezcla estéreo antes del
amplificador.
11
11
13
13
14
14
15
15
16
16
17
17
18
18
20
20
21
21
22
22
23
23
24
24
12
12
8
1
4
5
6
7
9
10
10
19
19
2
3
8
Page 18
18
Panel trasero
1. Nivel de la batería: Estos LED muestran el estado de
la batería y cuando debe recargarse. La vida útil de la
batería varía en función del volumen y el consumo.
2. Salidas para altavoces: Conecte estas salidas a los
altavoces Envoi Go con el cable para altavoz incluido.
3. Interruptor de encendido: Enciende y apaga el Envoi
Go.
4. Fusible: Si necesita reemplazar el fusible, utilice un
fusible de 100~240 V / T4AL 250 V.
5. Cable de corriente (IEC): Conecte aquí el cable de
alimentación incluido.
IMPORTANTE: Cuando se ilumina la luz
indicadora de carga de la batería, esto
indica que debe recargarse. Para obtener
una carga completa, apague el
dispositivo y realice la carga durante seis
horas o hasta que la luz verde indique
una carga completa.
IMPORTANTE: Para maximizar la vida
útil de la batería, es importante cargar la
unidad regularmente.
IMPORTANTE: Cuando el LED rojo
encima del indicador de bajo nivel de
batería se enciende, comience la carga
inmediatamente. Nunca almacene el
Envoi Go con una carga baja. Además,
nunca almacene el Envoi Go con el
interruptor de encendido en la posición
ON. Asegúrese de que la unidad siempre
esté apagada antes de almacenarla,
durante cualquier cantidad de tiempo.
1
2
3
4
5
Page 19

19
Tabla de efectos
PARA OÍR LOS EFECTOS EN UNA ENTRADA DE CANAL: Ajuste la perilla FX/Aux para el canal y luego
ajuste la perilla FX Return. Pulse el botón FX on/off para encender los efectos. Use la perilla DSP Effects
para elegir uno de los siguientes efectos:
Nro. PRESET DESCRIPCIÓN
1 LÁMINA 1
Simula la reverberación de una sala con un tiempo de
decaimiento largo.
2 HABITACIÓN 1
Simula el sonido ambiente de la acústica de una
habitación natural con un decaimiento largo.
3 LÁMINA 2
Simula una reverberación de lámina con decaimiento
intermedio.
4 LÁMINA 3
Simula una reverberación de lámina con decaimiento
corto.
5 HABITACIÓN 2
Reproduce el sonido ambiente de la acústica de una
habitación natural con un decaimiento intermedio.
6 HABITACIÓN 3
Reproduce el sonido ambiente de la acústica de una
habitación natural con un decaimiento corto.
7 SALA 1
Simula el sonido ambiente de una gran sala para
conciertos con decaimiento intermedio.
8 SALA 2
Simula el sonido ambiente de una gran sala para
conciertos con decaimiento largo.
9 RETARDO 1: Retardo monoaural típico.
10 RETARDO 2: Retardo estéreo "ping-pong" típico.
11 FLANGER
Efecto de flange estéreo clásico, similar al despegue de
un avión a reacción.
12 CORO
Efecto de modulación que brinda un efecto suave y
etéreo de barrido.
13 CORO/HABITACIÓN 1 Típico efecto de coro y decaimiento corto combinados.
14 CORO/HABITACIÓN 2 Típico efecto de coro y decaimiento largo combinados.
15 CANCELACIÓN VOCAL
Reduce las voces en una grabación.
Nota: Este efecto funciona mejor para reducir las voces
grabadas originalmente en mono y colocadas al centro
de la mezcla estéreo.
16 ALTAVOZ GIRATORIO Simula el efecto típico de un altavoz giratorio de los '60.
Page 20

20
Panel de medios
Funciones del panel de medios:
1. USB/SD/BT/Menu/Mode (USB/SD/BT/Menú/Modo):
Selecciona la fuente del Media Panel: USB, SD y
Bluetooth. Púlselo y suéltelo para activar el modo de
apareamiento de Bluetooth. Una vez conectado a
Bluetooth, mantenga pulsado Mode para seleccionar
de entre las opciones para BT (Bluetooth) Disconnect
(desconectar), Select EQ (seleccionar ecualizador),
Delete Paired Info (eliminar información de
apareamiento) y Device Information (información del
dispositivo). Cuando haya insertado una SD o USB,
mantenga pulsado Mode para acceder a EQ
(ecualizador), Play Mode (modo de reproducción) o
Change Device (cambiar dispositivo).
2. Play/Pause (Reproducir/Pausa): Reproduce o hace
pausa en la fuente de USB, SD o Bluetooth de la
fuente del panel de medios. Dentro de los ajustes de
modo, funciona como seleccionar/intro.
3. Stop (Detener): Detiene la reproducción de la fuente
del panel de medios.
4. Repeat (Repetir): Alterna entre las diferentes opciones
de repetición para las fuentes USB y SD.
5. Pista anterior/Bajar volumen: Retrocede a la pista
anterior del USB o tarjeta SD. Dentro de los ajustes de
modo, funciona como izquierda/arriba. Al escuchar de
fuentes Bluetooth, pulsar Prev (anterior) en algunas aplicaciones puede hacer que vaya a otra lista de
reproducción o género musical. Mantenga pulsado este botón para disminuir el volumen de la pista.
6. Pista siguiente/Subir volumen: Avanza a la pista siguiente del USB o tarjeta SD. Dentro de los
ajustes de modo, funciona como derecha/abajo. Al escuchar de fuentes Bluetooth, pulsar Next
(Siguiente) en algunas aplicaciones puede hacer que vaya a otra lista de reproducción o género
musical. Mantenga pulsado este botón para aumentar el volumen de la pista.
7. El símbolo de reproducción se ilumina cuando se está reproduciendo una pista.
8. El símbolo de repetir se ilumina cuando se configura la repetición de una pista SD o USB. El cuadro
debajo del símbolo Repeat muestra la opción de repetición seleccionada. Consulte Operación > USB
Mode (Modo USB) > Modo de reproducción para obtener más información.
9. Muestra la canción que se está reproduciendo actualmente y el número total de canciones en la
carpeta seleccionada.
10. Muestra el tipo de preset del ecualizador modificado al mantener pulsado el botón Mode estando
conectado a fuentes Bluetooth, SD o USB y seleccionar EQ.
11. Muestra la velocidad en bits y el tipo de la canción que se está reproduciendo actualmente.
Nota: Si el archivo utiliza una velocidad de bits variable, este número cambiará a medida que se
reproduce la canción.
12. Memoria SD o USB que se está reproduciendo.
13. Nombre del archivo que se está reproduciendo.
14. Analizador del espectro de frecuencia.
15. Tiempo actual y tiempo total de la canción que se está reproduciendo.
7
8
9
10
11
12
13
14
15
1 2
3 4
5
6
Page 21

21
Operación
Apareamiento de un dispositivo Bluetooth
1. Encienda su dispositivo Bluetooth.
2. Encienda el Envoi Go.
3. Pulse y suelte el botón Mode para ingresar al modo Bluetooth.
4. Navegue hasta la pantalla de configuración de Bluetooth de su dispositivo, seleccione el Envoi Go y
conéctese a él.
Nota: Si se le solicita un código, introduzca 0000.
5. Reproduzca música desde su dispositivo Bluetooth.
6. Ajuste el volumen del Envoi Go manteniendo pulsados los botones |<< o >>| para aumentar o disminuir
el volumen.
7. Para desconectar el apareamiento, apague el Bluetooth de su dispositivo o seleccione "Eliminar datos
de apareamiento" en el menú de Bluetooth del Envoi Go.
Modo Bluetooth
Para acceder a un dispositivo apareado:
1. Pulse y suelte el botón Mode (Modo), hasta que aparezca el icono Bluetooth en la pantalla. El
dispositivo previamente apareado entonces se conectará automáticamente.
Nota: Cuando conecta un dispositivo USB, tarjeta SD o dispositivo Bluetooth, Envoi Go conmutará
automáticamente a la última fuente conectada.
2. En modo Bluetooth, mantenga pulsado el botón Mode durante 2 segundos para ver opciones
adicionales.
3. Utilice los botones |<< y >>| para recorrerlas y pulse Play/Pause (Reproducir/pausa) para seleccionar
uno de los ajustes que se muestran a continuación.
BT Disconnect: Esta función deshabilita la conexión desde la fuente de audio Bluetooth.
EQ (Ecualizador): Envoi Go le brinda 7 presets de ecualización opcionales para mejorar la música. Puede
seleccionar uno de los siguientes ajustes de ecualización:
• Normal (Nor)
• Pop
• Rock
• Jazz
• Clásica (Clas)
• Country (Cou)
• Graves bajos (Bas)
Nota: Los presets del ecualizador digital sólo pueden aplicarse a fuentes Bluetooth, SD y USB.
Eliminar información de apareamiento: Seleccione esta opción para "olvidar" un dispositivo Bluetooth
previamente apareado de forma que el Envoi Go no se reconectará con él al entrar nuevamente en modo
Bluetooth.
Información del dispositivo: Muestra el nombre del dispositivo del Envoi Go.
Salir: Abandona el menú de Bluetooth.
Page 22

22
USB Mode (Modo USB)
Para acceder a un dispositivo USB conectado:
1. Pulse y suelte el botón Mode (Modo), hasta que aparezca el icono de dispositivo USB en la esquina
superior derecha de la pantalla.
Nota: Cuando conecta un dispositivo USB, tarjeta SD o dispositivo Bluetooth, Envoi Go conmutará
automáticamente a la última fuente conectada.
2. En modo USB, mantenga pulsado el botón Mode durante 2 segundos para ver opciones adicionales
del menú de USB.
3. Utilice los botones |<< y >>| para recorrerlas y pulse Play/Pause (Reproducir/pausa) para seleccionar
uno de los ajustes que se muestran a continuación.
EQ (Ecualizador): Envoi Go le brinda 7 presets de ecualización opcionales para mejorar la música. Puede
seleccionar uno de los siguientes ajustes de ecualización:
• Normal (Nor)
• Pop
• Rock
• Jazz
• Clásica (Clas)
• Country (Cou)
• Graves bajos (Bas)
Nota: Los presets del ecualizador digital sólo pueden aplicarse a fuentes Bluetooth, SD y USB.
Modo de reproducción:
• Todos (A): Reproduce y repite todas las pistas del dispositivo USB.
• Repetir uno (1): Reproduce y repite la pista actual.
• Repetir carpeta (F): Reproduce las pistas de la carpeta actual y luego reinicia la reproducción de las
pistas.
• Normal (N): Reproduce todas las pistas del dispositivo USB.
• Aleatorio (R): Selecciona una pista al azar para reproducir.
• Explorar (I): Reproduce los primeros 10 segundos de cada pista del dispositivo USB.
Change Device (Cambiar dispositivo): Le permite alternar entre escuchar audio de la tarjeta SD y de un
dispositivo USB conectado.
Exit (Salir): Abandona el menú del modo USB.
U-Disk Folder (Carpeta U-Disk) (se ven en el menú cuando se pone en pausa la pista del USB):
Selecciona una pista de una carpeta de la unidad USB. Utilice los botones |<< y >>| para navegar hacia
arriba o abajo y pulse Play/Pause para abrir una carpeta o seleccionar una pista para reproducir.
Delete File (Eliminar archivo) (se ven en el menú cuando se pone en pausa la pista del USB):
Elimina la pista actualmente seleccionada.
Delete All (Eliminar todo) (se ven en el menú cuando se pone en pausa la pista del USB):
Elimina todas las pistas de la unidad USB.
Salir: Abandona el menú de opciones de música.
Page 23

23
Modo de tarjeta SD
Para acceder a una tarjeta SD insertada:
1. Pulse y suelte el botón Mode (Modo), hasta que aparezca el icono de tarjeta SD en la pantalla.
Nota: Cuando conecta un dispositivo USB, tarjeta SD o dispositivo Bluetooth, Envoi Go conmutará
automáticamente a la última fuente conectada.
2. En modo de tarjeta SD, mantenga pulsado el botón Mode durante 2 segundos para ver opciones
adicionales del menú.
3. Utilice los botones |<< y >>| para recorrerlas y pulse Play/Pause (Reproducir/pausa) para seleccionar
uno de los ajustes que se muestran a continuación.
EQ (Ecualizador): Envoi Go le brinda 7 presets de ecualización opcionales para mejorar la música. Puede
seleccionar uno de los siguientes ajustes de ecualización:
• Normal (Nor)
• Pop
• Rock
• Jazz
• Clásica (Clas)
• Country (Cou)
• Graves bajos (Bas)
Nota: Los presets del ecualizador digital sólo pueden aplicarse a fuentes Bluetooth, SD y USB.
Modo de reproducción:
• Todos (A): Reproduce y repite todas las pistas de la tarjeta SD.
• Repetir uno (1): Reproduce y repite la pista actual.
• Repetir carpeta (F): Reproduce las pistas de la carpeta actual y luego reinicia la reproducción de las
pistas.
• Normal (N): Reproduce todas las pistas de la tarjeta SD.
• Aleatorio (R): Selecciona una pista al azar para reproducir.
• Explorar (I): Reproduce los primeros 10 segundos de cada pista de la tarjeta SD.
Change Device (Cambiar dispositivo): Le permite alternar entre escuchar audio de la tarjeta SD y de un
dispositivo USB conectado.
Exit (Salir): Abandona el menú del modo de tarjeta SD.
Card Folder (Carpeta de la tarjeta) (se ven en el menú cuando se pone en pausa la pista de la tarjeta SD):
Selecciona una pista de una carpeta de la tarjeta SD. Utilice los botones |<< y >>| para navegar hacia arriba
o abajo y pulse Play/Pause para abrir una carpeta o seleccionar una pista para reproducir.
Delete File (Eliminar archivo) (se ven en el menú cuando se pone en pausa la pista de la tarjeta SD):
Elimina la pista actualmente seleccionada.
Delete All (Eliminar todo) (se ven en el menú cuando se pone en pausa la pista de la tarjeta SD):
Elimina todas las pistas de la tarjeta SD.
Salir: Abandona el menú de opciones de música.
Page 24

24
Solución de problemas
Si experimenta problemas, realice lo siguiente:
• Asegúrese de que todos los cables y los otros dispositivos estén conectados firme y correctamente.
• Asegúrese de estar utilizando Envoi Go como describe esta Guía del usuario.
• Asegúrese de que todos sus otros dispositivos o medios funcionen correctamente.
• Si cree que Envoi Go no está funcionando correctamente, busque su problema y solución en la
siguiente tabla.
Problema: Solución: Consulte:
La unidad no se enciende.
Asegúrese de que la entrada de corriente
del Envoi Go esté conectada correctamente
a una toma de corriente utilizando el cable
de corriente incluido.
I
nstalación
El Envoi Go no emite ningún
sonido o el sonido está
distorsionado.
Asegúrese de que todas las conexiones de
cables y dispositivos estén firmes y
correctas.
NOTA: Si su dispositivo Bluetooth no
reconoce al Envoi Go, ingrese a los ajustes
de Bluetooth de su dispositivo Bluetooth y
"olvide" el Envoi Go de la lista de
dispositivos. Si se activa el modo Bluetooth,
el Envoi Go reaparecerá luego de 5
segundos. Selecciónelo para reconectarse.
Asegúrese de que ninguno de los cables
esté dañado.
Asegúrese de que los ajustes en su
dispositivo Bluetooth, altavoz, mezclador,
etc. sean correctos.
I
nstalación
El Envoi Go no reproduce el
audio proveniente de mi
dispositivo Bluetooth.
Asegúrese de haber apareado
correctamente su dispositivo Bluetooth.
Mejore la recepción de la señal Bluetooth
acercando su dispositivo Bluetooth al Envoi
Go. También evite que se interpongan
obstáculos (paredes, muebles, etc.) en la
línea de visión entre su dispositivo Bluetooth
y el Envoi Go.
I
nstalación y Operación
Mi dispositivo Bluetooth
solicita un PIN para
aparearse con el Envoi Go.
Introduzca 0000 como el PIN. (Algunos
dispositivos Bluetooth antiguos pueden
requerir que introduzca un PIN).
Operación
Page 25

25
Guide d’utilisation (Français)
Présentation
• Batterie rechargeable intégrée
• Chaque enceinte dispose d’un haut-parleur d'extrêmes graves de 16,5 cm et de deux haut-parleurs
pleine gamme de 7,6 cm positionnés en angle
• Connexion Bluetooth pour la transmission en continu d'audio sans fil
• Lecteur USB/SD MP3/WMA intégré avec écran ACL pour une lecture automatique
• Embase de montage de 35 mm pour support sous les enceintes et le contrôleur
Veuillez consulter la section Installation de ce guide pour apprendre comment intégrer le système
d’enceintes Envoi Go à votre système audio, puis reportez-vous à la section Fonctionnement pour
commencer à l’utiliser.
1. Veuillez vous assurer que tous les articles énumérés dans le Contenu de la boîte de ce guide sont inclus
dans la boîte.
2. VEUILLEZ LIRE LE LIVRET DES CONSIGNES DE SÉCURITÉ AVANT D'UTILISER LE PRODUIT.
3. Veuillez examiner le schéma de connexion.
4. Veuillez vous assurer que tous les appareils d’entrée tels que microphones, lecteurs de disques
compacts ou lecteurs multimédia numériques raccordés sont éteints et que leur volume est à « zéro ».
5. Veuillez raccorder tous les appareils comme indiqué sur le schéma.
6. Mettez tous les appareils sous tension dans l'ordre suivant :
• sources d'entrée audio (p. ex., microphones, instruments, lecteurs de disques compacts)
• Envoi Go
7. Pour mettre hors tension, toujours inversez l'opération :
• Envoi Go
• sources d’entrée audio
Contenu de la boîte
Envoi Go (Deux enceintes et un contrôleur)
Câble d’alimentation
2 câbles pour enceintes de 4,5 m
Guide d’utilisation
Consignes de sécurité et informations concernant la garantie
Assistance
Pour les dernières informations concernant ce produit (la configuration système minimale requise, la
compatibilité, etc) et l’enregistrement du produit, veuillez visitez le site denonpro.com.
Le câble d’alimentation et les câbles audio peuvent être rangés dans le compartiment arrière.
Page 26

26
Piles rechargeables
Les piles au plomb rechargeables sont du même type que les batteries utilisées dans les automobiles.
Comme pour la batterie de votre automobile, la manière dont vous l'utilisez a un impact direct sur sa durée
de vie. Cependant, avec une bonne utilisation la pile au plomb peut avoir une durée de vie de plusieurs
années. Voici quelques recommandations pour prolonger au maximum la durée de vie de la pile interne.
Utilisation
générale
Chargez complètement la batterie avant utilisation.
Chargez complètement la batterie avant d’entreposer l’enceinte.
Entreposage
Pour optimiser la longévité du produit, ne pas entreposer dans des températures
extrêmement chaudes (supérieur à 32 °C (90 °F)) ou extrêmement froides (moins de
0 °C (32 °F)).
Il n’y a aucun problème à laisser l’enceinte branchée. Cela ne surchargera pas la
batterie.
Si vous laissez le niveau de charge de la batterie s’affaiblir sans la recharger pendant 6
mois, elle risque de perdre sa capacité de charge de façon permanente.
Réparation
Si la batterie ne parvient plus à se recharger, vérifiez le fusible situé près de l'entrée du
câble d'alimentation. Si le fusible n'est pas intact, veuillez le remplacer.
La batterie peut être remplacée.
Pour la garantie et les pièces de rechange, veuillez visiter denonpro.com.
Élimination
Apportez l’appareil dans un centre de recyclage ou disposez selon les règlements de
votre municipalité.
IMPORTANT : Ne jamais laisser le
Envoi Go sous tension lorsqu’il n’est
plus utilisé. Veillez à éteindre ce
produit lorsqu’il n’est pas utilisé.
Page 27

27
Installation
Les articles qui ne figurent pas dans la section Présentation > Contenu de la boîte sont vendus
séparément.
Raccordez tous les câbles alors que tous les appareils sont hors tension et que toutes les commandes de
volume sont au minimum. Veuillez suivre la procédure ci-dessous afin que chaque canal puisse traiter un
signal :
1. Déverrouillez les loquets sur le dessus de l’enceinte avec le contrôleur afin de le retirer.
2. Ouvrez le compartiment de rangement au dos du contrôleur, puis retirez le câble d'alimentation et les
câbles pour enceinte.
3. Placez le contrôleur au milieu des deux enceintes en laissant assez de distance entre les deux afin
d'obtenir un maximum de séparation stéréophonique.
4. Branchez les câbles d'enceintes dans les sorties enceinte gauche et droite à l'arrière du contrôleur.
5. Réglez tous les boutons de niveau pour tous les canaux et le bouton de niveau principal à zéro, puis
aplanissez l’égalisation.
6. Branchez votre micro ou votre instrument sur le canal.
7. Branchez le câble d'alimentation et mettez le système Envoi Go sous tension.
8. Réglez le bouton de niveau général à moins de 70 %.
9. Réglez le bouton de niveau du canal. Lorsque le volume est réglé correctement, la DEL du canal ainsi
que la DEL du limiteur (LIM) sont éteintes.
Tablette
Enregistreur
Lecteur MP3
Guitar
Microphone
Page 28

28
Caractéristiques
Panneau avant
1. Écran : Affiche les modes de fonctionnement du
panneau multimédia : Bluetooth, USB et SD.
2. Port USB : Branchez une clé USB pour faire la lecture
de fichiers MP3 et WMA.
3. Fente pour carte SD : Insérez une carte SD pour faire la
lecture de fichiers MP3 et WMA.
4. Module multimédia : Commandes pour les sources
Bluetooth, SD et USB. Le symbole du module
multimédia s’allume lorsque cette source est en cours
de lecture.
5. Sélecteur d’entrée : Ce sélecteur permet de régler la
source du signal du canal 5/6 entre les entrées
SD/MP3/USB et l’entrée 3,5 mm/2-Trk.
6. Volume général : Ce bouton contrôle le niveau de sortie
générale de toutes les entrées.
7. Vumètres : Ces DEL indiquent le niveau des canaux
combiné ainsi que le niveau du volume général. Baissez
le volume si la DEL du limiteur s’allume trop
fréquemment.
8. Touche FX On/Off : Cette touche permet d’activer les
effets internes.
9. Bouton des effets DSP : Ce bouton permet de
sélectionner des préréglages d'effets internes du
contrôleur afin de les ajouter aux entrées canaux.
10. Bouton FX Return : Ce bouton permet de régler le
niveau du signal transmis par les effets DSP internes aux
canaux.
11. Boutons de niveau : Ces boutons permettent d’ajuster
le niveau du gain du canal correspondant.
12. DEL d’écrêtage du canal : Cette DEL devient rouge
lorsqu’il y a de l’écrêtage sur le canal. Lorsque cela se
produit, diminuez le niveau du canal ou appuyez sur la
touche Pad.
13. Égalisation des hautes fréquences : Augmente ou
diminue les hautes fréquences entre -12 dB et +12 dB.
14. Égalisation des basses fréquences : Augmente ou diminue les basses fréquences entre -12 dB et
+12 dB.
15. Bouton FX/Aux : Ce bouton contrôle la quantité de signaux qui est transmis au processeur d'effets
interne et à la sortie auxiliaire.
16. Pad :
Cette touche permet de réduire les signaux d'entrée élevés (par exemple, d'instruments équipés
de microphone lors d'une représentation) afin d’éviter l’écrêtage du canal.
17. Entrées microphone (XLR) : Ces entrées XLR permettent de brancher des microphones
électrodynamiques. Le volume de ces entrées est commandé par le bouton de niveau.
18. Entrée ligne 6,35 mm : Cette entrée permet de brancher un appareil à niveau ligne, comme un clavier
ou un module de percussion.
19. Entrée stéréo 3,5 mm : Cette entrée permet de brancher un appareil à niveau ligne, comme un
lecteur de disques compacts, une carte son ordinateur, un smartphone, un appareil multimédia, etc.
20. Entrées L/Mono / Right : Cette entrée stéréo permet de brancher un appareil à niveau ligne, comme
un clavier ou un module de percussion. Pour les sources mono, utilisez seulement l’entrée L/Mono.
21. Entrées 2-Trk In : Reliez les sorties d'un appareil externe à ces entrées en utilisant des câbles RCA
standard. Elles peuvent être utilisées pour brancher un lecteur de disques compacts ou un appareil
mobile (ordinateur portable, tablette, téléphone mobile, etc.).
22. Sorties 2-Trk Out : Cette sortie permet d’acheminer le signal de la sortie principale vers un lecteur
cassettes, une carte son d’ordinateur ou un enregistreur portable.
23. Sortie auxiliaire : Cette sortie transmet le signal de la sortie Effets/auxiliaire vers un appareil externe.
24. Effets d’insert externes : Cette prise permet de brancher un égaliseur externe ou un compresseur en
utilisant des câbles d’insert en Y. Lorsqu'un processeur externe est branché à cette prise, le signal
stéréo est transmis après avoir été réglé par le bouton de niveau, puis est retourné dans le mix stéréo
avant l'amplificateur.
11
11
13
13
14
14
15
15
16
16
17
17
18
18
20
20
21
21
22
22
23
23
24
24
12
12
8
1
4
5
6
7
9
10
10
19
19
2
3
8
Page 29

29
Panneau arrière
1. Indicateur de charge : Ces DEL indiquent le niveau de
charge de la batterie et quand elle doit être rechargée.
L’autonomie de la batterie est affectée par le volume et
le niveau d’utilisation.
2. Sorties enceinte : Ces sorties permettent de brancher
les deux enceintes du système Envoi Go en utilisant le
câble pour enceinte fourni.
3. Interrupteur d'alimentation : Cet interrupteur met le
système Envoi Go sous et hors tension.
4. Fusible : Si le fusible doit être remplacé, utilisez un
fusible de calibre 100~240 V/T4AL 250 V.
5. Câble d'alimentation (CEI) : Cette entrée permet de
brancher le câble d’alimentation fourni.
1
2
3
4
5
IMPORTANT : Lorsque l’indicateur de
charge s’allume, cela indique que la
batterie doit être rechargée. Pour une
charge complète, éteignez l'appareil et
recharger la batterie pendant 6 heures,
ou jusqu'à ce que l’indicateur devienne
vert indiquant une charge complète.
IMPORTANT : Pour maximiser la durée
de vie de la batterie, il est important de
recharger l'appareil régulièrement.
IMPORTANT : Lorsque la DEL rouge audessus de l'indicateur de charge
s’allume, rechargez la batterie
immédiatement. Ne jamais ranger le
système Envoi Go lorsque la batterie est
faible. Et, ne jamais le ranger lorsque
l’interrupteur d’alimentation est en
position de fonctionnement (ON). Veuillez
vous assurer que l'appareil est toujours
mis hors tension avant de le ranger, pour
quelque durée que ce soit.
Page 30

30
Tableau des effets
POUR ENTENDRE LES EFFETS SUR UN CANAL : Réglez le bouton FX/Aux du canal et réglez ensuite le
bouton FX Return. Appuyez sur touche FX On/Off afin d’activer les effets. Uilisez le sélecteur d’effet pour
sélectionner un des effets ci-dessous :
# PRÉRÉGLAGE DESCRIPTION
1 PLATE 1
Reproduit une réverbération à plaque avec un long
affaiblissement.
2 ROOM 1
Reproduit l’acoustique naturelle d'une salle avec un
long affaiblissement.
3 PLATE 2
Reproduit une réverbération à plaque avec un
affaiblissement moyen.
4 PLATE 3
Reproduit une réverbération à plaque avec un
affaiblissement court.
5 ROOM 2
Reproduit l’acoustique naturelle d'une salle avec un
affaiblissement moyen.
6 ROOM 3
Reproduit l’acoustique normale d'une salle avec un
affaiblissement court.
7 HALL 1
Reproduit l’acoustique d'une grande salle de concert
avec un affaiblissement moyen.
8 HALL 2
Reproduit l’acoustique d'une grande salle de concert
avec un long affaiblissement.
9 DELAY 1 Effet de retard mono caractéristique.
10 DELAY 2 Effet de retard stéréo ping-pong caractéristique.
11 FLANGER
Effet Flanger classique, semblable au son produit par
un avion au décollage.
12 CHORUS
Effet de modulation, donne un effet de balayage doux
et éthéré.
13 CHORUS/ROOM 1
Effet de coeur et de réverbération à court
affaiblissement combinés ensemble.
14 CHORUS/ROOM 2
Effet de coeur et de réverbération à long affaiblissement
caractéristiques combinés ensemble.
15 VOCAL CANCEL
Réduit la voix sur l'enregistrement.
Remarque : Cet effet fonctionne mieux pour réduire les
voix qui ont été enregistrées en mono et placées au
centre du mix stéréo.
16 ROTARY SPEAKER
Reproduit un effet rotatoire caractéristique d’enceintes
des années 60.
Page 31

31
Module multimédia
Fonctions du module multimédia :
1. USB/SD/BT/Menu/Mode : Cette touche permet de
sélectionner la source du module multimédia : USB, SD et
Bluetooth. Enfoncez puis relâchez la touche Bluetooth pour
entrée en mode de jumelage. Lorsque la connexion
Bluetooth est établie, maintenez la touche Mode enfoncée
pour sélectionner parmi les options : BT Disconnect
(déconnexion Bluetooth), Select EQ (égalisation), Delete
Paired Info (suppression des données de connexion) et
Device Information (nom de l’appareil). Lorsque la
connexion est SD ou USB, maintenez la touche Mode
enfoncée afin d’accéder aux réglages EQ (égalisation),
PlayMode (mode de lecture) ou Change device (changer
d’appareil).
2. Lancer/interrompre la lecture : Cette touche permet de
lancer ou d’interrompe la lecture de la source USB, SD ou
Bluetooth du panneau multimédia. Dans les paramètres
Mode, cette touche permet de sélectionner et de confirmer
votre sélection.
3. Arrêt de lecture : Cette touche permet d’arrêter la lecture
de la source du module multimédia.
4. Lecture répétée : Cette touche permet de faire défiler les
différentes options de répétition pour les sources USB et
SD.
5. Piste précédente/Volume - : Cette touche permet de
passer à la piste précédente de la source USB ou de la
carte SD. Dans les paramètres Mode, cette touche permet
de déplacer le curseur vers la gauche et vers le haut. Sur
des sources Bluetooth, cette touche permet de passer à
d’autres listes de lecture ou de genre musical, selon
l’application. Maintenez cette touche enfoncée pour
diminuer le volume de la piste.
6. Piste suivante/Volume + : Cette touche permet de passer
à la piste suivante de la source USB ou de la carte SD.
Dans les paramètres Mode, cette touche permet de
déplacer le curseur vers la droite et vers le bas. Sur des
sources Bluetooth, cette touche permet de passer à
d’autres listes de lecture ou de genre musical, selon
l’application. Maintenez cette touche enfoncée pour
augmenter le volume de la piste.
7. Le symbole de lecture s’allume lorsqu'une piste est en
cours de lecture.
8. Le symbole de répétition s’allume lorsqu'une piste SD ou
USB a été programmer avec une répétition. L’encadré sous
le symbole de répétition affiche l'option de répétition
sélectionnée. Veuillez consulter la section Fonctionnement
> Mode USB > Mode de lecture pour plus d'information.
9. Affiche la chanson en cours et le nombre total de chansons
dans le dossier sélectionné.
10. Pour afficher la modification du type de préréglage
d’égalisation, maintenez la touche Mode enfoncée
lorsqu'une source Bluetooth, SD ou USB est connectée,
puis sélectionnez EQ.
11. Affiche le débit binaire et le type de chanson.
Remarque : Si le fichier utilise un débit binaire variable, ce
nombre changera au cours de la lecture de la chanson.
12. Carte SD ou clé USB en cours de lecture.
13. Nom du fichier en cours de lecture.
14. Analyseur de spectre de fréquence.
15. Heure et durée totale de la chanson en cours de lecture.
7
8
9
10
11
12
13
14
15
1 2
3 4
5
6
Page 32

32
Fonctionnement
Jumelage d'un appareil Bluetooth
1. Veuillez mettre votre appareil Bluetooth sous tension.
2. Mettez l’enceinte Envoi Go sous tension.
3. Enfoncez puis relâchez la touche Mode pour entrée en mode Bluetooth.
4. Accédez à l'écran de configuration de votre appareil Bluetooth, sélectionnez Envoi Go, et lancez le
jumelage.
Remarque : Si vous êtes invité à entrer un mot de passe, saisissez 0000.
5. Lancez la lecture audio sur votre appareil Bluetooth.
6. Régler le volume de l'Envoi Go en maintenant enfoncée une des touches |<< ou >>| pour diminuer ou
augmenter le volume.
7. Pour supprimer la connexion, désactivez la fonction Bluetooth sur votre appareil ou sélectionnez
« Delete paired info » du menu Bluetooth de l’Envoi Go.
Mode Bluetooth
Pour accéder à un appareil Bluetooth jumelé :
1. Maintenez la touche Mode enfoncée jusqu’à ce que l’icône Bluetooth s’affiche à l’écran. L'appareil
précédemment jumelé se connectera ensuite automatiquement.
Remarque : Lorsque vous connectez un appareil USB, une carte SD ou appareil Bluetooth, le système
Envoi Go passera automatiquement à la source la plus récemment connectée.
2. Maintenez la touche Mode enfoncée pendant 2 secondes en mode Bluetooth afin d’afficher les options
supplémentaires du menu.
3. Utilisez les touches |<< et >>| pour faire défiler les options, puis appuyez sur la touche de
Lecture/Pause pour sélectionner l'un des paramètres ci-dessous.
Déconnexion Bluetooth : Cette fonction désactive la connexion de la source audio Bluetooth.
Égalisation (EQ) : L’enceinte Envoi Go dispose de 7 préréglages d’égalisation afin d'apporter des
améliorations à la musique. Vous pouvez sélectionner parmi les paramètres d'égalisation suivants :
• Normal (Nor)
• Populaire
• Rock
• Jazz
• Classique (Clas)
• Country (Cou)
• Graves (Bas)
Remarque : Les préréglages d'égalisation numériques ne peuvent s'appliquer qu'à des sources Bluetooth,
SD et USB.
Suppression des informations de jumelage (Delete Paired Info) : Sélectionnez cette option pour
« oublier » un appareil Bluetooth précédemment jumelé afin d’empêcher que l’Envoi Go n’essaie de se
reconnecter à cet appareil en mode Bluetooth.
Device Information : Affiche le nom du système Envoi Go.
Quitter (Exit) : Vous permet de quitter le menu Bluetooth.
Page 33

33
Mode USB
Pour accéder à un appareil USB :
1. Enfoncez puis relâchez la touche Mode enfoncée jusqu’à ce que l’icône Bluetooth s’affiche dans le
coin supérieur droit de l’écran.
Remarque : Lorsque vous connectez un appareil USB, une carte SD ou appareil Bluetooth, le système
Envoi Go passera automatiquement à la source la plus récemment connectée.
2. Maintenez la touche Mode enfoncée pendant 2 secondes en mode USB afin d’afficher les options
supplémentaires du menu.
3. Utilisez les touches |<< et >>| pour faire défiler les options, puis appuyez sur la touche de
Lecture/Pause pour sélectionner l'un des paramètres ci-dessous.
Égalisation (EQ) : L’enceinte Envoi Go dispose de 7 préréglages d’égalisation afin d'apporter des
améliorations à la musique. Vous pouvez sélectionner parmi les paramètres d'égalisation suivants :
• Normal (Nor)
• Populaire
• Rock
• Jazz
• Classique (Clas)
• Country (Cou)
• Graves (Bas)
Remarque : Les préréglages d'égalisation numériques ne peuvent s'appliquer qu'à des sources Bluetooth,
SD et USB.
Mode de lecture :
• Toutes les pistes (A) : Vous permet de faire la lecture de toutes les pistes sur le dispositif USB, puis de
les répéter.
• Répétition d’une piste (1) : Vous permet de faire la lecture de la piste sélectionnée, puis de la répéter.
• Répétition d’un dossier (F) : Vous permet de faire la lecture de toutes les pistes dans le dossier
sélectionné, puis de recommencer la lecture de toutes les pistes.
• Normal (N) : Vous permet de faire la lecture de toutes les pistes sur le dispositif USB.
• Aléatoire (R) : Sélectionne une piste au hasard.
• Balayage (I) : Vous permet de faire la lecture des 10 premières secondes de chaque piste sur le
dispositif USB.
Changement d’appareil (Change Device) : Vous permet de passer de la lecture du dispositif USB à la
lecture de la carte SD insérée.
Quitter (Exit) : Vous permet de quitter le menu USB.
Dossier USB (U-Disk Folder) (s’affiche dans le menu lorsque la lecture de la piste USB est interrompue) :
Vous permet de sélectionner une piste dans un dossier sur le dispositif USB. Utilisez les touches |<< et >>|
pour faire défiler les dossiers, puis appuyez sur la touche de Lecture/Pause pour ouvrir l'un des dossiers
ou sélectionner une piste à lire.
Supprimer le fichier (Delete File) (s’affiche dans le menu lorsque la lecture de la piste USB est
interrompue) : Vous permet de supprimer la piste sélectionnée.
Supprimer tous les fichiers (Delete All) (s’affiche dans le menu lorsque la lecture de la piste USB est
interrompue) : Vous permet de supprimer toutes les pistes sur le dispositif USB.
Quitter (Exit) : Vous permet de quitter le menu des options musique.
Page 34

34
Mode carte SD
Pour accéder à la carte SD insérée :
1. Maintenez la touche Mode enfoncée jusqu’à ce que l’icône carte SD s’affiche à l’écran.
Remarque : Lorsque vous connectez un appareil USB, une carte SD ou appareil Bluetooth, le système
Envoi Go passera automatiquement à la source la plus récemment connectée.
2. Maintenez la touche Mode enfoncée pendant 2 secondes en mode carte SD afin d’afficher les options
supplémentaires du menu.
3. Utilisez les touches |<< et >>| pour faire défiler les options, puis appuyez sur la touche de
Lecture/Pause pour sélectionner l'un des paramètres ci-dessous.
Égalisation (EQ) : L’enceinte Envoi Go dispose de 7 préréglages d’égalisation afin d'apporter des
améliorations à la musique. Vous pouvez sélectionner parmi les paramètres d'égalisation suivants :
• Normal (Nor)
• Populaire
• Rock
• Jazz
• Classique (Clas)
• Country (Cou)
• Graves (Bas)
Remarque : Les préréglages d'égalisation numériques ne peuvent s'appliquer qu'à des sources Bluetooth,
SD et USB.
Mode de lecture :
• Toutes (A) : Vous permet de faire la lecture de toutes les pistes sur la carte SD, puis de les répéter.
• Répète une piste (1) : Vous permet de faire la lecture de la piste en cours, puis de la répéter.
• Répétition d’un dossier (F) : Vous permet de faire la lecture de toutes les pistes dans le dossier
sélectionné, puis de recommencer la lecture de toutes les pistes.
• Normal (N) : Vous permet de faire la lecture de toutes les pistes sur la carte SD.
• Aléatoire (R) : Sélectionne une piste au hasard.
• Balayage (I) : Vous permet de faire la lecture des 10 premières secondes de chaque piste sur la carte
SD.
Changement d’appareil (Change Device) : Vous permet de passer de la lecture de la carte SD à la lecture
du dispositif USB branché.
Quitter (Exit) : Vous permet de quitter le menu carte SD.
Dossier sur la carte (Card Folder) (s’affiche dans le menu lorsque la lecture de la piste de la carte SD est
interrompue) : Vous permet de sélectionner une piste dans un dossier sur la carte SD. Utilisez les touches
|<< et >>| pour faire défiler les dossiers, puis appuyez sur la touche de Lecture/Pause pour ouvrir l'un des
dossiers ou sélectionner une piste à lire.
Supprimer le fichier (Delete File) (s’affiche dans le menu lorsque la lecture de la piste de la carte SD est
interrompue) : Vous permet de supprimer la piste sélectionnée.
Supprimer tous les fichiers (Delete All) (s’affiche dans le menu lorsque la lecture de la piste de la carte SD
est interrompue) : Vous permet de supprimer toutes les pistes sur la carte SD.
Quitter (Exit) : Quitter le menu des options musique.
Page 35

35
Guide de dépannage
En cas de problème, procédez comme suit :
• Assurez-vous que tous les câbles et les autres périphériques sont correctement raccordés.
• Assurez-vous que vous utilisez Envoi Go comme indiqué dans ce Guide d’utilisation.
• Assurez-vous que vos autres appareils ou médias fonctionnent correctement.
• Si vous croyez que Envoi Go ne fonctionne pas correctement, vérifiez le tableau suivant afin de
trouver le problème et la solution.
Problème : Solution : Veuillez consulter :
L’appareil ne s’allume pas. Veuillez vous assurer que le câble
d’alimentation du Envoi Go est correctement
branché à l’entrée d’alimentation et à la
prise secteur.
I
nstallation
Le Envoi Go ne produit
aucun son, ou le son est
déformé.
Assurez-vous que tous les câbles et
appareils soient correctement raccordés.
Assurez-vous que les câbles ne soient pas
endommagés.
Assurez-vous que les paramètres de votre
appareil Bluetooth, enceinte, console de
mixage, etc. soient correctement réglés.
I
nstallation
Le Envoi Go ne transmet pas
le signal audio de l’appareil
Bluetooth.
Assurez-vous que vous avez correctement
jumelé votre appareil Bluetooth au Envoi Go.
REMARQUE : Si votre appareil Bluetooth ne
reconnaît pas le système Envoi Go, accédez
aux paramètres Bluetooth de votre appareil
Bluetooth et supprimer le système Envoi Go
de la liste des appareils (Oublier). Lorsque le
mode Bluetooth est réactivé, le système
Envoi Go devrait réapparaître après 5
secondes. Sélectionnez-le pour le connecter.
Améliorez la réception du signal Bluetooth
en rapprochant votre appareil Bluetooth du
Envoi Go. Veuillez également vous assurer
qu’il n’y a aucun obstacle (murs, meubles,
etc.) entre l’appareil Bluetooth et le Envoi
Go.
I
nstallation et
Fonctionnement
Jumeler mon appareil
Bluetooth au Envoi Go
nécessite un NIP.
Entrez 0000. (Certains appareils Bluetooth
plus anciens peuvent vous demander
d’entrer un NIP.)
F
onctionnement
Page 36

36
Guida per l’uso (Italiano)
Introduzione
• Batteria ricaricabile incorporata
• Woofer da 6,5", due driver articolati a gamma completa da 3" per ciascun altoparlante
• Collegamento Bluetooth per lo streaming audio wireless
• Lettore USB/SD MP3/WMA per la riproduzione senza operatore con lettore LCD
• Presa di montaggio su palo da 35 mm sotto gli altoparlanti e l'unità di controllo
Si veda il capitolo Setup della presente guida per sapere come integrare l'Envoi Go al proprio impianto
audio, quindi fare riferimento al capitolo Operazione per iniziare a utilizzare l'Envoi Go.
1. Assicurarsi che tutti gli elementi elencati nel paragrafo “Contenuti della confezione” siano contenuti nella
confezione stessa.
2. LEGGERE ATTENTAMENTE IL LIBRETTO DELLE ISTRUZIONI DI SICUREZZA PRIMA DI
UTILIZZARE IL PRODOTTO.
3. Studiare lo schema dei collegamenti.
4. Assicurarsi che tutti i dispositivi di ingresso quali microfoni, lettori CD o lettori digitali siano spenti e che i
relativi volumi siano su "zero".
5. Collegare tutti i dispositivi come illustrato.
6. Accendere tutto nel seguente ordine:
• Sorgenti di ingresso audio (microfoni, strumenti, lettori CD)
• Envoi Go
7. Al momento dello spegnimento, invertire questa operazione spegnendo:
• Envoi Go
• Qualsiasi dispositivo di ingresso
Contenuti della confezione
Envoi Go (due altoparlanti e un controller)
Cavo di alimentazione
(2) cavi per altoparlante (15 piedi; 4,5 m)
Guida per l’uso
Istruzioni di sicurezza e garanzia
Assistenza
Per conoscere le ultime informazioni in merito a questo prodotto (i requisiti di sistema complete, compatibilità,
ecc) e per la registrazione del prodotto, recarsi alla pagina denonpro.com.
Il cavo di alimentazione e i cavi audio possono essere riposti nello scomparto presente a livello del pannello
posteriore.
Page 37

37
Batterie ricaricabili
Le batterie ricaricabili al piombo-acido sono dello stesso tipo di quelle utilizzate nelle automobili. Come nel
caso della batteria dell'auto, la maniera in cui si utilizza questa batteria ha un notevole impatto sulla sua vita
utile. Con un utilizzo adeguato, una batteria al piombo-acido può durare per anni. Ecco alcune
raccomandazioni per garantire la massima durata dalla batteria interna.
Utilizzo generico
Caricare a fondo il prodotto prima dell'uso.
Caricare a fondo il prodotto prima di riporlo.
Come riporre
l’apparecchio
Per la massima longevità del prodotto, evitare di riporlo a temperature eccessivamente
elevate (superiori a 90°F/32°C) o eccessivamente fredde (meno di 32°F/0°C).
L'impianto audio può essere lasciato collegato. Così facendo la batteria non si
sovraccarica.
Se si lascia il livello della batteria basso e non la si ricarica per 6 mesi, potrebbe perdere
capacità in via permanente.
Riparazioni
Se la batteria non si carica, verificare le condizioni del fusibile presso l'ingresso del
cavo di alimentazione. Se il fusibile non è intatto, sostituirlo.
La batteria può essere sostituita.
Per garanzia e parti di ricambio, visitare la pagina denonpro.com.
Come eliminare
l’apparecchio
Recarsi con l’apparecchio presso un centro di riciclaggio oppure eliminarlo in
conformità con le normative locali.
IMPORTANTE: non lasciare mai l'Envoi
Go acceso quando non è in uso.
Assicurarsi di spegnere il prodotto
durante i periodi di inattività.
Page 38

38
Setup
Gli elementi non elencati sotto Introduzione > Contenuti della confezione sono venduti separatamente.
Collegare i cavi con tutti i dispositivi spenti e assicurarsi che tutti i comandi volume main siano spenti.
Affinché venga elaborato un segnale per ciascun canale, procedere come segue:
1. Aprire le cerniere della cabina in cima all'Envoi Go e scollegare le casse dal controller.
2. Aprire lo scomparto del pannello posteriore del controller e rimuovere il cavo di alimentazione e i cavi
dell'altoparlante.
3. Posizionare il controller al centro dei due altoparlanti posti a una distanza sufficiente, l'uno dall'altro,
per il massimo della separazione stereo.
4. Inserire i cavi dell'altoparlante nelle uscite altoparlante sinistra e destra sul retro del controller.
5. Impostare tutte le manopole Level di canale su zero, la manopola Master su zero e l'EQ piatto.
6. Collegare il mic o lo strumento al canale.
7. Collegare il cavo di alimentazione al controller e accendere l'Envoi Go.
8. Impostare la manopola Master su non più del 70%
9. Regolare la manopola di livello canale. Quando il volume è regolato in maniera corretta, il LED di
canale e il LED del LIM (Limitatore) non si devono accendere.
Tablet
Registratore
Lettore
MP3
Guitar
Microfono
Page 39

39
Caratteristiche
Pannello anteriore
1. Display: mostra a display le modalità del pannello
dei media per Bluetooth, USB e SD.
2. Porta USB: collegare qui il drive flash USB per
riprodurre file musicali MP3 e WMA.
3. Slot scheda SD: Inserire qui la scheda SD per
riprodurre file musicali MP3 e WMA.
4. Pannello dei media: comandi per le fonti
Bluetooth, SD e USB. Quando la fonte viene
riprodotta, il simbolo della modalità Media Panel si
accende.
5. Interruttore fonte di ingresso: seleziona se il
canale 5/6 utilizzerà SD/MP3/USB come fonte o
l'ingresso da 1/8” (3,5 mm) / 2-Trk.
6. Volume Master: controlla il livello complessivo
degli ingressi canale.
7. Misuratori LED: mostra il livello audio dei livelli
canale combinati insieme al livello del volume
Master. Abbassare il volume se il LED LIM
(limitatore) si accende troppo.
8. FX On/Off: premere questo tasto per attivare gli
effetti interni.
9. Manopola effetti DSP: scegliere tra i preset effetti
interni del controller da applicare agli ingressi
canale.
10. FX Return: regola il livello del segnale inviato dagli
effetti DSP interni ai canali.
11. Level (livello): regola il guadagno di segnale per
ciascun canale.
12. LED di picco canale: questo LED si illumina di
rosso se il segnale del canale salta. Se ciò accade,
abbassare la manopola di livello Level per quel
canale o premere il tasto Pad.
13. High EQ (Acuti): aumenta o diminuisce il livello
delle frequenze alte (acuti) in un intervallo compreso
tra -12dB e +12dB.
14. Low EQ (Bassi): aumenta o diminuisce il livello
delle frequenze basse (bassi) in un intervallo
compreso tra -12dB e +12dB.
15. FX/Aux: controlla la quantità di segnale inviata al processore di effetti interni e all'uscita Aux.
16. Pad: premere questo tasto per ridurre i segnali di ingresso elevato (ad esempio quelli di strumenti
microfonati da vicino durante un'esibizione) per evitare che il canale salti.
17. Ingresso mic (XLR): collegare microfoni dinamici agli ingressi XLR. Controllare il volume di questi
ingressi servendosi della manopola Level.
18. Ingresso di linea da 1/4” (6,35 mm): collegare un dispositivo a livello di linea quali una tastiera o una
drum machine a questo livello.
19. Ingresso stereo da 1/8” (3,5mm): collegare un dispositivo a livello di linea quali un lettore CD, una
scheda audio di un computer, uno smartphone un dispositivo multimediale, ecc. a questo livello.
20. L/Mono / Right: collegare un dispositivo a livello di linea quali una tastiera o una drum machine a
questo canale stereo. In caso di fonti mono, collegarle unicamente all'ingresso L/Mono.
21. Ingresso 2-Trk: collegare le uscite di un dispositivo esterno a questi ingressi servendosi di cavi
standard RCA. Questi possono essere utilizzati per collegare un lettore CD o un dispositivo mobile
(laptop, tablet, telefono cellulare, ecc.).
22. Uscita 2-Trk: convogliare il segnale di uscita in un lettore di nastri, una scheda audio di un computer
o un registratore portatile.
23. Uscita Aux: invia il segnale FX/Aux a un dispositivo esterno.
24. Effetti insert esterni: collegare un equalizzatore o compressore esterno servendosi dei “cavi di
inserzione a Y”. Quando un processore esterno viene inserito nel jack, il segnale stereo sarà inviato
dopo il livello Master e convogliato nel mix stereo prima dell'amplificatore.
11
11
13
13
14
14
15
15
16
16
17
17
18
18
20
20
21
21
22
22
23
23
24
24
12
12
8
1
4
5
6
7
9
10
10
19
19
2
3
8
Page 40

40
Pannello posteriore
1. Indicatori di livello della batteria: questi LED
mostrano lo stato della batteria e indicano quando
deve essere ricaricata. La durata della batteria dipende
a seconda del volume e dell'utilizzo che se ne fa.
2. Uscite casse: collegare queste uscite agli altoparlanti
dell'Envoi Go con il cavo per altoparlante in dotazione.
3. Interruttore di alimentazione: accende e spegne
l'Envoi Go.
4. Fusibile: se il fusibile deve essere sostituito, servirsi di
un fusibile con tensione nominale di 100~240V / T4AL
250V.
5. Cavo di alimentazione (IEC): collegare a questo livello
il cavo di alimentazione in dotazione.
1
2
3
4
5
IMPORTANTE: quando la spia di livello
di carica della batteria si illumina,
significa che è richiesta una ricarica. Per
effettuare una ricarica completa,
spegnere il dispositivo e caricarlo per 6
ore oppure fino a quando la spia verde
non indica che la carica è completa.
IMPORTANTE: per massimizzare la
durata della batteria, è importante
caricare l'apparecchio regolarmente.
IMPORTANTE: quando il LED rosso al di
sopra dell'indicatore di livello batteria
BASSO è acceso, iniziare
immediatamente la ricarica. Mai riporre
l'Envoi Go con la batteria scarica. Inoltre,
mai riporre l'Envoi Go con l'interruttore di
alimentazione su ON. Assicurarsi che
l'apparecchio sia sempre spento prima di
riporlo, per qualsiasi periodo di tempo.
Page 41

41
Schema degli effetti
PER SENTIRE GLI EFFETTI SU UN INGRESSO CANALE: regolare la manopola FX/Aux per il canale e
regolare la manopola FX Return. Premere il tasto FX on/off per accendere gli effetti. Servirsi della manopola
effetti DSP per scegliere uno degli effetti qui di seguito:
# PRESET DESCRIZIONE
1 PLATE 1
Simula il riverbero di un piatto con un lungo tempo di
decadenza.
2 ROOM 1
Simula l'ambiente con l'acustica naturale di una stanza
con lungo tempo di decadenza.
3 PLATE 2 Simula il riverbero di un piatto con decadenza media.
4 PLATE 3 Simula il riverbero di un piatto con decadenza breve.
5 ROOM 2
Simula l'ambiente con l'acustica naturale di una stanza
con tempo di decadenza medio.
6 ROOM 3
Simula l'ambiente con l'acustica naturale di una stanza
con tempo di decadenza breve.
7 HALL 1
Simula l'ambiente di una grande sala da concerti con
decadenza media.
8 HALL 2
Simula l'ambiente di una grande sala da concerti con
lunga decadenza.
9 DELAY 1 Delay mono tipico.
10 DELAY 2 Delay stereo ping-pong tipico.
11 FLANGER
Classico effetto di flanging stereo, simile al suono di un
jet che decolla.
12 CHORUS
Effetto di modulazione, garantisce un effetto morbido
ed etereo.
13 CHORUS/ROOM 1
Tipico effetto chorus e riverbero dalla decadenza breve
combinati.
14 CHORUS/ROOM 2
Tipico effetto chorus e riverbero dalla decadenza lunga
combinati.
15 VOCAL CANCEL
Riduce il livello della parte vocale in una registrazione.
Nota bene: questo effetto funziona meglio per ridurre
voci originariamente registrate in mono e collocate al
centro nel mix stereo.
16 ALTOPARLANTE ROTANTE
Simula l'effetto di un altoparlante rotante tipico del
1960.
Page 42

42
Pannello dei media
Funzioni Pannello dei media:
1. USB/SD/BT/Menu/Mode: seleziona la fonte del
pannello dei media: USB, SD e Bluetooth. Premere e
rilasciare per attivare la modalità di collegamento
Bluetooth. Una volta collegato al Bluetooth, tenere
premuto Mode per scegliere tra le opzioni BT
(Bluetooth) Disconnect, Select EQ, Delete Paired Info
e Device Information (scollega, scegli EQ, cancella
info di collegamento, informazioni sul dispositivo).
Quando collegato a una scheda SD o a USB, tenere
premuto Mode per accedere a EQ, Play Mode o
Change Device.
2. Play/Pause: riproduce o interrompe
momentaneamente la riproduzione della fonte USB,
SD, o Bluetooth del pannello dei media. Quando ci
si trova in Mode (modalità), funziona come
comando di selezione/invio (select/enter).
3. Stop: interrompe la riproduzione della fonte del
pannello dei media.
4. Repeat (Ripeti): scorre lungo le diverse opzioni di
ripetizione per le fonti USB e SD.
5. Previous Track/Volume Down (traccia
precedente/volume giù): passa alla traccia
precedente presente su USB o scheda SD. Quando
ci si trova in Mode (modalità), funziona come
comando per sinistra/su (left/up). Quando si
ascoltano fonti Bluetooth, la pressione di
Prev in alcune app può far passare a un'altra playlist o a un
altro genere musicale. Tenere premuto questo tasto per ridurre il volume della traccia.
6. Next Track/ Volume Up (traccia successiva/volume su): passa alla traccia successiva presente su
USB o scheda SD. Quando ci si trova in Mode (modalità), funziona come comando per destra/giù
(right/down). Quando si ascoltano fonti Bluetooth, la pressione di Next in alcune app può passare a
un'altra playlist o a un altro genere musicale. Tenere premuto questo tasto per aumentare il volume
della traccia.
16. Il simbolo Play si illumina durante la riproduzione di una traccia.
17. Il simbolo Repeat si illumina quando una traccia SD o USB è stata impostata in modo da essere
ripetuta. La casella sotto il simbolo Repeat mostra l'opzione di ripetizione selezionata. Si veda
Operazione > Modalità USB > Modalità Play (di riproduzione) per maggiori informazioni.
18. Visualizza a display la canzone attualmente riprodotta e il numero totale di canzoni presenti nella
cartella selezionata.
19. Mostra a display il tipo di preset EQ cambiato tenendo premuto il tasto Mode quando collegato a
fonti Bluetooth, SD o USB e selezionando EQ.
20. Mostra a display la frequenza dei bit e il tipo di canzone riprodotta.
Nota bene: se il file impiega una frequenza di bit variabile, questo numero cambierà man mano che la
canzone viene riprodotta.
21. Memoria SD o USB riprodotta.
22. Nome del file riprodotto.
23. Analizzatore dello spettro di frequenza.
24. Tempo corrente e tempo totale della canzone riprodotta.
7
8
9
10
11
12
13
14
15
1 2
3 4
5
6
Page 43

43
Operazione
Allineamento di un dispositivo Bluetooth
1. Accendere il dispositivo Bluetooth.
2. Accendere l'Envoi Go.
3. Premere e rilasciare il tasto Mode per entrare in modalità Bluetooth.
4. Navigare fino alla schermata di configurazione del dispositivo Bluetooth, selezionare Envoi Go, e
collegare.
Nota bene: se viene richiesta una password, inserire 0000.
5. Avviare la riproduzione di musica dal dispositivo Bluetooth.
6. Regolare il volume di Envoi Go i tenendo premuto il tasto |<< o >>| per abbassare o alzare il volume.
7. Per annullare l'allineamento, spegnere il Bluetooth sul dispositivo o selezionare "Delete paired info"
(cancella info di collegamento) nel menu Bluetooth di Envoi Go.
Modalità Bluetooth
Per accedere a un dispositivo Bluetooth collegato:
1. Tenere premuto il tasto Mode fino a quando l'icona Bluetooth non compare sullo schermo. Il
dispositivo collegato in precedenza si collegherà automaticamente.
Nota bene: quando si collega un dispositivo USB, una scheda SD o un dispositivo Bluetooth, l'Envoi
Go passerà automaticamente alla fonte collegata più di recente.
2. In modalità Bluetooth, tenere premuto il tasto Mode per 2 secondi per visualizzare ulteriori opzioni.
3. Servirsi dei tasti |<< e >>| per scorrere e premere Play/Pause per selezionare una delle impostazioni di
cui sotto.
BT Disconnect: Questa funzione disabilita il collegamento dalla fonte audio Bluetooth.
EQ: Envoi Go offre 7 preset di equalizzatore opzionali per migliorare la musica. È possibile scegliere una
delle seguenti impostazioni EQ:
• Normal (Nor)
• Pop
• Rock
• Jazz
• Classic (Clas)
• Country (Cou)
• Low Bass (Bas)
Nota bene: i preset EQ digitali possono essere applicati unicamente a fonti Bluetooth, SD e USB.
Cancella info collegamento: scegliere questa opzione per “dimenticare” un dispositivo Bluetooth collegato
in precedenza in modo che l'Envoi Go non si riconnetta una volta nuovamente in modalità Bluetooth.
Informazioni sul dispositivo: mostra il nome del dispositivo dell'Envoi Go.
Exit (esci): lascia il menu Bluetooth.
Page 44

44
Modalità USB
Per accedere a un dispositivo USB collegato:
1. Tenere premuto il tasto Mode fino a quando l'icona del dispositivo USB compare nell'angolo superiore
destro dello schermo.
Nota bene: quando si collega un dispositivo USB, una scheda SD o un dispositivo Bluetooth, l'Envoi
Go passerà automaticamente alla fonte collegata più di recente.
2. In modalità USB, tenere premuto il tasto Mode per 2 secondi per visualizzare ulteriori opzioni del menu
USB.
3. Servirsi dei tasti |<< e >>| per scorrere e premere Play/Pause per selezionare una delle impostazioni di
cui sotto.
EQ: Envoi Go offre 7 preset di equalizzatore opzionali per migliorare la musica. È possibile scegliere una
delle seguenti impostazioni EQ:
• Normal (Nor)
• Pop
• Rock
• Jazz
• Classic (Clas)
• Country (Cou)
• Low Bass (Bas)
Nota bene: i preset EQ digitali possono essere applicati unicamente a fonti Bluetooth, SD e USB.
Modalità Play (di riproduzione):
• All (A) (tutte): riproduce e ripete tutte le tracce presenti sul dispositivo USB.
• Repeat One (1) (ripeti una): riproduce e ripete la traccia corrente.
• Repeat Folder (F) (ripeti cartella): riproduce le tracce presenti nella cartella corrente e riavvia la
riproduzione delle tracce.
• Normal (N) (normale): riproduce le tracce presenti sul dispositivo USB.
• Random (R) (casuale): sceglie una traccia a caso da riprodurre.
• Browse (I): riproduce i primi 10 secondi di ciascuna traccia presente sul dispositivo USB.
Change Device (cambia dispositivo): permette di passare dall'ascolto della scheda SD a quello di un drive
USB collegato.
Exit (esci): lascia il menu Modalità USB.
Cartella U-disk (Visto nel menu quando la traccia USB è in pausa) :
scegliere una traccia da una cartella
presente sul drive USB. Servirsi dei tasti |<< e >>| per navigare su o giù e premere Play/Pause per aprire
una cartella o selezionare una traccia da riprodurre.
Delete File (cancella file) (Visto nel menu quando la traccia USB è in pausa): cancella la traccia
selezionata.
Delete All (cancella tutti) (Visto nel menu quando la traccia USB è in pausa): cancella tutte le tracce
presenti sul drive USB.
Exit (esci): lascia il menu opzioni Music.
Page 45

45
Modalità scheda SD
Per accedere a una scheda SD inserita:
1. Tenere premuto il tasto Mode fino a quando l'icona della scheda SD non compare sullo schermo.
Nota bene: quando si collega un dispositivo USB, una scheda SD o un dispositivo Bluetooth, l'Envoi
Go passerà automaticamente alla fonte collegata più di recente.
2. In modalità Scheda SD, tenere premuto il tasto Mode per 2 secondi per visualizzare ulteriori opzioni
menu.
3. Servirsi dei tasti |<< e >>| per scorrere e premere Play/Pause per selezionare una delle impostazioni di
cui sotto.
EQ: Envoi Go offre 7 preset di equalizzatore opzionali per migliorare la musica. È possibile scegliere una
delle seguenti impostazioni EQ:
• Normal (Nor)
• Pop
• Rock
• Jazz
• Classic (Clas)
• Country (Cou)
• Low Bass (Bas)
Nota bene: i preset EQ digitali possono essere applicati unicamente a fonti Bluetooth, SD e USB.
Modalità Play (di riproduzione):
• All (A) (tutte): riproduce e ripete tutte le tracce presenti sulla scheda SD.
• Repeat One (1) (ripeti una): riproduce e ripete la traccia corrente.
• Repeat Folder (F) (ripeti cartella): riproduce le tracce presenti nella cartella corrente e riavvia la
riproduzione delle tracce.
• Normal (N) (normale): riproduce le tracce presenti sulla scheda SD.
• Random (R) (casuale): sceglie una traccia a caso da riprodurre.
• Browse (I): riproduce i primi 10 secondi di ciascuna traccia presente sulla scheda SD.
Change Device (cambia dispositivo): permette di passare dall'ascolto della scheda SD a quello di un drive
USB collegato.
Exit (esci): lascia il menu Modalità Scheda SD.
Cartella scheda (Visto nel menu quando la scheda SD è in pausa): scegliere una traccia da una cartella
presente sulla scheda SD. Servirsi dei tasti |<< e >>| per navigare su o giù e premere Play/Pause per aprire
una cartella o scegliere una traccia da riprodurre.
Delete File (cancella file) (Visto nel menu quando la scheda SD è in pausa): cancella la traccia selezionata.
Delete All (cancella tutti) (Visto nel menu quando la scheda SD è in pausa): cancella tutte le tracce presenti
sulla scheda SD.
Exit (esci): lascia il menu opzioni Music.
Page 46

46
Risoluzione di problemi
In caso di problemi, procedere come segue:
• Assicurarsi che tutti i cavi e i dispositivi siano collegati in maniera corretta e ben salda.
• Assicurarsi di utilizzare Envoi Go come descritto nel presente Guia per l'uso.
• Assicurarsi che gli altri dispositivi o media funzionino correttamente.
• Se si ritiene che Envoi Go non funzioni come si deve, verificare nella seguente tabella il problema
riscontrato e la relativa soluzione.
Problema: Soluzione: Si veda:
Non si accende.
Assicurarsi che l'ingresso di alimentazione
del Envoi Go sia collegato a una presa di
alimentazione utilizzando le cavo in
dotazione.
Setup
Il Envoi Go non produce
alcun suono o il suono è
distorto.
Assicurarsi che tutti i cavi e i collegamenti ai
dispositivi siano sicuri e corretti.
Assicurarsi che non vi siano cavi
danneggiati.
Assicurarsi che le impostazioni sul
dispositivo Bluetooth, altoparlante, mixer,
ecc. siano corrette.
Setup
L'audio proveniente dal mio
dispositivo Bluetooth non
viene riprodotto tramite il
Envoi Go.
Assicurarsi di aver collegato adeguatamente
il dispositivo Bluetooth.
NOTA BENE: se il dispositivo Bluetooth non
riconosce l'Envoi Go, recarsi sulle
impostazioni Bluetooth del proprio
dispositivo Bluetooth e "dimenticare" l'Envoi
Go nell'elenco dei dispositivi. Se la modalità
Bluetooth è attiva, l'Envoi Go riappare dopo
5 secondi. Selezionarlo per ricollegarlo.
Migliorare la ricezione del segnale Bluetooth
avvicinando il dispositivo Bluetooth al Envoi
Go. Inoltre, rimuovere eventuali ostacoli
(pareti, mobili, ecc.) in modo che ci sia una
linea d'aria libera tra il dispositivo Bluetooth
e il Envoi Go.
Setup e Operazione
Il collegamento del mio
dispositivo Bluetooth al Envoi
Go richiede un PIN.
Inserire 0000 come PIN. (Alcuni dispositivi
Bluetooth più vecchi possono richiedere
l'inserimento di un PIN).
Operazione
Page 47

47
Benutzerhandbuch (Deutsch)
Einführung
• Eingebauter Akku
• 6,5" Woofer, zwei flexible 3" Fullrange-Treiber pro Lautsprecher
• Bluetooth-Verbindung für drahtlose Audioübertragung
• USB/SD MP3/WMA-Player für die selbständige Wiedergabe mit LCD-Display
• Integrierte 35mm-Fassung für Ständermontage unter Lautsprecher und Steuereinheit
Bitte lesen Sie das Setup-Kapitel in dieser Anleitung, um zu erfahren, wie Sie Envoi Go in Ihr Audiosystem
integrieren können. Lesen Sie anschließend das Kapitel Betrieb, um Envoi Go in Betrieb zu nehmen.
1. Stellen Sie sicher, dass alle im Lieferumfang aufgelisteten Teile in der Verpackung enthalten sind.
2. LESEN SIE DIE SICHERHEITSHINWEISE, BEVOR SIE DAS PRODUKT VERWENDEN.
3. Werfen Sie einen Blick auf die Anschlussübersicht.
4. Stellen Sie sicher, dass alle Eingabegeräte wie Mikrofone, CD-Player oder digitale Wiedergabegeräte
ausgeschaltet sind und deren Lautstärke auf "Null“ steht.
5. Verbinden Sie alle Geräte wie angegeben.
6. Schalten Sie alles in folgender Reihenfolge ein:
• Audio-Eingangsquellen (z.B. Mikrofone, Instrumente, CD-Player)
• Envoi Go
7. Beim Ausschalten gehen Sie in umgekehrter Reihenfolge vor:
• Envoi Go
• alle Eingabegeräte
Lieferumfang
Envoi Go (Zwei Lautsprecher und ein Controller)
Netzkabel
(2) Lautsprecherkabel (15 Fuß; 4,5m)
Benutzerhandbuch
Sicherheitshinweise und Garantieinformationen
Kundendienst
Für aktuelledie neuesten Informationen zu diesem Produkt (Systemanforderungen, Informationen zur
Kompatibilität etc.) und zur Produktregistrierung besuchen Sie denonpro.com.
Das Netzkabel und die Audiokabel können im rückseitigen Fach aufbewahrt werden.
Page 48

48
Wiederaufladbare Batterien
Bei wiederaufladbaren Bleibatterien handelt es sich um die gleiche Art von Batterien, die in Autos verwendet
werden. Und wie bei Ihrer Autobatterie ist es auch für die Benutzungsdauer dieser Batterie von äußerster
Wichtigkeit, wie sie verwendet wird. Bei vorschriftsmäßigem Gebrauch und richtiger Pflege kann eine
Bleibatterie jahrelang halten. Lesen Sie die nachstehenden Empfehlungen, um aus der eingebauten Batterie
das Beste herauszuholen.
Allgemeine
Verwendung
Laden Sie das Gerät vor der Verwendung vollständig auf.
Laden Sie es vollständig auf, bevor Sie es verstauen.
Lagerung
Um eine optimale Langlebigkeit des Produkts zu garantieren, bewahren Sie es nicht in
extrem heißen (über 90°F / 32°C) oder extrem kalten (unter 32°F / 0°C) Temperaturen
auf.
Sie können Ihr Sound-System angesteckt lassen. Der Akku wird dabei nicht überladen.
Wenn Ihr Akku einen niedrigen Ladestand hat und Sie ihn 6 Monate lang nicht aufladen,
kann er dauerhaft an Kapazität verlieren.
Reparatur
Wenn sich der Akku nicht aufladen lässt, überprüfen Sie die Sicherung in der Nähe des
Netzkabelanschlusses. Ist die Sicherung nicht intakt, ersetzen Sie sie bitte.
Der Akku kann ersetzt werden.
Für Garantie und Ersatzteile, besuchen Sie denonpro.com.
Entsorgung
Bringen Sie das Gerät in ein Recyclingzentrum oder entsorgen Sie es entsprechend
lokaler Verordnungen.
WICHTIG: Lassen Sie Envoi Go
niemals eingeschaltet, wenn es nicht in
Verwendung ist. Achten Sie darauf,
dass dieses Produkt bei Inaktivität
ausgeschaltet wird.
Page 49

49
Setup
Teile, die nicht unter Einführung > Lieferumfang angegeben sind, sind separat erhältlich.
Nehmen Sie Kabelverbindungen nur bei ausgeschalteten Geräten vor und sorgen Sie dafür, dass alle
Hauptlautstärkeregler auf Null gestellt wurden. Befolgen Sie die unten angeführten Anweisungen, um für
jeden Kanal ein Signal zu verarbeiten:
1. Öffnen Sie die Verriegelungen an der Oberseite des Envoi Go und trennen Sie die Lautsprecher vom
Controller.
2. Öffnen Sie das rückseitige Staufach am Controller und entnehmen Netzkabel und Lautsprecherkabel.
3. Positionieren Sie den Controller in der Mitte zwischen den beiden Lautsprechern. Achten Sie darauf,
dass die Lautsprecher genügend Abstand voneinander haben, um eine maximale Stereotrennung zu
erzielen.
4. Schließen Sie die Lautsprecherkabel in den linken und rechten Lautsprecherausgang auf der
Rückseite des Controllers an.
5. Stellen Sie alle Kanalpegelregler und den Gesamtlautstärkeregler auf Null und bringen die EQEinstellungen in die neutrale Position.
6. Schließen Sie Ihr Mikrofon oder Instrument an den Kanal an.
7. Verbinden Sie das Netzkabel mit dem Controller und schalten Sie Envoi Go ein.
8. Stellen Sie den Master-Regler auf maximal 70%.
9. Passen Sie den Kanalpegelregler an. Wenn die Lautstärke richtig eingestellt ist, sollte weder die
Kanal-LED noch die LIM-LED (Limiter) leuchten.
Tablet
Recorder
MP3 Player
Gitarre
Mikrofon
Page 50

50
Funktionen
Vorderseite
1. Display: Zeigt die Medien-Panel-Modi für Bluetooth,
USB und SD an.
2. USB-Anschluss: Verbinden Sie Ihren USB-Stick, um
MP3- und WMA-Musikdateien abzuspielen.
3. SD-Kartensteckplatz: Legen Sie die SD-Karte hier ein,
um MP3- und WMA-Musikdateien abzuspielen.
4. Medien-Panel: Bedienelemente für Bluetooth-, SD- und
USB-Quellen. Das Symbol des Medien-Panel-Modus
wird leuchten, wenn diese Quelle wiedergegeben wird.
5. Eingangsquellenwahlschalter: Legt fest, ob Kanal 5/6
SD/MP3/USB oder den 1/8" (3,5 mm) / 2-Trk-Eingang
als Quelle verwendet.
6. Master-Lautstärke: Dies steuert den Gesamtpegel für
alle Kanaleingänge.
7. LED-Anzeigen: Zeigt den Audiopegel der kombinierten
Kanalpegel zusammen mit dem Gesamtlautstärkepegel.
Reduzieren Sie die Lautstärke, wenn die LIM-LED
(Limiter) übermäßig oft leuchtet.
8. FX Ein/Aus: Drücken Sie diese Taste, um die internen
Effekte zu aktivieren.
9. DSP-Effektregler: Wählen Sie Effekte aus den internen
Effekt-Presets des Controllers aus, um diese auf die
Kanaleingänge anzuwenden.
10. FX-Return: Stellt den Pegel des Signals ein, das von
den internen DSP-Effekten an die Kanäle gesendet wird.
11. Pegel: Regelt die Signalverstärkung für jeden Kanal.
12. Kanal-Peak-LED: Diese LED leuchtet rot, wenn das
Kanalsignal übersteuert. In diesem Fall sollten Sie den
Wert des Pegelreglers für diesen Kanal reduzieren oder
die Pad-Taste drücken.
13. High EQ (Höhen): Erhöht oder verringert die hohen
Frequenzen (Höhen) im Bereich zwischen -12dB und
+12dB.
14. Low EQ (Bass): Erhöht oder verringert die tiefen
Frequenzen (Bass) im Bereich zwischen -12dB und +12dB.
15. FX/Aux: Steuert den Anteil des Signals, das an den internen Effektprozessor und den Aux-Ausgang
gesendet wird.
16. Pad: Drücken Sie diese Taste, um hohe Eingangssignale (z.B. von nahe am Mikrofon platzierten
Instrumenten während einer Performance) zu reduzieren, um ein Übersteuern des Kanals zu
vermeiden.
17. Mikrofoneingang (XLR): Schließen Sie dynamische Mikrofone an die XLR-Eingänge an. Regeln Sie
die Lautstärke dieser Eingänge mit dem Pegelregler.
18. 1/4" (6,35 mm) Line-Eingang: Schließen Sie hier ein Line-Level-Gerät an, z.B. ein Keyboard oder
Drum-Machine.
19. 1/8" (3,5 mm) Stereoeingang: Schließen Sie hier ein Line-Level-Gerät an, z.B. CD-Player, ComputerSoundkarte, Smartphone, Mediengerät usw.
20. L/Mono / Rechts: Schließen Sie ein Line-Level-Gerät an diesen Stereokanal an, z.B. ein Keyboard,
eine Drum-Maschine etc. Bei Mono-Quellen verbinden Sie nur den L/Mono-Eingang.
21. 2-Trk-Eingang: Sie können diese Eingänge mit den Ausgängen eines externen Aufnahmegeräts
verbinden, indem Sie handelsübliche Cinch-Kabel verwenden. Diese können verwendet werden, um
einen CD-Player oder ein mobiles Gerät (Laptop, Tablet, Handy etc.) anzuschließen.
22. 2-Trk-Ausgang: Leiten Sie das Signal in ein Tapedeck, eine Computer-Soundkarte oder einen
tragbaren Recorder.
23. Aux-Ausgang: Sendet das FX/Aux-Signal an ein externes Gerät.
24. Externe Insert-Effekte: Verbinden Sie dies mit einem externen Equalizer oder Kompressor mithilfe
der "Insert Y-Kabel". Wenn ein externer Prozessor an die Buchse angeschlossen ist, wird das
Stereosignal dem Gesamtpegel nachgeschaltet gesendet und vor dem Verstärker in den Stereo-Mix
zurückgeschliffen.
11
11
13
13
14
14
15
15
16
16
17
17
18
18
20
20
21
21
22
22
23
23
24
24
12
12
8
1
4
5
6
7
9
10
10
19
19
2
3
8
Page 51

51
Rückseite
1. Akkuladestand: Diese LEDs zeigen den Ladestand
des Akkus an. Die Lebensdauer des Akkus hängt von
Lautstärke und Betriebsdauer ab.
2. Lautsprecherausgänge: Verbinden Sie diese
Ausgänge mit den Envoi Go-Lautsprechern über die
mitgelieferten Lautsprecherkabel.
3. Netzschalter: Schaltet Envoi Go ein oder aus.
4. Sicherung: Falls die Sicherung ersetzt werden muss,
verwenden Sie eine Sicherung mit einer Leistung von
100~240V / T4AL 250V.
5. IEC-Netzkabel: Schließen Sie das mitgelieferte
Netzkabel hier an.
1
2
3
4
5
WICHTIG: Wenn die Akkuanzeige
leuchtet, zeigt dies an, dass das Gerät
aufgeladen werden muss. Um das Gerät
vollständig aufzuladen, schalten Sie es
aus und laden es 6 Stunden lang auf oder
solange bis das grüne Licht eine
vollständige Ladung anzeigt.
WICHTIG: Um die Akkulebensdauer zu
maximieren, ist es wichtig, das Gerät
regelmäßig aufzuladen.
WICHTIG: Wenn die rote LED über der
Anzeige NIEDRIGER Akkuladestand
leuchtet, sollten Sie sofort mit dem
Ladevorgang beginnen. Bewahren Sie
Envoi Go niemals mit einem niedrigen
Ladestand auf. Darüber hinaus sollten Sie
Envoi Go niemals aufbewahren, wenn der
Netzschalter in der Position EIN ist.
Achten Sie darauf, dass das Gerät immer
ausgeschaltet ist, bevor Sie es längere
Zeit aufbewahren.
Page 52

52
Effektediagramm
SO HÖREN SIE DIE EFFEKTE EINES KANALEINGANGS: Stellen Sie den FX/Aux-Regler für den Kanal ein
und passen den FX Return-Regler an. Drücken Sie die FX Ein/Aus-Taste, um die Effekte einzuschalten.
Verwenden Sie den DSP-Effektregler, um einen der folgenden Effekte auszuwählen:
# PRESET BESCHREIBUNG
1 PLATE 1
Simuliert den Nachhall in einem Raum mit langer
Abklingzeit.
2 ROOM 1
Simuliert eine natürliche Raumakustik mit langer
Abklingzeit.
3 PLATE 2 Simuliert einen Plattenhall mit mittlerer Abklingzeit.
4 PLATE 3 Simuliert einen Plattenhall mit kurzer Abklingzeit.
5 ROOM 2
Simuliert eine natürliche Raumakustik mit mittlerer
Abklingzeit.
6 ROOM 3
Simuliert eine natürliche Raumakustik mit kurzer
Abklingzeit.
7 HALL 1
Simuliert die Atmosphäre eines großen Konzertsaals mit
mittlerer Abklingzeit.
8 HALL 2
Simuliert die Atmosphäre eines großen Konzertsaals mit
langer Abklingzeit.
9 DELAY 1 Typischer Mono-Delay.
10 DELAY 2 Typischer Ping-Pong-Stereo-Delay.
11 FLANGER
Klassischer Stereo-Flanger-Effekt, der dem Abheben
eines Düsenflugzeugs ähnelt.
12 CHORUS
Modulationseffekt, sorgt für einen weichen, ätherischen
Filtereffekt.
13 CHORUS/ROOM 1
Typischer Chorus- und Reverb-Effekt mit kurzer
Abklingzeit in Kombination.
14 CHORUS/ROOM 2
Typischer Chorus- und Reverb-Effekt mit langer
Abklingzeit in Kombination.
15 VOCAL-CANCEL
Reduziert die Stimme in einer Aufnahme.
Hinweis: Dieser Effekt funktioniert am besten bei
Gesang, der ursprünglich in Mono aufgenommen und
mittig im Stereofeld platziert wurde.
16 ROTARY-LAUTSPRECHER
Simuliert einen typischen 1960er Jahre RotaryLautsprecher-Effekt.
Page 53

53
Medien-Panel
Funktionen des Medien-Panels:
1. USB/SD/BT/Menü/Modus: Wählt die MedienPanelquelle aus: USB, SD und Bluetooth. Drücken
Sie diese Taste kurz, um den BluetoothKoppelmodus zu aktivieren. Wenn eine BluetoothVerbindung hergestellt wurde, halten Sie die ModusTaste, um aus den BT-Optionen (BluetoothOptionen) Trennen, EQ Wählen Koppel-Info Löschen
und Geräteinformationen auszuwählen. Wenn Sie via
SD oder USB verbunden sind, halten Sie Modus, um
auf EQ, Wiedergabemodus oder Gerät Ändern
zuzugreifen.
2. Wiedergabe/Pause: Die Quelle via USB, SD oder
Bluetooth-Medien-Panel wird wiedergegeben oder
pausiert. In den Modus-Einstellungen agiert dies als
Auswählen/Enter.
3. Stopp: Stoppt die Wiedergabe des Medien-Panels.
4. Wiederholen: Wechselt zwischen den verschiedenen
Wiederholungsoptionen für USB- und SD-Quellen.
5. Vorheriger Track/Lautstärke Verringern: Springt
zum vorherigen USB- oder SD-Karten-Track. In den
Modus-Einstellungen agiert dies als Links/Oben. Bei
der Wiedergabe von Bluetooth-Quellen kann es in
einigen Apps sein, dass das Drücken von Vorheriger
Track auf eine andere Wiedergabeliste oder ein
anderes Musik-Genre schaltet. Halten Sie diese
Taste gedrückt, um die Lautstärke des Tracks zu
verringern.
6. Nächster Track/ Lautstärke Erhöhen: Springt zum
nächsten USB- oder SD-Karten-Track. In den
Modus-Einstellungen agiert dies als Rechts/Abwärts.
Bei der Wiedergabe von Bluetooth-Quellen kann es
in einigen Apps sein, dass das Drücken von
Nächster Track auf eine andere Wiedergabeliste
oder ein anderes Musik-Genre schaltet. Halten Sie
diese Taste gedrückt, um die Lautstärke des Tracks
zu erhöhen.
7. Das Wiedergabesymbol leuchtet, wenn ein Track
wiedergegeben wird.
8. Das Wiederholen-Symbol leuchtet, wenn ein SDoder USB-Track auf Wiederholen eingestellt wurde.
Der Kasten unter dem Symbol Wiederholen zeigt die
Wiederholungsoption an, die ausgewählt ist. Siehe
Betrieb > USB-Modus > Wiedergabe-Modus für
weitere Informationen.
9. Zeigt den aktuell gespielten Song und die
Gesamtzahl der Songs im ausgewählten Ordner.
10. Zeigt den EQ Preset-Typ, der geändert wird, indem
Sie die Modus-Taste gedrückt halten, wenn Sie mit
Bluetooth-, SD- oder USB-Quellen verbunden sind
und EQ auswählen.
11. Zeigt die Bitrate und die Art des abgespielten Songs
an.
Hinweis: Wenn die Datei eine variable Bitrate nutzt,
ändert sich diese Zahl während der Song läuft.
12. Wiedergegebener SD- oder USB-Speicher.
13. Name der wiedergegebenen Datei.
14. Frequenz-Spektrumanalysator.
15. Aktuelle Zeit und gesamte Spieldauer des
abgespielten Songs.
7
8
9
10
11
12
13
14
15
1 2
3 4
5
6
Page 54

54
Betrieb
Koppeln eines Bluetooth-Geräts
1. Schalten Sie Ihr Bluetooth-Gerät ein.
2. Schalten Sie Envoi Go ein.
3. Drücken Sie kurz die Modus-Taste, um in den Bluetooth-Modus zu gelangen.
4. Navigieren Sie zum Setup-Bildschirm des Bluetooth-Geräts, wählen Sie Envoi Go, und stellen eine
Verbindung her.
Hinweis: Wenn Sie einen Passcode benötigen, geben Sie 0000 ein.
5. Spielen Sie auf Ihrem Bluetooth-Gerät Musik ab.
6. Passen Sie die Lautstärke am Envoi Go an, indem Sie |<< oder >>| gedrückt halten, um den Pegel zu
verringern oder zu erhöhen.
7. Um die Geräte zu trennen, schalten Sie Bluetooth auf Ihrem Gerät aus oder wählen
"Verbindungsdaten löschen" aus dem Envoi Go Bluetooth-Menü.
Bluetooth-Modus
So greifen Sie auf ein gekoppeltes Bluetooth-Gerät zu:
1. Drücken Sie kurz auf die Modus-Taste bis das Bluetooth-Symbol am Bildschirm erscheint. Die zuvor
gekoppelten Geräte werden dann automatisch verbunden.
Hinweis: Wenn Sie ein USB-Gerät, SD-Karte oder Bluetooth-Gerät verbinden, wird Envoi Go
automatisch auf die zuletzt angeschlossene Quelle wechseln.
2. Im Bluetooth-Modus halten Sie die Modus-Taste 2 Sekunden lang gedrückt, um weitere Optionen
anzuzeigen.
3. Verwenden Sie die Tasten |<< und >>| zum Durchsuchen und drücken Wiedergabe/Pause, um eine
der folgenden Einstellungen zu wählen.
BT-Trennen: Diese Funktion deaktiviert die Verbindung der Bluetooth-Audioquelle.
EQ: Envoi Go bietet 7 optionale Equalizer-Presets, um die Klangqualität zu erweitern. Sie können aus
folgenden EQ-Einstellungen wählen:
• Normal (Nor)
• Pop
• Rock
• Jazz
• Klassik (Clas)
• Country (Cou)
• Wenig Bass (Bas)
Hinweis: Die digitalen EQ-Presets können nur auf Bluetooth-, SD- und USB-Quellen angewendet werden.
Verbindungsdaten löschen: Wählen Sie diese Einstellung, damit ein zuvor gekoppeltes Bluetooth-Gerät
diese Verbindungsdaten "vergisst", damit Envoi Go beim Wechseln in den Bluetooth-Modus nicht erneut
eine Verbindung herstellt.
Geräteinformationen: Zeigt Envoi Go's Gerätenamen an.
Verlassen: Verlässt das Bluetooth-Menü.
Page 55

55
USB-Modus
Für den Zugriff auf ein angeschlossenes USB-Gerät:
1. Drücken Sie kurz auf die Modus-Taste bis das USB-Gerätesymbol oben rechts am Bildschirm
erscheint.
Hinweis: Wenn Sie ein USB-Gerät, SD-Karte oder Bluetooth-Gerät verbinden, wird Envoi Go
automatisch auf die zuletzt angeschlossene Quelle wechseln.
2. Im USB-Modus halten Sie die Modus-Taste 2 Sekunden lang gedrückt, um weitere USB-Menüoptionen
anzuzeigen.
3. Verwenden Sie die Tasten |<< und >>| zum Durchsuchen und drücken Wiedergabe/Pause, um eine
der folgenden Einstellungen zu wählen.
EQ: Envoi Go bietet 7 optionale Equalizer-Presets, um die Klangqualität zu erweitern. Sie können aus
folgenden EQ-Einstellungen wählen:
• Normal (Nor)
• Pop
• Rock
• Jazz
• Klassik (Clas)
• Country (Cou)
• Wenig Bass (Bas)
Hinweis: Die digitalen EQ-Presets können nur auf Bluetooth-, SD- und USB-Quellen angewendet werden.
Wiedergabe-Modus:
• Alle (A): Spielt und wiederholt alle Tracks am USB-Gerät.
• Repeat One (1): Spielt und wiederholt den aktuellen Track.
• Repeat-Ordner (F): Spielt die Tracks im aktuellen Ordner und wiederholt dann die Wiedergabe der
Tracks.
• Normal (N): Spielt die Tracks am USB-Gerät.
• Random (R): Spielt einen zufällig ausgewählten Track ab.
• Durchsuchen (I): Spielt die ersten 10 Sekunden jedes Tracks am USB-Gerät.
Gerät wechseln: Damit können Sie von der SD-Karte auf ein angeschlossenes USB-Laufwerk wechseln.
Verlassen: Verlassen des USB-Modusmenüs.
U-Disk-Ordner (Im Menü zu sehen, wenn der USB-Track pausiert wird): Wählen Sie einen Track aus einem
Ordner am USB-Laufwerk aus. Verwenden Sie die Tasten |<< und >>|, um nach oben oder unten zu
navigieren und drücken Sie Wiedergabe/Pause, um einen Ordner zu öffnen oder einen Track für die
Wiedergabe auszuwählen.
Dateien löschen (Im Menü zu sehen, wenn der USB-Track pausiert wird): Löscht den aktuell ausgewählten
Track.
Alle Löschen (Im Menü zu sehen, wenn der USB-Track pausiert wird): Löscht alle Titel am USB-Laufwerk.
Verlassen: Verlassen des Musikoptionsmenüs.
Page 56

56
SD-Karten-Modus
So greifen Sie auf eine eingelegte SD-Karte zu:
1. Drücken Sie kurz auf die Modus-Taste bis das SD-Kartensymbol am Bildschirm erscheint.
Hinweis: Wenn Sie ein USB-Gerät, SD-Karte oder Bluetooth-Gerät verbinden, wird Envoi Go
automatisch auf die zuletzt angeschlossene Quelle wechseln.
2. Im SD-Kartenmodus halten Sie die Modus-Taste 2 Sekunden lang gedrückt, um weitere Menüoptionen
anzuzeigen.
3. Verwenden Sie die Tasten |<< und >>| zum Durchsuchen und drücken Wiedergabe/Pause, um eine
der folgenden Einstellungen zu wählen.
EQ: Envoi Go bietet 7 optionale Equalizer-Presets, um die Klangqualität zu erweitern. Sie können aus
folgenden EQ-Einstellungen wählen:
• Normal (Nor)
• Pop
• Rock
• Jazz
• Klassik (Clas)
• Country (Cou)
• Wenig Bass (Bas)
Hinweis: Die digitalen EQ-Presets können nur auf Bluetooth-, SD- und USB-Quellen angewendet werden.
Wiedergabe-Modus:
• Alle (A): Spielt und wiederholt alle Tracks auf der SD-Karte.
• Repeat One (1): Spielt und wiederholt den aktuellen Track.
• Repeat-Ordner (F): Spielt die Tracks im aktuellen Ordner und wiederholt dann die Wiedergabe der
Tracks.
• Normal (N): Spielt die Tracks auf der SD-Karte.
• Random (R): Spielt zufällig ausgewählten Track ab.
• Durchsuchen (I): Spielt die ersten 10 Sekunden jedes Tracks auf der SD-Karte.
Gerät wechseln: Damit können Sie von der SD-Karte auf ein angeschlossenes USB-Laufwerk wechseln.
Verlassen: Verlassen des SD-Kartenmodusmenüs.
Kartenordner (Im Menü zu sehen, wenn der SD-Karten-Track pausiert wird): Wählen Sie einen Track aus
einem Ordner auf der SD-Karte aus. Verwenden Sie die Tasten |<< und >>|, um nach oben oder unten zu
navigieren und drücken Wiedergabe/Pause, um einen Ordner zu öffnen oder einen Track für die
Wiedergabe auszuwählen.
Dateien löschen (Im Menü zu sehen, wenn der SD-Karten-Track pausiert wird): Löscht den aktuell
ausgewählten Track.
Alle Löschen (Im Menü zu sehen, wenn der SD-Karten-Track pausiert wird): Löscht alle Tracks auf der SDKarte.
Verlassen: Verlassen des Musikoptionsmenüs.
Page 57

57
Fehlerbehebung
Wenn Sie ein Problem haben, gehen Sie wie folgt vor:
• Sorgen Sie dafür, dass alle Kabel und Geräte Medien richtig und fest angeschlossen sind.
• Achten Sie darauf, dass Envoi Go laut vorliegendem Benutzerhandbuch verwendet wird.
• Achten Sie darauf, dass Ihre anderen Geräte oder Medien ordnungsgemäß funktionieren.
• Wenn Sie glauben, dass Envoi Go nicht ordnungsgemäß funktioniert, überprüfen Sie die folgende
Tabelle auf Lösungen für das Problem.
Problem: Lösung: Siehe:
Das Gerät lässt sich nicht
einschalten.
Vergewissern Sie sich, dass der
Netzeingang des Envoi Go ordnungsgemäß
mit dem mitgelieferten Netzkabel an eine
Steckdose angeschlossen ist.
Setup
Das Envoi Go gibt keinen
Ton aus bzw. der Ton klingt
verzerrt.
Stellen Sie sicher, dass alle Kabel- und
Geräteanschlüsse sicher und korrekt sind.
Achten Sie darauf, dass keine Kabel
beschädigt sind.
Vergewissern Sie sich, dass die
Einstellungen auf Ihrem Bluetooth-Gerät,
Lautsprecher, Mixer usw. korrekt sind.
Setup
Die Audiosignale von
meinem Bluetooth-Gerät
werden nicht über das Envoi
Go abgespielt.
Stellen Sie sicher, dass eine
ordnungsgemäße Verbindung zu Ihrem
Bluetooth-Gerät hergestellt wurde.
HINWEIS: Wenn Ihr Bluetooth-Gerät Envoi
Go nicht erkennt, navigieren Sie in die
Bluetooth-Einstellungen auf Ihrem BluetoothGerät und "Ignorieren" Envoi Go in der
Geräteliste. Wenn der Bluetooth-Modus
aktiviert ist, scheint Envoi Go nach 5
Sekunden erneut auf. Wählen Sie Envoi Go
aus, um eine Verbindung herzustellen.
Verbessern Sie den BluetoothSignalempfang, indem Sie Ihr BluetoothGerät näher an das Envoi Go bringen.
Achten Sie darauf, dass keine Hindernisse
(Wände, Möbel etc.) die direkte Sichtlinie
zwischen dem Bluetooth-Gerät und dem
Envoi Go beeinträchtigen.
Setup und
B
etrieb
Das Koppeln meines
Bluetooth-Geräts mit dem
Envoi Go erfordert einen PIN.
Geben Sie 0000 als PIN ein. (Einige ältere
Bluetooth-Geräte können Sie auffordern,
einen PIN einzugeben.)
B
etrieb
Allgemeinhinweis zur Konformitätserklärung: Hiermit erklären wir, daß sich das Gerät Envoi
Go in Übereinstimmung mit den grundlegenden Anforderungen der europäischen Richtlinie
1999/5/EG befindet. Die vollständige EG Konformitätserklärung kann unter folgender Adresse
angefordert werden:
inMusic GmbH
Harkortstrasse 12-32
40880 Ratingen
Germany
Page 58

2x150 Watts peak, 2x75 Watts RMS
Page 59

Page 60

denonpro.com
Manual Version 1.0
 Loading...