

Page 1

Envoi
User Guide
English ( 3 – 10 )
Guía del usuario
Español ( 11 – 18 )
Guide d'utilisation
Français ( 19 – 26 )
Guida per l'uso
Italiano ( 27 – 34 )
Benutzerhandbuch
Deutsch ( 35 – 42 )
Appendi
x
English ( 43 )
Page 2

Page 3

3
User Guide (English)
Introduction
• 2-way active speaker (10" woofer, 1" compression HF driver)
• Built-in rechargeable battery provides up to 12 hours of sound
• Full-range, highly musical frequency response: 55–20kHz
• 120 watts RMS, 240 watts peak (AC power line); 80 watts RMS, 160 watts peak (DC battery-powered)
• Bluetooth connection for wireless audio streaming
• USB/SD MP3/WMA Player for unattended playback with LCD display
• Pole-mount socket, telescoping handle and transport wheels built-in
Please see this guide’s Setup chapter to learn how to integrate Envoi with your audio system, and then refer to the
Operation chapter to start using Envoi.
1. Make sure all items listed in the Box Contents are included in the box.
2. READ SAFETY INSTRUCTION BOOKLET BEFORE USING THE PRODUCT.
3. Study the connection diagram.
4. Make sure all input devices such as microphones, CD players, or digital media players are turned off and volume
settings are set at "zero."
5. Connect all devices as shown.
6. Switch everything on in the following order:
• audio input sources (i.e. microphones, instruments, CD players)
• Envoi
7. When turning off, always reverse this operation:
• Envoi
• any input devices
Box Contents
Envoi
Power Cable (standard IEC)
2 AA Batteries
Wireless Microphone
Wireless Microphone Antenna
User Guide
Safety Instructions & Warranty Information Booklet
Support
The microphone and antenna can be stored in the top compartment.
For the latest information about this product (system requirements, compatibility information, etc.) and product
registration, visit denonpro.com.
Page 4
4
Rechargeable Batteries
Rechargeable lead-acid batteries are the same type used in automobiles. As with your car battery, how you use this
battery has a significant impact on its lifespan. With proper use and treatment, a lead-acid battery can last for
years. Here are some recommendations for getting the longest life from the internal battery.
General Usage
Charge fully before use.
Charge fully before storing.
Storage
For best product longevity, do not store at exceedingly hot (greater than 90°F / 32°C) or
exceedingly cold (less than 32°F / 0°C) temperatures.
It is acceptable to leave your sound system plugged in. This will not overcharge the battery.
If you leave the battery level low and do not charge it for 6 months, it may permanently lose
capacity.
Repair
If the battery fails to charge, check the fuse near the power cable input. If the fuse is not
intact, please replace it.
The battery can be replaced (details in the Technical Specifications).
For Warranty and Parts, visit denonpro.com.
Disposal
Bring the unit to a recycling center or dispose of in accordance with local ordinances.
Setup
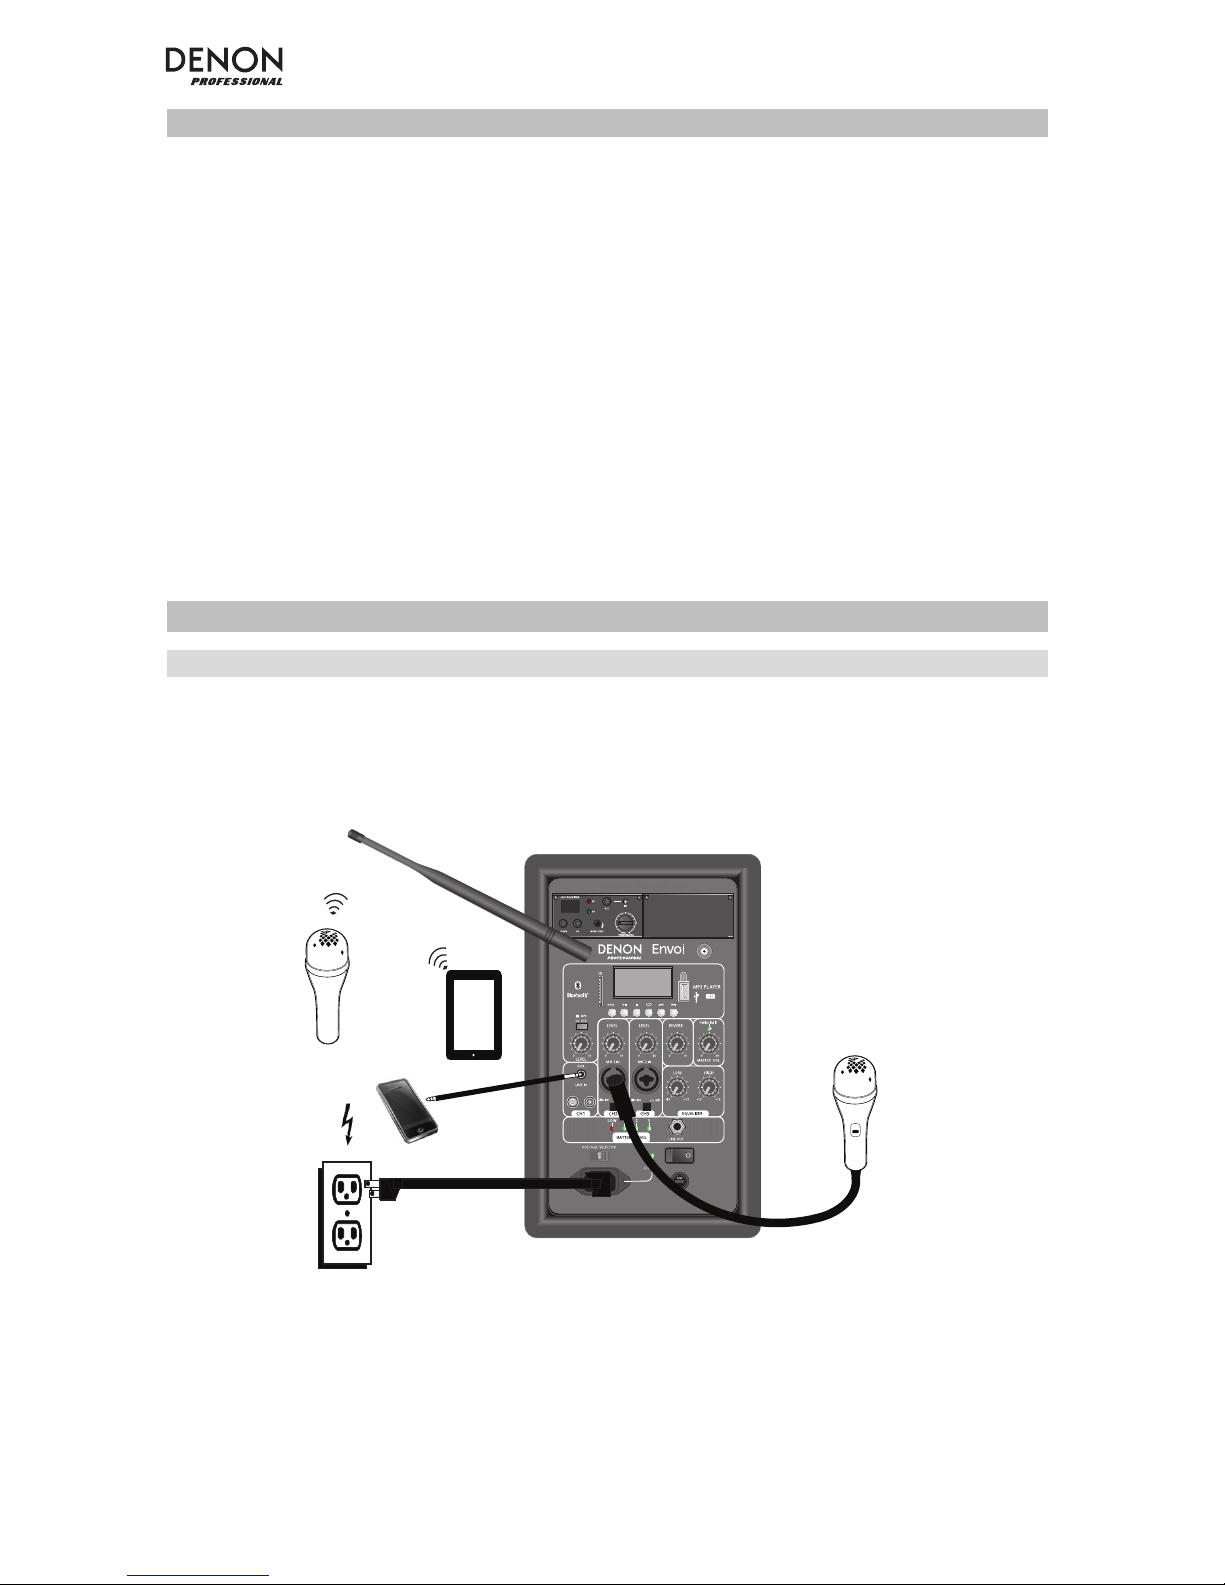
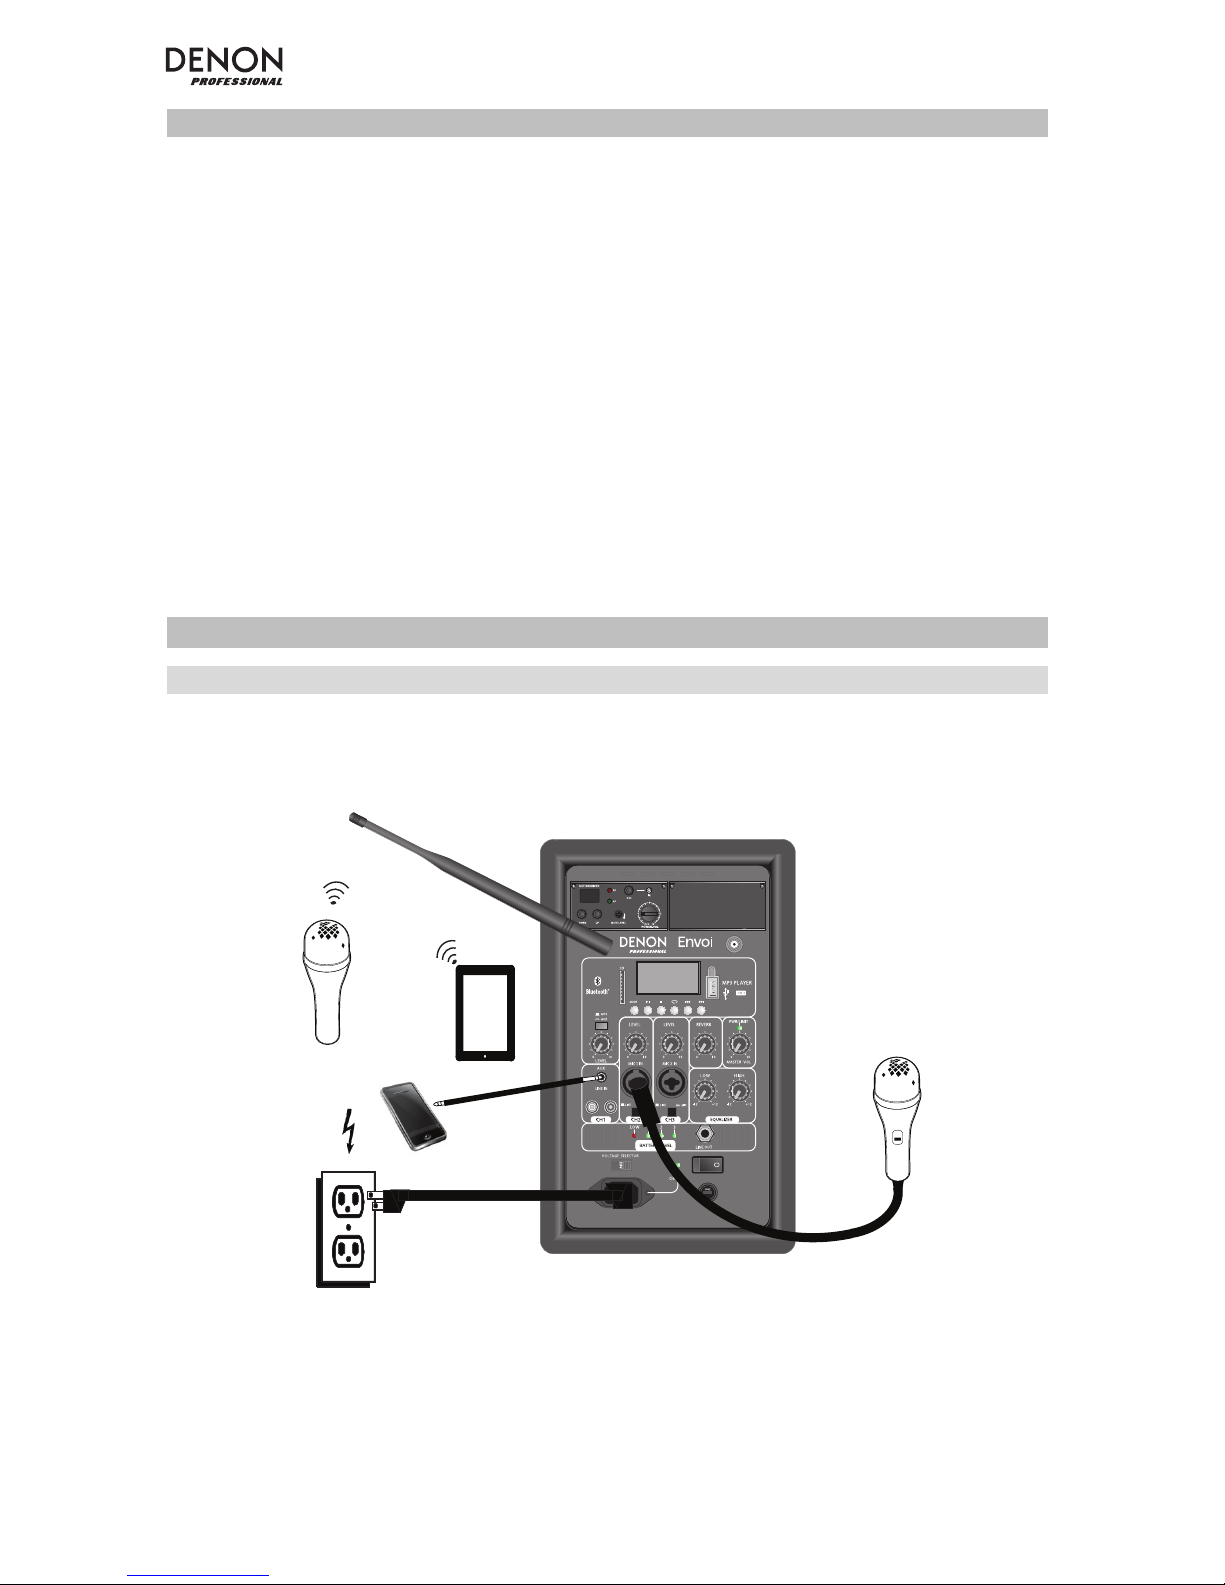
Connection Diagram
Items not listed under Introduction > Box Contents are sold separately.
Tablet
Power
Smartphone
Microphone
Wireless
Microphone
Page 5
5
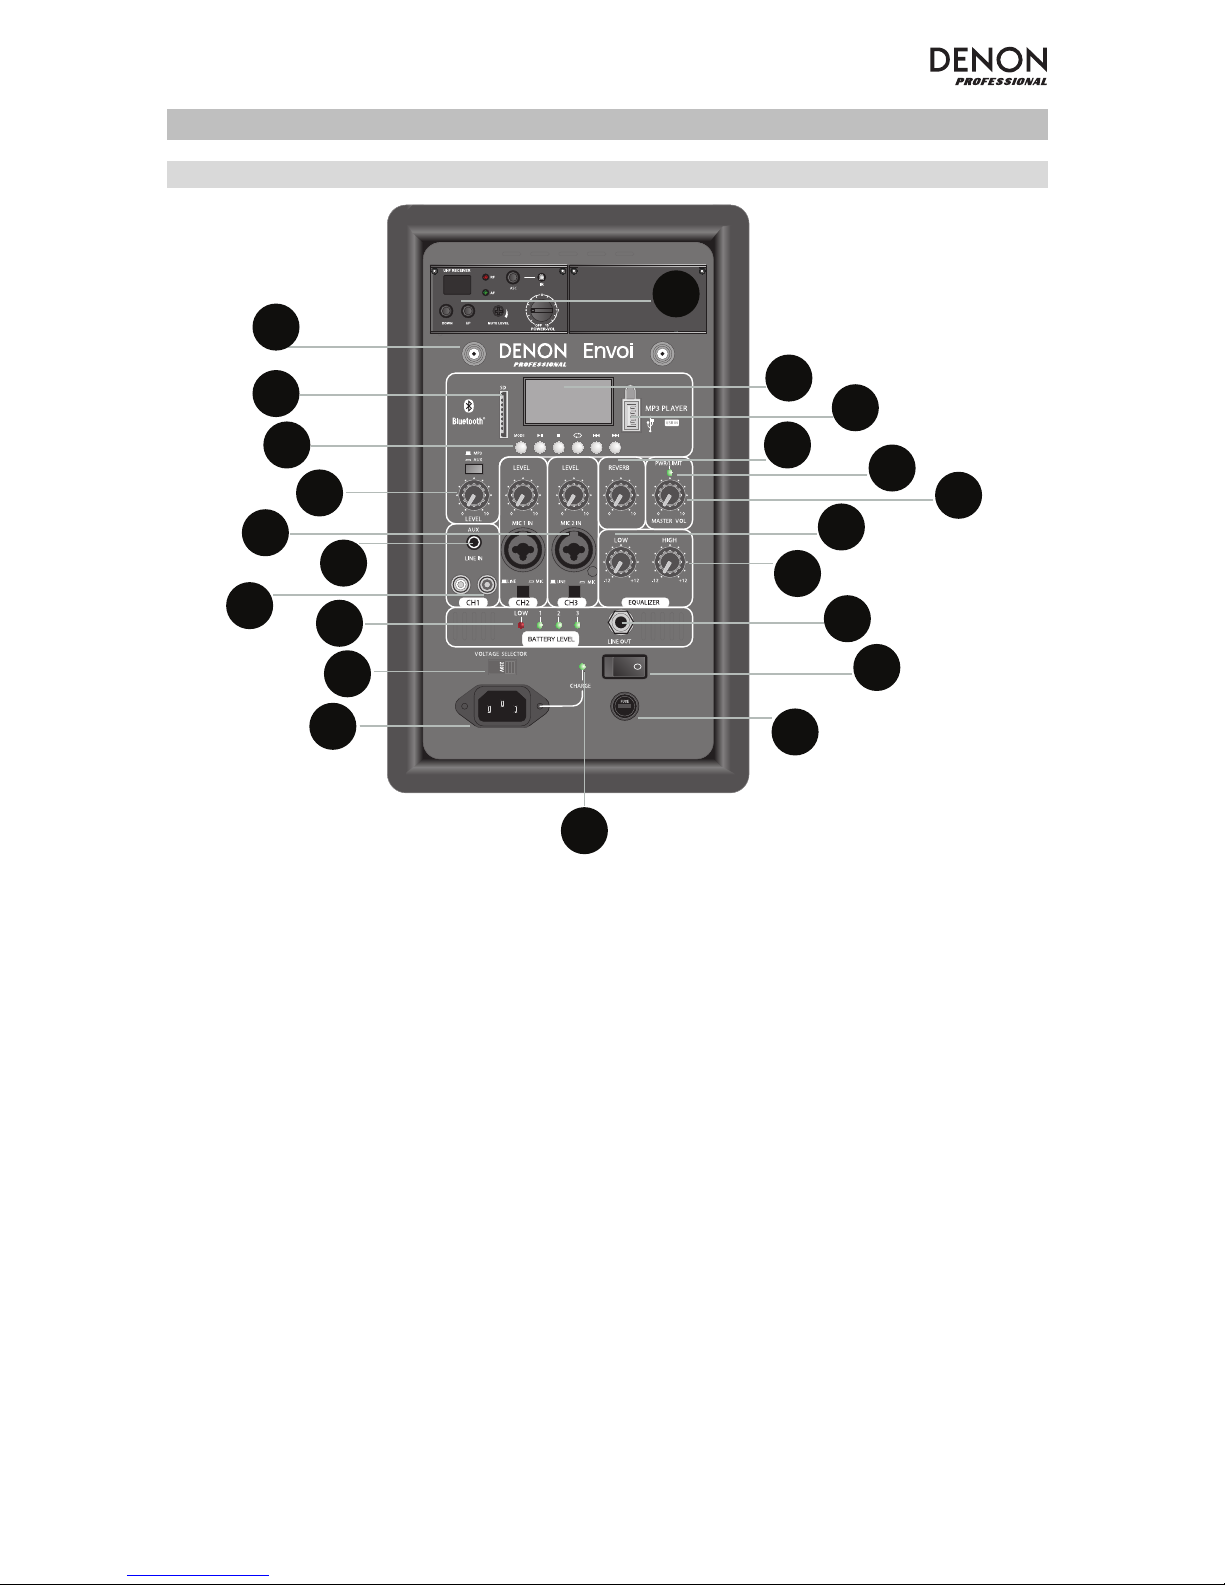
Features
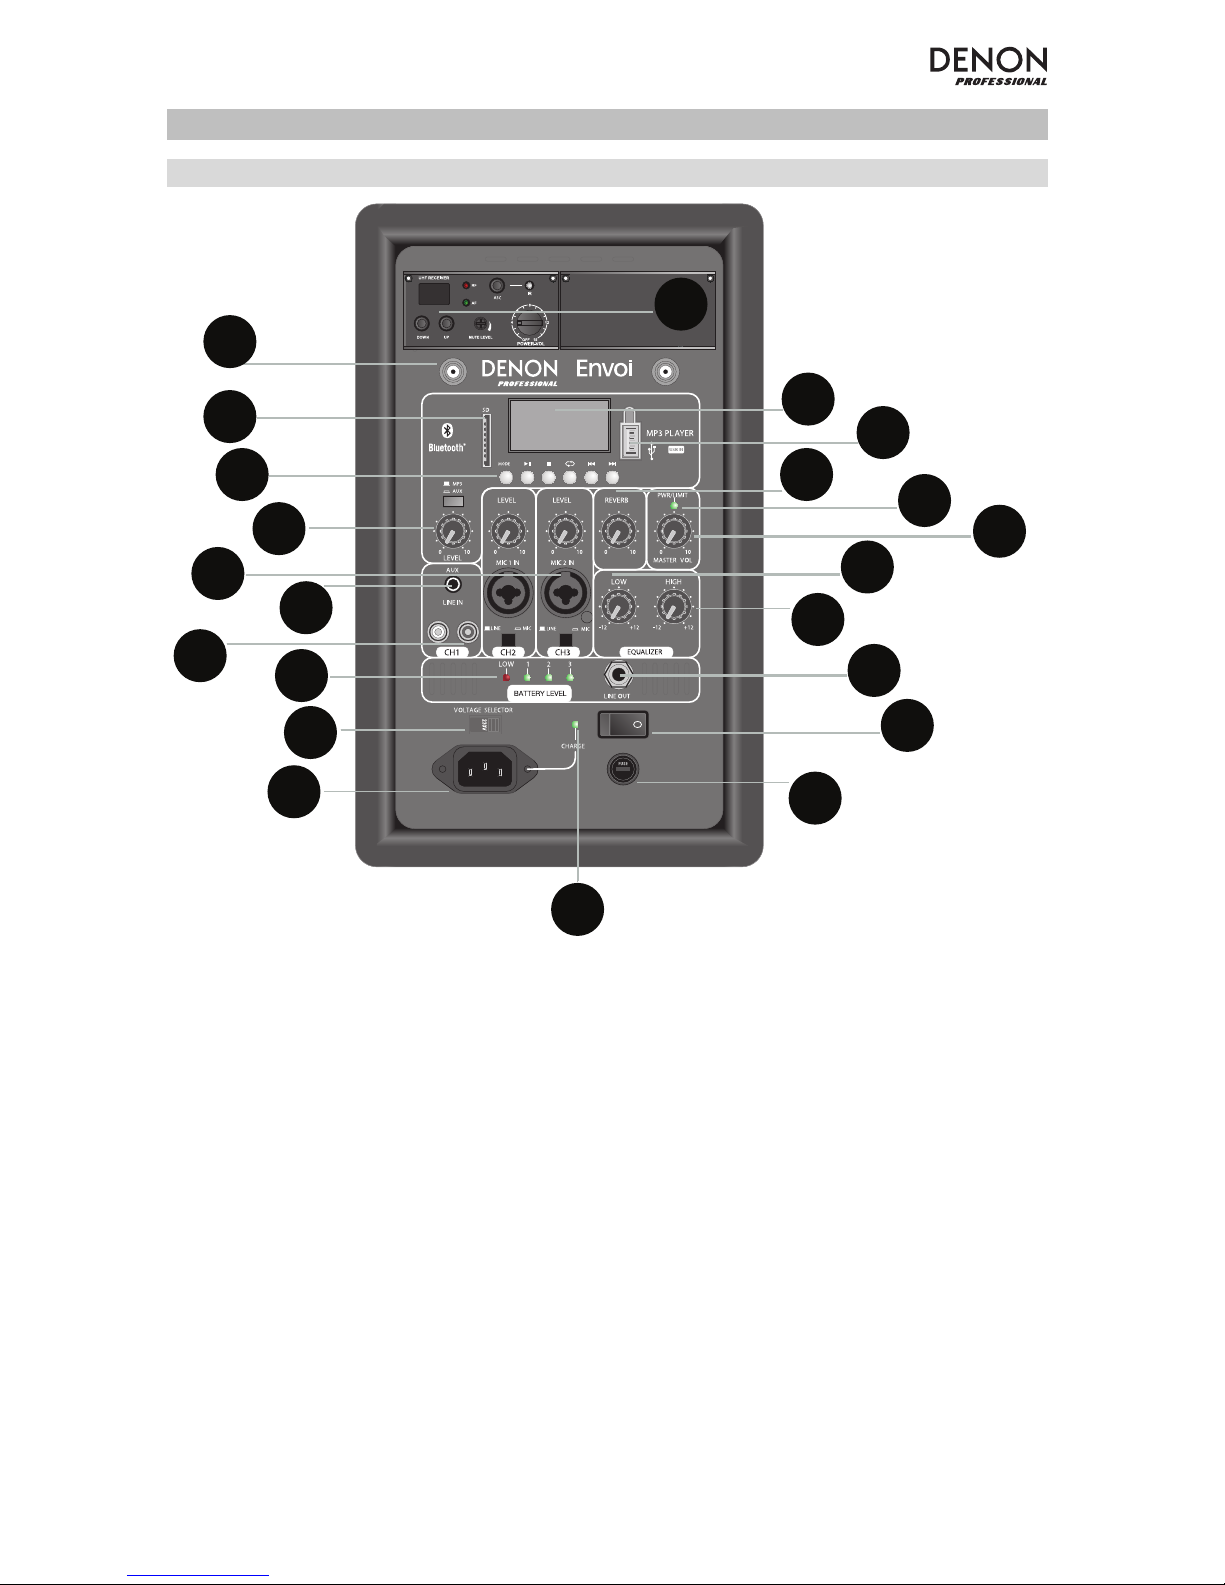
Rear Panel
1. Display: Displays the Media Panel modes for Bluetooth, USB, and SD.
2. USB Port: Connect your USB flash drive to play MP3 and WMA music files.
3. SD Card Slot: Insert your SD card here to play MP3 and WMA music files.
4. Media Panel: Controls for the Bluetooth, SD, and USB sources. The Media Panel Mode source symbol will
illuminate when that source is playing.
5. Mic Input (1/4" / 6.35mm and XLR): Connect a dynamic microphone to the 1/4” (6.35mm) or XLR inputs.
Control the volume of these inputs using the Mic Input volume knob. When connecting a microphone, make
sure the Line/Mic button is pressed down for Mic mode. When connecting a line-level device, such as a
keyboard, drum machine, CD player, etc, make sure the button is in the raised position for Line mode.
6. Aux Input (1/8" / 3.5mm): Connect a CD player, digital media player, or other audio source to this 1/8” (3.5
mm) stereo auxiliary input. Control the output volume using the Aux/MP3 Level knob (with the switch in the
Aux position).
7. RCA Inputs: Connect a CD player, digital media player, mixer, or other media source to these inputs. Remove
the rubber covers on the inputs to attach your cables.
8. Line Output (1/4" / 6.35mm): Connect this 1/4" (6.35mm) output to another active (powered) speaker. The
level of the output is controlled by each channel’s Level knob and the Master Volume knob.
9. High EQ: Increases or decreases the high (treble) frequencies at a range between -12dB to + 12dB.
10. Low EQ: Increases or decreases the low (bass) frequencies at a range between -12dB to + 12dB.
11. Power/Clip LED: This LED will be solid green when powered on. The LED will flash red if the signal from the
inputs or Media Panel source is clipping. If this happens, decrease the setting of the Mic Input volume knob,
Line Level volume knob, or Media Panel volume knob.
12. Aux/MP3 Switch: When the button is depressed, the Aux signal will pass through. When the button is raised,
the MP3/Bluetooth signal will pass through. Use the Aux/MP3 Level knob below it to control the volume of
sound source.
13. Power On/Off Switch: Turns Envoi on or off.
14. Power Cable Input (IEC): Insert the included power cable here to power the unit.
2
1
3
4
5
6
7
8
9
10
11
12
13
14
15
16
18
19
20
21
22
17
Page 6
6
15. Voltage Selector: If your unit has a voltage selector
switch, change its setting only when necessary (e.g., when
traveling to a country or region with a different voltage),
and replace the fuse with one with an appropriate rating
(printed under the unit’s power cable input, next to the
desired voltage). Selecting an improper voltage setting or
using a fuse with an incorrect rating can damage the unit
and/or fuse.
16. Fuse: If the fuse needs replacing, use a fuse rated at
T2.5AL/250V for voltages of 220-240V; for voltages of 100120V, use a fuse rated at T5AL/250V.
17. Charge Indicator: When connected to AC power, Envoi’s
LED light will illuminate when it is charging. Once charging
is complete, the LED will go off.
18. Battery Level Indicator: While Envoi is powered ON and
unit is not plugged in, these lights indicate the power left in the battery. Battery life varies based on volume
and usage. When the “LOW” light on, the battery will be depleted soon and should be recharged.
19. Reverb: Adjust this knob to control how much of an echo effect is applied to the signal for the wireless
microphone and the two Mic Inputs.
20. Master Volume: This controls the overall level for all inputs.
21. Wireless Mic Settings: Adjust these controls when using the wireless mic. Make sure to hold the microphone
close to your mouth when speaking.
The group of controls includes an IR emitter for wireless mic
synchronization. See the Wireless Mic Setup chapter for more details on using these controls.
22. Antenna Connector: Remove the rubber cover on the connector to attach the included BNC antenna. Adjust
this antenna to get the best wireless mic reception. Disconnect the antenna when not using the wireless mic
and when moving the unit.
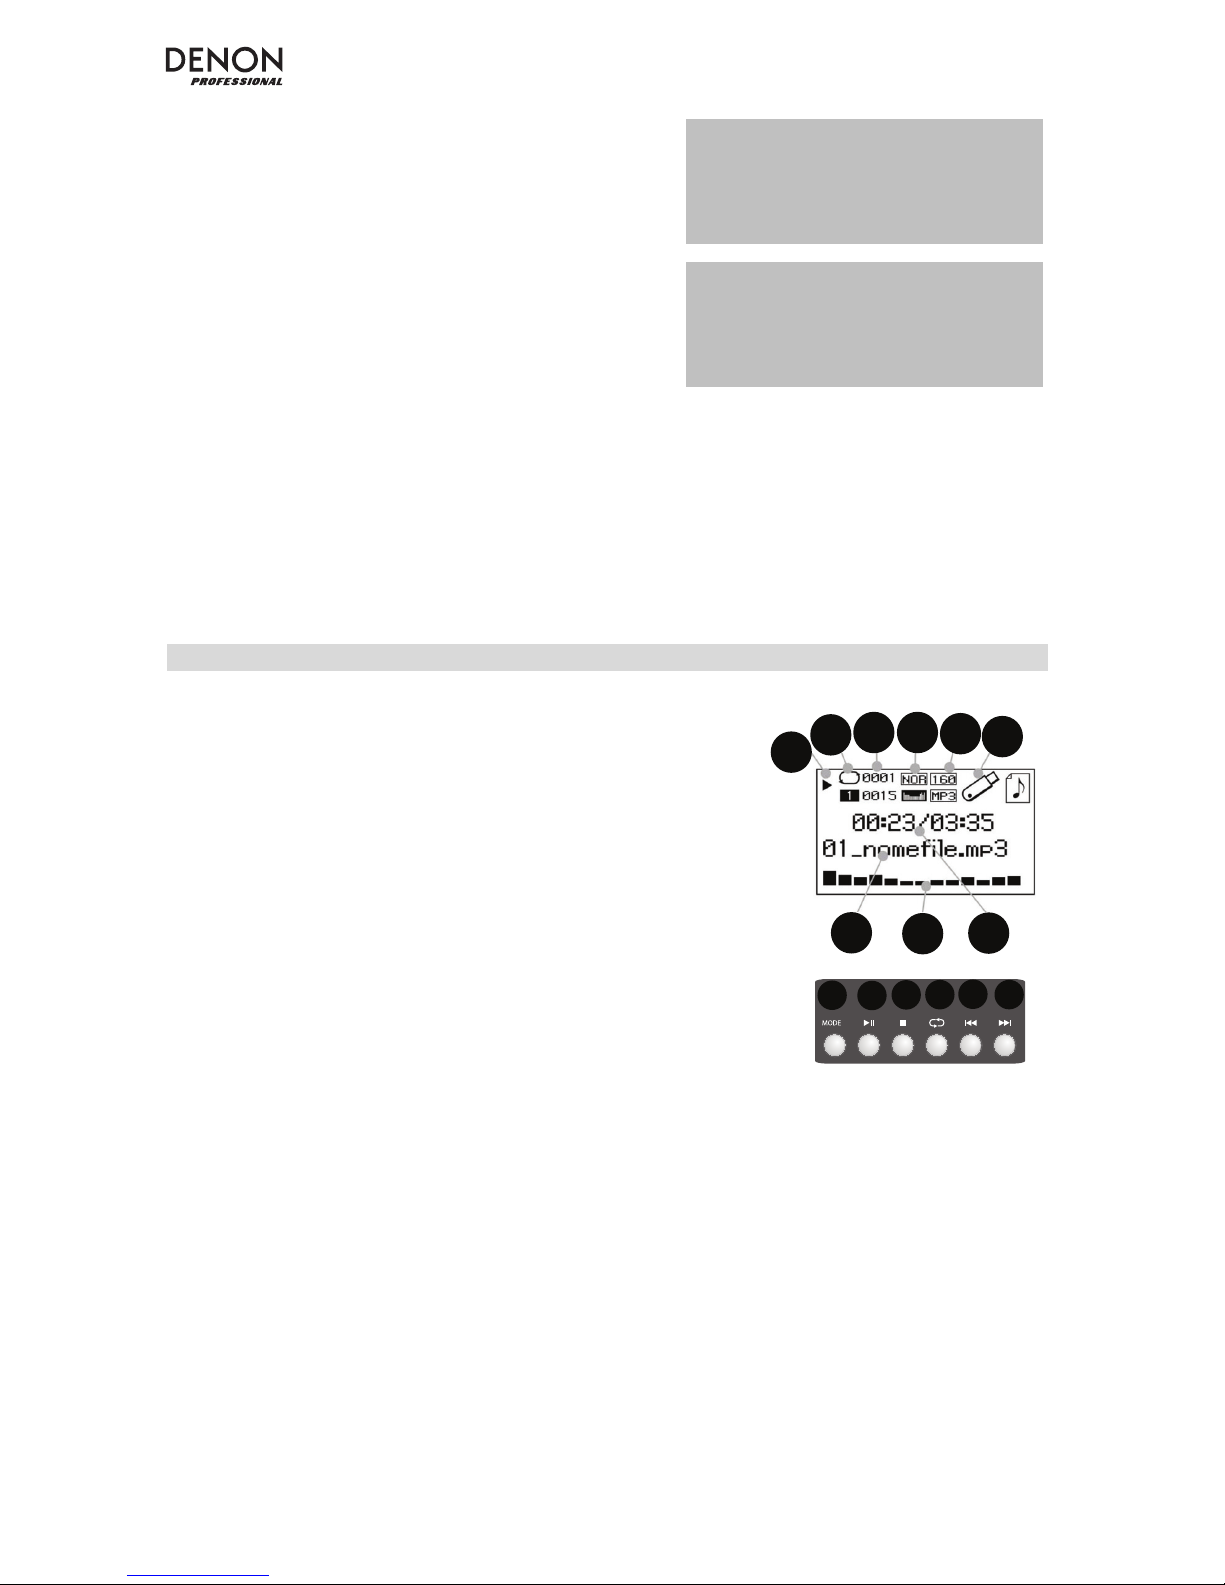
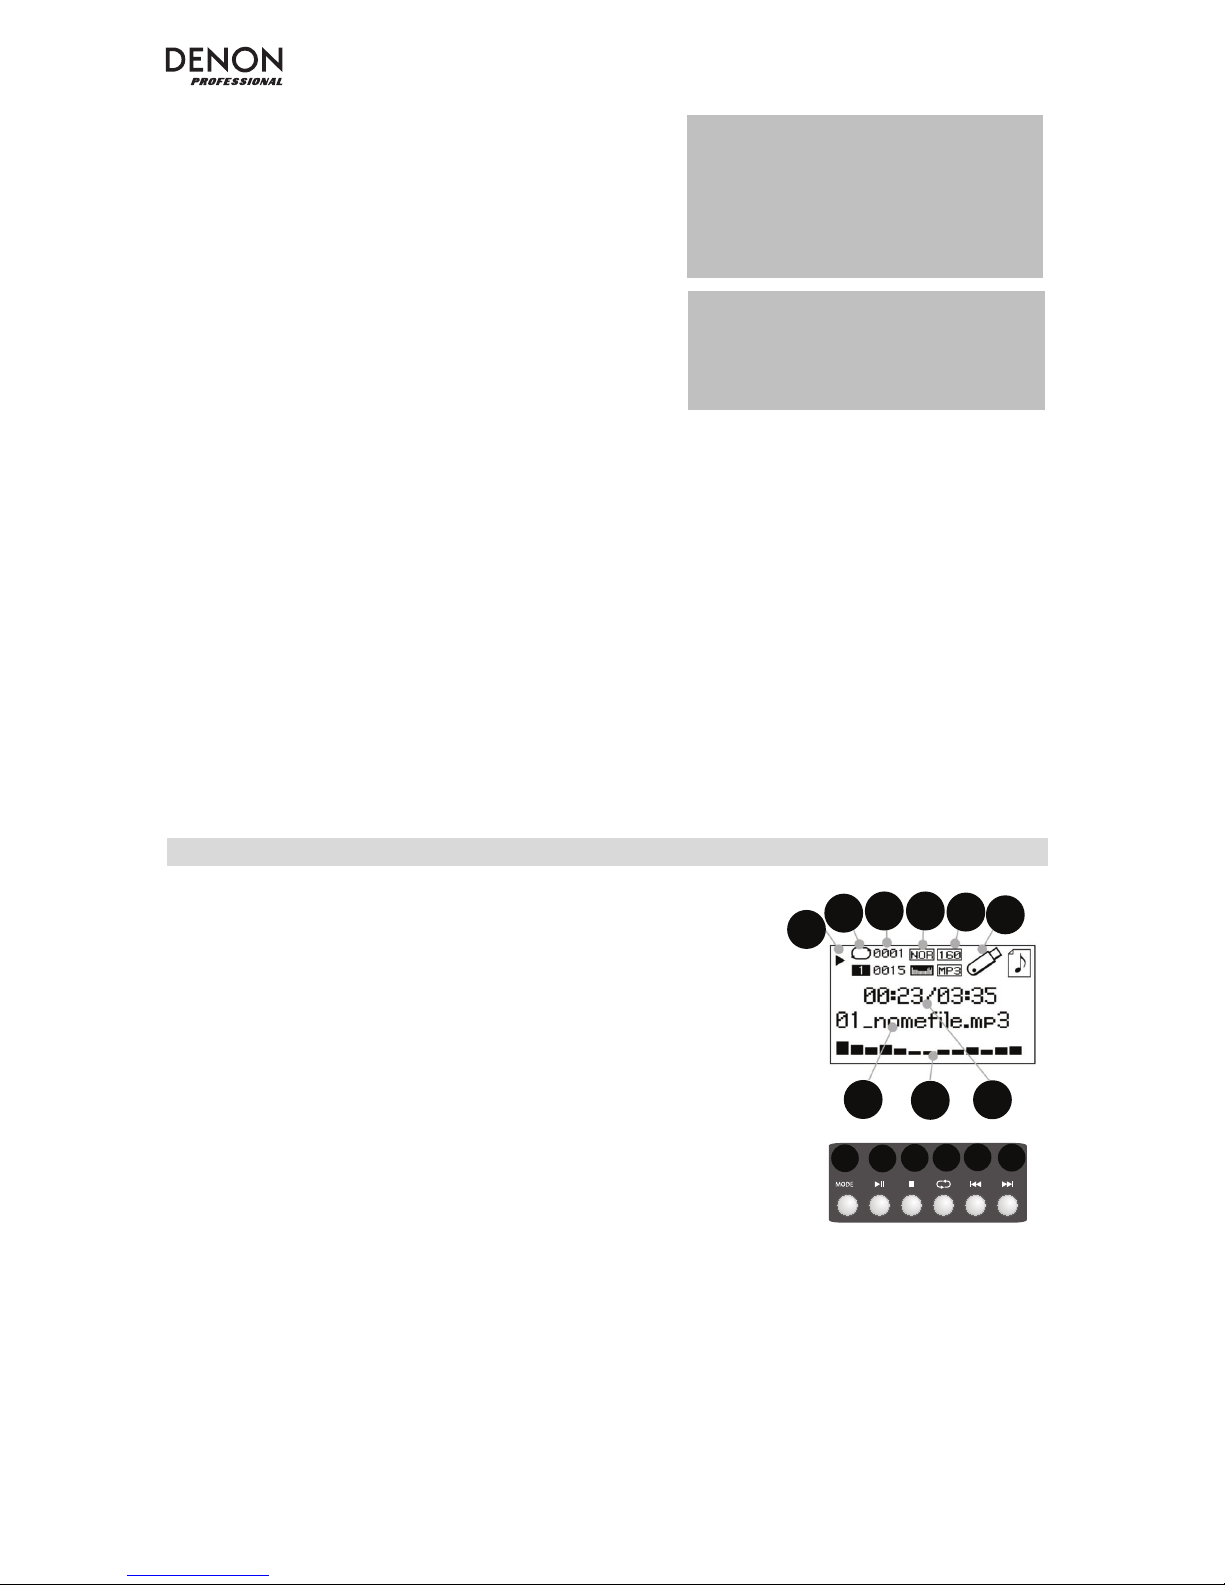
Media Panel
Media Panel functions:
1. Mode: Selects the Media Panel source: USB, SD, and Bluetooth.
2. Play/Pause: Plays or pauses the USB, SD, or Bluetooth Media Panel
source.
3. Stop: Stops the Media Panel source from playing.
4. Repeat: Cycles through the different repeat options for USB and SD
sources.
5. Prev: Goes to the previous USB or SD card track. When listening to
Bluetooth sources, pressing Prev in some apps may go to another
playlist or music genre. Press and hold this button to decrease the
track volume.
6. Next: Advances to the next USB or SD card track. When listening to
Bluetooth sources, pressing Next in some apps may go to another
playlist or music genre. Press and hold this button to increase the
track volume.
7. The Play symbol illuminates when a track is being played.
8. The Repeat symbol illuminates when a SD or USB track has been set
to repeat.
9. Displays the current song playing and the total number of songs in the
selected folder.
10. Displays the EQ preset type.
11. Displays the bit rate and type of playing song.
Note: If the file uses a variable bit rate, this number will change as the
song plays.
12. SD or USB memory being played.
13. Name of the file being played.
14. Frequency spectrum analyzer.
15. Current time and total time of the playing song.
1
2
3
4
5
6
7
8
9
10
11
12
13
14
15
IMPORTANT: When the battery light
indicator illuminates red, this indicates that a
charge is required. For a full charge, turn off
the device and charge for 8 hours, or until
the green light indicates full charge.
IMPORTANT: To maximize battery life, it is
important to charge the unit regularly. It is
not recommended to leave the unit
uncharged for longer than 3 consecutive
days.
Page 7
7
Operation
Wireless Mic Setup
To use the included wireless mic, follow these setup steps:
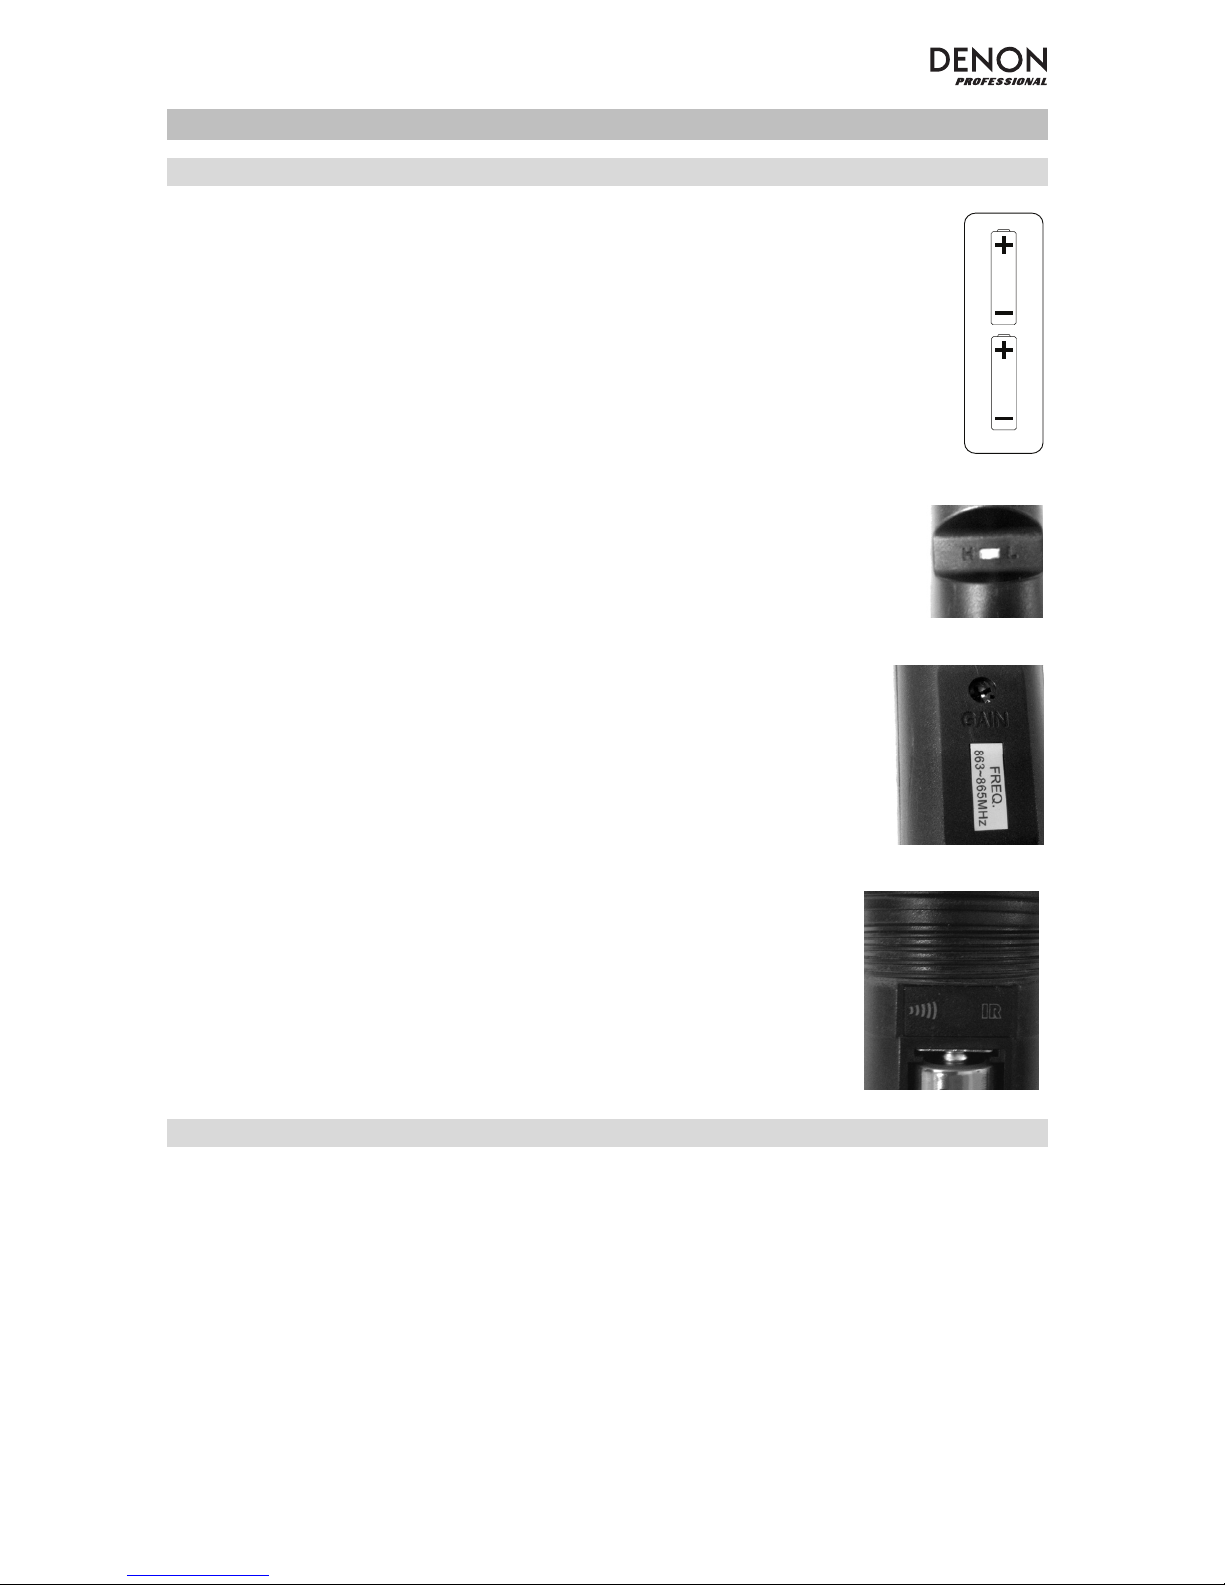
1. Ensure 2 new AA alkaline batteries are installed in the wireless mic (see the battery
installation side graphic). The microphone handle unscrews to reveal the battery
compartment. Screw the handle back on with the threads facing inward.
2. On the UHF Receiver panel on Envoi, turn on Power-Vol knob clockwise.
3. Turn on the wireless microphone using the switch found on the bottom of the
microphone. Watch the AF indicator to make sure a signal is being received.
4. Use the Up or Down buttons to select a wireless channel that gives a strong signal.
5. Hold the microphone close to your mouth when speaking and the AF LED will
illuminate on the Wireless Mic Settings panel. Adjust the Power-Volume knob to
increase the level.
Note: If needed, the High/Low (H/L) switch on the wireless mic (see the side
graphic) can be adjusted to increase the signal range. The High power setting
consumes more battery power to provide extended range and reception. The Low
setting extends battery life for use in scenarios where a lower operating range is
acceptable.
Note: If needed, the gain adjustment on the microphone can be adjusted clockwise
for more output gain. For less output gain, the screw can be adjusted counterclockwise.
Mute Level
In most situations this should be left at the factory preset position. However, in cases of
high RF activity, the mute levels can be re-adjusted to suppress interference from other
wireless devices in a shared RF environment. This will reduce interference when an audio
signal is not present. If the AF or RF LEDs flicker or stay on when the wireless
microphone is off, the Mute Level screw on the UHF receiver panel should be turned
counter-clockwise until the LEDs are off. When the Mute Level is properly adjusted, the
corresponding AF and RF LEDs will light up only when the wireless microphone is being
used.
Setting ASC (Auto-Sync Channel)
If you receive interference or if another channel is needed, select another channel using
the ASC (Auto-Sync Channel) button.
1. Select the UHF channel you want to use with the best reception using the Up or
Down buttons.
2. Turn the microphone on and place the microphone’s sensor (found above the
battery compartment, seen in the graphic above) near Envoi’s IR LED.
3. Press the ASC button once on Envoi and wait for about 3 seconds, until the IR
LED stops flashing. When it finds an interference-free channel, the wireless mic will
be matched to that channel.
Pairing a Bluetooth Device
1. Turn on your Bluetooth device.
2. Power on Envoi.
3. Navigate to your Bluetooth device’s setup screen, select Bluetooth which is the Envoi speaker, and connect.
Note: If prompted for a passcode, enter 0000.
4. Play music from your Bluetooth device.
5. Adjust the volume from Envoi by holding down the |<< or >>| button to decrease or increase the volume.
6. To disconnect pairing, turn off Bluetooth on your device or select “Delete paired info” from the Envoi
Bluetooth menu.
Page 8

8
Bluetooth Mode
To access a paired Bluetooth device:
1. Press and release the Mode button until the Bluetooth icon appears on the screen.
2. In Bluetooth mode, press and hold the Mode button for 2 seconds to see additional options.
3. Use the |<< and >>| buttons to scroll through and press Play/Pause to select one of the settings seen below.
BT Disconnect: This function disables the connection from the Bluetooth audio source.
EQ: Envoi provides 7 optional equalizer presets to enhance music. You may select from these EQ settings:
• Normal (Nor)
• Pop (Pop)
• Rock (Rock)
• Jazz (Jazz)
• Classic (Clas)
• Country (Cou)
• Low Bass (Bas)
Delete Paired Info: Select this to “forget” a previously paired Bluetooth device so that Envoi will not re-connect
when switching back to Bluetooth mode.
Device Information: Shows information about Envoi’s Bluetooth name.
Exit: Leaves the Bluetooth menu.
USB Mode
To access a connected USB device:
1. Press and release the Mode button until the USB device icon appears on the screen.
2. In USB mode, press and hold the Mode button for 2 seconds to see additional USB menu options.
3. Use the |<< and >>| buttons to scroll through and press Play/Pause to select one of the settings seen below.
Play Mode:
• All (A): Plays through and repeats all of the tracks on the USB device.
• Repeat One (1): Plays and repeats the current track.
• Repeat Folder (F): Plays through the tracks in the current folder and then restarts playback of the tracks.
• Normal (N): Plays through the tracks on the USB device.
• Random (R): Selects a random track to play.
• Browse (I): Plays the first 10 seconds of each track on the USB device.
EQ: Envoi provides 7 optional equalizer presets to enhance music. You may select from these EQ settings:
• Normal (Nor)
• Pop (Pop)
• Rock (Rock)
• Jazz (Jazz)
• Classic (Clas)
• Country (Cou)
• Low Bass (Bas)
Change Device: Allows you to change from listening to the SD card or to a connected USB drive.
Exit: Leaves the USB Mode menu.
U-Disk Folder: Select a track from a folder on the USB drive. Use the |<< and >>| buttons to navigate up or down
and press Play/Pause to open a folder or select a track to play.
Delete File: Deletes the currently selected track.
Delete All: Deletes all tracks on the USB drive.
Exit: Leaves the Music options menu.
Page 9

9
SD Card Mode
To access an inserted SD card:
1. Press and release the Mode button until the SD card icon appears on the screen.
2. In SD Card mode, press and hold the Mode button for 2 seconds to see additional menu options.
3. Use the |<< and >>| buttons to scroll through and press Play/Pause to select one of the settings seen below.
Play Mode:
• All (A): Plays through and repeats all of the tracks on the SD card.
• Repeat One (1): Plays and repeats the current track.
• Repeat Folder (F): Plays through the tracks in the current folder and then restarts playback of the tracks.
• Normal (N): Plays through the tracks on the SD card.
• Random (R): Selects a random track to play.
• Browse (I): Plays the first 10 seconds of each track on the SD card.
EQ: Envoi provides 7 optional equalizer presets to enhance music. You may select from these EQ settings:
• Normal (Nor)
• Pop (Pop)
• Rock (Rock)
• Jazz (Jazz)
• Classic (Clas)
• Country (Cou)
• Low Bass (Bas)
Change Device: Allows you to change from listening to the SD card or to a connected USB drive.
Exit: Leaves the SD Card Mode menu.
Card Folder: Select a track from a folder on the SD card. Use the |<< and >>| buttons to navigate up or down and
press Play/Pause to open a folder or select a track to play.
Delete File: Deletes the currently selected track.
Delete All: Deletes all tracks on the SD card.
Exit: Leaves the Music options menu.
Page 10

10
Troubleshooting
If you encounter a problem, try doing these things first:
• Make sure all cables and other connected devices are properly and securely connected.
• Make sure you are using Envoi as described in this User Guide.
• Make sure your other devices or media are working properly.
• If you believe Envoi is not working properly, check the following table for your problem and solution.
Problem: Solution: Please see:
Power does not turn on.
Make sure Envoi’s power input is properly
connected to a power outlet using the included
power adapter / power cable.
Setup
There is no signal or only a
weak signal between Envoi and
the wireless microphone.
Check the battery LED on the wireless
microphone to ensure it is powered on. If
battery power is low, change the batteries.
Check that the UHF Receiver Power-Vol switch
is on.
Make sure there are no objects (computers,
walls, pipes, etc.) between the wireless
microphone and Envoi.
Change the channel on Envoi.
Operation > Wireless Mic
Setup
I'm experiencing interference
with the signal between Envoi
and the wireless mic.
Make sure the UHF receiver antenna is properly
adjusted.
Keep any connected audio cables away from
the antenna.
Make sure no other devices are sending signals
on the same frequency channel that you are
using.
Select another channel using the ASC (AutoSync Channel).
Adjust the Mute Level setting. A higher Mute
Level setting provides better protection against
interference but may also reduce signal range.
Choose a setting that most effectively mutes
interference yet allows the true signal to pass
through. If poor signal quality requires a higher
Mute Level setting, try to eliminate the
interference or switch the UHF channel to avoid
a loss of signal range.
Operation > Wireless Mic
Setup
and
Operation > Setting ASC
(Auto-Sync Channel)
Envoi does not produce any
sound, or the sound is
distorted.
Make sure all cable and device connections are
secure and correct.
Make sure none of the cables are damaged.
Make sure the settings on your Bluetooth
device, loudspeaker, mixer, etc. are correct.
Setup
Audio from my Bluetooth
device does not play through
Envoi.
Make sure you have properly paired your
Bluetooth device.
Improve the Bluetooth signal reception by
moving your Bluetooth device closer to Envoi.
Also, remove obstacles (walls, furniture, etc.) so
there is a clear line of sight between your
Bluetooth device and Envoi.
Setup and Operation
Pairing my Bluetooth device to
Envoi requires a PIN.
Enter 0000 as the PIN. (Some older Bluetooth
devices may require you to enter a PIN.)
Operation
Page 11

11
Guía del usuario (Español)
Introducción
• Altavoz activo de 2 vías (woofer de 10 pulg., driver de compresión de HF de 1 pulg.)
• Su batería recargable brinda hasta 12 horas de sonido
• Respuesta en frecuencia de rango completo, altamente musical: 55-20kHz
• Alimentación de 120 W RMS, 240 W pico (línea de corriente de CA); 80 W RMS, 160 W pico (alimentado con
batería de CC)
• Conexión Bluetooth para transmitir audio de forma inalámbrica
• Reproductor USB/SD MP3/WMA con pantalla LCD que reproduce sin supervisión
• Zócalo para montaje en poste, manija telescópica y ruedas para transporte integradas
Consulte el capítulo Instalación de esta guía para aprender a integrar el Envoi con su sistema de audio y luego
consulte el capítulo Operación para comenzar a utilizar el Envoi.
1. Asegúrese de que todos los artículos indicados en “Contenido de la caja” estén incluidos en ella.
2. LEA EL FOLLETO DE INSTRUCCIONES DE SEGURIDAD ANTES DE UTILIZAR EL PRODUCTO.
3. Estudie el diagrama de conexión.
4. Asegúrese de que todos los dispositivos de entrada tales como micrófonos y reproductores de CD o
reproductores de otros medios digitales estén apagados y con el control de volumen en “cero”.
5. Conecte todos los dispositivos como se muestra.
6. Encienda todo en el siguiente orden:
• fuentes de entrada de audio (por ejemplo, micrófonos, instrumentos, reproductores de CD)
• Envoi
7. Al apagar, realice siempre esta operación en forma inversa:
• Envoi
• cualquier otro dispositivo de entrada
Contenido de la caja
Envoi
Cable de corriente (IEC estándar)
2 baterías AA
Micrófono inalámbrico
Antena del micrófono inalámbrico
Guía del usuario
Folleto de instrucciones de seguridad e información sobre la garantía
Soporte
El micrófono y la antena puede almacenarse en el compartimiento superior.
Para obtener la información más completa acerca de este product (los requisitos del sistema, compatibilidad, etc) y
registro del producto, visite denonpro.com.
Page 12
12
Baterías recargables
Las baterías de plomo-ácido recargables son del mismo tipo que se usa en los automóviles. Al igual que con la
batería del vehículo, la forma en que se usa tiene una influencia significativa en la duración de su vida útil. Con un
uso y tratamiento correctos, una batería de plomo-ácido puede durar varios años. He aquí algunas
recomendaciones para prolongar la vida útil de la batería interna.
Uso general
Cargar completamente antes de utilizar.
Cargar completamente antes de almacenar.
Almacenamiento
Para lograr la mayor longevidad del producto, no lo almacene a temperaturas muy altas
(superiores 32°C / 90°F) o muy frías (inferiores a 0°C / 32°F).
Es aceptable dejar su sistema de sonido enchufado. No sobrecargará la batería.
Si deja que el nivel de la batería baje y no la carga durante 6 meses, puede perder
permanentemente su capacidad.
Reparación
Si la batería no se carga, compruebe el fusible cerca de la entrada del cable de alimentación.
Si el fusible no está intacto, remplácelo.
La batería puede remplazarse (consulte los detalles en la sección Especificaciones técnicas).
Por la garantía y las piezas de repuesto, visitando denonpro.com.
Disposición final
Lleve la unidad a un centro de reciclaje o deséchela de acuerdo a las ordenanzas locales.
Instalación
Diagrama de conexión
Los elementos que no se enumeran en Introducción > Contenido de la caja se venden por separado.
Tableta
Suministro
eléctrico
Teléfono
inteligente
(smartphone)
Micrófono
Micrófono
inalámbrico
Page 13
13
Características
Panel trasero
1. Pantalla: Muestra los modos del Media Panel (Panel de medios) para Bluetooth, USB, y SD.
Nota: El Pantalla viene con un protector de plástico adherido. Quítelo para visualizar el Pantalla de manera
óptima.
2. Puerto USB: Conecte su unidad flash USB para reproducir archivos MP3 y WMA de música.
3. Ranura para tarjeta SD: Inserte su tarjeta SD aquí para reproducir archivos MP3 y WMA de música.
4. Panel de medios: Controles para fuentes de Bluetooth, SD, y USB. El símbolo de fuente del modo Panel de
medios se iluminará cuando se esté reproduciendo esa fuente.
5. Entrada micrófono (1/4 pulg. (6.35mm) y XLR): Conecte un micrófono dinámico a las entradas de 1/4
(6.35mm) pulg. o XLR. Controle el volumen de estas entradas utilizando la perilla del volumen de entrada del
micrófono. Al conectar el micrófono, asegúrese de que el botón Line/Mic está presionado de manera de
seleccionar el modo Micrófono. Al conectar un dispositivo de nivel de línea, como por ejemplo un teclado,
caja de ritmos, reproductor de CD, etc., asegúrese de que el botón esté levantado de manera de seleccionar
el modo Línea.
6. Entrada auxiliary (1/8" / 3.5mm): Conecte a esta entrada auxiliar estéreo de 1/8 pulg. un reproductor de CD,
un reproductor de medios digitales u otra fuente de audio. Controle el volumen de salida utilizando la perilla
Aux/MP3 Level (Nivel de Auxiliar/MP3) (con el interruptor en la posición Aux).
7. Entradas RCA: Conecte a estas entradas un reproductor de CD, un reproductor de medios digitales, un
mezclador u otras fuentes de medios. Retire las cubiertas de goma de las entradas para conectar los cables.
8. Salida de Linea (1/4"/ 6.35mm): Conecte esta salida 1/4" (6.35mm) a otro altavoz activo (alimentado). El nivel
de la salida se controla mediante la perilla Level (Nivel) de cada canal y la perilla Master Volume (Volumen
maestro).
9. Ecualización de agudos: Aumenta o disminuye las frecuencias altas (agudos) en un rango entre -12 dB y +
12 dB.
10. Ecualización de graves: Aumenta o disminuye las frecuencias bajas (graves) en un rango entre -12 dB y + 12
dB.
11. LED de alimentación/«clipping»: Este LED se ilumina permanentemente con luz verde una vez encendido.
Este LED destella con luz roja si la señal de las entradas o de la fuente del panel de medios se está
recortando. Si este ocurre, disminuya el ajuste de la perilla de volumen de entrada del micrófono, la perilla de
volumen de nivel de línea o la perilla de volumen del panel de medios.
2
1
3
4
5
6
7
8
9
10
11
12
13
14
15
16
18
19
20
21
22
17
Page 14
14
12. Interruptor Aux/MP3: Cuando el botón esté pulsado, la
señal Auxiliar pasará. Cuando el botón esté levantado, la
señal MP3/Bluetooth pasará. Utilice la perilla Aux/MP3
Level bajo él para controlar el volumen de la fuente de
sonido.
13. LED de recorte: Este LED destella con luz roja si la señal
de las entradas o de la entrada del Media Panel se está
recortando. Si este ocurre, disminuya el ajuste de las
perillas de volumen Micrófono Entrada, Línea Entrada, o
del volumen del Media Panel.
14. Volumen del Media Panel: Ajusta el volumen del altavoz
para las fuentes de tarjeta SD, puerto USB y Bluetooth.
15. Selector de voltaje: Si su unidad cuenta con un
conmutador selector de voltaje, cambie su posición solo
cuando sea necesario (por ej. cuando viaja a un país o
región con voltaje diferente) y cambie el fusible por uno de
la especificación apropiada (impresa debajo de la entrada del cable de alimentación de la unidad, junto al
voltaje deseado). Si selecciona un valor de voltaje inadecuado o usa un fusible de especificación incorrecta,
puede dañarse la unidad y/o el fusible.
16. Fusible: Si debe reemplazar el fusible, utilice un fusible T2,5AL/250V para voltajes de 220-240 V; para voltajes
de 100-120 V, utilice un fusible T5AL/250V.
17. Indicador de carga: Cuando esté conectado a corriente alterna, la luz LED del Envoi se iluminará cuando se
esté cargando. Una vez completada la carga, el LED se apagará.
18. Indicador de nivel de la batería: Mientras el Envoi está encendido y la unidad no está enchufada, estas luces
indican la energía remanente en la batería. La vida útil de la batería varía en función del volumen y el
consumo. Cuando la luz "LOW" se enciende, la batería se agotará en poco tiempo y necesita recargarse.
19. Reverberación: Ajuste esta perilla para controlar cuánto efecto de eco se aplica a la señal para el micrófono
inalámbrico y las dos entradas Mic.
20. Volumen maestro: Esto controla el nivel general para todas las entradas.
21. Ajustes del micrófono inalámbrico: Ajuste estos controles cuando utilice el micrófono inalámbrico.
Asegúrese de mantener el micrófono cerca de su boca al hablar.
El grupo de controles incluye un emisor
infrarrojo para sincronizar el micrófono inalámbrico. Consulte el capítulo Configuración del micrófono
inalámbrico para obtener más detalles sobre cómo utilizar estos controles.
22. Conector de la antena: Retire las cubiertas de goma del conector para conectar la antena BNC incluida.
Ajuste esta antena de FM para obtener la mejor recepción inalámbrica del micrófono. Desconecte la antena
cuando no esté utilizando el micrófono inalámbrico o al trasladar la unidad.
Media Panel Panel (Panel de medios)
Funciones del Media Panel:
1. Modo: Selecciona la fuente del Media Panel: USB, SD, o Bluetooth.
2. Reproducción/Pausa: Reproduce/hace pausa en la fuente de USB, SD
o Bluetooth del Media Panel.
3. Detener: Detiene la reproducción de la fuente del Media Panel.
4. Repeat (Repetir): Alterna entre las diferentes opciones de repetición
para las fuentes USB y SD.
5. Anterior: Retrocede a la pista anterior del USB o tarjeta SD. Al escuchar
de fuentes Bluetooth, pulsar Prev (Anterior) en algunas aplicaciones
puede hacer que vaya a otra lista de reproducción o género musical.
Mantenga pulsado este botón para disminuir el volumen de la pista.
6. Siguiente: Avanza a la pista siguiente del USB o tarjeta SD. Al escuchar
de fuentes Bluetooth, pulsar Next (Siguiente) en algunas aplicaciones
puede hacer que vaya a otra lista de reproducción o género musical.
Mantenga pulsado este botón para aumentar el volumen de la pista.
7. El símbolo de reproducción se ilumina cuando se está reproduciendo
una pista.
8. El símbolo de repetir se ilumina cuando se configura la repetición de una pista SD o USB.
9. Muestra la canción que se está reproduciendo actualmente y el número total de canciones en la carpeta
seleccionada.
10. Muestra el tipo de preset del ecualizador.
11. Muestra la velocidad en bits y el tipo de la canción que se está reproduciendo actualmente.
Nota: Si el archivo utiliza una velocidad de bits variable, este número cambiará a medida que se reproduce la
canción.
12. Memoria SD o USB que se está reproduciendo.
13. Nombre del archivo que se está reproduciendo.
14. Analizador del espectro de frecuencia.
15. Tiempo actual y tiempo total de la canción que se está reproduciendo.
1
2
3
4
5
6
7
8
9
10
11
12
13
14
15
IMPORTANTE: Cuando el indicador
luminoso de la batería se ilumina con luz
roja, esto quiere decir que se la batería
necesita cargarse. Para una carga completa,
apague el dispositivo y cárguelo durante 8
horas o hasta que la luz verde indique que
se completó la carga.
IMPORTANTE: Para maximizar la vida de la
batería, es importante cargar la unidad
periódicamente. No se recomienda dejar la
unidad descargada por más de 3 días
consecutivos.
Page 15

15
Instalación del micrófono inalámbrico
Para utilizar el micrófono inalámbrico incluido, siga estos pasos:
1. Asegúrese de colocar 2 pilas alcalinas AA nuevas en el micrófono inalámbrico
(consulte el gráfico lateral sobre la instalación de las pilas). El mango del micrófono se
desatornilla para revelar el compartimiento de las pilas. Atornille el mango nuevamente
con la rosca hacia adentro.
2. En el panel del receptor de UHF del Envoi, encienda la perilla Power-Vol (Encendido-
volumen) en sentido horario.
3. Encienda el micrófono inalámbrico mediante el interruptor que se encuentra en la parte
inferior del micrófono. Observe el indicador de AF para asegurarse de que se reciba
una señal.
4. Utilice los botones arriba o abajo para seleccionar un canal inalámbrico que tenga
una señal fuerte.
5. Mantenga el micrófono cerca de su boca al hablar y el LED AF se iluminará en el panel
de ajustes del micrófono inalámbrico. Ajuste la perilla de encendido-volumen para
aumentar el nivel.
Nota: De ser necesario, el interruptor H/L (alta/baja potencia) en el micrófono inalámbrico
(consulte el gráfico lateral) puede ajustarse para aumentar el alcance de la señal. El ajuste de
alta potencia consume más energía de las pilas para brindar un mayor alcance y recepción.
El ajuste de baja potencia extiende la vida útil de las pilas en escenarios en donde es
aceptable trabajar con un menor rango operativo.
Nota: De ser necesario, la ganancia del micrófono se puede ajustar en sentido horario para
una mayor ganancia de salida. Para una menor ganancia de salida, el tornillo se puede
ajustar en sentido antihorario.
Nivel de silenciamiento
En la mayoría de las situaciones, debe dejarse en la posición predeterminada de fábrica. Sin
embargo, en situaciones de alta actividad de RF, los niveles de silenciamiento se pueden
reajustar para suprimir las interferencias de otros dispositivos inalámbricos en un ambiente
de RF compartido. Esto reducirá la interferencia cuando no haya una señal de audio
presente. Si los LED de AF o RF parpadean o se mantienen iluminados cuando el micrófono
inalámbrico está apagado, el tornillo del nivel de silenciamiento en el panel del receptor de
UHF debe girarse en sentido antihorario hasta que los LED se apaguen. Cuando el nivel de
silenciamiento está ajustado correctamente, los LED de AF y RF se iluminarán solamente
cuando se esté utilizando el micrófono inalámbrico.
Ajuste del ASC (Canal de sincronización automática)
Si recibe interferencia o si necesita otro canal, seleccione otro canal utilizando el botón ASC (Canal de
sincronización automática).
1. Seleccione el canal de UHF con la mejor recepción que desee utilizar mediante los botones arriba o abajo.
2. Encienda el micrófono y coloque el sensor del mismo (ubicado encima del compartimiento de pilas, como se
ve en el gráfico anterior) cerca del LED IR del Envoi.
3. Pulse el botón ASC del Envoi una vez y espere alrededor de 3 segundos hasta que el LED IR deja de
parpadear. Cuando encuentre un canal sin interferencia, el micrófono inalámbrico se ajustará a ese canal.
Apareamiento de un dispositivo Bluetooth
1. Encienda su dispositivo Bluetooth.
2. Encienda el Envoi.
3. Navegue hasta la pantalla de configuración de Bluetooth de su dispositivo, seleccione el Bluetooth que
corresponda al altavoz Envoi y conéctese a él.
Nota: Si se le solicita un código, introduzca 0000.
4. Reproduzca música desde su dispositivo Bluetooth.
5. Ajuste el volumen del Envoi manteniendo pulsados los botones |<< o >>| para aumentar o disminuir el
volumen.
6. Para desconectar el apareamiento, apague el Bluetooth de su dispositivo o seleccione "Eliminar datos de
apareamiento" en el menú de Bluetooth del Envoi.
Page 16

16
Modo Bluetooth
Para acceder a un dispositivo apareado:
1. Pulse y suelte el botón Mode (Modo), hasta que aparezca el icono Bluetooth en la pantalla.
2. En modo Bluetooth, mantenga pulsado el botón Mode durante 2 segundos para ver opciones adicionales.
3. Utilice los botones |<< y >>| para recorrerlas y pulse Play/Pause (Reproducir/pausa) para seleccionar uno de
los ajustes que se muestran a continuación.
BT Disconnect: Esta función deshabilita la conexión desde la fuente de audio Bluetooth.
EQ (Ecualizador): Envoi le brinda 7 presets de ecualización opcionales para mejorar la música. Puede seleccionar
uno de los siguientes ajustes de ecualización:
• Normal (Nor)
• Pop (Pop)
• Rock (Rock)
• Jazz (Jazz)
• Clásica (Clas)
• Country (Cou)
• Graves bajos (Bas)
Eliminar información de apareamiento: Seleccione esta opción para "olvidar" un dispositivo Bluetooth
previamente apareado de forma que el Envoi no se reconectará con él al entrar nuevamente en modo Bluetooth.
Información del dispositivo: Muestra información sobre el nombre de Bluetooth del Envoi.
Salir: Abandona el menú de Bluetooth.
USB Mode (Modo USB):
Para acceder a un dispositivo USB conectado:
1. Pulse y suelte el botón Mode (Modo), hasta que aparezca el icono de dispositivo USB en la pantalla.
2. En modo USB, mantenga pulsado el botón Mode durante 2 segundos para ver opciones adicionales del menú
de USB.
3. Utilice los botones |<< y >>| para recorrerlas y pulse Play/Pause (Reproducir/pausa) para seleccionar uno de
los ajustes que se muestran a continuación.
Modo de reproducción:
• Todos (A): Reproduce y repite todas las pistas del dispositivo USB.
• Repetir uno (1): Reproduce y repite la pista actual.
• Repetir carpeta (F): Reproduce las pistas de la carpeta actual y luego reinicia la reproducción de las pistas.
• Normal (N): Reproduce todas las pistas del dispositivo USB.
• Aleatorio (R): Selecciona una pista al azar para reproducir.
• Explorar (I): Reproduce los primeros 10 segundos de cada pista del dispositivo USB.
EQ (Ecualizador): Envoi le brinda 7 presets de ecualización opcionales para mejorar la música. Puede seleccionar
uno de los siguientes ajustes de ecualización:
• Normal (Nor)
• Pop (Pop)
• Rock (Rock)
• Jazz (Jazz)
• Clásica (Clas)
• Country (Cou)
• Graves bajos (Bas)
Change Device (Cambiar dispositivo): Le permite alternar entre escuchar audio de la tarjeta SD y de un dispositivo
USB conectado.
Exit (Salir): Abandona el menú del modo USB.
U-Disk Folder (Carpeta U-Disk): Selecciona una pista de una carpeta de la unidad USB. Utilice los botones |<< y
>>| para navegar hacia arriba o abajo y pulse Play/Pause para abrir una carpeta o seleccionar una pista para
reproducir.
Delete File (Eliminar archivo): Elimina la pista actualmente seleccionada.
Delete All (Eliminar todo): Elimina todas las pistas de la unidad USB.
Salir: Abandona el menú de opciones de música.
Page 17

17
Modo de tarjeta SD
Para acceder a una tarjeta SD insertada:
1. Pulse y suelte el botón Mode (Modo), hasta que aparezca el icono de tarjeta SD en la pantalla.
2. En modo de tarjeta SD, mantenga pulsado el botón Mode durante 2 segundos para ver opciones adicionales
del menú.
3. Utilice los botones |<< y >>| para recorrerlas y pulse Play/Pause (Reproducir/pausa) para seleccionar uno de
los ajustes que se muestran a continuación.
Modo de reproducción:
• Todos (A): Reproduce y repite todas las pistas de la tarjeta SD.
• Repetir uno (1): Reproduce y repite la pista actual.
• Repetir carpeta (F): Reproduce las pistas de la carpeta actual y luego reinicia la reproducción de las pistas.
• Normal (N): Reproduce todas las pistas de la tarjeta SD.
• Aleatorio (R): Selecciona una pista al azar para reproducir.
• Explorar (I): Reproduce los primeros 10 segundos de cada pista de la tarjeta SD.
EQ (Ecualizador): Envoi le brinda 7 presets de ecualización opcionales para mejorar la música. Puede seleccionar
uno de los siguientes ajustes de ecualización:
• Normal (Nor)
• Pop (Pop)
• Rock (Rock)
• Jazz (Jazz)
• Clásica (Clas)
• Country (Cou)
• Graves bajos (Bas)
Change Device (Cambiar dispositivo): Le permite alternar entre escuchar audio de la tarjeta SD y de un dispositivo
USB conectado.
Exit (Salir): Abandona el menú del modo de tarjeta SD.
Card Folder (Carpeta de la tarjeta): Selecciona una pista de una carpeta de la tarjeta SD. Utilice los botones |<< y
>>| para navegar hacia arriba o abajo y pulse Play/Pause para abrir una carpeta o seleccionar una pista para
reproducir.
Delete File (Eliminar archivo): Elimina la pista actualmente seleccionada.
Delete All (Eliminar todo): Elimina todas las pistas de la tarjeta SD.
Salir: Abandona el menú de opciones de música.
Page 18

18
Solución de problemas
Si experimenta problemas, realice lo siguiente:
• Asegúrese de que todos los cables y los otros dispositivos estén conectados firme y correctamente.
• Asegúrese de estar utilizando Envoi como describe esta Guía del usuario.
• Asegúrese de que todos sus otros dispositivos o medios funcionen correctamente.
• Si cree que Envoi no está funcionando correctamente, busque su problema y solución en la siguiente tabla.
Problema: Solución: Consulte:
La unidad no se enciende.
Asegúrese de que la entrada de corriente del Envoi
esté conectada correctamente a una toma de
corriente utilizando el adaptador de corriente / cable
de corriente incluido.
Instalación
No hay señal o solamente una
señal débil entre el Envoi y el
micrófono inalámbrico.
V
erifique el LED de las pilas en el micrófono
inalámbrico para asegurarse de que esté encendido.
Si las pilas están agotándose, remplácelas.
Verifique que el interruptor Power-Vol del receptor
de UHF esté encendido.
Asegúrese de que no haya ningún objeto
(computadoras, paredes, cañerías, etc.) entre el
transmisor inalámbrico y el Envoi.
Cambie el canal en el Envoi.
Funcionamiento > Ajustes
del micrófono inalámbrico
Estoy experimentando
interferencia en la señal entre el
Envoi y el micrófono inalámbrico.
Asegúrese de que la antena del receptor de UHF
esté ajustada correctamente.
Mantenga los cables de audio conectados alejados
de la antena.
Asegúrese de que no haya otros dispositivos
transmitiendo señales en el mismo canal de
frecuencia que está usando.
Seleccione otro canal utilizando el ASC (Canal de
sincronización automática).
Ajuste el nivel de silenciamiento. Un valor de ajuste
mayor del silenciamiento proporciona mejor
protección contra la interferencia pero puede
también reducir el rango de señal. Elija el ajuste que
silencie la interferencia más eficazmente y permita a
la vez que pase la señal verdadera. Si la calidad
pobre de la señal requiere un ajuste mayor del
silenciamiento, trate de eliminar la interferencia o
cambie el canal de UHF para evitar una disminución
en el rango de señal.
Funcionamiento > Ajustes
del micrófono inalámbrico
y
Funcionamiento > Ajuste del
ASC (Canal de sincronización
automática)
El Envoi no emite ningún sonido o
el sonido está distorsionado.
Asegúrese de que todas las conexiones de cables y
dispositivos estén firmes y correctas.
Asegúrese de que ninguno de los cables esté
dañado.
Asegúrese de que los ajustes en su dispositivo
Bluetooth, altavoz, mezclador, etc. sean correctos.
Instalación
El Envoi no reproduce el audio
proveniente de mi dispositivo
Bluetooth.
Asegúrese de haber apareado correctamente su
dispositivo Bluetooth.
Mejore la recepción de la señal Bluetooth acercando
su dispositivo Bluetooth al Envoi. También evite que
se interpongan obstáculos (paredes, muebles, etc.)
en la línea de visión entre su dispositivo Bluetooth y
el Envoi.
I
nstalación y Operación
Mi dispositivo Bluetooth solicita
un PIN para aparearse con el
Envoi.
Introduzca 0000 como el PIN. (Algunos dispositivos
Bluetooth antiguos pueden requerir que introduzca
un PIN).
Operación
Page 19

19
Guide d'utilisation (Français)
Introduction
• Enceinte active 2 voies (haut-parleur basses fréquences de 25,4 cm, haut-parleur hautes fréquences à
compression de 2,5 cm)
• Batterie rechargeable intégrée procure jusqu’à 12 heures d’utilisation
• Réponse en fréquence pleine gamme : 55-20 kHz
• Puissance de 120 watts RMS, 240 watts crête (alimentation CA); 80 watts RMS, 160 watts crête (batterie)
• Connexion Bluetooth® pour la transmission en continu d'audio sans fil
• Lecteur USB/SD MP3/WMA intégré avec écran ACL pour une lecture automatique
• Embase pour montage, poignée rétractable et roues intégrées
Veuillez consulter la section Installation de ce guide pour apprendre comment intégrer le Envoi avec votre système
audio, puis reportez-vous à la section Fonctionnement pour commencer à utiliser le Envoi.
1. Assurez-vous que tous les articles énumérés dans le contenu de la boîte de ce guide sont inclus dans la boîte.
2. VEUILLEZ LIRE LE LIVRET DES CONSIGNES DE SÉCURITÉ AVANT D'UTILISER LE PRODUIT.
3. Veuillez examiner le schéma de connexion.
4. Veuillez vous assurer que tous les appareils d’entrée tels que microphones, lecteurs de disques compacts ou
lecteurs multimédia numériques raccordés sont éteints et que leur volume est à « zéro ».
5. Veuillez raccorder tous les appareils comme indiqué sur le schéma.
6. Mettez tous les appareils sous tension dans l'ordre suivant :
• sources d'entrée audio (p. ex., microphones, instruments, lecteurs de disques compacts)
• Envoi
7. Pour mettre hors tension, toujours inversez l'opération :
• Envoi
• sources d’entrée audio
Contenu de la boîte
Envoi
Câble d’alimentation (standard IEC)
2 piles de format AA
Microphone sans fil
Antenne pour microphone sans fil
Guide d'utilisation
Consignes de sécurité et information concernant la garantie
Assistance
Le microphone et le l'antenne peuvent être rangés dans le compartiment supérieur.
Pour les dernières informations concernant ce produit (la configuration système minimale requise, la compatibilité,
etc) et l'enregistrement du produit, veuillez visitez le site denonpro.com.
Page 20

20
Piles rechargeables
Les piles au plomb rechargeables sont du même type que les batteries utilisées dans les automobiles. Comme pour
la batterie de votre automobile, la manière dont vous l'utilisez a un impact direct sur sa durée de vie. Cependant,
avec une bonne utilisation la pile au plomb peut avoir une durée de vie de plusieurs années. Voici quelques
recommandations pour prolonger au maximum la durée de vie de la pile interne.
Utilisation
générale
Chargez complètement la batterie avant utilisation.
Chargez complètement la batterie avant d’entreposer l’enceinte.
Entreposage
Pour optimiser la longévité du produit, ne pas entreposer dans des températures extrêmement
chaudes (supérieur à 32 °C / 90 °F) ou extrêmement froides (moins de 0 °C / 32 °F).
Il est acceptable de laisser votre système audio branché. Cela ne surchargera pas la batterie.
Si vous laissez le niveau de batterie s’affaiblir sans la recharger pendant 6 mois, elle risquerait
de perdre sa capacité de charge de façon permanente.
Réparation
Si la batterie ne parvient plus à se recharger, vérifiez le fusible situé près de l'entrée du câble
d'alimentation. Si le fusible n'est pas intact, veuillez le remplacer.
La batterie peut être remplacée (veuillez consulter la section Spécifications techniques).
Pour toutes questions concernant la garantie et les pièces de rechange, veuillez communiquer
avec le service de pièces de rechange en visitant denonpro.com.
Élimination
Apportez l’appareil dans un centre de recyclage ou disposez selon les règlements de votre
municipalité.
Démarrage
Schéma de connexion
Les éléments qui ne figurent pas dans Introduction > Contenu de la boîte sont vendus séparément.
Tablette
Alimentation
secteur
Téléphone
intelli
g
ent
Micro
p
hone
Microphone
sans fil
Page 21

21
Caractéristiques
Panneau arrière
1. Écran: Affiche les modes de fonctionnement de l’enceinte : Bluetooth, USB, et SD.
Remarque : Un film de protection en plastique recouvre l’écran à cristaux liquides. Retirez-le pour un
affichage optimal.
2. Port USB : Branchez une clé USB pour faire la lecture de fichiers MP3 et WMA.
3. Emplacement pour carte mémoire SD : Insérez une carte SD pour faire la lecture de fichiers MP3 et WMA.
4. Module Media Panel : Commandes pour les sources Bluetooth, SD, et la USB. Le symbole du module Media
Panel s’allume lorsque cette source est en cours de lecture.
5. Entrée microphone (6,35 mm et XLR) : Ces entrées permettent de brancher un microphone
électrodynamique. Le volume de ces entrées est commandé par le bouton Mic Input volume. Lors de la
connexion d'un microphone, assurez-vous que le bouton Line/Mic est enfoncé en mode Mic. Lors de la
connexion d'un dispositif à niveau ligne, comme un clavier, module de percussion, lecteur CD, etc., assurezvous que le bouton est en position relevée pour le mode Line.
6. Entrée auxiliaire (1/8" / 3.5mm): Cette entrée stéréo 3,5 mm permet de brancher un lecteur de disques
compacts, un lecteur multimédia ou autres sources audio. Contrôler le volume de sortie en utilisant le bouton
Aux/MP3 Level (sélecteur en position Aux).
7. Entrées RCA : Ces entrées permettent de brancher un lecteur de disques compacts, un lecteur multimédia,
une console de mixage ou autres sources audio. Retirez les protecteurs en caoutchouc des entrées pour
brancher les câbles.
8. Sortie Ligne (1/4"/ 6.35mm) : Cette sortie 1/4" (6.35mm) permet de brancher une autre enceinte amplifiée. Le
niveau de ces sorties est commandé par le bouton Level de chaque canal et le bouton Master Volume.
9. Égalisation des hautes fréquences : Augmente ou diminue les hautes fréquences et Media Panel entre -
12 dB à + 12 dB.
10. Égalisation des basses fréquences : Augmente ou diminue les basses fréquences et Media Panel entre -
12 dB à + 12 dB.
11. Voyant d'alimentation/Écrêtage : Cette DEL devient verte lors de la mise sous tension. En présence
d'écrêtage du signal des entrées ou du panneau multimédia, le voyant DEL clignote rouge. Pour remédier à
l’écrêtage, diminuez le réglage du bouton Mic Input volume, Line Level volume ou volume du panneau
multimédia.
2
1
3
4
5
6
7
8
9
10
11
12
13
14
15
16
18
19
20
21
22
17
Page 22

22
12. Sélecteur Aux/MP3 : Lorsque cette touche est enfoncée,
le signal Aux est retransmis. Lorsque cette touche est
relâchée, le signal MP3/Bluetooth est retransmis. Le
bouton Aux/MP3 Level permet de régler le volume de la
source audio.
13. Témoin d’écrêtage : En présence d'écrêtage du signal
des entrées ou du Media Panel, le voyant DEL clignote.
Pour remédier à l’écrêtage, diminuez le réglage du bouton
Microphone Entrée Volume, Ligne Entrée Volume, ou
Volume Media Panel.
14. Volume Media Panel : Ce bouton permet de régler le
volume de l’enceinte pour les sources Bluetooth, USB, la
carte et SD.
15. Sélecteur de tension : Si votre appareil dispose d’un
sélecteur de tension, changez seulement le réglage si
nécessaire (par exemple, lorsque vous voyagez dans un
pays ou une région utilisant une tension différente) et
remplacez le fusible par un de même calibre (imprimé sous l’entrée d’alimentation de l’appareil, à côté de la
tension désirée). L’utilisation d’une tension inappropriée ou d’un fusible de calibre inapproprié pourrait
endommager l’appareil et/ou le fusible.
16. Fusible : Si le fusible doit être remplacé, utilisez un fusible de calibre T2.5AL/250 V pour les tensions de 220-
240 V; pour les tensions de 100-120 V, utiliser un fusible de calibre T5AL/250V.
17. Indicateur de rechargement : Lorsqu'il est connecté à l'alimentation secteur, le voyant DEL de l’Envoi
s’allume afin d’indiquer que le rechargement de la batterie est en cours. Une fois la batterie rechargée, le
voyant DEL s’éteint.
18. Indicateur de niveau de charge : Alors que l'Envoi est sous tension sans être branché à une alimentation
secteur, ces quatre voyants indiquent le niveau de charge de la batterie. L’autonomie de la batterie est
affectée par le volume et le niveau d’utilisation. Lorsque le voyant « LOW » est allumé, cela indique que la
batterie sera bientôt épuisée et qu’elle doit être rechargée.
19. Reverb : Réglez ce bouton pour contrôler la quantité d'un effet d'écho appliquée au signal pour le
microphone sans fil et les deux entrées Mic Inputs.
20. Master Volume : Ce bouton contrôle le niveau de sortie générale de toutes les entrées.
21. Paramètres du microphone sans fil Réglez ces paramètres lorsque vous utilisez le microphone sans fil.
Assurez-vous de tenir le microphone près de votre bouche lorsque vous parlez.
Le groupe de commandes
comprend un émetteur infrarouge pour la synchronisation de microphone sans fil. Veuillez consulter la section
Configuration du microphone sans fil pour plus d'informations sur l’utilisation de ces commandes.
22. Connecteur d'antenne : Retirez les protecteurs en caoutchouc du connecteur pour brancher l’antenne BNC.
Ajustez cette antenne afin d’obtenir la meilleure réception pour le microphone. Débranchez l’antenne lorsque
vous n'utilisez pas le microphone ou que vous déplacez l'appareil.
Module Media Panel
Fonctions du module Media Panel :
1. Mode: Cette touche permet de sélectionner la source du module Media Panel :
USB, SD, ou Bluetooth.
2. Lecture/Pause: Cette touche permet de lancer ou d’interrompe la lecture de la
source Bluetooth, USB ou de la carte SD du module Media Panel.
3. Stop: Cette touche permet d’arrêter la lecture de la source du module Media
Panel.
4. Repeat : Cette touche permet de faire défiler les différentes options de
répétition pour les sources USB et SD.
5. Piste précédente: Cette touche permet de passer à la piste précédente de la
source USB ou de la carte SD. Sur des sources Bluetooth, cette touche permet
de passer à d’autres listes de lecture ou de genre musical, selon l’application.
Maintenez cette touche enfoncée pour diminuer le volume de la piste.
6. Piste suivante: Cette touche permet de passer à la piste suivante de la source USB ou de la carte SD. Sur
des sources Bluetooth, cette touche permet de passer à d’autres listes de lecture ou de genre musical, selon
l’application. Maintenez cette touche enfoncée pour augmenter le volume de la piste.
7. Le symbole de lecture s’allume lorsqu'une piste est en cours de lecture.
8. Le symbole de répétition s’allume lorsqu'une piste SD ou USB a été programmer avec une répétition.
9. Affiche la chanson en cours et le nombre total de chansons dans le dossier sélectionné.
10. Affiche le type d’égalisation programmé.
11. Affiche le débit binaire et le type de chanson.
Remarque : Si le fichier utilise un débit binaire variable, ce nombre changera au cours de la lecture de la
chanson.
12. Carte SD ou clé USB en cours de lecture.
13. Nom du fichier en cours de lecture.
14. Analyseur de spectre de fréquence.
15. Heure et durée totale de la chanson en cours de lecture.
1
2
3
4
5
6
7
8
9
10
11
12
13
14
15
IMPORTANT : Lorsque l’indicateur de
charge devient rouge, cela indique que la
batterie doit être rechargée. Pour une charge
complète, éteignez l'appareil et recharger la
batterie pendant 8 heures, ou jusqu'à ce que
l’indicateur devienne vert indiquant une
charge complète.
IMPORTANT : Pour maximiser la durée de
vie de la batterie, il est important de
recharger l'appareil régulièrement. Il n'est
pas recommandé de laisser l'appareil avec
une batterie déchargée pendant plus de 3
jours consécutifs.
Page 23

23
Fonctionnement
Installation du microphone sans fil
Pour utiliser le microphone sans fil inclus, veuillez suivre les étapes de configuration
suivantes :
1. Vérifiez que deux nouvelles piles alcalines AA sont installées dans le microphone
sans fil (voir le graphique d’installation des piles). Dévissez la poignée du
microphone pour ouvrir le compartiment des piles. Revissez la poignée avec les fils
vers l'intérieur.
2. Sur le panneau récepteur UHF de l’Envoi, tournez le bouton Power-Vol dans le sens
horaire.
3. Allumez le microphone sans fil en utilisant l'interrupteur qui se trouve sur le dessous
du microphone. Vérifiez l’indicateur AF pour vous assurer qu’un signal est reçu.
4. Utilisez les touches de défilement du haut et du bas pour sélectionner un canal
sans fil ayant un signal clair et puissant.
5. Tenez le microphone près de votre bouche lorsque vous parlez et l’indicateur DEL
AF devrait s’allumer sur le panneau des paramètres du microphone sans fil. Ajustez
le bouton Power-Volume pour augmenter le niveau.
Remarque : Si nécessaire, ajustez le sélecteur de portée du signal (H/L) du microphone
sans fil (consultez le graphique) pour augmenter la portée du signal. Le réglage élevé
consomme plus d’énergie afin d’augmenter la portée et offrir une meilleure réception. Le
réglage faible prolonge la durée de vie de la batterie et convient lorsqu’une portée
inférieure est acceptable.
Remarque : Si nécessaire, tournez la commande du gain du microphone dans le sens
horaire afin d’augmenter le gain. Pour diminuer le gain, tournez la commande du gain du
microphone dans le sens antihoraire.
Mute Level
Dans la plupart des situations, cette commande devrait être laissée au réglage d’usine.
Toutefois, en cas de forte activité RF, les niveaux de mise en sourdine peuvent être
réajustés afin de supprimer les interférences d'autres appareils sans fil dans un même
environnement RF. Cela permettra de réduire les interférences lorsqu'un signal audio n'est
pas présent. Si l’indicateur DEL AF ou RF clignote ou allume lorsque le microphone sans
fil est hors tension, la commande Mute Level du panneau du récepteur UHF doit être
tournée dans le sens antihoraire jusqu'à ce que les voyants s’éteignent. Lorsque la
commande Mute Level est correctement réglée, les indicateurs DEL AF et RF
correspondants s’allument uniquement lorsque le microphone sans fil est utilisé.
Balayage automatique des canaux (ASC)
En présence d’interférences, ou lorsqu’un autre canal est nécessaire, utilisez la touche ASC (Auto-Sync Channel).
1. Sélectionnez le canal UHF avec la meilleure réception possible en utilisant les touches de défilement du haut
ou du bas.
2. Mettez le microphone sous tension et placez le capteur du microphone (au-dessus du compartiment des
piles, dans le graphique ci-dessus) près de la DEL IR de l’Envoi.
3. Appuyez une fois sur la touche ASC de l’Envoi et attendez environ 3 secondes, jusqu'à ce que la DEL IR
arrête de clignoter. Lorsqu'il détecte un canal sans interférence, le microphone sans fil se connectera à ce
canal.
Jumelage d'un appareil Bluetooth
1. Veuillez mettre votre appareil Bluetooth sous tension.
2. Mettez l’enceinte Envoi sous tension.
3. Accédez à l'écran de configuration de votre appareil Bluetooth, sélectionnez Bluetooth pour l’enceinte Envoi,
et lancez le jumelage.
Remarque : Si vous êtes invité à entrer un mot de passe, saisissez 0000.
4. Lancez la lecture audio sur votre appareil Bluetooth.
5. Régler le volume de l'Envoi en maintenant enfoncée une des touches |<< ou >>| pour diminuer ou augmenter
le volume.
6. Pour supprimer la connexion, désactivez la fonction Bluetooth sur votre appareil ou sélectionnez « Delete
paired info » du menu Bluetooth de l’Envoi.
Page 24

24
Mode Bluetooth
Pour accéder à un appareil Bluetooth jumelé :
1. Maintenez la touche Mode enfoncée jusqu’à ce que l’icône Bluetooth s’affiche à l’écran.
2. Maintenez la touche Mode enfoncée pendant 2 secondes en mode Bluetooth afin d’afficher les options
supplémentaires du menu.
3. Utilisez les touches |<< et >>| pour faire défiler les options, puis appuyez sur la touche de Lecture/Pause
pour sélectionner l'un des paramètres ci-dessous.
Déconnexion Bluetooth : Cette fonction désactive la connexion de la source audio Bluetooth.
Égalisation (EQ) : L’enceinte Envoi dispose de 7 préréglages d’égalisation afin d'apporter des améliorations à la
musique. Vous pouvez sélectionner parmi les paramètres d'égalisation suivants :
• Normal (Nor)
• Populaire (Pop)
• Rock (Rock)
• Jazz (Jazz)
• Classique (Clas)
• Country (Cou)
• Graves (Bas)
Suppression des informations de jumelage (Delete Paired Info) : Sélectionnez cette option pour « oublier » un
appareil Bluetooth précédemment jumelé afin d’empêcher que l’Envoi n’essaie de se reconnecter à cet appareil en
mode Bluetooth.
Informations sur l’appareil (Device Information) : Vous permet d’afficher les informations sur le nom Bluetooth de
l'Envoi.
Quitter (Exit) : Vous permet de quitter le menu Bluetooth.
Mode USB
Pour accéder à un appareil USB :
1. Maintenez la touche Mode enfoncée jusqu’à ce que l’icône Bluetooth s’affiche à l’écran.
2. Maintenez la touche Mode enfoncée pendant 2 secondes en mode USB afin d’afficher les options
supplémentaires du menu.
3. Utilisez les touches |<< et >>| pour faire défiler les options, puis appuyez sur la touche de Lecture/Pause
pour sélectionner l'un des paramètres ci-dessous.
Mode de lecture :
• Toutes les pistes (A) : Vous permet de faire la lecture de toutes les pistes sur le dispositif USB, puis de les
répéter.
• Répétition d’une piste (1) : Vous permet de faire la lecture de la piste sélectionnée, puis de la répéter.
• Répétition d’un dossier (F) : Vous permet de faire la lecture de toutes les pistes dans le dossier sélectionné,
puis de recommencer la lecture de toutes les pistes.
• Normal (N) : Vous permet de faire la lecture de toutes les pistes sur le dispositif USB.
• Aléatoire (R) : Sélectionne une piste au hasard.
• Balayage (I) : Vous permet de faire la lecture des 10 premières secondes de chaque piste sur le dispositif USB.
Égalisation (EQ) : L’enceinte Envoi dispose de 7 préréglages d’égalisation afin d'apporter des améliorations à la
musique. Vous pouvez sélectionner parmi les paramètres d'égalisation suivants :
• Normal (Nor)
• Populaire (Pop)
• Rock (Rock)
• Jazz (Jazz)
• Classique (Clas)
• Country (Cou)
• Graves (Bas)
Changement d’appareil (Change Device) : Vous permet de passer de la lecture du dispositif USB à la lecture de la
carte SD insérée.
Quitter (Exit) : Vous permet de quitter le menu USB.
Dossier USB (U-Disk Folder) : Vous permet de sélectionner une piste dans un dossier sur le dispositif USB. Utilisez
les touches |<< et >>| pour faire défiler les dossiers, puis appuyez sur la touche de Lecture/Pause pour ouvrir l'un
des dossiers ou sélectionner une piste à lire.
Supprimer le fichier (Delete File) : Vous permet de supprimer la piste sélectionnée.
Supprimer tous les fichiers (Delete All) : Vous permet de supprimer toutes les pistes sur le dispositif USB.
Quitter (Exit) : Vous permet de quitter le menu des options musique.
Page 25

25
Mode carte SD
Pour accéder à la carte SD insérée :
1. Maintenez la touche Mode enfoncée jusqu’à ce que l’icône carte SD s’affiche à l’écran.
2. Maintenez la touche Mode enfoncée pendant 2 secondes en mode carte SD afin d’afficher les options
supplémentaires du menu.
3. Utilisez les touches |<< et >>| pour faire défiler les options, puis appuyez sur la touche de
Lecture/Pause pour sélectionner l'un des paramètres ci-dessous.
Mode de lecture :
• Toutes (A) : Vous permet de faire la lecture de toutes les pistes sur la carte SD, puis de les répéter.
• Répète une piste (1) : Vous permet de faire la lecture de la piste en cours, puis de la répéter.
• Répétition d’un dossier (F) : Vous permet de faire la lecture de toutes les pistes dans le dossier
sélectionné, puis de recommencer la lecture de toutes les pistes.
• Normal (N) : Vous permet de faire la lecture de toutes les pistes sur la carte SD.
• Aléatoire (R) : Sélectionne une piste au hasard.
• Balayage (I) : Vous permet de faire la lecture des 10 premières secondes de chaque piste sur la carte
SD.
Égalisation (EQ) :
L’enceinte Envoi dispose de 7 préréglages d’égalisation afin d'apporter des améliorations à la
musique. Vous pouvez sélectionner parmi les paramètres d'égalisation suivants :
• Normal (Nor)
• Populaire (Pop)
• Rock (Rock)
• Jazz (Jazz)
• Classique (Clas)
• Country (Cou)
• Graves (Bas)
Changement d’appareil (Change Device) : Vous permet de passer de la lecture de la carte SD à la lecture
du dispositif USB branché.
Quitter (Exit) : Vous permet de quitter le menu carte SD.
Dossier sur la carte (Card Folder) : Vous permet de sélectionner une piste dans un dossier sur la carte SD.
Utilisez les touches |<< et >>| pour faire défiler les dossiers, puis appuyez sur la touche de Lecture/Pause
pour ouvrir l'un des dossiers ou sélectionner une piste à lire.
Supprimer le fichier (Delete File) : Vous permet de supprimer la piste sélectionnée.
Supprimer tous les fichiers (Delete All) : Vous permet de supprimer toutes les pistes sur la carte SD.
Quitter (Exit) : Quitter le menu des options musique.
Page 26

26
Guide de dépannage
En cas de problème, procédez comme suit :
• Assurez-vous que tous les câbles et les autres périphériques sont correctement raccordés.
• Assurez-vous que vous utilisez Envoi comme indiqué dans ce Guide d’utilisation.
• Assurez-vous que vos autres appareils ou médias fonctionnent correctement.
• Si vous croyez que Envoi ne fonctionne pas correctement, vérifiez le tableau suivant afin de trouver le problème et la
solution.
Problème : Solution : Veuillez consulter :
L’appareil ne s’allume pas.
V
euillez vous assurer que l’adaptateur
d’alimentation / le câble d’alimentation du Envoi est
correctement branché à l’entrée d’alimentation et
à la prise secteur.
Installation
Il n'y a pas de signal ou seulement
un signal faible entre l'Envoi et le
microphone sans fil.
V
érifiez le voyant DEL du microphone sans fil pour
assurer qu'il est sous tension. Si les piles sont
faibles, changez-les.
Vérifiez que le bouton Power-Vol du récepteur UHF
est réglé sur « On ».
Vérifiez qu'aucun objet (ordinateurs, murs, tuyaux,
etc.) ne se trouve entre le microphone et l’Envoi.
Modifiez le canal sur l’Envoi.
Fonctionnement >
Installation du microphone
sans fil
Il y a de l’interférence dans le
signal entre l'Envoi et le
microphone sans fil.
Assurez-vous que l’antenne UHF du récepteur est
bien branchée.
Assurez-vous que tous les câbles audio branchés
ne soient pas près de l’antenne.
Assurez-vous qu’il n’y a pas d’autres appareils qui
transmettent sur le même canal de fréquence.
Sélectionnez autre canal en utilisant la touche de
balayage automatique des canaux (ASC).
Ajustez le réglage de la commande Mute Level. Un
réglage plus élevé offre une meilleure protection
contre les interférences, mais peut également
réduire la portée du signal. Sélectionnez un réglage
qui élimine le plus efficacement le bruit tout en
permettant de recevoir le signal. Si la qualité du
signal nécessite un réglage Mute Level plus élevé,
essayez d'éliminer l'interférence ou de changer le
canal UHF afin d’éviter une perte d'amplitude du
signal.
Fonctionnement >
Installation du microphone
sans fil
et
Fonctionnement > Balayage
automatique des canaux
(ASC)
Le Envoi ne produit aucun son, ou
le son est déformé.
Assurez-vous que tous les câbles et appareils soient
correctement raccordés.
Assurez-vous que les câbles ne soient pas
endommagés.
Assurez-vous que les paramètres de votre appareil
Bluetooth, enceinte, console de mixage, etc. soient
correctement réglés.
Installation
Le Envoi ne transmet pas le signal
audio de l’appareil Bluetooth.
Assurez-vous que vous avez correctement jumelé
votre appareil Bluetooth au Envoi.
Améliorez la réception du signal Bluetooth en
rapprochant votre appareil Bluetooth du Envoi.
Veuillez également vous assurer qu’il n’y a aucun
obstacle (murs, meubles, etc.) entre l’appareil
Bluetooth et le Envoi.
Installation et
Fonctionnement
Jumeler mon appareil Bluetooth
au Envoi nécessite un NIP.
Entrez 0000. (Certains appareils Bluetooth plus
anciens peuvent vous demander d’entrer un NIP.)
Fonctionnement
Page 27

27
Guida per l'uso (Italiano)
Introduzione
• Altoparlante attivo a 2 vie (woofer da 10", driver di compressione HF da 1")
• Batteria incorporata ricaricabile per un utilizzo massimo di 12 ore
• Risposta di frequenza completa, altamente musicale: 55–20kHz
• Alimentazione 120 watt RMS, 240 watt picco (cavo di alimentazione CA); 80 watt RMS, 160 watt picco
(alimentazione CC a batteria)
• Collegamento Buetooth per lo streaming audio wireless
• Lettore USB/SD MP3/WMA per la riproduzione senza operatore con lettore LCD
• Presa per montaggio su palo, manico telescopico e rotelle di trasporto incorporati
Si veda il capitolo Setup della presente guida per sapere come integrare il Envoi al proprio impianto audio, quindi
fare riferimento al capitolo Operation per iniziare a utilizzare il Envoi.
1. Assicurarsi che tutti gli elementi elencati nel paragrafo “Contenuti della confezione” siano contenuti nella
confezione stessa.
2. LEGGERE ATTENTAMENTE IL LIBRETTO DELLE ISTRUZIONI DI SICUREZZA PRIMA DI UTILIZZARE IL
PRODOTTO.
3. Studiare lo schema dei collegamenti.
4. Assicurarsi che tutti i dispositivi di ingresso quali microfoni, lettori CD o lettori digitali siano spenti e che i relativi
volumi siano su "zero".
5. Collegare tutti i dispositivi come illustrato.
6. Accendere tutto nel seguente ordine:
• Sorgenti di ingresso audio (microfoni, strumenti, lettori CD)
• Envoi
7. Al momento dello spegnimento, invertire questa operazione spegnendo:
• Envoi
• Qualsiasi dispositivo di ingresso
Contenuti della confezione
Envoi
Cavo di alimentazione (standard IEC)
2 batterie AA
Microfono wireless
Antenna per microfono wireless
Guida per l'uso
Istruzioni di sicurezza e garanzia
Assistenza
Il microfono e l'antenna possono essere riposti nello scomparto in alto.
Per conoscere le ultime informazioni in merito a questo prodotto (i requisiti di sistema complete, compatibilità, ecc) e
per la registrazione del prodotto, recarsi alla pagina denonpro.com.
Page 28

28
Batterie ricaricabili
Le batterie ricaricabili al piombo-acido sono dello stesso tipo di quelle utilizzate nelle automobili. Come nel caso
della batteria dell'auto, la maniera in cui si utilizza questa batteria ha un notevole impatto sulla sua vita utile. Con un
utilizzo adeguato, una batteria al piombo-acido può durare per anni. Ecco alcune raccomandazioni per garantire la
massima durata dalla batteria interna.
Utilizzo generico
Caricare a fondo il prodotto prima dell'uso.
Caricare a fondo il prodotto prima di riporlo.
Entreposage
Pour optimiser la longévité du produit, ne pas entreposer dans des températures extrêmement
chaudes (supérieur à 32 °C / 90 °F) ou extrêmement froides (moins de 0 °C / 32 °F).
Il est acceptable de laisser votre système audio branché. Cela ne surchargera pas la batterie.
Si vous laissez le niveau de batterie s’affaiblir sans la recharger pendant 6 mois, elle risquerait
de perdre sa capacité de charge de façon permanente.
Réparation
Se la batteria non si carica, verificare le condizioni del fusibile presso l'ingresso del cavo di
alimentazione. Se il fusibile non è intatto, sostituirlo.
La batteria può a sua volta essere sostituita (maggiori dettagli al paragrafo Specifiche
Tecniche).
Per informazioni in merito a Garanzia e parti di ricambio, contattare il dipartimento parti di
ricambio alla pagina denonpro.com.
Élimination
Apportez l’appareil dans un centre de recyclage ou disposez selon les règlements de votre
municipalité.
Inizio
Schema dei collegamenti
Elementi non elencati sotto Introduzione > Contenuti della confezione sono venduti separatamente.
Tablet
Alimentazione
Smartphone
Microfono
Microfono
wireless
Page 29

29
Caratteristiche
Pannello posteriore
1. Display: mostra a display le modalità del pannello dei media per Bluetooth, USB, e SD.
Nota bene: lo schermo Display è fornito con una protezione in plastica. Rimuovere la protezione per una
visualizzazione ottimale dell' Display.
2. Porta USB: Collegare qui il drive flash USB per riprodurre file musicali MP3 e WMA.
3. Slot scheda SD: Inserire qui la scheda SD per riprodurre file musicali MP3 e WMA.
4. Pannello dei media: comandi per le fonti Bluetooth, SD, e USB. Quando la fonte viene riprodotta, il simbolo
della modalità Media Panel si accende.
5. Ingresso microfono (1/4” (6.35mm) e XLR): collegare un microfono dinamico agli ingressi da 1/4” (6.35mm)
o XLR. Controllare il volume di questi ingressi servendosi della manopola volume Mic Input. Al momento di
collegare un microfono, assicurarsi che il tasto Line/Mic sia premuto per la modalità Mic. Al momento di
collegare un dispositivo a livello di linea quale una tastiera, una drum machine, un lettore CD ecc., assicurarsi
che il tasto sia in posizione sollevata per entrare in modalità Linea.
6. Ingresso Aux (1/8" / 3.5mm): collegare un lettore CD, un lettore di media digitali o altre fonti audio a questo
ingresso ausiliario stereo da 1/8". Controllare il volume di uscita servendosi della manopola Aux/MP3 Level
(con l'interruttore su Aux).
7. Ingressi RCA: collegare un lettore CD, un lettore di media digitale, un mixer, o altre fonti di media a questi
ingressi. Rimuovere i coperchi di gomma dagli ingressi per fissare i cavi.
8. Uscita Linea (1/4" (6.35mm): collegare questa uscita 1/4" (6.35mm) a un altro altoparlante attivo (alimentato).
Il livello dell'uscita è controllato dalla manopola Level di ciascun canale e dalla manopola Master Volume.
9. High EQ: aumenta o diminuisce le frequenze alte (acute) in un intervallo compreso tra -12dB e + 12dB.
10. Low EQ: aumenta o diminuisce le frequenze basse (bassi) in un intervallo compreso tra -12dB e + 12dB.
11. LED Power/Clip: all'accensione, questo LED sarà di colore verde fisso. Il LED lampeggia di rosso se il
segnale proveniente dagli ingressi o dal Pannello dei media salta. Se ciò dovesse accadere, abbassare
l’impostazione della manopola Mic Input volume o volume del Media Panel.
12. Interruttore Aux/MP3: quando il tasto è premuto, passerà il segnale Aux. Quando il tasto è sollevato, passerà
il segnale MP3/Bluetooth. Servirsi della manopola Aux/MP3 Level sotto di esso per controllare il volume della
fonte audio.
2
1
3
4
5
6
7
8
9
10
11
12
13
14
15
16
18
19
20
21
22
17
Page 30

30
13. LED Clip: questo LED lampeggia di rosso se il segnale
dagli ingressi o dal Pannello dei media salta. Se ciò
dovesse accadere, abbassare l’impostazione della
manopola Microfono Ingresso Volume, Linea Ingresso
Volume, o volume del Media Panel.
14. Volume pannello dei media: regola il volume
dell'altoparlante per le fonti scheda SD, porta USB e
Bluetooth.
15. Selettore di voltaggio: se l'apparecchio è dotato di un
interruttore di selezione della tensione, cambiarne
l'impostazione solo quando necessario (ad es. quando si è
in viaggio in un Paese o in una regione con un voltaggio
diverso) e sostituire il fusibile con uno dalla tensione
nominale adeguata (stampata sotto l'ingresso per il cavo di
alimentazione dell'apparecchio, accanto al voltaggio
desiderato). La scelta di un valore di tensione inadeguato o
l'utilizzo di un fusibile dalla tensione nominale errata può danneggiare l'apparecchio e/o il fusibile.
16. Fusibile: se il fusibile deve essere sostituito, servirsi di un fusibile con tensione nominale T2.5AL/250V per
voltaggi di 220-240V e T5AL/250V per voltaggi di 100-120V.
17. Indicatore di carica: quando è collegato all'alimentazione CA, il LED rosso di Envoi si accende durante la
ricarica. Una volta portata a termine la ricarica, il LED si spegne.
18. Indicatore di livello della batteria: quando l'Envoi è acceso (ON) e l'apparecchio non è collegato alla rete
elettrica, questa spia indica la carica residua a livello della batteria. La durata della batteria dipende dal
volume e dall'utilizzo che se ne fa. Quando la spia “LOW” è accesa, la batteria sarà presto scarica. Deve
quindi essere ricaricata.
19. Reverb: regolare questa manopola per controllare la quantità di effetto echo applicata al segnale per il
microfono wireless e ai due ingressi Mic.
20. Volume Master: controlla il livello complessivo di tutti gli ingressi.
21. Impostazione Mic Wireless: regolare questi comandi quando si utilizza un microfono wireless. Assicurarsi di
reggere il microfono vicino alla bocca mentre si parla.
Il gruppo di comandi comprende un trasmettitore IR per
la sincronizzazione wireless del microfono. Si veda il capitolo Configurazione del microfono wireless per
maggiori dettagli in merito all'uso di questi comandi.
22. Connettore antenna: rimuovere il coperchio di gomma presente sul connettore per fissare l'antenna BNC in
dotazione. Regolare questa antenna per ottenere la migliore ricezione del microfono wireless. Scollegare
l'antenna quando non si utilizza il microfono wireless e quando si sposta l'apparecchio.
Pannello dei media
Funzioni Pannello dei media:
1. Mode: Seleziona la fonte del pannello dei media: USB, SD, o
Bluetooth.
2. Play/Pause: Riproduce o interrompe momentaneamente la
riproduzione della fonte USB, SD, o Bluetooth del pannello dei
media.
3. Stop: Interrompe la riproduzione della fonte del pannello dei media.
4. Repeat (Ripeti): scorre lungo le diverse opzioni di ripetizione per le
fonti USB e SD.
5. Prev: Passa alla traccia precedente presente su USB o scheda SD.
Quando si ascoltano fonti Bluetooth, la pressione di Prev in alcune
app può passare a un'altra playlist o a un altro genere musicale.
Tenere premuto questo tasto per ridurre il volume della traccia.
6. Next: Passa alla traccia successiva presente su USB o scheda SD.
Quando si ascoltano fonti Bluetooth, la pressione di Next in alcune
app può passare a un'altra playlist o a un altro genere musicale.
Tenere premuto questo tasto per aumentare il volume della traccia.
7. Il simbolo Play si illumina durante la riproduzione di una traccia.
8. Il simbolo Repeat si illumina quando una traccia SD o USB è stata
impostata in modo da essere ripetuta.
9. Visualizza a display la canzone attualmente riprodotta e il numero totale di canzoni presenti nella cartella
selezionata.
10. Mostra a display il tipo di preset EQ.
11. Mostra a display la frequenza dei bit e il tipo di canzone riprodotta.
Nota bene: se il file impiega una frequenza di bit variabile, questo numero cambierà man mano che la
canzone viene riprodotta.
12. Memoria SD o USB riprodotta.
13. Nome del file riprodotto.
14. Analizzatore dello spettro di frequenza.
15. Tempo corrente e tempo totale della canzone riprodotta.
1
2
3
4
5
6
7
8
9
10
11
12
13
14
15
IMPORTANTE: quando la spia della batteria
si illumina di rosso, significa che è richiesta
una ricarica. Per effettuare una ricarica
completa, spegnere il dispositivo e caricarlo
per 8 ore oppure fino a quando la spia verde
non indica che la carica è completa.
IMPORTANTE: per massimizzare la durata
della batteria, è importante caricare
l'apparecchio regolarmente. Non è
raccomandato lasciare l'apparecchio scarico
per più di 3 giorni consecutivi.
Page 31

31
Uso
Impostazione del microfono wireless
per utilizzare il mic wireless in dotazione, procedere come segue:
1. Assicurarsi che 2 nuove batterie alcaline AA siano inserite nel mic wireless (si veda lo
schema laterale circa l'installazione della batteria). L'impugnatura del microfono si
svita per mettere a nudo lo scomparto batterie. Avvitare nuovamente l'impugnatura
con le filettature rivolte verso l'interno.
2. Sul pannello UHF Receiver dell'Envoi, accendere la manopola Power-Vol girandola in
senso orario.
3. Accendere il microfono wireless servendosi dell'interruttore situato in fondo al
microfono. Guardare l'indicatore AF per assicurarsi che un segnale sia ricevuto.
4. Servirsi dei tasti Su o Giù per selezionare un canale wireless che offra un segnale
forte.
5. Tenere il microfono vicino alla bocca mentre si parla: il LED AF si accenderà sul
pannello delle impostazioni del microfono wireless. Regolare la manopola PowerVolume per aumentare il livello.
Nota bene: se necessario, l'interruttore alto/basso (H/L) sul microfono wireless (si veda
l'immagine a lato) può essere regolato per aumentare la portata del segnale. La
configurazione "alto" consuma più batteria garantendo una portata e una ricezione estese.
La configurazione "basso" prolunga la durata della batteria e può essere utilizzata quando
una portata operativa inferiore è accettabile.
Nota bene: se necessario, il valore del guadagno sul microfono può essere regolato in
senso orario per ottenere un maggiore guadagno di uscita. Per un minor guadagno di uscita,
la vite può essere regolata in senso antiorario.
Livello Mute
Nella maggior parte delle situazioni, questo comando va lasciato nella posizione predefinita
di fabbrica. Tuttavia, in caso di elevata attività RF, i livelli di silenziamento possono essere
nuovamente regolati per eliminare le interferenze di altri dispositivi wireless in un ambiente
RF condiviso. Questo ridurrà l'interferenza quando non sono presenti segnali audio. Se i LED
AF o RF sfarfallano o restano accesi quando il microfono wireless è spento, la vite del livello
Mute sul pannello del ricevitore UHF va girata in senso antiorario fino a quando i LED non si
spengono. Quando il livello Mute è regolato adeguatamente, i LED AF ed RF corrispondenti
si accenderanno unicamente quando il microfono wireless è in uso.
Impostazione ASC (Auto-Sync Channel)
Se si ricevono interferenze o qualora fosse necessario un altro canale, selezionare un altro canale servendosi del
tasto ASC (Auto-Sync Channel).
1. Selezionare il canale UHF che si desidera utilizzare con la migliore ricezione servendosi dei tasti Su o Giù.
2. Accendere il microfono e collocare il sensore del microfono (situato sopra lo scomparto batterie, come
illustrato nell'immagine di cui sopra) vicino al LED IR dell'Envoi.
3. Premere il tasto ASC una volta sull'Envoi e attendere circa 3 secondi, fino a quando il LED IR smette di
lampeggiare. Quando trova un canale libero da interferenze, il microfono wireless si collegherà a tale canale.
Allineamento di un dispositivo Bluetooth
1. Accendere il dispositivo Bluetooth.
2. Accendere l'Envoi.
3. Navigare fino alla schermata di configurazione del dispositivo Bluetooth, selezionare Bluetooth, cioè
l'altoparlante Envoi, e collegare.
Nota bene: se viene richiesta una password, inserire 0000.
4. Avviare la riproduzione di musica dal dispositivo Bluetooth.
5. Regolare il volume di Envoi tenendo premuto il tasto |<< o >>| per abbassare o alzare il volume.
6. Per annullare l'allineamento, spegnere il Bluetooth sul dispositivo o selezionare "Delete paired info" (cancella
info di collegamento) nel menu Bluetooth di Envoi.
Page 32

32
Modalità Bluetooth
Per accedere a un dispositivo Bluetooth collegato:
1. Tenere premuto il tasto Mode fino a quando l'icona Bluetooth non compare sullo schermo.
2. In modalità Bluetooth, tenere premuto il tasto Mode per 2 secondi per visualizzare ulteriori opzioni.
3. Servirsi dei tasti |<< e >>| per scorrere e premere Play/Pause per selezionare una delle impostazioni di cui
sotto.
BT Disconnect: Questa funzione disabilita il collegamento dalla fonte audio Bluetooth.
EQ: Envoi offre 7 preset di equalizzatore opzionali per migliorare la musica. È possibile scegliere una delle seguenti
impostazioni EQ:
• Normal (Nor)
• Pop (Pop)
• Rock (Rock)
• Jazz (Jazz)
• Classic (Clas)
• Country (Cou)
• Low Bass (Bas)
Cancella info collegamento: scegliere questa opzione per “dimenticare” un dispositivo Bluetooth collegato in
precedenza in modo che l'Envoi non si riconnetta una volta nuovamente in modalità Bluetooth.
Informazioni sul dispositivo: mostra informazioni relative al nome Bluetooth di Envoi.
Exit (esci): lascia il menu Bluetooth.
Modalità USB
Per accedere a un dispositivo USB collegato:
1. Tenere premuto il tasto Mode fino a quando l'icona del dispositivo USB non compare sullo schermo.
2. In modalità USB, tenere premuto il tasto Mode per 2 secondi per visualizzare ulteriori opzioni del menu USB.
3. Servirsi dei tasti |<< e >>| per scorrere e premere Play/Pause per selezionare una delle impostazioni di cui
sotto.
Modalità Play (di riproduzione):
• All (A) (tutte): riproduce e ripete tutte le tracce presenti sul dispositivo USB.
• Repeat One (1) (ripeti una): riproduce e ripete la traccia corrente.
• Repeat Folder (F) (ripeti cartella): riproduce le tracce presenti nella cartella corrente e riavvia la riproduzione
delle tracce.
• Normal (N) (normale): riproduce le tracce presenti sul dispositivo USB.
• Random (R) (casuale): sceglie una traccia a caso da riprodurre.
• Browse (I): riproduce i primi 10 secondi di ciascuna traccia presente sul dispositivo USB.
EQ: Envoi offre 7 preset di equalizzatore opzionali per migliorare la musica. È possibile scegliere una delle seguenti
impostazioni EQ:
• Normal (Nor)
• Pop (Pop)
• Rock (Rock)
• Jazz (Jazz)
• Classic (Clas)
• Country (Cou)
• Low Bass (Bas)
Change Device (cambia dispositivo): permette di passare dall'ascolto della scheda SD a quello di un drive USB
collegato.
Exit (esci): lascia il menu Modalità USB.
Cartella U-disk: scegliere una traccia da una cartella presente sul drive USB. Servirsi dei tasti |<< e >>| per navigare
su o giù e premere Play/Pause per aprire una cartella o selezionare una traccia da riprodurre.
Delete File (cancella file): cancella la traccia selezionata.
Delete All (cancella tutti): cancella tutte le tracce presenti sul drive USB.
Exit (esci): lascia il menu opzioni Music.
Page 33

33
Modalità scheda SD
Per accedere a una scheda SD inserita:
1. Tenere premuto il tasto Mode fino a quando l'icona della scheda SD non compare sullo schermo.
2. In modalità Scheda SD, tenere premuto il tasto Mode per 2 secondi per visualizzare ulteriori opzioni menu.
3. Servirsi dei tasti |<< e >>| per scorrere e premere Play/Pause per selezionare una delle impostazioni di cui
sotto.
Modalità Play (di riproduzione):
• All (A) (tutte): riproduce e ripete tutte le tracce presenti sulla scheda SD.
• Repeat One (1) (ripeti una): riproduce e ripete la traccia corrente.
• Repeat Folder (F) (ripeti cartella): riproduce le tracce presenti nella cartella corrente e riavvia la riproduzione
delle tracce.
• Normal (N) (normale): riproduce le tracce presenti sulla scheda SD.
• Random (R) (casuale): sceglie una traccia a caso da riprodurre.
• Browse (I): riproduce i primi 10 secondi di ciascuna traccia presente sulla scheda SD.
EQ: Envoi offre 7 preset di equalizzatore opzionali per migliorare la musica. È possibile scegliere una delle seguenti
impostazioni EQ:
• Normal (Nor)
• Pop (Pop)
• Rock (Rock)
• Jazz (Jazz)
• Classic (Clas)
• Country (Cou)
• Low Bass (Bas)
Change Device (cambia dispositivo): permette di passare dall'ascolto della scheda SD a quello di un drive USB
collegato.
Exit (esci): lascia il menuModalità Scheda SD.
Cartella scheda: scegliere una traccia da una cartella presente sulla scheda SD. Servirsi dei tasti |<< e >>| per
navigare su o giù e premere Play/Pause per aprire una cartella o scegliere una traccia da riprodurre.
Delete File (cancella file): cancella la traccia selezionata.
Delete All (cancella tutti): cancella tutte le tracce presenti sulla scheda SD.
Exit (esci): lascia il menu opzioni Music.
Page 34

34
Risoluzione di problemi
In caso di problemi, procedere come segue:
• Assicurarsi che tutti i cavi e i dispositivi siano collegati in maniera corretta e ben salda.
• Assicurarsi di utilizzare Envoi come descritto nel presente Guia per l'uso.
• Assicurarsi che gli altri dispositivi o media funzionino correttamente.
• Se si ritiene che Envoi non funzioni come si deve, verificare nella seguente tabella il problema riscontrato e la relativa
soluzione.
Problema: Soluzione: Si veda:
Non si accende.
Assicurarsi che l'ingresso di alimentazione del
Envoi sia collegato a una presa di alimentazione
utilizzando l'adattatore / le cavo in dotazione.
Setup
Non è presente alcun segnale o
solo un segnale debole tra Envoi e
il microfono wireless.
V
erificare il LED batteria sul microfono wireless per
assicurarsi che sia acceso. Se il livello di carica
della batteria è basso, sostituire le batterie
stesse.
Verificare che l'interruttore Alimentazione ricevitore
UHF-Vol sia acceso.
Assicurarsi che non vi siano oggetti (computer,
pareti, mobili, ecc.) tra il microfono wireless ed
Envoi.
Cambiare il canale su Envoi.
Operazione>Impostazione
del microfono wireless
Ci sono interferenze di segnale tra
Envoi e il microfono wireless.
Assicurarsi che l'antenna del ricevitore UHF sia
regolata debitamente.
Tenere tutti i cavi audio collegati lontani
dall'antenna.
Assicurarsi che non vi siano altri dispositivi a inviare
segnali sullo stesso canale di frequenza utilizzato.
Selezionare un altro canale servendosi dell'ASC
(Auto-Sync Channel, sincronizzazione automatica
del canale).
Regolare l'impostazione del livello Mute.
Un'impostazione più elevata del livello Mute offre
una maggiore protezione dalle interferenze, ma
riduce anche la portata del segnale. Scegliere una
configurazione che silenzi efficacemente le
interferenze consentendo al tempo stesso al vero
segnale di passare. Se una scarsa qualità di segnale
richiede un'impostazione più elevata del livello Mute,
tentare di eliminare l'interferenza o cambiare il
canale UHF per evitare una perdita di portata del
segnale.
Operazione>Impostazione
del microfono wireless
e
Operazione > Impostazione
ASC (Auto-Sync Channel)
Il Envoi non produce alcun suono
o il suono è distorto.
Assicurarsi che tutti i cavi e i collegamenti ai
dispositivi siano sicuri e corretti.
Assicurarsi che non vi siano cavi danneggiati.
Assicurarsi che le impostazioni sul dispositivo
Bluetooth, altoparlante, mixer, ecc. siano corrette.
Setup
L'audio proveniente dal mio
dispositivo Bluetooth non viene
riprodotto tramite il Envoi.
Assicurarsi di aver collegato adeguatamente il
dispositivo Bluetooth.
Migliorare la ricezione del segnale Bluetooth
avvicinando il dispositivo Bluetooth al Envoi. Inoltre,
rimuovere eventuali ostacoli (pareti, mobili, ecc.) in
modo che ci sia una linea d'aria libera tra il
dispositivo Bluetooth e il Envoi.
Setup e Uso
Il collegamento del mio
dispositivo Bluetooth al Envoi
richiede un PIN.
Inserire 0000 come PIN. (Alcuni dispositivi Bluetooth
più vecchi possono richiedere l'inserimento di un
PIN).
Uso
Page 35

35
Benutzerhandbuch (Deutsch)
Einführung
• 2-Wege-Aktivlautsprecher (10" Woofer, 1" HF-Kompressionstreiber)
• Integrierter Akku für bis zu 12 Stunden Sound
• Hochmusikalischer Frequenzgang in vollem Frequenzspektrum: 55-20kHz
• 120 Watt RMS, 240 Watt Peak (Leistung AC-Netzleitung); 80 Watt RMS, 160 Watt Peak (DC-Batteriebetrieb)
• Bluetooth-Verbindung für drahtlose Audioübertragung
• USB/SD MP3/WMA-Player für die selbständige Wiedergabe mit LCD-Display
• Integrierte Fassung für Ständermontage, Teleskopgriff und Transportrollen
Bitte lesen Sie das Setup-Kapitel in dieser Anleitung, um zu erfahren, wie Sie das Envoi in Ihr Audiosystem
integrieren können. Lesen Sie anschließend das Kapitel Betrieb, um das Envoi in Betrieb zu nehmen.
1. Stellen Sie sicher, dass alle im Lieferumfang aufgelisteten Teile in der Verpackung enthalten sind.
2. LESEN SIE ZUERST DIE SICHERHEITSHINWEISE, BEVOR SIE DAS PRODUKT VERWENDEN.
3. Werfen Sie einen Blick auf die Anschlussübersicht.
4. Stellen Sie sicher, dass alle Eingabegeräte wie Mikrofone, CD-Player oder digitale Wiedergabegeräte
ausgeschaltet sind und deren Lautstärke auf "Null" steht.
5. Verbinden Sie alle Geräte wie angegeben.
6. Schalten Sie alles in folgender Reihenfolge ein:
• Audio-Eingangsquellen (z.B. Mikrofone, Instrumente, CD/MP3-Player)
• Envoi
7. Beim Ausschalten gehen Sie in umgekehrter Reihenfolge vor:
• Envoi
• alle Eingabegeräte
Lieferumfang
Envoi
Netzkabel (IEC-Norm)
2 Batterien
Kabelloses Mikrofon
Funkmikrofonantenne
Benutzerhandbuch
Sicherheitshinweise & Garantieinformationen
Kundendienst
Mikrofon und Antenne können im obersten Fach aufbewahrt werden.
Für aktuelledie neuesten Informationen zu diesem Produkt (Systemanforderungen, Informationen zur Kompatibilität
etc.) und zur Produktregistrierung besuchen Sie denonpro.com.
Page 36

36
Wiederaufladbare Batterien
Bei wiederaufladbaren Bleibatterien handelt es sich um die gleiche Art von Batterien, die in Autos verwendet
werden. Und wie bei Ihrer Autobatterie ist es auch für die Benutzungsdauer dieser Batterie von äußerster
Wichtigkeit, wie sie verwendet wird. Bei vorschriftsmäßigem Gebrauch und richtiger Pflege kann eine Bleibatterie
jahrelang halten. Lesen Sie die nachstehenden Empfehlungen, um aus der eingebauten Batterie das Beste
herauszuholen.
Allgemeine
Verwendung
Laden Sie das Gerät vor der Verwendung vollständig auf.
Laden Sie es vollständig auf, bevor Sie es verstauen.
Aufbewahrung
Lagern Sie das Produkt nie bei extrem warmen (mehr als 32°C / 90°F) oder übermäßig kalten
(weniger als 0°C / 32°F) Temperaturen, um die optimale Langlebigkeit zu erzielen.
Sie können Ihr Sound-System angesteckt lassen. Der Akku wird dabei nicht überladen.
Wenn Ihr Akku einen niedrigen Ladestand hat und Sie ihn 6 Monate lang nicht aufladen, kann er
dauerhaft an Kapazität verlieren.
Reparatur
Wenn sich der Akku nicht aufladen lässt, überprüfen Sie die Sicherung in der Nähe des
Netzkabelanschlusses. Ist die Sicherung nicht intakt, ersetzen Sie sie bitte.
Der Akku kann ersetzt werden (Details in den Technischen Daten).
Für Garantie und Ersatzteile besuchen Sie denonpro.com.
Entsorgung
Bringen Sie das Gerät in ein Recyclingzentrum oder entsorgen Sie es entsprechend lokaler
Verordnungen.
Setup
Anschlussdiagramm
Teile, die nicht im Einführung > Lieferumfang angegeben sind, sind separat erhältlich.
Tablet
Stromversor
gung
Smartphone
Mikrofon
Kabelloses
Mikrofon
Page 37

37
Funktionen
Rückseite
1. Display: Zeigt die Medien-Panel-Modi für Bluetooth, USB, und SD.
Hinweis: Die Display-Anzeige wird mit einem Kunststoffschutzfilm ausgeliefert. Entfernen Sie diesen Film, um
die Anzeige optimal zu nutzen.
2. USB-Port: Verbinden Sie Ihren USB-Stick, um MP3- und WMA-Musikdateien abzuspielen.
3. SD-Kartensteckplatz: Legen Sie die SD-Karte hier ein, um MP3- und WMA-Musikdateien abzuspielen.
4. Medien-Panel: Bedienelemente für Bluetooth, SD, und USB. Das Symbol des Medien-Panel-Modus wird
leuchten, wenn diese Quelle wiedergegeben wird.
5. Mikrofon Eingang: (1/4" (6.35mm) und XLR): Schließen Sie ein dynamisches Mikrofon an die 1/4" (6.35mm)
oder XLR-Eingänge an. Regeln Sie die Lautstärke dieser Eingänge mit dem Mikrofoneingangspegelregler.
Achten Sie beim Anschluss eines Mikrofons darauf, dass die Taste Line/Mic für den Mic-Modus
heruntergedrückt wurde. Wenn Sie ein Line-Level-Gerät, z.B. Keyboard, Drum-Machine, CD-Player etc.
anschließen, achten Sie bitte darauf, dass sich die Taste im Line-Modus in der angehobenen Position
befindet.
6. Aux-Eingang (1/8" / 3.5mm): Schließen Sie einen CD-Player, digitalen Medien-Player oder eine andere
Audioquelle an diesen 1/8" AUX-Stereoeingang an. Kontrollieren Sie die Ausgangslautstärke mit dem Regler
Aux/MP3-Pegel (mit dem Schalter in der Aux-Position).
7. Cinch-Eingänge: Schließen Sie einen CD-Player, einen digitalen Medien-Player, Mixer oder eine andere
Medienquelle an diese Eingänge an. Entfernen Sie die Gummiabdeckungen an den Eingängen, um die Kabel
anzubringen.
8. Line-Ausgangt (1/4" (6.35mm): Verbinden Sie diesen 1/4" (6.35mm)-Ausgang mit einem anderen aktiven (mit
Strom versorgten) Lautsprecher. Der Ausgabepegel wird pro Kanal mit dem Pegelregler und dem
Gesamtlautstärkeregler angepasst.
9. High-EQ: Hebt oder senkt die hohen Frequenzen (Höhen) in einem Bereich von -12 dB bis + 12 dB.
10. Low-EQ: Hebt oder senkt die niedrigen Frequenzen (Bass) für in einem Bereich von -12 dB bis + 12 dB.
11. Power-/Clipping-LED: Diese LED leuchtet grün, wenn das Gerät eingeschaltet wird. Diese LED blinkt rot,
wenn das Signal von den Eingängen oder der Medien-Panelquelle übersteuert. Wenn dies passiert, reduzieren
Sie die Einstellung des Mikrofoneingangspegelreglers, des Line-Level-Lautstärkereglers oder des MedienPanel-Lautstärkereglers.
12. Aux/MP3-Schalter: Wenn die Taste heruntergedrückt ist, wird das Aux-Signal durchgeschliffen. Wenn die
Taste erhoben ist, wird das MP3/Bluetooth-Signal durchgeschliffen. Verwenden Sie den darunterliegenden
Aux/MP3-Pegelregler, um die Lautstärke der Tonquelle zu steuern.
2
1
3
4
5
6
7
8
9
10
11
12
13
14
15
16
18
19
20
21
22
17
Page 38

38
13. Clip-LED: Diese LED blinkt rot, wenn das Signal von den
Eingängen oder von der Medien-Panelquelle übersteuert.
Wenn dies passiert, verringern Sie die Einstellung von
Eingang Mikrofon Lautstärke, Line-Eingang Lautstärke,
oder Medien-Panellautstärke.
14. Medien-Panellautstärke: Regelt den Lautsprecherpegel
für das die SD-Karte, den USB-Anschluss und die
Bluetooth-Quellen.
15. Spannungswähler: Wenn Ihr Gerät über einen
Spannungswähler verfügt, dann ändern Sie dessen
Position nur, wenn es notwendig ist (z.B. wenn Sie in ein
Land oder eine Region mit einer anderen Spannung reisen)
und ersetzen die Sicherung durch eine mit einem
geeigneten Sicherungswert (siehe Aufdruck unter dem
Netzkabeleingang des Geräts, neben der gewünschten Spannung). Wenn Sie eine falsche
Spannungseinstellung wählen oder eine Sicherung mit einem falschen Sicherungswert verwenden, kann dies
das Gerät und/oder die Sicherung beschädigen.
16. Sicherung: Falls die Sicherung ersetzt werden muss, verwenden Sie eine Sicherung mit einer Nennleistung
von T2.5AL/250V für Spannungen von 220-240V; für Spannungen von 100-120V verwenden Sie eine
Sicherung mit einer Nennleistung von T5AL/250V.
17. Ladeanzeige: Wenn das Gerät an das Stromnetz angeschlossen ist, wird das LED-Licht des Envoi beim
Ladevorgang leuchten. Sobald der Ladevorgang abgeschlossen ist, erlischt die LED.
18. Akkustandanzeige: Wenn Envoi EINGESCHALTET ist und nicht an eine Steckdose angesteckt wurde, zeigen
diese LEDs die restliche Lebensdauer des Akkus an. Die Akkulebensdauer variiert je nach Lautstärke und
Verbrauch. Wenn das "LOW"-Licht leuchtet, wird der Akku bald leer sein und sollte aufgeladen werden.
19. Reverb: Mit diesem Regler steuern Sie den Anteil des Echoeffekts, der dem Signal des Funkmikrofons und
der beiden Mikrofoneingänge hinzugefügt wird.
20. Master-Lautstärke: Dies steuert den Gesamtpegel für alle Eingänge.
21. Drahtlose Mikrofoneinstellungen: Passen Sie diese Bedienelemente bei Verwendung des Funkmikrofons an.
Achten Sie darauf, das Mikrofon beim Sprechen nahe am Mund zu halten.
Die Bedienelemente enthalten
einen IR-Sender für die drahtlose Mikrofon-Synchronisation. Siehe Kapitel Einrichten des Funkmikrofons für
weitere Informationen zur Verwendung dieser Bedienelemente.
22. Antennenanschluss : Entfernen Sie die Gummiabdeckung an der Buchse, um die mitgelieferte BNC-Antenne
anzuschließen. Justieren Sie die Antenne, um den besten Empfang für das Funkmikrofon zu erzielen. Trennen
Sie die Antenne, wenn Sie das Funkmikrofon nicht verwenden oder wenn Sie das Gerät bewegen.
Medien-Panel
Funktionen des Medien-Panels:
1. Modus: Wählt die Medien-Panelquelle aus: USB, SD, oder Bluetooth.
2. Wiedergabe/Pause: Die Quelle via USB, SD oder Bluetooth-Medien-
Panel wird wiedergegeben oder pausiert.
3. Stopp: Stoppt die Wiedergabe des Medien-Panels.
4. Zurück: Springt zum vorherigen USB- oder SD-Karten-Track. Bei der
Wiedergabe von Bluetooth-Quellen kann es in einigen Apps sein, dass
das Drücken von "Zurück" auf eine andere Wiedergabeliste oder ein
anderes Musik-Genre schaltet. Halten Sie diese Taste gedrückt, um
die Lautstärke des Tracks zu verringern.
5. Wiederholen: Wechselt zwischen den verschiedenen
Wiederholungsoptionen für USB- und SD-Quellen.
6. Weiter: Springt zum nächsten USB- oder SD-Karten-Track. Bei der
Wiedergabe von Bluetooth-Quellen kann es in einigen Apps sein, dass
das Drücken von "Weiter" auf eine andere Wiedergabeliste oder ein anderes Musik-Genre schaltet.
Halten Sie diese Taste gedrückt, um die Lautstärke des Tracks zu erhöhen.
7. Das Wiedergabesymbol leuchtet, wenn ein Track wiedergegeben wird.
8. Das Symbol Wiederholen leuchtet, wenn ein SD- oder USB-Track auf "Wiederholen" gestellt wurde.
9. Zeigt den aktuell gespielten Song und die Gesamtzahl der Songs im ausgewählten Ordner.
10. Zeigt den EQ-Preset-Typ.
11. Zeigt die Bitrate und die Art des abgespielten Songs an.
Hinweis: Wenn die Datei eine variable Bitrate nutzt, ändert sich diese Zahl während der Song läuft.
12. Wiedergegebener SD- oder USB-Speicher.
13. Name der wiedergegebenen Datei.
14. Frequenz-Spektrumanalysator.
15. Aktuelle Zeit und gesamte Spieldauer des abgespielten Songs.
1
2
3
4
5
6
7
8
9
10
11
12
13
14
15
WICHTIG: Wenn die Akkuanzeige rot leuchtet,
zeigt dies an, dass das Gerät aufgeladen werden
muss. Um das Gerät vollständig aufzuladen,
schalten Sie es aus und laden es 8 Stunden lang
auf oder solange bis das grüne Licht eine
vollständige Ladung anzeigt.
WICHTIG: Um die Batterielebensdauer zu
maximieren, ist es wichtig, das Gerät regelmäßig
aufzuladen. Es wird nicht empfohlen, das Gerät
länger als 3 aufeinander folgende Tage
ungeladen zu lassen.
Page 39

39
Betrieb
Einrichten des Funkmikrofons
Um das mitgelieferte Funkmikrofon zu verwenden, gehen Sie folgendermaßen vor:
1. Stellen Sie sicher, dass 2 neue AA-Alkalibatterien in das Funkmikrofon gelegt
wurden (siehe seitliche Grafik zum Einlegen der Batterien). Schrauben Sie den
Mikrofongriff auf, um das Batteriefach zu erreichen. Schrauben Sie den Griff mit
dem Gewinde nach innen wieder an.
2. Drehen Sie den Power Vol-Regler am UHF-Empfänger-Panel des Envoi im
Uhrzeigersinn.
3. Schalten Sie das Funkmikrofon mit dem Schalter an der Unterseite des Mikrofons
ein. Sehen Sie sich die AF-Anzeige an, um sicherzustellen, dass ein Signal
empfangen wird.
4. Verwenden Sie die Tasten Aufwärts oder Abwärts, um einen Funkkanal
auszuwählen.
5. Halten Sie das Mikrofon beim Sprechen nahe am Mund und die AF-LED am Panel
der Funkmikrofoneinstellungen beginnt zu leuchten. Drehen Sie den PowerVolume-Regler, um den Pegel zu erhöhen.
Hinweis: Bei Bedarf können die Hoch/Niedrig (H/L)-Schalter am Funkmikrofon
angepasst werden (siehe seitliche Grafik), um die Reichweite zu erhöhen. Die Einstellung
Hoch verbraucht mehr Batterie, um eine erhöhte Reichweite und Empfang zu bieten. Die
Einstellung Niedrig verlängert die Batterielaufzeit, wenn ein niedrigerer Betriebsbereich
akzeptabel ist.
Hinweis: Bei Bedarf kann die Gain-Einstellung am Mikrofon im Uhrzeigersinn angepasst
werden, um eine größere Ausgangsverstärkung zu erzielen. Für eine geringere
Ausgangsverstärkung kann die Schraube gegen den Uhrzeigersinn gedreht werden.
Mute-Pegel
In den meisten Fällen sollte dies in der Werkseinstellung belassen werden. Bei hoher RFAktivität können die Mute-Pegel neu eingestellt werden, um Störungen durch andere
drahtlose Geräte in einer gemeinsamen HF-Umgebung zu unterdrücken. Dies wird
Störungen reduzieren, wenn kein Audiosignal vorhanden ist. Wenn die AF- oder RFLEDs flackern oder eingeschaltet bleiben, wenn das Funkmikrofon ausgeschaltet ist,
sollten Sie die Mute-Pegel-Schraube am UHF-Empfänger-Panel gegen den
Uhrzeigersinn drehen, bis sich die LEDs ausschalten. Wenn der Mute-Pegel richtig
eingestellt ist, werden die entsprechenden AF- und RF-LEDs nur leuchten, wenn das
Funkmikrofon verwendet wird.
Einstellen des ASC (Auto-Sync-Kanal)
Wenn Sie Störungen empfangen oder ein anderer Kanal benötigt wird, wählen Sie einen anderen Kanal aus, indem
Sie die ASC-Taste (Auto-Sync-Kanal) drücken.
1. Wählen Sie den gewünschten UHF-Kanal mit dem besten Empfang aus, indem Sie die Tasten Aufwärts oder
Abwärts verwenden.
2. Schalten Sie das Mikrofon ein und legen Sie den Mikrofonsensor (oberhalb des Batteriefachs, siehe Grafik
oben) in die Nähe von Envoi's IR-LED.
3. Drücken Sie am Envoi einmal auf die ASC-Taste und warten ca. 3 Sekunden bis die IR-LED nicht mehr blinkt.
Wenn das Gerät einen störungsfreien Kanal findet, wird das Funkmikrofon mit diesem Kanal verbunden.
Koppeln eines Bluetooth-Geräts
1. Schalten Sie Ihr Bluetooth-Gerät ein.
2. Schalten Sie Envoi ein.
3. Navigieren Sie zum Setup-Bildschirm des Bluetooth-Geräts, wählen Sie Bluetooth und den Envoi-
Lautsprecher und stellen eine Verbindung her.
Hinweis: Wenn Sie einen Passcode benötigen, geben Sie 0000 ein.
4. Spielen Sie auf Ihrem Bluetooth-Gerät Musik ab.
5. Passen Sie die Lautstärke am Envoi an, indem Sie |<< oder >>| gedrückt halten, um den Pegel zu verringern
oder zu erhöhen.
6. Um die Geräte zu trennen, schalten Sie Bluetooth auf Ihrem Gerät aus oder wählen "Verbindungsdaten
löschen" aus dem Envoi Bluetooth-Menü.
Page 40

40
Bluetooth-Modus
So greifen Sie auf ein gekoppeltes Bluetooth-Gerät zu:
1. Drücken Sie kurz auf die Modus-Taste bis das Bluetooth-Symbol am Bildschirm erscheint.
2. Im Bluetooth-Modus halten Sie die Modus-Taste 2 Sekunden lang gedrückt, um weitere Optionen
anzuzeigen.
3. Verwenden Sie die Tasten |<< und >>| zum Durchsuchen und drücken Wiedergabe/Pause, um eine der
folgenden Einstellungen zu wählen.
BT-Trennen: Diese Funktion deaktiviert die Verbindung der Bluetooth-Audioquelle.
EQ: Envoi bietet 7 optionale Equalizer-Presets, um die Klangqualität zu erweitern. Sie können aus folgenden EQ-
Einstellungen wählen:
• Normal (Nor)
• Pop (Pop)
• Rock (Rock)
• Jazz (Jazz)
• Klassik (Clas)
• Country (Cou)
• Wenig Bass (Bas)
Verbindungsdaten löschen: Wählen Sie diese Einstellung, damit ein zuvor gekoppeltes Bluetooth-Gerät diese
Verbindungsdaten "vergisst", damit Envoi beim Wechseln in den Bluetooth-Modus nicht erneut eine Verbindung
herstellt.
Geräteinformationen: Zeigt Informationen über den Bluetooth-Namen von Envoi.
Verlassen: Verlässt das Bluetooth-Menü.
USB-Modus
Für den Zugriff auf ein angeschlossenes USB-Gerät:
1. Drücken Sie kurz auf die Modus-Taste bis das USB-Gerätesymbol am Bildschirm erscheint.
2. Im USB-Modus halten Sie die Modus-Taste 2 Sekunden lang gedrückt, um weitere USB-Menüoptionen
anzuzeigen.
3. Verwenden Sie die Tasten |<< und >>| zum Durchsuchen und drücken Wiedergabe/Pause, um eine der
folgenden Einstellungen zu wählen.
Wiedergabe-Modus:
• Alle (A): Spielt und wiederholt alle Tracks am USB-Gerät.
• Repeat One (1): Spielt und wiederholt den aktuellen Track.
• Repeat-Ordner (F): Spielt die Tracks im aktuellen Ordner und wiederholt dann die Wiedergabe der Tracks.
• Normal (N): Spielt die Tracks am USB-Gerät.
• Random (R): Spielt einen zufällig ausgewählten Track ab.
• Durchsuchen (I): Spielt die ersten 10 Sekunden jedes Tracks am USB-Gerät.
EQ: Envoi bietet 7 optionale Equalizer-Presets, um die Klangqualität zu erweitern. Sie können aus folgenden EQEinstellungen wählen:
• Normal (Nor)
• Pop (Pop)
• Rock (Rock)
• Jazz (Jazz)
• Klassik (Clas)
• Country (Cou)
• Wenig Bass (Bas)
Gerät wechseln: Damit können Sie von der SD-Karte auf ein angeschlossenes USB-Laufwerk wechseln.
Verlassen: Verlassen des USB-Modusmenüs.
U-Disk-Ordner: Wählen Sie einen Track aus einem Ordner am USB-Laufwerk aus. Verwenden Sie die Tasten |<<
und >>|, um nach oben oder unten zu navigieren und drücken Sie Wiedergabe/Pause, um einen Ordner zu öffnen
oder einen Track für die Wiedergabe auszuwählen.
Dateien löschen: Löscht den aktuell ausgewählten Track.
Alle Löschen: Löscht alle Titel am USB-Laufwerk.
Verlassen: Verlassen des Musikoptionsmenüs.
Page 41

41
SD-Karten-Modus
So greifen Sie auf eine eingelegte SD-Karte zu:
1. Drücken Sie kurz auf die Modus-Taste bis das SD-Kartensymbol am Bildschirm erscheint.
2. Im SD-Kartenmodus halten Sie die Modus-Taste 2 Sekunden lang gedrückt, um weitere Menüoptionen
anzuzeigen.
3. Verwenden Sie die Tasten |<< und >>| zum Durchsuchen und drücken Wiedergabe/Pause, um eine der
folgenden Einstellungen zu wählen.
Wiedergabe-Modus:
• Alle (A): Spielt und wiederholt alle Tracks auf der SD-Karte.
• Repeat One (1): Spielt und wiederholt den aktuellen Track.
• Repeat-Ordner (F): Spielt die Tracks im aktuellen Ordner und wiederholt dann die Wiedergabe der Tracks.
• Normal (N): Spielt die Tracks auf der SD-Karte.
• Random (R): Spielt zufällig ausgewählten Track ab.
• Durchsuchen (I): Spielt die ersten 10 Sekunden jedes Tracks auf der SD-Karte.
EQ: Envoi bietet 7 optionale Equalizer-Presets, um die Klangqualität zu erweitern. Sie können aus folgenden EQEinstellungen wählen:
• Normal (Nor)
• Pop (Pop)
• Rock (Rock)
• Jazz (Jazz)
• Klassik (Clas)
• Country (Cou)
• Wenig Bass (Bas)
Gerät wechseln: Damit können Sie von der SD-Karte auf ein angeschlossenes USB-Laufwerk wechseln.
Verlassen: Verlassen des SD-Kartenmodusmenüs.
Kartenordner: Wählen Sie einen Track aus einem Ordner auf der SD-Karte aus. Verwenden Sie die Tasten |<< und
>>|, um nach oben oder unten zu navigieren und drücken Wiedergabe/Pause, um einen Ordner zu öffnen oder
einen Track für die Wiedergabe auszuwählen.
Dateien löschen: Löscht den aktuell ausgewählten Track.
Alle Löschen: Löscht alle Tracks auf der SD-Karte.
Verlassen: Verlassen des Musikoptionsmenüs.
Allgemeinhinweis zur Konformitätserklärung: Hiermit erklären wir, daß sich das Gerät Envoi
in Übereinstimmung mit den grundlegenden Anforderungen der europäischen Richtlinie
1999/5/EG befindet. Die vollständige EG Konformitätserklärung kann unter folgender Adresse
angefordert werden:
inMusic GmbH
Harkortstrasse 12-32
40880 Ratingen
Germany
Page 42

42
Fehlerbehebung
Wenn Sie ein Problem haben, gehen Sie wie folgt vor:
• Sorgen Sie dafür, dass alle Kabel und Geräte Medien richtig und fest angeschlossen sind.
• Achten Sie darauf, dass Envoi laut vorliegendem Benutzerhandbuch verwendet wird.
• Achten Sie darauf, dass Ihre anderen Geräte oder Medien ordnungsgemäß funktionieren.
• Wenn Sie glauben, dass Envoi nicht ordnungsgemäß funktioniert, überprüfen Sie die folgende Tabelle auf Lösungen für
das Problem.
Problem: Lösung: Siehe:
Das Gerät lässt sich nicht
einschalten.
Vergewissern Sie sich, dass der Netzeingang des Envoi
ordnungsgemäß mit dem mitgelieferten Netzteil /
Netzkabel an eine Steckdose angeschlossen ist.
Setup
Kein Signal oder nur ein schwaches
Signal zwischen Envoi und dem
Funkmikrofon.
Überprüfen Sie die Batterie-LED am Funkmikrofon, um
sicherzustellen, dass es eingeschaltet ist.
Wenn die
Batterie schwach ist, wechseln Sie sie aus.
Vergewissern Sie sich, dass der Power-Vol-Schalter am
UHF-Empfänger eingeschaltet ist.
Vergewissern Sie sich, dass sich keine Gegenstände
(Computer, Wände, Rohre etc.) zwischen dem
Funkmikrofon und Envoi befinden.
Ändern Sie den Kanal am Envoi.
B
etrieb > Einrichten des
Funkmikrofons
Zwischen Envoi und dem
Funkmikrofon gibt es Interferenzen.
Sorgen Sie dafür, dass die UHF-Empfängerantenne
richtig eingestellt ist.
Halten Sie alle angeschlossenen Audiokabel von der
Antenne fern.
Achten Sie darauf, dass keine anderen Geräte Signale
über den gleichen Frequenzkanal senden, den Sie
verwenden.
Wählen Sie mit dem ASC (Auto-Sync-Kanal) einen
anderen Kanal aus.
Passen Sie den Mute-Pegel an. Eine höhere MutePegeleinstellung bietet zwar einen besseren Schutz
gegen Interferenzen, aber kann auch zu einer
Verminderung des Signalbereichs führen. Wählen Sie
eine Einstellung, die Interferenzen am effektivsten
herausfiltert und gleichzeitig ein klares Signal passieren
lässt. Falls die schlechte Signalqualität eine höhere MutePegeleinstellung erfordert, versuchen Sie die Störquellen
zu beseitigen oder auf den UHF-Kanal zu wechseln, um
eine Reduzierung des Signalbereichs zu vermeiden.
B
etrieb > Einrichten des
Funkmikrofons
und
Betrieb > Einstellen des ASC
(Auto-Sync-Kanal)
Das Envoi gibt keinen Ton aus bzw.
der Ton klingt verzerrt.
Stellen Sie sicher, dass alle Kabel- und Geräteanschlüsse
sicher und korrekt sind.
Achten Sie darauf, dass keine Kabel beschädigt sind.
Vergewissern Sie sich, dass die Einstellungen auf Ihrem
Bluetooth-Gerät, Lautsprecher, Mixer usw. korrekt sind.
Setup
Die Audiosignale von meinem
Bluetooth-Gerät werden nicht über
das Envoi abgespielt.
Stellen Sie sicher, dass eine ordnungsgemäße
Verbindung zu Ihrem Bluetooth-Gerät hergestellt wurde.
Verbessern Sie den Bluetooth-Signalempfang, indem Sie
Ihr Bluetooth-Gerät näher an das Envoi bringen. Achten
Sie darauf, dass keine Hindernisse (Wände, Möbel etc.)
die direkte Sichtlinie zwischen dem Bluetooth-Gerät und
dem Envoi beeinträchtigen.
Setup und
B
etrieb
Das Koppeln meines BluetoothGeräts mit dem Envoi erfordert einen
PIN.
Geben Sie 0000 als PIN ein. (Einige ältere BluetoothGeräte können Sie auffordern, einen PIN einzugeben.)
B
etrieb
Page 43

43
Appendix (English)
Specifications
Specifications are subject to change without notice.
* Bluetooth range is affected by walls, obstructions, and movement. For optimal performance, place the product in the center
of the room so it is unobstructed by walls, furniture, etc.
** Battery life may vary based on temperature, age, and volume usage of product.
Trademarks and Licenses
Denon is a trademark of D&M Holdings Inc., registered in the U.S. and other countries.
The Bluetooth word mark and logos are owned by the Bluetooth SIG, Inc.
All other product or company names are trademarks or registered trademarks of their respective owners.
Watts
120W RMS/AC (240W peak); 80W RMS/DC battery-powered (160W peak)
Speaker Type 2 way full-range active speaker
Woofer
10” (254 mm) woofer
Driver
1” (25.4 mm) compression driver
Frequency Response
55 Hz - 20 kHz
USB Port Supported file systems: (FAT16/32); supported file formats: MP3, WMA
SD Card Slot
Supported file systems: (FAT16/32); supported file formats: MP3, WMA
Impedance
4 Ohm
UHF Frequency Range
US: 584 – 608 MHz; 16 channels
EU/UK: 863 – 865 MHz; 16 channels
Wireless Mic Power 2 AA 1.5V batteries
Wireless Mic Range
66 ft.
20 m
Bluetooth Version
Bluetooth 3.0 (backwards compatible)
Bluetooth Profiles
AVRCP
Bluetooth Range
33 ft.
10 m
Envoi Battery Type
(2) 12V DC, 5Ah/20Hr lead acid batteries
Envoi Battery Life
Up to 12 hours at half power, 3-4 hours at max power
Envoi Battery Recharge Time Approximately 10 hours
Envoi Battery Dimensions
(Depth x Width x Height)
3.5” x 2.75” x 4”
90 mm x 70 mm x 101 mm
Envoi Mounting Socket Standard 35 mm socket allows mounting on a speaker stand
Envoi Dimensions
(Depth x Width x Height)
11.9" x 14.2" x 22"
303 mm x 360 mm x 560 mm
Envoi Weight
35.3 lbs.
16.05 kg
Page 44

denonpro.com
Manual Version 1.8
 Loading...