

Page 1

http://www.emc2000.co.kr
)&& TEST REPORT
Repo
rt No.: EMC-)&&-R0149
User manual
EMCcompliance Ltd. Page: 1 of 1
480-5 Shin-dong, Yeongtong-gu, Suwon-city, Gyunggi-do, 443-390, Korea
82 31 336 9919 (Main) 82 31 336 4767 (Fax)
This test report shall not be reproduced except in full, Without the written approval.
Page 2
1
Appendix
TroubleshootingPlaybackConnectionsPreparation
Contents
Index
DSB-200
WIRELESS MUSIC SYSTEM
Owner’s Manual
You can print more than one page of a PDF onto a single sheet of paper.
Envaya
Page 3
2
Appendix
TroubleshootingPlaybackConnectionsPreparation
Index
Contents
Contents
Preparation
Accessories ························································································ 4
Features ······························································································ 5
High Sound Quality ·········································································· 5
Good Design ···················································································· 5
Simple Operation ············································································· 5
Part names and functions ····························································· 6
Opening the Stand ·········································································· 8
Charging ····························································································· 9
Charging this Unit ············································································· 9
Using this unit's power supply to charge a smartphone ················ 12
Turn the power on ········································································ 13
Switching the power to standby ···················································· 13
Connections
Bluetooth Connection ·································································· 14
Pairing ···························································································· 14
Three Bluetooth Connection Methods ··········································· 14
Case 1: Pairing with this unit for the first time ······························· 15
Case 2: Connecting to a Bluetooth device
that has already been paired ·························································· 17
Case 3: NFC connection to a Bluetooth device equipped with
the NFC function ············································································ 18
Simultaneously connecting Bluetooth devices
(Multipoint function) ······································································· 19
Playback
Adjusting the volume ··································································· 20
Turning o the sound temporarily (muting) ···································· 20
Listening to music using a wired connection ······················· 21
Page 4
3
Appendix
TroubleshootingPlaybackConnectionsPreparation
Index
Contents
Troubleshooting
Contents ··························································································· 22
Tips ································································································· 23
Troubleshooting ··········································································· 24
Restarting the unit ········································································ 27
Appendix
Replacing the grill net ····································································· 28
Explanation of Terms ······································································ 29
Trademark information ···································································· 30
Specifications ··················································································· 31
Index ·································································································· 33
Page 5

4
Appendix
TroubleshootingPlaybackConnections
Contents
Index
Preparation
Accessories
Check the following parts before use.
q Quick Start Guide w Safety Instructions e AC adapter r Replacement plug for AC adapter
For Europe
For U.K.
For North America/
Japan
t Interchangeable nets
(3 colors)
Thank you for purchasing this Denon product. To ensure proper operation, please read this owner’s manual carefully before using the product.
After reading this manual, be sure to keep it for future reference.
Page 6
5
Appendix
TroubleshootingPlaybackConnections
Contents
Index
Preparation
High Sound Quality
•Despite its compact size, this unit is equipped with two high sound
quality full range speakers, and a passive radiator that utilizes
double suspension to provide sound with a broad, overflowing
presence and deep base tones.
•Compatible with the high sound quality aptX codec
This unit is compatible with a wide range of codecs, including the high
sound quality aptX, AAC and SBC. This unit automatically selects the
optimum compatible codec for your smartphone or tablet so you can
enjoy high-grade wireless sound.
Good Design
•This unit is available in two colors. The white model features a high
gloss finish that brings a touch of class to the room, and the black
model features a soft feel finish that has a smooth, gentle texture.
•The speaker grill can be removed and the inside net changed
between any of the four provided colors (orange, pink, blue or
gray). This means you can color coordinate this unit with the decor
in your room.
Simple Operation
•Smartphones that are equipped with the NFC function can be
smoothly paired and connected with this unit simply by touching
this unit with the smartphone.
•The power supply to this unit can be switched on by operating
the smartphone or tablet. For example, you can switch the power
supply to the unit on and listen to music straight after waking up and
without getting out of bed, simply by operating your smartphone.
Features
Page 7
6
Appendix
TroubleshootingPlaybackConnections
Contents
Index
Preparation
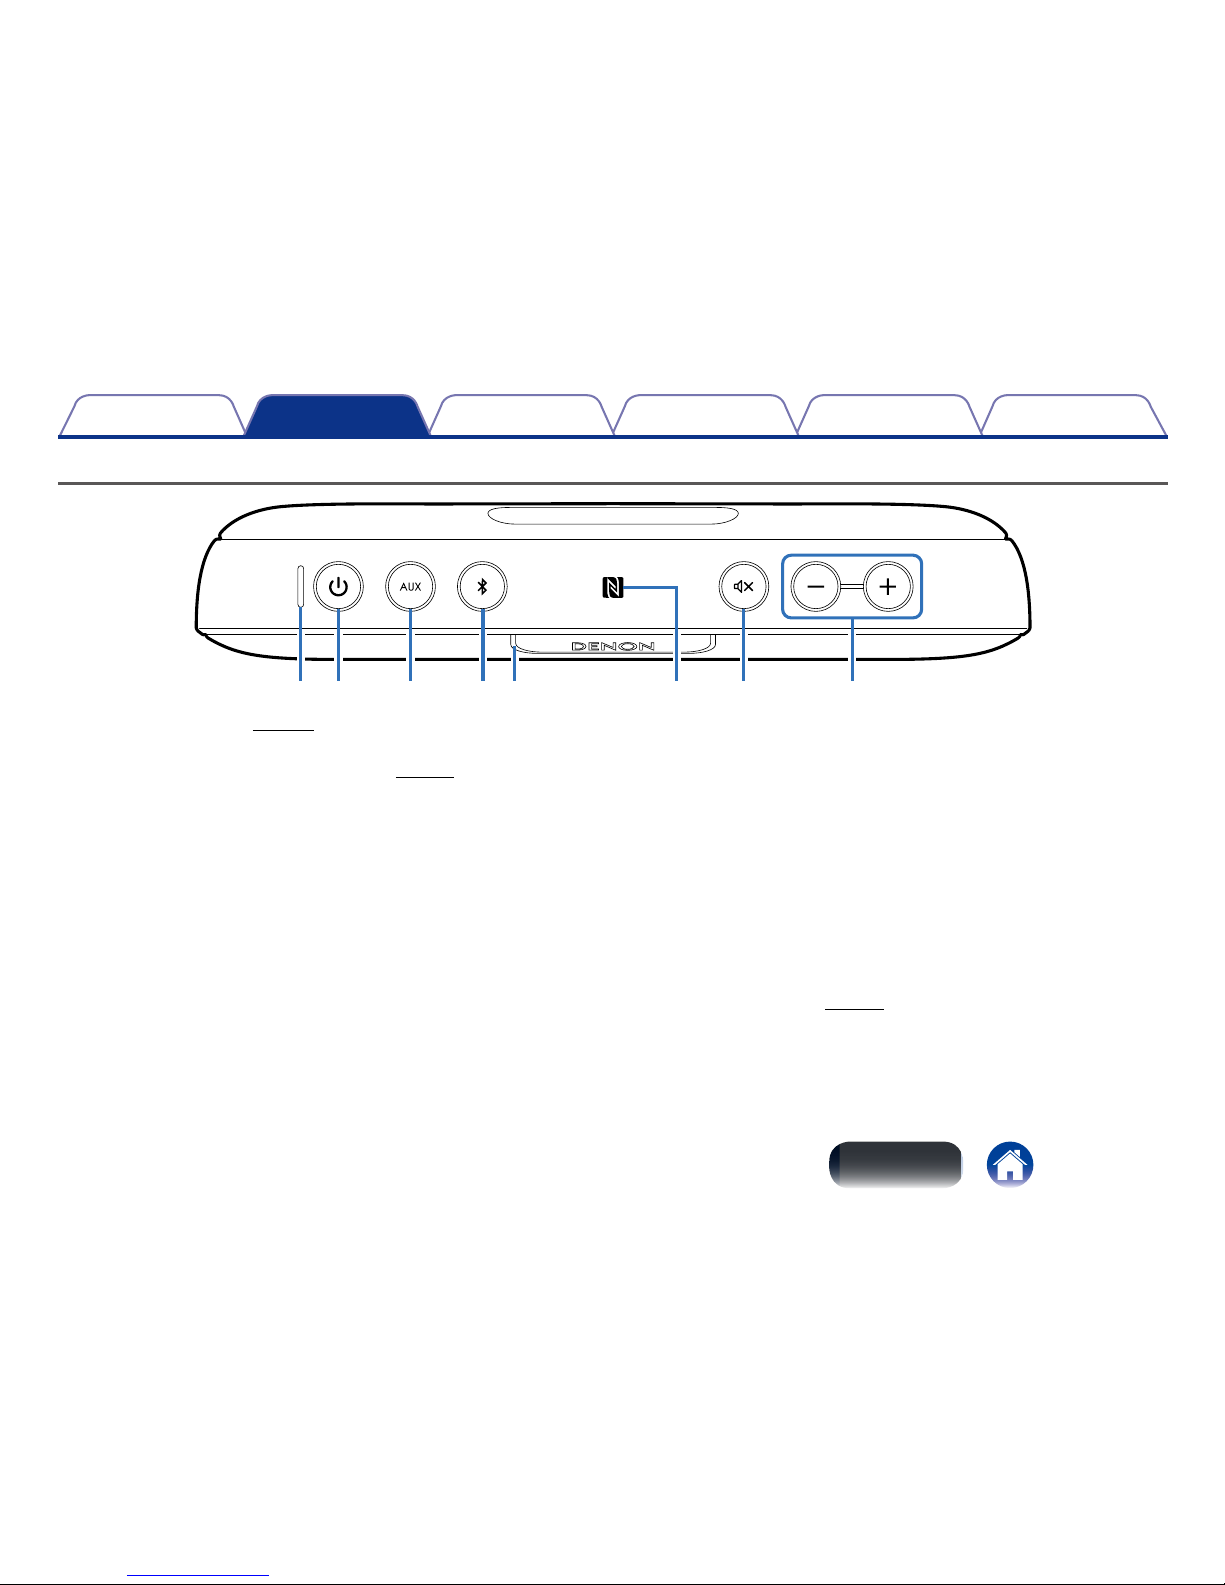
wq e r uyt i
Part names and functions
q Battery Indicator (vpage11)
w Power operation button (X)
Turns the power supply to on/standby (vpage13).
e AUX button
Switches input to a portable music player or other such devices
connected by a cable.
r Bluetooth button
Switches input to Bluetooth. Also, press this button when pairing with
a device.
t Illumination LED
This lights in the following way according to the power supply status.
•Power on (using the AC adapter): Lit
•Power on (using batteries): Lit
(turns o 5 seconds after the power is
turned on.)
•Normal standby: O
•Eco standby: O
•Muted: Blinking
y N mark
When pairing (registering) a Bluetooth device that is equipped with the
NFC function, touch the Bluetooth device to this mark.
u Mute button
Mutes the volume (vpage20).
i Volume adjustment button (-,+)
Adjusts the volume.
Page 8
7
Appendix
TroubleshootingPlaybackConnections
Contents
Index
Preparation
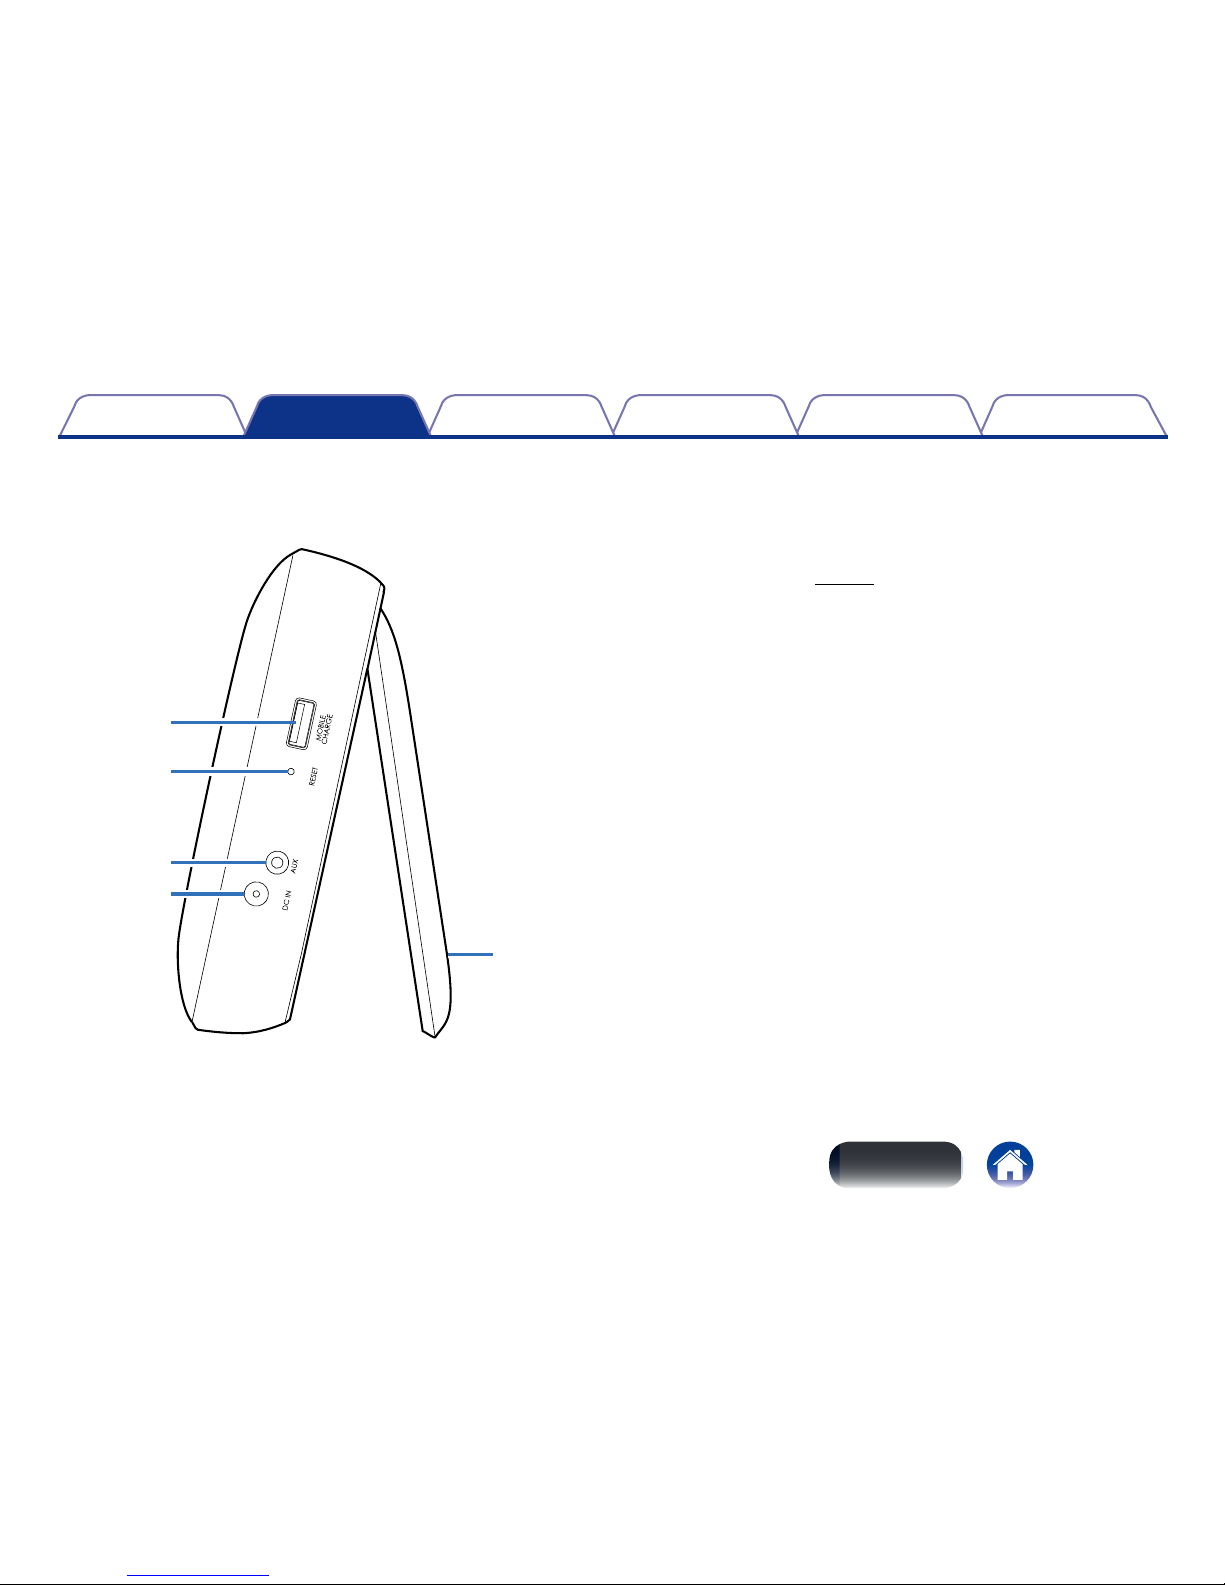
o
Q3
Q0
Q1
Q2
o Charging port
Connect using a USB cable (sold separately) to recharge the smartphone
or portable music player.
Q0 Reset button
Restarts this unit (vpage27).
Q1 AUX Input connector
Use a stereo mini cable (sold separately) to connect to the headphones
jack of a portable music player, etc.
Q2 DC IN connector
Connect the supplied AC adapter.
Q3 Stand
Page 9

8
Appendix
TroubleshootingPlaybackConnections
Contents
Index
Preparation
While holding this unit with both hands, use one hand to squeeze the indentations in the stand to open it.
Note
•When standing this unit up for use, be sure to place it on a flat surface. Placing it on an unstable surface is dangerous because this unit may fall.
Opening the Stand
Page 10
9
Appendix
TroubleshootingPlaybackConnections
Contents
Index
Preparation
Charging this Unit
This unit can be charged for use. It can also be used with the supplied AC adapter connected to a wall socket.
Before using for the first time, be sure to fully charge this unit.
%
•It takes approximately O hours to fully charge the battery when it is completely discharged.
•This unit can be used for approximately O hours when the battery is fully charged.
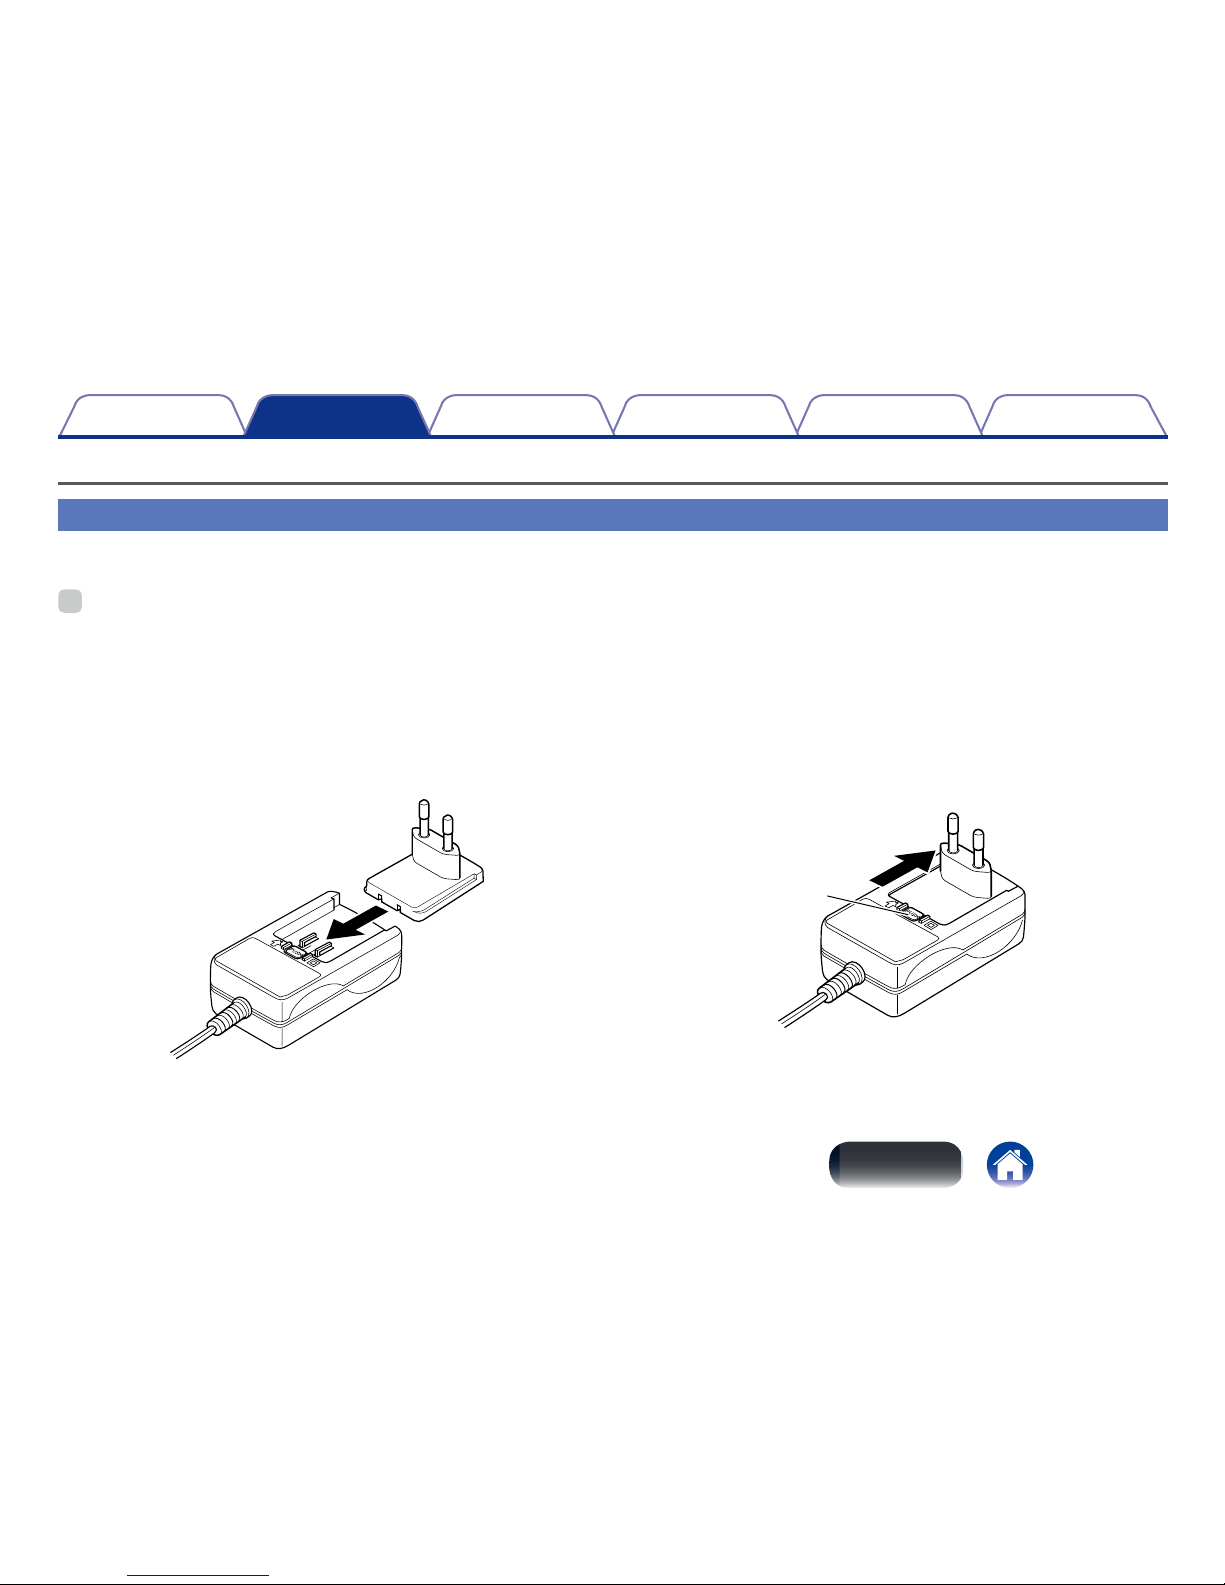
2 Replacing the AC Adapter Plug
Attach the adapter plug that fits the power socket in your region as shown in the figure.
[Removing a replacement AC adapter plug]
While pressing the
q button, slide in the direction of the arrow to
remove.
q
[Attaching a replacement AC adapter plug]
Push in the direction of the arrow until a “click” sound is heard.
Charging
Page 11
10
Appendix
TroubleshootingPlaybackConnections
Contents
Index
Preparation
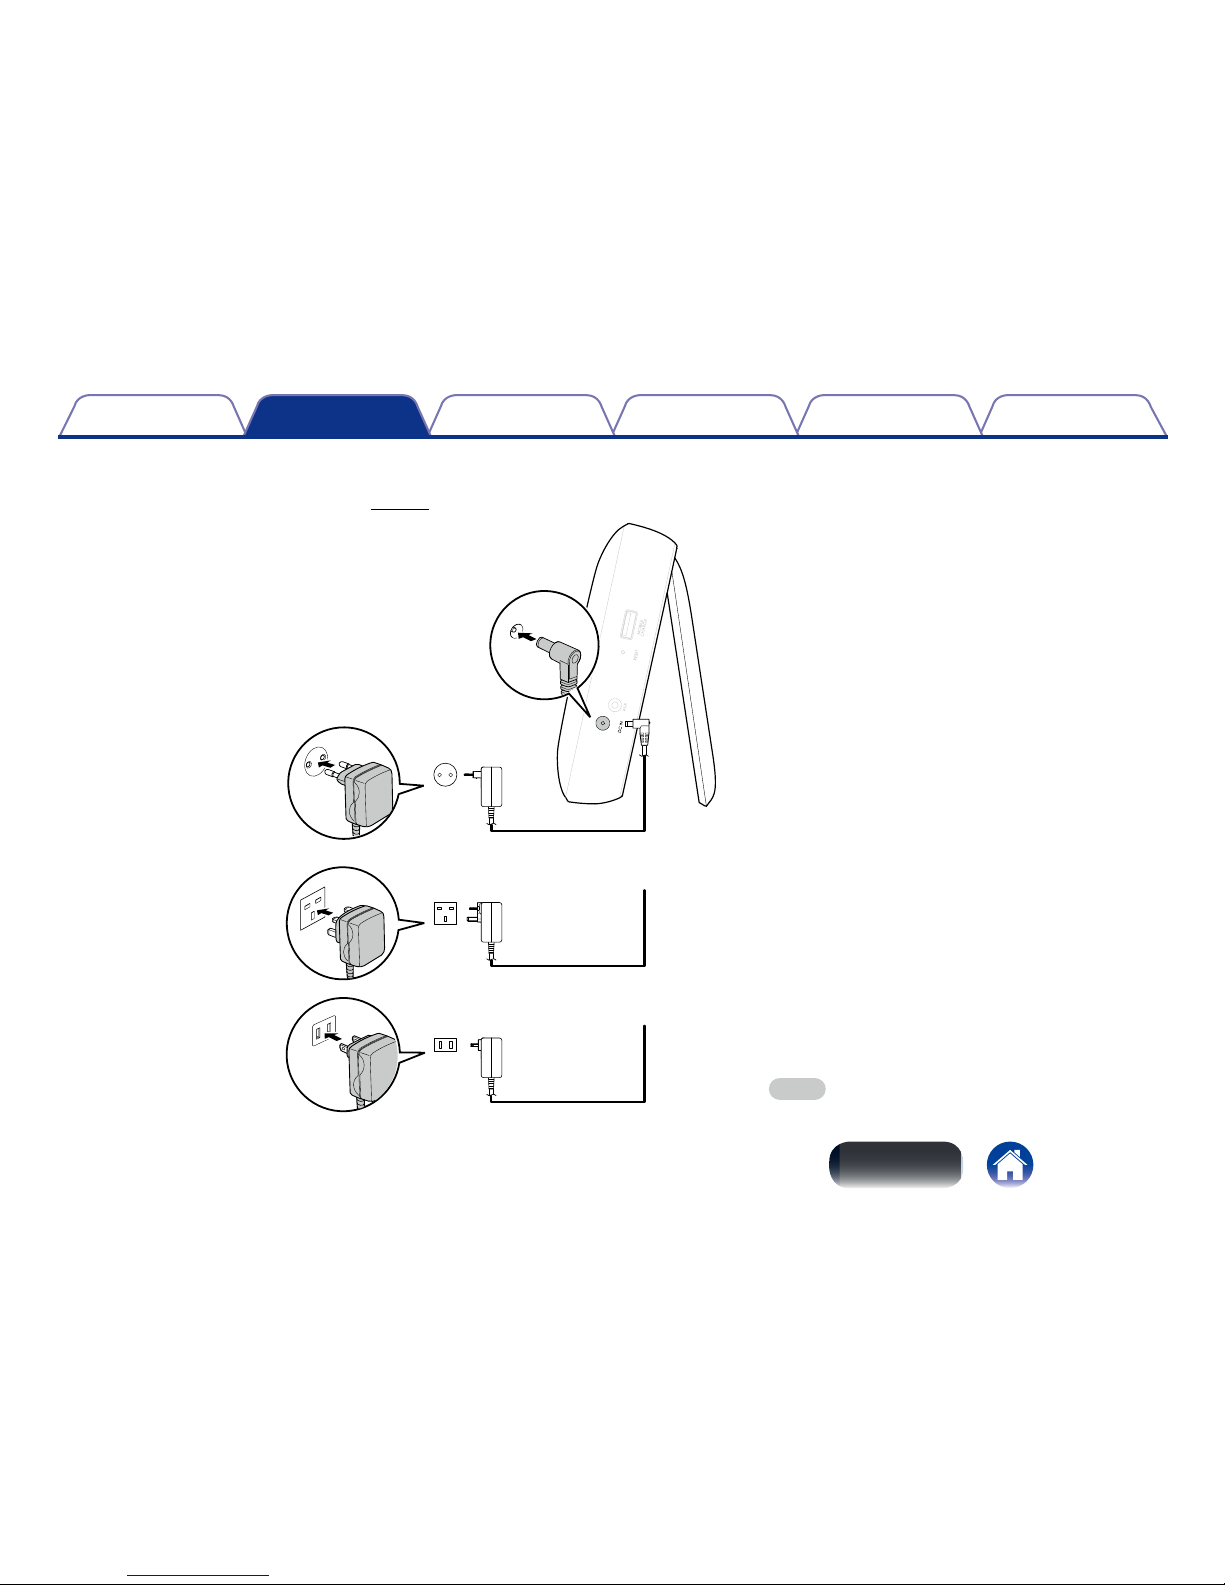
2 Connecting the AC Adapter
This unit automatically starts charging when the AC adapter is connected.
See “Remaining battery indicator” (vpage11) for details on the remaining battery indicator.
for U.K.
240V, 50Hz
for North America/
Japan
100 - 120V,
50/60Hz
for Europe
230V, 50/60Hz
AC adapter
(supplied)
Note
•Only use the supplied AC adapter.
To household power outlet
Page 12

11
Appendix
TroubleshootingPlaybackConnections
Contents
Index
Preparation
2 Remaining battery indicator
The remaining battery level when this unit is being charged or used on
battery power is indicated as shown below.
Battery Indicator
When connected to the AC adapter (charging)
The charging status is always indicated when charging.
Charging status Battery Indicator
90 - 100% Lit
60 - 90% Blinking
30 - 60% Blinking
0 - 30% Blinking
When running on battery power
Press the X button to display the remaining battery when running on
battery power. The remaining battery is displayed for approximately 5
seconds.
Remaining battery Battery Indicator
60 - 100% Lit
30 - 60% Lit
5 - 30% Lit
0 - 5% Blinking
%
•When the remaining battery falls below 5%, connect the AC adapter and recharge
this unit.
Page 13

12
Appendix
TroubleshootingPlaybackConnections
Contents
Index
Preparation
Using this unit's power supply to charge a smartphone
When a device such as a smartphone or portable music player, etc. is connected to this unit using a USB cable (sold separately), the connected device
can be charged. This unit is designed to use its power supply to charge devices connected to it.
1
Press and hold X until an electronic sound is heard.
The illumination LED lights and the power supply switches on.
%
•When this unit is running on battery power, the illumination LED switches o after
approximately 5 seconds.
2
Use a USB cable (sold separately) to connect a
smartphone or portable music player etc. to this unit.
The connected device starts charging.
•When this unit is running on battery power, power supply to the
connected device is automatically stopped when the remaining
battery falls below 5%.
USB cable (sold separately)
%
•Charging of the connected device is stopped when the power supply for this unit
is in standby.
Page 14

13
Appendix
TroubleshootingPlaybackConnections
Contents
Index
Preparation
1
Press and hold X until an electronic sound is heard.
The illumination LED lights and the power supply switches on.
%
•When this unit is paired with a Bluetooth device, the power supply of this unit can
be turned on by operating the paired Bluetooth device.
•When this unit is running on battery power, the illumination LED switches o after
approximately 5 seconds.
1
Press and hold X for approx. 3 seconds.
The LED of the Bluetooth button or AUX button goes out, and the
power switches to standby.
2 Eco Standby Function
The power consumption in standby mode can be reduced to the
minimum level by using the eco standby function.
However, when the eco standby function is enabled, the power of this
unit cannot be switched on by operating a Bluetooth device. When
using the eco standby function, press the X button on this unit to turn
the power on.
The eco standby function is turned o in the factory settings.
1
Press and hold X for approx. 6 seconds.
The power indicator blinks twice and this unit switches to eco
standby.
Turn the power on
Switching the power to standby
Page 15

14
Appendix
TroubleshootingPlaybackPreparation
Contents
Index
Connections
Bluetooth Connection
You can enjoy listening to music wirelessly by connecting this unit to a Bluetooth compatible device.
Pairing (registration) is an operation that is required in order to connect a
Bluetooth device to this unit using Bluetooth. When paired, the devices
authenticate each other and can connect without mistaken connections
occurring.
When using Bluetooth connection for the first time, you need to pair this
unit and the Bluetooth device to be connected.
This unit can store pairing information for a maximum of 8 devices.
Note
•Multiple Bluetooth devices cannot be played back at the same time.
There are three methods for connecting with Bluetooth. Use the
connection method for your particular circumstances.
Case 1
Pairing with this unit for the first time (vpage15)
Case 2
Connecting to a Bluetooth device that has already been paired
(vpage17)
Case 3
NFC connection to a Bluetooth device equipped with the NFC
function (vpage18)
Three Bluetooth Connection MethodsPairing
Page 16

15
Appendix
TroubleshootingPlaybackPreparation
Contents
Index
Connections
2
Press and hold the Bluetooth button for 3 seconds until
an electronic sound is heard.
The Bluetooth button blinks rapidly and this unit enters pairing
mode.
3
Turn the Bluetooth function of the Bluetooth device on.
•For details, see the Owner’s Manual of the Bluetooth device.
Bluetooth ON
1
Press and hold X until an electronic sound is heard.
The illumination LED lights and the power supply switches on.
•This unit automatically enters pairing mode the first time the
power is switched on after purchase. In this case, you do not
need to perform the operations in step 2.
Case 1: Pairing with this unit for the first
time
Page 17

16
Appendix
TroubleshootingPlaybackPreparation
Contents
Index
Connections
4
Select “Envaya” from the list of devices displayed in
the screen of the Bluetooth device.
When pairing is complete and the devices are connected by
Bluetooth, an electronic sound is heard and the Bluetooth button
changes from blinking to lit.
DSB-200
%
•If “Envaya” is not displayed in the screen of the Bluetooth device, search
for devices on the Bluetooth device.
•If you are asked to enter a pass key in the Bluetooth device screen, enter
“0000”.
5
Playback music on the Bluetooth device.
The music played back on the Bluetooth device is output from this
unit.
%
•If pairing fails, try again from step 2.
•If you want to pair other Bluetooth devices, repeat steps 2 to 5 for each of the
devices that you want to pair.
Note
•This unit remains in the pairing mode for approximately 5 minutes. If the pairing
mode of this unit is canceled before you have finished pairing, repeat the process
again from step 2.
•This unit cannot pair with Bluetooth devices that have a pass key other than
“0000”.
2 Deleting Pairing Information
1
Press and hold the Bluetooth button for approx. 10
seconds until an electronic sound is heard.
All of the registered pairing information is deleted.
Note
•Even when an electronic sound is heard approximately 3 seconds after pressing
and holding the Bluetooth button, continue holding down the button.
Page 18

17
Appendix
TroubleshootingPlaybackPreparation
Contents
Index
Connections
1
Press and hold X until an electronic sound is heard.
The illumination LED lights and the power supply switches on.
•When the Bluetooth function of the device that was last
connected is turned on, it automatically connects to this unit.
•If the input on this unit is set to AUX, press the Bluetooth button
to switch to Bluetooth input.
2
Turn the Bluetooth function of the Bluetooth device on.
•For details, see the Owner’s Manual of the Bluetooth device.
Bluetooth ON
3
Select “Envaya” from the list of devices displayed in
the screen of the Bluetooth device.
When a device is connected by Bluetooth, an electronic sound is
heard and the Bluetooth button changes from blinking to lit.
DSB-200
4
Playback music on the Bluetooth device.
Music from the Bluetooth device is output from this unit.
Case 2: Connecting to a Bluetooth
device that has already been
paired
Page 19

18
Appendix
TroubleshootingPlaybackPreparation
Contents
Index
Connections
Simply touch this unit with the Bluetooth device. The power supply to this
unit automatically turns on and the Bluetooth device can pair or connect
to this unit.
1
Turn the NFC function of the Bluetooth device on.
•For details, see the Owner’s Manual of the Bluetooth device.
2
Touch the NFC antenna section of the Bluetooth device
onto the N mark on this unit.
The power supply to this unit turns on, the Bluetooth button blinks
and the device starts to connect by Bluetooth.
When a device is connected by Bluetooth, an electronic sound is
heard and the Bluetooth button changes from blinking to lit.
•Follow the Bluetooth device instructions to complete the
operation.
3
Playback music on the Bluetooth device.
Music from the Bluetooth device is output from this unit.
%
•When a Bluetooth device that is playing back music touches the N mark on
this unit, the music starts being output from this unit.
•When the N mark is touched again during Bluetooth connection, the
Bluetooth connection is disconnected.
•If a dierent Bluetooth device is touched to the N mark while this unit is
connected to a Bluetooth device, playback from the previously connected
Bluetooth device stops and this device connects to the most recently
touched Bluetooth device.
Note
•When connecting using the NFC connection, release the lock function on the
Bluetooth device.
Case 3: NFC connection to a Bluetooth
device equipped with the NFC
function
Page 20

19
Appendix
TroubleshootingPlaybackPreparation
Contents
Index
Connections
Simultaneously connecting Bluetooth
devices (Multipoint function)
Music can only be output from this unit from one Bluetooth device connected
using Bluetooth, but three Bluetooth devices can be simultaneously
connected to this unit (vpage14 “Bluetooth Connection”).
It is convenient to connect devices that you use frequently so that you do
not need to re-connect each time you want to switch playback devices.
Pair the devices that you want to connect in advance.
Audio signal
During playback
During Bluetooth connection
2 Switching playback devices
1
Stop or pause playback on the device that is currently
playing back.
2
Playback the device that you want to playback.
Page 21

20
Appendix
TroubleshootingConnectionsPreparation
Contents
Index
Playback
The volume of the music output from this unit can be adjusted both on
the Bluetooth device and on this unit.
1
Connect this unit and a Bluetooth device.
•For details on how to connect, see “Bluetooth Connection”
(vpage14).
2
Adjust the volume on this unit to a low volume.
3
Check that the volume on the Bluetooth device is not
too high, and start playback.
•For details, see the Owner’s Manual of the Bluetooth device.
4
Adjust to the desired volume using the volume
adjustment button on this unit.
Turning o the sound temporarily
(muting)
1
Press :.
The illumination LED blinks and the music output from this unit
stops.
%
•To cancel muting, press the : button again. Muting can also be canceled by
adjusting the volume while the sound is muted.
Adjusting the volume
Page 22

21
Appendix
TroubleshootingConnectionsPreparation
Contents
Index
Playback
You can enjoy listening to music from this unit by connecting a portable
music player, etc. to this unit using a stereo mini cable (sold separately).
1
Press and hold X until an electronic sound is heard.
The illumination LED lights and the power supply switches on.
2
Connect the AUX input connector on this unit to the
headphones jack of the portable music player using a
stereo mini cable (sold separately).
•When a stereo mini cable is connected to the AUX input connector
of this unit, the input of this unit automatically switches to AUX.
Stereo mini cable
(sold separately)
3
Playback the portable music player and adjust the
volume.
Note
•Use a stereo mini cable that has 3-pole plugs.
1-pole
2-pole
3-pole
1-pole
2-pole
3-pole
4-pole
Listening to music using a wired connection
Page 23

22
Appendix
PlaybackConnectionsPreparation
Contents
Index
Troubleshooting
Contents
2 Tips .................................................................... (22)
I want to charge a Bluetooth device .................................................(23)
I want to replace the net in the unit .................................................(23)
I want to connect multiple Bluetooth devices and switch easily
between them ..................................................................................(23)
I want to connect an NFC compatible device using NFC .................(23)
I want to turn this unit's power on
by operating a Bluetooth device .......................................................(23)
I want to reduce the power consumption to the minimum during
standby .............................................................................................(23)
2 Troubleshooting ..............................................(22)
Power does not turn on ....................................................................(22)
No sound comes out ........................................................................(25)
Sound is distorted, interrupted or noise occurs ...............................(25)
Cannot pair devices ..........................................................................(26)
Cannot connect using NFC ...............................................................(26)
Power is turned off ...........................................................................(26)
Page 24

23
Appendix
PlaybackConnectionsPreparation
Contents
Index
Troubleshooting
Tips
I want to charge a Bluetooth device
•Use a USB cable (sold separately) to connect the Bluetooth device to this unit (vpage12).
I want to replace the net in the unit
•Remove the grill and attach one of the supplied interchangeable nets (vpage28).
I want to connect multiple Bluetooth devices and switch easily between them
•Music can only be output from this unit from one Bluetooth device connected using Bluetooth, but three Bluetooth devices can be simultaneously
connected to this unit. To switch easily between connections, connect Bluetooth devices that you use frequently to this unit. To switch playback to a
dierent Bluetooth device when multiple Bluetooth devices are connected, stop playback on the device that is currently playing back, and then start
playback on a dierent Bluetooth device (vpage19).
I want to connect an NFC compatible device using NFC
•Enable the NFC function on the NFC compatible device, and touch the NFC device to the N mark on this unit (vpage18).
I want to turn this unit's power on by operating a Bluetooth device
•Playback music on a Bluetooth device that is connected using Bluetooth to this unit. In this case, turn this unit's eco standby mode o (vpage13).
I want to reduce the power consumption to the minimum during standby
•Turn the eco standby function on (vpage13). When this function is turned on, you cannot turn the power supply to this unit on by operating a
Bluetooth device.
Page 25

24
Appendix
PlaybackConnectionsPreparation
Contents
Index
Troubleshooting
Troubleshooting
1. Are the connections correct?
2. Is the set being operated as described in the owner’s manual?
If this unit does not operate properly, check the items listed in the table below. Should the problem persist, there may be a malfunction.
In this case, disconnect the power immediately and contact your store of purchase.
2 Power does not turn on
Symptom Cause/Solution Page
Power does not turn on
(When AC adapter is connected).
•Check whether the AC adapter is connected correctly.
•Check that the power plug is inserted correctly into the power outlet.
•Check that the replacement AC adapter plug is correctly attached to the AC adapter.
10
10
9
Power does not turn on
(When AC adapter is not connected).
•If this unit is not used for a long period of time (approximately 14 days), the power supply from
the battery will be automatically switched o in order to protect the battery (battery protection
function). The battery protection function is canceled when the AC adapter is connected.
•Battery has completely discharged. Connect the AC adapter and recharge the battery.
10
10
Page 26

25
Appendix
PlaybackConnectionsPreparation
Contents
Index
Troubleshooting
2 No sound comes out
Symptom Cause/Solution Page
No sound comes out. •Check that the power supply to this unit and connected devices is on.
•Check that the volume control this unit and connected devices is adjusted to an appropriate
level.
•Pair a Bluetooth device with this unit.
•When playing back music using a wired connection, check that the stereo mini cable is
connected securely.
•The AUX input connector of this unit is compatible with stereo mini cables that have 3-pole
plugs. Some smartphones or portable music players are compatible with stereo mini cables
that have 4-pole plugs. Be sure to prepare a connection cable that is compatible with the
specifications of the device that you want to connect.
•If this unit is in muting mode, cancel muting mode.
13
20
14
21
21
20
2 Sound is distorted, interrupted or noise occurs
Symptom Cause/Solution Page
Sound is distorted, interrupted or
noise occurs.
•Check that the volume control this unit and connected devices is adjusted to an appropriate
level.
•Bring the connected device closer to this unit.
•Move this unit away from appliances such as microwave ovens or wireless LAN devices.
•Turn the power of the Bluetooth device o and on again.
20
-
-
-
Page 27

26
Appendix
PlaybackConnectionsPreparation
Contents
Index
Troubleshooting
2 Cannot pair devices
Symptom Cause/Solution Page
Cannot pair devices. •Turn the power of this unit o and on again.
•Move the Bluetooth device to within 1 meter of this unit and then try again.
•Turn the power of the Bluetooth device o and on again.
13
-
-
2 Cannot connect using NFC
Symptom Cause/Solution Page
Cannot connect using NFC. •Check that the Bluetooth device is equipped with the NFC function.
•Check the position of the NFC antenna on the Bluetooth device, and touch the N mark on this
unit with the NFC antenna of the Bluetooth device. Keep the Bluetooth device in contact with
this device until the Bluetooth device responds.
-
18
2 Power is turned o
Symptom Cause/Solution Page
Power is turned o. •If the input of this unit is set to Bluetooth and no audio is played back for approximately 15
minutes, this unit automatically enters standby mode. Turn the power of this unit o and on
again.
•If the input of this unit is set to AUX and it is not operated for approximately 8 hours, this unit
automatically enters standby mode. Turn the power of this unit o and on again (AUX auto
standby function). To turn the AUX auto standby function o, press and hold the AUX button
for approximately 3 seconds when the input of this unit is set to AUX.
-
-
Page 28

27
Appendix
PlaybackConnectionsPreparation
Contents
Index
Troubleshooting
Restarting the unit
If this unit does not operate correctly, use a pointed object such as a pin to
press the reset button on the side of the unit.
Page 29

28
TroubleshootingPlaybackConnectionsPreparation
Contents
Index
Appendix
You can replace the grill net with a dierent colored net.
1
Unhook the hook on the base of this unit with your
finger.
2
Unhook the grill net hook with your finger.
3
Attach one of the interchangeable nets.
•As shown in the figure, align the net with the cutout side, and
hook the other side onto the grill hooks.
4
Attach the grill onto the unit.
Replacing the grill net
Page 30

29
TroubleshootingPlaybackConnectionsPreparation
Contents
Index
Appendix
Explanation of Terms
N
NFC (Near Field Communication)
This is technology that enables wireless communication over a short
range. Terminals that are equipped with the NFC function can be easily
connected to this unit simply by touching.
Page 31

30
TroubleshootingPlaybackConnectionsPreparation
Contents
Index
Appendix
Trademark information
The Bluetooth® word mark and logos are registered trademarks owned
by Bluetooth SIG, Inc. and any use of such marks by D&M Holdings Inc.
is under license. Other trademarks and trade names are those of their
respective owners.
©2013 CSR plc and its group companies.
The aptX® mark and the aptX logo are trade marks of CSR plc or one of its
group companies and may be registered in one or more jurisdictions.
The N mark is a trademark or registered trademark of NFC forum, Inc. in
the United States and in other countries.
Page 32

31
TroubleshootingPlaybackConnectionsPreparation
Contents
Index
Appendix
2 Audio section
Rated output:
125W+125W (Load 8Ω, 20Hz - 20kHz T.H.D 0.05%)
165W+165W (Load 6Ω, 1kHz T.H.D 0.7%)
Maximum eective output power:
195W+195W (Load 6Ω, 1kHz T.H.D 10% 2-channel driving JEITA)
235W (Load6Ω, 1kHz T.H.D 10% 1-channel driving JEITA)
Frequency response:
10Hz - 100kHz:+1, –3dB (in DIRECT mode)
Speaker driver: 76.00MHz - 90.00MHz
Bluetooth standards: 1.2μV (12.8dBf)
Supported profiles: Mono: 2.8μV (20.2dBf)
Supported codecs: Mono: 70dB (IHF-A, in DIRECT mode)
Stereo: 67dB (IHF-A, in DIRECT mode)
2 Bluetooth section
Communication system:
Maximum communication range:
Frequency band:
Modulation method:
Compatible Bluetooth profiles:
Supported Codecs:
Transmission range (A2DP):
Specifications
Page 33

32
TroubleshootingPlaybackConnectionsPreparation
Contents
Index
Appendix
2 General
Waterproofing: IPX2 equivalent
AC adapter: AC100 - 240V, 50/60Hz
2 Dimensions
Unit : mm
48
140
255
138
105
48
2 Weight : 1.3 kg
z For purposes of improvement, specifications and design are subject to change without notice.
Page 34

33
TroubleshootingPlaybackConnectionsPreparation
Contents
Index
Appendix
v A
Accessories ····························································· 4
v C
Connections
AC adapter ·························································· 10
Bluetooth connection (Pairing) ··························· 14
USB Cable ··························································· 12
v M
Multipoint function ················································ 19
v N
NFC Function ···················································18、30
v P
Pairing ···································································· 14
Playback
AUX (wired) ························································· 21
Bluetooth ····························································· 20
Index
v R
Replacing the grill net ············································ 28
Return to the default settings ······························· 27
v T
Tips ······································································· 23
Troubleshooting ···················································· 24
Turning the power on ············································ 13
Page 35

D&M Holdings Inc.
3520 10324 00AD
www.denon.com
IC
“This device complies with Industry Canada license-exempt RSS standard(s). Operation is subject to the following two
conditions: (1) this device may not cause interference, and (2) this device must accept any interference, including
interference that may cause undesired operation of the device. The user is cautioned that this device should be used
only as specified within this manual to meet RF exposure requirements”.
Le présent appareil est conforme aux CNR d'Industrie Canada applicables aux appareils radio exempts de licence.
L'exploitation est autorisée aux deux conditions suivantes:
(1) l'appareil ne doit pas produire de brouillage, et
(2) l'utilisateur de l'appareil doit accepter tout brouillage radioélectrique subi, même si le brouillage est
susceptible d'en compromettre le fonctionnement
Warning
This appliance and its antenna must not be co-located or operation in conjunction with any other antenna or
transmitter. A minimum separation distance of 20 cm must be maintained between the antenna and the person
for this appliance to satisfy the RF exposure requirements.
FCC
This device complies with part 15 of the FCC Rules. Operation is subject to the following two conditions:
(1) This device may not cause harmful interference, and
(2) this device must accept any interference received, including interference that may cause undesired operation.
Users are not permitted to make changes or modify the device in any way.
Changes or modifications not expressly approved by Samsung will void the user’s authority to operate the equipment.
 Loading...