

denon-professional Denon Professional DN-280 486053_dn280_userguide_v1_4 [en, es, it, de, fr]
Page 1

User Guide
Guía del usuario
Guide d’utilisation
Guida per l’uso
Benutzerhandbuch
Appendix
English (2–6)
Español (7–11)
Français (12–16)
Italiano (17–21)
Deutsch (22–26)
English (27)
Page 2
User Guide (English)
Introduction
Thank you for purchasing the DN-280. At Denon Professional, performance and reliability mean as
much to us as they do to you. That’s why we design our equipment with only one thing in mind—to
make your performance the best it can be.
Box Contents
DN-280
IEC Power Cable
Rack Mount Ears & Screws
Rubber Feet
Euroblock Connector
User Guide
Safety & Warranty Manual
Support
For the latest information about this product (documentation, technical specifications, system
requirements, compatibility information, etc.) and product registration, visit denonpro.com.
For additional product support, visit denonpro.com/support.
2
Page 3
Features
Front Panel
3
1
2
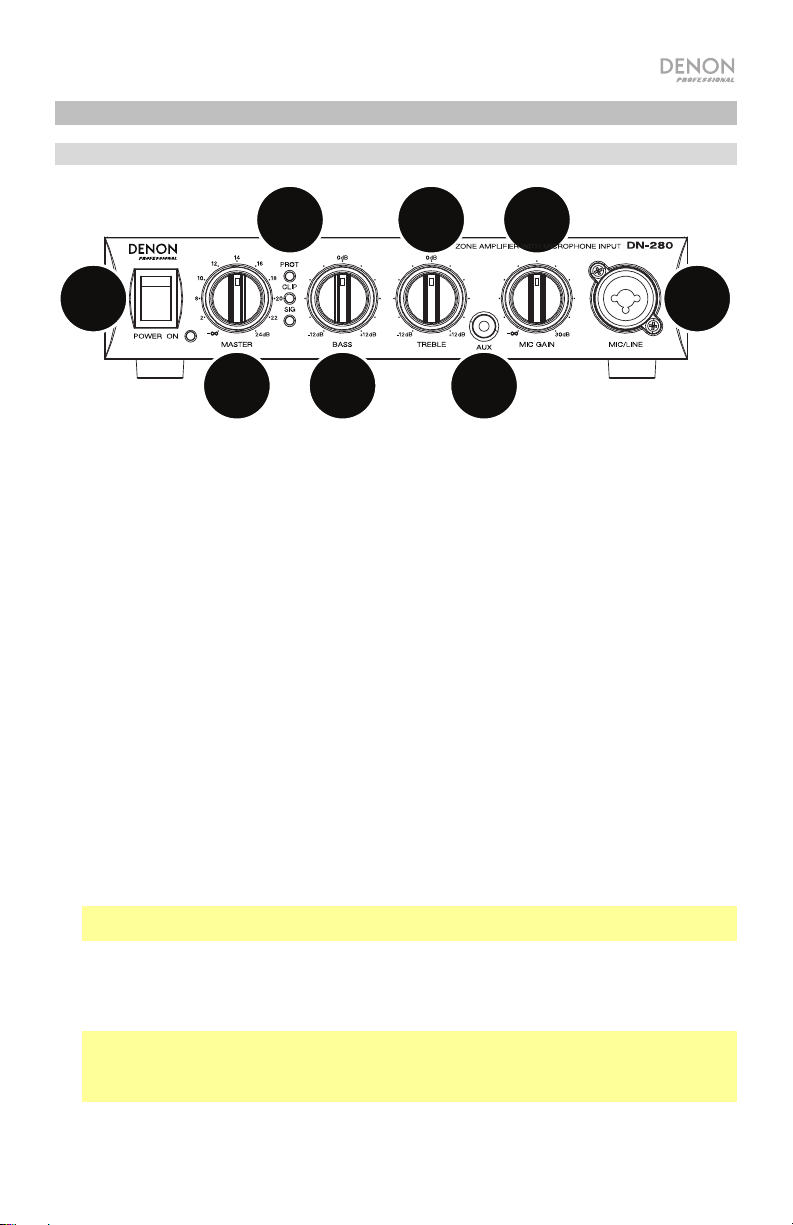
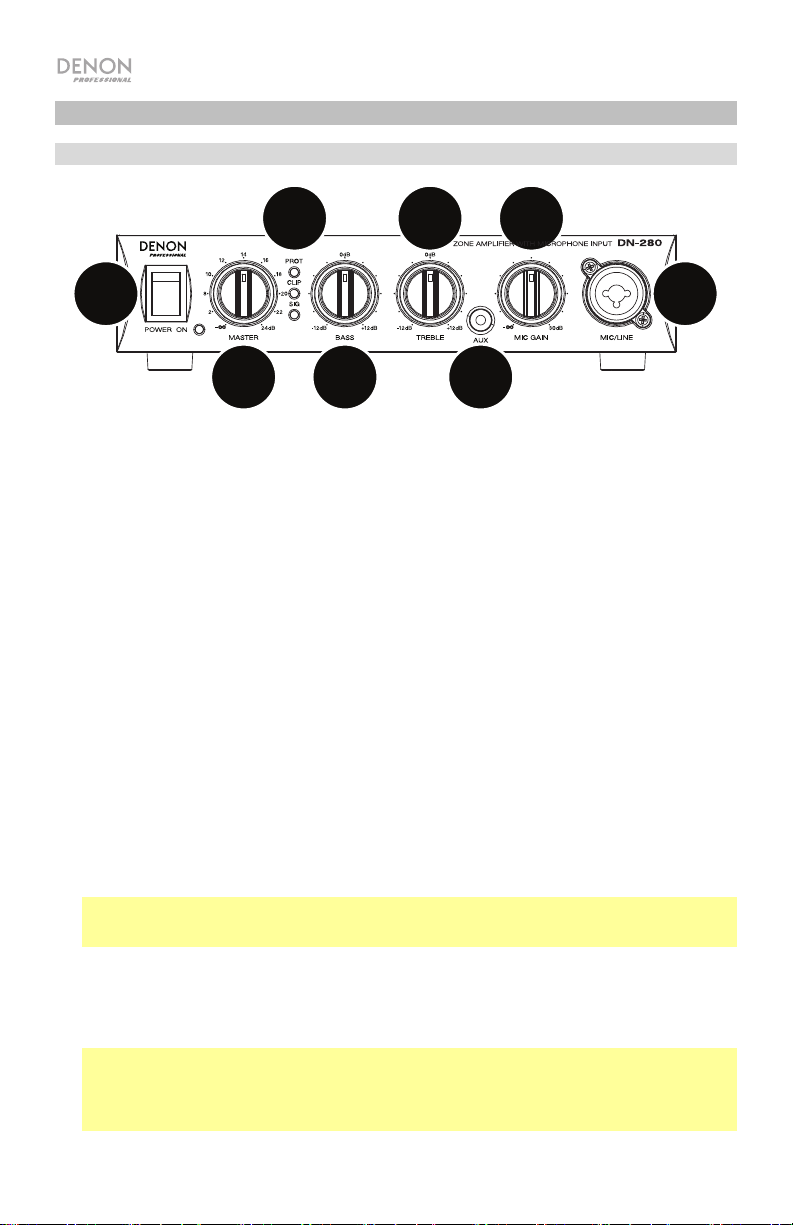
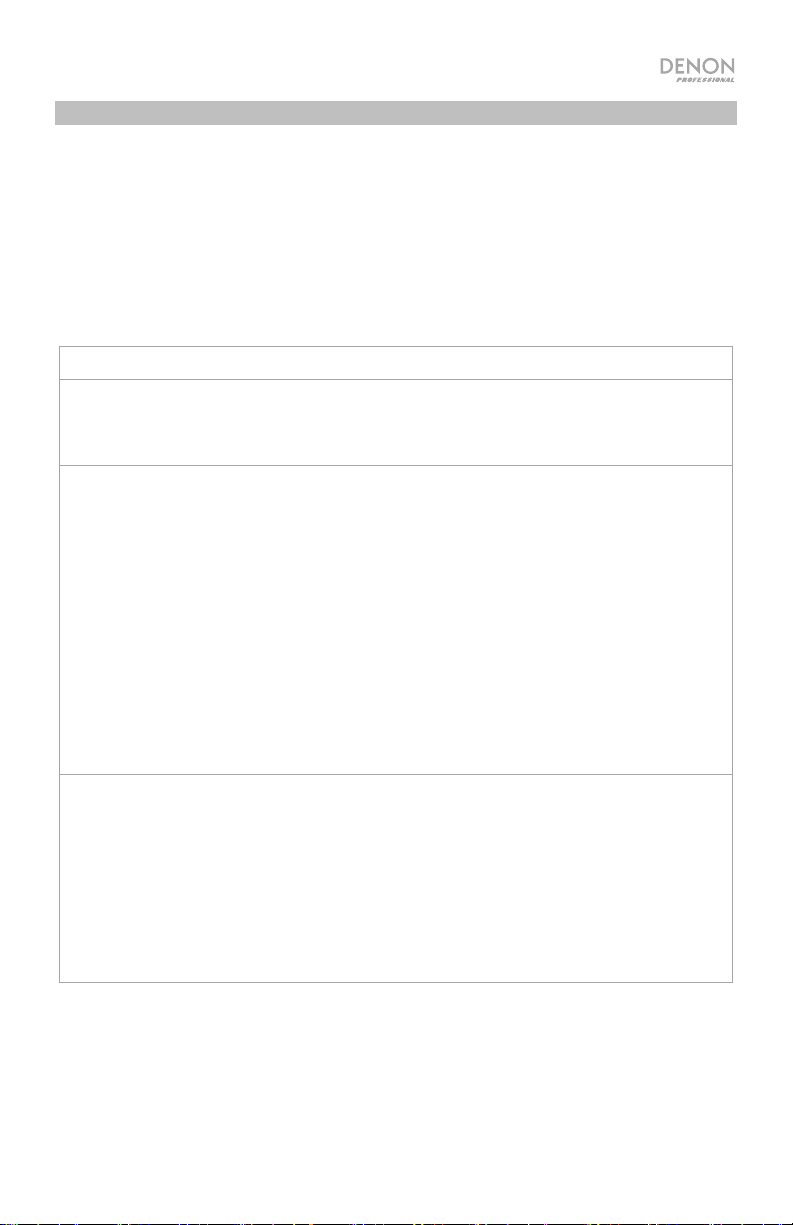
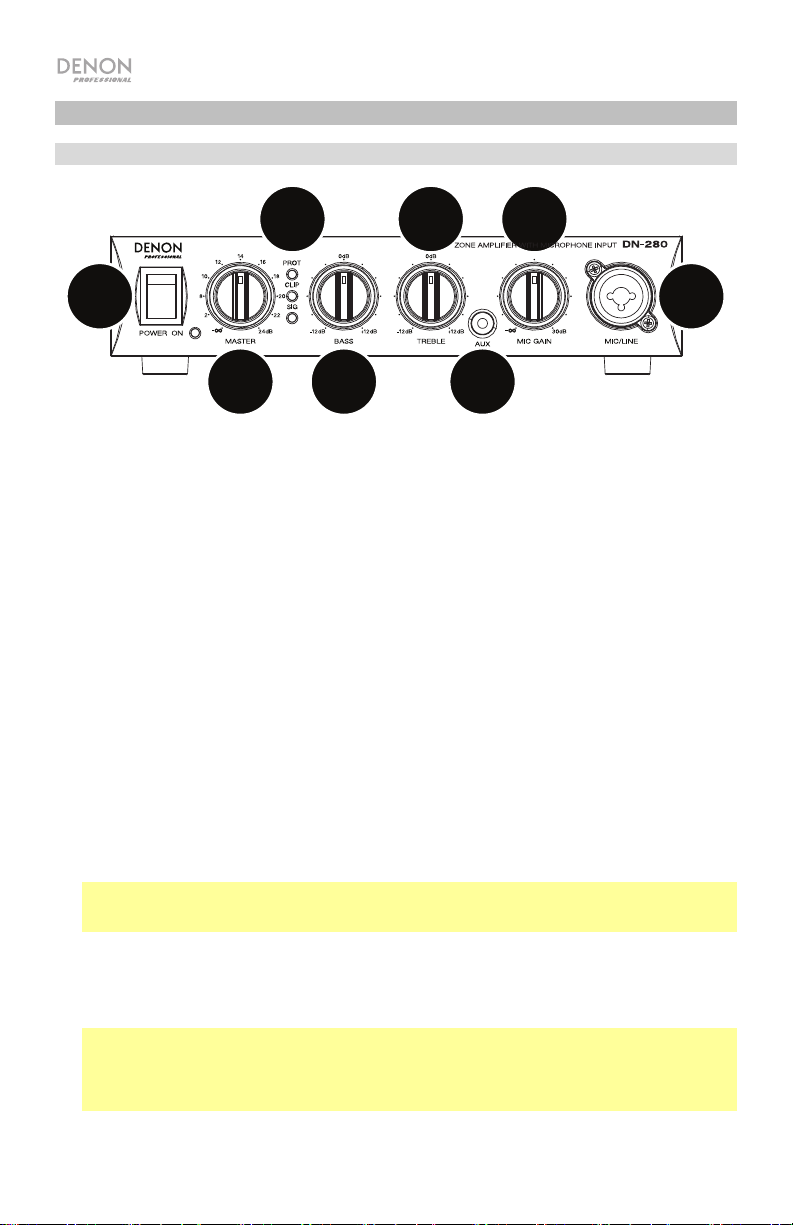
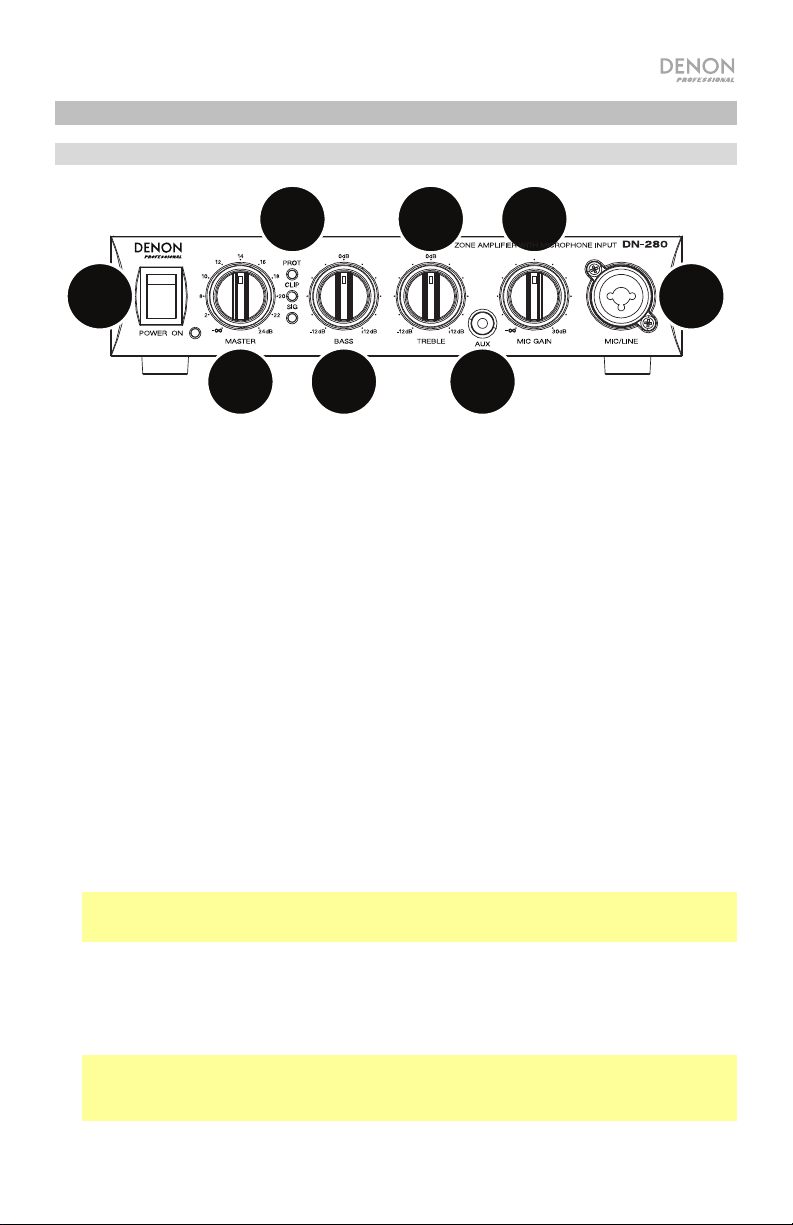
1. Power Switch: Press this switch to power DN-280 on or off. Make sure the Master knob is all
the way down before powering on. The power LED will turn on when DN-280 is powered on.
2. Master: Turn this knob to control the volume level of the audio signal sent to
DN-280’s Speaker Output.
3. Signal/Clip/Protection LEDs: These lights show the signal status of the Channel Input:
• Signal LED (SIG): The Signal LED will be lit green when the signal coming from the Channel
Input is at an optimal volume level.
• Clip LED (CLIP): When the Clip LED is lit red, the Channel Input’s signal is “peaking” (higher
than 0 dB). To prevent the “clipping” (distortion) that can result from a loud input signal, turn the
Master knob counter-clockwise or reduce the volume on the device plugged into the Channel
Input.
• Protection LED (PROT): If the Protection LED turns red, DN-280 is in heat protection mode
and will not output sound. To restore sound output, reduce DN-280’s temperature by making
sure there is good ventilation and/or decreasing the volume.
4. Speaker Bass: Turn this knob to control the level of the low (bass) frequencies sent from DN280’s Speaker Output.
5. Speaker Treble: Turn this knob to control the level of the high (treble) frequencies sent from DN280’s Speaker Output.
6. Aux Input: Connect an audio device to this input using a standard 1/8” (3.5 mm) stereo/TRS
cable.
Note: The Aux Input and rear panel Channel Input cannot be used at the same time. The
Channel Input will be disabled when a device is plugged into the Aux Input.
7. Mic Gain: Turn this knob to control the volume level of the Mic/Line Input.
8. Mic/Line Input: Connect a microphone or line-level device to this input using a standard XLR or
1/4” (6.35 mm) TRS cable. Turn the Mic Gain knob to control the volume level of this input.
Note: This input includes a ducking feature, which automatically reduces the gain of the Aux
Input and Channel Input by 20 dB when the microphone is in use at the same time (such as
when paging). After 2.5 seconds without input from the microphone, the Aux Input and Channel
Input gain will return to their set levels.
4
5
6
7
8
3
Page 4
Rear Panel
3 4
1
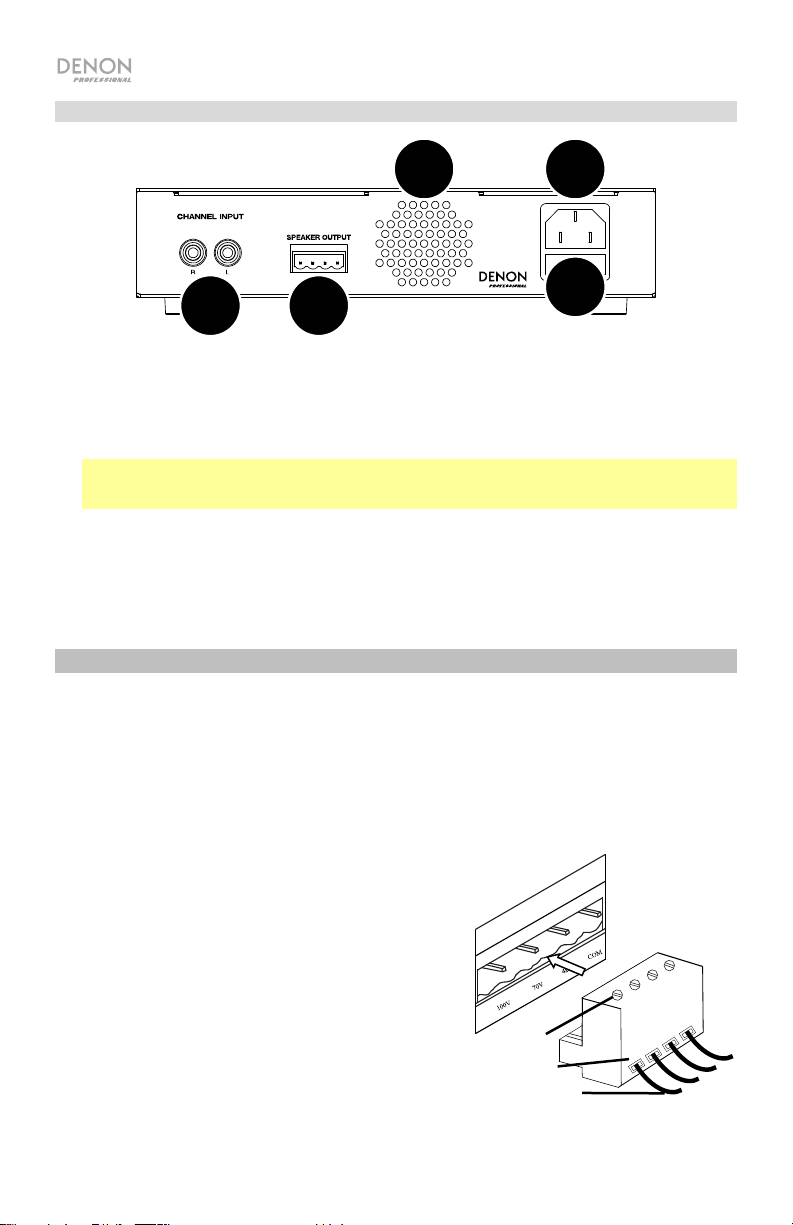
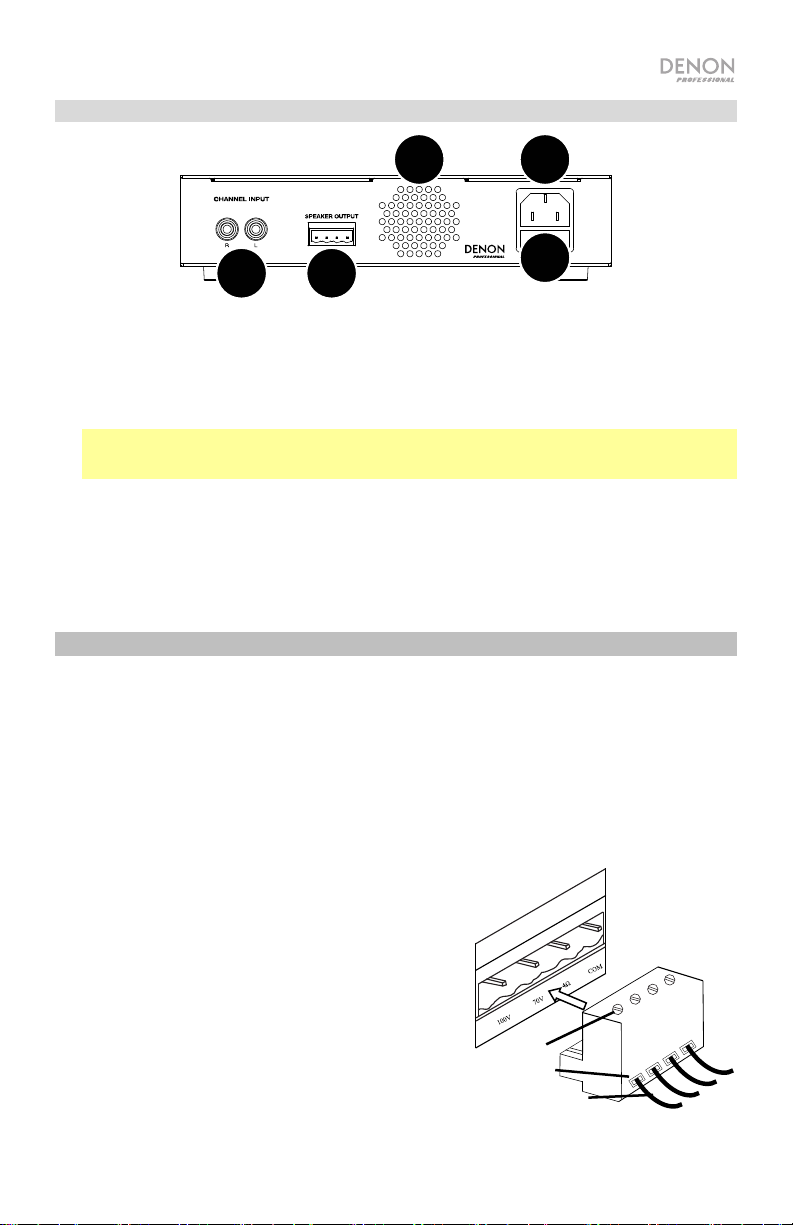
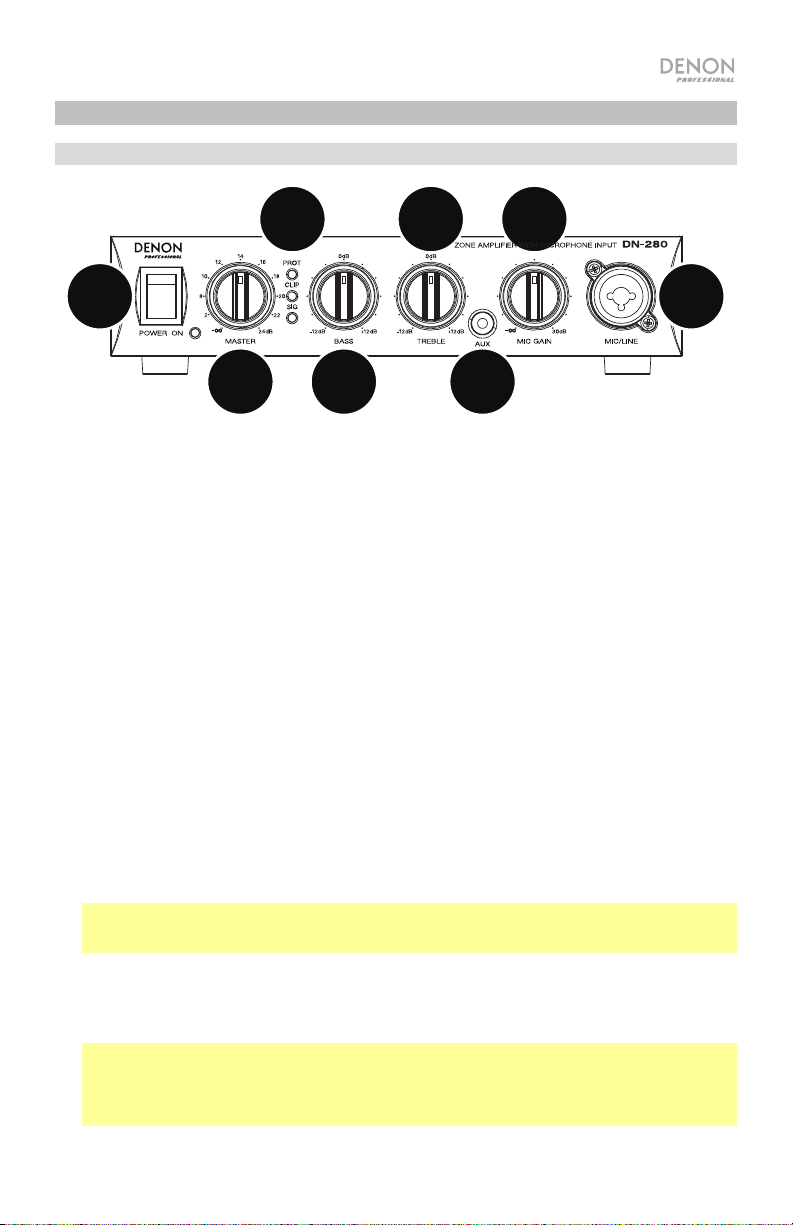
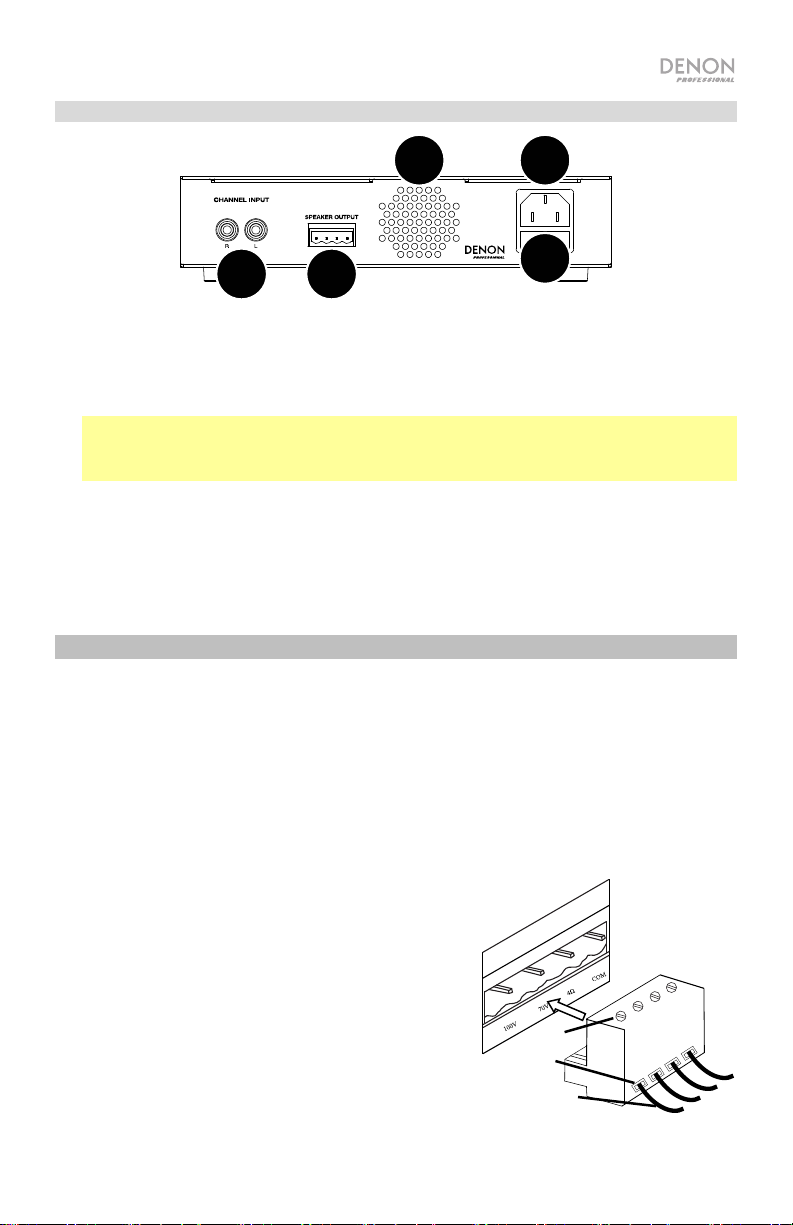
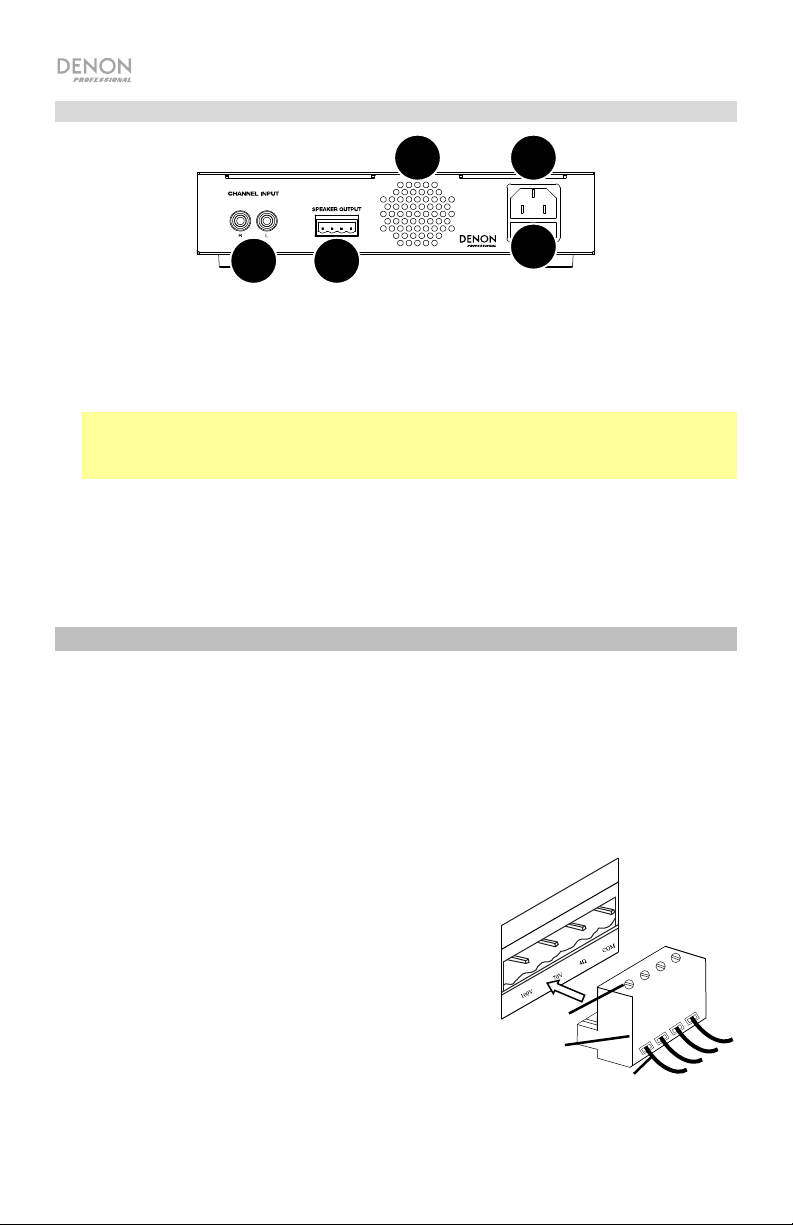
1. Channel Input (unbalanced RCA): Use an RCA cable to connect an external audio source to this
input. The left and right input signals will be summed to mono.
2. Speaker Output: This output sends the main/master signal from DN-280 to your external speaker.
Connect this output to your speaker using the included Euroblock connector and speaker wire (not
included). The power of the output is less than 60 W (without distortion). See Setup for more
information.
Important: Connect only one speaker type to the speaker output. Use only 70V/100V speakers designed
with step-down transformers with the 70V/100V outputs. Do not connect a low-impedance speaker (4Ω)
to the 70V/100V output terminals, as this may result in damage to your amplifier and/or speaker.
3. Vents: For proper performance, keep the vents clear from obstructions to allow air to flow.
4. Power Input: Use the included power cable to connect this input to a power outlet. Make sure DN280’s Power Switch is set to off when connecting or disconnecting the cable.
5. Fuse: If the unit’s fuse is broken, lift this tab to replace the fuse. Replace it with a fuse that has an
appropriate rating (following the specifications located on the rear panel of DN-280). Using a fuse with an
incorrect rating can damage the unit and/or fuse.
Setup
Getting Started:
1. Connect an audio source to the Channel Input, Aux Input, or Mic/Line Input.
2. Connect your speaker to the Speaker Output using the included Euroblock connector and speaker wire (not included). See Using the Euroblock Connector below for more details.
3. Make sure that the Master knob is all the way down.
4. Connect the power cable from the Power Input to a power outlet. Then power on DN-280.
5. Adjust the Master knob to get a strong signal without distortion.
6. Adjust the Treble and Bass knobs to further control the frequencies of the sound.
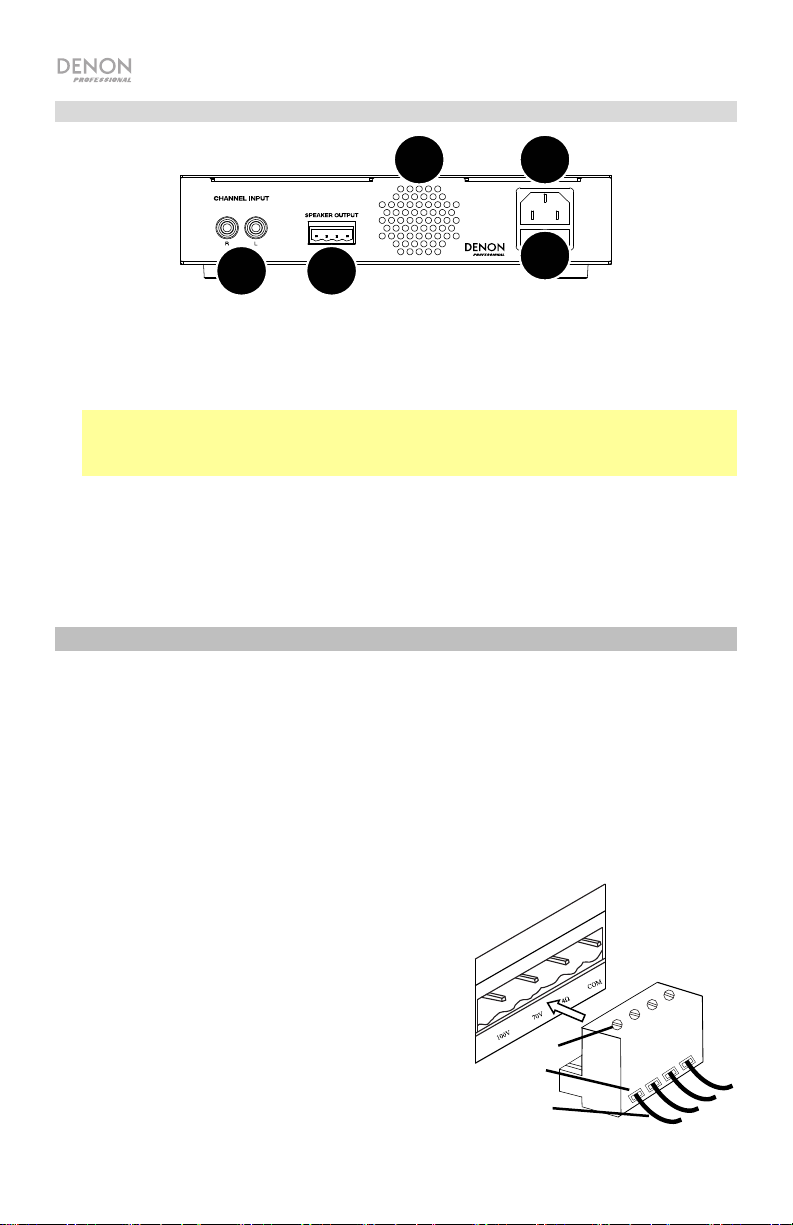
Using the Euroblock Connector:
1. Use a small screwdriver to loosen the screws corresponding
2. Twist the speaker wire to form a tight strand and insert this
3. Tighten the screws corresponding to the insert ports on the
4. Insert the Euroblock connector into the Speaker Output
If you would like to disconnect a wire, first make sure you
loosen the corresponding screw on the Euroblock connector
before you pull out the wire.
to the insert ports on the Euroblock connector.
into the appropriate insert port (as indicated below the
Speaker Output on DN-280). Push the wire until it is
secured inside. Repeat this step for each port.
Euroblock connector.
on DN-280.
2
Speaker Output
Euroblock
Connector
Screws
Insert Ports
Speaker Wire
5
4
Page 5
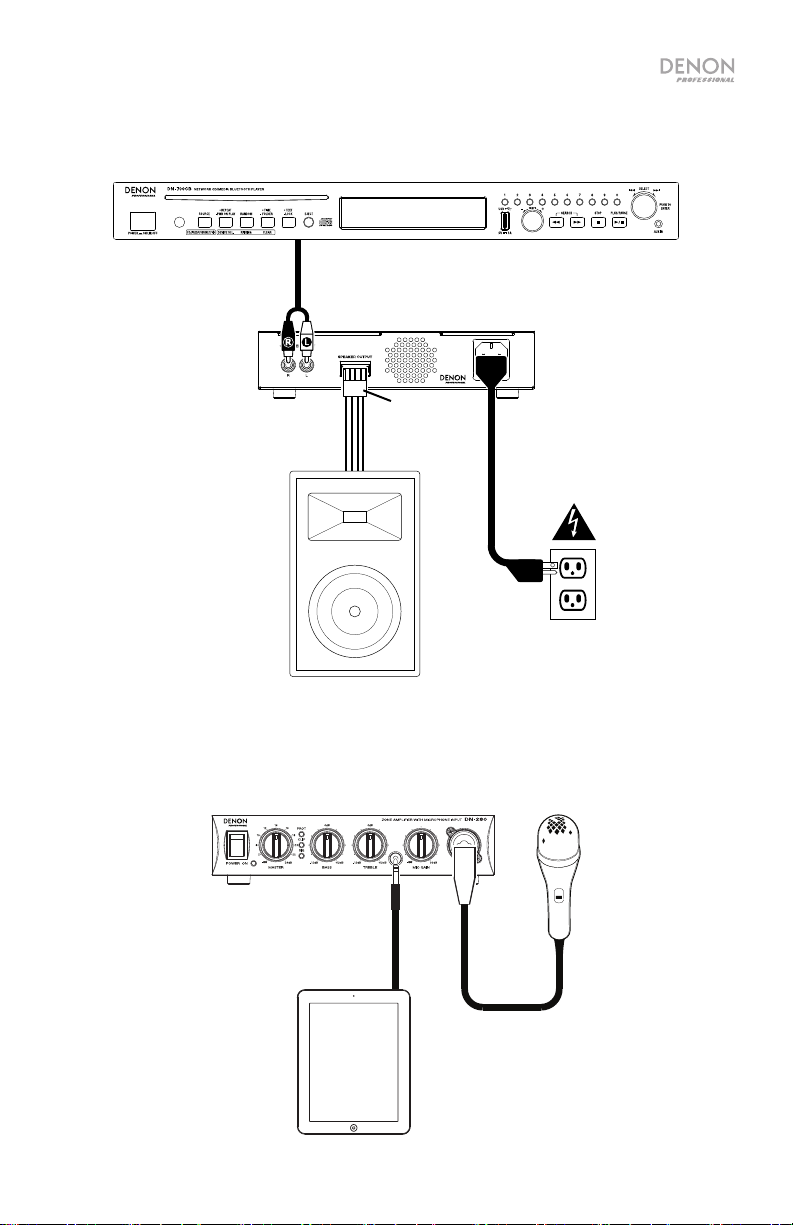
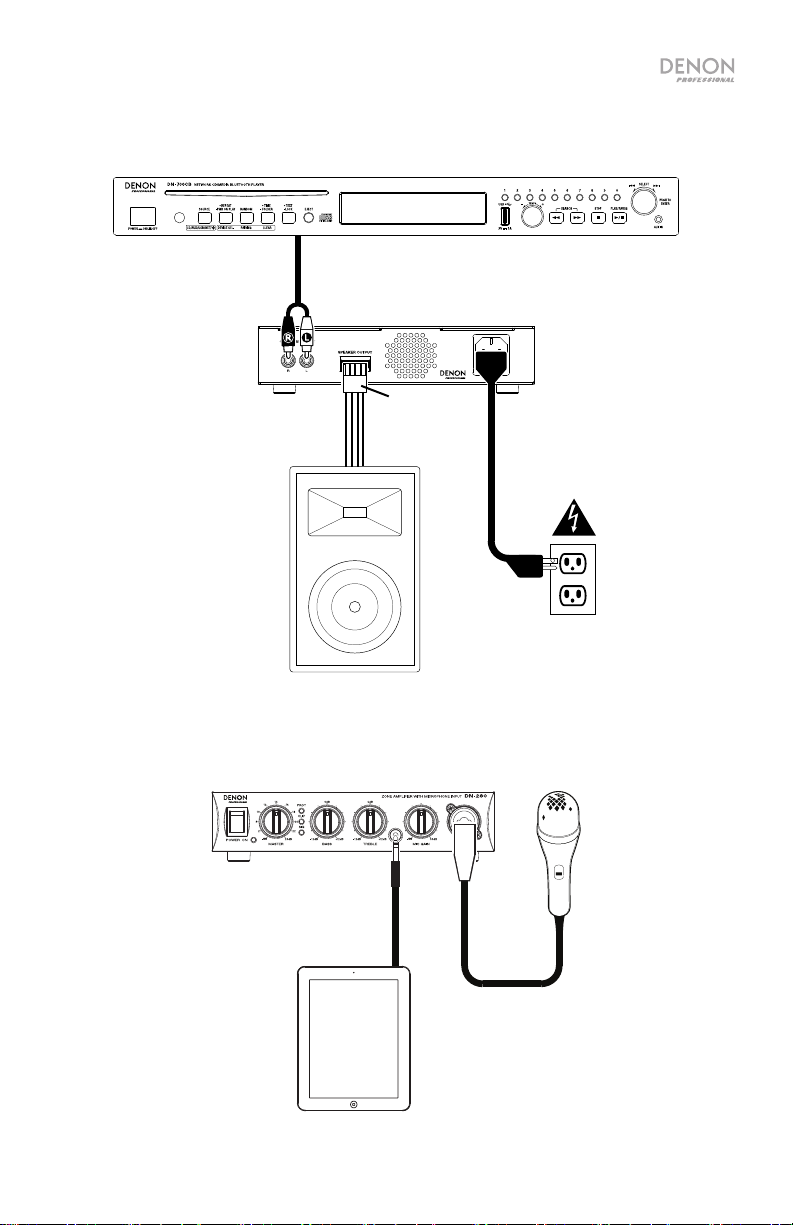
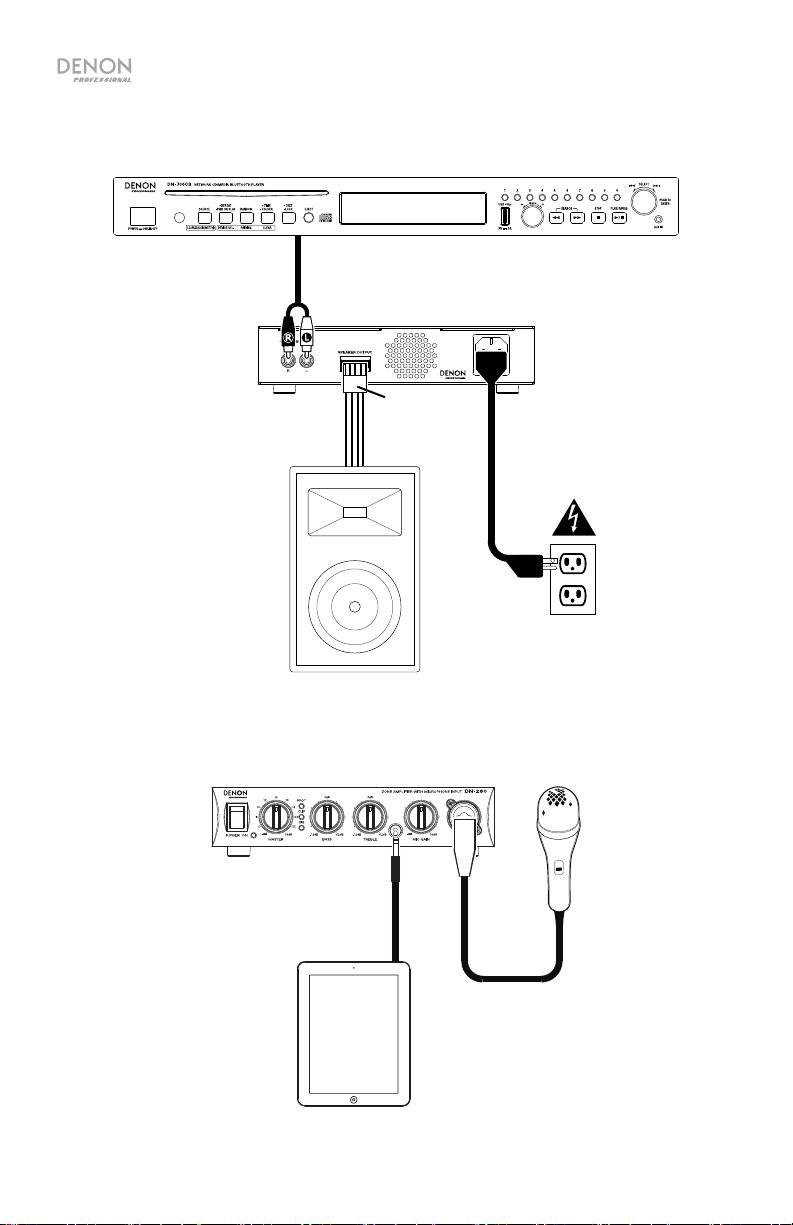
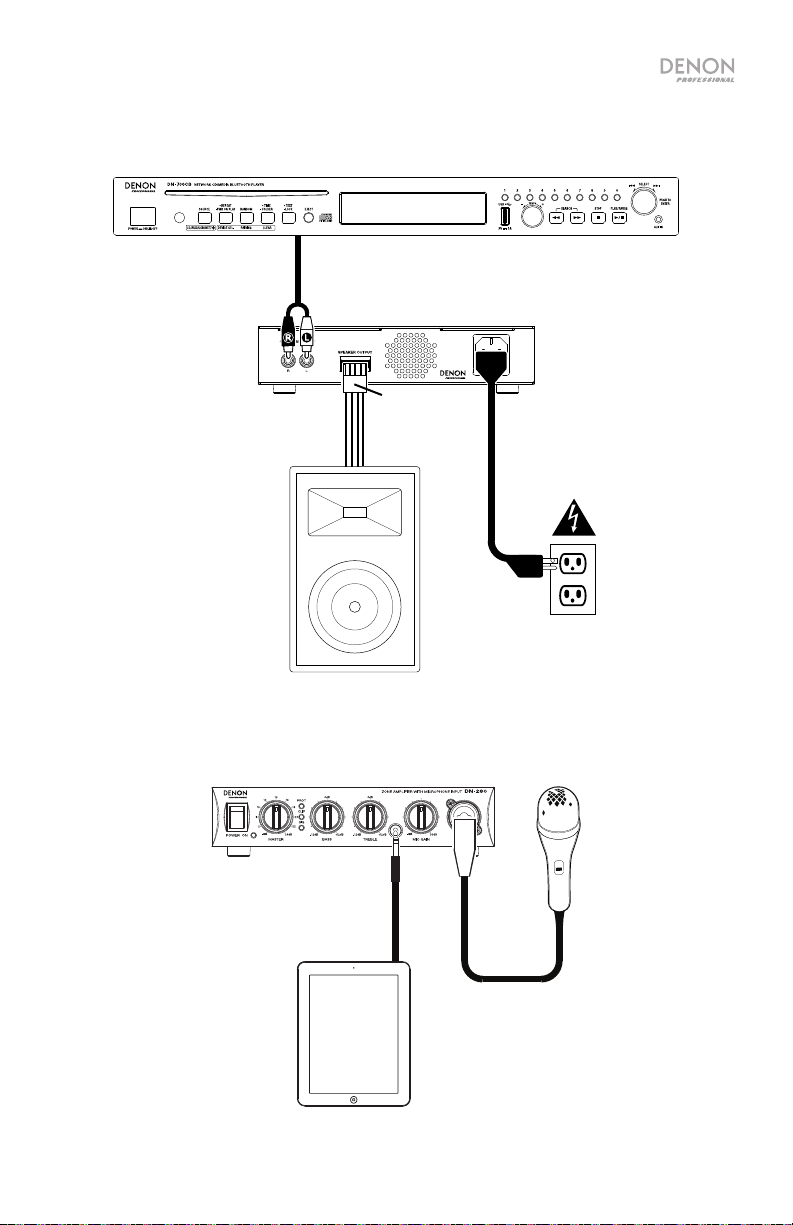
Rear Panel Connection Diagram
Items not listed under Introduction > Box Contents are sold separately.
Audio Source
DN-280 Rear Panel
Included
Euroblock
Connector
Speaker
Power Outlet
Front Panel Connection Diagram
Items not listed under Introduction > Box Contents are sold separately.
DN-280
Front Panel
(tablet, smartphone, etc.)
Auxiliary Device
Microphone
5
Page 6
Troubleshooting
If you encounter a problem, first try one or more of the following:
• Make sure all cables and other connected devices are properly and securely connected.
• Make sure you are using DN-280 as described in this user guide.
• Make sure your other devices are working properly.
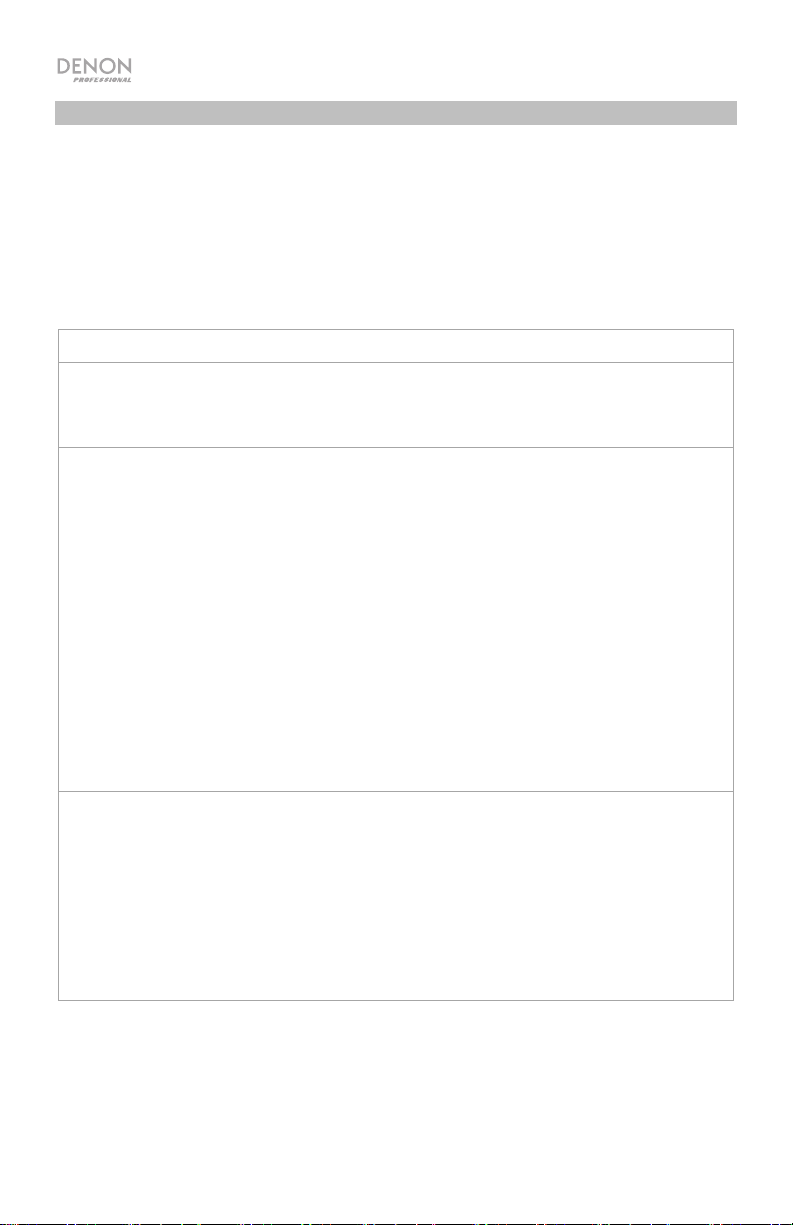
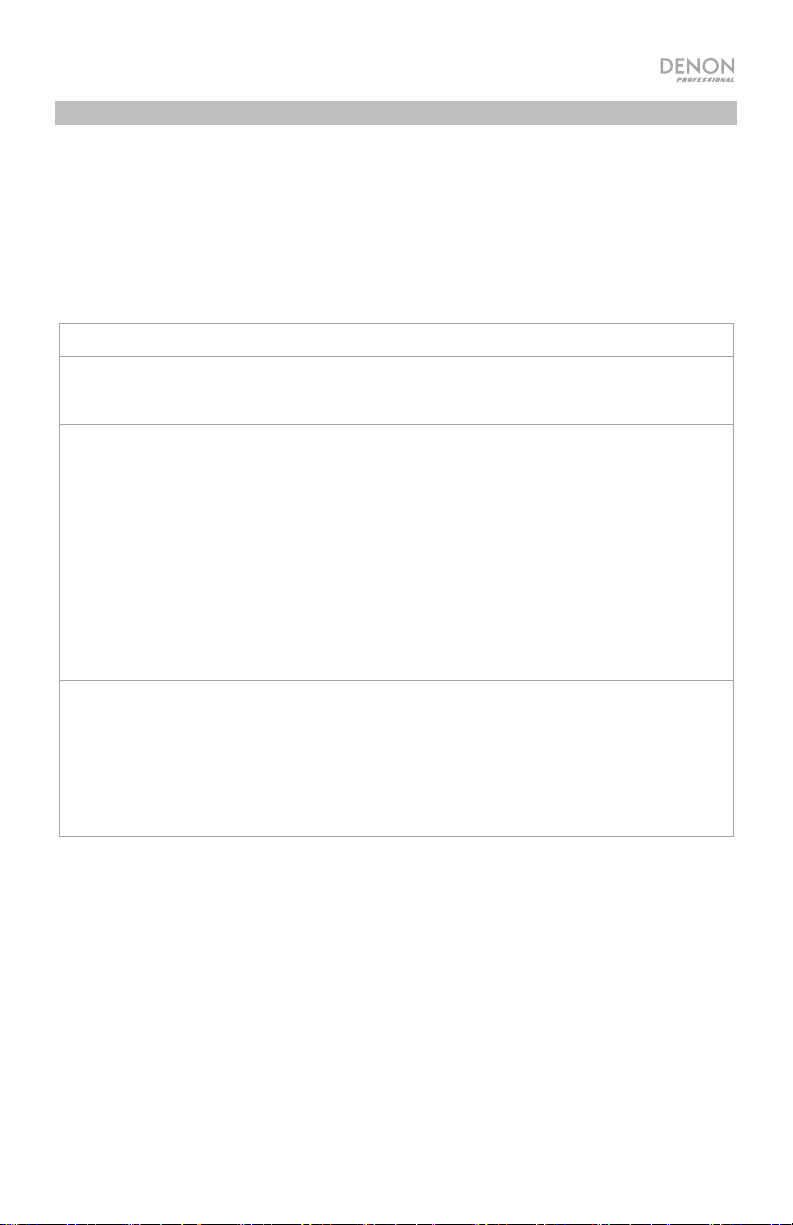
• If you believe DN-280 is not working properly, check the following table for your problem and
solution.
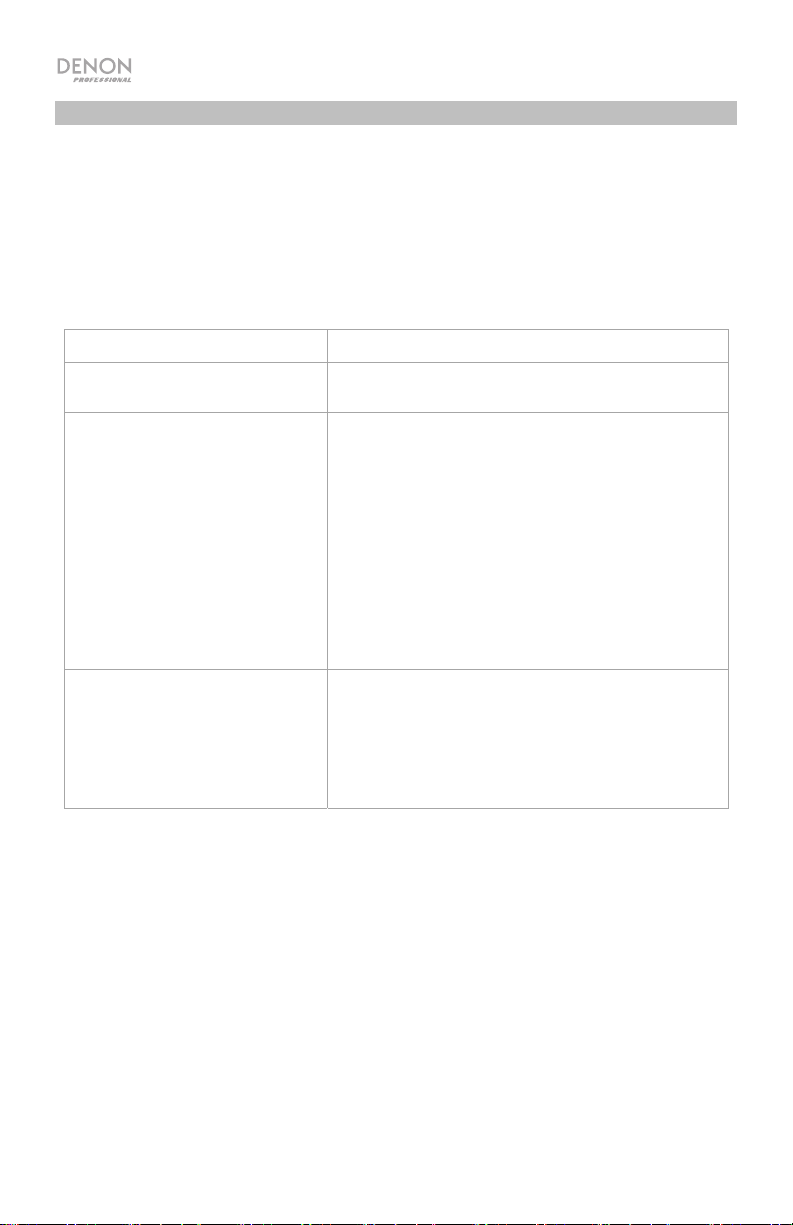
Problem: Solution:
Power does not turn on.
DN-280 does not produce any
sound, or the sound is distorted.
The sound has a hum or noise. Check the polarity of the input connections.
Make sure DN-280’s Power Input is properly connected
to a power outlet using the included power cable.
Make sure all cable and device connections are secure
and correct.
Make sure none of the cables are damaged.
Make sure the volume settings on your loudspeaker,
mixer, etc. are correct.
If you are trying to produce sound through the Channel
Input, make sure that no device is plugged into the Aux
Input.
If the Protection (PROT) LED is on, reduce DN-280’s
temperature by making sure there is good ventilation,
and/or decreasing the volume.
If an unbalanced connection is used, ensure the terminal
(-) is linked to GND.
If the clip LED is lit, reduce the volume.
Check the polarity of the speaker connections.
6
Page 7

Guía del usuario (Español)
Introducción
Gracias por comprar el DN-280. En Denon Professional, el rendimiento y la confiabilidad significan
tanto para nosotros como para usted. Por eso es que diseñamos nuestros equipos con una sola
cosa en mente—hacer que pueda tocar su mejor interpretación.
Contenido de la caja
DN-280
Cable de corriente IEC
“Orejas” y tornillos para racks
Patas de goma
Conector Euroblock
Guía del usuario
Manual sobre la seguridad y garantía
Soporte
Para obtener la información más reciente acerca de este producto (documentación, especificaciones
técnicas, requisitos de sistema, información de compatibilidad, etc.) y registrarlo, visite
denonpro.com.
Para obtener soporte adicional del producto, visite denonpro.com/support.
7
Page 8
Características
Panel frontal
3
1
2
1. Interruptor de encendido: Pulse este interruptor para encender o apagar el DN-280. El LED de
encendido se illuminará cuando el DN-280 esté encendido. Asegúrese de que la perilla de volumen
maestro esté completamente hacia abajo antes de encender.
2. Master (perilla de volumen maestro): Gire esta perilla para controlar el volumen del Speaker Output
(salida para un altavoz).
3. LED de señal/recorte/protección: Estas luces muestran el estado de la señal del Channel Input
(entrada del canal):
• LED de señal (SIG): El LED de señal se encenderá de color verde cuando la señal proveniente del
Channel Input (entrada del canal) se encuentren un nivel de volumen óptimo.
• LED de recorte (CLIP): Cuando el LED de recorte se enciende de color rojo, la señal de la
entrada del canal está llegando a su "pico" (más de 0 dB). Para evitar los "recortes" (distorsión)
que pueden darse como resultado de una señal de entrada con demasiado volumen, gire la perilla
Master (volumen maestro) en sentido antihorario o disminuya el volumen en el dispositivo es
encuentra conectado a la Channel Input (entrada del canal).
• LED de protección (PROT): Si el LED de protección se enciende de rojo significa que el DN-280
se encuentra en modo de protección y no emitirá sonido. Para restaurar la salida de sonido,
reduzca la temperatura del DN-280 asegurándose de que haya una buena ventilación y/o
disminuyendo el volumen.
4. Bass (Graves del altavoz): Gire esta perilla para controlar el nivel de las frecuencias bajas (graves)
enviados desde el Speaker Output (salida para un altavoz).
5. Treble (Agudos del altavoz): Gire esta perilla para controlar el nivel de las frecuencias altas (agudos)
enviados desde el Speaker Output (salida para un altavoz).
6. Aux (entrada auxiliar): Conecte un dispositivo de audio a esta entrada utilizando un cable estéreo/TRS
estándar de 3,5 mm (1/8 pulg.).
Nota: La entrada auxiliar y el Channel Input (entrada del canal) del panel trasero no se pueden usar
al mismo tiempo. El Channel Input (entrada del canal) se desactivará cuando se conecte un
dispositivo a la entrada auxiliar.
7. Mic Gain (Nivel de entrada para micrófono/dispositivo de nivel de línea): Gire esta perilla para
controlar el nivel de volumen de la entrada para micrófono/ dispositivo de nivel de línea.
8. Mic/Line (Entrada para micrófono/dispositivo de nivel de línea): Conecte un micrófono o dispositivo
de nivel de línea a esta entrada mediante cables XLR o TRS de 6,35 mm (1/4 pulg.). Gire la perilla Mic
Gain ubicada en el panel frontal para controlar su nivel de volumen.
Nota: Esta entrada incluye una característica de atenuación automática, la cual reduce
automáticamente la ganancia de la entrada auxiliar y la entrada de canal en 20 dB cuando se utiliza
el micrófono al mismo tiempo (como, por ejemplo, al realizar anuncios). Tras 2,5 segundos sin recibirse
ninguna entrada proveniente del micrófono, la ganancia de la entrada auxiliar y la entrada de canal
regresarán a sus niveles establecidos.
8
4
5
6
7
8
Page 9
Panel trasero
3 4
1
1. Channel Input (entrada del canal, RCA no balanceada): Utilice un cable RCA para conectar a esta
entrada una fuente externa de audio. Las señales de entrada izquierda y derecha se sumarán al
monoaural.
2. Speaker Output (salida para un altavoz): Esta salida envia la señal maestra de DN-280 a su altavoz
externo. Conecte esta salida a su altavoce utilizando un cable para altavoces (no incluido) y el conector
Euroblock incluido. La potencia de la salida es de menos de 60 W (sin distorsión). Consulte Instalación
para obtener más información.
Nota: Conecte solo un tipo de altavoz a la salida de amplificador. Utilice solamente altavoces de 70V/
100V diseñados con transformadores reductores con las salidas de 70V/100V. Si utiliza altavoces de baja
impedancia 4 en salidas de 70V/100V este amplificador se podría sobrecargar y posiblemente dañar.
3. Ventilaciones de aire: Para un buen funcionamiento, mantenga las ventilaciones libres de
obstrucciones para permitir que el aire fluya.
4. Entrada de corriente: Utilice el cable de corriente incluido para conectar esta entrada a una toma de
corriente. Asegúrese de que el interruptor power del DN-280 esté en la posición apagado cuando
conecte o desconecte el cable.
5. Fusible: Si el fusible de la unidad está roto, levante esta lengüeta para reemplazar el fusible. Reemplácelo
por un fusible con especificación apropiada (siguiendo las especificaciones ubicadas en el panel trasero
de DN-280). Si utiliza un fusible de especificación incorrecta, puede dañarse la unidad y/o el fusible.
2
5
Instalación
Para comenzar:
1. Conecte una fuente de audio al Entrada del canal, Entrada auxiliar o Entrada para micrófono/
dispositivo de nivel de línea.
2. Conecte su altavoce al Speaker Output (salida para un altavoz) utilizando un cable para altavoces (no incluido) y el conector Euroblock incluido. La potencia de la salida es de menos de 60 W (sin distorsión). Consulte Uso del conector Euroblock a continuación para obtener más información.
3. Asegúrese de que la perilla Master (volumen maestro) esté completamente hacia abajo.
4. Conecte el cable de corriente incluido desde la entrada de corriente a la toma de corriente. Luego
encienda el DN-280.
5. Ajuste la perilla Master (volumen maestro) para obtener una señal fuerte sin distorsiones.
6. Ajuste las perillas Treble (agudos) y Bass (graves) para controlar aún más las frecuencias del sonido.
Uso del conector Euroblock:
1. Utilice un destornillador pequeño para aflojar los tornillos
correspondientes a los puertos de inserción en el conector
Euroblock.
2. Retuerza el cable del altavoz para que quede ajustado e
insértelo en el puerto de inserción apropiado (como se
indica debajo del Speaker Output (salida para un
altavoz) del DN-280). Tire del cable hasta que quede
sujetado en el interior. Repita este paso para cada puerto.
3. Apriete los tornillos correspondientes a los puertos de
inserción en el conector Euroblock.
4. Inserte el conector Euroblock en el Speaker Output
(salida para un altavoz) del DN-280.
Si desea desconectar un cable, primero asegúrese de aflojar
el correspondiente tornillo en el conector Euroblock antes del tirar del cable hacia fuera.
Tornillos
Puertos de
inserción
Cable del altavoz
Salida para
un altavoz
Conector
Euroblock
9
Page 10
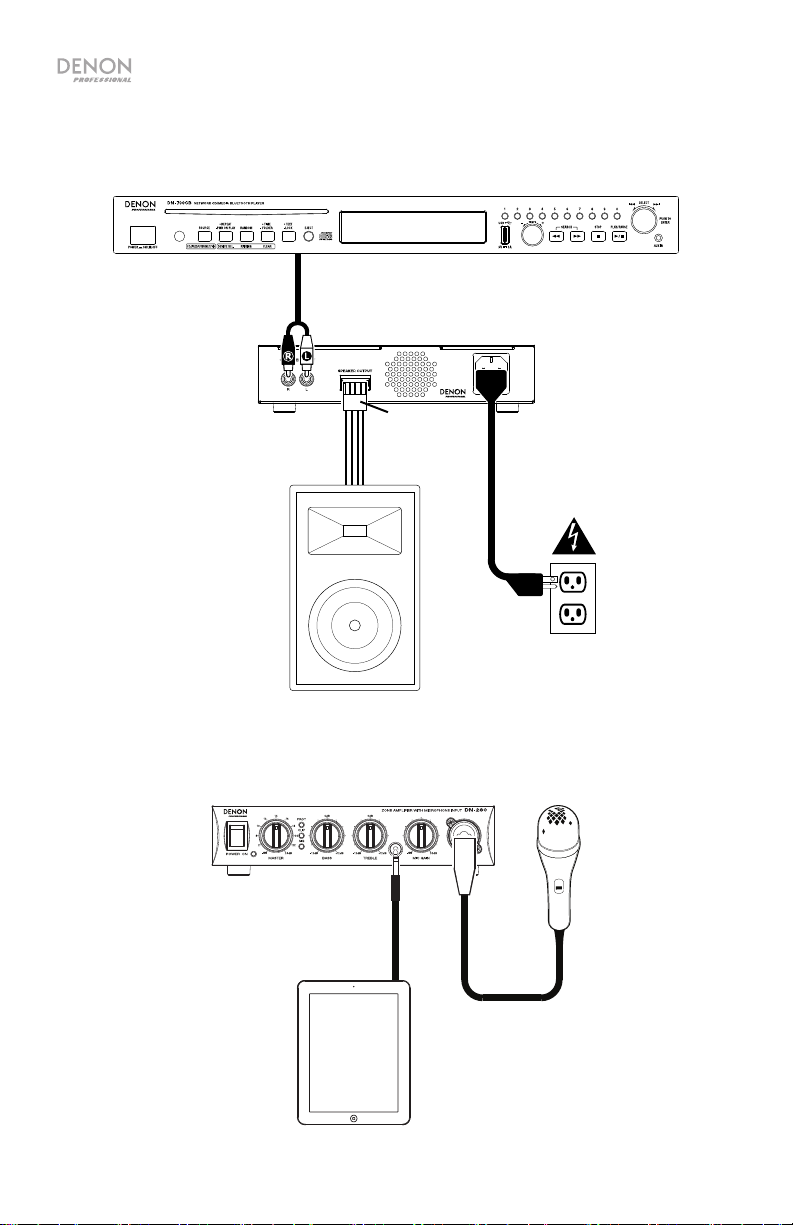
Diagrama de conexión (Panel trasero)
Los elementos que no se enumeran en Introducción > Contenido de la caja se venden por separado.
Fuente de audio
Panel trasero de DN-280
Conector
Euroblock
incluido
Altavoce
Toma de corriente
Diagrama de conexión (Panel frontal)
Los elementos que no se enumeran en Introducción > Contenido de la caja se venden por separado.
Panel frontal
de DN-280
Dispositivo auxiliar
(tableta, teléfono inteligente, etc.)
10
Micrófono
Page 11
V
Solución de problemas
Si experimenta problemas, realice lo siguiente:
• Asegúrese de que todos los cables y los otros dispositivos estén conectados firme y
correctamente.
• Asegúrese de estar utilizando DN-280 como describe esta guía del usuario.
• Asegúrese de que todos sus otros dispositivos o medios funcionen correctamente.
• Si cree que DN-280 no está funcionando correctamente, busque su problema y solución en la
siguiente tabla.
Problema: Solución:
La unidad no se enciende.
El DN-280 no emite ningún sonido o el sonido
está distorsionado.
El sonido tiene un zumbido o ruido.
Asegúrese de que la entrada de corriente del
DN-280 esté conectada correctamente a una
toma de corriente utilizando el cable de
corriente incluido.
Asegúrese de que todas las conexiones de
cables y dispositivos estén firmes y correctas.
Asegúrese de que ninguno de los cables esté
dañado.
Asegúrese de que los ajustes de volumen en
su altavoz, mezclador, etc. sean correctos.
Si está intentando reproducir sonido a través
del Channel Input (entrada del canal),
asegúrese de que no haya ningún dispositivo
conectado a la entrada auxiliar.
Si se enciende el LED de protección (PROT),
reduzca la temperatura del DN-280
asegurándose de que haya una buena
ventilación y/o disminuyendo el volumen.
erifique la polaridad de las conexiones de
entrada.
Si se está utilizando una conexión no
balanceada, asegúrese de que el terminal (-)
esté conectado a GND.
Si el LED de recorte está encendido, disminuya
el volumen de salida.
Verifique la polaridad de las conexiones del
altavoz.
11
Page 12

Guide d’utilisation (Français)
Introduction
Merci d’avoir fait l’acquisition du DN-280. Chez Denon Professional, la performance et la fiabilité
sont aussi importantes pour nous qu’ils le sont pour vous. C’est pourquoi nous concevons nos
produits avec une seule chose en tête — faire de votre performance la meilleure qui soit.
Contenu de la boîte
DN-280
Câble d’alimentation CEI
Équerres et vis de montage en rack
Pieds en caoutchouc
Connecteur Euroblock
Guide d’utilisation
Consignes de sécurité et informations concernant la garantie
Assistance
Pour les toutes dernières informations concernant la documentation, les spécifications techniques, la
configuration requise, la compatibilité et l’enregistrement du produit, veuillez visiter denonpro.com.
Pour de l’assistance supplémentaire, veuillez visiter le site denonpro.com/support.
12
Page 13
Caractéristiques
Panneau avant
3
1
2
1. Interrupteur d'alimentation : Cette interrupteur permet de mettre le DN-280 sous et hors tension. Le
témoin d'alimentation DEL s’allume lorsque le DN-280 est sous tension. Veillez à ce que le bouton
Master soit au minimum avant de mettre l’appareil sous tension.
2. Master : Ce bouton permet d’ajuster le volume du signal audio transmis au Speaker Output (sortie
enceinte).
3. DEL du signal/d’écrêtage/de protection : Ces voyants indiquent l'état du signal de Channel Input
(entrée du canal) :
• DEL du signal (SIG) : La DEL du signal devient verte lorsque le signal de Channel Input (entrée
du canal) est de niveau optimal.
• DEL d’écrêtage (CLIP) : La DEL d’écrêtage du signal de Channel Input (entrée du canal) devient
rouge lorsque le signal est déformé ou écrêté (plus de 0 dB). Pour éviter l’écrêtage (distorsion) pouvant
résulter d'un signal d'entrée fort, tournez le bouton Master dans le sens antihoraire ou diminuez le
volume de l'appareil branché à le Channel Input (entrée du canal).
• DEL de protection (PROT) : Lorsque la DEL de protection devient rouge, le DN-280 passe en mode
de protection contre la surchauffe et arrête de produire un signal. Pour rétablir le signal, vous devez
réduire la température du DN-280 en vous assurant qu'il y a une bonne ventilation et/ou diminuez le
volume.
4. Bass : Ce bouton permet d'ajuster le niveau des basses fréquences transmis par le Speaker Output
(sortie enceinte).
5. Treble : Ce bouton permet d'ajuster le niveau des hautes fréquences transmis par le Speaker Output
(sortie enceinte).
6. Entrée Aux : Cette entrée auxiliaire permet de relier un appareil audio en utilisant un câble 3,5 mm
stéréo/TRS.
Remarque : L’entrée aux et le Channel Input (entrée du canal) arrière ne peuvent être utilisées en
même temps. Le Channel Input (entrée du canal) est désactivé lorsqu'un appareil est branché à
l'entrée aux.
7. Mic Gain : Ce bouton permet d'ajuster le volume de l’entrée microphone/appareil à niveau ligne.
8. Mic/Line (entrée microphone/appareil à niveau ligne) : Cette entrée permet de brancher un
microphone ou un appareil à niveau ligne en utilisant un câble XLR standard ou TRS 6,35 mm. Le
niveau du signal de cette entrée est commandé par le bouton Mic Gain.
Remarque : Cette entrée comprend une fonction de réduction, qui réduit automatiquement le gain de
l’entrée auxiliaire et de l’entrée du canal de 20 dB lorsque le microphone est utilisé simultanément
(p. ex., lors d’une communication). Lorsque l’appareil ne détecte aucun signal entrant du microphone
pendant 2,5 secondes, le gain de l’entrée auxiliaire et de l’entrée du canal est rétabli aux niveaux
définis.
4
5
6
7
8
13
Page 14
V
Panneau arrière
3 4
1
1. Channel Input (entrée du canal, RCA asymétrique) : Utilisez un cable RCA pour relier cette entrée à
une source audio externe. Les signaux d'entrée gauche et droit seront combinés en mono.
2. Speaker Output (sortie enceinte) : Cette sortie transmet le signal général du DN-280 vers une
enceinte externe. Utilisez le connecteur Euroblock inclus et câble pour enceinte (non inclus) pour
raccorder cette sortie à votre enceinte. La puissance de la sortie est moins de 60 W (sans distorsion).
Veuillez consulter la section Démarrage pour de plus amples informations.
Remarque : Connectez un seul type d'enceinte à chaque sortie d'amplificateur. Utilisez uniquement
des enceintes de 70 V/100 V équipées de transformateurs abaisseurs avec les sorties 70 V/100 V.
L'utilisation d’enceintes à basse impédance (4Ω) sur des sorties de 70 V/100 V pourrait surcharger et
éventuellement endommager cet amplificateur.
3. Air ducts : Afin d’assurer le bon fonctionnement de l’appareil, veillez à ne pas bloquer cette sortie d’air.
4. Entrée d'alimentation : Utilisez le câble d'alimentation fourni pour brancher cette entrée à une prise
secteur. Veuillez vous assurer que DN-280 soit hors tension lorsque vous branchez/débranchez le câble
d’alimentation.
5. Fusible : Si le fusible de l'appareil est endommagé, soulevez cette languette afin de remplacer le
fusible. Remplacez-le par un fusible de calibre approprié (en suivant les spécifications techniques situés
sur le panneau arrière de DN-280). L'utilisation d'un fusible de calibre inapproprié pourrait endommager
l'appareil et/ou le fusible.
Démarrage
Mise en route :
1. Branchez une source audio a l’entrée du canal, entrée aux, ou entrée microphone/appareil à niveau
ligne.
2. Utilisez le connecteur Euroblock inclus et câble pour enceinte (non inclus) pour raccorder le Speaker
Output (sortie enceinte) à votre enceinte. Veuillez consulter Utilisation du connecteur Euroblock ci-
dessous pour de plus amples informations.
3. Veillez à ce que le bouton Master soit au minimum.
4. Utilisez le câble d'alimentation fourni pour brancher l’entrée d’alimentation à une prise secteur. Puis
mettez le DN-280 sous tension.
5. Réglez le bouton Master afin d’obtenir un signal fort sans distorsion.
6. Réglez les boutons Treble et Bass afin de contrôler les fréquences du signal avec plus de précision.
Utilisation du connecteur Euroblock :
1. Utilisez un petit tournevis pour desserrer les vis
correspondant aux ports d'insertion du connecteur
Euroblock.
2. Torsadez le fil de l’enceinte pour former un brin serré et
insérez-le dans le port approprié (comme indiqué dessous
la Speaker Output (sortie enceinte) du DN-280), en
poussant le fil jusqu'à ce qu’il soit bien fixé à l’intérieur.
Répétez cette étape pour chacun des ports.
3. Resserrez les vis correspondant aux ports d'insertion du
connecteur Euroblock.
4. Insérez le connecteur Euroblock dans la Speaker Output
(sortie enceinte) du DN-280.
Si vous souhaitez déconnecter un fil, desserrez la vis
correspondante du connecteur Euroblock avant de retirer le fil.
14
2
5
Sortie enceinte
Connecteur
Euroblock
is
Ports
d’insertion
Fil de
l’enceinte
Page 15
(
Schéma de connexion (Panneau arrière)
Les éléments qui ne figurent pas dans Introduction > Contenu de la boîte sont vendus séparément.
Source audio
Panneau arrière de DN-280
Connecteur
Euroblock
Inclus
Enceinte
Prise secteur
Schéma de connexion (Panneau avant)
Les éléments qui ne figurent pas dans Introduction > Contenu de la boîte sont vendus séparément.
Panneau avant
de DN-280
Périphérique auxiliaire
tablette, smartphone, etc.)
Microphone
15
Page 16
V
V
Guide de dépannage
En cas de problème, procédez comme suit :
• Assurez-vous que tous les câbles et les autres périphériques sont correctement raccordés.
• Assurez-vous que vous utilisez DN-280 comme indiqué dans ce guide d’utilisation.
• Assurez-vous que vos autres appareils ou médias fonctionnent correctement.
• Si vous croyez que DN-280 ne fonctionne pas correctement, vérifiez le tableau suivant afin de
trouver le problème et la solution.
Problème : Solution :
L’appareil ne s’allume pas.
Le DN-280 ne produit aucun son, ou le son est
déformé.
Il y a un ronflement ou des bruits parasites dans le
signal.
euillez vous assurer que le câble
d’alimentation du DN-280 est
correctement branché à l’entrée
d’alimentation et à la prise secteur.
Assurez-vous que tous les câbles et
appareils soient correctement raccordés.
Assurez-vous que les câbles ne soient
pas endommagés.
Assurez-vous que les paramètres de
volume de votre enceinte, console de
mixage, etc. soient correctement réglés.
Si vous souhaitez transmettre un signal
par le Channel Input (entrée du canal),
veillez à ce qu’aucun appareil ne soit
branché à l'entrée aux.
Lorsque la DEL de protection (PROT)
est allumée, vous devez réduire la
température du DN-280 en vous assurant
qu'il y a une bonne ventilation et/ou
diminuez le volume.
érifiez la polarité des connexions
d’entrée.
Si une connexion asymétrique est utilisée,
veillez à ce que la borne (-) soit reliée à la
mise à la terre (GND).
Si la DEL d’écrêtage est allumée,
réduisez le volume de sortie.
Vérifiez la polarité des connexions
d’enceintes.
16
Page 17

Guida per l’uso (Italiano)
Introduzione
Grazie per aver acquistato il DN-280. Per noi di Denon Professional, prestazioni e affidabilità contano
moltissimo, proprio come per te. Ecco perché progettiamo i nostri dispositivi con un unico obiettivo
in mente: rendere le tue prestazioni le migliori possibili.
Contenuti della confezione
DN-280
Cavo di alimentazione IEC
Attacchi e viti per il rack
Piedini in gomma
Connettore Euroblock
Guida per l’uso
Istruzioni di sicurezza e garanzia
Assistenza
Per le ultime informazioni in merito a questo prodotto (documentazione, specifiche tecniche, requisiti
di sistema, informazioni sulla compatibilità, ecc.) e per effettuarne la registrazione, recarsi alla pagina
denonpro.com.
Per ulteriore assistenza sul prodotto, recarsi alla pagina denonpro.com/support.
17
Page 18
Caratteristiche
Pannello anteriore
3
1
2
1. Interruttore di alimentazione: premere questo interruttore per accendere o spegnere il DN-280. Il LED
di alimentazione si illumina quando il DN-280 viene acceso. Assicurarsi che la manopola Master sia
completamente girata prima di accendere l’apparecchio.
2. Master: girare questa manopola per controllare il volume del segnale audio inviato al Speaker Output
(uscita Altoparlante).
3. LED segnale/clip/protezione: queste spie mostrano lo stato del segnale dell’ingresso Canale:
• LED segnale (SIG): il LED segnale sarà illuminato di verde quando il segnale proveniente dal
Channel Input (ingresso Canale) è a un livello di volume ottimale.
• LED clip (CLIP): quando il LED clip è illuminato di rosso, il segnale dal Channel Input (ingresso
Canale) ha un “picco” (superiore a 0 dB). Per impedire il “salto” (distorsione) che può derivare da
un segnale di ingresso forte, girare la manopola Master in senso antiorario o abbassare il volume a
livello del dispositivo collegato al Channel Input (ingresso Canale).
• LED di protezione (PROT): se il LED di protezione si illumina di rosso, il DN-280 si trova in
modalità di protezione contro il calore e non emette suoni. Per ripristinare l’uscita audio, ridurre la
temperatura del DN-280 assicurandosi che ci sia una buona ventilazione e/o abbassando il volume.
4. Bass (bassi dell'altoparlante): girare questa manopola per controllare il livello delle frequenze basse
(bassi) inviate dal Speaker Output (uscita altoparlante).
5. Treble (alti dell'altoparlante): girare questa manopola per controllare il livello delle frequenze alte
(treble) inviate dal Speaker Output (uscita altoparlante).
6. Ingresso Aux: collegare un dispositivo audio a questo ingresso servendosi di un cavo stereo/TRS
standard da 1/8” (3,5 mm).
Nota bene: l’ingresso Aux e il Channel Input (ingresso Canale) sul pannello posteriore non possono
essere utilizzati contemporaneamente. Quando un dispositivo viene collegato all’ingresso Aux, il
Channel Input (ingresso Canale) verrà disabilitato.
7. Mic Gain (guadagno del microfono): girare queste manopole per controllare il livello del volume
dell’ingressi del microfono/dispositivo a livello di linea.
8. Mic/Line (ingresso Microfono/Dispositivo a livello di linea): Collegare un microfono o un dispositivo
a livello di linea a questo ingresso servendosi un cavo XLR o TRS da 1/4" (6,35 mm) standard.
Nota bene: questo ingresso include una funzione di ducking (“abbassamento”) che riduce
automaticamente il guadagno dell’Ingresso Aux e dell’Ingresso Channel di 20 dB quando il microfono
è in uso contemporaneamente (ad esempio quando si fanno annunci). Dopo 2,5 secondi senza alcun
segnale dal microfono, il guadagno dell’Ingresso Aux e quello dell’Ingresso Channel torneranno ai livelli
predefiniti.
18
4
5
7
8
6
Page 19
V
Pannello posteriore
3 4
1
1. Channel Input (ingresso Canale, RCA non bilanciato): Servirsi un cavo RCA per collegare questo
ingresso ad una fonte audio esterna. I segnali di ingresso sinistro e destro verranno sommati a mono.
2. Speaker Output (uscita Altoparlante): Questa uscita invia il segnale principale da parte di DN-280 ad
il vostra altoparlante. Collegare questa uscita per l’altoparlante servendosi del connettore Euroblock in
dotazione e un cavo per altoparlanti (non in dotazione). La potenza di l’uscita è meno di 60 W (senza
distorsione). Per maggiori informazioni, si veda Configurazione.
Nota bene: Collegare solo un tipo di altoparlante a l'uscita dell'amplificatore. Servirsi unicamente di
altoparlanti da 70V/100V progettati con trasformatori abbassatori con l'uscita da 70V/100V. L’utilizzo di
altoparlanti a bassa impedenza da 4 su uscite da 70V/100V causerà un sovraccarico e potrà
danneggiare l’amplificatore.
3. Ventole di sfiato: Per un corretto funzionamento, non bloccare la ventola.
4. Ingresso di alimentazione: servirsi del cavo di alimentazione in dotazione per collegare questo
ingresso ad una presa di alimentazione. Assicurarsi che il DN-280 sia spento al momento di collegare e
scollegare il cavo.
5. Fusibile: se il fusibile dell'apparecchio è rotto, sollevare questa linguetta per sostituirlo. Sostituire il
fusibile con uno dalla tensione nominale adeguata (seguendo le specifiche tecniche situate su pannello
posteriore di DN-280). L'utilizzo di un fusibile dalla tensione nominale errata può danneggiare
l'apparecchio e/o il fusibile.
Configurazione
Primi passi:
1. Collegare una fonte audio al ingresso Canale, ingresso Aux o ingresso del Microfono/Dispositivo a
livello di linea.
2. Collegare l’altoparlante al Speaker Output (uscita Altoparlante) servendosi del connettore Euroblock
in dotazione e un cavo per altoparlanti (non in dotazione). Per maggiori informazioni, si veda
Utilizzando il connettore Euroblock sotto.
3. Assicurarsi che la manopola Master sia completamente girata.
4. Collegare il cavo di alimentazione in dotazione dall'ingresso di alimentazione a una presa di
alimentazione. Poi accendere il DN-280.
5. Regolare la manopola Master per ottenere un segnale forte senza distorsione.
6. Regolare le manopole Bass (bassi) e Treble (acuti) per controllare ulteriormente le frequenze del suono.
Utilizzando il connettore Euroblock:
1. Servirsi di un piccolo cacciavite per allentare le viti
corrispondenti alle porte di inserimento a livello del
connettore Euroblock.
2. Girare il cavo dell'altoparlante per formare un fascio stretto e
inserirlo nella porta adeguata (seguendo le indicazioni
situate al di sotto dal Speaker Output (uscita Altoparlante)
del DN-280). Spingere il cavo fino a inserirlo saldamente.
Ripetere questo passaggio per ogni porta.
3. Serrare le viti corrispondenti alle porte di inserimento a
livello del connettore Euroblock.
4. Inserire il connettore Euroblock a livello dal Speaker Output
(uscita Altoparlante) sul DN-280.
Se si desidera scollegare un cavo, assicurarsi innanzitutto di
allentare la vite corrispondente sul connettore Euroblock prima di estrarre il cavo stesso.
2
5
Uscita Altoparlante
Connettore
Euroblock
iti
Porte di
inserimento
Cavo
dell’altoparlante
19
Page 20
Schema dei collegamenti (Pannello posteriore)
Elementi non elencati sotto Introduzione > Contenuti della confezione sono venduti separatamente.
Fonte audio
Pannello posteriore di DN-280
Connettore
Euroblock
In dotazione
Altoparlante
Presa di alimentazione
Schema dei colleegamenti (Pannello anteriore)
Elementi non elencati sotto Introduzione > Contenuti della confezione sono venduti separatamente.
Pannello anteriore
20
di DN-280
Dispositivo ausiliario
(tablet, smartphone, etc.)
Microfono
Page 21
V
Risoluzione di problemi
In caso di problemi, procedere come segue:
• Assicurarsi che tutti i cavi e i dispositivi siano collegati in maniera corretta e ben salda.
• Assicurarsi di utilizzare DN-280 come descritto nel presente guida per l'uso.
• Assicurarsi che gli altri dispositivi o media funzionino correttamente.
• Se si ritiene che DN-280 non funzioni come si deve, verificare nella seguente tabella il problema
riscontrato e la relativa soluzione.
Problema: Soluzione:
Non si accende.
Il DN-280 non produce alcun suono o il
suono è distorto.
Il suono presenta ronzio o rumore.
Assicurarsi che l'ingresso di alimentazione del
DN-280 sia collegato a una presa di alimentazione
utilizzando le cavo in dotazione.
Assicurarsi che tutti i cavi e i collegamenti ai
dispositivi siano sicuri e corretti.
Assicurarsi che non vi siano cavi danneggiati.
Assicurarsi che le impostazioni degli altoparlanti,
mixer, ecc. siano corrette.
Se si sta cercando di produrre audio tramite il
Channel Input (ingresso Canale), assicurarsi che
non ci siano dispositivi collegati al ingresso Aux.
Se il LED di protezione (PROT) è acceso, ridurre
la temperatura del DN-280 assicurandosi che ci sia
una buona ventilazione e/o abbassando il volume.
erificare le polarità delle connessioni di ingresso.
Se viene utilizzata una connessione non bilanciata,
assicurarsi che il terminale (-) sia collegato a GND.
Se il LED clip è acceso, ridurre il volume di uscita.
Verificare le polarità delle connessioni
dell’altoparlante.
21
Page 22

Benutzerhandbuch (Deutsch)
Einführung
Vielen Dank für den Kauf des DN-280. Bei Denon Professional schätzen wir Leistung und
Zuverlässigkeit - genau wie Sie. Darum entwerfen wir unsere Geräte stets nur mit einem einzigen Ziel
vor Augen: Ihre Anwendung so gut wie möglich zu unterstützen.
Lieferumfang
DN-280
IEC-Netzkabel
Rackmontagewinkel & Schrauben
Gummifüße
Euroblock-Anschlüsse
Benutzerhandbuch
Sicherheitshinweise und Garantieinformationen
Kundendienst
Für die neuesten Informationen zu diesem Produkt (Dokumentation, technische Daten,
Systemanforderungen, Informationen zur Kompatibilität etc.) und zur Produktregistrierung besuchen
Sie denonpro.com.
Für zusätzlichen Produkt-Support besuchen Sie denonpro.com/support.
22
Page 23
Funktionen
Vorderseite
3
1
2
1. Netzschalter: Drücken Sie diesen Schalter, um DN-280 ein- oder auszuschalten. Die Power-LED
beginnt zu leuchten, wenn das DN-280 eingeschaltet wird. Vergewissern Sie sich vor dem Einschalten,
dass der Master-Regler ganz heruntergedreht ist.
2. Master: Drehen Sie diesen Regler, um die Lautstärke des Audiosignals anzupassen, das an den
Speaker Output (Lautsprecherausgang) gesendet wird.
3. Signal-/Clipping/Schutz-LEDs: Diese LEDs zeigen den Signalstatus des Channel Input
(Kanaleingangs) an:
• Signal-LED (SIG): Die Signal-LED leuchtet grün, wenn das vom Channel Input (Kanaleingang)
kommende Signal einen optimalen Lautstärkepegel hat.
• Clip-LED (CLIP): Wenn die Clip-LED des Eingangs rot leuchtet, clippt das Signal des Channel Input
(Kanaleingangs) (höher als 0 dB). Drehen Sie den Master-Regler gegen den Uhrzeigersinn, um ein
„Clipping“ (Verzerrung) zu vermeiden, das durch ein lautes Eingangssignal verursacht werden kann,
oder verringern Sie die Lautstärke des am Channel Input (Kanaleingang) angeschlossenen Geräts.
• Schutz-LED (PROT): Wenn die Schutz-LED rot leuchtet, befindet sich das DN-280 im
Hitzeschutzmodus und gibt keinen Ton aus. Um die Tonausgabe wiederherzustellen, reduzieren Sie
die Temperatur des DN-280, indem Sie für gute Belüftung sorgen und/oder die Lautstärke verringern.
4. Bass (Lautsprecherbass): Drehen Sie diesen Regler, um den Pegel der tiefen Frequenzen (Bass)
anzupassen, die das DN-280 an den Speaker Output (Lautsprecherausgang) sendet.
5. Treble (Lautsprecherhöhen): Drehen Sie diesen Regler, um den Pegel der hohen Frequenzen (Höhen)
anzupassen, die das DN-280 an den Speaker Output (Lautsprecherausgang) sendet.
6. Aux-Eingang: Schließen Sie ein Audiogerät mit einem standardmäßigen 1/8" (3,5 mm) Stereo-/TRSKabel an diesen Eingang an.
Hinweis: Der Aux-Eingang und der Channel Input (Kanaleingang) auf der Rückseite können nicht
gleichzeitig verwendet werden. Der Channel Input (Kanaleingang) wird deaktiviert, wenn ein Gerät an
den Aux-Eingang angeschlossen wird.
7. Mic Gain: Drehen Sie diesen Regler, um die Lautstärke des Mikrofons anzupassen, die an dem
Mikrofon/Line-Level-Gerät-Eingang angeschlossenen ist.
8. Mic/Line (Mikrofon/Line-Level-Gerät-Eingang): Verbinden Sie einen Mikrofon oder Line-Level-Gerät
mit diesem Eingang über einem standardmäßigen XLR- oder 1/4" (6,3 mm) Klinkenkabel an. Drehen Sie
den Mic In Pegelregler, um ihre Pegel anzupassen.
Hinweis: Dieser Eingang verfügt über eine Ducking-Funktion, die die Verstärkung des AUX-Eingangs
und des Kanaleingangs automatisch um 20 dB verringert, wenn das Mikrofon gleichzeitig verwendet
wird (z. B. beim Paging). Nach 2,5 Sekunden ohne Eingabe über das Mikrofon kehren der AUX-Eingang
und die Kanaleingangsverstärkung auf ihre festgelegten Pegel zurück.
4
5
6
7
8
23
Page 24
Rückseite
3 4
1
1. Channel Input (Kanaleingang, unsymmetrische Cinch): Verwenden Sie Cinch-Kabel, um eine externe
audioquelle mit disem Eingang zu verbinden. Die linken und rechten Eingangssignale werden zu Mono
summiert.
2. Speaker Output (Lautsprecherausgang): Dieser Ausgang sendet von DN-280 zu Ihrem Lautsprecher
das Hauptsignal. Verbinden Sie diesen Ausgang über dem Euroblock-Anschluss (im Lieferumfang
enthalten) und einem Lautsprecherkabel (separat erhältlich) mit Ihrem Lautsprecher. Die Leistung des
Ausgang ist weniger als 60 W (ohne Verzerrung). Siehe Setup für weitere Informationen.
Hinweis: Schließen Sie nur einen Lautsprechertyp an den Verstärkerausgang an. Verwenden Sie nur
70V/100V-Lautsprecher mit Abwärtstransformatoren mit die 70V/100V-Ausgängen. Die Verwendung
von 4Ω-Lautsprechern mit niedriger Impedanz an 70V/100V-Ausgängen kann diesen Verstärker
überlasten und möglicherweise beschädigen.
3. Öffnungen: Um eine einwandfreie Funktion zu gewährleisten, blockieren Sie den Öffnungen nicht.
4. Netzeingang: Verwenden Sie das mitgelieferte Netzkabel, um diesen Eingang mit einer Steckdose zu
verbinden. Sorgen Sie dafür, dass der Netzschalter des DN-280 beim Verbinden oder Trennen des
Kabels auf Aus steht.
5. Sicherung: Wenn die Sicherung des Geräts beschädigt ist, heben Sie diese Lasche an, um die Sicherung
zu ersetzen. Ersetzen Sie sie mit einer Sicherung, die einen geeigneten Sicherungswert besitzt (gemäß
den technische Spezifikationen auf der Rückseite von DN-280). Die Verwendung einer Sicherung mit
falschem Sicherungswert kann das Gerät und/oder Sicherung beschädigen.
Setup
Erste Schritte:
1. Verbinden Sie eine Audioquelle mit alle Mikrofone mit dem den Kanaleingang, Aux-Eingang, oder
Mikrofon/Line-Level-Gerät-Eingang.
2. Verbinden Sie den Speaker Output (Lautsprecherausgang) über dem Euroblock-Anschluss (im
Lieferumfang enthalten) und einem Lautsprecherkabel (separat erhältlich) mit Ihrem Lautsprecher. Siehe
Verwendung des Euroblock-Anschlusses für weitere Informationen.
3. Vergewissern Sie sich dass der Master-Regler ganz heruntergedreht ist.
4. Verbinden Sie das mitgelieferte Netzkabel mit dem Netzeingang und einer Steckdose; Schalten Sie das
DN-280 ein.
5. Passen Sie den Master-Regler an, um ein starkes Signal ohne Verzerrung zu erhalten.
6. Stellen Sie die Regler für Lautsprecherhöhen und Lautsprecherbass ein, um das Klangbild noch
weiter anzupassen.
Verwendung des Euroblock-Anschlusses:
1. Lösen Sie mit einem kleinen Schraubendreher die Schrauben,
die den Einstecköffnungen am Euroblock-Stecker entsprechen.
2. Verdrillen Sie die Lautsprecherdrähte, um eine feste Litze zu
bilden und führen Sie diese in den entsprechenden Einsatzport
ein (wie unter dem Speaker Output (Lautsprecherausgang) des
DN-280 angegeben). Schieben Sie den Draht nach innen, bis er
fest sitzt. Wiederholen Sie diesen Schritt für jeden Port.
3. Ziehen Sie die Schrauben an, die den Einstecköffnungen am
Euroblock-Stecker entsprechen.
4. Stecken Sie den Euroblock-Stecker in den Speaker Output
(Lautsprecherausgang) des DN-280.
Wenn Sie ein Kabel abziehen möchten, müssen Sie zuerst die
entsprechende Schraube am Euroblock-Stecker lösen, bevor Sie
das Kabel herausziehen.
24
2
5
LautsprecherAusgang
Euroblock-
Stecker
Schrauben
Einsteck-
öffnungen
Lautsprecherdrähte
Page 25
Anschlussdiagramm (Rückseite)
Teile, die nicht unter Einführung > Lieferumfang angegeben sind, sind separat erhältlich.
Audioquelle
Rückseite von DN-280
EuroblockAnschluss (im
Lieferumfang
enthalten)
Lautsprecher
Steckdose
Anschlussdiagramm (Vorderseite)
Teile, die nicht unter Einführung > Lieferumfang angegeben sind, sind separat erhältlich.
Vorderseite
von DN-280
Auxiliary Device
(Tablet, smartphone, etc.)
Mikrofon
25
Page 26
V
Fehlerbehebung
Wenn Sie ein Problem haben, gehen Sie wie folgt vor:
• Sorgen Sie dafür, dass alle Kabel und Geräte Medien richtig und fest angeschlossen sind.
• Achten Sie darauf, dass DN-280 laut vorliegendem Benutzerhandbuch verwendet wird.
• Achten Sie darauf, dass Ihre anderen Geräte oder Medien ordnungsgemäß funktionieren.
• Wenn Sie glauben, dass DN-280 nicht ordnungsgemäß funktioniert, überprüfen Sie die folgende
Tabelle auf Lösungen für das Problem.
Problem: Lösung:
Das Gerät lässt sich nicht einschalten.
Das DN-280 gibt keinen Ton aus bzw. der Ton klingt
verzerrt.
Die Tonausgabe hat ein Brummen oder Rauschen. Überprüfen Sie die Polarität der
26
ergewissern Sie sich, dass der
Netzeingang des DN-280
ordnungsgemäß mit dem mitgelieferten
Netzkabel an eine Steckdose
angeschlossen ist.
Stellen Sie sicher, dass alle Kabel- und
Geräteanschlüsse sicher und korrekt sind.
Achten Sie darauf, dass keine Kabel
beschädigt sind.
Vergewissern Sie sich, dass die
Lautstärkeeinstellungen auf Ihrem
Lautsprecher, Mixer usw. korrekt sind.
Wenn Sie versuchen, Sound über den
Channel Input (Kanaleingang) zu
erzeugen, vergewissern Sie sich, dass
kein Gerät an den Aux-Eingang
angeschlossen ist.
Wenn die Schutz-LED (PROT) leuchtet,
senken Sie die Temperatur des DN-280,
indem Sie auf gute Belüftung achten
und/oder die Lautstärke verringern.
Eingangsanschlüsse.
Wenn eine unsymmetrische Verbindung
verwendet wird, stellen Sie sicher, dass
der Anschluss (-) mit GND verbunden ist.
Wenn die Clip-LED leuchtet, verringern
Sie die Ausgangslautstärke.
Überprüfen Sie die Polarität der
Lautsprecheranschlüsse.
Page 27
k
k
Appendix (English)
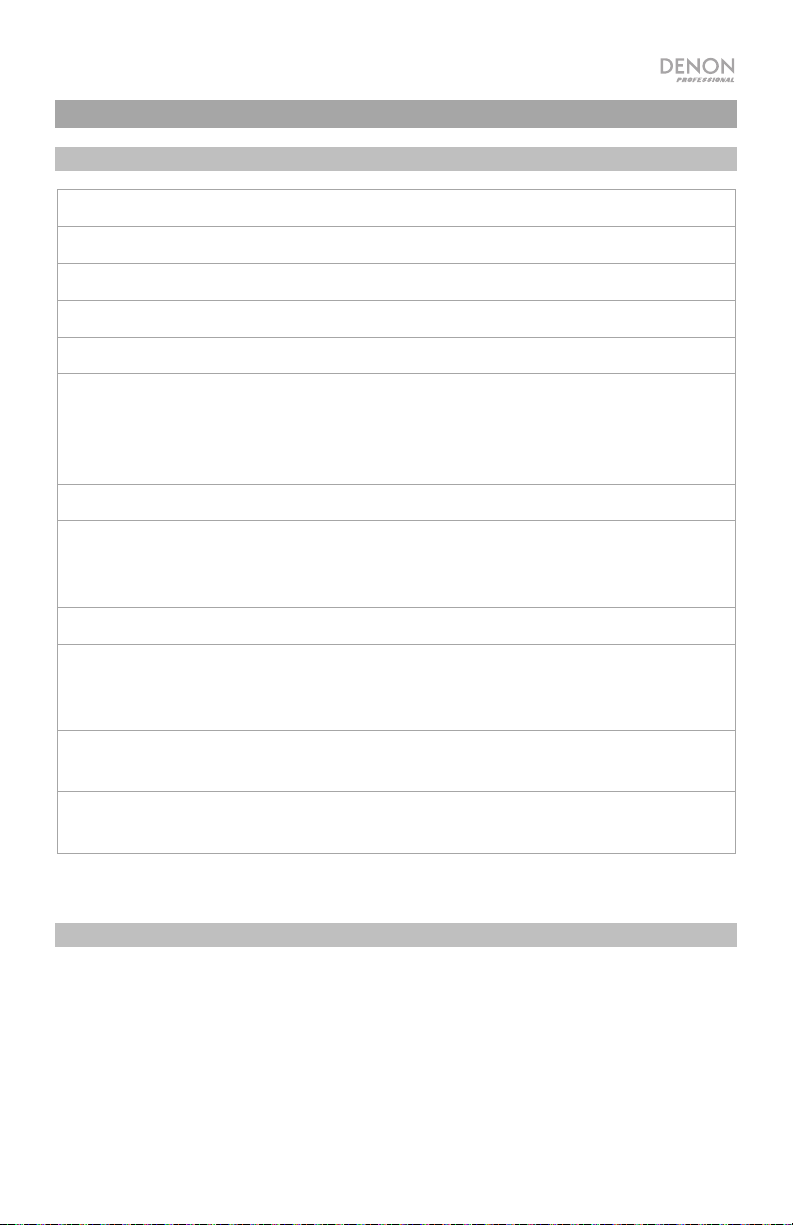
Technical Specifications
Total Harmonic Distortion
< 0.1% (A-weighted)
Frequency Response
Signal-to-Noise Ratio
Damping Factor
Output Power
Connectors
100 Hz – 15 kHz (+0/-3 dBv)
> 95 dB (A-weighted)
> 200 (1
8 )
60 W
(1) Euroblock channel output
(1) Dual RCA input
(1) XLR / TRS 1/4” (6.35 mm) combination input
(1) TRS 1/8” (3.5 mm) auxiliary input
20
Input Impedance
balanced or 10k unbalanced
Input Sensitivity Dual RCA input: 0+/-1 dBv
Auxiliary input: -10+/-1 dBv
Combination input: -30+/-1 dBv
Voltage Gain
Power
40+0/-1 dB (100 V)
100 V ~, 50/60 Hz, 100 W
110–120 V ~, 50/60 Hz, 100 W
220–240 V ~, 50/60 Hz, 100 W
Dimensions
(width x depth x height)
Weight
7.9” x 10.7” x 1.7”
200 x 273 x 43 mm
5.3 lbs.
2.4 kg
Specifications are subject to change without notice.
Trademarks & Licenses
Denon is a trademark of D&M Holdings Inc., registered in the U.S. and other countries. Denon Professional
products are produced by inMusic Brands, Inc., Cumberland, RI 02864, USA. All other product names,
company names, trademarks, or trade names are those of their respective owners.
27
Page 28

denonpro.com
Manual Version 1.4
 Loading...