

Demon 1902 User Manual

625 STREET DEMON™
Part Numbers: 1900, 1901, & 1902
INSTRUCTION MANUAL
LIT701
US Patent # D648746S
www.demoncarbs.com
1

Table of Contents
INTRODUCTION ..................................................................................................................................................................... 3
Recommended Parts and Accessories ............................................................................................................................... 3
Removal of Existing Carburetor .......................................................................................................................................... 3
Installation of Street Demon™ Carburetor ......................................................................................................................... 4
Connecting the Throttle Linkage ......................................................................................................................................... 5
Connecting the Transmission Linkage ............................................................................................................................... 5
GM TH350, 200R4 /700R4 .................................................................................................................................................. 5
Ford Kick-Down Linkage .................................................................................................................................................. 6
Chrysler Applications ....................................................................................................................................................... 6
Vacuum Lines ........................................................................................................................................................................ 7
Electric Choke ....................................................................................................................................................................... 7
Air Cleaner ............................................................................................................................................................................. 8
Priming the Carburetor ......................................................................................................................................................... 8
Mechanical Fuel Pump ...................................................................................................................................................... 8
Electric Fuel Pump ............................................................................................................................................................ 8
Ladies and Gentlemen, Start Your Engines! ...................................................................................................................... 8
Preliminary Tuning and Adjustments ................................................................................................................................. 8
Curb Idle Speed and Mixture Adjustments ......................................................................................................................... 8
Fuel Pressure......................................................................................................................................................................... 9
PERFORMANCE TUNING AND ADJUSTMENT ................................................................................................................. 10
Secondary Air Valve Tuning .............................................................................................................................................. 10
Accelerator Pump Tuning and Adjustment ...................................................................................................................... 10
Main Metering Tuning ......................................................................................................................................................... 11
Theory of Operation ........................................................................................................................................................ 11
Tuning ............................................................................................................................................................................... 12
Steady State Cruise Tuning ........................................................................................................................................ 13
Part Throttle Acceleration Tuning (25% to 75% throttle) ......................................................................................... 13
Choosing the Correct Metering Rod and Step-Up Springs ..................................................................................... 13
Wide Open Throttle Tuning ......................................................................................................................................... 13
Long Duration Camshaft Tuning ................................................................................................................................ 14
Tuning for Elevation .................................................................................................................................................... 14
Removal and Installation of Metering Rods, Step-Up Springs and Jets ....................................................................... 14
Metering Rod and Step-Up Spring Replacement ......................................................................................................... 14
Primary/Secondary Jet Replacement & Float Level Check & Adjustment ................................................................ 14
Winter Fuel ........................................................................................................................................................................... 16
Care and Cleaning ............................................................................................................................................................... 16
Troubleshooting .................................................................................................................................................................. 16
Demon Carburetion™ Limited Warranty .......................................................................................................................... 20
2
INTRODUCTION
Part Number
Description
1921
Street Demon™ calibration kit
1950
Idle kick-up solenoid and bracket
1951
Street Demon™ TPS kit (for use with electronic transmissions requiring a TPS signal)
1952
GM throttle linkage cable attachment bracket
1953
Throttle cable and transmission kickdown bracket
1954
Ford kickdown spring and perch kit
1958
Billet Throttle Cable Bracket
1959
Billet Detent Bracket for 1958 Throttle Cable Bracket
160049
Universal carburetor installation kit
124007
Chrysler throttle stud
786004
Demon chrome 14” air cleaner assembly
1920
Street Demon™ rebuild kit
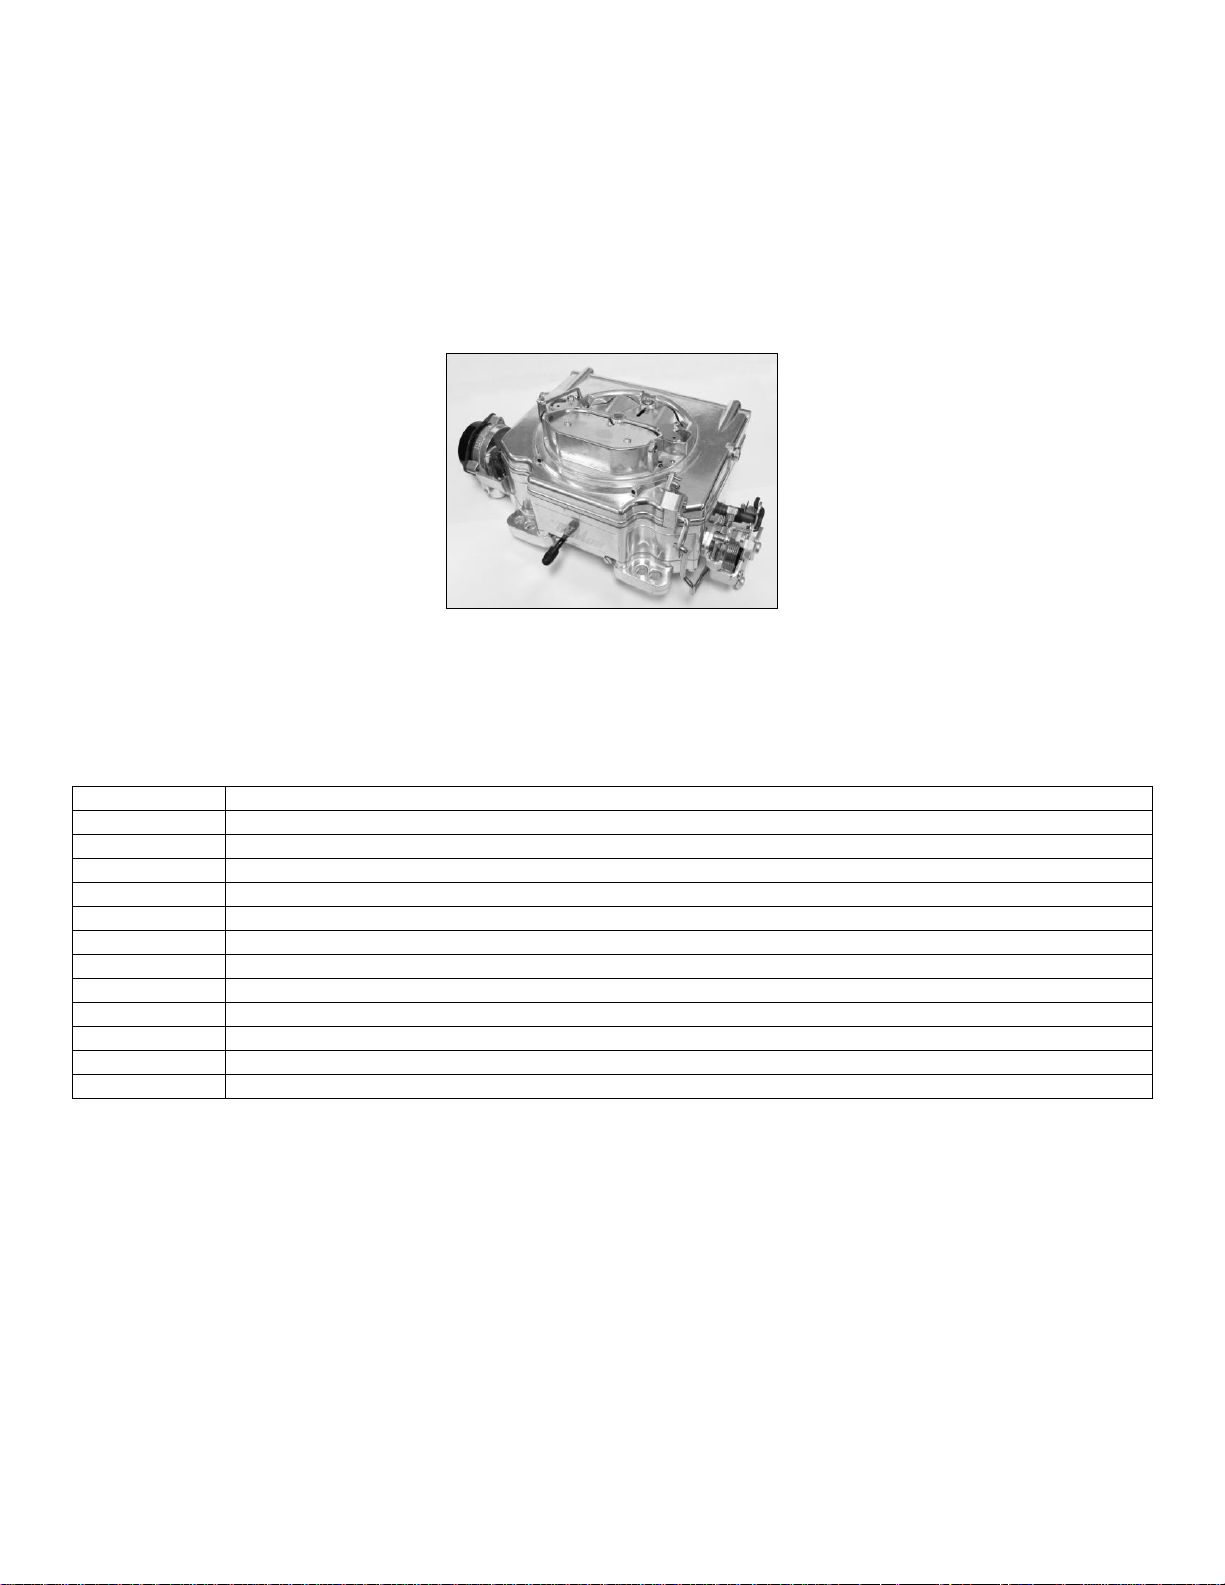
Street Demon™ Carburetors™ have many unique features that make them one of the best
performing carburetors in the market! Whether it is street / strip performance, or just getting the most
out of your hot rod, the Street Demon™ will give you optimum performance. This manual will
discuss the special points and unique features of the carburetor, and the correct procedures for
proper installation and tuning. The goal is to help you understand the thoughts behind the Street
Demon™, and to increase your knowledge of carburetion. Please read and understand this manual
completely to assure that you get the most out of your new Street Demon™ carburetor.
If you experience any installation questions, problems, or issues, please contact our technical service
department between the hours of 8AM and 5PM CST M-F @ 1-270-901-3346.
DO NOT RETURN TO THE PLACE OF PURCHASE, unless instructed to do so by technical service.
Recommended Parts and Accessories
Removal of Existing Carburetor
1. Remove the air cleaner, exercising care to carefully detach any vacuum lines from the air cleaner and marking them
so they can be reassembled to the air cleaner in the same manner.
2. Remove the existing carburetor by the following procedure:
A. Carefully disconnect the fuel line.
WARNING: Carefully protect the open end of the fuel lines, so that no foreign particles can enter. Wrap the
end of the fuel line with a clean lint-free cloth.
B. Disconnect and mark all vacuum lines and wiring (if any) to the carburetor.
C. Disconnect the PCV hose.
D. Disconnect the choke rod or heat tubes (if equipped).
E. Disconnect and remove the throttle linkage and automatic kickdown linkage. Save all retaining clips.
3
F. Unbolt and remove the carburetor from the manifold.
FITTING TYPE
MANUFACTURER
PART NUMBER
# 6 MALE INLET
SNIPER PERFORMANCE
60406421 (BLUE)
60406423 (BLACK)
#6 STANDARD
EARL’S
991942ERL
3. If the intake manifold is being changed at this time, install the new manifold according to the manifold manufacturer’s
directions.
Installation of Street Demon™ Carburetor
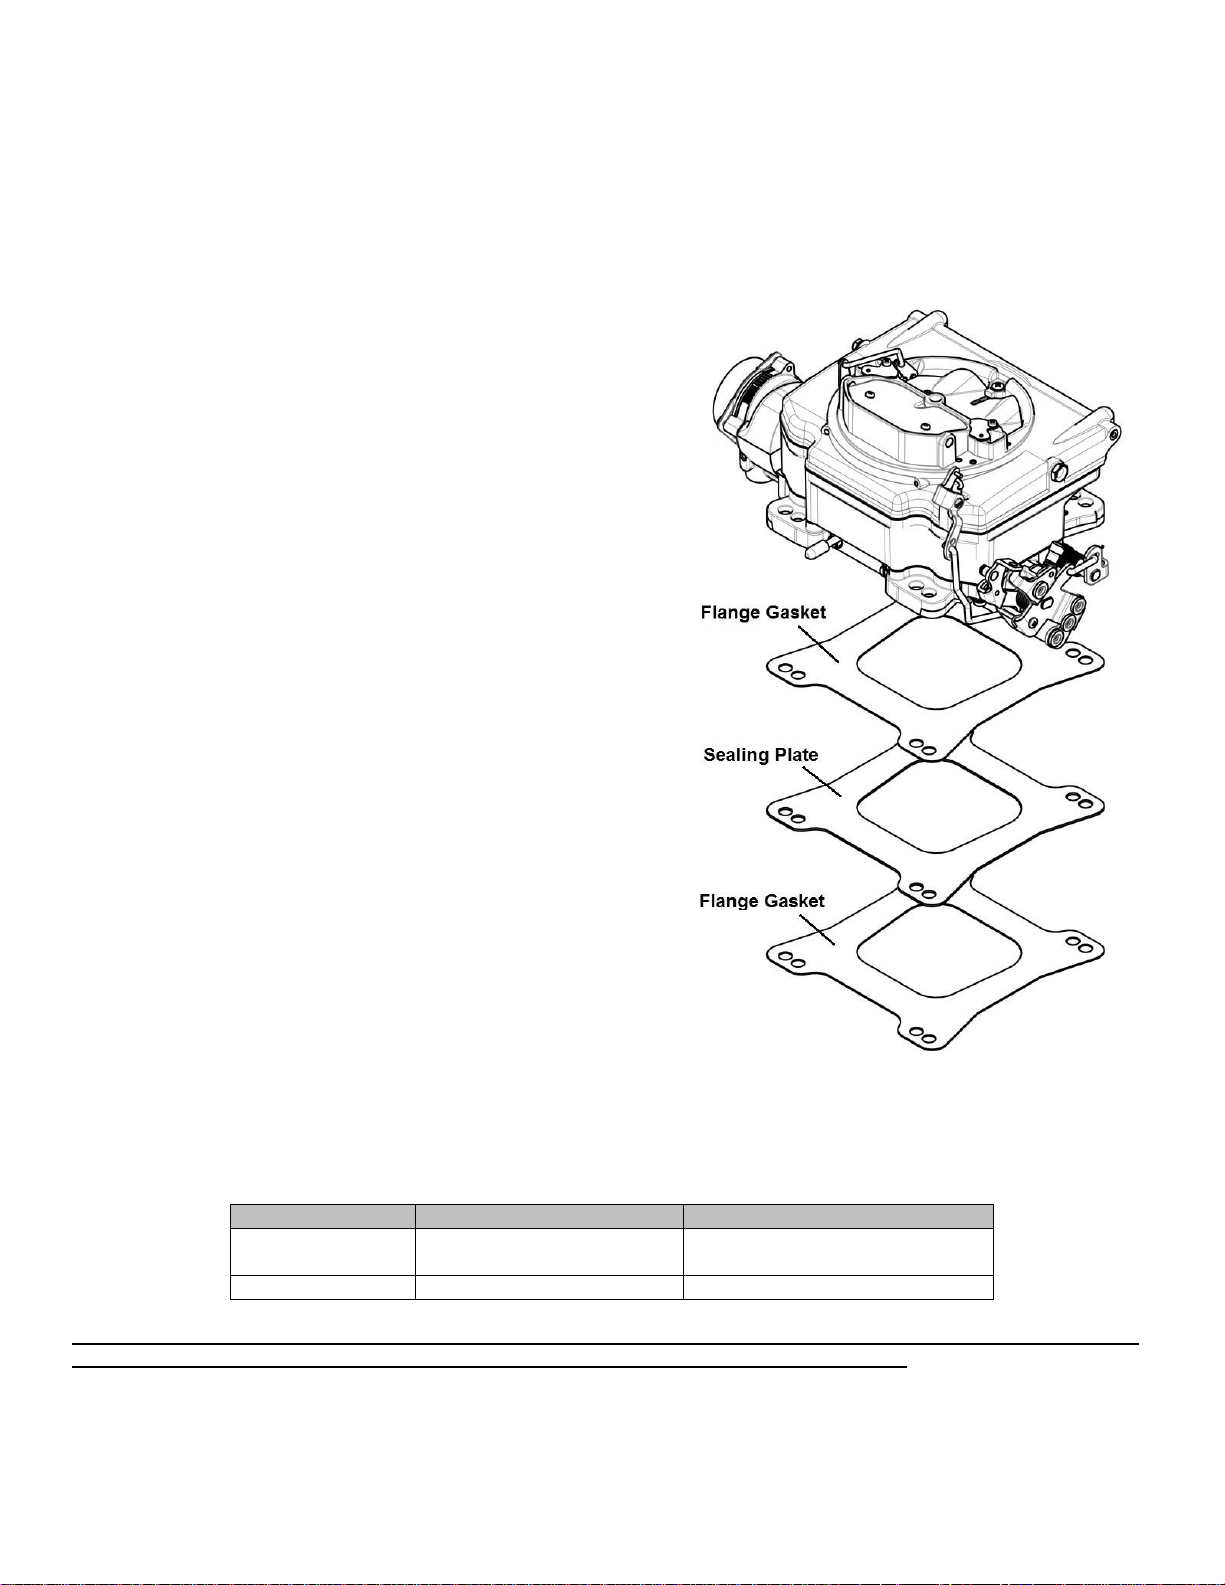
1. Install the carburetor-mounting studs (provided) in the proper location on the intake manifold carburetor flange.
2. Place a new carburetor flange gasket, sealing plate and
second flange gasket provided with the carburetor, in the
proper position on the intake manifold (Fig. 1).
NOTE: The sealing plate is required for the proper function
of the idle circuit which aids in idle fuel atomization
along with a reduction in heat transfer from the
intake manifold.
NOTE: If installing the Street Demon™ on a factory cast iron
spread bore style manifold, a spacer may be
required for proper throttle opening.
3. Place the carburetor on top of the flange gasket on the
manifold. Install the hold down nuts and snug down
progressively in a “crisscross” pattern (60-80 in./lbs.).
4. Open and close the throttle a few times to ensure the throttle
operates smoothly with no binding or sticking.
WARNING: Over tightening may result in a warped or
cracked carburetor throttle body.
WARNING: Any sticking, binding, or other interference in
the throttle linkage could result in
uncontrolled engine speed. This could result
in engine damage or personal injury.
5. In some cases, the existing fuel line will have to be cut and
connected with a length of rubber fuel hose and a clamp. The
Street Demon™ carburetor comes with three fuel fittings.
5/16” hose barb, 3/8” hose barb (installed) and a 3/8” inverted
flare fuel fitting for a hard line. Select the appropriate fuel fitting
and install into the carburetor making sure to use the new fuel
inlet fitting gasket also supplied in the kit. Figure 1
Optional Fuel Inlet Fittings
Street Demon™ 9/16"- 24 threaded fuel inlet boss accepts the following optional fittings:
If installation requires cutting the metal fuel line, cut the fuel line with a good tube cutter. This will minimize the chance of
producing metal chip particles. If a hacksaw must be used, then metal chips must be removed.
WARNING: During the fuel line installation, DO NOT allow any foreign particles to enter the fuel lines, which
could then cause flooding and may result in a fire.
WARNING: Keep the fuel line away from the EGR valve (if equipped) on the intake manifold.
4
WARNING: In all cases where the fuel line has been cut, it is essential that it be clean to ensure that no metal
particles enter the fuel bowl after the new carburetor installation. Remove the fuel line at the
pump and blow the line clean with compressed air. DO NOT use the procedure where the coil
wire is disconnected, the engine cranked for a few revolutions, and the fuel collected in a
container. This procedure is unsafe because sparking can occur either at the coil or at the
distributor end of the coil wire and ignite any fuel spilled in the engine compartment.
MAINTENANCE WARNING: Fuel system components, including fuel lines and the carburetor, should be
inspected periodically to assure no fuel leakage and to ensure the soundness of the hoses. Today’s clean
emissions engines provide higher temperatures in the engine compartment. These high temperatures promote
faster aging of non-metallic materials.
Hoses that exhibit surface cracks, when bent to 180°, should be replaced. The presence of liquid fuel demands
tightening of fittings, hose replacement, and re-torquing of the fuel system component flange nuts.
Connecting the Throttle Linkage
NOTE: Before connecting the linkage, operate the throttle lever to assure the correct travel (no sticking or
binding), by opening to wide-open throttle and back to closed throttle several times. Correct any
sticking or binding conditions before proceeding.
NOTE: If installing on a GM vehicle where the throttle cable needs to utilize the large hole in the top of the
throttle lever, a part # 1952 GM throttle linkage cable attachment bracket will be needed.
With the pedal held firmly against a stop or the floorboard, pull the carburetor to its wide open position. Adjust the linkage
rod or cable to the proper length, and then attach it to the baseplate linkage. Remember, the pedal should make contact
with a positive stop, just as the carburetor gets to wide open throttle. With the linkage rod or cable attached to the
baseplate, make sure the carburetor can return to its curb idle position. Install your return spring(s) to the bottom of the
throttle lever as shown in Figure 2, and check again for smooth operation to wide open throttle, and then closed again.
Figure 2
Connecting the Transmission Linkage
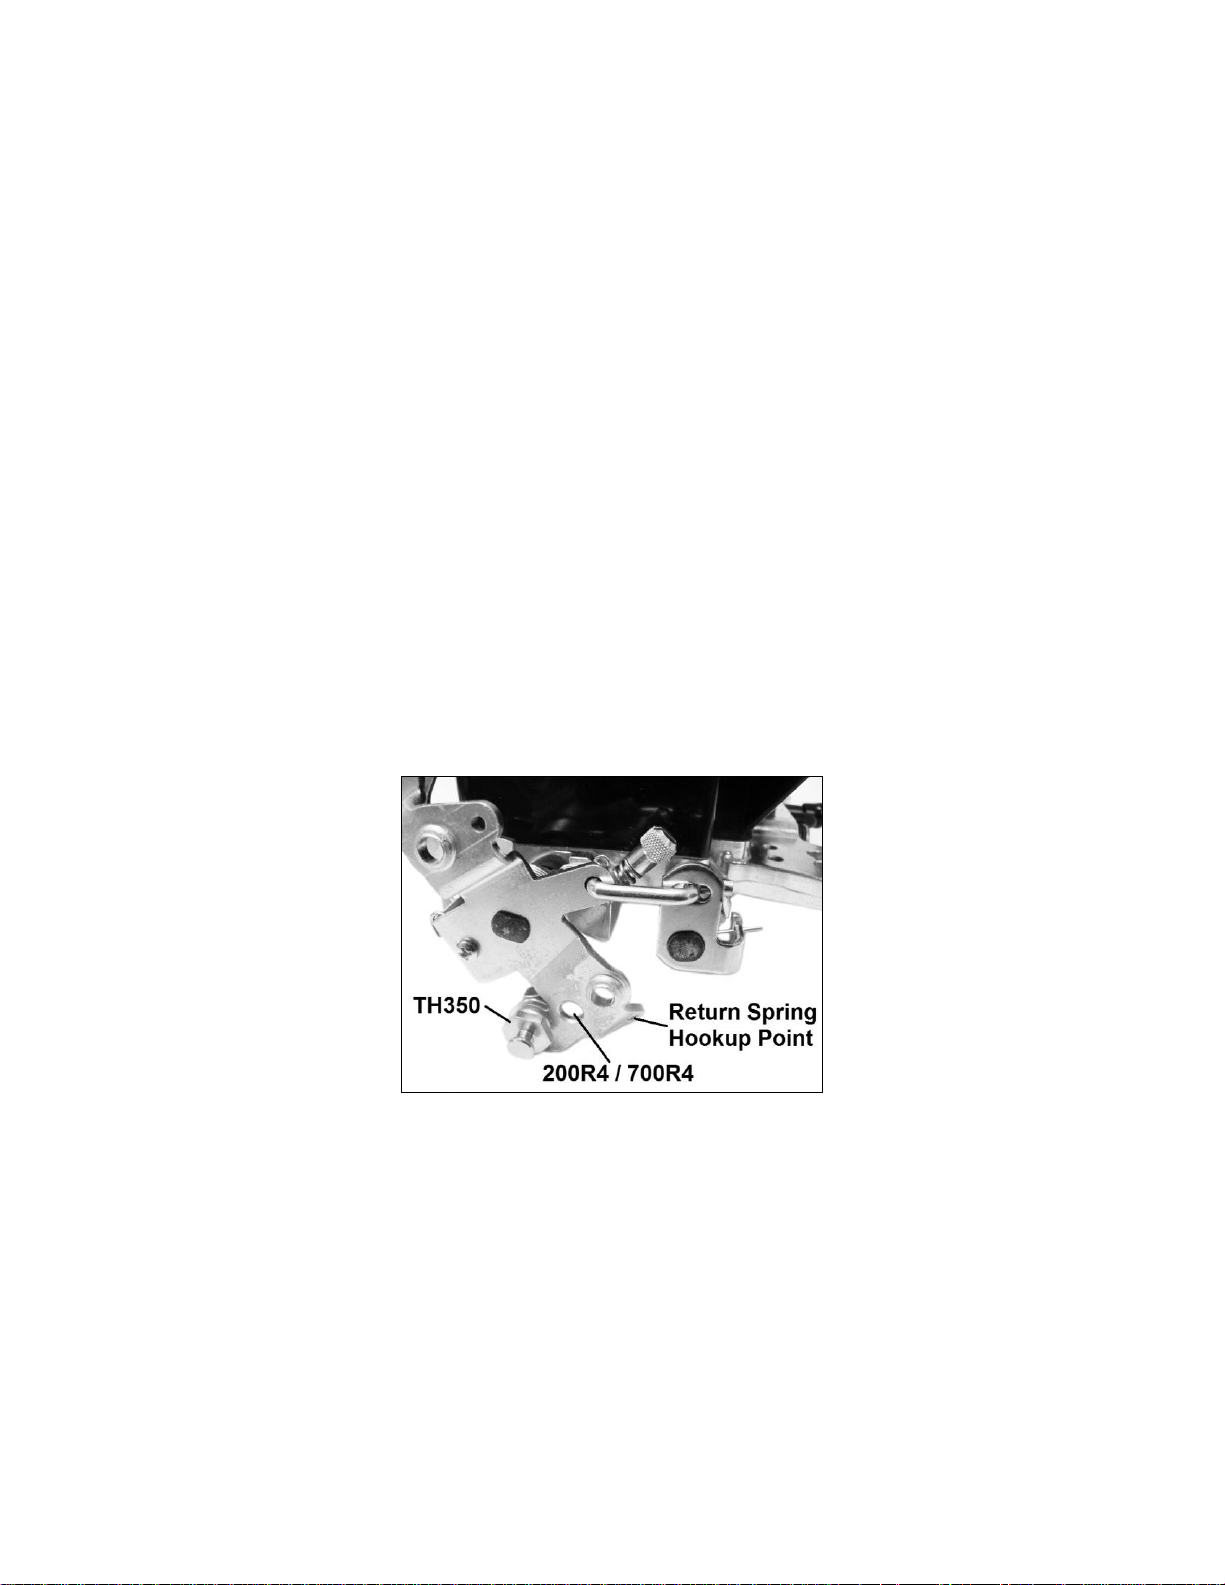
GM TH350, 200R4 /700R4
Attach the transmission kickdown stud (supplied) into the proper hole location on the throttle lever as seen in (Fig. 2).
Attach the TV cable to the stud and adjust per transmission manufacturer’s specifications, using Chilton®, Motor®, or
other repair manual designed for your specific transmission.
WARNING: If you are unfamiliar with overdrive transmission TV cable adjustments, consult a qualified
transmission expert. Failure to properly adjust the TV cable on overdrive transmissions can lead
to poor shifting and / or transmission failure. Demon Carburetion assumes no responsibility for
transmission damage or failure caused by improperly adjusted TV cables.
5
NOTE: If this carburetor is to be used in an application utilizing an electronic transmission that requires a
throttle position sensor signal to operate properly, Demon has you covered. Part # 1951 Street Demon
TPS kit is designed to bolt directly to your new Street Demon™ carburetor to provide the needed TPS
signal to an electronic transmission. Consult the installation manual for the 1951 Street Demon TPS kit
for installation and adjustment instructions.
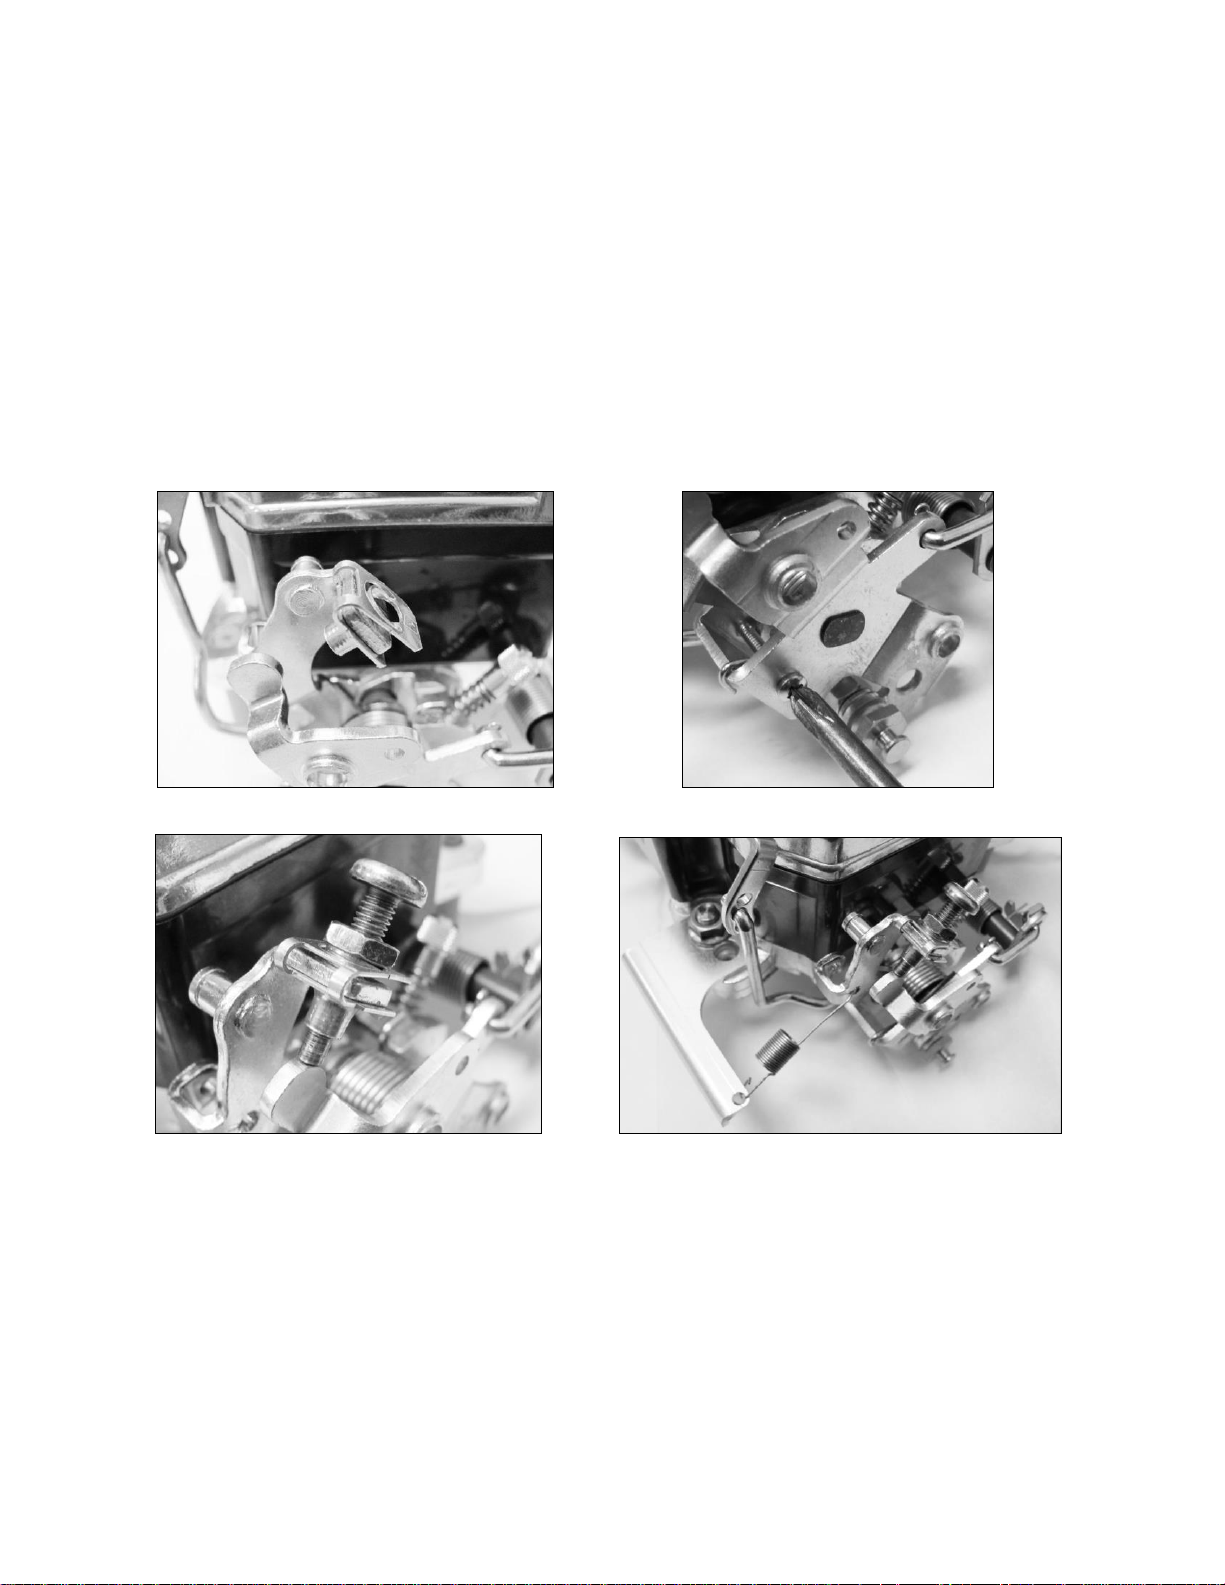
Ford Kick-Down Linkage
All Street Demon™ Carburetors come with a Ford kick-down linkage. If running a Ford automatic and the kickdown
linkage is needed, a spring and perch kit (Part # 1954) is required.
NOTE: Street Demon™ Carburetors will not work with a Ford AOD transmission.
1. Press the screw retainer into position (Fig. 3).
2. Remove shipping screw (Fig. 4).
3. Install adjustment screw and locknut (Fig. 5). Consult the Ford Service Manual for proper setting.
4. Install the mounting bracket and return spring (Fig. 6).
Figure 3 Figure 4
Figure 5 Figure 6
WARNING: Install the transmission kickdown adjustment screw retainer, adjustment screw, and locknut, as
correctly indicated. Failure to attend to this detail may result in a sticking wide-open throttle or
dangerous uncontrolled engine speed.
Chrysler Applications
If installing on a Chrysler, it may be necessary to purchase and install a Chrysler throttle stud part # 124007 onto the
Street Demon™ carburetor as in figure 7 below.
6
 Loading...