

Deluce Lighting DLPAN10WBLKWW, DLPAN20WBLKDL, DLPAN10WBLKWWPIR, DLPAN10WBLKDLPIR, DLPAN20WBLKWW Fitting Instructions Manual
...
IMPORTANT INSTALLATION INFORMATION
• Installation should be carried out in accordance with the latest
edition of the IEE Wiring Regulations (BS7671) and taking into
consideration the latest Building Regulations. If in doubt, consult a
qualified electrician.
• Important: Ensure that ALL electrical connections are tight with no
loose strands including factory made connections.
• Before commencing any installation or maintenance work,
ensure electricity is switched off at the mains.
• Please take note of the maximum rated voltage for your floodlight.
PLEASE NOTE THIS FLOODLIGHT IS MULTI-VOLTAGE - AN
APPROPRIATE 110V STEP-DOWN TRANSFORMER MUST BE
USED WHEN USING THE FLOODLIGHT ON SITE.
NOT PIR VERSION, PIR VERSION IS 230-240V ONLY.
• Please take note of the IP (Ingress Protection) rating of your
floodlight when deciding location.
• Always allow sufficient slack in the supply cable in order to remove
the floodlight from its position for any future maintenance.
• Care must be taken for installations where the lens or bezel may
come into contact with bare skin.
• Please take note of the nearest illuminated surface as detailed on
the product label.
• Always check whether the site of the installation can
support the weight of the floodlight.
For safety, 1.5 times the weight of the floodlight is
recommended. If you are unsure do not install.
GENERAL INSTALLATION
1. Please make sure you are safe when working at height.
2. Employ the latest safety regulations and procedures to ensure the
safe installation of this floodlight.
3. When positioning your floodlight out of doors please take note that
outdoor electrical installations should be installed by a qualified
Electrician. Correct circuit protection for all exterior electrical services
should include a residual current device (RCD), also known as an
earth leakage circuit breaker (ELCB). This simple device ensures that
the power is cut off immediately; it detects a leakage of current
to earth, which indicates an electrical fault which is potentially
threatening to life.
Observe these few Simple rules and keep your outdoor electrical
installation safe.
INSTALLATION INSTRUCTIONS
1. Select the required position for the floodlight.
2. Remove the mounting bracket from the floodlight.
3. Fix the mounting bracket to the mounting surface with appropriate
screws and wall plugs, sufficient to take the weight of the fitting.
4. Replace the main body of the floodlight to the bracket, ensuring
that cables are not trapped between the base mounting bracket and
the floodlight,
5. Connect the floodlight to the mains supply, with an appropriate
junction box or connection fitting, making sure any exposed
connections and joints are sufficiently weatherproofed.
When using with 110V supply make sure the correct CEE plug is
fitted to connect to the transformer - NOT PIR Version.
6. Then make the electrical connections as follows:
LIVE - (Red or Brown) to a terminal marked L
NEUTRAL - (Black or Blue) to a terminal marked N
EARTH - (Green/Yellow) to a terminal marked
WARNING - THIS FITTING MUST BE EARTHED
7. Ensure that there are no exposed conductors, loose or trapped cable
strands.
8. Adjust the angle of the floodlight by the retaining/adjustment bolt,
making sure the bolt is re-tightened.
9. Switch on the power supply to test.
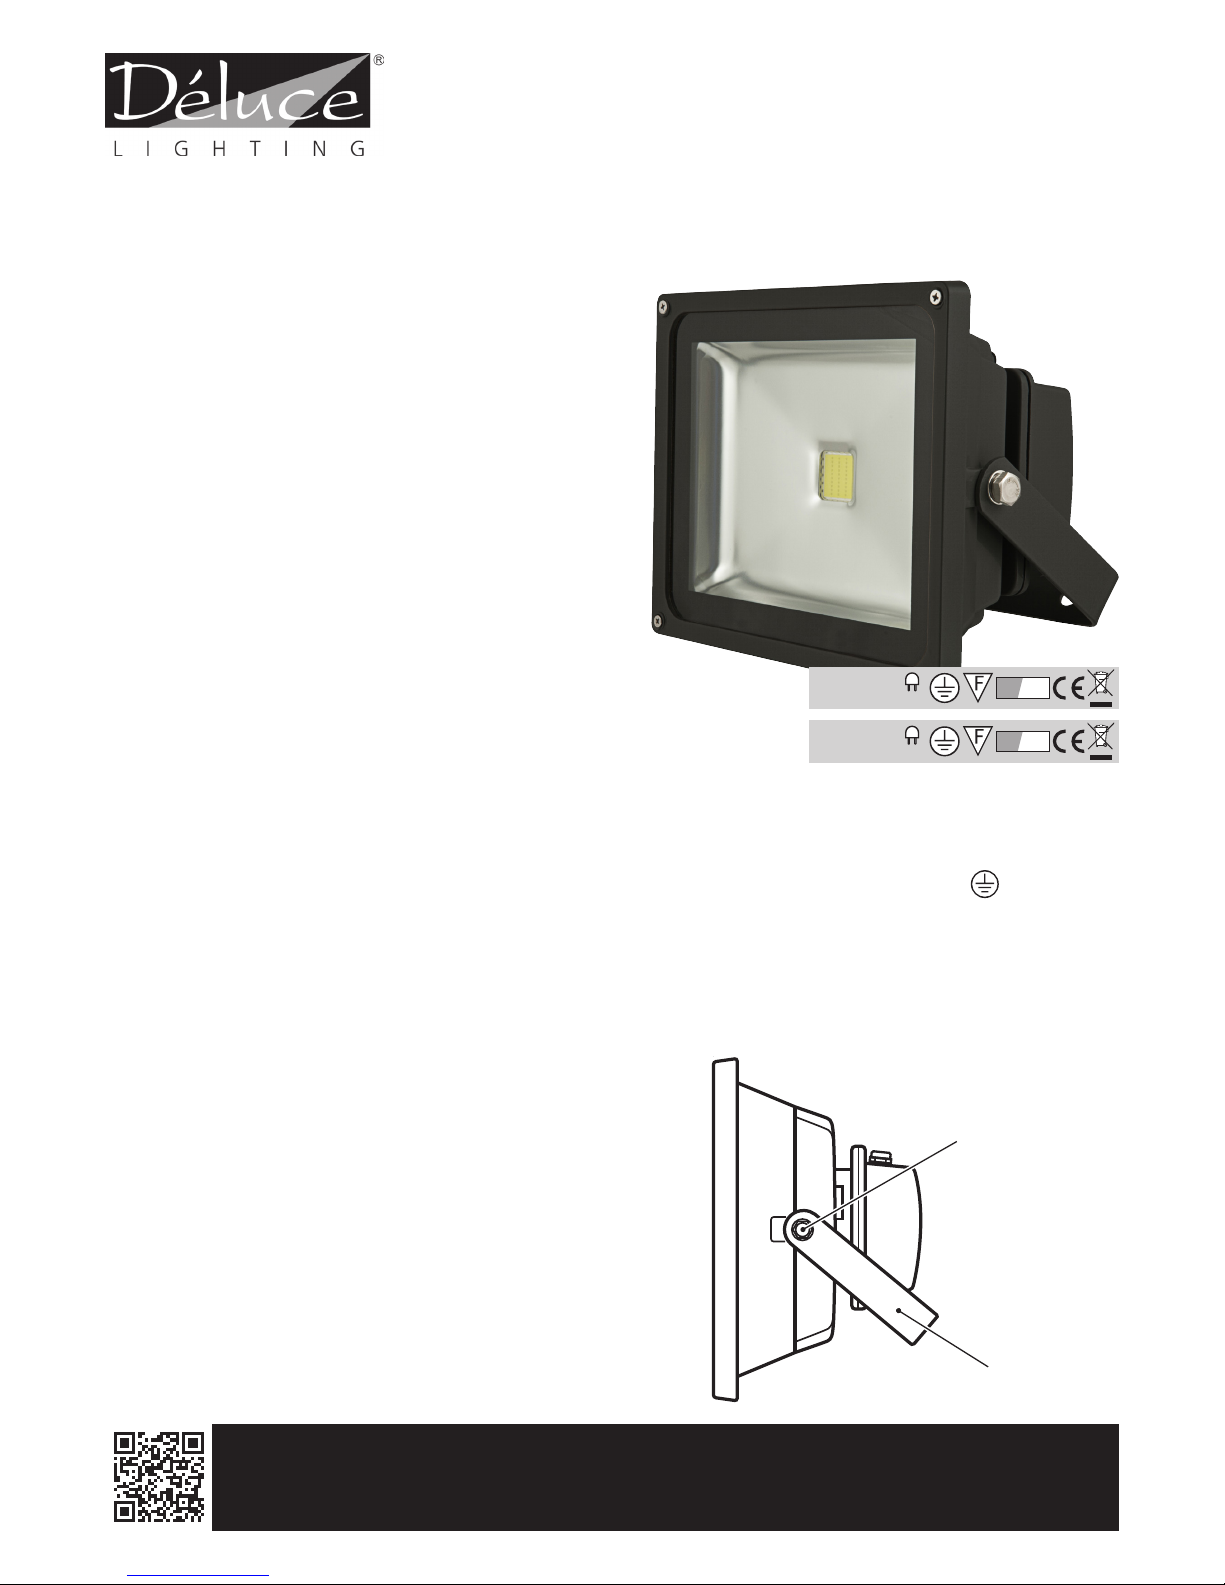
MOUNTING
BRACKET
MOUNTING BRACKET RETAINING/
ADJUSTMENT BOLT
LED PANTHER
FLOODLIGHT FITTING
INSTRUCTIONS
DEL0585a/Feb_2016/issue_1 page 1 of 2
www.delucelighting.com
PLEASE READ THESE INSTRUCTIONS CAREFULLY BEFORE INSTALLATION
LEAVE A COPY FOR THE USER/MAINTENANCE ENGINEER FOR FUTURE REFERENCE
We recommend this fitting is installed by a qualified Electrician.
100-240V
LED
IP 65Standard
PIR
230-240V
LED
IP 44
These instructions are for the Déluce Lighting Panther LED Floodlights :
DLPAN10WBLKDL, DLPAN10WBLKWW, DLPAN10WBLKDLPIR, DLPAN10WBLKWWPIR, DLPAN20WBLKDL, DLPAN20WBLKWW,
DLPAN20WBLKDLPIR & DLPAN20WBLKWWPIR DLPAN30WBLKDL, DLPAN30WBLKWW, DLPAN30WBLKDLPIR, DLPAN30WBLKWWPIR,
DLPAN50WBLKDL, DLPAN50WBLKWW, DLPAN50WBLKDLPIR & DLPAN50WBLKWWPIR

On the base of the PIR there are three (3) dials:
PIR ADJUSTMENT (FOR PIR MODELS)
TIME LUXSENS
RANGE ADJUSTMENT
The PIR sensor is situated on a moveable joint.
The sensor range can be adjusted by moving the PIR both
vertically and horizontally.
Please be aware that PIR detectors are more sensitive
to movement across them than they are to movement
towards them. This should be considered when
positioning during installation.
SPECIFICATIONS
Detection Method: Passive infrared sensor
Time Adjustment: 5 seconds to 8 minutes (approx)
Power Consumption: 6 Watts maximum for the sensor
unit only
Sensor Range ( SENS )
This dial sets the floodlight’s sensitivity to movement.
Turning the dial clockwise will adjust the sensitivity range,
as follows :
up to 10mtrs x 140° degree spread (approx).
TIME DIAL ( TIME )
This dial controls how long the light will remain on once
activated.
It will operate from 5 Seconds to 8 Minutes. Turning the
dial fully clockwise will set the unit to it longest time
setting and fully anti-clockwise will set it at its shortest
setting.
DAYLIGHT ADJUSTMENT DIAL ( LUX )
This dial sets the floodlight to be activated at different
light levels. To set the light to activate only after dark, wait
until dusk and turn the dial completely anti-clockwise.
Slowly turn the dial clockwise until the light comes on.
The light will now activate after dusk.
PLEASE NOTE - TO OPERATE UNDER MANUAL OVERRIDE :
When the fitting is installed and operating normally under automatic control from the PIR it can be switched to permanent
operation by simply switching the power off and on again within 3 seconds (the fitting will now be on all the time!).
To change the operation back to automatic control through the PIR simply switch the fitting off again and wait a minimum of
7 seconds. After 7 seconds switch the power back on and the fitting will again be under automatic control through the PIR (the
fitting will only be activated and switched on when movement is detected).
LED PANTHER
FLOODLIGHT FITTING
INSTRUCTIONS
MAINTENANCE
1. Please make sure the power is switched off before starting any
maintenance.
2. In order to maintain good even light coverage, the glass cover
should be cleaned regularly.
3. For good heat dissipation the floodlight housing should also be
cleaned regularly.
4. Please take care when cleaning the glass or floodlight housing.
DO NOT USE water or cleaning solutions, cleaning should
preferably be done with a clean dry cloth.
DEL0585a/Feb_2016/issue_1 page 2 of 2
www.delucelighting.com
PLEASE READ THESE INSTRUCTIONS CAREFULLY BEFORE INSTALLATION
LEAVE A COPY FOR THE USER/MAINTENANCE ENGINEER FOR FUTURE REFERENCE
We recommend this fitting is installed by a qualified Electrician.
GUARANTEE
This product is guaranteed in the EU for a period of 1 year from the date of purchase. The guarantee is invalid in the case of improper use, installation, tampering, removal of the
QC date label, installation in an improper working environment or installation not according to the current edition of the IEE Wiring Regulations (BS 7671). Should this product
fail during the guarantee period it will be replaced free of charge, subject to correct installation and return of the faulty unit. Déluce Lighting does not accept responsibility for any
installation costs associated with the replacement of this product. Your statutory rights are not affected. Déluce Lighting reserves the right to alter specifications without prior notice.
These instructions are for the Déluce Lighting Panther LED Floodlights :
DLPAN10WBLKDL, DLPAN10WBLKWW, DLPAN10WBLKDLPIR, DLPAN10WBLKWWPIR, DLPAN20WBLKDL, DLPAN20WBLKWW,
DLPAN20WBLKDLPIR & DLPAN20WBLKWWPIR DLPAN30WBLKDL, DLPAN30WBLKWW, DLPAN30WBLKDLPIR, DLPAN30WBLKWWPIR,
DLPAN50WBLKDL, DLPAN50WBLKWW, DLPAN50WBLKDLPIR & DLPAN50WBLKWWPIR
 Loading...