

Page 1

User Manual for PC-80D Easy ECG Monitor
I
Instructions to User
Dear Users,
Thank you very much for purchasing our product . Please read the manua l very carefully before usin g this device.
These instructions describe the operating procedures to be followed strictly. Failure to follow these instructions may cause
measuring abnormality, device damage, or personal injury.
No part of this manual may be photocopied, reproduced or translated into another language without the prior written consent.
Creative reserves the right to improve and amend it at any time without prior notice.
Version of This Manual: Ver1.1
All rights rese rved.
3502-2430011
Page 2

User Manual for PC-80D Easy ECG Monitor
II
WARMING
1. Check the device to make sure that there is no visible damage that may affect user’s safety and measurement performance. Stop using the unit,
when there is obvious damage.
2. Stop using the ECG cable if it is damaged, please change a new one.
3. Do NOT make diagnosis oneself by the measurement an d measurement results, always consult the doctor if abnormal information is presented
frequently.
4. It is NOT designed or intended for medical diagnosis.
5. It is NOT designed or intended for therapy purpose.
6. Do NOT use the device in the bathroom or moist circumstance.
7. Do NOT operate in the environment where strong electro-magnetic interference exists.
8. Necessary service must be performed by qualified service engineers ONLY.
9. Clinical ECG examination is suggested for normal examination of your heart condition.
10. Connect/Disconnect data cable to the monitor gently and carefully, do NOT wring or shake the data cable plug with force to insert into or
unplug from data interface port, or the data interface port may be damaged.
11. When the ECG amplifier is overload or saturation due to lead off or poor contacts between electrode and the skin, the monitor will prompt
“Contact?” to remind the operator.
12. Do not touch the metal electrodes or place the electrodes of lead wire on patient for ECG measurement while the USB cable is connected to
PC, electrical hazard will be caused by the leakage current.
13. ECG electrodes, lead wires and cable are not allowed to contact any other conductive parts.
14. It is strongly recommended to use Ag /AgCl (Silver Chloride) electrode to make sure the ECG signal quality is good.
15. Dispose of the expired device and its accessories according to applicable local regulations.
Page 3

User Manual for PC-80D Easy ECG Monitor
III
Table of contents
1 Overview ..................................................................................................................................................................................... 1
1.1 Appearance ............................................................................................................................................................................ 1
1.2 Name and Model ................................................................................................................................................................... 2
1.3 Str ucture ................................................................................................................................................................................ 2
1.4 Features ................................................................................................................................................................................. 2
1.5 Intended Use .......................................................................................................................................................................... 3
1.6 Operating Environment ......................................................................................................................................................... 3
2 Instal l at io n .................................................................................................................................................................................. 3
2.1 Batteries in stallatio n .............................................................................................................................................................. 3
3 Default menu s creen ................................................................................................................................................................... 4
3.1 Menu sc re en .......................................................................................................................................................................... 4
4 ECG measurements .................................................................................................................................................................... 5
4.1 Methods of ECG measurement .............................................................................................................................................. 5
4.2 Measuring procedure ............................................................................................................................................................. 8
4.2.1 Preparing P hase ................................................................................................................................................................ 8
4.2.2 Quick measurement by built-in electro de s ........................................................................................................................ 8
4.3Long term measurement by external lead wires ...................................................................................................................... 8
4.3.1 Chest lead measurement ................................................................................................................................................... 9
4.3.2 Limb lead measurement .................................................................................................................................................... 9
4.4Data analysis and measurement Result Description ............................................................................................................... 11
Page 4

User Manual for PC-80D Easy ECG Monitor
IV
5 W ave fo rm Re vie w ..................................................................................................................................................................... 12
5.1 Record list ........................................................................................................................................................................... 12
5.2 W aveform Review ............................................................................................................................................................... 13
6 Data Management .................................................................................................................................................................... 15
6.1 Stor a g e status ....................................................................................................................................................................... 15
6.2 Delete ID ............................................................................................................................................................................. 15
6.3 Delete all ............................................................................................................................................................................. 16
6.4 Upload Data......................................................................................................................................................................... 16
7 Measurement option se tting ..................................................................................................................................................... 17
7.1Creating new ID ................................................................................................................................................................... 18
8 System Set up ............................................................................................................................................................................. 19
8.1 Sound setting ....................................................................................................................................................................... 19
8.2 Brig h tness Sett ing ................................................................................................................................................................ 19
8.3 Time/Date Setti ng ................................................................................................................................................................ 19
8.4Auto power off ..................................................................................................................................................................... 20
8.5 Power saving ....................................................................................................................................................................... 20
8.6 Language ............................................................................................................................................................................. 20
9 Help ........................................................................................................................................................................................... 21
10 Technical Specifications ......................................................................................................................................................... 22
10.1 ECG m e asurement ............................................................................................................................................................. 22
10.2 Power supply ..................................................................................................................................................................... 22
10.3 Classification ..................................................................................................................................................................... 23
Page 5

User Manual for PC-80D Easy ECG Monitor
V
10.4 Display .............................................................................................................................................................................. 23
10.5 Data Memory ..................................................................................................................................................................... 23
10.6 Overall Dimension and Weight .......................................................................................................................................... 23
10.7 A ddit ional declara tio n ........................................................................................................................................................ 23
11 Mainte nance ............................................................................................................................................................................ 24
12. Tr oubleshooting ..................................................................................................................................................................... 25
13 Key of Symbols ....................................................................................................................................................................... 26
Appendix 1 A ddition al measur ing method ................................................................................................................................ 27
Appendix2 Measurement Result Description ............................................................................................................................ 29
Appendix3 General Knowledge of ECG .................................................................................................................................... 31
Page 6
User Manual for PC-80D Easy ECG Monitor
1
1 Overview
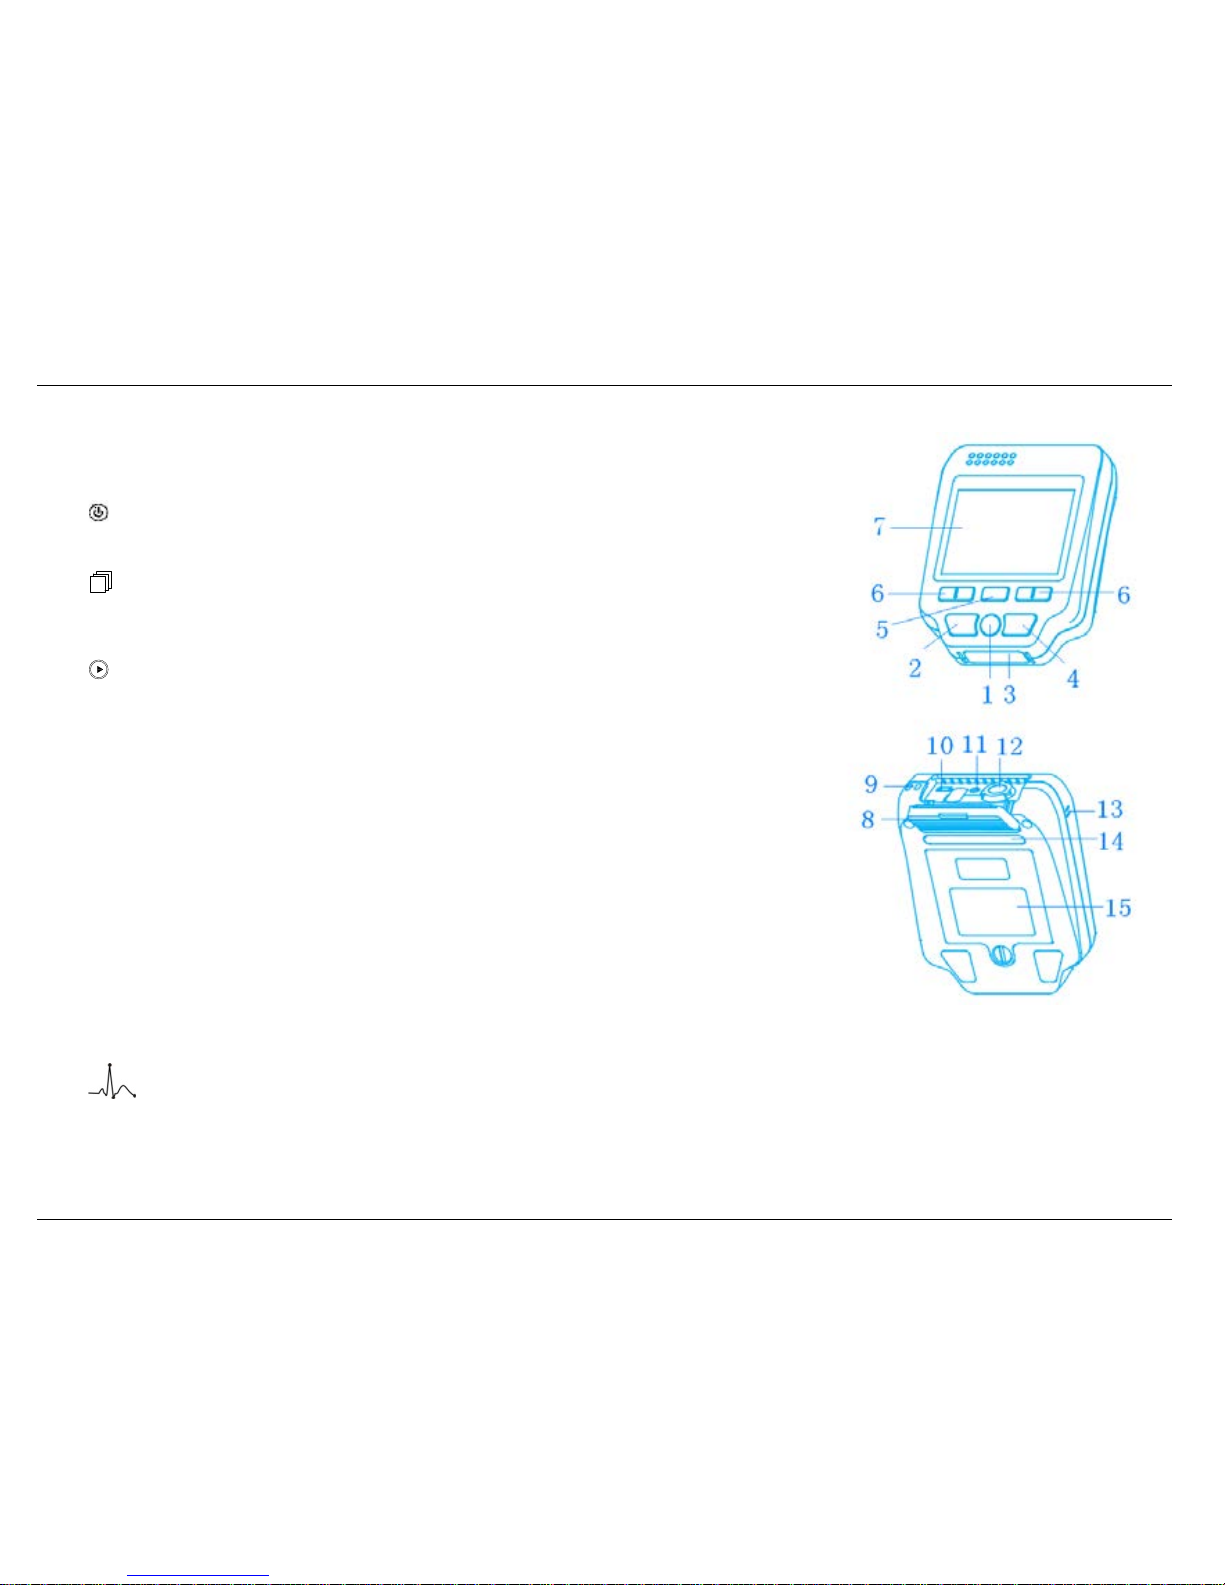
1.1 App ear ance
1. Power: Long time press (about 2 seconds) makes the device power on or off; short time
press turns on/off the backlight.
2.
Back: back to upper level of menu.
3. Metal Electrode I
4.
Measurement: shortcut button for built-in el ectrodes measuring, press this button to start
measuring.
5.
▇ OK:
confirm selection or modification.
6. Navigation key:
Left: move the cursor forwards/to the left, or adjust parameter values.
Right: move the cursor backwards/to the right, or adjust parameter values.
Up: move the cursor upward/forward, or adjust parameter values.
Down: move the cursor downwards /backward, or adjust parameter values.
7. Display screen: display ECG waveforms and data.
8. I/O cover
9. Lanyard hole
10. USB interface: USB data socket.
11. DC input socket
12.
:
Lead wire socket : for connecting to lead wire.
13. Speaker
14. Metal electrode II and III
15. Battery cover, nameplate
Figure1-1
Page 7

User Manual for PC-80D Easy ECG Monitor
2
1.2 Name and Mode l
Name: Easy ECG Monitor
Model: PC-80D
1.3 Structure
PC-80D Easy ECG Monitor mainly consists of circuit boards, display scr een and metal electrodes/lead wires.
1.4 Features
1. Small in size, light in weight, and easy to carry.
2. One-key measurement, easy to operate.
3. ECG waveform and interpretation of results are displayed clearly on color dot-matrix LCD screen.
4. UP to 19 types of measurement results can be presented.
5. High capacity of built-in memory, 24 hours records storage and review for single channel waveform; and 8 hours records storage and review
for 3 channel waveforms.
6. Quick measurement by built-in metal electrodes, external lead wires (including limb lead and chest lead) for long term measurements are
optional.
7. Voice prompt is available
8. With data management function, data records can be reviewed and deleted locally, uploaded to PC as well.
9. Auto power off time can be set.
10. With power saving feature.
Page 8

User Manual for PC-80D Easy ECG Monitor
3
1.5 Intended Use
This Easy ECG Monitor is intended for measuring and recording theECG waveform and average heart rate of adult patient. It is applicable for use in
clinics and homes, and convenient to operate by the patients themselves.
This device is not an ECG monitor used in clinical institution or hospital, but is used for spot-check purpose ONLY. It can not be used to
substitute the normal ECG examination or real time monitoring. The measurement results are useful reference for doctor, but do not make direct
diagnostic or analytical decision based on the information provided by this device.
1.6 Operating Environment
Operating temperature 5 ℃~ 40℃
Operating humidity 30%~80%
Atmospheric pressure 70 kPa ~106kPa
2 Installation
2.1 Batte ries installation
1.Open the battery cover by a screwdriver or a coin.
2. Insert four AA size batteries directly (as shown in figure 2-1).
3.Close the batter cover and fasten it.
Do NOT insert batteries with their polarities reversed. Dispose of the used batteries according to applicable local regulations.
Note: Protecting films are attached to the electrodes of device, so please remove the protecting films before measurement.
Figure 2-1
Page 9
User Manual for PC-80D Easy ECG Monitor
4
3 Default menu screen
3.1 Menu screen
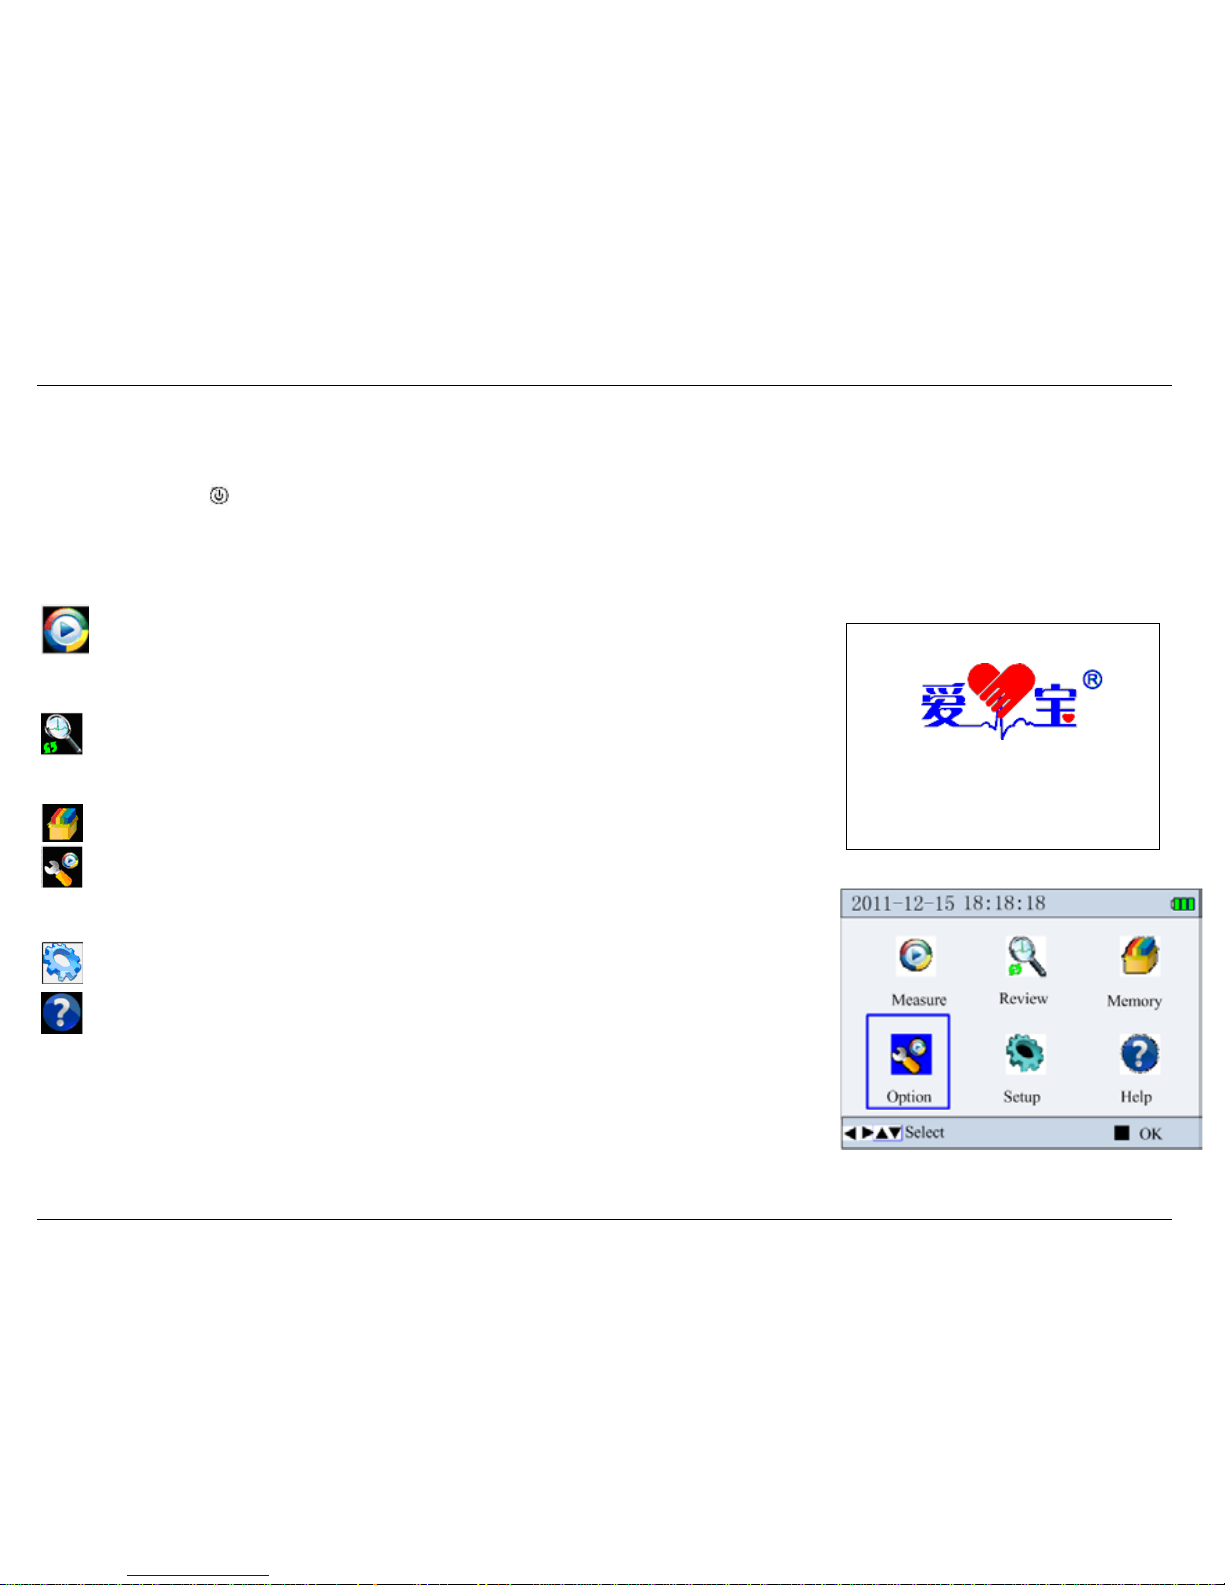
Long time press the “ ”Power key (lasting for 2 seconds) until a beep sound is heard to indicate the unit is turned on, then the booting screen will
appear, as shown in the figure 3-1, after that the device enters into the default menu screen, as shown in figure 3-
2.
There are 6 entries, press navigation key to shift focus on them and press “” ok key to go into the selected entry. Each entry has an icon and it is
defined as following:
Measure: Detect ECG signal, mean while, display waveform, HR value, and analyze the ECG
waveform to prompt necessary information.
Review: Recall and view the ECG records stored in this device (including waveform data and
measurement result).
Memory: ECG records management including storage status check and record deletion.
Option: Measurement related setup including signal input selection, measuring time, bandwidth,
HR alarm limit setting and user ID (ID number).
Setup: System setup including date/time, language, sound and display etc.
Help: Provide on-line information about measuring methods and general knowledge of ECG.
Version:1
.10
Figure 3-1
Figure 3-2
Page 10
User Manual for PC-80D Easy ECG Monitor
5
4 ECG measurements
There are 2 measuring modes for the ECG measurement, which includes quick measurement by built-in electrodes and long term measurement by
external lead wires.
Quick measurement: press “
” measure key to enter into the quick measurement directly; it can display single channel ECG signal measured by
built-in electrodes, the signal can be lead I, lead II or chest lead according to the electrode placement. This measurement takes 30 seconds.
Long te rm measurement: after selecting the signal input option in the measuring option menu, move the cursor to the “
” measure icon, then press
the “”ok key to start the long term measurement.
For long term measurement, the external lead wires will be used in stead of built-in electrodes; there are two options for signal input.
Limb lead measurement: it measures 3 channels ECG signal for lead I, lead II, and lead III simultaneously and displays them;
Chest lead measurement: it measures single channel ECG signal with different chest lead according to the electrode placement. It is suitable for long
term measurement.
4.1 Methods of ECG measurement
It is recommended to clean your skin with SOAP and water to keep it moist without oily.
1. Measurement by built-in electrodes:
Easy and quick ECG measurement by built-in electrodes can be done by putting electrodes on hand, leg and chest
respectively.
1). Hand measurement
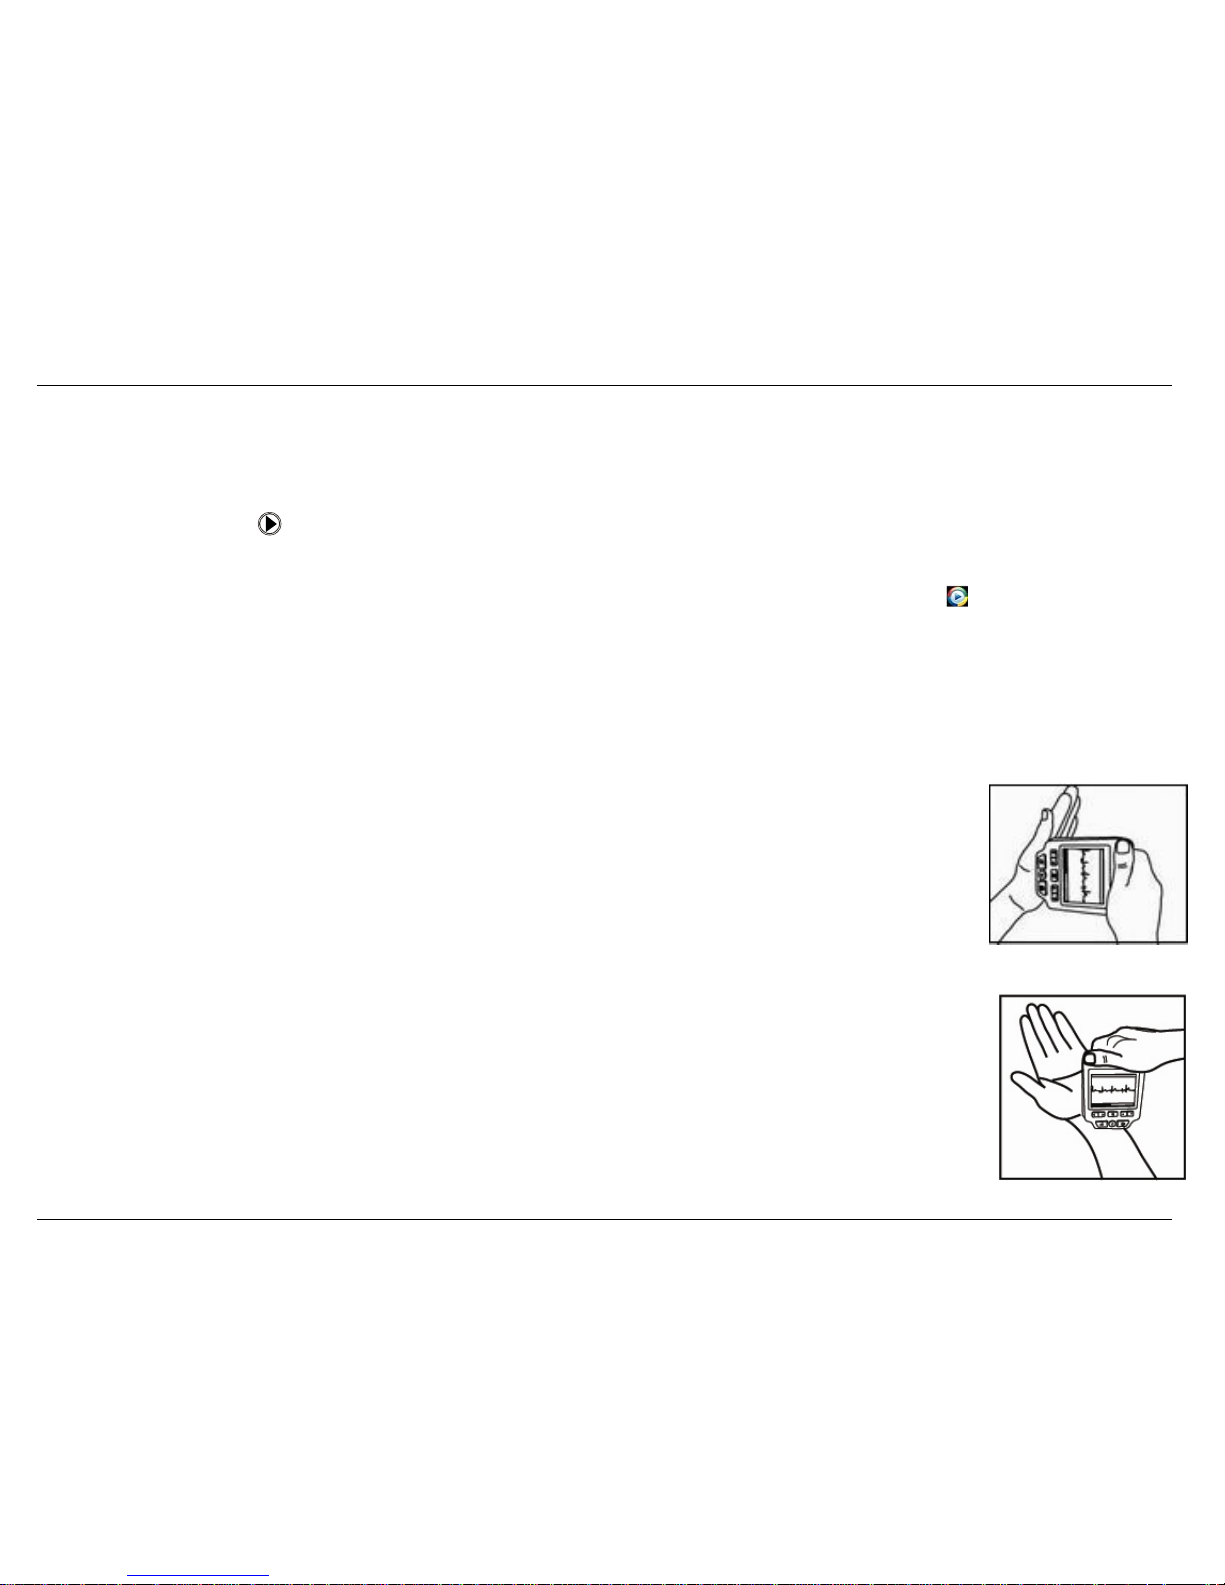
It is convenient to take ECG measurement by hands or palms. The ECG waveform detected by this method is
equivalent to Lead I of regular ECG examination.
A. Palm placement: Hold the de vice with right hand; make sure that the fingers touch the metal electrode II and III reliably.
Press the electrode I on the left palm, as shown in figure 4-1.
B. Wrist placement: Hold the device with right hand; make sure that the fingers touch the metal electrode II and III
reliably. Press the electrode I below the left wrist about 1 inch, as shown in figure 4-2. When the ECG signal at palm
placement is not good, try to measure with wrist placement.
Figure 4-1 palm placement
Figure 4-2 wrist placement
Page 11
User Manual for PC-80D Easy ECG Monitor
6
Note: Keep at ease and make sure the skin contact well with the electrodes during ECG measurement. Please place the device on correct position, do
not shake it during the measurement. Dirty skin may cause poor signal quality, so clean your skin before measuring.
2). Leg Measurement
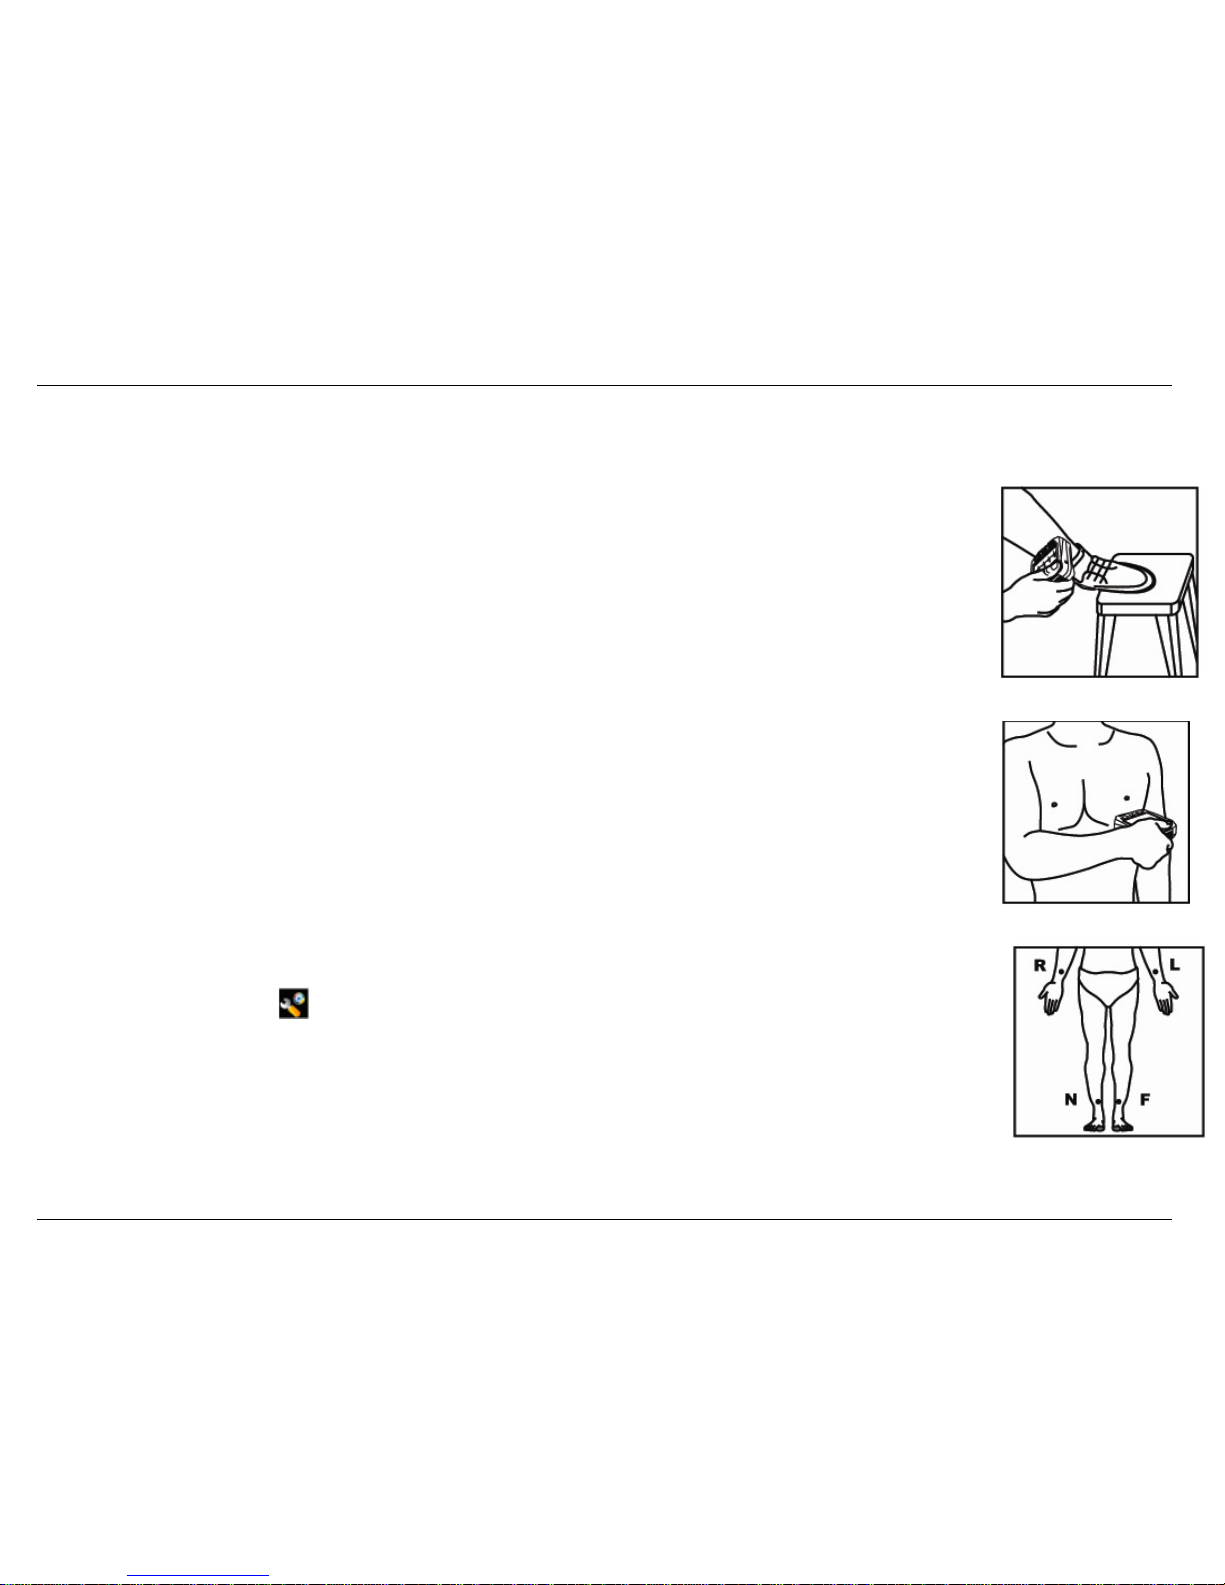
The ECG waveform detected by Leg Measurement is equivalent to Lead II of re gular ECG examination. Keep at ease when
seating down, and then lift your left leg on a bench. Hold the device with the right hand when measuring and make sure that
the fingers touch the metal electrode II and III reliably, place the electrode I on the left leg above the ankle, as shown in
figure 4-3.
Note: Keep at ease and make sure the skin is clean and moist before measuring.
3). Chest Measurement
It is recommended to take ECG measurement on chest, since the signal detected by this way is stronger and with less
interference. The ECG waveform detected by Chest Measurement is similar to the Lead V4 or V5 of regular ECG
examination. Hold the device with the right hand, make sure that the fingers touch the metal electrode II and III
reliably, as shown in figure 4-4, place the electrode I on the left chest align with the midclavicular line (V4 position) or the
anterior axillary line(V5 position) and on the level of the 5
th
intercostal space.
Note: keep at ease and clean the electrode I by using the wet cloth before measuring. If the waveform baseline wanders or
noisy waveform appears, hold your breath for a moment to get stable and clean signal.
2. Measurement by external lead wires
The ECG signal which is detected by exter nal lead wires is more stable than that by hand measurement. ECG
measurement by external lead wires can be done by placing the electrodes on limbs or chest respectively.
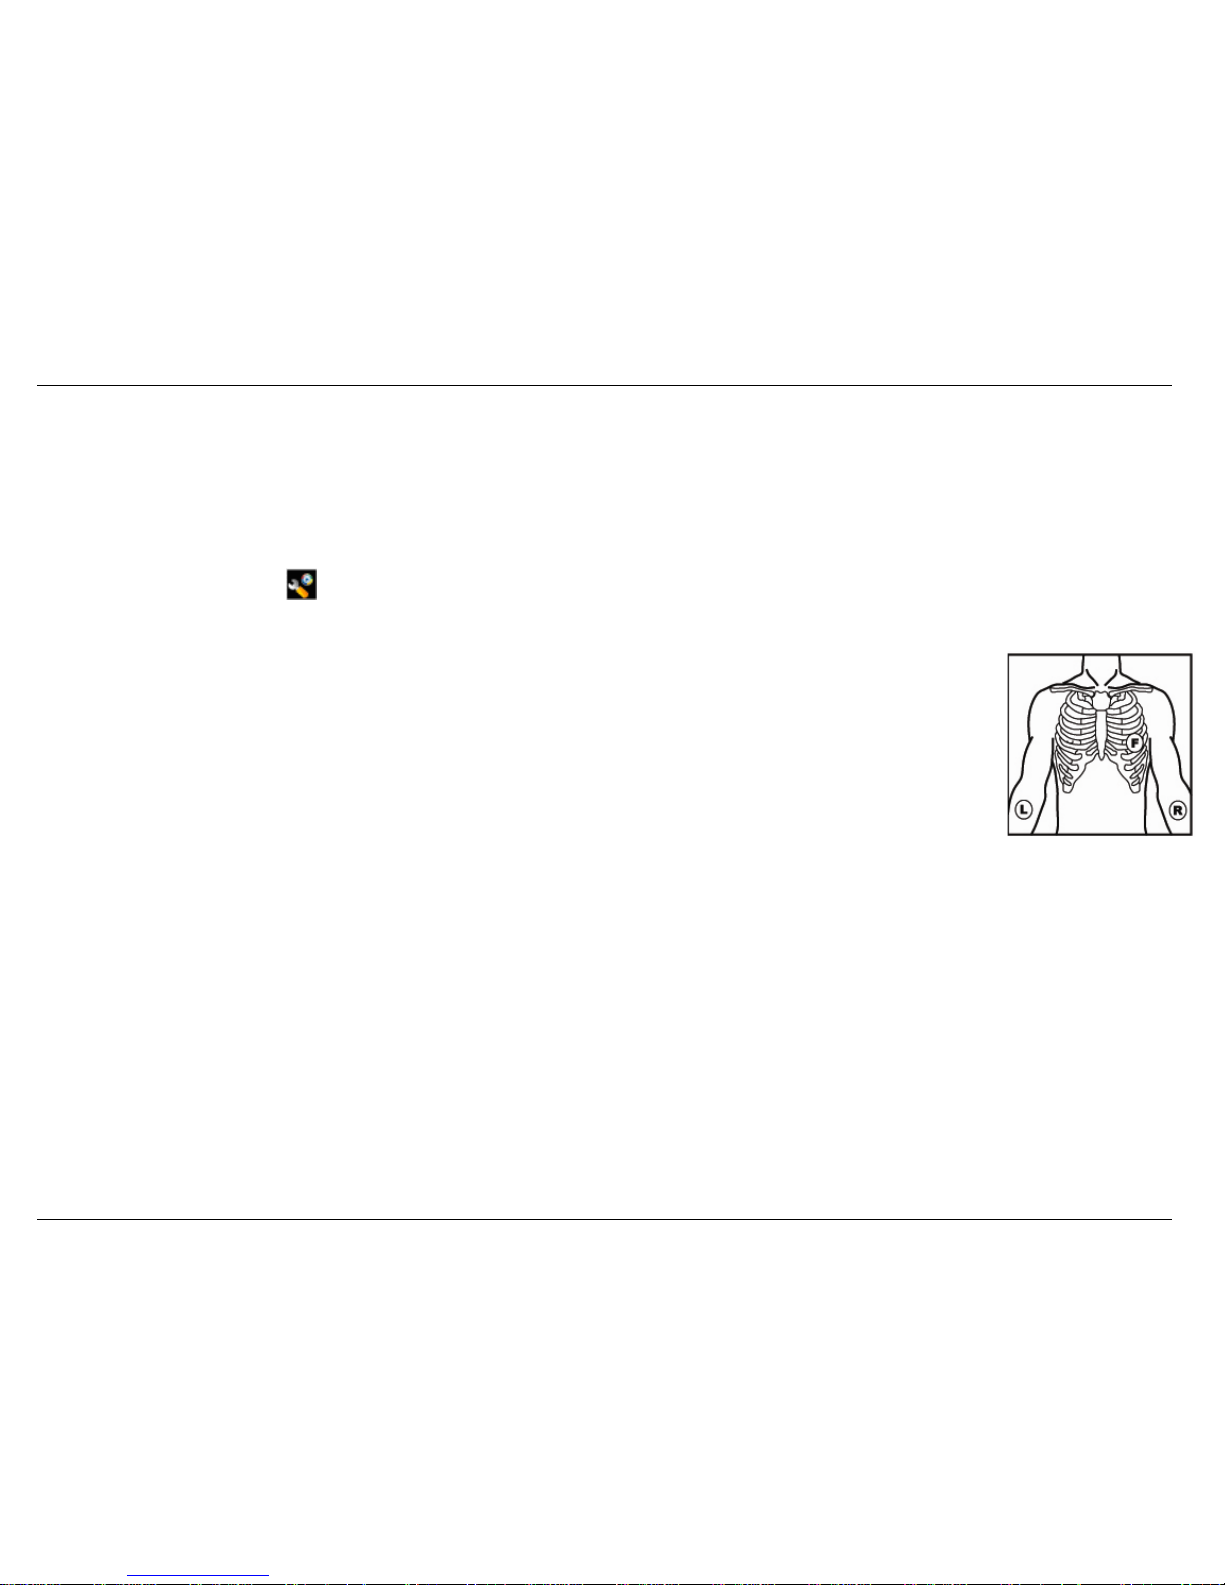
1). Electrodes placement on limbs
On default menu screen enter “ ” option setup menu to select “limb lead” for signal input. By this way, the 3 channels of
limb lead I, II and III can be measured and displayed si multaneously and continuously. Either adhesive electrodes or limb clip
type electrodes (optional) can be used to do the measurement. The location of the electrodes is shown in figure 4-5.
R (red): place on interior of right arm (between the wrist and the elbow);
L (yellow): place on interior of the left arm (between the wrist and the elbow);
F (green): place on interior of the left leg (between the knee and the ankle);
N (black): place on interior of the right leg (between the knee and the ankle)
Figure 4-4 Chest measurement
Figure 4-3 Leg measurement
Figure 4-5 the location of electrodes on limbs
Page 12
User Manual for PC-80D Easy ECG Monitor
7
Operation: Connecting the lead wires after placing the electrodes well and then insert the connector onto the device; Power on the device to select
the “limb lead” for signal input and set the measuring time on option setup menu, then press “”ok key to start the measurement.
Note: keep at ease when seating or lying down. Clean the skin by using the wet cloth when selecting limb clip type electrodes (optional) to measure.
Direction of using disposable ECG electrodes: Tearing off the protective film to place it on the skin, and then connecting the electrodes with lead
wires. It is recommended to put the electrodes on chest for longtime monitoring, please refer appendix 1 for more details.
2). Electrodes placement for Chest Lead Measurement
On default menu screen enter “ ” option setup menu to select “chest lead” for signal input. ECG signal detected by this method is single channel
measurement, which is equivalent to the waveform of regular chest lead. It is intended for professional use (ie. by doctor). The location of the
electrodes is shown in figure 4-6.
R (red): place on interior of right arm (between the wrist and the elbow);
L (yellow): place on interior of the left arm (between the wrist and the elbow);
F (green): on the 5th intercostal space at the left anterior axillary line;
N (black): unused.
Operation: Connecting the lead wires after placing the electrodes well and then insert the connector onto the device; Power
on the device to select the “chest lead “for signal input and to set the measuring time on option
setup menu, then press “”ok key to start the measurement.
Note:
1. The Chest Lead Measurement can obtain the ECG signal of Chest Lead (V1-V6). Please refer to appendix I to select the location of F (green)
electrode when you want to get the different chest lead. At the same time, you should set the lead information (V1-V6) that you want on the option
setup menu.
2. Either adhesive electrode or sucking bulb electrode (optional) can be used to Chest Lead Measurement. Please refer to appendix I for more details
about measuring methods.
Figure 4-6 the location of chest lead measurement
Page 13
User Manual for PC-80D Easy ECG Monitor
8
4.2 Measuring procedure
4.2.1 Preparing Phase
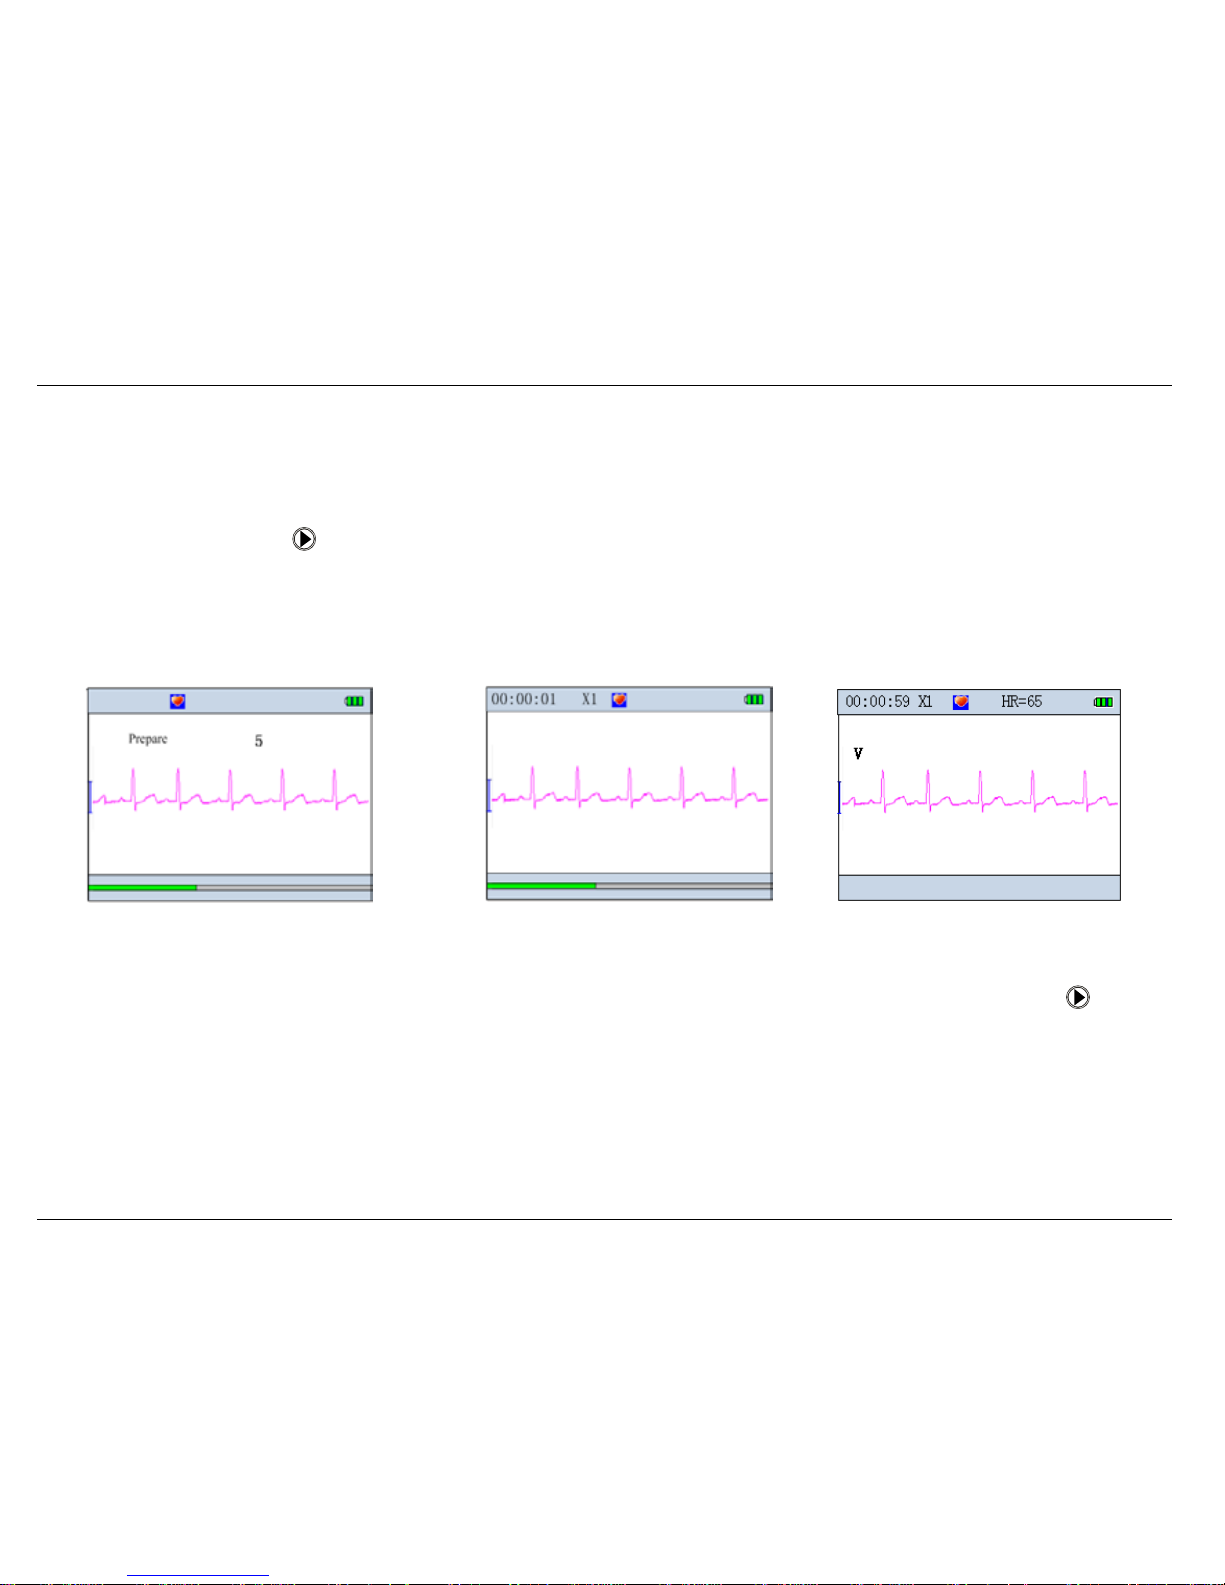
The quick measurement is as following for details:
At default menu screen, press “
” measure key to enter into the quick measuring screen directly, as shown in figure 4-7, in addition, at the
beginning of measurement (including quick and long term measurement), the preparing phase shows on the screen with a heart beat icon and counting
down seconds, the beeper will sound with the counting down at the interval of one second.
During this period the device will check the signal quality and auto scale the display. Please adjust your holding position if the detected waveform is
not smooth or poor signal and it may prompt:“Chec k well-connection with lead wires.”
4.2.2 Quick measureme nt by built-in ele ctrodes
Please refer to the section 4.1 “Hand measure ment” to make the electrodes well-connection with skin. At default menu screen, press “ ” measure
key can enter into quick measurement preparing screen directl y, after 10 seconds, it will enter into the measuring screen, as shown in Figure 4-8. The
measuring time lasts for about 30 seconds.
4.3Long te rm measurement by externa l lead wires
There are 2 options (limb lead and chest lead) for long term measurement by external electrodes. The detail information about the electrodes
placement is described in section 4.1.
Figure 4-9measuring(chest lead )
Figure 4-7 (quick measurement)
Figure 4-8 (quick measurement)
Page 14
User Manual for PC-80D Easy ECG Monitor
9
4.3.1 Chest lead measurement
Please refer to the section 4.1 “Chest lead measurement” to connect the lead wires; enter “ ” option setup menu to select “chest lead” for signal
input; return to default menu screen, move the cursor to the “
” measure icon, press the “”ok key to enter into external electrodes measurement (3
lead wires) preparing screen, after 10 seconds, it will enter into the chest lead measuring screen, as shown in Figure 4-9. In this measuring mode, it
can measure and display the ECG signal of lead I, lead II, lead III or chest lead (V4) respectively according to electrodes placement.
4.3.2 Limb lead measurement
Please refer to the section 4.1 “Chest lead measurement” to connect the lead wires; enter “ ” option
setup menu to select “limb lead” for signal input; return to default menu screen, move the cursor to the
“
” icon, press the “”ok key to enter into external electrodes measurement (4 lead wires) preparing
screen. After 10 seconds, it will enter into the limd lead measuring screen, as shown in Figure 4-10.
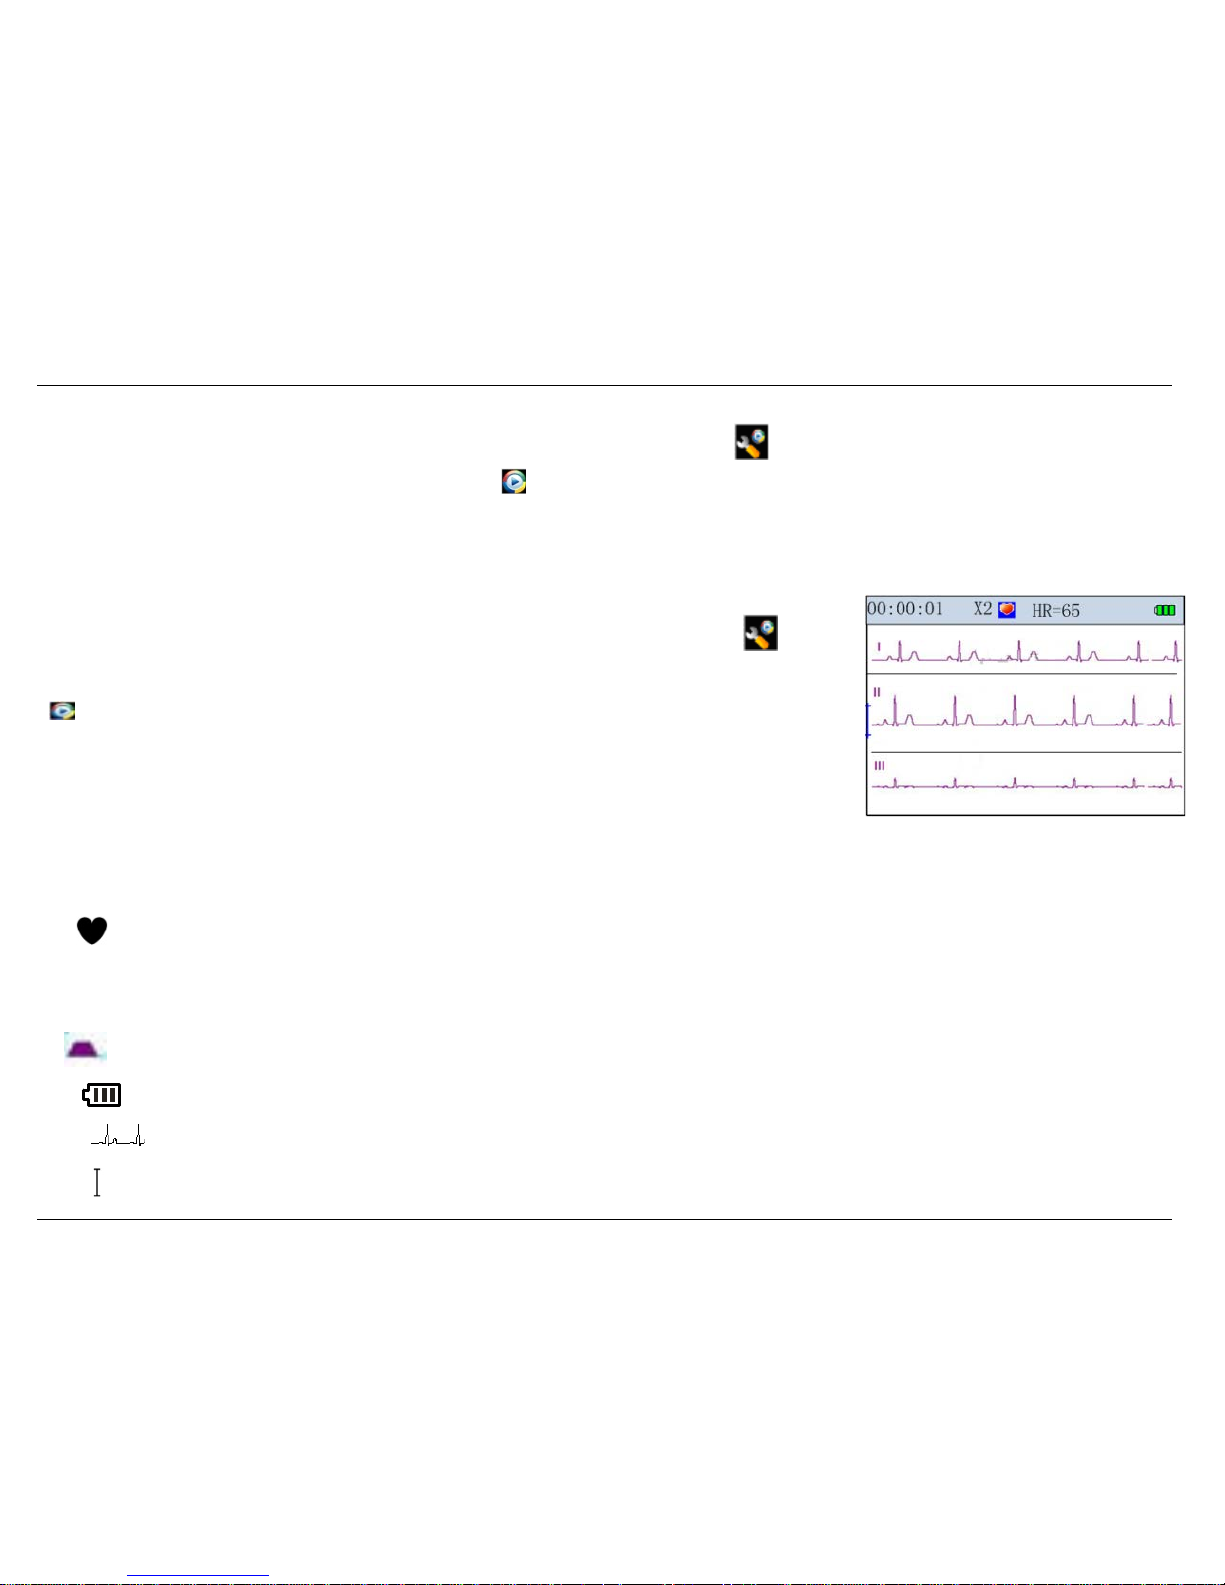
On-screen display:
(1 ) “00
:00:
01”: Measuring time
(2) “X1”:“X1”: ECG waveform amplitude scale; “X2”: twice size of the nominal scale; “X4”: four
times size of the nominal scale.
(3) “ ”: Heart beat indicator. It flashes while heart beats.
(4) “HR=65”: Current HR value. It is displayed during measurement only when external lead wires are used, if the ECG signal is poor, this value
could become “---”.
(5)
: Enhanced filter mode indication. It shows up only when the bandwidth is set to enhanced mode.
(6)“ ”: Status of battery capacity
(7) “
”: ECG waveform
(8) “”: Mark corresponding to 1mV amplitude
Figure 4-4 measuring(Ext.4)
Figure 4-10 measuring(limb lead )
Page 15
User Manual for PC-80D Easy ECG Monitor
10
(9) “ ”: Status bar of measurement progress.
Operation:
When in the quick measurement by built-in electrodes:
① Press “
” key, the measuring display screen will be made a quarter turn counterclockwise;
② Press the “
” ok key or “ ”return key to stop measuring and return to the default menu screen directly, the measuring data won’t be saved.
When in the external electrodes lead wire measurement:
① The device will stop measuring automatically if the measuring time is over;
② Press the “
” ok key or “ ” return key to stop measuring and return to the default menu screen directly, the measuring data would be saved.
Note:
① If the storage is full, the device will stop to measure and it prompts “Fail to save this record because of full data memory”, at this moment, you
should delete some records to make sure enough storage space, then measuring again.
② If the battery is low, the battery icon “
” flashes red, the device stop to measure and it prompts “low battery voltage, measuring is interrupted,
return key to exit! ”, at this time, connect to external power can continue to measure, or exchanging a new battery to measure again.
③ During measuring mode, it will have regular pulse beep sound.
④During the measurement by external lead wires, if “HR alarm” option is set to “On” and the HR value is out of the alarm limits, the alarm sounds
will occur with 3 short beeps, and the HR value is reversely displayed.
⑤ During the quick measurement, if the device does not check well contact with the electrodes or the signal is poor, it will not be calculate the
average HR value, the measuring result is “poor signal, measure again”, this data will not be saved.
⑥ During the measurement, if the placement of electrodes loose contact with the electrodes, it will prompt “poor signal”. If it is external lead wire
measurement, the HR value shows “__”.
Page 16
User Manual for PC-80D Easy ECG Monitor
11
4.4Data analysis and measurement Result Description
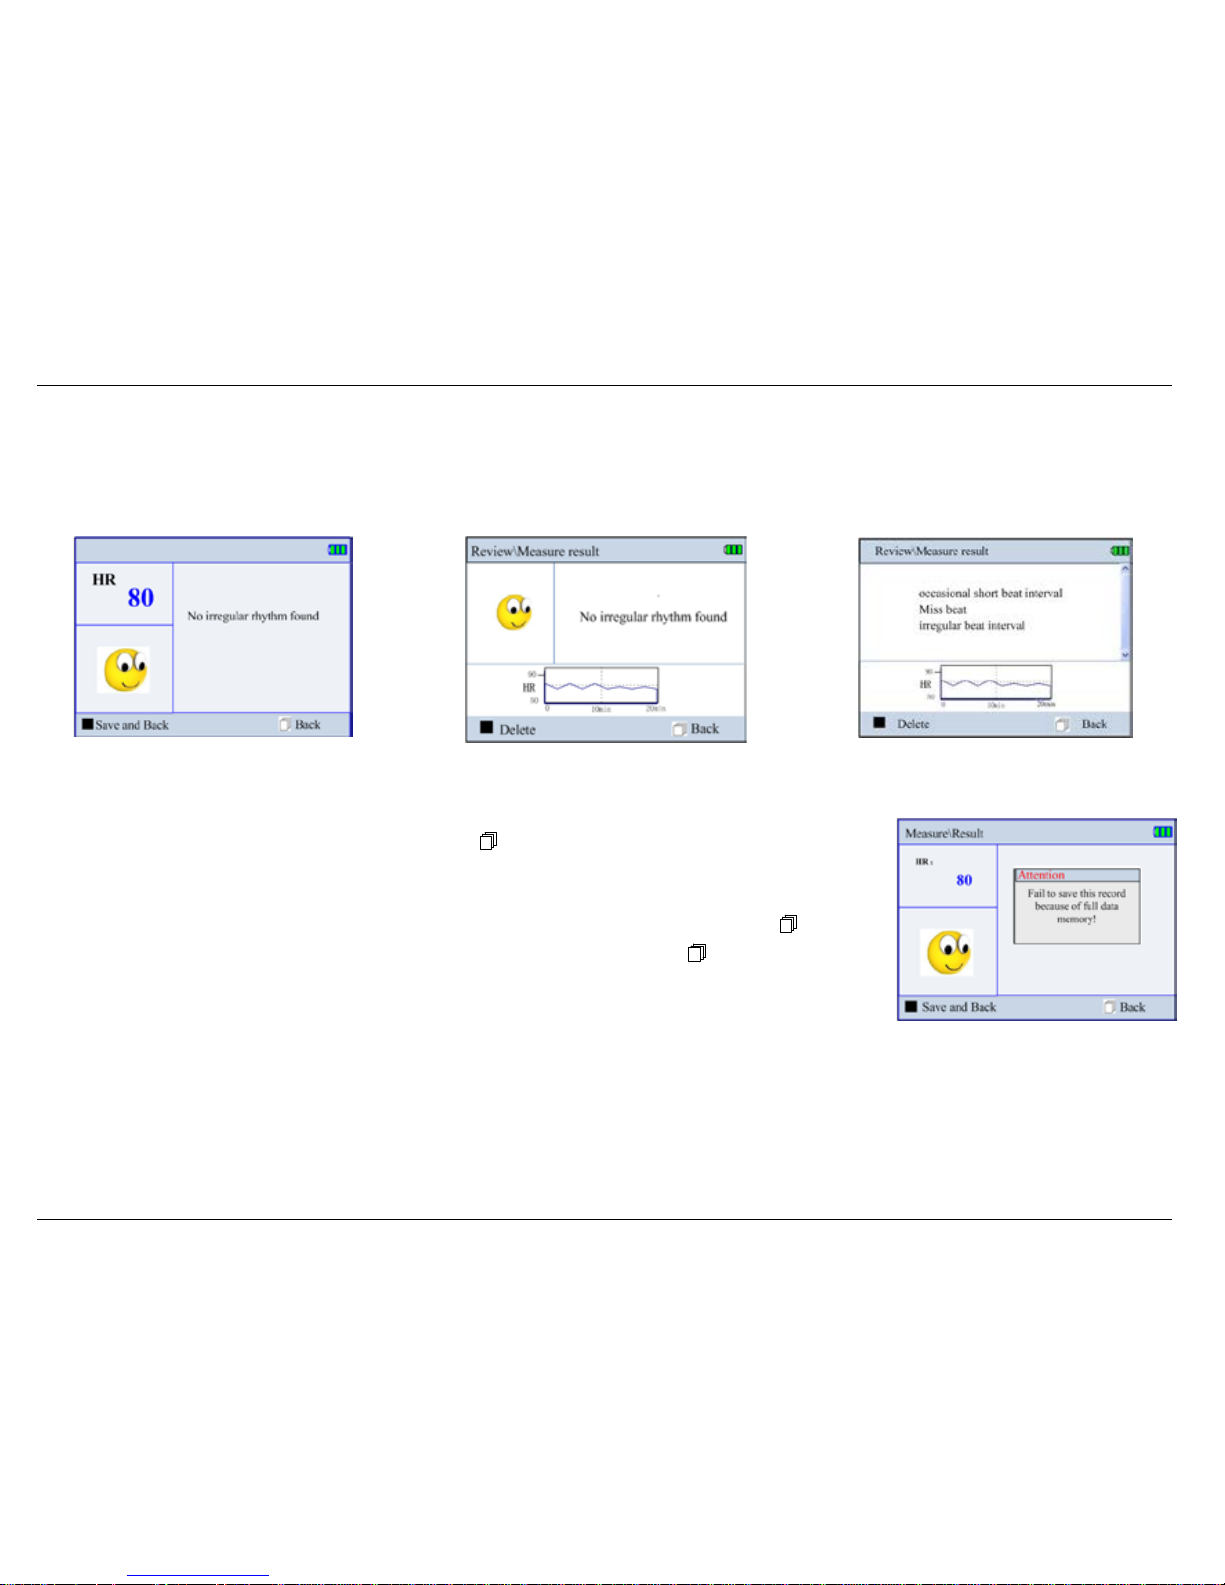
When the measuring is finished, the device will analyze the measurement result, as shown in figure 4-11/4-12/4-13; the measurement result
description refers to the index 2.
1. In the external lead wire measuring mode, the current measurement result will be saved acquiescently, as
shown in figure 4-12/4-13. Press the “” ok key or “
” back to return the default menu screen after
reviewing the result.
2. After the quick measurement by built-in electrodes, the device will be saved the result automatically, and it
prompts “The result is saved successfully, as shown in figure 4-14. Press the “” o k key or “
” back to
return the default menu screen. If without any key operation in 6 seconds, press “
” back key, return to
default menu screen directly and the current measurement result won’t be saved
Notes:
1. Voice prompts for working status and measuring result.
2. The device can provide with 19 types ECG measurement result display when using the quick measurement, the
measurement result descriptions refer to the appendix 2 for detail.
3. Up to 8 hours records can be stored in built-in memory, when the memory is full, the device will prompt that "Memory full".
4. During the external lead wire measurement, the measurement result screen will not be displayed if you press to stop measuring.
Figure 4-12(no irregularity found in Ext.)
Figure 4-14
Figure4-11(no irregularity found Quick measurement)
Figure 4-13 (irregularity found in Ext.)
Page 17
User Manual for PC-80D Easy ECG Monitor
12
5 Waveform Review
5.1 Reco r d list
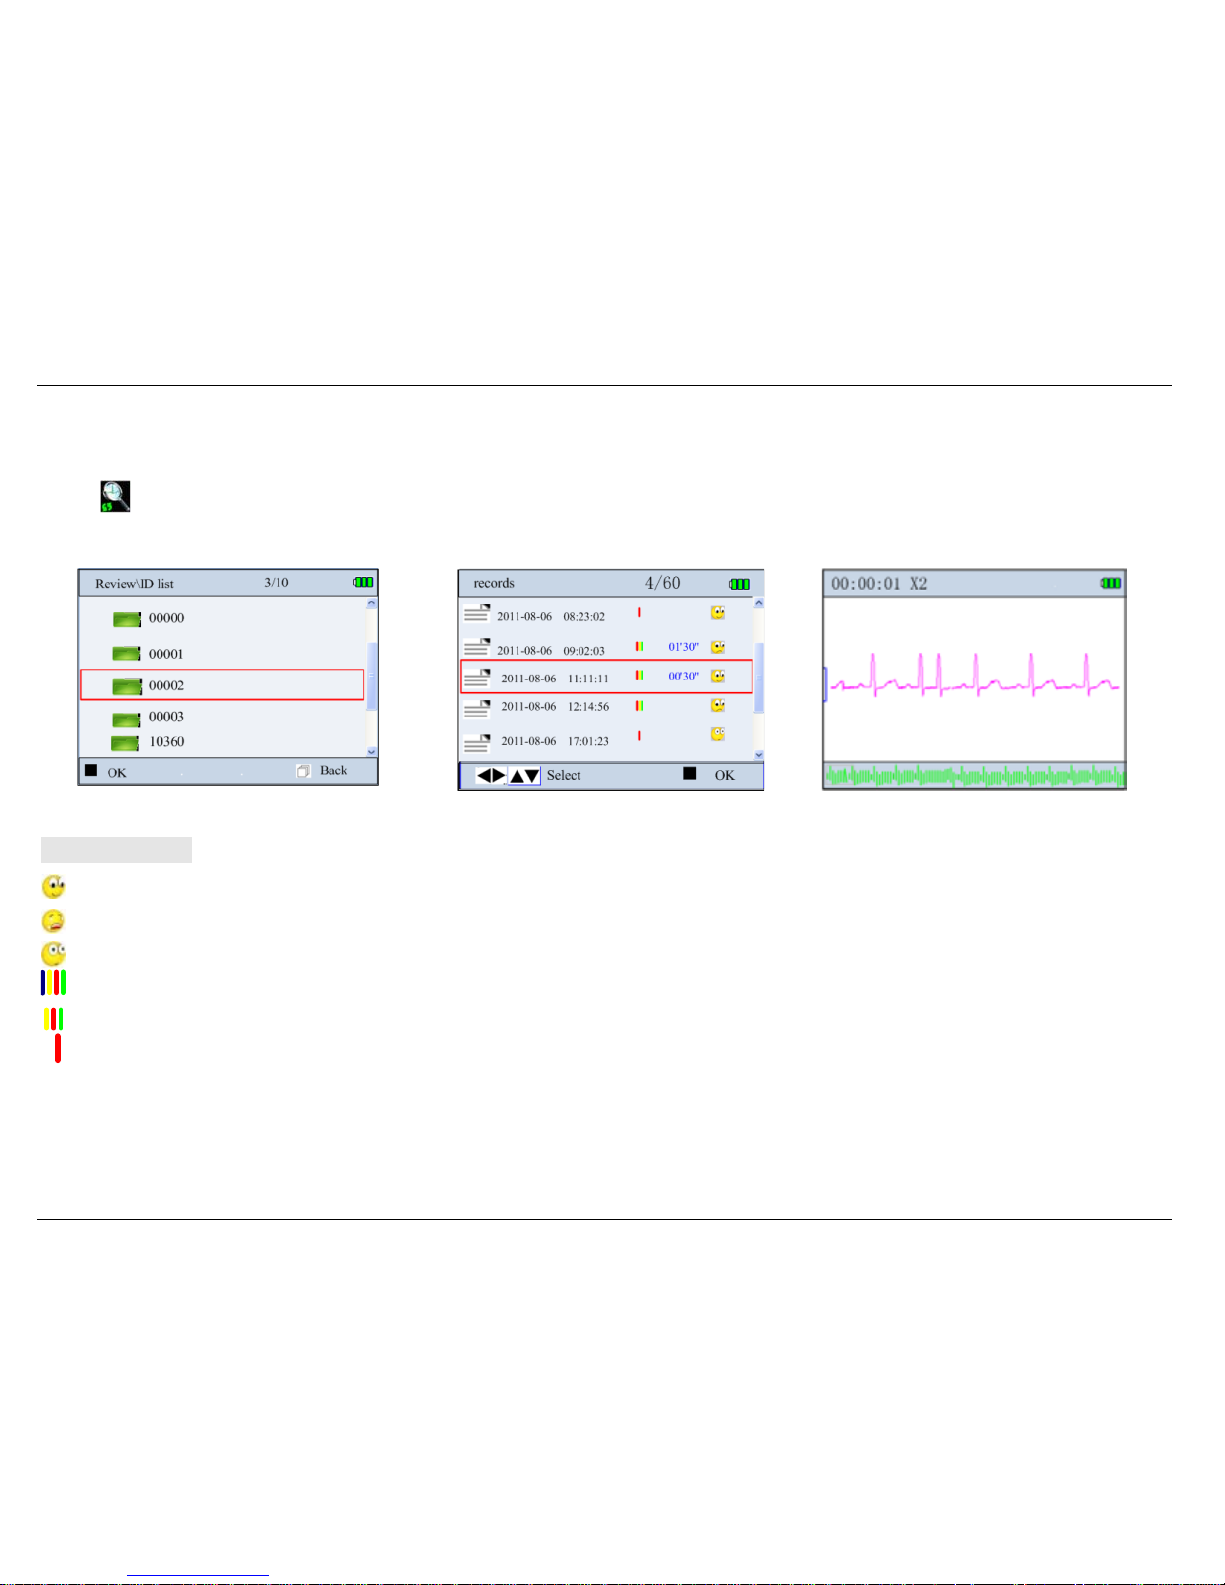
Select “ ” review key on the default menu screen, then press “” ok key to enter into the user ID list screen, as shown in Figure 5-1. Selecting a
folder which contains the data for a given ID,then press OK key,the display screen is as shown in Figure 5-2
.
Legend of icons :
: Indicates the measured result without irregularity found.
: Indicates the measured result with irregularity found.
: Indicates that the waveform with much interference or lead off during measurement.
: Indicates the Limb measurement by external electrodes (With 4 lead wires)
: Indicates the Chest lead measurement by external electrodes (With 3 lead wires)
: Indicates the quick measurement (by built-in electrodes)
Note: the ID list only display the ID which contains data.
Figure 5-2 waveform review/record list
Figure 5-1 waveform review/ID list
Figure 5-3 Review(Quick measurement)
Page 18
User Manual for PC-80D Easy ECG Monitor
13
5.2 Waveform Review
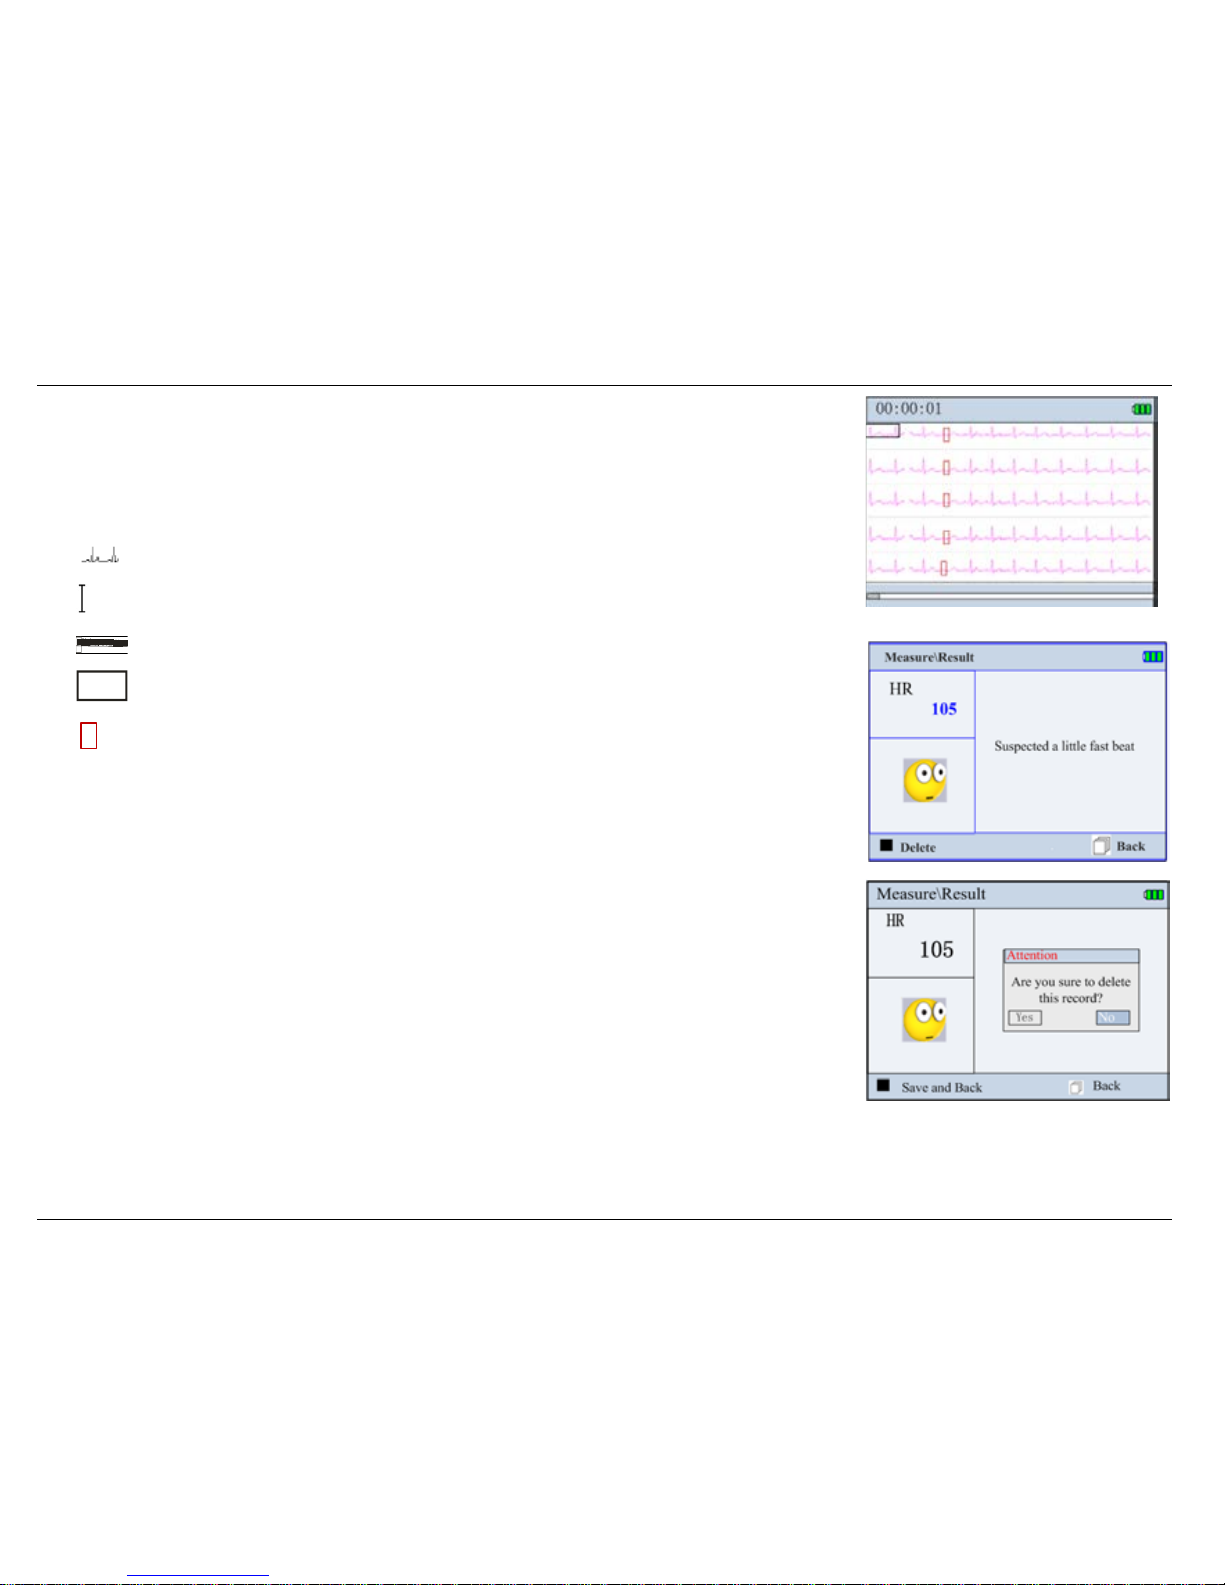
In the record list, selecting a record, then press “”o k key, the quick measurement record is shown in the
figure 5-3; the external lead wire measuring records is shown in figure 5-4.
On-screen display:
(1)“ ”: Measured ECG waveform
(2) “
”: Mark corresponding to 1mV amplitude
(3) “ ”: ECG waveform snap-shot
(4) “ ”: Zooming box for ECG waveform
(5) “
”: Mark of irregular segment of waveform. Please refer to appendix 2 for detailed information.
Notes: The Zooming box contains ECG waveform measured in about 3~4 seconds.
1. For quick measurement by built-in electrodes, the display will review this record automatically, press
“” ok key, the display will browse the recorded waveform automatically, Press it again to stop the
browsing operation; Press the “/” can scroll the waveform manually. When the re view is finished,
press “” ok key to bring the measurement result, as shown in figure5-5, in the measuring result screen,
press “” ok ke y, it prompts “Are you sure to delete this record?”, as shown in figure 5-6 screen. You can
delete this record according the prompts.
2.
For external lead wires measurement (limb lead and chest lead), the display shows 5 lines of
compressed waveform, e very line contains 30 seconds of waveform data as shown in figure 5-4. Press
the “/” key to move the grey zooming box pane, press “” ok key to zoo m in the waveform
display within the grey zooming box.
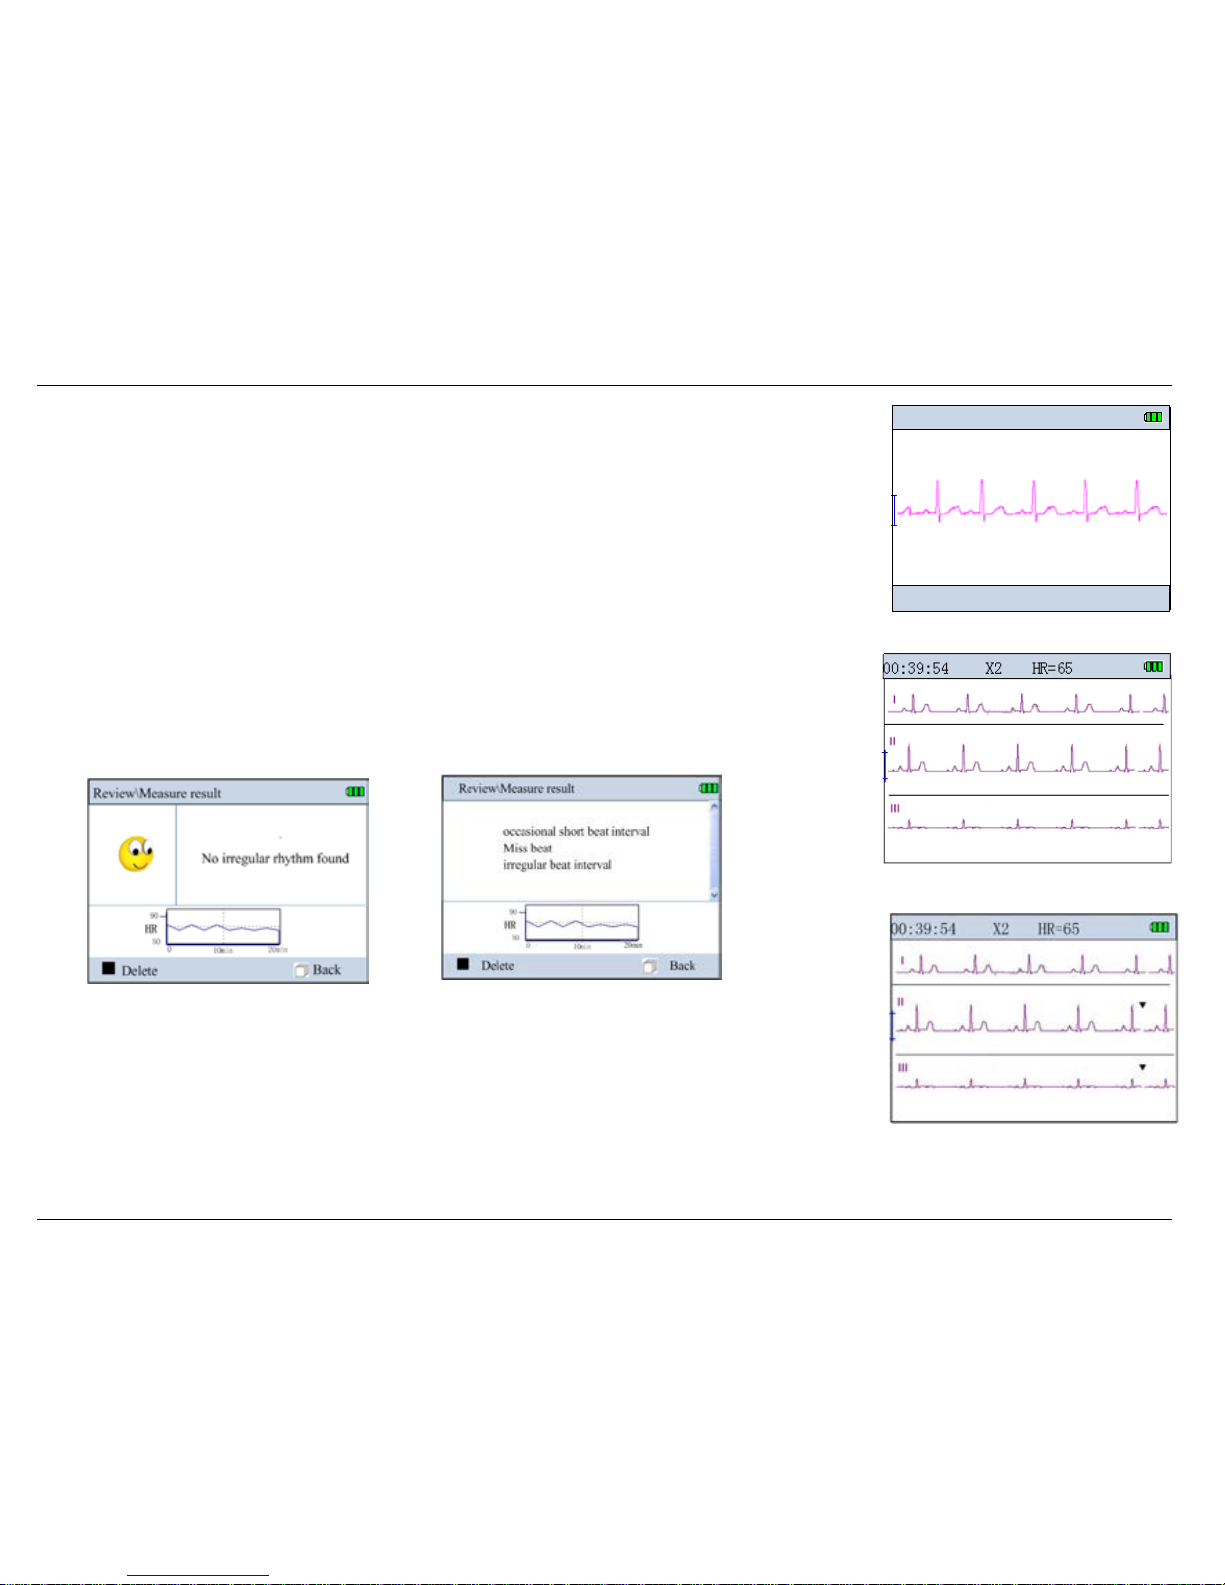
The chest lead review screen is shown in figure5-7; the limb lead review screen is shown in figure 5-8.
Figure 5-5
Figure 5-4 Review(External electrodes)
Figure 5-6
Page 19
User Manual for PC-80D Easy ECG Monitor
14
In the figure 5-7/5-8/5-9 screen, press the “” ok key can review the result description for this ID record, as
shown in figure 5-10/5-11. In the measure result screen, press the “” ok key can delete this record. Note:
① When in limb lead review screen, press “,” key can switch the three and single signal channel on
screen display; and if there is any irregular found in the review screen, it will display the measuring HR
value instantaneously, and there is an inverted triangle shown on the irregular segment, as shown in figure
5-9.
② For the external lead wire measurement record description, if there is no irregular found, it w ill display a
smile face and prompts “No irre gularity found”. HR trend graph which shown below displays the HR
record in length of 20 minutes in one page, press “,” to review next page, as shown in figure 5-10;
if there is any irregularity found, the result is as shown in the figure 5-11, it will display the statistical
result of irregularity.
Figure 5-7 (The Chest lead)
Figure 5-8 (no irregular found in Limb lead)
Figure5-11 (irregularity found in Ext. )
Figure 5-9 (irregular found in Limb
00:00:01 X1
V
Page 20
User Manual for PC-80D Easy ECG Monitor
15
6 Data Management
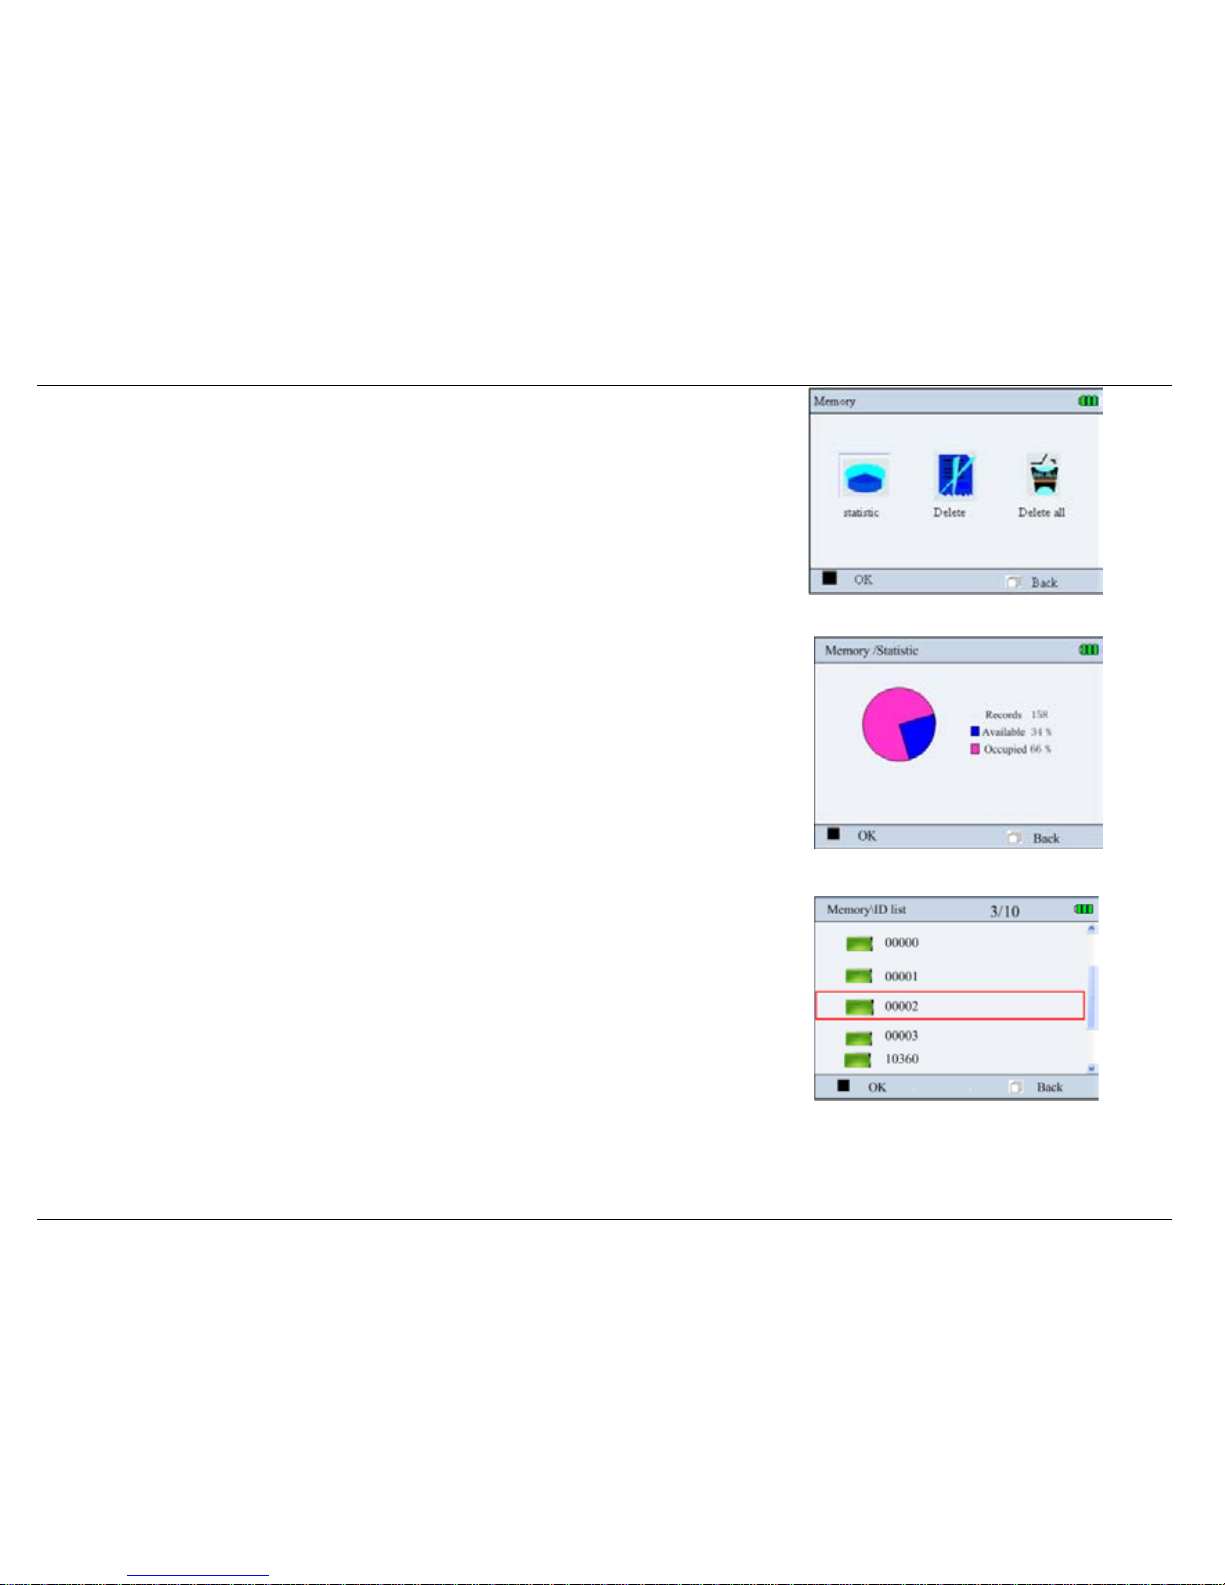
Select “Memory” icon on the default menu, then press “ OK” button to enter into data
management screen, as shown in Figure 6-1.
6.1 Storage status
On data management screen, select “Statistic”, then press “ ” ok key to enter into the Storage
status screen, as shown in Figure 6-2.
6.2 Delete ID
1. On data management screen, select “Delete” with Navigation Key, then press “” ok key to
enter into the ID list screen, as shown in figure 6-3.
2. Press the Navigation Key “,, or ” to select the ID; when pressing “”ok ke y, there are
two different prompts for two different situations:
Situation 1: this ID does not contain any data record.
(1) The ID number of “00000” ~ “00004” is reserved, when pressing “” ok key, the device
prompts “This ID can’t be removed”.
(2) If it is a new ID, press the “”ok key to delete the selected the record according to the
prompt: “Are you sure to delete this ID”.
Situati on 2: there are data records under this ID. Pressing “” ok key to enter into the record
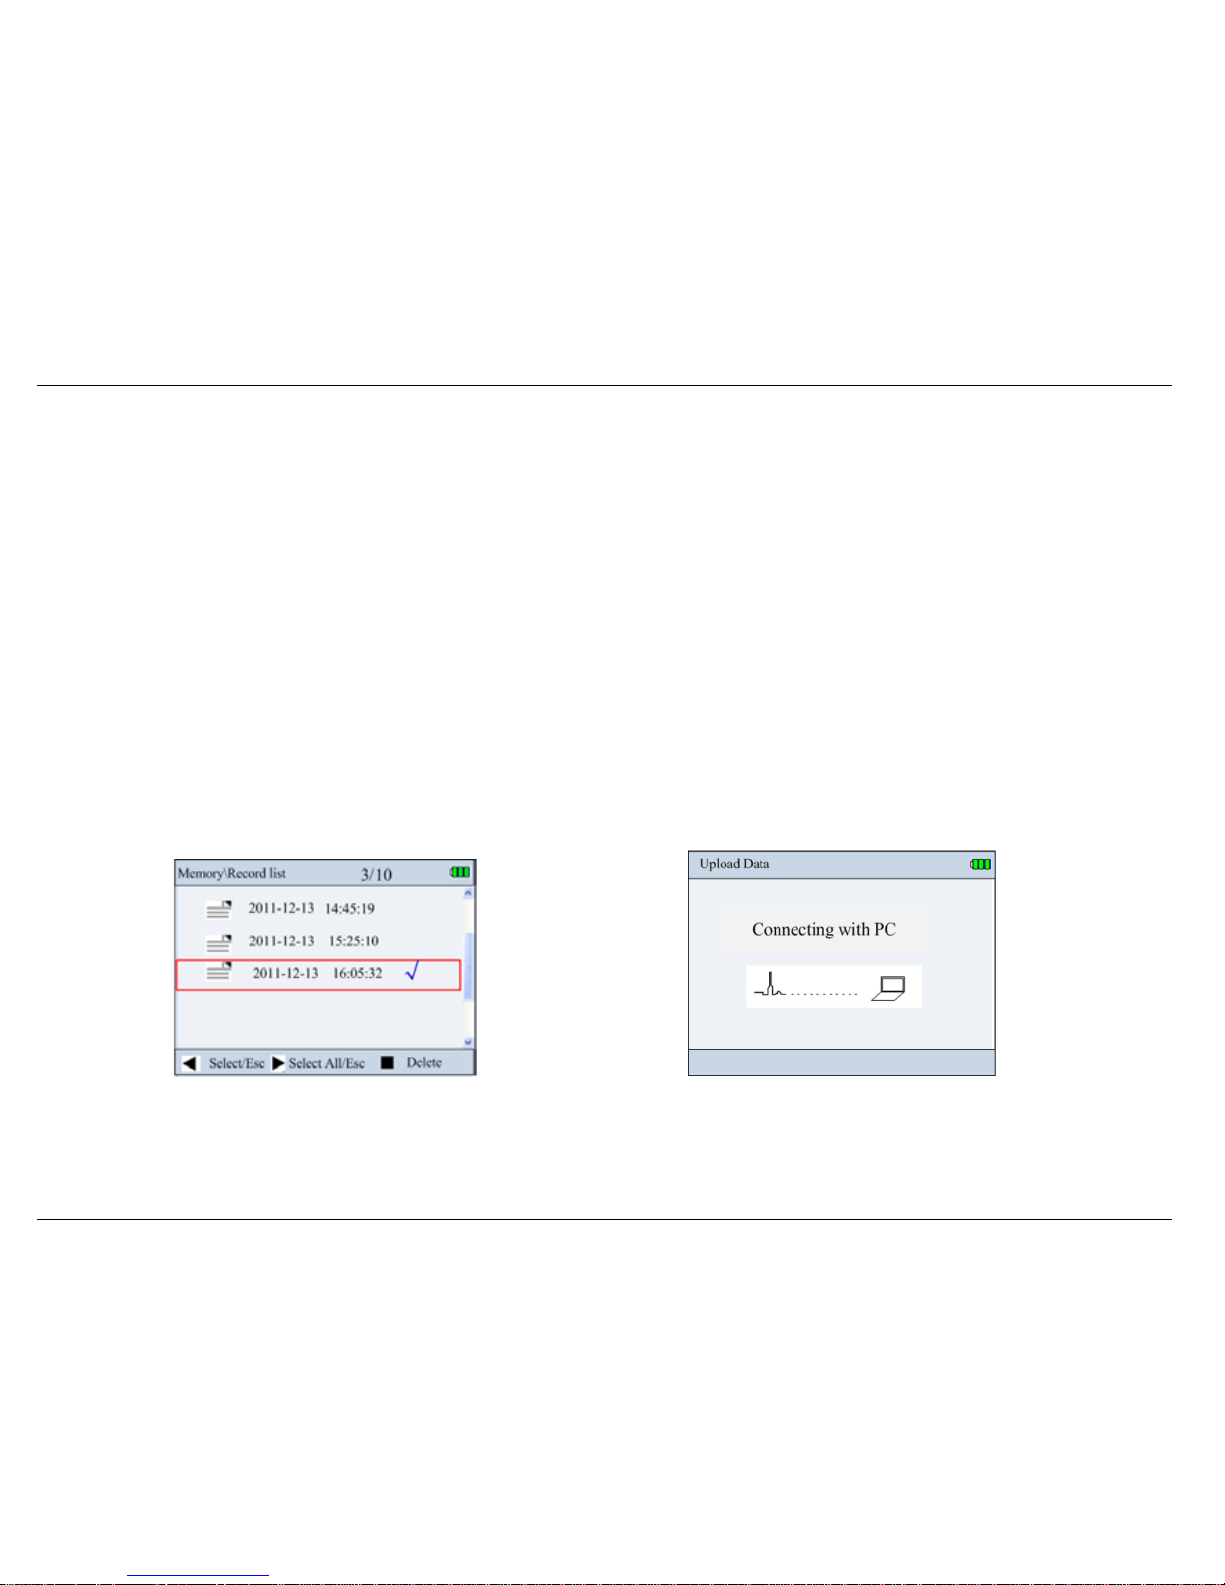
list screen, as shown in figure 6-4. The record list screen display the date and time of all records for this ID.
Press the Navigation Key “” key to perfor m select this ID(press it again to cancel selection), the selected record will be labeled “√” ;
Figure 6-3
Figure 6-1
Figure 6-2
Page 21
User Manual for PC-80D Easy ECG Monitor
16
Press the Navigation Key “” key to select all the data records under this ID (press it again to cancel selection), the selected record will be labeled
“√”;
Press “”ok key: delete the selected record according to the prompt.
Note: the ID list display the all ID numbers, even if there is no record under this ID number.
6.3 Delete all
On data management screen, select “Delete all” with Navigation Key, then press “” ok key, at this time it prompts that “Delete all”, as shown in
figure 6-6. You can delete all data records stored in the device according to the prompt.
6.4 Upload Data
When measuring is finished, on data management screen, select “Upload data” to ent er into upload data screen, as shown in figure 6-5. On t his screen,
you can transmit data to PC for data management, and interpretation through PC-80D data cable. Please refer to the ECG Viewer Manager for
detailed operation.
Figure 6-4 Figure 6-5
Page 22
User Manual for PC-80D Easy ECG Monitor
17
7 Measurement option setting
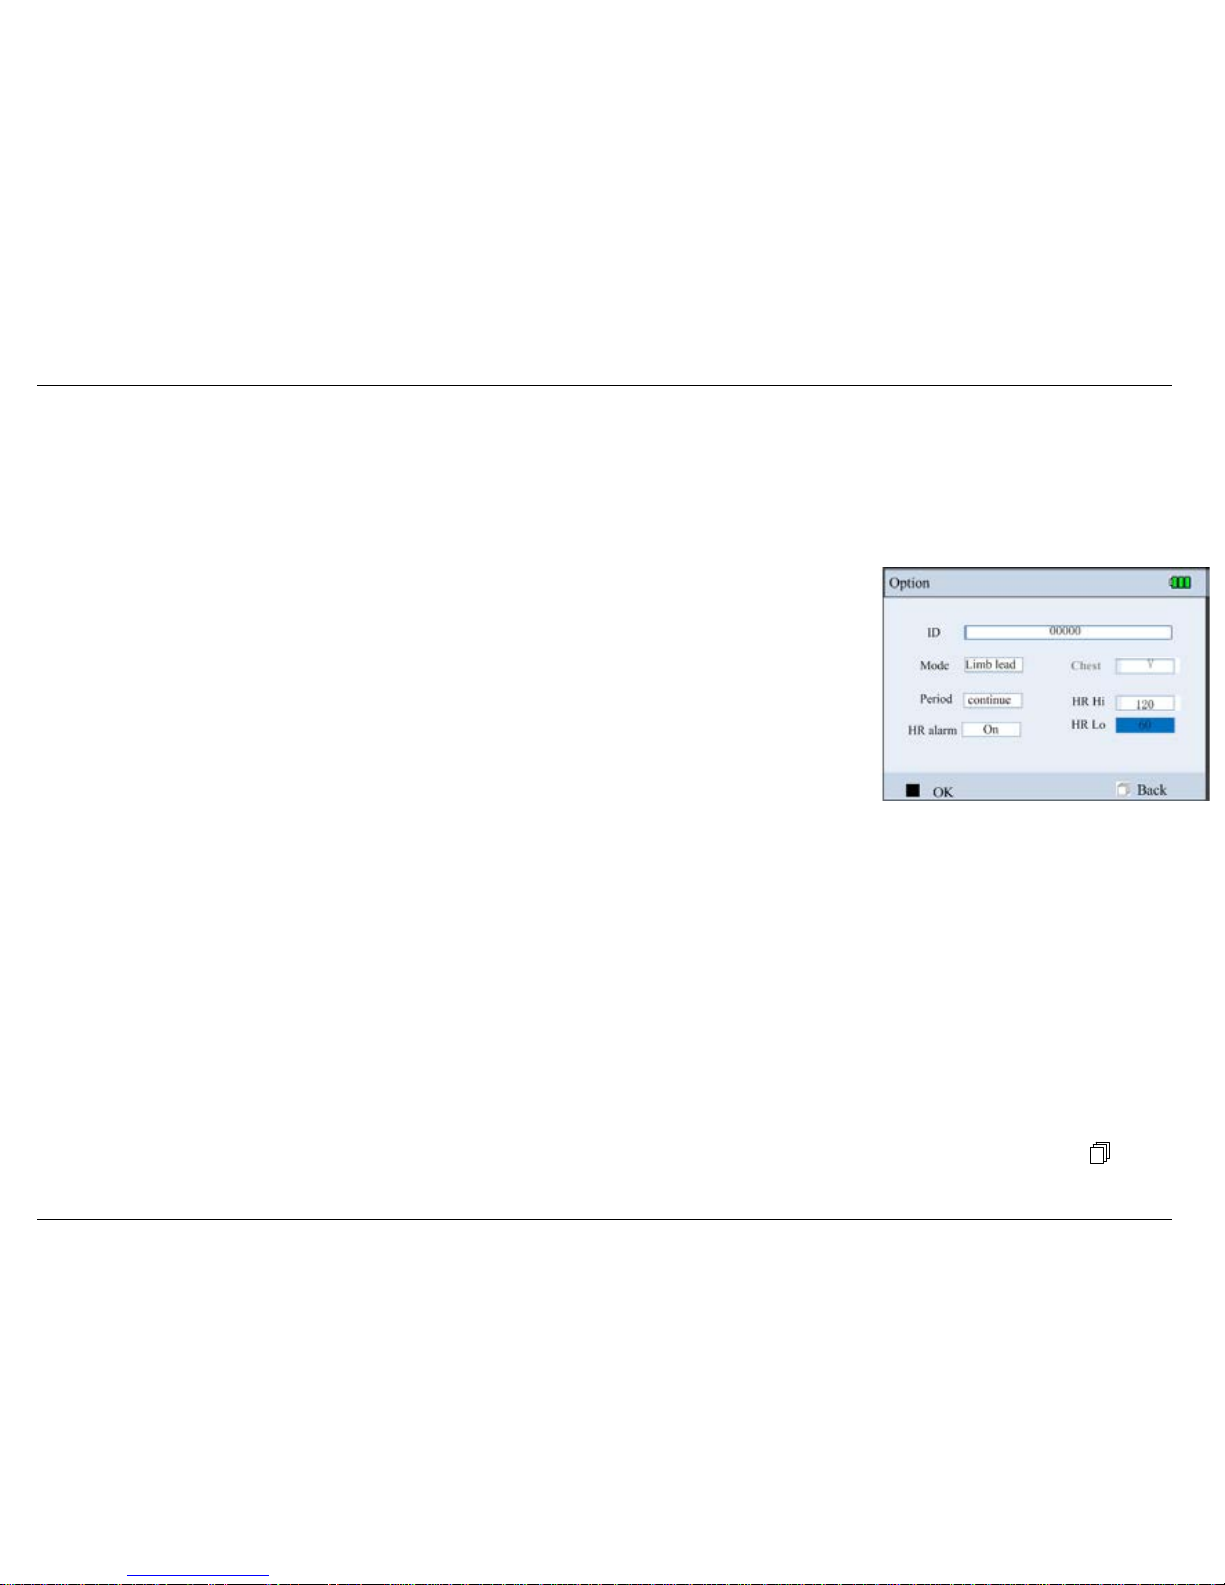
On the default menu,select the “Option”,then press the “”ok key to enter into the optional parameters setting for measurement, as shown in figure
7-1.
On-screen display:
User ID: Displaying the established ID No. or “New ID”. At most 100 ID can be created. When creating a
new ID, at most 30 characters can be entered; the default ID is “00000”, the number of “00000” ~ “00004”
is reserved (already created at factory) and can not be deleted.
Mode: it is valid only for external lead wires. “Limb lead” and “Chest lead” are optional. The “Limb lead”
is external electrodes measurement with 4 lead wires; the “Chest lead” is the external electrodes
measurement with 3 lead wires, it is intended for professional use (ie. by doctor). The “limb lead” or quick
measurement by built-in electrodes is recommended for normal use. The default setting is “limb lead”.
Chest lead: when the measuring mode is set to “chest lead”, V lead is defaulted setting. If you want to obtain specific Chest Lead (V1-V6), select the
lead name (V1-V6) from the pull-down menu.
Period: “30S”, “1min”, “5min”, “10min”, “30min”, “continuous” are optional. The default measuring time is “continuous”.
HR alarm:“On “and “Off “are optional. The default setting is “On”.
HR Hi/Lo: 35~240bpm, the default value is 120bpm; the low alarm limit setting range: 30~235bpm, the default value is 60 bpm.
operation:
1. Press the navigation key “/, or ”: Move the cursor upwards/backwards.
2.Press“” ok key:Conform to option and enter into the corresponding parameter setting.
3. Press the navigation key “ or ”: Adjust parameter values.
4. Press“” ok key:Conform the selection, if you do not want to adjust parameter values, or the setting is accomplished,please enter the“
Back”
button.
Figure 7-1
Page 23
User Manual for PC-80D Easy ECG Monitor
18
7.1Creating new ID
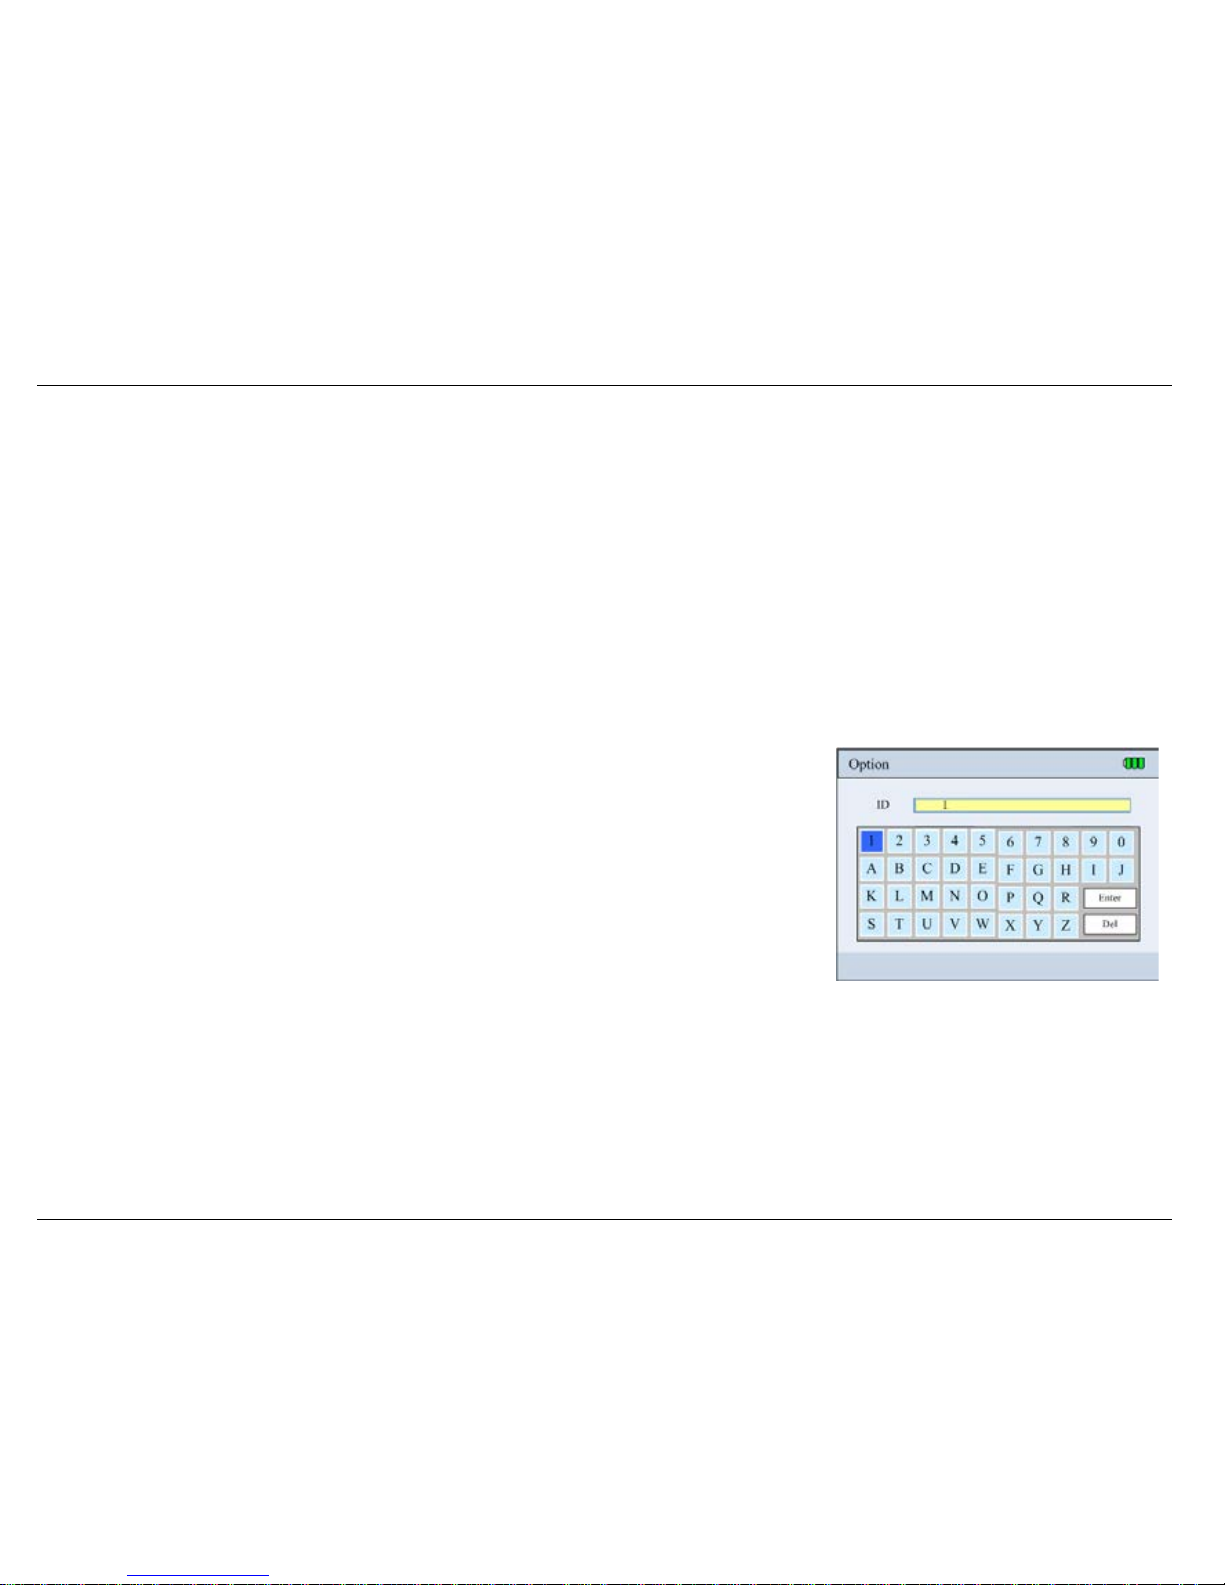
On the “Option" setup menu, selecting “ New ID” item from the ID pull-down menu, as shown in figure7-2.
Operation:
1. Press the navigation key “,,or”: Move the cursor upwards/backwards.
2. Press the“”ok key : Conform to select the corresponding numbers or letters.
3. Press the navigation key “,or”:Move the cursor to “Enter”key ,press the OK key “” to accomplish the operation.
During entering the ID number, you can move the cursor to the “Del” button to correct the numbers or letters input error. When the entering number
exceeds 30 characters, the cursor would move to the “Enter”button to prompt the user that the
entering is finished.
Figure7-2
Page 24
User Manual for PC-80D Easy ECG Monitor
19
8 System Setup
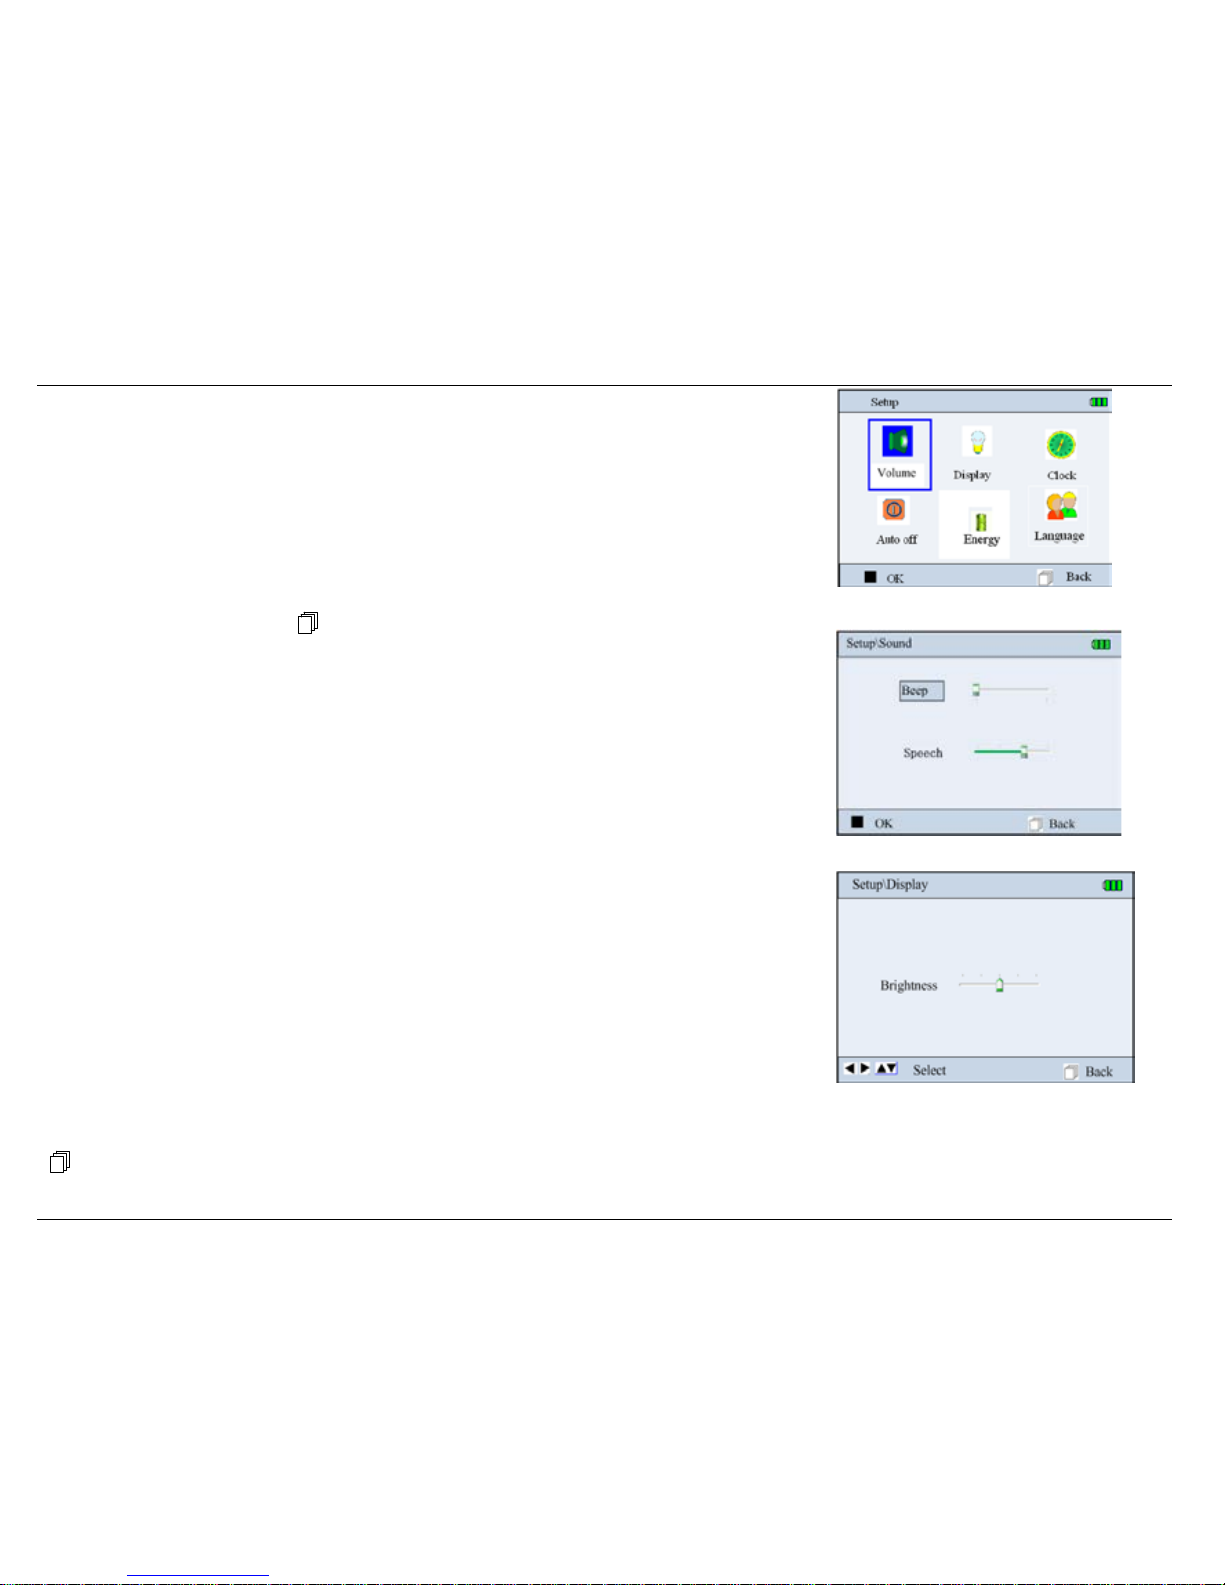
On the default menu screen, select “Setting” with Navigation Key, then press “”ok key button to
enter into system setup screen, as shown in Figure 8-1.
1.Press the navigation key “,,or”:Move the cursor upwards/backwards.
2.Press“” ok key:Conform to option and enter into the corresponding parameter setting.
3. Press the navigation key “,,or”:Adjust parameter values.
4. Press“” ok key:Conform to option, if you do not want to adjust parameter values, or the setting is
accomplished,please enter the“
Back” button.
8.1 Sound setting
On system setting screen, select “Volume” to enter into the sound setting screen, as shown in figure
8-2.
Beep: Setting the beeper and voice Open/Close. Move the slide icon to left means the beeper is
disabled; Move the slide icon to right means the beep is enabled.
Speech: Adjust the volume with the navigation key. Move the slide icon to left means the speech
volume is minimal; Move the slide icon to right means the speech volume is maximal
.
8.2 Brightness Setting
Brightness setting screen is shown in figure8-3. Adjust brightness with Navigation Key.
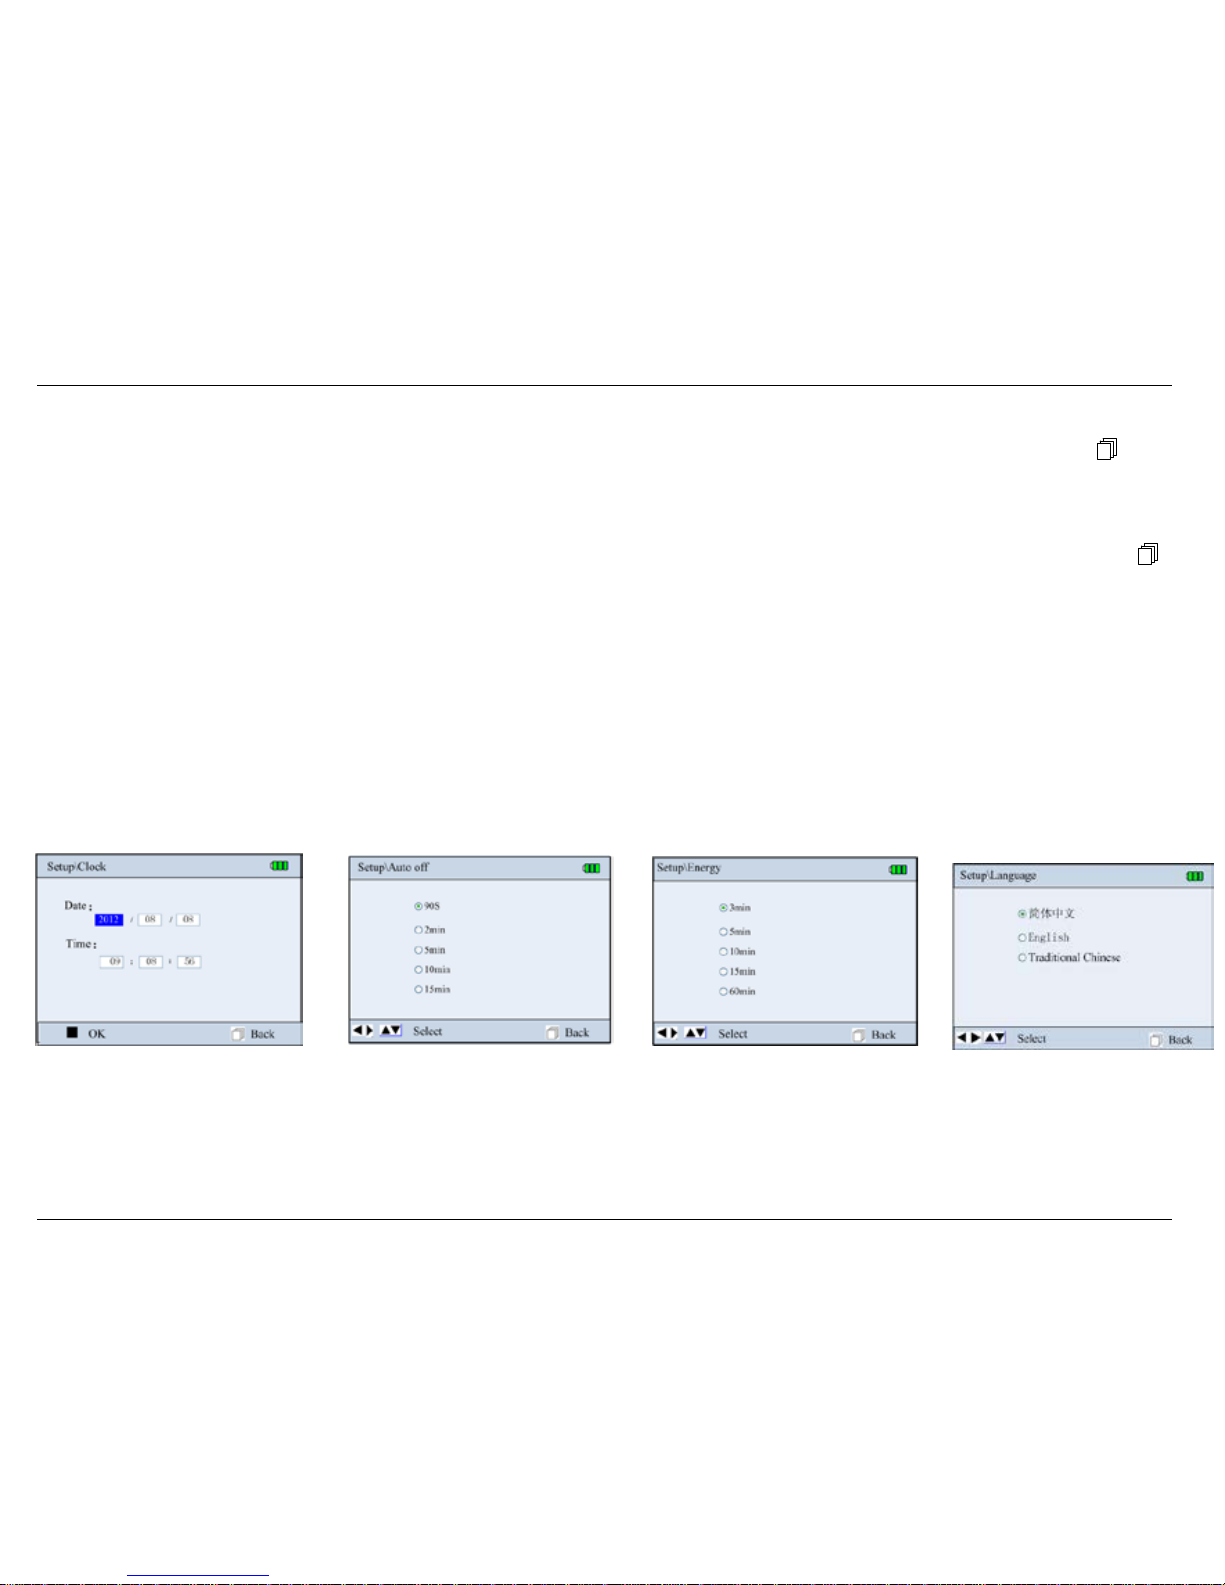
8.3 Time/Date Setting
Date and time setting screen is shown as figure 8-4.
1. press navigation key“,,or”and “” ok key to select the date and time you need.
2. press navigation key “,”to adjust the time value.
3. Press “”ok key confirm the date and time setting value. If you do not want to adjust the parameter value or the setting is finished, please press the
“
” back button.
Figure 8-1
Figure 8-2
Figure 8-3
Page 25
User Manual for PC-80D Easy ECG Monitor
20
8.4Auto power off
The timeout setting for auto power off is shown in the figure 8-5. Press navigation key“,,or” to set the timeout time. Press the “ ” back
button when setting is done.
8.5 Power saving
The power saving setting screen is shown in figure 8-6. Press navigation key“,,or” to set the timeout time for power saving. Press the “ ”
back button when setting is done. The display screen will be dark when the device works in power saving mode.
Exit from power saving mode:
① Press any key to exit from power saving mode.
② Power saving mode terminates automatically when lead off.
8.6 Language
Press navigation key“,,or” in the system setup screen shown in the figure 8-1 to select language icon,press “”ok key to change the
language, as shown in the figure 8-7.
It has “Chinese”, “Traditional Chinese” and “English” language modes.
Figure 8-4
Figure 8-6
Figure 8-5
Figure 8-7
Page 26
User Manual for PC-80D Easy ECG Monitor
21
9 Help
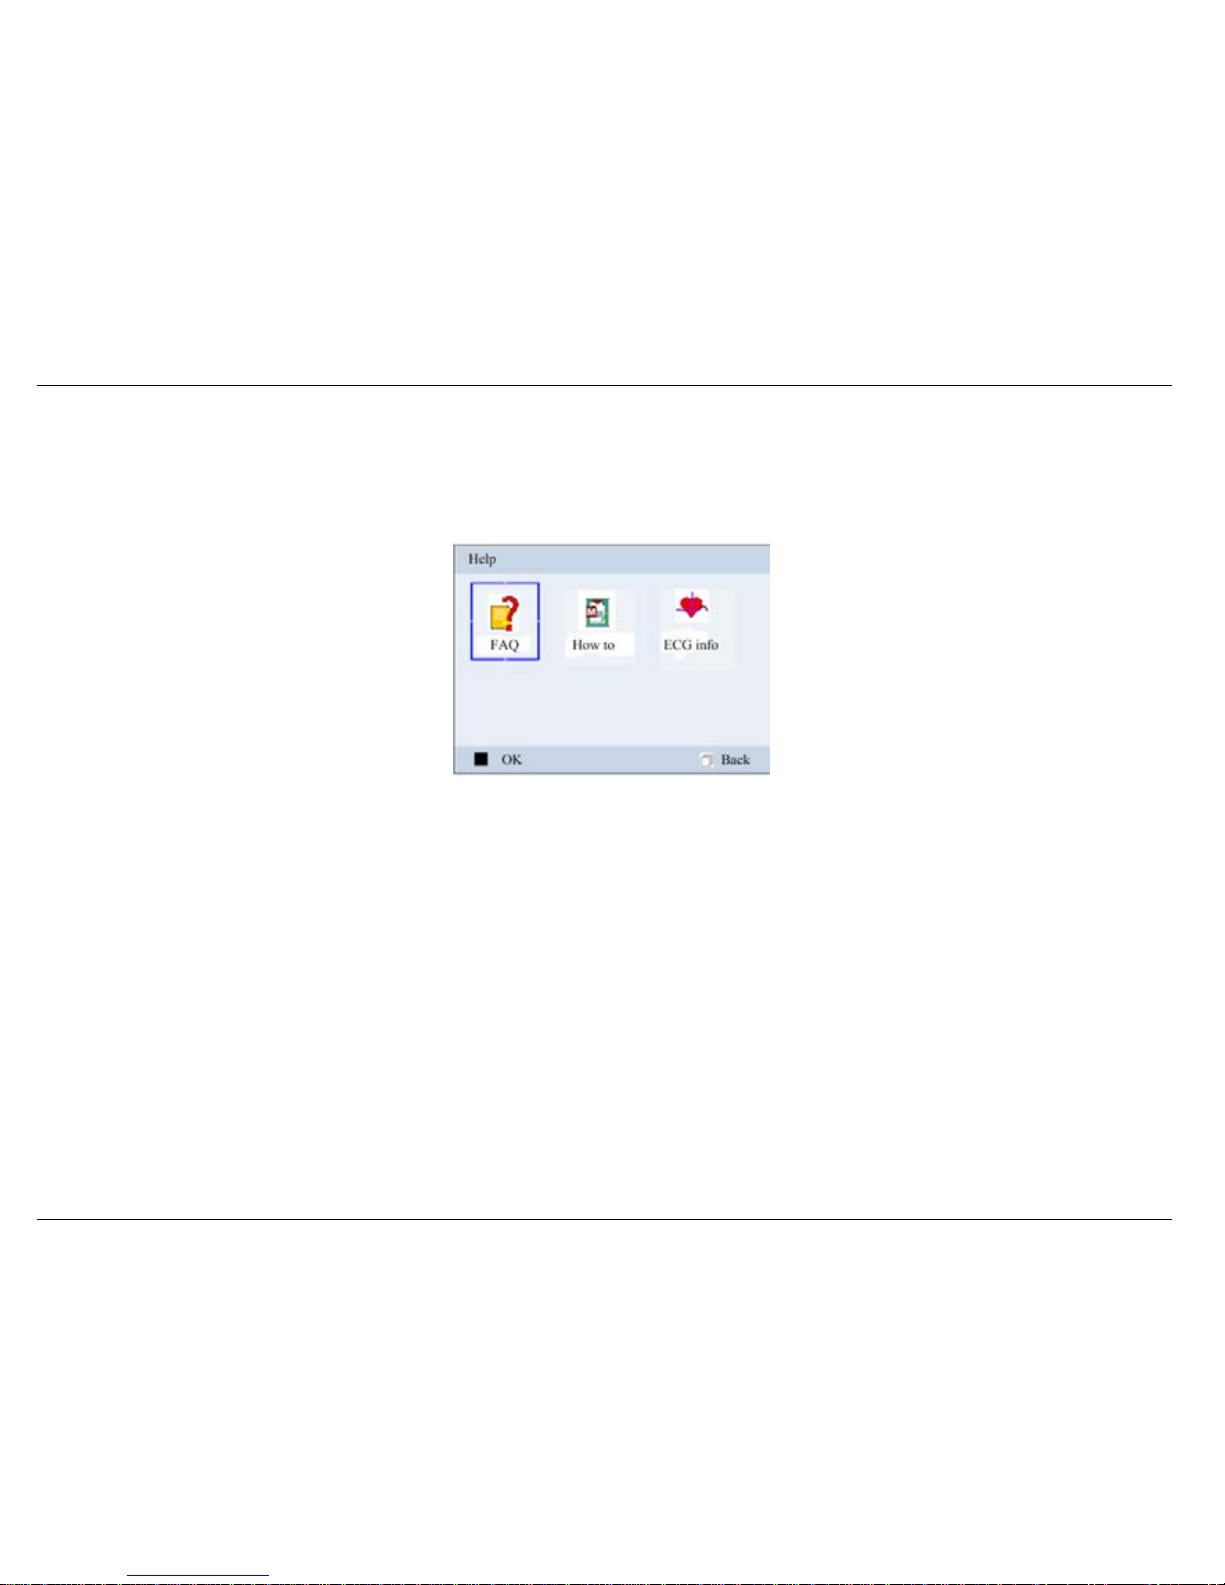
On default menu screen, select “Help”, then press “” ok key to enter into help info screen. In the info screen,you can browse the “FAQ”, “How to”,
“ECG info” and software version information. As shown in 9-1.
Figure 9-1
Page 27

User Manual for PC-80D Easy ECG Monitor
22
10 Technical Specifications
10.1 ECG measurement
1. Amplification channels: 3.
2. Signal input: 3 embedded metal electrodes or external lead wire cable (with 3/4 lead wires).
3. Lead selections and measuring methods: Quick measurement by embedded electrodes; measurement by external electrodes with 3 lead wires
(single channel for Lead I, II, or III) or 4 lead wires (3 simultaneous channels for Lead I, II and III)
4. ECG bandwidth: 0.05Hz~40Hz (Enhanced mode), 0.5Hz~40Hz (Normal mode).
5. Internal noise level:≤30μVp-p
6. Heart Rate measuring range:30bpm~240bpm
7. Heart Rate measuring accuracy:±2bpm or ±2%, whichever is greater
8. Display scale::5.0mm/mV±10%
9. Common-mode rejection ratio (CMRR): ≥60dB
10.Waveform sweeping speed:20mm/s±10%
11. Input loop current:≤ 0.1 µA
12. Input impedance: ≥5 MΩ(single ended)
13. Max. input DC offset voltage: ±300mV
10.2 Power supply
Battery: 4×AA alkaline batteries(or 4×AA NiMH rechargeable batteries)
External DC input: 5.0V/1.0A;provided AC adapter input voltage: a.c. 100~240V, 50/60Hz.
Auto power-off: timeout setting from 90s to 15 minutes
Threshold of low battery voltage indication: 4.4V +/±0.2V.
Page 28

User Manual for PC-80D Easy ECG Monitor
23
10.3 Classification
1. The type of protection against electric shock: Internally powered equipment
2. The degree of protection against electric shock: Type BF applied part
3. The degree of protection against harmful ingress of liquid: Ordinary equipment without protection against ingress of liquid.
4. Electro-magnetic Compatibility: Group I, Class B
10.4 Display
1. LCD type: Color LCD
2. Display area: 70.08mm x 52.56mm.
10.5 Data Memor y
Stored data records can be uploaded to the computer by data cable provided by the manufacturer.
10.6 Overall Dimension and Weight
Dimension: (L)130mm×(W)98mm×(H)36 mm
Weight:400g(not including batteries)
10.7 Additional declaration
1) Electro-surgical interference suppression: Without the function of Electro-surgical interference suppression.
2) Defibrillator discharge protection: Without protection against defibrillator discharge.
3) Respiration or lead off detector and active noise suppressor: The auxiliary leakage current is less than 0.1uA.
4) Per minutes HR average calculation: the latest 8 times R-R intervals falling on the range of heartbeat average.
5) Display updates speed: 1 time/ second.
6) Battery life: Four AA alkaline batteries can be used for more than 2 hours measurement, or Four AA NiMH rechargeable battery (Capability at least
2200mAH) can be used for more than 8 hours.
Maximal input DC offset voltage: ±300mV.
Page 29

User Manual for PC-80D Easy ECG Monitor
24
11 Maintenance
1. Please change the batteries, when appears low-voltage icon.
2. It is recommended to wipe the metal electrode with medical alcohol, when the measuring signal is too weak.
3. Please wipe the surface of the unit with clean cloth or let it dry in air.
4. Please take out the batteries if the unit will not be used for a long time.
5. Storage and Transportation
Ambient temperature: -20 to 60ºC
Relative humidity: 10~ 95%
Atmospheric pressure: 50~107.4KPa
6. In case any indication of damage about the function of the monitor,it is not allowed to apply it to the patient for any monitoring. Please contact the
local dealer or our company in case of any problems. We are to offer you the best solution for your satisfaction.
7. The maintenance is to extend the life of the electrodes; on the surface of the electrodes you should clean it by wet cloth or medical alcohol if
necessary. It is recommended to protect the electrodes from ultraviolet radiation; do not wipe the electrodes with hard and rough things.
Notes:
1. Keep it away from corrosive substances, explosive substances, high/low temperature and moisture.
2. If the device gets wet or has water steam, please stop operating it.
3. When it is taken from cold environment to warm and humid environment, please do not use it immediately.
4. DO NOT operate the button on front panel with sharp materials.
5. DO NOT immerge the device into liquid. Do NOT spray any liquid on it directly.
6. The life of this unit is 5 years. In order to ensure its long service life, please pay attention to the use of maintenance.
Page 30
User Manual for PC-80D Easy ECG Monitor
25
12. Troubleshooting
Trouble
The device can not turn on.
Possible Reason
Solution
1. The batteries are drained or almost
drained.
2. The batteries are not inserted
properly.
3. The device is broken out.
1. Change batteries.
2. Reinstall batteries.
3. Please contact the local service center.
Trouble
The device is failure in measuring heart rate.
Possible Reason
Solution
1. Electrode and body does not contact
well.
2. Moved when measuring.
3. Electromagnetic interference.
4. Weak signal.
1. Place the electrode correctly.
2. When measuring, please keep quiet and avoid
moving.
3. Keep away from interference source.
4. Change a place (chest) to measure.
Trouble
ECG waveform excursion, strong irrelevant waveform or the ECG waveform displays on the screen, but the prompt info is “Contact?”
Possible Reason
Solution
1. Skin is dry or oily.
2. Electrode and body does not contact
tightly.
3. Muscle strain.
1. Clean skin with soap and water and eliminate skin crumb
and grease to make the skin wet and greaseless.
2. Press the electrode with a certain force.
3. Keep hand relax while measuring.
Page 31
User Manual for PC-80D Easy ECG Monitor
26
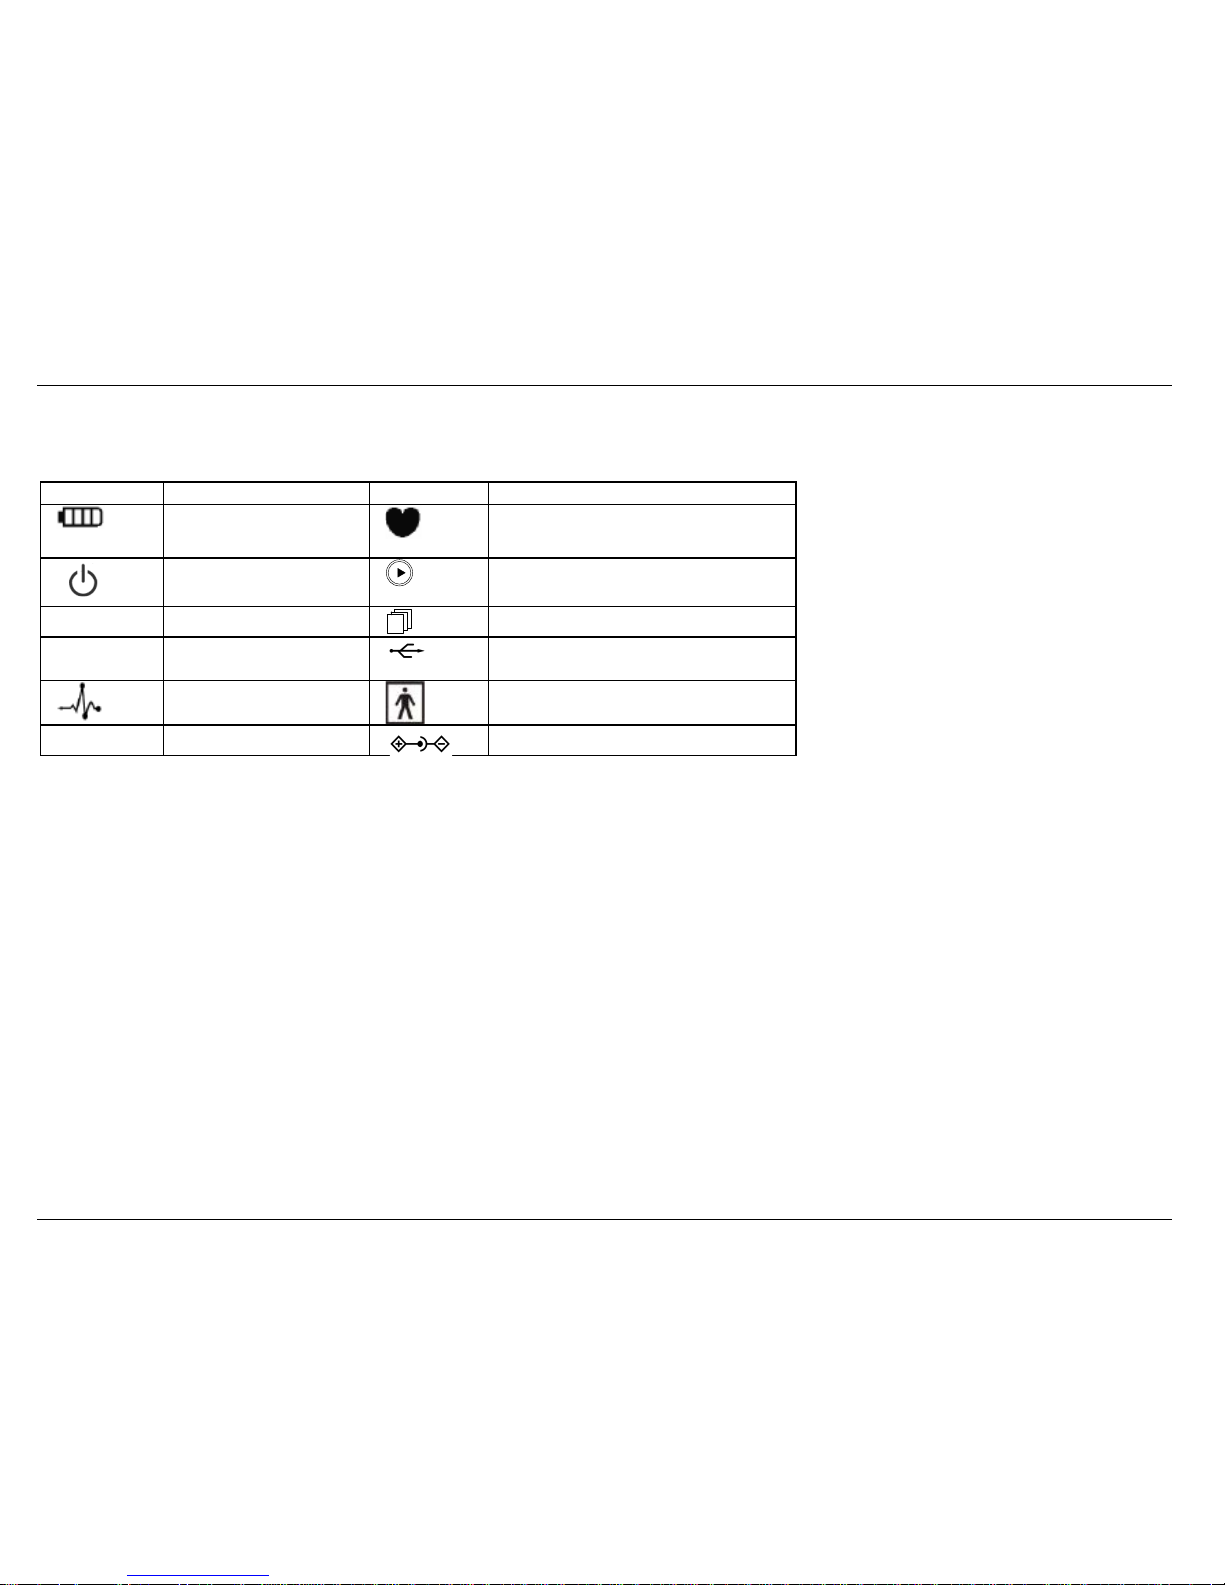
13 Key of Symbols
Symbol
Description
Symbol
Description
Battery indicator
Heart Rate (Unit: beats per minutes)
Power button
shortcut button for ECG measuring
▇
Confirmation button
Back button
,,,
Navigation key
USB Port
Lead wire socket
Type BF
SN
Serial number
DC power supply port
Page 32
User Manual for PC-80D Easy ECG Monitor
27
Appendix 1 Additional measuring method
Direction of using limb clip type electrodes: clean the electrodes by using wet cloth; plug the lead wires into socket; or
affix the lead wires to clip, and then keep the clip in measuring position.
Direction of using sucking bulb electrode: Squeeze the rubber bulb with your hand to make the metal dish place on the
measuring position.
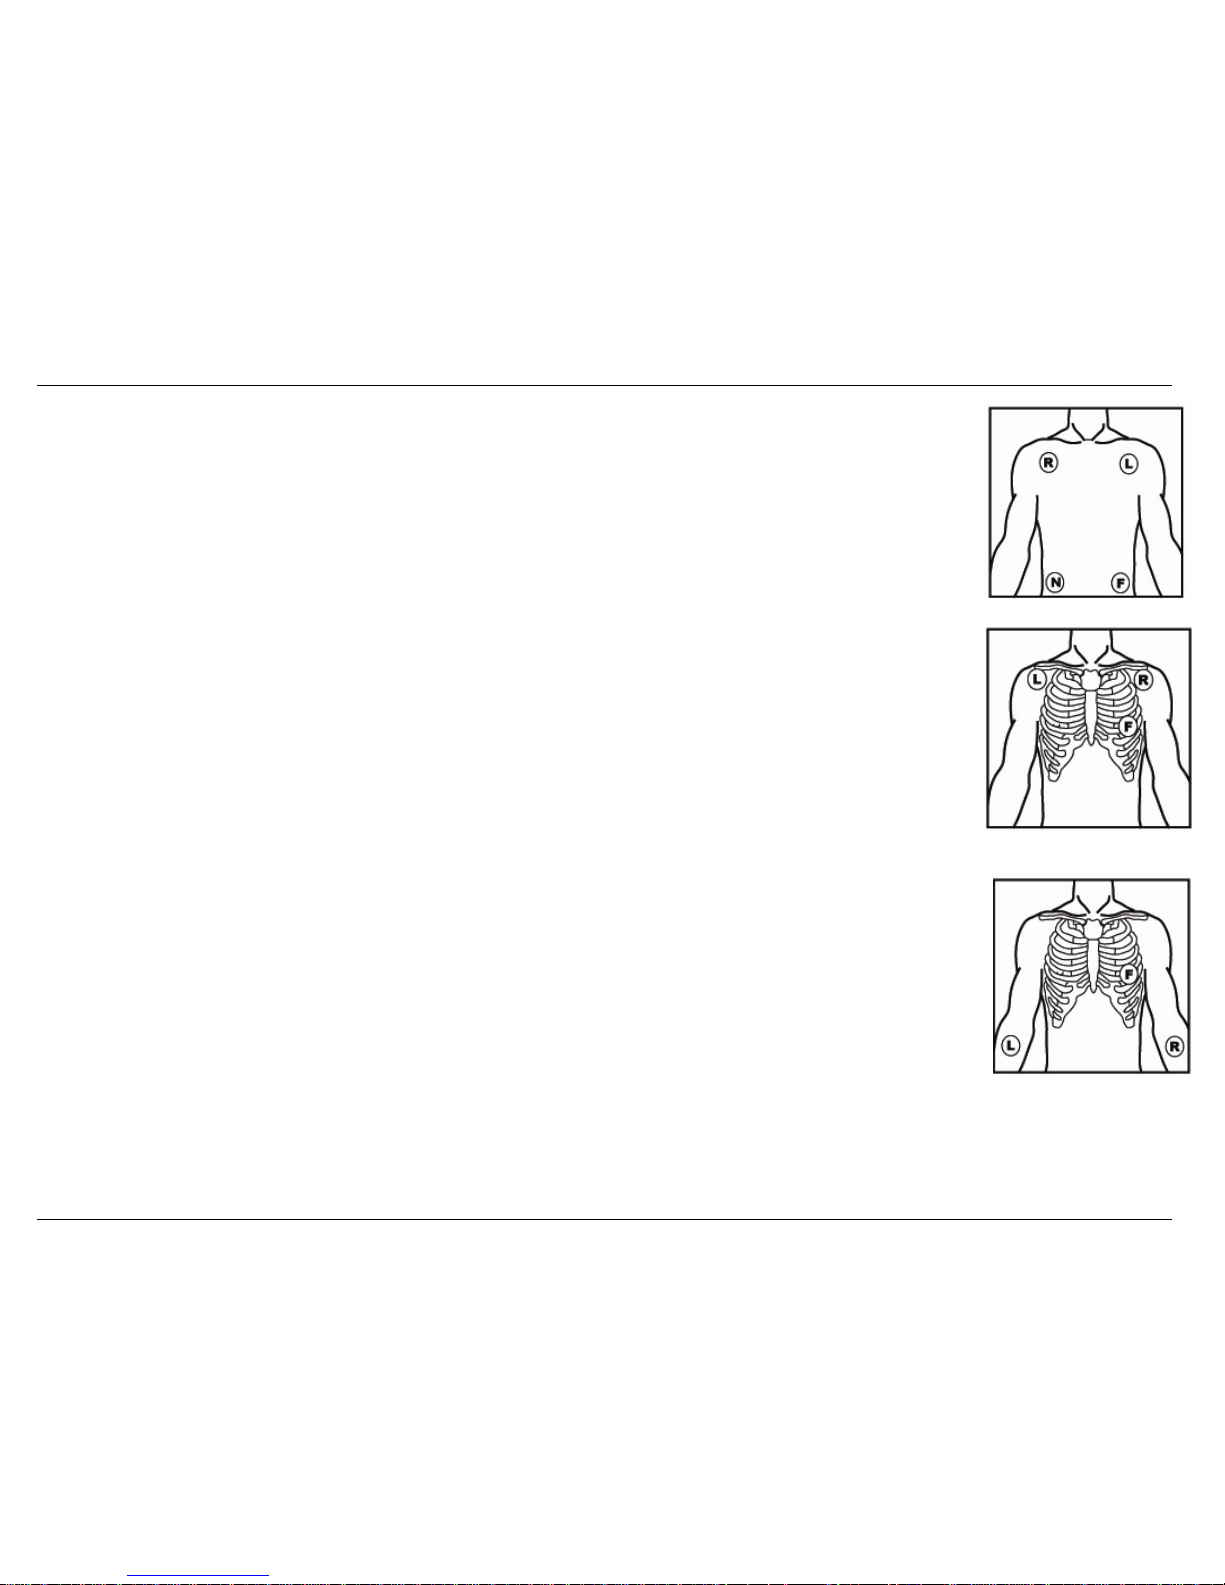
1. Limb lead measurement (paste on chest)
This measurement applies to long term measurement for ECG signal of li mb lead I, II, or III. The electrodes are adhesive
ECG electrodes.
The location of the electrodes: (as shown in figure 1)
R: below the clavicle and close to right shoulder;
L: below the clavicle and close to left shoulder;
N: on the right lower abdomen;
F: on the left lower abdomen.
2. Chest lead measurement (paste on chest)
R (red): below the clavicle and close to left shoulder;
L (yellow): below the clavicle and close to right shoulder;
F (green): on chest, please refer to the figure 4 (location of V1-V6 is optional).
N (black): unused.
3. Chest lead measurement (limb clip type electrodes + sucking bulb electrode)
R(red): place on interior of left arm (between wrist and elbow);
L (yellow): place on interior of the right arm (between wrist and elbow);
F sucking bulb electrode (green): on chest,please refer to the figure 4 -1(location of V1-V6 is optional);
N (black): unused.
Figure 2 chest lead (paste on chest)
Figure 3 chest lead(limb clip type electrodes +
sucking bulb electrode)
Figure 1 limb lead (paste on chest)
Page 33
User Manual for PC-80D Easy ECG Monitor
28
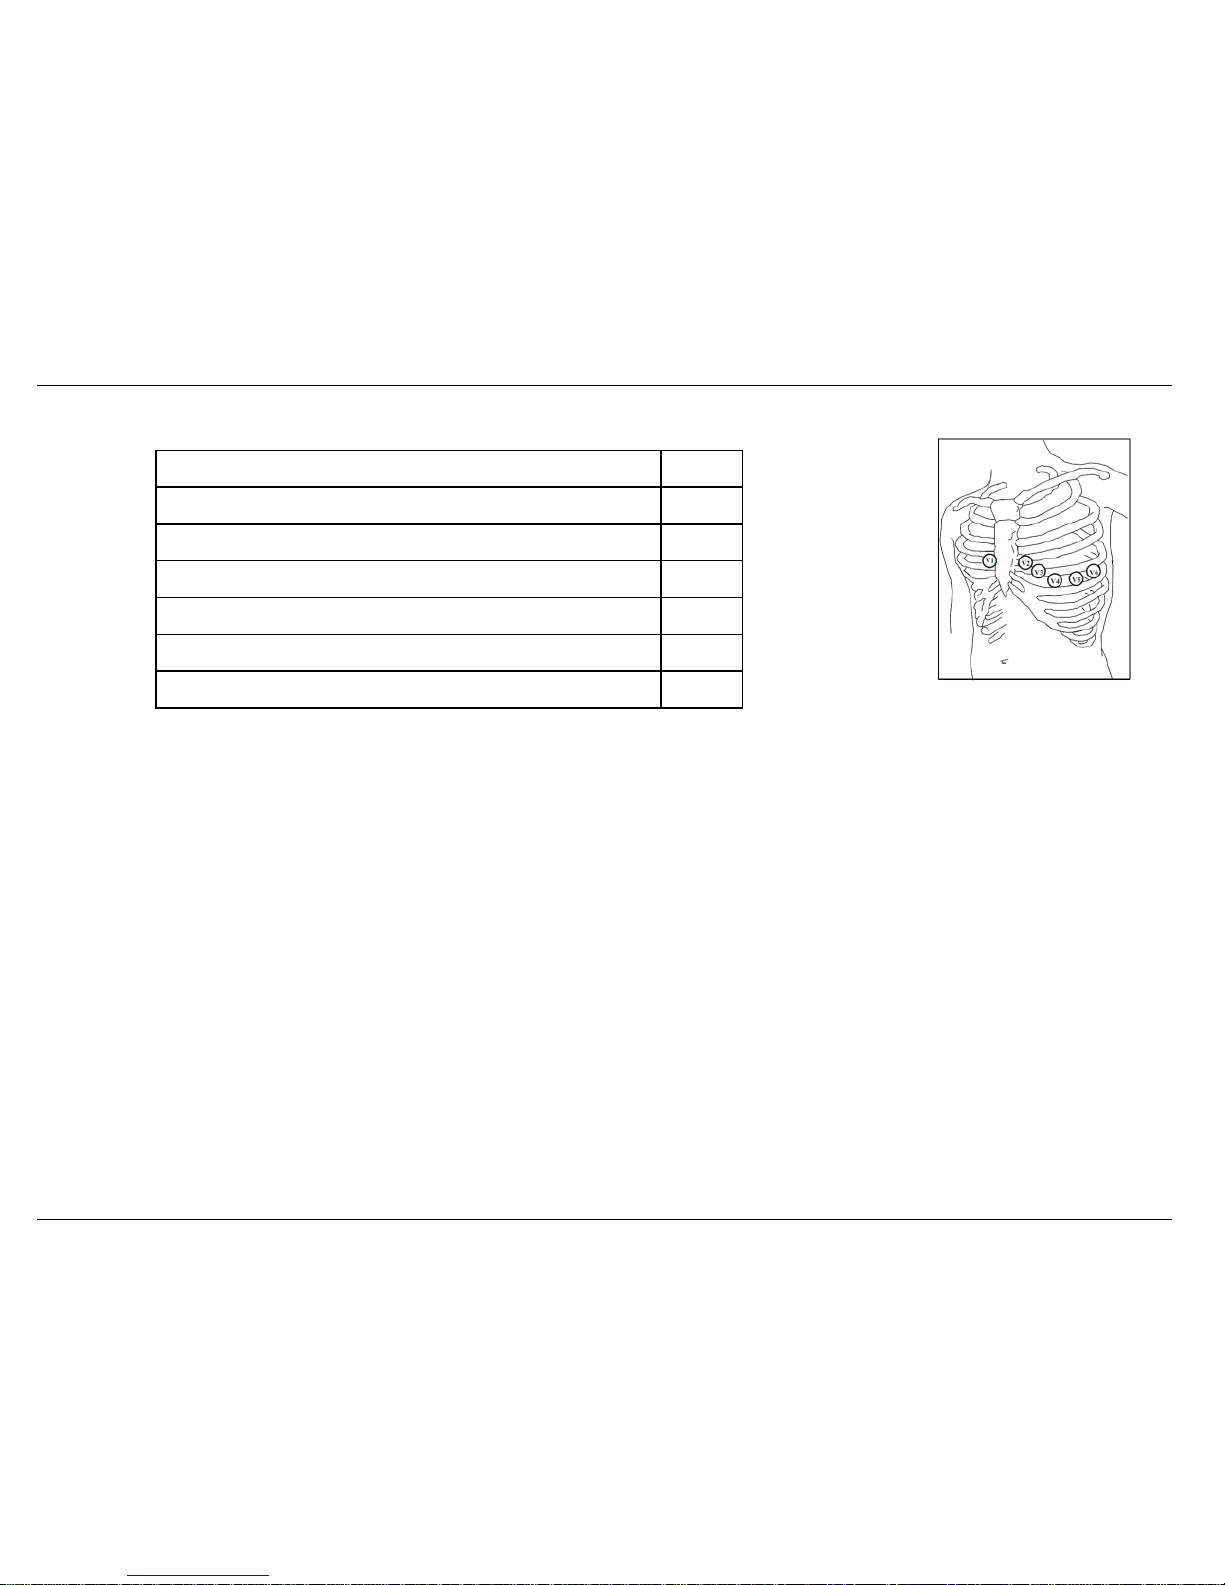
4. F(green)electrode location of Chest lead measurement
The location of ECG electrodes:
electrode location for V1-V6
on the 4th intercostal space at right border of sternum V1
on the 4th intercostal space at left border of sternum V2
midway between the V2 and V4 V3
on the 5th intercostal space at the left midclavicular line V4
on the left anterior axillary line at the horizontal level of V4 V5
on the left midaxillary line at the horizontal level of V4 V6
Figure 4 F electrode location of chest lead
Page 34
User Manual for PC-80D Easy ECG Monitor
29
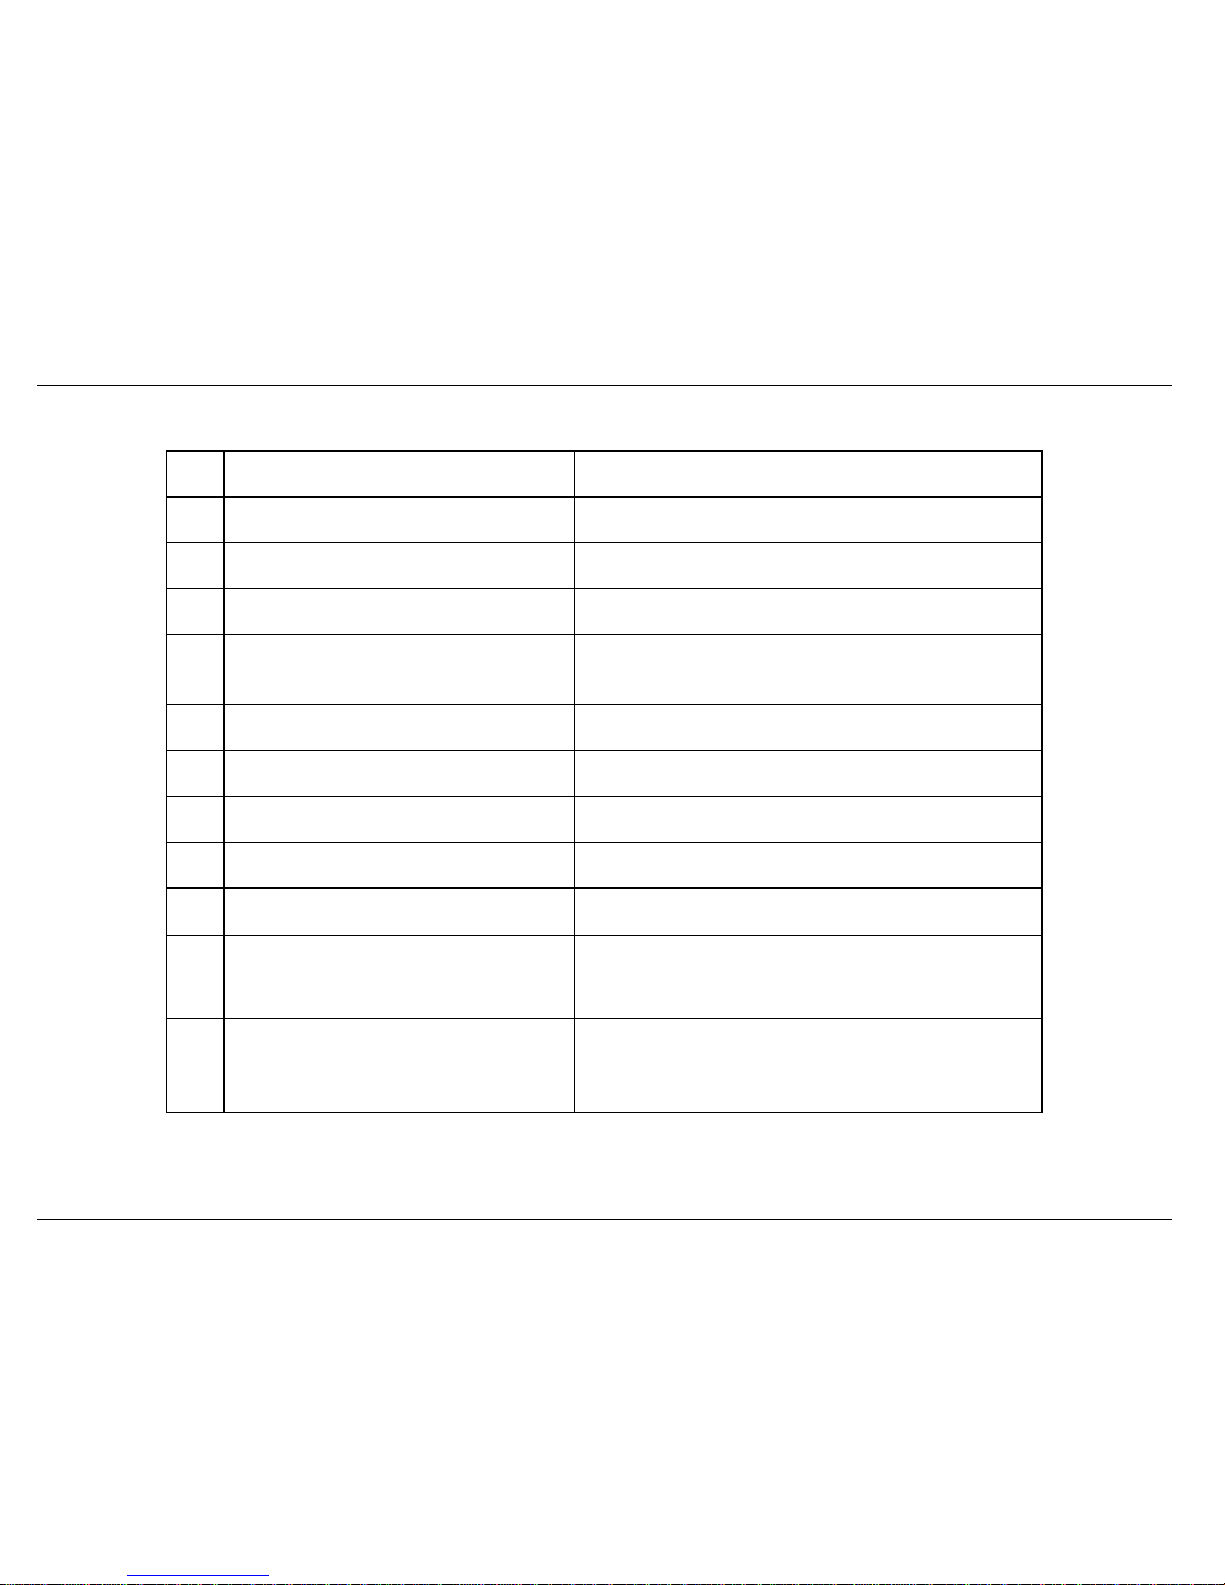
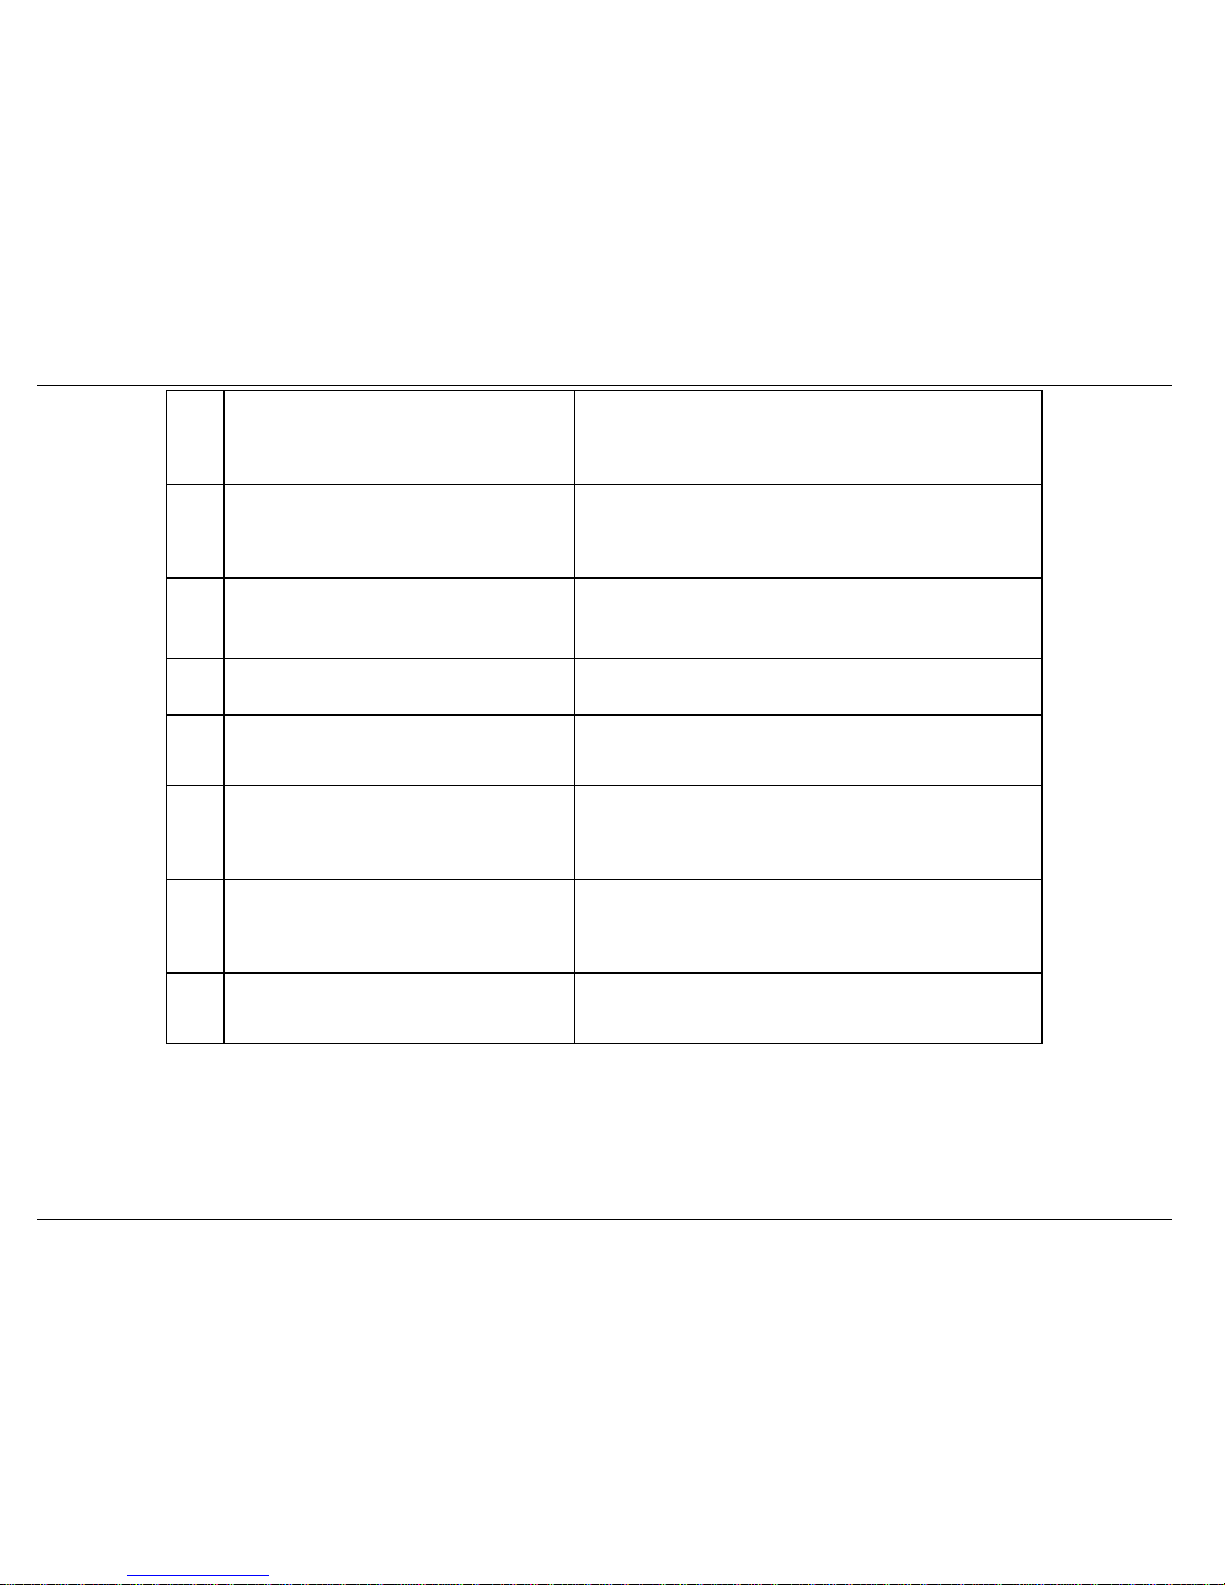
Appendix2 Measurement Result Description
No. ECG Measurement Result Descriptions
Notes: (bpm:time/minute)
1
No irregularity found.
60 bpm ≤ HR ≤ 100 bpm, No irregular HR found.
2 Suspected a little fast beat
100 bpm < HR <= 110 bpm
3 Suspected fast beat
HR> 110 bpm
4 Suspected missing Beat No heart beat is detected within the period of twice of
average R-R interval
5 Suspected arrest
No heartbeat is detected within 4 seconds
6 Suspected short run of fast beat
More than 3 consecutive premature beats are found
7 Suspected a little slow beat
50 bpm <= HR < 60 bpm
8 Suspected slow beat
HR < 50 bpm
9 Suspected occasional short beat interval
Premature beat
10 Suspected occasional irregular beat
interval
Bigeminy and Trigeminy.
11
Suspected a little fast and interval with
occasional short beat interval
A little fast beat and suspected Premature beat.
Page 35
User Manual for PC-80D Easy ECG Monitor
30
12
Suspected a little slow and interval with
occasional short beat interval
A little slow beat and suspected Premature beat.
13
Suspected a little slow beat and interval
with occasional irregular beat
A little slow beat and suspected Bigeminy /Trigeminy.
14
Waveform baseline wander
Signal saturation or lead wire off during measuring, but
the average HR still be calculated.
15
Suspected fast beat with baseline wander
Fast beat and interval with waveform baseline wander.
16
Suspected slow beat with baseline wander
A little slow beat and interval with waveform baseline
wander.
17
Suspected occasional short beat interval
with baseline wander
Premature beat with waveform baseline wander
18
Suspected occasional irregular beat
interval with baseline wander
Bigeminy /Trigeminy with baseline wander
19
Poor Signal, measure again
Small waveform or baseline wander is larger, average HR
can not be measured.
Page 36
User Manual for PC-80D Easy ECG Monitor
31
Appendix3 General Knowledge of ECG
Ⅰ
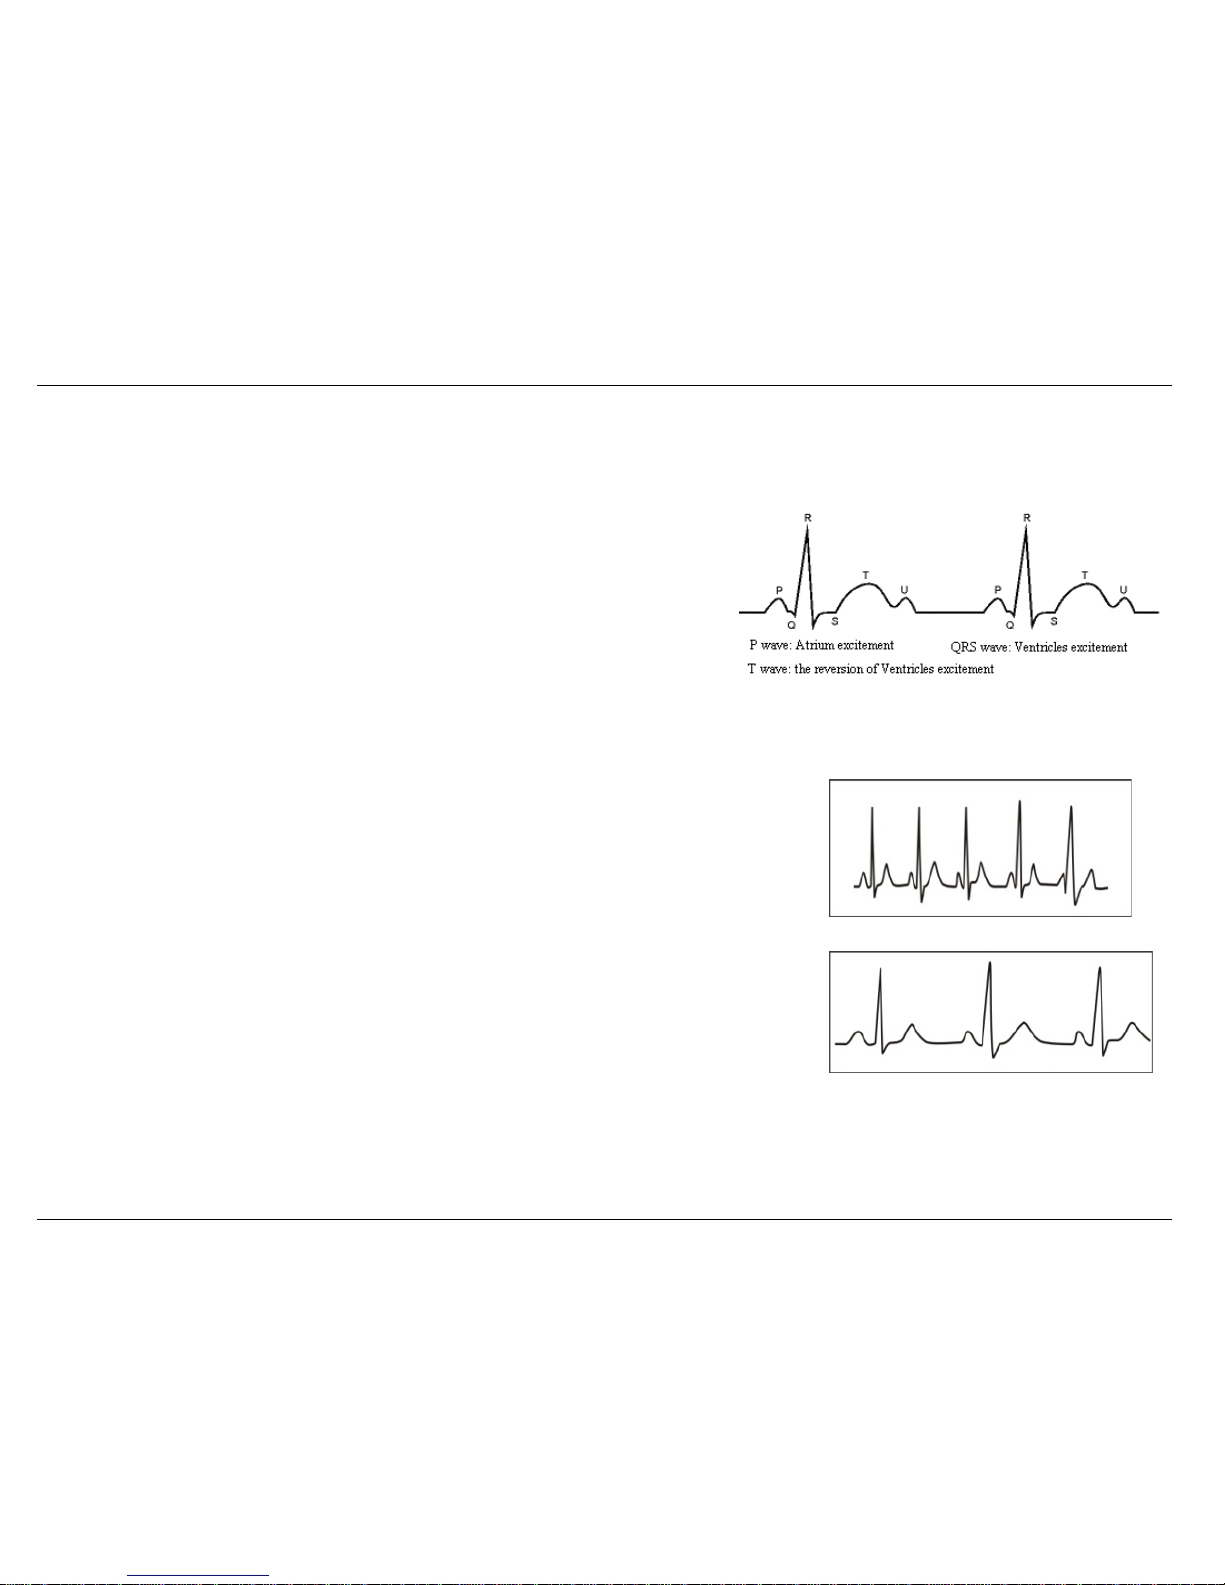
Normal sinus rhythm: In sinus conditions, SA node paces the heart with the regularly rate and the normal rhythm. The heart rate is in the range of
60 to 100 times per minute and the rhythm is regular. P wave is normal and each one is
followed by a QRS wave. P-R interval: 0.12~0.20s; QRS wave: 0.06~0.10s; No ectopic
ECG activity.
Symptom: Sinus rhythm, heart rate: 60~100bpm
Indication: Normal
Ⅱ
Several abnormal ECG waveforms
1) Tachycardia: The heartbeat beco mes faster. Tachycardia is determined by the rhythm of the heart, the average rhythm beats faster than 100
times a minute is considered as Tachycardia. The result description “Suspected fast beat” in this
device may be doubted as Tachycardia.
Symptom: heart rate>100bpm
Indication: It may occur with the normal pe ople who have these physiology conditions: rage,
fatigue, smoking, drinking too much wine, excessive coffee and strong tea, etc.
Pathology: anemia, Hyperthyroidism, blood hypoxia, myocarditis, hypokalemia, fever, influence
of some medication (such as atropine, epinephrine etc.).
Suggestion: If it belongs to pathology condition, please go to hospital.
2) Bradycardia: The heartbeat becomes more slowly. It is determined by the rhythm of the heart,
the average rhythm is less than 60 beats per minute is considered as Bradyca rdia. The result description “Suspected slow beat” in this device may
be doubted as Bradycardia.
Symptom: heart rate<60bpm
Figure 1 Normal ECG W aveform
Figure 2 Tachycardia Waveform
Figure 3 Bradycardia Waveform
Page 37
User Manual for PC-80D Easy ECG Monitor
32
Indication: It occurs when healthy people fall asleep, and it can be found in athlete (or those who love doing sports frequently), old people, or
vagus excitement person.
Pathology: Sick sinus syndrome, Ischemic heart disease, Cardiomyopathy, intracranial hypertension, increased hypokalemia, Low temperature,
period of convalescence of acute infectious disease or after use some medicines such as digitalis.
Suggestion: If it belongs to the pathology condition, please see the doctor.
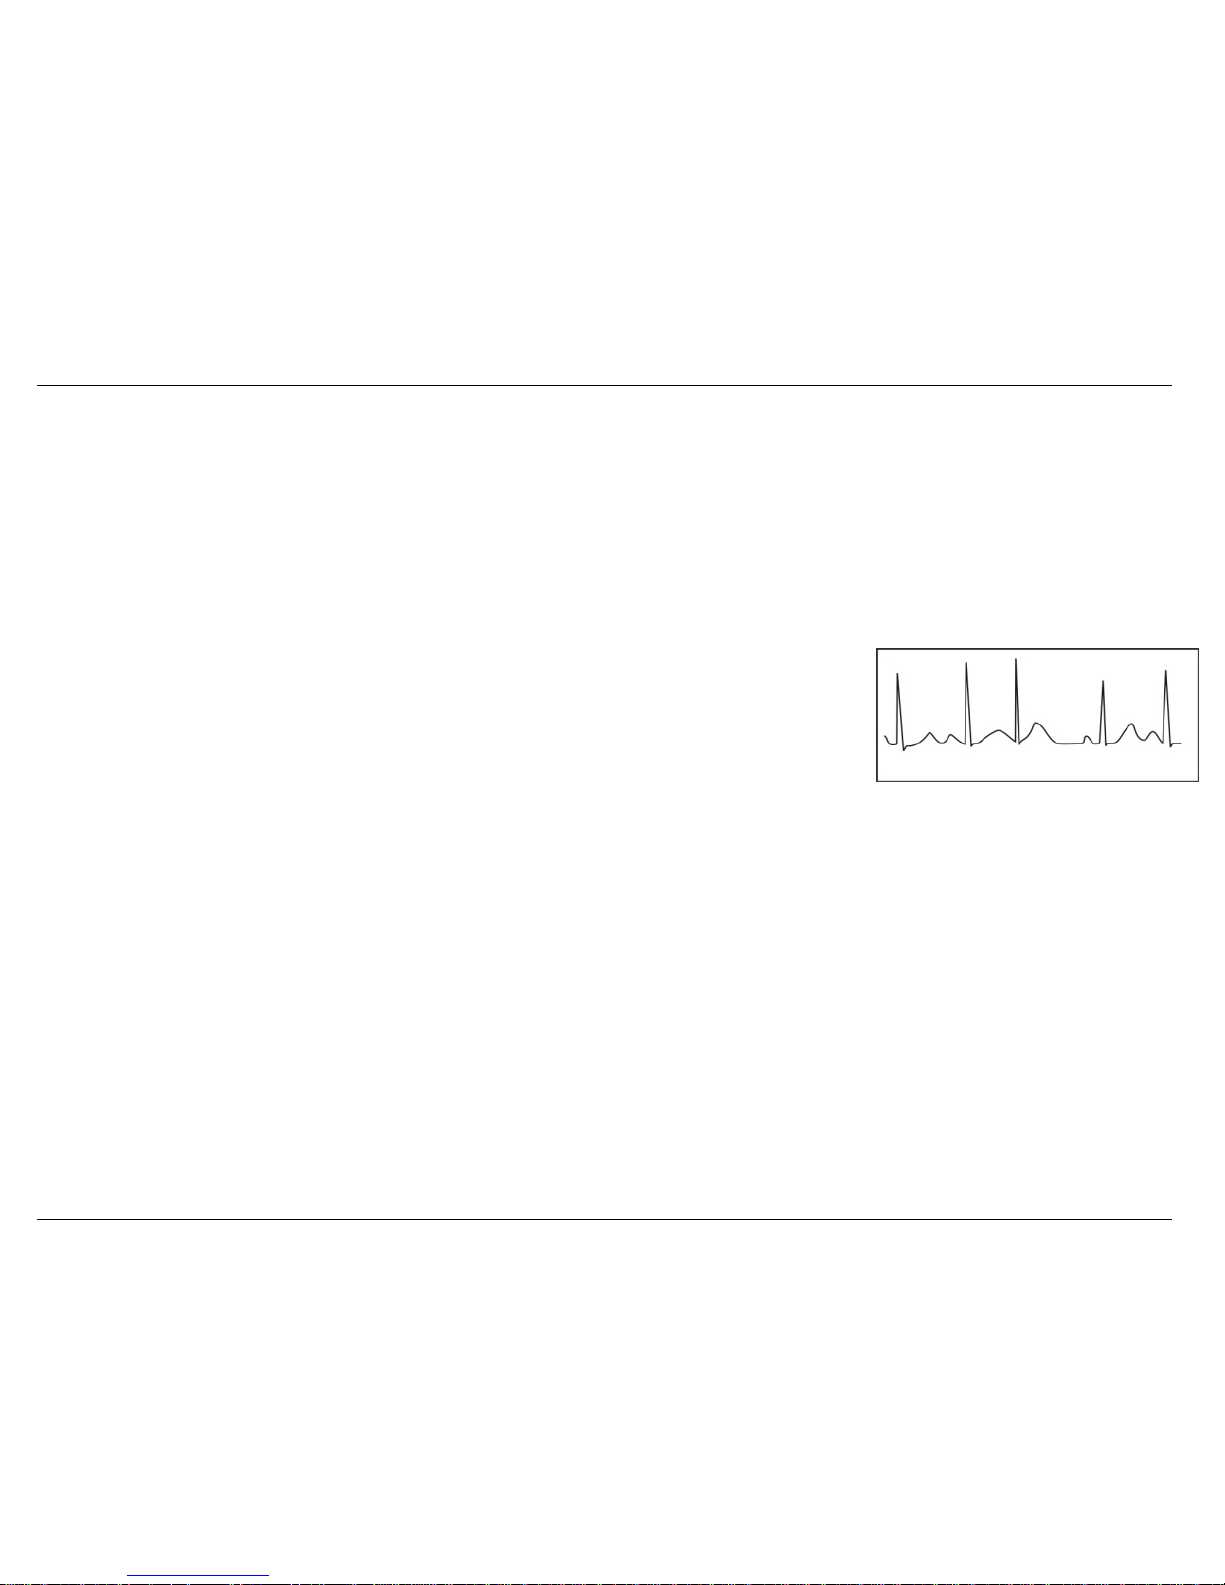
Premature beat: In a normal beat a QRS waveform appears prematurely and is followed by a comeback pause. The result description “Suspected
occasional short beat interval” in this device may be doubted as Premature beat.
What is premature beats?It is premature contraction. The normal heart beat is always regularly, and
each beat interval is also symmetrically; Premature beat is out of this general regulation, the heart beats
prematurely and followed by a long time interval; the phenomena of a premature beat between two heart
beats is called inserting premature beat. The display of “early beat” may be suspected Premature beat.
According to different original positions, it can be divided into Premature aerial Contraction,
Premature Nodal Contraction and Premature Ventricular Contraction (PVC), which needed to be judged by experts.
Symptom: The heart beat is arrhythmic, it occurs as the phenomenon that the heart suddenly beats and then stops for a while. Some people have
palpitation or have no symptom.
Indication: The premature beat can be found occasionally in healthy people, with no distinct symptom or sometimes with palpitation. This may be
caused by fatigue, anxiety, insomnia, smoking too much, or drinking too much wine, coffee, strong tea etc. It can be recovered without treatment.
However, if premature beat occurs frequently, continuously or in multi-focus, it will indicate functional cardiovascular disease. Please see a doctor
as soon as possible.
Suggestion: The character of premature beat needs professional to confirm, so please save the temporal figure in time. When seeing a doct or , you
can recall it to doctor to judge the character of premature(Premature atrial Contraction, Premature Nodal Contraction, Premature Ventricular
Contraction or multi-focus premature beat)and help cure.
Testee’s Symptom: Normal heart beat is followed by a premature beat.
Figure 4 Premature Beat
Page 38
User Manual for PC-80D Easy ECG Monitor
33
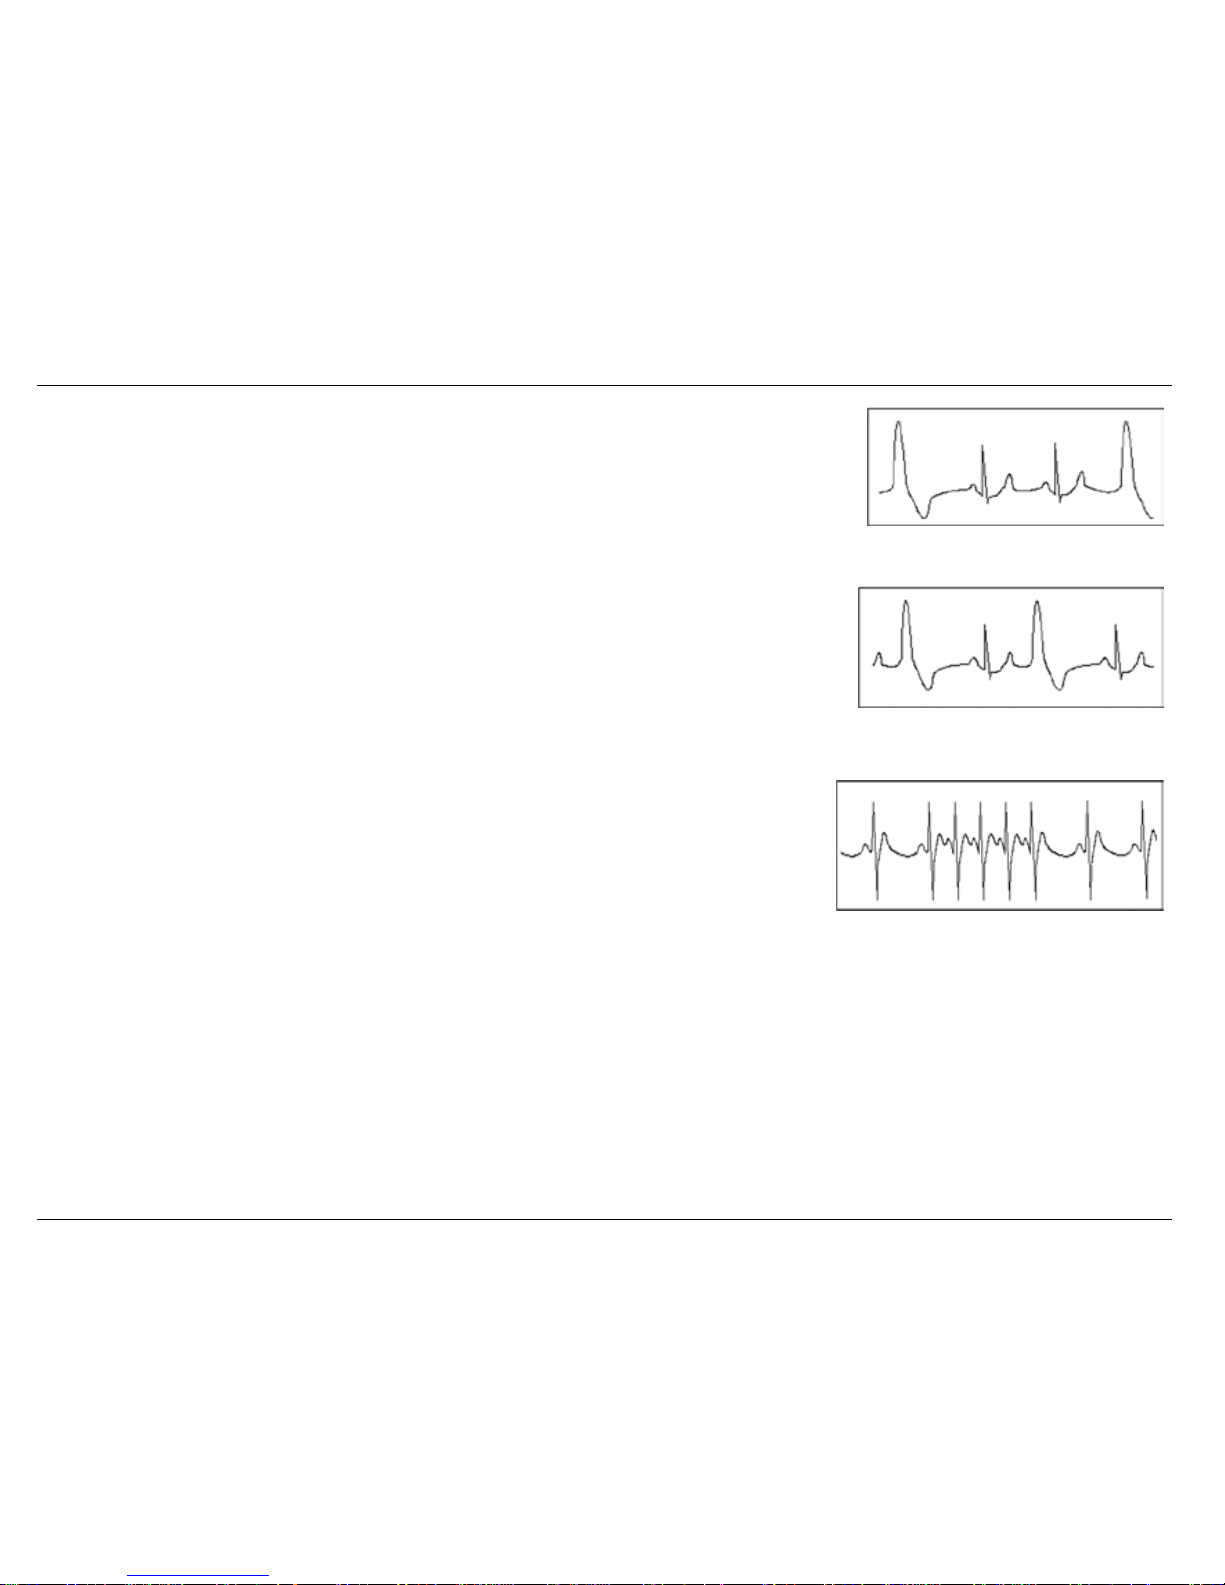
3) Bigeminy: It is a type of PVC in which a normal beat is coupled with a premature beat.
Because of its trigger cardiac abnormal pacemaker in different position, it divided into arial, ventricular
and node. In the clinic medically, the ventricular is the
most common, aria is more common, but the node is rarely found.
Indication: PVC occurs frequently.
Suggestion: Please see the doctor
5) Trigeminy: It is a type of PVC in which two normal beats are coupled with a premature beat. Because
of its
trigger cardiac abnormal pacemaker in different position,
it divided into Arial, ventricular and node. If ventricular trigeminy occurs 3 times continuously, please see a doctor as soon as possible.
Indication: PVC occurs frequently.
Suggestion: Please see the doctor.
6) Short run of tachycardia: PVC (Premature Ventricular Contraction) occurs more than 3 times
continuously.
Testee’s Symptom: PVC occurs More than 3 times continuously.
The heart beat is fast and regularly, but starts and stops suddenly.
According to the different of active original position, it can be divided into: Paroxysmal ventricular tachycardia, Paroxysmal supraventricular
tachycardia (Needing professional to judge).
1) Paroxysmal supraventricular tachycardia:By atrial and nodal extrasystole cause to happen, frequency >180Dpm(time/minute).
Indication:Most commonly found in healthy people, it causes by deep respiration, tachypnea, positional changes, swallow, rage etc. It also appears in
functional cardiac disease,such as Wolff - Parkinson-White Syndrome, rheumatic heart disease, coronary heart disease, Cardiomyopathy, Congenital
heart disease, medicinal reaction(digitalis toxicosis)etc.
Figure 5 Bigeminy
Figure 6 Trigeminy
Figure 7 Tachycardia
Page 39

User Manual for PC-80D Easy ECG Monitor
34
Suggestion:If it occurs time after time, please see the doctor as soon as possible.
2) Paroxysmal ventricular tachycardia:Caused by Premature Ventricular Contraction, Heart Rate >140bpm.
Indication:Most commonly found in heart disease patient, it can cause ventricle fibrillation if it’s serious, so the tester needs to see a doctor
immediately.
Suggestion:The character of short run needs professional to confirm, so please save the temporal figure in time. And you can provide it to doctor as a
reference.
 Loading...