


User Manual
GSM Alarm System
All rights reserved by Delta Security Co., Ltd
www.deltasecurity.cn

Dear Clients,
Thank you for using our GSM Alarm System. We are committed to giving you the
best home security available today and we take the safety of your home and
family seriously. Our system allows you to instantly arm and disarm your property,
instantly change your system settings and find out your system status and much
more. At safety concerns, we encourage you to change the default password as
soon as you get your system set up. This guide will walk you through the easy set
up of your system. We’ve started with already customizing and turning your
system to your specifications, so everything is ready to go when you open the
box.
Please keep this instruction manual in case you may read it at any time in the
future. Thanks again for choosing our products and service.
www.deltasecurity.cn

Cautions
To avoid personal inquiry and the damage to the product, please take the following preventive
measures.
● Input Voltage: DC12V 1A. Do not use power adapter with different specifications.
● Use the professional tools for assembling to avoid the damage to the main panel
● Press the touch keypad lightly
● Keep it away from the moist environment and flammable explosive environment
● Keep the product dry and clean
● An ideal place to mount the panel should be under the minimum RF signal interference and
the center of all defense zones, generally living room.
● Please change your password (default: 888888) as soon as you get this alarm system.
● To obtain a high quality intercom voice, it is highly suggested to keep a 35cm distance to the
Mic.
Features
1: Ultra-thin design, 14mm thickness
2: Menu user interface, easy and comfortable
3: SMS/Bluetooth communication
4: Mute, Volume up/Down
5. RFID function
6: Up to 50 wireless and 2 wired defense zones, each zone can be edited including rename,
delay, siren off, set up as home zone, etc.
7: Door sensor auto-search, manual search
8: Authorized priority phone number in order to fast access to panel without password.
9: Low battery reminding
10: Support CID
11: Chime function
12: USB port to upgrade your software online
13:Built-in engineering model, easy trouble-shooting
www.deltasecurity.cn

1. Alarm Host Diagram
GSM signal indicator: Flash once every second when no SIM card or searching network;
Flashes once every 3 seconds when GSM signal is in normal.
Arm: Arm the system by panel has a 60s’ delay (Default factory set).
Home mode: Enter into home mode. All sensors in Normal Zone are armed except those in
Home mode zone which are disarmed so that users can move freely at home
Disarm: could be done by keypad or RFID tags or Remote controllers
Emergency/SOS: Go into emergency status.
Debugging interface: Software calibration, for manufacture use only
Interface for the wired defense zones: port for wired accessories excluding wired siren
Upgrading switch: software online upgrading
www.deltasecurity.cn

2. Start Up
a. Insert a SIM card
Insert a SIM card in direction as above pictures indicate. Push until you hear a click of spring.
Do not insert or take out the SIM card when the main unit panel is powered on.
b. Connect wired accessories with Panel
The panel supports 2 wired accessories excluding wired siren. There is a cable within the
package with one side connecting panel, and another side having 4 wires in different color and
connecting 2 wired accessories. :
Wired Zone 1:
Wired Zone 2:
Blue wire
Signal
Red wire
Signal
Green Wire
Grounding
Yellow wire
Grounding
c. Power on: Connect the power adapter to POWER port on back of the console; Route
the power adapter (12V 1A) cord through the channel toward the side of the console; Plug the
power adapter into nearby electrical wall outlet that is not controlled by a switch; Keep the
Power Switch at ON position for internal backup charging.
www.deltasecurity.cn

3. Operation Instructions
Initiating image:
MUTE
Silent the keyboard
VOL+
Volume up
VOL-
Volume down
MENU
Main menu
Function Key:
BACK
Return to previous menu
UP
Volume up
DOWN
Volume down
ENTER
Main menu
SAVE
Save up the settings
ABC/abc/123
Switch the input method
DELETE
Delete the inputs
www.deltasecurity.cn

Start to Set
Before doing any settings, we need enter into setting status or enter into
“Program” menu. Please follow those steps. Each step within this manual has to
be followed with “Enter” to confirm your operation.
Disarm the system----Press “Menu” ----Select “Program” ----Input password
(default value: 888888)
Start Menu
【Program】Start to set the system
【Chime】Turn on/off the doorbell Function
【Alarmed Record】: Record alarm events
【Event】: Check out details of opening the door each time
www.deltasecurity.cn
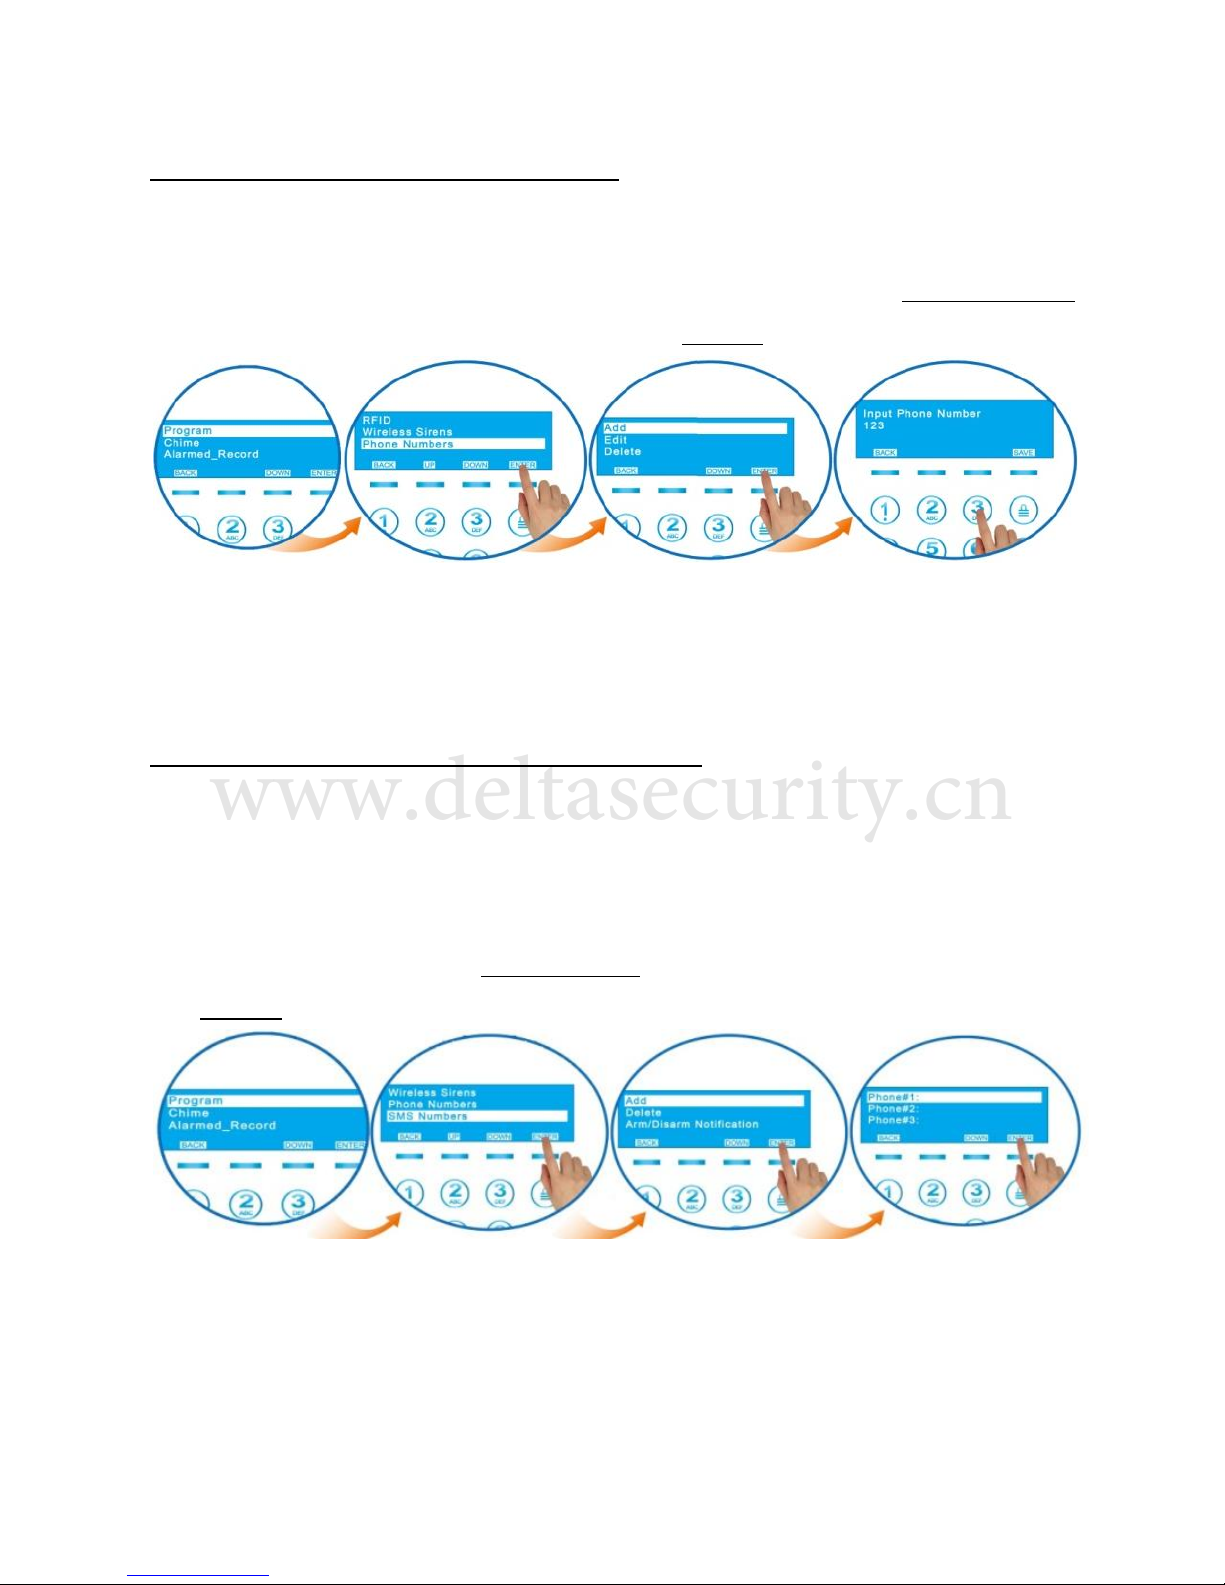
Add a Phone number/SMS number
a. Add a phone number into system
Enter into “program” menu---Select “Phone Numbers” and Enter---Select “Add” and press
Enter---Input numbers on the keyboard and press Save. The system can store 6 phone numbers,
and each phone number is equal to or not longer than 22 digits.
b. Delete a phone number from system
“Program” ---“Phone Numbers”---“Delete”---Select the phone number—“YES”---“Delete”
c. Auto Login phone number
This number can access to the system without password. Here are the operation steps.
“Program”---“Phone Numbers”---“Edit”---Select a phone number---“YES”---“Save”
d. Add a SMS number into system
Enter into “program” menu---“SMS Numbers”---“Add”---Select “Phone #” ---Input numbers and
press Save. The system can store 3 SMS numbers and each SMS number is equal to or shorter
than 22 digits.
e. Arm/Disarm notification
Default set is “YES”. Every time we arm/disarm the system, it will send a message to preset
SMS phone numbers. Choose “No” will turn off the notification message.
“Program”---“SMS numbers”---“Arm/Disarm notification”---“Yes/No”
www.deltasecurity.cn

Remote Control
In order to protect people on life-threaten occasions, to press SOS button on remote controller
will not trigger alarm, but system will make emergency call and send SMS.
a. Add a remote control into system
This system can register with 8 remote controllers and each of them can be renamed. Besides,
the name of remote control can be recorded. Here are the steps.
Enter into “Program”---Select “Remote Controllers”---“Add”---Trigger the remote controller by
press any key on remote controllers---Input any name you want to identify the remote
controller---Record the name of remote controller. Each step has to be followed with “Enter”
to confirm your operation.
b. Delete a remote control
Enter into “Program”---“Delete”---Select a remote controller---Select “YES” and press “Delete”
c. Rename &Record a remote control
Rename: Enter into “Program”---“Remote controllers”---“Edit”---Select the one remote
control you want to edit---Select “Edit Owner Name”---Input the new name and “Save”.
Record: Recording the name of a remote control is meaningful. Once the SOS key on remote
controller is triggered, the system will dial the preset phone number immediately and the
recording will be played when the emergency call is answered.
Follow the first 4 steps of “Rename”---Select “Record Owner Name”---“Record” and Enter, and
then you will have 5 seconds to recording the name of this remote control.
www.deltasecurity.cn

Wireless Sensors
a. Add a sensor into system, Rename&Record
The system is able to connect with 50 wireless accessories not including remote control, RFID
tags and wireless siren. Here are steps.
Enter into “Program” menu---“Sensors”---“Add”---Trigger sensor, remit a signal to panel---Input
the name of the sensor on the keyboard and “Save”---Recording the sensor name in 5 seconds.
Each step has to be followed by “Enter” to confirm your operation.
b. Wireless sensors Auto-Search
The system can identify the sensor name and location automatically.
Enter into “Program”---“Sensors”---“Edit”---“Auto Search Sensors”---Trigger the sensor and the
system will display the sensor name on screen.
c. Wireless sensors manual search
The sensor name and location can be found manually. Here are the steps.
www.deltasecurity.cn

d. Edit Sensor
Each sensor within the system can be edited with different features and functions. Identify the
sensor’s name by either way of above two methods, press “Enter” to confirm.
【Edit the Zone Name】: Sensor name has to be controlled within 25 letters. When panel
receives an intrusion signal from this sensor, panel will report all your programmed
information to owner by SMS. It’s highly suggested to program the name with much more
information. Then the owner will be well informed in event of intrusion. For example, PIR in
living room can be named “PIR01 living room”
【Record Zone Name】: Record the sensor name within 5 seconds. The system will count down
from 5. The record will be played when the emergency call is answered. Same as zone name,
it’s highly suggested to record as much information as possible.
【Emergency Zone】: The alarm will be triggered in event of intrusion even the system is in
Disarm, Home Mode status.
【Home Zone】: 【YES】Home zone ; 【No】Normal zone
At home mode, all the sensor being preset as home zone will disarm and those in normal
zones are armed.
【Chime Zone】: Turn on/off the chime function
【Delayed Zone】: Delay the system alarm. We can program the delay time at
“Menu”---“Program”---“System Settings”---“Alarm Delay Time”
【Siren Enabled】 : Turn on/off the siren in event of being triggered
【Delete】:Delete the Sensor
www.deltasecurity.cn

RFID tags
a. Add a RFID tag into your system
The system can accept up to 8 RFID tags.
Enter into “Program” and press “Enter”---Select “RFID” and press “Enter”—Select
“Add”---Hold your RFID tag and make it close to RFID reading area as bellowing
photo. The system will generate a code automatically. At this time, press “Enter”
and system will ask you to add a name for this RFID tag. Add a name and save it.
b. Rename a RFID tag
If you want to change a name for your RFID tags, please follow the steps.
Enter into “Program”---“Edit”---Select one RFID tag listed on your system from Card 01 to
Card 08 and press “Enter”---Input a new name and “Save”
c. Delete a RFID tag
Enter into “Program”---“RFID”---“Delete”---Select the RFID tag you want to remove and press
“Enter”---Select “Yes”---“Delete”
d. Arm/Disarm Send SMS 【YES/NO】
Enter into “Program”---“RFID”---“ARM/Disarm Send SMS”---【YES/NO】
【YES】Each time system arm/disarm by RFID tag, there will be a notification SMS to preset
SMS phone numbers.
【No】system arm/disarm by RFID tag will not notify preset SMS phone numbers.
www.deltasecurity.cn

Wireless Siren
a. Add a wireless siren into system
The system can register 3 wireless sirens at most. Here are the operation steps.
Enter into “Program”---“Wireless Sirens”---“Add”, then you will see a default name “Sirens 1”
on the LCD screen, press “Enter” as bellowing picture indicates.
Then system will imply that “Put Siren in Setting Mode”.
How to put siren in setting mode?
Plug in the wireless siren into power jacket and you will hear a strong beep from siren. Press
the black button on left side of siren for four times, and you will see the four indicating lights
on. The wireless siren goes into setting status.
Now, focus back onto panel, signal indicator flashes and panel sends signal to wireless siren
automatically. You will hear a long beep from wireless siren as a response. Add successful.
b. Rename a wireless siren
Enter into “Program”---“Wireless Sirens”---“Edit”---Select one siren---“Edit Name”---Input a
new name and “Save”
c. Delete a wireless siren
“Program”---“Wireless Sirens”---“Delete”---Select one siren and “Delete”---“Yes”---“Delete”
www.deltasecurity.cn
Turn on/off the Siren
“Program”---“Wireless Sirens”---“Siren Enable”---Select “Yes” to turn on siren, Select “No” to
turn off siren.
Siren Sound Duration
Set siren sound duration from 1~180 seconds.
“Program”---“Wireless Sirens”---“Duration”---Input a number between 1 to 180 and “Save”
Arm/Disarm wireless siren notification
“Program”---“Wireless Sirens”---“Arm/Disarm Tone”---Select “Yes” to turn on the notification
long beep, then users will be well informed when the wireless siren is arm or disarmed, or
Select “No” to turn off.
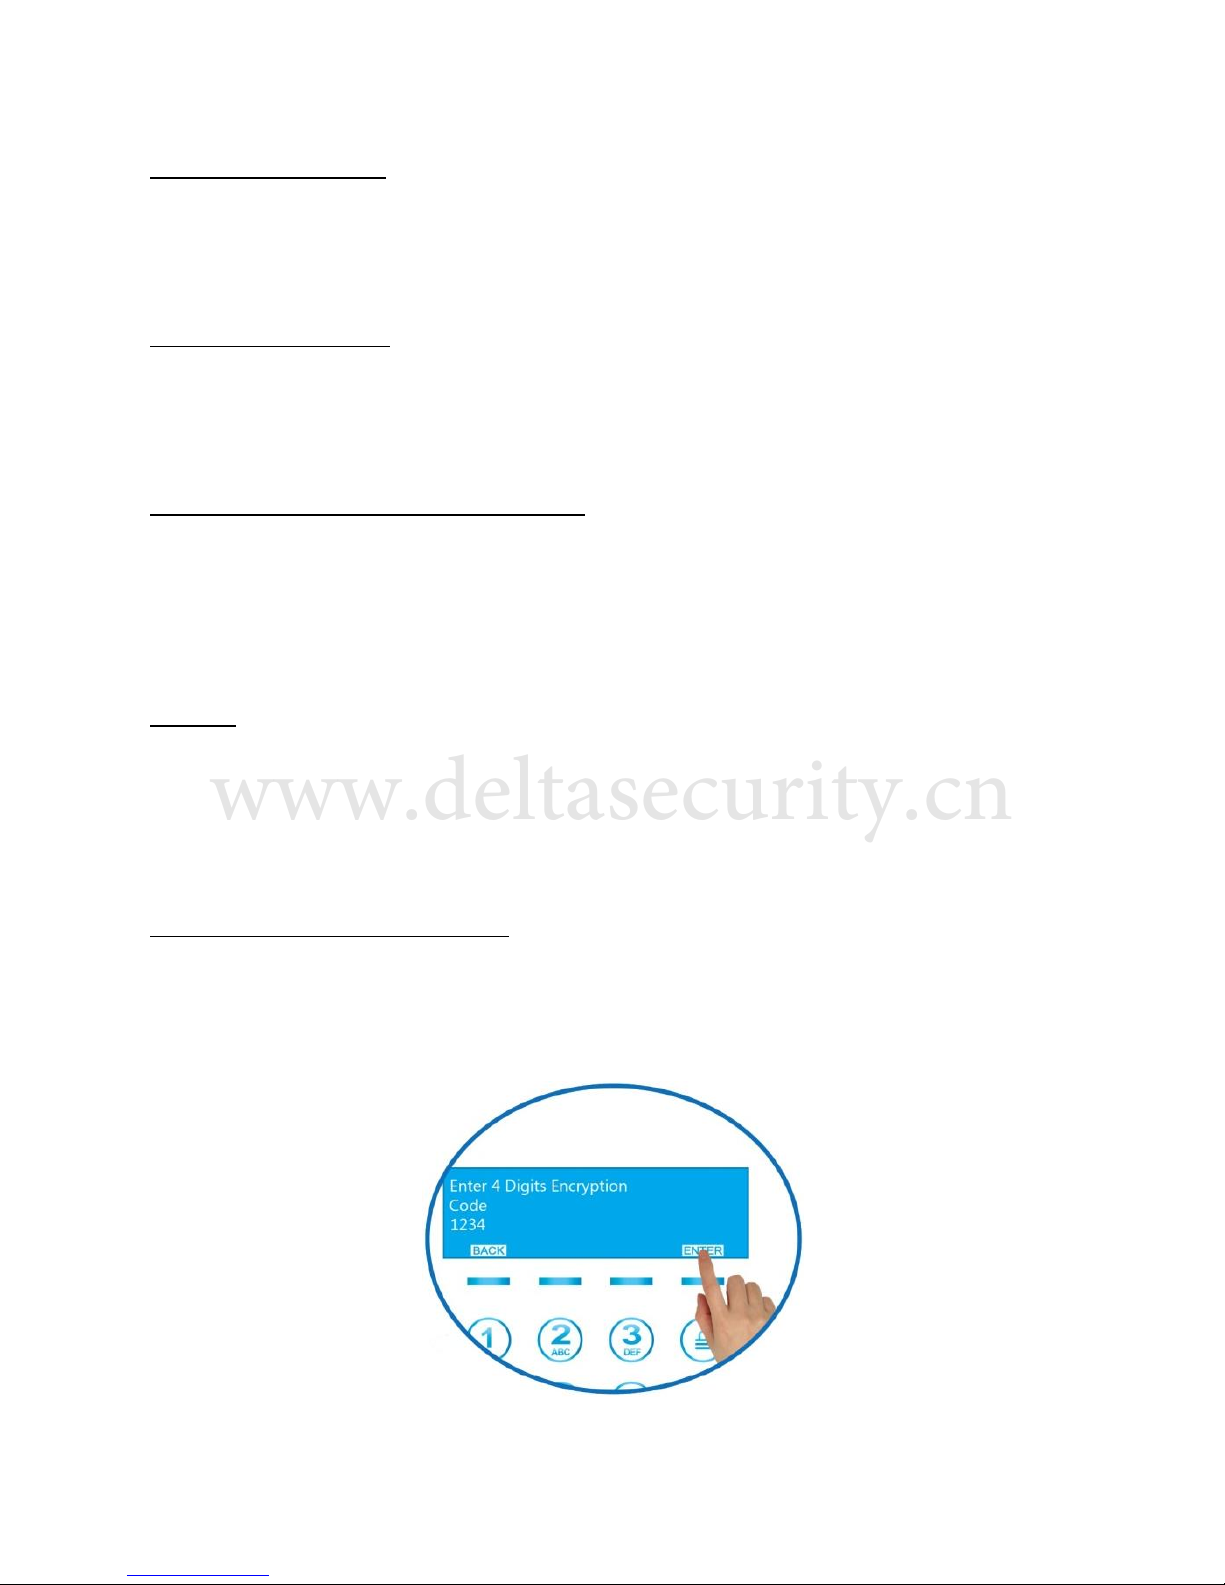
Encrypt
Encrypt the wireless siren can obviously reduce the false alarm.
Enter into “Program”---“Wireless Sirens”---“Encryption”---Input 4 digits encryption number as
bellowing picture indicates and press “Enter”.
Important notice for encryption
0000 and 5555 are not allowed and will be considered as error data!
One group of 4 digits encryption number is unique to one wireless siren.
www.deltasecurity.cn

Bluetooth Communication between panel and cell
There are two way to connect the cell with system via an APP, Bluetooth and GSM network.
Within Bluetooth range, we can use Bluetooth to realize basic control of the system. Out of
Bluetooth range, App will choose GSM network automatically. 8 cell numbers can be paired
with system via Bluetooth. Format the system will disconnect all the paired mobiles.
How to connect your cell with system via Bluetooth
First of all, be familiar with Bluetooth menu within system
Disarm the system, enter into “Menu”---“Program”---“Bluetooth Settings”
Bluetooth On/Off: make sure it’s on, and then the cell is able to detect it.
Name: we can change a name for Bluetooth, one easy to remember.
Visible: choose “YES”, the device can be detected. In avoid of malicious pairing, choose “No”
after you finish pairing with your own mobile.
Delete Paired Mobile: remove existing registered mobile number from system.
Host Mode: Searching Bluetooth Devices
Second, install and run the APP provided by Manufacturer on the mobile.
If it’s your first time to run the APP, select a proper language. The cell will request if activating
the Bluetooth function and select “YES”. Otherwise, activate your Bluetooth function on the
cell manually.
Add Host name, host phone number, and bluetooth Address as APP indicates on Cell phone.
www.deltasecurity.cn
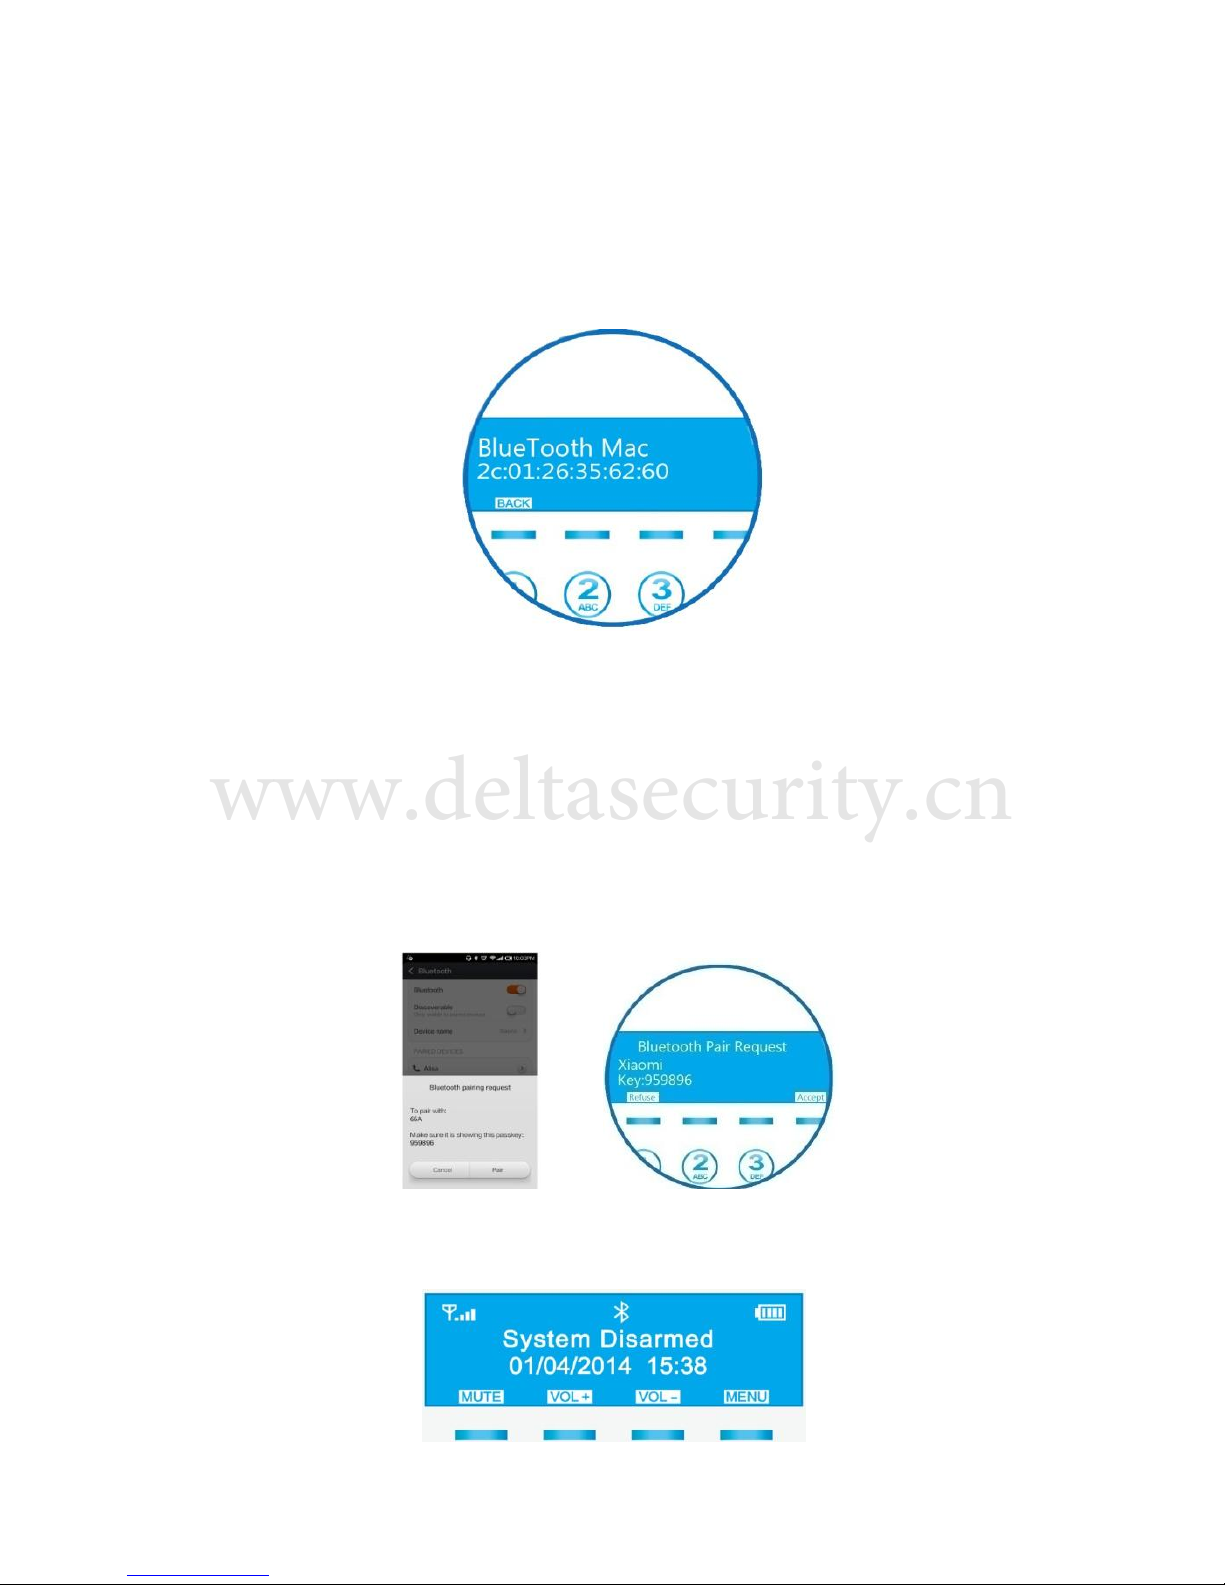
How to find out Bluetooth Address of your alarm panel?
Disarm the alarm system---“Program”---“System About”---“BlueTooth Mac” and press “Enter”,
then system will generate a BlueTooth Mac/Address automatically as belowing picture. The
BlueTooth Mac is random and unique. Input the same address on Cell phone and save.
And then, Input the correct password of host (default: 888888) on cell and save.
Third, pairing the cell with alarm panel via bluetooth
Initiate the search of Bluetooth Device on the cell. You will see “66A” bluetooth device on your
searching results. Select it and the cell will pop up a dialogue with Device name and Passkey. At
the same time, panel will pop up a dialogue with the same Passkey and your cell brand, select
“Accept” on the alarm panel.
Mobile interface Alarm Panel interface
At last, you will see a Bluetooth mark on the panel LCD screen. Pairing completed.
www.deltasecurity.cn

Monitoring Center
The alarm system use standard Ademco Contact ID to connect with monitoring
center. Get a telephone number and User ID from your monitoring service
provider and input them into the alarm system. And make sure turn on the
upload alarm data and upload ARM/Disarm data. Then the monitoring center can
watch your property right away.
Here are the operation steps.
Disarm the system and touch “Menu”---Enter into “Program”---“Monitoring
Center”, page up and down on the panel and you will see a whole menu for
monitoring center as bellowing picture.
Monitoring Center Number: the system can accept 2 monitoring center phone
numbers at most. Make sure that the mobile number is no longer than 20 digits.
ADEMCO Contact ID: it is composed of 4 digits of numbers, which is authorized
and designated by the monitoring service provider.
Upload Alarm Data: select “YES”, then the system alarm settings will be uploaded
to the monitoring service provider.
Upload Arm/Disarm Data: select “YES”, the system ARM/DISARM data will be
sent to monitoring service provider automatically.
www.deltasecurity.cn

Outgoing Message
In event of intrusion, this message will be sent to preset SMS numbers. If you also record the
message, the record will be played to preset Phone Numbers before the emergency call is
answered.
a. Edit the message
Disarm the system enter into “Menu”---“Program”---Page down and select “Outgoing
Message”---“ Edit Text Message”---Input the message on alarm panel and Save.
The message should be shorter than 25 letters and symbols.
b. Record the message
Disarm the system and enter into “Menu”---“Program”---“Outgoing Message”---“Record”
The record should control within 10 seconds. The system will count down from 10 when doing
the record.
c. Delete the message
Disarm the system and enter into “Menu”---“Program”---“Outgoing Message”---“Delete”
www.deltasecurity.cn

Timely arm/disarm system
The menu can realize system automatically arm/disarm itself on a setting time.
How to set the automatic system arm/disarm time?
Enter into “Menu”---“Program”---“Timely Arm/Disarm”---“Enable”---“Set Arm Time”---Input an
automatic system arming time in 24 hour format (HH:MM) and press “Save”.
The preset system arming time should be any value between 00:00 and 23:59.
Use the same method to set an automatic system disarming time.
Delay arm/disarm
It’s a very practical function in daily life. We suggest setting a 40’s delay for system arming.
Particularly when you firstly get your alarm system on hand and not so familiar with the
features and function, it’s easy to trigger the alarm. It’s highly recommended to set a delay
time for system arming. Then there will be a plenty of time to fix the false alarm.
How to set the delay time?
Disarm the system and enter into “Menu”---“Program”---“System Settings”---“Arm delay
time”---Input a number between 1 and 999 as bellowing picture and “Save”.
Use the same method to set the system disarm delay time.
www.deltasecurity.cn

Door/Window Open Reminding
With this feature, the system cannot be armed if any single one of door/window sensors is not
closed. The system will remind you to keep all the windows and doors closed before leaving
the house and arming the system. Here are the setting steps.
Disarm the alarm system and enter into “Menu”---“Program”---“System
Settings”---“Door/Window Open Tip”---Select “YES”
Change a system language
Disarm the system and enter into “Menu”---“Program”---“System
Settings”---“Language”---page down and select one language.
For now we have English only and more languages will be added into system later.
Change a password
Disarm the system and enter into “Menu”---“Program”---“System
Settings”---“Password”---Conform you r “Old Password” and press “Enter”---Input a new 6
digits password and press “Enter”---input the new password to confirm and press “Save”.
It’s highly recommended to change the password as soon as you get your alarm system.
System date and time
Take out the battery will erase customized date and time setting and return back to factory set.
Disarm the system and enter into “Menu”---“Program”---“System
Settings”---“Date/Time”---“Date”---“Display Format”---Select one format and press “Save” and
then press “Back” to return to former dialogue---select “Set Date”---input date according to
previously saved date format and press “Save”. YYYY/MM/DD: Year/Month/Day
System time setting: “Menu”---“Program”---“System Settings”---“Time”---input a time in 24
hour format and press “Save”. Blank will be considered an error data.
www.deltasecurity.cn

Restore factory set
It may lead to the lost of all the customized system settings. Be careful to operate it unless you
have to.
Enter into “Menu”---“Program”---“System Settings”---“Factory Reset”---Then you will see there
are two options, “Restore Defaults” and “Format System”
Restore defaults: Except Remote controller, Sensors, Wireless Siren, RFID tags and Bluetooth
communication, the rest of system settings are returned to default status.
Format System: All the system settings are cleared.
About System
System information can be checked by following the steps:
Disarm the system and enter “Menu”---“Program”---“System About”, then we can see a menu
as bellowing picture.
【Version】 : Software version
【Production Date】: The date of Manufacture
【Manufacture By】 : The Manufacturer
【IMEI】 : a 15 digits number, the symbol of legit networking access.
【Bluetooth Mac】Bluetooth address, a series of number generated by system automatically.
The number will be needed when pairing the cell phone with alarm system via Bluetooth.
www.deltasecurity.cn

Hardware Test
This auto trouble-shooting feature enables users to rule out the failed parts by themselves in
event of system failure.
Disarm the system and enter into “Menu”---“Program”---“Hardware test”, page up and down,
we will see whole menu.
【Lcd Test 】: Test whether the LCD screen can work normally
【Led Test】: Test whether Led Lights and the backlights can work normally
【Key Test】: Test whether the keyboard can work normally
【RFID Test】: Test whether the RFID Reader area can work normally
【Voice Test】: Test whether the Voice Prompts is Accurate & Complete
【Record Test】: Test Whether the Host can record normally
【RF Receive Test】 : Test if the Host can receive the Wireless Sensors/Detectors’ signal
【RF Send Test】: Test if the Host can send the signal normally
【Battery Test】: Test if the back-up Battery power works normally
【Power Off Test】: To test if the power adapter can charge the Host normally
【Call Test】: To test if the Host can receive the calling & act according to the instructions
【Net Central Test】 : To test if the Host can connect to the Monitoring Center Normally
【Wired Zone Test】: To test whether the wired defense zone work normally when triggering
【Bluetooth Test】: To test whether the Host can scan the other Bluetooth devices normally
www.deltasecurity.cn

4. How to remote control the alarm system via phone call or SMS
By phone call or sending SMS, we can realize basic control of system.
a. Remote control by SMS
Make sure your SMS phone number is preset on your alarm system. Otherwise
the alarm system will not accept your instruction.
Edit SMS with content “8888881”, to Arm the system;
Edit SMS with content “8888882”, to Disarm the system;
Edit SMS with content “8888883”, to enter into “Home mode”
Edit SMS with content “8888884”, to inquire system arm/disarm status
888888 is system default password. If the password has been changed, replace it
with new password.
b. Remote control by Phone call
Make sure your phone number is preset on your alarm system. Otherwise the
alarm system will not accept your instruction.
Dial the phone number of your alarm system and you will hear a voice “Please
input the password”. Enter the password (Default: 888888) on your mobile
phone and then there will be another voice instruction “Please input the
instruction”. Now press
Number key 1: to arm the system
Number Key 2: to disarm the system
Number key 3: to monitoring and listening to the alarm site for 30 seconds. If
continuous monitoring is required, press”3” key again to extend time for 30s.
All rights reserved by Delta Security CO.,Ltd
www.deltasecurity.cn
 Loading...