

Page 1

DeltaMaker 3D Printer
Getting Started
Last Updated: February 2015
Page 2

DELTAMAKER GETTING STARTED GUIDE
2
Table of Contents
TABLE OF CONTENTS 2
WELCOME 3
SECTION 1: UNPACKING/SETUP 4
REMOVING THE PRINTER FROM THE BOX 4
INSTALLING THE FILAMENT SPOOL HOLDER 5
INSTALLING THE ACRYLIC BUILD PLATE 5
PLUGGING-IN THE POWER SUPPLY 6
CONNECTING TO THE OCTOPRINT USER INTERFACE 7
SECTION 2: CALIBRATION 8
AUTOMATIC BED MAPPING 9
SETTING THE NOZZLE HEIGHT 10
SAVING THE CALIBRATION SETTING 10
SECTION 3: YOUR FIRST PRINT 11
LOADING THE FILAMENT 11
PREPARING TO PRINT 16
PRINTING A SAMPLE OBJECT 17
PRE-LOADED SAMPLES 17
PRINTING FLOW 18
UNLOADING THE FILAMENT 19
ALTERNATE UNLOAD PROCEDURE 19
SECTION 4: PRINTING OTHER 3D OBJECTS 21
DOWNLOAD AN OBJECT 21
PREPARE THE OBJECT 22
SEND OBJECT TO PRINTER 22
PRINT THE OBJECT 23
SECTION 5: TROUBLESHOOTING 24
COMMON PROBLEMS 24
ADVANCED CALIBRATION 26
BED LEVELING & NOZZLE HEIGHT ADJUSTMENT 26
TOUCH PROBE CALIBRATION- ADVANCED 26
Page 3

DELTAMAKER GETTING STARTED GUIDE
3
Welcome
This Guide is designed to get you started using your DeltaMaker 3D Printer. Even if you are familiar
with other desktop 3D printers, it is important that you read through this guide, as there are several
unique features on your DeltaMaker 3D Printer.
The latest version of this guide is available at:
http://download.deltamaker.com/docs/deltamaker-getting-started-guide.pdf
In section 1, you will learn how to safely unbox the DeltaMaker 3D Printer, and how to set it up.
Sections 2 will show you how to calibrate you DeltaMaker 3D Printer. In section 3 and 4 we will
discuss printing your own 3D objects. Section 5 includes tips for achieving the best results from your
DeltaMaker 3d Printer.
The entire DeltaMaker Team is excited to welcome you to the world of 3D printing. By following the
instructions in this guide, you are ensuring that you get the most out of your DeltaMaker 3D Printer, and
will enjoy trouble-free 3D printing as you make cool things.
CAUTION: The DeltaMaker 3D Printer generates very high temperatures and contains
moving parts that can cause injury. Never reach inside the DeltaMaker while it is
operating. Also, always allow the DeltaMaker to cool down before touching the Extruder
print head in the center of the machine.
CAUTION: Do not leave the DeltaMaker unattended while it is operating.
Page 4

DELTAMAKER GETTING STARTED GUIDE
4
Section 1: Unpacking/Setup
Removing the printer from the box
Please be very careful when removing your DeltaMaker 3D Printer from its shipping carton. When
lifting your DeltaMaker 3D Printer out of the carton, be sure to hold it by the aluminum frame only.
Never lift or pull on any of the wires or tubes that extend from the top of the printer frame to the printhead.
1. Carefully remove the foam packing material from the box.
2. Remove the Accessory Box. It includes the build plate, power supply, and other items (see the
Packing List for the complete contents).
3. Lift the DeltaMaker 3D Printer by grasping the aluminum frame. DO NOT pull on the wires,
carriages, arms, print-head, or other components.
Page 5

DELTAMAKER GETTING STARTED GUIDE
5
Installing the Filament Spool Holder
Install the filament spool holder into the filament spool holder mount on the rear of the printer.
Installing the Acrylic Build Plate
Attach the acrylic build plate to the magnetic mounts on the base of the DeltaMaker 3D Printer. Make
sure all three magnets are in contact with the mounting hardware on the acrylic build plate, and it is
parallel to the front edge of the printer (the front edge is on the opposite side from the spool of PLA).
Page 6
DELTAMAKER GETTING STARTED GUIDE
6
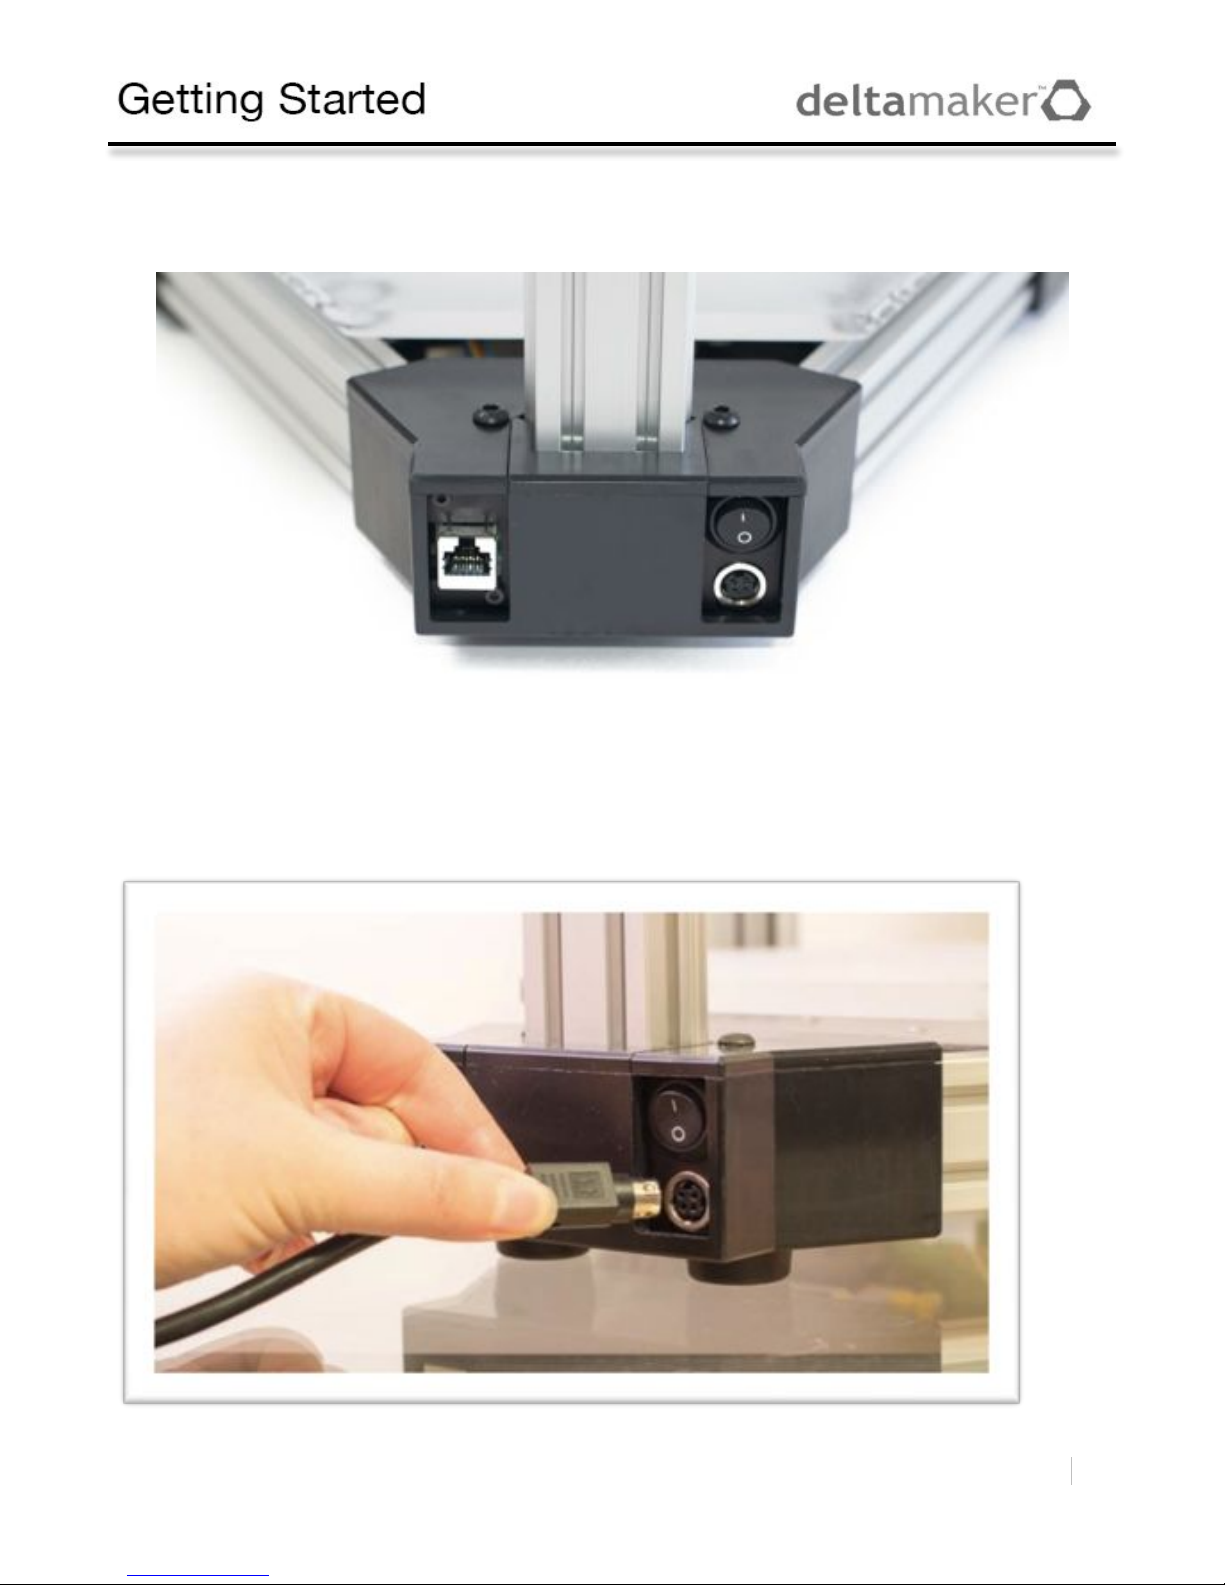
Plugging-in the Power Supply
Plug the power supply connector into the power connector on the DeltaMaker 3D Printer and turn on the
DeltaMaker 3D Printer using the switch above the power supply connector.
It is important to note that the power cord locks into place once it is plugged in to the DeltaMaker 3D
Printer. In order to remove the power cord, do not yank or pull hard. Simply slide the black “box”
around the end connected to the printer away from the printer to unlock. While holding this position, the
cord should be easy to remove.
Page 7

DELTAMAKER GETTING STARTED GUIDE
7
Connecting to the OctoPrint User Interface
Turn on the power switch on the back of the DeltaMaker 3D Printer. Wait a couple minutes for the
printer software to complete its start-up process.
1. The DeltaMaker 3D Printer will broadcast its own WiFi hotspot called
“DeltaMaker_WiFi_####”, where #### is a 4 digit number. Connect to it using the password
listed on the printed information included with your printer. You also have the option of
connecting to your home network via a wired Ethernet connection located next to the power
source.
2. Go to deltamaker.local in your browser (be sure to omit the www). If you are unable to connect
to deltamaker.local, you may need to install iTunes to use the bonjour service (this is what allows
you to connect directly to the DeltaMaker 3D Printer). If you are still unable to connect, you
may access the printer using its numeric address (e.g. http://192.168.10.1).
3. If you have not previously done so, please select the Login
function in the top-right corner of the screen. The username
is “admin” and the password is included on the printed
information that came with your printer. If you do not have
that password, please contact support@deltamaker.com for
assistance.
Page 8

DELTAMAKER GETTING STARTED GUIDE
8
Section 2: Calibration
The calibration procedure is performed with the build plate attached to the printer. Make sure the acrylic
build plate is flush with the front edge of the printer (the front edge is on the opposite side from the
spool of PLA). In order for the auto bed mapping to work properly, the build plate must be securely
attached to the printer.
The calibration procedure must be performed while the extruder is cool. If the nozzle is hot when you
perform the calibration procedure, you could permanently damage your acrylic build plate.
The calibration procedure is outlined here and then detailed in the following paragraphs. You must
follow these steps precisely or risk damaging your build plate.
1. Select the “Auto Bed Mapping” button on the Control tab. Observe that the print head moves to
the top position (home) and then lowers to the build plate, touching it at multiple points with the
touch probe.
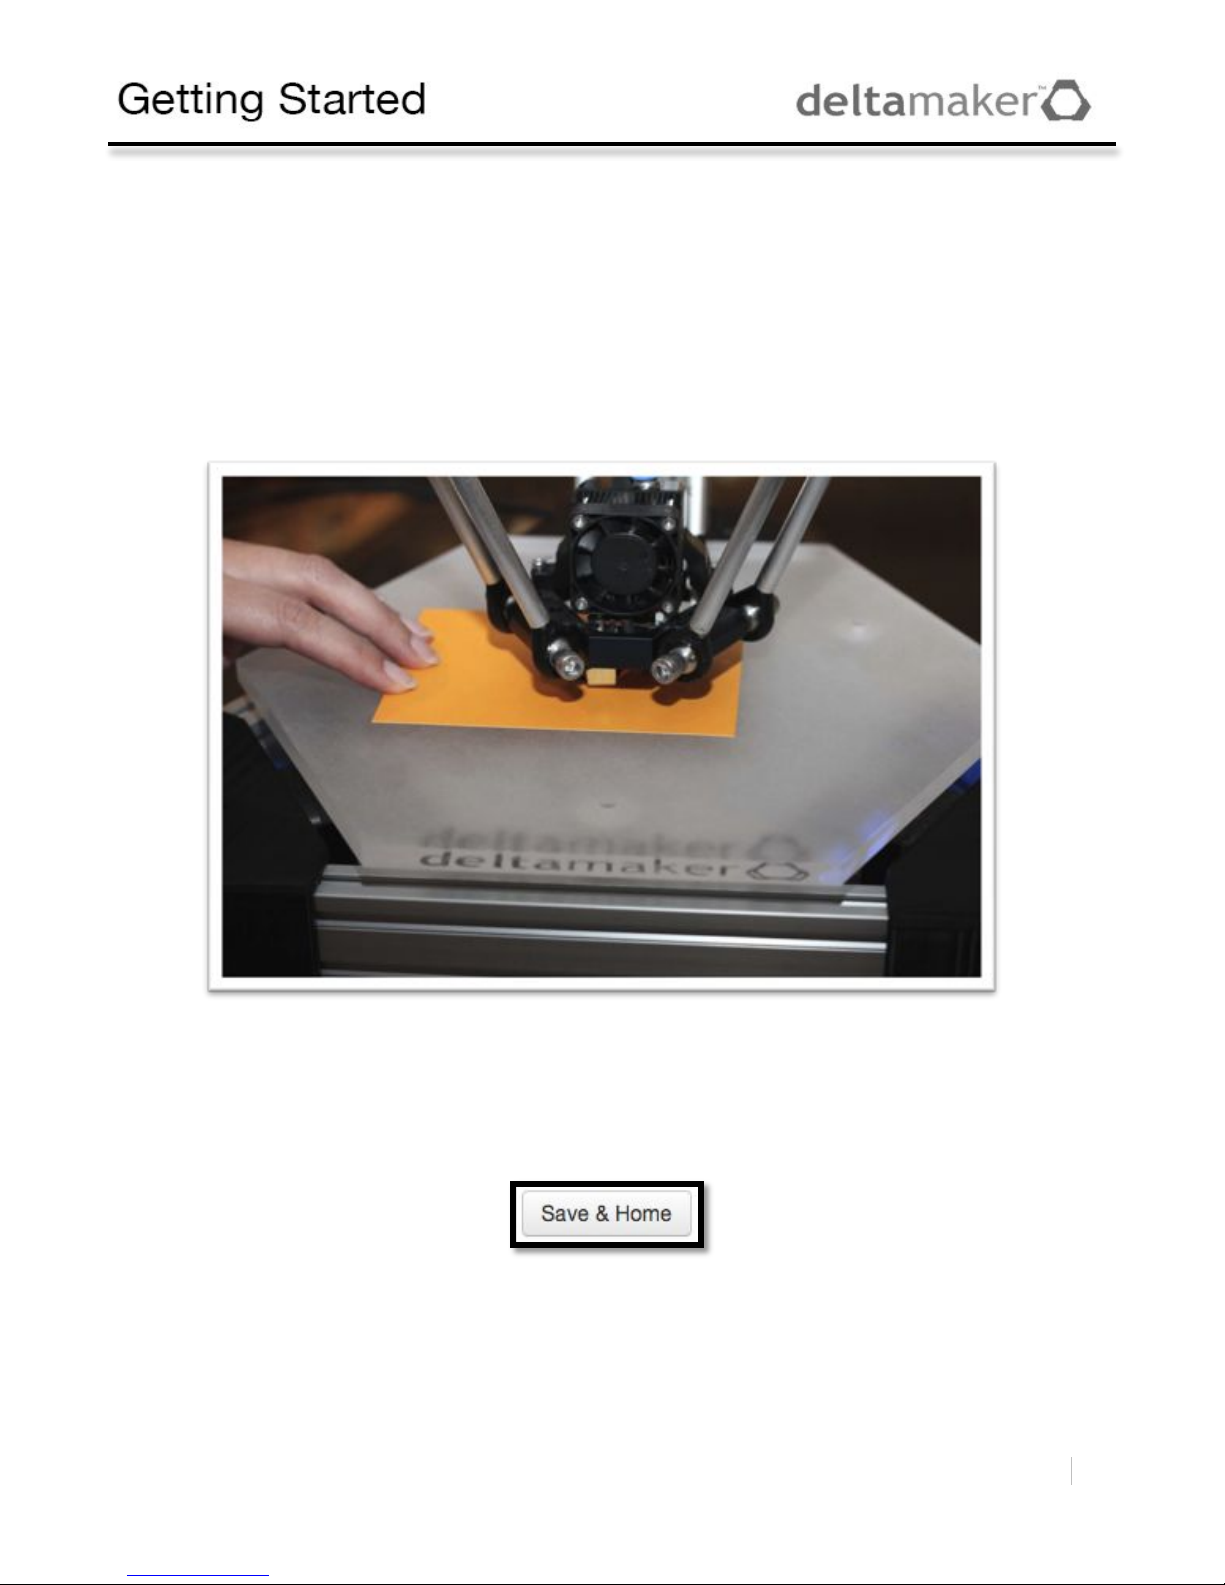
2. Next, set the nozzle height by placing a piece of paper on the build plate and selecting the “Move
Nozzle to Bed” button. Observe that the print head moves to the home position and then lowers
to the center of the build plate. The nozzle should stop just as it makes contact with the piece of
paper you placed over the build plate.
3. Carefully attempt to slide the paper across the bed while the nozzle is above it. If the pressure of
the nozzle is preventing the paper from easily sliding, than the nozzle is too low. Press the “Too
Low” button one or more times, until the paper will easily slide while still making contact with
the nozzle.
4. If the nozzle is above the paper, or the paper slides without any contact with the nozzle, then the
nozzle is too high. Press the “Too High” button one or more times, until a small amount of
friction is felt when you slide the paper under the nozzle.
5. Press the “Save & Home” button to save the bed mapping and nozzle height settings. Observe
that the print head moves to the home position.
Page 9

DELTAMAKER GETTING STARTED GUIDE
9
Automatic Bed Mapping
Under the Control tab, click “Auto Bed Mapping”. This process will take a couple of minutes. You will
see the nozzle moving to the bed in several locations around the bed. This is how the printer maps out
the bed and knows exactly where it is. This process needs to be done every time the build plate is
removed or the printer is moved.
Page 10
DELTAMAKER GETTING STARTED GUIDE
10
Setting the Nozzle Height
1. Place a regular sheet of paper on the printer bed, and select “Move Nozzle to Bed”.
2. After the nozzle is lowered, you should be able to move the paper under the nozzle with a small
amount of friction.
a. If you feel no friction, it means the nozzle is too high. Click on “Too High” and retest for
friction.
b. If it feels tight or you feel a lot of friction, click on “Too Low”. This will raise the nozzle
slightly. Adjust the nozzle until you feel just a small amount of friction between it and
the sheet of paper.
Saving the calibration setting
Click the “Save & Home” button to store the bed mapping data and the nozzle height adjustment in nonvolatile memory in the printer. By doing so, you may omit the calibration step the next time you print
an object on your DeltaMaker 3D Printer. This button also raises the print head to the “home” position.
Page 11

DELTAMAKER GETTING STARTED GUIDE
11
Section 3: Your First Print
Loading the Filament
1. Under the Temperature tab, select 230 degrees C from dropdown box for the hot end labeled
“set”. It is important to note that the nozzle gets extremely hot and should never be touched
directly when the unit is on. Always use snips, pliers or other tools when removing scraps of
PLA from the nozzle.
Page 12

DELTAMAKER GETTING STARTED GUIDE
12
2. Snip the end of the spool of PLA (about .5” from the end or past any sharp kinks). You may find
it easier to load if you snip at a slight angle.
3. Straighten the first six inches of the PLA by gently bending it. The PLA does not need to be
perfectly straight, but reducing any bends will make the PLA easier to load.
Page 13
DELTAMAKER GETTING STARTED GUIDE
13
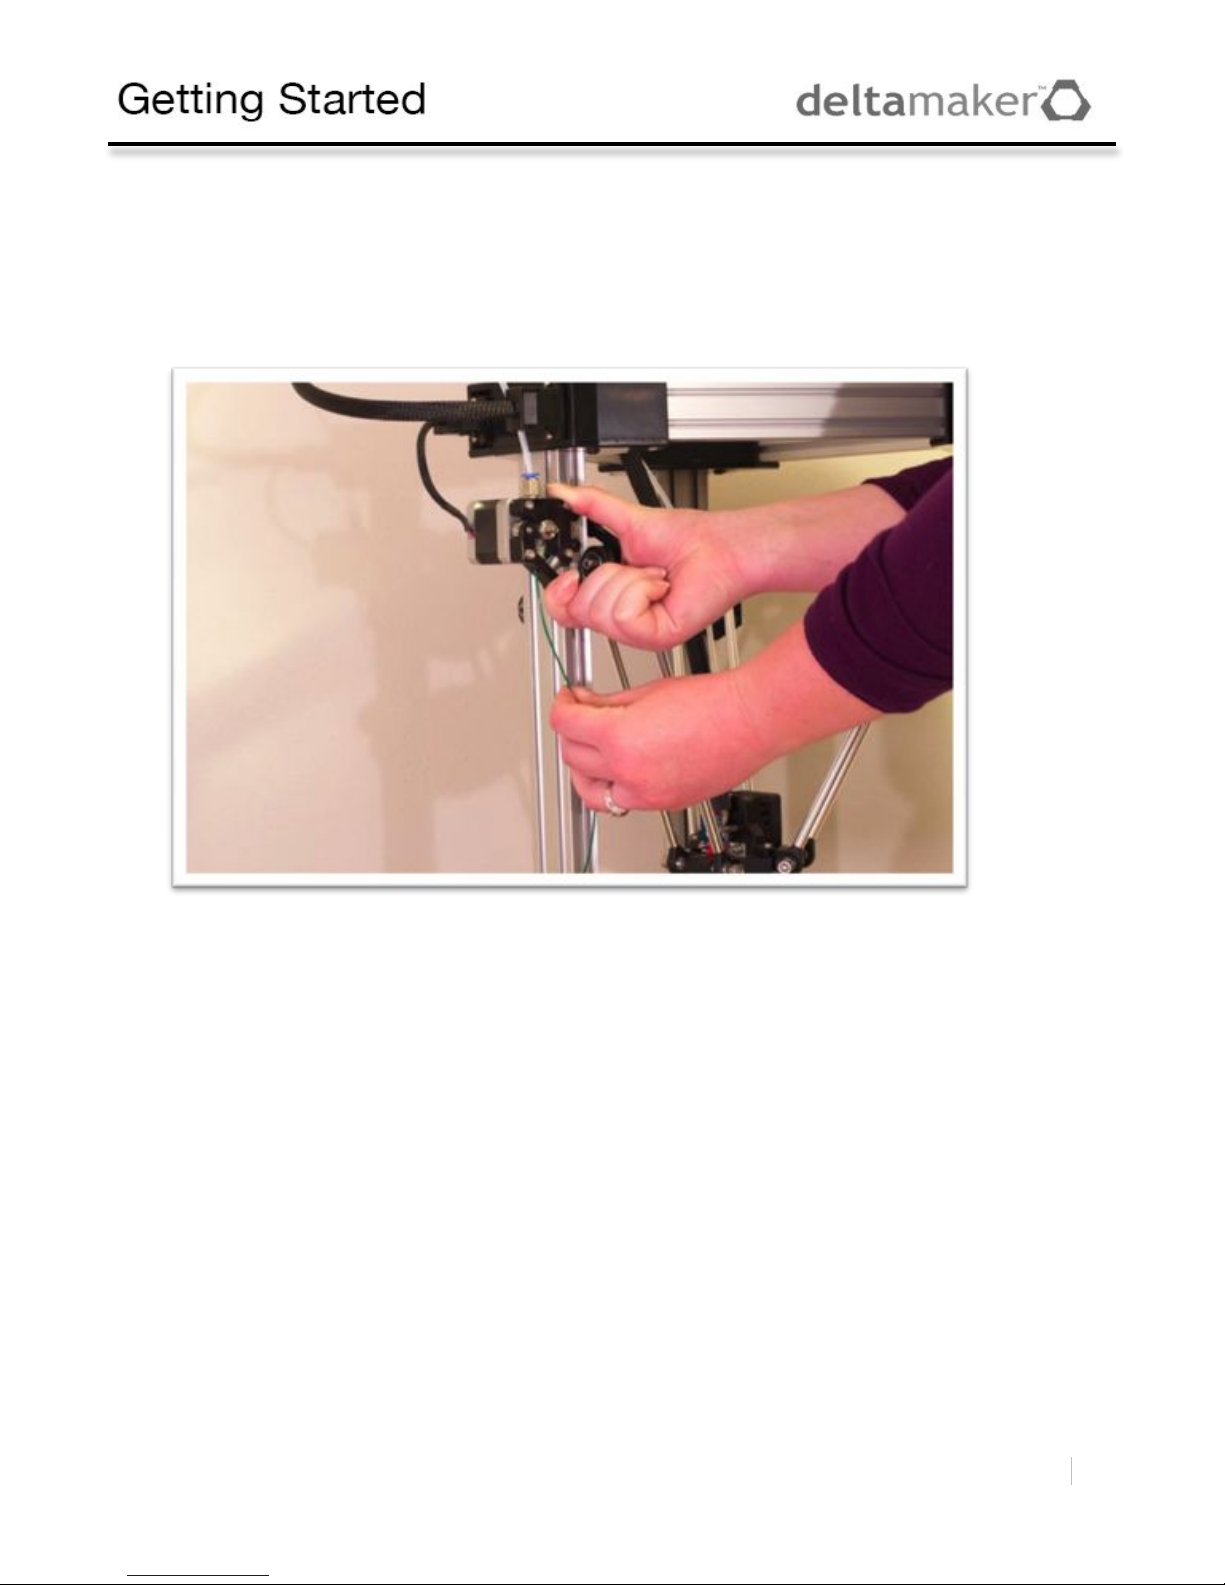
4. Slip the end of the PLA through the hole in the trigger.
5. Squeeze the trigger and push the PLA up into the Bowden (clear) tube. Keep in mind that
getting it past the opening may require turning the PLA or adjusting hand position. Think of it as
trying to slide something through multiple holes that have been aligned. Resistance means that it
is caught on an edge just inside the opening and you will need to turn the PLA or reposition your
hand. You can try snipping flat or at an angle to see what works best for you.
Page 14

DELTAMAKER GETTING STARTED GUIDE
14
6. Once past the opening, you should be able to see the PLA going through the tube toward the
extruder. You will feel the PLA stop, but you aren’t quite there just yet. Keep feeding the PLA
while squeezing the trigger.
Page 15

DELTAMAKER GETTING STARTED GUIDE
15
7. Slowly and easily push the PLA past the resistance point at the end of the tube. You should be
able to feel it give way and then see PLA flowing from the print head.
8. It is possible to load PLA with the unit cold, but NEVER remove PLA from a cooled unit. Make
sure the printer is warmed up when you remove or change the PLA.
Page 16

DELTAMAKER GETTING STARTED GUIDE
16
Preparing to Print
Once your unit reaches temperature (you can check this on the temperature tab), go to the control tab
and click on the “extrude” button. Let it sit at temperature for a couple of minutes for best results. You
should extrude at least 20mm of PLA. Once you have flow, then you are ready to print.
Page 17

DELTAMAKER GETTING STARTED GUIDE
17
Printing a Sample Object
For your first few prints, we recommend that you print from the sample files preloaded on your printer.
Your DeltaMaker 3D Printer is pre-loaded with some sample 3D objects, so you may begin printing
immediately. Many of these are also available on thingiverse.com.
Pre-Loaded Samples
These files are displayed on the left side of the OctoPrint
screen.
• 01_Calibration_Cube
o a small cube, measuring 20 x 20 x 20 mm
• 02_DM_Logo
o a small DeltaMaker Logo
• 03_Mr_Jaws
o a shark (by Mahoney,
http://www.thingiverse.com/thing:14702)
• 04_Stretchlet
o a strechy braclet (by emmett,
http://www.thingiverse.com/thing:13505)
• 05_Squirrel
o a small squirrel (by MBCook,
http://www.thingiverse.com/thing:11705)
• 07_MAKE_Robot
o a small robot (by MAKE,
http://www.thingiverse.com/thing:40212)
• 20_DM1_Spool_Bracket
o holds the spool holder on the back of the printer
• 21_DM1_Spool_Holder
o removable spool holder
Page 18

DELTAMAKER GETTING STARTED GUIDE
18
Printing Flow
1. Choose a file and click on “print”. The printer may not begin printing immediately. DO NOT
place your hand on the bed, as the DeltaMaker 3D
Printer may begin printing at any time and contact with
skin will cause a severe burn.
2. Keep in mind that the estimated print times are only
estimates and not meant to be exact. Actual print times
may be longer.
3. You can watch the progress of your print in the “state”
box which gives you current status, estimated print time,
remaining print time, file size, and the name of the file
being printed.
4. By clicking on the tab labeled “GCode Viewer”, you can
watch the progress of the file being printed layer by
layer.
5. While your object is printing, you may continue to use
the OctoPrint User Interface to monitor its progress, if
you wish. Alternatively, you may close the OctoPrint
window and use your computer for another purpose, or
turn off your computer completely.
6. The DeltaMaker 3D Printer does not need to be
connected to your computer to operate; it is fully
functional as a stand-alone printer.
Page 19

DELTAMAKER GETTING STARTED GUIDE
19
Unloading the Filament
Whenever you wish to change filament colors, or remove the filament spool from the printer, you should
use the following procedure to unload the filament. If you plan to use the same spool of filament for
your next print, you may leave the filament loaded in the printer while the extruder nozzle is cooling
down. Always reheat the nozzle before removing the filament.
1. Make sure your DeltaMaker 3D Printer is at temperature (230°C).
2. Grasp the filament directly below the extruder drive, and pinch the trigger.
3. PUSH a few centimeters of filament into the extruder, and observe a string of melted filament
exiting the nozzle.
4. Then, SLOWLY PULL the filament out of the extruder, and recoil it on your filament spool.
Alternate Unload Procedure
You may also unload the filament at a lower temperature, by pulling the filament out of the extrusion
nozzle, directly above the print head. The procedure is also called a “cold-pull” and will remove the
filament from the inside of the nozzle. This is useful for removing old filament and debris, which can
cause clogs, from the nozzle.
1. In OctoPrint, set the hot end temperature to 100 C.
2. Press the “home” button to lock the print head at the home position.
Page 20

DELTAMAKER GETTING STARTED GUIDE
20
3. When the temperature is at 100 C, remove the filament guide tube (Bowden tube) from the top of
the print head. This is performed by simultaneously pressing DOWN on the blue ring at the top
of the print head while pulling UP on filament guide tube.
4. Continue pulling the filament guide tube up slowly until all of the filament is removed from the
nozzle.
5. Snip off the filament just below the end of the guide tube, and reinsert the guide tube in the blue
circle.
6. Recoil the filament on the filament spool
Page 21

DELTAMAKER GETTING STARTED GUIDE
21
Section 4: Printing Other 3D Objects
After you have printed a few of the sample objects included with your DeltaMaker 3D Printer, you will
be ready to print objects of your own choosing. You may wish to download additional objects from
Thingiverse, or design your own objects using 3D modeling software or a CAD program (computeraided design).
To achieve the best results with your DeltaMaker 3D Printer, it is important that you understand the 3D
printing “workflow” that should be used with your printer. The step in this work-flow are outlined
below and explained in further detail later in this section.
1. Begin with a 3D object in the correct (STL) digital file format.
2. Prepare the 3D object (STL file) for printing.
3. Send the 3D object to the DeltaMaker 3D Printer.
4. Print the 3D object.
Download an Object
Begin with a 3D object in the correct (STL) digital file format. The industry standard digital file format
for 3D printing is the STL file. STL files may be downloaded from a variety of website, or created by
3D modeling and CAD programs.
Page 22

DELTAMAKER GETTING STARTED GUIDE
22
Prepare the Object
For simple 3D models, such as this one, no preparation for the model is required. The STL file may be
sent directly to the DeltaMaker 3D Printer for printing.
In this step, the STL file is checked for errors and automatically repaired if necessary. The “repaired”
STL is then converted to a set of detailed instructions that will be used to control the motion of the
DeltaMaker 3D Printer while the object is being printed. These detailed instructions will be stored in the
digital file format called GCode.
To print more complicated 3D models, please see our documentation on “slicing” for detailed
instructions.
Send Object to Printer
The “Upload” button is used for sending 3D models (STL or GCODE files) to the DeltaMaker 3D
Printer. In the example below, the upload button is pressed, and the desired STL file is selected. Your
printer includes built-in memory to store hundreds of 3D objects. This allows you to easily print
additional copies of your 3D objects in the future. After you upload your object, it will appear in the
printer’s file list, alongside the sample objects included with
your printer.
The DeltaMaker 3D Printer will immediately begin “slicing” the 3D model. In a few moments, the
model will be ready for printing.
Page 23

DELTAMAKER GETTING STARTED GUIDE
23
Print the Object
Once the object has been sliced, it will appear on your list of files. To print your object, use the same
procedure as you did to print the sample object(s) as explained in section 3.
Page 24

DELTAMAKER GETTING STARTED GUIDE
24
Section 5: Troubleshooting
Common Problems
Problem: The item being printed does not adhere to the print bed.
Solution: Your print nozzle may be positioned too high. Cancel your print and try the friction test
by clicking “move nozzle to bed”. You should be able to slide a piece of plain copy paper under the
print head and feel a small amount of friction. If you do not feel any friction, click the button labeled
“too high” on the control tab. Continue until you feel some friction but are still able to easily move the
paper around.
Problem: The item being printed sticks to the bed and is very difficult to remove.
Solution: Sand the build plate with coarse sandpaper. Using a sanding block with “80 grit”
sandpaper, sand the surface of the acrylic build plate. It is important not to be too rough and take care
not to put pits in the acrylic surface. If the bed is too smooth, the cooled PLA will be difficult to
remove. If it is freshly sanded, items should be much easier to remove.
Page 25

DELTAMAKER GETTING STARTED GUIDE
25
Problem: The print started out just fine, but PLA began to flow inconsistently and print layers are
not adhering to each other.
Solution 1: The PLA spool may be caught on something and not rotating correctly. Make sure that
the spool is able to spin freely and make sure that the PLA is not caught on the trigger, which would
keep it from flowing through the Bowden tube properly
Solution 2: The print head may be clogged. With the unit fully warmed up, try gently pulling the
PLA (while squeezing the trigger) back part way through the Bowden tube then pushing it back in.
Keep pushing until you see PLA beginning to flow from the nozzle. You will need to restart your print
from the beginning.
Problem: When printing a very wide object, the extruder nozzle is too high, or too low at the far
edges of the object, even after completing the Nozzle Height Adjustment procedure.
Solution: Perform the Automatic Bed Mapping, and Nozzle Height Adjustment procedure again. If
the problem persists, there is an advanced calibration procedure that may be performed to correct this
issue. See below.
Page 26

DELTAMAKER GETTING STARTED GUIDE
26
Advanced Calibration
The DeltaMaker 3D Printer is completely calibrated and tested at the factory before it is shipped. Under
normal circumstances, users will rarely need to perform the advanced calibration procedure described
below. However, in situations where the DeltaMaker 3D Printer was subjected to extended vibration or
rough handling during shipping, it may need to be recalibrated after it arrives at its destination.
Below is the procedure for recalibrating the touch probe on the DeltaMaker 3D Printer. Before
beginning this procedure, please repeat the auto bed mapping and nozzle height adjustment that you did
in Section 2 of this users guide.
For your convenience, this procedure is summarized below. Please note that during normal operation,
the auto bed mapping function should be performed anytime the build plate has been removed and
reattached to the printer.
Bed Leveling & Nozzle Height Adjustment
Please refer to the instructions in section 2.
Touch Probe Calibration- Advanced
The touch probe on the DeltaMaker 3D Printer’s print head is calibrated in the factory, before the printer
is used for the first time. To ensure the accuracy of the auto bed mapping function, the touch probe
should be recalibrated anytime the printer has been subjected to extended vibration (such as during
shipping). Please note that the touch probe calibration should only be performed after the auto bed
mapping and nozzle height adjustment (section 2) have been completed.
1. The touch probe calibration procedure is similar to the nozzle height adjustment, and it begins
with placing a piece of paper on the build plate. Please note that the first calibration point will be
near the front of the build plate, so ensure that
your piece of paper is located accordingly.
2. Next, press the “Next Calibration Point” in the
Touch Probe Calibration section, at the bottom of
the Control tab. Observe that the print head lowers
to the build plate.
3. Attempt to slide the paper across the bed while the
nozzle is above it. If the paper slides easily, with
only a small amount of friction from the nozzle,
then the touch probe calibration at this calibration
point is correct. Press the “Next Calibration
Point” button to continue.
4. If the pressure of the nozzle is preventing the
paper from sliding, than the touch probe
calibration is too low at this calibration point. Press the “Point Too Low” button one or more
times, until the paper will easily slide while still making contact with the nozzle.
Page 27

DELTAMAKER GETTING STARTED GUIDE
27
5. If the nozzle is above the paper, or the paper slides without any contact with the nozzle, then the
touch probe calibration is too high at this calibration point. Press the “Point Too High” button
one or more times, until a small amount of friction is felt when you slide the paper under the
nozzle
6. Press the “Next Calibration Point” button to move the print head to the next touch probe
calibration point. Repeat steps 9 through 12 until all calibration points have be checked, and
adjusted, if necessary. For maximum accuracy, continue repeating these steps to check each
calibration point twice.
7. Press the “SAVE” button to save the calibration data.
Please Note: It is very important that you save the calibration data before you print a 3D object on your
printer. Without the proper “auto bed mapping” and “touch probe calibration” data saved on your
printer, the hot nozzle could come in contact with your build plate and cause a scratch or hole.
 Loading...