

Page 1

Z1V
USER MANUAL
Page 2

TABLE OF CONTENTS
Important Safety Information ...................................... 4
Sym b ols Used ... . ...... ...... . . ...... ....... . ...... ....... . ...... ....... . ...... ....... . ...... ..... 4
General Safet y I nformation ... ...... . ....... ...... . ....... ...... . ....... ...... ....... . ...... . 4
Qumi Z1V Inst allation Not i ce ...... . ...... ....... . ...... ....... . ....... ...... . ....... ...... . . 5
Power Supply Saf ety ..... . ....... ...... . . ...... ...... . . ...... ...... . . ...... ...... . . ...... ...... 5
Cl eaning Qum i .... ...... . . ...... ...... . . ...... ...... . . ...... ....... . ...... ....... ....... ....... ... 5
Co n trol War ning . . ...... ....... . ...... ....... ....... ....... ...... . . ...... ...... . . ...... ...... . . ... 5
Regulatory Compliance ............................................... 6
FC C Warning ... ....... ...... . ....... ...... . . ...... ...... . . ...... ...... . . ...... ...... . . ...... ...... 6
Ca n ada .. ....... . ...... ....... . ....... ...... . ....... ...... ....... . ...... ....... . ...... ....... . ...... . 6
Safety Certif ications .. ....... . ...... ....... . ...... ....... . ....... ...... . ....... ...... . ....... ... 6
Di sposal and Rec ycling .. . ....... ...... . . ...... ...... . . ...... ...... . ....... ...... ....... . ..... 6
Introduction ................................................................. 7
About this Man u a l ..... ....... ....... ....... ...... . ....... ...... . . ...... ...... . . ...... ...... . . ... 7
Qumi Z1V Main Fea t ures .... ....... . ...... ....... . ...... ....... . ....... ...... . ....... ...... . . 7
Package Contents ....................................................... 8
Your Projector ............................................................. 9
Fr ont-Left View .. ...... . ....... ...... . ....... ...... ....... . ...... ....... . ...... ....... . ...... ..... 9
Re a r View ..... . ...... ....... . ....... ...... . ....... ...... ....... . ...... ....... . ...... ....... . ...... . 9
Top View .... ....... . ...... ....... . ...... ....... . ...... ....... . ....... ...... . ....... ...... ....... . . 10
Bottom View ....... ....... . ...... ...... . . ...... ...... . . ...... ....... . ...... ....... . ...... ....... . 10
Remote Control ......................................................... 11
Re m ote Control Keypad ........ ...... . ....... ...... ....... . ...... ....... . ...... ....... . ..... 11
Activating t he Remote Contr o l Battery .... ....... . ....... ...... ....... . ...... ...... . . . 12
Re p lacing t h e Remote Contr o l Battery ... ....... . ...... ....... . ...... ....... ....... ... 12
Powering/Charging the Projector .............................. 13
Powering On/ Off the Proj e c t or..... . ....... ...... . ....... ...... . ....... ...... . ....... ..... 15
Making Connections .................................................. 17
Using the Projector ................................................... 18
2
Page 3

Adjusting the Focus... . . ...... ...... . . ...... ...... . ....... ....... ....... ....... ...... . ....... . 18
Pla ying Video F rom a Stor a g e Device (USB Flash Drive, m icroSD Card) 19
Vie wing photo s From a Stor a g e Device (U S B Flash Drive, microSD C a r d)
... . ....... ...... . . ...... ...... . . ...... ...... . . ...... ...... . . ...... ....... ....... ....... ....... ....... . 21
Pla ying Audio F rom a Stor a g e Device (USB Flash Drive, m icroSD Card) 23
Pla ying From a Video Source ( HD MI) .... ....... . ...... ....... . ...... ....... . ...... ... 25
Using the Bluetooth Speaker .................................... 26
Using the Settings Menu ........................................... 28
The Setting s Men u .. ...... ....... . ...... ....... . ...... ....... . ...... ....... . ...... ....... ..... 30
Displ a y S ettin g s ... . . . . . .. . ........................... . . . . . ... ................ 30
Audio S et tings . . . . . .......................... . . . . . . . . . ........................ 31
Image S e ttings .. . . . . ........................ ... . . . . . . .. ...................... 31
Timer ................... ... . . . . . ........................... . . . . . . .. .............. 32
Other S e t t ings ....... . . . . . . ........................... . . . . . .. . ................ 32
Troubleshooting/FAQ ................................................ 33
Tips .. ....... . ...... ....... . ...... ....... . ....... ...... . ....... ...... . ....... ...... . ....... ...... .... 33
System Reset Met hod (Reboot ) ....... . ...... ....... . ....... ...... . ....... ...... ....... . . 33
Image Problem s . ...... . ....... ...... ....... . ...... ....... . ...... ....... . ...... ....... . ...... ... 33
Re m ote Control Problems .. ...... . ....... ...... . ....... ....... ...... . ....... ...... . ....... . 34
Audio Problems .. ....... . ...... ...... . . ...... ...... . . ...... ....... . ...... ....... . ...... ....... . 34
FA Qs ..... . . ...... ...... . . ...... ....... . ...... ....... ....... ....... ....... ....... ...... . ....... ..... 35
Vivitek Suppor t Site .... ...... ....... . ...... ....... . ...... ....... . ...... ....... . ...... ....... . 36
Additional Information .............................................. 36
Projection Dis t a nce vs Pr o j ection Size .... ....... . ....... ...... . ....... ...... . ....... . 36
Timing Mode T able .. ...... . ....... ...... ....... . ...... ....... . ...... ....... . ...... ....... . .... 37
Specifications .... . ...... ....... . ...... ....... . ...... ....... . ....... ...... . ....... ...... ....... . . 38
3
Page 4

IMPORTANT SAFETY INFORMATION
IMPORTANT:
!
It is strongly recommended that you read this section carefully before using
Qumi Z1V. These safety and usage instructions will make sure you enjoy many
years of safe use of Qumi Z1V. Keep this manual for future reference.
Symbols Used
Warning symbols are used on the unit and in this manual to alert you of hazardous
situations. The following symbols are used to call attention to important information.
NOTE:
Provides additional information on the topic at hand
IMPORTANT:
!
Provides additional information that should not be overlooked.
CAUTION:
!
Alerts you to situations that may damage the unit.
WARNING:
!
Alerts you to situations that may damage the unit, create a hazardous
environment, or
cause personal injury.
Throughout this manual, component parts and items in the OSD (On-Screen Display)
menus are denoted in bold font as in this example:
“Press the Menu button on top of the projector or remote control to open the
Settings menu”.
General Safety Information
Do not open the casing. There are no user-maintainable parts inside the machine.
For any maintenance, please contact a qualified service technician.
Follow all warnings and precautions on the machine or in this Manual.
According to its design, the projection light source is extremely bright. To avoid
harm to your eyes, do not look straight at the lens when the LED is ON.
Do not place the machine on unstable surface or stand.
Avoid using the system near water, in direct sunlight, or near a heating device.
Do not place any heavy objects (e.g., books or bags) on the unit.
4
Page 5
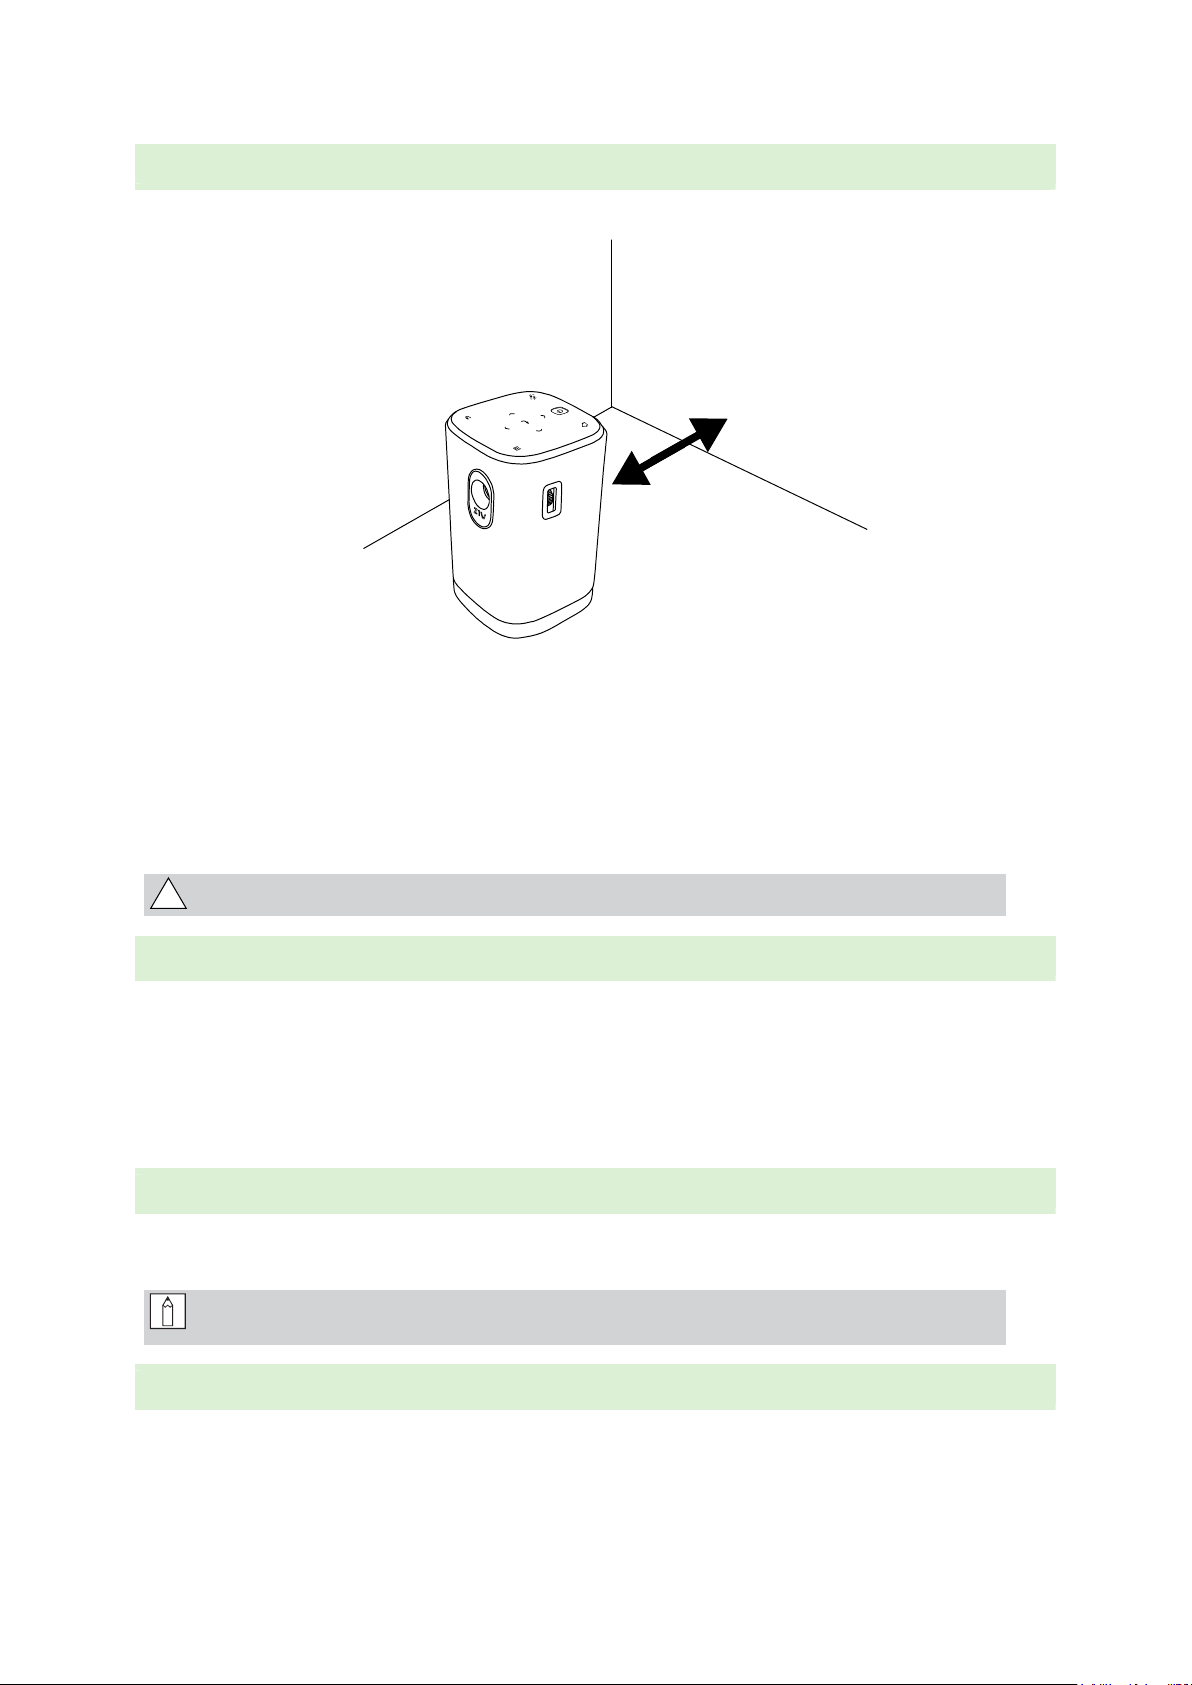
Qumi Z1V Installation Notice
Allow at least a 500mm (20”) clearance around the exhaust vent.
500 mm
(20 in.)
Make sure that the intake vents do not recycle hot air from the exhaust vent.
When operating Qumi Z1V in an enclosed space, make sure that the surrounding air
temperature within the enclosure does not exceed the operating temperature while
Qumi Z1V is running, and the air intake and exhaust vents are unobstructed.
All enclosures should pass a certified thermal evaluation to make sure that Qumi Z1V
does not recycle exhaust air, as this may cause the device to shut down even if the
enclosure temperature is with the acceptable operating temperature range.
CAUTION: Avoid usage of Qumi Z1V in dusty environments.
!
Power Supply Safety
Only use the supplied adapter.
Do not place anything on the cord. Place the cord where it will not be in the way of
foot traffic.
Remove the battery from the remote control when storing or not in use for a
prolonged period.
Cleaning Qumi
Before cleaning, disconnect the power supply cables. Refer to Powering
On/Off the Projector on page 15.
NOTE: Qumi Z1V will be warm after usage. Allow Qumi Z1V to cool down
before storing away.
Control Warning
Before installing and using Qumi Z1V, read the regulatory notices in the Regulatory
Compliance on page 6.
5
Page 6

REGULATORY COMPLIANCE
FCC Warning
This equipment has been tested and found to comply with the limits for a Class B
digital device pursuant to Part 15 of the FCC Rules. These limits are designed to
provide reasonable protection against harmful interference when the equipment is
operated in a commercial environment.
This equipment generates, uses, and can radiate radio frequency energy and, if not
installed and used in accordance with the instruction manual, may cause harmful
interference to radio communications. Operation of this equipment in a residential
area is likely to cause harmful interference in which case the user will be required to
correct the interference at his/her own expense.
Any Changes or modifications not expressly approved by the parties responsible for
compliance could void the user’s authority to operate the equipment.
Canada
This class B digital apparatus complies with Canadian ICES-003.
Safety Certifications
Projector: CENB, REACH, ROHS, WEEE, FCCID, TUV NORTH AMERICA, SRRC, CB,
BQB
Power Adapter: DOE, WEEE, FCC, UL, EAC, TUV-GS, CB, PSB, TUV-S, EAC, KCC,
CCC, CECP, BIS, BSMI, ISC
Disposal and Recycling
This product may contain other electronic waste that can be hazardous if not
disposed of properly. Recycle or dispose in accordance with local, state, or federal
Laws. For more information, contact the Electronic Industries Alliance at
www.eiae.org.
DISPOSAL: Do not use household or municipal waste collection
services for disposal of electrical and electronic equipment. EU
countries require the use of separate recycling collection services.
6
Page 7

INTRODUCTION
About this Manual
This manual is intended for end users and describes how to install and operate Qumi
Z1V. Wherever possible, relevant information—such as an illustration and its
description—has been kept on one page. This printer-friendly format is both for your
convenience and to help save paper, thereby protecting the environment. It is suggested
that you only print sections that are relevant to your needs.
Qumi Z1V Main Features
Native WVGA (854 x 480) resolution with a maximum resolution of 1080p (1920 x
1080)
Texas Instruments DLP® chip technology for long-lasting precise color, image quality
and low power consumptions
Long lasting, energy efficient RGB LED light source for up to 20,000 hours of
operation
Dual 5watt speakers pump out crisp, clear and dynamic sound for an incredible
theater-quality audio experience
Standalone Bluetooth® speaker for convenient audio playback from a smartphone,
tablet or other BT enabled audio device
Assortment of connectivity options including HDMI, USB, microSD and earphone
audio-out
PC-free playback of photos, videos and other media with the integrated multimedia
player
Up to 2 hours of continuous on-the-go entertainment with the built-in 8,000mAH
battery
Dual infrared sensors for handy remote control from either in front or behind
Lightweight friendly profile for easy movement and transportation
Tripod port for convenient projector setup and positioning
7
Page 8
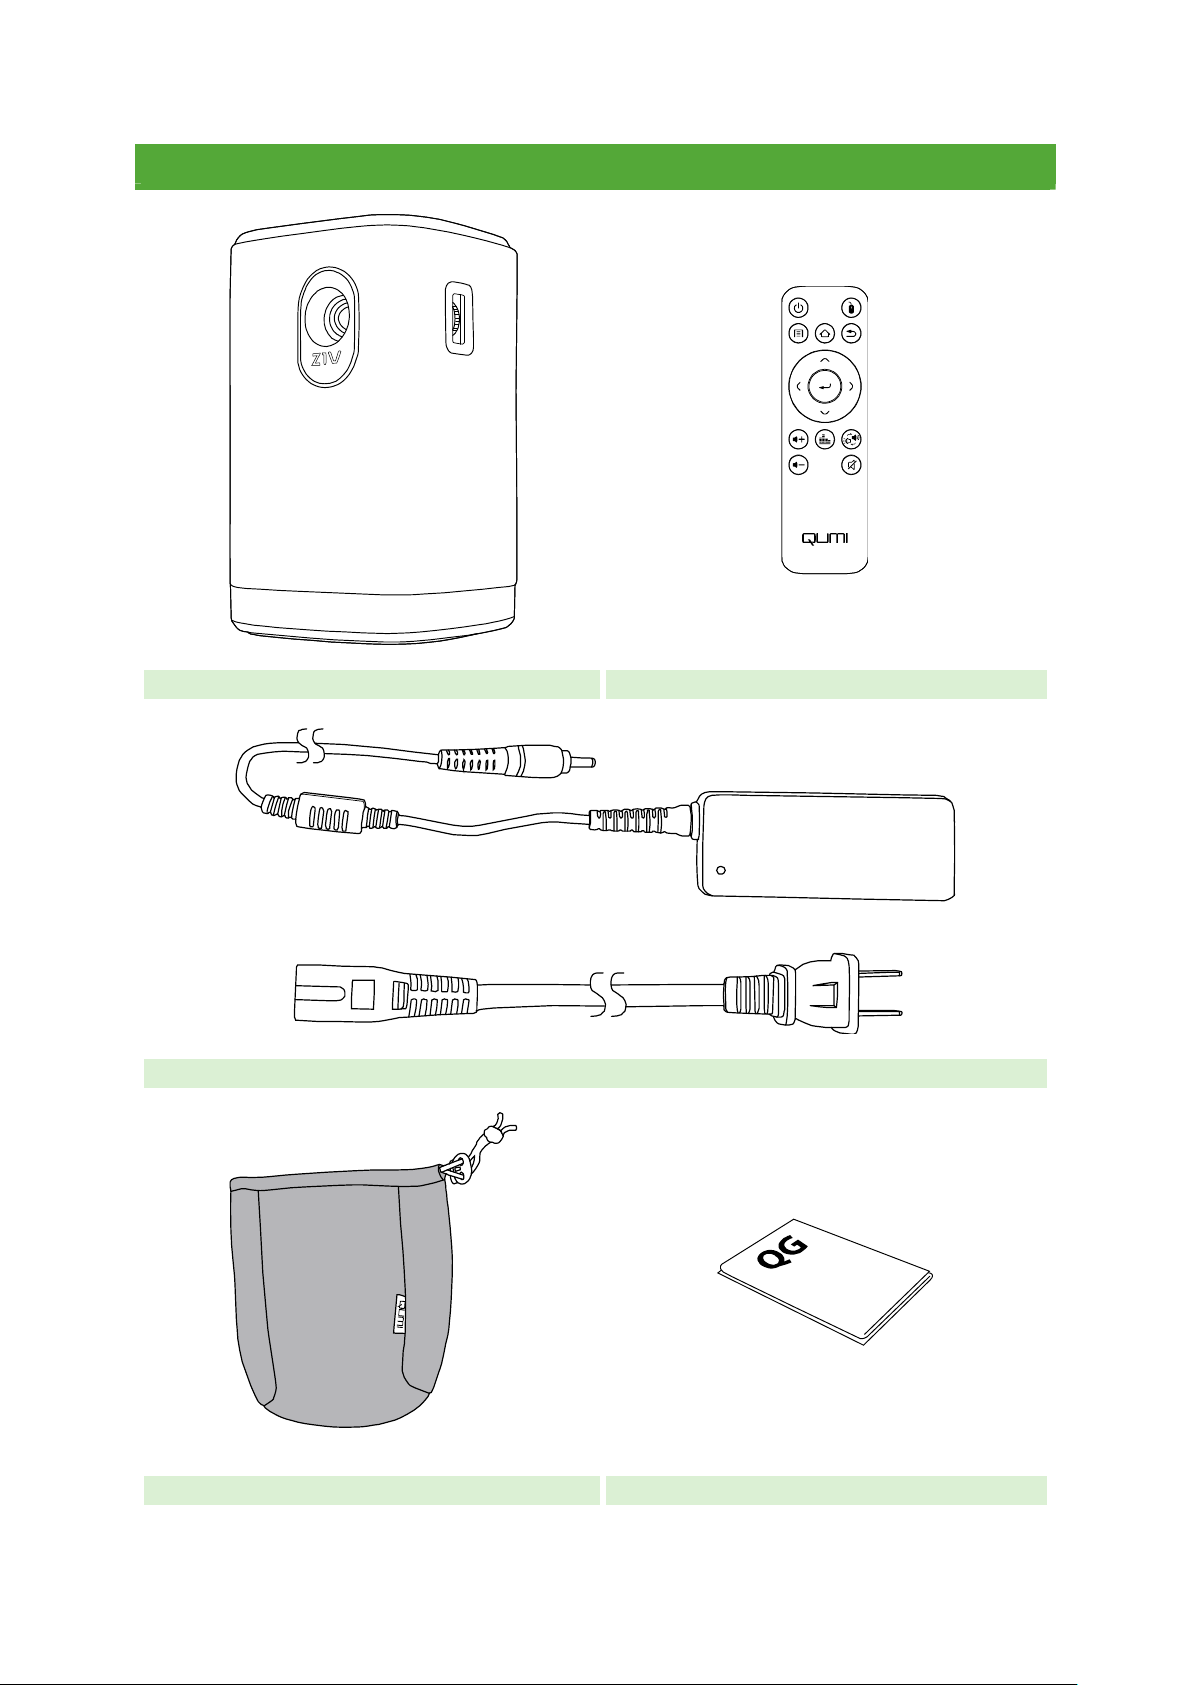
PACKAGE CONTENTS
Qumi Z1V Remote Control
Adapter
Carry Bag Documentation
8
Page 9
YOUR PROJECTOR
1
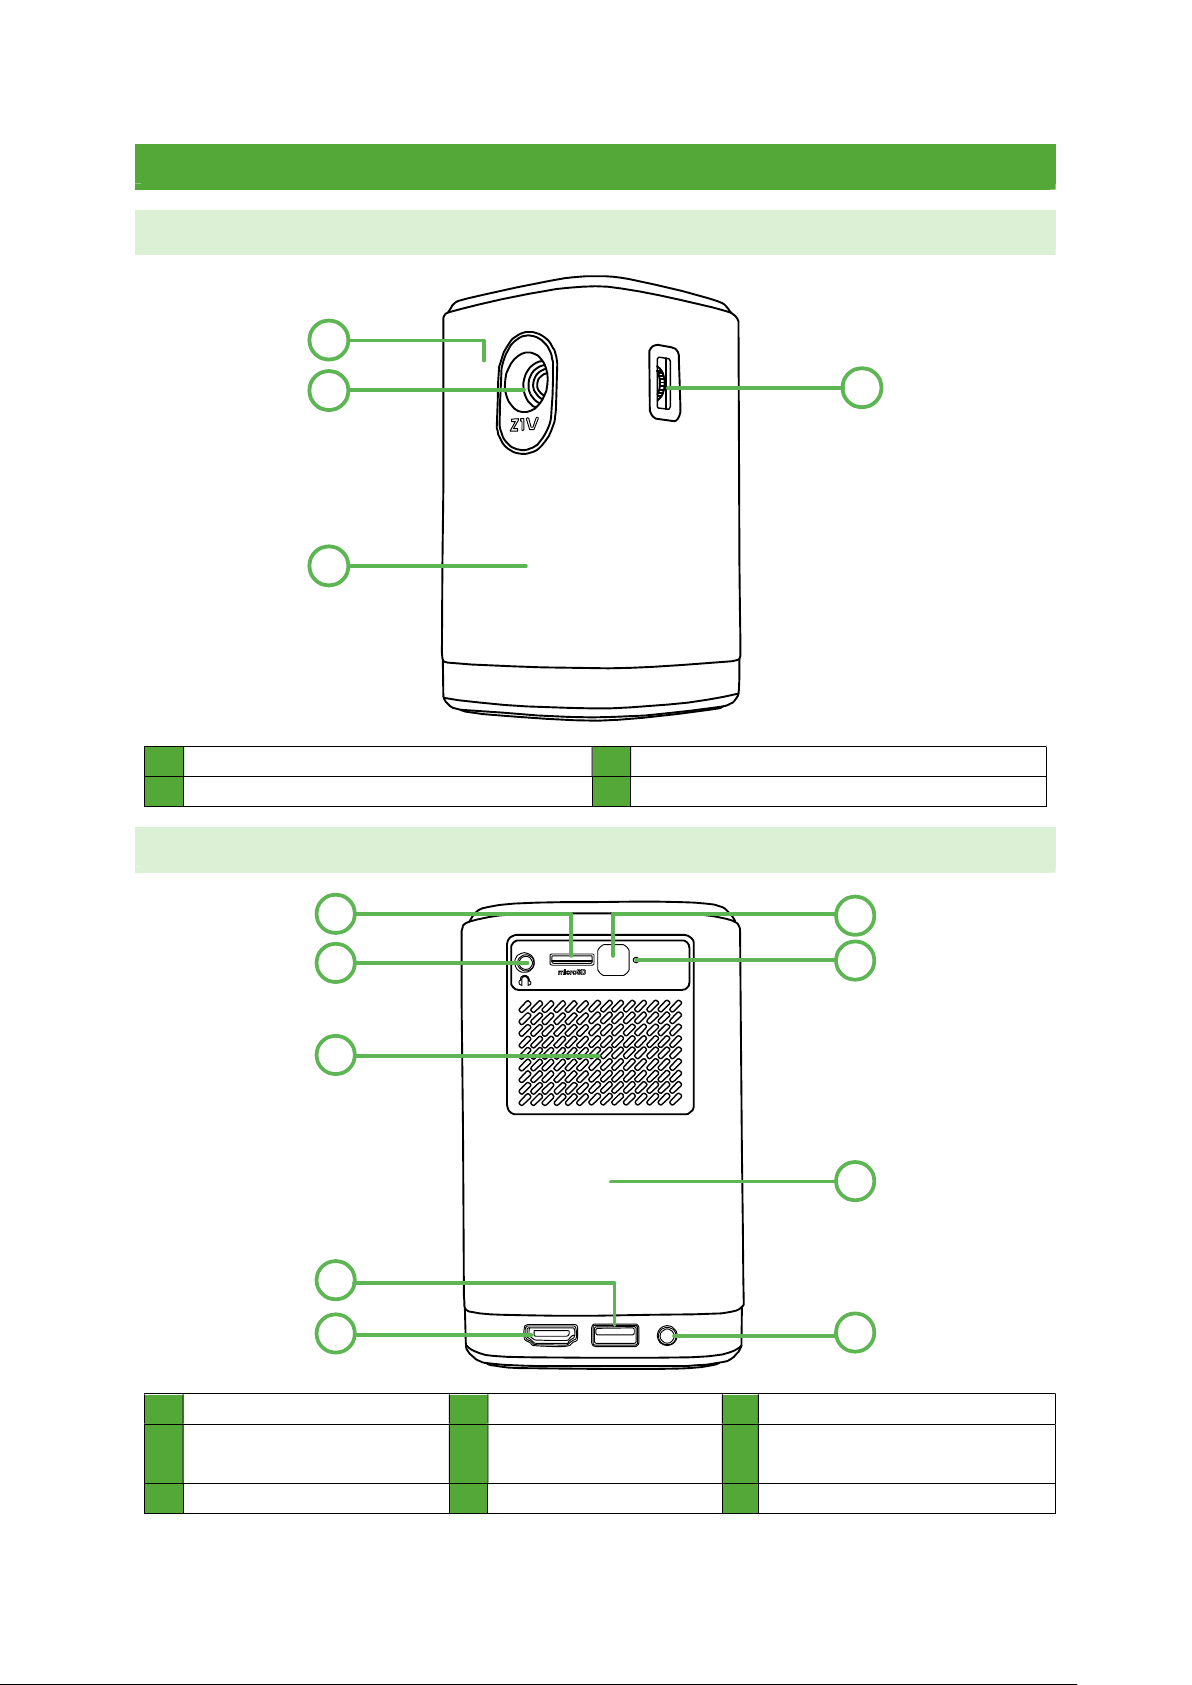
Front-Left View
2
3
1 Front IR Sensor 3 Front Speaker
2 Lens 4 Focus Dial
Rear View
1
2
4
6
7
3
8
4
5
1 microSD slot 4 Type-A USB Port 7 Reset Button
Audio Out (3.5mm)
2
Jack
3 Air Vent 6 Rear IR Sensor 9 DC In Port
5 HDMI Port 8 Rear Speaker
9
9
Page 10
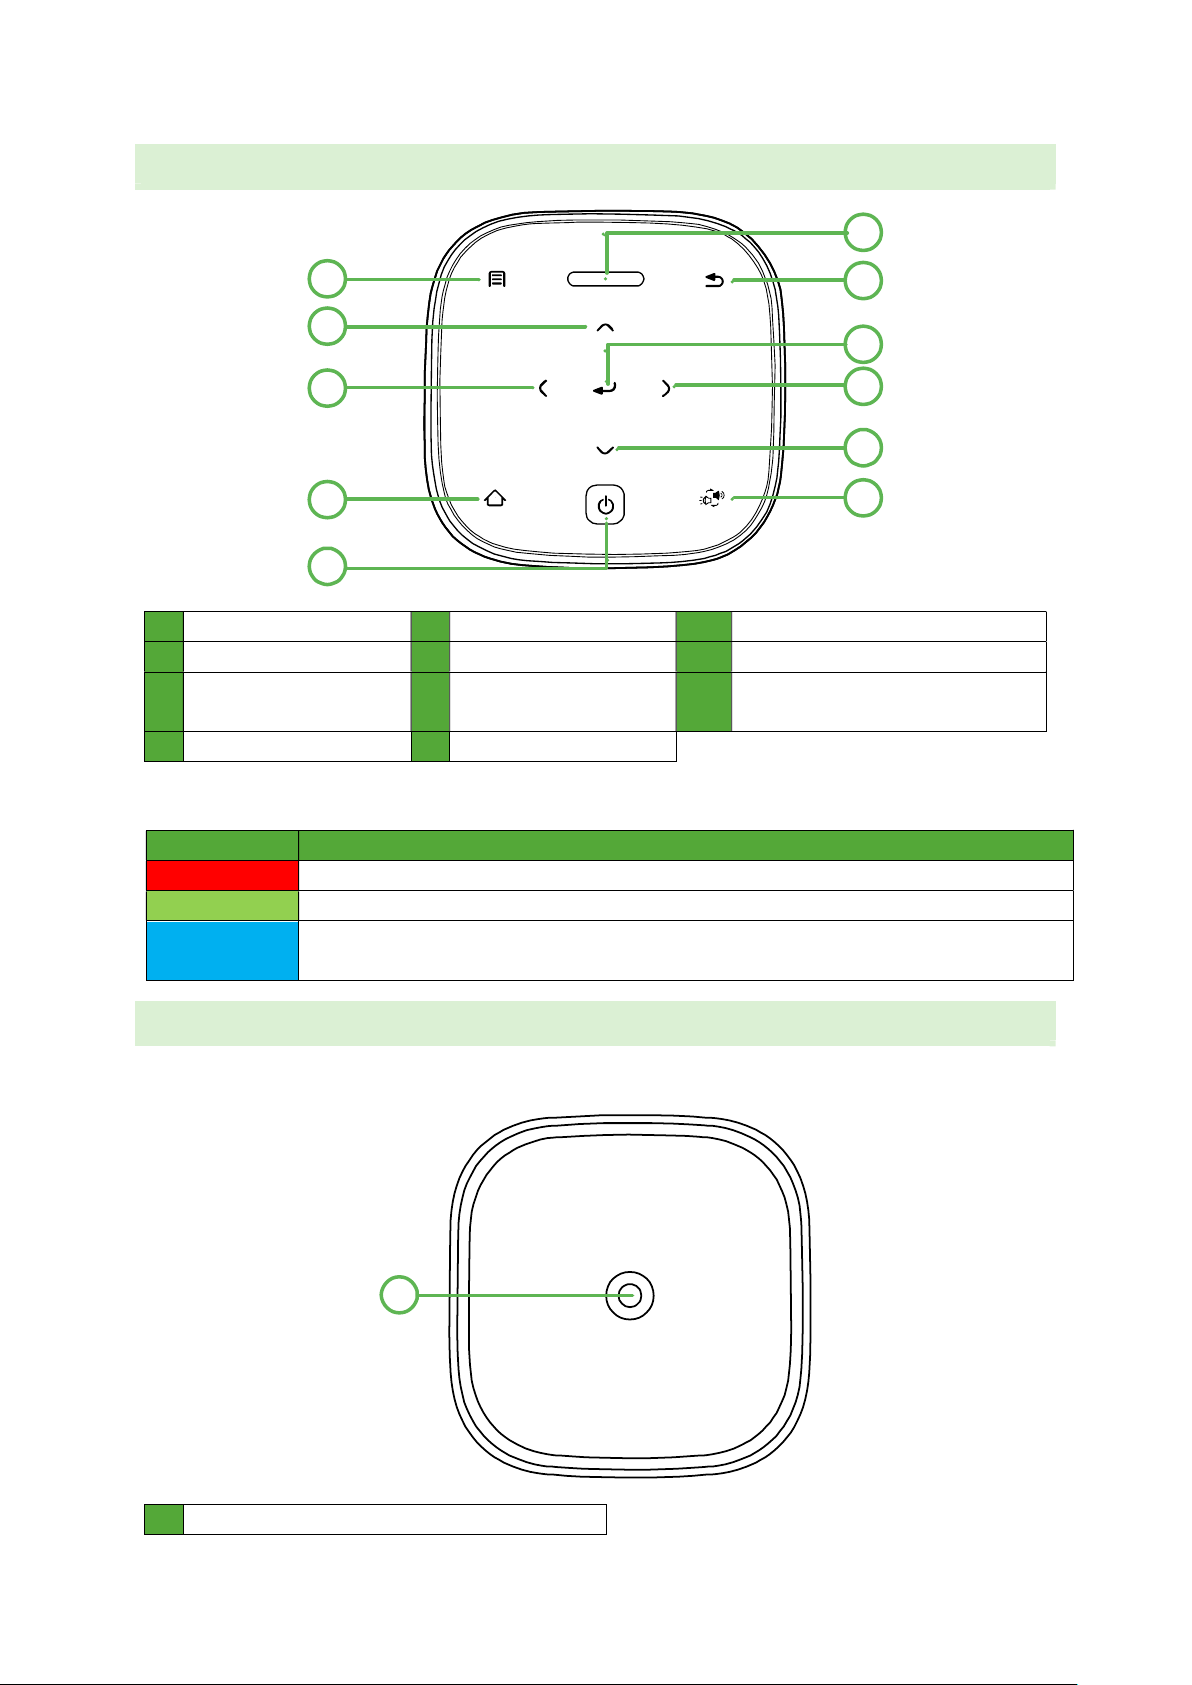
Top View
6
1
7
2
8
3
9
10
4
11
5
1 Menu Button 5 Power Button 9 Right Button
2 Up Button 6 Status LED 10 Down Button
3 Left Button 7 Exit Button 11
4 Home Button 8 Enter Button
LED Color Charge Status
RED Charging the device
GREEN Fully Charged
BLUE
Bluetooth speaker mode (charge information cannot be
displayed when using this function)
Projector/Bluetooth
Mode Button
Bottom View
1 Tripod Connector
1
10
Page 11
REMOTE CONTROL
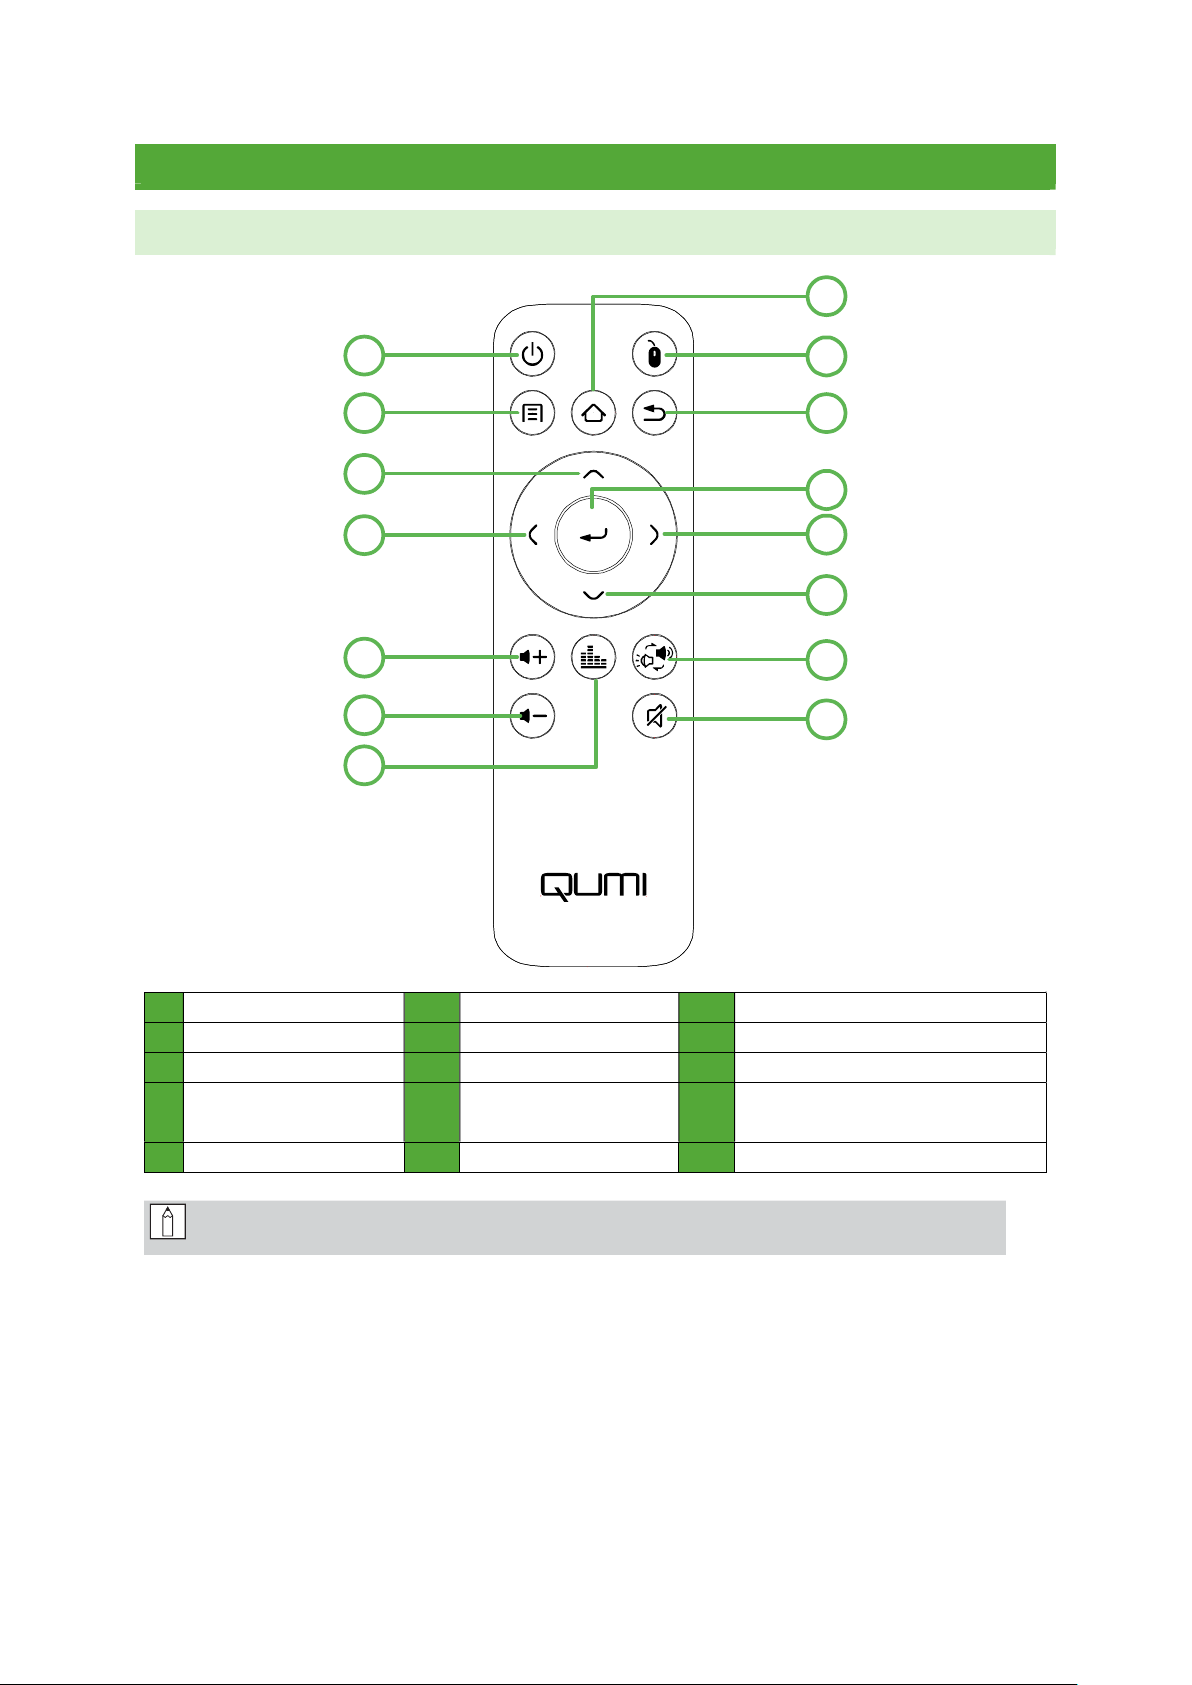
Remote Control Keypad
8
1
2
3
4
9
10
11
12
13
5
6
14
15
7
1 Power ON/OFF 6 Volume Down 11 Enter
2 Menu 7 Audio Mode 12 Right
3 Up 8 Home 13 Down
4 Left 9 Mouse* 14
5 Volume Up 10 Exit 15 Mute
NOTE:
*This feature is not available for the current model of Qumi Z1V
Projector/Bluetooth
Mode
11
Page 12
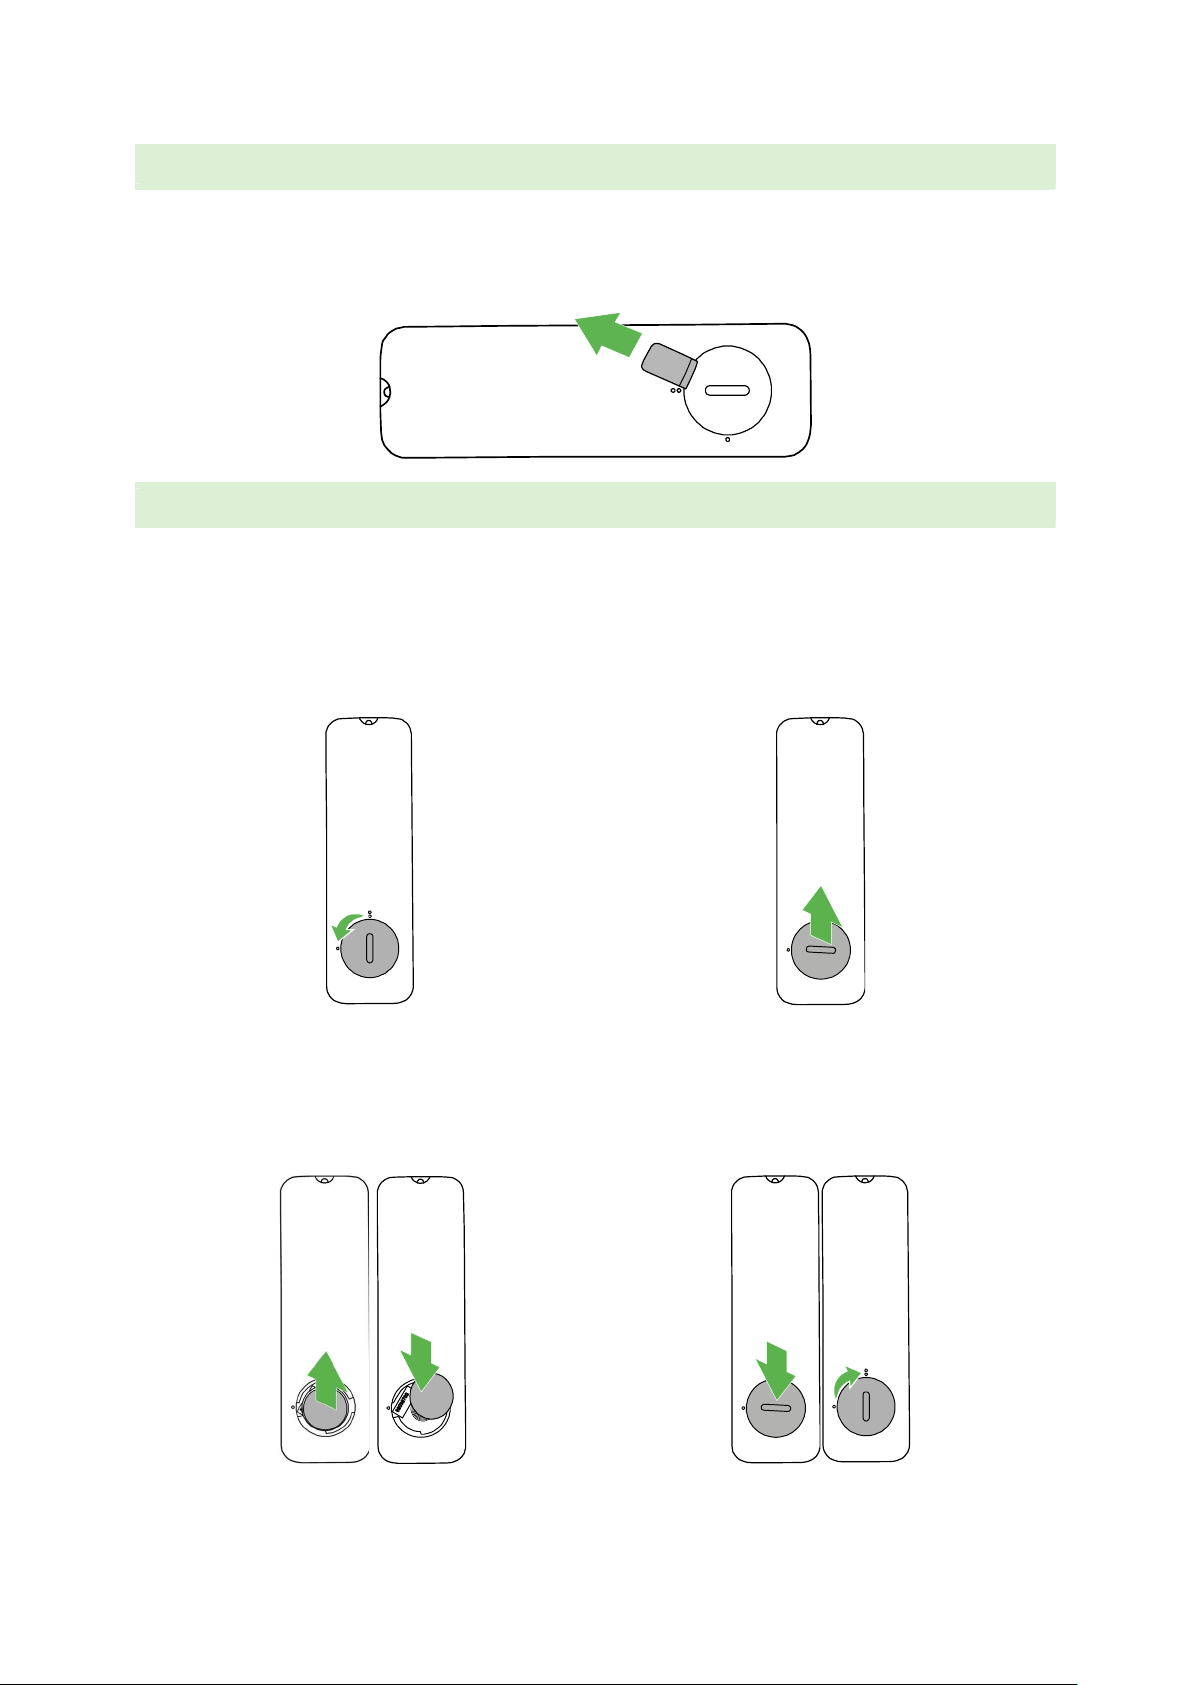
Activating the Remote Control Battery
When using the remote control for the first time, the plastic sticker covering the battery
must be removed. To remove the plastic sticker, pull the tab at the bottom side of the
remote control to remove the plastic sticker from the battery compartment.
Replacing the Remote Control Battery
To replace the remote control battery:
1. Rotate the battery compartment cover
counter-clockwise so the line on the
cover points to the single dot on the
remote control.
3. Remove the old battery and replace it
with the new battery.
2. Remove the battery compartment
cover.
4. Place the battery compartment cover
back on the battery compartment and
rotate the cover clockwise so the line
on the cover points to the double
alignment dots.
12
Page 13

POWERING/CHARGING THE PROJECTOR
To supply power to the Qumi Z1V:
1. Connect the power cable to a power socket
2. Connect the power cable to the supplied adapter.
3. Connect the adapter cable to the DC In port on the projector.
3
12
4. Once the adapter and power cable are connected to the projector, the Status LED on
the top of the projector will illuminate indicating the charge status.
The charging status will also be indicated on the home screen.
13
Page 14

14
Page 15

Powering On/Off the Projector
To power on the projector:
1. Press the power ( ) button on the top of the projector or the power ( ) button on
the remote control.
IMPORTANT:
!
The remote control can only power on the projector when the projector is
connected to a power supply.
2. The fans will begin to operate and the Qumi logo will appear on the screen:
15
Page 16

To power off the projector:
1. Press the power ( ) button on the top of the projector or the power ( ) button on
the remote control.
2. A message will appear on the projected screen to confirm power off. Press the power
( ) button on the top of the projector or the power ( ) button on the remote
control again.
16
Page 17

MAKING CONNECTIONS
1
3
2
4
No.
1 Audio Out Headphones
2 HDMI
3 microSD
4 USB Type-A
Port
Connection
Device
Blu-Ray/DVD
Players, Set-top
Boxes, PCs
microSD Card
(Media Files)
USB Flash Drive
(Media Files)
Corresponding Section
Playing from a Video Source (HDMI) on
page 25
Playing Video from a Storage Device (USB
Flash Drive, microSD Card) on page 19
Viewing Photos from a Storage Device
(USB Flash Drive, microSD Card) on page
21
Playing Audio from a Storage Device (USB
Flash Drive, microSD Card) on page 23
Playing Video from a Storage Device (USB
Flash Drive, microSD Card) on page 19
Viewing Photos from a Storage Device
(USB Flash Drive, microSD Card) on page
21
Playing Audio from a Storage Device (USB
Flash Drive, microSD Card) on page 23
17
Page 18

USING THE PROJECTOR
Adjusting the Focus
To adjust the focus of the projected image, rotate the dial on the side of the projector
until correct focus is achieved.
18
Page 19

Playing Vid eo from a Storage D evice (USB Flash Dr ive,
microSD Card )
To play a video file from a storage device:
1. Connect the device to the projector. Refer to the Making Connections section on
page 17.
2. Power on the projector. Refer to the Powering On/Off the Projector section on
page 15.
NOTE:
If you are already viewing video or playing music from a different source press
the home ( ) or exit ( ) button on the keypad or remote control to return to
the home screen.
3. Using the keypad or remote control, select VIDEO from the home screen and press
the enter ( ) button.
NOTE:
If both a USB flash drive and a microSD card are simultaneously connected to the
projector, a menu will appear with both storage options shown. Select the storage
media where the video file is located to continue.
4. Navigate to the folder where the video is located and press the enter ( ) button.
5. Select the video file you want to play and press the enter ( ) button.
19
Page 20

NOTE:
Only the following video formats are supported: AVI, VOB, MOV, MKV, DAT, MPG,
MP4.
6. The video will begin playing on the projected screen.
1 2 3 4 5 6 7 8
No. Icon Function Description
1
2
3
4
5
6
7
8
NOTE:
If you stop playing the video file and select the file again at a later time, a prompt
will appear asking you if you want to resume playing from the point where you
previously stopped play. Select Yes to continue playing.
Previous Select to go to the previous file
Rewind Select to rewind at 2x, 4x, 8x, or 16x speed
Stop Select to stop playing the current video
Play / Pause Select to pause play; Select again to resume play
Fast Forward Select to fast forward at 2x, 4x, 8x, or 16x speed
Next Select to go to the next file
Repeat All
Repeat One Select to play a single video file on a loop
Repeat None Select to play the current video file one time only
More Information Select to view the more information menu
Select to play all the video files in the playlist on a
loop
20
Page 21

Viewing Photos from a Storage Device (USB Flash Drive,
microSD Card )
To view an image file from a storage device:
1. Connect the device to the projector. Refer to the Making Connections section on
page 17.
2. Power on the projector. Refer to the Powering On/Off the Projector section on
page 15.
NOTE:
If you are already viewing video or playing music from a different source press
the home ( ) or exit ( ) button on the keypad or remote control to return to
the home screen.
3. Using the keypad or remote control, select PHOTO from the home screen and press
the enter ( ) button.
NOTE:
If both a USB flash drive and a microSD card are simultaneously connected to the
projector, a menu will appear with both storage options shown. Select the storage
media where the image file is located to continue.
4. Navigate to the folder where the image is located and press the enter ( ) button.
5. Select the image file you want to view and press the enter ( ) button.
21
Page 22

NOTE:
Only the following image formats are supported: JPG, JPEG, BMP, PNG.
6. An image slideshow will begin playing on the projected screen starting with the
image selected in the previous step.
NOTE:
The slideshow will cycle through all the images in the folder for 5 seconds per
image.
1 2 3 4 5 6 7
No. Icon Function Description
1
2
3
4
5
6
7
NOTE:
To play background music during a slideshow, the music file must be located in
the same folder in the storage device as the image files.
Mute/Unmute Music Select to mute/play the background music
Previous
Stop
Play / Pause Select to pause play; Select again to resume play
Next Select to view the next image in the slideshow
Repeat All
Repeat One Select to play a single image file continuously
Repeat None Select to play the current image one time only
Rotate
Select to view the previous image in the
slideshow
Select to stop viewing the image and return to
the slideshow
Select to play all the image files in the slideshow
on a loop
Select to rotate the current image clockwise 90degrees
22
Page 23

Playing Audio from a Storage D evice (USB Flash Dr ive,
microSD Card )
To play an audio file from Storage Device:
1. Connect the device to the projector. Refer to the Making Connections section on
page 17.
2. Power on the projector. Refer to the Powering On/Off the Projector section on
page 15.
NOTE:
If you are already viewing video or playing music from a different source press
the home ( ) or exit ( ) button on the keypad or remote control to return to
the home screen.
3. Using the keypad or remote control, select AUDIO from the home screen and press
the enter ( ) button.
NOTE:
If both a USB flash drive and a microSD card are simultaneously connected to the
projector, a menu will appear with both storage options shown. Select the storage
media where the music file is located to continue.
4. Navigate to the folder where the audio file is located and press the enter ( )
button.
5. Select the audio file you want to play and press the enter ( ) button.
23
Page 24

NOTE:
Only the following audio formats are supported: MP3, WMA, M4A, AAC.
6. An audio playlist will begin playing on the projected screen starting with the image
selected in the previous step.
NOTE:
The playlist will begin with the image selected in the previous step, and then cycle
through all the songs in the folder.
1 2 3 4 5 6 7
No. Icon Function Description
1
2
3
4
5
6
7
Previous Select to play the previous audio file in the playlist
Rewind Select to rewind at 2x, 4x, 8x, or 16x speed
Stop
Play / Pause Select to pause play; Select again to resume play
Fast Forward Select to fast forward at 2x, 4x, 8x, or 16x speed
Next Select to play the next audio file in the playlist
Repeat All
Repeat One Select to play a single audio file on a loop;
Repeat None Select to play the current audio file one time only
Select to stop playing the audio file and return to
the playlist
Select to play all the audio files in the playlist on a
loop;
24
Page 25

Playing from a Video Source (H DMI)
To project a video from a device connected to the HDMI port:
1. Connect the device to the projector. Refer to the Making Connections section on
page 17.
2. Power on the projector. Refer to the Powering On/Off the Projector section on
page 15.
NOTE:
If you are already viewing video or playing music from a different source press
the home ( ) or exit ( ) button on the keypad or remote control to return to
the home screen.
3. Using the keypad or remote control, select HDMI from the home screen and press
the enter ( ) button.
4. The video will automatically be projected onto the screen.
5. To control the video playback use the control options directly from the video source.
Press the exit ( ) button on the keypad or remote control to return to the home
screen.
NOTE:
Press the enter ( ) button on the keypad or remote control to view
information on the video source.
25
Page 26

USING THE BL UETOOTH SPEAKER
You can use Qumi Z1V as a speaker to play music from mobile devices wirelessly via
their mobile devices. To use the projector as a speaker:
1. Power on the projector. Refer to the Powering On/Off the Projector section on
page 15.
2. Press the Projector/Bluetooth Mode ( ) button on the keypad or the remote
control to enable Bluetooth on the projector.
3. When activated, the projector lens will turn off and the Status LED will illuminate blue
with behavior based on the following:
Solid Blue - Successfully connected.
Quick Blinking Blue - Waiting for connection. If after 1 minute of quick blinking
there is no connection, then the pairing process needs to be restarted.
Slow Blinking - Connection failed.
26
Page 27

4. Enable Bluetooth on your mobile device and select Qumi Z1V in your mobile device’s
Bluetooth pairing menu.
NOTE:
Once paired your mobile device will automatically connect to the projector. Each
subsequent time your mobile device is within range of the projector and Bluetooth
is enabled on both devices they will automatically connect to each other.
5. Play music on your mobile device.
To deactivate Bluetooth Mode:
1. Press the Projector/Bluetooth Mode ( ) button on the keypad or the remote
control.
2. When deactivated, the projector lens will turn on and the Status LED will no longer
illuminate blue.
27
Page 28

USING THE S ETTINGS MENU
The Settings menu allows the user to adjust display, audio, and other settings for the
projector.
To access the Settings menu:
1. Choose one of the following:
Press the menu ( ) button on the remote control or the keypad.
Select SETTINGS from the home screen and press the enter ( ) button.
28
Page 29

2. The Settings menu will appear on the projected screen.
3. Use the following keys on either the remote control or the keypad to navigate the
Settings Menu:
Up ( ) or Down ( ) button to navigate to a menu item
Enter ( ) button to select that menu item or sub-menu
Exit ( ) button to return to the previous menu or sub-menu
Left ( ) or Right ( ) button to change the settings of a menu or sub-menu item
29
Page 30

The Settings Menu
DISPLAY SETTIN GS
Category Menu Item
Presentation
Bright --
Movie --
Display
Mode
User
Sub-Menu
Item
--
Contrast Adjusts the contrast levels
Brightness Adjusts the brightness levels
Color Adjusts the color values
Sharpness Adjusts the sharpness of the image
Tint Adds a color tint to the image
Color
Temperature
Description
Switches the display settings to predefined settings ideal for presentations
Switches the display settings to predefined settings that maximize
brightness
Switches the display settings to predefined settings ideal for movies
Selects a color temperature profile:
User, Cool, Normal or Warm
30
Page 31

AUDIO SETTINGS
Category Menu Item
Volume -- Adjusts the volume of the Qumi Z1V
Audio
Settings
Sound Mode
IMAGE SETTINGS
Sub-Menu
Item
Standard
Music
Movie
User
Description
Switches the audio settings to standard predefined settings
Switches the audio settings to pre-defined
settings ideal for music
Switches the audio settings to pre-defined
settings ideal for movies
Adjusts the frequency levels of the audio
settings
Category Menu Item
Aspect
Ratio
Auto
Image
Settings
Keystone
Projection --
Light Mode
Sub-Menu
Item
-- Sets the aspect ratio to Auto, 4:3, or 16:9
Manual
Auto Automatically adjusts the keystone setting
--
Description
Allows you to manually adjust the keystone
setting
Sets the projector to project from Front,
Rear, Front/Ceiling, Rear/Ceiling
Set the light mode to Auto, Standard or
Eco
31
Page 32

TIMER
Category Menu Item Description
Timer Timer
Sets a timer that turns off the projector in 10min,
20min, 30min, or 60min.
OTHER SETTINGS
Category Menu Item Description
Language Select a language for the OSD
Other Settings
Factory
Reset
Software
Update
Status
Resets all the settings to factory defaults
Allows you to update the software on the projector
via a USB flash drive connected to the USB port
Displays the current Software Version and the
LED Hours used for the projector’s lamp
32
Page 33

TROUBLESHOOTING/FAQ
These guidelines provide tips to deal with problems you may encounter while using
Qumi. If the problem remains unresolved, contact your dealer for assistance.
The problem sometimes can be as simple as improper connection of cables. Review the
following possible issues before proceeding to the problem-specific solutions.
Use another electrical device to confirm that the electrical outlet is properly working.
Make sure that Qumi is turned on.
Make sure all connections are securely connected.
Make sure that the connected device is turned on.
Make sure that the connected PC is not in suspended mode or sleep mode.
Tips
In each problem-specific section, perform the steps in the order suggested. Doing so
may help solve the problem more quickly.
In order to avoid replacing non-defective parts, try to find and isolate the problem
For example, if you replace batteries and the problem remains, put the original batteries
back and move to the next step.
Keep a record of the steps you take when troubleshooting. The information may be
useful for reference when calling technical support or for bringing Qumi to service
personnel.
System Reset Method (Reboot)
On the rear side of Qumi next to the IR sensor, there is a small pinhole. Insert a
paperclip (or similar sized object) into the hole and press for 3 seconds to reboot Qumi.
Image Problems
Problem: No image appears on the screen.
1. Check whether the source (PC, Flash Drive, DVD Player, Set-top Box, etc…) is
properly configured.
2. Turn off all of the equipment and power up the equipment again in the correct order.
33
Page 34

Problem: The image is blurred.
1. Adjust the focus directly via the focus buttons on the projector or remote control
2. Ensure that the distance between the Qumi and the screen is within specified range
3. Clean Qumi lens with optical lens cleaning cloth if it is dirty.
Problem: The image is wider at the top or bottom (trapezoid effect).
1. Position Qumi so that it is as perpendicular to the screen as possible.
2. Adjust the Keystone settings in the Settings menu to correct the problem by either
turning Auto Keystone on or by manually adjusting the keystone setting (Settings >
Image Settings > Auto Keystone)
Problem: The image is reversed.
1. Check the image orientation of the Projector in the Settings menu (Settings >
Image Settings > Projection).
Remote Control Probl ems
Problem: Qumi does not respond to the remote control commands.
1. Aim the remote control towards the front or rear sensor on the Qumi.
2. Make sure the path between remote and sensor is not obstructed.
3. Turn off any fluorescent lights in the room.
4. Check to see if the battery polarity is correct.
5. Replace the batteries.
6. Turn off other infrared-enabled devices in the vicinity.
7. Have the remote control serviced.
Problem: The remote control’s power button does not turn on the Qumi.
1. Make sure that the Qumi is using the power adapter.
Audio Problems
Problem: There is no sound.
1. Adjust the volume on the audio source.
2. Test the output of the audio source with other speakers.
3. If using Bluetooth, ensure that Qumi is in Bluetooth mode on and ensure that pairing
has occurred.
4. Have Qumi serviced.
Problem: The sound is unstable in Bluetooty speaker mode
1. Check to make sure that Qumi is within ranch of your Bluetooth device (Smartphone,
Tablet, etc.) .
2. Use another Bluetooth speaker to test the output of the audio source.
3. Have Qumi serviced.
34
Page 35

FAQs
1. Is it possible to connect Qumi to a game console, such as a Microsoft® Xbox
or Sony® Playstation?
Yes, Qumi can be used to display content from an Xbox or Playstation console. This
can be done by connecting the HDMI cable from the game console to Qumi.
2. Can Qumi project content from a television?
Watching television content can be done by connecting a cable box, digital set-top
box or satellite receiver directly to Qumi. For example, if a cable box is used, it can
be connected by an HDMI cable to Qumi.
3. How are images from a USB storage device displayed?
Images and other content can be displayed by connecting the following devices to
Qumi:
• USB flash drive
• microSD card
Once the devices are connected, images can be displayed by using the Qumi Photo
Player.
4. Which cable is required for video devices to be connected with Qumi?
Video devices can be connected to Qumi by using an HDMI cable if the video devices
contain an HDMI appropriate output port.
5. What type of video formats does Qumi support?
AVI//VOB/MOV/MKV/DAT/MPG/MP4
6. What type of audio formats does Qumi support?
MP3/WMA/M4A/AAC
7. What type of photo formats does Qumi support?
JPG/JPEG/BMP/PNG
8. What type of document formats does Qumi support?
Qumi does not support document playback (Example: Microsoft® Office, Adobe®
PDF or TXT).
9. How long will the LED light source in Qumi last and can it be replaced?
Qumi does not use a typical light source. It uses a set of Light Emitting Diodes (LED)
to illuminate and project images. LED’s have a greater lifespan than conventional
lamps. The Qumi’s LED is estimated to last for approximately 20,000 hours. The
lifespan of the LED depends on factors such as brightness, usage, environmental
conditions. LED brightness can decrease over time. The LED module is not
replaceable.
10. Why do I need to re-adjust the focus on my Qumi after it’s powered up?
For the best picture quality, adjustment of the projector’s Focus-Dial may be
necessary once the operational temperature has been met.
35
Page 36

11. I’ve lost my remote. Where can I get a replacement?
Contact your Reseller or Vivitek Service via www.vivitekcorp.com (select region) to
obtain a replacement remote (Charges may be applied).
12. Why won’t Qumi recognize my USB flash drive?
The USB flash drive must be formatted in FAT32, FAT16 or NTFS.
13. Bluetooth doesn work with my BT device (Example: keyboard, mouse or
other similar device)?
Qumi’s Bluetooth function is only for audio playback between a smartphone, tablet or
other BT enabled audio device.
14. Why won’t the remote control’s Power On button switch on the Qumi?
When the projector is off and not attached to the power adapter, the remote control
doesn’t support “Power On”. Once the power adapter is connected, the remote
control’s “Power On” feature will function normally.
Vivitek Support Site
Please visit www.vivitekcorp.com and select your region for more information, support
and product registration.
ADDITIONAL INFORMATION
Projection Distance vs Projection Size
Image Height
Projection Distance
Image Diagonal
(cm/inch)
39.3/15.5 33.3/13.1 20.8/8.2 40/15.8
59.0/23.6 50.0/19.7 31.2/12.3 60/23.6
78.6/31.0 66.7/26.2 41.7/16.4 80/31.5
98.3/38.7 83.3/32.8 52.1/20.5 100/39.4
117.9/46.4 100.0/9.4 62.5/24.6 120/47.2
137.6/54.2 116.7/45.9 72.9/28.7 140/55.1
157.2/61.9 133.3/52.5 83.3/32.8 160/63.0
176.9/69.6 150.0/59.1 93.7/36.9 180/70.9
196.5/77.4 166.7/65.6 104.2/41.0 200/78.7
NOTE: The offset table has a 10% tolerance due to optical component
variations.
Image Width
(cm/inch)
Image Height
(cm/inch)
Projection Distance
(cm/inch)
36
Page 37

Timing Mode Table
Resolution Horizontal Synchronization Vertical Synchronization [HZ]
VESA640x480_60 31.47 59.94
VESA640x480_72 37.86 72.81
VESA640x480_75 37.5 75
VESA800x600_60 37.88 60.32
VESA800x600_72 48.08 72.19
VESA800x600_75 46.88 75
VESA1024x768_60 48.36 60
VESA1024x768_70 56.48 70.07
VESA1024x768_75 60.02 75.03
VESA1280x768_60-RB 47.4 59.99
VESA1280x768_60 47.78 59.87
VESA1280x800_60 49.7 59.81
VESA1280x800_75 62.79 74.93
VESA1280x1024_60 63.98 60.02
VESA1280x1024_75 79.98 75.02
VESA1280x960_60 60 60
VESA1400x1050_60 65.32 59.98
VESA1440x900_60 55.93 59.89
VESA1600x1200_60 75 60
VESA1680x1050_60-RB 64.67 59.88
VESA1680x1050_60 65.29 59.95
VESA1920x1080_60 67.5 60
VESA1920x1200_60-RB 74.04 59.95
IBM-720x400-70 31.467 70.08
MAC-640x480-66 35 66.67
MAC-832x624-75 49.722 74.55
MAC-1024x768-60 48.773 59.99
MAC-1152x870-75 68.681 75.06
854 x 480 31.8 60.6
SDTV-480i60 15.734 59.94
SDTV-480P59 31.469 59.394
SDTV-576i50 15.625 50
SDTV-576P50 31.25 50
HDTV-720P50 37.5 50
HDTV-720P60 45 60
HDTV-1080i50 28.125 50
HDTV-1080i60 33.75 60
HDTV-1080p24 27 24
HDTV-1080p25 28.13 25
HDTV-1080P30 33.75 30
HDTV-1080P50 56.25 50
HDTV-1080P60 67.5 60
37
Page 38

Specifications - Projector
Model No.:
Native Resolution WVGA (854 x 480)
Maximum Resolution 1080p (1920 x 1080)
Throw Ratio
(Distance/Width)
Image Size (Diagonal) 0.5m - 1.9m (19.7” - 75”)
Projection Distance 0.5m - 2.0m (1.6ft - 6.6ft)
Aspect Ratio 16:9 Native
Keystone Correction Vertical ±30°(Auto Keystone)
Bluetooth® Audio Yes (Bluetooth® 4.0)
Storage Expansion Yes (microSD, USB Flash Drive)
Multiple Media
Player
Speakers 5W (x2) (Stereo)
Tripod Mount
I/O Connection Ports
Yes (Video, Image, Audio)
Qumi Z1V
1.2:1 (Manual Adjustment Focus)
Yes (Standard 1/4-20 L6.3 mm camera mount
hole)
HDMI v1.4b, Earphone-Out (3.5mm), USB Type A,
microSD Card Slot
Battery Type
(Embedded)
Power Supply AC 100-240V, 50/60Hz
Power Consumption 36W (Normal Mode)
Projection Method Table Top, Ceiling Mount (Front or Rear)
Dimensions (W x D x H) 86 x 86 x 136mm (3.4" x 3.4” x 5.1”)
Weight (Approximate) 500g (1.1lbs)
NOTE: For questions regarding product specifications, please contact your
local dealer.
8,000 mAh (3.7V) Li-Polymer Rechargeable Battery
(Up to 2 hours of usage)
Specifications - Adaptor
Model No.:
Manufacturer Delta Electronics, Inc
Rating
Operating Temperature
ADP-36PH A
Input: 100-240V~, 1A, 50-60Hz
Output: 12Vdc, 3A
0°C to 40°C
38
Page 39

FCC Statement
This equipment has been tested and found to comply with the limits for a Class B
digital device, pursuant to part 15 of the FCC rules. These limits are designed to
provide reasonable protection against harmful interference in a residential installation.
This equipment generates, uses and can radiate radio frequency energy and, if not
installed and used in accordance with the instructions, may cause harmful interference
to radio communications. However, there is no guarantee that interference will not
occur in a particular installation. If this equipment does cause harmful interference to
radio or television reception, which can be determined by turning the equipment off
and on, the user is encouraged to try to correct the interference by one or more of the
following measures:
-Reorient or relocate the receiving antenna.
-Increase the separation between the equipment and receiver.
-Connect the equipment into an outlet on a circuit different from that to which the
receiver is connected.
-Consult the dealer or an experienced radio/TV technician for help.
To assure continued compliance, any changes or modifications not expressly
approved by the party.
Responsible for compliance could void the user’s authority to operate this
equipment. (Example- use only shielded interface cables when connecting to
computer or peripheral devices).
This equipment complies with Part 15 of the FCC Rules. Operation is subject to
the following two conditions:
(1) This device may not cause harmful interference, and
(2) This device must accept any interference received, including interference that
may cause undesired operation.
RF warning statement:
The device has been evaluated to meet general RF exposure requirement.
device can be used in portable exposure condition without restriction.
The
Page 40

Vivitek Americas
46101 Fremont Blvd, Fremont, CA 94538
U.S.A.
T: +1-510-668-5100
F: +1-510-668-0680
Vivitek Asia
7F, No. 186, Ruey Kuang Road, Neihu, Taipei 11491
Taiwan R.O.C.
T: +886-2-8797-2088
F: +886-2-6600-2358
Vivitek Europe
Zandsteen 15, 2132 MZ Hoofddorp
The Netherlands
T: +31-20-800-3960
F: +31-20-655-0999
www.vivitekcorp.com
 Loading...