

Page 1

The user manual of the HD Pocket Projector
Product name: HD Pocket Projector
Trade: VIVITEK
Mode: Q3PLUS
FCC ID: H79Q3PLUS
User Manual
Page 2
Foreword
Copyright
©2015 Vivitek is a trademark of Delta Electronics, Inc. All other trademarks
are the property of their respective owners. All values, weights and sizes in this Manual are
approximate values. Specifications are subject to change without notice.
Disclaimer
The information in this Manual is subject to change without notice. The Manufacturer disclaims
all expressions and warranties with regard to any information contained herein, in particular to
the implied warranties of merchantability and fitness for a particular purpose. The Manufacturer
reserves the right to modify or change this Manual and any information contained herein
without prior notice.
Trademark
HDMI, HDMI and High-Definition Multimedia Interface are the
trademarks or registered trademarks of HDMI Licensing LLC in the
U.S. and other countries (regions).
ii
Page 3

Important Safety Information
Important:
It is strongly recommended to read this part before usage of Qumi. These safety and usage
instructions will ensure a safe usage of Qumi for several years. Please keep this Manual
properly for future reference.
Symbols
A warning symbol, either on the machine or in this Manual, denotes a hazard.
The following symbols are used to call attention to important information.
Note:
Indicate additional information besides the topic.
Important:
Indicate additional information that shouldn't be ignored.
Caution:
Indicate the situation which may result in damage to the machine.
Warning:
Indicate the situation which may result in machine damage, environmental hazard or personal
injury.
In this Manual, components and items in the OSD (on screen display) menu are in bold. For
example:
“Press the menu button on the remote controller to open the main menu”. ”
General Safety Information
y Do not open the casing. There are no user-maintainable parts inside the machine. For any
maintenance, please contact a qualified service technician.
y Follow all warnings and precautions on the machine or in this Manual.
y According to its design, the projection light source is extremely bright. To avoid harm to
eyes, do not look straight at the lens when the LED is ON.
y Do not place the machine on unstable surface or rack.
y Do not use the system near water or thermal equipment, and avoid direct sunlight.
y Do not place any heavy objects (e.g., books or bags) on the machine.
iii
Page 4
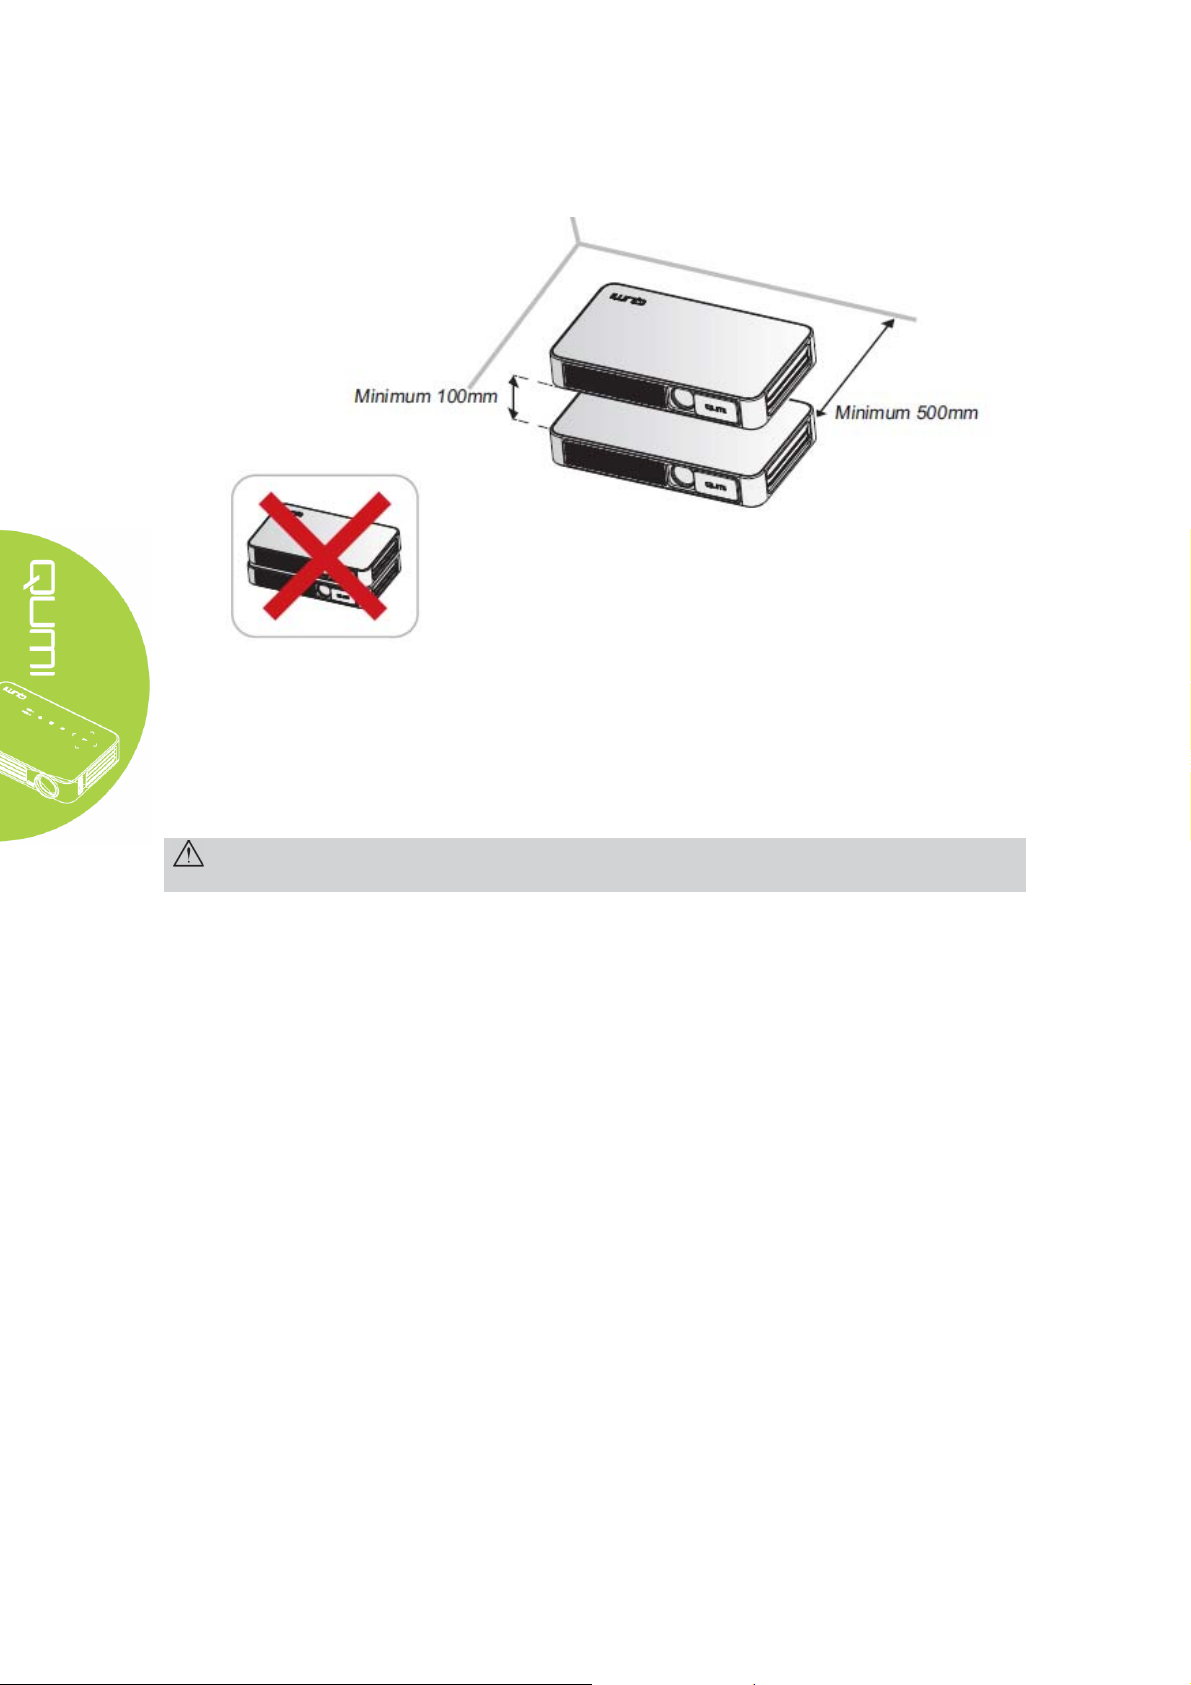
Installation Precautions
y Leave at least 500mm surround the air outlet.
y Ensure that the air inlet will not take any hot gas from the air outlet.
y When Qumi is used in a confined space, ensure that the ambient temperature will not
exceed the working temperature of Qumi and the air inlet and outlet are unclogged.
y Every confined space should pass through professional thermal evaluation to avoid
circulation during Qumi exhaust. Otherwise, even when the confined space temperature is
within the acceptable working temperature range, the machine may also shut down.
Caution:
Avoid usage of Qumi in dusty environment.
iv
Page 5

Power supply safety
y Only use supplied adapter.
y Do not place any objects on the power supply cables. Place the power supply cables at
proper places to avoid tread.
y If the machine is stored or out of service for a long time, please get the battery out of the
remote controller.
Qumi Cleaning
y Before cleaning, disconnect the power supply cables. See “Qumi Cleaning” in Page 39.
Note:
After usage, Qumi will become a bit hot. Cool Qumi down before putting it into the cabinet.
Control warning
Before installation and usage, please read the control precautions in “Control Compliance” in
Page 47.
Symbol description
Abandon: Do not dispose old electrical and electric equipment through domestic or
municipal garbage collection system. As EU countries required, special recycle
system shall be used.
Main characteristics
y Light-weight, easy for package and transportation.
y High luminance, capable of display at sunlight or bright room.
y Support of 16.70 million colors of UXGA data resolution, delivery of clear and bright
images.
y Flexible installation, support of several projection methods including front projection, rear
projection, ceiling and rear ceiling.
y Upright sight projection. In angle projection, advanced trapezoid can be used for
correction.
y Auto detection of input sources.
About this Manual
This Manual provides Qumi installation and usage instructions for the final users. If possible,
related information (e.g., sketch maps and illustrations) shall be in one page. This
printer-friendly method not only facilitates reading, but also saves papers and protects the
environment. It is suggested to print related chapters as needed.
v
Page 6

Table of Contents
Foreword .................................................................................................................................................. ii
Chapter 1 Views .......................................................................................................................................... 1
Views ....................................................................................................................................................... 1
Standard accessories: ................................................................................................................................ 3
Remote controller ..................................................................................................................................... 4
Set remote controller ................................................................................................................................ 5
Chapter 2 Start to Use ................................................................................................................................ 6
What you need .......................................................................................................................................... 6
Set Qumi .................................................................................................................................................. 7
Happy cast- Android operation ............................................................................................................. 12
Happy cast-iOS operation ..................................................................................................................... 14
Chapter 3 Qumi User Interface ............................................................................................................... 16
Views ..................................................................................................................................................... 16
Photo ...................................................................................................................................................... 17
Video ...................................................................................................................................................... 18
Music ..................................................................................................................................................... 19
Files ....................................................................................................................................................... 20
APP Store .............................................................................................................................................. 21
Browser .................................................................................................................................................. 22
Application program .............................................................................................................................. 23
WiFi ....................................................................................................................................................... 24
Setting .................................................................................................................................................... 25
Chapter 4 OSD Setting ............................................................................................................................. 26
OSD menu control .................................................................................................................................. 26
OSD menu overview .............................................................................................................................. 27
Setting OSD menu language .................................................................................................................. 28
Chapter 5 Qumi Maintenance ................................................................................................................. 38
Qumi Cleaning ....................................................................................................................................... 38
Cleaning lens .......................................................................................................................................... 38
Troubleshooting ..................................................................................................................................... 39
Specification ........................................................................................................................................... 42
Vivitek support website .......................................................................................................................... 43
Projection distance and size ................................................................................................................... 44
Projection distance and size specification .............................................................................................. 44
List of compatible signal ........................................................................................................................ 45
Qumi size ............................................................................................................................................... 46
Regulatory compliance ........................................................................................................................... 47
Safety certificate ..................................................................................................................................... 47
Waste and recycle .................................................................................................................................. 47
List of name and content of to xic and hazardous substances or elements in the Product ............. 48
vi
Page 7
Chapter 1 Views
Views
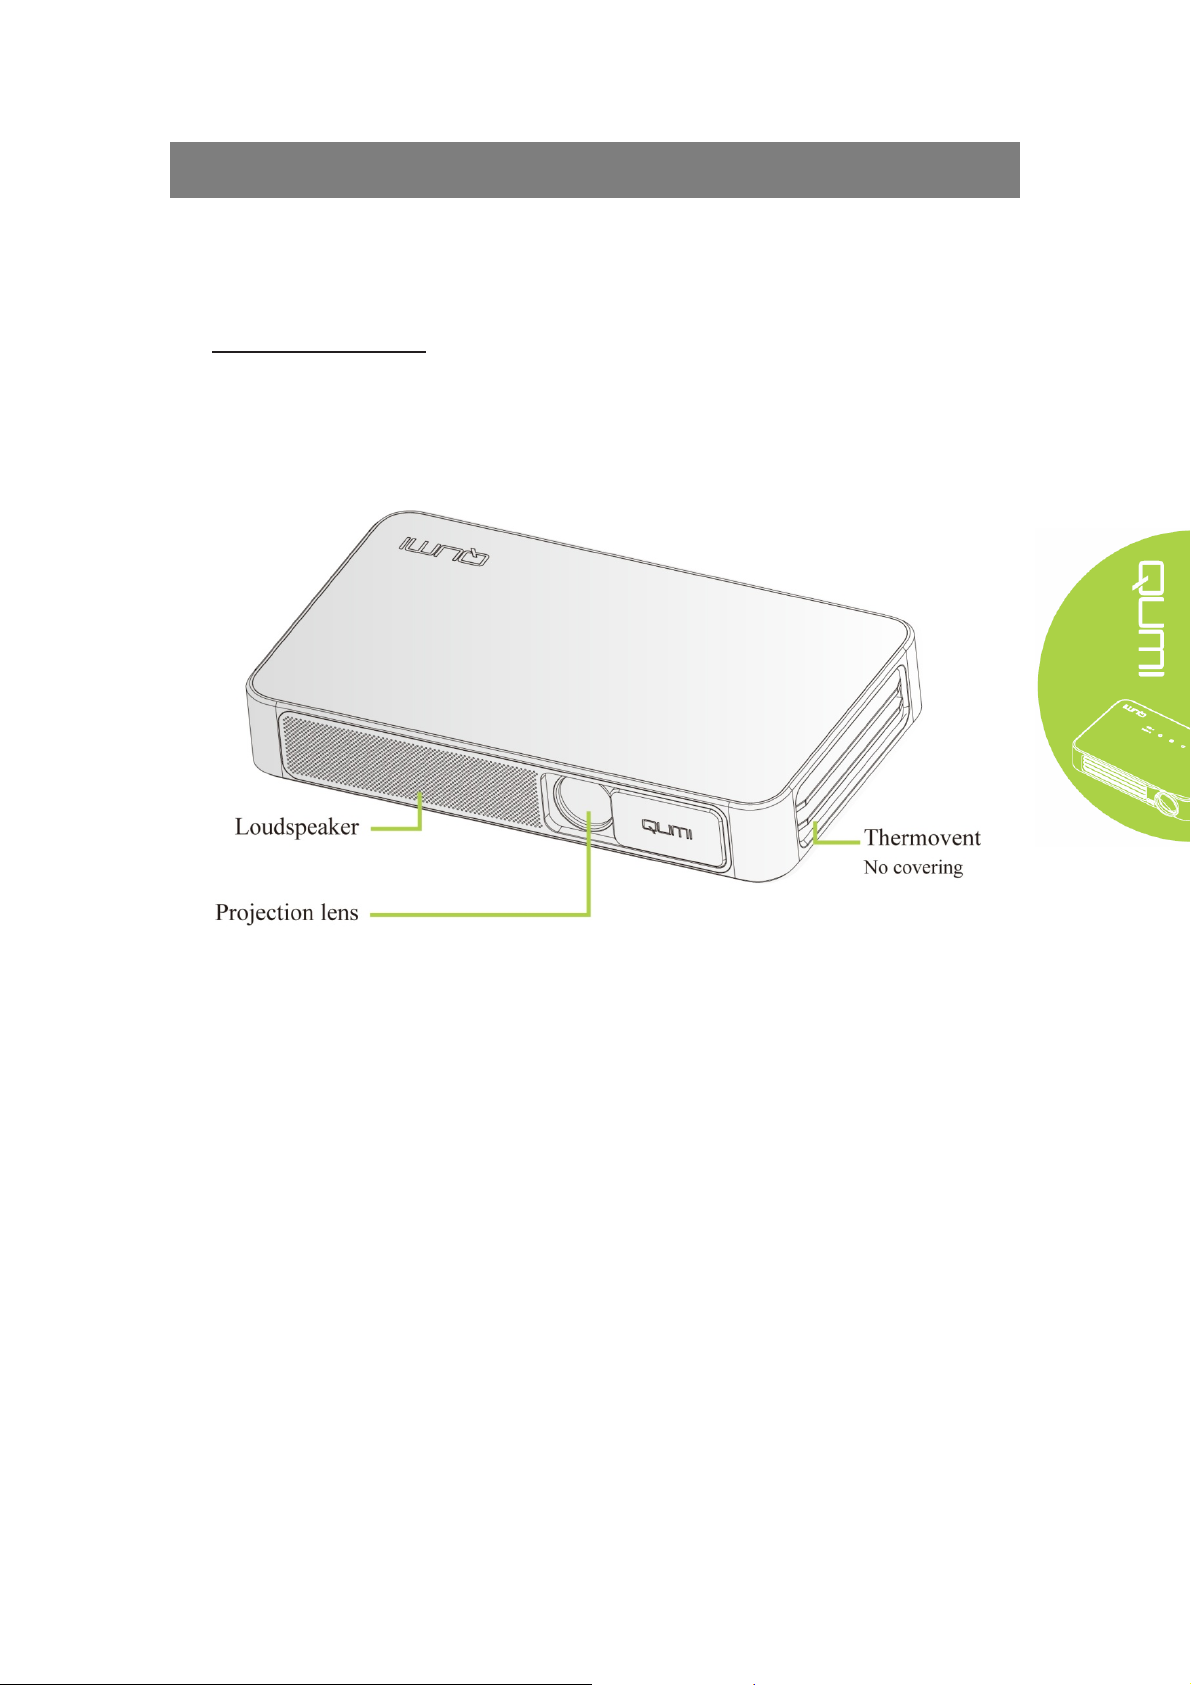
Front/Top/Right view
1
Page 8
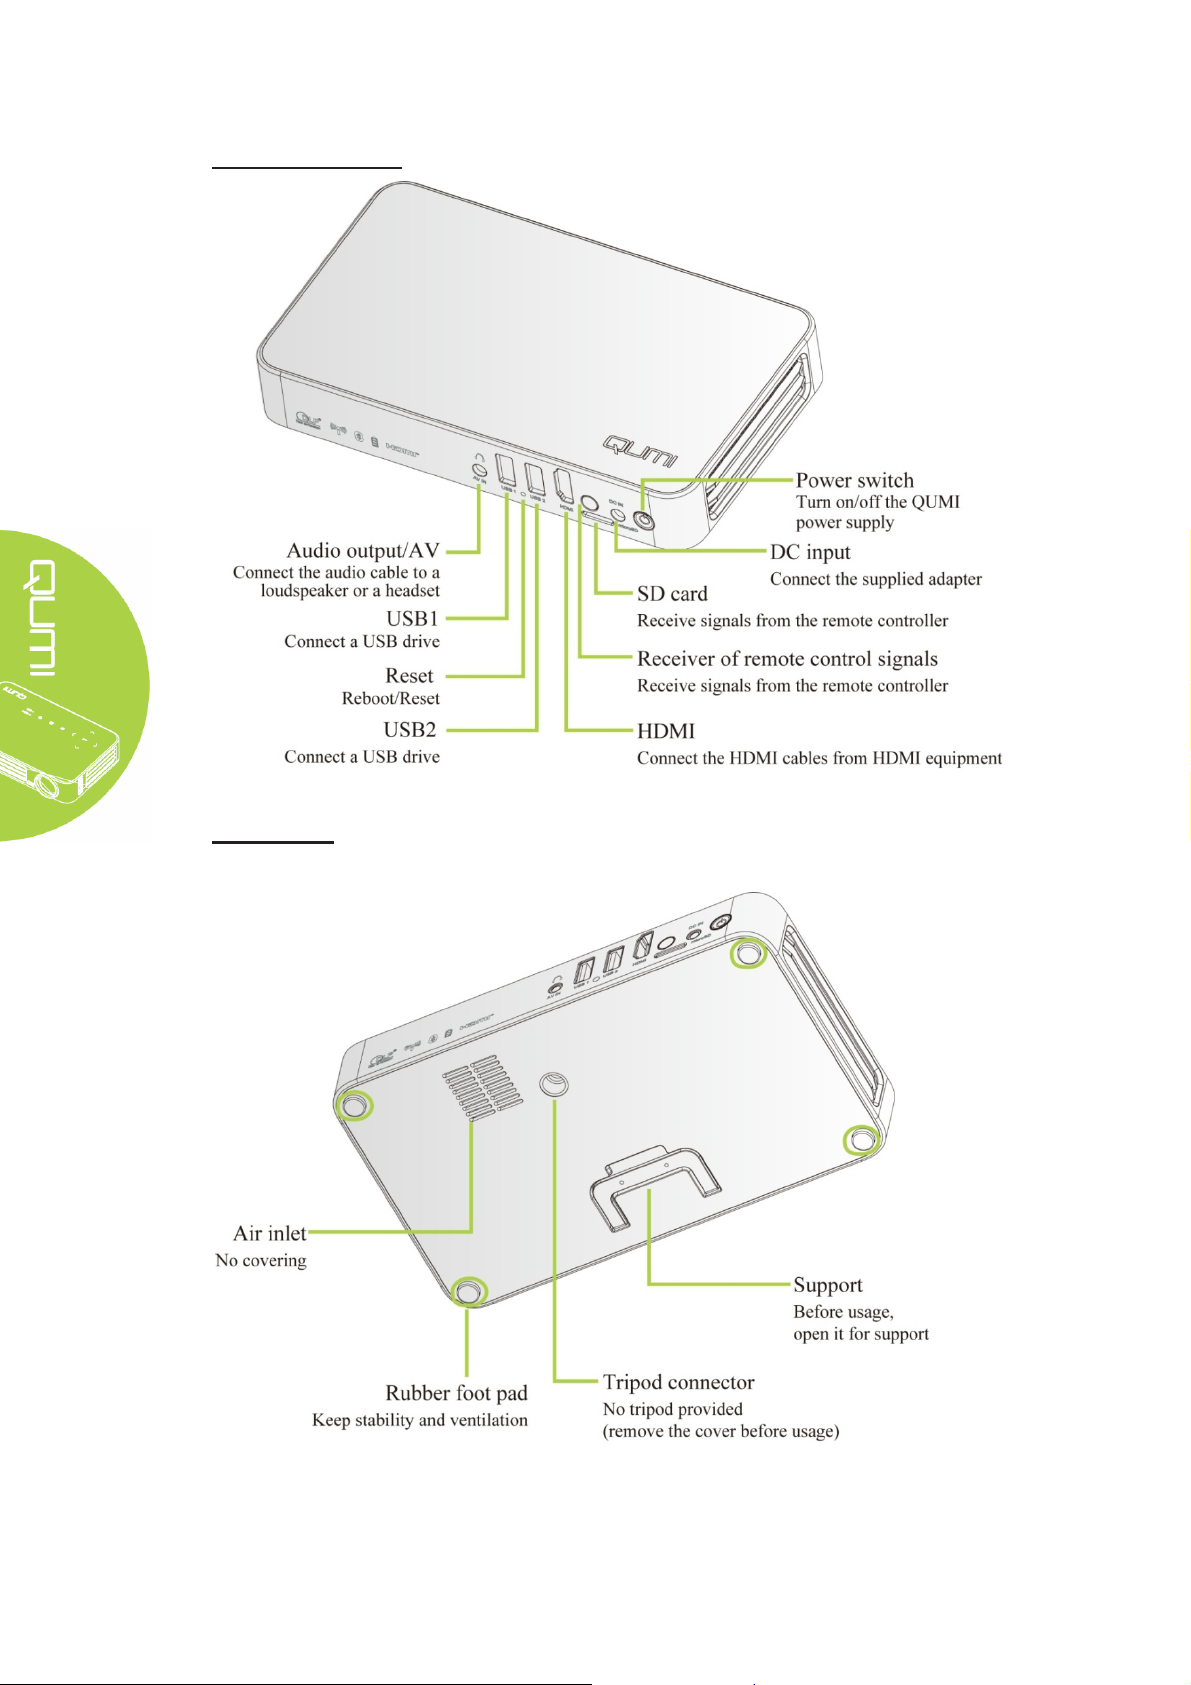
Rear/Top/Left view
Bottom view
2
Page 9
n
Q
F
k
c
o
:
p
m
o
r
m
d
p
l
m
e
a
i
i
R
r
l
i
e
r
e
u
W
d
P
Sta
dard ac
essories:
umi access
ries include
Rem
Powe
Docu
te controller
r supply cab
ent kit (Us
(with a 3VC
e and adapte
r Manual, Q
2025 batte
(based on r
ick Start,
y)
gions)
arranty Car
)
or any item
eep original
missing, ap
packaging
Stan
earance dam
aterials pro
ard HDMI c
age or mach
erly for repa
bles
ne failure, p
ring purpos
ease contact
.
your dealer.
lease
3
Page 10
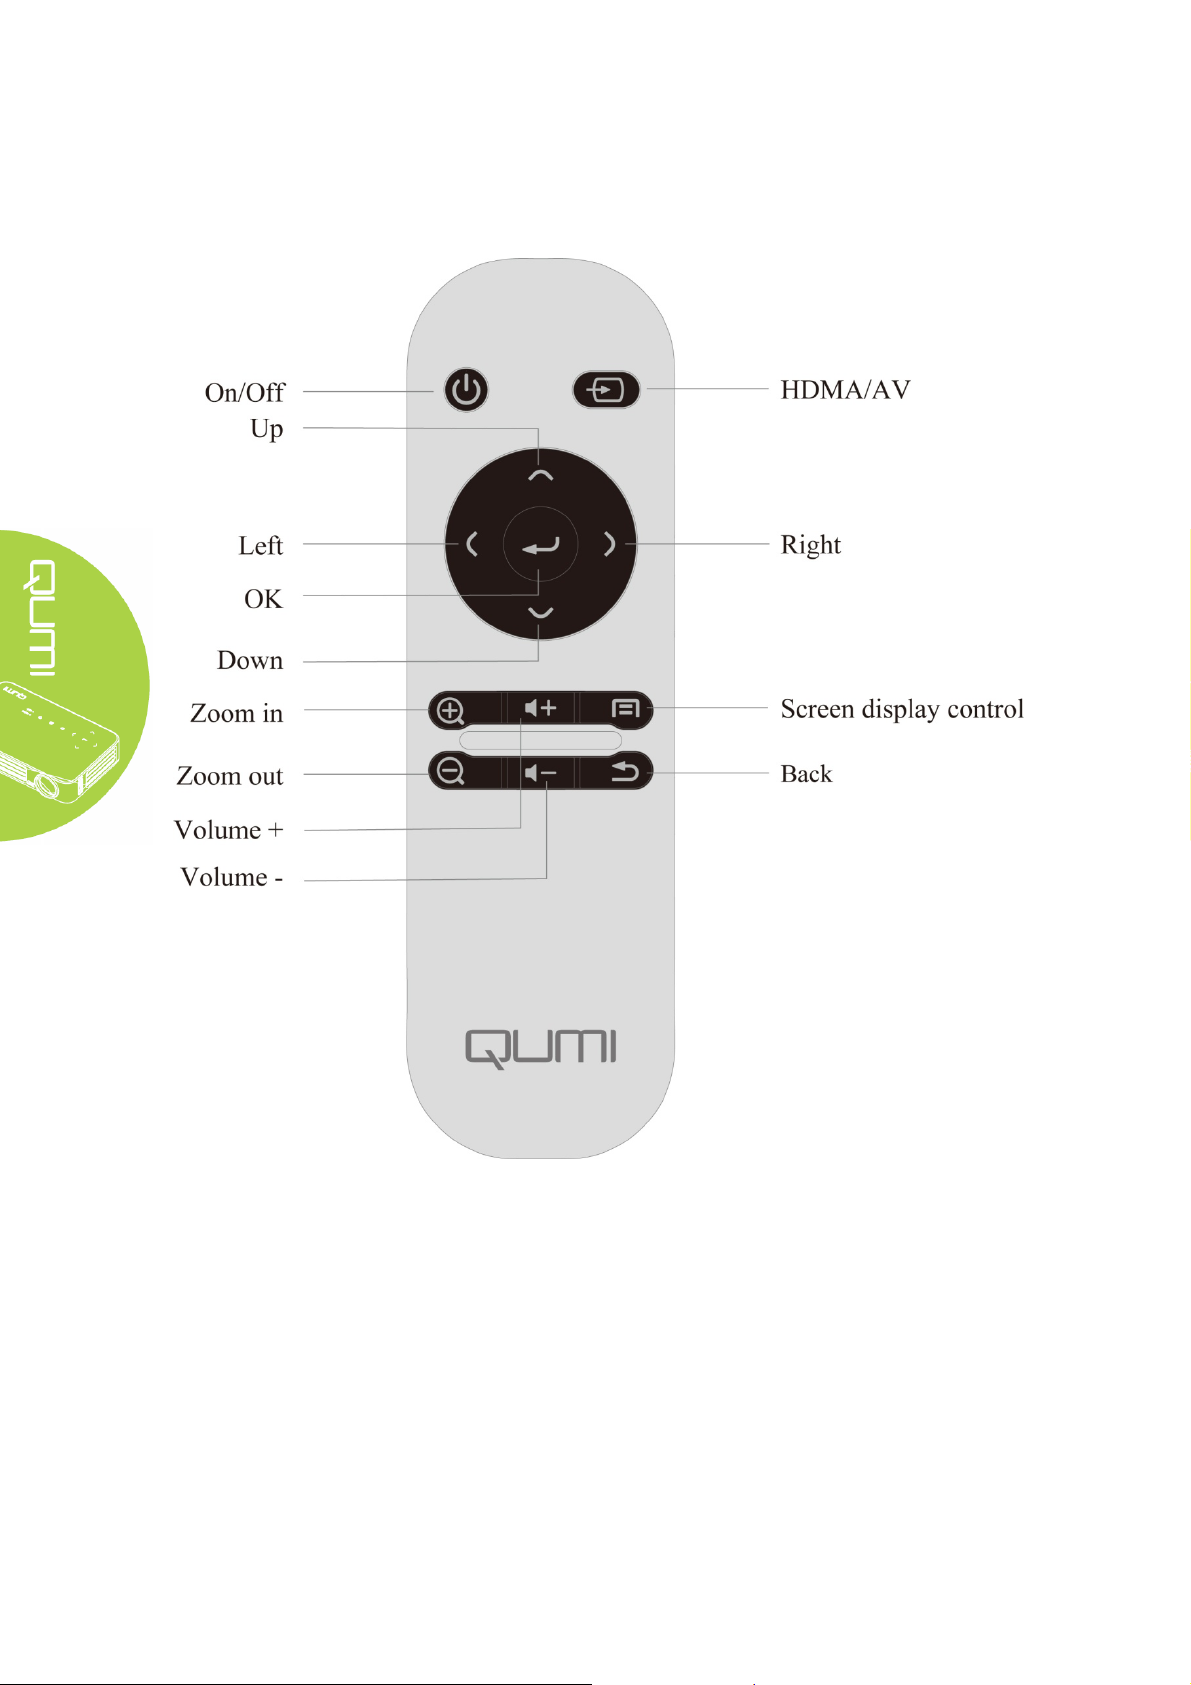
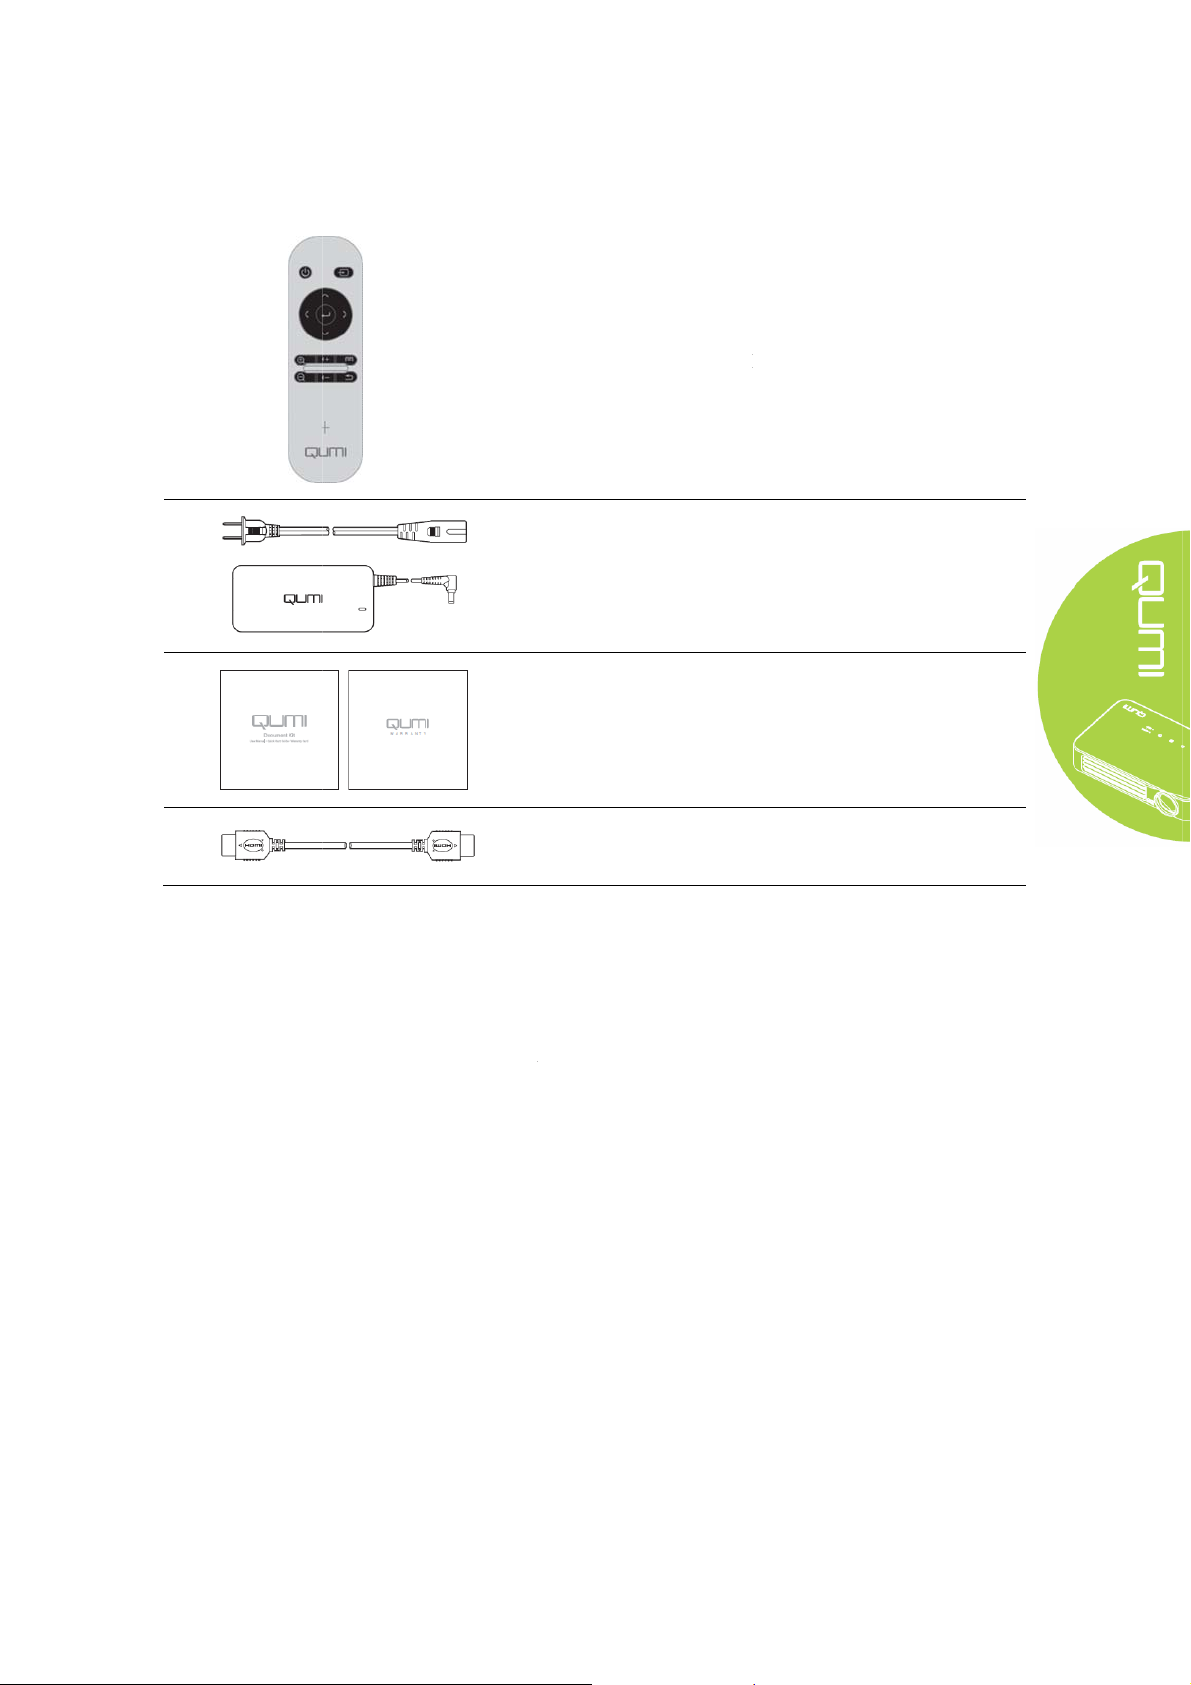
Remote controller
4
Page 11
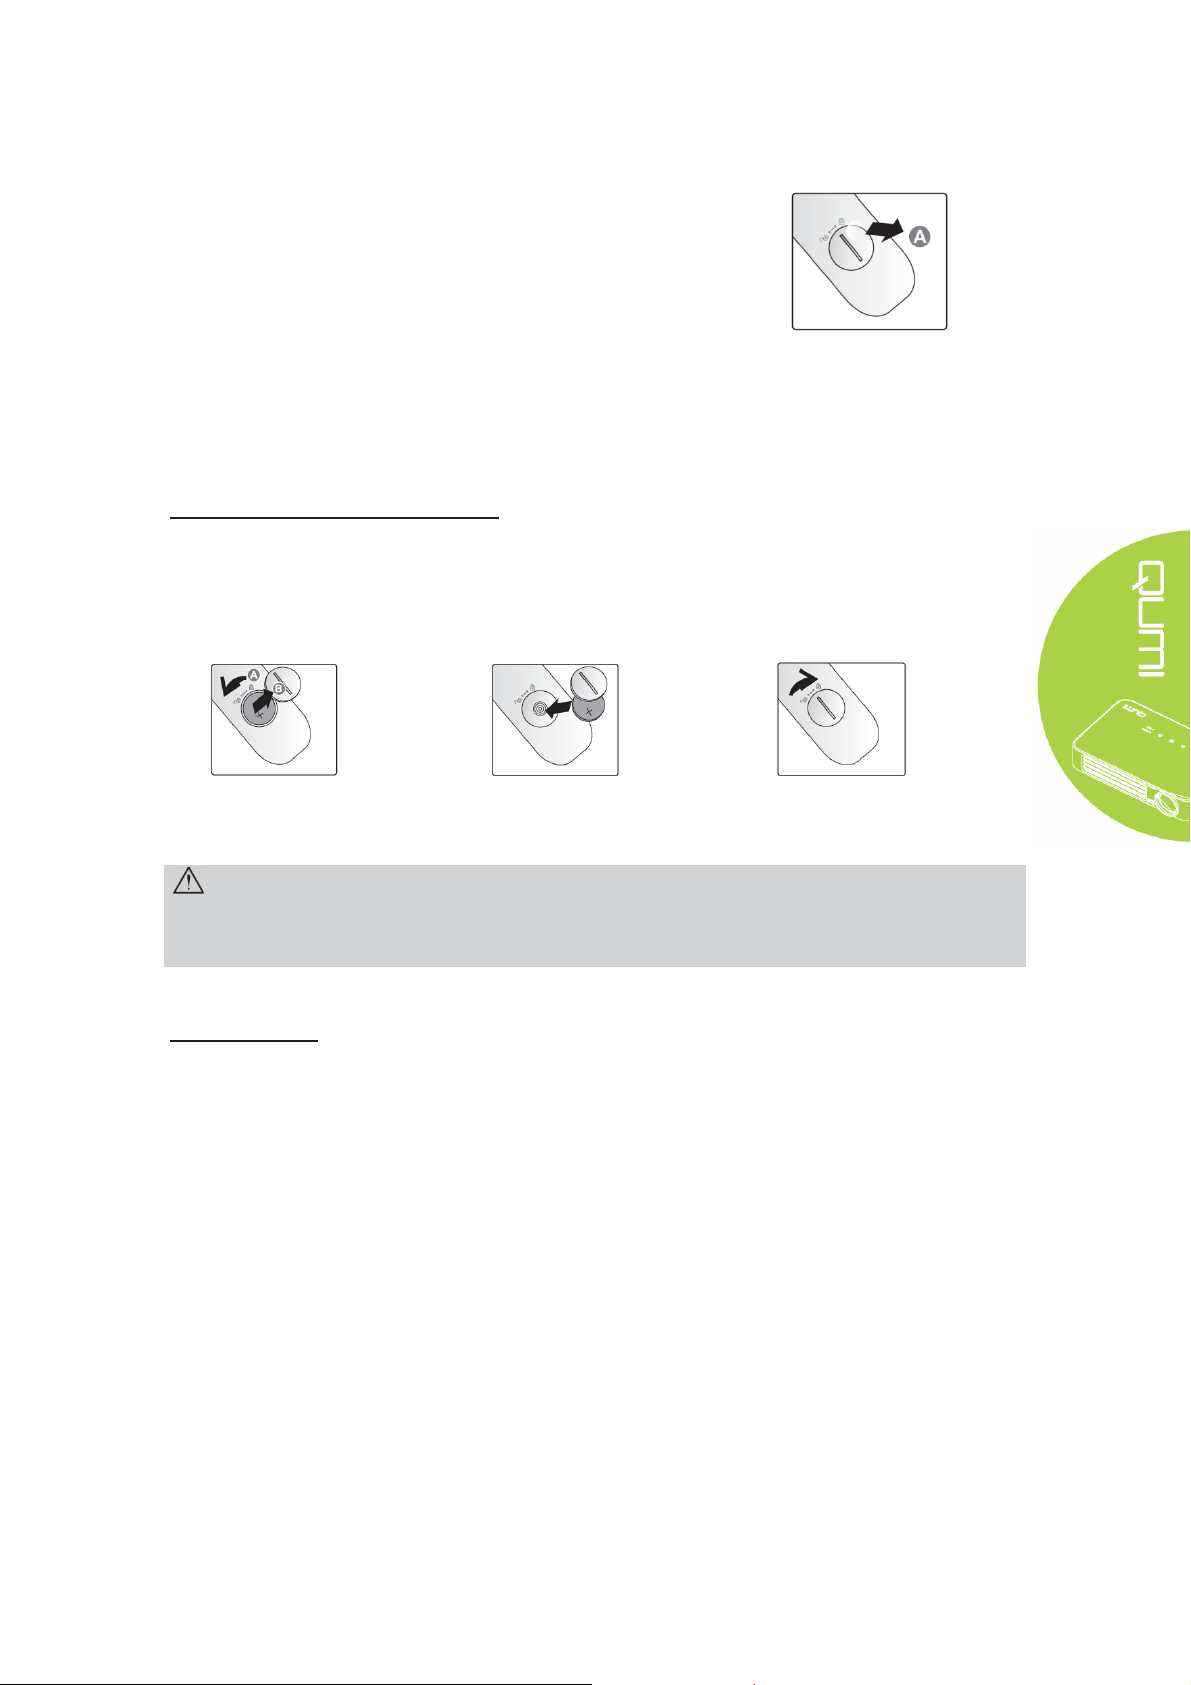
Set remote controller
The remote controller has one (1) 3V lithium battery (CR2025).
The battery is preassembled in the remote controller.
Before usage of the remote controller, get the plastic sheet (A) out
of the battery compartment.
Change remote controller battery
Get the groove stuck and
1.
rotate (A) in the arrow
direction, and open the
battery compartment cover
(B).
Caution:
1. Only use 3V lithium battery (CR2025).
2. Dispose the old battery in accordance with local regulations.
3. If Qumi is out of service for a long time, take out the battery.
Take out the old battery and
2.
install a new one (positive
upwards).
Rotate and install the cover
3.
in the arrow direction.
Working scope
The remote controller controls Qumi through infrared transmission, rather than direct control.
The working radius of the remote controller is about 7m (23 inches) and the working angle is
15° higher or lower than Qumi (However, the remote controller cannot be vertical to the side or
back of Qumi).
If Qumi fails to respond to the remote controller's commands, move the controller closer to
Qumi.
5
Page 12
Chapter 2 Start to Use
What you need
Qumi can be connected to several types of external and peripheral equipment. To play music,
connect Qumi to an external or portable music player. To play films, connect Qumi to DVD,
VCD or VHS player. To play video and display photos, connect Qumi to video camera and
digital camera. To display files and other types of media, connect Qumi to peripherals like
computer and USB drive.
Those devices can be connected to Qumi through corresponding cables. Ensure that all
connected devices have appropriate output interfaces.
6
Page 13

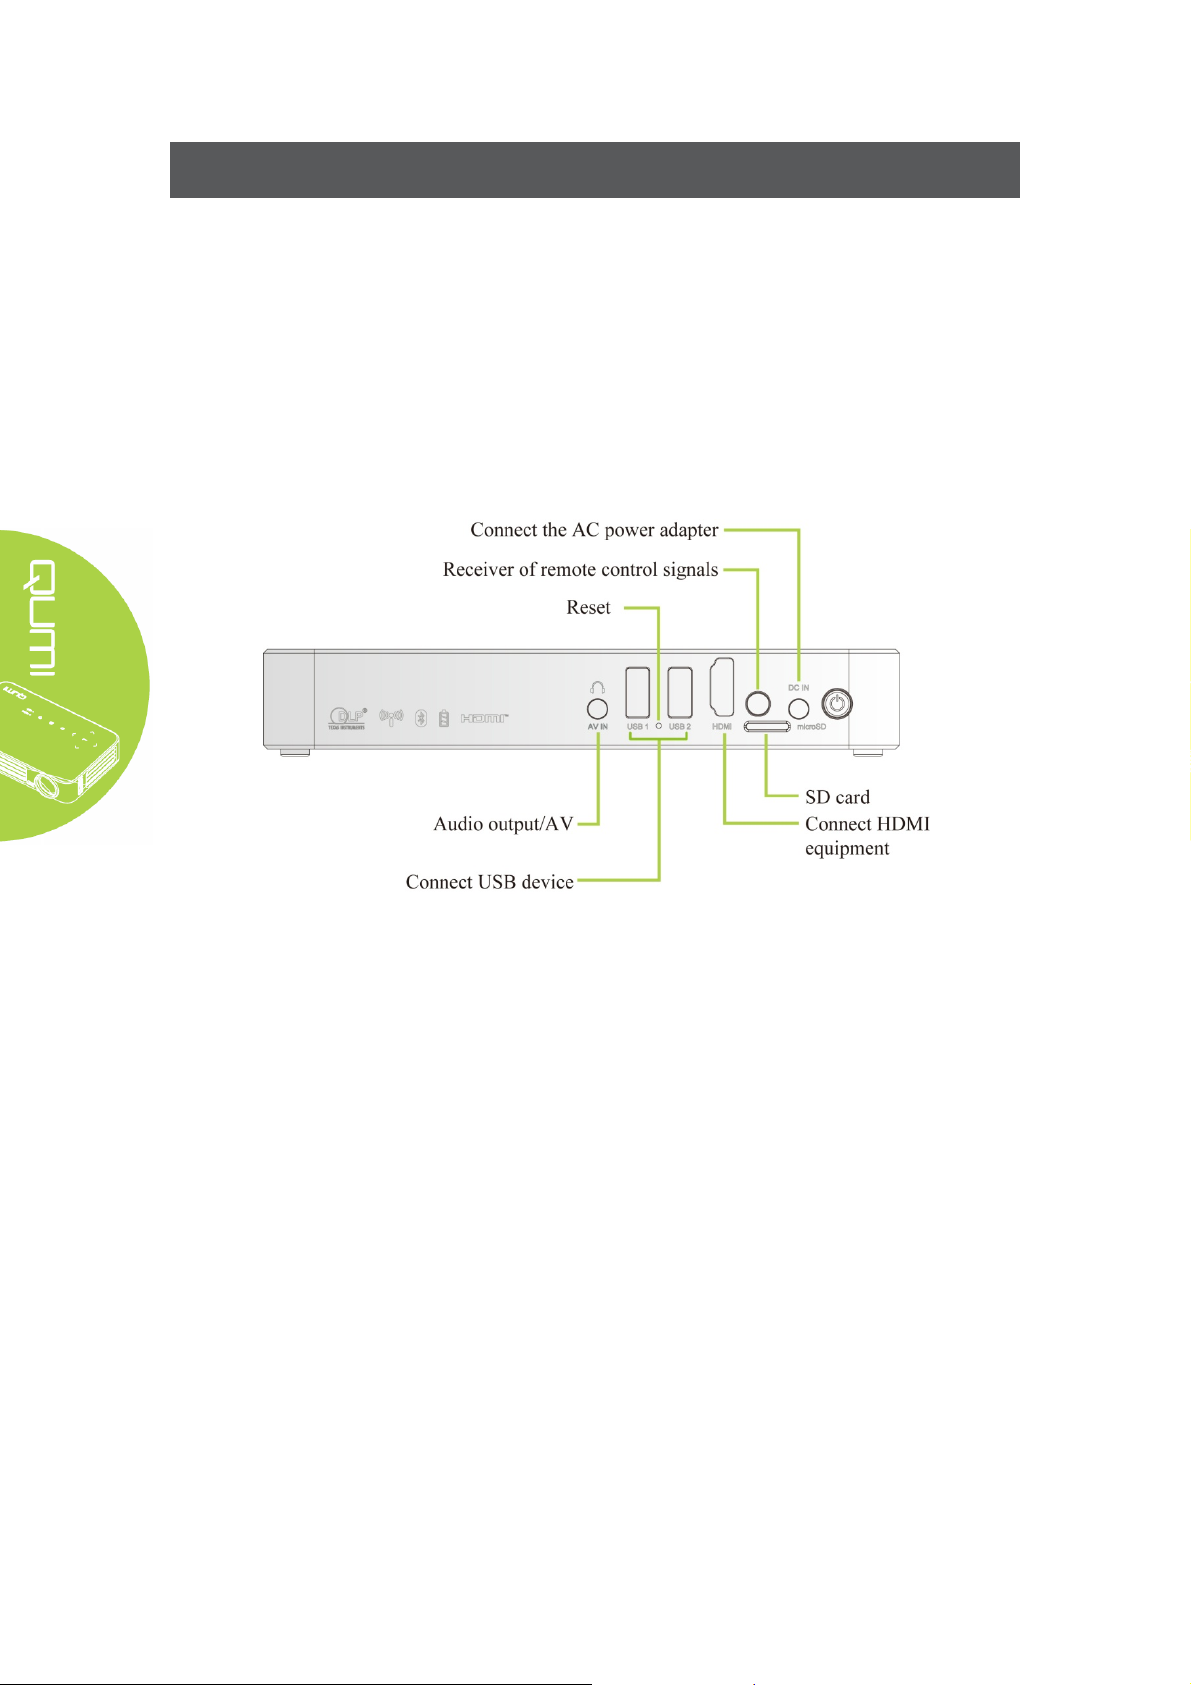
Set Qumi
Connect peripherals through HDMIconnection Connect the HDMI compatible
peripherals to Qumi through cables (optical).
Use
7
Page 14
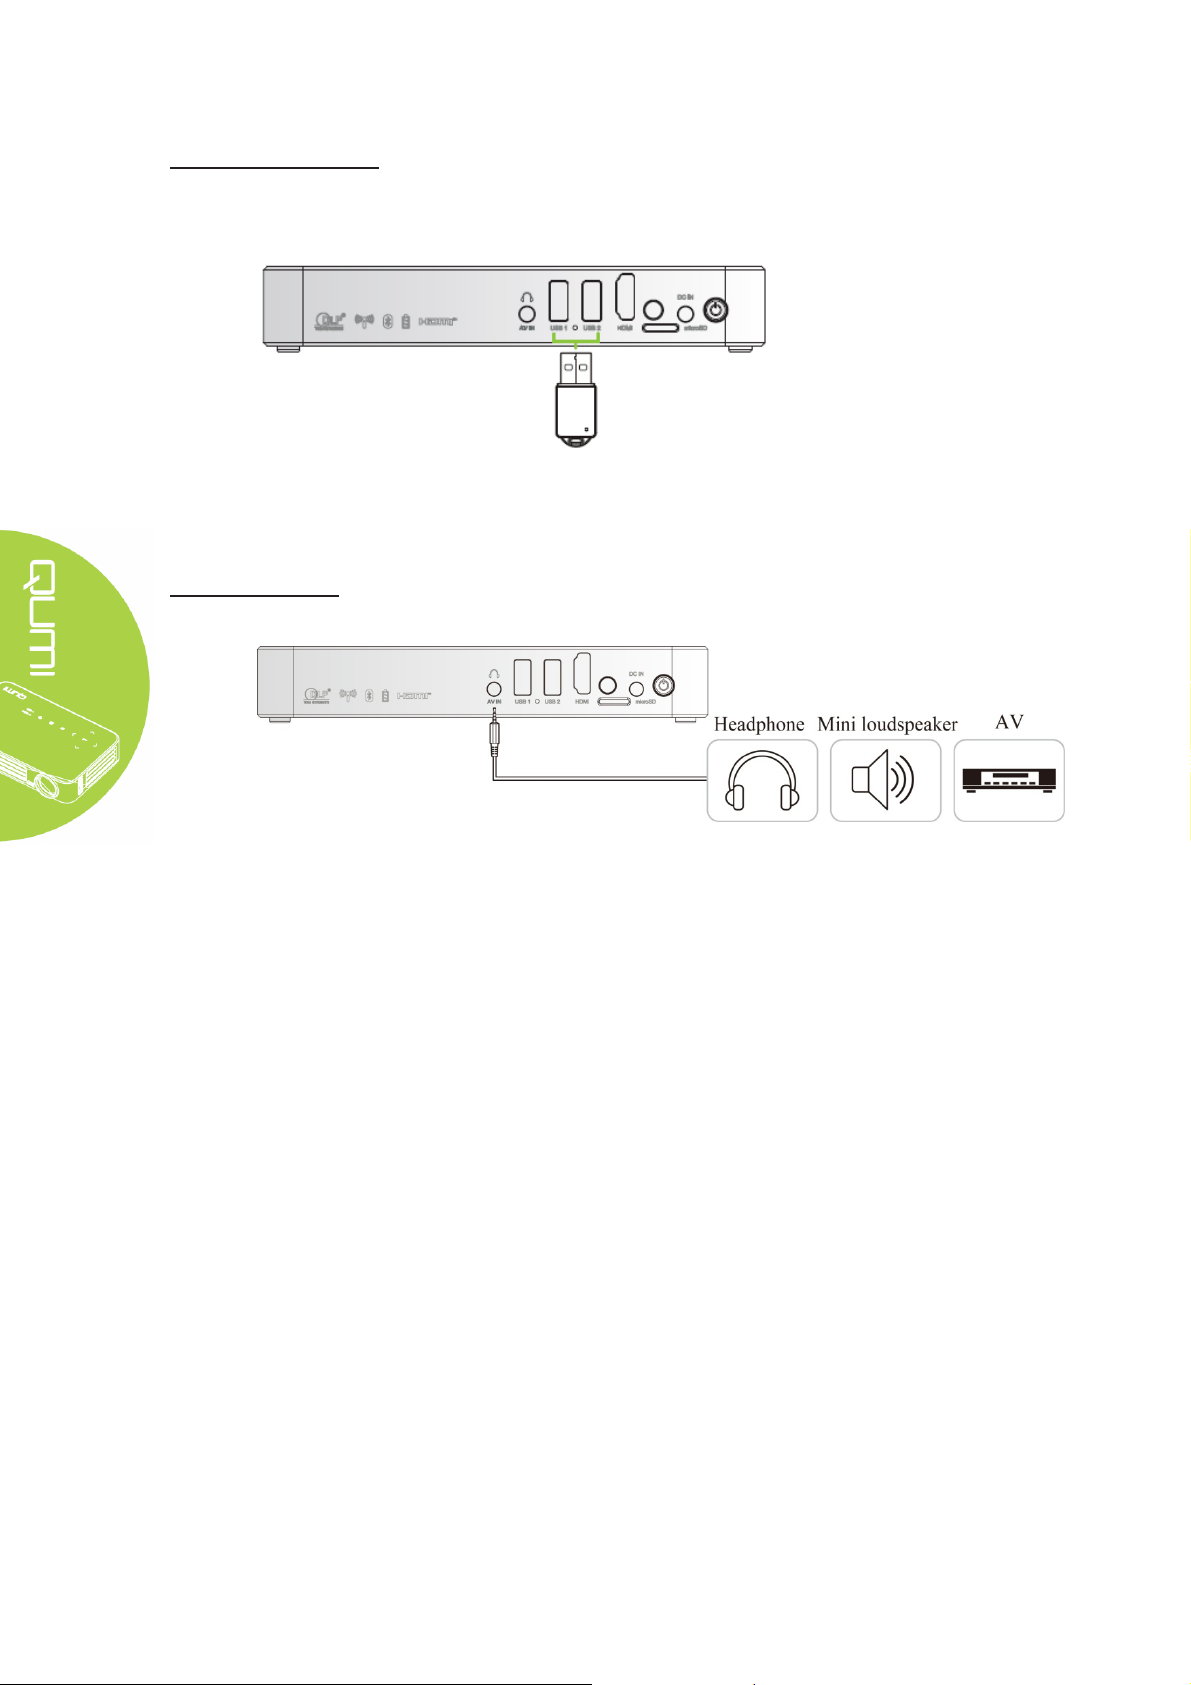
Connect a USB drive
Connect a storage device (like a USD drive) to corresponding port for connection to Qumi.
Audio output/AV
Connect a headset or a mini loudspeaker to the audio output jack for connection to Qumi.
8
Page 15
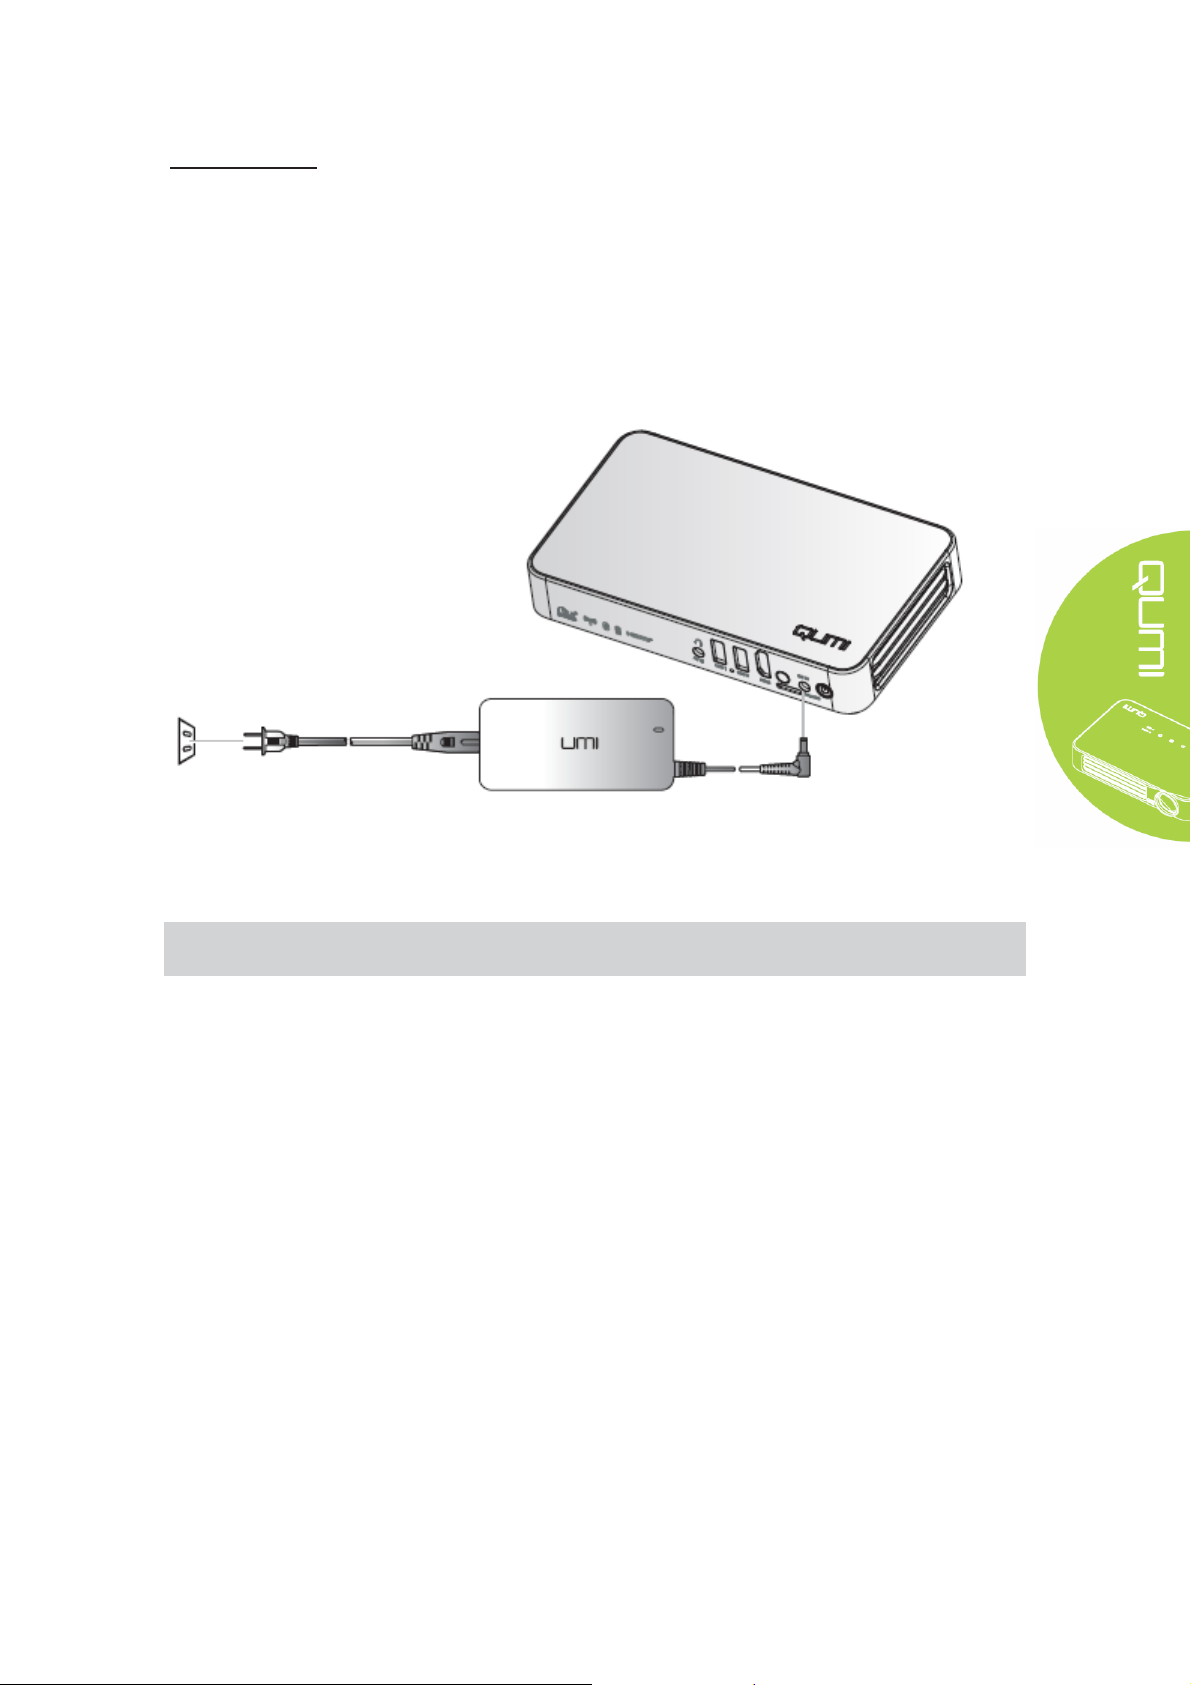
Charge battery
After outage, charge the projector in the steps below:
Connect the AC adapter to Qumi.
Connect the other end of AC adapter to a wall outlet.
During charging, at the receiver of remote controller, the blue light will be on. After full charge,
the blue light will be off.
Note:
The battery will be fully charged after 3-4h.
9
Page 16
Power on/off Qumi
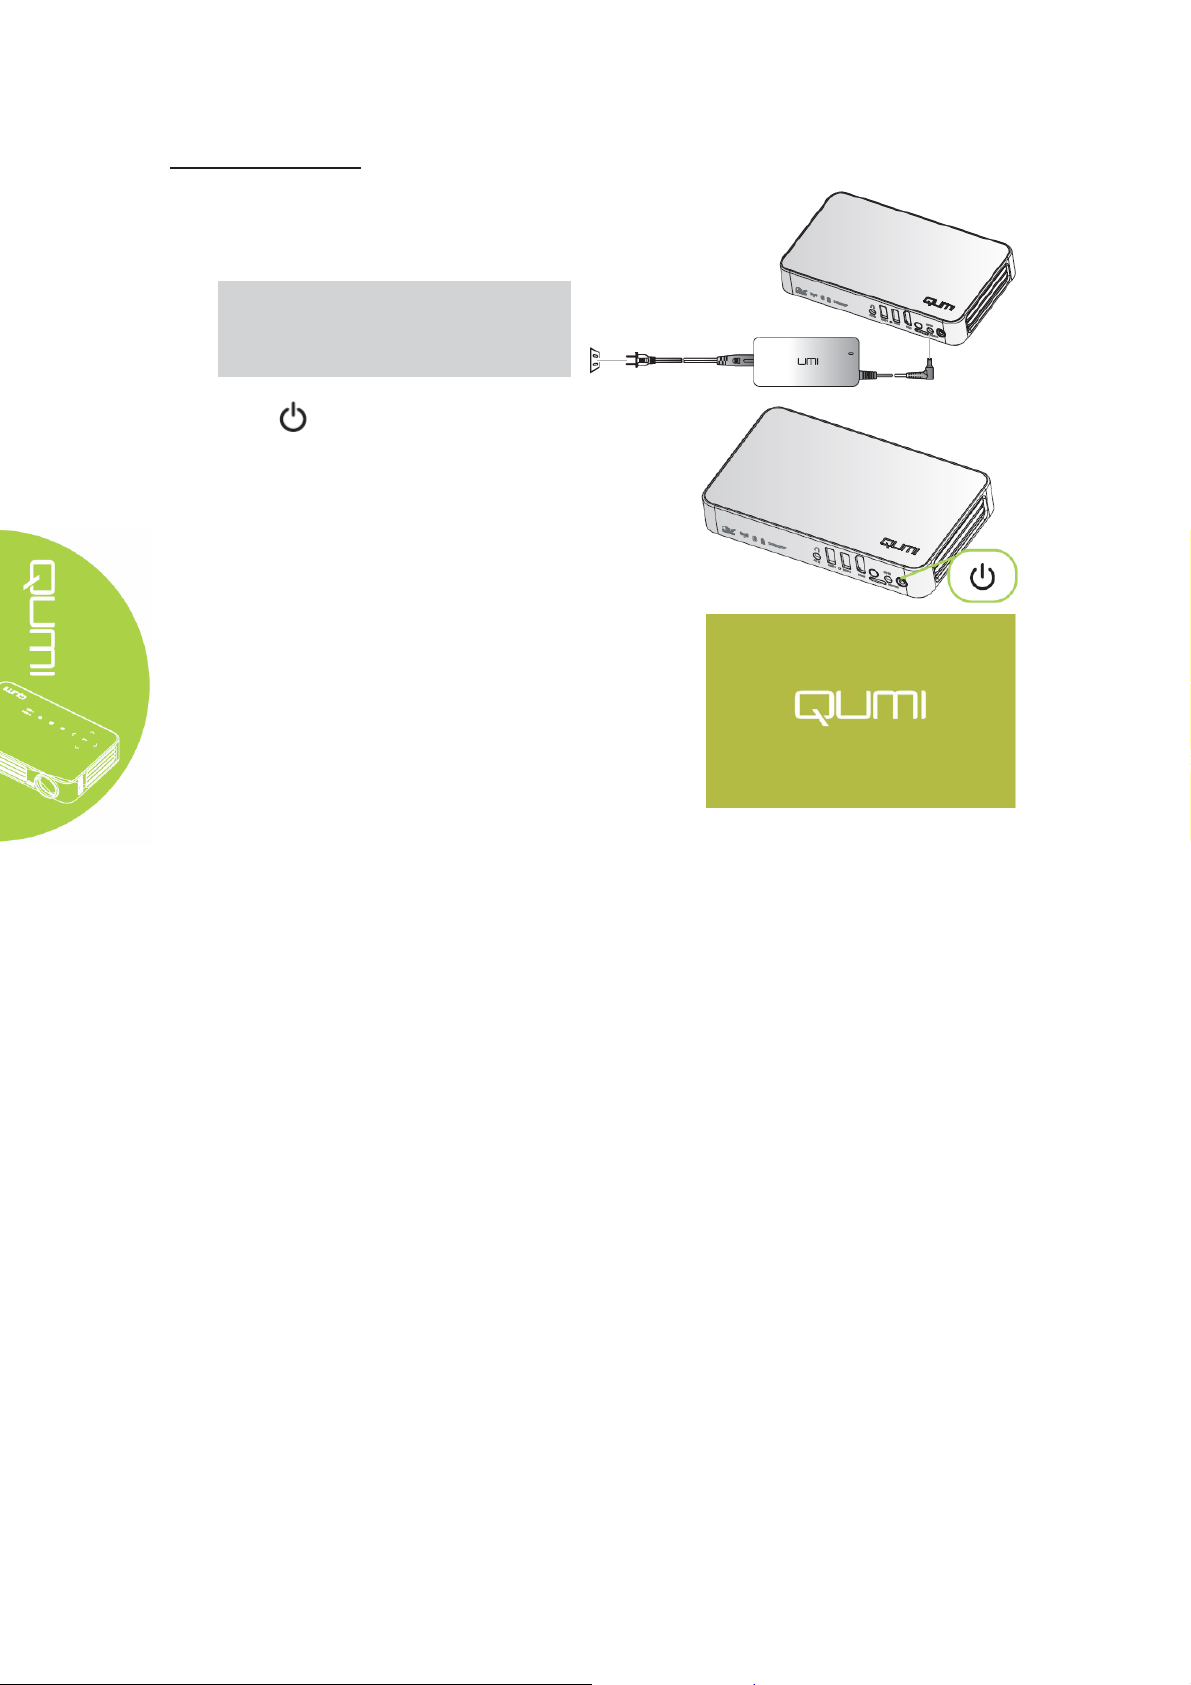
Connect the AC adapter to Qumi.
1.
Connect the other end of AC adapter to a
wall outlet.
Note:
The adapter models may differ over
region.
2.
Press power button to power on
Qumi.
When AC is connected, hold 1 second.
When AC is not connected, hold 5
seconds.
Qumi displays startup screen and detects
all connected devices.
10
Page 17
p
c
d
H
U
U
p
w
p
o
a
n
g
H
s
u
p
b
O
n
n
p
oPlag
h
h
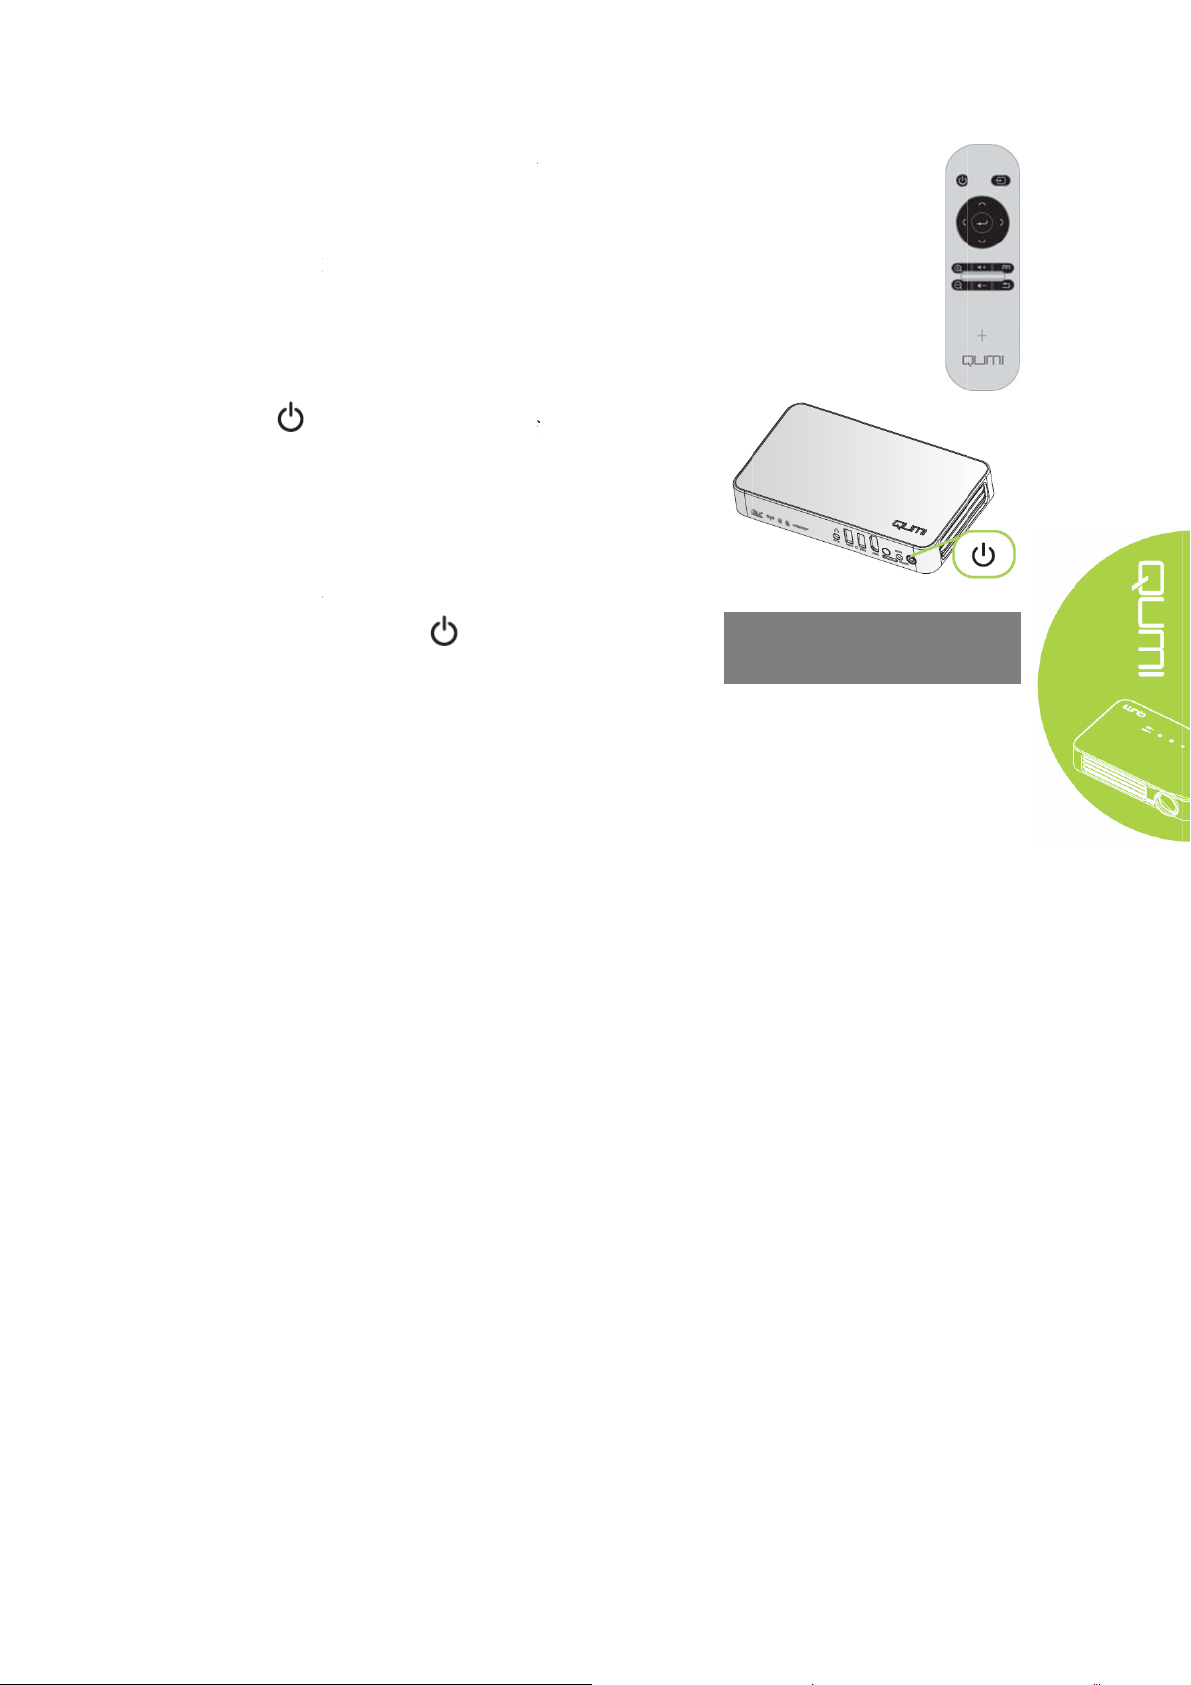
If several in
3.
(signal sour
appropriate
y HDMI:
y USB1:
y USB2:
4.
Press
When “Po
5.
message ap
is powered
ut devices
e) button o
evice throu
DMI/DVI
SB disc
SB disc
ower button
er off? Plea
ears, press
ff.
re connected
the remote
h ▲ or ▼ b
to power off
e press the
power
, press the S
controller a
tton.
Qumi.
ower butto
utton. The
URCE
d select
again”
rojector
P
wer off?
ease press t
ain
e power button
11
Page 18

Happy cast- Android operation
Screen mirror -Android
Operation I:
Turn on Happycast and scan the two-dimensional code with an Android phone to download and
install the Mobile Version Happycast;
Turn on the Projector Setting - General - More - Portable Hotspot - Portable WLAN Hotspot;
Conform the portable WLAN hotspot with a tick √.
After the mobile phone is connected to the projector WiFi, turn on the mobile Happycast screen,
and click device matched to the projector name (as shown below)
for screen mirror operation.
Note:
The mobile phone and the projector are not connected to any third-party WiFi.
12
Page 19

Operation II:
Ensure that the mobile phone and the projector are under a same WiFi environment;
Turn on Happycast and scan the two-dimensional code with an Android phone to download and
install the Mobile Version Happycast;
Turn on the mobile Happycast screen, and click device matched to the projector name (as
shown below) for screen mirror operation.
Note:
Ensure that the mobile phone and the projector are under a same WiFi environment
13
Page 20

Happy cast-iOS operation
Screen mirror -iOS
Operation I:
Turn on the Projector Setting - General - More - Portable Hotspot - Portable WLAN Hotspot;
Conform the portable WLAN hotspot with a tick √.
Turn on the projector Happycast; ensure that the mobile phone is connected to the projector
WiFi, slide up from the bottom of mobile phone screen to appear the console interface. Click
Airplay button to select the device to be projected. Turn on the mirror image switch (as shown
below) for screen mirror operation.
Note:
The mobile phone and the projector are not connected to any third-party WiFi.
14
Page 21

Operation II:
Ensure that the mobile phone and the projector are under a same WiFi environment;
Turn on the projector Happycast;
slide up from the bottom of mobile phone screen to appear the console interface. Click Airplay
button to select the device to be projected. Turn on the mirror image switch (as shown below)
for screen mirror operation.
Note:
Ensure that the mobile phone and the projector are under a same WiFi environment
15
Page 22

Chapter 3 Qumi User Interface
Views
Qumi user interface (UI) is designed for setting and convenient operation. UI enables a
complete medium experience by accessing medium files via smart devices (phones or pads) or
USD drives.
UI mainly comprises nine functions:
y Photo - display photo and provide slide function; the available images in connected
USBdrives or devices are listed in the “Photo” menu.
y Video - play film files; the available videos in connected USB drives or devices are
listed in the “Video” menu.
y Music - play audio files; the available music files in connected USB drives or devices
are listed in the “Music” menu.
y Office -play the files; the available files in connected USB drives or devices are listed
in the “File” menu.
y APPStore - manage downloads, updates and accesses to the APPStore.
y Browser- display HTML files of the web page servers or file systems (an application
for standard and general markup languages) and achieve user-file interaction.
y Apps - manage and operate all application program settings related to QUMI.
y WiFi - achieve mutual wireless connection among PC, portable devices (e.g., PAD,
mobile phone) and other terminals.
y Settings - access to Display, Audio file, Wireless linkage, Bluetooth, Memory,
General, Application and System.
16
Page 23

Photo
All available images in connected USB drives or devices are listed in the “Photo” menu.
Open Image - Select Viewing mode.
Press , , and buttons on the remote controller to select files and press
for display. The control panel display will change based on the file. The table below lists
available functions.
Menu bar/Icon Description
Photo Album, Place, Time, Figure, Tag
1.
2.
Select photo album, Allow offline viewing, Refresh
Slide view, Network view
Play slide, Select item, Group by
17
Page 24

Video
Play film files; the available videos in connected USB drives or devices are listed in the “Video”
menu. Open video -- Select local disk/USB -- Click the video for display
Press , , and buttons on the remote controller to select files and press
for display. The control panel display will change based on the file. The table below lists
available functions.
Menu bar/Icon Description
Back to UI
Back to previous step
18
Page 25

Music
Play audio files; the available music files in connected USB drives or devices are listed in the
“Music” menu. Open Music --, including five categories: Musician, Album, Song, Playlist and
Playing.
Press , , and buttons on the remote controller to select files and press
for display. The control panel display will change based on the file. The table below lists
available functions.
Menu
bar/Icon
Song list
Shuffle play
Repeat play all/Current songs
Lyrics
Description
19
Page 26

Files
Play the files; the available files in connected USB drives or devices are listed in the “File”
menu. Open the file -- Open -- Local directory -- Select file for opening
Press , , and buttons on the remote controller to select files and press for
display. The control panel display will change based on the file. The table below lists available
functions.
Menu
bar/Icon
Open Local directory, Cloud storage
Share Send quick disc, Access and share, More
Manage Copy files, Delete files, Clear records
Click Delete icon, Check the file to be deleted, Click OK for deletion.
Sort by: File name, Change time (refresh)
Close
Description
20
Page 27
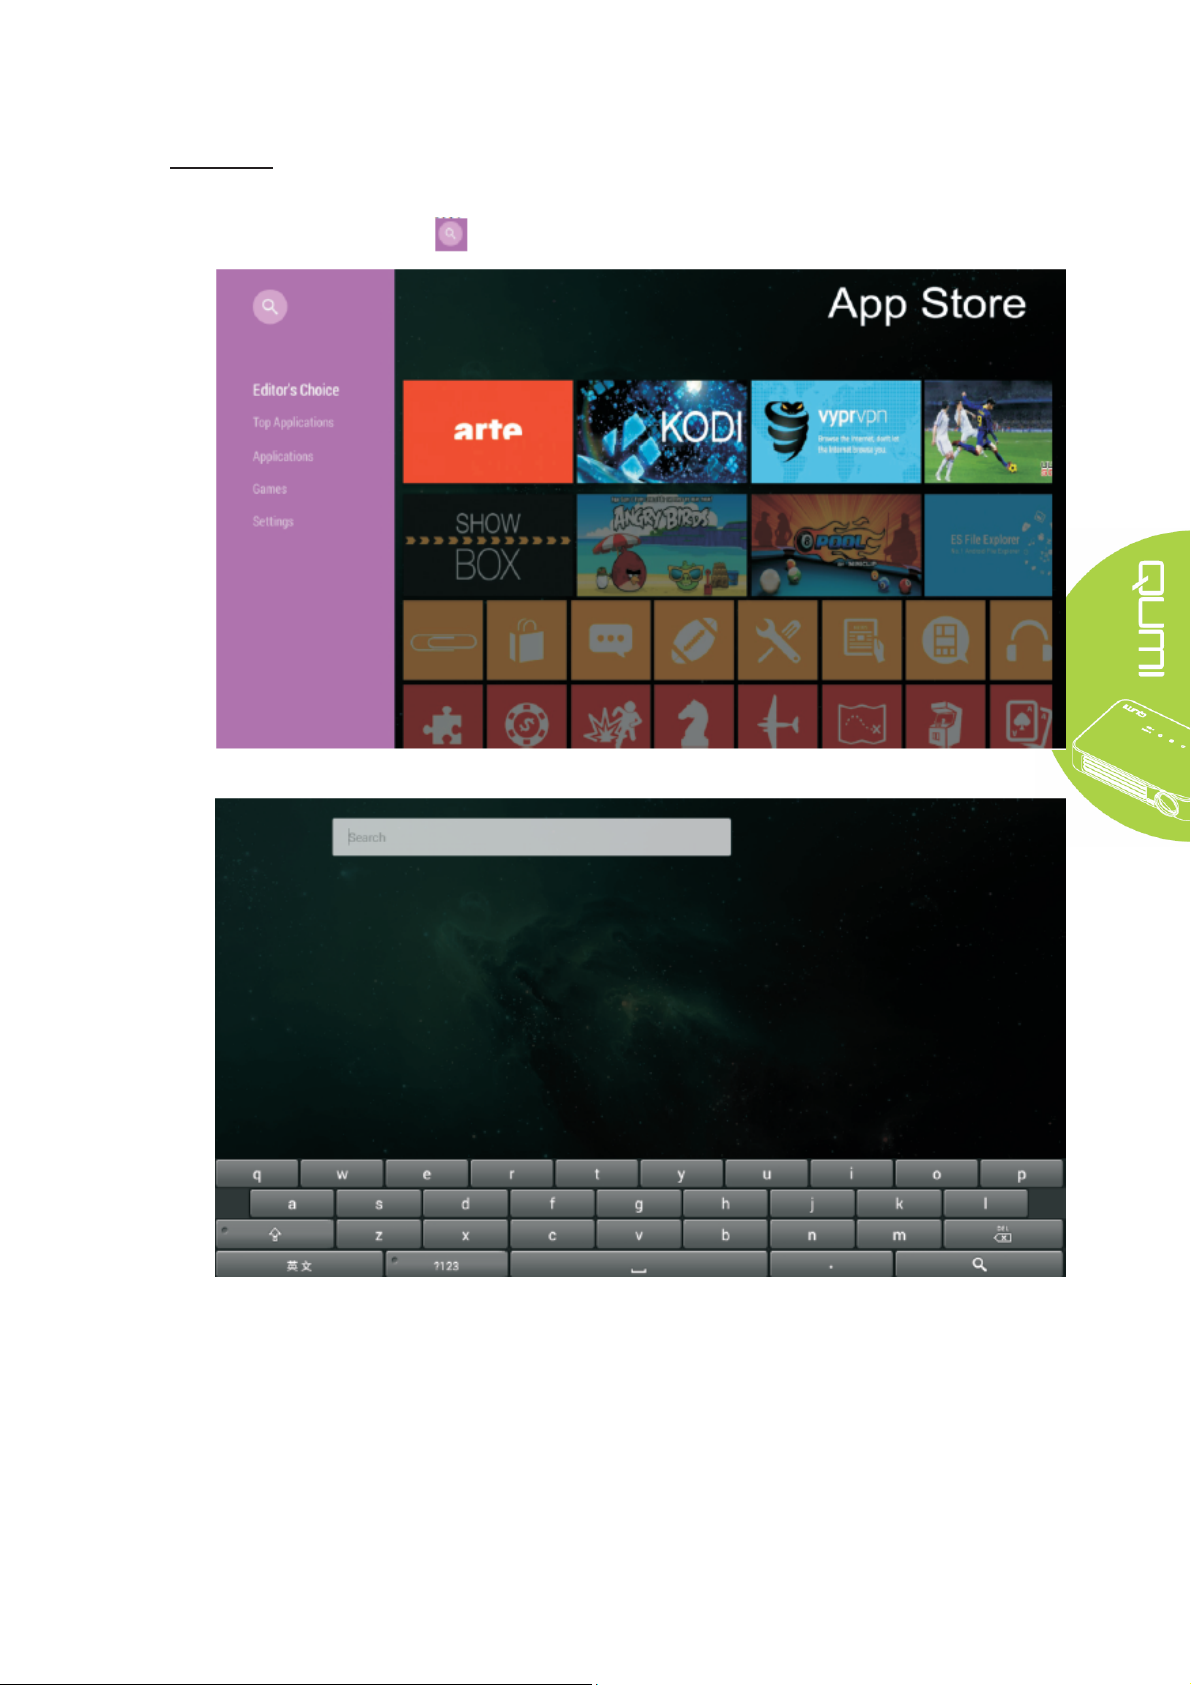
APP Store
Manage downloads, updates and accesses to the APPStore.
Open APP Store -- Click
Search the desired APP.
21
Page 28

Browser
Display HTML files of the web page servers or file systems (an application for standard and
general markup languages) and achieve user-file interaction.
Press , , and buttons on the remote controller to select files and press
for display. The control panel display will change based on the file. The table below lists
available functions.
Menu bar/Icon Description
Please select
country
Asian/China/Europe/Middle EastIndia/Latin America/Taiwan/USA
Refresh, Advance, New tab, Share webpage, Find on webpage, Request for
desktop website, Webpage information, Set
Add to the bookmarks
Search or input website
Find local bookmark
22
Page 29

Application program
Manage and operate all application program settings related to QUMI.
Open All Applications -- Click application based on required operation
23
Page 30

WiFi
Achieve mutual wireless connection among PC, portable devices (e.g., PAD, mobile phone)
and other terminals.
Enable WiFi -- Select network name
Input password -- Click Connect
Press , , and buttons on the remote controller to select files and press for
display. The control panel display will change based on the file. The table below lists available
functions.
Menu bar/Icon Description
Enable/disableWiFi
Press the WLAN protection setting button on the Router, which can be
marked as “WPS” or
Add Network
Scan, WPSPIN input, WLAN direct, Advanced
:
24
Page 31

Setting
Access to Display, Audio file, Wireless linkage, Bluetooth, Memory, General, Application and
System.
Press , , and buttons on the remote controller to select files and press for
display. The control panel display will change based on the file. The table below lists available
functions.
Menu
bar/Icon
Display Change font size, Project screen
Audio file Volume, System (Default audio prompt, Touch prompt)
Wireless
network
Bluetooth Turn on/off Bluetooth
Storage Internal storage display, SD card installation and formatting
General Wireless and network setting, Equipment setting, Personal setting, Account
Application Downloaded applications, Running applications, All applications
System Status information, Legal information, Model, Android version, Core version,
Connect wireless network
setting, System setting
Version number
Description
25
Page 32

Chapter 4 OSD Setting
OSD menu control
Qumi has an OSD (on screen display) setting menu for adjusting and changing settings, like
display setting and audio setting. OSD menu has 10 sub-menus:
y Menu language - set language display formats of the system. Press OK for entry.
Select and move to the desired language by Arrow Keys and then press MENU key or
Exit to exit.
y Display mode - adjust brightness, saturation, sharpness and contrast of the screen
display. Press OK for entry. Select different image modes by Left/Right Key. Press
Up/Down key to select user mode and press Left/Right key to adjust brightness,
saturation, sharpness and contrast. Press MENU or Exit for confirmation and exit.
y Audio mode - change audio output mode of the system. Select and move to the
desired mode by Left/Right Key and then press Menu or Exit for confirmation and
exit.
y Color temperature - adjust color temperature of screen and RGB parameters. Select
and move to the desired mode by Left/Right Key and then press Menu or Exit for
confirmation and exit.
y Zoom mode - adjust scale of screen. Select and move to the target mode by Up/Down
Key and then press Menu or Exit for confirmation and exit.
y Projection method - flip screen display. Press OK Key to view flip effect.
y Electronic trapezoid correction - correct trapezoids displayed in the screen.
y Software update (USB) - update software. Place the software in the root directory of
USB drive, and then press OK Key to enter the update confirmation interface and
select Yes to update the software.
y Reset All - restore factory settings and default parameters of the system, including
image, sound, screen flip, trapezoid, etc.
y State - display relevant information of the system (such as version).
If the interface is provided in HDMI, OSD menu may be accessed via menu buttons on the
remote controller or keyboard.
If the interface is provided in Qumi media center menu, OSD menu may be accessed via the
menu button on remote controller or the menu on the keyboard.
Note:
If OSD is non-active for 10 seconds, then OSD menu will be closed.
26
Page 33

OSD menu overview
The following figure allows you to quickly find a certain setting or confirm its scope.
Main Menu Submenu/setting
Menu language esky, English, Français, Dansk, Espaol, Hrvatski, Deutsch, Eλληolk, Italiano,
Magyar, Polski, Romnete, Nederlands, Português, Slovenina, Norsk, русский,
Srpski, Suomi, Simplified Chinese, Svenska, Traditional Chinese, Български
Display mode Bright - contrast 50 , brightness 50 , color 50 , sharpness 50 , hue 50
Demo - contrast 49 , brightness 49 , color 50 , sharpness 50 , hue 50
Film - contrast 49 , brightness 49 , color 40 , sharpness 50 , hue 50
User - independently adjust as required by application
Audio mode Standard - Treble 50 , Bass 50
Music - Treble 75 , Bass 75
Film - Treble 75 , Bass 90
Sport - Treble 35 , Bass 35
User - independently adjust as required by application
Color temperature Cold color -Red 50, Green 50, Blue 50
Standard -Red 50, Green 50, Blue 50
Warm color -Red 60, Green 38, Blue 25
User - independently adjust as required by application
Zoom mode 4:3, 16:9, zoom in 1, zoom in 2
Projection method 3, 2, 1, 0
Electronic
trapezoid
correction
Software update
(USB)
Reset All Yes/No
State Model Q3PLUS
Auto - standard automatic trapezoid
Manual - -35 - +35
Version No. XX.X-XXX.XX.XX
27
Page 34

Setting OSD menu language
Menu language of OSD may be changed. Perform the following steps to change the menu
language:
1. Press the Screen Display Control Key on remote controller and enter OSD menu.
2. Move the cursor to highlight the menu language, and press .
3. Press , , and buttons until the target menu language is highlighted by
cursor and setting of menu language is completed.
4. Press button to close OSD.
28
Page 35

Setting display mode
Display mode of OSD may be changed. Perform the following steps to change the display
mode:
1. Press the Screen Display Control Key on remote controller and enter OSD menu.
2. Move the cursor to highlight the display mode, and press .
3. Press and buttons until the target display mode (Bright, Demo, Film and User) is
highlighted by cursor and setting of display mode is completed.
4. Press button to close OSD.
Note:
Contrast, brightness, color and sharpness of user display mode may be adjusted as
required by application.
29
Page 36

Setting audio mode
Audio mode of OSD may be changed. Perform the following steps to change the audio mode:
1. Press the Screen Display Control Key on remote controller and enter OSD menu.
2. Move the cursor to highlight the audio mode, and press .
3. Press and buttons until the target audio mode (Standard, Music, Film, Sport and
User) is highlighted by cursor and setting of audio mode is completed.
4. Press button to close OSD.
Note:
Treble and bass of user audio mode may be adjusted as required by application.
30
Page 37

Setting color temperature
Color temperature of OSD may be changed. Perform the following steps to change the color
temperature:
1. Press the Screen Display Control Key on remote controller and enter OSD menu.
2. Move the cursor to highlight the color temperature, and press .
3. Press and buttons until the target color temperature is highlighted by cursor and
setting of color temperature is completed.
4. Press button to close OSD.
Note:
Red, green and blue color of user color temperature may be adjusted as required by
application.
31
Page 38

Setting zoom mode
Zoom mode of OSD may be changed. Perform the following steps to change the zoom mode:
1. Press the Screen Display Control Key on remote controller and enter OSD menu.
2. Move the cursor to highlight the zoom mode, and press .
3. Press and buttons until the target zoom mode is highlighted by cursor and
setting of zoom mode is completed.
4. Press button to close OSD.
32
Page 39

Setting projection method
Projection method of OSD may be changed. Perform the following steps to change the
projection method:
1. Press the Screen Display Control Key on remote controller and enter OSD menu.
2. Move the cursor to highlight the projection method, and press .
3. Repeatedly press button to select target projection method (3, 0, 1 and 2), and
setting of projection method is completed.
4. Press button to close OSD.
33
Page 40

Setting electronic trapezoid correction
Electronic trapezoid correction of OSD may be changed. Perform the following steps to change
the electronic trapezoid correction:
1. Press the Screen Display Control Key on remote controller and enter OSD menu.
2. Move the cursor to highlight the electronic trapezoid correction, and press .
3. Press , , and buttons until the target electronic trapezoid correction is
highlighted by cursor and setting of electronic trapezoid correction is completed.
4. Press button to close OSD.
Note:
Electronic trapezoid correction may be adjusted as required by application. (Values are
between -35 - +35)
34
Page 41

Setting software update (USB)
Please contact with your local supplier of projectors.
35
Page 42

Setting of reset all
OSD may all be reset. Perform the following steps to reset all:
1. Press the Screen Display Control Key on remote controller and enter OSD menu.
2. Move the cursor to highlight the reset all, and press .
4. Press button to select Yes, all settings will be reset automatically, after then the
QUMI user interface will be automatically switched back. Press button to select No,
the OSD screen control menu will be automatically switched back.
36
Page 43

View status
View status via OSD. Perform the following steps to view status:
1. Press the Screen Display Control Key on remote controller and enter OSD menu.
2. Move the cursor to highlight the status, and press .
37
Page 44

Chapter 5 Qumi Maintenance
Qumi Cleaning
Clean Qumi to remove dust and dirt for its normal operation.
Warning:
1. Before cleaning, close Qumi and disconnect the power lines. Otherwise injury or system
damage may be caused.
2. During cleaning, only wet cloth may be used. Exposure to water is not allo wed for vents of
Qumi.
3. If internal part of Qumi is exposed to a little water during cleaning, then Qumi cannot be
used unless it is ventilated for several hours with its power lines disconnected.
4. If internal part of Qumi is exposed to lots of water during cleaning, then Qumi should be
sent for maintenance with its power lines disconnected.
Cleaning lens
Cleansing fluid of optical lenses may be purchased from most of camera shops and other outlets.
Perform the following steps to clean the Qumi lens:
1. Drop a little cleansing fluid on a piece of clean and soft cloth. (Do no drop the cleansing fluid
directly on lens.)
2. Softly wipe lens by circles.
Caution:
1. Do not use abrasive cleansing fluid or solution.
2. In order to avoid discoloration or color fading, exposure to cleansing liquid is prohibited
for Qumi shell.
38
Page 45

Troubleshooting
FAQs and solutions
In case of any problem arising from application of Qumi, all these methods may provide you
with skills for problem solving. If such problem cannot be solved, please contact your
distributor for help.
Some problems may just be caused by improper connection of cables. Please check for possible
conditions as below before seeking particular solutions.
y Use other electrical equipment to check whether the power of outlet is normally supplied.
y Ensure that Qumi is switched on.
y Ensure that all connections are secured.
y Ensure that all connected devices are switched on.
y Ensure that connected PC is not in suspended mode or sleep mode.
y Ensure that connected laptop is properly provided with external display.
Troubleshooting skills
In specific problem parts, relevant steps should be performed as per suggested sequence. By
doing so, all problems may be solved quickly.
In order to avoid unnecessary replacement of normal parts, the problem parts should be found
out as much as possible.
For example, if the problem still exists after replacement of battery, then you should place back
original battery and continue the next step.
Please record performed steps during troubleshooting, which will become useful references
when contacting technology support or sending Qumi for maintenance.
Operation methods of Reset Key
The Reset Key is provided with an embedded key switch; and reset operation should be
completed by inserting and pressing a pin (with its size corresponding to Reset Key) into the
Reset Key.
39
Page 46

Image problem
Problem: No image displayed in the screen
1. Check whether PC is properly configured.
2. Close all devices and then power them on again in proper sequence.
Problem: Blurring image
1. Operate by remote controller.
2. Ensure that the distance between Qumi and screen is within specified limit.
3. If lens of Qumi are polluted, clean them by a cleaning cloth for optical lenses.
Problem: Wider up or low end of image (trapezoid effect)
1. Adjust Qumi to make it vertical to the screen as much as possible.
2. Adjust trapezoid correction configuration of OSD to solve problems or configure the
automatic trapezoid correction as “ON”.
Problem: Inverted image
Check for configured direction of “Projection method” in OSD “Configuration” menu.
Problem: Striped image
1. In OSD, restore “Frequency” and “Track” of “Computer” menu to default setting.
2. Connect Qumi to another computer and check whether the problem is caused by the video
card.
Problem: Image without contrast
Adjust setting of “Contrast” in OSD “Image” menu
Problem: Color of projected image is not matched with that of source image
Adjust “Color temperature” in OSD “Image” menu
Problem of remote controller
Problem: Qumi fails to respond to the remote controller commands
1. Align the remote controller with the remote sensor of Qumi.
2. Ensure there is no obstacle between remote controller and remote sensor.
3. Close fluorescent lamps in the room.
4. Check whether battery polarity is correct.
5. Replacement of Battery.
6. Close other equipment that enables infrared rays in surrounding area.
7. Send the remote controller for maintenance.
40
Page 47

Audio problem
Problem: No sound
1. Adjust the volume of audio source.
2. Check the connection of audio cable.
3. Use other loudspeaker to test output of audio source.
4. Send Qumi for maintenance.
Problem: Sound distortion
1. Check the connection of audio cable.
2. Use other loudspeaker to test output of audio source.
3. Send Qumi for maintenance.
FAQs and solutions
1. Can Qumi be connected to the game console such as Microsoft Xbox or Sony PS3?
Yes. Information from Xbox or PS3 console can be displayed in Qumi. Therefore, it can
be achieved by connecting HDMI cables of game console to Qumi.
2. Can Qumi project contents of TV?
TV can only generate images on its screen; if you want to view TV contents in Qumi, you
would have to connect Qumi to cable box, digital set-top box or satellite receiver. For
example, the cable box can be connected to Qumi via HDMI cables.
41
Page 48

Specification
Model Qumi Q3PLUS Series
Resolution HD (720p-1280x720)
Projection distance 0.7m~3.7m (19"-100")
Size of projection screen
(diagonal)
Projection lens Electronic zoom in/out
Throw ratio 1.66:1
Vertical trapezoid correction +/-35 step (-45º - +33º)
Projection method
Data compatibility VGA, SVGA, XGA, SXGA, SXGA+, UXGA, Mac
SDTV/EDTV/HDTV 480i, 480p, 720p, 1080i, 1080p
Video compatibility
Safety certificate UL, CCC, CE, CB, BQB, FCCID, WEEE, RoHS, SRRC, Reach,
Operating temperature 5ºC~45ºC
Dimensions (WXHXD) 176mm(6.93") x 102.5mm(4.04") x 27.6mm (1.09)
AC input
Power consumption 36W
Audio loudspeaker 2W double-channel speaker
Input terminal
Output terminal 3.5 mm headphone jack (volume control) x 1
762mm~2, 286mm (30”~90”)
Front projection, rear projection, desk projection, front ceiling and
rear ceiling projection
HDTV(720p, 1080i/p), NTSC/NTSC4.43, PAL (B/G/H/I/M/N/60),
SECAM
General AC 100-240, typical value @ 110VAC
(100-240)/+-10%
HDMIx1 and AV (3.5 mm min Jack available)
USB Type x 2
Note:
Any question about the product specifications, please contact local distributors.
42
Page 49

4. How to display images from digital camera or USB storage device?
Connect such device to Qumi to display corresponding images or other contents by:
y USB drive, hard disk and card reader
y Digital camera
y Smartphone
y Multimedia storage browser
When connected to such device, Qumi media center can be used to display images.
5. Which kind of cables should be used to connect video device to Qumi?
HDMI cables or USB drive can be used to connect video device to Qumi if such device are
equipped with corresponding ports.
6. Which video formats apply to Qumi?
Avi/Rm/Rmvb/Ts/Vob/Mkv/Mov/ISO/wmv/asf/flv/dat/mpg/mpeg.
7. Which audio formats apply to Qumi?
MP3/WMA/AAC/WAV/OGG/AC3/DDP/TrueHD/DTS/DTS/HD/FLAC/APE.
8. Which document formats apply to Qumi?
Microsoft
®
Office 97-2010 (Word, Excel®, PowerPoint®), Adobe® PDF (1.0, 1.1, 1.2, 1.3,
1.4).
9. Which formats doese Qumi support?
JPEG/BMP/GIF/PNG/TIFF.
10. How long can the LED in Qumi be used and can it be replaced?
Qumi does not support common Qumi bulbs. Instead, Qumi uses a set of light emitting
diodes (LED) for lighting and projecting images. Compared with traditional bulbs, LED
has a longer service life. It is expected that Qumi LED can be used for around 30,000
hours. Service life of LED depends on brightness, service condition, environmental
condition, etc. LED Brightness will reduce over time. LED modules cannot be replaced.
11. Why should I readjust the focal length after Qumi is initiated?
In order to ensure best image quality, Zoom in+/Zoom out- Key on the remote controller
may be adjusted when the operation temperature is reached.
Vivitek support website
For more information, support and production registration, please visit www.vivitekcorp.com.
43
Page 50

Projection distance and size
Projection distance and size specification
Image diagonal
(cm/inch)
76.2/30 66.4/26.14 37.4/14.72 112.5/44.29
101.6/40 88.6/34.88 49.8/19.61 150.3/59.17
114.3/45 99.6/39.21 56/22.05 169.1/66.57
127/50 110.7/43.58 62.3/24.53 188/74.02
152.4/60 132.8/52.28 74.7/29.41 225.8/88.9
177.8/70 155/61.02 87.2/34.33 263.6/103.78
203.2/80 177.1/69.72 99.6/39.21 301.2/118.58
228.6/90 199.2/78.43 112.1/4.13 339.1/133.5
Note:
Due to the differences in optical components, around 10% tolerance may exist in such offset
tables.
Image width (cm/inch) Image width (cm/inch) Projection distance
(cm/inch)
44
Page 51

List of compatible signal
Signal Resolution
800x600(for 3D) 76.3 120.0 O
VESA
1024x768(for 3D) 97.6 120.0 O
Apple® Mac
SDTV
EDTV
HDTV
Horizontal
synchronization (KHZ)
720x400 37.9 85.0 O
640x480 31.5 60.0 O
640x480 37.9 72.0 O
640x480 37.5 75.0 O
640x480 43.3 85.0 O
800x600 35.2 56.0 O
800x600 37.9 60.0 O
800x600 48.1 72.0 O
800x600 46.9 75.0 O
800x600 53.7 85.0 O
1024x768 48.4 60.0 O
1024x768 56.5 70.0 O
1024x768 60.0 75.0 O
1024x768 68.7 85.0 O
1280x800 49.7 59.8 O
1280x800 62.8 74.9 O
1280x800 71.6 84.8 O
1280x1024 63.98 60.0 O
1280x1024 79.98 75.0 O
1280x1024 91.1 85.0 O
1400x1050 65.3 60.0 O
1440x900 55.9 60.0 O
1600x1200 75.0 60.0 O
1920x1080 67.2 60.0 O
640x480 35.0 66.68 O
832x624 49.725 74.55 O
1024x768 60.24 75.0 O
1152x870 68.68 75.06 O
480i 15.734 60.0 O
576i 15.625 50.0 O
480p 31.469 60.0 O
576p 31.25 50.0 O
720p 37.5 50.0 O
720p 45.0 60.0 O
1080i 33.8 60.0 O
1080i 28.1 50.0 O
1080p 67.5 60.0 O
1080p 56.3 50.0 O
Vertical
synchronization (HZ)
DVI/HDMI
O: Available frequency
-: Unavailable frequency
*: Display level
45
Page 52

Qumi size
46
Page 53

Regulatory compliance
FCC warning
As confirmed by tests, the Device conforms to Section 15 of FCC Rules in respect of
limitations on Grade B digital equipment. Such limitations aim to provide the Device with
proper protection against harmful interference in commercial environment.
The Device may produce, use and radiate radio frequency energy; if the Device is not installed
and used in accordance with instructions, harmful interference may be caused to radio
communication. Using the Device in residential district may cause harmful interference; in such
case, users are obliged to eliminate interference at their own cost.
Any change or modification, if not specifically approved by conforming responsible party, will
lead to disqualification of users in respect of the Device.
Canada
The Grade B digital device conforms to requirements of Canada ICES-003.
Safety certificate
Projector: CENB, REACH, ROHS, WEEE, FCCID, UL, CCC, SRRC, CB, BQB;
Adapter: DOE, WEEE;
Waste and recycle
The Product, if disposed improperly, may contain some hazardous electronic materials . The
Product should be recovered or disposed in accordance with federal, state and local laws. Please
contact Electronic Industries Alliance (website: www.eiae.org) for more details.
47
Page 54

List of name and content of toxic and hazardous substances or
elements in the Product
In accordance with the “Measures for the Control of Pollution from Electronic Information
Products” issued by the Chinese government, in order to control and reduce pollution on
environment caused by wasted electronic information products; promote production and sales of
low-pollution electronic information products; and protect environment and human health, the toxic
and hazardous substances that may be contained in the Product are listed as follows:
Toxic and Hazardous Substances or Elements
Name of Part
Optical engine (aluminum or
aluminum magnesium alloy)
Camera lens X O O O O O
LED light source X X O O O O
Inverter X O O O O O
Fragments (free-cutting phosphor
copper)
Fan assembly X O O O O O
Temperature switch O O X O O O
Substrate components X O O O O O
Cables and wires X O O O O O
Power line X O O O O O
Power socket components X O O O O O
Metal parts (free-cutting
phosphor copper and brass nail)
Remote controller X O O O O O
○: indicates that the content of such toxic and hazardous substances in all homogeneous materials of the component is
lower than the limit specified in SJ/T11363-2006 standard.
X: indicates that the content of such toxic and hazardous substances in any homogeneous material of the component
is more than the limit specified in SJ/T11363-2006 standard.
Remarks: Given the different regulations on RoHS between EU and China, the projector product conforms to EU
RoHS Directive (Restriction of Hazardous Substances in Electrical and Electronic Equipment); all components
marked with “X” in this table refer to allowed exemptions of EU ROHS Directive.
Pb
Hydrargyrum
(Pb)
X O O O O O
X O O O O O
X O O O O O
(Hg)
Cadmium
(Cd)
Chromium
VI
(Cr(VI))
Polybrominated
Biphenyls
(PBB)
Polybrominated
Diphenyl
Ethers
(PBDE)
48
Page 55

FCC Statement
This equipment has been tested and found to comply with the limits for a Class B digital
device, pursuant to part 15 of FCC Rules. These limits are designed to provide
reasonable protection against harmful interference in a residential installation. This
equipment generates and can radiate radio frequency energy and, if not installed and
used in accordance with the instructions, may cause harmful interference to radio
communications. However, there is no guarantee that interference will not occur in a
particular installation. If this equipment does cause harmful interference to radio or
television reception, which can be determined by turning the equipment off and on, the
user is encouraged to try to correct
The interference by one or more of the following measures:
Reorient or relocate the receiving antenna.
Increase the separation between the equipment and receiver.
Connect the equipment into an outlet on a circuit different from that to which the receiver
is connected.
Consult the dealer or an experienced radio/TV technician for help
This device complies with Part 15 of FCC Rules.
Operation is subject to the following two conditions:
This device may not cause harmful interference, and This device must accept any
interference received, including interference that may cause undesired operation.
Note: The manufacturer is not responsible for any radio or TV interference caused by
unauthorized modifications to this equipment. such modifications could void the user’s
authority to operate this equipment.
FCC RF Radiation Exposure Statement
This equipment complies with FCC RF radiation exposure limits set forth for an
uncontrolled environment. This equipment should be installed and operated with a
minimum distance of 20 centimeters between the radiator and your body.
You can search more information form the webpage: https://www.fcc.gov/
49
 Loading...