

Page 1
DNI Smart Grid Data Collector
SGDC-D22 User Manual
Rev. 1.9
2017/01/19
Notice:
1. Delta Networks Inc. reserves the right to change specifications detailed in this document at any time without notice, and assumes no
responsibility for any errors within this document.
2. This document contains proprietary technical information in which is the property of the Delta Networks Inc. and shall not be disclosed
to others in whole or in part, reproduced, copied, or used as the basis for design, manufacturing, or sale of apparatus without written
permission of Delta Networks Inc.
Page 2

Doc #: 1ANSU-160004
Table of Contents
1. Introduction ............................................................................................................................................................ 1
1.1. GENERAL DESCRIPTION ................................................................................................................................................... 1
1.2. TARGET APPLICATIONS .................................................................................................................................................... 1
1.3. PRODUCT INFORMATION .................................................................................................................................................. 1
1.4. REGULATION DECLARATION ............................................................................................................................................. 2
2. Platform Description ............................................................................................................................................... 3
2.1. HARDWARE INFORMATION ............................................................................................................................................... 3
2.2. SOFTWARE INFORMATION ................................................................................................................................................ 5
3. Tool Chain Installation ............................................................................................................................................ 7
3.1. ENVIRONMENT................................................................................................................................................................. 7
3.2. INSTALLING STLINUX ON UBUNTU .................................................................................................................................. 7
3.3. ADD TOOL CHAIN PATH ................................................................................................................................................... 8
4. Getting Started ........................................................................................................................................................ 9
4.1. CONNECT TO PC .............................................................................................................................................................. 9
4.2. SIM CARD AND SD CARD INSTALLATION .......................................................................................................................11
4.3. LOGIN DATA COLLECTOR ............................................................................................................................................... 12
5. The First Program ................................................................................................................................................. 14
5.1. COMPILE HELLOWORLD.C .............................................................................................................................................. 14
5.2. SEND FILES TO DATA COLLECTOR .................................................................................................................................. 14
5.3. EXECUTE PROGRAM AT DATA COLLECTOR ..................................................................................................................... 14
6. Communication Settings ........................................................................................................................................ 15
6.1. STATIC IP ON ETH0 ......................................................................................................................................................... 15
6.2. DHCPD AND DHCP CLIENT ......................................................................................................................................... 15
6.3. 3G ................................................................................................................................................................................. 16
6.4. PPPOE OVER ETH0 ......................................................................................................................................................... 17
7. Daemons & Utilities............................................................................................................................................... 20
7.1. RAMDISK ....................................................................................................................................................................... 20
7.2. NFS (NETWORK FILE SYSTEM) ..................................................................................................................................... 21
7.3. TELNET & SSH SERVICE ................................................................................................................................................ 22
DNI SGDC-D22 User Manual
Page 3

Doc #: 1ANSU-160004
7.4. FTP & SCP .................................................................................................................................................................... 24
7.5. HTTP ............................................................................................................................................................................ 25
7.6. NTP & RTC ................................................................................................................................................................... 27
7.7. SSL ............................................................................................................................................................................... 28
7.8. SENDMAIL VIA SMTP .................................................................................................................................................... 29
8. I/O Control ............................................................................................................................................................ 30
8.1. DATA COLLECTOR ID ................................ ................................................................................................ ..................... 30
8.2. SYSTEM READY LED ..................................................................................................................................................... 30
8.3. BUZZER ......................................................................................................................................................................... 30
8.4. RESET BUTTON .............................................................................................................................................................. 30
8.5. RS-232 & RS-485 ......................................................................................................................................................... 30
8.6. SD CARD ....................................................................................................................................................................... 31
8.7. COMBINE WDT INTO YOUR PROGRAM .......................................................................................................................... 31
9. Linux Kernel Upgrade & Backup .......................................................................................................................... 33
10. Reference .............................................................................................................................................................. 35
DNI SGDC-D22 User Manual
Page 4

Revision History
Version
Date
Author
Description
1.0
2012/5/9
DNI SG Team
Initial Release.
1.1
2012/5/23
DNI SG Team
Add Linux Kernel Upgrade & Backup section.
1.2
2012/6/4
DNI SG Team
Add & modify sections below
- Communication Settings
- Daemons & Utilities
- I/O Control
1.3
2012/10/12
DNI SG Team
Modify some configurations.
1.4
2013/11/29
DNI SG Team
Add SIM & SD card installation.
1.5
2014/4/29
DNI SG Team
Add ZigBee feature for SGDC-D23.
1.6
2014/11/4
DNI SG Team
Add SGDC-D24.
1.7
2016/9/2
Jacky Lai
Update to standard format
Remove 2G(GPRS) for certification
1.8
2017/1/5
Jacky Lai
Added FCC description in 1.4
1.9
2017/1/19
Jacky Lai
Added RF Exposure, 2.1091description in 1.4
Doc #: 1ANSU-160004
DNI SGDC-D22 User Manual
Page 5
Doc #: 1ANSU-160004
Model Name
Description
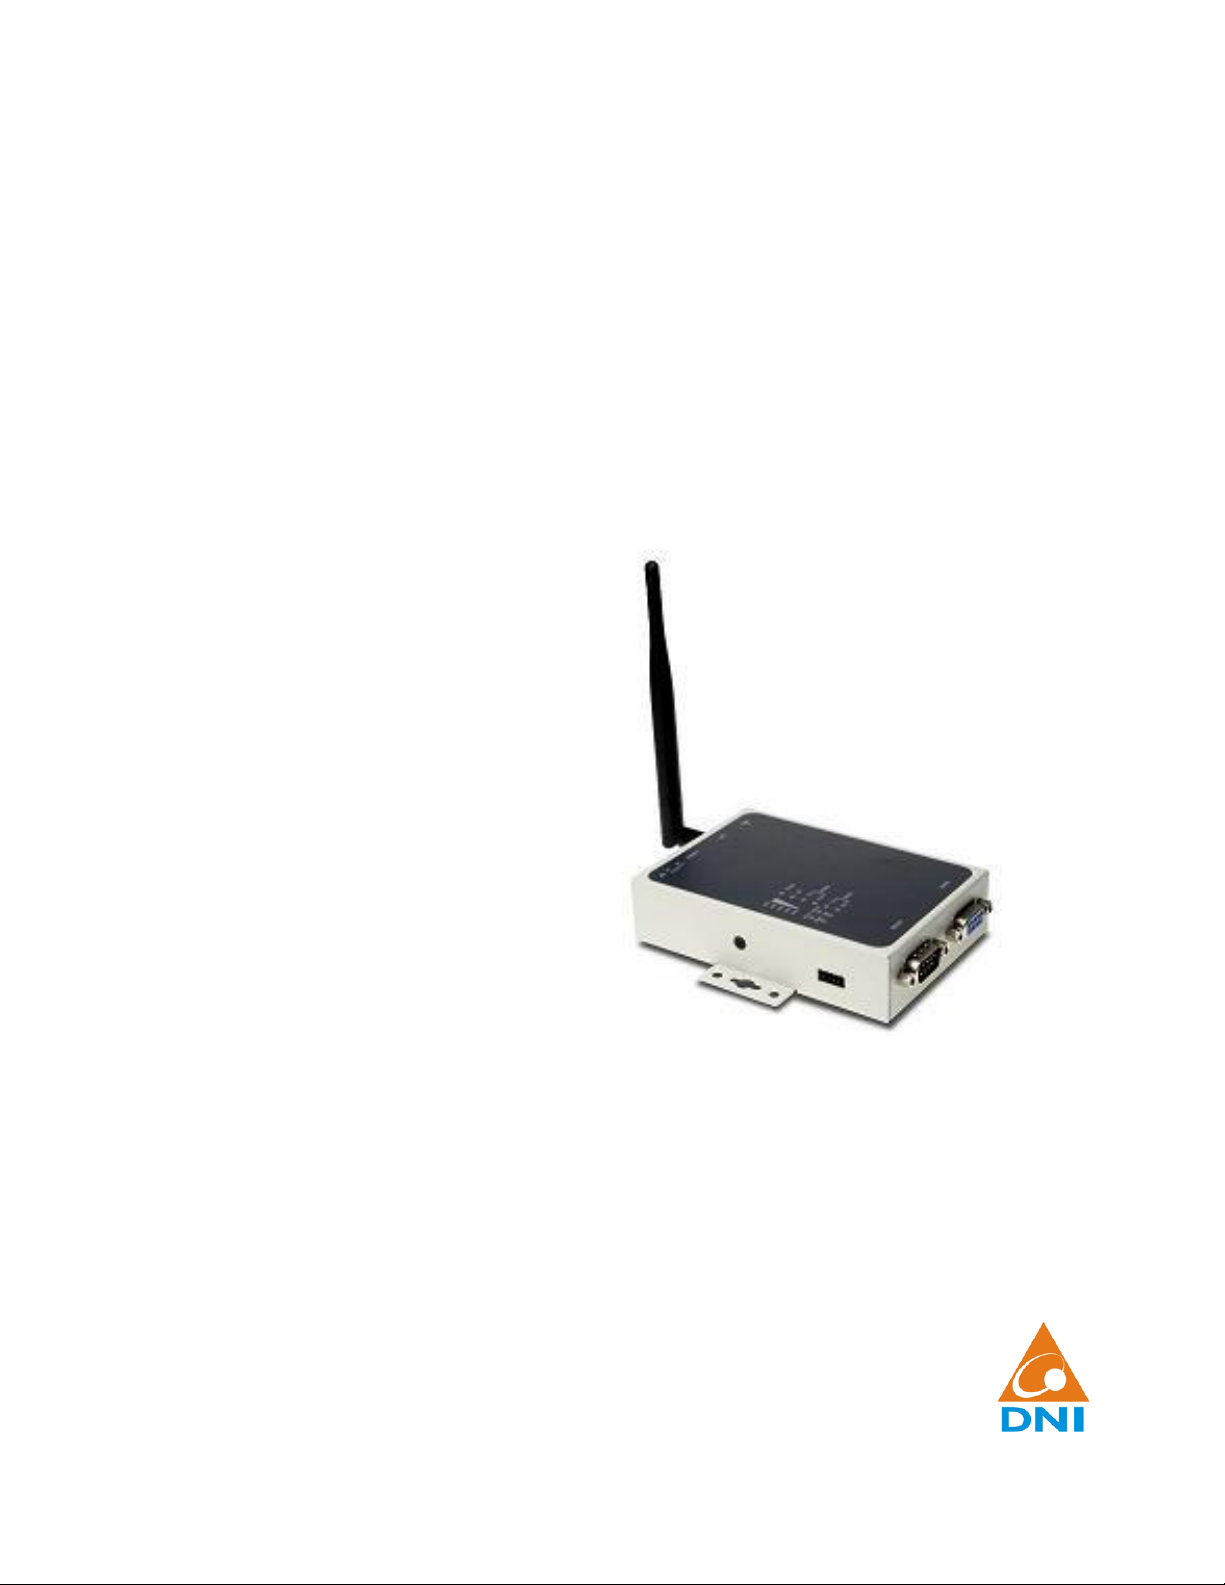
SGDC-D22
Data collector with 3G communication board.
1. Introduction
1.1. General Description
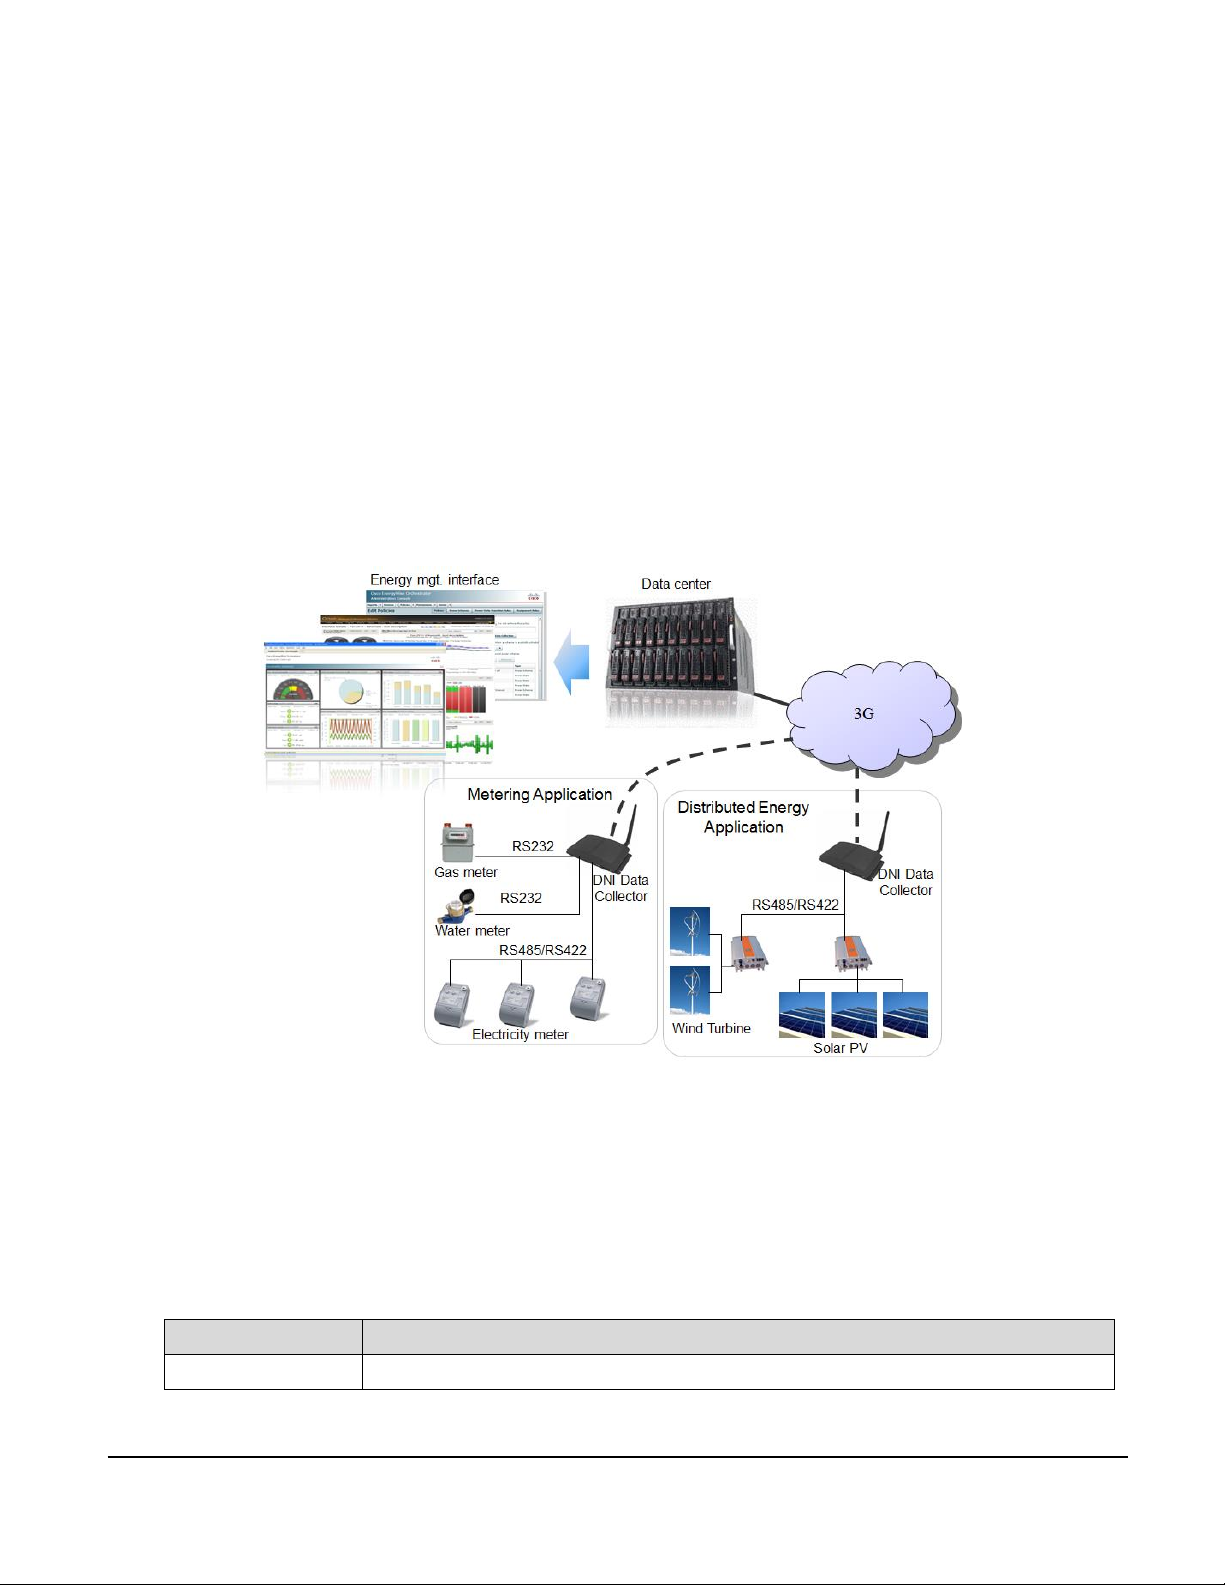
DNI data collector SGDC-D22 is a 3G version ARM9 based embedded system with 3G for WAN communication and
Ethernet port, RS-232 and RS-422/485 interfaces for LAN communication as well to collect data from devices via
LAN communication and forward to data center via WAN communication. The communication capability can fulfill
the requirements in smart metering and distributed energy monitoring applications as well as the sensor network and
internet of things applications.
1.2. Target Applications
DNI data collector is an embedded system designed for smart grid applications as well as the IoT related applications.
1.3. Product Information
Figure 1, DNI data collector applications.
DNI SGDC-D22 User Manual
Page 6

Doc #: 1ANSU-160004
1.4. Regulation declaration
The changes or modifications not expressly approved by the party responsible for compliance could void the user’s
authority to operate the equipment. To comply with the FCC RF exposure compliance requirements, this device and its
antenna must not be co-located or operating to conjunction with any other antenna or transmitter.
Note: This equipment has been tested and found to comply with the limits for a Class B Digital Device, pursuant to part
15 of the FCC Rules. These limits are designed to provide reasonable protection against harmful interference in a
residential installation. This equipment generates, uses and can radiate radio frequency energy and, if not installed and
used in accordance with the instruction, may cause harmful interference to radio communication. However, there is no
grantee that interference will not occur in a particular installation. If this equipment dose cause harmful interference to
radio or television reception, which can be determined by turning the equipment off and on, the user is encouraged to
try to correct the interference by one or more of the following measures:
--Reorient or relocate the receiving antenna.
--Increase the separation between the equipment and receiver.
--Connect the equipment into an outlet on a circuit different from that to which the receiver is connected.
--Consult the dealer or an experienced radio/TV technician for help.
This device should have at least 20 cm separation distance to persons.
DNI SGDC-D22 User Manual
Page 7
2. Platform Description
Feature
Description
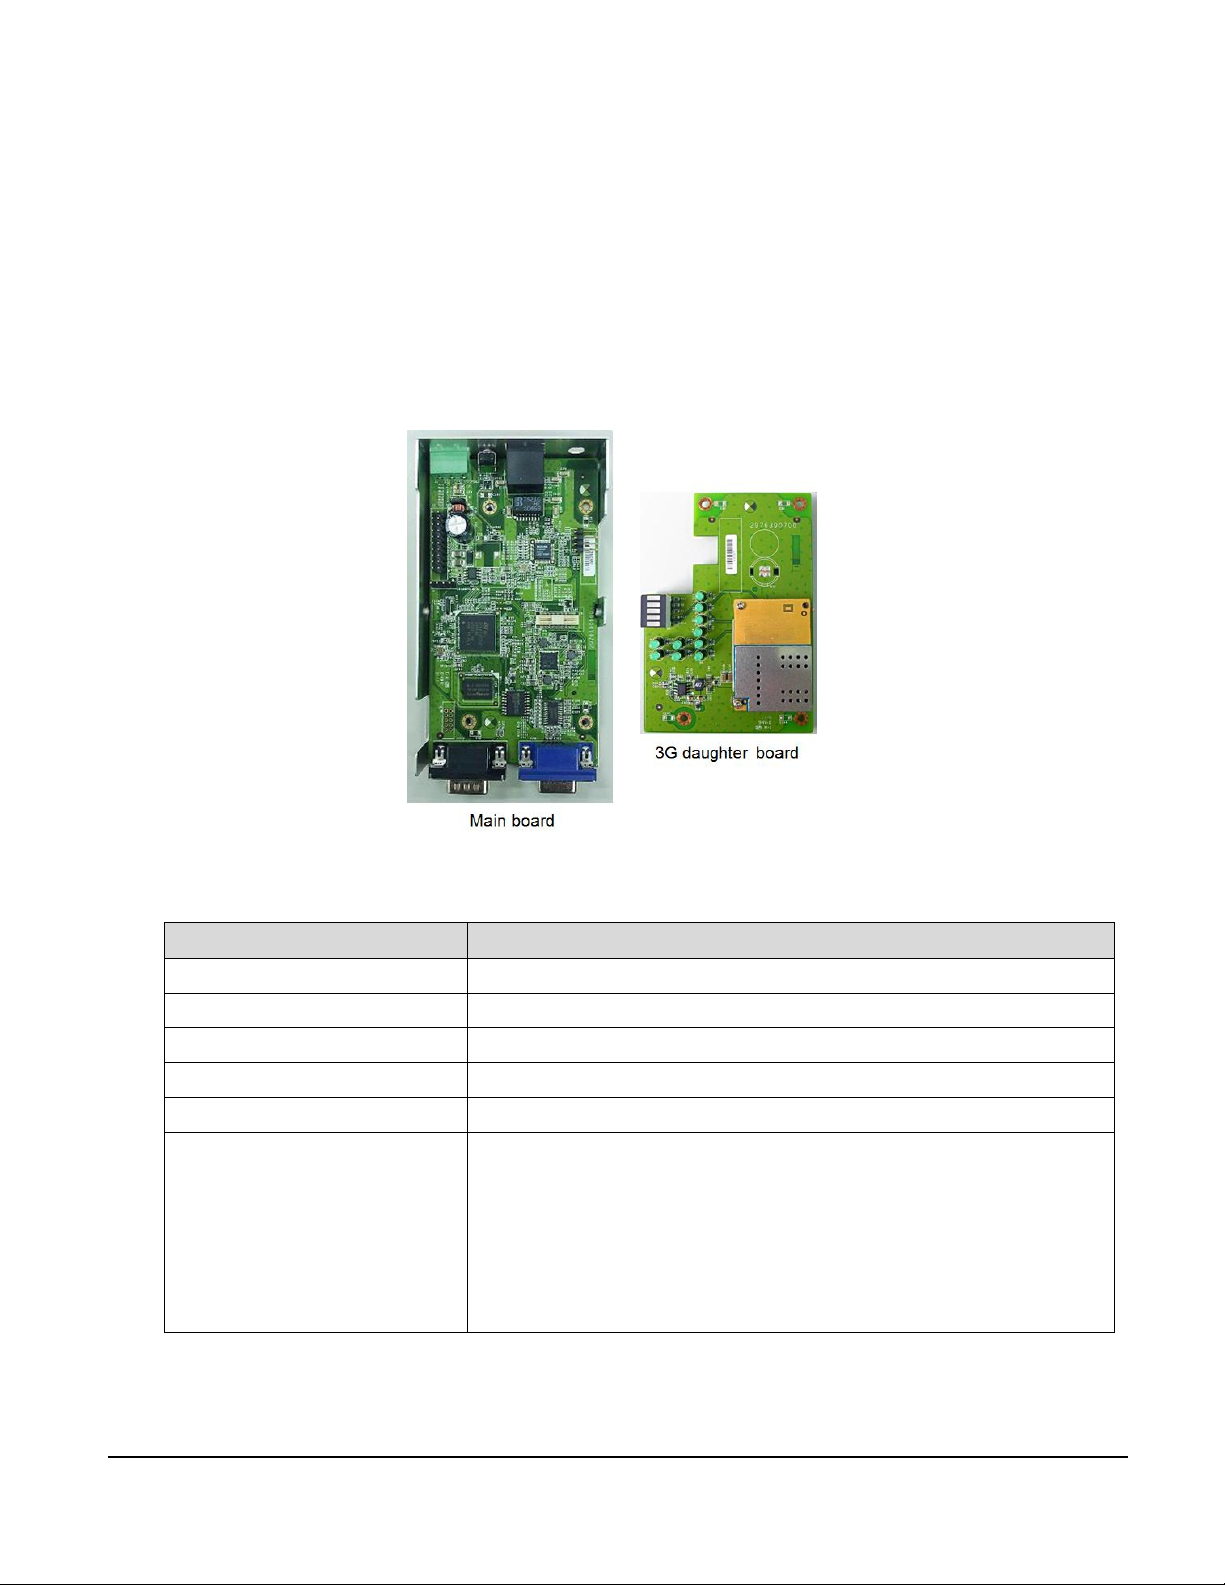
Main Board
With CPU, memory and major interfaces of data collector.
3G Daughter Board
With 3G module and LED indicators.
CPU
ST SPEAr 320S
Flash
32MB (16MB 2)
DDR-II
64MB
3G Module1
3G: (model name: SGDC-D22)
Five band: UMTS/HSPA+ 1900MHz
HSPA 3GPP Release 6, 7
UMTS 3GPP release 4
Output power:
- Class 3 (+24dBm +1/-3dB) for UMTS 1900,WCDMA FDD BdII
2.1. Hardware Information
DNI data collector incorporates the following hardware components as shown in Figure 2.
Doc #: 1ANSU-160004
Figure 2, DNI data collector hardware components.
DNI SGDC-D22 User Manual
Page 8

The interfaces of data collector are illustrated as following table.
Interface
Description
Note
Power
A 3-pin terminal block to connect 12-48VDC
V+, V and GND.
Reset Button
Hardware reset button. Support back to factory
default setting function.
Ethernet Port
RJ45 port for Ethernet connection.
Antenna
External antenna with SMA connector.
Console Port
Local port for direct connecting to concentrator
(RJ45 connector).
Wall Mount
2 L shape parts for wall mount installation.
RS-232
Male DB9 connector for RS-232 connection.
PIN 2: RXD
PIN 3: TXD
PIN 5: GND
RS-422/485
Female DB9 connector for RS-422/485
connection. Support switching RS-485 or
RS-422 modes by software.
Please find the pin define in separate
table.
GPIO
2x5-pin digital I/O for applications.
PIN 1: GND
PIN 2: GND
PIN 3: DI3
PIN 4: DO3
PIN 5: DI2
PIN 6: DO2
PIN 7: DI1
PIN 8: DO1
PIN 9: DI0
PIN 10: DO0
Doc #: 1ANSU-160004
DNI SGDC-D22 User Manual
Page 9
Interface
Description
Note
SIM Card &
SD Card Slots1
Serial Port
Device Name
Software
Switch Command
Hardware
PIN Definition
RS-485
(2-wire)
/dev/ttyM1
setport 1
PIN 1: GND
PIN 2: DATA(A)
PIN 3: DATA(B)+
RS-422
(4-wire)
/dev/ttyM1
setport 0
PIN 1: GND
PIN 2: RX
PIN 3: RX+
PIN 4: TX+
PIN 5: TX
Feature
Description
Note
Power
Power indicator
Turn on when power on.
Ready
Get the system ready information and turn on the
ready LED when data collector connect to data
center and get response from communication
server.
Turn on when connect to data
center.
RS-232
TxD × 1, RxD × 1
Blink when communication.
RS-485
TxD × 1, RxD × 1
Blink when communication.
3G
3G connection indicator.
Turn on when 3G connected.
3G
Signal Strength1
5 levels for ZigBee signal strength indicators.
LAN10 / LAN100
2 for 10/100Mbps speed indicators
Blink when communication.
Software Package
STLinux 2.3 or above
Operation System
Linux kernel 2.6.37 or above
RS-485 pin define:
Doc #: 1ANSU-160004
LED display:
2.2. Software Information
DNI SGDC-D22 User Manual
Page 10

Doc #: 1ANSU-160004
Utilities
Busybox 1.19.3
File System type
Jffs2
Toolchain
Gcc v4.2.4, Glibc v2.6.1, GDB v6.3
DNI SGDC-D22 User Manual
Page 11
3. Tool Chain Installation
3.1. Environment
Host OS: Ubuntu 10.04
STLinux image file: STLinux-2.3-spear-20091209.iso
http://ftp.stlinux.com/pub/stlinux/2.3/iso/
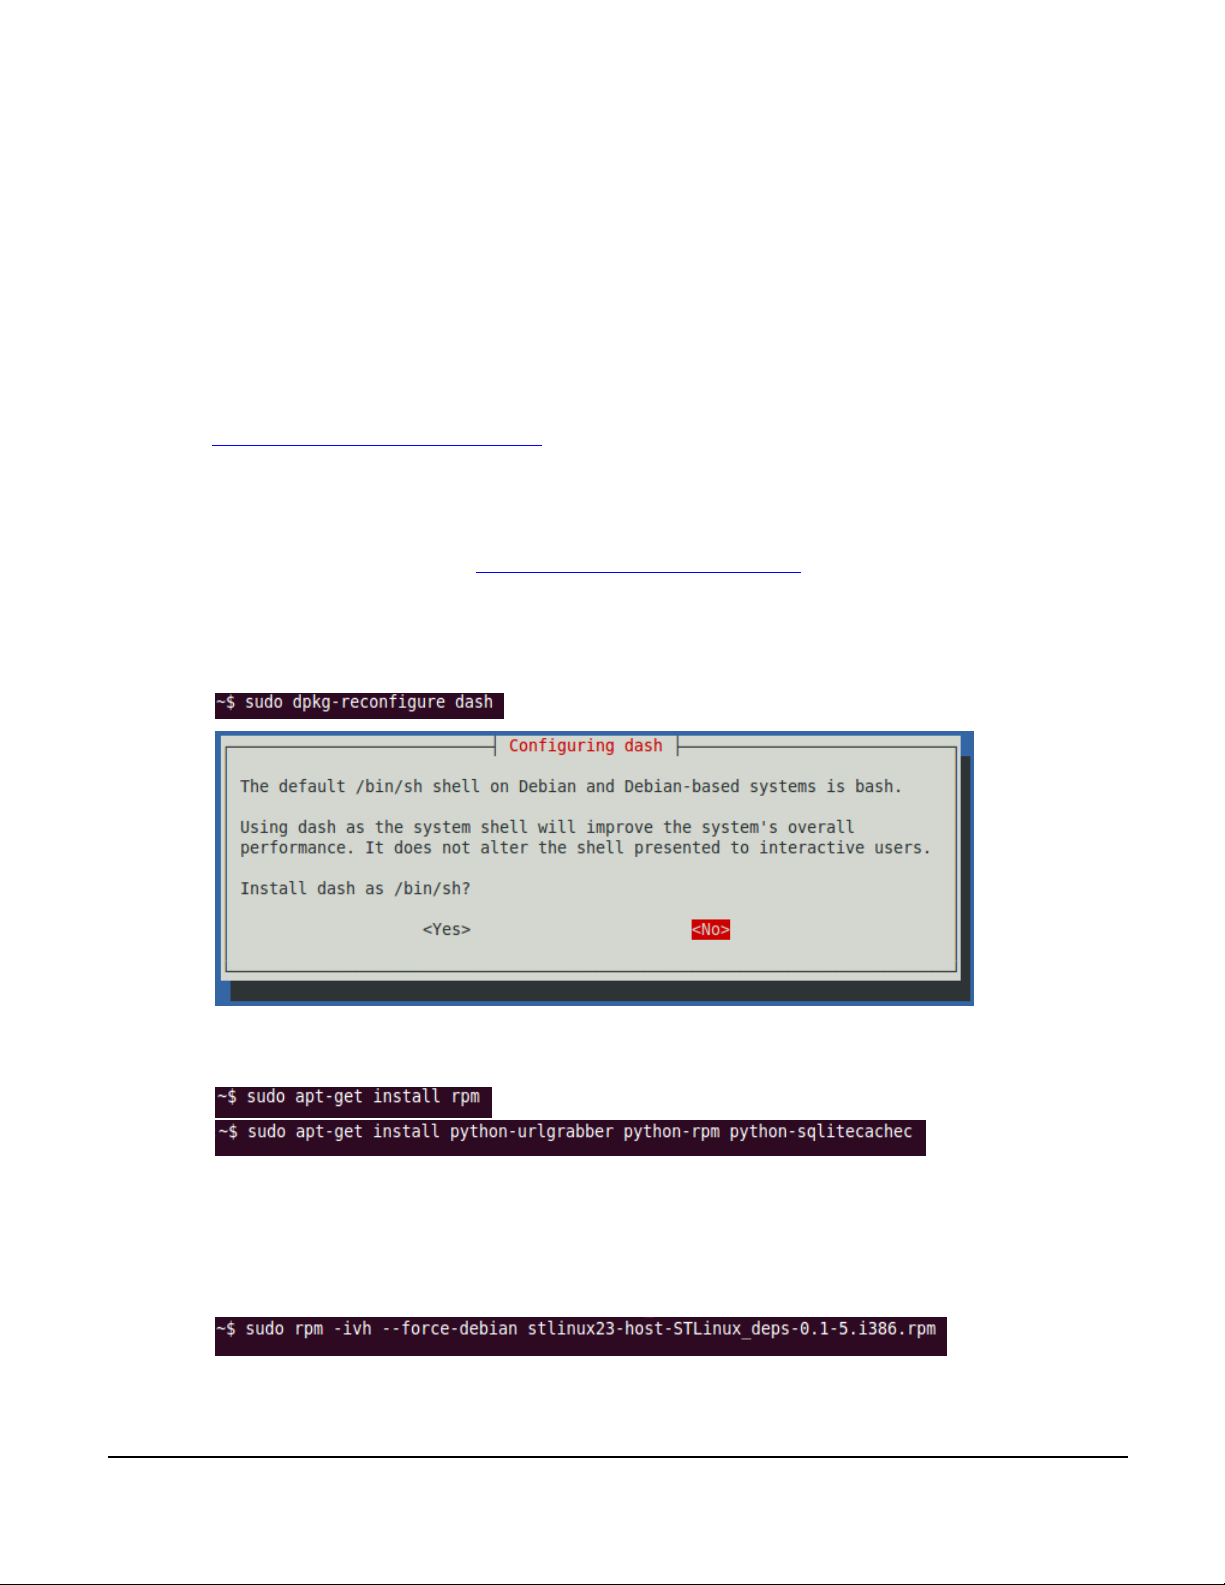
3.2. Installing STLinux on Ubuntu
Please refer to the installation guide at http://www.stlinux.com/faq?q=node/361.
Installation steps:
Make /bin/sh bash
Doc #: 1ANSU-160004
Installing RPM on Ubuntu
Populating the RPM databases with "Provides"
Download “STLinux_deps” rpm file at
http://www.stlinux.com/sites/default/files/stlinux23-host-STLinux_deps-0.1-5.i386.rpm then install it.
DNI SGDC-D22 User Manual
Page 12
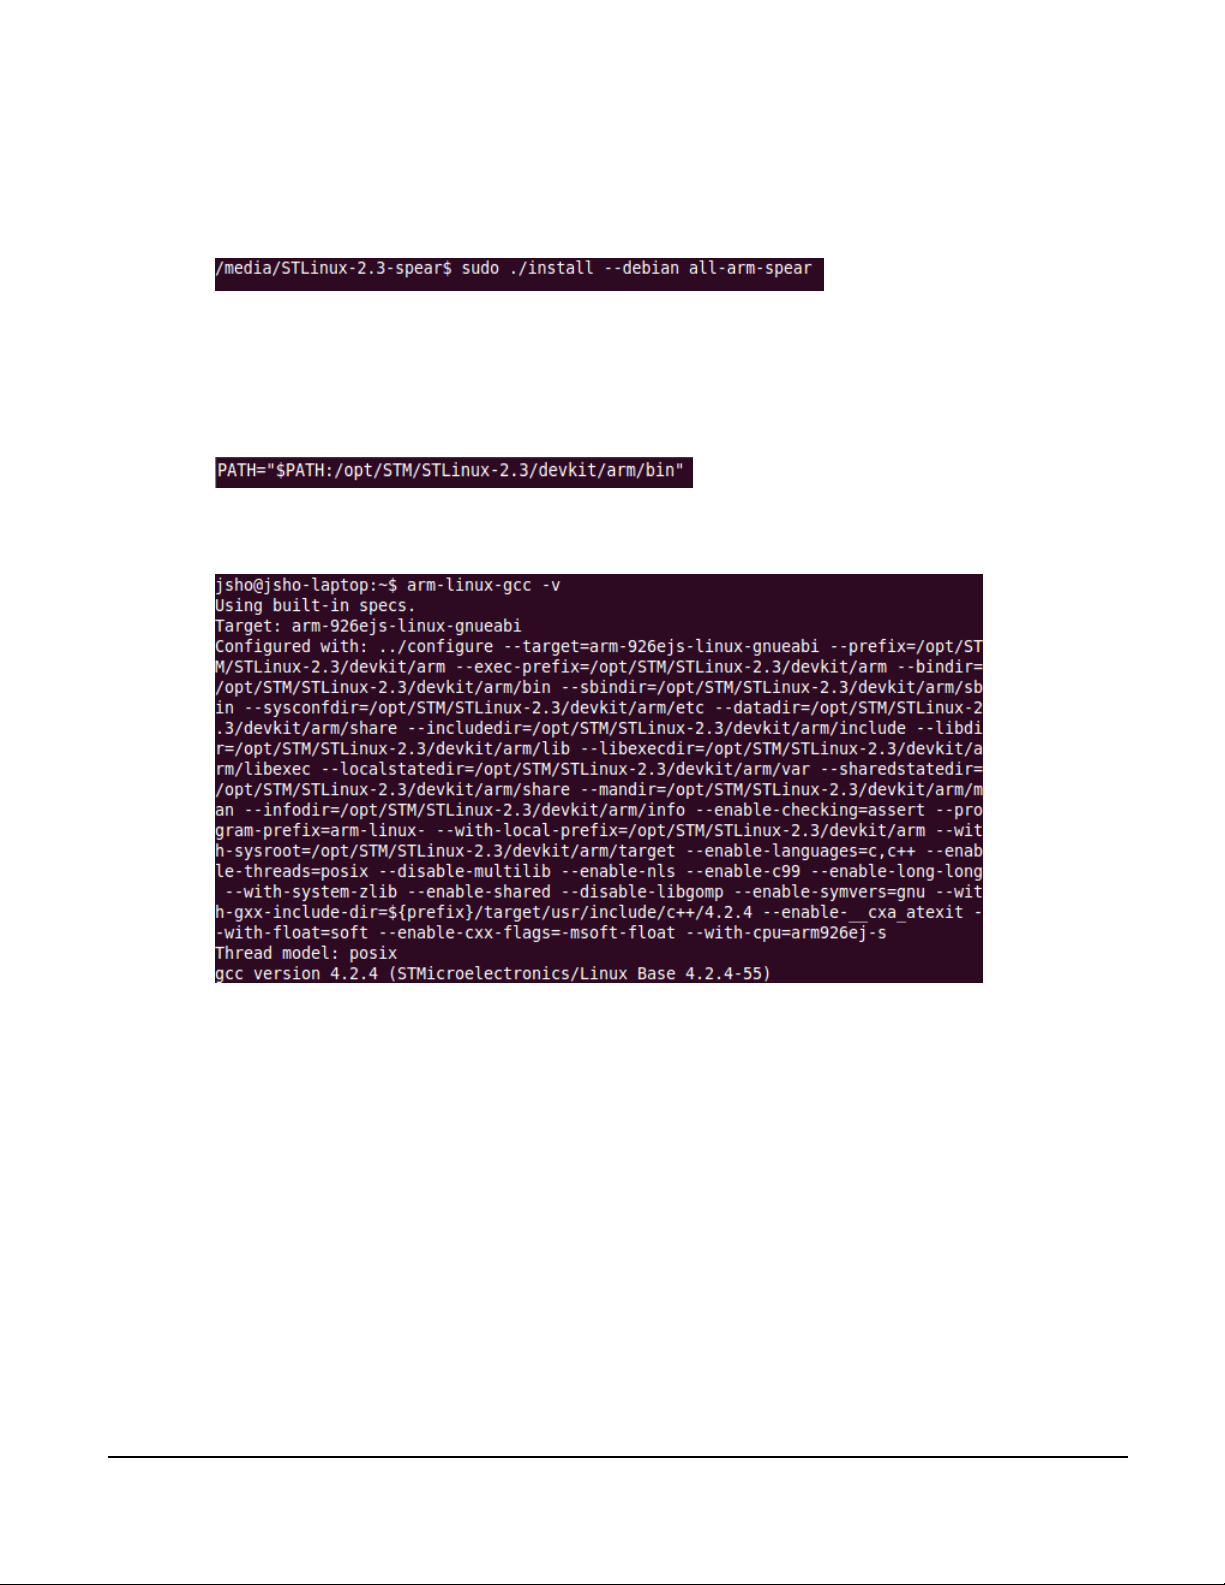
Install STLinux
Mount image file “STLinux-2.3-spear-20091209.iso” then install it.
After installation completed, STLinux package would be place at /opt/STM/STLinux-2.3/.
3.3. Add Tool Chain Path
Add tool chain path at ~/.bashrc then re-login.
Test tool chain
Doc #: 1ANSU-160004
DNI SGDC-D22 User Manual
Page 13

Doc #: 1ANSU-160004
Baud Rate
115200 bps
Parity
None
Data Bits
8
Stop Bit
1
Flow Control
None
4. Getting Started
4.1. Connect to PC
DNI data collector provides two interfaces for PC to login, configure and maintenance. Users can connect to a PC
through a serial console port (RS-232) or by using SSH utility over the network connection. This section will describe
how to connect DNI data collector to PC through these two interfaces.
4.1.1. Serial Console Port (RS-232)
When using the serial console port to connect, first, make sure the console cable is correctly connected between DNI
data collector and a host PC.
Then open a serial port terminal emulator (e.g. Hyper Terminal or PuTTY) and fill the port settings as shown in the
following table.
Figure 3, Hyper Terminal Com Port Properties.
DNI SGDC-D22 User Manual
Page 14

Figure 4, PuTTY Configuration for Serial Connection.
Doc #: 1ANSU-160004
4.1.2. SSH Utility (Network)
By default, DNI data collector enables the SSH service to support remote log in. The default network IP of DNI data
collector is 192.168.1.100. Please also make sure that the IP used by PC is also in the 192.168.1.x subnet. The network
cable can be connected directly between a PC and a DNI data collector.
Figure 5, PuTTY Configuration for SSH Connection.
DNI SGDC-D22 User Manual
Page 15

Doc #: 1ANSU-160004
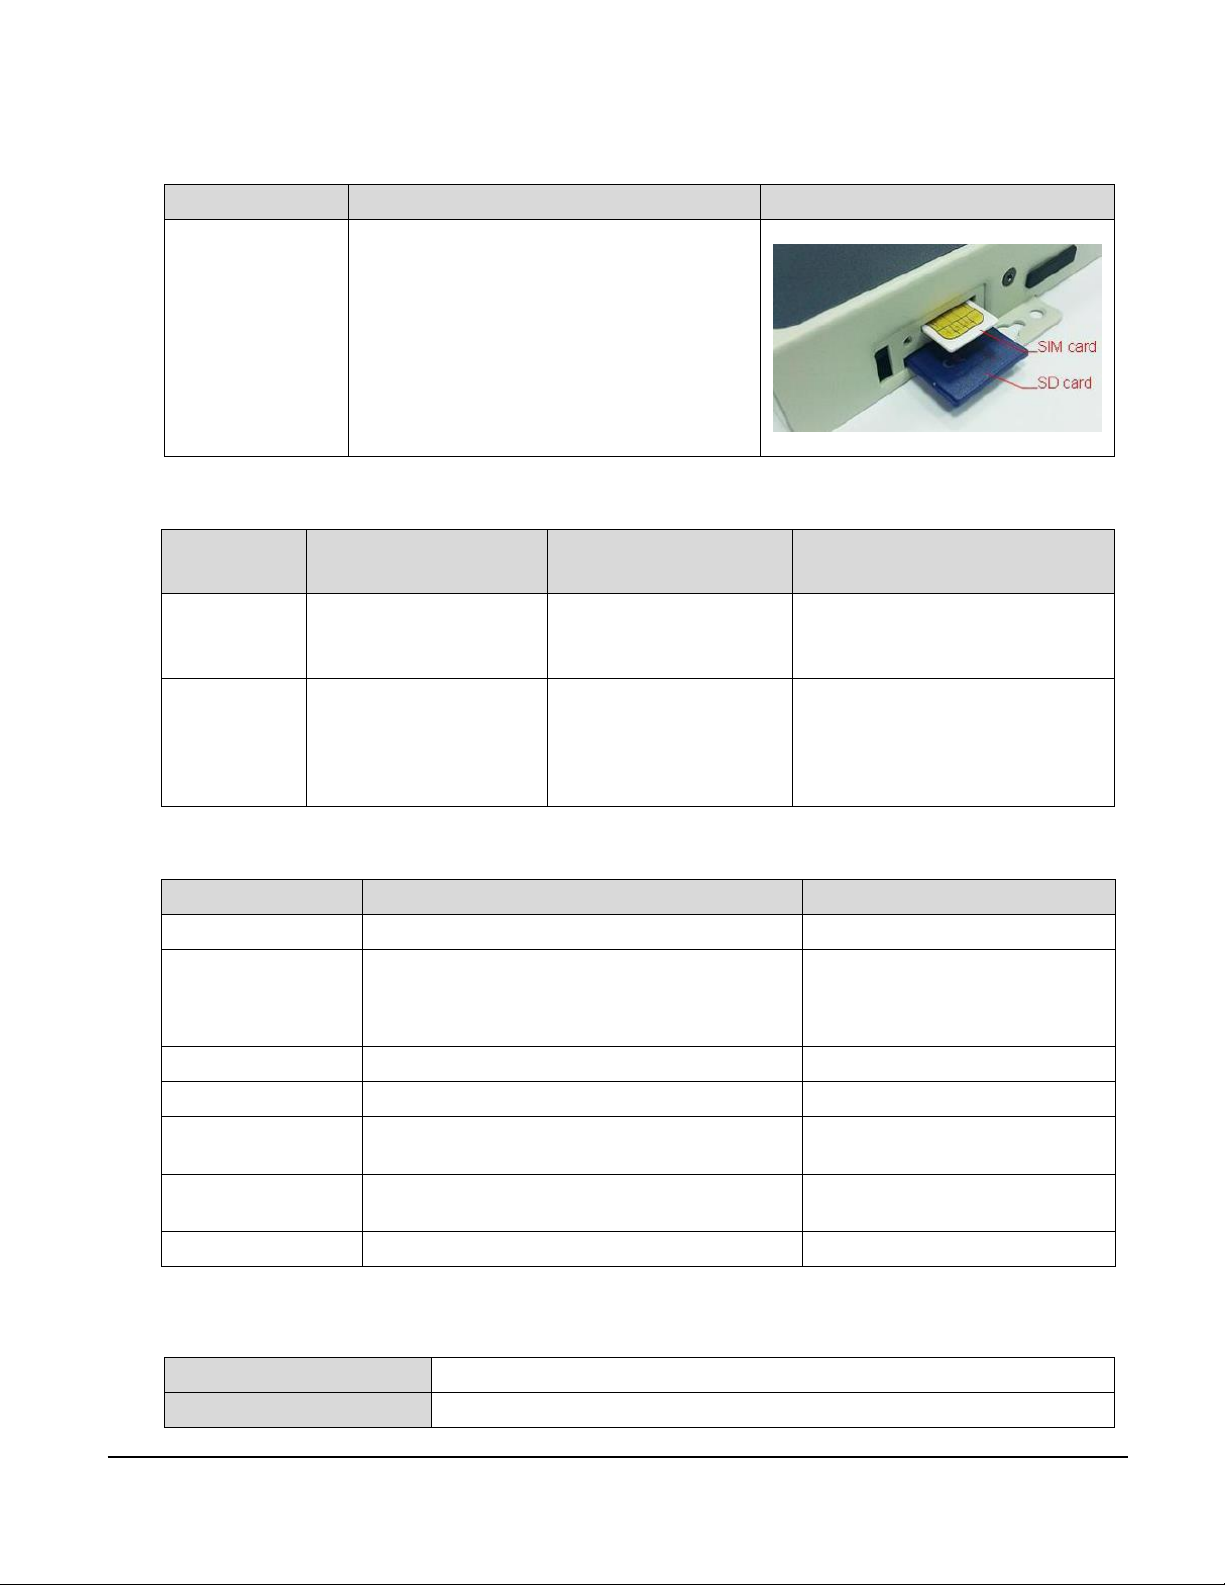
4.2. SIM Card and SD Card Installation
The SIM card and SD card slots are behind the left side cover gate of the SGDC-D22. Please refer to the following
picture and instructions to install SIM card and SD card.
1. Open the cover gate by rotating the screw in anti-clockwise way.
2. Insert the SIM card and SD card into the slot in correct direction. (The unfilled corner is on the right side.)
3. Close the cover gate by rotating the screw in clockwise direction, and be sure the gate is closed when the device is
power-on.
Figure 6, SIM card and SD card installation
DNI SGDC-D22 User Manual
Page 16

Doc #: 1ANSU-160004
4.3. Login Data Collector
Once the connection (either serial or SSH) is established, a prompt for login will be shown in the window. The default
account for log in is root. The default password for root is ‘dnidni’. First time to log in through SSH, some terminal
emulator may show alerts that the host key is unknown, please accept it and continue the log in procedure.
Figure 7, Data collector Log In Example Output (Serial).
Figure 8, Putty Security Alert.
DNI SGDC-D22 User Manual
Page 17

Figure 9, Data collector Log In Example Output (SSH).
Doc #: 1ANSU-160004
DNI SGDC-D22 User Manual
Page 18

5. The First Program
5.1. Compile helloworld.c
Use cross compiler at host to compile the program for data collector.
Use “file” command to check the program after compiling.
# arm-linux-gcc helloworld.c -o helloworld
# file helloworld
Result:
Doc #: 1ANSU-160004
5.2. Send Files to Data Collector
Use “scp” command at host to send the file to data collector.
# scp helloworld root@192.168.1.10:/var
Result:
5.3. Execute Program at Data Collector
Execute the program at the data collector.
Result:
DNI SGDC-D22 User Manual
Page 19

6. Communication Settings
auto eth0
iface eth0 inet static
address 192.168.1.100
network 192.168.1.0
netmask 255.255.255.0
broadcast 192.168.1.255
gateway 192.168.1.254
start 192.168.1.20
end 192.168.1.99
interface eth0
opt router 192.168.1.254
option subnet 255.255.255.0
option lease 600 # 10min
opt dns 168.95.1.1 168.95.192.1
#static_lease 00:13:96:03:a7:ed 192.168.1.30
#static_lease 00:13:96:03:a5:f0 192.168.1.31
6.1. Static IP on eth0
To set the static IP for DCU in eth0, please edit /etc/network/interfaces
# vi /etc/network/interfaces
And you can apply this configuration by executing the following command:
# set-static-ip
Doc #: 1ANSU-160004
6.2. DHCPD and DHCP Client
DCU can act as a DHCP server to assign IP to the client in the same network.
Enable DHCPD:
# udhcpd
Edit the /etc/udhcpd.conf if needed.
# vi /etc/udhcpd.conf
DCU also can act as a DHCP client to get IP configuration from DHCP server.
# dhcpip
DNI SGDC-D22 User Manual
Page 20

Doc #: 1ANSU-160004
To act as dhcp server or client on booting, it can be configured in /etc/rc.d/rc.local.
6.3. 3G
Before using 3G communication, please insert a SIM card into the slot on the 3G module. The position of the SIM slot
and the direction of SIM card please refer to the section 4.2.
DNI data collector uses pppd to handle the 3G connection. 3G service providers have their own setting such as APN
and dial number. Please contact the provider to get the correct values. The APN value is defined in
/etc/ppp/ppp-on-dialer. And the dial number is in /usr/sbin/3g-connect.
Figure 10, Change APN.
DNI SGDC-D22 User Manual
Page 21

Doc #: 1ANSU-160004
Figure 11, Change Dial Number.
After confirm the APN and the dial number, use the following command to connect a 3G service.
# 3g-connect
You also can get RSSI value and reflash the signal strength led status by using the following command.
# get-rssi-ber
To get imsi code, use the command below.
# getimsi
Use the command below to disconnect the 3G service.
# 3g-disconnect
6.4. PPPoE over eth0
To access Internet via the service form your ISP, e.g. ADSL, you can use PPPoE to connect to your ISP. Before using
PPPoE, you need to request your ISP to setup an ADSL modem in your house and get some information, e.g.
username and password, which is needed on setting your connection.
DNI SGDC-D22 User Manual
Page 22

Doc #: 1ANSU-160004
>>> Enter your PPPoE user name: your_username
>>> Enter the Ethernet interface connected to the DSL modem: (default eth0): eth0
>>> Enter the demand value (default no): no
>>> Enter the DNS information here: server (Please enter a specific DNS server IP when ISP has provided it to you.)
>>> Please enter your PPPoE password: your_password
>>> Choose a type of firewall (0-2): 0
>>> Accept these settings and adjust configuration files (y/n)? y
When ADSL modem is ready to use, please use Ethernet cable to connect DCU and ADSL modem and execute the
following command to connect to your ISP.
First, you need to setup the parameters for the PPPoE connection.
# pppoe-setup
Please answer the following questions:
After setting up parameters, use the following command to conect to the remote server:
# pppoe-start
When the connection is built up, there will be a message “… Connected! ” on the console.
Figure 12, Connect and disconnect with PPPoE.
DNI SGDC-D22 User Manual
Page 23

When you want to disconnect, use the following command to disconnect the PPPoE connection.
# pppoe-stop
Doc #: 1ANSU-160004
DNI SGDC-D22 User Manual
Page 24

7. Daemons & Utilities
7.1. Ramdisk
To mount a virtual disk on the memory, you can execute the following command to create a ramdisk.
Create a directory for ramdisk:
# mkdir –p /var/ramdisk
Allocate a specific memory size and mount it to the ramdisk:
# mount –t tmpfs none /var/ramdisk –o size=16M
Finally, you can use df command to check the information of the ramdisk you created.
# df
Doc #: 1ANSU-160004
Figure 13, Mount a ramdisk with 16MB size.
If you want to umount the ramdisk, use the command below:
# umount /var/ramdisk
DNI SGDC-D22 User Manual
Page 25

7.2. NFS (Network File System)
Before using NFS, a NFS server is needed. To create a NFS server on your PC, please refer to:
Linux: http://tldp.org/HOWTO/NFS-HOWTO/server.html
Windows: http://sourceforge.net/projects/freenfs/
When your NFS server is ready, please execute the following commands to connect to your NFS server.
Create a directory for NFS:
# mkdir -p /mnt/nfs
Mount NFS server directory to your local directory:
# mount -t nfs -o nolock server_IP:/directory /mnt/nfs
Finally, you can use df command to check the information of NFS directory you mounted.
Doc #: 1ANSU-160004
# df
Figure 14, Mount a remote directory to the local one via NFS.
If you want to disconnect and umount from the NFS server, use the command below:
# umount /mnt/nfs
DNI SGDC-D22 User Manual
Page 26

Doc #: 1ANSU-160004
ftp stream tcp nowait root /usr/local/sbin/pure-ftpd pure-ftpd -H &
telnet stream tcp nowait root /usr/sbin/telnetd telnetd -i
ssh stream tcp nowait root /usr/bin/dropbear dropbear -i
#www stream tcp nowait root /usr/sbin/httpd httpd -i -h /home/htdocs
7.3. Telnet & SSH Service
Telnet and SSH can be used to remote login to the DCU. SSH uses encryption transportation, and the transportation on
Telnet is only by ACSII code.
You can turn on those services on the /etc/inetd.conf to make them as auto-run daemon after booting.
# vi /etc/inetd.conf
The default port of telnet service will be port 23.
The default port of SSH service will be port 22.
You can use PuTTY or other terminal programs to login DCU via those protocols.
Figure 15, Use Putty to create a telnet or SSH connection.
DNI SGDC-D22 User Manual
Page 27

Doc #: 1ANSU-160004
There will be a notification to user to update the key on your PC, when SSH protocol is used. Press “Yes” to allow this
operation.
Figure 16, Notification for key updating.
Figure 17, Login to the DCU via telnet or SSH.
Default username/password: root/dnidni
After login, you can operate the DCU remotely.
DNI SGDC-D22 User Manual
Page 28

Doc #: 1ANSU-160004
ftp stream tcp nowait root /usr/local/sbin/pure-ftpd pure-ftpd -H &
telnet stream tcp nowait root /usr/sbin/telnetd telnetd -i
ssh stream tcp nowait root /usr/bin/dropbear dropbear -i
#www stream tcp nowait root /usr/sbin/httpd httpd -i -h /home/htdocs
7.4. FTP & SCP
FTP and SCP can be used for file transmission to the DCU. Ftp is the normal way to transmit file on the internet, and
SCP is a file transmission way on the SSH protocol.
You can turn on those services on the /etc/inetd.conf to make them as auto-run daemon after booting.
# vi /etc/inetd.conf
The default port of ftp service will be port 21.
SCP:
SCP can be used correctly when SSHd is turned on.
FTP/SCP client on PC:
FTP: http://filezilla-project.org/download.php
SCP: http://winscp.net/
FTP/SCP client on DCU
FTP:
# ftpget –u username –p password HOST_IP [LOCAL_FILE] REMOTE_FILE
# ftpput –u username –p password HOST_IP REMOTE_FILE [LOCAL_FILE]
SCP:
# scp root@HOST_IP:/REMOTE_FILE LOCAL_FILE
# scp LOCAL_FILE root@HOST_IP:/REMOTE_FILE
DNI SGDC-D22 User Manual
Page 29

Doc #: 1ANSU-160004
ftp stream tcp nowait root /usr/local/sbin/pure-ftpd pure-ftpd -H &
telnet stream tcp nowait root /usr/sbin/telnetd telnetd -i
ssh stream tcp nowait root /usr/bin/dropbear dropbear -i
www stream tcp nowait root /usr/sbin/httpd httpd -i -h /home/htdocs
7.5. HTTP
DCU can act as a simple HTTP WEB server, and you can follow the command below to build up your own web server.
Create a folder for WEB server and create a homepage.
# mkdir –p /home/htdocs
# echo "<html><body><h1>It works!</h1></body></html>" >> /home/htdocs/index.html
You can turn on those services on the /etc/inetd.conf to make them as auto-run daemon after booting.
# vi /etc/inetd.conf
Figure 18, Create a simple web server.
DNI SGDC-D22 User Manual
Page 30

You can use browser to show the page you created if the httpd is running well.
Doc #: 1ANSU-160004
Figure 19, Web page from Http server.
DNI SGDC-D22 User Manual
Page 31

Doc #: 1ANSU-160004
7.6. NTP & RTC
NTP protocol is used to synchronize the time between DCU and the time server. You need to find a NTP server and
use the following command to adjust the time on DCU.
# ntpdate <ntpserver_ip>
If there is no NTP server that DCU can reach, you can also adjust Linux system time manually.
# date MMDDhhmmYYYY
After adjusting Linux system time, you need to save the correct time to the HW RTC. Please execute the following
command to save time to RTC.
# hwclock -w –u
Figure 20, Time synchronization with ntp server and write back to the RTC.
DNI SGDC-D22 User Manual
Page 32

7.7. SSL
OpenSSL is used to encrypt and decrypt on different algorithm for different purpose.
You can use the command to check what kind of command and algorithm are supported.
# openssl –h
Doc #: 1ANSU-160004
Figure 21, OpenSSL commands and algorithms supported.
DNI SGDC-D22 User Manual
Page 33

Doc #: 1ANSU-160004
Subject: This is a mail test
CC: xxxx@gmail.com
To: yyyy@gmail.com
From: zzzz@gmail.com
This is a test
7.8. Sendmail via SMTP
Sendmail is used to send a mail via SMTP protocol, the following command is an example to send a mail from DCU
to Gmail SMTP server, and Gmail SMTP server will help you to send the mail to the receiver’s mail server.
Use vi to create an example mail:
# vi /var/mailtest
After editing the test mail content, please use the following command to send it out. (Noted: make sure that the DCU
can access Internet.)
# sendmail -f zzzz@gmail.com -v -H 'openssl s_client -connect smtp.gmail.com:465 -quiet' -auUSERNANE
-apPASSWORD < /var/mailtest
DNI SGDC-D22 User Manual
Page 34

8. I/O Control
8.1. Data Collector ID
To get DCU id, execute the following command.
# getuid
8.2. System Ready LED
To get turn on or turn off the ready led, execute the following command.
# sysrd-led-on
# sysrd-led-off
8.3. Buzzer
Doc #: 1ANSU-160004
To control the buzzer, execute the following command with the unit in millisecond.
# buzzer <msec>
8.4. Reset Button
The action of the reset button is programmable. The default action is:
< 5 seconds: Reset the device.
> 5 seconds: Recovery to the default settings.
8.5. RS-232 & RS-485
RS-232 port is mapped to the Linux device /dev/ttyM0, and RS485 is /dev/ttyM1. RS-485 can support 2-wire and
4-wire mode, you need to select the correct mode before you use it. To select the RS-485 mode, execute the following
command.
2-wire mode:
# setport 1
4-wire mode:
# setport 0
DNI SGDC-D22 User Manual
Page 35

Doc #: 1ANSU-160004
char wdt_dev[] = "/dev/watchdog"
int fd;
fd = open(wdt_dev, O_RDWR);
if (fd < 0) {
printf("Error in opening device\n");
}
int ret = 0;
int timeleft=0;
struct watchdog_info ident;
int timeout = 45; /* in seconds */
/* to find out supported options in watchdog */
ret = ioctl(fd, WDIOC_GETSUPPORT, &ident);
/* to set time out */
ioctl(fd, WDIOC_SETTIMEOUT, &timeout);
/* to find out how much time is left before reset */
ret = ioctl(fd, WDIOC_GETTIMEOUT, &timeleft);
/* Refresh watchdog timer at every 10 secs to prevent reset */
while (1) {
ioctl(fd, WDIOC,KEEPALIVE, 0);
sleep(10);
}
8.6. SD Card
SD card is designed to be mounted automatically. When a SD card is inserted into the SD card slot, there will be
directory on /var/sd. The mount point will be removed when the SD card is removed.
8.7. Combine WDT Into Your Program
DNI data collector provides a watchdog timer which has a 32- bit down counter with a programmable timeout value.
On timeout it generates an interrupt and reset signal. The WDT is intended to be used to generate a system reset if a
software failure (or a system hang) occurs. The WDT driver provides a set of ioctls to the user. Through this interface
user can configure, program and refresh the WDT. The device node of WDT is /dev/watchdog. The following code
snippets demonstrate how to use the WDT.
To open the WDT interface:
To control the WDT and set the timeout as 45 seconds:
DNI SGDC-D22 User Manual
Page 36

The WDT interface IOCTL options:
IOCTL Code
Usages
WDIOC_GETSUPPORT
The fields returned in the ident structure are:
identity: A string identifying the watchdog driver firmware_version: the firmware
version of the card if available.
options: A flags describing what the device supports.
WDIOC_KEEPALIVE
This ioctl does exactly the same thing as a write to the watchdog device and hence
refreshes the timer
WDIOC_SETTIMEOUT
Set time out in seconds, after which reset would be generated (if WDT is not
refreshed)
WDIOC_GETTIMEOUT
Query the current timeout
Doc #: 1ANSU-160004
DNI SGDC-D22 User Manual
Page 37

Doc #: 1ANSU-160004
9. Linux Kernel Upgrade & Backup
Upgrade:
Use FTP or SCP to put your kernel image into the device directory /var and execute the following command on the
device to upgrade the kernel image.
# flashcp –v /var/<imagename> /dev/mtd3
Figure 22, Upgrade Linux kernel image.
When it is done, please reboot your device to apply the kernel image you upgraded.
Backup:
Execute the following command to backup the current kernel image on the device to the /var directory.
# dd if=/dev/mtd3 of=/var/kernel.img
DNI SGDC-D22 User Manual
Page 38

Doc #: 1ANSU-160004
Figure 23, Backup Linux kernel image from DCU.
When it is done, you can restore the kernel.img via FTP or SCP to your remote computer.
DNI SGDC-D22 User Manual
Page 39

10. Reference
ST Microelectronics: http://www.st.com/internet/com/home/home.jsp
NXP: http://www.nxp.com/#/homepage
Doc #: 1ANSU-160004
DNI SGDC-D22 User Manual
 Loading...