

User Manual

LauncherPlus User Manual
Copyright © 2017 Vivitek. Vivitek is a trademark of Delta Electronics, Inc. Page 2
Table of Contents
The Device ........................................................................ 3
Button Behavior ........................................................................ 3
When the LauncherPlus is connected but not projecting (Main button LED is solid red) .................. 3
When the LauncherPlus is projecting (Main button LED is solid blue) .............................................. 3
When the LauncherPlus is projecting to a quadrant (Corner button LED is solid blue) ..................... 3
When the LauncherPlus is paused (Main button LED is solid red) .................................................... 4
LED Behavior ............................................................................ 4
During the pairing process: ................................................................................................................... 4
After Pairing: ......................................................................................................................................... 4
Installation (Pairing) ........................................................ 5
NovoConnect Device in Hotspot mode .................................. 5
Via the NovoConnect Device’s USB Port ............................................................................................. 5
Via your PC’s USB Port ........................................................................................................................ 7
NovoConnect Device in Wi-Fi mode ....................................... 8
Via the NovoConnect Device’s USB Port ............................................................................................. 8
Via your PC’s USB port ........................................................................................................................ 9
NovoConnect Device with a Wired Connection ................... 11
Via the NovoConnect Device’s USB Port ........................................................................................... 11
Via your PC’s USB Port ...................................................................................................................... 13
Usage .............................................................................. 14
Additional Settings ........................................................ 16
Connection Settings ............................................................... 16
Password Lock ....................................................................... 17
LauncherPlus User Manual
Copyright © 2017 Vivitek. Vivitek is a trademark of Delta Electronics, Inc. Page 3
The Device
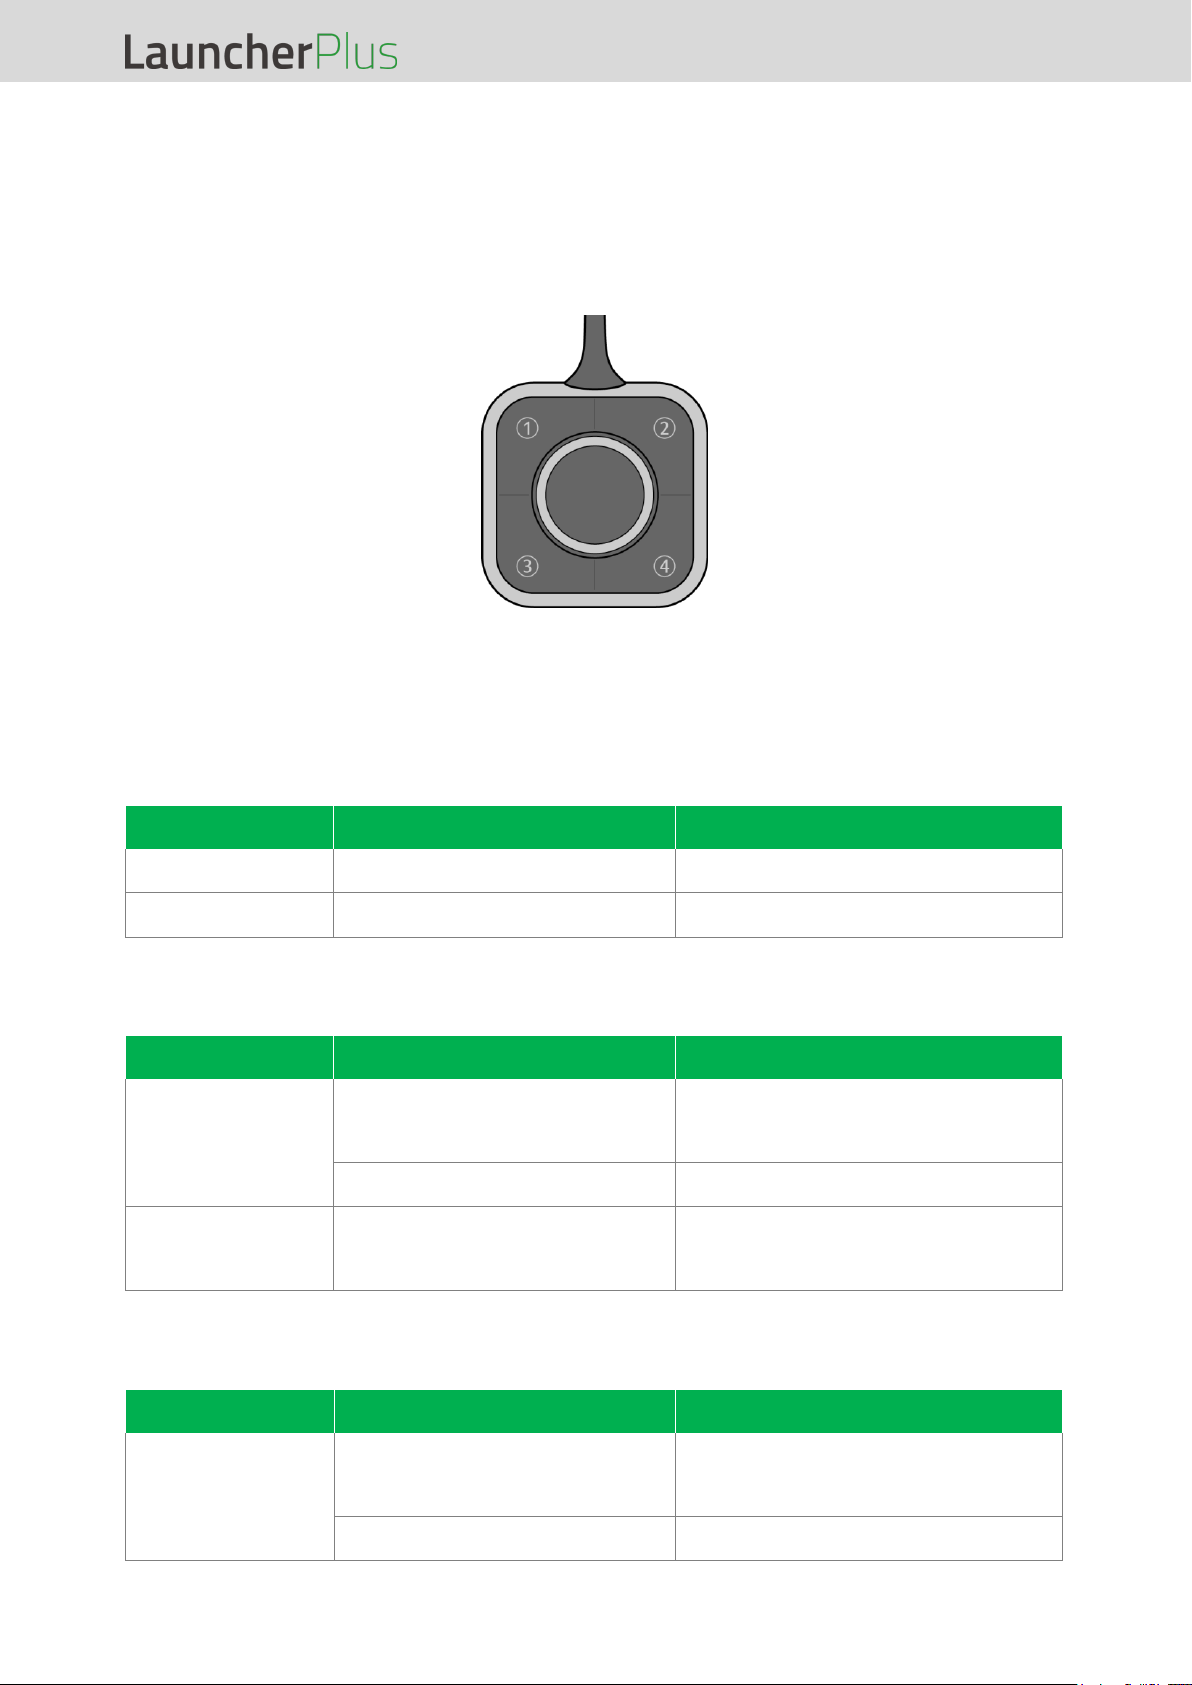
The LauncherPlus features a main button in the center of the device along with four
corner buttons, all with corresponding LED indicators, whose behavior is described
below.
Button Behavior
When the LauncherPlus is connected but not projecting
(Main button LED is solid red)
Button
Action
Behavior
Main Button
Press
Starts projecting
Corner Buttons
N/A
N/A
When the LauncherPlus is projecting
(Main button LED is solid blue)
Button
Action
Behavior
Main Button
Press
Pauses projection
(the NovoConnect device returns
to the main screen)
Press and hold for 3 seconds
Disconnects the LauncherPlus
Corner Buttons
Press
Projects the computer’s screen
onto the corresponding quadrant
of the display
When the LauncherPlus is projecting to a quadrant
(Corner button LED is solid blue)
Button
Action
Behavior
Main Button
Press
Projects the computer’s screen
onto the display in full screen
mode
Press and hold for 3 seconds
Disconnects the LauncherPlus
LauncherPlus User Manual
Copyright © 2017 Vivitek. Vivitek is a trademark of Delta Electronics, Inc. Page 4
The Selected
Corner Button
Press
Pauses projection
(the NovoConnect device returns
to the main screen)
An Unselected
Corner Button
Press
Switches projection of the
computer’s screen to the
corresponding quadrant of the
display
When the LauncherPlus is paused
(Main button LED is solid red)
Button
Action
Behavior
Main Button
Press
Projects the computer’s screen
onto the display in full screen
mode
Press and hold for 3 seconds
Disconnects the LauncherPlus
Corner Buttons
Press
Projects the computer’s screen
onto the corresponding quadrant
of the display
LED Behavior
During the pairing process:
LED
Definition
Main Button LED
Corner Button LEDs
Flashing Blue
(All) Flashing Blue
The LauncherPlus has been plugged
into a PC.
Solid Red
N/A
The LauncherPlus has been paired to a
NovoPro, but is not projecting.
After Pairing:
LED
Definition
Main Button LED
Corner Button LEDs
Solid Blue
N/A
The LauncherPlus is projecting in full
screen mode
N/A
(Single) Solid Blue
The LauncherPlus is projecting in the
corresponding button’s quadrant
N/A
(Single) Flashing
Blue
The LauncherPlus is switching
projection mode
Solid Red
N/A
Projection is paused
LauncherPlus User Manual
Copyright © 2017 Vivitek. Vivitek is a trademark of Delta Electronics, Inc. Page 5
Installation (Pairing)
There are various ways to pair the LauncherPlus to a NovoConnect device based on the
network setting of the NovoConnect device. The table below outlines the various
settings and their respective pairing methods:
NovoConnect Device’s Network
Connection Type
Pairing Method
Hotspot
Via the NovoConnect device’s USB Port
Via the PC’s USB Port
Wi-Fi
Via the NovoConnect device’s USB Port
Via the PC’s USB Port
Wired
Via the NovoConnect device’s USB Port
Via the PC’s USB Port
The sections below describe the instructions for each pairing method.
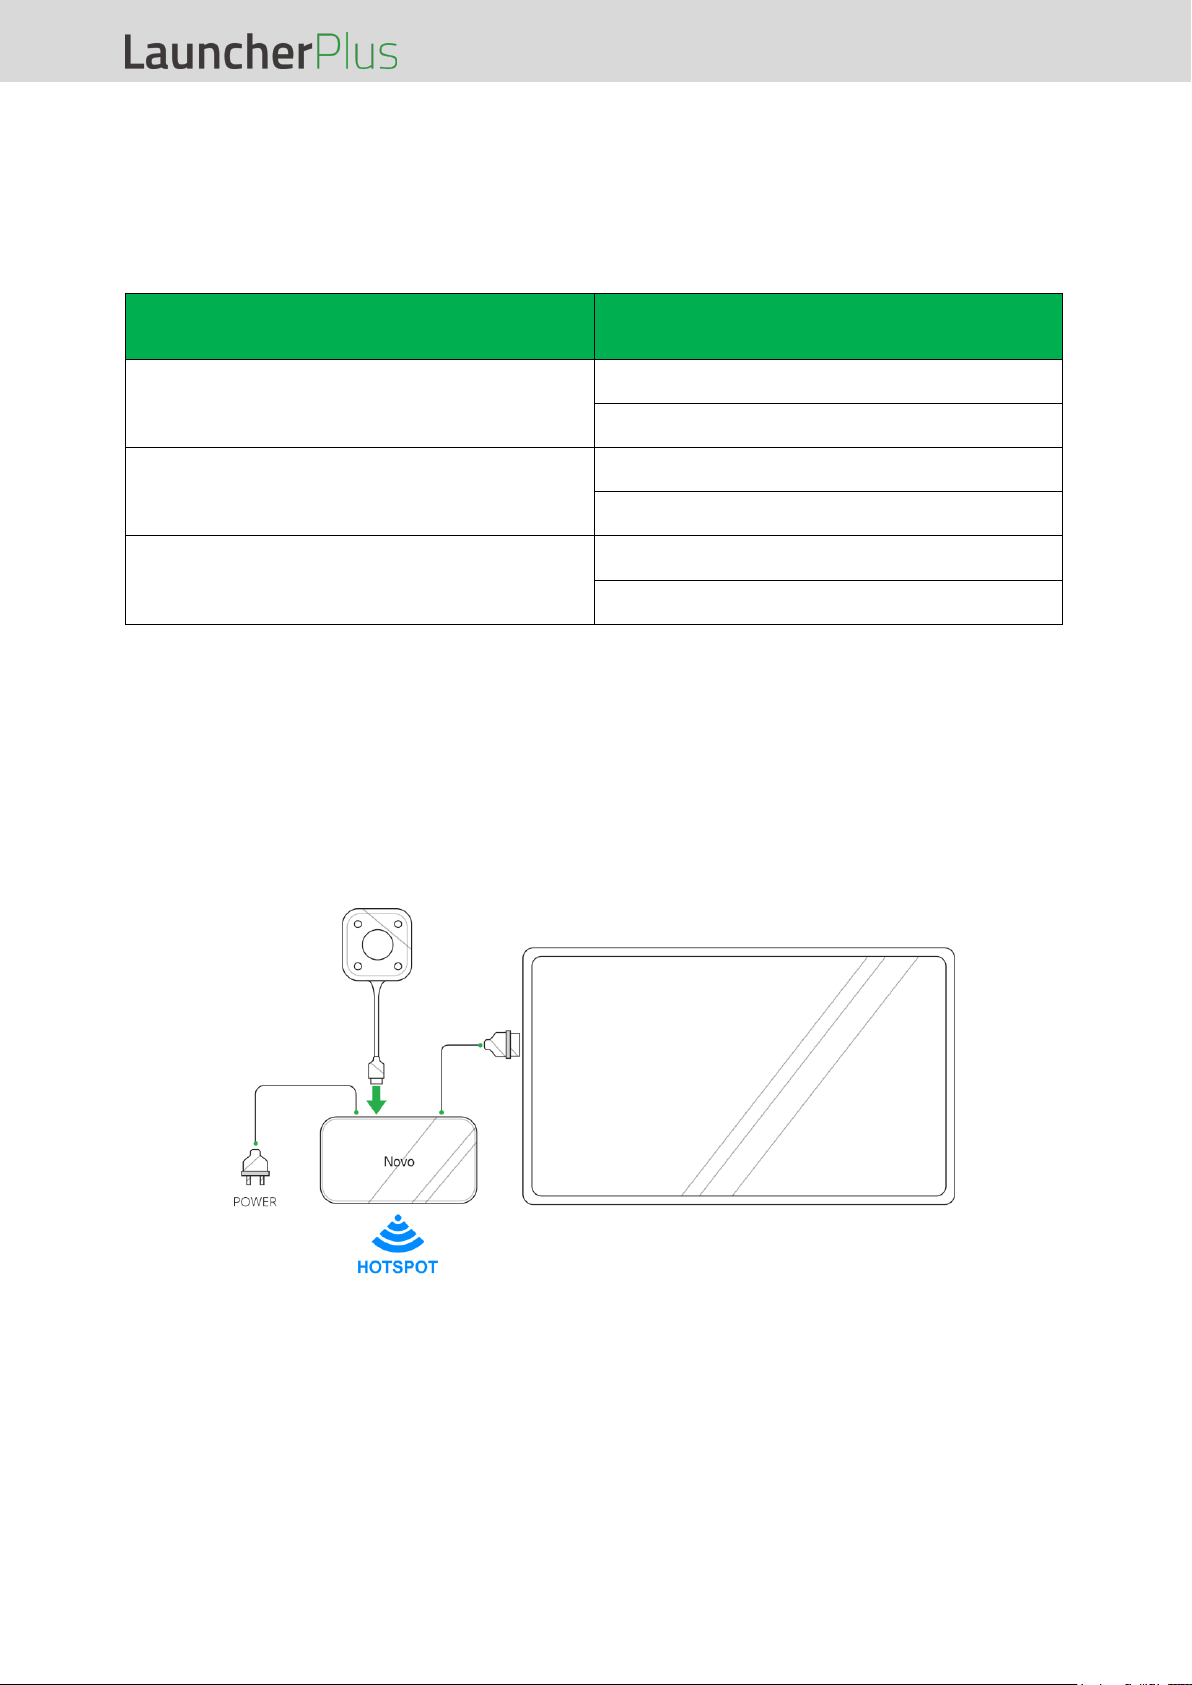
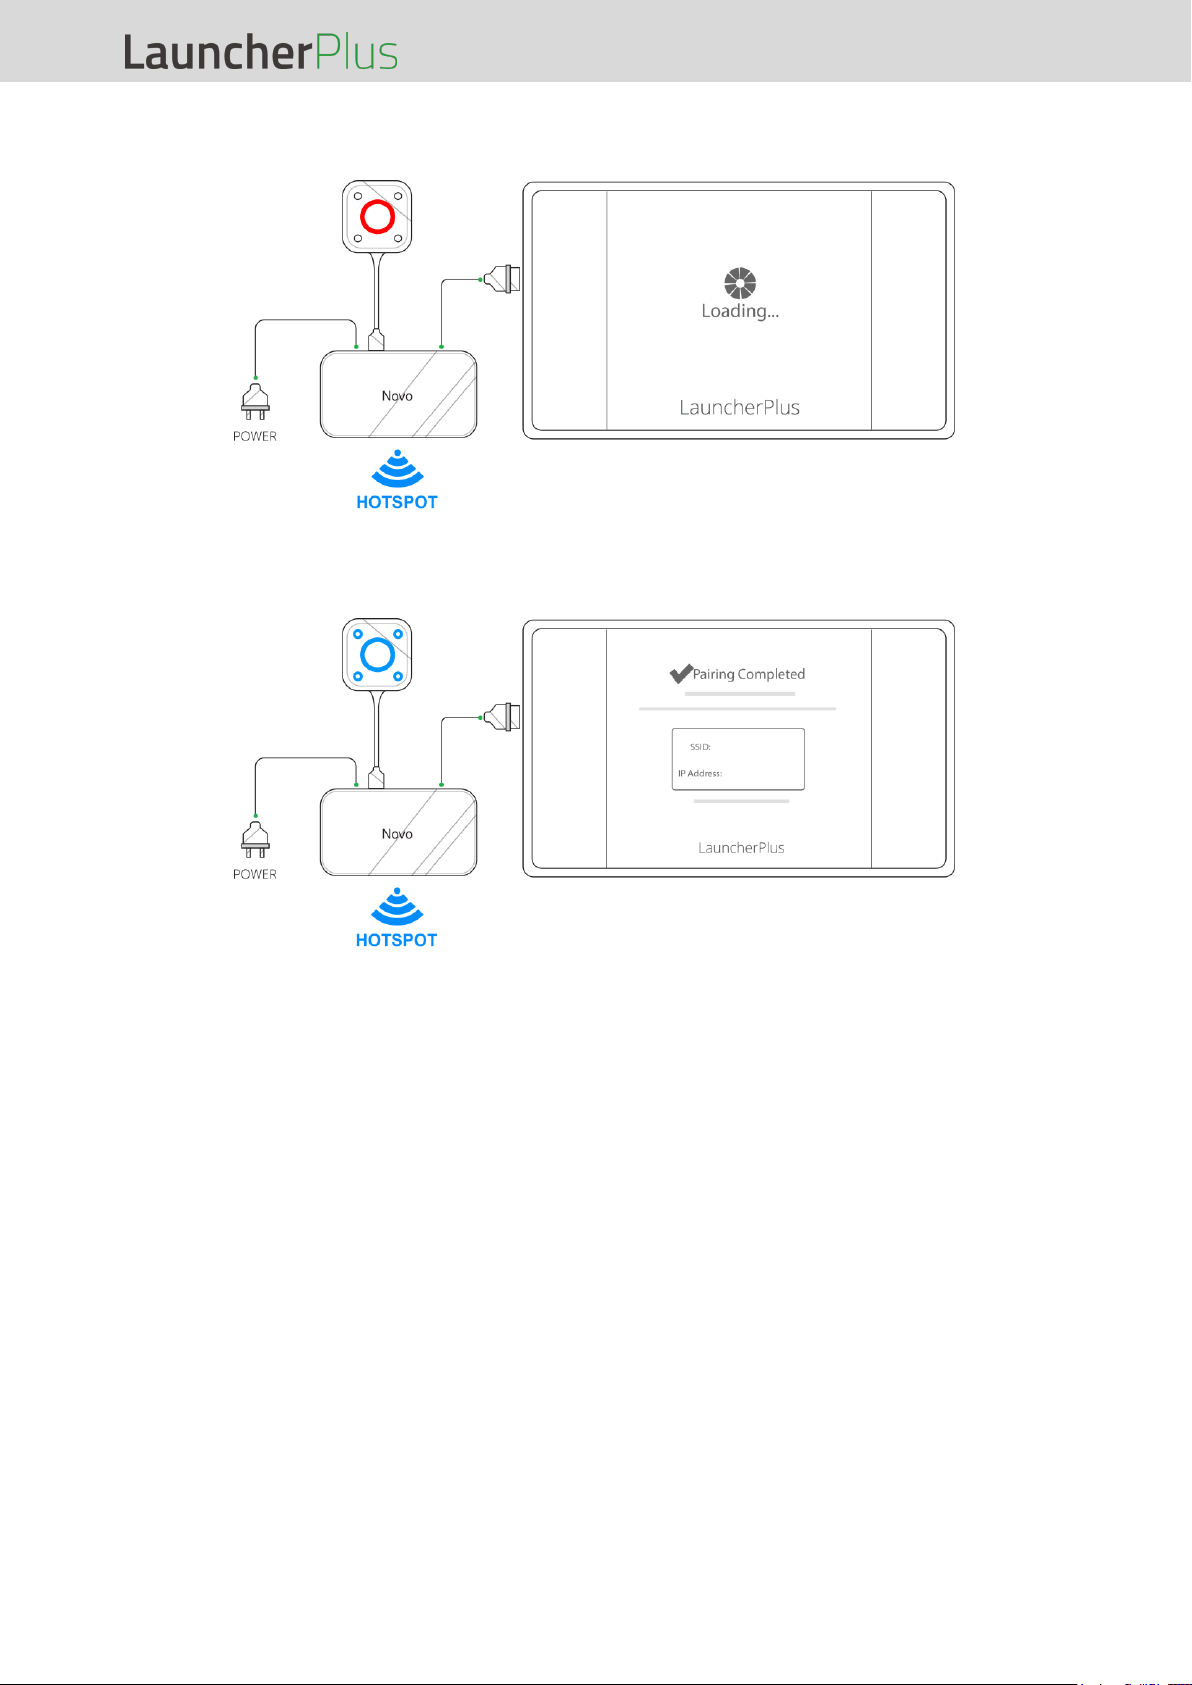
NovoConnect Device in Hotspot mode
Via the NovoConnect Device’s USB Port
1. Connect the LauncherPlus to the NovoConnect device.
NOTE: The NovoConnect device must be powered on and connected to a display.
LauncherPlus User Manual
Copyright © 2017 Vivitek. Vivitek is a trademark of Delta Electronics, Inc. Page 6
2. The main button on the LauncherPlus lights up red and a Loading… screen is
shown on the display.
3. Wait for the main and corner buttons on the LauncherPlus to light up blue and the
Pairing Completed screen to be shown on the display.
4. The pairing process is complete. Proceed to the Usage section to begin using the
LauncherPlus.

LauncherPlus User Manual
Copyright © 2017 Vivitek. Vivitek is a trademark of Delta Electronics, Inc. Page 7
Via your PC’s USB Port
Before pairing via the PC’s USB port, ensure that the PC features a working Wi-Fi
connection with WEP, WPA/WPA2, or 802.1x encryption.
1. Connect the LauncherPlus to your PC’s USB port. The LauncherPlus will check to
see if its software package is already stored in the PC. If the software package is not
stored in the PC, the PC will begin retrieving its software.
2. Once the software is ready, the LauncherPlus will begin scanning for NovoConnect
devices.
3. A list of scanned NovoConnect devices will appear. Select the NovoConnect device
you want to connect to from the list.
4. Once you have selected the NovoConnect device, the pairing process will be
complete. Proceed to step #3 of the Usage section to begin using the LauncherPlus.

LauncherPlus User Manual
Copyright © 2017 Vivitek. Vivitek is a trademark of Delta Electronics, Inc. Page 8
NovoConnect Device in Wi-Fi mode
Before pairing, ensure that the NovoConnect device is powered on and features a
working Wi-Fi connection with WEP, WPA/WPA2, or 802.1x encryption.
Via the NovoConnect Device’s USB Port
1. Connect the LauncherPlus to the NovoConnect device.
2. For WEP, WPA/WPA2 Wi-Fi Connections: A prompt will appear asking for the WiFi password. Enter the Wi-Fi password.
For 802.1x Wi-Fi Connections: A prompt will appear asking for the Wi-Fi login and
password. Enter the Wi-Fi login and password.

LauncherPlus User Manual
Copyright © 2017 Vivitek. Vivitek is a trademark of Delta Electronics, Inc. Page 9
3. Once you have entered the Wi-Fi connection login and/or password, wait for the
main and corner buttons on the LauncherPlus to light up blue and the Pairing
Completed screen to be shown on the display.
NOTE: If a pairing failure prompt appears re-enter the login and/or password.
4. The pairing process is complete. Proceed to the Usage section to begin using the
LauncherPlus.
Via your PC’s USB port
Before pairing via the PC, ensure that the PC features a working Wi-Fi connection with
WEP, WPA/WPA2, or 802.1x encryption.
1. Connect the LauncherPlus to your PC’s USB port. The LauncherPlus will check to
see if its software package is already stored in the PC. If the software package is not
stored in the PC, the PC will begin retrieving its software.

LauncherPlus User Manual
Copyright © 2017 Vivitek. Vivitek is a trademark of Delta Electronics, Inc. Page 10
2. Once the software is ready, the LauncherPlus will begin scanning for Wi-Fi
connections.
3. A list of Wi-Fi connections will appear. Select the SSID of the Wi-Fi router which your
NovoConnect device is connected to from the list.
For WEP, WPA/WPA2 Wi-Fi Connections: A prompt will appear asking for the Wi-
Fi password. Enter the Wi-Fi password.
For 802.1x Wi-Fi Connections: A prompt will appear asking for the Wi-Fi login and
password. Enter the Wi-Fi login and password.
NOTE: If you are unable to find the SSID for the router you want to connect to select Scan.
4. Once you have entered the correct password and/or login, the pairing process will be
complete. Proceed to step #3 of the Usage section to begin using the LauncherPlus.

LauncherPlus User Manual
Copyright © 2017 Vivitek. Vivitek is a trademark of Delta Electronics, Inc. Page 11
NovoConnect Device with a Wired
Connection
Before pairing ensure that the NovoConnect device is powered on and is connected via
the LAN port to a router that features a working Wi-Fi connection with WEP,
WPA/WPA2, or 802.1x encryption.
Via the NovoConnect Device’s USB Port
1. Connect the LauncherPlus to the NovoConnect device.
2. A pairing menu will appear. In the menu select the SSID of the network that the
NovoConnect device is connected to.

LauncherPlus User Manual
Copyright © 2017 Vivitek. Vivitek is a trademark of Delta Electronics, Inc. Page 12
3. For WEP, WPA/WPA2 Wi-Fi Connections: A prompt will appear asking for the WiFi password. Enter the Wi-Fi password.
For 802.1x Wi-Fi Connections: A prompt will appear asking for the Wi-Fi login and
password. Enter the Wi-Fi login and password.
4. Once you have entered the Wi-Fi connection login and/or password, wait for the
main and corner buttons on the LauncherPlus to light up blue and the Pairing
Completed screen to be shown on the display.
NOTE: If a pairing failure prompt appears re-enter the login and/or password.
5. The pairing process is complete. Proceed to the Usage section to begin using the
LauncherPlus.

LauncherPlus User Manual
Copyright © 2017 Vivitek. Vivitek is a trademark of Delta Electronics, Inc. Page 13
Via your PC’s USB Port
Before pairing via the PC, ensure that the PC features a working Wi-Fi connection with
WEP, WPA/WPA2, or 802.1x encryption.
1. Connect the LauncherPlus to your PC’s USB port. The LauncherPlus will check to
see if its software package is already stored in the PC. If the software package is not
stored in the PC, the PC will begin retrieving its software.
2. Once the software is ready, the LauncherPlus will begin scanning for Wi-Fi
connections.
3. A list of Wi-Fi connections will appear. Select the SSID of the router which your
NovoConnect device is connected to (via its LAN port) from the list.
For WEP, WPA/WPA2 Wi-Fi Connections: A prompt will appear asking for the Wi-
Fi password. Enter the Wi-Fi password.
For 802.1x Wi-Fi Connections: A prompt will appear asking for the Wi-Fi login and
password. Enter the Wi-Fi login and password.
NOTE: If you are unable to find the SSID for the router you want to connect to select Scan.

LauncherPlus User Manual
Copyright © 2017 Vivitek. Vivitek is a trademark of Delta Electronics, Inc. Page 14
4. Once you have entered the correct password and/or login, the pairing process will be
complete. Proceed to step #3 of the Usage section to begin using the LauncherPlus.
Usage
Follow the steps below to begin using the LauncherPlus.
1. For First-Time Usage: Connect the LauncherPlus to a computer and the
LauncherPlus will begin retrieving its software package.
For Subsequent Usage: Connect the LauncherPlus to a computer and the Novo
software will run automatically.
2. Once the software is ready, the LauncherPlus will begin scanning for the
NovoConnect device.

LauncherPlus User Manual
Copyright © 2017 Vivitek. Vivitek is a trademark of Delta Electronics, Inc. Page 15
3. After the LauncherPlus has found the NovoConnect device, the main button on the
LauncherPlus lights up red. Press the button to begin presenting.
4. Your computer’s screen is shown on the display.
5. Press any corner button on the LauncherPlus to project your computer’s screen onto
the corresponding quadrant of the display, the button's blue LED will light when it is
in use.

LauncherPlus User Manual
Copyright © 2017 Vivitek. Vivitek is a trademark of Delta Electronics, Inc. Page 16
Additional Settings
Once you have already paired your LauncherPlus with a NovoPro device, additional
settings for your LauncherPlus can be configured from the Novo software, including
pairing settings and a password lock.
Connection Settings
To configure the pairing settings for your LauncherPlus:
1. Connect your LauncherPlus to a computer so that the Novo software launches.
2. Click the options menu ( ) and select Configure LauncherPlus.
3. Select Edit in the LauncherPlus settings menu.
4. Continue with steps 3 - 4 in the Manual Pairing section.

LauncherPlus User Manual
Copyright © 2017 Vivitek. Vivitek is a trademark of Delta Electronics, Inc. Page 17
Password Lock
You may configure your LauncherPlus with a password lock to prevent users from
changing settings for the device. To create a password lock for your LauncherPlus:
1. Connect your LauncherPlus to a computer so that the Novo software launches.
2. Click the options menu ( ) and select Configure LauncherPlus.
3. Select Lock in the LauncherPlus settings menu.

LauncherPlus User Manual
Copyright © 2017 Vivitek. Vivitek is a trademark of Delta Electronics, Inc. Page 18
4. Select Enable protection in the LauncherPlus Settings Protection window.
5. Enter the password you want to set for your Launcher Plus, confirm the password,
and then select Save.
Once a password lock is set for your LauncherPlus, the password will need to be
entered anytime a user wants to manually pair the LauncherPlus.
For more information on the other setting items in the Novo software options menu,
please consult your NovoPro user manual.

LauncherPlus User Manual
Copyright © 2017 Vivitek. Vivitek is a trademark of Delta Electronics, Inc. Page 19
⚫ FCC warning statement
FCC – Federal Communication Commission (USA)
This equipment has been tested and found to comply with the limits for a Class B digital device, pursuant
to Part 15 of the FCC Rules. These limits are designed to provide reasonable protection against harmful
interference in a residential installation. This equipment generates uses and can radiate radio frequency
energy and, if not installed and used in accordance with the instructions, may cause harmful interference
to radio communications. However, there is no guarantee that interference will not occur in a particular
installation. If this equipment does cause harmful interference to radio or television reception, which can
be determined by turning the equipment off and on, the user is encouraged to try to correct the
interference by one of the following measures:
‧ Reorient or relocated the receiving antenna.
‧ Increase the separation between the equipment and receiver.
‧ Connect the equipment into an outlet on a circuit different from that to which the receiver is connected.
‧ Consult the dealer or an experienced radio/TV technician for help.
FCC – RF Radiation Exposure Statement:
This equipment complies with FCC radiation exposure limits set forth for an uncontrolled environment. End users
must follow the specific operating instructions for satisfying RF exposure compliance. This transmitter must not be colocated or operation in conjunction with any other antenna or transmitter. The highest SAR value for this device is
1.28W/kg.
FCC Caution:
Any changes or modifications not expressly approved by the party responsible for compliance could void the user’s
authority to operate this equipment.
This device complies with Part 15 of the FCC Rules. Operation is subject to the following two conditions:
(1) This device may not cause harmful interference and
(2) This device must accept any interference received, including interference that may cause undesired operation

Vivitek Americas
46101 Fremont Blvd, Fremont, CA 94538
U.S.A.
T: +1-510-668-5100
F: +1-510-668-0680
Vivitek Asia
7F, No. 186, Ruey Kuang Road, Neihu, Taipei 11491
Taiwan R.O.C.
T: +886-2-8797-2088
F: +886-2-6600-2358
Vivitek Europe
Zandsteen 15, 2132 MZ Hoofddorp
The Netherlands
T: +31-20-800-3960
F: +31-20-655-0999
www.vivitekcorp.com
 Loading...