


i

1
Contents
Section Description Page
1. General Information ............................................................................... 6
1.1 About this Manual .......................................................................... 6
1.2 General Warnings / Notes on Safety............................................. 6
1.3 Validity ............................................................................................ 7
1.4 Product Description ....................................................................... 7
1.5 How it Works .................................................................................. 8
1.6 Additional Information ................................................................... 8
2. Installation and Wiring .......................................................................... 9
2.1 Instruction before Installation ....................................................... 9
2.2 Unpacking ....................................................................................... 9
2.3 Package Inspection ...................................................................... 10
2.4 Identify of Inverter ........................................................................ 10
3. Product Overview ................................................................................ 11
3.1 Dimension ..................................................................................... 11
3.2 Function Introduction .................................................................. 12
3.2.1 LCD Display and Buttons .................................................... 12
3.2.2 Inverter Input / Output Interface ......................................... 13
4. Installation ............................................................................................ 14
4.1 Installing Location ....................................................................... 14
4.2 Mounting ....................................................................................... 14
5. Wiring.................................................................................................... 18
5.1 Preparation before Wiring ........................................................... 18
5.2 AC Grid Connection: 3-Phase+PE or 3-Phase+N+PE ............... 20
5.2.1 Required Protective Devices and Cable Cross-sections . 20
5.3 DC Connection (from PV Array) .................................................. 24
5.4 Communication Module Connections ........................................ 26
5.4.1 RS-485 Connection .............................................................. 26
5.4.2 EPO Functions ..................................................................... 28
5.4.3 Dry Contact Connection ...................................................... 28
6. Active / Reactive Power Control and Fault Ride Through ................ 29
6.1 Active Power Control ................................................................... 29
6.1.1 Power Limit .......................................................................... 29
6.1.2 Power vs. Frequency ........................................................... 30
6.2 Reactive Power Control ............................................................... 31
6.2.1 Fixed Active Factor cosφ .................................................... 31

2
6.2.2 Active Factor cosφ(P) ......................................................... 31
6.2.3 Fixed Reactive Power .......................................................... 32
6.2.4 Reactive Power / Voltage Characteristic Q(U) ................... 32
6.3 Fault Ride Through (FRT) ............................................................ 33
7. Turn on/off PV inverter ........................................................................ 35
7.1 Home Page ................................................................................... 37
7.2 LCD Flow Chart ............................................................................ 37
7.2.1 Power Meter ......................................................................... 37
7.2.2 Energy Log ................................ ................................ ........... 38
7.2.3 Event Log ............................................................................. 38
7.2.4 Operation Data ..................................................................... 39
7.2.5 Inverter Information ............................................................. 39
7.2.6 Settings ................................................................................ 40
7.2.6.1 Personal Setting ...................................................... 40
7.2.6.2 Coefficient Setting .................................................. 41
7.2.6.3 Installation Settings ................................................ 41
7.2.6.4 Active/Reactive Power Control .............................. 44
7.2.6.4.1 Power Limit ............................................... 45
7.2.6.4.2 Power vs. Frequency ................................ 45
7.2.6.4.3 Constant cosφ ........................................... 46
7.2.6.4.4 cosφ(P) ...................................................... 46
7.2.6.4.5 Constant Reactive Power ......................... 47
7.2.6.4.6 Q(U) ............................................................ 47
7.2.6.5 FRT (Fault ride through) ......................................... 48
8. Maintenance ......................................................................................... 49
8.1 Clean Fan ...................................................................................... 49
8.2 Replace Fan .................................................................................. 50
8.3 Clean Air Outlets .......................................................................... 50
9. Measurement, Error message and Trouble Shooting ....................... 51
9.1 Measurement ................................................................................ 51
9.2 Error Message & Trouble Shooting ............................................ 54
10. De-Commissioning .............................................................................. 60
10.1 De-Commissioning Procedure .................................................... 60
11. Technical Data ...................................................................................... 61
11.1 Specification ................................................................................. 61

3
Figure
Section Description Page
Figure 1-1 Solar system operation illustration ................................................. 8
Figure 2-1 Unpacking process ........................................................................ 9
Figure 2-2 Wooden case unpacking process .................................................. 9
Figure 2-3 The identification label ................................................................. 10
Figure 3-1 Dimension of RPI-M8/ M10/ M12/ M15A/ M20A .......................... 11
Figure 3-2 Dimension of RPI-M15/ M20/ M30 ............................................... 11
Figure 3-3 Inverter exterior objects ............................................................... 12
Figure 3-4 LCD display and control panel ..................................................... 12
Figure 3-5 Input/Output interfaces of M8/ M10/ M12/ M15A/ M20A .............. 13
Figure 3-6 Input/Output interfaces of M15/ M20/ M30 ................................... 13
Figure 3-7 Air outlet illustration ..................................................................... 13
Figure 4-1 Screw the mounting bracket ........................................................ 15
Figure 4-2 Correct and incorrect installation illustration ................................ 16
Figure 4-3 Proper installation gap ................................................................. 17
Figure 5-1 Connection of a system for floating DC inputs ............................. 18
Figure 5-2 Connection of system with positive/negative ground ................... 19
Figure 5-3 Stripping the wire ......................................................................... 21
Figure 5-4 AC plug illustrationfor M8/ M10/ M12/ M15/ M15A/ M20/ M20A. . 22
Figure 5-5 AC plug illustration for M30 .......................................................... 23
Figure 5-6 DC Wiring illustration ................................................................... 25
Figure 5-7 Communication module ............................................................... 26
Figure 5-8 Multi-inverter connection illustration ............................................ 27
Figure 5-9 Dry contact port & Assignments ................................................... 28
Figure 6-1 Power vs. frequency characteristic .............................................. 30
Figure 6-2 cosφ(P) characteristic .................................................................. 31
Figure 6-3 Q(U) characteristic. ...................................................................... 32
Figure 6-4 Borderlines of the voltage profile of a type-2 generating plant at the
network connection point .............................................................................. 34
Figure 6-5 FRT characteristic ........................................................................ 34
Figure 7-1 LCD display &control panel ......................................................... 35
Figure 7-2 Select county page ...................................................................... 36
Figure 7-3 Select language page .................................................................. 36
Figure 7-4 Home page .................................................................................. 37
Figure 7-5 Menu page ................................................................................... 37

4
Figure 7-6 Power meter page ....................................................................... 37
Figure 7-7 Energy log flow chart ................................................................... 38
Figure 7-8 Event log flow chart ..................................................................... 38
Figure 7-9 Operation data flow chart ............................................................. 39
Figure 7-10 Inverter information page ........................................................... 39
Figure 7-11 Setting page ............................................................................... 40
Figure 7-12 Personal setting page ................................................................ 40
Figure 7-13 Coefficient setting page ............................................................. 41
Figure 7-14 Install setting page –User mode ................................................ 42
Figure 7-15 Insulation setting ........................................................................ 42
Figure 7-16 Install setting page – Installer mode .......................................... 42
Figure 7-17 Grid setting page ....................................................................... 43
Figure 7-18 Active/Reactive powersetting page ............................................ 44
Figure 7-19 Power limit setting page ............................................................. 45
Figure 7-20 Power vs. frequency setting page. ............................................. 45
Figure 7-21 Constant cosφ setting page ....................................................... 46
Figure 7-22 cosφ(P) setting page ................................................................. 46
Figure 7-23 Constant Reactive Power setting page ...................................... 47
Figure 7-24 Q(U) setting page ...................................................................... 47
Figure 7-25 FRT setting page ....................................................................... 48
Figure 8-1 dissembling fan connections ........................................................ 49
Figure 8-2 disassembling fan overview ......................................................... 50
Figure 8-3 Disassembling fan ....................................................................... 50
Figure 8-4 Disassembling air outlets ............................................................. 50

5
Table
Section Description Page
Table 2-1 Packing list .................................................................................... 10
Table 5-1 Recommended upstream protection ............................................. 20
Table 5-2 Wire size of AC input ..................................................................... 20
Table 5-3 The wiring system of the inverter. .................................................. 23
Table 5-4 Maximum rating of input power ..................................................... 24
Table 5-5 Cable size ..................................................................................... 24
Table 5-6 Definition of RS 485 pin................................................................. 26
Table 5-7 RS-485 data format ....................................................................... 27
Tabel 5-8 Terminal resister setting ................................................................ 27
Tabel 5-9 EPO functions ............................................................................... 28
Table 7-1 LED indicator ................................................................................. 36
Table 7-2 Grid setting parameters ................................................................. 43
Table 9-1 Measurement and message .......................................................... 51
Table 9-2 Error Message ............................................................................... 54
Table 9-3 Warning Message ......................................................................... 55
Table 9-4 Fault Message ............................................................................... 56
Table 11-1 Specification for RPI-M8/ M10/ M12 ............................................ 61
Table 11-2 Specification for RPI-M15/ M20/ M30 .......................................... 64
Table 11-3 Specification for RPI-M15A/ M20A .............................................. 67

6
1. General Information
1.1 About this Manual
Congratulations on the purchase of your Delta RPI-M8/ M10/ M12/ M15/ M15A/
M20/ M20A/ M30 grid-tied solar inverter. This manual will assist you in becoming
familiar with this product. Please observe all safety regulations and take into
account technical connection conditions required at your local grid utility.
1.2 General Warnings / Notes on Safety
Careful handling of the product will contribute to service life durability and
reliability. Both are essential to ensure maximum yield from your product. As
some of the solar inverter models are heavy, two people may be required for
lifting purposes.
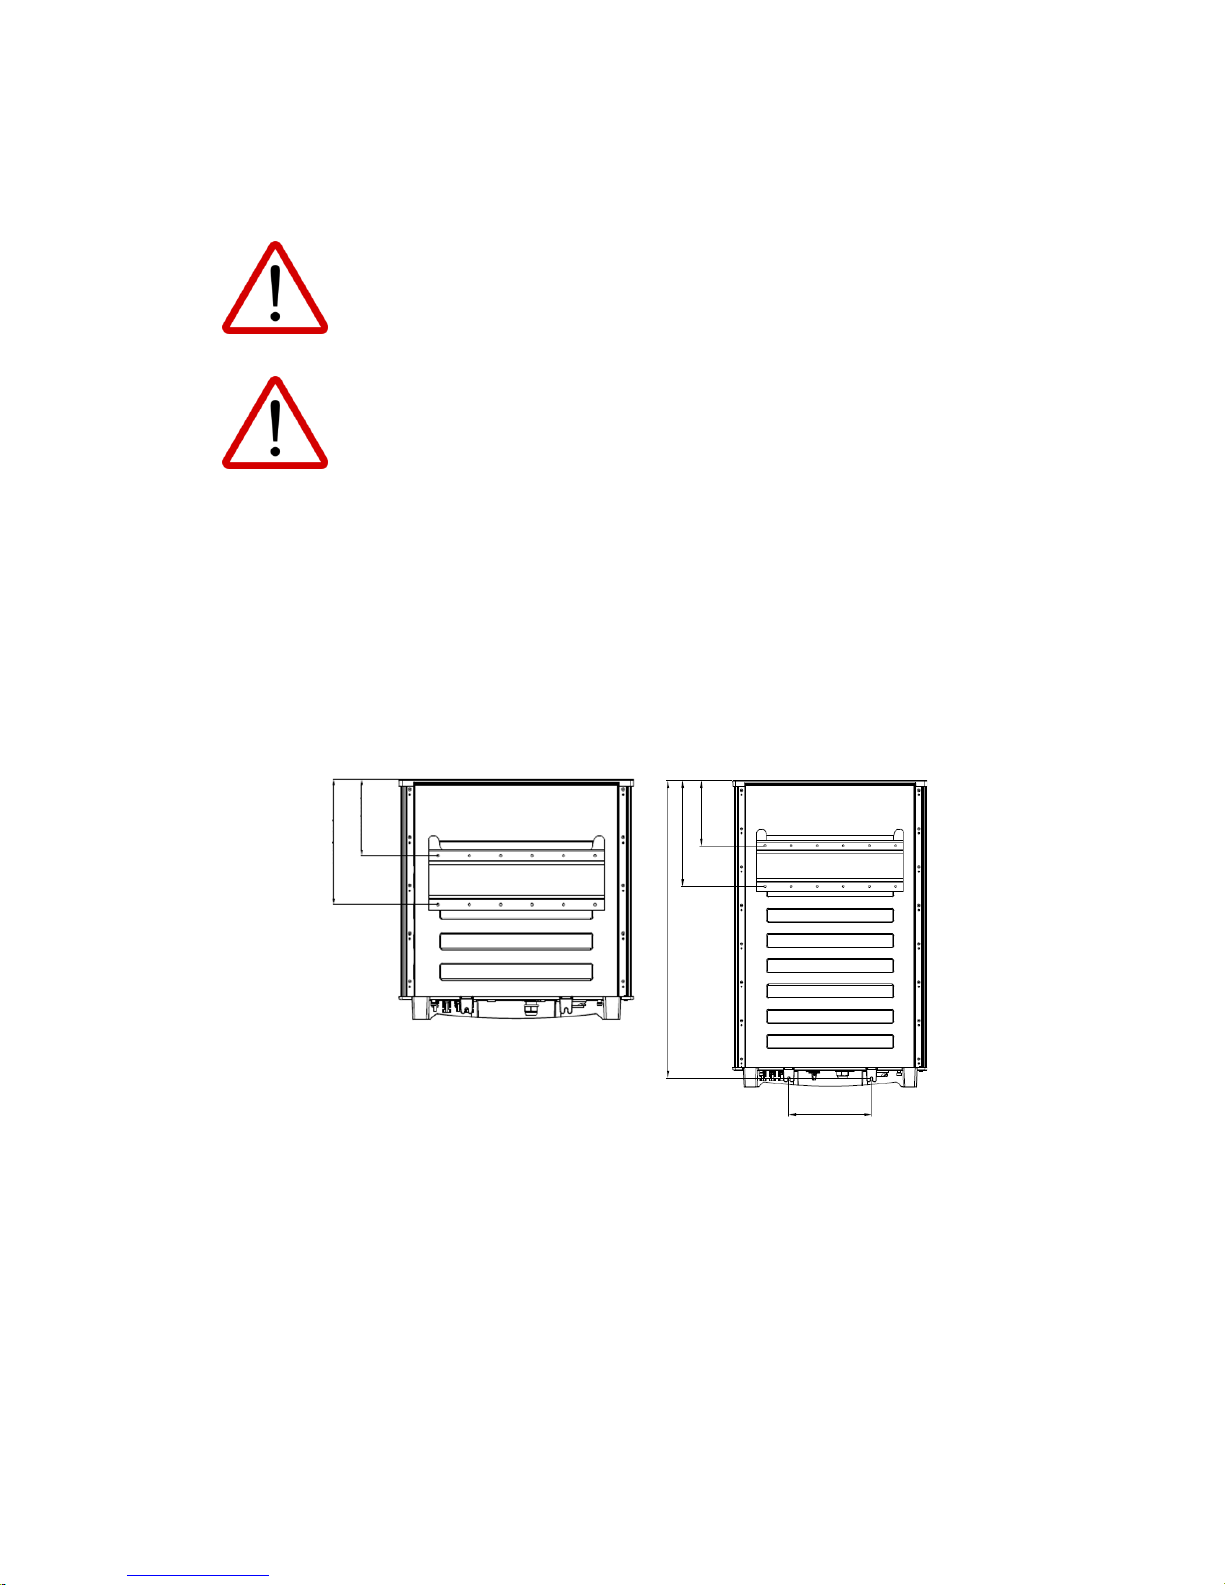
CAUTION!
During operation of electrical devices, certain parts are under
dangerous voltage.
Inappropriate handling can lead to physical injury and material
damage.
Always adhere to the installation regulations. Installation may
only be conducted by certified electricians.
WARNING!
Repair work on the device should ONLY be carried out by the
manufacturer. No user serviceable parts inside.
Please observe all points in the operation and installation manual.
Isolate the device from the grid and the PV modules before
undertaking work on the device.
DANGER!
To avoid risk of electrical shock, do not open the solar inverter.
The inverter contains no internal user-serviceable parts. Opening
the inverter will void the warranty.
Dangerous voltage is present for 5 minutes after disconnecting all
sources of power.
Remember that the unit has a high leakage current. The PE
conductor MUST be connected prior to commencing operation.

7
WARNING:BURN HAZARD
The unit may reach very high temperatures and the device
surface can become quite hot. Sufficient cooling time is
necessary for optimal yield.
1.3 Validity
This user manual describes the installation process, maintenance, technical data
and safety instructions of the following solar inverter models under the DELTA
brand.
◆RPI-M8 ◆ RPI-M10 ◆ RPI-M12
◆RPI-M15 ◆ RPI-M15A ◆ RPI-M20
◆RPI-M20A ◆ RPI-M30
1.4 Product Description
This device is a 3-phase grid-tied solar inverter. It converts direct current (DC)
electricity from the PV array into 3-phase alternating current (AC) which feeds
the excess generated power back to the local grid.
This inverter allows for a wide voltage range (200~1000V) and has a high
performance efficiency and user friendly design and operation. Please note these
devices do not support off-grid functionality.
The features for RPI-M8/ M10/ M12/ M15/ M15A/ M20/ M20A/ M30 are shown
below.
Features
Power Rating:8/ 10/ 12/ 15/ 20/ 30 kVA
3Phase, Grid-tie, Transformerless solar inverter
Maximum efficiency:> 98 %
Europe efficiency: >97.5%
Reactive power capability (Cap 0.8 – Ind 0.8)
Low output current harmonic distortion (THD < 3%) @ full load
2 MPP Trackers
Record up to 30 event logs.
5” LCD display

8
1.5 How it Works
The operation of solar inverter is shown as the figure 1-1. In order to save energy
and electricity, solar inverter convert the DC input power supplied from the PV
Array into 3-phase AC output power to Grid.
PV Array
Electrical Grid
Solar Inverter
DC Distribution
box
3PH
AC Distribution
box
Surge arrestor
Fuse
DC switch
Surge arrestor
AC breaker
3 phase, N, PE
E-Today: 47kWh
21. Jun 2010 13:50
Runtime: 8.2Hrs Power: 12103W
On Grid, Derating, cosφ – Ind 0.9
20
15
10
5
0
4 8 12 16 20 24
Figure 1-1 Solar system operation illustration
1.6 Additional Information
For more detailed information for RPI-M8/ M10/ M12/ M15/ M15A/ M20/ M20A/
M30 or other related product information, please visit http://www.deltaww.com.
9
2. Installation and Wiring
2.1 Instruction before Installation
Due to the variety of users and installation environments, it is recommended to
read this manual thoroughly before installation. Installation of the unit and
start-up procedures must be carried out by accredited technicians.
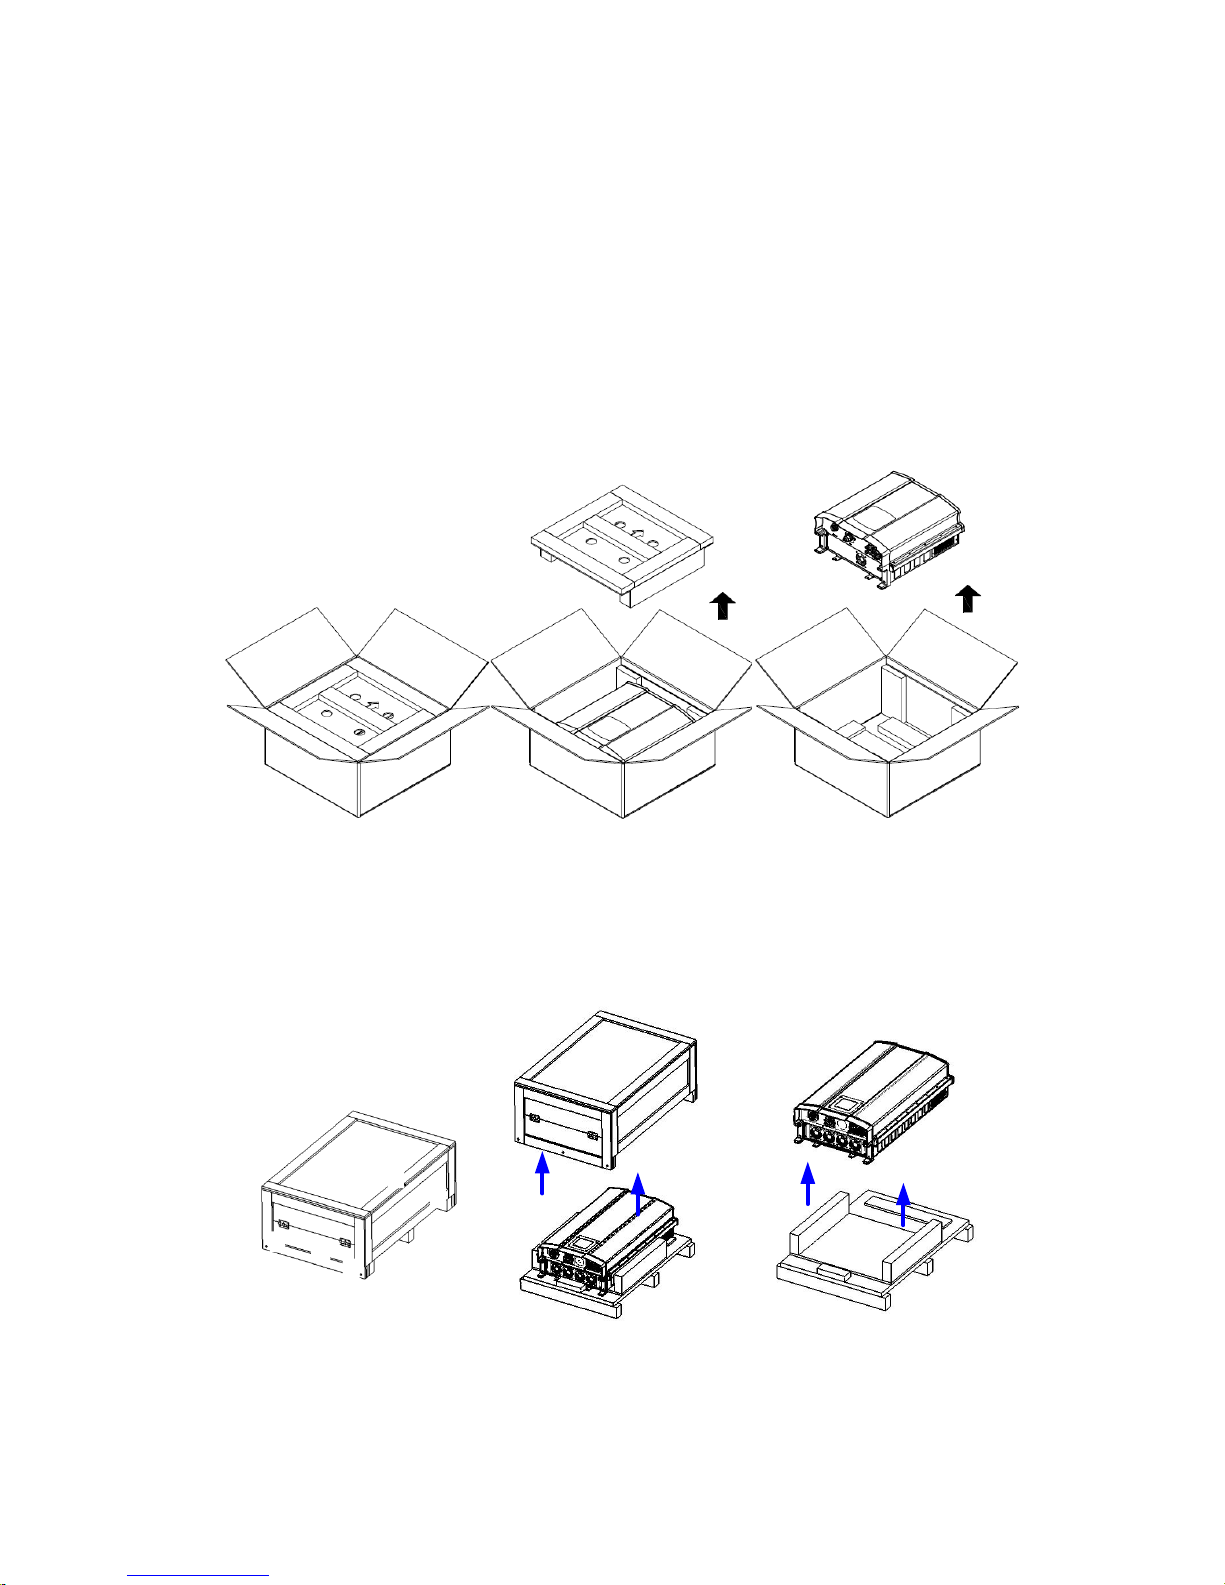
2.2 Unpacking
Unpacking process for RPI-M8/ M10/ M12/ M15A/ M20A is shown as Figure 2-1.
a. b. c.
Figure 2-1 Unpacking process
Unpacking process for RPI-M15/ M20/ M30 is shown as Figure 2-2.
5
4
6
1
2
3
a. b. c.
Figure 2-2 Wooden case unpacking process

10
2.3 Package Inspection
Unforeseeable events causing damage or movement may occur during shipment.
Please check for damage on the wooden carton upon receiving your inverter.
Please check the model number and the serial number on the packaging is
identical with the model number and serial number on the unit itself.
Check if all the accessories are in the package, the standard accessories are list
as Table 2-1:
Table 2-1 Packing list
RPI-M8/ M10/ M12/ M15/ M15A/ M20/ M20A/ M30
Object
Qty
Description
PV Inverter
1
RPI-M8/ M10/ M12/ M15/ M15A/ M20/
M20A/ M30 solar inverter
User Manual
1
The Instruction to provide the information
of safety, Installation, specification, etc.
AC Plug
1
Connector for AC connection
Mounting Bracket
1
Wall mounting bracket to mount the solar
inverter on the wall
Caution: If there is any visible damage to the inverter/accesories or any
damage to the packaging, please contact your inverter supplier.
2.4 Identify of Inverter
Users can identify the model number by the information on the product label. The
model number, specification and the series No. is specified on the product label.
Regard to the label location, please refer to the figure 2-3.
RPI-M15/ M20/ M30RPI-M8/ M10/ M12 RPI-M15A/ M20A
Figure 2-3 The identification label
11
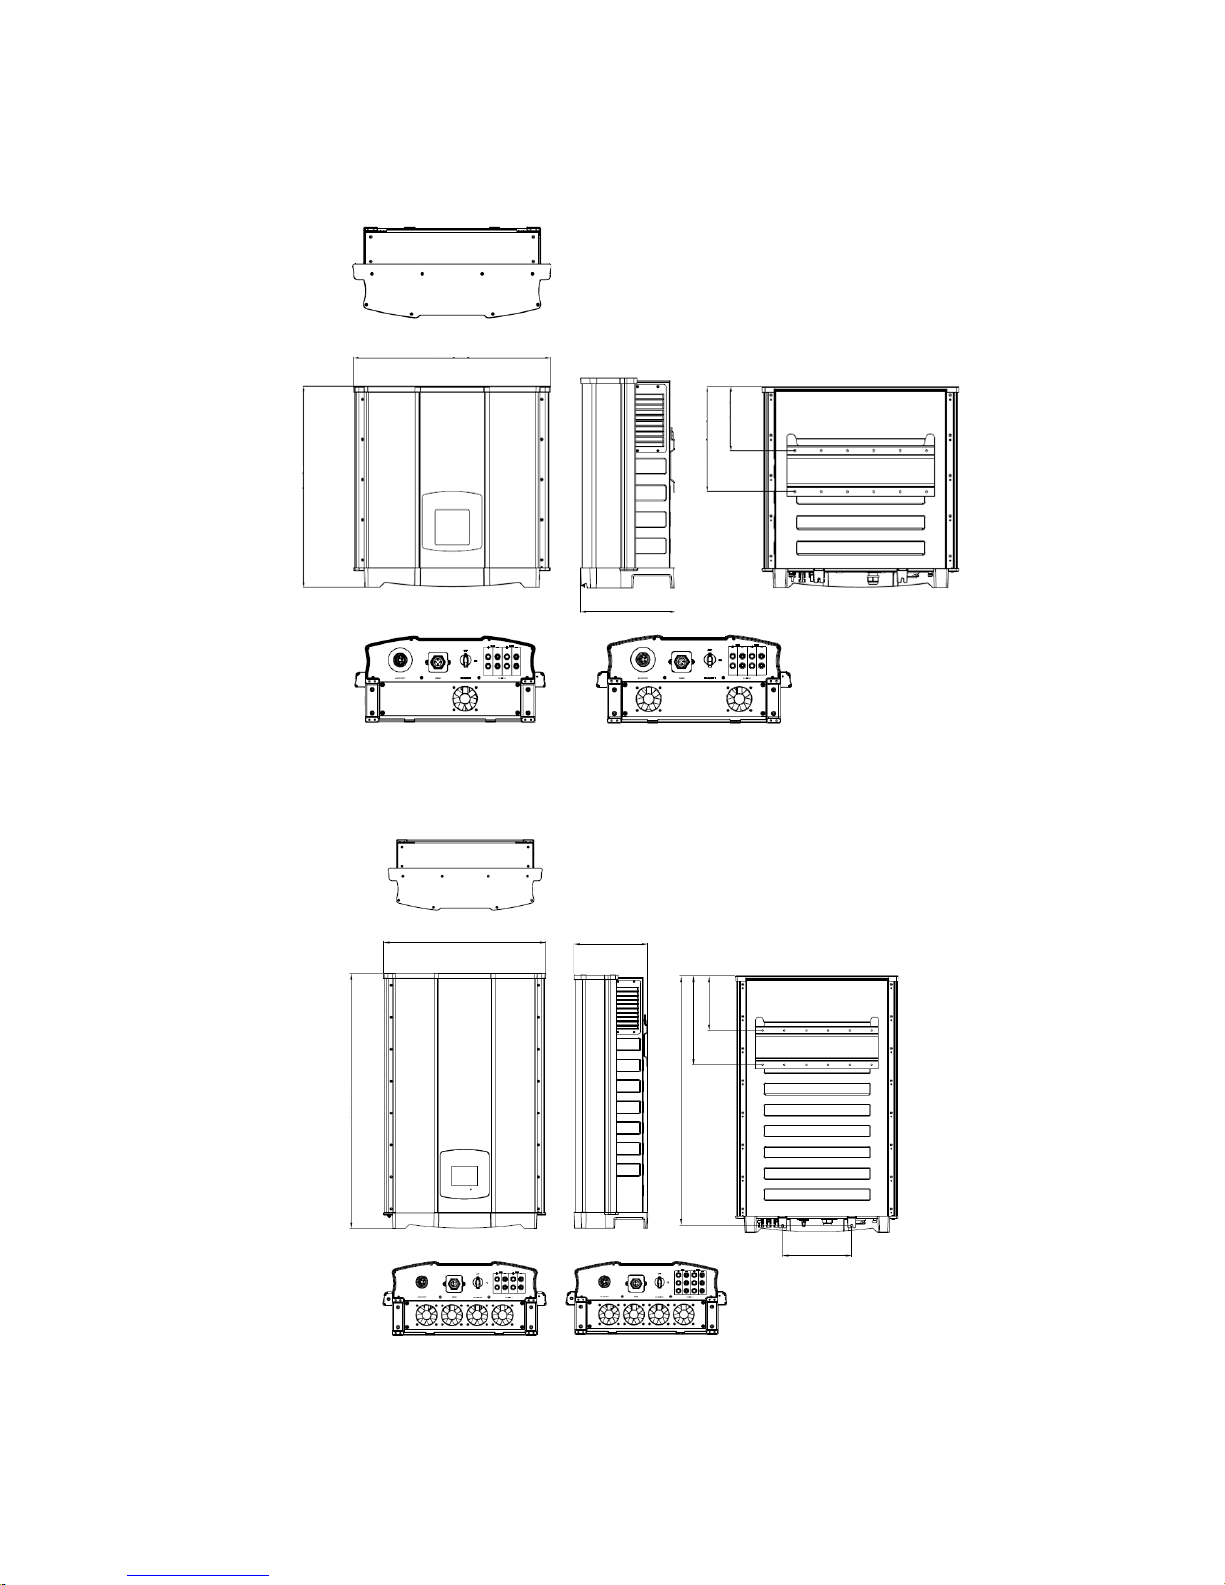
3. Product Overview
3.1 Dimension
Top view
Front view Side view Back view
Bottom view
326 [12.8]
198 [7.8]
278 [10.9]
612 [24.1]
625 [24.6]
RPI-M8/ M10/ M12 RPI-M15A/ M20A
Figure 3-1 Dimension of RPI-M8/ M10/ M12/ M15A/ M20A
Top view
Front view Side view Back view
RPI-M30RPI-M20 / RPI-M15
Bottom view
331 [13.0]
203 [8.0]
278 [10.9]
960 [37.8]
612 [24.1]
931 [36.6]
260 [10.2]
Figure 3-2 Dimension of RPI-M15/ M20/ M30
12
3.2 Function Introduction
The Inverter’s exterior objects are shown in Figure 3-3. The detailed description
can be found in sections 3.2.1 and 3.2.2.
LCD/LED Display
and Buttons
DC Connectors
AC Connectors
Communication
Connetions
DC Switch
Air outlets
Label
DC Switch
AC Connectors
Communication
Connetions
LCD/LED Display
and Buttons
Air outlets
RPI-M15/ M20/ M30
RPI-M8/ M10/ M12/
M15A/ M20A
Label
DC Connectors
Fan*4
Fan*1 or 2
Figure 3-3 Inverter exterior objects
3.2.1 LCD Display and Buttons
EXIT: Exit Menu
UP: Move Up
Down: Move Down
LCD Display ENT: Enter Menu or Confirm
LED Indicator (GRN/RED)
Figure 3-4 LCD display and control panel
13
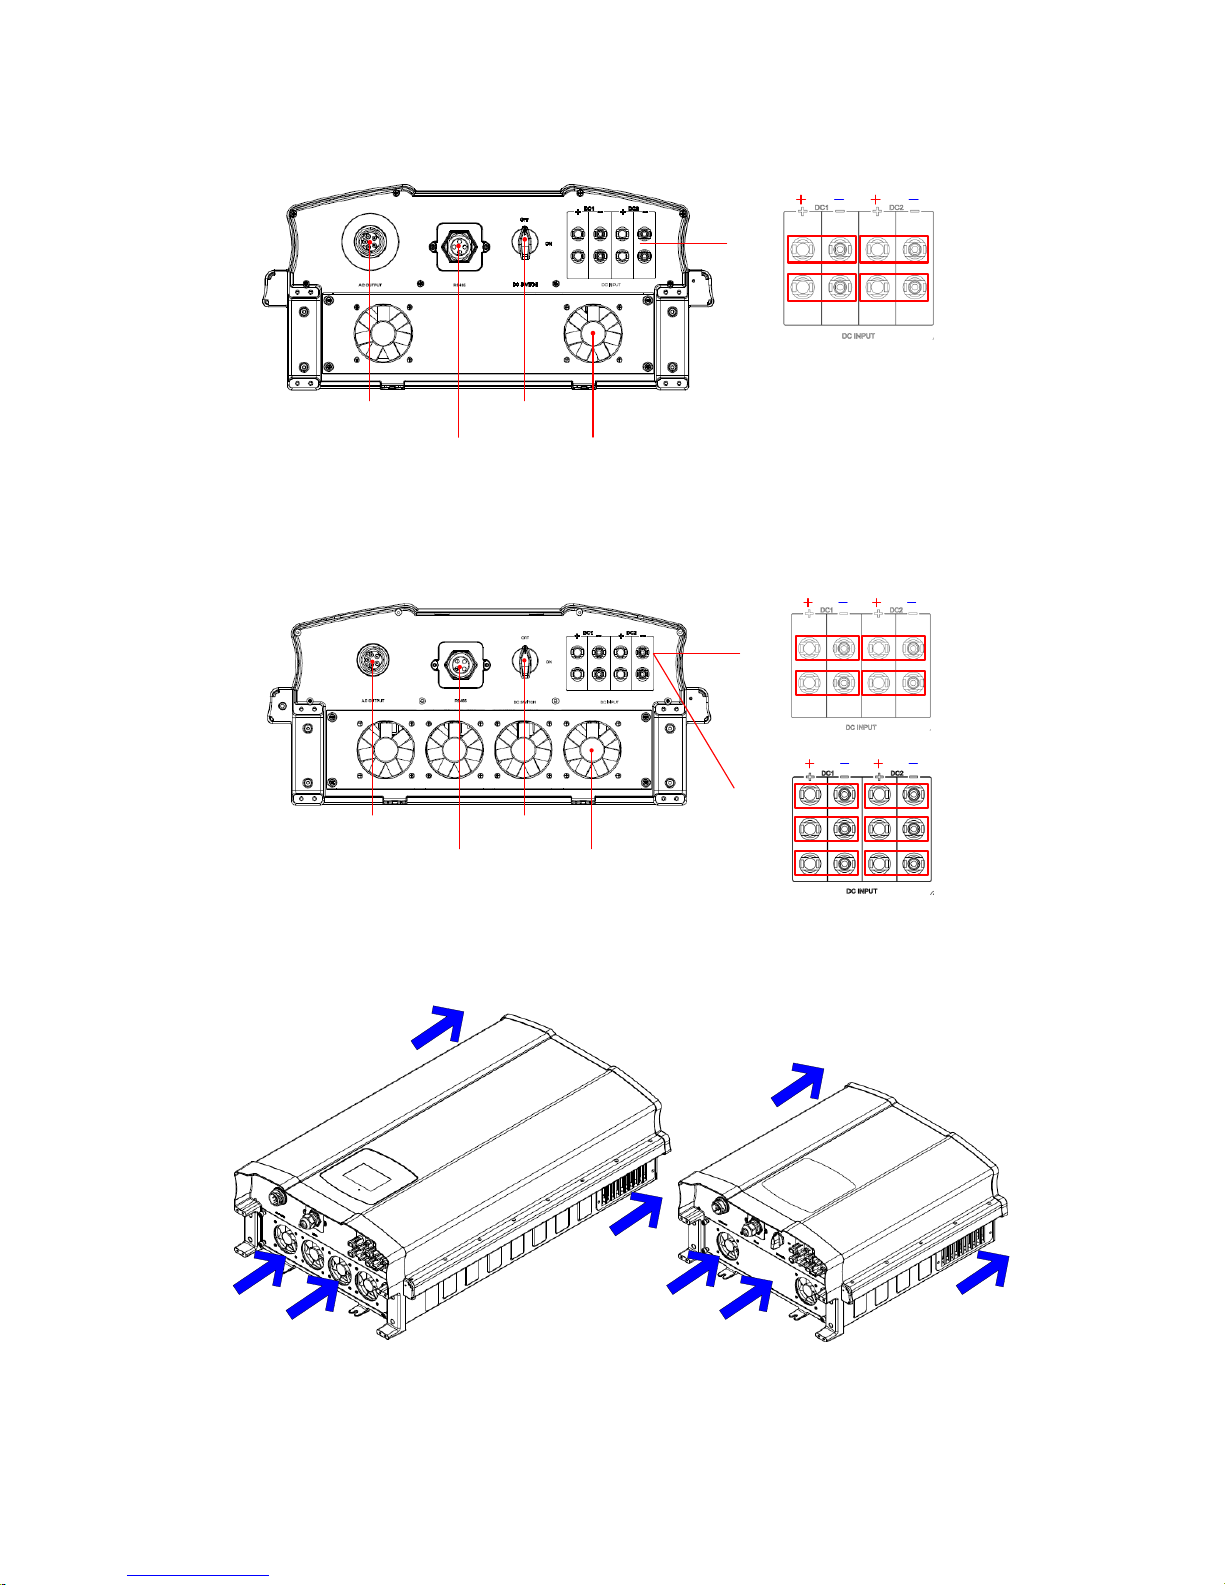
3.2.2 Inverter Input / Output Interface
Communication
-RS-485 *2
-EPO *2
-Dry Contact *2
DC1
DC2
RPI-M8/ M10/ M12/ M15A/ M20A
Fan*1 or 2
AC Connector
230/400Vac, 3Ph
DC Switch
String1
String2
String3
String4
Figure 3-5 Input/Output interfaces of M8/ M10/ M12/ M15A/ M20A
AC Connector
230/400Vac, 3Ph
Fan *4
DC1 DC2
RPI-M30
DC1 DC2
RPI-M15/ M20
DC Switch
String1
String2
String3
String4
String1
String2
String3
String4
String5
String6
Communication
-RS-485 *2
-EPO *2
-Dry Contact *2
Figure 3-6 Input/Output interfaces of M15/ M20/ M30
Figure 3-7 Air outlet illustration
14
4. Installation
4.1 Installing Location
WARNING!
Do not install the unit near or on flammable surfaces.
Please mount the unit tightly on a solid/smooth surface.
CAUTION!
The unit should not be installed in a direct sunlight.
4.2 Mounting
This unit is designed to be wall-mounted. Please ensure the installation is
perpendicular to the wall and the AC plug at the base of the unit. Do not install
the device on a slanting wall. The dimensions of the mounting bracket are shown
in the figure below. There are 12pcs of M6 screws required for mounting plate.
Fix the supplied wall-mount plate securely on the wall before attaching the
inverter onto the mounting plate.
Back view
331 [13.0]
203 [8.0]
931 [36.6]
260 [10.2]
326 [12.8]
198 [7.8]
Back view

15
M6 Screw M6 Screw
M6 Screw *6
Wall
M6 Screw *6
> 125cm
> 70cm > 80cm
> 80cm
Inverter #1 Inverter #2
Figure 4-1 Screw the mounting bracket

16
90
Figure 4-2 Correct and incorrect installation illustration
CAUTION!
◆ The bracket supplied with the unit is specially designed and
should be the only mounting device used for the unit.
◆ It is recommended to install the inverter in a suitable location
which offers non-obscured and safe access, in turn ensuring
easy access for service and maintenance.
◆ Please leave an appropriate gap in between units when
installing several solar inverter systems.
◆ Please install solar inverter at an eye level to allow easy
observation for operation and parameter setting.
◆ Ambient temperature -20°C~60°C.(power derating above
40°C)
◆ It is essential to ensure sufficient space for product operation
as shown in Figure 4-3.

17
> 60 CM
> 60 CM
> 60 CM
> 60 CM
> 60 CM
Figure 4-3 Proper installation gap

18
5. Wiring
5.1 Preparation before Wiring
1. Ensure voltage values and polarities are correct.
2. When grounding the solar array, an isolation transformer is required due to
the RPI-series not having galvanic isolation between the DC-input and
AC-output.
3. The ground fault detection is a fixed internal setting. It cannot be modified.
4. Whole system wiring and connections can be seen in Figure 5-1 and 5-2.
5. Inverter can accept DC inputs in parallel (1 MPP tracker/2 parallel inputs).
6. Different DC connection type needs different settings of insulation detection.
About setting, please refer to 7.2.6.3 Install Setting.
1
2
3
4
L1
L2
L3
N
PE
Communication
Wiring
1
2
3
PV Array
AC Wiring
DC Wiring
Parallel or
Separate
DC Distribution box
DC1 DC2
*
* Some models can support 3P3W
system, please refer to table 5-3.
Figure 5-1 Connection of a system for floating DC inputs

19
Isolated
transformer
Utility
To
Inverter
3Ph,
400Vac
3Ph,
400Vac
Must be Parallel
Connection
PV Array
DC Distribution box
(Plus-GND or Minus-GND)
Z
Z
or
Must install a
transformer
Some models can support 3P3W
system, please refer to table 5-3.
Figure 5-2 Connection of system with positive/negative ground
WARNING! SHOCK HAZARD
Note: Whenever a PV array is exposed to sunlight, a shock hazard
may exist due to output wires or exposed terminals. To reduce the
risk of shock during installation, cover the array with an opaque
(dark) material and ensure that the Disconnect Device in the
inverter is set to OFF before commencing any wiring.

20
5.2 AC Grid Connection: 3-Phase+PE or 3-Phase+N+PE
WARNING! Death and serious injuries may occur.
Before AC wiring, please ensure AC breaker is switched off.
5.2.1 Required Protective Devices and Cable Cross-sections
It is recommended to install upstream circuit breakers between AC side and
inverter side for over current protection.
Table 5-1 Recommended upstream protection
Model
Upstream circuit breaker
RPI-M8
20A
RPI-M10
20A
RPI-M12
30A
RPI-M15
30A
RPI-M15A
30A
RPI-M20
40A
RPI-M20A
40A
RPI-M30
60A
G N L1 L3L2
N
L1
L2
L3
PE
To solar inverter AC
plug
The AC cable must be jacked and meet the specification in table 5-2.
Table 5-2 Wire size of AC input
Model
Current Rating
Wire size
Torque
Temperature
RPI-M8
40 A
5 - 8 mm2
0.7 N m
Meet UL 10070
RPI-M10
RPI-M12
RPI-M15
RPI-M15A
RPI-M20
RPI-M20A
RPI-M30
60 A
10 mm2 or 6 AWG
3 N m
Meet UL 10070

21
AC’s wiring can be separated into 3-phase and PE (3P3W) or 3-phase, N, and
PE (3P4W). Only some models can support 3P3W system. Please refer to table
5-3. The following instruction is based on 3P4W. If the grid system is 3P3W,
please ignore the description of N.
CAUTION! Machine and equipment damage may occur.
◆ Make sure to choose the correct wire size AC cable.
◆ Failure to follow these instructions may cause AC plug
damage.
Follow the steps below to strip the wires before assembling the AC plug:
a) Trim the L1, L2, L3, and N wire to 52.5 mm (2.0 inch).
b) Strip 12 mm (0.5 inch) of insulation from all wire ends.
c) Remove 55 mm (2.2 inch) of AC cable outer jacket.
Figure 5-3 Stripping the wire

22
Assemble the AC plug and wires as the procedures shown in figure 5-4(for all
models except RPI-M30) and figure 5-5(for RPI-M30 model only). Inverter allows
either positive or negative phase sequence. That means the sequence of L1~ L3
can be reversed. However, N and PE must be connected correctly.
L1
L2
N
PE
L3
Inverter
Fix it
Rotate to loose the AC plug
Inverter
Rotate to tighten the inserter
Rotate to tighten the plug
Rotate gland to
fix cable
Cable
AC Plug
AC plug
1 : L1
2 : L2
3 : L3
4 : N
: PE
Cable
Cable
Cable
L1
L2
L3
N
PE
Socket
Align the biggest latch of the AC plug and the socket
Figure 5-4 AC plug illustrationfor M8/ M10/ M12/ M15/ M15A/ M20/ M20A.

23
L1
L2
N
PE
L3
L1
L2
L3
N
PE
Fix it
Rotate to loose the AC plug
AC plug
Rotate to tighten the AC plug
Inverter
Rotate to tighten the plug
Rotate gland to
fix cable
Figure 5-5 AC plug illustration for M30
Table 5-3 The wiring system of the inverter.
Model
Wiring
RPI-M8/ M10/ M12
RPI-M15/ M20
P/N: RPIXX3N5430098 or 09
3P3W+PE
╳
╳
3P4W+PE
Model
Wiring
RPI-M15/ M20
P/N: RPIXX3N5431000
RPI-M15A/ M20A/ M30
3P3W+PE
3P4W+PE
After wiring, installer should choose the AC connection type on the control panel.
About setting, please refer to 7.2.6.3 Install Setting.
The AC voltage should be as followings:
3P3W 3P4W
L1-L2: 400 Vac 10% L1-N: 230 Vac 10%
L1-L3: 400 Vac 10% L2-N: 230 Vac 10%
L2-L3: 400 Vac 10% L3-N: 230 Vac 10%

24
5.3 DC Connection (from PV Array)
WARNING!
When undertaking DC wiring, please ensure the correct
polarities are connected.
When undertaking DC wiring, please ensure that the power
switch on the PV array is OFF.
CAUTION!
◆ The connection number of PV Array, open circuit voltage and
power of String_1 and String _2 must be coherent.
◆ The connection number of PV Array, open circuit voltage and
power of String _3 and String _4 must be coherent.
◆ The maximum open circuit voltage of PV Array cannot be
higher than 1000V.
◆ The range of MPP Voltage of Input1 and Input2 shall be in
350~800 Vdc.
◆ The device installed between PV Array and inverter must meet
the following specifications:
a.) Rated voltage > open-circuit voltage of PV Array.
b.) Rated current > short-circuit current of PV Array.
◆ The input power to the inverter should not higher than the
rated power shown in table 5-4.
Table 5-4 Maximum rating of input power
Type of limit
RPI-M8
RPI-M10
RPI-M12
RPI-M15
Total input power
8.8 kW
11 kW
13.2 kW
16.5 kW
Input1 or Input2
5.9 kW
7.4 kW
8.8 kW
8.25 kW
Type of limit
RPI-M15A
RPI-M20
RPI-M20A
RPI-M30
Total input power
16.5 kW
22 kW
22 kW
32 kW
Input1 or Input2
8.25 kW
11 kW
11 kW
16 kW
Table 5-5 Cable size
Model
Current Rating
Wire size
Temperature
M8
DC 10A
2 - 3mm2 / 14 AWG
Meet UL 10070
M10/ M12
DC 20A
3 - 5mm2 / 12 AWG
Meet UL 10070
M15A/ M20A
DC 34A
5 - 6mm2 / 10 AWG
Meet UL 10070
M15/ M20/ M30
DC 34A
5 - 6mm2 / 10 AWG
Meet UL 10070

25
DC wiring polarity is divided into positive and negative, which is shown as in
Figure 5-6. The connection shall be coherent with the indication marked on
inverter.
PV-KBT4/6 Ⅱ
PV-KST4/6 Ⅱ
Figure 5-6 DC Wiring illustration

26
5.4 Communication Module Connections
The Communication Module supports the functions of communication with a
computer. There are two types of modules. One has RJ45-type RS-485
connector, and the other has terminals-type RS-485 connector.
Terminal Resistor
Dry contact
(3A / 28V)
RS-485
EPO
(Emergency Power off)
VCC
GND
RS-485
+
-
+
-
EPO
(Emergency Power off)
RJ45-type Terminals-type
Figure 5-7 Communication module
5.4.1 RS-485 Connection
The pin definition of RS-485 is shown as in table 5-6. Installers should switch ON
the terminal resistor when single inverter is installed. The wiring of multi-inverter
connection is shown as figure 5-8. Installers should switch ON terminal resister
at the first and last devices of the RS485 chain as shown in Figure 5-8. The other
terminal resisters should be switched OFF. Please refer to table 5-8 for the
terminal resister setting.
Table 5-6 Definition of RS 485 pin
Pin
Function
Pin
Function
1 2 3 4 5 6
4
DATA-
1
VCC (+12V)
5
DATA+
2
GND
7
VCC (+12V)
3
DATA+
8
GND
4
DATA-
5
DATA+
6
DATA-
RJ45-type
Terminals-type

27
Terminal Resister
Terminal Resister
PIN FUNCTION
4
5
7
8
DATA-
DATA+
VCC(+12V)
GND
Data Format:
Baud rate: 9600
Data bits: 8
Stop bit: 1
Parity: N/A
Pin Layout:
120Ω(1/2W)
DATA+ to DATA-
120Ω(1/2W)
DATA+ to DATA-
RS485/USB
or
RS485/RS232
Figure 5-8 Multi-inverter connection illustration
Table 5-7 RS-485 data format
RS-485 Data format
Baud rate
9600, 19200, or 38400
Data bit
8
Stop bit
1
Parity
N/A
Tabel 5-8 Terminal resister setting
OFF
ON
1 2
OFF OFF
ON
ON
ON
ON
OFF
OFF
SW
Terminal
Resistor
ON
1 2
SW ON
SW OFF

28
5.4.2 EPO Functions
RJ45-type Communication Module provides 2 sets of emergency power off
function (EPO1 and EPO2). Terminals-type Communication Module only has 1
set of EPO (EPO1). When the outer external switch is shorted, the inverter will
shutdown immediately.
Tabel 5-9 EPO functions
EPO1
EPO2
Short
Pin1 & Pin2
Enable EPOs
Short
Pin4 & Pin5
5.4.3 Dry Contact Connection
RPI-series provides 1 set of Dry Contact function. When inverter is on grid, Com
& NO2 will be shorted. When the Fan Fail is detected, Com & NO1 will be
shorted.
Figure 5-9 Dry contact port & Assignments

29
6. Active / Reactive Power Control and Fault Ride Through
Installers can adjust Active/Reactive power control only when Grid System are
set to: Germany MV, Germany LV, Italy LV, or Italy MV (a password is required to
change these settings). Fault ride through (FRT) can only be adjusted when Grid
System is set to: Germany MV, Italy MV, or Italy LV.
There are 2 settings for active power control and 4 settings for reactive power
control that can be configured based on the requirement of the local network
operator. It can be configured to have active power control and/or one of the
reactive power control functions.
6.1 Active Power Control
6.1.1 Power Limit
According to BDEW’s technical guideline in page 25 (June 2008 version):
It must be possible to operate the generating facility at reduced power output. In
the cases listed below, the network operator is entitled to require a temporary
limitation of the power feed-in or disconnect the facility:
- potential danger to secure system operation,
- congestion or risk of overload on the network operator’s network,
- risk of islanding,
- risk to the steady-state or dynamic network stability,
- rise in frequency endangering the system stability,
- repairs or implementation of construction measures,
- within the scope of generation management/ feed-in management/ network
security
- management (see „Grundzüge zum Erzeugungsmanagement“)
User can reduce inverter output power by set percentage of actual or rated power.
Please refer to 7.2.6.4.1 Power Limit for the settings procedure.

30
6.1.2 Power vs. Frequency
There’re 2 different operation curves that depend on Country setting.
Germany LV: follow the curve in Figure 6-1-a
Germany MV/ Italy BT/ Italy MT: follow the curve in Figure 6-1-b
legend:
Pm is the power generated at the time of exceeding f
start
P is the feeding power
f is the mains frequency
fstart is the frequency when the power reduction starts
fstop is the frequency when there is has zero power
Gradient is the slope of power reduction
Configuration can be made to meet the requirements from the network operator.
Please refer to 7.2.6.4.2 Power vs. Frequency for the settings procedure.
P
Pm
fstart
fstop
f
(Hz)
Gradient
P
Pm
f
recovery
f
start
f
stop
f
(
Hz
)
Gradient
6-1-a 6-1-b
Figure 6-1 Power vs. frequency characteristic

31
6.2 Reactive Power Control
According to BDEW:
With active power output, it must be possible to operate the generating plant in
any operating point with at least a reactive power output corresponding to a
active factor at the network connection point of
cos φ = 0.95 underexcited to 0.95 overexcited
Values deviating from the above must be agreed upon by contract. In the
consumer reference arrow system (see Annex B.4), that means operation in
quadrant II (under-excited) or III (overexcited).With active power output, either a
fixed target value for reactive power provision or a target value variably
adjustable by remote control (or other control technologies) will be specified by
the network operator in the transfer station. The setting value is either
a) a fixed active factor cosφ or
b) a active factor cosφ(P) or
c) a fixed reactive power in MVar or
d) a reactive power/voltage characteristic Q(U).
6.2.1 Fixed Active Factor cosφ
Configurations can be made to set the power factor from Cap 0.8 to Ind 0.8
(inverter would stop reactive power control if output power is below 10% rated
power).
6.2.2 Active Factor cosφ(P)
Once user enables this method, inverter will deliver the reactive current
according to output active power in that moment. The below figure is an example.
Please refer to 7.2.6.4.4 cosφ(P) for the settings procedure.
Cap 0.85
Ind 0.85
P/Pn
1
cosφ
Figure 6-2 cosφ(P) characteristic

32
6.2.3 Fixed Reactive Power
When this function is enabled, the inverter will send reactive power (ie. Q) in
relation to the fixed reactive power setting. The range is Cap 53% to Ind 53%.
6.2.4 Reactive Power / Voltage Characteristic Q(U)
After selecting “Q(U) control”, User can adjust “Q” against the Grid voltage
operation curves shown in Figure 6-3.
V
1s
V
2s
V
1i
V
2i
Q
i limit
Q
s limit
V
V
1s
V
2s
V
1i
V
2i
Q
i limit
Q
s limit
V
Q
CurveA CurveB
Figure 6-3 Q(U) characteristic.

33
6.3 Fault Ride Through (FRT)
According to BDEW:
2.5.1.2 Dynamic network support
Dynamic network support means voltage control in the event of voltage drops
within the high and extra-high voltage network with a view to avoiding
unintentional disconnections of large feed-in power, and thus network collapse.
In the light of the strong increase in the number of generating plants to be
connected to the medium-voltage network, the integration of these plants into the
dynamic network support scheme is becoming ever more important.
Consequently, these generating plants must generally participate in dynamic
network support even if this is not required by the network operator at the time of
the plant’s connection to the network. That means that generating plants must be
able in technical terms
not to disconnect from the network in the event of network faults,
to support the network voltage during a network fault by feeding a reactive
current into the network,
not to extract from the medium-voltage network after fault clearance more
inductive reactive power than prior to the occurrence of the fault.
These requirements apply to all types of short circuits (i.e. to single-phase,
two-phase and three-phase short circuits).
Just like in the Transmission Code 2007 7, a distinction is made in these
guidelines between type-1 and type-2 generating plants with regard to their
behaviour in the event of network disturbances. A type-1 generating unit exists
if a synchronous generator is directly (only through the generator transformer)
connected to the network. All other plants are type-2 generating units.
The following conditions shall apply to type-2 generating plants, taking the
Transmission Code 2007, Section 3.3.13.5, into account:
Generating units must not disconnect from the network in the event of
voltage drops to 0 % Uc of a duration of ≤ 150 ms.
Below the blue line shown in Figure 2.5.1.2-2, there are no requirements
saying that generating plants have to remain connected to the network.
Voltage drops with values above the borderline 1 must not lead to instability or to
the disconnection of the generating plant from the network (TC2007; 3.3.13.5,
section 13; extended to asymmetrical voltage drops).
If the voltage drops at values above the borderline 2 and below the borderline 1,
generating units shall pass through the fault without disconnecting from the
network. Feed-in of a short-circuit current during that time is to be agreed with
the network operator. In consultation with the network operator, it is permissible

34
to shift the borderline 2 if the generating plant’s connection concept requires to
do so. Also in consultation with the network operator, a short-time disconnection
from the network is permissible if the generating plant can be resynchronized 2
seconds, at the latest, after the beginning of the short-time disconnection. After
resynchronization, the active power must be increased with a gradient of at least
10% of the nominal capacity per second (TC2007; 3.3.13.5, section 14).
Figure 6-4 Borderlines of the voltage profile of a type-2 generating plant at the network
connection point
RPI-M8/ M10/ M12/ M15/ M15A/ M20/ M20A/ M30 implements the FRT behavior
as the figure below, in area
1. Keep normally operate
2. Feed-in reactive current according to ΔU/Un and K factor
3. Short-time disconnect
4. Long-time disconnect
U/Un
IB/In
K factor
K factor
+10-10
100%
U1
0
t1
t2
Fault occurence
t3
time
Ugrid/Unom
2 3
4
1
U2
Udrop
Figure 6-5 FRT characteristic

35
7. Turn on/off PV inverter
WARNING:BURN HAZARD
The enclosure temperature may exceed over 70°C while operating.
To avoid injury, do not touch the surface of the inverter whilst the
unit is in operation.
After installation, please ensure the AC, the DC and communication connection
are correct. Switch on the DC switch. When enough power is generated from the
PV array, the device will operate automatically and will initially ‘self-test’. This
self-test takes approximately 2 minutes and will occur at first start-up of the day.
The display on the inverter includes a 320x240 pixel LCD display and LED
indicator lights to indicate inverter status. The green and red colour LED indicator
light represents different inverter statuses.
EXIT: Exit Menu
UP: Move Up
Down: Move Down
LCD Display ENT: Enter Menu or Confirm
LED Indicator (GRN/RED)
Figure 7-1 LCD display &control panel

36
Table 7-1 LED indicator
Condition
Green LED
Red LED
Standby or Countdown
FLASH
*1
OFF
Power ON
ON
OFF
Error or Fault
OFF
ON
Night time (No DC)
OFF
OFF
Bootloader mode
FLASH
*2
*1 ON 1s / OFF 1s
*2 ON 1s / OFF 1s, Green and Red are interleaving
On the first start up, the country and language has to be set. The system will
show the main menu after these are set.
21. Jun 2010 13:50
Select Country – 1/3
ENT
EXIT
21. Jun 2010 13:50
No Yes
Confirm Country
Australia
Austria
Belgium
China
Czech
England
France
Are you sure to set county :
xxxxxxxx
Figure 7-2 Select county page
21. Jun 2010 13:50
English
Deutsch
Français
Italiano
Español
Nederlands
Select Language
Figure 7-3 Select language page

37
7.1 Home Page
When inverter is operating normally, the LCD will display the homepage as
shown in Figure 7-4, user can get the information of output power, inverter status,
E-today, date and time.
E-Today: 47kWh
21. Jun 2010 13:50
Runtime: 8.2Hrs Power: 12103W
On Grid
20
15
10
5
0
4 8 12 16 20 24
Today Energy
Today Runtime
Inverter Status
Today Power Curve
Day - Time
Output Power
Figure 7-4 Home page
7.2 LCD Flow Chart
Press the EXIT button to enter the menu page (Figure 7-5). The option “E-today”
is the homepage.
Power Meter 7.2.1
Energy Log 7.2.2
Event Log 7.2.3
Operation Data 7.2.4
Inverter Information 7.2.5
Setting 7.2.6
Figure 7-5 Menu page
7.2.1 Power Meter
This page shows the information about input and output power.
Power Meter
Input1 Input2
P
V
I
W
V
A
1420
222
6.4
1480
224
6.6
Output
1455
225
6.5
Today Energy:
Today Runtime:
21. Jun 2010 13:50
kWh0
Today Earning:
Today CO2 Saved:
Hours0.0
0
kg0.0
€
Figure 7-6 Power meter page
Menu
Operation Data
E-Today
Power Meter
Event Log
Energy Log
Setting
Inverter Information

38
7.2.2 Energy Log
Press ENTER on this page to view the historical data on the power generated
from a yearly, monthly and daily basis.
21. Jun 2010 13:50
Energy Log - Total
Life Energy:
Life Runtime:
Total CO2 Saved:
kWh
Hours
kg
29200
3651
54312
21. Jun 2010 13:50
180
150
120
90
60
30
0
Energy Log - Month
2010.06
2010.05
1447
2690 kg
1 Day5 10 15 20 25 30
kWh
Month CO2 Saved:
180
150
120
90
60
30
0
Exit Day
E-Month: kWh
kWh06,Peak Day:
Energy Log - Year
2010
17033
2354
31681
4500
3750
3000
2250
1500
750
0
kg
Month
kWh
1 2 3 4 5 6 7 8 9 10 11 12 Month
Year CO2 Saved:
2009Exit Month
E-Year:
Peak Month:
kWh
kWh
21. Jun 2010 13:50
21. Jun 2010 13:50
2010.06
2010.04
Exit
Month CO2 Saved:
4612 kg
Day
180
150
120
90
60
30
0
1 Day10 15 20 25 30
Energy Log - Month
kWh
2010.05
5
Energy Log - Year
21. Jun 2010 13:50
2010
2009
2009
4500
3750
3000
2250
1500
750
0
Month
kWh
Month
1 2 3 4 5 6 7 8 9 10 11 12
2008
Exit Month
54312 kg
Year CO2 Saved:
21. Jun 2010 13:50
Energy Log - Day
2010.06.20
2010.06.212010.06.19
Exit
kg
kW
Hour
Day CO2 Saved:
149
Year
20
15
10
5
0
4 8 12 16 20 24
ENT
ENT
21. Jun 2010 13:50
Energy Log - Day
2010.06.21
46
14
86
kg
kW
Hour
Day CO2 Saved:
2010.06.20
20
15
10
5
0
4 8 12 16 20 24
Exit Year
kWh
kWh
Peak Hour:
E-Day:
EXIT EXIT
EXITENT ENT EXIT
ENT
EXIT
ENT ENT
May,
01 pm,
92
80
15 kWh
kWh
Peak Hour:
E-Day:
01 pm,
2480
E-Month:
kWh
kWh15,Peak Day: 95
29200
2490
E-Year:
Peak Month:
kWh
kWh
Jul,
Total Earning: 0 €
History
Figure 7-7 Energy log flow chart
7.2.3 Event Log
This page displays all the events (errors or fault) and it can show 30 records at at
a time. Press ENTER to view all the statistical data.
Event Log
21. Jun 2010 13:50
1. 15/02/2010 17:02
2. 02/12/2009 09:13
3. 23/11/2009 15:28
4. 03/10/2009 06:02
5. 27/05/2009 05:52
6. 18/02/2009 16:46
AC Freq High
No Grid
HW Fan
Insulation
Insulation
HW DC Injection
Summary
21. Jun 2010 13:50
HW DC Injection
Temperature
HW NTC1 Fail
HW NTC2 Fail
HW NTC3 Fail
HW NTC4 Fail
Event Count
2
1
0
0
0
0
Event Summary – 1/8
1
0
ENT
EXIT
Figure 7-8 Event log flow chart

39
7.2.4 Operation Data
The operation data is split into 4 pages. It records the maximum and/or minimum
values of history; including voltage, current, power and temperature.
Operation Data – 1/4
21. Jun 2010 13:50
Input1
Voltage
Current
Power
Voltage
Current
Power
Input2
Maximum
(Vdc)
(A)
(W)
(Vdc)
(A)
(W)
811
25.2
11200
785
26.3
10301
Operation Data – 2/4
21. Jun 2010 13:50
L1
Voltage
Current
Power
Voltage
Current
Power
Voltage
Current
Power
L2
L3
Maximum
(Vdc)
(A)
(W)
(Vdc)
(A)
(W)
(Vdc)
(A)
(W)
247
30.5
6810
244
30.3
6756
245
30.1
6745
Operation Data – 4/4
21. Jun 2010 13:50
Temperature Max. Min.
Inside
Heatsink - 1
Heatsink - 2
Heatsink - 3
(℃)
(℃)
(℃)
(℃)
59.3
75.5
74.2
73.6
15.7
15.3
15.2
15.2
Operation Data – 3/4
21. Jun 2010 13:50
Output
Voltage
Current
Power
Frequency
(Vdc)
(A)
(W)
(Hz)
Maximum
247
30.5
20311
50.10
ENT
or
ENT
or
ENT
or
ENT
or
Figure 7-9 Operation data flow chart
7.2.5 Inverter Information
This page has the following information: serial number, firmware version,
installation date and inverter ID. If user wants to change inverter ID, please refer
to 7.2.6.3 Install Setting.
.
Inverter Information
21. Jun 2010 13:50
Serial Number
DSP-Version
Installation Date
AE46000006
05.Jan.2009
1.80
Red.-Version 1.17
Comm.-Version
1.99
Inverter ID 001
Country Custom
Figure 7-10 Inverter information page

40
7.2.6 Settings
The Settings page includes Personal, Coefficients, Installation, Active/Reactive
Power Control and FRT Settings.
Settings
21. Jun 2010 13:50
Coefficients Settings
Personal Settings
Install Settings
Active/Reactive Power Control
FRT
Figure 7-11 Setting page
7.2.6.1 Personal Setting
The language, date, time, screensaver, LCD brightness and contrast can be set
in the Personal Settings.
Personal Settings
21. Jun 2010 13:50
Language English
Date
Time
Screen Saver
21 / 06 / 2010
(DD/MM/YYYY)
Brightness
Contrast
[ ]
5 min[
]
3[
]
2[
]
13:50
Figure 7-12 Personal setting page

41
7.2.6.2 Coefficient Setting
Users can set the following parameters according their needs.
Coefficient Settings
21. Jun 2010 13:50
1.86
CO2 Saved kg/kWh
[ ]
Earning Value/kWh
Currency ($,€)
[
[
2.50
€
]
]
Figure 7-13 Coefficient setting page
7.2.6.3 Installation Settings
A password is required to enter the Installation Setting. These settings are
different for end customers and installers. The password once set, cannot be
reset. Once a the correct password has been entered, access to configure the
Inverter ID, Insulation, RCMU, Reconnection Time, Ramp-up Power and AC
Connection will be granted.
CAUTION !
The following settings can only be adjusted by installers or
engineers. Changing these settings may result in damage to the
inverter and other equipment.
Insulation: Inverter will measure the impedance between the Array and PE
before connecting to grid. If the impedance is lower than the value that is set
in Insulation Settings, inverter will stop connecting to grid. There are 6
modes users can select in Insulation settings: ON, Positive Ground,
Negative Ground, DC1 Only, DC2 Only, and Disable. After an analysis has
been made for the site, the impedance should be set to best suit the
environment of the installation.
DC Injection: Inverter will shutdown if the DC component in the AC current
is over the limit.
RCMU: If there is a leakage current between the input and output which
exceeds the limit, inverter will shutdown immediately.
Reconnction Time: The time before the inverter connects to grid.
Ramp-up Power: The rate of increase in the output power. (%/min)

42
AC connection: Depending on the site conditions, the two systems
available are 3P3W and 3P4W.
Install Settings
21. Jun 2010 13:50
Inverter ID
Insulation
RCMU
Password
21. Jun 2010 13:50
*
ENT
ENT
EXIT
Country ItalyMV
[ 001 ]
[ ON ]
Grid Settings
[ ]
Reconnection Time
[
]
60 s
Ramp-up Power
20
%/m
Install Settings
21. Jun 2010 13:50
AC Connection
[
]
3P4W
Figure 7-14 Install setting page –User mode
Install Settings
21. Jun 2010 13:50
Inverter ID
Insulation
RCMU
Insulation
21. Jun 2010 13:50
Mode
Resistance
ON
1200
[
[
]
] kohm
ENT
EXIT
Country ItalyMV
[ 001 ]
[ ON ]
Grid Settings
[ ]
Reconnection Time
[
]
60 s
Ramp-up Power
20
%/m
Figure 7-15 Insulation setting
The system will add the options DC-Injection, Return to Factory, Country and
Grid Setting once the technician password has been entered. In Grid Setting
selection, technician can adjust the protection parameters (OVR, UVR, OFR,
UFR, etc) to Utility. Before setting of the protection to Utility, please set the
country as “Custom.” Returning the inverter to factory settings will revert the
inverter setting back to default and remove all event and energy records.
Install Settings – 1/2
21. Jun 2010 13:50
DC Injection
Inverter ID
Insulation
RCMU
[ 001 ]
[ ON ]
Country ItalyMV
Grid Settings
Return to Factory [ Yes / No ]
Install Settings – 2/2
21. Jun 2010 13:50
20
[
]
Reconnection Time
[
]
Ramp-up Power
%/m
S
300
AC Connection [ ]
3P4W
Figure 7-16 Install setting page – Installer mode

43
21. Jun 2010 13:50
Grid Settings – 1/4
Vac High Off
Vac High On
Vac High Off T
Vac Low Off
Vac Low On
Vac Low Off T
276.0 V
253.0 V
0.5 s
184.0 V
195.5 V
0.5 s
[
[
[
[
[
[
]
]
]
]
]
]
21. Jun 2010 13:50
Grid Settings – 2/4
Vac High Off Slow
Vac High On Slow
Vac High Off Slow T
Vac Low Off Slow
Vac Low On Slow
Vac Low Off Slow T
276.0 V
253.0 V
0.5 s
184.0 V
195.5 V
0.5 s
[
[
[
[
[
[
]
]
]
]
]
]
21. Jun 2010 13:50
Grid Settings – 3/4
Fac High Off
Fac High On
Fac High Off T
Fac Low Off
Fac Low On
Fac Low Off T
52.00 Hz
50.50 Hz
1.5 s
47.00 Hz
49.95 Hz
5.00 s
[
[
[
[
[
[
]
]
]
]
]
]
21. Jun 2010 13:50
Grid Settings – 4/4
Reconnection Time
[ ]300 s
Figure 7-17 Grid setting page
There are 19 parameters on the Grid Settings page. Users can refer to table 7-2
for the function of each parameter.
Table 7-2 Grid setting parameters
Parameter
Description
Vac High Off
Inverter will be disconnected from the grid if the AC phase
voltage rises to this value.
Vac High On
Inverter will be reconnected to grid if the AC phase voltage
drops to this value.
Vac High Off T
If AC voltage reaches the Vac High Off value, the inverter will
be disconnected in this time.
Vac Low Off
The inverter will be disconnected from grid if the AC phase
voltage drops to this value.
Vac Low On
Inverter will be reconnected to grid if the AC phase voltage
rises to this value.
Vac Low Off T
If the AC voltage reaches to the Vac Low Off value, the inverter
will be disconnected in this time.
Vac High Off Slow
Same functionality as the Vac High Off, but the value must be
set lower.
Vac High On Slow
Same functionality as the Vac High On, but the value must be
set lower.

44
Vac High Off Slow T
Same functionality as the Vac High Off T, but the time must be
set longer.
Vac Low Off Slow
Same functionality as the Vac Low Off, but the value must be
set higher.
Vac Low On Slow
Same functionality as the Vac Low On, but the value must be
higher.
Vac Low Off Slow T
Same functionality as the Vac High Off T, but the time must be
longer.
Fac High Off
The inverter will be disconnected from grid if the AC frequency
rises to this value.
Fac High On
The inverter will be reconnected to grid if the AC frequency
drops to this value.
Fac High Off T
If AC frequency reaches the Fac High Off value, the inverter will
be disconnected in this time.
Fac Low Off
Inverter will be disconnected from if the AC frequency drops to
this value.
Fac Low On
Inverter will be reconnected to grid if the AC frequency rises to
this value.
Fac Low Off T
If AC frequency reaches the Fac Low Off value, the inverter will
be disconnected in this time.
Reconnection Time
The time before the inverter reconnects to grid.
7.2.6.4 Active/Reactive Power Control
User can enter this page only when the country is sets as Germany LV, Germany
MV, Italy LV, or Italy MV. User has to enter user’s password before enter this
page.
Password
21. Jun 2010 13:50
ENT
ENT
EXIT
ENT
EXIT
Active/Reactive Power
21. Jun 2010 13:50
Power vs. Frequency
Power Limit
Constant cosφ
cosφ(P)
Constant Reactive Power
Q(V)
*1
*2
*3
Settings
21. Jun 2010 13:50
Coefficients Settings
Personal Settings
Install Settings
Active/Reactive Power Control
FRT
Figure 7-18 Active/Reactive powersetting page

45
7.2.6.4.1 Power Limit
The power limit can be set by the percentage of actual/rated power. The Mode
will turn the power limiting on and off.
Active Power Control
21. Jun 2010 13:50
Actual/Rated Power
Set Point 100
Rated
[
[
]]%
Mode
ON[ ]
Figure 7-19 Power limit setting page
7.2.6.4.2 Power vs. Frequency
Please notice the gradient is different between Italy and other countries.
- Italy BT/ MT: used to calculate the frequency of zero power. Ie. Fstop =
Fstart + Gradient * 50
- For other countries (ex. Germany LV or MV): Gradient means the slope
of power reduction, ie/ -xx%/Hz
Recovery time is accessible only if Country is set as Italy BT or MT. This means
If the frequency is back to normal before the time runs out, the inverter has to
stay on the power at that certain period of time and it cannot increase the power.
a
b
c
d
e
f
P
Pm
fstart
fstop
f
(Hz)
Statism
P
Pm
f
recovery
f
start
f
stop
f
(
Hz
)
a
b
c
d
e
e
f
Active Power Control
21. Jun 2010 13:50
Start Frequency
Actual/Rated Power Actual
50.30
[
[
]
]
Stop Frequency
- -[ ]HzHz
- -[ ] Hz
Statism 40[ ] %
Mode ON[ ]
Recovery Frequency
Recovery Time
300
[
]
s
b
c
Statism
Figure 7-20 Power vs. frequency setting page.

46
7.2.6.4.3 Constant cosφ
When this Mode is activated, the inverter will maintain the power factor as a
constant value. The range is from Cap 0.80 to Ind 0.80.
Reactive Power Control
21. Jun 2010 13:50
cosφ Ind 0.90[ ]
Mode ON[ ]
Figure 7-21 Constant cosφ setting page
7.2.6.4.4 cosφ(P)
The output power factor would be affected by feeding power. Lock-in voltage and
Lock-out voltage are only adjustable if the country setting is either Italy BT or Italy
MT. The Inverter will feed-in reactive power depending on the active power once
the Grid voltage is higher than the Lock-in voltage. It will revert back to active
power when Grid voltage is lower than Lock-out voltage. For the countries other
than Italy, cosφ (P) control will not affect the Grid voltage.
a
b
c
d
Lock-out Voltage [ ]
Reactive Power Control
21. Jun 2010 13:50
Mode OFF[ ]
230.0
V
Lock-out Voltage
[ ]
Reactive Power Control
21. Jun 2010 13:50
Lower limit - cosφ
Upper limit - cosφ Cap 0.90
Ind 0.90
[
[
]
]
Lower Power 0[ ] %
Upper Power 100[ ] %
Lock-in Voltage 241.5[ ] V
Upper
Limit
Lower
Limit
P/Pn
1
cosφ
Lower
Power
Upper
Power
a
b
c
d
Figure 7-22 cosφ(P) setting page

47
7.2.6.4.5 Constant Reactive Power
When this Mode is activated, inverter will maintain the reactive power as a
constant value.
Reactive Power Control
21. Jun 2010 13:50
Mode
Reactive Power (Q/Sn) Cap 30
OFF
[
[
]
]
%
Figure 7-23 Constant Reactive Power setting page
7.2.6.4.6 Q(U)
RPI-series support two kind of Q(U) curves. Please refer to fiqure 7-24.
Reactive Power Control
21. Jun 2010 13:50
Qi limit
Qs limit Ind 44
Cap 44
[
[
]]%
%
V2i
207.0[ ]
V
V2s 253.0[ ]
V
211.6[ ]
V
V1i
V1s 248.4[ ]
V
Reactive Power Control
21. Jun 2010 13:50
5[ ]
%
Mode
OFF[ ]
Lock-out Power
20[ ]Lock-in Power %
Delay Time
10[ ]
s
a
b
c
d
e
f
g
V
1s
V
2s
V
1i
V
2i
Q
i limit
Q
s limit
V
Q
V
1s
V
2s
V
1i
V
2i
Q
i limit
Q
s limit
V
Q
Curve A
Curve B
a
b
c
d
e
f
g
a
b
c
d
e
f
g
Figure 7-24 Q(U) setting page

48
7.2.6.5 FRT (Fault ride through)
This function is only for Germany MV, Italy LV, and Italy MV. It is not
recommended that an end customers modify the default values.
U/Un
IB/In
K factor
K factor
+10-10
FRT – 1/2
21. Jun 2010 13:50
Dead band - Vh
K factor
Vdrop
U1
t1
+10[ ] %
[
[
[
[
2.0
5
20
150
]
]
]
]
%
%
ms
t2
[ 1.5 ] s
Dead band - Vl
-10[ ] %
a
b
c
d
e
f
g
ab
c
c
100%
U1
0
t1
t2
Fault occurence
t3
time
Ugrid/Unom
2 3
4
1
U2
Udrop
FRT – 2/2
21. Jun 2010 13:50
t3 [ 3.0 ]
s
Mode
ON[ ]
h
i
d
e
f
g h
Figure 7-25 FRT setting page

49
8. Maintenance
In order to ensure normal operation of the inverter, please check the unit
regularly. Check that all terminals, screws and cables are connected and appear
as they did upon installation. If there are any impaired or loose parts, please
contact your solar installer.
Ensure that there are no foreign objects in the path of the heat outlet and keep
the unit and its surroundings clean and tidy.
WARNING !
Before any maintenance, please switch AC and DC power off to
avoid risk of electronic shock.
8.1 Clean Fan
Loosen the 4 screws shown in Figure 8-1. Once the screws are loose, pulling the
fan bracket out will expose the connectors. As shown in Figure 8-1, there is one
wire per fan. The bracket is completely detachable once the connectors are
disconnected as shown in Figure 8-2.
1
2
3
4
RPI-M15/ M20/ M30
RPI-M8/ M10/ M12 RPI-M15A/ M20A
Figure 8-1 dissembling fan connections

50
Figure 8-2 disassembling fan overview
8.2 Replace Fan
In the event that a fan needs to be replaced, user should disassemble the 4 pcs
screws around the fans and disconnect the connector right behind the fan
bracket. Then replace new fan and reassemble the 4pcs screws.
RPI-M15/ M20/ M30
RPI-M8/ M10/ M12
RPI-M15A/ M20A
Figure 8-3 Disassembling fan
8.3 Clean Air Outlets
Disassembling the 4 screws of air outlet and cleaning it should be done regularly.
Figure 8-4 Disassembling air outlets

51
9. Measurement, Error message and Trouble Shooting
9.1 Measurement
Table 9-1 Measurement and message
E-Today: 47kWh
21. Jun 2010 13:50
Runtime: 8.2Hrs Power: 12103W
On Grid
20
15
10
5
0
4 8 12 16 20 24
1
2 3
Power Meter
Input1 Input2
P
V
I
W
V
A
1420
222
6.4
1480
224
6.6
Output
1455
225
6.5
Today Energy:
Today Runtime:
21. Jun 2010 13:50
kWh0
Today Earning:
Today CO2 Saved:
Hours0.0
0
kg0.0
€
4
5
6
7
8
9
10
11
12
13
14
15
16
21. Jun 2010 13:50
Energy Log - Total
Life Energy:
Life Runtime:
Total CO2 Saved:
kWh
Hours
kg
29200
3651
54312
Total Earning: 0 €
History
17
18
19
20
Energy Log - Year
2010
17033
2354
31681
4500
3750
3000
2250
1500
750
0
kg
Month
kWh
1 2 3 4 5 6 7 8 9 10 11 12 Month
Year CO2 Saved:
2009Exit Month
E-Year:
Peak Month:
kWh
kWh
21. Jun 2010 13:50
May,
21
22
23
21. Jun 2010 13:50
Energy Log - Month
2010.06
2010.05
1447
2690 kg
1 Day5 10 15 20 25 30
kWh
Month CO2 Saved:
Exit Day
E-Month: kWh
kWh06,Peak Day: 92
24
25
26
21. Jun 2010 13:50
Energy Log - Day
2010.06.21
46
14
86
kg
kW
Hour
Day CO2 Saved:
2010.06.20
20
15
10
5
0
4 8 12 16 20 24
Exit Year
kWh
kWh
Peak Hour:
E-Day:
01 pm,
27
28
29
Operation Data – 1/4
21. Jun 2010 13:50
Input1
Voltage
Current
Power
Voltage
Current
Power
Input2
Maximum
(Vdc)
(A)
(W)
(Vdc)
(A)
(W)
811
25.2
11200
785
26.3
10301
30
31
32
33
34
35
Operation Data – 2/4
21. Jun 2010 13:50
L1
Voltage
Current
Power
Voltage
Current
Power
Voltage
Current
Power
L2
L3
Maximum
(Vdc)
(A)
(W)
(Vdc)
(A)
(W)
(Vdc)
(A)
(W)
247
30.5
6810
244
30.3
6756
245
30.1
6745
36
37
38
39
40
41
42
43
44
52
Operation Data – 3/4
21. Jun 2010 13:50
Output
Voltage
Current
Power
Frequency
(Vdc)
(A)
(W)
(Hz)
Maximum
247
30.5
20311
50.10
45
46
47
48
Operation Data – 4/4
21. Jun 2010 13:50
Temperature Max. Min.
Inside
Heatsink - 1
Heatsink - 2
Heatsink - 3
(℃)
(℃)
(℃)
(℃)
59.3
75.5
74.2
73.6
15.7
15.3
15.2
15.2
53
54
55
56
49
50
51
52
No.
Measurement
Meaning
1
E-Today
Total energy generated today
2
Runtime
Operation time today
3
Power
Actual power is generating
4
Input1 - P
Power of DC Input1
5
Input1 - V
Voltage of DC Input1
6
Input1 - I
Current of DC Input1
7
Input2 - P
Power of DC Input2
8
Input2 - V
Voltage of DC Input2
9
Input2 - I
Current of DC Input2
10
Output - P
Power of AC output
11
Output- V
Voltage of AC output
12
Output- I
Current of AC output
13
Today Energy
Accumulate electricity generated today
14
Today Runtime
Accumulated operation time today
15
Today Earning
Accumulated dollars amount earned today
16
Today co2 saved
Accumulated CO2 emission retrenched today
17
Life Energy
Total energy generated to present time
18
Life Runtime
Accumulated operation time to present time
19
Total co2 saved
Accumulated CO2 emission retrenched to present time
20
Total Earning
Accumulated the total amount of money earned
21
Peak Month
The maximum energy generated of one month in that year.
22
E-Year
Total energy generated in that year
23
Year CO2 saved
Accumulated CO2 emission retrenched in that year
24
Peak Day
The maximum energy generated of one day in that month

53
25
E-Month
Total energy generated in that month
26
Month CO2 saved
Accumulated CO2 emission retrenched in that month
27
Peak Hour
The maximum energy generated of one hour in that day
28
E-Day
Total energy generated in that day
29
Day CO2 saved
Accumulated CO2 emission retrenched in that day
30
Input1 Voltage Maximum
The maximum DC Input1 voltage from history
31
Input1 Current Maximum
The maximum DC Input1 current from history
32
Input1 Power Maximum
The maximum DC Input1 power from history
33
Input2 Voltage Maximum
The maximum DC Input2 voltage from history
34
Input2 Current Maximum
The maximum DC Input2 current from history
35
Input2 Power Maximum
The maximum DC Input2 power from history
36
L1 Voltage Maximum
The maximum L1 phase voltage from history
37
L1 Current Maximum
The maximum L1 phase current from history
38
L1 Power Maximum
The maximum L1 phase power from history
39
L2 Voltage Maximum
The maximum L2 phase voltage from history
40
L2 Current Maximum
The maximum L2 phase current from history
41
L2 Power Maximum
The maximum L2 phase power from history
42
L3 Voltage Maximum
The maximum L3 phase voltage from history
43
L3 Current Maximum
The maximum L3 phase current from history
44
L3 Power Maximum
The maximum L3 phase power from history
45
Output Voltage Maximum
The maximum Grid voltage from history
46
Output Current Maximum
The maximum output current from history
47
Output Power Maximum
The maximum output power from history
48
Output Frequency Maximum
The maximum Grid frequency from history
49
Inside Max.
The maximum inverter inner temperature value
50
Heatsink-1 Max.
The maximum Heatsink-1 temperature value
51
Heatsink-2 Max.
The maximum Heatsink-2 temperature value
52
Heatsink-3 Max.
The maximum Heatsink-3 temperature value
53
Inside Min.
The minimum inverter inner temperature value
54
Heatsink-1 Min.
The minimum Heatsink-1 temperature value
55
Heatsink-2 Min.
The minimum Heatsink-2 temperature value
56
Heatsink-3 Min.
The minimum Heatsink-3 temperature value

54
9.2 Error Message & Trouble Shooting
Table 9-2 Error Message
ERROR
Message
Possible cause
Action
AC Freq
High
1. Actual utility frequency is over
the OFR setting
2. Incorrect country setting
3. Detection circuit malfunction
1. Check the utility frequency on the inverter
terminal
2. Check country setting
3. Check the detection circuit inside the inverter
AC Freq
Low
1. Actual utility frequency is
under the UFR setting
2. Incorrect country or Grid
setting
3. Detection circuit malfunction
1. Check the utility frequency on the inverter
terminal
2. Check country & Grid setting
3. Check the detection circuit inside the inverter
Grid Quality
Non-linear load in Grid and near
to inverter
Grid connection of inverter need to be far away
fromnon-linear load if necessary
HW Connect
Fail
1. Wrong connection in
AC plug
2. Detection circuit malfunction
1. Check the AC connection, must accords to
manual
2. Check the detection circuit inside the inverter
No Grid
1. AC breaker is OFF
2. Disconnect in AC plug
1. Switch on AC breaker
2. Check the connection in AC plug and make
sure it connects to inverter
AC Volt Low
1. Actual utility voltage is under
the UVR setting
2. Incorrect country or Grid
setting
3. Wrong connections in AC plug
4. One or more internal fuses are
broken
5. Detection circuit malfunction
1. Check the utility voltage connection to the
inverter terminal
2. Check country & Grid setting
3. Check the connection in AC plug
4. Replace fuses (FUC1-3) and check all
switching devices in boost & inverter stages
5. Check the detection circuit inside the inverter
AC Volt High
1. Actual utility voltage is over
the OVR setting
2. Utility voltage is over the Slow
OVR setting during operation
3. Incorrect country or Grid
setting
4. Detection circuit malfunction
1. Check the utility voltage on the inverter
terminal
2. Check the utility voltage on the inverter
terminal
3. Check country & Grid setting
4. Check the detection circuit inside the inverter

55
Solar1 High
1. Actual Solar1 voltage is over
1000Vdc
2. Detection circuit malfunction
1. Modify the solar array setting, and make the
Voc less than 1000Vdc
2. Check the detection circuit inside the inverter
Solar2 High
1. Actual Solar2 voltage is over
1000Vdc
2. Detection circuit malfunction
1. Modify the solar array setting, and make the
Voc less than 1000Vdc
2. Check the detection circuit inside the inverter
Insulation
1. PV array insulation fault
2. Large PV array capacitance
between Plus to Ground or
Minus to Ground or both.
3. Detection circuit malfunction
1. Check the insulation of Solar inputs
2. Check the capacitance, dry PV panel if
necessary
3. Check the detection circuit inside the inverter
Table 9-3 Warning Message
Warning
Message
Possible cause
Action
Solar1 Low
1. Actual Solar1 voltage is
under the limit
2. Some devices were
damaged inside the inverter
if the actual Solar1 voltage is
close to "0"
3. Detection circuit malfunction
1. Check the Solar1 voltage connection to the
inverter terminal
2. Check all switching devices in boost1
3. Check the detection circuit inside the inverter
Solar2 Low
1. Actual Solar2 voltage is
under the limit
2. Some devices were
damaged inside the inverter
if the actual Solar2 voltage is
close to "0"
3. Detection circuit malfunction
1. Check the Solar2 voltage connection to the
inverter terminal
2. Check all switching devices in boost2
3. Check the detection circuit inside the inverter
HW FAN
1. One or more fans are locked
2. One or more fans are
defective
3. One ore more fans are
disconnected
3. Detection circuit malfunction
1. Remove the object that stuck in the fan(s)
2. Replace the defective fan(s)
3. Check the connections of all fans
4. Check the detection circuit inside the inverter

56
Table 9-4 Fault Message
FAULT
Message
Possible cause
Action
HW DC
Injection
1. Utility waveform is abnormal
2. Detection circuit malfunction
1. Check the utility waveform. Grid connection of
inverter need to be far away from non-linear
load if necessary
2. Check the detection circuit inside the inverter
Temperature
High
1. The ambient is over 60℃
(The installation is abnormal)
2. Detection circuit malfunction
1. Check the installation ambient and
environment
2. Check the detection circuit inside the inverter
HW NTC1
Fail
1. Ambient temperature >90℃
or <-30℃
2. Detection circuit malfunction
1. Check the installation ambient and
environment
2. Check the detection circuit inside the inverter
(RTM1)
Temperature
Low
1. Ambient temperature is
<-30℃
2. Detection circuit malfunction
1. Check the installation ambient and
environment
2. Check the detection circuit inside the inverter
(RTM1, RTB1, RTG1 and RTH1)
HW NTC2
Fail
1. Ambient temperature >90℃
or <-30℃
2. Detection circuit malfunction
1. Check the installation ambient and
environment
2. Check the detection circuit inside the inverter
(RTB1)
HW NTC3
Fail
1. Ambient temperature >90℃
or <-30℃
2. Detection circuit malfunction
1. Check the installation ambient and
environment
2. Check the detection circuit inside the inverter
(RTG1)
HW NTC4
Fail
1. Ambient temperature >90℃
or <-30℃
2. Detection circuit malfunction
1. Check the installation ambient and
environment
2. Check the detection circuit inside the inverter
(RTH1)
HW DSP
ADC1
1. Insufficient input power
2. Auxiliary power circuitry
malfunction
3. Detection circuit malfunction
1. Check the input voltage, must > 150Vdc
2. Check the auxiliary circuitry inside the inverter
3. Check the detection circuit inside the inverter
HW DSP
ADC2
1. Insufficient input power
2. Auxiliary power circuitry
malfunction
3. Detection circuit malfunction
1. Check the input voltage, must > 150Vdc
2. Check the auxiliary circuitry inside the inverter
3. Check the detection circuit inside the inverter

57
HW DSP
ADC3
1. Insufficient input power
2. Auxiliary power circuitry
malfunction
3. Detection circuit malfunction
1. Check the input voltage, must > 150Vdc
2. Check the auxiliary circuitry inside the inverter
3. Check the detection circuit inside the inverter
HW Red
ADC1
1. Insufficient input power
2. Auxiliary power circuitry
malfunction
3. Detection circuit malfunction
1. Check the input voltage, must > 150Vdc
2. Check the auxiliary circuitry inside the inverter
3. Check the detection circuit inside the inverter
HW Red
ADC2
1. Insufficient input power
2. Auxiliary power circuitry
malfunction
3. Detection circuit malfunction
1. Check the input voltage, must > 150Vdc
2. Check the auxiliary circuitry inside the inverter
3. Check the detection circuit inside the inverter
HW
Efficiency
1. The calibration is incorrect
2. Current feedback circuit is
defective
1. Check the accuracy of current and power
2. Check the current feedback circuit inside the
inverter
HW COMM2
1. Red. CPU is idling
2. The communication
connection is disconnected
1. Check reset and crystal in Red. CPU
2. Check the connection between Red. CPU and
DSp
HW COMM1
1. DSP is idling
2. The communication
connection is disconnected
3. The communication circuit
malfunction
1. Check reset and crystal in DSP
2. Check the connection between DSP and
COMM
3. Check the communication circuit
Ground
Current
1. PV array insulation fault
2. Large PV array capacitance
between Plus to Ground or
Minus to Ground
3. Either side of boost driver or
boost choke malfunction
4. Detection circuit malfunction
1. Check the insulation of Solar inputs
2. Check the capacitance (+ <-> GND & - <->
GND), must < 2.5uF. Install a external
transformer if necessary
3. Check boost driver & boost choke
4. Check the detection circuit inside the inverter
HW Connect
Fail
1. Power line is disconnected
inside the inverter
2. Current feedback circuit is
defective
1. Check the power lines inside the inverter
2. Check the current feedback circuit inside the
inverter
RCMU Fail
1. RCMU is disconnected
2. Detection circuit malfunction
1. Check the RCMU connection inside the
inverter
2. Check the detection circuit inside the inverter

58
Relay Test
Short
1. One or more relays are
sticking
2. The driver circuit for the relay
malfunction
1. Replace the defective relay(s)
2. Check the driver circuit inside the inverter
Relay Test
Open
1. One or more relays are
abnormal
2. The driver circuit for the relay
malfunction
3. The detection accuracy is not
correct for Vgrid and Vout
1. Replace the defective relay(s)
2. Check the driver circuit inside the inverter
3. Check the Vgrid and Vout voltage detection
accuracy
Bus
Unbalance
1. Not totally independent or
parallel between inputs
2. PV Array short to Ground
3. Driver for boost is defective or
disconnected
4. Detection circuit malfunction
1. Check the inputs connections
2. Check the PV Array insulation
3. Check the driver circuit for boost inside the
inverter
4. Check the detection circuit inside the inverter
HW Bus
OVR
1. Driver for boost is defective
2. Voc of PV array is over
1000Vdc
3. Surge occurs during operation
4. Detection circuit malfunction
1. Check the driver circuit for boost inside the
inverter
2. Modify the solar array setting, and make the
Voc less than 1000Vdc
3. N/A
4. Check the detection circuit inside the inverter
AC Current
High
1. Surge occurs during operation
2. Driver for inverter stage is
defective
3. Switching device is defective
4. Detection circuit malfunction
1. N/A
2. Check the driver circuit in inverter stage
3. Check all switching devices in inverter stage
4. Check the detect circuit inside the inverter
HW CT A
Fail
1. Test current loop is broken
2. CSC1 is defective
3. Detection circuit malfunction
1. Check the connection of WC3 to CNC16
2. Replay CSC1 with new one
3. Check the detection circuit inside the inverter
HW CT B
Fail
1. Test current loop is broken
2. CSC2 is defective
3. Detection circuit malfunction
1. Check the connection of WC3 to CNC16
2. Replace CSC2 with new one
3. Check the detection circuit inside the inverter
HW CT C
Fail
1. Test current loop is broken
2. CSC3 is defective
3. Detection circuit malfunction
1. Check the connection of WC3 to CNC16
2. Replace CSC3 with new one
3. Check the detection circuit inside the inverter

59
HW AC OCR
1. Large Grid harmonics
2. Switching device is defective
3. Detection circuit malfunction
1. Check the utility waveform. Grid connection of
inverter need to be far away from non-linear
load if necessary
2. Check all switching devices in inverter stage
3. Check the detection circuit inside the inverter
HW ZC Fail
The detection circuit for
synchronal signal malfunction
Check the detection circuit for synchronal signal
inside the inverter
DC Current
High
1. Switching device in boost is
defective
2. Driver for boost is defective
3. Input current detection circuit
malfunction
1. Check all switching device in boost
2. Check the driver curcuit for boost inside the
inverter
3. Check input current detection circuit

60
10. De-Commissioning
10.1 De-Commissioning Procedure
If it is necessary to put the device out of operation for maintenance and/or
storage, please follow the instructions below.
WARNING!
To avoid injuries, please follow the procedures:
◆ Switch off AC circuit breaker to disconnect with electricity grid.
◆ Switch off DC switch to disconnect with DC source.
◆ Switch off the PV array switch to disconnect from the PV array.
◆ Use proper voltage meter to confirm that the AC and DC power
are disconnected from the unit.
◆ Remove the AC wiring immediately to completely disconnect
from electricity grid.
◆ Remove the DC wiring to disconnect from PV Array.
◆ Remove the communication module RS-485 connection from
the computer connection.
◆ After completing the above steps, the inverter can be removed.

61
11. Technical Data
11.1 Specification
Table 11-1 Specification for RPI-M8/ M10/ M12
RPI-M8
RPI-M10
RPI-M12
GENERAL
Enclosure
Powder coated aluminum
Operating temperature
-20~60℃, full power up to 40℃
Operating Altitude
2000 m
Relative humidity
0 – 100% non-condensing.
Environmental category
Outdoor, wet locations
Protection degree
IP65 (Electronics)
Pollution degree
II
Overvoltage category
AC output :III, DC Input :II
Maximum backfeed current
to the array
0
Galvanic isolation
NO
Safety class
Class I metal enclosure with protective earth
Weight
40kg
40kg
40kg
Dimensions
625 × 612 × 278 mm
Connectors
Weather resistant connectors
DC INPUT (Solar side)
Maximum input power
9kW
11kW
13.2kW
Recommended PV power range
7kW–10.5kW
8.8kW–13.2kW
10.5kW– 15.5kW
Nominal voltage
635Vdc
Operating voltage
200Vdc – 1000 Vdc
Startup voltage
> 250 Vdc
Start up power
40W
MPP tracker
Parallel inputs: 1 MPP tracker
Separate inputs: 2 MPP trackers
Absolute maximum voltage
1000Vdc
MPPT range at Nominal Power
Balanced inputs (50/50)
280~850 Vdc
350~850 Vdc
420~850 Vdc
Unbalanced inputs (67)
330~850 Vdc
350~850 Vdc
420~850 Vdc
Unbalanced inputs (33)
280~850 Vdc
350~850 Vdc
420~850 Vdc
Number of inputs
4 pairs MC4
Rated current
Each MPPT: 17A
Total: 30A
Each MPPT: 20A
Total: 30A
Each MPPT: 20A
Total: 30A

62
Maximum short circuit
current per MPPT (Isc)
24 A
24 A
24 A
AC OUTPUT (GRID SIDE)
Nominal power
8kVA
10kVA
12kVA
Maximum power
8.4kVA
10.5kVA
12.6kVA
Voltage
3Ph, 230/400Vac (3phase / N / PE)
Nominal current
11.6 A
14.5 A
17.4A
Maximum current
12.8 A
16 A
19.2 A
Inrush current
150A/100μs
150A/100μs
150A/100μs
Maximum output fault
current (rms)
22 A
22 A
22 A
Maximum output overcurrent
protection
16 A
20 A
25 A
Frequency
50 Hz model: 47 – 53 Hz
60 Hz model: 57 – 63 Hz
Total harmonic distortion
< 3 %
Power factor
> 0.99 @ full power
Adjustable: 0.80 leading – 0.80 lagging
DC current injection
<0.5% rated current
Tare loss
<2 W
Maximum efficiency
98.2%
98.3%
98.3%
EU efficiency
97.4%
97.7%
97.7%
AC connector
3 Ph + N + PE; 3-phase AC plug that meets IP67
and specifications in table 5-2.
Fuse
N/A. Please connect to an external protection
device (1.25 rated current)
SYSTEM INFORMATION / COMMUNICATION
User interface
Black-on-white graphical LCD display
365 days data logger and real time clock
30 events record
Externalcommunication
2 RS-485 connections

63
REGULATIONS & DIRECTIVES
CE conformity
Yes
Grid interface
VDE0126-1-1, VDE-AR-N 4105, RD1699, CEI 0-21
Emission
EN 61000-6-3
Harmonics
EN 61000-3-2
EN 61000-3-12
Variations and flicker
EN 61000-3-3
EN 61000-3-11
Immunity
EN 61000-6-2
Immunity
ESD
IEC 61000-4-2
RS
IEC 61000-4-3
EFT
IEC 61000-4-4
Surge
IEC 61000-4-5
CS
IEC 61000-4-6
PFMF
IEC 61000-4-8
Electrical safety
IEC 62109-1/ -2
MISCELLANEOUS
Cooling
Fan, 1pcs
Fan, 1pcs
Fan, 1pcs
Enclosure
Mounting bracket
Aluminum with powder coating

64
Table 11-2 Specification for RPI-M15/ M20/ M30
RPI-M15
RPI-M20
RPI-M30
GENERAL
Enclosure
Powder coated aluminum
Operating temperature
-20~60℃, full power up to 40℃
Operating Altitude
2000 m
Relative humidity
0 – 100% non condensing.
Environmental category
Outdoor, wet locations
Protection degree
IP65 (Electronics)
Pollution degree
II
Overvoltage category
AC output :III, DC Input :II
Maximum backfeed current
to the array
0
Galvanic isolation
NO
Safety class
Class I metal enclosure with protective earth
Weight
67.2kg
67.2kg
72.2kg
Dimensions
960 × 612 × 278 mm
Connectors
Weather resistant connectors
DC INPUT (Solar side)
Maximum input power
16.5kW
22 kW
33kW
Recommended PV power range
14kW – 19kW
18kW – 25kW
26kW – 38kW
Nominal voltage
650Vdc
Operating voltage
200Vdc – 1000 Vdc
Startup voltage
> 250 Vdc
Start up power
40W
MPP tracker
Parallel inputs: 1 MPP tracker
Separate inputs: 2 MPP trackers
Absolute maximum voltage
1000V
Maximum power MPPT range
Balanced inputs (50/50)
350-800Vdc
350-800Vdc
480-800Vdc
Unbalanced inputs (33/67)
470-800Vdc
480-800Vdc
620-800Vdc
Number of inputs
4 pairs MC4
6 pairs MC4
Rated current
24 A * 2
30A * 2
34 A * 2
Maximum short circuit
current per MPPT(Isc)
24 A
30 A
34 A

65
AC OUTPUT (GRID SIDE)
Nominal power
15kVA
20kVA
30kVA
Maximum power
16kVA
21kVA
30kVA
Voltage
3Ph, 230/400Vac
Nominal current
22 A
29A
43 A
Maximum current
25 A
32 A
46 A
Inrush current
150A/100μs
150A/100μs
150A/100μs
Maximum output fault
current (rms)
21.8 A
21.8 A
21.8 A
Maximum output over current
protection
32 A
40 A
58 A
Frequency
50 Hz models: 47 – 53 Hz
60 Hz models: 57 – 63 Hz
Total harmonic distortion
< 3 %
Power factor
> 0.99 @ full power
Adjustable: 0.80 leading – 0.80 lagging
DC current injection
<0.5% rated current
Tare loss
<2 W
Maximum efficiency
98.2 %
EU efficiency
> 97.5 %
AC connector
3 Ph + N + PE; 3-phase AC plug that meets IP67
and specifications in table 5-2.
Fuse
N/A. Please connect to an external protection
device (1.25 rated current)
SYSTEM INFORMATION / COMMUNICATION
User interface
Black-on-white graphical LCD display
365 days data logger and real time clock
30 events record
Externalcommunication
2 RS-485 connections

66
REGULATIONS & DIRECTIVES
CE conformity
Yes
Grid interface
VDE0126-1-1, VDE-AR-N 4105, RD1699, CEI 0-21
Emission
EN 61000-6-3
Harmonics
EN 61000-3-12
Variations and flicker
EN 61000-3-11
Immunity
EN 61000-6-2
Immunity
ESD
IEC 61000-4-2
RS
IEC 61000-4-3
EFT
IEC 61000-4-4
Surge
IEC 61000-4-5
CS
IEC 61000-4-6
PFMF
IEC 61000-4-8
Electrical safety
IEC 62109-1/ -2
MISCELLANEOUS
Cooling
Fan, 4pcs
Enclosure
Mounting bracket
Aluminum with powder coating

67
Table 11-3 Specification for RPI-M15A/ M20A
RPI-M15A
RPI-M20A
GENERAL
Enclosure
Powder coated aluminum
Operating temperature
-25~60℃, full power up to 40℃
Operating Altitude
2000 m
Relative humidity
0 – 100% non condensing.
Environmental category
Outdoor, wet locations
Protection degree
IP65 (Electronics)
Pollution degree
II
Overvoltage category
AC output :III, DC Input :II
Maximum backfeed
current to the array
0
Galvanic isolation
NO
Safety class
Class I metal enclosure with protective earth
Weight
43kg
43kg
Dimensions
625 × 612 × 278 mm
Connectors
Weather resistant connectors
DC INPUT (Solar side)
Maximum input power
16.5kW
22 kW
Recommended PV power range
14kW – 19kW
18kW – 25kW
Nominal voltage
635Vdc
Operating voltage
200Vdc – 1000 Vdc
Startup voltage
> 250 Vdc
Start up power
40W
MPP tracker
Parallel inputs: 1 MPP tracker
Separate inputs: 2 MPP trackers
Absolute maximum voltage
1000V
Maximum power MPPT range
Balanced inputs (50/50)
355-820Vdc
470-820Vdc
Unbalanced inputs (67)
475-820Vdc
635-820Vdc
Unbalanced inputs (33)
235-820Vdc
310-820Vdc
Number of inputs
4 pairs MC4
Rated current
22 A * 2
22 A * 2
Maximum short circuit
current per MPPT (Isc)
24 A
24 A

68
AC OUTPUT (GRID SIDE)
Nominal power
15kVA
20kVA
Maximum power
15.75kVA
21kVA
Voltage
3Ph, 230/400Vac
Nominal current
22 A
29 A
Maximum current
24 A
32 A
Inrush current
150A/100μs
150A/100μs
Maximum output fault
current (rms)
22 A
22 A
Maximum output over current
protection
30 A
40 A
Frequency
50 Hz models: 47 – 53 Hz
60 Hz models: 57 – 63 Hz
Total harmonic distortion
< 3 %
Power factor
> 0.99 @ full power
Adjustable: 0.80 leading – 0.80 lagging
DC current injection
<0.5% rated current
Tare loss
<2 W
Maximum efficiency
98.3 %
98.4 %
EU efficiency
97.9 %
98.1 %
AC connector
3 Ph + N + PE; 3-phase AC plug that meets IP67
and specifications in table 5-2.
Fuse
N/A. Please connect to an external protection
device (1.25 rated current)
SYSTEM INFORMATION / COMMUNICATION
User interface
Black-on-white graphical LCD display
365 days data logger and real time clock
30 events record
Externalcommunication
2 RS-485 connections

69
REGULATIONS & DIRECTIVES
CE conformity
Yes
Grid interface
VDE0126-1-1, VDE-AR-N 4105, RD1699, CEI 0-21
Emission
EN 61000-6-3
Harmonics
EN 61000-3-12
Variations and flicker
EN 61000-3-11
Immunity
EN 61000-6-2
Immunity
ESD
IEC 61000-4-2
RS
IEC 61000-4-3
EFT
IEC 61000-4-4
Surge
IEC 61000-4-5
CS
IEC 61000-4-6
PFMF
IEC 61000-4-8
Electrical safety
IEC 62109-1/ -2
MISCELLANEOUS
Cooling
Fan, 2pcs
Enclosure
Mounting bracket
Aluminum with powder coating

204
 Loading...