

Delta Qumi_DP274-A13VVxx, Qumi_DP274-A13VVxB, Qumi_DP274-A13VVxA Service Manual
Delta Elec. Inc. Qumi Rev.02
Company Confidential VIVITEK___________________ Delta________________
1
2011/07/05
DATA PROJECTOR
SERVICE MANUAL
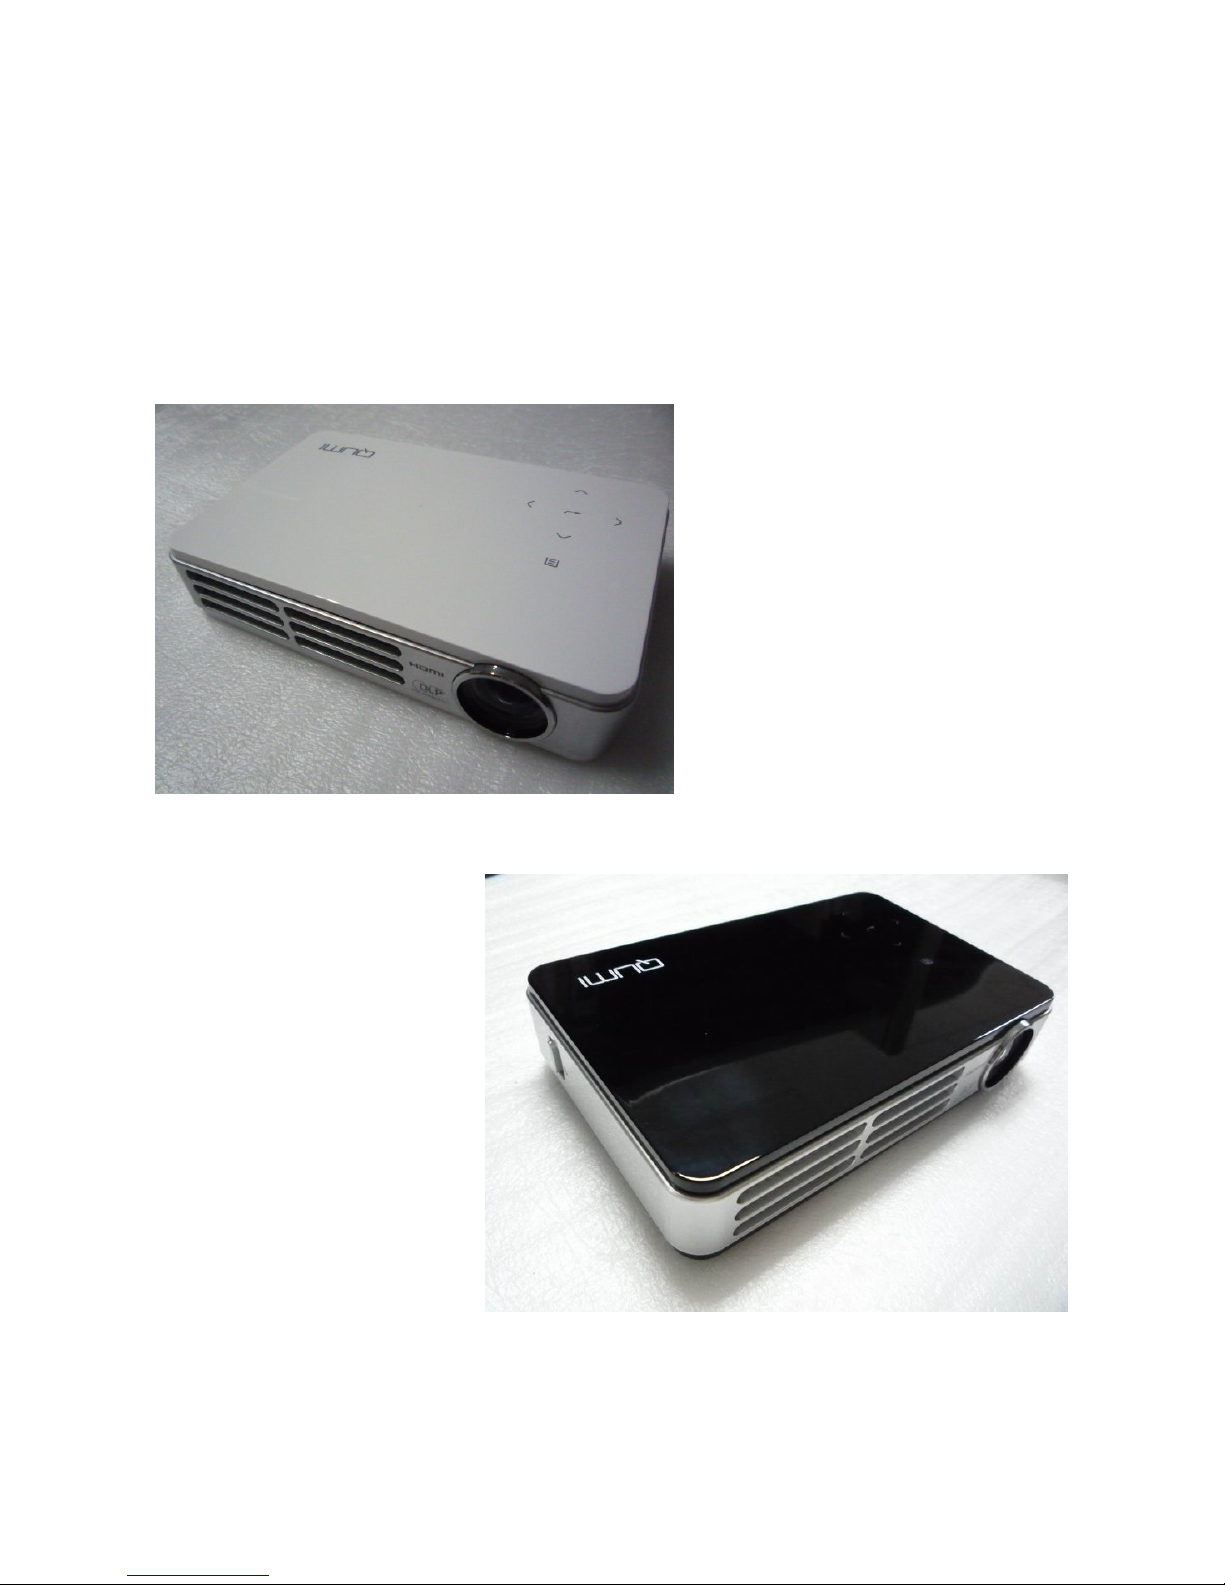
Qumi_DP274-A13VVxA
Qumi_DP274-A13VVxB

Delta Elec. Inc. Qumi Rev.02
Company Confidential VIVITEK___________________ Delta________________
2
2011/07/05
CONTENTS
1.COMPLIANCE OF SAFE REPAIR........................................................................................4
1-1.Caution During Disassembling And Assembling.............................................................4
1-2.Lamp.............................................................................................................................. 4
1-3.Lens................................................................................................................................4
2.SPECIFICATIONS.................................................................................................................5
2-1.Summary Specifications................................................................................................. 5
2-2.Views the projector……..………….………………………………………..…………..….…6
2-3.Remote control...............................................................................................................8
2-4.Optical adjustment image size......................................................................................10
2-5.BLOCK DIAGRAM....................................................................................................... 11
3.TROUBLE SHOOTING...................................................................................................... 12
4. DISASSEMBLY AND ASSEMBLY ..........................................................…………........... 17
5. Firmware Download......................................................................................................... 28
5-1.
Projector USB Drivers Installation Guide………………………………….……………...28
5-2. DLP Projector Composer (firmware) User Guide…………………………….…………..33
5-3. Started with Download………………………………………………………………………34
5-4.Starting and Shutting down the Projector……………………………………………….....39
5-5.Setting an Access Password (Security Lock)………………………………….…………..41
5-6.DLP Projector security unlock……………………………………….………………………43
5-7.Factory Reset……………..…………………………………………………………..…….. 45
5-8. Status…………………………………………..…………………………………………………………45
6. Calibration…………………………….……………………………………..….………………..46
7. EDID…………………………………………………………………………………………….…50
8. Service Note..…………………………………..………………………………………………..59
9. LED Message…………………………………………………………………………………….60
10. Factory preset Display modes……………………………………………….……….…..…61
11. Projector Installation Notice……………………………………………………..…………..63
12. Projector Dimensions……………………………………………………………………...…64
13.FAN Control……………………………………………………………………………………..65
14. Spare parts list……………………………………………………………………………….…66

Delta Elec. Inc. Qumi Rev.02
Company Confidential VIVITEK___________________ Delta________________
3
2011/07/05
Revised History
NO. Description
Date
00 Draft Edit 6-24-2011
01 Preliminary 6-28-2011
02
Page 33, Step of into MFG Mode method diagram modifies.
Page 15~16 list number remark. Page 66~71 Spare part list update
7-05-2011

Delta Elec. Inc. Qumi Rev.02
Company Confidential VIVITEK___________________ Delta________________
4
2011/07/05
1. Important safety information
Be sure to read this Service Manual before providing services. In the projector, full
consideration is taken to ensure safety for fire, electric shock, injury, harmful radiation, and
substance. Therefore, observe the notice described in this Service Manual so that safety is
kept when providing services. Moreover, be sure to observe the notice described in the
Instruction Manual.
Pay attention to the following items during service inspection.
1-1 Cautions during disassembling and assembling
1. This equipment contains parts under high voltage. When making repairs, etc.
Be sure to pull out the power plug beforehand to insure safety.
2. Parts may be very hot immediately after use.
Make sure the equipment has cooled off sufficiently before carrying out repairs.
3. Make sure that parts and screws and wiring, etc. are returned to their original positions.
Tube, tape and other insulation materials have been used for safety reasons.
The internal wiring has been designed to avoid direct contact with hot parts or parts under
high voltage when using clamps or other tools.
4. The parts used in this device have special safety features such as flame-resistance and
anti-voltage properties. When replacing parts, always use parts supplied from the factory.
5. After finishing operations make sure that all parts and wires have been returned to their
original position and that there has been no deterioration of the area around the location that
was worked on.
6. Be sure to use a grounding strap (wrist band) during repair and inspection.
1-3 Lens
Do not look into a lens during projection. This damages your eyes.

Delta Elec. Inc. Qumi Rev.02
Company Confidential VIVITEK___________________ Delta________________
5
2011/07/05
2. SPECIFICATIONS
2-1. Summary Specifications
Model
Qumi_DP274-A13VVxx
Display type
TI DLP DMD 0.45” , 12deg , S310 , WXGA Dark Chip3
Resolution
1280 x 800
Projection distance
762mm-2286mm
Projection screen size
25.43” to 76.34” inches
Throw ratio
1.55
Aspect Ratio
16:10
Vertical keystone
correction
+/- 15 degrees
Video compatibility
HDTV , NTSC , PAL , SECAM
Operation temperature
5° ~ 35°C
Dimensions (WxHxD)
160.0mm (W) x102.4mm (H) x32.3mm (D)
Weight
1.4 lbs typ.
AC Input
AC Universal 100 ~ 240, Typical @ 110VAC (100~240)/+-10%
w/Adaptor --- Normal:70W typ , ECO:20W typ
Power consumption
wo/Adaptor --- Normal:60W typ , ECO:18W typ
Stand By
<0.5 watts @110Vac 60Hz
LED Brightness
Bright Mode: 120~170 lumens
Audio speaker
AMP 1W speaker
Digital -- HDMI C type x 1
Analog -- Universal I/O x 1
(through a transferring line of universal I/O (24 pin) to D-SUB (15 pin)
Component -- Thru RGB_IN
AN in -- ψ3.5 mm phone jack for CVBS and Audio R/L
(through a transferring line of 4 contact phone jack to CVBS/ AUDIO R/L RCA jack)
USB connector type A x 1
Input terminals
Media Card -- Micro SD x 1
Output terminals
Audio Out -- 3.5mm earphone jack (Volume control) x 1
Delta Elec. Inc. Qumi Rev.00
Company Confidential Vivitek ______________________ Delta____________
6
2011/06/24
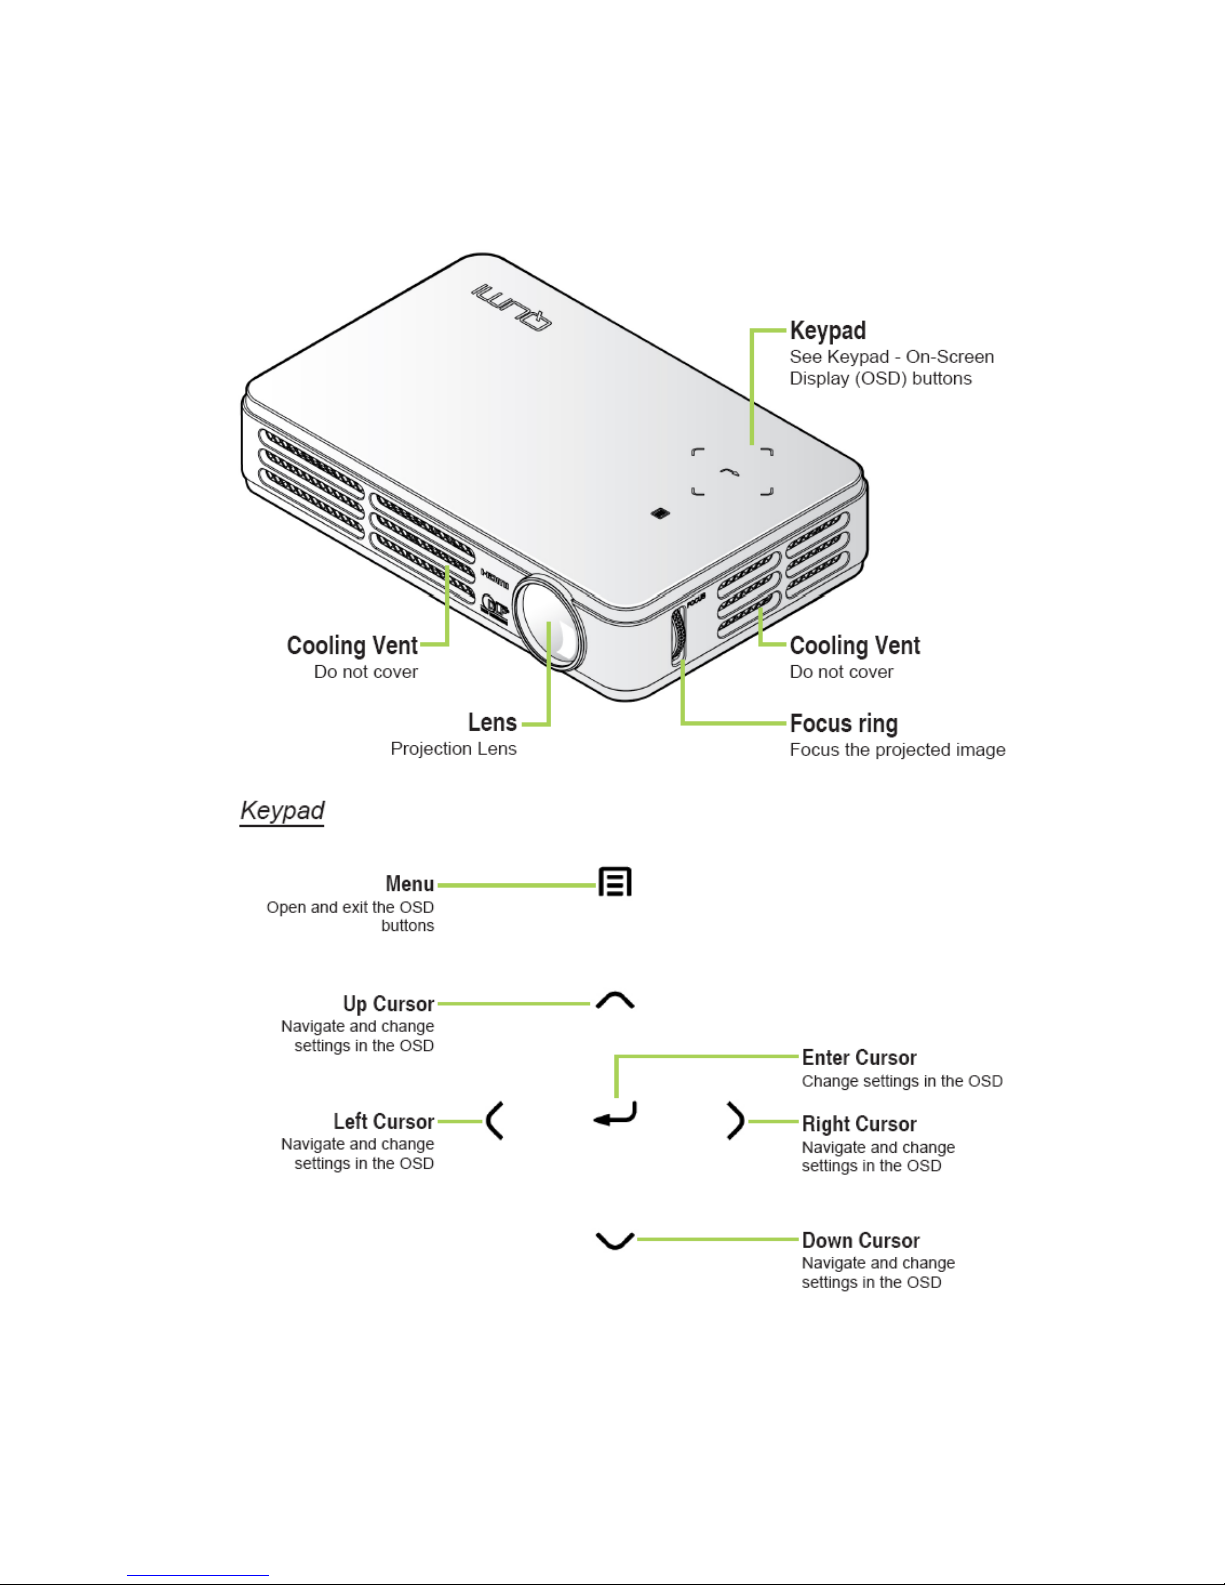
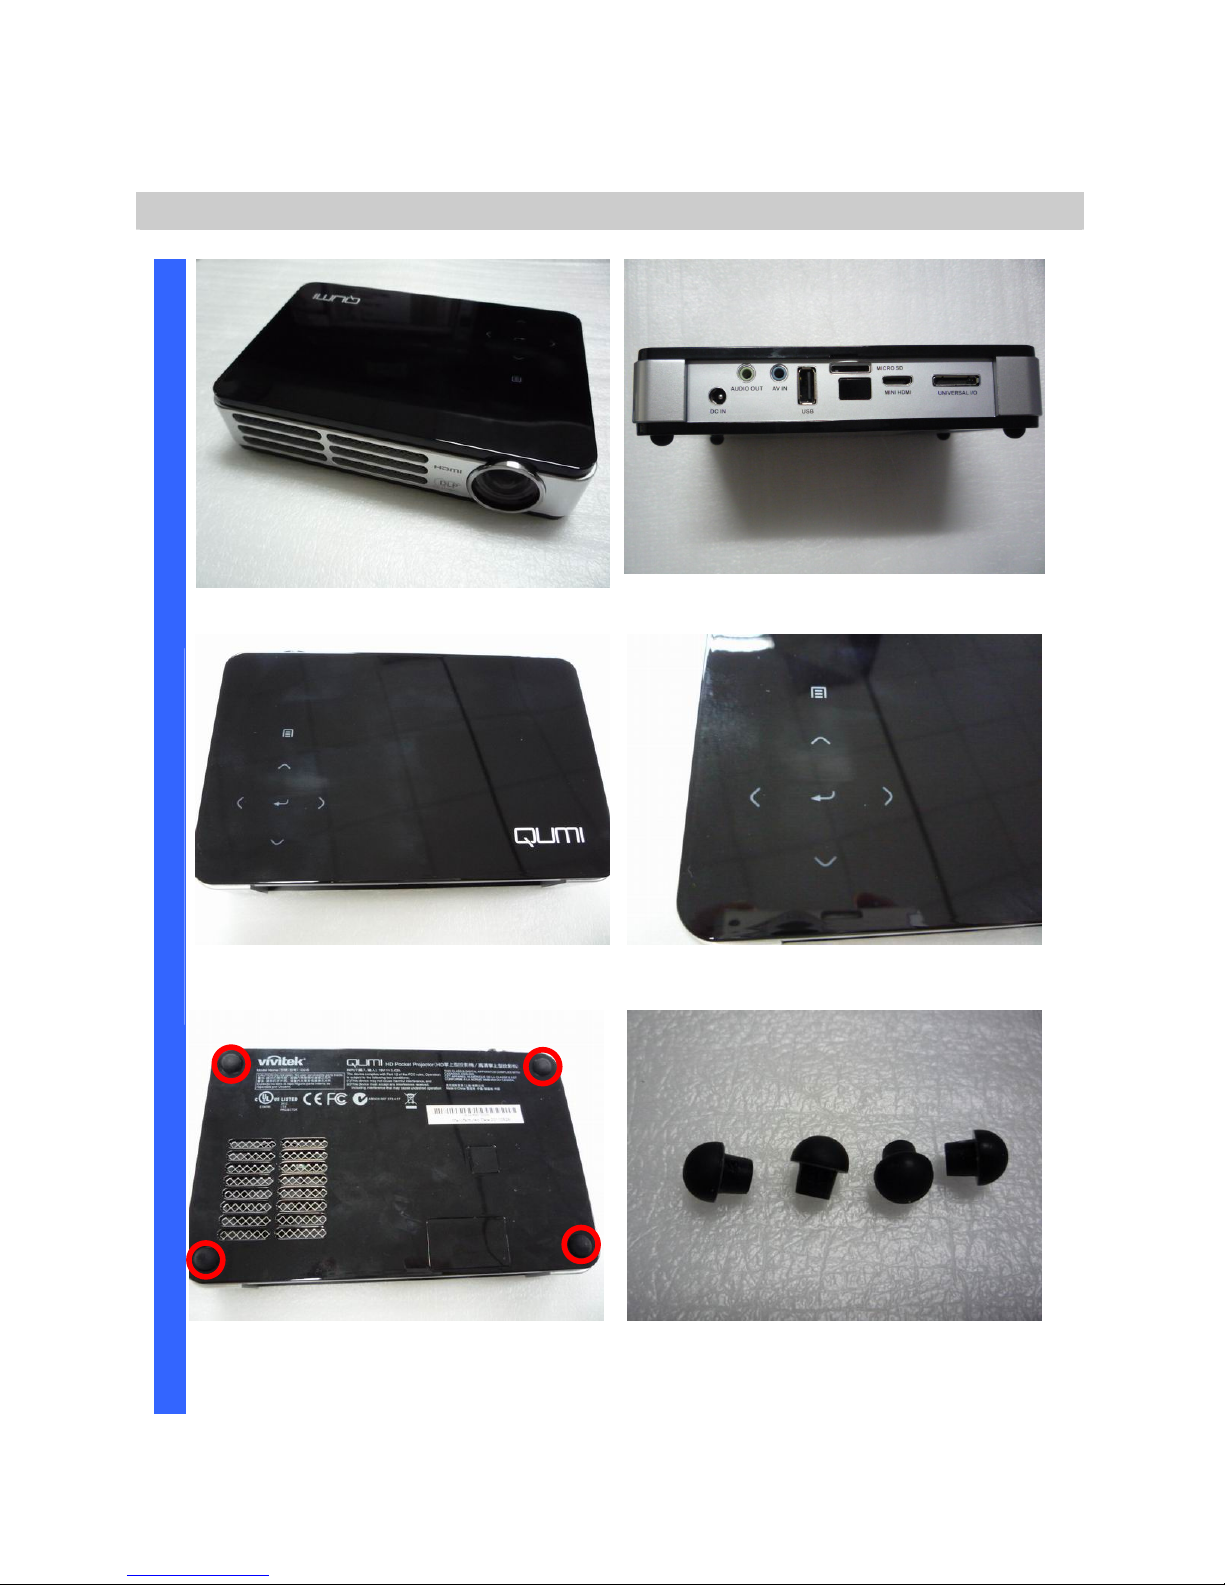
2-2. Views the projector
Front/Top/Right View
Delta Elec. Inc. Qumi Rev.00
Company Confidential Vivitek ______________________ Delta____________
7
2011/06/24
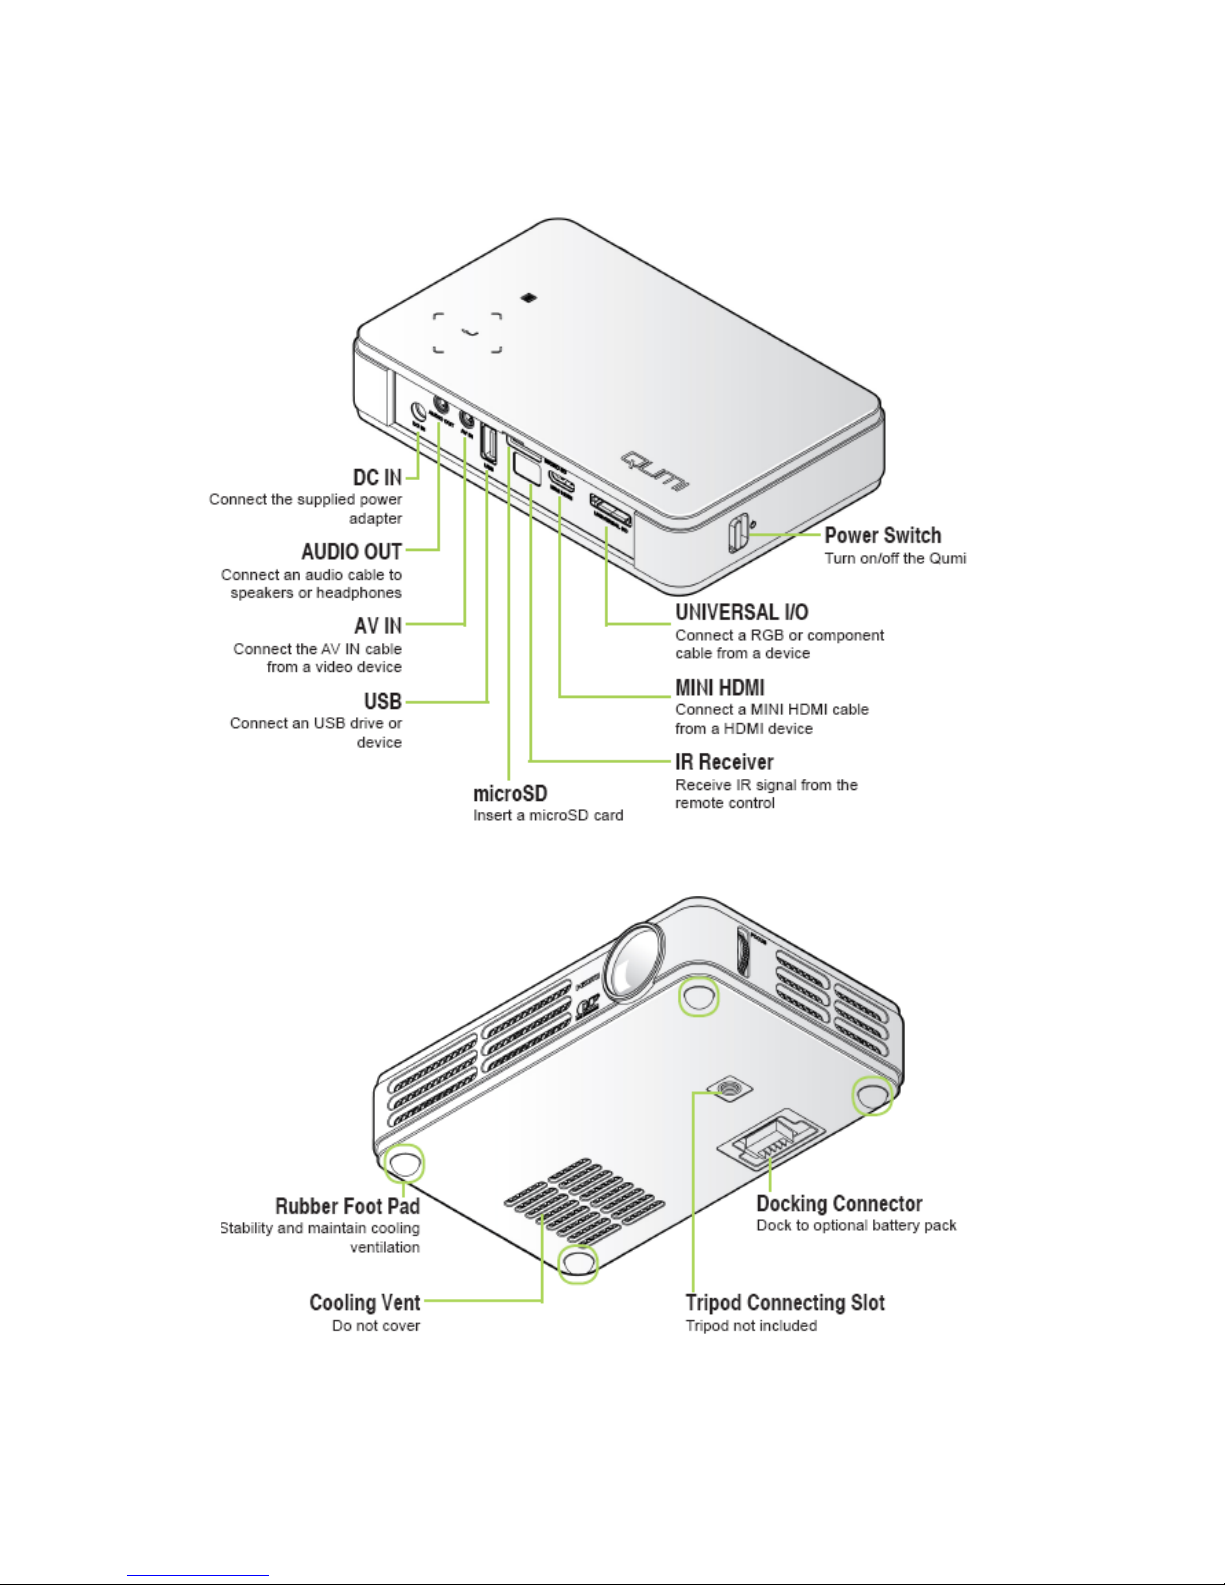
B. Rear/Top/Left view
Bottom view
Delta Elec. Inc. Qumi Rev.00
Company Confidential Vivitek ______________________ Delta____________
8
2011/06/24
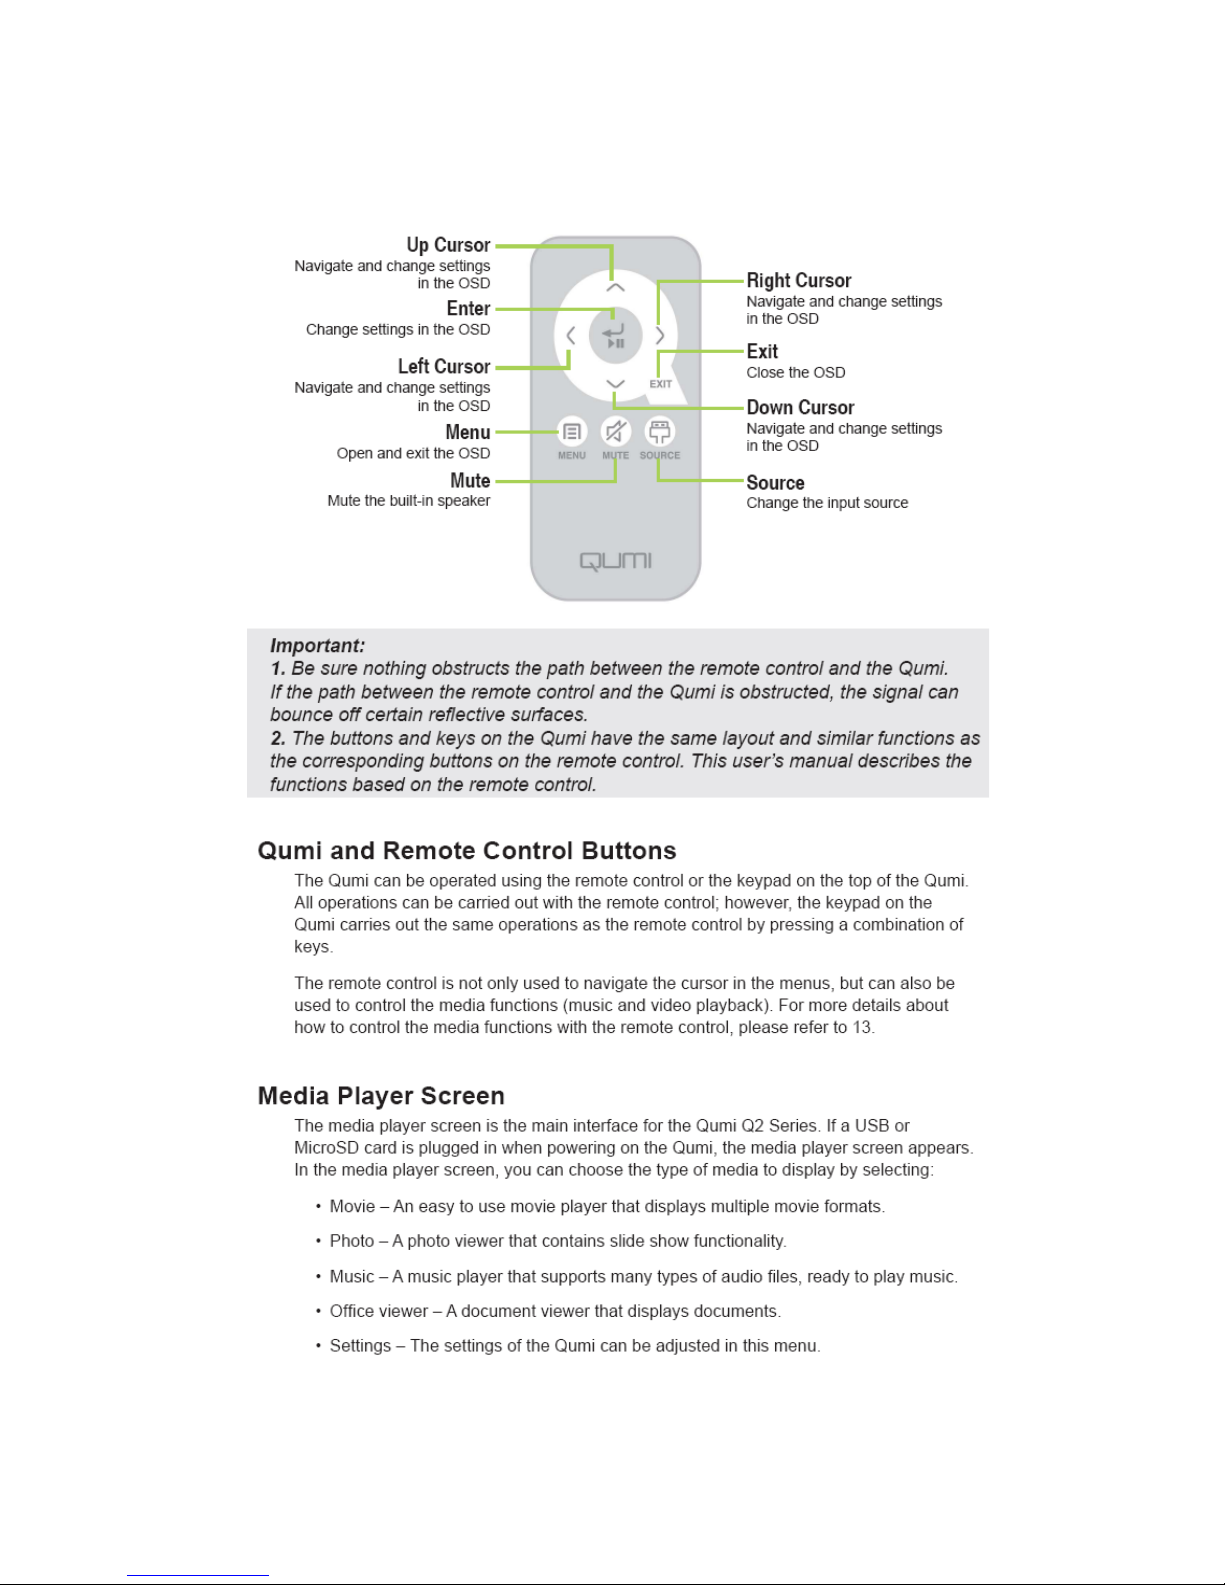
2-3. Remote control
Delta Elec. Inc. Qumi Rev.00
Company Confidential Vivitek ______________________ Delta____________
9
2011/06/24
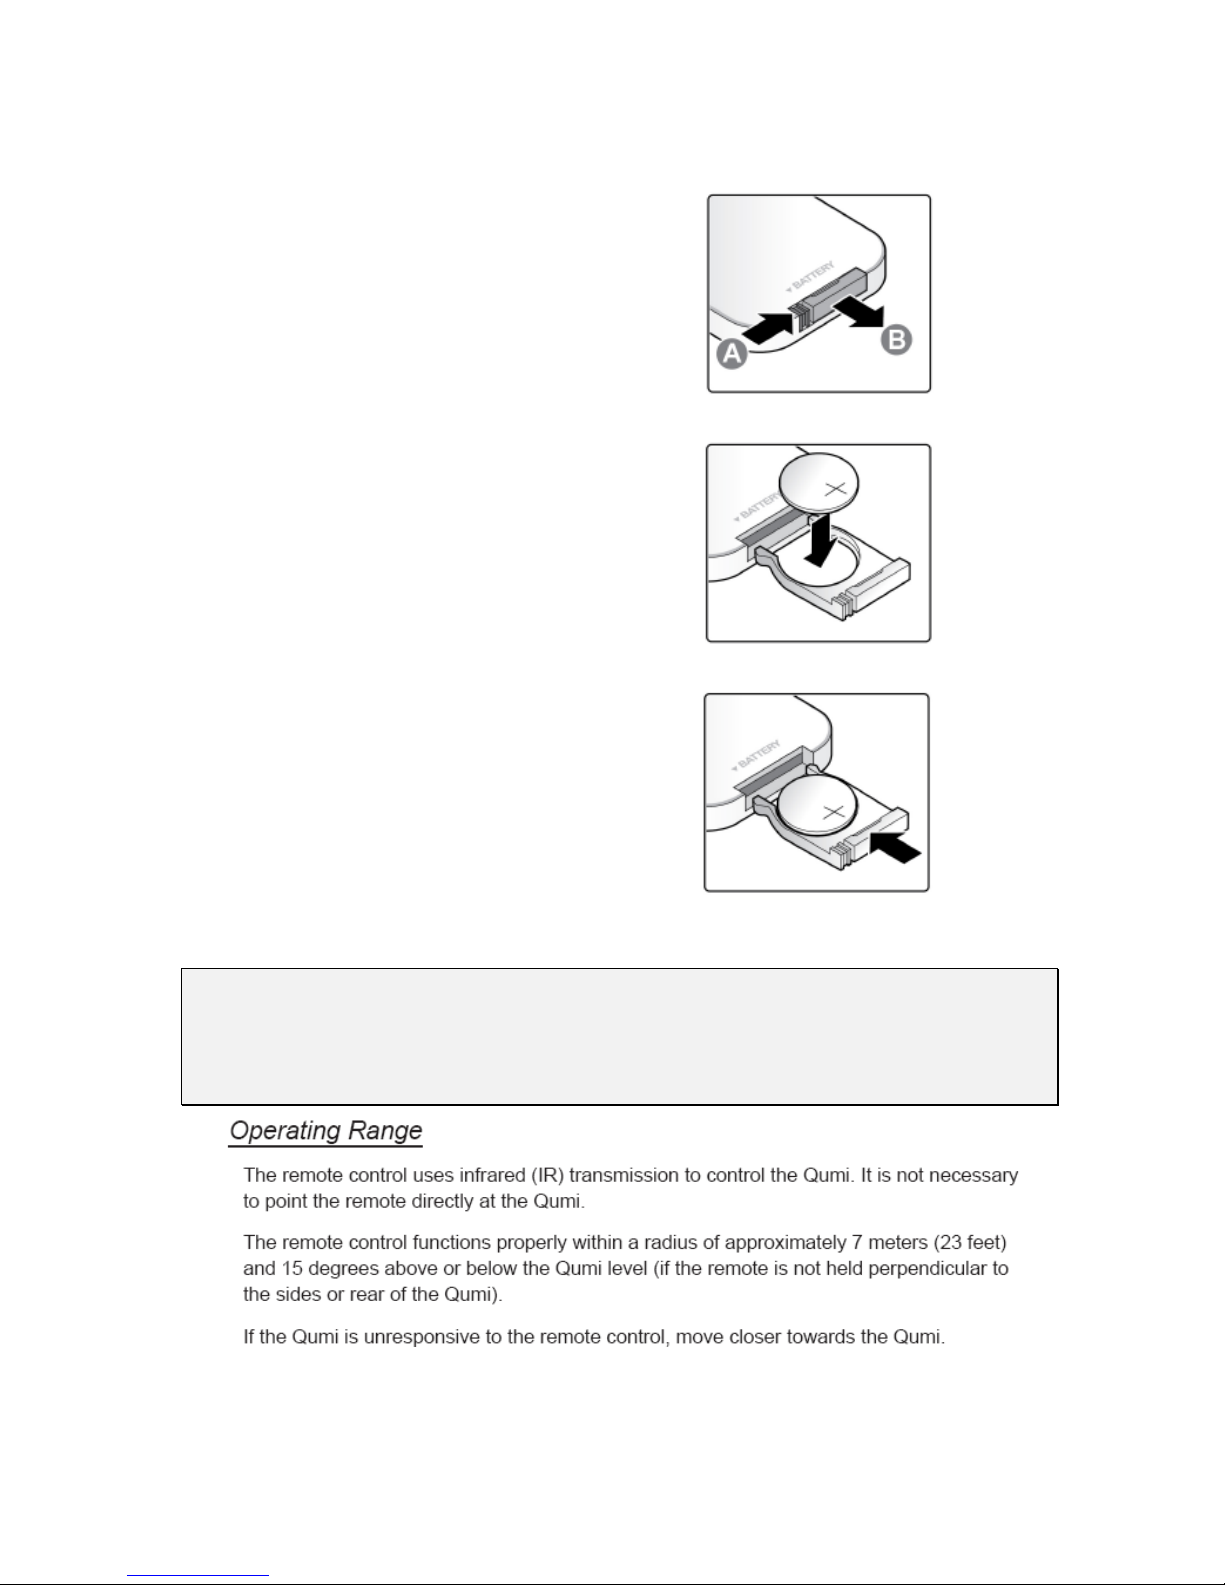
1.
Remove the battery compartment
cover by sliding the cover in the
direction of the arrow (A). Pull out the
cover (B).
2.
Insert the battery with the positive
side facing up.
3.
Replace the cover.
Caution:
1. Only use a 3V lithium battery (CR2025)
2. Dispose of used batteries according to local ordinance regulations.
3. Remove the battery when not using the projector for prolonged periods.
Delta Elec. Inc. Qumi Rev.00
Company Confidential Vivitek ______________________ Delta____________
10
2011/06/24
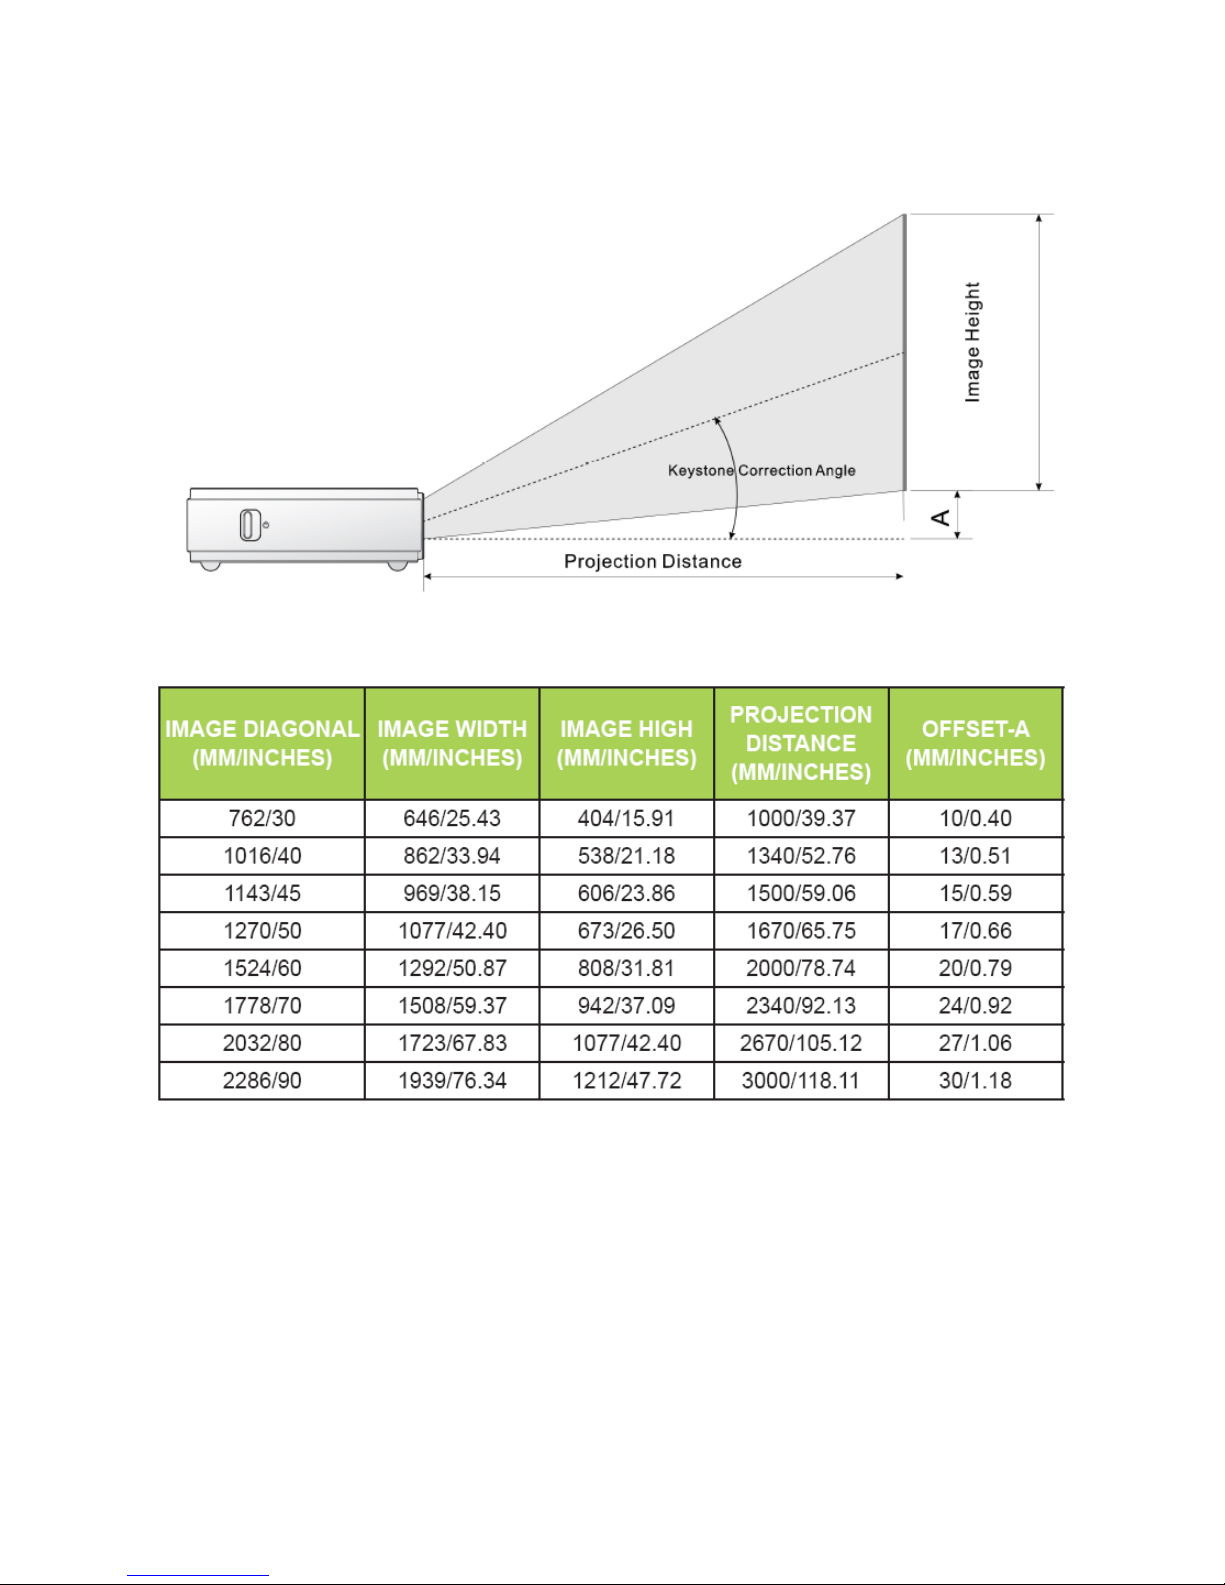
2-4. Optical Adjustment & Image Size
Projection Distance and Size Table
Delta Elec. Inc. Qumi Rev.00
Company Confidential Vivitek ______________________ Delta____________
11
2011/06/24
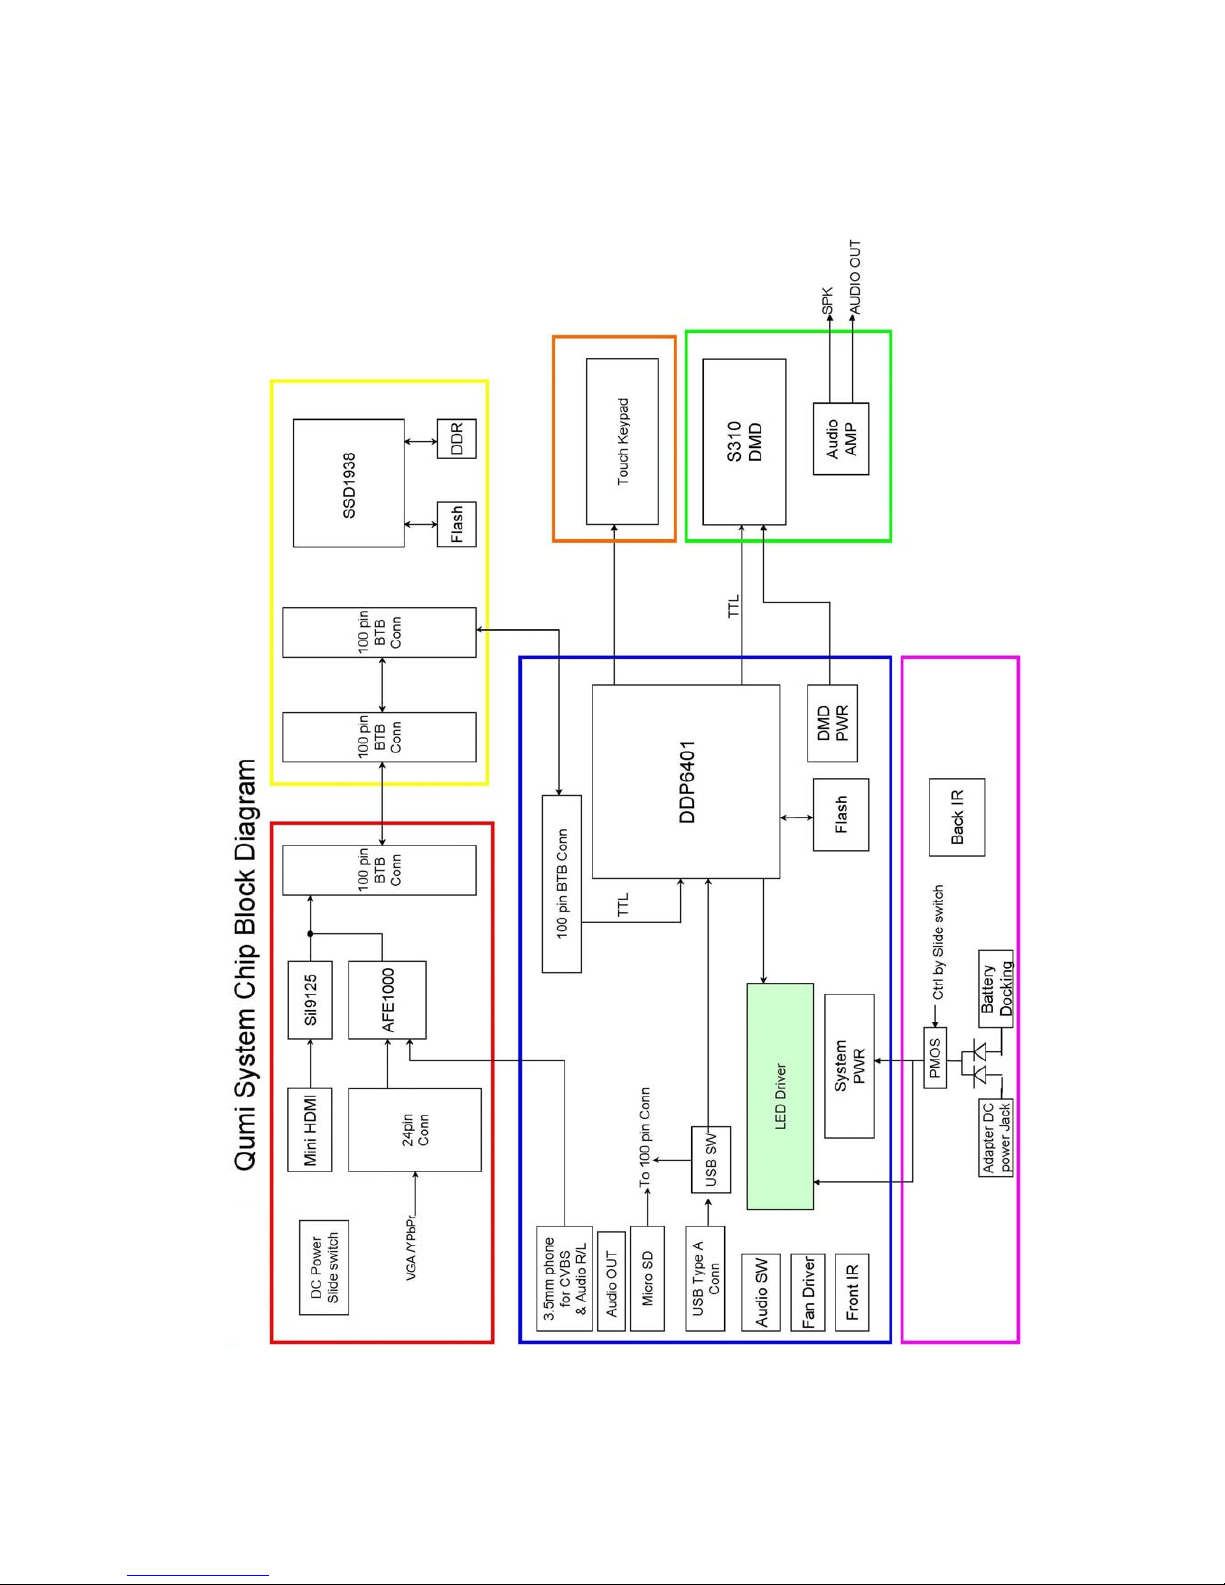
2-5. Block Diagram

Delta Elec. Inc. Qumi Rev.00
Company Confidential Vivitek ______________________ Delta____________
12
2011/06/24
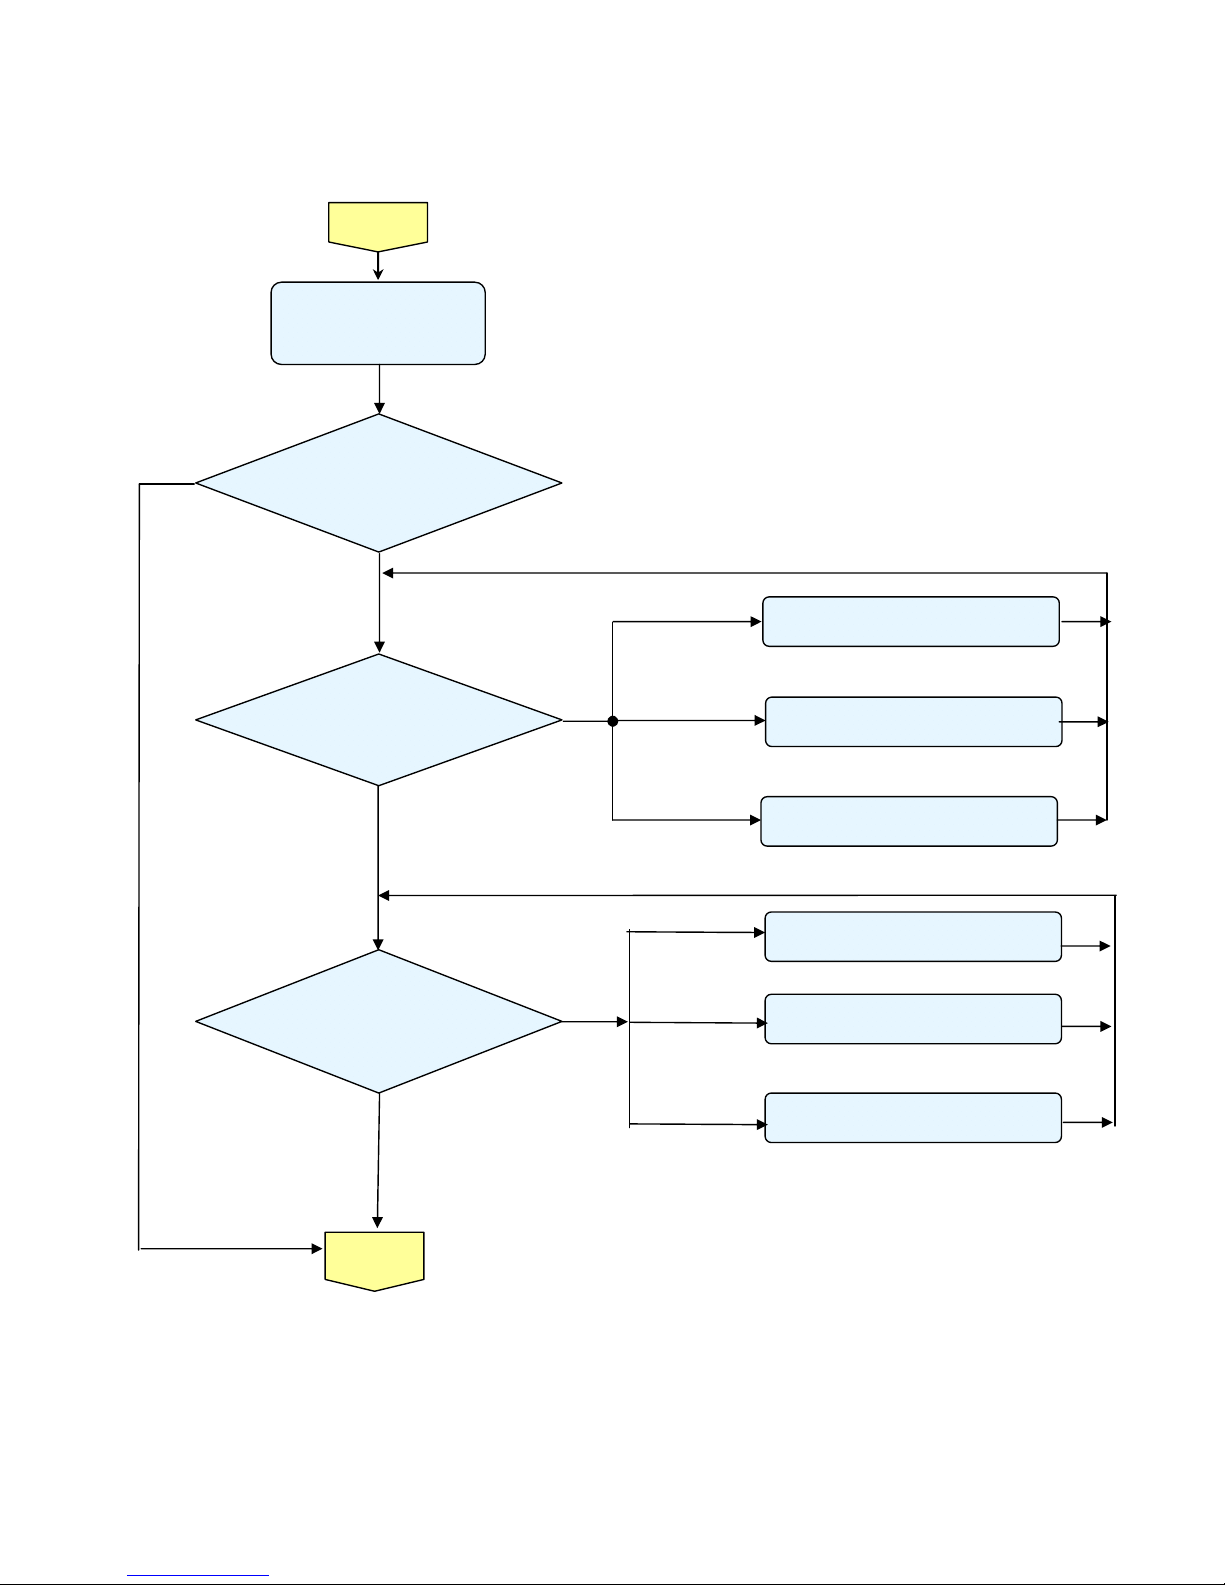
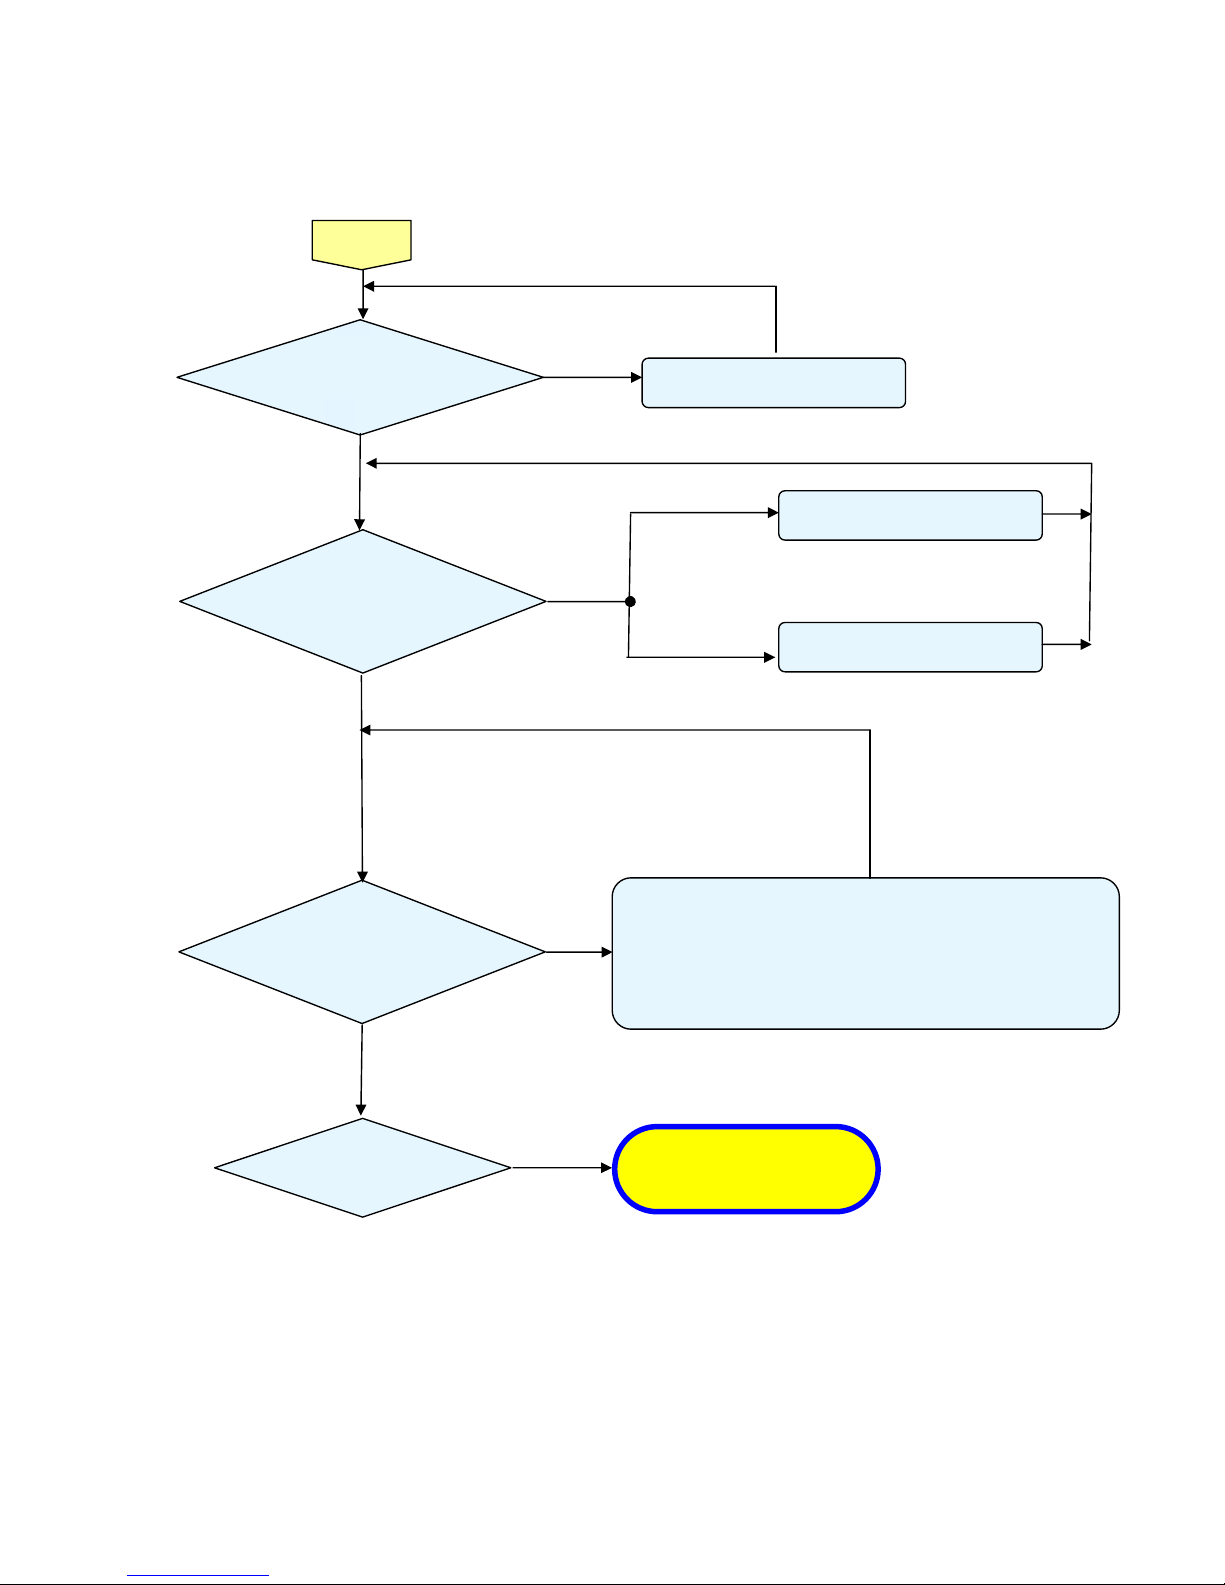
3. TROUBLE SHOOTING
Carry out the following checks before disassembling the equipment.
Waiting
Power On
Connect the power cord
• Power Supply Unit malfunction
•Check the connection of
BATTERY DOCKING BD P31 to MB P700)
• Check MCU firmware is ok or not
•Check keypad connection ( MB P360 to Keypad P1)
< Stand-by >
Left: Blue
Right: Blue
< Power supply error >
Left: OFF
Right: OFF
Yes
No
No
Delta Elec. Inc. Qumi Rev.00
Company Confidential Vivitek ______________________ Delta____________
13
2011/06/24
Tur n th e
power ON
Image
Display
< Powering up >
Left: Blue
Right: Blue
< LED-Lit error >
Left: 3binks
< Normal operation >
Left: Off
Right: Off
No
< LED Thermistor error >
Left: 8 binks
• MB J0302 disconnected
• LED-Red NTC thermistor disconnected
• MB J0402 disconnected
• LED-Green NTC thermistor disconnected
• MB J0202 disconnected
• LED-Blue NTC thermistor disconnected
Ri
g
ht: 1 blinks
Ready:2blinks
Ready:3blinks
Yes
Yes
No
Y
T2 error, Red LED Drive malfunction
T3 error, Green LED Drive malfunction
T4 error, Blue LED Drive malfunction
Ready: 1 blinks
Read
y
:2 blinks
Read
y
:3blinks
Delta Elec. Inc. Qumi Rev.00
Company Confidential Vivitek ______________________ Delta____________
14
2011/06/24
Y
No
Image
Display
• MB (P361) of Fan disconnected
• Fan32 (System) malfunction
Right: 1 blink
Right: 2 blinks
• HDMI/B (P201) of Fan disconnected
• Fan1 (Blower) malfunction
< Fan error>
Left: 6 blinks
• Main Board Ass’y malfunction
• DMD Set malfunction
Does the LED
go off during
o
p
eration?
System OK
Normal operation
Projector logo screen
display
• Temperature protector operated due to the increase in temperature based
on operating environment
• Temperature protector operated due to blocked suction and exhaust holes
or dirty fan
• Power board Assy’s malfunction
• LED chip malfunction
• T1 sensor malfunction
<Over temperature >
Left: 3 blink
Right: OFF
No
No
Yes
No
No
Yes
Yes

Delta Elec. Inc. Qumi Ver.02
Company Confidential Vivitek ______________________ Delta____________
15
2011/07/05
Common problems and solutions
These guidelines provide tips to deal with problems you may encounter while using the projector. If the
problem remains unsolved, contact your dealer for assistance.
Often after time spent troubleshooting, the problem is traced to something as simple as a loose
connection. Check the following before proceeding to the problem-specific solutions.
• Use some other electrical device to confirm that the electrical outlet is working.
• Ensure the projector is turned on.
• Ensure all connections are securely attached.
• Ensure the attached device is turned on.
• Ensure a connected PC is not in suspend or sleep mode.
• Ensure the connected notebook computer is properly configured for an external display
Image Problems
Problem: No image appears on the screen
1.Verify the settings on your notebook or desktop PC.
2.Turn off all equipment and power up again in the correct order.
Problem: The image is blurred
1.Adjust the Focus on the projector.
2.Ensure the Qumi-to-screen distance is within the specified range.
3.Check that the Qumi lens is clean.
Problem: The image is wider at the top or bottom (trapezoid effect)
1.Position the Qumi so it is as perpendicular to the screen as possible.
2.Use the Keystone button on the remote control or projector to correct the problem.
Problem: The image is reversed
1.Check the orientation of the projection setting in the Installation I menu of the OSD.
Problem: The image is streaked
1.Set the Frequency and Tracing settings on the Computer menu of the OSD to the default
settings.

Delta Elec. Inc. Qumi Ver.02
Company Confidential Vivitek ______________________ Delta____________
16
2011/07/05
2.Connect the Qumi to anther computert to make sure that the problem is not caused by a
computer’s video card.
Problem: The image is flat with no contrast
1.Adjust the Contrast setting on the Image menu of the OSD.
Problem: The color of the projected image does not match the source image.
1.Adjust the Color Temperature and Gamma settings on the Image menu of the OSD
Remote Control Problems
Problem: The Qumi does not respond to the remote control
1.Direct the remote control towards remote sensor on the Qumi.
2.Ensure the path between remote and sensor is not obstructed.
3.Turn off any fluorescent lights in the room.
4.Check to see if the battery polarity is correct
5.Replace the batteries.
6Turn off other Infrared-enabled devices in the vicinity.
7.Have the remote control serviced.
Audio Problems
Problem: There is no sound
1.Adjust the volume on the remote control.
2.Adjust the volume of the audio source.
3.Check the audio cable connection.
4.Test the source audio output with other speakers.
5.Have the projector serviced.
Problem: The sound is distorted
1.Check the audio cable connection.
2.Test the source audio output with other speakers.
3.Have the projector serviced.
Delta Elec. Inc. Qumi Ver.02
Company Confidential Vivitek ______________________ Delta____________
17
2011/07/05
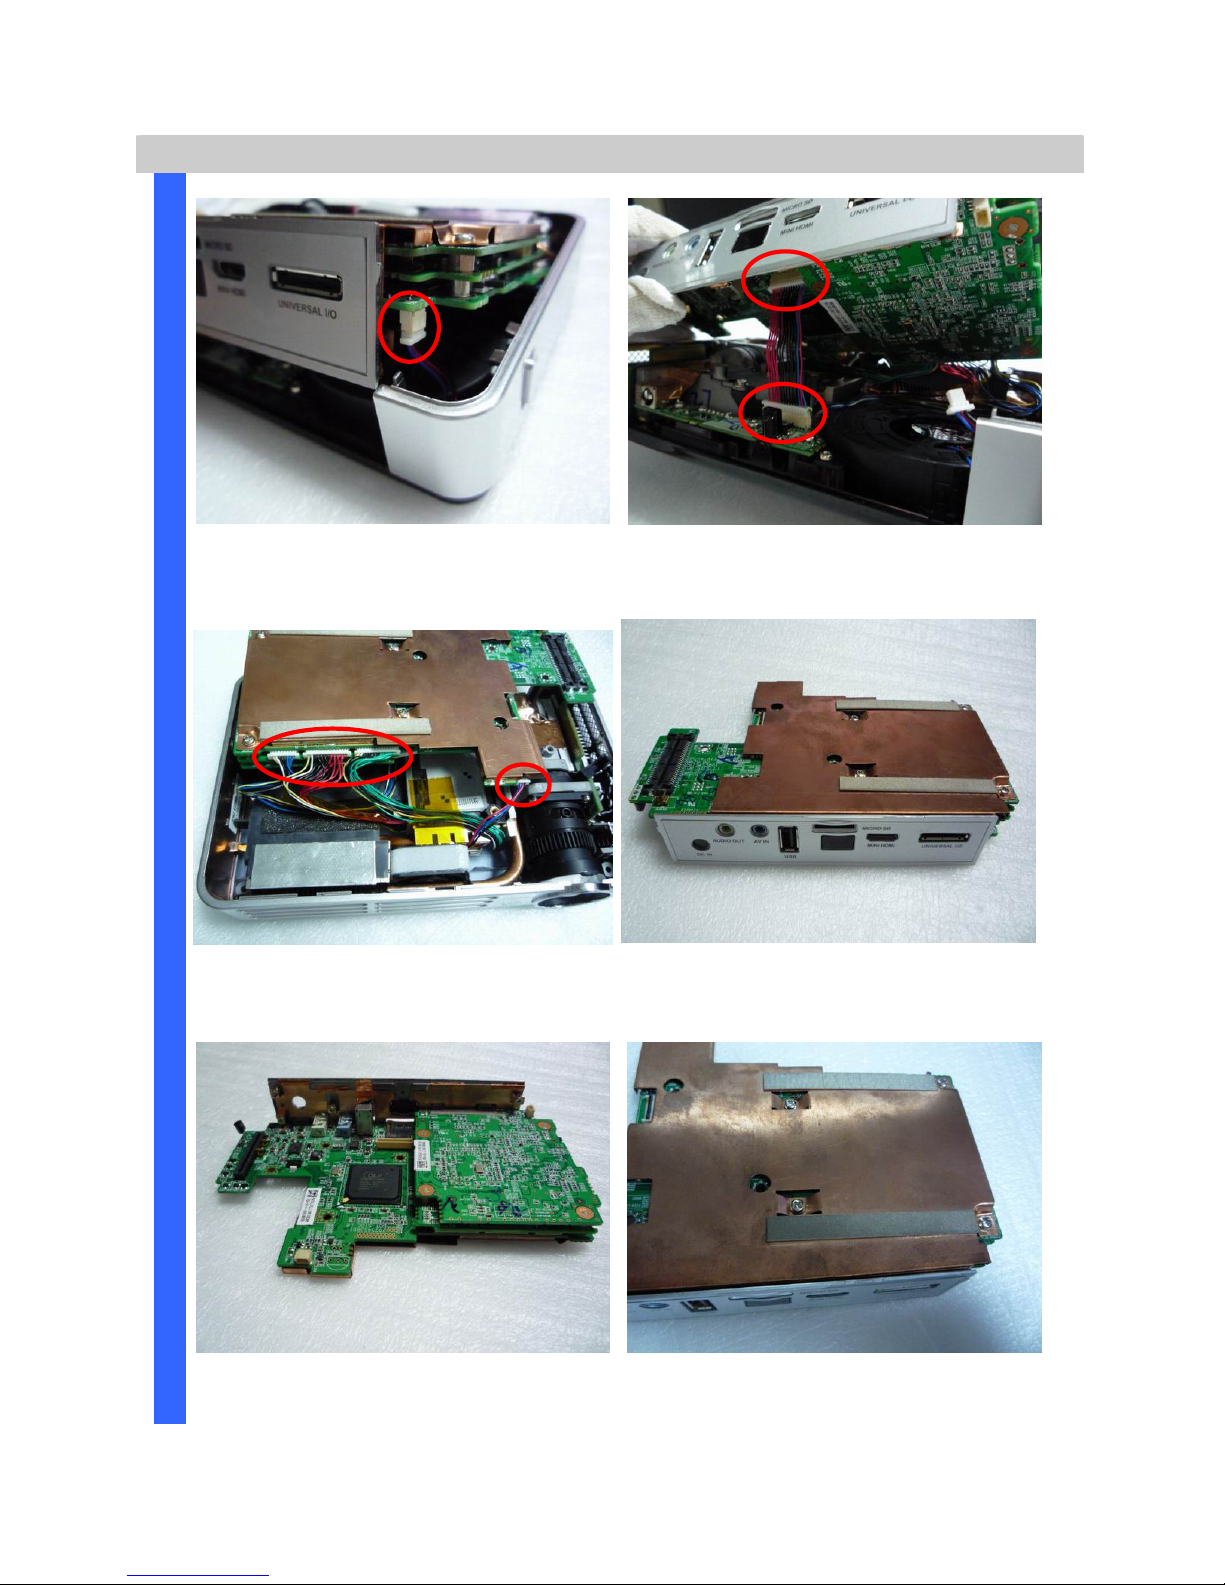
4. DISASSEMBLY AND ASSEMBLY
Review the Qumi and Removing the foot rubbers
Look the full set projector. Look at the IO side.
Look at the case of top side. Look at the keypad of top side.
D
I
S
A
S
S
E
M
B
L
Y
Remove the four foot rubbers. Review these rubbers.
Delta Elec. Inc. Qumi Ver.02
Company Confidential Vivitek ______________________ Delta____________
18
2011/07/05
Removing the Top Cover and replacing the keypad touch board
Remove the four screws. Review the four screws (S01).
Remove the Top cover like this.
Be careful this connector when you
assembly it.
D
I
S
A
S
S
E
M
B
L
Y
Review the Top Cover assy. Replace the keypad touch board like
this.
Delta Elec. Inc. Qumi Ver.02
Company Confidential Vivitek ______________________ Delta____________
19
2011/07/05
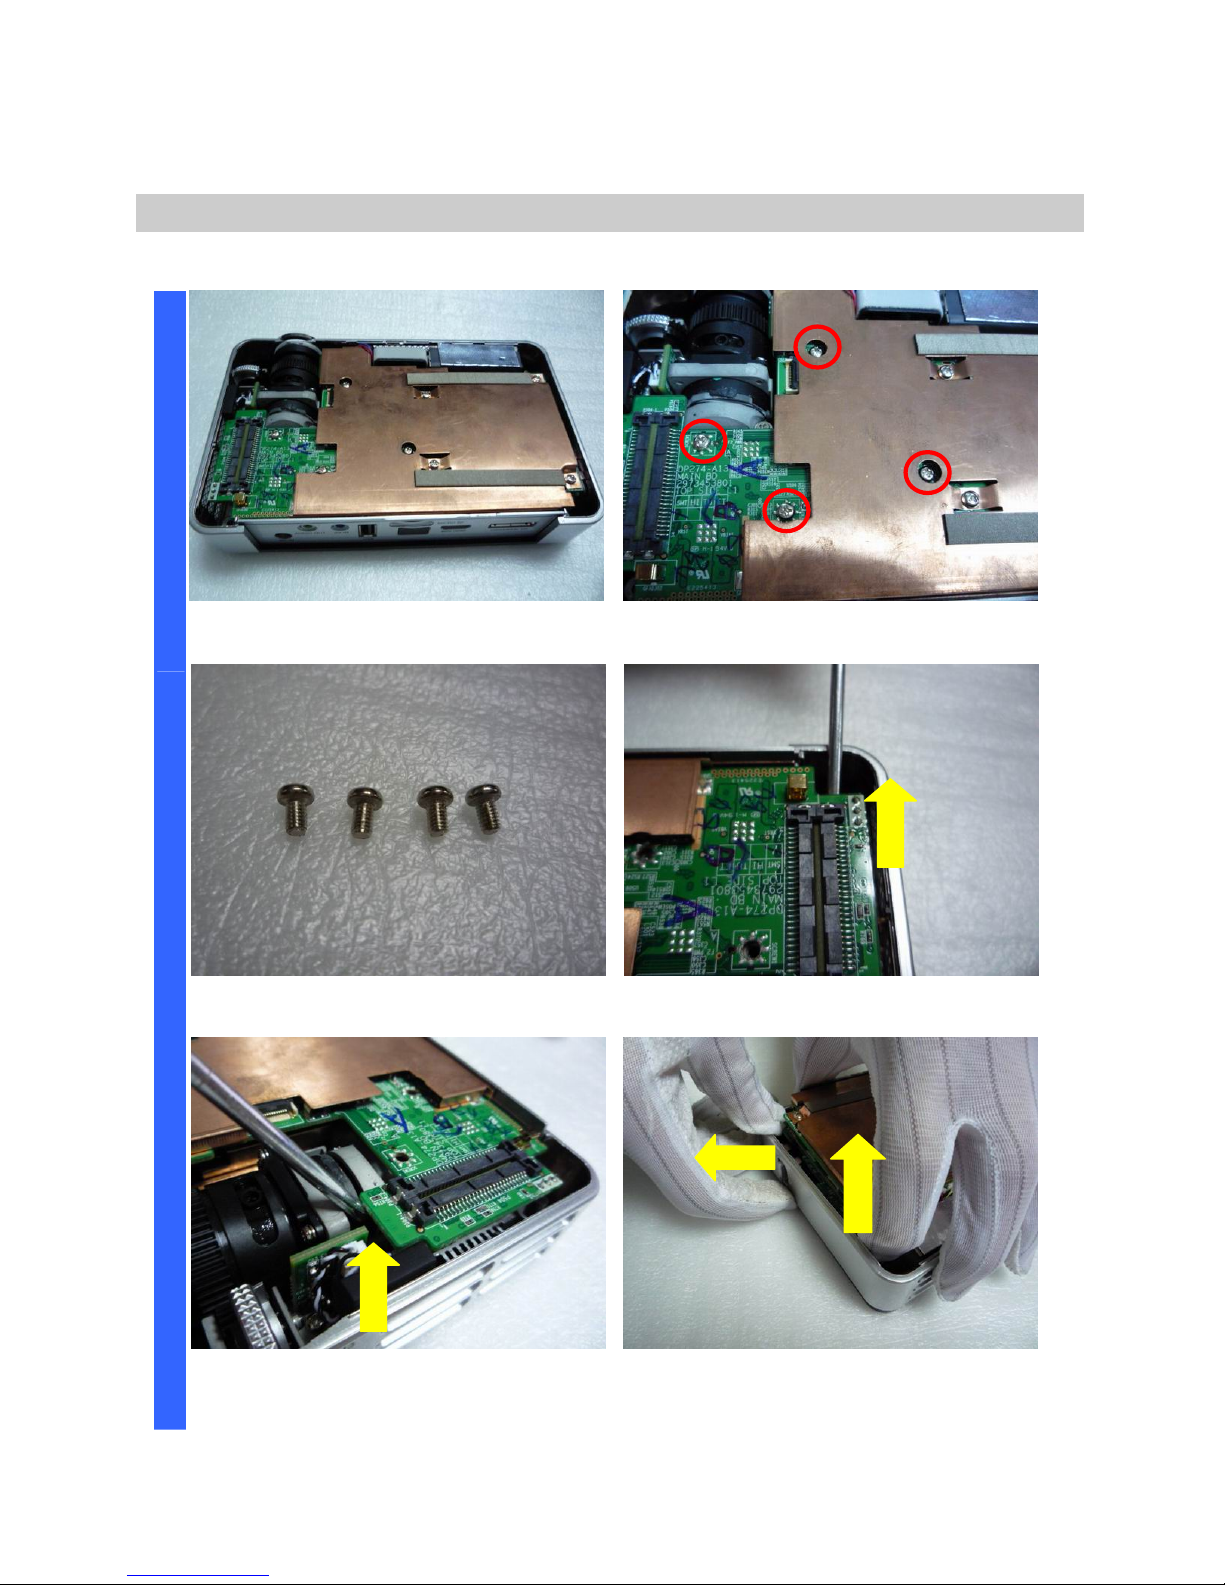
Removing the Main Board assy
Review the Qumi. Remove the four screws.
Review the four screws (S02).
Firstly, tilt one side of the main board
like this.
D
I
S
A
S
S
E
M
B
L
Y
Secondly, tilt the other side like this. Remove the main board like this.
Delta Elec. Inc. Qumi Ver.02
Company Confidential Vivitek ______________________ Delta____________
20
2011/07/05
Removing the Main Board assy
Be careful the Blower FAN connector
when you assembly.
Be careful these connectors when you
assembly it.
Be careful these connectors when you
assembly it.
Review the Main board assy.
D
I
S
A
S
S
E
M
B
L
Y
Review the Main board assy. Remove the four screws.
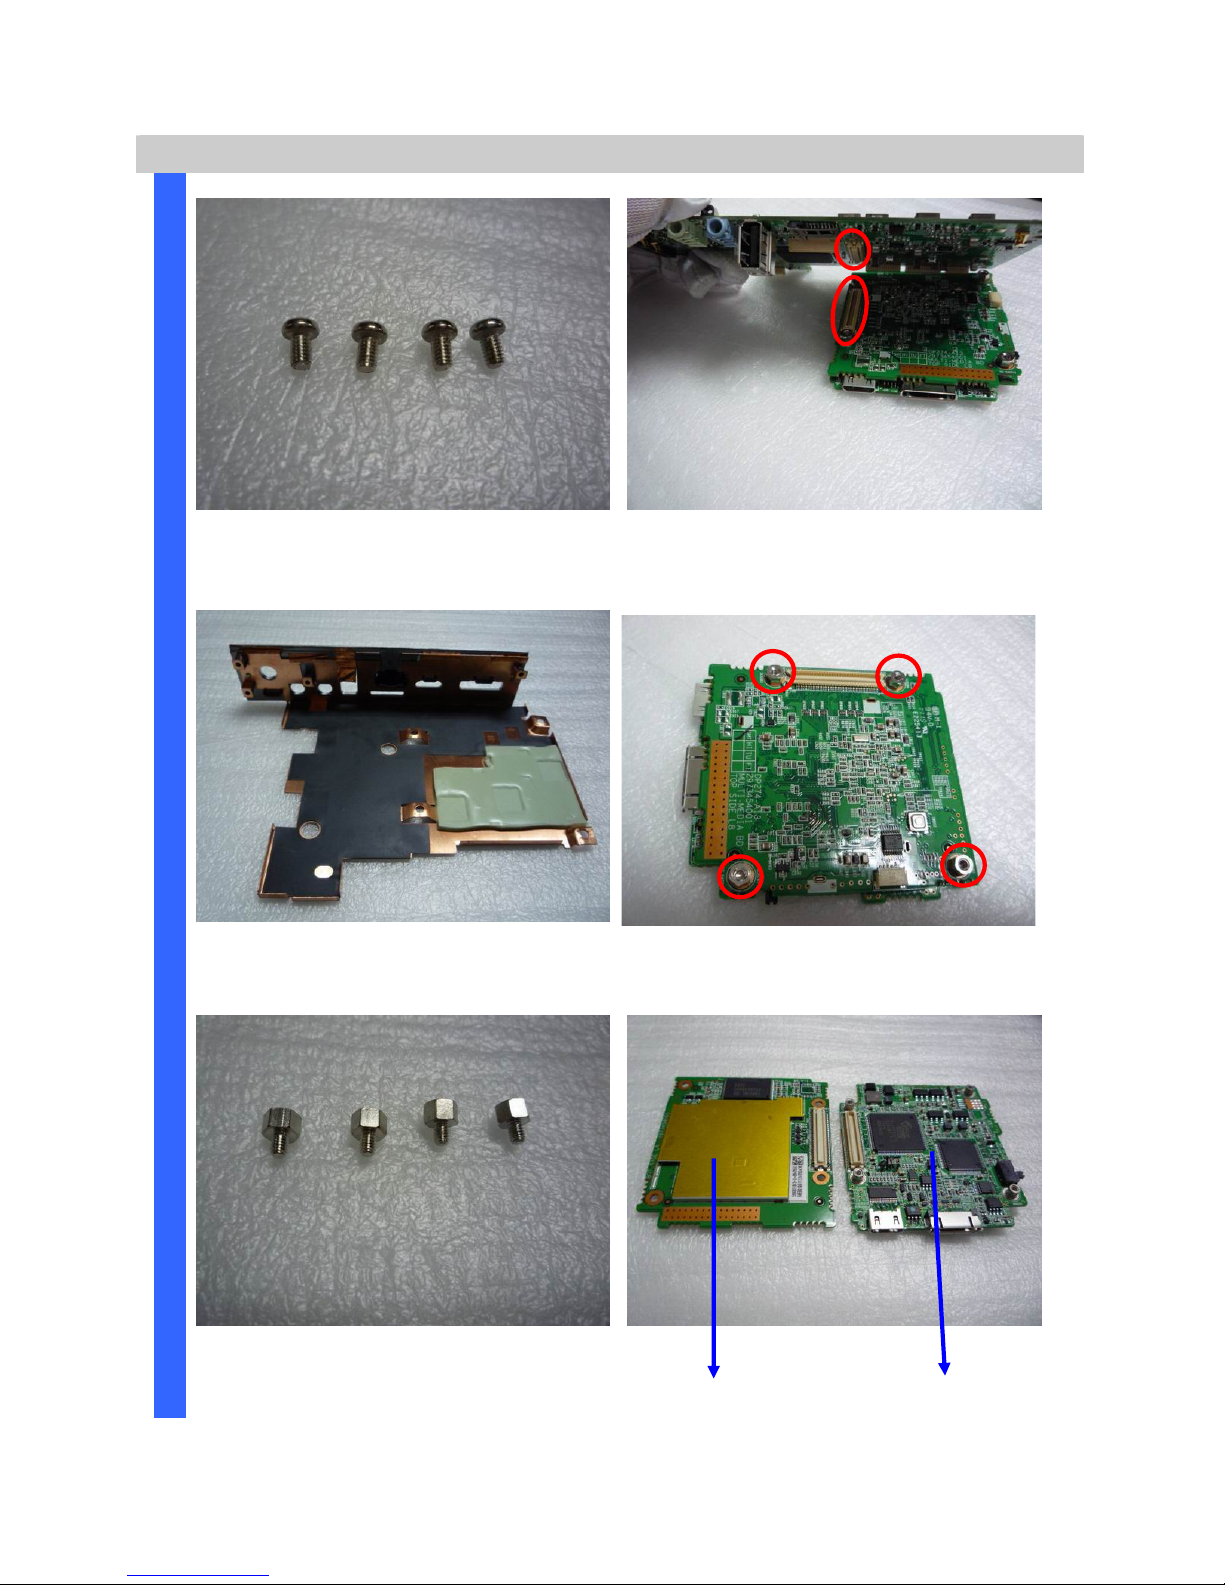
Delta Elec. Inc. Qumi Ver.02
Company Confidential Vivitek ______________________ Delta____________
21
2011/07/05
Removing the Main Board
Review the four screws (S02) and take
off the main board.
Be careful the two connectors when
you assembly.
Review the main board shielding. Remove the four screws.
D
I
S
A
S
S
E
M
B
L
Y
Remove the four screws (S03).
Review the
MULTI-MEDIA BD and HDMI+VGA BD
Delta Elec. Inc. Qumi Ver.02
Company Confidential Vivitek ______________________ Delta____________
22
2011/07/05
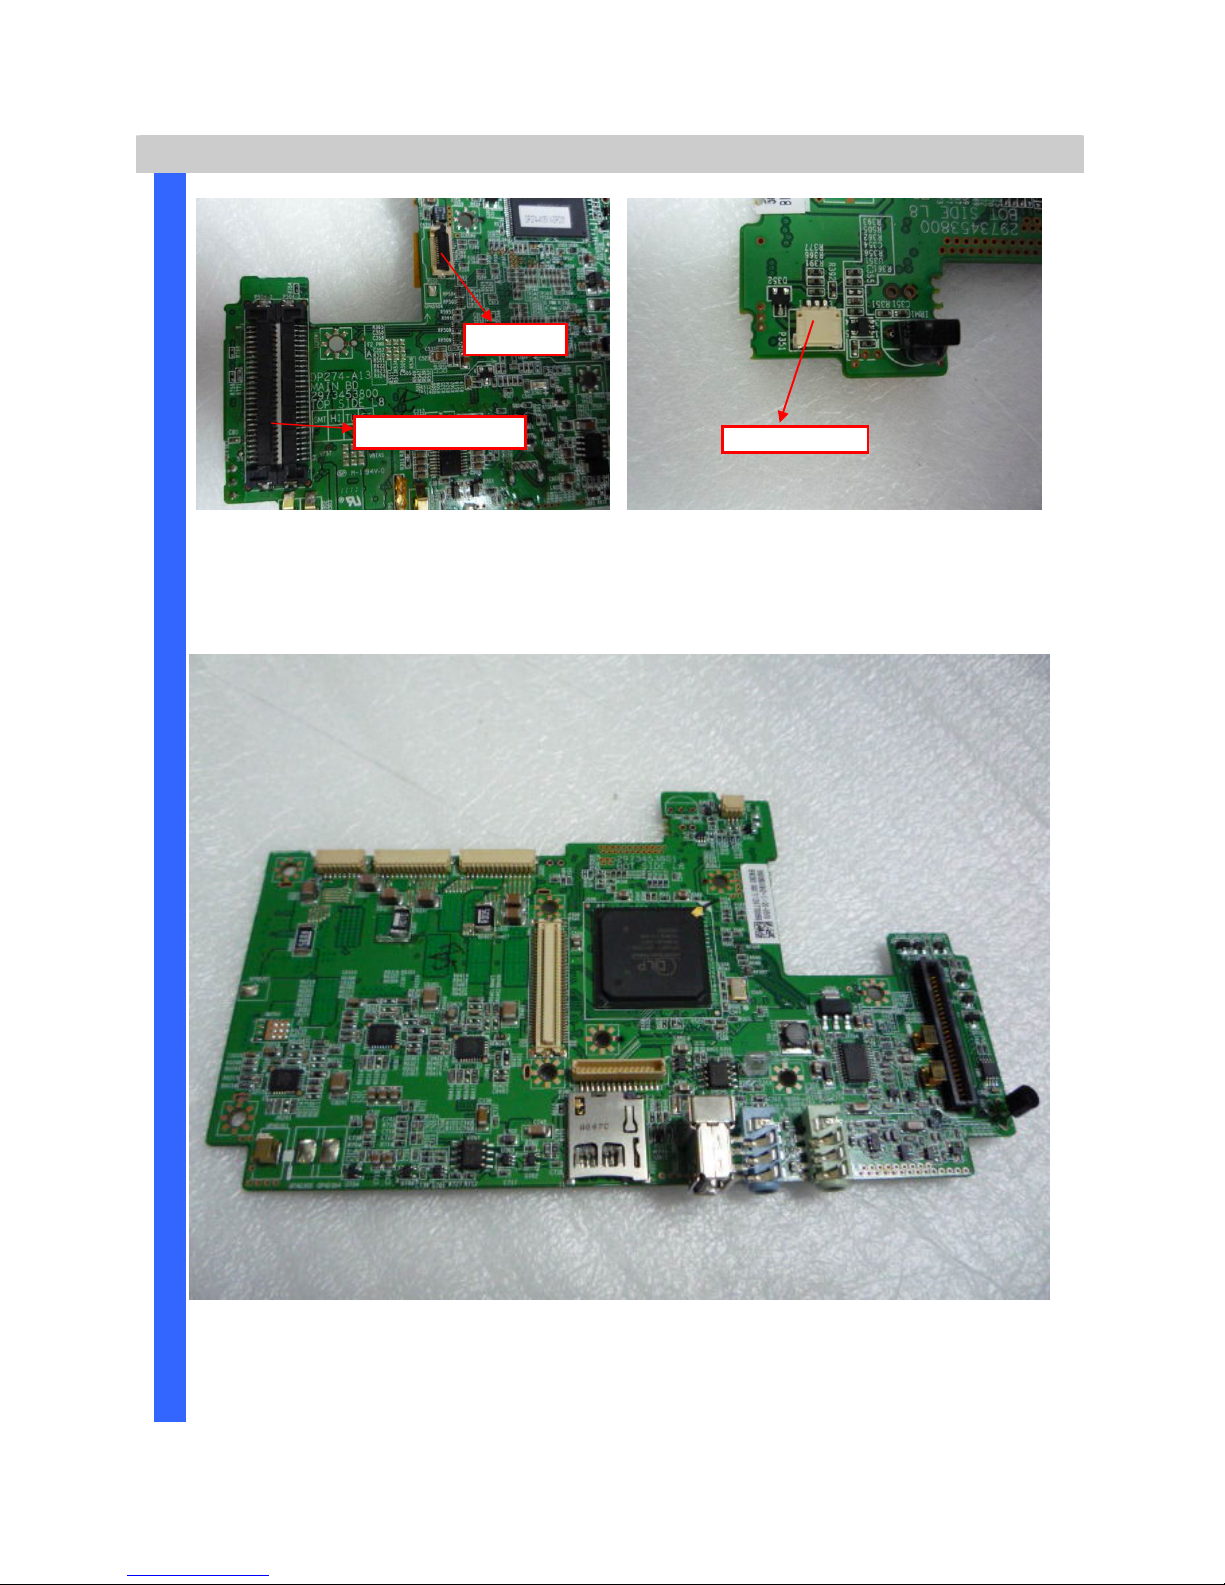
Main Board Review
Careful area of these connectors and
check these right positions connection
when you recover main board again.
Careful the connector and check the
right position connection when you
recover main board again.
D
I
S
A
S
S
E
M
B
L
Y
Main Board Review #Top side
P504 DMD Connector
P350 Keypad
P351 Axial FAN
 Loading...