

Page 1
http://www.delta.com.tw/industrialautoma tion/
Z щ྅ቢ
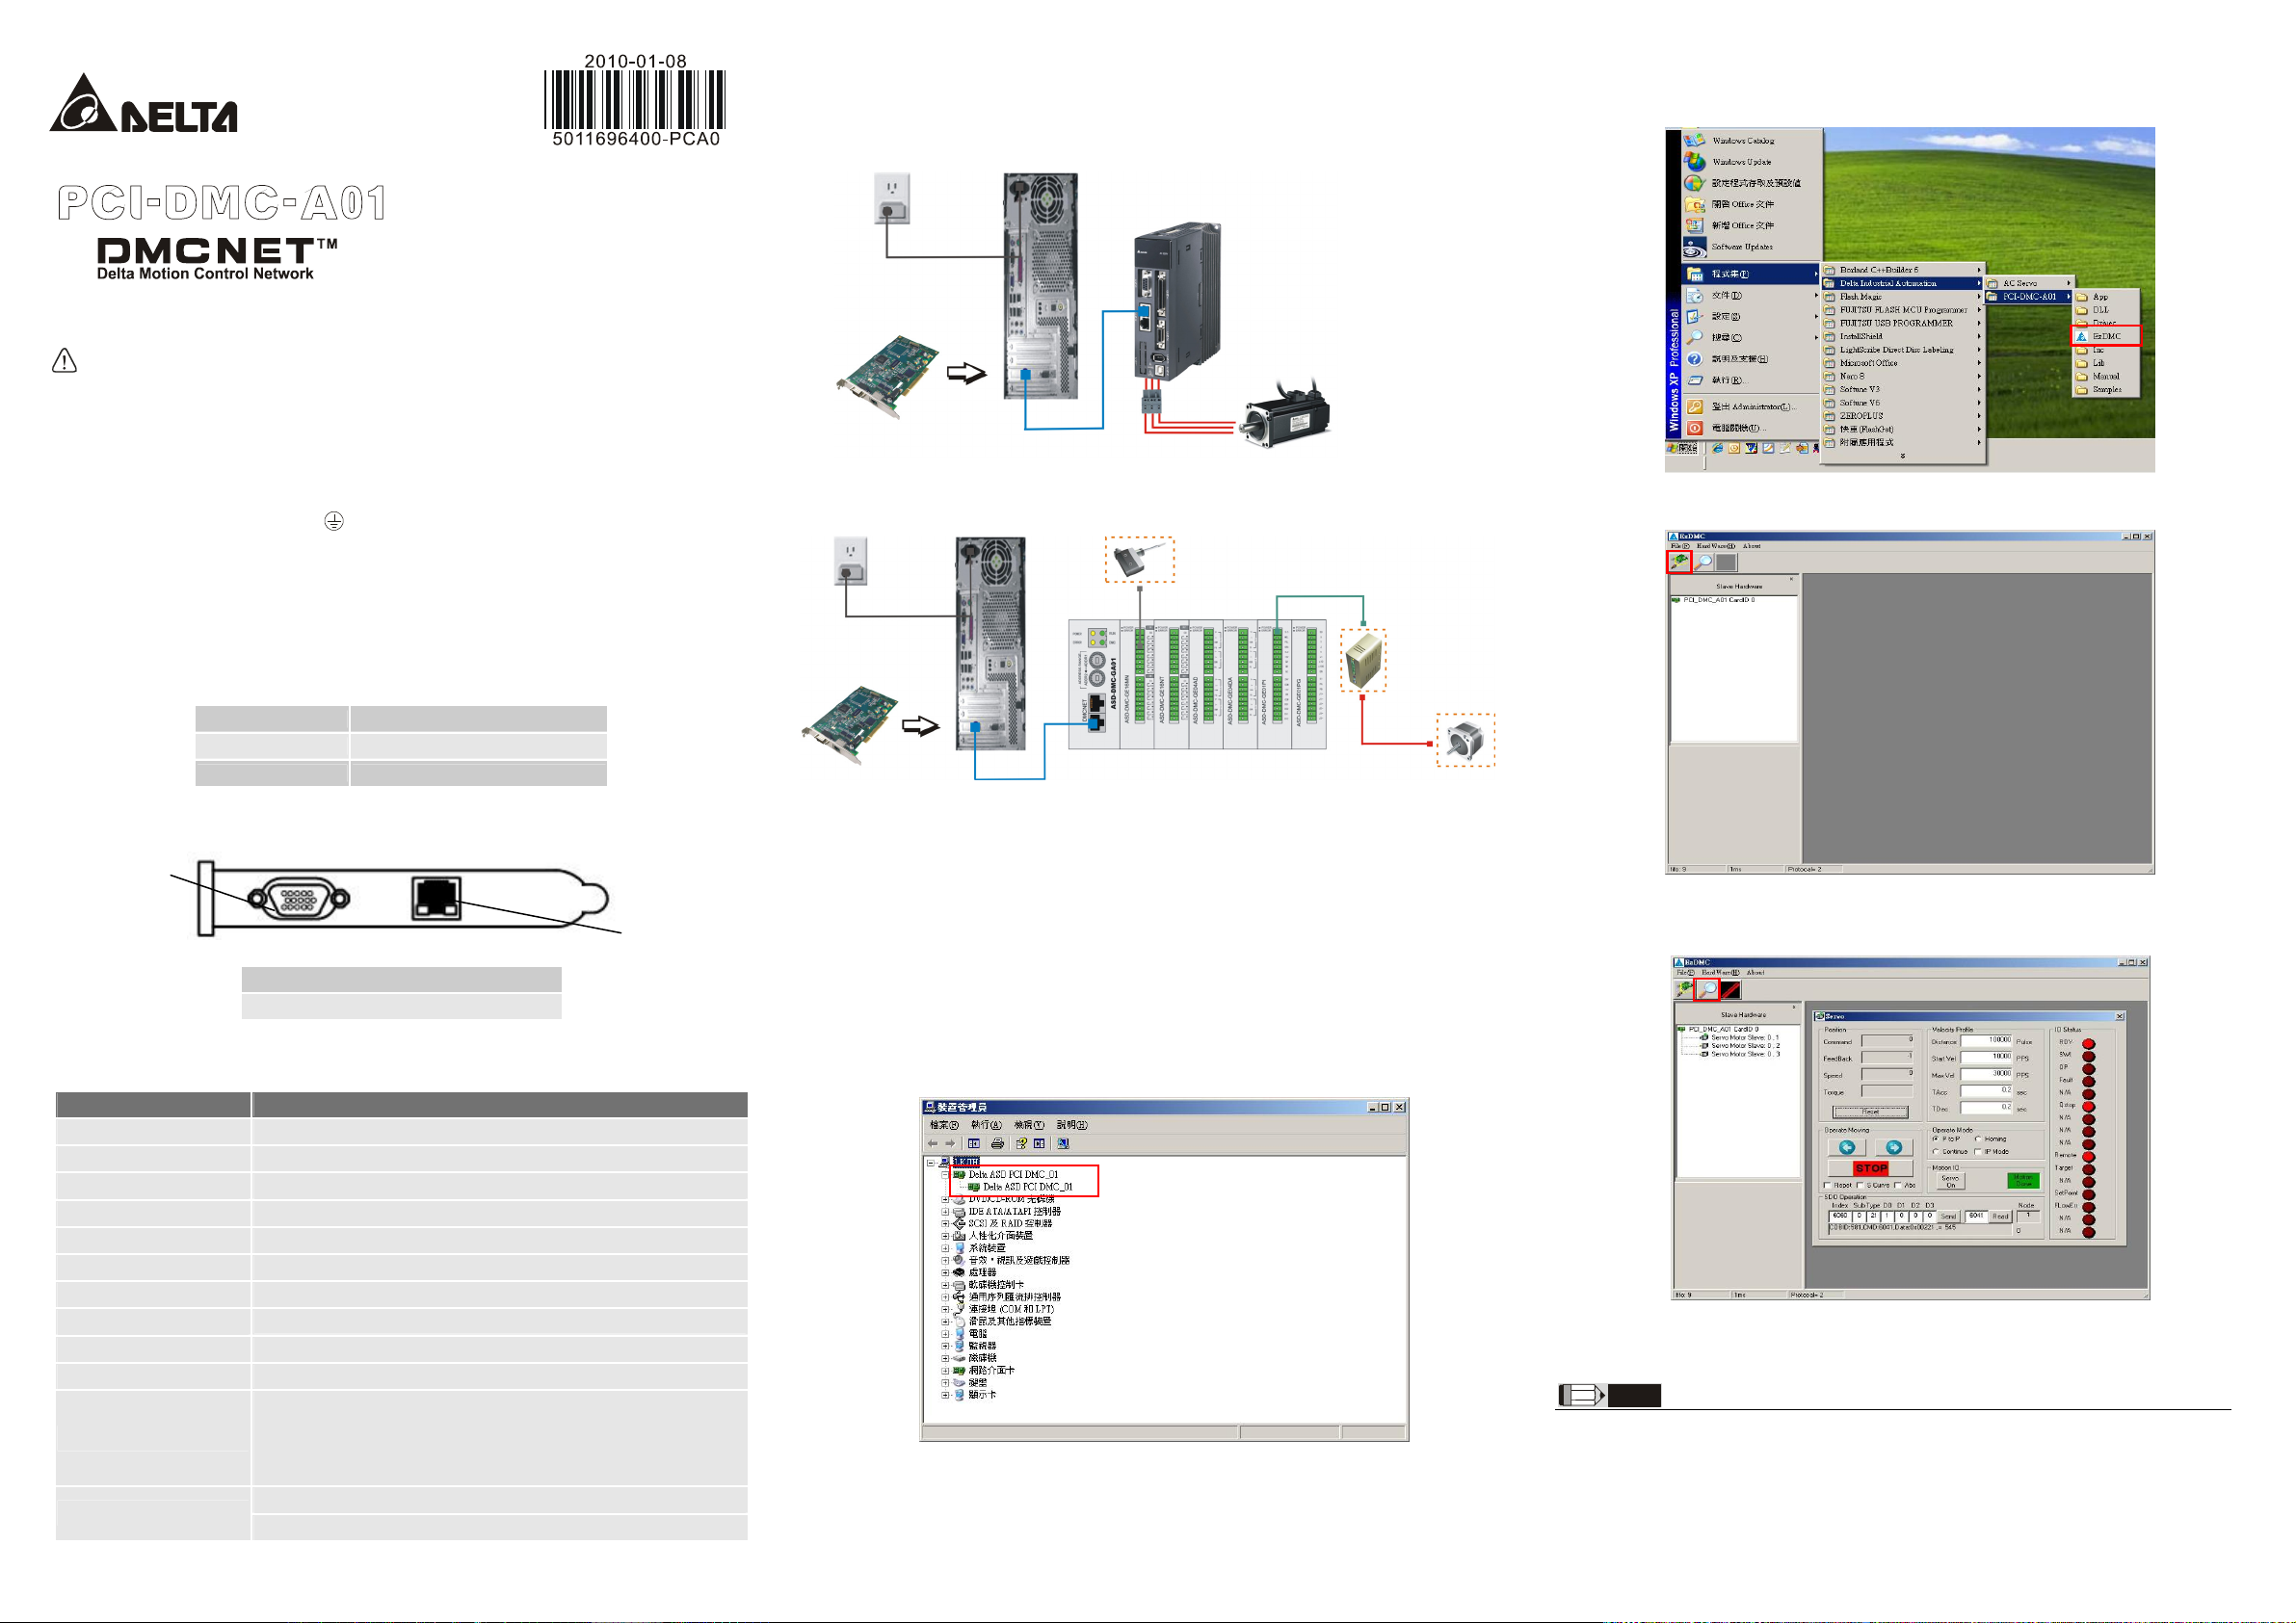
3.1 安裝範例
連接 ASDA- A2-F 伺服驅動器
應用程式 EzDMC 的開啟與使用
1. 點選「開始」Æ「程式集」Æ「Delta Industrial Automation」Æ「PCI-DMC-A01」,點選執行【EzDMC】。
έ྿ྻજଠטคΙ
(DMCNET
TM
఼ݭ)
щ྅ᄲځ
ڦຍְี
3 請在使用之前,詳細閱讀本安裝手冊。此安裝手冊只提供規格、伺服驅動器安裝及應用軟體(EzDMC)基本操作,
有關於 PCI-DMC-A01 所包含應用與操作,在此無詳細的介紹,請讀者參閱相關的專業文章或書籍資料。
3 本通訊介面卡須搭配本公司 DMCNET 系列擴充模組產品或ASDA-A2 系列伺服驅動器進行使用,實施配線時,
務必拔除/切斷電源。
3 使用者使用本通訊介面卡時,必須將之安裝於具防塵、防潮及免於靜電破壞之工業電腦內。該電腦安裝的作業
系統必須是
3 輸入電源切斷後,一分鐘之內,請勿觸摸內部電路。請勿在上電時觸摸任何端子。
3 搭配使用的伺服驅動器上之接地端子
3 通訊介面卡上連接口之端子禁止外力重壓,避免導致產品損壞。
Windows 2000/Windows XP
X யݡᖎ
1.1 型號說明
PCI - DMC - A01
1.2 連接埠介紹
1
(1)
(1)產品介面 PCI 介面
(2)產品名稱 DMC:Delta Motion Control
(3)版本識別碼 A01:標準品
1. 輸入/輸出訊號連接埠
2. DMCNET 擴充模組連接埠
Y Αఢ
。
務必正確的接地,可提高產品抗雜訊能力。
(2)
(3)
2
連接 GE: Gateway Extension(遠端主機的擴充模組)/GA: Gateway(遠端主機模組)
施工注意
1. 將通訊介面卡安裝於工業電腦,請做好靜電防護措施並避免微小的金屬導體掉入安裝主機內部。
2. 連接擴充模組時,請使用規範之傳輸線規格,並確實將其壓入對應之連接埠,避免通訊異常狀況產生。
3.2 注意事項
使用環境
1. 請勿將通訊介面卡裝置於落塵大、油煙、金屬性粉塵及易受靜電衝擊的環境當中。
2. 其它有關於通訊介面卡硬體詳細安裝說明,請參閱 PCI-DMC-A01 使用手冊「2.2 硬體安裝」一節。
[ ᜭજёщ྅ᄃᑕϡёֹϡ
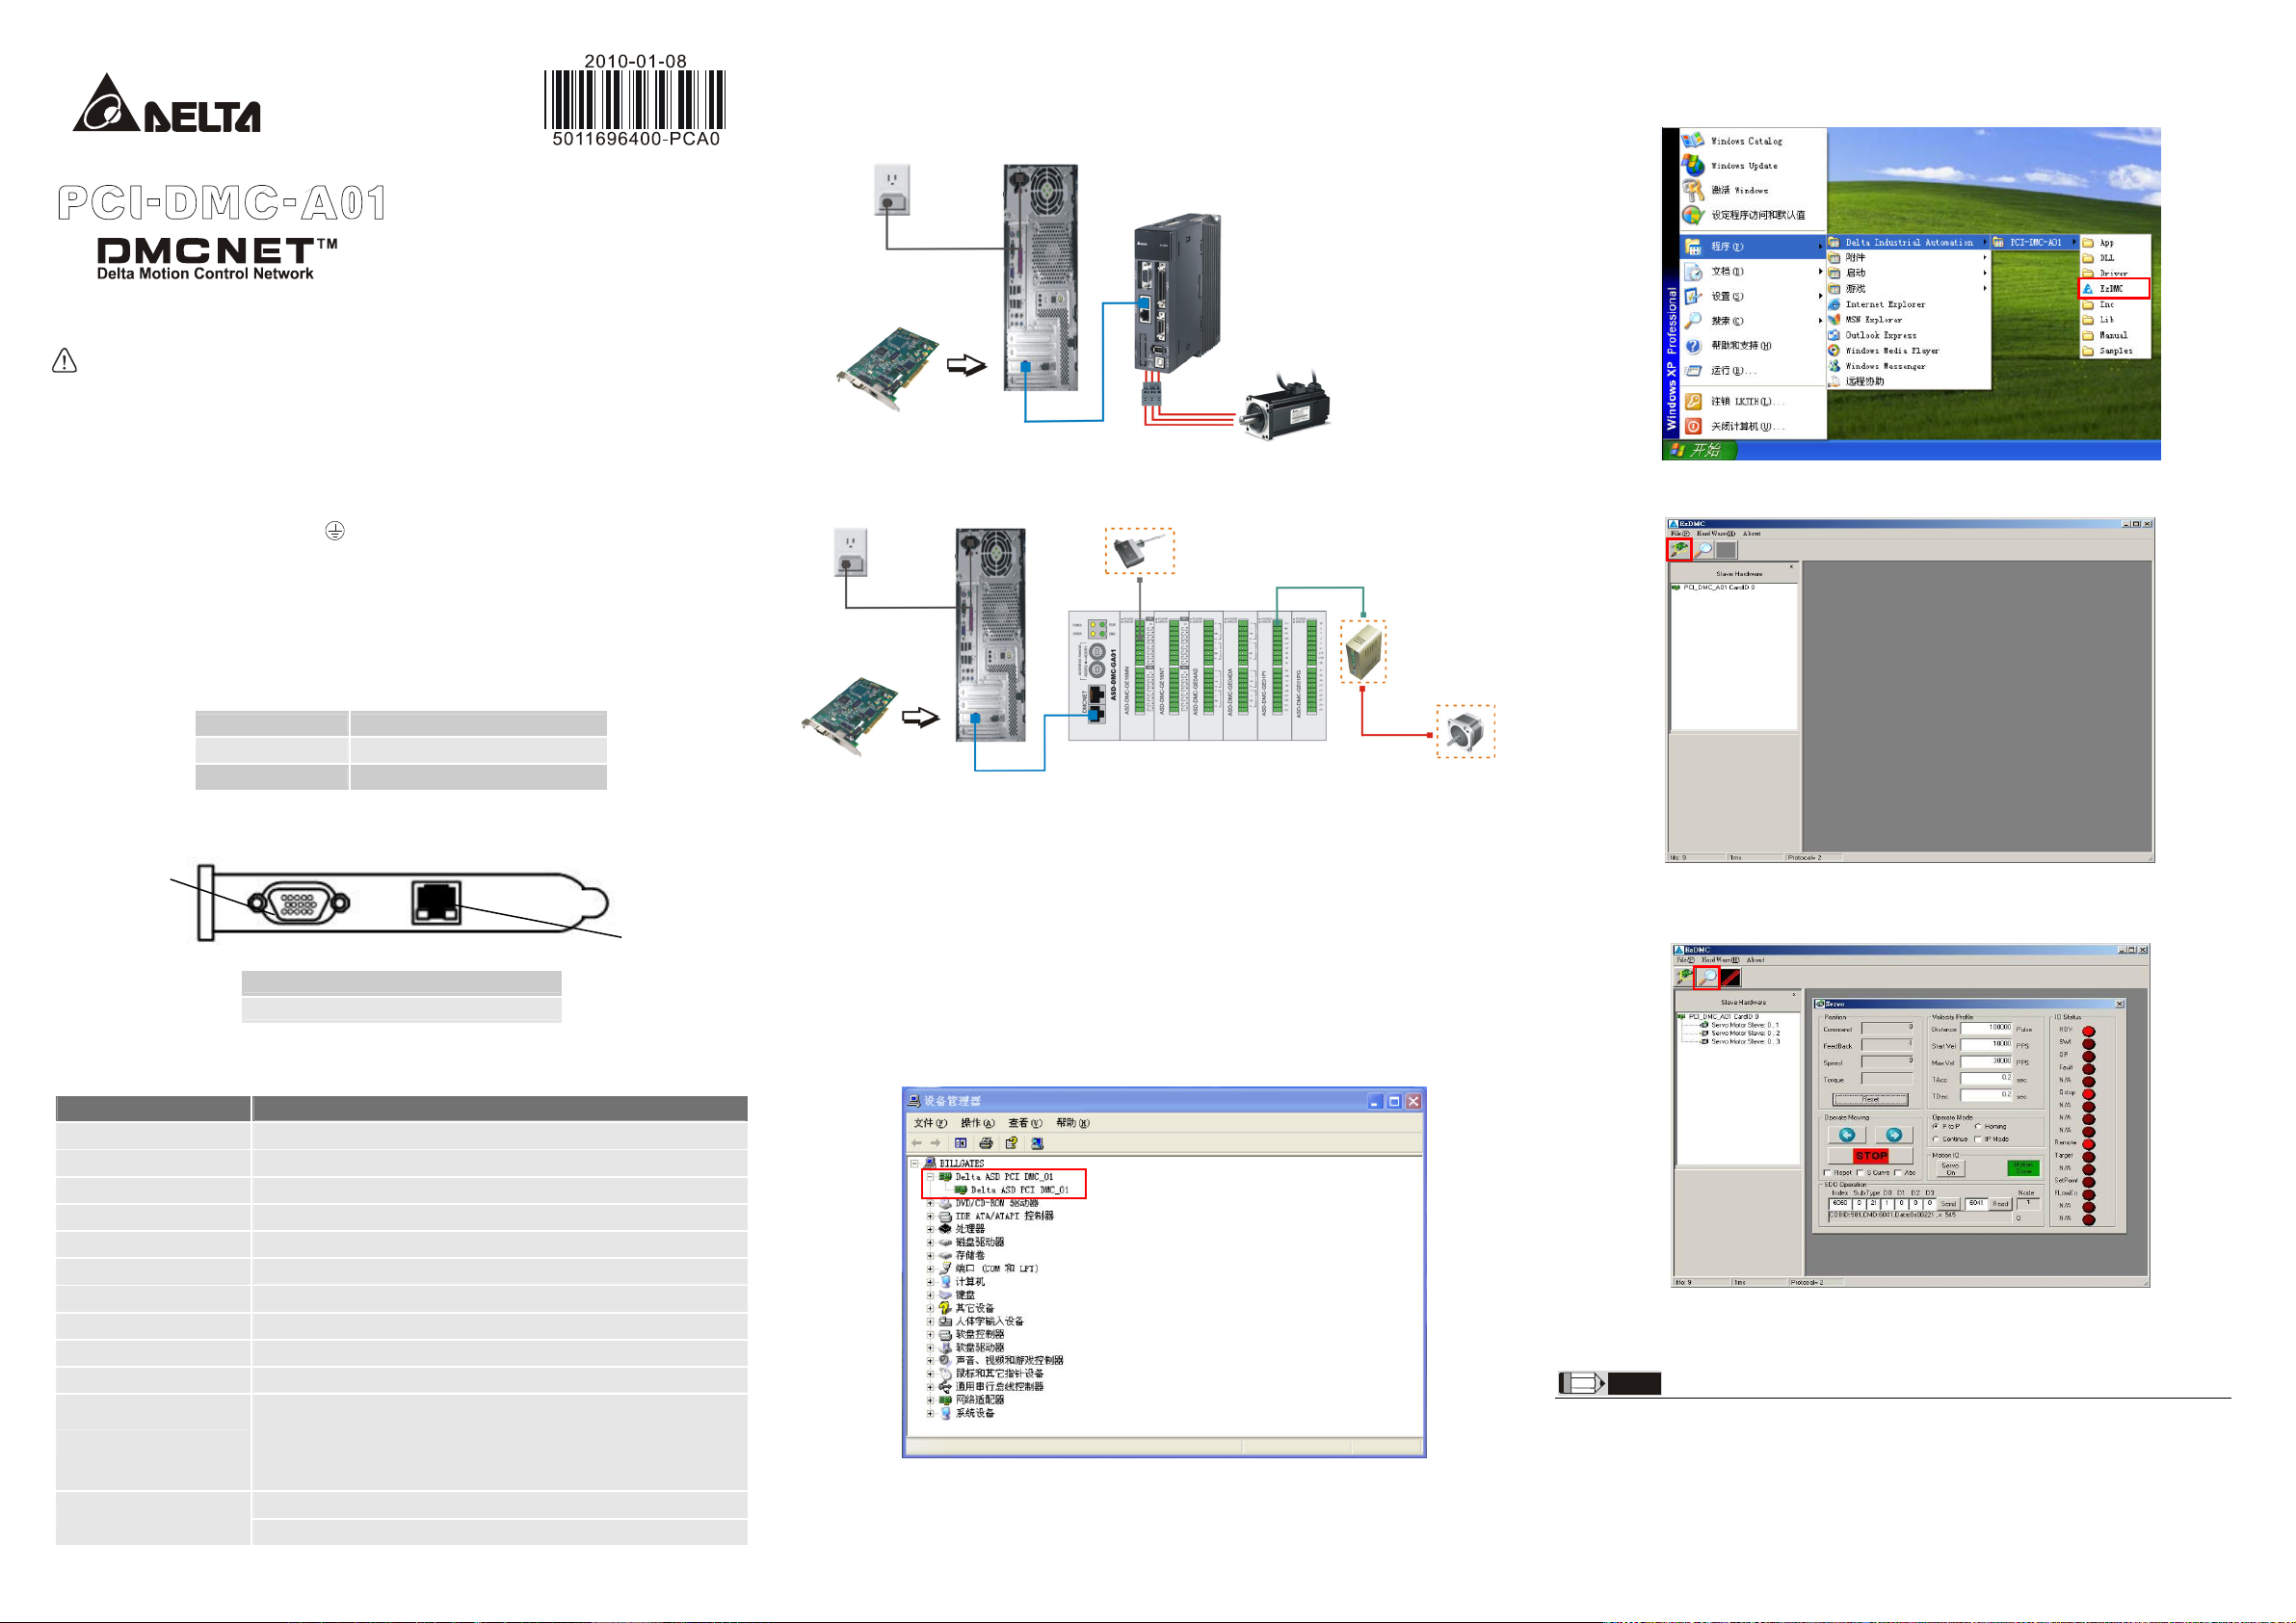
安裝驅動與應用程式軟體,安裝完畢後,檢視「裝置管理員」中「Delta ASD PCI DMC_01」是否有被新增。
2. 按壓「Search Card」功能鍵(方框處),此時會找尋到您安裝於工業電腦的 PCI-DMC-A01 通訊介面卡。
3. 接妥擴充模組,並開啟擴充模組電源,隨後按壓「Scan Slave」功能鍵(方框處),此時系統將搜尋並對應
到已連接之擴充模組,隨後即可依您的需求進行運動控制等操作。
選項
支援驅動器模組 Delta ASDA-A2-F 伺服驅動器
原點復歸模式 35 種(藉由 DMCNET 參數設置控制)
運動速率切線控制 T-curve、S-curve
補間模式 線性、圓弧與連續
Ring 數 1 組
傳輸線
通訊距離 最大 30 公尺(12 slave module)
串列控制介面
PCI 規格 ver.2.2;支援 32-bit, 3.3V/5VDC 操作型式
電源消耗量
雜訊免疫力
操作環境
Category 5e STP Ethernet cable (24AWG/4Pairs)
half duplex RS-485 with transformer isolation
+5V DC at 0.5A typical
突波電壓耐受量:1500VAC(Primary-secondary);1500VAC(Primary-PE)
ESD (IEC 61131-2, IEC 61000-4-2): 8KV Air Discharge
EFT (IEC 61131-2, IEC 61000-4-4): Power Line: 2KV, Communication I/O: 1KV
RS (IEC 61131-2, IEC 61000-4-3): 26MHz ~ 1GHz, 10V/m
操作溫度:0℃ ~ 50℃;儲存溫度:-20℃ ~ 70℃
濕度:5 ~ 95% RH 以下(不結露)
PCI-DMC-A01
NOTE
1) 本說明書內所記載之規格若有變更,本公司恕不另行通知。當內容規格有所修正時,請洽詢代理商或至台達網站
http://www.delta.com.tw/industrialautomation/下載最新版本。
Page 2
http://www.delta.com.tw/industrialautoma tion/
Z щ྅ቢ
3.1 安装范例
连接 ASDA-A2-F 伺服驱动器
应用程序 EzDMC 的开启与使用
1. 点击「开始」Æ「程序」Æ「Delta Industrial Automation」Æ「PCI-DMC-A01」,点击执行【EzDMC】。
έ྿ྻજଠטคΙ
(DMCNET
TM
఼ݭ)
щ྅ᄲځ!
ڦຍְี
3 请在使用之前,详细阅读本安装手册。此安装手册只提供规格、伺服驱动器安装及应用软件(EzDMC)基本操作,
有关于 PCI-DMC-A01 所包含应用与操作,在此无详细的介绍,请读者参阅相关的专业文章或书籍资料。
3 本通讯界面卡须搭配本公司 DMCNET 系列扩展模块产品或 ASDA-A2 系列伺服驱动器进行使用,实施配线时,
务必拔除/切断电源。
3 使用者使用本通讯界面卡时,必须将其安装于具防尘、防潮及免于静电破坏的工业电脑内。该电脑安装的作业
系统必须是
3 输入电源切断后,一分钟之内,请勿触摸内部电路。请勿在上电时触摸任何端子。
3 搭配使用的伺服驱动器上的接地端子
3 通讯界面卡上连接口的端子禁止外力重压,避免导致产品损坏。
Windows 2000/Windows XP
X!யݡᖎ
1.1 型号说明
PCI - DMC - A01
1.2 连接口說明
1
(1)
(1)产品接口 PCI 接口
(2)产品名称 DMC:Delta Motion Control
(3)版本识别码 A01:标准品
1. 输入/输出信号连接端口
2. DMCNET 扩展模块连接端口
Y Αఢ
。
务必正确的接地,可提高产品抗噪音能力。
(2) (3)
2
连接 GE: Gateway Extension(远端主机的扩展模块)/GA: Gateway(远端主机模块)
施工注意
1. 将通讯界面卡安装于工业电脑,请做好静电防护措施并避免微小的金属导体掉入安装主机内部。
2. 连接扩展模块时,请使用规范的传输线规格,并确实将其压入对应的连接端口,避免通讯异常状况产生。
3.2 注意事项
使用环境
1. 请勿将通讯界面卡安装于落尘大、油烟、金属性粉尘及易受静电冲击的环境当中。
2. 其它有关于通讯界面卡硬件详细安装说明,请参阅 PCI-DMC-A01 使用手册「2.2 硬件安装」一节。
[ ᜭજԔщ྅ᄃᑕϡԔֹϡ
安装驱动与应用程序软件,安装完毕后,检查「设备管理器」中「Delta ASD PCI DMC_01」是否有被新增。
2. 点击「Search Card」功能键(方框处),此时会找寻到您安装于工业电脑的 PCI-DMC-A01 通讯界面卡。
3. 接好扩展模块,并开启扩展模块电源,然后点击「Scan Slave」功能键(方框处),此时系统将搜寻并对应
到已连接的扩展模块,然后即可依您的需求进行运动控制等操作。
选项
支持驱动器模块 Delta ASDA-A2-F 伺服驱动器
原点复位模式 35 种(借由 DMCNET 参数设置控制)
运动速率切线控制 T-curve、S-curve
插补模式 线性、圆弧与连续
Ring 数 1 组
传输线
通讯距离 最大 30 公尺(12 slave module)
串行控制接口
PCI 规格 ver.2.2;支持 32-bit, 3.3V/5VDC 操作型式
电源消耗量
抗噪音能力
操作环境
Category 5e STP Ethernet cable (24AWG/4Pairs)
half duplex RS-485 with transformer isolation
+5V DC at 0.5A typical
突波电压耐受量:1500VAC(Primary-secondary);1500VAC(Primary-PE)
ESD (IEC 61131-2, IEC 61000-4-2): 8KV Air Discharge
EFT (IEC 61131-2, IEC 61000-4-4): Power Line: 2KV, Communication I/O: 1KV
RS (IEC 61131-2, IEC 61000-4-3): 26MHz ~ 1GHz, 10V/m
操作温度:0℃ ~ 50℃;储存温度:-20℃ ~ 70℃
湿度:5 ~ 95% RH 以下(不结露)
PCI-DMC-A01
NOTE
1) 本说明书内所记载的规格若有变更,本公司恕不另行通知。当内容规格有所修正时,请咨询代理商或至台达网站
http://www.delta.com.tw/industrialautomation/下载最新版本。
Page 3

http://www.delta.com.tw/industrialautoma tion/
Delta Motion Control Card
(DMCNET
TM
Communication
Type)
Instruction Sheet
Warning
3 Please read this instruction carefully before use.
3 This instruction provides the information of specifications, installation and basic operation and settings of
EzDMC application software program. Regarding the applications of PCI-DMC-A01 DMCNET motion control
card, there is no detailed information available on this instruction. If the users need complete information of
the applications of PCI-DMC-A01 DMCNET motion control card, please refer to relevant professional articles
and books.
3 PCI-DMC-A01 DMCNET motion control card should be used with DMCNET extension modules or ASDA-A2
series servo system. Ensure to switch off the power before wiring.
3 Please install this PCI-DMC-A01 DMCNET motion control card in an industrial embedded PC free of airborne
dust, humidity and static electricity. The operating system must be Windows 2000 or Windows XP.
3 DO NOT touch any internal circuit in 1 minute after the power is switched off. Do NOT touch any terminal
when the power is switched on.
3 Make sure the ground terminal is correctly grounded in order to prevent electromagnetic interference.
3 DO NOT place any heavy objects on the connection port of PCI-DMC-A01 DMCNET motion control card.
Doing so may damage the product.
Z Installation & Wiring
3.1 Installtion Examples
Connecting to ASDA-A2-F Series Servo System
Connecting to GE (Gateway Extension) and GA (Gateway) Modules
Activate and Use EzDMC Application Software Program
1. Click “start” Æ “Programs” Æ ”Delta Industrial Automation” Æ “PCI-DMC-A01”, and then execute
[EzDMC] to activate EzDMC application software program.
2. After EzDMC application software program is activated, the first window to show up is as follows.
Click ”Search Card” button, the system will search the connected PCI-DMC-A01 DMCNET motion
control card immediately.
X Introduction
1.1 Model Explanation
PCI - DMC - A01
(1)
(1) Product Interface PCI Interface
(2) Product Name DMC: Delta Motion Control
(3) Version A01: Standard
1.2 Connection Port Selection
(2)
1
1. Connection Port for Digital Input / Digital Output
2. Connection Port for DMCNET Extension Module
Y Specifications
Item PCI-DMC-A01
Support Module Delta ASDA-A2-F Type Servo Drive
Homing Mode 35 types (Parameter Setting via DMCNET)
Velocity Profiles T-curve, S-curve
Interpolation Mode Linear, Circular and Continuous
Ring 1 Ring
Communication Cable Category 5e STP Ethernet cable (24AWG/4Pairs)
Communication Distance Max. 30m (12 slave module)
Communication Interface half duplex RS-485 with transformer isolation
PCI Specifications ver.2.2, supports 32-bit, 3.3V/5VDC operation
Power Consumption +5V DC at 0.5A typical
Withstand (Peak) voltage: 1500VAC(Primary-secondary);
1500VAC(Primary-PE)
Noise Tolerance Threshold
Environment
ESD (IEC 61131-2, IEC 61000-4-2): 8KV Air Discharge
EFT (IEC 61131-2, IEC 61000-4-4): Power Line: 2KV, Communication I/O: 1KV
RS (IEC 61131-2, IEC 61000-4-3): 26MHz ~ 1GHz, 10V/m
Operating Temperature: 0oC ~ 50oC; Storage Temperature: -20oC ~ 70oC
Humidity: 5 ~ 95% (non-condensing)
(3)
2
Wiring Note
1. When installing PCI-DMC-A01DMCNET motion control card into an industrial embedded PC, make sure to
discharge any potential static electricity and avoid any conductive debris and tiny metal materials enter the
industrial embedded PC when screwing and wiring.
2. When connecting PCI-DMC-A01DMCNET motion control card to the extension modules, make sure to use
the proper communication cable within the stated specifications. Ensure that the communication cable is
plugged into the correct connection port. Otherwise, it may result in communication error.
3.2 Caution
Environment
1. DO NOT install this DMCNET motion control card in a place subjected to corrosive or flammable gases,
liquids, airborne dust, metallic particles and static electricity.
2. For the explanation of hardware installation of this DMCNET motion control card, please refer to “Section
2.2 Hardware Installation” described in PCI-DMC-A01 User Guide.
[ Software Settings
Install PCI-DMC-A01 setup driver software first. After setup, open “Device Manager” dialog box to check if
PCI-DMC-A01 DMCNET motion control card (Delta ASD PCI DMC_01) is connected or not.
3. Then, connect and power the extension modules and click “Scan Slave” button. At this time, the system
will search the available extension modules for performing motion control operation according to users’
requirements.
NOTE
1) The content of this instruction sheet may be revised without prior notice. Please consult our distributors or download the most
updated version at http://www.delta.com.tw/industrialautomation.
 Loading...