

Page 1
ONLINE
N series
6-10KVA
USER MANUAL
Uninterruptible Power Supply
Page 2

CONTENT
1. IMPORTANT SAFETY INSTRUCTIONS.................................................................................................................1
2. INTRODUCTION ......................................................................................................................................................3
2-1 FUNCTIONS AND FEATURES..........................................................................................................................3
2-2 FRONT CONTROL PANEL................................................................................................................................4
2-3 REAR CONTROL PANEL..................................................................................................................................5
3. TECHNICAL DATA .....................................................................................................................................................7
4. INSTALLATION.........................................................................................................................................................10
4-1 UNPACKING AND INITIAL INSPECTION.......................................................................................................10
4-2 STORAGE AND BATTERY MAINTENANCE..................................................................................................10
4-3 PLACEMENT....................................................................................................................................................10
4-4 HANDLING.......................................................................................................................................................12
5. OPERATION..............................................................................................................................................................13
5-1 POWER ON/OFF INVERTER...........................................................................................................................13
5-2 LCD FUNCTION SELECTION SWITCH ..........................................................................................................15
5-3 PARAMETER SET-UP MODE .........................................................................................................................16
5-4 OPERATION ON BYPASS VOLTAGE BEYOND ALLOWABLE RANGE......................................................18
5-5 OVERLOAD AND SHUTDOWN OPERATION................................................................................................18
5-6 VERIFYING THE BATTERY STATUS.............................................................................................................19
5-7 OPERATION OF MANUAL BYPASS SWITCH ...............................................................................................19
6. COMMUNICATION INTERFACE..............................................................................................................................20
6-1 RS232 INTERFACE .........................................................................................................................................20
6-2 REMOTE EMERGENCY POWER OFF............................................................................................................20
6-3 DRY CONTACT................................................................................................................................................21
6-4 SNMP CARD (OPTIONAL) ..............................................................................................................................22
6-5 DETECTION FOR QUANTITY OF EXTERNAL BATTERY PACK..................................................................23
1
Page 3

1. IMPORTANT SAFETY INSTRUCTIONS
This manual contains important instructions for the unit that should be followed during
installation and maintenance of the UPS and batteries.
Install the on line UPS in a well ventilated area, away from flammable liquids and gases. Do
not let the unit come in contact with water.
External slits and openings in the cabinet are provided for ventilation. To ensure reliable
operation of the product and to protect from overheating these openings must not be blocked
or covered. Objects must never be inserted into ventilation holes or openings.
Do not stand beverage containers on the unit.
This UPS was designed to power all modern computer loads and associated peripheral
devices, such as monitors, modems, cartidge tape drives, external floppy drives etc.. Do not
use it for pure inductive or capacitive loads. It is not rated to power life support equipment.
All recorded media, such as diskettes, tapes and cartridges, should be kept a minimum of
60cm from the UPS. Otherwise, the magnetic field created by operation of the UPS may
erase data on those devices.
All repairs or installation should be performed by qualfied service personnel. The UPS
contains voltages which are potentially hazardous. The output receptacles may be alive even
when the UPS is not connected to the mains.
Risk of a possible electrocution is possible when the battery is connected to the UPS.
Therefore, do not forget to disconnect the batteries before any service is to be done on the
UPS. To disconnect, remove the battery fuse holder which is located at the rear panel of the
UPS.
Isolate Uninterruptible Power Supply (UPS) before working on the circuit. A readily accessible
disconnect device shall be incorporated in the fixed wiring.
HIGH LEAKAGE CURRENT – Earth connection essential before connecting power source.
Federal Communications Commission Interference Statement
This equipment has been tested and found to comply with the limits for a Class A digital
device, pursuant to Part 15 of the FCC Rules. These limits are designed to provide
reasonable protection against harmful interference when the equipment is operated in a
commercial environment. This equipment generates, uses and can radiate radio frequency
energy and, if not installed and used in accordance with the instructions manual, may cause
harmful interference to radio communications. Operation of this equipment in a residential
area is likely to cause harmful interference in which case the user will be required to correct
the interference at his own expense.
FCC Caution: To assure continued compliance, (example-use only shielded interface cables
when connecting to computer or peripheral devices). Any changes or modifications not
expressly approved by the party responsible for compliance could void the user’s authority to
operate this equipment.
ATTENTION, hazardous through electrical shock. Also with disconnection of this unit from the
mains, hazardous voltage still may be accessible through supply from the batteries. The
battery supply should be therefore disconnected in the plus and minus pole of the batteries
when maintenance or service work inside the UPS is necessary.
Do not dispose of the batteries in a fire, the batteries may explode.
1
Page 4

Do not open or mutilate the battery or batteries. Released electrolyte is harmful to the skin
and eyes. It may be toxic.
A battery can present a risk of electric shock and chemical hazard. The following precaution
should be observed when working on batteries.
* Remove watches, rings or other metal objects.
* Use only tools with insulated handles.
- The compliance with the following standards provides the conformity:
- EN 62040-1-1
- EN 62040-2 CLASS A
- IEEE-C62.41 Category B
- IEC 61000-2-2
- IEC 61000-4-2 LEVEL3
- IEC 61000-4-3 LEVEL3
- IEC 61000-4-4 LEVEL4
- IEC 61000-4-5 LEVEL4
- IEC 61000-4-6
- IEC 61000-4-8
- CNS 14843-1
- CNS 13438 CLASS A
SYMBOL
PROTECTIVE GROUNDING TERMINAL: A TERMINAL WHICH MUST BE
CONNECTED TO EARTH GROUND PRIOR TO MAKING ANY OTHER
CONNECTION TO THE EQUIPMENT.
A TERMINAL TO WHICH OR FROM WHICH A DIRECT CURRENT OR VOLTAGE
MAY BE APPLIED OR SUPPLIED.
THIS SYMBOL INDICATES THE WORD "PHASE".
2
Page 5

2. INTRODUCTION
2-1 FUNCTIONS AND FEATURES
A True ON LINE design. The UPS insures the critical power protection for your
mission-critical equipment at all times.
Wide input range of power supply that reduces discharge rate of battery.
A smart charger design for auto equalizing charge to shorten charging time.
Equipped with RS232 port and Dry-contact interface, using the power management
software “UPSentry Smart 2000” allows near-end and far-end UPS monitoring
management.
Automatic detection of 50/60Hz field input frequency
With excellent performance. Input current using active input power factor correction
and a high-frequency inverter with pulse width modulation.
Optional isolated output transformer: Provides isolation and multiple output voltage.
Start-on-battery capability for powering up the UPS even if utility power is not
available.
Optional SNMP interface card is an optional accessory for network communication.
Implementing diagnostic test and LCD message display by using microprocessor
technology can provide detailed information on operation status.
Manual and static bypass switch forms. Allowance for switching to the main power
supply.
Static bypass supply circuit incorporates functions such as surge suppression and
EMI filter.
Remote emergency power off (REPO): Emergency shutdown control through the
remote emergency power-off (REPO) port.
Auto recovery function of inverter:
When the AC pow er is restored after a low battery shutdown, the UPS inverter will
automatically restart.
Automatic transfer to inverter output from static bypass after overload condition is
cleared.
Alarm cancel facility to switch off the audible alarm and indicative lights still lit in the
event of long BACK-UP periods.
External battery cabinet can be used for extending operation time of battery mode.
Operation of “ECONOMIC Mode” (Optional): When input voltage is within the range of
rating voltage (±10%), the UPS is working in the bypass mode for higher efficiency.
Otherwise the UPS will be switched to inverter mode.
Auto detection for voltage in bypass mode: The protection range is +15%~ - 20%.
When the bypass voltage is beyond protection range, the UPS will not supply output
power to the load.
Auto detection and display for normal operation of fan.
3
Page 6
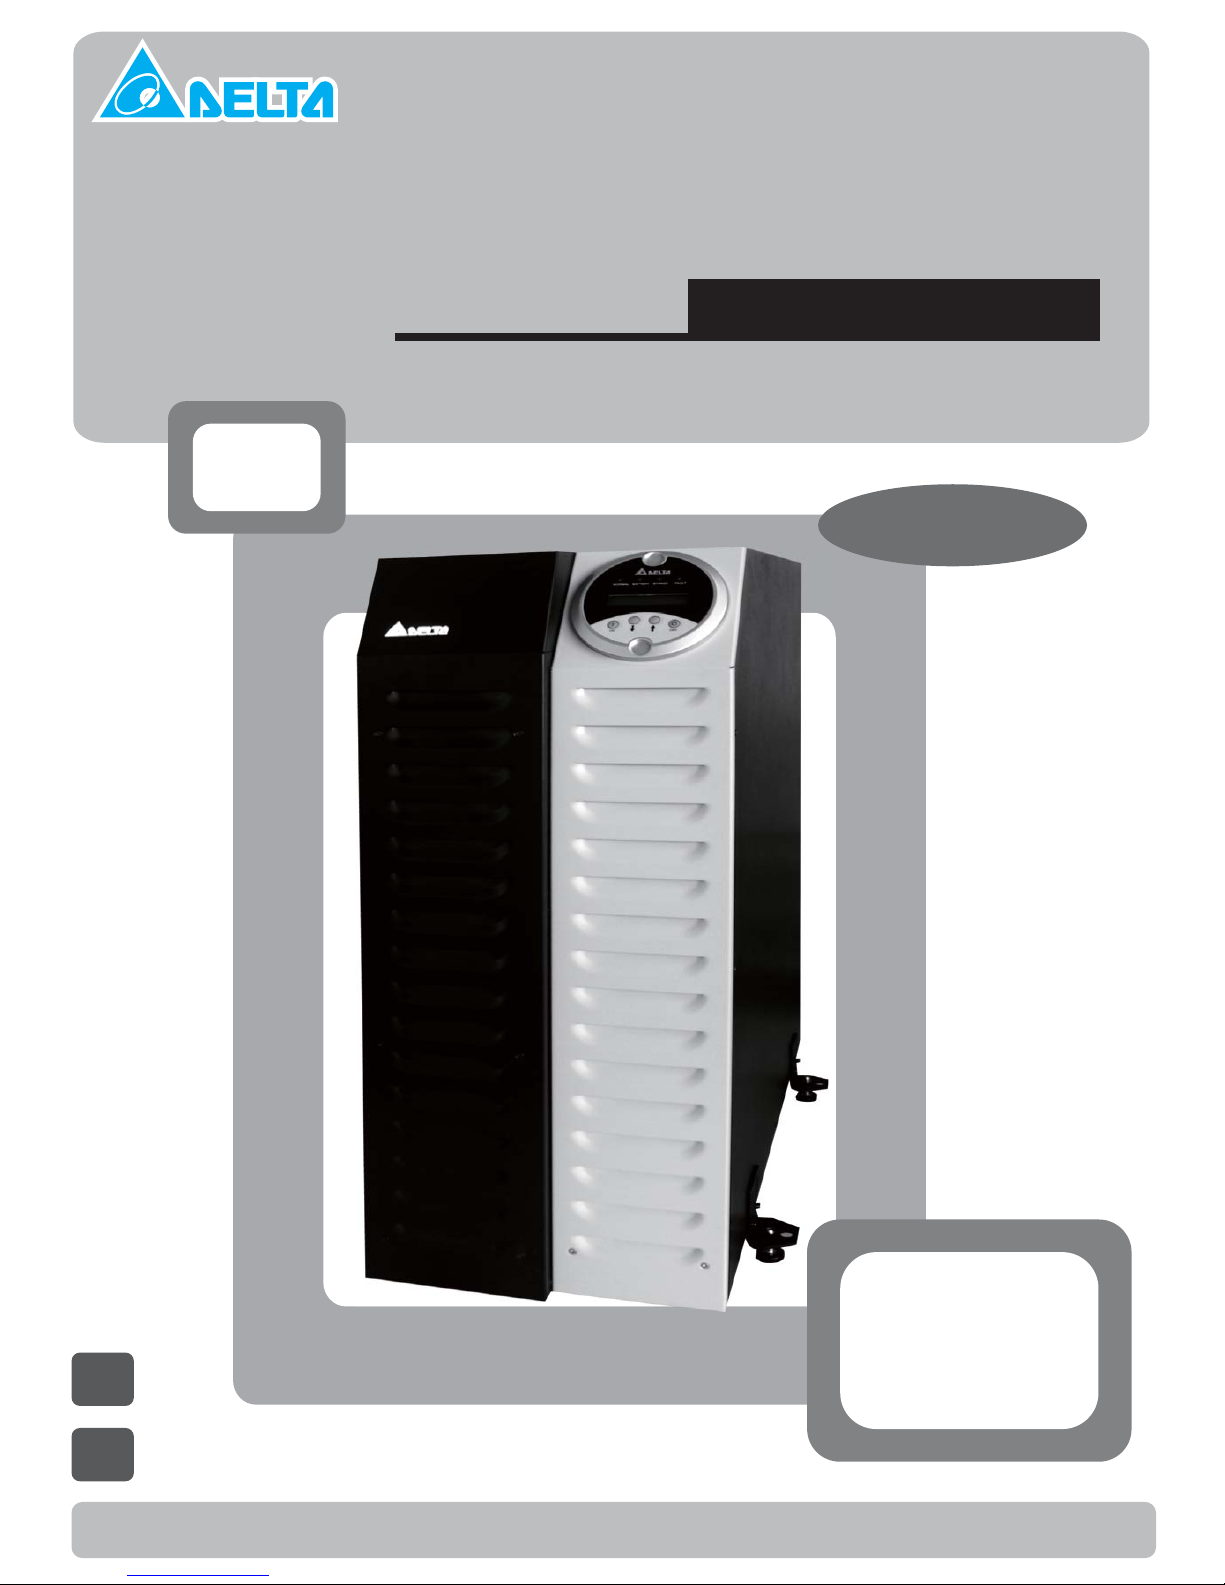
2-2 FRONT CONTROL PANEL
NORMAL
ON OFF
FAULTBYPASSBATTERY
FRONT CONTROL PANEL
1. INVERTER ON BUTTON
Press the “ON” button for 3 seconds to activate the inverter.
2. INVERTER OFF BUTTON
Press the “OFF” button for more than 3 seconds to disable the inverter.
3. FUNCTION BUTTON
- In BYPASS/ECONOMIC/ON LINE/BATTERY mode, press the up (↑) or down (↓) button to
view information on load, voltage and frequency of bypass, input and output, battery and
charger. (Refer to 5.2.)
- In ON LINE and ECONOMIC modes, pressing the up (↑) button for more than 3 seconds can
detect the battery capacity.
NOTE: If the UPS is in alarm status, pressing the up (↑) or down (↓) button for more than 3
seconds can disable the buzzer.
4. BACKLIT LCD DOT MATRIX DISPLAY
16×2 character display indicates the operating status of I/P and O/P voltage and
battery voltage.
5. NORMAL LED
Display the UPS DC/AC circuit is working or not.
6. BATTERY LED
Display the UPS power source is from battery.
7. BYPASS LED
Display bypass voltage condition and UPS output voltage path from bypass.
8. FAULT LED
4
Page 7
Display any abnormality condition happened on UPS.
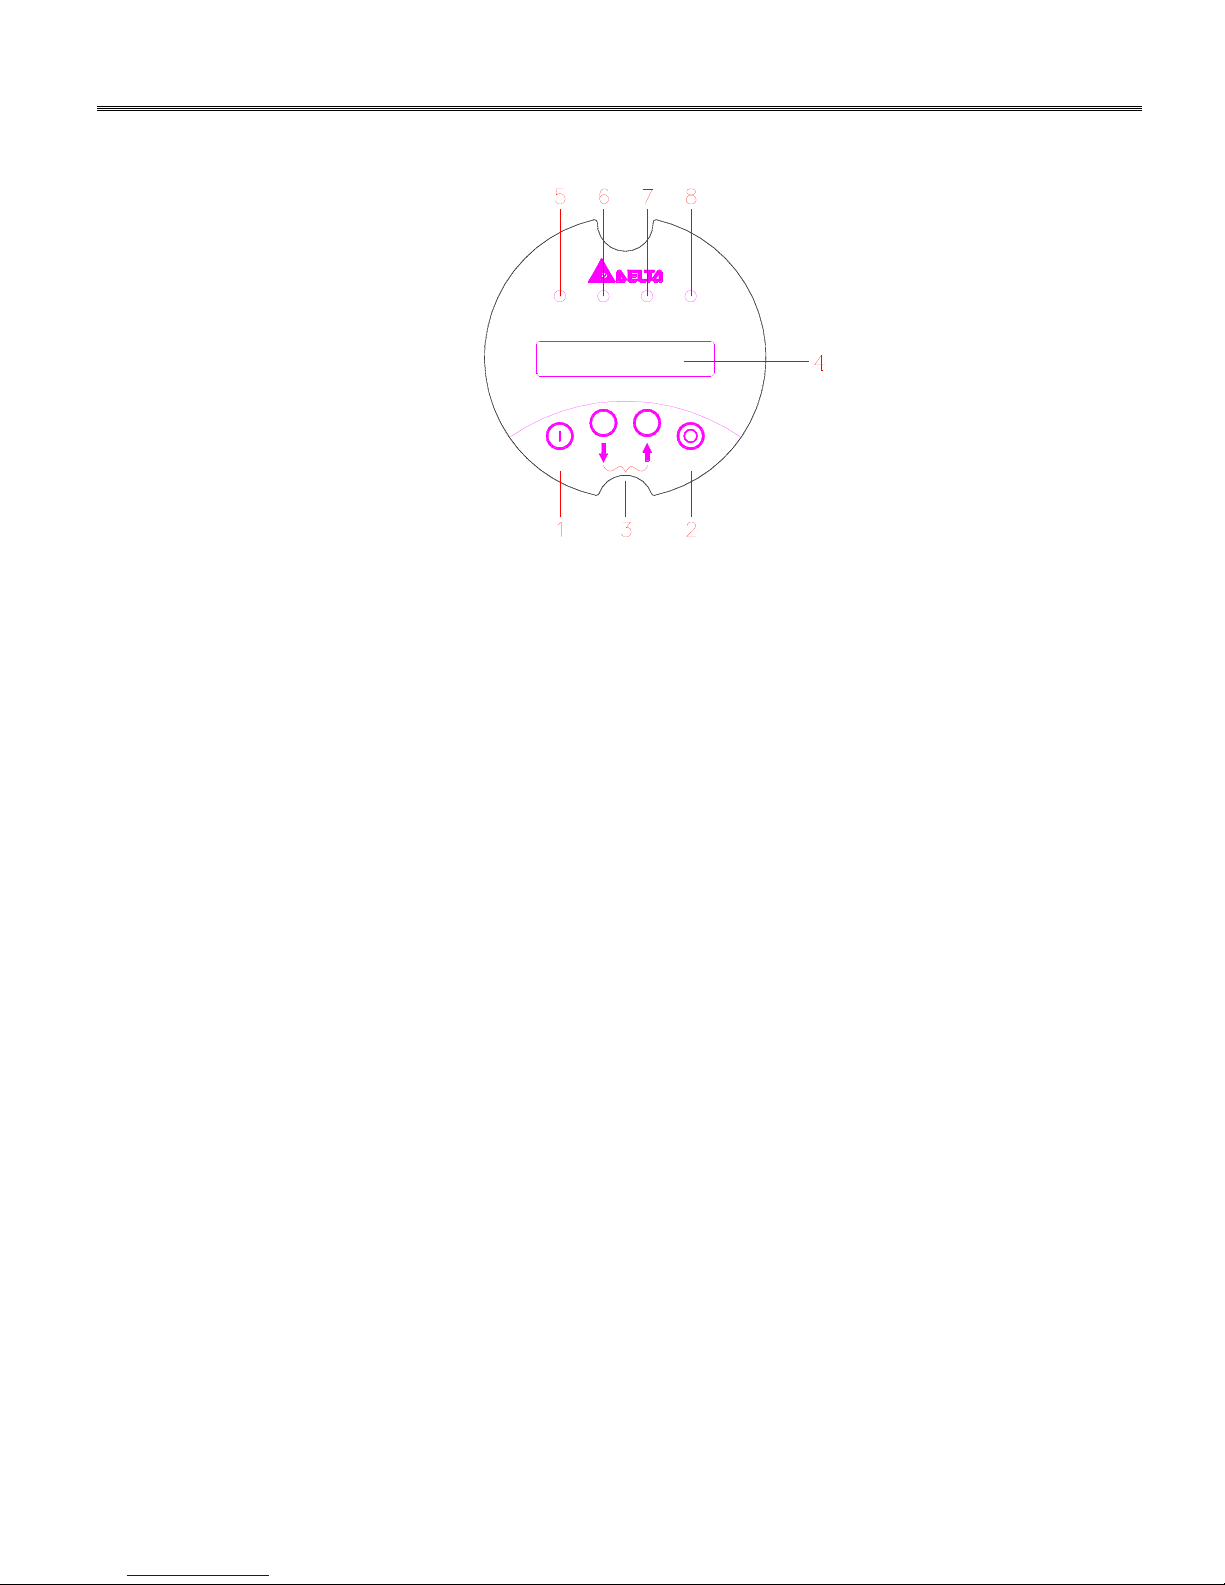
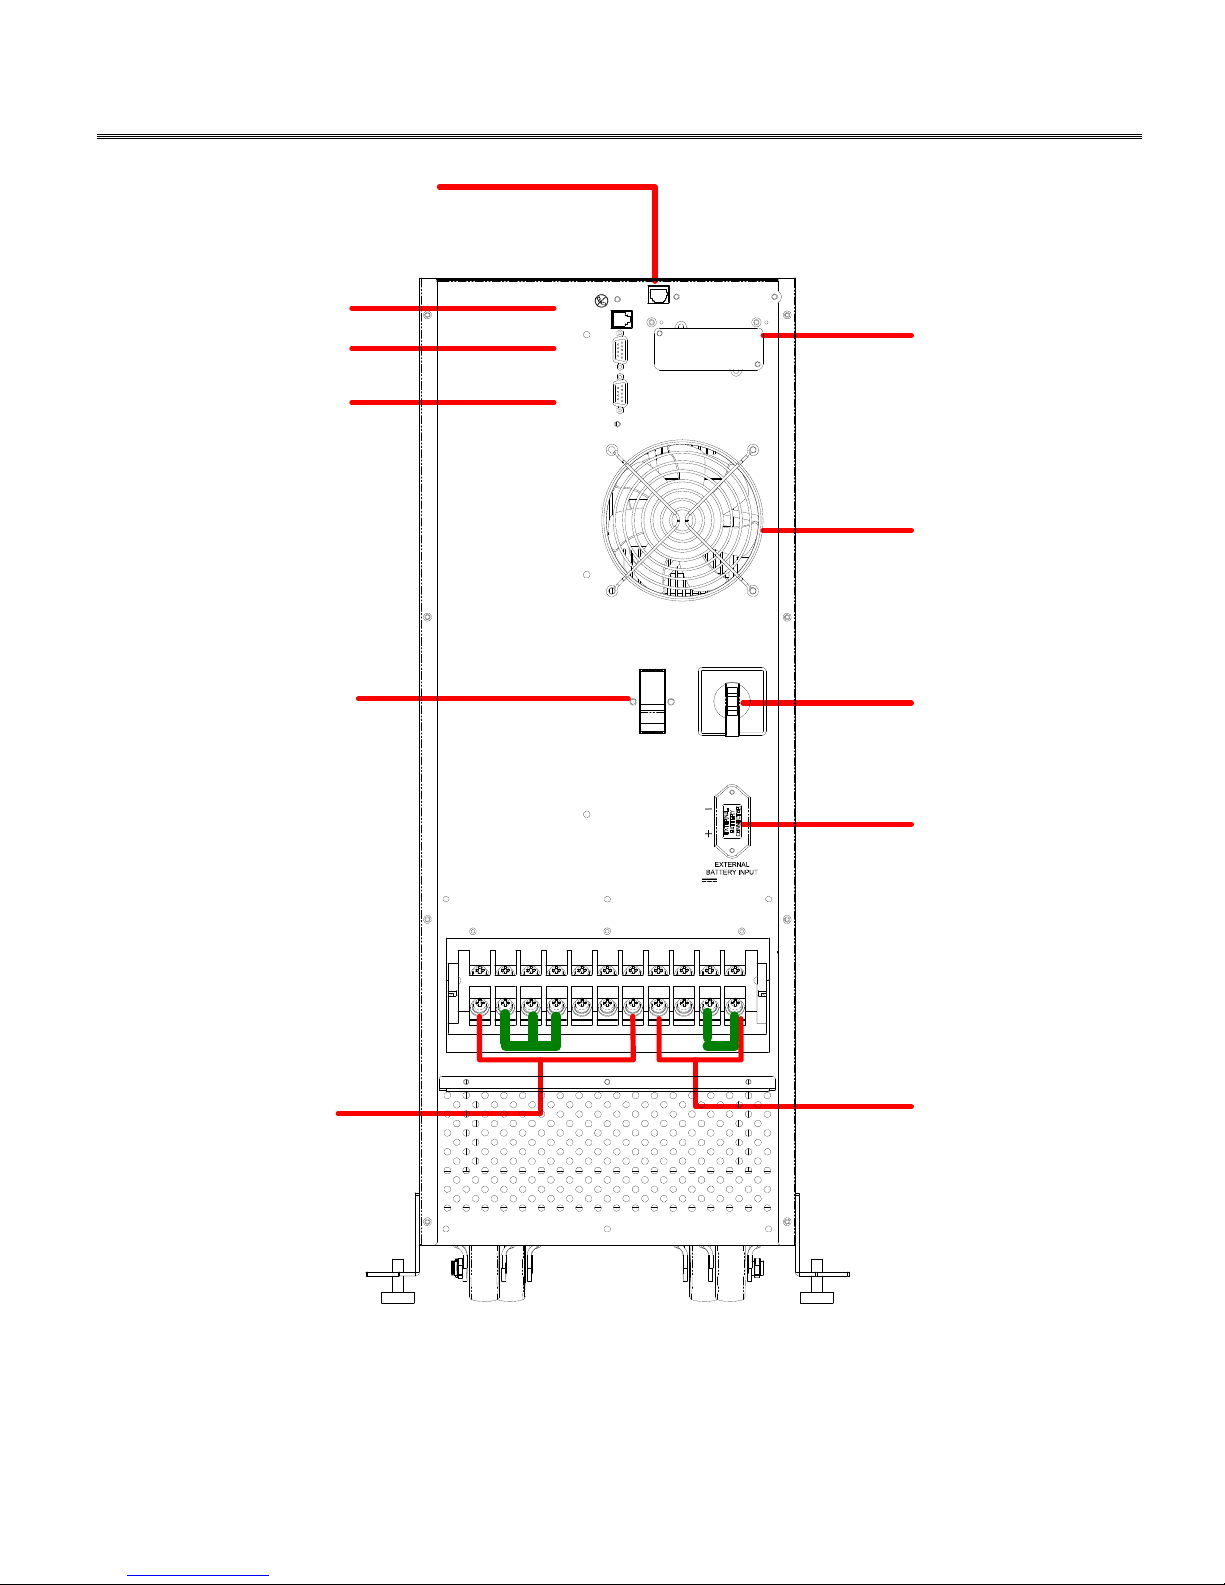
2-3 REAR CONTROL PANEL
7
8
9
5
11
EMERGENCY
POWER OFF
RS-232
DRY
CONTACT
BATT. NO.
AC
INPUT
BREAKER
3
10
SNMP
6
MANUAL BYPASS
1
4
240VDC 20A
2
6KVA
5
Page 8
BATT. NO.
EMERGENCY
POWER OFF
RS-232
SNMP
DRY
CONTACT
MANUAL BYPASS
7
8
240VDC 4 0A
11
EMERGENCY
POWER OFF
DRY
CONTACT
BATT. NO.
RS-232
SNMP
10
9
6
5
MANUAL BYPASS
1
240VDC 40A
4
32
12KVA
6
Page 9

(1). MANUAL BYPASS SWITCH:
To change power load from static bypass to directive bypass while maintaining UPS
without any power interruption.
(2). INPUT TERMINALS:
To connect the AC mains input.
(3). OUTPUT TERMINALS:
Connection of the load terminals is supported by UPS.
(4). EXTERNAL BATTERY CABINET CONNECTOR:
Connect to external battery cabinet to extend the backup time.
(5). AC INPUT BREAKER:
Provides safe protection for UPS AC input.
(6). EXHAUST FANS:
For cooling air ventilation of UPS.
(7). REMOTE EMERGENCY POWER OFF:
For more details, refer to Chapter 6.
(8). TRUE RS232 INTERFACE PORT:
For more details, refer to Chapter 6.
(9). DRY-CONTACT INTEERFACE PORT:
For more details, refer to Chapter 6.
(10). SNMP CARD (OPTIONAL):
For more details, refer to Chapter 6.
(11). EXTERNAL BATTERY PACK DETECTION:
For more details, refer to Chapter 6.
7
Page 10

3. TECHNICAL DATA
Model 6KVA 12KVA
1. Power
1.1 Power (VA) 6000VA 12000VA
1.2 Power (W) PF=0.7 4200W 8400W
2. Output Waveform Sine wave
3. Input
3.1 Input Voltage 220Vac, single phase
3.2 Input Current 27.3A 54.5A
- Inrush Current
- Power Factor 0.99 (At Normal Line and Full Load)
3.3 Efficiency (Full Resistance Load)
- On line Mode (AC to AC) 88% (Full linear load)
- Economy Mode 94% (Full linear load)
3.4 Input Frequency 50/60Hz±0.5,1, 2, 3, 4, 5 Hz (Programmable)
3.5 Input Protection Circuit Breaker 40A (1 pole x 1) 63A (1 pole x 1)
4. Output
200A
4.1 Output Voltage
- RMS Voltage
- Static Regulation
4.2 Harmonic Distortion 5%
4.3 Overload Capability ≦102% Continuous
102%~125%: 1 Minute
125%~150%: 30 Seconds
150%: Immediate
4.4 Overload Release
4.5 Inverter Short Circuit Protection Current
4.6 Short Circuit Protection
4.7 Output Frequency 50/60Hz 0.5Hz (Battery mode)
4.8 Output Protection Circuit Breaker
- Bypass (Outside Installation Capacity)
- Inverter
4.9 Crest Factor
40A(1pole*1) 63A(1pole*1)
120V/220Vac, single phase
2
90 5 (Rated Load)
90A 150A
Shutdown and no output
Electronic protection
2.7:1
7
Page 11

Model 6KVA 12KVA
5. Battery & Charger
5.1 Types Sealed Lead Acid
5.2 Number of Battery
5.3 Protection
5.4 Recharge Voltage
5.5 Recharge Current 8Hrs 90
- Standard Mode
5.6 Battery Leakage Current 1mA≦
5.7 Battery Low Voltage Alarm 220Vdc 3
5.8 Battery Shutdown Voltage
5.9 Back-up Time
0.7A at 250Vdc (175W) 1.4A at 250Vdc (350W)
212Vdc 3(discharge exceed 1hour)
≧7 Minutes (4200W)
12V/ 7Ah x 20PCS
6. Operation
6.1 Transfer Time
- On line Mode
- Main Power Failure 0ms
- Main Power Recover 0ms
12Vdc battery x 20 PCS
30A/600V x 2pcs FUSE
Floating 271Vdc/ Boost 280Vdc
200Vdc 3
≧3 Minutes (8400W)
12V/ 9Ah x 20PCS
- Inverter To Bypass 1ms
- Bypass To Inverter 1ms
- Economy Mode
- Main Power Recover 0ms
- Inverter To Bypass 1ms
- Bypass To Inverter 1ms
- Main Power Failure 8ms (Typical)
6.2 Audible Noise 53 dBA 65 dBA
7. Indications
7.1 LED Status Mimic Diagram Normal, Battery, Bypass, Fault
7.2 LCD Display Refer to Chapter 5.
8. Communications
8.1 RS232 Refer to Chapter 6
8.2 Remote Emergency Power Off Refer to Chapter 6
8.3 Dry-Contact Refer to Chapter 6
8.4 SNMP Function (Optional) Refer to Chapter 6
8.5 External Battery Pack Detection Refer to Chapter 6
8
Page 12

Model 6KVA 12KVA
9. Connection
9.1 Input Terminal Block 60A/600V 4 Pin x1
9.2 Output Terminal Block 60A/600V 7 Pin x1
9.3 Extended Battery I/P Socket 40A
10. Manual Bypass Switch Function 25A 63A
11. Outlook
11.1 Dimension
- Depth (D)
- Width (W)
- Height (H)
- Net Weight
- Battery Cabinet Weight
12 Environment
12.1 Ambient Operating Temperature
12.2 Ambient Storage Temperature
12.3 Relitive Humidity
13 Standards
13.1 CNS 14843-1
13.2 CNS 13438 Class A
13.3 IEEE-C62.41 Category B
13.4 EN62040-1-1
13.5 EN62040-2 Class A
13.6 IEC 61000-2-2
13.7 IEC 61000-4-2 Level 3
13.8 IEC 61000-4-3 Level 3
13.9 IEC 61000-4-4 Level 4
13.10 IEC 61000-4-5 Level 4
13.11 IEC 61000-4-6
13.12 IEC 61000-4-8
133KG/ 293LB 166KG/ 365.7LB
581mm/22.87 inches
280mm/11.02 inches
761mm/29.96 inches
180KG/ 396LB
o
0
C~40 oC/32 oF~104 oF
o
-20
C~40 oC/-4 oF~104 oF
5%~95% H
Yes
Yes
Yes
Yes
Yes
Yes
Yes
Yes
Yes
Yes
Yes
Yes
9
Page 13

4. INSTALLATION
4-1 UNPACKING AND INITIAL INSPECTION
Carefully unpack and inspect the UPS upon receipt. If there is damage or anything is missing
from the shipment, contact the dealer from whom you purchased the unit and save the
packaging for future shipment. The packaging is recyclable, save the box and packing
material for reuse. (Pay attention to the packing method. If you need to return the UPS any
time, repack it how it was originally shipped.) If the unit passes the initial inspection, record
the purchase date on rear panel of the unit .
Package content: 1. User Manual 1
2. RS232 Cable 1
3. “UPSentry Smart 2000” software CD 1
4-2 STORAGE AND BATTERY MAINTENANCE
If the UPS is to be stored before installation, it should be placed in a dry, ventilated area where
it will not be exposed to dirt, moisture or other contaminates.
Extreme storage temperatures:
-20C to + 60C without batteries.
-20C to + 45C with batteries for a short period.
Maximum period for battery storage: 6 months at 20C or 3 months at 30C.
Eight hours of charging time is needed when the UPS is charged for the first time.
If battery capacity still remains low after recharging for 8 hours, contact your dealer to replace
the batteries.
If the UPS is to be powered off for a long period, it is recommended that the UPS should be
switched on for 24 hours before power off. The battery should be recharged every 3 months to
prevent irreversible battery damage.
While replacing the batteries, use the same number and the following types of batteries:
6KVA:12V/7Ah*20/1SET, YUASA( NP7-12) or CSB(GP1270) or B&B(HR7-12).
12KVA:12V/9Ah*20/1SET, YUASA (REW45-12) or CSB (HR1234WF2) or B&B (HR9-12)
or Matsushita(LC-R19).
4-3 PLACEMENT
Install the ON LINE UPS in a temperature and humidity controlled, indoor environment,
free of conductive contaminants. Ambient temperature must not exceed 40°C (104°F).
IMPORTANT: To maintain the maximum battery life, please keep the UPS at an ambient
temperature of 15C to 25C. Battery life is reduced by half for every 10C above 25C.
10
Page 14

Required Protective Devices and Cable Selection:
Refer to the following table on recommended cable and upstream protection:
Model Rated Input Cable Rated Output Cable
6 KVA 8AWG or 8mm2
8AWG or 8mm
2
D curve – 40A
Upstream Circuit-Breaker
12 KVA 6AWG or 14mm2 6AWG or 14mm2 D curve – 63A
SELECTION OF CONDUIT AND BUSHING:
According to National Electrical Code, install all the wiring with suggested suitable conduit and bushing as below.
Conduit: Flexible metal conduit sized one inch.
Bushing: Overall diameter is 40.5mm, height is 13.1mm.
Input and Output Connection:
When connecting the cable, please note that:
1. Before connecting, turn off the UPS and cut off AC power and battery.
2. Ensure the cable is fitted. The minimum tightening torque shall not be less than 35 lbs with a cable sleeve &
secured by the connector clamp.
3. Connect the EARTH wire to the terminal marked with “
” .
The connective methods of input and output:
1. Output 1, 3 wires: (For 6KVA and 12KVA)
11
Page 15

4-4 HANDLING
The unit is fitted with wheels for moving it over a short distance. It is stabilized by four feet at
both side.
For safety reason, secure the unit by releasing the feet. Refer to Fig.1&2 or Fig.1&3
The UPS should always have a clearance space of 300mm at the rear and 100mm on its side.
Refer to Fig.4
First change the direction
and fixed of “L” type metal
Remove the
screws.
then revolve screw plastic
foots to ground.
Fig.1 Fig. 2
30cm
UPS
First change the direction and
revolve screw plastic foots on
side of “L” type metal then to
fixed “L” type metal on ground.
Fig.3 Fig.4
10 cm
12
Page 16

5. OPERATION
5-1 POWER ON/OFF INVERTER
Power on Inverter
Switch on the AC input breaker on rear control panel, and the load will be energized.
When the AC input is normal, press the inverter “ON” button on front control panel for 3
seconds.
When the AC input fails, press the “ON” button for more than 3 seconds to turn on inverter
from batteries.
The UPS starts diagnostic test and shows the results on the back lit LCD display as shown
below.
DIAGNOSIS MODE
AC START BATTERY START
DIAGNOSTIC MODE
FREQ OUT= XXHZ
DIAG N O STIC M OD E
INPUT XXXV/XXHZ
DIAG N O STIC M OD E
RECTIFIER OK
DIAG N O STIC M OD E
CHARGER OK
DIAGNOSTIC MODE
BATTERY OK
DIAGNOSTIC MODE
DC BUS OK
DIAGNOSTIC MODE
TESTING INVERTER
ON LINE MODE
LOAD= XXX % X. XXKW.
DIAGNOSTIC MODE
FREQ OUT=XXHZ
DIAGNOSTIC MODE
INPUT XXXV/XXHZ
DIAGNOSTIC MODE
RECTIFIER OK
DIAGNOSTIC MODE
BATTERY OK
DIAGNOSTIC MODE
DC BUS OK
DIAGNOSTIC MODE
TESTING INVERTER
ON BATTERY
LOAD=XXX% X.XXKW
.
13
Page 17

After diagnostic test, the load is supplied by the inverter; if the diagnostic test fails, the
error messages will be shown as below.
ERROR MESSAGES
BAD BATTERY
CHARGER FAILURE
DC BUS FAILURE
INVERTER FAILURE
OUTPUT FAILURE
FAN FAILURE
BAD BATTERY
SHUT DOWN
CHARGER FAILURE
SHUT DOWN
DC BUS FAILURE
SHUT DOWN
INVERTER FAILURE
SHUT DOWN
OUTPUT FAILURE
SHUT DOWN
FAN FAILURE
SHUT DOWN
Power Off Inverter
Press the ”OFF” button on front control panel to disable the inverter:
If the AC input power exists, the UPS will be switched to BYPASS mode.
If the UPS is in backup mode, the message ”UPS OFF WAITING” will be displayed on LCD
about thirty seconds then disappear.
Before removing the battery connect wire, please wait until the message “UPS OFF
WAITING” displayed on LCD disappears.
14
Page 18

5-2 LCD FUNCTION SELECTION SWITCH
In BYPASS/ECONOMIC/ON LINE/BATTERY mode, press the up (↑) or down (↓) button on front
control panel to view different power readings on LCD.
OPERATION IN BYPASS MODE
OPERATION IN ECONOMY MODE
BYPASS MODE
LOAD = XXX% X.XXKW
PRESS SELECT KEY
BYPASS MODE
BYPS = XXXV XX.XHz
PRESS SELECT KEY
BYPASS MODE
IN = XXXV XX.XHz
PRESS SELECT KEY
BYPASS MODE
OUT = XXXV XX.XHz
PRESS SELECT KEY
BYPASS MODE
BATT=XXXV XXX%
PRESS SELECT KEY
BYPASS MODE
CHRG=XXXV FLOAT(BOOST)
PRESS SELECT KEY
ECONOMY MODE
LOAD = XXX% X.XXKW
PRESS SELECT KEY
ECONOMY MODE
BYPS = XXXV XX.XHz
PRESS SELECT KEY
ECONOMY MODE
IN = XXXV XX.XHz
PRESS SELECT KEY
ECONOMY MODE
OUT = XXXV XX.XHz
PRESS SELECT KEY
ECONOMY MODE
BATT=XXXV XXX%
PRESS SELECT KEY
ECONOMY MODE
CHRG=XXXV FLOAT(BOOST)
PRESS SELECT KEY
OPERATION IN ON LINE MODE OPERATION IN BATTERY MODE
ON LINE MODE
LOAD = XXX% X.XXKW
PRESS SELECT KEY
ON LINE MODE
BYPS = XXXV XX.XHz
PRESS SELECT KEY
ON LINE MODE
IN = XXXV XX.XHz
PRESS SELECT KEY
ON LINE MODE
OUT = XXXV XX.XHz
PRESS SELECT KEY
ON LINE MODE
BATT=XXXV XXX%
PRESS SELECT KEY
ON LINE MODE
CHRG=XXXV FLOAT(BOOST)
PRESS SELECT KEY
ON BATTERY
LOAD = XXX% X.XXKW
PRESS SELECT KEY
ON BATTERY
BYPS = XXXV XX.XHz
PRESS SELECT KEY
ON BATTERY
IN = XXXV XX.XHz
PRESS SELECT KEY
ON BATTERY
OUT = XXXV XX.XHz
PRESS SELECT KEY
ON BATTERY
BATT=XXXV XXX%
PRESS SELECT KEY
ON BATTERY
CHRG = XXXV OFF
PRESS SELECT KEY
15
Page 19

5-3 PARAMETER SET-UP MODE
Press both up (↑) and down (↓) buttons altogether for 3 seconds, then the UPS will enter SET-UP
mode.
SET-UP MODE
UPS SET-UP
EXIT ENTER
OUTPUT VOLTAGE
SCROLL SELECT
OUTPUT VAC=220V
SCROLL SELECT
Select output voltage
Retrun to set initial
OUTPUT VAC=230V
SCROLL SELECT
Select output voltage
Retrun to set initial
Re t u r n
OUTPUT FREQUENCY
SCRO
LL SELECT
Re t u r n
ECONOMY MODE
SCROLL SELECT
Re t u r n
OUTPUT VAC=240V
SCROLL SELECT
Select output voltage
Retrun to set initial
FREQUENCY=60HZ
SCROLL SELECT
Sel ec t out put f r e quenc y
Return to set initial
FREQUENCY=50HZ
SCROLL SELECT
Sel ect economy mode
Return to set initial
ECONOMY ON
SCROLL SELECT
Sel ect out put f r eque ncy
Return to set initial
ECONOMY OFF
SCROLL SELECT
Se l e c t e c o no my mo de
Return to set initial
16
Page 20

BYPASS TRANSFER
SCROLL SELECT
Re t u r n
TRANSFER ON
SCROLL SELECT
Sel ect out put frequency
Return to set initial
TRANSFER OFF
SCROLL SELECT
Sel ec t ec onomy mode
Return to set initial
EXTEND BATTERY
SCROLL SELECT
Re t u r n
Re t u r n
BATTERY=00Ah
SCROLL SELECT
Sel ect out put frequency
Return to set initial
BATTERY=60Ah
SCROLL SELECT
Sel ec t ec onomy mode
Return to set initial
BATTERY=100Ah
SCROLL SELECT
Sel ect out put fr equency
Return to set initial
BATTERY=160Ah
SCROLL SELECT
Sel ec t ec onomy mode
Return to set initial
BATTERY=200Ah
SCROLL SELECT
Sel ect economy mode
Return to set initial
17
Page 21

5-4 OPERATION ON BYPASS VOLTAGE BEYOND ALLOWABLE RANGE
The UPS can automatically detect the voltage in bypass mode. The protection range is
+15%~-20%. When the bypass voltage is beyond protection range, the UPS will not supply
output power to the load.
BYPS OUT OF VOLT
LOAD = XXX% X.XXKW
When the bypass voltage is higher than 115% of rating voltage,
the UPS will alarm and will not supply output power to the load.
The message “BYPS OUT OF VOLT” will also be displayed on
LCD.
When the bypass voltage is lower than 80% of rating voltage, the
UPS will alarm and will not supply output power to the load. The
message “BYPS OUT OF VOLT” will also be displayed on LCD.
5-5 OVERLOAD AND SHUTDOWN OPERATION
Overload Operation
When the UPS detects an output overload, it will commence a countdown (The length of time
depends on the severity of the overload.). If the UPS is still overloaded at the end of the
countdown, the UPS will automatically shut down and enter BYPASS mode.
Overload
Condition
102%-125%
125%-150%
LCD Display Message
Overload 102%
Load=XXX%X.XXKW
Overload 125%
Load=XXX%X.XXKW
Countdown to
Shutdown
1 minute
30 seconds.
>150%
Shutdown Operation
Condition
Extended Overload
Output Short Circuit
Remote Shutdown Command
Emergency stop power off
DC BUS Fault
Internal Temperature Faults
Overload 150%
Immediate
Load=XXX%X.XXKW
LCD Display Message
OVERLOAD XXX%
SHUT DOWN
OVER CURRENT
SHUT DOWN
REMOTE COMMAND
SHUT DOWN
EMERGENCY STOP
SHUT DOWN
+/-DC BUS HIGH/ LOW
SHUT DOWN
OVER TEMPERATURE
SHUT DOWN
18
Page 22

5-6 VERIFYING THE BATTERY STATUS
The battery status is shown as below:
Battery Status Buzzer of Back-up Status LCD Display
Full
Beep per 2 seconds
Mid
Low Beep per 0.5 second
Under Long beep Battery under shutdown
BATTERY mode
BATT=
shutdown imminent
V
Low battery
%
5-7 OPERATION OF MANUAL BYPASS SWITCH
The manual bypass switch is used for maintenance. In this situation, the AC input power is
directly supplied to the load.
CAUTION!
Activate manual bypass switch only when the UPS is in BYPASS mode.
NORMAL
BYPASS
BYPASS
NORMAL
STEP 1: Turn off the inverter power to switch the
UPS to BYPASS Mode.
STEP 2: Switch from “ON LINE” to “BYPASS”.
STEP 3: Switch off the AC Input breaker on rear
STEP 4: Remove the battery connect wire.
STEP 1: Insert the battery connect wire.
STEP 2: Switch on the AC Input breaker on rear
STEP 3: Switch from “BYPASS” back to
STEP 4: Press the ON button on front control
panel.
panel..
“ON LINE”.
panel to turn on the inverter.
19
Page 23

6. COMMUNICATION INTERFACE
g)
6-1 RS232 INTERFACE
A 9-pin female SUB-D connector is provided on rear panel of UPS to transmit the UPS signals
to the computer. Using the Delta “UPSenrty Smart 2000” software allows users to check the
power status. The details on signals are shown as below.
Load level
Battery status
Battery level
UPS mode
Input voltage
Output voltage
Input frequency
Temperature inside unit
Set shut-down delay
time
Enable / Disable beeper
Remote shut-down
6-2 REMOTE EMERGENCY POWER OFF
Pin Assignment:
Pin 2: TXD (Transmit Data)
Pin 3: RXD (Receiving Data)
Pin 5: GND (Signal Ground)
Pin 7: PNP (Signal Receivin
Hardware:
Baud Rate ----------------2400 bps
Data Length -------------- 8 bits
Stop Bit ------------------ 1 bit
Parity --------------------- NONE
Pin Assignment of RJ11:
12V
1
2
3
4
5
6
X
X
1
2
3
4
5
6
If short pin (2, 3) or pin (2, 5) or pin (4, 5) or pin (4, 3), then the UPS will be powered off.
NOTE: This port must not be connected to the Telecom Port.
20
Page 24

6-3 DRY CONTACT
The sub-D communication port (9-pin female type) is used for powering on/off the UPS by
external control signal. UPS can also transmit its status through this port. Refer to the
following Dry contact table.
State
Normal
Pin
Pin 8, 3 Pin 1,3 Pin 6, 3 Pin 5, 3 Pin 2, 3
Open Open Open
Back up Close
Low Battery Close
Fault Close
Bypass Close Open
Inverter Open Close
NOTE: means the state may be “Open” or ” Close”.
Pin Assignment:
LOW BATTERY
THE CAPACITY OF
DRY CONTACT:
AC 250V/8A
DC 12V
NO
NCCOM
NO
COM NC
NO
BYPASS
INVERTER
Fig. 5-2
NCCOM
Imin.> 3.3mA
REMOTE SHUTDOWN
SIGNAL FROM
EXTERNAL
>2 sec
12 V
±3V
0
21
Page 25

6-4 SNMP CARD (OPTIONAL)
SNMP network interface is a powerful tool for remote control and UPS monitoring.
NOTE: For more information on SNMP CARD, contact your local dealer.
EMERGE NCY
POWER OFF
BATT. NO.
RS-232
DRY
CONTACT
SNMP
BYPASS
MANUAL BYPASS
INPUT
BREAKER
240VDC 35.6A
22
Page 26

6-5 DETECTION FOR QUANTITY OF EXTERNAL BATTERY PACK
When the UPS is connected with Delta’s standard battery packs, you can detect the total battery
capacity by linking the UPS to the battery pack.
NOTE: This function can detect maximum two external battery packs.
UPSBATTERY 1BATTERY 2
23
Page 27

www.deltaww.com
 Loading...