

Page 1

LX STROLLER:
ASSEMBLY INSTRUCTIONS
ADULT ASSEMBLY REQUIRED
INSTRUCCIONES DE ENSAMBLAJE
DEBE SER ENSAMBLADO POR UN ADULTO
Styles and colors may vary
Los estilos y colores pueden varia
Customer Care Tel. 1-(800)-377-3777
Tel. del Servicio al Cliente. 1-(800)-377-3777
(A)
www.DeltaChildrensProducts.com
DCP Cat # 12-03-10-V5
Page 2
Consumer Information
WARNING
Prevent serious injury from falls
or sliding out:
• ALWAYS use the restraint system.
• Only children who have developed enough
upper body control to sit without leaning
forward can use the front seat in the
upright position.
• NEVER leave child unattended.
• DO NOT use the storage bag to carry children.
To prevent product from tipping over:
• DO NOT exceed the maximum storage weight
limit of 3 lbs (1.36 kg) in the storage bag.
• DO NOT exceed the maximum storage weight
limit of 3 lbs (1.36 kg) in the cup holder.
• DO NOT place additional items on this
product, except as recommended in
the instructions.
To prevent injury:
• Make sure all body parts are clear of the
stroller when folding and unfolding.
• DO NOT place hot liquids in the cup holder.
Hot liquids can burn your child.
• Please read these instructions before assembly and use of this product.
• Adult assembly is required.
• Use only for a child who weighs less than 35 lbs (15.88 kg).
• Maximum weight limit for the storage bag is 3 lbs (1.36 kg).
• Maximum weight limit for the cup holder is 3 lbs (1.36 kg).
• Product features and decorations may vary from the photo.
Care
• The plastic parts may be wiped clean using a mild cleaning solution and
damp cloth. Hand wash fabric with damp cloth and air dry.
Do not use bleach.
• To keep your stroller wheels from squeaking, use a silicone or graphite
based lubricant.
Manufactured for and distributed by:
114 West 26th Street, New York, NY 10001
Customer Service
Tel. 1-(800)-377-3777
www.DeltaChildrensProducts.com
customerservice@DeltaChildrensProducts.com
MADE IN CHINA
2
Page 3
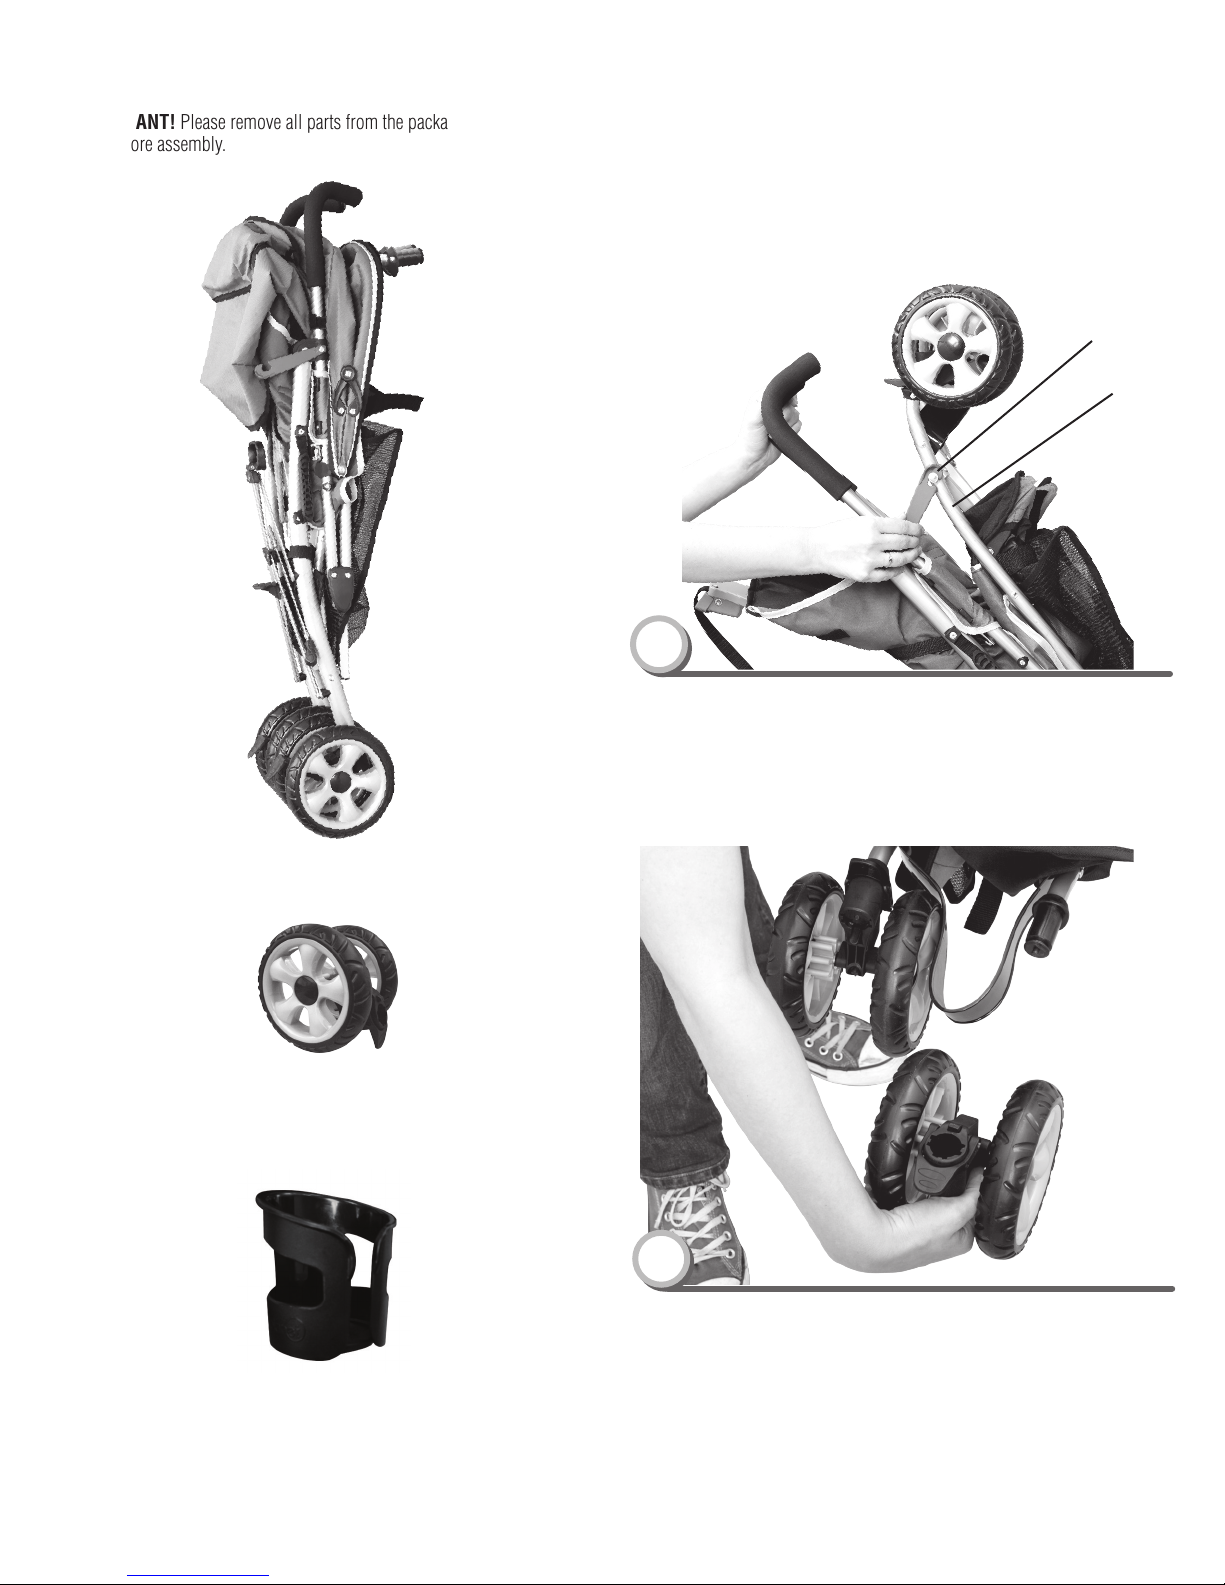
Parts Assembly
IMPORTANT! Please remove all parts from the package and identify
them before assembly.
IMPORTANT! Before assembly or each use, inspect this product for
damaged hardware, loose joints, missing parts or sharp edges.
DO NOT use if any parts are missing or broken. Contact manufacturer for
replacement parts and instructions if needed. Never substitute parts.
Latch Clip
Side Frame
1
• Locate the latch clip on the side frame of the stroller.
• Pull to release the latch clip.
Front Swivel
Wheels X 2
Cup Holder
Customer Service Tel. (800) 377-3777
2
Attaching Front Swivel Wheels
• Locate the legs on the front of the stroller. (as pictured above)
• Attach wheel unit to the front of the stroller leg,
make sure you hear a “snap”.
• Check to make sure the wheel units are properly attached.
• Repeat on opposite side.
3
www.DeltaChildrensProducts.com
Page 4
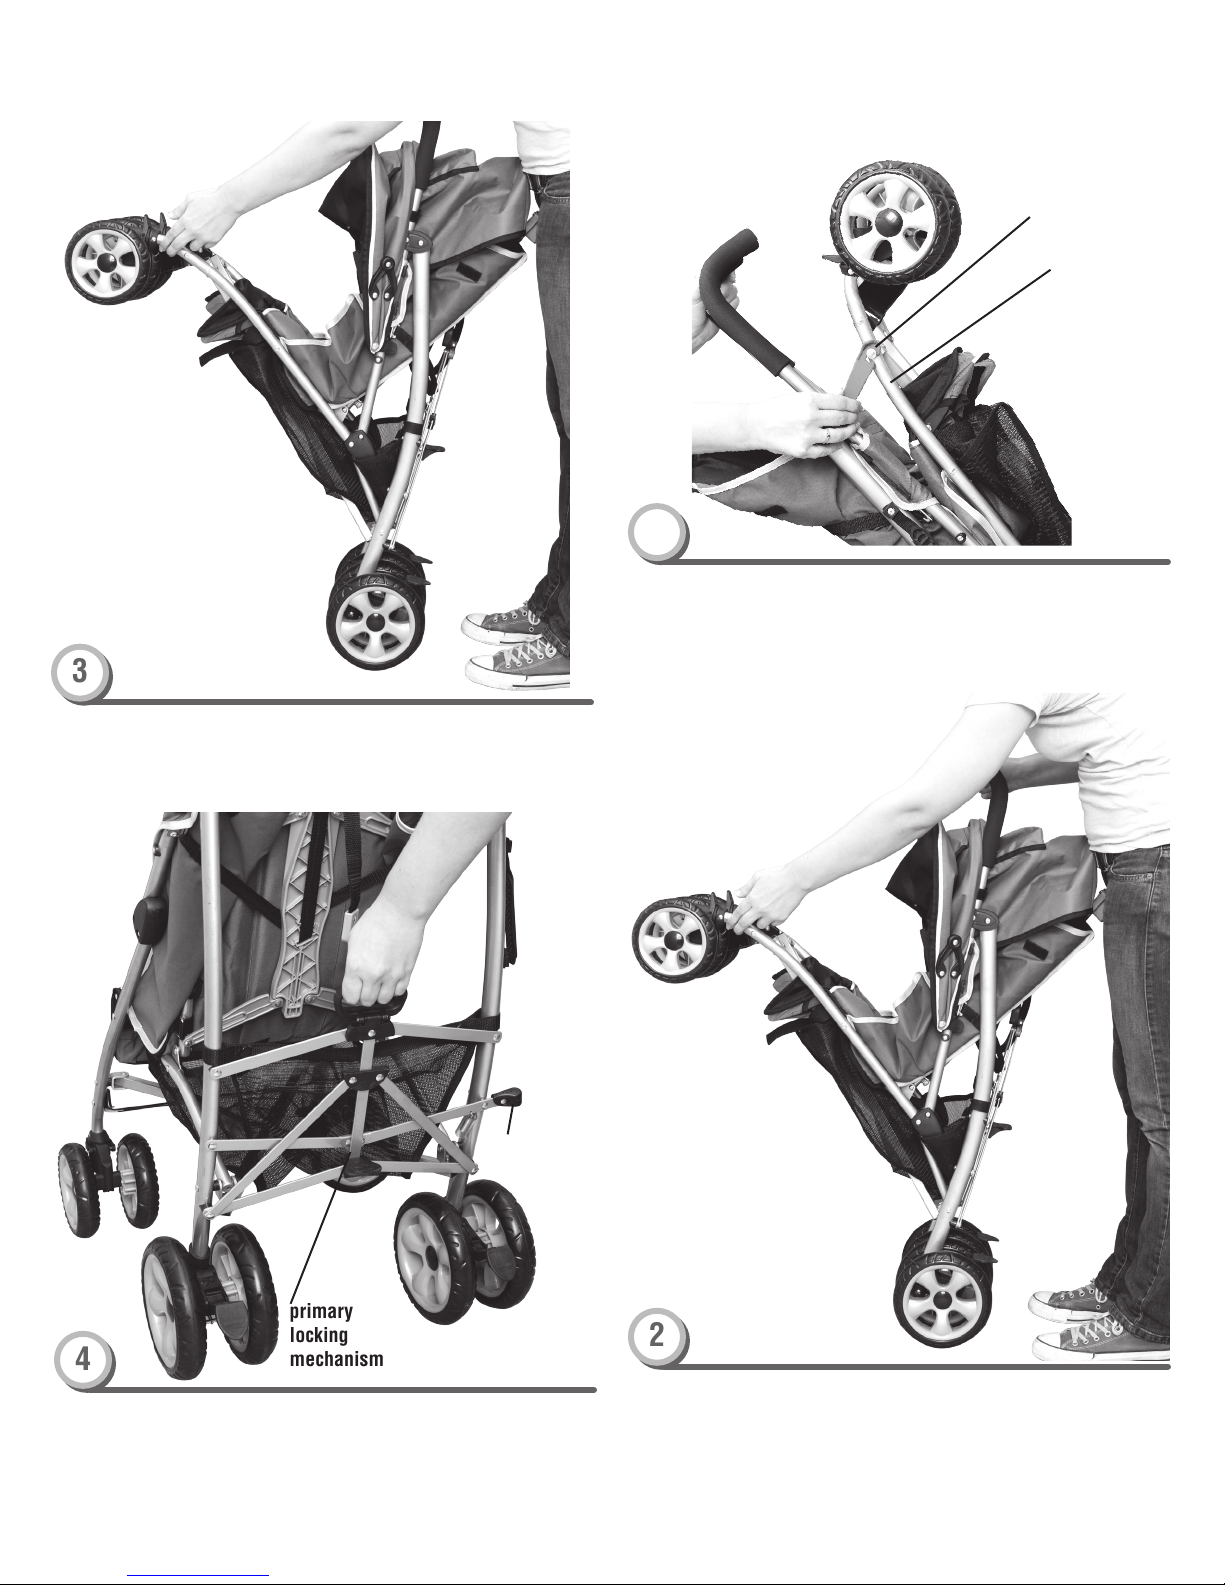
Assembly Setup and Use
1
To Unfold
• Locate the latch clip on the side of the stroller.
• Pull to release the latch clip on the side of the stroller.
Latch Clip
Side Frame
3
• Position the stroller upright on its rear wheels.
• Grasp a handle with one hand. With your other hand, push down on the
front of the stroller to open.
Secondary
v
primary
locking
4
Opening Stroller
• With your hand around the grip, press down on the primary locking
mechanism until it “clicks” into place.
• Release the secondary lock, by pressing the pedal placed on the right
side of the stroller’s frame with your foot.
mechanism
Customer Service Tel. (800) 377-3777
2
• Position the stroller upright on its rear wheels.
• Grasp a handle with one hand. With your other hand, push down on the
front of the stroller to open.
4
www.DeltaChildrensProducts.com
Page 5
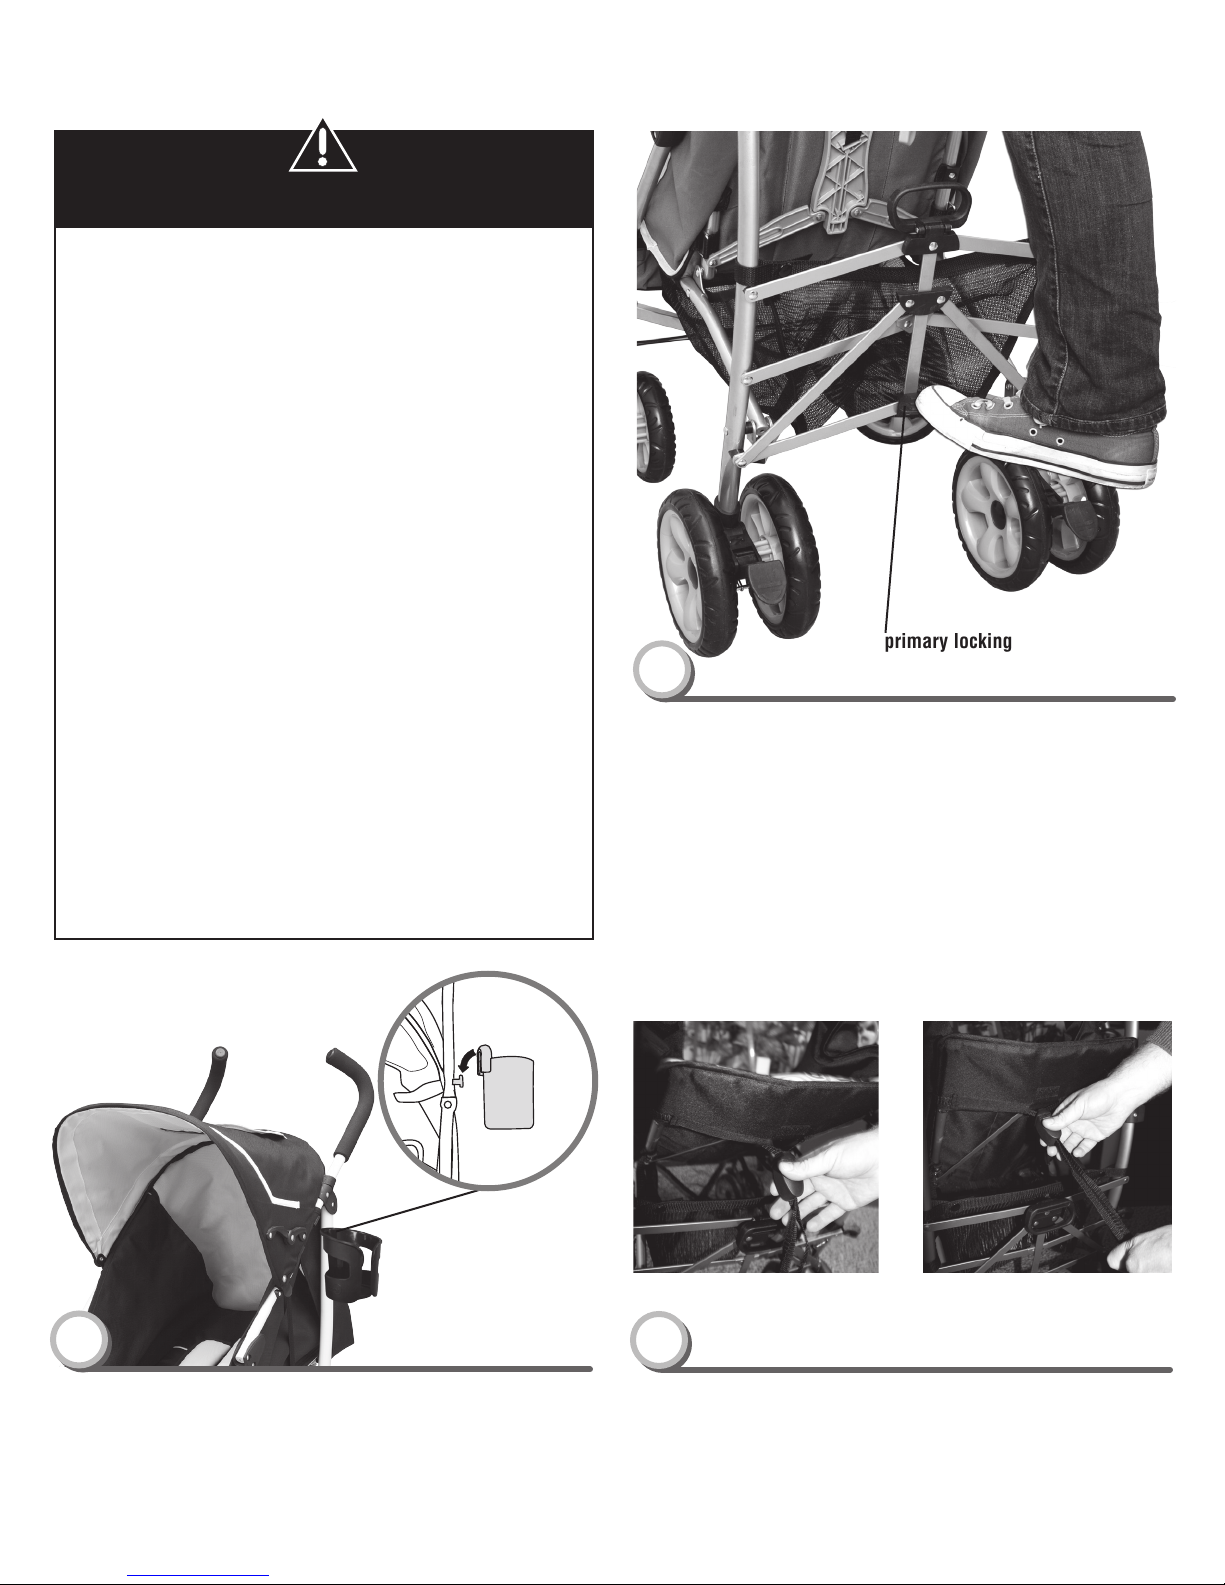
Setup and Use
WARNING
Prevent serious injury from falls
or sliding out:
• ALWAYS use the restraint system.
• Only children who have developed enough
upper body control to sit without leaning
forward can use the front seat in the
upright position.
• NEVER leave child unattended.
• DO NOT use the storage bag to carry children.
To prevent product from tipping over:
• DO NOT exceed the maximum storage weight
limit of 3 lbs (1.36 kg) in the storage bag.
• DO NOT exceed the maximum storage weight
limit of 3 lbs (1.36 kg) in the cup holder.
• DO NOT place additional items on this
product, except as recommended in
the instructions.
To prevent injury:
• Make sure all body parts are clear of the
stroller when folding and unfolding.
• DO NOT place hot liquids in the cup holder.
Hot liquids can burn your child.
primary locking
4
Opening Stroller
• With your hand around the grip, press down on the primary locking
mechanism until it “clicks” into place.
• Release the secondary lock, by pressing the pedal placed on the right
side of the stroller’s frame with your foot.
mechanism
3
Attaching Cup Holder
• Locate the knob on the side of the stroller.
• Fit the notch in the cup holder over the knob on the side rail and push
down until you hear a “click”. Pull up on the cup holder to be sure it
is secure.
Customer Service Tel. (800) 377-3777
UPRIGHTRECLINE
5
Seat Back Adjustment
• Press button on cord housing and pull away to recline seat, as shown in
fig. 1.
• To return to an upright position, hold cord loop while moving cord
housing towards the backseat.
5
www.DeltaChildrensProducts.com
Page 6

Setup and Use
TO LOCK
TO UNLOCK
6
Canopy Adjustment
• The canopy can be adjusted to the open or closed position.
TO LOCK
CANOPY OPEN
CANOPY CLOSED
8
Front Swivel Wheel base
To lock the swivel wheel base:
• Lift both swivel pedals until they “click” into the locked
position.
Make sure the brake pedals are pressed down completely.
To unlock the swivel wheel base:
• Press both swivel pedals down until they “click” into the unlocked
position.
TO UNLOCK
7
Rear Wheel Brakes
To lock the rear wheel brakes:
• Press both brake pedals down until they “click” into the locked position.
Make sure the brake pedals are pressed down completely.
• Always set both brake pedals whenever you park the stroller.
To unlock the rear wheel brakes:
• Lift both brake pedals until they “click” into the unlocked position.
Customer Service Tel. (800) 377-3777
9
To Adjust the Calf Rest
• The calf rest can be adjusted up or down for the child’s comfort.
•To adjust the calf rest press the lock button on both sides of the seat and
adjust the calf rest to the desired position.
6
www.DeltaChildrensProducts.com
Page 7

Securing Child
Waist BeltWaist Belt
Crotch Belt
1
Securing Child
• Place your child in the stroller. Position the crotch belt between your
child’s legs.
• Pull shoulder straps over child’s arm and shoulder and fasten both strap
ends to the restraint system.
• Fasten both waist belts to the buckle on each side of the crotch belt.
Make sure you hear a “click” on both sides.
• Check to be sure the restraint system is securely attached by pulling it
away from your child. The restraint system should remain attached.
Restraint System
2
• Tighten each waist belt and shoulder strap so that the restraint system is
snug against your child.
Please refer to the next section for instructions to tighten the waist belts.
TIGHTEN
3
To tighten the waist belts and shoulder straps:
• Feed the anchored end of a waist belt up through the buckle to form a
loop A. Pull the free end of the waist belt B.
• Repeat this procedure to tighten the other waist belt.
• Feed the top end of the shoulder strap through the plastic stay to form
a loop . Pull the bottom end down to tighten the strap .
• Repeat this procedure to tighten the other shoulder strap.
To loosen the waist belts and shoulder straps:
• Feed the free end of the waist belt up through the buckle to form a
• Repeat this procedure to loosen the other waist belt.
• Feed the bottom end of the shoulder strap through the plastic stay to form
a loop . Pull the top end up to loosen the strap .
• Repeat this procedure to loosen the other shoulder strap.
Please note: After adjusting the restraint system to fit your child, make sure
you pull on it to be sure it is securely fastened.
C
loop A. Enlarge the loop by pulling on the end of the loop toward the
buckle. Pull the anchored end of the waist belt to shorten the free end of
the waist belt B.
C
LOOSEN
D
D
Customer Service Tel. (800) 377-3777
7
www.DeltaChildrensProducts.com
Page 8

primary locking
mechanism
Storage
Secondary
lock
2
• Lift the front wheels toward the closed canopy.
Latch Clip
Side Frame
3
• Slide the latch clip onto the side frame to secure in the folded
storage position.
1
Hint: Make sure canopy is in the closed position before folding the stroller.
• With your hand , Pull up on the primary locking mechanism.
• With your foot, step on the secondary lock.
Customer Service Tel. (800) 377-3777
4
• Storage position.
8
www.DeltaChildrensProducts.com
Page 9

Información al consumidor
ADVERTENCIA
Evite lesiones serias ocasionadas por caídas
o por deslizamiento hacia afuera:
• Utilice SIEMPRE el sistema de sujeción.
• Solo niños que hayan desarrollado suficiente
control de la parte superior de se cuerpo para
permanecer sentados sin inclinarse hacia
adelante pueden usar el asiento delantero en
su posición vertical.
• NUNCA pierda de vista al niño.
• NO utilice el bolso de almacenamiento para
llevar a los niños.
Para prevenir que el coche se vuelque:
• NO exceda el límite máximo de peso de
almacenamiento de 3 libras (1.36 Kg) en el
bolso de almacenamiento.
• NO exceda el límite máximo de peso de 3
libras (1.36 Kg) en el portavasos.
• NO coloque artículos extras en este producto,
excepto lo recomendado en las instrucciones.
Para prevenir lesiones:
• Asegúrese de que todas las partes del cuerpo
estén alejadas del coche cuando se pliegue o
se extienda.
• NO coloque líquidos calientes en el
portavasos, los líquidos calientes pueden
quemar a su niño.
• Por favor lea estas instrucciones antes de ensamblar y utilizar este producto.
• Debe ser ensamblado por un adulto.
• Solo para ser utilizado por niños que pesen menos de 35 libras (15.88 kg).
• El límite máximo de peso en el bolso de almacenamiento es 3 libras (1.36 kg).
• El límite máximo de peso en el portavasos es de 3 libras (1.36 Kg.).
• Las características y las decoraciones del producto pueden ser diferentes al de
la foto.
Cuidado
• Las piezas de plástico se pueden limpiar con una solución de limpieza suave
y un paño húmedo. Lavar a mano la tela con un paño húmedo y aire seco. No
utilizar lejía.
• Para mantener su cochecito de ruedas chirrían, utilice un lubricante de silicona
o grafito base.
Fabricado y distribuido por:
114 West 26th Street, New York, NY 10001
Servicio al cliente
Tel. 1-(800)-377-3777
www.DeltaChildrensProducts.com
customerservice@DeltaChildrensProducts.com
HECHO EN CHINA
9
Page 10

Piezas Ensamblaje
IMPORTANTE! Por favor saque todas las piezas del paquete e iden-
tifíquelas antes de ensamblar.
IMPORTANTE! Antes de ensamblar o de cada uso, inspeccione este
producto por herrajes dañados, uniones sueltas, piezas faltantes o bordes
filosos.
NO utilice si tiene alguna pieza faltante o rota. Contacte al fabricante para
el reemplazo de piezas y si necesita instrucciones. Nunca reemplace las
piezas.
Gancho de cierre
Estructura Lateral
1
• Ubique el gancho de cierre en la estructura lateral del coche.
• Jale para soltar el gancho de cierre.
Ruedas giratorias
frontales x 2
Portavasos
Servicio al Cliente Tel. (800) 377-3777
2
Enganchar las ruedas giratorias frontales
• Ubique las patas al frente del coche. (como se ilustra arriba)
• Enganche el módulo de las ruedas al frente del coche, asegúrese de
escuchar el chasquido.
• Asegúrese de que el módulo de las ruedas esté debidamente enganchado.
• Repita en el lado opuesto.
10
www.DeltaChildrensProducts.com
Page 11

Ensamblaje Montaje y Uso
1
A desarrollarse
• Ubique el gancho de cierre en la estructura lateral del coche.
• Jale para soltar el gancho de cierre.
Gancho de cierre
Estructura Lateral
3
• Coloque el coche erguido sobre sus ruedas traseras.
• Agarre una manija con una mano. Con su otra mano, empuje hacia abajo
en el frente del coche para que abra.
Cierre secundario
Mecanismo de
cierre primario
4
Para Abrir el coche
• Con su mano en la manija, presione hacia abajo el mecanismo de cierre
primario hasta que enganche en su lugar.
• Libere el cierre secundario oprimiendo con su pie el pedal ubicado a la
derecha de la estructura del coche.
Servicio al Cliente Tel. (800) 377-3777
2
• Coloque el coche erguido sobre sus ruedas traseras.
• Agarre una manija con una mano. Con su otra mano, empuje hacia abajo
en el frente del coche para que abra.
11
www.DeltaChildrensProducts.com
Page 12

Montaje y Uso
ADVERTENCIA
Evite lesiones serias ocasionadas por caídas
o por deslizamiento hacia afuera:
• Utilice SIEMPRE el sistema de sujeción.
• Solo niños que hayan desarrollado suficiente
control de la parte superior de se cuerpo para
permanecer sentados sin inclinarse hacia
adelante pueden usar el asiento delantero en
su posición vertical.
• NUNCA pierda de vista al niño.
• NO utilice el bolso de almacenamiento para
llevar a los niños.
Para prevenir que el coche se vuelque:
• NO exceda el límite máximo de peso de
almacenamiento de 3 libras (1.36 Kg) en el
bolso de almacenamiento.
• NO exceda el límite máximo de peso de 3
libras (1.36 Kg) en el portavasos.
• NO coloque artículos extras en este producto,
excepto lo recomendado en las instrucciones.
Para prevenir lesiones:
• Asegúrese de que todas las partes del cuerpo
estén alejadas del coche cuando se pliegue o
se extienda.
• NO coloque líquidos calientes en el
portavasos, los líquidos calientes pueden
quemar a su niño.
Mecanismo de
4
Para Abrir el coche
• Con su mano en la manija, presione hacia abajo el mecanismo de cierre
primario hasta que enganche en su lugar.
• Libere el cierre secundario oprimiendo con su pie el pedal ubicado a la
derecha de la estructura del coche.
cierre primario
3
Enganchar el portavasos
• Ubique la perilla a un lado del coche.
• Ajuste la muesca del portavasos sobre la perilla de la barra lateral y
empuje hacia abajo hasta que escuche un “click”. Hale el portavasos hacia
arriba para asegurarse de que quede fijo.
Servicio al Cliente Tel. (800) 377-3777
VERTICALRECLINAR
5
Ajuste del espaldar del asiento
• Presione el botón del regulador de reclinación y hale hacia afuera para
que el asiento se recline, como se muestra en la fig. 1.
• Para volver a su posición vertical, sostenga las tiras mientras desliza el
regulador de reclinación hacia el espaldar del asiento.
12
www.DeltaChildrensProducts.com
Page 13

Montaje y Uso
PARA BLOQUEAR
PARA DESBLOQUEAR
6
Ajuste del toldo
• El toldo puede ser usado en las posiciones de abierto o cerrado.
PARA BLOQUEAR
TOLDO ABIERTO
TOLDO CERRADO
8
Base de la rueda giratoria frontal
Para bloquear la base de la rueda giratoria:
• Presione hacia abajo ambos pedales giratorios hasta que enganchen en su
posición de bloqueo.
Asegurese de que los pedales de freno son empujados hacia
abajo por completo.
Para desbloquear la distancia entre ejes de giro:
• Levante ambos pedales de giro hasta que encajen en la posici on de
desbloqueo.
PARA DESBLOQUEAR
7
Frenos de las ruedas traseras
Para bloquear los frenos de las ruedas traseras
• Presione ambos pedales de los frenos hacia abajo hasta que enganchen
en su posición de bloqueo. Asegúrese de que los pedales del freno estén
completamente apretados hacia abajo.
• Utilice siempre ambos pedales de los frenos cada vez que pare el coche.
Para desbloquear los frenos de las ruedas traseras:
• Levante ambos pedales del freno a su posición de desbloqueo hasta que
escuche el “click”
Servicio al Cliente Tel. (800) 377-3777
9
Para ajustar el soporte para piernas
• El soporte para piernas puede ser ajustado hacia arriba o abajo para
comodidad del niño.
• Ajuste el soporte para piernas en la posición deseada presionando el botón
de seguridad.
13
www.DeltaChildrensProducts.com
Page 14

Sujetar al niño
Correa de la cintura
Correa de la cintura
Correa de la
entrepierna
1
Sujetar al niño
• Coloque a su niño en el coche. Ponga la correa de la entrepierna entra las
piernas de su niño.
• Coloque las correas para los hombros sobre el brazo y el hombro del niño
y abroche ambos extremos de las correas al sistema de sujeción.
• Abroche ambas correas de la cintura a la hebilla en cada lado de la correa
de la entrepierna. Asegúrese de que escuche el “click” en ambos lados.
• Controle para cerciorarse de que el sistema de sujeción esté debidamente
atado halándolo hacia afuera. El sistema de sujeción debe permanecer
atado.
APRIETE
Sistema de retencion
2
• Apriete el cinturón de seguridad de ambos lados y las correas de los
hombros de manera de que el sistema de sujeción quede cómodamente
ajustado a su niño.
Por favor consulte la siguiente sección para las instrucciones de como
apretar las correas de la cintura.
3
Apretar las correas de la cintura y las correas de los hombros:
•Inserte el extremo de la correa de la cintura que esta fijo a través de la
hebilla formando una lazada A. Jale el extremo libre de la correa de la
cintura B.
• Repita este procedimiento para apretar la otra correa de la cintura.
• Inserte el extremo superior de la correa del hombro a través del pasador
plástico formando una lazada. Jale hacia abajo el extremo inferior para
apretar la correa.
• Repita este procedimiento para apretar la otra correa del hombro.
Para aflojar las correas de la cintura y de los hombros:
• Inserte el extremo libre de la correa de la cintura a través de la hebilla
formando una lazada A. Agrande la lazada jalando en el extremo de la
lazada que está hacia la hebilla. Jale el extremo fijo de la correa de la cintura para acortar el extremo libre de la correa de la cintura B.
• Repita este procedimiento para aflojar la otra correa de la cintura.
• Inserte el extremo inferior de la correa del hombro a través del pasador
plástico formando una lazada. Jale el extremo superior hacia arriba para
aflojar la correa.
• Repita este procedimiento para aflojar la otra correa del hombro.
Por favor note: Luego de ajustar el sistema de sujeción a su niño,
asegúrese de jalarlo para constatar de que esté bien abrochado.
AFLOJE
Servicio al Cliente Tel. (800) 377-3777
14
www.DeltaChildrensProducts.com
Page 15

Almacenamiento
Cierre secundario
2
• Levante las ruedas delanteras hacia el toldo cerrado.
Mecanismo de
cierre primario
Gancho de cierre
Estructura Lateral
3
• Deslice el gancho de cierre sobre el lado de la estructura para que quede
asegurado en su posición plegada de almacenaje.
1
Dato: Asegúrese de que el toldo esté cerrado antes de plegar el coche.
• Con su mano jale del mecanismo de cierre primario.
•Con su pie, pise el cierre secundario.
Servicio al Cliente Tel. (800) 377-3777
4
• Posición de almacenaje.
15
www.DeltaChildrensProducts.com
Page 16

Manufactured for and distributed by:
Fabricado y distribuido por:
114 West 26th Street, New York, NY 10001
customerservice@DeltaChildrensProducts.com
Customer Service/Servicio al Cliente
Tel. 1-(800)-377-3777
www.DeltaChildrensProducts.com
MADE IN CHINA
HECHO EN CHINA
16
 Loading...