

Page 1

www.deltaww.com
Delta
EtherCAT
Programming Guide
Industrial Automation Headquarters
Delta Electronics, Inc.
Taoyuan Technology Center
No.18, Xinglong Rd., Taoyuan City,
Taoyuan County 33068, Taiwan
TEL: 886-3-362-6301 / FAX: 886-3-371-6301
Asia
Delta Electronics (Jiangsu) Ltd.
Wujiang Plant 3
1688 Jiangxing East Road,
Wujiang Economic Development Zone
Wujiang City, Jiang Su Province, P.R.C. 215200
TEL: 86-512-6340-3008 / FAX: 86-769-6340-7290
Delta Greentech (China) Co., Ltd.
238 Min-Xia Road, Pudong District,
ShangHai, P.R.C. 201209
TEL: 86-21-58635678 / FAX: 86-21-58630003
Delta Electronics (Japan), Inc.
Tokyo Ofce
2-1-14 Minato-ku Shibadaimon,
Tokyo 105-0012, Japan
TEL: 81-3-5733-1111 / FAX: 81-3-5733-1211
Delta Electronics (Korea), Inc.
1511, Byucksan Digital Valley 6-cha, Gasan-dong,
Geumcheon-gu, Seoul, Korea, 153-704
TEL: 82-2-515-5303 / FAX: 82-2-515-5302
Delta Electronics Int’l (S) Pte Ltd.
4 Kaki Bukit Ave 1, #05-05, Singapore 417939
TEL: 65-6747-5155 / FAX: 65-6744-9228
Delta Electronics (India) Pvt. Ltd.
Plot No 43 Sector 35, HSIIDC
Gurgaon, PIN 122001, Haryana, India
TEL : 91-124-4874900 / FAX : 91-124-4874945
Americas
Delta Products Corporation (USA)
Raleigh Ofce
P.O. Box 12173,5101 Davis Drive,
Research Triangle Park, NC 27709, U.S.A.
TEL: 1-919-767-3800 / FAX: 1-919-767-8080
Delta Greentech (Brasil) S.A.
Sao Paulo Ofce
Rua Itapeva, 26 - 3° andar Edicio Itapeva One-Bela Vista
01332-000-São Paulo-SP-Brazil
TEL: 55 11 3568-3855 / FAX: 55 11 3568-3865
Europe
Delta Electronics (Netherlands) B.V.
Eindhoven Ofce
De Witbogt 20, 5652 AG Eindhoven, The Netherlands
TEL : +31 (0)40-8003800 / FAX : +31 (0)40-8003898
*We reserve the right to change the information in this manual without prior notice.
Delta
EtherCAT
Programming Guide
Page 2

March, 2017
Table of Contents
Introduction to API Library
1.1 How to use function libraries? ··············································································· 1-2
1.2 Start a new project ······························································································ 1-2
1.2.1 Using VC ······································································································ 1-2
1.2.2 Using VB ······································································································ 1-2
1.2.3 Using VB.Net ································································································ 1-2
1.2.4 Using C# ······································································································ 1-3
EtherCAT Introduction
2.1 Maximum number of the slave device ····································································· 2-2
2.2 Initialize RTX runtime environment ········································································· 2-3
2.3 Introduction to RTSS Task Manager ······································································· 2-4
EtherCAT Operation Example
3.1 EtherCAT Initialization ························································································· 3-3
3.1.1 Function list ·································································································· 3-3
3.1.2 Application examples ······················································································ 3-3
3.2 Motion control of homing ······················································································ 3-6
3.2.1 Function list ·································································································· 3-6
3.2.2 Application examples ······················································································ 3-6
3.3 Torque control ···································································································· 3-9
3.3.1 Function list ·································································································· 3-9
3.3.2 Application examples ······················································································ 3-9
3.4 Constant speed control ······················································································ 3-12
3.4.1 Function list ································································································ 3-12
3.4.2 Application examples ···················································································· 3-12
3.5 Motion control in PP mode ·················································································· 3-16
3.5.1 Function list ································································································ 3-16
3.5.2 Application examples ···················································································· 3-16
3.6 Motion control in CSP mode ··············································································· 3-20
3.6.1 Function list ································································································ 3-20
3.6.2 Application examples ···················································································· 3-21
3.7 EtherCAT Slave IO control (digital input) ································································ 3-38
Page 3

March, 2017
3.7.1 Function list ································································································ 3-38
3.7.2 Application examples ···················································································· 3-38
3.8 EtherCAT Slave IO control (digital output) ······························································ 3-40
3.8.1 Function list ································································································ 3-40
3.8.2 Application examples ···················································································· 3-40
3.9 Application of EtherCAT analog input module (R1-EC-8124 ) ······································ 3-42
3.9.1 Function list ································································································ 3-42
3.9.2 Application examples ···················································································· 3-42
3.10 Application of EtherCAT analog output module (R1-EC-9144) ··································· 3-44
3.10.1 Function list ······························································································· 3-44
3.10.2 Application examples··················································································· 3-44
3.11 Application of EtherCAT Compare function for PCI card (PCI-L221-B1) ······················· 3-47
3.11.1 Function list ······························································································· 3-47
3.11.2 Appli cation examples ··················································································· 3-48
API List of Dynamic-Link Library
4.1 Data T y pe and Setting Range ··············································································· 4-2
4.2 API list and descriptions ······················································································· 4-2
EtherCAT Master Configuration
5.1 _ECAT_Master_Set_CycleTime············································································· 5-3
5.2 _ECAT_Master_Get_CycleTime ············································································ 5-4
5.3 _ECAT_Master_NodeID_Alias_Enable···································································· 5-5
5.4 _ECAT_Get_SerialNo·························································································· 5-6
5.5 _ECAT_Master_Get_DLL_SeqID ··········································································· 5-7
5.6 _ECAT_Autoconfig_Open_File ·············································································· 5-8
5.7 _ECAT_Autoconfig_Save_File ·············································································· 5-9
5.8 _ECAT_Autoconfig_Set_Slave_DCTime ································································ 5-10
5.9 _EACT_Autoconfig_Clear_ConfigFile ··································································· 5-11
5.10 _ECAT_Autoconfig_Set_NodeID_Alias ································································ 5-12
5.11 _ECAT_Autoconfig_Get_NodeID_Alias ································································ 5-14
5.12 _ECAT_Autoconfig_Save_NodeID_Alias ····························································· 5-15
Master Initialization
6.1 _ECAT_Master_Open ························································································· 6-3
6.2 _ECAT_Master_Initial ·························································································· 6-4
6.3 _ECAT_Master_Reset ························································································· 6-5
6.4 _ECAT_Master_Close ························································································· 6-6
6.5 _ECAT_Master_Get_CardSeq ·············································································· 6-7
Page 4

March, 2017
6.6 _ECAT_Master_Get_SlaveNum ············································································ 6-8
6.7 _ECAT_Master_Get_Slave_Info ············································································ 6-9
6.8 _ECAT_Master_Get_DC_Status ·········································································· 6-11
6.9 _ECAT_Master_Get_Connect_Status ··································································· 6-12
6.10 _ECAT_Master_Get_Api_BufferLength ································································ 6-13
6.11 _ECAT_Master_Get_Cycle_SpendTime ······························································· 6-14
6.12 _ECAT_Master_Check_Initial_Done ··································································· 6-15
6.13 _ECAT_Master_Get_Initial_ErrorCode ································································ 6-16
6.14 _ECAT_Master_Check_Working_Counter ···························································· 6-17
6.15 _ECAT_Master_Get_Return_Code_Message ······················································· 6-18
EtherCAT CoE Standard Communication
7.1 _ECAT_Slave_SDO_Send_Message ····································································· 7-3
7.2 _ECAT_Slave_SDO_Read_Message ····································································· 7-4
7.3 _ECAT_Slave_SDO_Quick_Send_Message ···························································· 7-5
7.4 _ECAT_Slave_SDO_Quick_Read_Message ···························································· 7-6
7.5 _ECAT_Slave_SDO_Read_Response ···································································· 7-7
7.6 _ECAT_Slave_SDO_Wait_All_Done ······································································· 7-8
7.7 _ECAT_Slave_SDO_Get_ErrorCode ······································································ 7-9
7.8 _ECAT_Slave_SDO_Check_Done ······································································· 7-11
7.9 _ECAT_Slave_PDO_Get_OD_Data ····································································· 7-12
7.10 _ECAT_Slave_PDO_Set_OD_Data ···································································· 7-13
7.1 1 _EC AT_Slave_PDO_Get_Information ································································· 7-14
7.12 _ECAT_Slave_PDO_Get_Detail_Mapping ··························································· 7-15
7.13 _ECAT_Slave_PDO_Get_Rx_Data ···································································· 7-16
7.14 _ECAT_Slave_PDO_Get_Tx_Data ····································································· 7-17
7.15 _ECAT_Slave_PDO_Set_Tx_Data ····································································· 7-18
7.16 _ECAT_Slave_PDO_Set_Tx_Detail_Data ···························································· 7-19
General Operation of Motion Axis
8.1 _ECAT_Slave_Motion_Set_Svon ··········································································· 8-3
8.2 _ECAT_Slave_Motion_Ralm ················································································· 8-4
8.3 _ECAT_Slave_Motion_Sd_Stop ············································································ 8-5
8.4 _ECAT_Slave_Motion_Emg_Stop ·········································································· 8-6
8.5 _ECAT_Slave_Motion_Set_Alm_Reaction ······························································· 8-7
8.6 _ECAT_Slave_Motion_Set_Position ······································································· 8-8
8.7 _ECAT_Slave_Motion_Set_Command ···································································· 8-9
8.8 _ECAT_Slave_Motion_Set_MoveMode ·················································· 8-10
8.9 _ECAT_Slave_Motion_Get_MoveMode································································· 8-1 1
8.10 _ECAT_Slave_Motion_Get_ControlWord ····························································· 8-12
Page 5

March, 2017
8.11 _EC AT_Slave_Motion_Get_StatusWord ······························································ 8-14
8.12 _ECAT_Slave_Motion_Get_Mdone ···································································· 8-16
8.13 _ECAT_Slave_Motion_Get_Position ··································································· 8-17
8.14 _ECAT_Slave_Motion_Get_Command ································································ 8-18
8.15 _ECAT_Slave_Motion_Get_T arget_Command ······················································ 8-19
8.16 _ECAT_Slave_Motion_Get_Actual_Position ························································· 8-20
8.17 _ECAT_Slave_Motion_Get_Actual_Command ······················································ 8-21
8.18 _ECAT_Slave_Motion_Get_Current_Speed ························································· 8-22
8.19 _ECAT_Slave_Motion_Get_Torque ···································································· 8-23
8.20 _ECAT_Slave_Motion_Get_Buffer_Length ··························································· 8-24
8.21 _ECAT_Slave_Motion_Set_TouchProbe_Config ···················································· 8-25
8.22 _ECAT_Slave_Motion_Set_TouchProbe_QuickStart ·············································· 8-28
8.23 _ECAT_Slave_Motion_Set_TouchProbe_QuickDone ·············································· 8-30
8.24 _ECAT_Slave_Motion_Set_TouchProbe_Disable ·················································· 8-32
8.25 _ECAT_Slave_Motion_Get_TouchProbe_Status ···················································· 8-33
8.26 _ECAT_Slave_Motion_Get_TouchProbe_Position ················································· 8-35
Cyclic Synchronous Position Mode (CSP)
9.1 _ECAT_Slave_CSP_Start_Move ········································································ 9-5
9.2 _ECAT_Slave_CSP_Start_V_Move ····································································· 9-7
9.3 _ECAT_Slave_CSP_Start_Arc_Move ··································································· 9-8
9.4 _ECAT_Slave_CSP_Start_Arc2_Move ······························································· 9-10
9.5 _ECAT_Slave_CSP_Start_Arc3_Move ······························································· 9-12
9.6 _ECAT_Slave_CSP_Start_Spiral_Move ······························································ 9-14
9.7 _ECAT_Slave_CSP_Start_Spiral2_Move ···························································· 9-15
9.8 _ECAT_Slave_CSP_Start_Sphere_Move ···························································· 9-17
9.9 _ECAT_Slave_CSP_Start_Heli_Move ································································ 9-18
9.10 _ECAT_Slave_CSP_Start_Multiaxes_Move ························································· 9-20
9.11 _EC AT_Slave_CSP_Start_Msbrline_Move ··························································· 9-21
9.12 _ECAT_Slave_CSP_Set_Gear ·········································································· 9-25
9.13 _ECAT_Slave_CSP_Set_Softlimit ······································································ 9-26
9.14 _ECAT_Slave_CSP_TargetPos_Change ····························································· 9-27
9.15 _ECAT_Slave_CSP_Velocity_Change ································································ 9-28
9.16 _ECAT_Slave_CSP_Feedrate_Overwrite ····························································· 9-29
9.17 _ECAT_Slave_CSP_Speed_Continue_Enable ······················································ 9-33
9.18 _ECAT_Slave_CSP_Speed_Continue_Set_Mode ················································· 9-34
9.19 _ECAT_Slave_CSP_Speed_Continue_Set_Combine_ Ratio ···································· 9-37
9.20 _ECAT_Slave_CSP_Scurve_Rate ······································································ 9-38
9.21 _ECAT_Slave_CSP_Liner_Speed_Master ··························································· 9-39
9.22 _ECAT_Slave_CSP_Mask_Axis ········································································ 9-41
Page 6

March, 2017
9.23 _ECAT_Slave_CSP_Sync_Config ······································································ 9-42
9.24 _ECAT_Slave_CSP_Sync_Move ······································································· 9-43
9.25 _ECAT_Slave_CSP_Start_Mabrline_Move ··························································· 9-44
9.26 _ECAT_Slave_CSP_Start_2Segment_Move ························································ 9-46
9.27 _ECAT_Slave_CSP_Start_PVT_Move ································································ 9-48
9.28 _ECAT_Slave_CSP_Start_PVTComplete_Move ··················································· 9-50
9.29 _ECAT_Slave_CSP_Virtual_Set_Enable ····························································· 9-52
9.30 _ECAT_Slave_CSP_Virtual_Set_Command ························································· 9-53
9.31 _ECAT_Slave_CSP_Get_SoftLimit_Status ··························································· 9-54
9.32 _ECAT_Slave_CSP_Pitch_Set_Interval ······························································· 9-55
9.33 _ECAT_Slave_CSP_Pitch_Set_Mode ································································· 9-56
9.34 _ECAT_Slave_CSP_Pitch_Set_Org ··································································· 9-57
9.35 _ECAT_Slave_CSP_Pitch_Set_Rel_T a ble ··························································· 9-58
9.36 _ECAT_Slave_CSP_Pitch_Set_Abs_Table ··························································· 9-59
9.37 _ECAT_Slave_CSP_Pitch_Set_Enable ······························································· 9-60
Cyclic Synchronous Velocity Mode (CSV)
10.1 _ECAT_Slave_CSV_Start_Move ········································································ 10-2
10.2 _ECAT_Slave_CSV_Multi_Start_Move ································································ 10-3
Cyclic Synchronous Torque Mode (CST)
11.1 _EC AT_Slave_CST_Start_Move ········································································ 11-2
1 1.2 _ECAT_Slave_CST_Multi_Start_Move ································································ 11- 3
Homing
12.1 _ECAT_Slave_Home_Config ············································································ 12-3
12.2 _ECAT_Slave_Home_Move ············································································ 12-19
12.3 _ECAT_Slave_Home_Status ··········································································· 12-20
EtherCAT Profile Position Mode (PP)
13.1 _ECAT_Slave_PP_Start_Move ·········································································· 13-3
13.2 _ECAT_Slave_PP_Advance_Config ··································································· 13-4
EtherCAT Profile Velocity Mode (PV)
14.1 _ECAT_Slave_PV_Start_Move ·········································································· 14-3
14.2 _ECAT_Slave_PV_Advance_Config ··································································· 14-4
Page 7

March, 2017
Inverter Motion Control
15.1 _ECAT_Slave_VL_Start_Move ·········································································· 15-2
EtherCAT Profile Torque Mode (PT)
16.1 _ECAT_Slave_PT_Start_Move ·········································································· 16-3
16.2 _ECAT_Slave_PT_Advance_Config ··································································· 16-4
Group Motion Control
17.1 _ECAT_Slave_User_Motion_Control_Set _Enable_Mode ········································17-3
17.2 _ECAT_Slave_User_Motion_Control_Get_Enable_Mode ········································ 17-5
17.3 _ECAT_Slave_User_Motion_Control_Set_T ype ···················································· 17-6
17.4 _ECAT_Slave_User_Motion_Control_Set_Data ···················································· 17-8
17.5 _ECAT_Slave_User_Motion_Control_Clear_Data ·················································· 17-9
17.6 _ECAT_Slave_User_Motion_Control_Get_DataCnt ············································· 17-10
17.7 _ECAT_Slave_User_Motion_Control_Ralm ························································ 17-1 1
17.8 _ECAT_Slave_User_Motion_Control_Svon ························································ 17-12
17.9 _ECAT_Slave_User_Motion_Control_Get_Alm ··················································· 17-13
Operation of DI/DO Module
18.1 _ECAT_Slave_DIO_Get_Input_Value ·································································· 18-3
18.2 _ECAT_Slave_DIO_Get_Output_Value ······························································· 18-4
18.3 _ECAT_Slave_DIO_Set_Output_Val ue ································································ 18-5
18.4 _ECAT_Slave_DIO_Get_Single_Input_Value ························································ 18-6
18.5 _ECAT_Slave_DIO_Get_Single_Output_Value ····················································· 18-7
18.6 _ECAT_Slave_DIO_Set_Single_Output_Value ······················································ 18-8
18.7 _ECAT_Slave_DIO_Set_Output_Error_Mode ······················································· 18-9
18.8 _ECAT_Slave_DIO_Set_Output_Error_Value ····················································· 18-10
Operation of AI/AO Module
19.1 _ECAT_Slave_AIO_Get_Input_Value ·································································· 19-3
19.2 _ECAT_Slave_AIO_Set_Output_Value ································································ 19-4
19.3 _ECAT_Slave_AIO_Get_Output_Value ······························································· 19-5
Operation of Pulse Module (For R1-EC5621D0 Series)
20.1 _ECAT_Slave_R1_EC5621_Set_Output_Mode ····················································· 20-3
20.2 _ECAT_Slave_R1_EC5621_Set_Input_Mode ······················································· 20-4
20.3 _ECAT_Slave_R1_EC5621_Set_ORG_Inverse ···················································· 20-5
20.4 _ECAT_Slave_R1_EC5621_Set_QZ_Inverse ······················································· 20-6
Page 8

March, 2017
20.5 _ECAT_Slave_R1_EC5621_Set_Home_SpMode ·················································· 20-7
20.6 _ECAT_Slave_R1_EC5621_Set_MEL_Inverse ····················································· 20-8
20.7 _ECAT_Slave_R1_EC5621_Set_PEL_Inverse ······················································ 20-9
20.8 _ECAT_Slave_R1_EC5621_Set_Svon_Inverse ·················································· 20-10
20.9 _ECAT_Slave_R1_EC5621_Set_Home _Slow_Down ·········································· 20-11
20.10 _ECAT_Slave_R1_EC5621_Get_IO_Status ····················································· 20-12
20.1 1 _ECAT_Slave_R1_EC56 21_Get_Single_IO_Status ············································ 20-13
Operation of Pulse Module (For R1-ECx62xD0 Series)
21.1 _ECAT_Slave_R1_ECx62x_Set_Output_Mode ····················································· 21-3
21.2 _ECAT_Slave_R1_ECx62x_Set_Input_Mode ······················································· 21-4
21.3 _ECAT_Slave_R1_ECx62x_Set_ORG_Inverse ····················································· 21-5
21.4 _ECAT_Slave_R1_ECx62x_Set_QZ_Inverse ······················································· 21-6
21.5 _ECAT_Slave_R1_ECx62x_Set_Home_SpMode ·················································· 21-7
21.6 _ECAT_Slave_R1_ECx62x_Set_MEL_Inverse ····················································· 21-8
21.7 _ECAT_Slave_R1_ECx62x_Set_PEL_Inverse ······················································ 21-9
21.8 _ECAT_Slave_R1_ECx62x_Set_Svon_Inverse ··················································· 21-10
21.9 _ECAT_Slave_R1_ECx62x_Set_Home_Slow_Down ············································ 21-11
21.10 _ECAT_Slave_R1_ECx62x_Get_IO_Status ······················································ 21-12
21.1 1 _ECAT_Slave_R1_ECx 62x _Get_Single_IO_Status ············································ 21-13
Operation of Delta Servo System
22.1 _ECAT_Slave_DeltaServo_Write_Parameter ························································ 22-3
22.2 _ECAT_Slave_DeltaServo_Read_Parameter ························································ 22-4
22.3 _ECAT_Slave_DeltaServo_Read_Parameter_Info ················································· 22-5
22.4 _ECAT_Slave_DeltaServo_Set_Velocity_Limit ······················································ 22-6
22.5 _ECAT_Slave_DeltaServo_Set_Compare_Enable ················································· 22-7
22.6 _ECAT_Slave_DeltaServo_Get_Compare_Enable ················································· 22-8
22.7 _ECAT_Slave_DeltaServo_Set_Compare_Config ·················································· 22-9
Analog Input Settings (For R1-EC8124D0)
23.1 _ECAT_Slave_R1_EC8124_Set_Input _RangeMode ············································· 23-3
23.2 _ECAT_Slave_R1_EC8124_Set_Input _ConvstFreq_Mode ····································· 23-4
23.3 _ECAT_Slave_R1_EC8124_Set_Input_Enable ····················································· 23-5
23.4 _ECAT_Slave_R1_EC8124_Get_Input _RangeMode ············································· 23-6
23.5 _ECAT_Slave_R1_EC8124_Set_Input _AverageMode ··········································· 23-7
Analog Output Settings (For R1-EC9144D0 Series)
24.1 _ECAT_Slave_R1_EC9144_Set_Output _RangeMode ··········································· 24-3
Page 9

March, 2017
24.2 _ECAT_Slave_R1_EC9144_Set_Output_Enable ··················································· 24-4
24.3 _ECAT_Slave_R1_EC9144_Get_Output _ReturnCode ··········································· 24-5
Auto Recording Function of Motion Axis
25.1 _ECAT_Slave_Record_Set_Type ······································································· 25-3
25.2 _ECAT_Slave_Record_Set_Enable ···································································· 25-4
25.3 _ECAT_Slave_Record_Get_Cnt ········································································ 25-5
25.4 _ECAT_Slave_Record_Read_Data ···································································· 25-6
25.5 _ECAT_Slave_Record_Clear_Data ···································································· 25-7
25.6 _ECAT_Slave_Record_Multi_Set_Enable ···························································· 25-8
25.7 _ECAT_Slave_Record_Multi_Clear_Data ···························································· 25-9
Operation of Local Digital I/O
26.1 _ECAT_GPIO_Set_Output ················································································ 26-3
26.2 _ECAT_GPIO_Get_Output ··············································································· 26-4
26.3 _ECAT_GPIO_Get_Input ·················································································· 26-5
High-Speed Pulse Compare Function
27.1 _ECAT_Compare_Set_Channel_Position ···························································· 27-4
27.2 _ECAT_Compare_Get_Channel_Position ···························································· 27-5
27.3 _ECAT_Compare_Set_Ipulser_Mode ·································································· 27-6
27.4 _ECAT_Compare_Set_Channel_Direction ··························································· 27-7
27.5 _ECAT_Compare_Set_Channel_Trigger_Time ····················································· 27-8
27.6 _ECAT_Compare_Set_Channel_One_Shot ·························································· 27-9
27.7 _ECAT_Compare_Set_Channel_Source···························································· 27-10
27.8 _ECAT_Compare_Set_Channel_Enable ···························································· 27-11
27.9 _ECAT_Compare_Channel0_Position ······························································· 27-12
27.10 _ECAT_Compare_Set_Channel0_Trigger _By_GPIO ········································· 27-13
27.1 1 _ECAT_Compare_S et_Channel1_Output_Enable ·············································· 27-14
27.12 _ECAT_Compare_Set_Channel1_Output_Mode ················································ 27-15
27.13 _ECAT_Compare_Get_Channel1_IO_Status ···················································· 27-17
27.14 _ECAT_Compare_Set_Channel1_GPIO_Out ···················································· 27-18
27.15 _ECAT_Compare_Set_Channel1_Position_Table ·············································· 27-19
27.16 _ECAT_Compare_Set_Channel1_Position _Table_Level ····································· 27-21
27.17 _ECAT_Compare_Get_Channel1_Position _Table_Count ···································· 27-24
27.18 _ECAT_Compare_Set_Channel_Polarity ························································· 27-25
27.19 _ECAT_Compare_Reuse_Channel1_Position _Table ········································· 27-26
27.20 _ECAT_Compare_Reuse_Channel1_Position _Table_Level ································· 27-27
Page 10

March, 2017
Information of EtherCAT Dynamic-Link Library (DLL)
28.1 _ECAT_Master_Get_DLL_Path ········································································· 28-2
28.2 _ECAT_Master_Get_DLL_Version ····································································· 28-3
28.3 _ECAT_Master_Get_DLL_Path_Single ······························································· 28-4
28.4 _ECAT_Master_Get_DLL_Version_Single ···························································· 28-5
Security of Software Protection
29.1 _ECAT_Security_Check_Verify key ····································································· 29-2
29.2 _ECAT_Security_Get_Check_Verifykey_State ······················································ 29-3
29.3 _ECAT_Security_Write_Verifykey ······································································· 29-4
29.4 _ECAT_Security_Get_Write_Verifykey_State ························································ 29-5
29.5 _ECAT_Security_Check_UserPassword ······························································ 29-6
29.6 _ECAT_Security_Get_Check_UserPassword _State ·············································· 29-7
29.7 _ECAT_Security_Write_UserPassword ······························································· 29-8
29.8 _ECAT_Security_Get_Write_UserPassword_State ················································ 29-9
Operating MRAM on PAC
30.1 _ECAT_Master_MRAM_Write_Word_Data ··························································· 30-2
30.2 _ECAT_Master_MRAM_Read_Word_Data ·························································· 30-3
30.3 _ECAT_Master_MRAM_Write_DWord_Data························································· 30-4
30.4 _ECAT_Master_MRAM_Read_DWord_Data ························································ 30-5
Retentive Digital Output of the Module (For 70E2 Series)
31.1 _ECAT_Slave_R1_EC70E2_Set_Output_Enable ·················································· 31-2
Retentive Digital Output of the Module (For 70X2 Series)
32.1 _ECAT_Slave_R1_EC70X2_Set_Output_Enable ·················································· 32-2
MPG Operation (For R1-EC5614D0 Series)
33.1 _ECAT_Slave_R1_EC5614_Set_MJ_Config ························································ 33-3
33.2 _ECAT_Slave_R1_EC5614_Set_MJ_Enable ························································ 33-5
33.3 _ECAT_Slave_R1_EC5614_Get_IO_Status ························································· 33-6
33.4 _ECAT_Slave_R1_EC5614_Get_MPG_Counter ··················································· 33-7
Error Code Description
34.1 List of error code ···························································································· 34-2
34.2 Error code description ···················································································· 34-10
Page 11

March, 2017
(This page is intentionally left blank.)
Page 12

March, 2017 1-1
Introduction to
API Function Library
This chapter introduces APIs of EtherCAT dynamic-link library (DLL). Users can
perform various functions through calling these API libraries. The contents below
provide instructions on how to import API libraries into your developing environment.
1.1 How to use function libraries? ······························································· 1-2
1.2 Start a new project ············································································· 1-2
1.2.1 Using VC ··················································································· 1-2
1.2.2 Using VB ··················································································· 1-2
1.2.3 Using VB.Net ·············································································· 1-2
1.2.4 Using C# ··················································································· 1-3
Page 13

Introduction to API Function Library EtherCAT Programming Guide
1-2 March, 2017
1
1.1 How to use function libraries?
When the installation program is completed, two function libraries will be found in the folder
named “lib”. They can be used in Visual Studio C and Borland C++ respectively.
Function library Development environment
EtherCatDll.lib Visual Studio C++
BCBEtherCAT_DLL.lib Borland C++Builder 6
1.2 Start a new project
1.2.1 Using VC
(1) Place following instructions in the user-built project:
#include “EtherCat_DLL.h”
#include “EtherCat_DLL_Err.h”
(2) Select Project / Setting / Link in Visual C development environment.
Then, type “..\lib\EtherCat_DLL.lib” in Object / Library modules
(3) Setup completed. Users can start to operate EtherCAT DLL with API.
1.2.2 Using VB
Place “EtherCat_DLL.bas” and “EtherCat_DLL_Err.bas” in the project created by users to control
EtherCAT DLL with API.
1.2.3 Using VB.Net
Place “EtherCat_DLL.vb” and “EtherCat_DLL_Err.vb” in the project created by users to control
EtherCAT DLL with API.
Page 14

EtherCAT Programming Guide Introduction to API Function Library
March, 2017
1-3
1
1.2.4 Using C#
Place “EtherCat_DLL.cs” and “EtherCat_DLL_Err.cs” in user-built project to control EtherCAT
DLL with API.
Note: For C# projects, please tick the Enable native code debugging option in the Debug tab. See figure
below. Serious errors (i.e. blue screen) will occur if this option is not ticked.
Figure 1.2.4.1 Settings for C# project
Page 15

Introduction to API Function Library EtherCAT Programming Guide
1-4 March, 2017
1
(This page is intentionally left blank.)
Page 16

March, 2017 2-1
EtherCAT Introduction
This chapter introduces the setting for applying Delta EtherCAT function library,
including the suggested maximum slave number for connection, initialization of RTX
operating system and the description on how to check if the EtherCAT associated DLL
can operate normally in RTS. Please see the contents below for more information.
2.1 Maximum number of the slave device ···················································· 2-2
2.2 Initialize RTX runtime environment ························································ 2-3
2.3 Introduction to RTSS Task Manager ······················································ 2-4
Page 17

EtherCAT Introduction EtherCAT Programming Guide
2-2 March, 2017
2
2.1 Maximum number of the slave device
Delta EtherCAT master has two types of operation system, RTX real-time operating system from
PAC and EtherCAT PCI m otion card. Since the operational efficiency among both differs from
one another, the connected slave number is different.
When EtherCA T master runs in R TX real-time operating system, the default of its comm unication
cycle is 1 ms (1K) and can connect up to remote modules and 64 motion axes, including servo
drives and pulse modules. There is no limitation on quantity of the device that connects to
EtherCAT master. However, if the communication cycle is shorter, the suggested maximum
number of the connected slave will be reduced in accordance with proportion. Please refer to
table 2.1.1 below for the suggested maximum slave quantity to avoid communication instability.
When EtherCAT master runs in PCI motion card, it can connect 64 remote modules and 32
motion axes at most with the default communication cycle 1 ms (1K). Please refer to table 2.1.2.
EtherCAT master runs in RTX real-time operating system of Delta PAC
Communication cycle (ms)
Max. number of the connected
remote module (1 ms)
Max. number of the connected
motion axis (1 ms)
4 ms 100 64
2 ms 100 64
1 ms 100 64
0.5 ms 50 32
0.25 ms 25 16
0.125 ms 22 8
Table 2.1.1 Suggested number of the slave
EtherCAT master runs in Delta PCI EtherCAT motion card
Communication cycle (ms)
Max. number of the connected
remote module (1 ms)
Max. number of the connected
motion axis (1 ms)
4 ms 64 32
2 ms 64 32
1 ms 64 32
0.5 ms 32 16
0.25 ms 16 8
0.125 ms 8 4
Table 2.1.2 Suggested number of the slave
Page 18
EtherCAT Programming Guide EtherCAT Introduction
March, 2017
2-3
2
2.2 Initialize RTX runtime environment
For running the real-time operating system uploaded by synchronous function of EtherCAT
communication, RTX has one CPU and one Ethernet communication port. If you are applying a
Delta EtherCA T motion card, such a s PCI-L221PPI, then there is nothing to do with R TX syst em.
When the host computer has started up, the RTX runtime environment will not be automatically
loaded into the system. It will start running only after instructions related to EtherCAT initialization
API are executed. Or, you can also manually enable RTX. See the steps below.
Once RTX is enabled, you can start to use other related functions and APIs in EtherCAT dynamic
link library.
(1) Open [RTX Properties]
File location: [Start] > [All programs] > [IntervalZero] > [RTX 2012] > [RTX Properties]
(2) Enable RTX devices
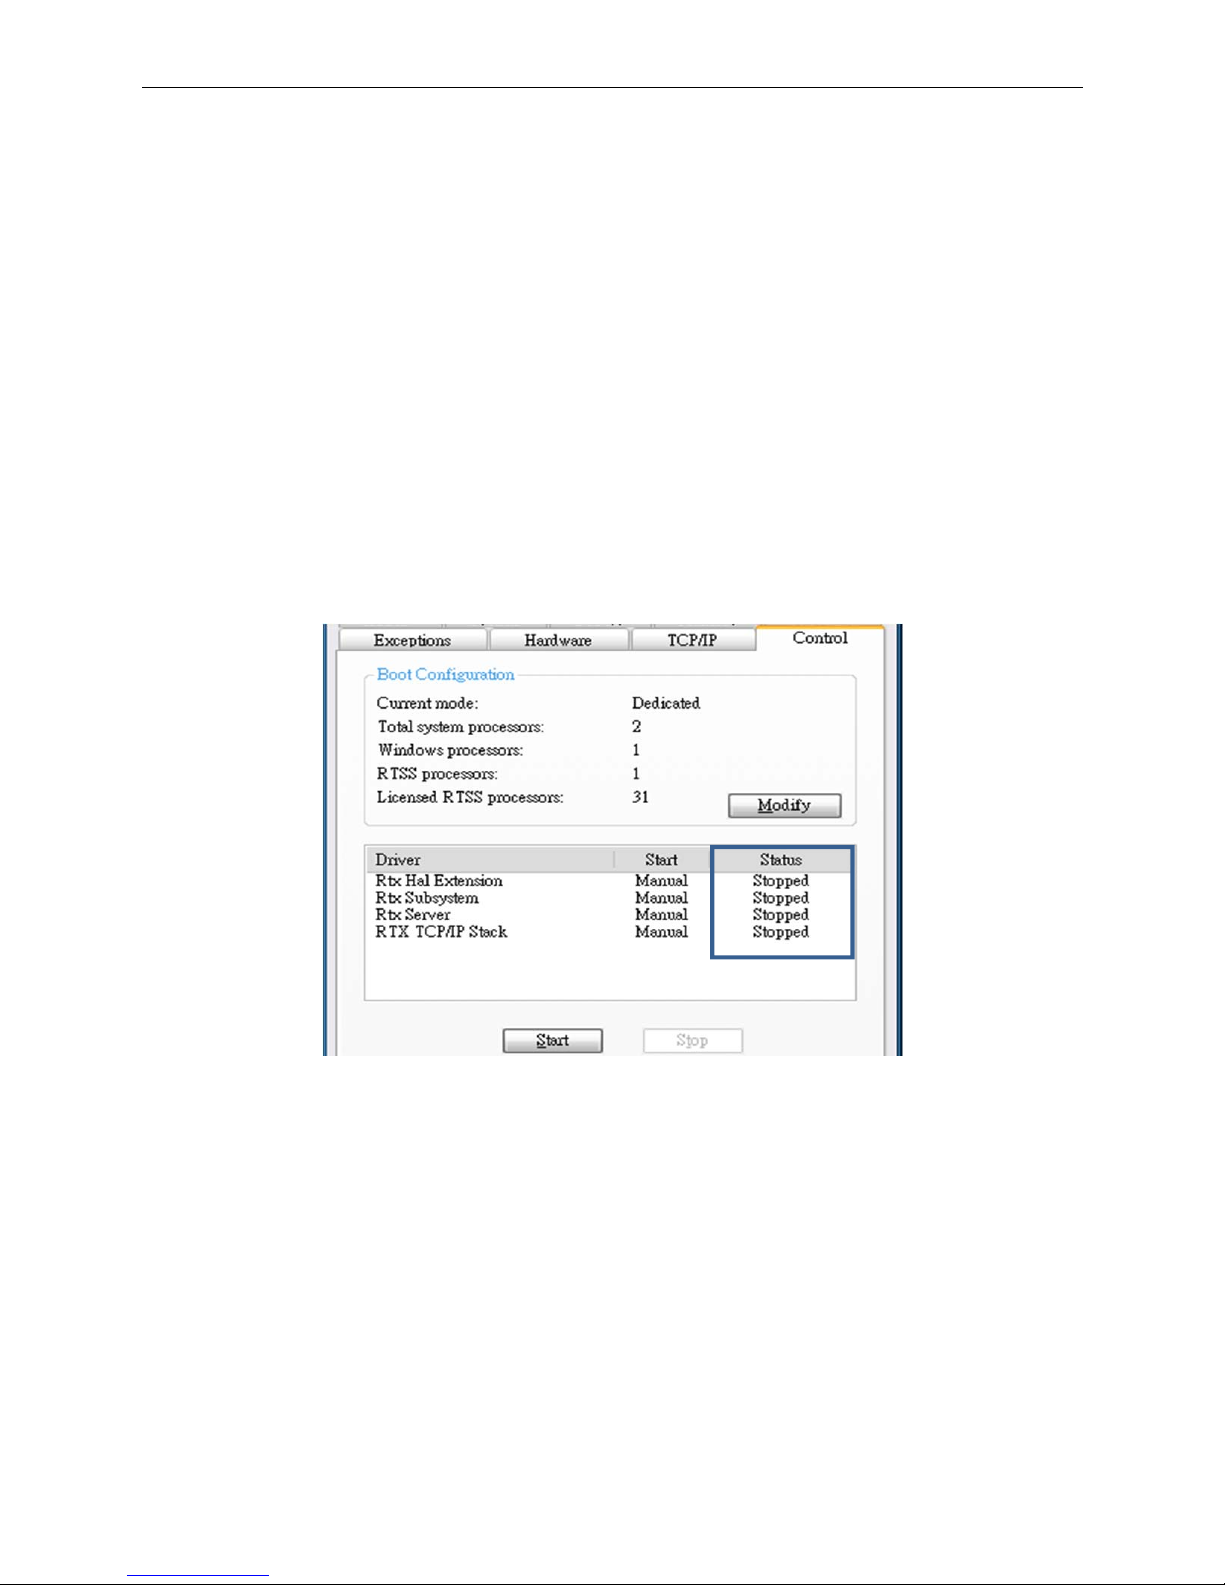
After opening [RTX Properties], select the Control tab and check the Driver status. If the driver
status shows “Stopped”, press the Start key to have the RTX devices start running.
Figure 2.2.1 RTX devices in Stopped status
Page 19
EtherCAT Introduction EtherCAT Programming Guide
2-4
March, 2017
2
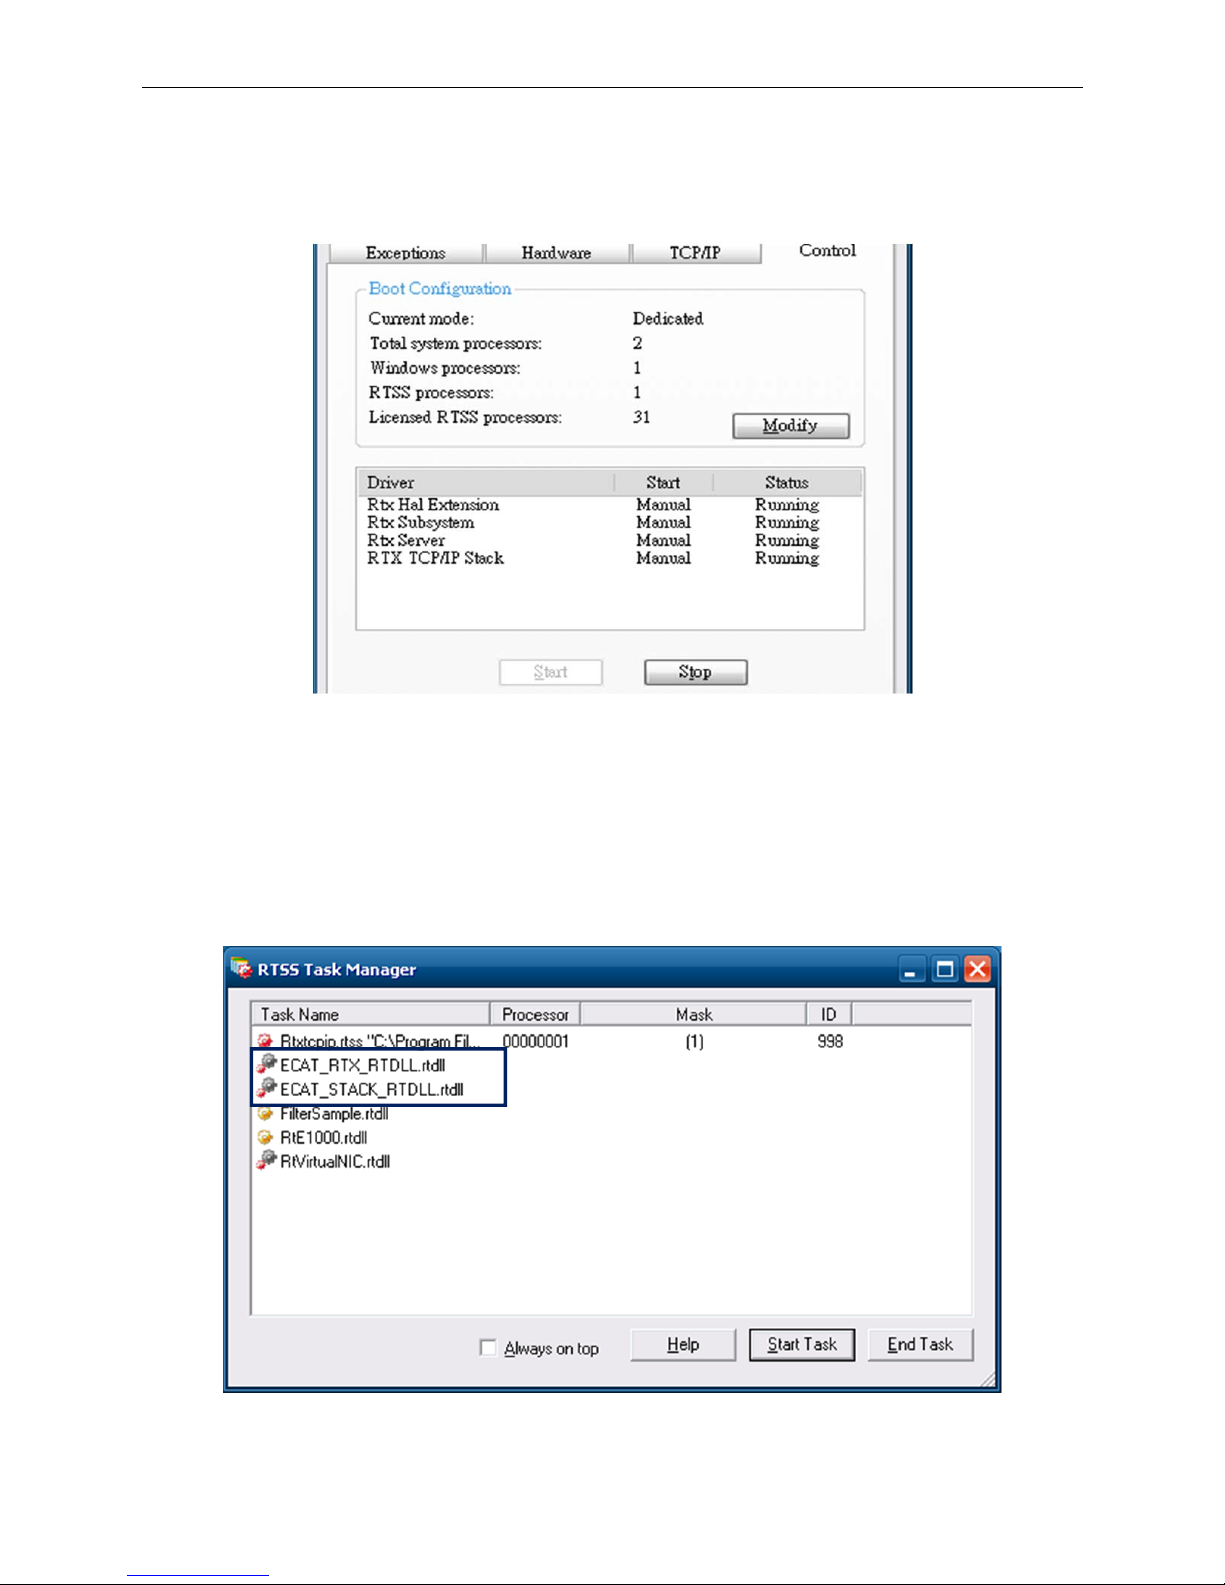
(3) Check the status of RTX devices
When the status of RTX devices shows “Running”, the user can start to use EtherCAT related
functions.
Figure 2.2.2 RTX devices in Running status
2.3 Introduction to RTSS Task Manager
RTSS Task Manager can be used to check whether the EtherCAT associ ated files
(ECA T _RTX_RTDLL.rtdll, ECAT_S TACK_RTDLL.rtdll) are operating normally in RTX.
Figure 2.3.1
Interface of RTSS Task Manager
Page 20

EtherCAT Programming Guide EtherCAT Introduction
March, 2017
2-5
2
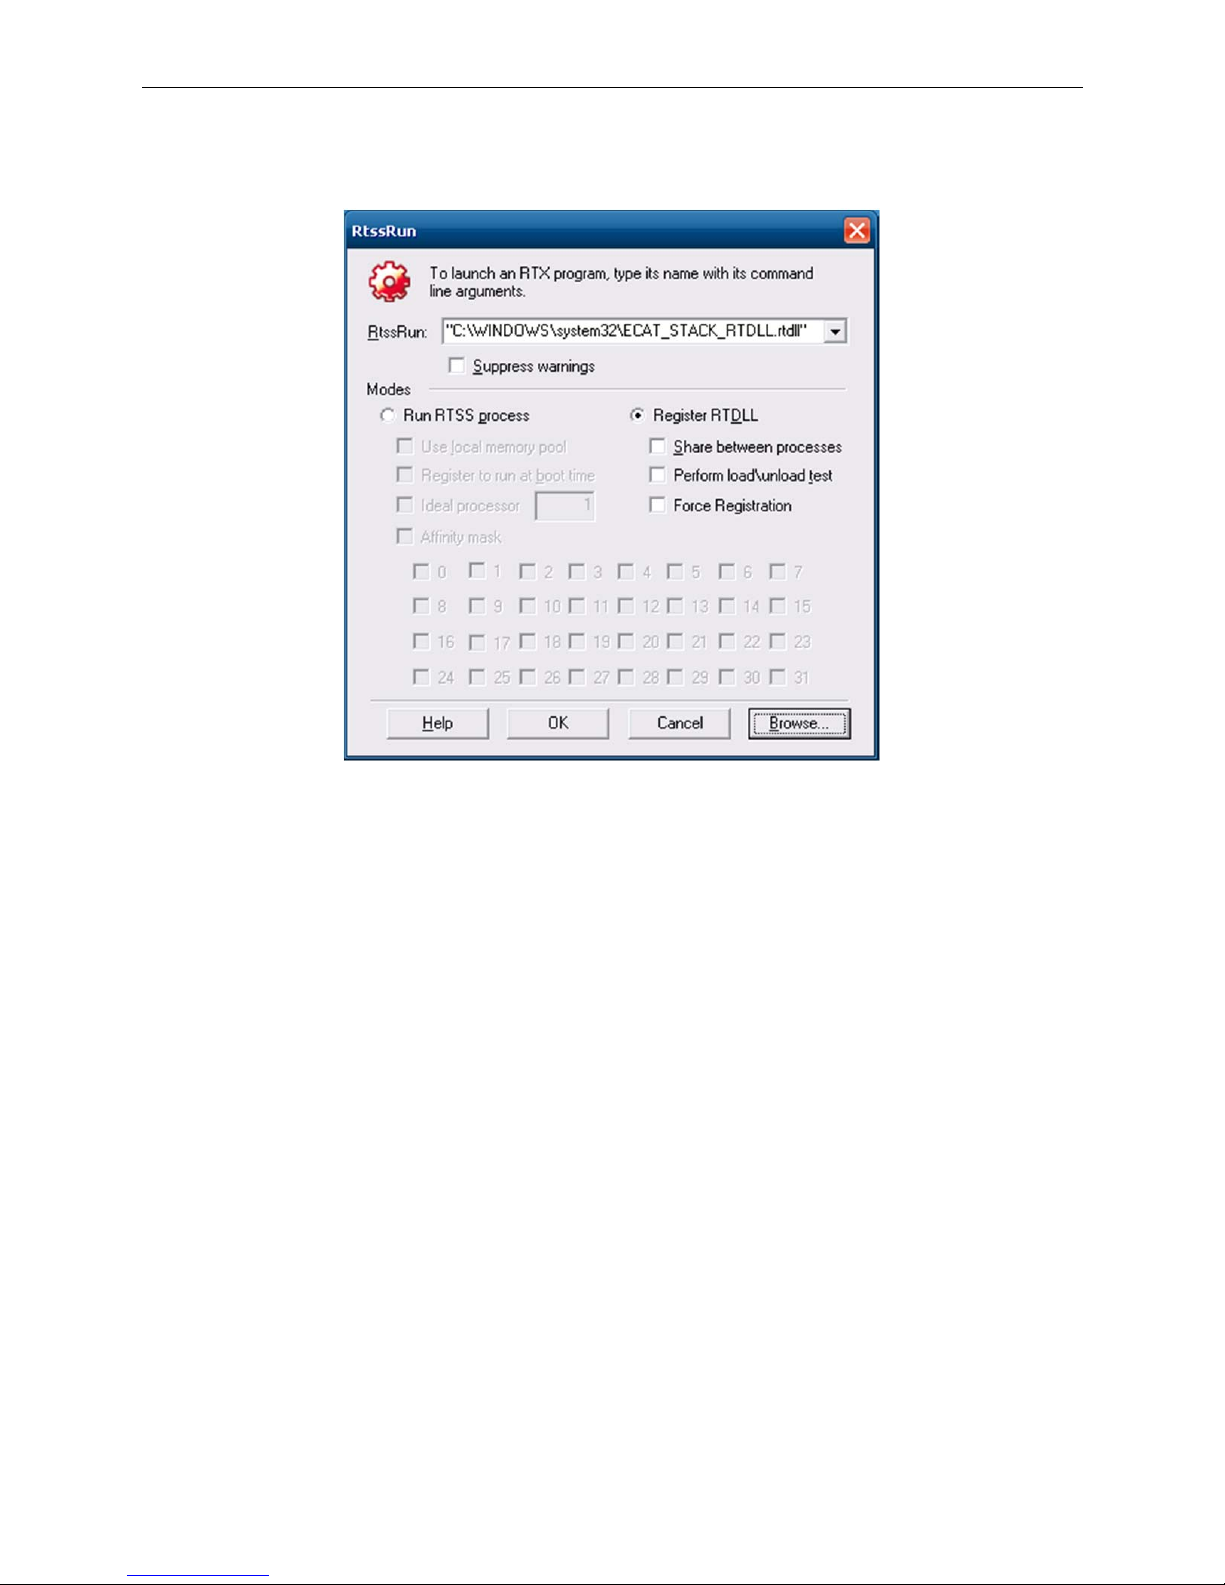
If there is any file missing in Task Manager, users can reload the missing file.
(1) Click the Start T ask key, and the RtssRun window will pop out.
Figure 2.3.2 RtssRun window
(2) Click Browse and select the missing file, which is placed in C:\Windows\system32\.
Figure 2.3.3 Select the missing file
Page 21
EtherCAT Introduction EtherCAT Programming Guide
2-6
March, 2017
2
Then, while the other options remain unchanged, press OK and the file will be loaded into RTX
system.
Figure 2.3.4 Load the missing file
Page 22

March, 2017 3-1
EtherCAT Operation
Example
This chapter provides the C/C++ examples of EtherCAT dynamic-link library, including
EtherCAT initialization, homing procedure, PT, PV, PP, CSP modes, remote digital
input/output module, analog input/output, and high-speed pulse compare function.
3.1 EtherCAT Initialization ········································································ 3-3
3.1.1 Function list ················································································ 3-3
3.1.2 Application examples ··································································· 3-3
3.2 Motion control of homing ····································································· 3-6
3.2.1 Function list ················································································ 3-6
3.2.2 Application examples ··································································· 3-6
3.3 Torque control ··················································································· 3-9
3.3.1 Function list ················································································ 3-9
3.3.2 Application examples ··································································· 3-9
3.4 Constant speed control ····································································· 3-12
3.4.1 Function list ·············································································· 3-12
3.4.2 Application examples ································································· 3-12
3.5 Motion control in PP mode ································································· 3-16
3.5.1 Function list ·············································································· 3-16
3.5.2 Application examples ································································· 3-16
3.6 Motion control in CSP mode ······························································· 3-20
3.6.1 Function list ·············································································· 3-20
3.6.2 Application examples ································································· 3-21
3.7 EtherCAT Slave IO control (digital input) ··············································· 3-38
3.7.1 Function list ·············································································· 3-38
3.7.2 Application examples ································································· 3-38
3.8 EtherCAT Slave IO control (digital output) ············································· 3-40
3.8.1 Function list ·············································································· 3-40
3.8.2 Application examples ································································· 3-40
3.9 Application of EtherCAT analog input module (R1-EC-8124) ····················· 3-42
3.9.1 Function list ·············································································· 3-42
3.9.2 Application examples ································································· 3-42
3.10 Application of EtherCAT analog output module (R1-EC-9144) ·················· 3-44
Page 23

EtherCAT Operation Example EtherCAT Programming Guide
3-2 March, 2017
3
3.10.1 Function list ············································································ 3-44
3.10.2 Application examples ································································ 3-44
3.11 Application of EtherCAT Compare function for PCI card (PCI-L221-B1) ······ 3-47
3.11.1 Function list ············································································ 3-47
3.11.2 Application examples ································································ 3-48
Page 24
EtherCAT Programming Guide EtherCAT Operation Example
March, 2017 3-3
3
3.1 EtherCAT initialization
3.1.1 Function list
Function name
_ECAT_Master_Open
_ECAT_Master_Get_CardSeq
_ECAT_Master_Initial
_ECAT_Master_Get_SlaveNum
_ECAT_Master_Reset
_ECAT_Master_Close
_ECAT_Master_Check_Initial_Done
Properties
Hardware
EtherCAT RTX (PAC) EtherCAT motion card
Supported
Y Y
3.1.2 Application examples
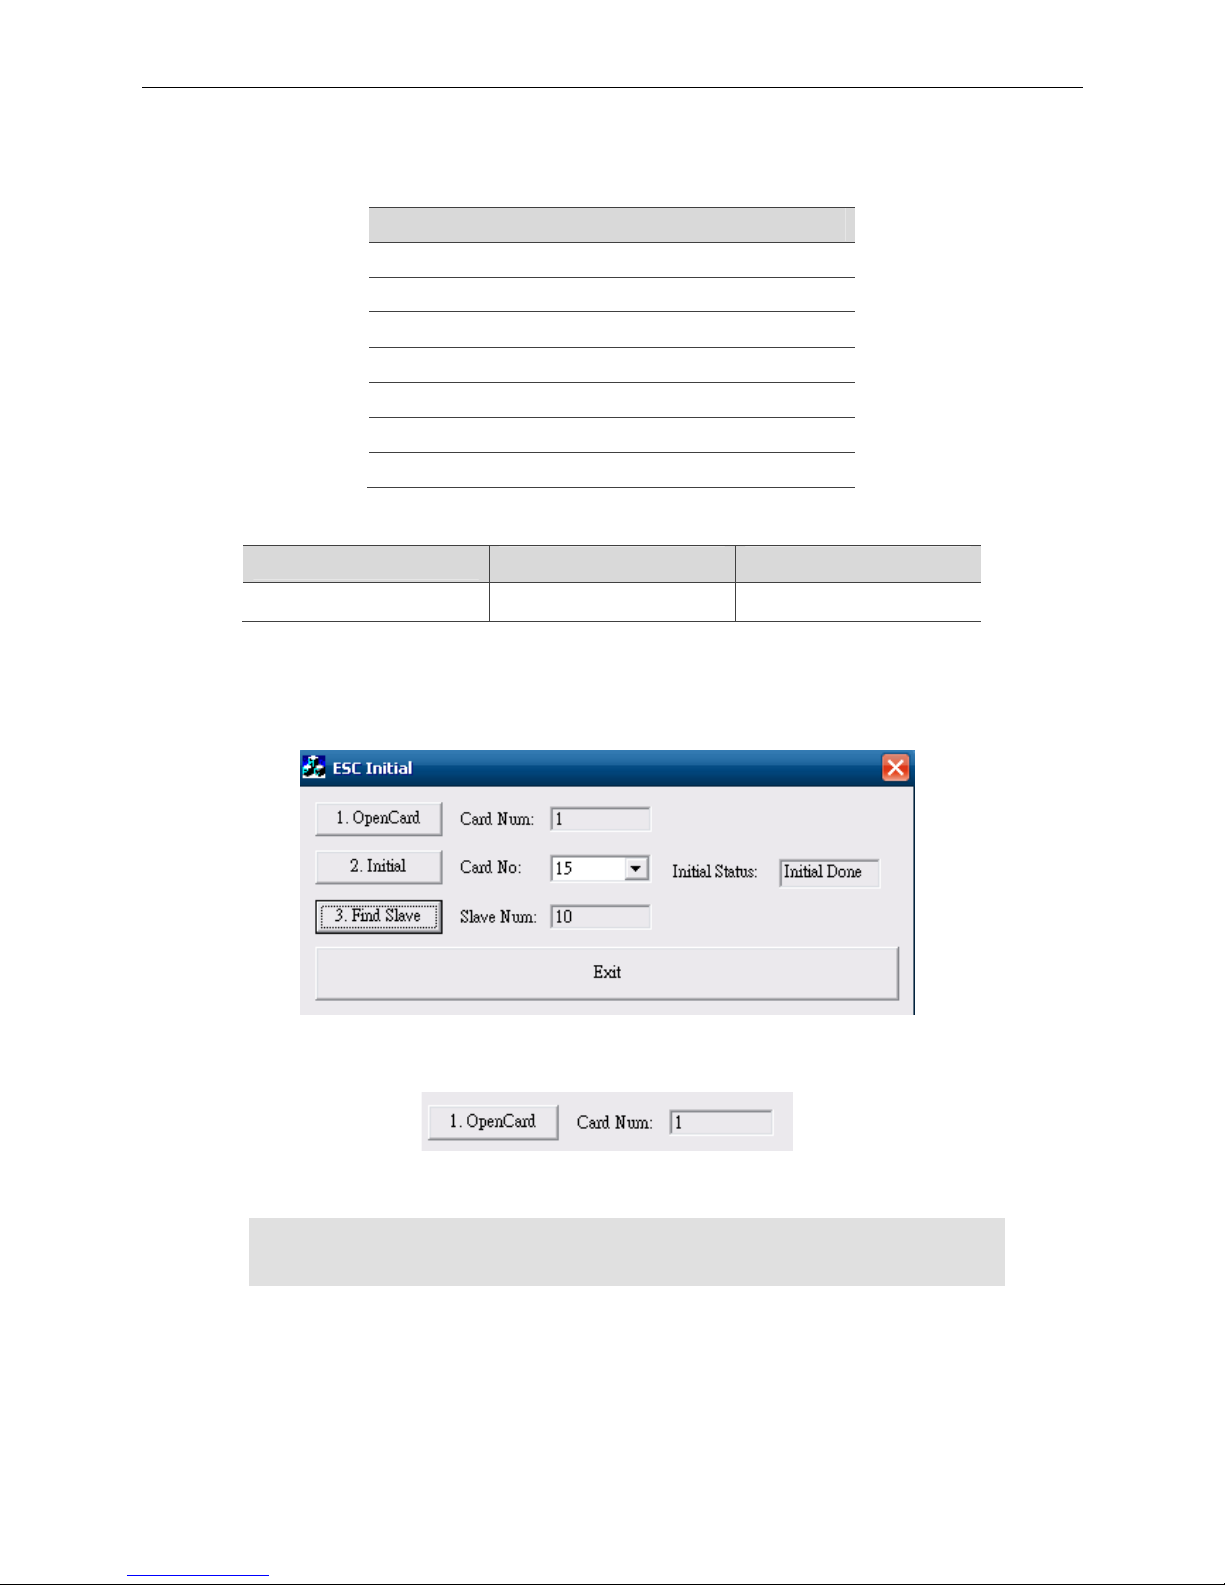
Program interface
Figure 3.1.2.1
(1) Activate interface card
Figure 3.1.2.2
Press the OpenCard key to execute the following program:
RetCode = _ECAT_Master_Open(&gESCExistCards);
/* The variable, gESCExistCards, will return EtherCAT motion card number. */
Page 25

EtherCAT Operation Example EtherCAT Programming Guide
3-4 March, 2017
3
(2) Initialize interface card
Figure 3.1.2.3
Press the Initial key to execute the following program:
for(i=0; i< gESCExistCards; i++)
{
RetCode = _ECAT_Master_Get_CardSeq(i, &CardNo);
/* Get the card No. of the PC interface Card i. This card No. is the dip switch value.
EtherCAT card number in RTX version is 16. */
RetCode = _ECAT_Master_Initial(CardNo);
/* Start to initialize the interface card. */
if(RetCode != 0)
{
strMsg.Format("_ECAT_Master_Initial, RetCode = %d", RetCode);
MessageBox(strMsg);
}
}
RetCode = _ECAT_Master_Check_Initial_Done(gESCCardNo, &InitialDone);
/* Get the Initial status. */
// Display the Initial Status:
// InitialDone = 1: Display “Pre Initial”
// InitialDone = 0: Display “Initial Done”
// InitialDone = 99: Display “Initial Error”
(3) Set the information of the connected modules
Figure 3.1.2.5
Press the Find Slave key to execute the following program:
RetCode = _ECAT_Master_Get_SlaveNum(gESCCardNo, &SlaveNum);
// Get the number of the connected modules.
When the above program completes, the number of the found Slave devices will be
displayed in Slave Num field.
Page 26

EtherCAT Programming Guide EtherCAT Operation Example
March, 2017 3-5
3
(4) Exit program
Figure 3.1.2.6
Press the Exit key to execute the following program:
for(i=0; i< gESCExistCards; i++)
{
_ECAT_Master_Reset(gpESCCardNoList[i]);
// Reset the interface card.
}
_ECAT_Master_Close();
// End the operation of motion control card.
Page 27
EtherCAT Operation Example EtherCAT Programming Guide
3-6 March, 2017
3
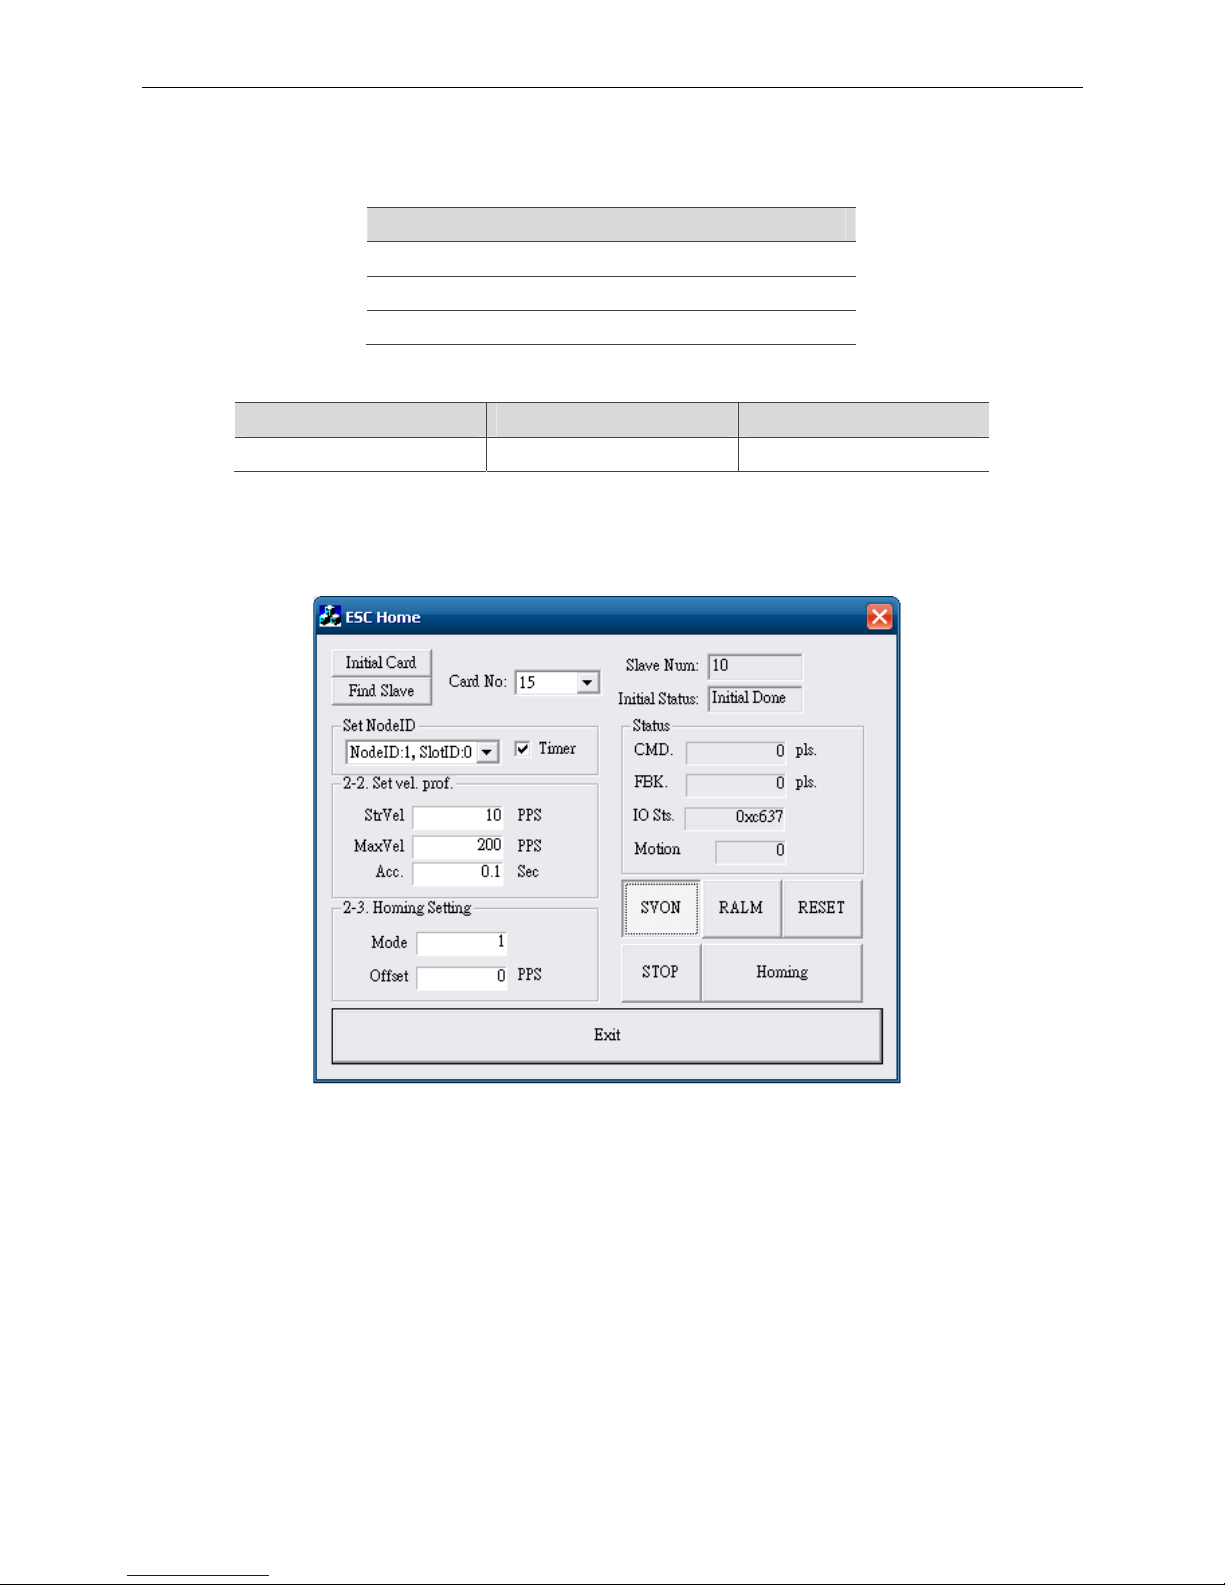
3.2 Motion control of homing
3.2.1 Function list
Function name
_ECAT_Slave_Home_Config
_ECAT_Slave_Home_Move
_ECAT_Slave_Motion_Sd_Stop
Properties
Hardware EtherCAT RTX (PAC) EtherCAT motion card
Supported Y Y
3.2.2 Application examples
Program interface
Figure 3.2.2.1
(1) Activate and initialize interface card
Press the Initial Card key (as shown in figure 3.2.2.1) to start initializing the interface card.
Press the Find Slave key (as shown in figure 3.2.2.1) to start searching the connecting
modules.
For more information about the interface card initialization, please see “Activate interface
card” and “Initialize interface card” in section 3.1.2.
Page 28
EtherCAT Programming Guide EtherCAT Operation Example
March, 2017 3-7
3
(2) Enter the parameter for motion control
Figure 3.2.2.2
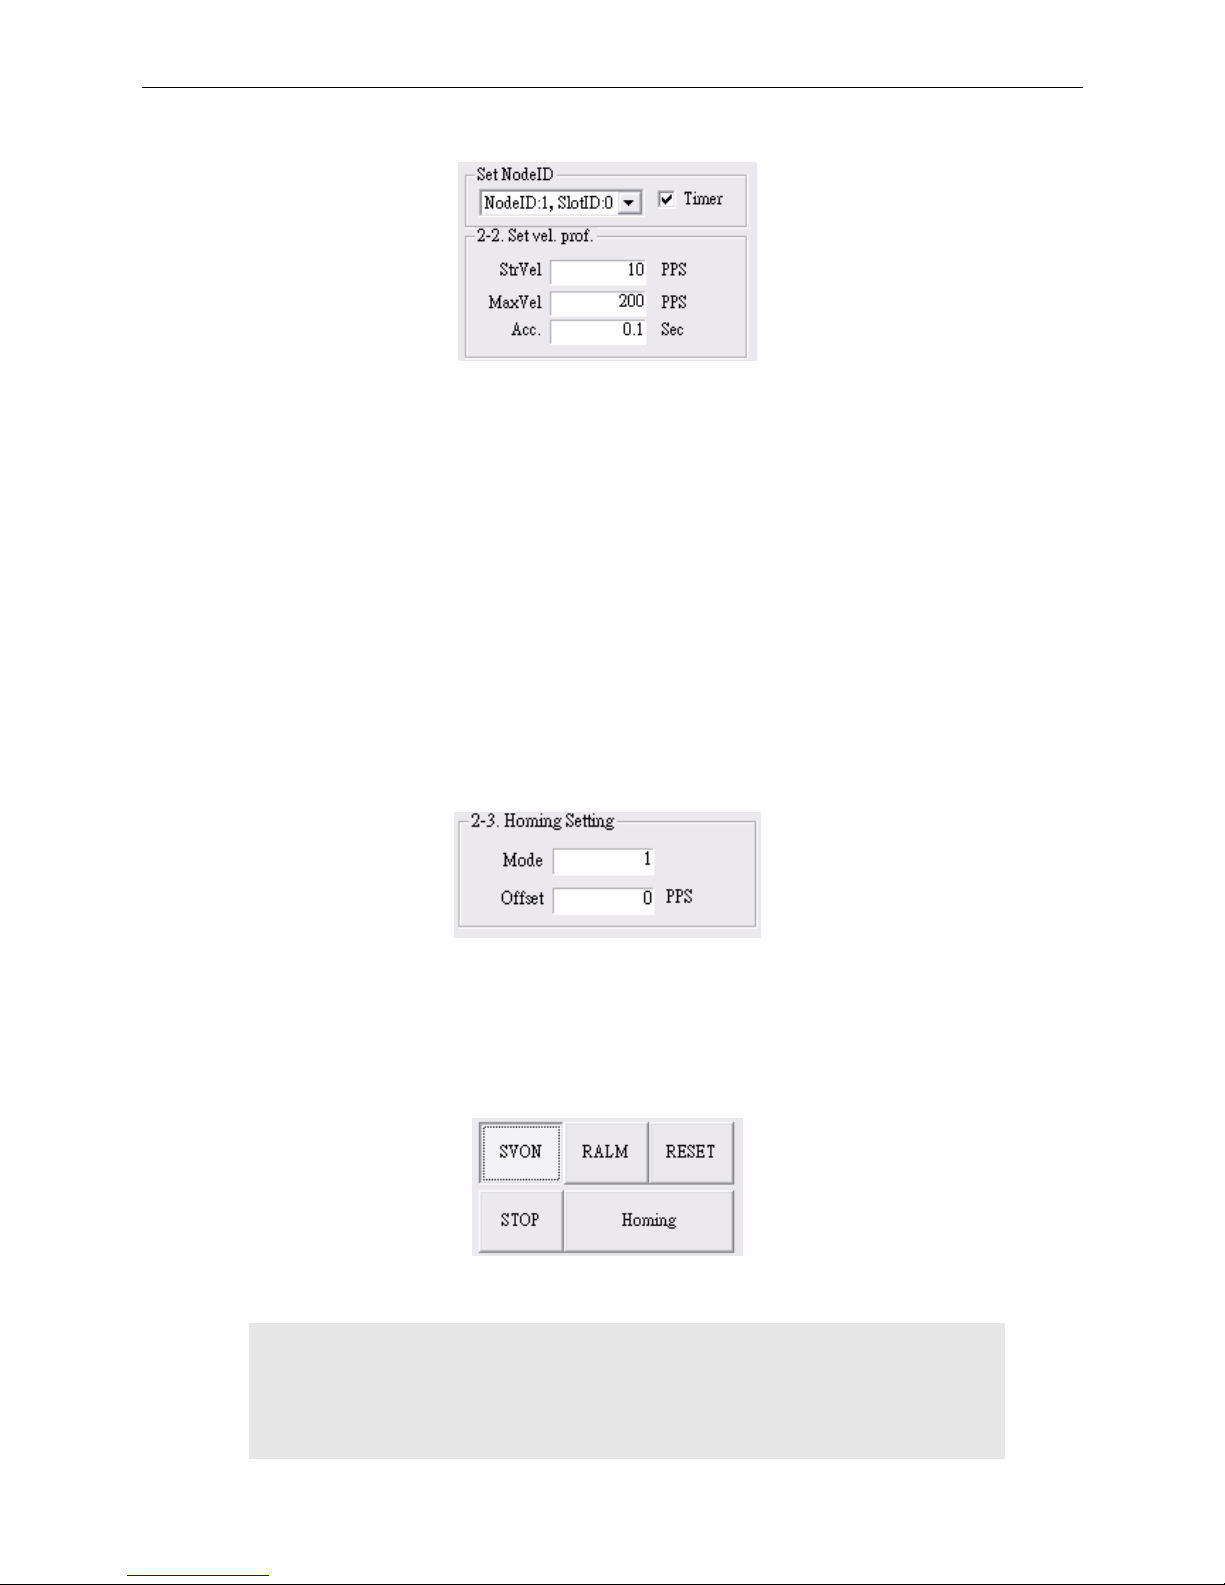
Select Node ID and Slot ID and check the Timer box to display the motion status.
Set NodeID: Specify the Node ID to be executed. The parameters “AxisNo” and “SlotNo”
in the API function.
Timer: Check the Timer box to display the current motion status.
StrVel.: Input motion speed for homing (pulse sent per second). The parameter
“FirstSpeed” in the API function.
MaxVel.: Input the motion speed after homing to the next index pulse (pulse sent per
second). The parameter “SecondSpeed” in the API function.
Acc.: Input the duration to accelerate to the target speed. The parameter “Tacc” in the API
function.
(3) Set the parameters for homing (homing mode and offset value)
Figure 3.2.2.3
Mode: Homing mode 1 ~ 35. The parameter “Mode” in the API function.
Offset: Homing offset. The parameter “Offset” in the API function.
(4) Set the servo motor to ON/OFF state (servo on/servo off)
Figure 3.2.2.4
Press the SVON key (as shown in figure 3.2.2.4) to execute the following program:
RetCode = _ECAT_Slave_Motion_Set_Svon(gESCCardNo, gNodeID, gSlotID,ON_OFF);
// ON_OFF
// 0: Servo OFF
// 1: Servo ON
Page 29

EtherCAT Operation Example EtherCAT Programming Guide
3-8 March, 2017
3
(5) Homing procedures
Press the Homing key (as shown in figure 3.2.2.4) to execute the following program:
RetCode = _ECAT_Slave_Home_Config(gESCCardNo, gNodeID, gSlotID, Mode, Offset,
StrVel, MaxVel, Tacc);
/* Set homing mode: 1 ~ 35, offset and speed parameters, but the servo will not operate
now. */
RetCode = _ECAT_Slave_Home_Move(gESCCardNo, gNodeID, gSlotID);
/* Start homing according to the set parameters. */
(6) Stop homing
To stop homing, press the STOP key (as shown in figure 3.2.2.4) to execute the following
program:
RetCode = _ECAT_Slave_Motion_Sd_Stop(gESCCardNo, gNodeID, gSlotID, Tdec);
/* Interrupt homing process. */
(7) Exit program
Press the Exit key to exit and close the program.
Execute “_ECAT_Master_Reset” and “_ECAT_Master_Close” to exit the function. Detailed
description about these two API is presented in section 3.1.2 Exit program.
Page 30
EtherCAT Programming Guide EtherCAT Operation Example
March, 2017 3-9
3
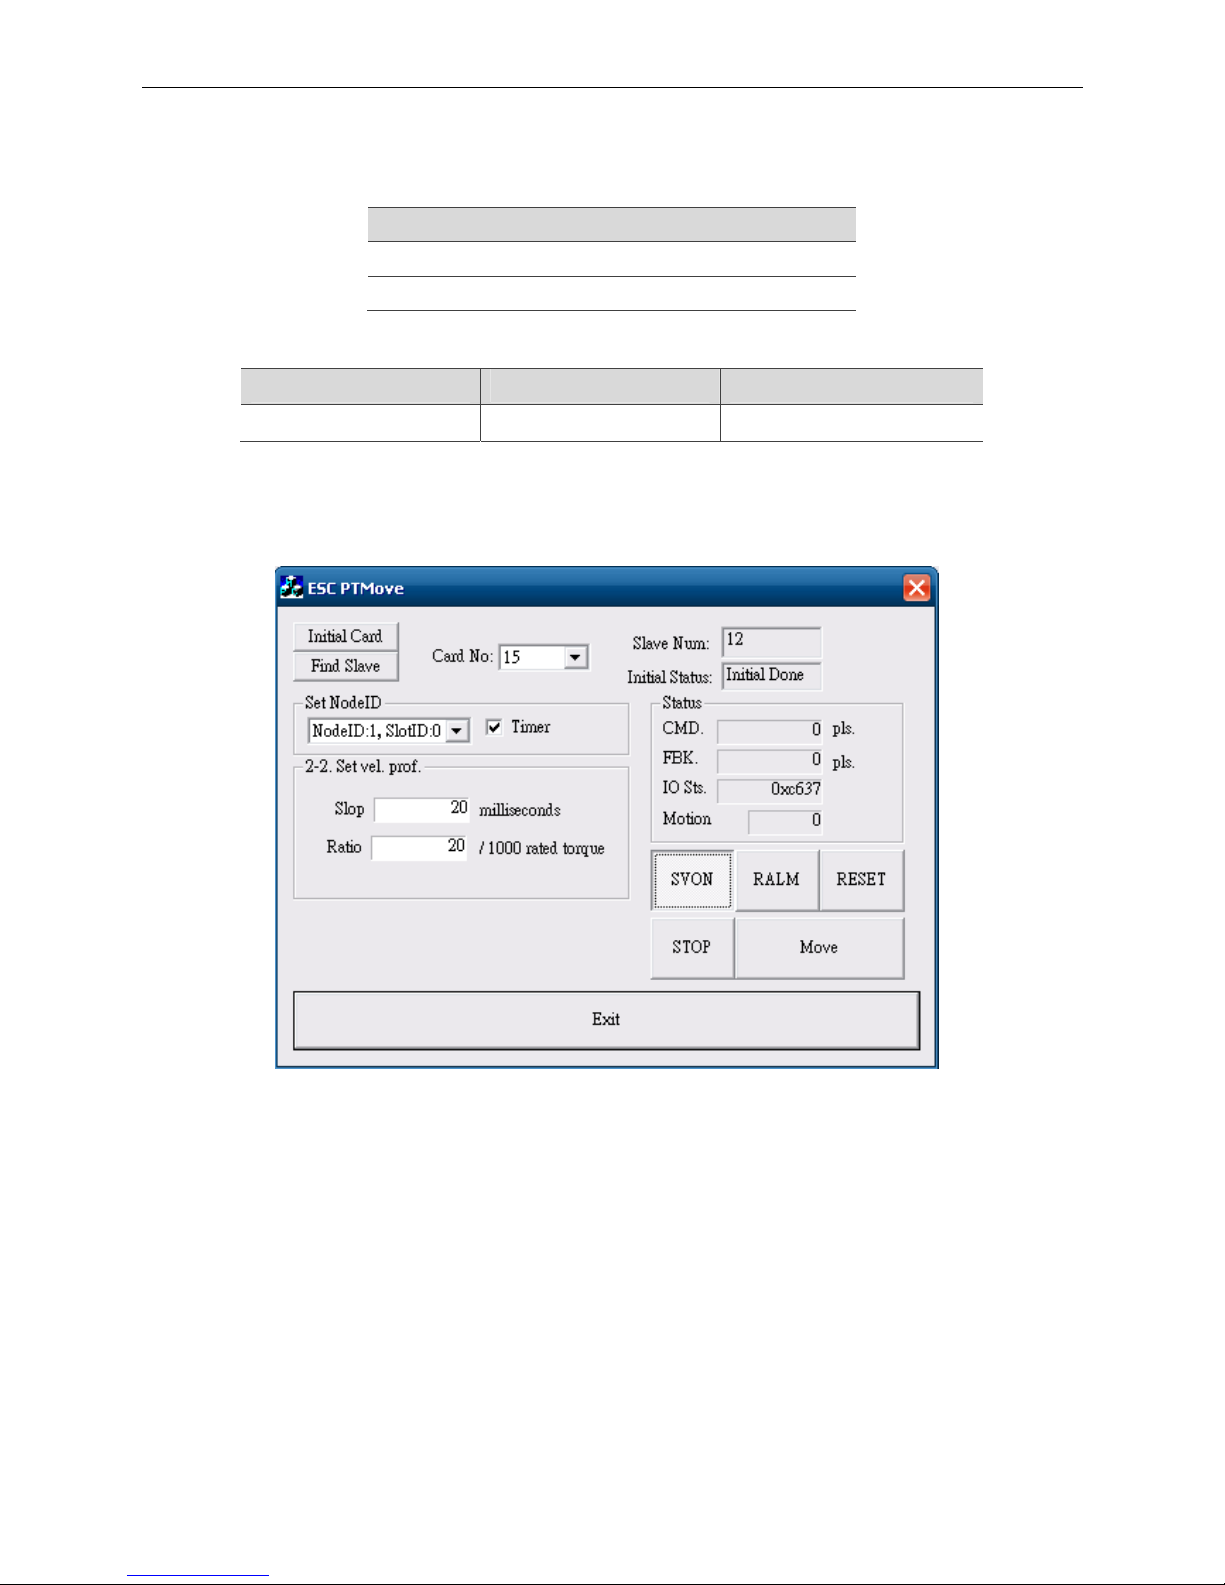
3.3 Torque control
3.3.1 Function list
Function name
_ECAT_Slave_PT_Start_Move
_ECAT_Slave_Motion_Emg_Stop
Properties
Hardware EtherCAT RTX (PAC) EtherCAT motion card
Supported
Y Y
3.3.2 Application examples
Program interface
Figure 3.3.2.1
(1) Activate and initialize interface card
Press the Initial Card key (as shown in figure 3.3.2.1) to start initializing the interface card.
Press the Find Slave key (as shown in figure 3.3.2.1) to start searching the connecting
modules.
For more information about the interface card initialization, please see “Activate interface
card” and “Initialize interface card” in section 3.1.2.
Page 31

EtherCAT Operation Example EtherCAT Programming Guide
3-10 March, 2017
3
(2) Set Node ID and Slot ID for the servo drive and enable motion status display
Figure 3.3.2.2
Select Node ID and Slot ID and check the Timer box to display the motion status.
Set NodeID: Specify the Node ID to be executed. The parameters “AxisNo.” and “SlotNo”
in the API function.
Timer: Check the Timer box to display the current motion status.
(3) Enter the Slop and Ratio values
Figure 3.3.2.3
Slop: Input the required time for the rated torque. (unit: ms)
Ratio: Input the permillage of the rated torque value. For example, if the ratio value is 20,
the rated torque will be 2%.
(4) Set the servo motor to ON/OFF state (servo on/servo off)
Figure 3.3.2.4
Press the SVON key (as shown in figure 3.3.2.4) to execute the following program:
RetCode = _ECAT_Slave_Motion_Set_Svon(gESCCardNo, gNodeID, gSlotID, ON_OFF);
// ON_OFF:
// 0: Servo OFF.
// 1: Servo ON.
(5) Torque control
Press the Move key (as shown in figure 3.3.2.4) to execute the following program:
RetCode = _ECAT_Slave_PT_Start_Move(gESCCardNo, gNodeID, gSlotID, Torque,
Slope);
/* Set torque parameters and enable torque control. */
// The motor will run in forward direction if the torque value is greater than 0, and run in
reverse direction if the value is smaller than 0.
Page 32

EtherCAT Programming Guide EtherCAT Operation Example
March, 2017 3-11
3
Press the STOP key (as shown in figure 3.3.2.4) to execute the following program:
RetCode = _ECAT_Slave_Motion_Emg_Stop(gESCCardNo, gNodeID, gSlotID);
/* Stop torque control of the motor. */
(6) Status display
Figure 3.3.2.5
Command values of the motion:
RetCode = _ECAT_Slave_Motion_Get_Command(gESCCardNo, gNodeID, gSlotID,
&Cmd);
// Get the command value (CMD. field).
RetCode = _ECAT_Slave_Motion_Get_Position(gESCCardNo, gNodeID, gSlotID, &Pos);
// Get the feedback value of the command (FBK. field).
Motion status:
RetCode = _ECAT_Slave_Motion_Get_StatusWord(gESCCardNo, gNodeID, gSlotID,
&Status);
// Get the current motion status (IO Sts. field).
RetCode = _ECAT_Slave_Motion_Get_Mdone(gESCCardNo, gNodeID, gSlotID,
&MCDone);
// Get the current status of the motor (Motion field).
(7) Reset feedback and clear alarm
Press the RESET key (as shown in figure 3.3.2.4) to execute the following program:
RetCode = _ECAT_Slave_Motion_Set_Position(gESCCardNo, gNodeID, gSlotID, 0);
// Clear feedback first (Value showed in servo drive panel will be set to 0).
RetCode = _ECAT_Slave_Motion_Set_Command(gESCCardNo,gNodeID,gSlotID,0);
// Then, clear the command.
Press the RALM key (as shown in figure 3.3.2.4) to execute the alarm clearing command:
RetCode = _ECAT_Slave_Motion_Ralm(gESCCardNo, gNodeID, gSlotID);
// Clear the alarm of slave station.
(8) Exit program
Press the Exit key to exit and close the program.
Execute “_ECAT_Master_Reset” and “_ECAT_Master_Close” to exit the function. Detailed
description about these two API is presented in section 3.1.2 Exit program.
Page 33

EtherCAT Operation Example EtherCAT Programming Guide
3-12 March, 2017
3
3.4 Constant speed control
3.4.1 Function list
Function name
_ECAT_Slave_PV_Start_Move
_ECAT_Slave_Motion_Sd_Stop
Properties
Hardware EtherCAT RTX (PAC) EtherCAT motion card
Supported
Y Y
3.4.2 Application examples
Program interface
Figure 3.4.2.1
(1) Activate and initialize interface card
Press the Initial Card key (as shown in figure 3.4.2.1) to start initializing the interface card.
Press the Find Slave key (as shown in figure 3.4.2.1) to start searching the connecting
modules.
For more information about the interface card initialization, please see “Activate interface
card” and “Initialize interface card” in section 3.1.2.
Page 34

EtherCAT Programming Guide EtherCAT Operation Example
March, 2017 3-13
3
(2) Set Node ID and Slot ID for the servo drive and enable motion status display
Figure 3.4.2.2
Select Node ID and Slot ID and check the Timer box to display the motion status.
Set NodeID: Specify the Node ID to be executed. The parameters “AxisNo.” and “SlotNo”
in the API function.
Timer: Check the Timer box to display the current motion status.
(3) Enter the acceleration/deceleration time and rotation speed per minute (rpm).
Figure 3.4.2.3
Velocit y: Input the target speed. The parameter “RPM” in the API function. *The actual
rpm value is 0.1 time of the variable Velocity.
Acc: Input the duration from current speed to target speed. The parameter “Tacc” in the
API function.
Dec: Input the duration to decelerate from current speed to 0. The parameter “Tdec” in the
API function.
(4) Set the servo motor to ON/OFF state (servo on/servo off)
Figure 3.4.2.4
Press the SVON key (as shown in figure 3.4.2.4) to execute the following program:
RetCode = _ECAT_Slave_Motion_Set_Svon(gESCCardNo, gNodeID, gSlotID, ON_OFF);
// ON_OFF:
// 0: Servo OFF.
// 1: Servo ON.
Page 35

EtherCAT Operation Example EtherCAT Programming Guide
3-14 March, 2017
3
(5) Speed control
Press the ← or → key (as shown in figure 3.4.2.4) to execute the following program:
RetCode = _ECAT_Slave_PV_Start_Move(gESCCardNo, gNodeID, gSlotID, Velocity,
Tacc, Tdec);
/* Set the parameters of speed mode (the acceleration and deceleration time) and enable
speed control. */
// The servo motor will run in forward direction if the rpm value is greater than 0, and will
run in reverse direction when the rpm value is smaller than 0.
Press the STOP key (as shown in figure 3.4.2.4) to execute the following program:
RetCode = _ECAT_Slave_Motion_Emg_Stop(gESCCardNo, gNodeID, gSlotID);
(6) Status display
Figure 3.4.2.5
Command values of the motion:
RetCode = _ECAT_Slave_Motion_Get_Command(gESCCardNo, gNodeID, gSlotID,
&Cmd);
// Get the command value (CMD. field).
RetCode = _ECAT_Slave_Motion_Get_Position(gESCCardNo, gNodeID, gSlotID, &Pos);
// Get the feedback value of the command (FBK. field).
Motion status:
RetCode = _ECAT_Slave_Motion_Get_Current_Speed(gESCCardNo,gNodeID, gSlotID,
&Spd);
// Get the current moving speed (SPD. field).
RetCode = _ECAT_Slave_Motion_Get_StatusWord(gESCCardNo, gNodeID, gSlotID,
&Status);
// Get the current status (IO Sts. field).
RetCode = _ECAT_Slave_Motion_Get_Mdone(gESCCardNo, gNodeID, gSlotID,
&MCDone);
// Get the current status of the motor. (Motion field)
Page 36

EtherCAT Programming Guide EtherCAT Operation Example
March, 2017 3-15
3
(7) Reset the feedback value and clear the alarm
Press the RESET key (as shown in figure 3.4.2.4) to execute the following program:
RetCode = _ECAT_Slave_Motion_Set_Position(gESCCardNo, gNodeID, gSlotID, 0);
// Clear feedback first (Value showed in servo drive panel will be set to 0).
RetCode = _ECAT_Slave_Motion_Set_Command(gESCCardNo,gNodeID,gSlotID,0);
// Then clear the command.
Press the RALM key (as shown in figure 3.4.2.4) to execute the alarm clearing command:
RetCode = _ECAT_Slave_Motion_Ralm(gESCCardNo, gNodeID, gSlotID);
// Clear the alarm of slave station.
(8) Exit program
Press the Exit key to exit and close the program.
Execute “_ECAT_Master_Reset” and “_ECAT_Master_Close” to exit the function. Detailed
description about these two API is presented in section 3.1.2 Exit program.
Page 37

EtherCAT Operation Example EtherCAT Programming Guide
3-16 March, 2017
3
3.5 Motion control in PP mode
3.5.1 Function list
Function name
_ECAT_Slave_PP_Start_Move
_ECAT_Slave_Motion_Sd_Stop
Properties
Hardware EtherCAT RTX (PAC) EtherCAT motion card
Supported
Y Y
3.5.2 Application examples
Program interface
Figure 3.5.2.1
(1) Activate and initialize interface card
Press the Initial Card key (as shown in figure 3.5.2.1) to start initializing the interface card.
Press the Find Slave key (as shown in figure 3.5.2.1) to start searching the connecting
modules.
For more information about the interface card initialization, please see “Activate interface
card” and “Initialize interface card” in section 3.1.2.
Page 38

EtherCAT Programming Guide EtherCAT Operation Example
March, 2017 3-17
3
(2) Set Node ID and Slot ID for the servo drive and enable motion status display
Figure 3.5.2.2
Select Node ID and Slot ID and check the Timer box to display the motion status.
Set NodeID: Specify the node ID to be executed. The parameters “AxisNo.” and “SlotNo”
in the API function.
Timer: Check the Timer box to display the current motion status.
(3) Enter the parameter for motion control
Figure 3.5.2.3
Dist.: Input the moving distance. The parameter “Dist” in the API function.
StrVel.: Input the initial speed. The parameter “StrVel” in the API function.
*The servo drive accelerates to the initial speed set in StrVel at its max. speed. Then, it
accelerates to the constant speed set in MaxVel with the acceleration time set in Acc.
MaxVel.: Input the constant speed. The parameter “MaxVel” in the API function.
Acc.: Input the duration from initial speed to constant speed. The parameter “Tacc” in the
API function.
Dec.: Input the duration to decelerate from the constant speed to 0. The parameter “Tdec”
in the API function.
ABS.: Check this box to have the motion conducted according to the absolute coordinates
set in Dist.
Page 39

EtherCAT Operation Example EtherCAT Programming Guide
3-18 March, 2017
3
(4) Set the servo motor to ON/OFF state (servo on/servo off)
Figure 3.5.2.4
Press the SVON key (as shown in figure 3.5.2.4) to execute the following program:
RetCode = _ECAT_Slave_Motion_Set_Svon(gESCCardNo, gNodeID, gSlotID, ON_OFF);
// ON_OFF:
// 0: Servo OFF
// 1: Servo ON
(5) Start to control the motion speed
Press the ← or → key (as shown in figure 3.5.2.4) to execute the following program:
RetCode = _ECAT_Slave_PP_Start_Move(gESCCardNo, gNodeID, gSlotID, Dist, StrVel,
MaxVel, Tacc, Tdec, gbIsABS);
// gblsABS
// 0: relative movement
// 1: absolute movement
(6) Stop the motion
Press the STOP key (as shown in figure 3.5.2.4) to enable emergency stop:
RetCode = _ECAT_Slave_Motion_Emg_Stop(gESCCardNo, gNodeID, gSlotID);
In this example, the movement is stopped urgently by setting the deceleration time to 0.
(7) Status display
Figure 3.5.2.5
Command values of the motion:
RetCode = _ECAT_Slave_Motion_Get_Command(gESCCardNo, gNodeID, gSlotID,
&Cmd);
// Get the command value (CMD. field).
RetCode = _ECAT_Slave_Motion_Get_Position(gESCCardNo, gNodeID, gSlotID, &Pos);
// Get the feedback value of the command (FBK. field).
Page 40

EtherCAT Programming Guide EtherCAT Operation Example
March, 2017 3-19
3
Motion status:
RetCode = _ECAT_Slave_Motion_Get_StatusWord(gESCCardNo, gNodeID, gSlotID,
&Status);
// Get the current status (IO Sts. field).
RetCode = _ECAT_Slave_Motion_Get_Mdone(gESCCardNo, gNodeID, gSlotID,
&MCDone);
// Get the current status of the motor (Motion field).
(8) Reset the feedback value and clear the alarm
Press the RESET key (as shown in figure 3.5.2.4) to execute the following program:
RetCode = _ECAT_Slave_Motion_Set_Position(gESCCardNo, gNodeID, gSlotID, 0);
// Clear feedback first (Value showed in servo drive panel will be set to 0).
RetCode = _ECAT_Slave_Motion_Set_Command(gESCCardNo, gNodeID, gSlotID, 0);
// Then, clear the command.
Press the RALM key (as shown in figure 3.5.2.4) to execute the alarm clearing command:
RetCode = _ECAT_Slave_Motion_Ralm(gESCCardNo, gNodeID, gSlotID);
// Clear the alarm of slave station
(9) Exit program
Press the Exit key to exit and close the program.
Execute “_ECAT_Master_Reset” and “_ECAT_Master_Close” to exit the function. Detailed
description about these two API is presented in section 3.1.2 Exit program.
Page 41

EtherCAT Operation Example EtherCAT Programming Guide
3-20 March, 2017
3
3.6 Motion control in CSP mode
3.6.1 Function list
Function name
_ECAT_Slave_Motion_Set_Svon
_ECAT_Slave_CSP_Start_Move
_ECAT_Slave_CSP_Start_V_Move
_ECAT_Slave_CSP_Start_Multiaxes_Move
_ECAT_Slave_CSP_Start_Arc_Move
_ECAT_Slave_CSP_Start_Arc2_Move
_ECAT_Slave_CSP_Start_Arc3_Move
_ECAT_Slave_CSP_Start_Spiral_Move
_ECAT_Slave_CSP_Start_Spiral2_Move
_ECAT_Slave_CSP_Start_Heli_Move
_ECAT_Slave_CSP_Start_Sphere_Move
_ECAT_Slave_Motion_Sd_Stop
_ECAT_Slave_Motion_Set_Position
_ECAT_Slave_Motion_Set_Command
_ECAT_Slave_Motion_Ralm
_ECAT_Slave_Motion_Get_Command
_ECAT_Slave_Motion_Get_Position
_ECAT_Slave_Motion_Get_Current_Speed
_ECAT_Slave_Motion_Get_StatusWord
_ECAT_Slave_Motion_Get_Mdone
_ECAT_Master_Check_Initial_Done
Properties
Hardware EtherCAT RTX (PAC) EtherCAT motion card
Supported
Y Y
Page 42

EtherCAT Programming Guide EtherCAT Operation Example
March, 2017 3-21
3
3.6.2 Application examples
Program interface
Figure 3.6.2.1
(1) Activate and initialize interface card
Press the Initial Card key (as shown in figure 3.6.2.1) to start initializing the interface card.
Press the Find Slave key (as shown in figure 3.6.2.1) to start searching the connecting
modules.
For more information about the interface card initialization, please see “Activate interface
card” and “Initialize interface card” in section 3.1.2.
(2) Select Node ID and Slot ID for the servo drive and enable motion status display
Figure 3.6.2.2
Select Node ID and Slot ID and check the Timer box to display the motion status.
Set NodeID: Specify the Node ID to be executed. The parameters “AxisNo.” and “SlotNo”
in the API function.
Timer: Check the Timer box to display the current motion status.
Page 43

EtherCAT Operation Example EtherCAT Programming Guide
3-22 March, 2017
3
(3) Select the moving mode
Figure 3.6.2.2
Single-axis motion control:
P To P: Point to point movement
Continue: Linear movement
Two-axis motion control:
Line2: Linear interpolation control
Arc: Type 1 arc interpolation control (with the known circle center and angle)
Arc2: Type 2 arc interpolation control (with the known end point and angle)
Arc3: Type 3 arc interpolation control (with the known circle center and end point)
Spiral: Type 1 spiral interpolation control (with the known circle center and angle)
Spiral2: Type 2 spiral interpolation control (with the known end point and circle
number)
Three-axis motion control:
Helix: Helical interpolation control
Line3: Linear interpolation control
Sphere: Three-axis sphere motion control
Page 44

EtherCAT Programming Guide EtherCAT Operation Example
March, 2017 3-23
3
(4) The parameter of single-axis motion control
Figure 3.6.2.3
Dist.: Input the moving distance. The parameter “Dist” in the API function.
StrVel.: Input the initial speed. The parameter “StrVel” in the API function.
ConstVel: Input the constant speed. The parameter “ConstVel” in the API function.
EndVel: Input the end speed when it reaches the target position. The parameter “EndVel”
in the API function.
TPhase1: Input the duration from initial speed to constant speed. The parameter
“TPhase1” in the API function.
TPhase2: Input the duration from constant speed to end speed. The parameter “TPhase2”
in the API function.
S-Curve: Check this box to use S-Curve for the speed curve. Otherwise, it will use
T-Curve.
ABS.: Check this box to have the motion conducted according to absolute coordinates set
in Dist.
(5) Set the servo motor to ON/OFF state (servo on/servo off)
Figure 3.6.2.4
Page 45

EtherCAT Operation Example EtherCAT Programming Guide
3-24 March, 2017
3
Press the SVON key (as shown in figure 3.6.2.4) to execute the following program:
RetCode = _ECAT_Slave_Motion_Set_Svon(gESCCardNo, gNodeID[i], gSlotID[i],
ON_OFF);
// ON_OFF:
// 0: Servo OFF
//1: Servo ON
(6) Select P To P and start the point to point motion control
Press the ← or → key (as shown in figure 3.6.2.4) to execute the following program:
RetCode = _ECAT_Slave_CSP_Start_Move(gESCCardNo, gNodeID[0], gSlotID[0],
Dist[0], StrVel, ConstVel, EndVel, Tacc, Tdec, gbIsSCurve, gbIsABS);
// gblsSCurve
// 1: T-Curve
// 2: S-Curve
// gblsABS
// 0: Relative movement
// 1: Absolute movement
(7) Change the position or speed in P To P mode
Figure 3.6.2.5
Press the ← or → key (as shown in figure 3.6.2.4) to select P To P motion control. To
replace the current position with a new position, press the Change key in Position Change
section (as shown in figure 3.6.2.5) to execute the following program:
RetCode = _ECAT_Slave_CSP_TargetPos_Change(gESCCardNo, gNodeID[0],
gSlotID[0], NewPos);
// Replace the current position with a new position.
To replace the current speed with a new speed, press the Change key in Velocity Change
section (as shown in figure 3.6.2.5) to execute the following program:
RetCode = _ECAT_Slave_CSP_Velocity_Change(gESCCardNo, gNodeID[0], gSlotID[0],
NewSpd, NewTdec);
// Replace the current speed with a new speed.
Page 46

EtherCAT Programming Guide EtherCAT Operation Example
March, 2017 3-25
3
(8) Set the Gear or software limit in P To P mode
Figure 3.6.2.6
Press the ← or → key (as shown in figure 3.6.2.4) to select P To P motion control. To set
the Gear values, press the Set key in the Set Gear section (as shown in figure 3.6.2.6) to
execute the following program:
RetCode = _ECAT_Slave_CSP_Set_Gear(gESCCardNo, gNodeID[0], gSlotID[0],
Numerator, Denominator, Enable);
// Set new gear values.
To set the software limit, press the Set key in the Set Soft Limit section (as shown in figure
3.6.2.6) to execute the following program:
RetCode = _ECAT_Slave_CSP_Set_Softlimit(gESCCardNo, gNodeID[0], gSlotID[0],
MLimit, PLimit, Enable);
// Set software limit values.
(9) Set the value for Feedrate Overwrite in P To P mode.
Figure 3.6.2.7
Press the ← or → key (as shown in figure 3.6.2.4) to execute P To P motion control.
To set the value of Feedrate Overwrite, drag the scrollbar (as shown in figure 3.6.2.7)
to execute the following program:
RetCode = _ECAT_Slave_CSP_Feedrate_Overwrite(gESCCardNo, gNodeID[0],
gSlotID[0], 2, NewSpd, 0.1);
// Mode=2; Users can change the speed and the speed (vector) of all motion commands
whether the command is being executed.
// Speed ratio
Page 47

EtherCAT Operation Example EtherCAT Programming Guide
3-26 March, 2017
3
(10) Select Continue for motion control with constant speed
Press the ← or → key (as shown in figure 3.6.2.4) to execute the following program:
RetCode = _ECAT_Slave_CSP_Start_V_Move(gESCCardNo, gNodeID[0], gSlotID[0], 0,
StrVel, MaxVel, Tacc, gbIsSCurve);
// gblsSCurve
// 1: T-Curve
// 2: S-Curve
(11) Two-axis motion mode (Line2, Spiral, Spiral2) and its settings
Figure 3.6.2.8
Line2 parameter settings: Two-axis linear interpolation
Dist1: Input the moving distance of axis X. The parameter “DistX” in the API function.
Dist2: Input the moving distance of axis Y. The parameter “DistY” in the API function.
StrVel.: Input the initial speed. The parameter “StrVel” in the API function.
ConstVel: Input the constant speed. The parameter “ConstVel” in the API function.
EndVel: Input the end speed when it reaches the target position. The parameter “EndVel”
in the API function.
TPhase1: Input the duration from initial speed to constant speed. The parameter
“TPhase1” in the API function.
TPhase2: Input the duration from constant speed to end speed. The parameter “TPhase2”
in the API function.
S-Curve: Check this box to use S-Curve for the speed curve. Otherwise, it will use
T-Curve.
ABS.: Check this box to have the motion conducted according to absolute coordinates set
in Dist.
Page 48

EtherCAT Programming Guide EtherCAT Operation Example
March, 2017 3-27
3
Spiral parameter settings: Type 1 of spiral interpolation (with the known circle center and
angle)
CenX: Input the X-coordinate of the circle center. The parameter “CenterPoint” in the API
function.
CenY: Input the Y-coordinate of the circle center. The parameter “CenterPoint” in the API
function.
Inter: Input the relative distance between the known spiral pitches. The parameter
“Spiral_Interval” in the API function.
Angle: Input the angle of the spiral movement. The parameter “Angle” in the API function.
StrVel.: Input the initial speed. The parameter “StrVel” in the API function.
ConstVel: Input the constant speed. The parameter “ConstVel” in the API function.
EndVel: Input the end speed when it reaches the target position. The parameter “EndVel”
in the API function.
TPhase1: Input the duration from initial speed to constant speed. The parameter
“TPhase1” in the API function.
TPhase2: Input the duration from constant speed to end speed. The parameter “TPhase2”
in the API function.
S-Curve: Check this box to use S-curve for the speed curve. Otherwise, it will use
T-Curve.
ABS.: Check this box to have the motion conducted according to absolute coordinates set
in Dist.
Spiral2 parameter settings: Type 2 of spiral interpolation (with the know end point and
circle number)
CenX: Input the X-coordinate of the circle center. The parameter “CenterPoint” in the API
function.
CenY: Input the Y-coordinate of the circle center. The parameter “CenterPoint” in the API
function.
EndX: Input the target position of X-coordinate. The parameter “EndPoint” in the API
function.
EndY: Input the target position of Y-coordinate. The parameter “EndPoint” in the API
function.
Num: Input the circle number of the spiral movement. The parameter “CycleNum” in the
API function.
Dir: Input the moving direction (0: Clockwise, 1: Anticlockwise). The parameter “Dir” in the
API function.
StrVel.: Input the initial speed. The parameter “StrVel” in the API function.
ConstVel: Input the constant speed. The parameter “ConstVel” in the API function.
EndVel: Input the end speed when it reaches the target position. The parameter “EndVel”
in the API function.
Page 49

EtherCAT Operation Example EtherCAT Programming Guide
3-28 March, 2017
3
TPhase1: Input the duration from initial speed to constant speed. The parameter
“TPhase1” in the API function.
TPhase2: Input the duration from constant speed to end speed. The parameter “TPhase2”
in the API function.
S-Curve: Check this box to use S-curve for the speed curve. Otherwise, it will use
T-Curve.
ABS.: Check this box to have the motion conducted according to absolute coordinates set
in Dist.
(12) Set the servo motor to ON/OFF state (servo on/servo off)
Press the SVON key (as shown in figure 3.6.2.4) to execute the following program:
RetCode = _ECAT_Slave_Motion_Set_Svon(gESCCardNo, gNodeID[i], gSlotID[i],
ON_OFF);
// ON_OFF:
// 0: Servo OFF
// 1: Servo ON
(13) Select Line2 for two-axis linear motion control
Press the ← or → key (as shown in figure 3.6.2.4) to execute the following program:
RetCode = _ECAT_Slave_CSP_Start_Multiaxes_Move(gESCCardNo, 2, gNodeID,
gSlotID, Dist, StrVel, MaxVel, EndVel, Tacc, Tdec, gbIsSCurve, gbIsABS);
// gblsSCurve
// 1: T-Curve
// 2: S-Curve
// gblsABS
// 0: Relative movement
// 1: Absolute movement
(14) Select Spiral for two-axis arc motion control (center point and angle)
Press the ← or → key (as shown in figure 3.6.2.4) to execute the following program:
RetCode = _ECAT_Slave_CSP_Start_Spiral_Move(gESCCardNo,gNodeID, gSlotID,
CenPoint, Spiral_Interval, Angle, StrVel, MaxVel, EndVel, Tacc, Tdec, gbIsSCurve,
gbIsABS);
// gblsSCurve
// 1: T-Curve
// 2: S-Curve
// gblsABS
// 0: Relative movement
// 1: Absolute movement
Page 50

EtherCAT Programming Guide EtherCAT Operation Example
March, 2017 3-29
3
(15) Select Spiral2 for two-axis arc motion control (end point and circles).
Press the ← or → key (as shown in figure 3.6.2.4) to execute the following program:
RetCode = _ECAT_Slave_CSP_Start_Spiral2_Move(gESCCardNo, gNodeID, gSlotID,
CenPoint, EndPoint, CycleNum, Dir, StrVel, MaxVel, EndVel, Tacc, Tdec, gbIsSCurve,
gbIsABS);
// gblsSCurve
// 1: T-Curve
// 2: S-Curve
// gblsABS
// 0: Relative movement
// 1: Absolute movement
(16) Two-axis motion mode (Arc, Arc2, Arc3) and the settings
Figure 3.6.2.9
Arc parameter settings: Type 1 of arc interpolation (with the known arc’s circle center and
angle)
CenX: Input the X-coordinate of the circle center. The parameter “CenterPoint” in the API
function.
CenY: Input the Y-coordinate of the circle center. The parameter “CenterPoint” in the API
function.
Angle: Set the arc angle. The parameter “Angle” in the API function.
StrVel.: Input the initial speed. The parameter “StrVel” in the API function.
ConstVel: Input the constant speed. The parameter “ConstVel” in the API function.
EndVel: Input the end speed when it reaches the target position. The parameter “EndVel”
in the API function.
TPhase1: Input the duration from initial speed to constant speed. The parameter
Page 51

EtherCAT Operation Example EtherCAT Programming Guide
3-30 March, 2017
3
“TPhase1” in the API function.
TPhase2: Input the duration from constant speed to end speed. The parameter “TPhase2”
in the API function.
S-Curve: Check this box to use S-curve for the speed curve. Otherwise, it will use
T-Curve.
ABS.: Check this box to have the motion conducted according to absolute coordinates set
in Dist.
Arc2 parameter settings: Type 2 of arc interpolation (with the known arc’s end point and
angle)
EndX: Input the target position of X-coordinate. The parameter “EndPoint” in the API
function.
EndY: Input the target position of Y-coordinate. The parameter “EndPoint” in the API
function.
Angle: Set the arc angle. The parameter “Angle” in the API function.
StrVel.: Input the initial speed. The parameter “StrVel” in the API function.
ConstVel: Input the constant speed. The parameter “ConstVel” in the API function.
EndVel: Input the end speed when it reaches the target position. The parameter “EndVel”
in the API function.
TPhase1: Input the duration from initial speed to constant speed. The parameter
“TPhase1” in the API function.
TPhase2: Input the duration from constant speed to end speed. The parameter “TPhase2”
in the API function.
S-Curve: Check this box to use S-curve for the speed curve. Otherwise, it will use
T-Curve.
ABS.: Check this box to have the motion conducted according to absolute coordinates set
in Dist.
Arc3 parameter settings: Type 3 of arc interpolation (with the known arc’s circle center
and end point)
CenX: Input the X-coordinate of the circle center. The parameter “CenterPoint” in the API
function.
CenY: Input the Y-coordinate of the circle center. The parameter “CenterPoint” in the API
function.
EndX: Input the target position of X-coordinate. The parameter “EndPoint” in the API
function.
EndY: Input the target position of Y-coordinate. The parameter “EndPoint” in the API
function.
Dir: Input the moving direction (0: Clockwise, 1: Anticlockwise). The parameter “Dir” in the
API function.
Page 52

EtherCAT Programming Guide EtherCAT Operation Example
March, 2017 3-31
3
StrVel.: Input the initial speed. The parameter “StrVel” in the API function.
ConstVel: Input the constant speed. The parameter “ConstVel” in the API function.
EndVel: Input the end speed when it reaches the target position. The parameter “EndVel”
in the API function.
TPhase1: Input the duration from initial speed to constant speed. The parameter
“TPhase1” in the API function.
TPhase2: Input the duration from constant speed to end speed. The parameter “TPhase2”
in the API function.
S-Curve: Check this box to use S-curve for the speed curve. Otherwise, it will use
T-Curve.
ABS.: Check this box to have the motion conducted according to absolute coordinates set
in Dist.
(17) Set the servo motor to ON/OFF state (servo on/servo off)
Press the SVON key (as shown in figure 3.6.2.4) to execute the following program:
RetCode = _ECAT_Slave_Motion_Set_Svon(gESCCardNo, gNodeID[i], gSlotID[i],
ON_OFF);
// ON_OFF
// 0: Servo OFF
// 1: Servo ON
(18) Select Arc for two-axis arc motion (circle center and angle)
Press the ← or → key (as shown in figure 3.6.2.4) to execute the following program:
RetCode = _ECAT_Slave_CSP_Start_Arc_Move(gESCCardNo, gNodeID, gSlotID,
CenPoint, Angle, StrVel, ConstVel, EndVel, Tacc, Tdec, gbIsSCurve, gbIsABS);
// gblsSCurve
// 1: T-Curve
// 2: S-Curve
// gblsABS
// 0: Relative movement
// 1: Absolute movement
Page 53

EtherCAT Operation Example EtherCAT Programming Guide
3-32 March, 2017
3
(19) Select Spiral for two-axis arc motion (end point and angle)
Press the ← or → key (as shown in figure 3.6.2.4) to execute the following program:
RetCode = _ECAT_Slave_CSP_Start_Arc2_Move(gESCCardNo, gNodeID,
gSlotID, EndPoint, Angle, StrVel, MaxVel, EndVel, Tacc, Tdec, gbIsSCurve,
gbIsABS);
// gblsSCurve
// 1: T-Curve
// 2: S-Curve
// gblsABS
// 0: Relative movement
// 1: Absolute movement
(20) Select Spiral2 for two-axis arc motion (circle center and end point)
Press the ← or → key (as shown in figure 3.6.2.4) to execute the following program:
RetCode = _ECAT_Slave_CSP_Start_Arc3_Move(gESCCardNo, gNodeID, gSlotID,
CenPoint,EndPoint,Dir,StrVel, ConstVel,EndVel,Tacc,Tdec,gbIsSCurve, gbIsABS);
// gblsSCurve
// 1: T-Curve
// 2: S-Curve
// gblsABS
// 0: Relative movement
// 1: Absolute movement
(21) Three-axis motion mode (Heli, Line3, Sphere) and the settings
Figure 3.6.2.10
Page 54

EtherCAT Programming Guide EtherCAT Operation Example
March, 2017 3-33
3
Heli parameter settings: Three-axis helical interpolation.
CenX: Input the X-coordinate of the circle center. The parameter “CenterPoint” in the API
function.
CenY: Input the Y-coordinate of the circle center. The parameter “CenterPoint” in the API
function.
Depth: Input the depth of the specified axis (the overall height of Z-axis). The parameter
“Depth” in the API function.
Pitch: Specify the pitch of the helix. The parameter “Pitch” in the API function.
Dir: Input the moving direction (0: Clockwise, 1: Anticlockwise). The parameter “Dir” in the
API function.
StrVel.: Input the initial speed. The parameter “StrVel” in the API function.
ConstVel: Input the constant speed. The parameter “ConstVel” in the API function.
EndVel: Input the end speed when it reaches the target position.The parameter “EndVel” in
the API function.
TPhase1: Input the duration from initial speed to constant speed. The parameter “TPhase1”
in the API function.
TPhase2: Input the duration from constant speed to end speed. The parameter “TPhase2” in
the API function.
S-Curve: Check this box to use S-curve for the speed curve. Otherwise, it will use T-Curve.
ABS.: Check this box to have the motion conducted according to absolute coordinates set in
Dist.
Line3 parameter settings: Linear interpolation.
Dist1: The moving distance of X-axis. The parameter “DistArray” in the API function.
Dist2: The moving distance of Y-axis. The parameter “DistArray” in the API function.
Dist3: The moving distance of Z-axis. The parameter “DistArray” in the API function.
StrVel.: Input the initial speed. The parameter “StrVel” in the API function.
ConstVel: Input the constant speed. The parameter “ConstVel” in the API function.
EndVel: Input the end speed when it reaches the target position. The parameter “EndVel” in
the API function.
TPhase1: Input the duration from initial speed to constant speed. The parameter “TPhase1”
in the API function.
TPhase2: Input the duration from constant speed to end speed. The parameter “TPhase2” in
the API function.
S-Curve: Check this box to use S-curve for the speed curve. Otherwise, it will use T-Curve.
ABS.: Check this box to have the motion conducted according to absolute coordinates in
Dist.
Page 55

EtherCAT Operation Example EtherCAT Programming Guide
3-34 March, 2017
3
Sphere parameter settings: Three-axis sphere motion (with given three points).
PosX1: The point to be passed through on X-axis (between starting and end point). The
parameter “Target1Point” in the API function.
PosY1: The point to be passed through on Y-axis (between starting and end point). The
parameter “Target1Point” in the API function.
PosZ1: The point to be passed through on Z-axis (between starting and end point). The
parameter “Target1Point” in the API function.
PosX2: The target coordinate of X-axis. The parameter “Target2Point” in the API function.
PosY2: The target coordinate of Y-axis. The parameter “Target2Point” in the API function.
PosZ2: The target coordinate of Z-axis. The parameter “Target2Point” in the API function.
StrVel.: Input the initial speed. The parameter “StrVel” in the API function.
ConstVel: Input the constant speed. The parameter “ConstVel” in the API function.
EndVel: Input the end speed when it reaches the target position. The parameter “EndVel” in
the API function.
TPhase1: Input the duration from initial speed to constant speed. The parameter “TPhase1”
in the API function.
TPhase2: Input the duration from constant speed to end speed. The parameter “TPhase2” in
the API function.
S-Curve: Check this box to use S-curve for the speed curve. Otherwise, it will use T-Curve.
ABS.: Check this box to have the motion conducted according to absolute coordinates in
Dist.
(22) Set the servo motor to ON/OFF state (servo on/servo off)
Press the SVON key (as shown in figure 3.6.2.4) to execute the following program:
RetCode = _ECAT_Slave_Motion_Set_Svon(gESCCardNo, gNodeID[i], gSlotID[i],
ON_OFF);
// ON_OFF
// 0: Servo OFF
// 1: Servo ON
(23) Select Heli for three-axis helical motion
Press the ← or → key (as shown in figure 3.6.2.4) to execute the following program:
RetCode = _ECAT_Slave_CSP_Start_Heli_Move(gESCCardNo, gNodeID, gSlotID,
CenPoint,Depth,Pitch,Dir,StrVel,ConstVel,EndVel,Tacc,Tdec,gbIsSCurve,gbIsABS);
// gblsSCurve
// 1: T-Curve
// 2: S-Curve
// gblsABS
// 0: Relative movement
// 1: Absolute movement
Page 56

EtherCAT Programming Guide EtherCAT Operation Example
March, 2017 3-35
3
See the figure below:
Figure 3.6.2.11
(24) Select Line3 for three-axis linear motion
Press the ← or → key (as shown in figure 3.6.2.4) to execute the following program:
RetCode = _ECAT_Slave_CSP_Start_Multiaxes_Move(gESCCardNo, 3, gNodeID,
gSlotID, Dist, StrVel, MaxVel, EndVel, Tacc, Tdec, gbIsSCurve, gbIsABS);
// gblsSCurve
// 1: T-Curve
// 2: S-Curve
// gblsABS
// 0: Relative movement
// 1: Absolute movement.
(25) Select Sphere for three-axis sphere motion
Press the ← or → key (as shown in figure 3.6.2.4) to execute the following program:
RetCode = _ECAT_Slave_CSP_Start_Sphere_Move(gESCCardNo, gNodeID, gSlotID,
Dist, Dist2, StrVel, ConstVel, EndVel, Tacc, Tdec, gbIsSCurve, gbIsABS);
// gblsSCurve
// 1: T-Curve
// 2: S-Curve
// gblsABS
// 0: Relative movement
// 1: Absolute movement.
Page 57

EtherCAT Operation Example EtherCAT Programming Guide
3-36 March, 2017
3
(26) Status display
Figure 3.6.2.12
Command values of the motion:
RetCode = _ECAT_Slave_Motion_Get_Command(gESCCardNo, gNodeID, gSlotID,
&Cmd);
// Get the command value (CMD. field).
RetCode = _ECAT_Slave_Motion_Get_Position(gESCCardNo, gNodeID, gSlotID, &Pos);
// Get the feedback value of the command (FBK. field).
Motion status:
RetCode = _ECAT_Slave_Motion_Get_Current_Speed(gESCCardNo,gNodeID, gSlotID,
&Spd);
// Get the moving speed (SPD. field).
RetCode = _ECAT_Slave_Motion_Get_StatusWord(gESCCardNo, gNodeID, gSlotID,
&Status);
// Get the current status (IO Sts. field).
RetCode = _ECAT_Slave_Motion_Get_Mdone(gESCCardNo, gNodeID, gSlotID,
&MCDone);
// Get the current status of the motor (Motion field).
RetCode = _ECAT_Slave_Motion_Get_Buffer_Length(gESCCardNo, gNodeID, gSlotID,
&BufLen);
// Get the current buffer status (Buffer field).
(27) Reset the feedback position and clear the alarm
Press the RESET key (as shown in figure 3.6.2.4) to execute the following program:
RetCode = _ECAT_Slave_Motion_Set_Position(gESCCardNo, gNodeID, gSlotID, 0);
// Clear feedback first (Value in servo drive panel will be set to 0).
RetCode = _ECAT_Slave_Motion_Set_Command(gESCCardNo, gNodeID, gSlotID, 0);
// Then, clear the command.
Press the RALM key (as shown in figure 3.6.2.4) to execute the alarm clearing command:
RetCode = _ECAT_Slave_Motion_Ralm(gESCCardNo, gNodeID, gSlotID);
// Clear the alarm of slave station.
Page 58

EtherCAT Programming Guide EtherCAT Operation Example
March, 2017 3-37
3
(28) Stop the motion
Press the STOP key (see figure 3.6.2.4) to decelerate to stop:
RetCode = _ECAT_Slave_Motion_Sd_Stop(gESCCardNo, gNodeID[0], gSlotID[0], Tdec);
In this example, the motion decelerates to stop, which is to stop the motion gradually
according to the set deceleration time.
(29) Exit program
Press the Exit key to exit and close the program.
Execute “_ECAT_Master_Reset” and “_ECAT_Master_Close” to exit the function. Detailed
description about these two API is presented in section 3.1.2 Exit program.
Page 59

EtherCAT Operation Example EtherCAT Programming Guide
3-38 March, 2017
3
3.7 Digital input module
3.7.1 Function list
Function name
_ECAT_Slave_DIO_Get_Input_Value
Properties
Hardware EtherCAT RTX (PAC) EtherCAT motion card
Supported
Y Y
3.7.2 Application examples
Program interface
Figure 3.7.2.1
(1) Activate and initialize interface card
Press the Initial Card key (as shown in figure 3.7.2.1) to start initializing the interface card.
Press the Find Slave key (see figure 3.7.2.1) to start searching the connecting modules.
For more information about the interface card initialization, please see “Activate interface
card” and “Initialize interface card” in section 3.1.2.
(2) Set Node ID and Slot ID for the module and enable contact status display
Figure 3.7.2.2
Select Node ID and Slot ID and check the Timer box to display the contact status.
Set NodeID: Specify the Node ID to be executed.The parameter “NodeID” and “SlotID” in
the API function.
Timer: Check the Timer box to display the current contact status.
Page 60

EtherCAT Programming Guide EtherCAT Operation Example
March, 2017 3-39
3
(3) Digital input (Slave DI)
To obtain the data sent from the digital input module, users have to use R1-EC-60X2
module and execute the program below:
RetCode = _ECAT_Slave_DIO_Get_Input_Value(gESCCardNo, gNodeID, gSlotID,
&gValue);
As shown in figure 3.7.2.3, no signal input is displayed in R1-EC-60X2 module.
Figure 3.7.2.3
(4) Exit program
Press the Exit key to exit and close the program.
Execute “_ECAT_Master_Reset” and “_ECAT_Master_Close” to exit the function. Detailed
description about these two API is presented in section 3.1.2 Exit program.
Page 61

EtherCAT Operation Example EtherCAT Programming Guide
3-40 March, 2017
3
3.8 Digital output module
3.8.1 Function list
Function name
_ECAT_Slave_DIO_Set_Output_Value
_ECAT_Slave_DIO_Get_Output_Value
Properties
Hardware EtherCAT RTX (PAC) EtherCAT motion card
Supported
Y Y
3.8.2 Application examples
Program interface
Figure 3.8.3.1
(1) Activate and initialize interface card
Press the Initial Card key (as shown in figure 3.8.3.1) to start initializing the interface card.
Press the Find Slave key (see figure 3.8.3.1) to start searching the connecting modules.
For more information about the interface card initialization, please see “Activate interface
card” and “Initialize interface card” in section 3.1.2.
(2) Set Node ID and Slot ID for the module and enble contact status display
Figure 3.8.3.2
Select Node ID and Slot ID and check the Timer box to display the contact status.
Set NodeID: Specify the Node ID to be executed. The parameters “NodeID” and SlotID” in
the API function.
Page 62

EtherCAT Programming Guide EtherCAT Operation Example
March, 2017 3-41
3
(3) Digital output
To output data via the digital output module, users have to use R1-EC-70X2 module and
execute the program below:
RetCode = ECAT_Slave_DIO_Set_Output_Value(gESCCardNo,gNodeID,gSlotID,
gValue);
The status of the digital output module can be obtained through the following program:
RetCode = _ECAT_Slave_DIO_Get_Output_Value(gESCCardNo,gNodeID,gSlotID,
&gValue);
As shown in the below figure, DO0 ~ DO15 are the output signals of Y00 ~ Y15 of
R1-EC-70X2 module Port 0.
Figure 3.8.3.3
(4) Exit program
Press the Exit key to exit and close the program.
Execute “_ECAT_Master_Reset” and “_ECAT_Master_Close” to exit the function. Detailed
description about these two API is presented in section 3.1.2 Exit program.
Page 63

EtherCAT Operation Example EtherCAT Programming Guide
3-42 March, 2017
3
3.9 Analog input module
3.9.1 Function list
Function name
_ECAT_Slave_AIO_Set_Input_RangeMode
_ECAT_Slave_R1_EC8124_Set_Input_AverageMode
_ECAT_Slave_AIO_Set_Input_ConvstFreq_Mode
_ECAT_Slave_AIO_Get_Input_Value
Properties
Hardware EtherCAT RTX (PAC) EtherCAT motion card
Supported
Y Y
3.9.2 Application examples
Program interface
Figure 3.9.2.1
(1) Activate and initialize interface card
Press the Initial Card key (as shown in figure 3.9.2.1) to start initializing the interface card.
Press the Find Slave key (see figure 3.9.2.1) to start searching the connecting modules.
For more information about the interface card initialization, please see “Activate interface
card” and “Initialize interface card” in section 3.1.2.
(2) Set Node ID for the module and enable contact status display
Figure 3.9.2.2
Select Node ID and check the Timer box to display the contact status.
Page 64

EtherCAT Programming Guide EtherCAT Operation Example
March, 2017 3-43
3
Set NodeID: Specify the Node ID to be executed. The parameters “AxisNo” and “SlotNo”
in the API function.
Timer: Check the Timer box to display the current contact status.
(3) Select AD Channel, AD Mode, Avg Range, and Conversion Time.
Figure 3.9.2.3
AD Channel: Select the AD channel (CH 0 ~ 3). The parameter “SlotNo” in the API
function.
AD Mode: Select the AD range. The parameter “RangeMode” in the API function.
Avg Range: Select the sample rate for the wave display. The parameter “AvgMode” in the
API function.
Conversion Time: Select the conversion time. The parameter “Mode” in the API function.
(4) When selecting AD Channel and AD Mode (as shown in figure 3.9.2.3), the following
program is executed:
RetCode = _ECAT_Slave_AIO_Set_Input_RangeMode(gESCCardNo,gNodeID, gSlotID,
Mode);
// SlotID is the channel of analog input
When selecting Avg Range (as shown in figure 3.9.2.3), the following program is
executed:
RetCode = _ECAT_Slave_R1_EC8124_Set_Input_AverageMode(gESCCardNo,
gNodeID, gSlotID, AvgMode);
When selecting Conversion Time (as shown in figure 3.9.2.3), the following program is
executed:
RetCode = _ECAT_Slave_AIO_Set_Input_ConvstFreq_Mode(gESCCardNo, gNodeID,
gSlotID, Mode);
To d is p l a y Data field (as shown in figure 3.9.2.3), execute the following program:
RetCode = _ECAT_Slave_AIO_Get_Input_Value(gESCCardNo,gNodeID,gSlotID,
&Value);
(5) Exit program
Press the Exit key to exit and close the program.
Execute “_ECAT_Master_Reset” and “_ECAT_Master_Close” to exit the function. Detailed
description about these two API is presented in section 3.1.2 Exit program.
Page 65

EtherCAT Operation Example EtherCAT Programming Guide
3-44 March, 2017
3
3.10 Analog output module
3.10.1 Function list
Function name
_ECAT_Slave_AIO_Set_Output_RangeMode
_ECAT_Slave_AIO_Set_Output_OverRange_Enable
_ECAT_Slave_R1_EC9144_Get_Output_ReturnCode
_ECAT_Slave_AIO_Set_Output_Value
_ECAT_Slave_AIO_Get_Output_Value
Properties
Hardware EtherCAT RTX (PAC) EtherCAT motion card
Supported
Y Y
3.10.2 Application examples
Program interface
Figure 3.10.2.1
Page 66

EtherCAT Programming Guide EtherCAT Operation Example
March, 2017 3-45
3
(1) Activate and initialize interface card
Press the Initial Card key (as shown in figure 3.10.2.1) to start initializing the interface
card.
Press the Find Slave key (as shown in figure 3.10.2.1) to start searching the connecting
modules.
For more information about the interface card initialization, please see “Activate interface
card” and “Initialize interface card” in section 3.1.2.
(2) Set Node ID for the module and enable contact status display
Figure 3.10.2.2
Select Node ID and check the Timer box to display the contact status.
Set NodeID: Specify the Node ID to be executed. The parameters “AxisNo” and “SlotNo”
in the API function.
Timer: Check the Timer box to display the current contact status.
(3) Select DA Channel and DA mode:
Figure 3.10.2.3
DA Channel: Select the No. of DA Channel (0 ~ 3). The parameter “SlotNo” in the API
function.
DA Mode: Select DA range. The parameter “Mode” in the API function.
Value: Displays the command value of the analog output set by the scrollbar. The
parameter “Value” in the API function.
OutValue: Displays the actual value of analog output. The parameter “Value” in the API
function.
Apply: Press the Apply key and the set voltage in Value will be converted to the actual
output voltage.
Over Range: When this box is checked, the output voltage value will increase by 10%.
Return Code: Displays the DA status.
Page 67

EtherCAT Operation Example EtherCAT Programming Guide
3-46 March, 2017
3
(4) When selecting DA Channel and DA Mode (as shown in figure 3.10.2.3), the following
program is executed:
RetCode = _ECAT_Slave_AIO_Set_Output_RangeMode(gESCCardNo, gNodeID,
gSlotID, Mode);
/* Set DA output range */
When the Apply key (as shown in 3.10.2.3) is pressed, the following program will be
executed:
RetCode = _ECAT_Slave_AIO_Set_Output_Value(gESCCardNo, gNodeID, gSlotID,
Value);
/* Set DA output value */
If the Get button in the Return Code section (as shown in 3.10.2.3) is pressed, the
following program will be executed:
RetCode = _ECAT_Slave_R1_EC9144_Get_Output_ReturnCode(gESCCardNo,
gNodeID, gSlotID, &RtCode);
/* Get DA status. */
To acquire the value of analog output module and display in Out Value field (as shown in
3.10.2.3), execute the program below.
RetCode = _ECAT_Slave_AIO_Set_Output_Value(gESCCardNo, gNodeID, gSlotID,
Value);
/* Acquire the value of the analog output module. */
(5) Exit program
Press the Exit key to exit and close the program.
Execute “_ECAT_Master_Reset” and “_ECAT_Master_Close” to exit the function. Detailed
description about these two API is presented in section 3.1.2 Exit program.
Page 68

EtherCAT Programming Guide EtherCAT Operation Example
March, 2017 3-47
3
3.11 EtherCAT motion card – high-speed pulse compare
function
3.11.1 Function list
Function name
_ECAT_Compare_Set_Channel_Position
_ECAT_Compare_Get_Channel_Position
_ECAT_Compare_Set_Ipulser_Mode
_ECAT_Compare_Set_Channel_Direction
_ECAT_Compare_Set_Channel_Trigger_Time
_ECAT_Compare_Set_Channel_One_Shot
_ECAT_Compare_Set_Channel_Source
_ECAT_Compare_Set_Channel_Enable
_ECAT_Compare_Channel0_Position
_ECAT_Compare_Set_Channel0_Trigger_By_GPIO
_ECAT_Compare_Set_Channel1_Output_Enable
_ECAT_Compare_Set_Channel1_Output_Mode
_ECAT_Compare_Get_Channel1_IO_Status
_ECAT_Compare_Set_Channel1_GPIO_Out
_ECAT_Compare_Set_Channel1_Position_Table
_ECAT_Compare_Get_Channel1_Positioin_Table_Level
_ECAT_Compare_Get_Channel1_Position_Table_Count
_ECAT_Compare_Set_Channel_Polarity
_ECAT_Compare_Reuse_Channel1_Postion_Table
_ECAT_Compare_Reuse_Channel1_Position_Table_Level
Properties
Hardware EtherCAT RTX (PAC) EtherCAT motion card
Supported
N Y
Page 69

EtherCAT Operation Example EtherCAT Programming Guide
3-48 March, 2017
3
3.11.2 Application examples
Program interface
Figure 3.11.2.1
(1) Activate and initialize interface card
*Make sure the PCI-L221-B1 interface card has been installed and it has to work with
Delta’s pulse module for pulse comparing in this example.
Press the Initial Card key (as shown in figure 3.11.2.1) to start initializing the interface
card.
Press the Find Slave key (as shown in figure 3.11.2.1) to start searching the connecting
modules.
For more information about the interface card initialization, please see “Activate interface
card” and “Initialize interface card” in section 3.1.2.
Page 70

EtherCAT Programming Guide EtherCAT Operation Example
March, 2017 3-49
3
(2) Select the Card No., Node ID, and QEP
Figure 3.11.2.2
Card: Select the EtherCAT PCI motion card No. to be used.
Node: Select the Node ID; in the example, this axis will generate pulse for comparison.
QEP1: Select channel 1 for pulse input. (It should correspond to the physical wiring of QA1
and QB1.)
QEP2: Select channel 2 for pulse input.
(It should correspond to the physical wiring of QA2
and QB2.)
(3) Select Polarity and Compare Type
Figure 3.11.2.3
High: Select this option to carry out the following program: 1: High (high-level trigger)
rt = _ECAT_Compare_Set_Channel_Polarity (gu16_CardNo, 1);
Low: Select this option to carry out the following program: 0: Low (low-level trigger)
rt = _ECAT_Compare_Set_Channel_Polarity (gu16_CardNo, 0);
Type: Select the differential signal channel for the triggered signal.
rt = _ECAT_Compare_Set_Channel_Source (gu16_CardNo, u16_Channel, gu16_Qep);
// u16_Channel:
// 0 = Channel 0 (CMP_1) for outputting the differential signal. (Compare the pulse at a
fixed pulse interval.)
// 1 = Channel 1 (CMP_2) for outputting the differential signal. (Compare the pulse at
user-defined pulse intervals.)
// gu16_Qep
// 0 = When setting QEP1, this parameter is 0, which means the compared pulse is from
the first QA and QB.
// 1 = When setting QEP2, this parameter is 1, which means the compared pulse is from
the second QA and QB.
Page 71

EtherCAT Operation Example EtherCAT Programming Guide
3-50 March, 2017
3
TCount: Number of the compared times.
rt = _ECAT_Compare_Get_Channel1_Position_Table_Count (gu16_CardNo,
&u32_Count);
/* Obtain the number of compared times. */
(4) MPC parameter settings
Figure 3.11.2.4
Enable: Enable/disable compare function. The following program is executed:
rt = _ECAT_Compare_Set_Channel_Enable (gu16_CardNo, u16_Channel, 1);
// 1: Enable
// 0: Disable
Inpulse Type: Select between AB Phase or CW_CCW mode. The following program is
executed:
rt = _ECAT_Compare_Set_Ipulser_Mode (gu16_CardNo, mode);
// 0: AB Phase
// 1: CW_CCW
Reset: Press this key to clear the pulse count of QEP1 and QEP2, and the following
program will be executed:
rt = _ECAT_Compare_Set_Channel_Position (gu16_CardNo, u16_Channel, 0);
// 0 represents the pulse number. It means to set the accumulated pulse position to 0.
QEP1 Inverse: Pulse incremental way of QAQB 1. Press this key and the following
program will be executed:
rt = _ECAT_Compare_Set_Channel_Direction (gu16_CardNo, 0, dir);
// 0: Signal source QA1, QB1
// dir:
// 0: Incremented pulse count
// 1: Decremented pulse count
QEP2 Inverse: Pulse incremental way of QAQB 2. Press this key and the following
program will be executed:
rt = _ECAT_Compare_Set_Channel_Direction (gu16_CardNo, 1, dir);
// 1: Signal source QA 2, QB 2
// dir:
// 0 = Incremented pulse count
// 1 = Decremented pulse count
Page 72

EtherCAT Programming Guide EtherCAT Operation Example
March, 2017 3-51
3
(5) Settings for pulse comparison
Figure 3.11.2.5
Trigger Time: Set the lasting time for triggering the signal.
Trigger count: Set the number of times for signal to be triggered.
Start Position: Set the starting position for signal to be compared.
Interval: Set the interval for signal to be compared. For example, if the value is set to 10,
signal will be triggered every 10 pulses. And the lasting time is determined by Trigger
Time.
ABS.: Check this box to compare the pulse based on the absolute coordinates.
Level: Check this box and the following program will be executed according to channel 1
(CMP_2), which is used to output differential signal:
rt = _ECAT_Compare_Set_Channel1_Output_Mode (gu16_CardNo, gbLevelValue);
// gbLevelValue: Channel 2 output mode of triggering signal.
// 0: Normal type (Users can define the pulse position).
// 1: User-defined type (Users can define the pulse position and determine the triggering
signal is low or high).
One Shot: Press this key, trigger the signal once and the following program will be
executed:
rt = _ECAT_Compare_Set_Channel_Trigger_Time (gu16_CardNo, u16_Channel,
time_us);
// time_us = The lasting time of this triggered signal; unit: us
rt = _ECAT_Compare_Set_Channel_One_Shot (gu16_CardNo, u16_Channel);
// Actual triggered signal outputted
Set: Select from >>> and <<< (direction) and the following program will be executed:
rt = _ECAT_Compare_Get_Channel_Position (gu16_CardNo, gu16_Qep, &i32_Pos )
// gu16_Qep: Pulse source for comparision
// &i32_Pos: Returns current incremented pulse (current position)
Select Type 0 for applying channel 0 (CMP_1) as the differential signal output channel to
output the triggered signal. (Compare the pulse at a fixed pulse interval)
rt = _ECAT_Compare_Channel0_Position (gu16_CardNo, i32_StartPoint, 0,
u32_CompareCount);
// i32_StartPoint: The starting position for pulse comparison
// u32_CompareCount: Pulse count for comparison
Page 73

EtherCAT Operation Example EtherCAT Programming Guide
3-52 March, 2017
3
Select Type 1 for applying channel 1 (CMP_2) as the differential signal output channel to
output the triggered signal. (Compare the pulse at user-defined pulse intervals. In this
example, the result of simulated pulse comparison at a fixed pulse interval is similar to
Type 0. Users can define different intervals according to the demand.)
Disable the differential signal output function of channel 2 first:
rt = _ECAT_Compare_Set_Channel1_Output_Enable (gu16_CardNo, 0);
// 0: Disable
// 1: Enable
If you do not check the Level box, the following program will be executed:
rt = _ECAT_Compare_Set_Channel1_Position_Table (gu16_CardNo,
&pi32_PointTable[0], u32_CompareCount);
// &pi32_PointTable: Data array. It is used for storing the compared pulse.
// u32_CompareCount: Pulse count comparison, which should be identical to the size of
data array.
Pulse comparison:
Figure 3.11.2.6 Compare the pulse at a fixed pulse interval
If you check the Level box, the following program will be executed:
rt = _ECAT_Compare_Set_Channel1_Position_Table_Level (gu16_CardNo,
&pi32_PointTable[0], &pu32_LevelTable[0], u32_CompareCount);
// &pi32_PointTable: Data array. It is used for storing the compared pulse.
// &pu32_LevelTable: Data array. It is used for storing the triggered level.
// u32_CompareCount: Cout of pulse comparison, which should be identical to the size of
data array.
Pulse comparison:
Figure 3.11.2.7 Compare the pulse at user-defined pulse intervals
Page 74

EtherCAT Programming Guide EtherCAT Operation Example
March, 2017 3-53
3
Enable the differential signal output function of channel 2:
rt = _ECAT_Compare_Set_Channel1_Output_Enable (gu16_CardNo, 1);
// 0: Disable
// 1: Enable
(6) Command display and testing operations:
Figure 3.11.2.8
Reset: Press this key to reset the command.
P2PMove: Press this key to move forward or backward. And the generated pulse will be
compared by the motion card.
STOP: Press this key to stop the motion.
Command: Display the motion’s current position.
(7) Exit program
Press the Exit key to exit and close the program.
Execute “_ECAT_Master_Reset” and “_ECAT_Master_Close” to exit the function. Detailed
description about these two API is presented in section 3.1.2 Exit program.
Page 75

EtherCAT Operation Example EtherCAT Programming Guide
3-54 March, 2017
3
(This page is intentionally left blank.)
Page 76

March, 2017 4-1
API List of Dynamic-Link
Library
This chapter lists all the APIs, data type and setting range of Delta EtherCAT
Dynamic-link library.
4
4.1 Data Type and Setting Range ······························································· 4-2
4.2 API list and descriptions······································································ 4-2
Page 77

API List of EtherCAT Dynamic-Link Library EtherCAT Programming Guide
4-2 March, 2017
4
4.1 Data type and value range
The “TYPE_DEF.H” file located in the “inc\VC\” folder (installation directory) defines the
general data type. See the following table. The data type, name, and rage are defined
as follows.
Data Type Description Range
U8 8-bit ASCII character 0 ~ 255
I16 16-bit signed integer -32768 ~ 32767
U16 16-bit unsigned integer 0 ~ 65535
I32 32-bit signed long integer -2147483648 ~ 2147483647
U32 32-bit unsigned long integer 0 ~ 4294967295
F32 32-bit single-precision floating-point -3.402823E38 ~ 3.402823E38
F64 64-bit double-precision floating point
-1.797683134862315E308 ~
1.797683134862315E309
Boolean Boolean TRUE, FALSE
4.2 API list and descriptions
EtherCAT Master Configuration
_ECAT_Master_Set_CycleTime
Set the cycle time of the EtherCAT master
communication. *Set before initialization.
_ECAT_Master_Get_CycleTime
Acquire the cycle time of the EtherCAT master
communication.
_ECAT_Master_NodeID_Alias_Enable
Determine whether to enable user-defined station.
*Set before initialization.
_ECAT_Master_Get_SerialNo
Get the serial No. of PAC or the motion card.
_ECAT_Master_Get_DLL_SeqID
Acquire the sequence ID of the current DLL.
_ECAT_Autoconfig_Open_File
Read and apply the configuration file of the
communication topology and DC data for system
initialization. *Set before initialization.
_ECAT_Autoconfig_Save_File
Save the current communication topology and DC
data to the configuration file.
_ECAT_Autoconfig_Set_Slave_DCTime
Set the DC time of each node.
_EACT_Autoconfig_Clear_ConfigFile
Clear the currently imported EtherCAT master
configuration.
_ECAT_Autoconfig_Set_NodeID_Alias
Set user-defined station alias of each node. *Set after
initialization.
_ECAT_Autoconfig_Get_NodeID_Alias
Acquire the user-defined station alias of each node.
*Set after initialization.
_ECAT_Autoconfig_Save_NodeID_Alias
Save the user-defined station alias to the module
memory block.
Page 78

EtherCAT Programming Guide API List of EtherCAT Dynamic-Link Library
March, 2017 4-3
4
EtherCAT Master Initialization
_ECAT_Master_Open
Check the number of motion cards and EtherCAT
kernels, as well as creating memory block.
_ECAT_Master_Initial
Initialize EtherCAT communication and switch the
slave to OP mode
_ECAT_Master_Reset
Reset the EtherCAT master’s status and switch
the slave to initial mode.
_ECAT_Master_Close
Disable all functions of EtherCAT master and
kernels and release the memory
_ECAT_Master_Get_CardSeq
Acquire motion card No.
_ECAT_Master_Get_SlaveNum
Acquire slave quantity on the communication bus
of the specified EtherCAT master
_ECAT_Master_Get_Slave_Info
Acquire EtherCAT slave information
_ECAT_Master_Get_DC_Status
Acquire the motion card's DC status, time and
time offset
_ECAT_Master_Get_Connect_Status
Acquire EtherCAT master’s connection status
_ECAT_Master_Get_Api_BufferLength
Acquire the command amount of each slave that
has not been completed
_ECAT_Master_Get_Cycle_SpendTime
Acquire the time spent on Tx and Rx every cycle
and the maximum consuming time in the log
_ECAT_Master_Check_Initial_Done
Check whether the DLL initialization has been
completed.
_ECAT_Master_Get_Initial_ErrorCode
Acquire the error code when error occurs
_ECAT_Master_Check_Working_Counter
Acquire the current connection status of EtherCAT
communication
_ECAT_Master_Get_Return_Code_Message
Acquire the corresponding message of each
return code
EtherCAT CoE Standard Communication
_ECAT_Slave_SDO_Send_Message
Issue SDO command (CANopen) to the slave
_ECAT_Slave_SDO_Read_Message
Acquire the current SDO data (CANopen) of the
slave
_ECAT_Slave_SDO_Quick_Send_Message
Issue SDO command (CANopen) to the slave
without waiting for the response
_ECAT_Slave_SDO_Quick_Read_Message
Issue SDO read command (CANopen) to the
slave without waiting for the response
_ECAT_Slave_SDO_Read_Response
Read the returned data from the slave.
_ECAT_Slave_SDO_Wait_All_Done
Wait multiple slaves to complete all the SDO
commands.
_ECAT_Slave_SDO_Get_ErrorCode
Acquire the error code of
ERR_ECAT_SDO_Return that returned during the
execution of SDO Send_Message or
Read_Message. Please refer to CANopen
protocol or the definition of each device for error
code.
_ECAT_Slave_SDO_Check_Done
Check if the specified slave has completed all the
SDO commands
_ECAT_Slave_PDO_Get_OD_Data
Read the data of an OD index in the PDO
mapping
_ECAT_Slave_PDO_Set_OD_Data
Send the data of an OD index in the PDO
mapping
Page 79

API List of EtherCAT Dynamic-Link Library EtherCAT Programming Guide
4-4 March, 2017
4
EtherCAT CoE Standard Communication
_ECAT_Slave_PDO_Get_Information
Acquire the basic information of each slave device
PDO.
_ECAT_Slave_PDO_Get_Detail_Mapping
Acquire the details of PDO mapping in the slave
device
_ECAT_Slave_PDO_Get_Rx_Data
Acquire all slave Rx data of the PDO mapping
_ECAT_Slave_PDO_Get_Tx_Data
Acquire all slave Tx data of the PDO mapping
_ECAT_Slave_PDO_Set_Tx_Detail_Data
Configure all slave Tx data of the PDO mapping
General Operation of Motion Axis
_ECAT_Slave_Motion_Set_Svon
Set the servo to On/Off state.
_ECAT_Slave_Motion_Ralm
Reset the alarm of the axis. Before applying this
command, please clear the alarm first. Otherwise,
the alarm might occur again.
_ECAT_Slave_Motion_Sd_Stop
Set the deceleration time for motor to decelerate
to stop
_ECAT_Slave_Motion_Emg_Stop
This is for emergency stop of the axis. The motor
will stop with its maximum deceleration
_ECAT_Slave_Motion_Set_Alm_Reaction
Set the action when alarm occurs
_ECAT_Slave_Motion_Set_Position
Specify current feedback position of the axis
_ECAT_Slave_Motion_Set_Command
Set the motion command data of the axis
_ECAT_Slave_Motion_Set_MoveMode
Set the motion mode of the axis
_ECAT_Slave_Motion_Get_MoveMode
Acquire the information of current motion mode
_ECAT_Slave_Motion_Get_ControlWord
Acquire the current control word of the axis
_ECAT_Slave_Motion_Get_StatusWord
Acquire the current status word of the axis.
_ECAT_Slave_Motion_Get_Mdone
Acquire the current status of motion done
_ECAT_Slave_Motion_Get_Position
Acquire the current position of the axis.
_ECAT_Slave_Motion_Get_Command
Acquire the current command information
_ECAT_Slave_Motion_Get_Target_Command
Acquire the target command data of the axis
_ECAT_Slave_Motion_Get_Actual_Position
Acquire the actual position command of the axis
_ECAT_Slave_Motion_Get_Actual_Command
Acquire the current command data. The data will
vary with to the applied motion mode.
_ECAT_Slave_Motion_Get_Current_Speed
Acquire the current speed of the axis
_ECAT_Slave_Motion_Get_Torque
Acquire the feedback torque from the motor
_ECAT_Slave_Motion_Get_Buffer_Length
Acquiring the quantity of the commands that have
not been carried out
_ECAT_Slave_Motion_Set_TouchProbe_Config
Set the mode of the first Touch Probe function
(Touch Probe 1)
_ECAT_Slave_Motion_Set_TouchProbe_QuickStart
Enable the first Touch Probe function (Touch
Probe 1)
_ECAT_Slave_Motion_Set_TouchProbe_QuickDone
Execute the first Touch Probe function (Touch
Probe 1) again
_ECAT_Slave_Motion_Set_TouchProbe_Disable
Disable the first Touch Probe function (Touch
Probe 1)
_ECAT_Slave_Motion_Get_TouchProbe_Status
Acquire the current status of the first Touch Probe
function (Touch Probe 1)
_ECAT_Slave_Motion_Get_TouchProbe_Position
Acquire the current position of first Touch Probe
function (Touch Probe 1)
Page 80

EtherCAT Programming Guide API List of EtherCAT Dynamic-Link Library
March, 2017 4-5
4
Cyclic Synchronous Position Mode (CSP)
_ECAT_Slave_CSP_Start_Move
Execute linear interpolation of single axis
_ECAT_Slave_CSP_Start_V_Move
Execute the single-axis motion with constant
speed
_ECAT_Slave_CSP_Start_Arc_Move
Execute two-axis arc motion, moving from current
position and the specified circle center to form the
specified arc’s angle
_ECAT_Slave_CSP_Start_Arc2_Move
Execute two-axis arc motion, moving from current
position and the specified circle center to form the
specified arc’s angle
_ECAT_Slave_CSP_Start_Arc3_Move
Execute two-axis arc motion, moving from the
current position and specified circle center to the
specified end point
_ECAT_Slave_CSP_Start_Spiral_Move
Execute two-axis spiral motion, moving from
current position and the specified circle center to
form the specified angle
_ECAT_Slave_CSP_Start_Spiral2_Move
Execute two-axis spiral motion, moving from
current position and the specified circle center to
the end point with the specified cycle number.
_ECAT_Slave_CSP_Start_Sphere_Move
Execute three-axis sphere motion and moving
from current position and the known circle center
to the target position with three-dimensional
vector
_ECAT_Slave_CSP_Start_Heli_Move
Set three-axis helical motion, moving from current
position and the known circle center to the
specified height in Z-axis direction
_ECAT_Slave_CSP_Start_Multiaxes_Move
Execute multi-axis linear motion
_ECAT_Slave_CSP_Start_Msbrline_Move
Execute multi-axis point to point motion with
smooth speed
_ECAT_Slave_CSP_Set_Gear
Set the E-gear ratio
_ECAT_Slave_CSP_Set_Softlimit
Set the software limit
_ECAT_Slave_CSP_TargetPos_Change
Set a new target position
_ECAT_Slave_CSP_Velocity_Change
Set a new target speed
_ECAT_Slave_CSP_Feedrate_Overwrite
For the advanced setting of speed change for
single axis
_ECAT_Slave_CSP_Speed_Continue_Enable Enable or disable the continuous speed function
_ECAT_Slave_CSP_Speed_Continue_Set_Mode Set the contin uous speed mode
_ECAT_Slave_CSP_Speed_Continue_Set_Combine
_Ratio
Set the percentage of for starting blending speed
of two commands.
_ECAT_Slave_CSP_Scurve_Rate
Set the ratio of S-curve and T-curve during
acceleration and deceleration
_ECAT_Slave_CSP_Liner_Speed_Master
Set the speed (vector) of advanced interpolation
function
_ECAT_Slave_CSP_Mask_Axis
When multi-axis command is being executed, this
API can be used to stop the specified axes without
influencing others
_ECAT_Slave_CSP_Sync_Config
Set the function of synchronous motion of multiple
axes
_ECAT_Slave_CSP_Sync_Move
Enable the function of synchronous motion of
multiple axes
_ECAT_Slave_CSP_Start_Mabrline_Move
Set to smooth the operation of point-to-point
motion of multiple axes
Page 81

API List of EtherCAT Dynamic-Link Library EtherCAT Programming Guide
4-6 March, 2017
4
Cyclic Synchronous Position Mode (CSP)
_ECAT_Slave_CSP_Start_2Segment_Move
Set the single-axis linear motion by specifying two
distances and speed
_ECAT_Slave_CSP_Start_PVT_Move
Set the single-axis motion to move to multiple
points at fixed time
_ECAT_Slave_CSP_Start_PVTComplete_Move
Specify the initial speed and end speed of the
single-axis motion, moving through multiple points
at fixed time.
_ECAT_Slave_CSP_Virtual_Set_Enable Enable function of virtual position
_ECAT_Slave_CSP_Virtual_Set_Command
Set the virtual position and replacing the current
position with the specified position
_ECAT_Slave_CSP_Get_SoftLimit_Status Acquire the status of software limit
_ECAT_Slave_CSP_Pitch_Set_Interval Set the interval of the pitch error compensation
_ECAT_Slave_CSP_Pitch_Set_Mode Set the mode of pitch error compensation
_ECAT_Slave_CSP_Pitch_Set_Org Set the start position of pitch error compensation.
_ECAT_Slave_CSP_Pitch_Set_Rel_Table
Set the relative position of each interval for pitch
error compensation
_ECAT_Slave_CSP_Pitch_Set_Abs_Table
Set the absolute position of each interval for pitch
error compensation
_ECAT_Slave_CSP_Pitch_Set_Enable Enable function of pitch error compensation.
Cyclic Synchronous Velocity Mode (CSV)
_ECAT_Slave_CSV_Start_Move
Execute single-axis motion with the setting speed
_ECAT_Slave_CSV_Multi_Start_Move
Execute multi-axes synchronous motion with the
setting speed
Cyclic Synchronous Torque Mode (CST)
_ECAT_Slave_CST_Start_Move
Execute single-axis motion with the setting torque
_ECAT_Slave_CST_Multi_Start_Move
Execute multi-axis synchronous motion with the
setting torque
Homing
_ECAT_Slave_Home_Config
Set the homing mode
_ECAT_Slave_Home_Move
Execute homing
_ECAT_Slave_Home_Status
Acquire the current homing status
Profile Position Mode (PP)
_ECAT_Slave_PP_Start_Move
Execute single-axis linear motion in PP mode
_ECAT_Slave_PP_Advance_Config
Advanced setting of PP mode
Page 82

EtherCAT Programming Guide API List of EtherCAT Dynamic-Link Library
March, 2017 4-7
4
Profile Velocity Mode (PV)
_ECAT_Slave_PV_Start_Move
Execute the single-axis motion with constant speed
in PV mode
_ECAT_Slave_PV_Advance_Config
Advanced setting of PV mode
Invertor Motion Control
_ECAT_Slave_VL_Start_Move
Inverter single-axis motion control with constant
speed. (Delta inverter only)
Profile Torque Mode (PT)
_ECAT_Slave_PT_Start_Move
Execute the single-axis motion with constant torque
in PT mode
_ECAT_Slave_PT_Advance_Config
Advanced setting of PT mode
Group Motion Control
_ECAT_Slave_User_Motion_Control_Set_Enable_
Mode
Set the group status.
*Please note that before enabling the group, users
should apply Set_Motion_Control_Type to specify
the axis for one group and use
_ECAT_Slave_User_Motion_Control_ Svon and
_ECAT_Slave_User_Motion_Control_Get_Alm to
confirm the status of each axis.
_ECAT_Slave_User_Motion_Control_Get_Enable_
Mode
Acquire the status in the current group.
_ECAT_Slave_User_Motion_Control_Set_T ype Set the motion mode in the sp ecified group.
_ECAT_Slave_User_Motion_Control_Set_Data
Set the data of each axis in the specified group.
_ECAT_Slave_User_Motion_Control_Clear_Data
Clear the data of each axis in the specified group.
_ECAT_Slave_User_Motion_Control_Get_DataCnt
Read the data number that have not been
processed in the specified group.
_ECAT_Slave_User_Motion_Control_ Ralm
Reset the alarm of all axes in the specified group.
_ECAT_Slave_User_Motion_Control_ Svon
Enable/disable all axes in the specified group.
_ECAT_Slave_User_Motion_Control_Get_Alm
Acquire the current alarm status in the specified
group.
Operation of DI/DO module
_ECAT_Slave_DIO_Get_Input_Value Acquire the DI status
_ECAT_Slave_DIO_Get_Output_Value Acquire the DO status
_ECAT_Slave_DIO_Set_Output_Value Set the DO status
_ECAT_Slave_DIO_Get_Single_Input_Value Acquire the input value of the specified channel
_ECAT_Slave_DIO_Get_Single_Output_Value Acquire the output value of the specified channel
_ECAT_Slave_DIO_Set_Single_Output_Value Set the output value of the specified channel
Page 83

API List of EtherCAT Dynamic-Link Library EtherCAT Programming Guide
4-8 March, 2017
4
Operation of DI/DO module
_ECAT_Slave_DIO_Set_Output_Error_Mode
Enable/Disable the retentive function of each
channel on remote DO module when EtherCAT
communication is disconnected
_ECAT_Slave_DIO_Set_Output_Error_Value
Set the output status of each channel on remote DO
module when EtherCAT communication is
disconnected and the retentive function is enabled
Operation of AI/AO Module
_ECAT_Slave_AIO_Get_Input_Value
Acquire analog input value
_ECAT_Slave_AIO_Set_Output_Value
Set analog output value
_ECAT_Slave_AIO_Get_Output_Value
Acquire analog output value
Operation of Pulse Module (R1-EC5621D0 series)
_ECAT_Slave_R1_EC5621_Set_Output_Mode
Set the mode of pulse output.
_ECAT_Slave_R1_EC5621_Set_Input_Mode
Set the mode of pulse input.
_ECAT_Slave_R1_EC5621_Set_ORG_Inverse
Set the contact type (NC/NO) of the origin switch
(ORG).
_ECAT_Slave_R1_EC5621_Set_QZ_Inverse
Set the contact type (NC/NO) of encoder’s Z pulse
(QZ).
_ECAT_Slave_R1_EC5621_Set_Home_SpMode
Apply the special mode when homing.
_ECAT_Slave_R1_EC5621_Set_MEL_Inverse
Set the contact type (NC/NO) of the negative limit
switch (MEL).
_ECAT_Slave_R1_EC5621_Set_PEL_Inverse
Set the contact type (NC/NO) of the positive limit
switch (PEL).
_ECAT_Slave_R1_EC5621_Set_Svon_Inverse
Set the contact type (NC/NO) of the servo enable
switch (Svon).
_ECAT_Slave_R1_EC5621_Set_Home_Slow_Down
It sets the deceleration time after the motor reaches
the origin
_ECAT_Slave_R1_EC5621_Get_IO_Status
Acquire the status of all I/O points
_ECAT_Slave_R1_EC5621_Get_Single_IO_Status
Acquire the status of single I/O point.
Operation of Pulse Module (R1-ECx62xD0 series)
_ECAT_Slave_R1_ECx62x_Set_Output_Mode Set the type of pulse output
_ECAT_Slave_R1_ECx62x_Set_Input_Mode Set the type of pulse input
_ECAT_Slave_R1_ECx62x_Set_ORG_Inverse
Set the contact type (NC/NO) of the origin switch
(ORG)
_ECAT_Slave_R1_ECx62x_Set_QZ_Inverse
Set the contact type (NC/NO) of encoder’s Z pulse
signal (QZ)
_ECAT_Slave_R1_ECx62x_Set_Home_SpMode Apply the special mode when homing
_ECAT_Slave_R1_ECx62x_Set_MEL_Inverse
Set the contact type (NC/NO) of the negative limit
switch (MEL)
_ECAT_Slave_R1_ECx62x_Set_PEL_Inverse
Set the contact type (NC/NO) of the positive limit
switch (PEL)
Page 84

EtherCAT Programming Guide API List of EtherCAT Dynamic-Link Library
March, 2017 4-9
4
Operation of Pulse Module (R1-ECx62xD0 series)
_ECAT_Slave_R1_ECx62x_Set_Svon_Inverse
Set the contact type (NC/NO) of the servo enable
switch (Svon)
_ECAT_Slave_R1_ECx62x_Set_Home_Slow_Down
It sets the deceleration time after the motor reaches
the Home switch
_ECAT_Slave_R1_ECx62x_Get_IO_Status Acquire the status of all I/O points
_ECAT_Slave_R1_ECx62x_Get_Single_IO_Status Acquire the status of single I/O point
Operation of delta servo drive
_ECAT_Slave_DeltaServo_Write_Parameter
Write servo parameter values to Delta servo drives
_ECAT_Slave_DeltaServo_Read_Parameter
Read servo parameter values from Delta servo
drives
_ECAT_Slave_DeltaServo_Read_Parameter_Info
Read servo parameter attributes from Delta servo
drives
_ECAT_Slave_DeltaServo_Set_Velocity_Limit
Set Delta servo motor’s max. speed
_ECAT_Slave_DeltaServo_Set_Compare_Enable
Write the pulse compare parameter, which is
identical to Delta servo parameter P5-59
_ECAT_Slave_DeltaServo_Get_Compare_Enable
Read the pulse compare parameter that is written
to the servo drive, which is identical to Delta servo
parameter P5-59
_ECAT_Slave_DeltaServo_Set_Compare_Config
Write the data array number and values of the
pulse compare function to Delta servo drives
Analog Input Settings (R1-EC8124D0 series)
_ECAT_Slave_R1_EC8124_Set_Input_RangeMode
Set the sampling range of Delta analog input
module
_ECAT_Slave_R1_EC8124_Set_Input_ConvstFreq_
Mode
Set the sampling rate of Delta analog input
module
_ECAT_Slave_R1_EC8124_Set_Input_Enable
Enable/Disable the analog input sampling function
of Delta analog input module
_ECAT_Slave_R1_EC8124_Get_Input_RangeMode
Acquire the sampling range of Delta analog input
module
_ECAT_Slave_R1_EC8124_Set_Input_AverageMode
Set the average times for the analog input filter of
Delta analog input module.
Analog Output Settings (R1-EC9144D0 series)
_ECAT_Slave_R1_EC9144_Set_Output_RangeMode
Set the output range of Delta analog output
module
_ECAT_Slave_R1_EC9144_Set_Output _Enable
Enable/Disable the analog output of Delta module
_ECAT_Slave_R1_EC9144_Get_Output_ReturnCode
Acquire the operation status of Delta analog
output module
Page 85

API List of EtherCAT Dynamic-Link Library EtherCAT Programming Guide
4-10 March, 2017
4
Auto Recording Function for Motion Axis
_ECAT_Slave_Record_Data_Set_Type Set the recording data type of specified axis.
_ECAT_Slave_Record_Data_Set_Enable
Enable/Disable the recording function of specified
axis
_ECAT_Slave_Record_Data_Get_Cnt Acquire the data entry number of specified axis
_ECAT_Slave_Record_Data_ReadData Acquire the recorded data of specified axis
_ECAT_Slave_Record_Clear_Data Delete the saved record of specified axis
_ECAT_Slave_Record_Multi_Set_Enable
Enable/Disable the recoding function of specified
multiple axes
_ECAT_Slave_Record_Multi_Clear_Data Delete the saved record of specified multiple axes
Operation of Local Digital I/O
_ECAT_GPIO_Set_Output
Control the output status of the GPIO on the motion
card
_ECAT_GPIO_Get_Output
Read the output status of the GPIO on the motion
card
_ECAT_GPIO_Get_Input Read the input status of the GPIO on the motion card
High-Speed Pulse Compare Function
_ECAT_Compare_Set_Channel_Position Overwrite a position value for the specified channel
_ECAT_Compare_Get_Channel_Position
Acquire the current position value of the specified
channel
_ECAT_Compare_Set_Ipulser_Mode
Set the mode of pulse input for the specified
channel
_ECAT_Compare_Set_Channel_Direction Set the pulse direction of the specified channel
_ECAT_Compare_Set_Channel_Trigger_Time
Set the trigger retaining time for the specified
channel
_ECAT_Compare_Set_Channel_One_Shot
Force the trigger manually once for the specified
channel
_ECAT_Compare_Set_Channel_Source Set the compare source for the specified channel.
_ECAT_Compare_Set_Channel_Enable
Enable/disable the compare function for the
specified channel
_ECAT_Compare_Channel0_Position
Set the parameters for triggering the signal at a
fixed pulse interval of channel 0
_ECAT_Compare_Set_Channel0_Trigger_By_GPIO
Set the parameters for triggering the signal at a
fixed pulse interval of channel 0, which is enabled /
disabled by GPIO
_ECAT_Compare_Set_Channel1_Output_Enable
Enable/Disable the trigger function of channel 1
(user-defined pulse intervals)
_ECAT_Compare_Set_Channel1_Output_Mode Set the output mode of channel 1
_ECAT_Compare_Get_Channel1_IO_Status Acquire the operation status of channel 1
_ECAT_Compare_Set_Channel1_GPIO_Out Set the output status of the PIN15 on CN2 of GPIO
Page 86

EtherCAT Programming Guide API List of EtherCAT Dynamic-Link Library
March, 2017 4-11
4
High-Speed Pulse Compare Function
_ECAT_Compare_Set_Channel1_Position_Table
Set the pulse data of channel 1 (user-defined pulse
intervals)
_ECAT_Compare_Set_Channel1_Position_Table_L
evel
Set the pulse data of channel 1 and its user-defined
active level for triggering signals
_ECAT_Compare_Get_Channel1_Position_Table_C
Acquire the current trigger counts of channel 1
_ECAT_Compare_Set_Channel_Polarity
Set the trigger level of the compare function
_ECAT_Compare_Reuse_Channel1_Position_Table
Re-execute the compare function of channel 1 once
_ECAT_Compare_Reuse_Channel1_Position_Table
_Level
Re-execute the compare function of channel 1 once,
which the trigger level is user-defined
Dynamic Link Library Information
_ECAT_Master_Get_DLL_Path Acquire the directory of the EtherCat_DLL.dll file
_ECAT_Master_Get_DLL_Version
Acquire the version information of the
EtherCat_DLL.dll file
_ECAT_Master_Get_DLL_Path_Single
Acquire the directory of the ECAT_RTX_DLL.dll or
PCI_L221.dll file
_ECAT_Master_Get_DLL_Version_Single
Acquire the version information of the
ECAT_RTX_DLL.dll or PCI_L221.dll file
Software Protection
_ECAT_Security_Check_Verifykey
Check the verification key
_ECAT_Security_Get_Check_Verifykey_State
Check the verification status of the verification key
_ECAT_Security_Write_Verifykey
Write the verification key into the verification IC
_ECAT_Security_Get_Write_Verifykey_State
Obtain the status and result of writing in the
verification key
_ECAT_Security_Check_UserPassword
Check the user password
_ECAT_Security_Get_Check_UserPassword_State
Acquire the status of verifying the user password
_ECAT_Security_Write_UserPassword
Write in the user password into the verification IC
_ECAT_Security_Get_Write_UserPassword_State
Acquire the status and result of writing in the user
password
Operating MRAM in PAC
_ECAT_Master_MRAM_Write_Word_Data
Write the U16 data (Word) to the specified address
of MRAM in PAC
_ECAT_Master_MRAM_Read_Word_Data
Read the U16 data (Word) from the specified
address of MRAM in PAC
_ECAT_Master_MRAM_Write_DWord_Data
Write the U32 data (DWord) into the specified
address of MRAM in PAC
_ECAT_Master_MRAM_Read_DWord_Data
Read the U32 data (DWord) from the specified
address of MRAM in PAC
Page 87

API List of EtherCAT Dynamic-Link Library EtherCAT Programming Guide
4-12 March, 2017
4
Retentive Digital Output Function (R1-EC70E2D0 series)
_ECAT_Slave_R1_EC70E2_Set_Output_Enable Enable/Disable the digital output of the module
Retentive Digital Output Function (R1-EC70X2D0 series)
_ECAT_Slave_R1_EC70X2_Set_Output_Enable Enable/Disable digital output of the module
MPG operation (R1-EC5614D0 series)
_ECAT_Slave_R1_EC5614_Set_MJ_Config
Set the parameters of MPG function
_ECAT_Slave_R1_EC5614_Set_MJ_Enable
Enable/Disable the MPG function
_ECAT_Slave_R1_EC5614_Get_IO_Status
Acquire the I/O contact status of the MPG module
_ECAT_Slave_R1_EC5614_Get_MPG_Counter
Acquire the value of the MPG counter
Page 88

March, 2017 5-1
EtherCAT Master
Configuration
This chapter provides introduction on how to use APIs for EtherCAT master before
initialization. APIs mentioned here are for adv anced users. If no special requirement is
defined, EtherCAT master is set in default.
5.1 _ECAT_Master_Set_CycleTime ···························································· 5-3
5.2 _ECAT_Master_Get_CycleTime ··························································· 5-4
5.3 _ECAT_Master_NodeID_Alias_Enable ··················································· 5-5
5.4 _ECAT_Get_SerialNo ········································································· 5-6
5.5 _ECAT_Master_Get_DLL_SeqID ·························································· 5-7
5.6 _ECAT_Autoconfig_Open_File ····························································· 5-8
5.7 _ECAT_Autoconfig_Save_File ······························································ 5-9
5.8 _ECAT_Autoconfig_Set_Slave_DCTime ··············································· 5-10
5.9 _EACT_Autoconfig_Clear_ConfigFile ···················································5-11
5.10 _ECAT_Autoconfig_Set_NodeID_Alias ················································· 5-12
5.11 _EC AT_Autoconfig_Get_NodeID_Alias ················································· 5-14
5.12 _ECAT_Autoconfig_Save_NodeID_Alias ··············································· 5-15
Page 89

EtherCAT Master Configuration EtherCAT Programming Guide
5-2 March, 2017
5
API list of EtherCAT master configuration
Function name
Description
_ECAT_Master_Set_CycleTime
Set the cycle time of the EtherCAT master
communication. *Set before initialization.
_ECAT_Master_Get_CycleTime
Acquire the cycle time of the EtherCAT master
communication.
_ECAT_Master_NodeID_Alias_Enable
Determine whether to enable user-defined station.
*Set before initialization.
_ECAT_Master_Get_SerialNo
Get the serial No. of PAC or the motion card.
_ECAT_Master_Get_DLL_SeqID
Acquire the sequence ID of the current DLL.
_ECAT_Autoconfig_Open_File
Read and apply the configuration file of the
communication topology and DC data for system
initialization. *Set before initialization.
_ECAT_Autoconfig_Save_File
Save the current communication topology and DC
data to the configuration file.
_ECAT_Autoconfig_Set_Slave_DCTime
Set the DC time of each node.
_EACT_Autoconfig_Clear_ConfigFile
Clear the currently imported EtherCAT master
configuration.
_ECAT_Autoconfig_Set_NodeID_Alias
Set user-defined station alias of each node. *Set after
initialization.
_ECAT_Autoconfig_Get_NodeID_Alias
Acquire the user-defined station alias of each node.
*Set after initialization.
_ECAT_Autoconfig_Save_NodeID_Alias
Save the user-defined station alias to the module
memory block.
Page 90

EtherCAT Programming Guide EtherCAT Master Configuration
March, 2017 5-3
5
5.1 _ECAT_Master_Set_CycleTime
Syntax
U16 PASCAL _ECAT_Master_Set_CycleTime (U16 CardNo, U16 Mode)
Purpose
This is for setting the cycle time
of the EtherCAT master communication. *Set before initialization.
Note: This API can only be executed after the EtherCAT Master has been started
( “_ECAT_Master_Open” in section 6.1) and before EtherCAT communication is initialized
( “_ECAT_Master_Initial” in section 6.2).
Parameter
Name Data type Property Description
CardNo U16 Number Card No.
Mode U16 Option
Communication cycle time (us)
0: 2000 us
1: 1000 us
2: 500 us
3: 250 us
4: 125 us
Example
U16 Status;
U16 CardNo=0;
U16 Cardnum=0;
Status = _ECAT_Master_Open (&Cardnum);
if (Cardnum>0)
{
Status = _ECAT_Master_Get_CardSeq (0, &CardNo);
// Execute the API after enabling the motion card an d before initialization.
U16 Mode = 3;
Status = _ECAT_Master_Set_CycleTime (CardNo, Mode);
Status = _ECAT_Master_Initial(CardNo);
}
Page 91

EtherCAT Master Configuration EtherCAT Programming Guide
5-4 March, 2017
5
5.2 _ECAT_Master_Get_CycleTime
Syntax
U16 PASCAL _ECAT_Master_Get_CycleTime (U16 CardNo, U16 *CycleTime)
Purpose
This is for acquiring the cycle time of the
EtherCAT master communication.
Note: This function can be used only after the EtherCAT Master is enabled by “_ECAT_Master_Open” (refer
to section 6.1).
Parameter
Name Data type Property Description
CardNo U16 Number Card No.
CycleTime U16* Time (us)
Communication cycle time (unit: us);
The Master currently only supports cycle times of
2000, 1000, 500, 250, 125. For the slave cycle time,
please refer to the description of each Slave.
Example
U16 Status;
U16 CardNo=0;
U16 Cardnum=0;
U16 CycleTime =0;
Status = _ECAT_Master_Open (&Cardnum);
if (Cardnum>0)
{
Status = _ECAT_Master_Get_CardSeq (0, &CardNo);
// Acquire the Master’s CycleTime setting information.
Status = _ECAT_Master_Get_CycleTime (CardNo, &CycleTime);
}
Page 92

EtherCAT Programming Guide EtherCAT Master Configuration
March, 2017 5-5
5
5.3 _ECAT_Master_NodeID_Alias_Enable
Syntax
U16 PASCAL _ECAT_Master_NodeID_Alias_Enable (U16 CardNo, U16 Enable)
Purpose
This is for determining whether to enable user-defined station.
*Set before initialization. If there is any EtherCA T slave that has not been assigned with an alias,
error message (0x1004) will occur.
Note:
1. Please make sure no repeated slave station alias is on the bus.
2. If you are using any of the Delta R1-EC series modules, please refer to Chapter 5.10
_ECAT_Autoconfig_Set_NodeID_Alias to set the station number of all R1-EC series modules on
the EtherCAT bus. Once the setting is complete, refer to section 5.12
_ECAT_Autoconfig_Save_NodeID_Alias to save this setting to the module’s memory. Then,
re-initialize EtherCAT bus.
3. If there is a repeated station alias or one of the station aliases is not set, an API error message
(0x1004) will occur.
4. This API can only be executed after the EtherCAT Master has been started
( “_ECAT_Master_Open” in section 6.1) and before EtherCAT communication is initialized
( “_ECAT_Master_Initial” in section 6.2).
Parameter
Name Data type Property Description
CardNo U16 Number Card No.
Enable U16 Option
0: Disable user-defined station alias.
1: Enable user-defined station alias.
Example
U16 Status;
U16 CardNo=0, Enable =1;
U16 MapNodeID;
U16 Cardnum=0;
Status = _ECAT_Master_Open (&Cardnum);
if (Cardnum>0)
{
Status = _ECAT_Master_Get_CardSeq (0, &CardNo);
// Disable EtherCAT communication.
Status = _ECAT_Master_Reset(CardNo);
// Enable user-defined station alias.
Status = _ECAT_Master_NodeID_Alias_Enable (CardNo, Enable);
// Eanble the EtherCAT communication again.
Status = _ECAT_Master_Initial(CardNo);
}
Page 93

EtherCAT Master Configuration EtherCAT Programming Guide
5-6 March, 2017
5
5.4 _ECAT_Get_SerialNo
Syntax
U16 PASCAL _ECAT_Get_SerialNo (U16 CardNo, U32* SerialNo)
Purpose
This is for acquiring the serial No. of the PAC or motion card.
Note: This API can only be executed after the EtherCAT Master has been started by API
“_ECAT_Master_Open” (section 6.1).
Parameter
Name Data type Property Description
CardNo U16 Number Card No.
SerialNo U32 Number Serial No.
Example
U16 Status;
U16 CardNo=0;
U32 SerialNo=0;
U16 Cardnum=0;
Status = _ECAT_Master_Open (&Cardnum);
if (Cardnum>0)
{
Status = _ECAT_Master_Get_CardSeq (0, &CardNo);
Status = _ECAT_Get_SerialNo (CardNo, &SerialNo);
}
Page 94

EtherCAT Programming Guide EtherCAT Master Configuration
March, 2017 5-7
5
5.5 _ECAT_Master_Get_DLL_SeqID
Syntax
U16 PASCAL _ECAT_Master_Get_DLL_SeqID (U16 CardNo, U16 *SeqID)
Purpose
This is for acquiring the sequence ID of the current dynamic link library (DLL).
Note: This API can only be executed after the EtherCAT Master has been started by _ECAT_Master_Open
(section 6.1).
Parameter
Name Data type Property Description
CardNo U16 Number Card No.
SeqID U16* Value Sequence ID of the current DLL.
Example
U16 Status;
U16 CardNo = 0;
U16 SeqID = 0;
U16 Cardnum=0;
Status = _ECAT_Master_Open (&Cardnum);
if (Cardnum>0)
{
Status = _ECAT_Master_Get_CardSeq (0, &CardNo);
Status = _ECAT_Master_Get_DLL_SeqID (CardNo, &SeqID);
}
Page 95

EtherCAT Master Configuration EtherCAT Programming Guide
5-8 March, 2017
5
5.6 _ECAT_Autoconfig_Open_File
Syntax
U16 PASCAL _ECAT_Autoconfig_Open_File (U16 CardNo, I8 *FilePath)
Purpose
This is for reading and applying the configuration file of communication topology and DC data.
EtherCA T Master will refer to the saved communicati on topology and DC data during con nection.
If the actual communication structure does not match the DC data, EtherCAT Master will return
an error code. With this API, you can avoid EtherCAT Master from issuing the wrong command
when the communication topology is changed accidently.
Note: This API can only be executed after the EtherCAT Master has been started
( “_ECAT_Master_Open” in section 6.1) and before EtherCAT communication is initialized
( “_ECAT_Master_Initial” in section 6.2).
Parameter
Name Data type Property Description
CardNo U16 Number Card No.
FilePath I8* String The directory of the configuration file
Example
U16 Status;
U16 CardNo=0;
I8 FilePath[255];
U16 Cardnum=0;
Status = _ECAT_Master_Open (&Cardnum);
if (Cardnum>0)
{
Status = _ECAT_Master_Get_CardSeq (0, &CardNo);
strcpy(FilePath, "C:\\EtherCA T_Information.dat");
Status = _ECAT_Autoconfig_Open_File (CardNo, FilePath);
Status = _ECAT_Master_Initial(CardNo);
}
Page 96

EtherCAT Programming Guide EtherCAT Master Configuration
March, 2017 5-9
5
5.7 _ECAT_Autoconfig_Save_File
Syntax
U16 PASCAL _ECAT_Autoconfig_Save_File (U16 CardNo, I8 *FilePath)
Purpose
This is for saving the communication topology and DC data to the configuration file.
Before initializing the master (_ECAT_Master_InitialEtherCAT in section 6.2), you can use
“_ECAT_Autoconfig_Open_File” (section 5.6) to import this configuration file so that the
EtherCAT Master will able to check if the actual topology complies with the configuration and
return an error code.
Note: This API can only be executed after the EtherCAT Master has been started by API
“_ECAT_Master_Open” (section 6.1).
Parameter
Name Data type Property Description
CardNo U16 Number Card No.
FilePath I8* String
Save the communication topology and DC data to the
configuration file
Example
U16 Status;
U16 CardNo=0;
I8 FilePath[255];
U16 Cardnum=0;
Status = _ECAT_Master_Open (&Cardnum);
if (Cardnum>0)
{
Status = _ECAT_Master_Get_CardSeq (0, &CardNo);
strcpy(FilePath, "C:\\EtherCA T_Information.dat");
Status = _ECAT_Autoconfig_Save_File (CardNo, FilePath);
}
Page 97

EtherCAT Master Configuration EtherCAT Programming Guide
5-10 March, 2017
5
5.8 _ECAT_Autoconfig_Set_Slave_DCTime
Syntax
U16 PASCAL _ECAT_Autoconfig_Set_Slave_DCTime (U16 CardNo, U16 NodeID,
U16 Mode)
Purpose
This is for setting the DC time of each node, which default is 1000 us.
Note: This API can only be executed after the EtherCAT Master has been started
( “_ECAT_Master_Open” in section 6.1) and before EtherCAT communication is initialized
( “_ECAT_Master_Initial” in section 6.2).
Parameter
Name Data type Property Description
CardNo U16 Number Card No.
NodeID U16 Number Node ID
Mode U16 Option
Set DC time for each node.
0: 2000 us
1: 1000 us
2: 500 us
3: 250 us
4: 125 us
Example
U16 Status;
U16 CardNo=0,NodeID=1;
U16 Mode=1; // 1ms
U16 Cardnum=0;
Status = _ECAT_Master_Open (&Cardnum);
if (Cardnum>0)
{
Status = _ECAT_Master_Get_CardSeq (0, &CardNo);
Status = _ECAT_Autoconfig_Set_Slave_DCTime (CardNo, NodeID, Mode);
Status = _ECAT_Master_Initial(CardNo);
}
Page 98

EtherCAT Programming Guide EtherCAT Master Configuration
March, 2017 5-11
5
5.9 _EACT_Autoconfig_Clear_ConfigFile
Syntax
U16 PASCAL _EACT_Autoconfig_Clear_ConfigFile (U16 CardNo)
Purpose
This is for clearing the configuration file loaded via _ECAT_Autoconfig_Open_File. It is mainly
used when a wrong file has been opened or the changes are not compatible with the previous
settings.
Note: This API can only be executed after the EtherCAT Master has been started
( “_ECAT_Master_Open” in section 6.1) and before EtherCAT communication is initialized
( “_ECAT_Master_Initial” in section 6.2).
Parameter
Name Data type Property Description
CardNo U16 Number Card No.
Example
U16 Status;
U16 CardNo=0;
U16 Cardnum=0;
Status = _ECAT_Master_Open (&Cardnum);
if (Cardnum>0)
{
Status = _ECAT_Master_Get_CardSeq (0, &CardNo);
Status = _EACT_Autoconfig_Clear_ConfigFile (CardNo);
Status = _ECAT_Master_Initial(CardNo);
}
Page 99

EtherCAT Master Configuration EtherCAT Programming Guide
5-12 March, 2017
5
5.10 _ECAT_Autoconfig_Set_NodeID_Alias
Syntax
U16 PASCAL _ECAT_Autoconfig_Set_NodeID_Alias (U16 CardNo, U16 NodeID, U16
MapNodeID)
Purpose
This is for configuring user-defined station alias of each node. *Set after initialization.
Note:
1. This API is only applicable to Delta R1-EC series remote modules.
2. After executing this API, users still need to validate the new station alias. To validate it, please set the
station alias of each node first and by using “_ECAT_Autoconfig_Save_NodeID_Alias” (refer to section
5.12). Meanwhile, the station alias information can be acquired by
“_ECAT_Autoconfig_Get_NodeID_Alias” (refer to section 5.11)
3. This API can only be executed after the EtherCAT Master has been started
( “_ECAT_Master_Open” in section 6.1) and before setting the user-defined station alias of each node
( “_ECAT_Autoconfig_Save_NodeID_Alias” in section 5.12) and
( “_ECAT_Master_NodeID_Alias_Enable” in section 5.3) also before ( “_ECAT_Master_Initial” in section
6.2).
Parameter
Name Data type Property Description
CardNo U16 Number Card No.
NodeID U16 Number Node ID
MapNodeID U16 Number Specify Node ID
Example
U16 Status;
U16 CardNo=0,NodeID=1;
U16 MapNodeID = 2;
U16 Cardnum=0;
Status = _ECAT_Master_Open (&Cardnum);
if (Cardnum>0)
{
Status = _ECAT_Master_Get_CardSeq (0, &CardNo);
// Reset EtherCAT communication
Status = _ECAT_Master_Reset(CardNo);
// Specified first node of slave device as station 2
Status = _ECAT_Autoconfig_Set_NodeID_Alias (CardNo, NodeID, MapNodeID);
// Save user-defined alias to all of the connected device, and then EtherCAT
communication will stop automatically.
Status = _ECAT_Autoconfig_Save_NodeID_Alias (CardNo);
// ………….waiting for reboot all of the device manually………….
bool module_reboot = false;
While(!module_reboot)
Page 100

EtherCAT Programming Guide EtherCAT Master Configuration
March, 2017 5-13
5
{
}
// Enabled the communication mode of user-defined alias
Status = _ECAT_Master_NodeID_Alias_Enable (CardNo, Enable);
// initialize EtherCAT communication
Status = _ECAT_Master_Initial(CardNo);
}
 Loading...