

Page 1
CS24D Startup Guide
Section 1-Initial Setup
The CS24D color sensor “sees” color by analyzing the diffused light from
an object illuminated by its LED light source.
The CS24D can sort up to fifteen different colors by comparing against
Teach values. That is, up to 15 Sort Outputs can be trained so that when
the sensor sees an object it will turn on the specified sort output that was
previously trained to that color.
The CS24D has four discrete outputs, which are binary coded to represent
the 15 Sort Outputs (trained colors). All outputs off is a “No match”
condition.
Once configured, typically only the discrete I/O on the CS24D is used for
control, providing universal compatibility with any PLC. However, for a
quick test of the CS24D, it is unnecessary to use the discrete I/O, as all
functions, including the Teach function, can be done using Delta’s
ColorSense program.
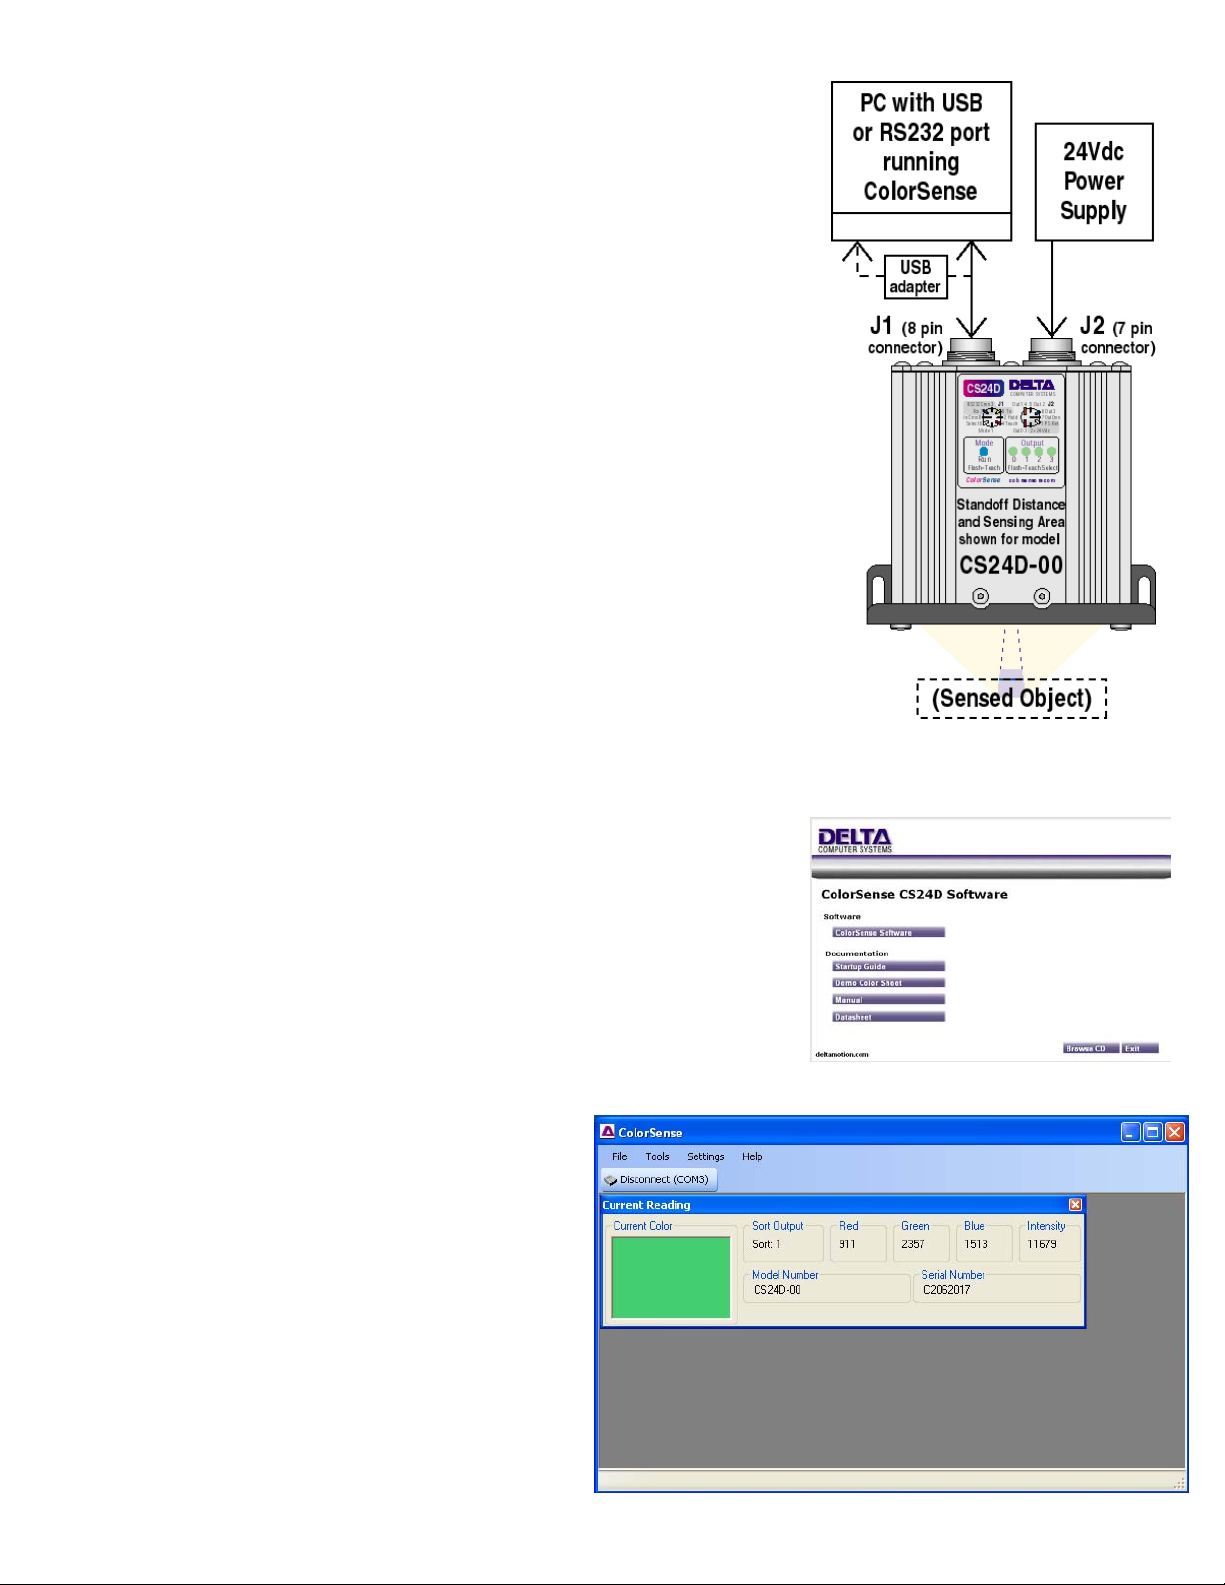
Wiring the CS24D for a Quick Test
As shown in the diagram, the PC connects up to J1 and the power supply to
J2. Use the cables available from Delta, or refer to the Wiring section in
the manual.
The Run LED is a steady blue when the unit is powered on and in normal operation.
The four green Output LEDs indicate the binary code of the Sort Output
that based on the Teach values and the color object that the sensor is
presently seeing. All of these Output LEDs are off if the current color
does not match a trained Sort Output (accept in Closest Color mode).
Loading the ColorSense Software
Delta’s ColorSense Configuration and Optimization software runs under
Windows on a PC having an RS232 serial port or an USB port with an
inexpensive USB-to-Serial adapter.
Using the installation CD-ROM that came with the sensor,
install the ColorSense program by clicking on the ColorSense
Software button or running the setup.exe file.
The default installation location is
C:\Program Files\ColorSense
When the ColorSense program is launched, it
will start with a large blank area and a top menu.
Once the serial communication has been
connected between the Sensor and the PC,
clicking the Connect (auto) button will
established communications. The button will
change to say Disconnect (COMn) and the
Current Status window will automatically open.
This window shows the color that the sensor is
currently reading and other sensor information.
Click the Setup Wizard button.
.
Page 2
CS24D Startup Guide
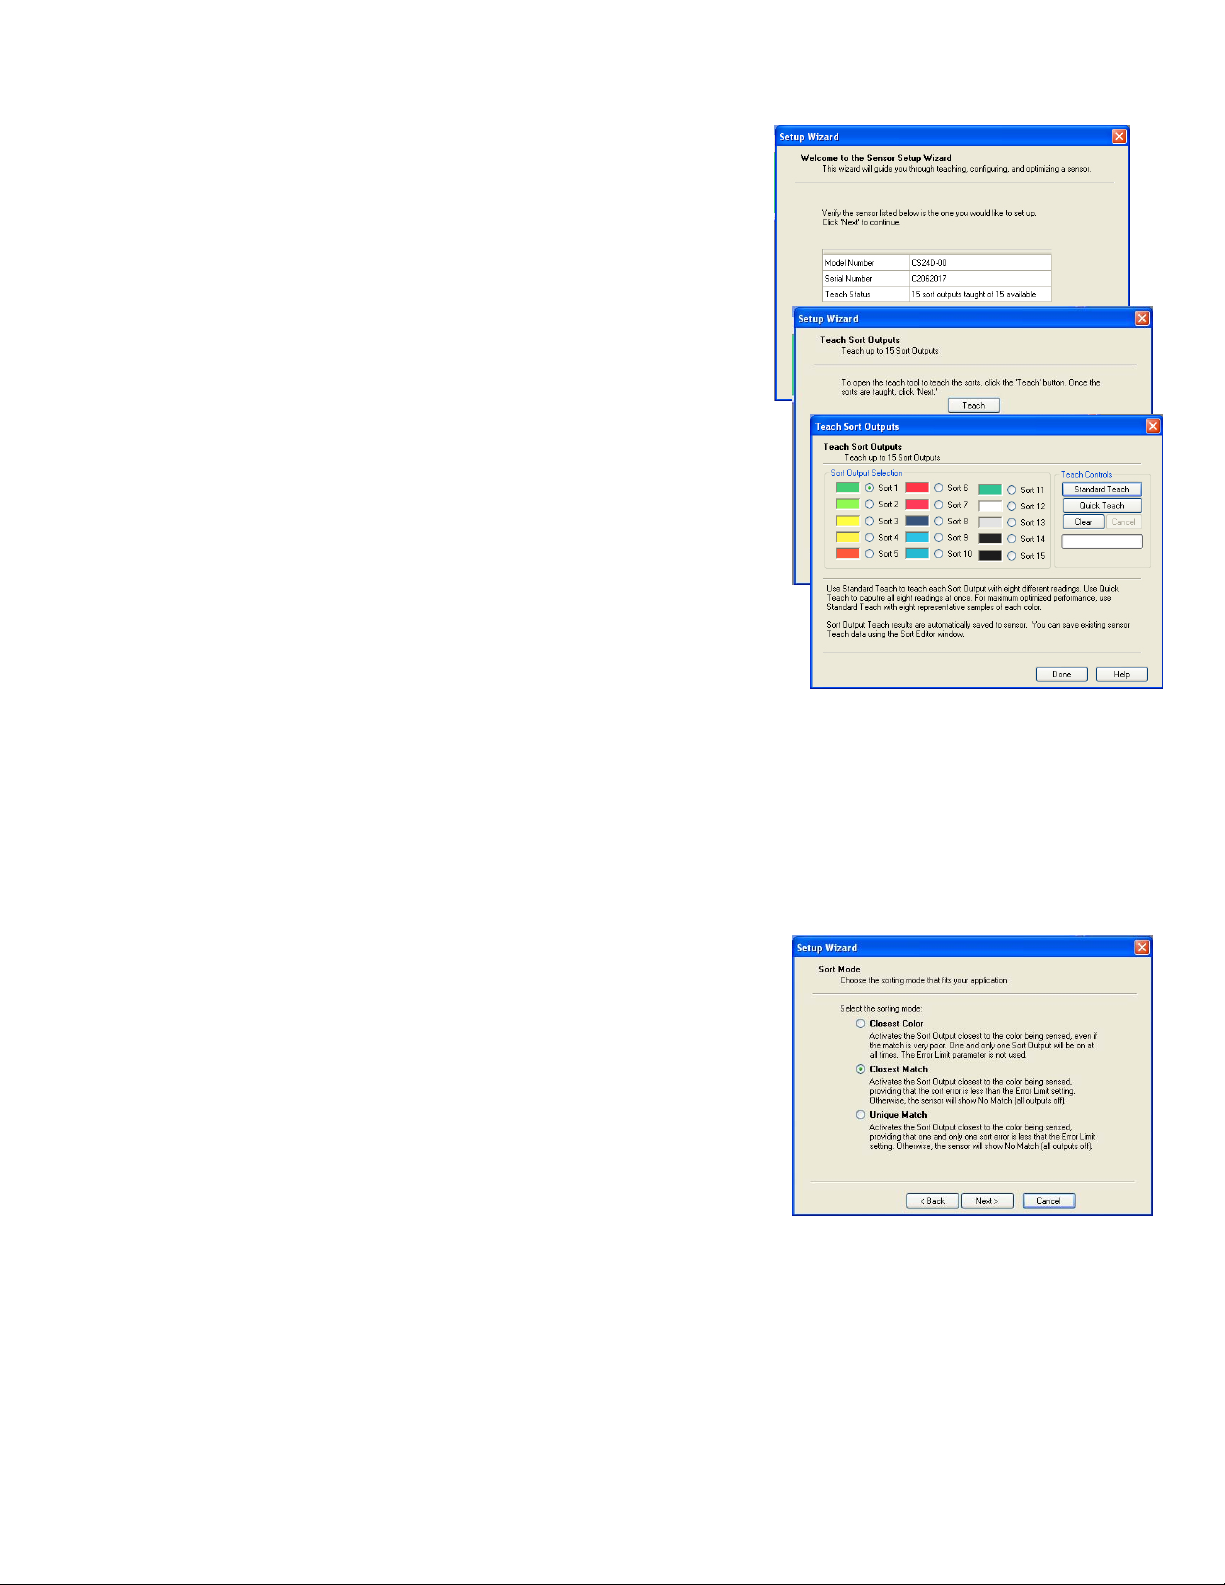
Section 2 – Using the Setup Wizard
When you start the Setup Wizard, it will open to an informational
screen showing the model and serial number of the sensor and the
number of Sort Outputs that have been taught. Pressing Next brings
up a screen asking if you are ready to Teach. (If you are not ready
to Teach, you can press the Next to see the rest of the Wizard).
Pressing the Teach button will bring up the Teach screen. To Teach,
place the first object (target color) in the sensing area at the correct
distance for the particular model of CS24D. Click on the Sort Output
that you want to associate with the first target color.
Click the Standard Teach button when you are ready to take the first
reading, and press it 7 more times; preferably with different samples or
at least different locations on the same sample. (The CS24D uses eight
readings of each target color in order to calculate a mean and standard
deviation. If multiple samples of the same object are available these
should be used in order to get an accurate representation of the color and
color variation). For a quick demonstration, you can click the Quick
Teach button to take all 8 readings at once; however performance cannot
be fully optimized without representative Teach data.
To Teach the CS24D to another object, select another Sort Output and press the Teach button to take the 8
readings. Click the Done button when the sensor has been trained to all of the samples.
As soon as the sensor has been trained, it will immediately start recognizing colors based on the default
configuration. Although the default parameters may provide acceptable performance, the next screens of
the Setup Wizard cover selecting modes and parameters for better performance.
The Color Demo Sheet can be used to demonstrate the CS24D performance over a wide range of colors.
(Although not recommended in practice, for a quick demo, one can avoid the Teach time and simply load
in the values from a file—see manual for details).
Section 3 – Configure Options
The next section of the Setup Wizard prompts you to set up all of the
Color Sensor user-settable options.
The Sorting Mode selection is dependant on the application.
Closest Color always turns on the Sort Output that is the closest
to the current color being seeing by the sensor—even if the match is
very poor. And if the current color is a good match to more than one
output, it will indicate whichever one is closest. Closest Color mode
can be the best mode for some sorting applications, but is rarely useful
for the common color verification applications.
Closest Match not only finds the closest match between the Teach colors and the current color, but also
requires that the calculated error on the match be less than the Error Limit (more later). Otherwise the
sensor reports a “no match” condition with all outputs OFF. Closest Match mode provides more
intuitive operation for the majority of applications.
Unique Match adds one more criteria—there can only be one Sort Output with a calculated error less
than the Error Limit, or the sensor will report a “no match” condition. Unique Match mode provides
more flexibility in flagging colors that may be out of the normal range.
Page 2 of 4 Delta Computer Systems, Inc.
Page 3

CS24D Startup Guide
The next important selection is the Teach Criteria.
Color Only is the best choice for accommodating large variations
in sensor-to-target distance but it cannot be used if any of the
target colors are shades of the same color (e.g. light gray and dark
gray). Color plus Intensity handles shades of colors, and gives
equal weighting to the RGB readings and the Intensity or
“darkness” of the color.
The Error Limit parameter is also calculated for you by the
optimize routine, although the default value will also probably work
fine for a quick test. Averaging should be set as high as possible,
especially with dark colors. The Stretch Outputs parameter can be
left at zero for most applications.
The last Setup Wizard screen allows you to review the parameters.
Pressing the Finish button will download the parameters to the CS24D
color sensor.
That’s all there is to it! The CS24D can now differentiate between the
Teach colors, with the result displayed on the four green Output LEDs.
Section 4 – Exploring ColorSense
By clicking on the icons in the Sort Editor screen, you can:
• Upload Teach data from the sensor
• Download Teach data to the sensor
• Save Teach data to a file
• Read Teach from a file.
Also, you can use the Arrow buttons to
“move” Sort data up or down in order to
change the output assigned to a taught color.
The “X” button deletes the data from the
selected output.
The Analyze screen shows the predicted
performance for the Teach data, which is
shown as the number of standard deviations
separating each Sort Output. Values less
than 3 indicate that the sensor has a hard
time differentiating between the target
colors, and values greater than 5 indicate a
high degree of confidence.
By selecting Custom from the pull-down box, you
can manually adjust the weighting factors and see
the affect on performance. This unique capability
allows the RGB and Intensity weightings to be
optimized to the actual Teach data.
CAUTION: In order for the standard deviation prediction to be correct, it is essential that the Teaching be
done optimally. All eight Teach readings must be taken, the eight readings must include representative
samples of the range of colors that are considered permissible for that Sort Output, and the sample objects
Page 3 of 4 Delta Computer Systems, Inc.
Page 4
CS24D Startup Guide
must be at the exact distance from and orientation to the sensor as they will be in actual operation. If the
distance and/or orientation can vary, then the eight samples should include this variation.
For more details about optimizing the sensor and saving sets of trained target colors to the PC, see the
appropriate sections in the CS24D Color Sensor Manual
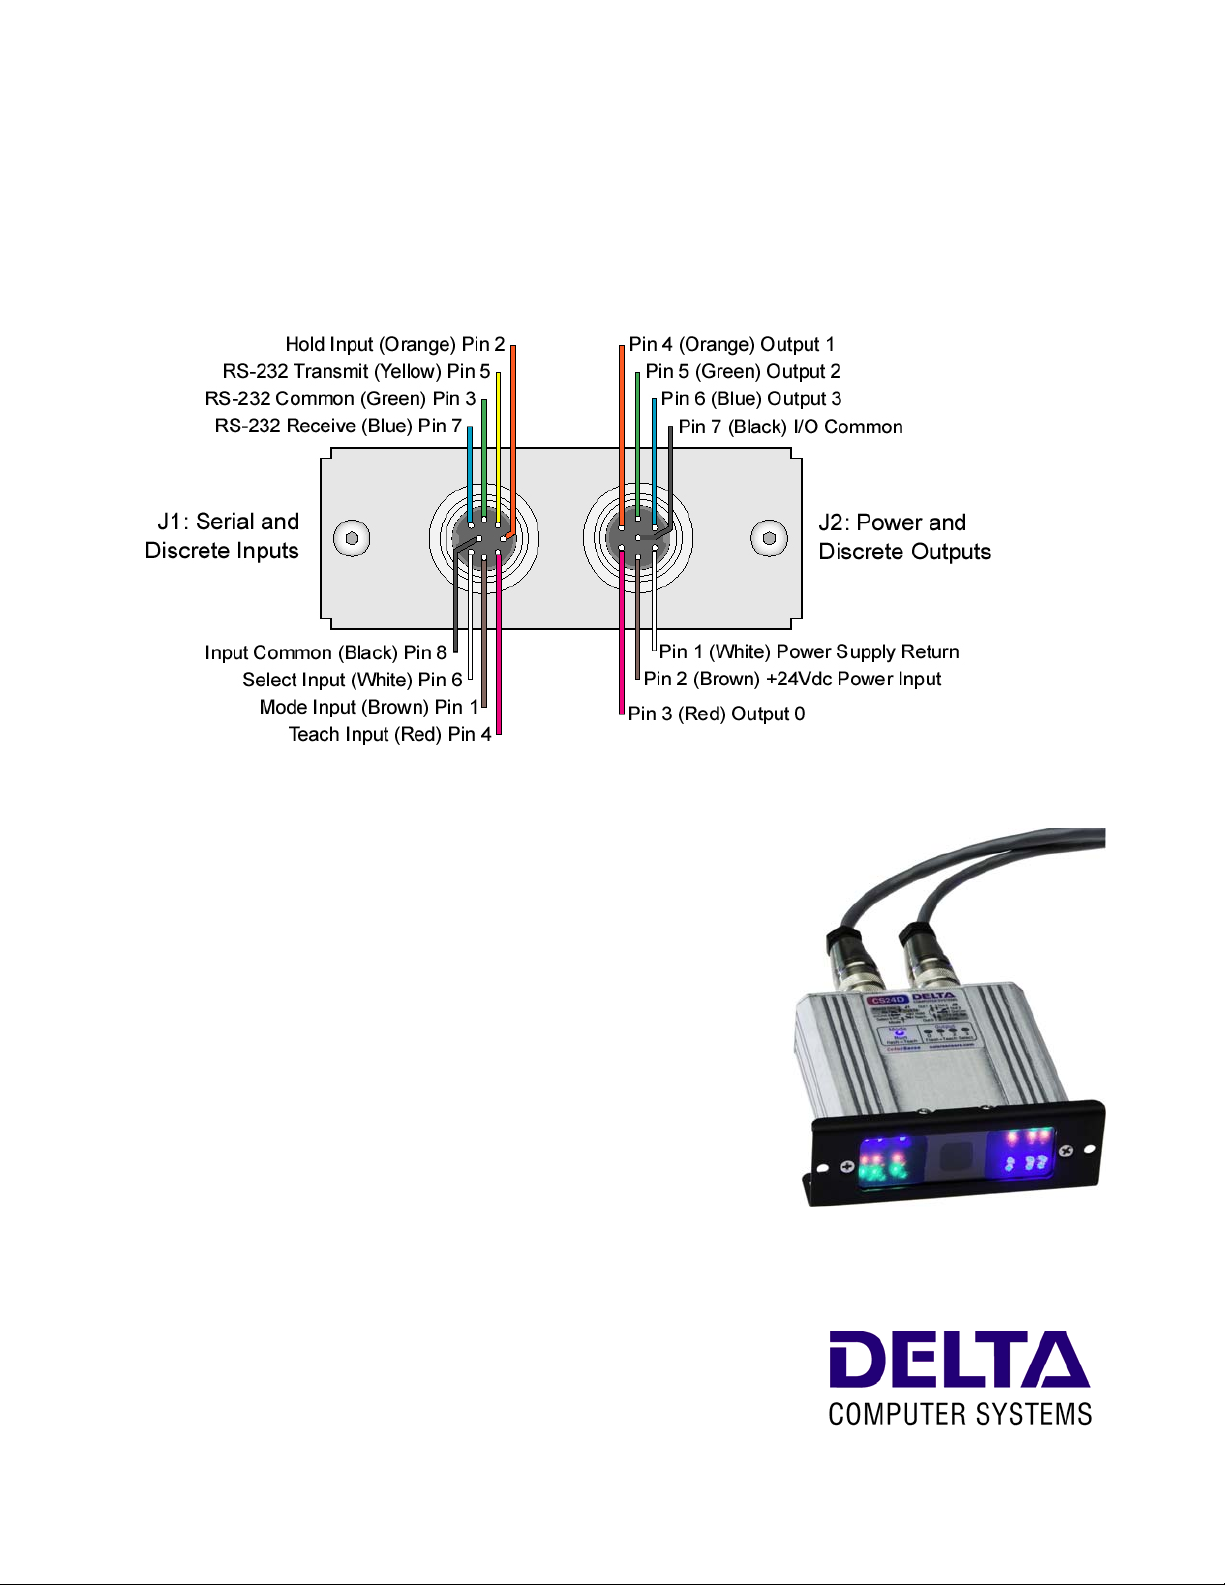
CS24D J1 and J2 Pin Designations
.
Support and Testing Services
Pre-sale and post-sale Technical Support on the CS24D Series
color sensors is available from Delta via telephone or internet.
Telephone (360) 254-8688 Fax (360) 254-5435
email: support@deltacompsys.com
To help ensure success on your project, Delta can test samples
and provide results and recommendations. Send the samples,
along with a brief description of the application to Delta at:
Delta Computer Systems, Inc.
1818 SE 17
Battle Ground, WA 98604
Attn: Color Sensor Samples for Testing
Alternately, since the CS24D is so easy to use and optimize,
you may want to try one yourself. Contact Delta for availability
of demo units.
Company Profile
Delta Computer Systems, Inc. manufactures motion controllers,
color sensors, and other electronic controls for a wide variety
of industrial applications. You can rely on Delta for practical
expertise, reliable products, responsive support and lasting value.
th
Street
Page 4 of 4 Delta Computer Systems, Inc.
 Loading...