

Page 1
85865
F
L
Model/Modelo/Modèle
T3552LF-WL
Series/Series/Seria
TM
Tesla
Write purchased model number here.
Escriba aquí el número del modelo comprado.
Inscrivez le numéro de modèle ici.
Rough-in R3500-WL required for installation
Rough-in R3500-WL necesario para la instalación
Rough-in R3500-WL requis pour l'installation
You may need / Usted puede necesitar / Articles dont vous pouvez avoir besoin:
O
E
T
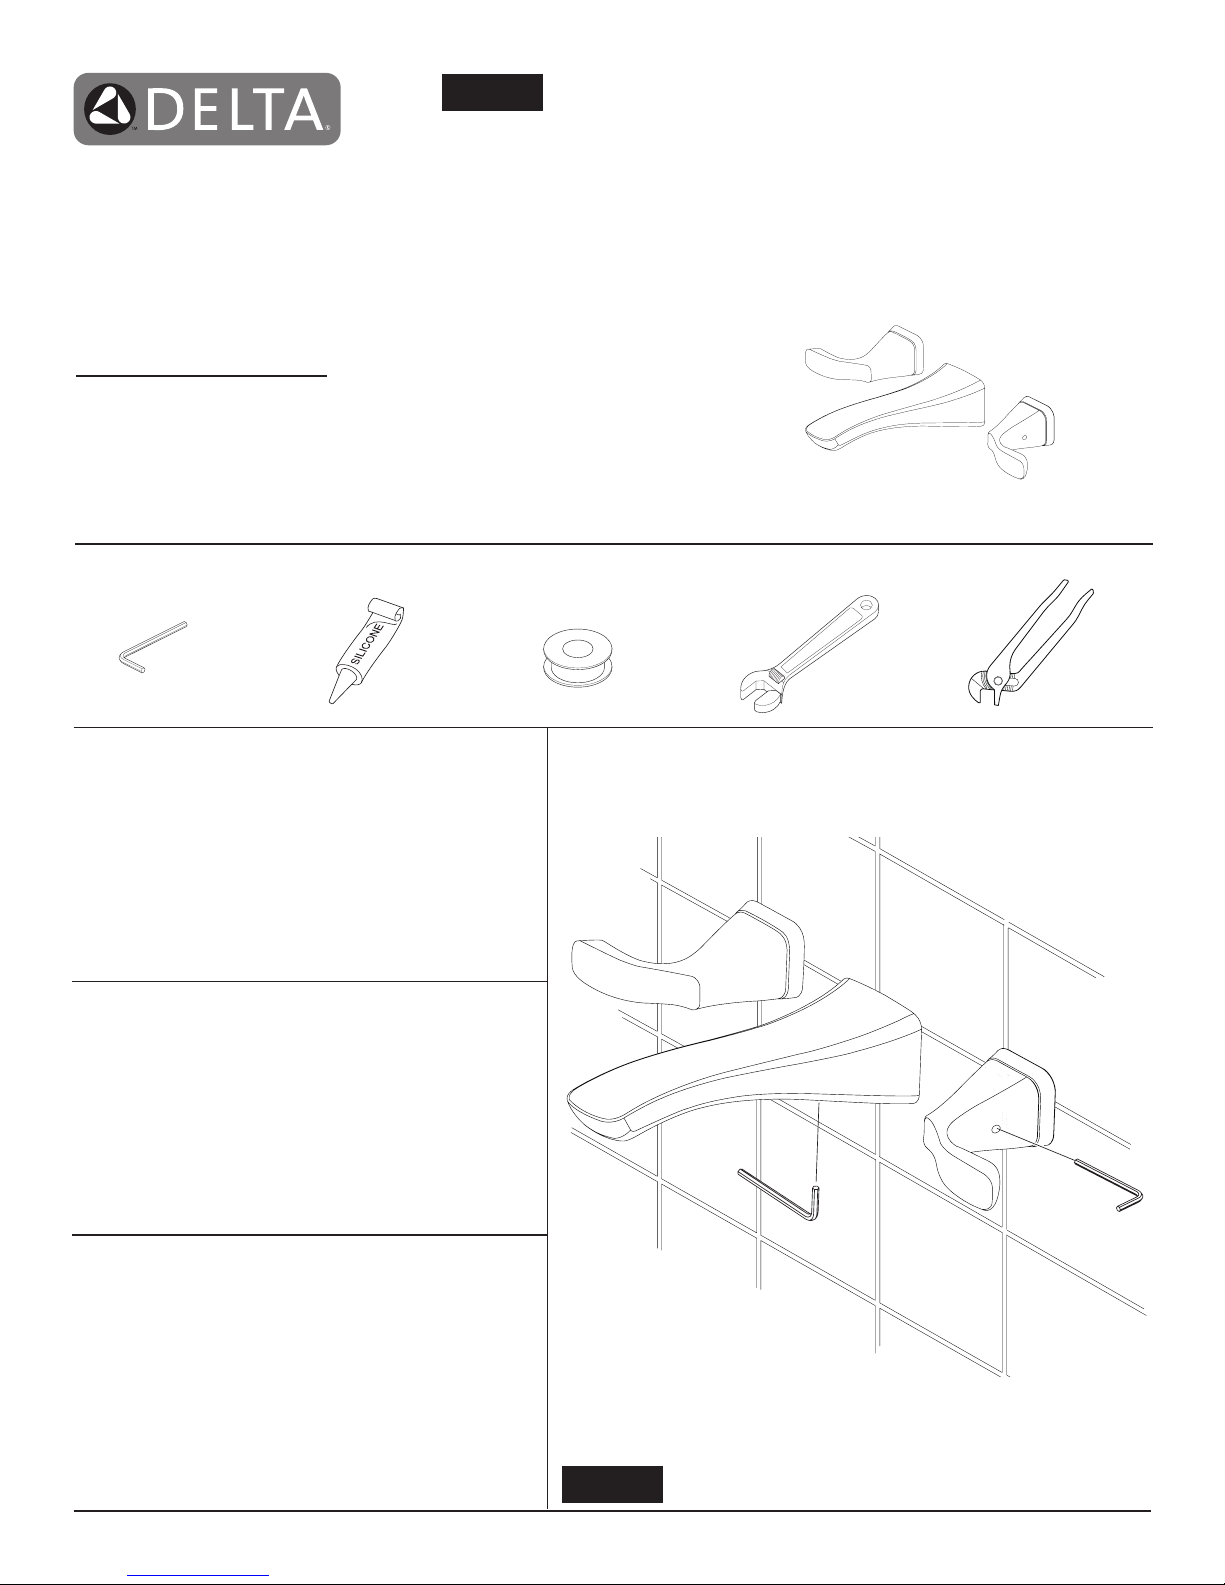
TWO HANDLE WALL MOUNTED LAVATORY
FAUCET TRIM
LLAVES DE AGUA - GRIFOS - DE DOS MANIJAS
PARA INSTALACIÓN EN LA PARED
ROBINETS MURAUX À DEUX MANETTES POUR
LAVABOMURAL POUR LAVABOS
N
1/8" (3.17mm)
For easy installation of your Delta faucet
you will need:
To
READ ALL
・
beginning.
To
READ ALL
・
information.
To complete the deck and valve rough-in prior to
・
installing this trim kit.
the instructions completely before
warnings, care and maintenance
Para instalación fácil de su llave Delta
usted necesitará:
LEER TODAS
・
antes de empezar.
LEER TODAS
・
de mantenimiento.
Para completar el borde y la instalación de válvulas
・
dentro de las paredes previa a la instalación de la
llave y sus accesorios.
las instrucciones completamente
los avisos, cuidados, e información
Pour installer votre robinet Delta
facilement, vous devez:
1/8" (3.17mm) 1/8" (3.17mm)
LIRE TOUTES
・
LIRE TOUE LES
・
les instructions de nettoyage et d’entretien.
Installez le corps du robinet et terminez le
・
pourtour du bain avant de poser les accessories
de nition.
www.deltafaucet.com
les instructions avant de débuter.
les avertissements ainsi que toutes
85865
1
4/26/2016 Rev. C
Page 2
A.
1 2
1
B.
2
Figure 1
1
3
4
2
4
3
2
1
3
1
C.
1
2
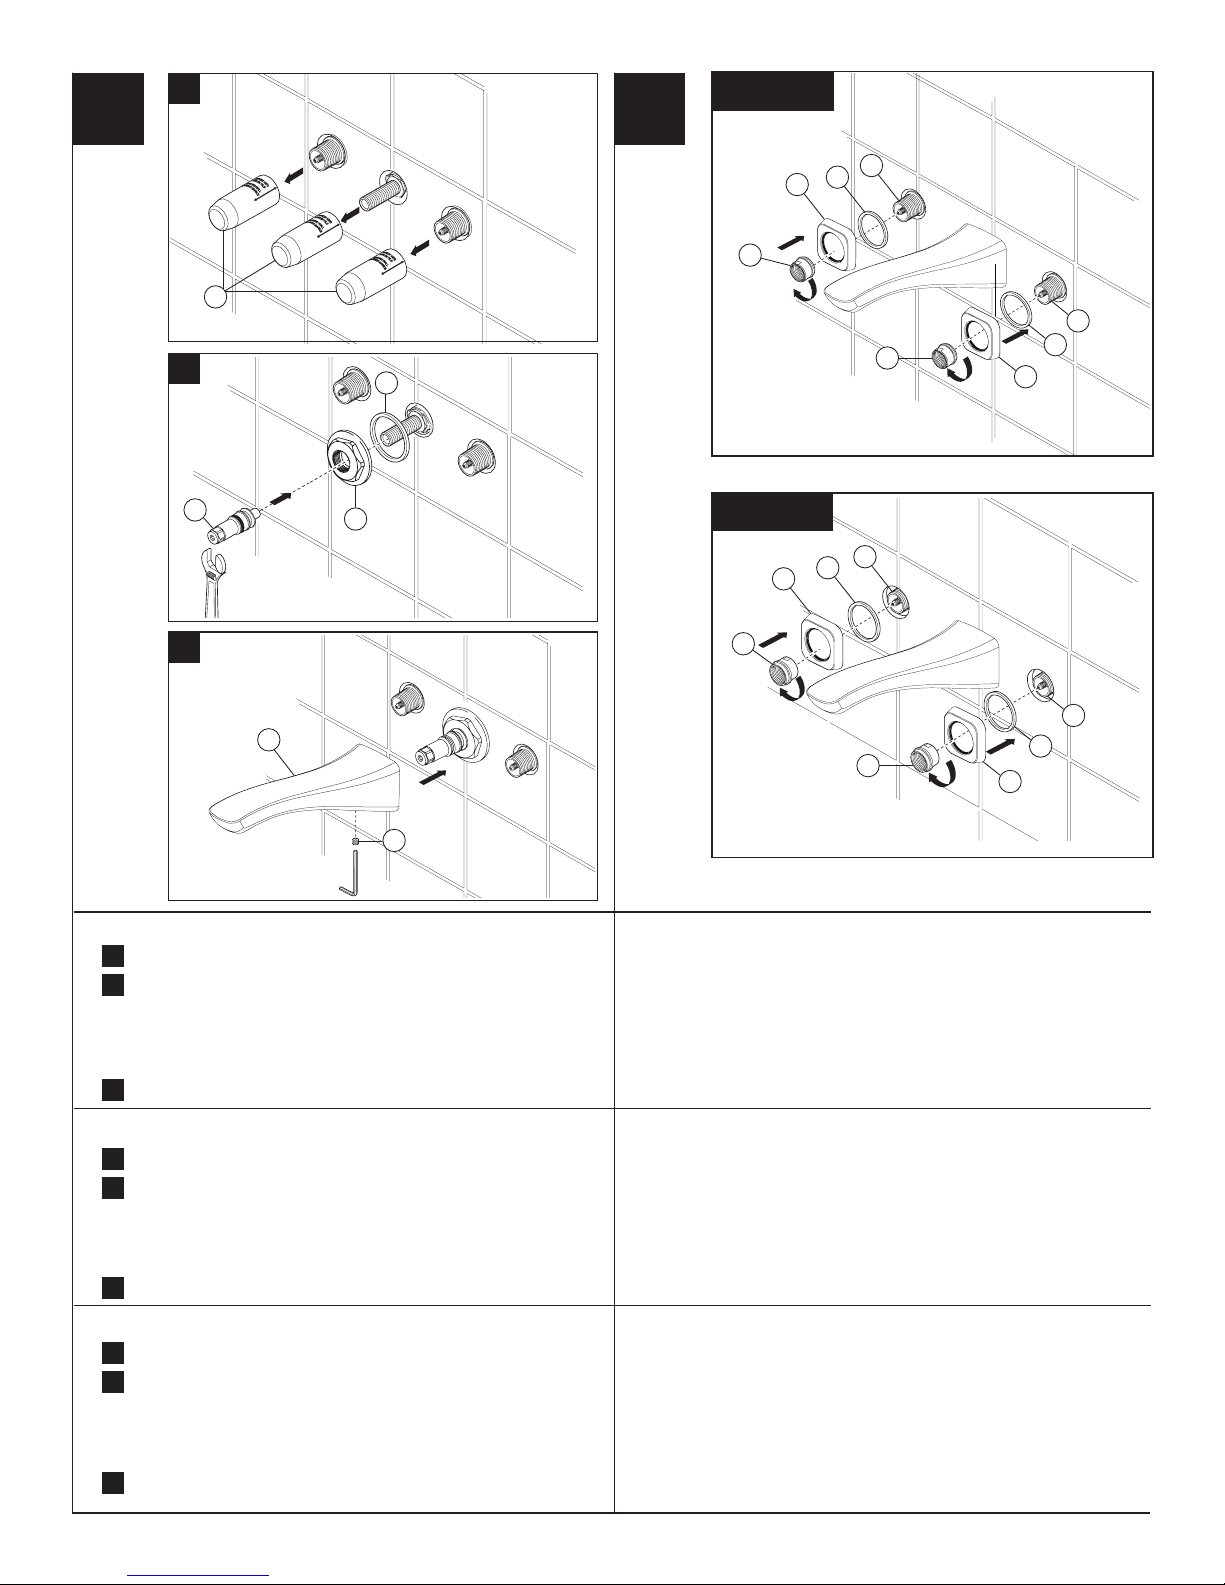
SPOUT FLANGE AND SPOUT INSTALLATION HANDLE FLANGE INSTALLATION
Pull off plasterguards (1) and discard them.
A
.
Install spout ange (1) and gasket (2). Option: If mounting
B
.
surface is uneven, apply suitable sealant to the back surface of
each escutcheon, according to the manufacturer’s instructions.
Finished wall thickness can vary from 1/8" to 1 1/8". Install spout
tube adapter (3). Tighten until adapter bottoms out on nut.
Install spout (1) and secure with set screw (2).
C
.
INSTALACIÓN DEL ADAPTADOR DEL SURTIDOR
Pull off plasterguards (1) and discard them.
A
.
Install spout ange (1) and gasket (2). Option: If mounting
B
.
surface is uneven, apply suitable sealant to the back surface of
each escutcheon, according to the manufacturer’s instructions.
Finished wall thickness can vary from 1/8" to 1 1/8". Install spout
tube adapter (3). Tighten until adapter bottoms out on nut.
Install spout (1) and secure with set screw (2).
C
.
Install handle ange (1) and gasket (2). Secure with ange nut (3).
Finished wall thickness can vary from 1/8 "to 1 1/8". If mounting sleeve
(4) is extending from nished wall more than 3/8", install ange nut (3)
as shown in gure 1. If mounting sleeve (4) is sub ush or extending less
than 3/8" from nished wall, install ange nut (3) as shown in gure 2.
HANDLE FLANGE INSTALLATION
Instale el reborde de la manija (1) y el empaque (2). Fije con la tuerca
con la arandela incorporada (3). El espesor de la pared acabada puede
variar desde 1/8" hasta 1 1/8". Si la mang a de instalación manga (4)
sobrepasa más de 3/8" de la pared acabada, instale la tuerca con la
arandela incorporada (3) como se muestra en el diagrama 1. Si la mang
a de instalación manga (4) está por debajo del nivel de la pared o se
extiende menos de 3/8" de la pared acabada, instale la tuerca con la
arandela incorporada (3) como se muestra en el diagrama 2.
Figure 2
1
3
4
2
3
4
2
1
SPOUT FLANGE AND SPOUT INSTALLATION
Pull off plasterguards (1) and discard them.
A
.
Install spout ange (1) and gasket (2). Option: If mounting
B
.
surface is uneven, apply suitable sealant to the back surface of
each escutcheon, according to the manufacturer’s instructions.
Finished wall thickness can vary from 1/8" to 1 1/8". Install spout
tube adapter (3). Tighten until adapter bottoms out on nut.
Install spout (1) and secure with set screw (2).
C
.
HANDLE FLANGE INSTALLATION
Installez l’embase de la manette (1) et le joint (2). Fixez la manette avec
l’écrou à embase (3). L’épaisseur du mur ni peut varier de 1/8" à 1
1/8" . Si la saillie du manchon (4) par rapport à la surface du mur ni est
supérieure à 3/8 po, installez l’écrou à embase (3) comme le montre la
gure 1. Si le manchon (4) est en retrait par rapport à la surface du mur
ni ou s’il présente une saillie de moins de 3/8 po par rapport à celle-ci,
installez l’écrou à embase (3) comme le montre la gure 2.
2
85865 Rev. C
Page 3

A.
3 4
3
2
1
Finished Wall
1 11/16"-1 3/4"
(42.8 mm -
44.4 mm)
1
B.
2
3
6
HANDLE INSTALLATION
Install stem extender (1) onto the cartridge. Mark the stem extender (1)
A
.
between 1 11/16" - 1 3/4" from nished wall; remove and cut if necessary.
Reinstall stem extender (1). Select one of the 4 supplied screw (2) lengths.
Screw must securely hold stem extender (1) in place.
Make sure handle insert (1) and glide ring (2) are pressed into place in
B
.
the handle (3). Install handle (3) onto stem (4). Align handle and ange in
the off position. If adjustment is needed remove handle (3) and screw (5).
Remove stem extender (4) and rotate one notch. Reinstall screw (5) and
handle. Install set screw (6) and button cover (7). Repeat steps A & B for
the other handle.
INSTALACIÓN DE LA MANIJA
Instale la extensión de la espiga (1) en el cartucho. Marque la espiga
A
.
(1) 1 11/16" - 1 3/4" de la pared acabada; quite y corte si se necesita.
Reinstale la extensión de la espiga (1). Seleccione uno de los 4 tornillos
de diferentes largos (2). El tornillo debe sujetar bien la extensión de la
espiga (1) en su sitio.
Asegúrese que el inserto de la manija (1) y el aro de deslice (2) estén
B
.
presionados en sitio en la manija (3). Instale la manija (3) en la espiga (4).
Alinee la manija y el reborde en la posición cerrada. Si se necesita ajustar,
quite la manija (3) y el tornillo (5). Quite la extensión de la espiga (4) y gire
una muesca. Reinstale el tornillo (5) y la manija. Instale el tornillo de ajuste
(6) y la cubierta del botón (7). Repita los pasos A y B en la otra manija.
INSTALLATION DES MANETTES
Installez la rallonge de tige (1) sur la cartouche. Faites une marque sur la
A
.
rallonge (1) à 1 11/16 po - 1 3/4 po de la surface du mur ni si nécessaire.
Enlevez-la et coupez-la. Réinstallez ensuite la rallonge de tige (1).
Sélectionnez une des 4 vis (2) de longueurs différentes fournies.La vis
doit maintenir la rallonge de tige (1) solidement en place.
Assurez-vous que l’élément rapporté de la manette (1) et l’anneau glissant
B
.
(2) sont bien calés dans la manette (3). Montez la manette (3) sur la tige
(4). Placez la manette en position de fermeture et assurez-vous qu’elle
se trouve dans la bonne position par rapport à l’embase. Si un réglage
est nécessaire, enlevez la manette (3) et la vis (5). Enlevez la rallonge de
tige (4) et reposez-la après l’avoir tournée d’un cran. Reposez la vis (5) et
la manette. Installez la vis de calage (6) et le capuchon (7). Répétez les
étapes A et B pour installer l’autre manette.
5
4
1
7
1
2
FLUSH YOUR SYSTEM
Remove aerator (1) using tool (2) provided with your faucet.
You may need to turn on cold water slightly to help push
NOTE:
out aerator. Turn both faucet handles (3) to full open position.
Turn on hot and cold supplies (if not already open) and ush
water lines for one minute. Important:This ushes away any
debris that could cause damage to internal parts or disrupt water
ow from your faucet. After ushing, turn handles to off position
and reassemble aerator using wrench.
INSTALACIÓN DE LA MANIJA
Quite el aireador (1) usando la herramienta (2) suministrada con
su llave de agua.
ayudarlo a sacar el aireador. Gire ambas llaves de agua (3) a la
posición completamente abierta. Abra los suministros de agua
caliente y fría (si todavía no se han abierto) y deje que el agua
corra por las tuberías por un minuto.
Importante: Esto limpia cualquier escombro que pudiera causar
daño a las partes internas o interrumpir el ujo del agua de su
llave de agua ó grifo. Después de dejar correr el agua, cierre el
agua con ambas manijas y reensamble el aireador usando la
llave plástica azul.
INSTALLATION DES MANETTES
Enlevez l’aérateur (1) à l’aide de la outil (2) fournie avec le
robinet.
peu pour déloger l’aérateur. Amenez les deux manettes (3) en
position ’ouverture maximale. Rétablissez l’arrivée d’eau chaude
et d’eau froide, si vous ne l’avez pas déjà fait, et laissez couler
l’eau une minute pour rincer la tuyauterie. Important : cette
opération vise à évacuer les corps étrangers qui pourraient
abîmer les éléments internes de votre robinet et nuire à son bon
fonctionnement. Une fois le rinçage terminé, fermez le robinet
et remontez ’aérateur au moyen de la clé en plastique bleue.
3
: vous pourrez devoir faire couler l’eau froide un
NOTE
Puede necesitar abrir el agua fría para
NOTA:
85865 Rev. C
Page 4

2
1
1
9
8
4
6
3
2
5
7
3
MAINTENANCE – VALVES
SHUT OFFWATER SUPPLIES BEFORE SERVICING VALVE OR
SPOUT ASSEMBLIES.
If your faucet leaks out of spout or around handle body, replace valve
cartridge (1).
A. Remove button (2) and set screw (3). Pull off handle (4).
B. Remove screw (5) and stem extender (6).
C. Remove ange nut (7),ange and gasket (8).
D. Remove mounting sleeve (9).
E. Unscrew cartridge by turning it counterclockwise using a 19 mm hex
socket wrench.
F. Install new cartridge and assemble other parts in reverse order.
NOTE: Line up handles with valves in closed position before
retting handles.
MANTENIMIENTO – VÁLVULAS
CIERRE LOS SUMINSTROS DE AGUA ANTES DE HACERLE EL
MANTENIMIENTO A LA VÁLVULA O AL SURTIDOR.
Si el agua se está por e caño o por debajo de la manija-- reemplace el
cartucho de la válvula (1).
A. Quite el botón (2) y el tornillo de presión (3). Arranque la manija (4).
B. Quite el tornillo (5) y el suplemento del tronco (6).
C. Quite la Tuerca con arandela incorporada (7), el reborde de la manija
y empaque (8).
D. Quite la manga de instalación (9).
E. Desatornille el cartucho dándole vuelta a la izquierda usando un de
19 milíme tros llave de socket.
F. Instale el nuevo cartucho y ensamble otras piezas en orden inverso.
NOTA: Formación manijas con las válvulas en la posición cerrada
antes de reinstalar las manijas.
MAINTENANCE – SPOUT
SHUT OFFWATER SUPPLIES BEFORE SERVICING VALVE OR
SPOUT ASSEMBLIES.
If your faucet leaks at base of spout, replace o-ring (1) on spout adapter (2).
A. Loosen set screw (3) on bottom side of spout and pull straight out on
spout to remove it from adapter.
B. Replace O-ring (1) on adapter (2).
C. Reassemble in reverse order.
D. If leak continues replace adapter (2).
MANTENIMIENTO – SURTIDOR
CIERRE LOS SUMINSTROS DE AGUA ANTES DE HACERLE EL
MANTENIMIENTO A LA VÁLVULA O AL SURTIDOR.
Si la llave de agua tiene una ltración o fuga de agua, cambie el aro-O (1)
en el adaptador del surtidor (2).
A. Aoje el tornillo de ajuste (3) en la parte de abajo del surtidor y hale
el surtidor directamente hacia fuera para sacarlo del adaptador.
B. Cambie el aro-O (1) en el adaptador (2).
C. Ensamble otra vez en orden inverso.
D. Si el escape del agua continúa substituya el adaptador (2).
ENTRETIEN – SOUPAPE
COUPEZ L’ALIMENTATION EN EAU AVANT D’ENTREPRENDRE
L’ENTRETIEN DE LA SOUPAPE OU DU BEC.
Si votre robinet coule hors du bec ou autour du corps de traitement,
substituez la cartouche de valve (1).
A. Retirez le bouton (2) et la vis de réglage (3). Retirez le traitement (4).
B. Retirez la vis (5) et l'unité d'extension de tige (6).
C. Retirez écrou à embase (7), embase de manette et joint (8)
D. Retirez la douille de support (9).
E. Dévissez la cartouche en la tournant dans le sens contraire des
aiguilles d'une montre u tilisant un h exa de 19 m illimètres cl é à
douille.
F. Installez la nouvelle cartouche et assemblez d'autres pièces à l'envers
la commande.
position de fermeture avant de remettre des traitements en état.
NOTE :Ligne traitements avec des valves en
ENTRETIEN – BEC
COUPEZ L’ALIMENTATION EN EAU AVANT D’ENTREPRENDRE
L’ENTRETIEN DE LA SOUPAPE OU DU BEC.
Si le robinet fuit par la base du bec, remplacez le joint torique (1) sur
l’adaptateur de bec (2).
A. Desserrez la vis de calage (3) du côté inférieur du bec et tirez
directement sur le be c pour le ret irer de l’ada ptateur.
B. Reposez le joint torique (1) sur l’adaptateur (2).
C. Reposez les éléments dans l’ordre inverse à celui de la dépose.
D. Si la fuite continue substituez l'adaptateur (2).
4
85865 Rev. C
Page 5

Specify Finish
▲
Especifíque el Acabado
Précisez le Fini
RP61828
O-Ring
Anillo “O”
RP75494
Spout Adapter
Adaptador del Surtidor
Adaptateur de bec
Joint Torique
RP61827
Spout Flange Nut
Tuerca con arandela
incorporada para
el Surtidor
RP78749▲
Flange and Gasket
Borde y junta
Bride et Joint
RP61830
Set Screw & Allen Wrench
Tornillo de Ajuste y Llave Allen
Vis et Clé Allen
RP48428
RP48428-1.2
Aerator & Wrench
Aireador y Llave
Aérateur et Clé
RP78748
Handle Assembly (2)
Conjunto de la manija (2)
Montage de la manette (2)
▲
RP61819
Length Screws (2)
Tornillos (2)
Vis (2)
RP62374
Set Screw,
Tornillo de Ajuste,
Vis,
Button
Capuchon
et Clé Allen
RP61821
Flange Nut (2)
Tuerca con arandela
incorporadas (2)
Écrou à embases (2)
RP61820
Stem Extender (2)
Extensión para la Espiga (2)
Rallonge de tige (2)
& Allen Wrench
Botón
y Llave Allen
5
85865 Rev. C
Page 6

CLEANING AND CARE
Care should be given to the cleaning of this product. Although its finish is extremely durable, it can be damaged by harsh abrasives or polish. To clean,
simply wipe gently with a damp cloth and blot dry with a soft towel.
Limited Warranty on Delta® Faucets
Parts and Finish
All parts (other than electronic parts and batteries) and finishes of this Delta® faucet are warranted
to the original consumer purchaser to be free from defects in material and workmanship for as long
as the original consumer purchaser owns the home in which the faucet was first installed or, for
commercial users, for 5 years from the date of purchase.
Electronic Parts and Batteries (if applicable)
Electronic parts (other than batteries), if any, of this Delta® faucet are warranted to the original
consumer purchaser to be free from defects in material and workmanship for 5 years from the
date of purchase or, for commercial users, for one year from the date of purchase. No warranty is
provided on batteries.
Delta Faucet Company will replace, FREE OF CHARGE, during the applicable warranty period,
any part or finish that proves defective in material and/or workmanship under normal installation,
use and service. If repair or replacement is not practical, Delta Faucet Company may elect to
refund the purchase price in exchange for the return of the product. These are your exclusive
remedies.
Delta Faucet Company recommends using a professional plumber for all installation and repair. We
also recommend that you use only genuine Delta® replacement parts.
Delta Faucet Company shall not be liable for any damage to the faucet resulting from misuse,
abuse, neglect or improper or incorrectly performed installation, maintenance or repair, including
failure to follow the applicable care and cleaning instructions.
LIMPIEZA Y CUIDADO DE SU LLAVE
Tenga cuidado al ir a limpiar este producto. Aunque su acabado es sumamente durable, puede ser afectado por agentes de limpieza o para pulir abrasivos. Para limpiar su llave, simplemente frótela con un trapo húmedo y luego séquela con una toalla suave.
Replacement parts may be obtained by calling the applicable number below or by writing to:
In the United States and Mexico: In Canada:
Delta Faucet Company Masco Canada Limited, Plumbing Group
Product Service Technical Service Centre
55 E. 111th Street 350 South Edgeware Road
Indianapolis, IN 46280 St. Thomas, Ontario, Canada N5P 4L1
1-800-345-DELTA (3358) 1-800-345-DELTA (3358)
customerservice@deltafaucet.com customerservice@mascocanada.com
Proof of purchase (original sales receipt) from the original purchaser must be made available to
Delta Faucet Company for all warranty claims unless the purchaser has registered the product with
Delta Faucet Company. This warranty applies only to Delta® faucets manufactured after January 1,
1995 and installed in the United States of America, Canada and Mexico.
DELTA FAUCET COMPANY SHALL NOT BE LIABLE FOR ANY SPECIAL, INCIDENTAL OR
CONSEQUENTIAL DAMAGES (INCLUDING LABOR CHARGES) FOR BREACH OF ANY
EXPRESS OR IMPLIED WARRANTY ON THE FAUCET. Some states/provinces do not allow the
exclusion or limitation of special, incidental or consequential damages, so these limitations and
exclusions may not apply to you. This warranty gives you special legal rights. You may also have
other rights which vary from state/province to state/province.
This is Delta Faucet Company’s exclusive written warranty and the warranty is not transferable.
If you have any questions or concerns regarding our warranty, please view our Warranty FAQs at
www.deltafaucet.com, email us at customerservice@deltafaucet.com or call us at the applicable
number above.
© 2016 Masco Corporation of Indiana
Garantía Limitada de las Llaves de Agua (grifos) Delta®
Piezas y acabado
Todas las piezas (excepto las piezas electrónicas y las pilas) y los acabados de esta llave de
agua Delta® están garantizados al consumidor comprador original de estar libres de defectos en
material y fabricación durante el tiempo que el comprador original posea la vivienda en la que la
llave de agua fue originalmente instalada o, para los consumidores comerciales, durante 5 años
a partir de la fecha de compra.
Componentes electrónicos y pilas (si aplicable)
Todas las piezas (salvo las pilas), si hay, de esta llave de agua Delta® están garantizadas al consumidor comprador original de estar libres de defectos en materiales y fabricación durante 5 años
a partir de la fecha de compra o, para los usuarios comerciales, por un año a partir de la fecha de
compra. No se garantizan las pilas.
Delta Faucet Company reemplazará, SIN CARGO, durante el período de garantía aplicable, cualquier pieza o acabado que pruebe tener defectos de material y/o fabricación bajo la instalación,
uso y servicio normal. Si la reparación o su reemplazo no es práctico, Delta Faucet Company tiene
la opción de reembolsarle su dinero por la cantidad del precio de compra a cambio de la devolución
del producto. Estos son sus únicos recursos.
Delta Faucet Company recomienda que use los servicios de un plomero profesional para todas las
instalaciones y reparaciones. También le recomendamos que utilice sólo las piezas de repuesto
originales de Delta®.
Delta Faucet Company no será responsable por cualquier daño a la llave de agua que resulte del
mal uso, abuso, negligencia o mala instalación o mantenimiento o reparación incorrecta, incluyendo el no seguir los cuidados aplicables y las instrucciones de limpieza.
Las piezas de repuesto se pueden obtener llamando al número correspondiente más abajo, o
escribiendo a:
En los Estados Unidos y México: En Canadá:
Delta Faucet Company Masco Canada Limited, Plumbing Group
Product Service Technical Service Centre
55 E. 111th Street 350 South Edgeware Road
Indianapolis, IN 46280 St. Thomas, Ontario, Canada N5P 4L1
1 800 345 DELTA (3358) 1 800 345 DELTA (3358)
customerservice@deltafaucet.com customerservice@mascocanada.com
La prueba de compra (recibo original) del comprador original debe ser disponible a Delta Faucet
Company para todos los reclamos a menos que el comprador haya registrado el producto con
Delta Faucet Company. Esta garantía le aplica sólo a las llaves de agua de Delta® fabricadas
después del 1 de enero 1995 e instaladas en los Estados Unidos de América, Canadá y México.
DELTA FAUCET COMPANY NO SE HACE RESPONSABLE POR CUALQUIER DAÑO ESPECIAL,
INCIDENTAL O CONSECUENTE (INCLUYENDO LOS GASTOS DE MANO DE OBRA) POR EL
INCUMPLIMIENTO DE CUALQUIER GARANTÍA EXPRESA O IMPLÍCITA DE LA LLAVE DE
AGUA. Algunos estados/provincias no permiten la exclusión o limitación de daños especiales,
incidentales o consecuentes, por lo que estas limitaciones y exclusiones pueden no aplicarle a
usted. Esta garantía le otorga derechos legales. Usted también puede tener otros derechos que
varían de estado/provincia a estado/provincia.
Esta es la garantía exclusiva por escrito de Delta Faucet Company y la garantía no es transferible.
Si usted tiene alguna pregunta o inquietud acerca de nuestra garantía, por favor, vea nuestra
sección de preguntas frecuentes FAQ sobre la garantía en www.deltafaucet.com, también puede
enviarnos un correo electrónico a customerservice@deltafaucet.com o llámenos al número que le
corresponda anteriormente incluido.
© 2016 Masco Corporación de Indiana
INSTRUCTIONS DE NETTOYAGE
Il faut le nettoyer avec soin. Même si son fini est extrêmement durable, il peut être abîmé par des produits fortement abrasifs ou des produits de polis-
sage. Il faut simplement le frotter doucement avec un chiffon humide et le sécher à l'aide d'un chiffon doux.
Pièces et finis
Toutes les pièces (à l’exception des composants électroniques et des piles) et tous les finis de ce
robinet Delta® sont protégés contre les défectuosités du matériau et les vices de fabrication par
une garantie qui est consentie au premier acheteur et qui demeure valide tant que celui-ci demeure
propriétaire de la maison dans laquelle le robinet a été installé. Dans le cas d’une utilisation commerciale, la garantie est de 5 ans à compter de la date d’achat.
Composants électroniques et piles (le cas échéant)
Si ce robinet Delta® comporte des composants électroniques, ces composants (à l’exception des
piles) sont protégés contre les défectuosités du matériau et les vices de fabrication par une garan-
tie consentie au premier acheteur qui est d’une durée de 5 ans à compter de la date d’achat. Dans
le cas d’une utilisation commerciale, la garantie est d’un an à compter de la date d’achat. Aucune
garantie ne couvre les piles.
Delta Faucet Company remplacera, GRATUITEMENT, pendant la période de garantie applicable,
toute pièce ou tout fini qui présentera une défectuosité du matériau et/ou un vice de fabrication
pour autant que le robinet ait été installé, utilisé et entretenu normalement. S’il est impossible de
réparer ou de remplacer le robinet, Delta Faucet Company pourra décider de rembourser le prix
d’achat du produit pour autant que celui-ci lui soit retourné. Il s’agit de vos seuls recours.
Delta Faucet Company recommande de confier l’installation et la réparation à un plombier pro-
fessionnel. Nous vous recommandons également d’utiliser uniquement des pièces de rechange
authentiques Delta®.
Delta Faucet Company se dégage de toute responsabilité à l’égard des dommages causés au
robinet en raison d’un mauvais usage, d’un usage abusif, de la négligence ou de l’utilisation d’une
méthode d’installation, de maintenance ou de réparation incorrecte ou inadéquate, y compris
les dommages résultant du non-respect des instructions de nettoyage et d’entretien applicables.
www.deltafaucet.com
Garantie limitée des robinets Delta
Pour obtenir des pièces de rechange, veuillez appeler au numéro applicable ci-dessous ou écrire
à l’adresse applicable ci-dessous.
Aux États-Unis et au Mexique : Au Canada:
Delta Faucet Company Masco Canada Limited, Plumbing Group
Product Service Technical Service Centre
55 E. 111th Street 350 South Edgeware Road
Indianapolis, IN 46280 St. Thomas, Ontario, Canada N5P 4L1
1-800-345-DELTA (3358) 1-800-345-DELTA (3358)
customerservice@deltafaucet.com customerservice@mascocanada.com
La preuve d’achat (reçu original) du premier acheteur doit être présentée à Delta Faucet Company
pour toutes les demandes en vertu de la garantie, sauf si le produit a été enregistré auprès de
Delta Faucet Company. La présente garantie s’applique uniquement aux robinets Delta® fabriqués
après le 1er janvier 1995 et installés aux États-Unis d’Amérique, au Canada et au Mexique.
DELTA FAUCET COMPANY SE DÉGAGE DE TOUTE RESPONSABILITÉ À L’ÉGARD DES
DOMMAGES PARTICULIERS, CONSÉCUTIFS OU INDIRECTS (Y COMPRIS LES FRAIS
DE MAIN-D’OEUVRE) QUI POURRAIENT RÉSULTER DE LA VIOLATION D’UNE GARANTIE
IMPLICITE OU EXPLICITE QUELCONQUE SUR LE ROBINET. Dans les États ou les provinces
où il est interdit de limiter ou d’exclure la responsabilité à l’égard des dommages particuliers,
consécutifs ou indirects, les limites et les exclusions susmentionnées ne s’appliquent pas. La
présente garantie vous donne des droits précis qui peuvent varier selon l’État ou la province où
vous résidez.
La présente garantie écrite est la garantie exclusive offerte par Delta Faucet Company et elle
n’est pas transférable.
Si vous avez des questions ou des préoccupations en ce qui concerne notre garantie, veuillez
consulter la page Warranty FAQs à www.deltafaucet.com, faire parvenir un courriel à customerservice@deltafaucet.com ou nous appeler au numéro applicable.
6
®
© 2016 Division de Masco Indiana
85865 Rev. C
 Loading...