

Page 1

Ambient
Air Cleaner and
Work Light
Purificateur d'air
ambiant avec
AP-100
10" Contractors Saw
(Model 36-978/36-979)
lampe de travail
Limpiador de aire
ambiental con luz
de trabajo
Instruction Manual
Manuel d’Utilisation
Manual de Instrucciones
FRANÇAIS (13) ESPAÑOL (25)
A15099_01-13-06_RevA
Copyright © 2006 Delta Machinery
www.deltamachinery.com
(800) 223-7278 - US
(800) 463-3582 - CANADA
Page 2

TABLE OF CONTENTS
IMPORTANT SAFETY INSTRUCTIONS . . . . . . . . . . . . . . . . . . . . . . . . . . . . . . . . . . . . . . . . . . . . . . . . . . . . . . . . . . . 2
SAFETY GUIDELINES - DEFINITIONS . . . . . . . . . . . . . . . . . . . . . . . . . . . . . . . . . . . . . . . . . . . . . . . . . . . . . . . . . . . 3
GENERAL SAFETY RULES . . . . . . . . . . . . . . . . . . . . . . . . . . . . . . . . . . . . . . . . . . . . . . . . . . . . . . . . . . . . . . . . . . . . 4
ADDITIONAL SPECIFIC SAFETY RULES . . . . . . . . . . . . . . . . . . . . . . . . . . . . . . . . . . . . . . . . . . . . . . . . . . . . . . . . . 5
FUNCTIONAL DESCRIPTION . . . . . . . . . . . . . . . . . . . . . . . . . . . . . . . . . . . . . . . . . . . . . . . . . . . . . . . . . . . . . . . . . . 7
CARTON CONTENTS . . . . . . . . . . . . . . . . . . . . . . . . . . . . . . . . . . . . . . . . . . . . . . . . . . . . . . . . . . . . . . . . . . . . . . . . . 7
ASSEMBLY . . . . . . . . . . . . . . . . . . . . . . . . . . . . . . . . . . . . . . . . . . . . . . . . . . . . . . . . . . . . . . . . . . . . . . . . . . . . . . . . . 8
OPERATION . . . . . . . . . . . . . . . . . . . . . . . . . . . . . . . . . . . . . . . . . . . . . . . . . . . . . . . . . . . . . . . . . . . . . . . . . . . . . . . . 9
TROUBLESHOOTING. . . . . . . . . . . . . . . . . . . . . . . . . . . . . . . . . . . . . . . . . . . . . . . . . . . . . . . . . . . . . . . . . . . . . . . . 10
MAINTENANCE. . . . . . . . . . . . . . . . . . . . . . . . . . . . . . . . . . . . . . . . . . . . . . . . . . . . . . . . . . . . . . . . . . . . . . . . . . . . . 10
SERVICE . . . . . . . . . . . . . . . . . . . . . . . . . . . . . . . . . . . . . . . . . . . . . . . . . . . . . . . . . . . . . . . . . . . . . . . . . . . . . . . . . . 12
ACCESSORIES . . . . . . . . . . . . . . . . . . . . . . . . . . . . . . . . . . . . . . . . . . . . . . . . . . . . . . . . . . . . . . . . . . . . . . . . . . . . . 12
WARRANTY. . . . . . . . . . . . . . . . . . . . . . . . . . . . . . . . . . . . . . . . . . . . . . . . . . . . . . . . . . . . . . . . . . . . . . . . . . . . . . . . 12
FRANÇAIS . . . . . . . . . . . . . . . . . . . . . . . . . . . . . . . . . . . . . . . . . . . . . . . . . . . . . . . . . . . . . . . . . . . . . . . . . . . . . . . . . 13
ESPAÑOL. . . . . . . . . . . . . . . . . . . . . . . . . . . . . . . . . . . . . . . . . . . . . . . . . . . . . . . . . . . . . . . . . . . . . . . . . . . . . . . . . . 25
IMPORTANT SAFETY INSTRUCTIONS
Read and understand all warnings and operating instructions before using any tool or equipment.
When using tools or equipment, basic safety precautions should always be followed to reduce the risk of
personal injury. Improper operation, maintenance or modification of tools or equipment could result in serious
injury and property damage. There are certain applications for which tools and equipment are designed. Delta
Machinery strongly recommends that this product NOT be modified and/or used for any application other than
for which it was designed.
If you have any questions relative to its application DO NOT use the product until you have written Delta Machinery
and we have advised you.
Online contact form at www.deltamachinery.com
Postal Mail: Technical Service Manager
Delta Machinery
4825 Highway 45 North
Jackson, TN 38305
(IN CANADA: 125 Mural St. Suite 300, Richmond Hill, ON, L4B 1M4)
Information regarding the safe and proper operation of this tool is available from the following sources:
Power Tool Institute
1300 Sumner Avenue, Cleveland, OH 44115-2851
www.powertoolinstitute.org
National Safety Council
1121 Spring Lake Drive, Itasca, IL 60143-3201
American National Standards Institute, 25 West 43rd Street, 4 floor, New York, NY 10036 www.ansi.org
ANSI 01.1Safety Requirements for Woodworking Machines, and the U.S. Department of Labor regulations www.osha.gov
SAVE THESE INSTRUCTIONS!
2
Page 3

SAFETY GUIDELINES - DEFINITIONS
It is important for you to read and understand this manual. The information it contains relates to
protecting YOUR SAFETY and PREVENTING PROBLEMS. The symbols below are used to help you
recognize this information.
Indicates an imminently hazardous situation which, if not avoided, will result in death or
serious injury.
Indicates a potentially hazardous situation which, if not avoided, could result in death or serious
injury.
Indicates a potentially haz ard ous situation which, if not avoided, may result in minor or mod er ate
injury.
Used without the safety alert symbol indicates potentially hazardous situation which, if not
avoided, may result in property damage.
CALIFORNIA PROPOSITION 65
Some dust created by power sanding, sawing, grinding, drilling, and other construction activities
contains chemicals known to cause cancer, birth defects or other reproductive harm. Some examples of these
chemicals are:
• lead from lead-based paints,
• crystalline silica from bricks and cement and other masonry products, and
• arsenic and chromium from chemically-treated lumber.
Your risk from these exposures varies, depending on how often you do this type of work. To reduce your
exposure to these chemicals: work in a well ventilated area, and work with approved safety equipment, al ways
wear NIOSH/OSHA approved, properly fit ting face mask or res pi ra tor when us ing such tools.
3
Page 4

GENERAL SAFETY RULES
Failure to follow these rules may result in serious personal injury.
1. FOR YOUR OWN SAFETY, READ THE INSTRUCTION
MANUAL BEFORE OPERATING THE MACHINE. Learning
the machine’s application, limitations, and specific hazards
will greatly minimize the possibility of accidents and injury.
2. WEAR EYE AND HEARING PROTECTION. ALWAYS
USE SAFETY GLASSES. Everyday eyeglasses are NOT
safety glasses. USE CERTIFIED SAFETY EQUIPMENT.
Eye protection equipment should comply with ANSI Z87.1
standards. Hearing equipment should comply with ANSI
S3.19 standards.
3. WEAR PROPER APPAREL. Do not wear loose clothing,
gloves, neckties, rings, bracelets, or other jewelry which may
get caught in moving parts. Nonslip protective footwear is
recommended. Wear protective hair covering to contain long
hair.
4. DO NOT USE THE MACHINE IN A DANGEROUS
ENVIRONMENT. The use of power tools in damp or wet
locations or in rain can cause shock or electrocution. Keep
your work area well-lit to prevent tripping or placing arms,
hands, and fingers in danger.
5. MAINTAIN ALL TOOLS AND MACHINES IN PEAK
CONDITION. Keep tools sharp and clean for best and safest
performance. Follow instructions for lubricating and changing
accessories. Poorly maintained tools and machines can further
damage the tool or machine and/or cause injury.
6. CHECK FOR DAMAGED PARTS. Before using the machine,
check for any damaged parts. Check for alignment of moving
parts, binding of moving parts, breakage of parts, and any
other conditions that may affect its operation. A guard or any
other part that is damaged should be properly repaired or
replaced with Delta or factory authorized replacement
parts. Damaged parts can cause further damage to the
machine and/or injury.
7. KEEP THE WORK AREA CLEAN. Cluttered areas and benches
invite accidents.
8. KEEP CHILDREN AND VISITORS AWAY. Your shop is a
potentially dangerous environment. Children and visitors can be
injured.
9. REDUCE THE RISK OF UNINTENTIONAL STARTING. Make
sure that the switch is in the “OFF” position before plugging
in the power cord. In the event of a power failure, move the
switch to the “OFF” position. An accidental start-up can cause
injury. Do not touch the plug’s metal prongs when unplugging
or plugging in the cord.
10. USE THE GUARDS. Check to see that all guards are in place,
secured, and working correctly to prevent injury.
11. REMOVE ADJUSTING KEYS AND WRENCHES BEFORE
STARTING THE MACHINE. Tools, scrap pieces, and other
debris can be thrown at high speed, causing injury.
12. USE THE RIGHT MACHINE. Don’t force a machine or an
attachment to do a job for which it was not designed. Damage
to the machine and/or injury may result.
13. USE RECOMMENDED ACCESSORIES. The use of
accessories and attachments not recommended by Delta
may cause damage to the machine or injury to the user.
14. USE THE PROPER EXTENSION CORD. Make sure your
extension cord is in good condition. When using an extension
cord, be sure to use one heavy enough to carry the current
your product will draw. An undersized cord will cause a drop
in line voltage, resulting in loss of power and overheating. See
the Extension Cord Chart for the correct size depending on
the cord length and nameplate ampere rating. If in doubt, use
the next heavier gauge. The smaller the gauge number, the
heavier the cord.
15. SECURE THE WORKPIECE. Use clamps or a vise to hold the
workpiece when practical. Loss of control of a workpiece can
cause injury.
16. FEED THE WORKPIECE AGAINST THE DIRECTION OF
THE ROTATION OF THE BLADE, CUTTER, OR ABRASIVE
SURFACE. Feeding it from the other direction will cause the
workpiece to be thrown out at high speed.
17. DON’T FORCE THE WORKPIECE ON THE MACHINE.
Damage to the machine and/or injury may result.
18. DON’T OVERREACH. Loss of balance can make you fall into
a working machine, causing injury.
19. NEVER STAND ON THE MACHINE. Injury could occur if the tool
tips, or if you accidentally contact the cutting tool.
20. NEVER LEAVE THE MACHINE RUNNING UNATTENDED.
TURN THE POWER OFF. Don’t leave the machine until it comes
to a complete stop. A child or visitor could be injured.
21. TURN THE MACHINE “OFF”, AND DISCONNECT THE
MACHINE FROM THE POWER SOURCE before installing or
removing accessories, changing cutters, adjusting or changing
set-ups. When making repairs, be sure to lock the start switch
in the “OFF” position. An accidental start-up can cause injury.
22. MAKE YOUR WORKSHOP CHILDPROOF WITH
PADLOCKS, MASTER SWITCHES, OR BY REMOVING
STARTER KEYS. The accidental start-up of a machine by a
child or visitor could cause injury.
23
. STAY ALERT, WATCH WHAT YOU ARE DOING, AND USE
COMMON SENSE. DO NOT USE THE MACHINE WHEN
YOU ARE TIRED OR UNDER THE INFLUENCE OF DRUGS,
ALCOHOL, OR MEDICATION. A moment of inattention while
operating power tools may result in injury.
24. USE OF THIS TOOL CAN GENERATE AND
DISBURSE DUST OR OTHER AIRBORNE PARTICLES,
INCLUDING WOOD DUST, CRYSTALLINE SILICA DUST
AND ASBESTOS DUST. Direct particles away from face
and body. Always operate tool in well ventilated area and
provide for proper dust removal. Use dust collection system
wherever possible. Exposure to the dust may cause serious
and permanent respiratory or other injury, including silicosis (a
serious lung disease), cancer, and death. Avoid breathing the
dust, and avoid prolonged contact with dust. Allowing dust to
get into your mouth or eyes, or lay on your skin may promote
absorption of harmful material. Always use properly fitting
NIOSH/OSHA approved respiratory protection appropriate for
the dust exposure, and wash exposed areas with soap and
water.
4
Page 5

ADDITIONAL SPECIFIC SAFETY RULES
Failure to follow these rules may result in serious personal injury.
DUST. Combining wood and metal dust can create an explosion
DO NOT USE THIS UNIT TO FILTER METAL
or fire hazard. This unit is intended to filter non-explosive
atmospheres only.
DO NOT USE THIS UNIT TO DISSIPATE FUMES
OR SMOKE. Explosions or fire can result. This air cleaner is
intended for use where only dry airborne dust is present. Its use
should be limited to non-explosive, non-metallic atmospheres.
1. DO NOT OPERATE THIS UNIT until it is completely
assembled and installed according to the instructions. A unit
incorrectly assembled can cause injury.
2. OBTAIN ADVICE from your supervisor, instructor, or
another qualified person if you are not thoroughly familiar
with the operation of this unit. Knowledge is safety.
3. FOLLOW ALL WIRING CODES and recommended electrical
connections to prevent electrical shock or electrocution.
4. DO NOT LIFT THIS UNIT BY THE POWER CORD. Do
not use the power cord as a hanging device. A damaged
power cord can cause electrical shock or electrocution.
5. SECURELY ANCHOR THIS UNIT to a permanent or fixed
supporting structure when suspending it from the ceiling.
A falling unit can cause serious injury. Always keep a
minimum of 7 feet between the bottom of the unit and the
floor surface to allow for sufficient head clearance. Use
only a chain rated for a minimum of 150 lb. working load
to adequately hold the unit. Use steel S-Hooks that are at
least 1/4" in diameter to suspend the unit from the ceiling.
Lag-type bolts used to suspend the unit from the ceiling
must be threaded at least 1-1/2" into supporting structural
members.
6. SUPPORT THIS UNIT or securely clamp it to the work
surface when it is used in a portable application to
eliminate potential injury and/or damage to the unit.
7. ENSURE THAT THE INTAKE AND EXHAUST AREAS
ARE CLEAR prior to starting the unit. Clogged intakes or
exhausts can cause an explosion and/or fire.
8. KEEP ARMS, HANDS, AND FINGERS AWAY FROM
THE FAN. Avoid all exposure to rotating parts to prevent
injury.
9. DO NOT OPERATE THIS UNIT WITHOUT THE FILTERS
IN PLACE. Dust and other small debris will go directly to
the motor, causing over-heating and the potential for fire
and/or explosion.
10. DO NOT ATTEMPT to remove or replace the filter(s) while the
unit is running. Exposed fan blades can cause severe cuts.
Make certain that the unit is disconnected from the power
source.
11. MAINTAIN THE UNIT in top condition. Clogged filters
can increase the potential for fire or explosion. Follow all
instructions for changing and cleaning filters.
12. STORE THE UNIT in a location that eliminates the
potential for damage to the power cord. A damaged
power cord can cause shock or electrocution. Safely store
power cord on the unit to eliminate tripping hazards.
13. TURN THE UNIT “OFF” and disconnect the unit from the
power source before installing or removing accessories,
before adjusting or changing set-ups, or when making
repairs. An accidental start-up can cause serious injury.
SAVE THESE INSTRUCTIONS.
Refer to them often and use them to instruct others.
POWER CONNECTIONS
A separate electrical circuit should be used for your machines. This circuit should not be less than #12 wire and should be protected
with a 20 Amp time lag fuse. If an extension cord is used, use only 3-wire extension cords which have 3-prong grounding type plugs
and matching receptacle which will accept the machine’s plug. Before connecting the machine to the power line, make sure the switch
(s) is in the “OFF” position and be sure that the electric current is of the same characteristics as indicated on the machine. All line
connections should make good contact. Running on low voltage will damage the machine.
Do not expose the machine to rain or operate the machine in damp locations.
MOTOR SPECIFICATIONS
Your machine is wired for 120 volts, 60 HZ alternating current. Before connecting the machine to the power source, make sure the
switch is in the “OFF” position.
GROUNDING INSTRUCTIONS
This machine must be grounded while in use to protect the operator from electric shock.
5
Page 6
1. All grounded, cord-connected machines:
In the event of a malfunction or breakdown, grounding provides a path of least resistance for electric current to reduce the risk of
electric shock. This machine is equipped with an electric cord having an equipment-grounding conductor and a grounding plug.
The plug must be plugged into a matching outlet that is properly installed and grounded in accordance with all local codes and
ordinances.
Do not modify the plug provided - if it will not fit the outlet, have the proper outlet installed by a qualified electrician.
Improper connection of the equipment-grounding conduc-tor can result in risk of electric shock. The conductor with insulation
having an outer surface that is green with or without yellow stripes is the equipment-grounding conductor. If repair or replacement
of the electric cord or plug is necessary, do not connect the equipment-grounding conductor to a live terminal.
Check with a qualified electrician or service personnel if the grounding instructions are not completely understood, or if in doubt a
s to whether the machine is properly grounded.
Use only 3-wire extension cords that have 3-prong grounding type plugs and matching 3-conductor receptacles that accept the
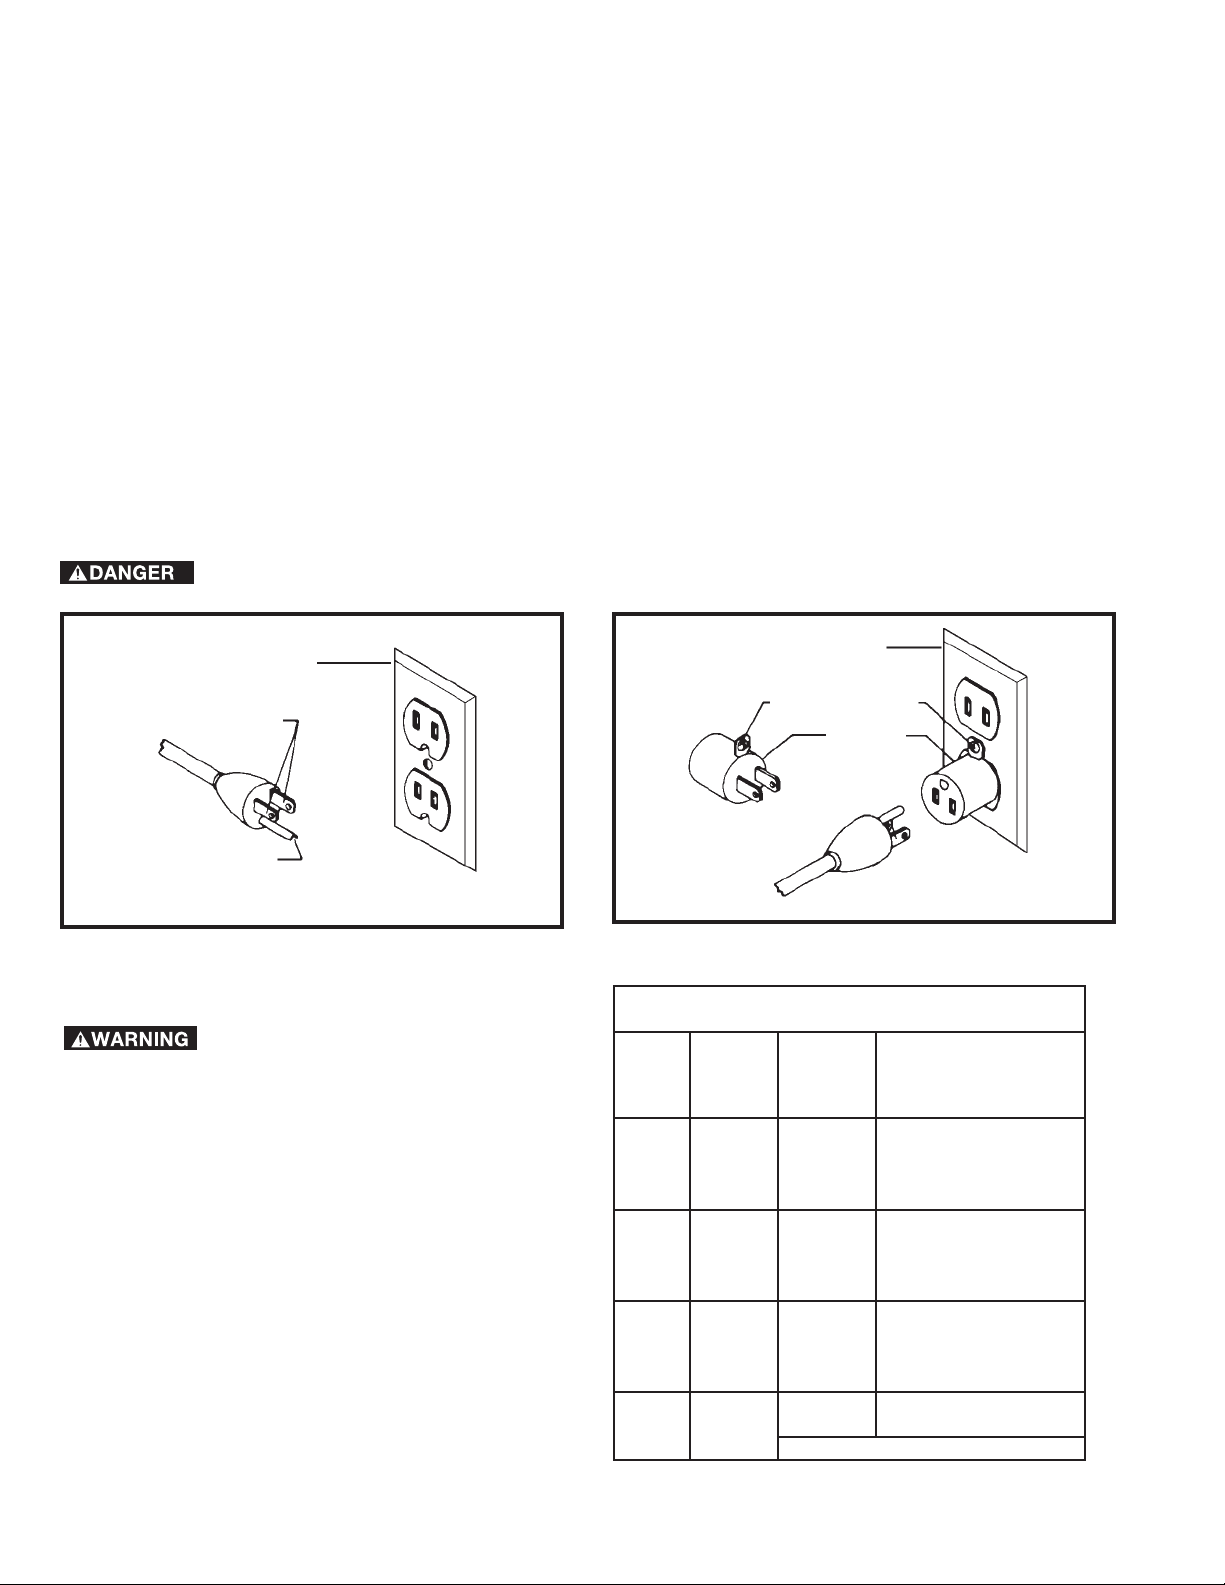
machine’s plug, as shown in Fig. A.
Repair or replace damaged or worn cord immediately.
2. Grounded, cord-connected machines intended for use on a supply circuit having a nominal rating less than 150 volts:
If the machine is intended for use on a circuit that has an outlet that looks like the one illustrated in Fig. A, the machine will have
a grounding plug that looks like the plug illustrated in Fig. A. A temporary adapter, which looks like the adapter illustrated in Fig.
B, may be used to connect this plug to a matching 2-conductor receptacle as shown in Fig. B if a properly grounded outlet is not
available. The temporary adapter should be used only until a properly grounded outlet can be installed by a qualified electrician.
The green-colored rigid ear, lug, and the like, extending from the adapter must be connected to a permanent ground such as a
properly grounded outlet box. Whenever the adapter is used, it must be held in place with a metal screw.
NOTE: In Canada, the use of a temporary adapter is not permitted by the Canadian Electric Code.
In all cases, make certain that the receptacle in question is properly grounded. If you are not sure, have a
qualified electrician check the receptacle.
GROUNDED OUTLET BOX
CURRENT
CARRYING
PRONGS
GROUNDING BLADE
IS LONGEST OF THE 3 BLADES
Fig. A Fig. B
EXTENSION CORDS
Use proper extension cords. Make
sure your extension cord is in good condition and is a
3-wire extension cord which has a 3-prong grounding
type plug and matching receptacle which will accept
the machine’s plug. When using an extension cord,
be sure to use one heavy enough to carry the current
of the machine. An undersized cord will cause a
drop in line voltage, resulting in loss of power and
overheating. Fig. D-1 shows the correct gauge to use
depending on the cord length. If in doubt, use the
next heavier gauge. The smaller the gauge number,
the heavier the cord.
GROUNDED OUTLET BOX
GROUNDING MEANS
ADAPTER
MINIMUM GAUGE EXTENSION CORD
RECOMMENDED SIZES FOR USE WITH STATIONARY ELECTRIC MACHINES
Total
Ampere
Rating Volts
0-6 120
0-6 120 25-50 16 AWG
0-6 120 50-100 16 AWG
0-6 120 100-150 14 AWG
6-10 120
6-10 120 25-50 16 AWG
6-10 120 50-100 14 AWG
6-10 120 100-150 12 AWG
10-12 120
10-12 120 25-50 16 AWG
10-12 120 50-100 14 AWG
10-12 120 100-150 12 AWG
12-16 120
12-16 120 25-50 12 AWG
12-16 120
Length of
Cord in
Feet
up to
25 18 AWG
up to
25 18 AWG
up to
25 16 AWG
up to
GREATER THAN 50 FEET NOT RECOMMENDED
Gauge of Extension
Cord
25 14 AWG
Fig. D-1
6
Page 7
FUNCTIONAL DESCRIPTION
FOREWORD
The Delta AP100 Air Purifier provides all the benefits of clean air along with lighting and portability with a 120 volt
induction motor, two-stage air filtration, two integrated fluorescent bulbs, and hanging capabilities. With 450 CFM (cubic
feet per minute) capacity, a coarse pre-filter and five micron inner filter, the AP100 significantly reduces wood dust to
eliminate health and cleaning concerns. In addition, the AP100 features two integrated, dedicated lights for finishing
applications and eye bolts for hanging the air purifier out of workshop space.
NOTICE: The photo on the manual cover illustrates the current production model. All other illustrations contained in the
manual are representative only and may not depict the actual labeling or accessories included. These are intended to
illustrate technique only.
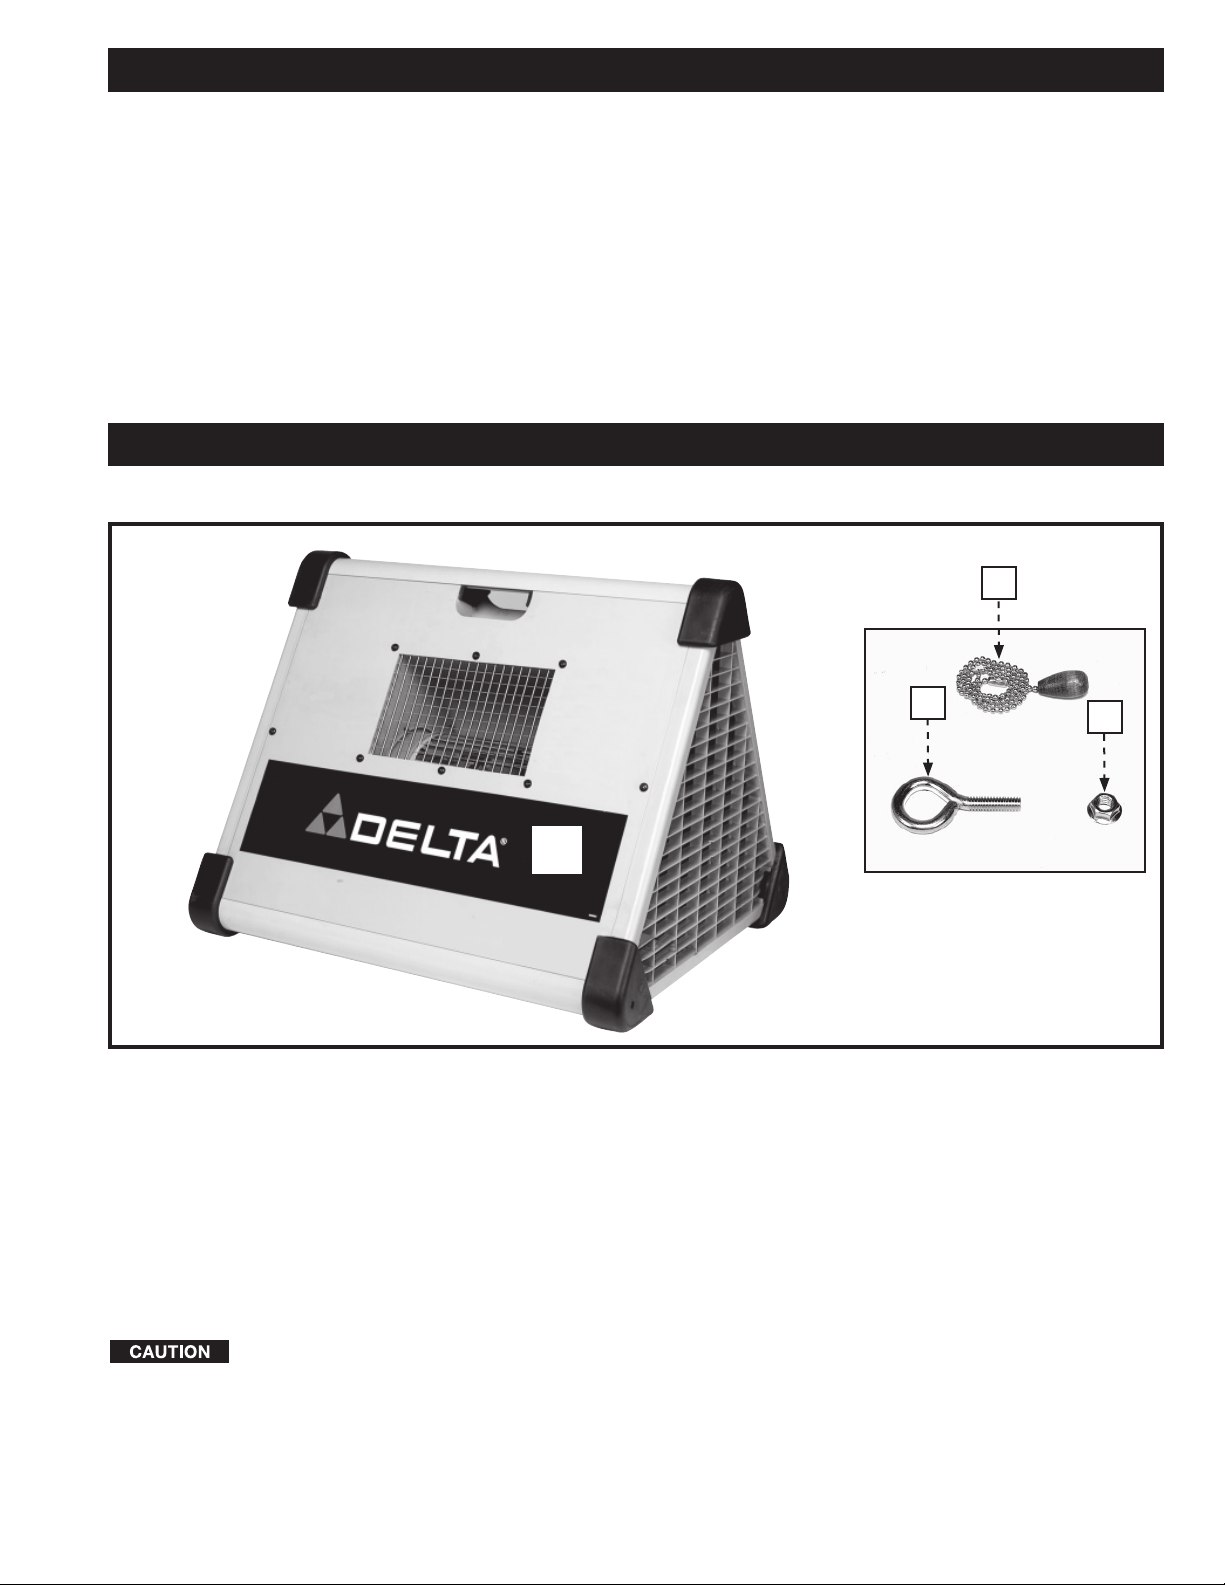
CARTON CONTENTS
2
UNPACKING AND CLEANING
1
1. Air Cleaner
2. Pull Cords (2)
3. 5/16-18x1½" Eye-Bolts (2)
4. 5/16-18 Flange Nuts (2)
3
4
Carefully unpack the machine and all loose items from the shipping container(s). Remove the rust-preventative oil from
unpainted surfaces using a soft cloth moistened with mineral spirits, paint thinner or denatured alcohol.
Do not use highly volatile solvents such as gasoline, naphtha, acetone or lacquer thinner for cleaning your
machine.
After cleaning, cover the unpainted surfaces with a good quality household floor paste wax.
7
Page 8
ASSEMBLY
For your own safety, do not connect the machine to the power source until the machine is
completely assembled and you read and understand the entire instruction manual.
ASSEMBLY TOOLS REQUIRED
No assembly tools are required.
ASSEMBLY TIME ESTIMATE
Assembly for this machine takes approximately 30 minutes.
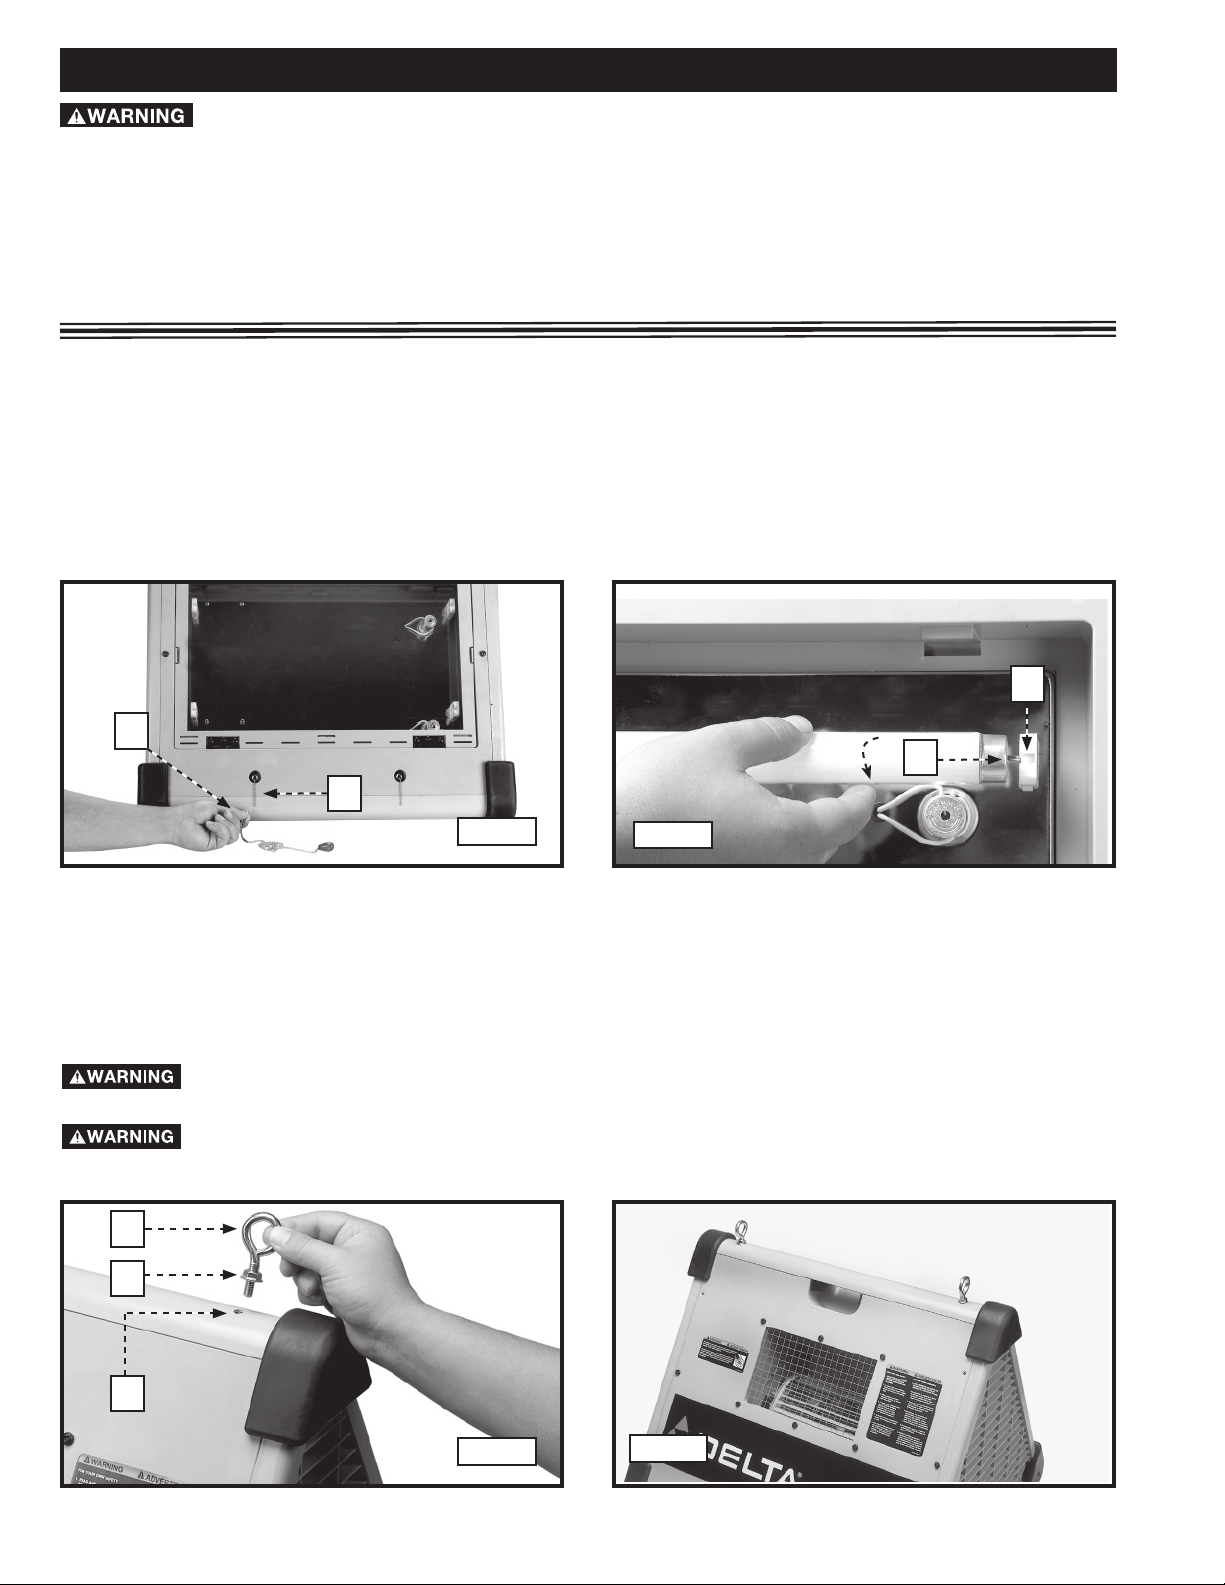
PULL CORDS
Insert the cord (A) Fig. 1 in the pull cord catch (B). Repeat this process for the remaining pull cord.
FLUORESCENT BULBS (NOT INCLUDED)
IMPORTANT: This unit uses standard 18"x1", 15 watt fluorescent light bulbs.
1. Insert one end of the bulb (A) Fig. 2 through the slot (B). Repeat this step for the other end of the bulb.
2. Twist the bulb 1/4 turn to lock it in place.
3. Repeat this process for the remaining bulb.
A
B
Fig. 1
Fig. 2
MOUNTING THE AIR CLEANER TO THE CEILING OR OVERHEAD SUPPOR
1. Thread a 5/16-18 flange nut (B) Fig. 3, on a 5/16-18 x 1-1/2" eye bolt (C).
2. Thread the eye-bolt (C) Fig. 3 in the hole (D).
NOTE: Tighten the eye-bolts at least eight complete turns.
3. Tighten the flange nut (B) Fig. 3 against the air cleaner.
4. Repeat this process for the remaining hole in the top of the air cleaner (Fig. 4).
to a ceiling or overhead support.
members.
This tool weighs approximately 40 pounds. Make certain the unit is securely supported when mounting it
Never secure the air cleaner hardware to drywall, drop ceiling tile/frame, or other non-structural
C
B
A
B
D
Fig. 3
Fig. 4
8
Page 9

When suspending the air cleaner from the ceiling or other overhead support, use steel s-hooks that are a
minimum of 1/4".
Thread all lag hooks at least 1-1/2" into supporting structural members.
Keep a minimum of seven feet between bottom of air cleaner and the floor surface
Do not use rope, cable, or power cord to suspend the unit from the ceiling. Use chain rated for a minimum
of a 150 lb. working load.
IMPORTANT: The air cleaner will operate more efficiently when the air flow is unrestricted. Do not locate the unit in a corner or
near heating or cooling vents.
OPERATION
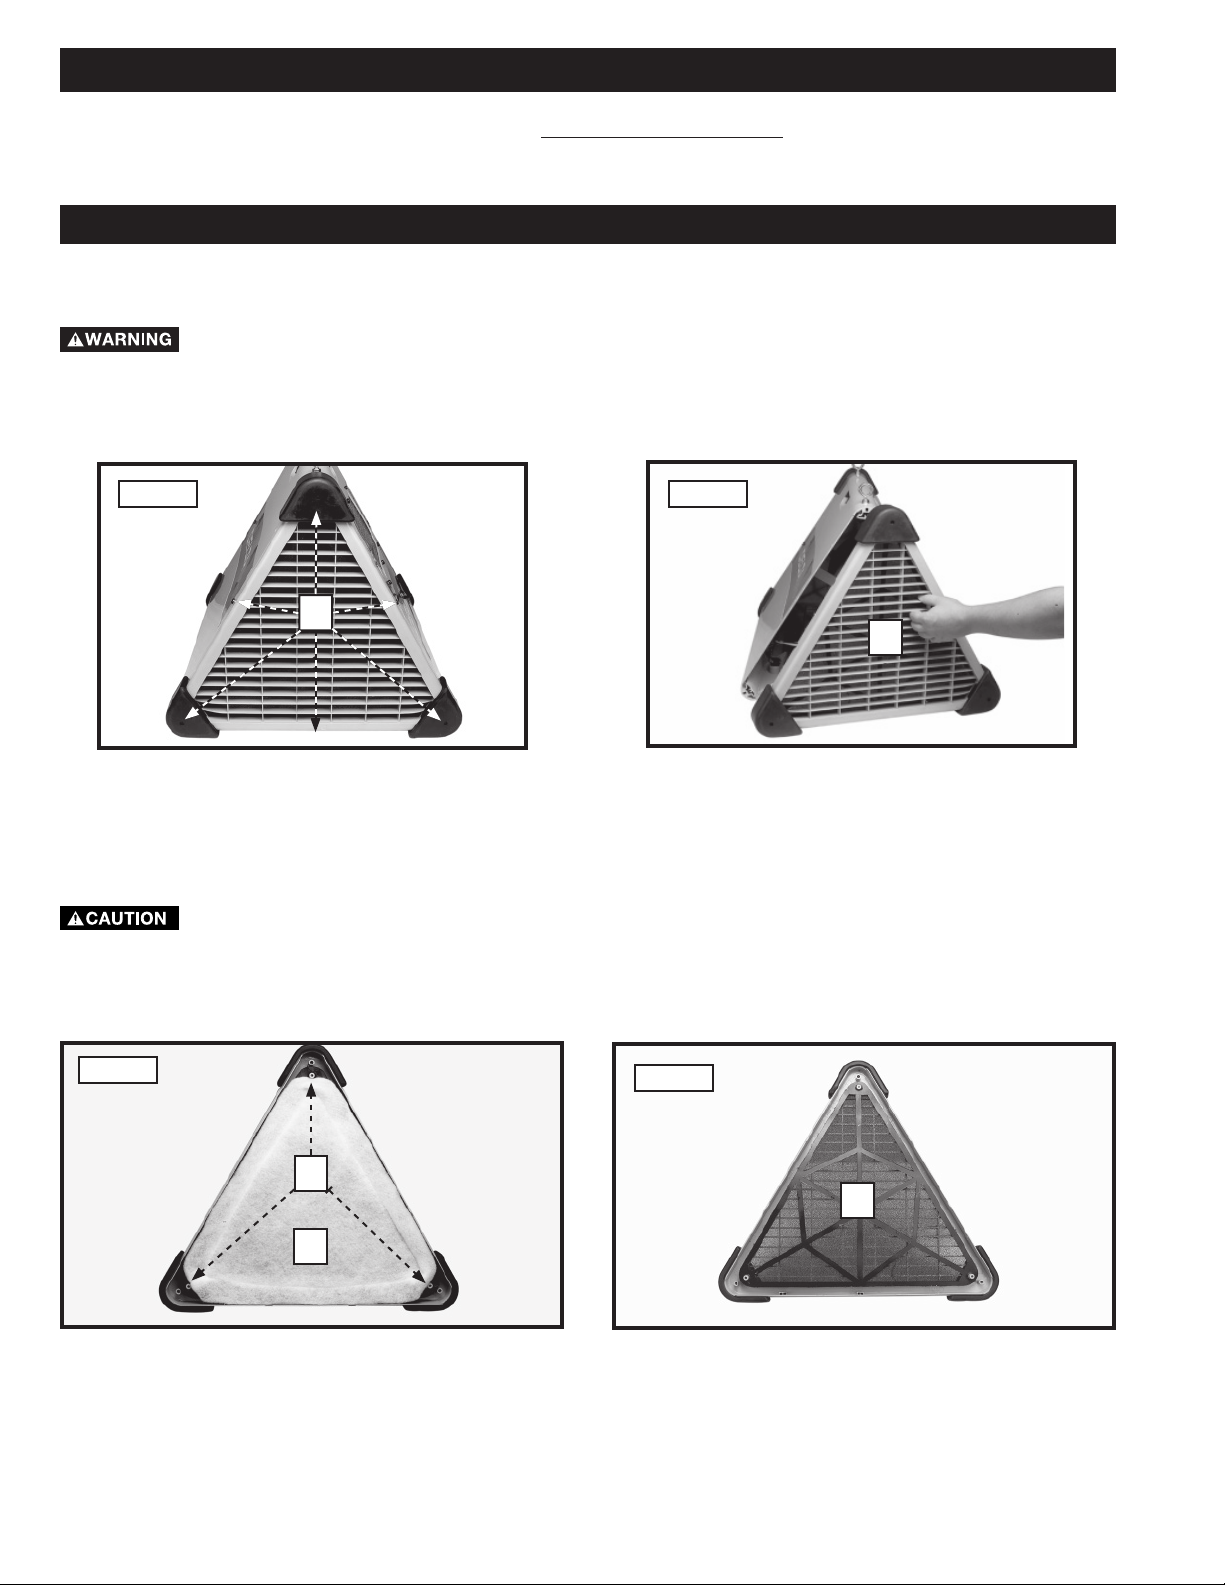
OPERATIONAL CONTROLS AND ADJUSTMENTS
CORD SWITCH
The Air Cleaner is equipped with an in-line rocker switch
(A) Fig. 5 on the power cord (B). To supply power to the
machine, press down on the end of the rocker switch that
has the white dot. To stop power to the unit, press down
on the opposite end.
Make sure that the switch (C) Fig. 5 is in
the “OFF” position before plugging in the power cord.
In the event of a power failure, move the switch to
the “OFF” position. An accidental start-up can cause
injury.
MOTOR AND LIGHT PULL CORDS
NOTE: The motor and light have independent pull switches,
but the cord switch must be in the “ON” position for them
to operate.
To start and stop the air cleaner motor, pull down on the
motor pull cord (C) Fig. 6. The motor pull cord (C) has a fan
icon to indicate the motor pull cord.
To turn the light "ON" and "OFF", pull down on the light
pull cord (D) Fig. 6. The light pull cord (D) has a bulb icon to
indicate the light pull cord.
B
LIGHT ICON
Fig. 6
C
A
Fig. 5
FAN ICON
C
D
MACHINE USE
NOTE: The air cleaner may produce a slight odor for the first few hours of operation because of the protective coating applied
to internal components. This odor will dissipate and should be disregarded.
Never operate the air cleaner without air filters in place.
The air cleaner can be used in the overhead position, on a work bench, or on the floor.
The Delta AP100 Air Cleaner can be used for:
a. sanding applications.
b. sawing applications.
c. dry wall applications.
d. any application where non-metallic dust is a factor.
9
9
Page 10
TROUBLESHOOTING
For assistance with your machine, visit our website at www.deltamachinery.com for a list of service centers or call the
DELTA Machinery help line at 1-800-223-7278 (In Canada call 1-800-463-3582).
MAINTENANCE
CHANGING AND CLEANING FILTERS
Disconnect unit from the power source!
1. Remove the six screws (A) Fig. 7 from the filter cover.
2. Pull the filter cover (C) Fig. 8 from the machine.
Fig. 7 Fig. 8
A
C
3. Remove the three spring clips (D) Fig. 9
4. Remove the bag filter (E) Fig. 9.
5. Remove the pre-filter (F) Fig. 10.
6. Depending on the condition, you can either clean or replace the filters (E) Fig. 9 and (F) Fig. 10. Clean the filters either
with a shop-vac or with compressed air.
toward yourself or anyone else. Always wear safety glasses and dust mask when performing this procedure.
7. Perform this operation in reverse to install the filters.
8. Replace the filters on the opposite side of the machine in the same manner.
Fig. 9
Compressed air can be dangerous. For operator safety, do not exceed 30 psi. Do not point the air nozzle
Fig. 10
D
F
E
10
10
Page 11
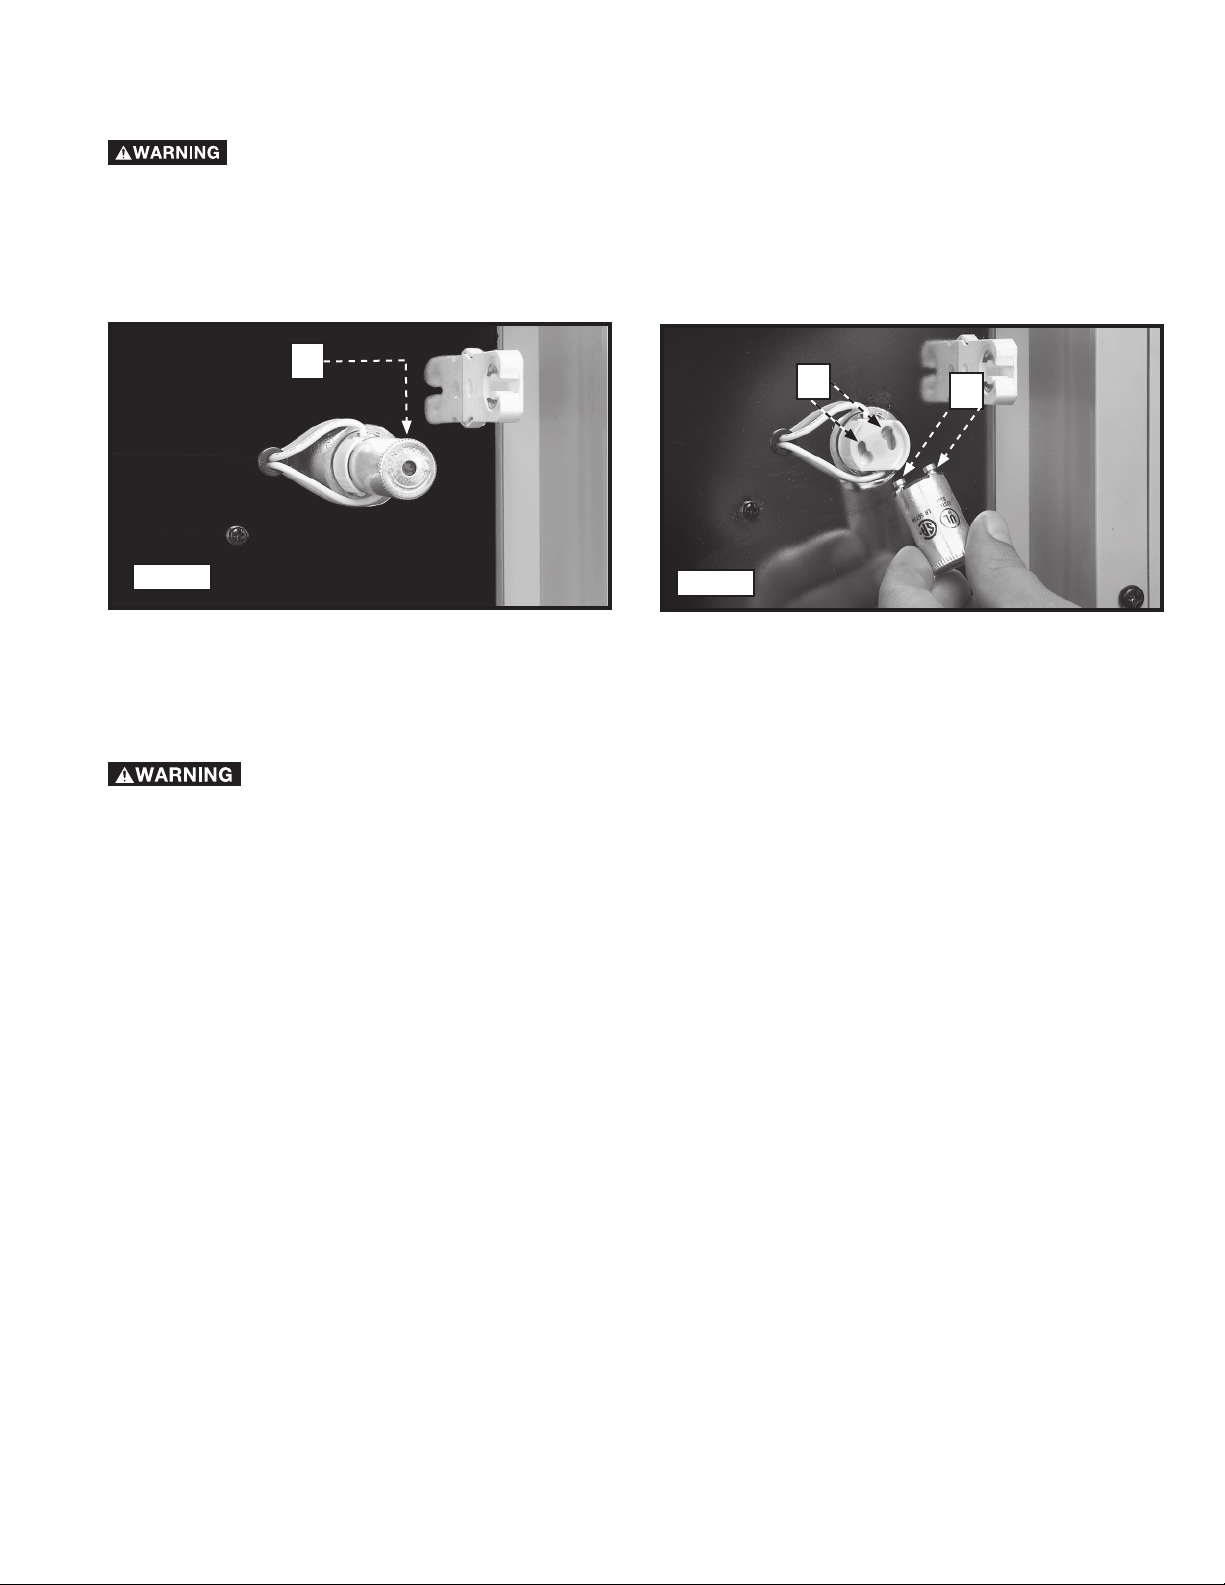
LIGHT STARTER
NOTE: The starters supplied with this machine are standard fluorescent starters (fs-2).
Disconnect unit from the power source!
1. To remove the starter (A) Fig. 11, turn the starter (A) counter clockwise until it stops. Pull the starter out.
2. Insert a new starter by aligning the two prongs (B) Fig. 12 with the two holes (C) in the starter holder. Turn the starter
clockwise until it stops.
A
C
B
Fig. 11
Fig. 12
KEEP THE UNIT CLEAN
Periodically blow out all air passages with dry compressed air. All plastic parts should be cleaned with a soft damp
cloth. NEVER use solvents to clean plastic parts. They could possibly dissolve or otherwise damage the material.
Wear certified safety equipment for eye, hearing and respiratory protection while using compressed air.
FAILURE TO START
Should your unit fail to start, check to make sure the prongs on the cord plug are making good contact in the outlet.
Also, check for blown fuses or open circuit breakers in the line.
11
11
Page 12

SERVICE
REPLACEMENT PARTS
Use only identical replacement parts. For a parts list or to
order parts, visit our website at
com.
You can also order parts from your nearest factoryowned branch, or by calling our Customer Care Center at
1-800-223-7278 to receive personalized support from highlytrained technicians.
servicenet.deltamachinery.
SERVICE AND REPAIRS
All quality tools will eventually require servicing and/or
replacement of parts. For information about Delta Machinery,
its factory-owned branches, or an Authorized Warranty
Service Center, visit our website at www.deltamachinery.
com or call our Customer Care Center at 1-800-223-7278.
All repairs made by our service centers are fully guaranteed
against defective material and workmanship. We cannot
guarantee repairs made or attempted by others.
You can also write to us for information at Delta Machinery,
4825 Highway 45 North, Jackson, Tennessee 38305 Attention: Product Service. Be sure to include all of the
information shown on the nameplate of your tool (model
number, type, serial number, etc.)
ACCESSORIES
A complete line of accessories is available from your Delta Supplier, Porter-Cable • Delta Factory Service Centers, and
Delta Authorized Service Stations. Please visit our Web Site www.deltamachinery.com for a catalog or for the name of
your nearest supplier.
Since accessories other than those offered by Delta have not been tested with this product, use
of such accessories could be hazardous. For safest operation, only Delta recommended accessories should be
used with this product.
WARRANTY
To register your tool for warranty service visit our website at www.deltamachinery.com.
Two Year Limited New Product Warranty
Delta will repair or replace, at its expense and at its option, any new Delta machine, machine part, or machine accessory which in normal
use has proven to be defective in workmanship or material, provided that the customer returns the product prepaid to a Delta factory service
center or authorized service station with proof of purchase of the product within two years and provides Delta with reasonable opportunity
to verify the alleged defect by inspection. For all refurbished Delta product, the warranty period is 180 days. Delta may require that electric
motors be returned prepaid to a motor manufacturer’s authorized station for inspection and repair or replacement. Delta will not be responsible
for any asserted defect which has resulted from normal wear, misuse, abuse or repair or alteration made or specifically authorized by anyone
other than an authorized Delta service facility or representative. Under no circumstances will Delta be liable for incidental or consequential
damages resulting from defective products. This warranty is Delta’s sole warranty and sets forth the customer’s exclusive remedy, with respect
to defective products; all other warranties, express or implied, whether of merchantability, fitness for purpose, or otherwise, are expressly
disclaimed by Delta.
12
12
Page 13

FRANÇAIS
13
Page 14

LES INSTRUCTIONS IMPORTANTES DE SURETE
n'importe quel outil ou n'importe quel équipement. En utilisant les outils ou l'équipement, les précautions de sûreté
fondamentales toujours devraient être suivies pour réduire le risque de blessure personnelle. L'opération déplacée,
l'entretien ou la modification d'outils ou d'équipement ont pour résultat la blessure sérieux et les dommages
de propriété. Il y a de certaines applications pour lequel outils et l'équipement sont conçus. La Delta Machinery
recommande avec force que ce produit n'ait pas modifié et/ou utilisé pour l'application autrement que pour lequel il
a été conçu.
Si vous avez n'importe quelles questions relatives à son application n'utilisent pas le produit jusqu'à ce que vous avez écrit
Porter-Cable et nous vous avons conseillé.
Information en ce qui concerne l'opération sûre et correcte de cet outil est disponible des sources suivantes:
American National Standards Institute, 25 West 43rd Street, 4 floor, New York, NY 10036 www.ansi.org ANSI 01.1Safety
Requirements for Woodworking Machines, and the U.S. Department of Labor regulations www.osha.gov
Lire et comprendre toutes instructions d'avertissements et opération avant d'utiliser
La forme en ligne de contact à www.deltamachinery.com
Courrier Postal: Technical Service Manager
Delta Machinery
4825 Highway 45 North
Jackson, TN 38305
Power Tool Institute
1300 Sumner Avenue, Cleveland, OH 44115-2851
www.powertoolinstitute.org
National Safety Council
1121 Spring Lake Drive, Itasca, IL 60143-3201
MESURES DE SÉCURITÉ - DÉFINITIONS
Ce guide contient des renseignements importants que vous deviez bien saisir. Cette information porte sur VOTRE
SÉCURITÉ et sur LA PRÉVENTION DE PROBLÈMES D’ÉQUIPEMENT. Afin de vous aider à identifier cette
information, nous avons utilisé les symboles ci-dessous. Veuillez lire attentivement ce guide en portant une attention
particulière à ces sections.
Indique un danger imminent qui, s'il n'est pas évité, causera de graves blessures ou la mort.
ou la mort
dommages; mineures ou moyennes.
.
LA PROPOSITION DE CALIFORNIE 65
activités de construction peut contenir des produits chimiques qui sont reconnus, par l'état de la Californie, de causer
le cancer, les anomalies congénitales ou autres maux de reproduction. Ces produits chimiques comprennent, entre
autres :
• le plomb provenant des peintures à base de plomb;
• la silice cristalline provenant de briques, de béton ou d'autres produits de maçonnerie
• l'arsenic et le chrome provenant du bois de charpente traité chimiquement
Le risque d'exposition à ces produits dépend de la fréquence d'exécution de ce genre de travaux. Afin de réduire l'exposition
à ces produits chimiques, travaillez dans un endroit bien aéré et utilisez de l'équipement de sécurité approuvé,
un masque facial ou respirateur homologué MSHA/NIOSH bien ajusté lorsque vous utilisez de tels outils.
Indique la possibilité d’un danger qui, s’il n’est pas évité, pourrait causer de graves blessures
Indique la possibilité d’un danger qui, s’il n’est pas évité, peut causer des dommages à la propriété.
S
ans le symbole d’alerte.
La poussière produite par le ponçage électrique le sciage, le meulage, le perçage et autres
Indique la possibilité d'un danger qui, s'il n'est pas évité,
peut causer des
portez toujours
CONSERVEZ CES INSTRUCTIONS!
14
Page 15

RÈGLES DE SÉCURITÉ GÉNÉRALES
L’inobservation de ces règles peut conduire à des blessures graves.
1. POUR SA SÉCURITÉ PERSONNELLE, LIRE LA NOTICE
D’UTILISATION, AVANT DE METTRE LA MACHINE EN
MARCHE, et pour aussi apprendre l’application et les limites de
la machine ainsi que les risques qui lui sont particuliers ainsi, les
possibilités d’accident et de blessures seront beaucoup réduites.
2. PORTEZ DES DISPOSITIFS DE PROTECTION DES YEUX
ET DE L'OUÏE. UTILISEZ TOUJOURS DES LUNETTES DE
SÉCURITÉ. Des lunettes ordinaires ne constituent PAS des
lunettes de sécurité. UTILISEZ DES ÉQUIPEMENTS DE
SÛRETÉ HOMOLOGUÉS. Les dispositifs de protection des yeux
doivent être conformes aux normes ANSI Z87.1. Les dispositifs
de protection de l'ouïe doivent être conformes aux normes ANSI
S3.19.
3. PORTER UNE TENUE APPROPRIÉE. Pas de cravates, de gants,
ni de vêtements amples. Enlever montre, bagues et autres bijoux.
Rouler les manches. Les vêtements ou les bijoux qui se trouvent
pris dans les pièces mobiles peuvent entraîner des blessures.
4. NE PAS UTILISER LA MACHINE DANS UN ENVIRONNEMENT
DANGEREUX. L’utilisation d’outils électriques dans des endroits
humides ou sous la pluie peut entraîner des décharges électriques
ou une électrocution. Garder la zone de travail bien éclairée pour
éviter de trébucher ou d’exposer les doigts, les mains ou les bras
à une situation dangereuse.
5. GARDER LES OUTILS ET LES MACHINES EN PARFAIT ÉTAT.
Garder les outils affûtés et propres afin d’obtenir le meilleur et
le plus sûr rendement. Suivre les instructions pour lubrifier et
changer les accessoires. Les outils et les machines mal entretenus
peuvent se dégrader davantage, et/ou entraîner des blessures.
6. INSPECTER LES PIÈCES POUR DÉCELER TOUT DOMMAGE.
Avant d’utiliser la machine, la vérifier pour voir s’il n’y a pas de
pièces endommagées. Vérifier l’alignement des pièces mobiles
et si ces pièces ne se coincent pas, la rupture de pièces, ou toute
autre condition pouvant en affecter le fonctionnement. Toute pièce
ou protecteur endommagé doit être réparé ou remplacé. Les
pièces endommagées peuvent dégrader davantage la machine
et/ou entraîner des blessures.
7. GARDER L’AIRE DE TRAVAIL PROPRE. Les zones et établis
encombrés favorisent les accidents.
8. GARDER LES ENFANTS ET LES VISITEURS À DISTANCE.
L’atelier est un lieu potentiellement dangereux. Les enfants et les
visiteurs peuvent se blesser.
9. ÉVITER LE DÉMARRAGE ACCIDENTEL. S’assurer que
l’interrupteur est sur « OFF » (ARRÊT) avant de brancher le
cordon. En cas de coupure de courant, placer l’interrupteur à la
position « OFF » (ARRÊT). Un démarrage accidentel peut entraîner
des blessures.
10. UTILISER LES DISPOSITIFS PROTECTEURS. Vérifier que tous
les dispositifs protecteurs sont bien en place, bien fixés et en bon
état de marche pour éviter les blessures.
11. ENLEVER LES CLÉS DE RÉGLAGE ET CELLES DE SERRAGE
AVANT DE METTRE LA MACHINE EN MARCHE. Les outils, les
chutes et les autres débris peuvent être projetés violemment et
blesser.
12. UTILISER LA BONNE MACHINE. Ne pas forcer la machine ou
l’accessoire à faire un travail pour lequel il n’a pas été conçu.
Des dommages à la machine et/ou des blessures pourraient
s’ensuivre.
13. UTILISER LES ACCESSOIRES RECOMMANDÉS. L’utilisation
d’accessoires non recommandés par Delta peut endommager la
machine et blesser l’utilisateur.
14. UTILISER LE CORDON PROLONGATEUR APPROPRIÉ.
S’assurer que le cordon prolongateur est en bon état. Lorsqu’un
cordon prolongateur est utilisé, s’assurer que celui-ci est d’un
calibre suffisant pour l’alimentation nécessaire à la machine. Un
cordon d’un calibre insuffisant entraînera une perte de tension
d’où une perte de puissance et surchauffe. Voir le tableau sur
les cordons prolongateurs pour obtenir le calibre approprié selon
la longueur du cordon et l’ampérage de la machine. S’il y a un
doute, utiliser un cordon d’un calibre supérieur. Plus le chiffre est
petit, plus le fil est gros.
15. FIXER LA PIÈCE. Utilisez les brides ou l'étau quand vous ne
pouvez pas fixer l'objet sur la table et contre la barrière à la main
ou quand votre main sera dangereusement près de la lame (à
moins de 6").
16. AVANCER LA PIÈCE DANS LE SENS CONTRAIRE À LA
ROTATION DE LA LAME, DE LA FRAISE OU DE LA SURFACE
ABRASIVE. L’alimentation dans l’autre sens peut entraîner une
projection violente de la pièce.
17. NE PAS FORCER LA MACHINE EN AVANÇANT LA PIÈCE
TROP VITE. Des dommages et/ou des blessures peuvent
s’ensuivre.
18. NE PAS SE PENCHER AU-DESSUS DE LA MACHINE. Une
perte de l’équilibre peut entraîner une chute sur la machine en
marche et causer des blessures.
19. NE JAMAIS MONTER SUR LA MACHINE. On peut se
blesser gravement si la machine bascule ou si l’on touche
accidentellement son outil tranchant.
20. NE JAMAIS LAISSER LA MACHINE EN MARCHE SANS
SURVEILLANCE. COUPER LE COURANT. Ne pas quitter la
machine tant qu’elle n’est pas complètement arrêtée. Un enfant
ou un visiteur pourrait se blesser.
21. METTRE LA MACHINE À L’ARRÊT « OFF » ET LA
DÉBRANCHER avant d’installer ou d’enlever des accessoires,
d’ajuster ou de changer des montages, ou lors des réparations.
Un démarrage accidentel peut entraîner des blessures.
22. METTRE L’ATELIER À L’ABRI DES ENFANTS AU MOYEN
DE CADENAS, D’INTERRUPTEURS PRINCIPAUX OU EN
ENLEVANT LES BOUTONS DES DISPOSITIFS DE MISE EN
MARCHE. Le démarrage accidentel de la machine par un enfant
ou un visiteur peut entraîner des blessures.
23. RESTER VIGILANT, ATTENTIF, ET FAIRE PREUVE DE BON
SENS. NE PAS UTILISER LA MACHINE LORSQUE L’ON
EST FATIGUÉ OU SOUS L’INFLUENCE DE DROGUES,
D’ALCOOL OU DE MÉDICAMENTS. Un instant d’inattention
lors de l’utilisation d’outils électriques peut entraîner des blessures
graves.
24.
PRODUIRE ET DISPERSER DE LA POUSSIÈRE OU D'AUTRES
PARTICULES EN SUSPENSION DANS L'AIR, TELLES QUE LA
SCIURE DE BOIS, LA POUSSIÈRE DE SILICIUM CRISTALLIN
ET LA POUSSIÈRE D'AMIANTE. Dirigez les particules loin du
visage et du corps. Faites toujours fonctionner l'outil dans un
espace bien ventilé et prévoyez l'évacuation de la poussière.
Utilisez un système de dépoussiérage chaque fois que possible.
L'exposition à la poussière peut causer des problèmes de santé
graves et permanents, respiratoires ou autres, tels que la silicose
(une maladie pulmonaire grave) et le cancer, et même le décès
de la personne affectée. Évitez de respirer de la poussière et de
rester en contact prolongé avec celle-ci. En laissant la poussière
pénétrer dans vos yeux ou votre bouche, ou en la laissant
reposer sur votre peau, vous risquez de promouvoir l'absorption
de substances toxiques. Portez toujours des dispositifs de
protection respiratoire homologués par NIOSH/OSHA, appropriés
à l'exposition à la poussière et de taille appropriée, et lavez à l'eau
et au savon les surfaces de votre corps qui ont été exposées.
L'UTILISATION DE CET OUTIL PEUT
CONSERVER CES DIRECTIVES.
15
Page 16

RÈGLES SPÉCIFIQUES ADDITIONNELLES DE SÛRETÉ
Négliger de suivre ces règles risque d’entraîner des blessures corporelles graves.
appareil pour filtrer la poussière de métal. La combinaison de
RISQUE D’INCENDIE Ne pas utiliser cet
poussières de bois et de métal peut créer un risque d’explosion
ou d’incendie. Cette unité sert seulement à filtrer les atmosphères
non-explosives.
RISQUE D’INCENDIE. Ne pas utiliser cet
appareil pour dissiper les vapeurs ou la fumée. Des explosions
ou un incendie pourraient en résulter. Ce purificateur d’air est
réservé aux utilisations en présence de poussière sèche en
suspension. Son utilisation devrait se limiter aux atmosphères
non-explosives, non-métalliques.
1. NE PAS FAIRE FONCTIONNER CET APPAREIL avant qu’il
ne soit entièrement assemblé et installé conformément à ces
directives. Un appareil mal assemblé peut provoquer des
blessures.
2. DEMANDER CONSEIL à un superviseur, instructeur, ou toute
autre personne qualifiée si l’on ne maîtrise pas parfaitement
l’utilisation de cet appareil. La connaissance est synonyme
de sécurité.
3. SUIVRE TOUS LES CODES DE CÂBLAGE et les connexions
électriques recommandées afin d’éviter tout choc électrique
ou électrocution.
4. NE PAS SOULEVER CET APPAREIL PAR LE CORDON
D’ALIMENTATION. Ne pas utiliser le cordon d’alimentation
comme dispositif pour suspendre. Un cordon endommagé
pourrait causer des chocs électriques ou une électrocution.
5. BIEN ANCRER CET APPAREIL à une structure de support
permanente ou fixe en le suspendant du plafond. Si l’appareil
tombe, il peut provoquer des blessures graves. Toujours
garder au moins 2,13 m (7 pieds) entre le bas de l’appareil
et la surface du plancher pour permettre un dégagement
de tête suffisant. Utiliser seulement une chaîne d’une valeur
nominale pour une charge de travail d’au moins 68 kg (150
lb) pour retenir adéquatement l’appareil en place. Utiliser des
crochets d’acier en forme de S d’au moins 0,64 cm (1/4 po)
de diamètre pour suspendre l’appareil du plafond. Les tirefonds utilisés pour suspendre l’appareil du plafond doivent
être enfilés au moins 3,8 cm (1 1/2 po) dans les éléments de
structure de support.
6. SUPPORTER CET APPAREIL ou le monter bien en place à
la surface de travail lorsqu’il est utilisé dans une application
portable afin d’éliminer la possibilité de blessures et/ou de
dommages à l’appareil.
7. S’ASSURER QUE LES SECTIONS D’ASPIRATION ET
D’ÉVACUATION SONT LIBRES avant de démarrer l’appareil.
Les sections d’aspiration et d’évacuation bloquées peuvent
provoquer une explosion et/ou des incendies.
8. TENIR LES BRAS, LES MAINS ET LES DOIGTS LOIN DU
VENTILATEUR. Éviter toute exposition aux pièces mobiles
pour prévenir les blessures.
9. NE PAS UTILISER CET APPAREIL SANS AVOIR LES FILTRES
EN PLACE. La poussière et autres petits débris entreront
directement dans le moteur provoquant une surchauffe et la
possibilité d’incendies et/ou d’explosion.
10. NE PAS ESSAYER de retirer ou de remplacer le(s) filtre(s)
tandis que l’appareil est en marche. Les lames exposées du
ventilateur peuvent provoquer de graves coupures. S’assurer
que l’appareil soit hors tension.
11. MAINTENIR L’APPAREIL en parfaite condition de
fonctionnement Les filtres bloqués peuvent augmenter la
possibilité d’incendie ou d’explosion : Suivre toutes les
instructions de changement et de nettoyage des filtres.
12. RANGER L’APPAREIL dans un endroit qui élimine la
possibilité de dommages au cordon d’alimentation. Un
cordon endommagé pourrait causer des chocs électriques
ou une électrocution. Bien ranger le cordon d’alimentation
sur l’appareil pour éviter de trébucher.
13. ÉTEINDRE L’APPAREIL ET le débrancher avant d’installer ou
de retirer tout accessoire, avant d’ajuster ou de modifier les
réglages, ou lors d’une réparation. Un démarrage accidentel
peut provoquer des blessures graves.
CONSERVER CES DIRECTIVES.
Les consulter souvent et les utiliser pour donner des directives aux autres.
RACCORDEMENTS ÉLECTRIQUES
Un circuit électrique séparé doit être utilisé pour les machines. Les fils de ce circuit doivent être au moins de calibre 12. Ce circuitdoit être
protégé par un fusible temporisé de 20 A. Si on utilise un cordon prolongateur, ce cordon doit être à trois fils, avoir unefiche à trois broches
et une prise de courant à trois cavités, mise à la terre qui correspond à la fiche de la machine. Avant debrancher la machine, s’assurer que
l’interrupteur (les interrupteurs) se trouve(nt) en position « OFF » (ARRÊT) et que le courantélectrique présente les mêmes caractéristiques
que celles qui sont inscrites sur la machine. Toutes les connexions électriquesdoivent établir un bon contact. Le fonctionnement sur une
basse tension endommagera la machine.
Ne pas exposer la machine à la pluie, et ne pas l’utiliser dans des endroits humides.
SPÉCIFICATIONS DU MOTEUR
Cette machine est câblée pour un fonctionnement sur un courant alternatif de 120 volts 60 Hz. Avant de brancher la machine, s’assurer
que l’interrupteur se trouve à la position « OFF » (ARRÊT).
INSTRUCTIONS DE MISE À LA TERRE
électriques
Cette machine doit être mise à la terre pendant son emploi, afin de protégerl’utilisateur des décharges
16
Page 17

1. Toutes les machines avec cordon mis à la terre: Dans l’éventualité d’un mauvais fonctionnement ou d’unepanne, la mise à la
terre fournit un trajet de moindre résistancepermettant de réduire le risque de décharge électrique. Cettemachine est dotée d’un
cordon électrique possédant unconducteur de mise à la terre de l’équipement ainsi que d’unefiche mise à la terre. La fiche doit être
branchée dans une prisede courant correspondante, installée de façon adéquate etmise à la terre conformément à tous les codes et
règlementslocaux.
Ne pas modifier la fiche fournie - si elle ne s’adapte pas à laprise de courant, il faut faire installer une prise de courantconvenable par
un électricien compétent.
Un mauvais raccordement du conducteur de mise à la terrede l’équipement peut entraîner un risque de déchargeélectrique. Le
conducteur possédant un isolant avec surfaceextérieure de couleur verte, avec ou sans rayures jaunes, estle conducteur de mise à la
terre de l’équipement. Si uneréparation ou un remplacement du cordon électrique s’avèrenécessaire, ne pas brancher le conducteur
de mise à la terrede l’équipement à une borne sous tension.
Consulter un électricien compétent ou le personnel de serviceaprès-vente si on ne comprend pas entièrement lesinstructions de mise
à la terre, ou si l’on doute que la machinesoit correctement mise à la terre.
Utiliser seulement des cordons prolongateurs à trois fils dotésd’une fiche mise à la terre, à trois broches, et de prises à troiscavités
convenant à la fiche de la machine, comme l’illustre lafigure A.
Réparer ou remplacer sans délai tout cordon endommagé ouusé.
2. Machines avec cordon mis à la terre prévues pour uneutilisation sur une alimentation nominale inférieure à150volts :Si
cette machine est prévue pour être utilisée sur un circuit quicomporte une prise semblable à celle illustrée à la figure A, lamachine
devra comporter une fiche mise à la terre semblableà celle illustrée à la figureA. Un adaptateur temporairesemblable à celui illustré
à la figureB, peut être utilisé pourraccorder cette fiche à une prise à deux cavités comme celleillustrée à la figure B, si une prise
correctement mise à la terren’est pas disponible. L’adaptateur temporaire ne doit êtreutilisé que jusqu’au moment où une prise
correctement miseà la terre est installée par un électricien compétent. L’oreillerigide ou autre dispositif semblable de couleur verte, sur
ledessus de l’adaptateur, doit être connecté sur une mise à laterre permanente comme, par exemple une boîte à prisescorrectement
mise à la terre. Quand un adaptateur est utilisé,celui-ci doit être retenu en place par une vis en métal.
REMARQUE: Au Canada, le Code canadien de l’électriciténe permet pas l’emploi d’un adaptateur temporaire.
electrictricen competent de verifire la prise.
Dans tous les cas, s'assurer quela prise en question est bien mise a la terre. Dans le doute, demander a un
BOÎTE À PRISES MISE À LA TERRE
BROCHES
CONDUCTRICESDE
COURANT
LA BROCHE DE MISE
ÀLA TERRE EST LA PLUS
LONGUEDES TROIS
Fig. A
CORDON DE RALLONGE
Employez les cordes appropriées
de prolongation. S'assurent votre corde de prolongation est
en bon état. En utilisant une corde de prolongation, soyez
sûr d'employer un assez lourd pour porter le courant de la
machine. Une corde trop petite causera une baisse dans la
tension secteur, ayant pour résultat la perte de puissance
et de surchauffe. Fig. D-1, expositions la mesure correcte
à employer selon la longueur de corde. En cas de doute,
utilisez la prochaine mesure plus lourde. Plus le nombre de
mesure est petit, plus la corde est lourde.
BOÎTE À PRISES MISE À LA TERRE
OREILLE DE MISEÀ LA
TERRE
ADAPTATEUR
Fig. B
MESUR MINIMUM DE CORDE D’EXTENSION
TAILLES RECOMMANDÉES POUR L'CUSAGE AVEC STATIONNAIRES ÉLECTRIQUES LES OUTILS
Longueur
Estimation
pere Volts
0-6 120
Totale De
Corde En
Pieds
up to
Mesure De Corde D’Am
25 18 AWG
D’Extension
0-6 120 25-50 16 AWG
0-6 120 50-100 16 AWG
0-6 120 100-150 14 AWG
6-10 120
up to
25 18 AWG
6-10 120 25-50 16 AWG
6-10 120 50-100 14 AWG
6-10 120 100-150 12 AWG
10-12 120
up to
25 16 AWG
10-12 120 25-50 16 AWG
10-12 120 50-100 14 AWG
10-12 120 100-150 12 AWG
12-16 120
up to
25 14 AWG
12-16 120 25-50 12 AWG
12-16 120
50 PI PLUS GRANDS QUE NON RECOMMANDES
17
Fig. D-1
Page 18

DESCRIPTION FONCTIONNELLE
AVANT-PROPOS
Le modèle Delta AP100 de purificateur d’air offre tous les avantages de l’air frais en plus d’éclairer et de se transporter
facilement. Il compte un moteur à induction de 120 volts, une filtration d’air en deux étapes et deux fluorescents intégrés ainsi
que la possibilité de le suspendre. Avec sa capacité de 450 pi³/min, un pré-filtre grossier et un filtre interne de cinq microns, le
modèle AP100 réduit de beaucoup la farine de bois pour éliminer les problèmes de santé et de nettoyage. En outre, le modèle
AP100 comprend deux lumières intégrées pour un éclairage concentré pour les applications de finition et les boulons à oeil
pour suspendre le purificateur d’air hors de l’espace de travail.
REMARQUE : La photo de la couverture du mode d’emploi illustre le modèle de production actuel. Les autres illustrations de ce
mode d’emploi ne sont présentes qu’à titre indicatif et il est possible que les étiquettes et accessoires actuels diffèrent des caractéristiques réelles de ce modèle. Ces illustrations ont uniquement pour but d’illustrer la technique.
CONTENUS DE BOITE
2
3
4
1
1. Purificateur d’air
2. Cordons (2)
3. Boulons à oeil 5/16-18x1½ po (2)
4. Écrou à embase de 5/16-18 (2)
DÉSEMBALLAGE ET NETTOYAGE
Désemballer soigneusement la machine et toutes les pièces de ou des emballage(s) d’expédition. Retirer l’huile anticorrosion des surfaces non peintes à l’aide d’un chiffon doux humidifié avec de l’alcool, du diluant à peinture ou de
l’alcool dénaturé.
N’utiliser pas de solvants hautement volatils tel l’essence, le naphte, l’acétone ou du diluant à
laque pour nettoyer.
Après nettoyage, couvrir les surfaces non peintes d’une cire à parquets d’usage domestique de bonne qualité.
18
18
Page 19

ASSEMBLAGE
soit completement assemblee et vous lisez et comprenez le manuel d'instruction entier.
CORDONS DE TIRAGE
Insérer le cordon (A), Fig. 1, dans le crochet du cordon de tirage (B). Répéter cette étape pour l’autre cordon de tirage.
FLUORESCENTS (NON INCLUS)
IMPORTANT : cet appareil utilise des fluorescents standards 18 po x 1 po, 15 watts.
1.
Insérer une extrémité du fluorescent A, Fig. 2, par la fente (B), répéter pour l’autre extrémité du fluorescent.
2. Tourner le fluorescent d’un tour pour verrouiller en place.
3. Répéter cette étape pour l’autre fluorescent.
Pour votre propre surete, ne reliez pas la machine a la source d'energie jusqu'a ce que la machine
OUTILS NÉCESSAIRES POUR L’ASSEMBLAGE
Aucun outil nécessaire pour l’assemblage.
DURÉE ESTIMÉE POUR L’ASSEMBLAGE
L’assemblage de cet appareil prend moins de 30 minutes.
A
B
Fig. 1
Fig. 2
MONTER LE PURIFICATEUR D’AIR
1. Enfiler les écrous à embase 5/16 -18 (B) fig. 5, dans un boulon à oeil 5/16-18x1 1/2 po (C).
2. Enfiler le boulon à oeil (C), Fig. 3, dans le trou (D).
REMARQUE : Enfiler les boulons à oeil dans au moins huit tours complets.
3. Serrer l’écrou à embase (B), Fig. 3, contre le purificateur d’air.
4. Répéter cette étape pour l’autre trou sur le dessus du purificateur d’air tel qu’illustré à la Fig. 4.
montant au plafond ou sur un support plafonnier.
plafond suspendu ou à tout autre élément ne faisant pas partie de la structure.
Cet outil pèse environ 18,12 kg (40 livres). S’assurer que l’appareil soit bien supporté en le
Ne jamais installer la quincaillerie du purificateur d’air aux cloisons sèches, au cadre/carreau de
C
B
A
B
D
Fig. 3
Fig. 4
19
Page 20

En suspendant le purificateur d’air du plafond ou de tout autre support suspendu, utiliser des crochets
d’acier en forme de S d’au moins 0,64 cm (1/4 po).
support.
Enfiler tous les crochets/tire-fonds d’au moins 3,8 cm (1-1/2 po) dans les éléments de structure de
Garder au moins 2,13 m (sept pieds) entre le bas du purificateur d’air et la surface du plancher.
utiliser une chaîne d’une valeur nominale pour une charge de travail d’au moins 68 kg (150 lb).
IMPORTANT : Le purificateur d’air fonctionnera plus efficacement lorsque le débit d’air circule librement. Ne pas placer
l’appareil dans un coin ou près de tout évent de chauffage ou de refroidissement.
Ne pas utiliser de corde, câble ou cordon d’alimentation pour suspendre l’appareil du plafond.
FONCTIONNEMENT
L'OPERATION CONTROLE DE LE ET LES AJUSTEMENTS
INTERRUPTEUR DU CORDON
Le purificateur d’air est doté d’un interrupteur à bascule en
ligne (A) Fig. 5, qui se trouve sur le cordon (B). Pour fournir
le pouvoir à la machine, la presse en bas sur la fin du
commutateur de bascule qui a le point blanc. Pour arrêter
le pouvoir à l’unité, la presse en bas sur la fin de contraire.
l’interrupteur a des marques sur
le côté pour déterminer la position ON/OFF (marche/
arrêt). La position « ON » (marche) est lorsque la partie
de l’interrupteur au point blanc (C) fig. 7, est enfoncée.
B
CORDONS DE TIRAGE DU MOTEUR ET D’ÉCLAIRAGE
REMARQUE: L’interrupteur de cordon doit être à la
position « on » (marche).
Pour commencer et arrêter l’air le moteur plus propre,
baisser sur la corde de force moteur (C) Fig. 6. La corde
moteur de force (C) a une icône de ventilateur pour indiquer
la corde de force moteur.
Pour tourner la lumière « SUR » et « DE », baisser sur la
corde de force légère (D) Fig. 6. La corde légère de force
(D) a une icône d’ampoule pour indiquer la corde de force
légère.
LIGHT ICON
Fig. 6
C
A
Fig. 5
FAN ICON
C
D
UTILISATION DE LA MACHINE
REMARQUE: Le purificateur d’air pourrait produire une légère odeur pendant les premières heures de fonctionnement à
cause du revêtement protecteur appliqué aux composants internes. Cette odeur s’évaporera et devrait être ign
Ne jamais faire fonctionner l’appareil sans ses filtres.
Le purificateur d’air peut servir en position en suspension, sur un établi ou sur le plancher. Le purificateur d’air Delta AP100
peut servir pour :
a. les applications de ponçage.
b. les applications de sciage.
c. les applications de cloisons sèches.
d. toute autre application où une poussière non-métallique est un facteur.
20
orée.
Page 21

DEPANNAGE
Pour l'assistance avec votre outil, visiter notre site web à www.deltamachinery.com pour une liste de centres de maintenance
ou appeler la ligne d'aide de Delta Machinery à 1-800-223-7278. (Canada: 1-800-463-3582).
MAINTENANCE
CHANGER ET NETTOYER LES FILTRES
Débrancher l’appareil de la source d’alimentation.
1. Retirer les six vis (A) Fig. 7, sur le couvercle du filtre.
2. Tirer sur le couvercle du filtre (C) Fig. 8, pour le retirer de l’appareil.
Fig. 7
Fig. 8
A
C
3. Retirer les trois pinces à ressort (D)Fig. 9.
4. Retirer le filtre du sac (E) Fig. 9.
5. Retirer le pré-filtre (F) Fig. 10.
6. Dépendre de la condition, vous ou peut nettoyer ou peut remplacer les filtres (E) Fig. 9 et (F) Fig. 10. Nettoyer les filtres
avec un vac d’atelier ou avec l’air serré.
ni pointer la buse d’air vers quiconque ni cibler la buse d’air vers votre propre corps. Toujours porter des lunettes de
sécurité et un masque antipoussière pour cette procédure.
7. Installer les deux filtres en ordre inverse de leur retrait, fixer les pinces à ressort et replacer le couvercle du filtre.
8. Replacer les autres filtres dans le sens opposé de l’appareil de la même manière.
L’air comprimé peut être dangereux. Pour la sécurité de l’opérateur, ne pas dépasser 30 lb/po²
Fig. 9
Fig. 10
D
F
E
21
Page 22

DÉMARREURS D’ÉCLAIRAGE
REMARQUE: Les démarreurs fournis avec cet appareil sont des démarreurs fluorescents standards (fs-2).
Débrancher l’appareil de la source d’alimentation.
1. Pour retirer le démarreur (A) Fig. 11, tourner le démarreur (A) dans le sens antihoraire jusqu’à ce qu’il s’arrête et retirer le
démarreur.
2. Insérer un nouveau démarreur en alignant les deux broches (B) Fig. 12, au bout du démarreur avec deux trous (C) dans
le porte-démarreur. Tourner le démarreur dans le sens horaire jusqu’à ce qu’il s’arrête.
A
C
B
Fig. 11
Fig. 12
GARDER LA MACHINE PROPRE
Dégager régulièrement toutes les conduites d’air avec de l’air comprimé sec. Toutes les pièces en plastique doivent être nettoyées
à l’aide d’un chiffon doux humide. NE JAMAIS utiliser de solvants pour nettoyer les pièces en plastique. Les solvants peuvent dissoudre ou endommager le matériel.
Porter des protections oculaire et auditive homologuées et utiliser un appareil respiratoire lors de
l’utilisation d’air comprimé.
DÉMARRAGE IMPOSSIBLE
Si la machine ne démarre pas, s’assurer que les lames de la fiche du cordon d’alimentation sont bien enfoncées dans la prise de
courant. Vérifier également que les fusibles ne sont pas grillés ou que le disjoncteur ne s’est pas déclenché.
22
Page 23

SERVICE
PIÈCES DE RECHANGE
Utiliser seulement des pièces de rechange identiques.
Pour obtenir une liste des pièces de rechange ou pour
en commander, consulter notre site Web au servicenet.
deltamachinery.com. Commander aussi des pièces auprès
d’une succursale d’usine ou composer le 1-800-223-7278
pour le service à la clientèle et recevoir ainsi une assistance
personnalisée de techniciens bien formés.
ENTRETIEN ET RÉPARATION
Tous les outils de qualité finissent par demander un
entretien ou un changement de pièce. Pour de plus
amples renseignements à propos de Delta Machinery,
ses succursales d’usine ou un centre de réparation sous
garantie autorisé, consulter notre site Web au www.
deltamachinery.com ou composer le 1-800-223-7278
pour le service à la clientèle. Toutes les réparations
effectuées dans nos centres de réparation sont entièrement
garanties contre les défauts de matériaux et de maind’oeuvre. Nous ne pouvons garantir les réparations
effectuées en partie ou totalement par d’autres.
Pour de plus amples renseignements par courrier, écrire
à Delta Machinery, 4825 Highway 45 North, Jackson,
Tennessee 38305, É.-U. – à l’attention de : Product
Service. S’assurer d’indiquer toutes les informations
figurant sur la plaque signalétique de l’outil (numéro du
modèle, type, numéro de série, etc.).
ACCESSOIRIES
Une ligne complète des accessoires est fournie des centres commerciaux d'usine de par votre de Porter-Cable•Delta
fournisseur, de Porter-Cable•Delta, et des stations service autorisées par Porter-Cable. Veuillez visiter notre site Web
www.deltamachinery.com pour un catalogue ou pour le nom de votre fournisseur plus proche.
avec ce produit, utilisation de tels accessoires a pu être dangereux. Pour l'exploitation sûre, seulement PorterCable•Delta a recommandé des accessoires devrait être utilisé avec ce produit.
Depuis des accessoires autre que ceux offertspar Porter-Cable•Delta n'ont pas été testés
23
Page 24

GARANTIE
Pour enregistrer votre outil pour la garantie service la visite notre site Web à www.deltamachinery.com.
Garantie limitée de deux ans
Delta réparera ou remplacera, à ses frais et à sa discrétion, toute nouvelle machine Delta, pièce de rechange ou tout accessoire qui,
dans des circonstances d'utilisation normale, s'est avéré défectueux en raison de défauts de matériau ou de fabrication, à condition
que le client retourne le produit (transport payé d'avance) au centre de réparation de l'usine Delta ou à un centre de réparation autorisé
accompagné d'une preuve d'achat et dans les deux ans de la date d'achat du produit, et fournisse à Delta une opportunité raisonnable de
vérifier le défaut présumé par une inspection. La période de garantie des produits Delta réusinés est de 180 jours. Delta peut demander
que les moteurs électriques soient retournés (transport payé d'avance) à un centre de réparation autorisé du fabricant du moteur en vue
d'une inspection, d'une réparation ou d'un remplacement. Delta ne peut être tenu pour responsable des défauts résultants de l'usure
normale, de la mauvaise utilisation, de l'abus, de la réparation ou de la modification du produit, sauf en cas d'autorisation spécifique
d'un centre de réparation ou d'un représentant Delta autorisé. En aucune circonstance Delta ne peut être tenu pour responsable des
dommages accidentels ou indirects résultant d'un produit défectueux. Cette garantie constitue la seule garantie de Delta et le recours
exclusif des clients en ce qui concerne les produits défectueux ; toutes les autres garanties, expresses ou implicites, de qualité
marchande, d'adéquation à un usage particulier, ou autre, sont expressément déclinées par Delta.
24
Page 25

ESPAÑOL
Page 26

INSTRUCCIONES DE SEGURIDAD IMPORTANTES
Lea y entienda todas advertencias y las instrucciones operadoras antes de utilizar cualquier
instrumento o el equipo. Cuando se usa instrumentos o equipo, las precauciones básicas de la seguridad
siempre se deben seguir para reducir el riesgo de la herida personal. La operación impropia, la conservación o la
modificación de instrumentos o equipo podrían tener como resultado el daño grave de la herida y la propiedad.
Hay ciertas aplicaciones para que equipaas con herramienta y el equipo se diseña. La Delta Machinery
recomienda totalmente que este producto no sea modificado y/o utilizado para ninguna aplicación de otra
manera que para que se diseñó.
Si usted tiene cualquiera pregunta el pariente a su aplicación no utiliza el producto hasta que usted haya escrito Delta
Machinery y nosotros lo hemos aconsejado.
La forma en línea del contacto en www. deltamachinery. com
El Correo Postal: Technical Service Manager
Delta Machinery
4825 Highway 45 North
Jackson, TN 38305
(IN CANADA: 125 Mural St. Suite 300, Richmond Hill, ON, L4B 1M4)
Información con respecto a la operación segura y apropiada de este instrumento está disponible de las fuentes siguientes:
Power Tool Institute
1300 Sumner Avenue, Cleveland, OH 44115-2851
ww.powertoolinstitute.org
National Safety Council
1121 Spring Lake Drive, Itasca, IL 60143-3201
American National Standards Institute, 25 West 43rd Street, 4 floor, New York, NY 10036 www.ansi.org
ANSI 01.1Safety Requirements for Woodworking Machines, and the U.S. Department of Labor regulations www.osha.gov
GUARDE ESTAS INSTRUCCIONES!
PAUTAS DE SEGURIDAD/DEFINICIONES
Es importante para usted leer y entender este manual. La información que lo contiene relaciona a proteger SU
SEGURIDAD y PREVENIR los PROBLEMAS. Los símbolos debajo de son utilizados para ayudarlo a reconocer
esta información.
Indica una situación de inminente riesgo, la cual, si no es evitada, causará la muerte o lesiones serias.
Indica una situación potencialmente riesgosa, que si no es evitada, podría resultar en la muerte o
lesiones serias.
Indica una situación potencialmente peligrosa, la cual, si no es evitada, podría resultar en lesiones
menores o mode-radas.
Usado sin el símbolo de seguridad de alerta indica una situa-ción potencialmente riesgosa la que,
si no es evitada, podría causar daños en la propiedad.
PROPOSICIÓN DE CALIFORNIA 65
Algunos tipos de aserrín creados por máquinas eléctricas de lijado, aserrado, amolado,
perforado u otras actividades de la construcción, contienen materiales químicos conocidos (en el Estado de
California) como causantes de cáncer, defectos de nacimiento u otros daños del aparato reproductivo. Algunos
ejemplos de dichos productos químicos son:
• El plomo contenido en algunas pinturas con base de plomo
• Sílice cristalizado proveniente de los ladrillos, el cemento y otros productos de albañilería
• Arsénico y cromo de madera tratada químicamente
Su riesgo por causa de estas exposiciones varía, dependiendo de con cuánta frecuencia realice este tipo de trabajo. Para
reducir su exposición a estos agentes químicos: trabaje en un área bien ventilada y trabaje con equipo de seguridad aprobado,
use siempre protección facial o respirador NIOSH/OSHA aprobados cuando deba utilizar dichas herramientas.
26
Page 27

NORMAS GENERALES DE SEGURIDAD
Si no se siguen estas normas, el resultado podría ser lesiones graves.
1. PARA SU PROPIA SEGURIDAD, LEA EL MANUAL DE
INSTRUCCIONES ANTES DE UTILIZAR LA MÁQUINA. Al
aprender la aplicación, las limitaciones y los peligros específicos
de la máquina, se minimizará enormemente la posibilidad de
accidentes y lesiones.
2. USE PROTECCIÓN DE LOS OJOS Y DE LA AUDICIÓN.
USE SIEMPRE ANTEOJOS DE SEGURIDAD. Los lentes de
uso diario NO son anteojos de seguridad. USE EQUIPO DE
SEGURIDAD CERTIFICADO. El equipo de protección de los
ojos debe cumplir con las normas ANSI Z87.1. El equipo de
protección de la audición debe cumplir con las normas ANSI
S3.19.
3. USE INDUMENTARIA ADECUADA. No use ropa holgada,
guantes, corbatas, anillos, pulseras u otras joyas que podrían
engancharse en las piezas móviles. Se recomienda usar calzado
antideslizante. Use una cubierta protectora del pelo para sujetar
el pelo largo.
4. NO UTILICE LA MÁQUINA EN UN ENTORNO PELIGROSO.
La utilización de herramientas mecánicas en lugares húmedos
o mojados, o en la lluvia, puede causar descargas eléctricas o
electrocución. Mantenga bien iluminada el área de trabajo para
evitar tropezar o poner en peligro los brazos, las manos y los
dedos.
5. MANTENGA TODAS LAS HERRAMIENTAS Y MÁQUINAS
EN CONDICIONES ÓPTIMAS. Mantenga las herramientas
afiladas y limpias para lograr el mejor y más seguro rendimiento.
Siga las instrucciones de lubricación y cambio de accesorios.
Las herramientas y las máquinas mal mantenidas pueden dañar
más la herramienta o la máquina y/o causar lesiones.
6. COMPRUEBE SI HAY PIEZAS DAÑADAS. Antes de utilizar
la máquina, compruebe si hay piezas dañadas. Compruebe
la alineación de las piezas móviles, si las piezas móviles se
atascan, si hay piezas rotas y toda otra situación que podría
afectar su funcionamiento. Un protector o cualquier otra
pieza que presente daños debe repararse o reemplazarse
apropiadamente. Las piezas dañadas pueden causar daños
adicionales a la máquina y/o lesiones.
7. MANTENGA LIMPIA EL ÁREA DE TRABAJO. Las áreas y los
bancos desordenados invitan a que se produzcan accidentes.
8. MANTENGA ALEJADOS A LOS NIÑOS Y A LOS VISITANTES.
El taller es un entorno potencialmente peligroso. Los niños y los
visitantes pueden sufrir lesiones.
9. REDUZCA EL RIESGO DE UN ARRANQUE NO
INTENCIONADO. Asegúrese de que el interruptor esté
en la posición de apagado antes de enchufar el cable de
alimentación. En caso de un apagón, mueva el interruptor a la
posición de apagado. Un arranque accidental podría causar
lesiones.
10. UTILICE LOS PROTECTORES. Asegúrese de que todos los
protectores estén colocados en su sitio, sujetos firmemente y
funcionando correctamente para prevenir lesiones.
11. QUITE LAS LLAVES DE AJUSTE Y DE TUERCA ANTES DE
ARRANCAR LA MÁQUINA. Las herramientas, los pedazos
de desecho y otros residuos pueden salir despedidos a alta
velocidad, causando lesiones.
12. UTILICE LA MÁQUINA ADECUADA. No fuerce una máquina
o un aditamento a hacer un trabajo para el que no se diseñó. El
resultado podría ser daños a la máquina y/o lesiones.
13. UTILICE ACCESORIOS RECOMENDADOS. La utilización de
accesorios y aditamentos no recomendados por Delta podría
causar daños a la máquina o lesiones al usuario.
14. UTILICE EL CORDÓN DE EXTENSIÓN ADECUADO.
Asegúrese de que el cordón de extensión esté en buenas
condiciones. Cuando utilice un cordón de extensión, asegúrese
de utilizar un cordón que sea lo suficientemente pesado como
para llevar la corriente que su producto tome. Un cordón de
tamaño insuficiente causará una caída de la tensión de la línea,
lo cual producirá una pérdida de potencia y recalentamiento.
Consulte el Cuadro de cordones de extensión para obtener
el tamaño correcto dependiendo de la longitud del cordón
y la capacidad nominal en amperios indicada en la placa de
especificaciones. En caso de duda, utilice el próximo calibre
más grueso. Cuanto más pequeño sea el número de calibre,
más pesado será el cordón.
15. SUJETE FIRMEMENTE LA PIEZA DE TRABAJO. Utilice las
abrazaderas o el tornillo cuando usted no puede asegurar el
objeto en la tabla y contra la cerca a mano o cuando su mano
estará peligroso cerca de la lámina (dentro de 6").
16. HAGA AVANZAR LA PIEZA DE TRABAJO CONTRA EL
SENTIDO DE ROTACIÓN DE LA HOJA, EL CORTADOR
O LA SUPERFICIE ABRASIVA. Si la hace avanzar desde el
otro sentido, el resultado será que la pieza de trabajo salga
despedida a alta velocidad.
17. NO FUERCE LA PIEZA DE TRABAJO SOBRE LA MÁQUINA.
El resultado podría ser daños a la máquina y/o lesiones.
18. NO INTENTE ALCANZAR DEMASIADO LEJOS. Una
pérdida del equilibrio puede hacerle caer en una máquina en
funcionamiento, causándole lesiones.
19. NO SE SUBA NUNCA A LA MÁQUINA. Se podrían producir
lesiones si la herramienta se inclina o si usted hace contacto
accidentalmente con la herramienta de corte.
20. NO DEJE NUNCA DESATENDIDA LA MÁQUINA CUANDO
ESTÉ EN MARCHA. APÁGUELA. No deje la máquina hasta
que ésta se detenga por completo. Un niño o un visitante podría
resultar lesionado.
21. APAGUE LA MÁQUINA Y DESCONÉCTELA DE LA FUENTE
DE ALIMENTACIÓN antes de instalar o quitar accesorios, antes
de ajustar o cambiar configuraciones o al realizar reparaciones.
Un arranque accidental puede causar lesiones.
22. HAGA SU TALLER A PRUEBA DE NIÑOS CON CANDADOS
E INTERRUPTORES MAESTROS O QUITANDO LAS LLAVES
DE ARRANQUE. El arranque accidental de una máquina por un
niño o un visitante podría causar lesiones.
23. MANTÉNGASE ALERTA, FÍJESE EN LO QUE ESTÁ
HACIENDO Y USE EL SENTIDO COMÚN. NO UTILICE
LA MÁQUINA CUANDO ESTÉ CANSADO O BAJO LA
INFLUENCIA DE DROGAS, ALCOHOL O MEDICA-MENTOS.
Un momento de distracción mientras se estén utilizando
herramientas mecánicas podría causar lesiones.
24. EL USO DE ESTA HERRAMIENTA
PUEDE GENERAR Y DISPERSAR POLVO U OTRAS
PARTÍCULAS SUSPENDIDAS EN EL AIRE, INCLUYENDO
POLVO DE MADERA, POLVO DE SÍLICE CRISTALINA Y
POLVO DE ASBESTO. Dirija las partículas de modo que se
alejen de la cara y del cuerpo. Utilice siempre la herramienta
en un área bien ventilada y proporcione un medio apropiado
de remoción de polvo. Use un sistema de recolección de polvo
en todos los lugares donde sea posible. La exposición al polvo
puede causar lesiones respiratorias graves y permanentes u
otras lesiones graves y permanentes, incluyendo silicosis (una
enfermedad pulmonar grave), cáncer y muerte. Evite aspirar el
polvo y evite el contacto prolongado con el polvo. Si se permite
que el polvo entre en la boca o en los ojos, o que se deposite en
la piel, se puede promover la absorción de material nocivo. Use
siempre protección respiratoria aprobada por NIOSH/OSHA que
se ajuste apropiadamente y sea adecuada para la exposición al
polvo, y lávese las áreas expuestas con agua y jabón.
27
Page 28

NORMAS ESPECÍFICAS ADICIONALES DE SEGURIDAD
Si no se siguen estas normas, el resultado podría ser lesiones personales graves.
PARA FILTRAR POLVO METÁLICO. Al combinar polvo
PELIGRO: NO UTILICE ESTA UNIDAD
de madera y polvo metálico se puede crear un peligro de
explosión o de incendio. Esta unidad está diseñada para
filtrar solamente atmósferas no explosivas.
NO UTILICE ESTA UNIDAD PARA
DISIPAR VAPORES O HUMO. Este limpiador de aire está
diseñado para utilizarse en lugares donde solamente haya
presente polvo seco suspendido en el aire. Su utilización
debe limitarse a atmósferas no metálicas no explosivas.
1. NO UTILICE ESTA UNIDAD HASTA QUE ESTÉ
COMPLETAMENTE MONTADA E INSTALADA DE
ACUERDO CON LAS INSTRUCCIONES.
2. OBTENGA ASESORAMIENTO DE SU SUPERVISOR,
INSTRUCTOR U OTRA PERSONA CALIFICADA si no
está completamente familiarizado con la utilización de
esta unidad.
3. SIGA TODOS LOS CÓDIGOS DE CABLEADO y todas
las conexiones eléctricas recomendadas.
4. NO LEVANTE ESTA UNIDAD POR EL CABLE DE
ALIMENTACIÓN. No use el cable de alimentación como
dispositivo para colgar.
5. ANCLE FIRMEMENTE ESTA UNIDAD A UNA
ESTRUCTURA DE SOPORTE cuando la suspenda del
techo. Mantenga siempre un mínimo de 7 pies entre la
parte inferior de la unidad y la superficie del piso, para
permitir que haya suficiente espacio de franqueo vertical.
Use únicamente una cadena con capacidad nominal de
carga de trabajo de 150 lb como mínimo, con el fin de
sujetar adecuadamente la unidad. Use ganchos en S
de acero que tengan un diámetro de al menos 1/4 de
pulgada para suspender la unidad del techo. Los pernos
de tipo rosca para madera que se utilicen para suspender
la unidad del techo deben enroscarse al menos 1-1/2
pulgadas en los miembros estructurales de soporte.
6. MENTE CON ABRAZADERAS EN LA SUPERFICIE DE
TRABAJO CUANDO SE UTILICE EN UNA APLICACIÓN
PORTÁTIL, para eliminar el movimiento potencial y/o los
daños por causa de caída.
7. ASEGÚRESE DE QUE LAS ÁREAS DE ADMISIÓN Y DE
ESCAPE ESTÉN DESPEJADAS ANTES DE ARRANCAR
LA UNIDAD.
8. MANTENGA LOS BRAZOS, LAS MANOS Y LOS DEDOS
ALEJADOS DEL VENTILADOR. Evite toda exposición a
las partes giratorias.
9. NO UTILICE ESTA UNIDAD SI NO TIENE LOS FILTROS
COLOCADOS EN SU SITIO.
10. NO INTENTE QUITAR NI REEMPLAZAR EL FILTRO
O LOS FILTROS MIENTRAS LA UNIDAD ESTÉ EN
MARCHA. Asegúrese de que la unidad esté desconectada
de la fuente de alimentación.
11. MANTENGA LA UNIDAD EN CONDICIONES ÓPTIMAS.
Mantenga limpios los filtros para lograr un rendimiento
óptimo. Siga todas las instrucciones para cambiar y
limpiar los filtros.
12. ALMACENE ESTA UNIDAD EN UN LUGAR que elimine
el potencial de daños al cable de alimentación. Guarde de
manera segura el cable de alimentación en la unidad para
eliminar los peligros de tropiezo.
13. APAGUE LA UNIDAD Y DESCONÉCTELA DE LA
FUENTE DE ALIMENTACIÓN antes de instalar o quitar
accesorios, o cuando haga reparaciones.
GUARDE ESTAS INSTRUCCIONES.
Consúltelas a menudo y úselas para instruir a otros.
CONEXIONES A LA FUENTE DE ALIMENTACIÓN
Debe utilizarse un circuito eléctrico independiente para las máquinas. Este circuito debe tener alambre de no menos del
No. 12 y debe estar protegido con un fusible de acción retardada de 20 A. Si se utiliza un cordón de extensión, utilice
únicamente cordones de extensión de tres alambres que tengan enchufes de tipo de conexión a tierra con tres terminales y
un receptáculo coincidente que acepte el enchufe de la máquina. Antes de conectar el máquina a la línea de alimentación,
asegúrese de que el interruptor(s) esté en la posición de apagado y cerciórese de que la corriente eléctrica tenga las mismas
características que las que estén indicadas en la máquina. Todas las conexiones a la línea de alimentación deben hacer buen
contacto. El funcionamiento a bajo voltaje dañará el máquina.
No exponga la máquina a la lluvia ni la utilice en lugares húmedos.
ESPECIFICACIONES DEL MOTOR
La máquina está cableada para corriente alterna de 120 V, 60 Hz. Antes de conectar la máquina a la fuente de alimentación,
asegúrese de que el interruptor esté en la posición de apagado.
INSTRUCCIONES DE CONEXIÓN A TIERRA
contra las descargas eléctricas.
Esta máquina debe estar conectada a tierra mientras se esté utilizando, para proteger al operador
28
Page 29

1. Todas las máquinas conectadas con cordón conectadas a tierra:
En caso de mal funcionamiento o avería, la conexión a tierra proporciona una ruta de resistencia mínima para la corriente eléctrica,
con el fin de reducir el riesgo de descargas eléctricas. Esta máquina está equipada con un cordón eléctrico que tiene un conductor de
conexión a tierra del equipo y un enchufe de conexión a tierra. El enchufe debe enchufarse en un tomacorriente coincidente que esté
instalado y conectado a tierra adecuadamente, de acuerdo con todos los códigos y ordenanzas locales.
No modifique el enchufe suministrado. Si el enchufe no cabe en el tomacorriente, haga que un electricista calificado instale el
tomacorriente apropiado.
La conexión inapropiada del conductor de conexión a tierra del equipo puede dar como resultado riesgo de descargas eléctricas. El
conductor con aislamiento que tiene una superficie exterior de color verde con o sin franjas amarillas es el conductor de conexión a
tierra del equipo. Si es necesario reparar o reemplazar el cordón eléctrico o el enchufe, no conecte el conductor de conexión a tierra del
equipo a un terminal con corriente.
Consulte a un electricista competente o a personal de servicio calificado si no entiende completamente las instrucciones de conexión a
tierra o si tiene dudas en cuanto a si la máquina está conectada a tierra apropiadamente.
Utilice únicamente cordones de extensión de tres alambres que tengan enchufes de tipo de conexión a tierra con tres terminales y
receptáculos de tres conductores que acepten el enchufe de la máquina, tal como se muestra en la Fig. A.
Repare o reemplace inmediatamente los cordones dañados o desgastados.
2. Máquinas conectadas con cordón conectadas a
tierra diseñadas para utilizarse en un circuito de alimentación que tenga
una capacidad nominal de menos de 150 V:
Si la máquina está diseñada para utilizarse en un circuito que tenga un tomacorriente parecido al que se ilustra en la Fig. A, la máquina
tendrá un enchufe de conexión a tierra que se parece al enchufe ilustrado en la Fig. A. Puede utilizarse un adaptador temporal, que se
parece al adaptador ilustrado en la Fig. B, para conectar este enchufe a un receptáculo coincidente de dos conductores, tal como se
muestra en la Fig. B, si no se dispone de un tomacorriente conectado a tierra apropiadamente. El adaptador temporal debe utilizarse
solamente hasta que un electricista calificado pueda instalar un tomacorriente conectado a tierra apropiadamente. La orejeta, lengüeta,
etc., rígida de color verde que sobresale del adaptador debe conectarse a una toma de tierra permanente, como por ejemplo una caja
tomacorriente conectada a tierra adecuadamente. Siempre que se utilice un adaptador, debe sujetarse en su sitio con un tornillo de
metal.
NOTA: En Canadá, el uso de un adaptador temporal no está permitido por el Código Eléctrico Canadiense.
no está seguro, haga que un electricista calificado compruebe el receptáculo.
En todos los casos, asegúrese de que el receptáculo en cuestión esté conectado a tierra adecuadamente. Si
CAJA TOMACORRIENTE
CONECTADA A TIERRA
TERMINALES
QUE LLEVAN
CORRIENTE
EL TERMINAL DE CONEXIÓN A
TIERRA ES EL MÁS LARGO DE
LOS 3 TERMINALES
Fig. A
CORDÓN DE EXTENSIÓN DE CALIBRE MÍNIMO
CORDONES DE EXTENSIÓN
Utilice cordones de extensión
apropiados. Asegúrese de que el cordón de extensión
esté en buenas condiciones y de que sea un cordón de
extensión de tres alambres que tenga un enchufe de tipo
de conexión a tierra con tres terminales y un receptáculo
coincidente que acepte el enchufe de la máquina.
Cuando utilice un cordón de extensión, asegúrese de
emplear un cordón que sea lo suficientemente pesado
como para llevar la corriente de la máquina. Un cordón
de tamaño insuficiente causará una caída de la tensión
de la línea eléctrica que dará como resultado pérdida
de potencia y recalentamiento. En la Fig. D1 se muestra
el calibre correcto que debe utilizarse dependiendo
de la longitud del cordón. En caso de duda, utilice el
siguiente calibre más pesado. Cuanto más pequeño sea
el número de calibre, más pesado será el cordón.
Capacidad Longitud Total Del Calibre Del Cordon
Nominal En Voltios Cordon De Extensión
Amperios En Pies
0-6 120 25-50 16 AWG
0-6 120 50-100 16 AWG
0-6 120 100-150 14 AWG
6-10 120
6-10 120 25-50 16 AWG
6-10 120 50-100 14 AWG
6-10 120 100-150 12 AWG
10-12 120
10-12 120 25-50 16 AWG
10-12 120 50-100 14 AWG
10-12 120 100-150 12 AWG
12-16 120
12-16 120 25-50 12 AWG
12-16 120
TAMAÑOS RECOMENDADOS PARA USO CON MÁQUINAS ELÉCTRICAS ESTACIONARIAS
0-6 120
CAJA TOMACORRIENTE
CONECTADA A TIERRA
MEDIO DE CONEXIÓN
TIERRA
ADAPTADOR
Fig. B
Hasta
25 18 AWG
Hasta
25 18 AWG
Hasta
25 16 AWG
Hasta
25 14 AWG
NO SE RECOMIENDA LONGITUDES MAYOR DE 50 PIES
Fig. D1
29
Page 30

DESCRIPCIÓN FUNCIONAL
PREFACIO
El purificador de aire Delta AP100 ofrece todos los beneficios del aire limpio junto con una lámpara portátil. Cuenta con un motor
de inducción de 120 voltios, filtrado de aire en dos etapas y dos tubos de luz fluorescente integrados y aditamentos para su
instalación. Con una capacidad de 450 CFM (pies cúbicos por minuto), un prefiltro para partículas de tamaño grande y un filtro
interior de cinco micrones, el AP100 reduce significativamente el polvo del aserrín de la madera y elimina así las preocupaciones
relacionadas con la limpieza y la salud. Además, el modelo AP100 cuenta con dos luces integradas para iluminación local en
aplicaciones de acabado y pernos de anilla para colgar el purificador de aire de modo que no obstruya el área de trabajo en el
taller.
NOTA: La foto del cubierta del manual illustra el modelo de production actual. Todas las demas ilustraciones son solamente
representativas y es posible que no muestren el color, el etiquetado y los accesorios reales.
CONTENIDO DE CARTON
2
3
4
1
1.
Depurador de Aire
2. Tire De la Cuerda (2)
3. Pernos de anilla 5/16-18x1½ (4)
4. Tuercas de pestaña de 5/16-18 (4)
DESEMPAQUETADO Y LIMPIEZA
Desembale cuidadosamente la máquina y todos los elementos sueltos del o los contenedores de envío. Retire el aceite
anticorrosivo de las superficies sin pintura con un paño suave humedecido con alcohol mineral, solvente o alcohol
desnaturalizado.
No use solventes volátiles como gasolina, nafta, acetona o solvente de barniz para limpiar la
máquina.
Luego de limpiar, cubra las superficies sin pintura con cera en pasta de buena calidad que se utiliza para los pisos del
hogar.
30
Page 31

ENSAMBLAJE
haya sido ensamblada por completo y usted haya leido y entendido completamente el manual del propietario.
CORDONES DE TIRO
Introduzca el cordón (A) Fig. 1 dentro del enganche del cordón de tiro (B). Repita este proceso con el cordón de tiro restante.
TUBOS FLUORESCENTES (NO SE INCLUYEN)
IMPORTANTE: Este dispositivo utiliza tubos fluorescentes estándar de 18 x1 pulgadas (45.72 x 2.54 cm) y 15 vatios.
1. Introduzca uno de los extremos del tubo (A) Fig. 2, a través de la ranura (B), repita el procedimiento con el otro extremo
del tubo.
2. Gire el tubo un cuarto de vuelta para fijarlo en su sitio.
4. Repita todo este proceso para el otro tubo.
Para su propia seguridad, no conecte la maquina a la fuente de energia hasta que la maquina
HERRAMIENTAS DE ENSAMBLAJE REQUERIDAS
No se requiere ningunas herramientas de la asamblea.
ESTIMACIÓN DEL TIEMPO DE ENSAMBLAJE
La asamblea para esta máquina es 30 minutos.
A
B
Fig. 1
Fig. 2
A
MONTANDO EL DEPURADOR DE AIRE AL TECHO O SOPORTE ELEVADO
1. Rosque una Fig. 3 de la tuerca del reborde 5/16-18 (B), sobre el "perno del ojo un 5/16-18x1½ (C).
2. Rosque Fig. 3 del perno de argolla (C), en el agujero (D).
NOTA: Pernos de argolla del hilo de rosca en por lo menos ocho vueltas completas.
3. Apriete la Fig. 3 de la tuerca del reborde (B), contra el filtro de aire.
4. Repita este proceso para el agujero restante en la tapa del filtro de aire según lo demostrado en Fig. 4.
Esta herramienta pesa 40 libras. Asegurese que la unidad este afianzada de manera segura
durante el montaje a un soporte de techo o soporte elevado.
Amas afiance la herramenteria de montaje a moros de piedra en seco, armazones o losetas de tech
abatible, u otros miembros no extructurales..
C
B
B
D
Fig. 3
Fig. 4
31
Page 32

que sean un minimo de 1/4" de acero.
minimum of a 150 lb. working load.
IMPORTANTE: El limpiador de aire funcionará con mayor eficiencia cuando el flujo de aire no se encuentre restringido. No
sitúe la unidad en una esquina ni cerca de conductos de calefacción o enfriamiento.
Cuando el depurador de aire vaya a ser suspendido del techo o de otro soporte elevado, use goncho-S
Rosque todos los gonchas a menos de 1-1/2" en el sestenido estructural.
Mantenga un espacio mínimo de siete pies entre el fondo del depurador de aire y la superficie del piso.
Do not use rope, cable, or power cord to suspend the unit from the ceiling. Use chain rated for a
OPERACIÓN
CONTROLES Y AJUSTES OPERACIONALES
CORD SWITCH
El Depurador de Aire viene equipado con un interruptor
oscilante en línea (A) Fig. 5, localizado en el cordón de
energía (B). Para arrancar o detener el motor, haga presión
hacia abajo sobre el interruptor oscilante.
Cerciórese que el interruptor (C) Fig. 5
está en el la posición apagado (OFF) antes del conectar
la cuerda del poder. En caso de un fallo del suministro
eléctrico, mueva el interruptor al la posición apagado
(OFF). Una compañía nueva accidental puede causar la
herida.
B
INTERRUPTORES DE CORDÓN PARA EL MOTOR Y LA LUZ
NOTA: El interruptor de cordón debe estar en la posición
de encendido ("on").
Para empezar y parar el motor más limpio aéreo, baje en el
motor tira cuerda (C) Fig. 6. El motor tira cuerda (C) tiene un
icono de ventilador para indicar el motor tira cuerda.
Para prender la luz y “LEJOS”, baja en la luz tira cuerda (D)
Fig. 6. La luz tira cuerda (D) tiene un icono de bombilla para
indicar la luz tira cuerda.
LIGHT ICON
C
A
Fig. 5
FAN ICON
C
D
Fig. 6
UTILIZAR LA MAQUINA
NOTA: El depurador de aire puede producir un ligero olor durante las primeras cuantas horas de funcionamiento debido al
revestimiento protectivo que se aplica a los componentes internos. Este olor se disipará y debe hacerse caso omiso de él.
Jamás ponga el depurador de aire en funcionamiento sin que los filtros de aire estén en sus sitios.
El filtro de aire se puede utilizar en la posición de arriba, en un banco de trabajo, o en el piso.
El limpiador de aire AP100 de Delta puede utilizarse en:
a. usos que enarenan.
b. usos que asierran.
c. usos de la pared seca.
d. cualquier otro uso donde está un factor el polvo no-metálico.
32
Page 33

LOCALIZACION DE FALLAS
Para obtener asistencia para su máquina, visite nuestro sitio Web en www.deltamachinery.com para tener acceso a una lista de
centros de servicio o llame a la línea de ayuda de Delta Machinery al 1-800-223-7278. (En Canadá, llame al 1-800-463-3582.)
MANTENIMIENTO
REEMPLAZO Y LIMPIEZA DE LOS FILTROS
Desconecte la máquina de fuente de energía.
1. Quite los seis tornillos (A) Fig. 7, de la cubierta del filtro.
2. Tire de la cubierta del filtro (C) Fig. 8, para quitarla de la máquina.
Fig. 7 Fig. 8
A
C
3. Quite los tres clips de resorte (D) Fig. 9.
4. Quite el filtro tipo de bolsa (E) Fig. 9.
5. Quite el prefiltro (F) Fig. 10.
6. Dependiendo de la condición, usted puede o limpio o reemplaza los filtros (E) Fig. 9 y (F) Fig. 10. Limpie los filtros o con
un vac o con aire comprimido.
El aire comprimido puede ser peligroso. Para la seguridad del operario, no sobrepase una presion de aire
de 30 psi ni apunte la tobera de aire hacia ninguna persona ni hacia su propia cuerpo. Utilice gafas de seguradad y una
careta guardpolvo siempre cuando vaya a realizar dicho procedimiento.
7. Realice este poeration en el revés para instalar los filtros.
8. Vuelva a colocar los otros filtros del lado opuesto de la máquina usando el mismo procedimiento.
Fig. 9
Fig. 10
D
F
E
33
Page 34

ARRANCADORES
NOTA: Este dispositivo se suministra con arrancadores fluorescentes estandar (FS-2).
Desconecte la máquina de fuente de energía.
1. Para quitar el arrancador (A) Fig. 11, gírelo (A) en sentido contrario al de las agujas del reloj hasta que se detenga o tope,
después tire del arrancador para sacarlo.
2. Introduzca un arrancador nuevo alineando las dos clavijas (B) Fig. 12 ubicadas en el extremo del arrancador con los
dos orificios (C) del porta arrancador. Gire el arrancador en el sentido de las agujas del reloj hasta que se detenga.
clockwise until it stops.
A
C
B
Fig. 11
Fig. 12
KEEP THE UNIT CLEAN
Periodically blow out all air passages with dry compressed air. All plastic parts should be cleaned with a soft damp
cloth. NEVER use solvents to clean plastic parts. They could possibly dissolve or otherwise damage the material.
Wear certified safety equipment for eye, hearing and respiratory protection while using compressed air.
FAILURE TO START
Should your unit fail to start, check to make sure the prongs on the cord plug are making good contact in the outlet.
Also, check for blown fuses or open circuit breakers in the line.
34
Page 35

SERVICE
REPLACEMENT PARTS
Use only identical replacement parts. For a parts list or to
order parts, visit our website at
com.
You can also order parts from your nearest factoryowned branch, or by calling our Customer Care Center at
1-800-223-7278 to receive personalized support from highlytrained technicians.
servicenet.deltamachinery.
SERVICE AND REPAIRS
All quality tools will eventually require servicing and/or
replacement of parts. For information about Delta Machinery,
its factory-owned branches, or an Authorized Warranty
Service Center, visit our website at www.deltamachinery.
com or call our Customer Care Center at 1-800-223-7278.
All repairs made by our service centers are fully guaranteed
against defective material and workmanship. We cannot
guarantee repairs made or attempted by others.
You can also write to us for information at Delta Machinery,
4825 Highway 45 North, Jackson, Tennessee 38305 Attention: Product Service. Be sure to include all of the
information shown on the nameplate of your tool (model
number, type, serial number, etc.)
ACCESSORIES
A complete line of accessories is available from your Delta Supplier, Porter-Cable • Delta Factory Service Centers, and
Delta Authorized Service Stations. Please visit our Web Site www.deltamachinery.com for a catalog or for the name of
your nearest supplier.
Since accessories other than those offered by Delta have not been tested with this product, use
of such accessories could be hazardous. For safest operation, only Delta recommended accessories should be
used with this product.
WARRANTY
To register your tool for warranty service visit our website at www.deltamachinery.com.
Two Year Limited New Product Warranty
Delta will repair or replace, at its expense and at its option, any new Delta machine, machine part, or machine accessory which in normal
use has proven to be defective in workmanship or material, provided that the customer returns the product prepaid to a Delta factory service
center or authorized service station with proof of purchase of the product within two years and provides Delta with reasonable opportunity
to verify the alleged defect by inspection. For all refurbished Delta product, the warranty period is 180 days. Delta may require that electric
motors be returned prepaid to a motor manufacturer’s authorized station for inspection and repair or replacement. Delta will not be responsible
for any asserted defect which has resulted from normal wear, misuse, abuse or repair or alteration made or specifically authorized by anyone
other than an authorized Delta service facility or representative. Under no circumstances will Delta be liable for incidental or consequential
damages resulting from defective products. This warranty is Delta’s sole warranty and sets forth the customer’s exclusive remedy, with respect
to defective products; all other warranties, express or implied, whether of merchantability, fitness for purpose, or otherwise, are expressly
disclaimed by Delta.
35
Page 36

The following are trademarks of PORTER-CABLE • DELTA (Las siguientes son marcas registradas de PORTER-CABLE • DELTA S.A.) (Les marques suivantes sont
des marques de fabriquant de la PORTER-CABLE • DELTA): Auto-Set®, BAMMER®, B.O.S.S.®, Builder’s Saw®, Contractor’s Saw®, Contractor’s Saw II™, Delta®,
DELTACRAFT®, DELTAGRAM™, Delta Series 2000™, DURATRONIC™, Emc²™, FLEX®, Flying Chips™, FRAME SAW®, Grip Vac™, Homecraft®, Jet-Lock®,
JETSTREAM®, ‘kickstand®, LASERLOC®, MICRO-SET®, Micro-Set®, MIDI LATHE®, MORTEN™, NETWORK™, OMNIJIG®, POCKET CUTTER®, PORTA-BAND®,
PORTA-PLANE®, PORTER-CABLE®&(design), PORTER-CABLE®PROFESSIONAL POWER TOOLS, PORTER-CABLE REDEFINING PERFORMANCE™, Posi-Matic®,
Q-3®&(design), QUICKSAND®&(design), QUICKSET™, QUICKSET II®, QUICKSET PLUS™, RIPTIDE™&(design), SAFE GUARD II®, SAFE-LOC®, Sanding Center®,
SANDTRAP®&(design), SAW BOSS®, Sawbuck™, Sidekick®, SPEED-BLOC®, SPEEDMATIC®, SPEEDTRONIC®, STAIR EASE®, The American Woodshop®&(design),
The Lumber Company®&(design), THE PROFESSIONAL EDGE®, THE PROFESSIONAL SELECT®, THIN-LINE™, TIGER®, TIGER CUB®, TIGER SAW®, TORQBUSTER®,
TORQ-BUSTER®, TRU-MATCH™, TWIN-LITE®, UNIGUARD®, Unifence®, UNIFEEDER™, Unihead®, Uniplane™, Unirip®, Unisaw®, Univise®, Versa-Feeder®, VERSAPLANE® , WHISPER SERIES®,WOODWORKER’S CHOICE™.
Trademarks noted with ™ and ® are registered in the United States Patent and Trademark Office and may also be registered in other countries. Las Marcas Registradas con
el signo de ™ y ® son registradas por la Oficina de Registros y Patentes de los Estados Unidos y también pueden estar registradas en otros países. Marques déposées,
indiquées par la lettre ™ et ®, sont déposées au Bureau des brevets d’invention et marques déposées aux Etats-Unis et pourraient être déposées aux autres pays.
Delta Machinery
4825 Highway 45 North
Jackson, TN 38305
www.deltamachinery.com
36
 Loading...