

Page 1
TYBOX 817- 827 W RF
1 and 2-channel wireless programmers
with built-in thermostat
User guide
TYBOX 827 RF
• Carefully read these instructions prior to use.
• Do not attempt to repair the unit yourself;
an after-sales service is available.
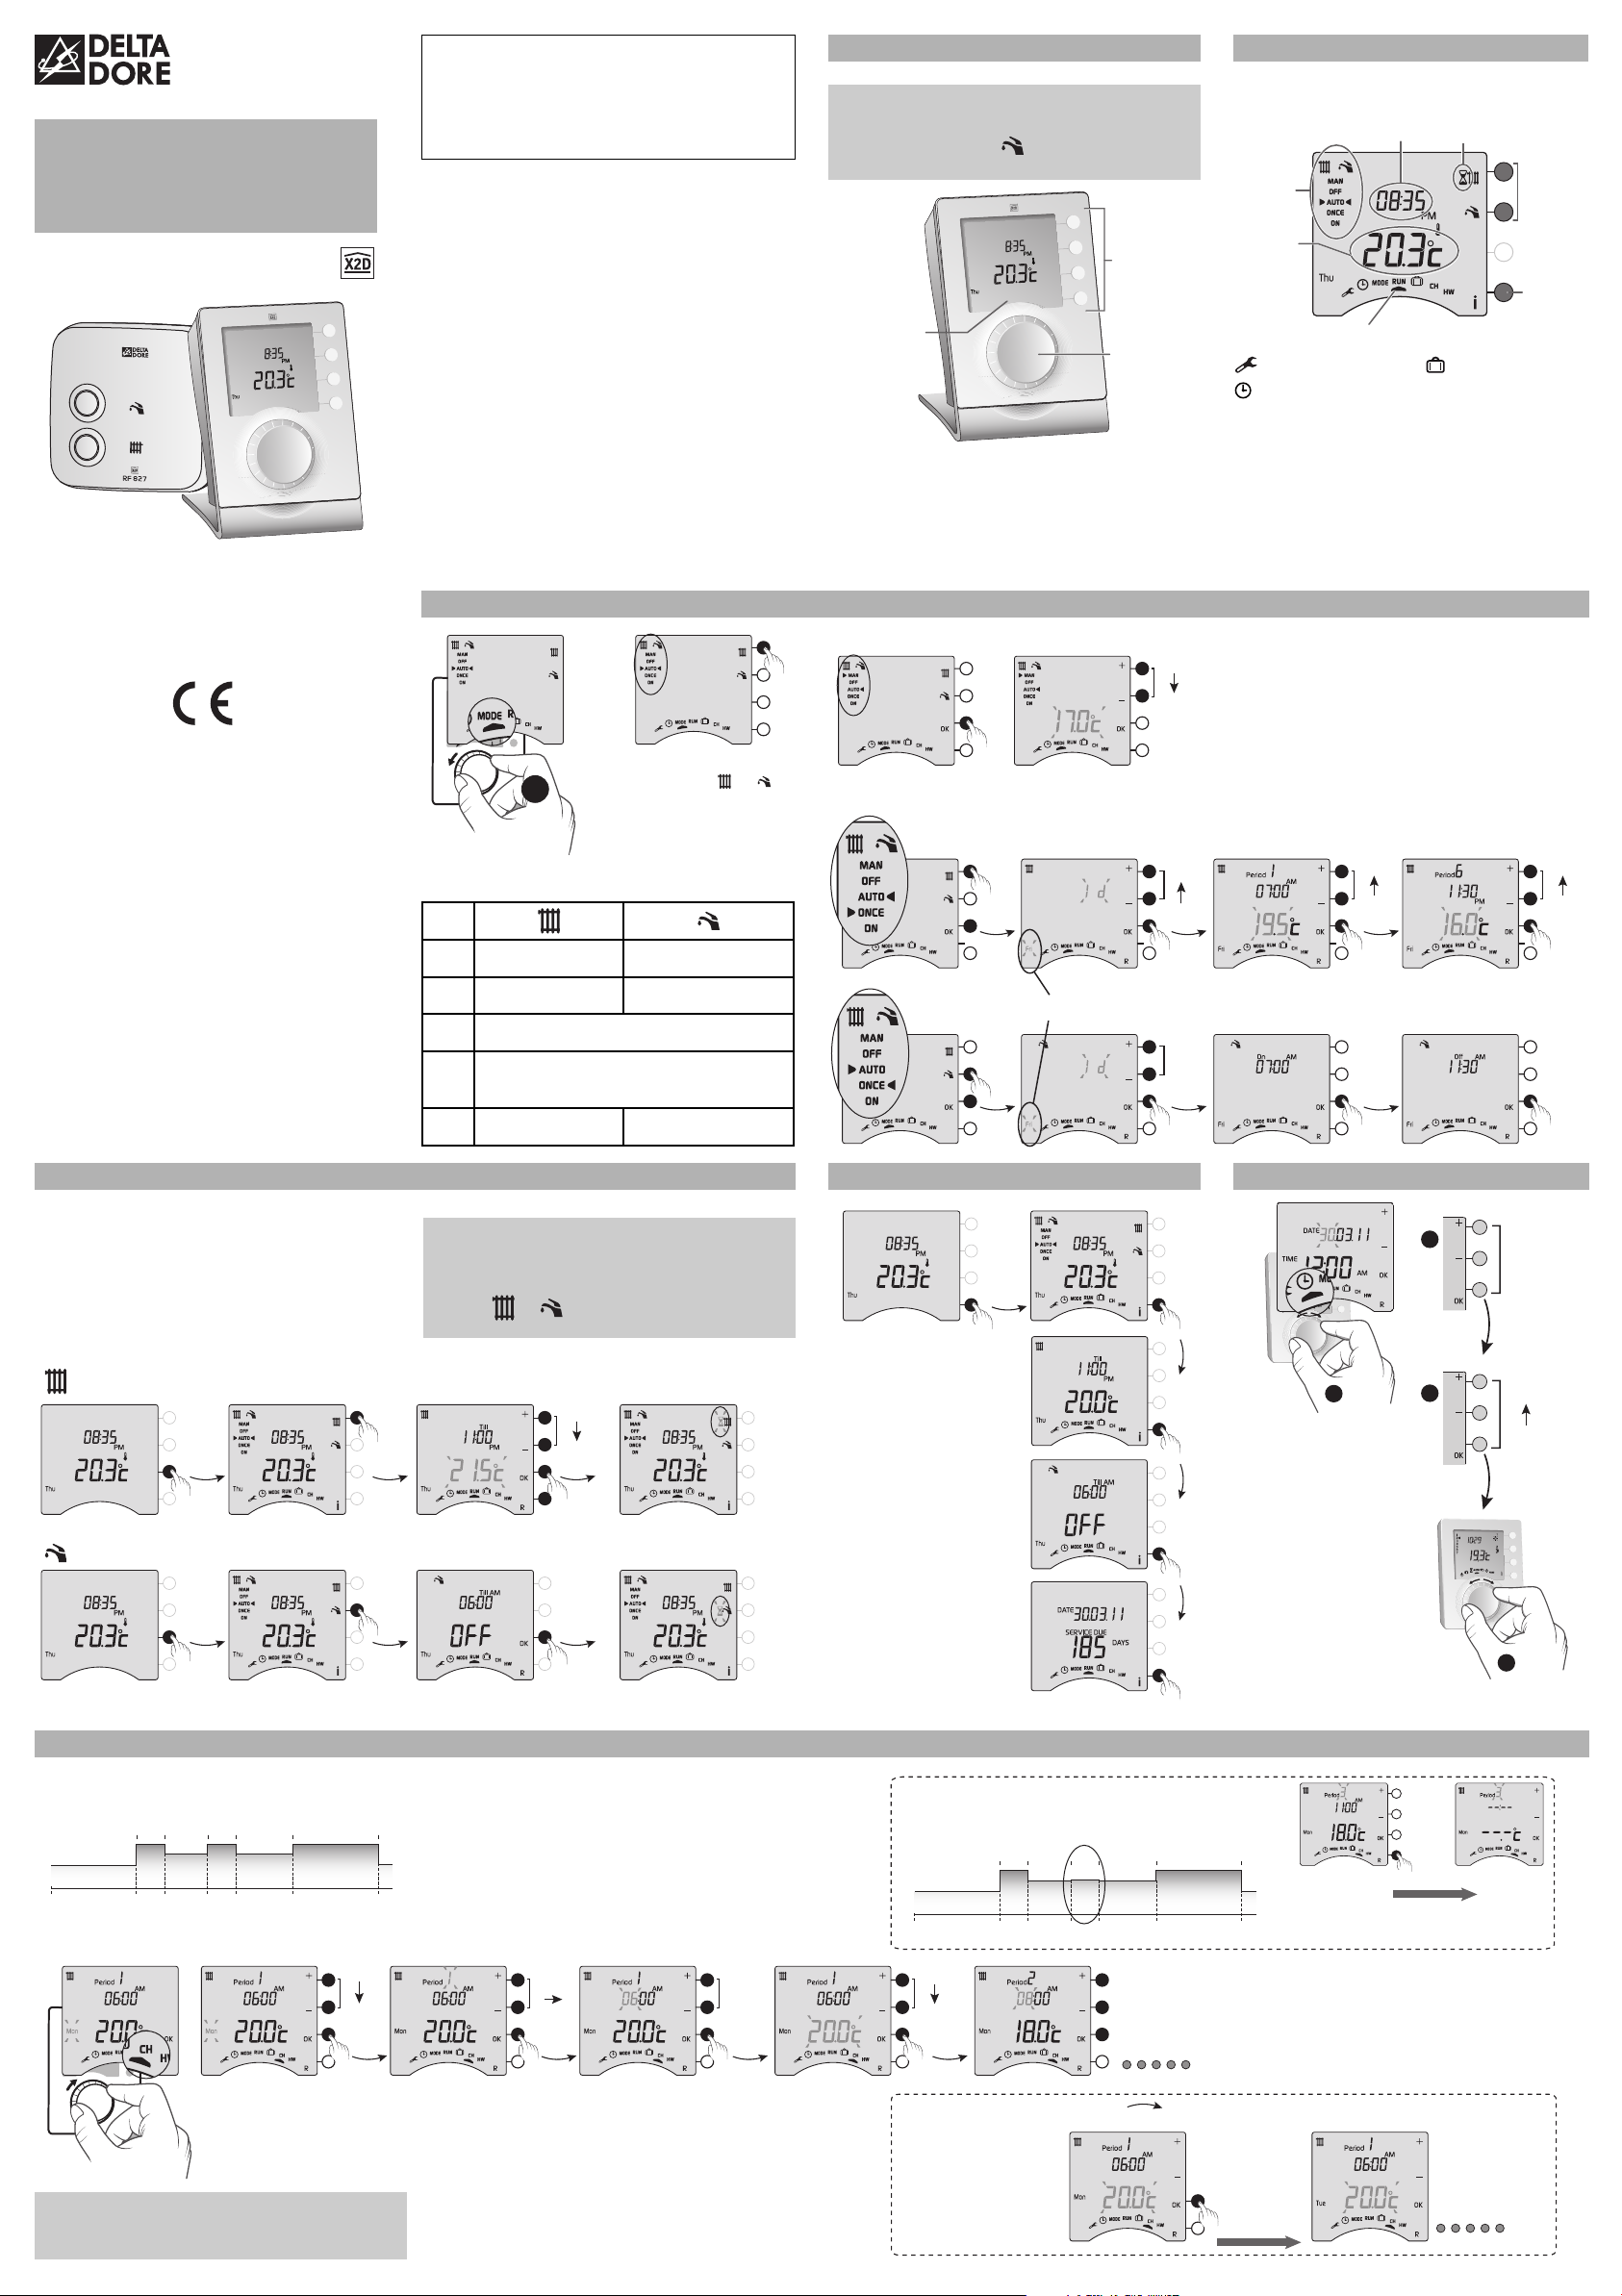
3. Choosing the operating mode
1. Pres e n t ation
• These instructions apply to both the TYBOX 817 WRF
and the TYBOX 827 WRF.
• The hot water mode ( ) is only available on the
TYBOX 827 WRF.
TYBOX 827 RF
Change mode
buttons
Stand-by
screen:
• Room
temperature
• Current day
and time
On the receiver:
- the green LED indicates that the product is
switched on,
- the red LED indicates the status of the output(s):
light on = ON, light off = OFF.
MAN Mode
Selector dial
5°C
30°C
2. RUN Mode
Press a button to “activate” the display.
Override
currently active
Absence mode
CH
Heating
programming
HW
Hot water
programming
Heating
and
hot water
modes
Room
temperature
General mode active
Configuration
Time setting
MODE
Operating mode
selection
RUN
Run the operating
mode selected
Turn the dial to exit the
setting mode.
Time
Override
buttons
Information
button
Delta Dore hereby declares that the equipment complies
with the essential requirements and other relevant provisions
The EC declaration of conformity for this equipment is available,
of the R&TTE Directive 1999/5/EC.
on request, from:
DELTA DORE - Bonnemain - 35270 Combourg (France)
“Technical info” department
Email: info.techniques@deltadore.com
1
Please not that you can’t define hot water
Select the mode
by pressing or
repeatedly.
ONCE Mode
Heating
temperature in this programmer
MAN
OFF
Constant
temperature setting
Frost Protection Off
NA
Hot water
Follows the programming
Follows the ONCE programme.
Return to AUTO mode at the end of the
countdown.
NA Permanent ON
Because of changes in standards and equipment, the characteristics given in the
text and the illustrations in this document are not binding unless confirmed.
AUTO
*2702541_rev.2*
ONCE
ON
4. Override 5. Information button
From the RUN mode, override enables:
- for the heating, modification of the temperature
setting (5°C to 30°C) until the next programme
change
- for the hot water, modification of the current
operation (ON/OFF) until the next programme
change
• Override is only accessible in AUTO or ONCE
mode.
• To cancel an active override, press the relevant
button ( or ) or turn the dial.
ONCE mode
end day
R: back to previous
setting
PERM
365
001
6. Date / Time
30°C
5°C
Automatic exit after 30 seconds
if no buttons are pressed and
the dial is not turned.
2
DD.MM.YY
30°C
5°C
7. Programming the heating
Example: default programme applied from
Monday to Friday:
Period
2 3 4 5 6
1
20°C 20°C 20°C
16°C 16°C
12.00
AM
The programme can be changed for each day.
18°C 18°C
6.00
8.00AM11.00AM1.00
AM
5.00
PM
PM
MON
SUN
R: back to previous
setting
11.00
PM
Period
1 6
5°C
30°C
HH:MM
Heating channel
status until ...
Hot water channel status
until ...
Current date and
number of days before
service.
Periods 2 to 5 can be disabled.
For example, disabling the midday slot
(periods 3 and 4).
16°C 16°C
12.00
AM
5°C
30°C
Period
2 3 4 5 6
1
20°C 20°C
18°C 18°C
6.00
8.00AM11.00AM1.00
AM
5.00
PM
PM
1
R: back to previous
setting
> 2 sec.
To return to the program, press the
11.00
again and hold for 2 seconds.
PM
PM
3
11.59 (23.59)
AM
12.00 (00.00)
4
R button
A simplified programme can be applied
(2 programmable periods) for a set number of days
(ONCE mode).
R: back to previous
setting
To copy the
programming from one
day to the next day.
Copy MON ... TUE ...
> 2 sec.
Page 2
8. Programming the hot water channel
Example: default programme applied from
Monday to Friday:
ON1OFF1ON2OFF2ON
3
OFF
3
ON/OFF periods 2 and 3 can be disabled.
For example, inhibition of the midday slot (ON and
OFF period 2).
12.00
AM
6.00AM8.00AM11.00AM1.00PM5.00
PM
The programme can be changed for each day.
MON
SUN
A simplified programme can be applied
(2 programmable periods) for a set number of days
(ONCE mode).
9. Absence mode
Number
of days of
absence
11.00
PM
PERM
365
001
Return
day
R: back to previous
setting
On/Off
1 3
15°C
5°C
The countdown
begins.
Return to RUN mode
at the end of the
countdown.
HH:MM
R: back to previous
setting
ON1OFF1ON2OFF2ON
12.00
AM
6.00AM8.00AM11.00AM1.00PM5.00
To copy the
programming from one
day to the next day.
3
PM
Copy MON ... TUE ...
OFF
3
> 2 sec.
To cancel the inhibition, press the R button
11.00
again and hold for 2 seconds.
PM
> 2 sec.
10. Compatible home automation options
You can associate your programmer with the
following options:
Type of
transmitter
associated
Opening
detector
Wireless
outdoor
sensor
Resulting function
“Energy saving” function
Heating switches to Frost Protection
mode when a window is opened
(temperature set in mode).
Indication of outside
temperature by consulting the
information menu (
i button).
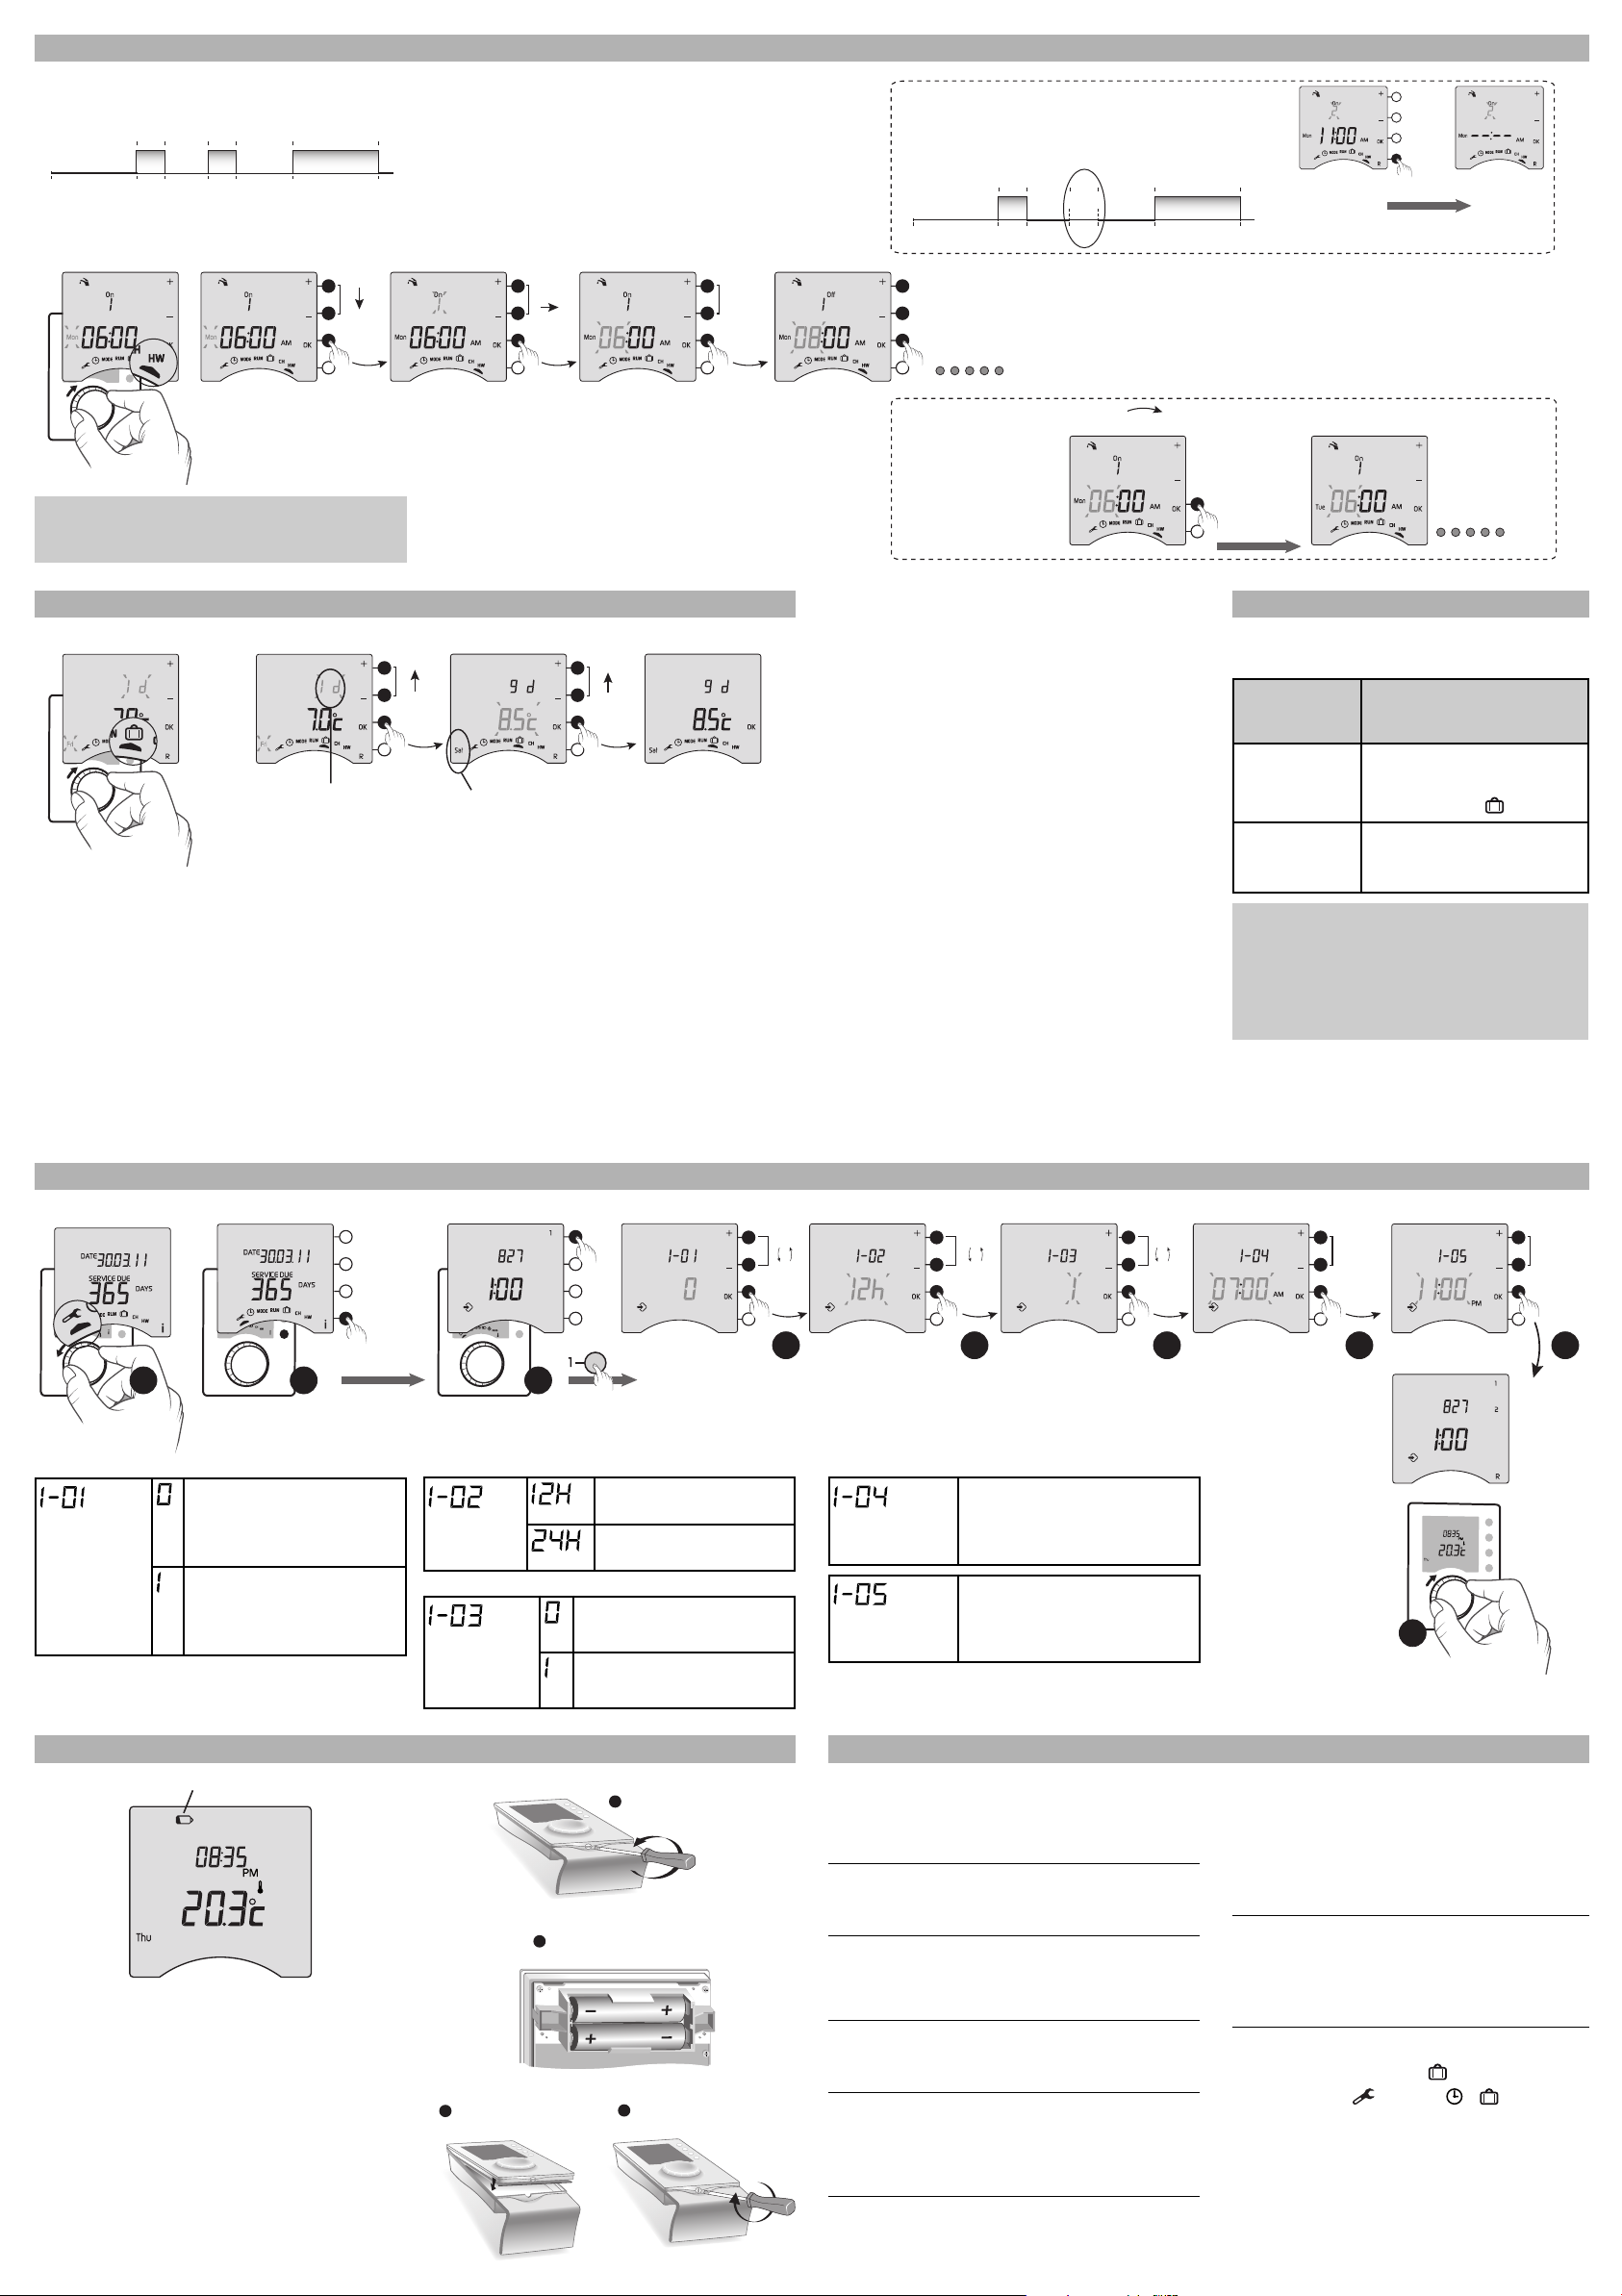
11. Basic configurations (menu 1)
1 2
> 5 sec.
For information about associating and
using home automation products,
contact:
“Technical info” department
DELTA DORE - Bonnemain
35270 Combourg (France)
Email: info.techniques@deltadore.com
0
1
12h
24h
0
HH:MM HH:MM
1
4 5 6 7 8
3
Modification of programme
User
modification
authorisation
and temperature settings
(from 5 °C to 30 °C)
authorised (default)
Modification of
programme not authorised and
temperature settings restricted
(19 °C +/- 3 °C)
12. Replacing the batteries
Battery level symbol
The batteries need changing when the battery level
symbol appears (2 LR03 or AAA 1.5V alkaline
batteries).
Precautions must be taken:
- You have approximately 30 seconds to change the
batteries before the time is reset to zero (if this
happens, reset the time).
- Ensure that the +/- polarities are correctly placed
when the battery is fitted into the unit.
- Do not dispose of used batteries in unauthorised
places (you should respect the environment by
taking the batteries to a suitable collection site).
- Do not recharge them.
Time
display
selection
Not authorised
Automatic
summer/winter
mode
Authorised (by default)
authorisation
2
Replace the batteries,
taking care to properly align the poles
Place the thermostat
3 4
on its base unit
12-hour clock (default)
24-hour clock
Separate the thermostat
1
from its base unit
Lock the thermostat
Setting from 12 midnight to
ONCE
programme
12 noon
(default value: 07:00 AM)
start time
Setting from 12 noon to
ONCE
programme
12 midnight
(default value: 11:00 PM)
end time
13. Troubleshooting
Nothing is displayed on the room
unit screen.
There is no power supply.
Check the batteries
The unit is in time setting mode.
You took too much time in changing the batteries.
Set the time. All the other settings have been kept.
The temperature displayed does not match
the temperature measured in the room
(thermometer).
Refer to the installation guide (menu 2-01).
The programme cannot be modified and the
temperature settings are limited (19 °C +/- 3 °C).
Refer to the Configuration section (menu 1-01).
“SERVICE DUE” is flashing on the display.
There are less than 30 days before the mandatory
service is due.
Contact your maintenance department.
.
9
“SERVICE DUE” is displayed on the unit.
The mandatory service date has passed.
The heating works on a set temperature setting
(override possible for 1 day).
The hot water will shut down (override possible for
2, 3 or 4 hours).
Contact your maintenance department.
The heating does not work according to the
required temperature.
If you have a Room Thermostat wired in series
with the programmer, check that this thermostat is
set to maximum.
Your heating system is in Frost-Protection
mode (temperature set in mode).
The dial is still in position, , , CHor
HW.
 Loading...