

Page 1
Lifetime Shower and Finish Limited Warranty:
consumer purchaser to be free from defects in material & workmanship for as long as the original consumer purchaser owns their home .
Delta Faucet Company recommends using a professio nal plumber for all installati on & repair.
Delta will replace, FREE OF CHARGE during the warran ty period, any part or finish that proves defecti ve in material and/or workma nship
under normal installation, use & service. Re placement parts may be obtained by
calli ng 1-800-345-DELTA (in the U.S. and Canada) or by wri ting to:
In the United States: In Canada:
Delta Faucet Company
Product Se rvice
55 E . 111th Street
Indianapolis, IN 46280
This warranty is extensive in that it cover s replacement of all defective part s and even fin ish, but these are only two
LABOR CHARGES AND/OR DAMAGE I NCURRED IN INSTALLATION, REPAIR OR REPLACEMEN T AS WELL AS ANY OTHER KIND OF
LOSS OR DAMAGES ARE EXCLUDED. Proof of purch ase (original s ales receip t) from the original cons umer purchaser must be mad available to Delta for all warranty claims. THIS IS THE EXCLUSIVE WARRA NTY BY DELTA FAUCET COMPANY, WHICH DOES NO T MAKE ANY
OTHER WARR ANTY OF ANY KIND, INCLUDING T HE IMPLIED WARRANT
This warranty excludes all industrial, commercial & business usage, whose purchas ers are he reby extend ed a five year limited warranty from
the date of purchase, with all other t erms of this warranty applying except t he duration of the warranty. This warranty is applicable to
Delta® showers manufactured aft er January 1, 1995.
Some states/provinces do not allow the exclusion or limitation o f incidental or conseq
may not apply to you. Any damag e to this shower as a result of misuse, abuse o r neglect, or any use of oth er than genuine Delta
replacement parts WILL VO ID THE WAR RANTY.
This warranty gives you specific lagal right s, and you may also have other rights which vary from state/province to state/province. It appli es
®
only to Delta
© 2011 Masco Corporation of Indiana
Garantía limitada de por vida de la llave su acabado:
comprador original, de estar libres de defectos de material y f abricación, por el tiempo que el consumidor co mprador original sea dueñ o de
su casa. Delta
Delta reemplazará,
y/o fabricación normal, uso y servicio. Piezas de repu esto pueden ser obtenidas llamando al 1-800-345-DELTA (en los Estado s Unidos) y
Canada) o escribendo a:
En los Estados Unidos: En Can
Delta Faucet Company
Product Se rvice
55 E . 111th Street
Indianapolis, IN 46280
Esta garantia es extensiva en lo que cubre el re emplazamiento de todas defectuosas y hasta el abacado, pero éstas son las únicas dos
cosas que están cubiertas. CA RGOS DE LABOR Y/O DANOS INCLURRIDOS EN LA INSTALACIÓN, REPARACIÓN, O REEMPLAZAMIENTO
COMO TAMBIÉN CUALQUIER OTRO TIPO DE PÉRDIDA O DAÑOS ESTÁN EXCLUÍDOS. Prueba de compra (recibo orig
comprador consu midor original debe de ser di sponible a Delta para to dos los re clamos. ESTA ES LA GARANTIA EXC LUSIVA DE DELTA
FAUCET COMPANY, QUE NO HACE CUALQUIER OTRA GARA NTIA DE CUALQUIER TIPO, INCLUYENDO LA G ARANTIA IMPLICITA DE
COMERCIALAZACION .
Esta garantia excluye todo uso industrial, c omercial, y de negocio, a cuyos comprado res se les da una garantia limitada extendia de cinco
años desdela fecha de compr
aplicable a las lla ves de Delta f abricadas después de Enero 1, 1995. Algunos estado s/provincias no permiten la exlusion o limitación de
daños incidenta les o consecuen tes de manera que la limitación o exclusión arriba es crita puede no aplicaríe a usted. Cualquier daño a esta
llave resultado del mal uso, abuso, o descuido, o cua lquier otro uso depiezas de repuesto que no sean genuinas d e Delta ANULARA LA
GARANTIA.
Esta garantia le da derechos legates especificos y ust ed puede, también tener otros derechos que varian de estad o/provincia a estado/
provincia. Es aplicable sólo a las llaves Delta
© 2011 Masco Corporation of Indiana
Garantie à vie limitées des robinets et de leurs finis :
défectuosités d e matériau et les vices de fabrication par une garantiequi est consentie au premier acheteur et qui demeure valide tant que
celui-ci demeure prop riétaire de sa maison. Delta recommande de fa ire appel à un plombier compétent pour l'installat ion et la répa ration de
robinet. P endant la période de garanti e, Delta remplacera GRATUITEMENT toute piéce ou tou
ou un vice de fabrication po ur autant que 'appareil ait été inst alle, utilisé e t entretenu correctement. Pour obtenir des piéces de rechange,
veuilez communicer par télépho ne au numéro 1-800-345-DELTA (aux États-Unis ou au Canada) et par écrit à l'lune des adresses suivantes:
Aux États-Unis : Au Canada :
Delta Faucet Company
Product Se rvice
55 E . 111th Street
Indianapolis, IN 46280
La présente
LES FRAIS DE MAIN-D'OEUVRE ET (OU) LESDOMMAG ES PROVOQUES AU COURS DE L'INSTALLATION DE LA REPARATION OU DU
REMPLACEMENT D' UN ÉLÉMENT AINSI QUE LES PERTES O U DOMMAGES DE TOUTE AUTRE NATURE NE SONT PAS COUVERTS PAR
LA GARANTIE. Toute réclamation en verfu de la présente g arantie doit étré adressée à Delta, ac
de la facture) du premier acheteur. CETTE GARANTIE E ST LA SEULE OFFERTE PAR DELTA FAUCET COMPANY OU MASCO CANADA.
SELON LE CAS ELLE EXCLUT TOU TE AUTRE GARANTIE Y COMPRIS LA GARANTIE IMPLICITE DE QUALITE MA RCHANDE.
Les robine ts installés da ns un établisse ment industriel ou commercial ou dans une place d'affaires sont protégés par une grantie d e cinq
ans sont ident iques à celle de la présente
1995.
Dans les Etats ou les provinces où il est interdit d'exclure ou de limiter les responsabilités à l'égard des dommages indirects ou fortuits, les
exclusions at les limites susmentionnées ne s'appliquent pas . Les dommages résultant d'une ma uvaise utilisation, d'une abusive de la négligence ou de l'utili sation de piéca s
La present e garantie vous donne de droits précis qui peuven t varier selon votre lieu de résidence . Elle ne s'ap plique qu'aux robinet s Delta
instaliés aux Etats-Unis au Canada at au Me xique.
© 2011 Masco Corporation of Indiana
showers installed in the United States of America, Canada, and Mexico.
®
Faucet Company recomiend a que use on plomero profesion al para todas las instal acìones y reparacìones.
LIBRE DE CARGO, durante el período de g arantia, cualqui er pieza o aba cado que pruebe tener de fectos de material
a, c on todos otros térmi nos de esta ga rantia aplicados , excepto el de duracíon de ésta. Esta garantiaes
garantie s'applique au remplacement de toutes les pièces défect ueuses, y compr is le fini, et elle ne couvre que ce s éléments.
autres que des pièces d' origine Delta RENDENT LA GARANTIE NULLE ET SANS EFFE CT.
All parts and finishes of the Delta® showers are warranted to the original
Masco Canada Limited, Plumbing Group
350 South Edgeware Road,
ST. Thomas , Ontairo, Canada N5P 4L1
things that are covered.
Y OF MERCHANTABILITY.
uential damages so the above limitation or excl usion
Todas la peizas de la llave Delta® están garanti zados al consum idor
:
Masco Canada Limited, Plumbing Group
350 South Edgeware Road,
ST. Thomas , Ontairo, Canada N5P 4L1
®
ins taladas en los Estados Unidos de Americ a, Canada y Mexico.
Toutes les pièces et les finis du robi net Delta® sont pro tégés contre les
t fini, présen tant une défect uosité de matériau
Masco Canada Limited, Plumbing Group
350 South Edgeware Road,
ST. Thomas , Ontairo, Canada N5P 4L1
compagnée de la preuve d 'achat (original
garantie. La présente garantie s'applique à tous les robinets De lta fabriques a prés le 1st janvier
®
inal de venta) del
Delta Shower System
Installation Instructions
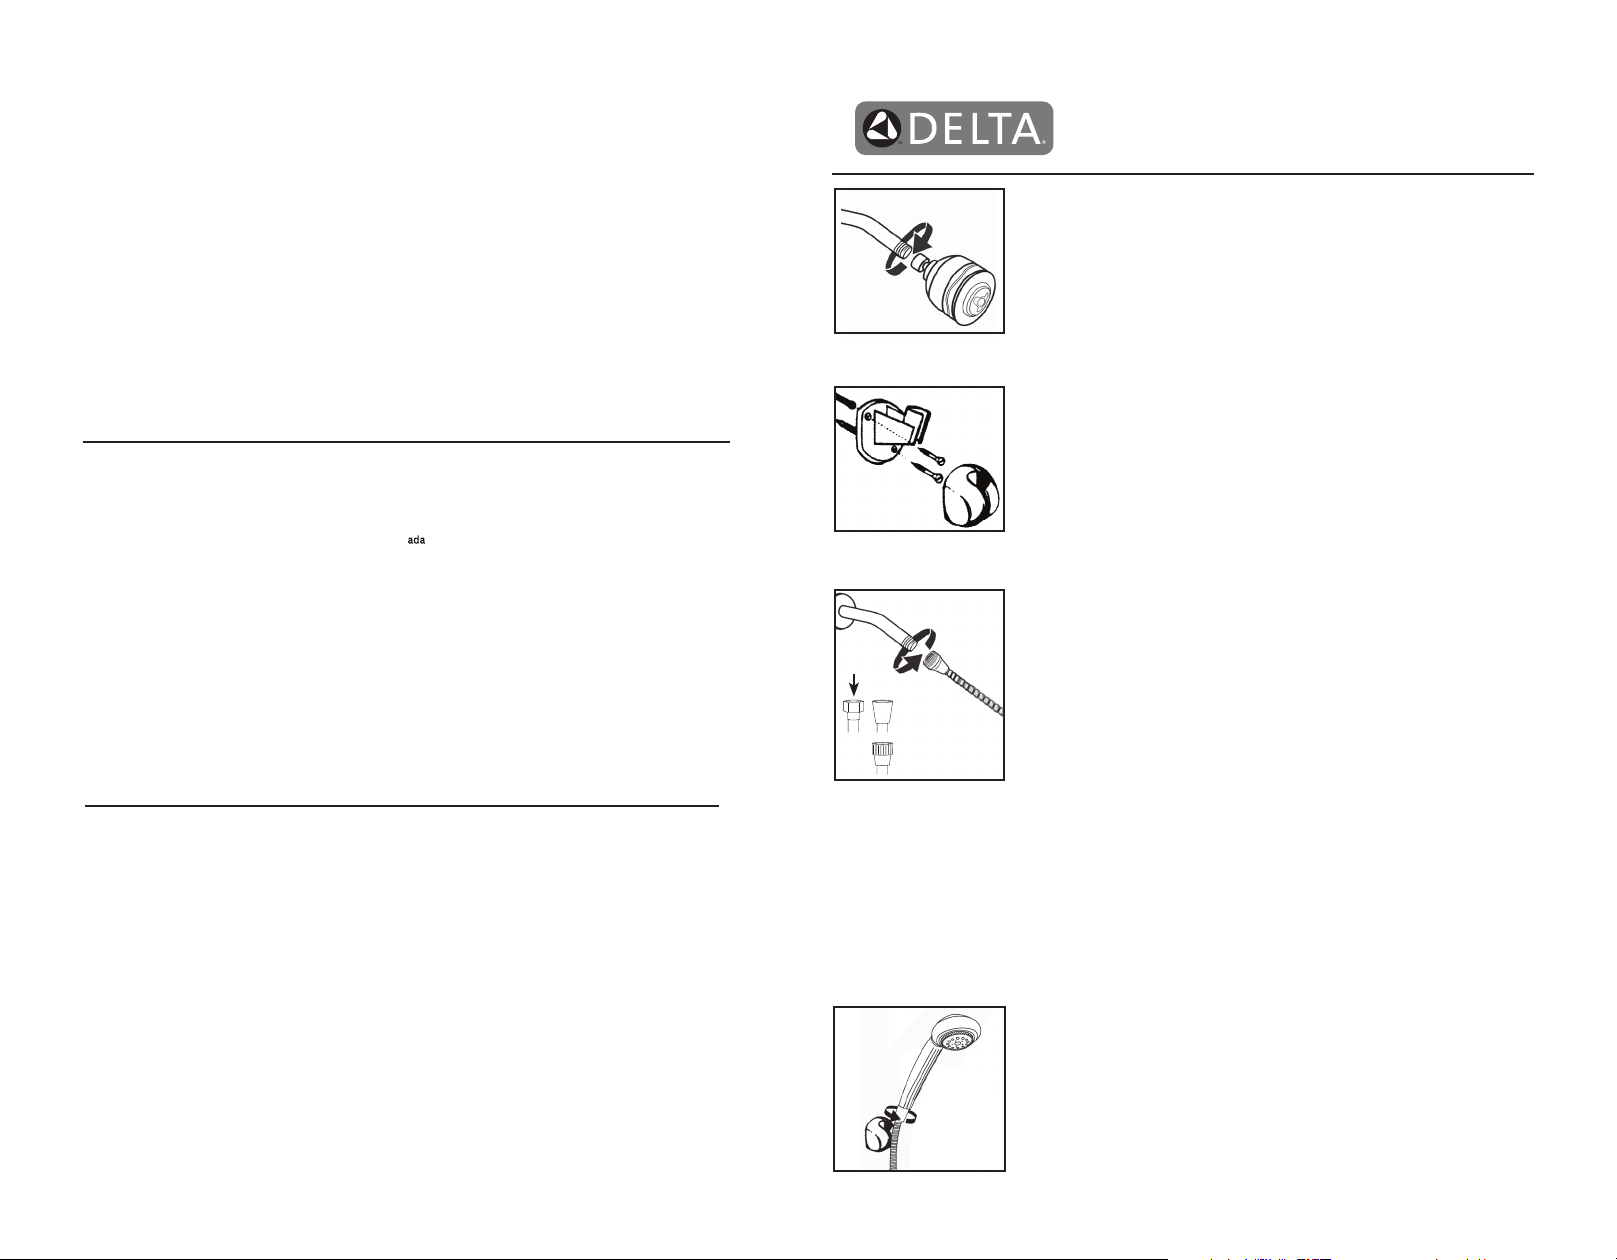
1. Remove Existing Shower Head
Turn the existing showerhead counter-clockwise with adjustable wrench orpliers.
Use care not to unscrew the shower arm; hold the shower arm secure. Note: If
your shower arm has a ball on the end of it, it will not work with this shower unit
and will need to be replaced with a standard shower arm.
2. Install Wall Mount
Select wall position based on your hose length. Prior to mounting,hold up the
gray mounting base with the circular handle in an ”up” position. Determine type of
mount for your application. For mounting into Tile: Drill 1/4”holes in grout (if
possible) and use enclosed anchors and screw mount to base. For mounting into
Fiberglass/Acrylic: Drill 1/4” holes (larger if needed for specific toggle bolts) in wall
and install with small toggle bolts (not supplied).
For Adhesive Mounting: Clean the surface area with extra-fine steel wool; then
apply rubbing alcohol or fingernail polish remover to prepare the surface and wipe
clean. Caution: The first position must be correct, as you cannot move the mount
after adhering to the surface. Peel off the backing film and position holder upright.
Press firmly into place. ALLOW 24 HOURS BEFORE USING. Snap shell cover
over the base on the wall.
Ridged
Nut
Hex
Nut
= 3A
= 3B
3B. Vacuum Breaker Hose Installation: your shower hose is equipped with a Vacuum Breaker, permanently installed
in the end of your hose that has a ridged nut (as pictured in 3B). Hand tighten the ridged nut clockwise to the
Shower Arm. Do not use a wrench or pliers. If you attach the ridged nut to the hand shower, the Vacuum Breaker
will not function.
Note: A Vacuum Breaker is a device that is required by certain code authorities to protect your water supply from
the back-flow of impure water. The Vacuum Breaker usually discharges a small amount of water each time you turn
on your shower. It may also drain water when you shut it off. Both are normal conditions – the water is draining
not leaking.
DO NOT TRY TO REMOVE OR TIGHTEN THE VACUUM BREAKER which is permanently installed into the hose.
This could cause damage to the mechanism.
®
3. Install Hose to Shower Arm and Hand Shower
It is recommended to wrap Plumber Tape (not included) around the threads of the
shower arm only.
3A. Standard Installation: A washer must be firmly seated into the bottom of the
standard hex nut end of the hose. Then firmly hand tighten the hose nut
clockwise onto the Shower Arm. Do not use a wrench or pliers. If your Hose has
Hose nuts, as pictured in 3A, you DO NOT need a vacuum breaker for installation.
In this case, the hand shower has an internal double check valve to prevent the
backflow of water.
4. Connect Tapered End of Hose to Hand Shower
Seat the washer, if provided, firmly into the hose nut. Remove the yellow tape
from the end of the hose that screws onto the hand shower. Carefully align the
thread of the tapered end of the Hose directly to the Hand Shower. Hand tighten
- do not use a wrench or pliers. Then place the Hand Shower into the Shower
Arm Mount. Rotate the Shower Arm Mount into desired position to hold the
Hand Shower.
#55435-Rev.Awww.deltafaucet.com
Page 2
Equipo de Regadera Manual
Directives d’installation Unité
de douchette à main
1. Retrait de la pomme de douche existante
Tournez la pomme de douche existante dans le sens inverse des aiguilles
d’une montre avec une clé ou une paire de pinces. Prenez soins de ne pas
dévisser le bras de douche en maintenant le bras fixe. Note : Cette unité de
douche ne peut pas être utilisée si l’embout du bras de douche est de type
sphérique. Vous devrez remplacer le bras de douche par un modèle standard
tel que le modèle U4993 de Delta.
2. Installation du support mural
Choisissez l’emplacement mural du support selon la longueur du boyau.
Avant le montage, maintenez en place la plaque def ixation grise avec l’appui
rond dirigé vers le haut. Déterminez de quelle façon le dispositif sera fixé au
mur. Pour une fixation sur tuile : Percez vos trous à l’aide d’une mèche de
1/4” (de préférence dans la portion du coulis) et utilisezles vis et ancrages
pour fixer la plaque. Pour fixation sur fibre de verre ou acrylique : Percez vos
trous à l’aide d’une mèche de 1/4” (ou plus grand si vous utilisez des
boulons à ailettes spécifiques) puis installez à l’aide de boulons à ailettes de
petite dimension (non inclus).
Pour fixation à l’aide d’un adhésif : Nettoyez la surface à l’aide d’une laine d’acier ( extra-fin) puis appliquez
de l’alcool à friction ou un diluant à polis à ongle et essuyez pour éliminer tous résidus. Avertissement :
Vous devez vous assurer de l’emplacement car il vous sera impossible d‘en changer la position une fois en
place. Retirez la couche protectrice verte de l’adhésif et fixer, à la verticale, la plaque bien dirigée dans sa
position de support.Pressez fermement en place. Allouez 24 heures avant l’utilisation. Cliquez le couvercle
sur la plaque def ixation du mur.
3. Raccordement du boyau au bras de douche
Installation régulière : Une rondelle d’étanchéité doit être bien insérée au
Écrou
cannelé
Écrou
hexagonal
= 3A
= 3B
Note : Un dispositif anti-refoulement est un dispositif requis par certaines autorités pour protéger
l’alimentation en eau de la communauté contre les retours d’eau. Le dispositif anti-refoulement décharge
normalement une petite quantité d’eau chaque fois qu’on met la douche en route.Il peut aussi drainer de
l’eau quand on l’arrête. Ce sont deux conditions normales –l’eau se draine, elle ne fuit pas.N’ESSAYEZ
PAS DE SERRER OU D’ENLEVER LE DISPOSITIF ANTI-REFOULEMENT QUI est installé de façon
permanente sur le flexible. Cela peut endommager le mécanisme.
3A.
fond de l’écrou hexagonal standard situé à l’extrémité du boyau. Raccordez
le boyau à la sortie d’eau du bras de douche, lef ixant fermement à la main
dans le sens des aiguilles d’une montre. Ne pas utiliser de clé ni de paire de
pinces.
Installation avec un casse-vide : Si l’installation requière la pose d’un
2B.
casse-vide, celui-ci doit être raccordé à l’écrou hexagonal standard situé au
bout du boyau. Joignez l’ensemble à la sortie d’eau du bras de douche.
Prenez note que si vous installez un casse-vide à votre douchette à main,le
système ne fonctionnera pas tel que désiré.
Delta Instrucciones de Insta-
lación
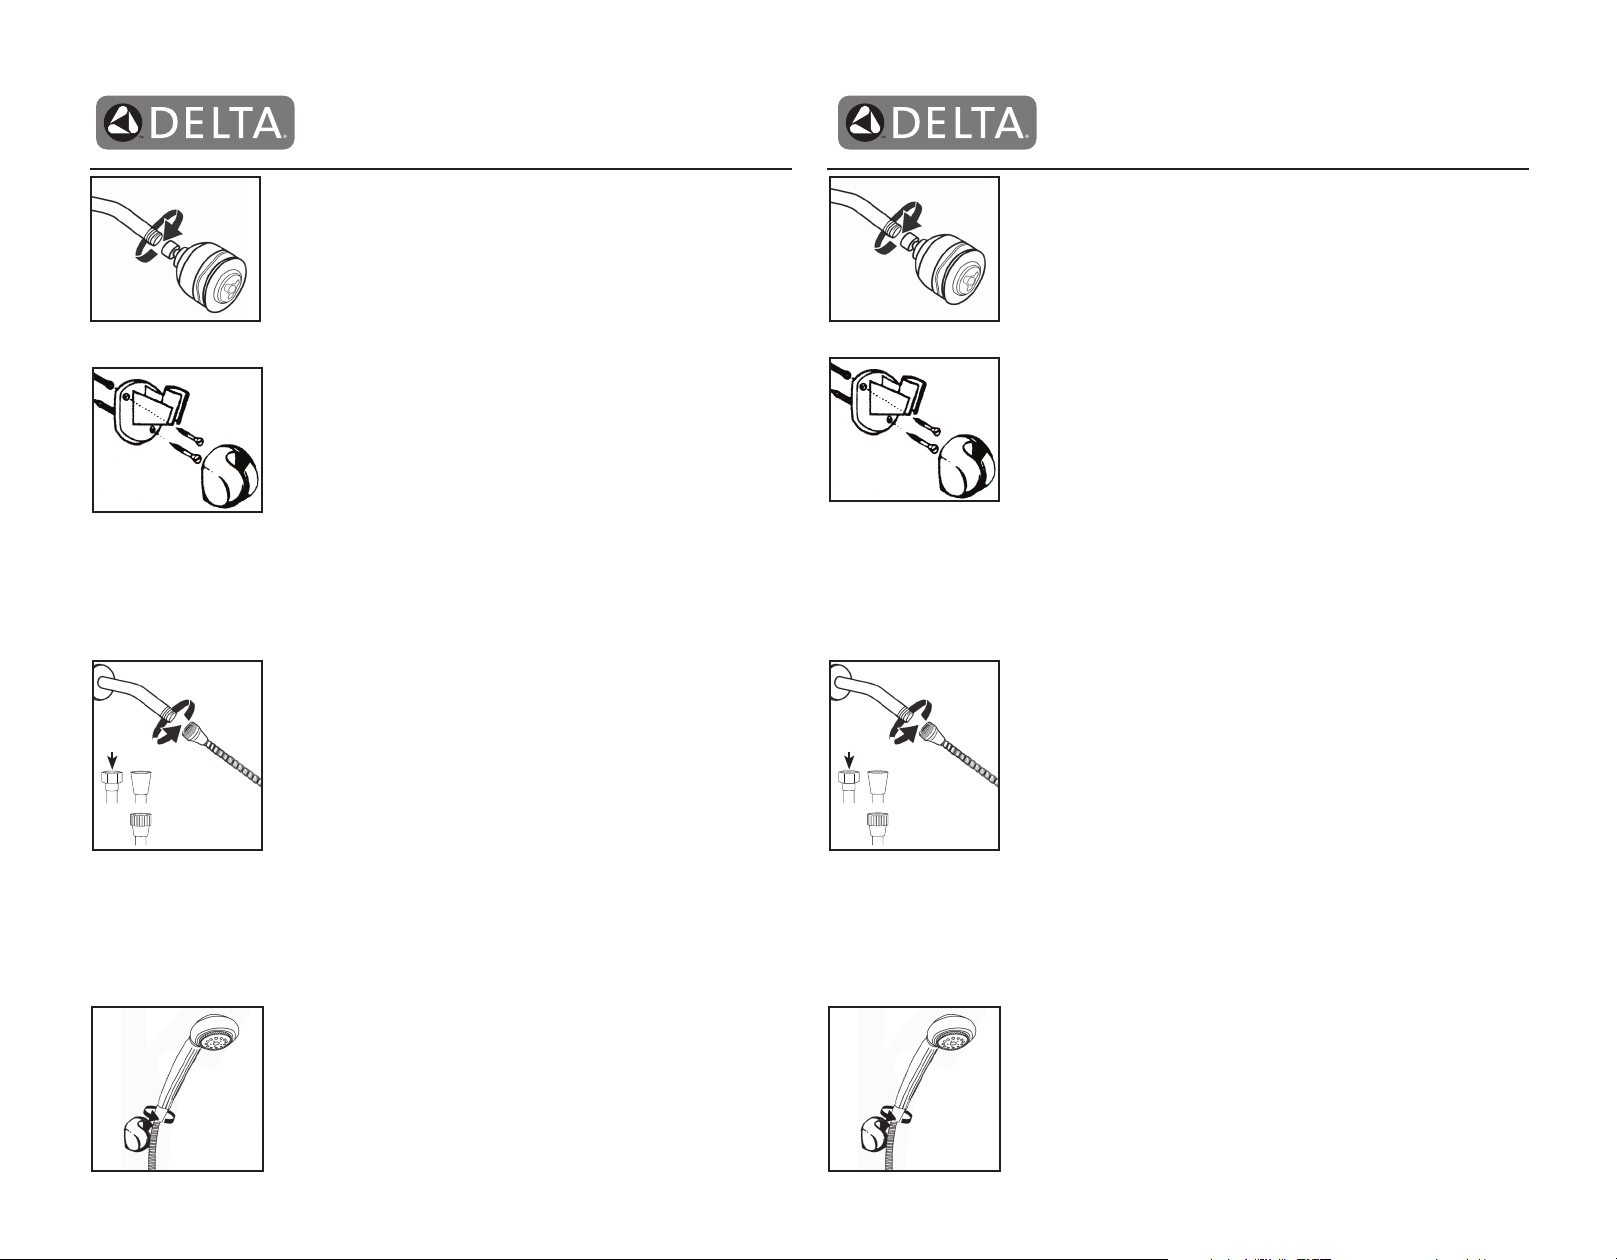
1. Quite la cabeza de la regadera vieja
Gire la cabeza de la regadera vieja en sentido inverso a las agujas del reloj
con una llave o pinzas. Tenga cuidado de no aflojar el brazo de la regadera;
sosténgalo de manera segura. Nota: Si el brazo de la regadera tiene una
bola en el extremo, no funcionará con esta regadera y necesitará reemplazarla con una montura estándar para el brazo de la regadera.
2. Instale la montura para la pared / Conecte la manguera
al suministro de agua
Elija la posición deseada en la pared de acuerdo al largo de la manguera.
Antes de instalarla, sostenga la base de montura gris con el mango circular
en posición “hacia arriba” y haga marcas para indicar la posición. Determine
el tipo de montura de acuerdo a su aplicación: Para montarla en azulejos:
Taladre orificios de1 /4” pulg. en la lechada (de ser posible) y use la montura
de anclas y tornillos incluidos en la base. Para montarla en fibra de vidrio /
acrílico: Perfore orificios de 1/4” pulg.(más grandes si se necesitan para
pernos acodados específicos) en la pared einstale con pernos acodados
Para montarla con adhesivo: Limpie la superficie con lanilla de acero extra fina; luego aplique alcohol. o
quitaesmalte de uñas para preparar la superficie y limpiar. Precaución: La primera posición debe ser la
correcta, ya que no podrá mover la montura después de adherirla a la superficie. Despegue la película
posterior de color verde y coloque el soporte en posición vertical. Presione firmemente en su lugar. DEJE
QUE TRANSCURRAN 24 HORAS ANTES DE USARLA. Coloque la cubierta a presión en la base de la
pared.
Tuerca
estriada
Tuerca
hexagonal
= 3A
= 3B
Nota: Un interruptor de vacío es un dispositivo que es requerido por ciertas autoridades para proteger el
suministro de agua de su comunidad contra el reflujo del agua. Este interruptor de vacío generalmente
descarga una pequeña cantidad de agua cuando abre la llave de la regadera por primera vez. También
podría drenar agua cuando la cierra. Ambas son condiciones normales, el agua está drenando, no
fugándose.
NO INTENTE APRETAR EL INTERRUPTOR DE VACÍO que ya se encuentra instalado en la manguera. Esto
puede ocasionar daño al mecanismo.
pequeños (noi ncluidos).
3. Instale la manguera al suministro de agua
Instalación estándar: Si se incluye una rondana debe asentarse firmemente
3A.
en el fondo del extremo de tuerca hexagonal estándar de la manguera.
Luego, apriete firmemente la manguera con la mano en sentido de las agujas
del reloj en la salida del suministro de agua. No use herramientas o pinzas.
Instalación con interruptor de vacío: Si para instalarla se necesita un
3B.
interruptor de vacío,éste debe conectarse al extremo de tuerca hexagonal
estándar de la manguera y luego instalarse en la conexión del suministro de
agua.Si instala el interruptor de vacío en la regadera de mano, no funcionará
apropiadamente.
3. Raccordement de l’embout à enfiler du boyau au filet de
la douchette à main
La rondelle d’étanchéité, si incluse (certains boyaux sont sans rondelle), doit
être bien insérée au fond de l’écrou du boyau. Alignez avec précaution le
filetage de la douchette à main à celui de l’embout à enfiler du boyau. Serrez
à la main. Ne pas utiliser de clé ni de paire de pinces. Pivotez le support pour
maintenir la douchette à main en position désirée.
#55435-FR-Rev.Awww.deltafaucet.com #55435-SP-Rev.Awww.deltafaucet.com
3. Conecte el extremo cónico de la manguera a la
egadera manual
Coloque la rondana, si se incluye, firmemente dentro de la tuerca de la
manguera. Con cuidado, alinee la rosca del extremo cónico de la manguera
directamente con la regadera manual. Apriete manualmente, no utilice llave
ni pinzas. Después coloque la regadera manual en el montaje del brazo para
regadera. Gire el montaje del brazo para regadera hasta encontrar la
posición deseada para sostener la.
 Loading...