

Page 1

CD audio system
Owner’s Manual
This symbol is
intended to alert the
user to the presence
of important operating
and maintenance
(servicing) instructions
in the literature
accompanying the
appliance.
Requires a subscription from XM Satellite Radio.
SA10034-11B1
Page 2

Owner’s Record
The model number is located at the bottom and
the serial number is located on the label at the back
of the Delphi CD Audio System. Record the serial
number in the space provided below. Refer to these
numbers when contacting your dealer regarding
this product.
Model No.: DELPHI SA10034-11B1
Serial No.: ______________________
WARNING: To prevent fire or shock hazard, do
not expose the Delphi CD Audio System to rain
or moisture.
CAUTION
RISK OF ELECTRIC SHOCK
DO NOT OPEN
CAUTION: TO REDUCE THE RISK OF ELECTRIC
SHOCK, DO NOT REMOVE REAR COVER.
NO USER-SERVICEABLE PARTS INSIDE. REFER
SERVICING TO QUALIFIED SERVICE PERSONNEL.
This symbol is intended to alert the user to the
presence of uninsulated “dangerous voltage”
within the product’s enclosure that may be of
sufficient magnitude to constitute a risk of electric
shock to persons.
Page 3

CONTENTS
Section 1
Delphi CD Audio System
Components . . . . . . . . . . . . . . . . . . . . . . . . . .2
Section 2
Key Functions
CD Panel . . . . . . . . . . . . . . . . . . . . . . . . . . . . .3
Remote Control . . . . . . . . . . . . . . . . . . . . . . .3
Section 3
Basic Operations
CD/MP3, AM/FM, Clock Module
Playing Audio CD or MP3 Files . . . . . . . . . .4
CD/MP3 Programming Options . . . . . . . . . .4
Displaying Information . . . . . . . . . . . . . . . . .5
About MP3 . . . . . . . . . . . . . . . . . . . . . . . . . . .6
AM/FM Radio Operation . . . . . . . . . . . . . . . .6
Adjusting the Tone (Bass and Treble) . . . . .6
Clock Functions . . . . . . . . . . . . . . . . . . . . . . .7
SKYFi™Module
Set-up . . . . . . . . . . . . . . . . . . . . . . . . . . . . . . .7
Positioning the XM®Antenna . . . . . . . . . . . .8
Optimizing Antenna Signal . . . . . . . . . . . . . .9
Antenna Mounting/Installation . . . . . . . . . . .9
Controlling Volume, Bass, and Treble . . . .10
System Sound Output Options
Adjusting Speaker Balance . . . . . . . . . . . . .11
Muting the Sound . . . . . . . . . . . . . . . . . . . .11
Headphones . . . . . . . . . . . . . . . . . . . . . . . . .11
Battery Operation . . . . . . . . . . . . . . . . . . . . . . . .11
Section 4
Reference
Caring for Your Delphi CD Audio System . . . .12
Precautions . . . . . . . . . . . . . . . . . . . . . . . . . . . . .12
Troubleshooting . . . . . . . . . . . . . . . . . . . . . . . . .13
Contacting Customer Service . . . . . . . . . . . . . .14
Technical Information . . . . . . . . . . . . . . . . . . . .14
Section 5
Warranty
. . . . . . . . . . . . . . . . . . . . . . . . . . . . . . . . . .15
1
Page 4
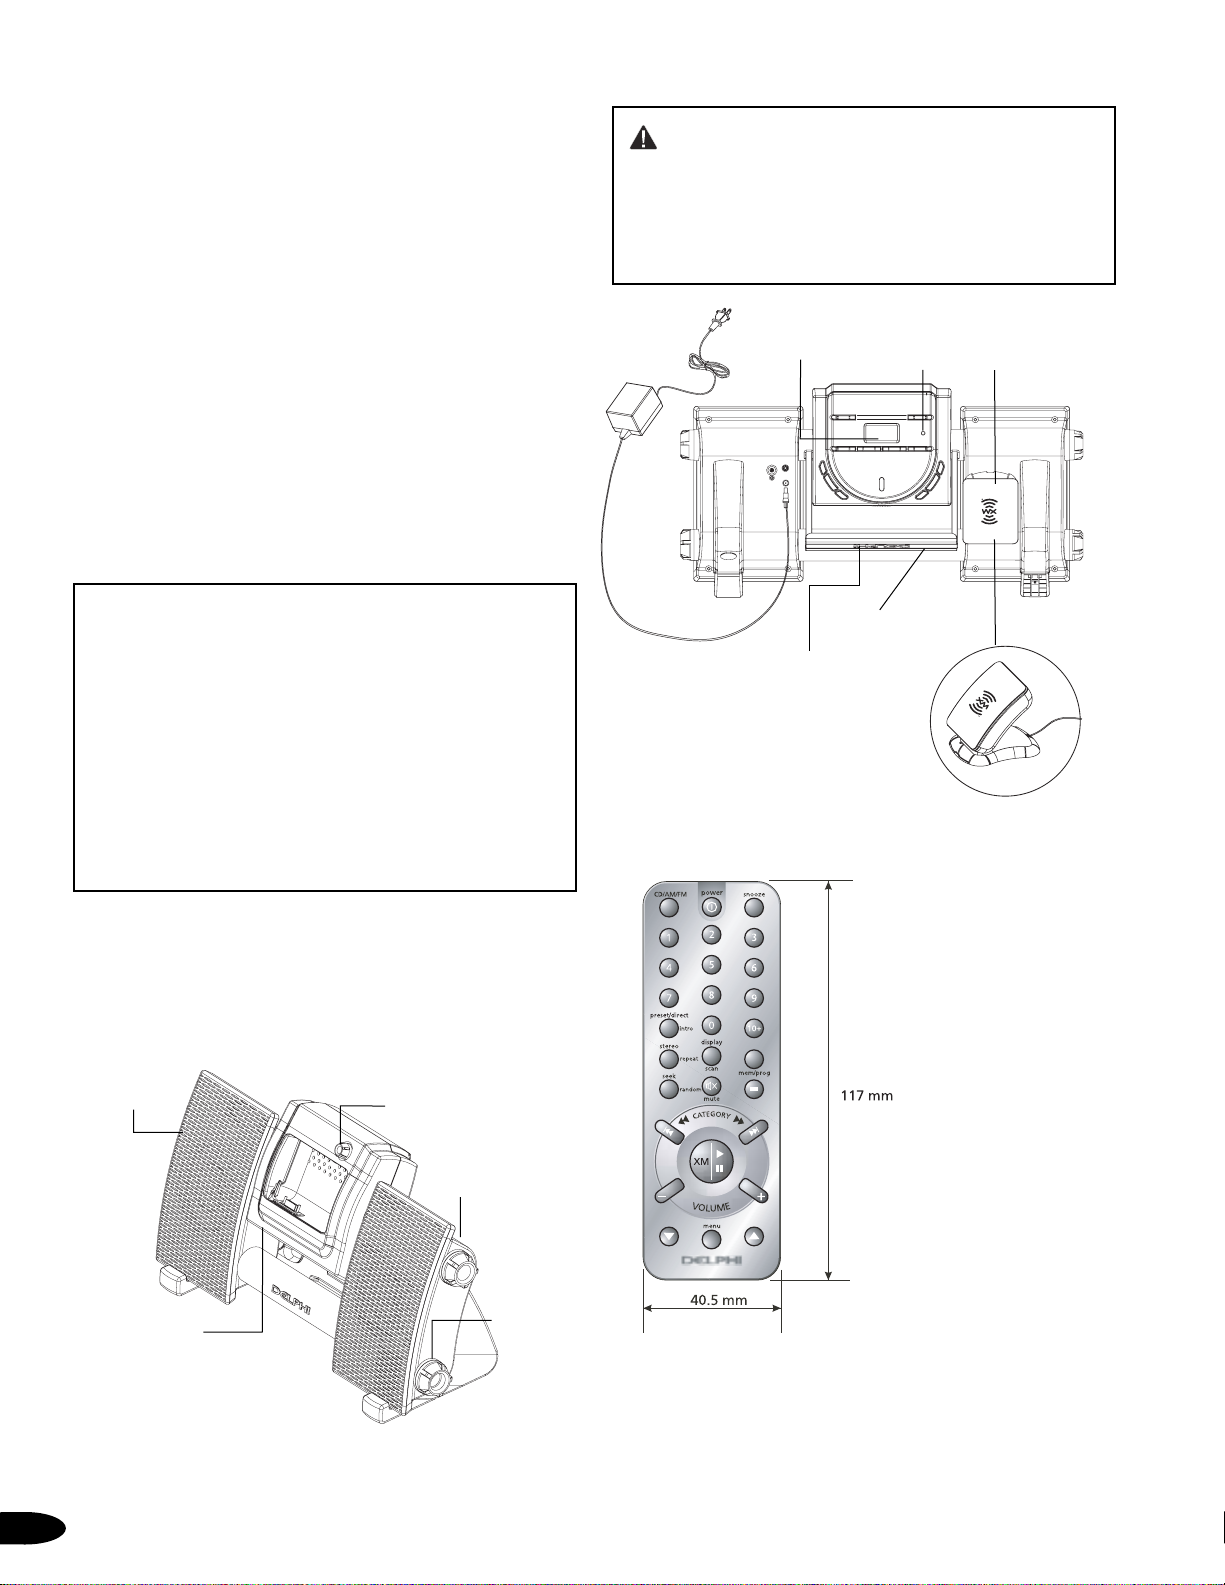
Delphi CD Audio System
The Delphi CD Audio System delivers multiple audio
playback options—all in one very smart, perfectly
portable package. Choose between these options for
your listening enjoyment: XM Satellite Radio with
your XM SKYFi Receiver (Delphi model number
SA10000, sold separately), compact disc playback
(including CD-R, CD-RW, and MP3 files), or AM/FM
radio. A rotating multifunction central unit allows
you to select the module of your choice.
Before operating your Delphi CD Audio System,
connect the supplied 12V A/C power adaptor to the
jack on the rear of the unit (Figure 2), and the other
end to a wall outlet. (For battery operation, see page
11.) When the system powers up, it will play in the
last mode selected.
The central unit of the Delphi CD Audio System
rotates forward and back 180 degrees. Please
follow the direction of the arrows on the top left
corner of each side when rotating. CAUTION: Do
not use excessive force, which could damage
the Delphi CD Audio System. Before rotating the
central unit:
• Store excess cable on the tab on the back of
the lower tube so that the antenna cable does
not interfere with rotation
• Retract the telescoping FM antenna and snap
it into its storage well
COMPONENTS
The following components are included with your
Delphi CD Audio System:
Figure 1: Delphi CD Audio System – Front View (SKYFi Module)
CAUTION: The two-inch-long bass response
ports on either side of the top tube on your Delphi
CD Audio System are designed to maximize airflow to the speakers for improved bass response.
Inserting objects into these openings may impair
speaker function and can damage the unit.
Figure 2: Delphi CD Audio System – Rear View
(CD/MP3, AM/FM Radio Module)
Figure 3: Delphi CD Audio System Remote Control
2
SECT ION 1
Volume control knob
Bass response ports
(L and R)
Battery tube
Speakers
(L and R)
SKYFi cradle
(SKYFi Receiver sold
separately)
Telescoping FM antenna
Easy-grip
handle/support
Infrared sensor
(for remote control)
XM Satellite Radio
antenna
LCD/clock
XM Satellite
Radio Antenna
Page 5
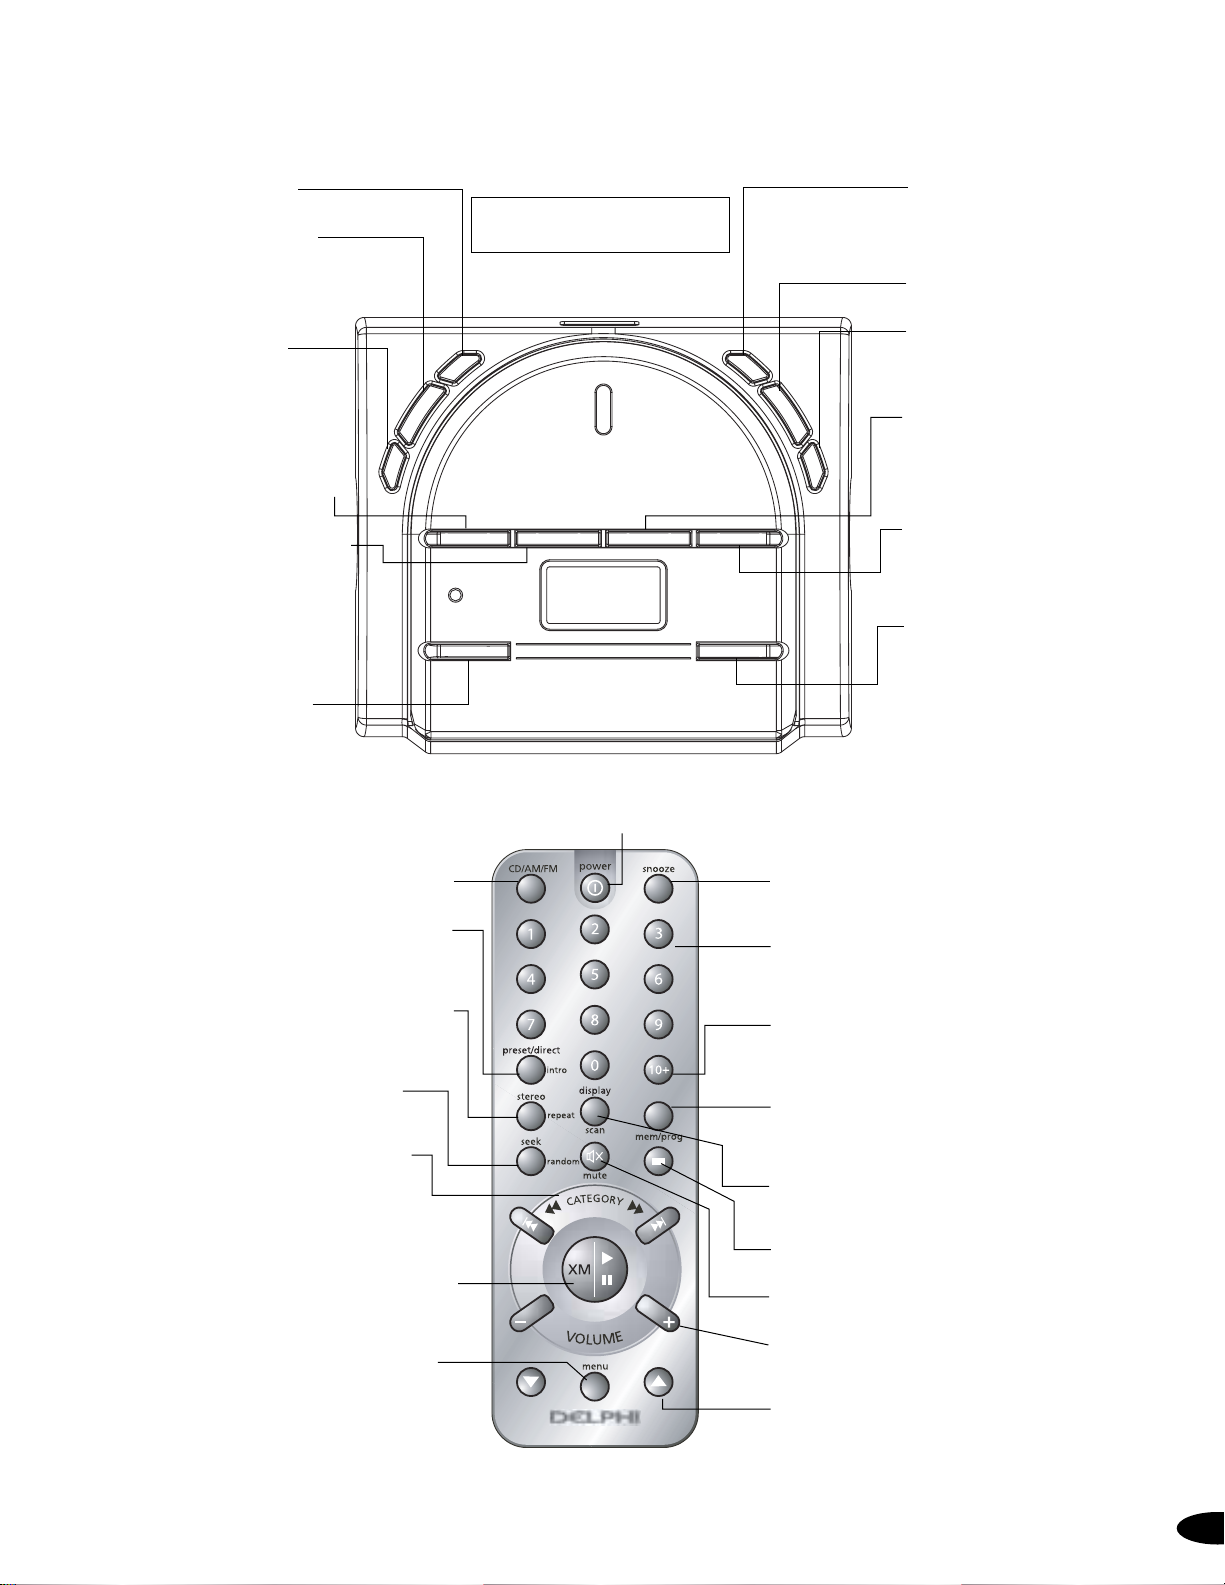
Key Functions
CD PANEL
3
SECT ION 2
Short press <1.5 seconds
Long press >1.5 seconds
Figure 5: Remote Control Key Functions
PWR (POWER) turns the
unit on and off.
VOL (VOLUME) adjusts the
volume up and down. The up
and down arrows on the Volume
key also enable selection and
programming of Menu
functions.
MENU changes Mode 1
(CD/MP3, AM/FM, and clock)
submenu functions in this
order: CLOCK, TMR (timer),
SLEEP, EQ, BBS (bass boost),
TREBLE, BALANCE, CD
TIMEMODE, and ID3.
SCAN searches for next or previ-
ous AM/FM stations with a strong
signal only. Press once to scan;
press a second time to select a
station.
TUNE manually searches up and
down AM/FM frequency bands.
SEEK searches AM/FM stations
stored in memory; press this key
once to begin searching; press a
second time to select a station.
PREV (PREVIOUS) jumps to the
previous track (short press) or
rewinds the current track (long
press) in CD/MP3 mode. This key
also enables selection of MP3
directories.
NEXT jumps to the next track
(short press) or plays the current
track fast forward (long press) in
CD/MP3 mode. This key also
enables selection of MP3 folders.
PLAY toggles between play and
pause in CD/MP3 mode.
STOP changes the radio frequency
band in AM/FM mode; in CD/MP3
mode, pressing this key can halt
CD/MP3 playback, cancel
programming, or clear programs
stored in memory.
MODE toggles between the
AM/FM tuner and CD/MP3
functions.
MEMORY programs CD/MP3 track
numbers to play in a specified
order. In AM/FM mode, this key
stores stations in memory (FM 1
to 18; AM 1 to 12). This key is
also used to set the clock and
timer in conjunction with the
Volume key.
CD/AM/FM toggles between CD/MP3 mode and
the AM/FM tuner.
PRESET/DIRECT/INTRO plays “intro” information
(the first 10 seconds) in CD mode (for normal CDs
only; MP3 has no such function). In SKYFi mode, this
key scrolls through preset banks and Direct Entry*.
STEREO/REPEAT toggles between “Stereo” and
“Mono” on the FM band in AM/FM mode. This
key controls various repeat play options in
CD/MP3 mode.
SEEK/RANDOM recalls station memory
locations in AM/FM mode. This key enables
random playback in CD/MP3 mode.
CATEGORY keys work in CD/MP3 mode to
jump to the previous track or next track (short
press) or fast-forward or rewind the current
track (long press). In SKYFi mode, these keys
scroll through XM Satellite Radio programming
categories*.
ENTER presets AM/FM stations in AM/FM mode,
programs play options in CD/MP3 mode, and toggles
between “play” and “pause” during CD/MP3 playback. In SKYFi mode, this key is used to select
channels and menu functions*.
MENU changes Mode 1 (CD/MP3, AM/FM, and
clock) submenu functions. In SKYFi mode, press this
key to select and change receiver configuration
options*.
*Refer to the
SKYFi Operating Guide
for more specific
information on operating your SKYFi Receiver.
Figure 4: CD Panel Key Functions
SNOOZE stops CD/MP3 or AM/FM play for 7 minutes
when the Delphi CD Audio System is set to function
as an alarm clock.
NUMBER KEYS 0-9 provide direct access to stored
stations in AM/FM mode and programmed tracks in
CD/MP3 mode. In SKYFi mode, these keys are used to
select channels or presets directly*.
10+ direct selects presets (for all modes) in numbered
locations higher than 10*.
MEM/PROG (MEMORY/PROGRAM) programs
CD/MP3 track numbers to play in a specified order. In
AM/FM mode, this key stores stations in memory (FM:
1 to 18, AM: 1 to 12). This key is also used to set the
clock and timer in conjunction with the Volume +/keys.
DISPLAY/SCAN scans preset AM/FM stations (short
press) or automatically stores stations in memory
(long press).
STOP halts CD/MP3 playback, cancels programming,
or clears programs stored in memory.
MUTE mutes the sound during CD/MP3 and AM/FM
play. In SKYFi mode, this key sets different display
options*.
VOLUME +/- KEYS adjust the volume up and down.
These keys also enable selection and programming of
Menu functions.
DOWN AND UP ARROWS enable selection of MP3
folders in CD/MP3 mode; in SKYFi mode, these arrows
change to the next or previous channel*.
POWER turns the unit on and off.
SCA
PWR
L +
VO
—
U
N
E
M
PLAY STOP PREV NEXT
N
+
T
UNE
—
S
EEK
MODE MEMORY
Page 6
Basic Operations
CD/MP3, AM/FM, CLOCK MODULE
Playing Audio CD or MP3 Files
The Delphi CD Audio System can play CDs, CD-Rs,
and CD-RWs recorded in Compact Disc Digital Audio
(CD-DA) format, as well as MP3 files recorded in CDROM format**. Playback may vary depending on
the quality of the compact disc and the condition of
the recording device.
To play compact discs:
1. Rotate the central unit so that the CD panel faces
forward. Be sure to follow the arrows when
rotating the unit. Complete the rotation until the
unit locks in position. CAUTION: Do not use
excessive force, which could damage the unit.
2. Press “Power” on the CD panel or remote control.
3. Holding the central unit steady, open the
compartment lid and insert a compact disc in
the CD player.
4. Close the CD compartment lid.
Before playing a compact disc, your Delphi CD
Audio System reads all file and directory information on the CD. Depending on file structure, this may
take more than one minute. “READING” is displayed
during this time. The first track on the CD will begin
to play automatically. At the same time, information
about the disc will display.
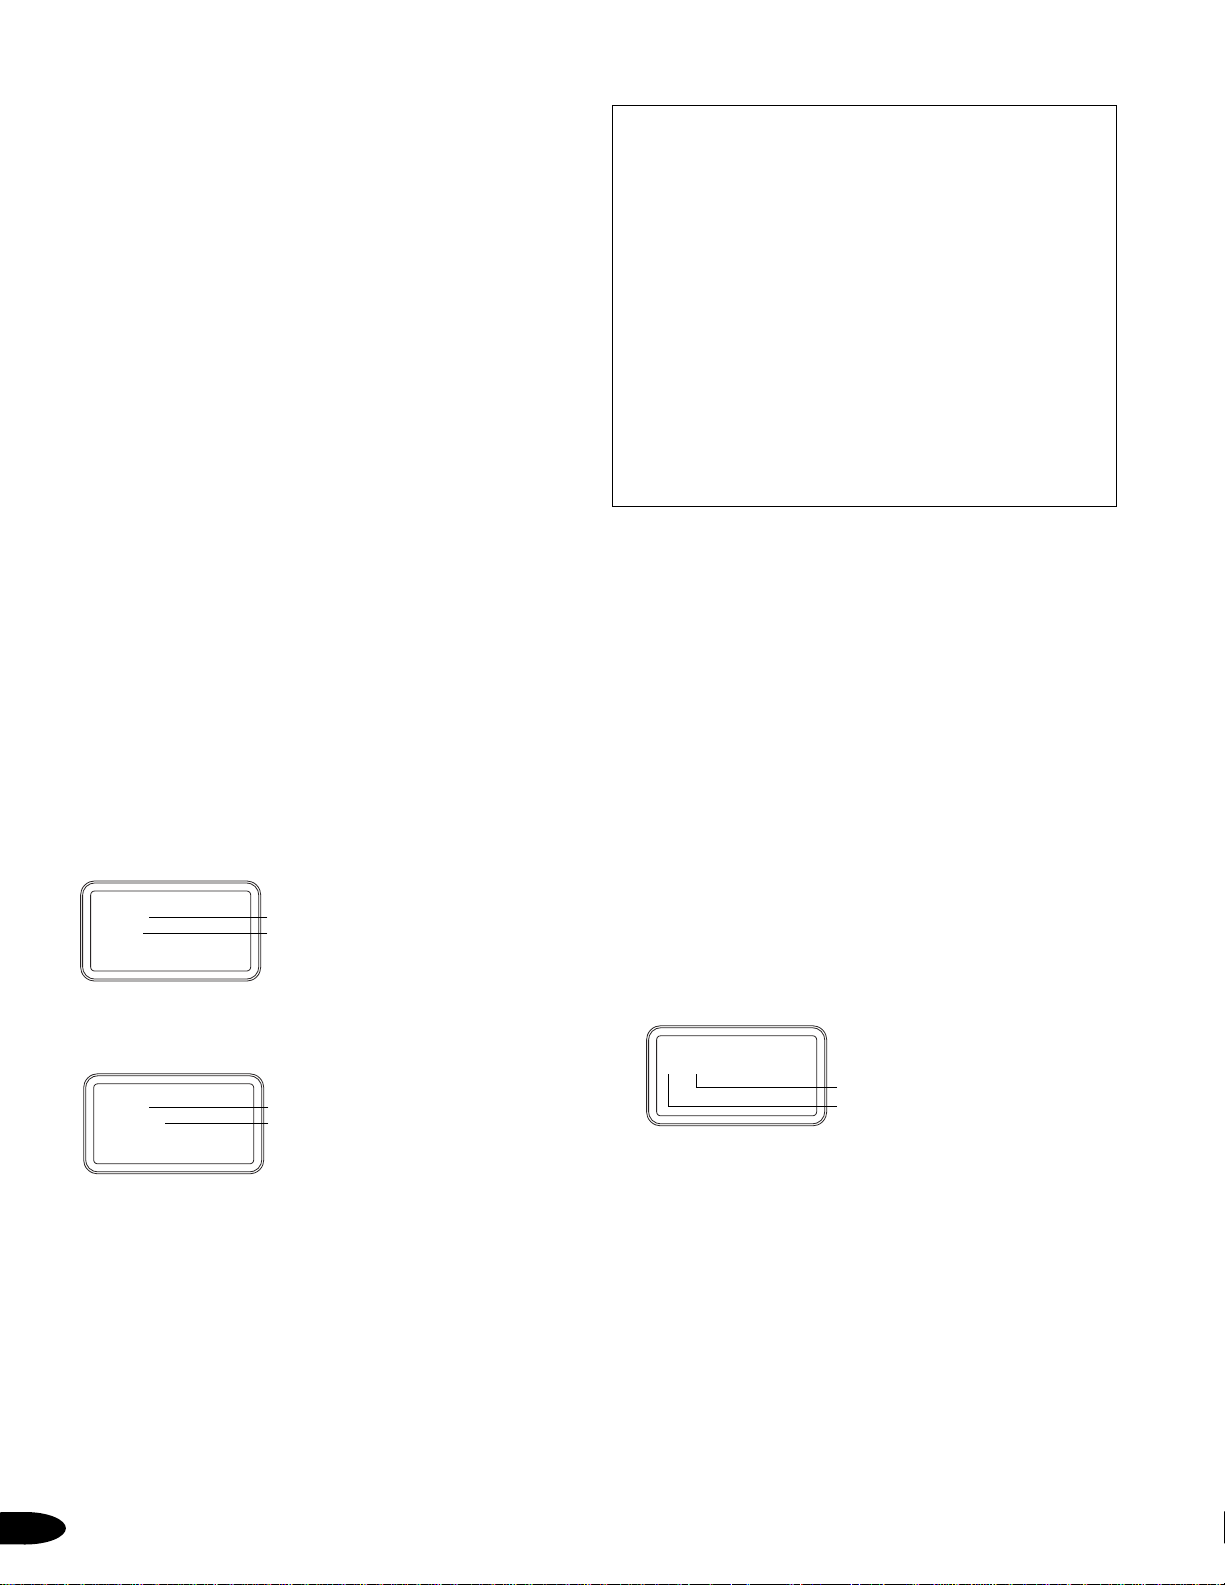
Figure 6: Initial CD Display
Figure 7: Initial MP3 Display
Proper Care and Storage of Compact
Discs
Scratches, dirt, and fingerprints on the surface of
compact discs may cause tracking errors. For optimum sound quality:
• Compact discs should be cleaned before playing;
using a dry, soft cloth, wipe from the center out,
never in a circular motion
• Do not clean compact discs with benzene or
other solvents, commercially available cleaners,
or antistatic spray intended for vinyl LPs
• Store CDs in their cases when not playing
• Do not allow CDs to be exposed to direct sunlight or heat sources
• Do not tape paper or apply stickers to CDs
CD/MP3 Programming Options
Your Delphi CD Audio System lets you program the
playing order of up to 30 CD/MP3 tracks or MP3
directories.
CD Program Play
To program the playing order of tracks on a CD:
1. In CD/MP3 mode, stop playback.
2. Press “Memory” on the CD panel or “mem/prog”
on the remote. “P01_ _” will flash on the LCD.
3. Press “Next” or “Prev” on the CD panel or the
category keys or numeric keys on the remote to
select a track number.
4. Press “Memory” or “mem/prog” to confirm.
5. “P02_ _” will flash. Continue Steps 3 and 4 until
all tracks have been selected (up to a maximum
of 30).
6. Press “Play” on the CD panel or the enter key on
the remote to play.
Figure 8: Display During CD Programming
MP3 Program Play
To program the playing order of tracks or directories
on an MP3:
1. In CD/MP3 mode, stop playback.
2. Press “Memory” on the CD panel or “mem/prog”
on the remote. “P01_ _ _-_ _ _” will display and
the first three _ _ _ (dashes in the register) will
flash on the LCD.
3. Press “Next” or “Prev” on the CD panel or the
category keys or numeric keys on the remote to
select a directory.
4
SECT ION 3
**Recording MP3 files for the Delphi CD Audio System may require the
use of “Full Version” CD-burning software packages (e.g., EasyCD
Creator™or Nero™).
Total track numbers
Total playback time
Total directory numbers
Total track numbers
Track number
Program number
CD
15 TRK
72:46
MP3
22 DIR
185 TRK
CD
P01-XX
Page 7

4. Press “Memory” or “mem/prog” to confirm the
selected directory.
5. The last three _ _ _ (dashes in the register) will
flash.
6. Press “Next” or “Prev” on the CD panel or the
category keys on the remote to select a track
number.
7. Press “Memory” or “mem/prog” to confirm.
“P02_ _ _-_ _ _” and the first three _ _ _ (dashes
in the register) will flash on the LCD.
8. Continue Steps 3 through 7 until all tracks or
directories have been selected (up to a
maximum of 30).
9. Press “Play” on the CD panel or the enter key on
the remote to play.
Figure 9: Display During MP3 Programming
Cancel/Delete Programs
Press “Stop” on the CD panel or remote to cancel
programming.
To delete programs in memory, press “Stop” twice
during program play.
Random Play (Remote Control Only)
At any time during CD/MP3 playback, press the
Seek/Random key on the remote to play CD or MP3
tracks in random order.
Repeat Play Options (Remote Control Only)
Normal Compact Disc
1. Press “stereo/repeat” to repeat a single track.
2. Press “stereo/repeat” a second time to repeat all
tracks on the CD.
3. Press “stereo/repeat” a third time to disable the
repeat function and return to normal play.
MP3 Disc
1. Press “stereo/repeat” to repeat a single track.
2. Press “stereo/repeat” a second time to repeat
play of all tracks in the current directory.
3. Press “stereo/repeat” a third time to repeat all
tracks on the MP3 disc.
4. Press “stereo/repeat” a fourth time to disable
the repeat function and return to normal play.
Displaying Information
Display Elapsed and Remaining Playing Time
While in CD/MP3 mode, press the Menu key nine
times to enter CD TMODE. Press the Vol+ key on the
CD panel or Vol+ on the remote to display elapsed
playing time. Press the —Vol key on the CD panel or
Vol— on the remote to display remaining playing time.
Figure 10: Elapsed Playback Time – CD Playback
Figure 11: Elapsed Playback Time – MP3 Playback
Display ID3 Information (MP3 Only)
The Delphi CD Audio System conforms to Version 1.1
of the ID3 tag format. ID3 information (song title, artist
name, and album name) can be displayed for CD/MP3
files created with this information. To display ID3
information:
1. During MP3 playback only, press the Menu key
on the CD panel or remote 10 times, then hold
to enter the ID3 submenu. If available, ID3 data
(song title, artist name, and album name) will
scroll left across the display once, and then
elapsed playing time will display.
2. Press “Menu” again to release.
Figure 12: ID3 Display
The Delphi CD Audio System can display MP3 directory
and file names up to 64 characters long. Eight characters
at a time will scroll left across the LCD. The characters
A-Z, a-z, 0-9, and _ can display.
Note: If there is no name for a particular directory,
or if the MP3 was not created with ID3 information,
“CURRENT” will appear in the display.
5
SECT ION 3
Track number = YYY
Directory number = XXX
Program number
Current track number
Elapsed playback time
Directory number
Current track number
Elapsed playback time
Directory number
Current track number
ID3 information
MP3
P01-XXX-YYY
CD
TRK 01
02:53
MP3
09-013
02:53
MP3
02-115
XXXXXXXX
Page 8

About MP3
MP3 (MPEG 1 Audio Layer-3) is a standard
technology and format for compressing a sound
sequence. Each file, or track, is compressed to
one-tenth of its original size.
In order to play MP3 files in the Delphi CD Audio
System, files must have been created according
to the following requirements:
Usable media – CD-Rs and CD-RWs
Usable disc format – ISO 9660 Level 1, Level 2,
and Joliet extension format discs
Maximum number of directories: 255
Maximum number of files: 255
AM/FM Radio Operation
Listening to AM/FM Radio
To listen to AM/FM radio stations:
1. Rotate the central unit so that the CD panel faces
forward. Be sure to follow the arrows when
rotating the unit. Complete the rotation until the
unit locks in position. CAUTION: Do not use
excessive force, which could damage the unit.
2. Press “Power” on the CD panel or remote control.
3. Press “Mode” on the CD panel or “CD/AM/FM”
on the remote control to select AM/FM mode.
4. Press “Stop” on the CD panel or “CD/AM/FM”
on the remote until the desired band (AM or FM)
appears in the display.
5. Press “Tune,” “Seek,” or “Scan” on the CD
panel or the category keys on the remote until
the desired station frequency shows in the display.
Storing AM/FM Stations in Memory
To store AM/FM stations in memory:
1. Select the desired AM/FM station.
2. Press “Memory” on the CD panel or
“mem/prog” on the remote.
3. With station frequency flashing on the display,
press “Tune” on the CD panel or “prev/next”
on the remote to select the desired memory
location (FM 1 to 18; AM 1 to 12).
4. Press “Memory” or “mem/prog” again to select.
Figure 13: Display While Storing AM/FM Stations in Memory
*Refer to the
SKYFi Operating Guide
for more specific information on
operating your SKYFi Receiver.
Seeking/Scanning
To search AM/FM stations manually:
Press “Tune” on the CD panel or “seek/random” on
the remote. The frequency increases one step (200
KHz for FM or 10 KHz for AM) with each press. The
display will repeat from the minimum if it reaches the
maximum frequency. If the selected station matches
one already stored in memory, the memory location
(FM 1 to 18; AM 1 to 12) will display.
To search stations stored in memory one by one:
1. Press “Scan” on the CD panel or “display/scan”
on the remote. If the received signal is strong, it
will stay tuned for 5 seconds with the station
frequency flashing.
2. Press “Scan” or “display/scan” a second time to
select the station or allow the next station in
memory to play automatically. Stored stations
will continue to scan in this way until one is
selected or until the tuner has returned to the
initial (INT) frequency. “INT” will show in the
display.
Adjusting the Tone (Bass and Treble)
Adjusting the Bass Level
To adjust the bass level:
1. Press the Menu key on the CD panel or remote
to show Menu functions on the display.
2. Press the Menu key six times, then hold to enter
the BASS submenu.
3. Press the Vol+ key on the CD panel or the Vol+
key on the remote to increase bass 1 dB per step
to reach a maximum of +10 dB. Press the —Vol
key on the CD panel or Vol— key on the remote
to decrease bass 1 dB per step to reach a
minimum of -10 dB.
Activating Bass Boost (BBS)
To activate BBS:
1. Press the Menu key on the CD panel or remote
to show Menu functions on the display.
2. Press the Menu key five times, then hold to
enter the BBS submenu.
3. Press the Vol+ key on the CD panel or the Vol+
key on the remote to activate BBS. Press the
—
Vol key on the CD panel or the Vol— key on the
remote to turn BBS off.
6
SECT ION 3
Frequency band
Stereo signal received
indicator
Memory location
Frequency
FM
ST
CH03
102.2 MHz
MEMORY
Page 9

Adjusting the Treble Level:
To adjust the treble level:
1. Press the Menu key on the CD panel or remote
to show Menu functions on the display.
2. Press the Menu key seven times, then hold to
enter the TREBLE submenu.
3. Press the Vol+ key on the CD panel or on the
remote to increase treble 1 dB per step to reach
a maximum of +10 dB. Press the —Vol key on the
CD panel or the remote to decrease treble 1 dB
per step to reach a minimum of -10 dB.
Note: If an AM/FM station is weak or noisy, you may
want to decrease the treble.
Equalizing Bass and Treble (EQ)
To equalize bass and treble:
1. Press the Menu key on the CD panel or remote
to show Menu functions on the display.
2. Press the Menu key four times, then hold to
enter the EQ (equalization) submenu.
3. Press +Vol or Vol— on the CD panel or the
remote to select one of the EQ auto settings:
Flat, Classic, Jazz, Rock, or Pop.
Clock Functions
Setting the Current Time
To set the current time:
1. Press the Menu key on the CD panel or remote
to show Menu functions on the display.
2. Press the Menu key once to select the CLOCK
submenu. (long press)
3. Press “Memory” on the CD panel or “mem/prog”
on the remote to enable the time-set function.
The hour will flash in the display.
4. Use the +Vol or Vol— on the CD panel or the
remote to adjust the hour
.
5. Press “Memory” or “mem/prog.” The minutes
will flash in the display.
6. Use the Vol+/— keys to adjust the minutes.
7. Press and hold the Menu key to leave the
CLOCK submenu. Or, if 5 seconds elapses with
no action, the display will return to normal status.
Figure 14: Time-Set Display
Setting the WAKE time
To set the WAKE time
Using the Snooze Function (Remote Control Only)
When the timer is set to function as an alarm clock,
you can use the Snooze key on your remote to stop
CD/MP3 playback for 7-minute intervals. To use the
Snooze function:
1. Press “snooze” to stop timed play. The unit will
play again after 7 minutes. Repeat as necessary.
2. Press any key on the CD panel or remote to disable Snooze and turn off the unit.
Programming Sleep Time
1. Press the Menu key on the CD panel or remote
to show Menu functions on the display.
2. Press the Menu key three times to enter the
SLEEP submenu.
3. Press the Vol+ key on the CD panel or the remote
to turn sleep time OFF or to program to shut off
after playing for 30, 60, 90, or 120 minutes.
SKYFI MODULE
With the Delphi CD Audio System and your XM
SKYFi Receiver (Delphi model number SA10000,
sold separately), it’s easy to enjoy XM Satellite
Radio programming wherever you go! (Subscription
required. Visit www.xmradio.com for details.)
Set-up
For SKYFi operation*:
1. Rotate the central unit so that the SKYFi cradle
faces forward. Be sure to follow the arrows
when rotating the unit. Complete the rotation
until the unit locks in position. CAUTION: Do not
use excessive force, which could damage the unit.
2. Connect the XM antenna to the antenna jack.
The 10-foot antenna cable can be used to position
the antenna away from the Delphi CD Audio
System for optimum reception. Alternatively, the
cable may be wound around the tab on the rear of
the lower tube (Figure 15), leaving just enough
cable to reach the antenna while it is docked on
the back of the speaker housing.
7
AM/PM select
Minutes
Hour
*Refer to the
SKYFi Operating Guide
for more specific information on
operating your SKYFi Receiver.
SECT ION 3
1.Press the MENU key on the CD panel or remote to
show MENU functions on the display.
2.Press the MENU key twice, then press the VOL + on
the CD panel or remote to set ALARM ON or press the
VOL - on the CD panel or remote to set ALARM OFF.
12:00 AM
Press and hold the MENU key, then press MENU
3.
key to set WAKE. Press MEMORY key to select
Minutes or Hour (the Minutes and Hour will flash).
Use the VOL + or VOL - on the CD panel or remote to
adjust WAKE time. After one hour of the WAKE time,
the unit will be automatically turned off, unless any
key (except SNOOZE) is pressed.
Page 10
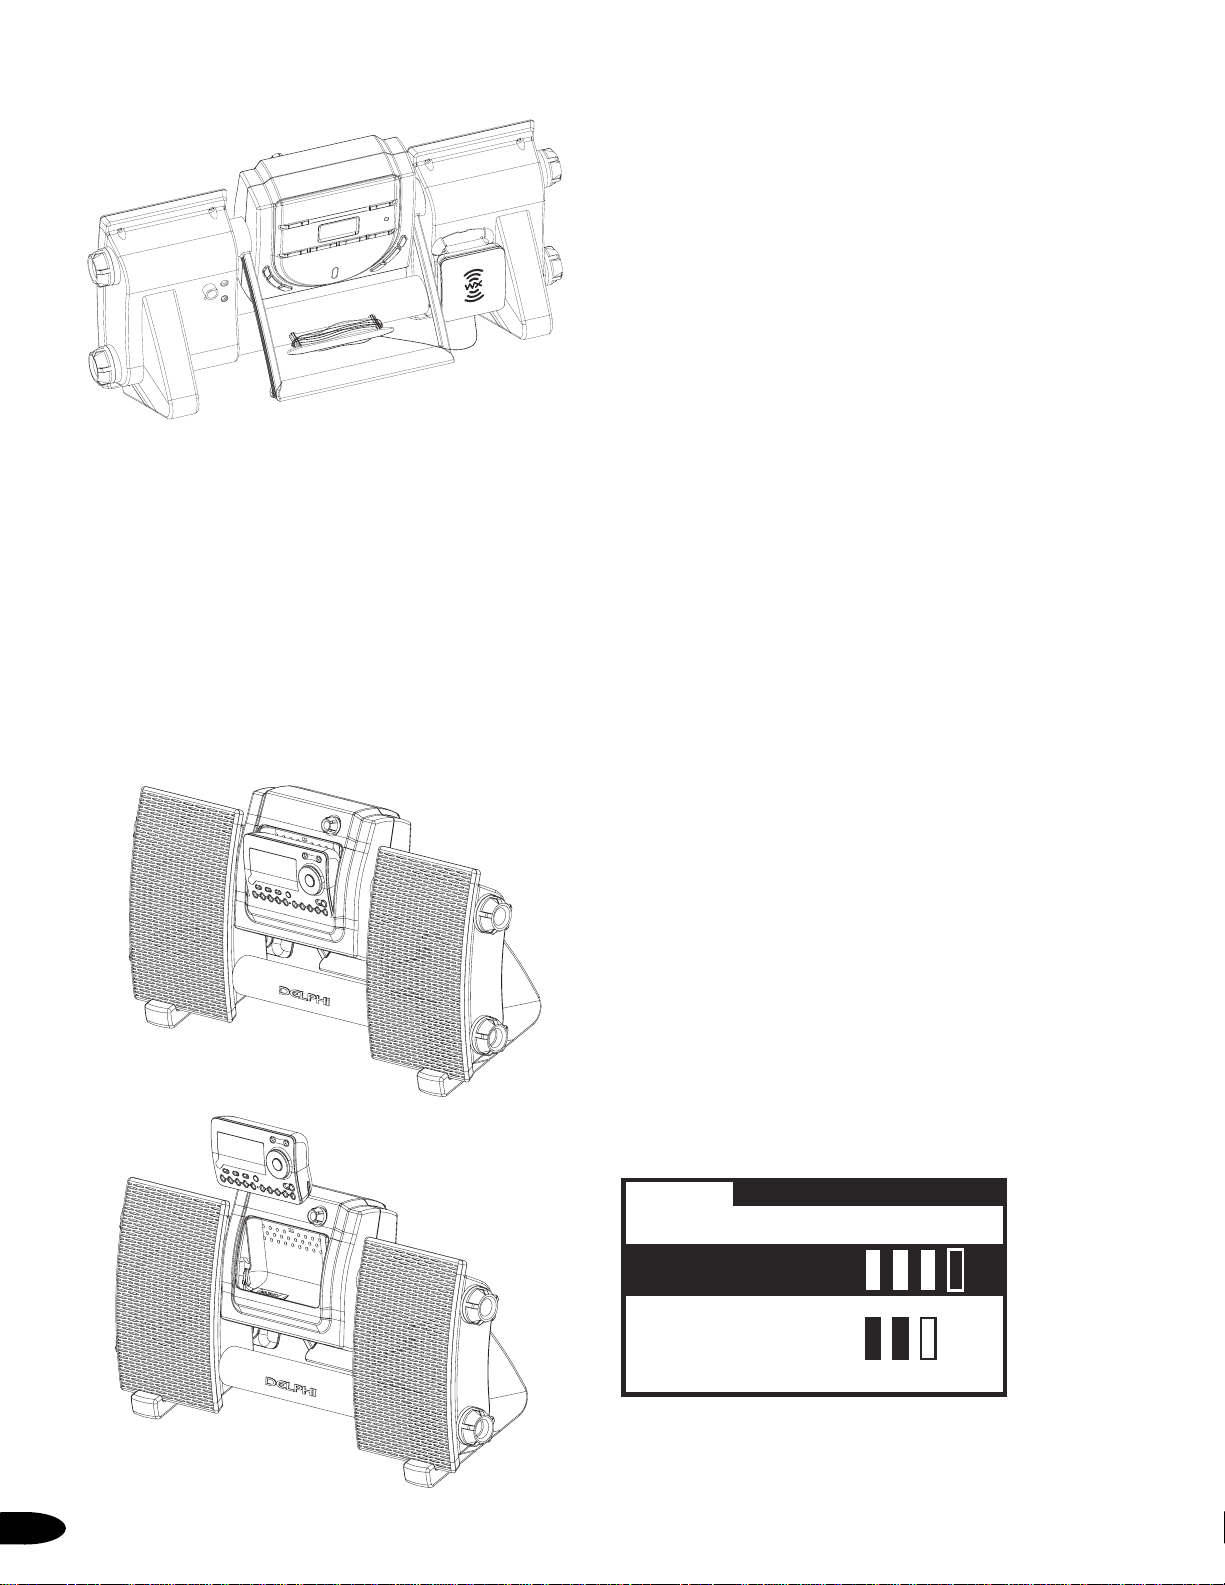
Figure 15
3. Holding the central unit steady, press the back of
the inset cradle, then allow it to tilt forward.
Carefully slide the SKYFi Receiver down into the
cradle (Figure 16). The alignment slots on the
receiver should line up with the tabs inside the
cradle. At the same time, the receiver should be
securely seated with the connector. Press the top
center of the SKYFi Receiver display, tilting it
back into the Delphi CD Audio System with a
firm but gentle click. Remove the SKYFi Receiver
by reversing this process (Figure 17).
Figure 16: Insertion of SKYFi
Receiver Into Cradle
Figure 17: SKYFi Receiver
Removal From Cradle
4. Press “Power” on the SKYFi Receiver or Delphi
CD Audio System remote to power up SKYFi.
5. If the display reads “ANTENNA” after powering
up, check that the antenna connection is secure
and completely engaged. Next, change channels
(from 0 to 1 or from 1 to 0 if the receiver is not
yet activated). If the “ANTENNA” message
remains, power down the radio, unplug the
antenna, and look for any obvious damage to
the connector, jack, or antenna cable. If no
damage is detected, reconnect the antenna, turn
the unit back on, and change channels again.
Contact your retailer if the message still appears.
6. If the display reads “NO SIGNAL” after powering
up, follow the instructions below and on page 9
for positioning the XM antenna and optimizing its
signal.
Once the Delphi CD Audio System is set up and the
SKYFi Receiver is inserted in its cradle, refer to the
SKYFi Operating Guide
for complete system opera-
tion and control information.
Positioning the XM Antenna
The XM antenna that comes with your Delphi CD
Audio System is a high-gain antenna that can
receive XM’s signal from XM’s satellites and/or,
depending on where you live, XM’s land-based
repeaters. It is recommended that the antenna be
positioned near a south-facing window or outdoors
with a clear view of the southern sky in order to
receive the satellite signal. In some cases, it will be
possible to receive XM’s signal through standard
home walls or a roof.
To position your antenna, first set up the Delphi CD
Audio System as described earlier in this guide.
Next, position the antenna until you receive the
strongest possible satellite signal (refer to Optimizing
XM Antenna Signal, page 9). If a satellite signal is
not available, you can optimize your antenna for a
terrestrial signal (signal from land repeater, where
available).
Figure 18
8
SECT ION 3
PRESS MENU TO EXIT
SATELLITE
Terrestrial
Page 11

Optimizing XM Antenna Signal
1. With the SKYFi cradle facing front, press the
Power button on the SKYFi Receiver or Delphi
CD Audio System remote.
2. Press the Menu button on the receiver or
remote.
3. Turn the scroll wheel on the SKYFi Receiver or
use the category keys on the remote until
“Antenna Aiming” is highlighted on the receiver
display.
4. With “Antenna Aiming” still highlighted, press
the Enter button on the SKYFi Receiver or
remote. The display will show the strength of
the satellite and/or terrestrial signals. The signal
strength is indicated by the number of filled
bars (Figure 18).
Antenna Mounting/Installation
Mounting the Antenna on the Delphi CD Audio
System
When outdoors with a clear view of the southern
sky or in an area of XM repeater coverage, or when
receiving a strong signal indoors, you can mount
the XM antenna directly on the back of the Delphi
CD Audio System.
1. Wind the antenna cable around the tab on the
back of the lower tube, leaving several inches of
cable free.
2. Fold the antenna down flat against its base.
3. Position the antenna so that the XM logo is
upside down. Then place the antenna base flush
against the back of the Delphi CD Audio System
so that the four pegs line up with the four slots
in the antenna base. Slide the antenna down
approximately 3/8 inch until the antenna is
securely docked. (See Figure19).
Figure 20
4. Position the antenna by pivoting the half with
the XM logo away from the back of the Delphi
CD Audio System. Then turn the entire system
until you get the strongest signal.
5. Use the “Antenna Aiming” screen (as described
under Optimizing XM Antenna Signal) to optimize
the antenna tilt angle and position.
SECT ION 3
Figure 19
Figure 21
Indoor Installation on a Flat Surface
To aim your antenna at the satellite:
1. Set antenna flat against its base on a flat
(horizontal) surface.
2. Turn the base of the antenna so that the XM
logo faces to the south.
3. Use the “Antenna Aiming” screen to optimize
the antenna tilt angle and position.
4. If necessary, experiment with different locations
near a south-facing window or outside.
9
Page 12
Your antenna comes with 10 feet of cable. If that is
not sufficient to locate the antenna where there is a
strong XM signal, you may purchase a 50-foot cable
extension (Delphi model number SA10006) from
your SKYFi retailer. Up to two extensions can be
used together for up to 110 total feet of cable.
Outdoor Installation or Indoor Wall Mounting
For maximum flexibility and convenience, your
XM antenna can also be attached vertically to an
external or internal wall.
1. Holding the antenna up, find a wall location that
provides a strong signal. It is recommended that
you use an extension cord to temporarily locate
your Delphi CD Audio System outdoors while
optimizing the antenna location with the
“Antenna Aiming” screen.
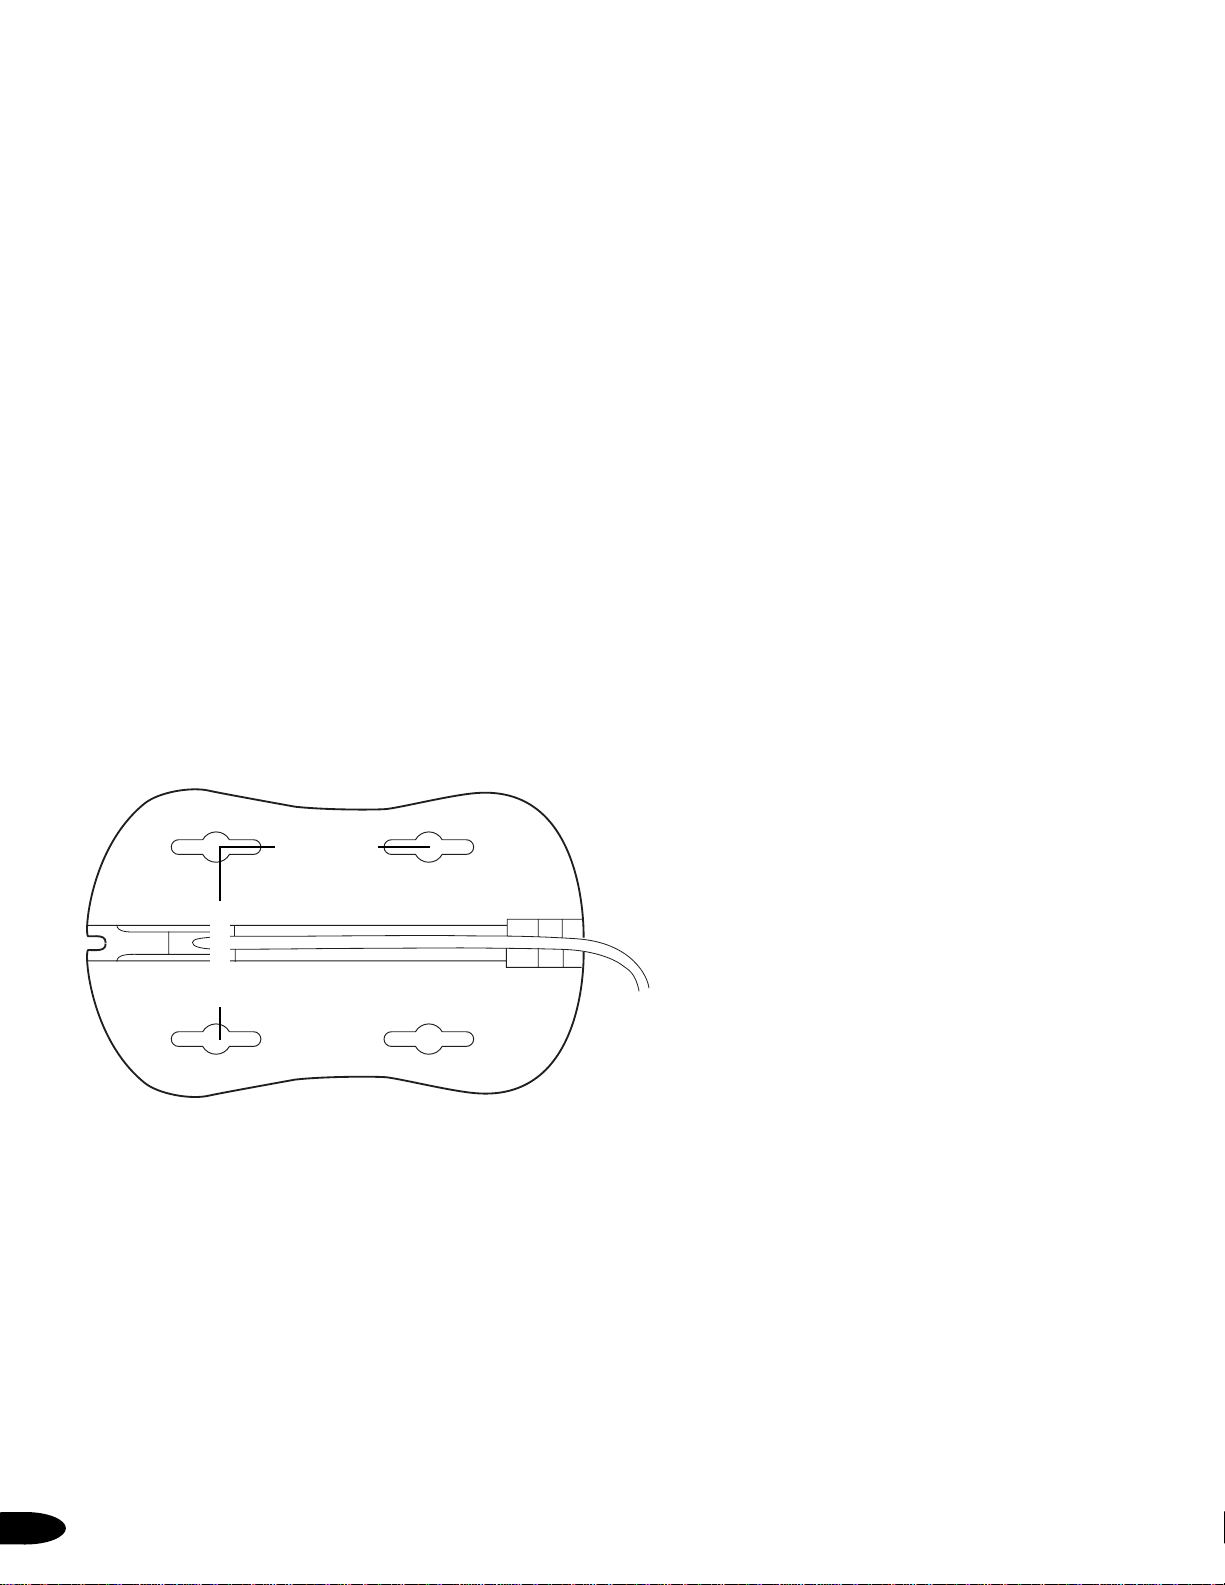
2. Attach four screws to the wall using the screwlocator pattern in Figure 22. (First, photocopy
the pattern to use as a template.) Use screws
with head sizes small enough to fit in the center
of each of the four holes but large enough not to
pop out of the elongated sections. #4 pan-head
screws (3/8-inch long) are recommended. Leave
1/8 inch of the screw shanks visible between the
heads and the wall.
Figure 22: Screw Locator Pattern
3. Tilt the antenna fully back on its base. Place the
antenna base on the four screw heads with the
antenna pivot at the top, and pull down approximately 3/8 inch until the base is firmly secured
on the wall. (Note that the XM logo will be
upside down when the antenna is properly
installed.)
4. Tilt the antenna away from the wall/base until
the signal is optimized.
Note: Do not cut the antenna cable and attach alternative connectors or cable. The cable and connectors
included with your Delphi CD Audio System are
specially chosen to ensure that they will work with
XM’s unique frequency band. Use only an XMapproved extension kit (Delphi model number
SA10006) with your SKYFi system.
Controlling Volume, Bass, and Treble
Controlling Volume
Use the volume knob on the SKYFi panel or the
Vol+/- keys on the remote control to adjust volume
when playing XM Satellite Radio stations.
If you also use your SKYFi Receiver with a SKYFi
Vehicle Adaptor or Home Adaptor kit, the SKYFi
Receiver will remember the volume level previously
set when connected to the Delphi CD Audio System
and will return to that setting the next time the system is used.
Note that the “Line Out” level cannot be reset while
the SKYFi Receiver is in the Delphi CD Audio System
since the volume control should be used to control
the audio output. If the line out setting is adjusted
while the receiver is in the SKYFi Vehicle Cradle or
Home Stand and is later reconnected to the
Delphi CD Audio System, it will automatically
return to the prior setting the next time it is
used in the SKYFi Vehicle Cradle or Home
Stand.
Bass and Treble
In SKYFi mode, bass and treble can be adjusted
by pressing the “Menu” button on the SKYFi
Receiver or remote, selecting “Bass + Treble,”
and then setting these features in the same
manner as other menu functions*.
If the SKYFi Receiver is removed from the
Delphi CD Audio System and used in a vehicle
or home adaptor, the bass and treble settings
on the SKYFi Receiver display will be “flat” or
“zero” since the audio signal will be processed by
the vehicle or home audio system. When the SKYFi
Receiver is returned to its cradle in the Delphi CD
Audio System, it will resume the most recent bass
and treble settings.
*Refer to the
SKYFi Operating Guide
for more specific information on
operating your SKYFi Receiver.
10
SECT ION 3
1.4 in (35 mm)
1.6 in (40 mm)
Page 13

SYSTEM SOUND OUTPUT OPTIONS
Adjusting Speaker Balance
1. Press the Menu key on the CD panel or remote
to show Menu functions on the display.
2. Press the Menu key eight times, holding on the
eighth press to enter the BALANCE submenu.
3. To adjust the right speaker, press the Vol+ key
on the CD panel or the Vol+ key on the remote to
increase one step at a time to a maximum of R10.
4. To adjust the left speaker, press the —Vol key on
the CD panel or Vol— key on the remote to
increase one step at a time to a maximum of L10.
Muting the Sound
To mute sound output during CD/MP3 and AM/FM
play:
1. Press the Vol— key repeatedly on the CD panel
or press the Mute key once on the remote until
“MUTE” appears on the display. All other
functions will continue.
2. To release, press the Mute key again or press
the +Vol/Vol— key on the CD panel or Vol+ or
Vol— key on the remote until volume is at the
desired level.
Headphones
You may listen to your Delphi CD Audio System
through headphones. Plug the headphones into the
headphone jack on the back of the right speaker
enclosure. Many popular styles and types of headphones or ear buds can be used as long as their
plugs and/or adaptors fit the industry standard 3.5
mm diameter stereo jack.
You may also use the headphone jack as your line
output jack to play through your home stereo system. Note: Most home stereo systems will work
with the Delphi CD Audio System. Due to Delphi’s
effort to maintain a distortion-free signal, some
home systems may exhibit a lower volume output
when connected to the Delphi CD Audio System
compared to other sources (e.g., CD players).
CAUTION: Hearing damage from loud
noise is almost undetectable until it is too
late. Your hearing can adapt to higher volumes
of sound. Sound that seems normal can be loud
and harmful to your hearing. Take precautions
by adjusting the volume control on your audio
system to a safe sound level before your hearing
adapts to it. To help avoid hearing loss or damage, do the following:
1. Adjust the volume control to the lowest setting.
2. Increase volume slowly until you hear comfortably and clearly.
BATTERY OPERATION OF THE DELPHI CD
AUDIO SYSTEM
You can operate your Delphi CD Audio System with
six D-cell batteries (not supplied) outdoors or in
other locations without access to an A/C power
source. Alkaline or rechargeable NiCD or NiMH batteries are recommended. Battery life will vary
depending on how the system is operated and the
type of batteries used.
Note: Rechargeable batteries are available in several
different capacities; the larger the “mAh” rating, the
longer the Delphi CD Audio System should play.
Some rechargeable batteries may provide sufficient
power for only 2 to 3 hours of playing time before
requiring recharging. To preserve battery life, the
A/C adaptor is recommended as the primary power
source for the Delphi CD Audio System. A 12V D/C
adaptor (Delphi model number SA10033) is also
available for use with 12V D/C portable power
sources or from a parked vehicle.
To insert batteries:
1. Disconnect the power adaptor from the back of
the Delphi CD Audio System.
2. Remove the left-side end cap from the lower
tube by unscrewing the cap counterclockwise
(Figure 24).
3. Insert six D-size (R20) batteries into the battery
compartment (lower tube). Make sure the
batteries face in the correct direction by verifying
that the positive (+) and negative (-) symbols in
the battery compartment match the same
symbols on the batteries.
4. Removing batteries is recommended when your
Delphi CD Audio System will not be in use for
an extended period of time. Batteries will discharge slowly (approximately 30 days) even
when the Delphi CD Audio System is not in use.
Figure 24: Battery Insertion in the Lower Tube
11
SECT ION 3
Page 14

Reference
CARING FOR YOUR DELPHI CD AUDIO
SYSTEM
Clean the Delphi CD Audio System cabinet and controls with a soft cloth slightly moistened with water
only. Do not use any type of abrasive pad, scouring
powder, or solvent, such as isopropyl alcohol or
benzene.
WARNING: Unplug the A/C power adaptor
during cleaning to avoid any electrical shock
hazard.
Precautions
CAUTION: Servicing of the Delphi CD Audio
System should be done by qualified personnel
only. In particular, do not disassemble the CD
player housing. The laser beam is harmful to the
eyes. Follow these additional safety precautions:
• Do not attempt to remove solid objects or
liquids that fall into the Delphi CD Audio
System. Discontinue operation, unplug the unit,
and consult qualified service personnel.
• Do not use non-standard compact discs (e.g.,
mini discs or square-, heart-, or star-shaped
discs) in the Delphi CD Audio System.
Attempting to use non-standard discs may
damage the unit.
Power Sources
• For A/C operation, it is recommended that only
the supplied A/C power adaptor be used. If
another adaptor is needed, make sure it is a
12V, 1800mA D/C adaptor with a unified polaritytype jack.
• As long as the Delphi CD Audio System is
connected to the wall outlet, it will continue
to draw power, even if it is turned off.
• Unplug the A/C power adaptor from the wall
outlet when the Delphi CD Audio System is not
to be used for an extended period of time.
• The Delphi CD Audio System takes six D-size
(R20) batteries.
• When the batteries are not being used, remove
them. This will help avoid possible damage to
your Delphi CD Audio System from battery
leakage or corrosion. Batteries will discharge
slowly, even when the Delphi CD Audio System
is not being used. (New alkaline batteries will
discharge in approximately 30 days when left
unused in the Delphi CD Audio System.)
Placement
• Place the Delphi CD Audio System on a flat and
stable surface to reduce the risk of the unit
falling and breaking.
• Protect the Delphi CD Audio System from the
direct rays of the sun, which can damage the
unit.
• Keep spring-wound watches or personal credit
cards using magnetic coding away from the
Delphi CD Audio System. The strong magnets
used for the speakers can erase magnetic coding
and can impair watch function.
CAUTION: The two-inch-long bass response
ports on either side of the top tube on your Delphi
CD Audio System are designed to maximize airflow
to the speakers for improved bass response.
Inserting objects into these openings may impair
speaker function and can damage the unit.
Protecting From Water Damage
• Before opening or closing the Delphi CD Audio
System CD player or battery compartment cover,
be sure to wipe off any water, dust, or sand on
the outside of the unit.
• The supplied A/C power adaptor is not waterresistant. To avoid electrical shock hazard, do
not use the Delphi CD Audio System near water
during A/C operation.
• Do not wash under running water. Water in the
headphone jack or other jacks and openings
may cause rusting and possible malfunction.
• Do not use soap or detergent.
• If the Delphi CD Audio System is splashed with
salt water or other liquid, wipe clean with a
damp cloth, then dry with a soft, dry cloth.
• Do not dry with an electric hair dryer, as the
unit’s plastic parts are not rated to withstand the
high temperatures generated by hair dryers.
• When transferring the Delphi CD Audio System
from a cold location to a warm location, or when
placing it in a humid location, condensation may
form on the CD player lens. If this happens,
allow the moisture to evaporate for at least one
hour before inserting and/or playing a compact
disc.
CAUTION: The Delphi CD Audio System is not
designed to be immersed in water or other
liquids or come in continuous contact with water.
12
SECT ION 4
Page 15

TROUBLESHOOTING
13
SECT ION 4
• Securely and safely connect the A/C power adaptor to a
wall outlet with 120V A/C output.
• Ensure batteries are inserted correctly.
• Check battery strength; if they are weak, replace all
batteries with new ones.
• Confirm that the desired function appears in the display;
if not, adjust the mode of your Delphi CD Audio System.
• Adjust the volume.
• Unplug the headphones.
• If in SKYFi mode, remove the SKYFi Receiver from its
cradle and re-insert.
• Move portable telephones or other equipment that emits
radio waves (~2.3GHz) away from the Delphi CD Audio
System.
• Check battery strength; if they are weak, replace all
batteries with new ones.
• Move the Delphi CD Audio System away from the
television.
• Re-insert the compact disc, ensuring the label faces up.
• Verify that the CD is a compatible file format (see
page 6 for compatible MP3 file formats).
• Finalize the CD-R or CD-RW with the recording device.
• Make sure the CD-R or CD-RW is not blank.
• Check the recording device and application software.
There may be a problem with the quality of the CD-R or
CD-RW .
• Check to make sure the CD player cover is closed.
• Re-insert the compact disc, ensuring the label faces up.
• Confirm that your Delphi CD Audio System is in CD
mode (CD panel facing forward and locked in postion).
• Verify that the CD is a compatible file format (see
page 6 for compatible MP3 file formats).
• Clean the CD (see page 4 for tips on proper cleaning).
• Remove the CD, and leave the compartment open for
at least one hour to allow moisture condensation to
evaporate.
• Reduce the volume.
• Check the compact disc for dirt, fingerprints, or scratches.
Clean it if it is dirty, or replace it if badly damaged.
• Move the Delphi CD Audio System to a location free
from vibration.
• Check the recording device and application software.
There may be a problem that affects the quality of the
CD-R or CD-RW.
• Refer to the
SKYFi Operating Guide
, included with your
SKYFi Receiver.
There is no power (or, if in SKYFi mode,
SKYFi starts then shuts off quickly).
There is no audio.
Noise is heard coming through the audio
system.
The audio is weak or poor quality in
AM/FM mode.
“NO DISC” or “ERROR” appears in the
display.
The compact disc does not play.
The audio cuts out or sound becomes
distorted when playing a CD, CD-R,
CD-RW, or MP3.
There are issues related to functioning of
the SKYFi Receiver or satellite radio signal
reception.
If this happens: You should:
Page 16

Contacting Product Technical Support and
Customer Service
If problems persist after trying all of these troubleshooting steps, unplug the A/C power adaptor and
remove all batteries. Wait until the CD panel or
SKYFi Receiver display clears completely, then plug
the A/C power adaptor back in and re-insert batteries. If this does not fix the problem, contact Delphi
at 1.877.GO DELPHI (1.877.463.3574) Monday
through Friday.
TECHNICAL INFORMATION
Audio Power Specifications
Power Output and Harmonic Distortion
With 3.2-ohm loads, both channels are driven from
150 to 10,000 Hz; rated 2.3 W per channel—minimum
RMS power, with no more than 10 percent total
harmonic distortion in A/C operation.
Other Specifications
CD/MP3 Player
System Compact disc digital audio
system
Laser diode properties
Material GaAlAs
Wavelength 780 nm
Emission duration Continuous
Laser output
(1)
<44.6 mW
Spindle speed 200 rpm to 500 rpm (CLV)
Number of channels 2
Frequency response 70 Hz – 20 kHz +1/-3 dB
Wow and flutter Below measurable limit
(1) Value measured at ~200 mm from the objective lens surface on the
optical pickup block with a 7 mm aperture.
AM/FM Radio
Frequency range
AM 530 – 1710 kHz
FM 87.5 – 107.9 MHz
Antenna AM internal
FM telescoping
General
Speakers Full range: 10 cm (4 in.)
diameter, 3.2 W, cone type (2)
Outputs 3.5 mm diameter ministereo
jack
Power output 2.3 W + 2.3 W (at 3.2 W,
10 percent harmonic distortion)
Power requirements
Delphi CD Audio System
D/C IN 12V jack Accepts supplied A/C power
adaptor for use with 120 V A/C,
60 Hz
Battery operation Accepts 6 D-size (R20) batteries
(not included)
Remote control Requires 2 AAA-size batteries
(included)
Dimensions
Delphi CD Audio System 20 in. W x 10 in. H x 7.5 in. D
(50.8 cm x 25.4 cm x 19.1 cm)
Remote control 4-5/8 in. W x 1-5/8 in. H x 1 in. D
(117 mm x 40.5 mm x 25 mm)
Weight
Delphi CD Audio System 5 lbs. 13 oz. (2.64 kg)
FM antenna 7.8 oz. (.22 kg)
Remote control 2.1 oz. (.06 kg)
Construction Body made of durable,
ABS plastic; handle has
thermoplastic rubber
(TPR) insert for easy grip
Liquid crystal display 40 mm x 20 mm dot
(LCD) matrix with orange LED
backlighting
Supplied accessories 12V A/C power adaptor
Integrated remote control
High-gain satellite radio
antenna
14
SECT ION 4
• Technical Support: 8 a.m. to 5:00 p.m. Eastern
Standard Time
Page 17

Warranty
PORTABLE XM SATELLITE RADIO LIMITED
CONSUMER WARRANTY
Delphi Product and Service Solutions (“Delphi”)
warrants all Portable XM Satellite Radio Products
sold by Delphi (“Products”) to be free of defects in
material and workmanship, subject to the following
conditions.
The duration of Delphi’s warranty with respect to
Delphi Portable XM Satellite Radio Products is limited
to one (1) year from the date of sale to the original
consumer purchaser.
No other express warranties are made with respect
to any Product. All implied warranties, including
warranties of merchantability and fitness for a particular purpose are limited to the warranty period
set forth above. This warranty is not transferable
and applies only to the original consumer purchaser
of the Product.
Delphi will, as its sole obligation under this warranty, replace or repair, at its option, any Product that
does not conform to this warranty. Under no circumstances will Delphi be liable for any incidental
or consequential damages under this warranty or
any implied warranties.
Delphi will not be responsible for damage resulting
from any (i) deviation from Delphi’s operating
instructions as printed in Delphi’s catalog or on any
packaging, labels or other literature provided with a
Product, (ii) installation of a Product in a manner
which is inconsistent with Delphi’s written instructions, (iii) alteration or modification of a Product,
(iv) misuse, (v) neglect, (vi) abuse, (vii) accident,
(viii) normal wear and tear, (ix) commercial use, (x)
service by anyone other than a Delphi authorized
repair facility, or (xi) other improper application,
installation or operation of the Product.
How You (the Customer) Can Get Service
To obtain warranty service during the first thirty (30)
days after the date of purchase, you must return the
defective Product with the original receipt to the
original place of purchase. To obtain warranty
service during the remainder of the warranty period,
you must contact Delphi by phone at 1-877-GO DELPHI
(1-877-463-3574).
If warranty service is needed at any time during the
warranty period, the purchaser will be required to
furnish a sales receipt/proof of purchase indicating
the date of purchase, amount paid and place of purchase. Customers who fail to provide such proof of
purchase will be charged for the repair of any
Product.
How State Law Relates to the Warranty
COPY: Some states do not allow limitations on how
long implied warranties last, or the exclusion or the
limitation of incidental or consequential damages.
So the above limitations or exclusions may not
apply to you. This warranty gives you specific legal
rights. You may also have other rights that may vary
from state to state.
NO PERSON IS AUTHORIZED BY DELPHI TO
MODIFY OR ADD TO THIS LIMITED WARRANTY.
15
SECT ION 5
Page 18

For Customers in the United States
This device complies with part 15 of the FCC rules.
Operation is subject to the following two conditions:
(1) This device may not cause harmful interference
(2) This device must accept any interference
received, including interference that may cause
undesired operation.
Changes or modifications not expressly approved
by Delphi could void the warranty.
Page 19

Printed on Recycled Paper
©2003 Delphi Corporation. All rights reserved.
DPSS-03-E-XXX
Delphi Corporation
1441 West Long Lake Road
Troy, Michigan 48098-5090
U.S.A.
Customer Service: [1] 877.GO DELPHI
www.delphi.com
The SKYFi name, XM name, and related logos are trademarks of XM Satellite Radio Inc.
 Loading...