

Page 1

Owner´s Manual DEA601 Radio
1 | P a g e
MY 2015
Delphi
3/1/2015
Owner´s Manual DEA601 Radio
Page 2

Owner´s Manual DEA601 Radio
2 | P a g e
Table of Contents
DEA601 Radio System .................................... 3
Introduction ................................................. 3
System Features and Functions ................... 3
Radio ........................................................... 4
Radio Button Operation ......................... 4
Smart Display ............................................. 5
Getting Started ....................................... 5
Audio Application ......................................... 10
Media Sources .......................................... 10
Media Audio Control Softkeys ............ 11
USB ...................................................... 16
CD Player ............................................. 17
Front Auxiliary ..................................... 18
Bluetooth Player ................................... 19
Rear Auxiliary ...................................... 19
Radio Sources ........................................... 19
AM/FM ................................................ 20
WX ....................................................... 20
Sirius XM ............................................. 20
Audio Widget ............................................ 23
Media source ........................................ 23
Radio source ......................................... 25
Phone ............................................................. 27
Contacts .................................................... 27
Contact Information ............................. 28
Favorites ............................................... 29
Making a Call ........................................... 29
Recent calls .......................................... 30
Incoming Call ....................................... 30
SMS .......................................................... 32
Apps ............................................................... 33
Clock ......................................................... 33
Camera Views ........................................... 35
Application Interface ............................ 36
Automatic Cameras View .................... 36
Gauges ...................................................... 37
Gauges.................................................. 37
Gauge States ......................................... 38
Virtual Gauges Pop-Up ........................ 39
Gauges Settings .................................... 39
Voice Recognition ..................................... 43
Vocabulary ........................................... 44
Direct Action Commands ..................... 44
Launch .................................................. 44
Phone Commands ................................. 45
Settings ........................................................... 47
Camera Application Settings ..................... 47
Display Settings ......................................... 48
Wireless & Networks ................................ 49
Wi-Fi .................................................... 49
Bluetooth .............................................. 52
OTA (Over the Air) .............................. 54
Keyboard Sound ........................................ 54
Date & Time .............................................. 55
Applications .............................................. 55
System Information ................................... 56
Language & Inputs .................................... 57
Language .............................................. 57
Text to speech output ............................ 58
System Audio ............................................ 58
Manual Equalization ............................. 59
Auto Equalization ................................. 60
Speed Dependent Volume .................... 61
Speakers Configuration ........................ 61
Seek Sensitivity -6dB to +6dB ............. 61
Tips and Troubleshooting .............................. 62
Radio ......................................................... 62
Unable to tune stations ......................... 62
Power operation ......................................... 62
Installation ................................................. 62
CD ............................................................. 62
CD player not functioning .................... 62
CD Insertion is not possible .................. 62
iPod ........................................................... 62
iPod does not play or there is no sound 62
iPod not functioning ............................. 62
Bluetooth ................................................... 62
My radio doesn't recognize my Bluetooth
enabled device. ..................................... 62
The device and my radio can't
communicate. ....................................... 62
Device music cannot be heard .............. 63
Rear Seat Audio (RSA) ............................. 63
The RSA shows no link. ....................... 63
Precautions .................................................... 63
Driver Distraction Avoidance ................... 63
Limited Applications/Functionalities ... 63
System memory ........................................ 63
Apple devices ............................................ 63
Sirius XM ................................ .................. 64
Warranty Replacement .............................. 64
Product Cleaning ....................................... 64
Moisture Condensation ............................. 64
Damage Disc ............................................. 64
Bluetooth ................................................... 64
Bluetooth Distraction ................................ 64
Disclaimers, Trademarks and License
Agreements .................................................... 64
FCC Information ....................................... 65
Conformity assessment issues ....................... 65
FCC/IC Regulatory Notice ....................... 65
Modification statement ......................... 65
Interference statement .......................... 65
Radiation Exposure Statement ............. 65
FCC Class B digital device notice ........ 65
CAN ICES-3 (B) / NMB-3 (B) ................. 66
Page 3

Owner´s Manual DEA601 Radio
3 | P a g e
DEA601 Radio System
Introduction
The information and figures in this manual describes features that may or may not be on your specific vehicle either because they are options that you did not
purchase or due to changes subsequent to the printing of this owner manual.
The DEA601 System consist of 7" Smart Display connected to a Radio.
The Smart Displaly function as a main display managing the entire user interface. The Smart Display with resistive touch-screen has a rear USB for playback or
USB modem connection, it manages the Applications, Phone interface, Audio, Internet and Bluetooth / W-Fi conections.
The Radio is a module capable of managing the audio output of the system to the speakers, containing the tuner (AM, FM, WX), Sirius XM, Front Aux, Rear Aux,
USB, CD. It also transmit the audio output from the Smart Display and manage the hard buttons.
System Features and Functions
The DEA601 System implements the following features and
functions:
7" display with resistive touch-screen.
Bluetooth & Wi-Fi connectivity
4 Integrated Analog Camera Inputs
Microphone Input (Mono)
GPS/Navigation Application Compatibility
Audio Outputs
Voice Recognition
Text to Speech
1 knob with center push.
Front Aux Input / Rear Aux Input
USB compatibility for Apple devices
CD Playback
Front USB Connectivity (USB Playback)
Tuner (AM/FM/WX)
Sirius XM
4/2 Speakers Output
Steering Wheel Control Compatibility
Rear Seat Audio Compatibility
Smart
Display
Radio
Page 4

Owner´s Manual DEA601 Radio
4 | P a g e
Radio
Radio Button Operation
Volume Knob/Power
Press Knob to turn ON the Radio. Rotate to Increase/decrease Volume.
Press and hold to turn radio OFF.
One-Hour Timer
With the ignition off, pressing the Volume/PWR button on Radio or center
button on RSA will turn on the receiver and activate the receiver’s one-hour
timer. The receiver will turn off after one hour or by pressing and hold the
Volume/PWR or RSA center button.
Eject
Press to eject the CD
Phone
The Phone Call button is used to enable the Phone call functionality.
Dim Day / Night
The Dimming “day” is used to increment the brightness level of the Smart
Display and the backlight level of the Radio bezel.
The Dimming “night” is used to decrease the brightness level of the Smart
Display and the backlight level of the Radio bezel.
Back / Home / Menu
The Back button is used to exit the current screen and open the previous
screen.
The Home button is used to go directly to the first home screen.
The Menu button is used to open the menu related to the current screen.
When the system is on Home screen, Menu button open the "System
Settings".
Page 5

Owner´s Manual DEA601 Radio
5 | P a g e
Smart Display
Getting Started
Using the touch screen
A Touch over a soft key activates or selects the corresponding function.
Figure 1 The Home screen.
A Swipe action is the case when the system registers a touch and a linear
streak movement over the screen.
The movement can be performed to the right, left, up and down.
The system is able to sense 4 different types of swipe action.
Swipe to the Right
Swipe to the Left
Swipe to Up
Swipe to Down
The next to the right screen is presented once the system senses a Swipe to
the Left action.
Figure 2: Swipe to the Left action presents right screen.
The next to the left screen is presented once the system senses a Swipe to
the Right action.
Figure 3: Swipe to the Right action presents left screen.
The next to the top screen is presented once the system senses a Swipe to
Down action.
Page 6

Owner´s Manual DEA601 Radio
6 | P a g e
Figure 4: Swipe to Down action presents up screen.
The next to the bottom screen is presented once the system senses a Swipe
to Up action.
Figure 5: Swipe to Up action presents down screen.
Home screen & Navigation buttons
The installed application icons are presented at the home screen. The home
screen is distributed in a main screen and subsequent home screens.
Each of the home screens present 6 application icons maximum plus the
Audio widget. The number of the subsequent home screens is relative to the
number of installed applications. Each subsequent home screen is added to
the right of the main home screen or next to the right of the last subsequent
home screen.
In the case the last subsequent home screen is reached and a swipe to the
left action is performed the system presents the main home screen. If a
swipe to right action is performed from the main home screen the system
presents the last subsequent home screen.
An indicator identifies which home screen is displayed. The screen indicator
is placed below the top bar of the home screen.
Each application icon in the home screen work as the application activation
soft key.
At the top bar of each of the home screens the next information is presented
all the time if available:
Clock
Alarm
Warning icons
Weather information
When the system is turned OFF but IGN and Battery are connected, the
clock view is kept small as illustrated on Figure 6.
Figure 6: Clock view in OFF power mode.
Page 7

Owner´s Manual DEA601 Radio
7 | P a g e
The alarm setting opens once the system senses a touch over the displayed
time area.
The weather information is presented in the Notification Bar; information is
updated based on the ambient air temperature reported by the vehicle. The
temperature measure units displayed are accordingly to the units selected in
the Display Settings menu. Every ignition cycle the system suppresses the
weather information until it receives the ambient air temperature from the
vehicle information.
The next Applications are presented at the Home Screen as default:
Cameras Views
Calculator
Gauges
Audio
Web Browser
Phone
The system present at the bottom of the screen the four soft keys navigation
buttons.
Back
Home
Menu
Voice Recognition
When the system senses the selection of the Back button the previous
screen is presented even if it was in a different app. The Back soft key
button doesn’t have any effect at the home screen.
When the system senses the selection of the Home soft key button the main
home screen is presented.
Figure 7 The Home Screen
When the system senses the selection of the Menu soft key button the
settings menu related to the current screen is presented.
Figure 8: Settings menu related to the current screen.
Page 8

Owner´s Manual DEA601 Radio
8 | P a g e
If the Menu button is activated at the home screen, the system settings
screen is presented.
Figure 9: The settings screen Part I.
Figure 10: The settings screen Part II
When the system senses the selection of the Voice Recognition soft key the
Voice Recognition app is launched.
Notification Icons
The following icons are placed in the Notification Bar in case these are
activated.
Icon
Meaning
Weather Information.
Alarm Indicator.
Installation Icon.
CD Indicator.
Mute Indicator.
Bluetooth Indicator.
Warning CD Indicator.
Signal Strength
Table 1: Icons meaning.
Dim Day / Night
The Dimming level is indicated each time Dim Day or Dim Night buttons are
pushed.
Page 9

Owner´s Manual DEA601 Radio
9 | P a g e
Figure 11: The Dimming level indicator pop-up
Volume
Volume level is indicated each time the volume knob is turned.
Figure 12: The Volume level indicator pop-up
Volume mute is also reported with a pop up indicator and on Top bar
indicator screen.
Figure 13: The Mute activation indicator icon pop-up
Figure 14: The Mute icon on the Notification Bar
Mute
This feature is used to mute the radio due to an external event in the vehicle.
The radio remains MUTE while event is active.
Page 10

Owner´s Manual DEA601 Radio
10 | P a g e
If this event occurs, the Media sources are paused. Once it ends, the
systems behave as if a pause was cancelled.
There are some actions that can cancel this mute like: Alarm notification,
volume changes, media insertion, BT call, among others.
Reverse Mute
The radio is muted if the reverse gear is selected. This interruption is ignored
if the radio is on BT call.
Selecting any transmission gear different than reverse cancels the mute
(starts the media).
Audio Application
Open the Audio App located on the home screen of the Smart Display. All
Music source are accessed and managed via the Audio app.
Figure 15 Open Audio App to access Music Sources.
The Audio sources are presented to the user in a Tab-bar at the top of the
application screen, each Audio source work as a softkey selector; the
selected Audio source icon is highlighted.
The system does not allow the selection of more than one Audio Source
option at a time. If the system senses the selection of the current Audio
source option no change will take place.
The system support 10 different Audio sources; 6 Media sources and 4
Radio sources.
Media Sources
The system displays the 6 Media sources at the main Audio sources tab-bar.
USB
CD
Aux
Bluetooth
Rear Aux
Wi-Fi
Figure 16: Audio App Media Sources.
If media audio source are not available, the corresponding icons are
displayed in gray.
Page 11

Owner´s Manual DEA601 Radio
11 | P a g e
Media Audio Control Softkeys
The system present the next control softkeys as part of the Media sources
interface.
Play/Pause
Next
Previous
Repeat
Shuffle
Search
Views
The softkeys are placed at the bottom of the Audio App screen.
In the case the CD media, USB or the Bluetooth media source is selected,
the user interface is illustrated on the Figure 16.
The system senses a long press of the next softkey for 2 seconds in order to
activate the fast forward function. The system senses a long press of the
previous softkey for 2 seconds in order to activate the fast reverse function.
The system displays the track time bar located under the album artwork of
the file that is being played.
Figure 17: Track Time Bar
In the case the USB media source is active the system indicates the type of
audio file displayed.
The Audio file is identified by one of the following options.
Song
Album
Search
If the Search softkey is selected the search screen is displayed with the next
elements:
White Box
Keyboard
The Keyboard works as the user-system interface to acquire the
alpha/numeric search. The white box displays the acquired information. The
system continue playing audio while performing the search. The Figure 18
illustrates the search screen.
Page 12

Owner´s Manual DEA601 Radio
12 | P a g e
Figure 18: The Search screen
Views
The system displays the current playing view as default. The system
presents the next view options once the Views softkey is selected.
Artists
Albums
All Songs
Playlists
Figure 19: Views Soft key
For Apple devices the system supports the following additional views:
Genre
Composer
Audio Books
The Views options replace the Audio Source options in the Media interface.
The system displays the song name, artist name and the album image
artwork if available.
Artist
The system present the albums allocated by artists as illustrated in Figure
20
Figure 20: The Artist view
All the artists work as a softkey. Once an artist option is selected the system
present the media files related to the artists selected as illustrated on Figure
21.
Page 13

Owner´s Manual DEA601 Radio
13 | P a g e
Figure 21: The Artist Albums view
For Apple devices the artist view screen follows the distribution and styling
as the Figure 22 illustrates.
Figure 22: Apple Artist View.
Once an artist is selected the system displays the list of the contained
albums, as shown in the Figure 23.
Figure 23: Apple Artist Albums View.
Each item of the list presents the Artist name. The system displays up to 5
items per screen. In the case there are more than 5 songs, the remaining
songs are distributed in bottom subsequent screens. All items in the list work
as a soft key button selector.
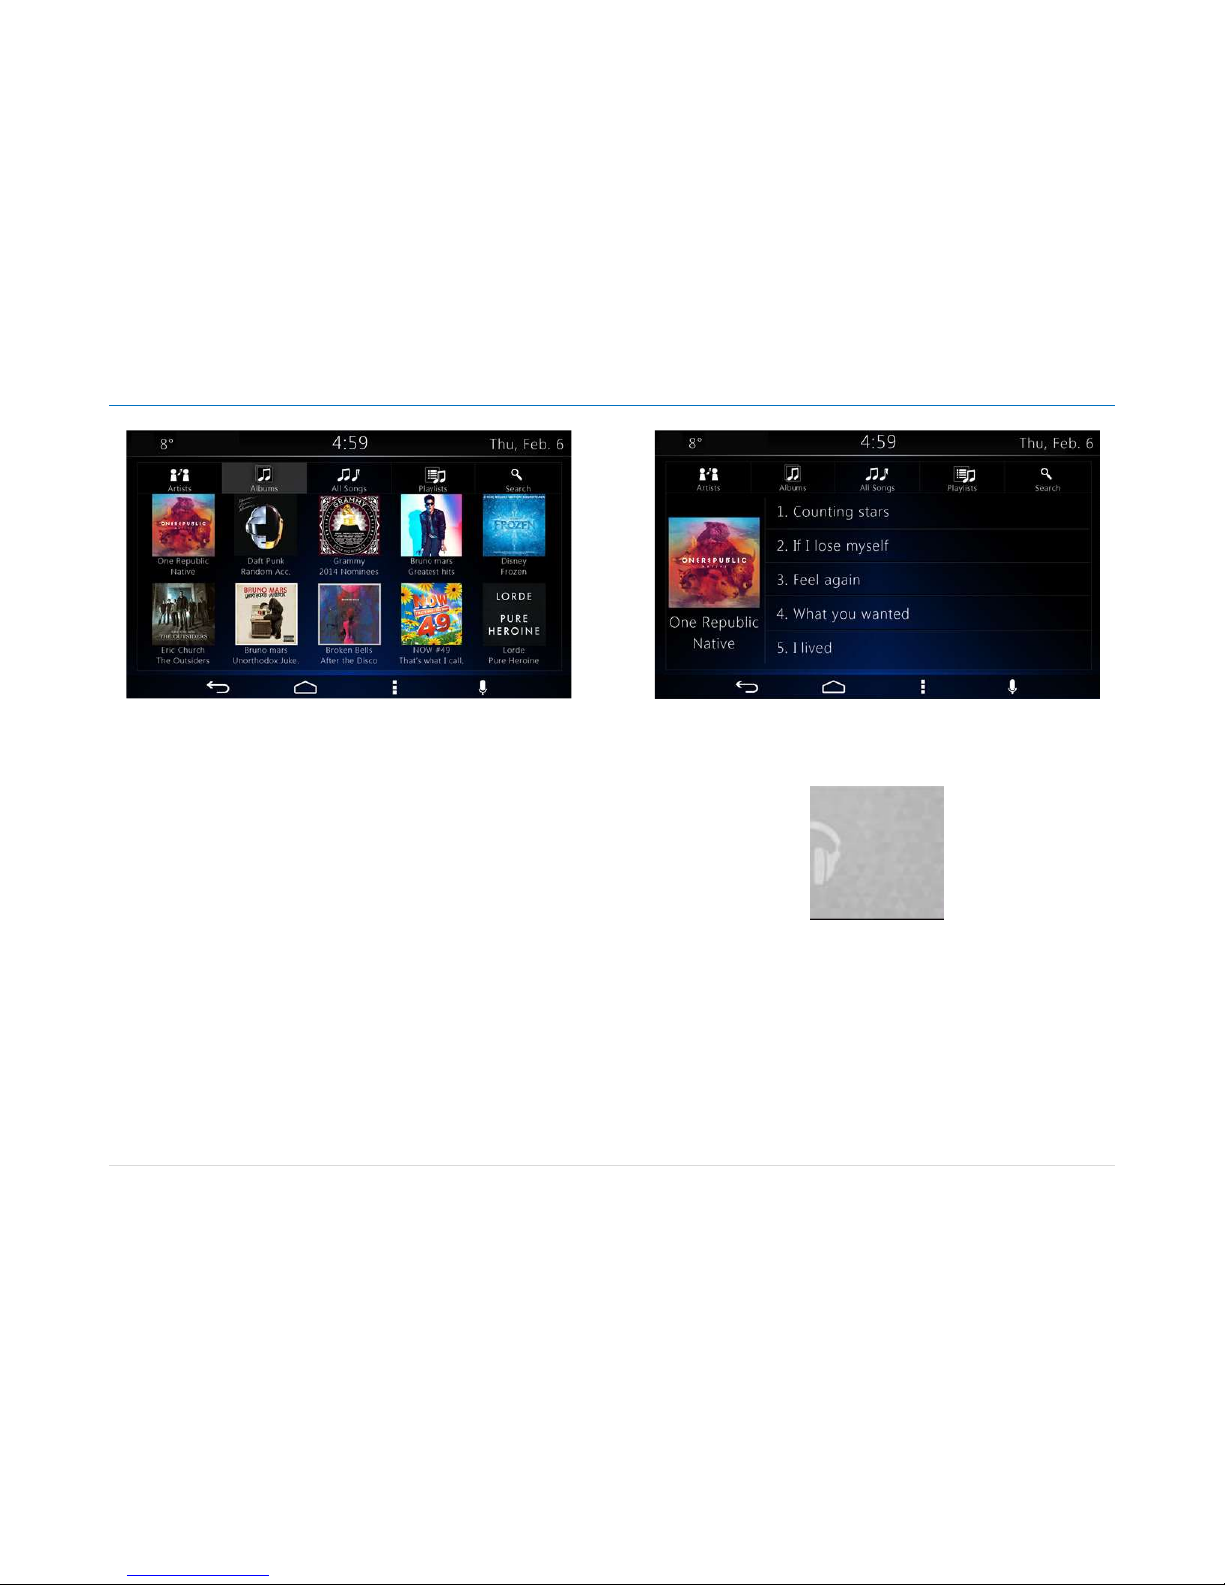
Albums
The albums view screen follows the distribution and styling as the Figure 24
illustrates.
Page 14
Owner´s Manual DEA601 Radio
14 | P a g e
Figure 24: The Albums view
The system display the albums contained in the media source selected. The
albums are displayed in a grid manner. Up to 10 album icons are displayed
per screen. In the case there are more than 10 albums, the remaining album
are distributed in a next to right subsequent screens.
Each album icon works as a softkey selector. The albums are distributed by
5 columns of two albums per screen. Each Album grid displays the Album
image (if available), Album name and Artist name.
If the Album name is not available the label "Unknown" as the album name
is displayed. If the Artist name is not available the label "Unknown" as the
artist name is displayed.
In the case the system detects the selection of one album the system
presents the songs contained in the album as Figure 25 illustrates.
Figure 25: The Songs contained in the selected album screen
In the case the album artwork is not available the system displays a
standard album icon as Figure 26 illustrates.
Figure 26: The Generic Album Artwork.
For Apple devices the album view screen follows the distribution and styling
as the Figure 23 illustrates.
Once an album is selected the system displays the list of the contained
songs.
Each item of the list shall present the Album name. The system displays up
to 5 items per screen. In the case there are more than 5 items the remaining
items are distributed in bottom subsequent screens.
All items in the list work as a soft key button selector.
Page 15

Owner´s Manual DEA601 Radio
15 | P a g e
All Songs
The all songs view screen follows the distribution and styling as the Figure
27 illustrates.
Figure 27: The all songs view.
Once the All Songs view is selected the system displays the list of the
contained songs. Each item of the list present the Song name and the Artist
name. The system displays up to 5 songs per screen. In the case there are
more than 5 songs, the remaining songs are distributed in bottom
subsequent screens.
All songs in the list work as a softkey button selector. Once a song is
selected, the system plays the selection.
Playlists
The system present the playlists contained in the connected device. The
system display the playlists distributed as albums.
The Views Button is not available for the next Media sources:
Aux
Rear Aux
Wi-Fi
CD
In the case the Rear Aux media source is selected, the user interface shall
follow the distribution and styling of the Figure 28.
Figure 28: The Rear Aux Media source screen.
In the case the Aux media source is selected, the user interface shall follow
the distribution and styling of the Figure 29.
Figure 29: The Aux Media source screen.
Page 16

Owner´s Manual DEA601 Radio
16 | P a g e
In the case the Wi-Fi media source is selected, the user interface shall follow
the distribution and styling of the Figure 30.
Figure 30: The Wi-Fi Media source screen.
USB
Playing from a USB
The USB port is in the front of the Radio.
Five volts DC power is limited to one amp from this port. Devices such as
iPad that require greater current will not charge from this port.
1. Connect the USB
2. The USB Source media is automatically selected and plays the
media content of the USB device if no other app of higher priority is
in use (I.E. phone call, video, reverse mute….).
3. To control and browse the selected media source refer to sections
Media Sources and Media Audio Control Softkey for further
information.
Drives
The USB MP3 players and USB drives connected must comply with the USB
Mass Storage specification:
MS-Dos partition only.
Class specification (USB MSC) and supports formats of FAT32,
FAT16, NTFS, and HFS+.
Hard disk drives may be played, but they are not supported.
The radio will not be able to play back write-protected music.
MTP players are not supported.
The following guidelines must be met when creating MP3 files; otherwise the
files might not play:
For MP3 Files
Bit rates: 32, 40, 48, 56, 64, 80, 96, 112, 124, 160, 192, 224, 256,
320 kbps for MPEG-1 Audio Layer 3.
Sampling frequencies: 32, 44.1 and 48 kHz for MPEG-1 Audio
Layer 3.
Maximum number of folders: Eight folders with 255 files per folder.
Maximum of 1,000 files on a disc.
M3u and pls playlist versions supported.
Recorded on a CD-R or CD-RW with a maximum capacity of 700
MB.
For Unprotected WMA Files
Versions: 1, 2, 7, 8, 9 and 9.1.
Bit rates: 32 - 320 kbps.
Sampling frequencies: 32 - 48 kHz.
Error Messages
If an “UNSUPPORTED” message is displayed, it could be for one of the
following reasons:
When a MTP Player or a USB device with unsupported format or
partition is connected.
When the device is damaged.
When the connected device was not connected as mass storage
device.
If “NO MUSIC” message is displayed, it could be because there are not MP3
or unprotected WMA files that can be played.
Page 17

Owner´s Manual DEA601 Radio
17 | P a g e
iPod
This Radio supports the following iPod models:
iPod classic
®
(6th generation)
iPod nano
®
( 6G)
iPod touch
®
(4G)
iPhone
®
(3G, 3GS, 4, and 4S)
Other iPods may be played, but functionality is not guaranteed.
Radio provides up to 1A of charge, so any device connected to the USB that
requires less than 1 A will be charged.
There may be problems with the operation and function in the following
situations:
When connecting an iPod on which a more recent version of the
firmware is installed than is supported by the Radio.
When connecting an iPod with firmware from other providers is
installed.
Playing from an iPod
To connect an iPod:
1. Connect one end of the standard iPod USB cable to the iPod's dock
connector.
2. Connect the other end to the USB port in the front of Radio.
3. Radio will start playing the USB and shows the track number, Song,
Artist, elapsed time, and Album information when available.
4. If the iPod is an unsupported model, it can still be listened to in the
vehicle by connecting to the auxiliary input jack using a standard
3.5 mm (1/8 in) stereo cable
5. To control and browse the selected media source refer to sections
Media Sources and Media Audio Control Softkey for further
information.
Expected behavior when iPod is connected:
The iPod battery recharges automatically while the vehicle is on.
The iPod shuts off and stops charging when the vehicle is shut off.
Error Messages
If an “UNSUPPORTED” message is displayed, it could be for one of the
following reasons:
When the iPod connected is not supported.
The iPod does not respond to the radio commands, in this case
reset the iPod and try again the connection.
If a “NO MUSIC” message is displayed, it could be for one of the following
reasons:
There are not any playable files in the iPod.
CD Player
The player can be used for CD and MP3 audio.
With the vehicle on, insert a disc into the slot, label side up. The player pulls
it in and begins playing.
The system is capable of playing:
Most audio CDs.
CD-R.
CD-RW.
MP3 or unprotected WMA formats.
When playing any compatible recordable disc, the sound quality can be
reduced due to disc quality, the method of recording, the quality of the music
that has been recorded, or the way the disc has been handled.
There can be increased skipping, difficulty in recording tracks, difficulty in
finding tracks, and/or difficulty in loading and ejecting.
If these problems occur, check the disc for damage or try a known good
disc.
To avoid damage to the CD player:
Do not use scratched or damaged discs.
Do not apply labels to discs. (The labels could get caught in the
player).
Insert only one disc at a time.
Keep the loading slot free of foreign materials, liquids, and debris.
Use a marking pen to label the top of the disc.
Page 18

Owner´s Manual DEA601 Radio
18 | P a g e
To load a disc:
1. Turn the vehicle on.
2. Insert a disc into the slot, label side up. The player pulls it in the
rest of the way. If the disc is damaged or improperly loaded, there
is an error on the screen and the disc ejects.
3. Press “Eject” to eject a disc from the CD player. If the disc is not
removed within a short period of time, it is automatically pulled back
into the player.
Playing an Audio CD
1. After the CD is inserted, the mode is changed to CD mode, unless
any mode with a higher priority is active (I.E. phone call, video,
reverse mute….).
2. To control and browse the selected media source refer to sections
Media Sources and Media Audio Control Softkey for further
information.
Error Messages
If “Disc Error” message is displayed and/or the disc comes out, it could be
for one of the following reasons:
The disc has an invalid or unknown format.
The disc is very hot. Try the disc again when the temperature
returns to normal.
The road is very rough. Try the disc again when the road is
smoother.
The disc is bent.
The disc is dirty, scratched, wet, or upside down.
The air is very humid. Try the disc again later.
There was a problem while burning the disc.
The label is caught in the CD player.
If the disc is not playing correctly, for any other reason, try a known
good CD.
If any error continues, contact your dealer.
For MP3 Files
Bit rates: 32, 40, 48, 56, 64, 80, 96, 112, 124, 160, 192, 224, 256,
320 kbps for MPEG-1 Audio Layer 3.
Sampling frequencies: 32, 44.1 and 48 kHz for MPEG-1 Audio
Layer 3.
Maximum number of folders: Eight folders with 255 files per folder.
Maximum of 1,000 files on a disc.
M3U and PLS playlist versions supported.
Recorded on a CD-R or CD-RW with a maximum capacity of 700
MB.
For Unprotected WMA Files
Versions: 1, 2, 7, 8, 9 and 9.1.
Bit rates: 32 - 320 kbps.
Sampling frequencies: 32 - 48 kHz.
Special Considerations
Root Directory:
The root directory is treated as a folder. All files contained directly under the
root directory are accessed prior to any root directory folders.
Empty Folders:
If a root directory or folder is empty or contains only folders, the player
advances to the next folder in the file structure that contains a compressed
audio file. The empty folder(s) are not displayed or numbered.
Front Auxiliary
Front auxiliary input is active when a jack connector is inserted.
After the connector is inserted, the mode is changed to Front Aux mode,
unless any mode with a higher priority is active (I.E. phone call, video,
reverse mute….).
This operation is not available while the system is in standby power mode.
In front auxiliary mode, you can play an external device such as an iPod
®
or
MP3 player via the auxiliary input jack on the front of the receiver.
To use an external device simply connect the device via the auxiliary input
jack.
Page 19

Owner´s Manual DEA601 Radio
19 | P a g e
Front auxiliary mode will not be available if no device is connected to the
auxiliary input jack on the front of the receiver.
Bluetooth Player
If your connected device supports this feature, it can be used as an audio
source input to the radio, allowing you to enjoy the music files stored on your
phone.
This feature is recommended to be used with the device default player.
Functionality cannot be warranted, when a third party player is used in the
connected device. The radio can be out of synchrony if the user alters or
command the player within the phone.
Playing Bluetooth Audio
1. Pair device to Smart display. Refer to Bluetooth Settings for further
information.
2. To control and browse the selected media source refer to sections
Media Sources and Media Audio Control Softkey for further information.
Notes:
Note 1: Repeat and random functions will only be shown if the cell phone
supports these feature.
Note 2: The contacts shown on the radio display will depend on the
information received by the radio from the phone device used.
Note 3: Functions may differ depending on the phone.
Please consult your cell phone user guide regarding how to enable it.
Note 4: Some phones will make the radio display BT AUDIO PAUSE while
audio is available. This is normal on phones that do not have full
compatibility with this radio Bluetooth remote control commands.
Note 5: Some devices will disconnect Bluetooth when a transfer is
performed.
Rear Auxiliary
The DEA601 is not safety product.
The cameras and the rear auxiliary inputs are provided for driver
conveniences only.
The purpose of this stereo input is to connect the audio output of an external
source or a sound channel from a safety system. When the source is an
external Navigation audio input the system detects activation of the
navigation system and the Rear Aux is set automatically, if no other source
with higher priority is active (I.E. phone call, video, reverse mute….).
During this Mode, the Radio streams the audio from the Navigation system
on the speakers (Stereo Signal). This operation is available under the next
conditions:
With Ignition ON and System ON: the radio shall change to REAR
AUX IN mode.
If the Navigation audio is deactivated, then the radio shall switch to the last
source (if available) if not, the radio shall return to the last tuner mode.
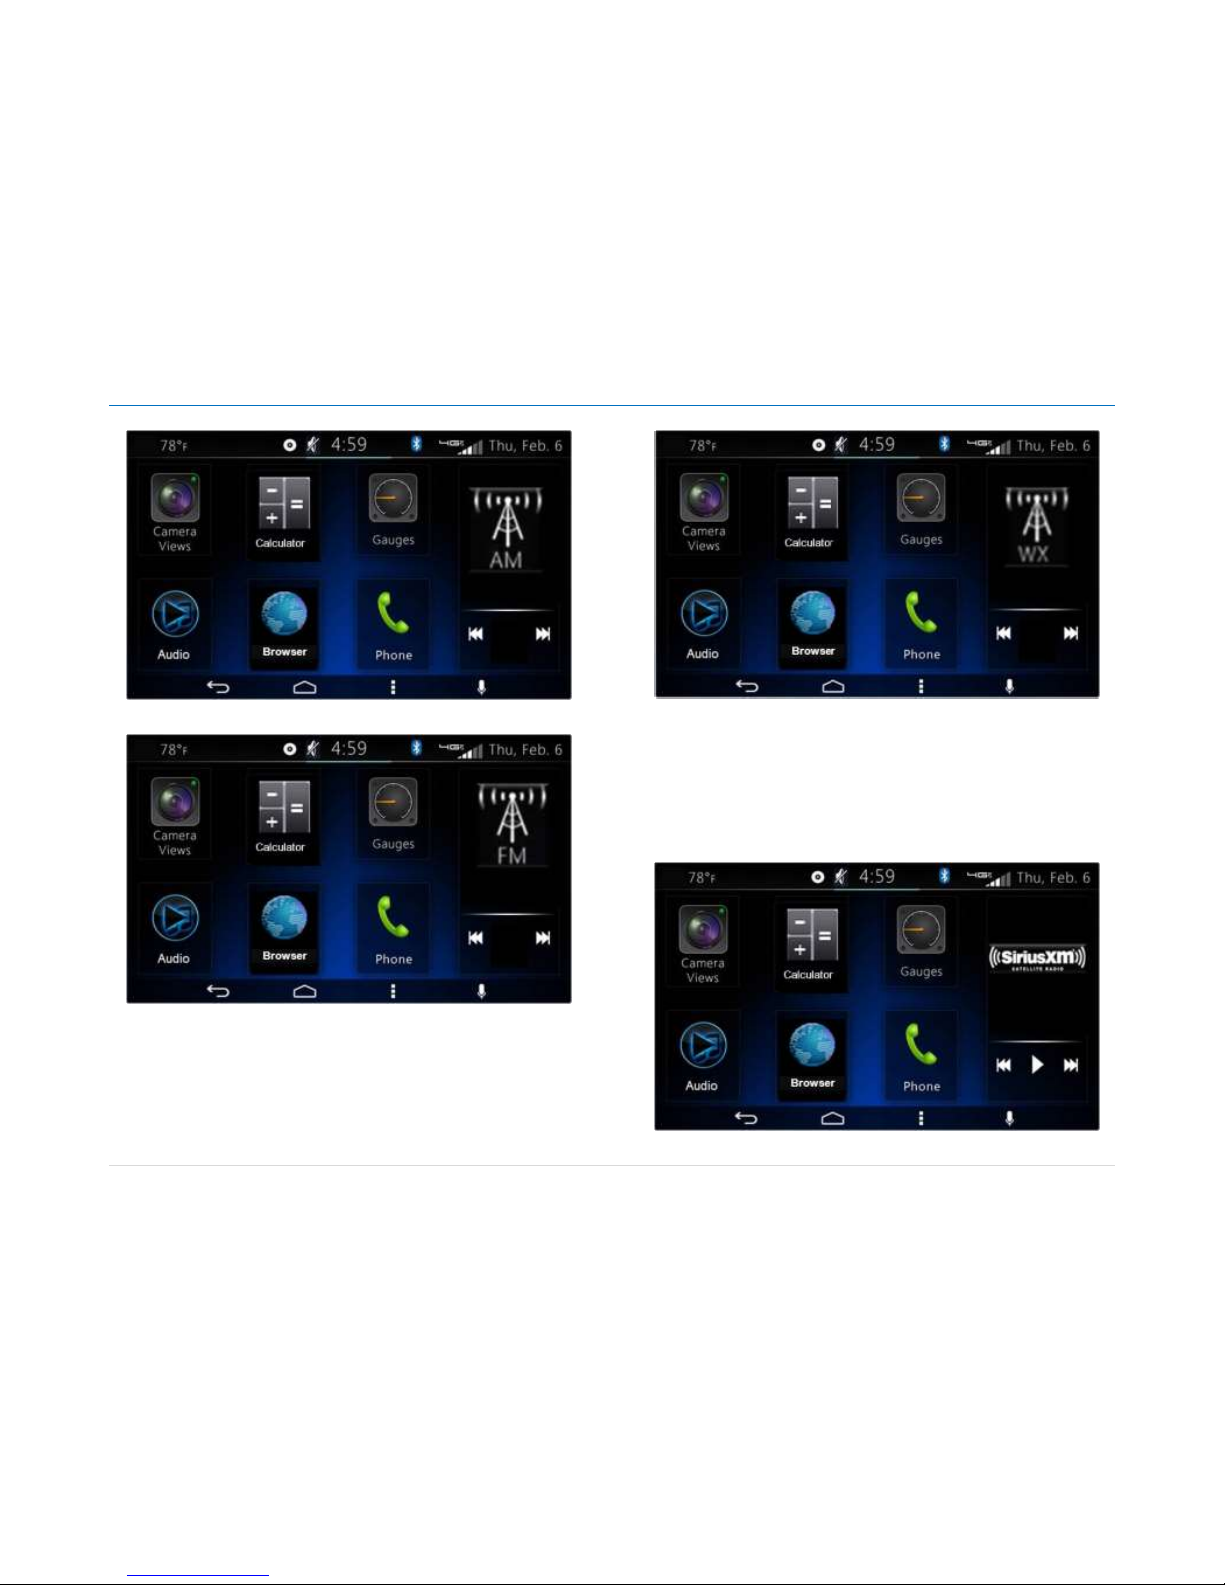
Radio Sources
The system displays the 4 Radio sources into the next to the right
subsequent tab-bar as illustrated on Figure 31.
AM
FM
Sirius XM
WX
Figure 31: Audio App Tuner Sources.
Page 20

Owner´s Manual DEA601 Radio
20 | P a g e
The system displays up to 12 presets memories in a tab divider manner at
the bottom of the screen interface. Each preset work as softkey button
selector. The presets that do not have a frequency assigned display only the
number of the grid.
In order to save a station in to a memory:
Tune the desired station.
Press and hold one of the 6 presets
When the selected station is displayed on the preset, the station
has been saved in the selected preset.
The system displays the current tuned frequency along with the
corresponding radio Band.
The systems display a specific screen interface for the Sirius XM source.
AM/FM
The system presents the next control softkeys as part of the AM/FM radio
source interface.
Next
Previous
Scan
Strong Station list
Update List
The AM/FM radio sources screens follow the distribution and styling as the
Figure 31 illustrates.
WX
The WX band is for the Governmental weather radio services frequencies;
the radio can tune 7 weather channels.
The system presents the next control softkeys as part of the WX radio
source interface.
Next
Previous
SCAN
The system presents 7 presets for this application. To save stations in to
preset follow the AM-FM instructions.
The WX radio source screen is illustrated in Figure 32.
Figure 32: The WX radio source screen.
Sirius XM
In the case the Sirius XM source is selected the system displays the current
tuned channel number and name.
The system present the next control softkeys as part of the Sirius XM
interface.
1. Category Browse control / Indicator
2. Scan Live
3. Direct Tuning
4. Buffer Indicator Bar
5. Replay Control
6. Jump to Live Control
7. Tune Scan Control
Page 21

Owner´s Manual DEA601 Radio
21 | P a g e
8. Channel Browsing
9. Presets (Smart Favorites)
The Sirius XM user interface screen is illustrated in Figure 33.
Figure 33: The Sirius XM user interface screen.
The channel number in the screen works as a softkey.
In the case the channel art is not available it’s replaced by the Sirius XM
logo.
The system activate the Scan function in the case the Scan option is
selected.
The system displays up to 18 presets memories in a tab divider manner at
the bottom of the screen interface. To save stations in to preset follow the
AM-FM instructions.
The system display a pop-up sub menu in the case the Menu button is
selected while in this screen.
The pop-up sub menu presents the next options as Figure 34 illustrates.
Audio Settings
Sirius XM settings
Figure 34: The pop-up sub menu screen.
Each of the options in the pop-up submenu works as a softkey.
The system open the Audio settings in a separate screen in the case this
option is selected.
In the case the Sirius XM settings are selected, the system displays the next
configurable options in a separate screen. Figure 35 & Figure 36 as
reference.
Preset View
Category Browser
Category list
Channel browser Auto select
Auto select timer
CHANNEL NAME
CATEGORY NAME
ARTIST NAME / CONTENT INFO
SONG NAME
CAT
Page 22

Owner´s Manual DEA601 Radio
22 | P a g e
Tune start
Reset Default
Figure 35: The Sirius XM Settings screen part I.
Figure 36: The Sirius XM Settings screen part II.
In the case the Category List option is selected, a separate screen opens
listing all the available categories. Figure 37 as reference.
Figure 37: The Category list screen.
The listed elements work as a soft key.
In the case the channel list option is selected, a separate screen open listing
all the available channels is presented. Figure 38 as reference.
Channel Browser
Auto Select
Auto Select Timer
1 Sec
3 Sec
Tune Start
Page 23

Owner´s Manual DEA601 Radio
23 | P a g e
Figure 38: The Channel list screen.
The listed elements work as a soft key.
Each of the options in the separate screen works as a softkey.
In the case the “Direct tuning” softkey is selected, a numeric keypad is
displayed as Figure 39 illustrates.
Figure 39: The search virtual button screen
Audio Widget
The Audio widget is displayed at the right of the home screen.
The Audio widget is displayed in case the system is playing Audio at the
Audio application and either the Back button of the Home button is pressed.
The Audio widget displays the Media and Radio source in case any is active.
Media source
The Audio widget presents the available song info such as the artist name,
album name, and song name. The widget support the following configuration
based on the Media sources selected.
USB
Bluetooth
AUX
Rear Aux
Wi-Fi
CD
The Audio widget present the next audio controls for the USB & Bluetooth
configurations. Figure 40 as reference.
Previous
Play/Pause
Next
CHANNEL NAME
CATEGORY NAME
ARTIST NAME / CONTENT INFO
SONG NAME
CAT
Page 24

Owner´s Manual DEA601 Radio
24 | P a g e
Figure 40 The Audio widget with available art work screen for USB & Bluetooth.
The Audio widget displays the art work corresponding to the playing song if
available. The Audio widget shall display a generic art work in case there is
no artwork for the playing song, Figure 41 as reference.
Figure 41: The Audio widget with no available art work screen for USB &
Bluetooth.
The Audio widget present the next audio controls for the CD configuration.
Figure 42 as reference.
Previous
Play/Pause
Next
Figure 42: The Audio widget for the CD configuration screen.
The Audio widget does not present audio controls for the AUX, Rear AUX &
Wi-Fi configuration. Figure 43, Figure 44 & Figure 45 as reference.
The note "Now Playing" shall be displayed only in case an audio file is
playing.
Page 25

Owner´s Manual DEA601 Radio
25 | P a g e
Figure 43: The Audio widget for the AUX configuration screen.
Figure 44: The Audio widget for the rear AUX configuration screen.
Figure 45: The Audio widget for the Wi-Fi configuration screen.
Radio source
The Audio widget shall display the next audio controls for the Radio source
configuration.
Previous
Next
The Audio widget shall present the Radio band selected and the frequency
tuned. Illustrated in Figure 46, Figure 47 & Figure 48.
Page 26
Owner´s Manual DEA601 Radio
26 | P a g e
Figure 46: The Audio widget for the radio band AM screen.
Figure 47: The Audio widget for the radio band FM screen.
Figure 48: The Audio widget for the Weather channel screen.
The Audio widget shall present the next audio controls for the SXM
configurations. Illustrated in Figure 49.
Previous
Play/Pause
Next
Figure 49: The Audio widget for the SiriusXM configuration screen.
Page 27

Owner´s Manual DEA601 Radio
27 | P a g e
Phone
Once your device is properly paired (see Settings / Bluetooth section),
DEA601 System supports Hands Free features if the connected device has
that capability.
Open the Phone App located on the home screen of the Smart Display as
illustrated on Figure 50. The system displays the Phone screen interface.
Figure 50: Select Phone App in Home Screen.
The Phone screen interface presents the next elements:
Numeric Keyboard
Call Button
Search Button
Contacts Button
Recent Calls Button
Favorites
SMS
The Phone screen interface is illustrated on Figure 51.
Figure 51: The Phone screen interface.
The system captures the number to dial from the displayed numeric
keyboard. In the case the system detects the activations of the call button
the system start with the dial process.
Contacts
The contacts options are open as default option. The system displays up to
4 items per screen. In the case there are more than 4 items, the remaining
items are distributed in bottom subsequent screens. Figure 51 as reference.
A loading image is displayed during the contact list synchronization. Figure
52 as reference.
Each item in the list works as a softkey.
Page 28

Owner´s Manual DEA601 Radio
28 | P a g e
Figure 52: The contact list synchronization screen.
In the case a failure is present during the contact synchronization a pop-up
message is displayed stating "No contact list loaded". Figure 53 as
reference.
Figure 53: The no contact list loaded screen.
The system activates the search function in case one of the next options is
selected.
Magnifying Glass icon
White box
In the case the search function is activated, the system displays a keyboard.
Figure 54 as reference.
Figure 54: The search contact screen.
The system is able to capture the information introduced. The system
performs a contact search based on the captured information. In the case a
contact is selected, the system displays the contact information screen.
Contact Information
The contact information displays the next information if available. Figure 55
as reference.
Contact photo
Contact Name
Company
Phone 1
Phone 2
Page 29

Owner´s Manual DEA601 Radio
29 | P a g e
E-mail
Address
If the contact photo is not available a generic contact image is displayed.
The Phone 1 and Phone 2 items work as a softkey. Figure 55 as reference.
Figure 55: The Contact information screen.
Favorites
In the case the favorites option is selected, the 8 favorite contacts are
displayed as Figure 56 illustrates.
Figure 56 The 8 favorites contacts screen.
Each of the favorite contacts works as a soft key. In the case a contact is
selected, the contact information of the corresponding contact is open.
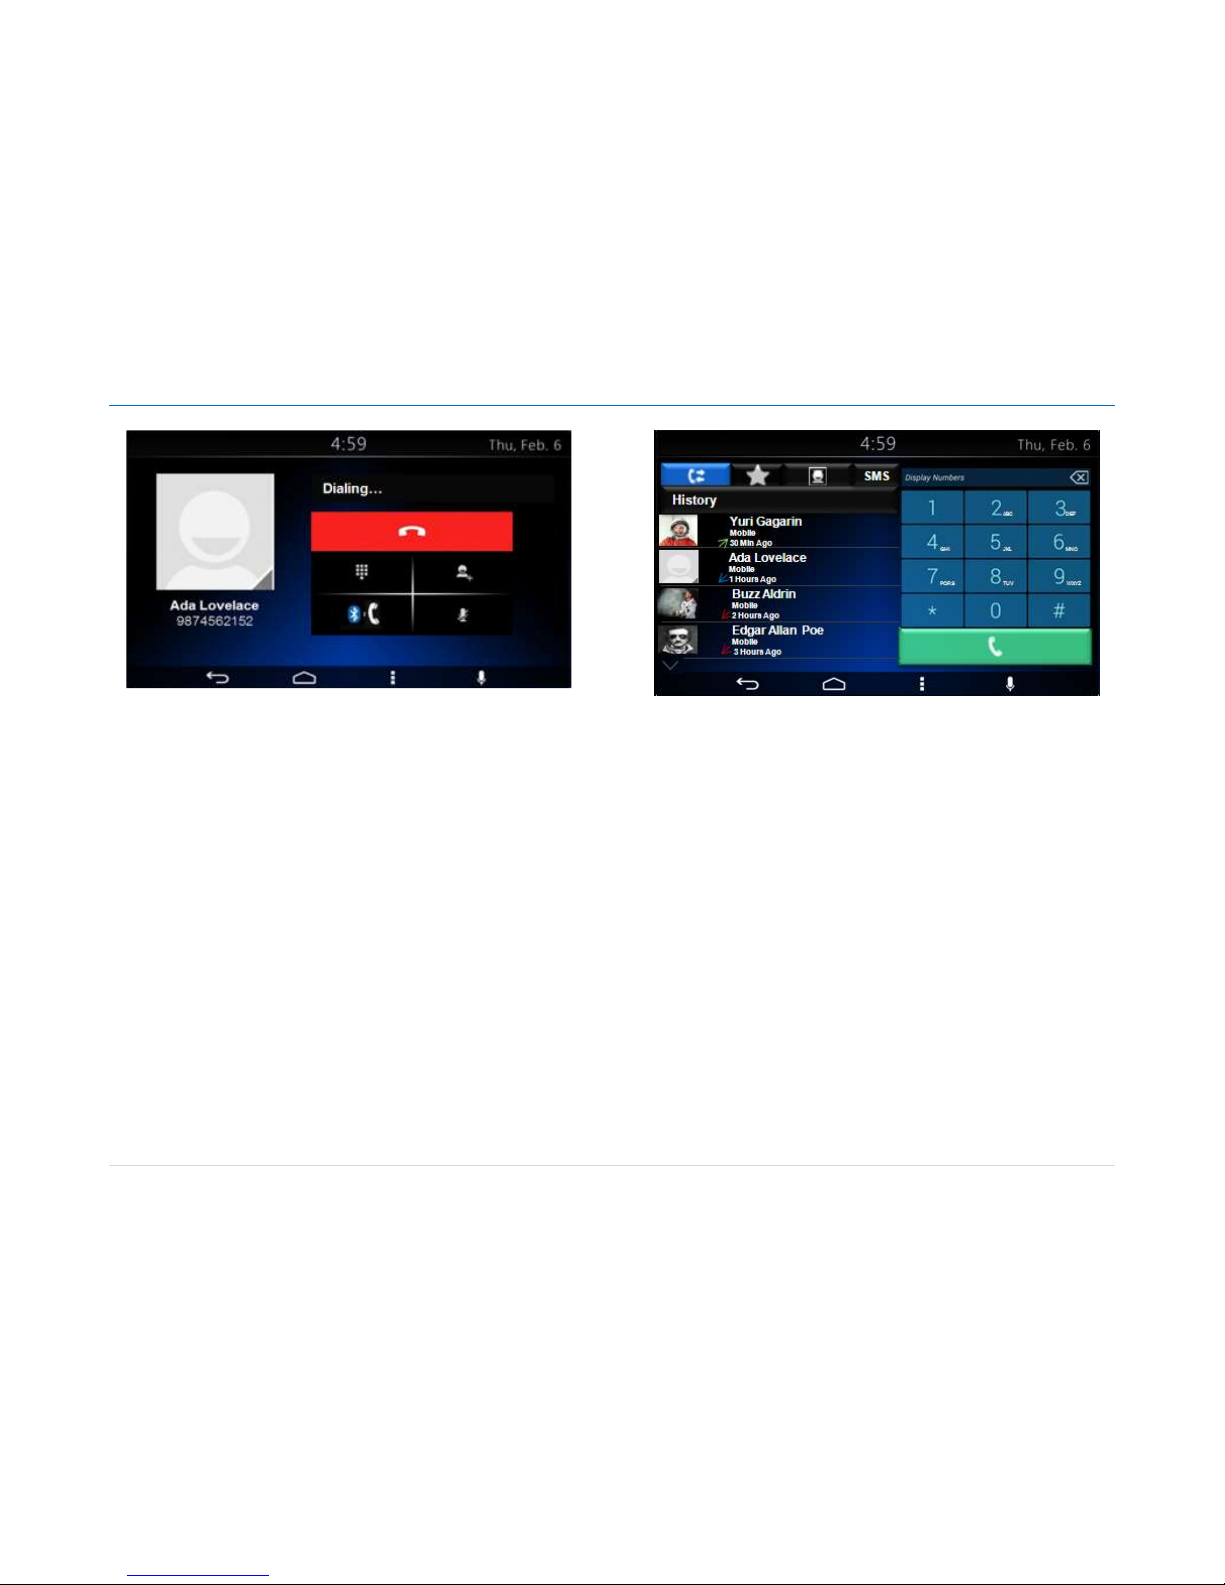
Making a Call
You can call a contact directly from the previously stored contact information
if the item Phone 1 or Phone 2 is selected; the system uses the information
there to start the dialing process.
You can also dial a new number directly on the dial pad and tap the green
phone soft key; the system uses the information there to start the dialing
process. The Figure 57 illustrates the dialing process
You can also start the call form a connected device.
Page 30
Owner´s Manual DEA601 Radio
30 | P a g e
Figure 57: The dialing process screen.
Recent calls
In the case the recent calls option is selected, the system displays the
history of the calls. The system displays up to 4 items per screen. Each
listed item presents the following information. Figure 58 as reference.
Contact name
Contact photo if available
Event indicator; Receive call, Made call or Missed Call
Time of when the event was performed indicator.
Figure 58 The history of calls screen.
The Receive call indicator is represented with a Blue arrow.
The Made call indicator is represented with a Green arrow.
The Missed call indicator is represented with a Red arrow.
Each contact listed work as a softkey.
In the case a contact is selected, the contact information of the
corresponding contact is open. Figure 55 as reference.
Incoming Call
The "incoming call screen" is displayed in case the system detects an
incoming call.
The incoming call displays the next information and softkey selector. Figure
59 as reference
Contact photo (if available)
Contact name
Contact number
The "incoming call" label
Accept call softkey selector
Reject call softkey selector
Page 31

Owner´s Manual DEA601 Radio
31 | P a g e
Figure 59: The incoming call screen.
In the case the system detect the selection of the Reject softkey the system
cancel the incoming call.
In the case the system detects the selection of the Accept softkey the
system allow the incoming call. Audio is distributed through Radio to Vehicle
speakers.
In the case the system detects the selection of the Accept softkey the
system display the current call screen presenting the next information and
softkey selectors.
Contact photo (if available)
Contact name
Contact number
Hang On softkey selector
Mute softkey selector
Keyboard activation softkey selector
Second call
Transfer call
The current call screen is displayed Figure 60 as reference.
Figure 60: The current call screen.
In the case the system detects the selection of the Hang On softkey the
system terminate the call.
If the Mute softkey is selected, the system disables the microphones.
If the system detects the selection of the Keyboard activation softkey; a pop-
up numeric keyboard is displayed. Figure 61 as a reference.
Figure 61: The pop-up numeric keyboard screen.
Page 32

Owner´s Manual DEA601 Radio
32 | P a g e
If the system detects the selection of the second call soft key the current call
is place on hold allowing dial to another number.
When the second call is activated, a numeric keyboard shall be displayed.
The system is able to capture the information introduced. The system uses
the capture information to perform a second call.
In the case the system detects the selection of the transfer call softkey, the
system transfer the current call to the Phone.
SMS
If the SMS option is selected, the system displays the received text
messages in a list manner. Figure 62 as reference.
Figure 62 The received text messages screen.
Each item in the list presents the next information.
Contact name
Contact photo if available
Message
Up to 3 messages are displayed at a time. If there are more than 3
messages, the remaining messages are placed in consequent screens.
The system provides the following options upon message notification shown
on the screen Read / Ignore
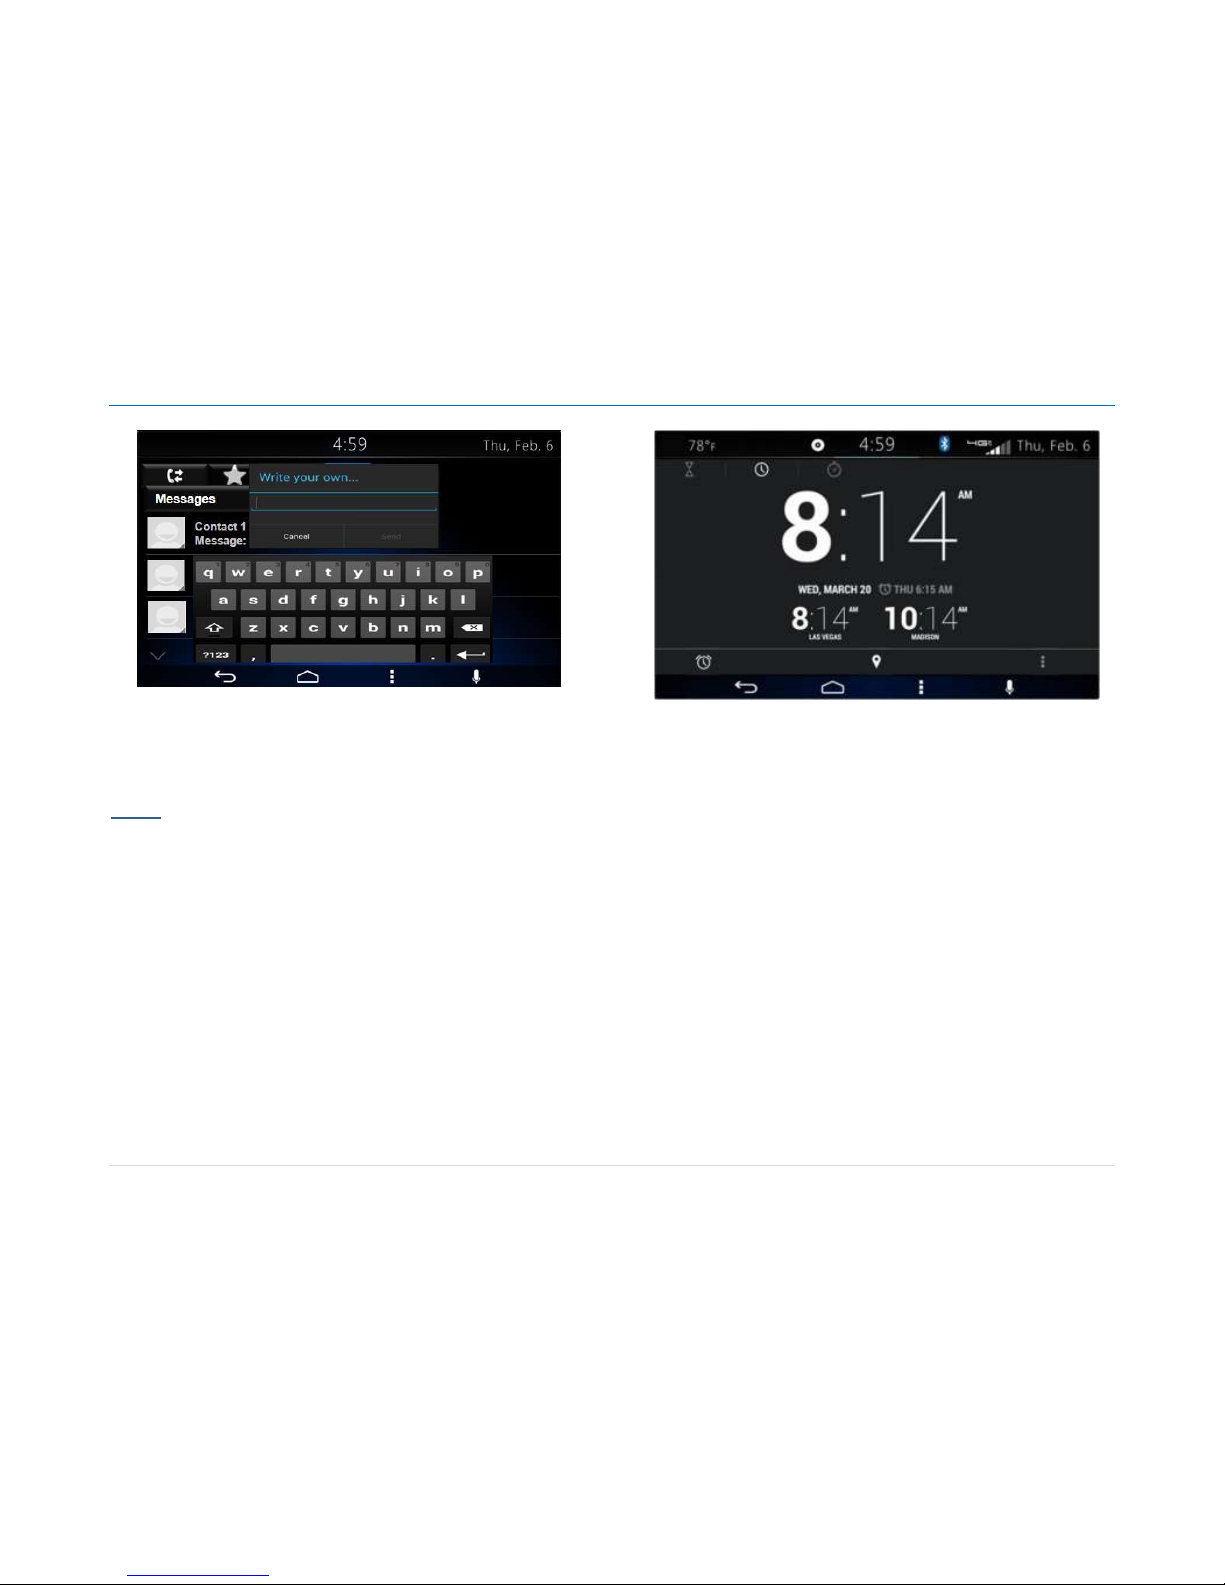
The SMS message information is displayed and provides a predefined
message list to replay with, as follows. See Figure 63:
1. Can´t talk now I can't answer right now. What’s up?
2. I´ll call you right back.
3. I’ll call you later.
4. Can´t talk now. Call me later?
5. Write your own...
Figure 63 Predefined message list
The system sends the selected message or opens the message editor or
application for the user to write the desired text. See Figure 64.
Page 33
Owner´s Manual DEA601 Radio
33 | P a g e
Figure 64 Message editor
While the vehicle is in motion (parking brake is not set or vehicle speed is
more than 5 km/h), the Personalize option is disabled.
Apps
Only authorized Applications can be installed on the system. Contact
your dealer for further information.
Clock
The Clock App presents the following screen. Figure 65 as reference.
Figure 65: Clock screen
In the case the alarm icon is selected, the system presents the following
Screen. Figure 66 as reference. Following options are presented.
Alarm list
Alarm On/Off control
Alarm sound settings
New alarm
Page 34

Owner´s Manual DEA601 Radio
34 | P a g e
Figure 66 Alarm list
Each item of the alarm list works as a softkey. Each item in the list can be
activated or deactivated with the ON/OFF select softkey.
If the + icon a new alarm is added to the list and a numeric pop-up pad is
presented. The time set on the numeric pop-up pad is used to set the alarm
once the OK softkey is selected. Figure 67 as reference.
Figure 67 Alarm setup pop-up
If click on the chevron icon the alarm audio settings are presented with the
following options Figure 68 as reference.
Tone
Volume
Repeat
Figure 68 Alarm audio settings
The Tone item work as a softkey. If selected a pop-up menu is presented
with the following source options for the alarm mode. Figure 69
Tone
FM
AM
SXM
USB
Page 35

Owner´s Manual DEA601 Radio
35 | P a g e
Figure 69 Alarm Source Selection
The repeat options allow the user to set the days of the week that the alarm
will be activated.
Once the alarm is set, the alarm indicator icon is displayed in the top bar of
the home screen. Figure 70 as reference.
Figure 70: The alarm indicator icon
Once the Alarm is activated a screen with the option to Cancel or Snooze
the alarm is presented See Figure 71.
Figure 71 Snooze / CAncel Alarm screen
Camera Views
The DEA601 is not a safety product.
The cameras and the rear auxiliary inputs are provided for driver
conveniences only.
Open the Camera Views App located on the home screen of the Smart
Display as illustrated on Figure 72. The system displays the Camera Views
screen interface.
Page 36

Owner´s Manual DEA601 Radio
36 | P a g e
Figure 72: Open Camera Views App.
Application Interface
The Camera Views App present the view of the 4 cameras installed on the
vehicle one at a time, each of the camera views option work as a softkey.
The system display the camera view corresponding to the soft key selected.
The system present the Reverse view as default once the application is
open.
The application presents the next activation softkeys relative to each of the
available views. Figure 73 as reference.
Reverse View
Forward View
Right View
Left View
Figure 73: Camera view reference.
This feature may not be available in all vehicles.
The mentioned activation softkeys is presented as part of the standard view
of the activation. The user is able to establish the view as full screen mode
and to return to the standard view mode.
The application indicates the current activated view. The forward camera
image is mirrored (left to right) to provide a correct image.
Automatic Cameras View
The next camera view is activated automatically under certain scenarios:
Reverse View
Right View
Left View
The system activates the Reverse View in case the vehicle is put in reverse
(if the automatic view function is activated).
The system activates the Right View in case the right turning signal is
activated (if the automatic view function is activated).
Page 37

Owner´s Manual DEA601 Radio
37 | P a g e
The system activates the Left view in case the left turning signal is activated
(if the automatic view function is activated).
The system informs the user which camera view is activated. The forward
camera view can only be activated manually.
The system provides the Automatic Camera View activation/deactivation
configurable options and Camera App Settings by pressing the Menu button
on the navigation bar.
Details for the Camera Application Settings are described under the
Settings section of this document.
Gauges
This feature may not be available in all vehicles.
Open the Gauges App located on the home screen of the Smart Display as
illustrated on Figure 74. The system displays the Gauges screen interface.
Figure 74: Open Gauges App.
The Gauges app can handle up to 30 gauges distributed in 5 screens as
Figure 75 represents.
Figure 75 Virtual Gauges Application Layout
Gauges are updated with information collected form vehicle digital buses.
The Virtual Gauges app show the last selected page each time that the
application is opened.
The default page (page 1) displayed in the Virtual Gauges app is displayed
in the following cases:
The first time the Virtual Gauges app is opened after an IGN or
BATT cycle
When the last selected page is not available
When the last selected page does not contain any gauge
Gauges
% Torque Gauge
Gauge display actual engine torque as a percentage of the maximum torque.
The range of the gauge is 0-100%.
+5° over scale shall be the maximum needle position
No warning states.
Oil Temp Gauge
The range of the gauge is from 100-300 °F and 50-150 °C.
Page 38

Owner´s Manual DEA601 Radio
38 | P a g e
The warning inputs are:
Engine Oil Overtemp (primary warning)
Stop Engine (secondary warning)
Warning logic has hysteresis built in to prevent rapid, intermittent
activation of this warning. When the message for Oil Temp warning
is no longer present then the warning condition becomes inactive.
English and SI gauges are available.
If "NA" message is transmitted the gauge face be removed leaving only a
black background.
Transmission Oil Temp Gauge
The gauge display transmission oil temp as measured at input.
The range is from 150-300 °F and 70-150 °C.
+5° over scale is the maximum needle position.
If "NA" message is transmitted the gauge face be removed leaving
only a black background.
No warning states.
DPF Status Gauge
The range is from clean to full.
Turbo Boost Gauge
Gauge display the turbo boost pressure.
The range of the gauge is form 0-80 PSI and 0-5.5 BAR.
+5° over scale is the maximum needle position.
No warning states.
English and SI gauges are available.
Fuel Economy Gauge
Digital part of the gauge display calculated average fuel economy from
CECU.
Analog part of the gauge displays the instantaneous fuel economy relative to
the average fuel economy.
The symbol “-”represent a 0 MPG (or 0 L/100km).
The symbol “+”represent 2x the average fuel economy.
In case of missing data or error message the needle is positioned vertically
and the digital part of the gauge display "0.0".
Gauge States
Each gauge is capable of 3 different states (when available):
1. Regular State
This state include Metric and English rates
Figure 76 Regular KW Oil Temp Gauge state Art Work (°F)
2. Warning States
In this state the Gauges Turn Red
o If Gauge reaches out of range condition, the virtual gauge
Pop-Up larger on the screen. Pop-up may return to its
original state per user interaction.
Page 39

Owner´s Manual DEA601 Radio
39 | P a g e
Figure 77 Warning KW Oil Temp Gauge state Art Work
3. Error States (Needle Deflection)
o If Data is not available, the gauge pointer shall
automatically be positioned in - 15° from the Null position
and stay in that position until data is available.
o If the gauge is under scaled, the gauge pointer
automatically be positioned in - 5° from the Null position
and stay in that position until data is rescaled.
o If the gauge is over scaled, the gauge pointer
automatically be positioned in + 5° from the Null position
and stay in that position until data is rescaled.
Virtual Gauges Pop-Up
All the Virtual Gauges function as softkeys, each Virtual Gauge softkey
toggle to a full screen zoom of the gauge when the user presses the Virtual
Gauge softkey.
While the Virtual Gauge is toggled to full screen zoom, a press of the screen
returns the gauge to its original size.
If the user presses the screen while the Virtual gauge is in process to toggle
in a full screen zoom, Virtual Gauges app cancel the full screen zoom toggle.
Gauges are automatically toggled to full screen zoom when a Warning State
is present.
If a Virtual Gauge has been toggled to full screen due to a warning condition
and another Virtual Gauge presents a warning condition, the first Virtual
Gauge in a warning state will be displayed for at least 3 seconds. After 3
seconds, the Virtual Gauge in a full screen state due to a warning state
return to a normal state allowing the second Virtual Gauge in a warning to
state to toggle to full screen.
All the Virtual Gauges minimized after being in full screen due to a warning
state remain in the warning state in their original size while the warning
condition of the gauge persists.
Gauges Settings
Pressing the soft key or hard key the Virtual Gauges app presents a popup menu with the following elements. Figure 78 as reference.
Preset 1 - Soft key
Preset 2 - Soft key
Edit Presets
Load Updates
Factory Reset
Presets
Presets are used to define personalized views of the gauges. Two presets
are available to save different combinations of the available gauges.
Page 40

Owner´s Manual DEA601 Radio
40 | P a g e
Figure 78 Gauges Settings Pop-up
Pressing the "Edit Presets" option from the settings pop-up allows the edition
of the Presets. Once the desire modifications are done, select the OK
Softkey to save changes or CANCEL softkey to discard changes. Figure 79
as reference.
Figure 79 Gauges Edit Preset Screen
Preset selection pop-up menu is displayed in order to specify which preset
memory should save the new layout. Figure 80 as reference.
Figure 80 Gauges Save Configuration Pop-up
The General Settings screen show and use the page numbers in their 3
states (Selected, Active and Disabled) as defined for the app.
The default page selected when accessing the General Settings in the
Virtual Gauges app is the page 1. The General Settings screen from the
Virtual Gauges app show the active virtual gauges.
The Default Virtual Gauges priorities and the User defined Virtual Gauges
priorities are saved on the memory
Preset Updates
The Presets soft keys indicate the Preset selected. The preset selected is
the target to be updated. Figure 81 as reference,
Page 41

Owner´s Manual DEA601 Radio
41 | P a g e
Figure 81 Gauges Load Configurations Pop-up
The default preset established is the one selected when the General settings
screen is opened.
The Virtual Gauges app allows the selection of one of the Presets at any
time by pressing the soft key.
If a Preset is selected while the other preset was active, the Virtual Gauges
app save the changes in the Preset previously active and then switch to the
selected Preset, updating the position of the active gauges according with
the priority level in stored the Preset.
During the saving of a preset or a restoration of the default presets the
Virtual Gauges app show a pop-up with the label "Processing..." while the
operation is performed.
The Virtual Gauges app update the priority level of the virtual gauges as they
are reorganized by the user, changing the priority level of the selected gauge
for the priority of the gauge in the target position selected by the user. This
will allow the Virtual Gauges app to keep the Virtual Gauges positions as
defined by the user without fixing the gauge position to a slot.
All the updates in the virtual gauges priority level are saved in the preset
selected as User Defined Virtual Gauges priorities.
The User Defined Virtual Gauges Priorities does not modify the Default
Virtual Gauges Priorities.
Gauge Population
Automatic arrangement is used to identify available gauges.
The population of the gauges for the Automatic arrangement is depending
on the priority preset selected.
The priority preset is configurable through the Settings menu of the Virtual
gauges app.
Automatic Population
The Virtual Gauges are populated by adding gauges if the relative vehicle
information is available. The Virtual Gauges app adds available gauges
following the priority established.
The actual Virtual Gauges page from the Virtual Gauges app page is
highlighted, allowing the user to differentiate it from the disabled pages and
from the active pages that are not selected as the actual page.
The Standard Priority list of gauges have a higher priority than the Optional
Gauges, even if a given gauge from the Optional gauges shares a priority
level with a gauge from the Standard Priority gauges.
If not Available information for a specific Gauge is received from the vehicle
information bus is received the related Gauge is hidden. Some virtual
gauges show a specific icon in the case of a not available gauge.
The Virtual Gauges app pages for gauges population are disabled if there
are no gauges in the page. The disabled Virtual Gauges app pages are
displayed in an opaque manner.
The active Virtual Gauges app pages are displayed in clear way which
allows the user to differentiate between the actual page and disabled pages.
As the optional virtual gauges become available, they starts to be
accommodated from the last active gauge displayed filling the available slots
in all the pages in an incremental order and following the preset priority.
Page 42

Owner´s Manual DEA601 Radio
42 | P a g e
The Virtual Gauges app does not allow the user to select the disabled gauge
pages until they become available.
Each time a Virtual Gauges app page is filled with gauges, the Virtual
Gauges app activate the subsequent page, in an incremental order, to
continue placing the active virtual gauges.
Priority presets
Priority Preset 1
Gauge
Priority
Engine Oil Temperature
Page One
Main Trans Oil Temperature
Page One
Manifold Pressure (Boost)
Page One
DPF Status
Page One
Fuel Economy
Page One
Percent Torque
Page One
Percent Horsepower
NA
Idle Time
NA
Idle Fuel
NA
Fuel Usage Rate
NA
Drive Axle #1 (front) Oil Temperature
2
Drive Axle #2 (rear) Oil Temperature
3
Drive Axle #3 (center) Oil Temperature
4
Air Filter Restriction Pressure
6
Fuel Filter Restriction/Fuel Pressure Gauge
7
Ammeter
1
Air Suspension Pressure 1
5
Tractor Brake Application
N/A – In Cluster
Pusher Axle #1 Pressure
8
PTO Hour Meter
9
Priority Preset 2
Gauge
Priority
Engine Oil Temperature
Page One
Main Trans Oil Temperature
Page One
Manifold Pressure (Boost)
Page One
DPF Status
Page One
Fuel Economy
Page One
Percent Torque
Page One
Percent Horsepower
N/A
Idle Time
N/A
Idle Fuel
N/A
Preset Gauges Interaction
The active gauges in the General Settings screen of the Virtual Gauges app
are able to move their positions by selecting a gauge and dragging it to a
new desired position.
When selecting a gauge and dragging it to a new position in the General
settings screen of the Virtual Gauges app, as the gauge moves it snap to the
closest gauge slot, even if the slot is occupied with other gauge, to show the
user there the new position of the gauge will be when the user deselect the
gauge.
While a gauge is being moved and starts snapping in other gauge slots in
the General Settings screen of the Virtual Gauges app, the non-moving
gauges re-position to give space to the dragged gauge.
The re-positioning of the non-selected gauges from the General Settings
screen of the Virtual Gauges app shall be according the following rules:
Gauges in the preceding slots will shift back one position until the
position where the selected gauge was originally is reached.
Gauges in slots after where the selected gauge snaps will remain
unaffected.
Once the user stops pressing the screen, all the gauges moved and the
gauge selected keep their new positions.
Only one gauge can be moved at a time to re-positioned in the General
Settings screen of the Virtual Gauges app.
While moving a gauge of position in the General Settings screen of the
Virtual Gauges app, if the user moves the gauge to one of the sides of the
screen, the Virtual gauges app switch to the next/previous page, depending
on the side. In this case, right side is related with the next page and the left
side is related with the previous page.
Page 43

Owner´s Manual DEA601 Radio
43 | P a g e
The page movement when a gauge is moved to one of the sides of the
screen in the General Settings screen in the Virtual Gauges app while the
gauge is being moved of position has the following restrictions:
The page switching shall be restricted to the active pages
If the gauge is moved to the left side of the screen while in the first
page no action shall be performed
If the gauge is moved to the right side of the screen while in the last
active page no action is performed
Reset to Default Screen
If the Reset to Default Soft key from the General Settings of the Virtual
Gauges app is depressed, the Virtual Gauges app shall restore the gauge
priority list to the Default Virtual Gauges priorities, updating also the position
of the gauges in the Settings Screen and in the Virtual Gauges app.
When short pressed, prior to reset to the Default Virtual Gauges priorities the
Virtual Gauges app displays the following Pup-up warning. Figure 82 as
reference.
Figure 82 Reset configuration Pop-up
OK and Cancel act as a soft keys in the Pop-up warning.
Pressing OK close the warning Pop-up returning and the General Settings
screen and restoring Default Virtual Gauges priorities as well as updating the
position of the gauges in the General Settings screen and in the Virtual
Gauges app.
Pressing Cancel close the warning Pop-up returning to the General Settings
Pop-up menu without changing any configuration.
Voice Recognition
Voice Recognition allows the user to launch applications, perform calls,
accept calls, and control actions of DEA601 system hands free.
Once the Voice Recognition function is activated the Voice Recognition
indicator is displayed.
The Voice Recognition indicator has two states:
Active
Inactive
While the system is capturing voice commands the system display the Voice
Recognition indicator in Active state as Figure 83 illustrates.
Figure 83: Voice Recognition Active screen.
Page 44

Owner´s Manual DEA601 Radio
44 | P a g e
Vocabulary
The DEA601 system is able to recognize the following vocabulary as a
Language Model for the Voice Recognition System in the DEA601.
Basic Numbers:
“Zero (Oh), One, Two, Three, Four, Five, Six, Seven, Eight, Nine”
Decimal Numbers:
“Ten, Eleven, Twelve, Thirteen, Fourteen, Fifteen, Sixteen, Seventeen,
Eighteen, Nineteen”
Decimals:
“Twenty, Thirty, Forty, Fifty, Sixty, Seventy, Eighty, Ninety”
Centesimal:
“Hundred, Thousand”
Special Characters:
“Number (Hash tag, Hash, Pound, Square), Star (Asterisk), Plus”
Basic disagree command:
“no, incorrect, wrong, negative, none are correct, none of these, not really,
no I said, no I did not, nope, na, noway”
Basic cancel command:
“No, Negative, Do not, Don’t, Cancel [request], Abort, stop, end”
Basic agree command:
“Yes, correct, that is correct, yeah, ya, yep, yup, sure, right, OK, positive,
you got it, probably, you bet”
General Audio Commands:
“Mute, Unmute”
General Options:
“Option (<Basic_Numbers | <Decimal_Numbers”
Help Command:
“Help”
If any of these is not valid the system says:
-"Sorry, Invalid Command"
Direct Action Commands
Direct action commands refer to commands from the vocabulary that does
not need a second action to perform the command. These commands
emulate a Softkey press or a Hard Button press in the System.
Time Command
-“What time is it”
The DEA601 show the Time in the Voice Recognition Pop-Up for 5 seconds.
After the 5 seconds the Pop-Up is closed.
-“What day is it”
The DEA601 show the Date in full format (It is [Day of the week], [Month]
[Day], [Year]) in the Voice Recognition Pop-Up for 5 seconds.
After the 5 seconds the Pop-Up is closed.
Launch
Switch command
-“Switch to ****** or Switch to ****** app”
The DEA601 Open the Application specified by the user.
Open command
-“Open ****** or Launch the ****** app”
The DEA601 Open the Application specified by the user.
General Options
-“Option ######”
In the case the system registers multiple valid results, it display a list of the
multiple valid results as Figure 84 illustrates.
Page 45

Owner´s Manual DEA601 Radio
45 | P a g e
Figure 84: Multiple valid results for the captured voice command screen.
Each item in the list works as a softkey selector.
The system activates one of the listed options by two ways:
Via a Voice command
Via the selection of the softkey selector
The system performs the function related to the option selected.
Phone Commands
- “Redial “
If a Bluetooth Phone is paired, the DEA601 open the Phone App and
attempt a call to the last number called.
-“Call Back “
If a Bluetooth Phone is paired, the DEA601 open the Phone App and
attempt a call to the last received call number.
-“Phone”
-“Call Contact”
After the "Call Contact" command, the DEA601 show a Help message in the
Pop-Up to indicate the user the following message.
Who do you want to call?
-" Johnny Cash home"
“****** at Home or ****** Home “
The DEA601 Call the contact specified by the user to the Home phone
number specified by the Bluetooth Paired device.
****** at Mobile or ****** Mobile
The DEA601 Call the contact specified by the user to the Mobile phone
number specified by the Bluetooth Paired device.
-“Dial Number”
After the “Dial Number” command, the DEA601 show a Help message in the
Pop-Up to indicate the user the following message.
What number do you want to call?
"Please say only numbers between 1 and 9"
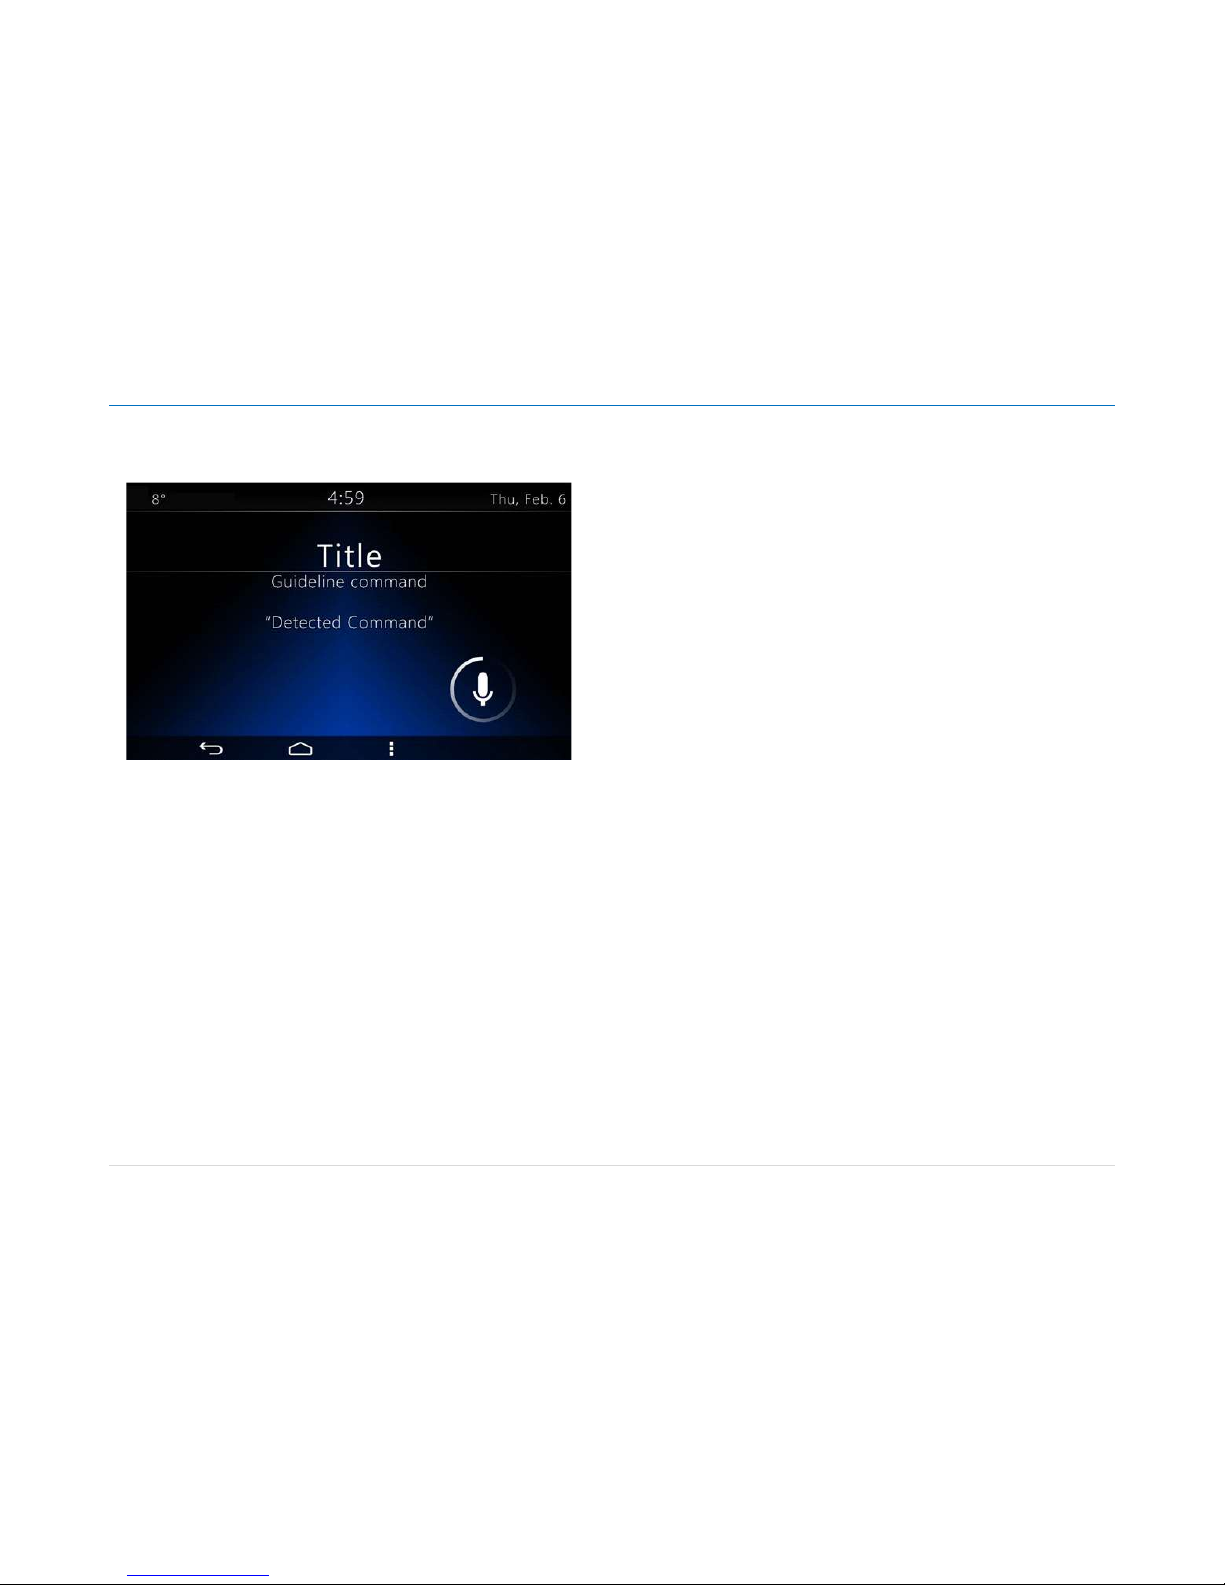
If no Bluetooth Phones are connected, the DEA601 show an indication that
say:
- Title: "Sorry"
- Guideline Command: "No Phone Connected"
While the system is processing the captured voice command the system
display the Voice Recognition indicator in Inactive state as Figure 85
illustrates.
Figure 85: Voice Recognition Inactive screen.
Page 46
Owner´s Manual DEA601 Radio
46 | P a g e
While the system is processing the captures voice command the system
display a processing information indicator as Figure 86 illustrates.
Figure 86: Voice Recognition processing screen
Once the system registers a valid command, the command to be performed
is displayed.
Page 47

Owner´s Manual DEA601 Radio
47 | P a g e
Settings
The system presents the next settings options. Figure 87 & Figure 88 as
reference:
Wireless & Networks
Language & Inputs
Date & Time
System Audio
System Information
Cameras settings
Apps
Keyboard Sound
Display Settings
Figure 87: The settings screen Part I.
Figure 88: The settings screen Part II
Each option is displayed in a grid manner. Each of the settings options
works as a softkey.
The Left upper corner Title indicates which section of the menu the user is
currently located. While inside the System Audio Settings, the system
continues playing the Audio.
The Menu softkey does not have functionality in this screen.
While inside the settings menus, the system continue showing the current
menu even if there is a track change.
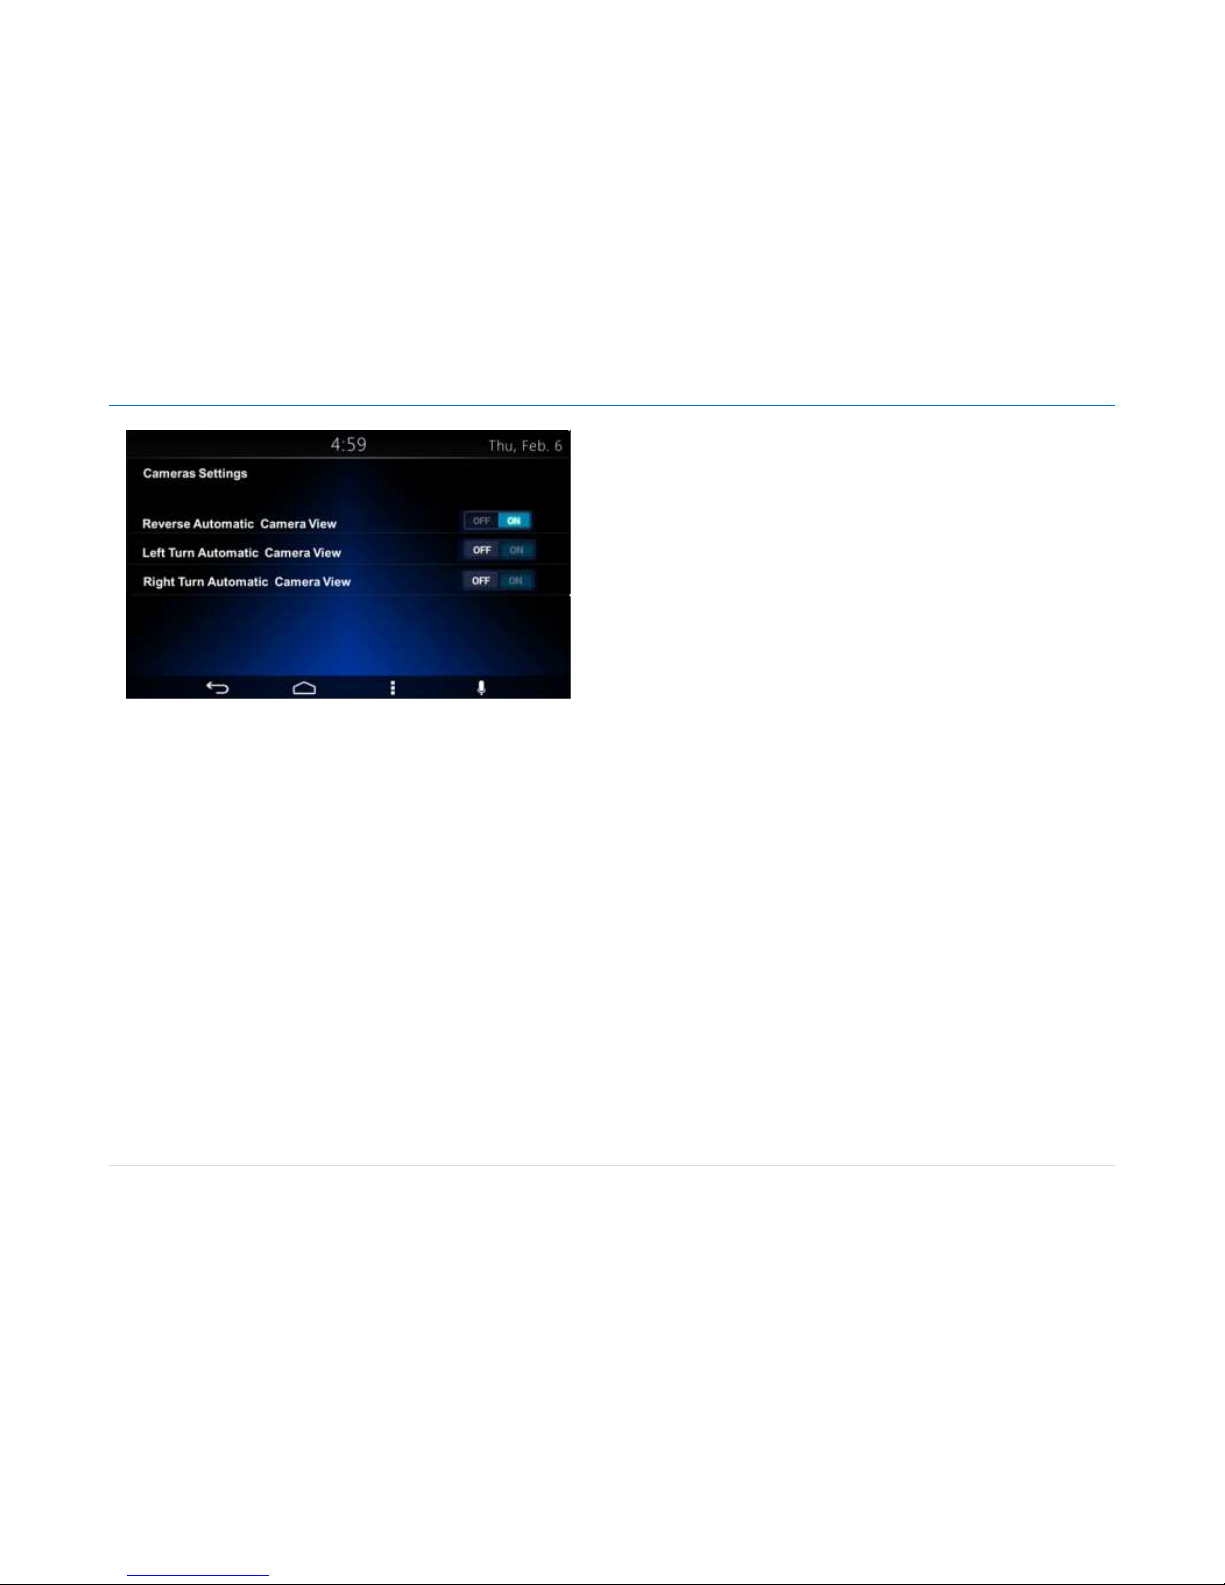
Camera Application Settings
In the case the Camera Settings is selected the system display the next
information as activation/deactivation controls, Figure 89 as reference.
Page 48
Owner´s Manual DEA601 Radio
48 | P a g e
Figure 89: The Cameras settings screen.
The next information is presented as read only.
Installed Cameras Video Format
The system display the next activation/deactivation controls.
Reverse Camera
Right Camera
Left Camera
The system displays the next configurable options in case the Reverse
camera is activated.
Reverse Automatic Camera View activation.
The system displays the next configurable options in case the left/right
camera is activated.
Turn Signal Automatic Camera View activation.
The activation softkey is displayed as a slider control. The slider control has
two states.
On: slide action to the right.
Off: slide action to the left.
In the case the system detects an On state the corresponding automatic
camera view is activated.
In the case the system detects an Off state the corresponding automatic
camera view is deactivated.
This menu may not be available in all vehicles
Display Settings
The system opens the Display Settings section in the case this option is
selected at system settings.
Once the Display Settings menu is open the system displays the following
configuration options. Figure 90 as reference.
Dimming brightness.
10% per step
25% per step
Units of measure
English
Metric
Page 49

Owner´s Manual DEA601 Radio
49 | P a g e
Figure 90: The Display Settings screen.
Wireless & Networks
The Wireless & Network settings are open once the system senses a touch
over the "Wireless & Networks" icon.
The “Wireless & Networks” menu is accessed while the System is ON.
Once the “Wireless & Networks” settings menu is open the next connectivity
options list is presented to the user following the next hierarchy: Figure 91
as reference.
Wi-Fi
Bluetooth
Figure 91: The Wireless & Networks settings screen
The Bluetooth & Wi-Fi activation options are presented to the user as a
slider controls.
Each slide control has two states.
On: slide action to the right
Off: slide action to the left
In the case the system detects an On state the corresponding wireless
option is activated.
In the case the system detects an Off state the corresponding wireless
option is deactivated.
Wi-Fi
In the case the Wi-Fi option is activated a separate sub screen display the
list of the available networks. The WPS activation soft key is present as part
of the Wi-Fi interface. The listed items in the available network list work as
soft keys.
A password to enable the connection might be required if the network is a
limited access network. In the case a password is required a pop-up sub
screen along with a virtual keyboard is displayed illustrated in Figure 92.
Page 50

Owner´s Manual DEA601 Radio
50 | P a g e
Figure 92: The Wi-Fi menu screen Part I.
The system captures the introduced password. The system uses the
captured password for the network connection process.
The system display a pop-up message for 3 seconds in case the captured
password is incorrect. Figure 93 as reference.
Figure 93: Error - Invalid Password process terminated
The system present the Wi-Fi menu screens following the distribution and
styling of the Figure 94, Figure 95, Figure 96 & Figure 97.
Figure 94: The Wi-Fi menu screen Part II.
Figure 95: The Wi-Fi menu screen Part III.
Page 51

Owner´s Manual DEA601 Radio
51 | P a g e
Figure 96: The Wi-Fi menu screen Part IV.
Figure 97: The Wi-Fi menu screen Part V.
In the case the system detects the activation of the Menu soft or hard key
the system display a pop sub menu with the following options, Figure 98 as
reference.
Scan
WPS Pin Entry
Wi-Fi Direct
Advanced
Figure 98: The Wi-Fi pop-up screen.
In the case the advanced option is selected the system display the standard
advanced Wi-Fi menu, Figure 99 & Figure 100 as references.
Figure 99: The Advanced Wi-Fi menu screen Part I.
Page 52

Owner´s Manual DEA601 Radio
52 | P a g e
Figure 100: The Advanced Wi-Fi menu screen Part II.
Bluetooth
The following profiles are supported by the system:
Advanced Audio Distribution Profile (A2DP)
Audio/Video Remote Control Profile (AVRCP)
Hands-Free Profile (HFP)
Phone Book Access Profile (PBAP)
Message Access Profile (MAP)
Personal Area Networking Profile (PAN)
Serial Port Profile (SPP)
The system can connect to a Bluetooth Device. To use this functionality your
device requires Bluetooth and to be paired and connected to the DEA600.
The supported device list is located in the following web page:
http://www.panapacific.com/support
Other devices may be connected and played but functionality cannot be
guaranteed.
You can connect up to 10 devices to the system; the DEA600 will connect to
the first available paired device, starting from the last paired/connected
device.
In the case the Bluetooth option is turned ON, a sub screens displayed
listing the next options. Figure 101 as reference.
“Visible to all nearby Bluetooth devices” option.
List of the Bluetooth devices available to connect.
Figure 101: The Bluetooth menu screen I.
The system activates the detection to other Bluetooth devices on the "Visible
to all nearby Bluetooth devices" option is activated.
The "Visible to all nearby Bluetooth devices" function is activated for 2
minutes.
Each of the items in the "List of the Bluetooth devices available to connect"
works as a softkey. Figure 102 as reference.
Page 53

Owner´s Manual DEA601 Radio
53 | P a g e
Figure 102: The Bluetooth menu screen II.
In the case one item of the "List of the Bluetooth devices available to
connect" is selected, a pop-up screen is displayed presenting the next
information and softkeys. Figure 103 as reference.
Information
Target device name
Passkey or White Box to introduce Passkey
Softkeys
Cancel option
Pair option
Figure 103: The Bluetooth menu screen III.
If the system detects the selection of the white box a keyboard is displayed.
The system captures in the White Box the introduced Passkey. Figure 104,
Figure 105 & Figure 106.
Figure 104: The Bluetooth menu screen IV.
In the case the Pair button is selected, the system starts the connection
process.
Page 54

Owner´s Manual DEA601 Radio
54 | P a g e
Figure 105: The Bluetooth menu screen V.
Figure 106: The Bluetooth menu screen VI.
In the case the Cancel button is selected, the system cancels the connection
process closing the pop-up screen.
If the connection process is cancelled a pop-up message is displayed stating
"Invalid Password process terminated". Figure 107 as reference.
Figure 107: Error - Invalid Password process terminated
The mentioned message is displayed for 3 seconds.
OTA (Over the Air)
The system is capable to manage the next OTA updates having Wi-Fi.
OS version.
Applications updates/installations.
DEA601 system Software Updates
Keyboard Sound
In the case the keyboard sounds option is selected, the system displays the
next configurable options illustrated Figure 108.
Dial pad touch tones
Touch sounds
Page 55
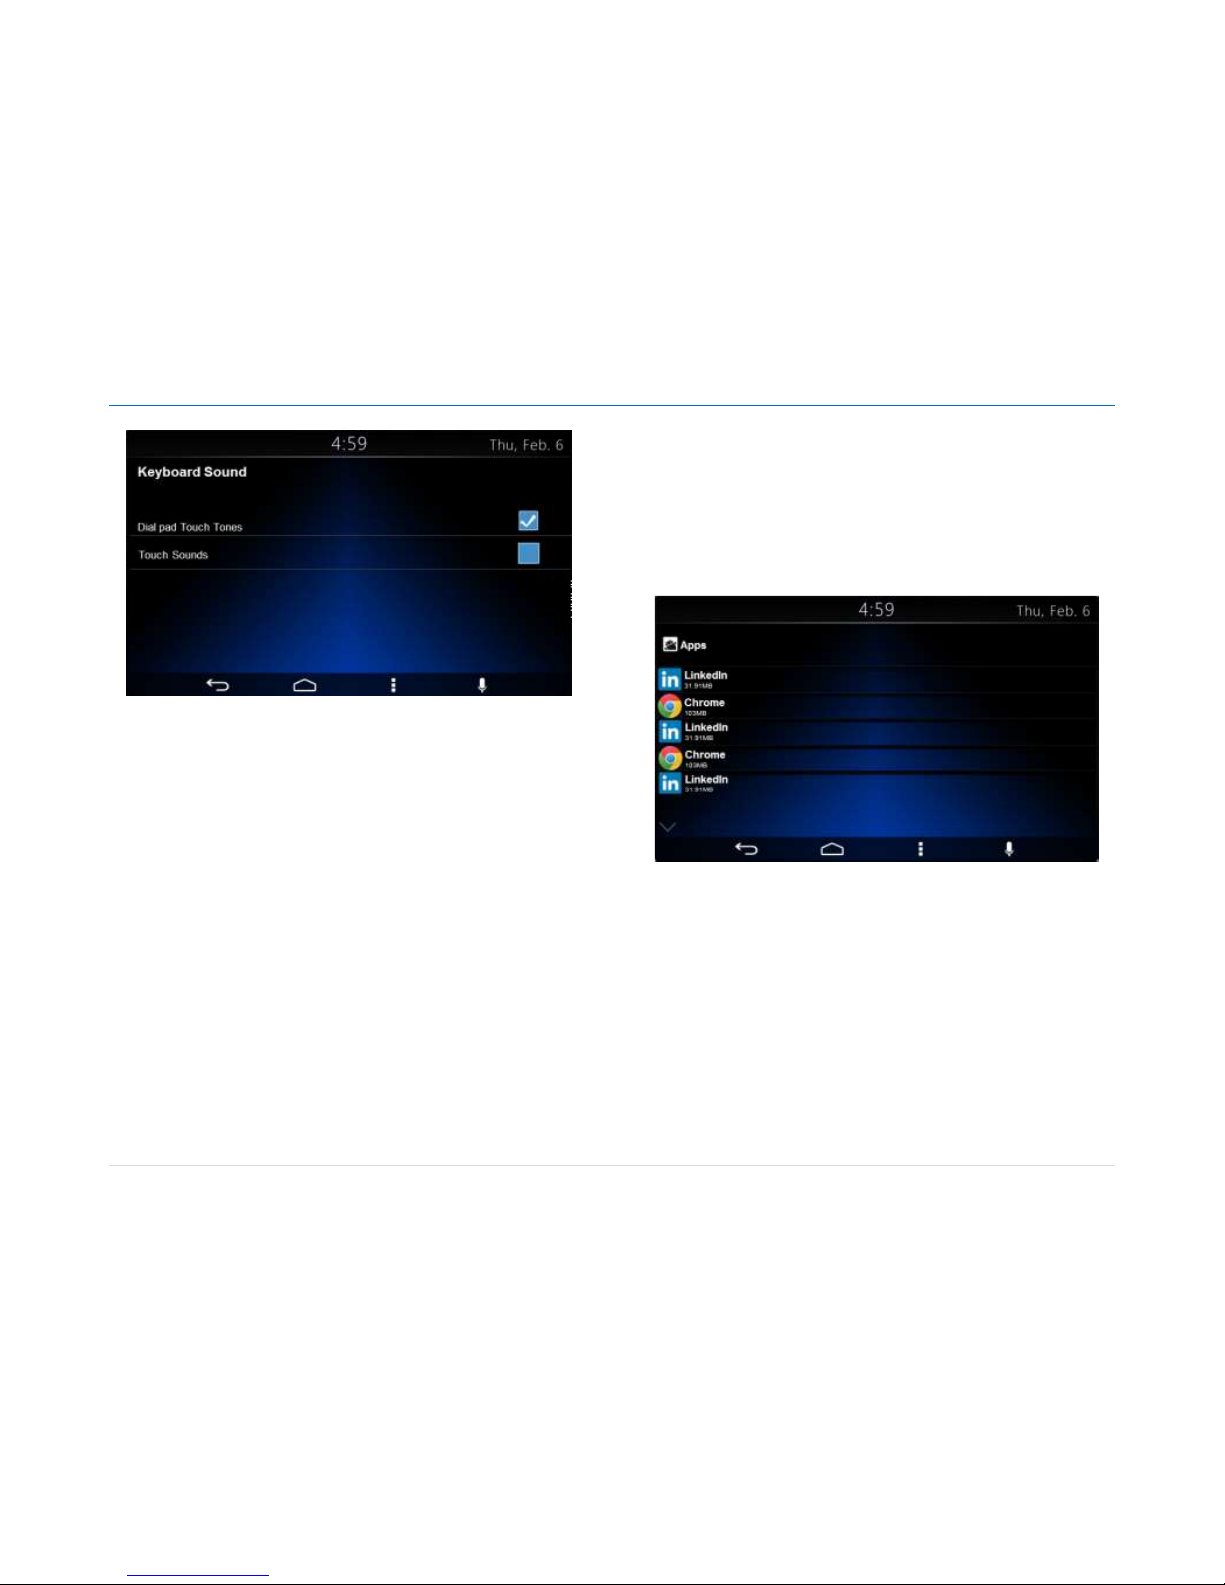
Owner´s Manual DEA601 Radio
55 | P a g e
Figure 108: The Keyboard sound option screen.
The system allows the activation and deactivation of the keyboard sound
option.
The system does not produce any audio from the keyboard sounds if this
option is not selected.
Date & Time
The system supports the standard Date & Time settings.
In the case the date & time option is selected, the system presents the next
configurable options following standard date & time settings functionality.
Automatic date & time
Automatic time zone
Set date
Set time
Select time zone
Use 24-hour format
Choose date format
The system shall present the following date format options only.
o 12/31/2014
o 31/12/2014
o 2014/12/31
Applications
The system supports the standard application manager settings.
In the case the Apps option is selected the system present a list of the
installed apps illustrated in. Figure 109.
Figure 109: The Apps option screen.
Each item in the list works as a softkey. Each item in the list presents the
next information.
Application icon
Application name
Application memory space
The system displays up to 5 items per screen. In the case there are more
than 5 items the remaining items are displayed in consequent screens.
In the case a listed item is selected, the system presents the following
controls and information. Figure 110 & Figure 111 as reference.
Page 56

Owner´s Manual DEA601 Radio
56 | P a g e
Controls:
Force stop button
Clear data button
Clear cache button
Clear Defaults button if available
Information
Application name
Application version
Application icon
List of applicable permissions
Storage information
The controls functions follow the standard apps functionality.
Figure 110 The App controls & information screen Part I.
Figure 111: The App controls & information screen Part II.
System Information
In the case the system information menu is selected, the system displays the
next information as Read only:
IP Address
Wi-Fi Mac Address
OS Version/Embedded Animation
Model Number
Regulatory Information
The system presents the System Information screen following the
distribution and styling of the Figure 112.
Page 57

Owner´s Manual DEA601 Radio
57 | P a g e
Figure 112: The System Information screen.
Language & Inputs
In the case the Language & Inputs menu is selected, the system displays the
next options:
Each option works as a softkey.
Language
Text to speech output
The system present the Language & Inputs options following the distribution
and styling of the Figure 113 & Figure 114.
Figure 113: The Language & Inputs options screen Part I.
Figure 114: The Language & Inputs options screen Part II.
Language
In the case the Language option is selected, the system displays the next
language options:
The System presents the following options under Language:
Page 58

Owner´s Manual DEA601 Radio
58 | P a g e
English
Spanish
Canadian French
Each language option has a checkbox as selector control. The system
allows the selection of one option at a time.
If the language is changed to other than English once the Voice Recognition
is active, a pop-up message is displayed stating: "Voice Rec function will be
inactive". Figure 115 as reference.
Figure 115: Warning - Voice Rec function will be inactive
As part of the pop-up message, the next two softkeys are displayed:
Ok to proceed
Cancel to not proceed
Text to speech output
The system present the "Text to speech output" as a turn On/Off control.
The system presents the following options under the Text to speech output
option:
Speech Rate
Listen to an Example
If the Speech rate is selected, a pop-up screen is open presenting the
following options. Figure 116 as reference.
Very Slow
Slow
Normal
Fast
Faster
Very Fast
Rapid
Very Rapid
Fastest
Cancel
Figure 116: The Speech rate pop-up screen.
The system allows the selection of one option at a time. The system adjusts
the Speech rate based on the selected option. The pop-up screen is closed
once an option is selected. If the current option is selected, the system
closes the pop-up screen. In the case the Cancel option is selected, the popup message is closed.
If the Listen to an example option is selected, the system plays a text to
speech example.
System Audio
In the case the System Audio is selected, the next configuration options are
displayed. Figure 117 as reference
Auto Equalization with the selected option
Manual Equalization
Fade
Page 59

Owner´s Manual DEA601 Radio
59 | P a g e
Balance
Speed Dependent Volume
4/2 Speakers Configuration
Seek Sensitivity
Figure 117: The System audio screen Part I.
The system presents the System Audio user interface following the
distribution and styling of the Figure 118 & Figure 119.
Figure 118: The System audio screen Part II.
Figure 119: The System audio screen Part III.
The Manual Equalization and the Auto Equalization options work as
softkeys.
The Fade and Balance configuration options are presented in a bar selector
manner.
While the radio is configured to 2 speakers, the Fade option is unavailable.
Manual Equalization
In the case the Manual Equalization option is selected, the system displays
the next configurable options: Figure 120 as reference.
Bass
Middle
Treble
Speed Dependant Volume
Speakers Configuration
Off
Low
Mid
High
4 Speakers
2 Speakers
Page 60

Owner´s Manual DEA601 Radio
60 | P a g e
Figure 120: The Manual equalizer screen.
The system adjust the Bass value accordingly with the selected value in the
Bass bar control.
The system adjust the Middle value accordingly with the selected value in
the Middle bar control.
The system adjust the Treble value accordingly with the selected value in
the Treble bar control.
The scale of the Bars is from -12dB to +12dB.
The system support detection of 24 steps on each of the bars.
The system adjusts 2 dB per step of the corresponding value.
Auto Equalization
In the case the Auto Equalization option is selected, the system displays the
next options. Figure 121 & Figure 122 as reference.
POP
ROCK
COUNTRY
NEWS
JAZZ
CLASSICAL
Figure 121: The Auto equalizer screen Part I.
Figure 122: The Auto equalizer screen Part II.
Page 61

Owner´s Manual DEA601 Radio
61 | P a g e
Each Audio setting section has a checkbox as selector control. The system
adjusts the Audio output configuration based on the option selected. The
system does not allow selecting more than one Auto Equalization option.
In the case the system detects the selection of the current Auto Equalization
option, no change will take place.
Speed Dependent Volume
This function increases the volume level with speed in order to compensate
engine or road noise and decreased when slow down.
In the case the Speed Dependent Volume option is selected, the system
displays the next configurable options. Figure 123 as reference.
Off
Low
Mid
High
Figure 123: The System audio screen Part II.
The system allows the selection of one option at a time.
Speakers Configuration
In the case the Speakers configuration option is selected, the system
displays the next configurable options. Figure 123 as reference.
4 Speakers
2 Speakers
The system allows the selection of one option at a time.
Seek Sensitivity -6dB to +6dB
The seek sensitivity option is present in a bar selector manner.
The scale of the seek sensitivity Bar is from -6 dB to +6 dB. The system
detects 12 steps on each of the bars. The system adjusts 1 dB per step of
the corresponding value. As illustrated in Figure 124.
Figure 124: Seek sensitivity screen.
Speed Dependant Volume
Speakers Configuration
Off
Low
Mid
High
4 Speakers
2 Speakers
Page 62

Owner´s Manual DEA601 Radio
62 | P a g e
Tips and Troubleshooting
Radio
Unable to tune stations
You are in a weak signal area.
Increase the Seek Sensitivity (see Seek Sensitivity section for
details).
Power operation
The system operates at 14Vdc nominal voltage, minimum of 10.5Vdc and a
maximum of 16Vdc. The maximum temperature of the system at nominal
conditions is 47°C.
If the battery is disconnected before or at the same time as the ignition line,
the system does not guarantee the memory retention.
The time of day is be set to the default value when the battery is
disconnected.
Installation
It is recommended that the system has an external current protection with a
maximum 8A fuse once is installed in the vehicle.
CD
CD player not functioning
Out of the operation range, Operation temperature of the CD is -20°C to
55°C (-4°F to 131°F).
Allow the vehicle´s interior temperature to increase or decrease
(depending on the case).
CD Insertion is not possible
A CD is already on the CD player.
Eject the CD and remove it.
iPod
iPod does not play or there is no sound
The iPod has not been recognized.
Verify that the iPod is supported.
If the iPod is supported, reset the iPod and re-connect again (see
iPod section for details).
iPod not functioning
Out of the operation range, Operation temperature of the iPod player is 20°C to 85°C (-4°F to 185°F).
Allow the vehicle´s interior temperature to be in human supportable range.
Bluetooth
My radio doesn't recognize my Bluetooth enabled device.
Try one of the following actions:
1. Remove the device, after that pair and connect the device. Refer to
DELETE ONE OR DELETE ALL DEVICES and to Pairing a Bluetooth
Device and Connecting a Device sections.
2. Make sure the device is turned on.
3. Make sure the Bluetooth adapter on your radio is enabled, Refer to
Bluetooth Enabling/Disabling section.
4. The device might be out of range. Try moving it closer.
The device and my radio can't communicate.
Try one of the following actions:
1. Make sure that you selected the correct device to be connected to. For
example, you might have two or more devices previously paired or
connected, so make sure you selected the right device.
2. Some devices require a passkey before they can be connected to the
radio.
3. Probably an incorrect passkey was typed or the time limit expired for
typing the passkey. Refer to Connecting a Device section.
Page 63

Owner´s Manual DEA601 Radio
63 | P a g e
4. If the device is close to other devices that use radio frequencies (such
as microwave ovens, cordless phones, remote controls for electronics
or lighting, or 802.11 wireless networks), those devices might be
creating interference. Try moving the device that isn't working farther
away from the other devices.
Device music cannot be heard
1. Verify the device is paired and connected. Refer to sections: Pairing a
Bluetooth Device and Connecting a Device.
2. Make sure BT AUDIO Source is selected in the source list menu. Refer
to Media Sources section.
3. Adjust the Volume on the radio by rotating the knob.
4. Verify that your device is not paused.
5. Make sure your device has music files.
Rear Seat Audio (RSA)
The RSA shows no link.
The radio requires up to 15 seconds to wake up, so if you wake up the radio
using the RSA and the radio is in sleep mode, the RSA will show "no-link"
while the radio starts. The communication shall be reestablished after this
time lapse expires.
Precautions
The DEA601 is not a safety product. The cameras and the rear auxiliary
inputs are provided for driver conveniences only.
Driver Distraction Avoidance
To avoid driver distractions, the System implement two states for the overall
functionality of the System:
Normal Functionality
Driving State
Normal functionality allows the user to access to all the functionalities of the
system; this state is enabled when the parking brake is set and when the
vehicle speed is less than 5 Km/h.
Driving state disables some functions/applications that may distract the
driver from the road; this state is activated when the parking brake is unset
and the vehicle speed is equal or greater than 5 km/h.
Limited Applications/Functionalities
Messaging
The System displays new message warnings with audible feedback
activating the TTS functionality while in the Driving Distraction Avoidance
Driving State. The audible feedback will read the incoming message using
the TTS functionality.
The user is not be allowed by the system to write new messages while in the
in the Driving Distraction Avoidance Driving State. The virtual keyboard will
be inactive during this state.
The user is only able to respond a message using the options from the
predefined messages.
Phone
The System allows the user to answer a call while in the Driving Distraction
Avoidance Driving State.
Also, the system allows the user to call using the virtual numeric keypad in
the screen.
Other Phone functionalities are restricted while in the Driving Distraction
Avoidance Driving State.
System memory
If the battery is disconnected before or at the same time as the ignition line,
the system does not guarantee the memory retention.
The time of day is be set to the default value when the battery is
disconnected.
Apple devices
Apple devices shall not be connected in the Rear mini USB port.
Page 64

Owner´s Manual DEA601 Radio
64 | P a g e
If not certified accessories are used to connect an Apple device to the
DEA600 system, it will not be able to provide Power as required for the
Apple device.
Sirius XM
The Sirius XM implementation includes only music.
Warranty Replacement
It is recommended that every time one or both of the modules are replaced
in the vehicle, any configurable settings (advanced menu, frequency zone,
etc) are configured with both modules connected.
Product Cleaning
Use a soft dry cloth for periodic cleaning. for more severe stains, please
dampen the cloth with water only. Anything else might affect the appearance
or damage the lens or plastics.
Moisture Condensation
You may notice the CD playback sound wavering due to the water
condensation. If this happens please remove the disc from the player and
wait about an hour for the moisture to evaporate.
Damage Disc
Don’t attempt the following
To play a cracked, warped or damaged disc. Playing a bad disc
could severely damage the playback mechanism.
To grip or pull out the disc while it is being pulled back into the
player by the automatic reloading mechanism.
To insert a disc into the mechanism when the unit is powered OFF.
Bluetooth
The Message Access Profile features with an Apple device are limited to
read/receive messages per Apple devices limitation. Apple devices do not
support sending messages through the MAP Bluetooth profile.
Bluetooth Distraction
When using a cell phone, it can be distracting to look too long or too often at
the screen of the phone or the infotainment system. Taking your eyes off the
road too long or too often could cause a crash resulting in injury or death.
Focus your attention on driving.
Disclaimers, Trademarks and License
Agreements
Delphi does not take any responsibility of an incomplete system in the
vehicle.
“Made for iPod” and “Made for iPhone” mean that an electronic accessory
has been designed to connect specifically to iPod or iPhone and has been
certified by the developer to meet Apple performance standards.
iPod and iPhone are trademarks of Apple Computer, Inc., registered in the
U.S. and other countries.
“SiriusXM” means that the radio has been designed and certified to meet
SiriusXM standards
SiriusXM is a trademark of SiriusXM Company registered in the U.S.
Page 65

Owner´s Manual DEA601 Radio
65 | P a g e
“The Bluetooth
®
word mark and logos are registered trademarks owned by
Bluetooth SIG, Inc. and any use of such marks by Delphi is under license.
Other trademarks and trade names are those of their respective owners.”
“The Wi-Fi CERTIFIED™ Logo is a certification mark of Wi-Fi Alliance®.”
FCC Information
Radio is complaint with Part 15 of the Federal Communications Commission
(FCC) rules and with Industry Canada Standards RSS-GEN/210.
FCC ID: L2C0057TR for USA
IC ID: 3432A-0057TR for Canada
Conformity assessment issues
FCC/IC Regulatory Notice
Modification statement
Delphi Electronics & Safety has not approved any changes or modifications
to this device by the user. Any changes or modifications could void the
user’s authority to operate the equipment.
Delphi Electronics&Safety n’approuve aucune modification apportée à
l’appareil par l’utilisateur, quelle qu’en soit la nature. Tout changement ou
modification peuvent annuler le droit d’utilisation de l’appareil par l’utilisateur.
Interference statement
This device complies with Part 15 of the FCC Rules and Industry Canada
licence‐exempt RSS standard(s). Operation is subject to the following two
conditions: (1) this device may not cause interference, and (2) this device
must accept any interference, including interference that may cause
undesired operation of the device.
Le présent appareil est conforme aux CNR d'Industrie Canada applicables
aux appareils radio exempts de licence. L'exploitation est autorisée aux deux
conditions suivantes : (1) l'appareil ne doit pas produire de brouillage, et (2)
l'utilisateur de l'appareil doit accepter tout brouillage radioélectrique subi,
même si le brouillage est susceptible d'en compromettre le fonctionnement.
Radiation Exposure Statement
This device complies with FCC/IC radiation exposure limits set forth for an
uncontrolled environment and meets the FCC radio frequency (RF)
Exposure Guidelines in Supplement C to OET65 and RSS‐ 102 of the IC
radio frequency (RF) Exposure rules. This transmitter must not be co-located
or operating in conjunction with any other antenna or transmitter.
Le présent appareil est conforme à l'exposition aux radiations FCC / IC
définies pour un environnement non contrôlé et répond aux directives
d'exposition de la fréquence de la FCC radiofréquence (RF) dans le
Supplément C à OET65 et RSS‐102 de la fréquence radio (RF) IC règles
d'exposition. L'émetteur ne doit pas être colocalisé ni fonctionner
conjointement avec à autre antenne ou autre émetteur.
FCC Class B digital device notice
This equipment has been tested and found to comply with the limits for a
Class B digital device, pursuant to part 15 of the FCC Rules. These limits
are designed to provide reasonable protection against harmful interference
in a residential installation. This equipment generates, uses and can radiate
radio frequency energy and, if not installed and used in accordance with the
instructions, may cause harmful interference to radio communications.
However, there is no guarantee that interference will not occur in a particular
installation. If this equipment does cause harmful interference to radio or
television reception, which can be determined by turning the equipment off
and on, the user is encouraged to try to correct the interference by one or
more of the following measures:
Reorient or relocate the receiving antenna.
Increase the separation between the equipment and receiver.
Page 66

Owner´s Manual DEA601 Radio
66 | P a g e
Connect the equipment into an outlet on a circuit different from that
to which the receiver is connected.
Consult the dealer or an experienced radio/TV technician for help.
CAN ICES-3 (B) / NMB-3 (B)
This Class B digital apparatus complies with Canaopedian ICES-003.
Cet appareil numérique de classe B est conforme à la norme canadienne
ICES-003.
WARNING! Th
is device must be used at least at 20 cm from the
human body
 Loading...