

Page 1
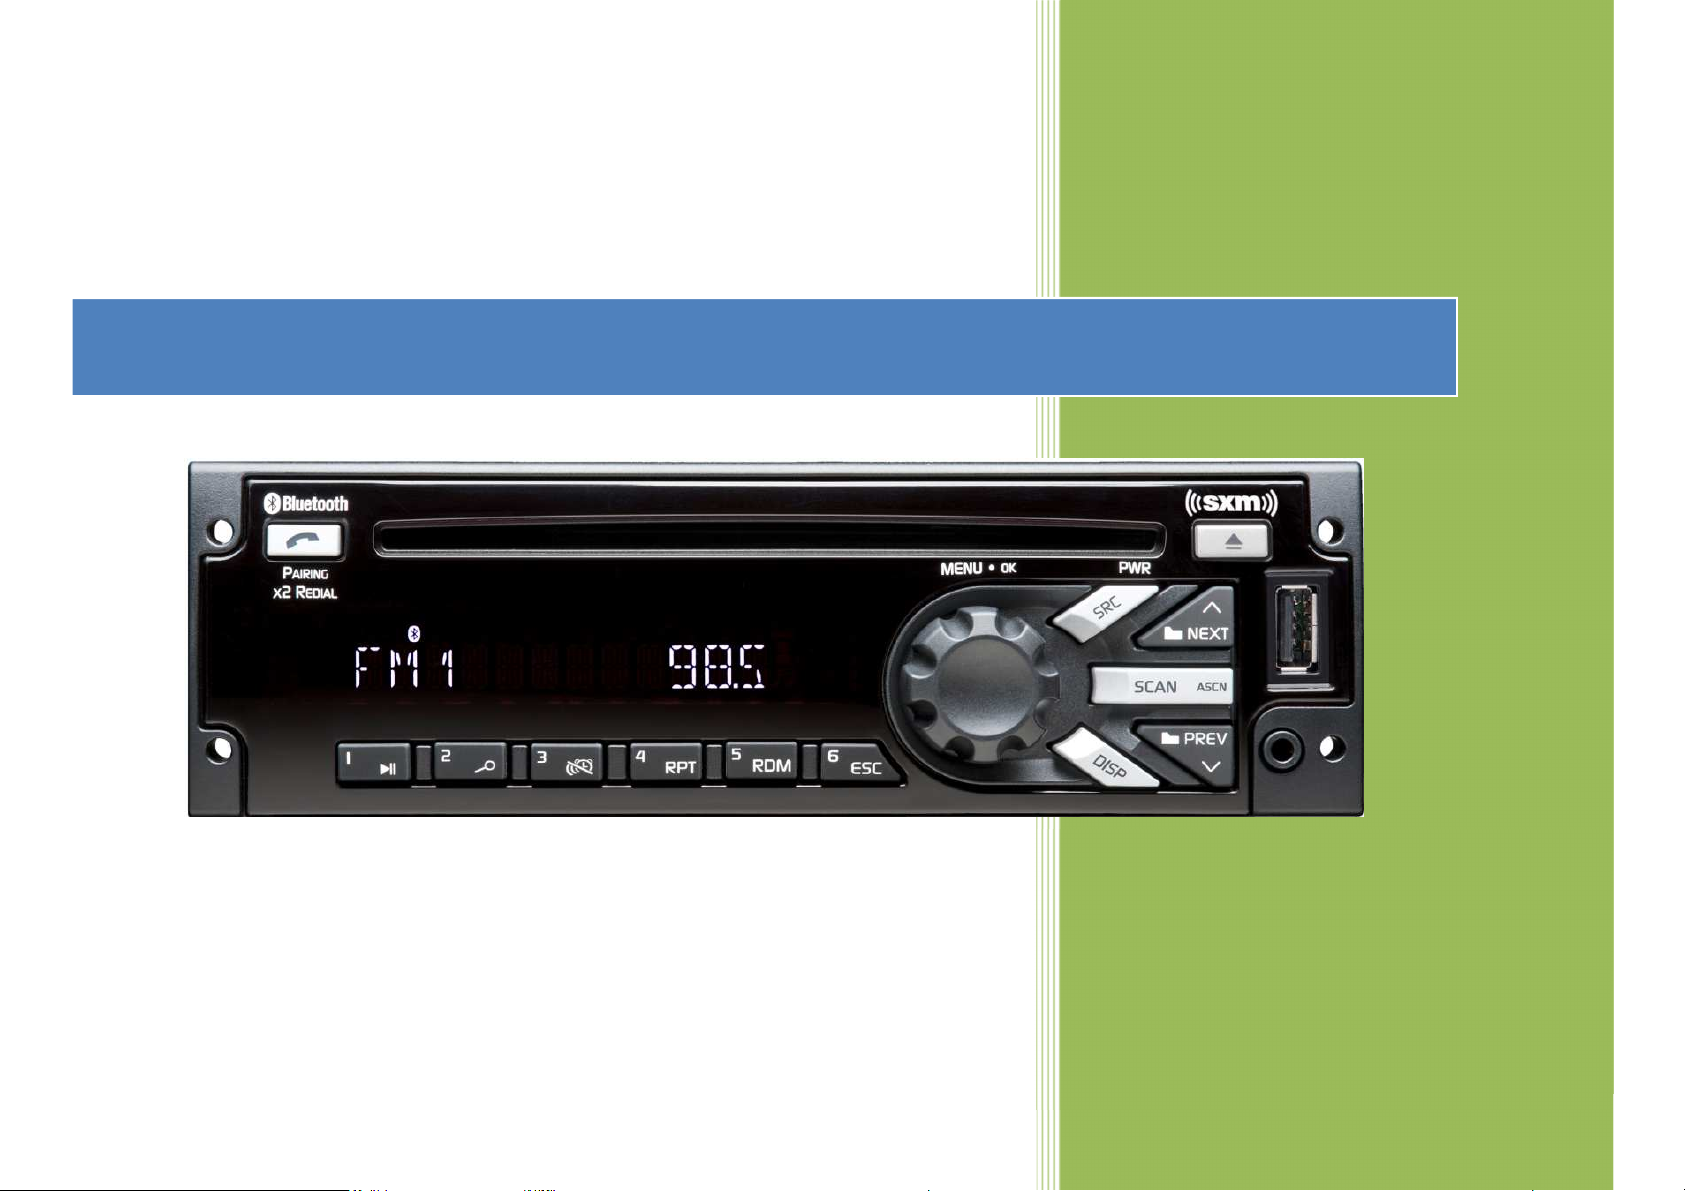
MY 2014
Owner´s Manual DEA5XX Radios
Delphi
MY 2014
Page 2

Contents
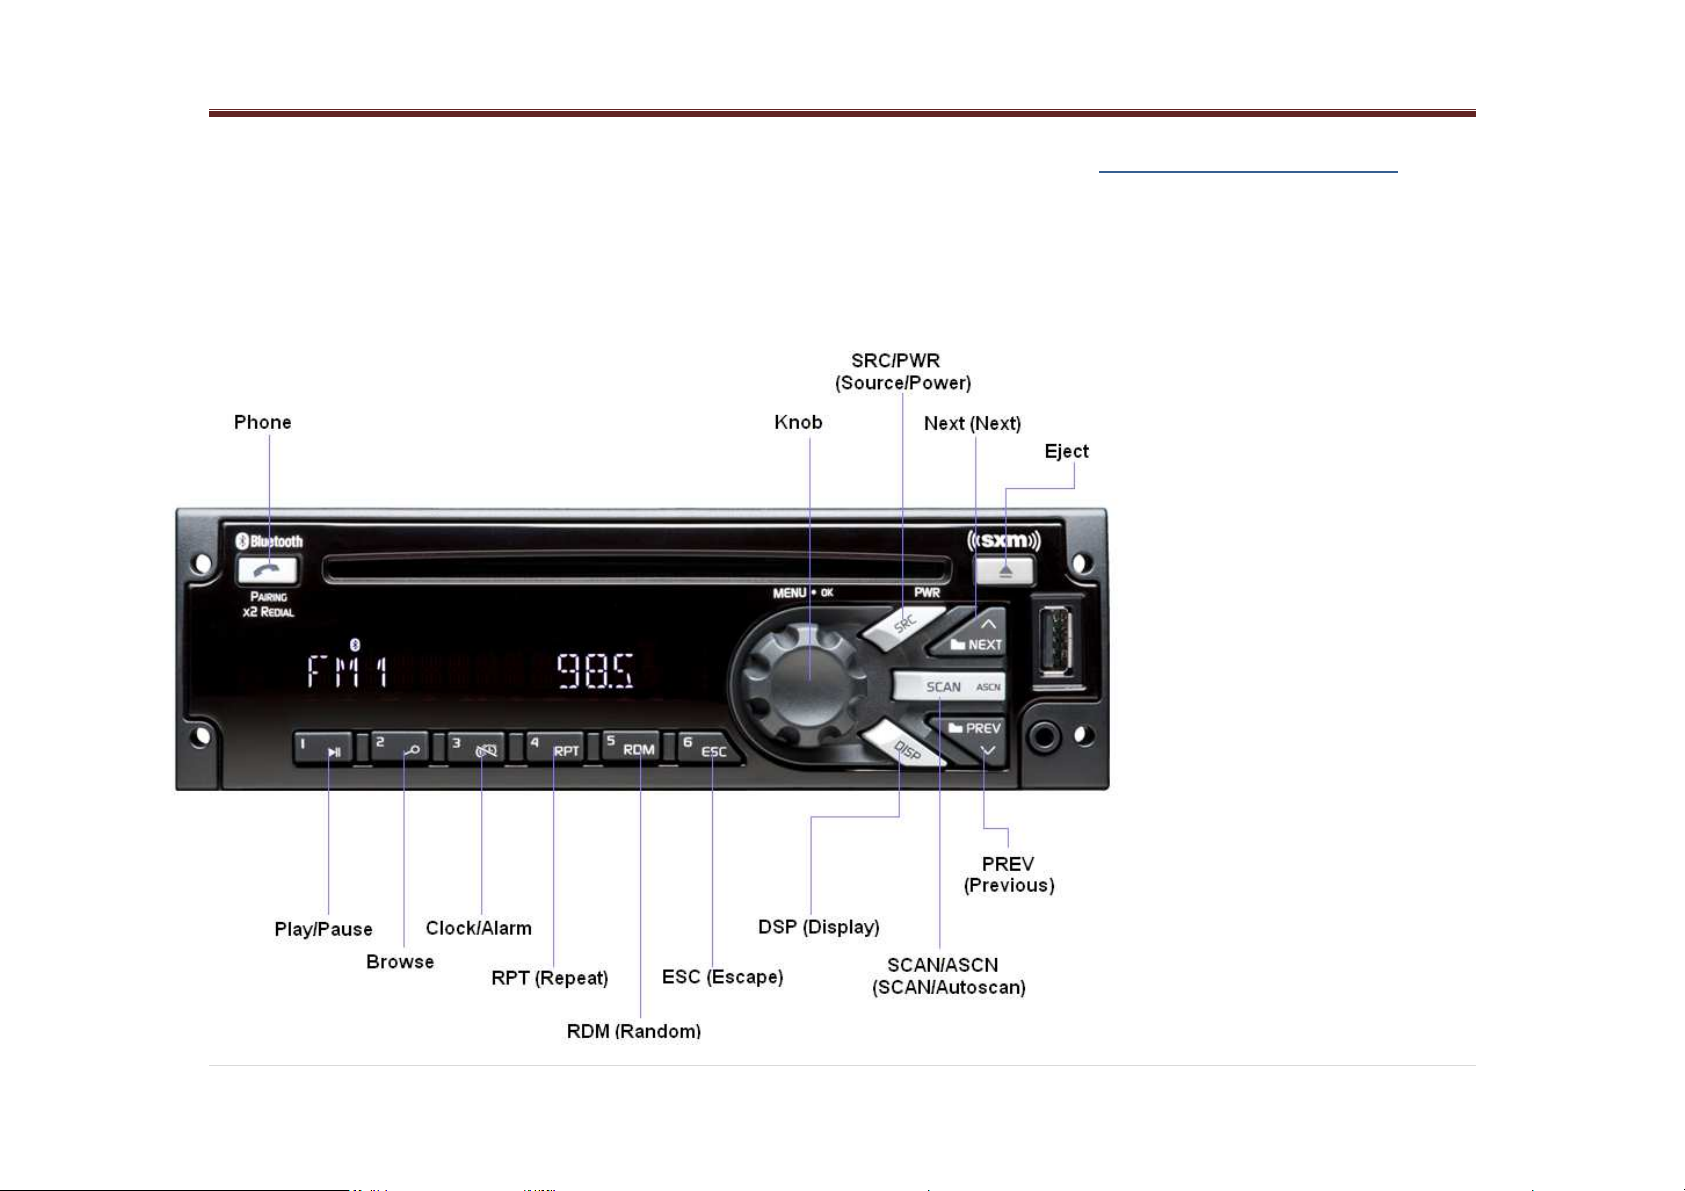
DEA5XX Radios System .................... 5
Introduction ..................................... 5
Overview ............................................. 5
Radio Button Operation ...................... 5
SRC/PWR ....................................... 5
One-Hour Timer .......................... 5
VOLUME KNOB/OK .................... 5
PREV (Previous/Reverse): .............. 5
NEXT (Next/Forward): ................... 5
EJECT ............................................. 5
PHONE (If equipped) ..................... 6
CLOCK/ALARM ........................... 6
SCAN/ASCAN ............................... 6
PLAY/PAUSE: ............................... 6
RPT (Repeat): ................................. 6
BROWSE ........................................ 6
RDM (Random) .............................. 6
ESC (ESCAPE) ............................... 6
DISP (DISPLAY) ........................... 6
Radio ................................................... 6
Audio Source .................................. 6
AM-FM-WX Radio ............................ 6
Owner´s Manual DEA5XX Radios
Tuning ............................................. 6
Manual Tuning ............................ 6
Seeking a Station ......................... 6
Presets ............................................. 7
Storing Radio Station Presets ...... 7
Tuning Radio Station Presets ...... 7
SCAN .............................................. 7
AUTOSCAN ................................... 7
WX .................................................. 7
SXM (If Equipped) ............................. 7
SXM Display .............................. 7
SXM Categories .......................... 7
SXM Channel Selection .............. 8
SXM Radio ID: ........................... 8
SXM Messages ........................... 8
iPod ..................................................... 8
Playing from an iPod ...................... 9
iPod Menu ....................................... 9
Playlists: ...................................... 9
Artists: ......................................... 9
Albums: ....................................... 9
Genres: ........................................ 9
Podcasts: ..................................... 9
Songs: .......................................... 9
Composers: ................................. 9
Audio Books: .............................. 9
PREV (Previous): ........................ 9
NEXT (Next): ............................. 9
FF/FR (Fast Forward/Fast
Reverse) ...................................... 9
RDM (Random): ....................... 10
RPT (Repeat): ........................... 10
Error Messages .............................. 10
USB ................................................... 10
Playing from a USB ...................... 10
USB MP3 Player and USB ........... 10
Drives ........................................ 10
For MP3 Files ........................... 10
For Unprotected WMA Files .... 10
Playing an USB Device ................ 10
PREV (Previous): ...................... 10
NEXT (Next): ........................... 10
FF/FR (Fast Forward/Fast
Reverse) .................................... 10
RDM (Random): ....................... 10
2 | P a g e
Page 3

RPT (Repeat) ............................ 10
Folder Up .................................. 10
Folder Down ............................. 11
SCAN ........................................ 11
Error Messages .............................. 11
Front Auxiliary .................................. 11
Rear Auxiliary ................................... 11
Bluetooth (If Equipped) .................... 11
Enabling/Disabling Bluetooth ....... 11
Pairing a Bluetooth Device ........... 11
Connecting a Device ..................... 12
Disconnecting a Device ................ 12
Deleting one or all Devices ........... 12
Hands Free/ Bluetooth Features .... 12
DIAL MENU ............................ 12
DIAL REDIAL ......................... 12
QUICK DIAL ........................... 12
DIAL CONTACT ..................... 13
LAST CALLS ........................... 13
CALL OPTIONS ...................... 13
BT Audio ...................................... 13
Bluetooth Player ........................ 13
Owner´s Manual DEA5XX Radios
Radio System Settings ...................... 14
Audio Control Menu ..................... 14
BASS ......................................... 14
MIDDLE ................................... 14
TREBLE ................................... 14
FADE ........................................ 14
BALANCE ................................ 14
AUTO EQ ................................. 14
CLOCK ..................................... 14
ALARM .................................... 14
User Menu ..................................... 15
Speakers (SPEAKERS) ............ 15
Seek Sensitivity (SEEK SEN) .. 15
Tune Configuration (TUNE CFG)
................................................... 15
Playback Configuration (PLBK
CFG) ......................................... 15
Dimming (DIMMING) ............. 15
Category Enable/Disable (CAT
E/D) ........................................... 15
HUE Adjustment (HUE ADJ) .. 15
Audio Players .................................... 16
CD Player ...................................... 16
To avoid damage to the CD
player: ....................................... 16
Loading and Ejecting Discs ...... 16
Playing an Audio CD ................ 16
SCAN ........................................ 16
Error Messages .......................... 16
MP3 ............................................... 17
Playing an MP3 CD .................. 17
For MP3 Files ........................... 17
For Unprotected WMA Files .... 17
Music Navigation CD MP3 and USB
....................................................... 17
OPTIONAL EQUIPMENT .............. 17
Infrared Remote Control ............... 17
FUSE ................................................. 18
Tips and Troubleshooting Chart ....... 18
Radio ............................................. 18
Unable to tune stations .............. 18
CD ................................................. 18
CD player not functioning ........ 18
CD Insertion is not possible ...... 18
iPod ............................................... 18
3 | P a g e
Page 4

iPod does not play or there is no
sound ......................................... 18
Owner´s Manual DEA5XX Radios
FCC Class B digital device notice
................................................... 20
iPod not functioning .................. 18
Bluetooth ....................................... 18
My radio doesn't recognize my
Bluetooth enabled device. ......... 18
The device and my radio can't
communicate. ............................ 18
Device music cannot be heard .. 18
Rear Seat Audio (RSA) ................. 19
The RSA shows no link. ........... 19
Trademarks and License Agreements 19
Precautions ........................................ 19
Product Cleaning ....................... 19
Moisture Condensation ............. 19
Damage Disc ............................. 19
Bluetooth Distraction ................ 19
CAN ICES-3 (B) / NMB-3 (B) . 20
1999/5/EC Directive regulatory
notices ........................................... 20
Conformity assessment issues ........... 19
FCC/IC Regulatory Notice ........... 19
Modification statement ............. 19
Interference statement ............... 19
Radiation Exposure Statement .. 20
4 | P a g e
Page 5
DEA5XX Radios System
Introduction
The information in this manual describes
features that may or may not be on your
specific vehicle either because they are options
that you did not purchase or due to changes
Owner´s Manual DEA5XX Radios
subsequent to the printing of this owner manual.
Overview
The Radio system is controlled by using the
buttons, RSA or steering wheel controls.
Radio Button Operation
SRC/PWR
Press to switch to FM -> AM -> WX -> SXM ->
CD -> USB/iPod -> AUX -> Bluetooth Audio (if
equipped) and to turn Radio ON. Press and
hold to turn radio OFF.
One-Hour Timer
With the ignition off, pressing the
SRC/PWR button will turn on the
receiver and activate the receiver’s onehour timer. The receiver will turn off after
one hour or by pressing and hold the
SRC/PWR button.
VOLUME KNOB/OK
Press for less than 3 seconds to display
Audio Control Menu.
Press for more than 3 seconds to Show
the User Menu. Rotate to
Increase/decrease Volume or during a
Menu for Navigation. Press while in a
Menu to confirm the selected action.
PREV (Previous/Reverse):
Press to select previous track or station.
Press and hold for FR or Tune Down
NEXT (Next/Forward):
Press to select next track or station.
Press and hold for FF or Tune Up
EJECT
Press to eject the CD
5 | P a g e
Page 6

PHONE (If equipped)
Press the Phone button for more than 3
seconds to show the Bluetooth Menu.
When Bluetooth is enabled, press the button to
display the Dial Menu or to accept an Incoming
Call (if a Phone is paired).
During a call press the button for more than 3
seconds to transfer the call from the radio to the
Phone.
CLOCK/ALARM
Press during Alarm activation to cancel the
Alarm.
Owner´s Manual DEA5XX Radios
ESC (ESCAPE)
Press to exit one Menu Level.
While on Bluetooth (if equipped): Press to reject
or cancel a Call.
DISP (DISPLAY)
If vehicle Ignition is ON:
Press to Change Source Display Views.
Press for more than 3 seconds to show the
Clock for a short time.
If vehicle Ignition is OFF:
Press to turn on the Radio and show the clock
for a few seconds.
through Front Aux and Bluetooth or USB and
Bluetooth at the same time.
AM-FM-WX Radio
Playing the Radio
Tuning
Select the desire “Tuner Configuration”
following the steps in the Menu section (page
15).
If is set to MANUAL, the radio will:
SCAN/ASCAN
Scans stations/CD tracks/MP3/WMA files and
folders and in tuner, stores strongest stations to
presets.
PLAY/PAUSE:
Press to pause / unpause current Media.
RPT (Repeat):
Press to repeat current track. Press again to
stop repeat. Look for the RPT icon in the radio
display to turn this feature ON or OFF.
BROWSE
Press to Navigate on the device and select a
specific song or play context (Applicable to USB
sticks, CD MP3 discs and iPods)
RDM (Random)
Press to play the tracks randomly. Press again
to stop random mode. Look for the RDM icon to
turn on in the radio display.
Radio
Audio Source
To access AM, FM, WX, SXM (if equipped),
iPod, USB, Rear Aux, Front Aux, CD or BT
Audio do one of the following:
Press the SRC radio button to scroll
through the options and select the desired
one.
Press the SRC button and then scroll the
source menu by knob rotation or
NEXT/PREV short presses and then select
by short-pressing the knob.
CD/MP3, USB/iPod, Front AUX and BT Audio
shall be accessed only if the radio model
supports them and a device is connected /
inserted for that specific source.
Please note, if a device is connected through
different sources at the same time, the
functionality cannot be guaranteed (Device
Dependent). Example: Device connected
Execute Manual Tuning when the
NEXT or PREV buttons are short
pressed.
Execute Seek when the NEXT or
PREV buttons are long pressed.
If is set to AUTO, the radio will:
Execute Seek when the NEXT or
PREV buttons are short pressed.
Execute Manual Tuning when the
NEXT or PREV buttons are long
pressed.
Manual Tuning
The current frequency will be
increased/decreased by 1 step of 0.2MHz (USA
FM mode), 10 kHz (USA AM mode) and one
channel (25 kHz) in WX mode.
Seeking a Station
When the Seek function is activated the radio
increments/decrements the frequency until a
tunable station is found.
6 | P a g e
Page 7

If a tunable station is not found the radio will
display “NO STATION FOUND”
Presets
Storing Radio Station Presets
Tune the desire frequency, and then long press
any of the Preset(1-6) buttons until the radio
produces a beep.
Tuning Radio Station Presets
Short press any of the Preset(1-6) buttons. The
frequency stored at the preset location is tuned
when the button is released.
SCAN
To initiate the Scan function, short press the
SCAN/ASCN button. When SCAN is initiated,
the radio seeks up in frequency and stops on
the next strong frequency for 8 seconds before
continuing to seek for the next strong station.
If no station is found in two passes through the
band, the radio will display “NO STATION
FOUND” and then tune its starting frequency.
AUTOSCAN
This function temporally stores the strongest 6
stations of the current band in the presets until
the radio is powered off or the source is
changed.
AUTOSCAN does not store the frequencies on
the presets on numerical order; they are stored
based on the order in which they were found
and on the quality of the frequency.
Owner´s Manual DEA5XX Radios
To initiate the AUTOSCAN function, long press
the SCN/ASCN button until the radio performs a
beep; then the “AUTO SCAN” icon will blink
while the radio is storing the temporary presets.
When the store process finishes the radio will
tune to the station stored in Preset 1 and the
“AUTO SCAN” icon shall be illuminated while
the mode is active.
To tune any of the 6 frequencies or to store new
presets follow the steps defined in the Presets
section.
To exit this mode and return to the original
presets execute any of the following actions:
• Press and hold the SCAN/ASCAN
button.
• Press the SRC/PWR button.
• Turn off the radio.
• Make an ignition cycle.
• Disconnect the battery.
WX
The WX band is for the Governmental weather
radio services frequencies; the radio can tune
the 7 weather channels following the steps in
Tuning, Presets and SCAN sections.
SXM (If Equipped)
Vehicles with a valid SiriusXM® satellite radio
subscription can receive SiriusXM
programming.
SiriusXM satellite radio has a wide variety of
programming and commercial-free music, coast
to coast, and in digital-quality sound.
SXM Display
When SiriusXM is active, the channel number,
channel name, artist name/content info, song
title or category name could be displayed on the
screen. SiriusXM may update the information at
any time.
To change the current display view, short press
the DISP button.
When a new channel is selected, a song
change occurs, SXM source is selected (from
power up or source change) or the information
is updated, all the elements will be displayed
using paging; the paging can be stopped by
short pressing the DISP button.
Display labels:
To easily recognize the displayed text the radio
uses the following convention:
Channel Number: CH
Channel Name: CH
Artist Name: ART
Content Info: INFO
Song Title: SONG
Category name: CAT
SXM Categories
SiriusXM stations are organized in categories.
The category list for SXM is in the following
webpage:
http://www.siriusxm.com/sxm/pdf/sirius/channel
guide.pdf
7 | P a g e
Page 8

To change the current category long press the
NEXT/PREV button and the radio will tune the
first channel on next or previous category.
Category mode Enable/Disabled
Category Search Mode Enabled means that
only channels in the current Category are
searched. When enabled, the CATEGORY icon
is turned on.
Category Search Mode Disabled means that all
channels are searched. When disabled, the
CATEGORY icon is turned off.
To enable/disable the category browse mode
follow the steps in the User Menu section
The default after a power up is Category
Disabled.
SXM Channel Selection
Presets and SCAN functions work the same as
defined in the SCAN subsection of AM-FM-WX
Radio.
Owner´s Manual DEA5XX Radios
SXM Radio ID:
If tuned to channel 0, “RADIO ID” label
alternates with the SXM radio eight-digit code.
This code is needed to activate the service.
DISP button does not work in channel 0.
Channel 0 is not available in category mode
enabled.
SXM Messages
SXM BUSY
The audio system is acquiring and/or
processing audio and/or text data. No action is
needed.
ART UNAVAIL
There is not Artist Name related with the current
song.
SONG UNAVAIL
There is not Song Title related with the current
song.
CHAN UNSUB
Active channel has become unsubscribed or the
requested channel is not unsubscribed.
SUBSCRIPTION UPDATED - PRESS
OK TO CONTINUE
The subscription of the radio was updated. To
remove the message and return to the previous
state pres “OK” (Knob).
CH UNAVAIL
Requested channel is reported unavailable for a
newly selected channel or the currently selected
channel.
Unavailable channels are those that are in the
legal channel range but are not currently
available for display or subscription as a
broadcast service.
After 3 seconds the previous channel (if
available) or channel 1 will be tuned.
NEXT button
While in SXM the radio will scroll to the next
channel available in numerical order.
PREV button
While in SXM the radio will scroll to the previous
channel available in numerical order.
If the SXM service is not activated, only the
free-to-air channels will be present.
CHAN UNAVAIL
There is no Channel Name related with the
current channel.
CHECK ANTENNA
SXM antenna or antenna cable is not
connected to the radio or the antenna is
shorted.
NO SIGNAL
SXM tuner module reports the No Signal
condition. Under this condition only Channel 0
will work as stated in this manual.
iPod
This Radio supports the following iPod models:
iPod classic® (6th generation)
iPod nano® ( 6G)
iPod touch® (4G)
iPhone® (3G, 3GS, 4, and 4S)
Other iPods may be played, but functionality is
not guaranteed.
Radio provides up to 1A of charge, so any
device connected to the USB that requires less
than 1 A will be charged.
8 | P a g e
Page 9

There may be problems with the operation and
function in the following situations:
When connecting an iPod on which a more
recent version of the firmware is installed
than is supported by the Radio.
When connecting an iPod with firmware
from other providers is installed.
Playing from an iPod
To connect an iPod:
1. Connect one end of the standard iPod USB
cable to the iPod's dock connector.
2. Connect the other end to the USB port in
the front radio display.
3. Radio will start playing the USB and shows
the track number, Song, Artist, elapsed
time, and Album information when
available.
4. iPod music information displays on the
radio’s display and begins playing through
the vehicle’s audio system.
5. If the iPod is an unsupported model, it can
still be listened to in the vehicle by
connecting to the auxiliary input jack using
a standard 3.5mm (1/8 in) stereo cable
Expected behavior when iPod is connected:
• The iPod battery recharges automatically
while the vehicle is on.
• The iPod shuts off and stops charging
when the vehicle is shut off.
iPod Menu
Press the magnifying glass (preset 1) button
while USB source (iPod connected) is active to
access the iPod Menu.
Use the Volume Knob or Next/Prev button to
navigate through the different options.
Use the iPod Menu to select:
Owner´s Manual DEA5XX Radios
Playlists:
1. Press to view the playlists on the iPod.
2. Select a playlist name to view a list of all
songs in the playlist.
3. Select the song from the list to begin
playback.
Artists:
1. Press to view the artists on the iPod.
2. Select an artist name to view a list of all
albums with songs by the artist.
3. Select an album.
4. Select the song from the list to begin
playback.
Albums:
1. Press to view the albums on the iPod.
2. Select an album name to view a list of all
songs on the album or select All Songs to
view all songs on the iPod.
3. Select the song from the list to begin
playback.
Genres:
1. Press to view the genres on the iPod.
2. Select a genre name to view a list of artists
of that genre.
3. Select an artist to view albums or All
Albums to view all albums of that genre.
4. Select Artist to view albums.
5. Select Album to view songs.
6. Select the song from the list to begin
playback.
Podcasts:
1. Press to view the podcasts on the iPod.
2. Select a podcast name to begin playback.
Songs:
1. Press to view a list of all songs on the iPod.
2. Select the song from the list to begin
playback.
Composers:
1. Press to view the composers on the iPod.
2. Select the composer to view a list of songs
by that composer.
3. Select a song from the list to begin
playback.
Audio Books:
1. Press to view the audio books on the iPod.
2.
Select the audio book from the list to begin
playback.
When an iPhone or iPod Touch with iOS lower
than iOS 5.0 is connected through USB and
Bluetooth, the audio may not be heard when the
iPod source is selected. To correct this situation
select either the dock connector in the phone or
disconnect and reconnect the Apple device.
Note: iOS is the Apple Operative System.
Use the following controls to play the iPod:
PREV (Previous):
Press to seek to the beginning of the current or
previous track.
If the track has been playing for less than ten
seconds, it seeks to the previous track. If longer
than ten seconds, the current track starts from
the beginning.
NEXT (Next):
Press to seek to the next track.
FF/FR (Fast Forward/Fast
Reverse)
To fast forward or reverse through a track,
press and hold Next or PREV button.
9 | P a g e
Page 10

RDM (Random):
Press to play the tracks randomly. Press again
to stop shuffle mode. Look for the RDM icon to
turn on in the radio display.
RPT (Repeat):
Press to repeat current track. Press again to
stop repeat. Look for the RPT icon to turn on in
the radio display.
Error Messages
If an “
UNSUPPORTED
it could be for one of the following reasons:
When the iPod connected is not supported
(look at page 7 for the list of iPods
supported).
The iPod does not respond to the radio
commands, in this case reset the iPod and
try again the connection.
If a “
NO MUSIC
be for one of the following reasons:
There are not any playable files in the iPod.
” message is displayed,
” message is displayed, it could
USB
Playing from a USB
A USB mass storage device can be connected
to the USB port.
The USB port is in the front of the radio display.
Five volts DC power is limited to one amp from
this port. Devices such as iPad that require
greater current will not charge from this port.
Owner´s Manual DEA5XX Radios
USB MP3 Player and USB
Drives
The USB MP3 players and USB drives
connected must comply with the USB Mass
Storage specification:
MS-Dos partition only.
Class specification (USB MSC) and
supports formats of FAT32, FAT16, NTFS,
and HFS+.
Hard disk drives may be played, but they
are not supported.
The radio will not be able to play back
write-protected music.
MTP players are not supported.
The following guidelines must be met when
creating MP3 files; otherwise the files might not
play:
For MP3 Files
Bit rates: 32, 40, 48, 56, 64, 80, 96, 112,
124, 160, 192, 224, 256, 320 kbps for
MPEG-1 Audio Layer 3.
Sampling frequencies: 32, 44.1 and 48
kHz for MPEG-1 Audio Layer 3.
Maximum number of folders: Eight folders
with 255 files per folder.
Maximum of 1,000 files on a disc.
M3u and pls playlist versions supported.
Recorded on a CD-R or CD-RW with a
maximum capacity of 700 MB.
For Unprotected WMA Files
Versions: 1, 2, 7, 8, 9 and 9.1.
Bit rates: 32 - 320 kbps.
Sampling frequencies: 32 - 48 kHz.
Playing an USB Device
1. Connect the USB and it begins to play.
2. Using the SRC Button select the USB
source.
3. Radio will start playing the USB and will
show the track number, Song, Artist,
elapsed time, and Album information when
available.
Use the following controls to play the disc:
PREV (Previous):
Press to seek to the beginning of the current or
previous track.
If the track has been playing for less than ten
seconds, it seeks to the previous track. If longer
than ten seconds, the current track starts from
the beginning.
NEXT (Next):
Press to seek to the next track.
FF/FR (Fast Forward/Fast
Reverse)
To fast forward or reverse through a track,
press and hold Next or PREV button.
RDM (Random):
Press to play the tracks randomly. Press again
to stop shuffle mode. Look for the RDM icon to
turn on in the radio display.
RPT (Repeat)
Press to repeat current track. Press again to
stop repeat. Look for the RPT icon to turn on in
the radio display.
Folder Up
Press to select next Folder.
If playing a specific playable scope, when
pressed the radio will jump and starts playing
track 1 as newly inserted USB.
10 | P a g e
Page 11

Folder Down
Press to select previous Folder, if playing a
specific playable scope, when pressed will
jump and starts playing track 1 as newly
inserted USB
SCAN
Short press to start the SCAN of the current
playing context.
Long press to SCAN the whole device starting
on track1.
Error Messages
If an “
UNSUPPORTED
it could be for one of the following reasons:
When a MTP Player or a USB device with
unsupported format or partition is
connected.
When the device is damaged.
When the connected device was not
connected as mass storage device.
If “
NO MUSIC
be because there are not MP3 or unprotected
WMA files that can be played.
” message is displayed, it could
” message is displayed,
Front Auxiliary
In front auxiliary mode, you can play an external
device such as an iPod® or MP3 player via the
auxiliary input jack on the front of the receiver.
To use an external device simply connect the
device via the auxiliary input jack.
Front auxiliary mode will not be available if no
device is connected to the auxiliary input jack
on the front of the receiver.
Owner´s Manual DEA5XX Radios
Rear Auxiliary
In rear auxiliary mode, you can play an external
device that you have connected via the
receiver’s rear power auxiliary input lines.
To use an external device simply connect the
device via the auxiliary input jack and select it
using the source button.
Rear Aux source will be available even when no
device is attached to the rear input.
Bluetooth (If Equipped)
The radio can connect to a Bluetooth Device.
To use this functionality your device requires
Bluetooth and to be paired and connected to
the radio.
The supported device list is located in the
following web page:
http://www.panapacific.com/support
Other devices may be connected and played
but functionality cannot be guaranteed.
You can connect up to 10 devices to the radio;
the radio will connect to the first available paired
device, starting from the last paired/connected
device.
The Bluetooth Menu is available when the
Phone button is pressed for more than 3
seconds. To navigate through it, rotate the
knob.
The Bluetooth Menu consists of the following
options: BT ENABLE, CONNECT PH,
DISCONNECT PH, ADD PHONE and DELETE
PH (some options are only available when a
device has been paired previously)
Enabling/Disabling Bluetooth
To Enable/Disable Bluetooth in your Radio (if it
is not already activated):
Press the Phone button for more than 3
seconds while the Radio is ON. The
Bluetooth Menu will be shown.
Rotate the Volume Knob until the display
shows: “BT Disable” or “BT Enable”.
Press the Volume Knob to Enable or
Disable the Bluetooth.
When devices were previously paired the
Phone Icon will be active and the arrow icons
will blink until the reconnection of the previously
paired phones is attempted (each phone
reconnection will be attempted three times).
Pairing a Bluetooth Device
To complete pairing the following steps must be
followed:
1. Enable Bluetooth on the radio and on the
device. Refer to your device’s Manual for
more information.
2. Pair the Device to the Radio:
Press the Phone button for more than 3
seconds The Bluetooth Menu will be
shown.
Rotate the Volume Knob until the display
shows: ADD PHONE.
Press the Volume Knob to confirm the
action.
The radio will display ADDING PH for 3
seconds. In this discoverable mode, the
Bluetooth status icon will blink for up to 3
minutes. If no phone was found, the radio
will display NO PH FOUND and the Phone
and arrows icon will be disabled.
During the discoverable mode set your cell
phone to add a Bluetooth device and look
for the name “Delphi500 Radio.”
11 | P a g e
Page 12

o Follow the instructions on your phone to
add a connection. When necessary, use
the 4-number PIN 0000 to connect to the
radio.
o When the cell phone has been
successfully added, the radio will display
PH CONNECTED and then the Bluetooth
device name. The Phone Icon will be
active on the display, arrows will be
disabled.
o When the radio connects, the Bluetooth
icon will blink. The blinking icon signifies
that the receiver is attempting to download
the cell phone’s CONTACTS (for the DIAL
CONTACTS function). The icon will cease
to blink if all contacts have been
downloaded or if the radio times out from
receiving contacts from the cell phone
device. See your phone’s user guide for
more information. See Notes 1, 2 and 4.
Connecting a Device
If your device was previously paired, you can
simply connect to the device:
1. Press the Phone button for more than 3
seconds. The Bluetooth Menu will be
shown
2. Rotate the Volume Knob until the display
shows CONNECT PH.
3. Press the knob to confirm the action. Select
the desired Device (rotate the knob and
confirm by pressing the knob). The radio
will show CONNECTING for 3 seconds.
4. When the radio connects, the radio will
display PH CONNECTED and the Device
Friendly Name, the Bluetooth icon will
blink. The blinking icon signifies that the
receiver is attempting to download the cell
phone’s CONTACTS (for the DIAL
CONTACTS function). The icon will cease
to blink if all contacts have been
downloaded or if the radio times out from
receiving contacts from the cell phone
Owner´s Manual DEA5XX Radios
device. Phone Icon will be active on the
display.
Disconnecting a Device
If your device is currently connected and you
required disconnecting it from the radio, follow
the next actions:
1. Press the Phone button for more than 3
seconds. The Bluetooth Menu will be
shown
2. Rotate the Volume Knob until the display
shows DISCONNECT PH.
3. Press the knob to confirm the action. The
radio will show DISCONNECT PH for a
short time. Once the Phone is
disconnected the radio will display
DISCONNECTED and then the Bluetooth
device name. The Phone Icon will be
inactive.
Deleting one or all Devices
To delete from the radio one or all devices
previously paired:
1. Press the Phone button for more than 3
seconds. The Bluetooth Menu will be
shown
2. Rotate the Volume Knob until the display
shows DELETE PH.
3. Press the knob to enter the submenu.
4. The radio will show a device list (navigate
through it by rotating the knob). Select the
device to be deleted or select DELETE ALL
to erase all the paired devices in the list by
pressing the Volume Knob. The radio will
show PH DELETED.
Hands Free/ Bluetooth Features
Once your device is properly paired (see Paring
a Bluetooth Device) and connected (see
Connecting a Device), the radio supports the
following Hands Free features if the connected
device has that capability.
DIAL MENU
The radio can retrieve the last calls and contact
information from the device (Hands Free profile
must be available in the device and in some
cases the action must be accepted by the user)
The dial menu is accessed when the device is
not in a call and the Phone button is pressed.
DIAL REDIAL
The user can retrieve the last phone number
called and place a call. Press the Phone button
and the last phone number called will be dialed.
QUICK DIAL
The radio is capable of storing phone numbers
in any of the available preset buttons.
To save a phone number, you can select the
contact using either the DIAL CONTACTS
feature or the LAST CALLS feature. When the
desired contact phone number is displayed,
press and hold any of the PRESET buttons until
you hear a beep confirming the phone number
has been saved.
To dial a saved phone number, select QUICK
DIAL from the menu and rotate the knob to
select the appropriate PRESET number. Press
the knob to place the call to the saved phone
number.
To change presets simply repeat the process
with the desired phone number. Presets are
overwritten.
12 | P a g e
Page 13

DIAL CONTACT
The radio is able to read and display cell phone
contacts. Press the Phone button to show the
DIAL MENU and rotate the knob until DIAL
CONTACTS is shown, press the knob to select
this feature. Rotate the knob to select between
the different stored contacts (up to 500 number
from the phone and 250 contacts from the SIM).
Press the OK button if you want to dial to the
listed contact.
The radio will download the following phone
numbers from each contact (if available):
HOME, WORK, MOBILE, OTHER and
PREFERRED. Within the menu they will be
displayed as either: H, W, M, O or P plus the 10
digit number (XXXXXXXXXX).
When the transfer is successful, the radio will
show the DIAL CONTACTS submenu. Each
time the radio connects to your phone, the DIAL
CONTACTS submenu is updated, so you may
need to repeat this manual operation as
needed.
LAST CALLS
The radio is capable of listing the last 10 calls
(DIALED, RECEIVED AND MISSED). Rotating
the knob will navigate the user through the
selected call list. Press the OK button to place
the call. See Note 1.
CALL OPTIONS
The following options are available during a
Hands Free call.
Accepting a Call
When an incoming call is received, the radio will
play the in bang ringtone if the device supports
this feature, otherwise a default ringtone will be
played, the user can adjust the Volume of the
ringtone, while the ringtone is played. Any
Owner´s Manual DEA5XX Radios
volume lower than 13, will not be considered for
the next incoming call. Volume above 13 will be
stored for the next call.
When an incoming call is received, the radio will
display the name (if available) and number of
the caller. To accept the call, press any of the
following radio buttons: Phone, Knob or NEXT.
Rejecting a Call
When an incoming call is received, the radio will
display the name (if available) and number of
the caller. To reject the call, press any of the
following radio buttons: ESC or PREV.
Ending a Call
When a Hands Free call is in progress, the
radio will display the caller’s number and the
elapsed time. To end a call, press any of the
following radio buttons: Phone, ESC or PREV.
Microphone Mute
When a Hands Free call is in progress, pressing
Pause/Play will mute the radio’s microphone.
Press again to deactivate mute.
Call Transfer
If a call is in progress, press the radio Phone
button for more than 3 seconds to transfer the
call to the cell phone for private conversations.
Repeat this process if you want to return into
Hands Free mode again. See Note 6.
BT Audio
Bluetooth Player
If your connected device supports this feature, it
can be used as an audio source input to the
radio, allowing you to enjoy the music files
stored on your phone.
This feature is recommended to be used with
the device default player. Functionality cannot
be warranted, when a third party player is used
in the connected device. The radio can be out
of synchrony if the user alters or command the
player within the phone.
To access music files on your phone press the
SRC button and select BT AUDIO.
In BT AUDIO you can use the following radio
buttons: Play, Pause, NEXT, PREV, Fast
Forward and Fast Reverse, Repeat and
Random, if the device supports them. See
Notes 1 and 3.
Play/Pause:
Press to play the current track. Press again to
pause the audio. See Note 5.
PREV (Previous):
Press to seek to the beginning of the current or
previous track.
If the track has been playing for less than ten
seconds, it seeks to the previous track. If longer
than ten seconds, the current track starts from
the beginning.
NEXT (Next):
Press to seek to the next track.
FF/FR (Fast Forward/Fast Reverse)
To fast forward or reverse through a track,
press and hold NEXT or PREV button
RDM (Random):
Press to play the tracks randomly. Press again
to stop shuffle mode. RDM Icon will be turn ON
or OFF when the feature is enabled or disabled.
RPT (Repeat):
Press to repeat current track. Press again to
stop repeat. RPT Icon will be turned ON or OFF
when the feature is enabled or disabled.
13 | P a g e
Page 14

Note 1: This function will only be shown if the
cell phone supports this feature.
Note 2: The contacts shown on the radio
display will depend on the information received
by the radio from the phone device used.
Note 3: Function may differ depending on the
phone.
Note 4: Some cell phones may require enabling
this feature through their own applications.
Please consult your cell phone user guide
regarding how to enable it.
Note 5: Some phones will make the radio
display BT AUDIO PAUSE while audio is
available. This is normal on phones that do not
have full compatibility with this radio Bluetooth
remote control commands.
Note 6: Some devices will disconnect Bluetooth
when a transfer is performed.
Radio System Settings
The radio contains two menus for settings
adjustment:
Audio Control Menu.
User Menu
These menus are defined in the following
sections.
Audio Control Menu
The Audio Control Menu is shown when the
Volume knob is pressed for less than 2
seconds.
In this menu the user can adjust the bass,
middle, treble, fade, balance and auto EQ.
Furthermore, modify the Clock and Alarm
Settings.
Owner´s Manual DEA5XX Radios
Once in the Audio Control menu, rotate the
knob until the desired option is displayed, press
the volume knob to select.
BASS
The display will show BASS and its current level
from -6 to +6. Rotate the knob clockwise to
increase the Bass and counterclockwise to
decrease it.
MIDDLE
The display will show MIDDLE and its current
level from -6 to +6. Rotate the knob clockwise to
increase the Middle and counterclockwise to
decrease it.
TREBLE
The display will show TREBLE and its current
level from -6 to +6. Rotate the knob clockwise to
increase the Treble and counterclockwise to
decrease it.
FADE
The display will show FADE and its current level
from -6 to +6. Rotate the knob clockwise to
move the sound to the front speakers and
counterclockwise to move the sound to the rear
speakers. Fade is not available in 2-speaker
mode.
BALANCE
The display will show BALANCE and its current
level from L15 to R15. Rotate the knob
clockwise to move the sound to the right
speakers and counterclockwise to move it to the
left speakers.
AUTO EQ
The display will show the current selected
option. Rotate the knob clockwise and
counterclockwise to cycle through auto EQ
options from 1 to 7.
Options are:
1. Pop
2. Rock
3. Country
4. News
5. Jazz
6. Classical
7. Manual
To select the desired option, press the knob
again
CLOCK
To adjust the time in the radio, press the knob
button to show the Audio Control Menu. Rotate
the knob until the Clock is shown on the display
and press the knob to enter the Clock Menu.
Once in the Clock Menu you can select 12-Hour
or 24-Hour format by rotating the knob and
pressing it to confirm.
Finally, after the format configuration and
confirmation, adjust the time settings and
confirm the changes by pressing the Knob
button
ALARM
To set the Alarm press, enter the Audio Control
Menu, select Alarm and press the knob. Once
in the Alarm Menu, change the ALARM
ON/OFF by rotating the knob and pressing the
knob to confirm the selection. When the user
selects ALARM ON, the Alarm Icon will be set
to ON and the following configuration options
will be shown:
TIME:
The format will be the same as the current clock
The alarm hour digits will begin to flash.
14 | P a g e
Page 15

selection (12- or 24-hour mode). Change the
hour by rotating the knob and confirm the hour
by pressing the knob. After that the alarm
minute digits will begin to blink, change and
confirm the selection.
SET TONE or SET MUSIC:
between SET TONE or SET MUSIC by rotating
the knob and pressing the knob.
VOLUME:
volume can be changed between Low, Mid and
High (no sound will be heard while setting up
the Tone volume). When Music is selected,
adjust the volume from 0 to 30.
When Tone is selected, the
Change
Turning the Alarm Off
When the alarm is triggered, to cancel the
alarm, short press the preset 3 button. If you do
not turn the alarm off, it will automatically shut
off after 63 minutes.
Activating Snooze
To SNOOZE the alarm, press any button for
less than 2 seconds when the alarm sounds,
except Preset 3 button. SNOOZE will appear for
3 seconds and the alarm will be postponed for 9
minutes.
User Menu
The User Menu is shown when the Volume
knob is pressed for more than 2 seconds.
In this menu the user can configured the
following options:
Speakers
Seek Sensitivity
Playback configuration
Dimming
Category Enable/Disable
Owner´s Manual DEA5XX Radios
Hue Adjustment.
Not all the options are available in all the
modes. See restrictions in the following
sections.
Once in the user menu, rotate the knob until the
desired option is displayed, press the volume
knob to select.
Speakers (SPEAKERS)
The display will show SPEAKERS and the
current selected option. This submenu allows
you to change the speakers between 2 and 4
Channels. Rotate the knob to change between
2CH or 4CH and press the Knob to select the
desired option.
Seek Sensitivity (SEEK SEN)
The display will show SEEK SENS and the
current level from -2 to +2. Rotate the knob
clockwise to increase the Sensitivity value and
counterclockwise to decrease it. Press the Knob
to select the desired option. This option is only
available when radio is playing Tuner Mode.
Tune Configuration (TUNE CFG)
The display will show TUNE and the current
selected option Auto or Manual. Rotate the
knob to change between AUTO and MANUAL,
press the Knob to select the desired option.
Playback Configuration (PLBK
CFG)
This menu allows the user to select the NEXT
and PREV buttons configuration. The display
will show the current selected option SEEK or
FAST F/F. Rotate the knob to change between
SEEK or FAST F/F, press the Knob to select
the desired option. This option is only available
when the radio is playing CD, USB or iPod
Mode.
Dimming (DIMMING)
When the vehicle uses dimming by CAN or
Analog configuration, the display will show
DIMMING 0. This value can be adjusted from 10 to +10. Otherwise the display will show
DIMMING and the current selected level from 0
to 30. Rotate the knob clockwise to increase the
Dimming and counterclockwise to decrease it
Category Enable/Disable (CAT
E/D)
The display will show CAT ENABLE or CAT
DISABLE depending on the current selection.
Rotate the knob to change between the two
options and press the Knob to confirm the
selection. This option is only available in SXM
Mode.
HUE Adjustment (HUE ADJ)
Depending on the Radio colors available the
display will show any of the following options:
AMBER or GREEN
RED or BLUE
Rotate the knob to change between the two
options and press the knob to confirm selection.
This option is only available in models equipped
with Dual Color.
15 | P a g e
Page 16

Audio Players
CD Player
The player can be used for CD and MP3 audio.
With the vehicle on, insert a disc into the slot,
label side up. The player pulls it in and begins
playing.
The system is capable of playing:
Most audio CDs.
CD-R.
CD-RW.
MP3 or unprotected WMA formats.
When playing any compatible recordable disc,
the sound quality can be reduced due to disc
quality, the method of recording, the quality of
the music that has been recorded, or the way
the disc has been handled.
There can be increased skipping, difficulty in
recording tracks, difficulty in finding tracks,
and/or difficulty in loading and ejecting.
If these problems occur, check the disc for
damage or try a known good disc.
To avoid damage to the CD player:
Do not use scratched or damaged discs.
Do not apply labels to discs. (The labels
could get caught in the player).
Insert only one disc at a time.
Keep the loading slot free of foreign
materials, liquids, and debris.
Use a marking pen to label the top of the
disc.
Loading and Ejecting Discs
To load a disc:
1. Turn the vehicle on.
2. Insert a disc into the slot, label side up. The
player pulls it in the rest of the way. If the disc is
Owner´s Manual DEA5XX Radios
damaged or improperly loaded, there is an error
on the screen and the disc ejects.
The disc automatically plays once loaded.
Press “Eject” to eject a disc from the CD player.
If the disc is not removed within a short period
of time, it is automatically pulled back into the
player.
Playing an Audio CD
1. Using SRC Button select the CD source.
2. Radio will start playing the CD and will show
the track number, Song, Artist, elapsed time,
and Album information displays when available.
Use the following controls to play the disc:
PREV (Previous):
Press to seek to the beginning of the current or
previous track.
If the track has been playing for less than ten
seconds, it seeks to the previous track. If longer
than ten seconds, the current track starts from
the beginning.
NEXT (Next):
Press to seek to the next track.
Fast Reverse/Fast Reverse (FR/FR):
To fast forward or reverse through a track,
press and hold Next or PREV button.
RDM (Random):
Press to play the tracks randomly. Press again
to stop shuffle mode. Look for the RDM icon to
turn on in the radio display.
RPT (Repeat):
Press to repeat current track. Press again to
stop repeat. Look for the RPT icon to turn on in
the radio display.
SCAN
Short Press to start the SCAN of the current
playing context.
Long Press to SCAN the whole device starting
on track1.
Folder Up (only available when
playing MP3 CDs)
Press to select next Folder, if playing a specific
playable scope, when pressed the radio plays
track 1 as newly inserted USB.
Folder Down (only available when
playing MP3 CDs)
Press to select previous Folder, if playing a
specific playable scope, when pressed the radio
plays track 1 as newly inserted USB.
Error Messages
If “Disc Error” message is displayed and/or the
disc comes out, it could be for one of the
following reasons:
The disc has an invalid or unknown format.
The disc is very hot. Try the disc again
when the temperature returns to normal.
The road is very rough. Try the disc again
when the road is smoother.
The disc is bent.
The disc is dirty, scratched, wet, or upside
down.
The air is very humid. Try the disc again
later.
There was a problem while burning the
disc.
The label is caught in the CD player.
If the disc is not playing correctly, for any
other reason, try a known good CD.
If any error continues, contact your dealer.
16 | P a g e
Page 17

MP3
Playing an MP3 CD
To play an MP3 CD, follow the same
instructions as for “Playing an Audio CD.”
The following guidelines must be met when
creating an MP3 disc; otherwise it might not
play:
For MP3 Files
Bit rates: 32, 40, 48, 56, 64, 80, 96, 112,
124, 160, 192, 224, 256, 320 kbps for
MPEG-1 Audio Layer 3.
Sampling frequencies: 32, 44.1 and 48
kHz for MPEG-1 Audio Layer 3.
Maximum number of folders: Eight folders
with 255 files per folder.
Maximum of 1,000 files on a disc.
M3U and PLS playlist versions supported.
Recorded on a CD-R or CD-RW with a
maximum capacity of 700 MB.
For Unprotected WMA Files
Versions: 1, 2, 7, 8, 9 and 9.1.
Bit rates: 32 - 320 kbps.
Sampling frequencies: 32 - 48 kHz.
Music Navigation CD MP3 and
USB
Press the magnifying glass (preset 2) button
while CD, MP3 or USB source is active to
access the CD MP3/USB Music Menu.
Use the Volume Knob or Next/Prev button to
navigate through the different options.
The Radio has two Options
Owner´s Manual DEA5XX Radios
Folder Mode:
Press the Volume Knob to view the folders
stored on the disc. Select a folder to view the
list of all songs in that folder. There might be a
delay before the list displays. Select a song
from the list to begin playback.
The folder structure can support up to five
levels of depth. The folders and then songs will
display in alphabetical order.
In this mode the folders are shown first and at
the end the tracks of that folder.
Playlist Mode
Press the Volume Knob to view the playlists
stored on the disc. Select a playlist to start
playing the first track in the current selected
playlist. There might be a delay before the list
displays.
Special Considerations
Root Directory:
The root directory is treated as a folder. All files
contained directly under the root directory are
accessed prior to any root directory folders.
Empty Folders
If a root directory or folder is empty or contains
only folders, the player advances to the next
folder in the file structure that contains a
compressed audio file. The empty folder(s) are
not displayed or numbered.
OPTIONAL EQUIPMENT
Infrared Remote Control
Your receiver is compatible with an optional
handheld remote control available from your
dealer. The remote control will:
1. Select a band
2. Turn your receiver on and off
3. Select the next or previous track/
Seek up and down
4. Mute/Pause
5. Select AUX inputs 1 or 2, iPod/USB
6. Play a CD
7. Adjust volume
8. Select a preset station
Button Functions
BAND: Press this button to select FM1, FM2,
AM or WX.
PWR: Press this button to turn the receiver
on/off.
SEEK /: Press these buttons to move to
the next available radio station or to go to the
next track.
||: Press this button to reduce volume to a
minimum. The radio display will read
MUTE: To deactivate mute, press this button
again. The audio source will continue to play
while the volume is at a minimum.
17 | P a g e
Page 18

AUX: Press this button to select Front Auxiliary,
Rear Auxiliary, iPod/USB or Bluetooth® Audio.
CD: Press this button to turn on your integrated
CD player.
VOL +/-: Press this button to adjust the volume.
1 – 6: Press this button to advance through the
presets in the selected band.
FUSE
Radio’s fuse is located in the fuse box of the
vehicle.
The optimal fuse values are between 10A and
15A.
Tips and Troubleshooting
Chart
Radio
Unable to tune stations
You are in a weak signal area.
Increase the Seek Sensitivity (see Seek
Sensitivity section for details).
CD
CD player not functioning
Out of the operation range, Operation
temperature of the CD is -20° to 55°C (-4°F to
131).
Allow the vehicle´s interior temperature to
increase or decrease (depending on the
case).
Owner´s Manual DEA5XX Radios
CD Insertion is not possible
A CD is already on the CD player.
Eject the CD and remove it.
iPod
iPod does not play or there is no
sound
The iPod has not been recognized.
Verify that the iPod is supported.
If the iPod is supported, reset the iPod and
re-connect again (see iPod section for
details).
iPod not functioning
Out of the operation range, Operation
temperature of the iPod player is -20° to 85°C (4°F to 185).
Allow the vehicle´s interior temperature to be in
human supportable range.
Bluetooth
My radio doesn't recognize my
Bluetooth enabled device.
Try one of the following actions:
1. Remove the device, after that pair and
connect the device. Refer to DELETE ONE
OR DELETE ALL DEVICES and to Pairing
a Bluetooth Device and Connecting a
Device sections.
2. Make sure the device is turned on.
3. Make sure the Bluetooth adapter on your
radio is enabled, Refer to Bluetooth
Enabling/Disabling section.
4. The device might be out of range. Try
moving it closer.
The device and my radio can't
communicate.
Try one of the following actions:
1. Make sure that you selected the correct
device to be connected to. For example,
you might have two or more devices
previously paired or connected, so make
sure you selected the right device.
2. Some devices require a passkey before
they can be connected to the radio.
3. Probably an incorrect passkey was typed
or the time limit expired for typing the
passkey. Refer to Connecting a Device
section.
4. If the device is close to other devices that
use radio frequencies (such as microwave
ovens, cordless phones, remote controls
for electronics or lighting, or 802.11
wireless networks), those devices might be
creating interference. Try moving the
device that isn't working farther away from
the other devices.
Device music cannot be heard
1. Verify the device is paired and connected.
Refer to sections: Pairing a Bluetooth
Device and Connecting a Device.
2. Make sure BT AUDIO SRC is selected in
the source list menu. Refer to PWR/SRC
Button section.
3. Adjust the Volume on the radio by rotating
the knob.
4. Verify that your device is not paused.
5.
Make sure your device has music files.
18 | P a g e
Page 19

Rear Seat Audio (RSA)
The RSA shows no link.
The radio requires up to 15 seconds to wake
up, so if you wake up the radio using the RSA
and the radio is in sleep mode, the RSA will
show "no-link" while the radio starts. The
communication shall be reestablished after this
time lapse expires.
Trademarks and License
Agreements
“Made for iPod” and “Made for iPhone” mean
that an electronic accessory has been designed
to connect specifically to iPod or iPhone and
has been certified by the developer to meet
Apple performance standards.
iPod and iPhone are trademarks of Apple
Computer, Inc., registered in the U.S. and other
countries.
“SiriusXM” means that the radio has been
designed and certified to meet SiriusXM
standards
Owner´s Manual DEA5XX Radios
SiriusXM is a trademark of SiriusXM Company
registered in the U.S.
FCC Information
Radio is complaint with Part 15 of the Federal
Communications Commission (FCC) rules and
with Industry Canada Standards RSSGEN/210/220/310.
Bluetooth
The Bluetooth® word mark and logos are
owned by the Bluetooth® SIG, Inc. and any use
of such marks by this radio is under license.
Precautions
Product Cleaning
Use a soft dry cloth for periodic cleaning. for
more severe stains, please dampen the cloth
with water only. Anything else might affect the
appearance or damage the lens or plastics.
Moisture Condensation
You may notice the CD playback sound
wavering due to the water condensation. If this
happens please remove the disc from the
player and wait about an hour for the moisture
to evaporate.
Damage Disc
Don’t attempt the following
• To play a cracked, warped or
damaged disc. Playing a bad disc
could severely damage the playback
mechanism.
• To grip or pull out the disc while it is
being pulled back into the player by
the automatic reloading mechanism.
• To insert a disc into the mechanism
when the unit is powered OFF.
Bluetooth Distraction
When using a cell phone, it can be distracting to
look too long or too often at the screen of the
phone or the infotainment system. Taking your
eyes off the road too long or too often could
cause a crash resulting in injury or death.
Focus your attention on driving.
Conformity assessment
issues
FCC/IC Regulatory Notice
Modification statement
Delphi Electronics & Safety has not approved
any changes or modifications to this device by
the user. Any changes or modifications could
void the user’s authority to operate the
equipment.
Delphi Electronics&Safety n’approuve aucune
modification apportée à l’appareil par
l’utilisateur, quelle qu’en soit la nature. Tout
changement ou modification peuvent annuler le
droit d’utilisation de l’appareil par l’utilisateur.
Interference statement
This device complies with Part 15 of the FCC
Rules and Industry Canada licence‐exempt
RSS standard(s). Operation is subject to the
following two conditions: (1) this device may not
cause interference, and (2) this device must
accept any interference, including interference
that may cause undesired operation of the
device.
19 | P a g e
Page 20

Le présent appareil est conforme aux CNR
d'Industrie Canada applicables aux appareils
radio exempts de licence. L'exploitation est
autorisée aux deux conditions suivantes : (1)
l'appareil ne doit pas produire de brouillage, et
(2) l'utilisateur de l'appareil doit accepter tout
brouillage radioélectrique subi, même si le
brouillage est susceptible d'en compromettre le
fonctionnement.
Radiation Exposure Statement
This device complies with FCC/IC radiation
exposure limits set forth for an uncontrolled
environment and meets the FCC radio
frequency (RF) Exposure Guidelines in
Supplement C to OET65 and RSS‐102 of the IC
radio frequency (RF) Exposure rules. This
transmitter must not be co-located or operating
in conjunction with any other antenna or
transmitter.
Le présent appareil est conforme à l'exposition
aux radiations FCC / IC définies pour un
environnement non contrôlé et répond aux
directives d'exposition de la fréquence de la
FCC radiofréquence (RF) dans le Supplément
C à OET65 et RSS‐102 de la fréquence radio
(RF) IC règles d'exposition. L'émetteur ne doit
pas être colocalisé ni fonctionner conjointement
avec à autre antenne ou autre émetteur.
FCC Class B digital device notice
This equipment has been tested and found to
comply with the limits for a Class B digital
device, pursuant to part 15 of the FCC Rules.
These limits are designed to provide reasonable
protection against harmful interference in a
residential installation. This equipment
generates, uses and can radiate radio
frequency energy and, if not installed and used
in accordance with the instructions, may cause
harmful interference to radio communications.
However, there is no guarantee that
interference will not occur in a particular
Owner´s Manual DEA5XX Radios
installation. If this equipment does cause
harmful interference to radio or television
reception, which can be determined by turning
the equipment off and on, the user is
encouraged to try to correct the interference by
one or more of the following measures:
• Reorient or relocate the receiving
antenna.
• Increase the separation between the
equipment and receiver.
• Connect the equipment into an outlet
on a circuit different from that to which
the receiver is connected.
• Consult the dealer or an experienced
CAN ICES-3 (B) / NMB-3 (B)
This Class B digital apparatus complies with
Canadian ICES-003.
Cet appareil numérique de classe B est
conforme à la norme canadienne ICES-003.
1999/5/EC Directive regulatory
notices
This device has been evaluated against the
essential requirements of the 1999/5/EC
Directive.
Bulg
arian
radio/TV technician for help.
СнастоящетоDelphi Electronics &
Safetyдекларира, че DEA500
отговарянасъщественитеизискванияи
другитеприложимиизискваниянаДирек
тива 1999/5/ЕС.
Delphi Electronics & Safety tímto
prohlašuje, že tento DEA500 je ve
Czec
shodě se základními požadavky a
h
dalšími příslušnými ustanoveními
směrnice 1999/5/ES.
Undertegnede Delphi Electronics &
Safety erklærer herved, at følgende
Dani
udstyr DEA500 overholder de
sh
væsentlige krav og øvrige relevante krav
i direktiv 1999/5/EF.
Hierbij verklaart Delphi Electronics &
Safety dat het toestel DEA500 in
Dutc
overeenstemming is met de essentiële
h
eisen en de andere relevante
bepalingen van richtlijn 1999/5/EG.
Hereby, Delphi Electronics & Safety,
declares that this DEA500 is in
Engli
compliance with the essential
sh
requirements and other relevant
provisions of Directive 1999/5/EC.
Käesolevaga kinnitab Delphi Electronics
& Safety seadme DEA500 vastavust
Esto
direktiivi 1999/5/EÜ põhinõuetele ja
nian
nimetatud direktiivist tulenevatele
teistele asjakohastele sätetele.
Hiermit erklärt Delphi Electronics &
Safety, dass sich das Gerät DEA500 in
Ger
Übereinstimmung mit den
man
grundlegenden Anforderungen und den
übrigen einschlägigen Bestimmungen
der Richtlinie 1999/5/EG befindet.
ΜΕ ΤΗΝ ΠΑΡΟΥΣΑ Delphi Electronics
& Safety ∆ΗΛΩΝΕΙ ΟΤΙ DEA500
Gree
ΣΥΜΜΟΡΦΩΝΕΤΑΙ ΠΡΟΣ ΤΙΣ
k
ΟΥΣΙΩ∆ΕΙΣ ΑΠΑΙΤΗΣΕΙΣ ΚΑΙ ΤΙΣ
ΛΟΙΠΕΣ ΣΧΕΤΙΚΕΣ ∆ΙΑΤΑΞΕΙΣ ΤΗΣ
Ο∆ΗΓΙΑΣ 1999/5/ΕΚ.
20 | P a g e
Page 21

EN 62479:2010
Alulírott, Delphi Electronics & Safety
nyilatkozom, hogy a DEA500 megfelel a
Hung
vonatkozó alapvetõ követelményeknek
arian
és az 1999/5/EC irányelv egyéb
elõírásainak.
Delphi Electronics & Safety vakuuttaa
täten että DEA500 tyyppinen laite on
Finni
direktiivin 1999/5/EY oleellisten
sh
vaatimusten ja sitä koskevien direktiivin
muiden ehtojen mukainen.
Par la présente Delphi
Electronics&Safety déclare que
Fren
l'appareil DEA500 est conforme aux
ch
exigences essentielles et aux autres
dispositions pertinentes de la directive
1999/5/CE.
Hér með lýsir Delphi Electronics &
Icela
Safety yfir því að DEA500er í samræmi
ndic
við grunnkröfur og aðrar kröfur, sem
gerðar eru í tilskipun 1999/5/EC
Con la presente Delphi Electronics &
Safety dichiara che questo DEA500 è
Italia
conforme ai requisiti essenziali ed alle
n
altre disposizioni pertinenti stabilite dalla
direttiva 1999/5/CE.
Ar šo Delphi Electronics & Safety
Latvi
deklarē, ka DEA500 atbilst Direktīvas
an
1999/5/EK būtiskajām prasībām un
citiem ar to saistītajiem noteikumiem.
Šiuo Delphi Electronics & Safety
Lithu
deklaruoja, kad šis DEA500 atitinka
anian
esminius reikalavimus ir kitas 1999/5/EB
Direktyvos nuostatas.
Hawnhekk, Delphi Electronics & Safety,
jiddikjara li dan DEA500jikkonforma mal-
Malte
ħtiġijiet essenzjali u ma provvedimenti
se
oħrajn relevanti li hemm fid-Dirrettiva
1999/5/EC.
Owner´s Manual DEA5XX Radios
Delphi Electronics & Safety erklærer
Norw
herved at utstyret DEA500er i samsvar
egian
med de grunnleggende krav og øvrige
relevante krav i direktiv 1999/5/EF.
Niniejszym Delphi Electronics & Safety
oświadcza, że DEA500jest zgodny z
Polis
zasadniczymi wymogami oraz
h
pozostałymi stosownymi
postanowieniami Dyrektywy 1999/5/EC
Delphi Electronics & Safety declara que
Portu
este DEA500 está conforme com os
gues
requisitos essenciais e outras
e
disposições da Directiva 1999/5/CE.
Delphi Electronics & Safety týmto
Slov
vyhlasuje, že DEA500spĺňa základné
ak
požiadavky a všetky príslušné
ustanovenia Smernice 1999/5/ES.
Delphi Electronics & Safety izjavlja, da je
Slov
ta DEA500v skladu z bistvenimi
enian
zahtevami in ostalimi relevantnimi
določili direktive 1999/5/ES.
Por medio de la presente Delphi
Electronics & Safety declara que
Span
DEA500cumple con los requisitos
ish
esenciales y cualesquiera otras
disposiciones aplicables o exigibles de
la Directiva 1999/5/CE.
Härmed intygar Delphi Electronics &
Safety att denna DEA500står I
Swe
överensstämmelse med de väsentliga
dish
egenskapskrav och övriga relevanta
bestämmelser som framgår av direktiv
1999/5/EG.
In order to satisfy the essential requirements of
1999/5/EC Directive, the product is compliant
with the following standards:
RF spectrum use EN 300 328 v1.7.1
(R&TTE art. 3.2)
EMC (R&TTE art.
3.1b)
Health & Safety
(R&TTE art. 3.1a)
The conformity assessment procedure referred
to in Article 10 and detailed in Annex IV of
Directive 1999/5/EC has been followed with the
involvement of the following Notified Body
Notified Body:
AT4 wireless, S.A.
ParqueTecnologico de Andalucía
C/ Severo Ochoa 2
29590 Campanillas – Málaga
SPAIN
Notified Body No: 1909
Thus, the following marking is included in the
product:
There is no restriction for the commercialization
of this device in all the countries of the
European Union.
EN 301 489-1 V1.9.2
EN 301 489-17 V2.2.1
EN 60950-1:2006 +
A11:2009 + A1:2010 +
A12:2011 + AC:2011
21 | P a g e
 Loading...