

Page 1

1) Read the instructions carefully.
2) Before starting the appliance, make sure
the filters are in position.
3) Check the filters regularly and if necessary
brush or replace.
4) If you wash the filters, make sure they are
completely dry before replacing them.
5) Keep the suction outlet away from eyes,
ears, nose etc when the appliance is in
operation.
6) Do not vacuum up red hot objects (cinders,
cigarette ends, etc).
7) Always unplug the appliance from the
mains socket when not in use or before
cleaning or maintenance.
8) Do not use the appliance if it appears to be
faulty.
9) To avoid damaging the insulation, do not
run the appliance over the power cable.
10)Never unplug the appliance by pulling the
power cable or the appliance itself.
11)Keep the appliance out of reach of children
or unfit persons.
12)Use the appliance for domestic use only as
described in the instructions.
13)For repairs, contact your dealer or an
authorized service centre only
The manufacturer reserves the right to modify appliances
and tools without warning. Original spare parts and tools
should always be used to maintain the efficiency of your
appliance. Failure to do so invalidates the guarantee.
9
WARNINGS
GB
DESCRIPTION
A. Handgrip
B. Hose with handgrip
C. Built-in handle
D. Power regulator (if present)
E. Clip for opening dust bag compartment
F. Air outlet filter grill
G. Dust bag full indicator
H. ON/OFF switch
I. Cable winder
L. Suction port
M. Carpet/floor brush
N. Multipurpose nozzle for upholstered furniture
O. Crevice tool
Page 2
PREPARATIONS FOR USE
FITTING THE HANDLE
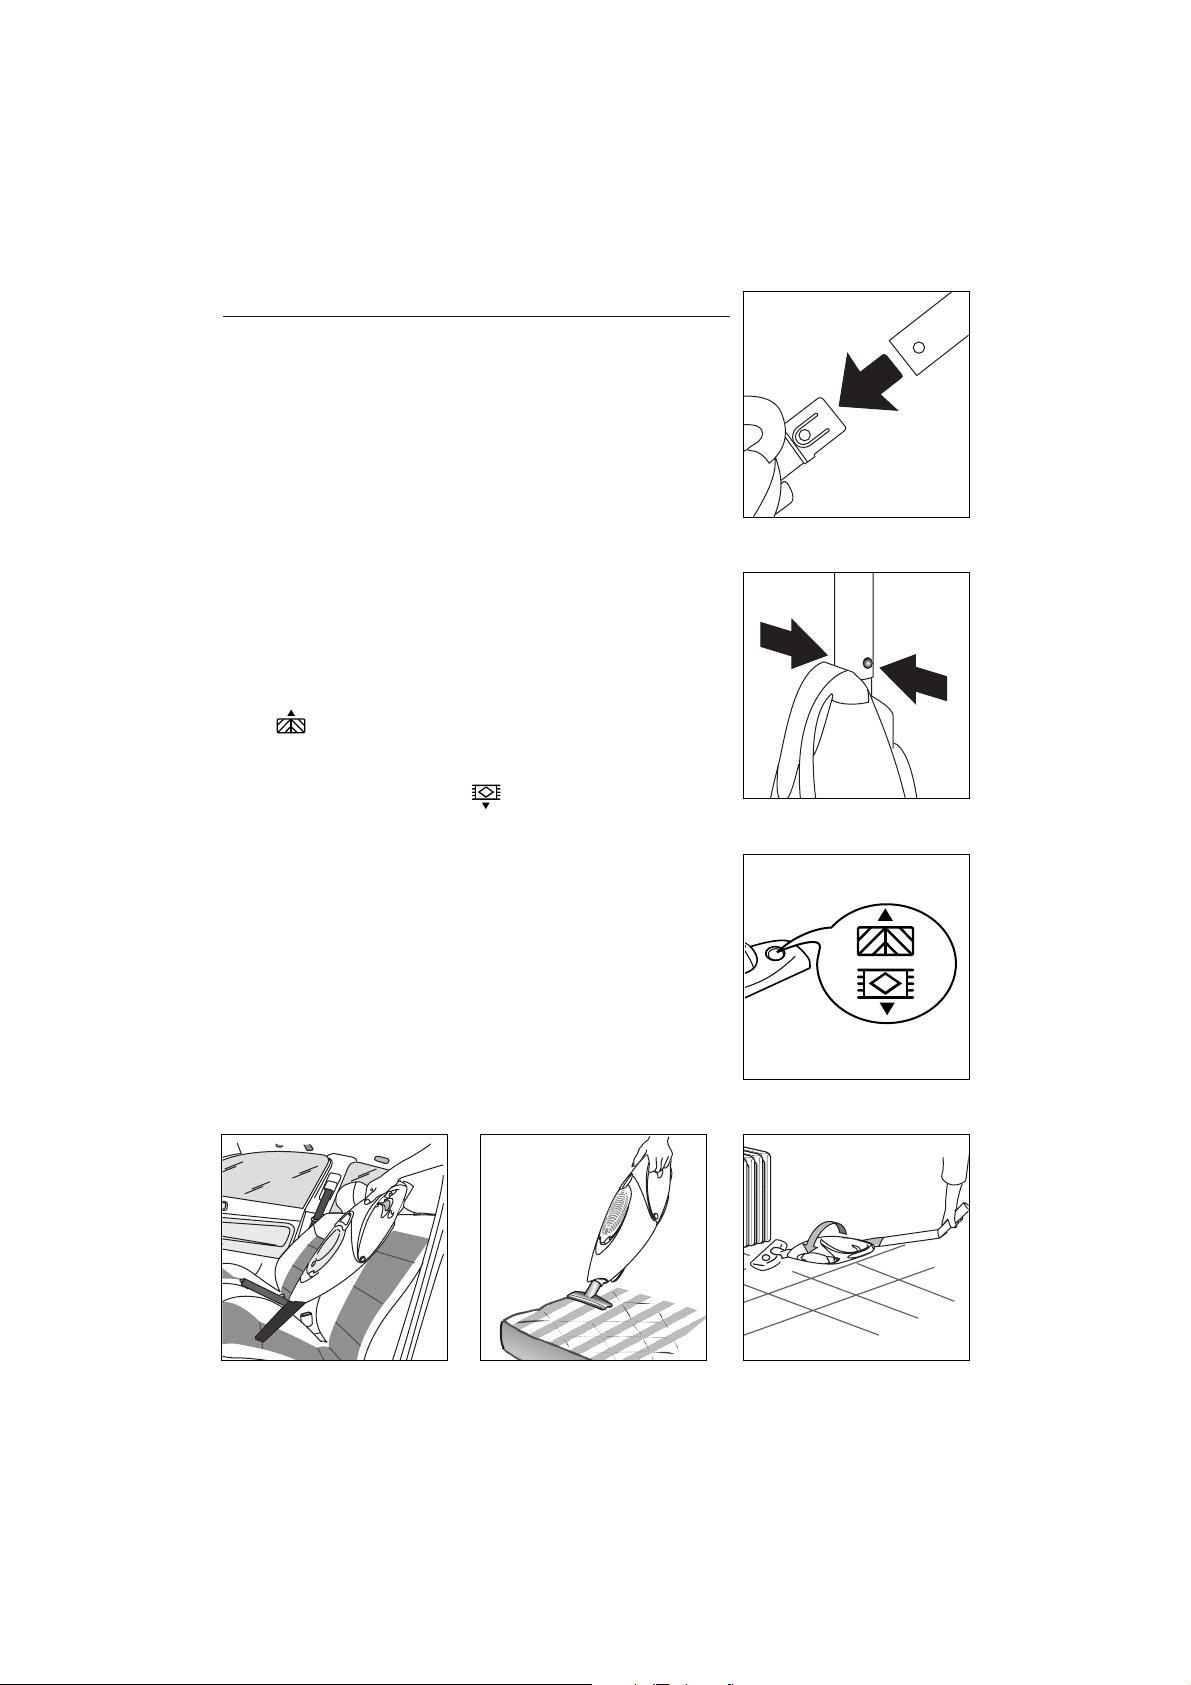
After unpacking the appliance, fit the hose with handgrip as shown
in fig.1.
Make sure the tab on the hose coupling clicks into place in the circular housing in the aluminium extension tube (fig.2).
The handle can be pulled out to use the appliance as a portable
vacuum cleaner (fig.5 and 6). Just press on the circular housing on
the tube (fig. 2) and pull upwards.
DESCRIPTION OF THE TOOLS
To make sure the tools are correctly attached to the cleaner, press in
firmly:
Carpet/floor brush (M)
Efficiently removes dust from floors (marble or tiled), rugs or carpets.
When the pedal (fig. 3) is pushed towards the "hard floors" position ( ), the bristles protrude to clean hard floors more efficiently. This position is recommended for in-depth cleaning of floors
and for floors with pronounced joints. When the pedal is pushed
towards the "carpets" symbol ( ), the bristles retract and the
brush is ready to clean fabric surfaces and delicate floors such as
parquet, marble, etc.
To reach under radiators or shallow furniture, flatten the brush by
lowering it and rotating it clockwise or anticlockwise (Fig. 4).
Multipurpose nozzle for upholstered furniture (fig. 5)
Ideal for cleaning sofas, armchairs, upholstery, car interiors, blankets, mattresses, curtains, etc.
Crevice tool (fig. 6)
For cleaning corners, edges, etc.
fig. 1
fig. 2
fig. 3
fig. 4
fig. 6 fig. 5
10
Page 3
TURNING THE APPLIANCE ON
Set the appliance up according to your cleaning requirements, then
plug into a suitable mains socket. Press the ON/OFF switch (H).
MODELS WITH POWER REGULATOR (D) (IF PRESENT)
In models with power regulation (D), adjust the power by turning
the regulator. Before turning the appliance on, you are recommended to turn the regulator to minimum.
The electronic regulator enables suction power to be varied according to the type of surface to be treated.
• Maximum power: use for carpets, rugs, corners, edges and
heavy dirt (gravel, breadcrumbs, etc).
•Medium power: saves electricity, reduces noise and is more than
enough to remove dust from hard floors and upholstery.
•Minimum power: essential when vacuuming delicate and light
objects such as lightweight upholstery to avoid the fabric being
sucked up and hampering efficient cleaning.
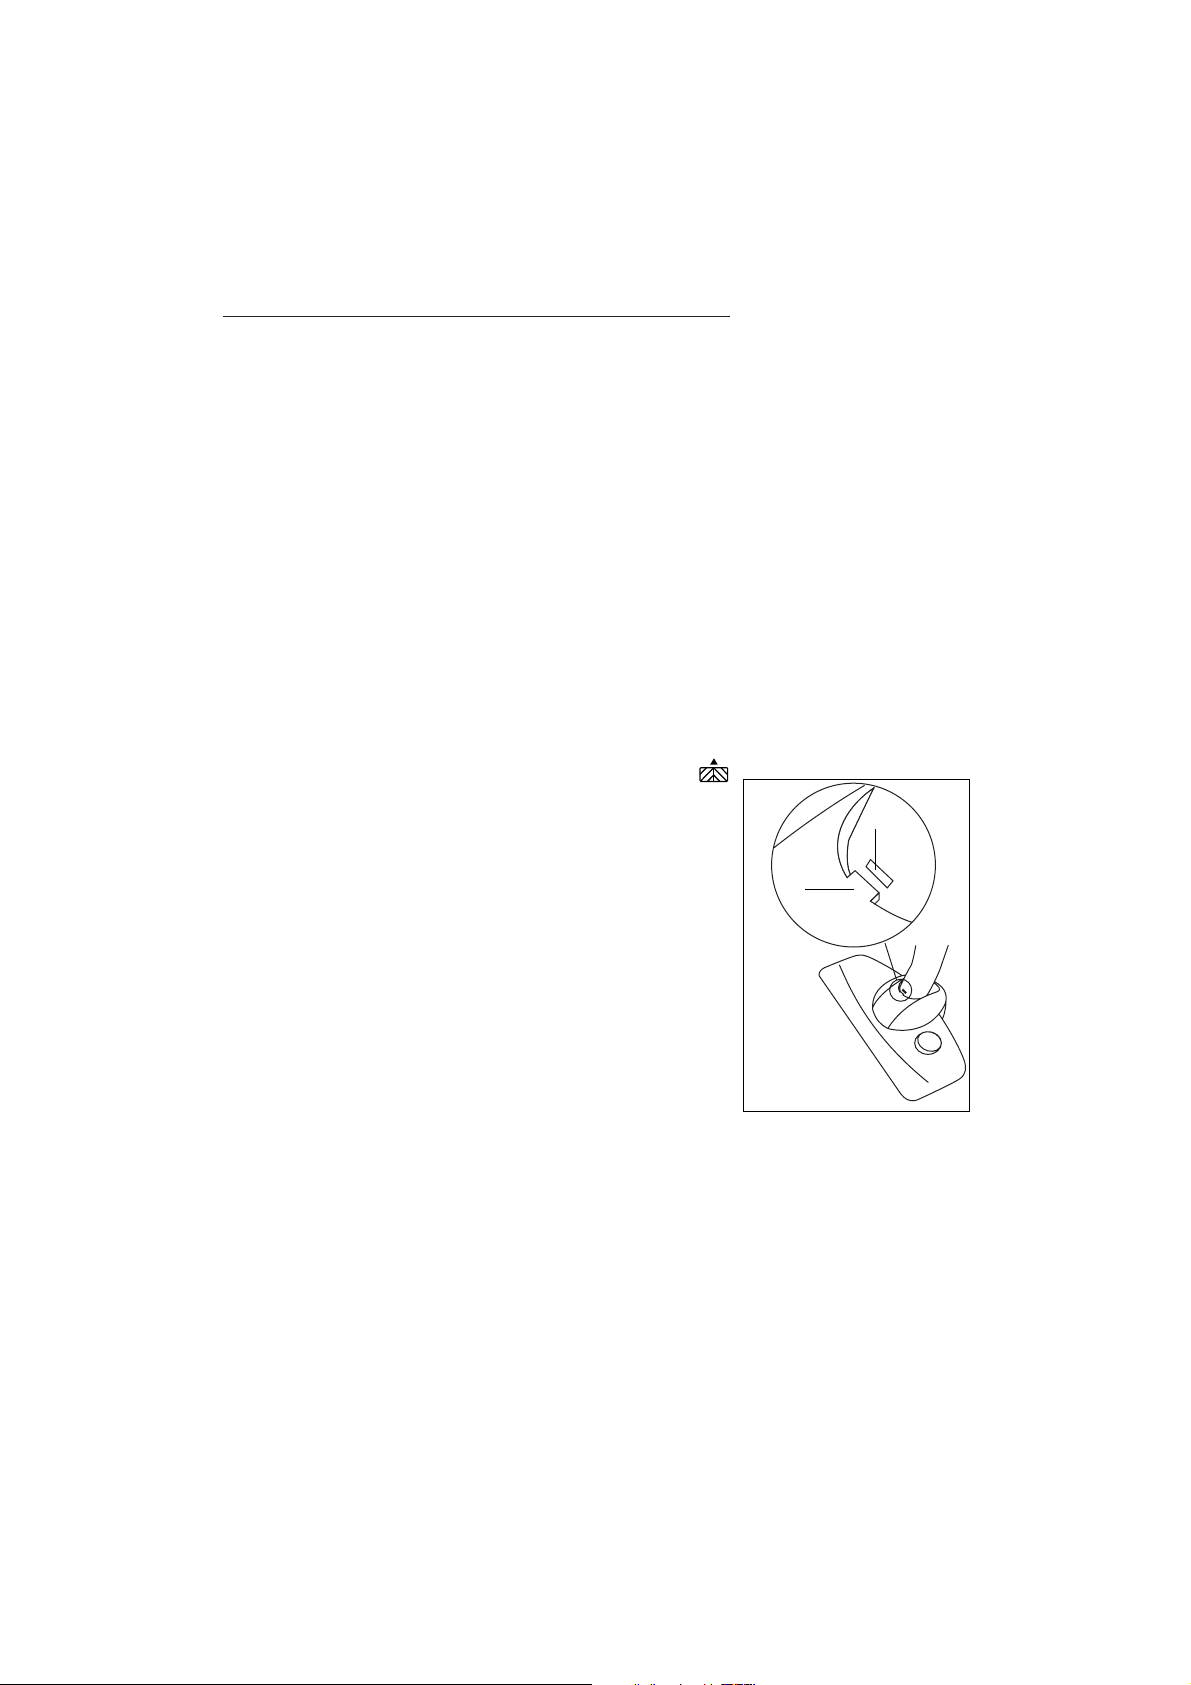
"PARKING" POSITION
While cleaning, the appliance can be left briefly in the vertical.
Simply extract the bristles (by pressing the pedal towards the
position), place the brush in an upright position and push the cleaner forwards until the guide X fits into the slot Y (see figure 7).
To resume work, pull the cleaner by the handgrip towards itself until
the brush joint is released.
The "parking" position can also be used to put the appliance
away after cleaning. You should, however, always rest it against
a wall.
11
fig. 7
X
Y
Page 4
CLEANING AND MAINTENANCE
Before carrying out maintenance of any sort, always make sure
the appliance is unplugged from the mains.
Dust bag full indicator (G)
The dust bag full indicator is activated when the vacuum hose is blocked or the paper dust bag is over full. The appliance takes a special
"square" bag. The shape of this bag exploits the available space to the
full. The quantity of dust collected is the same as in larger bags and
the performance of the appliance is always constant and efficient.
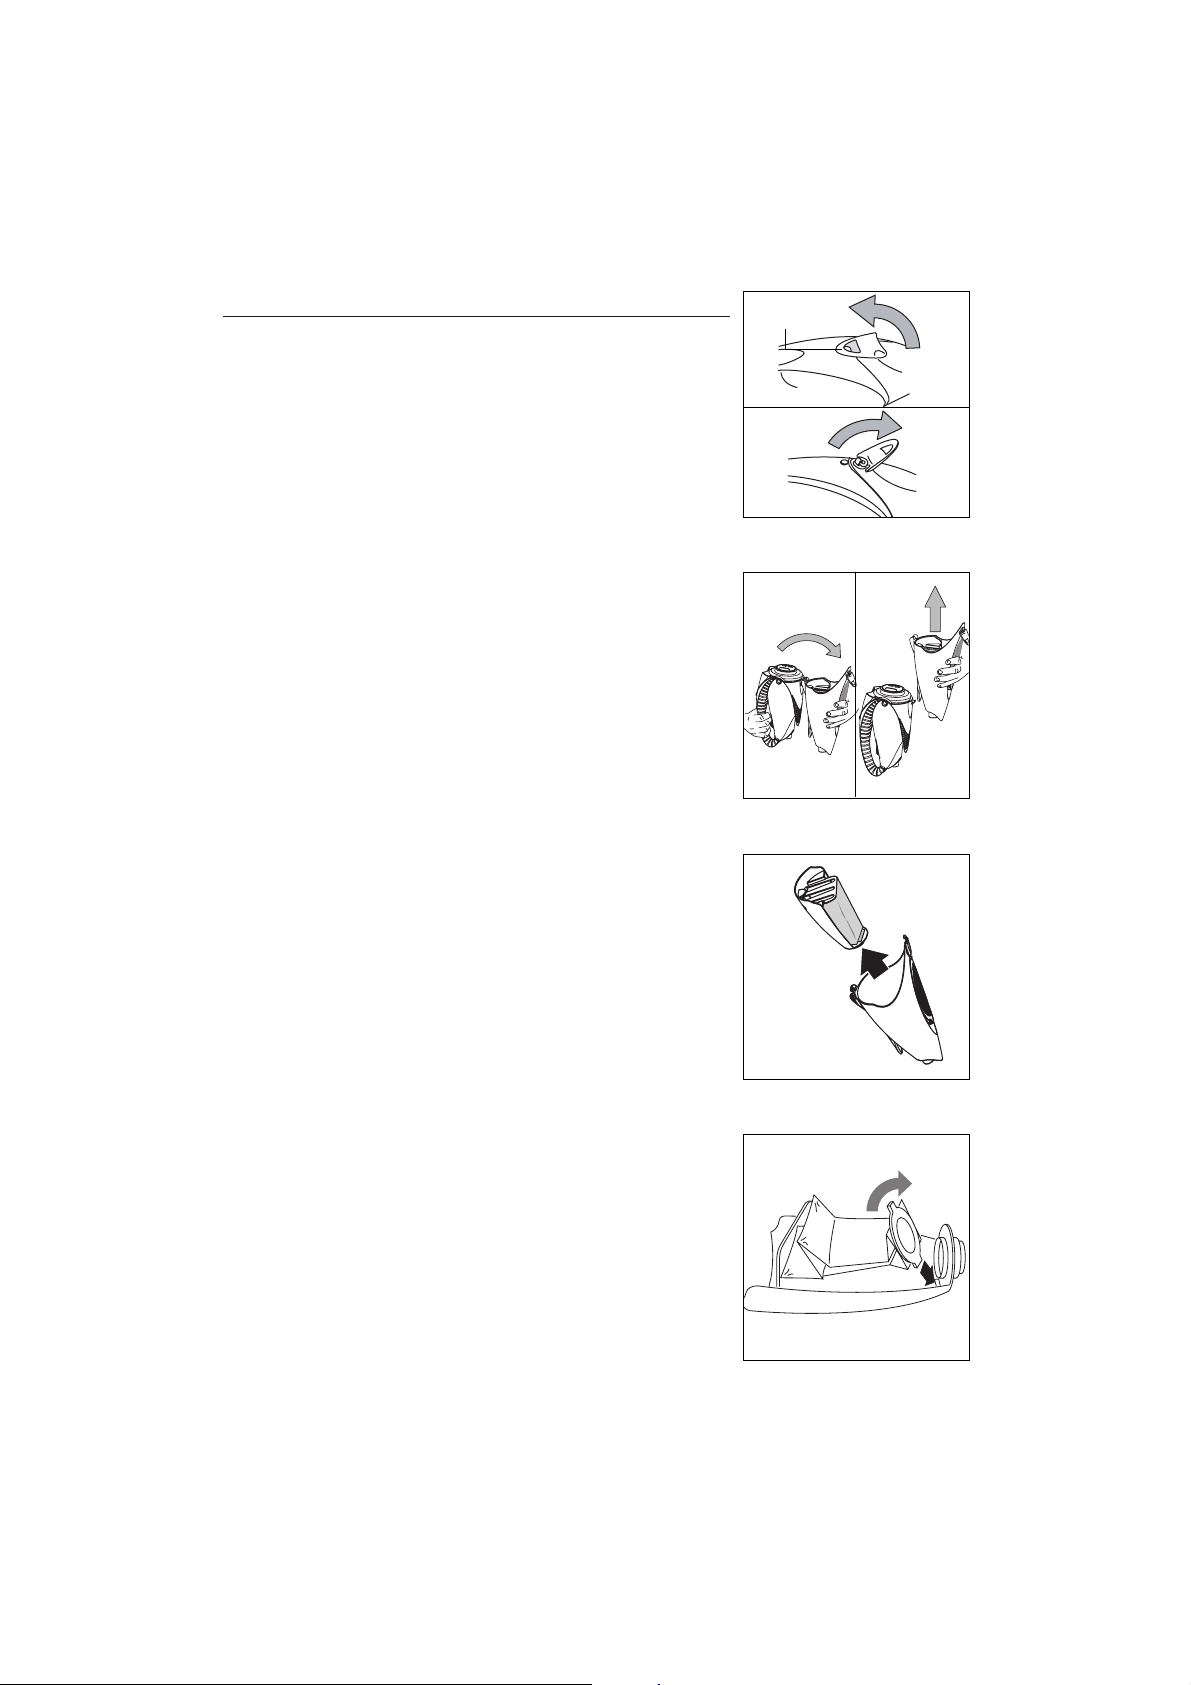
Replacing the dust bag.
Release the clip E (fig. 8), open the dust bag compartment and
separate it from the motor assembly (fig. 9).
Remove the dust bag holder and bag (fig. 10). Remove the bag and
replaced with a new one (fig.11).
Before inserting the new bag, fold the two bottom corners of the
bag itself. Thread the widest cardboard tab into the slot on the bottom of the bag holder, then push the top part of the cardboard forwards until it fits fully into the opening in the holder.
Make sure the bag is attached to the holder correctly.
Insert the bag holder into the dust bag compartment.
Close the dust bag compartment and fasten with the clip E.
fig. 10
fig. 11
12
Fig. 8
Clip E
1
2
Fig. 9
2
1
Page 5
Motor filter maintenance
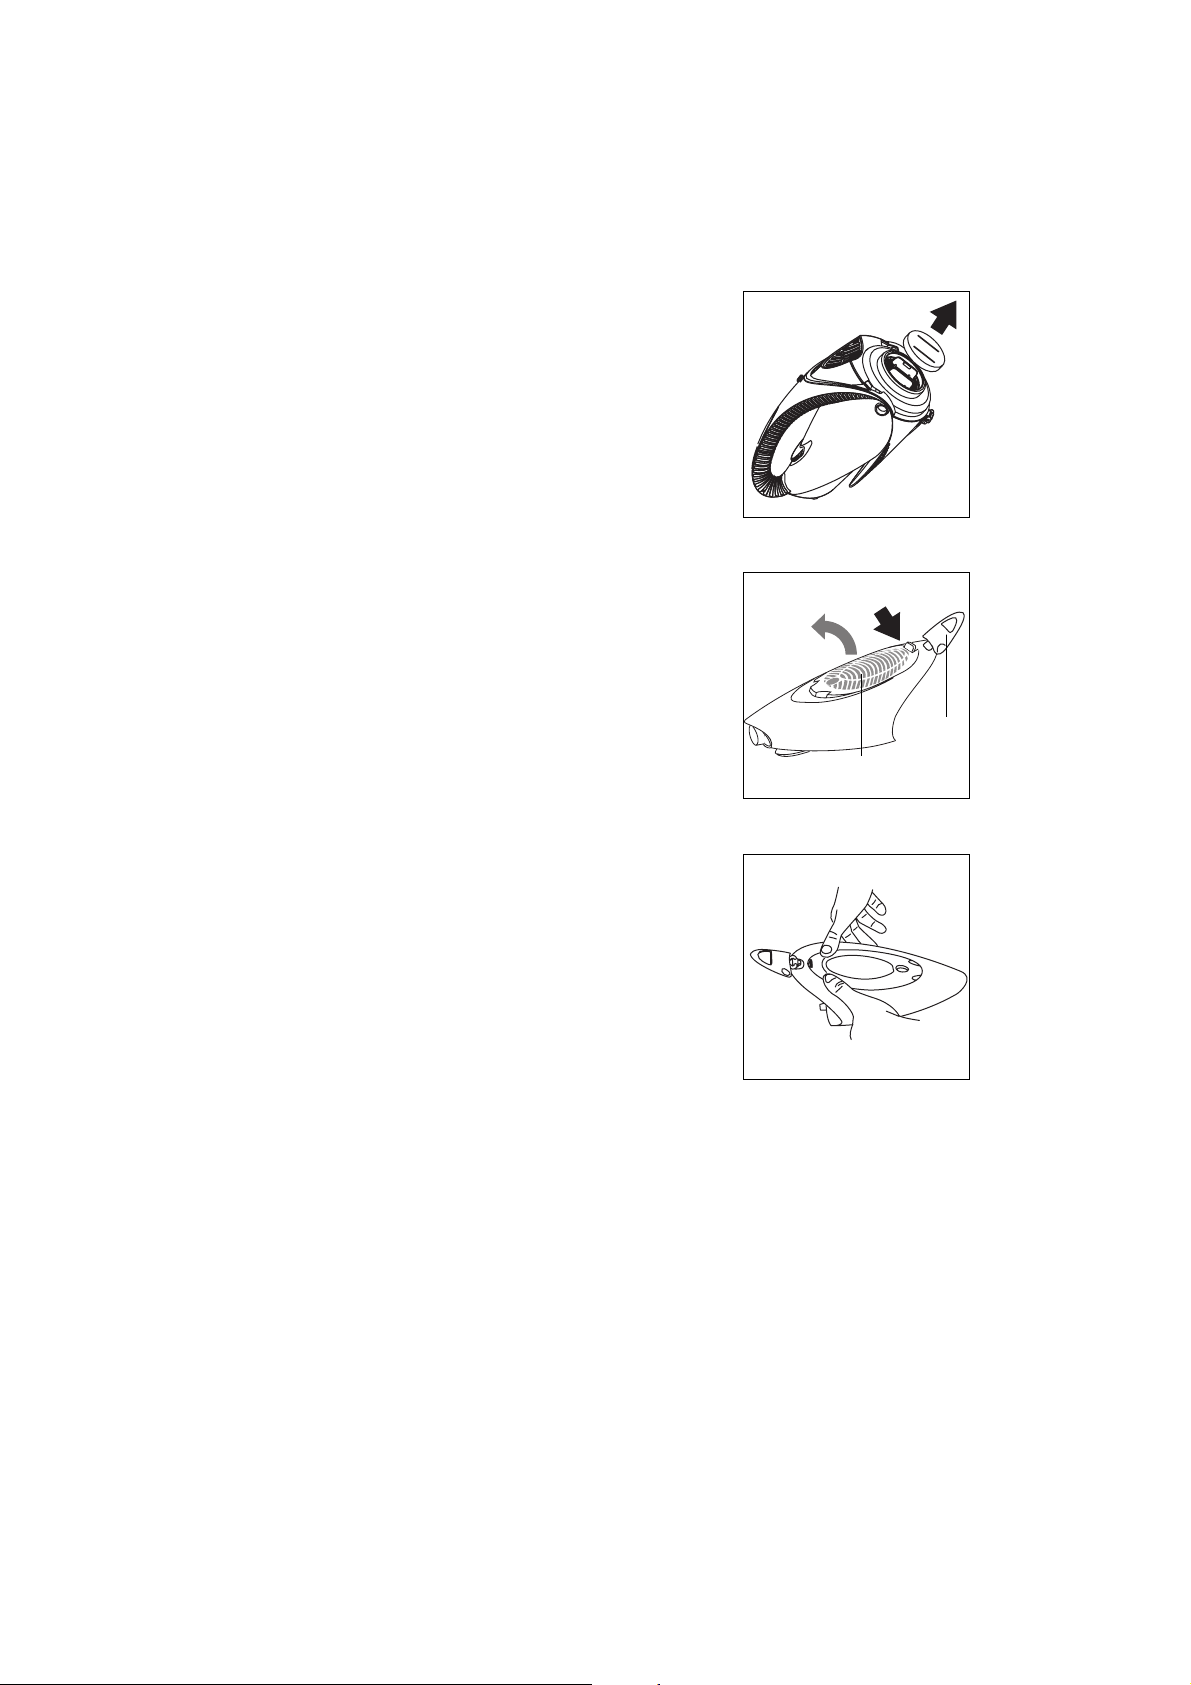
To keep suction power at maximum efficiency, the motor cool and
the air given out completely clean and dust free, always keep the
motor filter clean. To remove the filter, open the appliance, following the instructions for replacing the dust bag, then remove the filter (fig. 12). Simply wash regularly with water and normal detergent then when dry, replace.
Replacing the microfilter
Release clip E.
Release grill F using the tab (Fig. 13), then remove the grill and
extract the filter.
Replace the filter with a new one, attaching it to the teeth provided.
Replace the grill by pressing it down firmly on all sides (fig. 14). The
microfilter should be changed often (about every 2-3 months) to
avoid bacteria circulating in the environment.
13
Fig. 12
Fig. 13
F
E
Fig. 14
1
2
 Loading...