

De'Longhi GB-5726100200 Owner's Manual
IMPORTANT
GB
• Before using your barbecue, check that it has not been damaged in transit.
• Install the appliance on a flat surface out of the reach of children, as certain parts of the appliance
become very hot during operation.
• Before inserting the plug into the power socket, check that:
- the voltage shown on the rating plate (located on the bottom of the appliance) corresponds to the
mains voltage at the power socket
- the mains circuit and the power socket are sufficient for the load shown on the rating label, which
is located underneath the appliance
- the plug fits the power socket (if not, replace the socket)
- the power socket is adequately earthed; the manufacturer declines all responsibility if this safety
regulation is not observed.
• The temperature of accessible surfaces may be high when the appliance is operating.
• When operating the appliance, ensure that the power cable does not touch hot parts.
• Wash all the accessories carefully before using the appliance.
• When using for the first time, operate the appliance without food for at least 5 minutes until the "new"
smell disappears. Ensure that the room is well ventilated when doing this.
• If it is necessary to use an extension cable, ensure that the extension is fitted with an earth wire and
that the wires have at least the same section as those of the power cable (1.5 mm2).
• The power cable must not be replaced by the user, as this requires the use of special tools. If the power
cable is damaged, contact an authorized Service Centre.
This appliance conforms to EEC Directive EN 55Covered heating elemen for the suppression of radio
interference. The materials and objects intended to come into contact with foodstuffs conform to the
requirements of EEC Directive 89/109.
WARRANTY
Cut out the warranty card printed on the box. The card should be completed and kept together with a receipt
showing the date of purchase, and shown to the service engineer if repairs should be necessary.
We warrant this appliance to be free from defects in manufacturing and materials for one (1) year
from the date of purchase.
ASSEMBLY
• Before inserting the plug into the power socket, assemble the appliance carefully as follows:
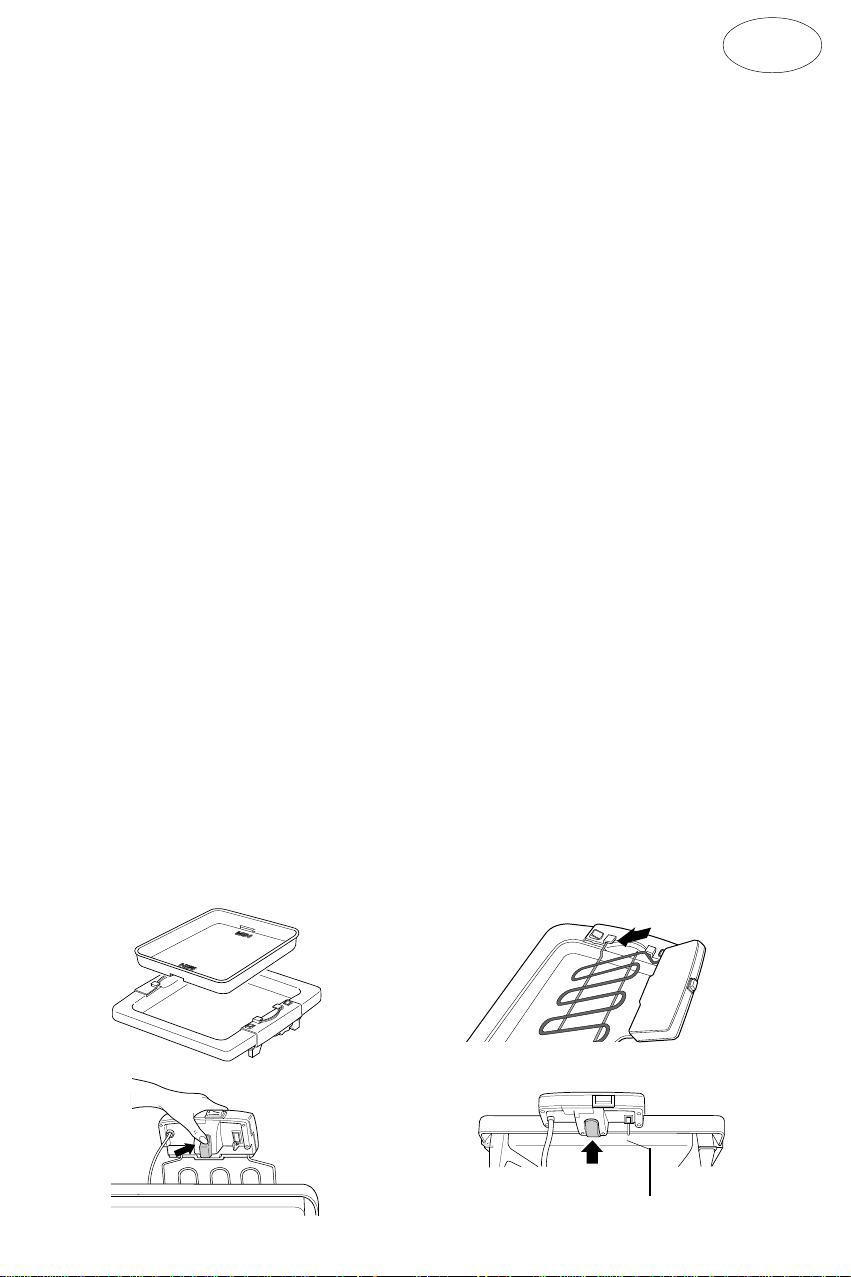
1) Place the drip tray (if supplied) in the base of the barbecue (fig. 1).
2) Insert the extremities of the heating element into the slots in the handles (fig. 2). Then press the lever
(fig. 3) and attach the control panel to the base of the barbecue as shown in fig.4.
Ensure that the control panel is correctly attached to the base of the appliance. A special safety device
ensures that the appliance cannot be switched on unless the control panel is correctly attached.
Fig. 1
Clip for power
Fig. 3 Fig. 4
cable and plug
Fig. 2
9
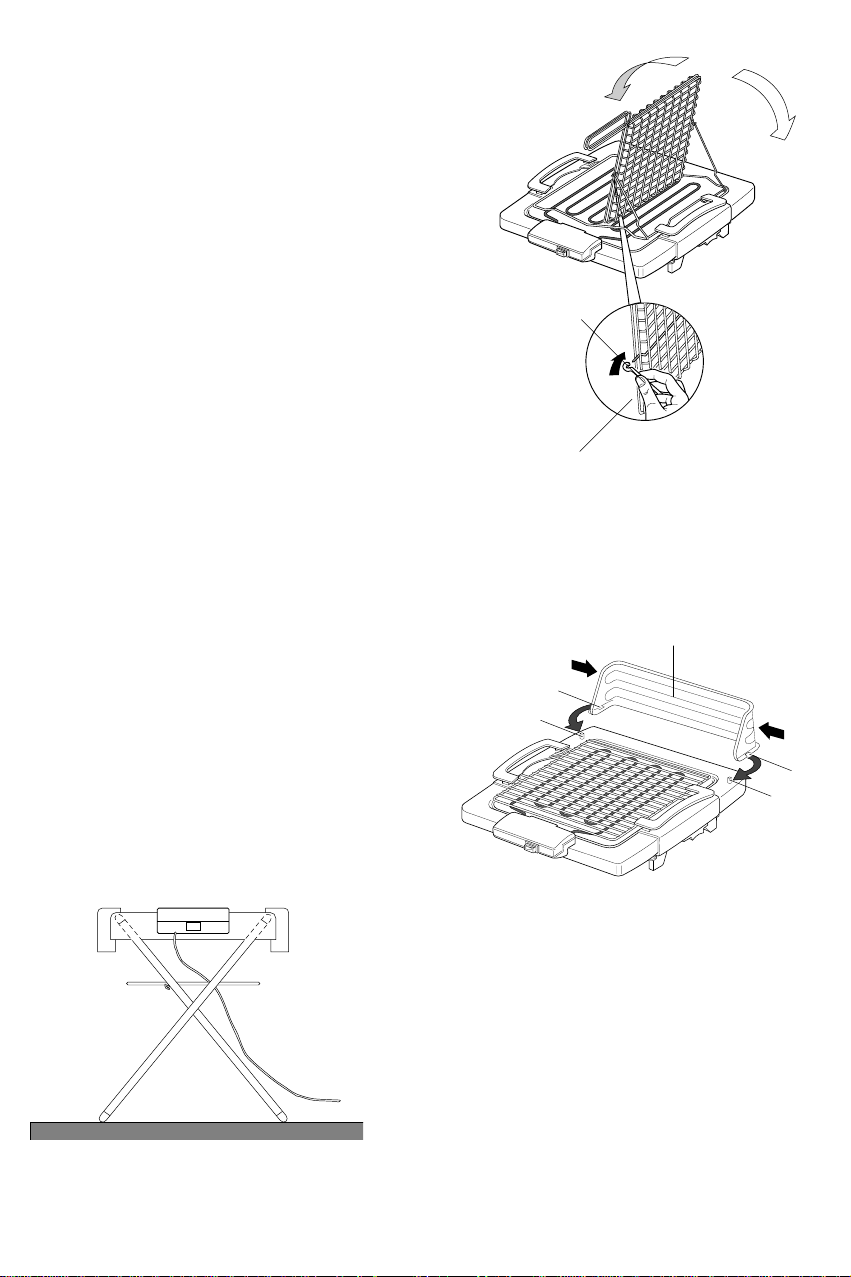
3) Some models feature a special rotating grilling
rack, which should be fitted as follows:
- Insert the pivot pins (A) into the eyelets (B)
on the grilling rack support (fig. 5).
- Insert the feet of the grilling rack into the
slots in the handle on the base of the
barbecue.
N.B. The pivot pins on the grilling rack are of
different dimensions. If necessary, turn
the grilling rack support so that the pivot
pins fit correctly into the eyelets.
A
Fig. 5
B
OUTSIDE USE
If your equipment can be used outdoors (the model's number ending in ".O" - consult the label
plate under the equipment), you are recommended to follow these guidelines:
1. Do not let the equipment stand in the rain. Bring it inside whenever not in use.
2. The electric feed cable and its extension cords must be kept dry (and, if possible, off the ground).
3. You should not cook outdoors when there is a
strong wind and when there is very cold weather.
Even so, the equipment comes with a wind
break (C) to be used on slightly windy days.
To set the equipment up correctly, bend the side
walls slightly until the grooves (B) snap in under
the pegs (A), as shown in the illustration.
B
A
C
B
A
Fig. 6
4. Some models come with a foldable support
stand especially practical for outdoor use:
- set up the stand as indicated in the
instructions enclosed.
- position the stand on hard, level ground so
as to prevent the equipment from tipping
Fig. 7
5. When the equipment is used outdoors, the cooking times listed in the recipes as well as on
the following tables may have to be increased depending on the temperature and wind
conditions.
10
while in use;
- place the grill itself on the top of the support
stand (as shown in fig. 7).
 Loading...