

Page 1

Instructions
Electric oil filled radiator
with Electronic Climate Control
5710004200 hm uk 31-01-2002 14:43 Pagina 1
Page 2
2
Fig.1
Fig.2
Fig.4
MANAUTO
0
:
°
C
Fig.3
5710004200 hm uk 31-01-2002 14:43 Pagina 2
Page 3
3
1. GENERAL INSTRUCTIONS
Remove the heater from the packaging. Turn upside down and rest on the polystyrene.
Check that neither the heater nor the power cable has been damaged in any way during transportation.
Do not operate the heater if damaged.
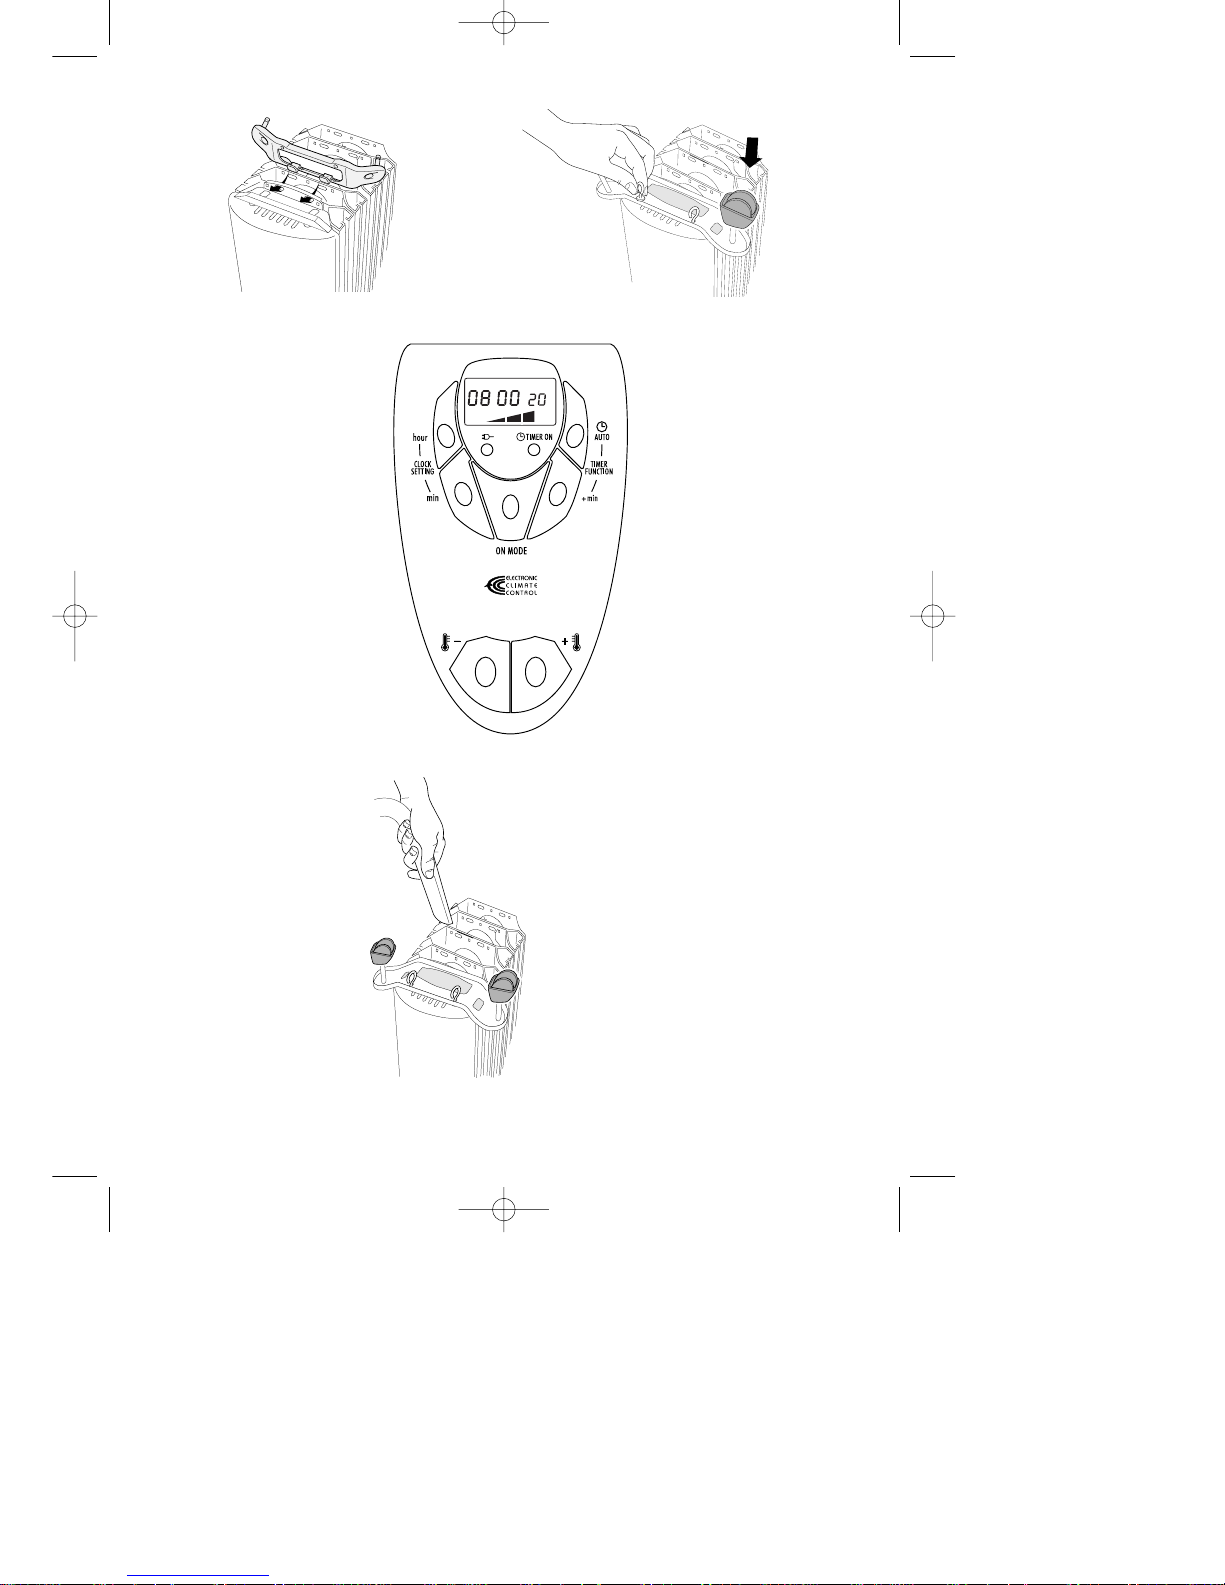
2. FITTING THE BRACKETS AND CASTORS
Insert the 2 tabs in the centre of the brackets into the location slots in the end column (at both
ends of the heater) (fig. 1).
Use the 4 eye bolts supplied with the appliance to fasten the brackets in position (fig. 2)
screwing them into the plastic fixing strip.
Fit the castors to the pins on the feet and push firmly until they click into position. Pull each
wheel to check that it is correctly inserted.
After fitting, turn the radiator to its upright operating position. Check that no pieces of polystyrene or other packaging material have been left between the elements of the heater.
3. ELECTRICAL CONNECTION
- Before plugging the radiator into the mains, check that your supply voltage is the same as
that shown on the rating plate of the appliance.
- If using more than one appliance at a time, it is important to ensure that the ring main is
adequate to cope with the power requirements.
- It is important to ensure that the socket is adequately earthed.
- This appliance complies with EEC Directive 89/336 relating to electromagnetic compatibility.
OPERATION AND USE
Plug the heater into the electric socket and the light will come on.
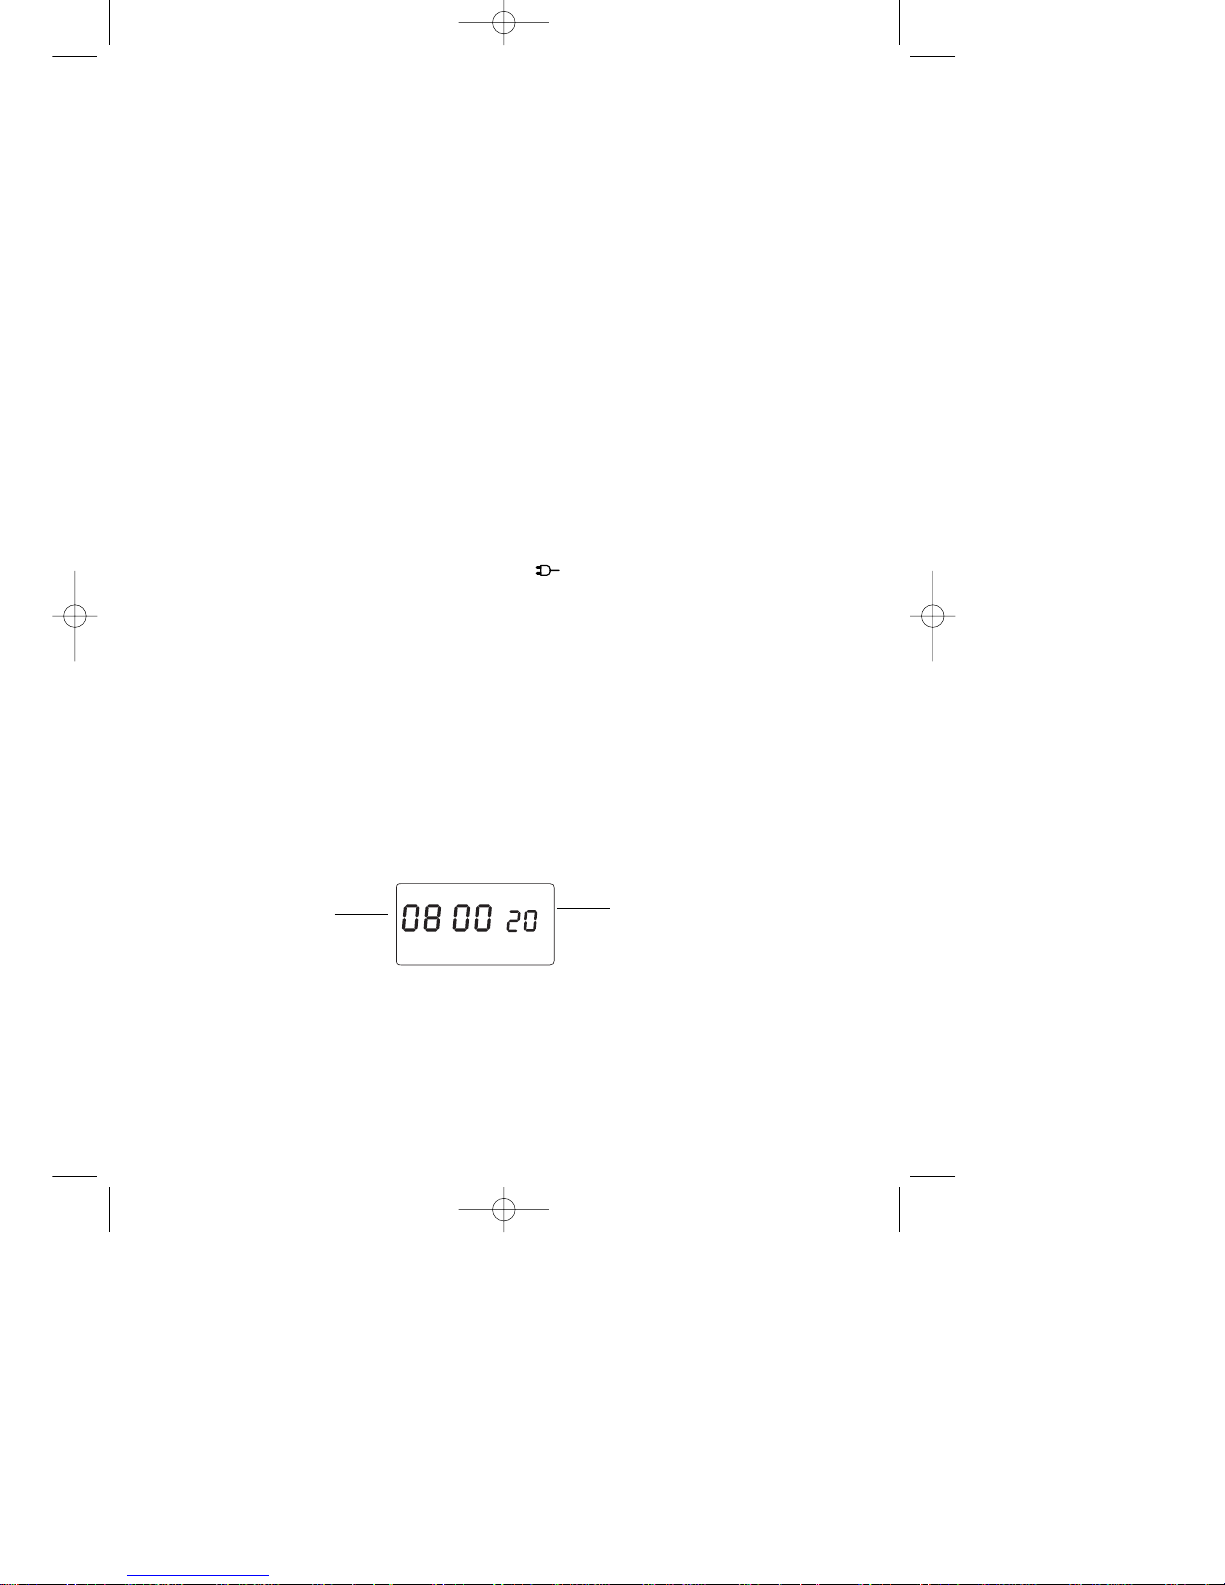
1) SETTING THE CLOCK
Set the clock to the correct time, proceeding as follows:
• Press the “hour” button until the display shows the hours for the correct time, then release
the button.
• Press the “min” button until the display shows the minutes for the correct time, then release
the button.
When setting the correct time, the numbers will flash on the display.
The clock will continue to flash for a few seconds after the adjustment has been made then stop
on the correct time and start working.
To change the time, press the “hour” or “min” button for at least 5 seconds, then proceed as
above to modify both hours and minutes.
To move through the hours or minutes quickly keep the relevant button pressed for longer than
3 seconds.
correct time
°
C
MAN
0
:
Set temperature
5710004200 hm uk 31-01-2002 14:43 Pagina 3
Page 4

2) OPERATION OF HEATER - WITHOUT TIMER - (MANUAL)
To operate the appliance in “manual” mode, press the “ON MODE” button. To set the required
power level, proceed as follows:
press the “ON MODE" button, and then press again one or more times within 5 seconds to select
the power level, as per the following sequence:
At any time during “Manual” operation, pressing the “ON MODE” button once will display the
previously set power level for 5 seconds; after this 5 second period, the display will return to
show the current operating power.
If Maximum power has been selected, press the “ +” or ” -” button to select the desired
comfort temperature from 5 to 35°C. By pressing the “ +” or “ -” button the desired temperature (shown on the right side of the display) will increase or decrease by 1°C. Keep pushbutton pressed to move through the temperature in fast mode.
This heater has Electronic Climate Control which automatically monitors and selects the ideal
power setting to maintain your chosen temperature.
If the selected temperature is higher than the actual room temperature, the appliance will start
automatically and rapidly heat the room until it reaches the selected temperature. The unit will
automatically maintain the temperature at a constant level, by switching between maximum,
medium, minimum power and OFF (If the room temperature exceeds the selected temperature
level the appliance will switch off).
If medium power level has been selected using the “ON MODE” button, the appliance will
4
°
C
MAN
:
MAN
:
°
C
°
C
MAN
:
°
C
MAN
0
:
°
C
MAN
:
set temperature
correct time
Maximum power
Medium power
Minimum power
Off
5710004200 hm uk 31-01-2002 14:43 Pagina 4
Page 5

modulate between medium, minimum power and OFF to maintain a selected temperature.
Note: the display will always show the power setting you have chosen, not the one it is currently working at.
FROST STAT FUNCTION
Press the “ON MODE” button (it is recommended to select the maximum power level). Set the
temperature to 5°C with the “ -” button. When set in this way, the appliance will switch on
automatically only if the room temperature falls below 5°C, thereby preventing freezing, at
minimum energy consumption.
N.B.This function is not guaranteed in the event of power failures, lasting more than 2 minutes.
3) PROGRAMMING THE ELECTRONIC TIMER
The timer allows you to set 2 programmes in a 24 hour period.
To programme the timer:
1-Press the “ AUTO” button, this accesses the 1st programme (programme A). The yellow
timer ON lamp will light up.
2-Set the start time for your programme by pressing the “HOUR” button to set the hour and the
“MIN” button to set the minutes.
3-To select how long you require the heater to be on, push the “+min“ button repeatedly until
your chosen operating timespan appears. The time periods you are able to choose from are
(30’, 45’, 1hr, 2hr, 4hr,8hr (max).
4- To program a second time period (programme B), press the ” AUTO” button twice and
then proceed as above to select the start hours and minutes. The set time will be the same as
for the first programme. When the operating time is changed, the time of both programmes
is updated.
Important: the operating time period must be the same as in Programme A. If the operating
time is changed e.g. from 45 min. to 1hour, both programmes will operate for 1 hour.
5
O
AUTO
:
O
:
AUTO
AUTO
°
C
0
AUTO
:
°
C
Timer lamp on
Display when setting
programme A
Display when setting
programme B
Display when setting for
45 mins operating time
°
C
MAN
:
5710004200 hm uk 31-01-2002 14:43 Pagina 5
Page 6

5- Use the “ +” or “ -” buttons to set the desired comfort temperature, as described above.
6-When set in this way the heater will automatically switch on at the set time for the designated
time period and automatically maintain the preset comfort temperature. To cancel a programme, press the “ AUTO” button and then the ”hour” buttons until the display shows as below.
TIMER OVERRIDE
To operate the appliance without using the timer, press the “ON MODE” button (Fig.3). The
yellow lamp will go off.
To go back to timed operation press “ AUTO”.
IMPORTANT
You must leave the heater plugged in at the mains socket to keep the heater’s memory programmed.
If the heater loses its electricity supply for more than 2 minutes, e.g. if unplugged or in the event
of a power failure, the heater’s programmes will be lost, and the timer will not work until reset.
In such an instance the display will show flashing numbers.
On using the appliance for the first time, turn it on to the maximum power and the highest
temperature setting for at least 8 hours. This is to eliminate the 'new odour’, which is released by the appliance. During this time ensure that the room is well ventilated.
5. MAINTENANCE
Before carrying out any maintenance, unplug the heater from the mains and wait for it to cool.
The oil-filled electric radiator requires no particular maintenance. It is sufficient to remove the
dust with a soft, dry cloth. Never use abrasive powders or solvents. If necessary remove concentrated areas of dirt with a vacuum cleaner. (Fig. 4)
6. WARNINGS
- Do not use this heater in the immediate surroundings of a bath, a shower or a swimming
pool.
-Never use the radiator to dry damp garments. Never rest the cable on hot elements.
- Use the radiator in the vertical position only.
- If the supply cord is damaged, it must be replaced by the manufacturer or it’s service agent
or a similary qualified person in order to avoid a hazard.
-When you start the radiator for the first time, leave it operating at maximum power for at
least two hours. During this operation, ventilate the room well to eliminate the “new” smell
emanating from the appliance.
- It is normal for the appliance to emit a squeaking noise when turned on for the first time.
- The heater must not be located directly below a socket-outlet.
- The appliance is not intended for use by young children or the infirm without supervision.
- Young children should be supervised to ensure that they do not play with the appliance.
- This radiator is filled with a precise quantity of oil and repairs which require it to be opened must be carried out exclusively by the manufacturer or an authorised service centre. In
the case of oil leaks, contact the manufacturer or the authorised service centre.
-When scrapping the appliance, respect legislation on the disposal of oil.
- Do not use the appliance in rooms with a base area of less than 4 m
2
.
IMPORTANT: Never for any reason cover the appliance during operation
as this could lead to dangerous overheating.
6
AUTO
:
5710004200 hm uk 31-01-2002 14:43 Pagina 6
Page 7

5710004200/
01.02
5710004200 hm uk 31-01-2002 14:43 Pagina 7
 Loading...