

DeLOCK 64055 User Manual
User manual
Mode d’emploi
Uživatelská příručka
Manuale utente
Manual de utilizare
Korisnički priručnik
Bedienungsanleitung
Manual del usuario
Instrukcja obsługi
Bruksanvisning
Használati utasítás
Εγχειρίδιο χρήστη
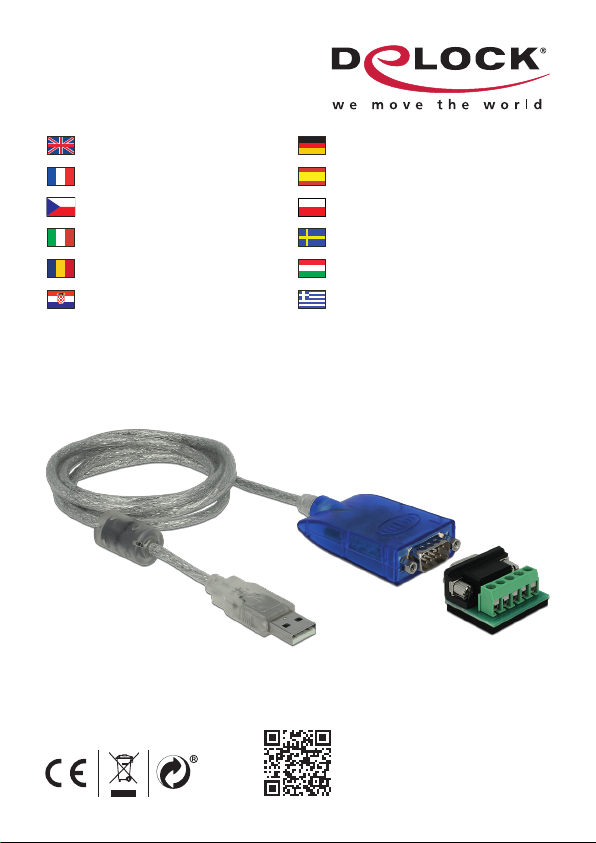
USB to Serial RS-422/485 Adapter
Product-No:64055
User manual no:64055-a
www.delock.com

English
Description
This USB Type-A to RS-422/485 Adapter by Delock expands the computer
by an industrial interface for machine controls, eldbus systems, measuring
instruments, computers, printers etc.
Protection features
The adapter protects itself and externally connected devices against electrostatic
discharges (ESD) and surge voltage.
Extended temperature range
The adapter supports with extended temperature range high reliability even in
demanding environments.
Specication
• Connectors:
Cable:
1 x USB Type-A male
1 x serial RS-422/485 DB9 male
Terminal block:
1 x serial RS-422/485 DB9 female
1 x RS-422/485 Terminal Block 5 pin
• Chipset: FTDI FT232R
• Auto data ow control
• Data transfer: asynchronous, full duplex, half duplex
• Data transfer rate up to 921.6 Kbps
• Supports Modbus
• ±15 kV ESD protection on all signal pins
• Surge Protection: 600 W peak pulse (TVS)
• 3 x LED indicator for power and activity
• Housing material: plastic
• Colour: blue
• Operating temperature: -40 °C ~ 85 °C
• Relative humidity: 5 - 95 % (non condensing)
• Cable length incl. connectors: ca. 1.5 m
• Plug & Play
-2-

English
System requirements
• Linux Kernel 4.6 or above
• Mac OS 10.14.1 or above
• Windows 7/7-64/8.1/8.1-64/10/10-64
• PC or laptop with a free USB Type-A port
Package content
• Converter USB Type-A to RS-422/485
• Driver CD
• Terminal block
• User manual
Safety instructions
• Protect the product against moisture
• Protect the product against direct sunlight
Driver Installation
1. Switch on your computer.
2. Connect the adapter to an available USB port of your computer.
3. The driver will be installed automatically. If this is not the case, please
perform the driver installation as follows:
4. Put the driver CD in the CD ROM drive.
5. Open device manager, than right click on the error port and click "Update
Driver".
6. Choose "Search for drivers on the computer (extended)".
7. Navigate to the appropriate folder of your operating system.
8. Tick "Include subfolders". Afterwards click on "Next".
9. The driver will now be installed.
10. You can now start to use the device.
-3-

English
Support Delock
If you have further questions, please contact our customer support
support@delock.de
You can nd current product information on our homepage: www.delock.com
Final clause
Information and data contained in this manual are subject to change without
notice in advance. Errors and misprints excepted.
Copyright
No part of this user manual may be reproduced, or transmitted for any purpose,
regardless in which way or by any means, electronically or mechanically, without
explicit written approval of Delock.
Edition: 03/2019
-4-

Deutsch
Systemvoraussetzungen
• Linux Kernel 4.6 oder höher
• Mac OS 10.14.1 oder höher
• Windows 7/7-64/8.1/8.1-64/10/10-64
• PC oder Notebook mit einem freien USB Typ-A Port
Packungsinhalt
• Konverter USB Typ-A zu RS-422/485
• Treiber CD
• Terminalblock
• Bedienungsanleitung
Sicherheitshinweise
• Produkt vor Feuchtigkeit schützen
• Produkt vor direkter Sonneneinstrahlung schützen
Treiber Installation
1. Schalten Sie den Computer ein.
2. Schließen Sie den Adapter an Ihrem freien USB Port des Computers an.
3. Der Treiber wird automatisch installiert. Sollte das nicht der Fall sein, so
führen Sie die Installation wie folgt aus:
4. Legen Sie die Treiber CD in Ihr Laufwerk ein.
5. Öffnen Sie den Geräte Manager und klicken Sie mit der rechten Maustaste
auf den nicht installierten Anschluss und aktivieren Sie "Treibersoftware
aktualisieren".
6. Wählen Sie "Auf dem Computer nach Treibersoftware suchen (erweitert)".
7. Navigieren Sie in den entsprechenden Ordner Ihres Betriebssystems.
8. Aktivieren Sie das Kontrollkästchen "Unterordner einbeziehen". Anschließend
klicken Sie auf "Weiter".
9. Der Treiber wird nun installiert.
10. Sie können nun das Gerät verwenden.
-5-
 Loading...