

Dell Wyse 7290 (Z Class Cloud Clients, Model Zx0)
Quick-Start Guide
Products: Z00D (cloud desktop), Z10D, Z50D, Z50S, Z90D7/E7/7B/7p, Z90D8/8B,
Z90DW, Z90S7/7p, Z90SW (thin clients)
See accompanying documents in the shipping carton for License Agreement and Warranty information. To find the latest
Quick-Start Guide, go to www.dell.com/wyse/manuals and click on the name of your product.
NOTE: A printed copy of the End User License Agreement is included in the shipping box and provided for
your reference only. The license at www.dell.com/wyse/licenses as of the purchase date is the controlling
licensing agreement. By copying, using, or installing the software or the product, you agree to be bound by those terms.
NOTE: If you use Dell Wyse Device Manager server software for managing this product, download
the latest version to ensure compatibility at www.dell.com/wyse/downloads.
CAUTION: Improper connection, mounting, or use of this product could result in component failure or undesired
interference. Read Safety Guidelines before setting up and operating this product.
Dell Wyse 7290 (Z-osztályú felhőkliensek – Zx0 modell)
Rövid útmutató
Termékek: Z00D (felhőasztal), Z10D, Z50D, Z50S, Z90D7/E7/7B/7p, Z90D8/8B, Z90DW, Z90S7/7p, Z90SW (Thin Client kliensek)
A licencmegállapodásra és a jótállásra vonatkozó információkért tekintse meg a szállítási dobozban található kísérődokumentumokat. A rövid útmutató legfrissebb verziója
elérhető a www.dell.com/wyse/manuals címen (kattintson saját termékének nevére az oldalon).
MEGJEGYZÉS: A Wyse Technology végfelhasználói licencmegállapodás nyomtatott példányát a szállítási dobozban mellékeltük Önnek (csak referenciaként szolgál). Az
irányadó licencmegállapodás a vásárlás időpontjában a www.dell.com/wyse/licenses weboldalon található megállapodás. A szoftver vagy a termék másolásával,
használatával és/vagy telepítésével Ön automatikusan elfogadja ezeket a feltételeket önmagára nézve.
MEGJEGYZÉS: Ha Ön a Wyse Device Manager kiszolgálószoftvert használja a termék kezeléséhez, akkor javasoljuk, hogy töltse le a program legújabb verzióját a
megfelelő kompatibilitás érdekében a www.dell.com/wyse/downloads weboldalról.
VIGYÁZAT: A termék nem megfelelő csatlakoztatása, rögzítése vagy használata egyes komponensek meghibásodásához, illetve nem kívánt interferenciához
vezethet. A termék beüzemelése és használata előtt olvassa el a Biztonsági előírások című szakaszban foglaltakat.
Dell Wyse 7290 (
Cloud Clients (Клиенты системы облачных вычислений) класс Z, модель Zx0)
Краткое руководство пользователя
Изделия: Z00D (облачный рабочий стол), Z10D, Z50D, Z50S, Z90D7/E7/7B/7p, Z90D8/8B, Z90DW, Z90S7/7p, Z90SW (thin clients)
Лицензионное соглашение и сведения о гарантии входят в состав сопроводительной документации, находящейся в упаковочной коробке. Последнюю версию
краткого руководства пользователя можно найти на сайте www.dell.com/wyse/manuals, нажав на название вашего изделия.
ПРИМЕЧАНИЕ. Содержащийся в упаковочной коробке экземпляр E лицензионного соглашения с конечным пользователем на технологию предоставлен
только для сведения. Официальный текст лицензии содержится в размещенной на веб-странице www.dell.com/wyse/licenses лицензии
на дату покупки. Копируя, используя или устанавливая данное программное обеспечение или данный продукт, вы соглашаетесь принять на себя обязательства по
соблюдению условий лицензионного соглашения.
ПРИМЕЧАНИЕ. Если вы используете программное обеспечение сервераDell Wyse Device Manager для работы с изделием, загрузите его последнюю версию с сайта
www.dell.com/wyse/downloads для гарантии совместимости.
ВНИМАНИЕ. При неправильном подключении, монтаже или использовании данного изделия возможен отказ компонентов или появление
нежелательного шума. Необходимо изучить указания по технике безопасности перед монтажом и использованием данного устройства.
Dell Wyse 7290 (Z Sınıfı Bulut İstemciler, Model Zx0)
Hızlı Başlangıç Kılavuzu
Ürünler: Z00D (bulut masaüstü), Z10D, Z50D, Z50S, Z90D7/E7/7B/7p, Z90D8/8B, Z90DW, Z90S7/7p, Z90SW (ince istemciler)
Lisans Anlaşması ve Garanti bilgileri için gönderilen kutudaki belgelere bakın. En güncel Hızlı Başlangıç Kılavuzu için www.dell.com/wyse/manuals adresini ziyaret edin ve
ürününüzün adına tıklayın.
NOT: Son Kullanıcı Lisans Anlaşması'nın basılı bir kopyası gönderilen kutuda bulunmaktadır ve yalnızca bilginiz için verilmiştir. Lisans anlaşması, satın alma tarihi itibariyle
www.dell.com/wyse/licenses adresindeki lisansa göre yürütülür. Yazılım veya ürünü kopyalayarak, kullanarak veya yükleyerek, bu şartlara bağlı kalacağınızı kabul edersiniz.
NOT: Bu ürünü yönetmek için Dell Wyse Device Manager sunucusu yazılımı kullanıyorsanız, uyumluluğundan emin olmak için www.dell.com/wyse/downloads.adresindeki son
sürümü indirin.
DİKKAT: Bu ürünün yanlış bağlanması, monte edilmesi veya kullanılması parçalarda arızaya veya istenmeyen girişime neden olabilir. Bu ürünü kurmadan ve
çalıştırmadan önce Güvenlik Talimatlarını okuyun.
0F1NCXA00
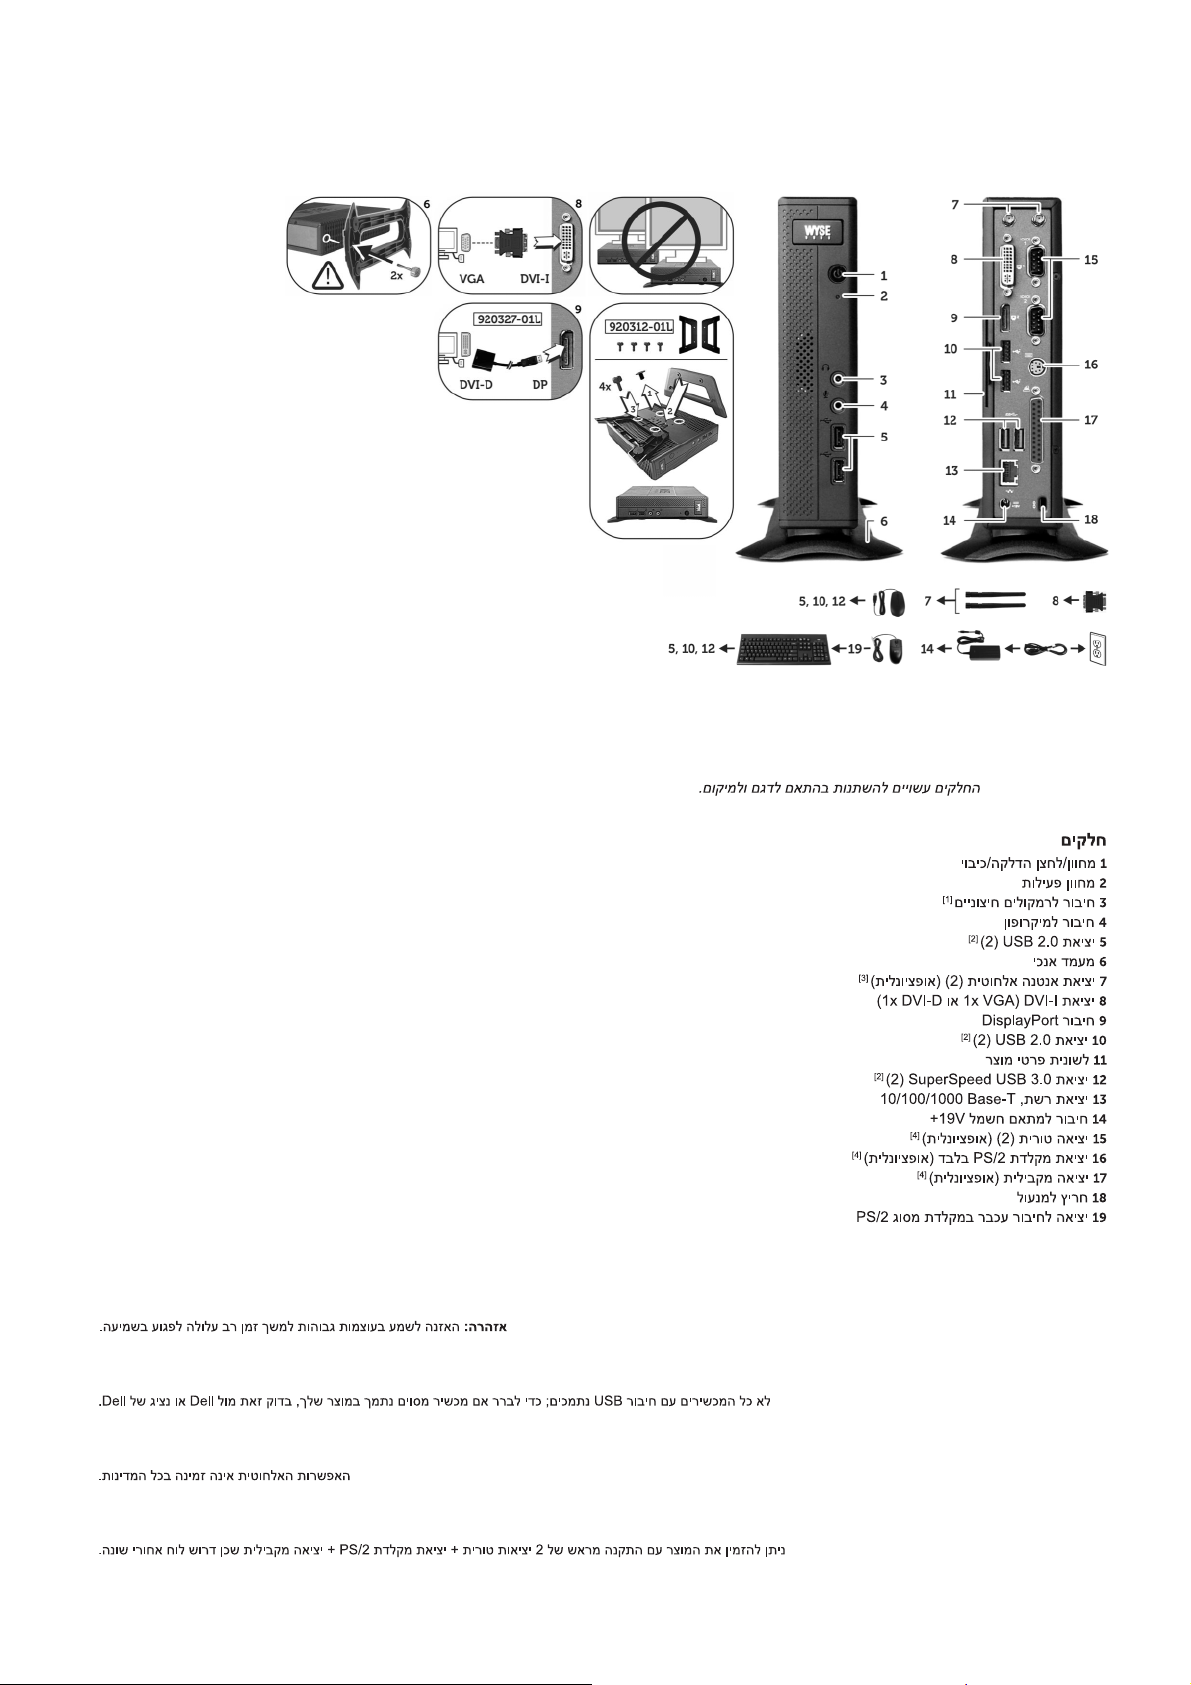
Z00D, Z10D, Z50D, Z50S, Z90D7/E7/7B/7p, Z90D8/8B, Z90DW, Z90S7/7p, Z90SW
Components Komponensek
1 Power on/off button/light 1 Be-/kikapcsoló gomb
2 Activity light 2 Aktivitási jelzőfény
3 Line out/Speaker out
4 Microphone in 4 Mikrofonbemenet
5 USB 2.0 port (2)
6 Vertical stand 6 Függőleges állvány
7 Wireless antenna port (2) (optional)
[1]
[2]
[3]
8 DVI-I port (1x DVI-D or 1x VGA) 8 DVI-I port (1 db DVI-D vagy 1 db VGA)
9 DisplayPort connector 9 DisplayPort csatlakozó
10 USB 2.0 port (2)
11 Product information tab 11 Termékinformációs fül
12 SuperSpeed USB 3.0 port (2)
[2]
[2]
13 Network port, 10/100/1000 Base-T 13 Hálózati port, 10/100/1000 Base-T
14 +19V Power adapter input 14 +19 V tápadapter-bemenet
15 Serial port (2) (optional)
16 PS/2 keyboard-only port (optional)
17 Parallel port (optional)
[4]
[4]
[4]
18 Lock receptacle 18 Rögzítőfoglalat
19 PS/2-type mouse port located on keyboard 19 PS/2 típusú egér portja (a billentyűzeten)
és jelzőfény
3 Vonalkimenet/
hangszórókimenet
5 USB 2.0 port (2)
[1]
[2]
7 Vezeték nélküli antenna portja (2) (opcionális)
10 USB 2.0 port (2)
12 SuperSpeed USB 3.0 port (2)
15 Soros port (2) (opcionális)
16 PS/2 port csak billentyűzethez (opcionális)
17 Párhuzamos port (opcionális)
[2]
[2]
[4]
[4]
[3]
Components may vary based on model and location.
A komponensek a modelltől és a helyszíntől függően változhatnak.
Компоненты могут различаться в зависимости от модели и региона.
[4]
Components may vary based on model and location.
Компоненты Parçalar
1
Кнопка вкл/выкл питания/светодиодный индикатор
2 Лампа активизации 2 Etkinlik ışığı
3 Линейный выход/выход динамика
4 Микрофонный вход 4 Mikrofon girişi
5 Порт USB 2.0 (2)
[2]
5 USB 2.0 bağlantı noktası (2)
[1]
6 Вертикальная стойка 6 Dikey altlık
7 Порт антенны беспроводной связи (2)
(дополнительно)
[3]
8 Порт DVI-I (1x DVI-D или 1x VGA) 8 DVI-I bağlantı noktası (1 adet DVI-D veya 1 adet VGA)
9 Разъе м DisplayPort 9 DisplayPort konektörü
10 Порт USB 2.0 (2)
11 Табли чк а с паспортными данными 11 Ürün bilgileri etiketi
12 Порт SuperSpeed USB 3.0 (2)
[2]
10 USB 2.0 bağlantı noktası (2)
[2]
12 SuperSpeed USB 3.0 bağlantı noktası (2)
13 Сетевой порт 10/100/1000 Base-T 13 Ağ bağlantı noktası, 10/100/1000 Base-T
14 Вход 19 В для адаптера питания 14 +19V Güç adaptörü girişi
Последовательный порт (2) (дополнительно)
15
16
Порт только для клавиатуры PS/2 (дополнительно)
17 Параллельный порт (дополнительно)
[4]
18 Розетка с фиксатором 18 Kilit yuvası
19 Установленный на клавиатуре порт для мыши
типа PS/2
[1]
Warning: Listening to audio at high volume levels for extended durations can damage your hearing.
Figyelmeztetés: Ha hosszú ideig, nagy hangerő mellett hallgat zenét vagy egyéb tartalmakat, fennáll a halláskárosodás veszélye.
Осторожно: длительное прослушивание аудиоинформации на высоких уровнях громкости может привести к повреждению органов слуха.
Uyarı: Yüksek düzeylerde uzun süre ses dinlemeniz işitme duyunuza zarar verebilir.
[2]
Not all USB devices are supported; check with Dell or your Dell representative to find out if a particular device is supported on your product.
A berendezés nem minden USB-s eszközt támogat, ezért kérjük, hogy a kompatibilitással kapcsolatban kérje a Dell vállalat vagy az Ön Dell képviselőjének megerősítését.
Поддерживаются не все устройства USB; данные об устройствах, поддерживаемых вашим прибором, можно получить у компании Dell или у ее представителей.
Tüm USB cihazları desteklenmez; ürününüzde özel bir cihazın desteklenip desteklenmediğini öğrenmek için Dell veya Dell temsilcinize danışın.
[3]
Wireless option not available in all localities.
A vezeték nélküli csatlakoztathatóság nem minden régióban érhető el.
Функция беспроводного подключения обеспечивается не для всех регионов.
Kablosuz seçeneği tüm bölgelerde kullanılamayabilir.
[4]
The 2x Serial + 1x PS/2 + 1x Parallel ports is a factory-installed option since it requires a different back panel.
A 2 db soros + 1 db PS/2 + 1 db párhuzamos port egy opcionális gyári foglalatkombináció (a szokványostól eltérő hátlapot igényel).
Порты 2x последовательный + 1x PS/2 + 1x параллельный являются устанавливаемыми на заводе вариантами, поскольку для них требуются разные задние панели.
2 adet Seri + 1 adet PS/2 + 1 adet Paralel bağlantı noktası farklı bir arka panel gerektirdiği için fabrikada kurulan bir seçenektir.
1 Güç açma/kapama düğmesi/ışığı
3 Hat çıkışı/Hoparlör çıkışı
[1]
[2]
7 Kablosuz anten bağlantı noktası (isteğe bağlı)
[2]
[4]
15 Seri bağlantı noktası (2) (isteğe bağlı)
[4
]
16 Yalnız PS/2 klavye bağlantı noktası (isteğe bağlı)
17 Paralel bağlantı noktası (isteğe bağlı)
19 Klavyede bulunan PS/2 türü fare bağlantı noktası
[3]
[2]
[4]
[4]
[4]

Setting Up Your Cloud Client
Be sure you have read Safety Guidelines before setting up and
operating this product. Refer to the figures and proceed as follows:
1
Make sure the monitor and the cloud client are turned off and
disconnected from AC power. Place the cloud client on a desk,
or use a Dell-approved mounting accessory kit.
2
Make all desired connections (video display and keyboard with
mouse are required). Connection to a 10/100/1000 Base-T
Ethernet network is required unless an optional WiFi network
adapter is used for wireless connection to a network. Additional
connections of peripheral devices may be made to the other
ports.
3
Connect the power adapter to the cloud client power input
before connecting to a 100-240V AC, 50-60 Hz electrical
outlet, and then press the power button to apply power. When
the initialization sequence is complete, the amber activity light
changes to green.
Safety Guidelines
Improper connection, mounting, or use of this product could result
in component failure or undesired interference. Read the following
guidelines before setting up and operating the device.
Setup
• Do not connect to AC power until all other connections
(including the power adapter) are made. Connecting or
disconnecting components or equipment on the back panel
when the device is receiving AC power can cause power
surges and damage the device.
• Do not force a connector into its socket. If any undue
resistance is encountered, ensure that the connector is
correctly oriented to the receptacle.
• For wireless usage and requirements, refer to the regulatory
notices in the device’s documentation.
Venting and Care
• Mount the device only as shown or in accordance with the
instructions provided with Dell-approved mounting accessory
kits. Improper orientation could restrict airflow of heat from
the device and damage it.
• Allow sufficient space around the device for ventilation; do
not place the device in any enclosure that restricts airflow
around the device; do not place any objects on the device or
block the vent outlets.
For environmental operating specifications, visit:
www.dell.com/wyse/Z00D
• Surge protectors for electrical devices are recommended in
areas of lightning. However, when lightning is occurring, your
equipment should be properly shut down and unplugged
from AC power until the storm has passed.
• Be very careful to not interrupt power while the device is
downloading a software update.
Battery
The device contains an internal button cell battery replaceable by
Dell or one of our Authorized Service Centers. For support, visit:
www.dell.com/support
WARNING: There is a risk of explosion if the battery is
replaced by an incorrect type. Always dispose of used
batteries according to the instructions accompanying the
battery.
WARNING: Perchlorate Materials - Special Handling May
Be Required under California Code of Regulations, title 22.
(Only required within the USA.)
Need more information?
Dell Reference Guides - User, Administrator, and related
documentation is available at: www.dell.com/wyse/manuals
Dell-Approved Mounting Accessory Kits - Information about
approved mounting accessory kit options is available at:
www.dell.com/wyse/accessories
Dell Service and Support - Latest software images are available at:
www.dell.com/wyse/downloads
Dell Device Manager - Information about Dell remote management
software is available at:
www.dell.com/wyse/WDM
Dell WSM - Information about Wyse WSM software is available at:
www.dell.com/wyse/WSM
Dell and the Environment - Information about Dell compliance
with RoHS and with the Waste Electrical and Electronic Equipment
(WEEE) is available at: www.dell.com/environment
Dell and Recycling - Information about recycling and reuse of Dell
products is available at: www.dell.com/recycling
Dell Warranty - The standard warranty is three years from the date
of purchase
.
Power Sources
• For regulatory compliance use only the power adapter that
comes with your device or a Dell-approved equivalent. For
proper replacement compare the labels on both device and
power adapter to ensure that their voltages match.
WARNING: Use of any other power adapter may damage
your device or the power adapter. The damage caused by an
improper power adapter is not covered by warranty.
• Accidental loss of power can damage device. Avoid
connecting it to any power outlet which can be accidentally
switched off. Do not hard reset the device by holding down
the power button during normal operation.
• When turning off the device, be sure to perform a complete
shutdown (via the user interface or a light press on the power
button). Do not disconnect the AC power cord, DC power
cord, or shut off power at a circuit breaker (including power
strips), etc., to turn off the device.
____________________________________________________________________
Copyright © 2014 Dell Inc. All rights reserved.
This product is protected by U.S. and international copyright and intellectual
property laws. Dell and the Dell logo are trademarks of Dell Inc. in the United
States and/or other jurisdictions. All other marks and names mentioned
herein may be trademarks of their respective companies.
Sept 2014 Dell PN: F1NCX Rev: A00
 Loading...