

Page 1

Dell Vostro 3267/3268
Owner's Manual
Regulatory Model: D13S
Regulatory Type: D13S002
Page 2

Примечания, предостережения и предупреждения
ПРИМЕЧАНИЕ: Пометка ПРИМЕЧАНИЕ указывает на важную информацию, которая поможет использовать
данное изделие более эффективно.
ПРЕДОСТЕРЕЖЕНИЕ: Пометка ПРЕДОСТЕРЕЖЕНИЕ указывает на потенциальную опасность повреждения
оборудования или потери данных и подсказывает, как этого избежать.
ПРЕДУПРЕЖДЕНИЕ: Пометка ПРЕДУПРЕЖДЕНИЕ указывает на риск повреждения оборудования, получения
травм или на угрозу для жизни.
© Корпорация Dell или ее дочерние компании, 2017. Все права защищены. Dell, EMC и другие товарные знаки являются товарными
знаками корпорации Dell Inc. или ее дочерних компаний. Другие товарные знаки могут быть товарными знаками соответствующих
владельцев.
2017 - 01
Rev. A00
Page 3

Contents
1 Работа с компьютером...............................................................................................................................6
Инструкции по технике безопасности......................................................................................................6
Подготовка к работе с внутренними компонентами компьютера..........................................................6
Выключение компьютера..........................................................................................................................7
Выключение компьютера (Windows 10)..............................................................................................................7
После работы с внутренними компонентами компьютера.................................................................... 7
2 Извлечение и установка компонентов................................................................................................... 8
Рекомендуемые инструменты..................................................................................................................8
крышку;...................................................................................................................................................... 8
Removing the cover.....................................................................................................................................................8
Installing the cover.......................................................................................................................................................8
Лицевая панель.........................................................................................................................................9
Removing the front bezel............................................................................................................................................9
Installing the front bezel.............................................................................................................................................. 9
Cooling shroud....................................................................................................................................................................9
Removing the cooling shroud.....................................................................................................................................9
Installing the cooling shroud......................................................................................................................................10
Плата расширения...................................................................................................................................10
Removing the expansion card...................................................................................................................................10
Installing the expansion card......................................................................................................................................11
Жесткий диск............................................................................................................................................ 11
Removing the hard drive assembly........................................................................................................................... 11
Removing the hard drive from the hard drive bracket............................................................................................11
Installing the hard drive into the hard drive bracket...............................................................................................12
Installing the hard drive assembly.............................................................................................................................12
Оптический дисковод.............................................................................................................................. 12
Removing the optical drive........................................................................................................................................12
Removing the optical drive bracket..........................................................................................................................13
Installing the optical drive bracket............................................................................................................................ 14
Installing the optical drive.......................................................................................................................................... 14
Плата WLAN....................................................................................................................................................................15
Removing the WLAN card.........................................................................................................................................15
Installing the WLAN card...........................................................................................................................................15
Радиатор...................................................................................................................................................16
Removing the heat sink assembly............................................................................................................................ 16
Installing the heat sink assembly...............................................................................................................................16
Модуль памяти.........................................................................................................................................17
Removing the memory module................................................................................................................................. 17
Installing the memory module....................................................................................................................................17
Блок питания............................................................................................................................................ 17
Removing the power supply unit (PSU).................................................................................................................. 17
Installing the power supply unit (PSU).................................................................................................................... 18
Contents
3
Page 4

Вентилятор корпуса.................................................................................................................................19
Removing the system fan.......................................................................................................................................... 19
Installing the system fan............................................................................................................................................20
Батарейка типа "таблетка"..................................................................................................................... 20
Removing the coin cell battery.................................................................................................................................20
Installing the coin cell battery....................................................................................................................................21
Системная плата......................................................................................................................................21
Removing the system board......................................................................................................................................21
Installing the system board....................................................................................................................................... 23
System board layout.................................................................................................................................................. 24
3 Технология и компоненты...................................................................................................................... 26
Processors........................................................................................................................................................................ 26
Идентификация процессоров в Windows 10...................................................................................................26
Проверка использования процессора в диспетчере задач............................................................ 26
Проверка загрузки процессора в мониторе ресурсов.....................................................................27
Наборы микросхем..................................................................................................................................28
Загрузка драйвера набора микросхем............................................................................................. 28
Идентификация набора микросхем в диспетчере устройств Windows 10............................................28
Драйверы набора микросхем Intel.................................................................................................................... 29
Видеокарта Intel HD .................................................................................................................................................... 30
Драйверы Intel HD Graphics.................................................................................................................................. 30
Параметры дисплея................................................................................................................................30
Идентификация адаптера дисплея.................................................................................................. 30
Загрузка драйверов........................................................................................................................... 30
Изменение разрешения экрана........................................................................................................ 30
Регулировка яркости в Windows 10.....................................................................................................................31
Подключение к внешним устройствам отображения.......................................................................31
Параметры жесткого диска..................................................................................................................... 31
Определение жесткого диска в Windows 10.................................................................................................... 31
Вход в режим настройки BIOS............................................................................................................................32
Функции USB-интерфейса...................................................................................................................... 32
Интерфейс USB 3.0 (SuperSpeed USB)..............................................................................................................32
Быстродействие.................................................................................................................................33
Область применения......................................................................................................................... 34
Совместимость...................................................................................................................................34
HDMI 1.4............................................................................................................................................................................34
HDMI 1.4 Features......................................................................................................................................................35
Advantages of HDMI.................................................................................................................................................35
Memory features..............................................................................................................................................................35
Проверка системной памяти ............................................................................................................35
Проверка системной памяти в программе настройки.....................................................................36
DDR4........................................................................................................................................................................... 36
Тестирование памяти с помощью ePSA.......................................................................................................... 38
Драйверы аудиоустройств Realtek HD....................................................................................................................38
4 Поиск и устранение неполадок..............................................................................................................40
Contents
4
Page 5

Диагностика............................................................................................................................................. 40
Диагностические сообщения об ошибках............................................................................................. 40
Системные сообщения об ошибке........................................................................................................ 44
5 Краткое описание программы настройки системы........................................................................... 46
Доступ к настройке системы.................................................................................................................. 46
Параметры настройки системы............................................................................................................. 46
General screen options..............................................................................................................................................46
System Conguration screen options......................................................................................................................47
Video screen options................................................................................................................................................. 48
Security screen options.............................................................................................................................................49
Secure Boot screen options..................................................................................................................................... 50
Intel Software Guard Extensions screen options....................................................................................................51
Performance screen options..................................................................................................................................... 51
Power Management screen options........................................................................................................................52
POST Behavior screen options................................................................................................................................ 53
Virtualization support screen options......................................................................................................................53
Maintenance screen options.................................................................................................................................... 53
Параметры экрана журнала системы.............................................................................................. 54
SupportAssist System Resolution screen options................................................................................................. 54
6 Specications..............................................................................................................................................55
ProcessorSystem informationMemoryVideoAudioCommunicationExpansion busDrivesCardsExternal
connectorsControl Lights And Diagnostic LightsPowerPhysical Dimensions of ChassisEnvironmental
specications....................................................................................................................................................................55
7 Обращение в компанию Dell...................................................................................................................59
Contents
5
Page 6

1
Работа с компьютером
Инструкции по технике безопасности
Соблюдайте приведенные ниже инструкции по технике безопасности во избежание повреждения компьютера и для
собственной безопасности. Если не указано иное, то каждая процедура, предусмотренная в данном документе,
подразумевает соблюдение следующих условий.
• прочитаны указания по технике безопасности, прилагаемые к компьютеру;
• для замены компонента или установки отдельно приобретенного компонента выполните процедуру снятия в обратном
порядке.
ПРЕДУПРЕЖДЕНИЕ: Отсоедините компьютер от всех источников питания перед снятием крышки компьютера
или панелей. После окончания работы с внутренними компонентами компьютера, установите все крышки,
панели и винты на место, перед тем как, подключить компьютер к источнику питания.
ПРЕДУПРЕЖДЕНИЕ: Перед началом работы с внутренними компонентами компьютера прочитайте инструкции
по технике безопасности, прилагаемые к компьютеру. Дополнительные сведения о рекомендациях по технике
безопасности содержатся на начальной странице раздела о соответствии нормативным требованиям по
адресу: www.Dell.com/regulatory_compliance.
ПРЕДОСТЕРЕЖЕНИЕ: Большинство видов ремонта может выполнять только квалифицированный специалист.
Пользователь может осуществлять поиск и устранение неисправностей и простой ремонт только в том случае,
если это рекомендуется в документации на изделие Dell, инструкциями интерактивной справки или службой
поддержки компании Dell. На ущерб, вызванный неавторизованным обслуживанием, гарантия не
распространяется. Прочтите и выполняйте инструкции по технике безопасности, поставляемые с устройством.
ПРЕДОСТЕРЕЖЕНИЕ: Заземлитесь для предотвращения возникновения электростатического разряда, надев
антистатический браслет или периодически прикасаясь к некрашеной металлической поверхности (например,
к разъему на задней панели компьютера).
ПРЕДОСТЕРЕЖЕНИЕ: Бережно обращайтесь с компонентами и платами. Не дотрагивайтесь до компонентов и
контактов платы. Держите плату за края или за металлическую монтажную скобу. Держите такие компоненты,
как процессор, за края, а не за контакты.
ПРЕДОСТЕРЕЖЕНИЕ: При отсоединении кабеля беритесь за разъем или специальную петлю на нем. Не тяните
за кабель. У некоторых кабелей имеются разъемы с фиксирующими лапками; перед отсоединением кабеля
такого типа нажмите на фиксирующие лапки. При разъединении разъемов старайтесь разносить их по прямой
линии, чтобы не погнуть контакты. А перед подсоединением кабеля убедитесь в правильной ориентации и
соосности частей разъемов.
ПРИМЕЧАНИЕ: Цвет компьютера и некоторых компонентов может отличаться от цвета, указанного в этом
документе.
Подготовка к работе с внутренними компонентами компьютера
Во избежание повреждения компьютера выполните следующие шаги, прежде чем приступать к работе с внутренними
компонентами компьютера.
1 Соблюдение Инструкций по технике безопасности обязательно.
2 Чтобы не поцарапать крышку компьютера, работы следует выполнять на плоской и чистой поверхности.
3 Выключите компьютер (см. раздел Выключение компьютера).
6 Работа с компьютером
Page 7

ПРЕДОСТЕРЕЖЕНИЕ: При отсоединении сетевого кабеля необходимо сначала отсоединить его от
компьютера, а затем от сетевого устройства.
4 Отсоедините от компьютера все сетевые кабели.
5 Отсоедините компьютер и все внешние устройства от электросети.
6 Нажмите и не отпускайте кнопку питания, пока компьютер не подключен к электросети, чтобы заземлить системную
плату.
7 Снимите крышку.
ПРЕДОСТЕРЕЖЕНИЕ: Прежде чем прикасаться к чему-либо внутри компьютера, снимите статическое
электричество, прикоснувшись к некрашеной металлической поверхности (например, на задней панели
компьютера). Во время работы периодически прикасайтесь к некрашеной металлической поверхности,
чтобы снять статическое электричество, которое может повредить внутренние компоненты.
Выключение компьютера
Выключение компьютера (Windows 10)
ПРЕДОСТЕРЕЖЕНИЕ: Во избежание потери данных сохраните и закройте все открытые файлы и выйдите из
всех открытых программ перед выключением компьютера.
1 Нажмите или коснитесь его.
2 Нажмите или коснитесь его, а затем нажмите кнопку Shut down (Завершение работы) или коснитесь ее.
ПРИМЕЧАНИЕ: Убедитесь, что компьютер и все подключенные к нему устройства выключены. Если
компьютер и подключенные устройства не выключились автоматически при завершении работы
операционной системы, нажмите и не отпускайте кнопку питания примерно 6 секунды, пока они не
выключатся.
После работы с внутренними компонентами компьютера
После завершения любой процедуры замены не забудьте подключить все внешние устройства, платы и кабели, прежде
чем включать компьютер.
1 Установите на место крышку.
ПРЕДОСТЕРЕЖЕНИЕ: Чтобы подсоединить сетевой кабель, сначала подсоедините его к сетевому
устройству, а затем к компьютеру.
2 Подсоедините к компьютеру все телефонные или сетевые кабели.
3 Подключите компьютер и все внешние устройства к электросети.
4 Включите компьютер.
5 Если необходимо, проверьте исправность работы компьютера, запустив программу Dell Diagnostics.
Работа с компьютером 7
Page 8
Извлечение и установка компонентов
В этом разделе приведены подробные сведения по извлечению и установке компонентов данного компьютера.
Рекомендуемые инструменты
Для выполнения процедур, описанных в этом документе, требуются следующие инструменты:
• маленькая шлицевая отвертка;
• Крестовая отвертка № 1
• небольшая пластиковая палочка
• Отвертка с шестигранной головкой
крышку;
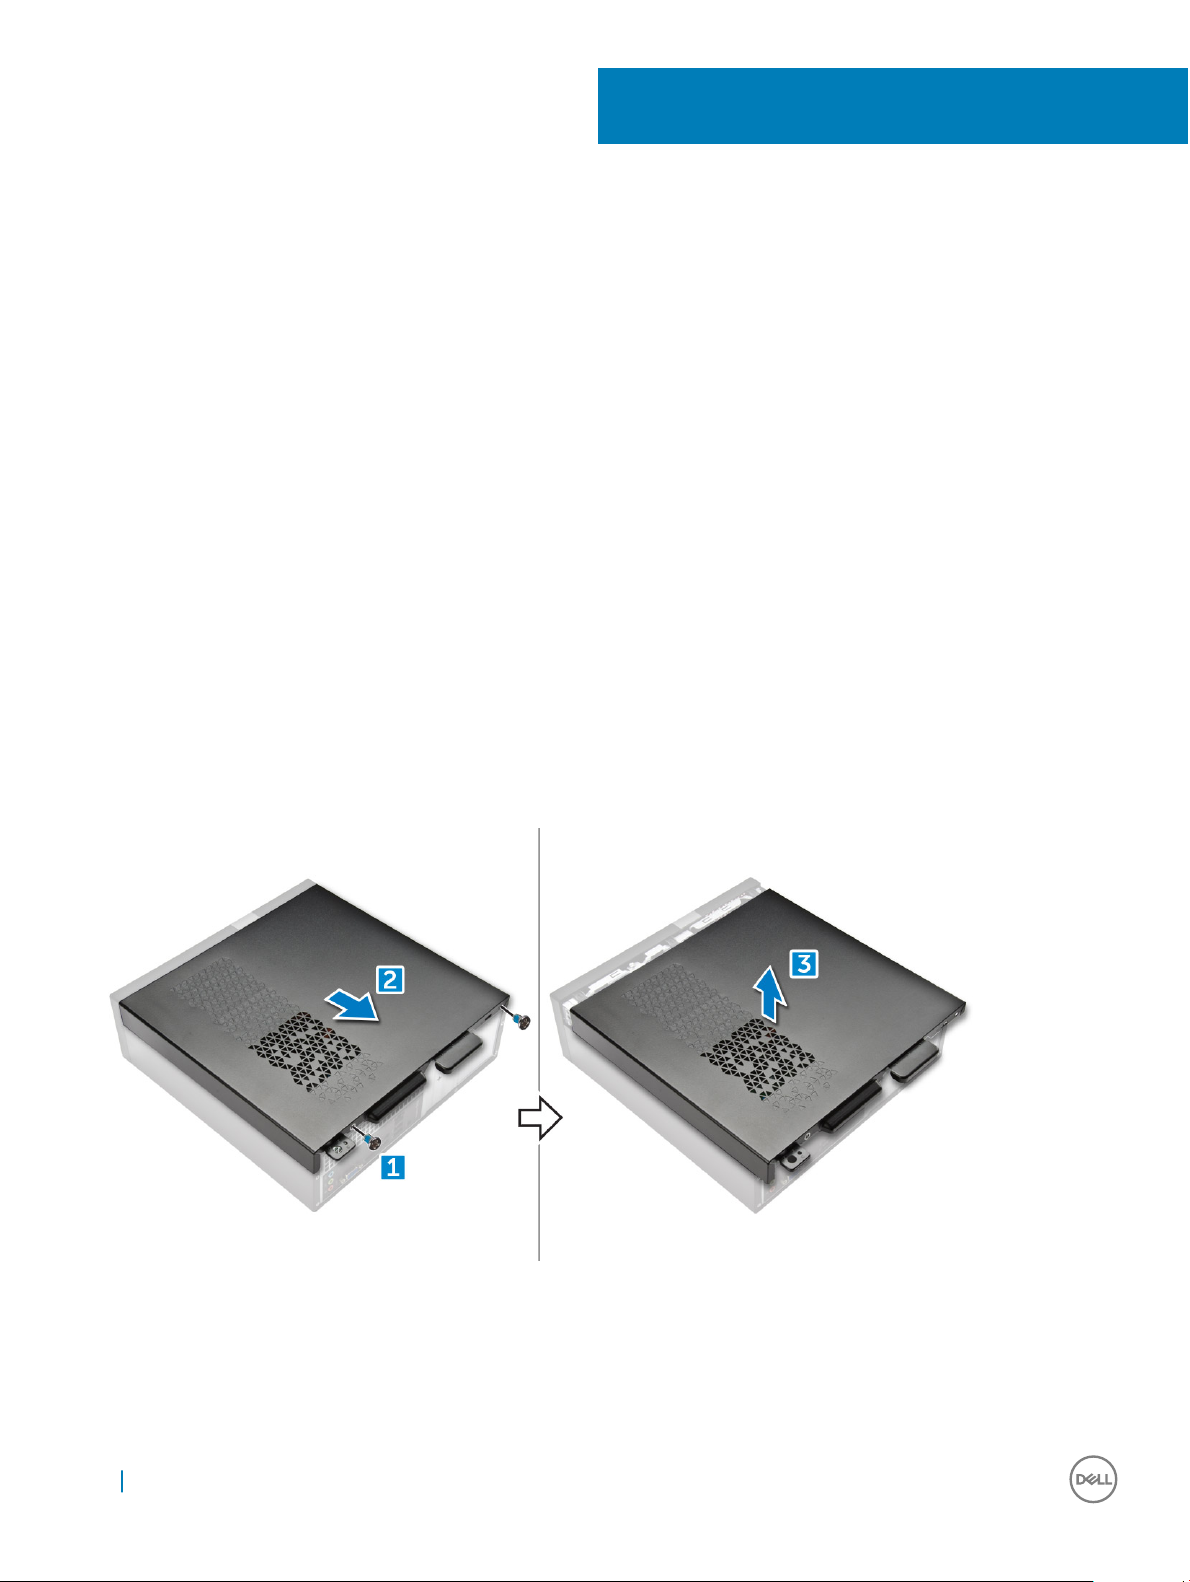
Removing the cover
2
1 Follow the procedure in Before working inside your computer.
2 Follow the steps to remove the cover:
a Remove the 6-32xL6.35 screws that secure the cover to the computer [1].
b Slide the computer cover towards the back of the computer [2].
c Lift and remove the cover from the computer [3].
Installing the cover
1 Slide the cover from the back of the computer, until the latches snap-in.
2 Tighten the 6-32xL6.35 screws to secure the cover.
8 Извлечение и установка компонентов
Page 9
3 Follow the procedures in After Working Inside Your Computer
Лицевая панель
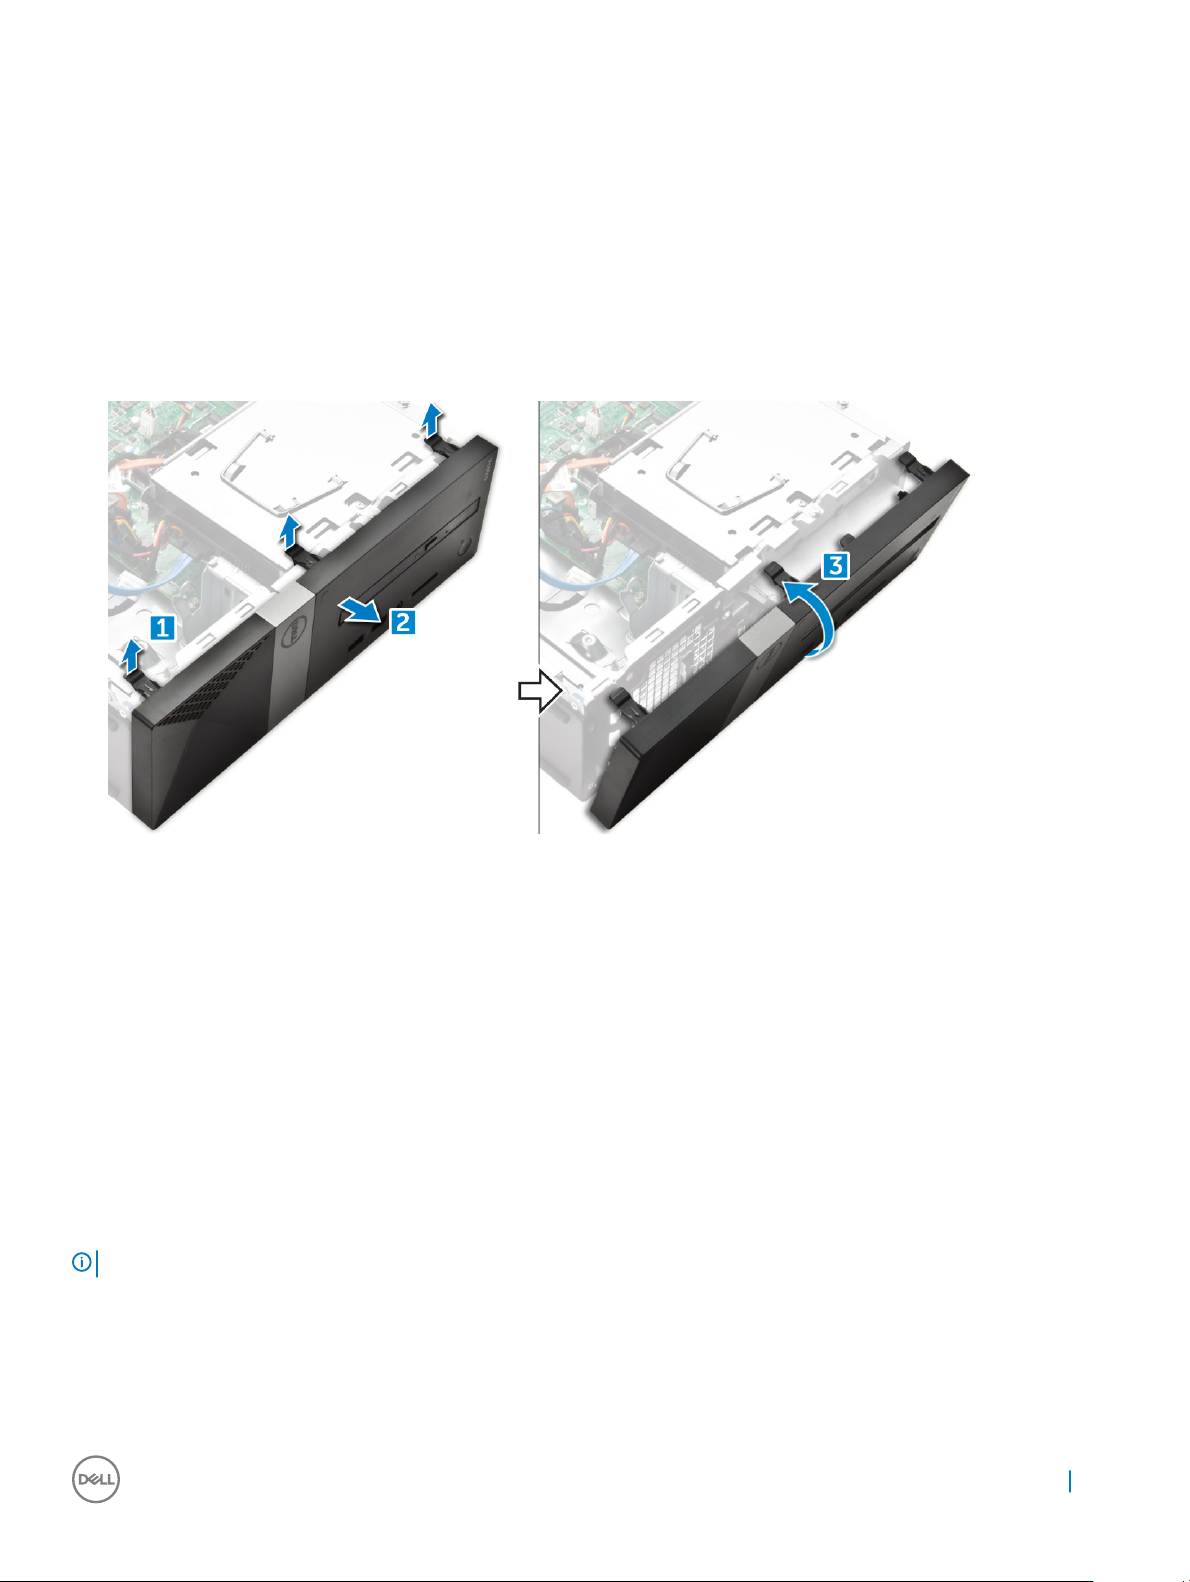
Removing the front bezel
1 Follow the procedure in Before working inside your computer.
2 Remove cover.
3 Follow the steps to remove the front bezel:
a Lift the tabs [1], and pull the front bezel [2].
b Lift the front bezel to remove it from the computer [3].
Installing the front bezel
1 Hold the bezel and ensure that the hooks on the tabs snap into the notches on the computer.
2 Rotate the front bezel toward the front of the computer.
3 Press the front bezel until the tabs snap in.
4 Install the cover.
5 Follow the procedure in After Working Inside Your Computer.
Cooling shroud
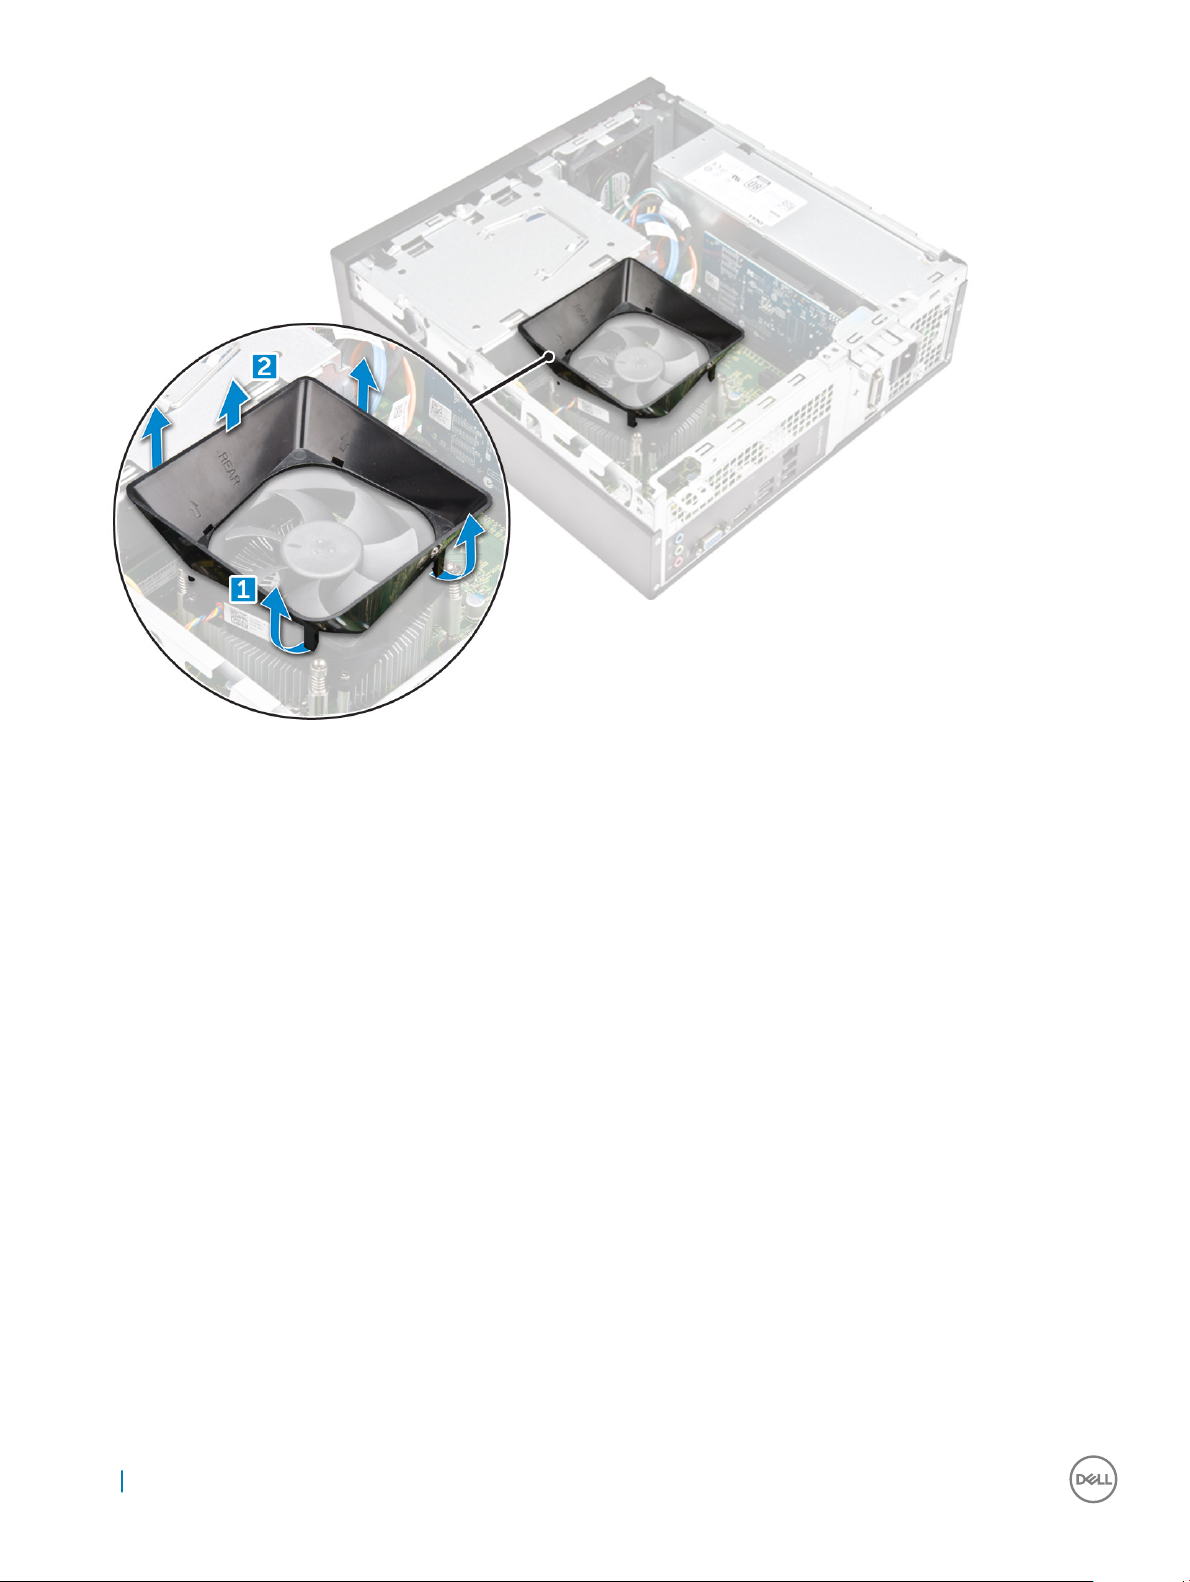
Removing the cooling shroud
: Cooling shroud is not a mandatory removal but recommended for easier access to the cables.
NOTE
1 Follow the procedure in Before working inside your computer.
2 Remove the cover
3 Follow the steps to remove the heat sink fan cover:
a Pry the plastic notches that secure the fan cover in an outward direction [1].
b Remove the fan cover from the heat sink assembly [2].
Извлечение и установка компонентов 9
Page 10
Installing the cooling shroud
1 Align the tabs on the cooling shroud with the securing slots on the computer.
2 Lower the cooling shroud into the chassis until it is rmly seated.
3 Install the cover.
4 Follow the procedure in After Working Inside Your Computer.
Плата расширения
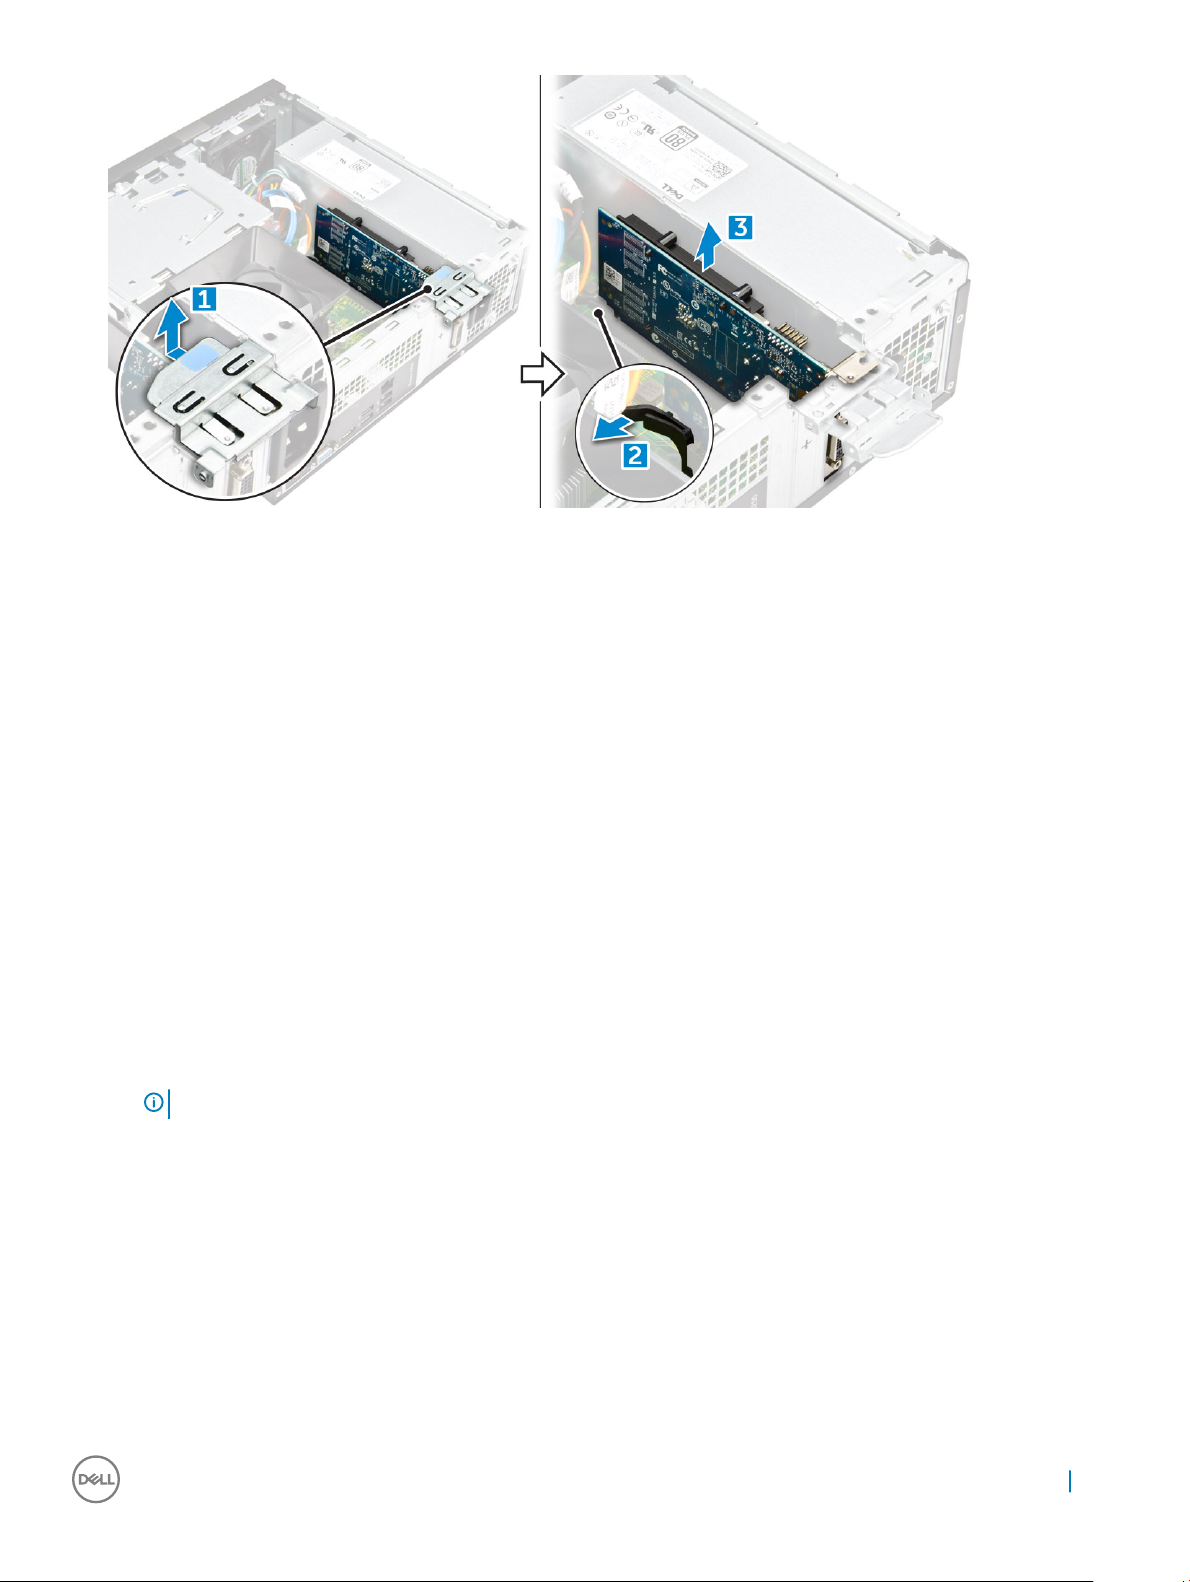
Removing the expansion card
1 Follow the procedure in Before working inside your computer.
2 Remove the cover.
3 Perform the following steps to remove the expansion card:
a Pull the metal tab to release the expansion card [1].
b Push the tab forward [2], and remove the expansion card from the slot on the computer [3].
10 Извлечение и установка компонентов
Page 11
Installing the expansion card
1 Insert the expansion card on the slot.
2 Push the card- retention latch to secure the expansion card.
3 Push the metal tab until it snaps in place.
4 Install the cover
5 Follow the procedure in After Working Inside Your Computer.
Жесткий диск
Removing the hard drive assembly
1 Follow the procedure in Before working inside your computer.
2 Remove the:
a cover
b bezel
c cooling shroud
3 Disconnect the power and the data cables from the hard drive.
NOTE: For easy access to the power and the data cables, it is recommended to remove the cooling shroud.
4 Follow the steps to remove the hard drive assembly:
a Remove the 6-32xL3.6 screws that secure the hard drive to the drive bay.
b Press the blue tab, and slide the hard drive from the hard drive bay.
Removing the hard drive from the hard drive bracket
1 Follow the procedures in Before Working Inside Your Computer.
2 Remove:
a cover
b front bezel
c cooling shroud
Извлечение и установка компонентов 11
Page 12

d hard drive assembly
3 Follow the steps to remove hard drive bracket:
a Remove the screw that secures the hard drive to the bracket.
b Slide and remove the hard drive from the bracket.
Installing the hard drive into the hard drive bracket
1 Slide the hard drive and tighten the screws to secure the hard drive to the bracket.
2 Install:
a hard drive assembly
b cooling shroud
c front bezel
d cover
3 Follow the procedure in After Working Inside Your Computer.
Installing the hard drive assembly
1 Slide the hard drive assembly into the drive bay.
2 Tighten the 6-32xL3.6 screws to secure the hard-drive assembly to the computer.
3 Connect the data and power cables to the hard drive.
4 Install:
a cooling shroud
b front bezel
c cover
5 Follow the procedures in After Working Inside Your Computer.
Оптический дисковод
Removing the optical drive
1 Follow the procedure in Before working inside your computer.
2 Remove the:
a cover
b bezel
c cooling shroud
d hard drive assembly
3 Follow the steps to release the optical drive:
a Remove the 6-32xL3.6 screw that secures the optical drive to the drive bay [1].
b Press the blue tab to loosen the optical drive [2].
c Slide the optical drive bracket from the computer [3].
12 Извлечение и установка компонентов
Page 13
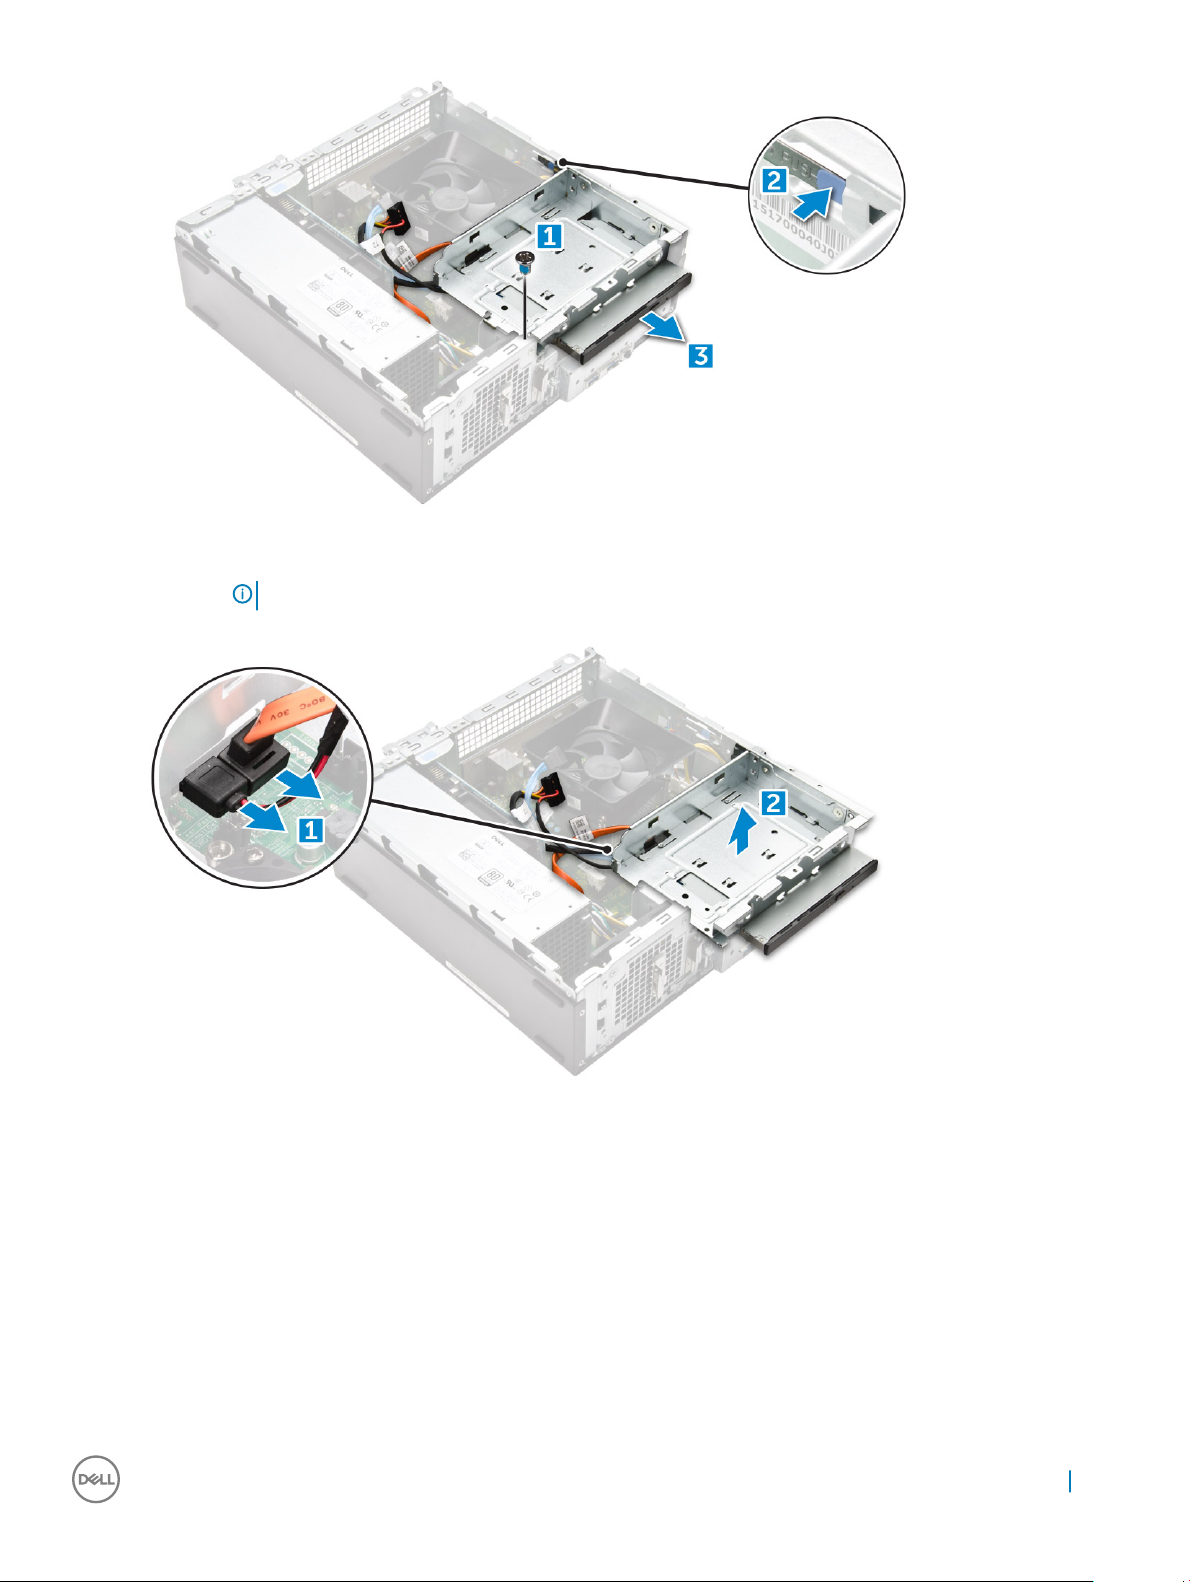
4 Follow the steps to remove the optical drive:
a Disconnect the power and the data cables from the optical drive [1].
NOTE: For easy access to the power and the data cables, it is recommended to remove the cooling shroud.
b Slide the optical drive [2] and lift it up to remove it from the chassis [3].
Removing the optical drive bracket
1 Follow the procedure in Before working inside your computer.
2 Remove the:
a cover
b bezel
c cooling shroud
d hard drive assembly
e optical drive
3 Follow the steps to remove the bracket from the optical drive.
a Remove the M2L2(04) screws that secure the bracket to the optical drive.
Извлечение и установка компонентов 13
Page 14
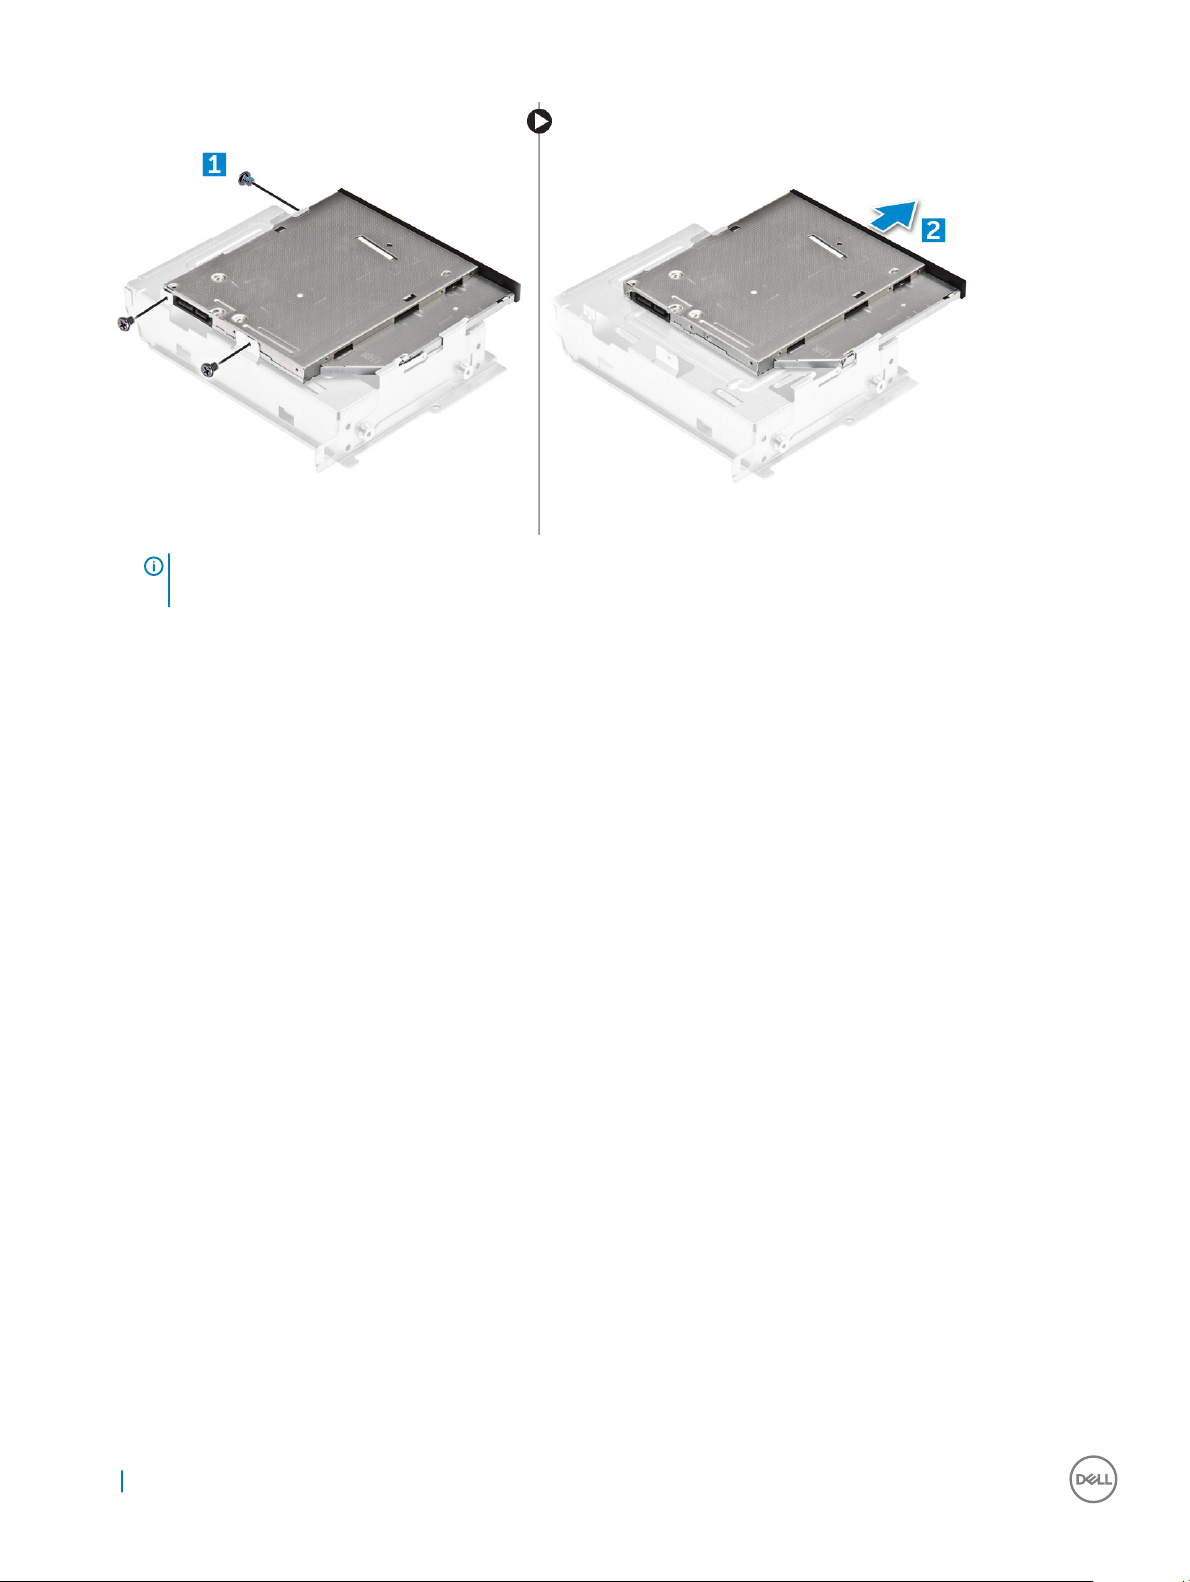
b Slide the optical drive from the bracket.
NOTE: Remove the optical-drive bracket only if you are replacing with a new optical drive. Otherwise, if optical drive
removal is only a pre-requisite to remove other components, then ignore Step 5 and Step 6
Installing the optical drive bracket
1 Slide the optical drive into the drive bay until it snaps.
2 Tighten the M2L2(04) screw to secure the optical drive to the bracket.
3 Install the:
a optical drive
b hard drive assembly
c cooling shroud
d front bezel
e cover
4 Follow the procedures in After Working Inside Your Computer.
Installing the optical drive
1 Insert the optical drive into the slot until it clicks into place.
2 Tighten the 6-32xL3.6 screw to secure the drive to the chassis.
3 Connect the data and power cables to the optical drive.
4 Install the:
a hard drive assembly
b cooling shroud
c front bezel
d cover
5 Follow the procedure in After Working Inside Your Computer.
14 Извлечение и установка компонентов
Page 15
Плата WLAN
Removing the WLAN card
1 Follow the procedure in Before working inside your computer.
2 Remove the:
a cover
b bezel
c cooling shroud
d hard drive assembly
e optical drive
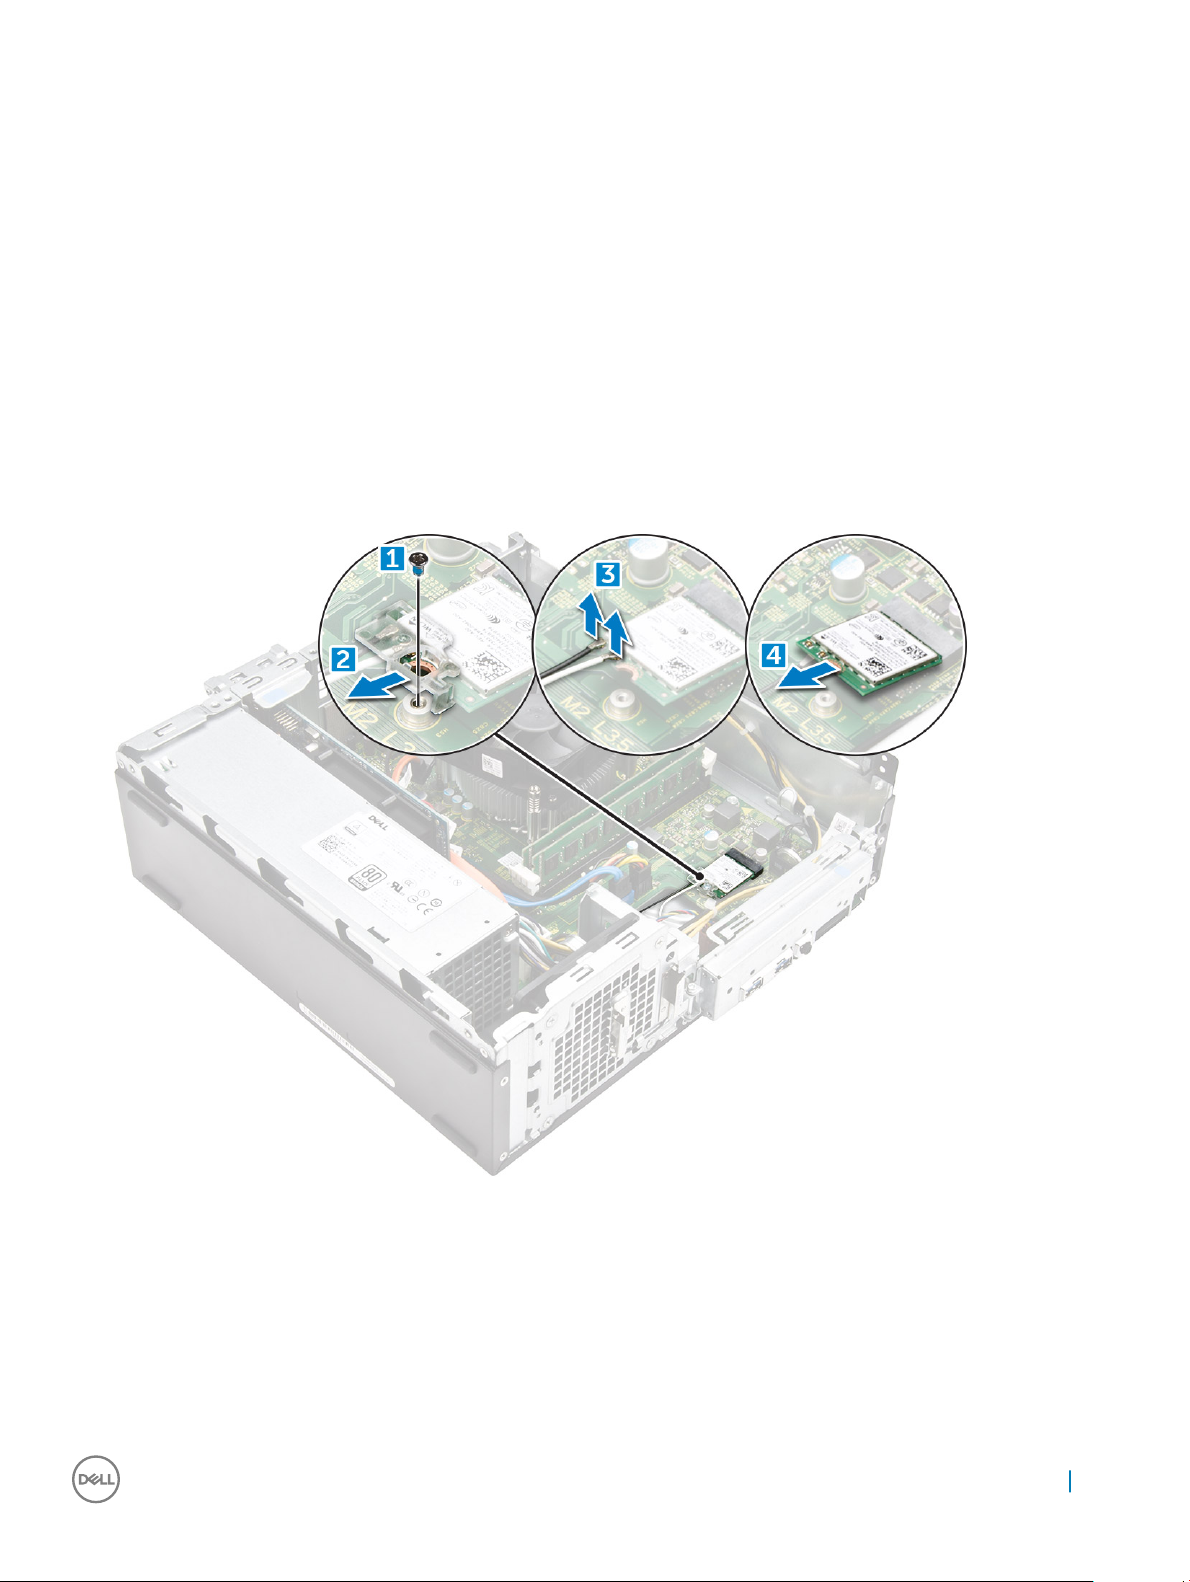
3 Perform the following steps to remove the WLAN card from the computer:
a Remove the M2L3.5 screw to release the plastic tab that secures the WLAN card to the computer [1, 2].
b Disconnect the WLAN cables from the connectors on the WLAN card [3].
c Remove the WLAN card from its connector on the system board [4].
Installing the WLAN card
1 Insert the WLAN card to the connector on the system board.
2 Connect the WLAN cables to the connectors on the WLAN card.
3 Place the plastic tab and tighten the M2L3.5 screw to secure the WLAN card to the system board.
4 Install:
a optical drive
Извлечение и установка компонентов 15
Page 16
b hard drive assembly
c cooling shroud
d front bezel
e cover
5 Follow the procedure in After Working Inside Your Computer.
Радиатор
Removing the heat sink assembly
1 Follow the procedure in Before working inside your computer.
2 Remove the:
a cover
b bezel
c cooling shroud
d hard drive assembly
e optical drive
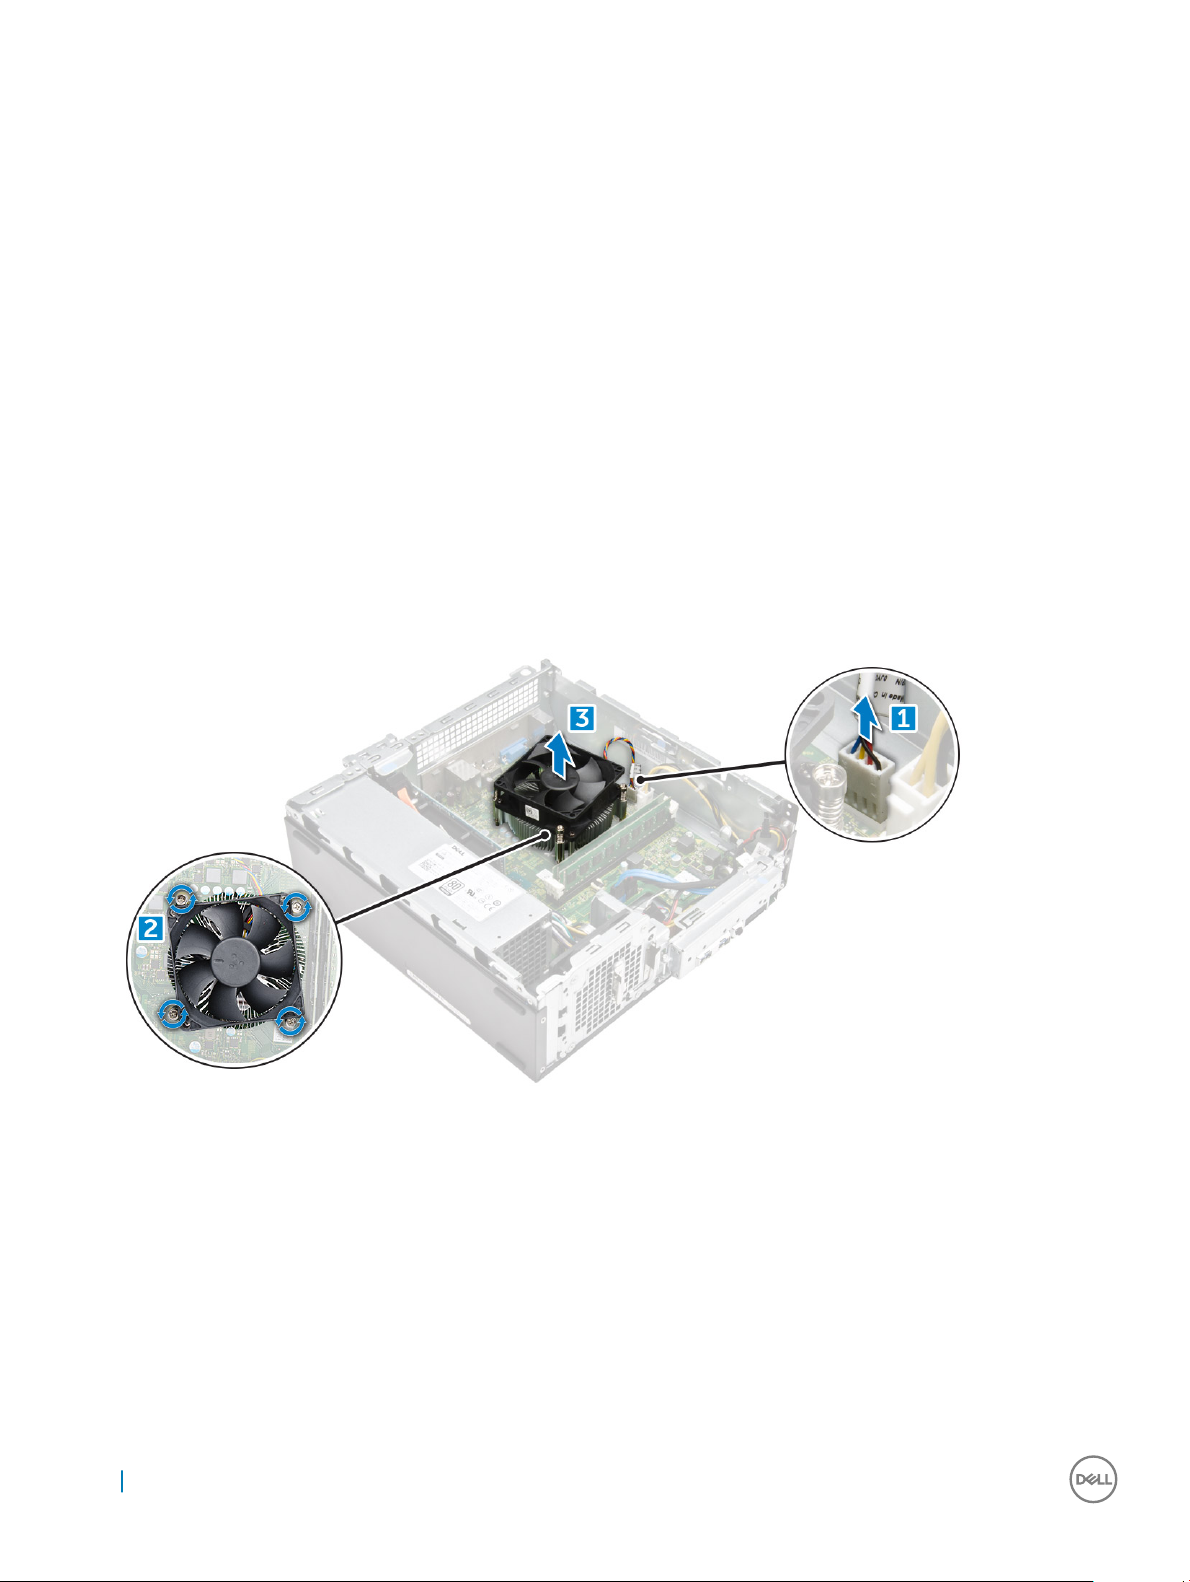
3 Follow the steps to remove the heat sink assembly:
a Disconnect the heat sink assembly cable from the system board [1].
b Remove the screws to loosen the processor fan and the heat sink [2].
c Lift the heat sink and remove it from the chassis [3].
Installing the heat sink assembly
1 Place the heat sink assembly in the slot by aligning with the screw holders.
2 Tighten the screws to secure the heat sink assembly to the system board.
3 Connect the heat sink assembly cable to the system board.
4 Install:
a optical drive
b hard drive assembly
c cooling shroud
d front bezel
e cover
16 Извлечение и установка компонентов
Page 17
5 Follow the procedure in After Working Inside Your Computer.
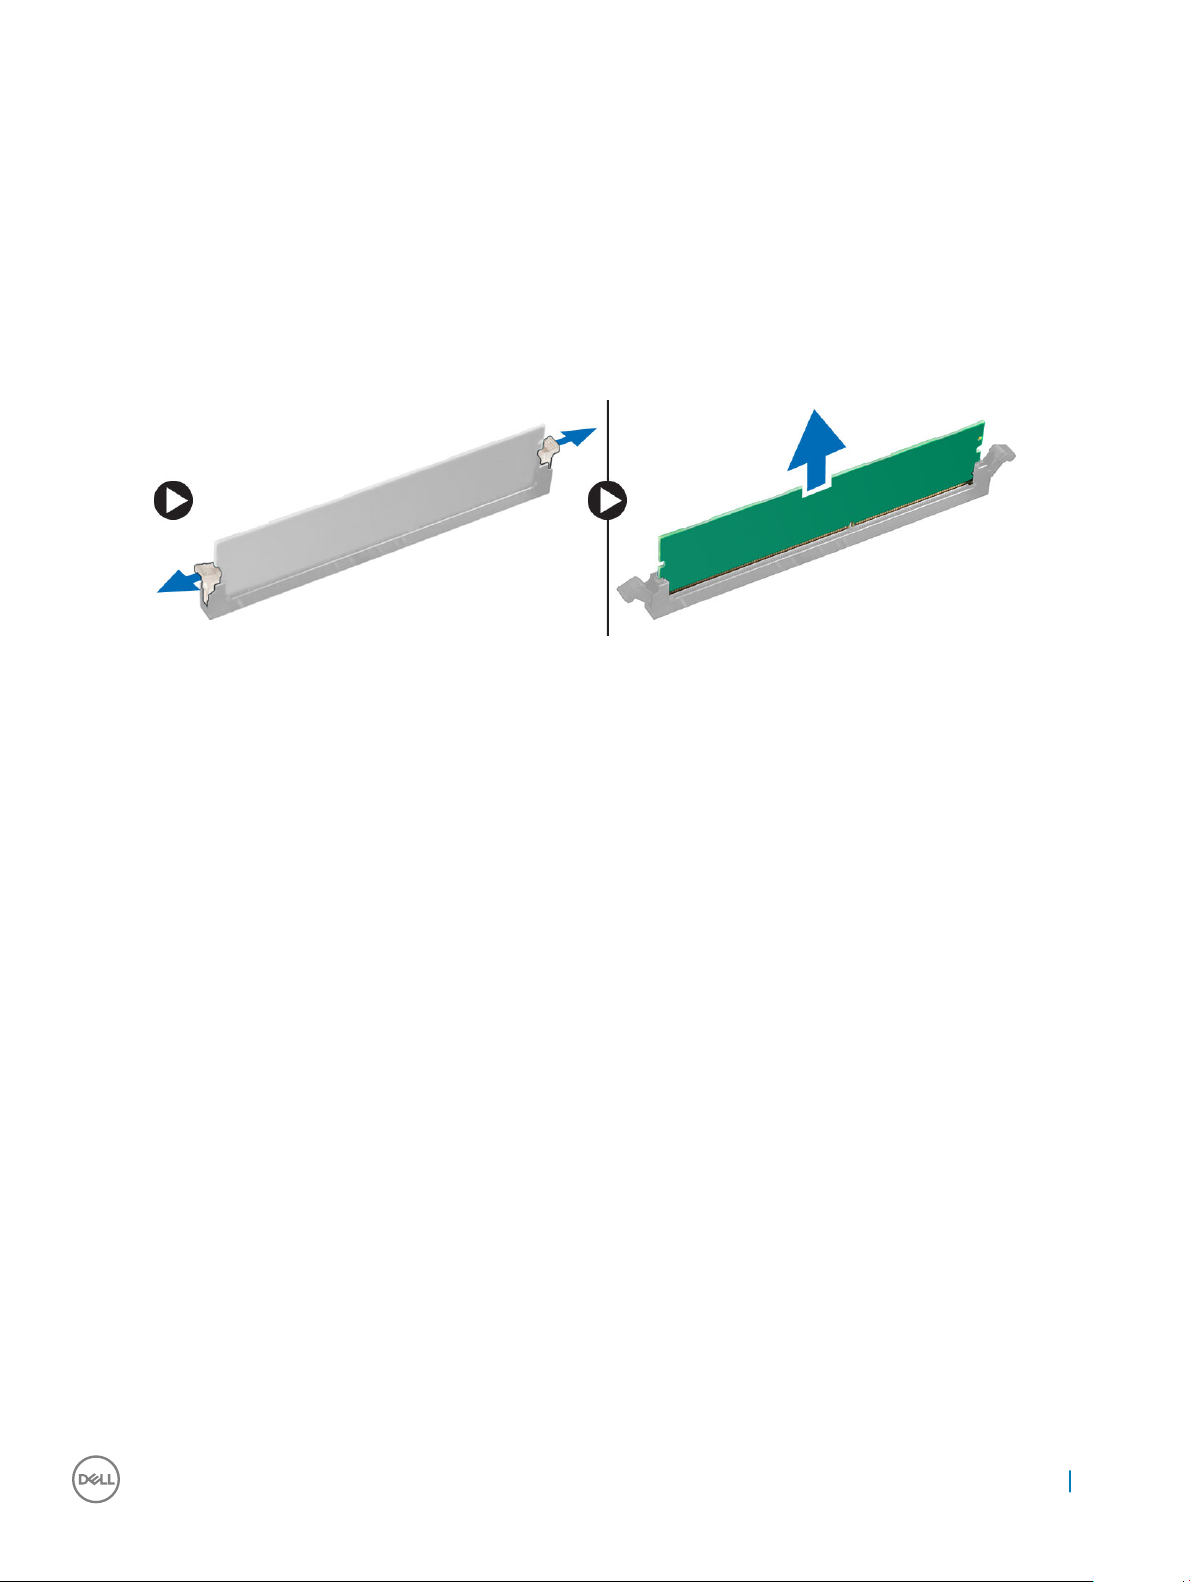
Модуль памяти
Removing the memory module
1 Follow the procedure in Before working inside your computer.
2 Remove the cover.
3 To remove the front memory module:
a Pull the clips securing the memory module until the memory module pops up.
b Remove the memory module from the system board.
Installing the memory module
1 Insert the memory module into the memory module socket until the clips secure the memory module.
2 Install the cover.
3 Follow the procedure in After working inside your computer.
Блок питания
Removing the power supply unit (PSU)
1 Follow the procedure in Before working inside your computer.
2 Remove the:
a cover
b bezel
c cooling shroud
d hard drive assembly
e optical drive
3 Perform the following steps to remove the power supply unit (PSU) from the computer:
a Disconnect the PSU cables from the connectors on the system board [1, 2].
b Unroute the PSU cables from the holder [3,4].
Извлечение и установка компонентов 17
Page 18
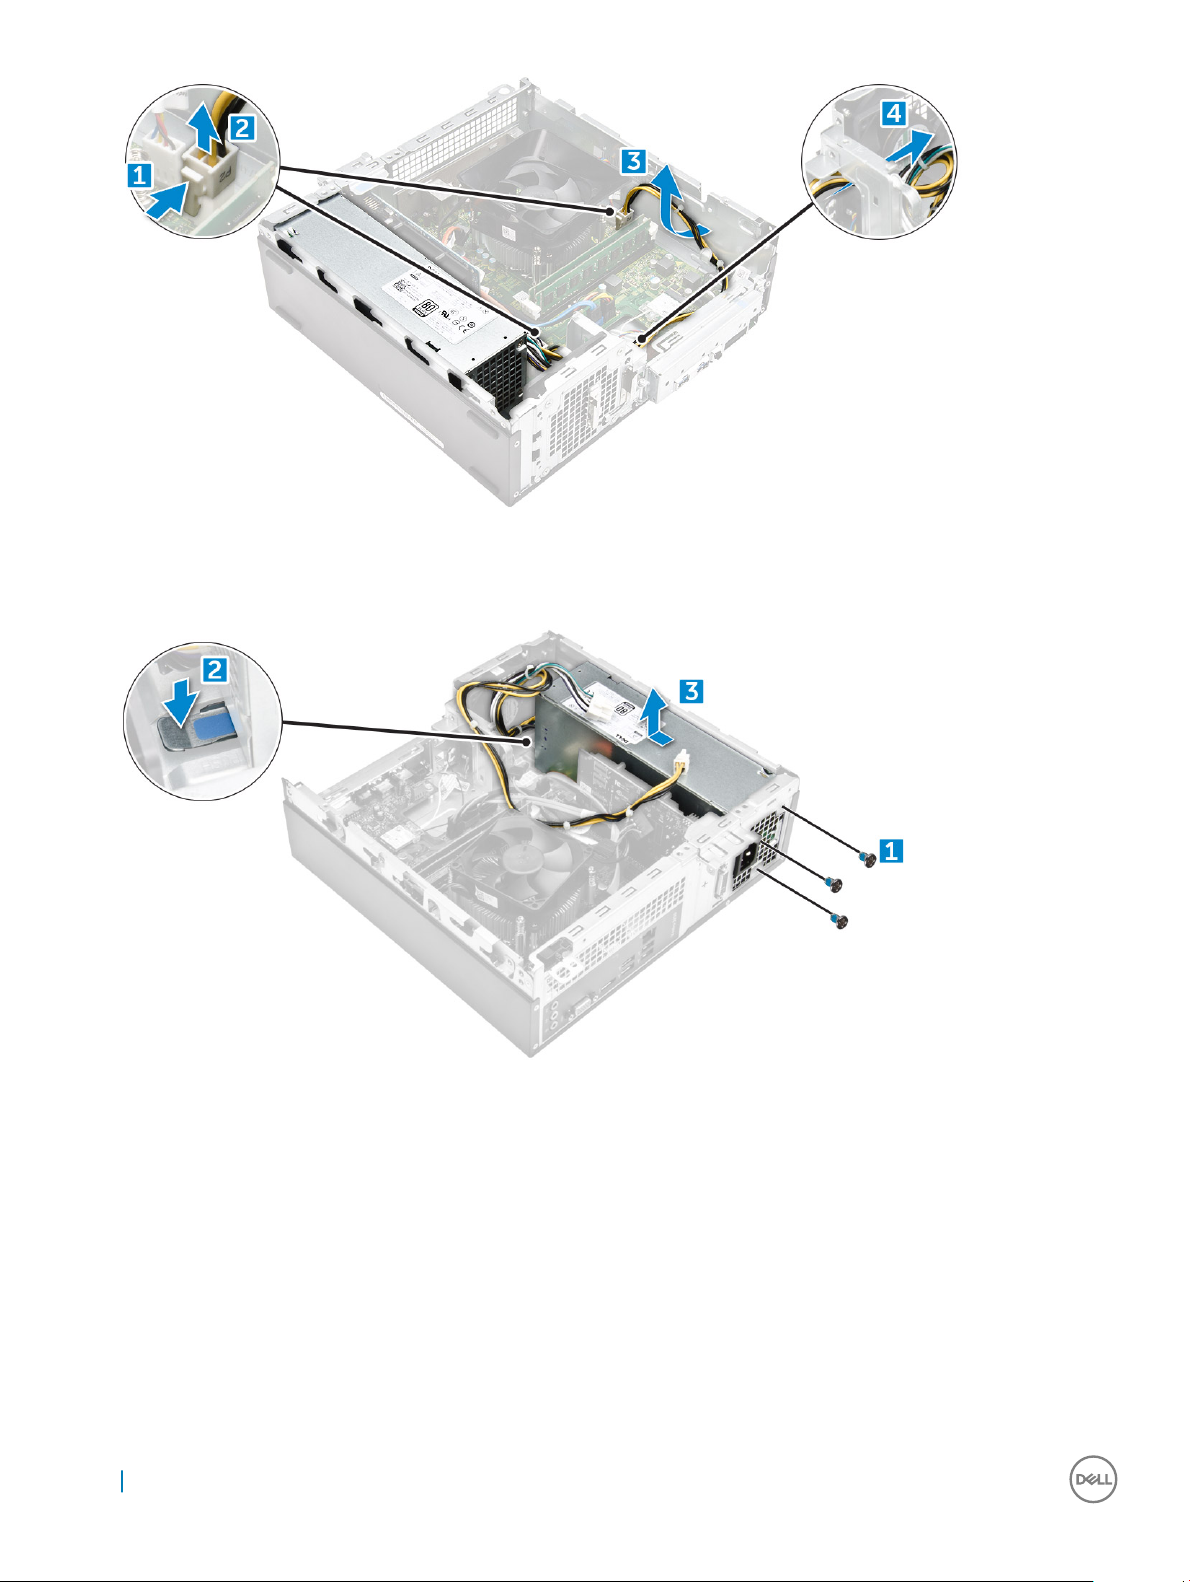
4 Perform the following steps to remove the PSU:
a Remove the 6-32xL6.35 screws that secure the PSU [1].
b Press the blue release tab to release the PSU [2].
c Slide and remove the PSU from the computer [3].
Installing the power supply unit (PSU)
1 Slide the PSU towards the back of the computer until it snaps into place.
2 Tighten the 6-32xL6.35 screws to secure the power supply unit to the computer.
3 Route the PSU cables through the placeholder.
4 Connect the PSU cables to their connectors on the system board.
5 Install the:
a optical drive
b hard drive assembly
c cooling shroud
d front bezel
e cover
18 Извлечение и установка компонентов
Page 19

6 Follow the procedure in After Working Inside Your Computer.
Вентилятор корпуса
Removing the system fan
1 Follow the procedure in Before working inside your computer.
2 Remove the:
a cover
b bezel
c cooling shroud
d hard drive assembly
e optical drive
3 Perform the following steps to remove the system fan from the computer:
a Disconnect the system fan cable from the connector on the system board [1].
b Unroute the system fan cable [2].
4 Remove the M6xL10 screws that secure the system fan to the computer chassis and remove it from the computer. [1,2]
Извлечение и установка компонентов 19
Page 20

Installing the system fan
1 Place the system fan on the computer.
2 Tighten the M6xL10 screws to secure the system fan to the computer.
3 Route and connect the system fan cable to the connector on the system board.
4 Install the:
a optical drive
b hard drive assembly
c cooling shroud
d front bezel
e cover
5 Follow the procedure in After Working Inside Your Computer.
Батарейка типа "таблетка"
Removing the coin cell battery
1 Follow the procedures in Before working inside your computer.
2 Remove the:
a cover
b bezel
c cooling shroud
d hard drive assembly
20 Извлечение и установка компонентов
Page 21

e optical drive
3 Perform the following steps to remove the coin cell battery:
a Press the release latch away from the battery to allow the battery to pop up from the socket [1].
b Lift the coin cell battery out of the computer [2].
Installing the coin cell battery
1 Place the coin cell battery in its slot on the system board.
2 Press until the release latch springs back into place and secures it.
3 Install the:
a optical drive
b hard drive assembly
c cooling shroud
d front bezel
e cover
4 Follow the procedures in After Working Inside Your Computer.
Системная плата
Removing the system board
1 Follow the procedure in Before working inside your computer.
2 Remove the
a cover
Извлечение и установка компонентов 21
Page 22

b bezel
c expansion cards
d memory module
e cooling shroud
f hard drive assembly
g optical drive
h WLAN card
i heat sink assembly
j power supply unit
k system fan
l coin cell battery
3 Disconnect the cables from the system board:
4 Follow the steps to release the I/O panel:
a Remove the 6-32xL6.35 screw that secures the I/O panel to the chassis [1].
b Press the tab to release the I/O panel from the chassis [2].
c Pull the I/O panel to release the I/O panel.
22 Извлечение и установка компонентов
Page 23

5 Follow the steps to remove the system board:
a Remove the 6-32xL6.35 screws that secure system board to the chassis [1].
b Lift the system board from the chassis.
Installing the system board
1 Insert the system board and ensure that ports are aligned to the holes on the back panel.
2 Tighten the 6-32xL6.35 screws to secure the system board.
Извлечение и установка компонентов 23
Page 24

3 Push the I/O panel to its original position until it snaps in.
4 Tighten the 6-32xL6.35 screw to secure the I/O panel to the chassis.
5 Connect the cables to the system board.
6 Install the:
a coin cell battery
b system fan
c power supply unit
d heat sink assembly
e WLAN card
f optical drive
g hard drive assembly
h cooling shroud
i memory module
j expansion card
k front bezel
l cover
7 Follow the procedures in After Working Inside Your Computer.
System board layout
1 Processor socket 2 CPU fan connector
3 PSU connector 4 Memory slot
5 WLAN card slot 6 Power button cable connector
7 Coin cell battery connector 8 System fan connector
24 Извлечение и установка компонентов
Page 25

9 SATA power connector 10 SATA0 connector
11 SATA2 connector 12 PSU connector
13 SATA1 connector 14 PCIex16 card slot
15 PCIex1 card slot
Извлечение и установка компонентов 25
Page 26

Технология и компоненты
Processors
Vostro 3267 systems are shipped with Intel 6th generation core processor technology. Vostro 3268 systems are shipped with Intel 7th
generation core processor technology.
Vostro 3267:
• Intel 6th Generation Celeron G3900 (2 MB Cache, 2.80 GHz)
• Intel 6th Generation Pentium G4400 (3 MB Cache, 3.30 GHz)
• Intel 6th Generation Core i3-6100 (3 MB Cache, 3.70 GHz)
• Intel 6th Generation Core i5-6400 (6 MB Cache, up to 3.30 GHz)
Vostro 3268:
• Intel 7th Generation Celeron G3930 (2 MB Cache, 2.90 GHz)
• Intel 7th Generation Pentium G4560 (3 MB Cache, 3.50 GHz)
• Intel 7th Generation Core i3-7100 (3 MB Cache, 3.90 GHz)
• Intel 7th Generation Core i5-7400 (6 MB Cache, up to 3.50 GHz)
• Intel 7th Generation Core i7-7700 (8 MB Cache, up to 4.20 GHz)
3
NOTE: The clock speed and performance varies depending on the workload and other variables. Total cache up to 8 MB cache
depending on processor type.
Идентификация процессоров в Windows 10
1 Коснитесь Поиск в Интернете и в Windows.
2 Введите Диспетчер устройств.
3 Коснитесь Процессор.
Отобразится основная информация о процессоре.
Проверка использования процессора в диспетчере задач
1 Правой кнопкой мыши щелкните в любом месте рабочего стола.
2 Выберите Запустить диспетчер задач.
Отобразится окно Диспетчер задач Windows.
3 Щелкните вкладку Быстродействие в окне Диспетчер задач Windows.
26 Технология и компоненты
Page 27

Проверка загрузки процессора в мониторе ресурсов
1 Правой кнопкой мыши щелкните в любом месте рабочего стола.
2 Выберите Запустить диспетчер задач.
Отобразится окно Диспетчер задач Windows.
3 Щелкните вкладку Быстродействие в окне Диспетчер задач Windows.
Отобразятся сведения о быстродействии процессора.
4 Щелкните Открыть монитор ресурсов.
Технология и компоненты 27
Page 28

Наборы микросхем
Все настольные компьютеры обмениваются данными с центральным процессором через набор микросхем. Данный
компьютер оснащается набором микросхем Intel серии 100.
Загрузка драйвера набора микросхем
1 Включите компьютер.
2 Перейдите на веб-узел Dell.com/support.
3 Выберите раздел Техподдержка продукта, введите сервисный код компьютера и щелкните Отправить.
ПРИМЕЧАНИЕ: Если сервисный код отсутствует, используйте функцию автоматического обнаружения
или выполните поиск вашей модели компьютера вручную.
4 Щелкните на Drivers and Downloads (Драйверы и загрузки).
5 Выберите операционную систему, установленную на компьютере.
6 Прокрутите страницу, разверните пункт Набор микросхем и выберите драйвер набора микросхем.
7 Нажмите Download File (Загрузить файл), чтобы загрузить последнюю версию драйвера набора микросхем для
компьютера.
8 После завершения загрузки перейдите в папку, где был сохранен файл драйвера.
9 Дважды щелкните значок файла драйвера набора микросхем и следуйте указаниям на экране.
Идентификация набора микросхем в диспетчере устройств Windows 10
1 Выберите Все параметры на панели чудо-кнопок Windows 10.
2 На панели управления выберите Диспетчер устройств.
3 Разверните пункт Системные устройства и найдите набор микросхем.
28 Технология и компоненты
Page 29

Драйверы набора микросхем Intel
Убедитесь, что драйверы набора микросхем Intel уже установлены на компьютере.
Таблица 1. Драйверы набора микросхем Intel
Перед установкой После установки
Технология и компоненты 29
Page 30

Видеокарта Intel HD
Этот компьютер оснащается графическим адаптером на наборе микросхем Intel HD Graphics.
Драйверы Intel HD Graphics
Проверьте, не установлены ли уже на компьютере драйверы Intel HD Graphics.
Таблица 2. Драйверы Intel HD Graphics
Перед установкой После установки
Параметры дисплея
Идентификация адаптера дисплея
1 Запустите чудо-кнопку «Поиск» и выберите пункт Параметры.
2 В поле поиска введите Диспетчер устройств и коснитесь Диспетчер устройств на панели слева.
3 Разверните Display adapters (Видеоадаптеры).
Отобразятся видеоадаптеры.
Загрузка драйверов
1 Включите компьютер.
2 Перейдите на веб-узел Dell.com/support.
3 Выберите раздел Техподдержка продукта, введите сервисный код компьютера и щелкните Отправить.
ПРИМЕЧАНИЕ: Если сервисный код отсутствует, используйте функцию автоматического обнаружения
или выполните поиск вашей модели компьютера вручную.
4 Щелкните на Drivers and Downloads (Драйверы и загрузки).
5 Выберите операционную систему, установленную на компьютере.
6 Прокрутите страницу вниз и выберите графический драйвер для установки.
7 Нажмите Download File (Загрузить файл) для загрузки драйвера видеоадаптера для компьютера.
8 После завершения загрузки перейдите в папку, где был сохранен файл графического драйвера.
9 Дважды щелкните значок файла драйвера видеоадаптера и следуйте указаниям на экране.
Изменение разрешения экрана
1 Правой кнопкой мыши щелкните в любом месте рабочего стола и выберите Параметры экрана.
2 Щелкните или коснитесь пункта Дополнительные настройки дисплея.
30 Технология и компоненты
Page 31

3 Выберите необходимое разрешение в раскрывающемся списке и коснитесь Применить.
Регулировка яркости в Windows 10
Для включения или отключения автоматической регулировки яркости экрана выполните следующее:
1 Правой кнопкой мыши щелкните пункт Все параметры → Система → Дисплей.
2 Используйте ползунок Автоматически настраивать яркость экрана, чтобы включить или отключить автоматическую
регулировку яркости.
ПРИМЕЧАНИЕ: Можно также использовать ползунок Уровень яркости для регулировки яркости
вручную.
Подключение к внешним устройствам отображения
Для подключения ноутбука к внешнему устройству отображения выполните следующие действия.
1 Убедитесь, что проектор включен, и подключите кабель проектора к разъему видеосигнала на компьютере.
2 Нажмите кнопку с логотипом Windows и клавишу P.
3 Выберите один из следующих режимов:
• Только экран ПК
• Дублировать
• Расширить
• Только второй экран
ПРИМЕЧАНИЕ: Дополнительные сведения см. в документе, поставляемом с устройством отображения.
Параметры жесткого диска
Этот компьютер поддерживает использование жесткого диска.
Определение жесткого диска в Windows 10
1 Выберите Все параметры на панели чудо-кнопок Windows 10.
2 Нажмите Панель управления, выберите Диспетчер устройств и разверните раздел Дисковые устройства.
Технология и компоненты 31
Page 32

Жесткий диск указан в разделе Дисковые устройства.
Вход в режим настройки BIOS
1 Включите или перезагрузите ноутбук.
2 Когда на экране появится логотип Dell, выполните одно из следующих действий, чтобы войти в программу настройки
BIOS:
• С помощью клавиатуры — удерживайте нажатой клавишу F2, пока не появится сообщение Entering BIOS (Вход в
BIOS). Для входа в меню выбора варианта загрузки нажмите клавишу F12.
Жесткий диск указан в разделе Информация о системе, в группе Общая.
Функции USB-интерфейса
Контроллер универсальной последовательной шины, также известный как USB, был представлен для применения на ПК в
1996 году и кардинально упростил соединение между хост-компьютером и периферийными устройствами, такими как
мыши и клавиатуры, внешние жесткие диски или оптические устройства, Bluetooth и многие другие периферийные
устройства, представленные на рынке.
Давайте посмотрим на эволюцию интерфейса USB, приведенную в таблице ниже.
Таблица 3. Эволюция USB
Тип Скорость передачи данных Категория Год введения
USB 3.0 4,8 Гбит/с Сверхвысокая скорость 2010
USB 2.0 480 Мбит/с Высокая скорость 2000
USB 1.1 12 Мбит/с Полная скорость 1998
USB 1.0 1,5 Мбит/с Низкая скорость 1996
Интерфейс USB 3.0 (SuperSpeed USB)
В течение многих лет стандарт USB 2.0 имел прочную репутацию стандартного интерфейса в мире персональных
компьютеров — его использовали около 6 миллиардов проданных устройств. Однако в настоящее время наблюдается
потребность в увеличении скорости, поскольку появляется все более быстрое оборудование и возрастают требования к
скорости передачи данных. Требования пользователей были наконец удовлетворены стандартом USB 3.0, теоретически
32 Технология и компоненты
Page 33

обладающим в 10 раз большей скоростью по сравнению со своим предшественником. Стандарт USB 3.0 обладает
следующими основными свойствами.
• Более высокие скорости передачи данных (до 4,8 Гбит/с)
• Повышенная максимальная мощность шины и потребление тока для лучшего энергообеспечения ресурсоемких
устройств
• Новые функции управления питанием
• Полностью дуплексный режим передачи данных и поддержки новых типов передачи данных
• Обратная совместимость с USB 2.0
• Новые разъемы и кабель
В разделах ниже приводятся некоторые из наиболее часто задаваемых вопросов по USB 3.0.
Быстродействие
Актуальная спецификация USB 3.0 задает три режима скорости: Это Super-Speed (Сверхскоростной), Hi-Speed
(Высокоскоростной) и Full-Speed (Полноскоростной). Новый сверхскоростной режим обеспечивает скорость передачи
данных 4,8 Гбит/с. Данный стандарт продолжает поддерживать высокоскоростной и полноскоростной режимы работы USB,
также известные как USB 2.0 и 1.1. Однако эти более медленные режимы по-прежнему работают на соответствующих
скоростях 480 и 12 Мбит/с и сохранены только для обратной совместимости.
Интерфейс USB 3.0 обеспечивает намного более высокую производительность за счет технических изменений,
перечисленных ниже:
• Дополнительная физическая шина, добавленная параллельно существующей шине USB 2.0 (см. рисунок ниже).
• В USB 2.0 было четыре провода (питание, заземление и одна дифференциальная пара для передачи данных); в USB 3.0
было добавлено еще четыре провода, т.е. две пары дифференциальных сигналов (передача и прием), в общей
сложности составив восемь соединений в разъемах и кабелях.
• В отличие от полудуплексного режима в USB 2.0 в USB 3.0 используется двунаправленный интерфейс передачи данных.
Это увеличивает теоретическую пропускную способность в 10 раз.
Из-за постоянно растущих требований к скорости передачи данных, распространения видеоматериалов высокой четкости,
терабайтных накопительных устройств, цифровых камер высокого разрешения и т. д. производительности USB 2.0 может
быть недостаточно. Кроме того, подключение USB 2.0 никогда не сможет даже приблизиться к теоретической максимальной
пропускной способности в 480 Мбит/с; реальная пропускная способность составляет не более 320 Мбит/с (40 Мбайт/с).
Технология и компоненты 33
Page 34

Аналогичным образом подключения USB 3.0 никогда не достигнут скорости 4,8 Гбит/с. Максимальная скорость передачи
данных составит немногим более 400 Мбайт/с. При такой скорости USB 3.0 оказывается в 10 раз быстрее USB 2.0.
Область применения
Стандарт USB 3.0 открывает устройствам более свободный канал для более быстрой работы. И если прежде стандарт USВ
был неприемлем при работе с видеоматериалами с точки зрения максимального разрешения, времени задержки и степени
сжатия, то сейчас можно легко представить работу видеосистем по USB с пропускной способностью, которая превышает
прежние значения скорости в 5–10 раз. Одноканальному DVI-разъему требуется пропускная способность до 2 Гбит/с.
Пропускная способность 480 Мбит/с накладывала существенные ограничения, однако скорость 5 Гбит/с открывает новые
перспективы. Обеспечивая заявленную пропускную способность 4,8 Гбит/с, новый стандарт USB получит распространение
в тех областях, где раньше такой интерфейс не применялся, например во внешних RAID-системах хранения данных.
Ниже перечислены некоторые из имеющихся на рынке устройств с поддержкой сверхскоростного USB 3.0:
• Внешние жесткие диски USB 3.0 для настольных ПК
• Портативные жесткие диски USB 3.0
• Стыковочные модули и адаптеры для жестких дисков стандарта USB 3.0
• Флэш-диски и устройства считывания карт памяти USB 3.0
• Твердотельные накопители USB 3.0
• RAID-накопители USB 3.0
• Приводы оптических носителей
• Мультимедийные устройства
• Сетевые устройства
• Платы адаптеров и концентраторы USB 3.0
Совместимость
Положительным фактором является то, что стандарт USB 3.0 будет мирно сосуществовать с USB 2.0, и такая схема
специально планировалась заранее. Что самое важное, хотя протокол USB 3.0 задает новый тип физических подключений
и потому требует новых кабелей для обеспечения более высокой скорости работы, сам разъем имеет ту же прямоугольную
форму с четырьмя контактами, как у USB 2.0, и будет размещаться на системах там же, где и раньше. В кабелях USB 3.0
имеется пять новых соединений для независимого переноса передаваемых и принимаемых данных. Эти соединения
становятся активными только при подключении к совместимому USB-разъему SuperSpeed.
В Windows 8 будет предусмотрена встроенная поддержка контроллеров USB 3.0. В предыдущих версиях Windows для этих
контроллеров требуются отдельные драйверы.
Корпорация Microsoft объявила, что в Windows 7 будет реализована поддержка USB 3.0, возможно не сразу после выпуска,
но в каком-то исправлении или пакете обновления. Не исключено, что после успешного внедрения поддержки USB 3.0 в
Windows 7 поддержка SuperSpeed будет реализована в Vista. Microsoft подтвердила это, заявив, что большинство ее
партнеров согласны, что ОС Vista также должна поддерживать USB 3.0.
О поддержке режима SuperSpeed в Windows XP пока ничего не известно. Учитывая семилетний возраст этой операционной
системы, вероятность этого стремится к нулю.
HDMI 1.4
This topic explains the HDMI 1.4 and its features along with the advantages.
HDMI (High-Denition Multimedia Interface) is an industry-supported, uncompressed, all-digital audio/video interface. HDMI provides an
interface between any compatible digital audio/video source, such as a set-top box, DVD player, or A/V receiver and a compatible digital
audio and/or video monitor, such as a digital TV (DTV). The intended applications for HDMI are set-top boxes, TVs, and DVD players. The
34 Технология и компоненты
Page 35

primary advantage is cable reduction and content protection provisions. HDMI supports standard, enhanced, or high-denition video, plus
multichannel digital audio on a single cable.
NOTE: The HDMI 1.4 will provide 5.1 channel audio support.
HDMI 1.4 Features
• HDMI Ethernet Channel - Adds high-speed networking to an HDMI link, allowing users to take full advantage of their IP-enabled
devices without a separate Ethernet cable
• Audio Return Channel - Allows an HDMI-connected TV with a built-in tuner to send audio data "upstream" to a surround audio system,
eliminating the need for a separate audio cable
• 3D - Denes input/output protocols for major 3D video formats, paving the way for true 3D gaming and 3D home theater applications
• Content Type - Real-time signaling of content types between display and source devices, enabling a TV to optimize picture settings
based on content type
• Additional Color Spaces - Adds support for additional color models used in digital photography and computer graphics.
• HDMI Micro Connector - A new, smaller connector for phones and other portable devices, supporting video resolutions up to 1080p
• Automotive Connection System - New cables and connectors for automotive video systems, designed to meet the unique demands of
the motoring environment while delivering true HD quality
Advantages of HDMI
• Quality HDMI transfers uncompressed digital audio and video for the highest, crispest image quality.
• Low -cost HDMI provides the quality and functionality of a digital interface while also supporting uncompressed video formats in a
simple, cost-eective manner
• Audio HDMI supports multiple audio formats, from standard stereo to multichannel surround sound
• HDMI combines video and multichannel audio into a single cable, eliminating the cost, complexity, and confusion of multiple cables
currently used in A/V systems
• HDMI supports communication between the video source (such as a DVD player) and the DTV, enabling new functionality
Memory features
In this computer, the memory (RAM) is a part of the system board.
• This computer supports 2133 MHz DDR4 for Vostro-3267 system.
• This computer supports DDR4 2133 MHz / 2400 MHzf or Vostro-3268 system.
NOTE: If this product is purchased with Intel 6th Gen CPUs or 7th Gen Celeron dual core CPU, the maximum MHz this product
can achieve is 2133, though the memory material used is 2400 MHz.
Проверка системной памяти
Windows 10
1 Нажмите кнопку Windows и выберите Все параметры > Система.
2 В разделе Система выберите О системе.
Технология и компоненты 35
Page 36

Проверка системной памяти в программе настройки
1 Включите или перезагрузите компьютер.
2 После того как появится логотип Dell, выполните одно из следующих действий:
• С помощью клавиатуры сделайте следующее. Нажимайте клавишу F2 до тех пор, пока не появится сообщение о
входе в режим настройки BIOS. Для входа в меню выбора загрузки нажмите клавишу F12.
3 На панели слева выберите Параметры > Общие > Сведения о системе,
Информация о памяти отображается на панели справа.
DDR4
Память с удвоенной скоростью передачи данных четвертого поколения (DDR4) пришла на смену технологиям DDR2 и DDR3,
обладавшим более низким быстродействием. DDR4 поддерживает емкость до 512 Гбайт, тогда как максимальная емкость
DDR3 составляет 128 Гбайт на модуль DIMM. Синхронное динамическое ОЗУ DDR4 имеет иную схему расположения
установочных пазов по сравнению с SDRAM и DDR. Это предотвращает установку неподходящей памяти в систему.
Энергопотребление DDR4 на 20% ниже (всего 1,2 В), чем у модулей DDR3, для которых требуется напряжение 1,5 В. DDR4
также поддерживает новый режим глубокого энергосбережения, благодаря которому хост-устройство переходит в режим
ожидания без обновления памяти. Предполагается, что режим глубокого энергосбережения уменьшит потребляемую
мощность в режиме ожидания на 40–50%.
Основные технические характеристики
Приведенная ниже таблица содержит технические характеристики памяти DDR3 в сравнении с DDR4.
Таблица 4. DDR3 и DDR4
Функция/параметр DDR3 DDR4 Преимущества DDR4
Плотность размещения
элементов в микросхеме
Скорость передачи данных 800–2 133 Мбит/с 1 600–3 200 Мбит/с Переход к повышенной
Напряжение 1,5 В 1,2 В Снижение
Стандарт низкого
напряжения
Количество внутренних
банков
Количество групп банков
(BG)
Число входов VREF 2 — DQ и CMD/ADDR 1 — CMD/ADDR Внутренний VREFDQ
tCK — с включенной
функцией DLL
512 Мбит — 8 Гбит 4–16 Гбит Увеличенная емкость DIMM
скорости ввода-вывода
энергопотребления памяти
Да (DDR3L при 1,35 В) Ожидается 1,05 В Снижение
энергопотребления памяти
8 16 Более высокая скорость
передачи данных
0 4 Ускоренный доступ в
пакетном режиме
300–800 МГц 667 МГц — 1,6 ГГц Более высокая скорость
передачи данных
tCK — без DLL 10–125 МГц (дополнительно) До 125 МГц, нижний предел
не определен
36 Технология и компоненты
Полная поддержка работы
без DLL
Page 37

Функция/параметр DDR3 DDR4 Преимущества DDR4
Задержка чтения AL+CL AL+CL Увеличенные значения
Задержка записи AL+CWL AL+CWL Увеличенные значения
Драйвер DQ (ALT) 40 Ом 48 Ом Оптимально подходит для
применения в PtP
Шина DQ SSTL15 POD12 Снижение шума и
энергопотребления вводавывода
Значения RTT (в Ом) 120, 60, 40, 30, 20 240, 120, 80, 60, 48, 40, 34 Поддержка повышенной
скорости передачи данных
RTT не допускается Чтение пакетов Отключается при чтении
пакетов
Режимы ODT Номинальный,
динамический
Управление ODT Требуется передача
сигналов ODT
Многоцелевой регистр Четыре регистра — 1
заданный, 3 RFU
Типы DIMM RDIMM, LRDIMM, UDIMM,
SODIMM
Число контактов DIMM 240 (R, LR, U); 204 (SODIMM) 288 (R, LR, U); 260 (SODIMM)
RAS Код корректировки ошибок CRC, четность,
Номинальный,
динамический, парковка
Не требуется передача
сигналов ODT
Четыре регистра — 3
заданных, 1 RFU
RDIMM, LRDIMM, UDIMM,
SODIMM
адресуемость, GDM
Подробные сведения о DDR4
Простота использования
Дополнительный режим
управления; изменение
значения OTF
Простота управления ODT;
допускается маршрутизация
без ODT, применение в PtP
Обеспечивает
дополнительное
специальное чтение
Дополнительные функции
RAS; улучшенная
целостность данных
Между модулями DDR3 и DDR4 существуют незначительные различия, перечисленные ниже.
Различие в установочных выемках
Расположение выемки модуля DDR4 отличается от расположения выемки модуля DDR3. Обе выемки находятся на стороне
вставки модуля, но расположение выемки DDR4 немного отличается, чтобы предотвратить установку модуля в
несовместимую плату или платформу.
Рисунок 1. Различие в установочных выемках
Увеличенная толщина
Технология и компоненты 37
Page 38

Модули DDR4 немного толще DDR3, потому что содержат больше сигнальных слоев.
Рисунок 2. Различие в толщине
Изогнутый край
Модули DDR4 имеют изогнутый край, что упрощает процесс установки модуля и снижает давление на печатную плату при
вставке модулей памяти.
Рисунок 3. Изогнутый край
Поиск и устранение неполадок
Ошибки памяти в системе отображаются с новым кодом неисправности ON-FLASH-FLASH или ON-FLASH-ON. Если
возникает сбой в работе всей памяти, дисплей не включается. Для поиска и устранения возможных неполадок памяти
можно попробовать заведомо исправные модули памяти в разъемах памяти на нижней панели системы или под
клавиатурой, как в некоторых портативных системах.
Тестирование памяти с помощью ePSA
1 Включите или перезагрузите компьютер.
2 После того как появится логотип Dell, выполните одно из следующих действий:
• С помощью клавиатуры: нажмите клавишу F2.
На компьютере начнется выполнение анализа системы перед загрузкой (PreBoot System Assessment, PSA).
ПРИМЕЧАНИЕ: Если вы не успели нажать эту клавишу и появился экран с логотипом операционной
системы, дождитесь появления рабочего стола. Затем выключите компьютер и повторите попытку.
Драйверы аудиоустройств Realtek HD
Проверьте, не установлены ли уже на компьютере драйверы аудиоустройств Realtek.
38 Технология и компоненты
Page 39

Таблица 5. Драйверы аудиоустройств Realtek HD
Перед установкой После установки
Технология и компоненты 39
Page 40

4
Поиск и устранение неполадок
Поиск неполадок можно произвести с помощью индикаторов, таких как диагностические световые сигналы, звуковые
сигналы и сообщения об ошибках, появляющиеся в процессе работы компьютера.
Диагностика
В ходе POST (Power On Self Test [самотестирования при включении питания]) компьютера проверяется его соответствие
основным требованиям к компьютеру и надлежащая работа оборудования перед началом процедуры загрузки. Если
компьютер проходит POST, загрузка компьютера продолжается в нормальном режиме. Однако, если компьютер не прошел
процедуру POST, он воспроизводит серию кодов светодиодными индикаторами во время запуска. Системный светодиодный
индикатор встроен в кнопку питания.
В приведенной ниже таблице показаны разные состояния индикаторов и то, что они означают.
Таблица 6. Диагностика
Количество вспышек
светодиодного индикатора
2 желтых 2 Память или ОЗУ не обнаружено
4 желтых 4 Сбой памяти или ОЗУ
5 желтых 5 Отказ батарейки КМОП-схемы
3 желтых, 4 белых 3,4 Недействительный образ восстановления
3 желтых, 3 белых 3,3 Образ восстановления не найден
Звуковые сигналы Описание неполадки
Диагностические сообщения об ошибках
Таблица 7. Диагностические сообщения об ошибках
Сообщения об ошибках Описание
AUXILIARY DEVICE FAILURE
BAD COMMAND OR FILE NAME
CACHE DISABLED DUE TO FAILURE
Неисправность сенсорной панели или внешней мыши. Если
используется внешняя мышь, проверьте правильность
подсоединения кабеля. Включите параметр Pointing Device
(Указывающее устройство) в программе настройки системы.
Проверьте правильность написания команды, расстановки
пробелов, а также правильность указанного пути к файлу.
Неисправность основного внутреннего кэша
микропроцессора. Обратитесь в компанию Dell
CD DRIVE CONTROLLER FAILURE
DATA ERROR
DECREASING AVAILABLE MEMORY
40 Поиск и устранение неполадок
Оптический дисковод не отвечает на команды компьютера.
Ошибка чтения данных с жесткого диска.
Возможно, один или несколько модулей памяти неисправны
или неправильно установлены. Переустановите модули
памяти или замените их, если это необходимо.
Page 41

Сообщения об ошибках Описание
DISK C: FAILED INITIALIZATION
Ошибка инициализации жесткого диска. Запустите тесты
жесткого диска в программе Dell Diagnostics.
DRIVE NOT READY
ERROR READING PCMCIA CARD
EXTENDED MEMORY SIZE HAS CHANGED
THE FILE BEING COPIED IS TOO LARGE FOR THE
DESTINATION DRIVE
A FILENAME CANNOT CONTAIN ANY OF THE FOLLOWING
CHARACTERS: \ / : * ? " < > | -
GATE A20 FAILURE
GENERAL FAILURE
Для выполнения операции необходимо установить жесткий
диск в отсек. Установите жесткий диск в отсек для жесткого
диска.
Компьютер не может определить плату ExpressCard.
Переустановите плату или попробуйте использовать другую
плату.
Объем памяти, записанной на энергонезависимую память
(NVRAM), не совпадает с объемом памяти, установленной в
компьютер. Перезагрузите компьютер. Если ошибка
повторится, обратитесь в корпорацию Dell.
Файл, который вы пытаетесь скопировать, слишком велик,
или диск заполнен. Попытайтесь скопировать файл на
другой диск или на диск большего размера.
Не используйте эти символы в именах файлов.
Возможно, плохо закреплен модуль памяти.
Переустановите модули памяти или замените их, если это
необходимо.
Операционная система не способна выполнить команду.
Это сообщение обычно сопровождается дополнительной
информацией, например (например, Printer out of
paper. Take the appropriate action.
HARD-DISK DRIVE CONFIGURATION ERROR
HARD-DISK DRIVE CONTROLLER FAILURE 0
HARD-DISK DRIVE FAILURE
Компьютер не может определить тип диска. Завершите
работу компьютера, извлеките жесткий диск и загрузите
компьютер с компакт-диска. После этого снова выключите
компьютер, переустановите жесткий диск и перезагрузите
компьютер. Запустите проверки жесткого диска в
диагностической программе Dell Diagnostics (смотрите
раздел ).
Жесткий диск не отвечает на команды с компьютера.
Завершите работу компьютера, извлеките жесткий диск и
загрузите компьютер с компакт-диска. После этого снова
выключите компьютер, переустановите жесткий диск и
перезагрузите компьютер. Если устранить неполадку не
удается, попробуйте установить другой жесткий диск.
Запустите проверки жесткого диска в диагностической
программе Dell Diagnostics (смотрите раздел ).
HARD-DISK DRIVE READ FAILURE
Возможно, жесткий диск несправен. Завершите работу
компьютера, извлеките жесткий диск и загрузите компьютер
Поиск и устранение неполадок 41
Page 42

Сообщения об ошибках Описание
с компакт-диска. После этого снова выключите компьютер,
переустановите жесткий диск и перезагрузите компьютер.
Если устранить неполадку не удается, попробуйте
установить другой жесткий диск. Запустите проверки
жесткого диска в диагностической программе Dell
Diagnostics (смотрите раздел ).
INSERT BOOTABLE MEDIA
INVALID CONFIGURATION INFORMATION-PLEASE RUN
SYSTEM SETUP PROGRAM
KEYBOARD CLOCK LINE FAILURE
KEYBOARD CONTROLLER FAILURE
KEYBOARD DATA LINE FAILURE
Операционная система пытается загрузиться с
незагрузочного носителя, такого как компакт-диск. Вставьте
загрузочный носитель. Вставьте загрузочный носитель.
Информация о конфигурации системы не совпадает с
конфигурацией аппаратных средств. Такое сообщение чаще
всего появляется после установки модуля памяти. Измените
соответствующие параметры в программе настройки
системы.
Если используется внешняя клавиатура, проверьте
правильность подсоединения кабеля. Выполните тест
Keyboard Controller (Контроллер клавиатуры) в программе
Dell Diagnostics (смотрите раздел
Если используется внешняя клавиатура, проверьте
правильность подсоединения кабеля. Перезагрузите
компьютер, не дотрагиваясь до клавиатуры и мыши во
время загрузки. Выполните тест Keyboard Controller
(Контроллер клавиатуры) в программе Dell Diagnostics
(смотрите раздел
Если используется внешняя клавиатура, проверьте
правильность подсоединения кабеля. Выполните тест
Keyboard Controller (Контроллер клавиатуры) в программе
Dell Diagnostics (смотрите раздел
KEYBOARD STUCK KEY FAILURE
LICENSED CONTENT IS NOT ACCESSIBLE IN
MEDIADIRECT
MEMORY ADDRESS LINE FAILURE AT ADDRESS, READ
VALUE EXPECTING VALUE
MEMORY ALLOCATION ERROR
MEMORY DOUBLE WORD LOGIC FAILURE AT ADDRESS,
READ VALUE EXPECTING VALUE
Если используется внешняя клавиатура или цифровая
клавиатура, проверьте правильность подсоединения
кабеля. Перезагрузите компьютер, не дотрагиваясь до
клавиатуры во время загрузки. Запустите проверку на
запавшие клавиши в диагностической программе Dell
Diagnostics (смотрите раздел ).
Программа Dell MediaDirect™ не может проверить
ограничения, установленные в отношении файла
программой управления правами на цифровые данные
Digital Rights Management (DRM), поэтому воспроизведение
файла не разрешается.
Возможно, неисправен или неправильно установлен модуль
памяти. Переустановите модули памяти или замените их,
если это необходимо.
Запускаемая программа конфликтует с операционной
системой, другой программой или утилитой. Выключите
компьютер и через 30 секунд включите снова. Запустите
программу еще раз. Если опять появляется сообщение об
ошибке, смотрите документацию по этой программе.
Возможно, неисправен или неправильно установлен модуль
памяти. Переустановите модули памяти или замените их,
если это необходимо.
42 Поиск и устранение неполадок
Page 43

Сообщения об ошибках Описание
MEMORY ODD/EVEN LOGIC FAILURE AT ADDRESS, READ
VALUE EXPECTING VALUE
Возможно, неисправен или неправильно установлен модуль
памяти. Переустановите модули памяти или замените их,
если это необходимо.
MEMORY WRITE/READ FAILURE AT ADDRESS, READ
VALUE EXPECTING VALUE
NO BOOT DEVICE AVAILABLE
NO BOOT SECTOR ON HARD DRIVE
NO TIMER TICK INTERRUPT
NOT ENOUGH MEMORY OR RESOURCES. EXIT SOME
PROGRAMS AND TRY AGAIN
OPERATING SYSTEM NOT FOUND
OPTIONAL ROM BAD CHECKSUM
SECTOR NOT FOUND
Возможно, неисправен или неправильно установлен модуль
памяти. Переустановите модули памяти или замените их,
если это необходимо.
Системе не удается обнаружить жесткий диск. Если
загрузочным устройством является жесткий диск, он должен
быть правильно установлен и разбит на разделы как
загрузочное устройство.
Возможно, операционная система повреждена. Обратитесь
в Dell.
Возможно, неисправна микросхема на системной плате.
Запустите тесты System Set (Системный набор микросхем) в
программе Dell Diagnostics (смотрите раздел
Слишком много открытых программ. Закройте все окна и
откройте программу, с которой вы хотите работать.
Чтобы переустановить операционную систему: Если
проблема не устраняется, обратитесь в Dell.
Произошел сбой дополнительного ПЗУ. Обратитесь в
корпорацию Dell.
Операционной системе не удается найти один из секторов
на жестком диске. Возможно, на жестком диске имеется
дефектный сектор или повреждена таблица размещения
файлов (FAT). Запустите утилиту проверки ошибок Windows,
чтобы проверить файловую структуру на жестком диске.
Смотрите инструкции в центре справки и поддержки
Windows (нажмите Пуск > Справка и поддержка). Если
дефектных секторов очень много, сделайте резервную
копию данных (если это возможно), а затем
переформатируйте жесткий диск.
SEEK ERROR
SHUTDOWN FAILURE
TIME-OF-DAY CLOCK LOST POWER
TIME-OF-DAY CLOCK STOPPED
Операционной системе не удается найти требуемую
дорожку на жестком диске.
Возможно, неисправна микросхема на системной плате.
Запустите тесты System Set (Системный набор микросхем) в
программе Dell Diagnostics (смотрите раздел Если
сообщение будет появляться снова, обратитесь в
корпорацию Dell.
Испорчены параметры конфигурации системы. Подключите
кабель питания компьютера к электросети, чтобы зарядить
аккумулятор. Если проблема не устранена, попробуйте
восстановить данные, войдя в программу настройки
системы, а затем немедленно выйдя из программы. Если
сообщение будет появляться снова, обратитесь в
корпорацию Dell.
Возможно, требуется подзарядка резервного аккумулятора,
обеспечивающего сохранение параметров конфигурации
системы. Подключите кабель питания компьютера к
Поиск и устранение неполадок 43
Page 44

Сообщения об ошибках Описание
электросети, чтобы зарядить аккумулятор. Если проблема
не устраняется, обратитесь в Dell.
TIME-OF-DAY NOT SET-PLEASE RUN THE SYSTEM SETUP
PROGRAM
TIMER CHIP COUNTER 2 FAILED
UNEXPECTED INTERRUPT IN PROTECTED MODE
X:\ IS NOT ACCESSIBLE. THE DEVICE IS NOT READY
Время или дата, установленные в программе настройки
системы, не совпадают с показаниями системных часов.
Измените значения параметров Дата и Время.
Возможно, неисправна микросхема на системной плате.
Запустите тесты System Set (Системный набор микросхем) в
программе Dell Diagnostics (смотрите раздел
Возможно, неисправен контроллер клавиатуры или плохо
вставлен модуль памяти. Запустите тесты System Memory
(системной памяти) и Keyboard Controller (контроллера
клавиатуры) в диагностической программе Dell Diagnostics
или обратитесь в корпорацию Dell.
Вставьте диск в дисковод и повторите попытку.
Системные сообщения об ошибке
Таблица 8. Системные сообщения об ошибке
Системное сообщение Описание
Alert! Previous attempts at booting this system
have failed at checkpoint [nnnn]. For help in
resolving this problem, please note this
checkpoint and contact Dell Technical Support.
(Внимание! Во время предыдущих попыток загрузки
системы происходил сбой в контрольной точке
[nnnn]. Для устранения этой неполадки запишите
код этой контрольной точки и обратитесь в
службу технической поддержки компании Dell)
По какой-то причине компьютер не смог завершить
процедуру загрузки три раза подряд.
CMOS checksum error (Ошибка контрольной суммы
КМОП)
CPU fan failure (Сбой вентилятора ЦП)
System fan failure (Сбой системного
вентилятора)
Hard-disk drive failure (Сбой жесткого диска)
Keyboard failure (Сбой клавиатуры)
No boot device available (Нет загрузочных
устройств)
44 Поиск и устранение неполадок
Выполнен сброс RTC, загружены настройки BIOS по
умолчанию.
Произошел отказ вентилятора ЦП.
Произошел сбой системного вентилятора.
Возможный сбой жесткого диска во время
самотестирования при включении питания.
Отказ клавиатуры или отсоединение кабеля. Если
переустановка кабеля не решит эту проблему, замените
клавиатуру.
Отсутствует загрузочный раздел на жестком диске,
отсоединился кабель жесткого диска или отсутствует
загрузочное устройство.
• Если загрузочным устройством является жесткий диск,
убедитесь, что кабели подсоединены, а диск правильно
установлен и разбит на разделы как загрузочное
устройство.
Page 45

Системное сообщение Описание
• Войдите в программу настройки системы и проверьте
правильность информации о последовательности
загрузки.
No timer tick interrupt (Отсутствует прерывание
от таймера)
ВНИМАНИЕ! СИСТЕМОЙ САМОКОНТРОЛЯ жесткого диска
обнаружен выход параметра за пределы обычного
рабочего диапазона. Компания Dell рекомендует
регулярно выполнять резервное копирование
данных. Параметр, выходящий за пределы
диапазона, может свидетельствовать (но не
обязательно свидетельствует) о возможной
неполадке жесткого диска.
Возможная неисправность одной из микросхем на
системной плате или отказ материнской платы.
Сбой в работе технологии оценки состояния жесткого диска
встроенной аппаратурой самодиагностики, возможный отказ
жесткого диска.
Поиск и устранение неполадок 45
Page 46

5
Краткое описание программы настройки
системы
Программа настройки системы позволяет решать следующие задачи:
• Изменение информации о конфигурации системы после добавления, изменения или извлечения любых аппаратных
средств компьютера.
• Установка или изменение параметра, задаваемого пользователем (например, пароля пользователя).
• Определение текущего объема памяти или задание типа установленного жесткого диска.
Перед использованием программы настройки системы рекомендуется записать информацию с экранов настройки системы
для использования в будущем.
ПРЕДОСТЕРЕЖЕНИЕ: Если вы не являетесь опытным пользователем компьютера, не изменяйте настройки
этой программы. Некоторые изменения могут привести к неправильной работе компьютера.
Темы:
• Доступ к настройке системы
• Параметры настройки системы
Доступ к настройке системы
1 Включите (или перегрузите) компьютер.
2 После появления белого логотипа Dell сразу нажмите клавишу F2.
Отобразится страница System Setup (Настройки системы).
ПРИМЕЧАНИЕ: Если вы не успели нажать эту клавишу и появился экран с логотипом операционной
системы, дождитесь появления рабочего стола Microsoft Windows. Затем завершите работу компьютера
и повторите попытку снова.
ПРИМЕЧАНИЕ: После отображения логотипа Dell можно также нажать клавишу F12 и выбрать параметр
BIOS Setup (Настройка BIOS).
Параметры настройки системы
ПРИМЕЧАНИЕ: В зависимости от компьютера и установленных в нем устройств, указанные в данном разделе
пункты меню могут отсутствовать.
General screen options
This section lists the primary hardware features of your computer.
Option Description
System Information
46 Краткое описание программы настройки системы
• System Information: Displays BIOS Version, Service Tag, Asset Tag, Ownership Tag, Ownership Date,
Manufacture Date, and the Express Service Code.
Page 47

Option Description
• Memory Information: Displays Memory Installed, Memory Available, Memory Speed, Memory Channels Mode,
Memory Technology, DIMM A Size, DIMM B Size.
• Processor Information: Displays Processor Type, Core Count, Processor ID, Current Clock Speed, Minimum
Clock Speed, Maximum Clock Speed, Processor L2 Cache, Processor L3 Cache, HT Capable, and 64-Bit
technology.
• Device Information: Displays Primary Hard Drive, SATA-0, M.2PCIe SSD-0, Dock eSATA Device, LOM MAC
Address, Video Controller, Video BIOS Version, Video Memory, Panel Type, Native Resolution, Audio Controller,
WiFi Device, WiGig Device, Cellular Device, Bluetooth Device.
Boot Sequence
Advanced Boot
Options
Date/Time Allows you to change the date and time.
Boot Sequence Allows you to change the order in which the computer attempts to nd an operating
system. The options are:
• Windows Boot Manager
By default, all the options are checked. You can also deselect any option or change the
boot order.
Boot List Options Allows you to change the boot list option:
• Legacy
• UEFI
This option allows you the legacy option ROMs to load. By default, the Enable Legacy Option ROMs is disabled.
System Conguration screen options
Option Description
Integrated NIC Allows you to congure the integrated network controller. The options are:
• Disabled
• Enabled
• Enabled w/PXE: This option is enabled by default.
SATA Operation Allows you to congure the internal SATA hard-drive controller. The options are:
• Disabled
• AHCI
: This option is enabled by default.
Drives Allows you to congure the SATA drives on board. All drives are enabled by default. The options are:
• SATA-0
• SATA-1
• SATA-2
SMART Reporting This eld controls whether hard drive errors for integrated drives are reported during system startup. This
technology is part of the SMART (Self-Monitoring Analysis and Reporting Technology) specication. This option is
disabled by default.
Краткое описание программы настройки системы 47
Page 48

Option Description
• Enable SMART Reporting
USB Conguration This eld congures the integrated USB controller. If Boot Support is enabled, the system is allowed to boot any
type of USB Mass Storage Devices (HDD, memory key, oppy).
If USB port is enabled, device attached to this port is enabled and available for OS.
If USB port is disabled, the OS cannot see any device attached to this port.
• Enable Boot Support
• Enable Front USB Ports
• Enable Rear USB Ports
NOTE: USB keyboard and mouse always work in the BIOS setup irrespective of these settings.
Front USB
Conguration
Rear USB
Conguration
Audio This eld enables or disables the integrated audio controller. By default, the Enable Audio option is selected. The
Miscellaneous
Devices
This eld eld enables or disables the rear USB conguration
• Rear Port 1(Bottom Left): This option is enabled by default.
• Rear Port 2 (Bottom Right): This option is enabled by default.
• Rear Port 1 (Top Left): This option is enabled by default.
• Rear Port 2 (Top Right): This option is enabled by default.
This eld eld enables or disables the front USB conguration
• Front Port 1(Left): This option is enabled by default.
• Front Port 2 (Right): This option is enabled by default.
options are:
• Enable Microphone: This option is enabled by default.
Allows you to enable or disable the following devices:
• Enable Camera
• Enabled Secure Digital (SD) Card
NOTE: All devices are enabled by default.
Video screen options
Option Description
Primary Display This option option determines which video controller becomes the primary display when multiple controllers are
available in the system
• Auto: This option is enabled by default.
• Intel HD Graphics: This option is enabled by default.
48 Краткое описание программы настройки системы
Page 49

Security screen options
Option Description
Admin Password Allows you to set, change, or delete the administrator (admin) password.
NOTE: You must set the admin password before you set the system or hard drive password. Deleting
the admin password automatically deletes the system password and the hard drive password.
NOTE: Successful password changes take eect immediately.
Default setting: Not set
System Password Allows you to set, change, or delete the system password.
NOTE: Successful password changes take eect immediately.
Default setting: Not set
Internal HDD-0
Password
Strong Password Allows you to enforce the option to always set strong passwords.
Password
Conguration
Password Bypass Allows you to enable or disable the permission to bypass the System and the Internal HDD password, when they
Password Change Allows you to enable the disable permission to the System and Hard Drive passwords when the admin password is
Allows you to set, change, or delete the password on the system's internal hard-disk drive.
NOTE: Successful password changes take eect immediately.
Default Setting: Not set
Default Setting: Enable Strong Password is not selected.
NOTE: If Strong Password is enabled, the Admin and System passwords must contain at least one
uppercase character, one lowercase character and be at least 8 characters long.
Allows you to determine the minimum and maximum length of the Administrator and System passwords.
are set. The options are:
• Disabled
• Reboot bypass
Default setting: Disabled
set.
Default setting: Allow Non-Admin Password Changes is selected.
UEFI Capsule
Firmware Update
Non-Admin Setup
Changes
TPM 2.0 Security Allows you to enable the Trusted Platform Module (TPM) during POST. The options are:
This option controls whether the system allows the BIOS updates through UEFI capsule update packages. This
option is disabled by default.
Allows you to determine whether changes to the setup options are allowed when an Administrator Password is set.
If disabled the setup options are locked by the admin password.
• TPM On (enabled by default)
• Clear
• PPI Bypass for Enabled Commands
Краткое описание программы настройки системы 49
Page 50

Option Description
• PPI Bypass for Disabled Commands
• Attestation Enable (enabled by default)
• Key Storage Enable (enabled by default)
• SHA-256 (enabled by default)
• Disabled
• Enabled (enabled by default)
• Optional hardware TPM 2.0
NOTE: To upgrade or downgrade TPM1.2/2.0, download the TPM wrapper tool (software).
Computrace Allows you to activate or disable the optional Computrace software The options are:
• Deactivate
• Disable
• Activate
NOTE: The Activate and Disable options will permanently activate or disable the feature and no further
changes are allowed
Default setting: Deactivate
CPU XD Support Allows you to enable the Execute Disable mode of the processor.
Enable CPU XD Support (default)
Admin Setup
Lockout
Allows you to prevent users from entering the setup when an Administrator password is set.
Default Setting: Enable Admin Setup Lockout is not selected.
Secure Boot screen options
Option Description
Secure Boot Enable This option enables or disables the Secure Boot feature.
• Disabled
• Enabled
Default setting: Enabled.
Expert Key
Management
Allows you to manipulate the security key databases only if the system is in Custom Mode. The Enable Custom
Mode option is disabled by default. The options are:
• PK
• KEK
• db
• dbx
If you enable the Custom Mode, the relevant options for PK, KEK, db, and dbx appear. The options are:
• Save to File—Saves the key to a user-selected le.
• Replace from File—Replaces the current key with a key from a user-selected le.
• Append from File—Adds a key to the current database from a user-selected le
50 Краткое описание программы настройки системы
Page 51

Option Description
• Delete—Deletes the selected key
• Reset All Keys—Resets to default setting
• Delete All Keys—Deletes all the keys
NOTE: If you disable the Custom Mode, all the changes made are erased and the keys restore to default
settings.
Intel Software Guard Extensions screen options
Option Description
Intel SGX Enable This eld species you to provide a secured environment for running code/storing sensitive information in the
context of the main OS. The options are:
• Disabled
• Enabled
Default setting: Disabled
Enclave Memory
Size
This option sets SGX Enclave Reserve Memory Size. The options are:
• 32 MB
• 64 MB
• 128 MB
Performance screen options
Option Description
Multi Core Support This eld species whether the process has one or all cores enabled. The performance of some applications
improve with the additional cores. This option is enabled by default. Allows you to enable or disable multi-core
support for the processor. The installed processor supports two cores. If you enable Multi Core Support, two cores
are enabled. If you disable Multi Core Support, one core is enabled.
• All (enabled by default)
• 1
• 2
• 3
Intel SpeedStep Allows you to enable or disable the Intel SpeedStep feature.
• Enable Intel SpeedStep
Default setting: The option is enabled.
C-States Control Allows you to enable or disable the additional processor sleep states.
• C states
Default setting: The option is enabled.
Краткое описание программы настройки системы 51
Page 52

Option Description
Limited CPUID
Value
Intel TurboBoost Allows you to enable or disable the Intel TurboBoost mode of the processor.
This eld limits the maximum value the processor standard CPUID function supports.
• Enable CPUID Limit
• Enable Intel TurboBoost
Default Setting: The option is enabled.
Power Management screen options
Option Description
AC Behavior Allows you to enable or disable the computer from turning on automatically when an AC adapter is connected.
• Power O (default)
• Power On
• Last Power State
Auto On Time Allows you to set the time at which the computer must turn on automatically. The options are:
• Disabled
• Every Day
• Weekdays
• Select Days
Default setting: Disabled
Deep Sleep Control Allows you to aggressive the system is at conserving power while Shut down (S5) or in Hybernate (S4) mode.
• Disabled (default)
• Enabled in S5 only
• Enabled in S4 and S5
USB Wake Support Allows you to enable USB devices to wake the system from Standby.
NOTE: This feature is only functional when the AC power adapter is connected. If the AC power
adapter is removed during Standby, the system setup removes power from all the USB ports to
conserve battery power.
• Enable USB Wake Support
Default setting: The option is disabled.
Wake on LAN/
WLAN
Allows you to enable or disable the feature that powers on the computer from the O state when triggered by a
LAN signal.
• Disabled: This option is enabled by default.
• LAN Only
• WLAN Only
• LAN or WLAN
52 Краткое описание программы настройки системы
Page 53

Option Description
• LAN with PXE Boot
Block Sleep This option lets you block entering to sleep (S3 state) in operating system environment.
Block Sleep (S3 state)
Default setting: This option is disabled
Intel Ready Mode Allows you to replace sleep S3 to put your PC in an always aware state that allows the user to interact with it even
while the PC is asleep
• Eanble Intel Ready Mode: The option is disabled.
POST Behavior screen options
Option Description
Numlock LED This option option species whether the NumLock LED should be on when the system boots.
• Enable Numlock LED: The option is enabled.
Keyboard Errors This option option species whether the keyboard related errors are reported when it boots.
• Enables Keyboard Error Detection: The option is disabled.
Fastboot Allows you to speed up the boot process by bypassing some of the compatibility steps. The options are:
• Minimal(default)
• Thorough
• Auto
Virtualization support screen options
Option Description
Virtualization Allows you to enable or disable the Intel Virtualization Technology.
Enable Intel Virtualization Technology (default).
VT for Direct I/O Enables or disables the Virtual Machine Monitor (VMM) from utilizing the additional hardware capabilities provided
by Intel® Virtualization technology for direct I/O.
Enable VT for Direct I/O - enabled by default.
Maintenance screen options
Option Description
Service Tag Displays the Service Tag of your computer.
Asset Tag Allows you to create a system asset tag if an asset tag is not already set. This option is not set by default.
Краткое описание программы настройки системы 53
Page 54

Option Description
SERR Messages This eld controls the SERR message mechanism. Some graphic card required the SERR message.
• Enable SERR Messages (default)
BIOS Downgrade This eld controls ashing of the system rmware to pervious revisions.
Allows BIOS Downgrade (Enabled by default)
Data Wipe This eld enables user to erase data from all internal storage device.
BIOS Recovery Allows you to recover from certain corrupted BIOS conditions from a recover le on the user primary hard drive or
an external USB key. Enabled by default.
Параметры экрана журнала системы
Параметр Описание
BIOS Events Позволяет просматривать и удалять события программы настройки системы (BIOS) во время
самотестирования при включении питания.
SupportAssist System Resolution screen options
Option Description
Auto OS Recovery
Threshold
SupportAssist OS
Recovery
Allows you to control the automatic boot ow for SupportAssist System. Options are:
• O
• 1
• 2 (Enabled by default)
• 3
Allows you to recover the SupportAssist OS Recovery (Disabled by default)
54 Краткое описание программы настройки системы
Page 55

Specications
NOTE: Предложения в разных регионах могут различаться. Приведены только те технические характеристики,
которые необходимо указывать при поставках компьютерной техники по закону. Для просмотра
дополнительных сведений о конфигурации компьютера нажмите Пуск - Справка и поддержка и выберите
нужный пункт для просмотра информации о компьютере.
Processor
Feature Specication
6
Type
For Vostro 3267:
• Intel 6th Generation Celeron G3900
• Intel 6th Generation Pentium G4400
• Intel 6th Generation Core i3-6100
• Intel 6th Generation Core i5-6400
For Vostro 3268:
• Intel 7th Generation Celeron G3930
• Intel 7th Generation Pentium G4560
• Intel 7th Generation Core i3-7100
• Intel 7th Generation Core i5-7400
• Intel 7th Generation Core i7-7700
System information
Feature
Chipset Intel H110
Memory
Feature
Memory module
connector
Memory module
capacity
Type 2133 MHz for Vostro 3267 system
Specication
Two DDR4 U-DIMM slots
2 GB, 4 GB, and 8 GB
2400 MHz for Vostro 3268 systems
NOTE: If this product is purchased with Intel 6th Gen CPUs or 7th Gen Celeron dual core CPU, the
maximum MHz this product can achieve is 2133, though the memory material used is 2400 MHz.
Specications 55
Page 56

Feature Specication
Minimum memory 2 GB
NOTE: Depending on the operating system installed, the requirement of the minimum memory might
vary.
Maximum memory 16 GB
NOTE: Each UDIMM slot supports a maximum of 8 GB memory.
Video
Feature Specication
Integrated Controller Intel HD graphics
Integrated video
memory
Discrete video PCI express x16 graphics card
Shared system memory
• NVIDIA GT 710 LP(Low Prole) with 2 GB memory DDR3
Audio
Feature
Type Integrated 5.1 high-denition audio
Specication
Communication
Feature
Type
Specication
• Dell Wireless Combo Card DW1707 and DW1810ac, and Intel 3165ac
• 10/100/1000 Gigabit Ethernet
• Bluetooth v4.0 +LE
Expansion bus
Feature
SATA 6 Gbps for hard drive; 1.5 Gbps for optical drive
USB 2.0 480 Mbps
USB 3.0 5 Gbps
Specication
Drives
Feature
Externally Accessible
— 5.25–inch optical
drive bays
56 Specications
Specication
One
Page 57

Feature Specication
Internally Accessible
— 3.5–inch/2.5–
inch drive bays
One 3.5–inch or Two 2.5-inch drive bays
Cards
Feature Specication
PCIe
M2 Slot One M.2 card slot for Wi-Fi and Bluetooth combo card
• one PCIe x16 half height card
• one PCIe x1 half height card
External connectors
Feature Specication
Audio — Back panel Three
Audio — Front Panel One headset connector
Network One RJ-45 connector
USB — Back panel Four USB 2.0 connectors
USB — Front Panel Two USB 3.0 connectors
Video
Memory-card reader One
• one 15-hole VGA connector
• one 19-pin HDMI connector
Control Lights And Diagnostic Lights
Feature
Power button light
Drive activity light White light—blinking white light indicates that the computer is reading data from, or writing data to the hard drive.
Specication
• White light—solid white light indicates power-on state; blinking white light indicates sleep/stand-by state of the
computer.
• Amber light—solid amber light indicates boot failure - System Power Error; blinking amber light indicates boot
failure - System Power OK.
Power
Feature
Wattage 180 W
Specication
Input voltage 90 VAC — 264 VAC
Input frequency 47 Hz–63 Hz
Input current 3 A/ 1.5 A
Specications 57
Page 58

Feature Specication
Output current 2.5 A
Maximum heat
dissipation
NOTE: Теплоотдача рассчитывается исходя из номинальной мощности блока питания.
Physical Dimensions of Chassis
Feature Specication
Height 293.1 mm (11.54 inches)
Width 92.60 mm (3.65 inches)
Depth 314.5 mm (12.38 inches)
Weight—Minimum 4.40 kg (9.71 pounds)
Environmental specications
Feature Specication
Temperature —
Operating
Temperature —
Storage
Relative humidity 20 % to 80 % (non-condensing)
10 °C to 35 °C (50 °F to 95 °F)
–40 °C to 65 °C (–40 °F to 149 °F)
Altitude —
Operating
Altitude — Storage –15.20 m to 10668 m (–50 ft to 35,000 ft)
Airborne
contaminant level
–15.20 m to 5000 m (–50 ft to 10,000 ft)
G1 as dened by ISA-S71.04–1985
58
Specications
Page 59

7
Обращение в компанию Dell
ПРИМЕЧАНИЕ: При отсутствии действующего подключения к Интернету можно найти контактные сведения в
счете на приобретенное изделие, упаковочном листе, накладной или каталоге продукции компании Dell.
Компания Dell предоставляет несколько вариантов поддержки и обслуживания через Интернет и по телефону. Доступность
служб различается по странам и видам продукции, и некоторые службы могут быть недоступны в вашем регионе. Порядок
обращения в компанию Dell по вопросам сбыта, технической поддержки или обслуживания пользователей описан ниже.
1 Перейдите на веб-узел Dell.com/support.
2 Выберите категорию поддержки.
3 Укажите свою страну или регион в раскрывающемся меню Choose a Country/Region (Выбор страны/региона) в
нижней части страницы.
4 Выберите соответствующую службу или ссылку на ресурс технической поддержки, в зависимости от ваших
потребностей.
Обращение в компанию Dell 59
 Loading...