

Page 1
Quick Start Guide
Guide d’information rapide | Guía de inicio rápido
Page 2

2
Page 3
Quick Start Guide
Page 4

About Notes
NOTE: A NOTE indicates important information that helps you make better use of
yourproduct.
__________________
Information in this document is subject to change without notice.
© 2011 Dell Inc. All rights reserved.
™
Dell
, the DELL logo, and Streak™ are trademarks of Dell Inc.; Microsoft® and Windows® are either trademarks or registered
trademarks of Microsoft Corporation in the United States and/or other countries.
Other trademarks and trade names may be used in this manual to refer to either the entities claiming the marks and names or
their products. Dell Inc. disclaims any proprietary interest in trademarks and trade names other than its own.
2011 - 08 P/N 0FNHM Rev. A00
Page 5

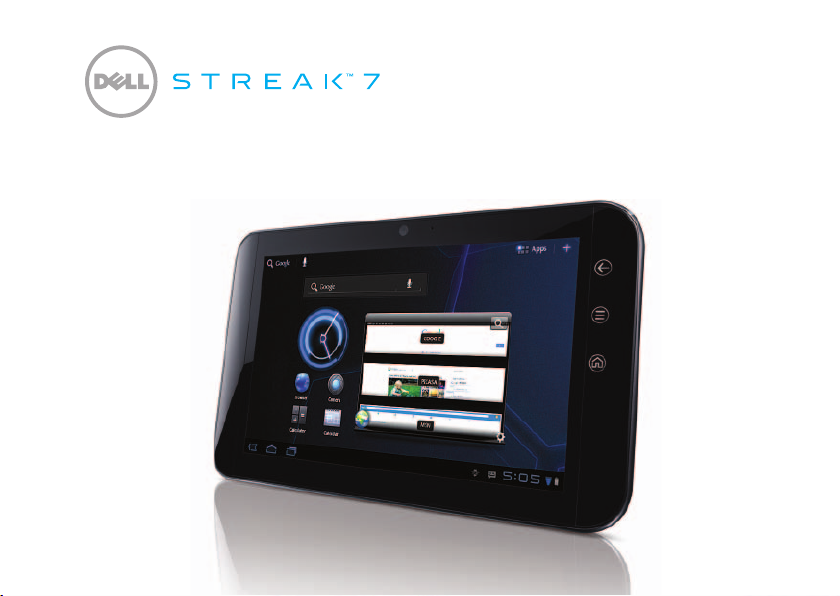
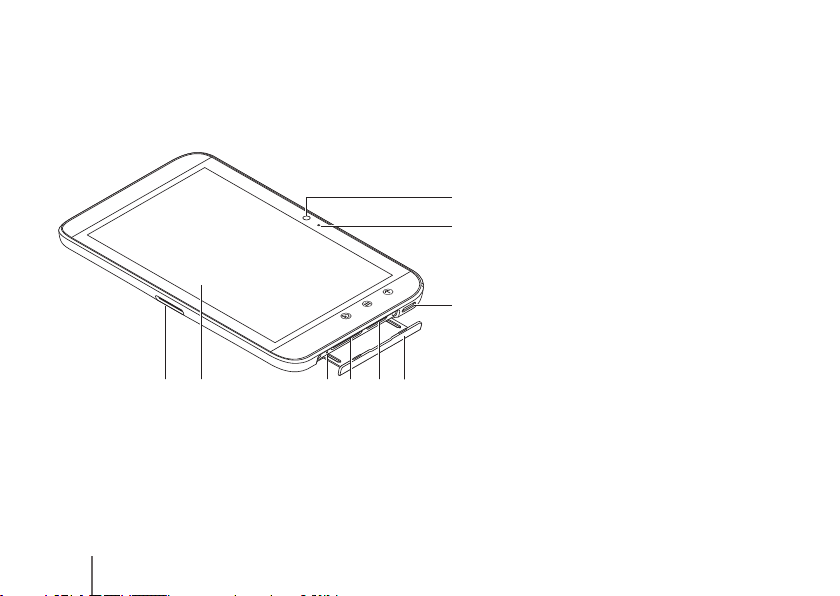
About Your Dell Streak 7 Tablet
5
4
3
6
7
8
9
2
1
1 Headphone connector
2 Speaker
3 Volume-up button
4 Volume-down button
5 Power and Sleep/Wake button
6 Battery-status light
7
Back button
8
Menu button
9
Home button
3
Page 6
1 30-pin connector
9
8
7
6
21 4
4
5
3
2 Touch screen
3 Force power-off button
4 SD-card slot
5 SIM-card slot
(on 3G model only)
6 Slot door
7 Speaker
8 Microphone
9 Camera
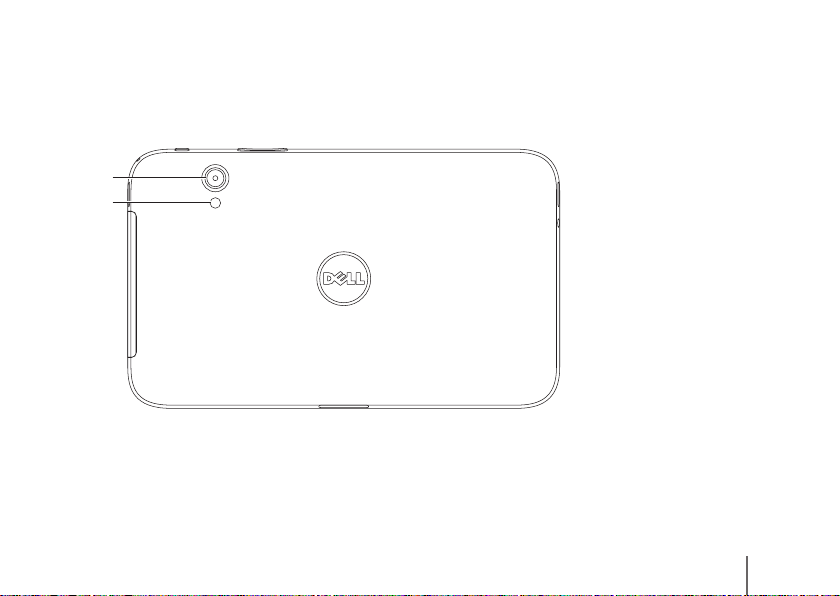
Page 7
1
2
1 Camera
2 Flash
5
Page 8
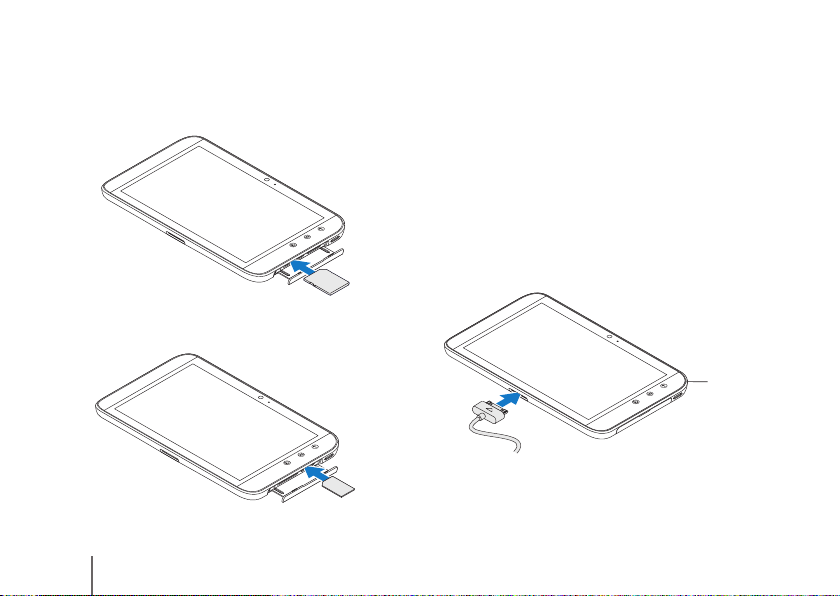
Set Up Your Dell Streak 7 Tablet
1. Insert the SD card (Optional)
2. Insert the SIM card on 3G model (Optional)
6
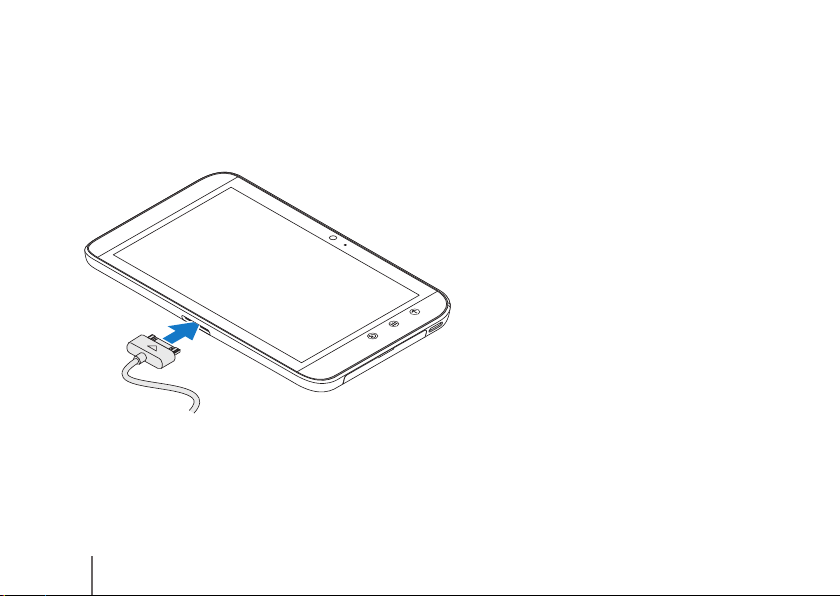
3. Charge the battery
Charge the battery of your tablet fully before
using it for the first time.
The battery-status light indicates the
following:
•Red — the battery is charging
•Green — the battery is fully charged
1
1 Battery status light
Page 9
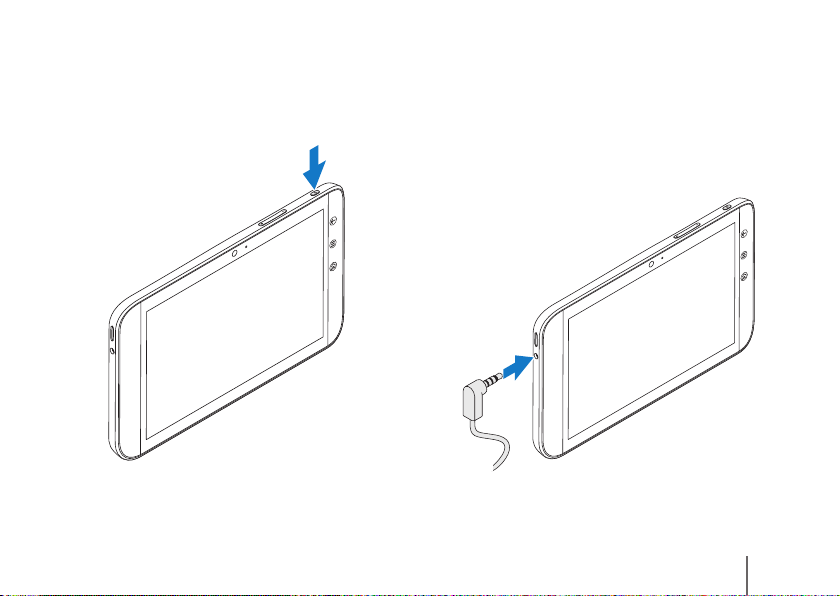
Turn on Your Tablet
Press and hold the power button to
turnonyour tablet.
Connect a Headphone
Connect the 3.5 mm headphone to the
headphone connector.
7
Page 10
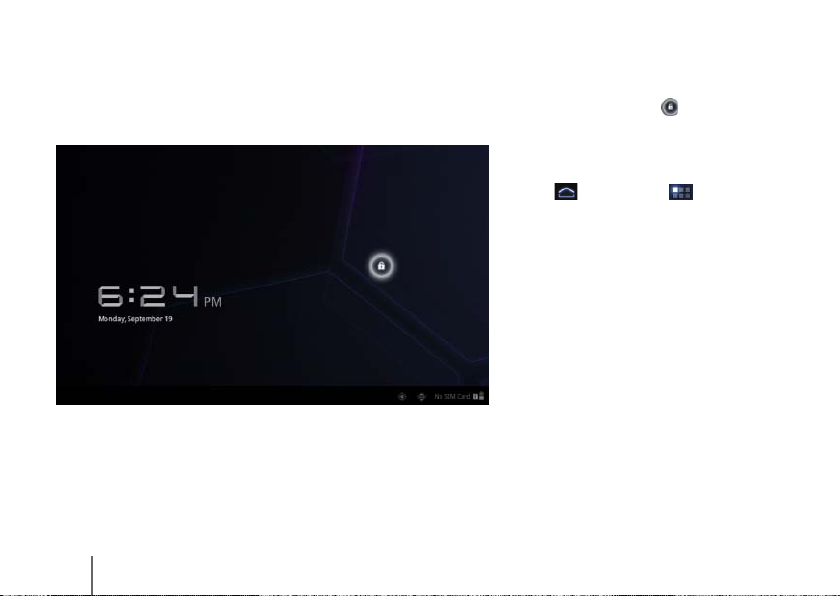
Lock Screen
Your tablet enters sleep mode automatically after a preset duration of inactivity. To wake up your
tablet from sleep mode, press the power button once. Touch and hold the lock icon to turn it
into a circle, and then drag the inner circle to the edge of the outer circle to unlock the screen.
To set the duration after which the
tablet enters sleep mode, touch
Home → Launcher →
Settings→ Screen→ timeout
andselect the desired option.
8
Page 11
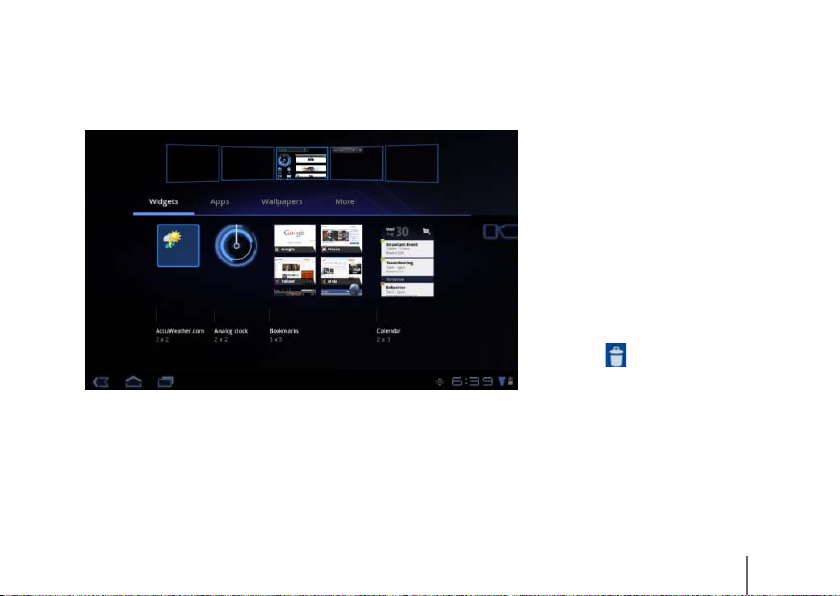
Dell Stage
Your tablet has five customizable Home screens. To navigate across the Home screens, flick
your finger to the right or left on the screen.
You can add the Dell Stage
widgets to the Home screens
Touch and hold your finger on an
empty area on the Home screen
to launch the widget manager.
To move an item such as a shortcut
or widget, touch and hold the item,
and then drag it to the new location.
To delete an item, touch and hold
the item, and then drag it to the
trash icon
To add a widget, shortcut, or folder,
touch and hold your finger on an
empty area on the Home screen,
and then touch the desired option.
.
9
Page 12
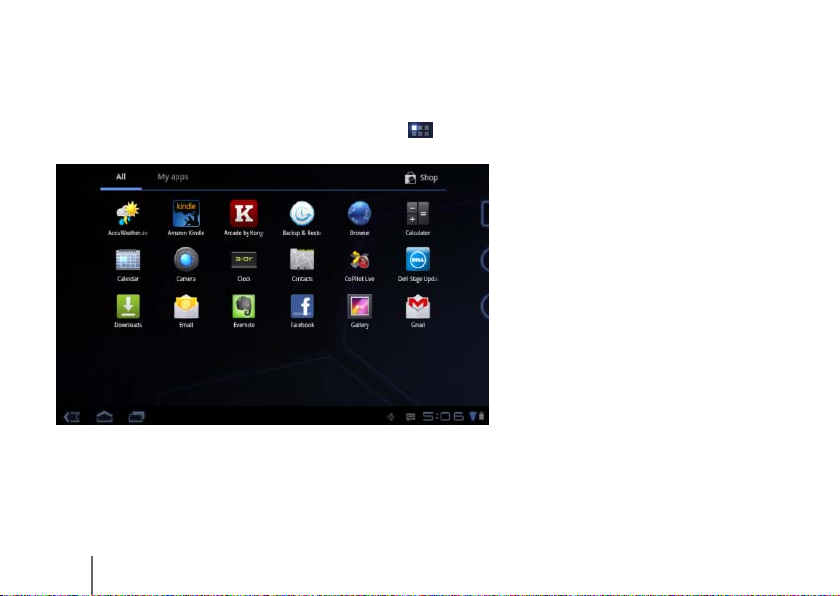
Launcher
The Launcher displays all the available applications on your tablet, including any applications
that you download and install from Android Market or other sources.
To open the Launcher, touch the Launcher icon
10
on the Home screen.
To open an application, touch the
application’s icon.
To create a shortcut to an
application, touch and hold the
application’s icon until the tablet
vibrates, and then drag it to
another location on any screen.
Page 13
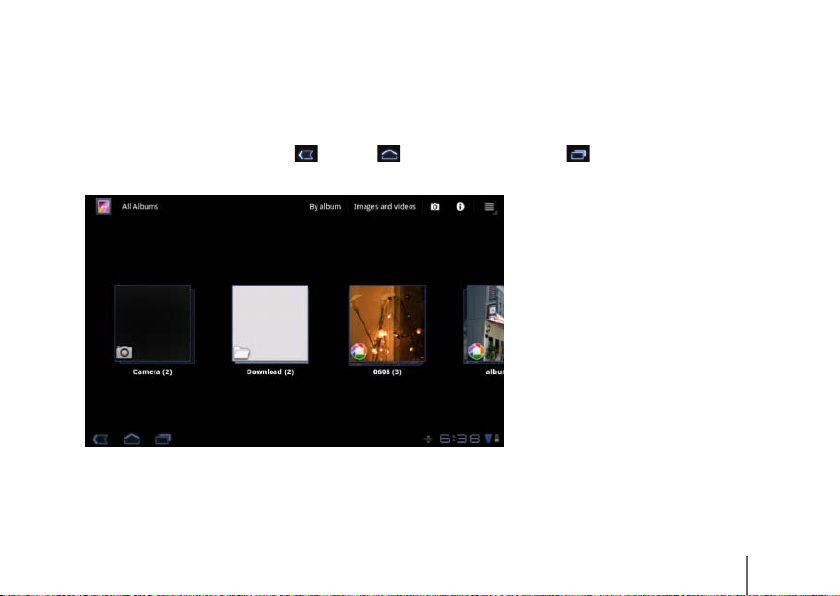
Status Bars
Action Bar — The Action Bar resides at the top of the screen and gives access to contexual
options, widgets, and more. The Action Bar is controlled by the active application.
System Bar — The System Bar resides at the bottom of the screen. It displays notifications
and system status. The Back
theSystem Bar.
, Home , and Menu navigation keys are available in
11
Page 14
Connect to a Wi-Fi Network
To connect your tablet to a Wi-Fi network:
1. Touch Home
2. Touch
The device scans for available wireless networks.
3. Touch Wi-Fi settings. The names and security settings of available Wi-Fi networks are
displayed in the Wi-Fi networks list.
4. Flick the Wi-Fi networks list and touch the name of the network that you want to connect to.
5. Type the password and other credentials (if required) and then touch Connect.
NOTE: When your device is connected to a Wi-Fi network, the Wi-Fi icon
the system bar.
12
→ Launcher → Settings.
Wireless & networks→ Wi-Fi to select the Wi-Fi check box.
appears in
Page 15

Add Your Gmail Contacts
To add your Gmail contacts to the Contact list on your tablet:
1. On the Home screen, touch the Launcher icon
2. Touch Menu
3. In the Accounts & sync screen, ensure that you select the Auto-sync and Background data
check boxes.
4. Ensure that you are connected to the Internet and touch Add account→ Google Accounts.
5. Enter your Google account login details and touch Sign in.
Your Gmail contacts are automatically added to your Contacts list.
The Gmail account you added appears under the Manage accounts section in the
Accounts& sync screen.
→ Accounts.
→ Contacts.
13
Page 16
Connect and Synchronize With a Computer
The Dell Mobile Sync software allows you to copy and synchronize music, photos, videos,
and Outlook contacts between your tablet and a computer.
To install the Dell Mobile Sync software on your computer:
1. Connect the 30-pin-to-USB cable to your tablet and your computer.
2. Obtain and install the drivers using one of the following methods:
• On your computer, find the file named Drivers.zip on the removable drive that represents
the internal tablet storage.
• Download the driver from support.dell.com/support/downloads.
14
Page 17

3. If the Dell Mobile Sync installer does not start automatically:
a. Double-click the new Removable Disk that appears on your computer.
b. Navigate to the Dell Mobile Sync folder on the removable disk.
c. Double-click the InstallDellMSync.exe file to start the installation.
NOTE: You can also download and install the Dell Mobile Sync software from
support.dell.com/support/downloads.
To sync music, photos, videos, and Outlook contacts:
1. Connect the 30-pin-to-USB cable to your tablet and your computer.
2. Double-click the DellMobile Sync icon
under the Devices section in the Dell Mobile Sync software.
3. After copy or sync is complete, disconnect the 30-pin-to-USB cable from your computer
and your tablet.
NOTE: For more information about the Dell Mobile Sync software and instructions to
synchronize your tablet using Wi-Fi, see the documentation included in the Dell Mobile
Syncsoftware.
on the Windows desktop. Your tablet appears
15
Page 18

More Information
To learn more about the features and settings available on your tablet, see the User’s Manual
available on the SD card on your tablet or at support.dell.com/manuals.
NOTE: QuickOffice is preinstalled in the tablet.
To view the User’s Manual available on the SD card, launch the QuickOffice application and
then select Memory card.
Before Sending Your Tablet for Repair
The service technicians at the service center may reset your Dell tablet to factory settings to
resolve the issue with your tablet. It is recommended that you back up your data using the
Backup & Restore feature before you send your tablet for repair.
16
Page 19

Guide d’information rapide
Page 20

À propos des remarques
REMARQUE: indique des informations importantes qui peuvent vous aider à mieux utiliser
votre produit.
__________________
Les informations contenues dans ce document sont sujettes à modification sans préavis.
©2011 Dell Inc. Tous droits réservés.
™
Dell
, le logo DELL et Streak™ sont des marques commerciales de Dell Inc. Microsoft® et Windows® sont des marques commerciales
ou des marques déposées de Microsoft Corporation aux États-Unis et dans d'autres pays.
D'autres marques et noms commerciaux peuvent être utilisés dans le présent manuel pour faire référence aux entités revendiquant
la propriété de ces marques ou de ces noms de produits. Dell Inc. décline tout intérêt propriétaire dans l'utilisation des marques
déposées et des noms de marques ne lui appartenant pas.
2011 - 08 N/P 0FNHM Rév. A00
Page 21

À propos de votre tablette Dell Streak7
5
4
3
6
7
8
9
2
1
1 Prise écouteur
2 Haut-parleur
3 Bouton Augmentation du volume
4 Bouton Diminution du volume
5 Bouton d'alimentation et de
veille/réveil
6 Voyant d'état de la batterie
7
Bouton Retour
8
Bouton Menu
9
bouton Accueil
19
Page 22

20
21 4
3
1 Connecteur à 30broches
9
8
7
6
5
2 Écran tactile
3 Bouton de mise hors
tension forcée
4 Fente de la carte SD
5 Fente de la carte SIM
(modèle 3G uniquement)
6 Cache
7 Haut-parleur
8 Microphone
9 Caméra
Page 23

1
2
1 Caméra
2 Flash
21
Page 24

Configurer votre tablette Dell Streak7
1. Insérer la carte SD (facultatif)
2. Insérer la carte SIM sur un modèle 3G
(facultatif)
22
3. Charger la batterie
Avant d'utiliser votre tablette pour la première
fois, chargez complètement sa batterie.
Le voyant de la batterie indique les états
suivants:
•Rouge — La batterie est en train de se charger
•Vert — La batterie est complètement chargée
1
1 Voyant d'état de la batterie
Page 25

Allumer votre tablette
Maintenez enfoncé le bouton d'alimentation
pour allumer la tablette.
Connecter un écouteur
Branchez l'écouteur de 3,5mm sur
son connecteur.
23
Page 26

Écran de verrouillage
Votre tablette passe automatiquement en mode veille après une période prédéfinie d'inactivité.
Pour sortir votre tablette du mode veille, appuyez une fois sur le bouton d'alimentation. Touchez
de manière prolongée l’icône de verrou jusqu’à ce qu’elle prenne la forme d’un cercle, puis
faites glisser le cercle intérieur vers le bord du cercle extérieur afin de déverrouiller l’écran.
Pour définir au bout de combien
de temps la tablette passe en mode
veille, touchez Accueil →
Lanceur → Réglages→ Écran→
délai d’inactivité et sélectionnez
l’option souhaitée.
24
Page 27

Dell Stage
Votre tablette comporte cinq écrans d'accueil personnalisables. Pour naviguer d'un écran
d'accueil à l'autre, balayez du doigt vers la gauche ou vers la droite de l'écran.
Vous pouvez ajouter les widgets
Dell Stage aux écrans d'accueil.
Maintenez la pression sur une zone
vide de l’écran d’accueil pour lancer
le gestionnaire de widgets.
Pour déplacer un élément, un
raccourci ou un widget, par
exemple, touchez cet élément de
manière prolongée et faites-le glisser
vers son nouvel emplacement.
Pour supprimer un élément,
touchez cet élément de manière
prolongée et faites-le glisser vers
la corbeille
Pour ajouter un widget, un
raccourci ou un dossier, touchez
de manière prolongée une zone
vide de l'écran d'accueil, puis
touchez l'option souhaitée.
.
25
Page 28

Lanceur
Le Lanceur affiche toutes les applications existant sur votre tablette, y compris celles que vous
téléchargez et installez à partir d'Android Market ou d'autres sources.
Pour ouvrir le Lanceur, touchez son icône
sur l'écran d'accueil.
26
Pour ouvrir une application, touchez
l'icône de cette application.
Pour créer un raccourci vers
une application, touchez l'icône
de cette application de manière
prolongée jusqu’à ce que la
tablette se mette à vibrer. Faites
alors glisser l'icône ailleurs vers
n'importe quel écran.
Page 29

Barres d’état
Barre d'actions — La barre d'actions se trouve en haut de l'écran et permet d'accéder à des
options contextuelles, des widgets, etc. La barre d'actions est contrôlée par l'application active.
Barre système — La barre système se trouve au bas de l'écran. Elle affiche des notifications
et l'état du système. Les touches de navigation Précédent
disponibles dans la barre système.
, Accueil , et Menu sont
27
Page 30

Se connecter à un réseau Wi-Fi
Pour connecter votre tablette à un réseau Wi-Fi:
1. Touchez Accueil
2. Touchez
L'appareil recherche les réseaux sans fil disponibles.
3. Touchez Paramètres Wi-Fi. Les noms et les paramètres de sécurité des réseaux Wi-Fi
disponibles sont affichés dans la liste Réseaux Wi-Fi.
4. Balayez la liste des réseaux Wi-Fi, puis touchez le nom du réseau auquel vous souhaitez
vous connecter.
5. Tapez le mot de passe et les autres identifiants (si nécessaire), puis touchez Connexion.
REMARQUE: Lorsque votre appareil est connecté à un réseau Wi-Fi, l'icône Wi-Fi
dan la barre système.
28
→ Lanceur → Réglages.
Sans-fil et réseaux→ Wi-Fi pour cocher la case Wi-Fi.
apparaît
Page 31

Ajouter vos contacts Gmail
Pour ajouter vos contacts Gmail à liste des contacts de votre tablette:
1. Dans l'écran d'accueil, touchez l'icône du Lanceur
2. Touchez Menu
3. Dans l’écran Comptes et synchro, les cases Auto-sync et Données de base doivent être cochées.
4. Assurez-vous que vous êtes bien connecté à Internet et touchez Ajouter un compte→
Comptes Google.
5. Entrez vos identifiants de compte Google et touchez Connexion.
Vos contacts Gmail sont automatiquement ajoutés à votre liste Contacts.
Le compte Gmail que vous avez ajouté apparaît dans la section Gérer les comptes de l’écran
Comptes et synchro.
→ Comptes.
→ Contacts.
29
Page 32

Se connecter et se synchroniser à un ordinateur
Le logiciel Dell Mobile Sync permet de copier ou de synchroniser de la musique, des photos,
des vidéos et des contacts Outlook entre votre tablette et un ordinateur.
Pour installer le logiciel Dell Mobile Sync sur votre ordinateur:
1. Connectez le câble 30broches/USB à la tablette et à l'ordinateur.
2. Procurez-vous et installez les pilotes en procédant de l'une des manières suivantes:
• Sur votre ordinateur, recherchez le fichier nommé Drivers.zip sur le disque amovible qui
représente l'espace de stockage interne de la tablette.
• Téléchargez le pilote à partir de support.dell.com/support/downloads.
30
Page 33

3. Si le programme d'installation Dell Mobile Sync ne démarre pas automatiquement:
a. Cliquez deux fois sur le nouveau disque amovible qui apparaît sur l'ordinateur.
b. Accédez au dossier Dell Mobile Sync sur le disque amovible.
c. Cliquez deux fois sur le fichier InstallDellMSync.exe pour démarrer l'installation.
REMARQUE: Vous pouvez également télécharger et installer le logiciel Dell Mobile Sync
depuis support.dell.com/support/downloads.
Pour synchroniser les musiques, photos, vidéos et contacts Outlook:
1. Connectez le câble 30broches/USB à la tablette et à l'ordinateur.
2. Cliquez deux fois sur l'icône Dell Mobile Sync
tablette apparaît dans la section Périphériques du logiciel Dell Mobile Sync.
3. Une fois la copie ou la synchronisation terminée, débranchez le câble 30broches/USB de
l'ordinateur et de la tablette.
REMARQUE: Pour plus d'informations sur le logiciel Dell Mobile Sync et pour savoir
comment synchroniser par Wi-Fi votre tablette, voir la documentation du logiciel Dell
Mobile Sync.
qui se trouve sur le bureau de Windows. La
31
Page 34

Informations complémentaires
Pour en savoir davantage sur les fonctionnalités et les options de votre tablette, consultez le
Manuel d'utilisation qui se trouve sur la carte SD de votre tablette ou sur support.dell.com/manuals.
REMARQUE: QuickOffice est préinstallé sur la tablette.
Pour afficher le Manuel d'utilisation qui se trouve sur la carte SD, lancez l'application QuickOffice,
puis sélectionnez Carte mémoire.
Avant d'envoyer votre tablette en réparation
Pour pouvoir résoudre le problème de votre tablette Dell, les techniciens du centre de réparation
peuvent être obligés de ramener cette dernière à ses réglages de sortie d'usine. Il est recommandé
de sauvegarder vos données à l'aide de la fonction Sauvegarde et restauration avant d'envoyer
votre tablette en réparation.
32
Page 35

Guía de inicio rápido
Page 36

Sobre las notas
NOTA: una NOTA proporciona información importante que le ayuda a utilizar su producto
de la mejor manera posible.
__________________
La información contenida en este documento puede modificarse sin previo aviso.
© 2011 Dell Inc. Todos los derechos reservados.
™
Dell
, el logotipo de DELL y Streak™ son marcas comerciales de Dell Inc.; Microsoft® y Windows® son bien marcas comerciales
o marcas comerciales registradas de Microsoft Corporation en Estados Unidos y otros países.
Este manual puede incluir otras marcas y nombres comerciales para referirse a las entidades que son propietarias de los mismos
o a sus productos. Dell Inc. renuncia a cualquier interés sobre la propiedad de marcas y nombres comerciales que no sean los suyos.
2011 - 08 N/P 0FNHM Rev. A00
Page 37

Sobre la tableta Dell Streak 7
5
4
3
6
7
8
9
2
1
1 Conector de auriculares
2 Altavoz
3 Botón de subir volumen
4 Botón de bajar volumen
5 Botón de encendido y de
suspensión/despertar
6 Indicador luminoso de
estado de la batería
7
Botón Atrás
8
Botón Menú
9
Botón Inicio
35
Page 38

36
21 4
3
1 Conector de 30 patas
9
8
7
6
5
2 Pantalla táctil
3 Botón de forzar apagado
4 Ranura para la tarjeta SD
5 Ranura para la tarjeta SIM
(solo en el modelo 3G)
6 Puerta de la ranura
7 Altavoz
8 Micrófono
9 Cámara
Page 39

1
2
1 Cámara
2 Flash
37
Page 40

Instalación de la tableta Dell Streak 7
1. Inserte la tarjeta SD (opcional)
2. Inserte la tarjeta SIM en el modelo 3G
(opcional)
38
3. Cargue la batería
Asegúrese de que la batería de la tableta
está totalmente cargada antes de usarla
porprimera vez.
El indicador luminoso del estado de la batería
indica lo siguiente:
•Rojo: la batería se está cargando
•Verde: la batería está totalmente cargada
1
1 Indicador del estado de la batería
Page 41

Encender la tableta
Mantenga presionado el botón de
encendido para encender la tableta.
Conectar unos auriculares
Conecte los auriculares de 3,5 mm al
conector de auriculares.
39
Page 42

Bloqueo de pantalla
La tableta entra en modo de suspensión automáticamente después de un período predeterminado
de inactividad. Para activar la tableta del modo de suspensión, presione el botón de encendido
una vez. Toque y mantenga presionado el icono de bloqueo para convertirlo en un círculo
ydespués arrastre el círculo interior al borde del círculo exterior para desbloquear la pantalla.
Para establecer la duración
después de la cual la tableta
entrará en modo de suspensión,
toque Inicio → Iniciador →
Ajustes→ Pantalla→ tiempo de
inactividad y seleccione la opción
que desee.
40
Page 43

Dell Stage
La pantalla dispone de cinco pantallas de inicio personalizables. Para desplazarse a través de las
pantallas de Inicio, arrastre el dedo hacia la derecha o la izquierda sobre la pantalla.
Puede agregar los widgets de Dell
Stage a las pantallas de inicio.
Mantenga el dedo sobre un área
vacía de la pantalla principal par
abrir el administrador de widgets.
Para mover un elemento como
un acceso directo o un widget,
mantenga pulsado el elemento
yarrástrelo a la nueva ubicación.
Para eliminar un elemento,
manténgalo pulsado y arrástrelo
al icono de la papelera
Para añadir un widget, acceso
directo o carpeta mantenga el
dedo apretado sobre un área
vacía de la pantalla Inicio, y toque
la opción deseada.
.
41
Page 44

Iniciador
El Iniciador muestra todas las aplicaciones disponibles en la tableta, incluyendo cualquier
aplicación que haya descargado e instalado desde Android Market u otras fuentes.
Para abrir el Iniciador, toque el icono del mismo
en la pantalla Inicio.
42
Para abrir una aplicación, seleccione
su icono.
Para crear un acceso directo para
una aplicación, mantenga pulsado
el icono de la aplicación hasta que
vibre la tableta y arrástrelo a otra
ubicación de cualquier pantalla.
Page 45

Barras de estado
Barra de acción: la barra de acción se encuentra en la parte superior de la pantalla y proporciona
acceso a las opciones contextuales, widgets, etc. La barra de acción se controla mediante la
aplicación activa.
Barra del sistema: la barra del sistema se encuentra en la parte inferior de la pantalla. Muestra
notificaciones y estados del sistema. Las teclas Atrás
disponibles en la barra del sistema.
, Inicio y Menú se encuentran
43
Page 46

Conectarse a una red Wi-Fi
Para conectar la tableta a una red Wi-Fi:
1. Toque Inicio
2. Toque
del Wi-Fi.
El dispositivo busca redes inalámbricas disponibles.
3. Toque Configuración del Wi-Fi. Los nombres y las configuraciones de seguridad de las redes
Wi-Fi disponibles se muestran en la lista de redes Wi-Fi.
4. Pase la lista de redes Wi-Fi y toque el nombre de la red a la que desee que desee conectarse.
5. Introduzca la contraseña y otras credenciales (si fuera necesario), y toque Conectar.
NOTA: Cuando el dispositivo esté conectado a una red inalámbrica, el icono del Wi-Fi
aparece en la barra del sistema.
44
→ Iniciador → Ajustes.
Conexión inalámbrica y redes→ Wi-Fi para seleccionar la casilla de verificación
Page 47

Añadir los contactos de Gmail
Para añadir los contactos de Gmail a la lista de contactos de la tableta:
1. En la pantalla Inicio, toque el icono del Iniciador
2. Touch Menú
3. En la pantalla Cuentas y sincronización, asegúrese de seleccionar las casillas de verificación
Autosincronización y Datos de fondo.
4. Asegúrese de que está conectado a Internet y toque Agregar cuenta→ Cuentas de Google.
5. Introduzca los datos de inicio de sesión de su cuenta de Google y toque Registrarse.
Los contactos de Gmail se agregan automáticamente a la lista Contactos.
La cuenta de Google que ha añadido aparece en la sección Administrar cuentas
Cuentas y sincronización.
→ Cuentas.
→ Contactos.
de la pantalla
45
Page 48

Conectar y sincronizar con un equipo
El software de Dell Mobile Sync le permite copiar o sincronizar música, fotografías, vídeos
ycontactos de Outlook entre la tableta y un equipo.
Para instalar el software de Dell Mobile Sync en su equipo:
1. Conecte el cable de 30 patas a USB a la tableta y al ordenador.
2. Obtenga e instale los controladores usando uno de los siguientes métodos:
• En la unidad extraíble del ordenador que representa el almacenamiento interno de la
tableta busque el archivo Drivers.zip.
• Descargue el controlador desde support.dell.com/support/downloads.
46
Page 49

3. Si el instalador de Dell Mobile Sync no se inicia automáticamente:
a. Haga doble clic en el nuevo disco extraíble que aparece en su equipo.
b. Vaya a la carpeta de Dell Mobile Sync en el disco extraíble.
c. Haga doble click en el archivo InstallDellMSync.exe para iniciar la instalación.
NOTA: También puede descargar e instalar el software Dell Mobile Sync desde
support.dell.com/support/downloads.
Para sincronizar música, fotografías, vídeos y contactos de Outlook:
1. Conecte el cable de 30 patas a USB a la tableta y al ordenador.
2. Haga doble clic en el icono de DellMobile Sync
aparece bajo la sección Dispositivos en el software de Dell Mobile Sync.
3. Cuando la copia o la sincronización haya terminado, desconecte el cable de 30 patas a USB
del ordenador y de la tableta.
NOTA: Para obtener más información sobre el software de Dell Mobile Sync y para ver
instrucciones sobre cómo sincronizar la tableta usando Wi-Fi, consulte la documentación
que se incluye en el software de Dell Mobile Sync.
en el escritorio de Windows. La tableta
47
Page 50

Más información
Para obtener más información sobre las funciones y configuración disponibles en la tableta,
consulte el Manual del usuario que se encuentra disponible en la tarjeta SD de la tableta o en
support.dell.com/manuals.
NOTA: QuickOffice está preinstalado en la tableta.
Para ver el Manual del usuario disponible en la tarjeta SD, toque la aplicación QuickOffice
yseleccione Tarjeta de memoria.
Antes de enviar la tableta a reparar
Los técnicos del centro de servicio pueden restablecer la tableta Dell a la configuración de
fábrica con el fin de resolver el problema que tenga. Se recomienda hacer copia de seguridad
de los datos usando la función Copia de seguridad y restauración antes de enviar la tableta
areparar.
48
Page 51

Page 52

Printed in China.
Imprimé en Chine.
Impreso en China.
www.dell.com | support.dell.com
 Loading...