

Dell Precision 6T337, 650, Precision Workstations 450, Precision Workstations 650 Setup And Quick Reference Manual
Page 1

Dell Precision™ Workstations 450 and 650
Setup and Quick Reference
Guide
www.dell.com | support.dell.com
Page 2

Notes, Notices, and Cautions
NOTE: A NOTE indicates important information that helps you make better
use of your computer.
NOTICE: A NOTICE indicates either potential damage to hardware or loss of
data and tells you how to avoid the problem.
CAUTION: A CAUTION indicates a potential for property damage,
personal injury, or death.
Abbreviations and Acronyms
For a complete list of abbreviations and acronyms, see the “Glossary” in the
User’s Guide.
____________________
Information in this document is subject to change without notice.
© 2002 Dell Computer Corporation. All rights reserved.
Reproduction in any manner whatsoever without the written permission of Dell Computer
Corporation is strictly forbidden.
Trademarks used in this text: Dell, the DELL logo, and Dell Precision are trademarks of Dell
Computer Corporation; Microsoft and Windows are registered trademarks of Microsoft Corporation.
Other trademarks and trade names may be used in this document to refer to either the entities claiming
the marks and names or their products. Dell Computer Corporation disclaims any proprietary interest
in trademarks and trade names other than its own.
December 2002 P/N 6T337 Rev. A01
Page 3

Contents
Finding Information and Assistance . . . . . . . . . . . . . . . . 5
Connect the keyboard and the mouse
Connect the modem or the network cable
Connect the monitor
Connect the speakers
Connect the power cables and turn on the computer
and monitor
Install additional software or devices
Connect the keyboard and mouse
Connect the modem or network cable
Connect the monitor
Connect the speakers
Connect the power cables and turn on the computer
and monitor
Install Additional Software or Devices
. . . . . . . . . . . . . . . 9
. . . . . . . . . . . . 10
. . . . . . . . . . . . . . . . . . . . . . 11
. . . . . . . . . . . . . . . . . . . . . . 14
. . . . . . . . . . . . . . . . . . . . . . . . . . 15
. . . . . . . . . . . . . . 16
. . . . . . . . . . . . . . . . 18
. . . . . . . . . . . . . . 19
. . . . . . . . . . . . . . . . . . . . . . 20
. . . . . . . . . . . . . . . . . . . . . . 23
. . . . . . . . . . . . . . . . . . . . . . . . . . 24
. . . . . . . . . . . . . 25
Caring for Your Computer
Solving Problems
. . . . . . . . . . . . . . . . . . . . . . . . . 27
. . . . . . . . . . . . . . . . . . . . . 26
Resolving Software and Hardware Incompatibilities
Using System Restore in Windows XP
Using Last Known Good Configuration
When to Use the Dell Diagnostics
Starting the Dell Diagnostics
System Lights
Beep Codes
Error Messages
Diagnostic Lights
Frequently Asked Questions
. . . . . . . . . . . . . . . . . . . . . . . . . 34
. . . . . . . . . . . . . . . . . . . . . . . . . . 35
. . . . . . . . . . . . . . . . . . . . . . . . 35
. . . . . . . . . . . . . . . . . . . . . . . 35
. . . . . . . . . . . . . . . . . . . . 42
Opening the Computer Cover
. . . . . . . . . . . . . . . . . . 31
. . . . . . . . . . . . . . . . . . . 44
. . . . . . . . . . . . . 29
. . . . . . . . . . . . . 30
. . . . . . . . . . . . . . . 30
. . . . . . 27
Contents 3
Page 4

4 Contents
Page 5
Finding Information and Assistance
The following table lists the resources that Dell provides as support tools.
Additional resources may be shipped with your computer.
What Are You Looking For? Find it Here
• A diagnostic program for my computer
• Drivers for my computer
•My User’s Guide
• My device documentation
• How to set up my computer
• How to care for my computer
• Troubleshooting information
• How to open my computer cover
• How to locate other documentation
Drivers and Utilities CD (also known as the
ResourceCD)
You can use this CD to access documentation, reinstall drivers, or run
diagnostics tools.
Setup and Quick Reference Guide
Setup and Quick Reference Guide 5
Page 6
What Are You Looking For? Find it Here
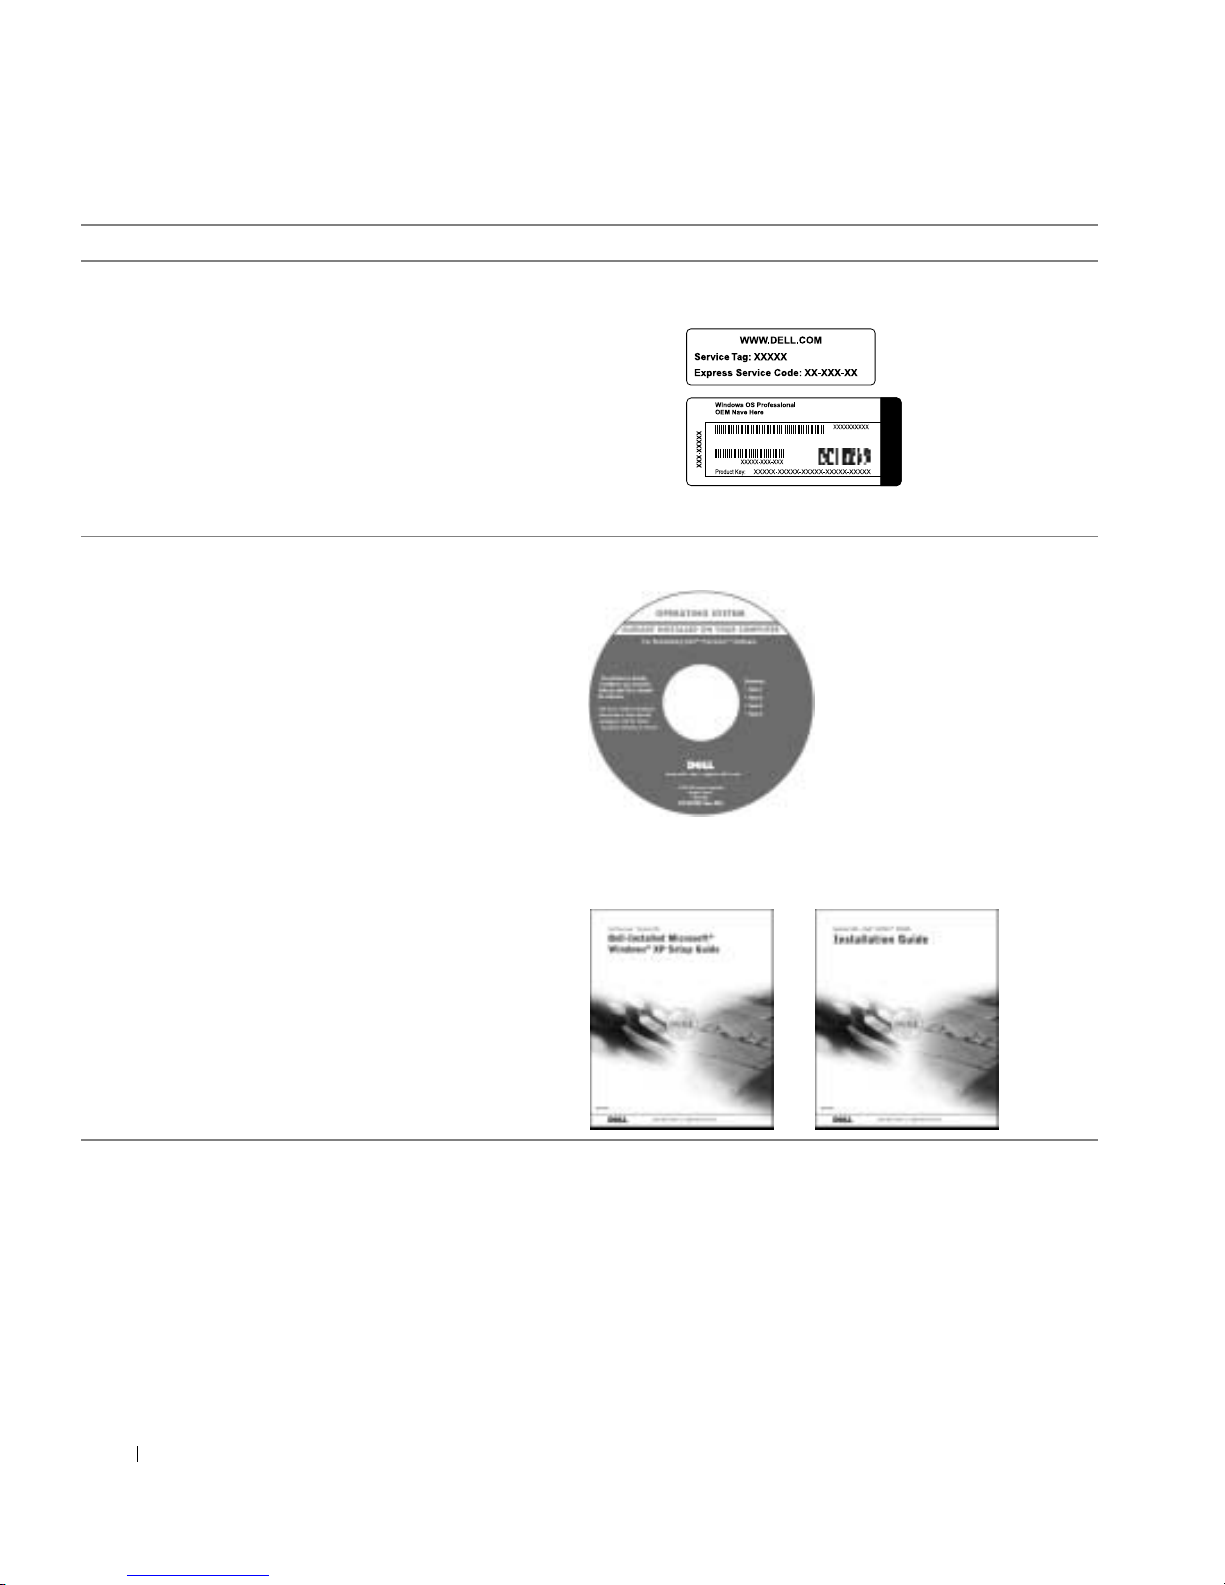
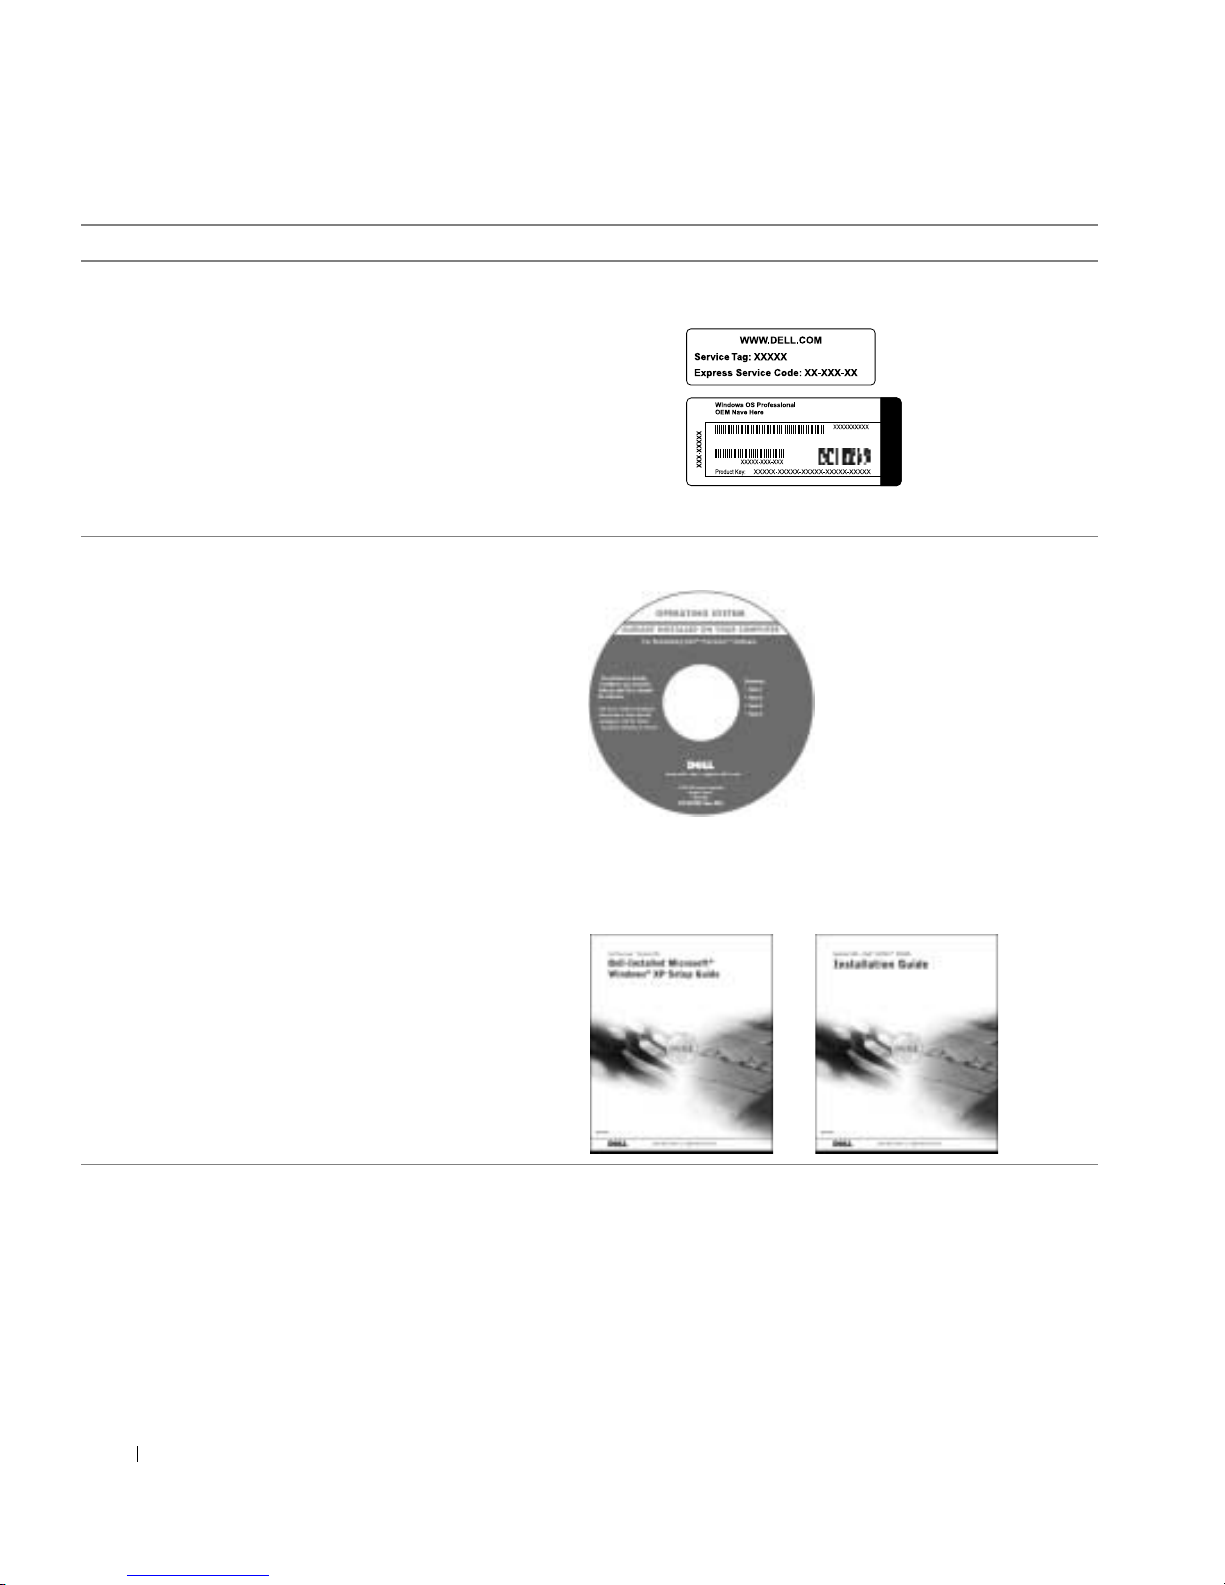
• Express Service Code and Service Tag
• Microsoft
®
Windows® License Label
Express Service Code and Product Key
The labels are located on your computer.
• How to reinstall my operating system Operating System CD and Installation Guide
www.dell.com | support.dell.com
After you reinstall your operating system, use the Drivers and Utilities
CD to reinstall drivers for the devices that came with your computer.
6 Setup and Quick Reference Guide
Page 7
What Are You Looking For? Find it Here
• How to remove and replace parts
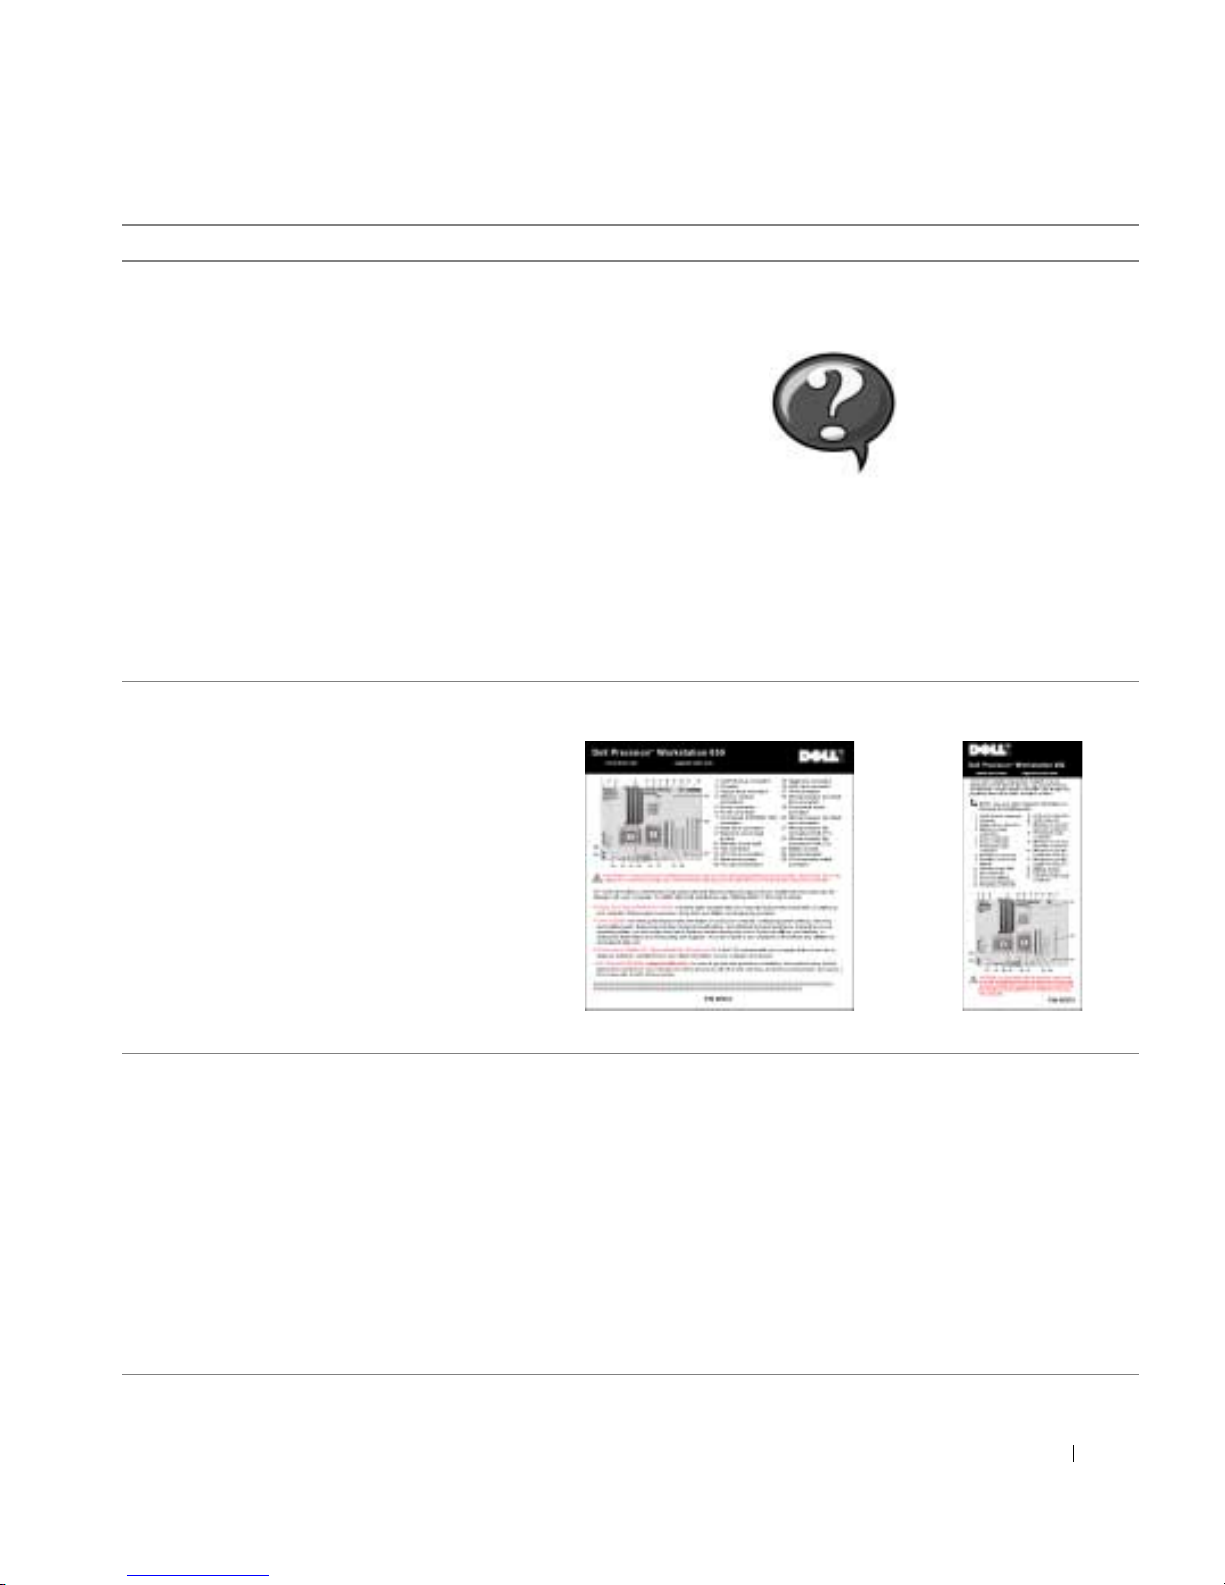
User’s Guide Icon (Microsoft Windows 2000)
• Technical specifications
• How to configure system settings
• How to troubleshoot and solve problems
Double-click the User’s Guide icon on your desktop.
Windows XP Help and Support Center
1 Click the Start button and click Help and Support.
2 Click User’s Guide.
• Location of connectors on the system board System Information Label
or
• Latest drivers for my computer
• Answers to technical service and support
questions
• Online discussions with other users and
technical support
• Documentation for my computer including
the Service Manual
The label is located on the inside of your computer cover.
Dell Support Website — support.dell.com
The Dell Support website provides several online tools, including:
• Knowledge Base — Hints, tips, and online courses
• Customer Forum — Online discussion with other Dell customers
• Upgrades — Upgrade information for components, such as memory,
the hard drive, and the operating system
• Customer Care — Contact information, order status, warranty, and
repair information
• Downloads — Drivers, patches, and software updates
• Reference — Computer documentation, product specifications, and
white papers
Setup and Quick Reference Guide 7
Page 8
What Are You Looking For? Find it Here
• Service call status and support history
• Top technical issues for my computer
• Frequently asked questions
• File downloads
• Details on my computer’s configuration
Dell Premier Support Website —
premiersupport.dell.com
The Dell Premier Support website is customized for corporate,
government, and education customers. This website may not be
available in all regions.
• Service contract for my computer
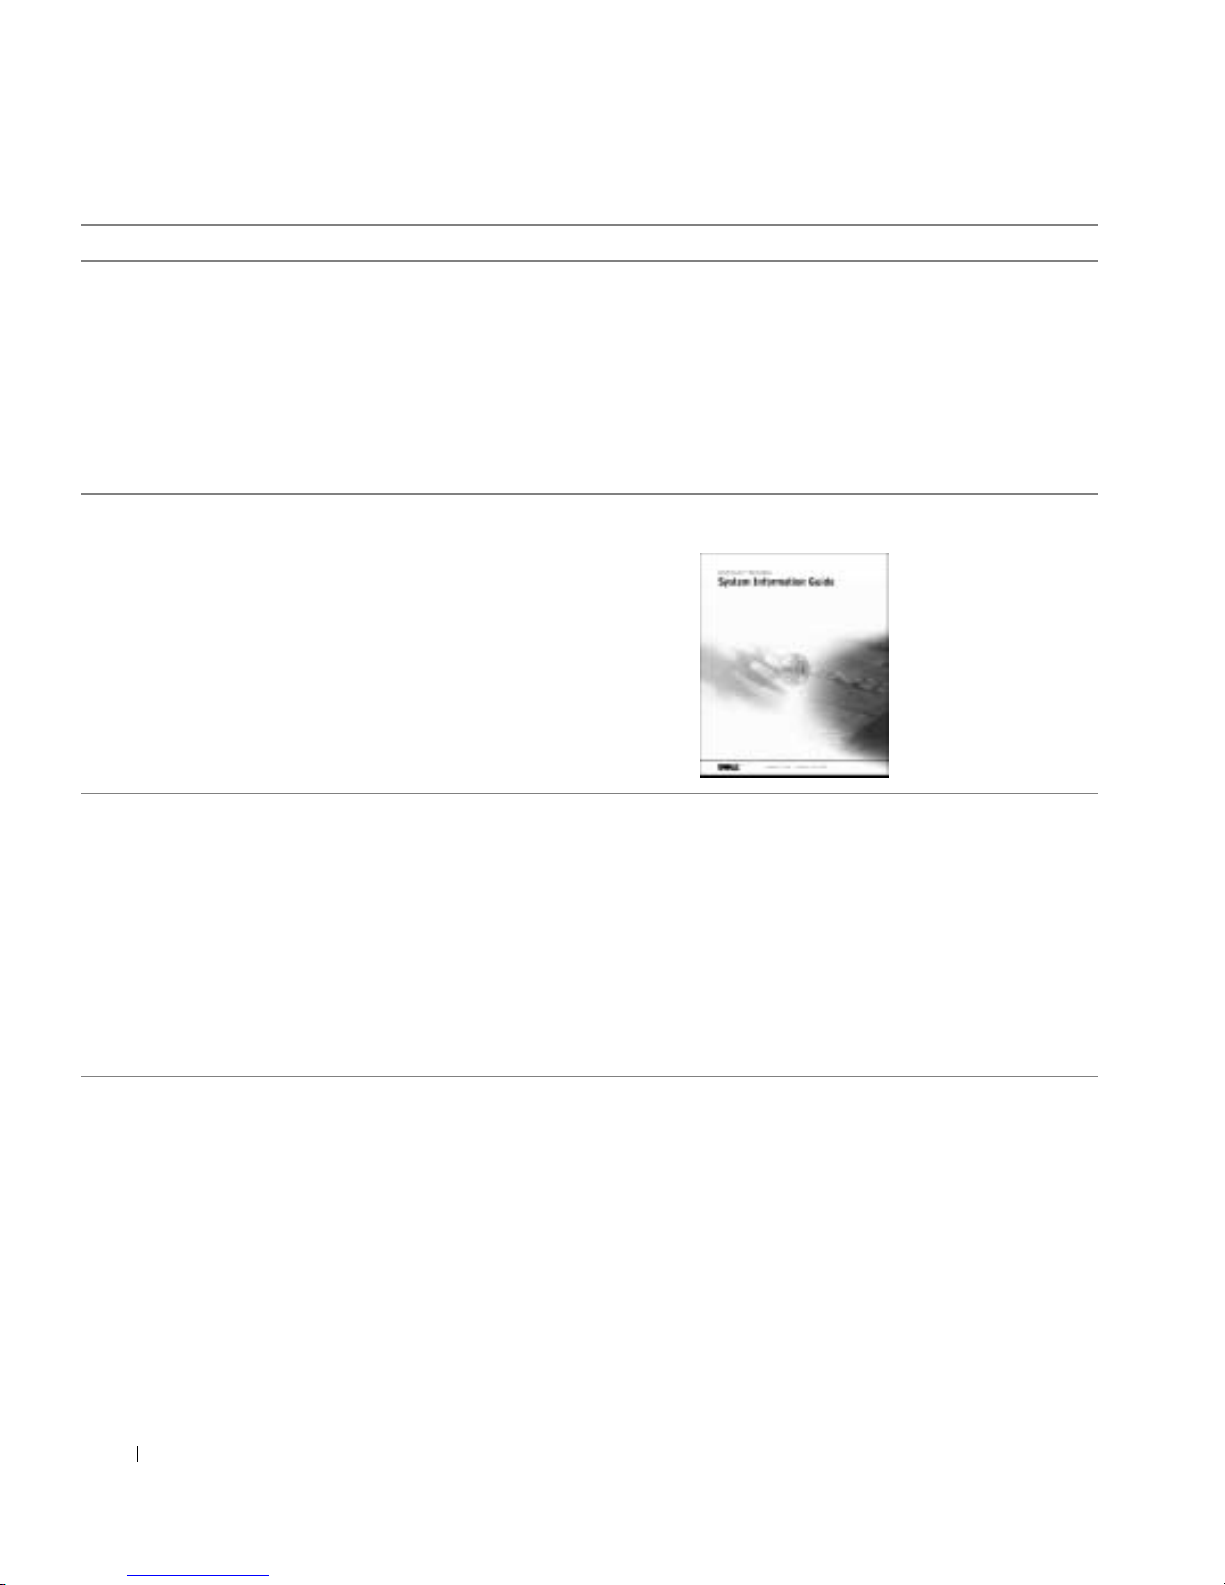
• Warranty information System Information Guide
www.dell.com | support.dell.com
• How to use Windows XP
• Documentation for my computer and
devices
Windows XP Help and Support Center
1 Click the Start button, and click Help and Support.
2 Type a word or phrase that describes your problem, and click the
arrow icon.
3 Click the topic that describes your problem.
4 Follow the instructions shown on the screen.
NOTE: For help using Windows 2000, click the Start button and click
Help.
8 Setup and Quick Reference Guide
Page 9

Setting Up Your Dell Precision™ 650
Computer
You must complete all steps to properly set up your computer.
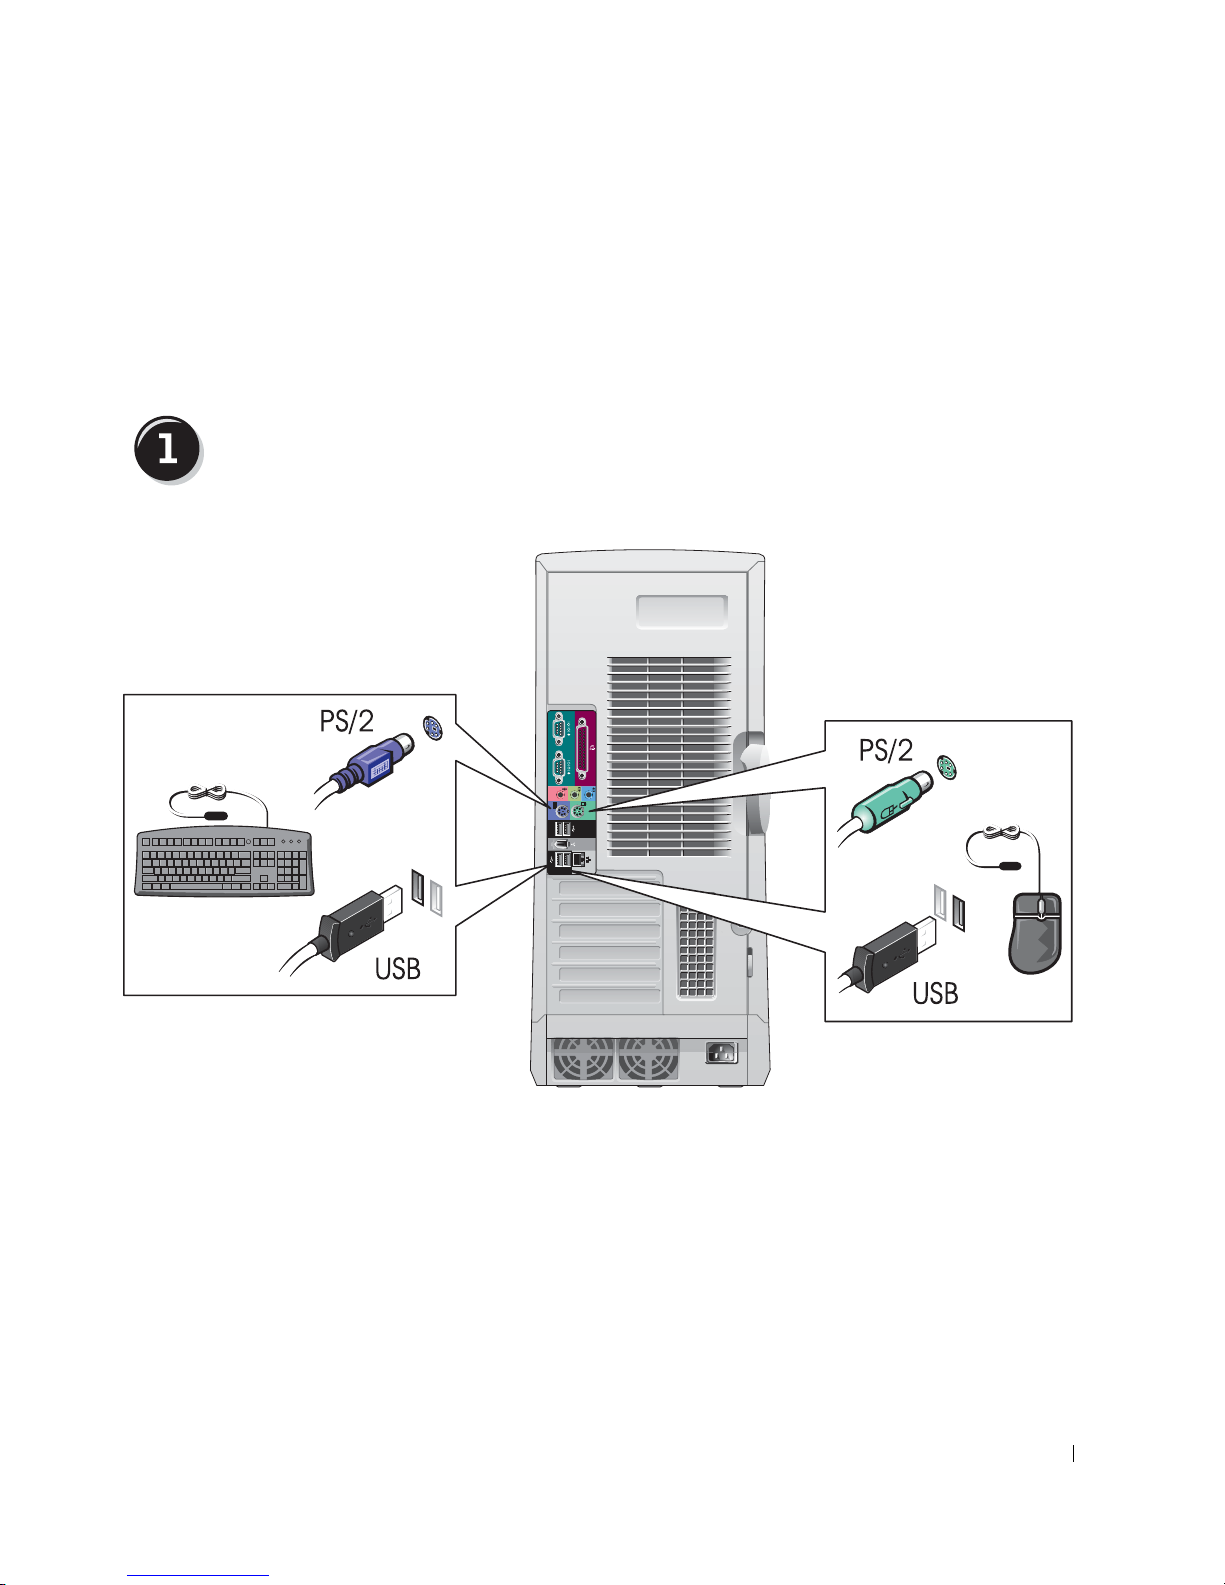
Connect the keyboard and the mouse
or
or
Setup and Quick Reference Guide 9
Page 10
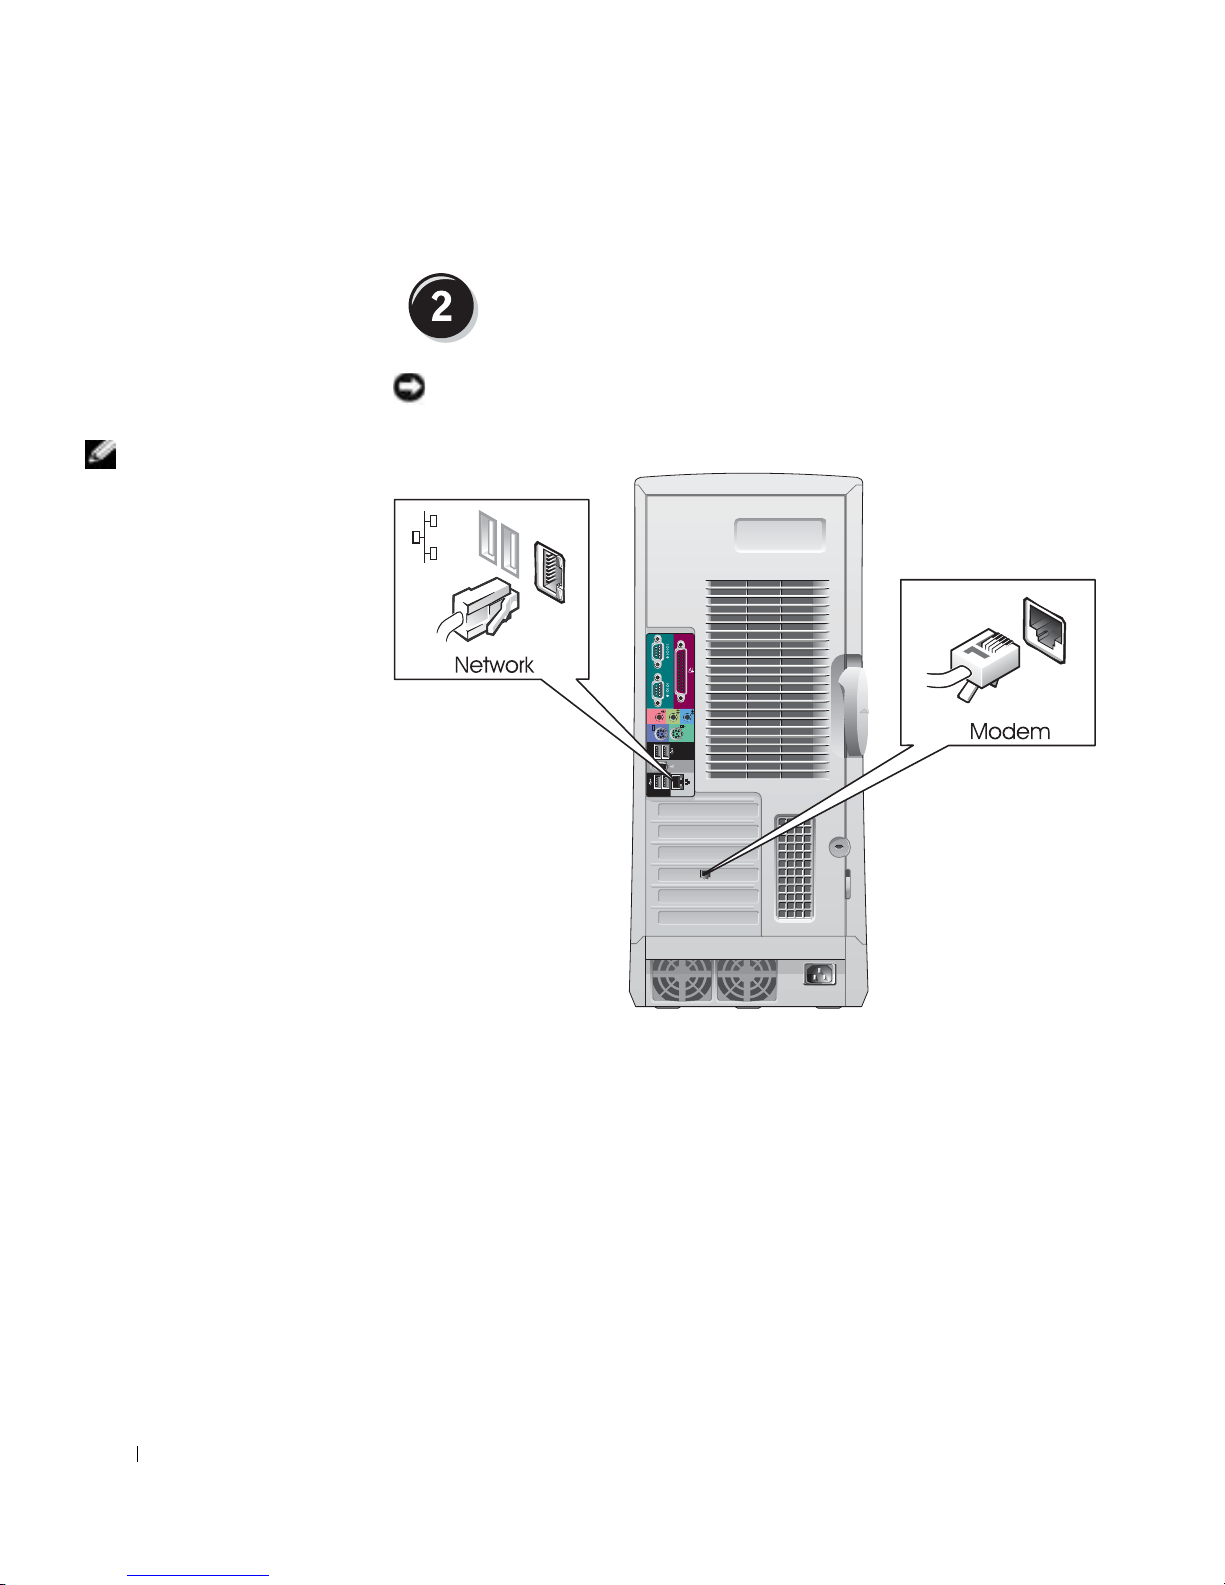
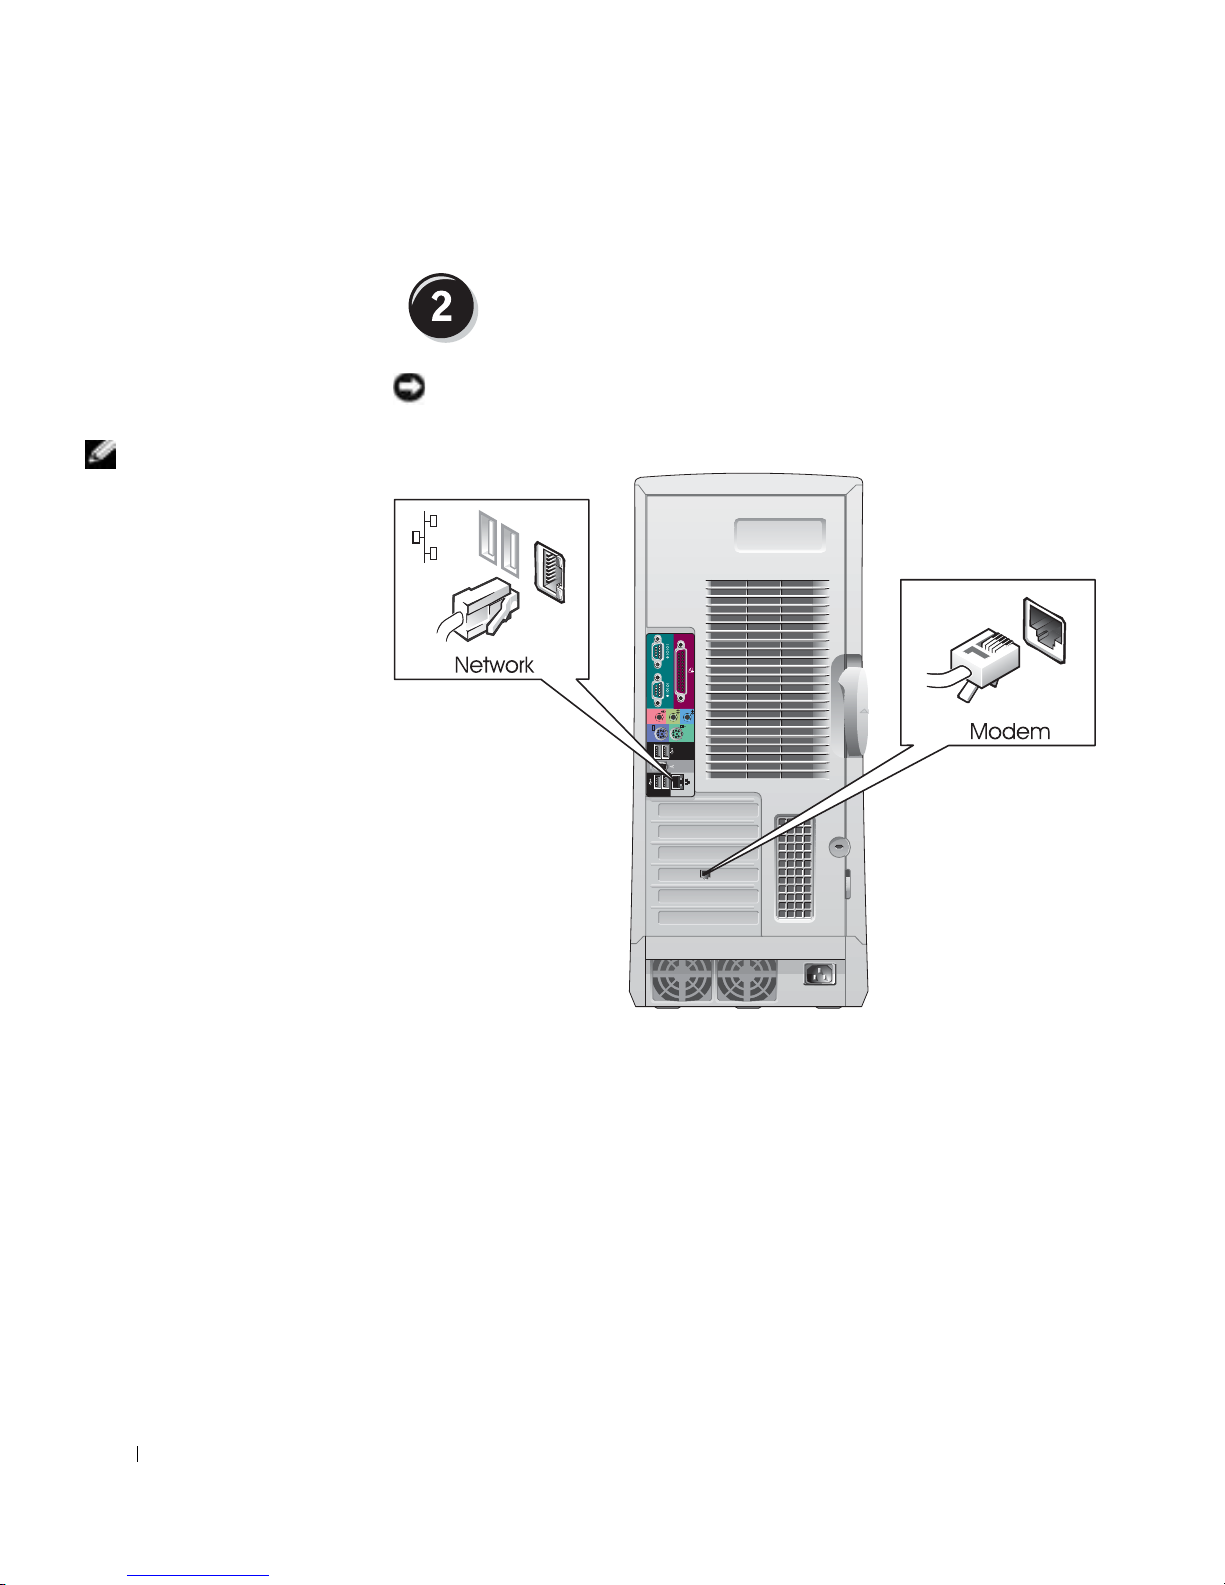
NOTE: If your computer
has a network card
installed, connect the
network cable to the card.
www.dell.com | support.dell.com
Connect the modem or the network cable
NOTICE: Do not connect a modem cable to the network adapter. Voltage
from telephone communications can damage the network adapter.
10 Setup and Quick Reference Guide
Page 11
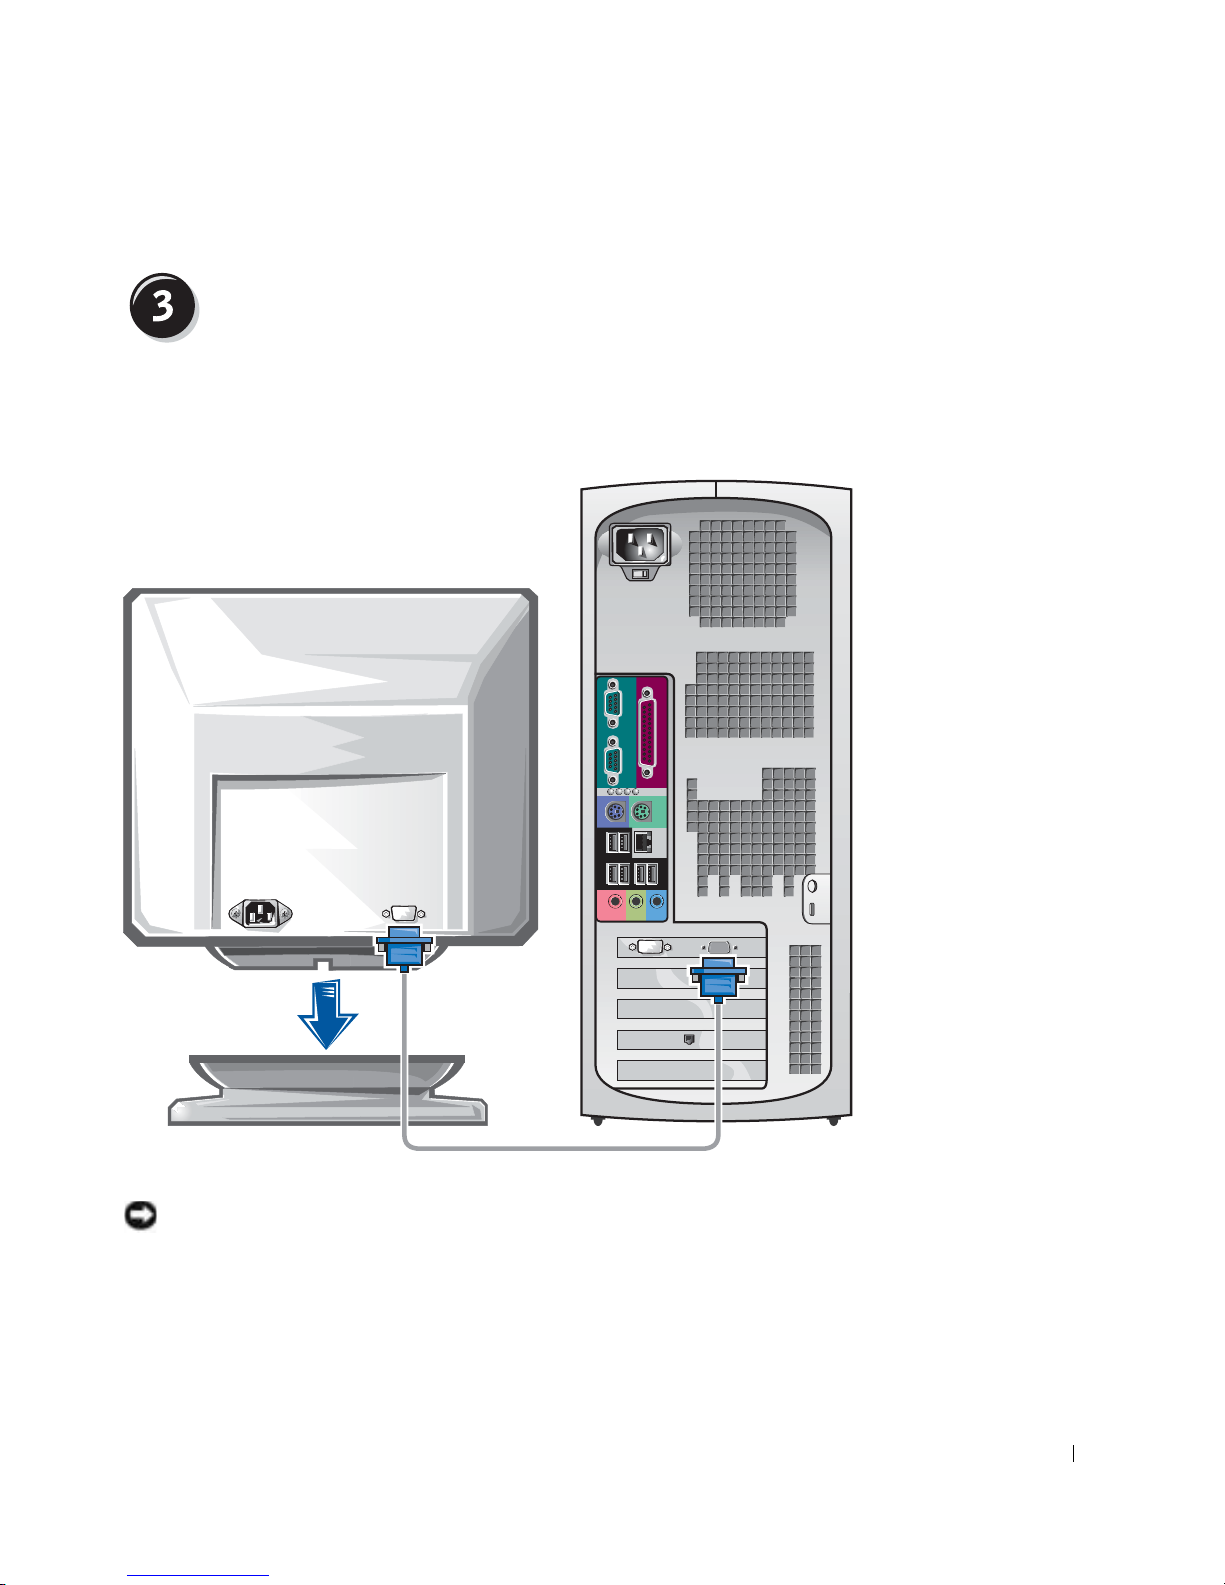
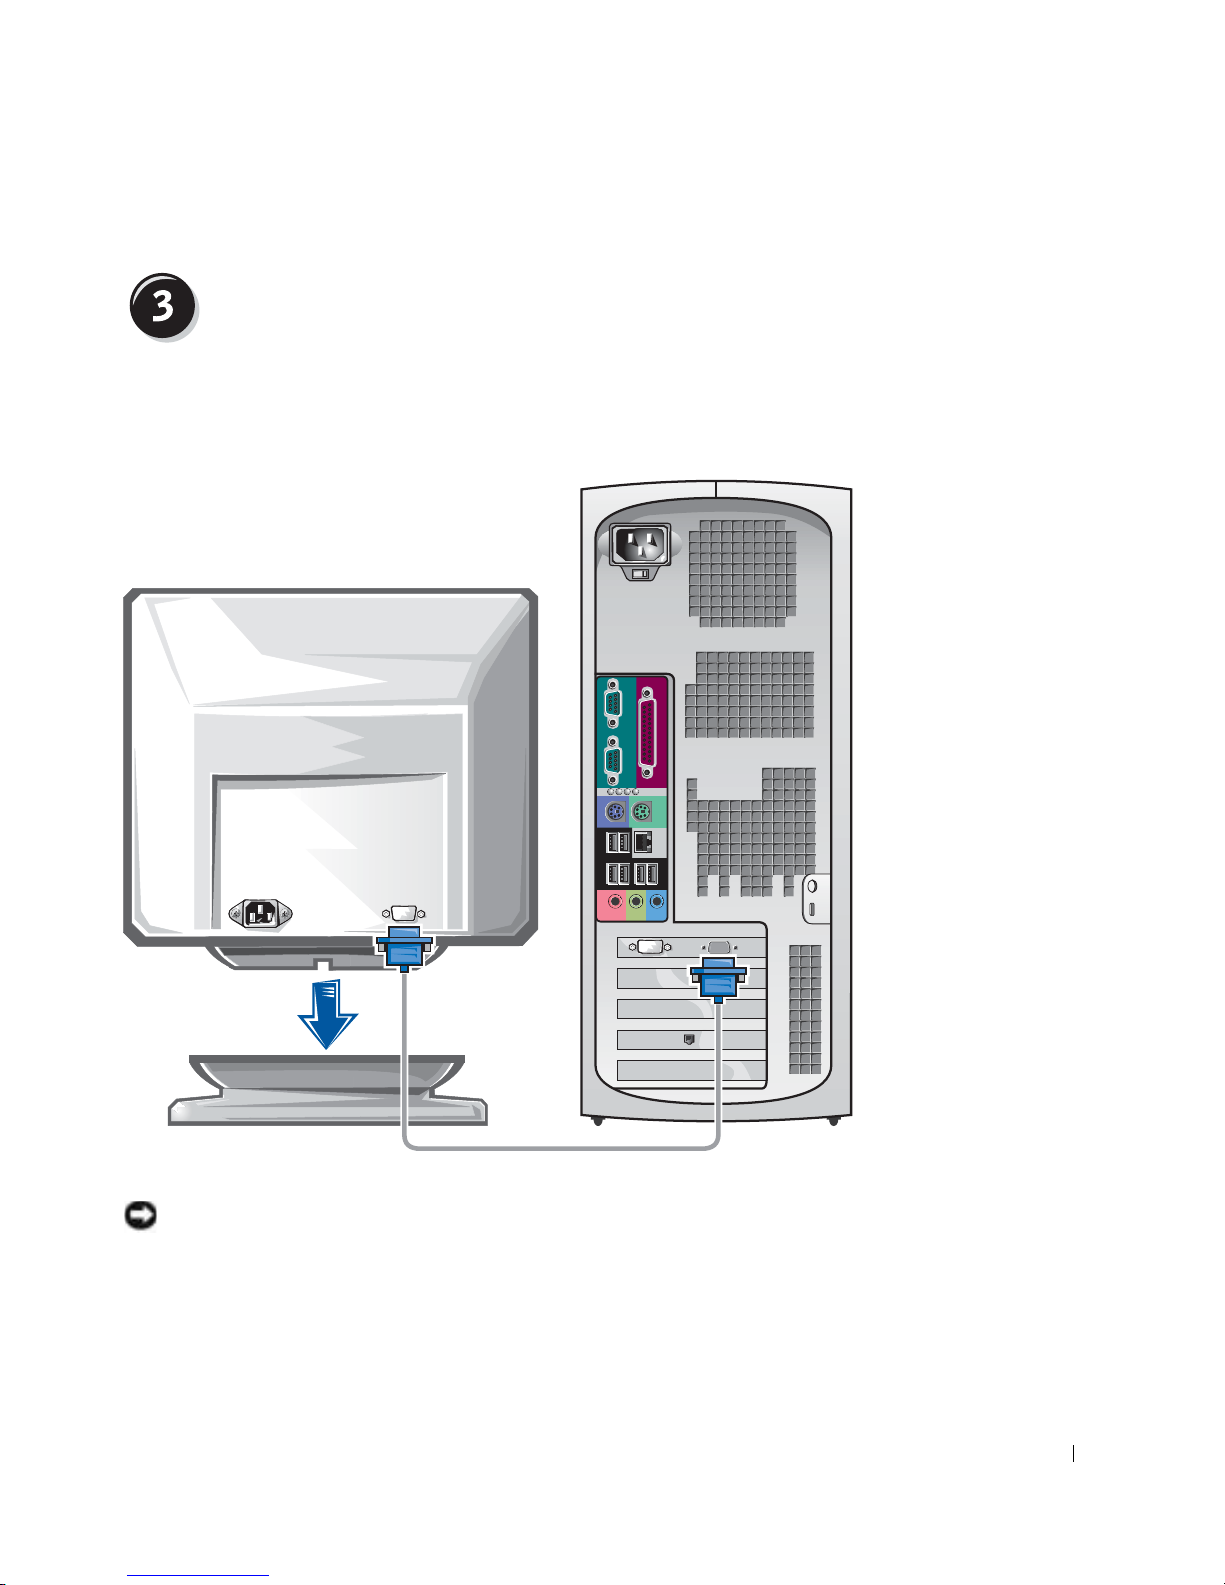
Connect the monitor
Depending on your graphics card, you can connect your monitor in various
ways.
A B C D
NOTICE: Your computer may require the use of the provided adapter or cable
to connect to your monitor.
Setup and Quick Reference Guide 11
Page 12
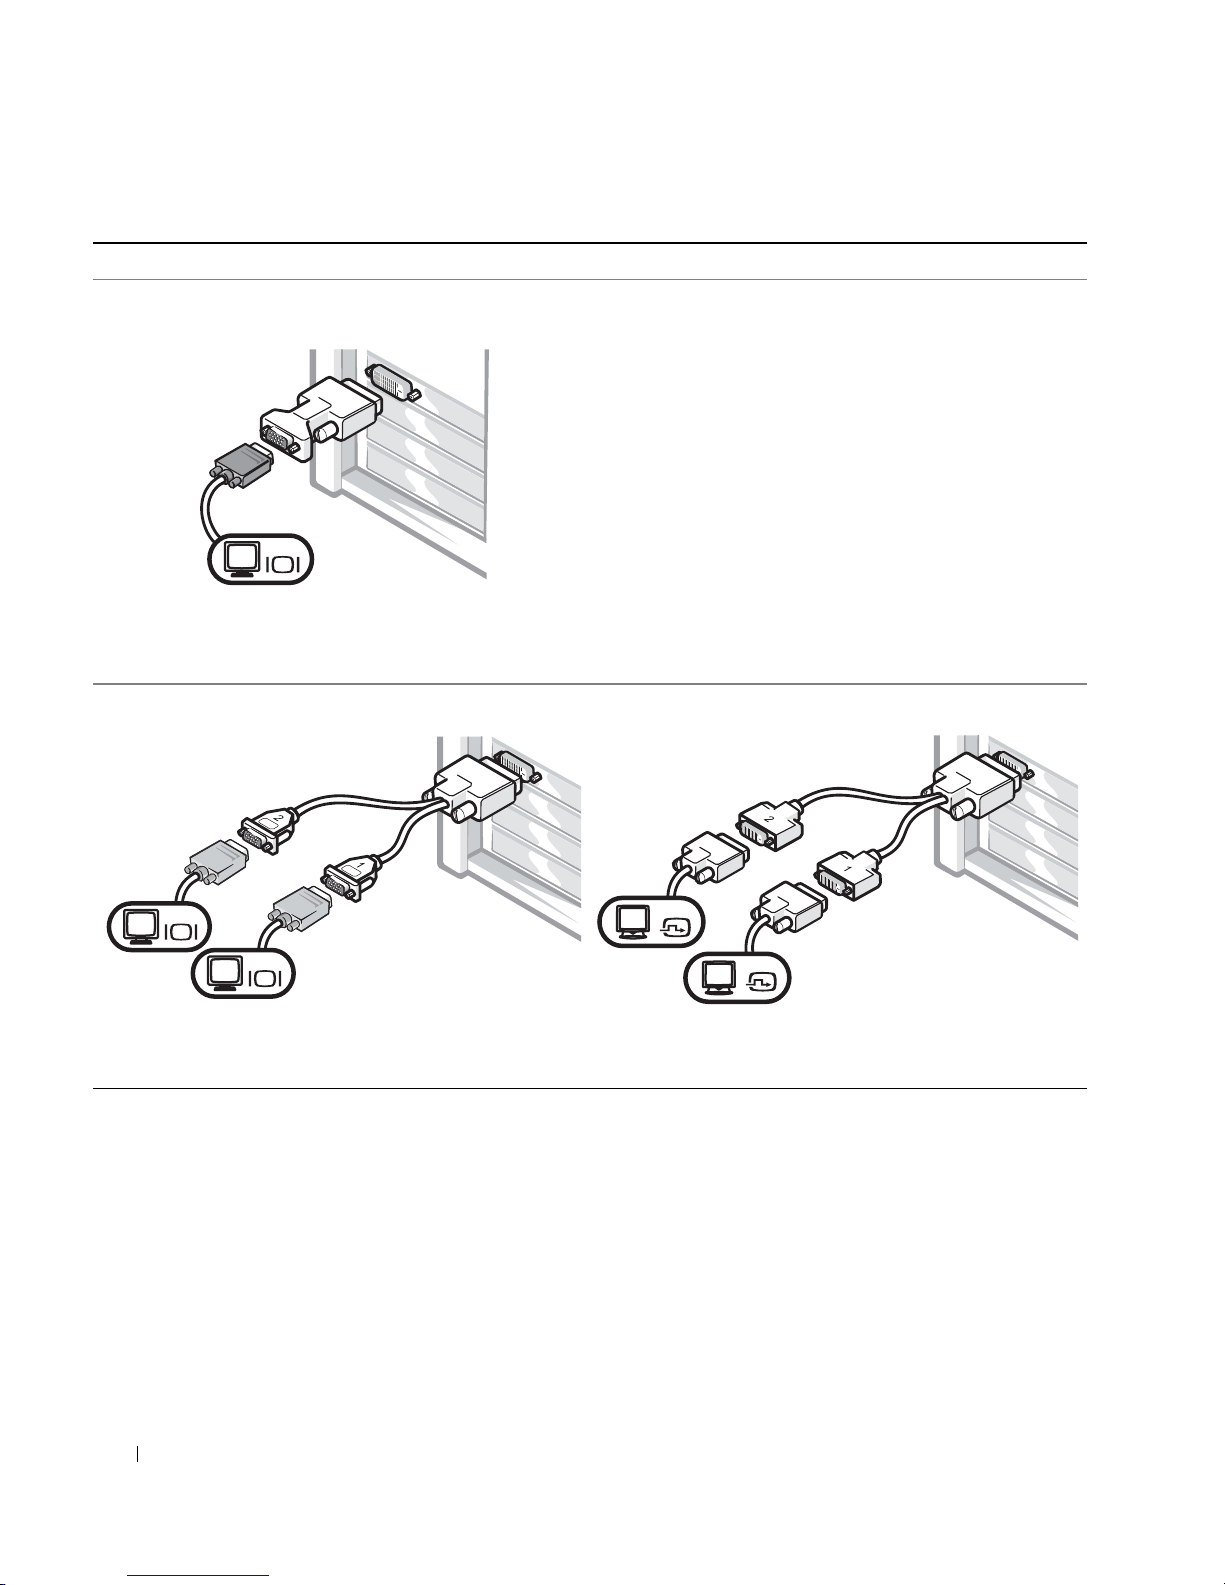
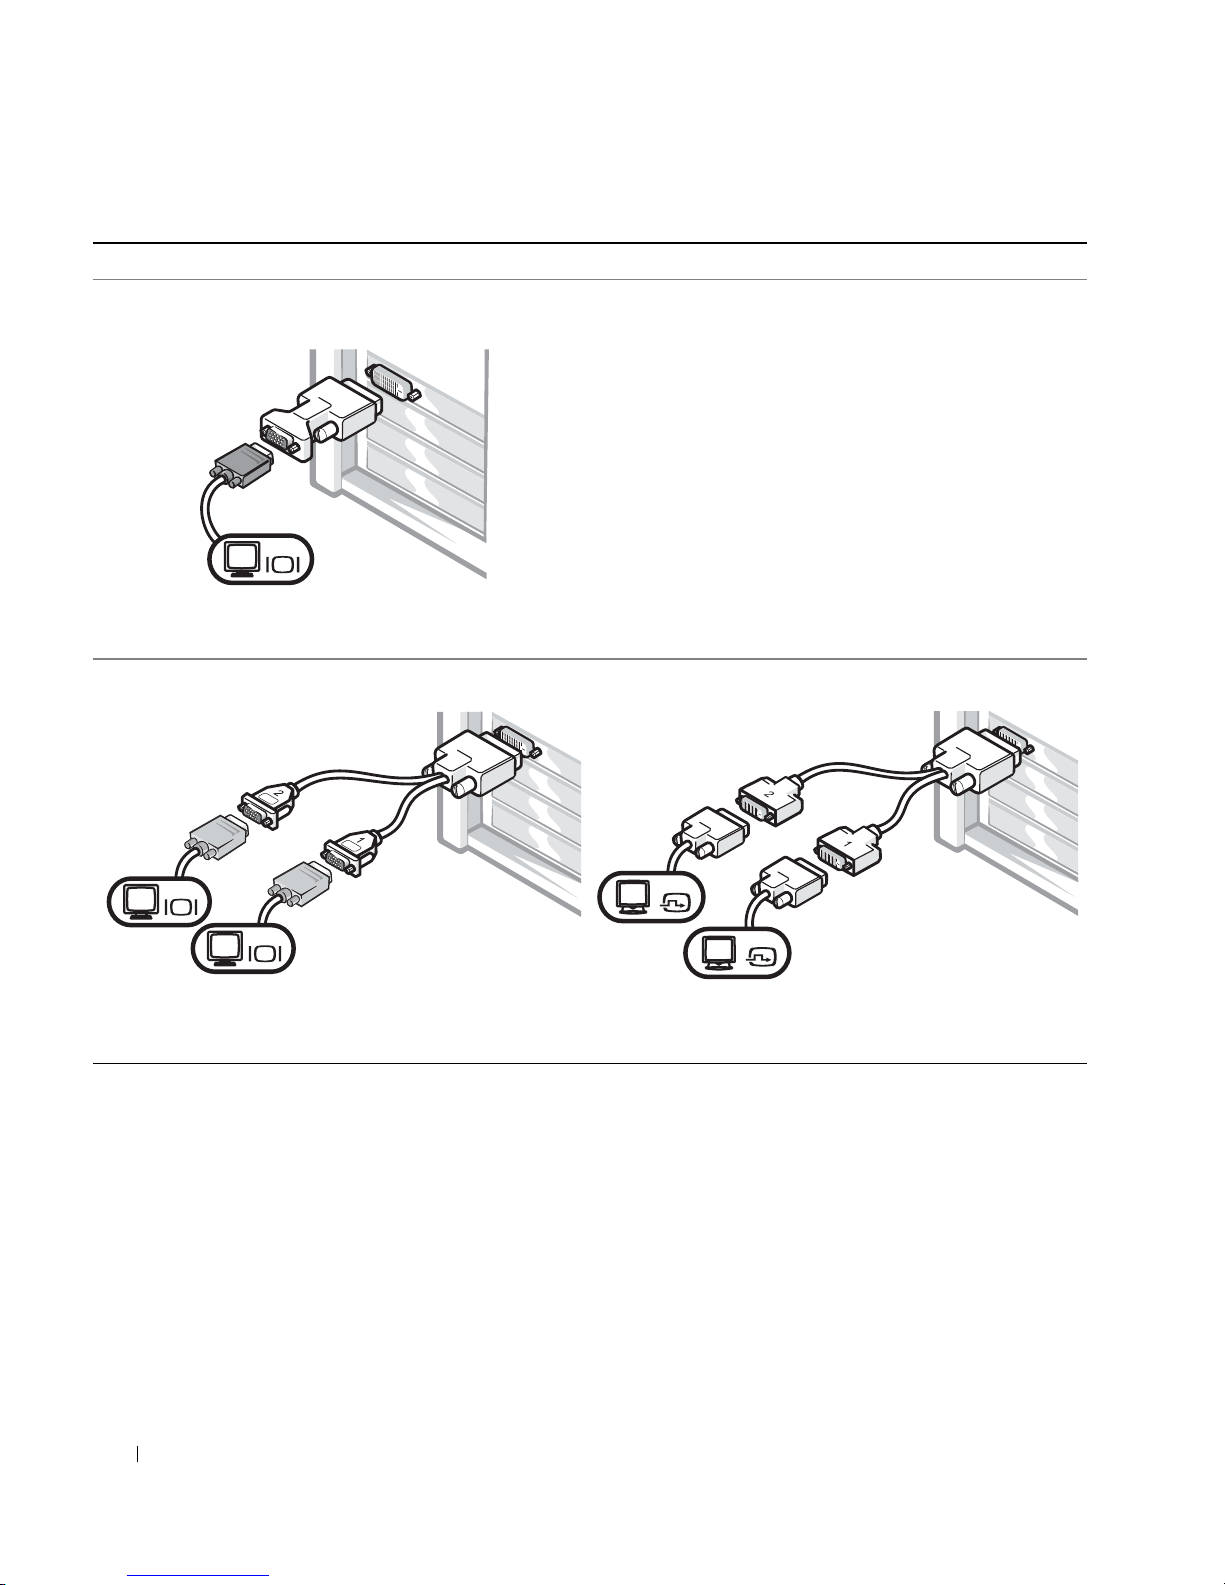
For single- and dual-monitor capable cards with a single connector
VGA Adapter
www.dell.com | support.dell.com
VGA
• Use the VGA adapter when you have a single
monitor graphics card and you want to connect to a
VGA monitor.
Dual VGA Y Cable Adapter
VGA
VGA
• Use the appropriate Y cable when your graphics card
has a single connector and you want to connect to
one or two VGA monitors.
Dual DVI Y Cable Adapter
DVI
DVI
• Use the appropriate Y cable when your graphics card
has a single connector and you want to connect to
one or two DVI monitors.
The dual-monitor cable is color coded; the blue connector is for the primary
monitor, and the black connector is for the secondary monitor. To enable
dual-monitor support, both monitors must be attached when the computer
starts.
12 Setup and Quick Reference Guide
Page 13
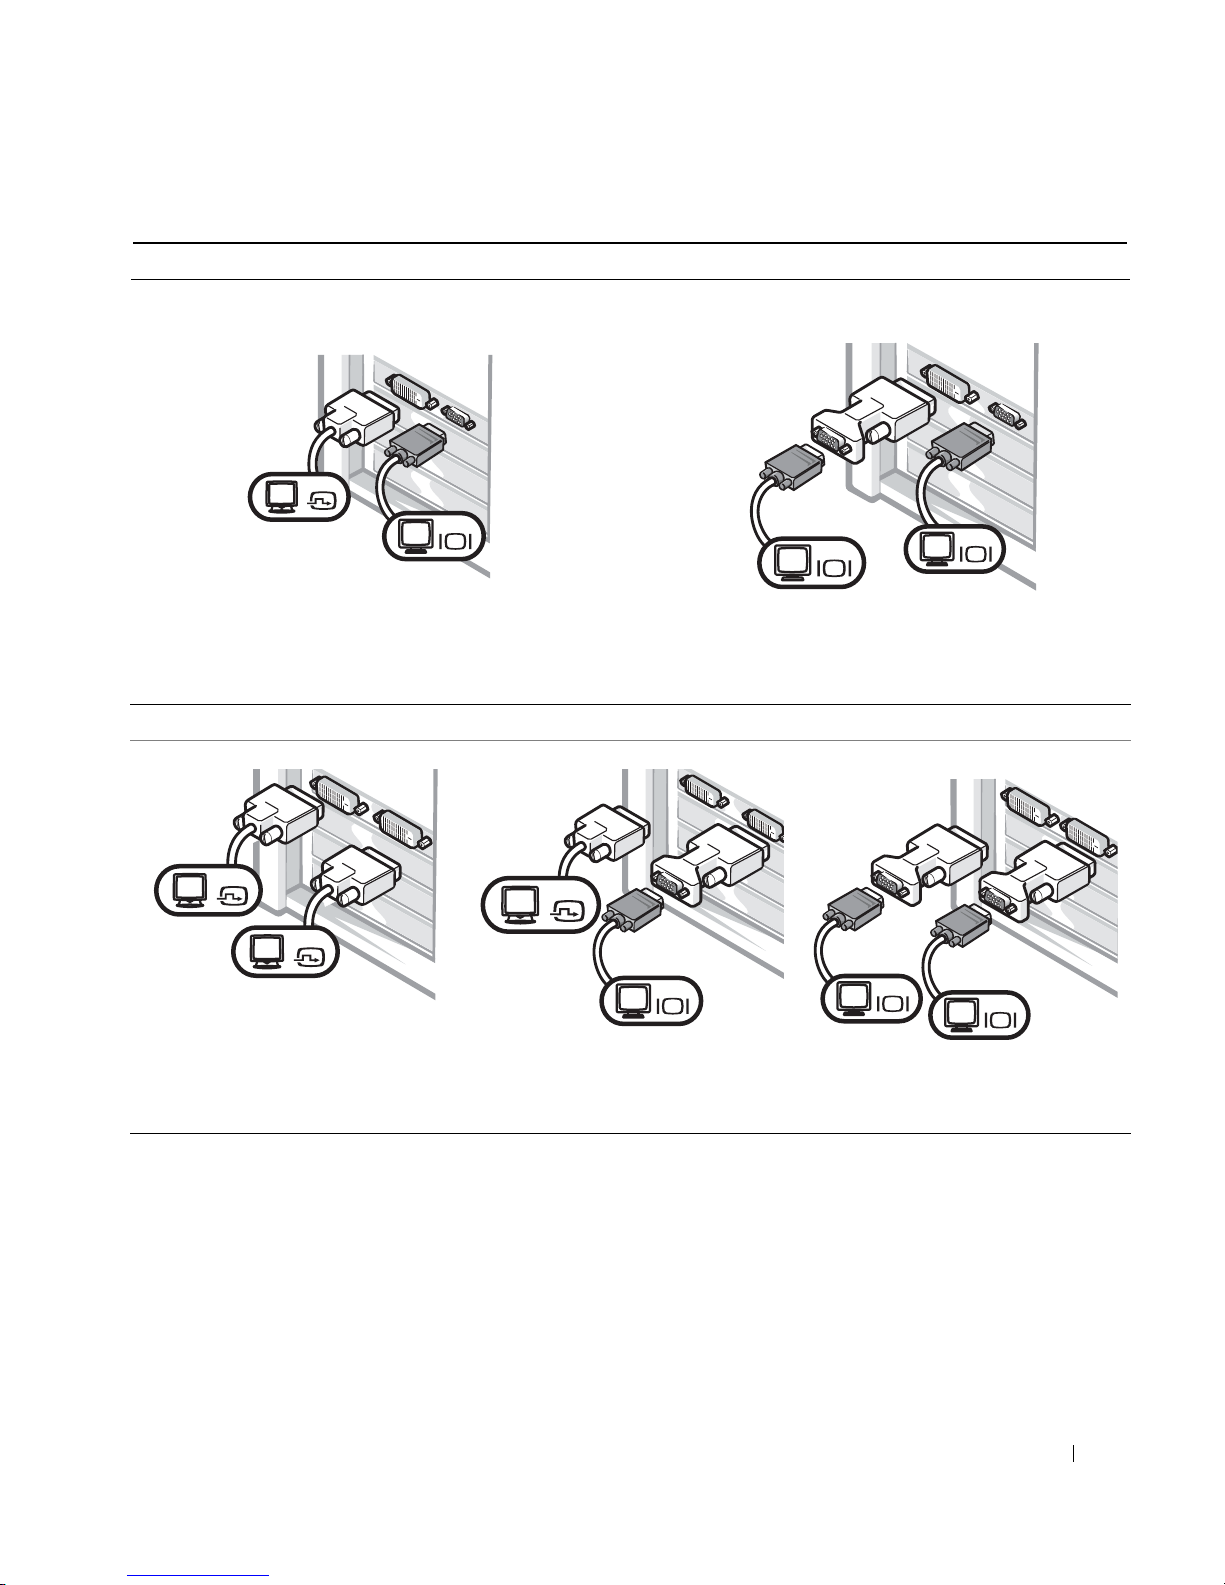
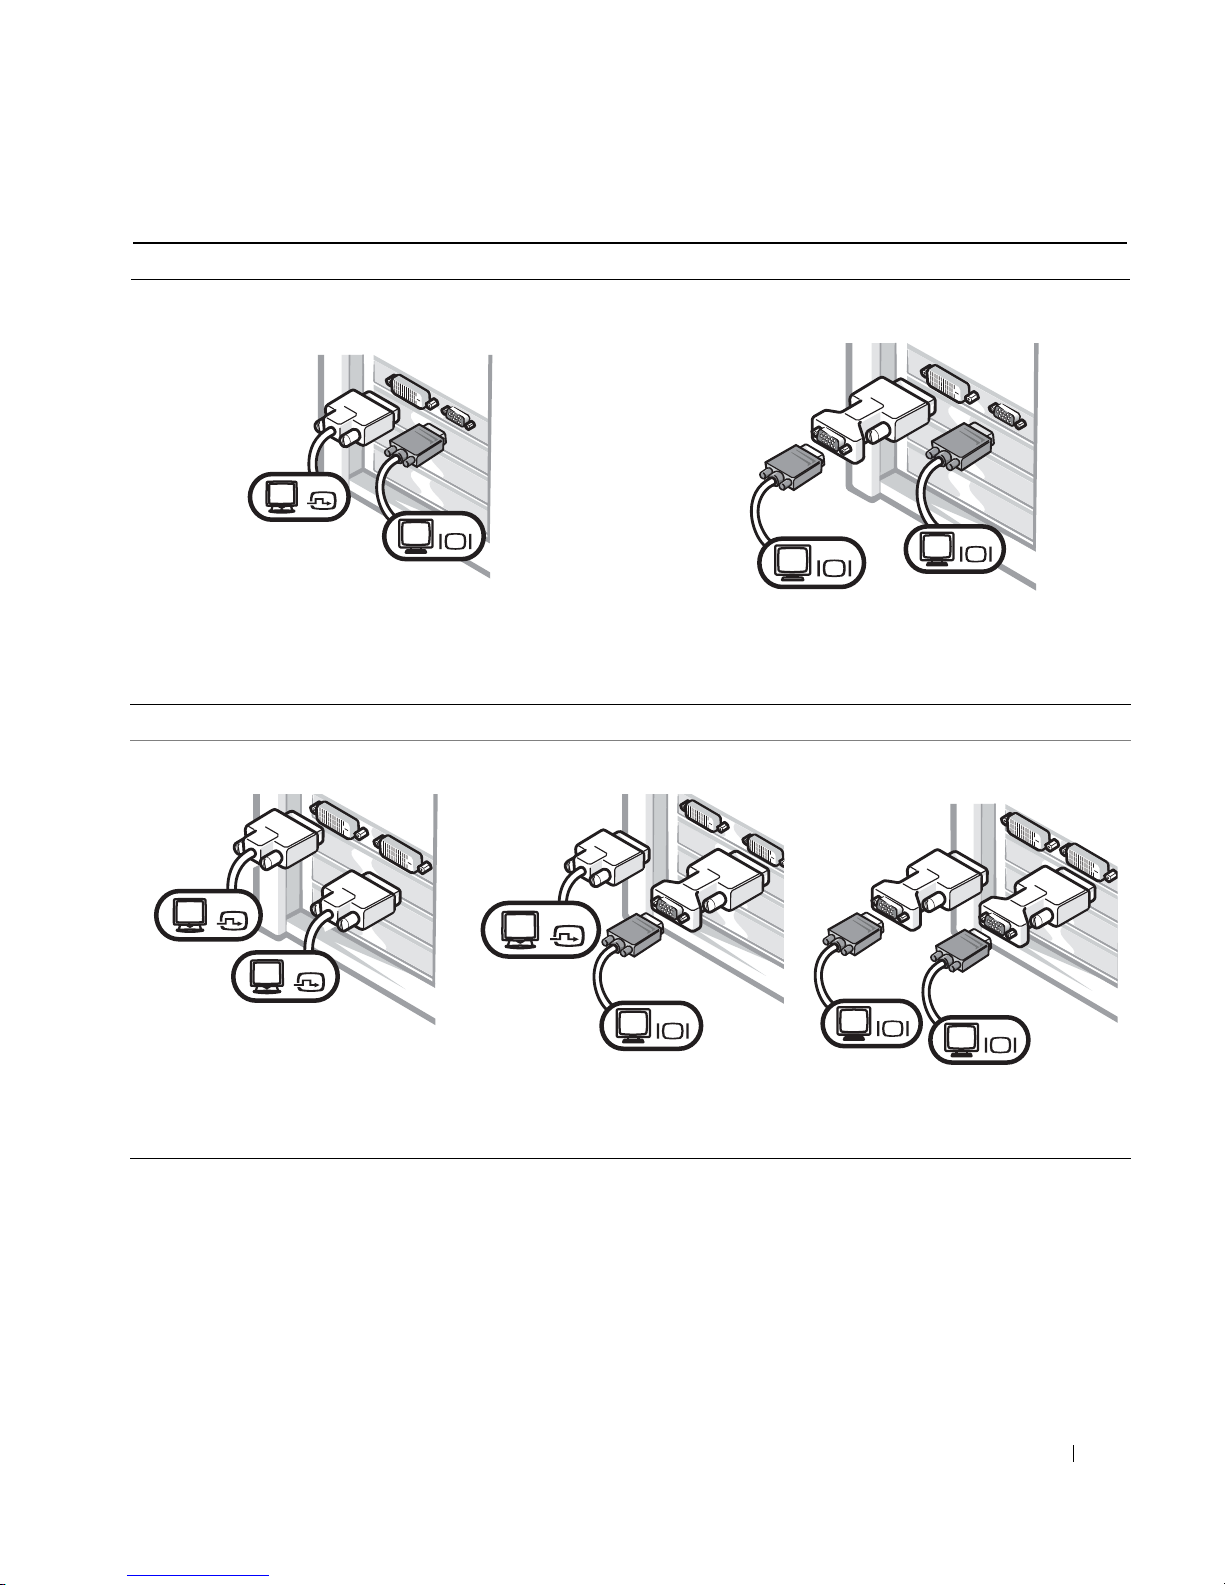
For dual-monitor capable cards with 1 DVI and 1 VGA connector
Single DVI/Single VGA
DVI
VGA
• Use the appropriate connector when you connect to
Dual VGA With VGA Adapter
• Use the VGA adapter when you want to connect to
one or two monitors.
For dual-monitor capable cards with 2 DVI connectors
Dual DVI
Dual DVI With One VGA Adapter
VGA
two VGA monitors.
Dual DVI With Two VGA Adapters
VGA
DVI
DVI
• Use the DVI connectors to
connect to one or two DVI
monitors.
DVI
VGA
• Use the VGA adapter to connect
a VGA monitor to one DVI
connector.
Setup and Quick Reference Guide 13
VGA
VGA
• Use two VGA adapters to
connect two VGA monitors to
the DVI connectors.
Page 14
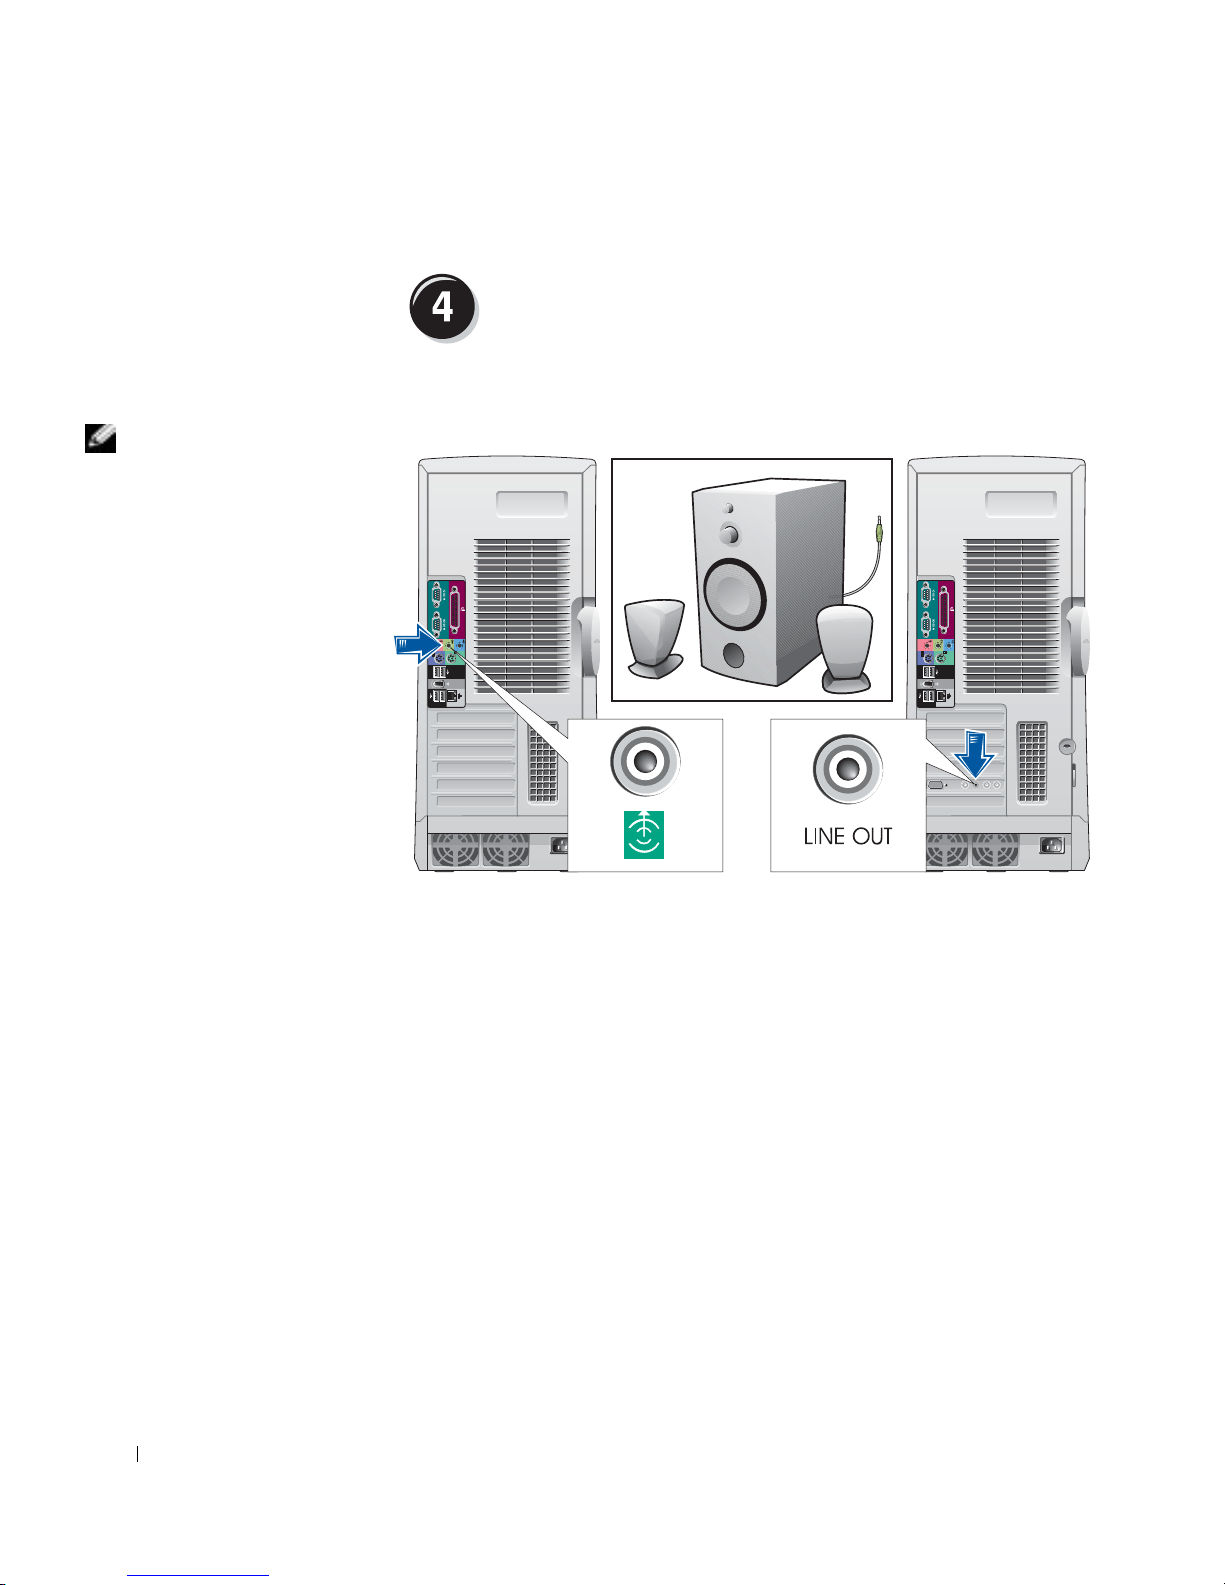
NOTE: If your computer
has an audio card
installed, connect the
speakers to the card.
www.dell.com | support.dell.com
Connect the speakers
14 Setup and Quick Reference Guide
Page 15
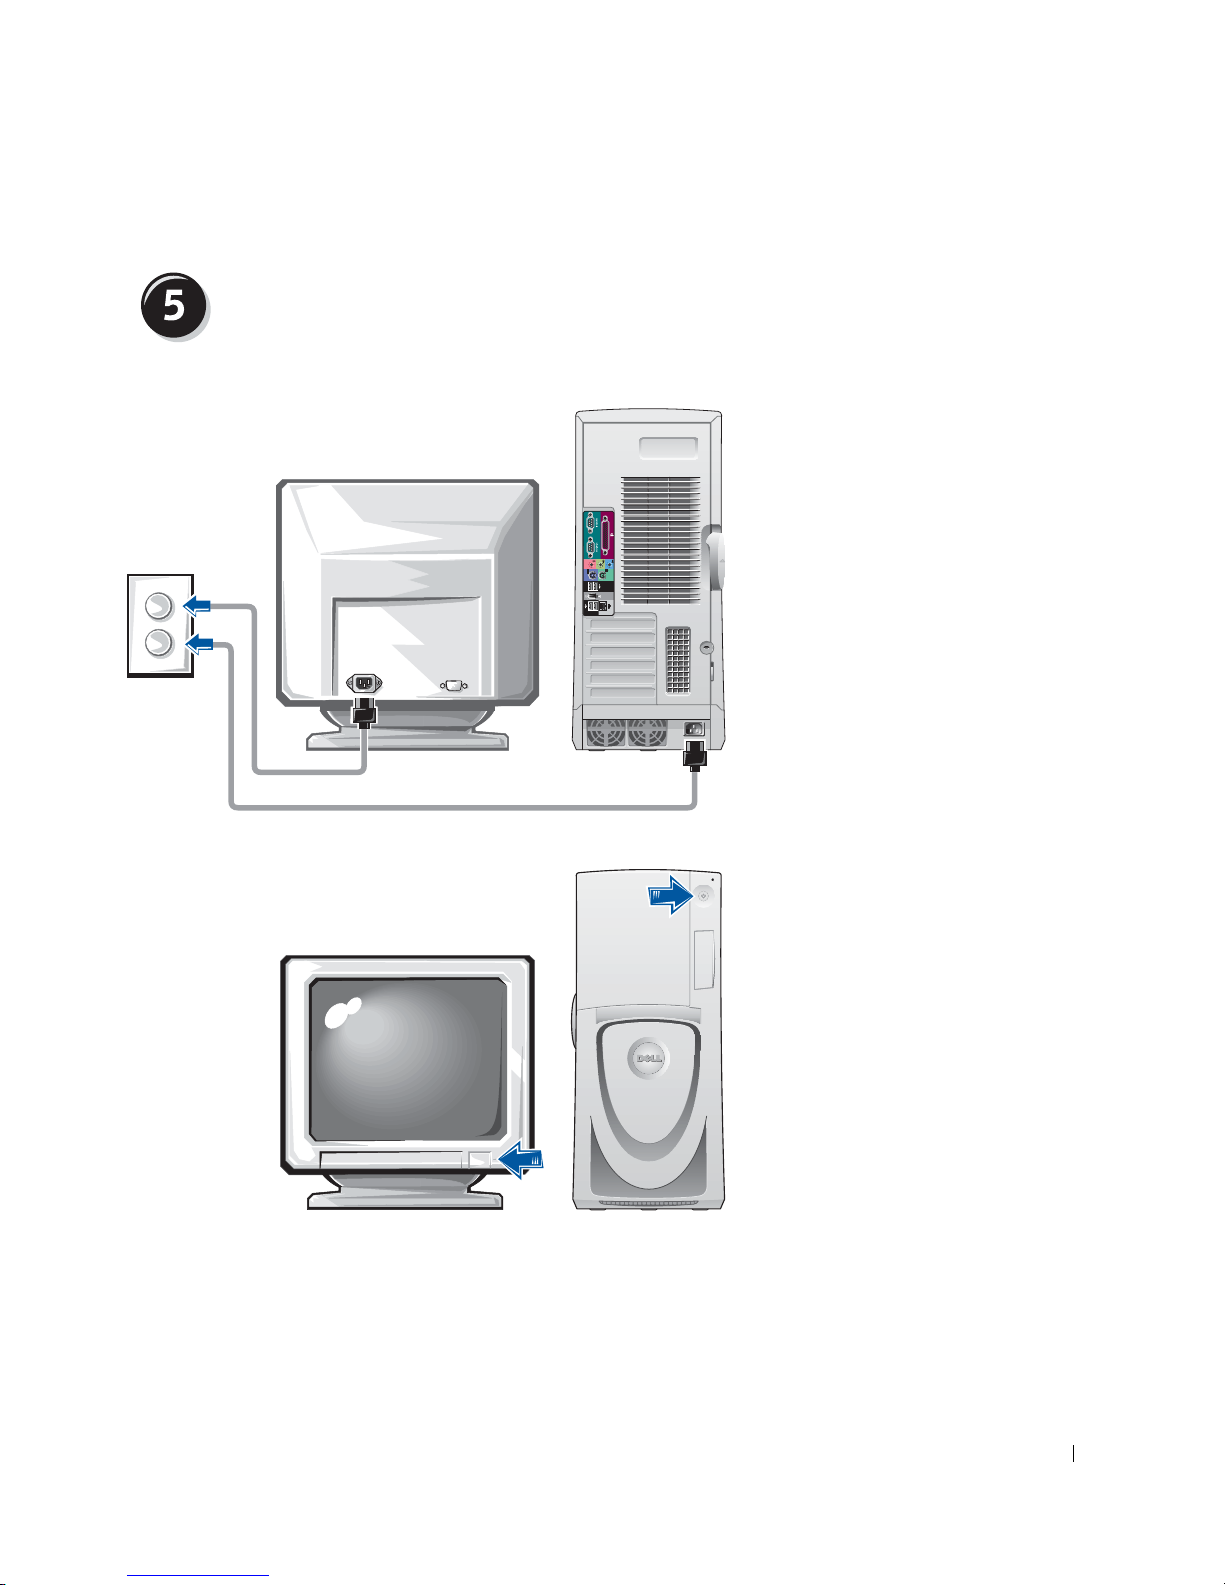
Connect the power cables and turn on the
computer and monitor
Setup and Quick Reference Guide 15
Page 16

Install additional software or devices
Before you install any devices or software that did not come with your
computer, read the documentation that came with the software or device or
contact the vendor to verify that the software or device is compatible with
your computer and operating system.
www.dell.com | support.dell.com
Congratulations! You have completed the setup for your
computer.
Your Dell Precision Workstation 650 User’s Guide contains additional
information about your computer such as:
• Technical specifications
• Front and back views of your computer, including all of the available
connectors
• Inside views of your computer, including a detailed graphic of the
system board and the connectors
• Instructions for cleaning your computer
• Information on software features, such as LegacySelect Technology
control, using a password, and system setup options
• A description of the Windows XP operating system
• Instructions for removing and installing parts, including memory,
cards, drives, the microprocessor, the VRM, and the battery
• Information for troubleshooting various computer problems
• Instructions for using the Dell Diagnostics and reinstalling drivers
• Information on how to contact Dell
You can access the User’s Guide from your hard drive, the Drivers and
Utilities CD, or the Dell Support website.
16 Setup and Quick Reference Guide
Page 17

To access the User’s Guide from your hard drive:
If you have Windows 2000, double-click the User’s Guides icon.
If you have Windows XP, click the Start button and click Help and
Support.
To access the User’s Guide from the CD:
1 Insert the Drivers and Utilities CD into the drive.
If you are using the Drivers and Utilities CD for the first time, the
ResourceCD Installation window opens to inform you that the CD is
about to begin installation.
2 Click OK to continue and then respond to the prompts offered by the
installation program.
3 Click Next at the Welcome Dell System Owner screen.
4 Select the appropriate System Model, Operating System, and Topic.
To access your User’s Guide from the Dell Support Site:
1 Go to support.dell.com.
2 Follow the prompts on the website that ask you for information
specific to your computer.
3 At the Dell Support website home page, click Reference, click User’s
Guides, click Systems, and then select your Dell Precision computer.
Setup and Quick Reference Guide 17
Page 18
www.dell.com | support.dell.com
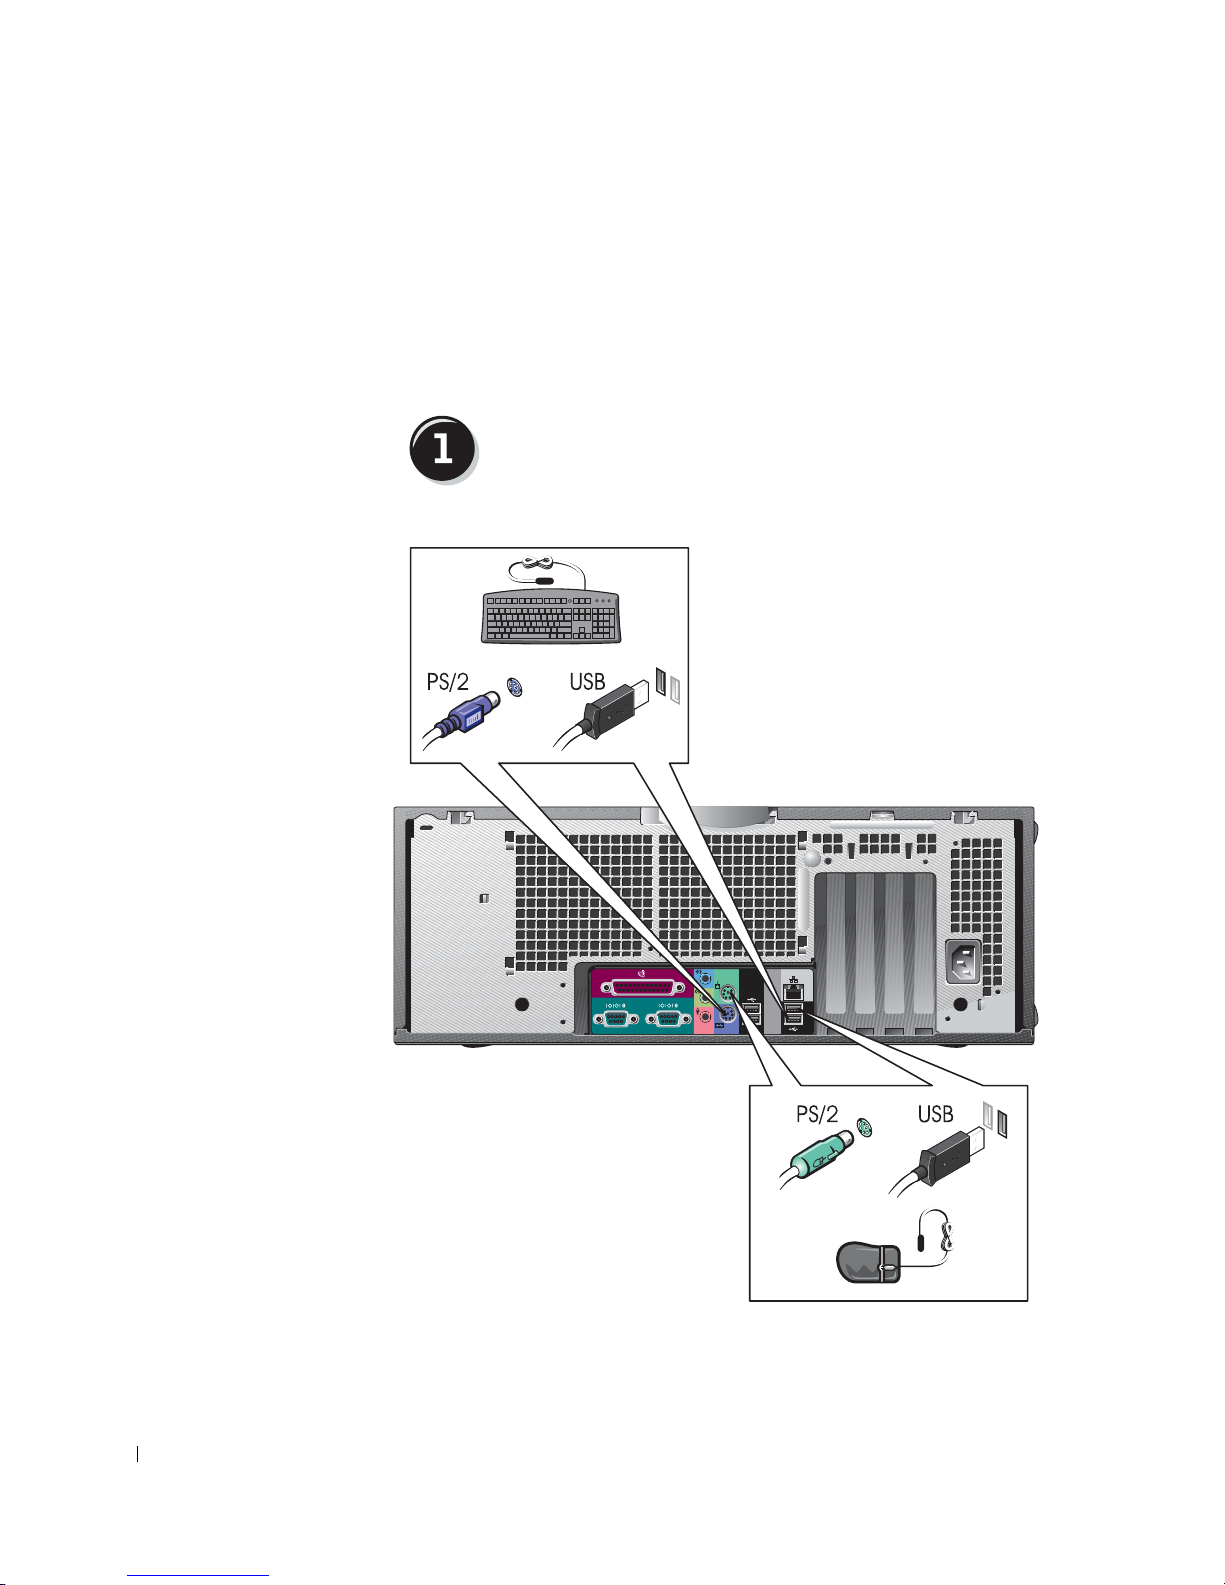
Setting Up Your Dell Precision 450
Computer
You must complete all steps to properly set up your computer.
Connect the keyboard and mouse
or
18 Setup and Quick Reference Guide
or
Page 19
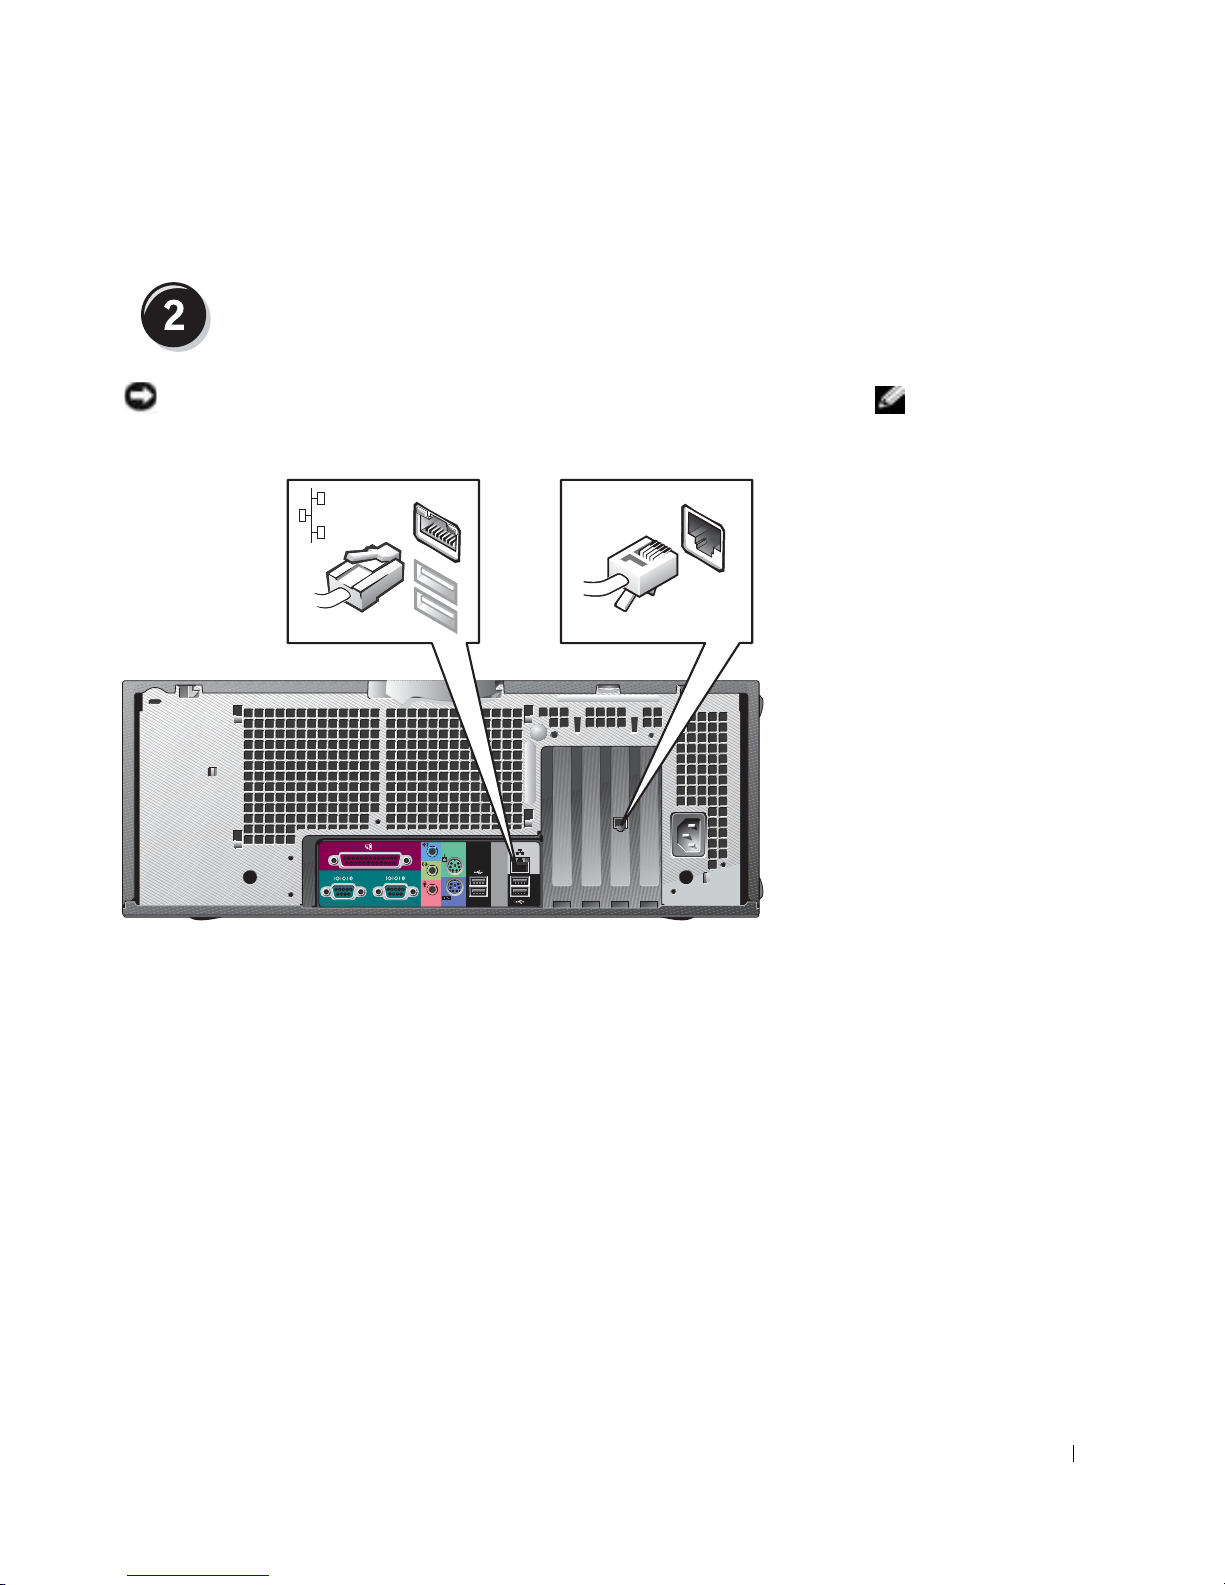
Connect the modem or network cable
NOTICE: Do not connect a modem cable to the network adapter. Voltage
from telephone communications cause damage the network adapter.
NOTE: If your computer
has a network card
installed, connect the
network cable to the card.
Setup and Quick Reference Guide 19
Page 20
www.dell.com | support.dell.com
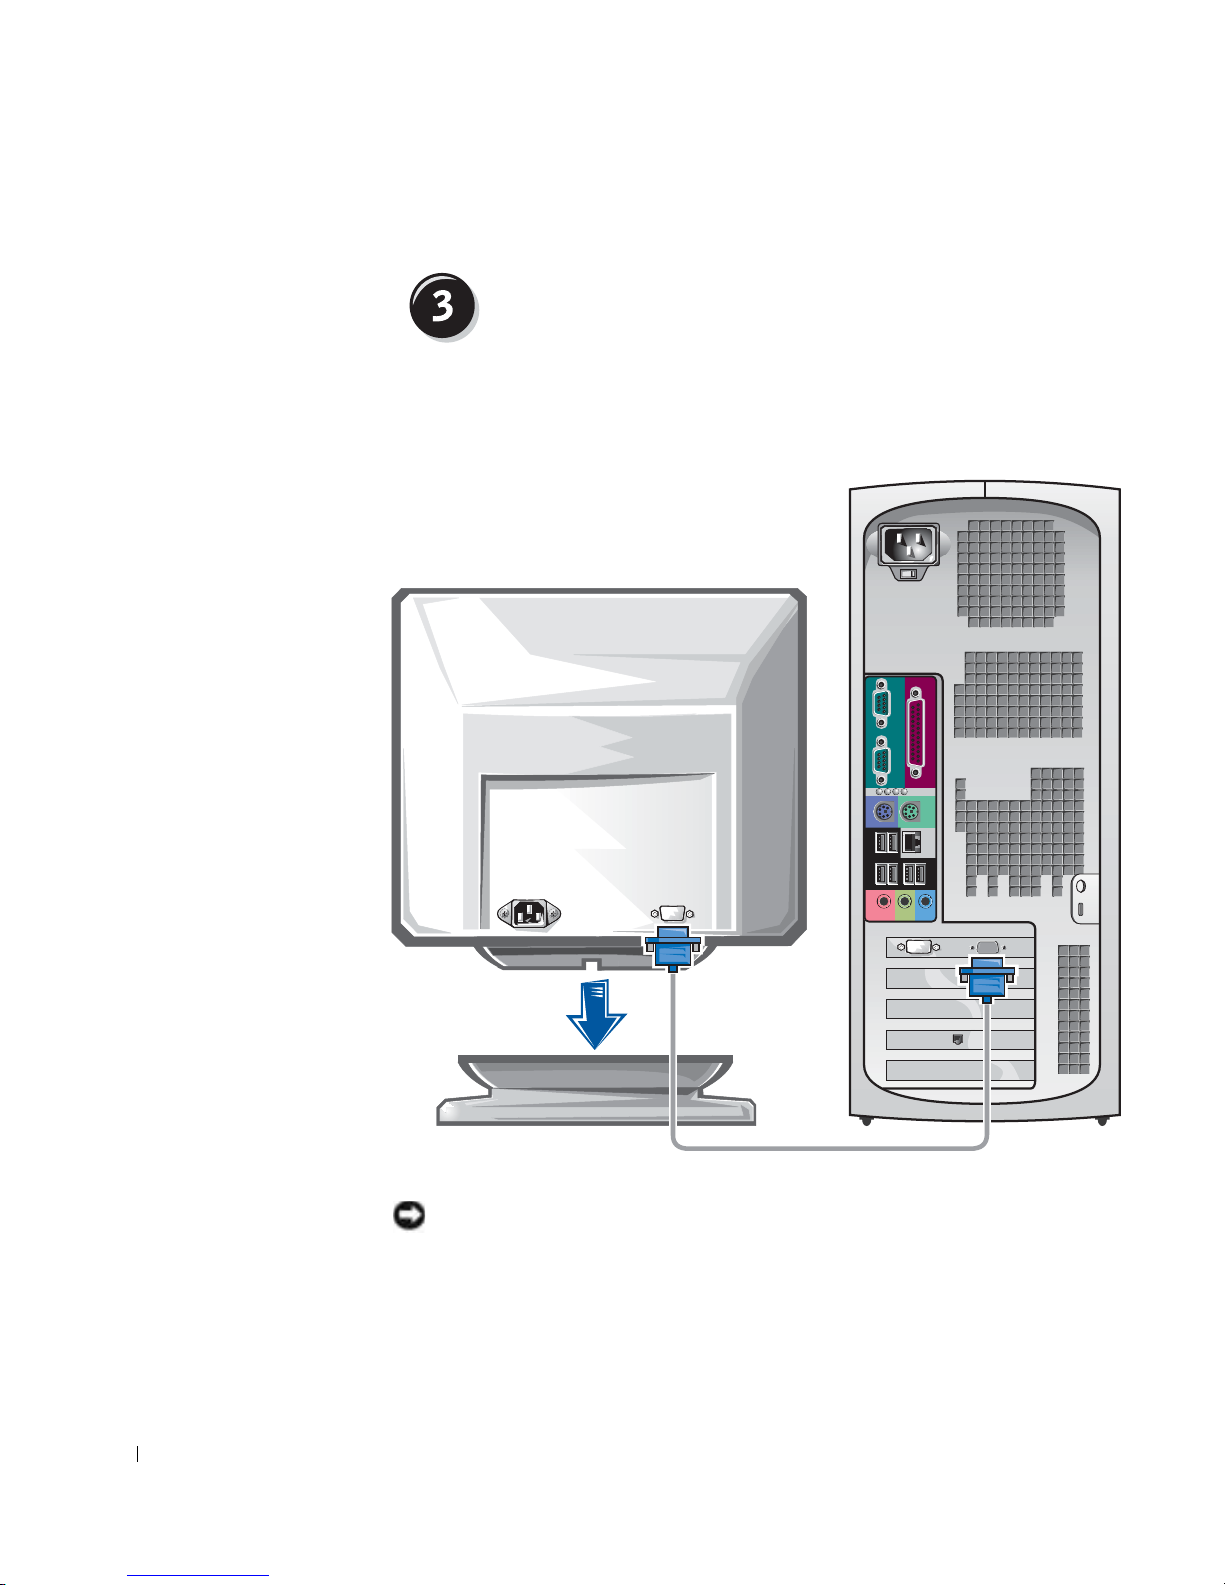
Connect the monitor
Depending on your graphics card, you can connect your monitor in various
ways.
A B C D
20 Setup and Quick Reference Guide
NOTICE: Your computer may require the use of the provided adapter or cable
to connect to your monitor.
Page 21

For single- and dual-monitor capable cards with a single connector
VGA Adapter
VGA
• Use the VGA adapter when you have a single
monitor graphics card and you want to connect to a
VGA monitor.
Dual VGA Y Cable Adapter
VGA
VGA
• Use the appropriate Y cable when your graphics card
has a single connector and you want to connect to
one or two VGA monitors.
Dual DVI Y Cable Adapter
DVI
DVI
• Use the appropriate Y cable when your graphics card
has a single connector and you want to connect to
one or two DVI monitors.
The dual-monitor cable is color coded; the blue connector is for the primary
monitor, and the black connector is for the secondary monitor. To enable
dual-monitor support, both monitors must be attached when the computer
starts.
Setup and Quick Reference Guide 21
Page 22
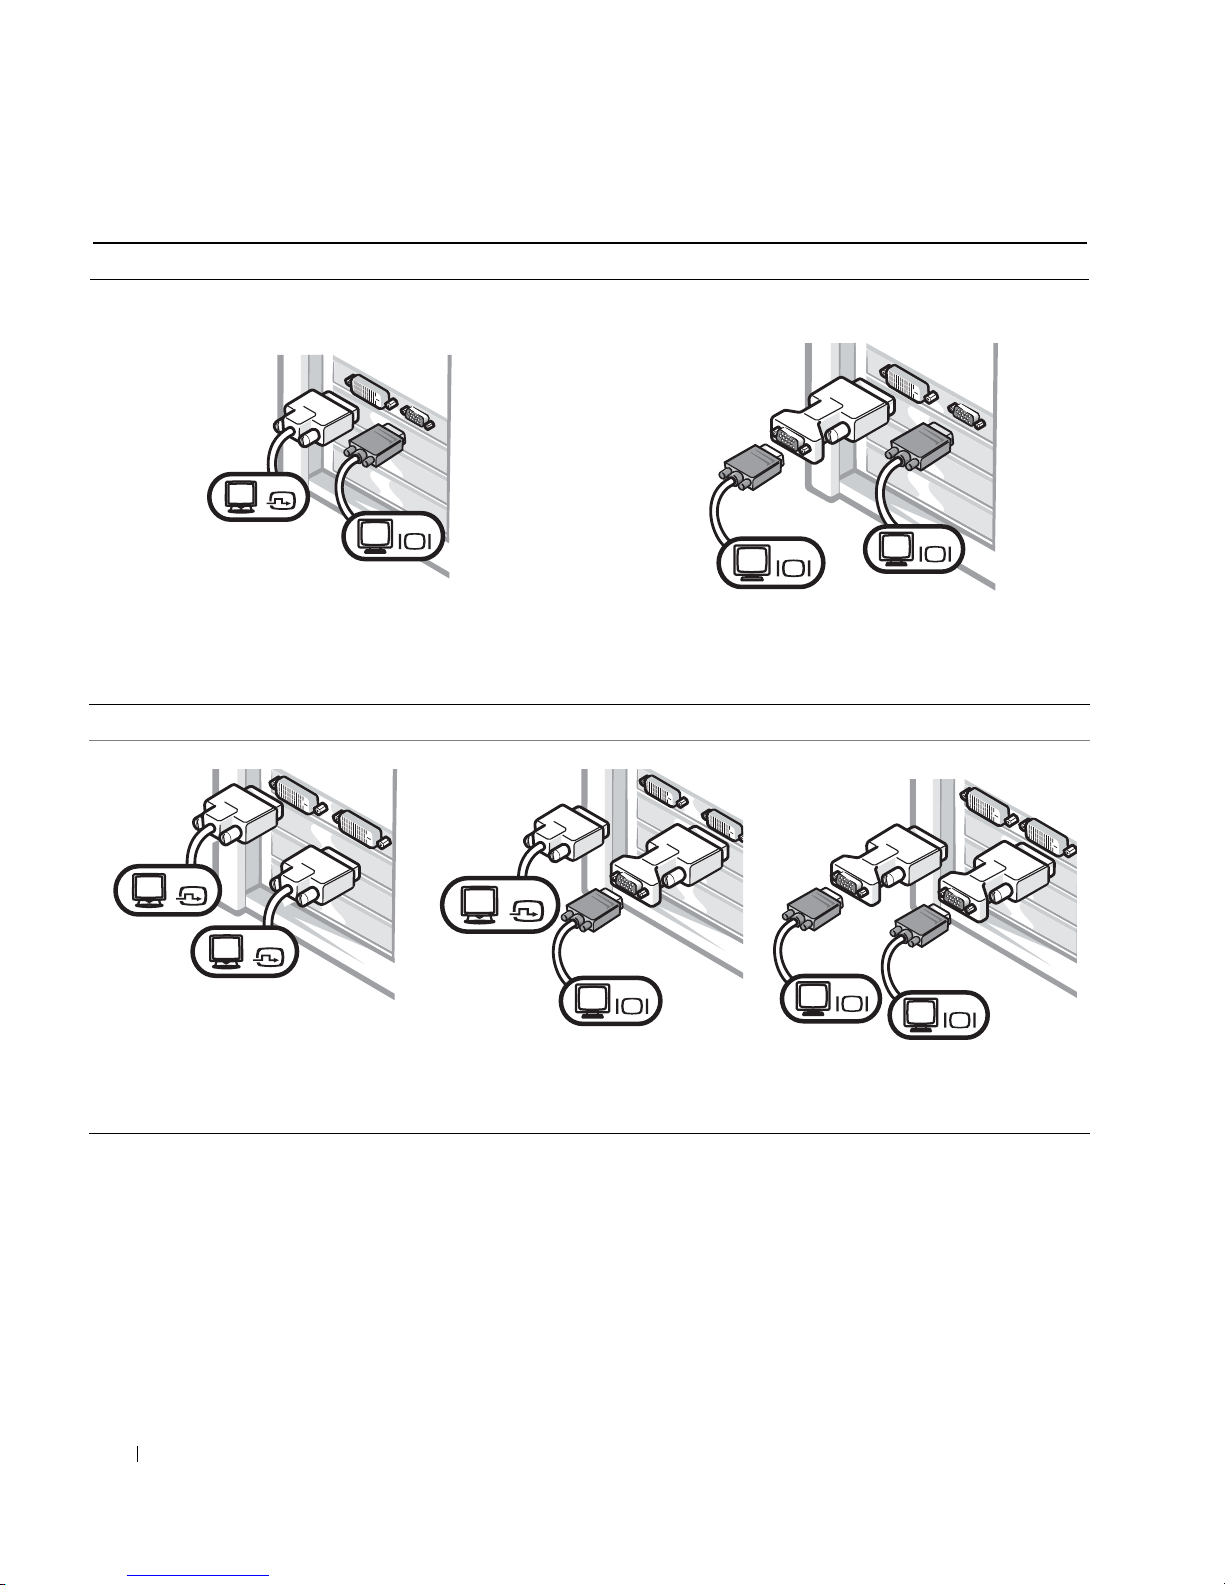
For dual-monitor capable cards with 1 DVI and 1 VGA connector
Single DVI/Single VGA
DVI
VGA
www.dell.com | support.dell.com
• Use the appropriate connector when you connect to
one or two monitors.
For dual-monitor capable cards with 2 DVI connectors
Dual DVI
Dual DVI With One VGA Adapter
Dual VGA With VGA Adapter
VGA
VGA
• Use the VGA adapter when you want to connect to
two VGA monitors.
Dual DVI With Two VGA Adapters
DVI
DVI
• Use the DVI connectors to
connect to one or two DVI
monitors.
• Use the VGA adapter to connect
a VGA monitor to one DVI
connector.
22 Setup and Quick Reference Guide
DVI
VGA
VGA
VGA
• Use two VGA adapters to
connect two VGA monitors to
the DVI connectors.
Page 23
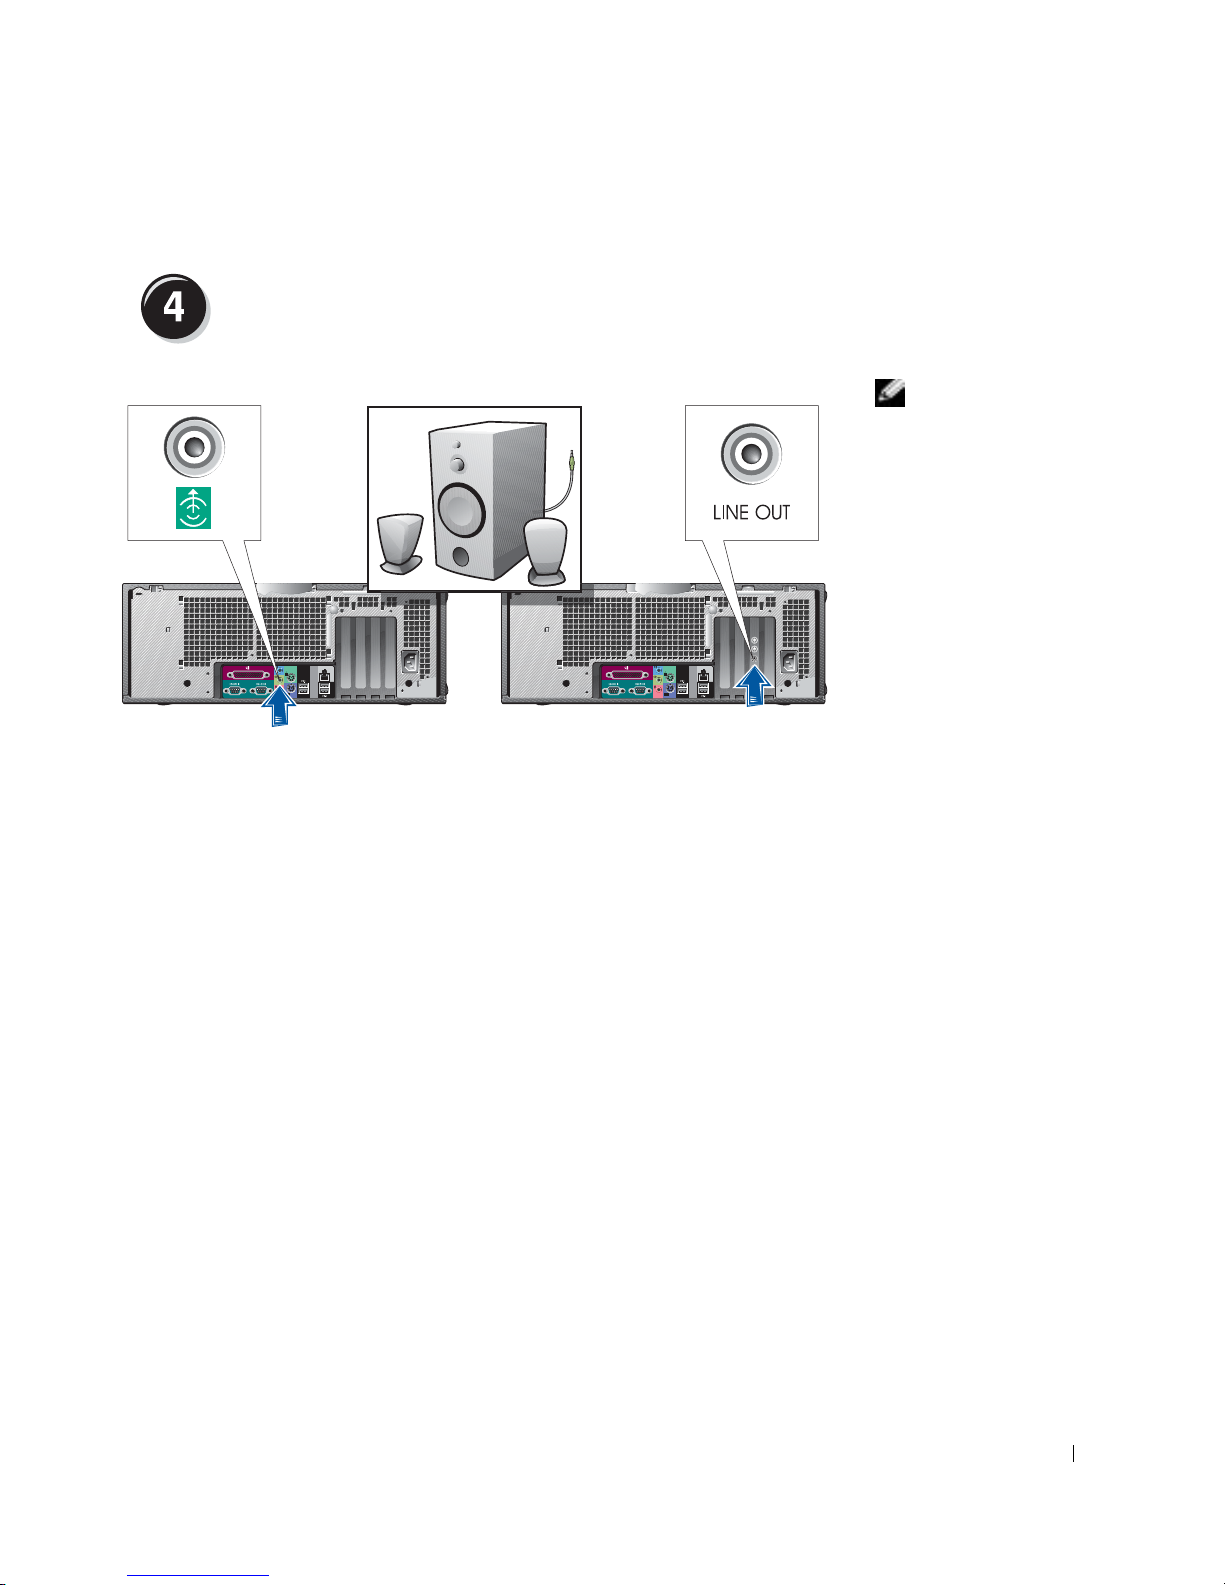
Connect the speakers
NOTE: If your computer
has an audio card
installed, connect the
speakers to the card.
Setup and Quick Reference Guide 23
Page 24
www.dell.com | support.dell.com
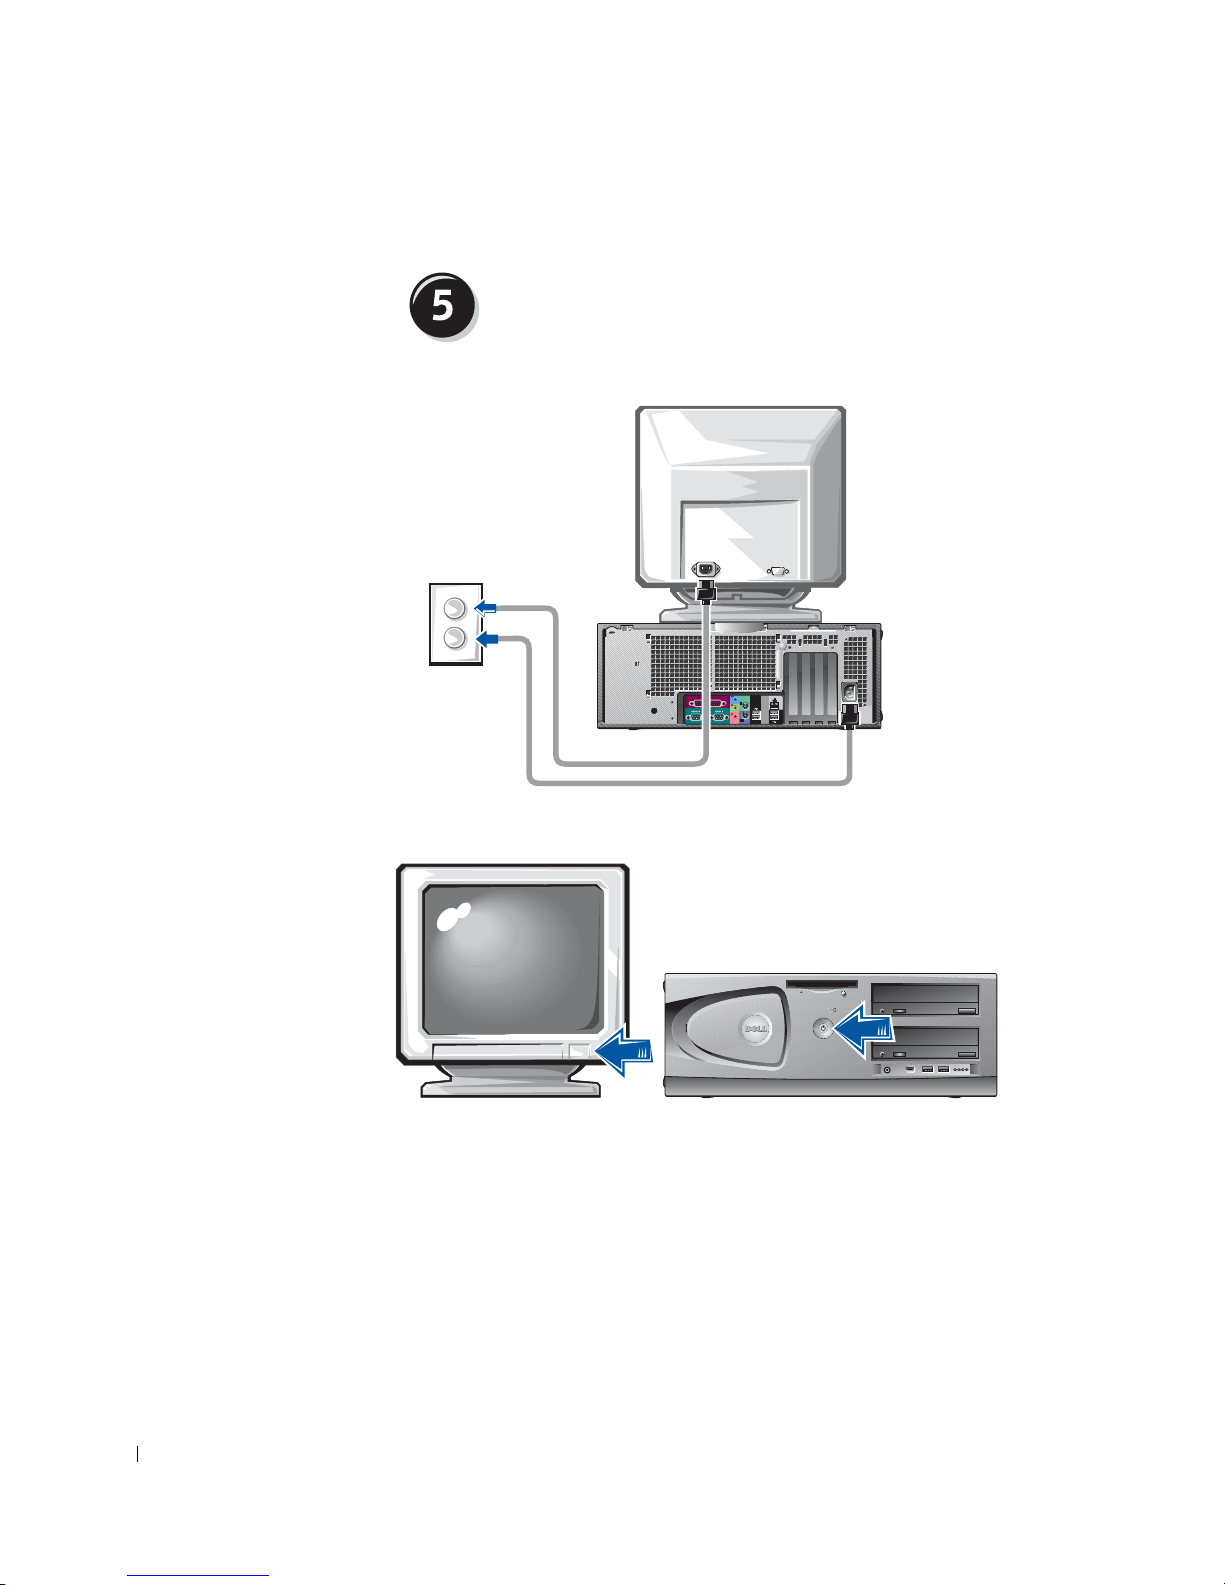
Connect the power cables and turn on the
computer and monitor
24 Setup and Quick Reference Guide
Page 25

Install Additional Software or Devices
Before you install any devices or software that did not come with your
computer, read the documentation that came with the software or device or
contact the vendor to verify that the software or device is compatible with
your computer and operating system.
Congratulations! You have completed the setup for your
computer.
Yo u r Dell Precision Workstation 450 User’s Guide contains additional
information about your computer such as:
• Technical specifications
• Front and back views of your computer, including all of the available
connectors
• Inside views of your computer, including a detailed graphic of the
system board and the connectors
• Instructions for cleaning your computer
• Information on software features, such as LegacySelect Technology
control, using a password, and system setup options
• A description of the Windows XP operating system
• Instructions for removing and installing parts, including memory,
cards, drives, the microprocessor, the VRM, and the battery
• Information for troubleshooting various computer problems
• Instructions for using the Dell Diagnostics and reinstalling drivers
• Information on how to contact Dell
You can access the User’s Guide from your hard drive, the Drivers and
Utilities CD, or the Dell Support website.
Setup and Quick Reference Guide 25
Page 26

To access the User’s Guide from your hard drive:
If you have Windows 2000, double-click the User’s Guides icon.
If you have Windows XP, click the Start button and click Help and
Support.
To access the User’s Guide from the CD:
1 Insert the Drivers and Utilities CD into the drive.
If you are using the Drivers and Utilities CD for the first time, the
ResourceCD Installation window opens to inform you that the CD is
about to begin installation.
www.dell.com | support.dell.com
2 Click OK to continue and then respond to the prompts offered by the
installation program.
3 Click Next at the Welcome Dell System Owner screen.
4 Select the appropriate System Model, Operating System, and Topic.
To access your User’s Guide from the Dell Support Site:
1 Go to support.dell.com.
2 Follow the prompts on the website that ask you for information
specific to your computer.
3 At the Dell Support website home page, click Reference, click User’s
Guides, click Systems, and then select your Dell Precision computer.
Caring for Your Computer
To help maintain your computer, follow these suggestions:
• To avoid losing or corrupting data, never turn off your computer when
the hard drive light is on.
• Schedule regular virus scans using virus software.
• Manage hard drive space by periodically deleting unnecessary files and
• Back up files on a regular basis.
• Periodically clean your monitor screen, mouse, and keyboard (see your
26 Setup and Quick Reference Guide
defragmenting the drive.
User’s Guide for more information).
Page 27

Solving Problems
Follow these tips when troubleshooting your computer:
• If you added or removed a computer part before the problem started,
review the installation procedures and ensure that the part is correctly
installed.
• If a peripheral device does not work, ensure that the device is properly
connected.
• If an error message appears on the screen, write down the exact
message. This message may help technical support diagnose and fix
the problem(s).
• If an error message occurs in a program, consult the program’s
documentation.
• If the recommended action in the troubleshooting section is to see a
section in your User’s Guide, you can use your Drivers and Utilities CD
or go to support.dell.com (on another computer if necessary) to access
your User’s Guide.
Resolving Software and Hardware Incompatibilities
Windows XP
Windows XP IRQ conflicts occur if a device either is not detected during
the operating system setup or is detected but incorrectly configured.
To check for conflicts on a computer running Windows XP:
1 Click the Start button and click Control Panel.
2 Click Performance and Maintenance and click System.
3 Click the Hardware tab and click Device Manager.
4 In the Device Manager list, check for conflicts with the other devices.
Conflicts are indicated by a yellow exclamation point (
conflicting device or a red
5 Double-click any conflict to display the Properties window.
X if the device has been disabled.
!) beside the
If an IRQ conflict exists, the Device status area in the Properties
window reports the cards or devices that share the device's IRQ.
Setup and Quick Reference Guide 27
Page 28

www.dell.com | support.dell.com
Resolve conflicts by reconfiguring the devices or removing the devices from
the Device Manager.
To use the Windows XP Hardware Troubleshooter:
1 Click the Start button and click Help and Support.
2 Type hardware troubleshooter in the Search field, and click the
arrow to start the search.
3 Click Hardware Troubleshooter in the Search Results list.
4 In the Hardware Troubleshooter list, click I need to resolve a hardware
conflict on my computer, and then click Next.
Windows 2000
To check for conflicts on a computer running Windows 2000:
1 Click the Start button, point to Settings, and then click Control
Panel.
2 In the Control Panel window, double-click System.
3 Click the Hardware tab.
4 Click Device Manager.
5 Click View and click Resources by connection.
6 Double-click Interrupt request (IRQ) to view the IRQ assignments.
Conflicts are indicated by a yellow exclamation point (
conflicting device or a red
7 Double-click any conflict to display the Properties window.
X if the device has been disabled.
!) beside the
If an IRQ conflict exists, the Device status area in the Properties
window reports the cards or devices that share the device's IRQ.
8 Resolve conflicts by reconfiguring the devices or removing the devices
from the Device Manager.
28 Setup and Quick Reference Guide
Page 29

To use the Windows 2000 Hardware Troubleshooter:
1 Click the Start button and click Help.
2 Click Troubleshooting and Maintenance on the Contents tab, click
Windows 2000 troubleshooters, and then click Hardware.
3 In the Hardware Troubleshooter list, click I need to resolve a hardware
conflict on my computer, and then click Next.
Using System Restore in Windows XP
The Windows XP operating system provides System Restore to allow you to
return your computer to an earlier operating state (without affecting data
files) if changes to the hardware, software, or other system settings have left
the computer in an undesirable operating state. See "Windows XP Help and
Support Center" on page 8 for additional information on using System
Restore.
NOTICE: Back up your data files regularly. System Restore does not monitor
your data files or recover them.
Creating a Restore Point
1 Click the Start button and click Help and Support.
2 Click System Restore.
3 Follow the instructions on the screen.
Restoring the Computer to an Earlier Operating State
NOTICE: Before you restore the computer to an earlier operating state, save
and close all open files and close all open programs. Do not alter, open, or
delete any files or programs until the system restoration is complete.
Click the Start button, point to All Programs→ Accessories→ System
1
To ol s, and then click System Restore.
2 Ensure that Restore my computer to an earlier time is selected, and
click Next.
3 Click a calendar date to which you want to restore your computer.
The Select a Restore Point screen provides a calendar that allows you
to see and select restore points. All calendar dates with available
restore points appear in bold.
Setup and Quick Reference Guide 29
Page 30

www.dell.com | support.dell.com
4 Select a restore point and click Next.
If a calendar date has only one restore point, then that restore point is
automatically selected. If two or more restore points are available, click
the restore point that you prefer.
5 Click Next.
The Restoration Complete screen appears after System Restore
finishes collecting data, and then the computer automatically restarts.
6 After the computer restarts, click OK.
To change the restore point, you can either repeat the steps using a
different restore point, or you can undo the restoration.
Using Last Known Good Configuration
1 Restart your computer and press <F8> when the message Please
select the operating system to start
2 Highlight Last Known Good Setting, press <Enter>, press <l>, and
then select your operating system when prompted.
Other Options to Help Resolve Additional Device or Software Conflicts
appears.
NOTICE: The following processes erase all of the information on your hard
drive.
• Reinstall your operating system using the operating system installation
guide and operating system CD.
During the operating system reinstallation, you can select to delete the
existing partitions and reformat your hard drive.
• Reinstall all drivers, beginning with the choppiest, using the Drivers
and Utilities CD.
When to Use the Dell Diagnostics
If you experience a problem with your computer, perform the checks in
"Solving Problems" in your User’s Guide and run the Dell Diagnostics before
you contact Dell for technical assistance. Running the Dell Diagnostics may
help you resolve the problem without contacting Dell. If you do contact
Dell, the test results can provide important information for Dell's service
and support personnel.
30 Setup and Quick Reference Guide
Page 31

The Dell Diagnostics allows you to:
• Perform express, extended, or custom tests on one or all devices
• Select tests based on a symptom of the problem you are having
• Choose how many times a test is run
• Display test results
• Suspend testing if an error is detected
• Access online help information that describes the tests and devices
• Receive status messages that tell you whether tests completed
successfully
• Receive error messages if problems are detected
Starting the Dell Diagnostics
It is recommended that you print these procedures before you begin.
NOTICE: Only use the Dell Diagnostics to test your Dell™ computer. Using
this program with other computers can result in error messages.
Enter system setup, review your computer’s configuration information, and
ensure that the device you want to test displays in system setup and is
active.
Start the Dell Diagnostics from either your hard drive or from the Drivers
and Utilities CD (also known as the ResourceCD).
Starting the Dell Diagnostics From Your Hard Drive
1 Shut down and restart the computer.
2 When the DELL
®
logo appears, press <F12> immediately.
If you wait too long and the Windows logo appears, continue to wait
until you see the Windows desktop. Then shut down your computer
through the Start menu and try again.
3 When the boot device list appears, highlight Boot to Utility Partition
and press <Enter>.
4 When the Dell Diagnostics Main Menu appears, select the test you
want to run.
Setup and Quick Reference Guide 31
NOTE: If you receive a
message stating that no
Diagnostics utility
partition has been found,
follow the instructions to
run the Dell Diagnostics
from your Drivers and
Utilities CD.
Page 32

Starting the Dell Diagnostics From the Drivers and Utilities CD
1 Insert the Drivers and Utilities CD into the CD drive.
2 Shut down and restart the computer.
When the DELL logo appears, press <F12> immediately.
If you wait too long and the Windows logo appears, continue to wait
until you see the Windows desktop. Then shut down your computer
through the Start menu and try again.
NOTE: This feature
changes the boot sequence
for one time only. On the
www.dell.com | support.dell.com
next start-up, the
computer boots according
to the devices specified in
system setup.
NOTE: The Service Tag
for your computer is
located at the top of each
test screen
3 When the boot device list appears, highlight IDE CD-ROM Device
and press <Enter>.
4 Select the IDE CD-ROM Device option from the CD boot menu.
5 Select the Boot from CD-ROM option from the menu that appears.
6 Type 1 to start the ResourceCD menu.
7 Type 2 to start the Dell Diagnostics.
8 Select Run the 32 Bit Dell Diagnostics from the numbered list. If
multiple versions are listed, select the version appropriate for your
platform.
9 When the Dell Diagnostics Main Menu appears, select the test you
want to run.
Dell Diagnostics Main Menu
1 After the Dell Diagnostics loads and the Main Menu screen appears,
click the button for the option you want.
Option Function
Express
Te st
Performs a quick test of devices. This test typically takes 10
to 20 minutes and requires no interaction on your part.
Run Express Test first to increase the possibility of tracing
the problem quickly.
32 Setup and Quick Reference Guide
Extended
Te st
Custom
Te st
Symptom
Tr ee
Performs a thorough check of devices. This test typically
takes an hour or more and requires you to answer questions
periodically.
Tests a specific device. You can customize the tests you
want to run.
Lists the most common symptoms encountered and allows
you to select a test based on the symptom of the problem
you are having.
Page 33

2 If a problem is encountered during a test, a message displaying the
error code and a description of the problem appear. Write down the
error code and problem description and follow the instructions on the
screen.
If you cannot resolve the error condition, contact Dell.
3 If you run a test from the Custom Test or Symptom Tree option, click
the applicable tab described in the following table for more
information.
Tab Function
Results Displays the results of the test and any error conditions
encountered.
Errors Displays error conditions encountered, error codes, and
problem description.
Help Describes the test and may indicate requirements for
running the test.
Configuration Displays your hardware configuration for the selected
device.
The Dell Diagnostics obtains your configuration
information for all devices from system setup, memory,
and various internal tests and displays it in the device
list in the left pane of the screen. The device list may
not display the names of all the components installed on
your computer or all devices attached to your computer.
Parameters Allows you to customize the test by changing the test
settings.
4 When the tests are completed, if you are running the Dell Diagnostics
from the Drivers and Utilities CD, remove the CD.
5 Close the test screen to return to the Main Menu screen. To exit the
Dell Diagnostics and restart the computer, close the Main Menu
screen.
Setup and Quick Reference Guide 33
Page 34

System Lights
The lights on the front of the computer can indicate a computer problem.
Power Light Hard-Drive
Light
Solid green N/A Power is on, and the computer is
Blinking green Blank The computer is in the suspended
www.dell.com | support.dell.com
Blinks green
several times and
then turns off
Solid yellow N/A The Dell Diagnostics is running a
N/A A configuration error exists. Check the diagnostic lights to see if
Cause Corrective Action
operating normally.
state (Windows 2000 and
Windows XP).
test, or a device on the system board
may be faulty or incorrectly
installed.
No corrective action is required.
Press the power button, move the
mouse, or press a key on the
keyboard to wake the computer. See
"Power Management" in the User’s
Guide for more information.
the specific problem is identified.
See the User’s Guide for more
information.
If the Dell Diagnostics is running,
allow the testing to complete.
Check the diagnostic lights to see if
the specific problem is identified.
Also, see "System Board Problems"
in the User’s Guide.
If the computer does not boot,
contact Dell for technical
assistance.
Blinking yellow Blank A power supply or system board
failure has occurred.
Blinking yellow Solid green A system board or VRM failure has
occurred.
Solid green and a
beep code during
POST
34 Setup and Quick Reference Guide
N/A A problem was detected while the
BIOS was executing.
Check the diagnostic lights to see if
the specific problem is identified.
See "Power Problems" and "System
Board Problems" in the User’s
Guide.
Check the diagnostic lights to see if
the specific problem is identified.
Also, see "System Board Problems"
in the User’s Guide.
See "Beep Codes" on page 35 for
instructions on diagnosing the beep
code. Also, check the diagnostic
lights to see if the specific problem
is identified.
Page 35
Power Light Hard-Drive
Light
Cause Corrective Action
Solid green power
light and no beep
code and no video
during POST
Solid green power
light and no beep
code, but the
computer locks
up during POST
N/A The monitor or the graphics card
may be faulty or incorrectly
installed.
N/A An integrated system board device
may be faulty.
Beep Codes
Your computer might emit a series of beeps that identify a problem. One
possible series (code 1-3-1) consists of one beep, a burst of three beeps, and
then one beep. This series tell you that the computer encountered a
memory problem.
If a beep code is emitted, write it down and look it up under "Beep Codes"
in the User’s Guide.
Error Messages
Check the diagnostic lights to see if
the specific problem is identified.
Also, see "Video Problems" in the
User’s Guide.
Check the diagnostic lights to see if
the specific problem is identified. If
the problem is not identified,
contact Dell for technical
assistance.
If an error occurs during start-up, a message may be displayed on the
monitor identifying the problem. See "Error Messages" in the User’s Guide
for suggestions on resolving any problems.
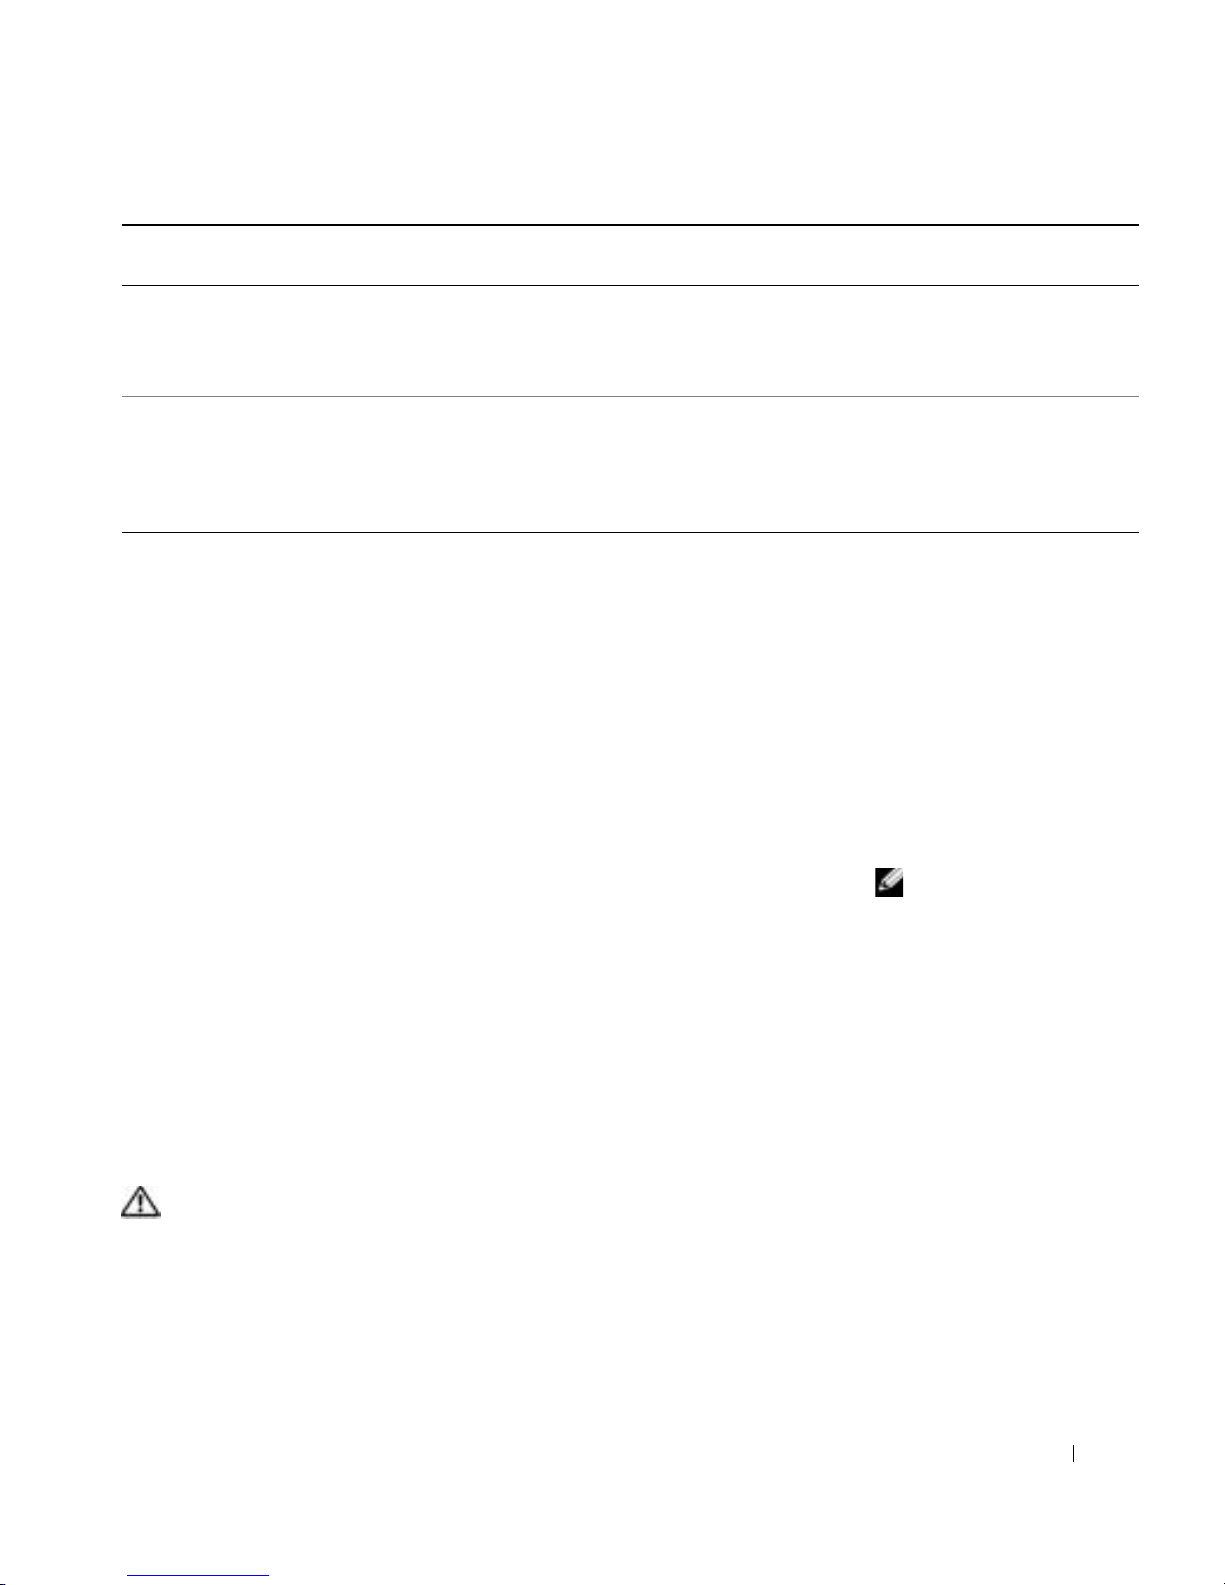
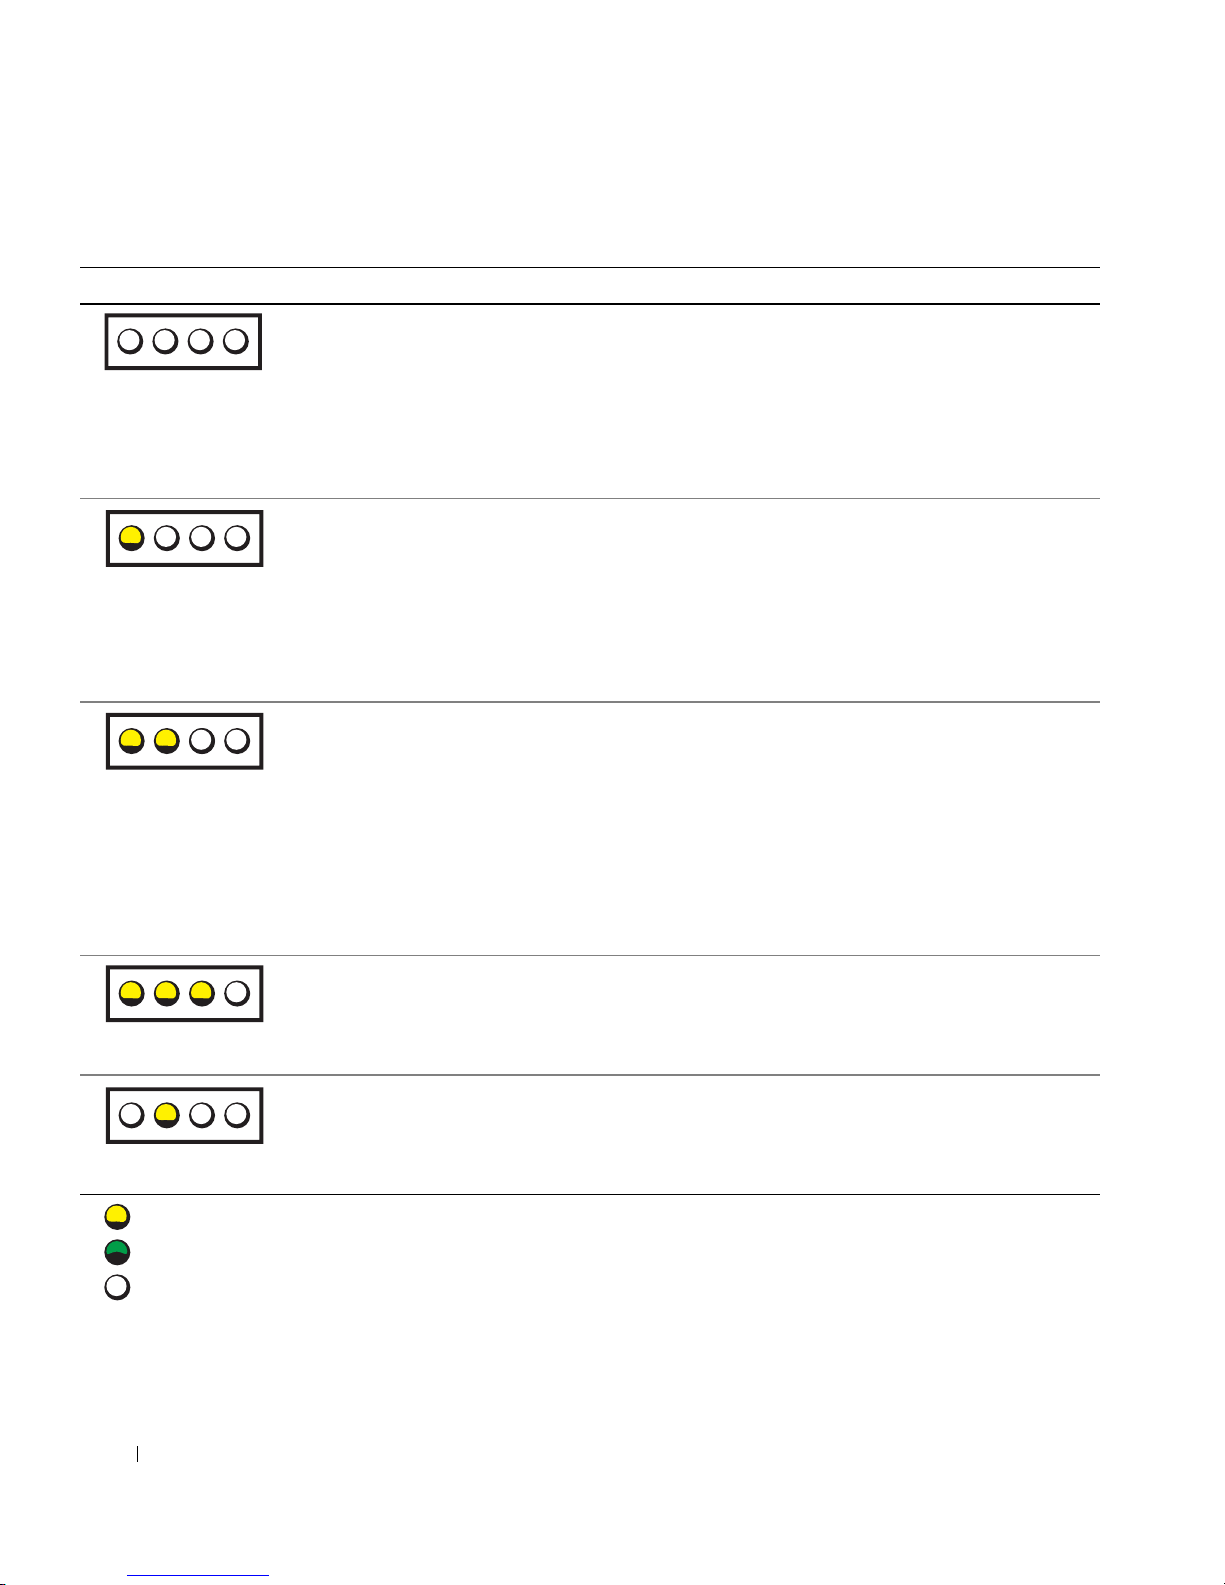
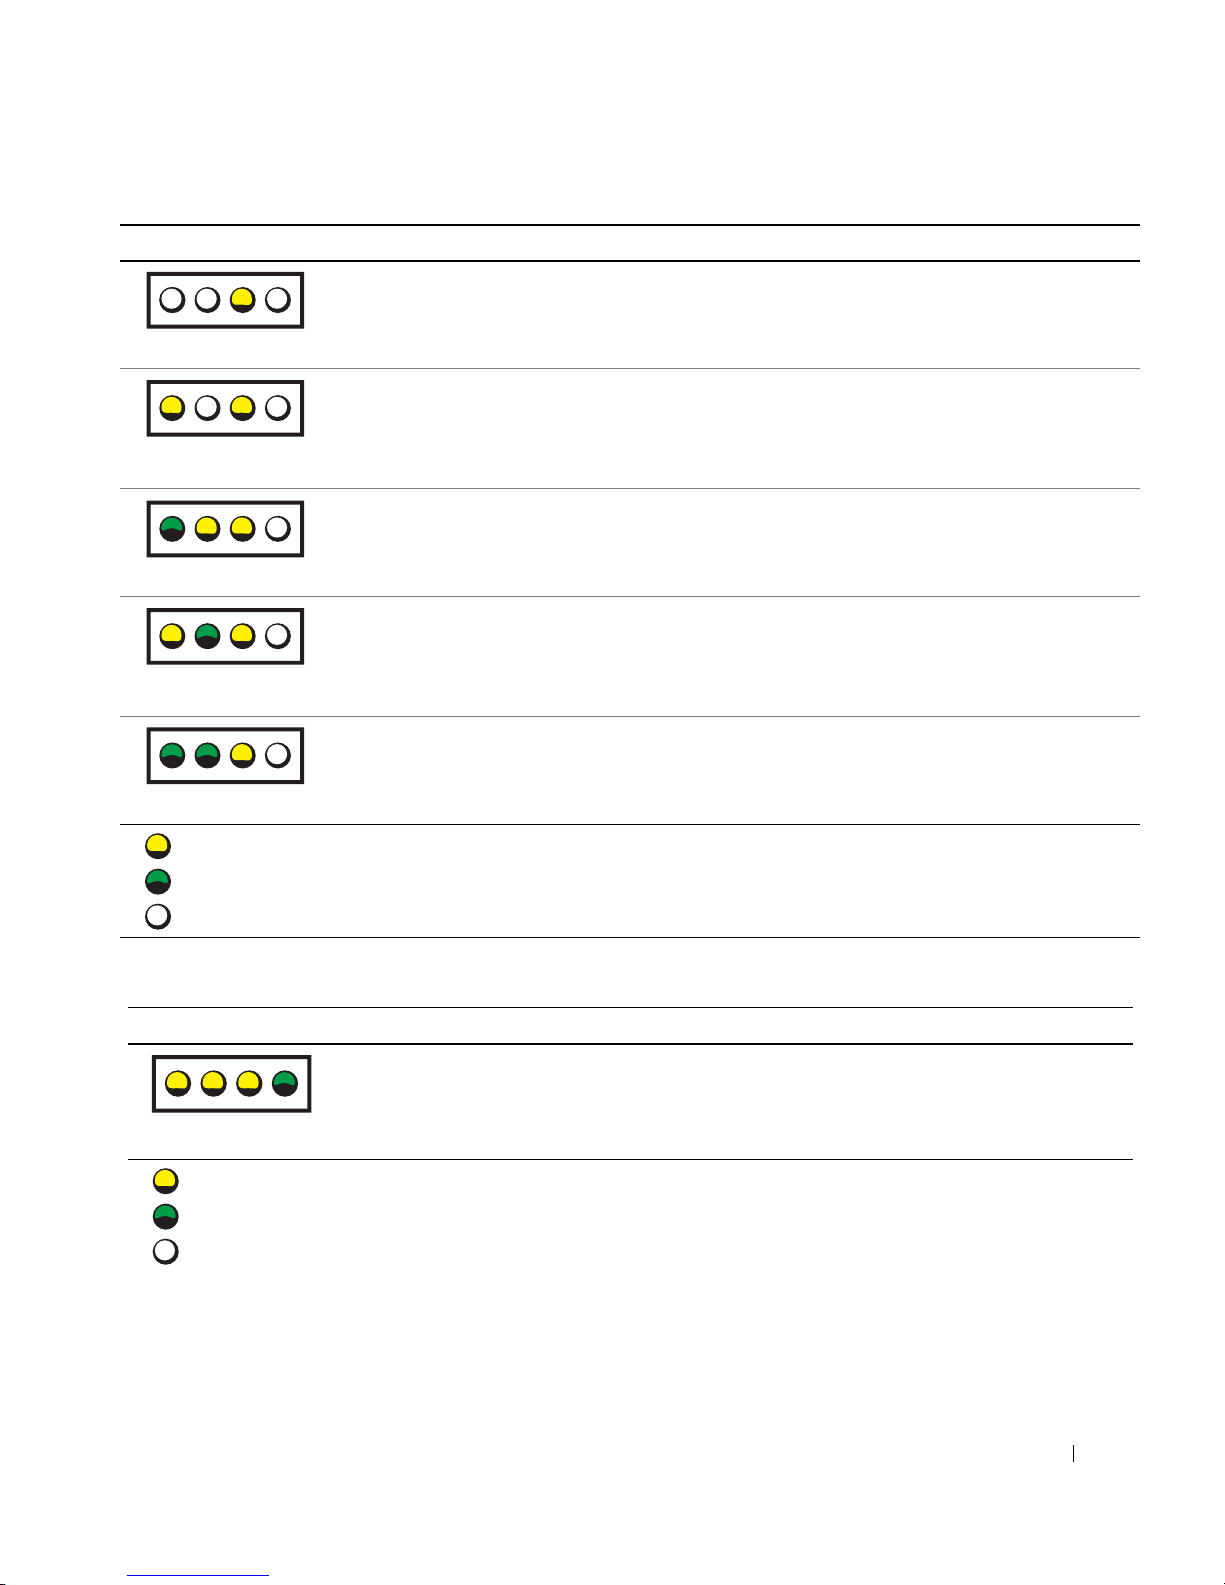
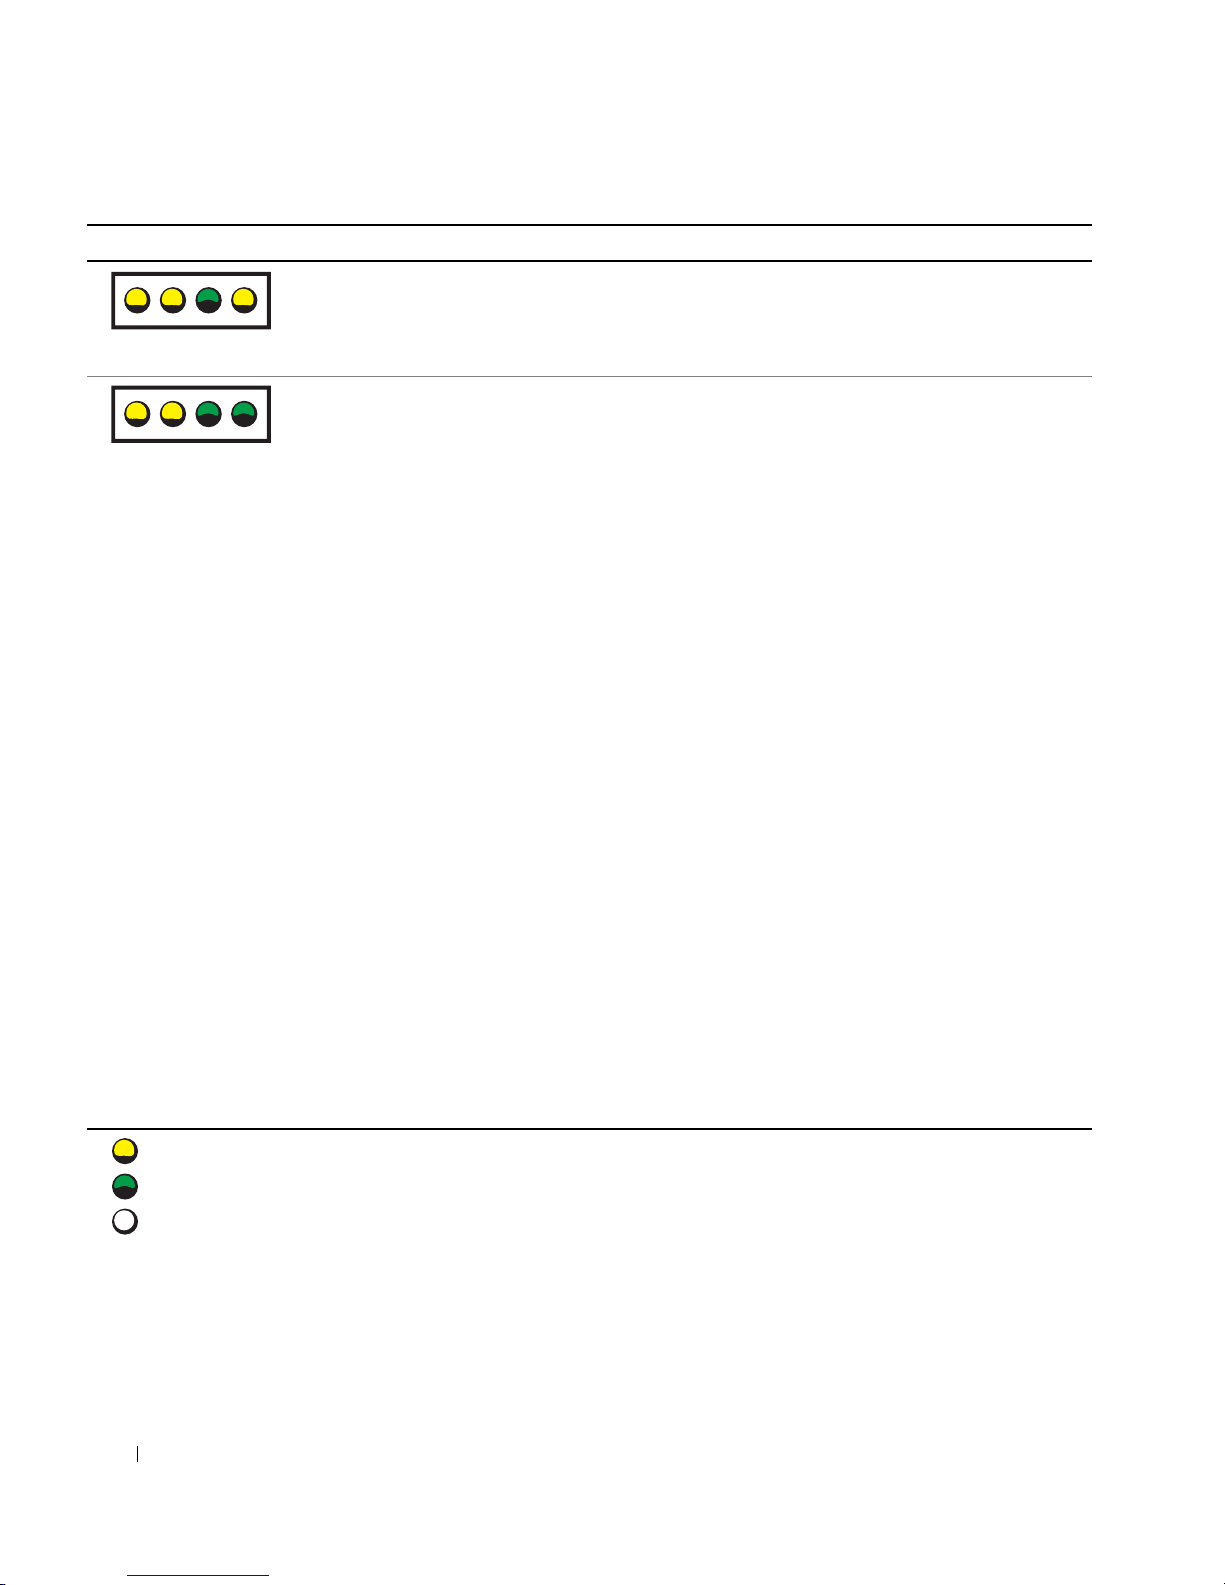
Diagnostic Lights
To help you troubleshoot a problem, your computer is equipped with four
lights on the front panel labeled "A," "B," "C," and "D." The lights can be
yellow or green. When the computer starts normally, the lights flash. After
the computer starts, the lights remain green. If the computer malfunctions,
the color and sequence of the lights identify the problem.
CAUTION: Before you begin any of the procedures in this section,
follow the safety instructions in the System Information Guide.
Setup and Quick Reference Guide 35
NOTE: If the message is
not listed, see the
documentation for either
the operating system or
the program that was
running when the message
appeared.
Page 36
Diagnostic Light Codes Before POST
Light Pattern Problem Description Suggested Resolution
No electrical power is supplied to
the computer.
A B C D
The computer is in a normal off
condition; the computer is
www.dell.com | support.dell.com
connected to its electrical outlet.
A B C D
The computer is in a reduced
power or "sleep" state.
A B C D
Connect the computer to its electrical outlet. Ensure
that the front-panel power light is on. If the power light
is off, ensure that the computer is connected to a
working electrical outlet, and then press the power
button.
If the problem is still not resolved, contact Dell for
technical assistance.
Press the power button to turn the computer on.
If the computer does not turn on, ensure that the frontpanel power light is on. If the power light is off, ensure
that the computer is connected to a working electrical
outlet, and then press the power button.
If the problem is still not resolved, contact Dell for
technical assistance.
Use one of the appropriate methods to "wake up" the
computer. See "Advanced Features" in your User’s
Guide.
If the problem is not resolved and you are trying to wake
the computer with a USB mouse or keyboard, substitute
the mouse or keyboard with a working PS/2 mouse or
keyboard and try to wake the computer.
If the problem is still not resolved, contact Dell for
technical assistance.
The BIOS is not executing. Ensure that the microprocessor is seated correctly and
A B C D
A possible power supply or power
cable failure has occurred.
A B C D
= yellow
= green
= off
36 Setup and Quick Reference Guide
restart the computer.
If the problem is still not resolved, contact Dell for
technical assistance.
Perform the procedure in "Power Problems" in the
User’s Guide.
If the problem is still not resolved, contact Dell for
technical assistance.
Page 37
Light Pattern Problem Description Suggested Resolution
A B C D
A B C D
A B C D
A B C D
A B C D
= yellow
A possible system board failure has
occurred.
A microprocessor and/or VRM
mismatch exists.
A possible VRM 0 failure has
occurred.
A possible VRM 1 failure has
occurred.
A possible VRM 0 and VRM 1
failure has occurred.
Contact Dell for technical assistance.
Perform the procedure in "Microprocessor Problems" in
your User’s Guide.
If the problem is still not resolved, contact Dell for
technical assistance.
Contact Dell for technical assistance.
Perform the procedure in "Microprocessor Problems" in
your User’s Guide.
If the problem is still not resolved, contact Dell for
technical assistance.
Contact Dell for technical assistance.
= green
= off
Diagnostic Light Codes During POST
Light Pattern Problem Description Suggestion Resolution
A possible BIOS failure has
occurred; the computer is
in the recovery mode.
Run the BIOS Recovery utility, wait for recovery
completion, and then restart the computer.
A B C D
= yellow
= green
= off
Setup and Quick Reference Guide 37
Page 38
Light Pattern Problem Description Suggestion Resolution
A B C D
A B C D
www.dell.com | support.dell.com
A possible microprocessor
failure has occurred.
Memory modules are
detected, but a memory
failure has occurred.
Reinstall the microprocessor and restart the computer.
1 Reset the memory modules to ensure that your
computer is successfully communicating with the
memory.
2 Restart the computer.
3 If the problem still exists, remove all the memory
modules and install one memory module in
memory module connector 4.
4 Restart the computer.
The following message appears: Alert!
Operating in Debug Mode. Please
Populate Memory in Pairs for Normal
Operation.
5 Press <F1> to boot to the operating system.
6 Run the System Memory test group in the Dell
Diagnostics.
7 If the memory module passes, shut down the
computer, remove the memory module, and repeat
the process with the remaining memory modules
until a memory error occurs during start-up or
diagnostic testing.
If the first memory module tested is defective,
repeat the process with the remaining modules to
ensure that the remaining modules are not
defective.
8 When the defective memory module is identified,
contact Dell for a replacement.
NOTE: If necessary, the computer can operate in
debug mode until new memory modules are installed.
= yellow
= green
= off
38 Setup and Quick Reference Guide
Page 39
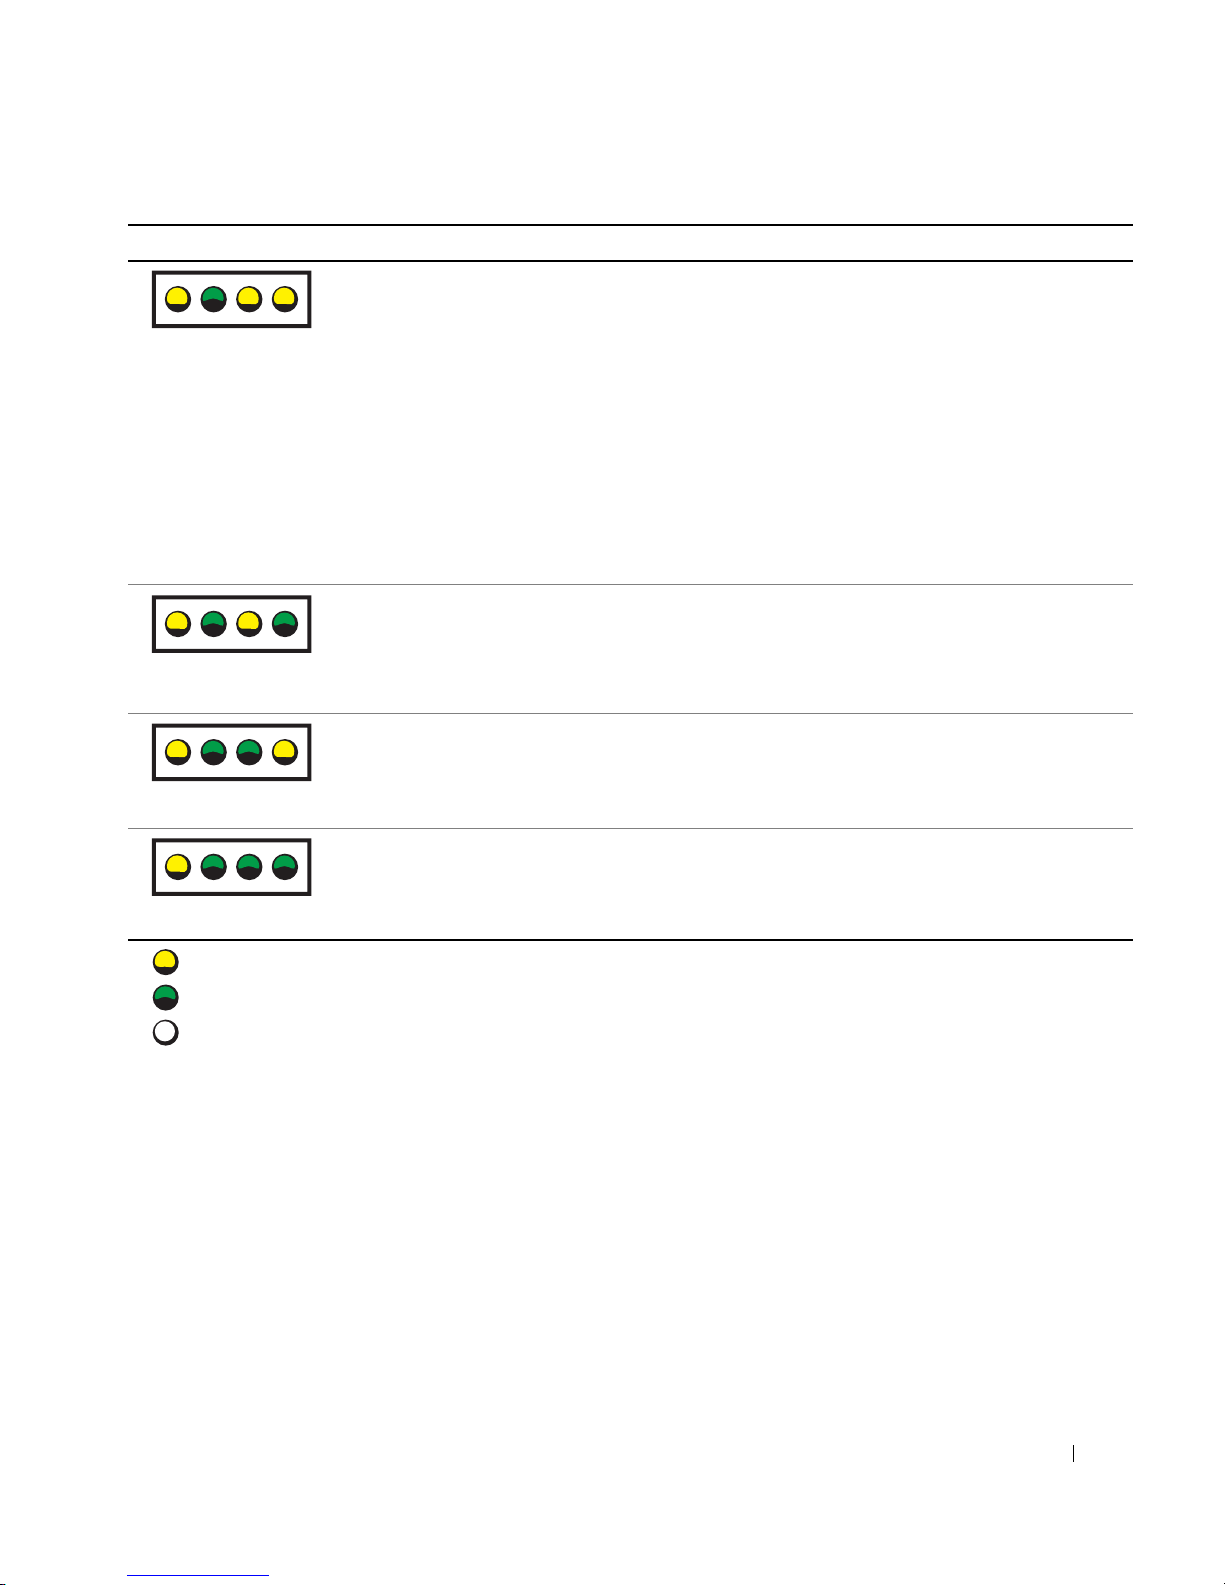
Light Pattern Problem Description Suggestion Resolution
A B C D
A B C D
A B C D
A possible expansion card
failure has occurred.
A possible graphics card
failure has occurred.
A possible floppy or hard
drive failure has occurred.
A possible USB failure has
occurred.
1 Determine if a conflict exists by removing a card
(not the graphics card) and then restarting the
computer.
2 If the problem persists, reinstall the card that you
removed, remove a different card, and then restart
the computer.
3 Repeat this process for each card. If the computer
starts normally, troubleshoot the last card removed
from the computer for resource conflicts (see
"Resolving Software and Hardware
Incompatibilities" in your User’s Guide).
4 If the problem persists, contact Dell.
Reinstall the graphics card and restart the computer.
If the problems still exists, install a graphics card that
you know works and restart the computer.
If the problem persists, contact Dell.
Check all power and data cable connections, and then
restart the computer.
Reinstall all USB devices, check cable connections,
and then restart the computer.
A B C D
= yellow
= green
= off
Setup and Quick Reference Guide 39
Page 40
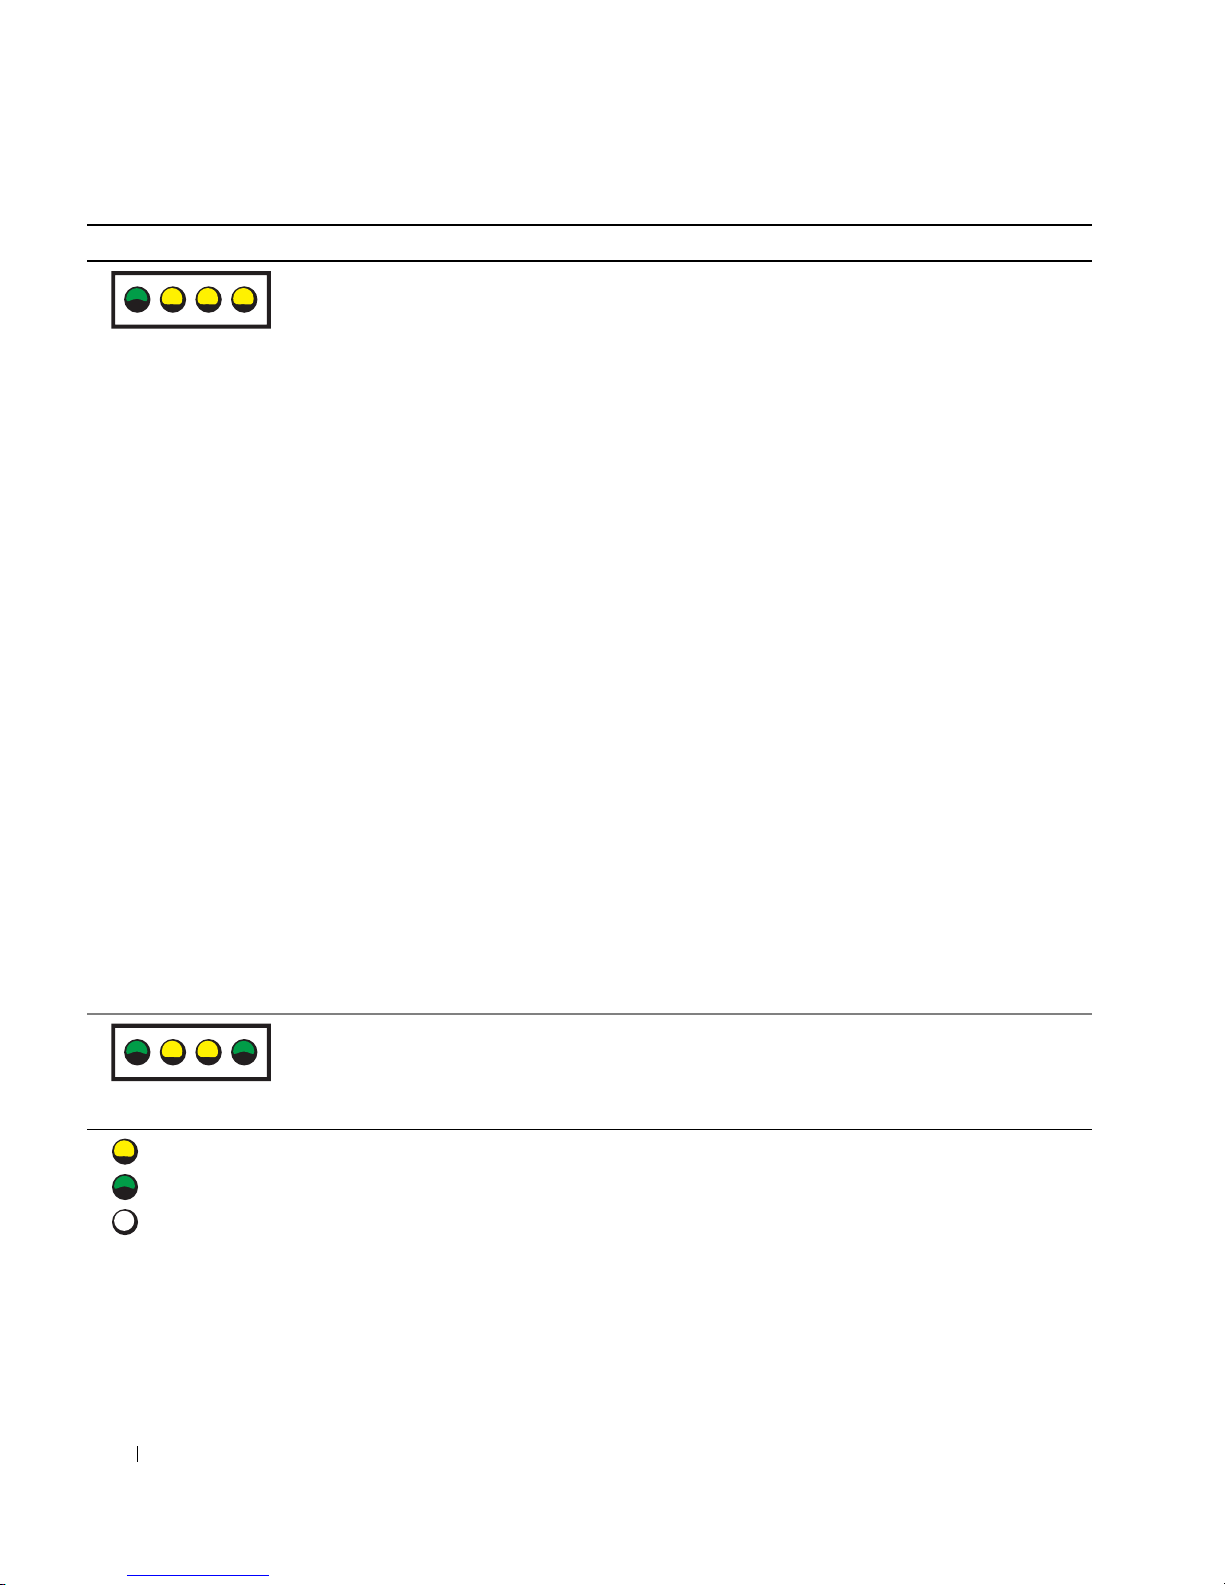
Light Pattern Problem Description Suggestion Resolution
A B C D
www.dell.com | support.dell.com
No memory modules are
detected.
1 Reset the memory modules to ensure that your
computer is successfully communicating with the
memory.
2 Restart the computer.
3 If the problem still exists, remove all the memory
modules and install one memory module in
memory module connector 4.
4 Restart the computer.
The following message appears: Alert!
Operating in Debug Mode. Please
Populate Memory in Pairs for Normal
Operation.
5 Press <F1> to boot to the operating system.
6 Run the System Memory test group in the Dell
Diagnostics.
7 If the memory module passes, shut down the
computer, remove the memory module, and repeat
the process with the remaining memory modules
until a memory error occurs during start-up or
diagnostic testing.
If the first memory module tested is defective,
repeat the process with the remaining modules to
ensure that the remaining modules are not
defective.
8 When the defective memory module is identified,
contact Dell for a replacement.
NOTE: If necessary, the computer can operate in
debug mode until new memory modules are installed.
System board failure has
occurred.
A B C D
= yellow
= green
= off
40 Setup and Quick Reference Guide
Perform the procedures in "System Board Problems" in
your User’s Guide.
If the problem persists, contact Dell.
Page 41
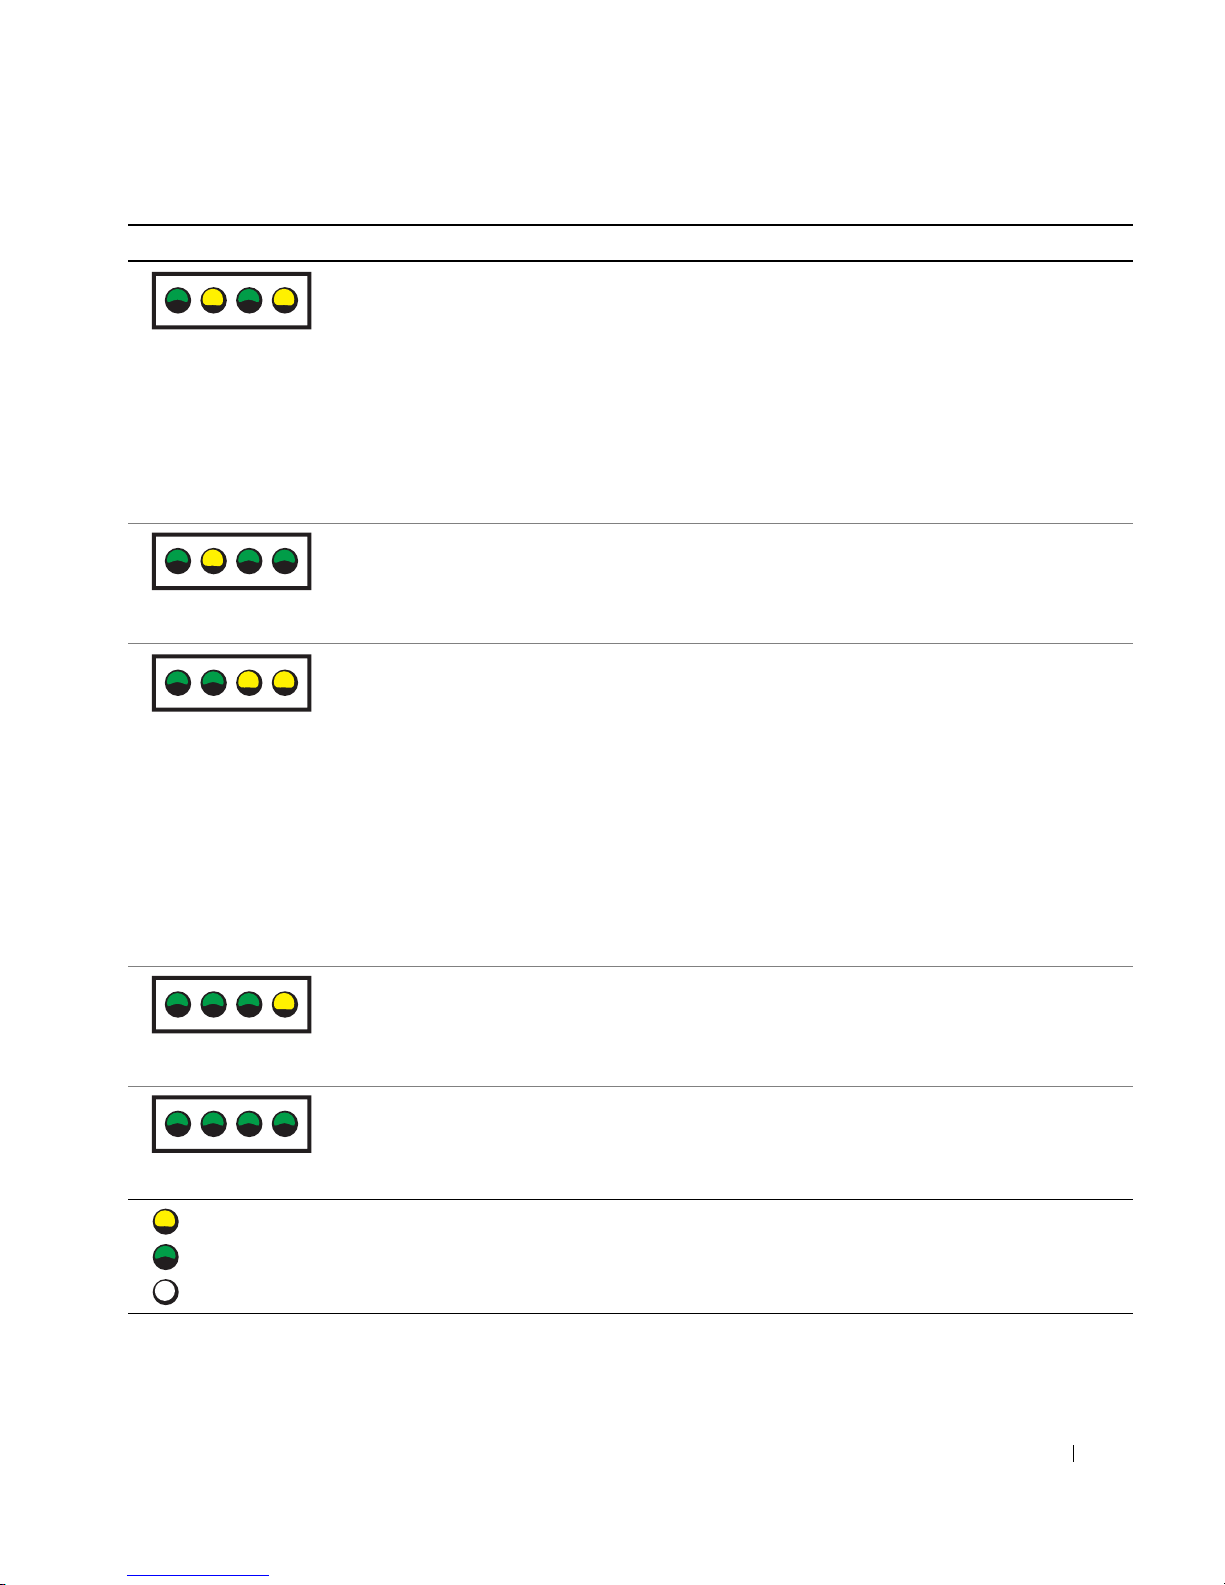
Light Pattern Problem Description Suggestion Resolution
A B C D
A B C D
A B C D
Memory modules are
detected, but a memory
configuration or
compatibility error exists.
A possible system board
resource and/or hardware
failure has occurred.
A possible expansion card
failure has occurred.
Ensure that there are no special memory
module/memory connector placement requirements
(see "Memory" in your User’s Guide).
Verify that the memory modules that you are
installing are compatible with your computer (see
"Memory" in your User’s Guide).
Reinstall the memory modules and then restart the
computer.
If the problem persists, contact Dell.
Perform the procedure in "System Board Problem" and
see "Resolving Software and Hardware
Incompatibilities" in your User’s Guide.
If the problem persists, contact Dell.
1 Determine if a conflict exists by removing a card
(not the graphics card) and then restarting the
computer.
2 If the problem persists, reinstall the card that you
removed, remove a different card, and then restart
the computer.
3 Repeat this process for each card. If the computer
starts normally, troubleshoot the last card removed
from the computer for resource conflicts (see
"Resolving Software and Hardware
Incompatibilities" in your User’s Guide).
4 If the problem persists, contact Dell.
A B C D
A B C D
= yellow
= green
= off
Other failure has occurred. Ensure that the cables are properly connected from
the hard drive, CD drive, and DVD drive to the
system board.
If the problem persists, contact Dell.
The computer is in a
normal operating condition
after POST.
None.
Setup and Quick Reference Guide 41
Page 42

www.dell.com | support.dell.com
How Do I... Solution Where to Find Additional
If a computer problem occurs that you are unable to resolve through the
steps in this section or the procedures in "Finding Solutions" in your User’s
Guide, complete the following steps before you contact Dell:
1 Write a detailed description of the error, beep code, or diagnostic light
problem.
2 Record your Express Service Code and Service Tag.
3 Contact Dell from the same location as your computer.
Frequently Asked Questions
Information
Set up my computer to use two
monitors?
Connect my monitor when the
monitor cable connector doesn’t
seem to fit the connector on the
back of my computer?
Connect my speakers? If you have a sound card installed,
If your computer has the required
graphics card to support dualmonitor setup, then look in your
box for a Y-cable. The cable has a
single connector on one end (plug
this connector into the back panel)
and branches into two connectors
(plug these connectors in the
monitor cables). For the Dell
Precision 650 computer, see
"Connect the monitor" on page 11
and for the Dell Precision 450
computer, see "Connect the
monitor" on page 20.
If your graphics card has a DVI
connector but your monitor has a
VGA connector, then you need to
use an adapter. An adapter should
be included in the box.
connect the speakers to the
connectors on the card. For the
Dell Precision 650 computer, see
"Connect the speakers" on page 14
and for the Dell Precision 450
computer, see "Connect the
speakers" on page 23.
To locate additional information
about using dual monitors, see the
graphics card documentation on
the Drivers and Utilities CD.
Contact Dell Support for more
information.
See the documentation that came
with your speakers for more
information.
42 Setup and Quick Reference Guide
Page 43

How Do I... Solution Where to Find Additional
Information
Find the right connectors for my
USB or IEEE 1394 devices?
Locate information about the
hardware and other technical
specifications for my computer?
Find documentation for my
computer?
Your Dell Precision 650 computer
has six USB connectors (two on
the front and four on the back). It
also has two IEEE 1394 connectors
(one on the front and one on the
back). See "Setting Up Your Dell
Precision™ 650 Computer" on
page 9.
Your Dell Precision 450 computer
has six USB connectors (two on
the front and four on the back).
See "Setting Up Your Dell
Precision 450 Computer" on
page 18.
Yo u r User’s Guide has a
specifications table that provides
more detailed information about
your computer and the hardware.
To locate your User’s Guide, see
"Finding Information and
Assistance" on page 5.
The following documentation is
available for your computer:
• User’s Guide
• Setup and Quick Reference
Guide
• System Information Guide
• System Information Label
• Service Manual
To locate these documents, see
"Finding Information and
Assistance" on page 5.
See the front and back view
graphics of your computer in your
User’s Guide. For help with
locating your User’s Guide, see
"Finding Information and
Assistance" on page 5.
Go to the Dell Support website at
support.dell.com and use one of
the following support tools: read
white papers on the latest
technology or communicate with
other Dell users at the Dell forum
chat room.
If you lose your documentation, it
is available on the Dell Support
website at support.dell.com.
Setup and Quick Reference Guide 43
Page 44

www.dell.com | support.dell.com
Opening the Computer Cover
CAUTION: Before you begin any of the procedures in this section,
follow the safety instructions in the System Information Guide.
1
Shut down the computer through the Start menu.
2 Ensure that your computer and attached devices are turned off. If your
computer and attached devices did not automatically turn off when
you shut down your computer, turn them off now.
NOTICE: To disconnect a network cable, first unplug the cable from your
computer and then unplug it from the network wall jack.
Disconnect any telephone or telecommunication lines from the
3
computer.
4 Disconnect your computer and all attached devices from electrical
outlets, and then press the power button to ground the system board.
5 If you have installed a padlock through the padlock ring on the back
panel, remove the padlock.
CAUTION: To guard against electrical shock, always unplug your
computer from the electrical outlet before opening the cover.
6
Lay the computer on its side as shown in the illustration.
NOTICE: Ensure that sufficient space exists to support the open cover—at
least 30 am (1 ft) of desktop space.
Open the computer cover:
7
a Slide the cover release latch toward the top of the computer.
b Raise the cover, and pivot it toward the front of the computer.
8 Ground yourself by touching an unpainted metal surface on the
computer, such as the metal at the back of computer, before touching
anything inside your computer.
While you work, periodically touch any unpainted metal surface on
the computer to dissipate any static electricity that could harm
internal components.
44 Setup and Quick Reference Guide
Page 45
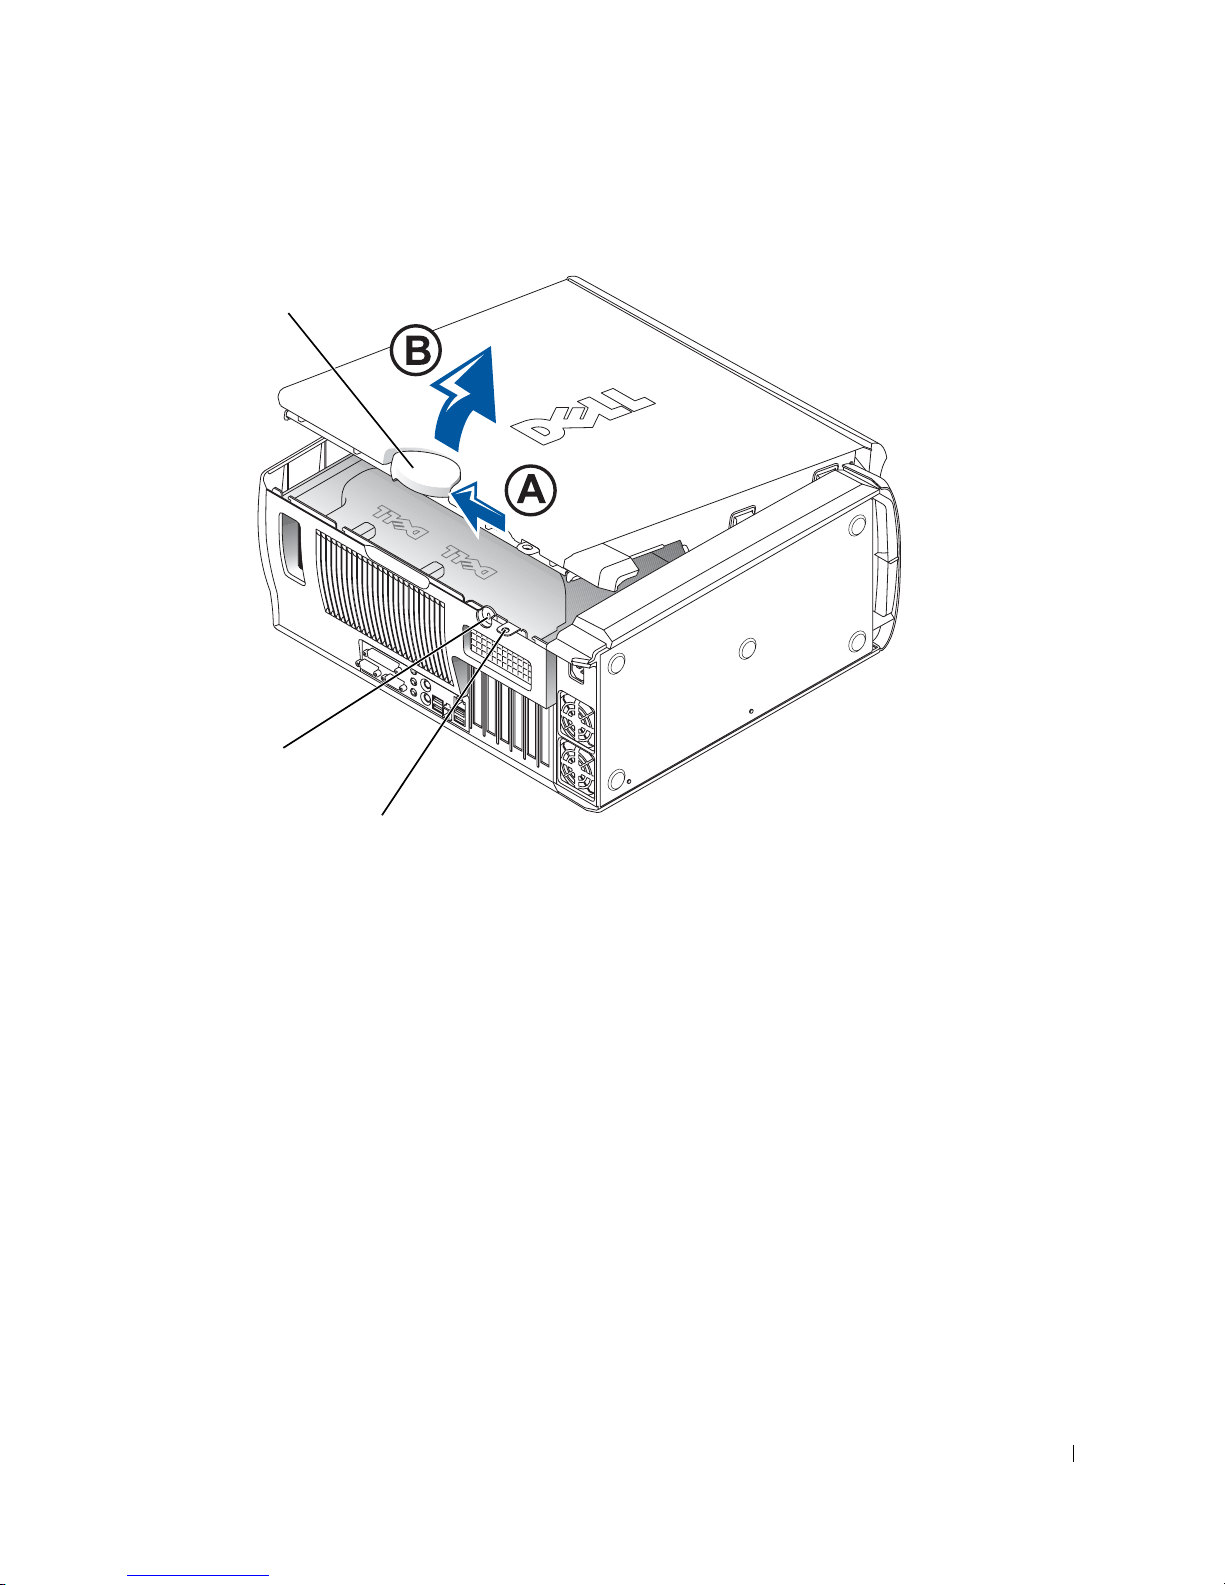
Dell Precision 650 Computer
cover release latch
security cable slot
padlock ring
Setup and Quick Reference Guide 45
Page 46
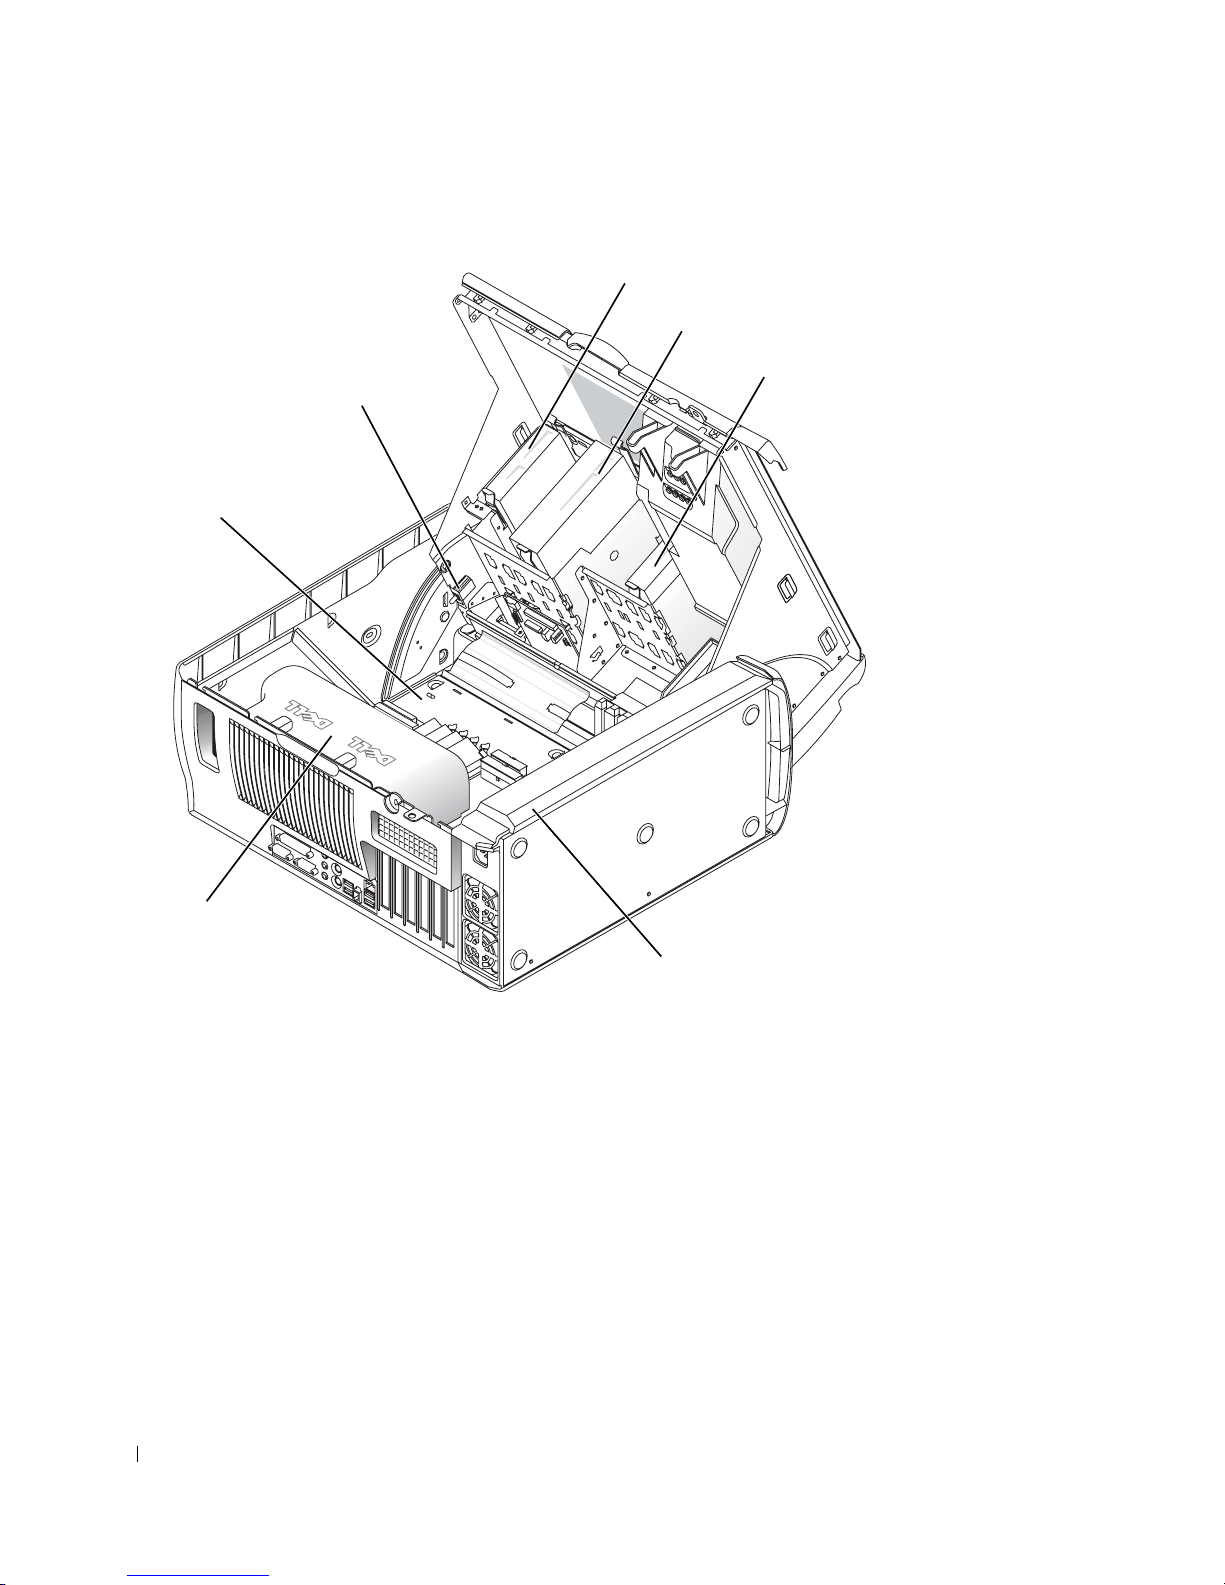
chassis intrusion switch
system board
www.dell.com | support.dell.com
Inside the Dell Precision 650 Computer
floppy drive
CD/DVD drive
hard drive
microprocessor
airflow shroud
46 Setup and Quick Reference Guide
power supply
Page 47
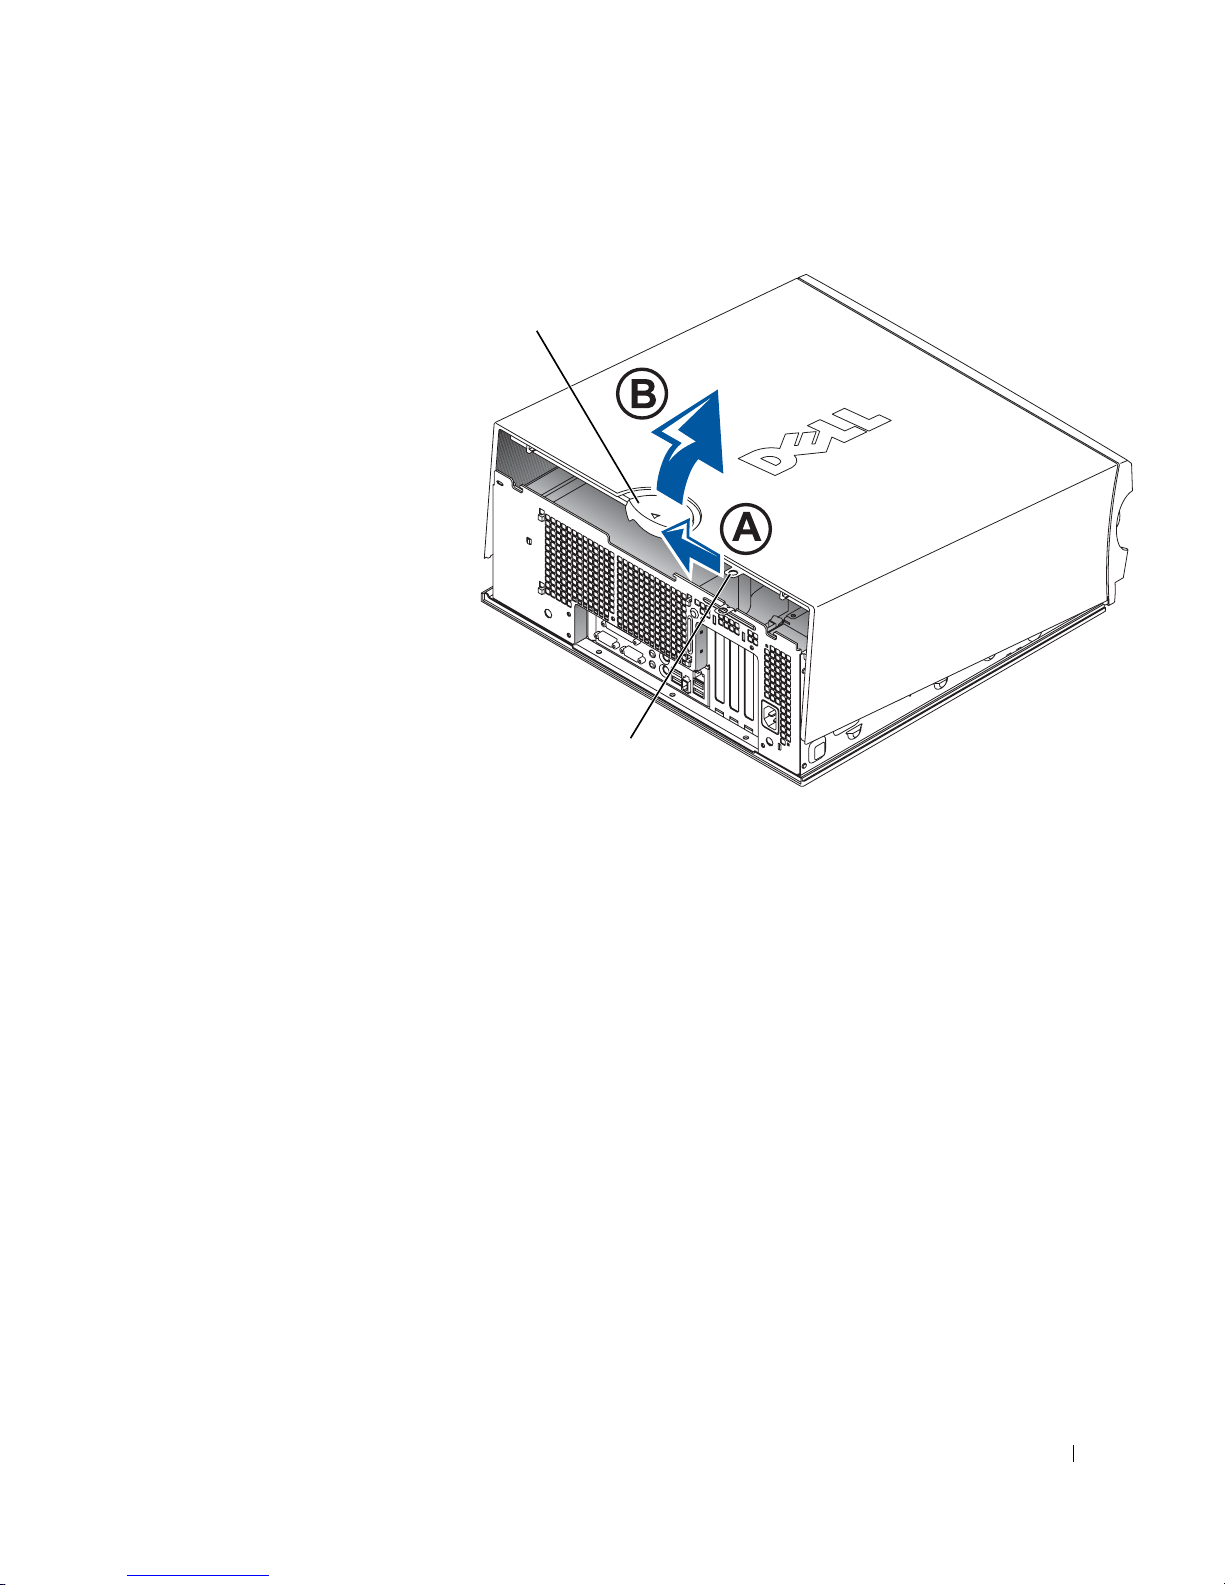
Dell Precision 450 Computer
cover release latch
padlock ring
Setup and Quick Reference Guide 47
Page 48
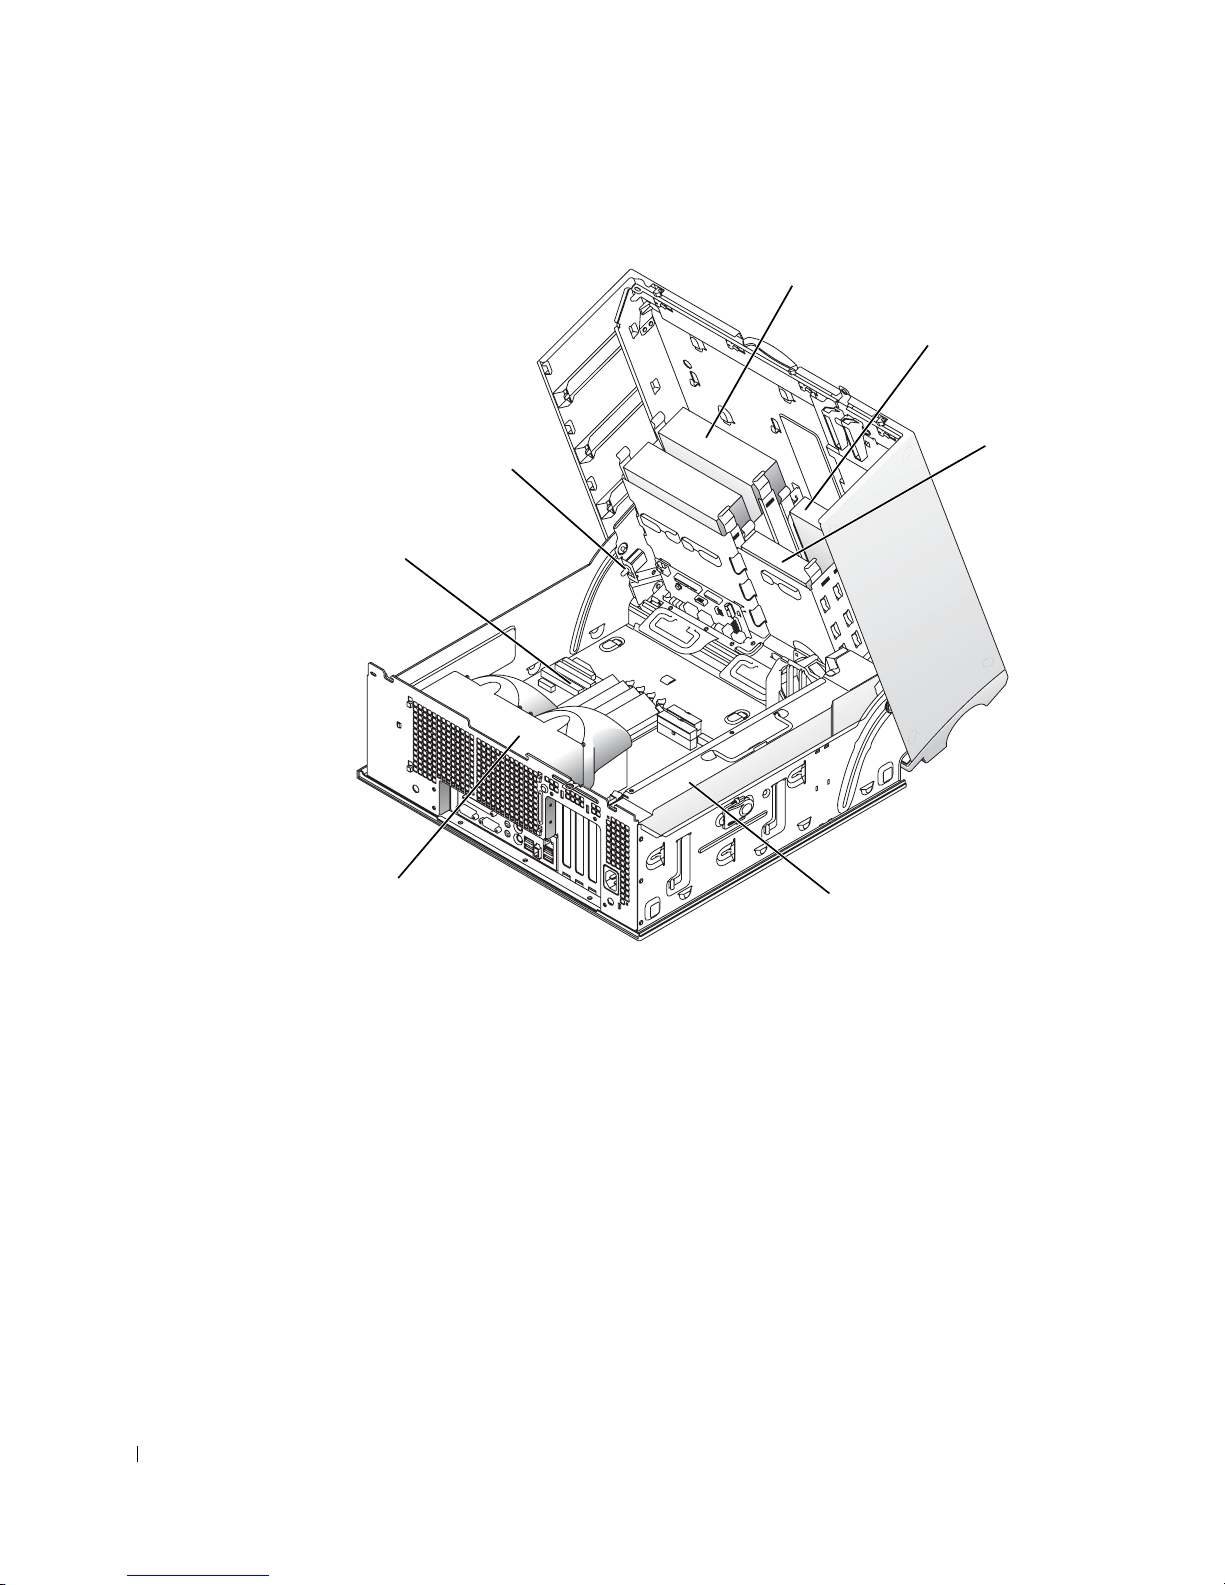
Inside the Dell Precision 450 Computer
CD/DVD drive
floppy drive
chassis intrusion switch
www.dell.com | support.dell.com
system board
microprocessor
airflow shroud
hard drive
power supply
48 Setup and Quick Reference Guide
Page 49

Dell Precision™ 450- og 650-arbejdsstation
Installations- og
referencehåndbog
www.dell.com | support.euro.dell.com
Page 50

Bemærkninger, meddelelser og
advarsler
BEMÆRK! En BEMÆRKNING angiver vigtige oplysninger, som du kan
bruge for at udnytte computeren optimalt.
MEDDELELSE: En MEDDELELSE angiver enten en mulig beskadigelse
af hardware eller tab af data og oplyser dig om, hvordan du kan undgå
dette problem.
ADVARSEL! En ADVARSEL angiver en mulig tingskade,
legemsbeskadigelse eller død.
Forkortelser og akronymer
En fuldstændig liste over forkortelser og akronymer finder du i ordlisten
i User's Guide (Brugerhåndbogen).
____________________
Oplysningerne i dette dokument kan ændres uden varsel.
© 2002 Dell Computer Corporation. Alle rettigheder forbeholdes.
Enhver form for gengivelse uden skriftlig tilladelse fra Dell Computer Corporation er strengt forbudt.
Anvendte varemærker i denne tekst: Dell, DELL-logoet og Dell Precision er registrerede
varemærker tilhørende Dell Computer Corporation. Microsoft og Windows er registrerede
varemærker tilhørende Microsoft Corporation.
Andre varemærker og firmanavne kan være brugt i dette dokument til at henvise til enten de
fysiske eller juridiske personer, som gør krav på mærkerne og navnene, eller til deres produkter.
Dell Computer Corporation fraskriver sig enhver tingslig rettighed, for så vidt angår varemærker
og firmanavne, som ikke er deres egne.
December 2002 Artikelnr. 6T337 Rev. A01
Page 51

Indhold
Sådan finder du oplysninger og hjælp . . . . . . . . . . . . . . . 53
Tilslut tastaturet og musen
Tilslut modemmet eller netværkskablet
Tilslut skærmen
Tilslut højttalerne
. . . . . . . . . . . . . . . . . . . . . . . . 59
. . . . . . . . . . . . . . . . . . . . . . . 62
. . . . . . . . . . . . . . . . . . . 57
. . . . . . . . . . . . . 58
Tilslut netledningerne, og tænd for computeren
og skærmen
. . . . . . . . . . . . . . . . . . . . . . . . . . 63
Installation af yderligere software eller enheder
Tilslut tastaturet og musen
Tilslut modemmet eller netværkskablet
Tilslut skærmen
Tilslut højttalerne
. . . . . . . . . . . . . . . . . . . . . . . . 68
. . . . . . . . . . . . . . . . . . . . . . . 71
. . . . . . . . . . . . . . . . . . . 66
. . . . . . . . . . . . . 67
Tilslut netledningerne, og tænd for computeren
og skærmen
. . . . . . . . . . . . . . . . . . . . . . . . . . 72
Installation af yderligere software eller enheder
. . . . . . . . 64
. . . . . . . . 73
Vedligeholdelse af computeren
Problemløsning
. . . . . . . . . . . . . . . . . . . . . . . . . . 75
. . . . . . . . . . . . . . . . . . 75
Løsning af software- og hardwareinkompatibilitet
Brug af System Restore (Systemgendannelse) i
Windows XP
. . . . . . . . . . . . . . . . . . . . . . . . . . 78
Brug af Last Known Good Configuration
(Sidste kendte fungerende konfiguration)
Hvornår skal du bruge Dell Diagnostics
(Dell Diagnosticering)
. . . . . . . . . . . . . . . . . . . . . 80
Sådan startes Dell Diagnostics (Dell Diagnosticering)
Systemlamper
Bipkoder
Fejlmeddelelser
Diagnosticeringslamper
. . . . . . . . . . . . . . . . . . . . . . . . . 84
. . . . . . . . . . . . . . . . . . . . . . . . . . . . 85
. . . . . . . . . . . . . . . . . . . . . . . . 86
. . . . . . . . . . . . . . . . . . . . 86
. . . . . . . 76
. . . . . . . . . . . . 79
. . . . . 80
Indhold 51
Page 52

Ofte stillede spørgsmål . . . . . . . . . . . . . . . . . . . . . . 94
Åbning af computerens dæksel
. . . . . . . . . . . . . . . . . . 96
52 Indhold
Page 53
Sådan finder du oplysninger og hjælp
Nedenstående tabel viser de ressourcer, Dell tilbyder som supportværktøjer.
Yderligere ressourcer leveres muligvis sammen med computeren.
Hvad søger du efter? Find det her
• Et fejlfindingsprogram til computeren
• Drivere til computeren
• User's Guide (Brugerhåndbog)
• Dokumentation til enheden
• Sådan konfigureres computeren
• Sådan passer du på computeren
• Fejlfindingsoplysninger
• Sådan åbnes computerens dæksel
• Sådan finder du anden dokumentation
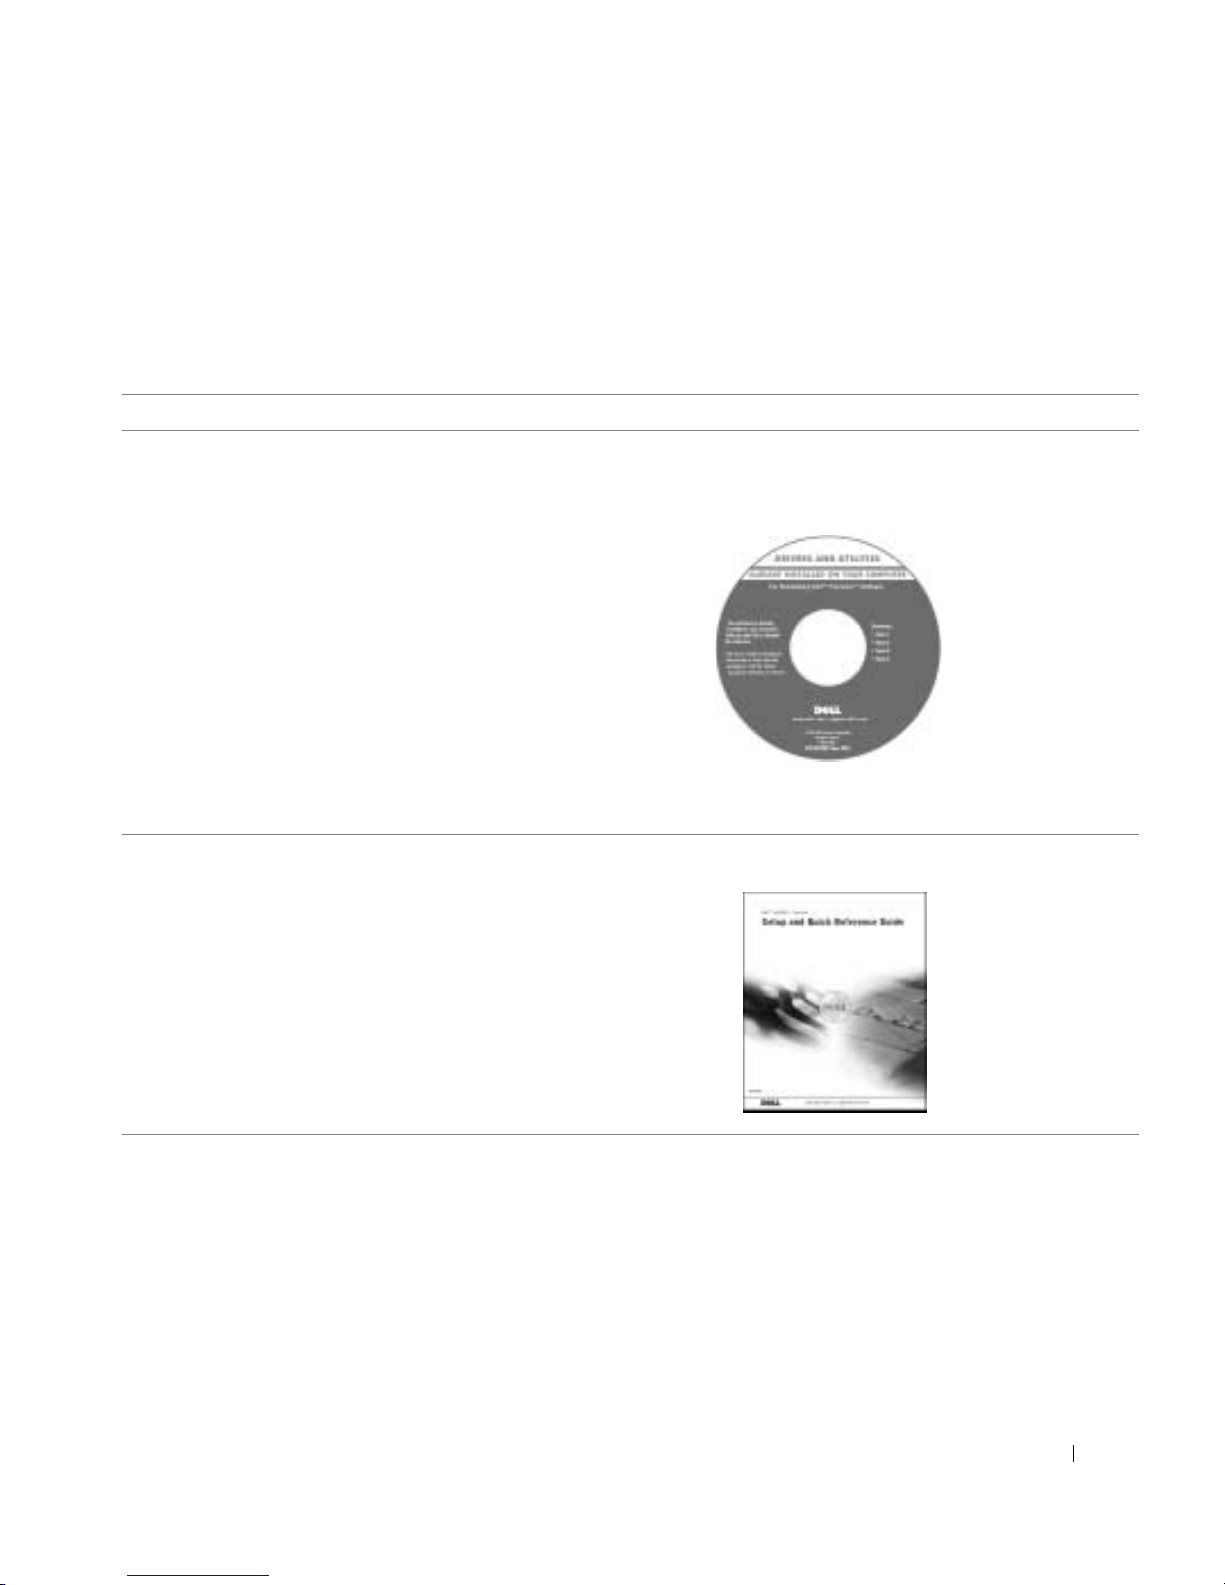
Cd'en Drivers and Utilities (Drivere og
hjælpeværktøjer – også kendt som ressourcecd'en)
Du kan bruge denne cd til at få adgang til dokumentation, geninstallere
drivere, eller køre diagnosticeringsværktøjer.
Installations- og referencehåndbog
Installations- og referencehåndbog 53
Page 54
Hvad søger du efter? Find det her
• Ekspresservicekode og servicemærke
• Microsoft
®
Windows®-licensmærke
Ekspresservicekode og produktnøgle
Mærkerne er placeret på computeren.
• Sådan geninstallerer du operativsystemet Cd med operativsystem og installationsvejledning
www.dell.com | support.euro.dell.com
Når du har installeret operativsystemet igen, skal du bruge cd'en
Drivers and Utilities (Drivere og hjælpeværktøjer) for at geninstallere
drivere til de enheder, der blev leveret sammen med computeren.
54 Installations- og referencehåndbog
Page 55
Hvad søger du efter? Find det her
• Afmontering og udskiftning af dele
• Tekniske specifikationer
Ikonet for User's Guide (Brugerhåndbog)
(Microsoft Windows 2000)
• Konfiguration af systemindstillinger
• Fejlfinding og løsning af problemer
Dobbeltklik på ikonet for
User's Guide
(Brugerhåndbog) på skrivebordet.
Windows XP Help and Support Center (Hjælp og
support)
1 Klik på knappen Start (Start), og klik på Help and Support (Hjælp
og support).
2 Klik på User's Guide (Brugerhåndbog).
• Placeringen af stik på systemkortet Mærkat med systemoplysninger
• De nyeste drivere til computeren
• Svar på spørgsmål om teknisk support
• Onlinediskussioner med andre brugere og
teknisk support
• Dokumentation til computeren, herunder
Service Manual (Servicehåndbog)
eller
Mærkatet er placeret på indersiden af computerdækslet.
Webstedet for Dell Support – support.dell.com
På webstedet for Dell Support finder du flere onlineværktøjer, herunder:
• Videnbase – råd, tip og onlinekurser
• Kundeforum – onlinediskussion med andre Dell-kunder
• Opgraderinger – opgraderingoplysninger om komponenter, f.eks.
hukommelse, harddisken og operativsystemet
• Kundeservice – kontaktoplysninger, ordrestatus, garanti og
reparationsoplysninger
• Download – drivere, programrettelser og softwareopdateringer
• Dokumentation – computerdokumentation, produktspecifikationer
og hvidbøger
Installations- og referencehåndbog 55
Page 56
Hvad søger du efter? Find det her
• Status for serviceopkald og oversigt
over support
• De vigtigste tekniske problemer for
computeren
• Ofte stillede spørgsmål
Webstedet for Dell Premier Support –
premiersupport.dell.com
Webstedet for Dell Premier Support er tilpasset kunder fra erhvervslivet,
den offentlige sektor og uddannelsessektoren. Webstedet er muligvis
ikke tilgængeligt i alle lande.
• Hentning af filer
• Oplysninger om computerens konfiguration
• Servicekontrakt for computeren
•Garanti Systeminformation
www.dell.com | support.euro.dell.com
• Brug af Windows XP
• Dokumentation til computeren og
enhederne
Windows XP Help and Support Center (Hjælp og
support)
1 Klik på knappen Start (Start), og klik på Help and Support (Hjælp
og support).
2 Skriv et ord eller en sætning, der beskriver problemet, og klik på
pileikonet.
3 Klik på det emne, der beskriver problemet.
4 Følg vejledning på skærmen.
BEMÆRK! Klik på knappen Start (Start), og klik på Help (Hjælp) for
at få oplysninger om brug af Windows 2000.
56 Installations- og referencehåndbog
Page 57
Konfiguration af Dell Precision™ 650computeren
Du skal udføre alle trin for at konfigurere computeren korrekt.
Tilslut tastaturet og musen
eller
eller
Installations- og referencehåndbog 57
Page 58
BEMÆRK! Hvis
dererinstalleret
et netværkskort i
computeren, skal du
tilslutte netværkskablet
til kortet.
www.dell.com | support.euro.dell.com
Tilslut modemmet eller netværkskablet
MEDDELELSE: Tilslut ikke et modemkabel til netværksadapteren.
Spænding fra telefonkommunikation kan beskadige netværksadapteren.
58 Installations- og referencehåndbog
Page 59
Tilslut skærmen
Du kan tilslutte skærmen på forskellige måder, afhængigt af hvilket
grafikkort du har.
A B C D
MEDDELELSE: Det er muligvis nødvendigt at benytte adapteren eller
kablet, der fulgte med skærmen, for at skærmen kan tilsluttes.
Installations- og referencehåndbog 59
Page 60
Grafikkort til én eller to skærme med et enkelt stik
VGA-adapter
VGA
www.dell.com | support.euro.dell.com
• Brug VGA-adapteren, hvis du har et grafikkort til én
skærm, og du vil tilslutte til en VGA-skærm.
VGA Y-kabel til to skærme
VGA
VGA
• Brug det korrekte Y-kabel, hvis dit grafikkort har
et enkelt stik, og du vil tilslutte til én eller to
VGA-skærme.
Kablet til to skærme er farvemærket. Det blå stik er til den primære
skærm, og det sorte stik er til den sekundære skærm. Hvis du vil aktivere
understøttelsen af to skærme, skal begge skærme være tilsluttet, når du
starter computeren.
DVI Y-kabel til to skærme
DVI
DVI
• Brug det korrekte Y-kabel, hvis dit grafikkort har
et enkelt stik, og du vil tilslutte til én eller to
DVI-skærme.
60 Installations- og referencehåndbog
Page 61
Grafikkort til to skærme med ét DVI- og ét VGA-stik
Én DVI/én VGA
DVI
VGA
• Benyt det korrekte stik, når du tilslutter til én
eller to skærme.
Grafikkort til to skærme med to DVI-stik
DVI til to skærme
DVI til to skærme med én
VGA-adapter
VGA til to skærme med VGA-adapter
VGA
VGA
• Benyt VGA-adapteren, når du tilslutter til to
VGA-skærme.
DVI til to skærme med to
VGA-adaptere
DVI
DVI
• Benyt DVI-stikkene, når du
tilslutter til en eller to DVIskærme.
DVI
VGA
• Benyt VGA-adapteren, når du
tilslutter en VGA-skærm til et
DVI-stik.
Installations- og referencehåndbog 61
VGA
VGA
• Benyt to VGA-adaptere, når
du tilslutter to VGA-skærme
til DVI-stikkene.
Page 62
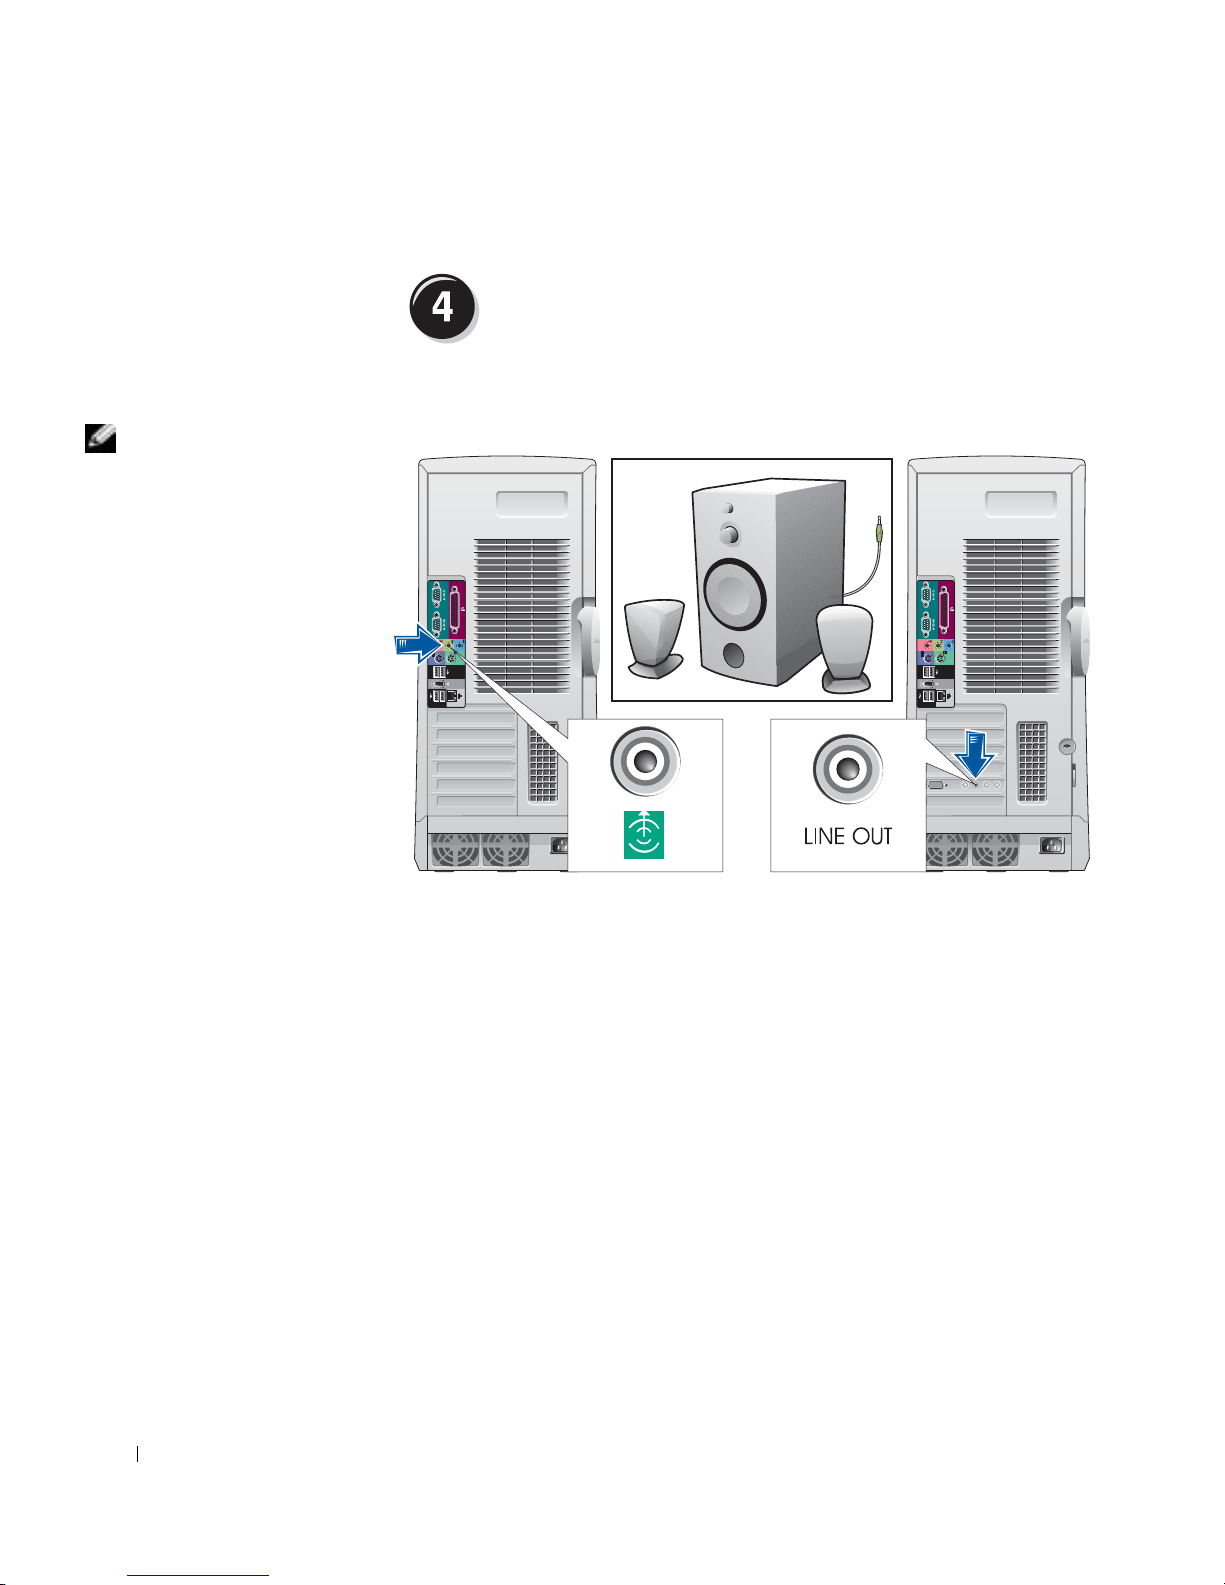
BEMÆRK! Hvis der
er installeret et lydkort
i computeren, skal du
tilslutte højttalerne
til kortet.
www.dell.com | support.euro.dell.com
Tilslut højttalerne
62 Installations- og referencehåndbog
Page 63
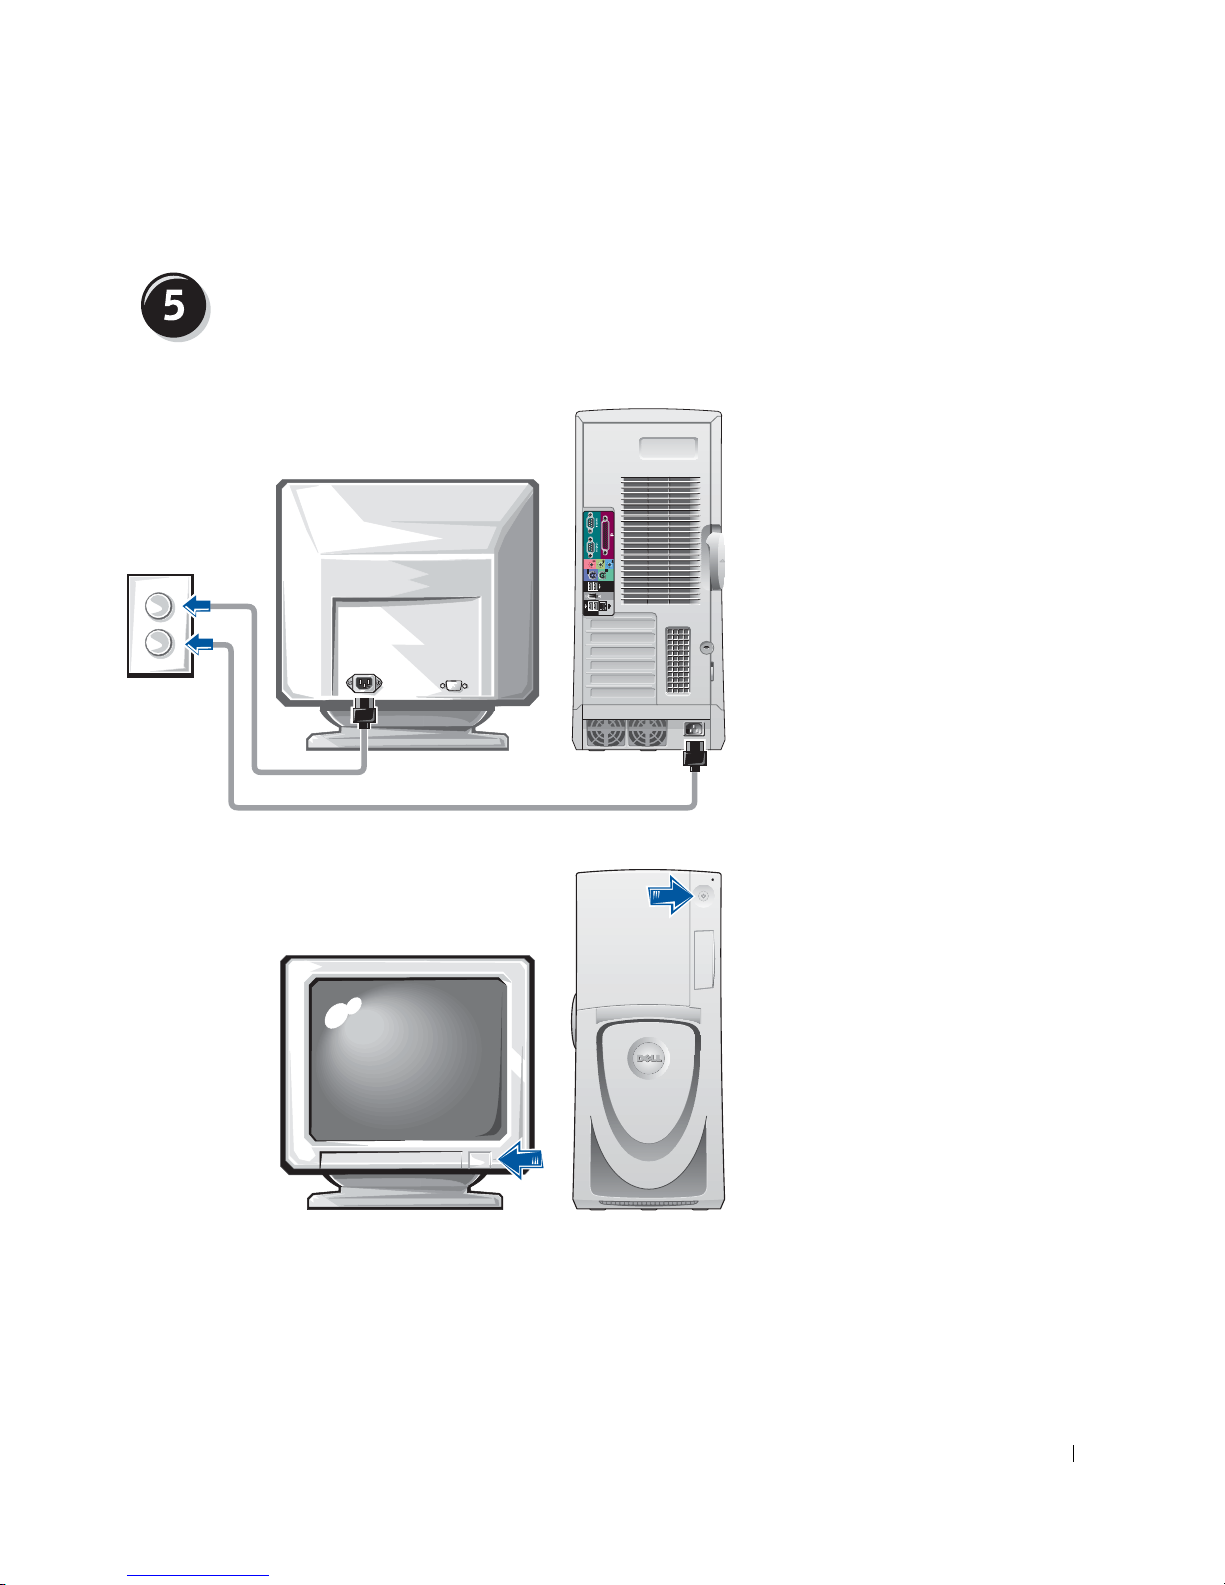
Tilslut netledningerne, og tænd for computeren
og skærmen
Installations- og referencehåndbog 63
Page 64

Før du installerer enheder eller software, der ikke blev leveret sammen med
computeren, skal du læse den dokumentation, der fulgte med softwaren
eller enheden, eller kontakte leverandøren for at kontrollere, at softwaren
eller enheden er kompatibel med computeren og operativsystemet.
Tillykke! Du har konfigureret computeren.
I User's Guide (Brugerhåndbog) til Dell Precision-arbejdsstation 650 finder
www.dell.com | support.euro.dell.com
du yderligere oplysninger om computeren, f.eks.:
Installation af yderligere software eller enheder
• Tekniske specifikationer
• Illustrationer af computerens for- og bagside, herunder alle
tilgængelige stik
• Illustrationer af, hvordan computeren ser ud indeni, herunder en
detaljeret illustration af systemkortet og stikkene
• Oplysninger om, hvordan computeren rengøres
• Oplysninger om softwarefunktioner, f.eks. styring af LegacySelect
Technology, brug af adgangskode og indstillinger for systeminstallation
• En beskrivelse af operativsystemet Windows XP
• Oplysninger om fjernelse og installation af forskellige dele, herunder
hukommelse, kort, drev, mikroprocessoren, VRM'en og batteriet
• Oplysninger om fejlfinding ved forskellige problemer med computeren
• Oplysninger om brug af Dell Diagnostics (Dell Diagnosticering) og
geninstallion af drivere
• Oplysninger om, hvordan du kan kontakte Dell
Du kan få adgang til User's Guide (Brugerhåndbog) på harddisken, på cd'en
Drivers and Utilities (Drivere og hjælpeværktøjer) eller på webstedet for
Dell Support.
64 Installations- og referencehåndbog
Page 65

Sådan får du adgang til User's Guide (Brugerhåndbog) på harddisken:
Hvis du har Windows 2000, skal du dobbeltklikke på ikonet for
User's Guide (Brugerhåndbog).
Hvis du har Windows XP, skal du klikke på knappen Start (Start)
og klikke på Help and Support (Hjælp og support).
Sådan får du adgang til User's Guide (Brugerhåndbog) på cd'en:
1 Læg cd'en Drivers and Utilities (Drivere og hjælpeværktøjer) i
cd-rom-drevet.
Hvis du bruger cd'en Drivers and Utilities (Drivere og
hjælpeværktøjer) for første gang, åbnes vinduet ResourceCD
Installation (Installation fra Ressource-cd) for at fortælle dig, at
installationen af cd'en begynder.
2 Klik på OK for at fortsætte, og følg derefter prompterne i
installationsprogrammet.
3 Klik på Next (Næste) på velkomstskærmbilledet.
4 Vælg den korrekte System Model (Systemmodel), det korrekte
Operating System (Operativsystem) og det relevante Topic (Emne).
Sådan får du adgang til User's Guide (Brugerhåndbog) på webstedet for
Dell Support:
1 Gå til support.dell.com.
2 Følg prompterne på webstedet, hvor du bliver bedt om specifikke
oplysninger om netop din computer.
3 Klik på Reference (Dokumentation), klik på User's Guides
(Brugerhåndbøger), klik på Systems (Systemer), og vælg derefter
din Dell Precision-computer på webstedet for Dell Support.
Installations- og referencehåndbog 65
Page 66
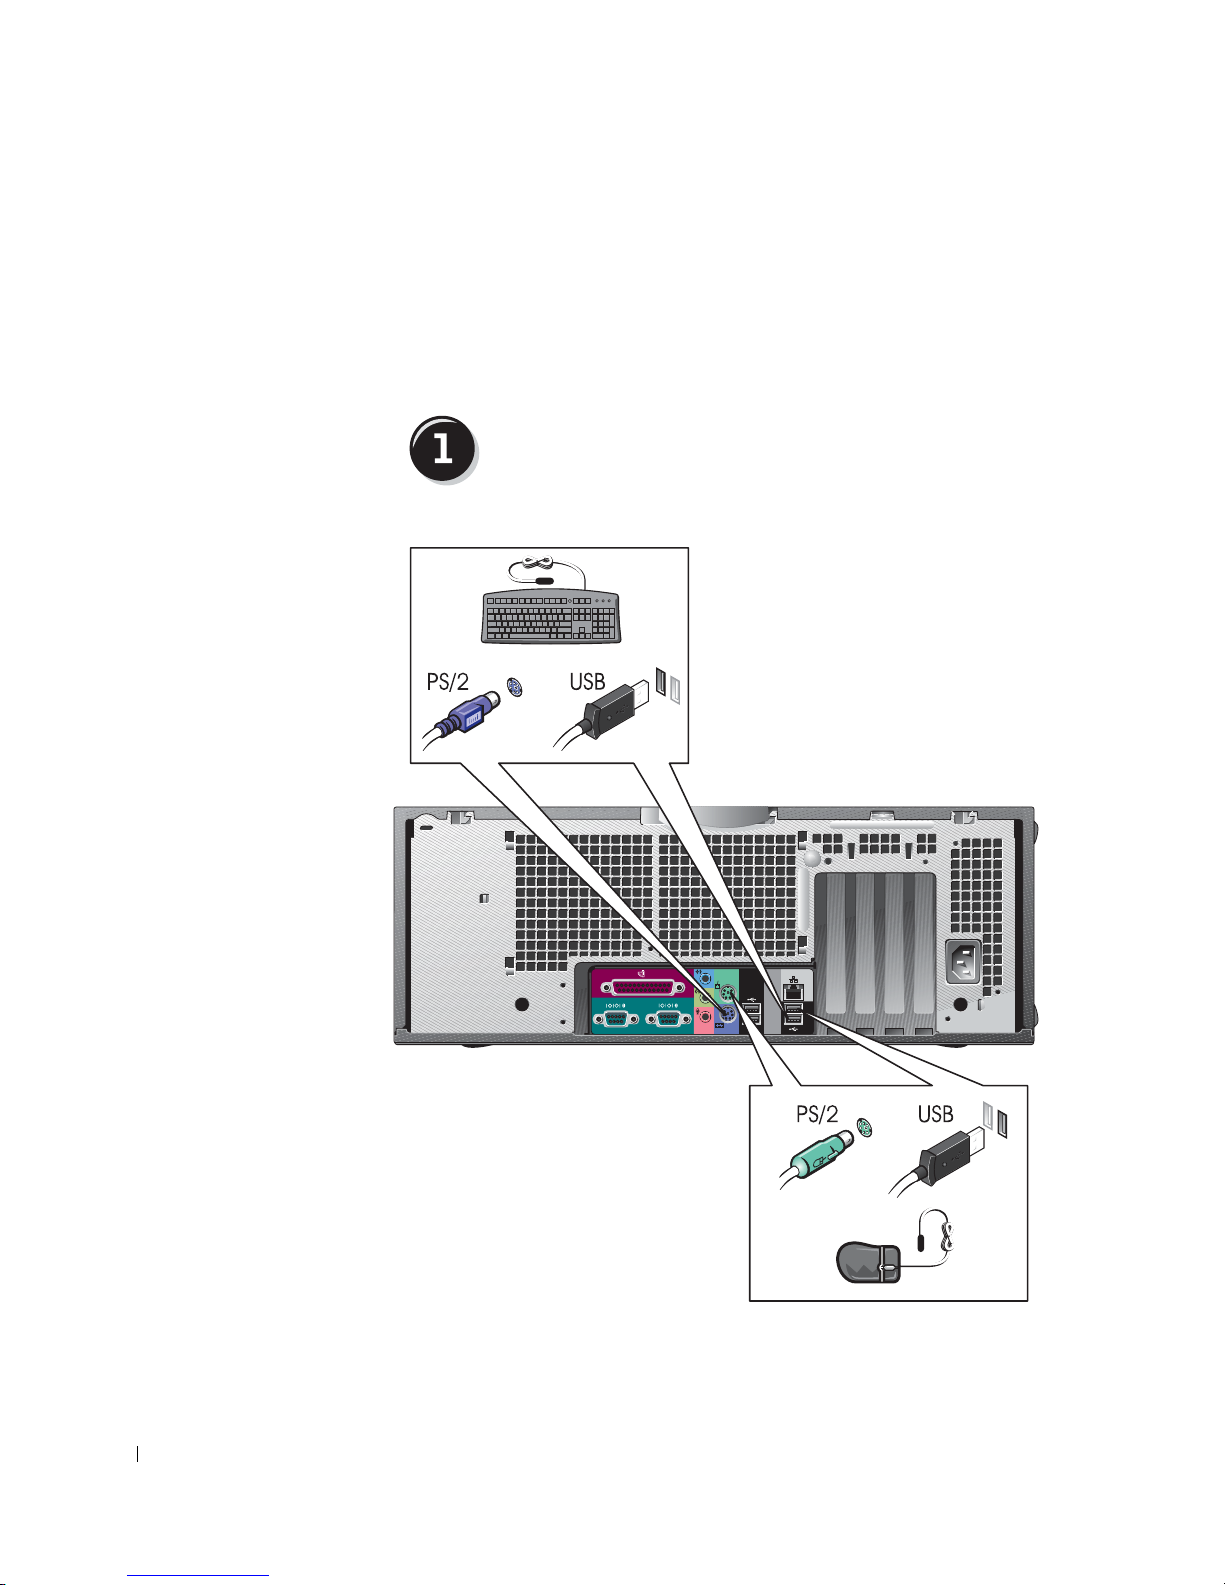
Konfiguration af Dell Precision 450computeren
Du skal udføre alle trin for at konfigurere computeren korrekt.
www.dell.com | support.euro.dell.com
Tilslut tastaturet og musen
eller
66 Installations- og referencehåndbog
eller
Page 67
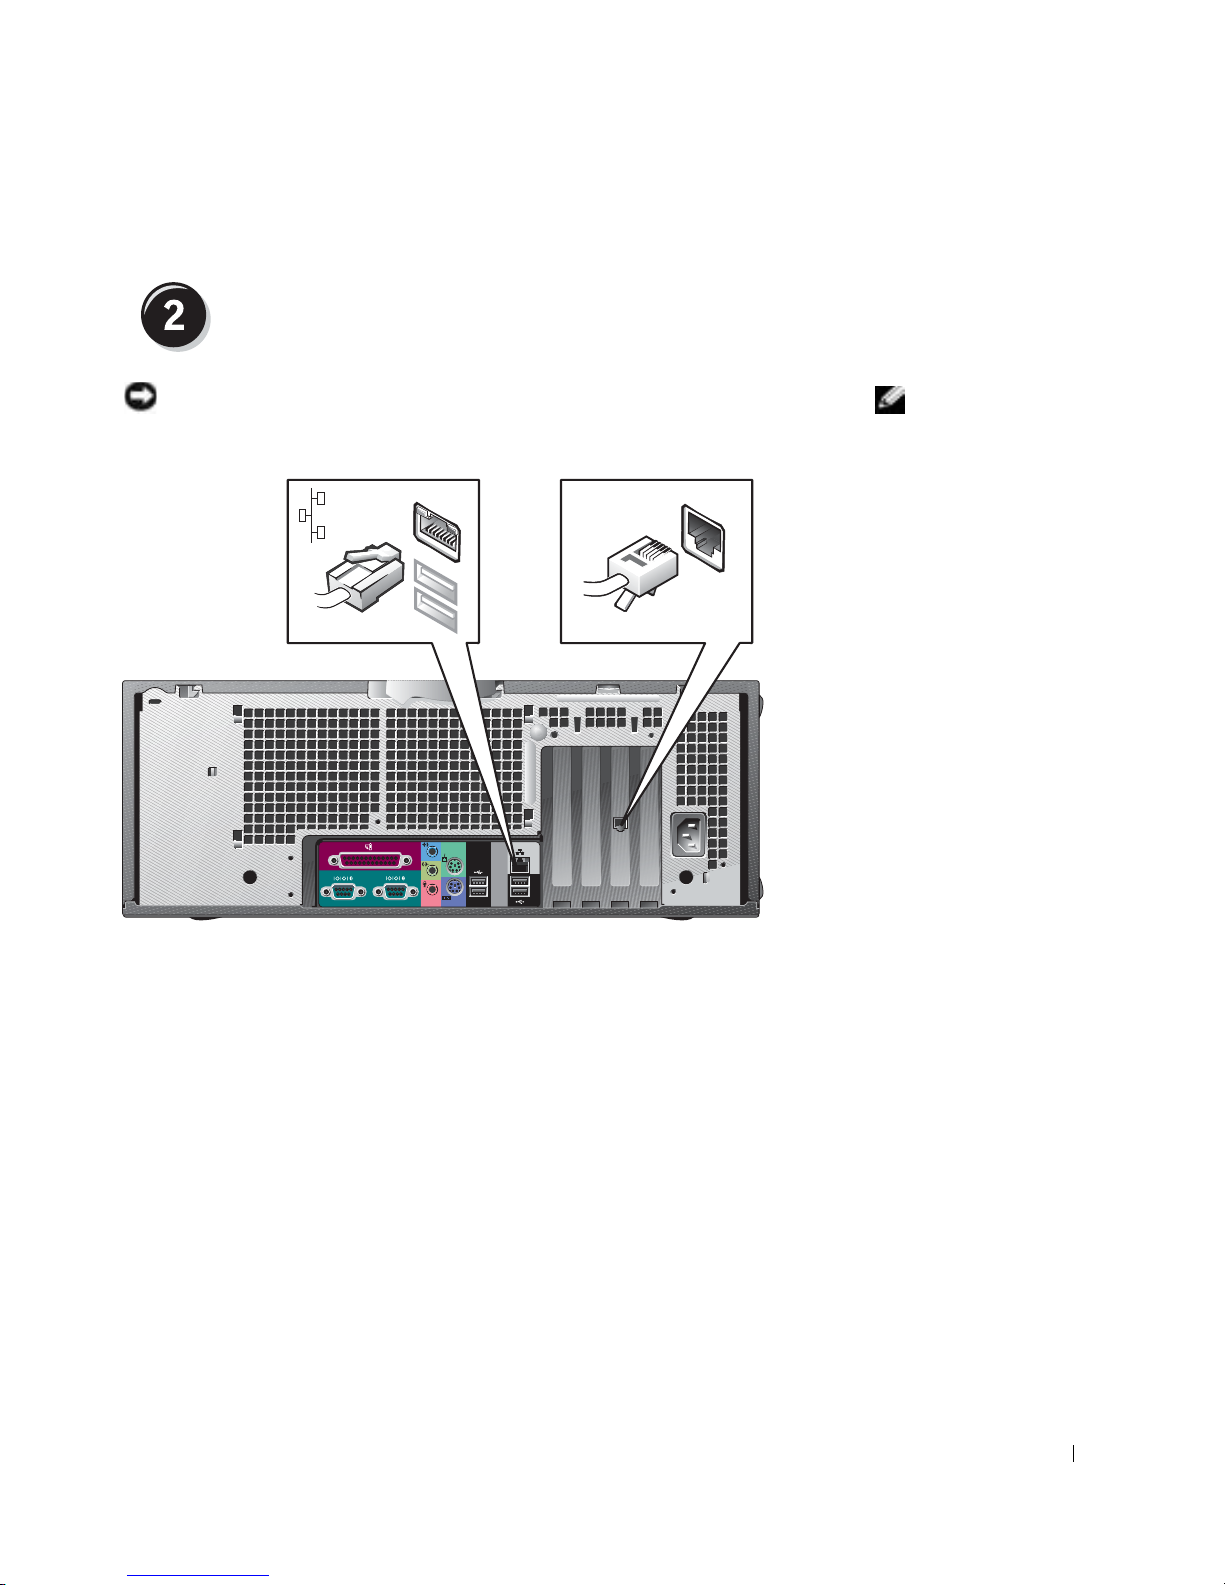
Tilslut modemmet eller netværkskablet
MEDDELELSE: Tilslut ikke et modemkabel til netværksadapteren.
Spænding fra telefonkommunikation beskadiger netværksadapteren.
BEMÆRK! Hvis
der er installeret
et netværkskort i
computeren, skal du
tilslutte netværkskablet
til kortet.
Installations- og referencehåndbog 67
Page 68
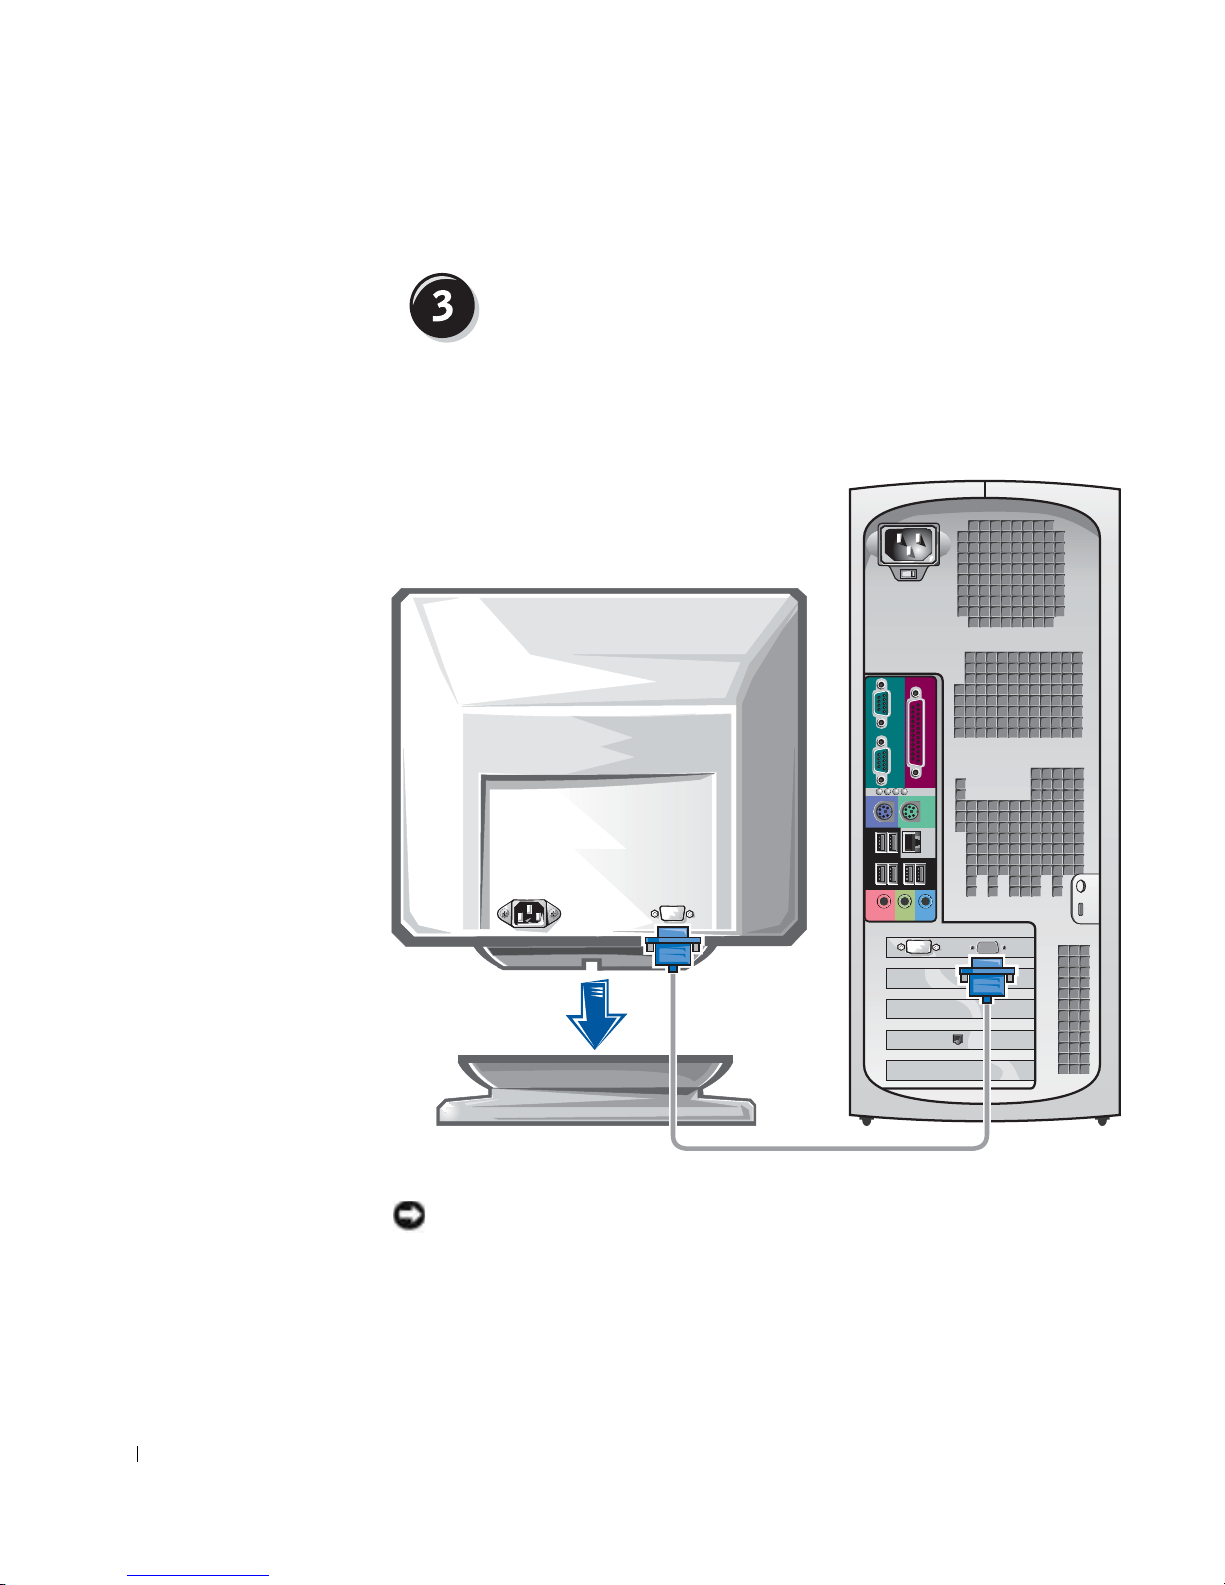
Du kan tilslutte skærmen på forskellige måder, afhængigt af hvilket
grafikkort du har.
www.dell.com | support.euro.dell.com
Tilslut skærmen
A B C D
68 Installations- og referencehåndbog
MEDDELELSE: Det er muligvis nødvendigt at benytte adapteren eller
kablet, der fulgte med skærmen, for at skærmen kan tilsluttes.
Page 69
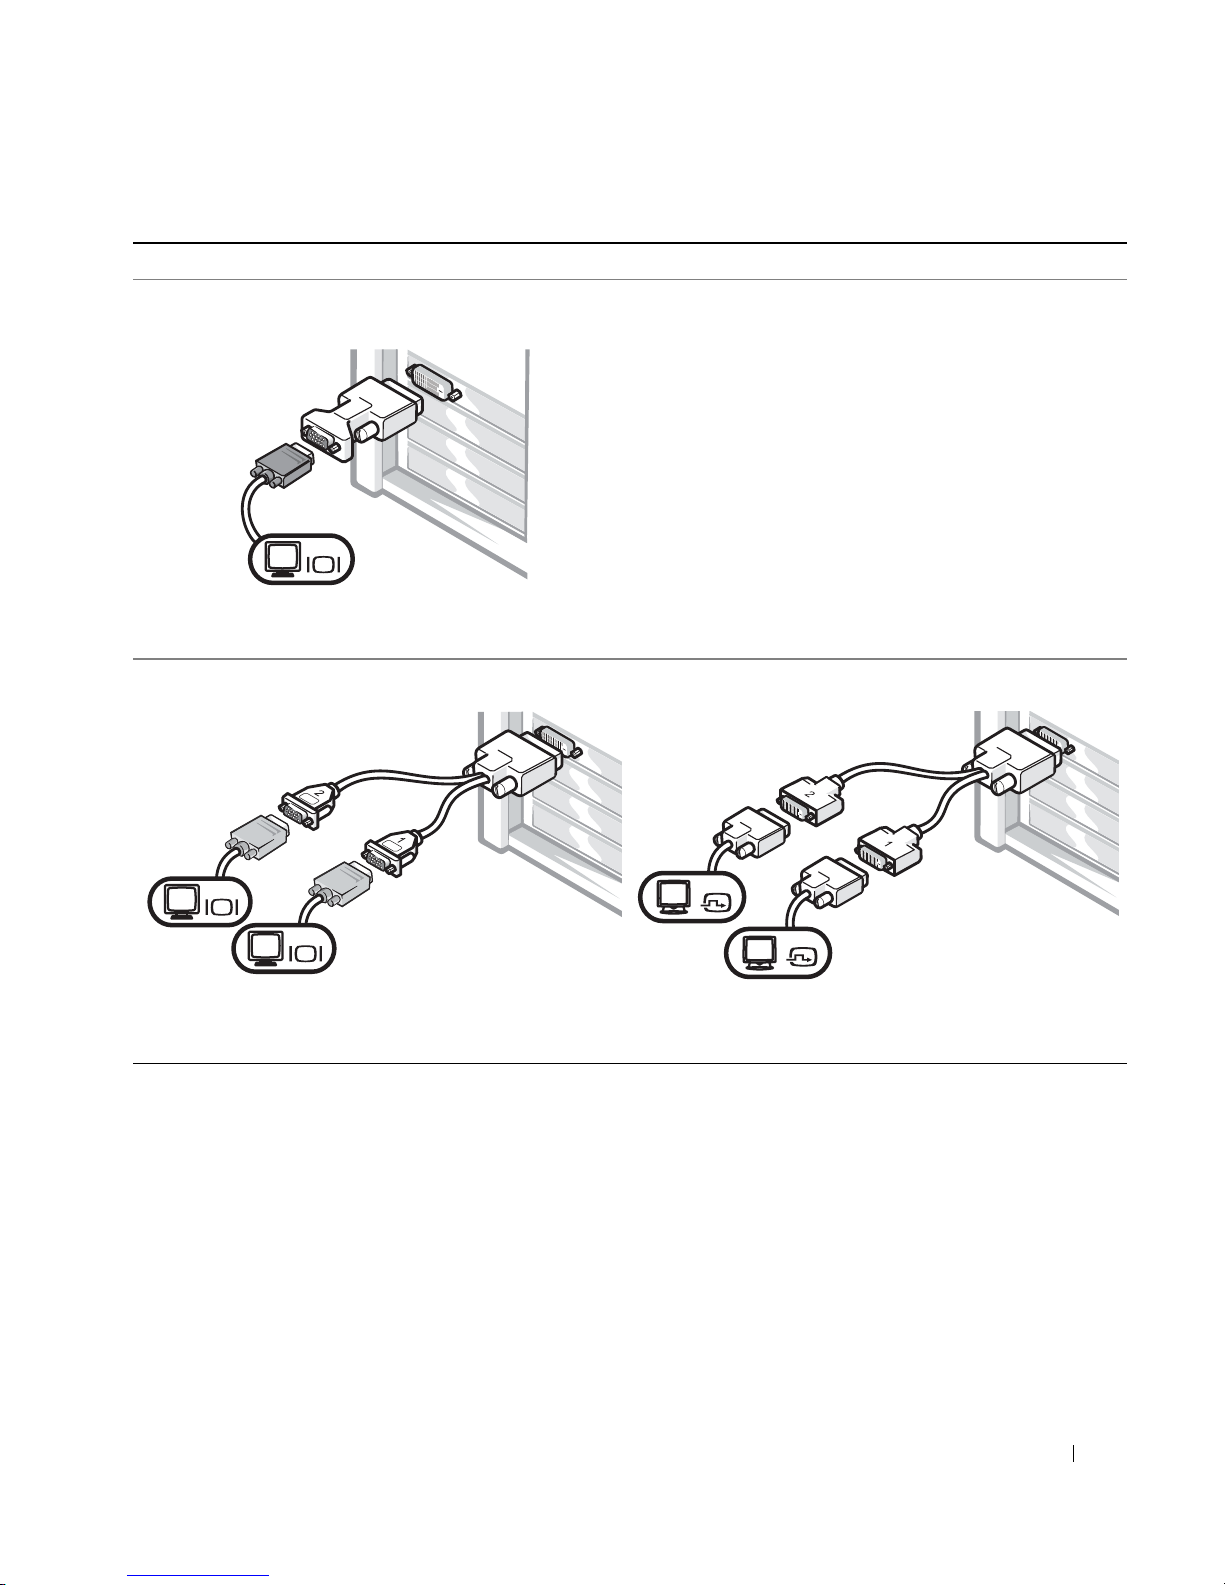
Grafikkort til én eller to skærme med et enkelt stik
VGA-adapter
VGA
• Brug VGA-adapteren, hvis du har et grafikkort til én
skærm, og du vil tilslutte til en VGA-skærm.
VGA Y-kabel til to skærme
VGA
VGA
• Brug det korrekte Y-kabel, hvis dit grafikkort har
et enkelt stik, og du vil tilslutte til én eller to
VGA-skærme.
DVI Y-kabel til to skærme
DVI
• Brug det korrekte Y-kabel, hvis dit grafikkort har
et enkelt stik, og du vil tilslutte til én eller to
DVI-skærme.
Kablet til to skærme er farvemærket. Det blå stik er til den primære
skærm, og det sorte stik er til den sekundære skærm. Hvis du vil aktivere
understøttelsen af to skærme, skal begge skærme være tilsluttet, når du
starter computeren.
DVI
Installations- og referencehåndbog 69
Page 70
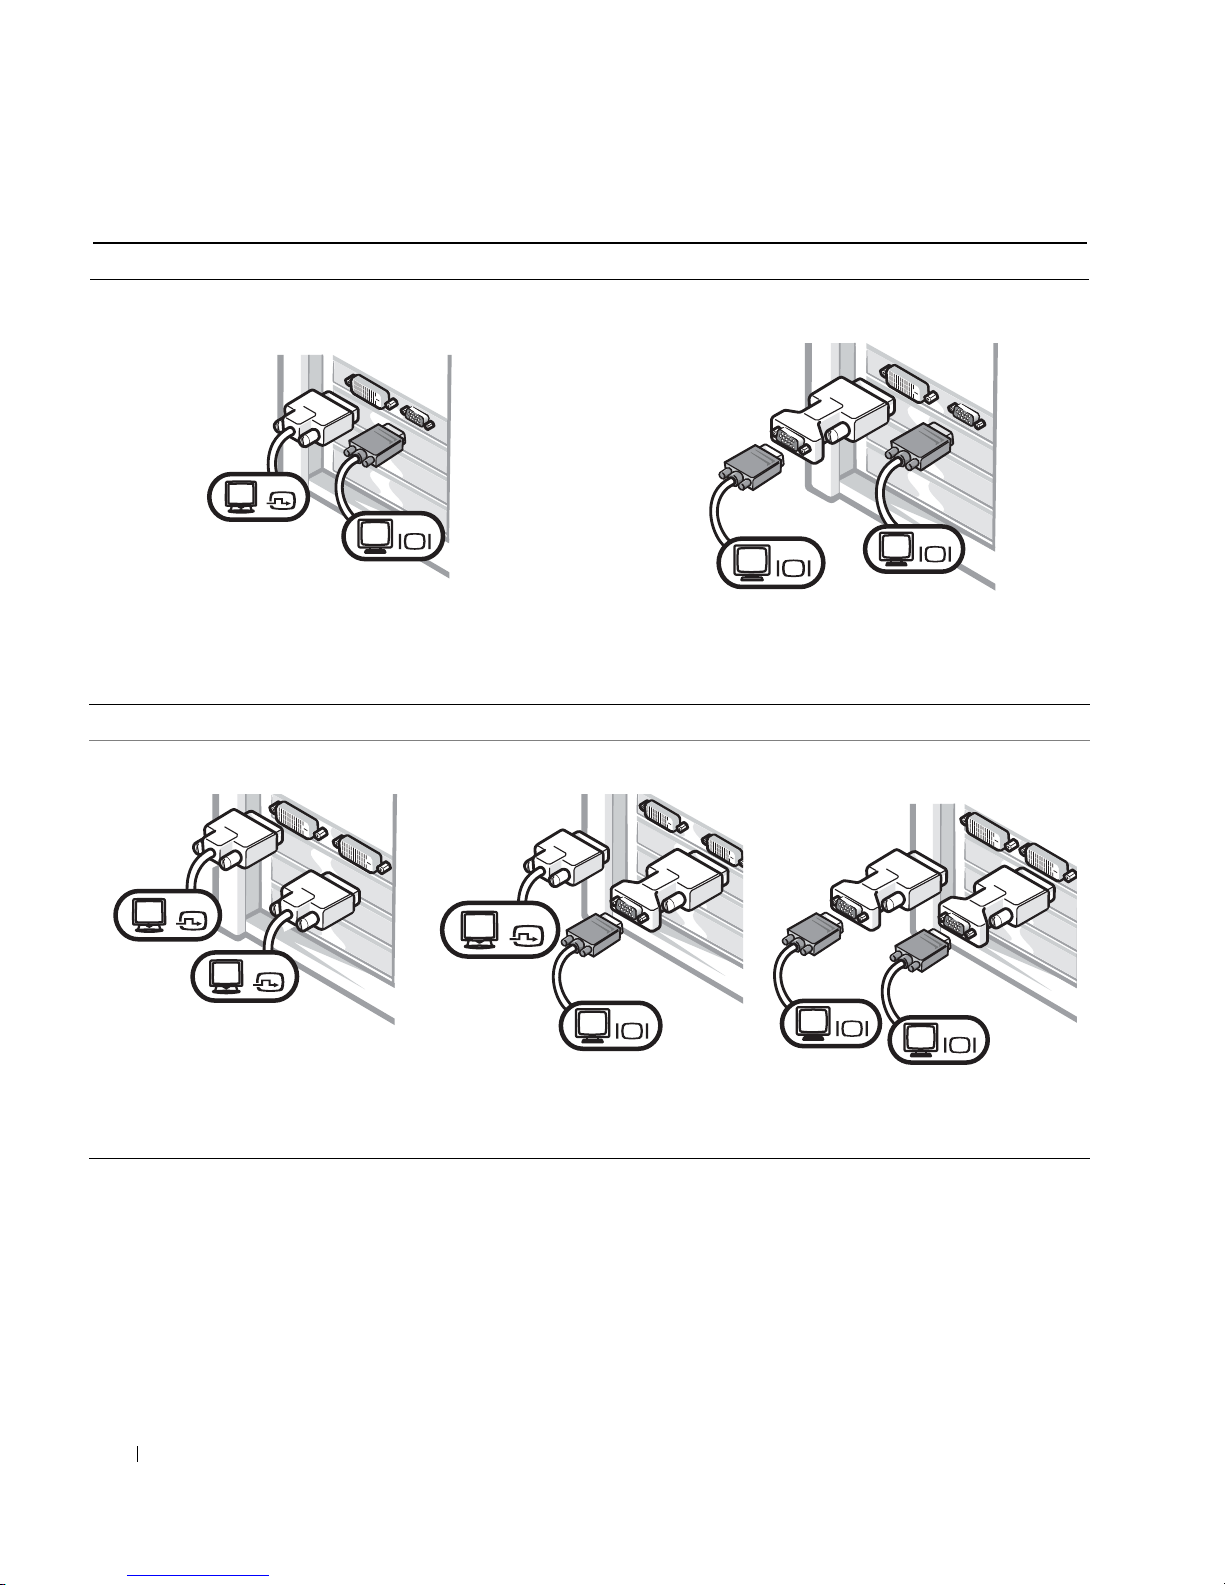
Grafikkort til to skærme med ét DVI- og ét VGA-stik
Én DVI/én VGA
DVI
www.dell.com | support.euro.dell.com
• Benyt det korrekte stik, når du tilslutter til én
eller to skærme.
Grafikkort til to skærme med to DVI-stik
DVI til to skærme
VGA til to skærme med VGA-adapter
VGA
• Benyt VGA-adapteren, når du tilslutter til to
DVI til to skærme med én VGAadapter
VGA-skærme.
VGA
VGA
DVI til to skærme med to VGAadaptere
DVI
DVI
• Benyt DVI-stikkene, når du
tilslutter til én eller to DVIskærme.
• Benyt VGA-adapteren, når du
tilslutter en VGA-skærm til et
DVI-stik.
70 Installations- og referencehåndbog
DVI
VGA
VGA
VGA
• Benyt to VGA-adaptere, når
du tilslutter to VGA-skærme
til DVI-stikkene.
Page 71
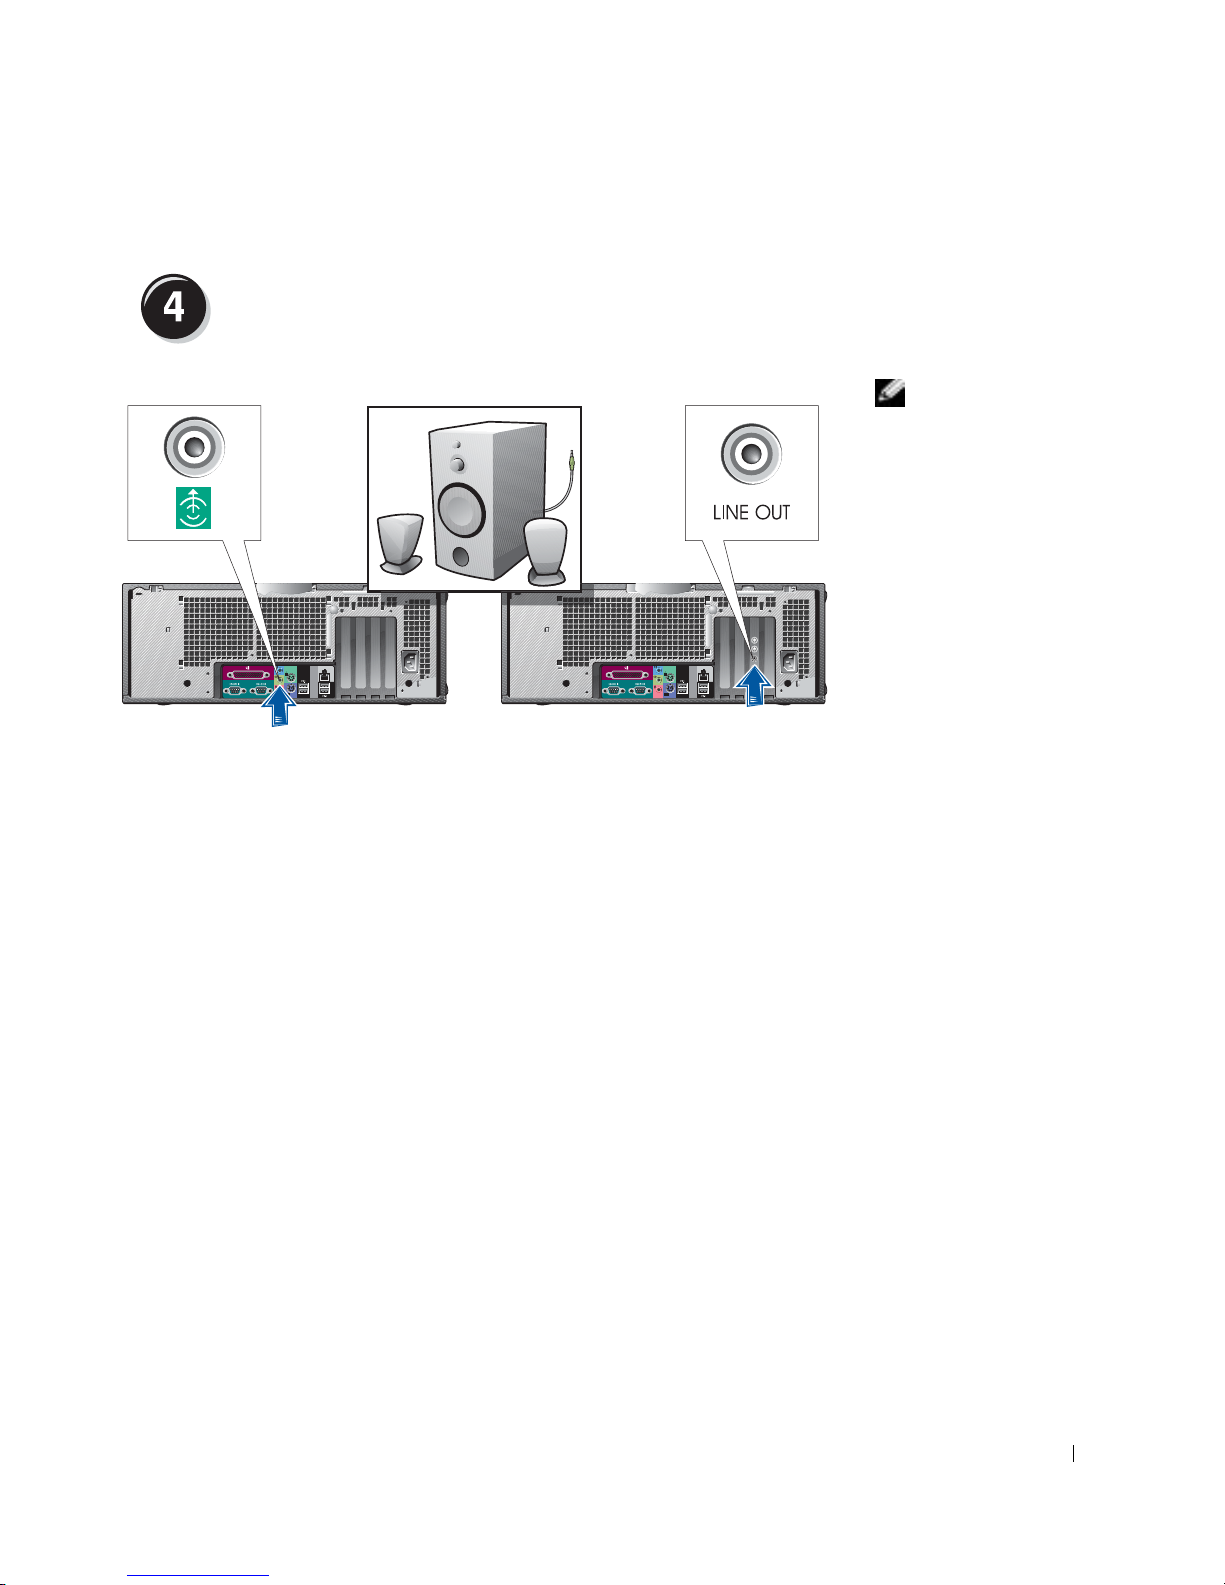
Tilslut højttalerne
BEMÆRK! Hvis der
er installeret et lydkort
i computeren, skal du
tilslutte højttalerne
til kortet.
Installations- og referencehåndbog 71
Page 72
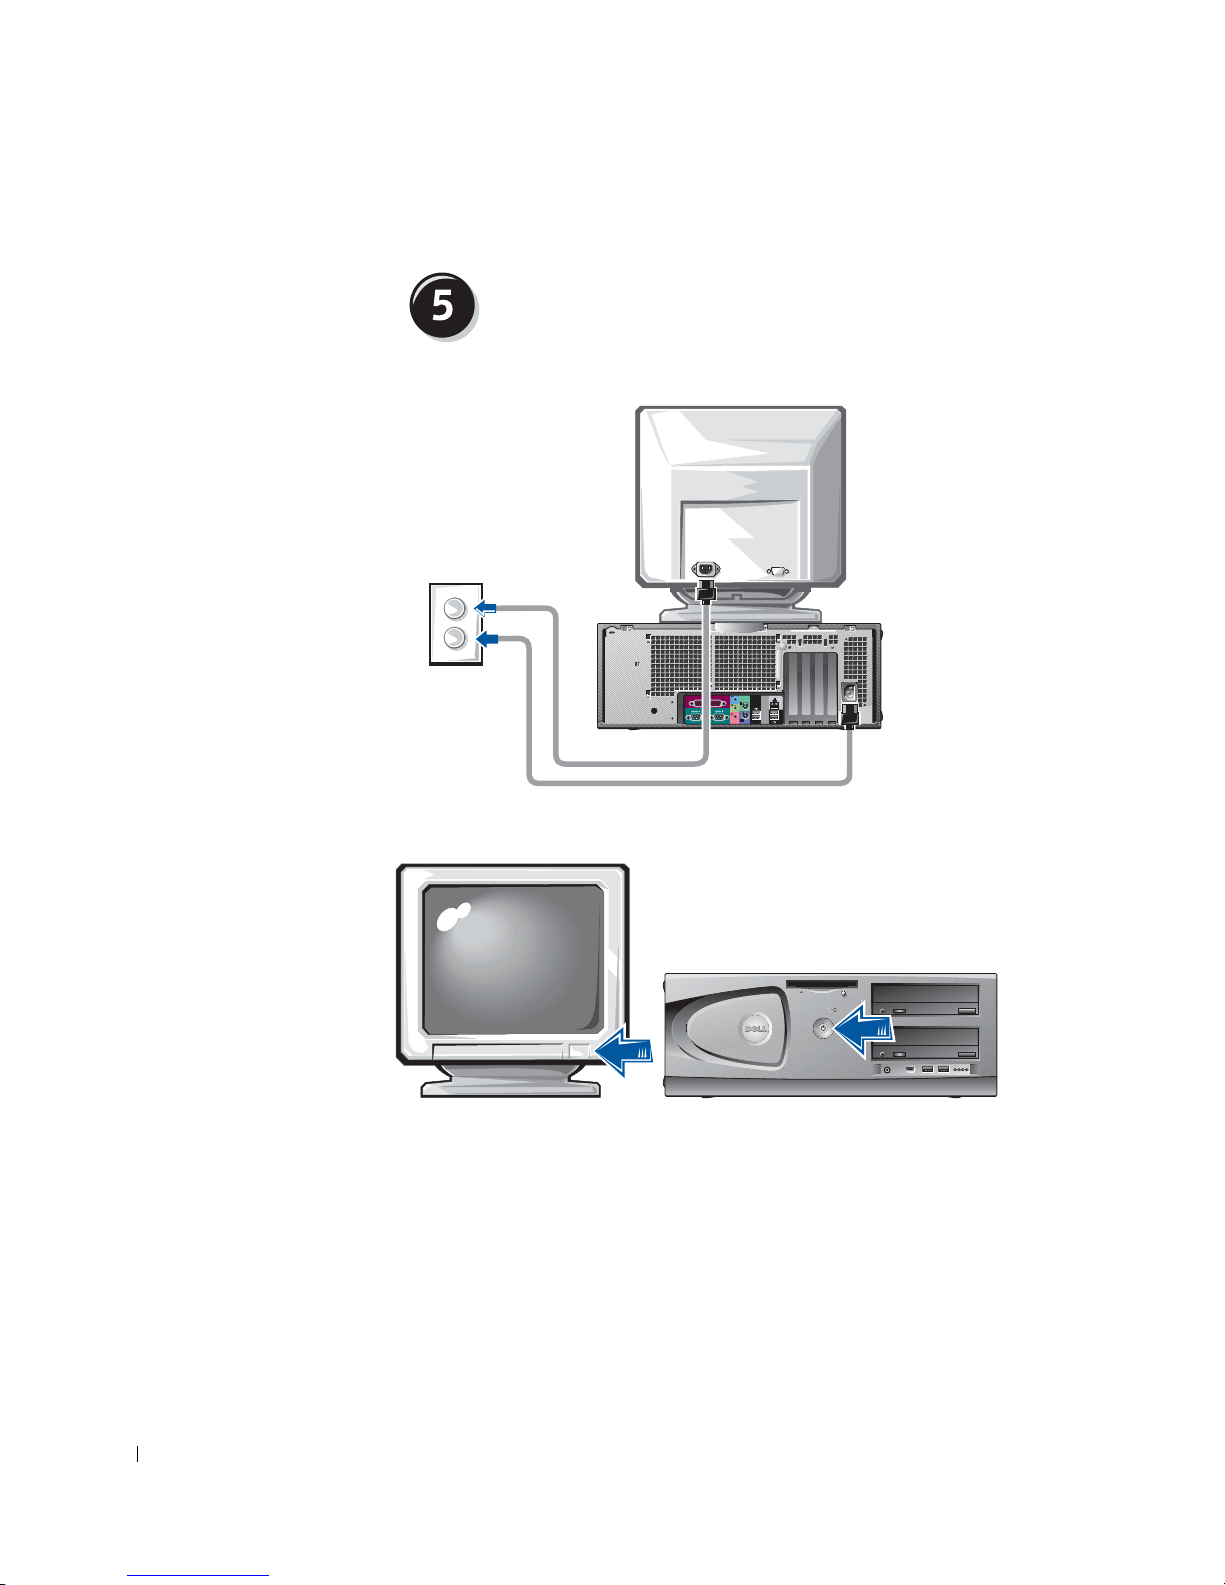
www.dell.com | support.euro.dell.com
Tilslut netledningerne, og tænd for computeren
og skærmen
72 Installations- og referencehåndbog
Page 73

Installation af yderligere software eller enheder
Før du installerer enheder eller software, der ikke blev leveret sammen med
computeren, skal du læse den dokumentation, der fulgte med softwaren
eller enheden, eller kontakte leverandøren for at kontrollere, at softwaren
eller enheden er kompatibel med computeren og operativsystemet.
Tillykke! Du har konfigureret computeren.
I User's Guide (Brugerhåndbog) til Dell Precision-arbejdsstation 450 finder
du yderligere oplysninger om computeren, f.eks.:
• Tekniske specifikationer
• Illustrationer af computerens for- og bagside, herunder alle
tilgængelige stik
• Illustrationer af, hvordan computeren ser ud indeni, herunder en
detaljeret illustration af systemkortet og stikkene
• Oplysninger om, hvordan computeren rengøres
• Oplysninger om softwarefunktioner, f.eks. styring af LegacySelect
Technology, brug af adgangskode og indstillinger for systeminstallation
• En beskrivelse af operativsystemet Windows XP
• Oplysninger om fjernelse og installation af forskellige dele, herunder
hukommelse, kort, drev, mikroprocessoren, VRM'en og batteriet
• Oplysninger om fejlfinding ved forskellige problemer med computeren
• Oplysninger om brug af Dell Diagnostics (Dell Diagnosticering)
og geninstallion af drivere
• Oplysninger om, hvordan du kan kontakte Dell
Du kan få adgang til User's Guide (Brugerhåndbog) på harddisken, på cd'en
Drivers and Utilities (Drivere og hjælpeværktøjer) eller på webstedet for
Dell Support.
Installations- og referencehåndbog 73
Page 74

Sådan får du adgang til User's Guide (Brugerhåndbog) på harddisken:
Hvis du har Windows 2000, skal du dobbeltklikke på ikonet for
User's Guide (Brugerhåndbog).
Hvis du har Windows XP, skal du klikke på knappen Start (Start)
og klikke på Help and Support (Hjælp og support).
Sådan får du adgang til User's Guide (Brugerhåndbog) på cd'en:
1 Læg cd'en Drivers and Utilities (Drivere og hjælpeværktøjer) i
cd-rom-drevet.
www.dell.com | support.euro.dell.com
Sådan får du adgang til User's Guide (Brugerhåndbog) på webstedet for
Dell Support:
Hvis du bruger cd'en
for første gang, åbnes vinduet
Drivers and Utilities
ResourceCD Installation
(Drivere og hjælpeværktøjer)
(Installation
fra Ressource-cd) for at fortælle dig, at installationen af cd'en begynder.
2 Klik på OK for at fortsætte, og følg derefter prompterne i
installationsprogrammet.
3 Klik på Next (Næste) på velkomstskærmbilledet.
4 Vælg den korrekte Systemmodel, det korrekte Operativsystem og det
relevante Emne.
1 Gå til support.dell.com.
2 Følg prompterne på webstedet, hvor du bliver bedt om specifikke
oplysninger om netop din computer.
3 Klik på Reference (Dokumentation), klik på User's Guides
(Brugerhåndbøger), klik på Systems (Systemer), og vælg derefter
din Dell Precision-computer på webstedet for Dell Support.
74 Installations- og referencehåndbog
Page 75

Vedligeholdelse af computeren
Nedenstående forslag kan være en hjælp, når du skal vedligeholde
computeren:
• Når du får en advarsel om lavt batteriniveau, skal du omgående gemme
dit arbejde for at undgå at miste eller beskadige data.
• Planlæg regelmæssige scanninger for virus med antivirussoftware.
• Ryd regelmæssigt op på harddisken ved at slette unødvendige filer
og defragmentere harddisken.
• Sikkerhedskopier filerne regelmæssigt.
• Rengør skærmen, musen og tastaturet jævnligt (yderligere oplysninger
finder du i User's Guide (Brugerhåndbog)).
Problemløsning
Følg nedenstående tip, når du skal finde frem til fejl på computeren:
• Hvis du tilføjede eller fjernede en del af computeren, inden problemet
opstod, skal du gennemse installationsprocedurerne og kontrollere,
at den pågældene del er korrekt installeret.
• Hvis en ekstern enhed ikke fungerer, skal du kontrollere, at enheden
er korrekt tilsluttet.
• På skærmen, bør du skrive den ned. Meddelelsen kan muligvis hjælpe
Dells tekniske support til at diagnosticere og løse problemet.
• Hvis der vises en fejlmeddelelse i et program, skal du se i
dokumentationen til det pågældende program.
• Hvis det under fejlfinding anbefales, at du ser i User's Guide
(Brugerhåndbog), kan du bruge cd'en Drivers and Utilities (Drivere og
hjælpeværktøjer), eller du kan gå til adressen support.dell.com (evt. på
en anden computer) for at få adgang til User's Guide (Brugerhåndbog).
Installations- og referencehåndbog 75
Page 76

Løsning af software- og hardwareinkompatibilitet
Windows XP
Windows XP IRQ-konflikter opstår, hvis en enhed enten ikke bliver
registreret under konfigurationen af operativsystemet eller er blevet
registreret, men ikke konfigureret korrekt.
Sådan kontrollerer du, om der er konflikter på en computer, der kører
Windows XP:
1
Klik på knappen
2 Klik på Performance and Maintenance (Ydelse og vedligeholdelse),
og klik på System (System).
Start
(Start), og klik på
Control Panel
(Kontrolpanel).
www.dell.com | support.euro.dell.com
Løs konflikterne ved at omkonfigurere enhederne eller fjerne enhederne fra
Device Manager (Enhedshåndtering).
Sådan bruger du Windows XP Hardware Troubleshooter (Hardwarefejlfinding):
3 Klik på fanen Hardware (Hardware), og klik derefter på Device
Manager (Enhedshåndtering).
4 Kontroller, om der er konflikter med andre enheder i listen Device
Manager (Enhedshåndtering).
Eventuelle konflikter vises med et gult udråbstegn (
enhed, der er i konflikt, eller et rødt
5
Dobbeltklik på en konflikt for at få vist vinduet
X, hvis enheden er deaktiveret.
!) ud for den
Properties
(Egenskaber).
Hvis der findes en IRQ-konflikt, viser statusområdet Device (Enhed)
i vinduet Properties (Egenskaber) de kort eller enheder, der deler
enhedens IRQ.
1 Klik på knappen Start (Start), og klik på Help and Support
(Hjælp og support).
2 Skriv hardware troubleshooter (hardwarefejlfinding) i feltet
Search (Søg), og klik på pilen for at starte søgningen.
3 Klik på Hardware Troubleshooter (Hardwarefejlfinding) på listen
4 Klik på I need to resolve a hardware conflict on my computer
76 Installations- og referencehåndbog
Search Results (Søgeresultater).
(Jeg har brug for at løse en hardwarekonflikt på min computer)
på listen Hardware Troubleshooter (Hardwarefejlfinding), og klik
derefter på Next (Næste).
Page 77

Windows 2000
Sådan kontrollerer du, om der er konflikter på en computer, der kører
Windows 2000:
1 Klik på knappen Start (Start), peg på Settings (Indstillinger), og klik
derefter på Control Panel (Kontrolpanel).
2
Dobbeltklik på
3 Klik på fanen Hardware (Hardware).
4 Klik på Device Manager (Enhedshåndtering).
5 Klik på View (Vis), og klik på Resources by connection (Ressourcer
System
(System) i vinduet
Control Panel
(Kontrolpanel).
efter tilslutning).
6 Dobbeltklik på Interrupt request (IRQ) (Interrupt request (IRQ))
for at få vist IRQ-tildelinger.
Eventuelle konflikter vises med et gult udråbstegn (
enhed, der er i konflikt, eller et rødt
7
Dobbeltklik på en konflikt for at få vist vinduet
X, hvis enheden er deaktiveret.
!) ud for den
Properties
(Egenskaber).
Hvis der findes en IRQ-konflikt, viser statusområdet Device (Enhed)
ivinduet Properties (Egenskaber) de kort eller enheder, der deler
enhedens IRQ.
8 Løs konflikterne ved at omkonfigurere enhederne eller fjerne
enhederne fra Device Manager (Enhedshåndtering).
Sådan bruger du Windows 2000 Hardware Troubleshooter (Windows 2000
Hardwarefejlfinding):
1 Klik på knappen Start (Start), og klik derefter på Help (Hjælp).
2 Klik på Troubleshooting and Maintenance (Fejlfinding og
vedligeholdelse) på fanen Contents (Indhold), klik på Windows 2000
troubleshooters (Windows 2000 Fejlfinding), og klik derefter på
Hardware (Hardware).
3 Klik på I need to resolve a hardware conflict on my computer
(Jeg har brug for at løse en hardwarekonflikt på min computer)
på listen Hardware Troubleshooter (Hardwarefejlfinding), og klik
derefter på Next (Næste).
Installations- og referencehåndbog 77
Page 78

Brug af System Restore (Systemgendannelse) i Windows XP
Operativsystemet Windows XP indeholder funktionen System Restore
(Systemgendannelse), hvormed du kan sætte computeren tilbage til
en tidligere driftstilstand (uden at der sker noget med datafiler), hvis
ændringer ved hardware, software eller andre systemindstillinger har fået
computeren i en uønsket driftstilstand. Yderligere oplysninger om brug af
System Restore (Systemgendannelse) finder du under "Windows XP Help
and Support Center (Hjælp og support)" på side 56.
MEDDELELSE: Sikkerhedskopier datafilerne regelmæssigt. System Restore
(Systemgendannelse) overvåger ikke dine datafiler eller genopretter dem.
Oprettelse af et gendannelsespunkt
www.dell.com | support.euro.dell.com
Gendannelse af computeren til et tidligere driftstidspunkt
1 Klik på knappen Start (Start), og klik på Help and Support (Hjælp og
support).
2 Klik på System Restore (Systemgendannelse).
3 Følg vejledningen på skærmen.
MEDDELELSE: Før du gendanner computeren til en tidligere driftstilstand,
skal du gemme og lukke alle åbne filer og lukke alle åbne programmer. Du må
ikke ændre, åbne eller slette nogen filer eller programmer, før
systemgendannelsen er fuldført.
1 Klik på knappen Start (Start), peg på All Programs → Accessories →
System Tools (Alle programmer → Tilbehør → Systemværktøjer), og
klik derefter på System Restore (Systemgendannelse).
2 Kontroller, at Restore my computer to an earlier time (Gendan
computeren til et tidligere tidspunkt) er markeret, og klik derefter
på Next (Næste).
3 Klik på en kalenderdato, som du vil gendanne computeren til.
Skærmbilledet Select a Restore Point (Vælg et gendannelsespunkt)
indeholder en kalender, hvor du kan se og vælge gendannelsespunkter.
Alle kalenderdatoer med ledige gendannelsespunkter vises med fed.
78 Installations- og referencehåndbog
Page 79

4 Vælg et gendannelsespunkt, og klik på Next (Næste).
Hvis en kalenderdato kun har et enkelt gendannelsespunkt, vælges det
automatisk. Hvis der er to eller flere ledige gendannelsespunkter, skal
du klikke på det punkt, du foretrækker.
5 Klik på Next (Næste).
Skærmbilledet Restoration Complete (Gendannelsen er fuldført)
vises, efter at System Restore (Systemgendannelse) har indsamlet
data, og derefter genstartes computeren automatisk.
6 Når computeren er genstartet, skal du klikke på OK.
Hvis du vil skifte gendannelsespunkt, kan du enten gentage trinene og
bruge et andet gendannelsespunkt, eller du kan fortryde gendannelsen.
Brug af Last Known Good Configuration (Sidste kendte
fungerende konfiguration)
1 Genstart computeren, og tryk på <F8>, når meddelelsen Please
select the operating system to start
operativsystem, der skal starte) vises.
2 Marker Last Known Good Setting (Sidste kendte fungerende
konfiguration), tryk på <Enter>, tryk på <l>, og vælg
operativsystem, når du bliver bedt om det.
(Marker det
Andre muligheder, der kan hjælpe med at løse yderligere enheds- eller
softwarekonflikter
MEDDELELSE: De følgende fremgangsmåder sletter alle oplysningerne
på harddisken.
• Geninstaller operativsystemet ved hjælp af installationsvejledningen
til operativsystemet og cd'en med operativsystemet.
Mens operativsystemet installeres igen, kan du vælge at slette de
eksisterende partitioner og omformatere harddisken.
• Geninstaller alle drivere vha. cd'en Drivers and Utilities (Drivere og
hjælpeværktøjer). Installer den driver, der kører mest ujævnt, først.
Installations- og referencehåndbog 79
Page 80

Hvornår skal du bruge Dell Diagnostics (Dell Diagnosticering)
Hvis du får problemer med computeren, skal du følge de retningslinjer, der
er beskrevet i afsnittet "Solving Problems" (Problemløsning) i User's Guide
(Brugerhåndbog) og køre Dell Diagnostics (Dell Diagnosticering), før
du kontakter Dell for at få hjælp. Ved at køre Dell Diagnostics (Dell
Diagnosticering) kan du muligvis løse problemet uden at kontakte Dell.
Hvis du kontakter Dell, kan testresultaterne give Dells service- og
supportpersonale vigtige oplysninger.
Med Dell Diagnostics (Dell Diagnosticering) kan du:
• Udføre hurtige, omfattende eller brugerdefinerede test på en eller
alle enheder
www.dell.com | support.euro.dell.com
Sådan startes Dell Diagnostics (Dell Diagnosticering)
Det anbefales, at du udskriver disse procedurer, før du begynder.
Få adgang til systemopsætningen, gennemse computerens
konfigurationsoplysninger, og sørg for, at den enhed, du vil teste,
er vist i systemopsætningen, og at den er aktiv.
• Vælge testmetoden ud fra, hvilke typer problemer der er tegn på
• Vælge, hvor mange gange en test skal køre
• Få vist testresultater
• Standse testen midlertidigt, hvis der opdages en fejl
• Få adgang til onlinehjælp, der beskriver testene og enhederne
• Modtage statusmeddelelser, der fortæller, om testene er blevet fuldført
uden fejl
• Modtage fejlmeddelelser, hvis der opstår problemer
MEDDELELSE: Brug kun Dell Diagnostics (Dell Diagnosticering) til at teste
din Dell™-computer. Brug af dette program sammen med andre computere kan
resultere i fejlmeddelelser.
Start Dell Diagnostics (Dell Diagnosticering) fra harddisken eller fra cd'en
Drivers and Utilities (Drivere og hjælpeværktøjer) (også kendt som
ResourceCD (Ressource-cd'en)).
80 Installations- og referencehåndbog
Page 81

Sådan startes Dell Diagnostics (Dell Diagnosticering) fra harddisken
1 Luk computeren, og genstart den.
2 Tryk på <F12>, så snart DELL
®
-logoet vises.
Hvis du venter for længe, og Windows-logoet vises, skal du fortsætte
med at vente, indtil du ser skrivebordet i Windows. Luk derefter
computeren via menuen Start (Start), og prøv igen.
3 Når listen med startenheder vises, skal du markere Boot to Utility
Partition (Start partitionen med diagnosticeringsværktøjet) og
trykke på <Enter>.
4 Når hovedmenuen i Dell Diagnostics (Dell Diagnosticering) vises,
skal du vælge, hvilken test du vil køre.
Sådan startes Dell Diagnostics (Dell Diagnosticering) fra cd'en Drivers and
Utilities (Drivere og hjælpeværktøjer)
1 Læg cd'en Drivers and Utilities (Drivere og hjælpeværktøjer) i
cd-rom-drevet.
2 Luk computeren, og genstart den.
Tryk på <F12>, så snart DELL-logoet vises.
Hvis du venter for længe, og Windows-logoet vises, skal du fortsætte
med at vente, indtil du ser skrivebordet i Windows. Luk derefter
computeren via menuen Start (Start), og prøv igen.
Når listen med startenheder vises, skal du markere IDE CD-ROM
3
Device
4 Vælg indstillingen IDE CD-ROM Device (IDE-cd-rom-enheden)
(IDE-cd-rom-enheden) og trykke på <Enter>.
fra cd'ens startmenu.
5 Vælg indstillingen Boot from CD-ROM (Start fra cd-rom) fra den
menu, der vises.
6 Skriv 1 for at åbne ressource-cd'ens menu.
BEMÆRK! Hvis der
vises en meddelelse om,
at der ikke blev fundet
en partition med
diagnosticeringsværktøjet, skal du følge
instruktionerne på
skærmen for at køre
Dell Diagnostics (Dell
Diagnostics) fra cd'en
Drivers and Utilities
(Drivere og
hjælpeværktøjer).
BEMÆRK! Denne
funktion ændrer kun
startsekvensen en enkelt
gang. Næste gang du
starter computeren,
starter den i
overensstemmelse med de
enheder, der er angivet i
systemopsætningen.
7 Skriv 2 for at starte Dell Diagnostics (Dell Diagnosticering).
8 Væ lg Run the 32 Bit Dell Diagnostics (Kør 32-bit Dell
Diagnosticering) på den nummererede liste. Hvis der er opført flere
versioner, skal du vælge den version, der passer til platformen.
9 Når hovedmenuen i Dell Diagnostics (Dell Diagnosticering) vises,
skal du vælge, hvilken test du vil køre.
Installations- og referencehåndbog 81
Page 82

Hovedmenuen i Dell Diagnostics (Dell Diagnosticering)
BEMÆRK!
Computerens
servicemærke er
placeret øverst på
testskærmbillederne.
www.dell.com | support.euro.dell.com
1 Når Dell Diagnostics (Dell Diagnosticering) er indlæst, og
skærmbilledet Main Menu (Hovedmenu) vises, skal du klikke
på knappen for den ønskede indstilling.
Indstilling Funktion
Hurtig test Udfører en hurtig test af enhederne. Denne test varer
typisk 10-20 minutter og kræver ingen handling fra dig.
Kør den hurtige test først for at øge muligheden for
hurtigt at identificere problemet.
Udvidet test Udfører en grundig test af enhederne. Denne test
varer typisk en time eller længere og kræver, at du
indimellem besvarer nogle spørgsmål.
Brugerdefineret
test
Tester en bestemt enhed. Du kan selv definere, hvilke
test du vil køre.
Liste over
symptomer
2
Hvis der opstår et problem under udførelsen af en test, vises der en
Her vises en liste over de hyppigst forekomne
symptomer, og du får mulighed for at vælge en test,
som er baseret på det problemsymptom, du er stødt på.
besked med en fejlkode og en beskrivelse af problemet. Skriv fejlkoden
og beskrivelsen af problemet ned, og følg vejledningen på skærmen.
Hvis du ikke kan løse problemet, skal du kontakte Dell.
3 Hvis du kører en test via indstillingen Custom Test (Brugerdefineret
test) eller indstillingen Symptom Tree (Liste over symptomer), skal
du klikke på den relevante fane, som er beskrevet i nedenstående tabel,
for at få yderligere oplysninger.
82 Installations- og referencehåndbog
Page 83

Fane Funktion
Resultater Her vises testresultaterne og de fejl, som opstod.
Fejl Her vises, hvilke fejl der opstod, fejlkoder og beskrivelser
af problemerne.
Hjælp Her får du en beskrivelse af testen og evt., hvilke krav
der stilles til udførsel af testen.
Konfiguration Her vises hardwarekonfigurationen for den valgte enhed.
Dell Diagnostics (Dell Diagnosticering) indeholder
konfigurationsoplysningerne for alle enhederne fra
systemopsætning, hukommelse og forskellige interne
test. Oplysningerne vises på listen over enheder i
skærmens venstre side. Det er ikke sikkert, at alle
komponenter, som er installeret på computeren, eller
alle enheder, som er tilsluttet til computeren, vises på
listen over enheder.
Parametre Giver dig mulighed for at tilpasse testen ved at ændre
testindstillingerne.
4 Hvis du kører Dell Diagnostics (Dell Diagnosticering) fra cd'en Drivers
and Utilities (Drivere og hjælpeværktøjer), skal du fjerne cd'en, når
testene er udført.
5 Luk testskærmbilledet for at vende tilbage til skærmbilledet
Main Menu (Hovedmenu). Hvis du vil afslutte Dell Diagnostics
(Dell Diagnosticering) og genstarte computeren, skal du lukke
skærmbilledet Main Menu (Hovedmenu).
Installations- og referencehåndbog 83
Page 84

Systemlamper
Lamperne på forsiden af computeren kan angive, at der er et problem
med computeren.
Strømindikator Lampen på
harddisken
Lyser grønt N/A Computeren er tændt og fungerer
Blinker grønt Lyser ikke Computeren er midlertidigt
www.dell.com | support.euro.dell.com
Blinker grønt flere
gange for derefter
at slukke
Lyser gult N/A Dell Diagnostics (Dell
N/A Der er fejl i konfigurationen. Kontroller diagnosticeringslam-
Årsag Udbedring
normalt.
standset (Windows 2000 og
Windows XP).
Diagnosticering) er ved at
udføre en test, eller en enhed
på systemkortet er muligvis
defekt eller forkert installeret.
Udbedring er ikke nødvendig.
Tryk på tænd/sluk-knappen,
flyt musen, eller tryk på en tast
på tastaturet for at aktivere
computeren. Yderligere oplysninger
finder du i afsnittet "Power
Management" (Strømstyring) i
User's Guide (Brugerhåndbog).
perne for at se, om det specifikke
problem er identificeret. Yderligere
oplysninger finder du i User's Guide
(Brugerhåndbog).
Hvis Dell Diagnostics (Dell
Diagnosticering) kører, skal du
vente, til testen er fuldført.
Kontroller diagnosticeringslamperne for at se, om det specifikke
problem er identificeret. Yderligere
oplysninger finder du i afsnittet om
problemer med systemkortet i
User's Guide (Brugerhåndbog).
Hvis computeren ikke starter, skal
du kontakte Dell for at få hjælp.
Blinker gult Lyser ikke Der er muligvis opstået en
84 Installations- og referencehåndbog
fejl i strømforsyningen eller
systemkortet.
Kontroller diagnosticeringslamperne for at se, om det specifikke
problem er identificeret. Yderligere
oplysninger finder du i afsnittet
"Power Problems" (Problemer med
strømmen) og afsnittet "System
Board Problems" (Problemer med
systemkortet) i User's Guide
(Brugerhåndbog).
Page 85

Strømindikator Lampen på
harddisken
Årsag Udbedring
Blinker gult Lyser grønt Der er muligvis opstået en fejl i
systemkortet eller i VRM'en.
Lyser grønt, og
der høres en
bipkode under
POST
Strømindikatoren
lyser grønt, og der
er ingen bipkode
og ingen video
under POST
Strømindikatoren
lyser grønt, og der
er ingen bipkode,
men computeren
låser under POST
N/A Der opstod et problem, mens
BIOS'en kørte.
N/A Skærmen eller grafikkortet er
muligvis defekt eller forkert
installeret.
N/A En integreret systemkortenhed
er muligvis defekt.
Kontroller diagnosticeringslamperne for at se, om det specifikke
problem er identificeret. Yderligere
oplysninger finder du i afsnittet
om problemer med systemkortet
i User's Guide (Brugerhåndbog).
Yderligere oplysninger om diagnosticering af bipkoden finder du
under "Bipkoder" på side 85.
Kontroller også diagnosticeringslamperne for at se, om det specifikke problem er identificeret.
Kontroller diagnosticeringslamperne for at se, om det specifikke
problem er identificeret. Yderligere
oplysninger finder du i afsnittet
"Video Problems" (Problemer med
videokortet) i User's Guide (Brugerhåndbog).
Kontroller diagnosticeringslamperne for at se, om det specifikke
problem er identificeret. Hvis
problemet ikke identificeres, skal
du kontakte Dell for at få hjælp.
Bipkoder
Computeren kan udsende en serie bip, som identificerer et problem. En
mulig serie (kode 1-3-1) består af et enkelt bip, tre bip i rap og så et enkelt
bip. Denne serie fortæller, at computeren har et hukommelsesproblem.
Hvis du hører en bipkode, skal du skrive den ned, og slå den op under
afsnittet "Beep Codes" (Bipkoder) i User's Guide (Brugerhåndbog).
Installations- og referencehåndbog 85
Page 86
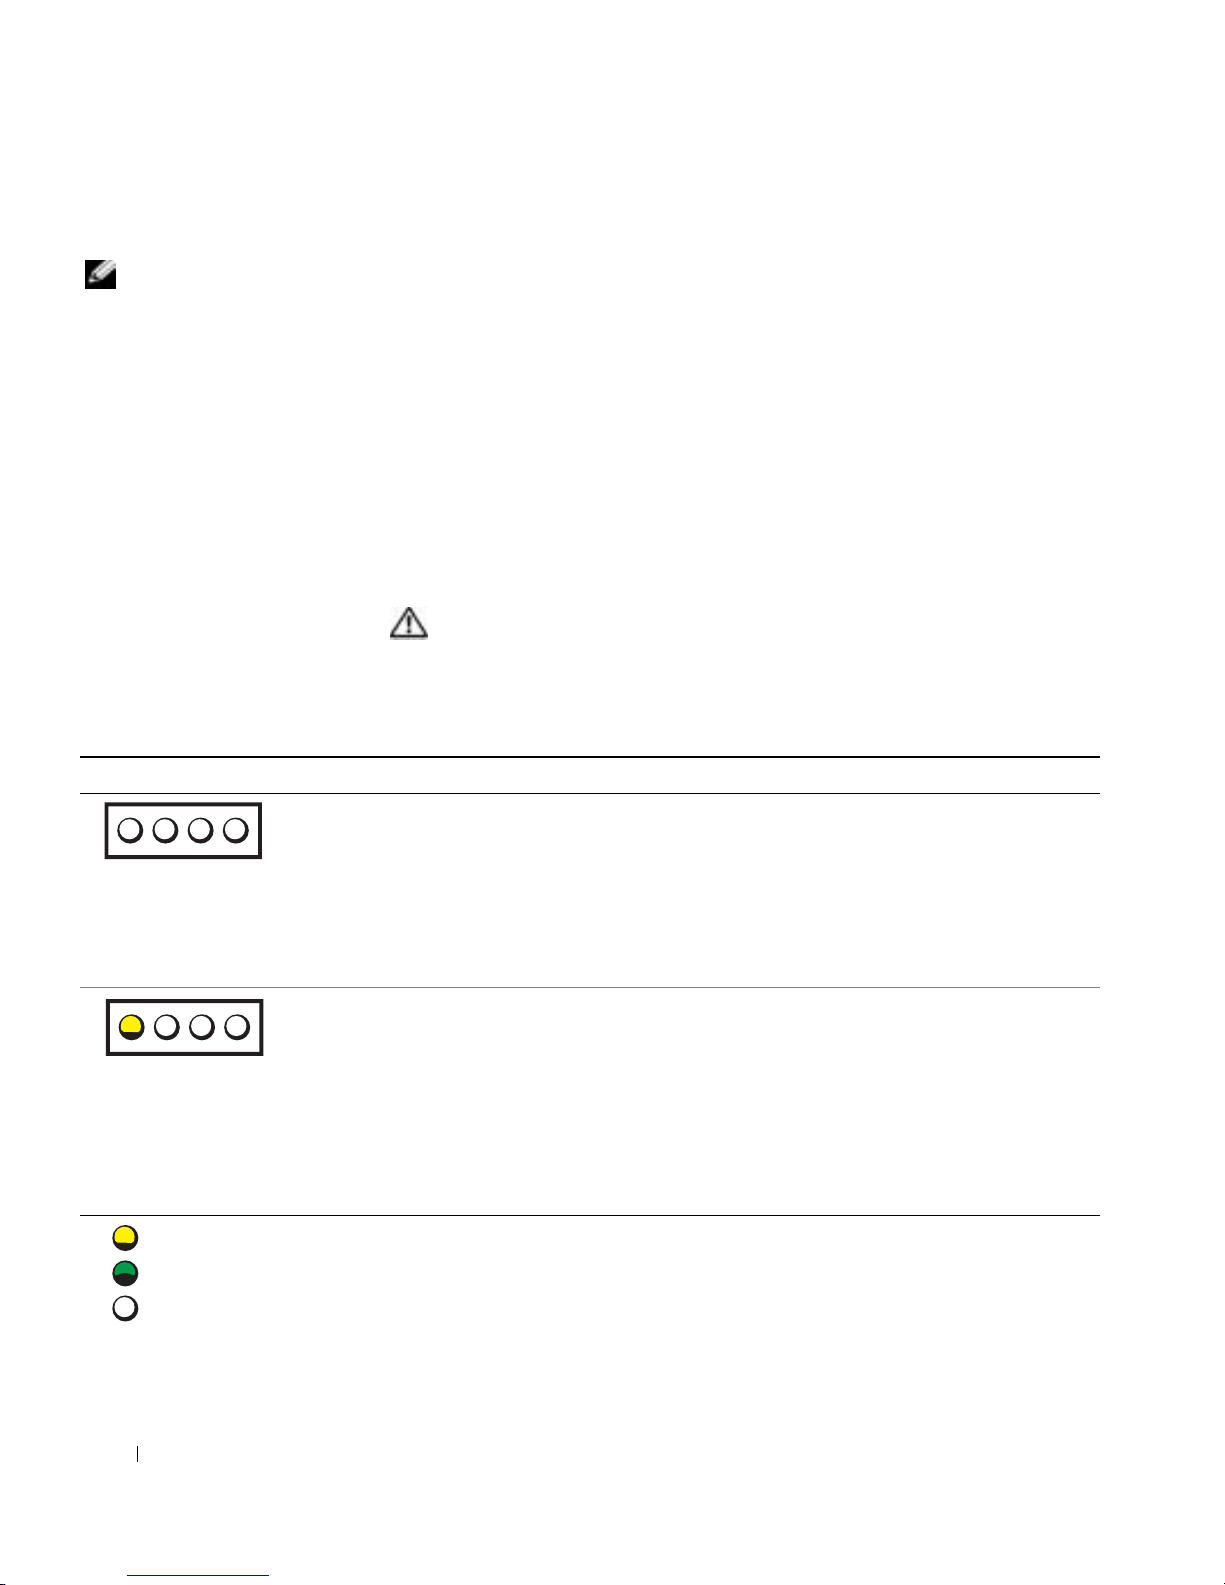
Fejlmeddelelser
BEMÆRK! Hvis
meddelelsen ikke findes
på listen, skal du se i
dokumentationen til enten
operativsystemet eller det
program, der kørte, da
meddelelsen blev vist.
Hvis der opstår en fejl under starten, kan der blive vist en meddelelse
på skærmen, der identificerer problemet. Se under "Error Messages"
(Fejlmeddelelser) i User's Guide (Brugervejledning) for at få forslag
til løsning af et problem.
Diagnosticeringslamper
Som en hjælp til at løse problemer er computeren udstyret med fire lamper
på frontpanelet, der er mærket "A","B", "C" og "D". Lamperne kan være
gule eller grønne. Når computeren starter normalt, blinker lamperne. Når
computeren er startet, forbliver lamperne grønne. Hvis computeren ikke
fungerer korrekt, identificerer farven og rækkefølgen af lamperne problemet.
www.dell.com | support.euro.dell.com
Lampemønster Problembeskrivelse Mulig løsning
Der er ikke tilsluttet strøm til
computeren.
A B C D
ADVARSEL! Før du begynder på nogen af procedurerne i dette
afsnit, skal du følge sikkerhedsinstruktionerne i
Systeminformation.
Koder for diagnosticeringslamper før POST
Tilslut computeren til en stikkontakt. Kontroller,
at strømindikatoren på frontpanelet lyser. Hvis
strømindikatoren er slukket, skal du kontrollere,
at computer er tilsluttet til en korrekt fungerende
stikkontakt og derefter trykke på tænd/sluk-knappen.
Hvis problemet ikke løses, skal du kontakte Dell for at få
hjælp.
Computeren er tilsluttet til en
stikkontakt, men er i en normal
deaktiveret tilstand.
A B C D
=gul
=grøn
=slukket
86 Installations- og referencehåndbog
Tryk på tænd/sluk-knappen for at tænde computeren.
Hvis computeren ikke tændes, skal du kontrollere,
at strømindikatoren på frontpanelet lyser. Hvis
strømindikatoren er slukket, skal du kontrollere,
at computer er tilsluttet til en korrekt fungerende
stikkontakt og derefter trykke på tænd/sluk-knappen.
Hvis problemet ikke løses, skal du kontakte Dell for at
få hjælp.
Page 87
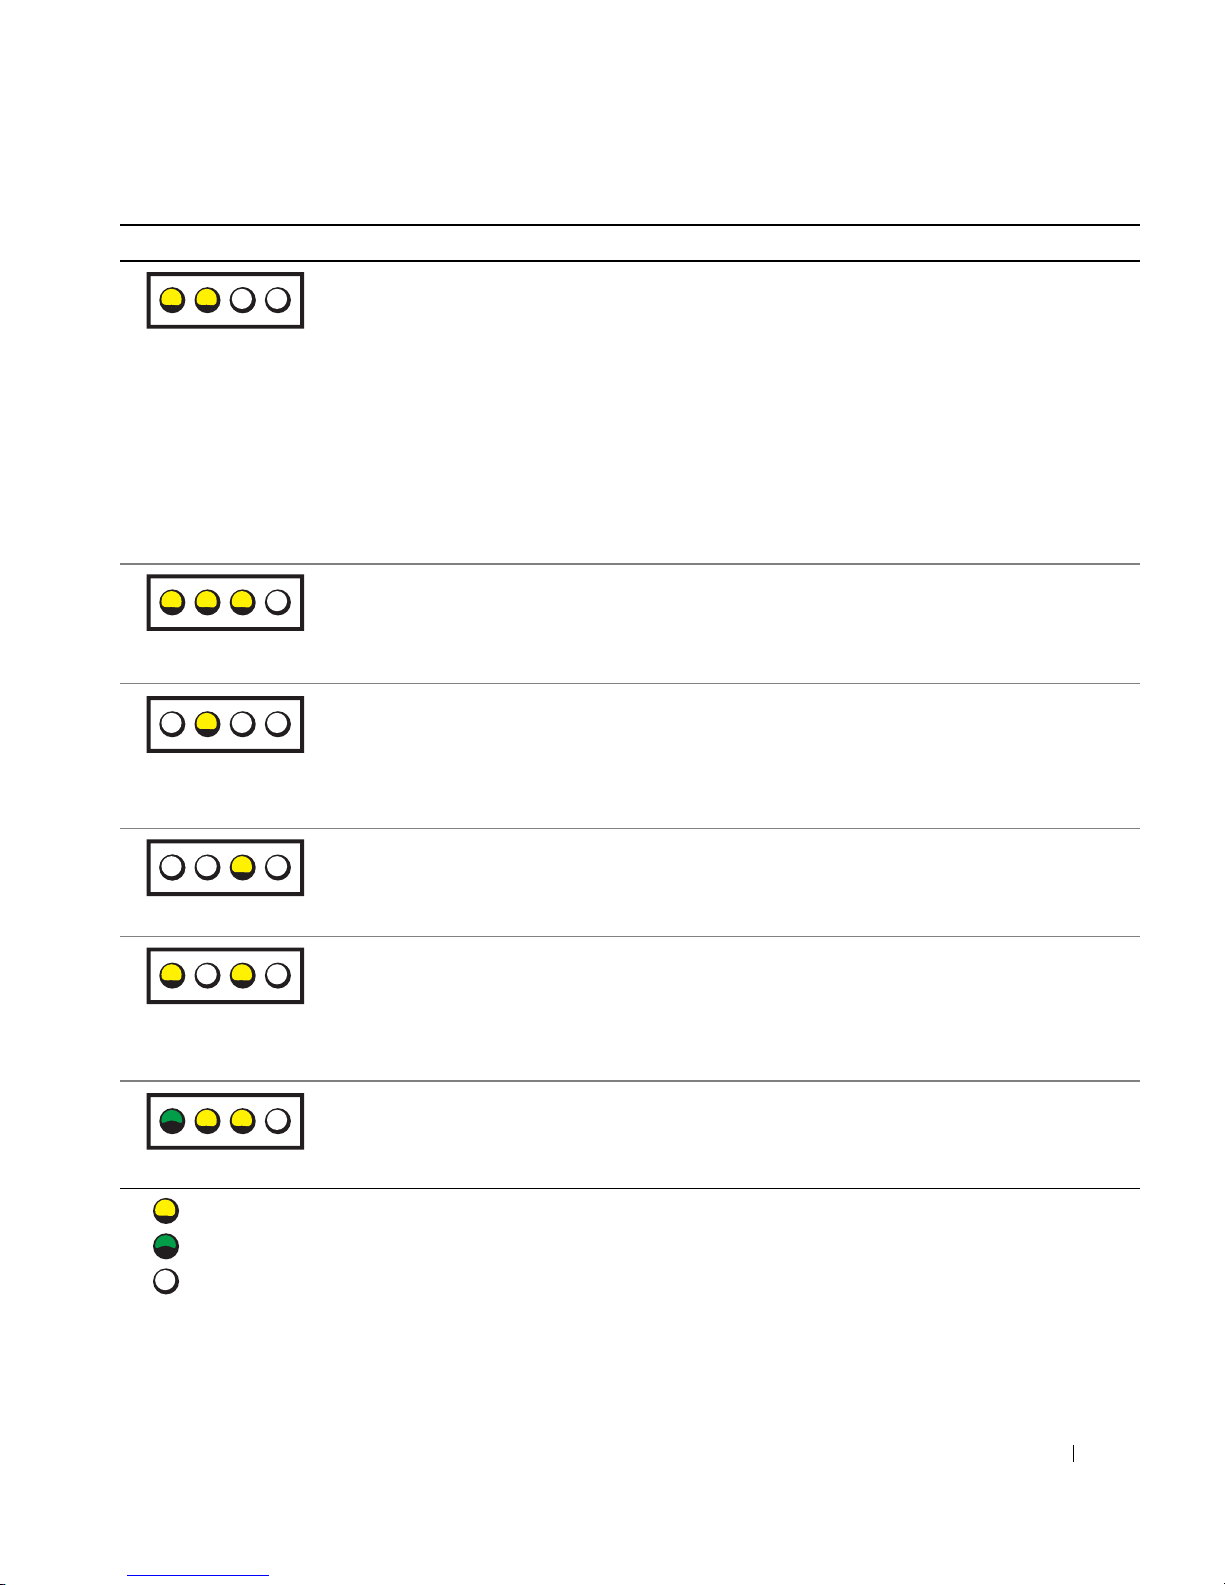
Lampemønster Problembeskrivelse Mulig løsning
A B C D
A B C D
A B C D
Computer er i strømbesparende
tilstand eller "dvale".
BIOS'en kører ikke. Kontroller, at mikroprocessoren er placeret korrekt, og
Der er muligvis opstået en fejl
i strømforsyningen eller
strømkablet.
Der er muligvis opstået en fejl
i systemkortet.
Brug en af følgende metoder til at "vække" computeren:
Yderligere oplysninger finder du i afsnittet "Advanced
Features" (Avancerede egenskaber) i User's Guide
(Brugerhåndbog).
Hvis problemet ikke løses, og du prøver at aktivere
computeren med en USB-mus eller et USB-tastatur,
skal du erstatte musen eller tastaturet med en korrekt
fungerende PS/2-mus eller et korrekt fungerende
tastatur og prøve at aktivere computeren.
Hvis problemet ikke løses, skal du kontakte Dell for at
få hjælp.
genstart computeren.
Hvis problemet ikke løses, skal du kontakte Dell for at
få hjælp.
Følg proceduren i afsnittet "Power Problems"
(Problemer med strømmen) i User's Guide
(Brugerhåndbog).
Hvis problemet ikke løses, skal du kontakte Dell for at
få hjælp.
Kontakt Dell for at få hjælp.
A B C D
A B C D
A B C D
=gul
=grøn
=slukket
Der er en uoverensstemmelse i
mikroprocessoren og/eller VRM'en.
Der er muligvis opstået en
VRM 0-fejl.
Følg proceduren i afsnittet "Microprocessor Problems"
(Problemer med mikroprocessoren) i User's Guide
(Brugerhåndbog).
Hvis problemet ikke løses, skal du kontakte Dell for at
få hjælp.
Kontakt Dell for at få hjælp.
Installations- og referencehåndbog 87
Page 88
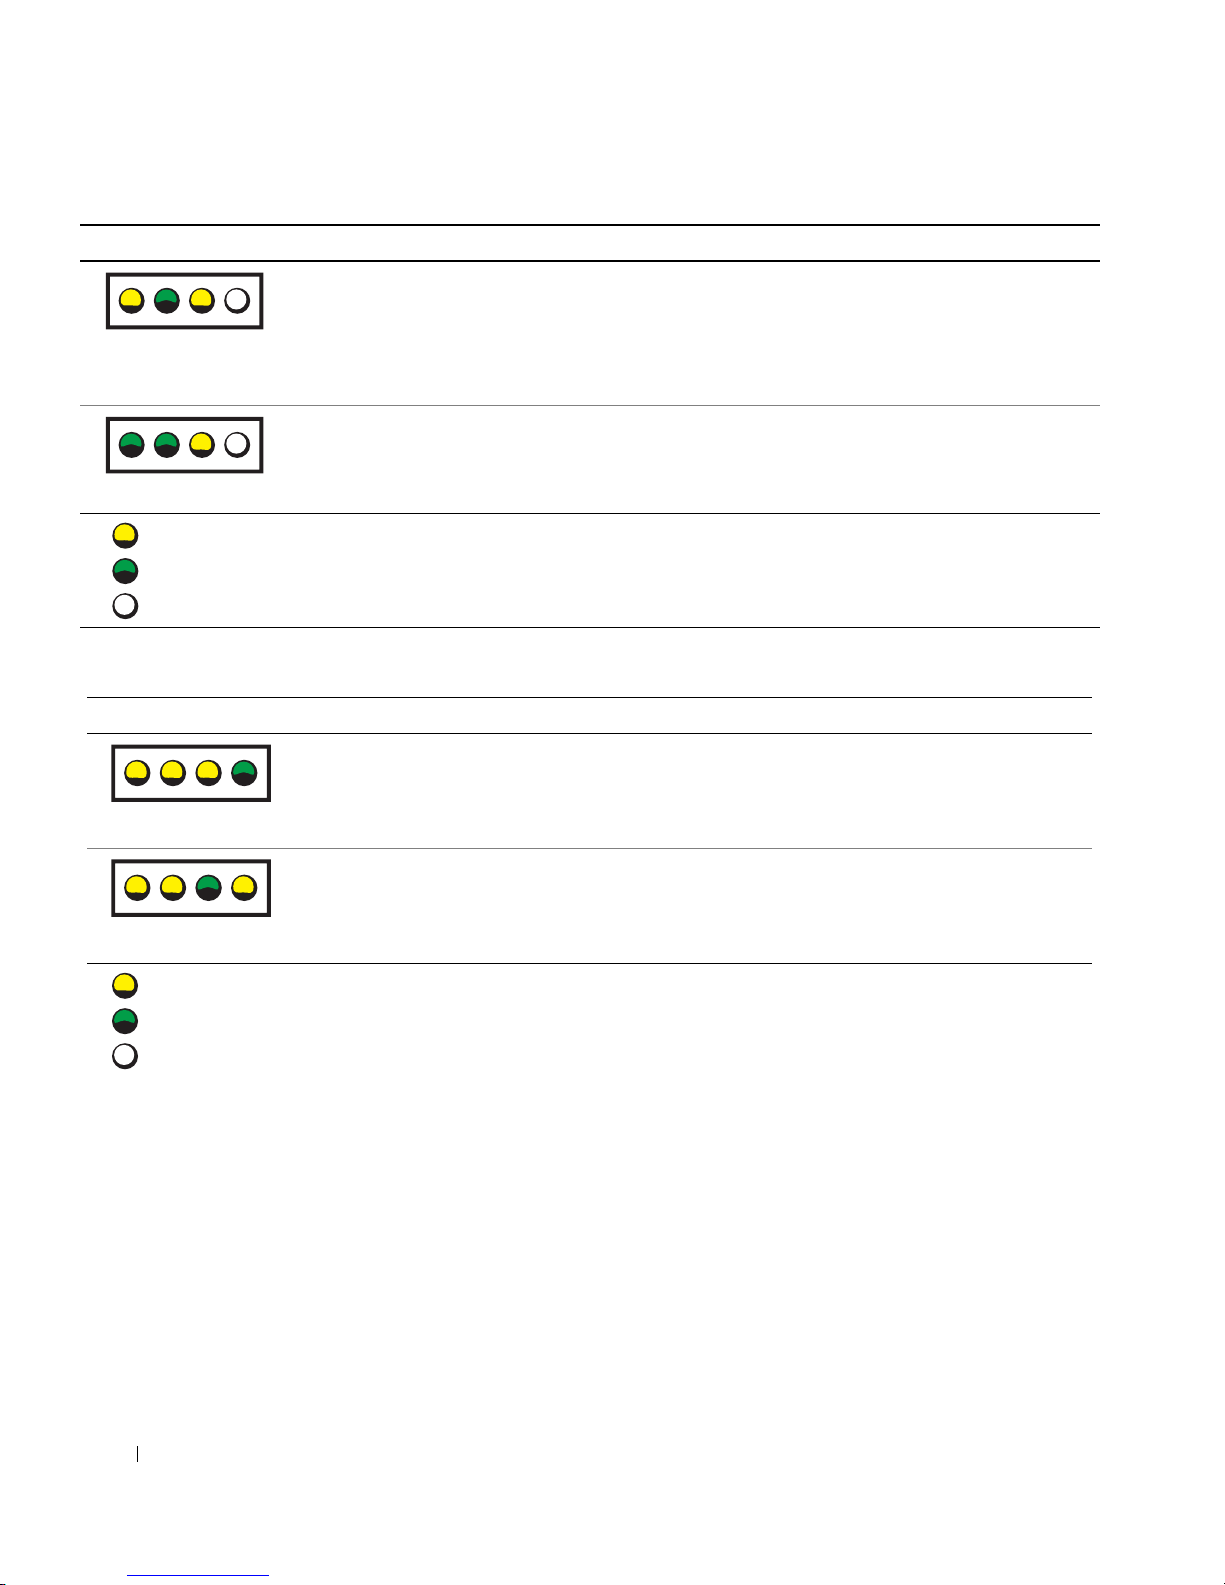
Lampemønster Problembeskrivelse Mulig løsning
Der er muligvis opstået en
VRM 1-fejl.
A B C D
Der er muligvis opstået en
VRM 0- og en VRM 1-fejl.
Følg proceduren i afsnittet "Microprocessor Problems"
(Problemer med mikroprocessoren) i User's Guide
(Brugerhåndbog).
Hvis problemet ikke løses, skal du kontakte Dell for at
få hjælp.
Kontakt Dell for at få hjælp.
A B C D
=gul
=grøn
www.dell.com | support.euro.dell.com
=slukket
Koder for diagnosticeringslamper under POST
Lampemønster Problembeskrivelse Mulig løsning
Der er muligvis opstået en
BIOS-fejl. Computeren er
i genoprettelsestilstand.
Kør værktøjet BIOS Recovery (BIOS-genoprettelse),
vent til genoprettelsen er udført, og genstart
computeren.
A B C D
A B C D
=gul
=grøn
=slukket
Der er muligvis opstået en
fejl i mikroprocessoren.
Geninstaller mikroprocessoren, og genstart
computeren.
88 Installations- og referencehåndbog
Page 89
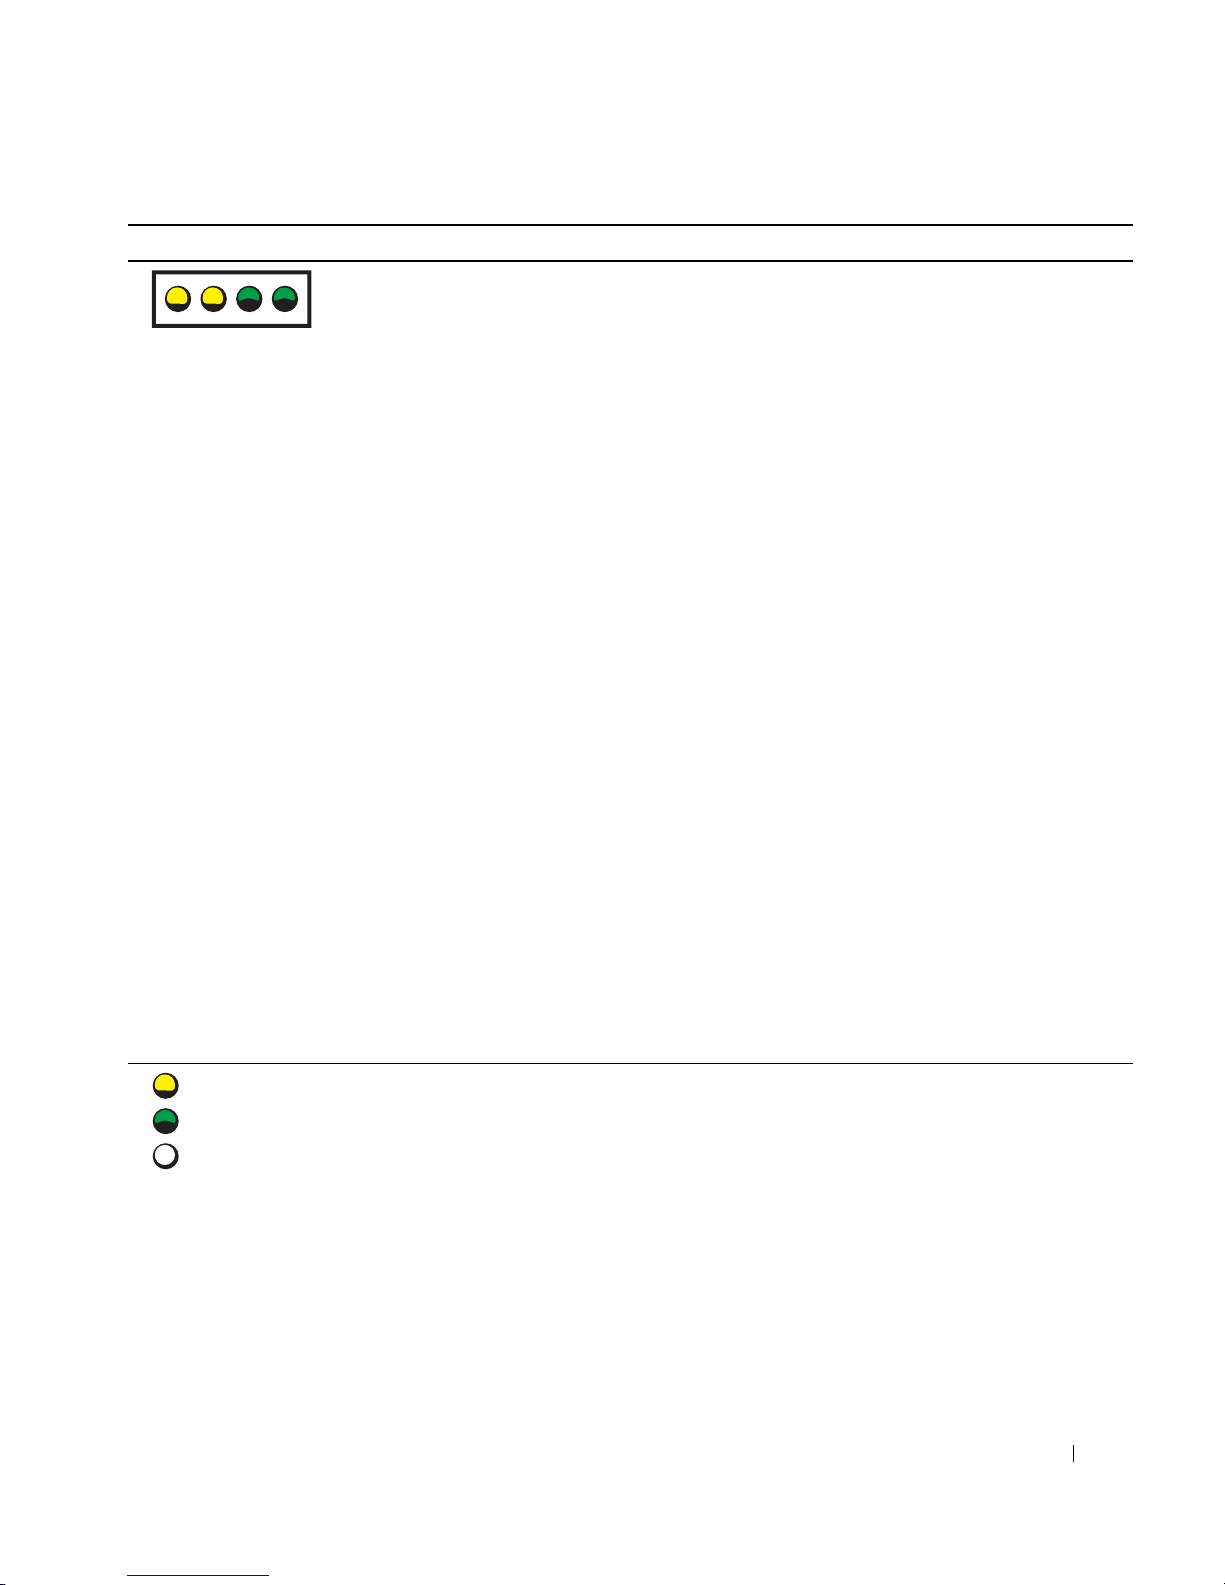
Lampemønster Problembeskrivelse Mulig løsning
A B C D
Der er registreret
hukommelsesmoduler,
men der er opstået en
hukommelsesfejl.
1 Nulstil hukommelsesmodulerne for at kontrollere,
at computeren kommunikerer fejlfrit med
hukommelsen.
2 Genstart computeren.
3 Hvis problemet stadig eksisterer, skal du fjerne
alle hukommelsesmoduler og installere et
hukommelsesmodul i hukommelsesmodulstik 4.
4 Genstart computeren.
Du får vist følgende meddelelse: Advarsel!
Kører i tilstanden Debug
(Fejlfindingstilstand). Par
hukommelsesmodulerne for at
genoptage normal drift.
5 Tryk på <F1> for at starte operativsystemet.
6 Kør testene af systemhukommelsen i Dell
Diagnostics (Dell Diagnosticering).
7 Hvis hukommelsesmodulet består disse test, skal
du slukke computeren, fjerne hukommelsesmodulet og gentage processen for de øvrige
hukommelsesmoduler, indtil du får vist en hukommelsesfejl, når computeren startes eller under en
diagnosticeringstest.
Hvis det hukommelsesmodul, som testes først, er
defekt, skal du gentage processen for de øvrige
moduler for at sikre, at de ikke er defekte.
8 Når det defekte hukommelsesmodul er identifi-
ceret, skal du kontakte Dell for at få det udskiftet.
BEMÆRK! Computeren kan evt. køre i
fejlfindingstilstand, indtil du har installeret nye
hukommelsesmoduler.
=gul
=grøn
=slukket
Installations- og referencehåndbog 89
Page 90
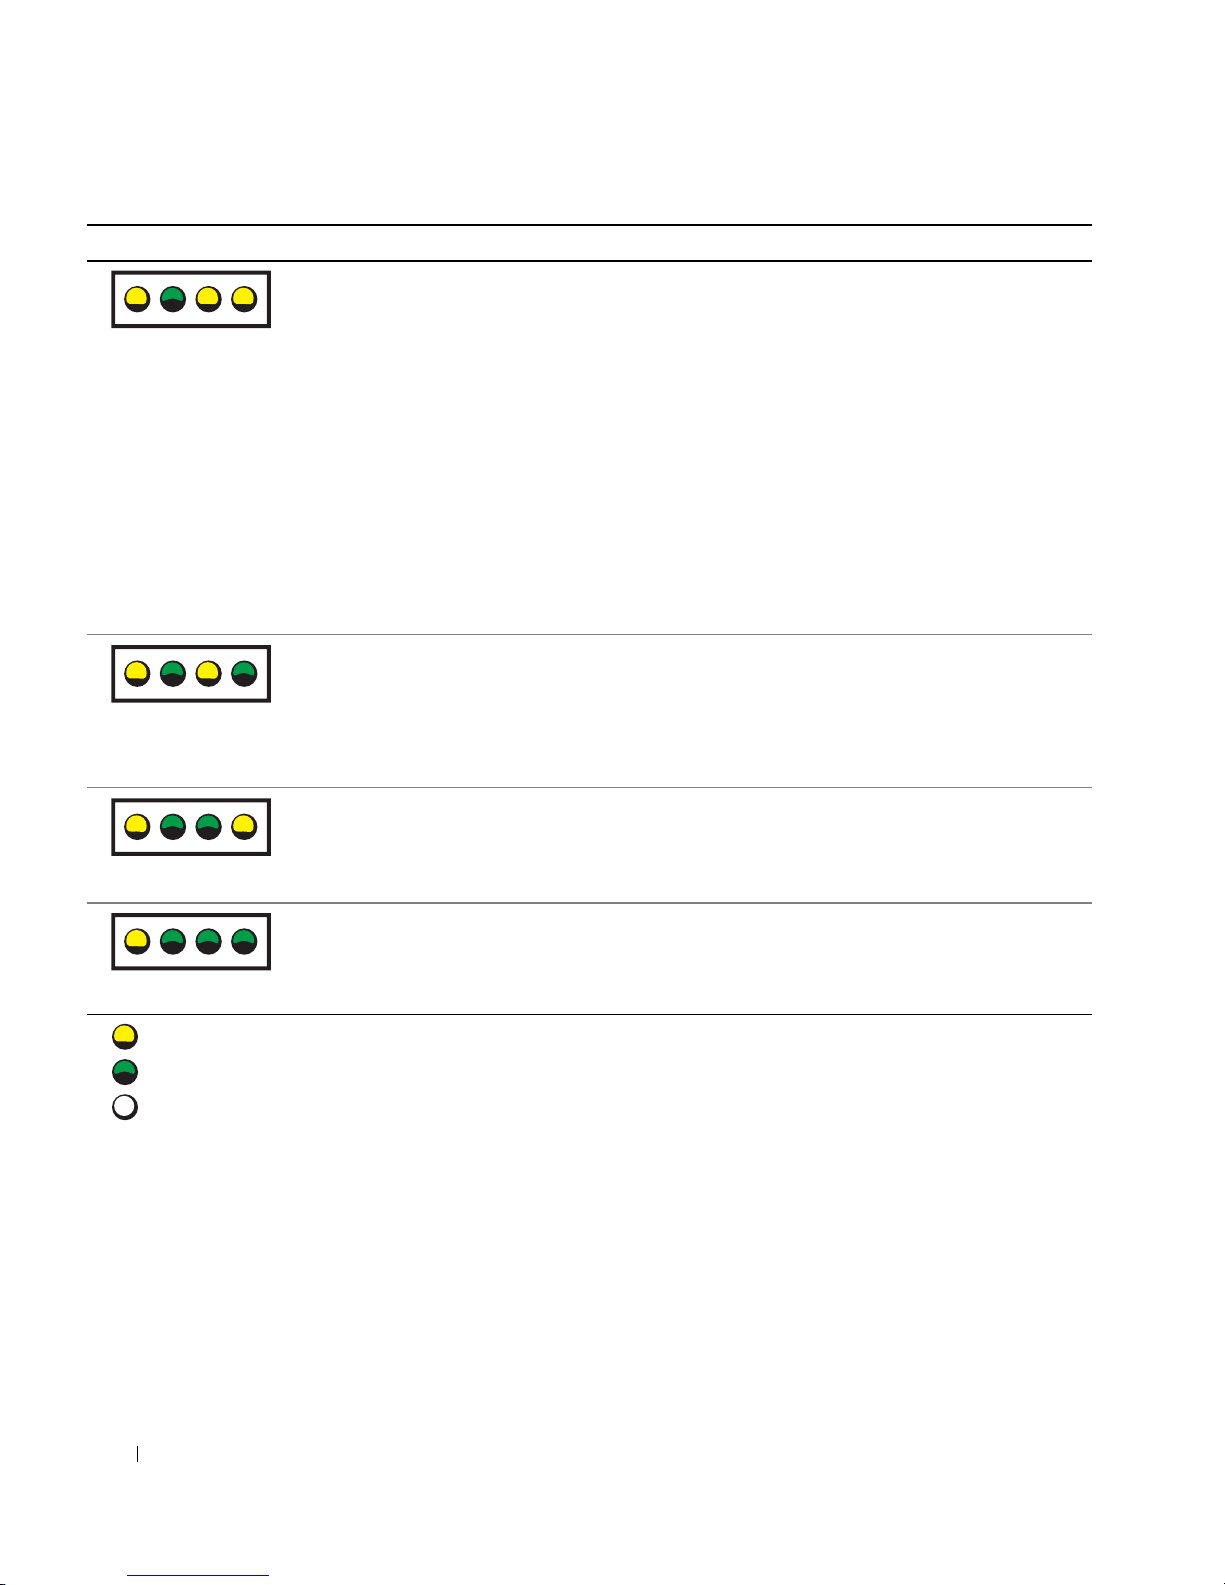
Lampemønster Problembeskrivelse Mulig løsning
Der er muligvis opstået en
fejl i et udvidelseskort.
A B C D
www.dell.com | support.euro.dell.com
Der er muligvis opstået en
fejl i grafikkortet.
A B C D
Der er muligvis opstået en
fejl ved diskettedrevet eller
harddisken.
A B C D
1 Find ud af, om der findes en konflikt ved at fjerne
et kort (ikke grafikkortet) og derefter genstarte
computeren.
2 Hvis problemet fortsætter, skal du geninstallere det
kort, du fjernede, fjerne et andet kort og derefter
genstarte computeren.
3 Gentag denne proces for hvert kort. Hvis
computeren starter normalt, skal du foretage
fejlfinding af det sidste kort, du fjerner, for
ressourcekonflikter (se "Resolving Software and
Hardware Incompatibilities" (Løsning af softwareog hardwareinkompatibilitet) i User's Guide
(Brugerhåndbog)).
4 Hvis problemet fortsætter, skal du kontakte Dell.
Geninstaller grafikkortet, og genstart computeren.
Hvis problemerne ikke løses, skal du installere et
grafikkort, som du ved virker, og genstarte
computeren.
Hvis problemet fortsætter, skal du kontakte Dell.
Kontroller alle tilslutninger af strøm- og datakabler, og
genstart computeren.
Der er muligvis opstået en
USB-fejl.
A B C D
=gul
=grøn
=slukket
90 Installations- og referencehåndbog
Geninstaller alle USB-enheder, kontroller
kabeltilslutninger, og genstart computeren.
Page 91
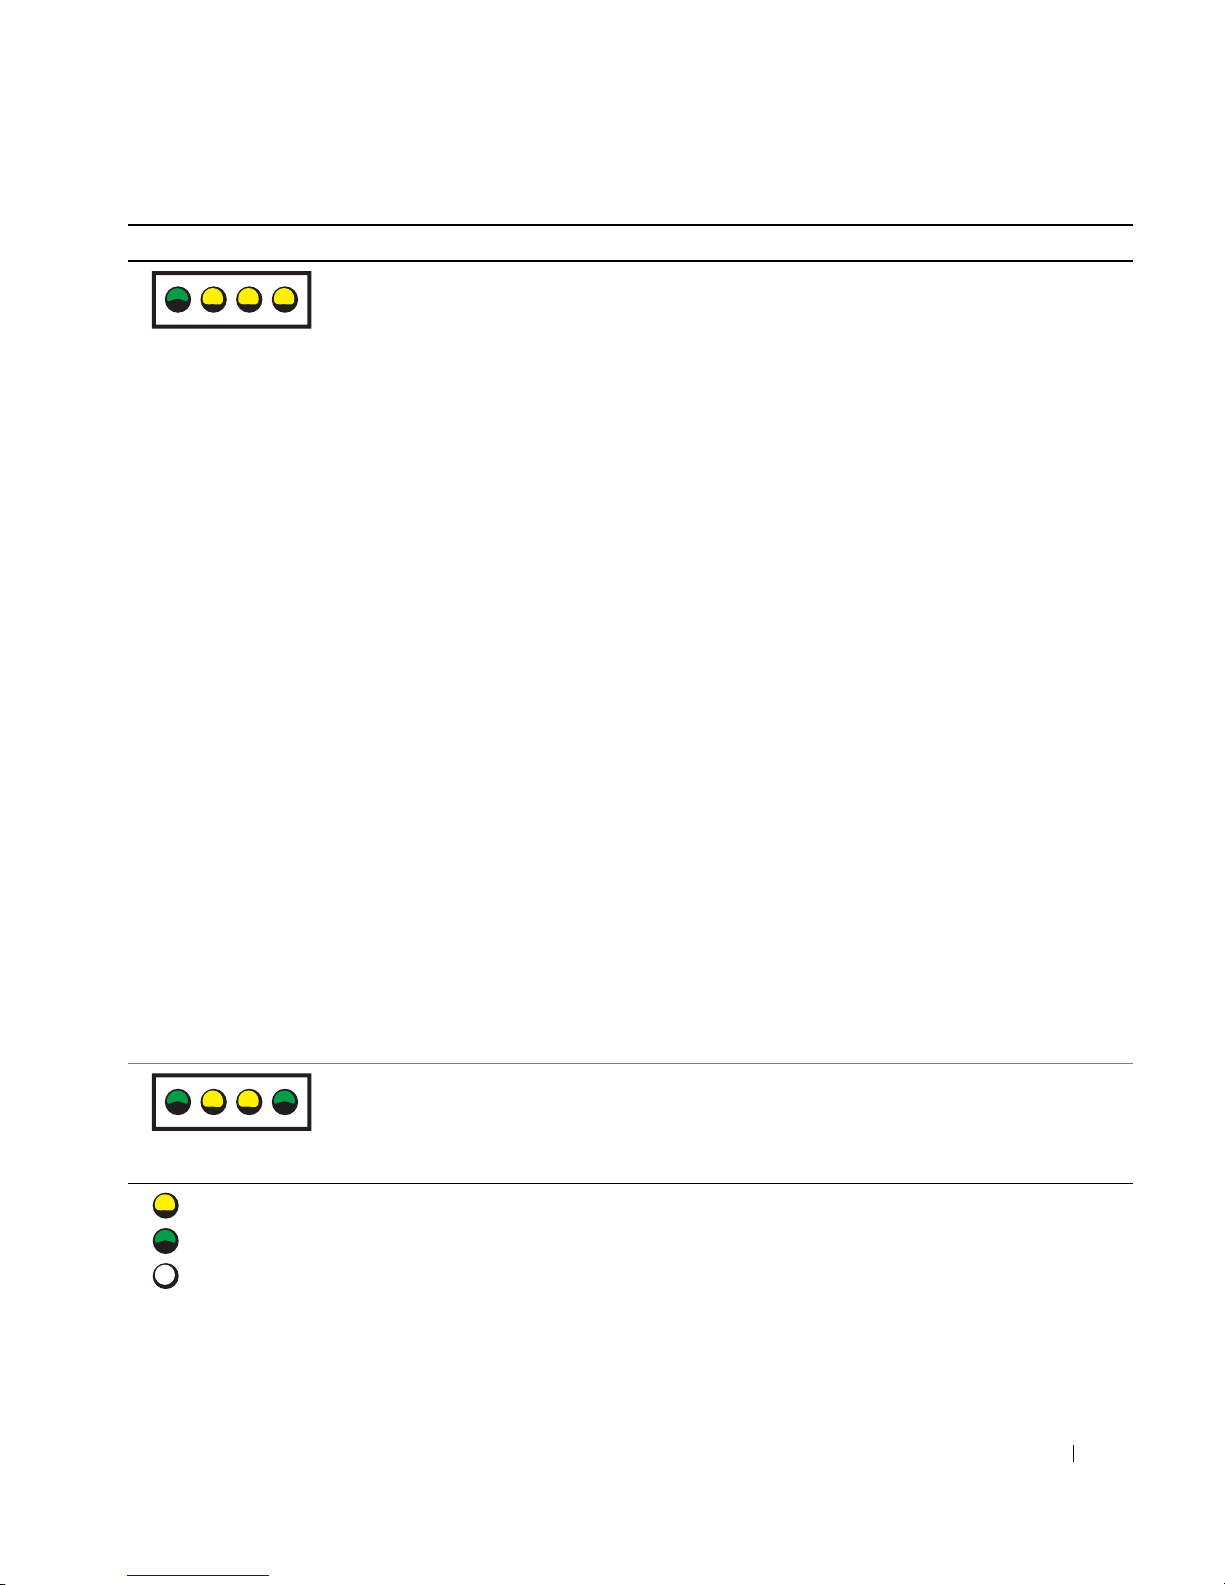
Lampemønster Problembeskrivelse Mulig løsning
A B C D
Der er ikke registreret
nogen hukommelsesmoduler.
1 Nulstil hukommelsesmodulerne for at kontrollere,
at computeren kommunikerer fejlfrit med
hukommelsen.
2 Genstart computeren.
3 Hvis problemet stadig eksisterer, skal du fjerne
alle hukommelsesmoduler og installere et
hukommelsesmodul i hukommelsesmodulstik 4.
4 Genstart computeren.
Du får vist følgende meddelelse: Advarsel!
Kører i tilstanden Debug
(Fejlfindingstilstand). Par
hukommelsesmodulerne for at
genoptage normal drift.
5 Tryk på <F1> for at starte operativsystemet.
6 Kør testene af systemhukommelsen i Dell
Diagnostics (Dell Diagnosticering).
7 Hvis hukommelsesmodulet består disse test, skal
du slukke computeren, fjerne hukommelsesmodulet og gentage processen for de øvrige
hukommelsesmoduler, indtil du får vist en hukommelsesfejl, når computeren startes eller under en
diagnosticeringstest.
Hvis det hukommelsesmodul, som testes først, er
defekt, skal du gentage processen for de øvrige
moduler for at sikre, at de ikke er defekte.
8 Når det defekte hukommelsesmodul er identifi-
ceret, skal du kontakte Dell for at få det udskiftet.
BEMÆRK! Computeren kan evt. køre i
fejlfindingstilstand, indtil du har installeret nye
hukommelsesmoduler.
A B C D
=gul
=grøn
=slukket
Der er opstået en fejl i
systemkortet.
Følg procedurernne i afsnittet "System Board
Problems" (Problemer med systemkortet) i User's
Guide (Brugerhåndbog).
Hvis problemet fortsætter, skal du kontakte Dell.
Installations- og referencehåndbog 91
Page 92
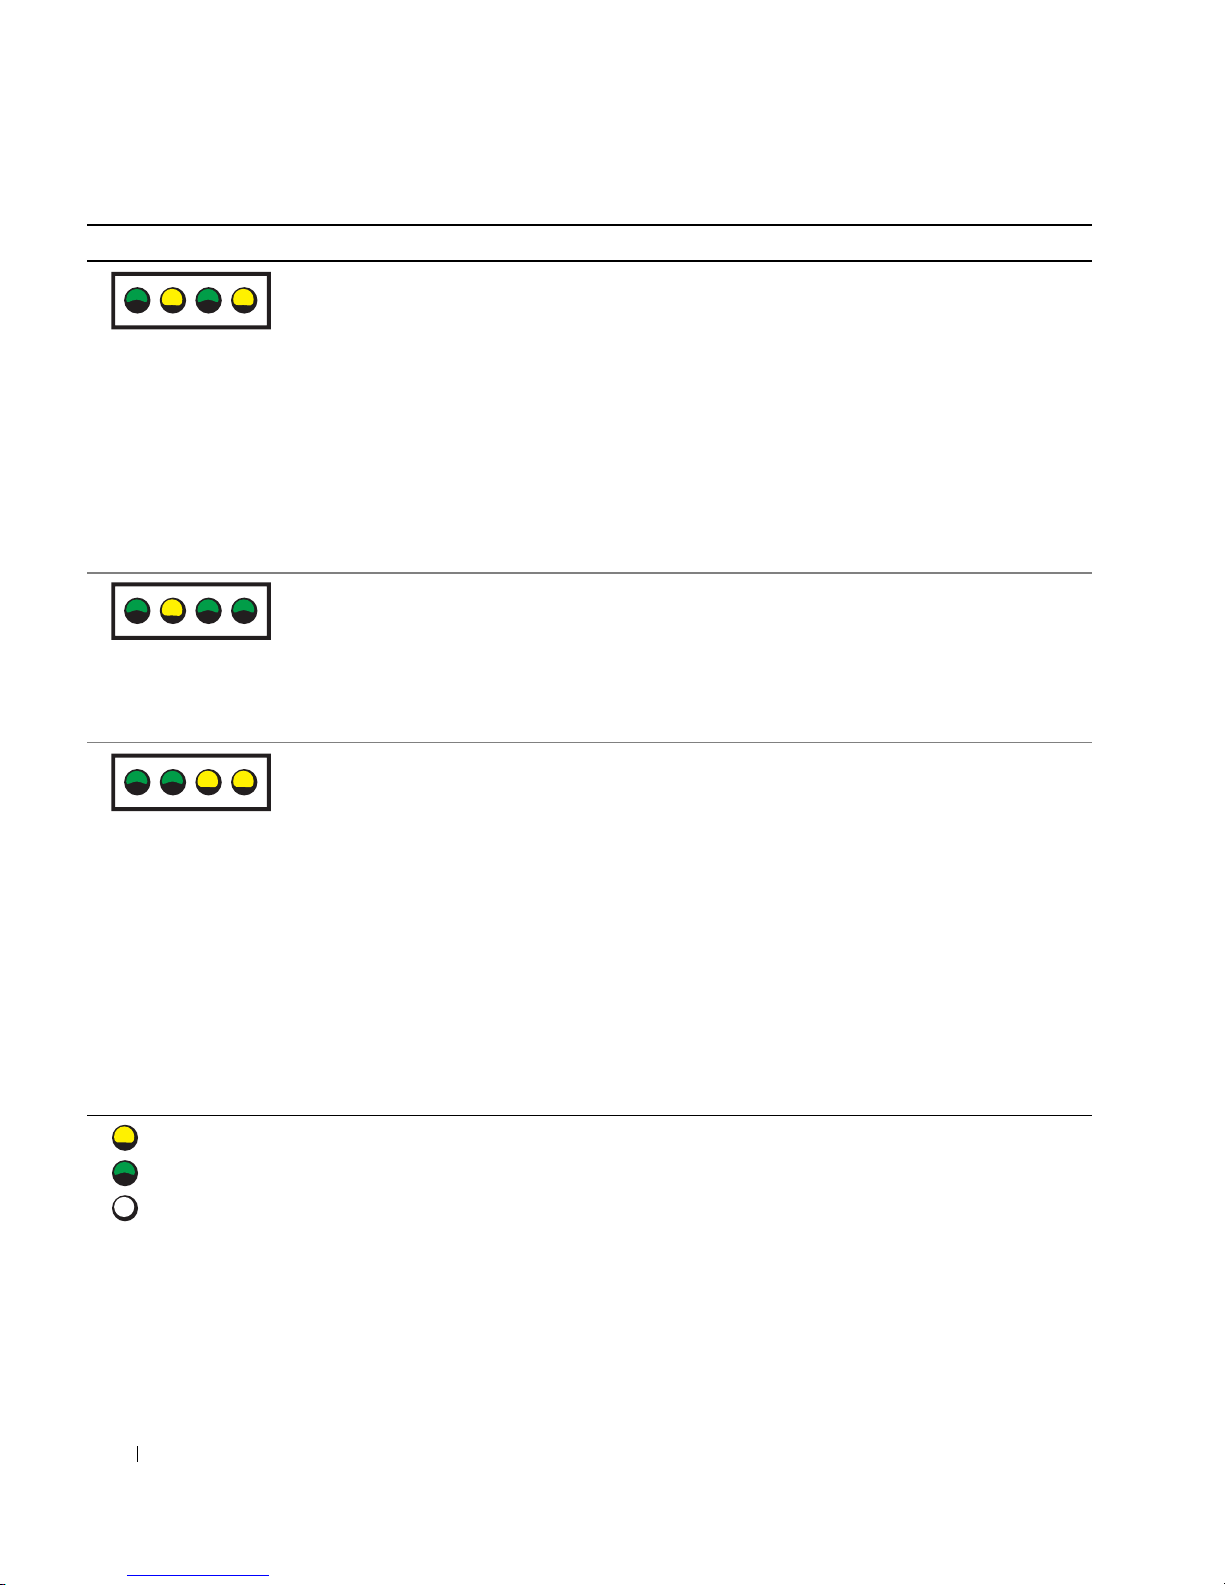
Lampemønster Problembeskrivelse Mulig løsning
Der er registreret hukommelsesmoduler, men der er
en fejl i hukommelseskonfi-
A B C D
www.dell.com | support.euro.dell.com
gurationen eller en kompatibilitetsfejl.
Der er muligvis opstået en
fejl i systemkortet og/eller i
hardwaren.
A B C D
Der er muligvis opstået en
fejl i et udvidelseskort.
A B C D
Kontroller, at der ikke er specielle krav til placeringen
af hukommelsesmodul/hukommelsesstik (se afsnittet
"Memory" (Hukommelse) i User's Guide
(Brugerhåndbog)).
Kontroller, at de hukommelsesmoduler, du installerer,
er kompatible med computeren (se afsnittet
"Memory" (Hukommelse) i User's Guide
(Brugerhåndbog)).
Geninstaller hukommelsesmodulerne, og genstart
computeren.
Hvis problemet fortsætter, skal du kontakte Dell.
Følg proceduren i afsnittet "System Board Problem"
(Problemer med systemkortet), og se afsnittet
"Resolving Software and Hardware Incompatibilities"
(Løsning af software- og hardwareinkompatibilitet) i
User's Guide (Brugerhåndbog).
Hvis problemet fortsætter, skal du kontakte Dell.
1 Find ud af, om der findes en konflikt ved at fjerne
et kort (ikke grafikkortet) og derefter genstarte
computeren.
2 Hvis problemet fortsætter, skal du geninstallere det
kort, du fjernede, fjerne et andet kort og derefter
genstarte computeren.
3 Gentag denne proces for hvert kort. Hvis
computeren starter normalt, skal du foretage
fejlfinding af det sidste kort, du fjerner, for
ressourcekonflikter (se "Resolving Software and
Hardware Incompatibilities" (Løsning af softwareog hardwareinkompatibilitet) i User's Guide
(Brugerhåndbog)).
4 Hvis problemet fortsætter, skal du kontakte Dell.
=gul
=grøn
=slukket
92 Installations- og referencehåndbog
Page 93
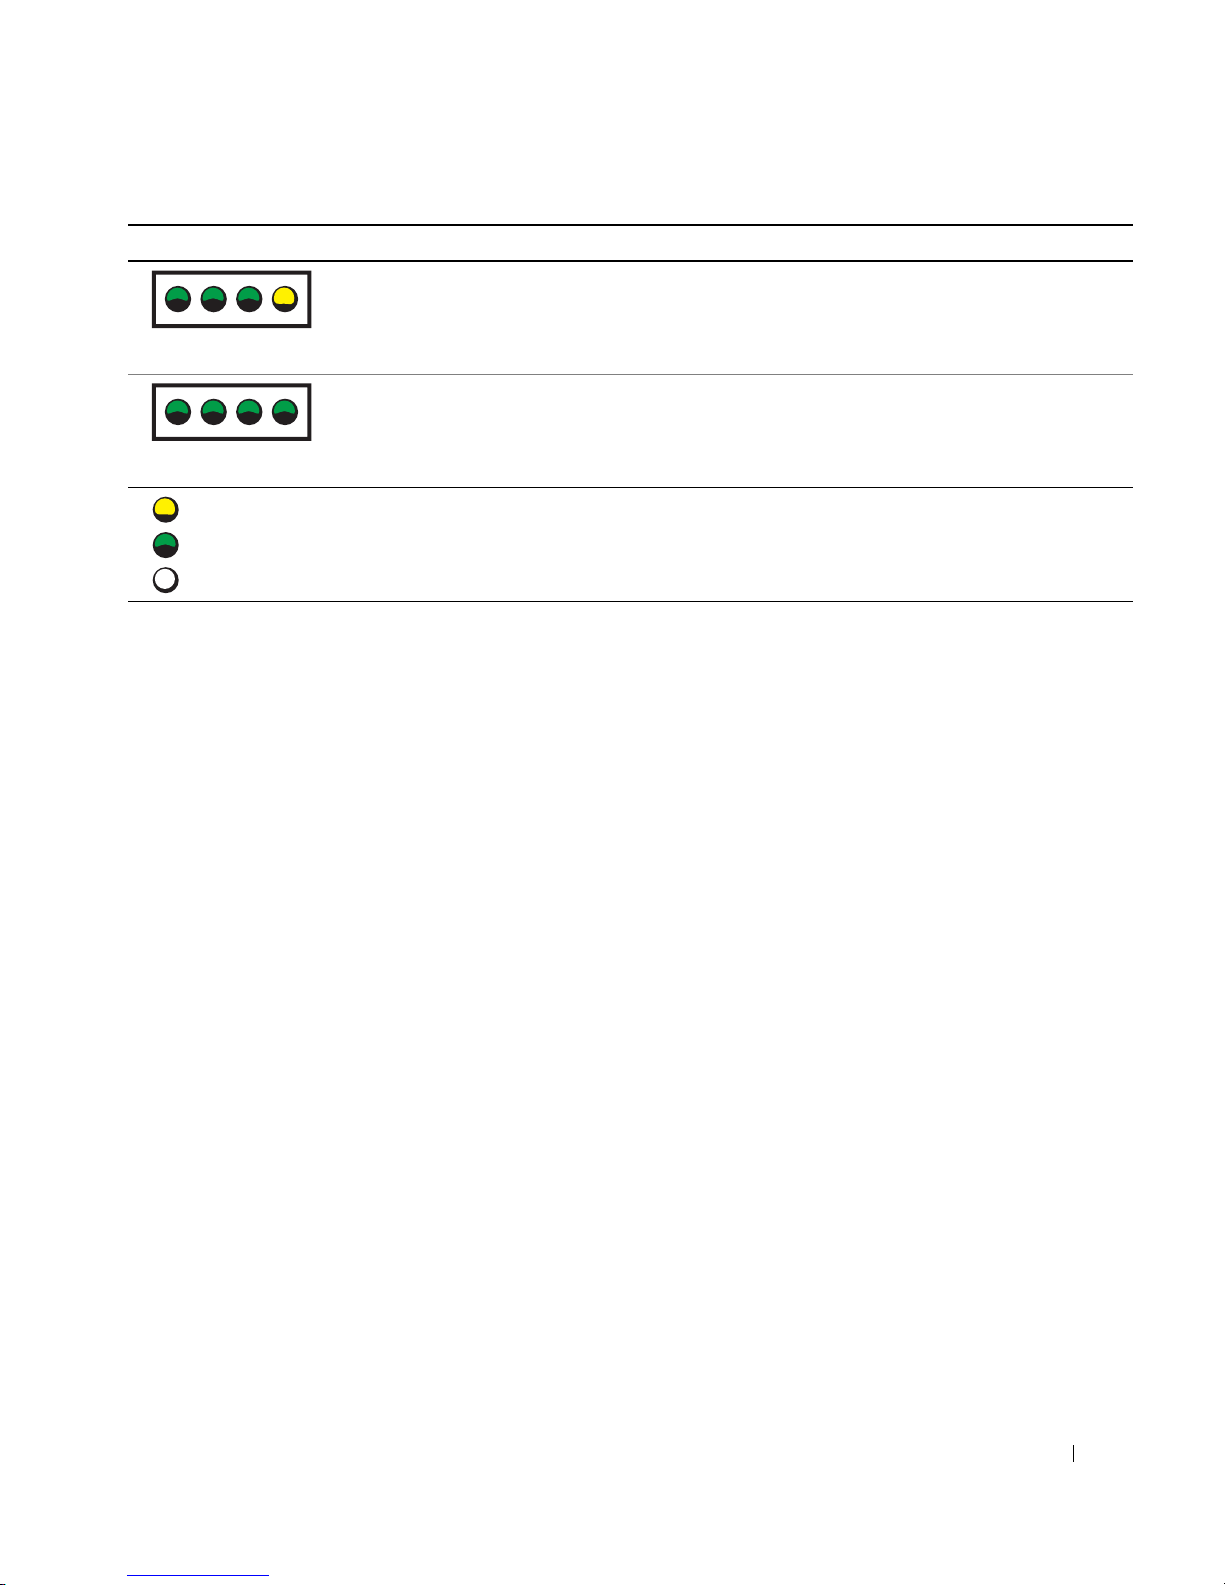
Lampemønster Problembeskrivelse Mulig løsning
Der er opstået en
anden fejl.
A B C D
Computeren er i en normal
driftstilstand efter POST.
Kontroller, at kablerne fra harddisken, cd-rom-drevet
og dvd-drevet er tilsluttet korrekt til systemkortet.
Hvis problemet fortsætter, skal du kontakte Dell.
Ingen.
A B C D
=gul
=grøn
=slukket
Hvis der opstår problemer med computeren, som du ikke kan løse ved hjælp
af trinene i dette afsnit eller procedurerne i "Finding Solutions" (Sådan
finder du løsninger) i User's Guide (Brugerhåndbog), skal du udføre
følgende trin, før du kontakter Dell:
1 Nedskriv en detaljeret beskrivelse af fejlen, bipkoden eller
diagnosticeringslampeproblemet.
2 Nedskriv ekspresservicekoden og servicemærkenummeret.
3 Kontakt Dell fra samme placering som computeren.
Installations- og referencehåndbog 93
Page 94

Ofte stillede spørgsmål
Hvordan... Løsning Yderligere oplysninger
Tilslutter jeg to skærme til
computeren?
www.dell.com | support.euro.dell.com
Tilslutter jeg skærmen, hvis
stikket på skærmens kabel ikke
ser ud til at passe til stikket bag
på computeren?
Tilslutter jeg højttalerne? Hvis du har installeret et lydkort,
Hvis computeren har det
påkrævede grafikkort til
understøttelse af to skærme, skal
du se i kassen efter et Y-kabel.
Kablet har et enkelt stik i den
ene ende (stik dette stik ind i
bagpanelet) og deler sig i to
stik (stik disse stik ind i
skærmkablerne). Hvis du har en
Dell Precision 650, skal du se i
afsnittet "Tilslut skærmen" på
side 59, og hvis du har en Dell
Precision 450, skal du se i afsnittet
"Tilslut skærmen" på side 68.
Hvis grafikkortet har et DVI-stik,
men skærmen har et VGA-stik, skal
du bruge en adapter. Der skal være
en adapter i kassen.
skal du slutte højttalerne til
stikkene på kortet. Hvis du har
en Dell Precision 650, skal du se
i afsnittet "Tilslut højttalerne" på
side 62, og hvis du har Dell
Precision 450, skal du se i afsnittet
"Tilslut højttalerne" på side 71.
Yderligere oplysninger om brug
af to skærme finder du i
dokumentationen til grafikkortet
på cd'en Drivers and Utilities
(Drivere og hjælpeværktøjer).
Kontakt Dell Support for at få flere
oplysninger.
Se den dokumentation, der blev
leveret sammen med højttalerne,
for at få flere oplysninger.
94 Installations- og referencehåndbog
Page 95

Hvordan... Løsning Yderligere oplysninger
Finder jeg det rigtige stik til
mine USB- eller IEEE 1394enheder?
Finder jeg oplysninger om
hardwaren og andre tekniske
specifikationer for computeren?
Finder jeg dokumentation til
min computer?
Dell Precision 650-computeren
har seks USB-stik (to foran og fire
bagpå). Den har også to IEEE
1394-stik (et foran og et bagpå).
Yderligere oplysninger finder du
i afsnittet "Konfiguration af Dell
Precision™ 650-computeren" på
side 57.
Dell Precision 450-computeren
har seks USB-stik (to foran og fire
bagpå). Yderligere oplysninger
finder du i afsnittet "Konfiguration
af Dell Precision 450-computeren"
på side 66.
I User's Guide (Brugerhåndbog) er
der en tabel med specifikationer,
der indeholder mere detaljerede
oplysninger om computeren og
hardwaren. Hvis du vil finde
User's Guide (Brugerhåndbog),
kan du se under "Sådan finder du
oplysninger og hjælp" på side 53.
Der er følgende dokumentation til
computeren:
• Brugerhåndbog
• Installations- og
referencehåndbog
• Systeminformation
• Mærkat med systemoplysninger
• Servicehåndbog
Hvis du vil finde disse dokumenter,
kan du se under "Sådan finder du
oplysninger og hjælp" på side 53.
Se illustrationen af forsiden og
bagsiden af computeren i User's
Guide (Brugerhåndbog). Hvis du
vil have hjælp til at finde User's
Guide (Brugerhåndbog), kan du
se under "Sådan finder du
oplysninger og hjælp" på side 53.
Gå til webstedet for Dell Support
på adressen support.dell.com, og
brug et af følgende supportværktøjer: Læs hvidbog om den nyeste
teknologi, eller kommuniker med
andre Dell-brugere i Dells meddelelsesforum.
Hvis du mister dokumentationen,
er den tilgængelig på webstedet
for Dell Support på adressen
support.dell.com.
Installations- og referencehåndbog 95
Page 96

Åbning af computerens dæksel
www.dell.com | support.euro.dell.com
. ADVARSEL! Før du begynder på nogen af procedurerne i
dette afsnit, skal du følge sikkerhedsinstruktionerne i
Systeminformation.
1
Luk computeren via menuen Start (Start).
2 Kontroller, at computeren og de tilsluttede enheder er slukket. Hvis
computeren og de tilsluttede enheder ikke blev slukket automatisk,
da du lukkede computeren, skal du slukke dem nu.
MEDDELELSE: Hvis du skal fjerne et netværkskabel, skal du først trække
stikket ud fra computeren og derefter trække det ud fra netværksstikket i
væggen.
3
Fjern alle telefon- og kommunikationslinjer fra computeren.
4 Tag netledningerne til computeren og alle tilsluttede enheder ud af
stikkontakten, og tryk derefter på tænd/sluk-knappen for at sikre, at
systemkortet har jordforbindelse.
5 Hvis du har installeret en lås i låseringen på bagpanelet, skal du
fjerne låsen.
ADVARSEL! For at undgå elektrisk stød skal du altid tage
computerens netledning ud af stikkontakten, før du åbner
dækslet.
Læg computeren på siden som vist på illustrationen.
6
MEDDELELSE: Kontroller, at der er tilstrækkelig plads til at understøtte
det åbne dæksel – mindst 30 cm plads på bordpladen.
7
Åbn computerens dæksel:
a Skub dækslets låsehåndtag mod den øverste del af computeren.
b Løft dækslet, og drej det mod forsiden af computeren.
8 Sørg for, at du har jordforbindelse, inden du rører ved noget inden
i computeren. Du kan gøre dette ved at røre ved en umalet
metaloverflade, f.eks metaloverfladen bag på computeren.
Mens du arbejder, skal du jævnligt røre ved en umalet metaloverflade
på computeren for at fjerne eventuel statisk elektricitet, der kan
beskadige de interne komponenter.
96 Installations- og referencehåndbog
Page 97
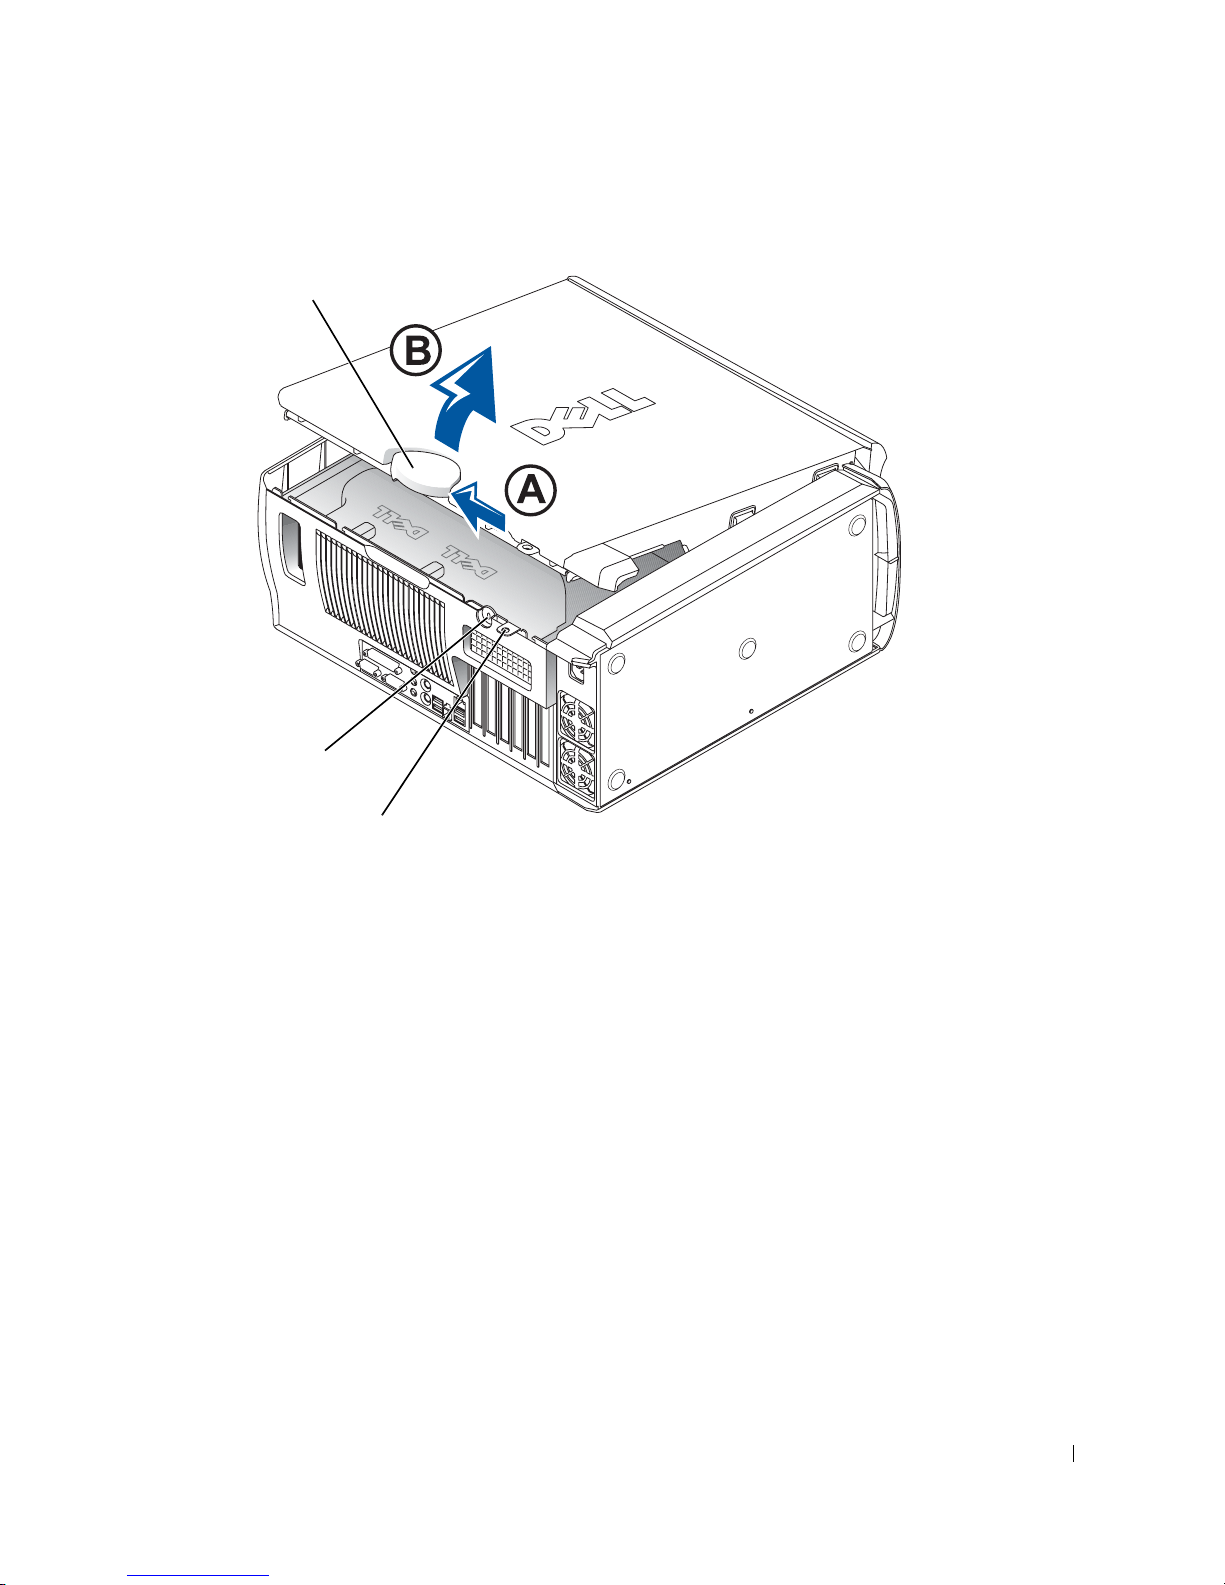
Dell Precision 650
dækslets låsehåndtag
stik til sikkerhedskabel
låsering
Installations- og referencehåndbog 97
Page 98
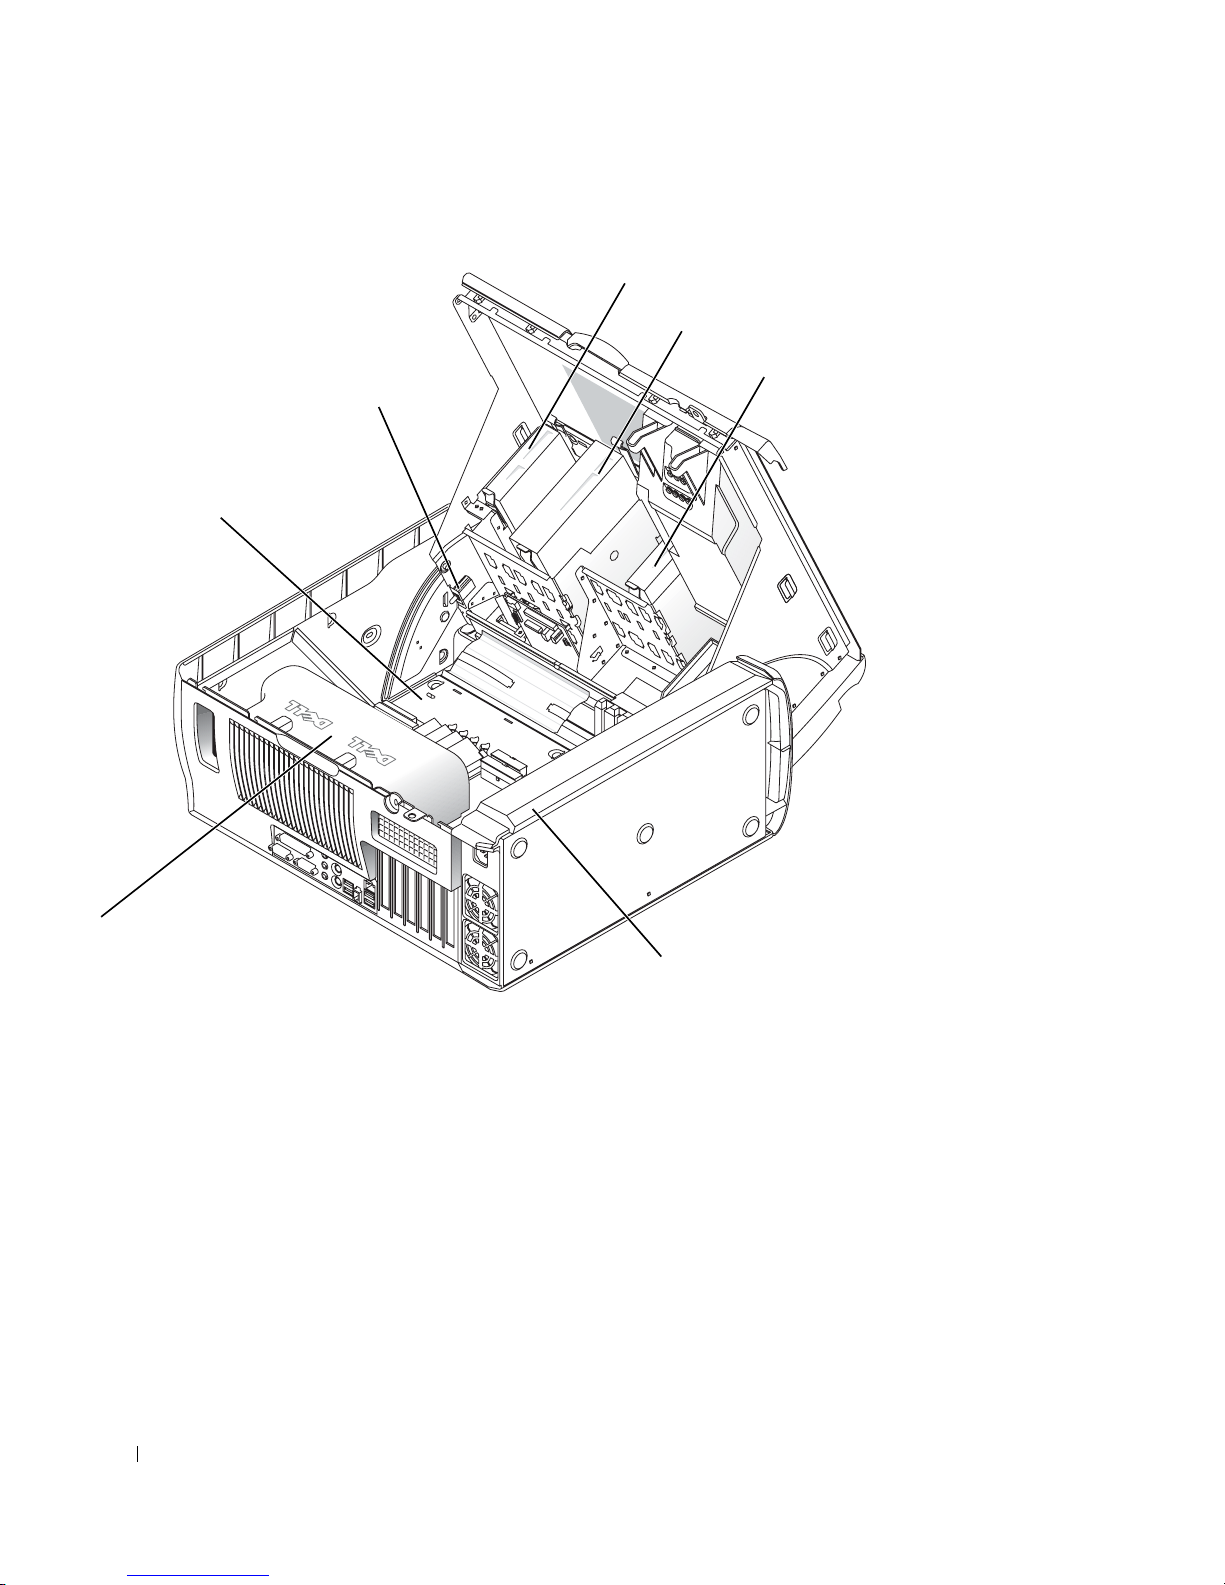
Inden i Dell Precision 650
kontakt til åbning af chassis
systemkort
www.dell.com | support.euro.dell.com
diskettedrev
Cd/dvd-drev
harddisk
forhindring af
luftgennemstrømning i
mikroprocessoren
98 Installations- og referencehåndbog
strømforsyning
Page 99
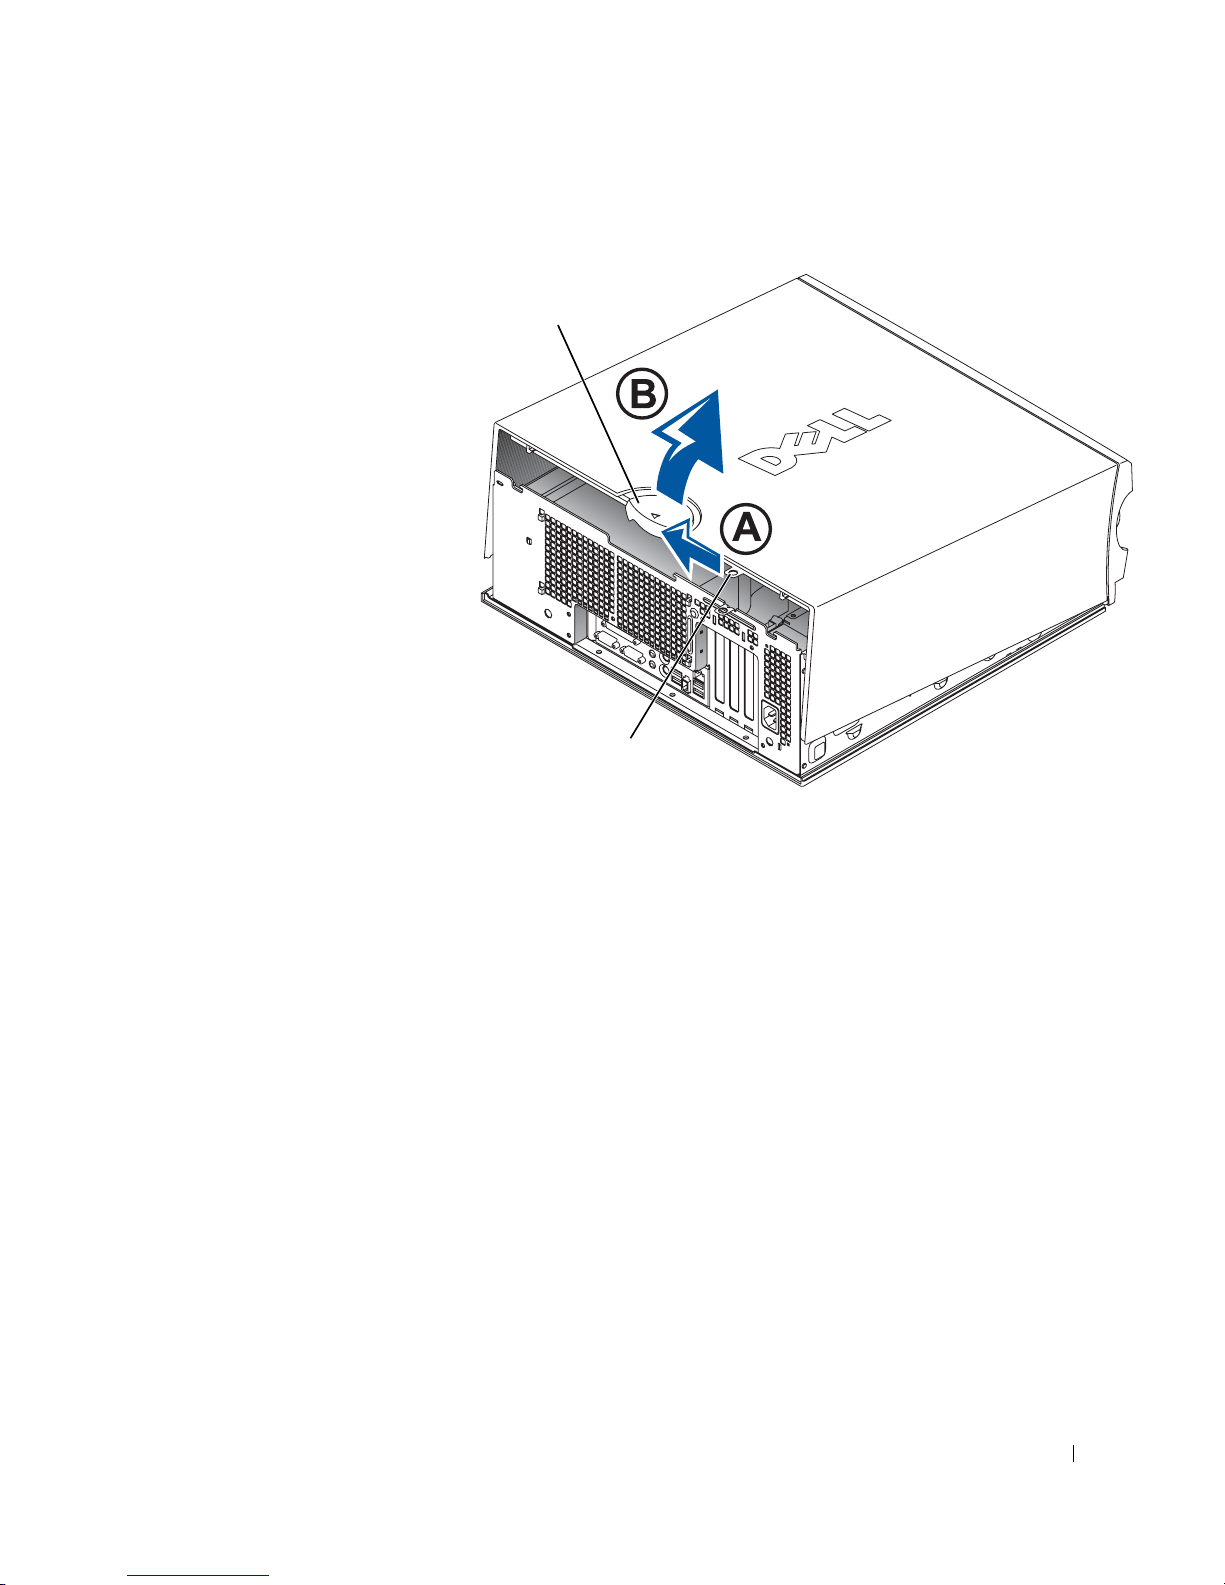
Dell Precision 450
dækslets låsehåndtag
låsering
Installations- og referencehåndbog 99
Page 100
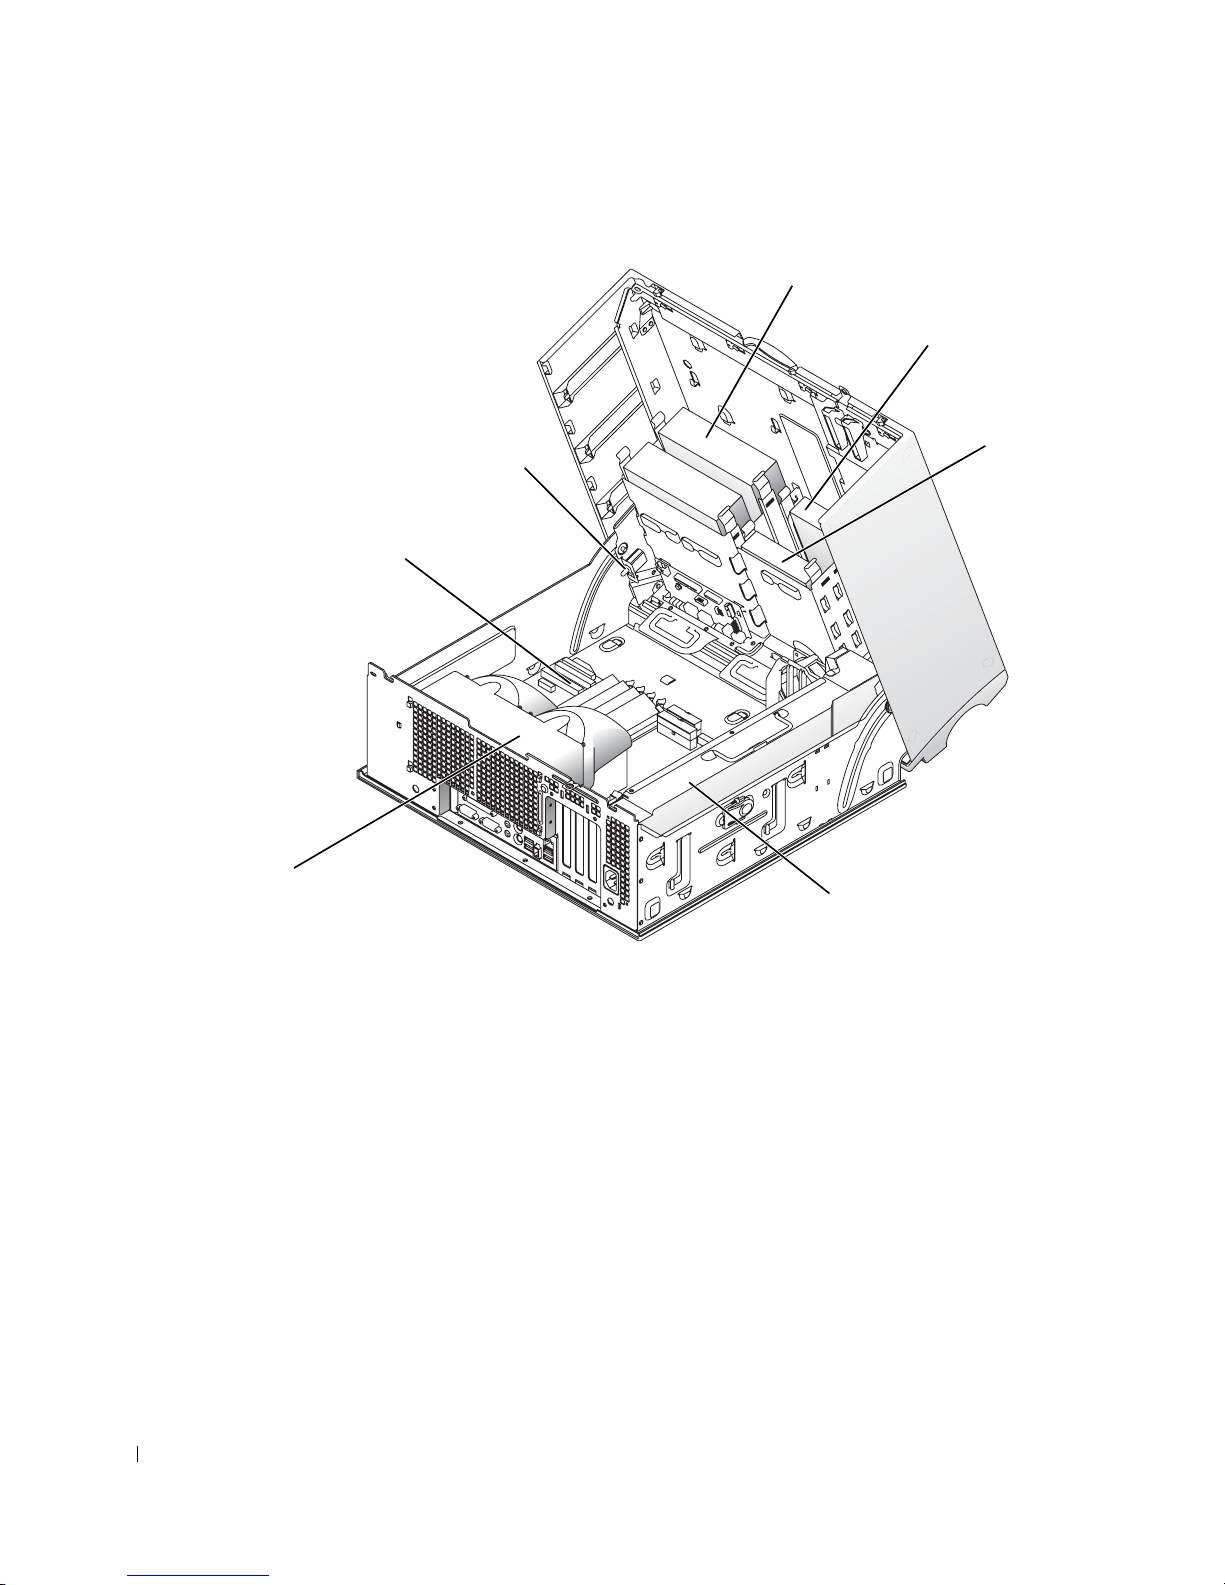
Inden i Dell Precision 450
Cd/dvd-drev
diskettedrev
kontakt til åbning af chassis
systemkort
www.dell.com | support.euro.dell.com
forhindring af
luftgennemstrømning
i mikroprocessoren
harddisk
strømforsyning
100 Installations- og referencehåndbog
 Loading...