

Page 1

Dell Precision™ Workstation 530
Setup and Quick
Reference Guide
www.dell.com | support.dell.com
Page 2

Notes, Notices, and Cautions
NOTE: A NOTE indicates important information that helps you make better
use of your computer.
NOTICE: A NOTICE indicates either potential damage to hardware or loss of
data and tells you how to avoid the problem.
CAUTION: A CAUTION indicates a potential for property damage,
personal injury, or death.
____________________
Information in this document is subject to change without notice.
© 2002 Dell Computer Corporation. All rights reserved.
Reproduction in any manner whatsoever without the written permission of Dell Computer
Corporation is strictly forbidden.
Trademarks used in this text: Dell, the DELL logo, and Dell Precision are trademarks of Dell
Computer Corporation; Microsoft and Windows are registered trademarks of Microsoft Corporation.
Other trademarks and trade names may be used in this document to refer to either the entities claiming
the marks and names or their products. Dell Computer Corporation disclaims any proprietary interest
in trademarks and trade names other than its own.
December 2002 P/N 533CX Rev. A03
Page 3

Contents
Finding Information and Assistance . . . . . . . . . . . . . . . . . . . . . . . 5
Using the Dell Precision™ ResourceCD . . . . . . . . . . . . . . . . . . . . . 9
Setting Up Your Computer . . . . . . . . . . . . . . . . . . . . . . . . . . . . 10
Dual Monitors . . . . . . . . . . . . . . . . . . . . . . . . . . . . . . . . . . . . . . 17
Frequently Asked Questions . . . . . . . . . . . . . . . . . . . . . . . . . . . 18
Safety First—For You and Your Computer . . . . . . . . . . . . . . . . . . 20
Opening the Computer Cover . . . . . . . . . . . . . . . . . . . . . . . . . . 21
Opening the Cover . . . . . . . . . . . . . . . . . . . . . . . . . . . . . . . . . . . 21
Inside Your Computer . . . . . . . . . . . . . . . . . . . . . . . . . . . . . . . . 23
Removing and Installing Parts . . . . . . . . . . . . . . . . . . . . . . . . . . 24
Adding Memory . . . . . . . . . . . . . . . . . . . . . . . . . . . . . . . . . . . . . 24
Adding a Hard Drive or Externally Accessible Drive . . . . . . . . . . 24
Adding a PCI Expansion Card . . . . . . . . . . . . . . . . . . . . . . . . . . 24
Upgrading the Video Card . . . . . . . . . . . . . . . . . . . . . . . . . . . . . 25
Upgrading Your Processor(s) . . . . . . . . . . . . . . . . . . . . . . . . . . . 25
Solving Problems . . . . . . . . . . . . . . . . . . . . . . . . . . . . . . . . . . . 25
When to Use the Dell Diagnostics . . . . . . . . . . . . . . . . . . . . . . . . 26
Starting the Dell Diagnostics . . . . . . . . . . . . . . . . . . . . . . . . . . . 27
Messages and Codes . . . . . . . . . . . . . . . . . . . . . . . . . . . . . . . . . . 30
Contents 3
Page 4

4 Contents
Page 5
Finding Information and Assistance
The following table lists the resources that Dell provides as support tools.
Additional resources may be shipped with your computer.
What Are You Looking For? Find it Here
• A diagnostic program for my computer
• Drivers for my computer
•My User’s Guide
• My device documentation
• How to set up my computer
• How to care for my computer
• Troubleshooting information
• How to open my computer cover
• How to locate other documentation
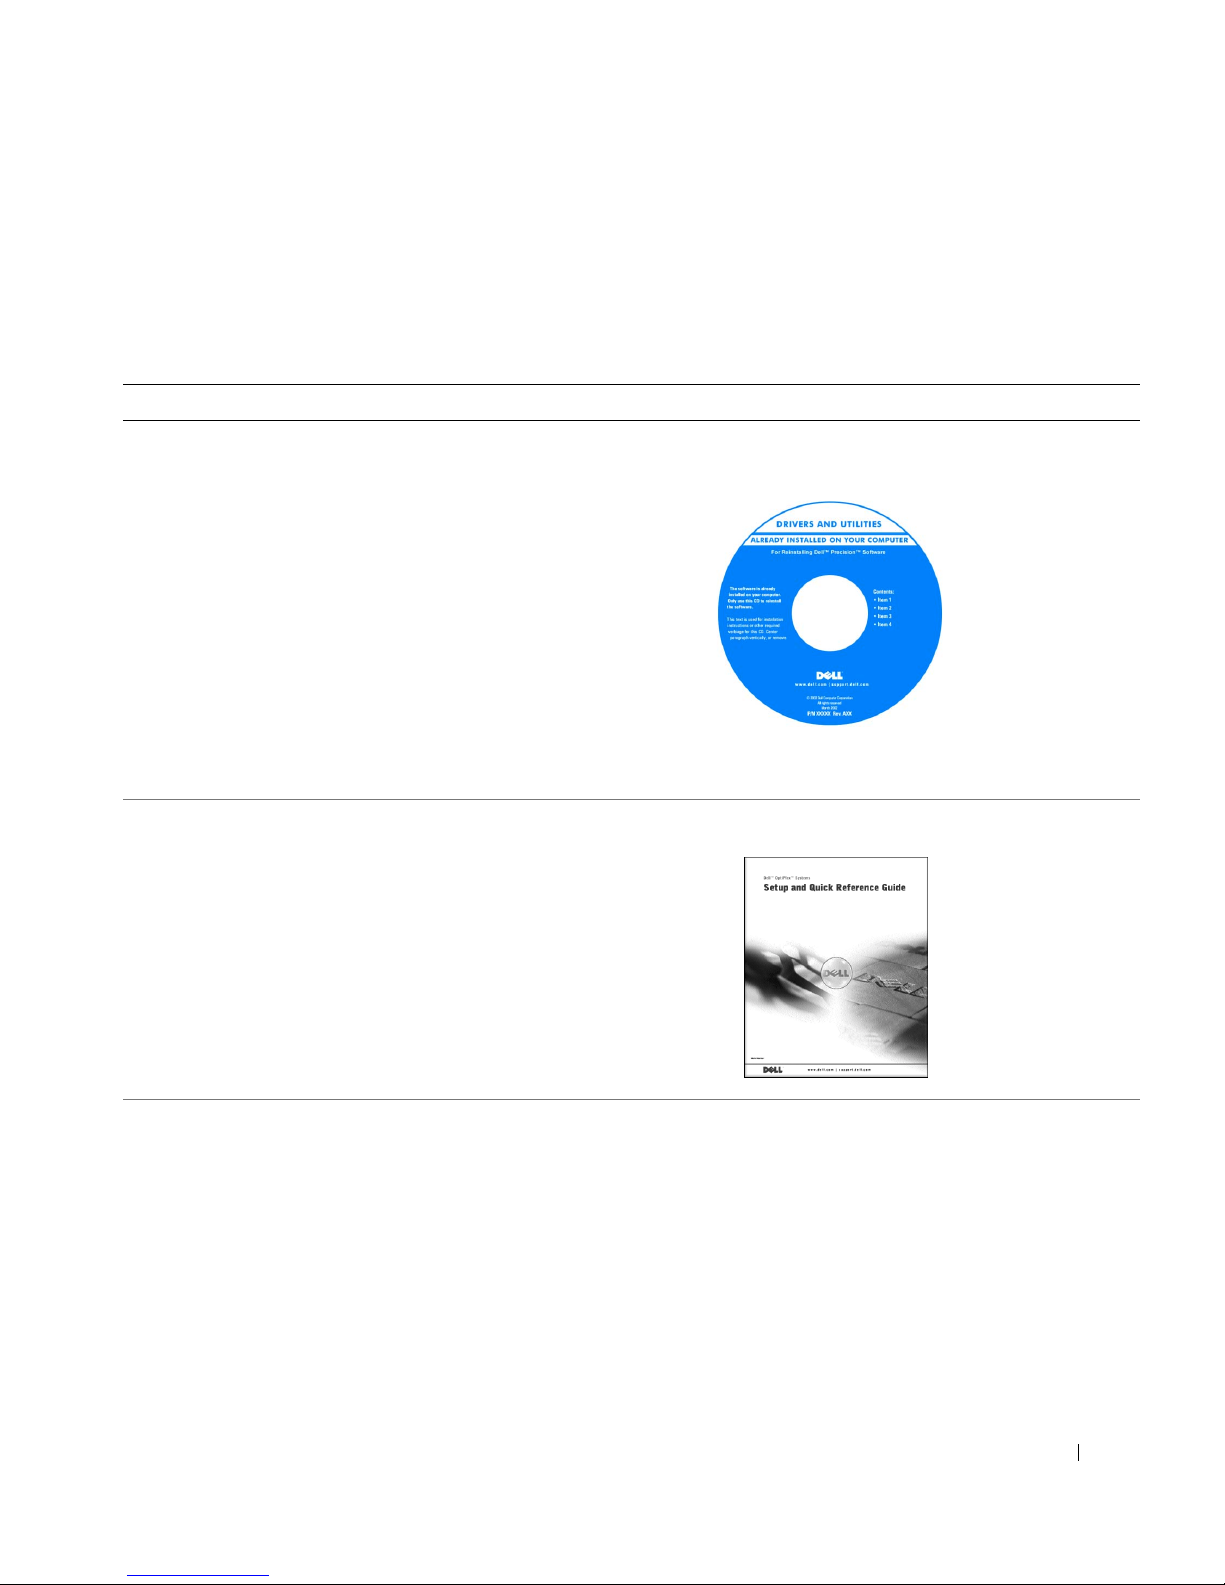
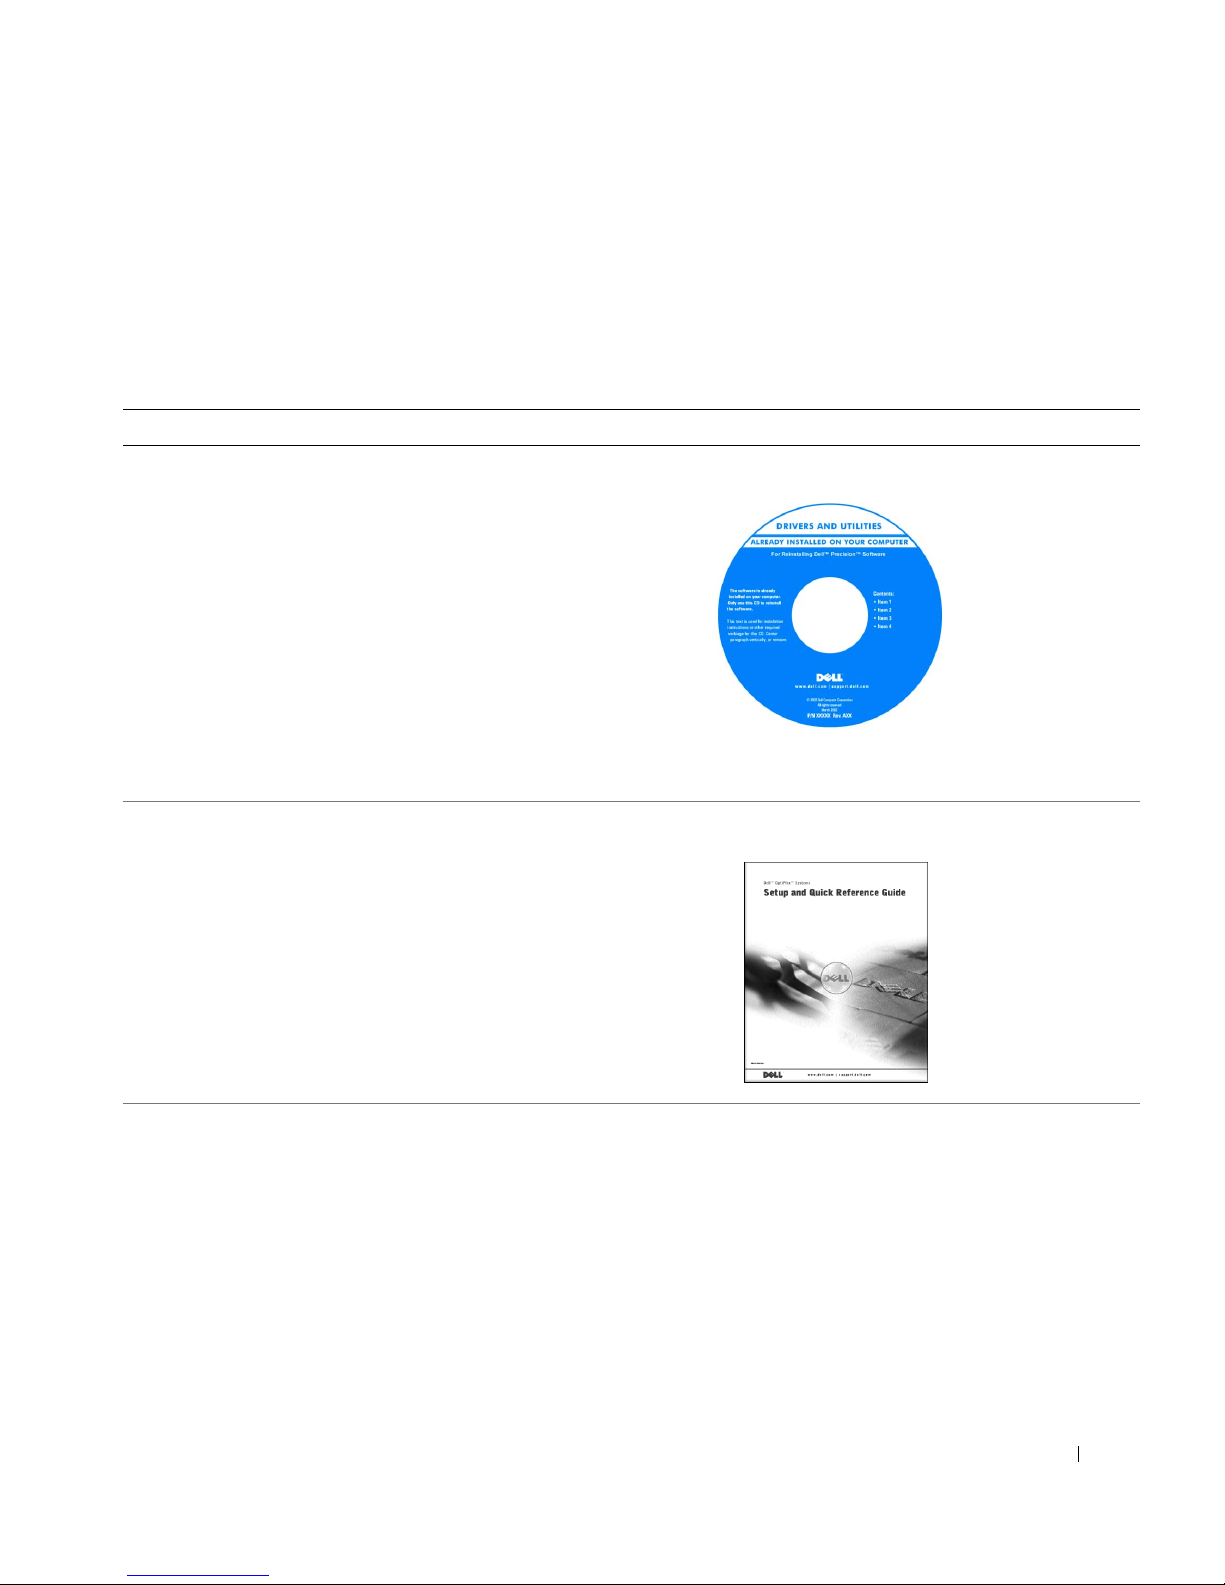
Drivers and Utilities CD (also known as the
ResourceCD)
You can use this CD to access documentation, reinstall drivers, or run
diagnostics tools.
Setup and Quick Reference Guide
Setup and Quick Reference Guide 5
Page 6
What Are You Looking For? Find it Here
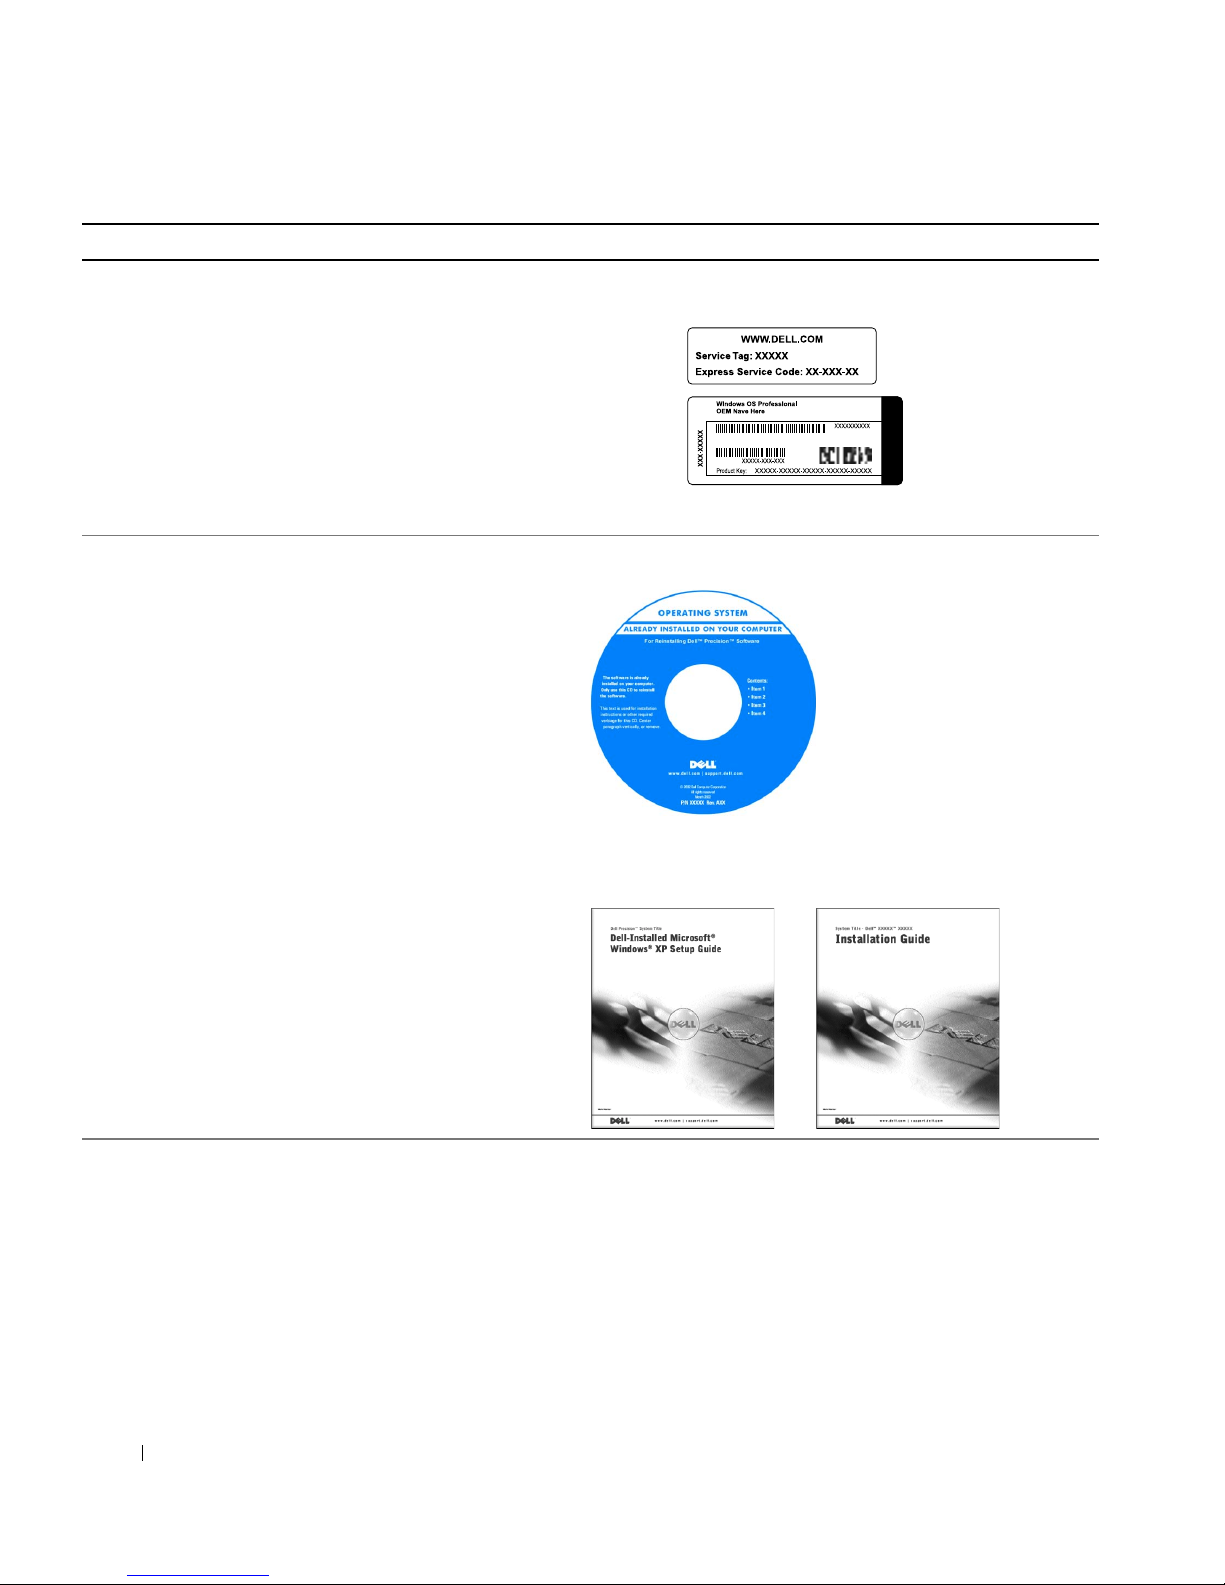
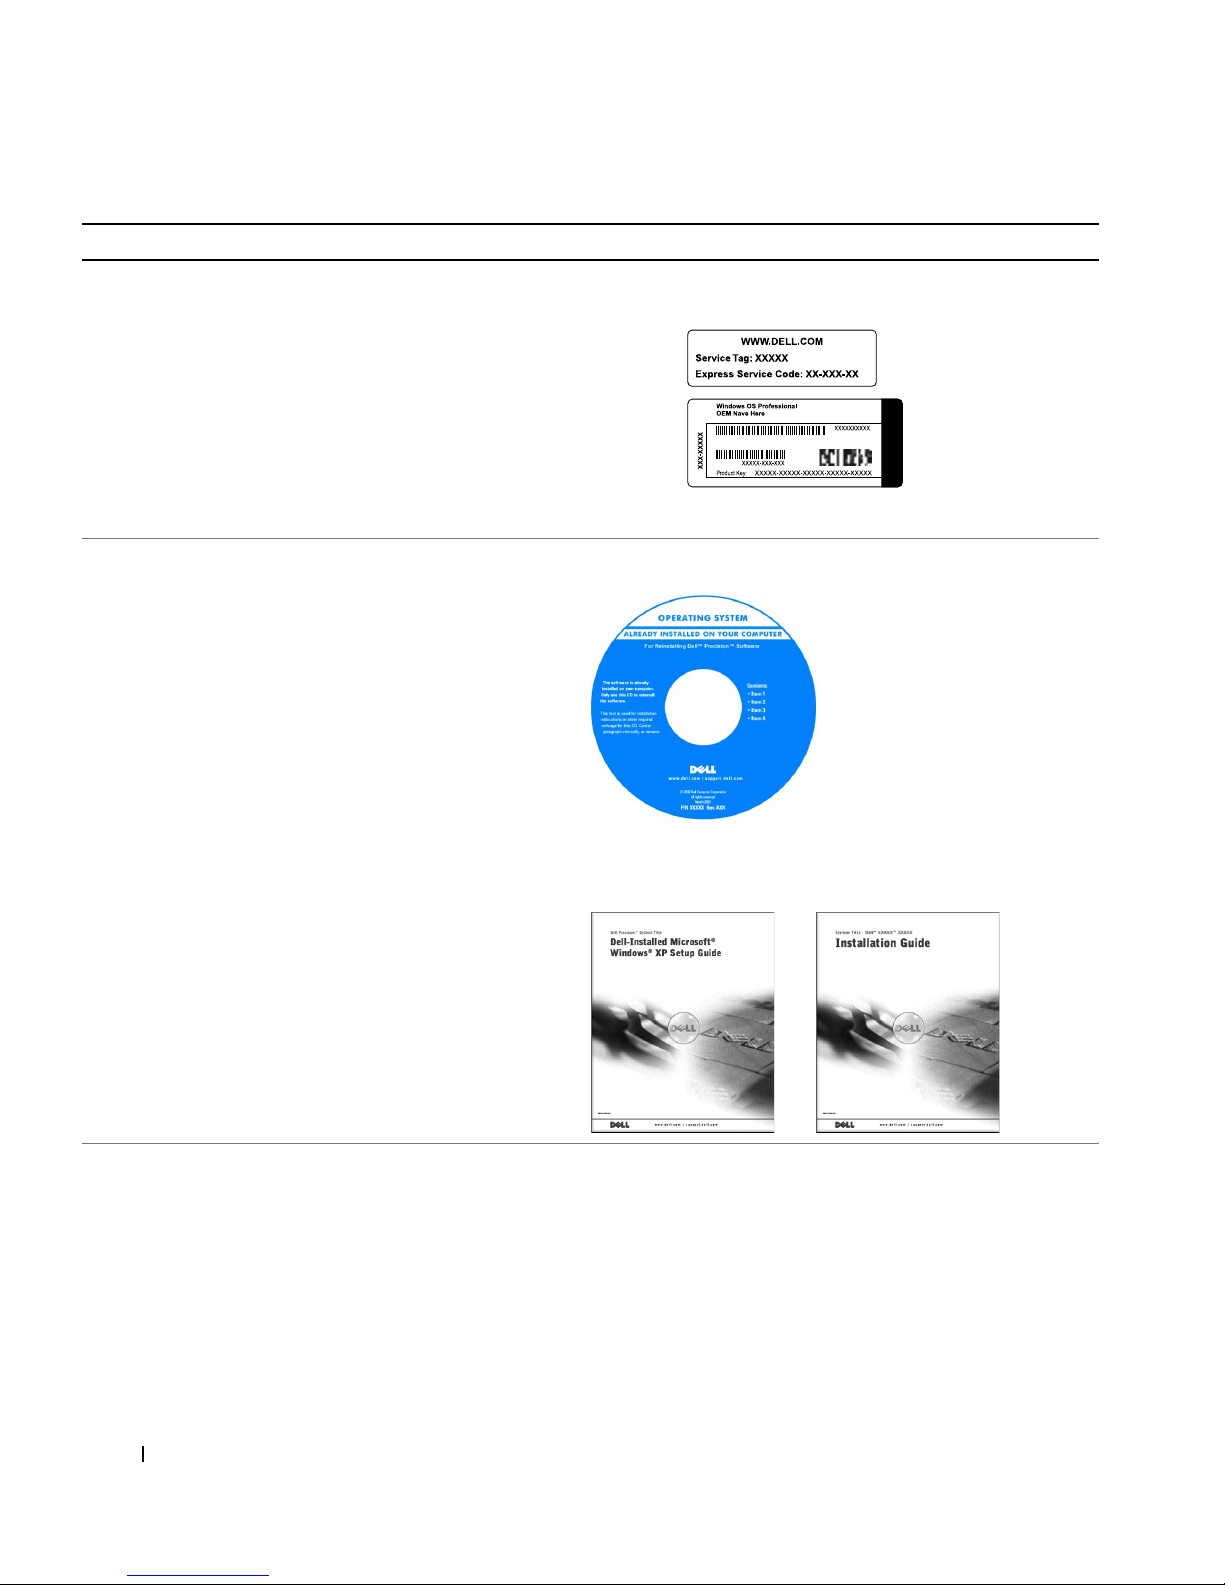
• Express Service Code and Service Tag
®
•Microsoft
Windows® License Label
Express Service Code and Product Key
The labels are located on your computer.
• How to reinstall my operating system Operating System CD and Installation Guide
www.dell.com | support.dell.com
After you reinstall your operating system, use the Drivers and Utilities
CD to reinstall drivers for the devices that came with your computer.
6 Setup and Quick Reference Guid e
Page 7
What Are You Looking For? Find it Here
• How to remove and replace parts
User’s Guide Icon (Microsoft Windows 2000)
• Technical specifications
• How to configure system settings
• How to troubleshoot and solve problems
Double-click the User’s Guide icon on your desktop.
Windows XP Help and Support Center
Click the Start button and click Help and Support.
1
Click User’s Guide.
2
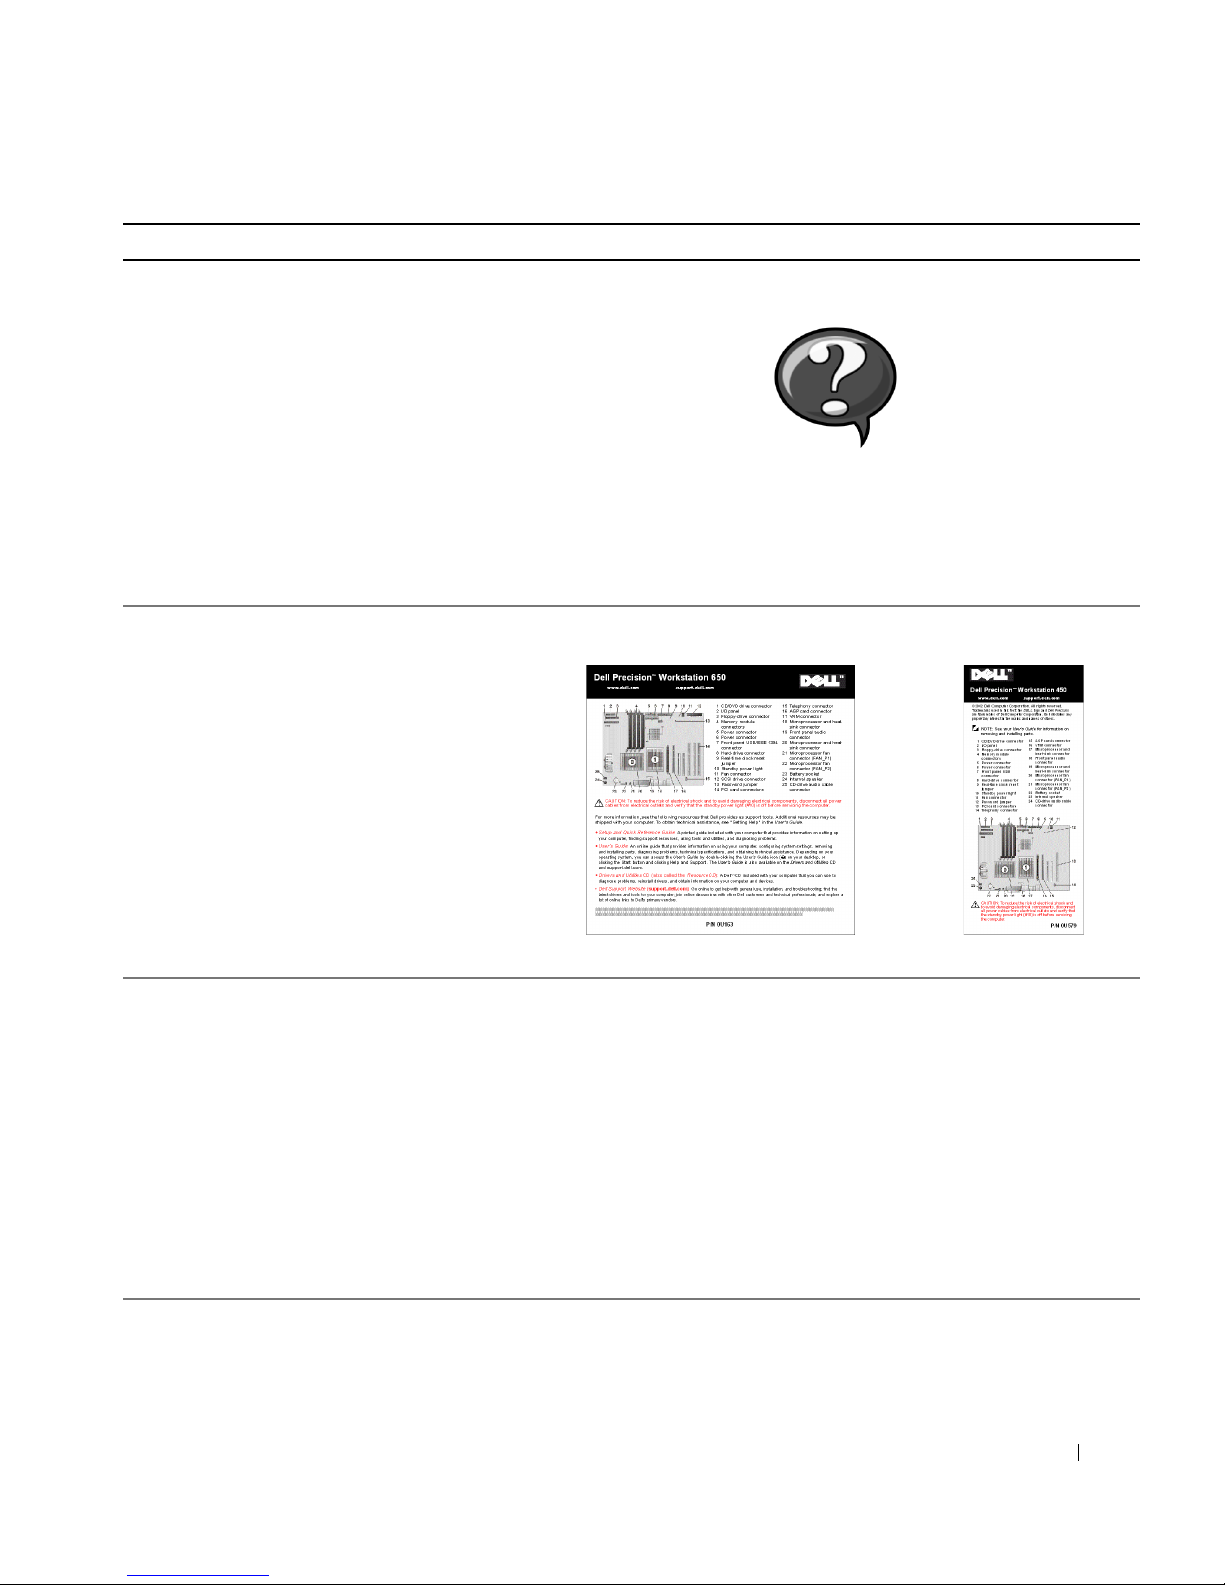
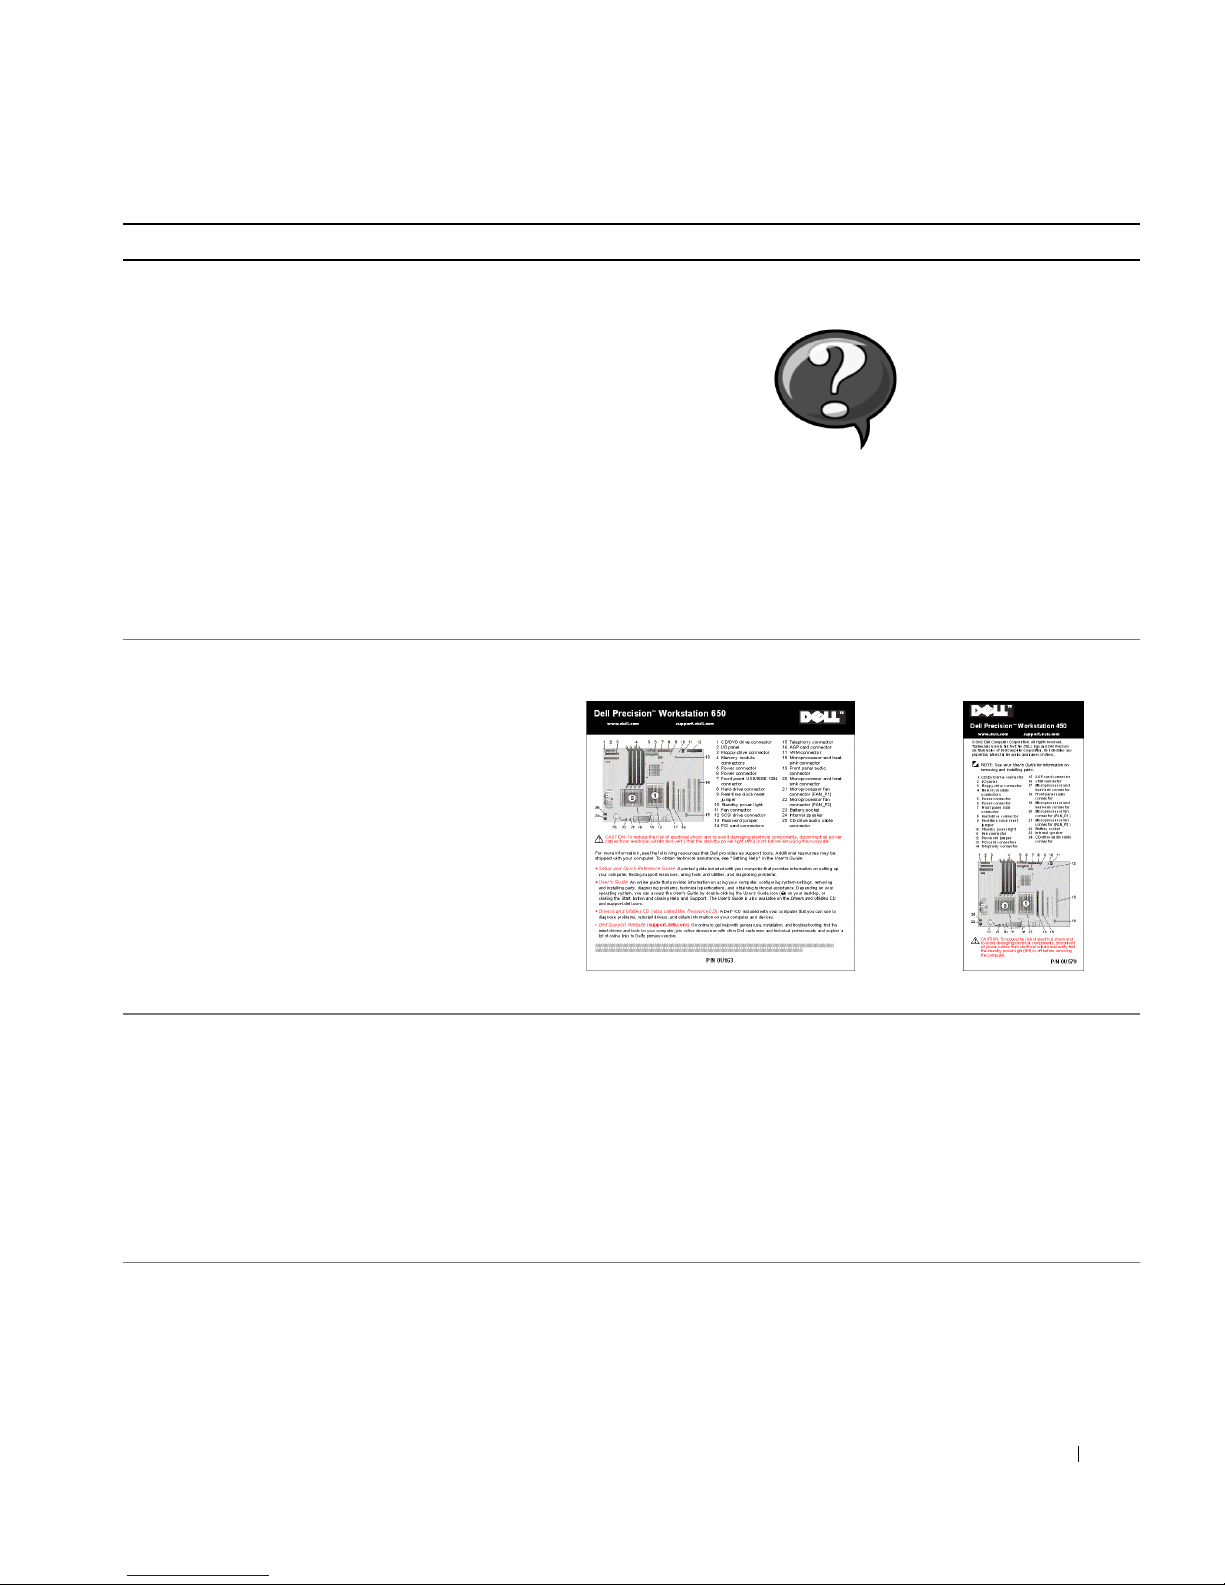
• Location of connectors on the system board System Information Label
or
• Latest drivers for my computer
• Answers to technical service and support
questions
• Online discussions with other users and
technical support
• Documentation for my computer including
the Service Manual
The label is located on the inside of your computer cover.
Dell Support Website — support.dell.com
The Dell Support website provides several online tools, including:
• Knowledge Base — Hints, tips, and online courses
• Customer Forum — Online discussion with other Dell customers
• Upgrades — Upgrade information for components, such as memory,
the hard drive, and the operating system
• Customer Care — Contact information, order status, warranty, and
repair information
• Downloads — Drivers, patches, and software updates
• Reference — Computer documentation, product specifications, and
white papers
Setup and Quick Reference Guide 7
Page 8
What Are You Looking For? Find it Here
• Service call status and support history
• Top technical issues for my computer
• Frequently asked questions
• File downloads
• Details on my computer’s configuration
Dell Premier Support Website —
premiersupport.dell.com
The Dell Premier Support website is customized for corporate,
government, and education customers. This website may not be
available in all regions.
• Service contract for my computer
• Warranty information System Information Guide
www.dell.com | support.dell.com
• How to use Windows XP
• Documentation for my computer and
devices
Windows XP Help and Support Center
Click the Start button, and click Help and Support.
1
Type a word or phrase that describes your problem, and click the
2
arrow icon.
Click the topic that describes your problem.
3
Follow the instructions shown on the screen.
4
NOTE: For help using Windows 2000, click the Start button and click
Help.
8 Setup and Quick Reference Guid e
Page 9

Using the Dell Precision™ ResourceCD
To use the Dell Precision ResourceCD from within the
Microsoft
1
®
Windows® operating system:
Insert the Dell Precision ResourceCD into the CD drive.
If you are using the Dell Precision ResourceCD for the first time on this
computer, the ResourceCD Installation window opens to inform you
that the ResourceCD is about to begin installation.
Click OK to continue.
2
To complete the installation, respond to the prompts offered by the
installation program.
Click Next at the Welcome Dell System Owner screen.
3
Select the appropriate System Model, Operating System,
4
Device Type, and To pi c.
To ac cess t he Dell Precision ResourceCD Guide, click User’s Guides in the
Top ic pull-down menu and click Dell Precision ResourceCD.
NOTE: To access device drivers and user documentation, you must use the
ResourceCD from within Windows. To use the Dell Diagnostics, you must insert
the ResourceCD in the CD drive and restart the computer. For information
about running the Dell Diagnostics, see "When to Use the Dell Diagnostics" on
page 26.
Setup and Quick Reference Guide 9
Page 10
www.dell.com | support.dell.com
1
Setting Up Your Computer
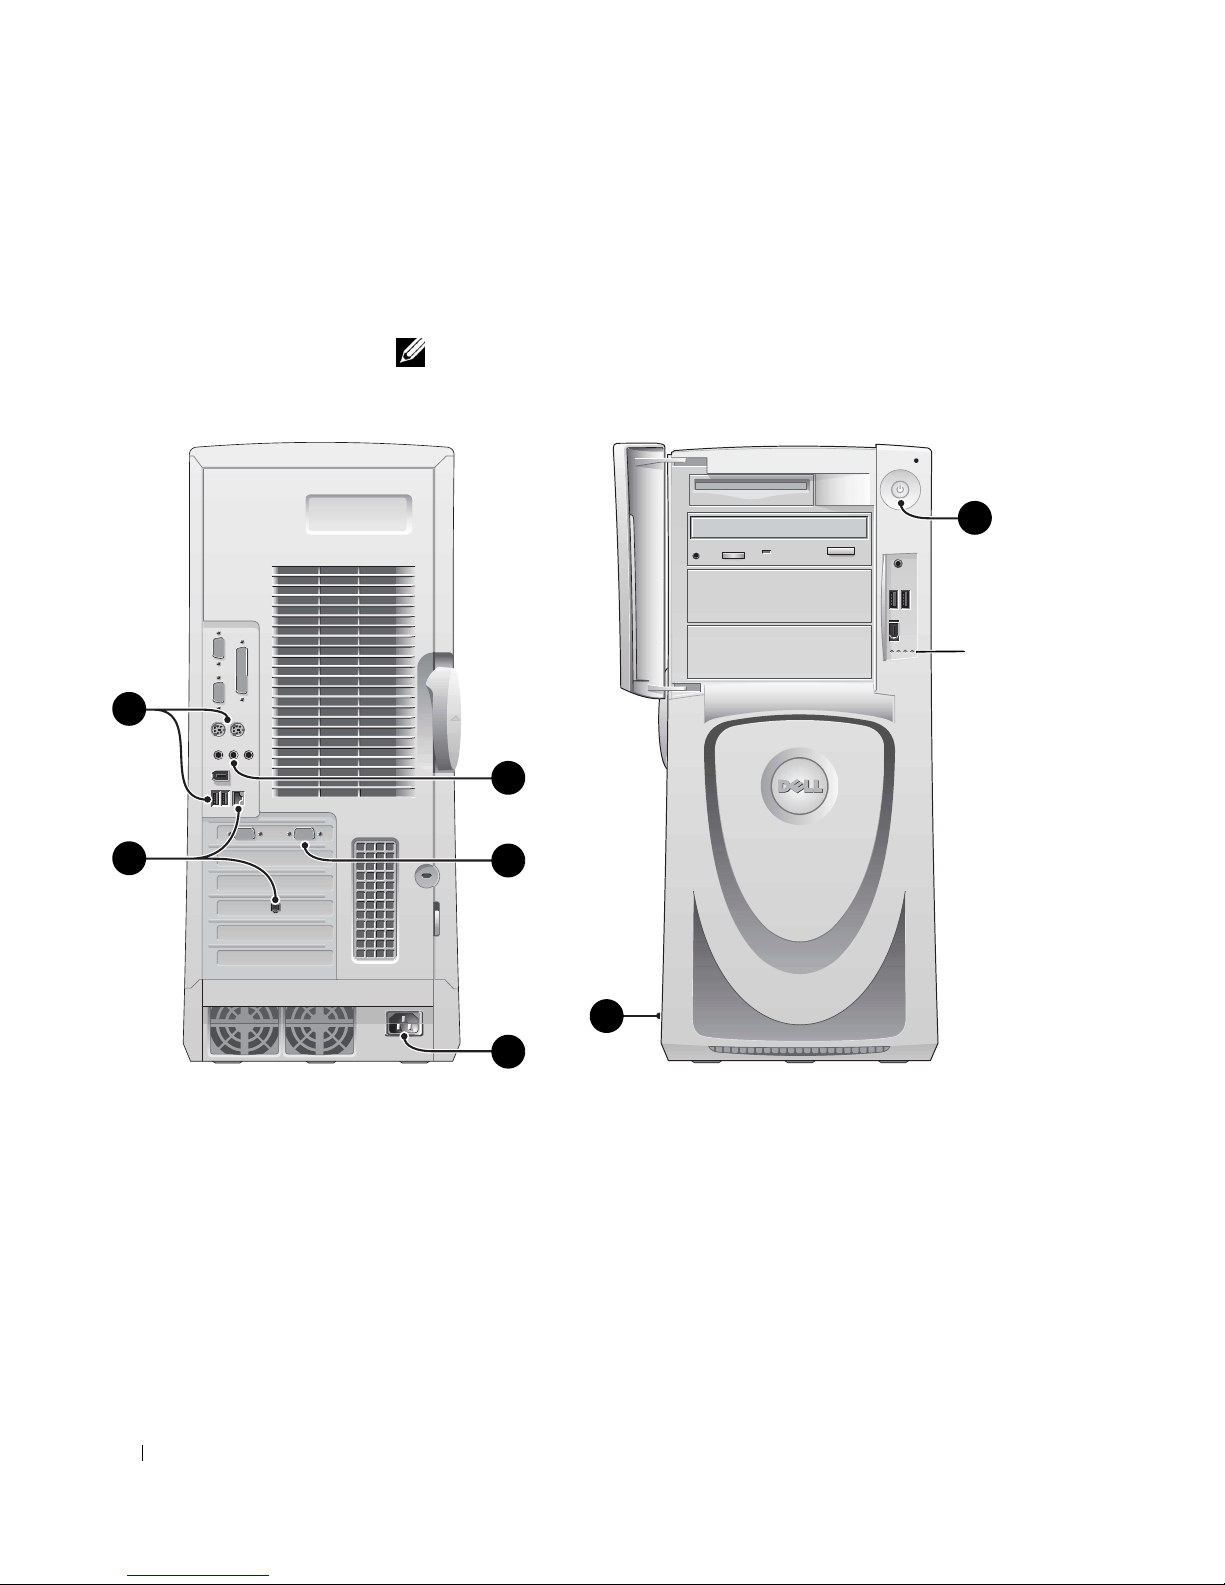
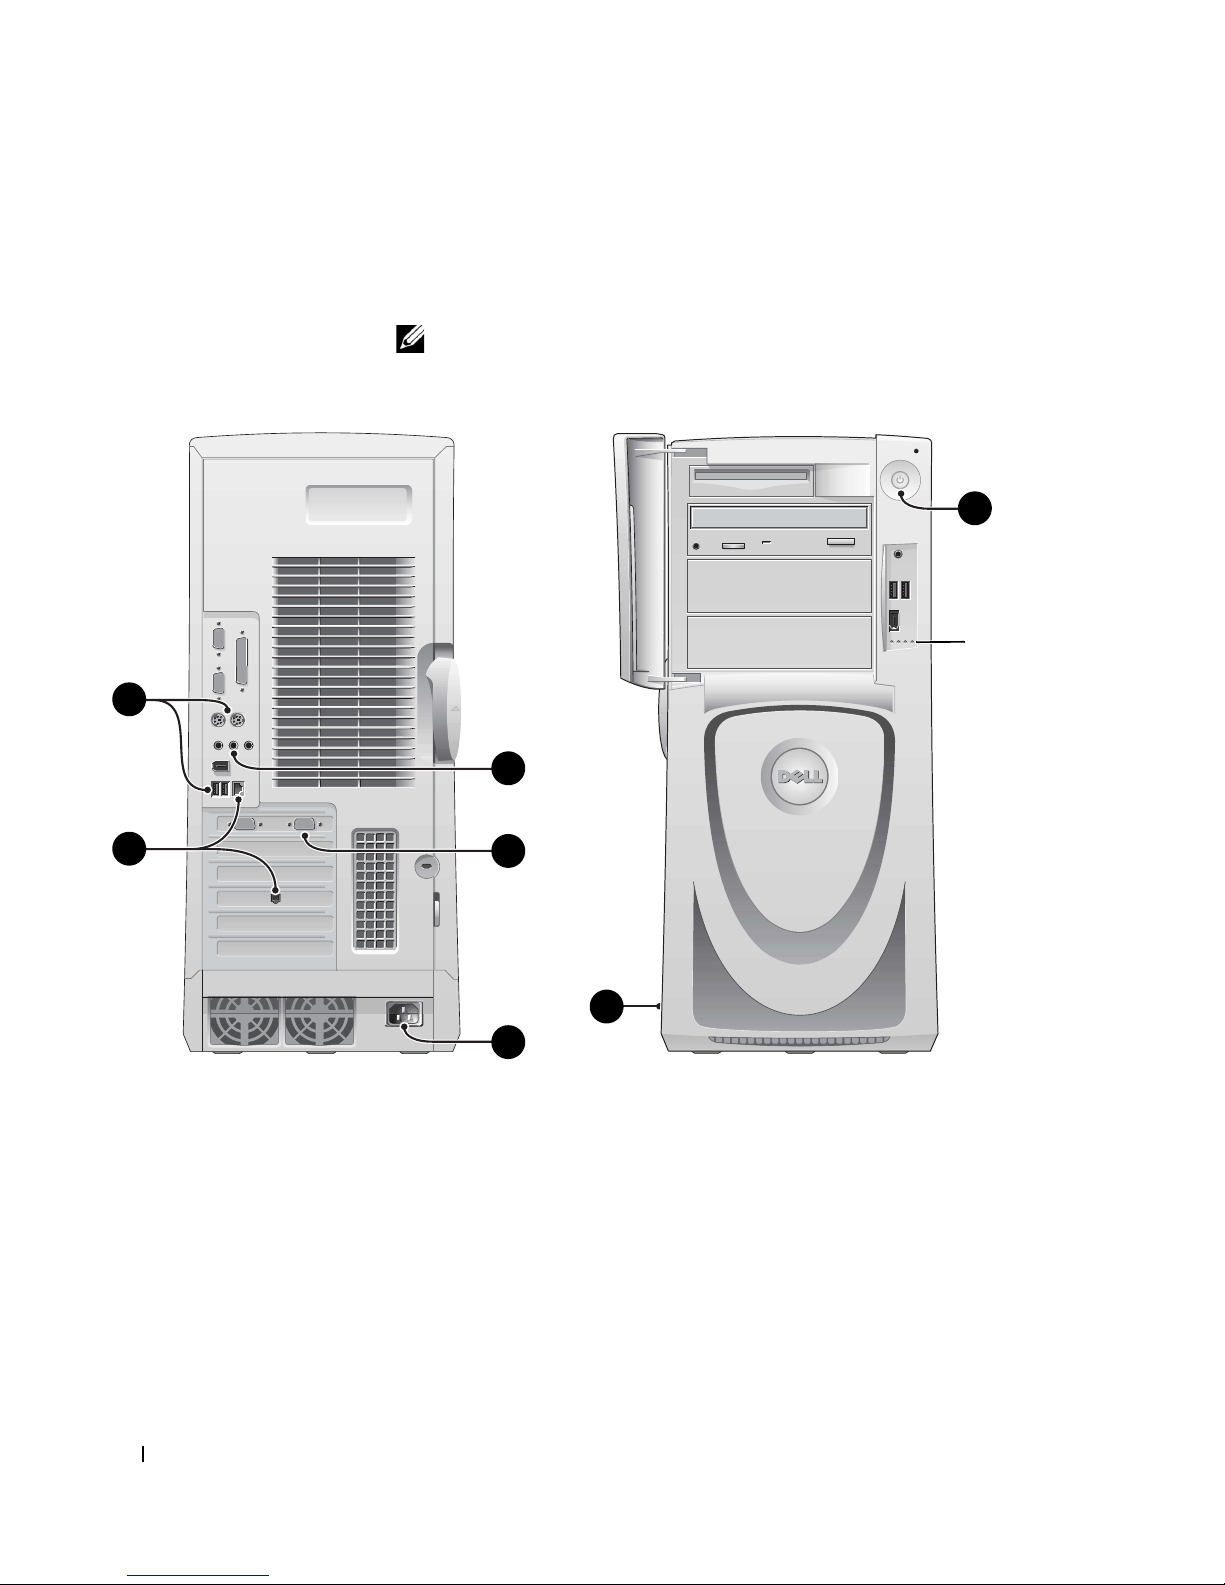
The numbers in the following figure correspond to the tasks described in
the setup steps.
NOTE: You must complete all steps to properly set up your computer.
Computer Features
6
diagnostic
lights
4
2
3
7
5
Back View Front View
(doors open)
10 Setup and Quick Reference Guid e
Page 11
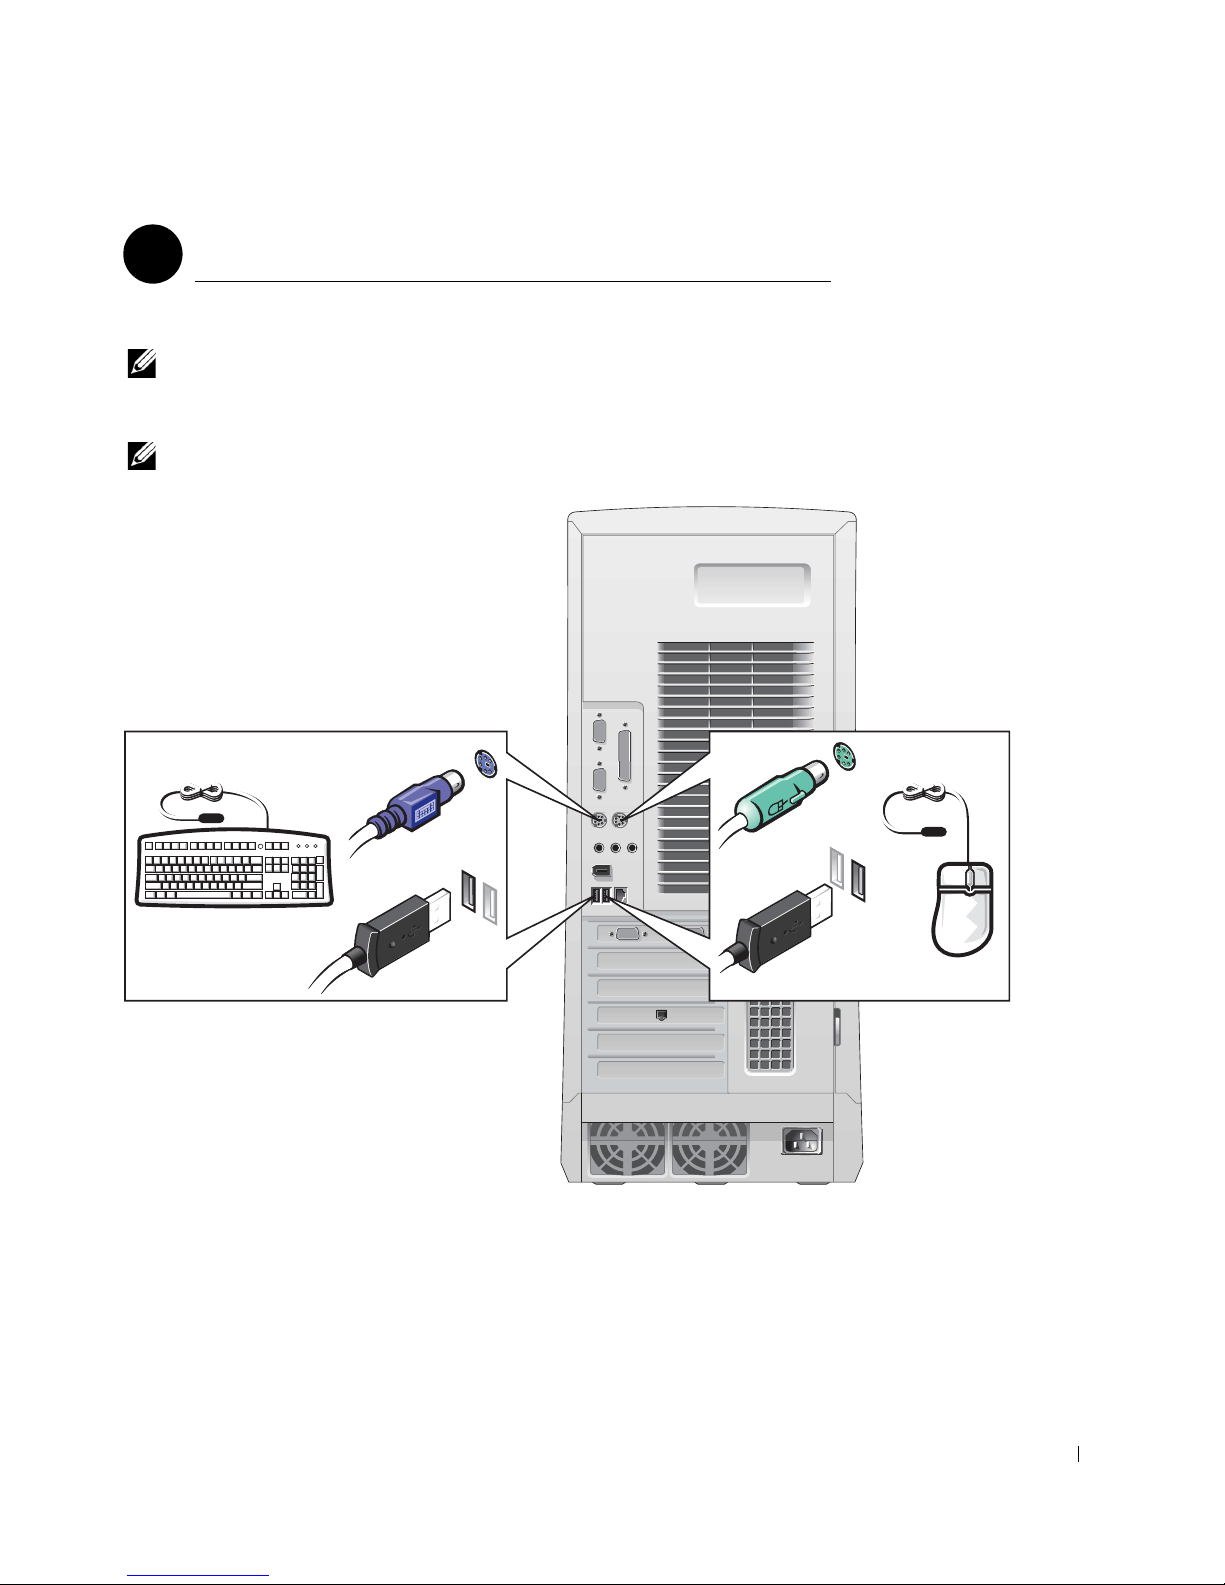
Keyboard and Mouse
1
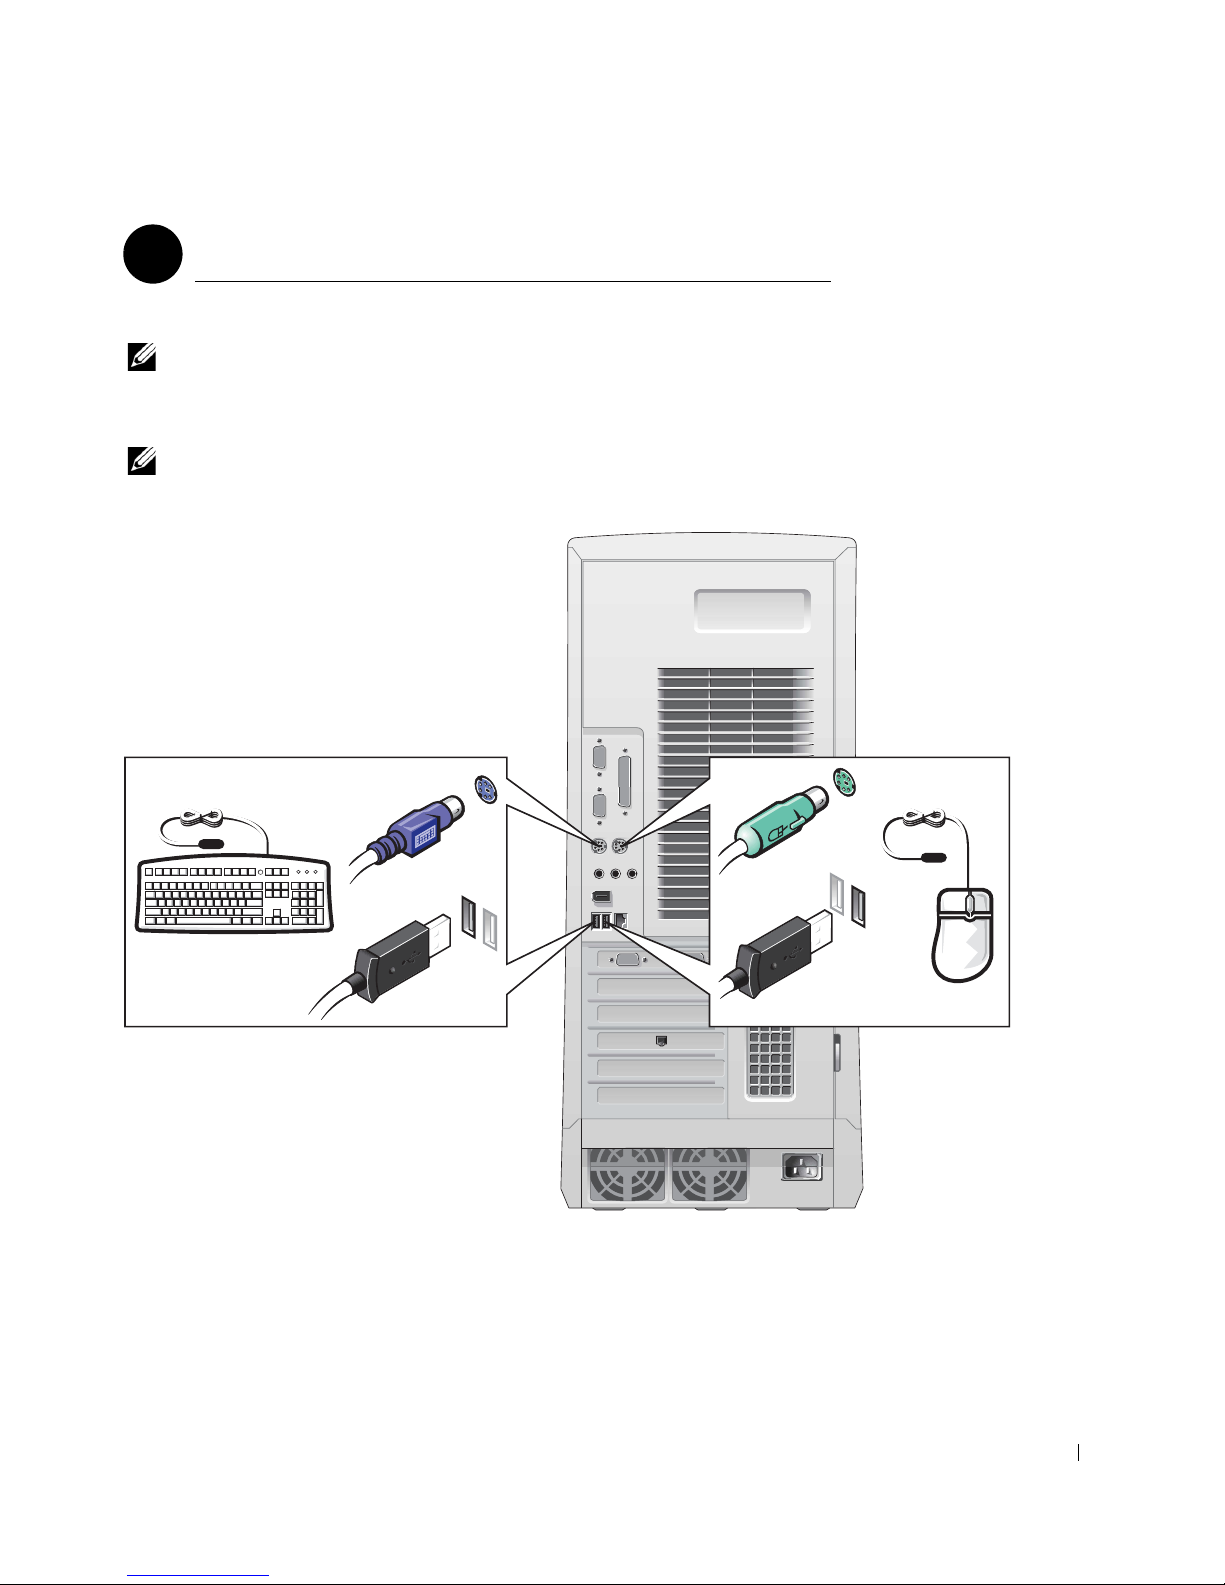
Connect the keyboard and mouse as shown in the following illustration.
NOTE: If you have a Personal System/2 (PS/2) keyboard, connect it into the
PS/2 keyboard connector. If you have a Universal Serial Bus (USB) keyboard,
connect it to a USB connector as shown in the illustration. Do not connect a
USB mouse or keyboard to the USB connectors on the front of the computer.
NOTE: Do not attempt to operate a PS/2 mouse and a USB mouse
simultaneously.
PS/2 or USB
keyboard
PS/2 or USB
mouse
Setup and Quick Reference Guide 11
Page 12
www.dell.com | support.dell.com
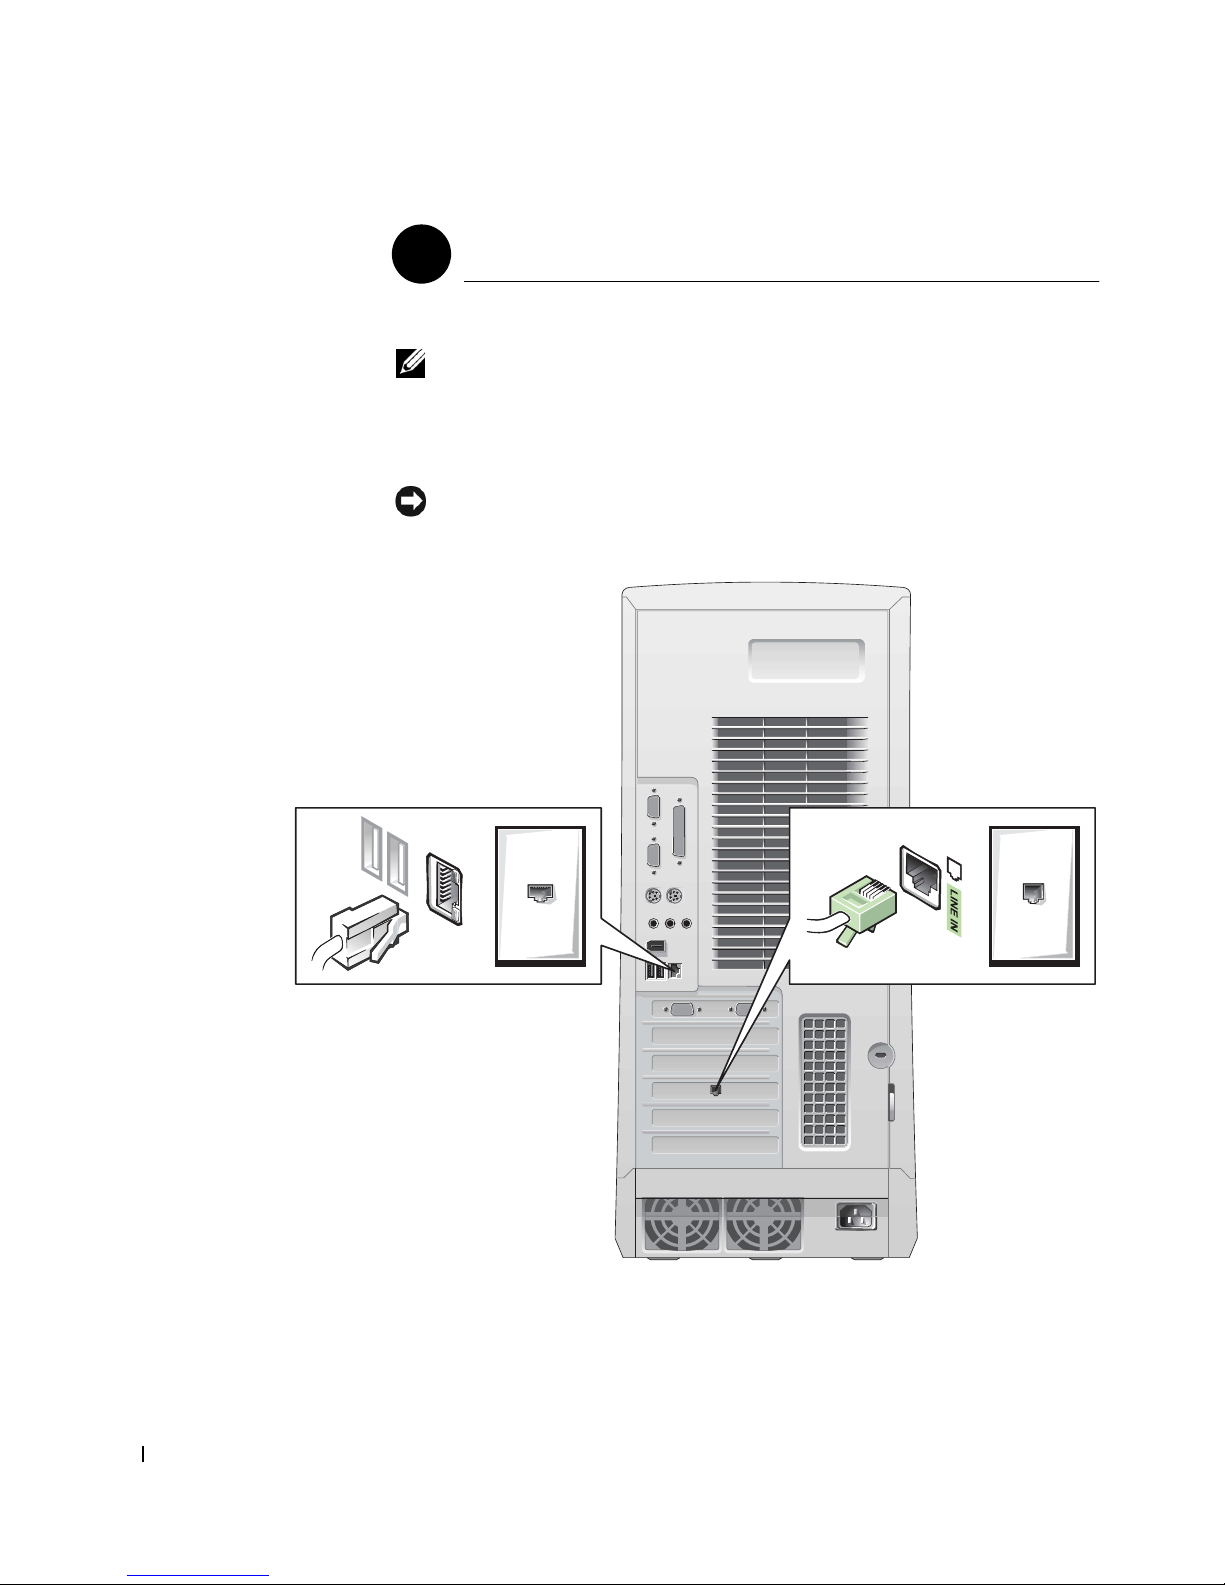
Network Adapter and Modem
2
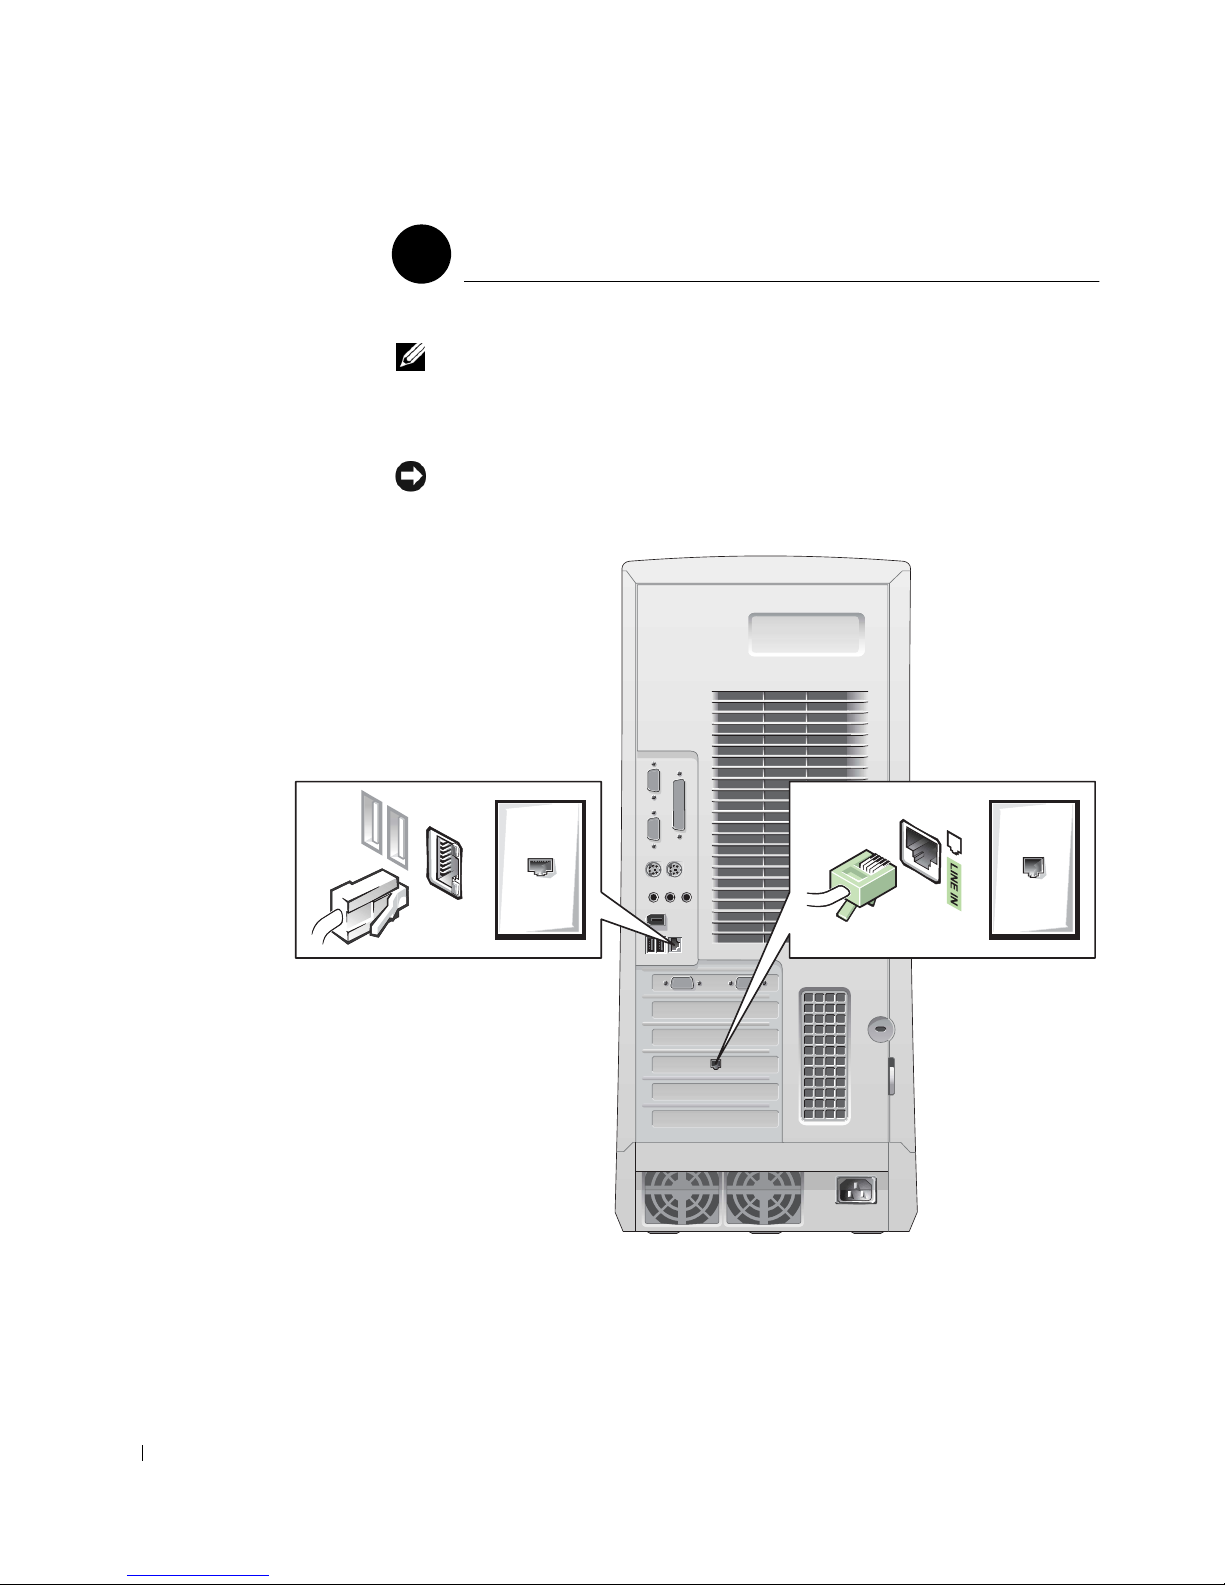
Insert the network cable, not the phone line, into the network connector.
NOTE: Your computer has an integrated network adapter. However, if your
computer has a network expansion card installed, connect the network cable to
the network card, not to the connector on the computer back panel.
If you have an optional modem, connect the phone line to the modem.
NOTICE: Do not connect a modem cable to the network adapter. Voltage
from telephone communications can cause damage to the network adapter.
network cable modem cable
12 Setup and Quick Reference Guid e
Page 13
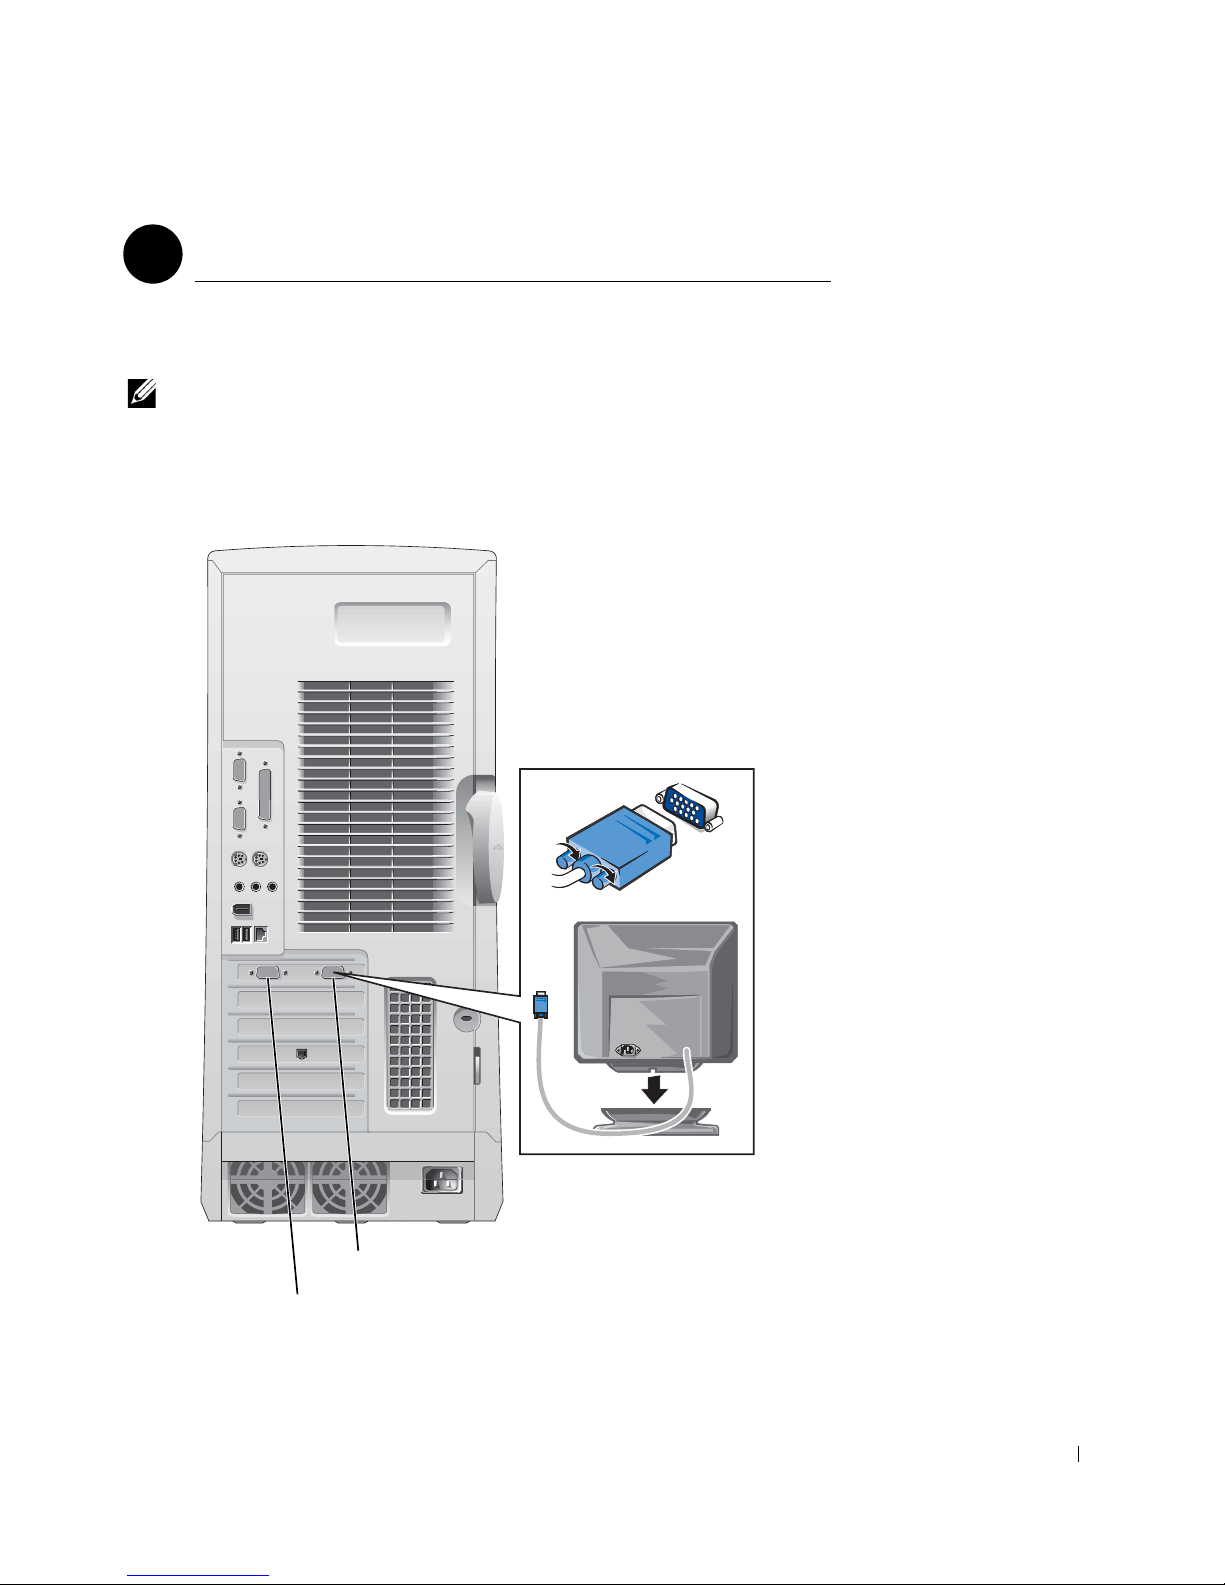
Monitor
3
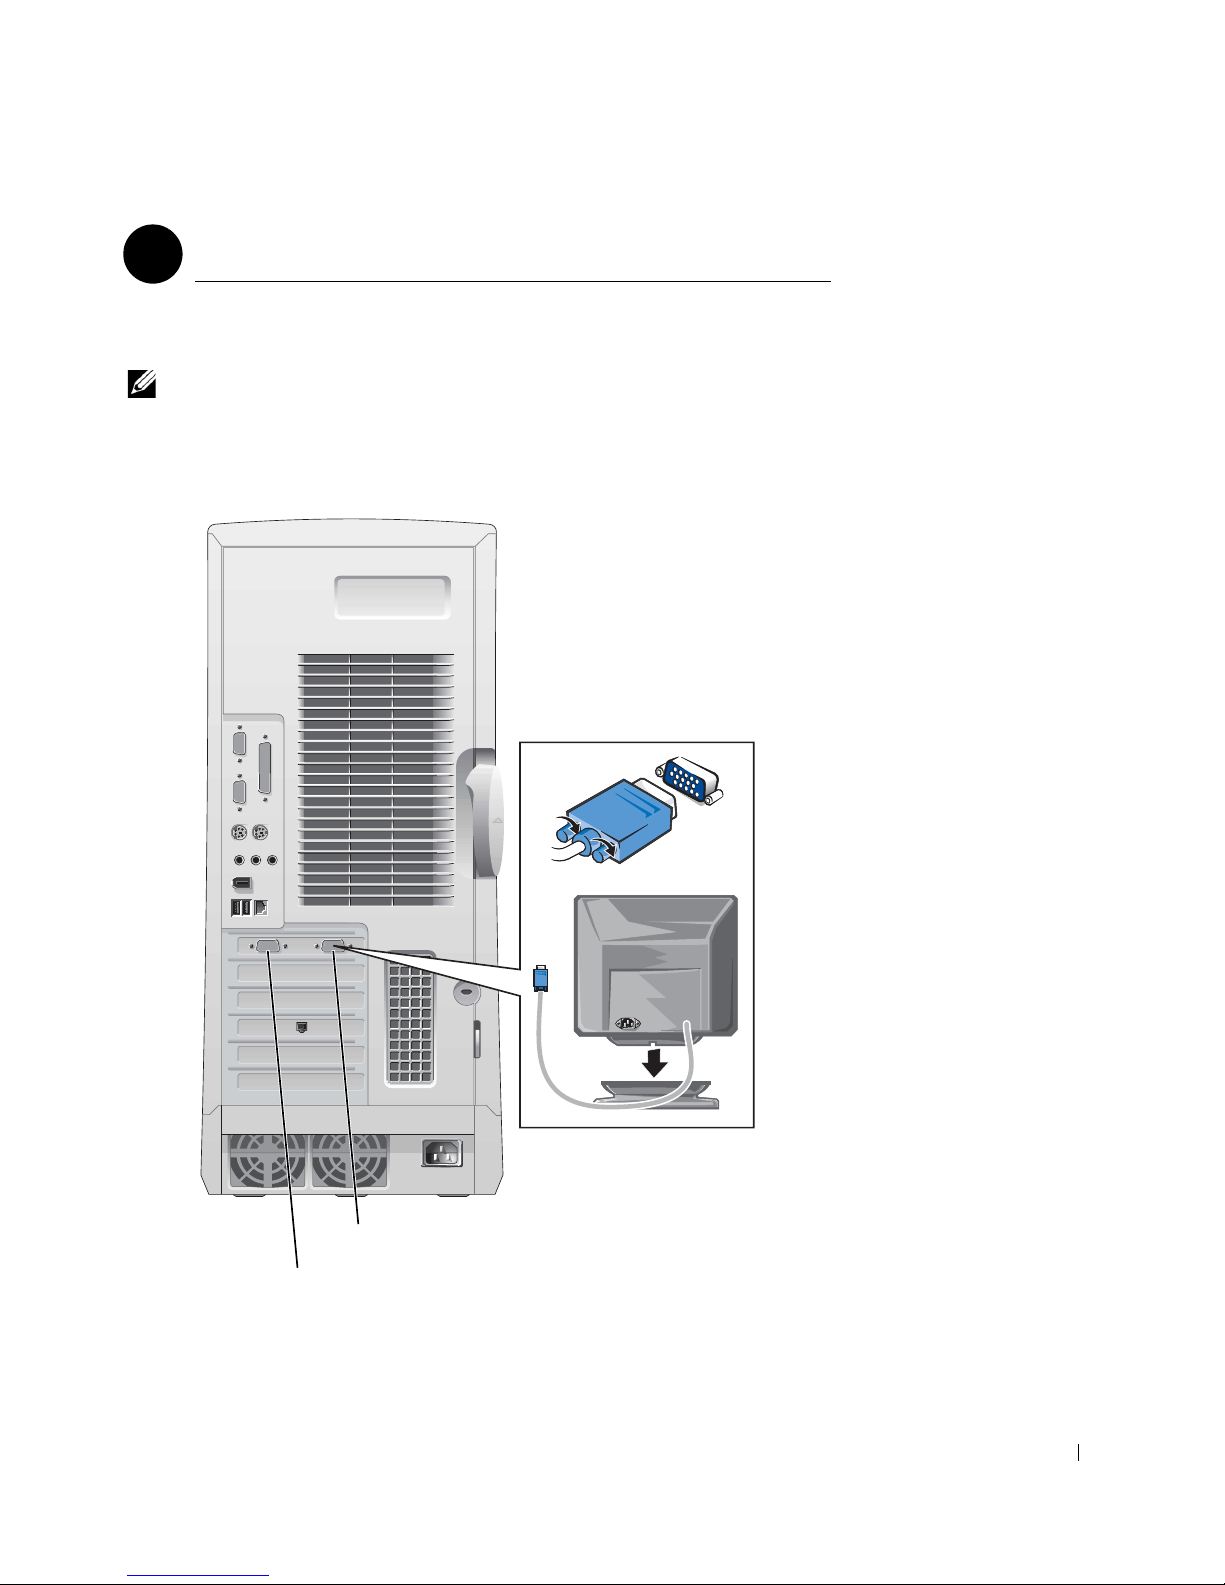
Align and gently insert the monitor cable to avoid bending connector pins.
Then tighten the thumbscrews on the cable connector.
NOTE: If you are only using one monitor with an optional dual-monitor card,
you must use the primary port. To enable dual-monitor support, both monitors
must be attached when the computer starts.
For setting up dual monitors, see "Dual Monitors" on page 17.
primary port
optional secondary port
Setup and Quick Reference Guide 13
Page 14
www.dell.com | support.dell.com
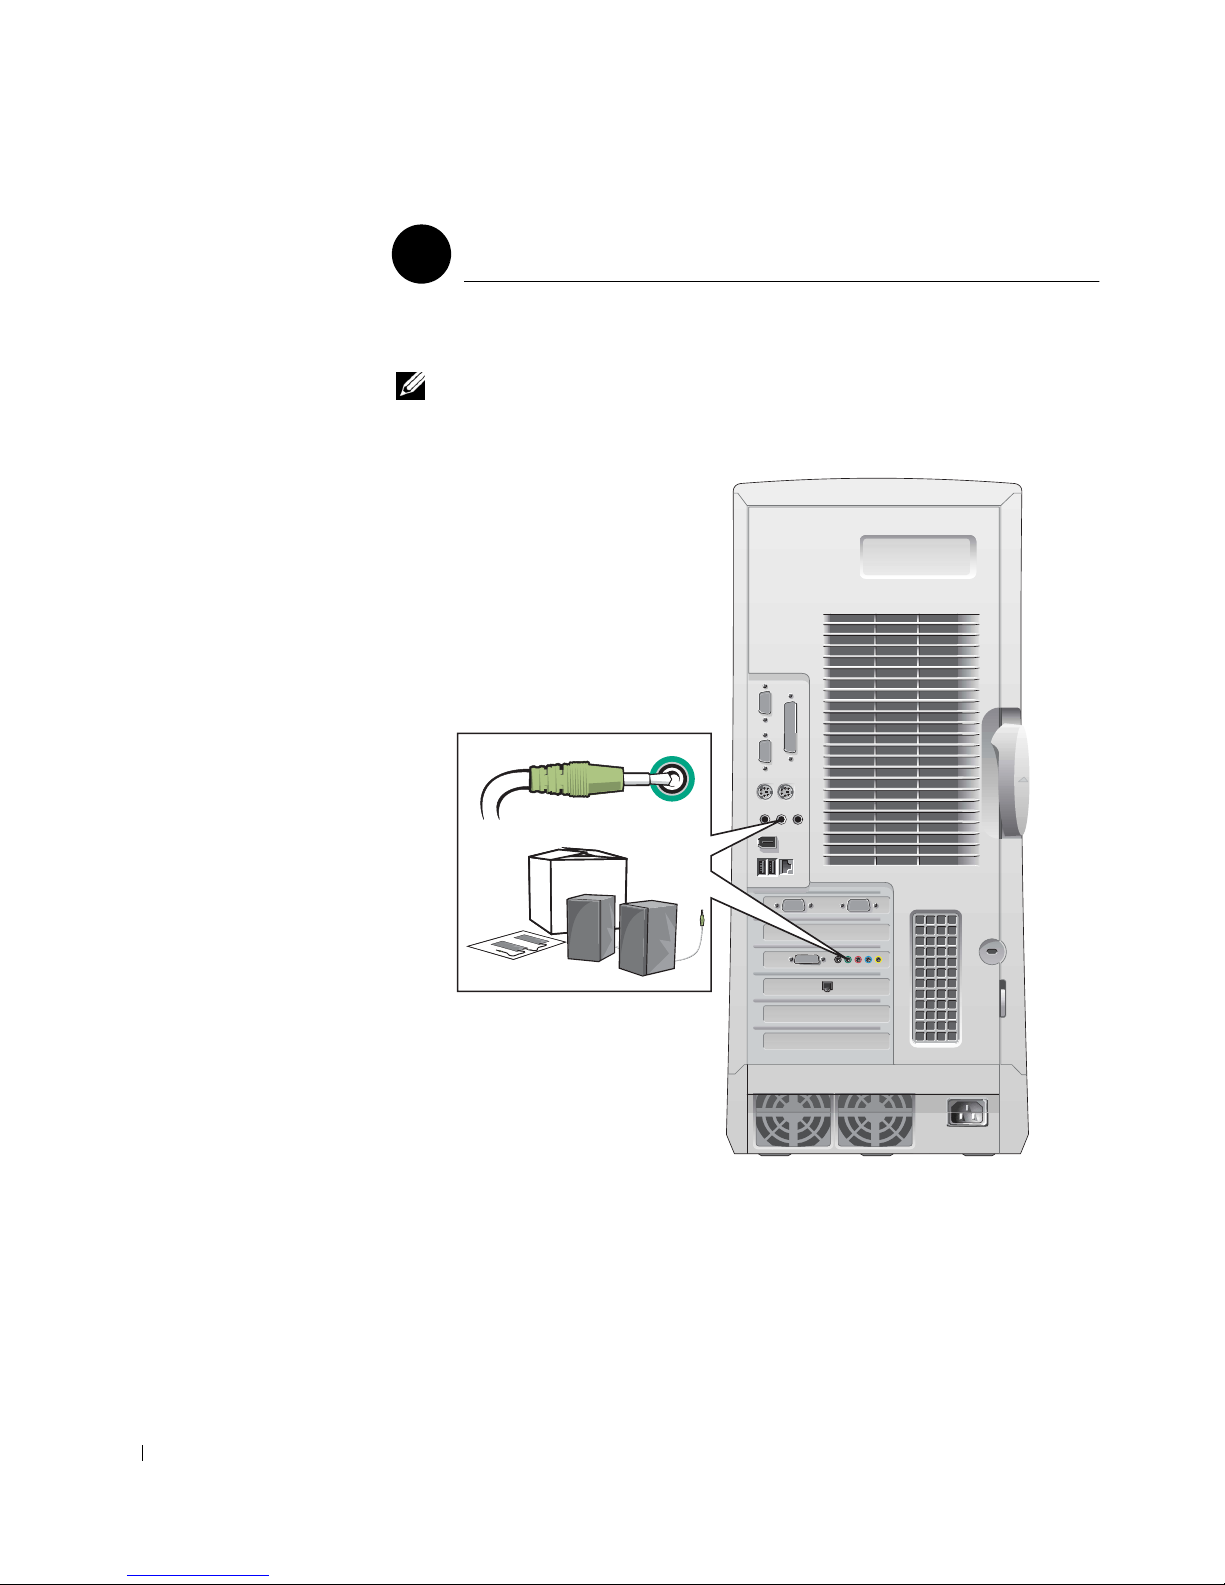
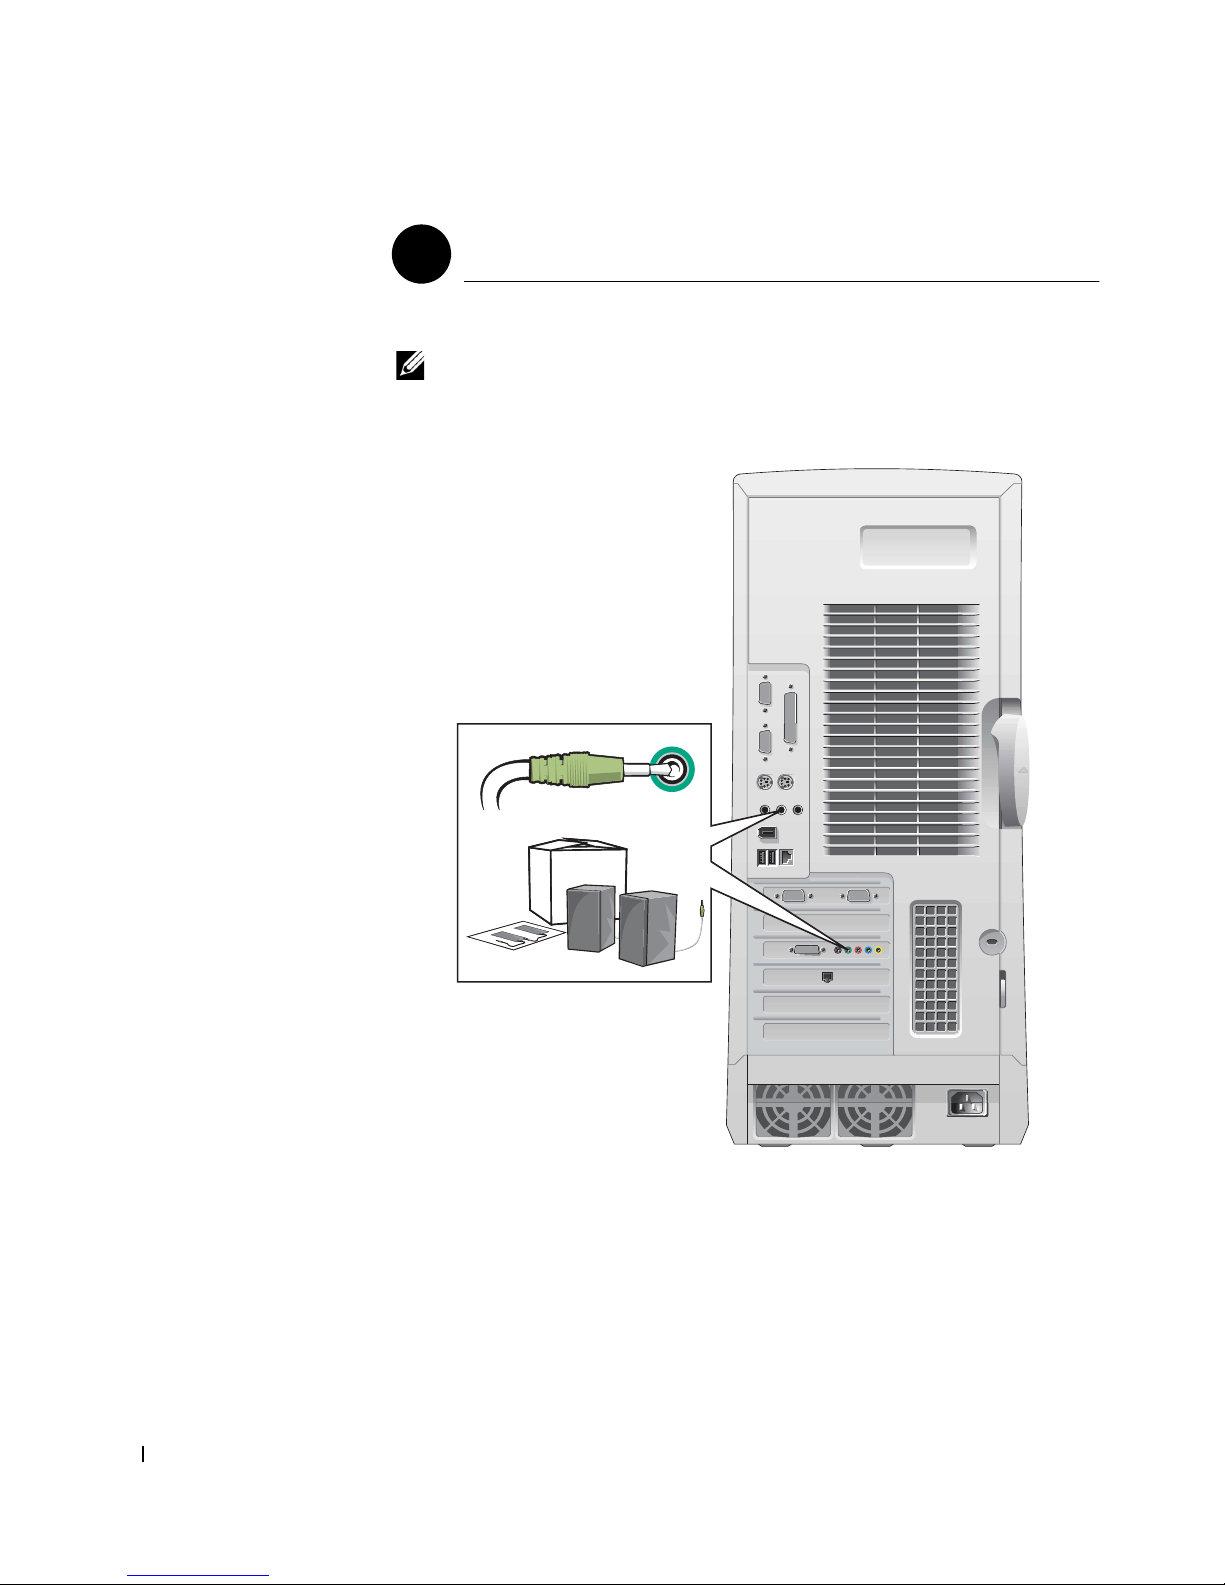
Speakers
4
Connect the speakers to the computer as shown on the instructions
supplied with the speakers.
NOTE: You r computer has an i n t e g rated audio co n t r o l ler. However, if you r
computer has an audio expansion card installed, connect external audio
devices to the sound card, not to the connectors on the computer back panel.
14 Setup and Quick Reference Guid e
Page 15
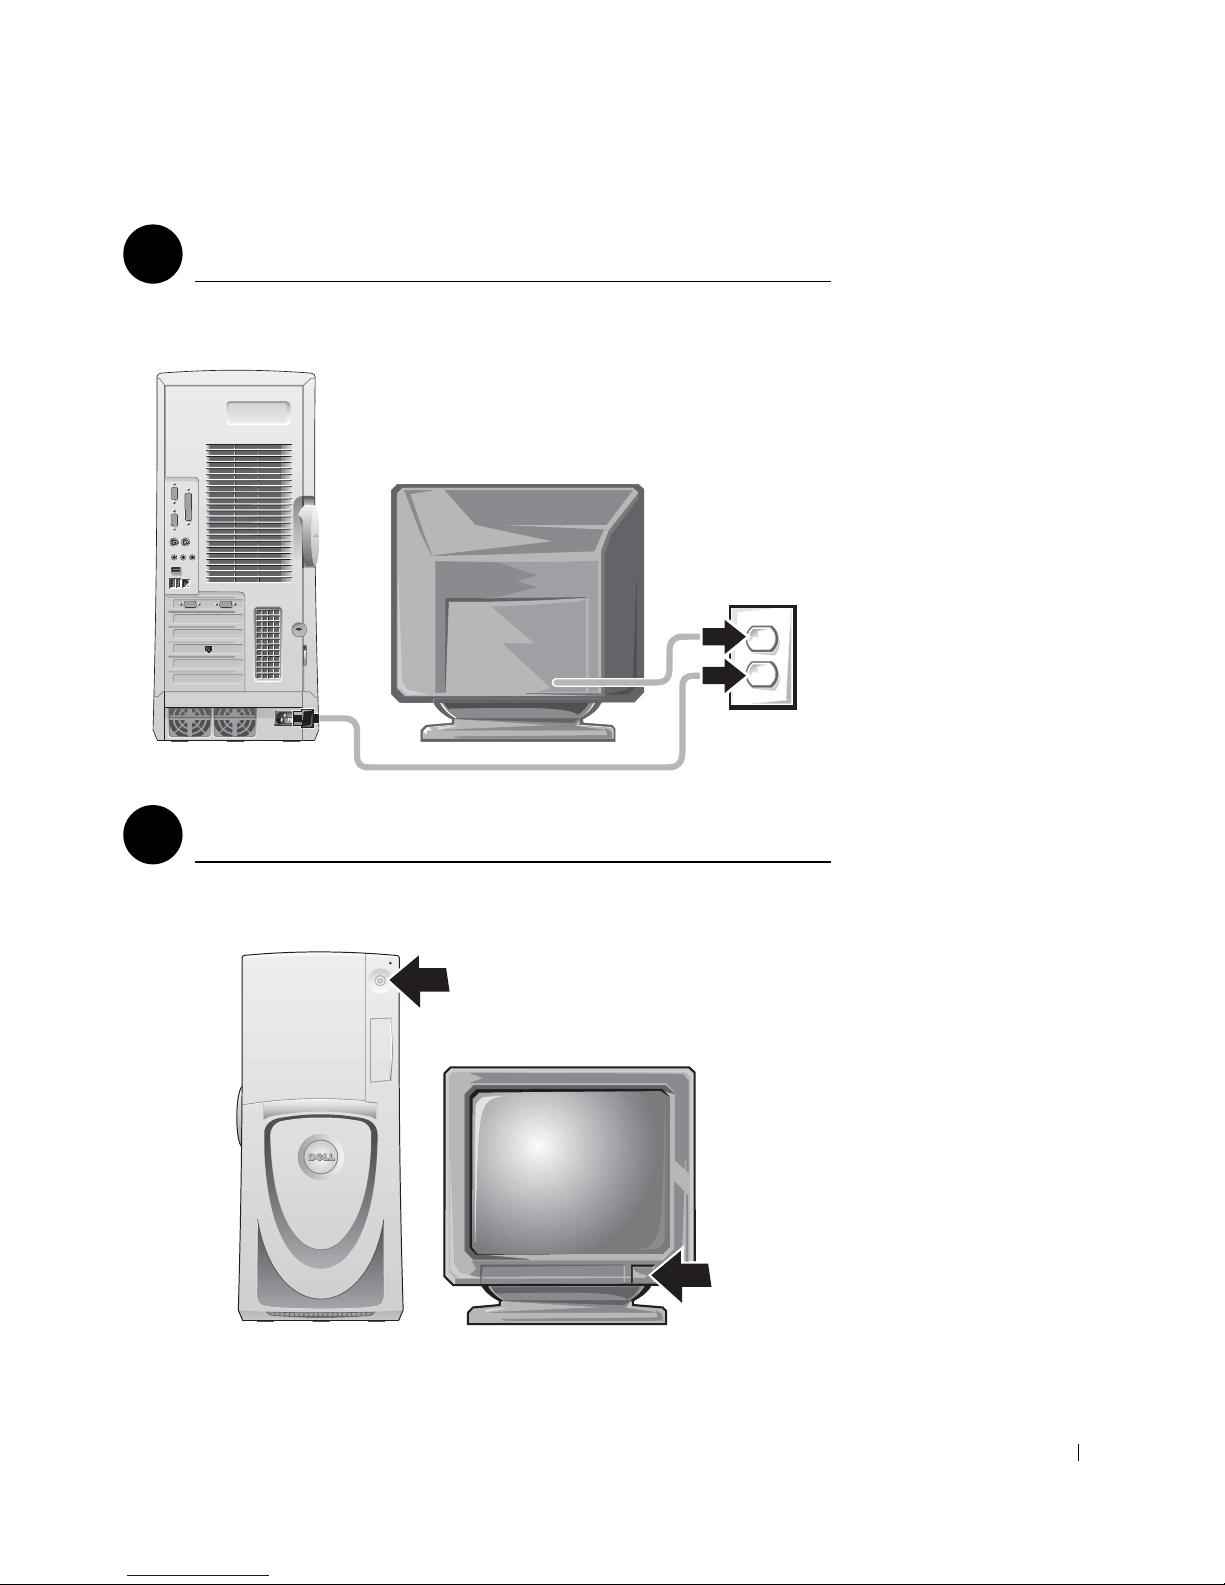
Power Connection
5
Plug in the computer and the monitor to their electrical outlets.
Power On
6
Press the power button on your computer and monitor to turn them on.
Setup and Quick Reference Guide 15
Page 16
www.dell.com | support.dell.com
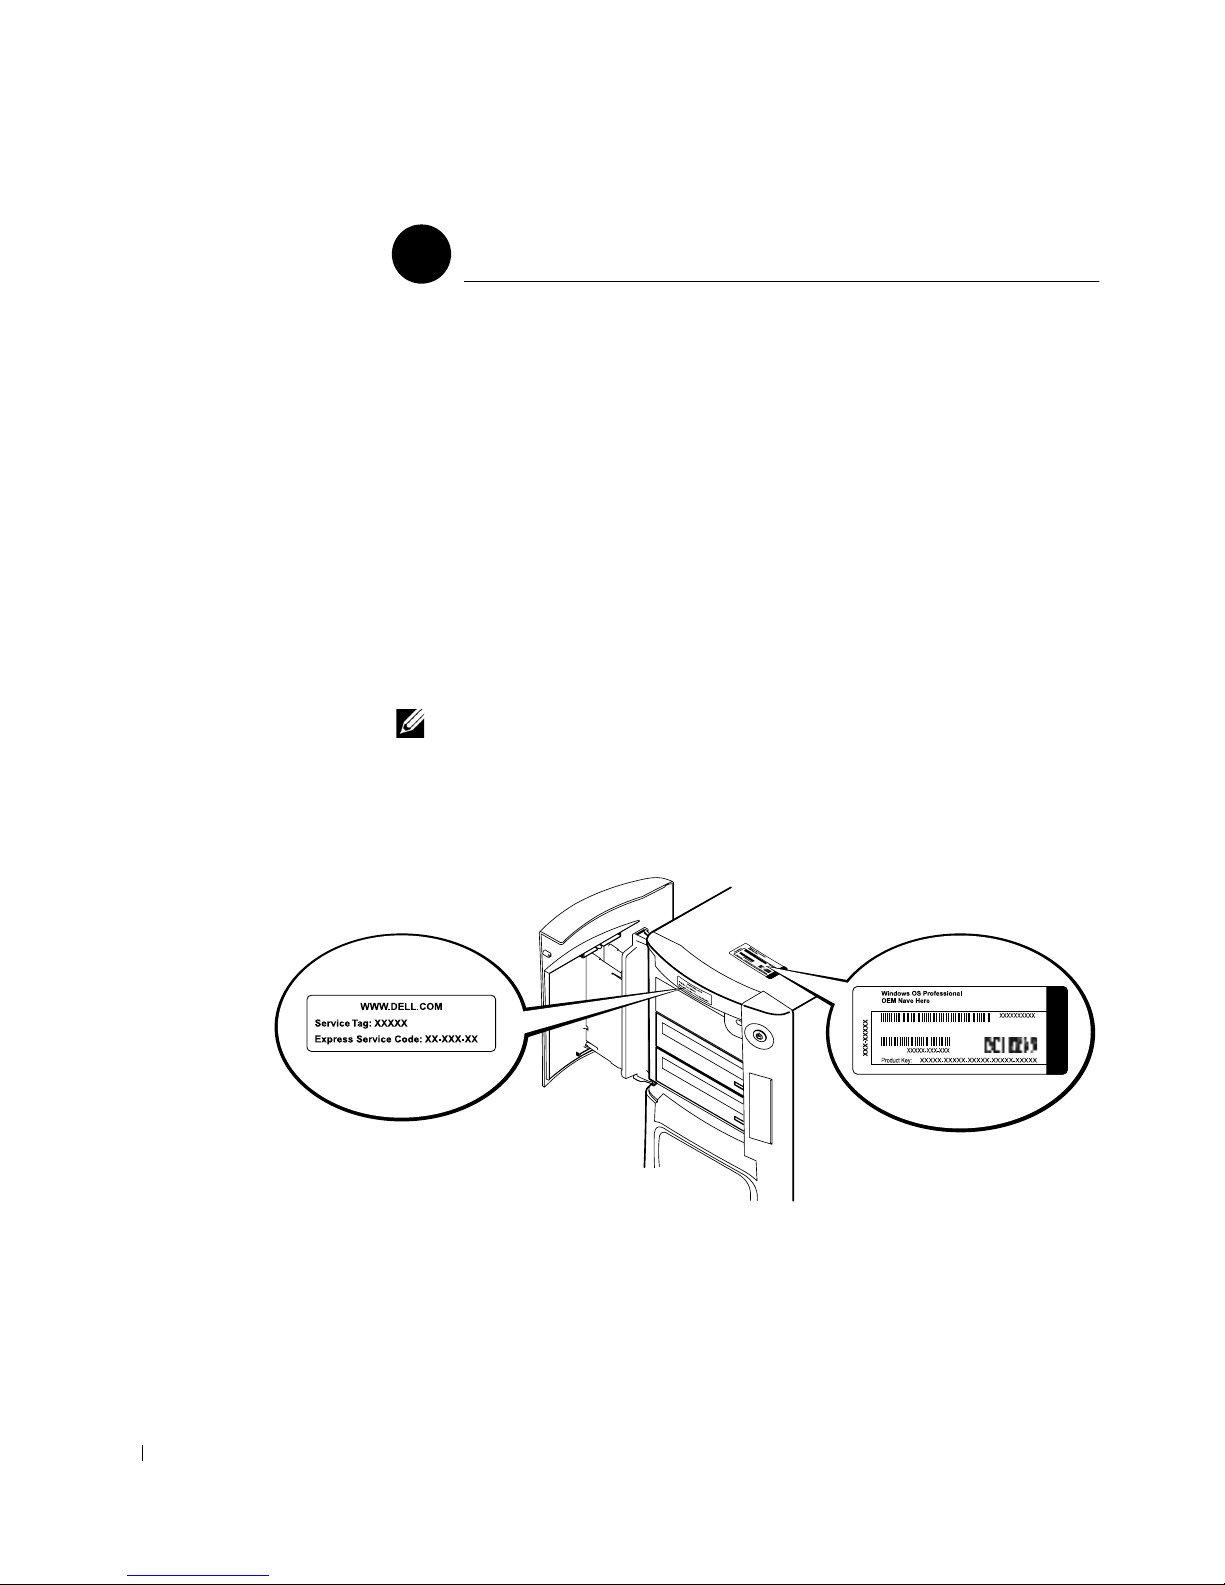
Setting Up the Operating System
7
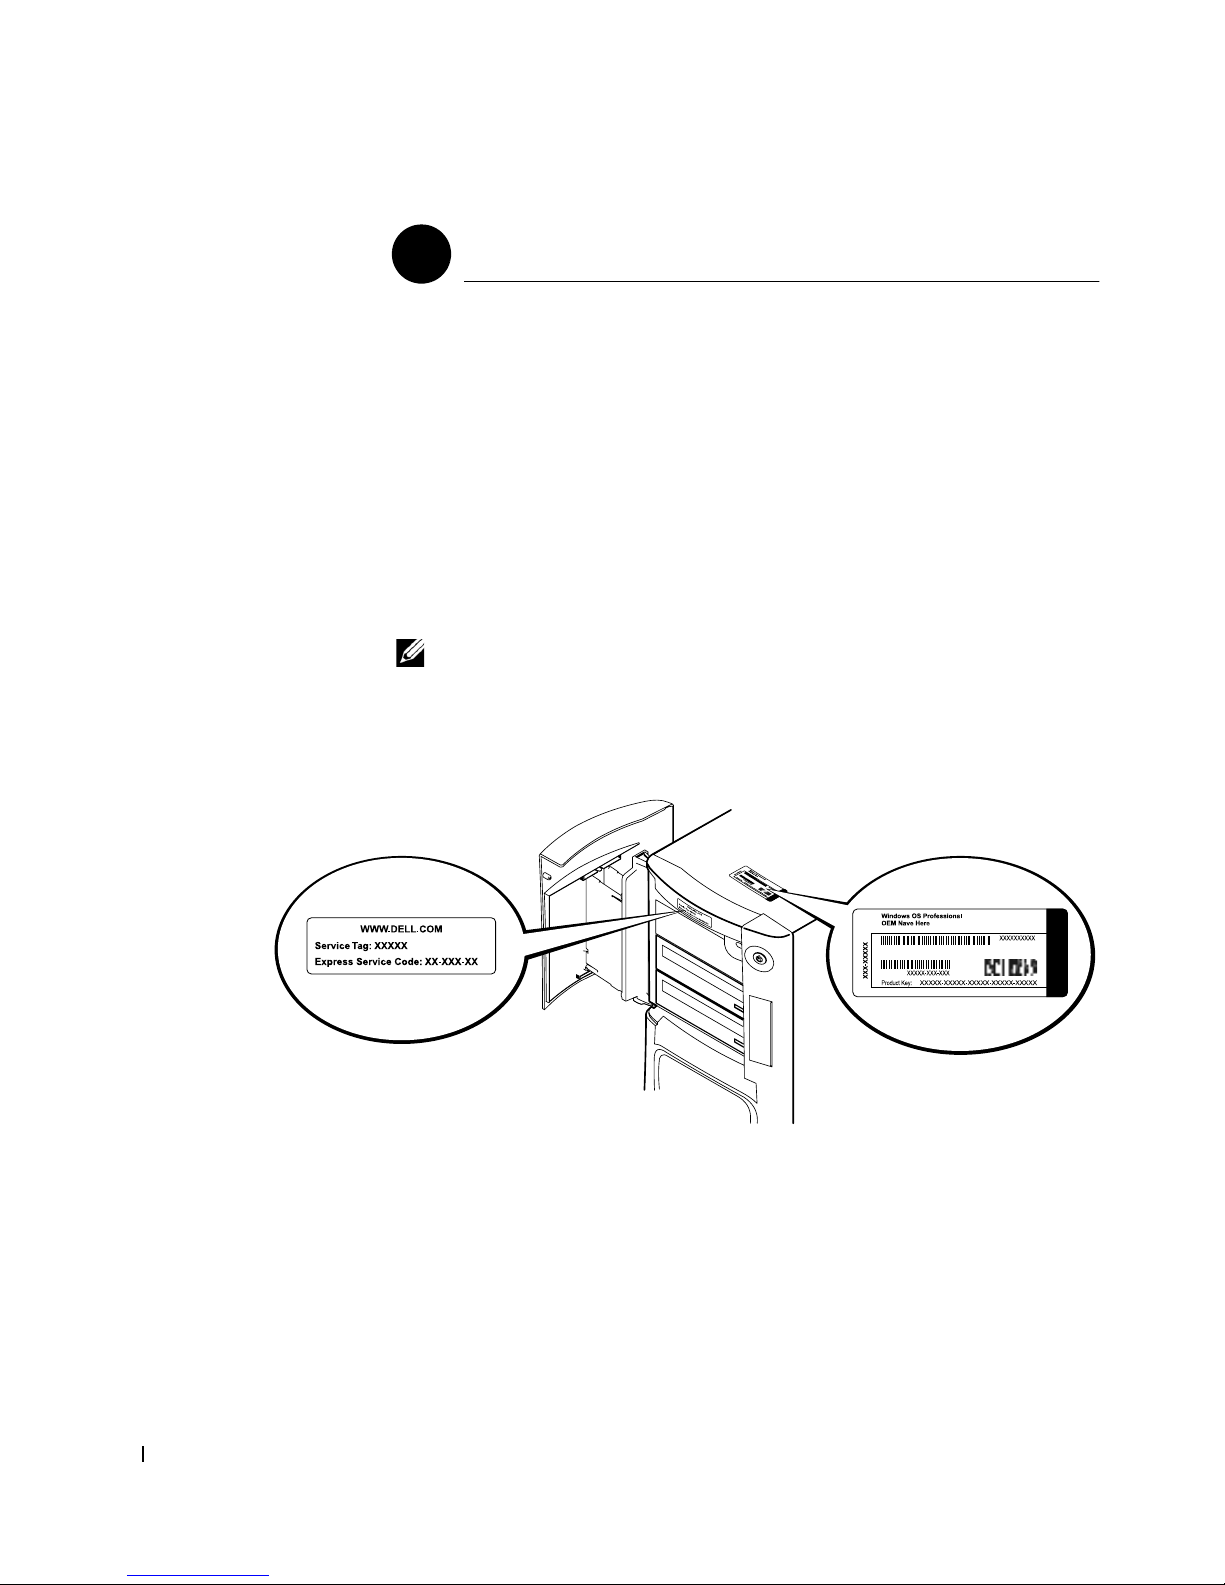
When you start the computer for the first time, a few system start-up
messages may appear, including one that shows your Service Tag and
Express Service Code.
Your computer is preconfigured with the operating system already installed.
Before turning on your computer for the first time, you must complete all
the previous setup steps, connecting all devices for your computer.
The initial setup of the operating system is automatic and may take several
minutes. Additional setup time may be required, depending on your
system’s internal and external devices.
Follow the operating system prompts to complete setup. You may be
prompted to enter the Windows Product Key (also called the Product ID or
COA) to complete the registration. You can find this above the service tag
on your computer.
NOTE: For more information on setting up the operating system, see the
operating system installation guide.
For future reference, write the number below:
Product Key (ID or COA): ________________________________________
For more information, access your computer documentation from the
User’s Guides icon on the desktop or from the Dell Precision ResourceCD.
16 Setup and Quick Reference Guid e
Page 17
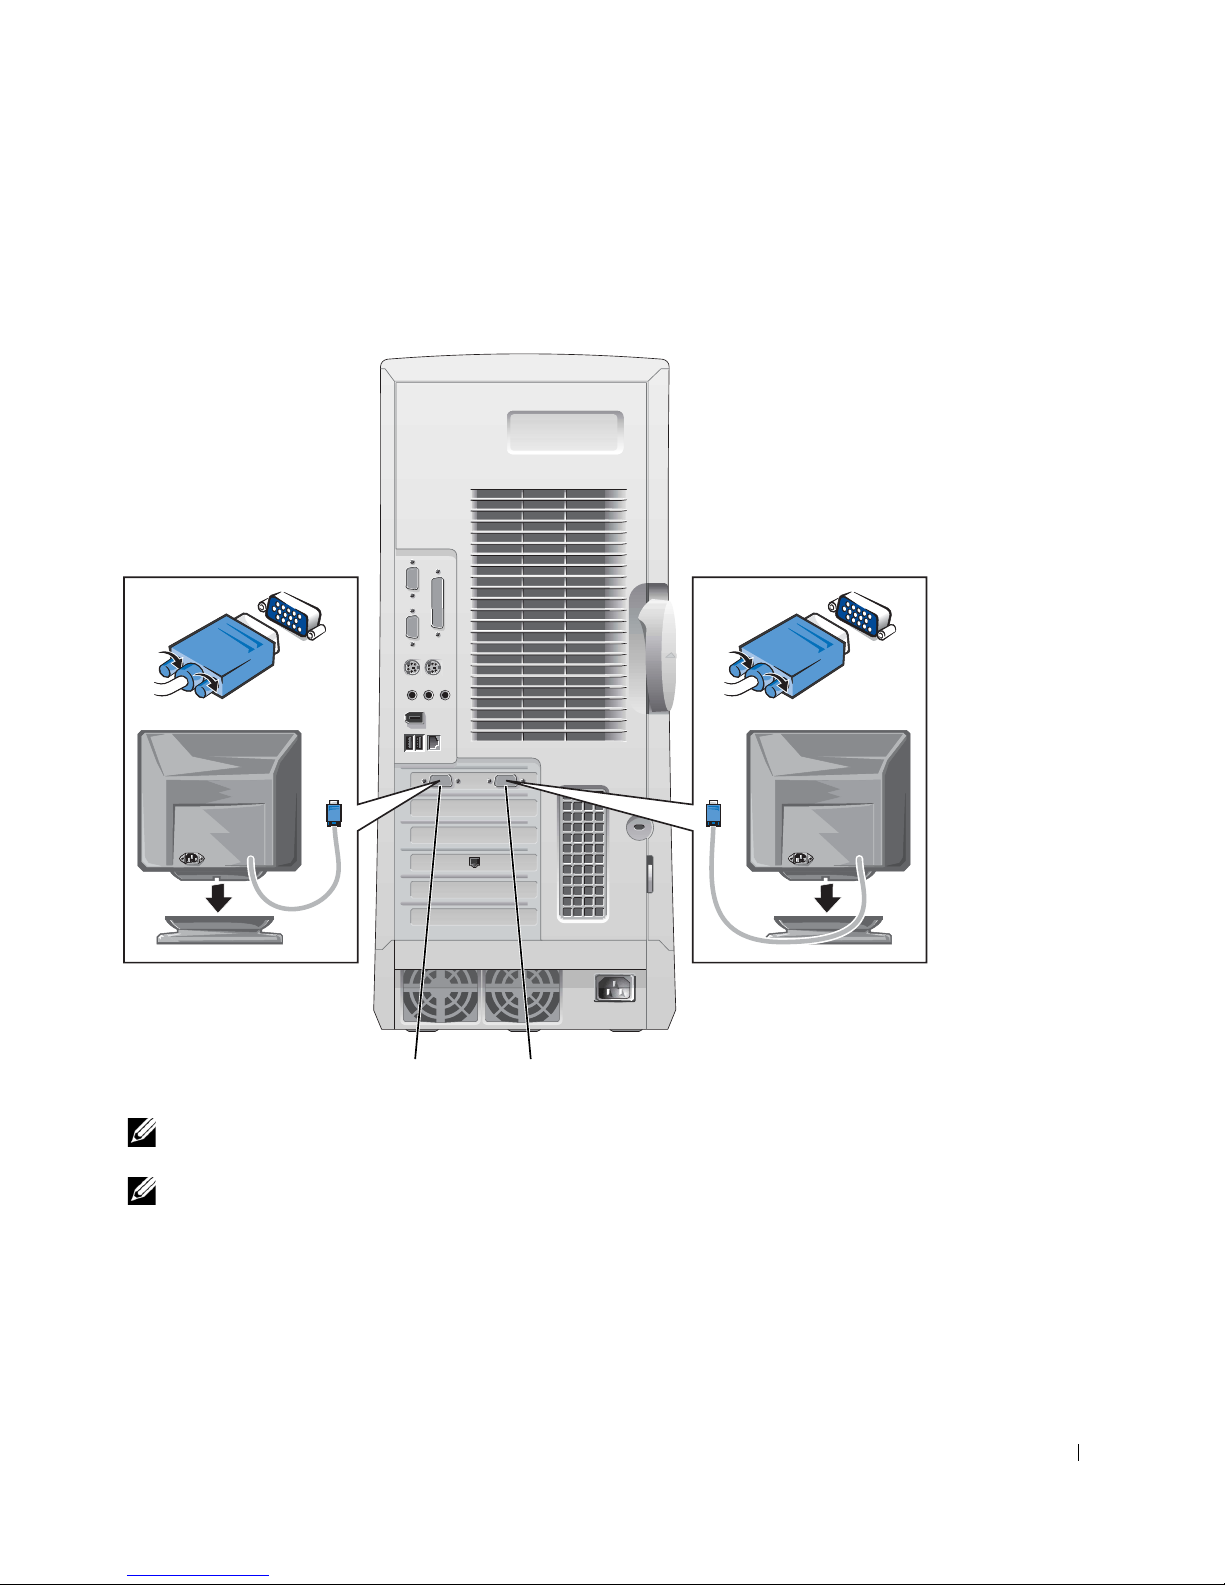
Dual Monitors
Attach the main monitor to the primary port. See "Frequently Asked
Questions" on page 18 for more information.
secondary port
NOTE: A second monitor is optional and requires a multimonitor graphics
adapter card.
NOTE: To enable dual-monitor support, both monitors must be attached when
the computer starts.
primary port
Setup and Quick Reference Guide 17
Page 18

Frequently Asked Questions
Problem? Try... Or try the Dell Precision
ResourceCD
How do I use my Dell
Precision ResourceCD?
Where can I find a
detailed User’s Guide
www.dell.com | support.dell.com
for my computer?
Where can I find a
warranty statement for
my computer?
Where can I find the
Product Key (also
called the Product ID
or Certificate of
Authenticity [COA])
for the operating
system registration?
How do I find
technical
specifications for my
computer?
See "Using the Dell
Precision™ ResourceCD" on
page 9 for more information.
Depending on your
operating system, doubleclick the User’s Guides icon
on your desktop or click the
Start button and select Help
and Support.
Documentation such as the
User’s Guide is available on
your hard drive.
Depending on your
operating system, doubleclick the User’s Guides icon
on your desktop or click the
Start button and select Help
and Support. See the
"Limited Warranty and
Return Policy" section in
your User’s Guide.
See page 16 of this
document.
Depending on your
operating system, doubleclick the User’s Guides icon
on your desktop or click the
Start button and select Help
and Support. See the
"Technical Specifications"
section in your User’s Guide.
Go to the main menu on the
Dell Precision ResourceCD.
Click User’s Guides in the
To pi c pull-down menu and
click Dell Precision
ResourceCD Guide.
Go to the main menu on the
Dell Precision ResourceCD.
Click User’s Guides in the
To pi c pull-down menu and
click the user’s guide
appropriate for your computer.
Go to the main menu on the
Dell Precision ResourceCD.
Click User’s Guides in the
To pi c pull-down menu, click
the user’s guide appropriate
for your computer, and then
see "Limited Warranty and
Return Policy."
Go to the main menu on the
Dell Precision ResourceCD.
Click User’s Guides in the
To pi c pull-down menu, click
the user’s guide appropriate
for your computer, and then
see "Technical Specifications."
Or try the Dell Support Site
Go to support.dell.com. At the
Welcome page, click
Dell Documents. Make selections
appropriate for your computer to
access your User’s Guide.
Go to support.dell.com. At the
Welcome page, click
Dell Documents. Make selections
appropriate for your computer to
access your User’s Guide. See
"Limited Warranty and Return
Policy" in the User’s Guide.
Go to support.dell.com. At the
Welcome page, click Ask Dudley!
and search using the keywords
Product Key.
Go to support.dell.com. At the
Welcome page, click
Dell Documents. Make selections
appropriate for your computer to
access your User’s Guide. See
"Technical Specifications" in the
User’s Guide.
18 Setup and Quick Reference Guid e
Page 19

Problem? Try... Or try the Dell Precision
ResourceCD
I have a computer with
a dual-monitorcapable graphics card.
How do I set up my
second monitor?
Depending on your
operating system, doubleclick the User’s Guides icon
on your desktop or click the
Start button, and then select
Help and Support and
Go to the main menu on the
Dell Precision ResourceCD.
Click User’s Guides in the
To pi c pull-down menu and
click the user’s guide
appropriate for your computer.
search for dual monitor.A
step-by-step procedure for
setting up dual monitors is
located in the video
controller User’s Guide.
If I need a driver for
my graphics card,
network adapter,
sound card, small
computer system
interface (SCSI)
software, or some
other device, where do
I locate it?
How do I open the
computer?
See "Using the Dell
Precision™ ResourceCD" on
page 9 for more information.
You may also have a CD
specifically for the device. If
so, search the contents of the
CD for documentation and
appropriate driver(s).
See "Opening the Computer
Cover" on page 21.
See the Dell Precision
WorkStations ResourceCD
Guide for more information.
Go to the main menu on the
Dell Precision ResourceCD.
Click User’s Guides in the
To pi c pull-down menu, click
the user’s guide appropriate
for your computer, and then
see "Removing and Installing
Parts."
The monitor is blank
and the power light is
blinking green. How
do I resume operations
with my computer?
The computer is in a
reduced power, or "sleep,"
state. Use one of the
appropriate methods to
"wake up" the computer.
Depending on your
operating system, double-
Go to the main menu on the
Dell Precision ResourceCD.
Click User’s Guides in the
To pi c pull-down menu, click
the user’s guide appropriate
for your computer, and then
see "Power Management."
click the User’s Guides icon
on your desktop or click the
Start button and select Help
and Support. See "Power
Management" in your
User’s Guide.
Or try the Dell Support Site
Go to http://support.dell.com.
At the Welcome page, click
Dell Knowledge Base and search
using the keywords dual
monitor.
Go to support.dell.com for help
with general usage, installation,
and troubleshooting instructions.
Go to support.dell.com. At the
Welcome page, click
Dell Documents. Make selections
appropriate for your computer to
access your User’s Guide. See
"Power Management" in the
User’s Guide.
Setup and Quick Reference Guide 19
Page 20
Problem? Try... Or try the Dell Precision
ResourceCD
How do I install
additional hardware on
my computer?
I installed 4 GB of
system memory. Why
does some of my
memory appear to be
www.dell.com | support.dell.com
missing?
How do I reinstall my
operating system?
See the interior service label
described in "Inside Your
Computer" on page 23. Also,
see "Removing and Installing
Parts" on page 24.
Depending on your
operating system, doubleclick the User’s Guides icon
on your desktop or click the
Start button and select Help
and Support. See "System
Memory" under the
"Removing and Installing
Parts" section in your
User’s Guide.
See the operating system
installation guide for
information on reinstalling
your operating system.
Go to the main menu on the
Dell Precision ResourceCD.
Click User’s Guides in the
To pi c pull-down menu, click
the user’s guide appropriate
for your computer, and then
see "Removing and Installing
Parts."
Go to the main menu on the
Dell Precision ResourceCD.
Click User’s Guides in the
To pi c pull-down menu, click
the user’s guide appropriate
for your computer, and then
see "System Memory."
Or try the Dell Support Site
Go to support.dell.com. At the
Welcome page, click
Dell Documents. Make selections
appropriate for your computer to
access your User’s Guide. See
"Removing and Installing Parts" in
the User’s Guide.
Go to support.dell.com. At the
Welcome page, click
Dell Documents. Make selections
appropriate for your computer to
access your User’s Guide. See
"System Memory" in the User’s
Guide.
Safety First—For You and Your
Computer
While working inside your computer, do not attempt to service the
computer except as explained in this guide and elsewhere in
Dell documentation. Always follow the instructions closely.
Working inside your computer is safe—if you observe the following
precautions.
CAUTION: FOR YOUR PERSONAL SAFETY AND PROTECTION OF
THE EQUIPMENT
20 Setup and Quick Reference Guid e
Page 21

Before you start to work on the computer, perform the following steps in the
sequence indicated:
1
Tu r n o f f the computer and all devices.
2
To u c h an unpainted metal surface on the computer, such as the metal
around the card-slot openings at the back of your computer, before
touching anything inside your computer.
3
Disconnect the computer and devices from their electrical outlets.
Doing so reduces the potential for personal injury or shock. Also
disconnect any telephone or telecommunication lines from the
computer.
NOTE: Before disconnecting a device from the computer or removing a
component from the system board, verify that the standby power light on the
system board has turned off. See the interior service label located on the inside
of the cover to locate the standby power light.
While you work, periodically touch an unpainted metal surface on the
computer to dissipate any static electricity that might harm internal
components.
In addition, Dell recommends that you periodically review the safety
instructions in the documentation that came with your computer.
Opening the Computer Cover
You may need to open the computer cover if you are going to remove or
install a part, reset a forgotten password, or diagnose a computer problem.
CAUTION: Before you perform this procedure, see " Safety First—
For You and Your Computer" on page 20.
Opening the Cover
Turn off the computer and devices, disconnect them from their
1
electrical outlets, and wait 10 to 20 seconds.
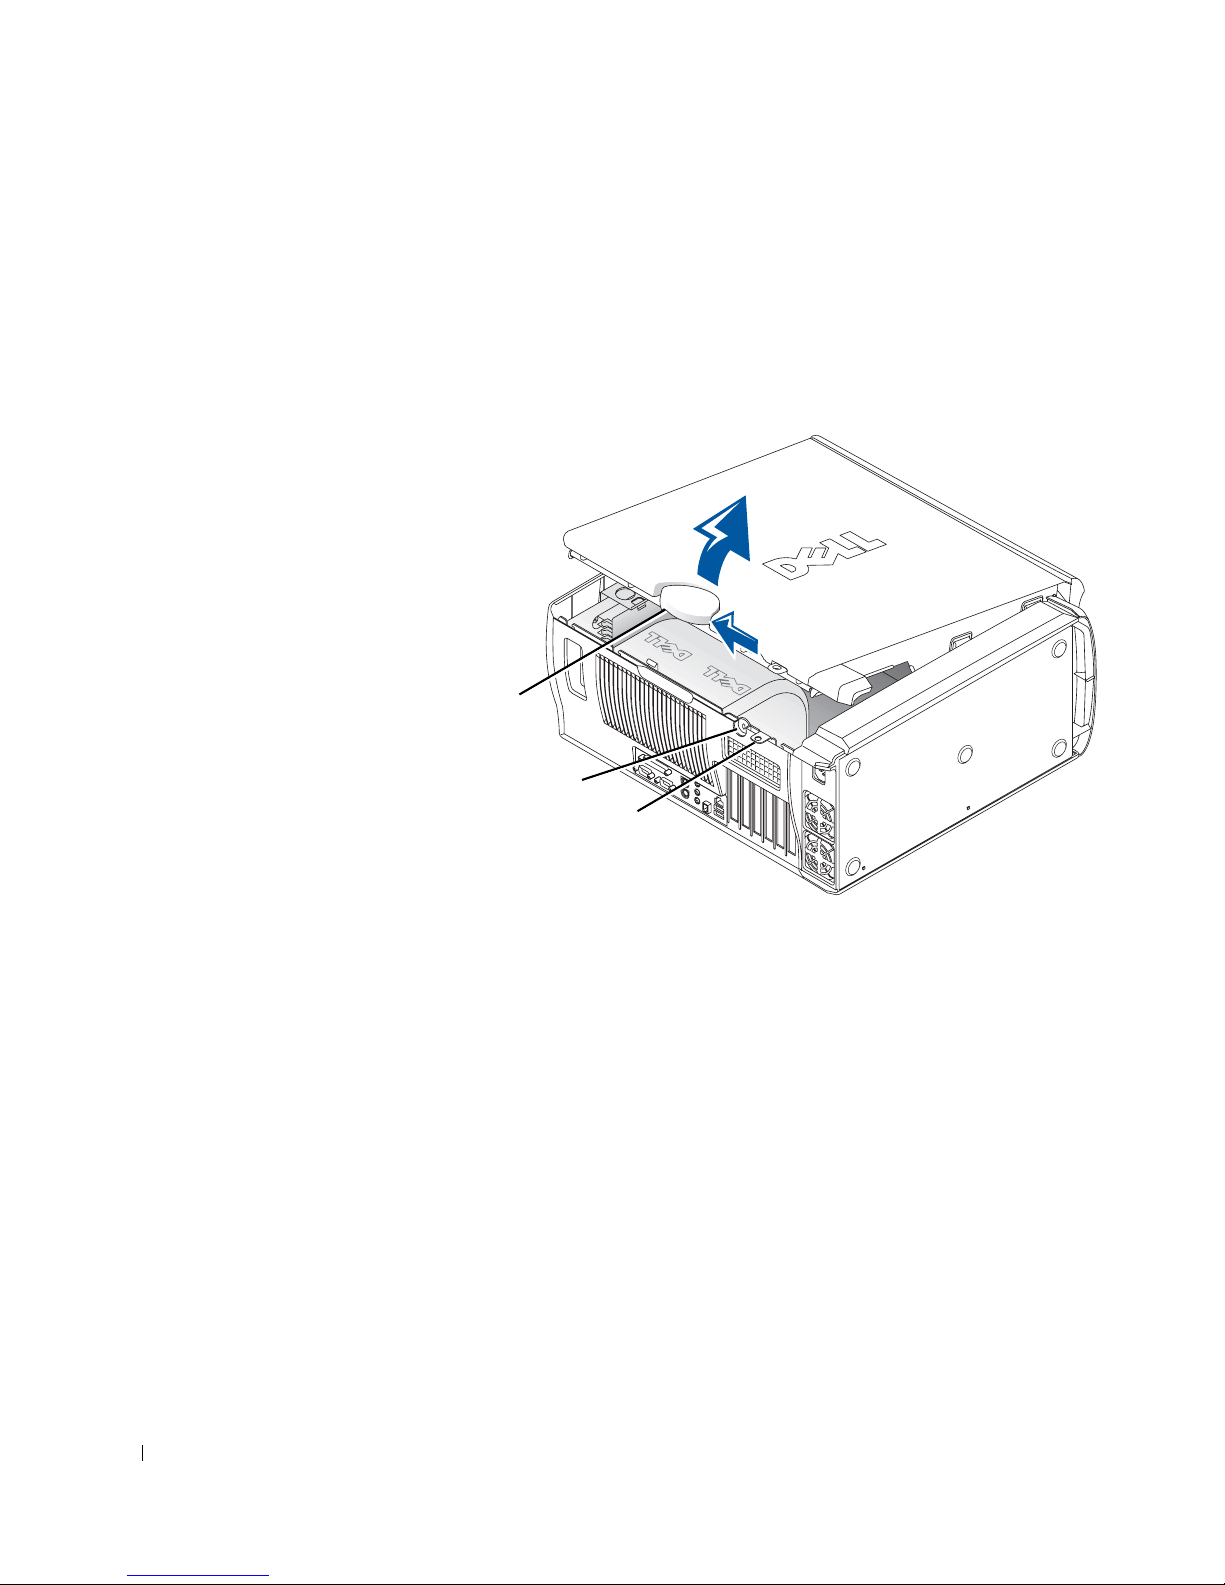
If you have installed a padlock through the padlock ring on the back
2
panel, remove the padlock (see the following figure).
Lay the computer on its right side.
3
Setup and Quick Reference Guide 21
Page 22
www.dell.com | support.dell.com
Open the computer cover:
4
Slide the cover release latch toward the top of the computer
a
(see the following figure).
Raise the back of the cover, and pivot it toward the front of the
b
computer.
cover
release latch
security cable slot
padlock ring
22 Setup and Quick Reference Guid e
Page 23
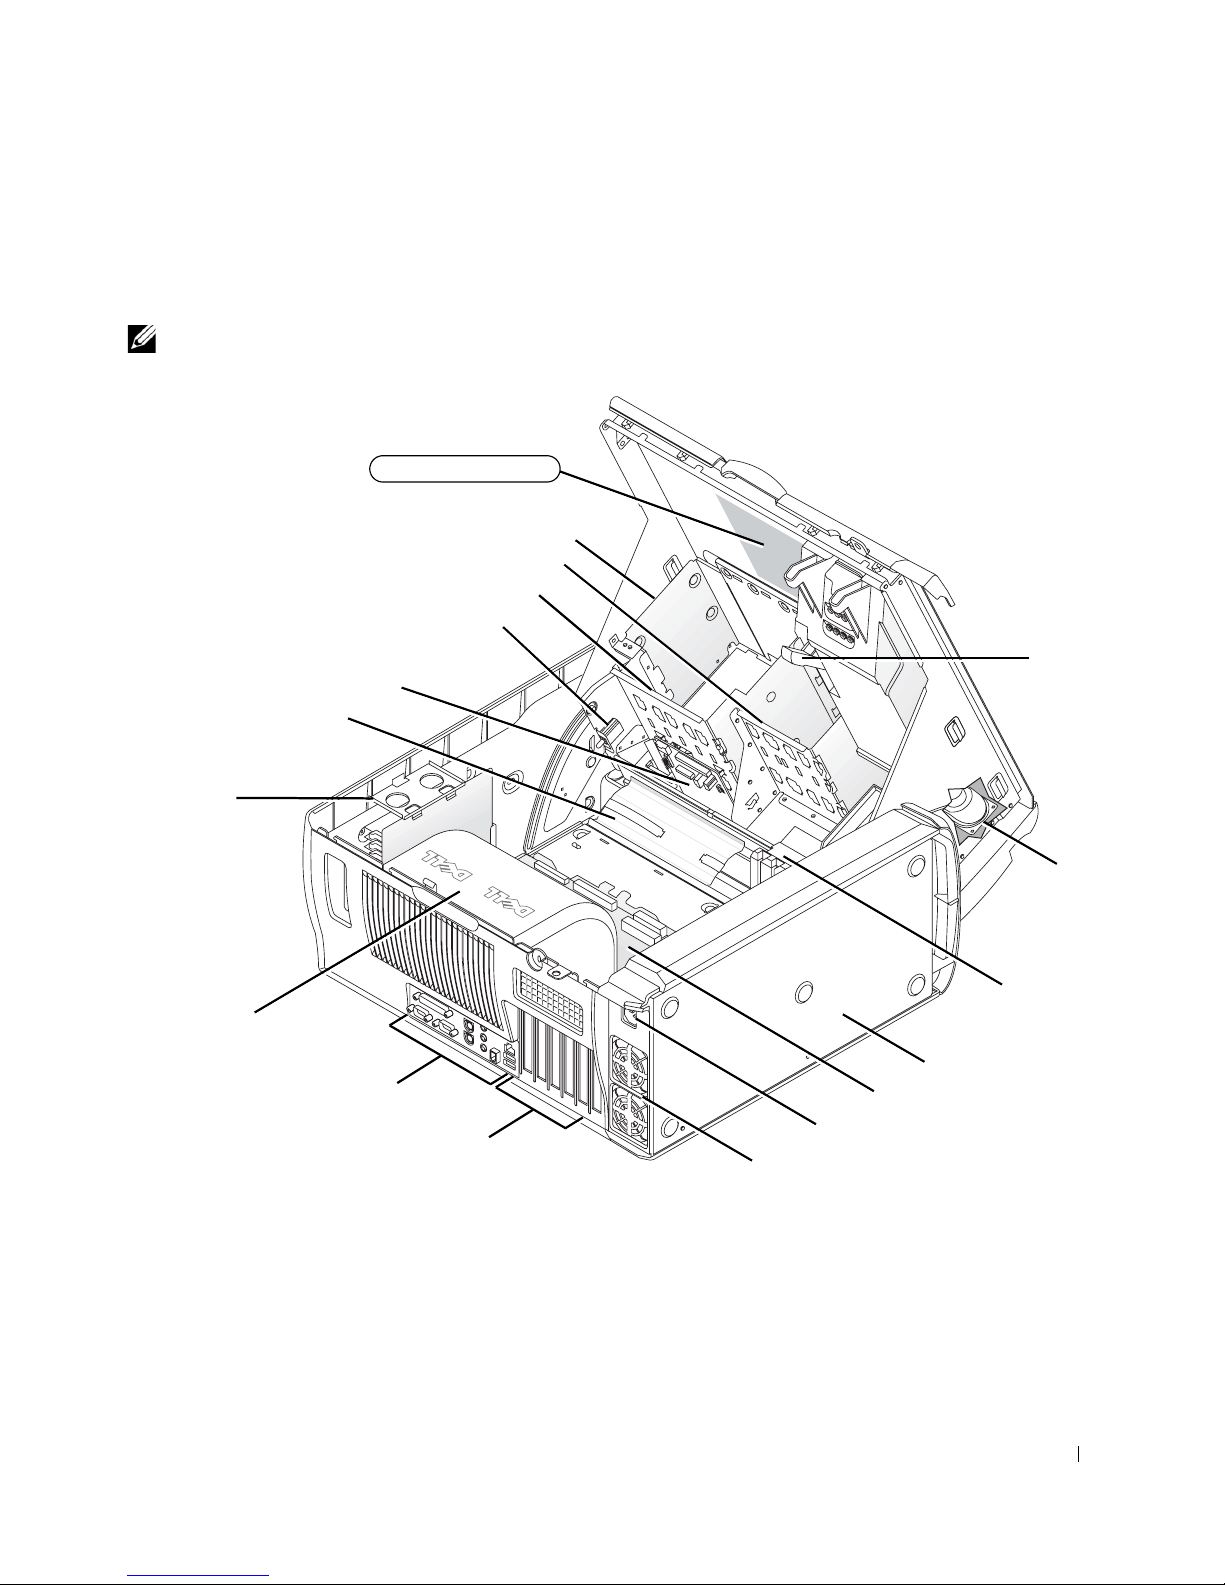
Inside Your Computer
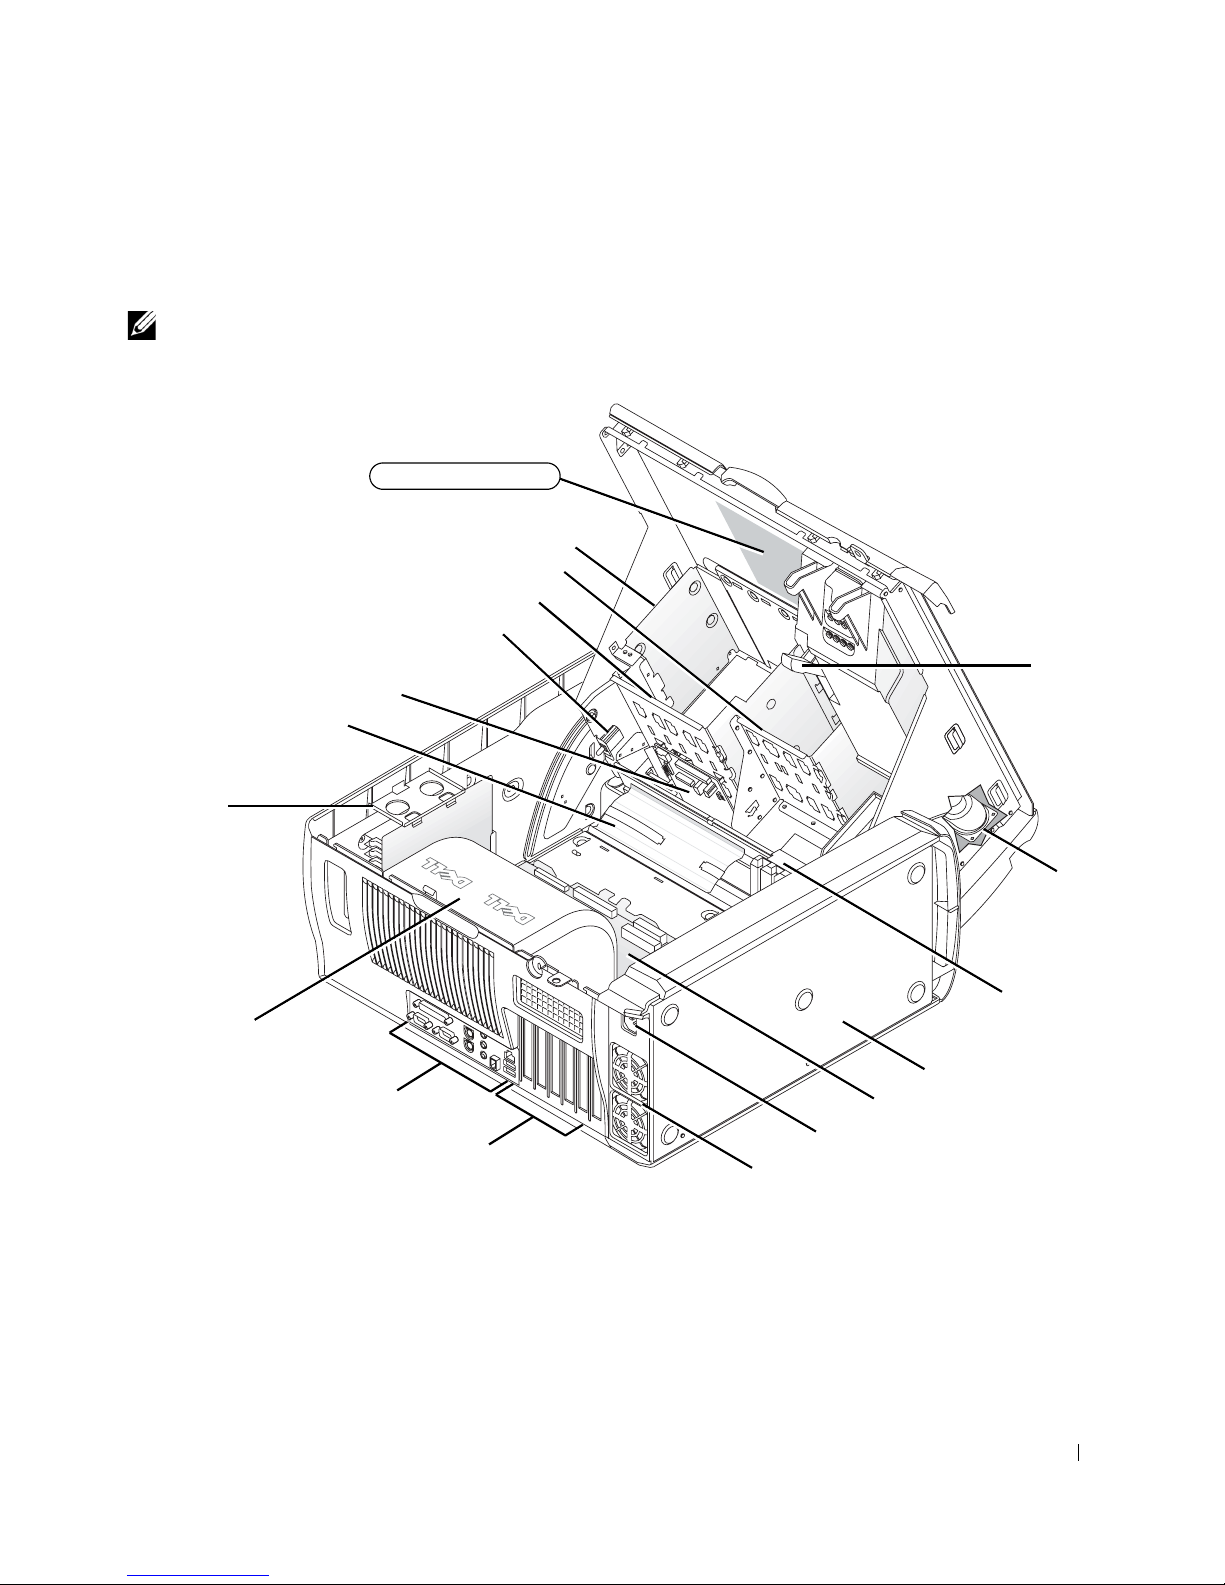
The following figure shows the computer with the cover open.
NOTE: A service label affixed to the inside of your computer cover provides
information about working inside your computer.
interior service label
diskette-drive bracket
hard-drive bracket
externally accessible-drive bracket
chassis intrusion switch
front panel
cable retainer
memory riser board
retention bracket
(if needed)
AGP card
brace
microprocessor
airflow shroud
I/O panel connectors
expansion-card slots
speaker
expansion-card
cooling fan
power supply
system board
AC power receptacle
power supply airflow vents
Setup and Quick Reference Guide 23
Page 24

www.dell.com | support.dell.com
Removing and Installing Parts
Instructions for removing and installing various parts are located in the
User’s Guide on your hard drive. To access this document:
Double-click the User’s Guides icon on your desktop.
1
NOTE: The User’s Guide is also available as a portable document format
(PDF) file at support.dell.com.
2
Click System Information.
Click System Documentation.
3
Click Dell Precision WorkStation 530 System User’s Guide.
4
Click Removing and Installing Parts.
5
Select Print from the File menu to print the procedure before you
6
begin working.
NOTE: To print the entire User’s Guide with the Internet Explorer browser,
select Print all linked documents in the Print window.
Adding Memory
Perform the preceding steps to access the User’s Guide, and then see
"System Memory."
Adding a Hard Drive or Externally Accessible Drive
Your computer has one or more enhanced integrated drive electronics
(EIDE) drives or SCSI drives. To determine which kind of drives you have,
see the order form that came with your computer.
Perform the preceding steps to access the User’s Guide, and then see
"Disk Drives and Media."
Adding a PCI Expansion Card
To add a Peripheral Component Interconnect (PCI) expansion card, such as
a modem, to your computer, perform the preceding steps to access the
User’s Guide, and then see "Expansion Cards."
24 Setup and Quick Reference Guid e
Page 25

Upgrading the Video Card
To upgrade your accelerated graphics port (AGP) card, see the
documentation for the video card and any other special instructions. The
documentation for your video card is included with your video card upgrade
kit. You can also find online documentation about your video card at
support.dell.com. Go to the page for your computer and click
Dell Documents, then click Video Adapter. Pick your video card from the
list displayed.
For instructions on installing the card in your computer, perform the
preceding steps to access your User’s Guide, and see "Expansion Cards."
Upgrading Your Processor(s)
Perform the preceding steps to access the User’s Guide, and then see
"Microprocessor."
Solving Problems
NOTE: If computer problems occur that require help from Dell support, write
down your Express Service Code and Service Tag below, and then contact Dell
from the same location as your computer.
Express Service Code: ___________________________
Service Tag: ___________________________
Setup and Quick Reference Guide 25
Page 26

Dell provides tools to help you solve problems. The tools listed in this
section can help you solve a problem when no other online tools are
available. Your computer includes the following tools:
www.dell.com | support.dell.com
D
ELL DIAGNOSTICS
Diagnostics that tests various components on your computer and helps identify
the cause of computer problems. For more information, see "When to Use the
Dell Diagnostics" on page 26.
S
YSTEM LIGHTS
indicate a computer problem. For more information, see "System Lights" on page
30.
D
IAGNOSTIC LIGHTS
indicate a computer problem. For more information, see "Diagnostic Lights" on
page 32.
S
YSTEM MESSAGES
current or possible failure. For more information, see "System Messages" on page
37.
B
EEP CODES
help identify a problem. For more information, see "Beep Codes" on page 37.
— A series of audible beep codes emitted by your computer can
— The Dell Precision ResourceCD contains Dell
— Located on the front of the computer, these lights can
— Located on the front of the computer, these lights can
— The computer reports these messages to warn you of
When to Use the Dell Diagnostics
If you experience a problem with your computer, perform the checks in
"Finding Solutions" in your User’s Guide and run the Dell Diagnostics
before you contact Dell for technical assistance. Running the Dell
Diagnostics may help you resolve the problem without contacting Dell. If
you do contact Dell, the test results can provide important information for
Dell's service and support personnel.
The Dell Diagnostics allows you to:
• Perform express, extended, or custom tests on one or all devices
• Select tests based on a symptom of the problem you are having
• Choose how many times a test is run
• Display test results
26 Setup and Quick Reference Guid e
Page 27

• Suspend testing if an error is detected
• Access online help information that describes the tests and devices
• Receive status messages that tell you whether tests completed
successfully
• Receive error messages if problems are detected
Starting the Dell Diagnostics
It is recommended that you print these procedures before you begin.
NOTICE: Only use the Dell Diagnostics to test your Dell™ computer. Using
this program with other computers can result in error messages.
Enter system setup, review your computer’s configuration information, and
ensure that the device you want to test displays in system setup and is
active.
Start the Dell Diagnostics from either your hard drive or from the Drivers
and Utilities CD (also known as the ResourceCD).
Starting the Dell Diagnostics From Your Hard Drive
Shut down and restart the computer.
1
When the DELL logo appears, press <F12> immediately.
2
If you wait too long and the Windows logo appears, continue to wait
until you see the Windows desktop. Then shut down your computer
through the Start menu and try again.
When the boot device list appears, highlight Boot to Utility Partition
3
and press <Enter>.
When the Dell Diagnostics Main Menu appears, select the test you
4
want to run.
Starting the Dell Diagnostics From the Drivers and Utilities CD
Insert the Drivers and Utilities CD into the CD drive.
1
Shut down and restart the computer.
2
When the DELL logo appears, press <F12> immediately.
NOTE: If you receive a
message stating that no
Diagnostics utility
partition has been found,
follow the instructions to
run the Dell Diagnostics
from your Drivers and
Utilities CD.
Setup and Quick Reference Guide 27
Page 28

If you wait too long and the Windows logo appears, continue to wait
until you see the Windows desktop. Then shut down your computer
through the Start menu and try again.
NOTE: This feature
changes the boot sequence
for one time only. On the
next start-up, the
computer boots according
to the devices specified in
system setup.
www.dell.com | support.dell.com
NOTE: The Service Tag
for your computer is
located at the top of each
test screen.
When the boot device list appears, highlight IDE CD-ROM Device
3
and press <Enter>.
Select the IDE CD-ROM Device option from the CD boot menu.
4
Select the Boot from CD-ROM option from the menu that appears.
5
Ty p e 1 to start the ResourceCD menu.
6
Ty p e 2 to start the Dell Diagnostics.
7
Select Run the 32 Bit Dell Diagnostics from the numbered list. If
8
multiple versions are listed, select the version appropriate for your
platform.
When the Dell Diagnostics Main Menu appears, select the test you
9
want to run.
Dell Diagnostics Main Menu
After the Dell Diagnostics loads and the Main Menu screen appears,
1
click the button for the option you want.
.
Option Function
Express
Te st
Performs a quick test of devices. This test typically takes 10
to 20 minutes and requires no interaction on your part.
Run Express Test first to increase the possibility of tracing
the problem quickly.
28 Setup and Quick Reference Guid e
Extended
Te st
Custom
Te st
Symptom
Tr ee
Performs a thorough check of devices. This test typically
takes an hour or more and requires you to answer questions
periodically.
Tests a specific device. You can customize the tests you
want to run.
Lists the most common symptoms encountered and allows
you to select a test based on the symptom of the problem
you are having.
Page 29

If a problem is encountered during a test, a message displaying the
2
error code and a description of the problem appear. Write down the
error code and problem description and follow the instructions on the
screen.
If you cannot resolve the error condition, contact Dell.
If you run a test from the Custom Test or Symptom Tree option, click
3
the applicable tab described in the following table for more
information.
Tab Fu nc t i on
Results Displays the results of the test and any error conditions
encountered.
Errors Displays error conditions encountered, error codes, and
problem description.
Help Describes the test and may indicate requirements for
running the test.
Configuration Displays your hardware configuration for the selected
device.
The Dell Diagnostics obtains your configuration
information for all devices from system setup, memory,
and various internal tests and displays it in the device
list in the left pane of the screen. The device list may
not display the names of all the components installed on
your computer or all devices attached to your computer.
Parameters Allows you to customize the test by changing the test
settings.
When the tests are completed, if you are running the Dell Diagnostics
4
from the Drivers and Utilities CD, remove the CD.
Close the test screen to return to the Main Menu screen. To exit the
5
Dell Diagnostics and restart the computer, close the Main Menu
screen.
Setup and Quick Reference Guide 29
Page 30

www.dell.com | support.dell.com
Changing the Boot Sequence
NOTE: For more information, see your User’s Guide.
Turn on your computer (if your computer is already on, restart it).
1
When F2 = Setup appears in the upper-right corner of the screen,
2
press <F2>.
The System Setup menu appears.
NOTE: If you wait too long and your operating system begins to load into
memory, let the computer complete the load operation, then restart the
computer and try again.
Use the arrow keys to highlight the Boot Sequence menu option and
3
press <Enter> to access the pop-up menu.
NOTE: Write down your current boot sequence in case you want to
restore it after running the Dell Diagnostics.
4
Use the arrow keys to highlight CD Device in the Boot First Device:
menu option and press <+> to move it to the top of the list.
Press <Alt><b> to restart your computer.
5
Messages and Codes
Your application programs, operating system, and computer can identify
problems and alert you to them. When a problem occurs, a message may
appear on your monitor screen, a beep code may sound, or a light code may
be generated. The following subsections present information about
messages, beep codes, and light codes.
System Lights
Your computer has a number of lights that can help you analyze and solve
problems. To locate these lights, see "Computer Features" on page 10.
The following table lists the codes for the system lights, gives probable
causes, and suggests corrective actions.
NOTE: For many system light codes, it is helpful to check the diagnostic lights
to see if the specific problem is identified. See "Diagnostic Lights" on page 32.
30 Setup and Quick Reference Guid e
Page 31

System Light Codes
Power Light Hard Drive Light Cause Corrective Action
Solid green N/A Power is on, and the computer is
No corrective action is required.
operating normally.
Blinking green Blank The computer is in the suspended
state (Windows 2000 and
Windows XP).
Use one of the appropriate methods
to "wake up" the computer. See
"Power Management" in the
User’s Guide.
Blinks green several
times and then
N/A A configuration error exists. Check the diagnostic lights to see if
the specific problem is identified.
turns off
Solid yellow N/A The Dell Diagnostics is running a
test, or a device on the system board
may be faulty or incorrectly installed.
If the Dell Diagnostics is running,
allow the testing to complete.
Check the diagnostic lights to see if
the specific problem is identified.
Also, see "System Board Problems" in
the User’s Guide.
If the computer does not boot,
contact Dell for technical assistance.
Blinking yellow Blank A power supply or system board
failure exists.
Check the diagnostic lights to see if
the specific problem is identified.
Also, see "Power Problems" and
"System Board Problems" in the
User’s Guide.
Blinking yellow Solid green A system board failure exists. Check the diagnostic lights to see if
the specific problem is identified.
Also, see "System Board Problems" in
the User’s Guide.
Solid green and a
beep code during
POST
N/A A problem was detected while the
BIOS was executing.
See "Beep Codes" on page 37 for
instructions on diagnosing the beep
code. Also, check the diagnostic lights
to see if the specific problem is
identified.
Solid green power
light and no beep
code and no video
during POST
Solid green power
light and no beep
code but the
computer locks up
N/A The monitor or the graphics card may
be faulty or incorrectly installed.
N/A An integrated system board device
may be faulty.
Check the diagnostic lights to see if
the specific problem is identified.
Also, see "Video Problems" in the
User’s Guide.
Check the diagnostic lights to see if
the specific problem is identified. If
the problem is not identified, contact
Dell for technical assistance.
during POST
Setup and Quick Reference Guide 31
Page 32

www.dell.com | support.dell.com
Diagnostic Lights
When you turn on your computer, it performs a series of self-diagnostic
tests. A successful power-on self test (POST) ends with a single beep that
signifies the start of normal operation. If the computer fails to complete the
POST, a series of lights located on the computer can help you understand
which test failed or why the computer stopped responding. These lights
communicate problems encountered before and during POST only, not
during normal operation. To locate the diagnostic lights, see "Computer
Features" on page 10.
The following table lists the codes for the diagnostic lights, gives probable
causes, and suggests corrective actions. The lights are labeled to help you
match the pattern on your computer with one shown in the tables.
32 Setup and Quick Reference Guid e
Page 33
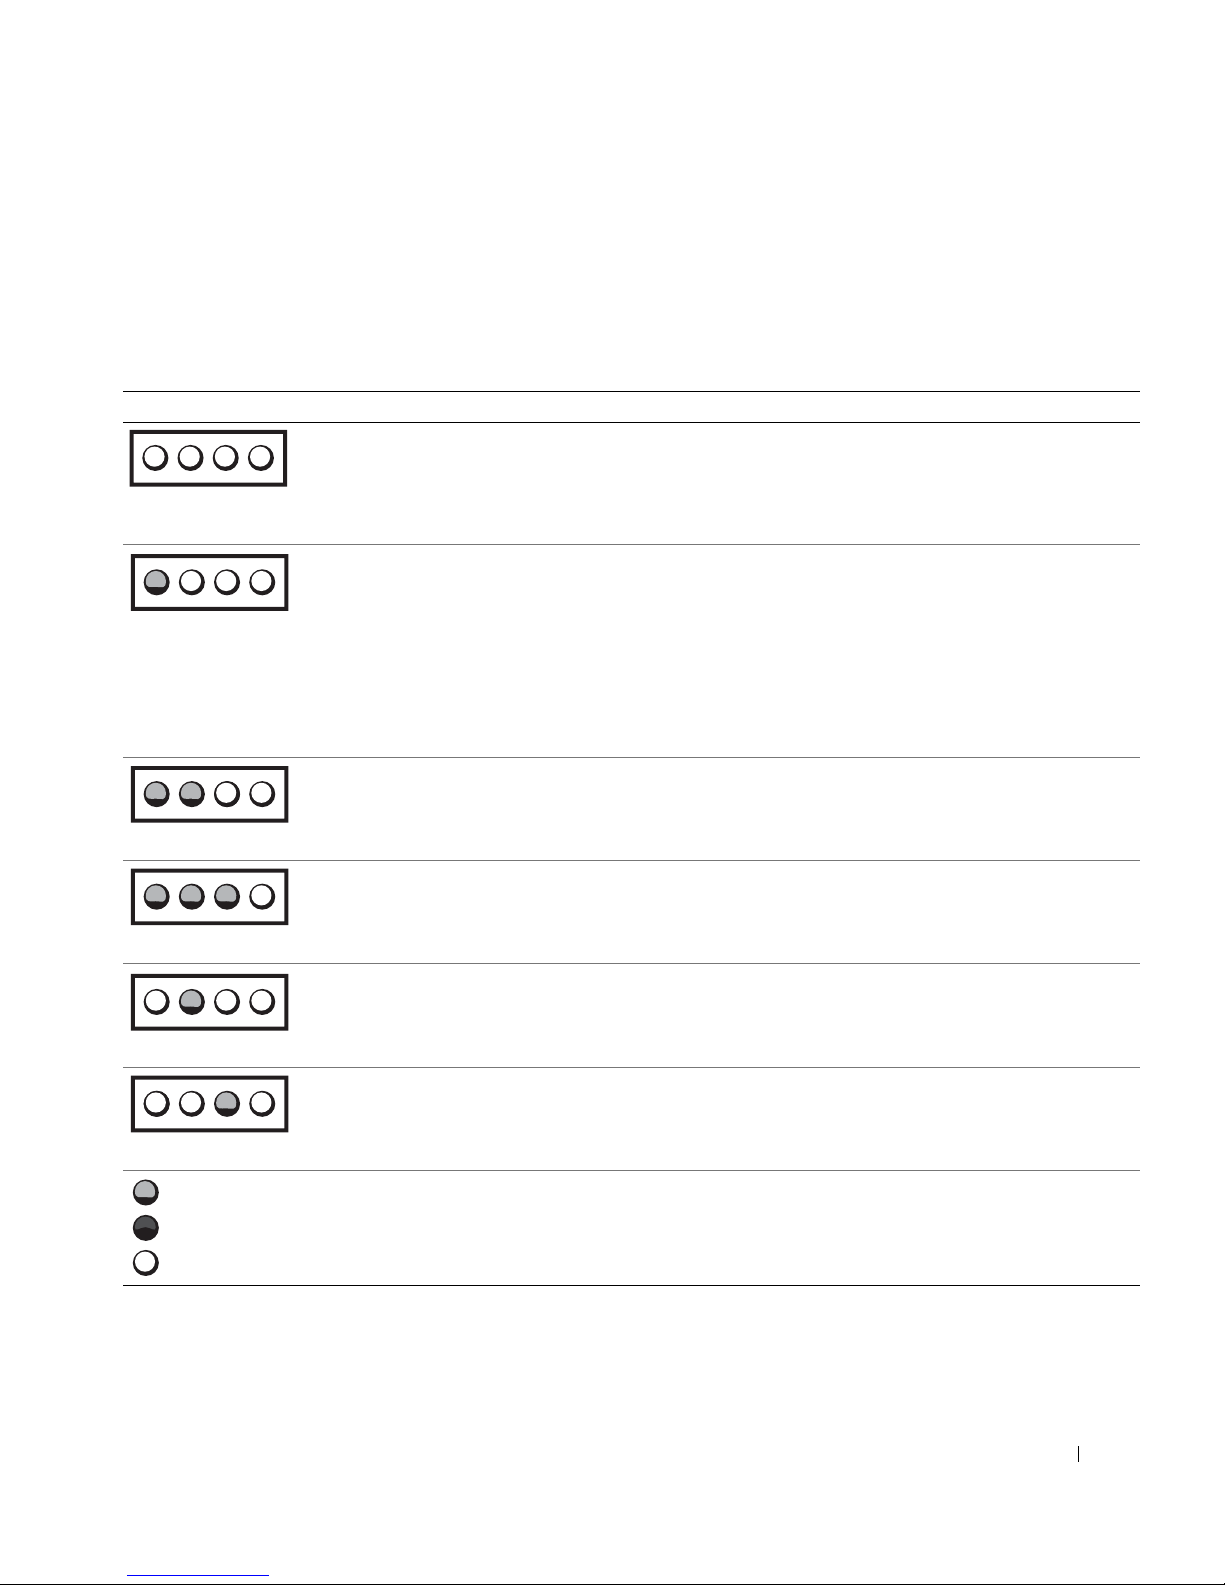
Diagnostic Light Codes Before POST
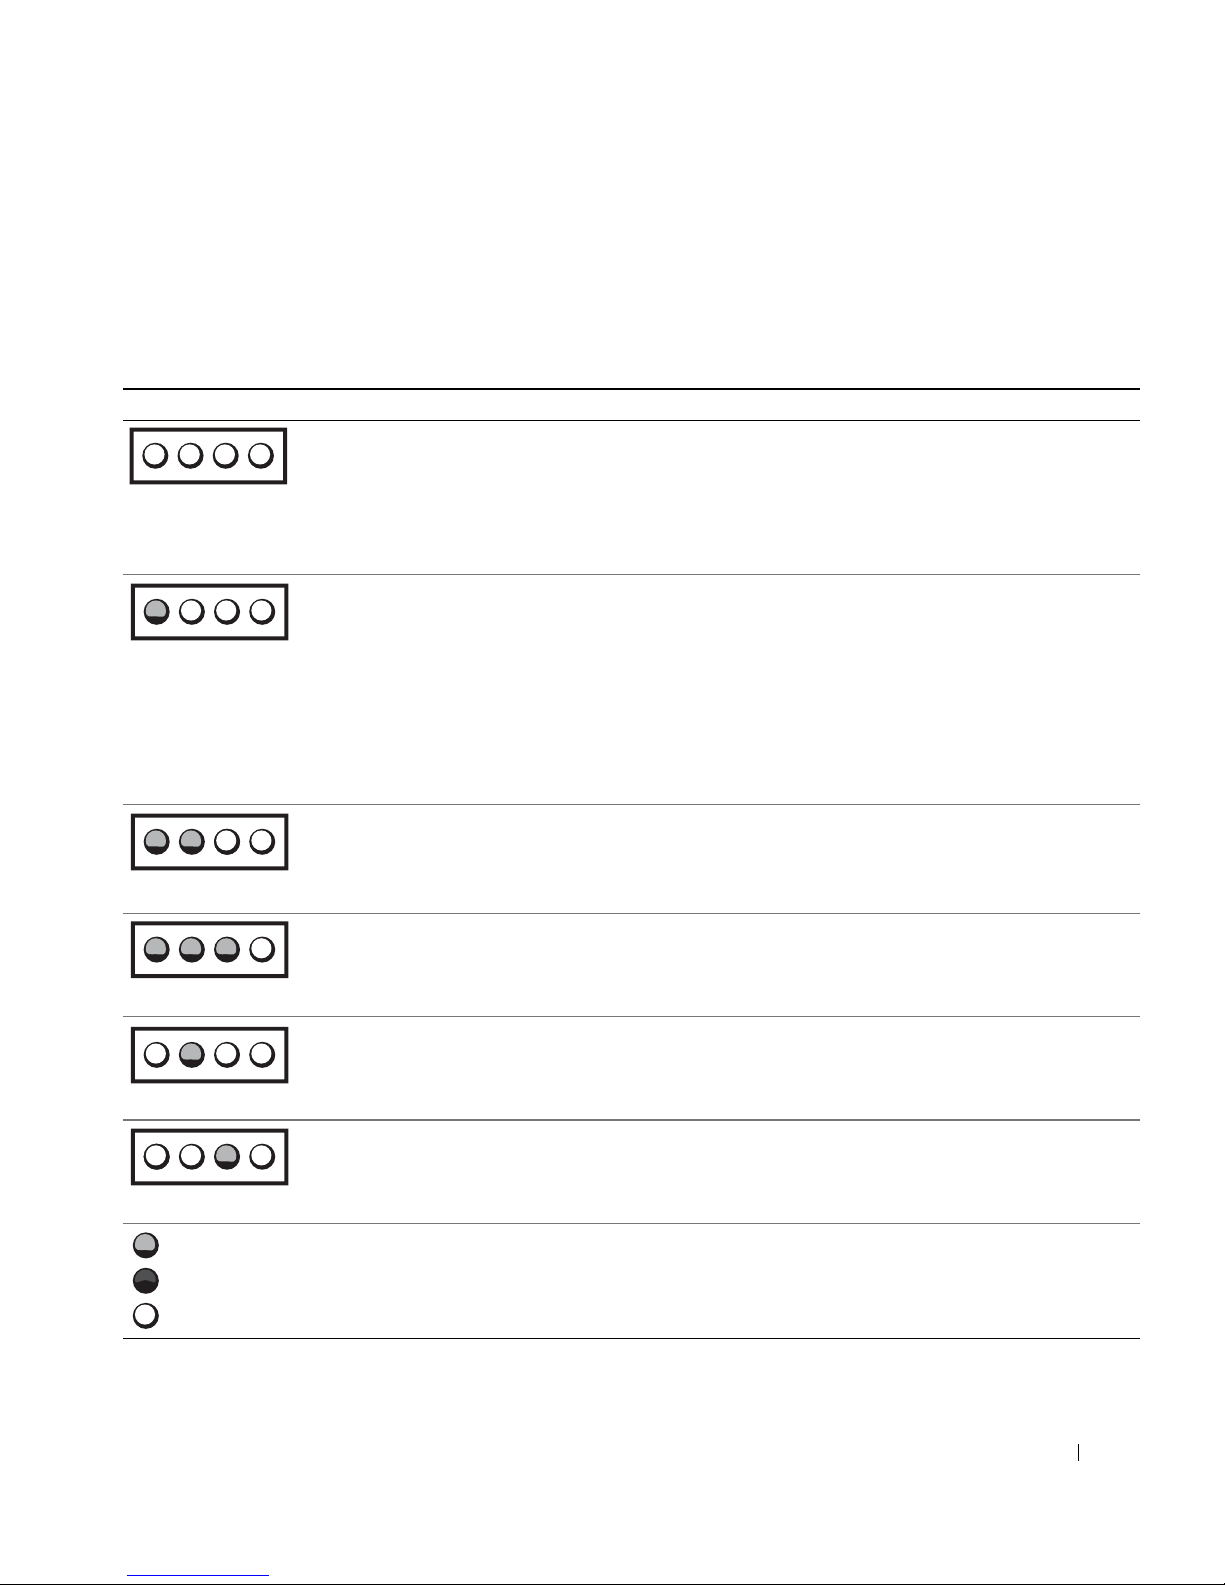
The following table lists the codes for the diagnostic lights that occur before
the computer begins the POST.
Diagnostic Light Codes Before POST
Light Pattern Cause Action
No electrical power is supplied to the
computer.
A B C D
Normal off condition. Computer is
connected to its electrical outlet.
A B C D
Computer is in a reduced power or
"sleep" state.
A B C D
BIOS is not executing. See "Reset Corrupted BIOS Settings" in the User’s Guide.
Connect the computer to its electrical outlet. Ensure that
the front-panel power light is on. If the power light is off,
ensure that the computer is connected to a working
electrical outlet, and then press the power button.
If the problem is still not resolved, contact Dell for
technical assistance.
Ensure that the front-panel power light is on. If the power
light is off, ensure that the computer is connected to a
working electrical outlet, and then press the power button.
When the computer is operating normally, it can be
automatically or remotely started as long as it remains
connected to an electrical outlet. For more information, see
"Power Management" in the User’s Guide.
If the problem is still not resolved, contact Dell for
technical assistance.
Use one of the appropriate methods to "wake up" the
computer. See "Power Management" in the User’s Guide.
If the problem is still not resolved, contact Dell for
technical assistance.
A B C D
Possible power supply or power cord
failure.
A B C D
Possible system board failure. Contact Dell for technical assistance.
A B C D
= yellow
= green
= off
See "Power Problems" in the User’s Guide.
Setup and Quick Reference Guide 33
Page 34
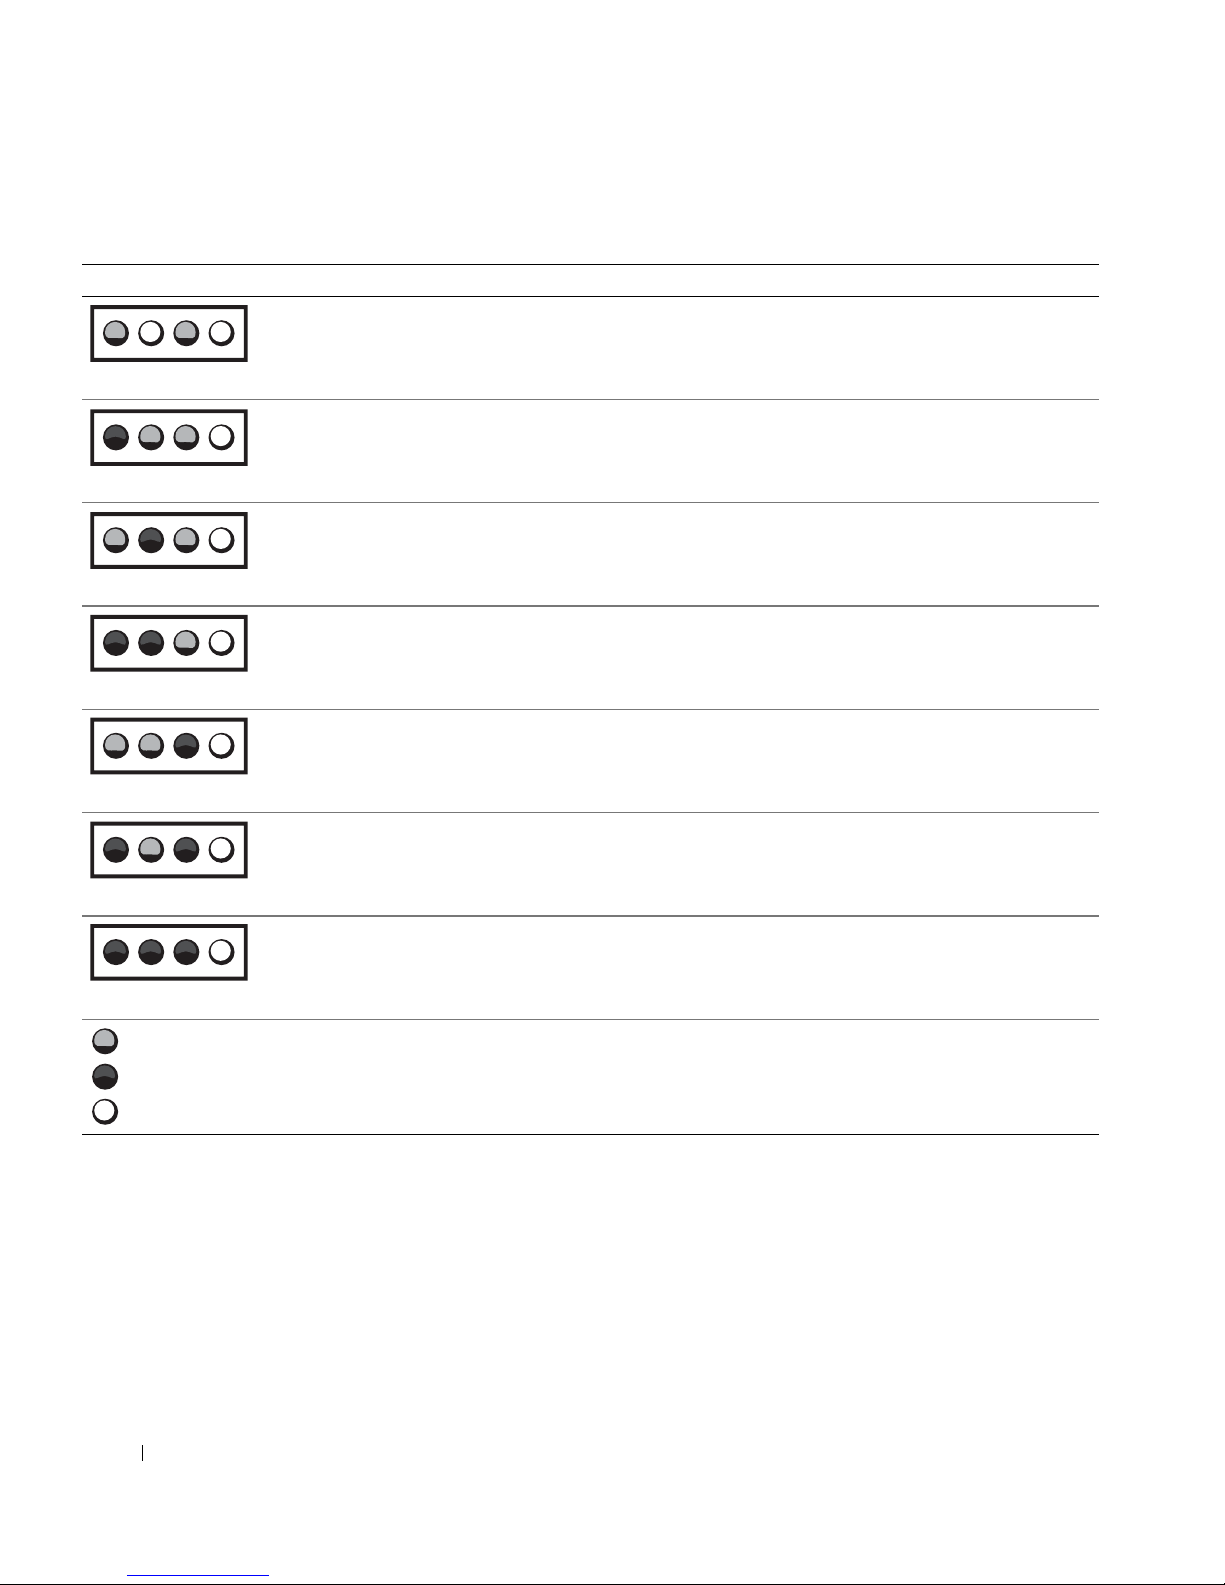
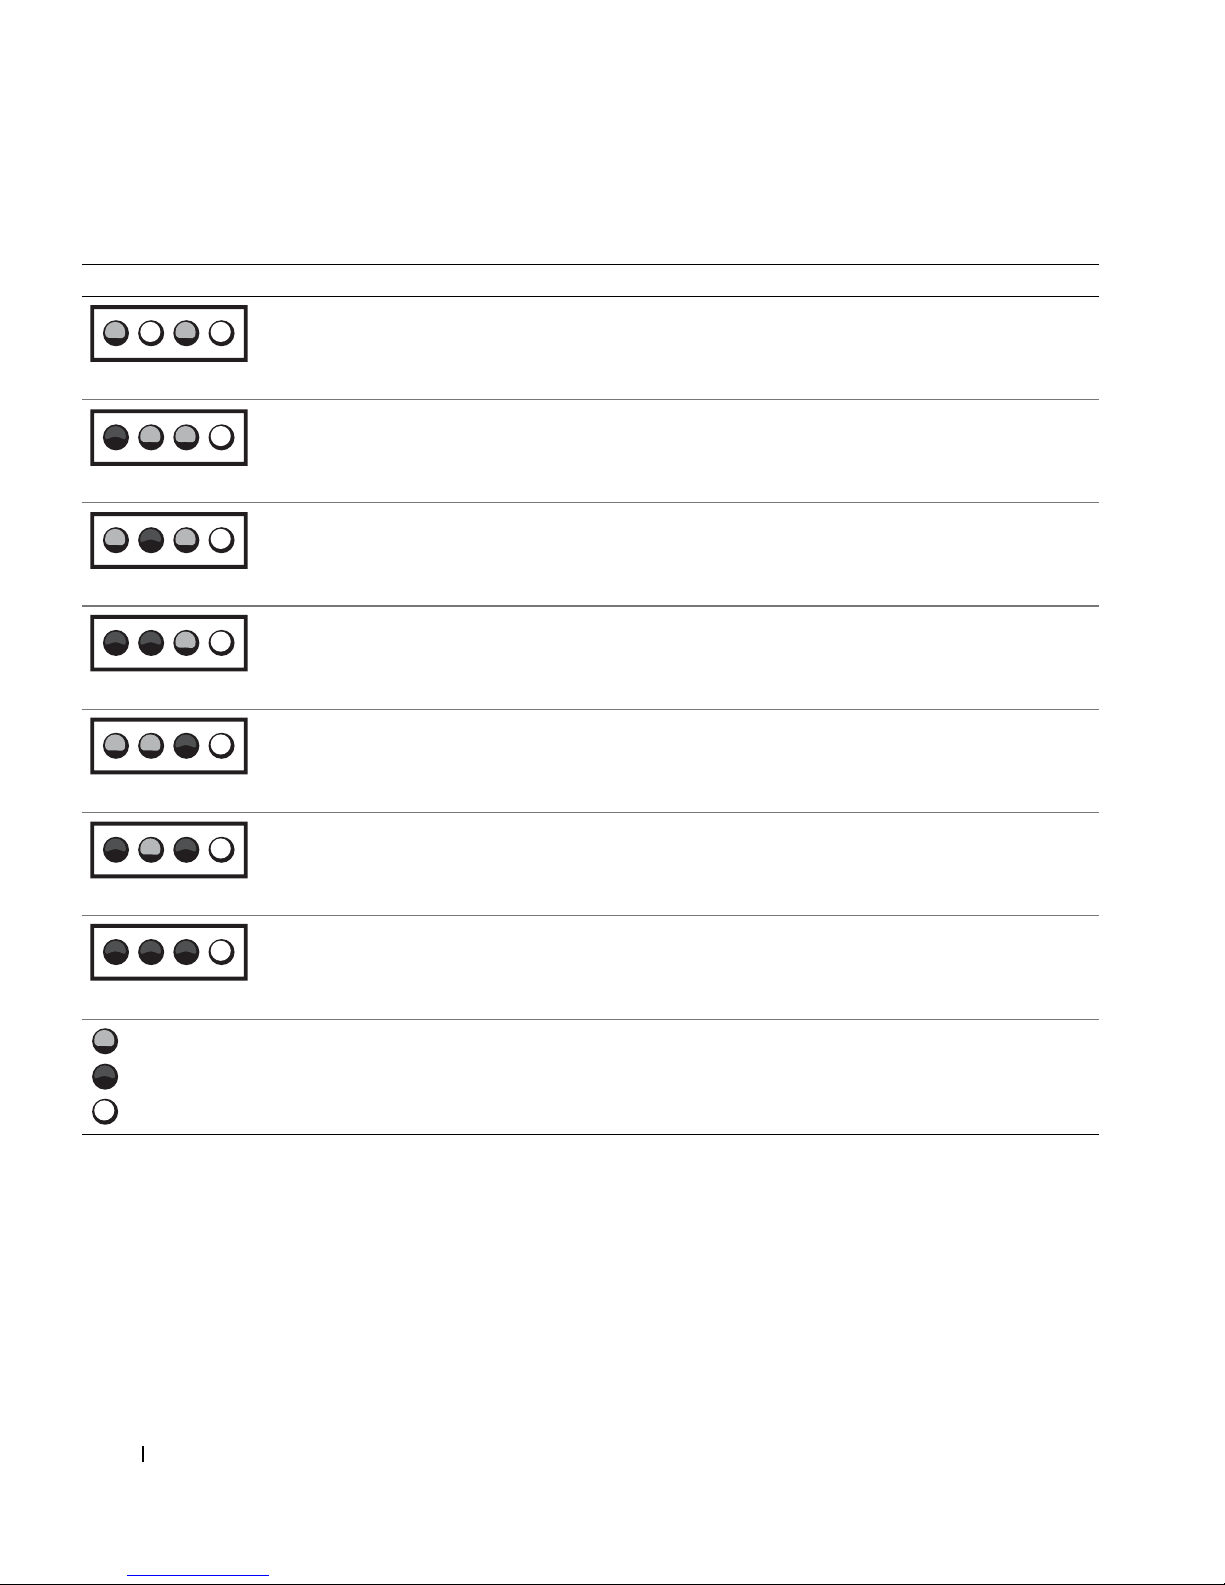
Diagnostic Light Codes Before POST (continued)
Light Pattern Cause Action
Microprocessor and/or voltage
regulator module (VRM) mismatch.
A B C D
Possible VRM 0 failure. See "Microprocessor Problems" in the User’s Guide.
A B C D
Possible VRM 1 failure. See "Microprocessor Problems" in the User’s Guide.
www.dell.com | support.dell.com
A B C D
Possible VRM 0 and VRM 1 failure. See "Microprocessor Problems" in the User’s Guide.
A B C D
Possible memory riser board A failure. See "System Memory Problems" in the User’s Guide.
A B C D
Possible memory riser board B failure. See "System Memory Problems" in the User’s Guide.
See "Microprocessor Problems" in the User’s Guide.
A B C D
Possible memory riser board A and
riser board B failure.
A B C D
= yellow
= green
= off
34 Setup and Quick Reference Guid e
See "System Memory Problems" in the User’s Guide.
Page 35
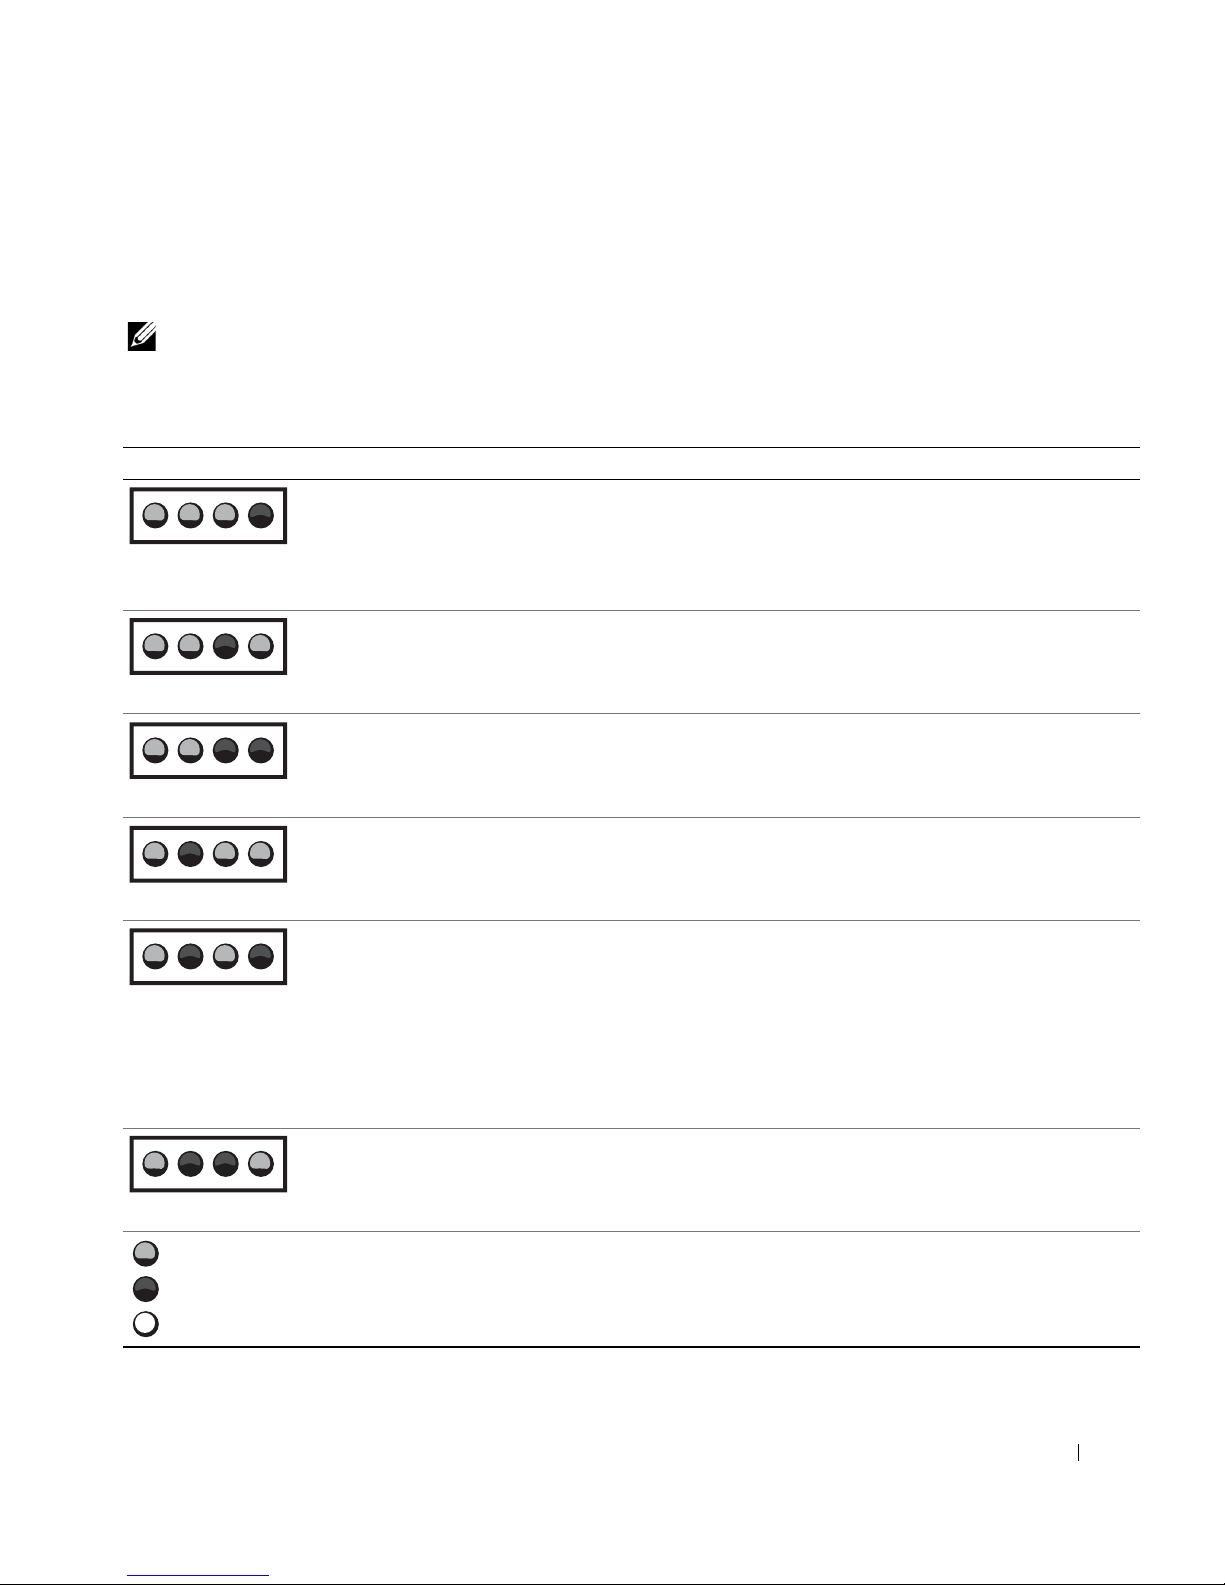
Diagnostic Light Codes During POST
The following table lists the codes for the diagnostic lights that occur while
the computer is performing the POST.
NOTE: If the computer is turned on and all four diagnostic lights are not on,
see "Diagnostic Light Codes Before POST" on page 33.
Diagnostic Light Codes During POST
Light Pattern Cause Action
Possible BIOS failure, and the computer is in
the recovery mode.
A B C D
Possible microprocessor failure. See "Microprocessor Problems" in the
Run the BIOS Recovery utility, and restart the
computer to retest. See "BIOS Recovery Utility"
in the User’s Guide.
If the problem is still not resolved, see "Reset
Corrupted BIOS Settings" in the User’s Guide.
User’s Guide.
A B C D
Possible memory failure. See "System Memory Problems" in the
User’s Guide.
A B C D
Possible expansion card failure or conflict. See "Expansion-Card Problems" and "Hardware
Conflicts" in the User’s Guide.
A B C D
A B C D
A B C D
= yellow
= green
= off
Possible video card failure. Reseat the video card, and restart the computer
to retest. For instructions on removing and
installing an expansion card, see "Removing an
Expansion Card" in the User’s Guide.
If the problem is not resolved, see "ExpansionCard Problems" in the User’s Guide.
If the problem is still not resolved, contact Dell
for technical assistance.
Possible diskette drive or hard-drive failure. See "Diskette Drive Problems" and "Hard Drive
Problems" in the User’s Guide.
Setup and Quick Reference Guide 35
Page 36
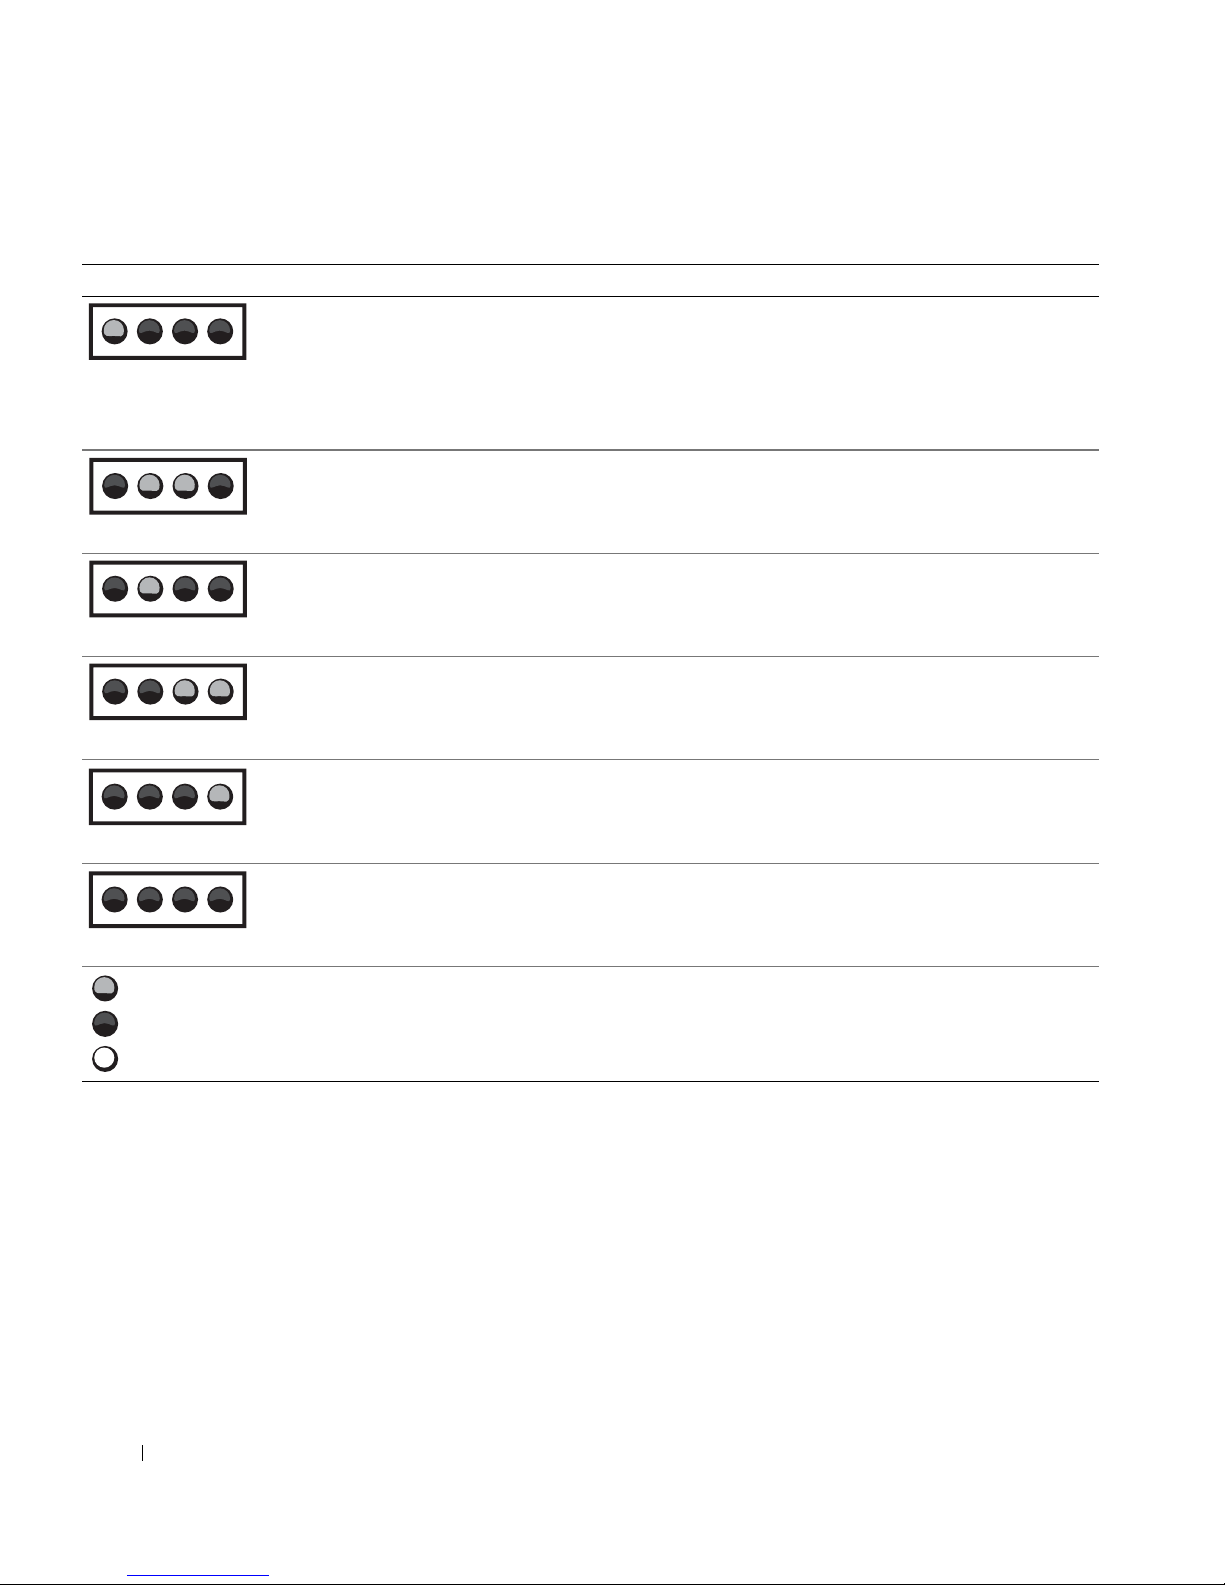
Diagnostic Light Codes During POST (continued)
Light Pattern Cause Action
Possible USB failure. Disconnect all USB devices and cables, and
A B C D
Possible system board resource and/or hardware
failure.
A B C D
www.dell.com | support.dell.com
Possible system board resource and/or hardware
failure.
A B C D
Possible expansion card failure or conflict. See "System Board Problems" and "Hardware
A B C D
Possible system board resource and/or hardware
failure.
restart the computer to retest. Then reconnect
all USB devices and cables, and restart the
computer to retest.
If the problem is still not resolved, contact Dell
for technical assistance.
See "System Board Problems" and "Hardware
Conflicts" in the User’s Guide.
See "System Board Problems" and "Hardware
Conflicts" in the User’s Guide.
Conflicts" in the User’s Guide.
See "System Board Problems" and "Hardware
Conflicts" in the User’s Guide.
A B C D
A B C D
= yellow
= green
= off
Normal operating condition after POST. No action is necessary.
36 Setup and Quick Reference Guid e
Page 37

System Messages
If an error occurs during start-up, a message may be reported on the
monitor identifying the problem. If a system message is displayed, look it up
under "System Messages" in the User’s Guide for suggestions on resolving
any problems. The system messages are listed alphabetically.
NOTE: If the system message you received is not listed in the User’s Guide,
check the documentation for the application program that you were running at
the time the message appeared and/or the operating system documentation for
an explanation of the message and a recommended action.
Beep Codes
If an error occurs during start-up that cannot be reported on the monitor,
your computer may emit a beep code that identifies the problem. The beep
code is a pattern of sounds: for example, one beep, followed by a second
beep, and then a burst of three beeps (code 1-1-3) means that the computer
was unable to read the data in nonvolatile random-access memory
(NVRAM).
If a beep code is emitted, write it down and look it up under
"System Beep Codes" in the User’s Guide.
Setup and Quick Reference Guide 37
Page 38

www.dell.com | support.dell.com
38 Setup and Quick Reference Guid e
Page 39

Dell Precision™ Workstation 530
安装与快速参考指南
www.dell.com | support.ap.dell/com/china
Page 40

注、注意和警告
注:注表示可以帮助您更好地使用计算机的重要信息。
注意:
问题。
警告:
注意表示可能会损坏硬件或导致数据丢失,并告诉您如何避免此类
警告表示存在可能导致财产损失、人身伤害或死亡的潜在危险。
____________________
本文件中的信息如有更改,恕不另行通知。
© 2002 Dell Computer Corporation
未经
本文件中使用的商标:
商标;
本文件中述及的其它商标和产品名称是指拥有相应商标和名称的公司或其制造的产品。
Dell Computer Corporation
2002 年 12 月 P/N 533CX Rev. A03
。版权所有,翻印必究。
Dell Computer Corporation
Dell、DELL
Microsoft 和 Windows 是 Microsoft Corporation
书面许可,不准以任何形式进行复制。
徽标和
Dell Precision 是 Dell Computer Corporation
对其它公司的商标和产品名称不拥有任何专利权。
的
的注册商标。
Page 41

目录
查找信息和帮助
使用 Dell Precision™ ResourceCD . . . . . . . . . . . . . . . . . . . . . . . . 47
安装计算机
双显示器 . . . . . . . . . . . . . . . . . . . . . . . . . . . . . . . . . . . . . . . . . . 55
常见问题
安全第一 — 为您和您的计算机着想
打开主机盖
计算机内部组件
卸下和安装部件
. . . . . . . . . . . . . . . . . . . . . . . . . . . . . . . . . . . . . . . . . 56
打开主机盖 . . . . . . . . . . . . . . . . . . . . . . . . . . . . . . . . . . . . . . . . 59
添加内存 . . . . . . . . . . . . . . . . . . . . . . . . . . . . . . . . . . . . . . . . . . 62
添加硬盘驱动器或外部可抽换驱动器 . . . . . . . . . . . . . . . . . . . . 62
添加 PCI 扩充卡 . . . . . . . . . . . . . . . . . . . . . . . . . . . . . . . . . . . . 62
升级视频卡 . . . . . . . . . . . . . . . . . . . . . . . . . . . . . . . . . . . . . . . . 63
升级处理器 . . . . . . . . . . . . . . . . . . . . . . . . . . . . . . . . . . . . . . . . 63
. . . . . . . . . . . . . . . . . . . . . . . . . . . . . . . . . . . . 43
. . . . . . . . . . . . . . . . . . . . . . . . . . . . . . . . . . . . . . . 48
. . . . . . . . . . . . . . . . . . . . . . 59
. . . . . . . . . . . . . . . . . . . . . . . . . . . . . . . . . . . . . . . 59
. . . . . . . . . . . . . . . . . . . . . . . . . . . . . . . . . . . . 61
. . . . . . . . . . . . . . . . . . . . . . . . . . . . . . . . . . . . 62
解决问题
. . . . . . . . . . . . . . . . . . . . . . . . . . . . . . . . . . . . . . . . . 63
何时使用 Dell 诊断程序 . . . . . . . . . . . . . . . . . . . . . . . . . . . . . . . 64
启动 Dell 诊断程序 . . . . . . . . . . . . . . . . . . . . . . . . . . . . . . . . . . 65
信息和代码 . . . . . . . . . . . . . . . . . . . . . . . . . . . . . . . . . . . . . . . . 68
目录 41
Page 42

42 目录
Page 43
查找信息和帮助
下表列出了
提供的支持工具资源。另外,您的计算机还可能附带了
Dell
其它资源。
您查找的内容 可以找到的位置
• 适用于计算机的诊断程序
• 适用于计算机的驱动程序
• 用户指南
• 设备说明文件
• 如何安装计算机
• 如何维护计算机
• 故障排除信息
• 如何打开主机盖
• 如何找到其它说明文件
Drivers and Utilities CD
您可以使用此
工具。
安装与快速参考指南
(也称为
来访问说明文件、重新安装驱动程序或运行诊断
CD
ResourceCD
)
安装与快速参考指南 43
Page 44
您查找的内容 可以找到的位置
• 快速服务代码和服务标签号码
•
Microsoft
®
Windows®
许可标签
• 如何重新安装操作系统
www.dell.com | support.ap.dell/com/china
快速服务代码和产品密钥
这些标签位于您的计算机上。
Operating System CD
和《安装指南》
重新安装操作系统后,请使用
带的设备重新安装驱动程序。
Drivers and Utilities CD
为计算机附
44 安装与快速参考指南
Page 45
您查找的内容 可以找到的位置
• 如何卸下和装回部件
“
User’s Guide
• 技术规格
• 如何配置系统设置
• 如何排除故障并解决问题
双击桌面上的“
Windows XP
单击“
1
Start
(帮助和支持)。
单击“
2
User's Guide
• 主机板上的连接器位置 系统信息标签
”(用户指南)图标
User's Guide
”(用户指南)图标。
(Microsoft Windows 2000)
帮助和支持中心
”(开始)按钮,然后单击“
”(用户指南)。
或
Help and Support
”
• 适用于计算机的最新驱动程序
• 对技术服务与支持问题的解答
• 与其他用户和技术支持人员进行联机讨论
• 适用于计算机的说明文件,包括《服务手
册》
此标签位于主机盖内侧。
Dell
Dell
支持
支持
站点
Web
Web
— support.dell.com
站点提供了几种联机工具,包括:
• 知识库 — 提示、技巧与联机课程
• 客户论坛 — 与其他
客户进行联机讨论
Dell
• 升级 — 内存、硬盘驱动器和操作系统等组件的升级信息
• 客户服务 — 联系信息、订购状态、保修和维修信息
• 下载 — 驱动程序、补丁程序和软件更新
• 参考 — 计算机说明文件、产品规格和白皮书
安装与快速参考指南 45
Page 46
您查找的内容 可以找到的位置
• 服务呼叫状态与支持历史记录
• 关于计算机的重要技术问题
• 常见问题
Dell
Dell
做。并非所有地区均可访问此
• 文件下载
• 关于计算机配置的详情
• 计算机的服务合同
• 保修信息 系统信息指南
www.dell.com | support.ap.dell/com/china
• 如何使用
• 适用于计算机和设备的说明文件
Windows XP
Windows XP
单击“
1
(帮助和支持)。
键入说明问题的字词,然后单击箭头图标。
2
单击说明问题的主题。
3
按照屏幕上显示的说明进行操作。
4
注:有关使用 Windows 2000 的帮助,请单击“Start”(开始)按
钮,然后单击“Help”(帮助)。
客户特选支持
客户特选支持
帮助和支持中心
”(开始)按钮,然后单击“
Start
站点
Web
Web
— premiersupport.dell.com
站点专为企业、政府和教育部门客户量身订
站点。
Web
Help and Support
”
46 安装与快速参考指南
Page 47

使用
Dell Precision™ ResourceCD
要通过
Microsoft
®
Windows®
请执行以下步骤:
1
将
Dell Precision ResourceCD
操作系统运行
放入
CD
Dell Precision ResourceCD
驱动器。
,
如果您是第一次在此计算机上运行
幕将显示“
口,通知您
2
单击“OK”(确定)继续。
ResourceCD Installation
ResourceCD
即将开始安装。
Dell Precision ResourceCD
”(
ResourceCD
安装程序)窗
要完成安装过程,请回应安装程序给出的提示。
3
在“
Welcome Dell System Owner
上单击“
4
选择适当的 “
(操作系统)、“
如果您想访问 《
题)下拉式菜单中单击 “
Precision ResourceCD
注:要访问设备驱动程序和用户说明文件,您必须在 Windows 中运行
ResourceCD。要运行 Dell 诊断程序,您必须将 ResourceCD 放入 CD 驱动
器,然后重新启动计算机。有关运行 Dell 诊断程序的信息,请参阅第 64
页上的 “何时使用 Dell 诊断程序”。
”(下一步)。
Next
System Model
Device Type
Dell Precision ResourceCD
User's Guides
”。
”(欢迎
”(系统机型)、“
”(设备类型)以及“
系统的主人)屏幕
Dell
Operating System
To pi c
指南》,请在 “
”(用户指南),然后单击 “
,屏
”
”(主题)。
”( 主
To pi c
Dell
安装与快速参考指南 47
Page 48
安装计算机
下图所示的各个编号与以下安装步骤中所述的任务相对应。
注:为了正确安装计算机,请务必完成所有步骤。
计算机部件
6
www.dell.com | support.ap.dell/com/china
1
2
背面视图 正面视图
诊断指示灯
4
3
7
5
(护盖已打开)
48 安装与快速参考指南
Page 49
键盘和鼠标
1
如下图所示连接键盘和鼠标。
注:如果您使用个人系统
如果您使用通用串行总线 (USB) 键盘,请如图所示将其连接至 USB 连接
器。请勿将 USB 鼠标或键盘连接至计算机正面的 USB 连接器。
注:请勿尝试同时使用 PS/2 鼠标和 USB 鼠标。
/2 (PS/2) 键盘,请将其连接至 PS/2 键盘连接器。
PS/2 或 USB
键盘
PS/2 或 USB
鼠标
安装与快速参考指南 49
Page 50
网络适配器和调制解调器
2
将网络电缆(而不是电话线)插入网络连接器。
注:计算机配有一个集成网络适配器。但是,如果您的计算机安装了网络
扩充卡,请将网络电缆连接至网络扩充卡上的连接器,而不要连接至计算
机背面板上的连接器。
如果您的计算机配备了调制解调器选件,请将电话线连接至调制解调器。
www.dell.com | support.ap.dell/com/china
网络电缆
注意:
坏网络适配器。
请勿将调制解调器电缆连接至网络适配器。电话通信电压可能会损
调制解调器电缆
50 安装与快速参考指南
Page 51
显示器
3
对齐并轻轻插入显示器电缆,注意不要弄弯连接器插针。然后拧紧电缆
连接器上的指旋螺钉。
注:如果您的计算机安装了双显示器卡选件,但是仅连接一台显示器,则
必须将显示器的电缆连接至主端口。要启用双显示器支持功能,计算机在
启动时必须连接两台显示器。
有关安装双显示器的信息,请参阅第
页上的“双显示器”。
55
主端口
次端口 (可选)
安装与快速参考指南 51
Page 52
4
按照扬声器附带的图示,将扬声器连接至计算机。
www.dell.com | support.ap.dell/com/china
扬声器
注:计算机已安装了集成音频控制器。但是,如果您的计算机安装了音频
扩充卡,请将外部音频设备连接至此声卡上的连接器,而不要连接至计算
机背面板上的连接器。
52 安装与快速参考指南
Page 53
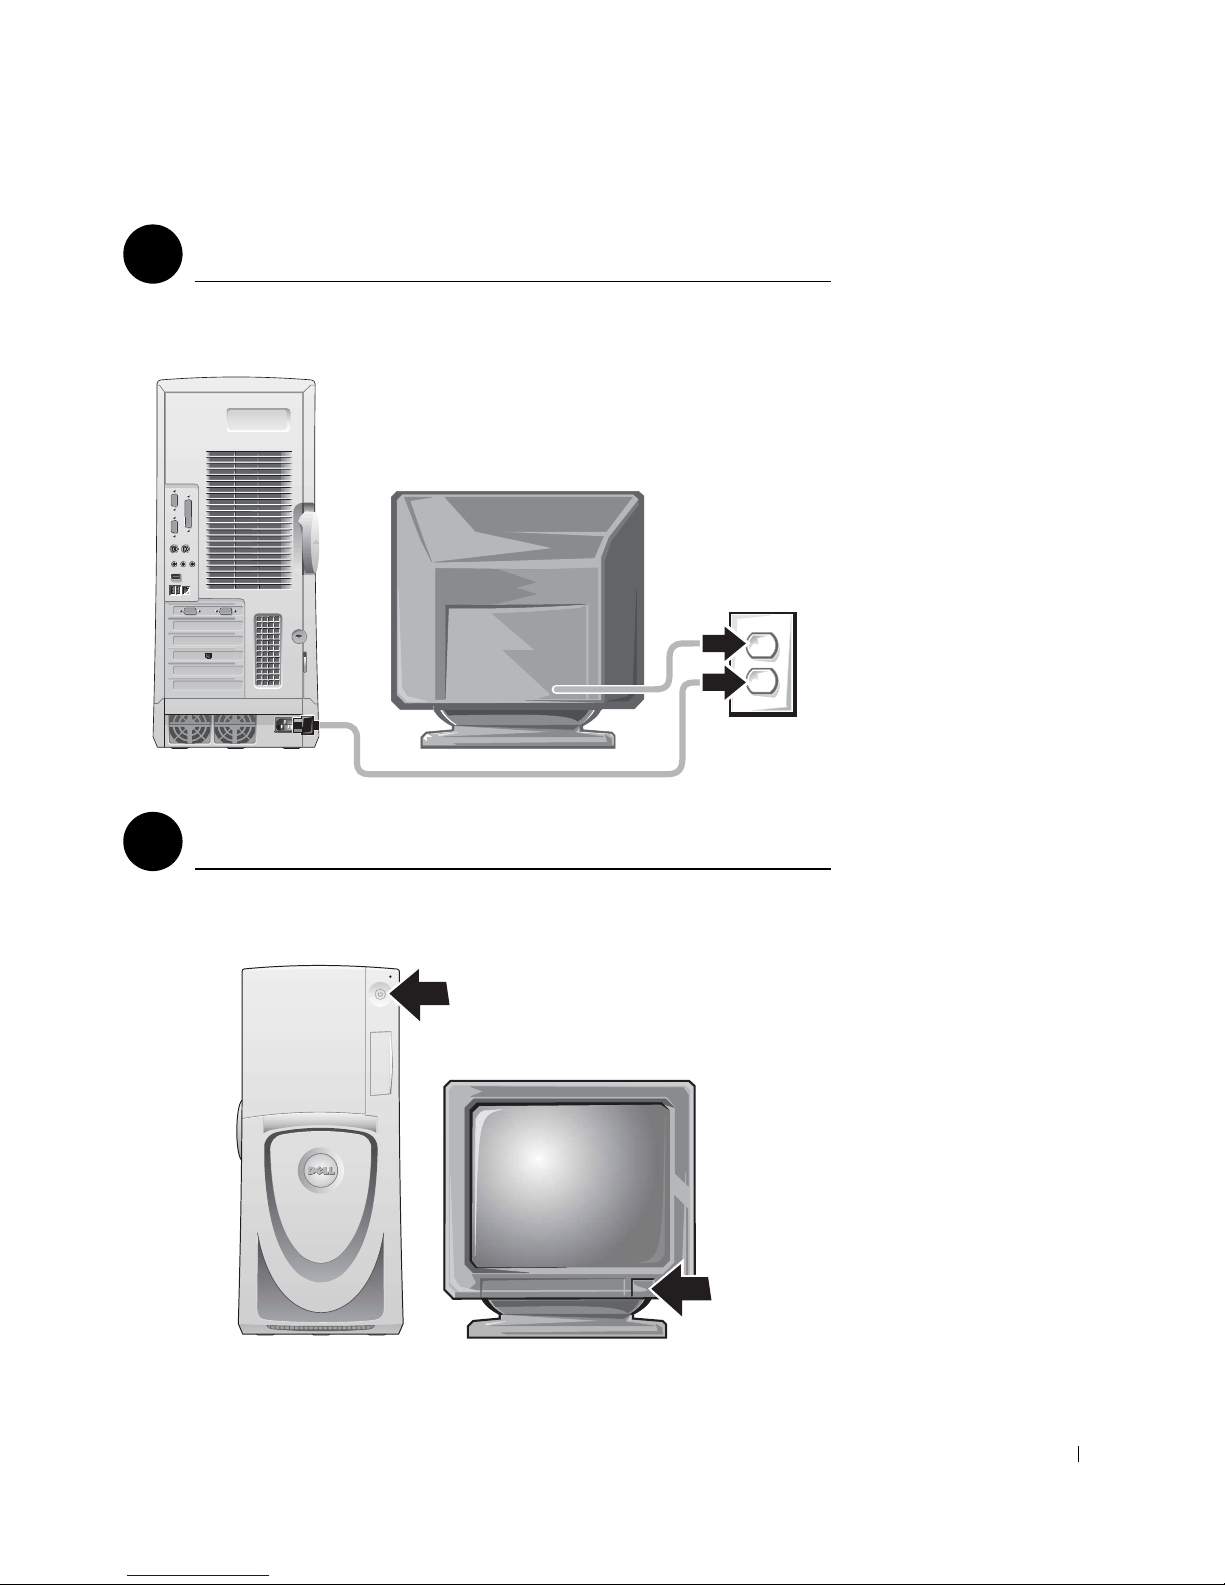
连接电源
5
将计算机和显示器的电源插头分别插入各自的电源插座。
开机
6
按下计算机和显示器的电源按钮,将其打开。
安装与快速参考指南 53
Page 54
安装操作系统
7
第一次启动计算机时,屏幕可能会显示几则系统启动信息,其中一则信
息显示了您的服务标签和快速服务代码。
计算机已预装了操作系统。第一次打开计算机之前,您必须完成上述所
有安装步骤,从而将所有必要的设备连接至计算机。
操作系统的初始安装是自动过程,并且可能会持续几分钟。但是也可能
需要更长的时间,视系统配备的内部和外部设备而定。
按照操作系统的提示进行安装。系统可能会提示您输入
密钥(也称产品标识号或
标签上找到此号码。
www.dell.com | support.ap.dell/com/china
请将此号码记在下面,以备将来参考:
产品密钥(标识号或
)以完成注册。您可以在计算机的服务
COA
有关安装操作系统的详情,请参阅操作系统安装指南。
注:
):
COA
___________________________________
Windows
产品
有关详情,请通过桌面上的“
Precision ResourceCD
54 安装与快速参考指南
User's Guides
访问计算机说明文件。
”(用户指南)图标或
Dell
Page 55
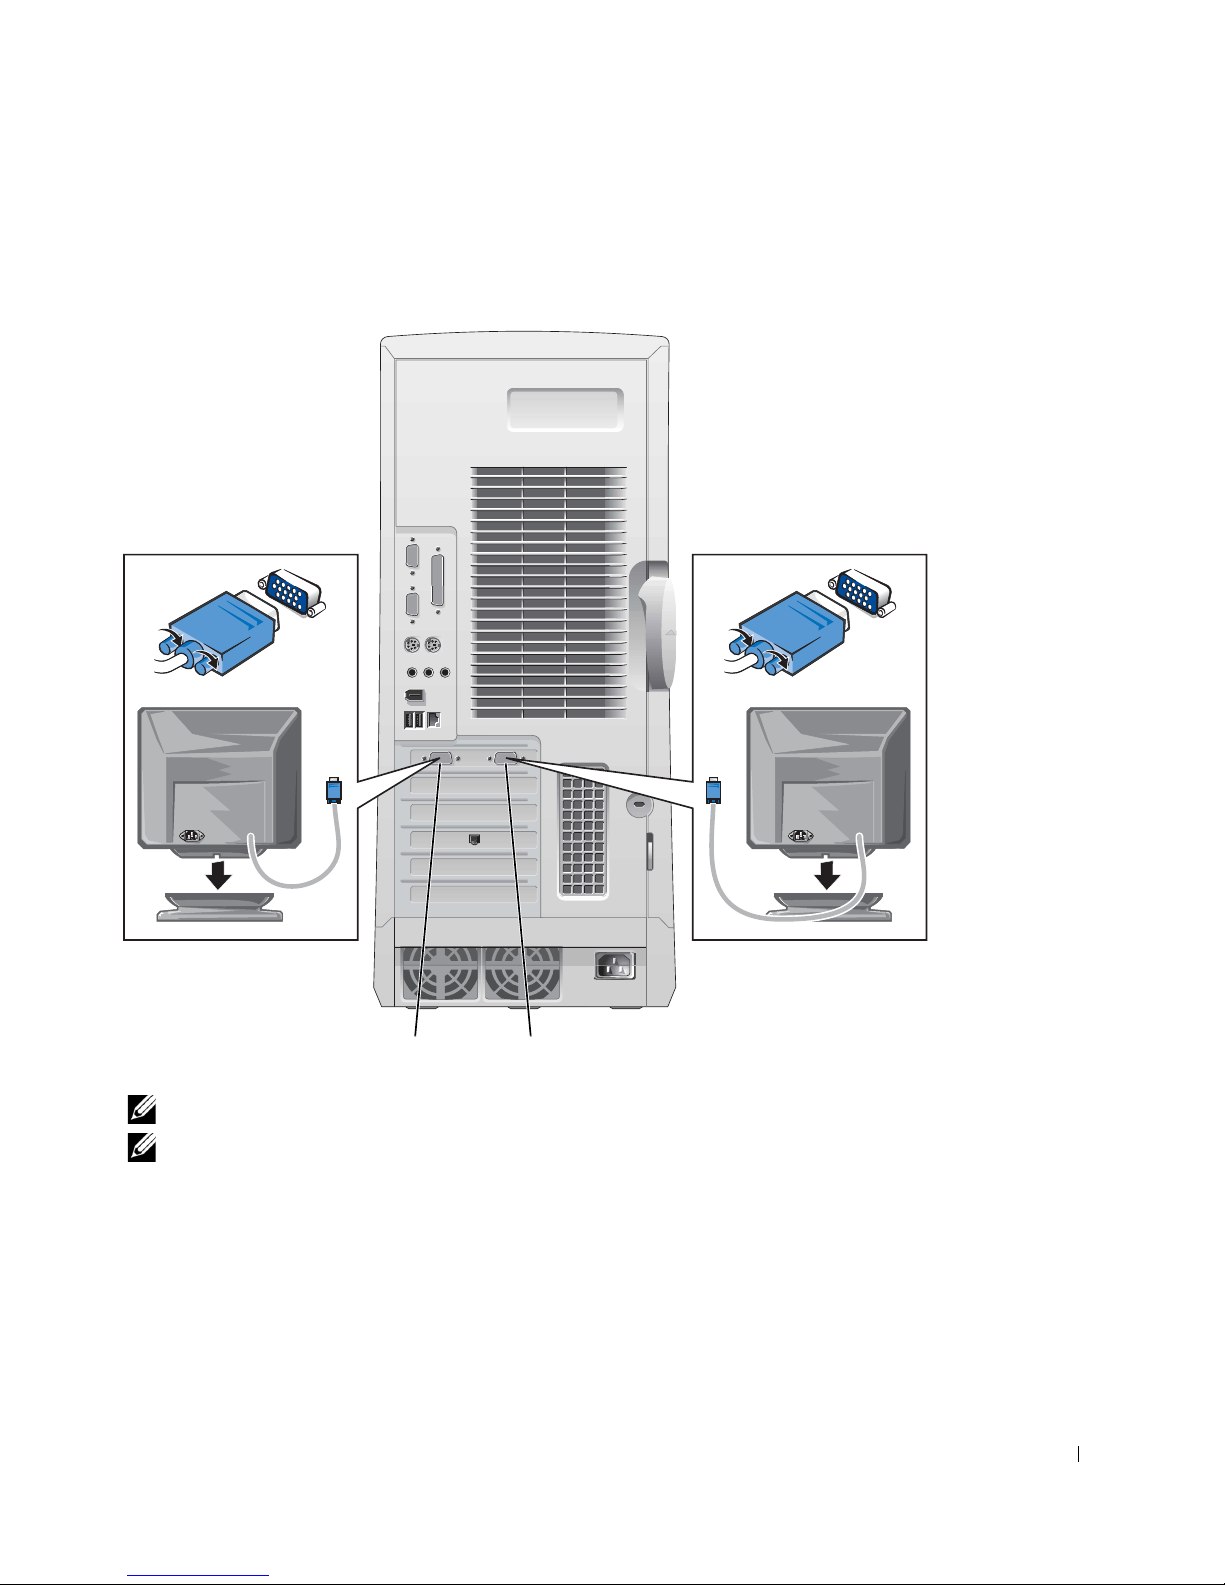
双显示器
将主显示器连接至主端口。有关详情,请参阅第
页上的“常见问题”。
56
次端口
注:第二个显示器为选配件,它需要使用多显示器图形适配卡。
要启用双显示器支持功能,计算机在启动时必须连接两台显示器。
注:
主端口
安装与快速参考指南 55
Page 56

常见问题
问题 尝试
如何使用
Precision ResourceCD
何处可以找到详细介
绍计算机的《用户指
www.dell.com | support.ap.dell/com/china
南》?
何处可以找到计算机
保修声明?
何处可以找到注册操
作系统所需的产品密
钥(也称产品标识号
或许可证
Dell
[COA]
?
)?
...
有关详情,请参阅第
上的“使用
ResourceCD
双击桌面上的“
Guides
标,或者单击“
(开始)按钮并选择
“
Help and Support
(帮助和支持),视您使
用的操作系统而定。
您可以在硬盘驱动器中找
到 《用户指南》等说明文
件。
双击桌面上的“
Guides
标,或者单击“
(开始)按钮并选择
“
Help and Support
助和支持),视您使用的
操作系统而定。请参阅
《用户指南》中的“有限
保修与退回规定”部分。
参阅本说明文件中的第
页。
Dell Precision™
”。
User's
”(用户指南)图
Start
User's
”(用户指南)图
Start
页
47
”
”
”
”(帮
54
或尝试使用
ResourceCD
进入
Dell Precision
ResourceCD
“
To pi c
单中单击“
(用户指南),然后单击
“
Dell Precision ResourceCD
Guide
ResourceCD
进入
Dell Precision
ResourceCD
“
To pi c
菜单中单击“
Guides
后单击适用于您的计算机的
用户指南。
进入
Dell Precision
ResourceCD
“
To pi c
菜单中单击“
Guides
击适用于您的计算机的用户
指南,然后参阅“有限保修
与退回规定”。
Dell Precision
的主菜单。在
”(主题)下拉式菜
User's Guides
”(
Dell Precision
指南)。
的主菜单。在
”(主题)下拉式
User's
”(用户指南),然
的主菜单。在
User's
下拉式
”(主题)
”(用户指南),单
”
或尝试使用
进入
support.dell.com
“
Welcome
击“
Dell Documents
明文件)。选择适用于您的计算
机的选项,访问您需要的《用户
指南》。
进入
support.dell.com
“
Welcome
击“
Dell Documents
明文件)。选择适用于您的计算
机的选项,访问您需要的《用户
指南》。参阅《用户指南》中的
“有限保修与退回规定”。
进入
support.dell.com
“
Welcome
单击“
Dudley
Product Key(产品密钥)。
Ask Dudley!
!),然后搜索关键字
支持站点
Dell
。在
”(欢迎)页面中单
”(
。在
”(欢迎)页面中单
”(
。在
”(欢迎)页面中,
”(询问
Dell
Dell
说
说
56 安装与快速参考指南
Page 57

问题 尝试
如何查找计算机的技
术规格?
...
双击桌面上的“
Guides
”(用户指南)图
标,或者单击“
(开始)按钮并选择
“
Help and Support
(帮助和支持),视您使
用的操作系统而定。请参
阅《用户指南》中的“技
术规格”部分。
我的计算机配备了可
支持双显示器的图形
卡;请问如何安装第
二台显示器?
双击桌面上的“
Guides
”(用户指南)图
标,或者单击“
(开始)按钮并选择
“
Help and Support
(帮助和支持),然后搜
索
dual monitor
器),视您使用的操作系
统而定。 视频控制器的
《用户指南》逐步介绍了
如何安装双显示器。
如果我的图形卡、网
络适配器、声卡、小
型计算机系统接口
(SCSI)
软件或其它设
备需要驱动程序,请
问何处可以找到这些
驱动程序?
有关详情,请参阅第
上的“使用
ResourceCD
您还可 能 具有此设备的专
用
。如果有,请搜索此
CD
的目录以获取说明文件
CD
和适用的驱动程序。
如何打开主机盖? 请参阅第
主机盖”。
User's
Start
”
User's
Start
”
(双显示
47
Dell Precision™
”。
页上的“打开
59
”
”
或尝试使用
Dell Precision
ResourceCD
进入
Dell Precision
ResourceCD
“
To pi c
单中单击“
的主菜单。在
”(主题)
User's Guides
(用户指南),单击适用于
您的计算机的用户指南,然
后参阅“技术规格”。
进入
Dell Precision
ResourceCD
“
To pi c
单中单击 “
的主菜单。在
”(主题)下拉式菜
User's Guides
(用户指南),然后单击适用
于您的计算机的用户指南。
有关详情,请参阅《
页
Precision WorkStations
ResourceCD
进入
Dell Precision
ResourceCD
“
To pi c
单中单击 “
指南》。
的主菜单。在
”(主题)
User's Guides
下拉式菜
(用户指南),单击适用于您
的计算机的用户指南,然后
参阅 “卸下和安装部件”。
下拉式菜
”
”
Dell
”
或尝试使用
进入
support.dell.com
“
Welcome
击“
Dell Documents
支持站点
Dell
。在
”(欢迎)页面中单
”(
Dell
说
明文件)。选择适用于您的计算
机的选项,访问您需要的《用户
指南》。参阅《用户指南》中的
“技术规格”。
访问
http://support.dell.com
点。在“
面上,单击“
Base
”(
Welcome
Dell Knowledge
知识库),然后搜
Dell
”(欢迎)页
站
索关键字 dual monitor(双
显示器)。
进入
support.dell.com
,获得有
关基本用法、安装和故障排除的
帮助信息。
安装与快速参考指南 57
Page 58

问题 尝试
显示器显示黑屏而电
源指示灯呈绿色闪烁。
如何恢复计算机的操
作?
...
计算机处于节能或“休
眠”状态。使用其中一种
合适的方法来“唤醒”计
算机。
双击桌面上的“
Guides
”(用户指南)图
标,或者单击“
User's
Start
(开始)按钮并选择
“
Help and Support
(帮助和支持),视您使
用的操作系统而定。参阅
《用户指南》中的“电源
管理”。
www.dell.com | support.ap.dell/com/china
如何在计算机上安装
其它硬件?
请参阅第
页上的 “计
61
算机内部组件”中介绍的
内部服务标签。另请参阅
第
页上的 “卸下和安
62
装部件”。
我的计算机安装了
系统内存。某些
4GB
内存似乎丢失了,是
何原因?
双击桌面上的“
Guides
”(用户指南)图
标,或者单击“
(开始)按钮并选择
“
Help and Support
User's
Start
(帮助和支持),视您使
用的操作系统而定。请参
阅《用户指南》“卸下和
安装部件”部分中的“系
统内存”。
如何重新安装操作
系统?
有关重新安装操作系统的
说明,请参阅操作系统安
装指南。
”
”
”
”
或尝试使用
Dell Precision
ResourceCD
进入
Dell Precision
ResourceCD
“
To pi c
单中单击“
的主菜单。在
”(主题)
User's Guides
下拉式菜
”
(用户指南),单击适用于
您的计算机的用户指南,然
后参阅“电源管理”。
进入
Dell Precision
ResourceCD
“
To pi c
单中单击 “
的主菜单。在
”(主题)
User's Guides
下拉式菜
”
(用户指南),单击适用于您
的计算机的用户指南,然后
参阅 “卸下和安装部件”。
进入
Dell Precision
ResourceCD
“
To pi c
单中单击“
的主菜单。在
”(主题)下拉式菜
User's Guides
”
(用户指南),单击适用于
您的计算机的用户指南,然
后参阅“系统内存”。
或尝试使用
进入
support.dell.com
“
Welcome
击“
Dell Documents
支持站点
Dell
。在
”(欢迎)页面中单
”(
Dell
说
明文件)。选择适用于您的计算
机的选项,访问您需要的《用户
指南》。参阅《用户指南》中的
“电源管理”。
进入
support.dell.com
“
Welcome
击“
Dell Documents
”(欢迎)页面中单
。在
”(
Dell
说
明文件)。选择适用于您的计算
机的选项,访问您需要的《用户
指南》。参阅《用户指南》中的
“卸下和安装部件”。
进入
support.dell.com
“
Welcome
击“
Dell Documents
”(欢迎)页面中单
。在
”(
Dell
说
明文件)。选择适用于您的计算
机的选项,访问您需要的《用户
指南》。参阅《用户指南》中的
“系统内存”。
58 安装与快速参考指南
Page 59

安全第一
—
为您和您的计算机着想
拆装计算机内部组件时,请勿尝试维修计算机,除非本指南和其它
说明文件中已有说明。请务必严格遵守有关说明。
遵循以下预防措施,可以确保您安全地拆装计算机内部组件。
警告:
开始工作之前,请依次执行以下步骤:
1
关闭计算机和所有设备。
2
接触计算机的内部组件之前,请触摸计算机未上漆的金属表面,例
如计算机背面插槽开口处周围的金属。
3
从电源插座中断开计算机和设备的连接。这样可以避免造成人身伤
害或受到电击。同时,请从计算机上断开所有电话或电信线路的连
接。
注:
机板上的备用电源指示灯是否已熄灭。有关此备用电源指示灯的位置,请
参见主机盖内侧粘贴的内部服务标签。
工作期间,请不时地触摸计算机未上漆的金属表面,导去可能会对
内部组件造成损害的静电。
为了保护您的人身安全和设备
从计算机中断开外围设备连接或从主机板上卸下组件之前,请检查主
Dell
另外,
建议您定期查阅计算机所附带说明文件中的安全说明。
Dell
打开主机盖
如果您准备拆装部件、重设忘记的密码或者诊断计算机问题,则可能需
要卸下主机盖。
警告:
计算机着想”。
打开主机盖
1
关闭计算机和设备,从电源插座中断开它们的连接,然后等待
至
2
如果您已在计算机背面板上的挂锁扣环中安装了一把挂锁,请取下
挂锁(参见下图)。
执行此过程之前,请先参阅第
秒钟。
20
页上的“安全第一
59
为您和您的
—
10
安装与快速参考指南 59
Page 60
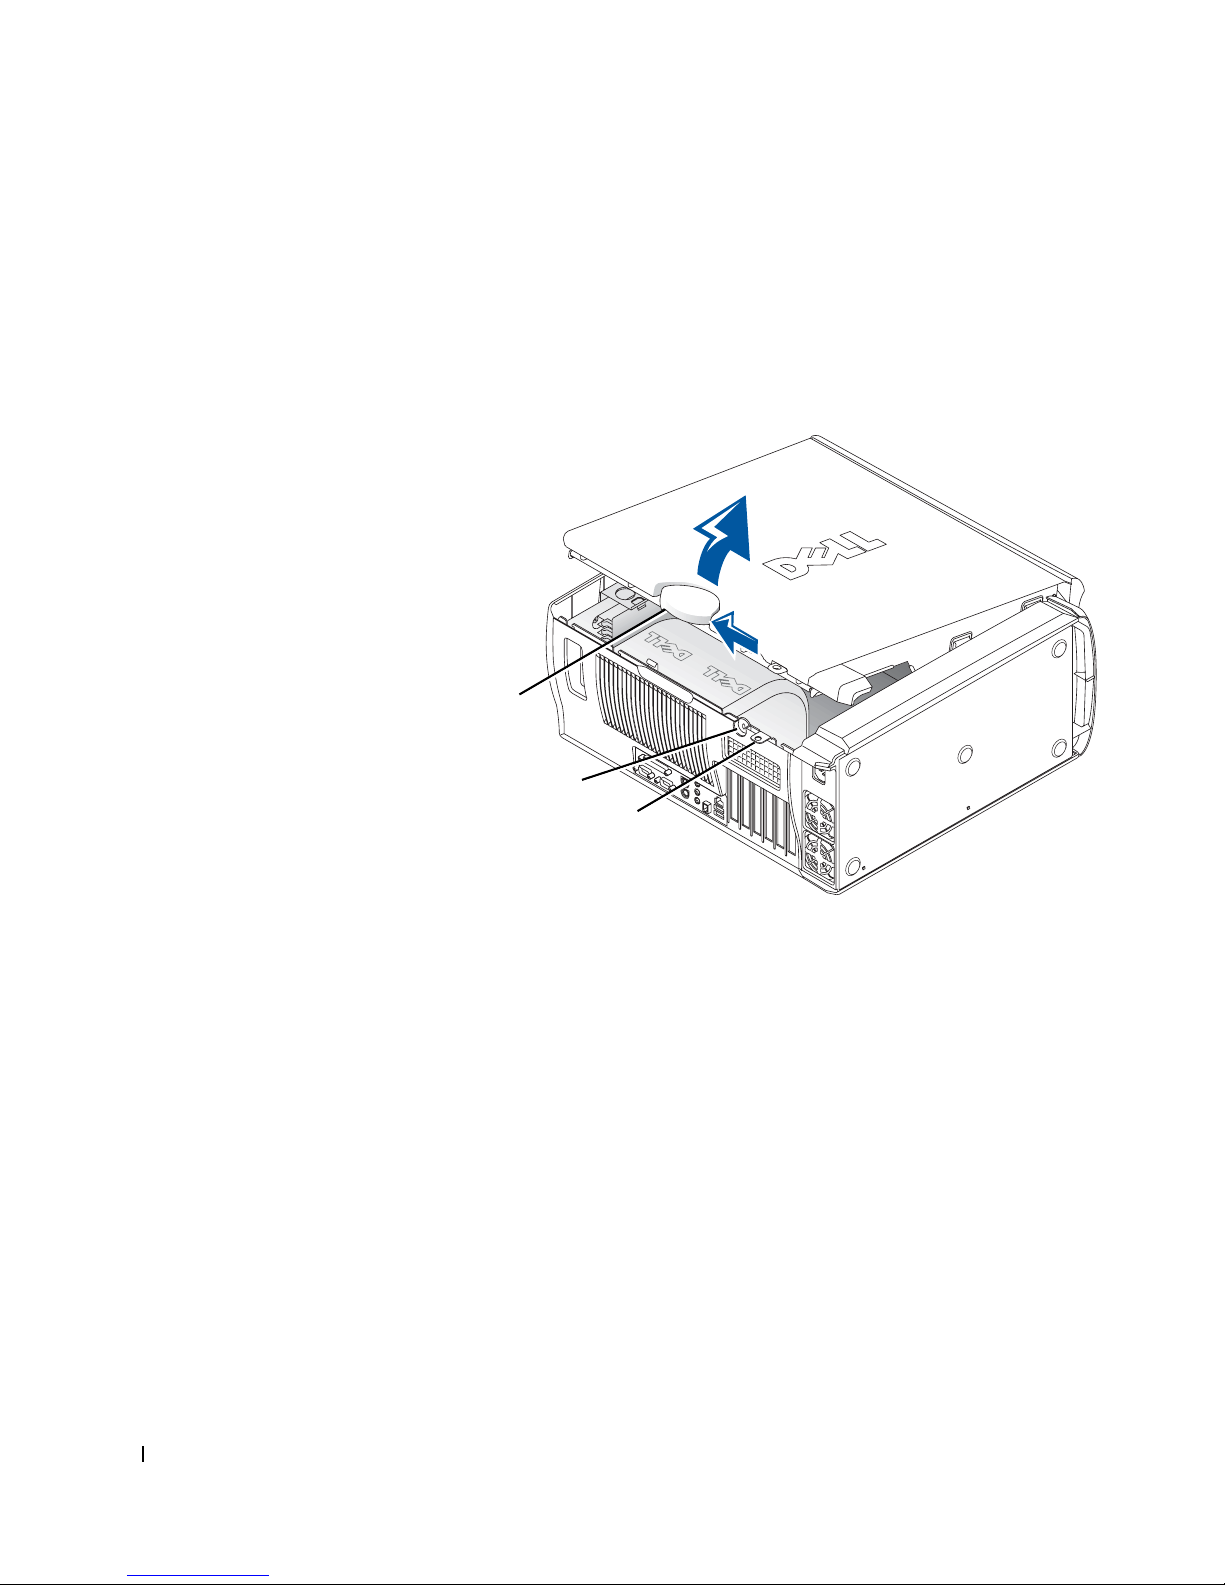
3
将计算机侧放,使其右侧朝下。
4
打开主机盖:
a
将主机盖释放闩锁朝计算机顶部滑动(参见下图)。
b
抬起主机盖后部并朝计算机正面转动。
www.dell.com | support.ap.dell/com/china
主机盖
释放闩锁
安全缆线孔
挂锁扣环
60 安装与快速参考指南
Page 61
计算机内部组件
下图显示了已打开主机盖的计算机。
注:服务标签粘贴在主机盖的内侧,它提供了有关计算机内部组件的信息。
内部服务标签
软盘驱动器支架
硬盘驱动器支架
外部可抽换驱动器支架
机箱防盗开关
前面板
电缆定位器
内存提升板
固定支架
(如果需要)
AGP 卡托架
微处理器
通风罩
I/O 面板连接器
扩充卡插槽
扬声器
扩充卡冷却
风扇
电源设备
主机板
交流电源插座
电源设备通风孔
安装与快速参考指南 61
Page 62

卸下和安装部件
有关卸下和安装各种部件的说明,请参阅硬盘驱动器中的《用户指南》。
要访问此说明文件:
1
双击桌面上的“
注:您还可以在 support.dell.com 中获得便携式文档格式 (PDF) 的
《用户指南》。
User's Guides
”(用户指南)图标。
2
3
4
5
www.dell.com | support.ap.dell/com/china
6
添加内存
执行前面所述的步骤打开《用户指南》,然后参阅“系统内存”。
添加硬盘驱动器或外部可抽换驱动器
您的计算机配备了一个或多个增强型集成驱动电子设备
或
SCSI
的订单。
单击“
单击“
单击“
System Information
System Documentation
Dell Precision WorkStation 530 System User's Guide
Precision WorkStation 530
单击“
Removing and Installing Parts
开始工作之前,从“
”(系统信息)。
”(系统说明文件)。
系统用户指南)。
”(卸下和安装部件)。
”(文件)菜单中选择“
File
”(打印)
Print
”(
Dell
以打印此过程。
注:要使用 Internet Explorer 浏览器打印整个《用户指南》,请 在 “Print”
(打印)窗口中选择“Print all linked documents”(打印链接的所有文档)。
(EIDE)
驱动器
驱动器。要确定计算机配备的驱动器类型,请参阅计算机附带
执行前面所述的步骤打开《用户指南》,然后参阅“磁盘驱动器和介质”。
添加
要将调制解调器等外围组件互连
面所述的步骤打开《用户指南》,然后参阅“扩充卡”。
62 安装与快速参考指南
PCI
扩充卡
(PCI)
扩充卡添加至计算机,请执行前
Page 63

升级视频卡
要升级加速图形端口
说明。视频卡升级套件附带了视频卡说明文件。您还可以在
support.dell.com
计算机的页面,单击“
“
Video Adapter
有关在计算机中安装视频卡的说明,请执行前面所述的步骤打开《用户
指南》,然后参阅“扩充卡”。
(AGP)
中找到有关视频卡的联机说明文件。进入适用于您的
”(视频适配器)。从显示的列表中选择您的视频卡。
卡,请参阅此视频卡的说明文件和其它特别
Dell Documents
”(
说明文件),然后单击
Dell
升级处理器
执行前面所述的步骤打开《用户指南》,然后参阅“微处理器”。
解决问题
如果您需要 Dell 支持人员帮助您解决计算机问题,请将快速服务代码
注:
和服务标签号码记在下面,然后从您购买计算机的地区与 Dell 联络。
快速服务代码:
服务标签:
___________________________
___________________________
安装与快速参考指南 63
Page 64

提供了多种用于帮助您解决问题的工具。无法获得其它联机工具
Dell
时,您可以使用本节列出的工具解决问题。计算机附带了以下工具:
D
ELL
算机上的各种组件,并且可以帮助您找出导致计算机问题的原因。有关详
情,请参阅第
系统指示灯
情,请参阅第
诊断指示灯
情,请参阅第
www.dell.com | support.ap.dell/com/china
系统信息
的问题。有关详情,请参阅第
哔声代码
详情,请参阅第
何时使用
如果您遇到计算机问题,请执行《用户指南》“查找解决方案”中的检
查步骤并运行
Dell
要与
息。
诊断程序
—
—
Dell
Dell Precision ResourceCD
—
页上的“何时使用
64
这些指示灯位于计算机正面,用于指示计算机问题。有关详
—
页上的“系统指示灯”。
68
这些指示灯位于计算机正面,用于指示计算机问题。有关详
—
页上的“诊断指示灯”。
70
计算机报告这些信息,从而通知您当前出现的故障或可能存在
75
哔声代码由计算机的扬声器发出,用于指示计算机问题。有关
页上的“哔声代码”。
75
诊断程序
诊断程序,然后再与
Dell
诊断程序后,您可能无需与
联络,检测结果也可以为
Dell
中的
Dell
诊断程序”。
Dell
页上的“系统信息”。
联络获得技术帮助。运行
Dell
联络即可解决问题。如果您确实需
Dell
的服务与支持人员提供重要信
Dell
诊断程序用于检测计
Dell
• 对一个或所有设备执行快速、扩展或自定义检测
• 根据问题的症状选择检测程序
• 选择运行多少次检测程序
• 显示检测结果
• 检测到错误时暂停检测
• 访问对检测程序和设备进行说明的联机帮助信息
64 安装与快速参考指南
诊断程序使您可以:
Page 65

• 接收状态信息,了解是否已成功完成检测
• 在检测到问题时接收错误信息
启动
Dell
诊断程序
建议您在开始之前先打印这些过程。
注意:请仅使用 Dell 诊断程序检测您的 Dell™ 计算机。如果将此程序用于
其它计算机,会导致出现错误信息。
进入系统设置程序,检查计算机的配置信息,并确保您要检测的设备显
示在系统设置程序中并已激活。
通过硬盘驱动器或
诊断程序。
Dell
通过硬盘驱动器启动
1
关闭并重新启动计算机。
2
屏幕显示
Drivers and Utilities CD
诊断程序
Dell
DELL
徽标时,立即按
如果您等待的时间太长,并且屏幕上显示了
续等待直至显示
Windows
桌面。然后通过“
(也称为
<F12>
键。
Windows
Start
ResourceCD
徽标,请继
”(开始)菜单
)启动
关闭计算机并再试一次。
3
屏幕显示引导设备列表时,突出显示“
(引导至公用程序分区)并按
<Enter>
Boot to Utility Partition
键。
”
注:如果显示的信息表
示未找到诊断公用程序
分区,请按照说明通过
Drivers and Utilities CD
来运行 Dell 诊断程序。
4
屏幕显示
通过
Drivers and Utilities CD
1
将
Drivers and Utilities CD
2
关闭并重新启动计算机。
屏幕显示
诊断程序主菜单时,选择要运行的检测程序。
Dell
DELL
启动
徽标时,立即按
Dell
放入
诊断程序
CD
<F12>
如果您等待的时间太长,并且屏幕上显示了
续等待直至显示
Windows
桌面。然后通过“
关闭计算机并再试一次。
驱动器。
键。
Windows
”(开始)菜单
Start
徽标,请继
安装与快速参考指南 65
Page 66
注:此功能只能更改一次
引导 顺 序。下一次启动
时,计算机将根据系统设
置程序中指定的设备进
行引导。
www.dell.com | support.ap.dell/com/china
3
4
5
6
7
8
9
Dell
显示引导设备列表时,突出显示“
CD-ROM
在
引导菜单中选择“
CD
设备)并按
<Enter>
IDE CD-ROM Device
设备)选项。
在显示的菜单中选择“
Boot from CD-ROM
导)选项。
键入
1,启动
键入
2,启动
ResourceCD
诊断程序。
Dell
在已编号的列表中选择“
32 位 Dell
诊断程序)。如果列出了多个版本,请选择适用于您的
菜单。
Run the 32 Bit Dell Diagnostics
平台的版本。
屏幕显示
诊断程序主菜单时,选择要运行的检测程序。
Dell
诊断程序主菜单
IDE CD-ROM Device
键。
”(
IDE CD-ROM
”(从
CD-ROM
”(
IDE
中引
”(运行
计算机的服务标签位
注:
于每个检测屏幕的顶部。
1
诊断程序载入并显示“
Dell
Main Menu
”(主菜单)屏幕后,单击
对应于所需选项的按钮。
选项 功能
Express
(快速
Te st
检测)
Extended
(扩展
Te st
检测)
Custom
(自定
Te st
义检测)
Symptom
(症状
Tr ee
树视图)
如果在检测期间遇到问题,信息将显示出错误代码和对所出现问题
2
对设备执行快速检测。此检测通常需要
并且无需您参与操作。先运行“
测)有利于提高快速找出问题的可能性。
对设备执行彻底的检测。此检测通常需要一个小时甚至
更长时间,并且需要您定期回答一些问题。
检测特定的某个设备。您可以自定义需要运行的检测程
序。
列出最常见的症状,使您可以根据问题的症状来选择检
测程序。
Express Test
10 至 20
分钟,
”(快速检
的描述。记下错误代码和问题描述,然后按照屏幕上的说明进行操
作。
66 安装与快速参考指南
如果您无法解决错误,请与
Dell
联系。
Page 67

3
如果您通过“
Custom Test
”(自定义检测)或“
Symptom Tree
(症状树视图)选项运行检测程序,请单击以下表格中列出的适当
标签以了解有关详情。
标签 功能
”
Results
(结果)
Errors
(错误)
Help
(帮助)
Configuration
(配置)
Parameters
(参数)
4
如果您通过
检测后取出该
5
关闭检测程序屏幕即可返回“
出
诊断程序并重新启动计算机,请关闭“
Dell
显示检测的结果以及遇到的任何错误。
显示遇到的错误、错误代码以及问题描述。
对检测程序进行说明,可能还会提示运行检测程序所
需满足的要求。
显示选定设备的硬件配置。
诊断程序通过系统设置程序、内存和各种内部检
Dell
测程序获得所有设备的配置信息,然后将其显示在屏
幕左窗格的设备列表中。设备列表可能不会显示计算
机中安装的所有组件或计算机连接的所有设备的名
称。
使您可以通过更改检测程序设置来自定义检测。
Drivers and Utilities CD
。
CD
菜单)屏幕。
运行
Main Menu
诊断程序,请在完成
Dell
”(主菜单)屏幕。要退
Main Menu
”(主
安装与快速参考指南 67
Page 68

更改引导顺序
注:有关详情,请参阅《用户指南》。
1
打开计算机(如果计算机已打开,请重新启动)。
2
屏幕右上角显示 F2 = Setup 时,请按
<F2>
键。
3
www.dell.com | support.ap.dell/com/china
4
5
信息和代码
应用程序、操作系统和计算机均可以识别问题并提醒您注意。出现问题
时,显示器屏幕可能会显示一则信息,系统会发出哔声代码或者生成指
示灯代码。以下小节对这些信息、哔声代码和指示灯代码进行了说明。
系统指示灯
屏幕将显示“
注:如果等待太久而使操作系统开始载入内存,请让计算机完成载入
过程;然后重新启动计算机并再试一次。
System Setup
使用箭头键突出显示“
然后按
<Enter>
注:记下当前的引导顺序,以备您在运行 Dell 诊断程序后恢复此引导
顺序。
键打开弹出式菜单。
使用箭头键突出显示“
菜单选项中的“
CD Drive
”(系统设置程序)菜单。
Boot Sequence
Boot First Device:
”(
CD
”(引导顺序)菜单选项,
”(第一个引导设备:)
驱动器),然后按
<+>
移至列表顶部。
按
<Alt><b>
组合键重新启动计算机。
键将其
计算机配备了多个指示灯,用于帮助您分析和解决问题。有关这些指示
灯的位置,请参阅第
下表列出了系统指示灯的代码、可能原因和建议的纠正措施。
68 安装与快速参考指南
页上的“计算机部件”。
48
注:您可以使用多种系统指示灯代码来检查诊断指示灯,以查看是否识别
出特定问题。请参阅第 70 页上的“诊断指示灯”。
Page 69

系统指示灯代码
电源指示灯 硬盘驱动器指示灯 原因 纠正措施
呈绿色稳定亮起 不适用 计算机已接通电源,并且操作正常。 无需采取纠正措施。
呈绿色闪烁 熄灭 计算机处于暂挂状态(
2000 和 Windows XP
)。
Windows
使用其中一种合适的方法来“唤
醒”计算机。参阅 《用户指南》中
的“电源管理”。
呈绿色闪烁数次,
然后熄灭
呈黄色稳定亮起 不适用
不适用 存在配置错误。 检查诊断指示灯,查看是否可以识
别出特定的问题。
诊断程序正在运行检测程序,
Dell
或者主机板上的设备出现故障或未
正确安装。
如果正在运行
Dell
成检测过程。
检查诊断指示灯,查看是否可以识
别出特定的问题。另请参阅 《用户
指南》中的 “主机板问题”。
诊断程序,请完
如果计算机不能引导,请与
Dell
系获取技术帮助。
呈黄色闪烁 熄灭 电源设备或主机板出现故障。 检查诊断指示灯,查看是否可以识
别出特定的问题。另请参阅《用户
指南》中的“电源问题”和“主机
板问题”。
呈黄色闪烁 呈绿色稳定亮起 主机板出现故障。 检查诊断指示灯,查看是否可以识
别出特定的问题。另请参阅《用户
指南》中的“主机板问题”。
在开机自测
(POST)
期间,呈绿
色稳定亮起并且计
算机发出哔声代码
在开机自测
(POST)
期间,电源
指示灯呈绿色稳定
不适用
运行期间检测到问题。 有关诊断哔声代码的说明,请参阅
BIOS
不适用 显示器或图形卡可能出现故障,或
者未正确安装。
第
页上的“哔声代码”。另外,
75
请检查诊断指示灯,查看是否可以
识别出特定的问题。
检查诊断指示灯,查看是否可以识
别出特定的问题。另请参阅《用户
指南》中的“视频问题”。
亮起,系统未发出
哔声代码并且没有
显示视频图象
在开机自测
(POST)
期间,电源
指示灯呈绿色稳定
不适用 集成的主机板设备可能出现故障。 检查诊断指示灯,查看是否可以识
别出特定的问题。如果不能识别问
题,请与
联系获取技术帮助。
Dell
亮起,系统未发出
哔声代码但计算机
已锁定
联
安装与快速参考指南 69
Page 70

诊断指示灯
计算机在打开时将执行一系列自我诊断检测程序。成功完成开机自测
(POST)
算机无法完成开机自测
示灯来了解哪一个检测程序出现失败或计算机停止回应的原因。这些指
示灯仅可传达开机自测
能传达正常操作期间出现的问题。有关诊断指示灯的位置,请参阅第
页上的“计算机部件”。
下表列出了诊断指示灯的代码、可能原因和建议的纠正措施。为指示灯
标上标签的目的是为了方便您比较计算机上的模式和表中列出的模式。
www.dell.com | support.ap.dell/com/china
过程后,计算机会发出一声哔声,表示开始正常操作。如果计
(POST)
(POST)
过程,您可以通过计算机上的一系列指
之前或开机自测期间出现的问题,而不
48
70 安装与快速参考指南
Page 71
开机自测
(POST)
之前的诊断指示灯代码
下表列出了在计算机开始进行开机自测
(POST)
之前出现的诊断指示灯
代码。
开机自测
指示灯模式 原因 操作
(POST)
A B C D
A B C D
A B C D
之前的诊断指示灯代码
计算机未接通电源。请将计算机连接至电源插座。确保前面板上的电源指示
灯亮起。如果电源指示灯熄灭,请确保将计算机连接至
可以正常供电的电源插座,然后按下电源按钮。
如果仍未解决问题,请与
正常关闭状态。计算机已连接至电
源插座。
计算机处于节能或“休眠”状态。 使用其中一种合适的方法来“唤醒”计算机。参阅《用
无法运行。 参阅《用户指南》中的“重设已损坏的
BIOS
确保前面板上的电源指示灯亮起。如 果电源指示灯熄
灭,请确保将计算机连接至可以正常供电的电源插座,
然后按下电源按钮。
如果计算机工作正常,则只要它连接至电源插座,就可
以自动或远程启动。有关详情,请参阅《用户指南》中
的“电源管理”。
如果仍未解决问题,请与
户指南》中的“电源管理”。
如果仍未解决问题,请与
联络获得技术帮助。
Dell
联络获得技术帮助。
Dell
联络获得技术帮助。
Dell
BIOS
设置”。
A B C D
A B C D
A B C D
= 黄色
= 绿色
= 熄灭
电源设备或电缆可能出现故障。 参阅《用户指南》中的“电源问题”。
主机板可能出现故障。 请与
联络获得技术帮助。
Dell
安装与快速参考指南 71
Page 72
开机自测
指示灯模式 原因 操作
(POST)
之前的诊断指示灯代码(续)
微处理器和/或调压器模块
匹配。
(VRM)
A B C D
VRM 0
可能出现故障。 参阅《用户指南》中的“微处理器问题”。
A B C D
VRM 1
可能出现故障。 参阅《用户指南》中的“微处理器问题”。
A B C D
VRM 0 和 VRM 1
www.dell.com | support.ap.dell/com/china
可能出现故障。 参阅《用户指南》中的“微处理器问题”。
A B C D
内存提升板
可能出现故障。 参阅《用户指南》中的“系统内存问题”。
A
A B C D
内存提升板
可能出现故障。 参阅《用户指南》中的“系统内存问题”。
B
不
参阅《用户指南》中的“微处理器问题”。
A B C D
内存提升板
A B C D
= 黄色
= 绿色
= 熄灭
72 安装与快速参考指南
A 和 B
可能出现故障。 参阅《用户指南》中的“系统内存问题”。
Page 73
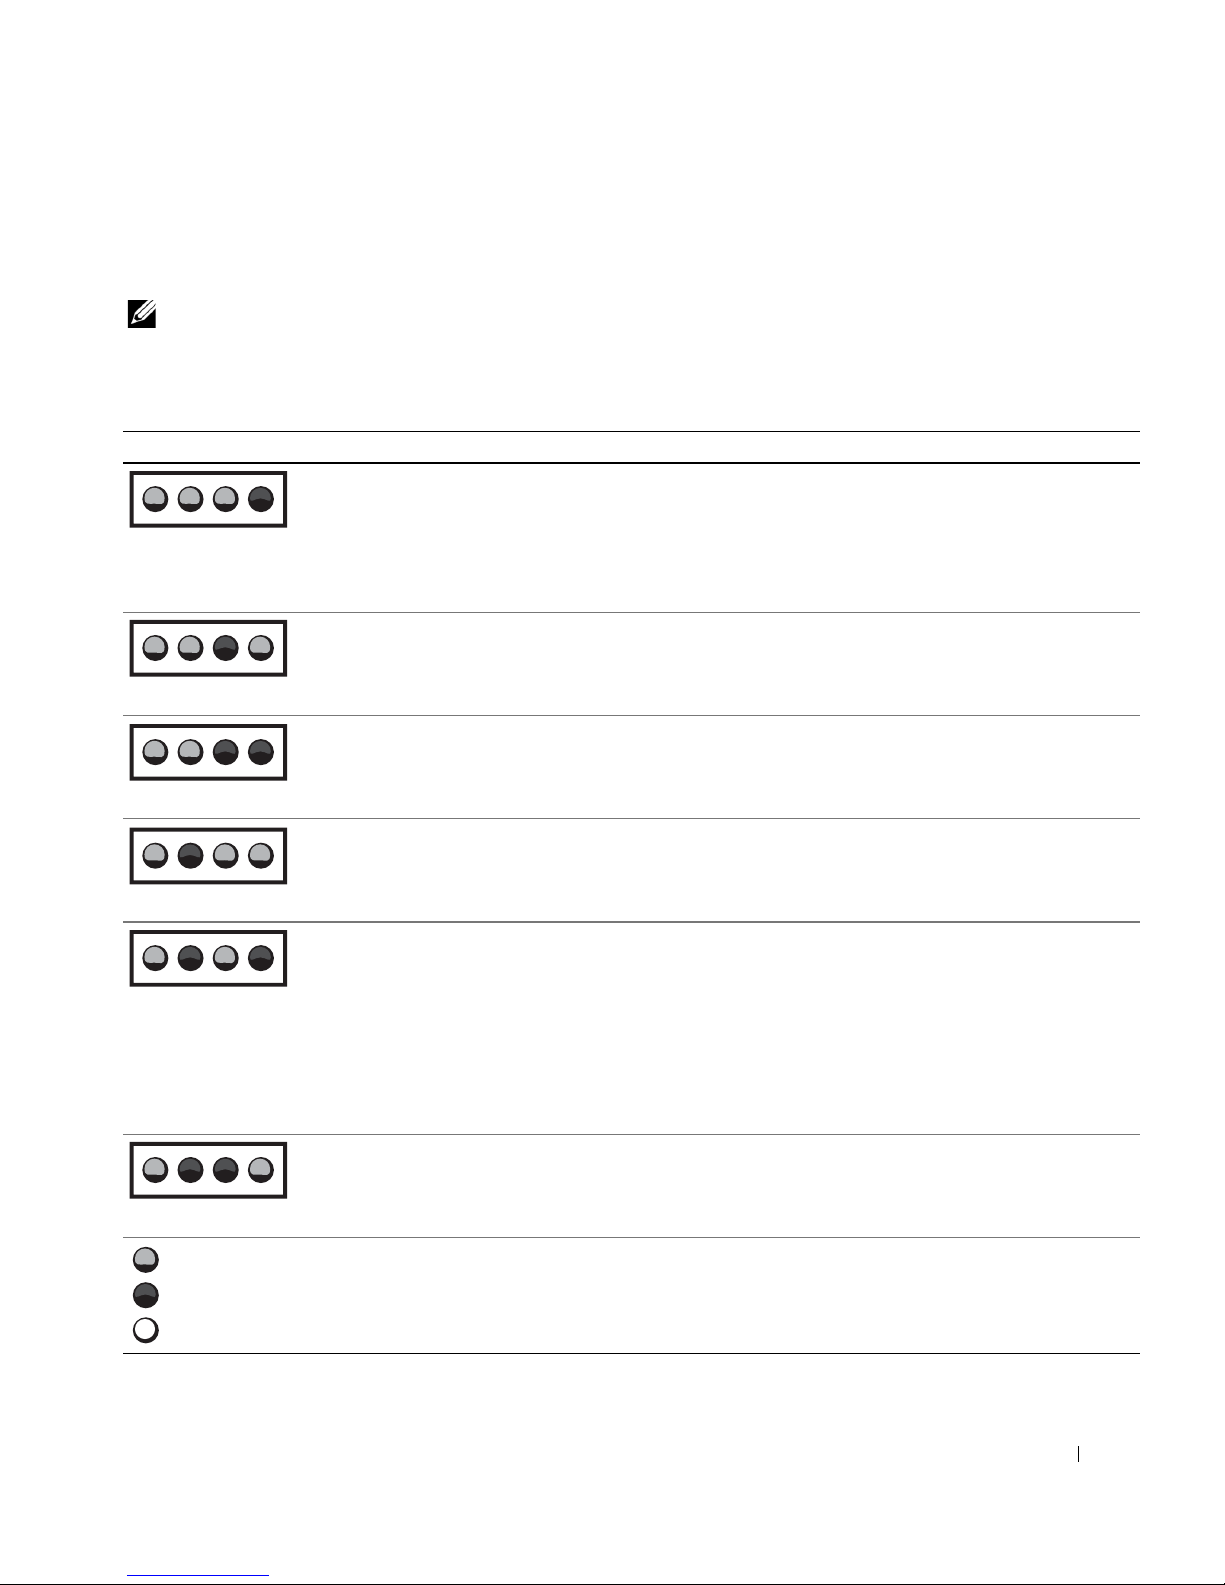
开机自测
(POST)
期间的诊断指示灯代码
下表列出了在计算机执行开机自测
注:如果打开计算机后,所有四个诊断指示灯均未亮起,请参阅第 71 页
上的“开机自测 (POST) 之前的诊断指示灯代码”。
开机自测
指示灯模式 原因 操作
(POST)
期间的诊断指示灯代码
可能出现故障,并且计算机处于恢复模
BIOS
式。
(POST)
A B C D
微处理器可能出现故障。 参阅《用户指南》中的“微处理器问题”。
期间出现的诊断指示灯代码。
运行
算机以再次进行检测。参阅《用户指南》中
的“
如果仍未解决问题,请参阅《用户指南》中
的“重设已损坏的
A B C D
内存可能出现故障。 参阅《用户指南》中的“系统内存问题”。
A B C D
扩充卡可能出现故障或发生冲突。 参阅《用户指南》中的“扩充卡问题”和
“硬件冲突”。
恢复公用程序,然后重新启动计
BIOS
恢复公用程序”。
BIOS
设置”。
BIOS
A B C D
A B C D
A B C D
= 黄色
= 绿色
= 熄灭
视频卡可能出现故障。 重置视频卡,然后重新启动计算机以再次进
行检测。有关卸下和安装扩充卡的说明,请
参阅《用户指南》中的“卸下扩充卡”。
如果仍未解决问题,请参阅《用户指南》中
的“扩充卡问题”。
如果仍未解决问题,请与
帮助。
软盘驱动器或硬盘驱动器可能出现故障。 参阅《用户指南》中的“软盘驱动器问题”
和“硬盘驱动器问题”。
安装与快速参考指南 73
联络获得技术
Dell
Page 74
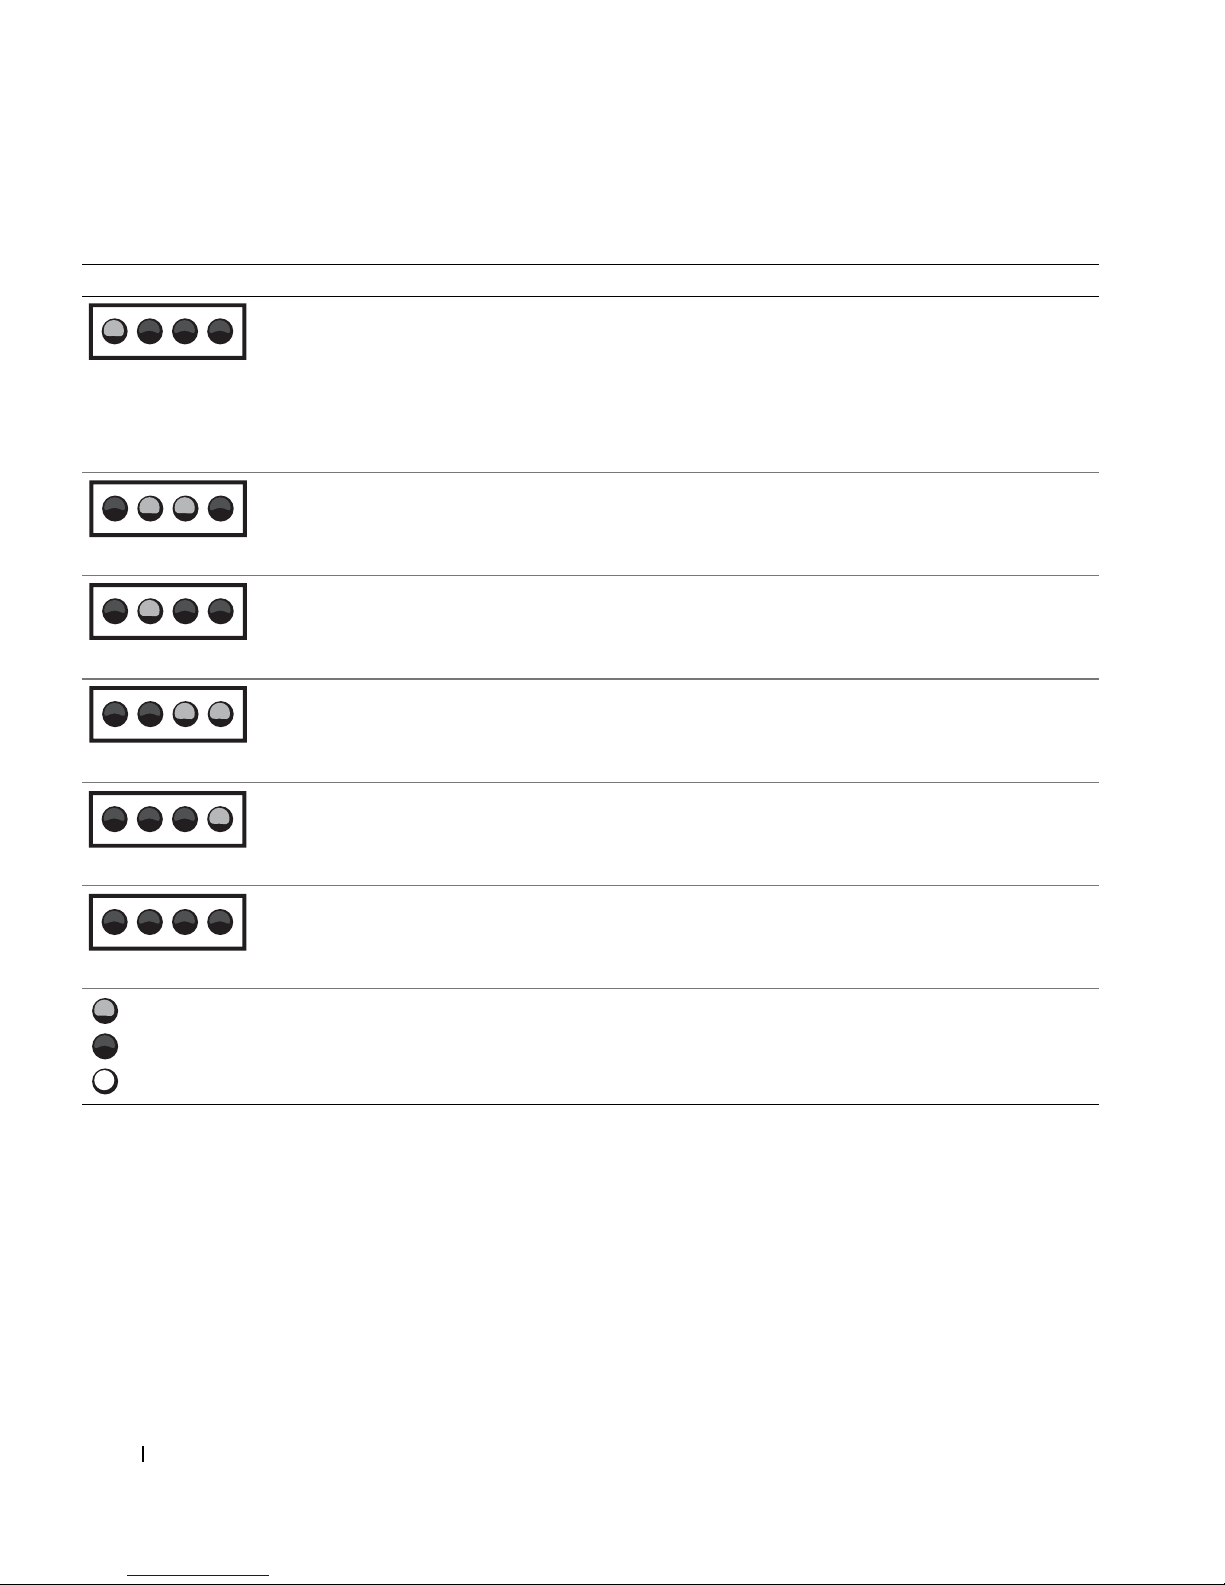
开机自测
指示灯模式 原因 操作
(POST)
A B C D
期间的诊断指示灯代码(续)
可能出现故障。 断开所有
USB
计算机以再次进行检测,然后重新连接所有
USB
行检测。
设备和电缆的连接,重新启动
USB
设备和电缆,重新启动计算机以再次进
主机板资源和(或)硬件可能出现故障。 参阅《用户指南》中的“主机板问题”和
A B C D
主机板资源和(或)硬件可能出现故障。 参阅《用户指南》中的“主机板问题”和
www.dell.com | support.ap.dell/com/china
A B C D
扩充卡可能出现故障或发生冲突。 参阅《用户指南》中的“主机板问题”和
A B C D
主机板资源和(或)硬件可能出现故障。 参阅《用户指南》中的“主机板问题”和
A B C D
计算机开机自测
(POST)
A B C D
如果仍未解决问题,请与
帮助。
“硬件冲突”。
“硬件冲突”。
“硬件冲突”。
“硬件冲突”。
后的正常操作状态。 无需采取措施。
联络获得技术
Dell
= 黄色
= 绿色
= 熄灭
74 安装与快速参考指南
Page 75

系统信息
如果计算机在启动期间发生错误,显示器屏幕将会显示一则说明问题的
信息。如果屏幕显示系统信息,请在《用户指南》的“系统信息”部分
中查找解决问题的建议。系统信息按字母顺序列出。
注:如果《用户指南》中未列出您收到的系统信息,请检查信息出现时正
在运行的应用程序的说明文件和/或操作系统说明文件,获得有关信息的说
明和建议采取的措施。
哔声代码
如果启动期间出现的错误无法显示在显示器屏幕上,则计算机可能会发
出用于标识问题的哔声代码。哔声代码是一种声音模式,例如:一声哔
声,接着是第二声哔声,然后是急促的三声哔声(代码
计算机无法读取非易失性随机存取存储器
(NVRAM)
中的数据。
1-1-3
),表示
如果计算机发出哔声代码,请将其记下,然后在《用户指南》的“系统
哔声代码”部分中查找此代码。
安装与快速参考指南 75
Page 76

www.dell.com | support.ap.dell/com/china
76 安装与快速参考指南
Page 77

Dell Precision™ Workstation 530
セットアップおよび
クイックリファレンスガイド
www.dell.com/jp
support.jp.dell.com
|
Page 78

メモ、注意および警告
メモ:
ています。
注意:
を示し、その危険を回避するための方法を説明しています。
警告:
ことを示します。
メモは、コンピュータを使いやすくする為の重要な情報を説明し
注意は、ハードウェアの損傷やデータの損失の可能性があること
警告は、物的損害、けが、または死亡の原因となる可能性がある
____________________
ここに記載されている内容は予告なく変更されることがあります。
© 2002 すべての著作権は Dell Computer Corporation にあります。
Dell Computer Corporation の書面による許可のない複写は、いかなる形態においても
厳重に禁じられています。
本書で使用されている商標について:Dell、DELL のロゴ、および Dell Precision は、
Dell Computer Corporation の商標です。Microsoft、および Windows は、Microsoft
Corporation の登録商標です。
本書では、必要に応じて上記記載以外の商標および会社名が使用されている場合があり
ますが、これらの商標や会社名は、一切 Dell Computer Corporation に所属するもので
はありません。
2002 年 12 月 P/N 533CX Rev. A03
Page 79

目次
情報とアシスタンスの入手
™
Dell Precision
コンピュータのセットアップ手順
デュアルモニタ
よくある質問
作業にあたっての注意
コンピュータカバーを開く
カバーを開く
コンピュータ内部
部品の取り外しと取り付け
メモリの追加
ハードドライブまたはフロントドライブの追加
拡張カードの追加
PCI
ビデオカードのアップグレード
プロセッサのアップグレード
ResourceCD
. . . . . . . . . . . . . . . . . . . . . . . . . . . . . . . . . . . . 93
. . . . . . . . . . . . . . . . . . . . . . . . . . . . . . . . . . . . . . . . . . 94
. . . . . . . . . . . . . . . . . . . . . . . . . . . . . . . . . . . . . . 98
. . . . . . . . . . . . . . . . . . . . . . . . . . . . . . . . . . . . . 100
. . . . . . . . . . . . . . . . . . . . . . . . . . . . . . . . . . . . . 101
. . . . . . . . . . . . . . . . . . . . . . . . . . . . . . . 81
の使い方
. . . . . . . . . . . . . . . . . . . . . . . . . . 86
. . . . . . . . . . . . . . . . . . . . . . . . . . . . . . . . . . . 97
. . . . . . . . . . . . . . . . . . . . . . . . . . . . . . . 98
. . . . . . . . . . . . . . . . . . . . . . . . . . . . . . 101
. . . . . . . . . . . . . . . . . . . . . . . . . . . . . . 102
. . . . . . . . . . . . . . . . . . . . . . . 102
. . . . . . . . . . . . . . . . . . . . . . . . . 102
. . . . . . . . . . . . . . . . . . 85
. . . . . . . . . . 101
問題の解決
いつ
Dell
メッセージとコード
. . . . . . . . . . . . . . . . . . . . . . . . . . . . . . . . . . . . . . . . . . . 102
診断プログラムを使用するか
Dell
診断プログラムの起動
. . . . . . . . . . . . . . . . . 103
. . . . . . . . . . . . . . . . . . . . . . . . . . 104
. . . . . . . . . . . . . . . . . . . . . . . . . . . . . . . . 108
目次
79
Page 80

80
目次
Page 81
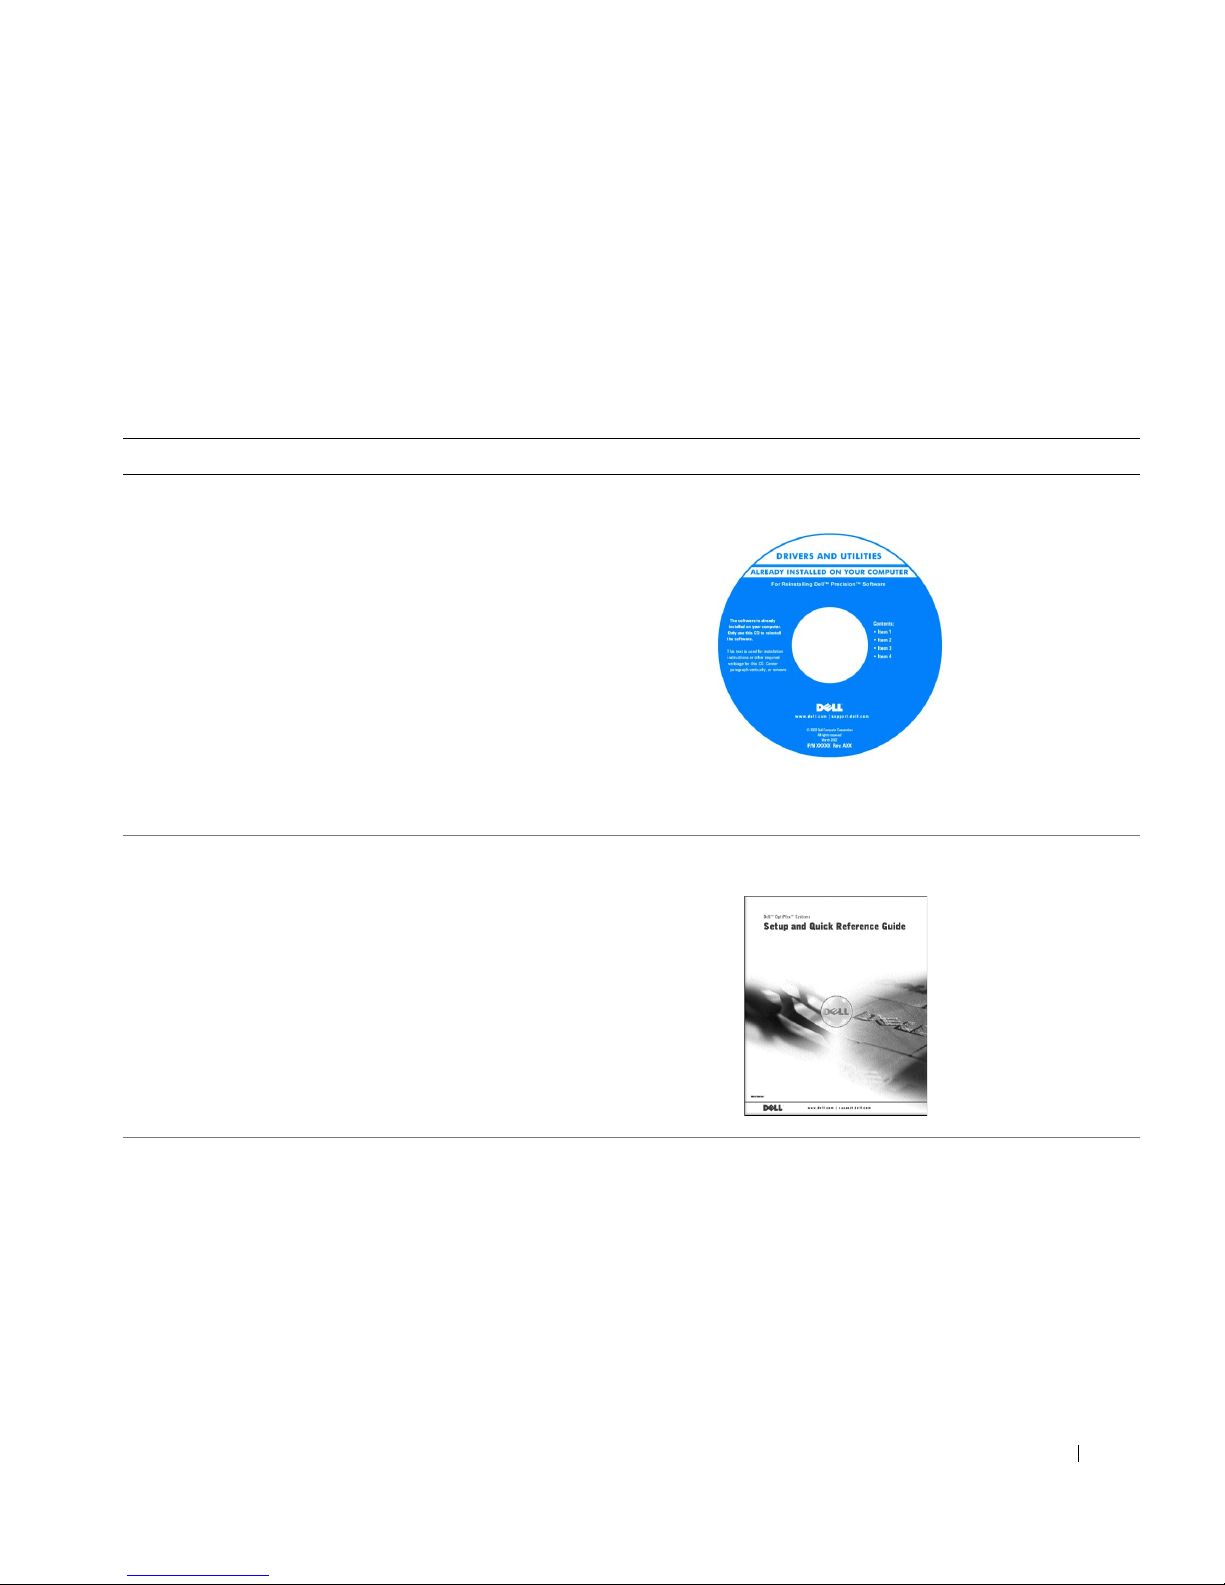
情報とアシスタンスの入手
以下の表は、
Dell
からサポートツールとして提供されているリソース
をまとめたものです。その他のリソースがコンピュータに同梱されて
いる場合もあります。
参照したい情報 参照する情報
コンピュータの診断プログラム
•
コンピュータのドライバ
•
ユーザーズガイド
•
デバイスのマニュアル
•
コンピュータのセットアップ方法
•
コンピュータのメンテナンス方法
•
トラブルシューティング情報
•
コンピュータカバーの開き方
•
その他のマニュアルの参照方法
•
Drivers and Utilities CD
この
トールしたり、診断ツールを実行するときに使用します。
セットアップおよびクイックリファレンスガイド
は、マニュアルにアクセスしたり、ドライバを再インス
CD
(または
ResourceCD
)
セットアップおよびクイックリファレンスガイド
81
Page 82
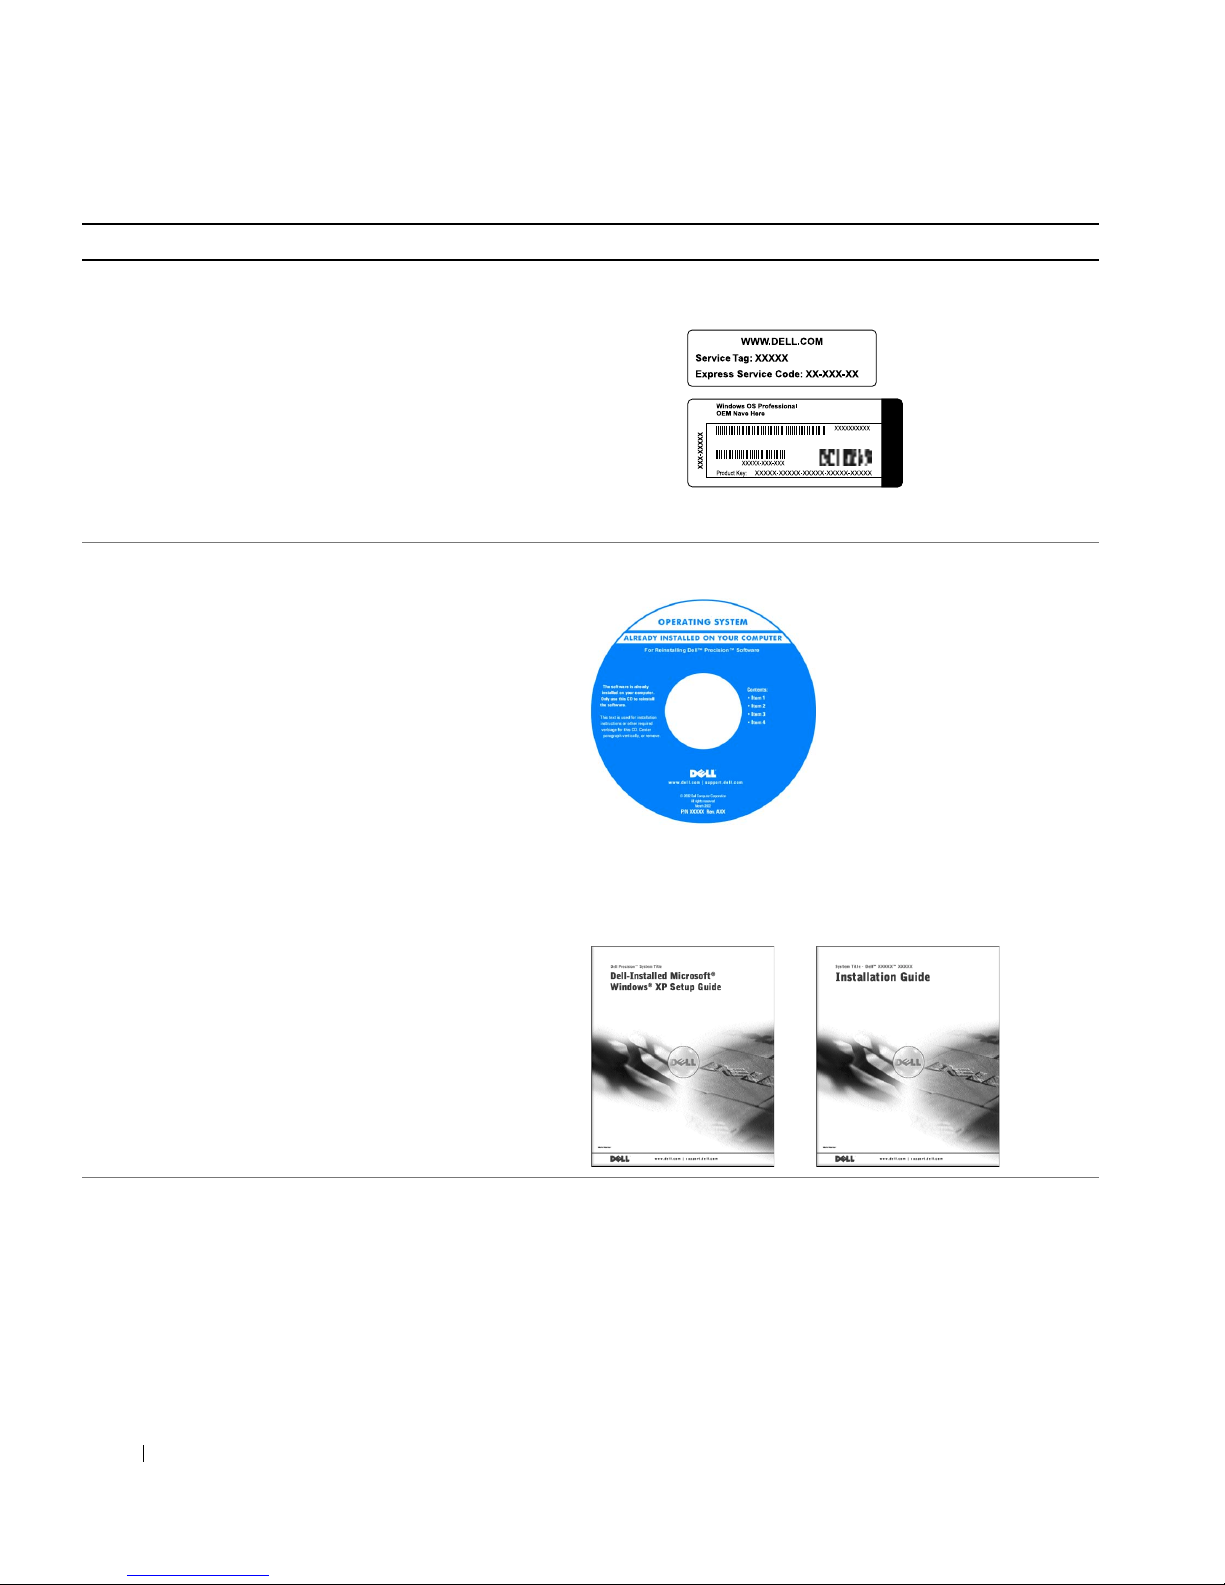
参照したい情報 参照する情報
エクスプレスサービスコードおよび
•
サービスタグ
• Microsoft® Windows®
ライセンス
ラベル
オペレーティングシステムの
•
再インストール方法
www.dell.com/jp | support.jp.dell.com
エクスプレスサービスコードおよびプロダクトキー
これらのラベルはコンピュータに貼付されています。
オペレーティングシステム
およびインストールガイド
CD
オペレーティングシステムを再インストールしたら、『
and Utilities CD
』を使用してコンピュータに同梱のデバイスの
ドライバを再インストールします。
Drivers
82
セットアップおよびクイックリファレンスガイド
Page 83
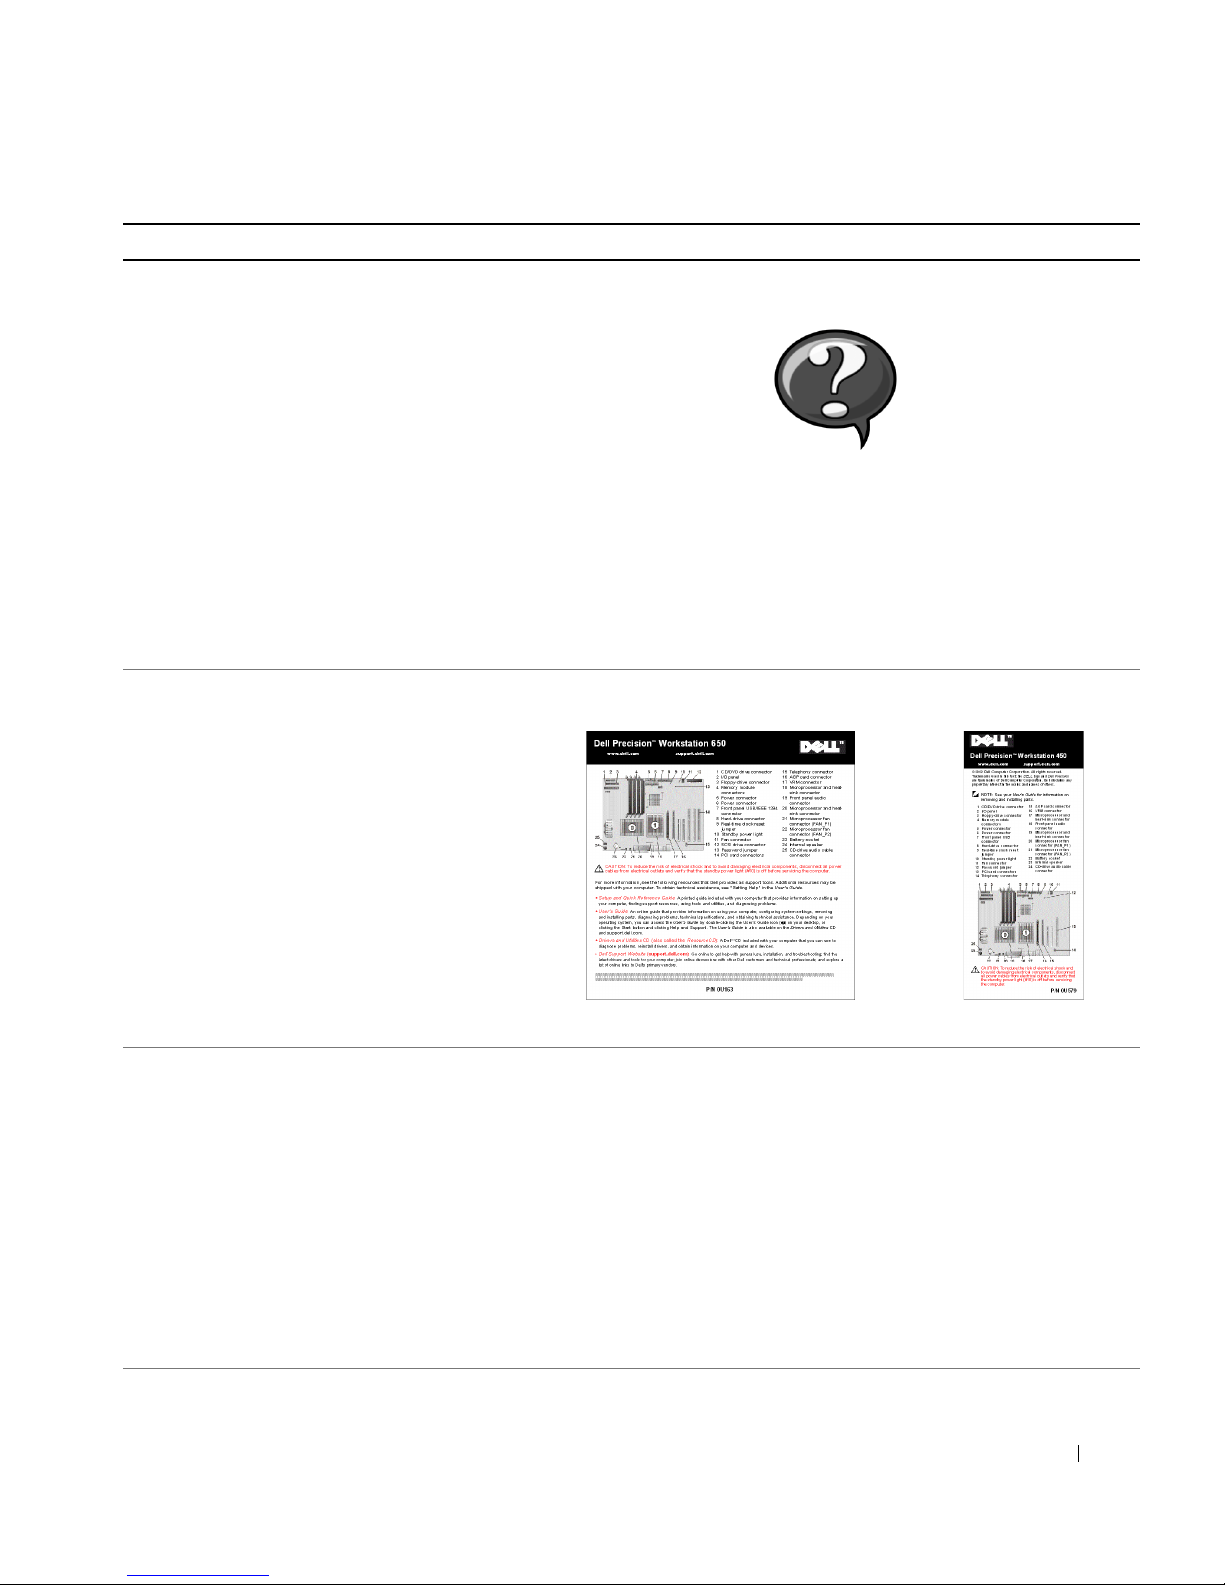
参照したい情報 参照する情報
部品の取り外しおよび交換方法
•
仕様
•
システムの設定方法
•
問題の解決方法
•
ユーザーズガイドアイコン(
デスクトップのユーザーズガイドアイコンをダブルクリックし
ます。
Windows XP
スタートボタンをクリックし、ヘルプとサポートをクリック
1
します。
ユーザーズガイドをクリックします。
2
システム基板のコネクタの位置 システム情報ラベル
•
ヘルプとサポート センター
Microsoft Windows 2000
)
コンピュータに対応したドライバ
•
テクニカルサービスやサポートに関す
•
る質問の答え
サービスマニュアルを含むコンピュー
•
タのマニュアル
または
ラベルはコンピュータカバーの内側にあります。
Dell
Dell
サポート
サポート
サイト
Web
サイトでは、下記のようなメニューが提供さ
Web
— support.jp.dell.com
れています。
技術情報
•
— Q & A
集、トラブル解決ナビ、
Diagnostics
(診
断プログラム)、インストールガイドなど。
ダウンロード
•
ファイルライブラリでは、ドライバ、ユーティ
—
リティなどのファイルのダウンロードサービス。
テクニカルサポートへのお問い合わせ
•
メールサポート、
— E-
電話テクニカルサポート、引き取り修理状況確認。
その他にも、参考資料、ショッピング、サポートツールなどの
メニューがあります。
セットアップおよびクイックリファレンスガイド
83
Page 84
参照したい情報 参照する情報
保証に関する情報 システム情報ガイド
•
• Windows XP
コンピュータおよびデバイスの
•
www.dell.com/jp | support.jp.dell.com
マニュアル
の使用方法
Windows XP
スタートボタンをクリックし、ヘルプとサポートをクリック
1
します。
問題を説明する単語や語句を入力して、矢印のアイコンをク
2
ヘルプとサポート センター
リックします。
問題を説明しているトピックをクリックします。
3
画面の指示に従ってください。
4
メモ:
Windows 2000
をお使いの場合、スタートボタンをクリッ
クし、ヘルプをクリックします。
84
セットアップおよびクイックリファレンスガイド
Page 85

Dell Precision™ ResourceCD の使い方
Microsoft®Windows®
ResourceCD
Dell Precision ResourceCD
『
1
Dell Precision ResourceCD
『
合は、
』を使用するには、次の手順に従います。
Dell ResourceCD
ウィンドウが表示され、
オペレーティングシステムで『
CD
』を
ドライブに挿入します。
』をコンピュータで初めて使用する場
InstallShield
用の
ResourceCD
ウィザードへようこそ
がインストールを開始する
ことを通知します。
OK
2
をクリックしてインストールを実行します。
インストールを完了するには、インストールプログラムが表示す
るプロンプトに答えていきます。
Dell
3
システムをお買い上げくださり、ありがとうございます画面
で次へをクリックします。
ご使用のシステムに合わせて、システムモデル、オペレーティン
4
グシステム、デバイスの種類、トピックを選択します。
Dell Precision ResourceCD
『
ガイド』にアクセスするには、トピックプ
ルダウンメニューのユーザーズガイドをクリックし、
ResourceCD
をクリックします。
Dell Precision
Dell Precision
メモ:
Windows
診断プログラムを使用する場合は、
てからコンピュータを再起動してください。
についての詳細は、「いつ
ページ)を参照してください。
デバイスドライバやユーザーマニュアルにアクセスする場合は、
が起動している状態で
ResourceCD
ResourceCD を CD
診断プログラムを使用するか」(
Dell
を使用してください。
ドライブに挿入し
診断プログラムの実行
Dell
セットアップおよびクイックリファレンスガイド
Dell
103
85
Page 86
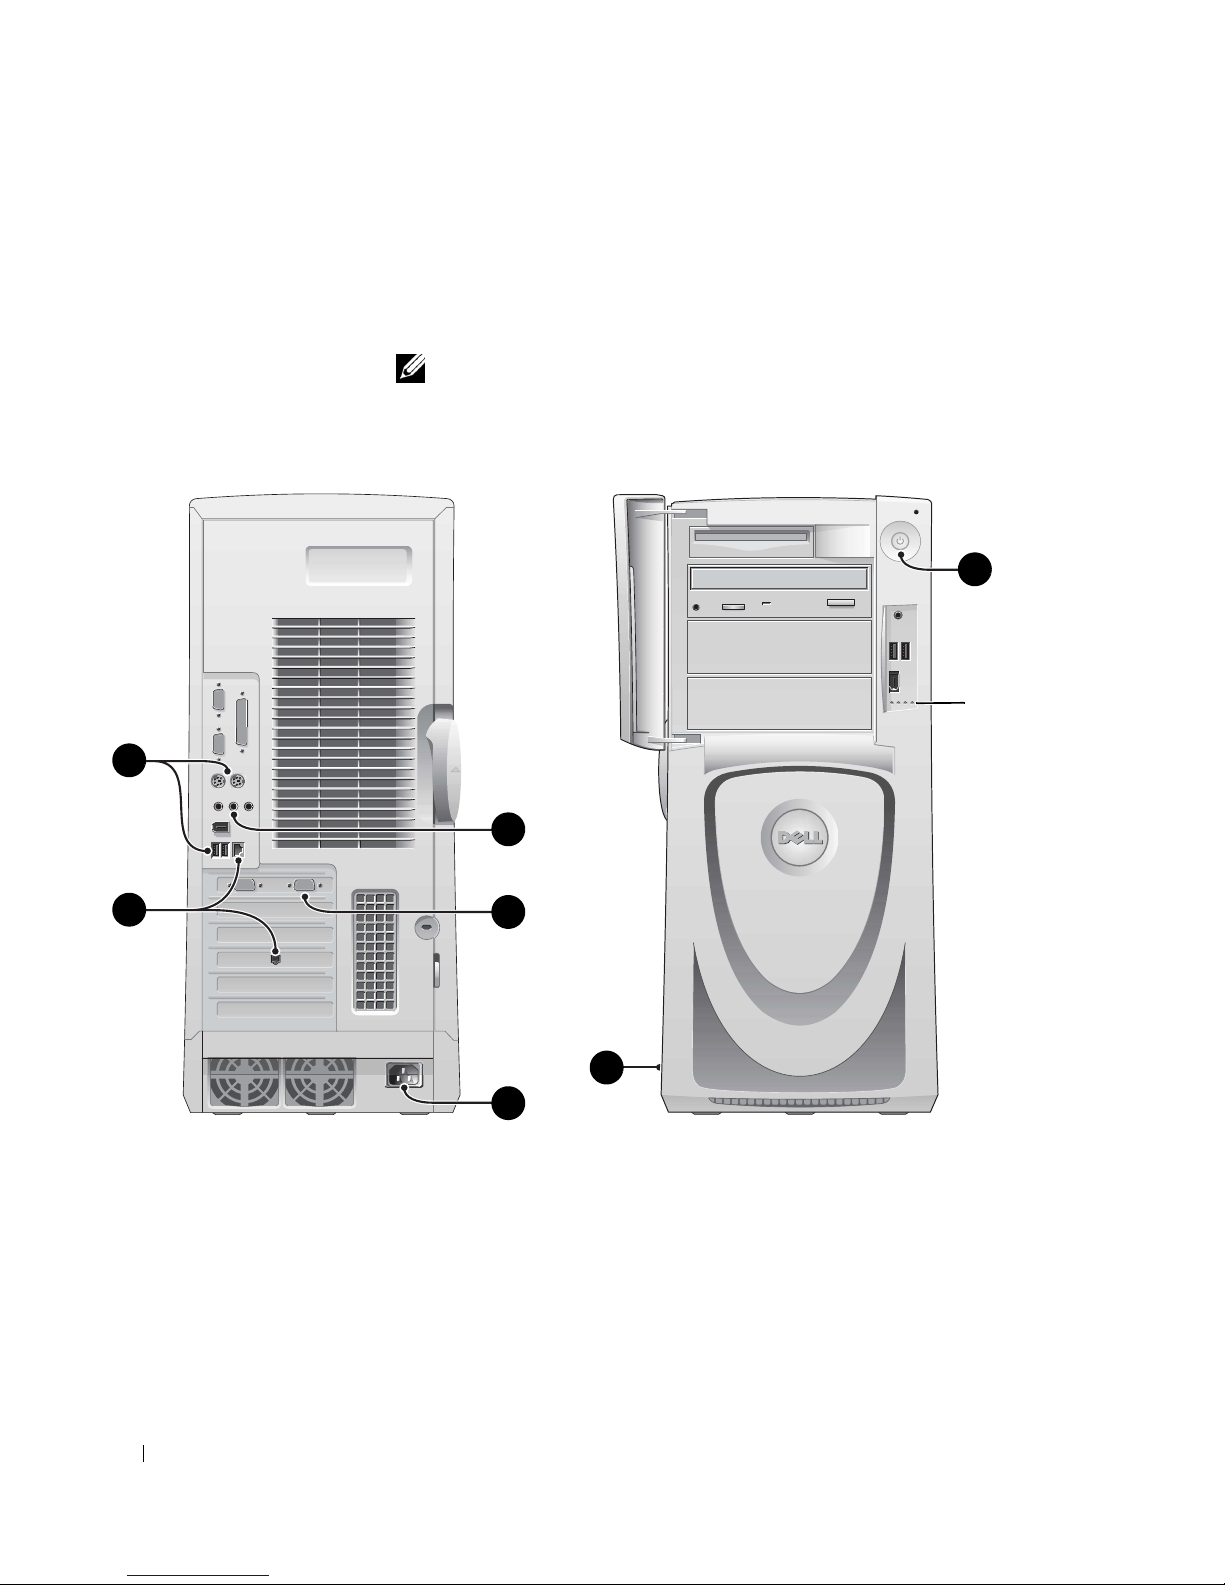
コンピュータのセットアップ手順
以下の図に示されている番号は、セットアップ手順の順番に対応して
います。
www.dell.com/jp | support.jp.dell.com
1
2
メモ:
う必要があります。
コンピュータの外観
コンピュータを正しくセットアップするには、すべての手順を行
4
3
6
診断用
ライト
背面図 正面図
86
セットアップおよびクイックリファレンスガイド
7
5
(ドアを開いた状態)
Page 87
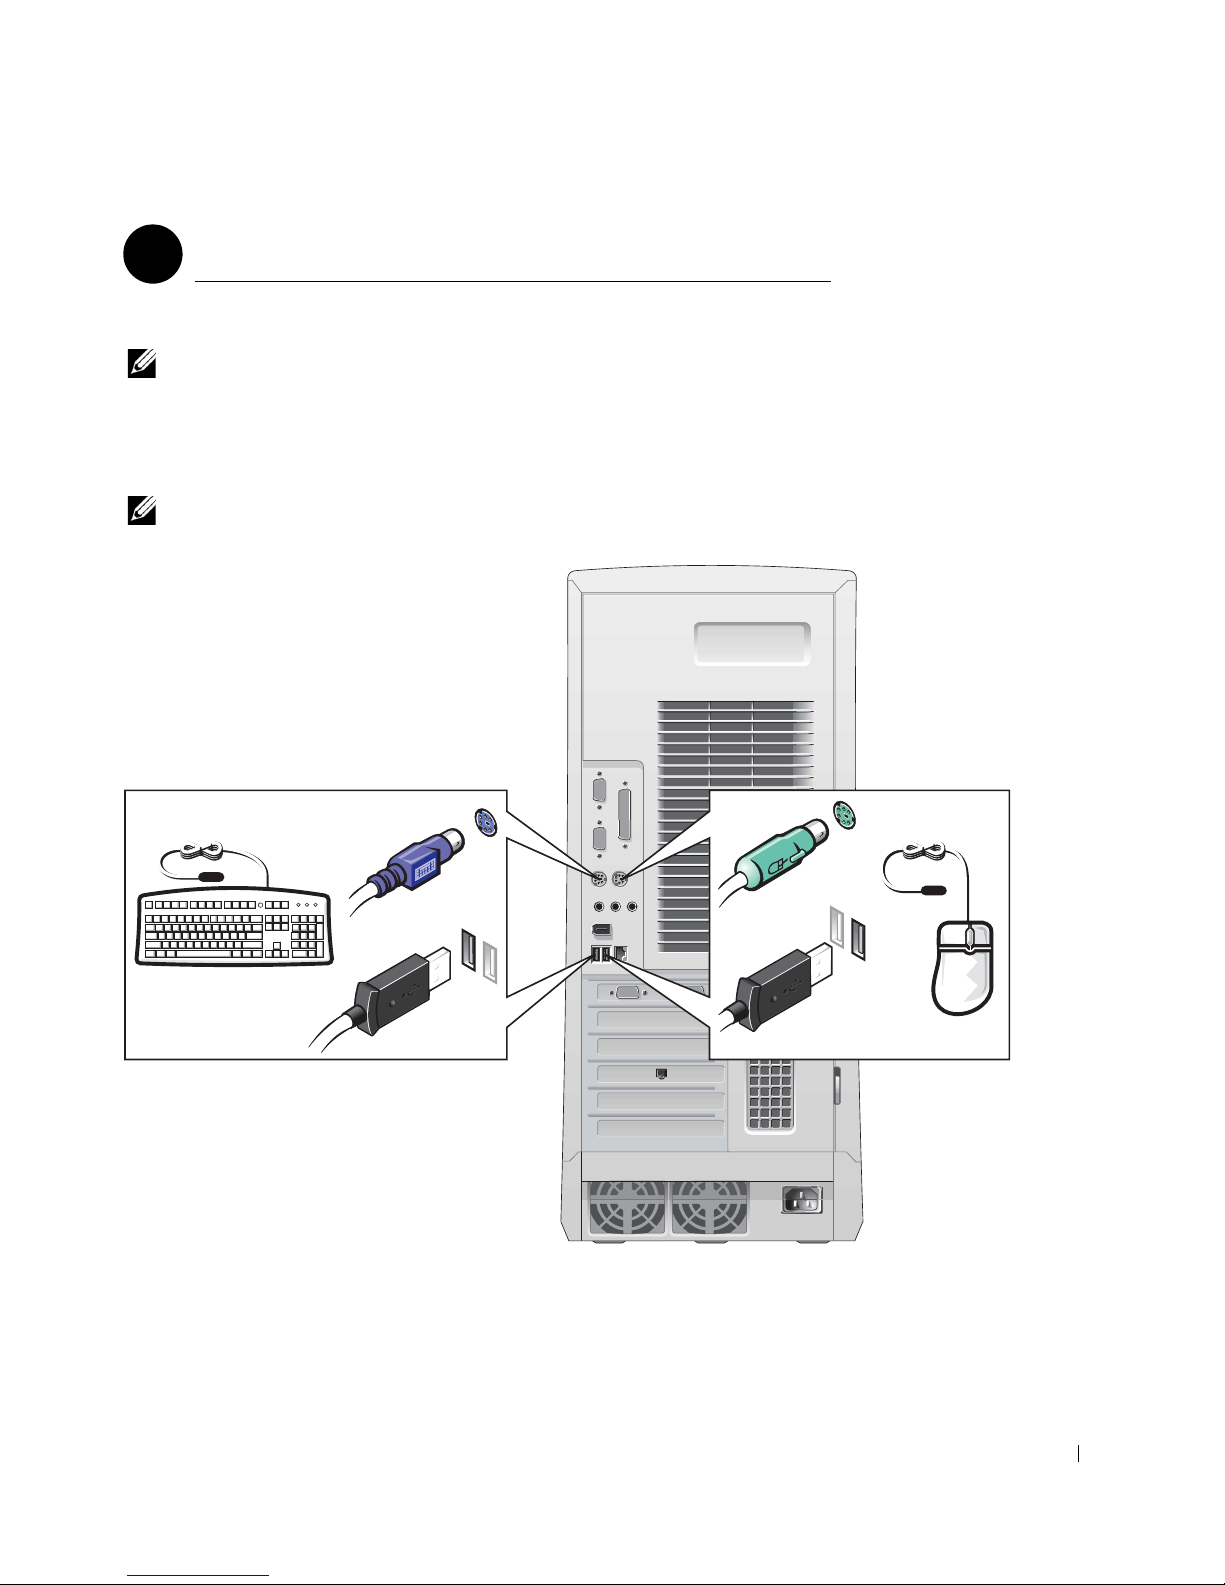
キーボードとマウス
1
キーボードとマウスを図のように接続します。
メモ:
キーボードコネクタに接続します。ユニバーサルシリアルバス(
キーボードを使用する場合は、図に示す
USB
は接続しないでください。
メモ:
Personal System/2(PS/2
マウスや
マウスと
PS/2
キーボードは、コンピュータ正面の
USB
USB
)キーボードを使用する場合は、
コネクタに接続します。
USB
コネクタに
USB
マウスは同時に使用しないでください。
PS/2
USB
)
または
PS/2
キーボード
USB
または
PS/2
マウス
USB
セットアップおよびクイックリファレンスガイド
87
Page 88
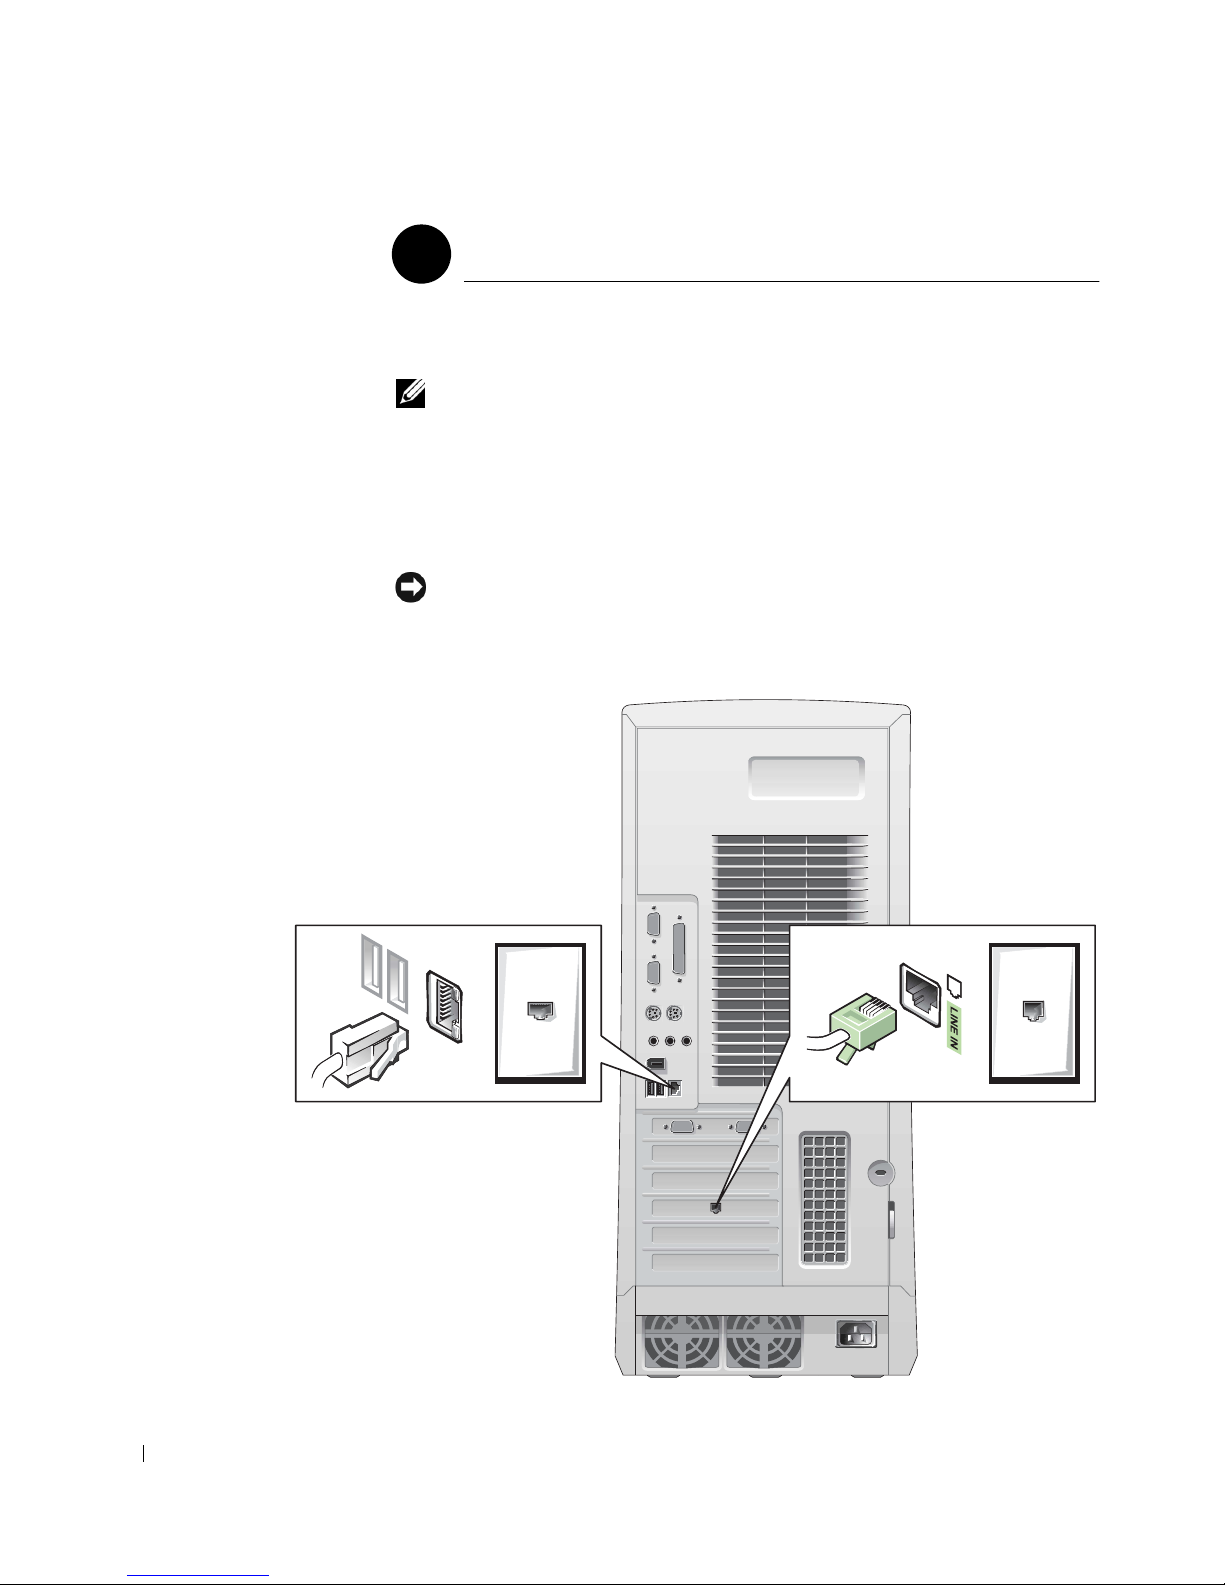
ネットワークアダプタとモデム
2
ネットワークケーブルをネットワークコネクタに挿入します。電話回
線は接続しないでください。
www.dell.com/jp | support.jp.dell.com
メモ:
ますが、コンピュータにネットワーク拡張カードが取り付けられている
場合は、ネットワークカードにネットワークケーブルを接続してくださ
い。コンピュータの背面パネルのコネクタには接続しないでください。
ご使用のコンピュータにはネットワークアダプタが内蔵されてい
オプションのモデムを使用する場合は、電話回線をモデムに接続し
ます。
注意:
い。電話通信で発生する電圧によって、ネットワークアダプタが損傷す
る場合があります。
モデムケーブルをネットワークアダプタに接続しないでくださ
ネットワークケーブル モデムケーブル
88
セットアップおよびクイックリファレンスガイド
Page 89
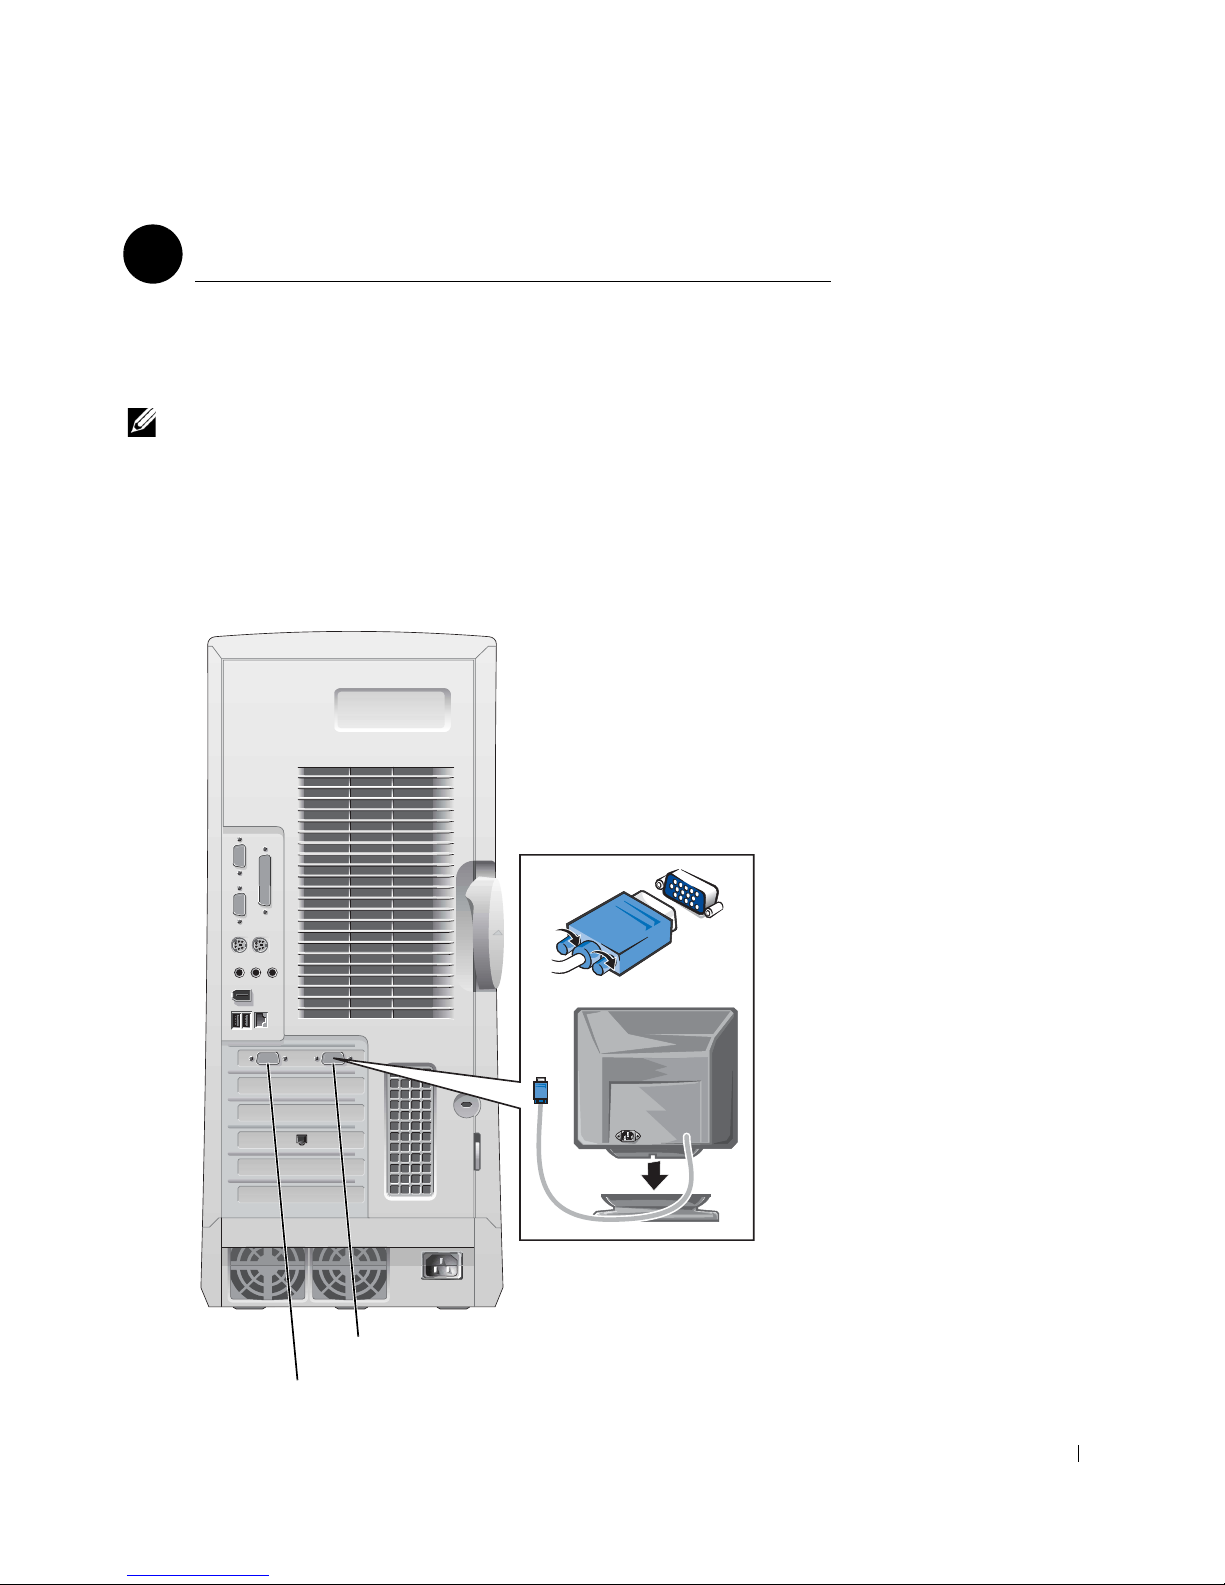
モニタ
3
コネクタピンを曲げないように、慎重に位置に合わせ、モニタケーブ
ルを挿入します。コネクタに差し込んだら、ケーブルコネクタの蝶ネ
ジをしっかりと締めてください。
メモ:
場合は、プライマリポートを使用してください。デュアルモニタサポー
トを有効にするには、コンピュータの起動時に両方のモニタが接続され
ている必要があります。
オプションのデュアルモニタカードにモニタを
台だけ接続する
1
デュアルモニタのセットアップについては、「デュアルモニタ」(
ページ )を参照してください。
93
プライマリポート
セカンダリポート(オプション)
セットアップおよびクイックリファレンスガイド
89
Page 90
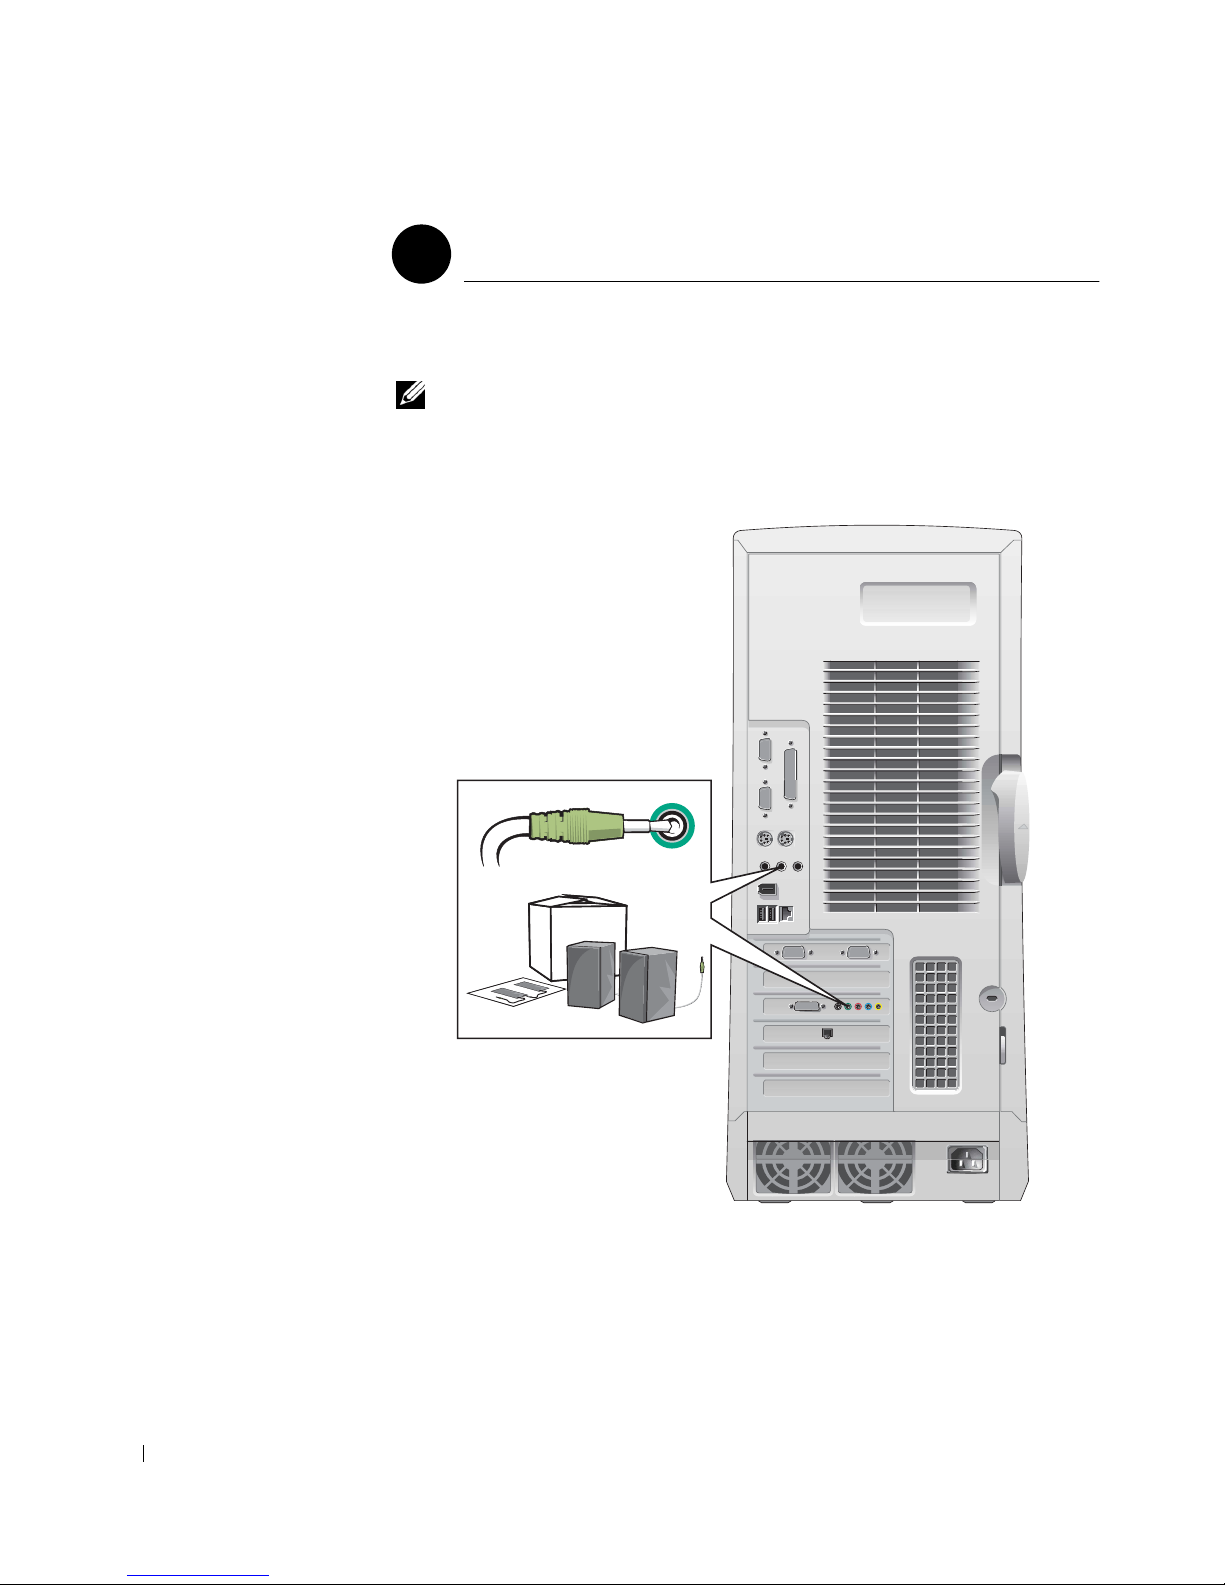
スピーカー
4
スピーカーに同梱の説明書に従って、スピーカーをコンピュータに接
続します。
www.dell.com/jp | support.jp.dell.com
メモ:
いますが、コンピュータにオーディオ拡張カードが取り付けられている
場合は、そのサウンドカードに外部オーディオ装置を接続してくださ
い。コンピュータの背面パネルのコネクタには接続しないでください。
ご使用のコンピュータにはオーディオコントローラが内蔵されて
90
セットアップおよびクイックリファレンスガイド
Page 91
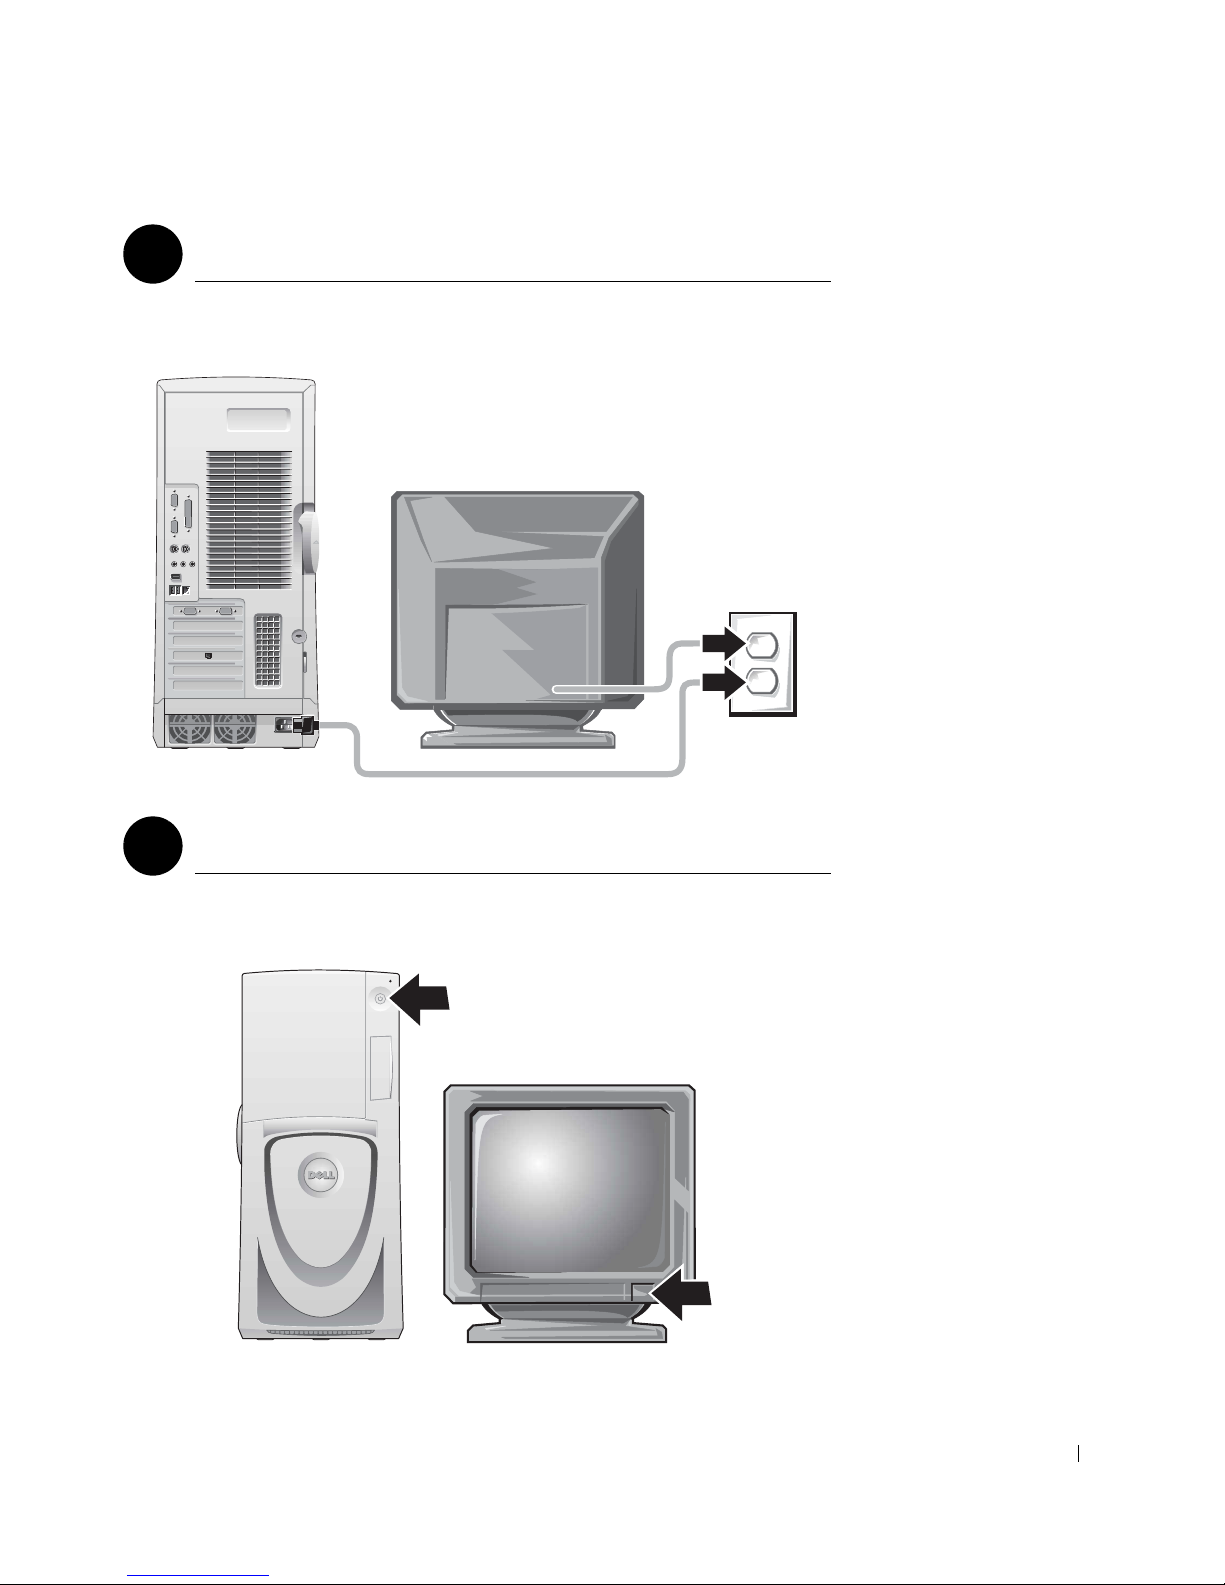
電源の接続
5
コンピュータとモニタの電源プラグをコンセントに差し込みます。
電源の投入
6
コンピュータとモニタの電源ボタンを押し、電源を入れます。
セットアップおよびクイックリファレンスガイド
91
Page 92
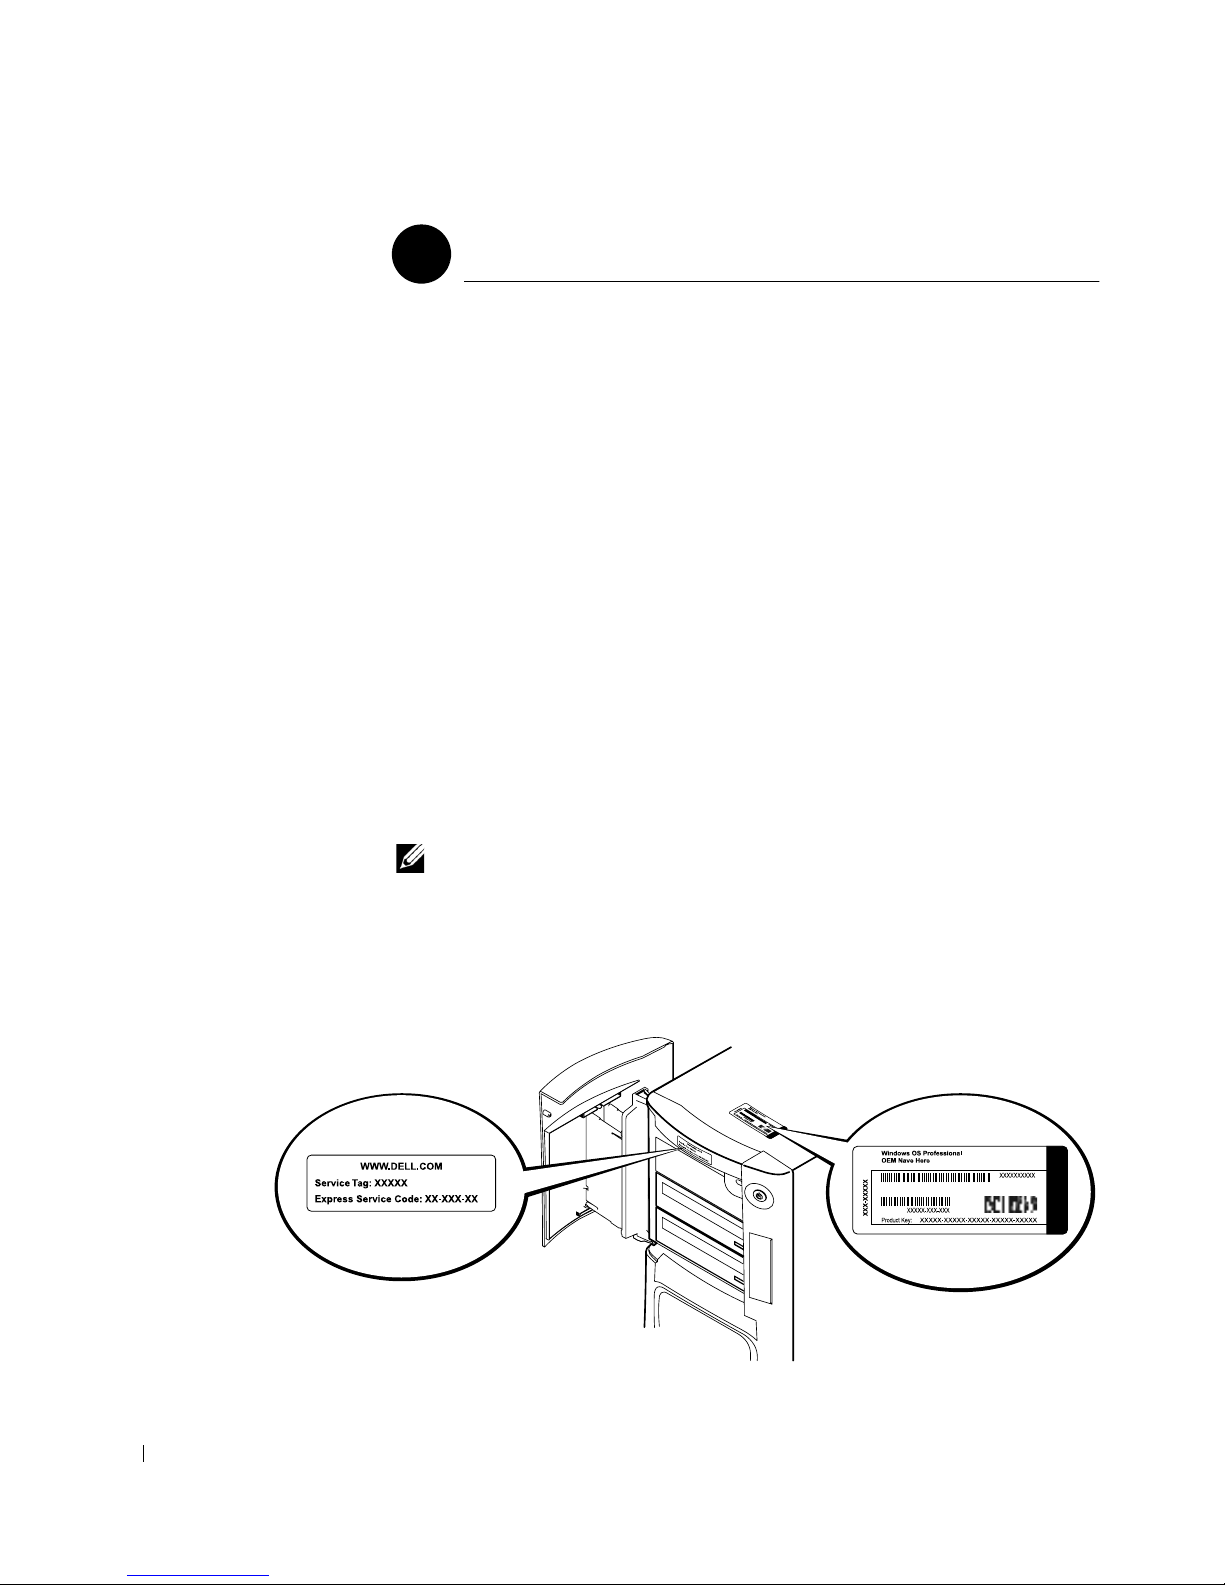
www.dell.com/jp | support.jp.dell.com
オペレーティングシステムのセットアップ
7
コンピュータを初めて起動するとシステム起動メッセージがいくつか
表示される場合があります。このとき、サービスタグやエクスプレス
サービスコードも表示されます。
コンピュータには、設定済みのオペレーティングシステムがあらかじ
めインストールされています。コンピュータに初めて電源を入れる前
に、すべてのデバイスをコンピュータに接続し、上記のセットアップ
手順をすべて完了しておく必要があります。
オペレーティングシステムの初回セットアップは自動的に行われま
す。この作業には数分間かかる場合があります。システムの内蔵デバ
イスや外付けデバイスによっては、それ以上時間がかかることもあり
ます。
オペレーティングシステムのプロンプトに従ってセットアップを完了
します。登録を完了するために、
ダクト
ID
または
COA
)を入力するように指示するプロンプトが表示
Windows
のプロダクトキー(プロ
される場合があります。プロダクトキー番号はコンピュータのサービ
スタグの上部に記載されています。
メモ:
ペレーティングシステムのインストールガイドを参照してください。
オペレーティングシステムのセットアップについての詳細は、オ
あとで参照するために、番号を下記に書き留めてください。
プロダクトキー(
ID
または
COA
):_____________________________
92
セットアップおよびクイックリファレンスガイド
Page 93
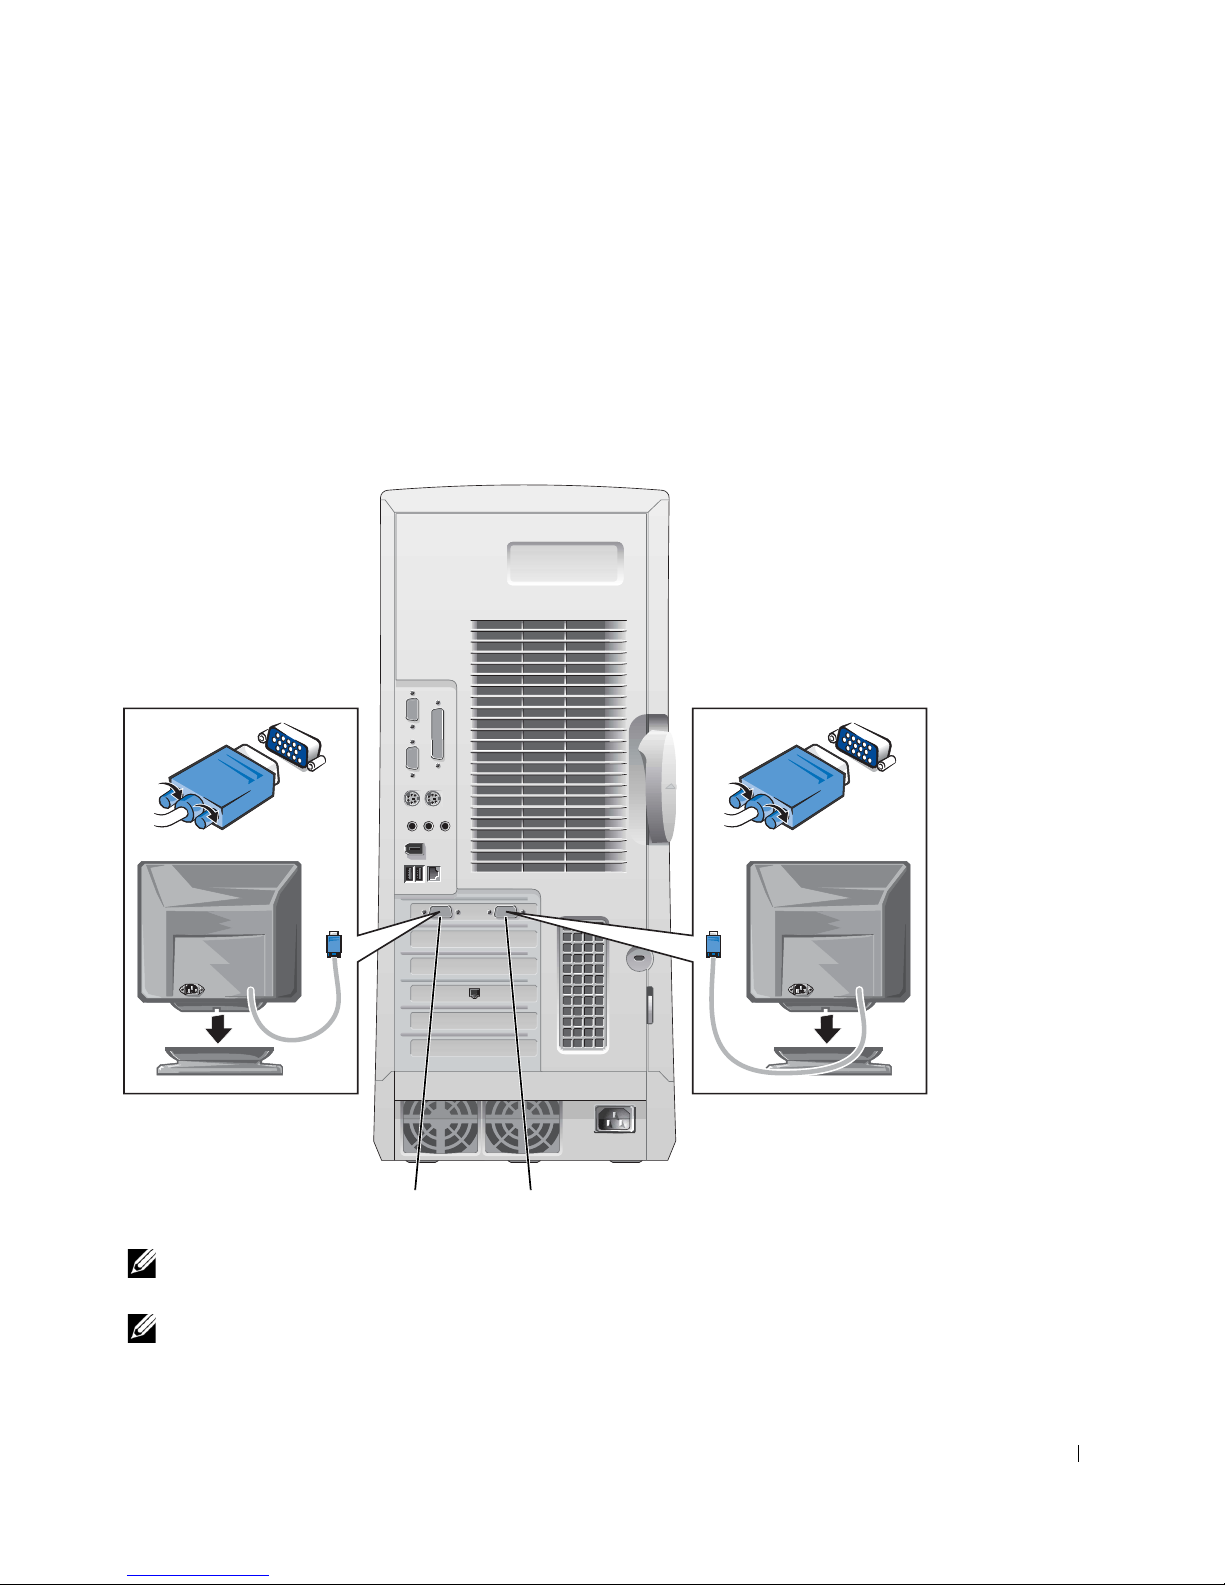
詳細については、デスクトップのユーザーズガイドアイコンまたは
『
Dell Precision ResourceCD』
スしてください。
からコンピュータのマニュアルにアクセ
デュアルモニタ
メインモニタをプライマリポートに接続します。詳細については、
「よくある質問」(
94
ページ)を参照してください。
セカンダリポート
メモ:
ダプタカードが必要となります。
メモ:
時に両方のモニタが接続されている必要があります。
セカンドモニタはオプションです。マルチモニタグラフィックア
デュアルモニタサポートを有効にするには、コンピュータの起動
プライマリポート
セットアップおよびクイックリファレンスガイド
93
Page 94

よくある質問
問題 対処方法
『
Dell Precision
ResourceCD
い方は
コンピュータの詳細
www.dell.com/jp | support.jp.dell.com
なユーザーズガイド
を参照するには
』の使
?
?
『ユーザーズガイド』など
詳細については、「
Precision™ ResourceCD
の使い方」(
を参照してください。
ご使用のオペレーティン
グシステムに応じて、
ユーザーズガイドアイコ
ンをダブルクリックする
か、スタートボタンをク
リックしてヘルプとサ
ポートを選択します。
のマニュアルはハードド
ライブに入っています。
85
Dell
ページ)
Dell Precision ResourceCD
を使用する場合
『
Dell Precision
ResourceCD
ニューにアクセスします。
トピックプルダウンメ
ニューのユーザーズガイ
ドをクリックし、
Precision ResourceCD
イドをクリックします。
『
Dell Precision
ResourceCD
ニューにアクセスします。
トピックプルダウンメ
ニューのユーザーズガイ
ドをクリックして、ご使
用のコンピュータ用の
『ユーザーズガイド』をク
リックします。
』のメインメ
Dell
ガ
』のメインメ
サポートサイトに
Dell
アクセスする場合
support.jp.dell.com
スします。サポートサイトへ
ようこそページで、システム
マニュアルをクリックしま
す。ご使用のコンピュータに
該当する内容を選択して、
『ユーザーズガイド』にアク
セスします。
にアクセ
コンピュータの保証
を参照するには
オペレーティング
システムを登録す
るためのプロダク
トキー(プロダク
ト
または
ID
Certificate of
Authenticity
)の記載
[COA]
場所は
94
?
セットアップおよびクイックリファレンスガイド
?
『サービス
ご案内』を参照します。
このマニュアルの
ページを参照してくだ
さい。
サポートの
&
92
support.jp.dell.com
スします。
にアクセ
Page 95

問題 対処方法
Dell Precision ResourceCD
を使用する場合
サポートサイトに
Dell
アクセスする場合
コンピュータの仕
様を確認するには
コンピュータに
デュアルモニタ対
応グラフィックス
カードが取り付け
られているが、セ
カンドモニタはど
のようにセット
アップすればいい
のか
?
ご使用のオペレーティン
グシステムに応じて、ユー
?
ザーズガイドアイコンを
ダブルクリックするか、ス
タートボタンをクリック
してヘルプとサポートを
選択します。『ユーザーズ
ガ イ ド 』の「 仕 様 」を 参 照
してください。
ご使用のオペレーティン
グシステムに応じて、ユー
ザーズガイドアイコンを
ダブルクリックするか、ス
タートボタンをクリック
してヘルプとサポートを
選択し、デュアルモニタ
情報を検索します。デュア
ルモニタのセットアップ
手順は、ビデオコントロー
ラの『ユーザーズガイド』
で順を追って説明されて
います。
『
Dell Precision
ResourceCD
』のメインメ
ニューにアクセスします。
トピックプルダウンメ
ニューのユーザーズガイド
をクリックし、ご使用のコ
ンピュータ用のユーザーズ
ガイドをクリックして、
「仕様」を参照します。
『
Dell Precision
ResourceCD
』のメインメ
ニューにアクセスします。
トピックプルダウンメ
ニューのユーザーズガイ
ドをクリックして、ご使
用のコンピュータ用の
の
『ユーザーズガイド』をク
リックします。
support.jp.dell.com
にアクセ
スします。サポートサイトへ
ようこそページで、システム
マニュアルをクリックします。
ご使用のコンピュータに該当
する内容を選択して、『ユー
ザーズガイド』にアクセスし
ます。『ユーザーズガイド』の
「仕様」を参照します。
グラフィックカー
ド、ネットワーク
アダプタ、サウン
ドカード、
SCSI
ソ
フトウェア、その
他のデバイス用の
ドライバはどこで
入手できるか
?
詳細については、「
Dell
Precision™ ResourceCD
の使い方」(
ページ)
85
を参照してください。
デバイス専用の
CD
が提
供されていることもあり
ます。その場合は、
CD
に
収録されているマニュア
ルを参照して適切なドラ
イバを使用してください。
詳細については、『
Precision Workstations
ResourceCD
照してください。
Dell
ガイド』 を参
support.jp.dell.com
スします。
セットアップおよびクイックリファレンスガイド
にアクセ
95
Page 96

問題 対処方法
Dell Precision ResourceCD
を使用する場合
サポートサイトに
Dell
アクセスする場合
コンピュータカ
バーの開け方は
?
モニタに何も表示
www.dell.com/jp | support.jp.dell.com
されず、電源ライ
トが緑色に点滅し
ているときに、コ
ンピュータの操作
を再開するには
?
「コンピュータカバーを
開く」(
ページ)を参
98
照してください。
コンピュータは省電力状
態の「スリープ」モード
になっています。適切な
手順に従って、コン
ピュータを「ウェイク
アップ」します。
ご使用のオペレーティン
グシステムに応じて、ユー
ザーズガイドアイコンを
ダブルクリックするか、ス
タートボタンをクリック
してヘルプとサポートを
選択します。『ユーザーズ
ガイド』の「電源管理」を
参照します。
『
Dell Precision
ResourceCD
』のメインメ
ニューにアクセスします。
トピックプルダウンメ
ニューのユーザーズガイ
ドをクリックし、ご使用
のコンピュータ用の
『ユーザーズガイド』をク
リックして、「部品の取り
外しと取り付け」を参照
します。
『
Dell Precision
ResourceCD
』のメインメ
ニューにアクセスします。
トピックプルダウンメ
ニューのユーザーズガイ
ドをクリックし、ご使用
のコンピュータ用の
『ユーザーズガイド』をク
リックして、「電源管理」
を参照します。
support.jp.dell.com
へアクセ
スして、一般的な使用方法、
インストール手順、トラブル
シューティング手順に関する
ヘルプを参照します。
support.jp.dell.com
にアクセ
スします。サポートサイトへ
ようこそページで、システム
マニュアルをクリックしま
す。ご使用のコンピュータに
該当する内容を選択して、
『ユーザーズガイド』にアク
セスします。『ユーザーズガ
イド』の「電源管理」を参照
します。
コンピュータに
ハードウェアを追
加するには
?
「コンピュータ内部」(
ページ)で説明している
内部サービスラベルを参
照してください。「部品の
取り外しと取り付け」
ページ)も参照して
(
101
ください。
96
セットアップおよびクイックリファレンスガイド
『
100
Dell Precision
ResourceCD
』のメインメ
ニューにアクセスします。
トピックプルダウンメ
ニューのユーザーズガイ
ドをクリックし、ご使用
のコンピュータ用の
『ユーザーズガイド』をク
リックして、「部品の取り
外しと取り付け」を参照
します。
support.jp.dell.com
にアクセ
スします。サポートサイトへ
ようこそページで、システム
マニュアルをクリックしま
す。ご使用のコンピュータに
該当する内容を選択して、
『ユーザーズガイド』にアク
セスします。『ユーザーズガ
イド』の「部品の取り外しと
取り付け」を参照します。
Page 97
問題 対処方法
Dell Precision ResourceCD
を使用する場合
サポートサイトに
Dell
アクセスする場合
のシステムメ
4 GB
モリを取り付けた
が、メ モ リ が 実 際
より少 なく表 示さ
れるのはなぜか
オペレーティング
システムを再イン
ストールするには
ご使用のオペレーティン
グシステムに応じて、
ユーザーズガイドアイコ
ンをダブルクリックする
か、スタートボタンをク
?
リックしてヘルプとサ
ポートを選択します。
ユーザーズガイドの「部
品の取り外しと取り付
け」の項の「コンピュー
タメモリ」を参照してく
ださい。
オペレーティングシステ
ムの再インストールにつ
いての詳細は、オペレー
?
ティングシステムのイン
ストールガイドを参照し
てください。
作業にあたっての注意
『
Dell Precision
ResourceCD
ニューにアクセスします。
トピックプルダウンメ
ニューのユーザーズガイ
ドをクリックし、ご使用
のコンピュータ用のユー
ザーズガイドをクリック
して、「コンピュータメモ
リ」を参照します。
』のメインメ
support.jp.dell.com
スします。サポートサイトへ
ようこそページで、システム
マニュアルをクリックしま
す。ご使用のコンピュータに
該当する内容を選択して、
『ユーザーズガイド』にアク
セスします。ユーザーズガイ
の「コンピュータメモリ」
ド
を参照してください。
にアクセ
コンピュータ内部の作業をする場合は、このガイドと
Dell
のマニュ
アルで説明されている以外の作業を行わないでください。記載されて
いる指示を、常にお守りください。
以下の注意事項をお守りいただければ、コンピュータ内の作業は安全
に行えます。
警告:
お客様の安全と機器を守るために
コンピュータでの作業を開始する前に、次の手順を順番通りに行って
ください。
コンピュータとすべてのデバイスの電源を切ります。
1
コンピュータの内部に触れる前に、コンピュータ背面のカードス
2
ロット開口部の周りの金属部分など、コンピュータの塗装されて
いない金属面に触れます
。
セットアップおよびクイックリファレンスガイド
97
Page 98

コンピュータとデバイスの電源プラグをコンセントから抜きま
3
す。こうすることにより、けがや感電の危険を避けることができ
ます。また、電話回線または通信回線のケーブルもコンピュータ
から抜きます。
www.dell.com/jp | support.jp.dell.com
メモ:
ステム基板から取り外す前に
消えていることを確認してください。スタンバイ電源ライトの位置につ
いては、カバー内にある内部サービスラベルで確認してください。
デバイスをコンピュータから取り外したり、コンポーネントをシ
、システム基板のスタンバイ電源ライトが
作業中も、定期的にコンピュータの塗装されていない金属面に触
れて、内部コンポーネントを損傷する可能性のある静電気を逃し
てください。
さらに、コンピュータに付属のマニュアルに記載されている安全上の
注意を定期的に読み返すことをお勧めします。
コンピュータカバーを開く
部品を取り外したり取り付ける場合や、忘れてしまったパスワードを
リセットする場合、コンピュータの問題を診断する場合は、コン
ピュータカバーを開く作業が必要となる場合があります。
警告:
を参照してください。
以下の手順を実行する前に、「作業にあたっての注意」(
カバーを開く
ページ)
97
98
コンピュータとデバイスの電源を切り、それぞれの電源プラグを
1
コンセントから抜いて
背面パネルのパドロックリングにパドロックが取り付けられてい
2
る場合は、パドロックを外します(次の図参照)。
コンピュータの右側を下にして倒します。
3
セットアップおよびクイックリファレンスガイド
10~20
秒待ちます。
Page 99
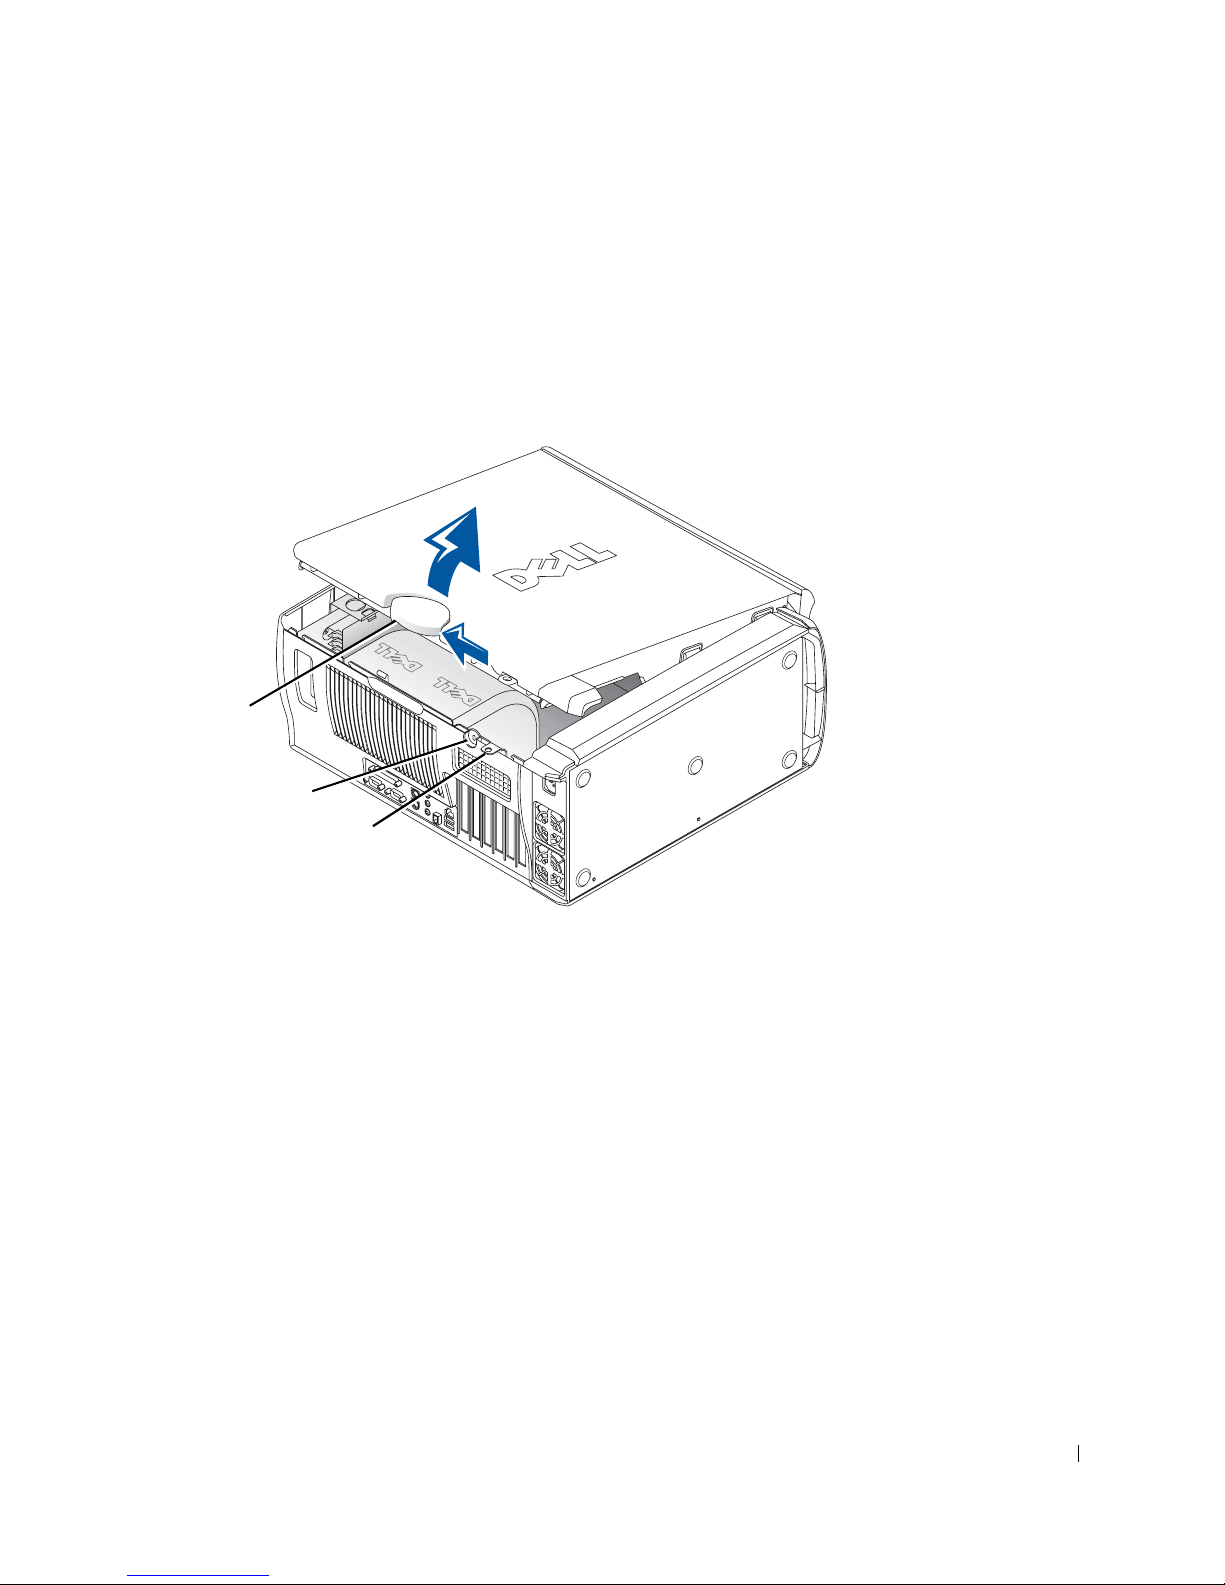
コンピュータカバーを開きます。
4
a
カバーリリースラッチをコンピュータの上部に向かってスラ
イドします(次の図を参照)。
b
カバーの後ろ側を持ち上げ、コンピュータの正面に向かって
開きます。
カバー
リリース
ラッチ
セキュリティ
ケーブルスロット
パドロックリング
セットアップおよびクイックリファレンスガイド
99
Page 100
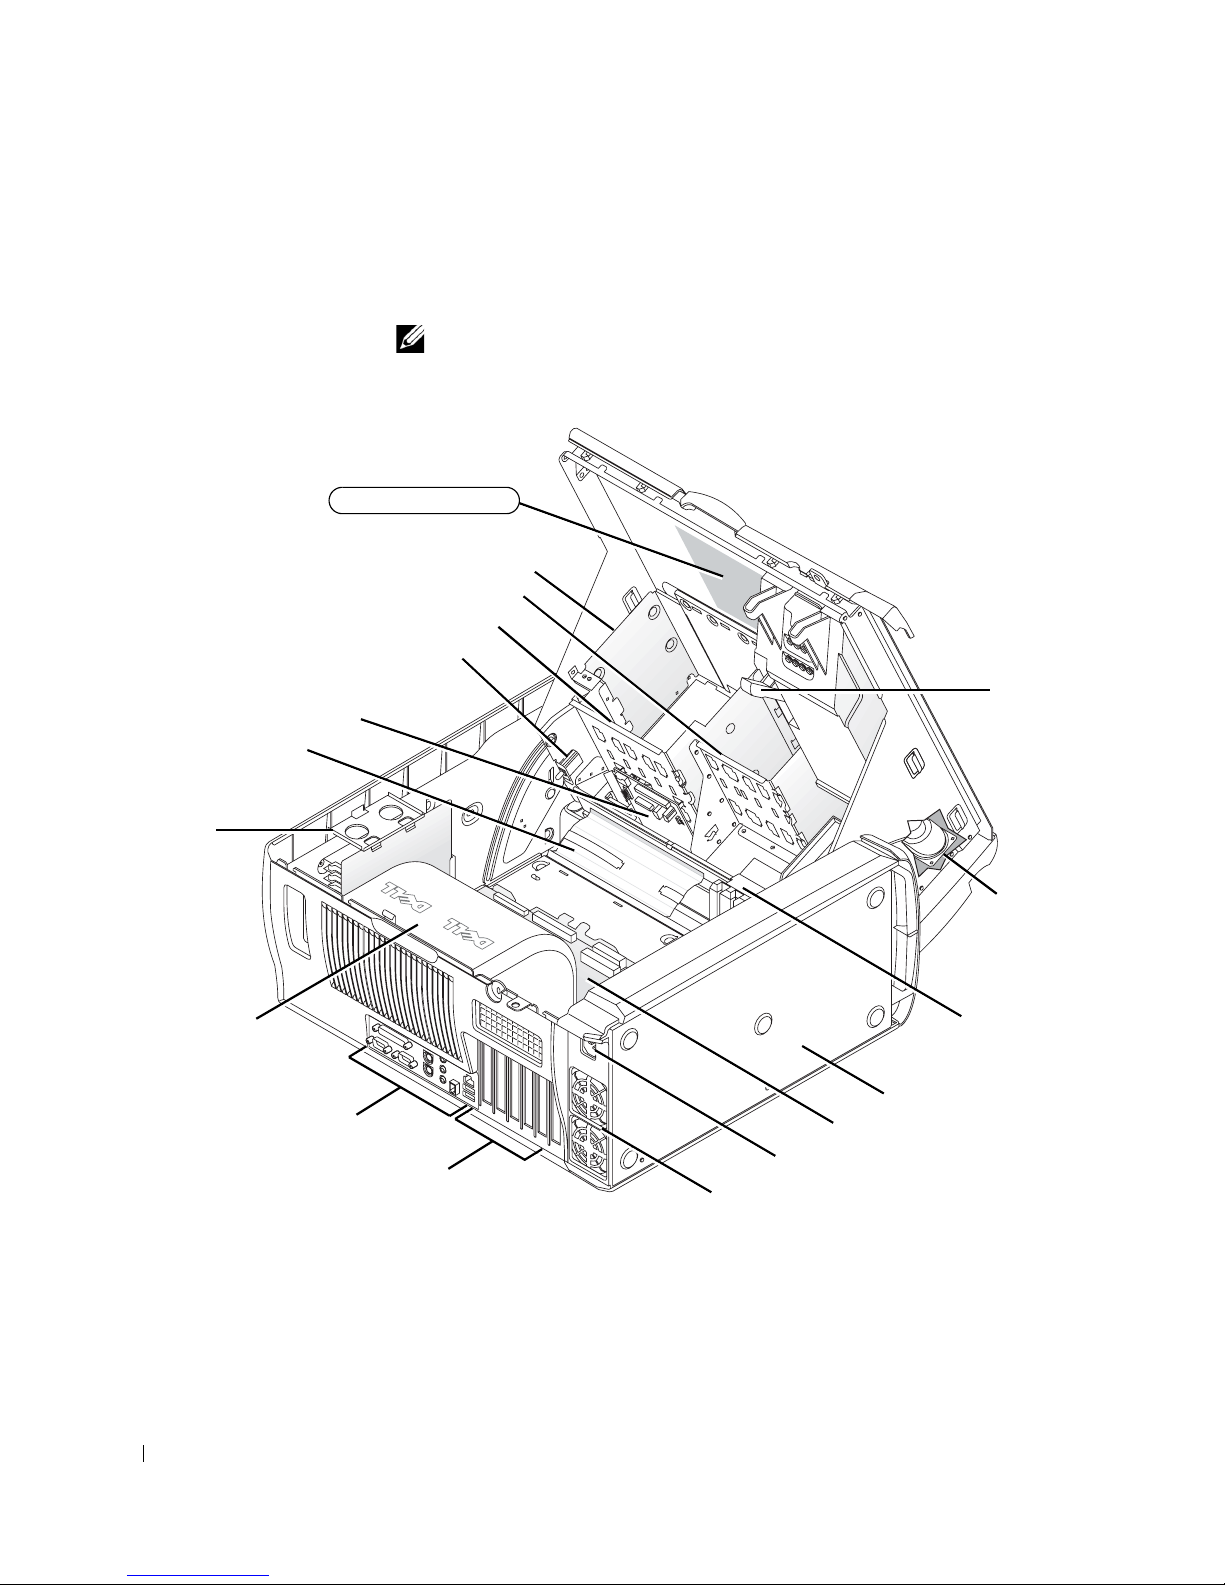
コンピュータ内部
以下の図は、カバーを開いた状態のコンピュータを示したものです。
www.dell.com/jp | support.jp.dell.com
シャーシイントルージョンスイッチ
ケーブルリテイナ
メモリライザボード
保持ブラケット
(必要な場合)
フロントドライブブラケット
フロントパネル
メモ:
コンピュータ内部の作業に関する情報が記載されています。
内部サービスラベル
ディスクドライブブラケット
ハードドライブブラケット
コンピュータカバーの内側にはサービスラベルが貼られており、
カード
AGP
ブレイス
スピーカー
マイクロプロセッサ
エアフローカバー
パネルコネクタ
I/O
拡張カードスロット
100
セットアップおよびクイックリファレンスガイド
システム基板
電源ソケット
AC
電源装置通気口
拡張カード
冷却ファン
電源装置
 Loading...