

Page 1

Dell Precision™ Workstations 450 and 650
User’s Guide
www.dell.com | support.dell.com
Page 2

This document describes the features and operation of your computer. This document is
stored on your computer hard drive. For information on other documentation included with
your computer, see "Finding Information for Your Computer."
Notes, Notices, and Cautions
NOTE: A NOTE indicates important information that helps you make better use of your
computer.
NOTICE: A NOTICE indicates either potential damage to hardware or loss of data and tells you
how to avoid the problem.
CAUTION: A CAUTION indicates a potential for property damage, personal
injury, or death.
Abbreviations and Acronyms
For a complete list of abbreviations and acronyms, see the Glossary.
If you purchased a Dell™ n Series computer, any references in this document to Microsoft®
Windows® operating systems are not applicable.
____________________
Information in this document is subject to change without notice.
© 2003 Dell Computer Corporation. All rights reserved.
Reproduction in any manner whatsoever without the written permission of Dell Computer Corporation is strictly
forbidden.
Trademarks used in this text: Dell, the DELL logo, Inspiron, Dell Precision, Dimension, OptiPlex, Dell OpenManage,
and Latitude are trademarks of Dell Computer Corporation; Intel, Pe ntium, and Celeron are registered trademarks and
Xeon is a trademark of Intel Corporation; Microsoft, MS-DOS, Windows NT, and Windows are registered trademarks of
Microsoft Corporation; IBM and OS/2 are registered trademarks of International Business Machines Corporation;
ENERGY STAR is a registered trademark of the U.S. Environmental Protection Agency. As an ENERGY STAR partner,
Dell Computer Corporation has determined that this product meets the ENERGY STAR guidelines for energy efficiency.
Other trademarks and trade names may be used in this document to refer to either the entities claiming the marks and
names or their products. Dell Computer Corporation disclaims any proprietary interest in trademarks and trade names
other than its own.
Models: WHL and WHM
April 2003 P/N 6T345 Rev. A03
Page 3

Page 4

Page 5

Contents
1 Information About Your Computer
Finding Information for Your Computer . . . . . . . . . . . . . . 2
Specifications . . . . . . . . . . . . . . . . . . . . . . . . . . . . 6
Caring for Your Computer
. . . . . . . . . . . . . . . . . . . . . 12
2 About Your Computer—Dell Precision 650
Front View . . . . . . . . . . . . . . . . . . . . . . . . . . . . . 14
Front View of the Computer (Doors Open)
Opening the Drive Door
Back View
Inside Your Computer . . . . . . . . . . . . . . . . . . . . . . . 22
System Board Components
. . . . . . . . . . . . . . . . . . . . . . . . . . . . . . 19
. . . . . . . . . . . . . . . . . . . . . 18
. . . . . . . . . . . . . . . . . . . . . 24
. . . . . . . . . . . . 16
3 About Your Computer—Dell Precision 450
Front View . . . . . . . . . . . . . . . . . . . . . . . . . . . . . 28
Back View
. . . . . . . . . . . . . . . . . . . . . . . . . . . . . . 30
Inside Your Computer
System Board Components
. . . . . . . . . . . . . . . . . . . . . . . 32
. . . . . . . . . . . . . . . . . . . . . 34
Contents 5
Page 6

4 Advanced Features
LegacySelect Technology Control . . . . . . . . . . . . . . . . . 38
Manageability . . . . . . . . . . . . . . . . . . . . . . . . . . . 38
Alert Standard Format
Dell OpenManage IT Assistant . . . . . . . . . . . . . . . . . 39
Dell OpenManage Client Instrumentation
. . . . . . . . . . . . . . . . . . . . . 38
. . . . . . . . . . . . 39
Security
Password Protection
System Setup
. . . . . . . . . . . . . . . . . . . . . . . . . . . . . . 40
Chassis Intrusion Detection
Padlock Ring and Security Cable Slot
. . . . . . . . . . . . . . . . . . . . . . . . 41
System Password
Setup Password
. . . . . . . . . . . . . . . . . . . . . . . 41
. . . . . . . . . . . . . . . . . . . . . . . . 44
. . . . . . . . . . . . . . . . . . 40
. . . . . . . . . . . . . 40
Disabling a Forgotten Password and Setting a New Password
. . . . . . . . . . . . . . . . . . . . . . . . . . . 46
Entering System Setup
System Setup Screens
. . . . . . . . . . . . . . . . . . . . . 46
. . . . . . . . . . . . . . . . . . . . . 46
. 45
Boot Sequence . . . . . . . . . . . . . . . . . . . . . . . . . 48
System Setup Options
Jumper Settings
. . . . . . . . . . . . . . . . . . . . . . . . . . 56
. . . . . . . . . . . . . . . . . . . . . 50
Power Button . . . . . . . . . . . . . . . . . . . . . . . . . . . 56
. . . . . . . . . . . . . . . . . . . . . . . . . . . . . . . . 57
TAPI
Installing a TAPI-Compliant Modem Card
Installing a TAPI Sound Card
. . . . . . . . . . . . . . . . . 58
. . . . . . . . . . . 57
Hyper-Threading
IEEE 1394
. . . . . . . . . . . . . . . . . . . . . . . . . . 60
. . . . . . . . . . . . . . . . . . . . . . . . . . . . 60
U320 SCSI Controller . . . . . . . . . . . . . . . . . . . . . . . 60
Integrated Striping
Creating a Stripe Volume
6 Contents
. . . . . . . . . . . . . . . . . . . . . . . . 61
. . . . . . . . . . . . . . . . . . . 61
Page 7

Deleting a Stripe Volume . . . . . . . . . . . . . . . . . . . . 62
Activating a Stripe Volume
. . . . . . . . . . . . . . . . . . 62
Troubleshooting the Stripe Volume . . . . . . . . . . . . . . . 63
5 Removing and Installing Parts—Dell Precision 650
6 Drives
Overview . . . . . . . . . . . . . . . . . . . . . . . . . . . . . . 70
IDE Drive Addressing
Connecting Drive Cables . . . . . . . . . . . . . . . . . . . . 71
SCSI Device Installation Guidelines
SCSI ID Numbers
Device Termination . . . . . . . . . . . . . . . . . . . . . . . 74
General Guidelines
SCSI Cables
. . . . . . . . . . . . . . . . . . . . . . . . . . 75
. . . . . . . . . . . . . . . . . . . . . 71
. . . . . . . . . . . . . . 73
. . . . . . . . . . . . . . . . . . . . . . . 74
. . . . . . . . . . . . . . . . . . . . . . . 75
Hard Drive
Removing a Hard Drive
Installing a Hard Drive
Floppy Drive
Removing a Floppy Drive
Installing a Floppy Drive
CD/DVD Drive
Removing a CD/DVD Drive
Installing a CD/DVD Drive
. . . . . . . . . . . . . . . . . . . . . . . . . . . . . 75
. . . . . . . . . . . . . . . . . . . . 76
. . . . . . . . . . . . . . . . . . . . . 80
. . . . . . . . . . . . . . . . . . . . . . . . . . . . 86
. . . . . . . . . . . . . . . . . . . . 87
. . . . . . . . . . . . . . . . . . . . 89
. . . . . . . . . . . . . . . . . . . . . . . . . . . 92
. . . . . . . . . . . . . . . . . . . 93
. . . . . . . . . . . . . . . . . . . 95
7 Microprocessor Airflow Shroud
Removing the Microprocessor Airflow Shroud . . . . . . . . . . 100
Installing the Microprocessor Airflow Shroud
. . . . . . . . . . 101
7 Contents
Page 8

8 Removing and Installing Parts—Dell Precision 450
9 Opening the Computer Cover
10 Memory
Memory Installation Guidelines . . . . . . . . . . . . . . . . 110
Removing a Memory Module . . . . . . . . . . . . . . . . . . 111
Adding a Memory Module
. . . . . . . . . . . . . . . . . . . 112
11 Cards
Cards . . . . . . . . . . . . . . . . . . . . . . . . . . . . . . . . 116
12
Installing a Card . . . . . . . . . . . . . . . . . . . . . . . . 117
Removing a Card
. . . . . . . . . . . . . . . . . . . . . . . . 122
13 Drives
8 Contents
Overview . . . . . . . . . . . . . . . . . . . . . . . . . . . . . . 126
IDE Drive Addressing
Connecting Drive Cables
. . . . . . . . . . . . . . . . . . . . . 127
. . . . . . . . . . . . . . . . . . . . 127
SCSI Device Installation Guidelines . . . . . . . . . . . . . . 129
SCSI ID Numbers
Device Termination
. . . . . . . . . . . . . . . . . . . . . . . 129
. . . . . . . . . . . . . . . . . . . . . . . 130
General Guidelines . . . . . . . . . . . . . . . . . . . . . . . 130
SCSI Cables
Hard Drive
Removing a Hard Drive
Installing a Hard Drive
Floppy Drive
. . . . . . . . . . . . . . . . . . . . . . . . . . 131
. . . . . . . . . . . . . . . . . . . . . . . . . . . . . 131
. . . . . . . . . . . . . . . . . . . . 132
. . . . . . . . . . . . . . . . . . . . . 136
. . . . . . . . . . . . . . . . . . . . . . . . . . . . 142
Page 9

Removing a Floppy Drive . . . . . . . . . . . . . . . . . . . . 143
Installing a Floppy Drive
. . . . . . . . . . . . . . . . . . . . 144
CD/DVD Drive
Removing a CD/DVD Drive
Installing a CD/DVD Drive
. . . . . . . . . . . . . . . . . . . . . . . . . . . 148
. . . . . . . . . . . . . . . . . . . 148
. . . . . . . . . . . . . . . . . . . 150
14 Microprocessor Airflow Shroud
Removing the Microprocessor Airflow Shroud . . . . . . . . . . 156
Installing the Microprocessor Airflow Shroud
15 Microprocessor
Installation Guidelines . . . . . . . . . . . . . . . . . . . . . . . 160
Installing the Microprocessor
Removing the Microprocessor
VRM . . . . . . . . . . . . . . . . . . . . . . . . . . . . . . . . 167
Installing a VRM
. . . . . . . . . . . . . . . . . . . . . . . 167
Removing a VRM . . . . . . . . . . . . . . . . . . . . . . . 169
. . . . . . . . . . . . . . . . . . . 160
. . . . . . . . . . . . . . . . . . . 163
. . . . . . . . . . 157
16 Battery
17 Closing the Computer Cover
18 Solving Problems
Troubleshooting Your Computer . . . . . . . . . . . . . . . . . 181
Battery Problems
Card Problems
9 Contents
. . . . . . . . . . . . . . . . . . . . . . . . . 181
. . . . . . . . . . . . . . . . . . . . . . . . . . . 181
Page 10

Drive Problems . . . . . . . . . . . . . . . . . . . . . . . . . . 183
Floppy drive problems
CD drive problems
. . . . . . . . . . . . . . . . . . . . . 183
. . . . . . . . . . . . . . . . . . . . . . . 184
Problems writing to a CD-RW drive . . . . . . . . . . . . . . 185
DVD drive problems
Hard drive problems
. . . . . . . . . . . . . . . . . . . . . . 185
. . . . . . . . . . . . . . . . . . . . . . 186
Dropped or Damaged Computer
E-Mail, Modem, and Internet Problems
. . . . . . . . . . . . . . . . . . 187
. . . . . . . . . . . . . 188
Error Messages . . . . . . . . . . . . . . . . . . . . . . . . . . 189
General Problems
The computer stops responding
A program stops responding
. . . . . . . . . . . . . . . . . . . . . . . . . 199
. . . . . . . . . . . . . . . . . 199
. . . . . . . . . . . . . . . . . . 199
A program crashes repeatedly . . . . . . . . . . . . . . . . . 199
A program is designed for an earlier Windows operating system
A solid blue screen appears
. . . . . . . . . . . . . . . . . . 200
200
Other software problems . . . . . . . . . . . . . . . . . . . . 200
Other technical problems
General hardware problems
IEEE 1394 Device Problems
Keyboard Problems
. . . . . . . . . . . . . . . . . . . . . . . . 203
. . . . . . . . . . . . . . . . . . . . 201
. . . . . . . . . . . . . . . . . . 202
. . . . . . . . . . . . . . . . . . . 203
Memory Problems . . . . . . . . . . . . . . . . . . . . . . . . . 204
Microprocessor Problems
Mouse Problems
. . . . . . . . . . . . . . . . . . . . . . . . . . 206
Network Problems
Power Problems
Printer Problems
. . . . . . . . . . . . . . . . . . . . . . . . . . 208
. . . . . . . . . . . . . . . . . . . . . . . . . 210
Serial or Parallel Device Problems . . . . . . . . . . . . . . . . 211
Sound and Speaker Problems
10 Contents
. . . . . . . . . . . . . . . . . . . . . 205
. . . . . . . . . . . . . . . . . . . . . . . . . 207
. . . . . . . . . . . . . . . . . . . 213
Page 11

No sound from speakers . . . . . . . . . . . . . . . . . . . . 213
No sound from headphones
. . . . . . . . . . . . . . . . . . 214
System Board Problems
Video and Monitor Problems
If the screen is blank
. . . . . . . . . . . . . . . . . . . . . 215
. . . . . . . . . . . . . . . . . . . 216
. . . . . . . . . . . . . . . . . . . . . 216
If the screen is difficult to read
19 Advanced Troubleshooting
Diagnostic Lights . . . . . . . . . . . . . . . . . . . . . . . . . 220
System Lights
Diagnostic Lights
Beep Codes
Dell Diagnostics . . . . . . . . . . . . . . . . . . . . . . . . . . 229
When to Use the Dell Diagnostics
Starting the Dell Diagnostics . . . . . . . . . . . . . . . . . 230
Drivers . . . . . . . . . . . . . . . . . . . . . . . . . . . . . . 232
What Is a Driver?
Identifying Drivers . . . . . . . . . . . . . . . . . . . . . . 233
Reinstalling Drivers
. . . . . . . . . . . . . . . . . . . . . . . . . 220
. . . . . . . . . . . . . . . . . . . . . . . 221
. . . . . . . . . . . . . . . . . . . . . . . . . . . . 228
. . . . . . . . . . . . . . . . . . . . . . . 232
. . . . . . . . . . . . . . . . . . . . . . 233
. . . . . . . . . . . . . . . . 217
. . . . . . . . . . . . . . . 229
Using System Restore
Creating a Restore Point
Restoring the Computer to an Earlier Operating State
Undoing the Last System Restore
Resolving Software and Hardware Incompatibilities
Windows XP
Windows 2000
20 Cleaning Your Computer
Before Cleaning Your Computer . . . . . . . . . . . . . . . . . 240
. . . . . . . . . . . . . . . . . . . . . . 235
. . . . . . . . . . . . . . . . . . . 235
. . . . . 235
. . . . . . . . . . . . . . . 236
. . . . . . 237
. . . . . . . . . . . . . . . . . . . . . . . . . 237
. . . . . . . . . . . . . . . . . . . . . . . . 238
Contents 11
Page 12

Computer, Keyboard, and Monitor . . . . . . . . . . . . . . . . 240
Mouse
. . . . . . . . . . . . . . . . . . . . . . . . . . . . . . . 240
Floppy Drive . . . . . . . . . . . . . . . . . . . . . . . . . . . . 241
CDs and DVDs
. . . . . . . . . . . . . . . . . . . . . . . . . . . 241
21 Ergonomic Computing Habits
. . . . . . . . . . . . . . . . . . . . . . . . . . . . . . . . . . . 245
22 Your Operating System
Reinstalling Microsoft® Windows® XP . . . . . . . . . . . . . . 248
Before You Reinstall
Reinstalling Windows XP . . . . . . . . . . . . . . . . . . . 248
Reinstalling Microsoft Windows 2000 . . . . . . . . . . . . . . 250
Microsoft Windows XP Features
Transferring Information to a New Computer
Switching to Classic View
Desktop Cleanup Wizard . . . . . . . . . . . . . . . . . . . . 254
Internet Connection Firewall
Setting Up a Home and Office Network
User Accounts and Fast User Switching . . . . . . . . . . . . 255
. . . . . . . . . . . . . . . . . . . . . . 248
. . . . . . . . . . . . . . . . . 252
. . . . . . . . . . . . . . . . . . . 253
. . . . . . . . . . . . . . . . . . 255
. . . . . . . . . . 252
. . . . . . . . . . . . 255
23 Regulatory Notices
FCC Notices (U.S. Only) . . . . . . . . . . . . . . . . . . . . 259
IC Notice (Canada Only)
CE Notice (European Union) . . . . . . . . . . . . . . . . . . 261
ENERGY STAR
Simplified Chinese Class A Warning Notice (China Only)
EN 55022 Compliance (Czech Republic Only) . . . . . . . . . 264
VCCI Notice (Japan Only)
12 Contents
. . . . . . . . . . . . . . . . . . . . 261
®
Compliance . . . . . . . . . . . . . . . . . 262
. . . . 263
. . . . . . . . . . . . . . . . . . . 264
Page 13

MIC Notice (Republic of Korea Only) . . . . . . . . . . . . . 266
Polish Center for Testing and Certification Notice
BSMI Notice (Taiwan Only) . . . . . . . . . . . . . . . . . . 269
NOM Information (Mexico Only)
24 Warranty and Return Policy
25 Getting Help
Technical Assistance . . . . . . . . . . . . . . . . . . . . . . . 276
Online Services
AutoTech Service
Automated Order-Status Service
Technical Support Service . . . . . . . . . . . . . . . . . . . 278
Problems With Your Order . . . . . . . . . . . . . . . . . . . . 278
. . . . . . . . . . . . . . . . . . . . . . . . 276
. . . . . . . . . . . . . . . . . . . . . . . 277
. . . . . . . 267
. . . . . . . . . . . . . . . 271
. . . . . . . . . . . . . . . 277
Product Information
Returning Items for Warranty Repair or Credit
Before You Call . . . . . . . . . . . . . . . . . . . . . . . . . . 279
Contacting Dell
26 Glossary
. . . . . . . . . . . . . . . . . . . . . . . 278
. . . . . . . . . 278
. . . . . . . . . . . . . . . . . . . . . . . . . . 281
Contents 13
Page 14

14 Contents
Page 15

SECTION 2
Information About
Your Computer
Finding Information for Your Computer
Specifications
Caring for Your Computer
1
Page 16
Finding Information for Your Computer
What Are You Looking For? Find it Here
• A diagnostic program for my computer
• Drivers for my computer
•My User’s Guide
• My device documentation
www.dell.com | support.dell.com
• How to set up my computer
• How to care for my computer
• Troubleshooting information
• How to open my computer cover
• How to locate other documentation
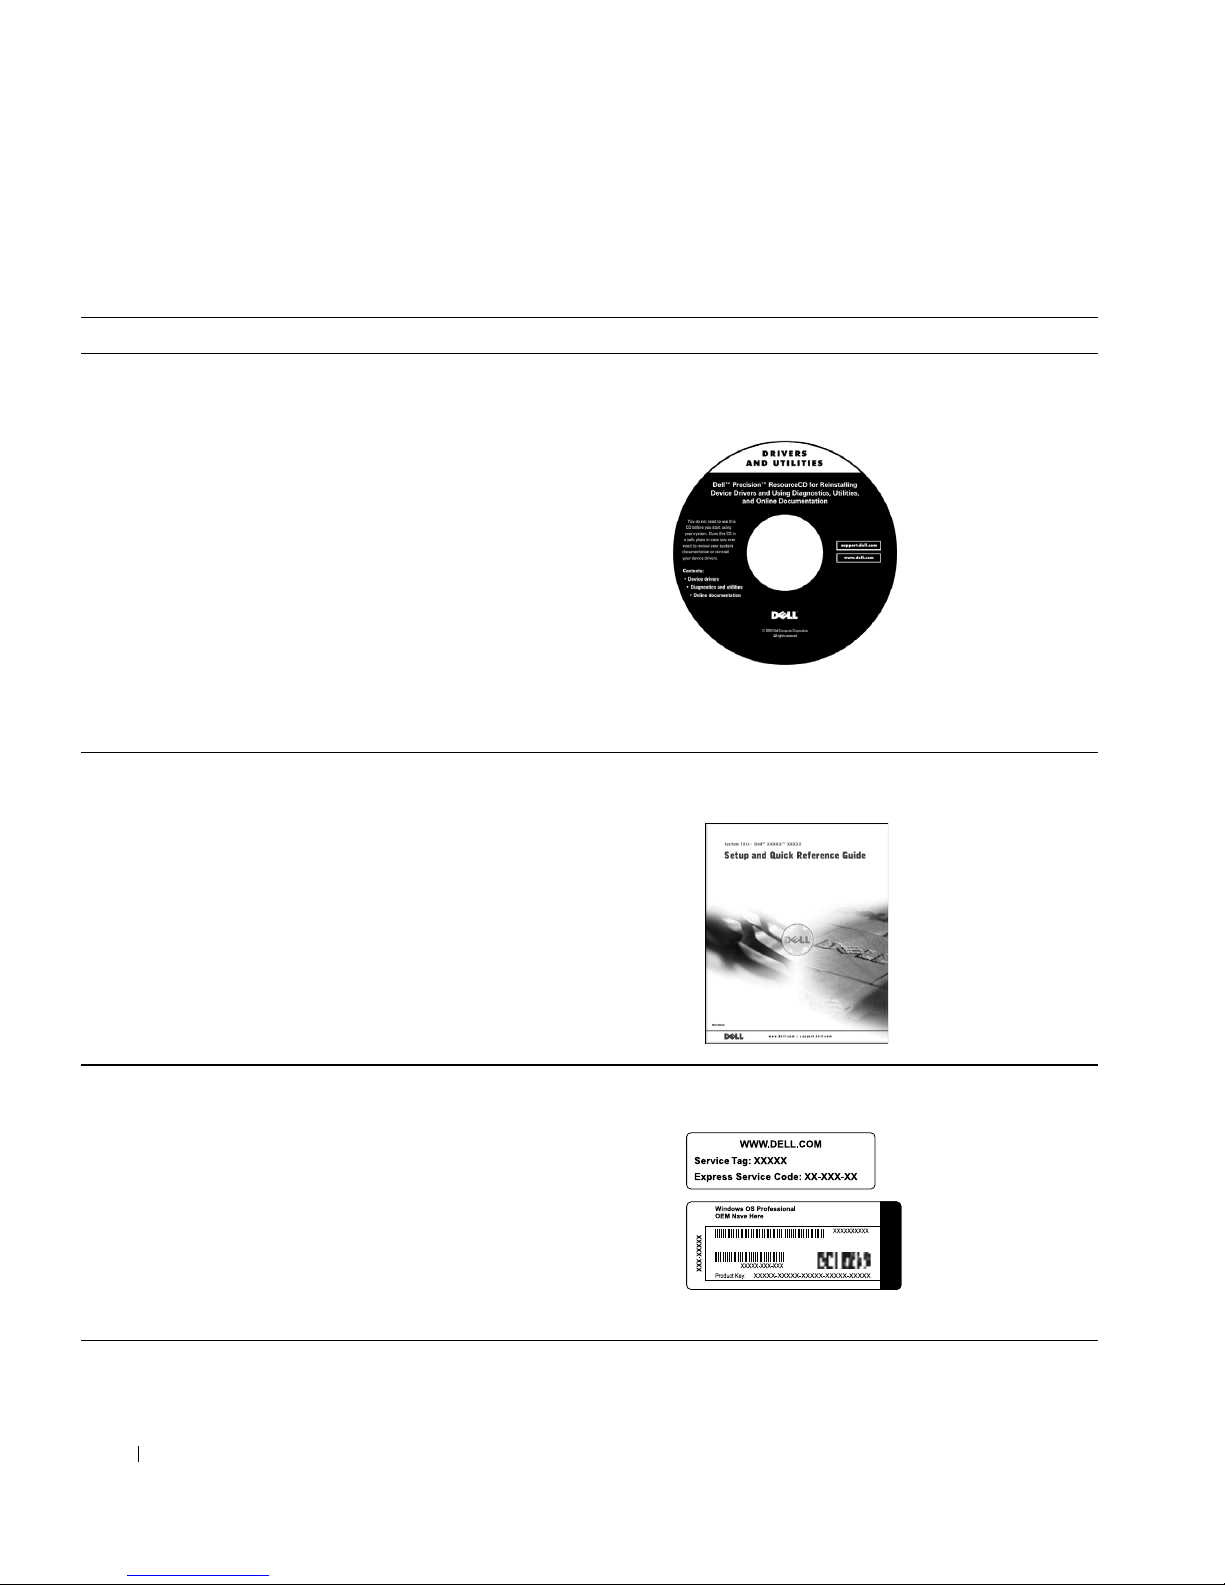
Drivers and Utilities CD (also know as the
ResourceCD)
You can use this CD to access documentation, reinstall drivers, or run
diagnostics tools.
Setup and Quick Reference Guide
• Express Service Code and Service Tag
Number
• Microsoft® Windows® License Label
2 Information About Your Computer
Express Service Code and Product Key
Located on your computer.
Page 17

What Are You Looking For? Find it Here
or
• System board connectors
• Location of system board components
• How to remove and replace parts
• Technical specifications
• How to configure system settings
• How to troubleshoot and solve problems
System Information Label
Located on the inside cover of your computer.
User’s Guide Icon (Microsoft Windows 2000)
Double-click the User’s Guides icon on your desktop.
Windows XP Help and Support Center
1 Click the Start button, and click Help and Support.
2 Click User’s Guide.
• Warranty Information System Information Guide
Information About Your Computer 3
Page 18

What Are You Looking For? Find it Here
• Latest drivers for my computer
• Answers to technical service and support
questions
• Online discussions with other users and
technical support
• Documentation for my computer including
the Service Manual
www.dell.com | support.dell.com
• Service call status and support history
• Top technical issues for my computer
•Frequently asked questions
•File downloads
• Details on my computer’s configuration
• Service contract for my computer
Dell Support Website — support.dell.com
The Dell Support website provides several online tools, including:
• Knowledge Base — hints, tips, and online courses
• Customer Forum — online discussion with other Dell customers
• Upgrades — upgrade information for components, such as memory,
the hard drive, and the operating system
• Customer Care — contact information, order status, warranty, and
repair information
• Downloads — drivers, patches, and software updates
• Reference — computer documentation, product specifications, and
white papers
Dell Premier Support Website —
premiersupport.dell.com
The Dell Premier Support website is customized for corporate,
government, and education customers. This site may not be available in
all regions.
4 Information About Your Computer
Page 19
What Are You Looking For? Find it Here
or
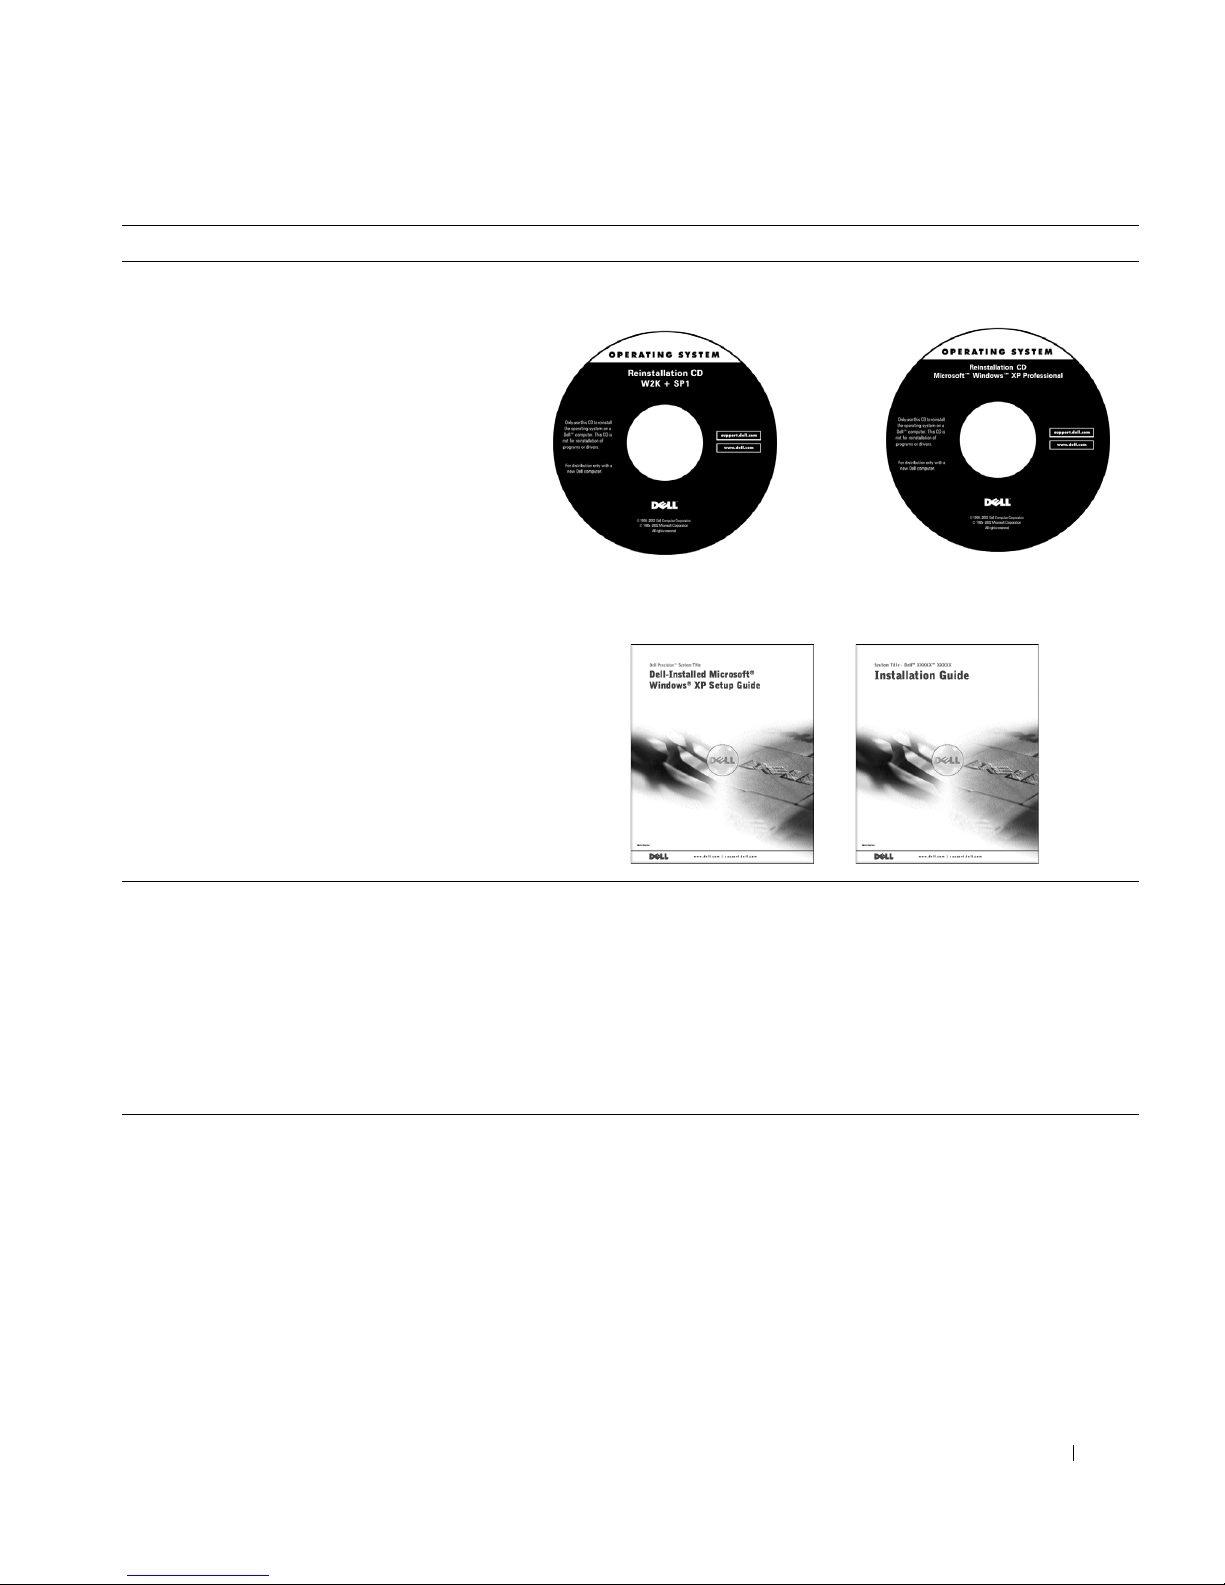
• How to reinstall my operating system Operating System CD and Installation Guide
After you reinstall your operating system, use the Drivers and Utilities
CD to reinstall drivers for the devices that came with your computer.
• How to use Windows XP
• Documentation for my computer and
devices
Windows XP Help and Support Center
1 Click the Start button, and then click Help and Support.
2 Type a word or phrase that describes your problem, and then click
the arrow icon.
3 Click the topic that describes your problem.
4 Follow the instructions shown on the screen.
NOTE: For help using Windows 2000, click the Start button and click
Help.
Information About Your Computer 5
Page 20

Specifications
Microprocessor
Microprocessor type Intel® Xeon™
Level 1 (L1) cache 8 KB
Level 2 (L2) cache 512-KB
Memory
Type PC2100 DDR
www.dell.com | support.dell.com
Memory connectors four
Memory capacities 256-, 512-MB, and 1-GB non-ECC or
Minimum memory 256 MB
Maximum memory 4 GB
BIOS address F0000h
ECC
Computer Information
Chip set Intel E7505
Data bus width 64 bits
Address bus width 32 bits
DMA channels 8
Interrupt levels 23
BIOS chip 4-Mb
Memory speed 266 MHz DDR (PC 2100 DDR)
6 Information About Your Computer
Page 21

Computer Information
NIC Gigabit integrated network interface
with ASF support as defined by DMTF
Capable of 10/100/1000 communication
• Green — A good connection exists
between a 10-Mbps network and the
computer.
• Orange — A good connection exists
between a 100-Mbps network and the
computer.
• Yellow — A good connection exists
between a 1 Gb (or 1000-Mbps)
connection.
• Off — The computer is not detecting
a physical connection to the network.
SCSI controller Dell Precision 650 computer —
Integrated U320 SCSI
Dell Precision 450 computer — Optional
add-in U320 SCSI
FSB clock 400- or 533-MHz data rate
Video
Type Dell Precision 650 computer — AGP Pro
110 at 8x/4x/2x/1x (1.5 V) or PCI
Dell Precision 450 computer — AGP Pro
50 at 8x/4x/2x/1x (1.5 V) or PCI
Audio
Type AC97, Sound Blaster emulation
Audio controller Analog Devices Codec AD1981b
Stereo conversion 16-bit analog-to-digital; 20-bit digital-
to-analog
Information About Your Computer 7
Page 22

Expansion Bus
Bus type Dual PCI-X 1.0 (3.3 V only), PCI 2.2
Bus speed PCI: 33 MHz; PCI-X: 66/100 MHz
Expansion-card connectors: Dell Precision 650 computer — Three
www.dell.com | support.dell.com
Drives
Externally accessible:
(3.3 V/5.0 V)
AGP Pro 3.0 (1.5 V only)
AGP Pro: 66 MHz
PCI-X connectors, two PCI slots, and
one AGP 8x Pro110 connector
Dell Precision 450 computer — One
PCI-X connector, two PCI slots, and one
AGP 8x Pro50 connector
Dell Precision 650 computer one 3.5-inch drive bay
three 5.25-inch drive bays
Dell Precision 450 computer one 3.5-inch drive bay
two 5.25-inch drive bays
Internally accessible:
Dell Precision 650 computer three bays for three 1-inch high or two
Dell Precision 450 computer two bays for two 1-inch high or one 1.6-
Connectors
External connectors:
Serial two 9-pin connectors; 16550-compatible
Parallel one 25-hole connector (bidirectional)
8 Information About Your Computer
1.6-inch high hard drives
NOTE: You can purchase a conversion
bracket from Dell that allows you to use
a 5.25-inch drive bay as an additional
hard drive bay.
inch high hard drives
Page 23

Connectors
IEEE 1394 Dell Precision 650 computer only —
Two 6-pin serial connectors
Video 15-hole connector (on add-in video
card)
Network connector RJ45 connector
PS/2 (keyboard and mouse) 6-pin mini-DIN connector
USB two USB 2.0-compliant connectors on
the front panel; four USB 2.0-compliant
connectors on the back panel
Audio Dell Precision 650 computer— Three
connectors for line-in, line-out, and
microphone on back panel; one
speaker/headphone and one microphone
connector on the front panel
Dell Precision 450 computer— Three
connectors for line-in, line-out, and
microphone on back panel; one
speaker/headphone on the front panel
System Board Connectors:
Primary IDE channel 40-pin connector
Secondary IDE channel 40-pin connector
Floppy drive 34-pin connector
SCSI 68-pin connector (Dell Precision 650
computer only)
CD drive audio interface 4-pin connector
Telephony (TAPI) 4-pin connector
Fans (3) 3-pin connector
I/O panel 34-pin connector
USB/IEEE 1394 16-pin connector
Information About Your Computer 9
Page 24

Key Combinations
<F2> starts embedded system setup (during
<F12> changes boot sequence (during start-up
<Ctrl><Alt><F10> launches the utility partition (if
<Ctrl><Enter> disables computer password at start-up
www.dell.com | support.dell.com
Controls and Lights
Power control push button
Power light green light; blinking green in sleep state;
Hard-drive access light green
start-up only)
only)
installed) during computer start-up
(after correct password is entered)
dual-color for computer operations —
green for power, yellow for diagnostics
Link integrity light (on integrated
network connector)
green light for 10-Mb operation; orange
light for 100-Mb operation; yellow light
for 1,000-Mb (1-Gb) operation
Activity light (on integrated network
yellow blinking light
connector)
Diagnostic lights four lights located on the front panel
Power
DC power supply:
Wattage Dell Precision 650 computer: 460 W
Dell Precision 450 computer: 360 W
Heat dissipation Dell Precision 650 computer: 1000
BTU/hr
Dell Precision 450 computer: 910
BTU/hr
Voltage 90 to 135 V at 50/60 Hz; 180 to 265 V at
50/60 Hz
Backup battery 3-V CR2032 lithium coin cell
10 Information About Your Computer
Page 25

Physical
Dell Precision 650 computer
Height 49.1 cm (19.3 inches)
Width 22.2 cm (8.7 inches)
Depth 48.8 cm (19.2 inches)
Weight 19 kg (42 lbs)
Dell Precision 450 computer
Height 16.5–16.8 cm (6.5–6.6 inches)
Width 44.7 cm (17.6 inches)
Depth 44.5 cm (17.5 inches)
Weight 18.6 kg (41 lbs)
Supported monitor weight (in
45.4 kg (100 lbs)
desktop orientation)
Environmental
Te mp er at u re :
Operating 10° to 35°C (50° to 95°F)
NOTE: At 35°C (95°F), the maximum
operating altitude is 914 m (3000 ft).
Storage –40° to 65°C (–40° to 149°F)
Relative humidity 20% to 80% (noncondensing)
Maximum vibration:
Operating 0.25 G at 3 to 200 Hz at 0.5 octave/min
Storage 0.5 G at 3 to 200 Hz at 1 octave/min
Maximum shock:
Operating bottom half-sine pulse with a change in
velocity of 50.8 cm/sec (20 inches/sec)
Information About Your Computer 11
Page 26

Environmental
www.dell.com | support.dell.com
Altitude:
Storage Dell Precision 650 comptuer:
nonoperating (half-sine pulse) 105 G,
2 ms
nonoperating (faired-square wave) 27
G with a velocity change of 508
cm/sec (200 inches/sec)
Dell Precision 450 computer:
nonoperating (half-sine pulse) 105 G,
2 ms
nonoperating (faired-square wave) 32
G wtih a velocity change of 596
cm/sec (200 inches/sec)
Operating –15 to 3048 m (–50 to 10,000 ft)
NOTE: At 35°C (95°F), the maximum
operating altitude is 914 m (3000 ft).
Storage –15 to 10,600 m (–50 to 35,000 ft)
Caring for Your Computer
To help maintain your computer, follow these suggestions:
• To avoid losing or corrupting data, never turn off your computer when the hard drive
light is on.
• Schedule regular virus scans using virus software.
• Manage hard drive space by periodically deleting unnecessary files and defragmenting
the drive.
• Back up files on a regular basis.
• Periodically clean your monitor screen, mouse, and keyboard (see "Cleaning Your
Computer").
12 Information About Your Computer
Page 27

2
SECTION 3
About Your
Computer—Dell
Precision 650
Front View
Back View
Inside Your Computer
System Board Components
Page 28
Front View
3
4
2
1
5
www.dell.com | support.dell.com
14 About Your Computer—Dell Precision 650
Page 29

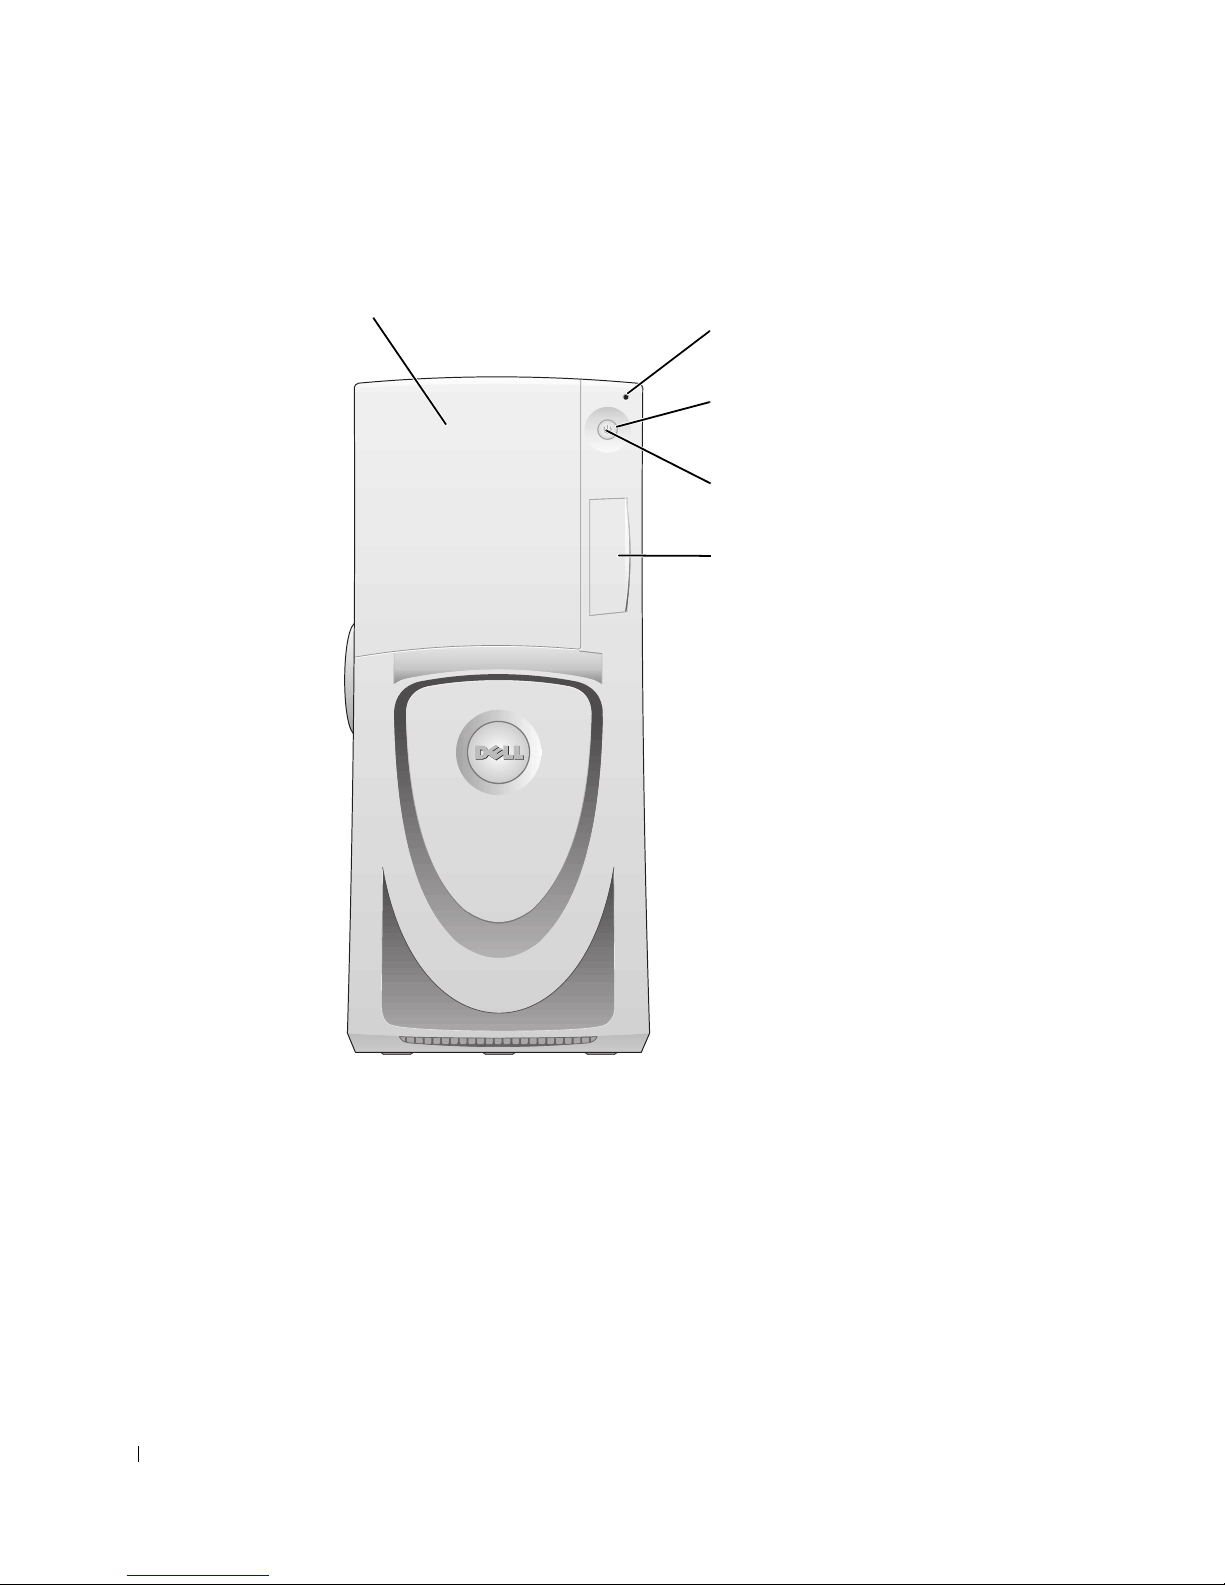
1 drive door Open the drive door to access the floppy and CD/DVD drives.
2 hard-drive light The hard-drive light is on when the computer reads data from or writes data to the
hard drive. The light might also be on when a device such as your CD player is
operating.
3 power button Press this button to turn on the computer.
NOTICE: To avoid losing data, do not use the power button to turn off the
computer. Instead, perform a Microsoft® Windows® shutdown.
4 power light The power light illuminates and blinks or remains solid to indicate the following
different states:
No light — The computer is in the off state.
Steady green — The computer is in a normal operating state.
Blinking green — The computer is in a power-saving state.
To exit from a power-saving state, press the power button or use the keyboard or
the mouse if it is configured as a wake device in the Windows Device Manager. For
more information about sleep states and exiting from a power-saving state, see
"Power Button."
See "Diagnostic Lights" for a description of light codes that can help you
troubleshoot problems with your computer.
5 front-panel door Open the door to use the front-panel connectors.
About Your Computer—Dell Precision 650 15
Page 30
Front View of the Computer (Doors Open)
6
3
2
1
7
4
5
www.dell.com | support.dell.com
16 About Your Computer—Dell Precision 650
Page 31

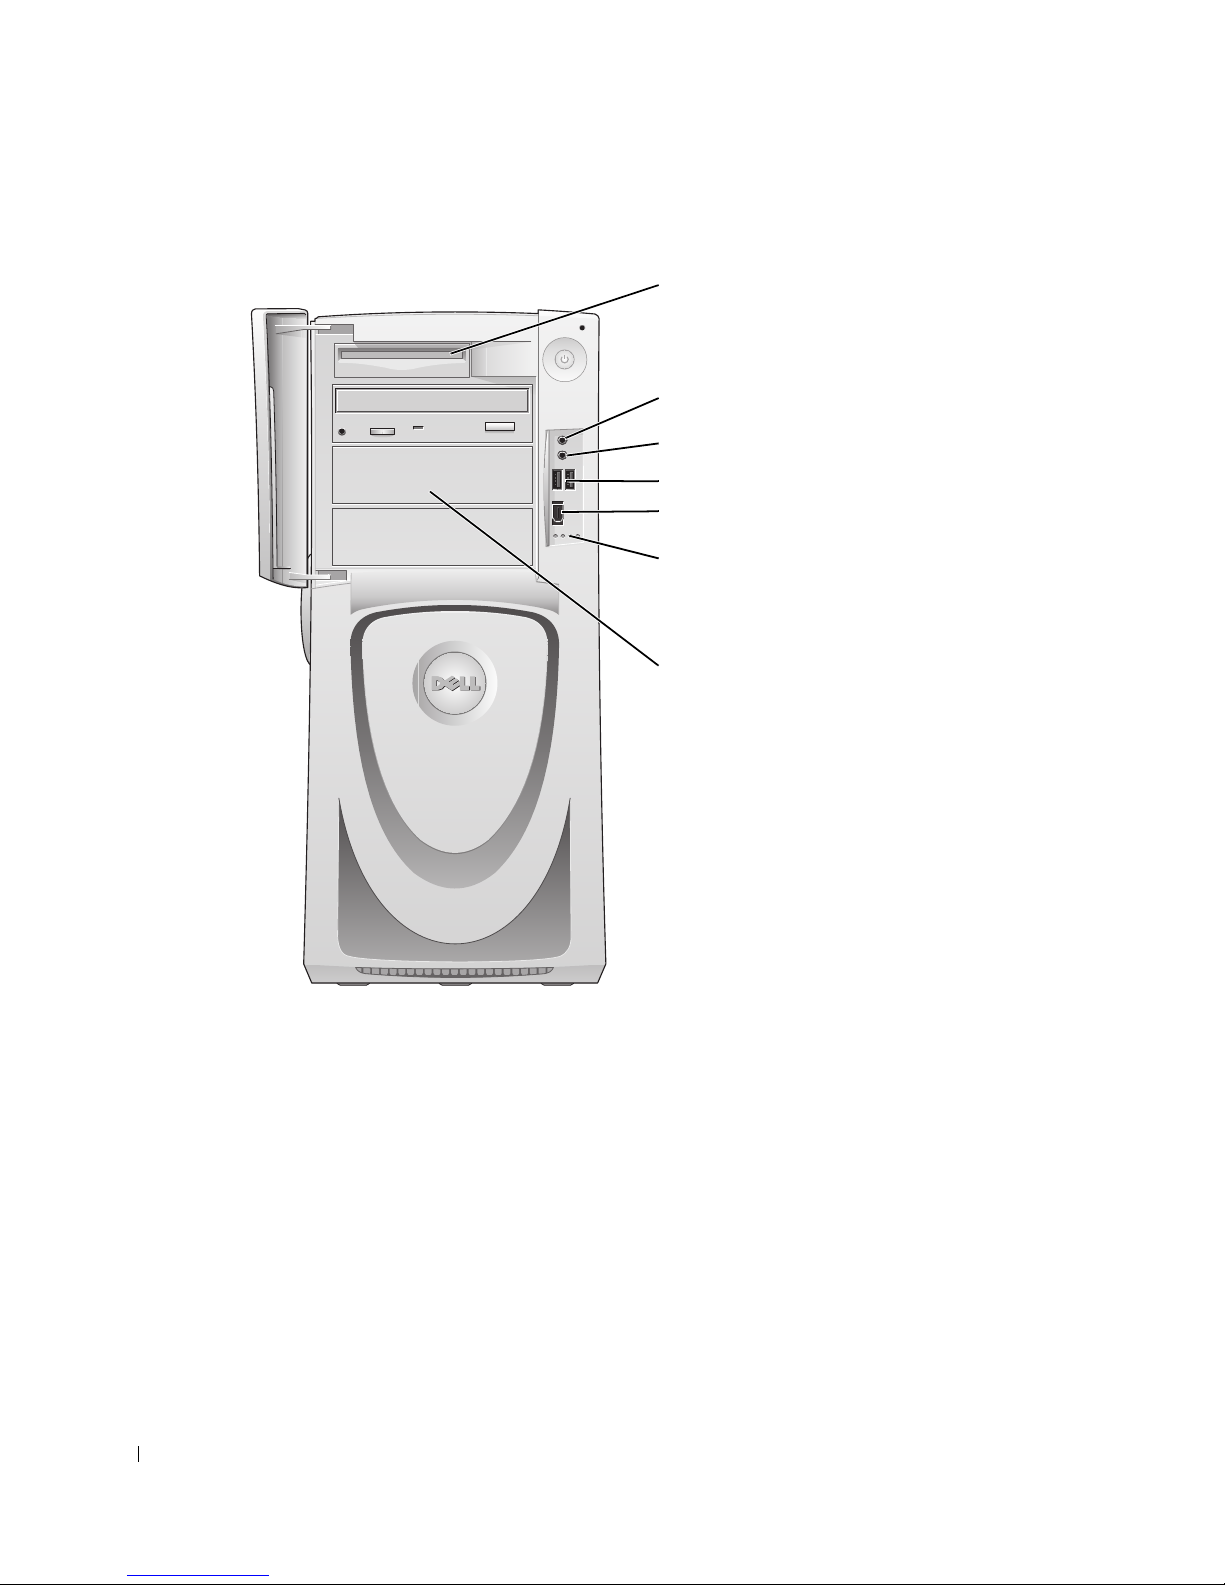
1 floppy drive Access the floppy drive.
2 headphone connector Attach headphones.
3 microphone connector Attach microphone.
4 USB 2.0 connectors (2) Use the front USB connectors for devices that you connect occasionally, such as
joysticks or cameras.
It is recommended that you use the back USB connectors for devices that typically
remain connected, such as printers and keyboards.
5 IEEE 1394 connector Attach high-speed serial multimedia devices, such as a digital video camera.
6 diagnostic lights (4) Use the lights to help you troubleshoot a computer problem based on the diagnostic
code. For more information, see "Diagnostic Lights."
7 externally accessible
drives
Access additional drives, such as a CD or DVD drive. Drive arrangement varies on
computer configuration.
About Your Computer—Dell Precision 650 17
Page 32
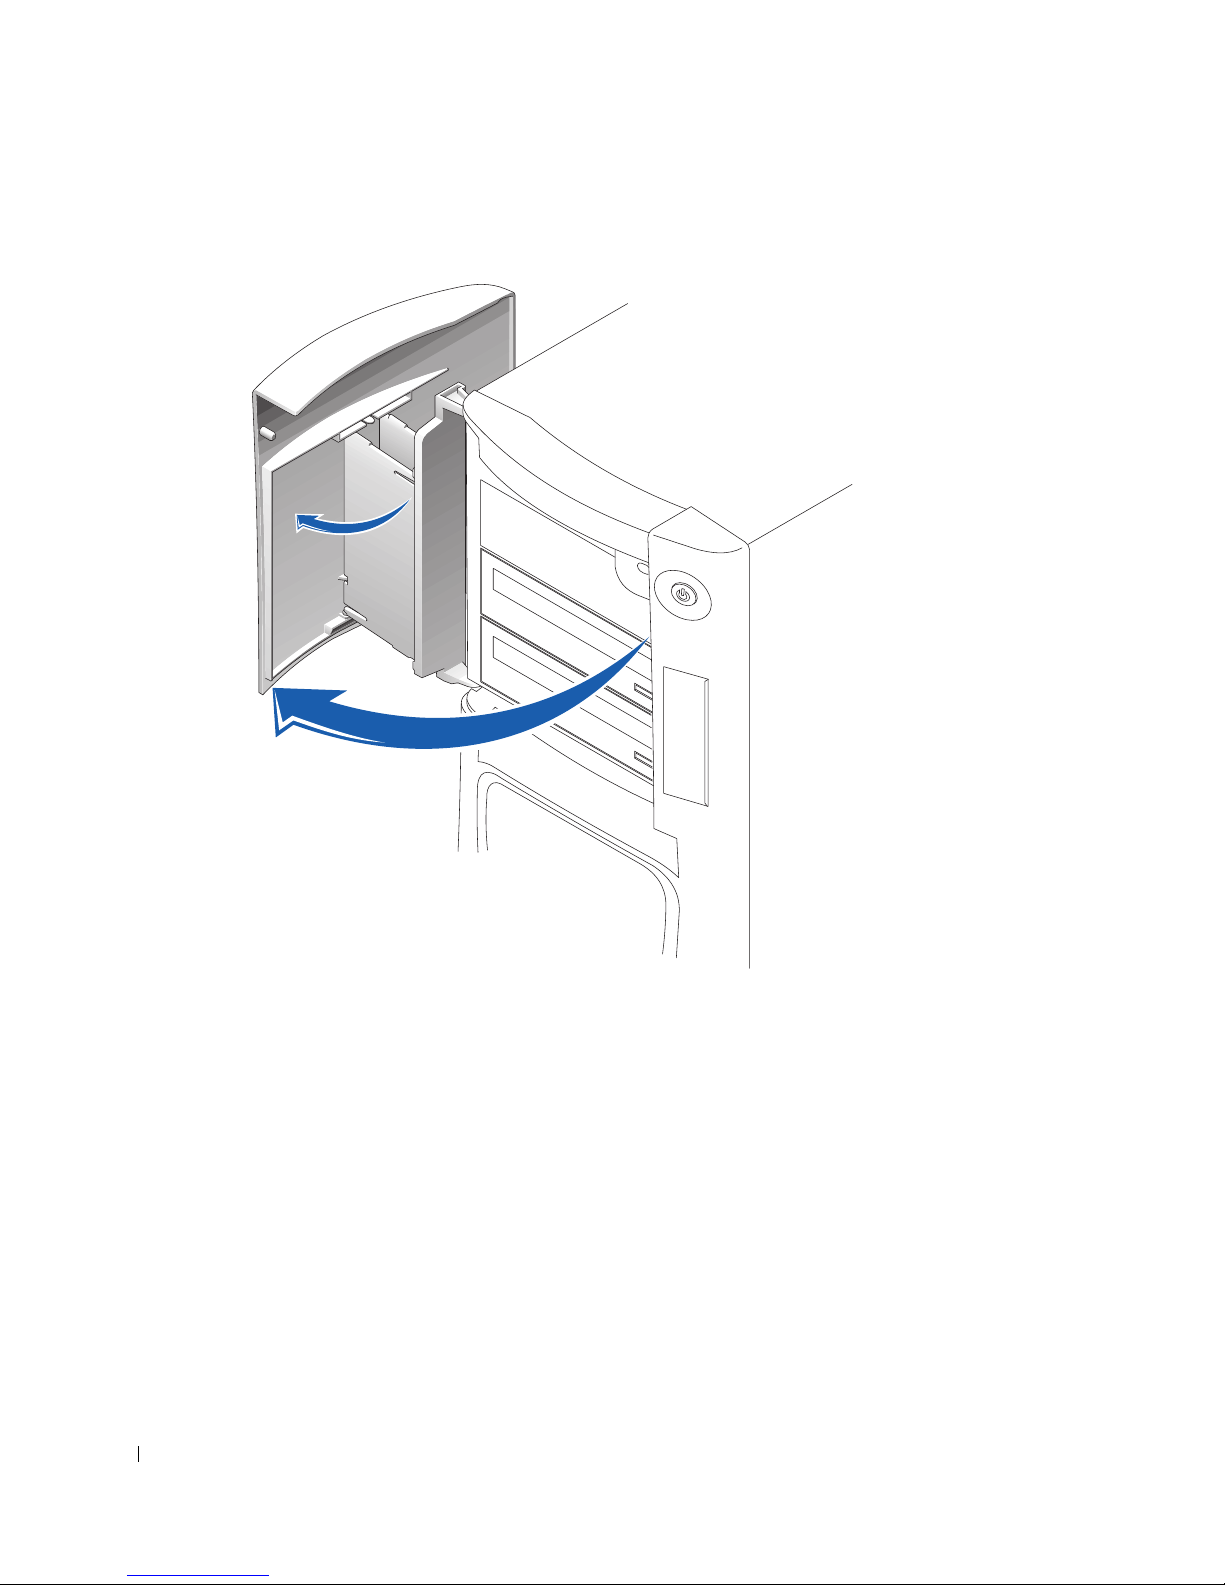
Opening the Drive Door
www.dell.com | support.dell.com
18 About Your Computer—Dell Precision 650
Page 33
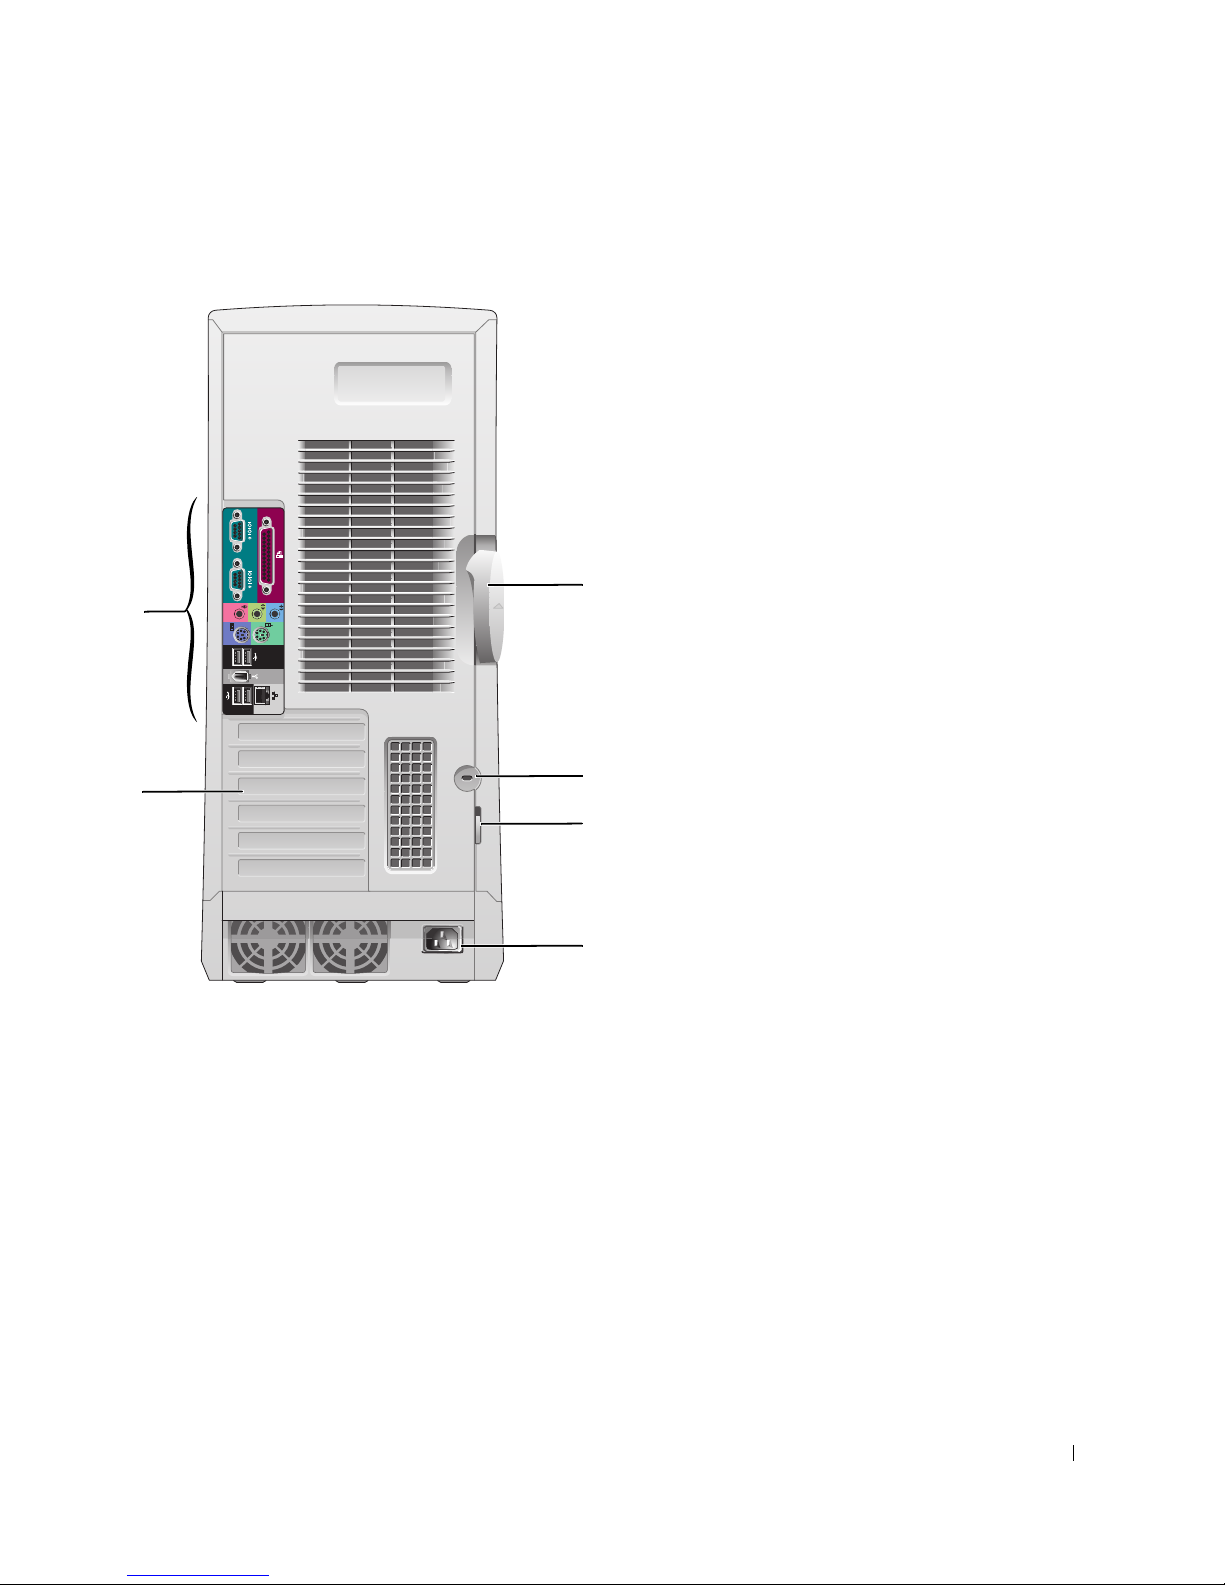
Back View
2
4
3
5
1
6
1 cover release latch Push the latch to the left to open the computer cover.
2 security cable slot Use a security cable with the slot to help secure your computer.
3 padlock ring Insert a padlock to lock the computer cover.
4 power connector Insert the power cable.
5 card slots (6) Access connectors for any installed PCI and AGP cards.
6 back panel connectors Plug serial, USB, and other devices into the appropriate connector.
About Your Computer—Dell Precision 650 19
Page 34
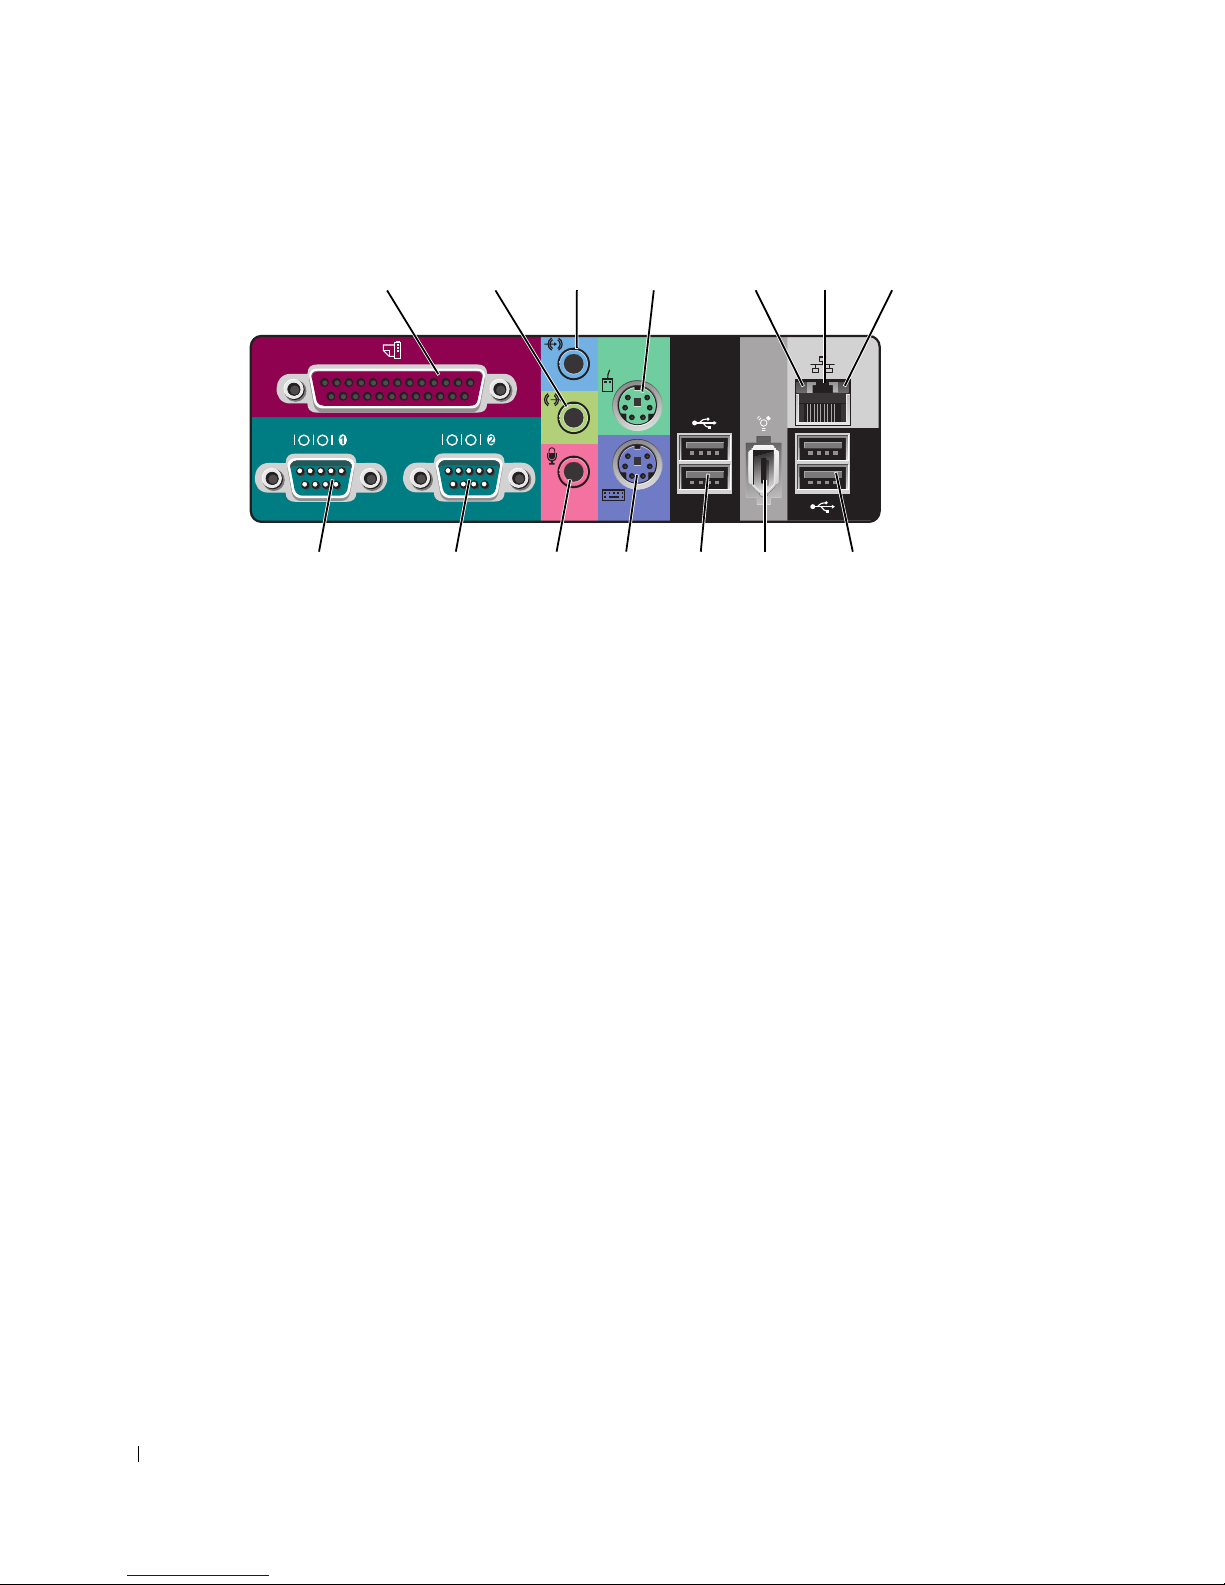
Back Panel Connectors
1234
14 13 12 11 910 8
567
www.dell.com | support.dell.com
20 About Your Computer—Dell Precision 650
Page 35

1 parallel connector Connect a parallel device, such as a printer, to the parallel connector. If you have a
USB printer, plug it into a USB connector.
NOTE: The integrated parallel connector is automatically disabled if the
computer detects an installed card containing a parallel connector configured to
the same address. For more information, see "System Setup Options."
2 line-out connector Use the green line-out connector (available on computers with integrated sound)
to attach headphones and speakers).
On computers with a sound card, use the connector on the card.
3 line-in connector Use the blue line-in connector (available on computers with integrated sound) to
attach a record/playback device such as a cassette player, CD player, or VCR.
On computers with a sound card, use the connector on the card.
4 mouse connector Plug a standard mouse into the green mouse connector. Turn off the computer
and any attached devices before you connect a mouse to the computer. If you have
a USB mouse, plug it into a USB connector.
®
If your computer is running the Microsoft
Windows® 2000 or Windows XP
operating system, the necessary mouse drivers have been installed on your hard
drive.
5 link integrity light • Green — A good connection exists between a 10-Mbps network and the
computer.
• Orange — A good connection exists between a 100-Mbps network and the
computer.
• Yellow — A good connection exists between a 1-Gbps (or 1000-Mbps)
connection.
• Off — The computer is not detecting a physical connection to the network.
6 network connector Attach the UTP cable to an RJ45 jack wall plate or to an RJ45 port on a UTP
concentrator or hub and press the other end of the UTP cable into the network
connector until the cable snaps securely into place.
The use of Category 5 wiring and connectors is recommended for our customers’
networks. If Category 3 wiring must be used, force the network speed to 10 Mbps
to ensure reliable operation.
On computers with a network connector card, use the connector on the card.
7 network activity light Flashes a yellow light when the computer is transmitting or receiving network
data. A high volume of network traffic may make this light appear to be in a steady
"on" state.
About Your Computer—Dell Precision 650 21
Page 36

8 USB 2.0 connectors (2) Use the back USB connectors for devices that typically remain connected, such as
printers and keyboards.
It is recommended that you use the front USB connectors for devices that you
connect occasionally, such as joysticks or cameras.
9 IEEE 1394 connector Attach high-speed serial multimedia devices.
10 USB 2.0 connectors (2) Use the back USB connectors for devices that typically remain connected, such as
printers and keyboards.
It is recommended that you use the front USB connectors for devices that you
connect occasionally, such as joysticks or cameras.
11 keyboard connector If you have a standard keyboard, plug it into the purple keyboard connector. If you
have a USB keyboard, plug it into a USB connector.
www.dell.com | support.dell.com
12 microphone connector Use the pink microphone connector (available on computers with integrated
sound) to attach a personal computer microphone for voice or musical input into
a sound or telephony program.
On computers with a sound card, use the microphone connector on the card.
13 serial connector (COM 2)Connect a serial device, such as a handheld device, to the serial port. The default
designations are COM1 for serial connector 1 and COM2 for serial connector 2.
For more information, see "System Setup Options."
14 serial connector (COM 1)Connect a serial device, such as a handheld device, to the serial port. The default
designations are COM1 for serial connector 1 and COM2 for serial connector 2.
For more information, see "System Setup Options."
Inside Your Computer
CAUTION: Before you begin any of the procedures in this section, follow the
safety instructions in the
CAUTION: To avoid electrical shock, always unplug your computer from the
electrical outlet before opening the cover.
NOTICE: Be careful when opening the computer cover to ensure that you do not accidentally
disconnect cables from the system board.
22 About Your Computer—Dell Precision 650
System Information Guide
.
Page 37
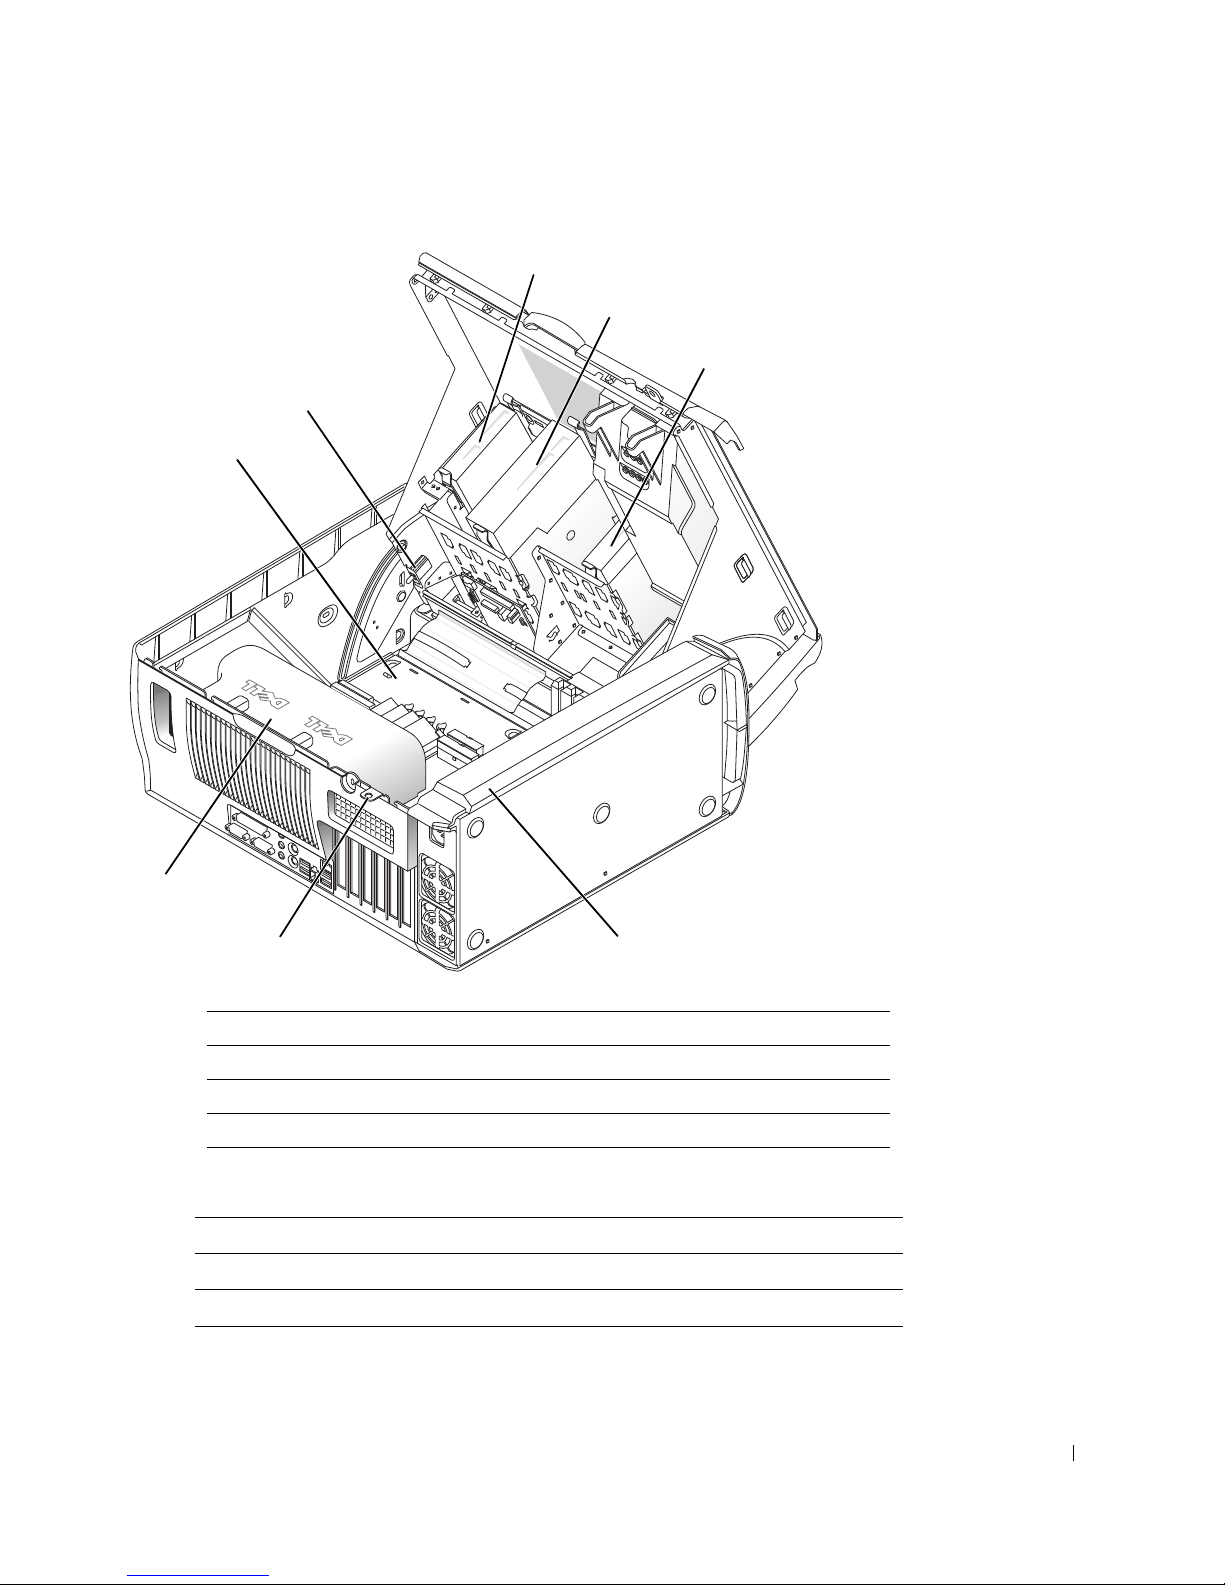
3
1
2
8
7
5
6
4
1 floppy drive 5 padlock ring
2 CD/DVD drive 6 microprocessor airflow shroud
3 hard drive 7 system board
4 power supply 8 chassis intrusion switch
Cable Colors
Device Cable Color
Hard drive Blue pull tab
Floppy drive Black pull tab
CD/DVD drive Orange pull tab
About Your Computer—Dell Precision 650 23
Page 38
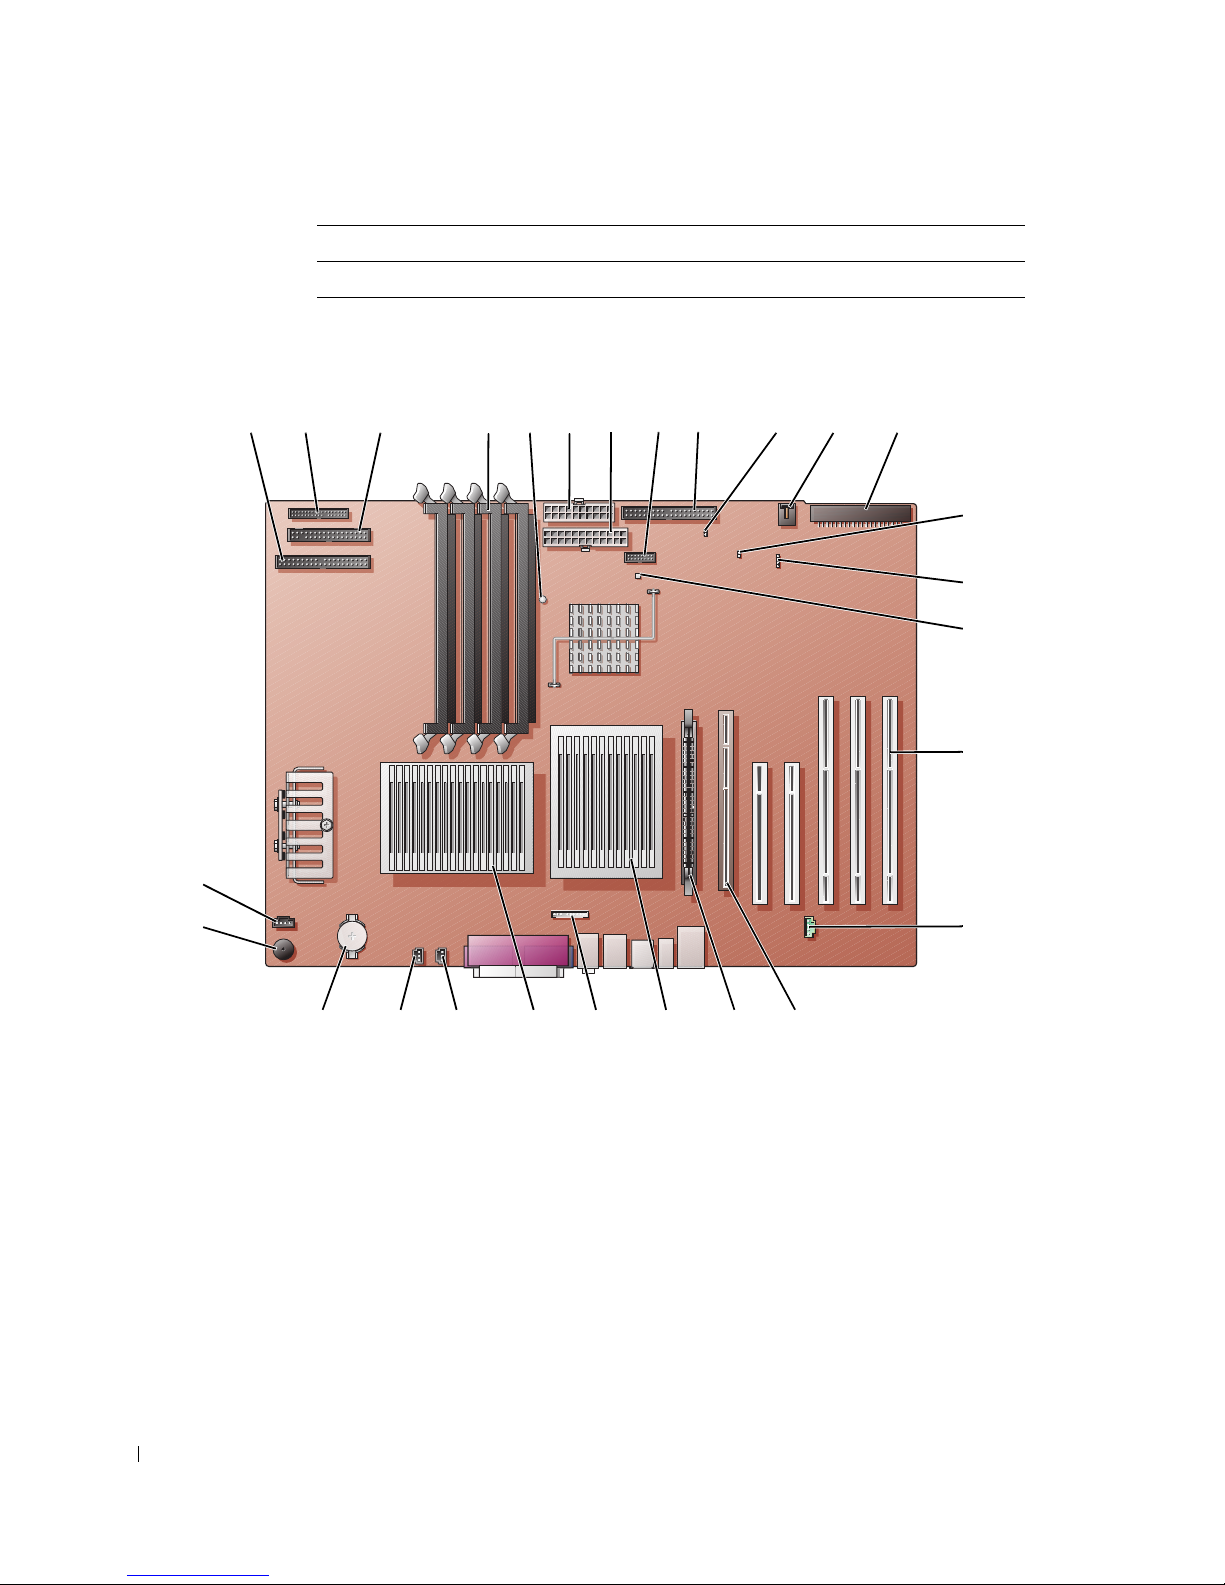
Device Cable Color
213467
8
9
10
2025
26
27
12
11
18
16
17
1924 23 22 21
13
5
15
14
I/O panel Yellow pull tab
System Board Components
www.dell.com | support.dell.com
24 About Your Computer—Dell Precision 650
Page 39

1 CD/DVD drive connector (IDE2) 15 standby power light (AUX_PWR_LED)
2 I/O panel connector (I/O PANEL) 16 PCI card connectors (PCI1, PCI2 [32-bit
connectors], PCI3 , PCI4, and PCI5 [64-bit PCIX connectors])
3 floppy-drive connector (DISKETTE) 17 telephony connector (MODEM)
4 memory module connectors (DIMM_1,
18 AGP card connector (AGP)
DIMM_2, DIMM_3, DIMM_4)
5 suspend-to-RAM light (STR_LED) 19 VRM connector (VRM)(for a second
microprocessor only)
6 power connector (POWER 2) 20 microprocessor and heat-sink connector
(CPU_1)
7 power connector (POWER 1) 21 front-panel audio connector (FP2AUDIO)
8 front-panel USB/IEEE 1394 connector (USB) 22 microprocessor and heat-sink connector
(CPU_0)
9 hard-drive connector (IDE1) 23 microprocessor fan connector (FAN_P1)
10 real-time clock reset jumper (RTCRST) 24 microprocessor fan connector (FAN_P0)
11 card fan connector (FAN) 25 battery socket (BATTERY)
12 SCSI drive connector (SCSI) 26 internal speaker (SPKR)
13 password jumper (PSWD) 27 CD drive audio cable connector (CD_IN)
14 auxiliary LED add-in storage adapter connector
(AUX_LED)
About Your Computer—Dell Precision 650 25
Page 40

www.dell.com | support.dell.com
26 About Your Computer—Dell Precision 650
Page 41

3
SECTION 4
About Your
Computer—Dell
Precision 450
Section TOC
Page 42
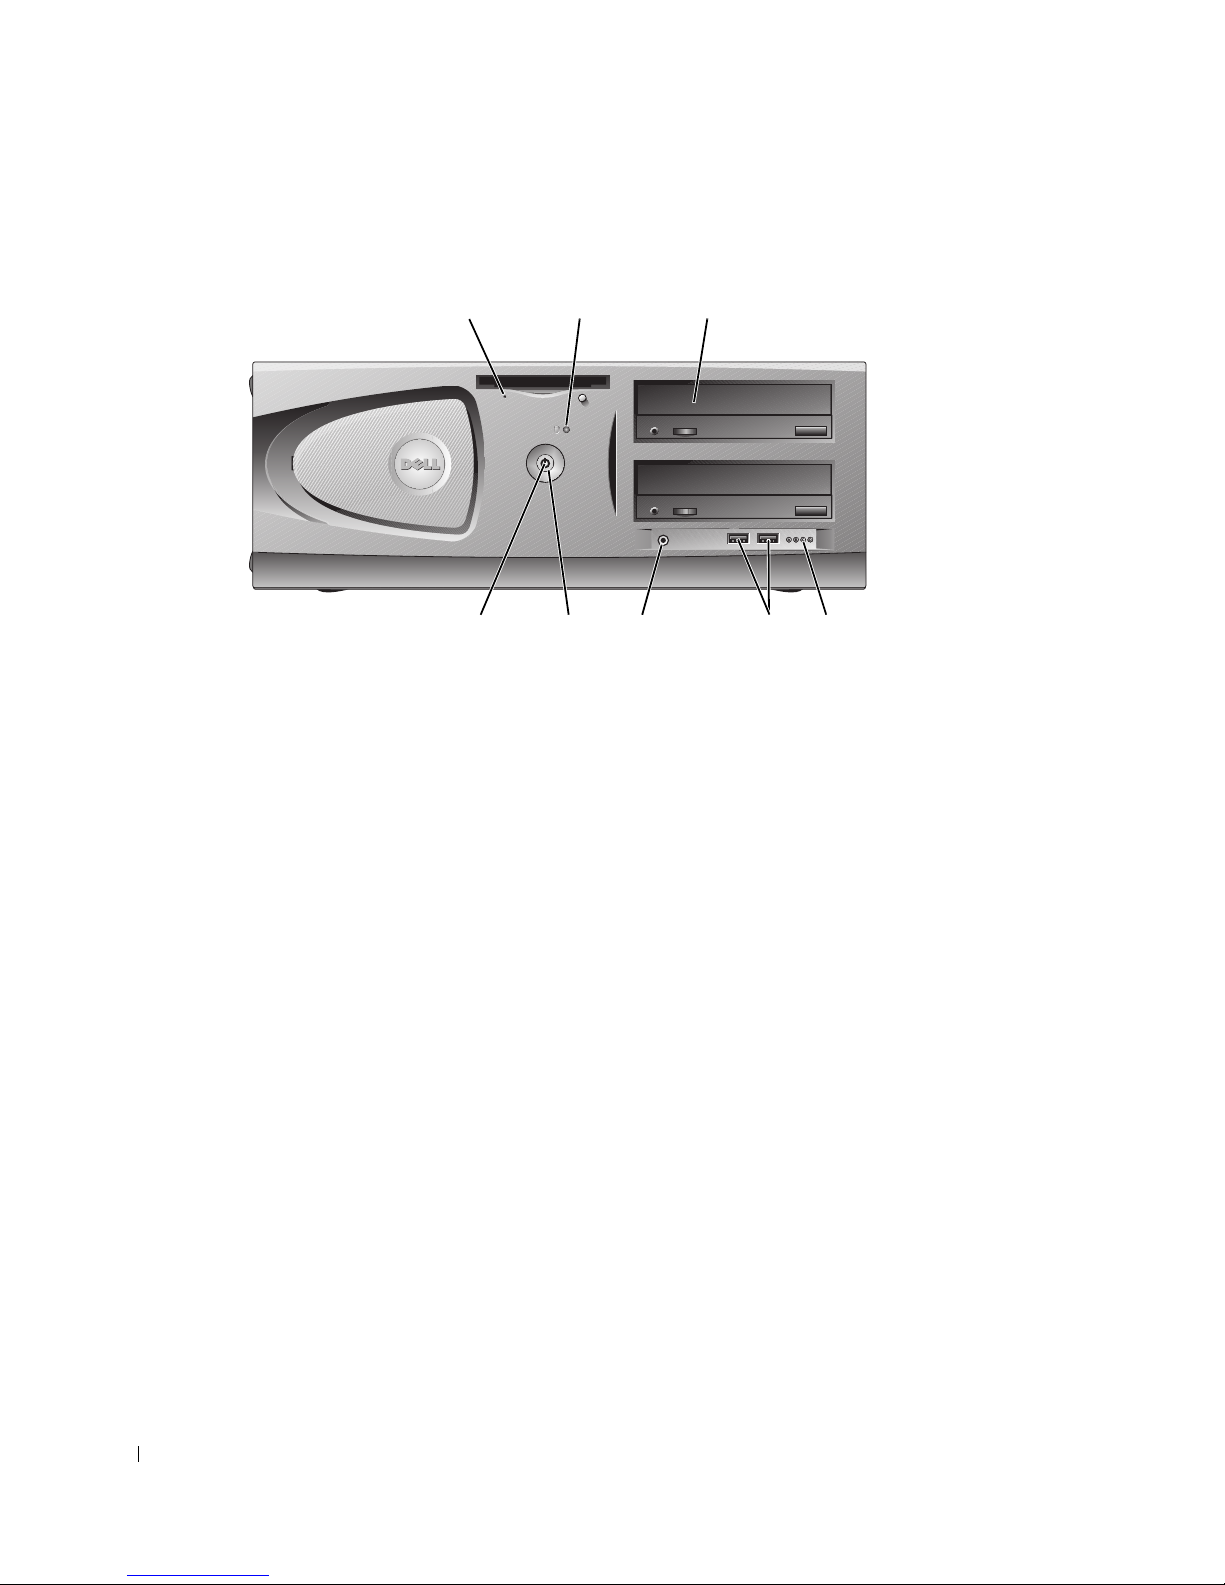
Front View
12 3
45678
www.dell.com | support.dell.com
1 floppy-drive light button The floppy-drive light is on when the computer reads data from or writes data to
the floppy drive. Wait until this light turns off before you remove the floppy disk
from the drive.
28 About Your Computer—Dell Precision 450
Page 43

2 hard-drive light The hard-drive light is on when the computer reads data from or writes data to the
hard drive. The light might also be on when a device such as your CD player is
operating.
3 CD/DVD drive Access the CD or DVD drive.
4 diagnostic lights (4) Use the lights to help you troubleshoot a computer problem based on the
diagnostic code. For more information, see "Diagnostic Lights."
5 USB 2.0 connectors (2) Use the front USB connectors for devices that you connect occasionally, such as
joysticks or cameras.
It is recommended that you use the back USB connectors for devices that typically
remain connected, such as printers and keyboards.
6 headphone connector Attach headphones.
7 power button Press this button to turn on the computer.
NOTICE: To avoid losing data, do not use the power button to turn off the
computer. Instead, perform a Microsoft® Windows® shutdown.
8 power light The power light illuminates and blinks or remains solid to indicate the following
different states:
No light — The computer is in the off state.
Steady green —The computer is in a normal operating state.
Blinking green —The computer is in a power-saving state.
To exit from a power-saving state, press the power button or use the keyboard or
the mouse if it is configured as a wake device in the Windows Device Manager. For
more information about sleep states and exiting from a power-saving state, see
"Power Button."
See "Diagnostic Lights" for a description of light codes that can help you
troubleshoot problems with your computer.
About Your Computer—Dell Precision 450 29
Page 44

Back View
12
345
1234
13 12 11 10 9 8
567
www.dell.com | support.dell.com
1 cover release latch Push the latch to the left to open the computer cover.
2 padlock ring Insert a padlock to lock the computer cover.
3 power connector Insert the power cable.
4 card slots (4) Access connectors for any installed PCI and AGP cards.
5 back panel connectors Plug serial, USB, and other devices into the appropriate connector.
Back Panel Connectors
30 About Your Computer—Dell Precision 450
Page 45

1 parallel connector Connect a parallel device, such as a printer, to the parallel connector. If you have a
USB printer, plug it into a USB connector.
NOTE: The integrated parallel connector is automatically disabled if the
computer detects an installed card containing a parallel connector configured to
the same address. For more information, see "System Setup Options."
2 line-out connector Use the green line-out connector (available on computers with integrated sound)
to attach headphones and speakers.
On computers with a sound card, use the connector on the card.
3 line-in connector Use the blue line-in connector (available on computers with integrated sound) to
attach a record/playback device such as a cassette player, CD player, or VCR.
On computers with a sound card, use the connector on the card.
4 mouse connector Plug a standard mouse into the green mouse connector. Turn off the computer
and any attached devices before you connect a mouse to the computer. If you have
a USB mouse, plug it into a USB connector.
®
If your computer is running the Microsoft
Windows® 2000 or Windows XP
operating system, the necessary mouse drivers have been installed on your hard
drive.
5 link integrity light • Green — A good connection exists between a 10-Mbps network and the
computer.
• Orange — A good connection exists between a 100-Mbps network and the
computer.
• Yellow — A good connection exists between a 1 Gb (or 1000-Mbps)
connection.
• Off — The computer is not detecting a physical connection to the network.
6 network connector Attach the UTP cable to an RJ45 jack wall plate or to an RJ45 port on a UTP
concentrator or hub and press the other end of the UTP cable into the network
connector until the cable snaps securely into place.
The use of Category 5 wiring and connectors is recommended for our customers’
networks. If Category 3 wiring must be used, force the network speed to 10 Mbps
to ensure reliable operation.
On computers with a network connector card, use the connector on the card.
About Your Computer—Dell Precision 450 31
Page 46

7 network activity light The yellow light flashes when the computer is transmitting or receiving network
data. A high volume of network traffic may make this light appear to be in a steady
"on" state.
8 USB 2.0connectors (2) Use the back USB connectors for devices that typically remain connected, such as
printers and keyboards.
It is recommended that you use the front USB connectors for devices that you
connect occasionally, such as joysticks or cameras.
9 USB 2.0 connectors (2) Use the back USB connectors for devices that typically remain connected, such as
printers and keyboards.
It is recommended that you use the front USB connectors for devices that you
connect occasionally, such as joysticks or cameras.
10 keyboard connector If you have a standard keyboard, plug it into the purple keyboard connector. If you
www.dell.com | support.dell.com
have a USB keyboard, plug it into a USB connector.
11 microphone connector Use the pink microphone connector (available on computers with integrated
sound) to attach a personal computer microphone for voice or musical input into
a sound or telephony program.
On computers with a sound card, use the microphone connector on the card.
12 serial connector (COM 2)Connect a serial device, such as a handheld device, to the serial port. The default
designations are COM1 for serial connector 1 and COM2 for serial connector 2.
For more information, see "System Setup Options."
13 serial connector (COM 1)Connect a serial device, such as a handheld device, to the serial port. The default
designations are COM1 for serial connector 1 and COM2 for serial connector 2.
For more information, see "System Setup Options."
Inside Your Computer
CAUTION: Before you begin any of the procedures in this section, follow the
safety instructions in the
CAUTION: To avoid electrical shock, always unplug your computer from the
electrical outlet before opening the cover.
NOTICE: Be careful when opening the computer cover to ensure that you do not accidentally
disconnect cables from the system board.
32 About Your Computer—Dell Precision 450
System Information Guide
.
Page 47
3
4
5
6
8
2
1
9
7
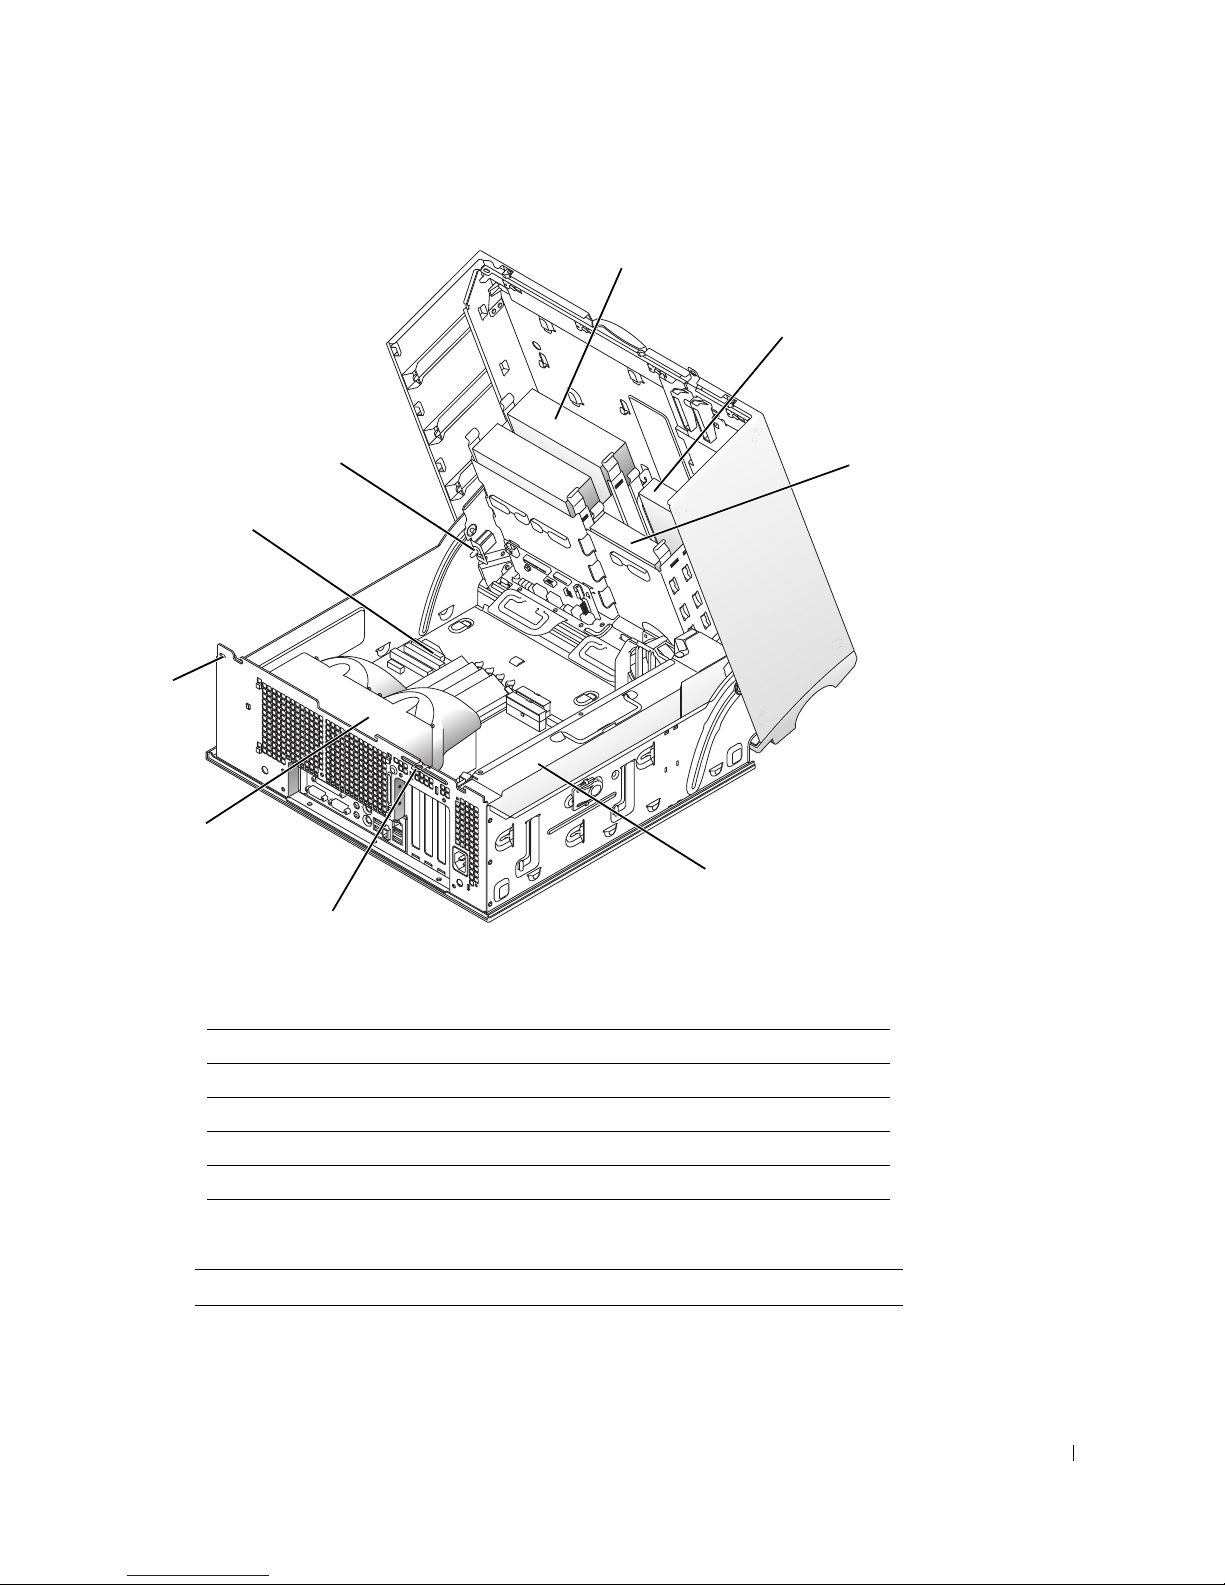
1 CD/DVD drive 6 microprocessor airflow shroud
2 floppy drive 7 security cable slot
3 hard drive 8 system board
4 power supply 9 chassis intrusion switch
5 padlock ring
Cable Colors
Device Cable Color
Hard drive Blue pull tab
About Your Computer—Dell Precision 450 33
Page 48
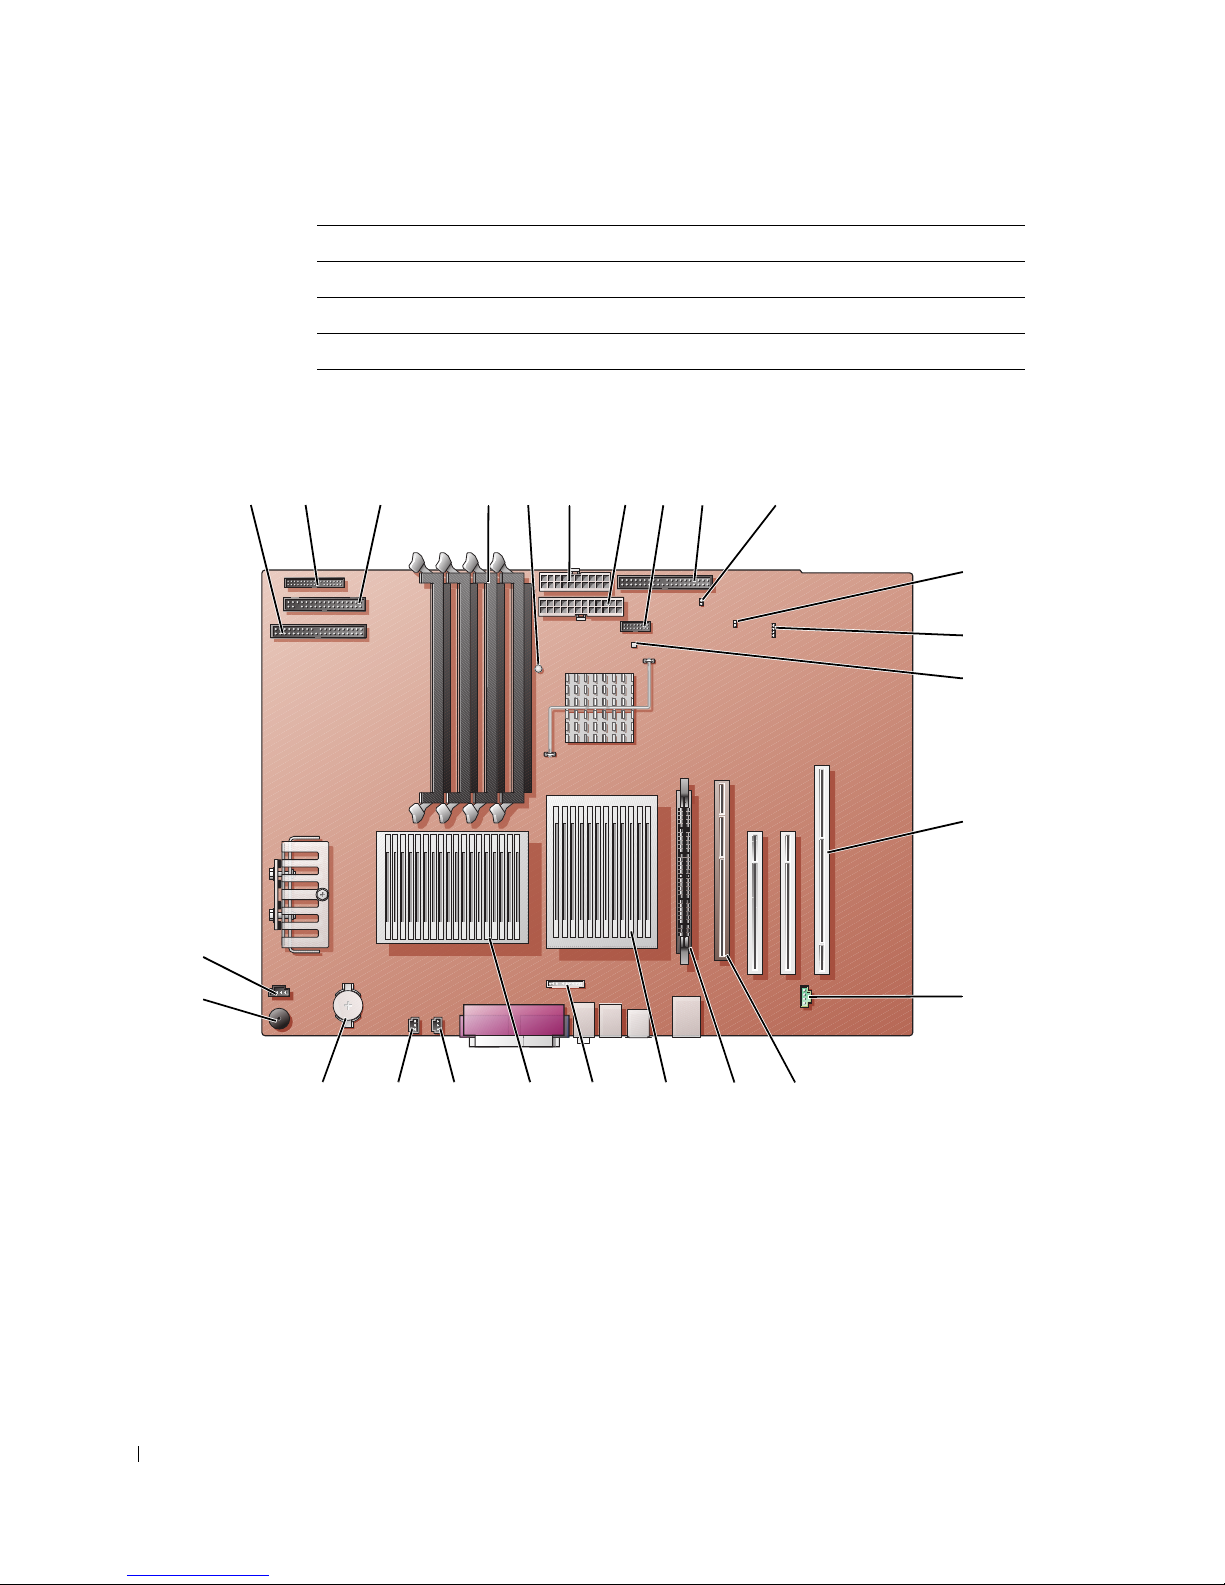
Device Cable Color
213467
8
9
16182223 21 20
24
25
14
10
15
1719
11
5
13
12
Floppy drive Black pull tab
CD/DVD drive Orange pull tab
I/O panel Yellow pull tab
System Board Components
www.dell.com | support.dell.com
34 About Your Computer—Dell Precision 450
Page 49

1 CD/DVD drive connector (IDE2) 14 PCI card connectors (PCI1, PCI2 [32-bit
connectors], and PCI3 [64-bit PCI-X
connector])
2 I/O panel (I/O PANEL) 15 telephony connector (MODEM)
3 floppy drive connector (DISKETTE) 16 AGP card connector (AGP)
4 memory module connectors (DIMM_1,
DIMM_2, DIMM_3, DIMM_4)
17 VRM connector (VRM) (for a second
microprocessor only)
5 suspend-to-RAM light (STR_LED) 18 microprocessor and heat-sink connector
(CPU_1)
6 power connector (POWER 2) 19 front-panel audio connector (FP2AUDIO)
7 power connector (POWER 1) 20 microprocessor and heat-sink connector
(CPU_0)
8 USB connector (USB) 21 microprocessor fan connector (FAN_P1)
9 hard-drive connector (IDE1) 22 microprocessor fan connector (FAN_P0))
10 real-time clock reset jumper (RTCRST) 23 battery socket (BATTERY)
11 password jumper (PSWD) 24 internal speaker (SPKR)
12 auxiliary LED add-in storage adapter connector
25 CD drive audio cable connector (CD_IN)
(AUX_LED)
13 standby power light (AUX_PWR_LED)
About Your Computer—Dell Precision 450 35
Page 50

www.dell.com | support.dell.com
36 About Your Computer—Dell Precision 450
Page 51

SECTION 5
Advanced Features
LegacySelect Technology Control
Manageability
Security
Password Protection
System Setup
4
Jumper Settings
Power Button
TAPI
Hyper-Threading
IEEE 1394
U320 SCSI Controller
Integrated Striping
Page 52

LegacySelect Technology Control
LegacySelect technology control offers legacy-full, legacy-reduced, or legacy-free solutions
based on common platforms, hard-drive images, and help desk procedures. Control is
provided to the administrator through system setup, Dell OpenManage™ IT Assistant, or
Dell™ custom factory integration.
LegacySelect allows administrators to electronically activate or deactivate connectors and
media devices that include serial and USB connectors, a parallel connector, a floppy drive,
and a PS/2 mouse. Connectors and media devices that are deactivated make resources
available. You must restart the computer for the changes to take effect.
www.dell.com | support.dell.com
Manageability
Alert Standard Format
ASF is a DMTF management standard that specifies "pre-operating system" or "operating
system-absent" alerting techniques. It is designed to generate an alert on potential security
and fault conditions when the operating system is in a sleep state or the computer is
powered down. ASF is designed to supersede previous operating system-absent alerting
technologies.
Your computer supports the following ASF alerts and remote capabilities:
Alert Description
Bad CPU The microprocessor has been unable to execute
its first instructions.
Chassis
Intrusion/Chassis
Intrusion Cleared
Corrupt BIOS The BIOS is corrupted.
Failure to Boot to
BIOS
The computer has been opened or the chassis
intrusion alert has been cleared.
The BIOS did not complete loading upon
initiation.
38 Advanced Features
Page 53

System Password
Failure
Entity Presence Periodic Heartbeats have been transmitted to
Temperature - Too High
(critical)
Voltage - Too Low
Too High (critical)
Cooling Device Limits The computer fan speed/rpm is out of limits.
Ethernet Connectivity
Enabled/Ethernet
Connectivity Disabled
Power Supply A fan or voltage failure exists inside the power
The system password is invalid (after 3 failed
attempts).
verify computer presence.
The computer temperature is out of limits.
The computer voltage is out of limits.
The Ethernet connectivity is enabled or
Ethernet connectivity is disabled.
supply.
For more information about Dell's ASF implementation, see the ASF User's Guide and the
ASF Administrator's Guide, available on the Dell Support website at support.dell.com.
Dell OpenManage IT Assistant
IT Assistant configures, manages, and monitors computers and other devices on a corporate
network. IT Assistant manages assets, configurations, events (alerts), and security for
computers equipped with industry-standard management software. It supports
instrumentation that conforms to SNMP, DMI, and CIM industry standards.
Dell OpenManage Client instrumentation, which is based on DMI and CIM, is available
for your computer. For information on IT Assistant, see the Dell OpenManage IT Assistant
User’s Guide available on the Dell Support website at support.dell.com.
Dell OpenManage Client Instrumentation
Dell OpenManage Client Instrumentation is software that enables remote management
programs such as IT Assistant to do the following:
• Access information about your computer, such as how many processors it has and what
operating system it is running
• Monitor the status of your computer, such as listening for thermal alerts from
temperature probes or hard-drive failure alerts from storage devices
• Change the state of your computer, such as updating its BIOS or shutting it down
remotely
Advanced Features 39
Page 54

A managed system is one that has Dell OpenManage Client Instrumentation set up on a
network that uses IT Assistant. For information about Dell OpenManage Client
Instrumentation, see the Dell OpenManage Client Instrumentation User’s Guide available
on the Dell Support website at support.dell.com.
Security
Chassis Intrusion Detection
NOTE: When the setup password is enabled, you must know the setup password before you can
reset the Chassis Intrusion setting.
www.dell.com | support.dell.com
This feature detects that the chassis was opened and alerts the user. To change the Chassis
Intrusion setting:
1 Enter system setup.
2 Press the down-arrow keys to move to the System Security option.
3 Press <Enter> to access the System Security option's pop-up menu.
4 Press the down-arrow key to move to the Chassis Intrusion setting.
5 Press the spacebar to select an option setting.
6 Exit system setup.
Option Settings
• Enabled — If the computer cover is opened, the setting changes to Detected, and the
following alert message displays during the boot routine at the next computer start-up:
Alert! Cover was previously removed.
To re se t t he Detected setting, enter system setup. In the Chassis Intrusion option,
press the left- or right-arrow key to select Reset, and then choose Enabled, Enabled-
Silent, or Disabled.
• Enabled-Silent (default) — If the computer cover is opened, the setting changes to
Detected. No alert message appears during the boot sequence at the next computer
start-up.
• Disabled — No intrusion monitoring occurs and no messages appear.
Padlock Ring and Security Cable Slot
Use one of the following methods to secure your computer:
40 Advanced Features
Page 55

• Use a padlock alone or a padlock and looped security cable with the padlock ring.
A padlock alone prevents the computer from being opened.
A security cable looped around a stationary object is used in conjunction with a
padlock to prevent unauthorized movement of the computer.
• Attach a commercially available antitheft device to the security cable slot on the back
of the computer.
NOTE: Before you purchase an antitheft device, ensure that it works with the security cable slot
on your computer.
Antitheft devices usually include a segment of metal-stranded cable with an attached
locking device and key. A Kensington lock is recommended. The documentation that
comes with the locking device contains instructions for installing it.
Password Protection
NOTICE: Although passwords provide security for the data on your computer, they are not
foolproof. If your data requires more security, it is your responsibility to obtain and use
additional forms of protection, such as data encryption programs.
System Password
NOTICE: If you leave your computer running and unattended without having a system
password assigned, or if you leave your computer unlocked so that someone can disable the
password by changing a jumper setting, anyone can access the data stored on your hard drive.
Option Settings
You cannot change or enter a new system password if either of the following two options is
displayed:
• Enabled — A system password is assigned.
• Disabled — The system password is disabled by a jumper setting on the system board.
You can only assign a system password when the following option is displayed:
• Not Enabled — A system password has not been assigned and the password jumper on
the system board is in the enabled position (the default).
Advanced Features 41
Page 56

Assigning a System Password
To escape from the field without assigning a system password, press <Tab> or the
<Shift><Tab> key combination to move to another field, or press <Esc> at any time
before you complete step 5.
1 Enter system setup and verify that Password Status is set to Unlocked.
2 Highlight System Password and then press the left- or right-arrow key.
The option heading changes to Enter Password, followed by an empty 32-character
field in square brackets.
3 Type your new system password.
www.dell.com | support.dell.com
You can use up to 32 characters. To erase a character when entering your password,
press <Backspace> or the left-arrow key. The password is not case sensitive.
Certain key combinations are not valid. If you enter one of these combinations, the
speaker emits a beep.
As you press each character key (or the spacebar for a blank space), a placeholder
appears in the field.
4 Press <Enter>.
If the new system password is less than 32 characters, the whole field fills with
placeholders. Then the option heading changes to Verify Password, followed by
another empty 32-character field in square brackets.
5 To confirm your password, type it a second time and press <Enter>.
The password setting changes to Enabled.
6 Exit system setup.
Password protection takes effect when you restart the computer.
Typing Your System Password
When you start or restart your computer, one of the following prompts appears on the
screen.
If Password Status is set to Unlocked:
Type in the password and
- press <ENTER> to leave password security enabled.
- press <CTRL><ENTER> to disable password security.
Enter password:
If Password Status is set to Locked:
42 Advanced Features
Page 57

Type the password and press <Enter>.
If you have assigned a setup password, the computer accepts your setup password as an
alternate system password.
If you type a wrong or incomplete system password, the following message appears on the
screen:
** Incorrect password. **
If you again type an incorrect or incomplete system password, the same message appears on
the screen. The third and subsequent times you type an incorrect or incomplete system
password, the computer displays the following message:
** Incorrect password. **
Number of unsuccessful password attempts: 3
System halted! Must power down.
Even after your computer is turned off and on, the previous message is displayed each time
you type an incorrect or incomplete system password.
NOTE: You can use Password Status in conjunction with System Password and Setup Password
to further protect your computer from unauthorized changes.
Deleting or Changing an Existing System Password
1 Enter system setup and verify that Password Status is set to Unlocked.
2 Restart your computer.
3 When prompted, type the system password.
4 Press <Ctrl><Enter> to disable the existing system password.
5 Confirm that Not Enabled is displayed for the System Password option.
If Not Enabled is displayed, the system password is deleted. If Not Enabled is not
displayed, press <Alt><b> to restart the computer, and then repeat step 3 through
step 5.
To assign a new password, follow the procedure in "Assigning a System Password."
6 Exit system setup.
Advanced Features 43
Page 58

Setup Password
Option Settings
• Enabled — Does not allow assignment of setup passwords; you must enter a setup
password to make changes to system setup.
• Not Enabled — Allows assignment of setup passwords; password feature is enabled
but no password is assigned.
Assigning a Setup Password
The setup password can be the same as the system password.
www.dell.com | support.dell.com
NOTE: If the two passwords are different, the setup password can be used as an alternate
system password. However, the system password cannot be used in place of the setup password.
1 Enter system setup and verify that Setup Password is set to Not Enabled.
2 Highlight Setup Password and press the left- or right-arrow key.
The computer prompts you to type and verify the password. If a character is not
permitted, the computer emits a beep.
3 Type and then verify the password.
After you verify the password, the Setup Password setting changes to Enabled. The
next time you enter system setup, the computer prompts you for the setup password.
4 Exit system setup.
A change to Setup Password becomes effective immediately (no need to restart the
computer).
Operating Your Computer With a Setup Password Enabled
When you enter system setup, the Setup Password option is highlighted, prompting you to
type the password.
If you do not type the correct password, the computer lets you view, but not modify, system
setup options.
NOTE: You can use password status in conjunction with setup password to protect the system
password from unauthorized changes.
Deleting or Changing an Existing Setup Password
To change an existing setup password, you must know the setup password.
44 Advanced Features
Page 59
1 Enter system setup.
2 Type the setup password at the prompt.
3 Highlight Setup Password and press the left- or right-arrow key to delete the existing
setup password.
The setting changes to Not Enabled.
To assign a new setup password, perform the steps in "Assigning a System Password."
4 Exit system setup.
Disabling a Forgotten Password and Setting a New Password
NOTICE: This process erases both the system and setup passwords.
CAUTION: Before you open the computer cover, see the safety instructions in the
System Information Guide
Open the computer cover.
1
2 Remove the jumper plug labeled "PSWD" from the jumper.
See "Jumper Settings" to locate the password jumper.
3 Close the computer cover.
.
4 Reconnect your computer and devices to electrical outlets and turn them on.
This disables the existing password(s).
5 Enter system setup and verify that Setup Password is set to Disabled.
6 Exit system setup.
CAUTION: Before you open the computer cover, see the safety instructions in the
System Information Guide
Open the computer cover.
7
8 Replace the PSWD jumper plug.
9 Close the computer cover and reconnect the computer and devices to electrical
.
outlets and turn them on.
This reenables the password feature. When you enter system setup, both password
options appear as Not Enabled—the password feature is enabled but no password is
assigned.
10 Assign a new system and/or setup password.
Advanced Features 45
Page 60

System Setup
Use system setup settings as follows:
• To set user-selectable options such as date and time or system password
• To read the current amount of memory or set the type of hard drive installed
It is recommended that you print the system setup screens (by pressing <Print Screen>) or
record the information for future reference.
Before you use system setup, you must know the kind of floppy drive(s) and hard drive(s)
installed in your computer. To confirm this information, see the Manufacturing Test Report
www.dell.com | support.dell.com
that came with your computer, or find this information in the online Dell Accessories
folder.
Entering System Setup
1 Turn on or restart your computer.
2 When Press <F2> to Enter Setup appears in the upper-right corner of the screen,
press <F2> immediately.
If you wait too long and the Microsoft
until you see the Windows desktop. Then shut down your computer and try again.
®
Windows® logo appears, continue to wait
NOTE: To ensure an orderly computer shutdown, consult the documentation that came with
your operating system.
System Setup Screens
System setup screens display current configuration information for your computer.
Information on the screen is organized into four areas:
• Title — The box at the top of all screens that lists the computer name
• Computer data — Two boxes below the title box that display your computer processor,
L2 cache, service tag, and the version number of the BIOS
• Options — A scrollable box listing options that define the configuration of your
computer, including installed hardware, power conservation, and security features
Fields to the right of the option titles contain settings or values. The fields that you
can change appear bright on the screen. The fields that you cannot change (because
they are set by the computer) appear less bright. When <Enter> appears to the right
of an option title, press <Enter> to access a popup menu of additional options.
46 Advanced Features
Page 61

• Key functions — A line of boxes across the bottom of all screens that lists keys and
their functions within system setup
– <F1> — Access the System Setup Help
– <ESC> — Exit System Setup
Advanced Features 47
Page 62
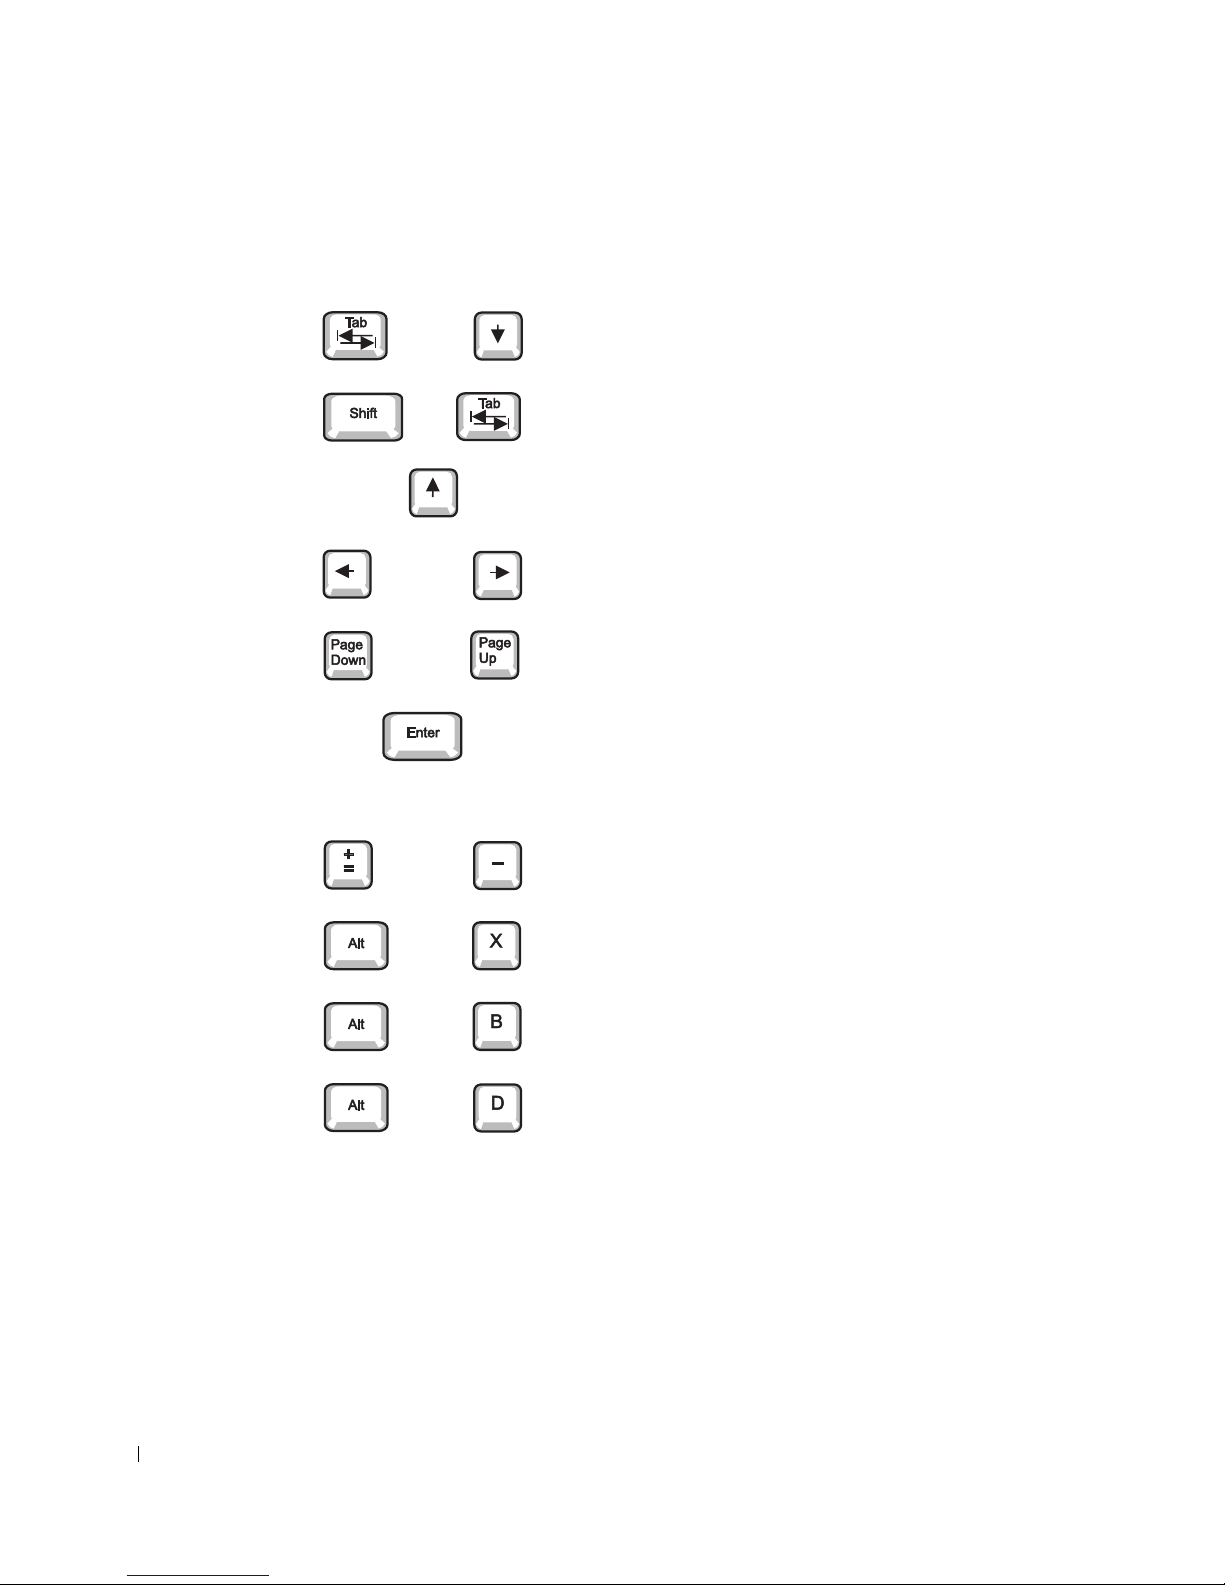
System Setup Navigation Keys
or
or
or
or
or
Keys Action
Moves to the next field.
Moves to the previous field.
www.dell.com | support.dell.com
spacebar or
Cycles through the options in a field. In many fields, you
can also type the appropriate value.
Scrolls through help information.
Enters the selected field's pop-up options menu.
In the selected field's pop-up options menu, cycles
through the options in a field.
Exits system setup without restarting the computer and
returns the computer to the boot routine.
Exits system setup and restarts the computer,
implementing any changes you have made.
Resets the selected option to the default.
Boot Sequence
This feature allows users to change the sequence of devices from which the computer boots.
48 Advanced Features
Page 63

Option Settings
• Normal — (Available only for the current boot process.) The computer attempts to
boot from the sequence of devices specified in system setup.
• Diskette Drive — The computer attempts to boot from the floppy drive. If the floppy
disk in the drive is not bootable, or if no floppy disk is in the drive, the computer
generates an error message.
• Hard Disk Drive C: — The computer attempts to boot from the primary hard drive. If
no operating system is on the drive, the computer generates an error message.
• CD Drive — The computer attempts to boot from the CD drive. If no CD is in the
drive, or if the CD has no operating system, the computer generates an error message.
• Integrated NIC — As the computer boots, it prompts you to press
<Ctrl><Alt><b>. Pressing this key combination causes a menu to display that
allows you to select a method for booting from a network server. If a boot routine is not
available from the network server, the computer attempts to boot from the next device
in the boot sequence list.
• USB Flash Device — Insert the key into a USB port and restart the computer. When
F12 = Boot Menu appears in the upper-right corner of the screen, press <F12>. The
BIOS detects the key and adds the USB key option to the boot menu.
Changing the Computer Boot Sequence for the Current Boot
You can use this feature, for example, to tell the computer to boot from the CD drive so you
can run the Dell Diagnostics, and specify that the computer boots from the hard drive when
the diagnostic tests are complete.
1 Turn on or restart your computer.
2 When F2 = Setup appears in the upper-right corner of the screen, press <F12>.
If you wait too long and the Microsoft Windows logo appears, continue to wait until
you see the Windows desktop. Then shut down your computer and try again.
NOTE: To ensure an orderly computer shutdown, consult the documentation that came with
your operating system.
The Boot Device Menu appears, listing all available boot devices. Each device has a
number next to it. At the bottom of the menu, enter the number of the device that is
to be used for the current boot only.
Changing Boot Sequence for Future Boots
1 Enter system setup.
Advanced Features 49
Page 64

2 Use the arrow keys to highlight the Boot Sequence menu option and press <Enter>
to access the pop-up menu.
NOTE: Write down your current boot sequence in case you want to restore it.
3 Press the up- and down-arrow keys to move through the list of devices.
4 Press the spacebar to enable or disable a device (enabled devices have a checkmark).
5 Press plus (+) or minus (–) to move a selected device up or down the list.
System Setup Options
www.dell.com | support.dell.com
Asset Tag — Displays the customer-programmable asset tag number for the
computer if an asset tag number is assigned.
Auto Power On — Sets time and days of week to turn on the computer
automatically. Choices are every day or every Monday through Friday.
Time is kept in a 24-hour format (hours:minutes). Change the start-up time by
pressing the right- or left-arrow keys to increase or decrease the numbers or to
type numbers in both the date and time fields.
Disabled is the default.
This feature does not work if you turn off your computer using a power strip or
surge protector.
CPU Information
• CPU Speed — Processor speed at which the computer boots
• Bus Speed — Speed of the microprocessor's system bus
• Processor ID — Manufacturer's identification code(s) for the installed
• Clock Speed — Core speed at which the microprocessor(s) operates
• Cache Size — Size of the microprocessor's L2 cache
• Hyper-Threading — Enables or disables Hyper-Threading technology for
Press the left- or right-arrow key to toggle the CPU Speed option between the
resident microprocessor's rated speed (the default) and a lower compatibility
speed.
To toggle between the rated processor speed and the compatibility speed
while the computer is running in real mode, press <Ctrl><Alt><\>. (For
keyboards that do not use American English, press <Ctrl><Alt><#>.)
microprocessor
operating systems that support this feature. The default setting is Disabled.
50 Advanced Features
Page 65

Diskette Drive A — Type of floppy drive(s) installed in the computer. With the
standard cabling configuration, Diskette Drive A (the boot floppy drive) is the
3.5-inch floppy drive installed in the top externally accessible drive bay. The two
options are 3.5 Inch, 1.44 MB, and Not Installed.
Tape drives are not reflected in the Diskette Drive A option. For example, if a
single floppy drive and a tape drive are attached to the floppy drive interface
cable, set Diskette Drive A to 3.5 Inch, 1.44 MB.
HARD-DISK DRIVE SEQUENCE — Allows the selection specific drive
devices for priority in boot. When this field is highlighted, press <Enter>.
A second dialog box appears with the list of devices that can be selected. Use the
+/- keys to move the device highlighted up or down in the priority list.
Fastboot
• On (default) — Your computer boots faster by skipping certain configurations
and tests.
• Off — Your computer does not skip certain configurations and tests during
the boot process.
Advanced Features 51
Page 66

Integrated Devices — Configures the following devices integrated with the
system board:
• Sound — Settings are On (default) or Off.
• USB Controller — Settings are On or Off.
• Network Interface Controller — Settings are On (default), Off, or On w/
• Mouse Port — Settings are On or Off.
• Serial Port 1 and Serial Port 2 — Settings are Off and Auto (default).
www.dell.com | support.dell.com
NOTE: When two COM connectors share an IRQ setting, you can use either
connector as necessary, but you may not be able to use them both at the same
time. If you are running the Microsoft Windows 95 or IBM
system, you cannot use both serial connectors at the same time. If the second
connector (COM3 or COM4) is also in use, the integrated connector is turned off.
• Paral l el Port — The settings are Mode, I/O Address, and DMA Channel.
NOTE: You cannot set the parallel connector to 3BCh if Mode is set to EPP.
• IDE Drive Interface — The settings are Off and Auto (default).
PXE.
Auto automatically configures a connector to a particular designation (COM1
or COM3 for Serial Port 1; COM2 or COM4 for Serial Port 2).
If you set a serial connector to Auto and add a card containing a connector
configured to the same designation, the computer automatically remaps the
integrated port to the next available connector designation that shares the
same IRQ setting as follows:
– COM1 (I/O address 3F8h), which shares IRQ4 with COM3, is remapped to
COM3 (I/O address 3E8h).
– COM2 (I/O address 2F8h), which shares IRQ3 with COM4, is remapped to
COM4 (I/O address 2E8h).
®
OS/2® operating
Mode settings are PS/2, EPP, ECP, AT, or Off. Set the Mode option according
to the type of device connected to the parallel connector. To determine the
correct mode to use, see the documentation that came with the device.
I/O Address settings are 378h (default), 278h, or 3BCh. The settings are not
available when Mode is set to Off.
DMA Channel appears only when Mode is set to ECP. Settings are DMA 1,
DMA 3, or Off.
Auto turns off the IDE interface when necessary to accommodate a controller
card installed in an expansion slot.
52 Advanced Features
Page 67

• Diskette Interface — The settings are Auto (default), Read Only, and Off.
Auto turns off the integrated floppy drive controller when necessary to
accommodate a controller card installed in an expansion slot.
Read Only prevents the computer's integrated floppy drive controller from
writing to floppy drives and activates Auto.
• USB Emulation — The settings are On and Off.
• Primary Video Controller — The settings are Auto and AGP (default).
Auto — If only an AGP card is installed, the computer uses the AGP card; if
only a PCI card is installed, the computer uses the PCI card; if both AGP and
PCI cards are installed, the computer uses the PCI card to boot.
AGP (default) — The computer uses the AGP card.
• Video DAC Snoop — The settings are Off (default) and On.
On corrects video problems such as incorrect colors or blank windows that
may occur when you use certain video cards.
For the Dell Precision™ Workstation 650 only:
• 1394 Controller — Enabled is the default.
• SCSI Controller — Disabled is the default.
KEYBOARD NUMLOCK —The settings are On and Off (does not apply to
84-key keyboards).
On — Activates the rightmost bank of keys so they provide the mathematical
and numeric functions shown at the top of each key.
Off — Activates the rightmost bank of keys so they provide cursor-control
functions shown by the label on the bottom of each key.
MEMORY INFORMATION — Indicates amount of installed memory, computer
memory speed, and AGP Aperture size
PCI IRQ ASSIGNMENT — Specifies which IRQ lines are assigned to the PCI
devices installed in the computer
Press <Enter> and then select the device whose IRQ line you want to change,
and press the plus (+) or minus (–) key to scroll through the available IRQ lines.
Advanced Features 53
Page 68

POWER MANAGEMENT —
• Suspend Mode — Selects S1 or S3 (default) power management suspend
• AC Power Recovery — Determines what happens when AC power is restored
• Low Power Mode — Selects the amount of power used when the computer is
www.dell.com | support.dell.com
mode
to the computer
– Off — The computer remains off when AC power is restored.
– On — The computer starts when AC power is restored.
– Last — The computer returns to the AC power state existing at the time
that AC power was lost.
in hibernate mode or off. Disabled is the default. When Enabled, Remote
Wake-Up events no longer start the computer from hibernate mode or off.
54 Advanced Features
Page 69

Primary Drive n and Secondary Drive n— The settings are Auto (use this
setting for all IDE devices from Dell) and Off.
Primary Drive n — Identifies drives attached to the primary IDE interface
connector (labeled "IDE1") on the system board.
Secondary Drive n — Identifies drives connected to the secondary IDE interface
connector (labeled "IDE2").
NOTE: You must have an IDE device connected to the primary IDE interface if
you have an IDE device connected to the secondary IDE interface.
If You Have a Problem
If the computer generates a drive error message the first time you boot your
computer after you install an IDE drive, your drive may not work with the
automatic drive-type detect feature. Press <Alt><d> in any hard drive field to
set the hard drive autoconfiguration feature.
During POST the computer scans the IDE channels for supported devices and
generates a summary message. For example, if the computer detects that a hard
drive is connected to the Primary channel and that a CD drive is connected to
the Secondary channel, the computer generates the following message:
Performing automatic IDE configuration...
Primary Master: IDE Disk Drive
Secondary Master: CD-ROM Reader
If the computer detects a device during the scan, it sets the device to Auto in
system setup. If no device is listed, it sets the device setting to Off in system
setup.
If your computer does not reset after you perform these steps, enter system setup
and reset the computer to its original factory settings:
1 Restart your computer.
2 As the computer restarts, press <F2> to enter system setup.
3 When the system setup screen appears, press <Alt><F> to load the default
settings.
The computer beeps when the settings are restored.
4 Verify that the time, date, and year are correct and that the Secondary Drive 0
option is set to Auto.
5 Press <Esc> and then press <Enter> to save your changes and exit.
The computer restarts.
Advanced Features 55
Page 70
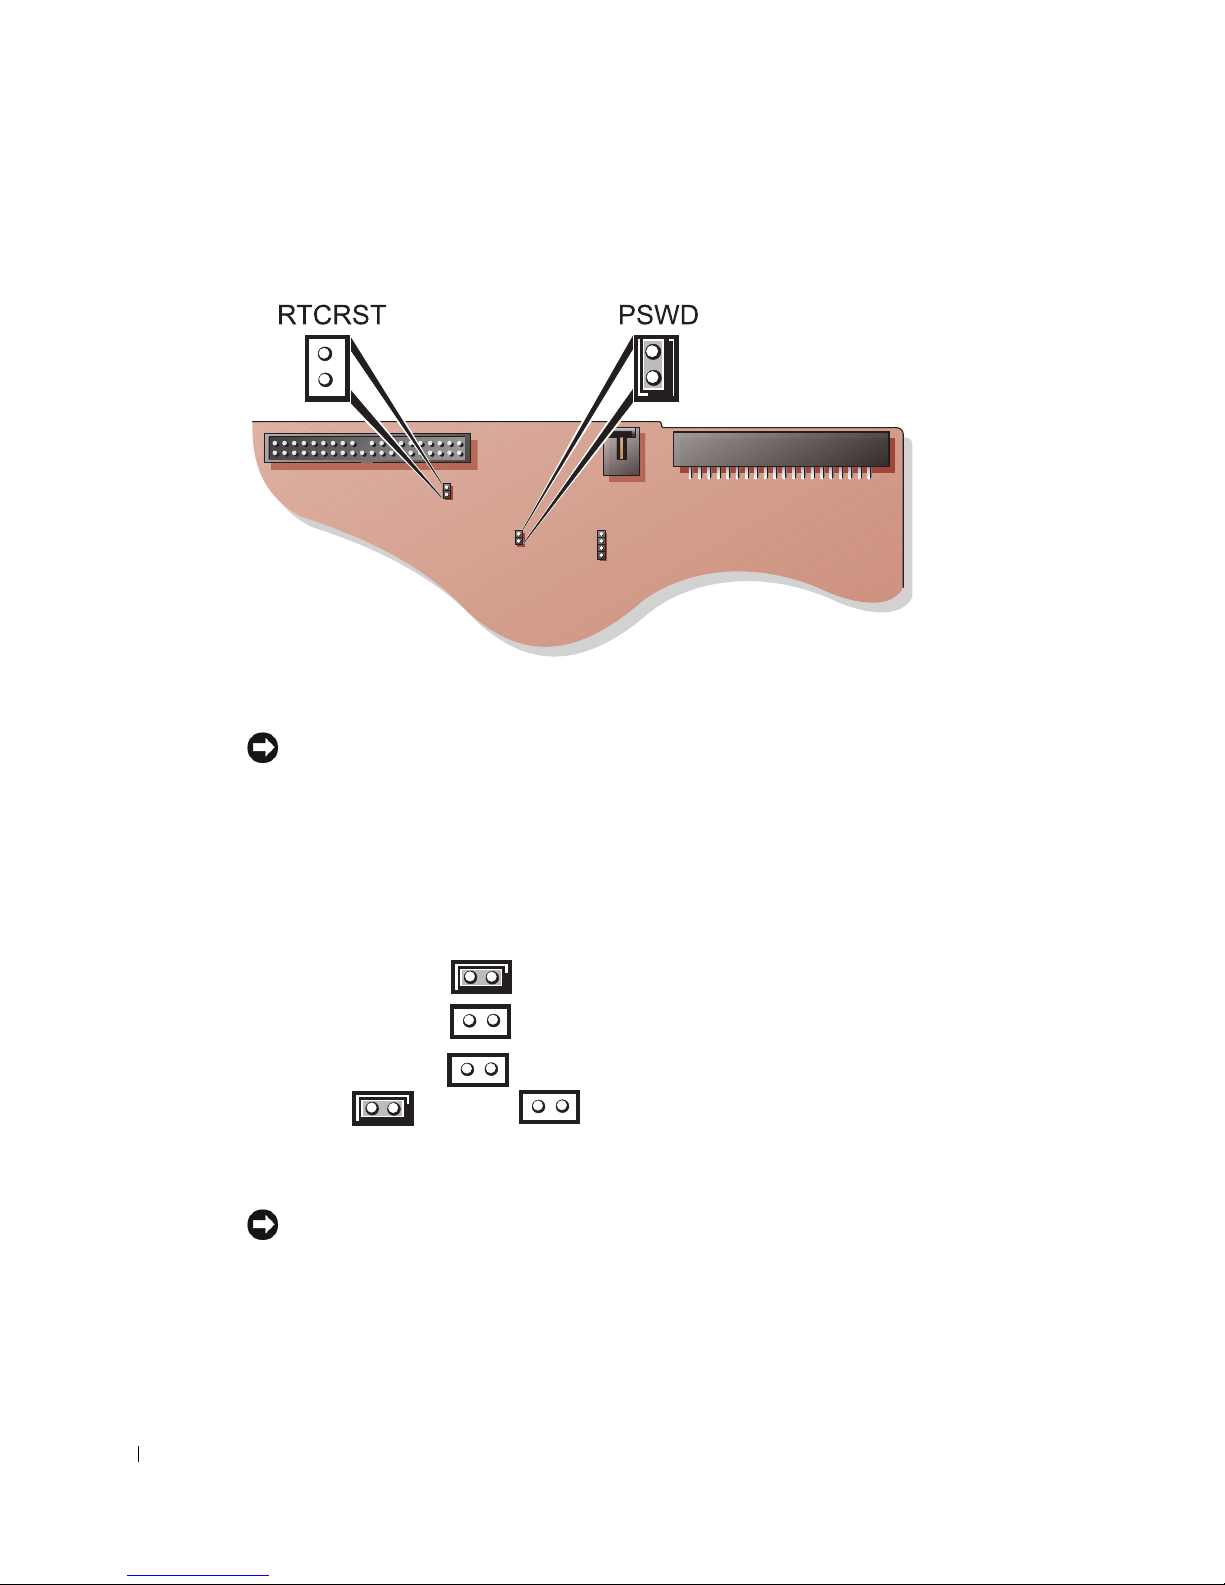
Jumper Settings
www.dell.com | support.dell.com
NOTICE: Ensure that your computer is turned off and unplugged before you change the jumper
settings. Otherwise, damage to your computer or unpredictable results can occur.
To change a jumper setting, pull the plug off its pin(s) and carefully fit it down onto the
pin(s) indicated.
Power Button
NOTICE: To turn off your computer, perform an orderly computer shutdown when possible.
You can use the ACPI feature to configure the function of the Microsoft Windows 2000 and
Windows XP operating systems.
56 Advanced Features
Jumper Setting Description
PSWD (default) Password features are enabled.
Password features are disabled.
RTCRST Real-time clock reset
jumpered unjumpered
Page 71
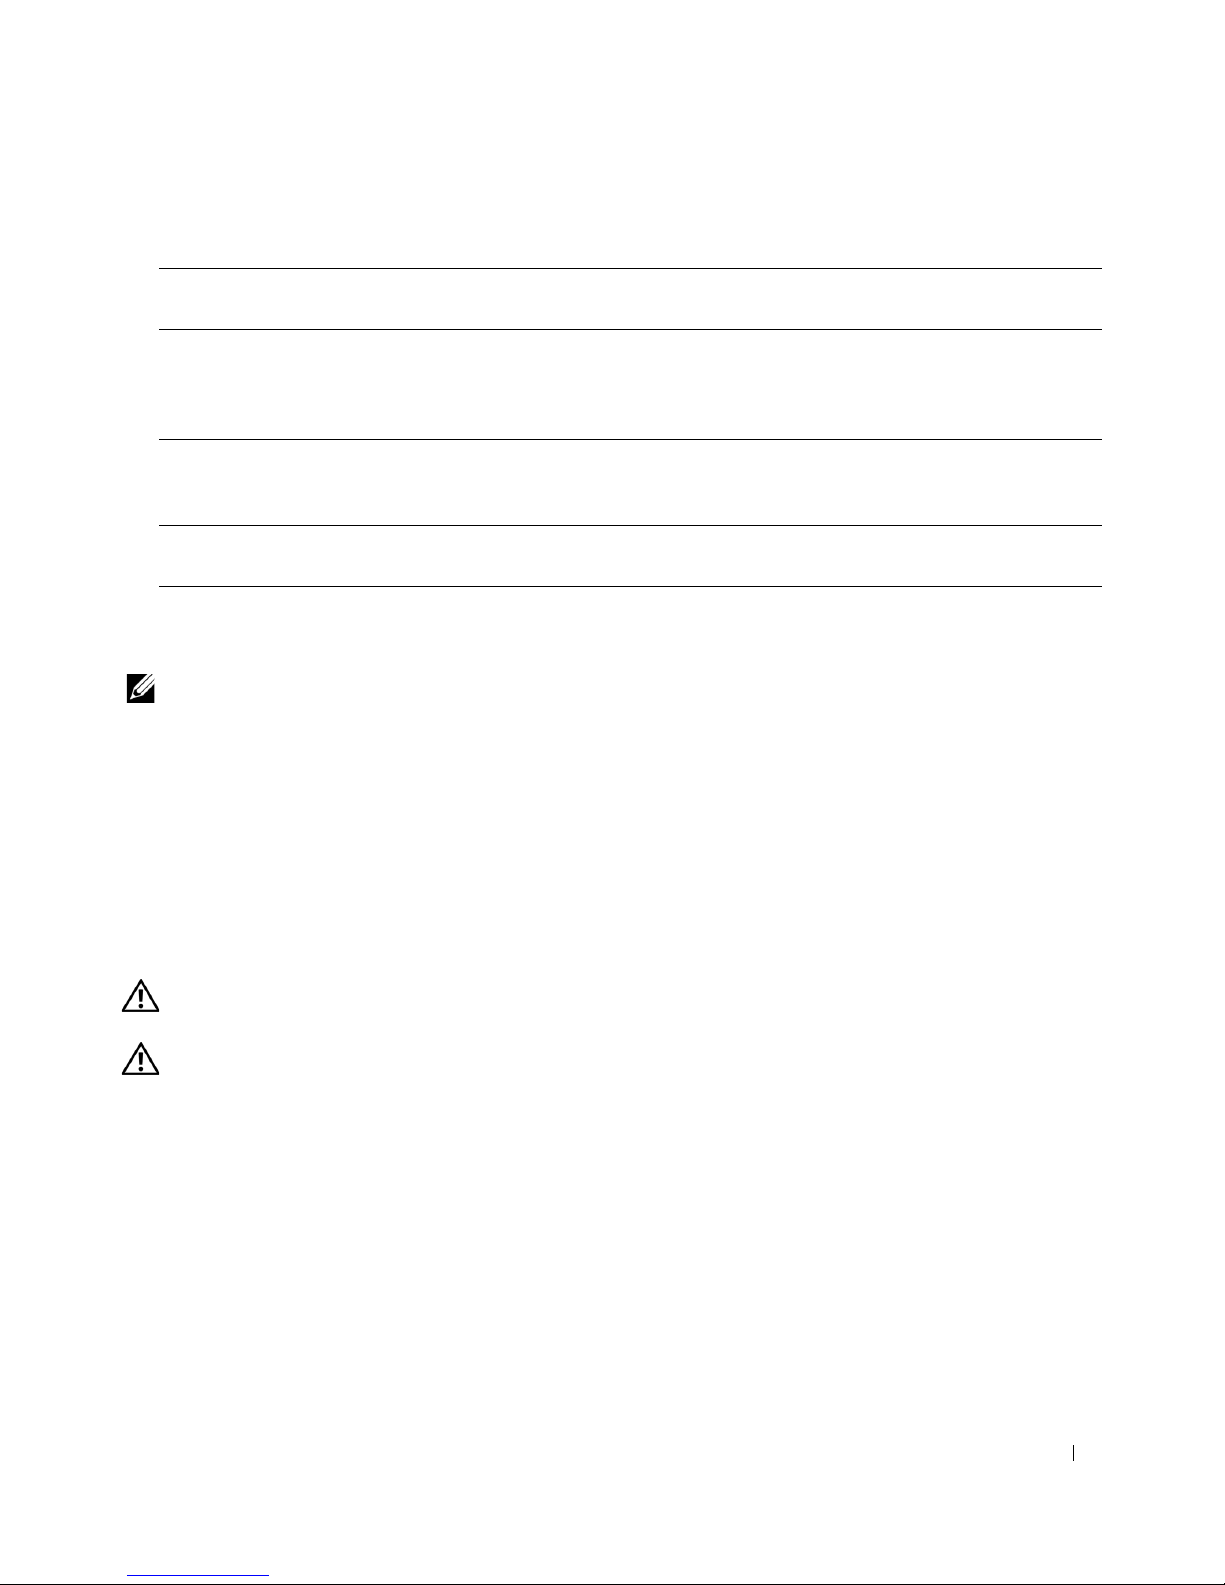
Power Button Functions for Operating Systems With ACPI Enabled
Action Computer Turned On and
ACPI Enabled
Press power
button
Hold power
button for 6
seconds
NOTE: Pressing or holding the power button to shut down the computer may result in data loss. Use the
power button to shut down the computer only if the operating system is not responding.
Computer goes into standby
mode or turns off
(depending on the operating
system setup)
Computer turns off Computer turns off Boots and computer turns on
Computer in Standby
Mode
Computer turns on Boots and computer turns on
Computer Turned Off
TAPI
NOTE: See the documentation that came with the TAPI-compliant card for more information
on using TAPI devices and to verify that the card works with your computer.
Your computer supports TAPI-compliant modem cards using the standard TAPI connector
(the green connector labeled MODEM or TELEPHONY). If your modem supports voice
features, you can connect your modem to the TAPI connector and then use your audio
speakers and microphone as an answering machine or speakerphone. The microphone
carries your voice into the computer and then through the TAPI system board connector to
your modem card. The caller’s voice enters through the modem card to the TAPI system
board connector and then out to the speakers. You can also use this configuration to record
and play audio files over the telephone by using third-party software.
CAUTION: Before you begin any of the procedures in this section, follow the
safety instructions in the
CAUTION: To guard against electrical shock, always unplug your computer from
the electrical outlet before opening the cover.
Installing a TAPI-Compliant Modem Card
1 Shut down the computer through the Start menu.
2 Ensure that your computer and attached devices are turned off. If your computer and
attached devices did not automatically turn off when you shut down your computer,
turn them off now.
System Information Guide
.
Advanced Features 57
Page 72

NOTICE: To disconnect a network cable, first unplug the cable from your computer and then
unplug it from the network wall jack.
Disconnect any telephone or telecommunication lines from the computer.
3
4 Disconnect your computer and all attached devices from electrical outlets, and then
press the power button to ground the system board.
5 If you have installed a padlock through the padlock ring on the back panel, remove the
padlock.
CAUTION: To guard against electrical shock, always unplug your computer from
the electrical outlet before opening the cover.
NOTICE: Before touching anything inside your computer, ground yourself by touching an
www.dell.com | support.dell.com
unpainted metal surface, such as the metal at the back of the computer. While you work,
periodically touch an unpainted metal surface to dissipate any static electricity that could harm
internal components.
Open the computer cover.
6
7 Install the TAPI-compliant modem card:
a Connect the 4-pin TAPI cable to the TAPI system board connector.
To locate the TAPI connector on the system board, see the system board
components illustration for your computer (for the Dell Precision 450 computer,
see "System Board Components" or for the Dell Precision 650 computer, see
"System Board Components").
b Connect the other end of the cable to the TAPI connector on the modem card.
To locate the TAPI connector on the card, see the documentation for the card.
8 Close the computer cover.
9 Reconnect the computer and devices to electrical outlets, and turn them on.
10 Install the appropriate modem driver and voice program.
For more information, see the manufacturer’s documentation and your Microsoft
Windows
Installing a TAPI Sound Card
You can connect your modem to a TAPI-compliant sound card connector (typically labeled
TAD) and then use the audio capabilities as a speakerphone.
1 Shut down the computer through the Start menu.
58 Advanced Features
®
documentation.
®
Page 73

2 Ensure that your computer and attached devices are turned off. If your computer and
attached devices did not automatically turn off when you shut down your computer,
turn them off now.
NOTICE: To disconnect a network cable, first unplug the cable from your computer and then
unplug it from the network wall jack.
Disconnect any telephone or telecommunication lines from the computer.
3
4 Disconnect your computer and all attached devices from electrical outlets, and then
press the power button to ground the system board.
5 If you have installed a padlock through the padlock ring on the back panel, remove the
padlock.
CAUTION: To guard against electrical shock, always unplug your computer from
the electrical outlet before opening the cover.
NOTICE: Before touching anything inside your computer, ground yourself by touching an
unpainted metal surface, such as the metal at the back of the computer. While you work,
periodically touch an unpainted metal surface to dissipate any static electricity that could harm
internal components.
Open the computer cover.
6
7 Install the TAPI-compliant sound card.
8 Connect external audio devices to the sound card’s connectors. Do not connect
external audio devices to the microphone, speaker/headphone, or line-in connectors
on the front or back panel of your computer.
9 Connect the 4-pin TAPI cable to the TAPI sound card connector.
To locate the TAPI connector on the sound card, see the documentation for the card.
10 Connect the other end of the cable to the TAPI connector on the modem card.
To locate the TAPI connector on the card, see the documentation for the card.
11 Close the computer cover.
12 Reconnect the computer and devices to electrical outlets, and turn them on.
13 Enter system setup, go to Integrated Devices, and change the setting for Sound to
Off.
14 Install the appropriate drivers for the new devices.
For more information, see the manufacturer’s documentation and your Windows
documentation.
Advanced Features 59
Page 74

Hyper-Threading
Hyper-Threading is an Intel® technology that can enhance overall performance by allowing
one physical microprocessor to function as two logical microprocessors, capable of
performing certain tasks simultaneously. It is recommended that you use the Windows XP
operating system because Windows XP is optimized to take advantage of Hyper-Threading
technology. While many programs can benefit from Hyper-Threading technology, some
programs have not been optimized for Hyper-Threading and may require an update from
the software manufacturer. Contact the software manufacturer for updates and information
on using your software with Hyper-Threading.
To determine if your computer is using Hyper-Threading technology:
www.dell.com | support.dell.com
1 Click the Start button, right-click My Computer, and then click Properties.
2 Click Hardware and click Device Manager.
3 In the Device Manager window, click the plus (+) sign next to the processor type. If
Hyper-Threading is enabled, the processor is listed twice.
You can enable or disable Hyper-Threading through system setup. For more information on
Hyper-Threading, search the Knowledge Base on the Dell Support website at
support.dell.com.
IEEE 1394
IEEE 1394 is a digital interface that can move large amounts of data between computers
and peripheral devices. IEEE 1394 is ideal for use with multimedia devices because it
speeds the transfer of data and large files, which enables a computer to connect directly to
devices such as digital video cameras.
The Dell Precision 650 computer provides a standard IEEE 1394 connector on both the
front and back panels (see "About Your Computer—Dell Precision 650").
U320 SCSI Controller
The U320 SCSI controller is PCI-X based and operates in a low voltage differential (LVD)
mode while running at U320 (320 MBps) speeds. The bus is backward compatible and can
run at U160 (160 MBps), Ultra2 (80 MBps), Ultra (40 MBps) speeds.
60 Advanced Features
Page 75

If single-ended (SE)devices are connected to the same bus as the LVD devices (such as
U320, U160, or Ultra2), the SCSI bus operates in SE mode and runs at maximum of Ultra
(40 MBps) speed.
For more information installing a SCSI device and SCSI ID settings for the Dell Precision
650, see "SCSI Device Installation Guidelines."
Integrated Striping
Your Dell Precision 650 computer supports integrated striping for a minimum of two hard
drives to a maximum of four hard drives on the Integrated Ultra320 SCSI channel.
Integrated striping writes data across multiple hard drives rather than writing to one hard
drive by partitioning each hard drive’s storage space into stripes. The stripe volume can be
created and deleted through a SCSI BIOS configuration utility.
Creating a Stripe Volume
NOTICE: Creating a stripe volume deletes all information that is currently on your hard drives.
Save all data before you begin this procedure.
Press <Ctrl><a> during system start-up when the following message appears: Press
1
Cntl-A to start LSI Logic Configuration Utility
.
NOTE: Key combinations for the utility are listed at the bottom of the configuration screen.
2 Select the drive controller and press <Enter>.
3 Use the arrow keys to select Add RAID Array and press <Enter>.
4 Use the <+> key to select YES for each drive that you want to be part of a stripe
volume. Use the <-> key to select NO for each drive that you do not want to be part
of a stripe volume.
NOTE: Multiple warning screens may appear if you have a valid partition on the drives selected
or if the drives selected to be part of the stripe are different sizes.
Press <F3> to save the changes.
5
6 Press any key to continue.
7 If you do not want to create the stripe volume, select Discard Changes Then Exit this
Menu.
If you are ready to create the stripe volume, Select Save Changes Then Exit This
Menu and press <Enter>.
Advanced Features 61
Page 76

While the configuration utility establishes the stripe volume, the following message
appears:
Processing...takes upto one minute. The main menu appears once
the stripe volume is created.
8 Press <Esc>, exit the configuration utility, and then press <Enter>.
The stripe volume can be used as a boot volume or as a data volume. For more information,
see your operating system documentation.
NOTE: If you choose unequal drive sizes to be part of the stripe volume, the available size of the
stripe volume is equal to the number of drives in the volume multiplied by the smallest drive size
in the volume. The unused space in the larger drive is unusable.
www.dell.com | support.dell.com
Deleting a Stripe Volume
NOTICE: Deleting stripe volume deletes all information that is currently on your stripe volume.
Save all data before you begin this procedure.
1 Press <Ctrl><a> during system start-up when the following message appears: Press
Cntl-A to start LSI Logic Configuration Utility
NOTE: Key combinations for the utility are listed at the bottom of the configuration screen.
Select the drive controller and press <Enter>.
2
3 Using the arrow keys, select Activate/Delete RAID Array and press <Enter>.
If more than one stripe volume is present on the controller, press any key to continue
and press <F2> to return to the top menu.
4 Select Delete Array and press <Enter>.
5 Press <F3> to delete the stripe volume.
While the configuration utility deletes the stripe volume, the following message
appears:
the stripe volume is deleted.
Activating a Stripe Volume
.
Processing...takes upto one minute. The main menu appears once
NOTE: A controller supports only one stripe volume. If more than one stripe volume is
connected to a controller, you can activate the stripe volume you want to use through the
configuration utility.
Press <Ctrl><a> during system start-up when the following message appears: Press
1
Cntl-A to start LSI Logic Configuration Utility
NOTE: Key combinations for the utility are listed at the bottom of the configuration screen.
2
Select the drive controller and press <Enter>.
62 Advanced Features
.
Page 77

3 Using the arrow keys, select Activate/Delete RAID Array and press <Enter>.
4 Press any key to continue.
5 Use the <Page Up> or the <Page Down> keys to select the volume to be activated.
6 Press <F2> to return to the top menu.
7 Select Activate Array and press <Enter>.
8 Press any key to continue.
While the configuration utility activates the stripe volume and deactivates the other
stripe volumes, the following message appears:
minute
NOTE: If a partial stripe volume is present and no longer part of a good array, the partial stripe
volume can be deleted, see "Deleting a Stripe Volume."
. The main menu appears once the stripe volume is activated.
Processing...takes upto one
Troubleshooting the Stripe Volume
DURING INSTALLATION, NO SCSI DRIVES ARE FOUND —
• Ensure that all devices are connected.
• Ensure that each device has a unique SCSI ID, including the SCSI controller.
• Ensure that the SCSI controller is enabled in the system BIOS.
• Ensure that all devices can be seen in the Fusion-MPT SCSI BIOS display
banner when the computer starts up.
• Reset the Fusion-MPT SCSI BIOS setting to default.
Advanced Features 63
Page 78

DURING INSTALLATION BLUE SCREENS OCCUR AND THE MESSAGE
"inaccessible boot device" APPEARS —
This error may be caused by:
NOTE: To create the driver diskette, use your
www.dell.com | support.dell.com
• Not pressing <F6> at the correct time during the operating system
installation
Restart the computer and operating system installation. Press <F6> when
prompted during the Microsoft Windows operating system installation to
load the drivers using the driver diskette for the SCSI controller.
Drivers and Utilities
CD.
• IRQ or I/O address conflict
Remove any third party components that were added.
• Boot order configuration
Ensure that the SCSI is part of the boot order configuration in system
setup.
• Master Boot Record Infection
Use a virus scanning program to determine if a virus has infected the
master boot record of the boot device. For help resolving virus issues, see
the Knowledge Base at support.dell.com.
A HARD DRIVE IS RECOGNIZED AS SEVEN DIFFERENT DEVICES WHEN
ONLY ONE IS PHYSICALLY CONNECTED TO THE SCSI BUS —
An older SCSI device may incorrectly indicate to the operating system that it
supports multiple LUNs. Contact the device manufacturer for a firmware
upgrade.
PROBLEMS WITH CERTAIN SCSI DEVICES WHEN USING AN
LTRA320 SCSI ADAPTER —
U
Some SCSI devices do not operate properly when the controller attempts to
negotiate Ultra320 SCSI transfer rates. Lower the transfer speed setting with the
Fusion-MPT SCSI BIOS Configuration Utility. Press <Ctrl><a> during system
start-up when the following message appears: Press Cntl-A to start
LSI Logic Configuration Utility.
64 Advanced Features
Page 79

THE COMPUTER HANGS AT BOOT, HAS A LONG BOOT TIME, OR A SCSI
DEVICE IS NOT AVAILABLE —
Some older SCSI devices do not support Domain Validation operations, which is
a feature of Ultra320 SCSI. When the computer boots, it performs Domain
Validation to test the data integrity of the SCSI bus between the host adapter
and each SCSI device. With some older SCSI devices, the Domain Validation
operations can cause the device to stop responding to SCSI commands.
Check all internal and external SCSI bus cable connections. If the problem
continues, disable Domain Validation for a specific SCSI device. To disable
Domain Validation for a specific SCSI device, use the Fusion-MPT SCSI BIOS
Configuration Utility to set the Sync Rate to 0 (async) and the Data Width to 8.
The SCSI device runs in async/narrow mode and no Domain Validation
operations are performed on the SCSI device.
Advanced Features 65
Page 80

THE INTEGRATED STRIPE VOLUME FAILS — The POST displays Failed
instead of Optimal.
1 Ensure that the SCSI cable is properly attached to each hard drive and to the
system board.
2 Ensure that the power cable is connected to each hard drive.
3 Ensure that the stripe volume drives have not been moved.
For additional assistance, see "Contacting Dell".
NOTICE: The following procedure may delete all the information that is
currently on your hard drives.
www.dell.com | support.dell.com
computer does not boot:
1 Press <Ctrl><a> during system startup when the following message
2 Access the Array Disk menu
3 Delete the integrated stripe volume.
If the BIOS recognizes all SCSI hard drives, enter the configuration utility and
recreate the intergrate stripe volume.
If one or more the hard drives is not recognized by the BIOS or is the
configuration utility does not allow the selection of one or more of the hard
drives:
1 Replace the defective hard drive(s).
2 Enter the configuration utility and recreate the integrated stripe volume.
If the integrated stripe volume contains the operating system and the
appears:
Utility.
Press Cntl-A to start LSI Logic Configuration
66 Advanced Features
Page 81

SECTION 6
Removing and
Installing Parts—Dell
Precision 650
5
Cards
Drives
Microprocessor Airflow Shroud
Microprocessor
VRM
Closing the Computer Cover
Page 82

www.dell.com | support.dell.com
68 Removing and Installing Parts—Dell Precision 650
Page 83

SECTION 7
Drives
Overview
Hard Drive
Floppy Drive
CD/DVD Drive
6
Page 84
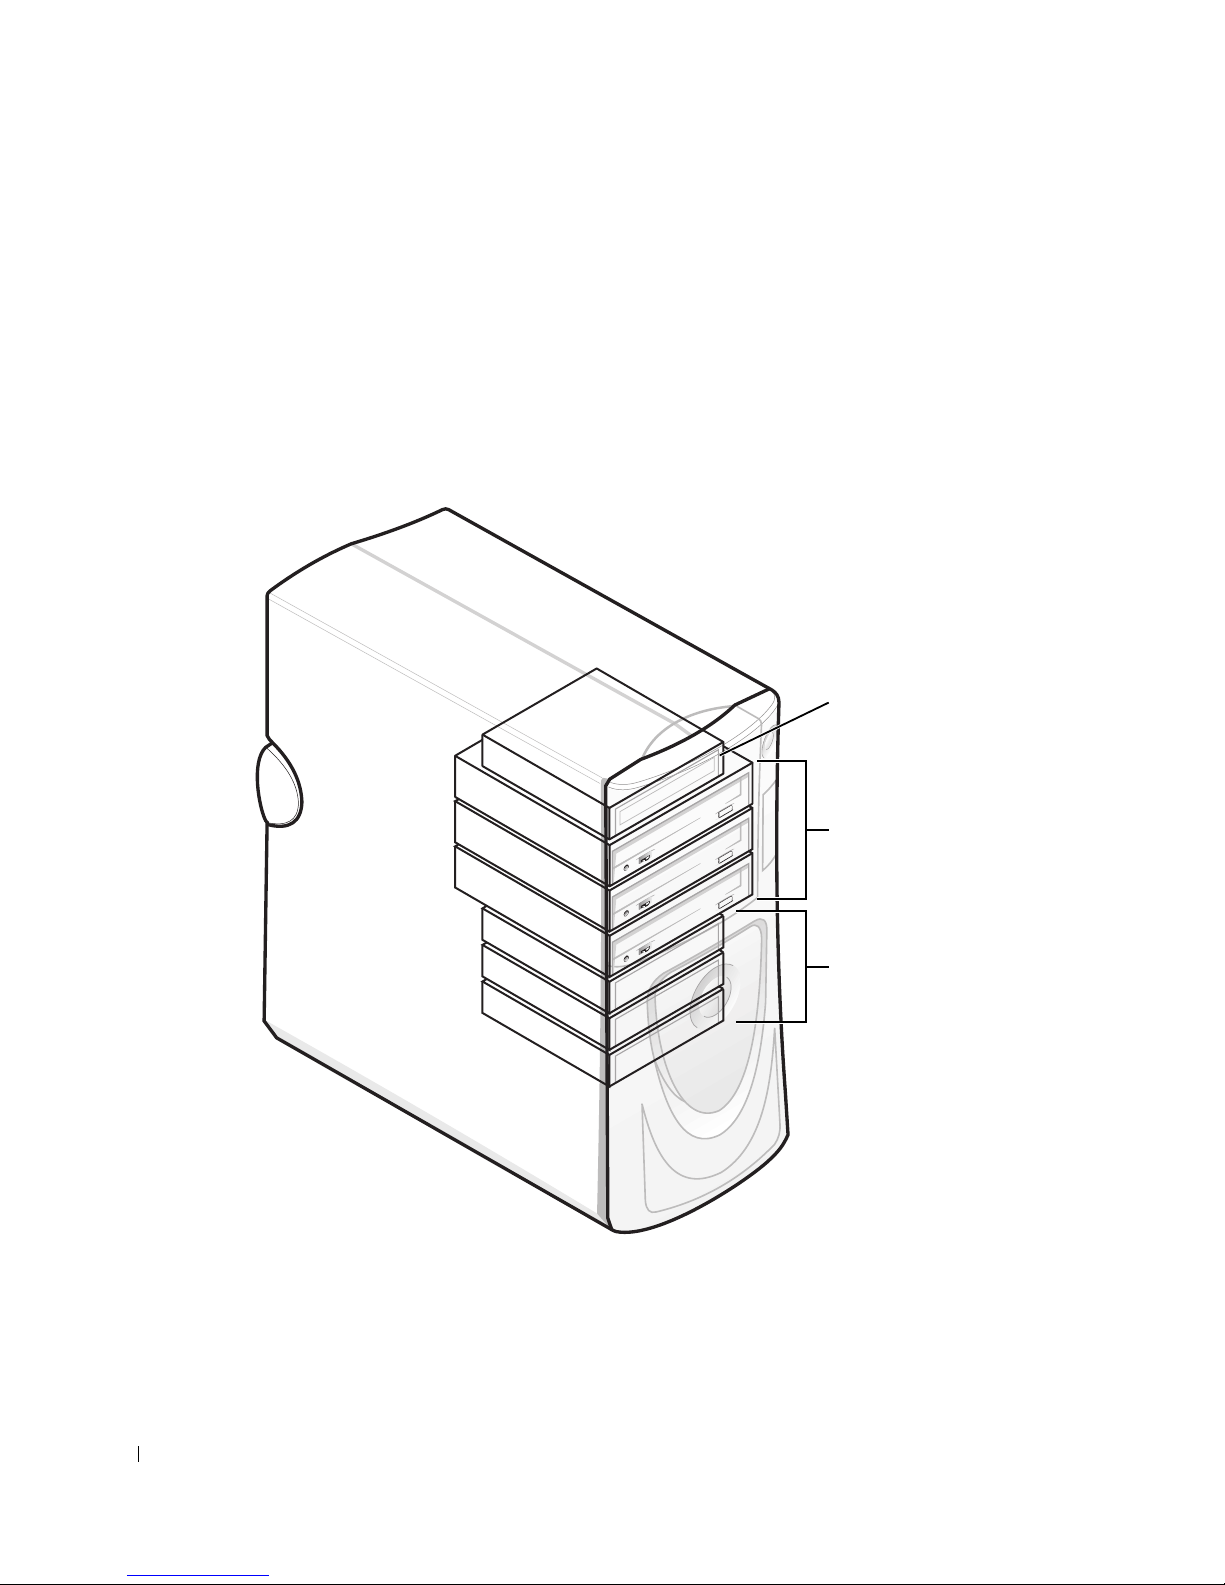
Overview
1
2
3
Your computer supports:
• Three hard drives (Your computer supports IDE, Serial ATA, and SCSI.)
• One floppy drive
• Three CD or DVD drives (One bay may be used for additional hard drive using an
add-in bay bracket.)
www.dell.com | support.dell.com
70 Drives
Page 85

1 floppy drive(s)
2 CD/DVD drive(s)
3 hard drive(s)
IDE Drive Addressing
When you connect two IDE devices to a single IDE interface cable and configure them for
the cable select setting, the device attached to the last connector on the interface cable is
the primary (master) or boot device (drive 0), and the device attached to the middle
connector on the interface cable is the secondary (slave) device (drive 1). See the drive
documentation in your upgrade kit for information on configuring devices for the cable
select setting.
Since cable select is the default setting, any additional drives that are installed do not need
to be set as a primary or secondary drive.
Your computer supports up to two IDE devices. Hard drives should be connected to the
connector labeled “IDE1,” and CD/DVD drives should be connected to the connector
labeled “IDE2.”
Connect serial ATA drives to the connectors labeled “SATA_0” or “SATA_1.”
Connecting Drive Cables
When you install a drive, you connect two cables—a DC power cable and an interface
cable—to the back of the drive.
NOTICE: If your system was purchased with a Serial ATA hard drive, the system includes the
newer style Serial ATA style power connector. If you are adding a Serial ATA hard drive to a
system that was not originally equipped with one and the drive you are adding requires the new
style Serial ATA power connector, you may need to obtain a power adapter cable from Dell. If
you need a Serial ATA power adapter cable, see Contacting Dell.
Drives 71
Page 86

www.dell.com | support.dell.com
21
IDE Drive Connector Serial ATA Connector
72 Drives
1 power cable
2 power input connector
Page 87
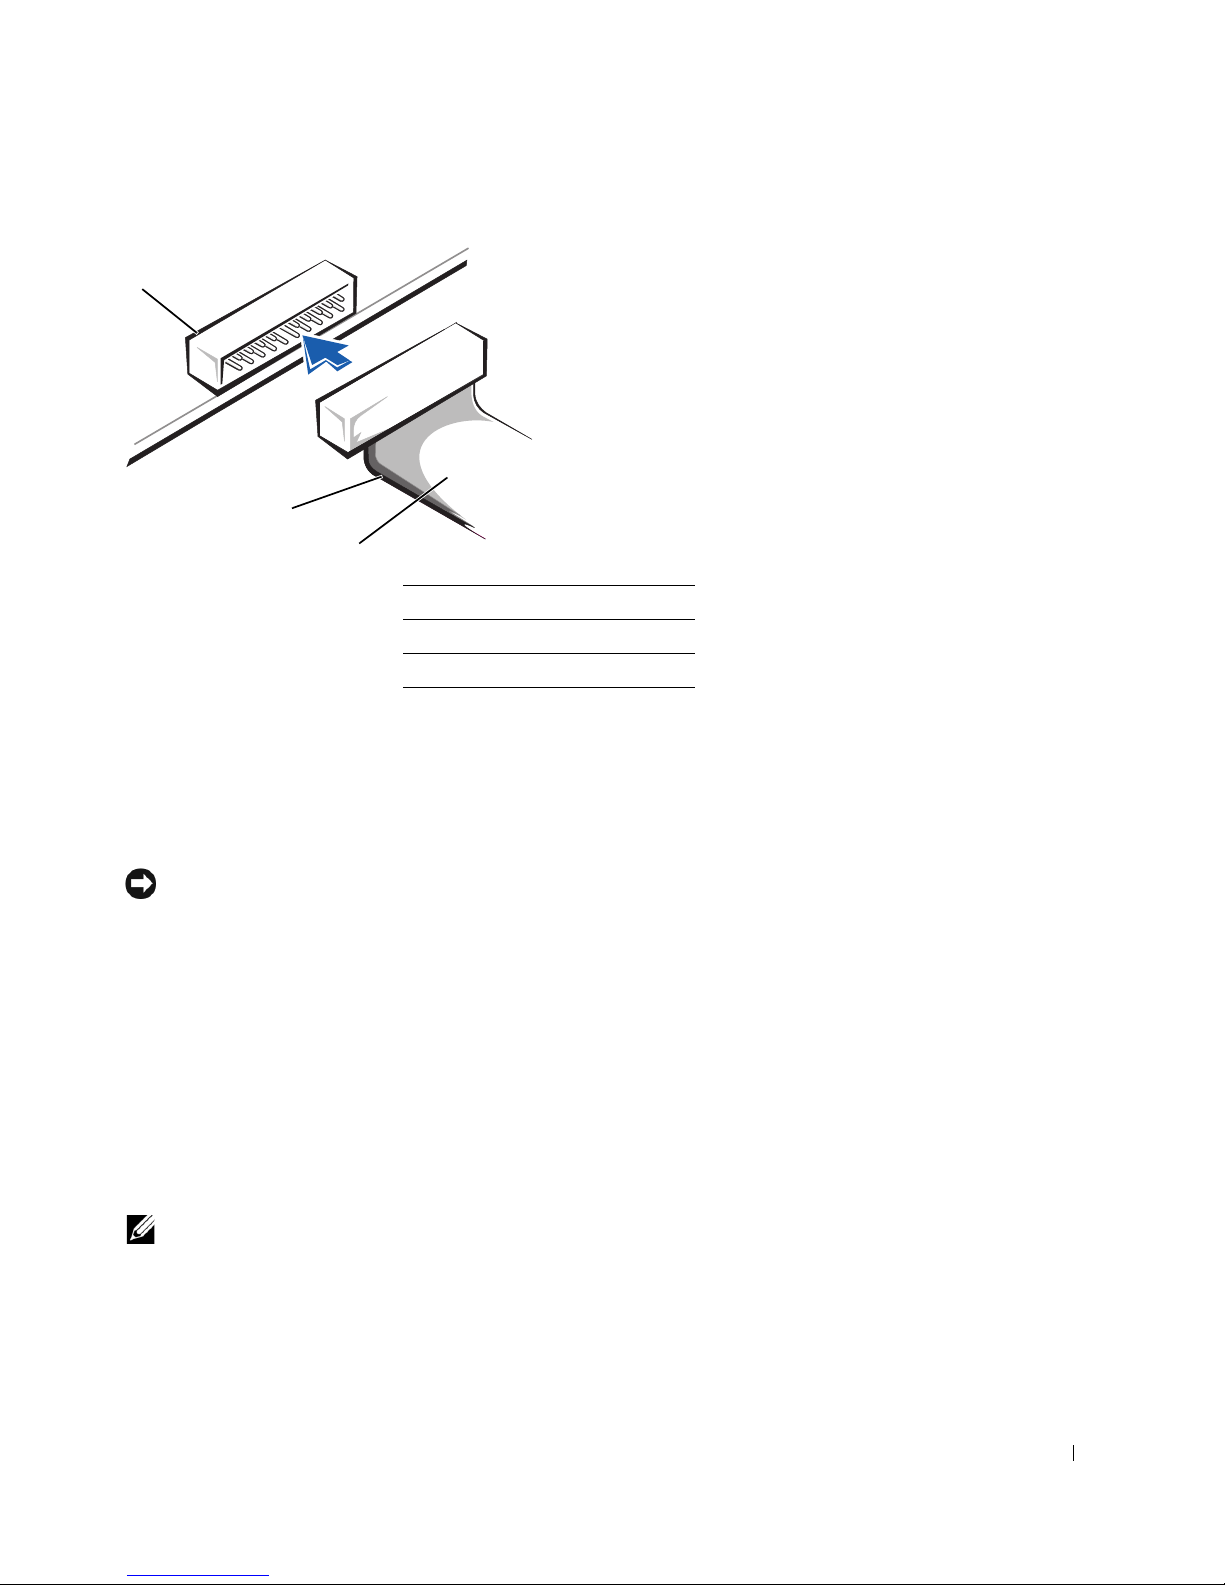
1 interface connector
1
3
2
2 colored stripe on cable
3 interface cable
Most interface connectors are keyed for correct insertion; that is, a notch or a missing pin on
one connector matches a tab or a filled-in hole on the other connector. Keyed connectors
ensure that the pin-1 wire in the cable (indicated by the colored stripe along one edge of the
cable) goes to the pin-1 end of the connector. The pin-1 end of a connector on a board or a
card is usually indicated by a silk-screened “1” printed directly on the board or card.
NOTICE: When you connect an interface cable, do not place the colored stripe away from pin 1
of the connector. Reversing the cable prevents the drive from operating and could damage the
controller, the drive, or both.
SCSI Device Installation Guidelines
This section describes how to configure and install SCSI devices in your computer. To
install a SCSI device, you can use one or both of the following SCSI controllers:
• The SCSI connector on the system board. To locate the SCSI system board connector,
see the system board illustration (for the Dell Precision 450 computer, see "System
Board Components" or for the Dell Precision 650 computer, see "System Board
Components" ) or the interior service label.
NOTE: The system board SCSI controller supports hard drives only. Do not connect CD or DVD
drives, tape drives, DAT drives, and so on.
• A SCSI controller card installed in your computer.
Drives 73
Page 88

SCSI ID Numbers
Internal SCSI devices must have a unique SCSI ID number from 0 to 15. If you are using
the SCSI connector on the system board and a SCSI controller card installed in your
computer, you have two separate SCSI buses operating. Each SCSI bus has a set of SCSI ID
numbers from 0 to 15.
When SCSI devices are shipped from the factory, the default SCSI ID numbers are
assigned as follows:
System Board Controller Controller Card
www.dell.com | support.dell.com
Device ID Device ID
Controller
Boot hard drive 0 Boot hard drive 0
NOTE: There is no requirement that SCSI ID numbers be assigned sequentially
or that devices be attached to the cable in order by ID number. If two or more
devices use the same ID, your computer may hang during POST and in SCSI
BIOS.
SCSI devices installed by Dell are configured correctly during the manufacturing process.
You do not need to set the SCSI ID for these SCSI devices.
If you attach additional optional SCSI devices, see the documentation for each device for
information about setting the appropriate SCSI ID number.
NOTICE: Dell recommends that you use only SCSI cables purchased from Dell. Cables
purchased elsewhere are not guaranteed to work with Dell computers.
Device Termination
7
Controller
CD or DVD drive 5
tape or DAT drive 6
7
SCSI logic requires that termination be enabled for the two devices at opposite ends of the
SCSI chain and disabled for all devices in between.
It is recommended that you use terminated cables and that you disable termination on all
devices. See the documentation provided with any optional SCSI device you purchase for
information on disabling termination on the device.
74 Drives
Page 89

General Guidelines
Follow these general guidelines when installing SCSI devices in your computer:
• Although you install SCSI devices essentially the same way as other devices, their
configuration requirements are different. For details on configuring your particular
SCSI subsystem, see the documentation for your SCSI devices and/or your host
adapter card.
• Configure the device for a SCSI ID number and disable termination, if necessary.
• To use an external SCSI device, you must have a SCSI controller card installed in your
computer. Connect one end of the external SCSI cable to the connector on the back
of the SCSI device. Attach the other end of the external SCSI cable to the connector
on the controller card installed in the computer.
• After you install a SCSI hard drive, Primary Drive 0 and Primary Drive 1 should be set
to None in system setup if no EIDE hard drives are installed. If you have any EIDE
devices on the second EIDE channel, such as a CD or tape drive, Secondary Drive 0
and/or Secondary Drive 1 should be set to Auto.
• You may need to use programs other than those provided with the operating system to
partition and format SCSI hard drives. See the documentation that came with your
SCSI software drivers for information on installing the appropriate drivers and
preparing your SCSI hard drive for use.
SCSI Cables
Ultra 320, Ultra 160/m, and Ultra2/Wide LVD drives (typically hard drives) both use a
68-pin cable. One end of the cable attaches to the SCSI connector on the system board or
the SCSI controller card installed in your computer. The remaining connectors on the cable
attach to the various drives.
Narrow SCSI drives (tape drives, CD drives, and some hard drives) use a 50-pin cable. One
end of this cable attaches to the SCSI controller card. The remaining connectors on the
cable attach to the various Narrow SCSI devices.
NOTICE: Dell recommends that you use only SCSI cables purchased from Dell. Cables
purchased elsewhere are not guaranteed to work with Dell computers.
Hard Drive
CAUTION: Before you begin any of the procedures in this section, follow the
safety instructions in the
System Information Guide
.
Drives 75
Page 90

NOTICE: To avoid damage to the drive, do not set it on a hard surface. Instead, set the drive on
a surface, such as a foam pad, that will sufficiently cushion it.
If you are replacing a hard drive that contains data you want to keep, back up your files
1
before you begin this procedure.
2 Shut down the computer through the Start menu.
3 Ensure that your computer and attached devices are turned off. If your computer and
attached devices did not automatically turn off when you shut down your computer,
turn them off now.
NOTICE: To disconnect a network cable, first unplug the cable from your computer and then
unplug it from the network wall jack.
www.dell.com | support.dell.com
4 Disconnect any telephone or telecommunication lines from the computer.
5 Disconnect your computer and all attached devices from electrical outlets, and then
press the power button to ground the system board.
6 If you have installed a padlock through the padlock ring on the back panel, remove the
padlock.
CAUTION: To guard against electrical shock, always unplug your computer from
the electrical outlet before opening the cover.
NOTICE: Before touching anything inside your computer, ground yourself by touching an
unpainted metal surface, such as the metal at the back of the computer. While you work,
periodically touch an unpainted metal surface to dissipate any static electricity that could harm
internal components.
Open the computer cover.
7
8 Ground yourself by touching an unpainted metal surface on the computer, such as the
metal at the back of the computer, before touching anything inside your computer.
While you work, periodically touch an unpainted metal surface on the computer to
dissipate any static electricity that might harm internal components.
Removing a Hard Drive
1 Disconnect the power and hard-drive cables from the drive.
76 Drives
Page 91
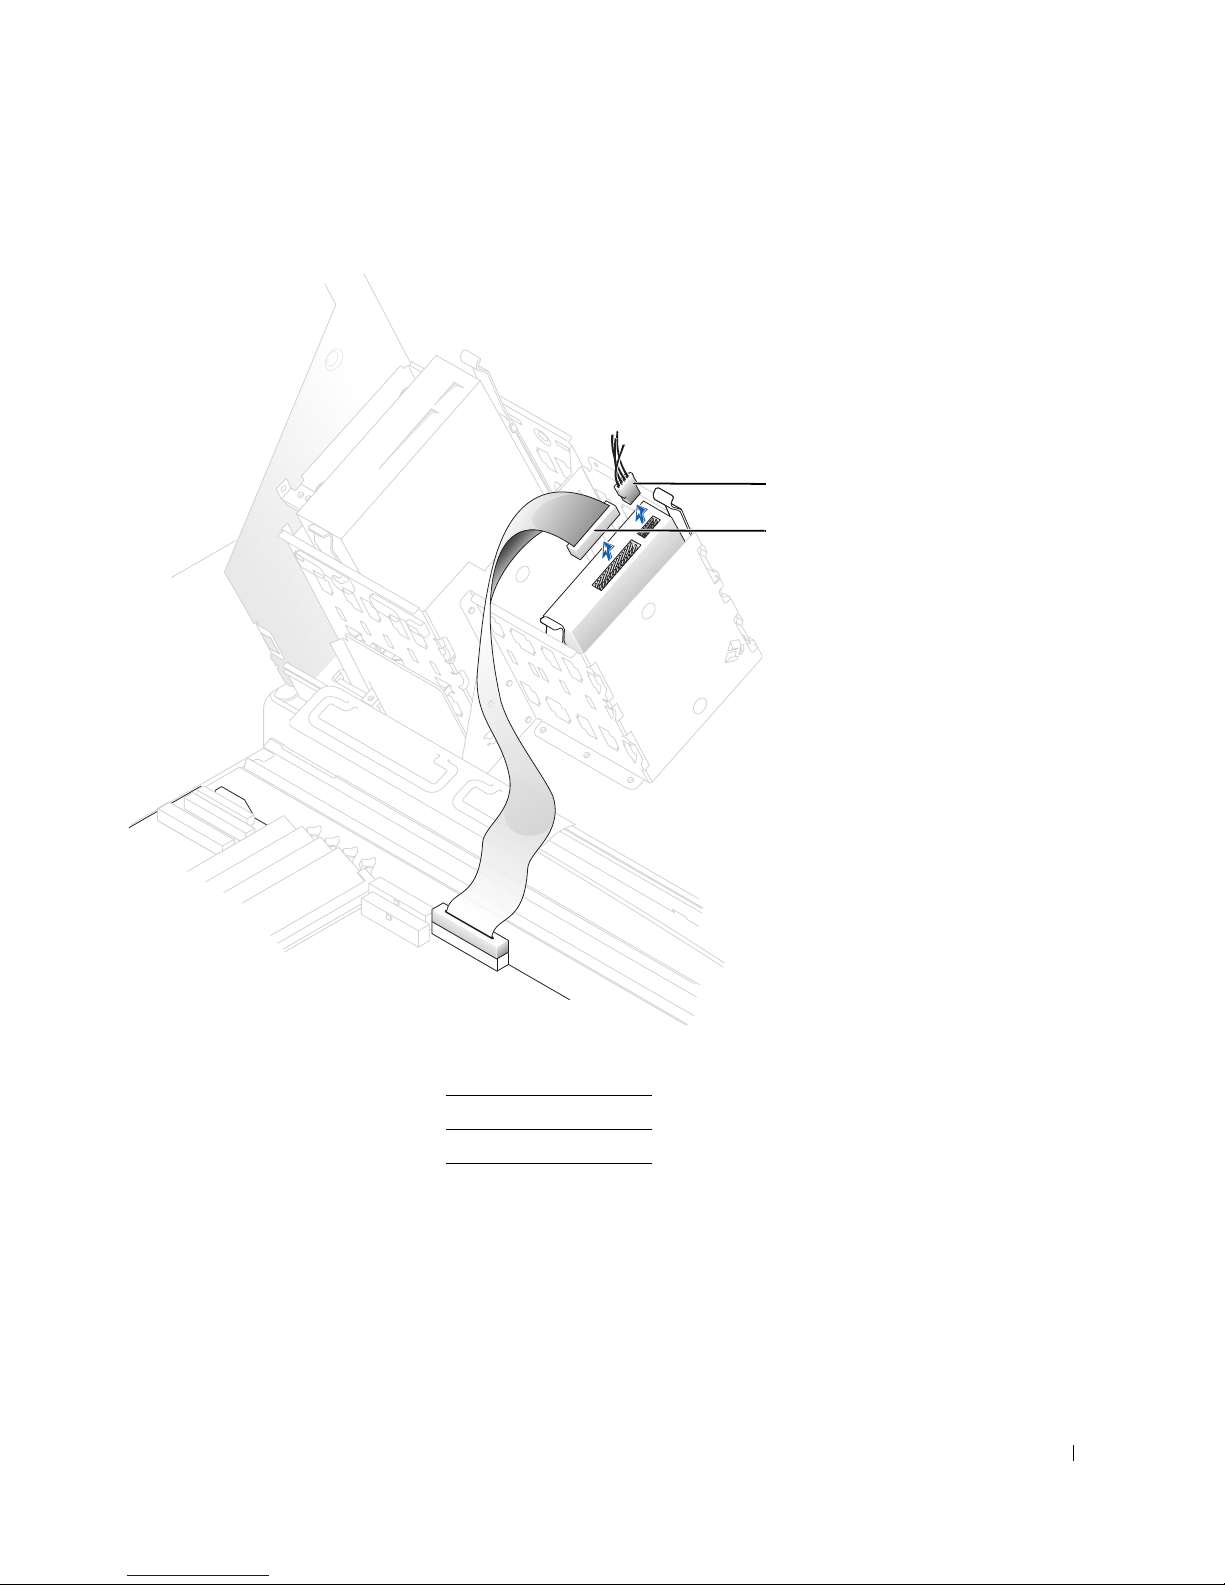
IDE/SCSI Drive
1
2
1 power cable
2 hard-drive cable
Drives 77
Page 92
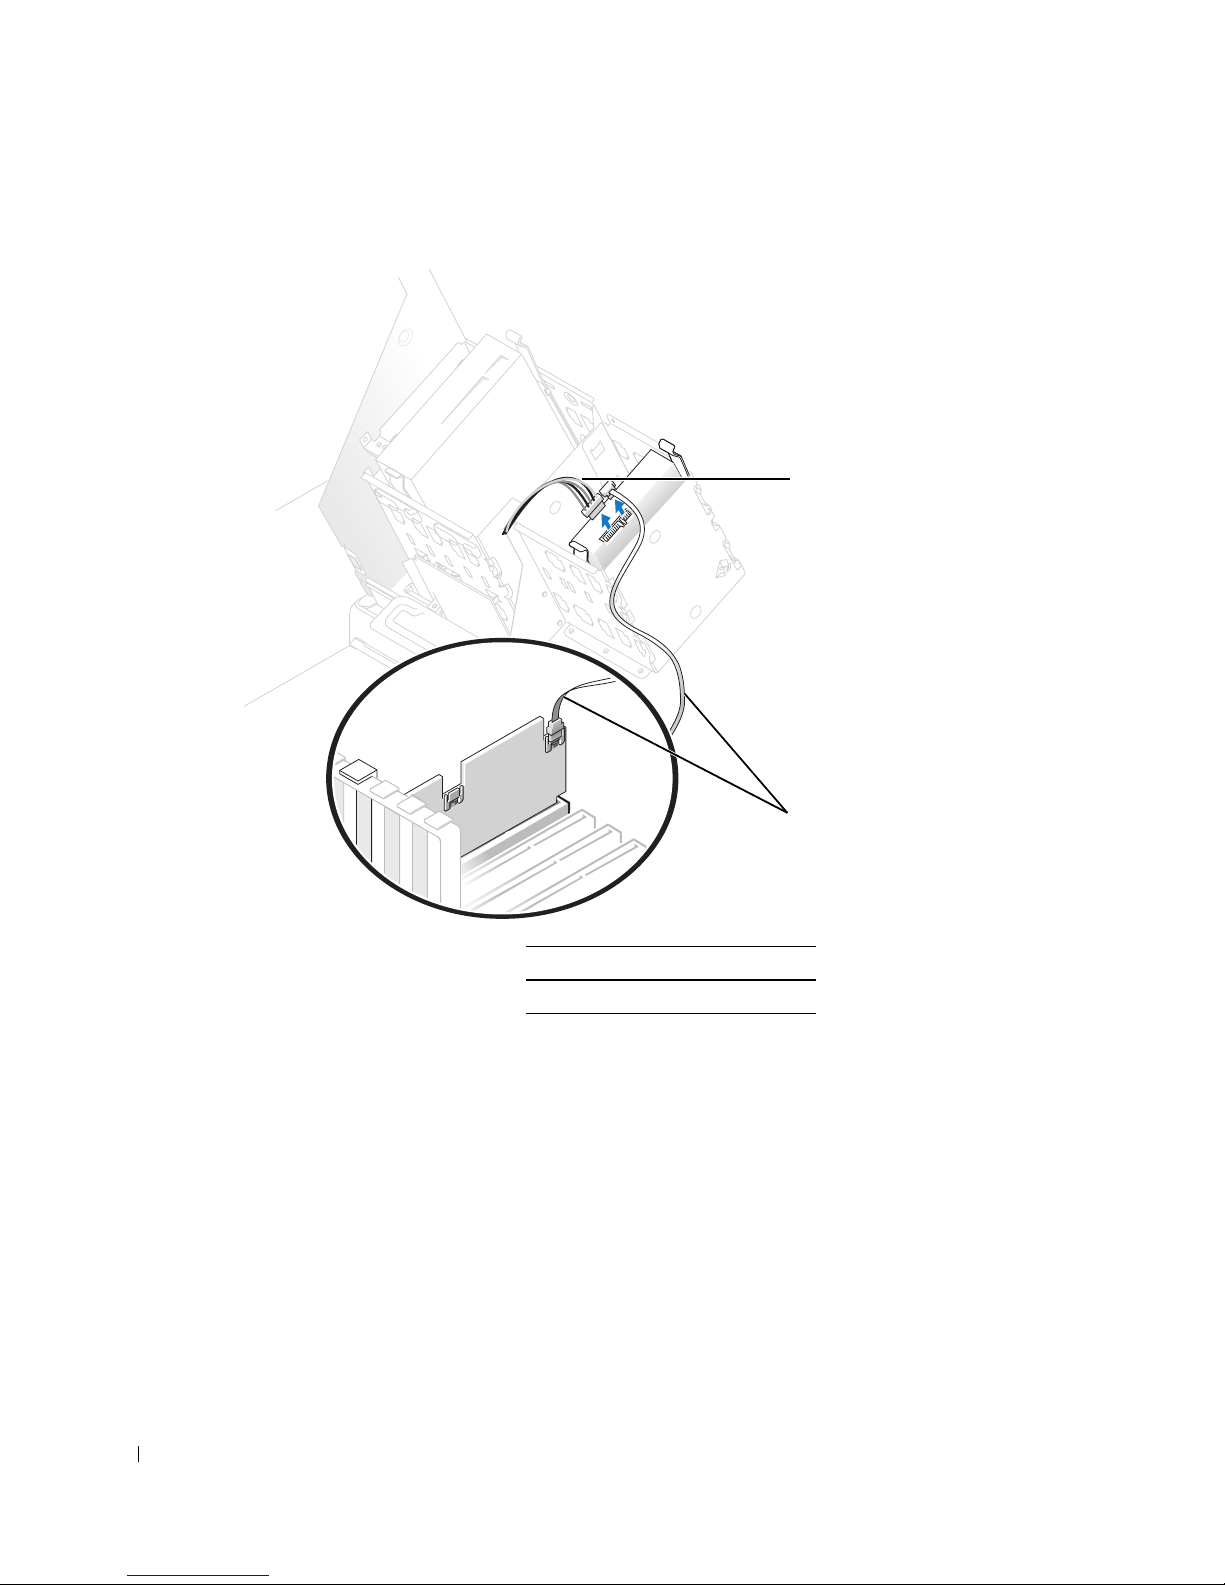
Serial ATA Drive
1
2
www.dell.com | support.dell.com
78 Drives
1 power cable
2 serial ATA hard-drive cable
Press in on the tabs on each side of the drive and slide the drive up and out.
2
Page 93
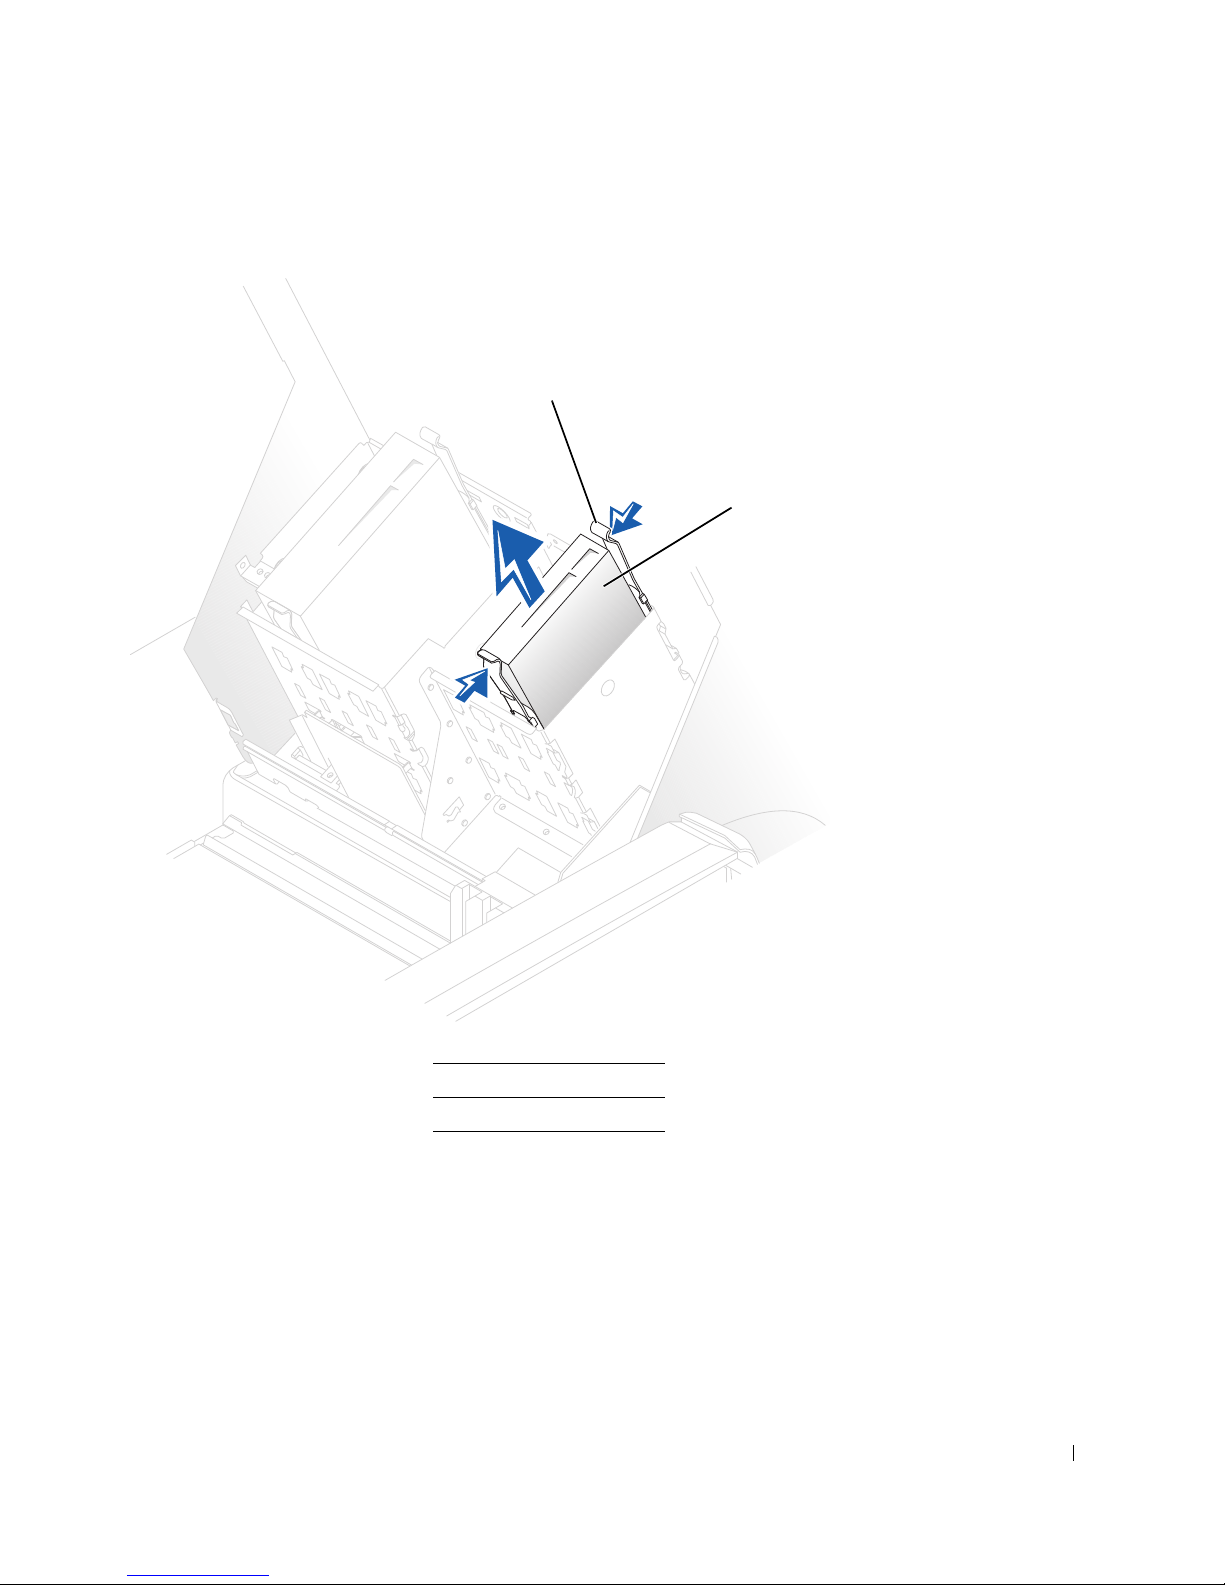
IDE/SCSI Drive
1
2
1 tab (2)
2 hard drive
Drives 79
Page 94
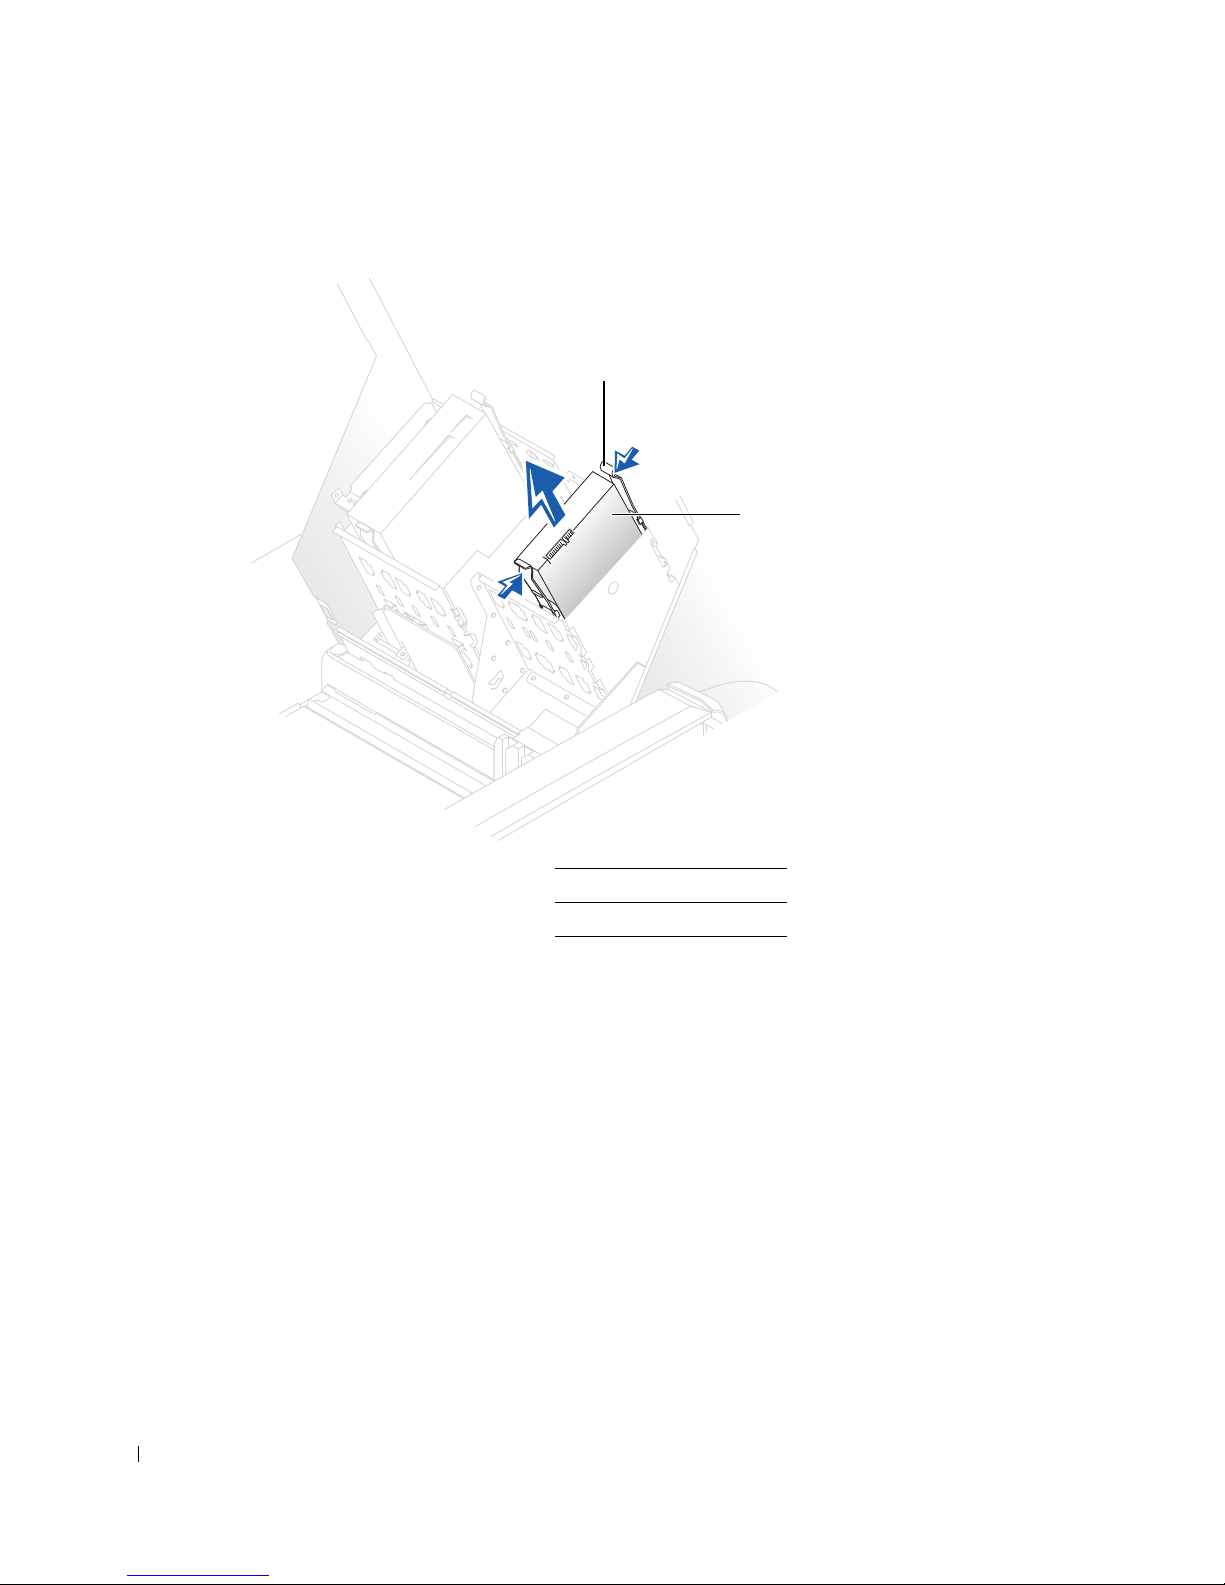
Serial ATA Drive
1
2
www.dell.com | support.dell.com
80 Drives
1 tab (2)
2 hard drive
Installing a Hard Drive
1 Unpack the replacement hard drive, and prepare it for installation.
2 Check the documentation for the drive to verify that it is configured for your
computer.
3 If your replacement hard drive does not have the bracket rails attached, remove the
rails from the old drive by removing the two screws that secure each rail to the drive.
Attach the bracket rails to the new drive by aligning the screw holes on the drive with
the screw holes on the bracket rails and then inserting and tightening all four screws
(two screws on each rail).
Page 95
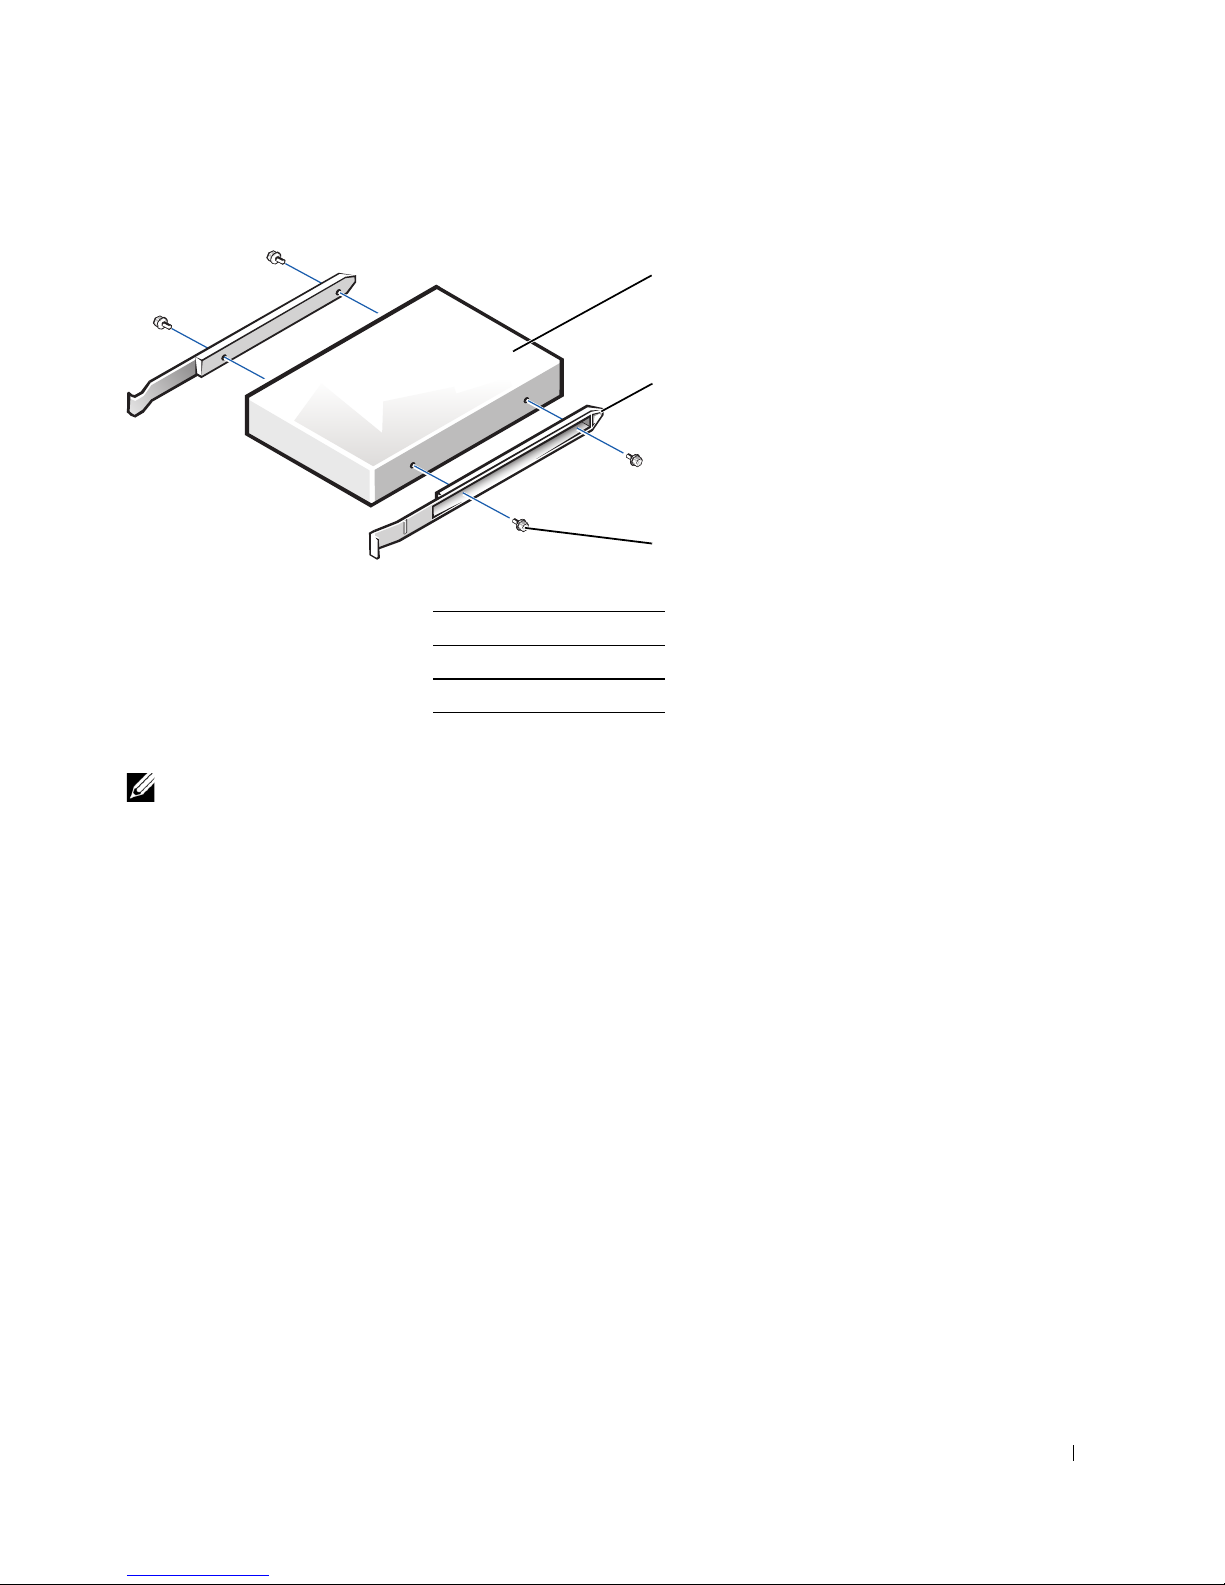
1 drive
1
3
2
2 bracket rails (2)
3 screws (4)
4 Gently slide the drive into place until the tabs securely click into position.
5If you are installing a hard drive in the lower bay, place the drive in the bay so that the power
connector is on the left-hand side (opposite of the top hard drive).
Drives 81
Page 96
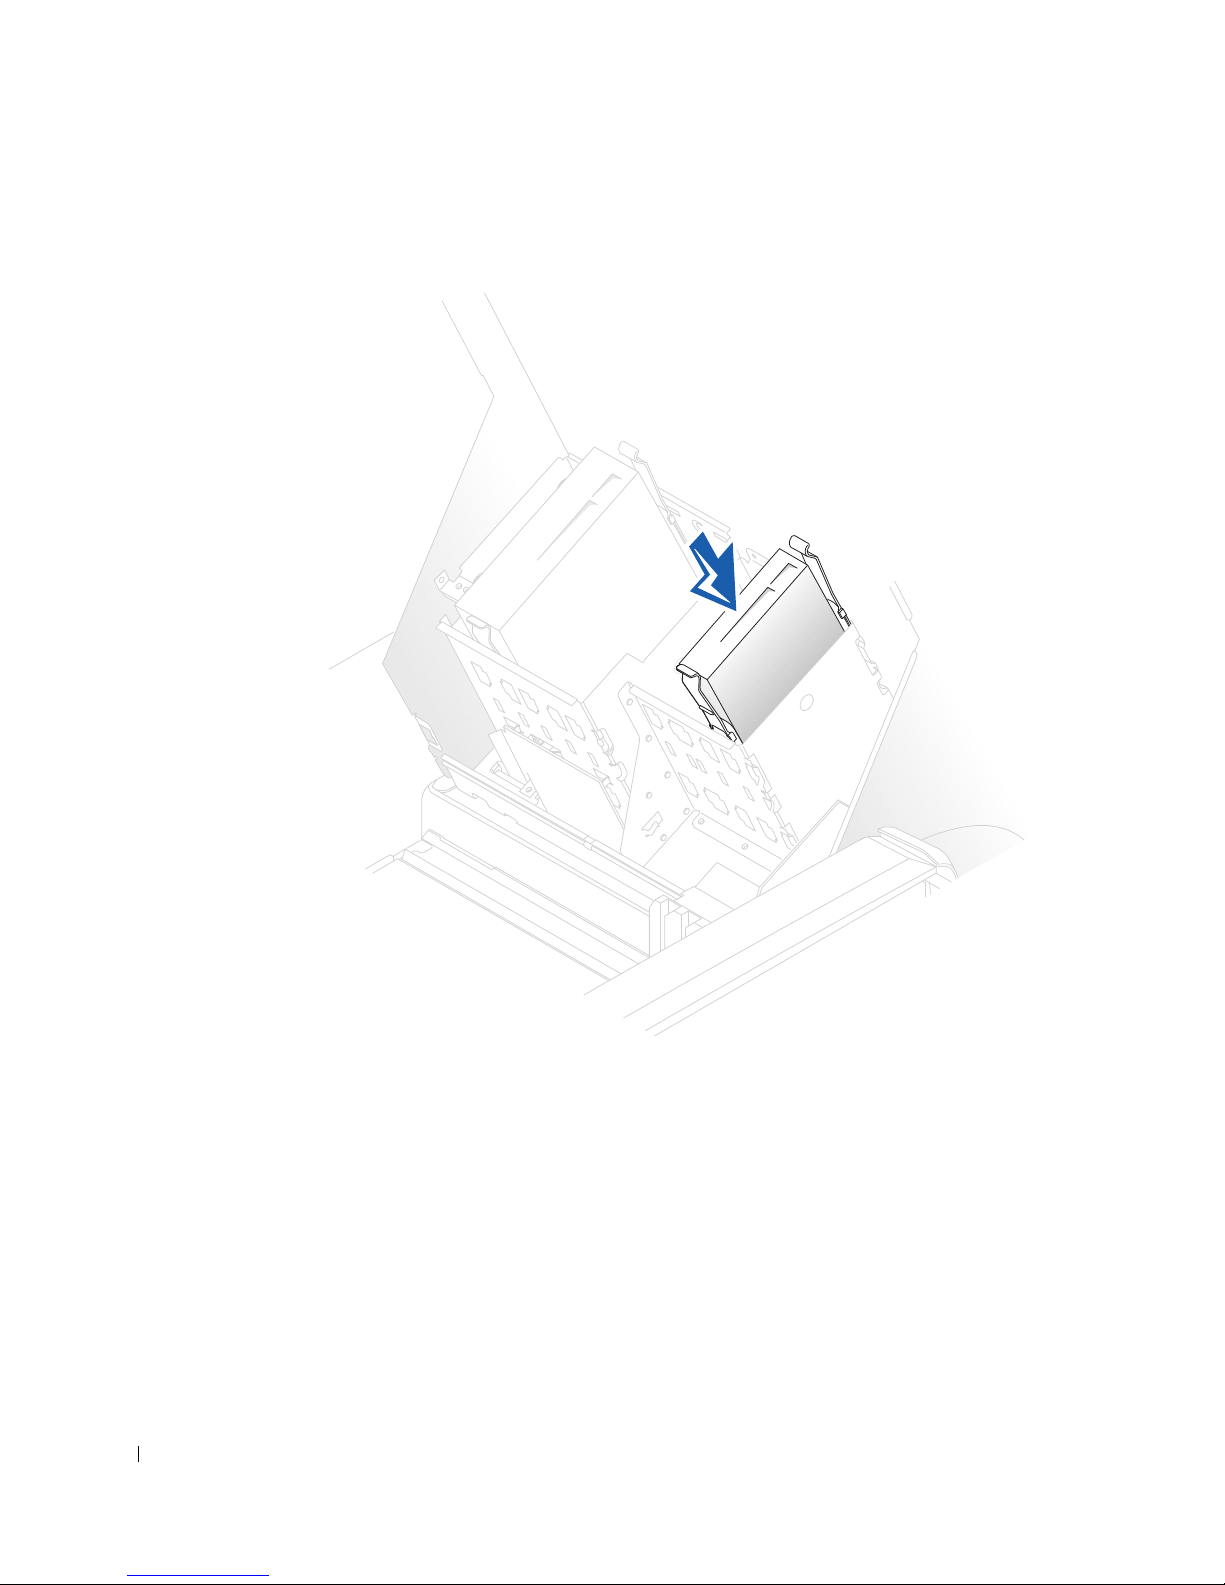
IDE/SCSI Drive
www.dell.com | support.dell.com
82 Drives
Page 97
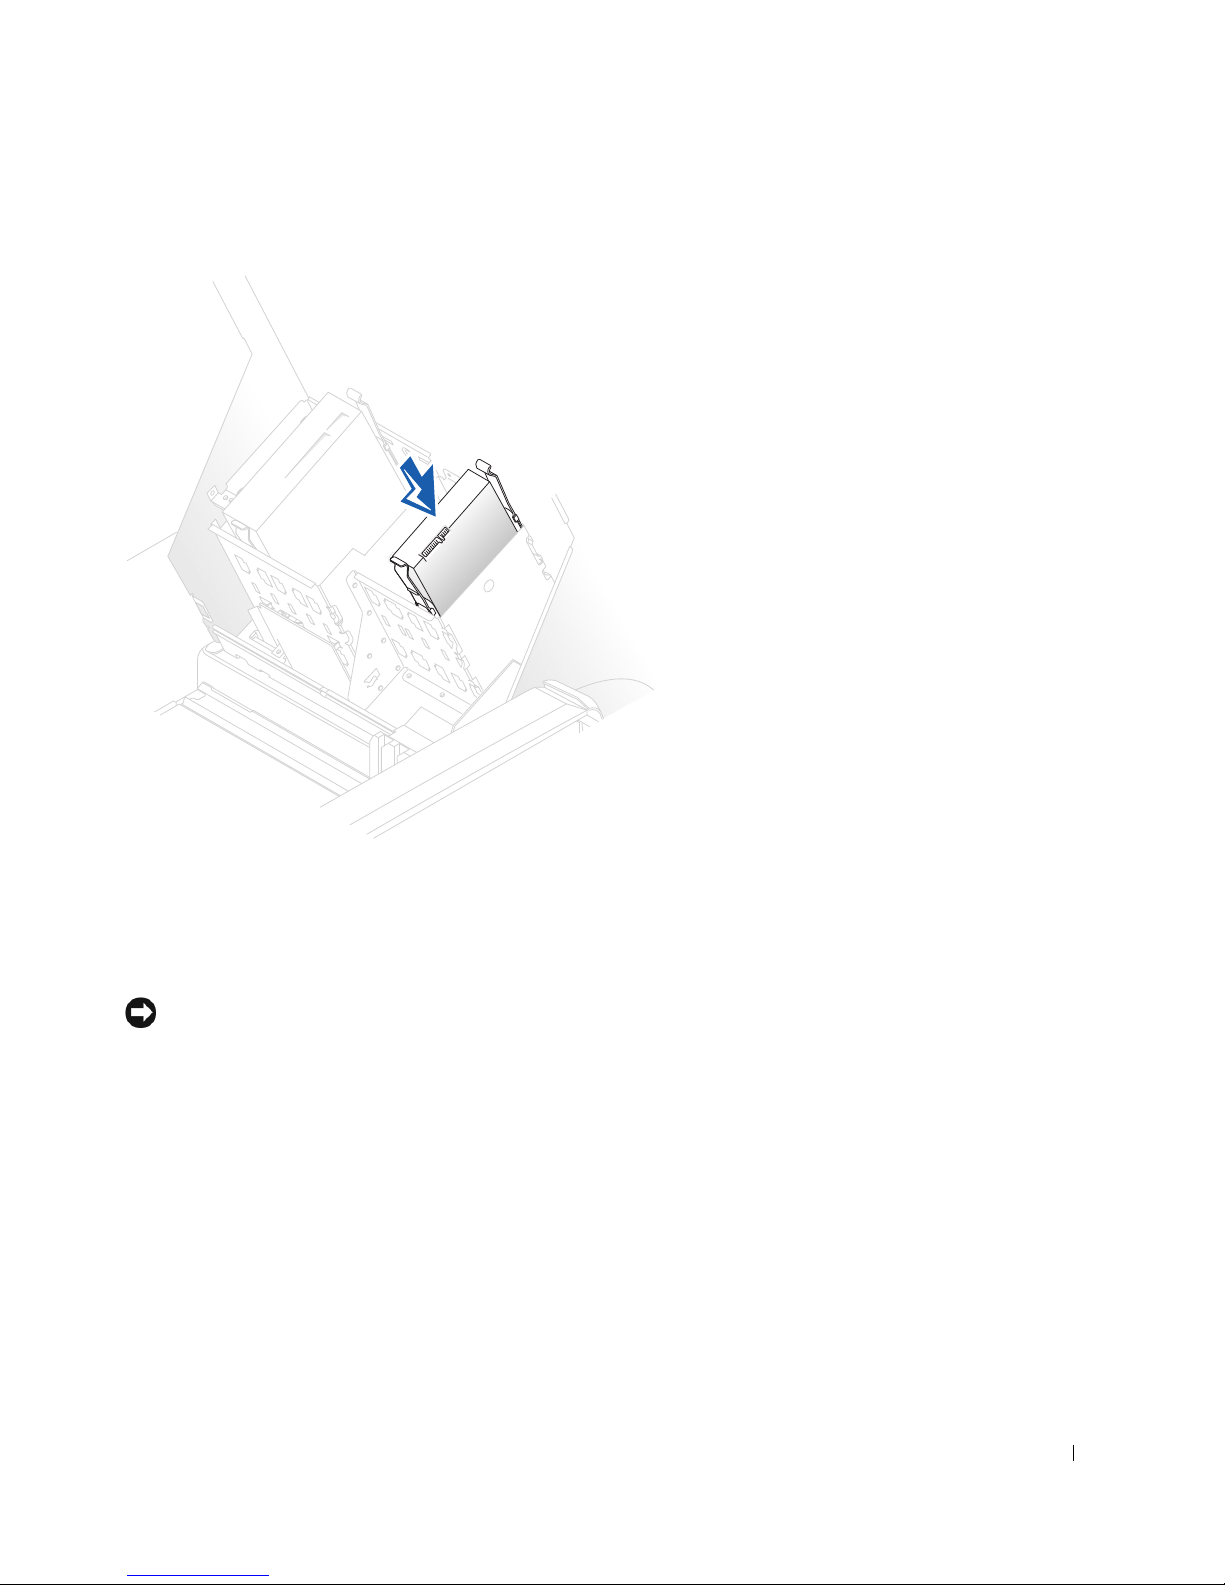
Serial ATA Drive
6
If you are installing a drive that has its own controller card, install the controller card in
an expansion slot.
See the documentation that accompanied the drive and controller card to verify that
the configuration is correct for your computer.
NOTICE: Match the colored strip on the cable with pin 1 on the drive (pin 1 is marked as "1").
7
Connect the power and hard-drive cables to the drive.
Drives 83
Page 98
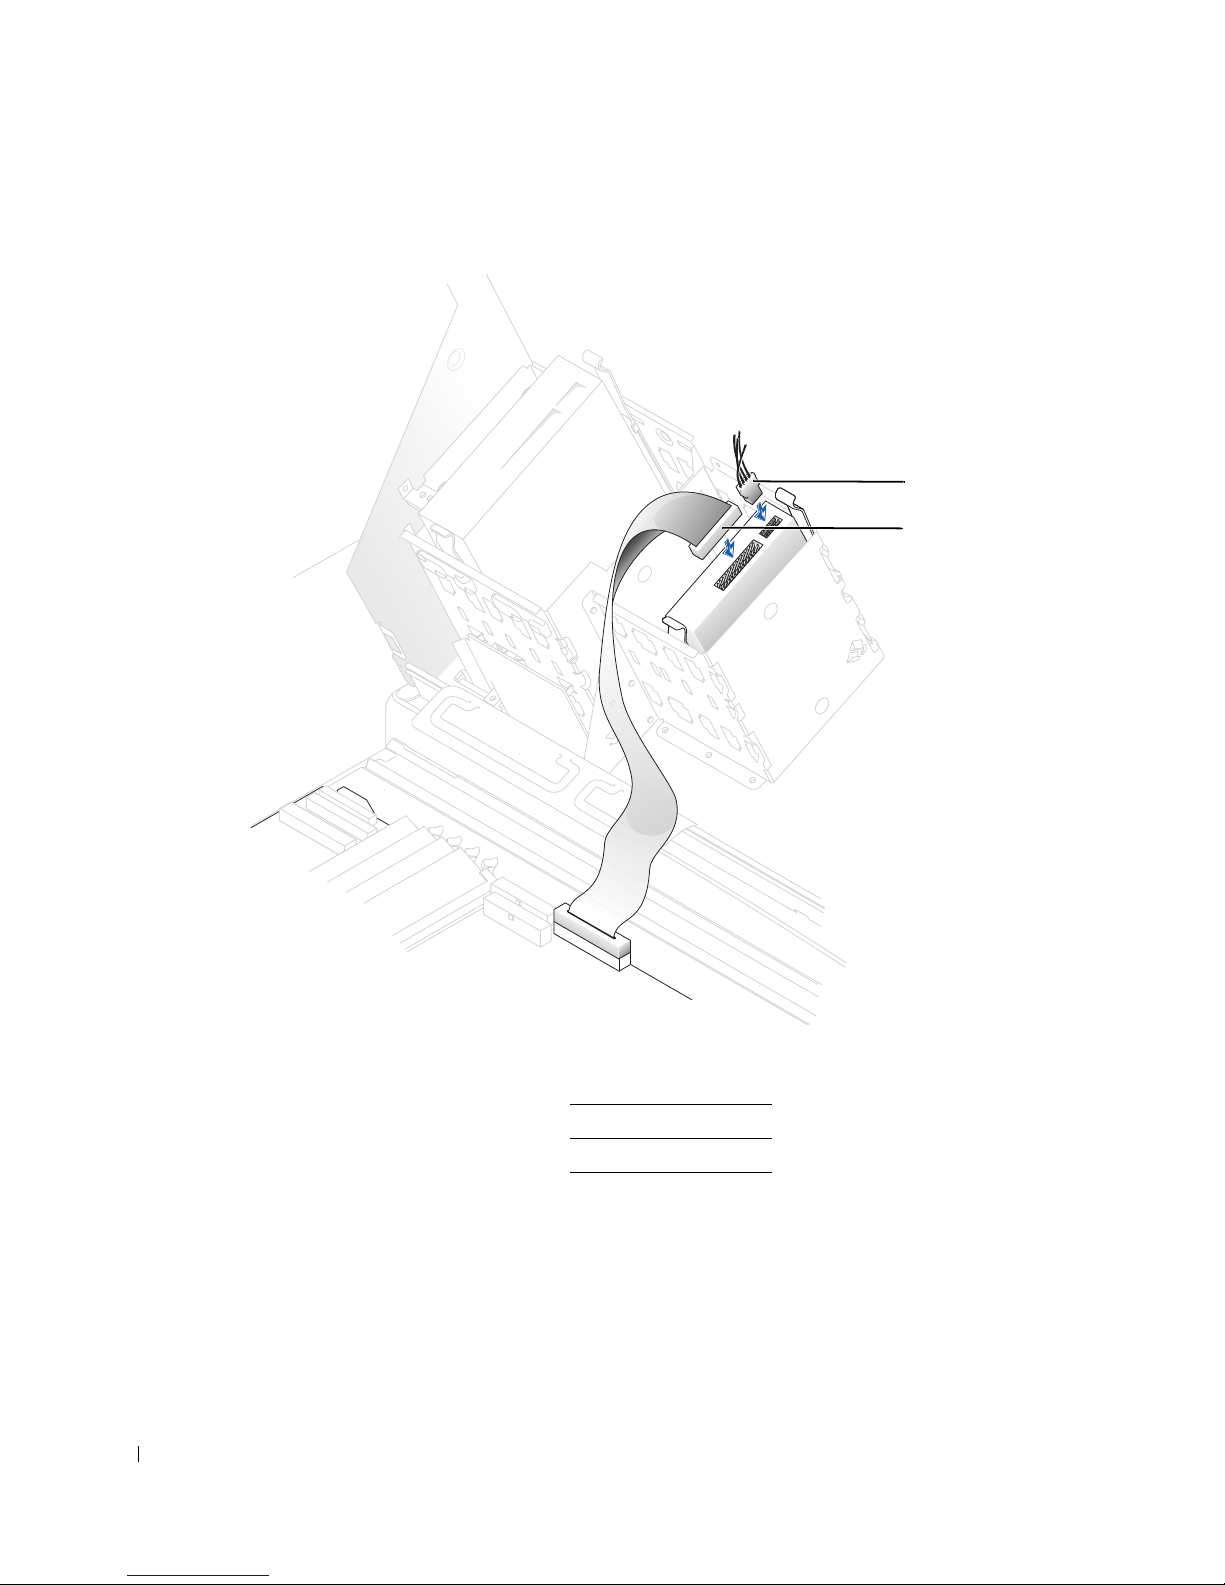
IDE/SCSI Drive
1
2
www.dell.com | support.dell.com
84 Drives
1 power cable
2 hard-drive cable
Page 99
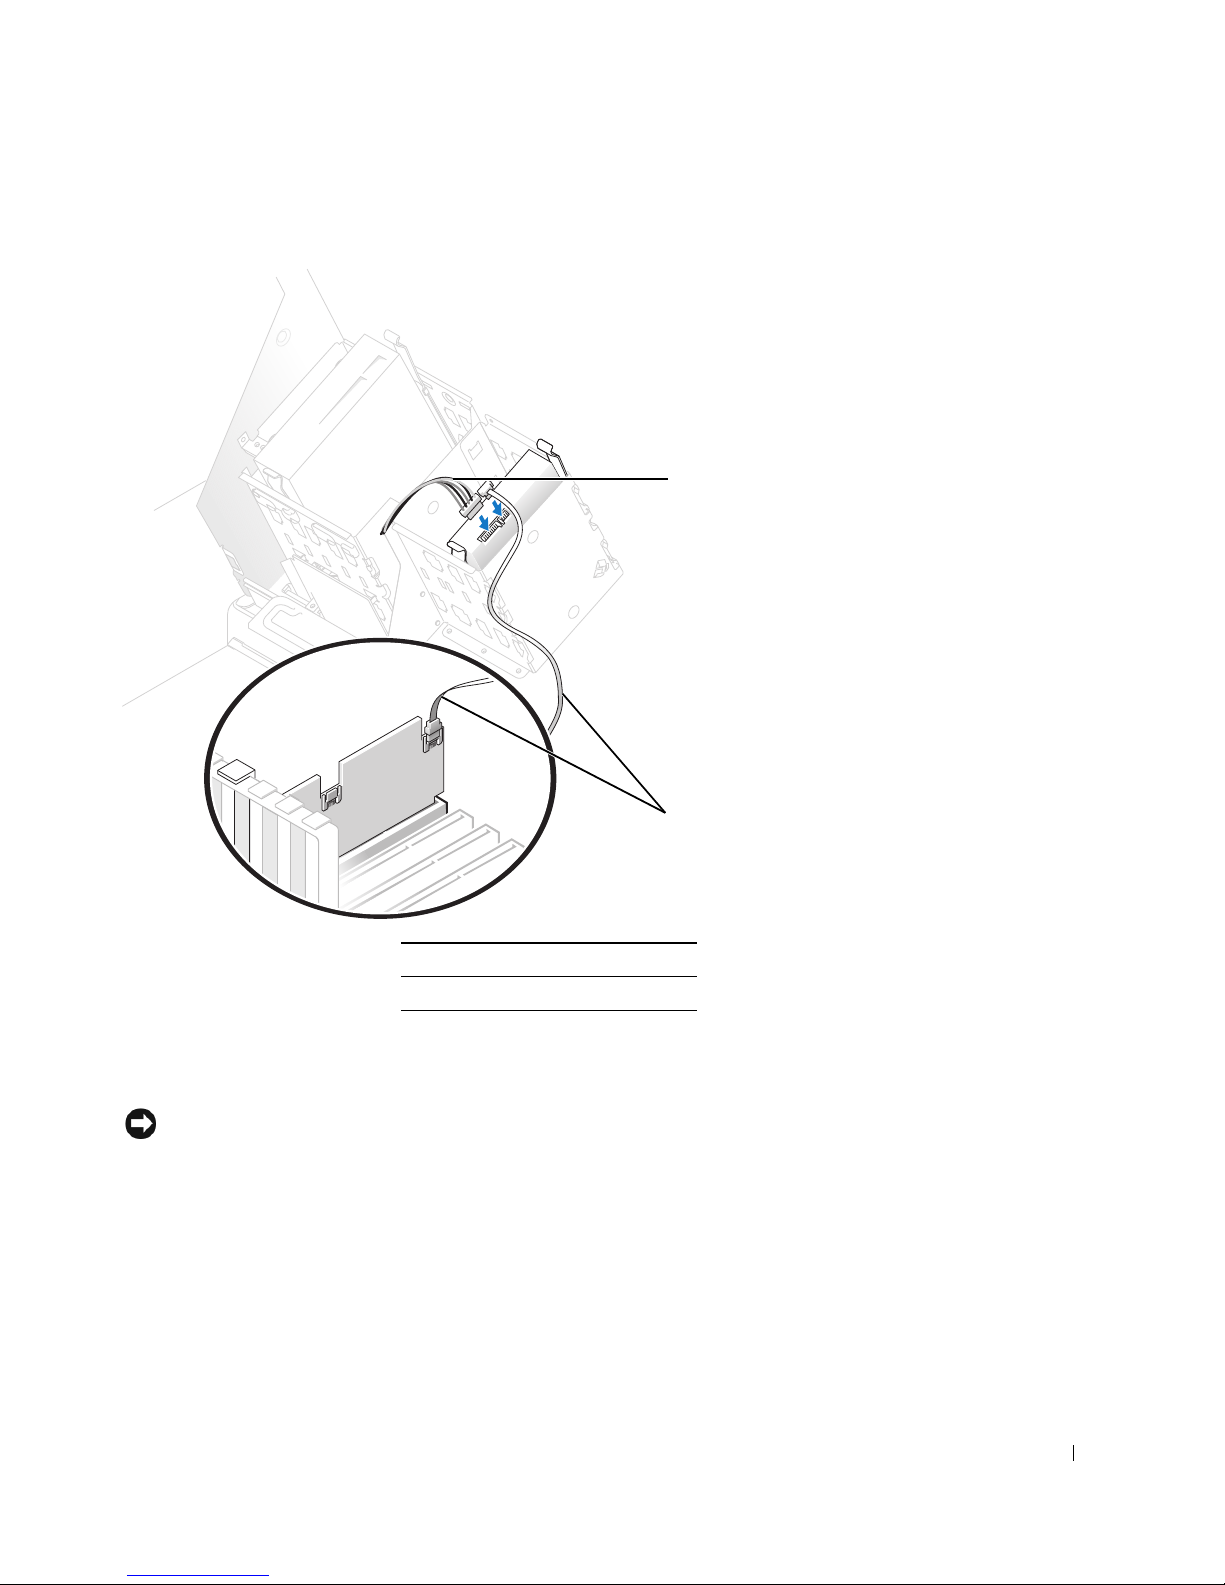
Serial ATA Drive
1
2
1 power cable
2 serial ATA hard-drive cable
8
Check all connectors to be certain that they are properly cabled and firmly seated.
9 Close the computer cover.
NOTICE: To connect a network cable, first plug the cable into the network wall jack and then
plug it into the computer.
Connect your computer and devices to electrical outlets, and turn them on.
10
See the documentation that came with the drive for instructions on installing any
software required for drive operation.
11 If the drive you just installed is the primary drive, insert a bootable floppy disk into
drive A.
Drives 85
Page 100

12 Turn on the computer.
13 Enter system setup, and update the your drive configuration.
14 After you have updated the system settings, exit system setup, and restart the
computer.
15 Partition and logically format your drive before you proceed to the next step.
See the documentation for your operating system for instructions.
16 Test the hard drive by running the Dell Diagnostics.
17 If the drive you just installed is the primary drive, install your operating system on the
hard drive.
www.dell.com | support.dell.com
Floppy Drive
CAUTION: Before you begin any of the procedures in this section, follow the
safety instructions in the
Shut down the computer through the Start menu.
1
2 Ensure that your computer and attached devices are turned off. If your computer and
attached devices did not automatically turn off when you shut down your computer,
turn them off now.
System Information Guide
.
NOTICE: To disconnect a network cable, first unplug the cable from your computer and then
unplug it from the network wall jack.
3 Disconnect any telephone or telecommunication lines from the computer.
4 Disconnect your computer and all attached devices from electrical outlets, and then
press the power button to ground the system board.
5 If you have installed a padlock through the padlock ring on the back panel, remove the
padlock.
CAUTION: To guard against electrical shock, always unplug your computer from
the electrical outlet before opening the cover.
NOTICE: Before touching anything inside your computer, ground yourself by touching an
unpainted metal surface, such as the metal at the back of the computer. While you work,
periodically touch an unpainted metal surface to dissipate any static electricity that could harm
internal components.
Open the computer cover.
6
7 Ground yourself by touching an unpainted metal surface on the computer, such as the
metal at the back of the computer, before touching anything inside your computer.
86 Drives
 Loading...