

Page 1

Dell Precision™ T7400
Quick Reference Guide
Model DCDO
www.dell.com | support.dell.com
Page 2

Notes, Notices, and Cautions
NOTE: A NOTE indicates important information that helps you make better use of
your computer.
NOTICE: A NOTICE indicates either potential damage to hardware or loss of data
and tells you how to avoid the problem.
CAUTION: A CAUTION indicates a potential for property damage, personal injury,
or death.
____________________
Information in this document is subject to change without notice.
© 2007 Dell Inc. All rights reserved.
Reproduction in any manner whatsoever without the written permission of Dell Inc. is strictly forbidden.
Trademarks used in this text: Dell, the DELL logo, and Dell Precision are trademarks of Dell Inc.;
Microsoft, Windows, and Windows Vista are either trademarks or registered trademarks of Microsoft
Corporation in the United States and/or other countries.
Other trademarks and trade names may be used in this document to refer to either the entities claiming
the marks and names or their products. Dell Inc. disclaims any proprietary interest in trademarks and
trade names other than its own.
Model DCDO
September 2007 P/N GX691 Rev. A00
Page 3

Contents
Finding Information . . . . . . . . . . . . . . . . . . . . 5
Setting Up Your Computer
. . . . . . . . . . . . . . . . . 9
Changing Between Tower and
Desktop Orientations
. . . . . . . . . . . . . . . . . 9
Installing Your Computer in an Enclosure
Transferring Information to a New Computer
Power Protection Devices
About Your Computer
. . . . . . . . . . . . . . . . . . 18
. . . . . . . . . . . . . 16
Front View (Tower Orientation)
Back View (Tower Orientation)
Back Panel Connectors
Cleaning Your Computer
. . . . . . . . . . . . . . 21
. . . . . . . . . . . . . . . . 23
Computer, Keyboard, and Monitor
Mouse (Non-Optical)
Floppy Drive
CDs and DVDs
Troubleshooting Tools
Power Lights
Diagnostic Lights
Beep Codes
System Messages
Hardware Troubleshooter
Dell Diagnostics
Troubleshooting
. . . . . . . . . . . . . . . . 23
. . . . . . . . . . . . . . . . . . . . 24
. . . . . . . . . . . . . . . . . . . 24
. . . . . . . . . . . . . . . . . . 24
. . . . . . . . . . . . . . . . . . . . 24
. . . . . . . . . . . . . . . . . . 26
. . . . . . . . . . . . . . . . . . . . 30
. . . . . . . . . . . . . . . . . 31
. . . . . . . . . . . . . 32
. . . . . . . . . . . . . . . . . . 33
. . . . . . . . . . . . . . . . . . 36
. . . . . 10
. . . . 13
. . . . . . . . . . 18
. . . . . . . . . . 20
. . . . . . . . . 23
Index . . . . . . . . . . . . . . . . . . . . . . . . . . . . . . . 53
Contents 3
Page 4

4 Contents
Page 5
Finding Information
NOTE: Some features or media may be optional and may not ship with your computer.
Some features or media may not be available in certain countries.
NOTE: Additional information may ship with your computer.
What Are You Looking For? Find It Here
• A diagnostic program for my computer
• Drivers for my computer
• My device documentation
• Desktop System Software (DSS)
Drivers and Utilities Disc
NOTE: The Drivers and Utilities disc may
be optional and may not ship with your
computer.
Documentation and drivers are already
installed on your computer. You can use
the Drivers and Utilities disc to reinstall
drivers (see "Reinstalling Drivers and
Utilities" in your User’s Guide) and to run
the Dell™ Diagnostics (see "Dell
Diagnostics" on page 33).
• How to remove and replace parts
•Specifications
• How to configure system settings
• How to troubleshoot and solve problems
NOTE: Drivers and documentation updates
can be found at support.dell.com.
Dell Precision™ User’s Guide
®
Microsoft
Windows Vista™ Help and Support Center
1
2
Windows® XP and Microsoft
Click
Start→
Help and Support→
Dell User and System Guides
System Guides
Click the
Quick Reference Guide 5
.
User’s Guide
for your computer.
→
Page 6
What Are You Looking For? Find It Here
• Warranty information
• Terms and Conditions (U.S. only)
• Safety instructions
• Regulatory information
• Ergonomics information
• End User License Agreement
Dell™ Product Information Guide
• Service Tag and Express Service Code
•Microsoft
®
Windows® Product Key
Service Tag and Microsoft Windows
Product Key
These labels are located on your computer:
• Use the Service Tag to identify your
computer when you use
or contact Dell support.
• Enter the Express Service Code to direct
your call when contacting Dell support.
support.dell.com
NOTE: As an increased security measure,
the newly designed Microsoft Windows
license label incorporates a missing portion,
or hole, to discourage removal of the label.
6 Quick Reference Guide
Page 7

What Are You Looking For? Find It Here
• Solutions — Troubleshooting hints and
tips, articles from technicians, online
courses, and frequently asked questions
• Community — Online discussion with
other Dell customers
• Upgrades — Upgrade information for
components, such as the memory, hard
drive, and operating system
• Customer Care — Contact information,
service call and order status, and warranty
and repair information
• Service and support — Service call status,
support history, service contract, and
online discussions with support
• Dell Technical Update Service — Proactive
e-mail notification of software and
hardware updates for your computer
• Reference — Computer documentation,
details on my computer configuration,
product specifications, and white papers
• Downloads — Certified drivers, patches,
and software updates
• Desktop System Software (DSS) — If you
reinstall the operating system for your
computer, you should also reinstall the
DSS utility. DSS automatically detects
your computer and operating system and
installs the updates appropriate for your
configuration, providing critical updates
for your operating system and support for
processors, optical drives, USB devices, for
example. DSS is necessary for correct
operation of your Dell computer.
Dell Support Website — support.dell.com
NOTE: Select your region or business
segment to view the appropriate support site.
To download Desktop System Software:
1
Go to
support.dell.com
country/region, and then click
& Downloads
2
Click
Select Model
make the appropriate selections or enter
the appropriate information for your
computer, and then click
3
Scroll down to
Utilities
and then click
NOTE: The support.dell.com user interface
may vary depending on your selections.
, select your
.
or
Enter a Tag
Confirm
System and Configuration
→
Desktop System Software
Download Now.
Drivers
,
.
,
Quick Reference Guide 7
Page 8
What Are You Looking For? Find It Here
• How to use Windows XP
• How to use Windows Vista
• How to work with programs and files
• How to personalize my desktop
Windows Help and Support Center
1
Click
Start→
2
Type a word or phrase that describes
your problem and click the arrow icon.
3
Click the topic that describes
your problem.
4
Follow the instructions on the screen.
• How to reinstall my operating system
Operating System Disc
The operating system is already installed
on your computer. To reinstall your
operating system, use the Operating System
disc that came with your computer (see
"Restoring Your Operating System" in your
User’s Guide).
Help and Support
.
8 Quick Reference Guide
After you reinstall your operating system,
use the optional Drivers and Utilities disc
to reinstall drivers for the devices that
came with your computer.
Your operating system product key label is
located on your computer.
NOTE: The color of your operating system
installation disc varies according to the
operating system you ordered.
Page 9
What Are You Looking For? Find It Here
• How to use Linux
• E-mail discussions with users of Dell
Precision products and the Linux
operating system
• Additional information regarding Linux
and my Dell Precision computer
Dell Supported Linux Sites
• linux.dell.com
• lists.us.dell.com/mailman/listinfo/linuxprecision
Setting Up Your Computer
Changing Between Tower and Desktop Orientations
CAUTION: Before you begin any of the procedures in this section, follow the
safety instructions in the
NOTE: To change your computer to either the tower or the desktop orientation, you
must use an optional kit available from Dell. See "Product Information" in your
User’s Guide for more details on ordering from Dell.
NOTE: The tower computer supports one more 3.5-inch drive in the front than does
the desktop computer.
1
Follow the procedures in "Before You Begin" in your
2
Remove the computer cover (see "Removing the Computer Cover" in your
User’s Guide
3
Remove the front panel (see "Removing the Front Panel" in your
4
Remove the drive panel and prepare the drive panel by adding or removing
).
Product Information Guide
inserts, as needed (see "Drive Panels" in your
.
User’s Guide
User’s Guide
User’s Guide
).
.
).
Switching From Tower to Desktop Orientation
1
Remove all installed floppy drives or media card readers by following the steps
in "Removing a Floppy Drive or Media Card Reader (Tower Computer)" in
your
User’s Guide
, and then reinstall a single floppy drive or media card reader
by following the steps in "Installing a Floppy Drive or Media Card Reader
(Desktop Computer)" in your
2
Remove all installed optical drives by following the steps in "Removing an
Optical Drive (Tower Computer)" in your
User’s Guide
.
User’s Guide
, and then reinstall
the drives by following the steps in "Installing an Optical Drive (Desktop
Computer)" in your
User’s Guide
.
Quick Reference Guide 9
Page 10

Switching From Desktop to Tower Orientation
1
Remove the floppy drive or media card reader (if installed) by following
the steps in "Removing a Floppy Drive or a Media Card Reader (Desktop
Computer)" in your
User’s Guide
, and then reinstall the floppy drive or
media card reader by following the steps in "Installing a Floppy Drive or
Media Card Reader (Tower Computer)" in your
2
Remove all installed optical drives by following the steps in "Removing an
Optical Drive (Desktop Computer)" in your
User’s Guide
User’s Guide
.
, and reinstall the
drives by following the steps in "Installing an Optical Drive (Tower Computer)"
in your
User’s Guide
.
Installing Your Computer in an Enclosure
Installing your computer in an enclosure can restrict airflow, can cause your
computer to overheat, and may impact your computer’s performance. Follow
the guidelines below when installing your computer in an enclosure.
NOTICE: The operating temperature specified in this manual reflects the maximum
ambient operating temperature. The ambient room temperature must be
a consideration when installing your computer in an enclosure. For details about
your computer’s specifications, see "Specifications" in your User’s Guide.
10 Quick Reference Guide
Page 11
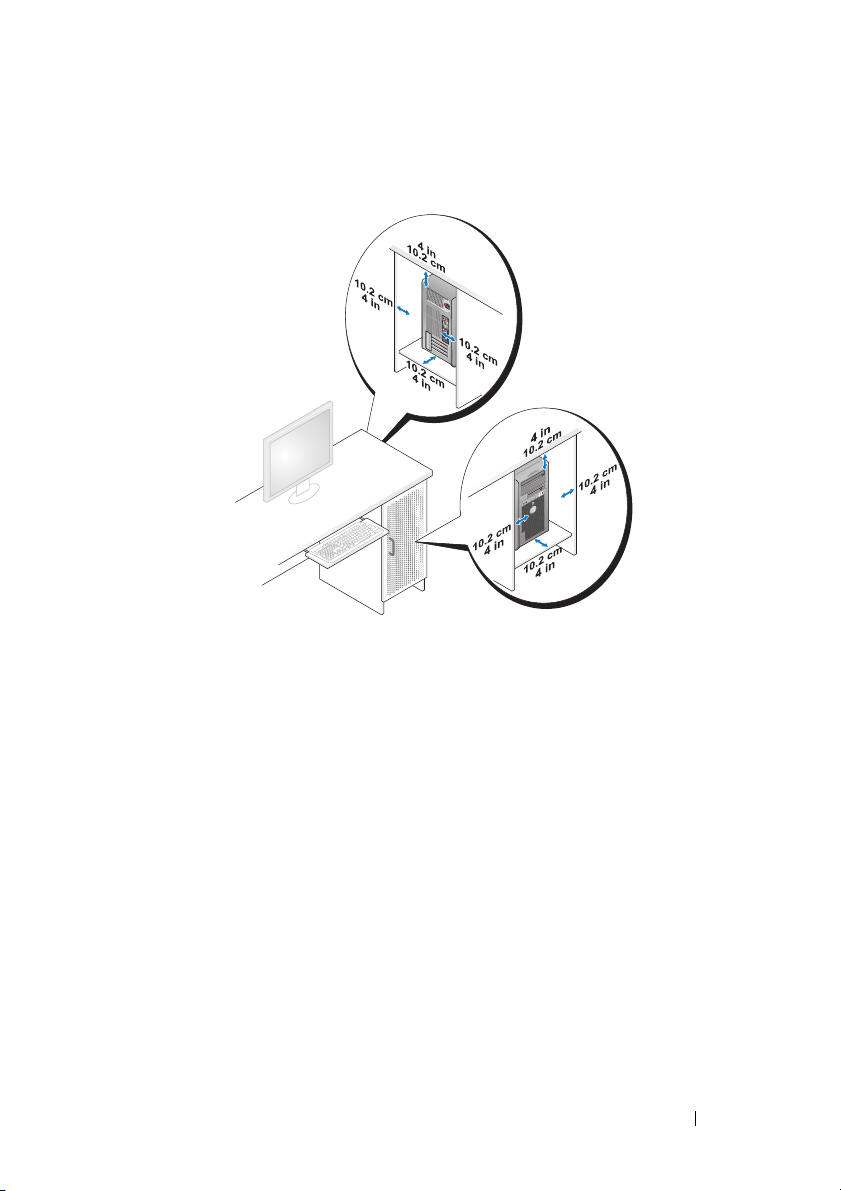
• Leave 10.2 cm (4 in) minimum clearance on all vented sides of the computer
to permit the airflow required for proper ventilation.
• If your computer is installed in a corner on or under a desk, leave 5.1 cm
(2 in) minimum clearance from the back of the computer to the wall to
permit the airflow required for proper ventilation.
• If your enclosure has doors, ensure that they allow at least 30 percent airflow
through the enclosure (front and back).
Quick Reference Guide 11
Page 12
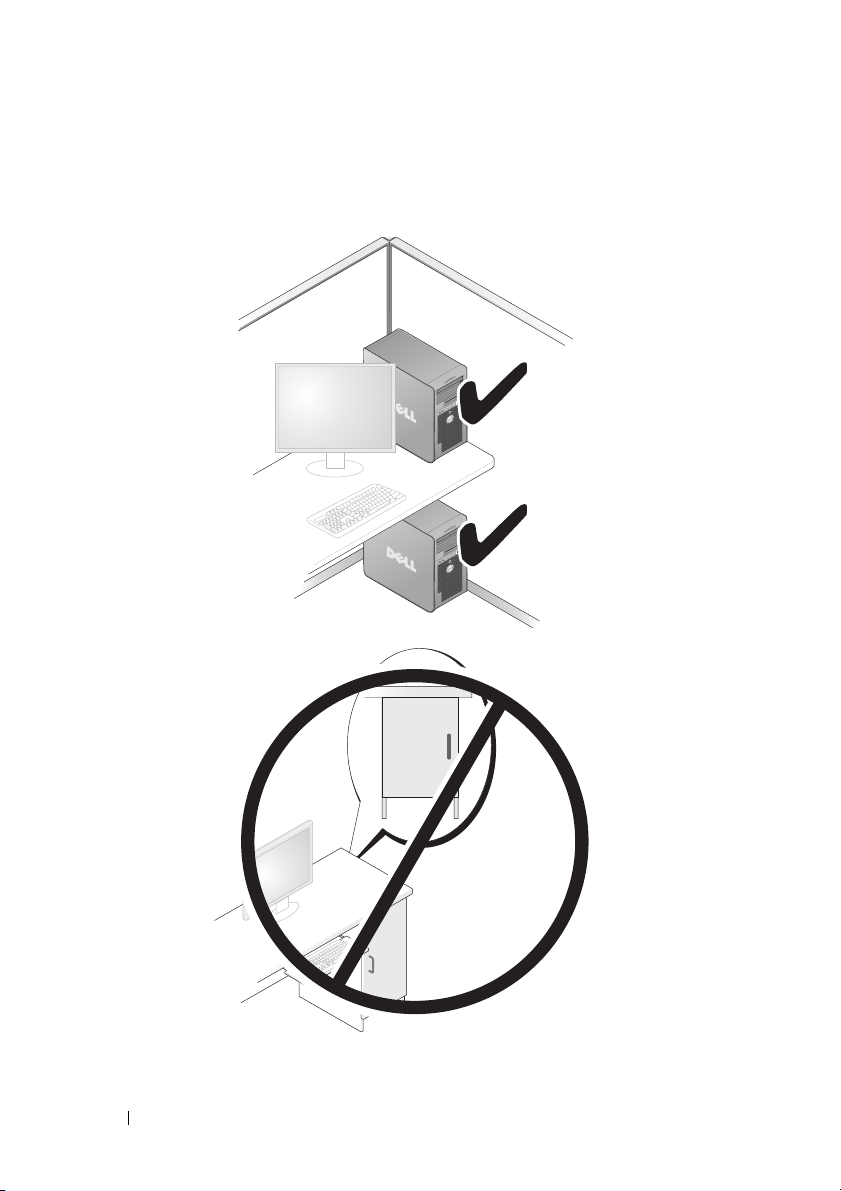
• Do not install your computer in an enclosure that does not allow airflow.
Restricting the airflow
impact your computer’s performance
can cause your computer to overheat and may
.
12 Quick Reference Guide
Page 13

Transferring Information to a New Computer
You can use your operating system wizards to help you transfer files and other
data from one computer to another computer.
Microsoft Windows XP
The Microsoft Windows XP operating system provides the Files and Settings
Transfer Wizard to transfer data, such as:
• E-mail messages
• Toolbar settings
•Window sizes
• Internet bookmarks
You can transfer data from one computer to another computer over a network
or serial connection, or by storing the data on removable media, such as
a writable CD or DVD.
NOTE: You can transfer information from one computer to another computer by
directly connecting a serial cable to the input/output (I/O) ports of the two computers. To
transfer data over a serial connection, you must use the Network Connections
utility in the Control Panel to perform additional configuration steps, such as setting
up an advanced connection and designating the host computer and the guest computer.
For instructions on setting up a direct cable connection between two computers,
see Microsoft Knowledge Base Article #305621, titled How to Set Up a Direct Cable
Connection Between Two Computers in Windows XP. This information may not be
available in certain countries.
Using the Files and Settings Transfer Wizard requires the Operating System
disc that came with your computer or a wizard disk, which the wizard can
create for you.
NOTE: For more information about transferring data, search support.dell.com for
document #154781 (What Are The Different Methods To Transfer Files From My Old
Computer To My New Dell™ Computer Using the Microsoft Windows XP Operating
System?).
NOTE: Access to the Dell Knowledge Base document may not be available in
certain countries.
Quick Reference Guide 13
Page 14

Files and Settings Transfer Wizard (With the Operating System Disc)
NOTE: The Files and Settings Transfer Wizard designates the source computer from
which data is to be transferred as the old computer, and designates the destination
computer to which the data is going to be transferred as the new computer.
PREPARE THE DESTINATION COMPUTER FOR THE FILE TRANSFER —
1
Click
Start→
Settings Transfer Wizard
2
Under
3
Under
the Windows XP CD
4
Review the information under
to the source computer. Do
COPY DATA FROM THE SOURCE COMPUTER —
1
Insert the Windows XP
Welcome to Microsoft Windows XP
The
2
Click
Perform additional tasks
3
Under
The
Files and Settings Transfer Wizard
4
Click
Next
5
Under
6
Under
and then click
7
Under
transfer, and then click
The selected data is copied and the
All Programs→
Accessories→ System Tools→
.
Which computer is this?
, click
New computer
Do you have a Windows XP CD?
, and then click
Next
Now go to your old computer
not
click
Next
Operating System
.
What do you want to do?
, click
Transfer files and settings
.
Which computer is this?
Select a transfer method
Next
.
What do you want to transfer?
Next
, click
Old Computer
, click the transfer method of your choice,
, click to select the data you want to
.
Completing the Collection Phase
Files and
, and then click
, click
I will use the wizard from
.
, and then go
.
disc into the source computer.
screen appears.
window appears.
, and then click
screen appears.
Next
.
.
Next
.
8
Click
Finish
.
14 Quick Reference Guide
Page 15

TRANSFER DATA TO THE DESTINATION COMPUTER —
1
Go to the destination computer.
2
Under
Now go to your old computer
3
Under
Where are the files and settings?
chose for transferring your settings and files, and then click
, click
Next
.
, click to select the method you
Next
.
The wizard reads the collected files and settings and applies them to the
destination computer. When the transfer is complete, the
Finished
screen appears.
4
Click
Finished
Files and Settings Transfer Wizard (Without the Operating System Disc)
, and then restart the computer.
To run the Files and Settings Transfer Wizard without the Operating System
disc, you must create a wizard disk. The wizard disk allows you to create
a backup image file on removable media.
NOTE: The Files and Settings Transfer Wizard designates the source computer from
which data is to be transferred as the old computer, and designates the destination
computer to which the data is going to be transferred as the new computer.
CREATE A WIZARD DISK —
1
On the destination computer, click
System Tools
2
Under
3
Under
in the following drive
4
Insert a writable CD or DVD, and then click OK.
5
Review the information under
to the source computer. Do
COPY DATA FROM THE SOURCE COMPUTER —
1
Insert the wizard disk into the source computer.
2
Click
3
Click
Browse...
4
Under
5
Under
and then click
→ Files and Settings Transfer Wizard
Which computer is this?
Do you have a Windows XP CD?
, and then click
not
Start→
Run
.
and navigate to
Which computer is this?
Select a transfer method
Next
.
Start→
All Programs→
Accessories→
.
, click
New computer
, click
I want to create a Wizard Disk
, and then click
Next
Next.
Now go to your old computer
click
Next
.
fastwiz
on the wizard disk, and then clickOK.
, click
Old Computer
, and then go
, and then click
Next
, click the transfer method of your choice,
.
.
Quick Reference Guide 15
Page 16

6
Under
What do you want to transfer?
transfer, and then click
Next
.
The selected data is copied and the
, click to select the data you want to
Completing the Collection Phase
screen appears.
7
Click
Finish
.
TRANSFER DATA TO THE DESTINATION COMPUTER —
1
Go to the destination computer.
2
Under
Now go to your old computer
3
Under
Where are the files and settings?
for transferring your settings and files, and then click
, click
Next
.
, click to select the method you chose
Next
.
The wizard reads the collected files and settings and applies them to the
destination computer. When the transfer is complete, the
Finished
screen appears.
4
Click
Finished
Microsoft Windows Vista
1
Click the Windows Vista Start button , and then click
and settings
2
In the
User Account Control
3
Click
Start a new transfer
, and then restart the computer.
→ Start Windows Easy Transfer.
dialog box, click
or
Continue a transfer in progress
Continue
Tran s fer f ile s
.
.
Follow the instructions provided on the screen by the Windows Easy Transfer
wizard.
Power Protection Devices
Several devices are available to protect against power fluctuations and failures:
• Surge protectors
• Line conditioners
• Uninterruptible power supplies (UPS)
16 Quick Reference Guide
Page 17

Surge Protectors
Surge protectors and power strips equipped with surge protection help prevent
damage to your computer from voltage spikes that can occur during electrical
storms or after power interruptions. Some surge protector manufacturers include
warranty coverage for certain types of damage. Carefully read the device warranty
when choosing a surge protector and compare joule ratings to determine the
relative effectiveness of different devices. A device with a higher joule rating
offers more protection.
NOTICE: Most surge protectors do not protect against power fluctuations or
power interruptions caused by nearby lightning strikes. When lightning occurs in
your area, disconnect the telephone line from the telephone wall jack and
disconnect your computer from the electrical outlet.
Many surge protectors have a telephone jack for modem protection. See the
surge protector documentation for modem connection instructions.
NOTICE: Not all surge protectors offer network adapter protection. Disconnect the
network cable from the network wall jack during electrical storms.
Line Conditioners
NOTICE: Line conditioners do not protect against power interruptions.
Line conditioners are designed to maintain AC voltage at a fairly constant level.
Uninterruptible Power Supplies
NOTICE: Loss of power while data is being saved to the hard drive may result in
data loss or file damage.
NOTE: To ensure maximum battery operating time, connect only your computer to
a UPS. Connect other devices, such as a printer, to a separate power strip that
provides surge protection.
A UPS protects against power fluctuations and interruptions. UPS devices contain
a battery that provides temporary power to connected devices when AC power
is interrupted. The battery charges while AC power is available. See the UPS
manufacturer documentation for information on battery operating time and to
ensure that the device is approved by Underwriters Laboratories (UL).
Quick Reference Guide 17
Page 18
About Your Computer
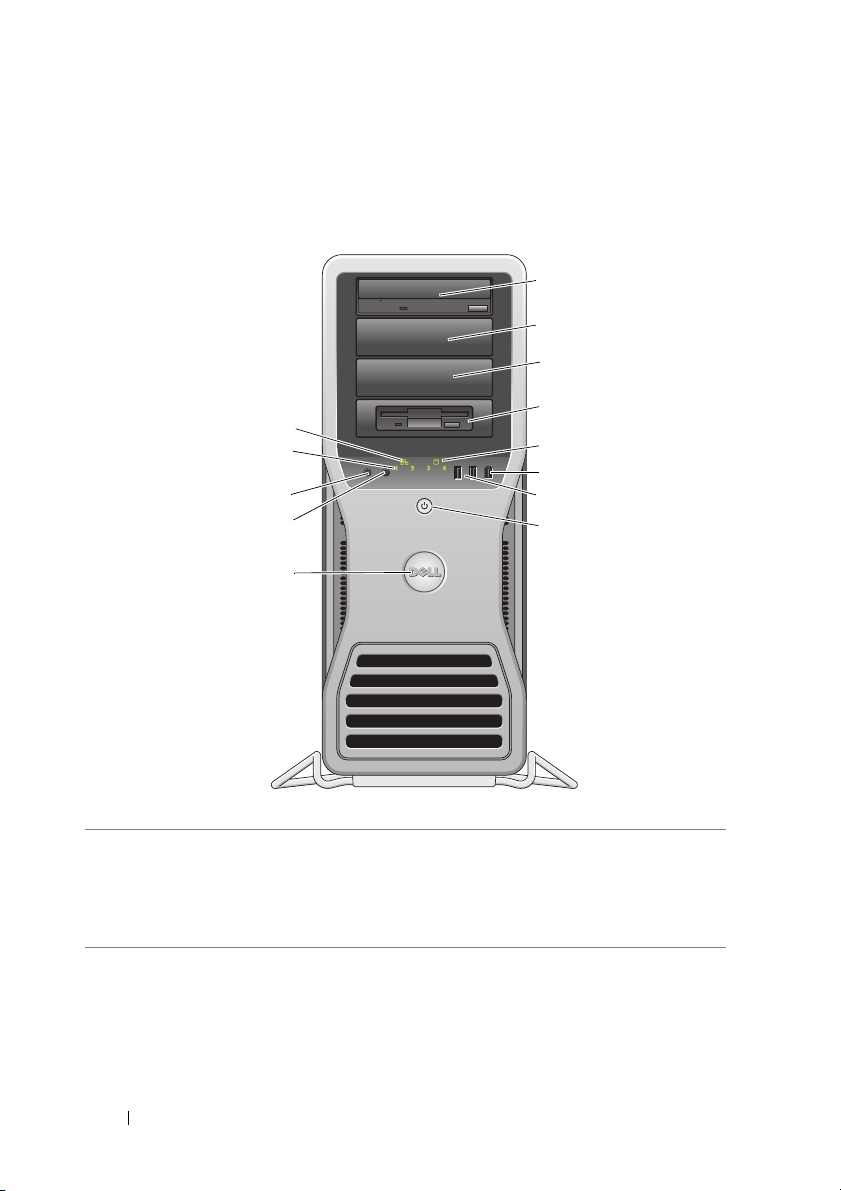
Front View (Tower Orientation)
1
2
3
1–3 5.25-inch
drive bays
13
12
11
10
9
Can hold a CD/DVD drive, or a media card reader, floppy
drive, or a SATA hard drive in a 5.25-inch drive bay carrier.
The hard-drive carrier is only for use in the 5.25-inch drive
bays. The floppy-drive/media card reader and hard-drive
carriers are not interchangeable.
4
5
6
7
8
18 Quick Reference Guide
Page 19

4 5.25-inch drive
bay with special
3.5-inch drive
panel plate
5 hard-drive
activity light
6 IEEE 1394
connector
7USB 2.0
connectors (2)
8 power button,
power light
Can hold a CD/DVD drive, or a media card reader, a floppy
drive, or a SATA hard drive in a 5.25-inch drive bay carrier. The
drive-panel plate shown here is only for use with a floppy drive
or media card reader; you can install the plate in front of any of
the four 5.25-inch drive bays. For more information, see "Drive
Panels" in your User’s Guide.
The hard-drive carrier is only for use in the 5.25-inch drive
bays. The floppy-drive/media card reader and hard-drive
carriers are not interchangeable.
The hard drive light is on when the computer reads data from
or writes data to the hard drive. The light might also be on
when a device such as your CD drive is operating.
Use the IEEE 1394 connector for high-speed data devices
such as digital video cameras and external storage devices.
Use the front USB connectors for devices that you connect
occasionally, such as flash memory keys, cameras, or bootable
USB devices.
Dell recommends that you use the back USB connectors for
devices that typically remain connected, such as printers
and keyboards.
Press the power button to turn on the computer. The light in
the center of this button indicates the power state. For more
information, see "Controls and Lights" in your User’s Guide.
NOTE: To avoid losing data, do not use the power button to
turn off the computer. Instead, perform an operating system
shutdown.
9 Dell badge You can rotate the Dell badge so that "Dell" is read horizontally,
depending on whether you use the desktop or tower orientation.
10 headphone
connector
11 microphone
connector
12 diagnostic
lights (4)
13 network link light The network link light is on when a good connection exists
Use the headphone connector to attach headphones.
Use the microphone connector to attach a personal
computer microphone for voice or musical input into a sound
or telephony program.
Use these lights to help you troubleshoot a computer problem
based on the diagnostic code. For more information, see
"Diagnostic Lights" in your User’s Guide.
between a 10-Mbps, 100-Mbps, or 1000-Mbps (or 1-Gbps)
network and the computer.
Quick Reference Guide 19
Page 20
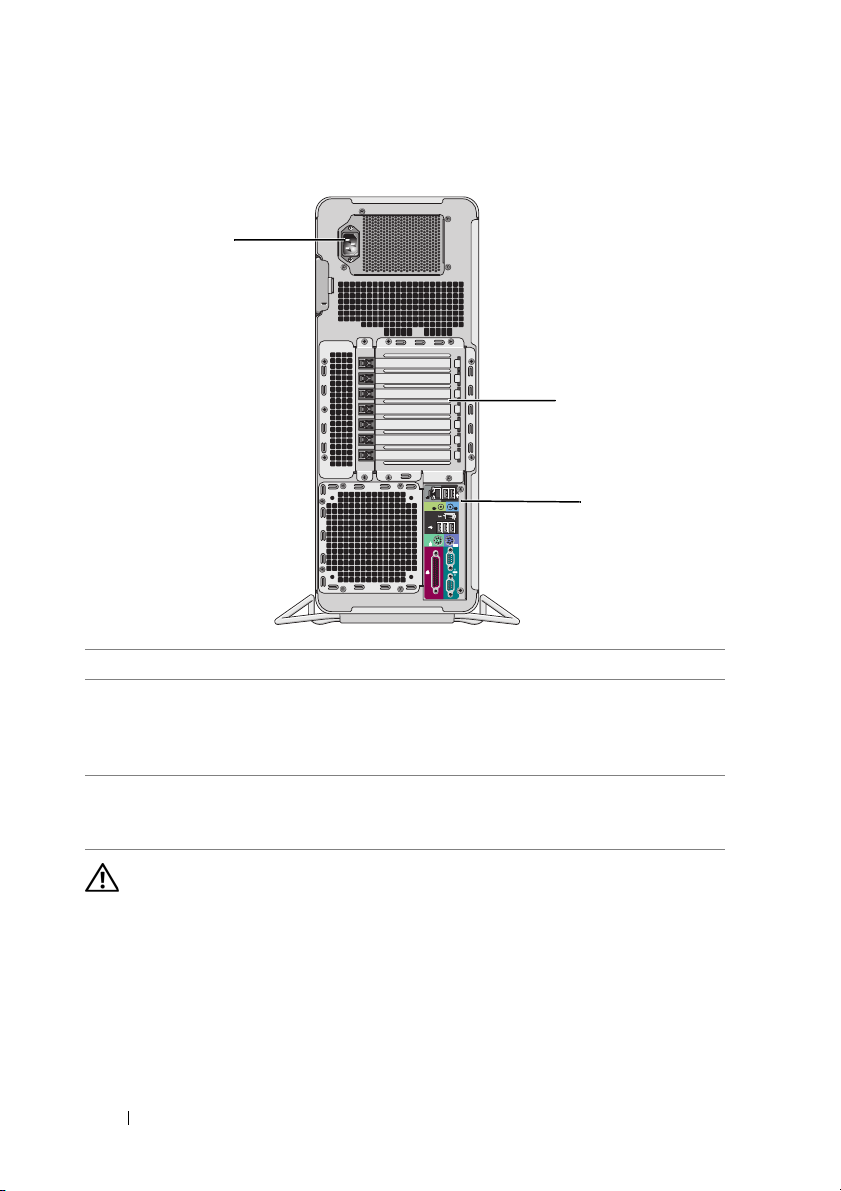
Back View (Tower Orientation)
1
2
3
1 power connector Connect the power cable.
2 card slots Slots 2–6 support full-length cards, including one PCI, two PCI
Express 2.0 x16, and two PCI-X slots. Slots 1 and 7 support
half-length cards, including one PCI Express x8 (wired as x4)
and one PCI-X slot.
3 back panel
connectors
Plug USB, audio, and other devices into the appropriate
connector (see "Back Panel Connectors" on page 21 for more
information).
CAUTION: Ensure that none of the computer air vents are blocked. Blocking them
can cause serious thermal problems.
20 Quick Reference Guide
Page 21
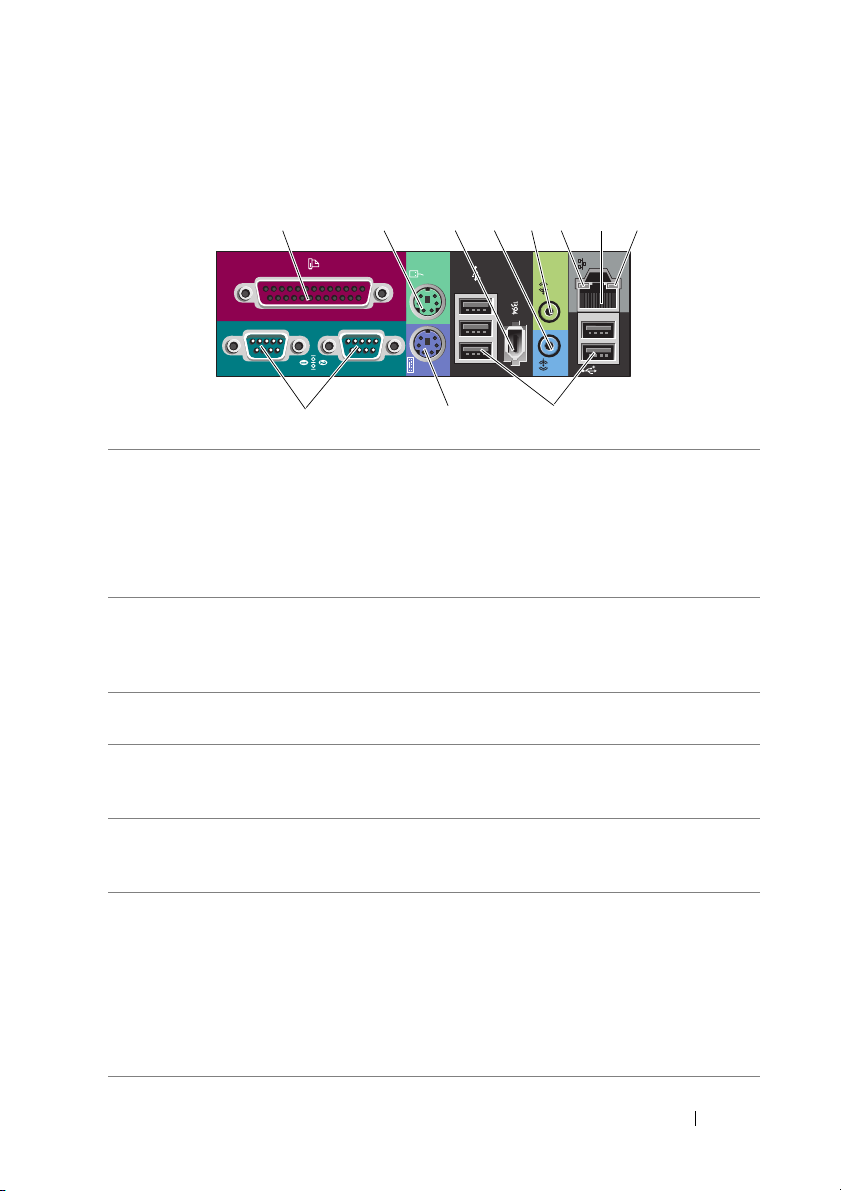
Back Panel Connectors
12345678
11 10 9
1 parallel connector Connect a parallel device, such as a printer, to the parallel
connector. If you have a USB printer, plug it into a USB connector.
NOTE: The integrated parallel connector is automatically
disabled if the computer detects an installed card containing
a parallel connector configured to the same address. For more
information, see "System Setup Options" in your User’s Guide.
2 mouse connector Plug a standard PS/2 mouse into the green mouse connector.
Turn off the computer and any attached devices before you
connect a mouse to the computer. If you have a USB mouse,
plug it into a USB connector.
3 IEEE 1394
connector
4 line-in connector Use the blue line-in connector to attach a playback device
5 line-out connector Use the green line-out connector to attach headphones and
6 link integrity light Green — A good connection exists between a 10-Mbps
Use the IEEE 1394 connector for high-speed data devices such
as digital video cameras and external storage devices.
such as an MP3 player, CD drive, or VCR. On computers with
a sound card, use the connector on the card.
most speakers with integrated amplifiers. On computers with
a sound card, use the connector on the card.
network and the computer.
Orange — A good connection exists between a 100-Mbps
network and the computer.
Yellow — A good connection exists between a 1000-Mbps
(or 1-Gbps) network and the computer.
Off — The computer is not detecting a physical connection to
the network.
Quick Reference Guide 21
Page 22

7 network adapter
connector
8network
activity light
9 USB 2.0
connectors (5)
10 keyboard
connector
11 serial
connectors (2)
To attach your computer to a network or broadband device,
connect one end of a network cable to either a network jack or
your network or broadband device. Connect the other end of
the network cable to the network adapter connector on your
computer. A click indicates that the network cable has been
securely attached.
Do not plug a telephone cable into the network connector.
On computers with an additional network connector card, use
the connectors on the card and on the back of the computer
when setting up multiple network connections (such as
a separate intra- and extranet).
It is recommended that you use Category 5 wiring and connectors
for your network. If you must use Category 3 wiring, force the
network speed to 10 Mbps to ensure reliable operation.
Flashes a yellow light when the computer is transmitting or
receiving network data. A high volume of network traffic may
make this light appear to be in a steady "on" state.
It is recommended that you use the front USB connectors for
devices that you connect occasionally, such as flash memory
keys, cameras, or bootable USB devices.
Use the back USB connectors for devices that typically remain
connected, such as printers and keyboards.
If you have a standard PS/2 keyboard, plug it into the purple
keyboard connector. If you have a USB keyboard, plug it into
a USB connector.
Connect a serial device, such as a handheld device, to the
serial port. If necessary, the address for this port can be
modified through the system setup program (see "System
Setup" in you User’s Guide).
22 Quick Reference Guide
Page 23

Cleaning Your Computer
CAUTION: Before you begin any of the procedures in this section, follow the
safety instructions in the
Product Information Guide
Computer, Keyboard, and Monitor
CAUTION: Before you clean your computer, disconnect the computer from the
electrical outlet. Clean your computer with a soft cloth dampened with water. Do
not use liquid or aerosol cleaners, which may contain flammable substances.
• Use a vacuum cleaner with a brush attachment to gently remove dust from
the slots and holes on your computer and from between the keys on the
keyboard.
NOTICE: Do not wipe the display screen with a soap or alcohol solution. Doing so
may damage the antiglare coating.
• To clean your monitor screen, lightly dampen a soft, clean cloth with water.
If possible, use a special screen-cleaning tissue or solution suitable for the
monitor’s antistatic coating.
• Wipe the keyboard, computer, and plastic part of the monitor with a soft
cleaning cloth moistened with water.
Do not soak the cloth or let water drip inside your computer or keyboard.
Mouse (Non-Optical)
1
Turn the retainer ring on the underside of your mouse counterclockwise,
and then remove the ball.
2
Wipe the ball with a clean, lint-free cloth.
3
Blow carefully into the ball cage to dislodge dust and lint.
4
Clean the rollers inside the ball cage with a cotton swab moistened lightly
with isopropyl alcohol.
5
Recenter the rollers in their channels, as needed. Ensure that fluff from
the swab is not left on the rollers.
6
Replace the ball and retainer ring, and then turn the retainer ring clockwise
until it clicks into place.
.
Quick Reference Guide 23
Page 24

Floppy Drive
NOTICE: Do not attempt to clean drive heads with a swab. The heads may become
misaligned and prevent the drive from operating.
Clean your floppy drive using a commercially available cleaning kit. These
kits contain pretreated floppy disks to remove contaminants that accumulate
during normal operation.
CDs and DVDs
NOTICE: Always use compressed air to clean the lens in the CD/DVD drive, and
follow the instructions that come with the compressed air. Never touch the lens
in the drive.
1
Hold the disc by its outer edge. You can also touch the inside edge of the
center hole.
NOTICE: To prevent damaging the surface, do not wipe in a circular motion around
the disc.
2
With a soft, lint-free cloth, gently wipe the bottom of the disc (the unlabeled
side) in a straight line from the center to the outer edge of the disc.
For stubborn dirt, try using water or a diluted solution of water and mild
soap. You can also purchase commercial products that clean discs and
provide some protection from dust, fingerprints, and scratches. Cleaning
products for CDs are safe to use on DVDs.
Troubleshooting Tools
Power Lights
CAUTION: Before you begin any of the procedures in this section, follow the
safety instructions in the
Product Information Guide
The power button light located on the front of the computer illuminates and
blinks or remains solid to indicate different states:
• If the power light is green and the computer is not responding, "Diagnostic
Lights" on page 26.
• If the power light is blinking green, the computer is in standby mode. Press
a key on the keyboard, move the mouse, or press the power button to resume
normal operation.
24 Quick Reference Guide
.
Page 25

• If the power light is off, the computer is either turned off or is not receiving
power.
– Reseat the power cable into both the power connector on the back of
the computer and the electrical outlet.
– If the computer is plugged into a power strip, ensure that the power
strip is plugged into an electrical outlet and that the power strip is
turned on.
– Bypass power protection devices, power strips, and power extension
cables to verify that the computer turns on properly.
– Ensure that the electrical outlet is working by testing it with another
device, such as a lamp.
– Ensure that the main power cable and front panel cable are securely
connected to the system board (see "System Board Components" in
your
User’s Guide
).
• If the power light is blinking amber, the computer is receiving electrical
power, but an internal power problem might exist.
– Ensure that the voltage selection switch is set to match the AC power
at your location, if applicable.
– Ensure that the processor power cable is securely connected to the
system board (see "System Board Components" in your
User’s Guide
• If the power light is steady amber, a device may be malfunctioning or
incorrectly installed.
– Remove and then reinstall the memory modules (see "Removing the
Front Panel" in your
– Remove and then reinstall any cards (see "Cards" in your
User’s Guide
).
User’s Guide
• Eliminate interference. Some possible causes of interference are:
– Power, keyboard, and mouse extension cables
– Too many devices on a power strip
– Multiple power strips connected to the same electrical outlet
).
).
Quick Reference Guide 25
Page 26
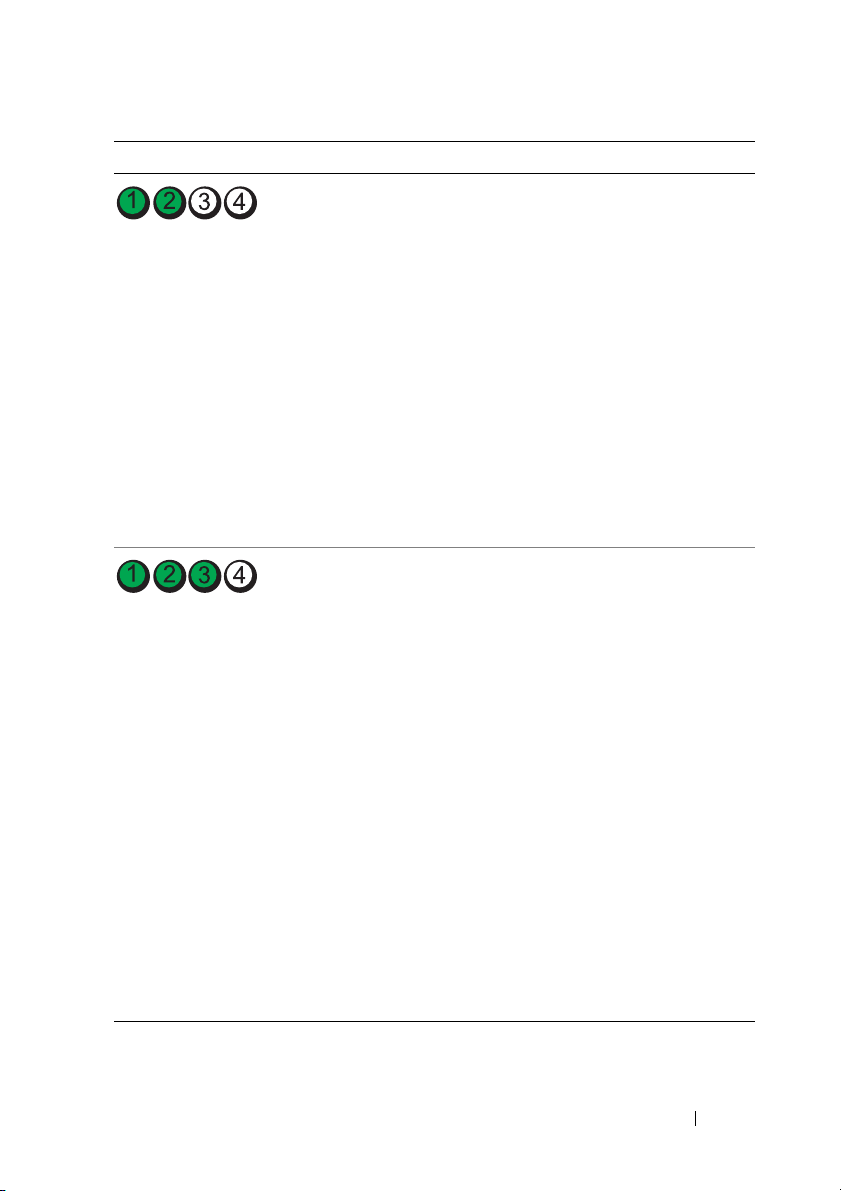
Diagnostic Lights
CAUTION: Before you begin any of the procedures in this section, follow the
safety instructions in the
Product Information Guide
To help troubleshoot a problem, your computer has four lights labeled 1, 2, 3, and
4 on the front panel (see "Front View (Tower Orientation)" on page 18). When
the computer starts normally, the lights flash, and then turn off. If the computer
malfunctions, use the sequence of the lights to help identify the problem.
NOTE: After the computer completes POST, all four lights turn off before booting to
the operating system.
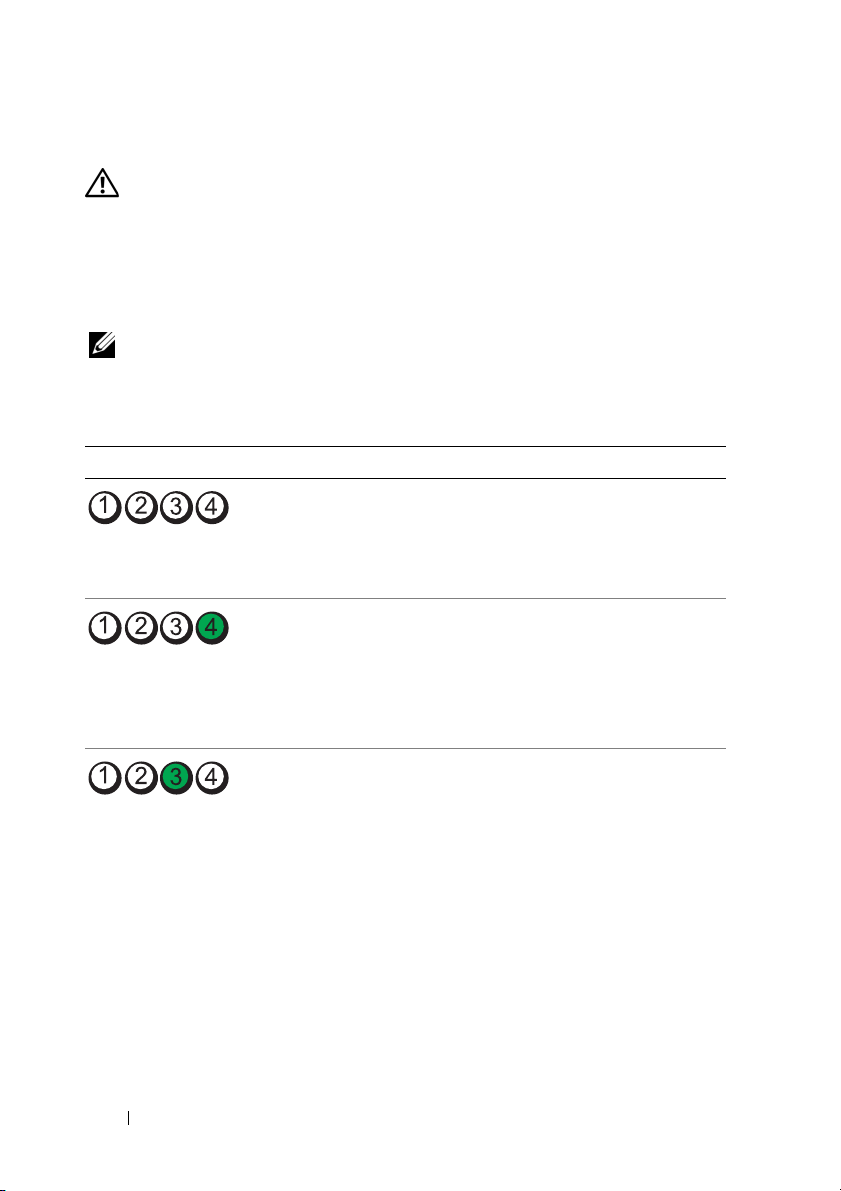
Diagnostic Light Codes During POST
Light Pattern Problem Description Suggested Resolution
The computer is in
a normal off
condition or
a possible pre-BIOS
failure has occurred.
A possible BIOS
failure has occurred;
the computer is in the
recovery mode.
A possible processor
failure has occurred.
Plug the computer into a working
electrical outlet and press the
power button.
• Run the BIOS Recovery utility, wait
for recovery completion, and then
restart the computer.
• If the problem persists, contact Dell
(see
User’s Guide
• Reseat the processor (see "Processor"
in your User’s Guide
• If the problem persists, contact Dell
(see
User’s Guide
.
"Contacting Dell" in your
).
).
"Contacting Dell" in your
).
26 Quick Reference Guide
Page 27
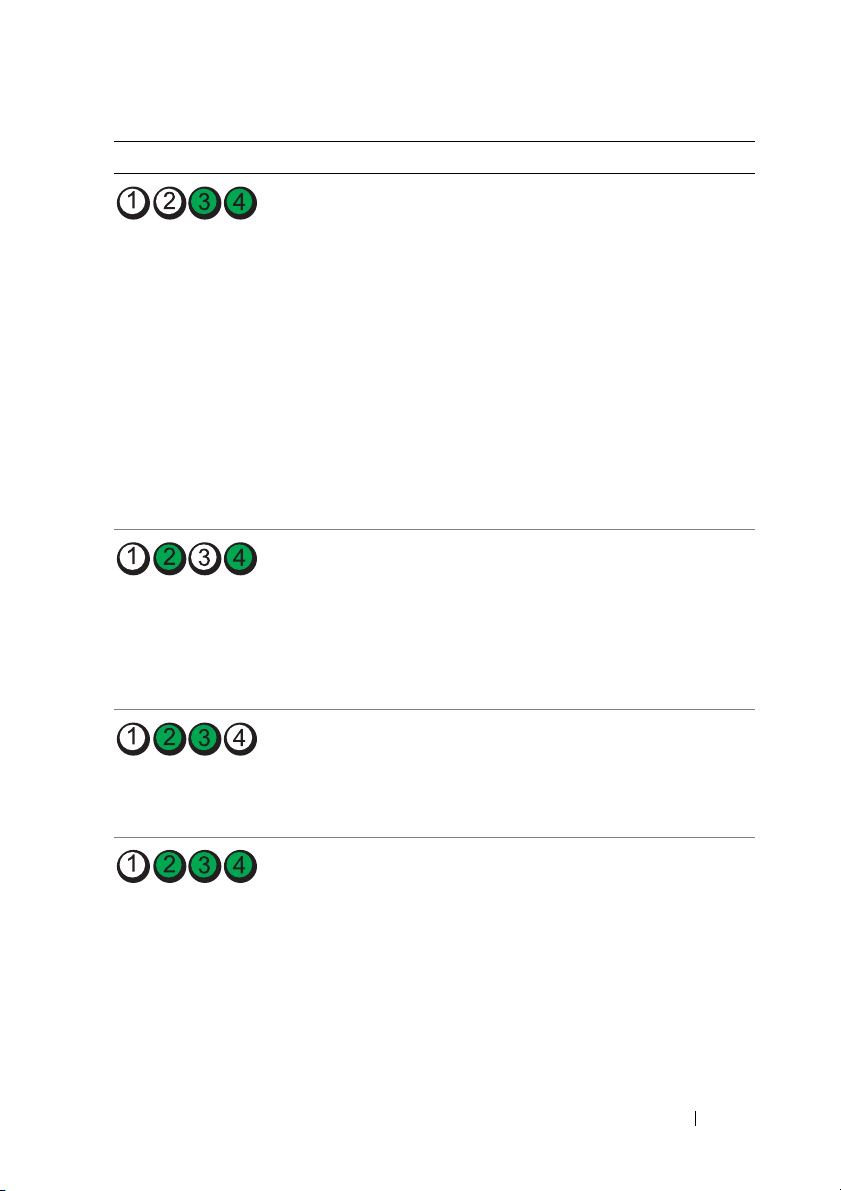
Light Pattern Problem Description Suggested Resolution
Memory modules are
detected, but
amemory failure
has occurred.
A possible graphics
card failure has
occurred.
A possible floppy or
hard drive failure has
occurred.
A possible USB failure
has occurred.
• If two or more memory modules are
installed, remove the modules
(see "Memory"
reinstall one module, and then restart
the computer. If the computer starts
normally, continue to install additional
memory modules (one at a time) until
you have identified a faulty module or
reinstalled all modules without error.
• If available, install working memory of
the same type into your computer
(see "Memory"
• If the problem persists, contact Dell
"Contacting Dell" in your
(see
User’s Guide
• Reseat any installed graphics cards
(see "Cards"
• If available, install a working graphics
card into your computer.
• If the problem persists, contact Dell
"Contacting Dell" in your
(see
User’s Guide
• Reseat all power and data cables and
restart the computer.
• If the problem persists, contact Dell
"Contacting Dell" in your
(see
User’s Guide
• Reinstall all USB devices, check cable
connections, and then restart the
computer.
• If the problem persists, contact Dell
"Contacting Dell" in your
(see
User’s Guide
in your User’s Guide
in your User’s Guide
).
in your User’s Guide
).
).
).
),
).
).
Quick Reference Guide 27
Page 28
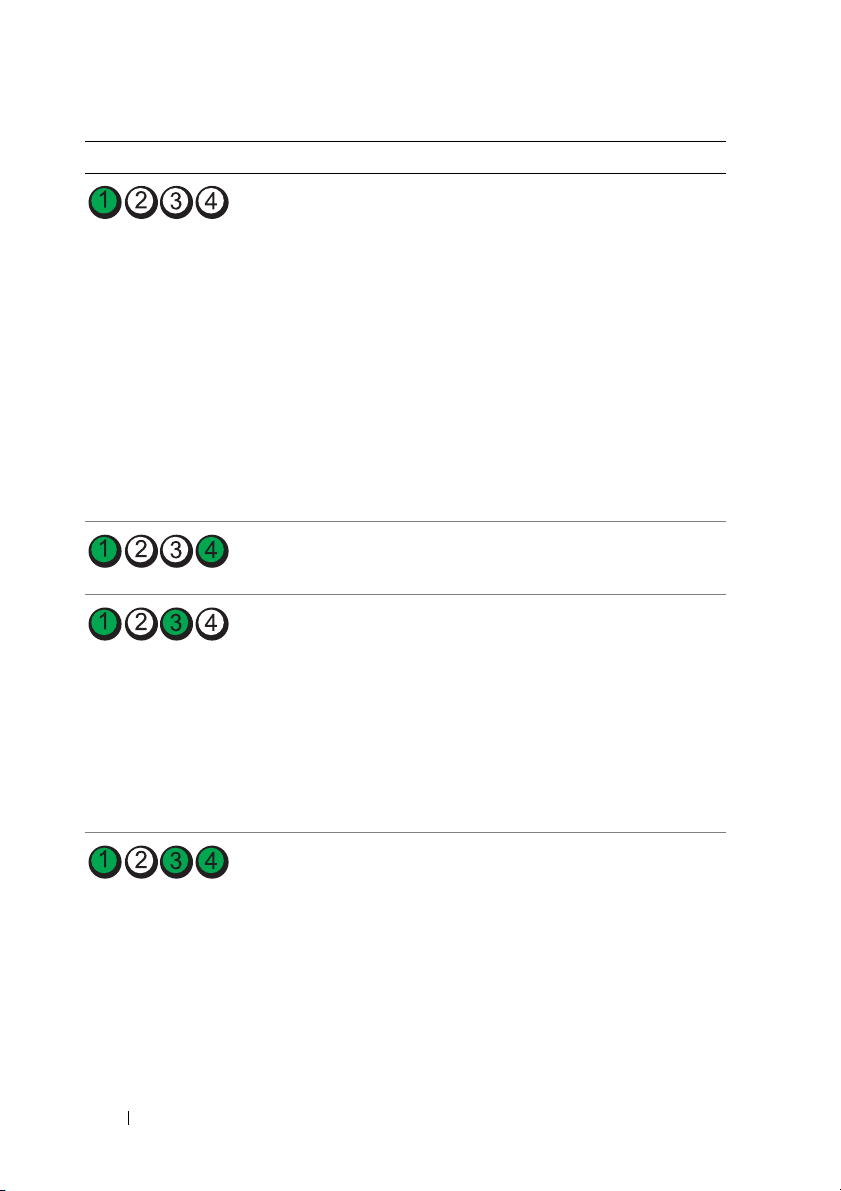
Light Pattern Problem Description Suggested Resolution
No memory
modules are detected.
System board failure
has occurred.
• If two or more memory modules are
installed, remove the modules
(see "Memory"
reinstall one module, and then restart
the computer. If the computer starts
normally, continue to install additional
memory modules (one at a time) until
you have identified a faulty module or
reinstalled all modules without error.
• If available, install working memory of
the same type into your computer
(see "Memory"
• If the problem persists, contact Dell
"Contacting Dell" in your
(see
User’s Guide
Contact Dell (see "Contacting Dell" in
your User’s Guide).
in your User’s Guide
in your User’s Guide
).
),
).
Memory modules are
detected, but
amemory
configuration or
compatibility
error exists.
A possible system
board resource and/or
hardware failure has
occurred.
28 Quick Reference Guide
• Ensure that no special requirements
for memory module/connector
placement exist (see "Memory"
your User’s Guide
• Ensure that the memory you are using
is supported by your computer
(see "Memory"
• If the problem persists, contact Dell
(see
"Contacting Dell" in your
User’s Guide).
• Perform the procedures in "Restoring
Your Operating System"
User’s Guide
• If the problem persists, contact Dell
(see "Contacting Dell"
User’s Guide
).
in your User’s Guide
.
in your
).
in
).
in your
Page 29
Light Pattern Problem Description Suggested Resolution
A possible
expansion card
failure has occurred.
1
Determine if a conflict exists by removing
an expansion card (not a graphics
card) and restarting the computer
(see "Cards"
2
If the problem persists, reinstall the card
in your User’s Guide
you removed, and then remove
a different card and restart the computer.
3
Repeat this process for each expansion
card installed. If the computer starts
normally, troubleshoot the last card
removed from the computer for resource
conflicts (see "Restoring Your Operating
in your User’s Guide
System"
4
If the problem persists, contact Dell
"Contacting Dell" in your
(see
).
Another failure
has occurred.
User’s Guide
• Ensure that all hard drive and
CD/DVD drive cables are properly
connected to the system board
(see "System Board Components"
your User’s Guide
• If there is an error message on the
screen identifying a problem with
a device (such as the floppy drive or
hard drive), check the device to make
sure it is functioning properly.
• If the operating system is attempting to
boot from a device (such as the floppy
drive or CD/DVD drive), check the
system setup program (see "System
in your User’s Guide
Setup"
the boot sequence is correct for the
devices installed on your computer.
• If the problem persists, contact Dell
"Contacting Dell" in your
(see
User’s Guide
).
).
).
in
).
) to ensure
Quick Reference Guide 29
Page 30

Beep Codes
Your computer may emit a series of beeps during start up. The series of beeps is
called a beep code and can be used to help identify a problem with your computer.
If your computer emits a series of beeps during start-up:
1
Write down the beep code.
2
Run the Dell Diagnostics to identify the cause (see "Dell Diagnostics" on
page 33).
Code Cause
2 short, 1 long BIOS checksum error
1 long, 3 short, 2 short Memory error
1 short F12 key pressed
Code
(repetitive
short beeps)
1BIOS checksum
2 No memory modules
3Possible
Description Suggested Remedy
failure. Possible
motherboard failure.
are detected.
motherboard failure.
Contact Dell (see "Contacting Dell" in
your User’s Guide).
• If two or more memory modules are
installed, remove the modules
(see "Memory"
reinstall one module, and then restart
the computer. If the computer starts
normally, continue to install additional
memory modules (one at a time) until
you have identified a faulty module or
reinstalled all modules without error.
• If available, install working memory of
the same type into your computer
(see "Memory"
• If the problem persists, contact Dell
(see
"Contacting Dell" in your
User’s Guide
Contact Dell (see "Contacting Dell" in
your User’s Guide).
in your User’s Guide
in your User’s Guide
).
),
).
30 Quick Reference Guide
Page 31

Code
Description Suggested Remedy
(repetitive
short beeps)
4 RAM Read/Write
failure.
• Ensure that no special requirements for
memory module/connector placement
exist (see "Memory"
in your User’s Guide
).
• Ensure that the memory you are using is
supported by your computer (see "Memory"
in your User’s Guide
).
• If the problem persists, contact Dell (see
"Contacting Dell" in your User’s Guide).
5 Real time clock failure.
Possible battery failure
or motherboard failure.
• Replace the battery (see "Replacing the
Battery"
in your User’s Guide
).
• If the problem persists, contact Dell (see
"Contacting Dell" in your User’s Guide).
6Video BIOS
Te st Fa i lu r e.
Dell (see "Contacting Dell" in your
User’s Guide).
System Messages
NOTE: If the message you received is not listed in the following table, see the
documentation for either the operating system or the program that was running
when the message appeared.
LERT! PREVIOUS ATTEMPTS AT BOOTING THIS SYSTEM HAVE FAILED AT CHECKPOINT
A
NNNN]. FOR HELP IN RESOLVING THIS PROBLEM, PLEASE NOTE THIS CHECKPOINT
[
AND CONTACT DELL TECHNICAL SUPPORT — The computer failed to complete the
boot routine three consecutive times for the same error (see "Contacting Dell" in your
User’s Guide for assistance).
CHECKSUM ERROR — Possible motherboard failure or the real-time clock
CMOS
battery charge is low. Replace the battery (see "Replacing the Battery" or "Contacting
Dell" in your User’s Guide for assistance).
FAN FAILURE — CPU fan failure. Replace the CPU fan (see "Removing the
CPU
Processor" in your User’s Guide).
F
LOPPY DISKETTE SEEK FAILURE — A cable may be loose, or the computer
configuration information may not match the hardware configuration. Check cable
connections (see "Contacting Dell" in your User’s Guide for assistance).
ISKETTE READ FAILURE — The floppy disk may be defective or a cable may be
D
loose. Replace the floppy disk and/or check for a loose cable connection.
Quick Reference Guide 31
Page 32

HARD-DISK READ FAILURE — Possible hard drive failure during hard-drive boot test
(see "Contacting Dell" in your User’s Guide for assistance).
EYBOARD FAILURE — Keyboard failure or the keyboard cable is loose (see "Keyboard
K
Problems" in your User’s Guide).
N
O BOOT DEVICE AVAILABLE — The system cannot detect a bootable device or partition.
• If the floppy drive is your boot device, ensure that the cables are connected and that
a bootable floppy disk is in the drive.
• If the hard drive is your boot device, ensure that the cables are connected and that
the drive is installed properly and partitioned as a boot device.
• Enter the system setup program and ensure that the boot sequence information is
correct (see "Entering System Setup"
NO TIMER TICK INTERRUPT — System board failure or a chip on the system board
might be malfunctioning (see "Contacting Dell" in your User’s Guide for assistance).
ON-SYSTEM DISK OR DISK ERROR — Replace the floppy disk with one that has
N
a bootable operating system or remove the floppy disk from drive A and restart
the computer.
OT A BOOT DISKETTE — Insert a bootable floppy disk and restart your computer.
N
NOTICE - H
A PARAMETER HAS EXCEEDED ITS NORMAL OPERATING RANGE. DELL RECOMMENDS
THAT YOU BACK UP YOUR DATA REGULARLY. A PARAMETER OUT OF RANGE MAY OR
MAY NOT INDICATE A POTENTIAL HARD DRIVE PROBLEM.—S.M.A.R.T error,
possible HDD failure. This feature can be enabled or disabled in BIOS setup.
ARD DRIVE SELF MONITORING SYSTEM HAS REPORTED THAT
in your User’s Guide
).
Hardware Troubleshooter
If a device is either not detected during the operating system setup or is
detected, but incorrectly configured, you can use the Hardware Troubleshooter
to resolve the incompatibility.
Windows XP:
1
Click
Start→
2
Ty p e
hardware troubleshooter
<Enter> to start the search.
3
In the
4
In the
the problem and click
32 Quick Reference Guide
Help and Support
Fix a Problem
section, click
Hardware Troubleshooter
Next
to follow the remaining troubleshooting steps.
.
in the search field and press
Hardware Troubleshooter
.
list, select the option that best describes
Page 33

Windows Vista:
1
Click the Windows Vista start button , and click
2
Ty p e
hardware troubleshooter
in the search field and press
Help and Support.
<Enter> to start the search.
3
In the search results, select the option that best describes the problem and
follow the remaining troubleshooting steps.
Dell Diagnostics
CAUTION: Before you begin any of the procedures in this section, follow the
safety instructions in the
When to Use the Dell Diagnostics
Product Information Guide
If you experience a problem with your computer, perform the checks in "Lockups
and Software Problems" (see "Troubleshooting" in your User’s Guide) and run
the Dell Diagnostics before you contact Dell for assistance.
You can run the Dell Diagnostics from your hard drive or from the Drivers and
Utilities disc.
See "System Setup" in your User’s Guide to review your computer’s configuration
information, and ensure that the device that you want to test displays in the
system setup program and is active.
NOTE: The Dell Diagnostics works only on Dell computers.
.
NOTE: Print the following procedures before you run the Dell diagnostics.
Starting the Dell Diagnostics From Your Hard Drive
The Dell Diagnostics is located on a separate diagnostic utility partition on
your hard drive.
NOTE: If your computer cannot display a screen image, see "Contacting Dell" in
your User’s Guide.
1
Turn on (or restart) your computer.
2
When the DELL logo appears, press <F12> immediately.
NOTE: Keyboard failure may result when a key is held down for extended
periods of time. To avoid possible keyboard failure, press and release <F12> in
even intervals to open the Boot Device Menu.
Quick Reference Guide 33
Page 34

NOTE: If at any time a message appears stating that no diagnostics utility
partition has been found, run the Dell Diagnostics from your Drivers and
Utilities disc (see "Starting the Dell Diagnostics From the Drivers and Utilities
Disc" on page 34)
.
If you wait too long and the operating system logo appears, continue to
wait until you see the Microsoft Windows desktop, and then shut down
your computer and try again.
3
At the
Boot Device Menu
appropriate number on the keyboard to highlight
, use the up- and down-arrow keys or press the
Boot to Utility Partition
and then press <Enter>.
NOTE: The Quickboot feature changes the boot sequence for the current
boot only. Upon restart, the computer boots according to the boot sequence
specified in the system setup program.
4
At the Dell Diagnostics
Main Menu
, left-click with the mouse, or press
<Tab> and then <Enter>, to select the test you want to run (see "Dell
Diagnostics Main Menu" on page 35).
NOTE: Write down any error codes and problem descriptions exactly as they
appear and follow the instructions on the screen.
5 After all tests have completed, close the test window to return to the
Dell Diagnostics Main Menu.
6 Close the Main Menu window to exit the Dell Diagnostics and restart
the computer.
,
Starting the Dell Diagnostics From the Drivers and Utilities Disc
1
Turn on your computer.
2
Press the eject button on the front of the optical drive to open the drive tray.
3
Place the
Drivers and Utilities
disc in the center of the drive tray, and then
press the eject button or gently push on the tray to close it.
4
Restart the computer.
5
When the DELL logo appears, press <F12> immediately.
NOTE: Keyboard failure may result when a key on the keyboard is held down
for extended periods of time. To avoid possible keyboard failure, press and
release <F12> in even intervals until the Boot Device Menu appears.
If you wait too long and the operating system logo appears, continue to
wait until you see the Microsoft Windows desktop, and then shut down
your computer and try again.
34 Quick Reference Guide
Page 35

6
At the
Boot Device Menu
appropriate number on the keyboard to highlight
CD-ROM
7
Press <1> to select the Dell Diagnostics.
8
At the
9
At the Dell Diagnostics
, and then press <Enter>.
NOTE: The Quickboot feature changes the boot sequence for the current
boot only. Upon restart, the computer boots according to the boot sequence
specified in the system setup program.
Dell Diagnostics Menu
, use the up- and down-arrow keys or press the
Onboard or USB
, press <1> to select the Dell Diagnostics.
Main Menu
, left-click with the mouse, or press
<Tab> and then <Enter>, to select the test you want to run (see "Dell
Diagnostics Main Menu" on page 35).
NOTE: Write down any error codes and problem descriptions exactly as they
appear and follow the instructions on the screen.
10 After all tests have completed, close the test window to return to the
Dell Diagnostics Main Menu.
11 Remove the Drivers and Utilities disc, close the Main Menu window to
exit the Dell Diagnostics, and then restart the computer.
Dell Diagnostics Main Menu
The following tests can be run from the Dell Diagnostics Main Menu:
Option Function
Express Test Performs a quick test of system devices. The test typically
takes 10 to 20 minutes and requires no interaction on your
part. Run Express Test first to increase the possibility of
tracing the problem quickly.
Extended Test Performs a thorough check of system devices. The test
typically takes an hour or more and periodically requires
your input to answer specific questions.
Custom Test Tests a specific device in the system and can be used to
customize the tests you want to run.
Symptom Tree Lists a number of common symptoms and allows you to
select a test based on the symptom of the problem you
are having.
Quick Reference Guide 35
Page 36

For any problem encountered during a test, a message appears with an error
code and a description of the problem. Write down the error code and problem
description exactly as it appears and follow the instructions on the screen. If
you cannot resolve the problem, contact Dell (see "Contacting Dell" in your
User’s Guide).
NOTE: The Service Tag for your computer is located at the top of each test screen.
When contacting Dell support, have your Service Tag ready.
The following tabs provide additional information for tests run from the
Custom Test or Symptom Tree option:
Tab Function
Results Displays the results of the test and any error conditions
encountered.
Errors Displays error conditions encountered, error codes, and the
problem description.
Help Describes the test and any requirements for running
the test.
Configuration
(Custom Test only)
Displays the hardware configuration for the selected device.
The Dell Diagnostics obtains configuration information for
all devices from the system setup program, memory, and
various internal tests, and it displays the information in the
device list in the left pane of the screen.
NOTE: The device list may not display the names of all the
components installed on your computer or all devices
attached to your computer.
Parameters
(Custom Test only)
Allows you to customize the test, if applicable, by changing
the test settings.
Troubleshooting
Follow these tips when you troubleshoot your computer:
• If you added or removed a part before the problem started, review the
installation procedures and ensure that the part is correctly installed.
• If a peripheral device does not work, ensure that the device is properly
connected.
• If an error message appears on the screen, write down the exact message.
This message may help support personnel diagnose and fix the problem(s).
36 Quick Reference Guide
Page 37

• If an error message occurs in a program, see the program’s documentation.
NOTE: The procedures in this document were written for the Windows default
view, so they may not apply if you set your Dell™ computer to the Windows
Classic view.
Battery Problems
CAUTION: There is a danger of a new battery exploding if it is incorrectly installed.
Replace the battery only with the same or equivalent type recommended by the
manufacturer. Discard used batteries according to the manufacturer's instructions.
CAUTION: Before you begin any of the procedures in this section, follow the
safety instructions in the
R
EPLACE THE BATTERY — If you have to repeatedly reset time and date information
Product Information Guide
.
after turning on the computer, or if an incorrect time or date displays during start-up,
replace the battery (see "Replacing the Battery" in your User’s Guide). If the battery
still does not work properly, contact Dell (see "Contacting Dell" in your User’s Guide).
Drive Problems
CAUTION: Before you begin any of the procedures in this section, follow the
safety instructions in the
NSURE THAT MICROSOFT WINDOWS RECOGNIZES THE DRIVE —
E
Product Information Guide
.
Windows XP:
•Click
Start
and click
My Computer
.
Windows Vista:
•Click
Start
and click
Computer
.
If the drive is not listed, perform a full scan with your antivirus software to check
for and remove viruses. Viruses can sometimes prevent Windows from recognizing
the drive.
EST THE DRIVE —
T
• Insert another disc to eliminate the possibility that the original drive is defective.
• Insert a bootable floppy disk and restart the computer.
CLEAN THE DRIVE OR DISK —
HECK THE CABLE CONNECTIONS
C
See "Cleaning Your Computer
" on page 23.
RUN THE HARDWARE TROUBLESHOOTER — See "Restoring Your Operating System"
in your User’s Guide.
UN THE DELL DIAGNOSTICS — See "Dell Diagnostics" on page 33.
R
Quick Reference Guide 37
Page 38

Optical Drive Problems
NOTE: High-speed optical drive vibration is normal and may cause noise, which
does not indicate a defect in the drive or the disc.
NOTE: Because of different regions worldwide and different disc formats, not all
DVD titles work in all DVD drives.
A
DJUST THE WINDOWS VOLUME CONTROL —
• Click the speaker icon in the lower-right corner of your screen.
• Ensure that the volume is turned up by clicking the slidebar and dragging it up.
• Ensure that the sound is not muted by clicking any boxes that are checked.
CHECK THE SPEAKERS AND SUBWOOFER — See "Sound and Speaker Problems" on
page 48.
Problems Writing to an Optical Drive
CLOSE OTHER PROGRAMS — The optical drive must receive a steady stream of data
during the writing process. If the stream is interrupted, an error occurs. Try closing all
programs before you write to the optical.
URN OFF STANDBY MODE IN WINDOWS BEFORE WRITING TO A DISC — Search for
T
the keyword standby in Windows Help and Support for information on power management
modes.
Hard Drive Problems
RUN CHECK DISK —
Windows XP:
1
Click
Start
and click
2
Right-click
3
Click
4
Click
Local Disk C:
Properties→ Tools→
Scan for and attempt recovery of bad sectors
My Computer
.
Check Now
.
.
and click
Start
.
Windows Vista:
1
Click
Start
2
Right-click
3
Click
The
Local Disk C:
Properties→ Tools→
User Account Control
computer, click
and click
Continue
Computer
.
.
Check Now
.
window may appear. If you are an administrator on the
; otherwise, contact your administrator to continue the
desired action.
4
Follow the instructions on the screen.
38 Quick Reference Guide
Page 39

E-Mail, Modem, and Internet Problems
CAUTION: Before you begin any of the procedures in this section, follow the
safety instructions in the
NOTE: Connect the modem to an analog telephone jack only. The modem does not
Product Information Guide
.
operate while it is connected to a digital telephone network.
NOTE: Do not plug a telephone cable into the network adapter connector (see "Back
Panel Connectors" in your User’s Guide).
HECK THE MICROSOFT OUTLOOK EXPRESS SECURITY SETTINGS — If you cannot
C
open your e-mail attachments:
1
In Outlook Express, click
2
Click
Do not allow attachments
Tools→
Options→
Security
.
to remove the check mark, as needed.
CHECK THE TELEPHONE LINE CONNECTION
CHECK THE TELEPHONE JACK
CONNECT THE MODEM DIRECTLY TO THE TELEPHONE WALL JACK
USE A DIFFERENT TELEPHONE LINE —
• Verify that the telephone line is connected to the jack on the modem (the jack has
either a green label or a connector-shaped icon next to it).
• Ensure that you hear a click when you insert the telephone line connector into
the modem.
• Disconnect the telephone line from the modem and connect it to a telephone; then
listen for a dial tone.
• If you have other telephone devices sharing the line, such as an answering machine,
fax machine, surge protector, or line splitter, bypass them and use the telephone to
connect the modem directly to the telephone wall jack. If you are using a line that is
3 meters (10 feet) or more in length, try a shorter line.
RUN THE MODEM DIAGNOSTIC TOOL —
Windows XP:
1
Click
Start→
All Programs→
2
Follow the instructions on the screen to identify and resolve modem problems.
Modem Helper
.
Modem Helper is not available on certain computers.
Windows Vista:
1
Click
Start →
2
Follow the instructions on the screen to identify and resolve modem problems.
All Programs→ Modem Diagnostic Tool
.
Modem diagnostics are not available on all computers.
Quick Reference Guide 39
Page 40

VERIFY THAT THE MODEM IS COMMUNICATING WITH WINDOWS —
Windows XP:
1
Click
Start→
Control Panel→
Options
2
Click the COM port for your modem, and then click
Query Modem
→
Modems
.
to verify that the modem is communicating with Windows.
Printers and Other Hardware→ Phone and Modem
Properties→ Diagnostics→
If all commands receive responses, the modem is operating properly.
Windows Vista:
1
Click
Start
→ Control Panel→
→
Options
2
Click the COM port for your modem, and then click
Modems
Query Modem
.
to verify that the modem is communicating with Windows.
Hardware and Sound→
Properties→
Phone and Modem
Diagnostics→
If all commands receive responses, the modem is operating properly.
ENSURE THAT YOU ARE CONNECTED TO THE INTERNET — Ensure that you have
subscribed to an Internet provider. With the Outlook Express e-mail program open,
click File. If Work Offline has a check mark next to it, click the check mark to remove
it and connect to the Internet. For help, contact your Internet service provider.
Error Messages
CAUTION: Before you begin any of the procedures in this section, follow the
safety instructions in the
Product Information Guide
.
If the error message is not listed, see the documentation for the operating system or
the program that was running when the message appeared.
A
FILENAME CANNOT CONTAIN ANY OF THE FOLLOWING CHARACTERS: \ / : * ? “ < > | —
Do not use these characters in filenames.
REQUIRED .DLL FILE WAS NOT FOUND — The program that you are trying to open
A
is missing an essential file. To remove and then reinstall the program:
Windows XP:
1
Click
Start→
Control Panel→ Add or Remove Programs→ Programs and Features
2
Select the program you want to remove.
3
Click
Uninstall
4
See the program documentation for installation instructions.
.
.
Windows Vista:
1
Click
Start
→ Control Panel→ Programs→ Programs and Features
2
Select the program you want to remove.
3
Click
Uninstall
4
See the program documentation for installation instructions.
.
.
40 Quick Reference Guide
Page 41

drive letter
:\ IS NOT ACCESSIBLE. THE DEVICE IS NOT READY — The drive
cannot read the disk. Insert a disk into the drive and try again.
NSERT BOOTABLE MEDIA — Insert a bootable floppy disk, CD, or DVD.
I
N
ON-SYSTEM DISK ERROR — Remove the floppy disk from the floppy drive and
restart your computer.
OT ENOUGH MEMORY OR RESOURCES. CLOSE SOME PROGRAMS AND TRY AGAIN —
N
Close all windows and open the program that you want to use. In some cases, you may
have to restart your computer to restore computer resources. If so, run the program
that you want to use first.
PERATING SYSTEM NOT FOUND — Contact Dell (see "Contacting Dell" in your
O
User’s Guide).
IEEE 1394 Device Problems
CAUTION: Before you begin any of the procedures in this section, follow the
safety instructions in the
NSURE THAT THE CABLE FOR THE IEEE 1394 DEVICE IS PROPERLY INSERTED INTO
E
THE DEVICE AND INTO THE CONNECTOR ON THE COMPUTER
Product Information Guide
.
ENSURE THAT THE IEEE 1394 DEVICE IS ENABLED IN SYSTEM SETUP — See
"System Setup Options" in your User’s Guide.
NSURE THAT THE IEEE 1394 DEVICE IS RECOGNIZED BY WINDOWS —
E
Windows XP:
1
Click
Start
2
Under
Properties
and click
Pick a Category
→
Control Panel
, click
Hardware→
.
Performance and Maintenance→
Device Manager
.
System→
System
Windows Vista:
1
Click
Start
2
Click
→ Control Panel→ Hardware and Sound
Device Manager.
.
If your IEEE 1394 device is listed, Windows recognizes the device.
NSURE THAT THE IEEE 1394 CARD IS PROPERLY SEATED
E
ENSURE THAT THE IEEE 1394 CABLE IS CONNECTED SECURELY TO THE SYSTEM
BOARD CONNECTOR AND THE CONNECTOR ON THE FRONT I/ O PANEL
IF YOU HAVE PROBLEMS WITH A DELL IEEE 1394 DEVICE — Contact Dell (see
"Contacting Dell" in your User’s Guide).
I
F YOU HAVE PROBLEMS WITH AN IEEE 1394 DEVICE NOT PROVIDED BY DELL —
Contact the IEEE 1394 device manufacturer.
Quick Reference Guide 41
Page 42

Keyboard Problems
CAUTION: Before you begin any of the procedures in this section, follow the
safety instructions in the
C
HECK THE KEYBOARD CABLE —
Product Information Guide
.
• Ensure that the keyboard cable is firmly connected to the computer.
• Shut down the computer (see "Turning Off Your Computer"
in your User’s Guide
),
reconnect the keyboard cable as shown on the setup diagram for your computer, and
then restart the computer.
• Ensure that the cable is not damaged or frayed and check cable connectors for bent or
broken pins. Straighten any bent pins.
• Remove any keyboard extension cables and connect the keyboard directly to the computer.
TEST THE KEYBOARD — Connect a properly working keyboard to the computer, and
then try using the keyboard.
UN THE HARDWARE TROUBLESHOOTER — See "Restoring Your Operating System"
R
in your User’s Guide.
Lockups and Software Problems
CAUTION: Before you begin any of the procedures in this section, follow the
safety instructions in the
Product Information Guide
.
The computer does not start up
CHECK THE DIAGNOSTIC LIGHTS — See "Diagnostic Lights" on page 26.
NSURE THAT THE POWER CABLE IS FIRMLY CONNECTED TO THE COMPUTER AND TO
E
THE ELECTRICAL OUTLET
The computer stops responding
NOTICE: You may lose data if you are unable to perform an operating system shutdown.
URN THE COMPUTER OFF — If you are unable to get a response by pressing a key on
T
your keyboard or moving your mouse, press and hold the power button for at least
8 to 10 seconds (until the computer turns off), and then restart your computer.
A program stops responding
END THE PROGRAM —
1
Press <Ctrl><Shift><Esc> simultaneously to access the Task Manager.
2
Click the
3
Click to select the program that is no longer responding.
4
Click
Applications
End Task
tab.
.
42 Quick Reference Guide
Page 43

A program crashes repeatedly
NOTE: Most software includes installation instructions in its documentation or on
a floppy disk, CD, or DVD.
HECK THE SOFTWARE DOCUMENTATION — If necessary, uninstall and then reinstall
C
the program.
A program is designed for an earlier Windows operating system
RUN THE PROGRAM COMPATIBILITY WIZARD —
Windows XP:
The Program Compatibility Wizard configures a program so that it runs in an
environment similar to non-Windows XP operating system environments.
1
Click
Start→
All Programs→ Accessories→ Program Compatibility Wizard→ Next
2
Follow the instructions on the screen.
Windows Vista:
The Program Compatibility Wizard configures a program so that it runs in an
environment similar to non-Windows Vista operating system environments.
1
Click
Start
→ Control Panel→ Programs→ Use an older program with this
version of Windows.
2
In the welcome screen, click
3
Follow the instructions on the screen.
Next
.
A solid blue screen appears
TURN THE COMPUTER OFF — If you are unable to get a response by pressing a key on
your keyboard or moving your mouse, press and hold the power button for at least
8 to 10 seconds (until the computer turns off), and then restart your computer.
.
Other software problems
CHECK THE SOFTWARE DOCUMENTATION OR CONTACT THE SOFTWARE
MANUFACTURER FOR TROUBLESHOOTING INFORMATION —
• Ensure that the program is compatible with the operating system installed on your computer.
• Ensure that your computer meets the minimum hardware requirements needed to run
the software. See the software documentation for information.
• Ensure that the program is installed and configured properly.
• Verify that the device drivers do not conflict with the program.
• If necessary, uninstall and then reinstall the program.
Quick Reference Guide 43
Page 44

BACK UP YOUR FILES IMMEDIATELY
USE A VIRUS- SCANNING PROGRAM TO CHECK THE HARD DRIVE, FLOPPY DISKS,
S, OR DVDS
CD
SAVE AND CLOSE ANY OPEN FILES OR PROGRAMS AND SHUT DOWN YOUR
COMPUTER THROUGH THE START MENU
Memory Problems
CAUTION: Before you begin any of the procedures in this section, follow the
safety instructions in the
I
F YOU RECEIVE AN INSUFFICIENT MEMORY MESSAGE —
Product Information Guide
.
• Save and close any open files and exit any open programs you are not using to see if
that resolves the problem.
• See the software documentation for minimum memory requirements. If necessary,
install additional memory (see "Installing a Memory Module"
• Reseat the memory modules (see "Removing the Front Panel"
in your User’s Guide
in your User’s Guide
to ensure that your computer is successfully communicating with the memory.
• Run the Dell Diagnostics (see "Dell Diagnostics" on page 33).
IF YOU EXPERIENCE OTHER MEMORY PROBLEMS —
• Reseat the memory modules (see "Removing the Front Panel"
in your User’s Guide
to ensure that your computer is successfully communicating with the memory.
• Ensure that you are following the memory installation guidelines (see "Installing
aMemory Module"
in your User’s Guide
).
• Ensure that the memory you are using is supported by your computer. For more
information about the type of memory supported by your computer, see "Removing
the Front Panel"
in your User’s Guide
.
• Run the Dell Diagnostics (see "Dell Diagnostics" on page 33).
).
)
)
Mouse Problems
CAUTION: Before you begin any of the procedures in this section, follow the
safety instructions in the
HECK THE MOUSE CABLE —
C
Product Information Guide
.
• Ensure that the cable is not damaged or frayed and check cable connectors for bent or
broken pins. Straighten any bent pins.
• Remove any mouse extension cables, and connect the mouse directly to the computer.
• Verify that the mouse cable is connected as shown on the setup diagram for your computer.
44 Quick Reference Guide
Page 45

RESTART THE COMPUTER —
1
Simultaneously press <Ctrl><Esc> to display the
2
Press <u>,
press the up- and down-arrow keys
Start
menu.
to highlight
Shut down
or
Turn Off
and then press <Enter>.
3
After the computer turns off, reconnect the mouse cable as shown on the setup diagram.
4
Turn on the computer.
TEST THE MOUSE — Connect a properly working mouse to the computer, and then
try using the mouse.
C
HECK THE MOUSE SETTINGS —
Windows XP:
1
Click
Start→ Control Panel→
2
Adjust the settings as needed.
Mouse
.
Windows Vista:
1
Click
Start
→
Control Panel→ Hardware and Sound→ Mouse
2
Adjust the settings as needed.
.
REINSTALL THE MOUSE DRIVER — See "Drivers" in your User’s Guide.
R
UN THE HARDWARE TROUBLESHOOTER — See "Restoring Your Operating System"
in your User’s Guide.
Network Problems
CAUTION: Before you begin any of the procedures in this section, follow the
safety instructions in the
C
HECK THE NETWORK LIGHT ON THE FRONT OF THE COMPUTER — If the link
Product Information Guide
.
integrity light is off (see "Controls and Lights" in your User’s Guide), no network
communication is occurring. Replace the network cable.
HECK THE NETWORK CABLE CONNECTOR — Ensure that the network cable is
C
firmly inserted into the network connector on the back of the computer and the
network jack.
ESTART THE COMPUTER AND ATTEMPT TO LOG ON TO THE NETWORK AGAIN
R
CHECK YOUR NETWORK SETTINGS — Contact your network administrator or the
person who set up your network to verify that your network settings are correct and
that the network is functioning.
UN THE HARDWARE TROUBLESHOOTER — See "Restoring Your Operating System"
R
in your User’s Guide.
,
Quick Reference Guide 45
Page 46

Power Problems
CAUTION: Before you begin any of the procedures in this section, follow the
safety instructions in the
I
F THE POWER LIGHT IS GREEN AND THE COMPUTER IS NOT RESPONDING — See
Product Information Guide
.
"Diagnostic Lights" on page 26.
F THE POWER LIGHT IS BLINKING GREEN — The computer is in standby mode.
I
Press a key on the keyboard, move the mouse, or press the power button to resume
normal operation.
F THE POWER LIGHT IS OFF — The computer is either turned off or is not receiving
I
power.
• Reseat the power cable in the power connector on the back of the computer and the
electrical outlet.
• Bypass power strips, power extension cables, and other power protection devices to
verify that the computer turns on properly.
• Ensure that any power strips being used are plugged into an electrical outlet and are
turned on.
• Ensure that the electrical outlet is working by testing it with another device, such as
alamp.
• Ensure that the main power cable and front panel cable are securely connected to the
system board (see "System Board Components"
in your User’s Guide
).
IF THE POWER LIGHT IS BLINKING AMBER — The computer is receiving electrical
power, but an internal power problem may exist.
• Ensure that the voltage selection switch is set to match the AC power at your location
(if applicable).
• Ensure that all components and cables are properly installed and securely connected
to the system board (see "System Board Components"
in your User’s Guide
).
IF THE POWER LIGHT IS STEADY AMBER — A device may be malfunctioning or
incorrectly installed.
• Remove and then reinstall all memory modules (see "Removing the Front Panel"
your User’s Guide
).
in
• Remove and then reinstall any expansion cards, including graphics cards (see "Cards"
in your User’s Guide
).
ELIMINATE INTERFERENCE — Some possible causes of interference are:
• Power, keyboard, and mouse extension cables
• Too many devices connected to the same power strip
• Multiple power strips connected to the same electrical outlet
46 Quick Reference Guide
Page 47

Printer Problems
CAUTION: Before you begin any of the procedures in this section, follow the
safety instructions in the
NOTE: If you need technical assistance for your printer, contact the printer’s
Product Information Guide
.
manufacturer.
C
HECK THE PRINTER DOCUMENTATION — See the printer documentation for setup
and troubleshooting information.
E
NSURE THAT THE PRINTER IS TURNED ON
CHECK THE PRINTER CABLE CONNECTIONS —
• See the printer documentation for cable connection information.
• Ensure that the printer cables are securely connected to the printer and the computer.
TEST THE ELECTRICAL OUTLET — Ensure that the electrical outlet is working by
testing it with another device, such as a lamp.
V
ERIFY THAT THE PRINTER IS RECOGNIZED BY WINDOWS —
Windows XP:
1
Click
Start→
Control Panel→
printers or fax printers
2
If the printer is listed, right-click the printer icon.
3
Click
Properties→
setting is
port(s):
following port(s):
.
Ports
LPT1 (Printer Port)
setting is
Printers and Other Hardware→
. For a parallel printer, ensure that the
. For a USB printer, ensure that the
USB
.
View installed
Print to the following
Print to the
Windows Vista:
1
Click
Start
→
Control Panel→ Hardware and Sound→ Printer
2
If the printer is listed, right-click the printer icon.
3
Click
Properties,
4
Adjust the settings, as needed.
and then click
Ports
.
.
REINSTALL THE PRINTER DRIVER — See the printer documentation for information
on reinstalling the printer driver.
Scanner Problems
CAUTION: Before you begin any of the procedures in this section, follow the
safety instructions in the
NOTE: If you need technical assistance for your scanner, contact the scanner’s
Product Information Guide
.
manufacturer.
Quick Reference Guide 47
Page 48

CHECK THE SCANNER DOCUMENTATION — See the scanner documentation for setup
and troubleshooting information.
NLOCK THE SCANNER — Ensure that your scanner is unlocked (if the scanner has
U
a locking tab or button).
ESTART THE COMPUTER AND TRY THE SCANNER AGAIN
R
CHECK THE CABLE CONNECTIONS —
• See the scanner documentation for information on cable connections.
• Ensure that the scanner cables are securely connected to the scanner and the computer.
VERIFY THAT THE SCANNER IS RECOGNIZED BY MICROSOFT WINDOWS —
Windows XP:
1
Click
Start→
Control Panel→
2
If your scanner is listed, Windows recognizes the scanner.
Printers and Other Hardware→
Scanners and Cameras
Windows Vista:
1
Click
Start
→
Control Panel→ Hardware and Sound→ Scanners and Cameras
2
If the scanner is listed, Windows recognizes the scanner.
REINSTALL THE SCANNER DRIVER — See the scanner documentation for instructions.
Sound and Speaker Problems
CAUTION: Before you begin any of the procedures in this section, follow the
safety instructions in the
Product Information Guide
.
No sound from speakers
NOTE: The volume control in MP3 and other media players may override the Windows
volume setting. Always check to ensure that the volume on the media player(s) has
not been turned down or off.
HECK THE SPEAKER CABLE CONNECTIONS — Ensure that the speakers are connected
C
as shown on the setup diagram supplied with the speakers. If you purchased a sound
card, ensure that the speakers are connected to the card.
NSURE THAT THE SUBWOOFER AND THE SPEAKERS ARE TURNED ON — See the
E
setup diagram supplied with the speakers. If your speakers have volume controls,
adjust the volume, bass, or treble to eliminate distortion.
DJUST THE WINDOWS VOLUME CONTROL — Click or double-click the speaker icon
A
in the lower-right corner of your screen. Ensure that the volume is turned up and that
the sound is not muted.
ISCONNECT HEADPHONES FROM THE HEADPHONE CONNECTOR — Sound from the
D
speakers is automatically disabled when headphones are connected to the computer’s
front-panel headphone connector.
.
.
48 Quick Reference Guide
Page 49

TEST THE ELECTRICAL OUTLET — Ensure that the electrical outlet is working by testing
it with another device, such as a lamp.
LIMINATE POSSIBLE INTERFERENCE — Turn off nearby fans, fluorescent lights, or
E
halogen lamps to check for interference.
R
UN THE SPEAKER DIAGNOSTICS
REINSTALL THE SOUND DRIVER — See "Drivers" in your User’s Guide.
R
UN THE HARDWARE TROUBLESHOOTER — See "Restoring Your Operating System"
in your User’s Guide.
No sound from headphones
CHECK THE HEADPHONE CABLE CONNECTION — Ensure that the headphone cable is
securely inserted into the headphone connector (see "About Your Computer" in your
User’s Guide).
DJUST THE WINDOWS VOLUME CONTROL — Click or double-click the speaker icon
A
in the lower-right corner of your screen. Ensure that the volume is turned up and that
the sound is not muted.
Video and Monitor Problems
CAUTION: Before you begin any of the procedures in this section, follow the
safety instructions in the
NOTICE: If your computer came with a PCI Express graphics card installed, removal
Product Information Guide
.
of the card is not necessary when installing additional graphics cards; however, the
card is required for troubleshooting purposes. If you remove the card, store it in a
safe and secure location. For information about your graphics card, go to
support.dell.com.
The screen is blank
NOTE: For troubleshooting procedures, see the monitor documentation.
HECK THE MONITOR CABLE CONNECTION —
C
• Ensure that the monitor cable is connected to the correct graphics card (for dual
graphics card configurations).
• If you are using a DVI-to-VGA adapter, ensure that the adapter is correctly attached to
the graphics card and monitor.
• Ensure that the monitor cable is connected as shown on the setup diagram for your
computer.
• Remove any video extension cables and connect the monitor directly to the computer.
Quick Reference Guide 49
Page 50

• Swap the computer and monitor power cables to determine if the monitor’s power
cable is defective.
• Check the connectors for bent or broken pins (it is normal for monitor cable connectors
to have missing pins).
CHECK THE MONITOR POWER LIGHT —
• If the power light is lit or blinking, the monitor has power.
• If the power light is off, firmly press the button to ensure that the monitor is turned on.
• If the power light is blinking, press a key on the keyboard or move the mouse to resume
normal operation.
TEST THE ELECTRICAL OUTLET — Ensure that the electrical outlet is working by testing
it with another device, such as a lamp.
C
HECK THE DIAGNOSTIC LIGHTS — See "Diagnostic Lights" on page 26.
The screen is difficult to read
CHECK THE MONITOR CABLE CONNECTION —
• Ensure that the monitor cable is connected to the correct graphics card (for dual
graphics card configurations).
• If you are using the optional
DVI-to-VGA
adapter, ensure that the adapter is correctly
attached to the graphics card and monitor.
• Ensure that the monitor cable is connected as shown on the setup diagram for your
computer.
• Remove any video extension cables and connect the monitor directly to the computer.
• Swap the computer and monitor power cables to determine if the monitor’s power
cable is defective.
• Check the connectors for bent or broken pins (it is normal for monitor cable connectors
to have missing pins).
CHECK THE MONITOR POWER LIGHT —
• If the power light is lit or blinking, the monitor has power.
• If the power light is off, firmly press the button to ensure that the monitor is turned on.
• If the power light is blinking, press a key on the keyboard or move the mouse to resume
normal operation.
TEST THE ELECTRICAL OUTLET — Ensure that the electrical outlet is working by
testing it with another device, such as a lamp.
HECK THE DIAGNOSTIC LIGHTS — See "Diagnostic Lights" on page 26.
C
50 Quick Reference Guide
Page 51

CHECK THE MONITOR SETTINGS — See the monitor documentation for instructions
on adjusting the contrast and brightness, demagnetizing (degaussing) the monitor,
and running the monitor self-test.
OVE THE SUBWOOFER AWAY FROM THE MONITOR — If your speaker system includes
M
a subwoofer, ensure that the subwoofer is positioned at least 60 centimeters (2 feet)
away from the monitor.
OVE THE MONITOR AWAY FROM EXTERNAL POWER SOURCES — Fans, fluorescent
M
lights, halogen lamps, and other electrical devices can cause the screen image to
appear shaky. Turn off nearby devices to check for interference.
OTATE THE MONITOR TO ELIMINATE SUNLIGHT GLARE AND POSSIBLE INTERFERENCE
R
ADJUST THE WINDOWS DISPLAY SETTINGS —
Windows XP:
1
Click
Start→
Control Panel→
2
Click the area you want to change or click the
3
Try different settings for
Appearance and Themes
Color quality
and
.
Display
icon.
Screen resolution
.
Windows Vista:
1
Click
Start
Display Settings
2
Adjust
Resolution
→
Control Panel→ Hardware and Sound→ Personalization
.
and
Colors settings,
as needed.
→
3D image quality is poor
CHECK THE GRAPHICS CARD POWER CABLE CONNECTION — Ensure that the power
cable for the graphics card(s) is correctly attached to the card.
C
HECK THE MONITOR SETTINGS — See the monitor documentation for instructions
on adjusting the contrast and brightness, demagnetizing (degaussing) the monitor,
and running the monitor self-test.
Only part of the screen is readable
TURN ON THE COMPUTER AND THE MONITOR AND ADJUST THE MONITOR
BRIGHTNESS AND CONTRAST CONTROLS — If the monitor works, the graphics
card(s) may be defective.
Contact Dell (see "Contacting Dell"
in your User’s Guide
Quick Reference Guide 51
).
Page 52

52 Quick Reference Guide
Page 53

Index
B
battery
problems, 37
beep codes, 30
C
CD-RW drive
problems, 38
Check Disk, 38
computer
beep codes, 30
crashes, 42-43
stops responding, 42
conflicts
software and hardware
incompatibilities, 32
connectors
headphone, 19
IEEE 1394, 19, 21
keyboard, 22
line-out, 21
mouse, 21
network adapter, 22
parallel, 21
serial, 22
sound, 21
USB, 19, 22
D
Dell Diagnostics, 33
Dell support site, 7
Desktop System Software, 7
diagnostic lights, 26
diagnostics
beep codes, 30
Dell Diagnostics, 33
lights, 19, 26
display. See monitor
documentation
End User License
Agreement, 6
ergonomics, 6
online, 7
Product Information
Guide, 6
regulatory, 6
safety, 6
User’s Guide, 5
warranty, 6
Drivers and Utilities
CD/DVD, 5
drives
problems, 37
Index 53
Page 54

E
I
e-mail
problems, 39
End User License Agreement, 6
ergonomics information, 6
error messages
beep codes, 30
diagnostic lights, 26
problems, 40
Express Service Code, 6
F
Files and Settings Transfer
Wizard (Windows XP), 13
H
hard drive
activity light, 19
problems, 38
hardware
beep codes, 30
conflicts, 32
Dell Diagnostics, 33
Hardware Troubleshooter, 32
headphone
connector, 19
IEEE 1394
connectors, 19, 21
problems, 41
Internet
problems, 39
IRQ conflicts, 32
K
keyboard
connector, 22
problems, 42
L
labels
Express Service Code, 6
Microsoft Windows, 6
Service Tag, 6
lights
back of computer, 26
diagnostic, 19, 26
hard drive activity, 19
link integrity, 21
network, 21-22
network activity, 22
Help and Support Center, 8
help file
Windows Help and Support
Center, 8
54 Index
Page 55

M
P
memory
problems, 44
messages
error, 40
system, 31
modem
problems, 39
monitor
blank, 49
hard to read, 50
problems, 49
mouse
connector, 21
problems, 44
N
network
connector, 22
problems, 45
O
operating system
reinstalling, 8
Operating System
CD/DVD, 8
optical drive
problems, 38
power
button, 19
line conditioners, 16
problems, 46
protection devices, 16
surge protectors, 16
UPS, 16
power light
conditions, 46
printer
connecting, 13
problems, 47
setting up, 13
problems
battery, 37
beep codes, 30
blue screen, 43
CD-RW drive, 38
computer crashes, 42-43
computer stops responding, 42
conflicts, 32
Dell Diagnostics, 33
diagnostic lights, 26
drives, 37
e-mail, 39
error messages, 40
general, 42
hard drive, 38
IEEE 1394, 41
Internet, 39
keyboard, 42
memory, 44
modem, 39
Index 55
Page 56

problems (continued)
monitor hard to read, 50
monitor is blank, 49
mouse, 44
network, 45
optical drive, 38
power, 46
power light conditions, 46
printer, 47
program crashes, 43
program stops responding, 42
scanner, 47
screen hard to read, 50
screen is blank, 49
software, 42-43
video and monitor, 49
volume adjusting, 48
Product Information Guide, 6
R
regulatory information, 6
sound connectors
line-out, 21
support website, 7
T
transferring information to a new
computer
Files and Settings Transfer Wizard
(Windows XP), 13
Windows Easy Transfer
(Windows Vista), 16
troubleshooting
beep codes, 30
conflicts, 32
Dell Diagnostics, 33
diagnostic lights, 26
Hardware Troubleshooter, 32
Help and Support Center, 8
power lights, 24
problems, 36
system messages, 31
S
S.M.A.R.T, 32
safety instructions, 6
scanner
problems, 47-48
screen. See monitor
Service Tag, 6
software
conflicts, 32
problems, 42-43
56 Index
U
uninterruptible power supply.
See UPS
UPS, 16
USB
connector, 22
connectors, 19
User’s Guide, 5
Page 57

V
video
problems, 49
volume
adjusting, 48
W
warranty information, 6
Windows Vista
Help and Support Center, 8
reinstalling, 8
Windows Easy Transfer, 16
Windows XP
Files and Settings Transfer
Wizard, 13
Hardware Troubleshooter, 32
Help and Support Center, 8
reinstalling, 8
wizards
Files and Settings Transfer Wizard
(Windows XP), 13
Program Compatibility
Wizard, 43
Windows Easy Transfer
(Windows Vista), 16
Index 57
Page 58

58 Index
Page 59

Dell Precision™ T7400
Rövid referencia útmutató
Típus DCDO
www.dell.com | support.dell.com
Page 60

Megjegyzések, figyelmeztetések és
óvintézkedések
MEGJEGYZÉS: A MEGJEGYZÉSEK a számítógép biztonságosabb és
hatékonyabb használatát elősegítő fontos tudnivalókat tartalmaznak.
FIGYELMEZTETÉS: A „FIGYELMEZTETÉS“ hardver-meghibásodás
vagy adatvesztés potenciális lehetőségére hívja fel a figyelmet, egyben
közli a probléma elkerülésének módját.
VIGYÁZAT! Az VIGYÁZAT esetleges tárgyi és személyi sérülésekre,
illetve életveszélyre hívják fel a figyelmet.
____________________
A jelen dokumentum tartalma előzetes figyelmeztetés nélkül megváltozhat.
© 2007 Dell Inc. Minden jog fenntartva.
A Dell Inc. írásos engedélye nélkül szigorúan tilos a dokumentumot bármiféle módon sokszorosítani.
A szövegben használt védjegyek: A Dell, a DELL embléma, és a Dell Precision a Dell Inc. védjegyei;
A Microsoft, Windows, és Windows Vista a Microsoft Corporation Egyesült Államokban és/vagy más
országokban bejegyzett védjegyei vagy bejegyzett védjegyei.
A dokumentumban más védjegyek és kereskedelmi megnevezések is szerepelhetnek, hivatkozásként
a márkák és megnevezések tulajdonosaira vagy termékeikre. A Dell Computer Corporation kizárólag
a saját védjegyeiből és bejegyzett neveiből eredő jogi igényeket érvényesíti.
Típus DCDO
2007. Szeptember A.sz. GX691 Mód. A00
Page 61

Tartalomjegyzék
Információkeresés . . . . . . . . . . . . . . . . . . 63
A számítógép üzembe helyezése
. . . . . . . . . 69
Torony (Tower) és Asztal (Desktop)
orientáció közötti váltás
A számítógép telepítése zárt helyen
. . . . . . . . . . . . . 69
. . . . . 70
Információk átvitele egy új számítógépre
Tápfeszültség védő eszközök . . . . . . . . . 77
A számítógép
Előlnézet (Torony orientáció)
. . . . . . . . . . . . . . . . . . . . . 79
. . . . . . . . . . 79
Hátulnézet (Torony orientáció) . . . . . . . . . 82
Hátlapi csatlakozók . . . . . . . . . . . . . . . 83
A számítógép tisztítása
Számítógép, billentyűzet és monitor
Egér (Nem optikai)
Hajlékonylemez-meghajtó
. . . . . . . . . . . . . . . 85
. . . . . 85
. . . . . . . . . . . . . . . . 86
. . . . . . . . . . . 86
CD-k és DVD-k . . . . . . . . . . . . . . . . . . 86
Hibaelhárító eszközök
Tápfeszültség jelzőlámpák
. . . . . . . . . . . . . . . 87
. . . . . . . . . . . 87
Diagnosztikai jelzőlámpák . . . . . . . . . . . 88
Hangjelzés kódok . . . . . . . . . . . . . . . . 93
Rendszerüzenetek . . . . . . . . . . . . . . . . 96
Hardver hibaelhárítás . . . . . . . . . . . . . . 97
Dell Diagnostics (Dell-diagnosztika) . . . . . . 98
Hibaelhárítás . . . . . . . . . . . . . . . . . . 102
. . . . 73
Tárgymutató . . . . . . . . . . . . . . . . . . . . . . 121
Tartalomjegyzék 61
Page 62

62 Tartalomjegyzék
Page 63

Információkeresés
MEGJEGYZÉS: Mivel néhány funkció vagy adathordozó opcionális,
elképzelhető, hogy nem képezi a számítógép részét. Elképzelhető, hogy
számítógépe egyes funkciói vagy adathordozói bizonyos országokban nem
működnek.
MEGJEGYZÉS: A számítógéphez kiegészítő információk is tartozhatnak.
Témakör Itt találja meg
•
Diagnosztikai program a számítógéphez
•
Illesztőprogramok a számítógéphez
•
Eszközdokumentáció
•
Desktop System Software
(Asztali rendszerszoftver) (DSS)
Drivers and Utilities (Illesztő- és
segédprogramok) lemez
MEGJEGYZÉS: Az
segédprogramokat tartalmazó Drivers
and Utilities
ezért elképzelhető, hogy nem része
számítógépe alaptartozékainak.
A dokumentáció és az illesztőprogramok
már telepítve vannak a számítógépen.
A Drivers and Utilities lemez segítségével
telepítheti újra az illesztőprogramokat
(lásd „Reinstalling Drivers and Utilities
(Illesztő- és segédprogramok újratelepítése)“
a Felhasználói kézikönyvben), vagy futtathatja
a Dell™ Diagnostics (Dell™ diagnosztika)
programot (lásd „Dell Diagnostics (Delldiagnosztika)“, oldal: 98).
lemez opcionális lehet,
illesztő- és
MEGJEGYZÉS: A legfrissebb
illesztőprogramokat és dokumentációt
megtalálja a support.dell.com
weboldalon.
Rövid referencia útmutató 63
Page 64

Témakör Itt találja meg
•
Alkatrészek eltávolítása és cseréje
•
Műszaki adatok
•
Rendszerbeállítások konfigurálása
•
Hibakeresés és -elhárítás
Dell Precision™ Felhasználói
kézikönyv
Microsoft
®
Windows® XP and
Microsoft Windows Vista™ Help and
Support Center (Microsoft Windows XP és
Windows Vista súgó és támogatás)
1
Kattintson a következőkre:
and Support
Dell User and System Guides
Felhasználói és rendszerkézikönyvek)
System Guides
2
Kattintson számítógépe
(Felhasználói kézikönyvére).
•
Garanciális tudnivalók
•
Eladási feltételek és kikötések az Egyesült
Dell™ Termékismertető
Államokban
•
Biztonsági előírások
•
Szabályozással kapcsolatos információk
•
Ergonómiával kapcsolatos információk
•
Végfelhasználói licencmegállapodás
Start→
(Súgó és támogatás)→
(Dell
(Rendszerkézikönyvek).
User’s Guide
Help
→
64 Rövid referencia útmutató
Page 65

Témakör Itt találja meg
•
Szervizcímke és expressz szervizkód
•
Microsoft® Windows® Product Key
(termékkulcs)
Szervizcímke és Microsoft Windows
termékkulcs
Ezek a címkék a számítógépen találhatók:
•
A számítógépet a szervizcímkével lehet
azonosítani a
használatakor vagy a műszaki támogatás
igénybevételekor.
•
A Dell műszaki támogatás igénybevételekor
az expressz szervizkód megadásával
irányíthatja a hívást a megfelelő helyre.
MEGJEGYZÉS: A megnövelt
biztonság érdekében az újonnan
kifejlesztett Microsoft Windows licenc
címke tartalmaz egy hiányzó részt
„lyukat“
vagy
megnehezítése érdekében.
support.dell.com
a címke eltávolításának
webhely
Rövid referencia útmutató 65
Page 66

Témakör Itt találja meg
•
Megoldások –– Hibakeresési útmutatások
és tippek, cikkek technikusoktól, online
tanfolyamok és gyakran feltett kérdések
•
Közösség — Online eszmecsere, más
Dell-ügyfelek részvételével
•
Frissítések –– Az egyes összetevőkre,
például a memóriára, merevlemezre és
operációs rendszerre vonatkozó frissítések
•
Ve v őszolgálat –– Elérhetőség, szervizkérés
és rendelés állapota, garanciális és javítási
információk
•
Szerviz és terméktámogatás –– Szervizhívás
állapota, szervizelőzmények,
szervizszerződés és online eszmecsere
aműszaki támogatással
•
Dell műszaki frissítési szolgáltatás —
Megelőző e-mail értesítés a szoftver és
hardver frissítésekről a számítógépe
számára
•
Referencia –– A számítógép
dokumentációja, a számítógép konfigurációs
adatai, a termék műszaki leírása, valamint
szakmai ismertető
•
Letöltések — Hitelesített illesztőprogramok,
javítócsomagok és programfrissítések
Dell támogatási weboldal —
support.dell.com
MEGJEGYZÉS: A megfelelő
támogatási webhely megtekintéséhez
válassza ki a régiót vagy az üzleti
szegmensét.
66 Rövid referencia útmutató
Page 67

Témakör Itt találja meg
•
Desktop System Software (DSS) — Az
operációs rendszer újratelepítése esetén
számítógépén újra kell telepítenie a DSS
segédprogramot is. A DSS automatikusan
észleli a számítógépünket és operációs
rendszerünket, és telepíti
a konfigurációnknak megfelelő frissítéseket,
amelyek kritikus frissítéseket nyújtanak az
operációs rendszerünk számára, valamint
támogatást a processzorok, optikai
meghajtók, USB eszközök számára, pl.
a DSS segédprogramra Dell számítógépünk
megfelelő működése érdekében van szükség.
A Desktop System Software
(asztali rendszerszoftver) letöltéséhez:
1
Menjen a
support.dell.com
válassza ki országát/régióját, majd
kattintson a
(Illesztőprogramok és letöltések) pontra.
2
Kattintson a
ki a modellt) vagy
be egy címkét) pontra, végezze el
a megfelelő kijelöléseket, vagy gépelje
be a megfelelő információt számítógépe
számára, majd kattintson a
(Megerősítés) gombra.
3
Görgessen le a
Utilities
(Rendszer és konfiguráció
segédprogramok)
Software
(Asztali rendszerszoftver)
pontra, majd kattintson a
(Letöltés most) gombra.
Now
MEGJEGYZÉS: A support.dell.com
felhasználói felület a választásától
függően változhat.
•
A Windows XP használata
•
A Windows Vista használata
•
A programok és fájlok kezelése
•
Az asztal személyre szabása
Windows Help and Support Center
(Windows súgó és támogatás)
1
Kattintson a
(Súgó és támogatás) elemre.
2
Írjon be egy szót vagy kifejezést a probléma
leírására, majd kattintson a nyílikonra.
3
Kattintson a problémához legközelebb
álló témakörre.
4
Kövesse a kijelzőn megjelenő utasításokat.
webhelyre,
Drivers & Downloads
Select Model
(Válassza
Enter a Tag
(Gépeljen
Confirm
System and Configuration
→
Desktop System
Download
Start→
Help and Support
Rövid referencia útmutató 67
Page 68

Témakör Itt találja meg
•
Az operációs rendszer újratelepítése
Az operációs rendszer lemeze
Az operációs rendszer már telepítve van
a számítógépen. Operációs rendszerének
újratelepítéséhez használja a számítógépéhez
kapott Operating System (Operációs
rendszer) lemezt (Lásd a „Restoring Your
Operating System“ (Az operációs rendszer
visszaállítása) c. fejezetet a User’s Guide
(Felhasználói kézikönyvben)).
Az operációs rendszer újratelepítése után,
a számítógéppel kapott eszközök
illesztőprogramjának újratelepítéséhez
használja az opcionális Drivers and
Utilities (illesztő- és segédprogramokat
tartalmazó) lemezt.
Az operációs rendszer product key
(termékkulcs-) címkéje a számítógépen
található.
MEGJEGYZÉS: Az operációs
rendszerünk telepítőlemezének színe
a megrendelt operációs rendszertől függ.
•
A Linux használata
•
E-mail eszmecserék a Dell Precision
termékek és a Linux operációs rendszer
használóival
•
További információk a Linux operációs
rendszerrel és a Dell Precision
számítógéppel kapcsolatban
A Dell által támogatott Linux
webhelyek
•
linux.dell.com
•
lists.us.dell.com/mailman/listinfo/linuxprecision
68 Rövid referencia útmutató
Page 69

A számítógép üzembe helyezése
Torony (Tower) és Asztal (Desktop) orientáció közötti váltás
VIGYÁZAT! Az ebben a részben ismertetett műveletek elvégzése
előtt tanulmányozza a
MEGJEGYZÉS: Ahhoz, hogy a számítógépünk torony vagy asztal
orientációját változtatni tudjuk, a Delltől opcionálisan beszerezhető
készletet (kit) kell használnunk. Lásd a „Termékismertetőt“ a
Kézikönyvben
MEGJEGYZÉS: A torony orientációjú számítógép elől egy további 3,5 collos
meghajtót támogat az asztali orientációjú számítógéphez képest.
1
Kövesse a
, hogyan lehet megrendelést feladni a Dellnek.
Felhasználói Kézikönyv
c. fejezetében szereplő eljárásokat.
2
Vegyük le a számítógép burkolatát (lásd „Removing the Computer Cover“
(A számítógép burkolat eltávolítása) c. fejezetet a
3
Vegyük le a számítógép előlapját (lásd „Removing the Front Panel“
(A számítógép előlap eltávolítása) c. fejezetet a
4
Vegyük le a meghajtó paneljét, és készítsük elő a meghajtó panelt az inzertek
szükség szerinti hozzáadásával vagy eltávolításával (lásd a „Drive Panels“
(Meghajtó panelek) c. fejezetet a
Toronyról asztal orientációra váltás
1
Távolítsuk el az összes telepített hajlékony lemezes meghajtót vagy adathordozó
kártya olvasót a
Felhasználói kézikönyv
Card Reader (Tower Computer)“ (Hajlékony lemez meghajtó vagy adathordozó
kártya olvasó eltávolítása (Torony számítógép)) c. fejezetében szereplő
lépéseket követve, majd telepítsünk újra egyetlen hajlékony lemezes
meghajtót vagy adathordozó kártya olvasót a
„Installing a Floppy Drive or Media Card Reader (Desktop Computer)“
(Hajlékony lemez meghajtó vagy adathordozó kártya olvasó telepítése
(Asztali számítógép)) c. fejezetében szereplő lépéseket követve.
2
Távolítsuk el az összes telepített optikai meghajtót a
„Removing an Optical Drive (Tower Computer)“ (Optikai meghajtó eltávolítása
(Torony számítógép)) c. fejezetének lépéseit követve, majd telepítsük újra
a meghajtókat a
Felhasználói kézikönyv
Computer)“ (Optikai meghajtó telepítése (Asztali számítógép)) c. fejezetében
szereplő lépéseket követve.
Termékismertetőt
„Before You Begin“ (Mielőtt elkezdené)
Felhasználói kézikönyvben
„Removing a Floppy Drive or Media
„Installing an Optical Drive (Desktop
.
Felhasználói
Felhasználói kézikönyvben
Felhasználói kézikönyvben
).
Felhasználói kézikönyv
Felhasználói kézikönyv
).
).
Rövid referencia útmutató 69
Page 70

Toronyról asztal orientációra váltás
1
Távolítsuk el a hajlékony lemezes meghajtót vagy adathordozó kártya olvasót
(ha telepítve volt) a
Felhasználói kézikönyv
„Removing a Floppy Drive or
a Media Card Reader (Desktop Computer)“ (Hajlékony lemez meghajtó vagy
adathordozó kártya olvasó eltávolítása (Asztali számítógép)) c. fejezetében
szereplő lépéseket követve, majd telepítsünk újra a hajlékony lemezes meghajtót
vagy adathordozó kártya olvasót a
Felhasználói kézikönyv
„Installing a Floppy
Drive or Media Card Reader (Tower Computer)“ (Hajlékony lemez meghajtó
vagy adathordozó kártya olvasó telepítése (Torony számítógép)) c. fejezetében
szereplő lépéseket követve.
2
Távolítsuk el az összes telepített optikai meghajtót a
Felhasználói kézikönyv
„Removing an Optical Drive (Desktop Computer)“ (Optikai meghajtó eltávolítása
(Asztali számítógép)) c. fejezetének lépéseit követve, majd telepítsük újra
a meghajtókat a
Felhasználói kézikönyv
„Installing an Optical Drive (Tower
Computer)“ (Optikai meghajtó telepítése (Torony számítógép)) c. fejezet
lépéseit követve.
A számítógép telepítése zárt helyen
Ha számítógépünket zárt helyen telepítjük, ezzel a légáramlást akadályozhatjuk,
ami számítógépünk túlmelegedését okozhatja és teljesítményét is befolyásolhatja.
Kövesse az alábbi útmutatást, ha számítógépét zárt helyen akarja telepíteni.
FIGYELMEZTETÉS: Az e kézikönyvben előírt üzemeltetési hőmérséklet
a legnagyobb környezeti hőmérsékletet tükrözi. A környezeti hőmérsékletet
feltétlenül tekintetbe kell venni amikor a számítógépet zárt helyen telepítjük.
Számítógépünk műszaki adatait a „Műszaki adatok“ címszónál nézhetjük
Felhasználói kézikönyvben
meg a
.
70 Rövid referencia útmutató
Page 71

•
A megfelelő szellőzéshez hagyjon legalább 10,2 cm térközt a számítógép
összes szellőzőnyílással ellátott oldalán.
•
Ha a számítógépet sarokban vagy egy asztal alatt telepítik, akkor hagyjon
szabadon egy legalább 5,1 cm-es (2 hüvelyk) hézagot a számítógép hátulja és
a fal között, hogy a megfelelő szellőzéshez szükséges légáramlás kialakulhasson.
•
Ha a zárt tér ajtókkal rendelkezik, akkor ügyeljünk, hogy az ajtók hagyjanak
legalább 30 százalékos légáramlást a zárt téren keresztül (elől és hátul).
Rövid referencia útmutató 71
Page 72

•
Ne telepítsük a számítógépet olyan zárt helyen, amely nem teszi lehetővé
a légáramlást. A légáramlás akadályozása
vezethet, és teljesítményét is befolyásolhatja
számítógépünk túlmelegedéséhez
.
72 Rövid referencia útmutató
Page 73

Információk átvitele egy új számítógépre
Igénybe vehetjük operációs rendszerünk varázslóit, hogy segítsenek fájlokat és
más adatokat átvinni egyik számítógépről a másikra.
Microsoft Windows XP
A Microsoft Windows XP operációs rendszer a Fájlok és beállítások átvitele varázslót
(Files and Settings Transfer Wizard) biztosítja a következő adatok átviteléhez:
•
E-mail üzenetek
•
Eszközsor beállítások
•
Ablak méretek
•
Internet könyvjelzők
Adatokat hálózaton vagy soros csatlakozáson keresztül vihetünk át egyik
számítógépről a másikra, vagy pedig úgy, hogy az adatokat cserélhető adathordozón,
pl. írható CD-n vagy DVD-n tároljuk.
MEGJEGYZÉS: Információkat vihetünk át egyik számítógépről a másikra,
ha közvetlenül összekötjük egy soros kábellel a két számítógép
bemeneti/kimeneti (I/O) portját. Ahhoz, hogy egy soros csatlakozáson
keresztül adatokat vihessünk át, használnunk kell a Vezérlőpulton (Control
Panel) található Network Connections (Hálózati kapcsolatok) segédprogramot
további konfigurációs lépések elvégzésére, pl. egy speciális csatlakozás
beállítására és a kiszolgáló (host) számítógép és a vendég (guest)
számítógép kijelölésére.
Két számítógép közötti közvetlen kábelcsatlakozás létesítéséhez szükséges
útmutatást lásd a Microsoft tudásbázis (Microsoft Knowledge Base) 305621
számú cikkét, melynek címe:
Between Two Computers in Windows XP
kábelcsatlakozást két számítógép között Windows XP operációs rendszerben).
Bizonyos országokban ez az információ esetleg nem hozzáférhető.
How to Set Up a Direct Cable Connection
(Hogyan létesítsünk közvetlen
A Files and Settings Transfer Wizard (Fájlok és beállítások átvitele varázsló)
használatához szükség van a számítógéphez adott Operating System (Operációs
rendszer) lemezre, vagy egy varázsló lemezre, amelyet a varázsló létrehozhat
számunkra.
Rövid referencia útmutató 73
Page 74

MEGJEGYZÉS: Az adatátvitellel kapcsolatos további információkért
keressünk rá a support.dell.com webhelyen a 154781 számú dokumentumra
What Are The Different Methods To Transfer Files From My Old Computer
(
To My New Dell™ Computer Using the Microsoft Windows XP Operating
System?
az új Dell™ számítógépemre a Microsoft Windows XP operációs rendszer
használatával?)).
MEGJEGYZÉS: A Dell tudásbázis (Dell Knowledge Base) dokumentumához
bizonyos országokban nem feltétlenül lehet hozzáférni.
Files and Settings Transfer Wizard (Fájlok és beállítások átvitele varázsló)
(az Operating System lemezzel)
MEGJEGYZÉS: A Files and Settings Transfer Wizard (Fájlok és beállítások
átvitele varázsló) a forrás számítógépet, amelyről az adatokat át kell vinni
old
adatokat át kell vinni
A CÉL SZÁMÍTÓGÉP ELŐ KÉSZÍTÉSE A FÁJL ÁTVITELHEZ —
1
Kattintson a
(Kellékek)→ System Tools
Transfer Wizard
2A Which computer is this?
computer
3A Do you have a Windows XP CD?
kérdés alatt kattintson a
(Milyen módszerek vannak fájlok átvitelére régi számítógépemről
(régi) számítógépnek nevezi; a cél számítógépet pedig, amelyre az
new
(új) számítógépnek nevezi.
Start→
All Programs
(Rendszereszközök)→
(Minden program)→
Files and Settings
Accessories
(Fájlok és beállítások átvitele varázsló) menüpontra.
(Melyik ez a számítógép?) alatt kattintson a
(Új számítógép) kapcsolóra, majd kattintson a
Next
(Tovább) gombra.
(Rendelkezik Windows XP CD-vel?)
I will use the wizard from the Windows XP CD
New
(A Windows XP CD-ről használom a varázslót) pontra, majd kattintson
a
Next
(Tovább) gombra.
4
Nézze meg az információt a
a régi számítógépére) alatt, majd menjen a forrás számítógépre.
a
Next
(Tovább) gombra.
ADATOK MÁSOLÁSA A FORRÁS SZÁMÍTÓGÉPRŐL —
1
Helyezze be a Windows XP
Now go to your old computer
Operating System
(Operációs rendszer) lemezt
(Most menjen
Ne
kattintson
a forrás számítógépbe.
Megjelenik a
Welcome to Microsoft Windows XP
(Üdvözli
a Microsoft Windows XP) képernyő.
2
Kattintson a
Perform additional tasks
74 Rövid referencia útmutató
(További feladatok végzése) pontra.
Page 75

3A What do you want to do?
files and settings
Megjelenik a
(Fájlok és beállítások átvitele) pontra.
Files and Settings Transfer Wizard
(Mit akar tenni?) kérdés alatt kattintson a
(Fájlok és beállítások átvitele
varázsló) ablaka.
4
Kattintson a
5A Which computer is this?
computer
6A Select a transfer method
a választott átviteli módszerre, majd a
7A What do you want to transfer?
adatokra, majd kattintson a
A kijelölt adatok átmásolódnak, megjelenik a
Phase
8
Kattintson a
ADATOK ÁTVITELE A CÉL SZÁMÍTÓGÉPRE —
1
Menjen a cél számítógépre.
2A Now go to your old computer
Next
a
3A Where are the files and settings?
Next
(Tovább) gombra.
(Melyik ez a számítógép?) alatt kattintson az
(Régi számítógép) kapcsolóra, majd kattintson a
(Válasszon egy átviteli módszert) alatt kattintson
Next
(Tovább) gombra.
(Mit akar átvinni?) alatt kattintson az átviendő
Next
(Tovább) gombra.
Completing the Collection
(Gyűjtő fázis befejezése) képernyő.
Finish
(Befejezés) gombra.
(Menjen a régi számítógépére) alatt kattintson
(Tovább) gombra.
(Hol vannak a fájlok és a beállítások?)
Next
(Tovább) gombra.
alatt kattintson arra a módszerre, amelyet beállításainak és fájljainak átviteléhez
választ, majd kattintson a
Next
(Tovább) gombra.
A varázsló olvassa az összegyűjtött fájlokat és beállításokat, majd a cél
számítógépre viszi őket. Amikor az átvitel kész, megjelenik a
Finished
képernyő.
Transfer
Old
(Kész)
4
Kattintson a
Files and Settings Transfer Wizard (Fájlok és beállítások átvitele varázsló)
(az Operating System lemez nélkül)
Finished
(Kész) gombra, majd indítsa újra a számítógépet.
Ahhoz, hogy a Files and Settings Transfer Wizard (Fájlok és beállítások átvitele
varázsló) varázslót az Operating System (Operációs rendszer) lemez nélkül
futtatni lehessen, létre kell hoznunk egy varázsló lemezt. A varázsló lemez lehetővé
teszi, hogy létrehozzunk egy biztonsági másolat (backup) kép fájlt (image file)
cserélhető adathordozón.
Rövid referencia útmutató 75
Page 76

MEGJEGYZÉS: A Files and Settings Transfer Wizard (Fájlok és beállítások
átvitele varázsló) a forrás számítógépet, amelyről az adatokat át kell vinni
old
(régi) számítógépnek nevezi; a cél számítógépet pedig, amelyre az
new
adatokat át kell vinni
VARÁZSLÓ LEMEZ LÉTREHOZÁSA —
1
A cél számítógépen kattintson a
Accessories
(Kellékek)→ System Tools
Settings Transfer Wizard
2A Which computer is this?
computer
(Új számítógép) kapcsolóra, majd kattintson a
3A Do you have a Windows XP CD?
kérdés alatt kattintson az
(Varázsló lemezt akarok létrehozni a következő meghajtón) pontra,
drive
majd kattintson a
4
Helyezzen be egy írható CD-t vagy DVD-t, majd kattintson az OK gombra.
5
Nézze meg az információt a
Next
a régi számítógépére) alatt, majd menjen a forrás számítógépre.
Next
(Tovább) gombra.
a
ADATOK MÁSOLÁSA A FORRÁS SZÁMÍTÓGÉPRŐL —
1
Helyezze be a varázsló lemezt a forrás számítógépbe.
2
Kattintson a
3
Kattintson a
Start→
Browse...
a varázsló lemezen, majd kattintson az
4A Which computer is this?
Old computer
(Régi számítógép) kapcsolóra, majd kattintson a
(új) számítógépnek nevezi.
Start→ All Programs
(Minden program)→
(Rendszereszközök)→ Files and
(Fájlok és beállítások átvitele varázsló) menüpontra.
(Melyik ez a számítógép?) alatt kattintson a
Next
(Tovább) gombra.
(Rendelkezik Windows XP CD-vel?)
I want to create a Wizard Disk in the following
(Tovább) gombra.
Now go to your old computer
Run
(Futtatás) elemre.
(Tallózás) gombra és navigáljon a
OK
gombra.
(Most menjen
Ne
kattintson
fastwiz
elemre
(Melyik ez a számítógép?) alatt kattintson az
Next
gombra.
5A Select a transfer method
a választott átviteli módszerre, majd a
6A What do you want to transfer?
adatokra, majd kattintson a
A kijelölt adatok átmásolódnak, megjelenik a
(Gyűjtő fázis befejezése) képernyő.
Phase
(Válasszon egy átviteli módszert) alatt kattintson
Next
(Tovább) gombra.
(Mit akar átvinni?) alatt kattintson az átviendő
Next
(Tovább) gombra.
Completing the Collection
New
(Tovább)
7
Kattintson a
Finish
(Befejezés) gombra.
76 Rövid referencia útmutató
Page 77

ADATOK ÁTVITELE A CÉL SZÁMÍTÓGÉPRE —
1
Menjen a cél számítógépre.
2A Now go to your old computer
a
Next
(Tovább) gombra.
3A Where are the files and settings?
(Menjen a régi számítógépére) alatt kattintson
(Hol vannak a fájlok és a beállítások?)
alatt kattintson arra a módszerre, amelyet beállításainak és fájljainak átviteléhez
választ, majd kattintson a
Next
(Tovább) gombra.
A varázsló olvassa az összegyűjtött fájlokat és beállításokat, majd a cél
számítógépre viszi őket. Amikor az átvitel kész, megjelenik a
Finished
képernyő.
4
Kattintson a
Microsoft Windows Vista
1
Kattintson a Windows Vista Start gombra , majd kattintson a
and settings
Finished
(Kész) gombra, majd indítsa újra a számítógépet.
(Fájlok és beállítások átvitele)→
Transfer files
Start Windows Easy Transfer
(Windows könnyű átvitel indítása) elemre.
2A User Account Control
párbeszéddobozban kattintson a
Continue
(Folytatás)
gombra.
3
Kattintson a
in progress
Start a new transfer
(Új átvitel indítása) vagy a
(Folyamatban lévő átvitel folytatása) gombra.
Continue a transfer
Kövesse a Windows Easy Transfer (Windows könnyű átvitel) varázslónak
a képernyőn megjelenő utasításait.
(Kész)
Tápfeszültség védő eszközök
Többféle eszköz áll rendelkezésre a tápfeszültség ingadozásai és kimaradásai
elleni védelemre:
•
Túlfeszültség védők
•
Hálózati kiegyenlítők
•
Szünetmentes tápegységek (UPS)
Rövid referencia útmutató 77
Page 78

Túlfeszültség védők
A túlfeszültség védők és a túlfeszültség elleni védelemmel felszerelt elosztós
hosszabbítók segítenek megvédeni számítógépünket az olyan feszültségugrásoktól
(tüskéktől) amelyek elektromos viharok során vagy feszültség-kimaradások
után keletkeznek. Egyes túlfeszültség védők gyártói garanciát is mellékelnek
bizonyos fajta károk esetére. Gondosan olvassuk el a garanciát, amikor kiválasztjuk
a túlfeszültség védőt, és hasonlítsuk össze az energia (joule) besorolásokat, hogy
megállapíthassuk a különböző eszközök viszonylagos hatásosságát. A nagyobb
joule besorolással rendelkező eszköz több védelmet kínál.
FIGYELMEZTETÉS: A legtöbb túlfeszültség védő nem véd a a közeli
villámcsapások által okozott feszültség-ingadozásoktól vagy feszültségkimaradásoktól. Ha villámlik a környéken, akkor húzzuk ki a telefonvezetéket
fali dugaszoló aljzatból és csatlakoztassuk le a számítógépet a hálózati
dugaszoló aljzatról.
Sok túlfeszültség védő telefon jack-dugóval rendelkezik a modem védelemhez. Lásd
a túlfeszültség védő dokumentációját a modem csatlakoztatási utasításait illetően.
FIGYELMEZTETÉS: Nem minden túlfeszültség védő kínál hálózati
adapter védelmet. Csatlakoztassuk le a számítógépes hálózati kábelt
a számítógépes hálózat fali csatlakozójáról elektromos viharok esetén.
Hálózati kiegyenlítők
FIGYELMEZTETÉS: A hálózati kiegyenlítők nem védenek a feszültség-
kimaradások ellen.
A hálózati kiegyenlítőket úgy alakították ki, hogy a váltakozó feszültséget egy
megfelelően állandó értéken tartsák.
Szünetmentes tápegységek
FIGYELMEZTETÉS: Adatvesztést vagy fájl károsodást okozhat, ha az
áramkimaradás akkor következik be, amikor éppen adatokat mentünk ki
merevlemezre.
MEGJEGYZÉS: A maximális akkumulátor élettartam biztosítása érdekében
csak a számítógépünket csatlakoztassuk az UPS-re. A többi eszközt, pl.
a nyomtatót, csatlakoztassuk egy másik, túlfeszültség elleni védelemmel
ellátott elosztóra.
78 Rövid referencia útmutató
Page 79

Az UPS véd a feszültség ingadozásai és kimaradásai ellen. Az UPS eszközök
egy akkumulátort tartalmaznak, amely ideiglenesen ellátja tápfeszültséggel
a csatlakoztatott eszközöket, amíg a villamos hálózatban feszültségkimaradás van.
Amikor a hálózati feszültség jelen van, az akkumulátor töltődik. Nézzük meg az UPS
gyártó dokumentációját az akkumulátor üzemidejét illetően, illetve győződjünk
meg róla, hogy az eszközt jóváhagyta-e az Underwriters Laboratories (UL).
A számítógép
Előlnézet (Torony orientáció)
1
2
3
13
12
11
10
9
Rövid referencia útmutató 79
4
5
6
7
8
Page 80

1–3 5,25 collos
meghajtó
helyek
4 5,25 collos
meghajtó hely
speciális
3,5 collos
meghajtó panel
lemezzel
5 merevlemez
aktivitásjelző
lámpa
6 IEEE 1394-es
csatlakozó
7 USB 2.0
csatlakozók (2)
Tartalmazhatnak CD/DVD meghajtót, adathordozó
kártya olvasót, hajlékonylemez-meghajtót, vagy egy
SATA merevlemez-meghajtót egy 5,25 collos keretben.
Merevlemez-keretek csak az 5,25 collos meghajtó
helyeken használhatók. A hajlékonylemez-
-meghajtó/adathordozó kártya olvasó és
a merevlemez-meghajtó-keretek nem cserélhetők fel
egymással.
Tartalmazhatnak CD/DVD meghajtót, adathordozó
kártya olvasót, hajlékonylemez-meghajtót, vagy egy
SATA merevlemez-meghajtót egy 5,25 collos keretben.
Az itt látható meghajtó-panel lap csak hajlékonylemezmeghajtóval vagy adathordozó kártya meghajtóval
használható; a lapot a négy 5,25 collos meghajtó hely
bármelyike elé felszerelhetjük. További tájékozódás
végett lásd a „Dell Panels“ (Dell panelek) címszó alatt
Felhasználói kézikönyvben
a
Merevlemez-keretek csak az 5,25 collos meghajtó
helyeken használhatók. A hajlékonylemez-
-meghajtó/adathordozó kártya olvasó és
a merevlemez-meghajtó-keretek nem cserélhetők fel
egymással.
A merevlemez lámpája akkor ég, amikor a számítógép
adatokat olvas a merevlemezől ill. ír fel a merevlemezre.
A lámpa olyankor is éghet, amikor egy eszköz, pl.
a CD meghajtónk működik.
Használjuk az IEEE 1394 csatlakozót az olyan nagy
sebességű eszközökhöz, mint pl. a videokamera és
akülső adattároló eszközök.
használjuk az előlapi USB csatlakozókat az olyan
eszközökhöz, amelyeket egyszer-egyszer alkalmilag
csatlakoztatunk, pl. flash memória kulcsokhoz,
kamerákhoz, vagy rendszerindításra alkalmas
(„bootolható“) USB eszközökhöz.
A Dell javasolja, hogy a hátlapi USB csatlakozókat
olyan eszközökhöz használjuk, amelyek rendszerint
állandóan csatlakoztatva vannak, pl. a nyomtatóhoz és
billentyűzethez.
.
80 Rövid referencia útmutató
Page 81

8 tápkapcsoló,
tápfeszültség
jelzőlámpa
Nyomja meg a tápfeszültség gombját a számítógép
bekapcsolásához. Az ennek a gombnak a közepén
lévő lámpa jelzi a tápfeszültség állapotát. További
tájékozódás végett lásd a „Controls and Lights
(Kezelőszervek és jelzőlámpák)“ címszó alatt
Felhasználói kézikönyvben
a
.
MEGJEGYZÉS: Az adatvesztés elkerülése érdekében
ne használjuk a tápfeszültség kapcsolóját a számítógép
kikapcsolására. Ehelyett végezzük el az operációs
rendszer szabályos leállítását (shutdown).
9 Dell embléma A Dell embléma elforgatható, hogy a „Dell“ felirat
vízszintesen olvasható legyen, attól függően, hogy az
„asztal“ vagy a „torony“ orientációt használjuk.
10 fejhallgató
csatlakozó
11 mikrofon
csatlakozó
12 diagnosztikai
jelzőlámpák (4)
13 számítógép-
hálózati
kapcsolat
jelzőlámpa
A fejhallgató csatlakozó fejhallgató csatlakoztatására
szolgál.
A mikrofon csatlakozó személyi számítógéphez való
mikrofon csatlakoztatására használható, hogy hangot
vagy zenét vihessünk be egy hang- vagy
telefonprogramba.
Ezek a jelzőlámpák a számítógépen fellépő hiba
elhárításánál segítenek diagnosztikai kód alapján.
További tájékozódás végett lásd a „Diagnostic Lights“
(Diagnosztikai jelzőlámpák) címszó alatt a
kézikönyvben
A számítógép-hálózat kapcsolati jelzőlámpa akkor ég,
ha jó kapcsolat áll fenn egy 10-Mbps, 100-Mbps, vagy
1000-Mbps (vagy 1-Gbps) sebességű számítógép-
hálózat és a számítógép között.
.
Felhasználói
Rövid referencia útmutató 81
Page 82

Hátulnézet (Torony orientáció)
1
2
3
1 hálózati
csatlakozó
2 kártya
bővítőhelyek
3 hátlapi
csatlakozók
VIGYÁZAT! Gondoskodjon róla, hogy a szellőző nyílások ne legyenek
eltorlaszolva. Eltorlaszolásuk súlyos melegedési problémákat okozhat.
Csatlakoztassa rá a hálózati tápkábelt.
A 2. – 6. kártya bővítőhelyek a teljes hosszúságú
kártyákat támogatják, konkrétan egy PCI kártyát, két
PCI Express 2.0 x16 kártyát és két PCI-X kártyát. Az 1.
és a 7. bővítőhely a félhosszúságú kártyákat támogatja,
egy PCI Express x8 (x4-ként huzalozott) kártyát és egy
PCI-X kártyát.
Dugja be az USB, audio, és más eszközöket
a megfelelő csatlakozóba (további információkat lásd
„Hátlapi csatlakozók“, oldal: 83).
82 Rövid referencia útmutató
Page 83

Hátlapi csatlakozók
12345678
11 10 9
1 párhuzamos
csatlakozó
Csatlakoztasson egy párhuzamos eszközt, például
párhuzamos nyomtatót a párhuzamos csatlakozóra.
Ha USB nyomtatója van, akkor azt dugja egy USB
csatlakozóba.
MEGJEGYZÉS: A beépített párhuzamos csatlakozó
automatikusan letiltódik, ha a számítógép olyan beszerelt
kártyát talál, amely ugyanarra a címre konfigurált
párhuzamos csatlakozót tartalmaz. További tájékozódás
végett lásd „System Setup Options“ (Rendszerbeállítási
lehetőségek) címszó alatt a
2 egér csatlakozó Dugjon egy szabványos PS/2 egeret a zöld
egércsatlakozóba. Kapcsolja ki a számítógépet az összes
csatlakozatott eszközzel együtt, mielőtt egy egeret
csatlakoztatnánk a számítógépre. Ha USB egere van,
akkor azt dugja egy USB csatlakozóba.
3 IEEE 1394-es
csatlakozó
4 vonali bemenet
(line-in)
csatlakozó
Használjuk az IEEE 1394 csatlakozót az olyan nagy
sebességű eszközökhöz, mint pl. a videokamera és
akülső adattároló eszközök.
A kék vonali bemenet (line-in) csatlakozót használjuk
a lejátszó eszközök, pl. MP3 lejátszó, CD meghajtó,
vagy videomagnó csatlakoztatására. Hangkártyával
rendelkező számítógépeknél használjuk a kártyán lévő
csatlakozót.
Felhasználói kézikönyvben
.
Rövid referencia útmutató 83
Page 84

5 vonali kimenet
(line-out)
csatlakozó
6 számítógép-
hálózati
kapcsolat
sértetlenség
jelzőlámpa
7 hálózati adapter
csatlakozó
8 hálózati
aktivitásjelző
lámpa
A zöld vonal kimeneti (line-out) csatlakozót használjuk
fejhallgatók és a legtöbb beépített erősítős hangszóró
csatlakoztatására. Hangkártyával rendelkező
számítógépeknél használjuk a kártyán lévő csatlakozót.
Zöld — Jó a kapcsolat egy 10 Mbps sebességű
számítógép-hálózat és a számítógép között.
Narancssárga — Jó a kapcsolat egy 100 Mbps sebességű
számítógép-hálózat és a számítógép között.
Sárga — Jó a kapcsolat egy 1000 Mbps (vagy 1 Gbps)
sebességű számítógép-hálózat és a számítógép között.
Kikapcsolt — A számítógép nem érzékel fizikai kapcsolatot
a számítógép-hálózathoz.
Ha a számítógépet hálózathoz vagy szélessávú eszközhöz
akarjuk csatlakoztatni, akkor csatlakoztassuk egy hálózati
kábel egyik végét egy hálózati jack dugóhoz, vagy
a számítógép-hálózatunkhoz vagy szélessávú
eszközünkhöz. A hálózati kábel másik végét
csatlakoztassuk a számítógépünkön lévő hálózati
adapter csatlakozóhoz. Kattanás jelzi, ha a hálózati
kábelt biztonságosan csatlakoztattuk.
Ne csatlakoztasson telefonkábelt a hálózati csatlakozóhoz.
Az olyan számítógépeken, amelyek további hálózati
csatlakozó kártyával rendelkeznek, használjuk a kártyán
és a számítógép hátulján lévő csatlakozót, amikor több
hálózati kapcsolatot alakítunk ki (pl. külön intra- és
extranetet).
Ajánlatos 5. kategóriájú (Category 5) huzalozást és
csatlakozásokat használni a hálózatunkhoz. Ha muszáj
3. kategóriájú huzalozást használnunk, akkor kényszerítsük
a hálózati sebességet 10 Mbps-re, hogy a biztonságos
működést biztosítsuk.
Sárga lámpa villog, ha a számítógép hálózati adatokat
küld vagy fogad. A nagy volumenű hálózati forgalom
hatására úgy tűnhet, hogy hogy ez a lámpa folyamatosan
világít.
84 Rövid referencia útmutató
Page 85

9 USB 2.0
csatlakozók (5)
10 billentyűzet
csatlakozó
11 soros
csatlakozók (2)
Ajánlatos az előlapi USB csatlakozókat olyan eszközökhöz
használni, amelyeket csak alkalmilag csatlakoztatunk, pl.
flash memória kulcsokhoz, kamerákhoz, vagy
rendszerindításra alkalmas („bootolható“) USB
eszközökhöz.
A hátoldali USB csatlakozókat olyan eszközökhöz
használjuk, amelyek rendszerint állandóan csatlakoztatva
vannak, pl. a nyomtatóhoz és a billentyűzethez.
Ha szabványos PS/2 billentyűzete van, akkor dugja be
a bíborszínű billentyűzet csatlakozóba. Ha USB egere
van, akkor azt dugja egy USB csatlakozóba.
Csatlakoztasson egy soros eszközt, pl. egy kézi eszközt
a soros portra. Szükség esetén ennek a portnak a címe
módosítható a rendszerbeállító programmal (lásd a „System
Setup“ (Rendszerbeállítás) c. fejezetet a
kézikönyvben
).
Felhasználói
A számítógép tisztítása
VIGYÁZAT! Az ebben a részben ismertetett műveletek elvégzése
előtt tanulmányozza a
Termékismertetőt
Számítógép, billentyűzet és monitor
VIGYÁZAT! A számítógépet tisztítás előtt áramtalanítani kell (húzza
ki a tápkábelt a dugaszoló aljzatból). A számítógépet nedves, puha
ronggyal lehet tisztítani. Ne használjon olyan folyékony vagy
aeroszolos tisztítószereket, amelyek gyúlékony anyagokat
tartalmaznak.
•
Használjon kefetoldalékos porszívót a por óvatos eltávolításához a számítógépen
található bővítőhelyekről és nyílásokból, valamint a billentyűzeten a billentyűk
közül.
.
FIGYELMEZTETÉS: Ne törölje le a megjelenítő képernyőjét szappanos
vagy alkoholos oldattal. Ha mégis így tesz, akkor megsértheti a tükröződés
elleni bevonatot.
•
A monitor képernyőjének megtisztításához enyhén nedvesítsen meg egy puha,
tiszta ruhát vízzel. Lehetőleg használjon speciális képernyő-tisztító kendőt
vagy oldatot, amely megfelel a monitor antisztatikus bevonatához.
Rövid referencia útmutató 85
Page 86

•
Törölje le a billentyűzetet, a számítógépet, és a monitor műanyag részeit puha,
vízzel megnedvesített tisztító ruhával.
Ne áztassa el a ruhát, és ne hagyja, hogy víz csurogjon be a számítógép vagy
a billentyűzet belsejébe.
Egér (Nem optikai)
1
Forgassa az egér alján lévő rögzítő gyűrűt az óramutató járásával ellenkező
irányba, majd vegye ki a golyót.
2
Törölje le a golyót tiszta, szöszmentes ruhával.
3
Gondosan fújjon bele a golyókosárba, hogy lejöjjön a por és a szösz.
4
Tisztítsa meg a görgőket a golyókosár belsejében izopropil alkohollal enyhén
megnedvesített pamut törlőruhával.
5
Szükség szerint állítsa újra középre a görgőket a csatornájukban. Ügyeljen,
hogy a törlőruháról származó szösz ne maradjon a görgőkön.
6
Tegye vissza a helyére a golyót és a rögzítő gyűrűt, majd forgassa el a rögzítő
gyűrűt az óramutató járásával egyező irányban, amíg a helyére nem kattan.
Hajlékonylemez-meghajtó
FIGYELMEZTETÉS: Ne kísérelje meg törlőruhával megtisztítani a meghajtó
író/olvasó fejeket. A fejek elállítódhatnak, és üzemképtelenné tehetik
a meghajtót.
A hajlékonylemez-meghajtót a kereskedelmi forgalomban kapható tisztító készlettel
tisztítsuk. Ez a készlet előkezelt hajlékonylemezeket tartalmaz a normál működés
során felhalmozódott szennyeződés eltávolításához.
CD-k és DVD-k
FIGYELMEZTETÉS: A CD/DVD meghajtóban található lencse
megtisztításához mindig sűrített levegőt használjunk, és kövessük a sűrített
levegőhöz adott használati utasítást. Soha ne érintsük meg a meghajtóban
lévő lencsét.
1
A lemezt a külső szélénél fogva tartsuk. A középső nyílás belső szélét is
megérinthetjük.
FIGYELMEZTETÉS: Ne törölgessük a lemezt körkörös mozdulattal, hogy
ne sértsük meg a lemez felületét.
86 Rövid referencia útmutató
Page 87

2
Puha, szöszmentes ruhával óvatosan töröljük meg a lemez alsó részét
(a címke nélküli oldalt) egyenes vonalban haladva középről a lemez külső
széle felé (sugárirányban).
A makacs piszok eltávolításához próbáljuk meg vizet vagy víz és enyhe szappan
felhígított oldatát használni. Vásárolhatunk kereskedelmi termékeket is,
amelyek megtisztítják a lemezeket és bizonyos védelmet biztosítanak a por,
ujjlenyomatok és karcolások ellen. A CD-khez való tisztítószerek DVD-hez
is biztonságosan használhatók.
Hibaelhárító eszközök
Tápfeszültség jelzőlámpák
VIGYÁZAT! Az ebben a részben ismertetett műveletek elvégzése
előtt tanulmányozza a
A számítógép előlapján látható tápfeszültség ki-bekapcsoló gomb jelzőlámpája
világít és villog vagy egyszínű marad, hogy jelezze a különböző állapotokat:
•
Ha a tápfeszültség jelzőlámpa zölden ég és a számítógép nem válaszol,
„Diagnosztikai jelzőlámpák“, oldal: 88.
•
Ha a tápfeszültség jelzőlámpa zölden villog, a számítógép készenléti (standby)
állapotban van. Nyomjunk meg egy billentyűt a billentyűzeten, mozgassuk
az egeret, vagy nyomjuk meg a tápfeszültség gombot a normális működés
folytatásához.
•
Ha a tápfeszültség jelzőlámpa nem ég, a számítógép vagy ki van kapcsolva,
vagy nem kap tápfeszültséget.
–
Húzzuk ki és dugjuk vissza a tápkábelt mind a számítógép hátulján lévő
csatlakozónál, mind pedig a villamos hálózat dugaszoló aljzatánál.
–
Ha a számítógép egy hosszabbítós elosztóra van csatlakoztatva, akkor
gondoskodjunk róla, hogy az elosztó be legyen dugva a hálózati
dugaszoló aljzatba és az elosztó be legyen kapcsolva.
–
Kerüljük meg az energia-védelmet (túlfeszültségvédőket stb.), elosztókat
és hosszabbító kábeleket, hogy meggyőződhessünk róla, hogy a számítógép
megfelelően bekapcsol.
–
Győződjön meg róla egy másik eszközzel – mondjuk egy lámpával - hogy
a dugaszoló aljzat jó-e.
–
Ügyeljen, hogy a hálózati tápkábel és az előlapi kábel stabilan csatlakozzon
a rendszerkártyához (Lásd a „System Board Components“ (Rendszerkártya
alkotóelemek) c. fejezetet a
Termékismertetőt
Felhasználói kézikönyvben
.
).
Rövid referencia útmutató 87
Page 88

•
Ha a tápfeszültség jelzőlámpa sárgán villog, akkor a számítógép megkapja
a tápfeszültséget, de valamilyen belső tápfeszültség-probléma állhat fenn.
–
Ügyeljen, hogy a feszültség választó kapcsoló úgy legyen beállítva, hogy
megfeleljen a lakóhelyünknek megfelelő váltakozó áramnak.
–
Ügyeljünk, hogy a processzor tápkábele stabilan csatlakozzon
a rendszerkártyához (Lásd a „System Board Components“ (Rendszerkártya
alkotóelemek) c. fejezetet a
•
Ha a tápfeszültség jelzőlámpa egyenletesen sárga fénnyel ég, akkor egy eszköz
Felhasználói kézikönyvben
).
esetleg nem megfelelően működik vagy helytelenül lett telepítve.
–
Vegyük ki, majd helyezzük vissza a memória modulokat (lásd „Removing
the Front Panel“ (A számítógép előlap eltávolítása) c. fejezetet a
kézikönyvben
–
Vegyünk ki és helyezzünk vissza minden kártyát (Lásd a „Cards“ (Kártyák)
c. fejezetet a
•
Küszöböljük ki az interferenciát. Az interferencia esetleges okai lehetnek:
–
Tápkábel, billentyűzet- és egér hosszabbítókábel
–
Túl sok eszköz van egy elosztóra dugva
–
Több elosztó csatlakozik ugyanarra a hálózati dugaszoló aljzatra
).
Felhasználói kézikönyvben
).
Felhasználói
Diagnosztikai jelzőlámpák
VIGYÁZAT! Az ebben a részben ismertetett műveletek elvégzése
előtt tanulmányozza a
Termékismertetőt
A hibaelhárítás segítésére a számítógépnek négy lámpája van, amelyek jelölése
1, 2, 3, és 4 az előlapon (lásd „Előlnézet (Torony orientáció)“, oldal: 79).
Amikor a számítógép normálisan elindul, a lámpák villognak,majd kialszanak.
A számítógép hibás működése esetén a jelzőlámpák szekvenciáját használjuk
a probléma azonosításához.
.
MEGJEGYZÉS: Miután a számítógép befejezte a POST eljárást, mind
a négy lámpa kialszik, mielőtt az operációs rendszer betöltése (boot)
megkezdődne.
88 Rövid referencia útmutató
Page 89

Diagnosztikai lámpakódok a POST folyamán
Lámpa mintázat Probléma leírása Javasolt megoldás
A számítógép normál
kikapcsolt állapotban
van, vagy pedig egy
esetleges BIOS-előtti
hiba lépett fel.
Valószínűleg BIOS
hiba lépett fel;
a számítógép
visszaállítási (recovery)
állapotban van.
Lehetséges, hogy
processzorhiba történt.
A memória modulokat
felismeri a rendszer, de
memóriahiba lépett fel.
Csatlakoztassa a számítógépet egy
működő hálózati dugaszoló aljzatra és
nyomja meg a tápfeszültség gombját.
•
Futtassa a BIOS Recovery (Visszaállítás)
segédprogramot, várjon a visszaállítás
befejeződésére, majd indítsa újra
a számítógépet.
•
Ha a hiba továbbra is fennáll, forduljon
a Dellhez (lásd
címszó alatt a
•
Húzza ki és nyomja vissza a processzort
(lásd a „Processzor“
Felhasználói kézikönyvben
a
•
Ha a hiba továbbra is fennáll, forduljon
a Dellhez (lásd
címszó alatt a
•
Ha kettő vagy annál több memória
modul van telepítve, akkor vegye ki
a modulokat (lásd „Memory“ (Memória)
címszónál a
utána tegyen vissza egy modult, majd
indítsa újra a számítógépet. Ha
a számítógép normálisan elindul, akkor
tegyen be további modulokat (egyszerre
csak egyet), amíg meg nem tudja
állapítani, hogy melyik a hibás modul,
vagy amíg az összes modult vissza nem
tette, és a hiba nem jelentkezik.
•
Ha van kéznél, akkor tegyen be
ugyanolyan típusú működő memóriát
a számítógépbe (lásd „Memory“
(Memória)
kézikönyvben
•
Ha a hiba továbbra is fennáll, forduljon
a Dellhez (lásd
címszó alatt a
„A Dell elérhetőségei“
Felhasználói kézikönyvben
„A Dell elérhetőségei“
Felhasználói kézikönyvben
Felhasználói kézikönyvben
címszó alatt a
).
„A Dell elérhetőségei“
Felhasználói kézikönyvben
).
c. pontot
).
).
),
Felhasználói
).
Rövid referencia útmutató 89
Page 90

Lámpa mintázat Probléma leírása Javasolt megoldás
Lehetséges, hogy
a grafikus kártya
hibásodott meg.
Valószínűleg
hajlékonylemez- vagy
merevlemez meghajtó
hiba lépett fel.
Lehetséges, hogy USB
hiba történt.
•
Vegyen ki és helyezzen vissza minden
telepített grafikus kártyát (Lásd a „Cards“
(Kártyák)
kézikönyvben
•
Ha rendelkezésre áll, tegyen be egy
működő grafikus kártyát a számítógépbe.
•
Ha a hiba továbbra is fennáll, forduljon
a Dellhez (lásd
címszó alatt a
•
Húzzon ki és dugjon vissza minden
tápkábelt és adatkábelt, majd indítsa
újra a számítógépet.
•
Ha a hiba továbbra is fennáll, forduljon
a Dellhez (lásd
címszó alatt a
•
Telepítsen újra minden USB eszközt,
ellenőrizze a kábelcsatlakozásokat,
majd indítsa újra a számítógépet.
•
Ha a hiba továbbra is fennáll, forduljon
a Dellhez (lásd
címszó alatt a
c. fejezetet a
).
„A Dell elérhetőségei“
Felhasználói kézikönyvben
„A Dell elérhetőségei“
Felhasználói kézikönyvben
„A Dell elérhetőségei“
Felhasználói kézikönyvben
Felhasználói
).
).
).
90 Rövid referencia útmutató
Page 91

Lámpa mintázat Probléma leírása Javasolt megoldás
A rendszer nem ismeri
fel a memória
modulokat.
A rendszerkártya
meghibásodott.
A rendszer felismeri
a memória modulokat,
de memóriakonfigurációs vagy kompatibilitási hiba áll
fenn.
•
Ha kettő vagy annál több memória
modul van telepítve, akkor vegye ki
a modulokat (lásd „Memory“ (Memória)
címszónál a
utána tegyen vissza egy modult, majd
indítsa újra a számítógépet. Ha
a számítógép normálisan elindul, akkor
tegyen be további modulokat (egyszerre
csak egyet), amíg meg nem tudja
állapítani, hogy melyik a hibás modul,
vagy amíg az összes modult vissza nem
tette, és a hiba nem jelentkezik.
•
Ha van kéznél, akkor tegyen be
ugyanolyan típusú működő memóriát
a számítógépbe (lásd „Memory“
(Memória)
kézikönyvben
•
Ha a hiba továbbra is fennáll, forduljon
a Dellhez (lásd
címszó alatt a
Forduljon a Dellhez (lásd „A Dell
elérhetőségei“ címszó alatt a Felhasználói
kézikönyvben).
•
Győződjön meg róla, hogy nincs
speciális követelmény a memória
modul ill. csatlakozó elhelyezésével
kapcsolatban (lásd „Memory“ (Memória)
címszónál a
•
Győződjön meg róla, hogy a számítógépe
által támogatott memóriát használ
(lásd „Memory“ (Memória)
alatt a
•
Ha a hiba továbbra is fennáll, forduljon
a Dellhez (lásd
címszó alatt a
Felhasználói kézikönyvben
címszó alatt a
).
„A Dell elérhetőségei“
Felhasználói kézikönyvben
Felhasználói kézikönyvben
Felhasználói kézikönyvben
„A Dell elérhetőségei“
Felhasználói kézikönyvben
),
Felhasználói
).
).
címszó
).
).
Rövid referencia útmutató 91
Page 92

Lámpa mintázat Probléma leírása Javasolt megoldás
Valószínűleg
rendszerkártya hiba
és/vagy hardver hiba
lépett fel.
•
Hajtsa végre a Felhasználói Kézikönyv
„Restoring Your Operating System“
(Az operációs rendszer visszaállítása)
c. fejezetében szereplő eljárásokat.
•
Ha a hiba továbbra is fennáll, forduljon
a Dellhez (lásd „A Dell elérhetőségei“
Lehetséges, hogy egy
bővítő kártya
hibásodott meg.
címszó alatt a
1
Úgy állapítsa meg, hogy fennáll-e
konfliktus, hogy vegyen ki egy bővítő
kártyát (de nem egy grafikus kártyát),
Felhasználói kézikönyvben
és indítsa újra számítógépet (lásd „Cards“
(Kártyák)
kézikönyvben
2
Ha a probléma továbbra is fennáll, akkor
címszónál a
).
telepítse újra azt a kártyát, amelyiket
eltávolított, majd vegyen ki egy másik
kártyát, és indítsa újra a számítógépet.
3
Ezt a folyamatot ismételje meg minden
telepített bővítő kártyával. Ha
a számítógép normálisan elindul, akkor
ellenőrizze a számítógépből utoljára
kivett kártyánál, hogy nincsenek-e
erőforráskonfliktusok (lásd „Restoring
Your Operating System“ (Az operációs
rendszer visszaállítása)
a
Felhasználói kézikönyvben
4
Ha a hiba továbbra is fennáll, forduljon
a Dellhez (lásd
címszó alatt a
„A Dell elérhetőségei“
Felhasználói kézikönyvben
).
Felhasználói
címszónál
).
).
92 Rövid referencia útmutató
Page 93

Lámpa mintázat Probléma leírása Javasolt megoldás
Más hiba lépett fel.
•
Ügyeljen, hogy az összes merevlemezés CD/DVD meghajtó kábel megfelelően
csatlakozzon a rendszerkártyához
(Lásd a „System Board Components“
(Rendszerkártya alkotóelemek) c.
fejezetet a
•
Ha olyan hibaüzenet jelenik meg
aképernyőn, amelyik egy eszközzel
kapcsolatos hibára utal (mint pl.
hajlékonylemez-meghajtó vagy
merevlemez-meghajtó), akkor ellenőrizze
az eszközt, hogy meggyőződjön helyes
működéséről.
•
Ha az operációs rendszer rendszertöltést
(boot) kísérel meg egy eszközről
(pl. hajlékonylemez-meghajtóról vagy
CD/DVD meghajtóról), akkor ellenőrizze
a rendszerbeállító programot (lásd
„System Setup“ (Rendszerbeállítás)
a
Felhasználói kézikönyvben
a rendszerindítási sorrend helyes legyen
a számítógépében telepített eszközök
számára.
•
Ha a hiba továbbra is fennáll, forduljon
a Dellhez (lásd
címszó alatt a
Felhasználói kézikönyvben
„A Dell elérhetőségei“
Felhasználói kézikönyvben
).
), hogy
).
Hangjelzés kódok
A számítógép esetleg egy sor hangjelzést ad az elinduláskor. A hangjelzés
sorozatot hangjelzés kódnak (beep code) nevezzük, és felhasználhatjuk, hogy
segítsen azonosítani a számítógépünkkel kapcsolatos valamilyen problémát.
Ha a számítógép egy sor hangjelzést ad az elinduláskor:
1
Írjuk le a hangjelzés kódot.
Rövid referencia útmutató 93
Page 94

2
Futtassuk le a Dell Diagnostics programot, hogy azonosítsuk az okot
(lásd „Dell Diagnostics (Dell-diagnosztika)“, oldal: 98).
Kód Ok
2 rövid, 1 hosszú BIOS ellenőrző összeg (kontrollszumma) hiba
1 hosszú, 3 rövid,
2 rövid
1 rövid F12 billentyű lenyomva
Memória hiba
Kód
(ismétlődő
rövid
hangjelzések)
1BIOS ellenőrzőösszeg
2 A rendszer nem ismeri
Leírás Javasolt orvoslás
hiba. Valószínű alaplap
hiba.
fel a memória
modulokat.
Forduljon a Dellhez (lásd „A Dell
elérhetőségei“ címszó alatt a Felhasználói
kézikönyvben).
•
Ha kettő vagy annál több memória modul
van telepítve, akkor vegye ki a modulokat
(lásd „Memory“ (Memória)
a
Felhasználói kézikönyvben
tegyen vissza egy modult, majd indítsa
újra a számítógépet. Ha a számítógép
normálisan elindul, akkor tegyen be
további modulokat (egyszerre csak egyet),
amíg meg nem tudja állapítani, hogy
melyik a hibás modul, vagy amíg az
összes modult vissza nem tette, és a hiba
nem jelentkezik.
•
Ha van kéznél, akkor tegyen be ugyanolyan
típusú működő memóriát a számítógépbe
(lásd „Memory“ (Memória)
Felhasználói kézikönyvben
a
•
Ha a hiba továbbra is fennáll, forduljon
a Dellhez (lásd
címszó alatt a
„A Dell elérhetőségei“
Felhasználói kézikönyvben
címszónál
), utána
címszó alatt
).
).
94 Rövid referencia útmutató
Page 95

Kód
(ismétlődő
rövid
hangjelzések)
3 Valószínű alaplap hiba. Forduljon a Dellhez (lásd „A Dell
4 RAM olvasási/írási hiba.
5 valós idejű óra hibája.
6 Video BIOS teszt hiba. Dell (lásd „A Dell elérhetőségei“ címszó
Leírás Javasolt orvoslás
elérhetőségei“ címszó alatt a Felhasználói
kézikönyvben).
•
Győződjön meg róla, hogy nincs speciális
követelmény a memória modul ill. csatlakozó
elhelyezésével kapcsolatban (lásd „Memory“
Valószínűleg elemhiba
vagy alaplap hiba.
(Memória)
kézikönyvben
•
Győződjön meg róla, hogy a számítógépe
által támogatott memóriát használ
(lásd „Memory“ (Memória)
Felhasználói kézikönyvben
a
•
Ha a hiba továbbra is fennáll, forduljon
a Dellhez (lásd
címszó alatt a
•
Cserélje ki az elemet (lásd „Replacing the
Battery“ (Elemcsere)
Felhasználói kézikönyvben
a
•
Ha a hiba továbbra is fennáll, forduljon
a Dellhez (lásd
címszó alatt a
alatt a Felhasználói kézikönyvben).
címszónál a
).
„A Dell elérhetőségei“
Felhasználói kézikönyvben
„A Dell elérhetőségei“
Felhasználói kézikönyvben
Felhasználói
címszó alatt
).
címszónál
).
).
).
Rövid referencia útmutató 95
Page 96

Rendszerüzenetek
MEGJEGYZÉS: Ha olyan üzenetet kapott, amely nem szerepel az alábbi
felsorolásban, akkor vagy az operációs rendszer vagy az üzenet
feltűnésekor futó program dokumentációjában keresse a hibaüzenetet.
A
LERT! (RIASZTÁS!) PREVIOUS ATTEMPTS AT BOOTING THIS SYSTEM
HAVE FAILED AT CHECKPOINT [NNNN]. (ENNEK A RENDSZERNEK AZ
ELINDÍTÁSÁRA (BOOT) TETT ELŐ Z Ő KÍSÉRLETEK NEM SIKERÜLTEK AZ
[
NNNN] ELLENŐ RZŐ PONTNÁL). FOR HELP IN RESOLVING THIS
PROBLEM, PLEASE NOTE THIS CHECKPOINT AND CONTACT DELL
ECHNICAL SUPPORT. (HA A PROBLÉMA MEGOLDÁSÁHOZ SEGÍTSÉGET
T
AKAR, AKKOR KÉRJÜK, JEGYEZZE FEL EZT AZ ELLENŐ RZŐ PONTOT, ÉS
FORDULJON A DELL TECHNICAL SUPPORT (MŰSZAKI TÁMOGATÁS)
RÉSZLEGÉHEZ)—A számítógépnek nem sikerült befejeznie a rendszerbetöltő rutint
három egymást követő alkalommal ugyanazon hiba miatt. (segítségért lásd „A Dell
elérhetőségei“ címszónál a Felhasználói kézikönyvben).
CMOS
Valószínűleg alaplap hiba vagy a valós idejű óra eleme lemerült. Cserélje ki az elemet
(lásd „Replacing the Battery“ (Elemcsere) címszónál a Felhasználói kézikönyvben).
CPU
ki a CPU ventilátort (lásd „Removing the Processor“ (A processzor eltávolítása) címszónál
a Felhasználói kézikönyvben).
FLOPPY DISKETTE SEEK FAILURE (HAJLÉKONYLEMEZ POZICIONÁLÁSI HIBA)—
Egy kábel meglazulhatott, vagy a számítógép konfigurációval kapcsolatos információ
esetleg nem felel meg a hardver konfigurációhoz. Ellenőrizze a kábelcsatlakozásokat
(segítségért lásd „A Dell elérhetőségei“ címszó alatt a Felhasználói kézikönyvben).
CHECKSUM ERROR (CMOS ELLENŐ RZŐ ÖSSZEG HIBA)—
FAN FAILURE (CPU VENTILÁTOR HIBA)—CPU ventilátor hiba. Cseréljük
ISKETTE READ FAILURE (HAJLÉKONYLEMEZ OLVASÁSI HIBA)—
D
A hajlékonylemez esetleg hibás vagy egy kábel meglazult. Cserélje ki a hajlékonylemezt
és/vagy ellenőrizze, hogy nincs-e meglazult kábelcsatlakozás.
ARD-DISK READ FAILURE (MEREVLEMEZ OLVASÁSI HIBA)—Lehetséges
H
merevlemez hiba a merevlemez rendszerbetöltési teszt folyamán (segítségért lásd
„A Dell elérhetőségei“ címszó alatt a Felhasználói kézikönyvben).
EYBOARD FAILURE (BILLENTYŰ ZET HIBA)— Billentyűzet hiba vagy
K
a billentyűzet kábele meglazult (lásd a „Keyboard Problems“ (Billentyűzet problémák)
címszónál a Felhasználói kézikönyvben).
96 Rövid referencia útmutató
Page 97

NO BOOT DEVICE AVAILABLE (NEM ÁLL RENDELKEZÉSRE
RENDSZERBETÖLTŐ ESZKÖZ)— A rendszer nem ismer fel egy rendszerbetöltésre
alkalmas („bootolható“) eszközt vagy partíciót.
•
Ha a hajlékonylemez-meghajtó a rendszerbetöltő eszközünk, akkor ügyeljen, hogy
a kábelek csatlakoztatva legyenek és a meghajtóban legyen egy indító lemez.
•
Ha merevlemez az indítóeszköze, akkor ügyeljen, hogy a kábelek csatlakoztatva legyenek,
a meghajtó megfelelően legyen telepítve, és indítóeszközként legyen particionálva.
•
Lépjen be a rendszerbeállító (system setup) programba, és gondoskodjon róla, hogy
a rendszerindító szekvencia helyes legyen (lásd „Entering System Setup“ (Belépés
a rendszerbeállító programba)
címszónál a
Felhasználói kézikönyvben
).
NO TIMER TICK INTERRUPT (NINCS ÓRAKETYEGÉSI (TIMER TICK)
MEGSZAKÍTÁS)—Rendszerkártya hiba vagy egy chip hibásan működik
a rendszerkártyán (segítségért lásd „A Dell elérhetőségei“ címszó alatt a Felhasználói
kézikönyvben).
ON-SYSTEM DISK OR DISK ERROR (NEM RENDSZERLEMEZ VAGY LEMEZ
N
HIBA)—Cserélje ki a hajlékonylemezt egy olyanra, amelyiken van egy indítható
operációs rendszer, vagy vegye ki a hajlékonylemezt az A: meghajtóból és indítsa újra
a számítógépet.
OT A BOOT DISKETTE (NEM RENDSZERINDÍTÓ HAJLÉKONYLEMEZ)—
N
Helyezzen be egy rendszerindító hajlékonylemezt, és indítsa újra a számítógépet.
NOTICE - H
THAT A PARAMETER HAS EXCEEDED ITS NORMAL OPERATING RANGE.
(FIGYELMEZTETÉS! – A
JELENTETTE, HOGY EGY PARAMÉTER TÚLLÉPTE A NORMÁLIS ÜZEMI
TARTOMÁNYÁT.) DELL RECOMMENDS THAT YOU BACK UP YOUR DATA
REGULARLY. (A DELL JAVASOLJA, HOGY RENDSZERESEN KÉSZÍTSEN
BIZTONSÁGI MÁSOLATOT RENDSZERÉRŐ L). A PARAMETER OUT OF RANGE
MAY OR MAY NOT INDICATE A POTENTIAL HARD DRIVE PROBLEM.
GY TARTOMÁNYON KVÜL ESŐ PARAMÉTER NEM FELTÉTLENÜL JELEZ
(E
POTENCIÁLIS MEREVLEMEZ PROBLÉMÁT)—S.M.A.R.T hiba, lehetséges HDD
ARD DRIVE SELF MONITORING SYSTEM HAS REPORTED
MEREVLEMEZ ÖNELLENŐRZŐ RENDSZER
meghibásodás. Ezt a funkciót engedélyezni lehet vagy le lehet tiltani a BIOS beállításánál
(setup).
Hardver hibaelhárítás
Ha egy eszközt a rendszer nem ismer fel az operációs rendszer beállítása
folyamán, vagy felismeri, de helytelenül konfigurálja, akkor az inkompatibilitás
feloldásához a hardver hibaelhárítást (Hardware Troubleshooter) használhatjuk.
Rövid referencia útmutató 97
Page 98

Windows XP:
Kattintson a
1
2
Gépelje be a keresőmezőbe, hogy
Start→
Help and Support
hardware troubleshooter
(Súgó és támogatás) elemre.
majd
nyomja meg az <Enter> billentyűt a keresés elindításához.
3A Fix a Problem
Troubleshooter
4A Hardware Troubleshooter
leginkább leírja a problémát, majd kattintson a
(Probléma javítás) részben kattintson a
elemre.
listájában válassza ki azt a lehetőséget, amelyik
Next
(Tovább) gombra, hogy
Hardware
követni tudja a hátralévő hibaelhárítási lépéseket.
Windows Vista:
Kattintsunk a Windows Vista start gombjára , és kattintson a
1
Support
2
Gépelje be a keresőmezőbe, hogy
(Súgó és támogatás) pontra.
hardware troubleshooter majd
Help and
nyomja meg az <Enter> billentyűt a keresés elindításához.
3
A keresés eredményében válassza ki azt a lehetőséget, amelyik a leginkább
leírja a problémát, majd kövesse a hátralévő hibaelhárítási lépéseket.
Dell Diagnostics (Dell-diagnosztika)
VIGYÁZAT! Az ebben a részben ismertetett műveletek elvégzése
előtt tanulmányozza a
Mikor van szükség a Dell Diagnostics használatára?
Termékismertetőt
Ha problémája támad a számítógéppel, végezze el a „Lefagyások és szoftver
problémák“ című részben ismertetett ellenőrzéseket (lásd „Troubleshooting“
(Hibaelhárítás) címszónál a Felhasználói kézikönyvben), futtassa a Dell-diagnosztikát,
és csak ezután forduljon a Dellhez segítségnyújtásért.
A Dell Diagnostics programot a merevlemezről futtathatja, vagy a Drivers and
Utilities lemezről.
A számítógép konfigurációs információinak áttekintéséhez, és annak ellenőrzéséhez,
hogy a tesztelendő eszköz megjelenik-e a rendszerbeállító programban és aktív-e,
lásd a Felhasználói kézikönyv „System Setup Program“ (Rendszerbeállító program)
című részét.
MEGJEGYZÉS: A Dell-diagnosztika kizárólag Dell számítógépeknél
működik.
MEGJEGYZÉS: Nyomtassa ki az alábbi eljárásokat, mielőtt futtatná a Dell
diagnostics programot.
.
98 Rövid referencia útmutató
Page 99

A Dell-diagnosztika elindítása merevlemezes meghajtóról
A Dell-diagnosztika a merevlemez egy rejtett diagnosztikai segédprogrampartíciójában található.
MEGJEGYZÉS: Ha a számítógép nem képes valamilyen képernyő
megjelenítésére, lásd a „A Dell elérhetőségei“ címszót a
kézikönyvben
1
Kapcsolja be (vagy indítsa újra) a számítógépet.
2
Amikor a DELL embléma megjelenik, azonnal nyomja meg az <F12> billentyűt.
MEGJEGYZÉS: A billentyűzet hibáját eredményezheti, ha egy billentyűt
hosszabb ideig lenyomva tartunk. Az esetleges billentyűzet hiba
elkerülése érdekében egyenlő időközönként nyomja le és engedje
vissza az <F12> billentyűt a Boot Device Menu (Indítóeszköz menü)
megnyitásához.
MEGJEGYZÉS: Ha bármikor arra figyelmeztető üzenetet lát, hogy
nem található a diagnosztikai segédprogramok partíciója, futtassa le
a Dell Diagnostics programot a
segédprogramokat tartalmazó) lemezről (lásd „A Dell Diagnostics
(Dell-diagnosztika) indítása a Drivers and Utilities (illesztő- és
segédprogramokat tartalmazó) lemezről“, oldal: 100)
.
Drivers and Utilities
Felhasználói
(illesztő- és
.
Ha túl sokáig vár és megjelenik az operációs rendszer logója, várjon tovább,
amíg meg nem jelenik a Microsoft Windows asztal, ezután kapcsolja ki
a számítógépet és próbálkozzon újra.
3A Boot Device Menu
számjegy-billentyű lenyomásával jelölje ki a
(Indítóeszköz menü), a fel- le-nyilakkal vagy a megfelelő
Boot to Utility Partition
(Rendszerindítás a segédprogram partícióba) menüpontot, majd nyomja le az
<Enter> billentyűt.
MEGJEGYZÉS: A Quickboot (Gyorsindítás) funkció csak az aktuális
indításhoz változtatja meg az indítási szekvenciát (sorrendet).
Újraindításkor a számítógép a rendszerbeállító (system setup) programban
megadott indítási szekvencia szerint indul el.
4
A Dell-diagnosztika
főmenüjében
, kattintsunk a bal egérgombbal, vagy nyomjuk
meg a <Tab> billentyűt, majd az <Enter> billentyűt a futtatandó teszt kijelöléséhez
(lásd „A Dell-diagnosztika főmenüje“, oldal: 101).
MEGJEGYZÉS: Jegyezze fel az esetleges hibakódokat és
problémaleírásokat pontosan úgy, ahogy azok megjelentek, és kövesse
a képernyőn megjelenő utasításokat.
Rövid referencia útmutató 99
Page 100

5
Az összes teszt befejeződése után zárja be a tesztablakot, hogy visszatérhessen
a Dell-diagnosztika
6
Zárja be a
Main Menu
Main Menu
(Főmenü).
(Főmenü) ablakát, hogy kiléphessen a Dell-diagnosztikából
és újraindíthassa számítógépét.
A Dell Diagnostics (Dell-diagnosztika) indítása a Drivers and Utilities
(illesztő- és segédprogramokat tartalmazó) lemezről
1
Kapcsolja be a számítógépet.
2
Nyomja meg a lemezkidobó (eject) gombot az optikai meghajtó előlapján
a lemeztálca kinyitásához.
3
Helyezze be a
Drivers and Utilities
lemezt a meghajtó tálcájának a közepére,
majd nyomja meg a lemezkidobó (eject) gombot, és óvatosan nyomja meg
a tálcát, hogy bezáródjon.
4
Indítsa újra a számítógépet.
5
Amikor a DELL embléma megjelenik, azonnal nyomja meg az <F12> billentyűt.
MEGJEGYZÉS: A billentyűzet hibáját eredményezheti, ha a billentyűzet
valamelyik billentyűjét hosszabb ideig lenyomva tartjuk. Az esetleges
billentyűzet hiba elkerülése érdekében egyenlő időközönként nyomja
le és engedje vissza az <F12> billentyűt, amíg a Boot Device Menu
(Indítóeszköz menü) meg nem jelenik.
Ha túl sokáig vár és megjelenik az operációs rendszer logója, várjon tovább,
amíg meg nem jelenik a Microsoft Windows asztal, ezután kapcsolja ki
a számítógépet és próbálkozzon újra.
6A Boot Device Menu
(Indítóeszköz menü), a fel- le-nyilakkal vagy a megfelelő
számjegy-billentyű lenyomásával jelölje ki az
menüpontot, majd nyomja le az <Enter> billentyűt.
MEGJEGYZÉS: A Quickboot (Gyorsindítás) funkció csak az aktuális
indításhoz változtatja meg az indítási szekvenciát (sorrendet).
Újraindításkor a számítógép a rendszerbeállító (system setup) programban
megadott indítási szekvencia szerint indul el.
7
Nyomja meg az <1> gombot a Dell-diagnosztika kiválasztásához.
8A Dell-diagnosztika menüben
kiválasztásához.
100 Rövid referencia útmutató
Onboard vagy USB CD-ROM
nyomja le az <1> gombot a Dell-diagnosztika
 Loading...