

Page 1

Dell™ PowerEdge™ Systems
Oracle Database 10g
Enterprise Edition — Linux for Intel
32-Bit Technology (x86)
Deployment Guide Version 2.2
®
www.dell.com | support.dell.com
Page 2

Notes and Notices
NOTE: A NOTE indicates important information that helps you make better use of your computer.
NOTICE: A NOTICE indicates either potential damage to hardware or loss of data and tells you how to avoid the problem.
____________________
Information in this document is subject to change without notice.
© 2006 Dell Inc. All rights reserved.
Reproduction in any manner whatsoever without the written permission of Dell Inc. is strictly forbidden.
Trademarks used in this text: Dell, the DELL logo, OpenManage, and PowerEdge are trademarks of Dell Inc.; EMC, PowerPath, and Navisphere
are registered trademarks of EMC Corporation; Intel and Xeon are registered trademarks of Intel Corporation; Red Hat is a registered trademark
of Red Hat, Inc.
Other trademarks and trade names may be used in this document to refer to either the entities claiming the marks and names or their products.
Dell Inc. disclaims any proprietary interest in trademarks and trade names other than its own.
August 2006 Rev. A01
Page 3

Contents
Oracle RAC 10g Deployment Service . . . . . . . . . . . . . . . . . . . . . . . 5
Software and Hardware Requirements
License Agreements
Important Documentation
. . . . . . . . . . . . . . . . . . . . . . . . . . . . . 7
. . . . . . . . . . . . . . . . . . . . . . . . . . . 7
Installing and Configuring Red Hat Enterprise Linux
. . . . . . . . . . . . . . . . . . . . . . 6
. . . . . . . . . . . . . . . 8
Installing Red Hat Enterprise Linux Using the Deployment CDs
Configuring Hugemem Kernel
Configuring Red Hat Enterprise Linux
. . . . . . . . . . . . . . . . . . . . . . . . 9
. . . . . . . . . . . . . . . . . . . . 9
Updating Your System Packages Using Red Hat Network
Verifying Cluster Hardware and Software Configurations
Fibre Channel Cluster Setup
. . . . . . . . . . . . . . . . . . . . . . . . 10
Configuring Networking and Storage for Oracle RAC 10g
Configuring the Public and Private Networks
Securing Your System
. . . . . . . . . . . . . . . . . . . . . . . . . . . . 17
Verifying the Storage Configuration
Configuring Shared Storage Using OCFS2
Configuring Shared Storage With ASM
Installing Oracle RAC 10g
Installing CRS
. . . . . . . . . . . . . . . . . . . . . . . . . . . . 24
. . . . . . . . . . . . . . . . . . . . . . . . . . . . . . . . 24
Installing the Oracle Database 10g Software
Applying the 10.1.0.5 Patchset
Configuring the Listener
Creating the Seed Database
. . . . . . . . . . . . . . . . . . . . . . . 26
. . . . . . . . . . . . . . . . . . . . . . . . . . 28
. . . . . . . . . . . . . . . . . . . . . . . . 29
RAC Post Deployment Fixes and Patches
Setting the Password for the User oracle
. . . . . . . . . . . . . . . . . . . . 17
. . . . . . . . . . . . . . . 13
. . . . . . . . . . . . . . . . . 19
. . . . . . . . . . . . . . . . . . 21
. . . . . . . . . . . . . . . 25
. . . . . . . . . . . . . . . . . 32
. . . . . . . . . . . . . . . . . 32
. . . . . . . 8
. . . . . . . . . 10
. . . . . . . . . . . 10
. . . . . . . . . . . 13
Contents 3
Page 4

Configuring and Deploying Oracle Database 10g (Single Node) . . . . . . . . 33
Configuring the Public Network
Configuring Database Storage
Configuring Shared Storage Using ASM
Installing Oracle Database 10g
Applying the 10.1.0.5 Patchset
Configuring the Listener
Creating the Seed Database
Setting the Password for the User oracle
. . . . . . . . . . . . . . . . . . . . . . 33
. . . . . . . . . . . . . . . . . . . . . . . 33
. . . . . . . . . . . . . . . . . . 34
. . . . . . . . . . . . . . . . . . . . . . . 36
. . . . . . . . . . . . . . . . . . . . . . . 37
. . . . . . . . . . . . . . . . . . . . . . . . . . 37
. . . . . . . . . . . . . . . . . . . . . . . . 38
. . . . . . . . . . . . . . . . . 40
Adding and Removing Nodes
Adding a New Node to the Network Layer
Configuring Shared Storage on the New Node
Configuring Shared Storage With ASM
Adding a New Node to the Clusterware Layer
Adding a New Node to the Database Layer
Removing a Node From the Cluster
Reinstalling the Software
Additional Information
Supported Software Versions
Configuring Automatic Reboot for a Hung Operating System
Determining the Private Network Interface
Troubleshooting
Getting Help
Dell Support
Oracle Support
. . . . . . . . . . . . . . . . . . . . . . . . . . . . . . . . . 55
. . . . . . . . . . . . . . . . . . . . . . . . . . . . . . . . . . . 59
. . . . . . . . . . . . . . . . . . . . . . . . . . . . . . . . . 59
. . . . . . . . . . . . . . . . . . . . . . . . . . . . . . . 60
Obtaining and Using Open Source Files
. . . . . . . . . . . . . . . . . . . . . . . . . . 41
. . . . . . . . . . . . . . . . . 41
. . . . . . . . . . . . . . 41
. . . . . . . . . . . . . . . . . . 41
. . . . . . . . . . . . . . . 45
. . . . . . . . . . . . . . . . 46
. . . . . . . . . . . . . . . . . . . . . 47
. . . . . . . . . . . . . . . . . . . . . . . . . . . . 50
. . . . . . . . . . . . . . . . . . . . . . . . . . . . . . 51
. . . . . . . . . . . . . . . . . . . . . . . 51
. . . . . . . 52
. . . . . . . . . . . . . . . . 53
. . . . . . . . . . . . . . . . . . . . . 60
Index . . . . . . . . . . . . . . . . . . . . . . . . . . . . . . . . . . . . . . . . . 61
4 Contents
Page 5

This document provides information about installing, configuring, reinstalling, and using Oracle
(RAC)
Database 10g Enterprise Edition with Real Application Clusters
supported configuration.
software on your Dell|Oracle
NOTE:
The following topics are covered:
• Software and hardware requirements
• Installing and configuring Red Hat
• Verifying cluster hardware and software configurations
• Configuring networking and storage for Oracle RAC 10
• Deploying Oracle RAC 10g database and patchsets on multiple nodes and creating a seed database
• Configuring and deploying Oracle Database 10
• Adding and removing nodes
• Reinstalling the software
• Additional information
• Troubleshooting
• Getting help
• Obtaining and using open source files
For more information on Dell’s supported configurations for Oracle Database 10g, see the Dell|Oracle
Tested and Validated Configurations website at www.dell.com/10g.
Use this document in conjunction with the Dell™ Deployment CD to install your software. If you install
your operating system using only the operating system CDs, the instructions in this document may not be applicable.
®
Enterprise Linux
g
g
(single node)
Oracle RAC 10g Deployment Service
If you purchased the Oracle RAC 10g Deployment Service, your Dell Professional Services representative
will assist you with the following:
• Verifying the cluster hardware and software configurations
• Configuring networking and storage
g
• Installing Oracle RAC 10
Release 1
Deployment Guide 5
Page 6

Software and Hardware Requirements
Before you install the Oracle RAC software on your system, follow the instructions in the Deploying
Dell-Tested and Validated Configurations for Oracle Database document shipped with your kit, to:
• Download the Red Hat CDs from the Red Hat website located at
• Locate your Oracle CD kit, or download the Oracle software from Oracle's website located at
www.oracle.com
• Download the Dell Deployment
Configurations website at www.dell.com/10g
.
CD images from
the Dell|Oracle Tested and Validated
, and burn the Dell Deployment CDs using the CD
images.
Table 1-1 lists basic software requirements for Dell’s supported configurations for Oracle. Table 1-2 and
Table 1-3 list the hardware requirements. For detailed information on the minimum software versions
for drivers and applications, see "Supported Software Versions."
Table 1-1. Software Requirements
Software Component Configuration
Red Hat Enterprise Linux AS (Version 4) operating
system for Intel
Oracle 10g Release 1 for 32-bit Linux Version 10.1.0.5
EMC® PowerPath®
(Fibre Channel clusters only)
®
32-bit technology (x86)
Quarterly Update 3
• Enterprise Edition, including the RAC option for clusters
• Enterprise Edition for single-node configuration
Version 4.5.1
rhn.redhat.com
.
NOTE: Depending on the number of users, the applications you use, your batch processes, and other factors,
you may need a system that exceeds the minimum hardware requirements in order to achieve the desired
performance.
NOTE: The hardware configuration of all the cluster nodes must be identical.
Table 1-2. Minimum Hardware Requirements—Fibre Channel Cluster
Hardware Component Configuration
Dell PowerEdge™ 1750, 1850, 2600,
2650, 2800, 2850, 4600, 6600, 6650,
6800, and 6850 systems [two to eight
nodes using Oracle Cluster File
System (OCFS2) or Automatic Storage
Management (ASM)]
3-GHz Intel Xeon
1 GB of random-access memory (RAM)
PowerEdge Expandable RAID Controller (PERC) for internal hard
drives
Two 36-GB hard drives (RAID 1) connected to a PERC
Three Gigabit network interface controller (NIC) ports
Two optical host bus adapter (HBA) ports
®
processor
6 Deployment Guide
Page 7

Table 1-2. Minimum Hardware Requirements—Fibre Channel Cluster (continued)
Hardware Component Configuration
Dell|EMC CX200, CX300, CX400,
CX500, or CX700 Fibre Channel storage
system
Gigabit Ethernet switch (two) See the Dell|Oracle Tested and Validated Configurations website
Dell|EMC Fibre Channel switch (two) Eight ports for two to six nodes
Table 1-3. Minimum Hardware Requirements—Single Node
Hardware Component Configuration
Dell PowerEdge 1750, 1850, 2600, 2650, 2800,
2850, 4600, 6600, 6650, 6800, and 6850 systems
Dell|EMC CX200, CX300, CX400, CX500, or
CX700 Fibre Channel storage system (optional)
Dell|EMC Fibre Channel switch (optional) Eight ports
See the Dell|Oracle Tested and Validated Configurations website
at www.dell.com/10g for information on supported configurations
at www.dell.com/10g for information on supported configurations
16 ports for seven or eight nodes
3-GHz Intel Xeon processor
1 GB of RAM
Two 36-GB hard drives (RAID 1) connected to a PERC
Two NIC ports
See the Dell|Oracle Tested and Validated Configurations
website at www.dell.com/10g for information on supported
configurations
License Agreements
NOTE: Your Dell configuration includes a 30-day trial license of the Oracle software. If you do not have a license
for this product, contact your Dell sales representative.
Important Documentation
For more information on specific hardware components, see the documentation that came with your system.
For Oracle product information, see the How to Get Started guide in the Oracle CD kit.
Deployment Guide 7
Page 8

Installing and Configuring Red Hat Enterprise Linux
NOTICE: To ensure that the operating system is installed correctly, disconnect all external storage devices
from the system before you install the operating system.
This section describes the installation of the Red Hat Enterprise Linux AS operating system and
the configuration of the operating system for Oracle deployment.
Installing Red Hat Enterprise Linux Using the Deployment CDs
1
Disconnect all external storage devices from the system.
2
Locate your Dell Deployment CDs and original Red Hat Enterprise Linux AS 4 with Update 3 CDs.
3
Insert
Dell Deployment CD 1
The system boots to the
4
When prompted for Tested and Validated Configurations, type 4 and press <Enter> to select
Oracle 10g R1 EE on Red Hat Enterprise Linux 4 32bit Update 3
5
When prompted for Solution Deployment Image source, type 1 to select
Deployment CD
6
When prompted, insert
into the CD drive.
A deployment partition is created and the contents of the CDs are copied to it. When the copy operation
is completed, the system automatically ejects the last CD and boots to the deployment partition.
When the installation is completed, the system automatically reboots and the Red Hat Setup Agent
appears.
and press <Enter>.
into the CD drive and reboot the system.
Dell Deployment CD 1
Dell Deployment CD 2
.
and subsequently the Red Hat Installation CDs
.
Copy solution by
7
In the
Red Hat Setup Agent Welcome
8
When prompted, specify a
9
When the
you cannot configure the network bonding in this window.
10
When the
completing the Oracle deployment.
11
Log in as
8 Deployment Guide
Network Setup
Security Level
root
.
root
window appears, click
window appears, disable the firewall. You may enable the firewall after
window, click
password.
Next
to configure your operating system settings.
Next
. You will configure network settings later as
Page 9

Configuring Hugemem Kernel
The Red Hat Enterprise Linux 4 hugemem kernel is required to configure the Oracle relational database
management system (RDBMS) to increase the size of the buffer cache above the default 1.7 GB value.
Using Dell Deployment CD 1, the Red Hat Enterprise Linux 4 hugemem kernel is installed by default.
Change the default boot parameters in the bootloader configuration file /etc/grub.conf to enable this option.
NOTE: Dell recommends that the hugemem kernel be used only on systems with more than 16 GB of RAM.
This kernel has some overhead which may degrade the performance on systems with less memory.
Configuring Red Hat Enterprise Linux
Log in as root on all the nodes and perform the following procedure:
1
Insert the
If you are using a CD, type:
/media/cdrom/install.sh
If you are using a DVD, type:
/media/cdrecorder/install.sh
Dell Deployment CD 2
into the CD drive.
The contents of the CD are copied to the
/usr/lib/dell/dell-deploy-cd
directory.
When the copy procedure is completed, remove the CD from the CD drive by typing:
umount /dev/cdrom
2
Navigate to the directory containing the scripts installed from the Dell Deployment CD by typing:
cd /dell-oracle-deployment/scripts/standard
NOTE: Scripts discover and validate installed component versions and, when required, update components
to supported levels.
3
Configure the Red Hat Enterprise Linux for Oracle installation by typing:
./005-oraclesetup.py
4
Start the environment variables by typing:
source /root/.bash_profile
5
Verify that the processor, RAM, and disk sizes meet the minimum Oracle installation requirements
by typing:
./010-hwCheck.py
If the script reports that a parameter failed, update your hardware configuration and run the script again.
Deployment Guide 9
Page 10

6
If you are deploying the cluster using OCFS2, perform the following steps:
a
Install OCFS2 Red Hat Package Managers (RPMs) by typing:
./340-rpms_ocfs.py
b
To ensure smooth mounting of OCFS2, type:
./350-ocfs_networkwait.py
Connect the external storage.
7
Updating Your System Packages Using Red Hat Network
Red Hat periodically releases software updates to fix bugs, address security issues, and add new features.
You can download these updates through the Red Hat Network (RHN) service. See the Dell|Oracle
Tested and Validated Configurations website at www.dell.com/10g for the latest supported
configurations before you use RHN to update your system software to the latest revisions.
NOTE: If you are deploying Oracle Database 10g on a single node, skip the following sections and see "Configuring
and Deploying Oracle Database 10g (Single Node)."
Verifying Cluster Hardware and Software Configurations
Before you begin the cluster setup, verify the hardware installation, communication interconnections,
and node software configuration for the entire cluster. The following sections provide setup information
for hardware and software Fibre Channel cluster configurations.
Fibre Channel Cluster Setup
Your Dell Professional Services representative completed the setup of your Fibre Channel cluster. Verify
the hardware connections, and the hardware and software configurations as described in this section.
Figure 1-1 shows an overview of the connections required for the cluster, and Table 1-4 summarizes
the cluster connections.
10 Deployment Guide
Page 11
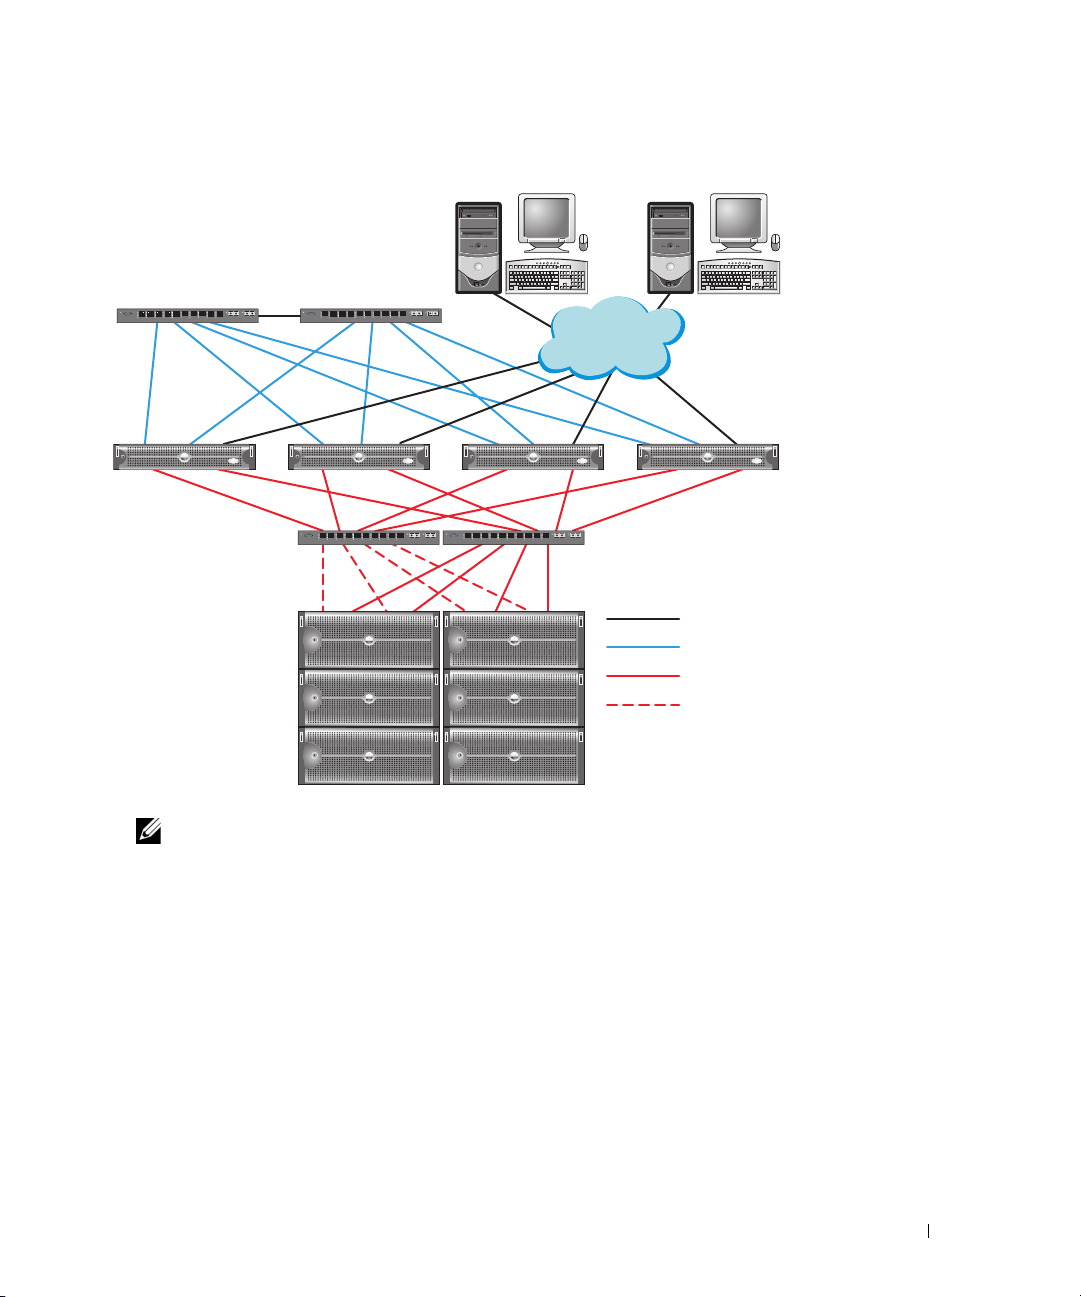
Figure 1-1. Hardware Connections for a Fibre Channel Cluster
Dell|EMC Fibre Channel storage systems
public network
PowerEdge systems
(Oracle database)
Gb Ethernet switches (private network)
Dell|EMC Fibre Channel switches (SAN)
LAN/WAN
Cat 5e (integrated NIC)
Cat 5e (copper gigabit NIC)
fiber optic cables
additional fiber optic cables
100
SP-A
HBA 0 HBA 1
switch 0
switch 1
1
SP-B
NOTE: The arrangement of storage processors, HBAs, and Fibre Channel switches shown
above is used for illustrative purposes and may vary for different network configurations.
Deployment Guide 11
Page 12

Table 1-4. Fibre Channel Hardware Interconnections
Cluster Component Connections
Each PowerEdge
system node
Each Dell|EMC Fibre
Channel storage system
Each Dell|EMC Fibre
Channel switch
Each Gigabit Ethernet
switch
One enhanced category 5 (Cat 5e) cable from public NIC to local area network
(LAN)
One Cat 5e cable from private Gigabit NIC to Gigabit Ethernet switch
One Cat 5e cable from a redundant private Gigabit NIC to a redundant Gigabit
Ethernet switch
One fiber optic cable from HBA 0 to Fibre Channel switch 0
One fiber optic cable from HBA 1 to switch 1
Two Cat 5e cables connected to the LAN
One to four optical connections to each Fibre Channel switch; for example,
for a four-port configuration:
• One optical cable from SPA port 0 to Fibre Channel switch 0
• One optical cable from SPA port 1 to Fibre Channel switch 1
• One optical cable from SPB port 0 to Fibre Channel switch 1
• One optical cable from SPB port 1 to Fibre Channel switch 0
One to four optical connections to the Dell|EMC Fibre Channel storage system
One optical connection to each PowerEdge system’s HBA
One Cat 5e connection to the private Gigabit NIC on each PowerEdge system
One Cat 5e connection to the remaining Gigabit Ethernet switch
Verify that the following tasks have been completed for your cluster:
• All hardware is installed in the rack.
• All hardware interconnections are set up as shown in Figure 1-1 and listed in Table 1-4.
• All logical unit numbers (LUNs), redundant array of independent disks (RAID) groups, and storage
groups are created on the Dell|EMC Fibre Channel storage system.
• Storage groups are assigned to the nodes in the cluster.
NOTICE: Before you perform the procedures in the following sections, ensure that the system hardware and
cable connections are installed correctly.
12 Deployment Guide
Page 13

Fibre Channel Hardware and Software Configurations
• Each node must include the following minimum hardware peripheral components:
– One or two hard drives (36-GB minimum) in the internal hard-drive bay
– Three Gigabit NIC ports
– Two Fibre Channel HBAs
• Each node must have the following software installed:
– Red Hat Enterprise Linux software (see Table 1-1)
– Fibre Channel HBA driver
– OCFS2 module for the kernel and the configuration tools for OCFS2
NOTE: OCFS supports two kinds of kernel, namely hugemem and Symmetric MultiProcessing (SMP).
Choose the OCFS type according to your kernel.
• The Fibre Channel storage must be configured with the following:
– A minimum of three LUNs created and assigned to the cluster
– A minimum LUN size of 5 GB
Configuring Networking and Storage for Oracle RAC 10g
This section provides information on setting up a Fibre Channel cluster running a seed database
and includes the following procedures:
• Configuring the Public and Private Networks
• Securing Your System
• Verifying the Storage Configuration
• Configuring Shared Storage Using OCFS2
• Configuring Shared Storage With ASM
Configuring Oracle RAC 10g database is complex and requires an ordered list of procedures.
To configure networking and storage in a minimal amount of time, perform the following procedures
in a sequence.
Configuring the Public and Private Networks
This section presents steps to configure the public and private cluster networks.
NOTE: Each node requires a unique public and private Internet Protocol (IP) address and an additional public
IP address to serve as the virtual IP address for the client connections and connection failover. The virtual IP
address must belong to the same subnet as the public IP. All public IP addresses, including the virtual IP address,
must be registered with DNS.
Deployment Guide 13
Page 14

Depending on the number of NIC ports available, configure the network interfaces as shown in Table 1-5.
Table 1-5. NIC Port Assignments
NIC Port Three Ports Available Four Ports available
1 Public IP and virtual IP Public IP
2 Private IP (bonded) Private IP (bonded)
3 Private IP (bonded) Private IP (bonded)
4 NA Virtual IP
NOTE: The Oracle installer requires that the public interface name and the bond name for the private interface be
the same on all the cluster nodes. If the public interfaces are different, a workaround is to use bonding to abstract
the network interfaces and use this for Oracle installation.
Configuring the Public Network
If you have not already configured your public network, configure it by performing the following
procedure on each node:
1
Log in as
2
Edit the network device file
root
.
/etc/sysconfig/network-scripts/ifcfg-eth#
, where # is the number
of the network device, and configure the file as follows:
DEVICE=eth0
ONBOOT=yes
IPADDR=<Public IP Address>
NETMASK=<Subnet mask>
BOOTPROTO=static
HWADDR=<MAC Address>
SLAVE=no
3
Edit the
/etc/sysconfig/network
with the fully qualified public node name.
For example, the line for the first node would be as follows:
HOSTNAME=node1.domain.com
Ty p e :
4
service network restart
Verify that the IP addresses are set correctly by typing:
5
ifconfig
14 Deployment Guide
file, and, if necessary, replace
localhost.localdomain
Page 15

6
Check your network configuration by pinging each public IP address from a client on the LAN outside
the cluster.
7
Connect to each node to verify that the public network is functioning and verify that the secure shell
(ssh) is working by typing:
ssh <public IP>
Configuring the Private Network Using Bonding
Before you deploy the cluster, configure the private cluster network to allow the nodes to communicate
with each other. This involves configuring network bonding and assigning a private IP address and host
name to each node in the cluster. To set up network bonding for Broadcom or Intel NICs and to
configure the private network, perform the following procedure on each node:
1
Log in as
2
Add the following line to the
root
.
/etc/modprobe.conf
file:
alias bond0 bonding
For high availability, edit the
3
The default value for
miimon
/etc/modprobe.conf
file and set the option for link monitoring.
is 0, which disables link monitoring. Change the value to
100 milliseconds initially, and adjust it as needed to improve performance, as shown in the following
example. Type:
options bonding miimon=100 mode=1
In the
4
/etc/sysconfig/network-scripts/
directory, create or edit the
ifcfg-bond0
configuration file.
For example, using sample network parameters, the file would appear as follows:
DEVICE=bond0
IPADDR=192.168.0.1
NETMASK=255.255.255.0
NETWORK=192.168.0.0
BROADCAST=192.168.0.255
ONBOOT=yes
BOOTPROTO=none
USERCTL=no
The entries for
DEVICE=bondn
IPADDR
NETMASK, NETWORK
is the required name for the bond, where n specifies the bond number.
is the private IP address.
, and
BROADCAST
are optional.
To use bond0 as a virtual device, you must specify which devices will be bonded as slaves.
Deployment Guide 15
Page 16

5
For each device that is a bond member, perform the following steps:
a
In the directory
/etc/sysconfig/network-scripts/
, edit the
ifcfg-ethn file, containing the following lines:
DEVICE=ethn
HWADDR=<MAC ADDRESS>
ONBOOT=yes
TYPE=Ethernet
USERCTL=no
MASTER=bond0
SLAVE=yes
BOOTPROTO=none
b
Ty p e
6
On
each node
service network restart
, verify that the private interface is functioning by typing:
and ignore any warnings.
ifconfig
The private IP address for the node should be assigned to the private interface bond0.
7
When the private IP addresses are set up on every node, ping each IP address from
that the private network is functioning.
8
Connect to each node and verify that the private network and
ssh
are functioning correctly by typing:
ssh <private IP>
9
On
each node,
modify the
/etc/hosts
file by adding the following lines:
127.0.0.1 localhost.localdomain localhost
<private IP node1> <private hostname node1>
<private IP node2> <private hostname node2>
one node
to ensure
<public IP node1> <public hostname node1>
<public IP node2> <public hostname node2>
<virtual IP node1> <virtual hostname node1>
<virtual IP node2> <virtual hostname node2>
NOTE: The examples in this and the following step are for a two-node configuration; add lines for each
additional cluster node.
16 Deployment Guide
Page 17

10
On
each node
, create or modify the
/etc/hosts.equiv
file by listing all of your public IP addresses or host
names. For example, if you have one public host name, one virtual IP address, and one virtual host
name for each node, add the following lines:
<public hostname node1> oracle
<public hostname node2> oracle
<virtual IP or hostname node1> oracle
<virtual IP or hostname node2> oracle
11
Log in as
rsh <public hostname nodex>
where
oracle
x
is the node number.
, and connect to each node to verify that remote shell (
rsh
) is working by typing:
,
Securing Your System
To prevent unauthorized users from accessing your system, Dell recommends that you disable rsh after
you install the Oracle software. Disable rsh by typing:
chkconfig rsh off
Verifying the Storage Configuration
While configuring the clusters, create partitions on your Fibre Channel storage. In order to create the
partitions, all cluster nodes must be able to detect the external storage devices. To verify that each node
can detect each storage LUN or logical disk, perform the following steps:
1
For Dell|EMC Fibre Channel storage, verify that the EMC Navisphere® agent and the correct version
of PowerPath (see Table 1-6) are installed on each node, and that each node is assigned to the correct
storage group in your Navisphere agent software. See the documentation that came with your
Dell|EMC Fibre Channel storage for instructions.
NOTE: The Dell Professional Services representative who installed your cluster performed this step. If you
reinstall the software on a node, you must complete this step.
2
Visually verify that the storage devices and cluster nodes are connected correctly to the Fibre Channel
switch (see Figure 1-1 and Table 1-4).
3
Verify that you are logged in as
root
.
Deployment Guide 17
Page 18

4
On
each node
, type:
more /proc/partitions
The node detects and displays the LUNs or logical disks, as well as the partitions created on those
external devices.
NOTE: The listed devices vary depending on how your storage is configured.
A list of the LUNs or logical disks that are detected by the node is displayed, as well as the partitions
that have been created on those external devices. PowerPath pseudo devices appear in the list, such as
/dev/emcpowera, /dev/emcpowerb
5
In the
/proc/partitions
file, ensure that:
, and
/dev/emcpowerc
.
• All PowerPath pseudo devices appear in the file with similar device paths. For example,
/dev/emcpowera, dev/emcpowerb
, and
/dev/emcpowerc
.
• The Fibre Channel LUNs appear as small computer system interface (SCSI) devices, and each
cluster node is configured with the same number of LUNs.
For example, if the node is configured with a SCSI drive or RAID container attached to
a Fibre Channel storage device with three logical disks,
or internal drive, and
emcpowera, emcpowerb
, and
sda
identifies the node’s RAID container
emcpowerc
identifies the LUNs (or PowerPath
pseudo devices).
If the external storage devices do not appear in the /proc/partitions file:
On
1
all the nodes
, stop the PowerPath service by typing:
service naviagent stop
service PowerPath stop
2
On
all the nodes
• For QLogic HBAs:
rmmod qla2300
modprobe qla2300
• For Emulex HBAs:
rmmod lpfc
modprobe lpfc
3
On
all the nodes
service PowerPath start
service naviagent start
4
Confirm that all the nodes detect the external storage devices by typing:
more /proc/partitions
18 Deployment Guide
, reload the HBA driver to synchronize the kernel's partition tables by typing:
, restart the PowerPath service by typing:
Page 19

Configuring Shared Storage Using OCFS2
Shared storage can be configured using either OCFS2 or ASM. This section provides procedures
for configuring shared storage using OCFS2.
1
Log in as
2
Perform the following steps:
a
b
c
root
on the
first node
.
Start the X Window System by typing:
startx
Generate the OCFS2 configuration file (
of
ocfs2
by typing the following in a terminal:
/etc/ocfs2/cluster.conf
) with a default cluster name
ocfs2console
From the menu, click
Cluster→ Configure Nodes
.
If the cluster is offline, the console will start it. A message window appears displaying that information. Close the message window.
Node Configuration
The
d
To add nodes to the cluster, click
window appears.
Add
. Enter the node name (same as the host name) and the
private IP. Retain the default value of the port number. After entering all the details mentioned,
click
OK
. Repeat this step to add all the nodes to the cluster.
e
3
When all the nodes are added, click
Window
f
From the menu, click
.
Cluster→ Propagate Configuration
Propagate Cluster Configuration Window
on the window and then click
g
Select
On
all the nodes
File→ Quit
.
, enable the cluster stack on startup by typing:
Close
Apply
and then click
appears. Wait until the message
.
/etc/init.d/o2cb enable
Change the O2CB_HEARTBEAT_THRESHOLD value on
4
a
Stop the O2CB service on
all the nodes
by typing:
/etc/init.d/o2cb stop
b
Edit the O2CB_HEARTBEAT_THRESHOLD value in
c
Start the O2CB service on
all the nodes
by typing:
/etc/init.d/o2cb start
Close
in the
Node Configuration
.
all the nodes
using the following steps:
/etc/sysconfig/o2cb
Finished
to 61 on
appears
all the nodes
.
Deployment Guide 19
Page 20

5
On the
first node
storage devices with
a
Create a primary partition for the entire device by typing:
fdisk /dev/emcpowerx
, for a Fibre Channel cluster, create one partition on each of the other two external
fdisk
:
Ty p e h for help within the
b
Verify that the new partition exists by typing:
fdisk
utility.
cat /proc/partitions
If you do not see the new partition, type:
sfdisk -R /dev/<device name>
NOTE: The following steps use the sample values /u01 and /u02 for mount points and u01 and u02 as labels.
6
On
any one node
slots (node slots refer to the number of cluster nodes) using the command line utility
, format the external storage devices with 4 K block size, 128 K cluster size, and 4 node
mkfs.ocfs2
mkfs.ocfs2 -b 4K -C 128K -N 4 -L u01 /dev/emcpowera1
mkfs.ocfs2 -b 4K -C 128K -N 4 -L u02 /dev/emcpowerb1
NOTE: For more information about setting the format parameters for clusters, see
http://oss.oracle.com/projects/ocfs2/dist/documentation/ocfs2_faq.html.
7
On
each node
a
Create mount points for each OCFS2 partition. To perform this procedure, create the target
, perform the following steps:
partition directories and set the ownerships by typing:
mkdir -p /u01 /u02
chown -R oracle.dba /u01 /u02
b
On
each node
, modify the
/etc/fstab
file by adding the following lines for a Fibre Channel
storage system:
/dev/emcpowera1 /u01 ocfs2 _netdev,datavolume,nointr 0 0
/dev/emcpowerb1 /u02 ocfs2 _netdev,datavolume,nointr 0 0
as follows:
Make appropriate entries for all OCFS2 volumes.
c
On
each node
mount -a -t ocfs2
d
On
each node
mount -a -t ocfs2
20 Deployment Guide
, type the following to mount all the volumes listed in the
, add the following command to the
/etc/rc.local
file:
/etc/fstab
file:
Page 21

Configuring Shared Storage With ASM
Configuring Shared Storage for Cluster Ready Service (CRS)
To configure shared storage with ASM, perform the following steps:
1
On the
Create three partitions of 150 MB each for the cluster repository, Voting Disk, and the Oracle system
parameter file by typing:
fdisk /dev/emcpowerx
On
2
more /proc/partitions
first node
each node
, create three partitions on an external storage device with
, verify the new partitions by typing:
fdisk
.
If the new partitions do not appear in the
/proc/partitions
file, type:
sfdisk -R /dev/<device name>
a
Start the raw devices by typing:
udevstart
b
Edit the
/etc/sysconfig/rawdevices
file and add the following lines for a Fibre Channel cluster:
/dev/raw/votingdisk /dev/emcpowera1
/dev/raw/ocr.dbf /dev/emcpowera2
/dev/raw/spfile+ASM.ora /dev/emcpowera3
c
Restart the Raw Devices Service by typing:
service rawdevices restart
Configuring Shared Storage for Database
The shared database partitions can either be configured as raw devices or can be configured using
the ASMLib software.
Deployment Guide 21
Page 22

Configuring Shared Storage Using ASMLib
1
To configure your cluster using ASM, perform the following steps on
a
Log in as
b
Configure the ASM kernel module by typing:
root
.
/etc/init.d/oracleasm configure
The following message appears on the screen:
Configuring the Oracle ASM library driver.
This will configure the on-boot properties of the Oracle ASM
library driver. The following questions will determine whether the
driver is loaded on boot and what permissions it will have. The
current values will be shown in brackets ('[]'). Hitting <ENTER>
without typing an answer will keep that current value. Ctrl-C will
abort.
A message appears prompting you to enter the default user owning the driver interface.
Ty p e
oracle
as mentioned below:
Default user to own the driver interface []: oracle
A message appears prompting you to enter the default group owning the driver interface.
Ty p e
dba
as mentioned below:
Default group to own the driver interface []: dba
all the nodes
:
A message appears prompting you to load the oracleasm driver on boot. To load the driver, type y
as mentioned below:
Start Oracle ASM library driver on boot (y/n) [n]: y
A message appears prompting you to fix permissions of Oracle ASM disks on boot. Type y as
mentioned below:
Fix permissions of Oracle ASM disks on boot (y/n) [y]:y
The following messages appear on the screen:
Writing Oracle ASM library driver configuration: [ OK ]
Creating /dev/oracleasm mount point: [ OK ]
Loading module "oracleasm": [ OK ]
Mounting ASMlib driver filesystem: [ OK ]
Scanning system for ASM disks: [ OK ]
22 Deployment Guide
Page 23

2
Label the partitions created earlier as ASM disks on
any one node
.
# /etc/init.d/oracleasm createdisk ASM1 /dev/emcpowerb1
Marking disk "/dev/emcpowerb1" as an ASM disk: [ OK ]
# /etc/init.d/oracleasm createdisk ASM2 /dev/emcpowerc1
Marking disk "/dev/emcpowerc1" as an ASM disk: [ OK ]
3
Scan the ASM disks on
all the other nodes
.
# /etc/init.d/oracleasm scandisks
Scanning system for ASM disks: [ OK ]
4
On
all the nodes
, verify that all the ASM disks are visible by typing:
# /etc/init.d/oracleasm listdisks
A list of all the configured ASM disks appears.
5
To add an additional ASM disk (for example, ASM3), edit the
all the nodes
on
and add the appropriate entries as shown below:
/etc/udev/scripts/raw-dev.sh
MAKEDEV raw
mv /dev/raw/raw1 /dev/raw/votingdisk
mv /dev/raw/raw2 /dev/raw/ocr.dbf
mv /dev/raw/raw3 /dev/raw/spfile+ASM.ora
mv /dev/raw/raw4 /dev/raw/ASM1
mv /dev/raw/raw5 /dev/raw/ASM2
mv /dev/raw/raw6 /dev/raw/ASM3
chmod 660
/dev/raw/{votingdisk,ocr.dbf,spfile+ASM.ora,ASM1,ASM2,ASM3}
chown oracle.dba
/dev/raw/{votingdisk,ocr.dbf,spfile+ASM.ora,ASM1,ASM2,ASM3}
file
On all the nodes, type:
udevstart
Repeat step 4.
Configuring Shared Storage Using Raw Devices
Log in as root on all the nodes and perform the following procedure:
1
Edit the
/etc/sysconfig/rawdevices
file and add the following lines for a Fibre Channel cluster:
/dev/raw/ASM1 /dev/emcpowerb1
/dev/raw/ASM2 /dev/emcpowerc1
2
Restart the Raw Devices Service by typing:
service rawdevices restart
Deployment Guide 23
Page 24

Installing Oracle RAC 10g
This section describes the steps required to install Oracle RAC 10g version 10.1.0.3, which involves
installing CRS and installing the Oracle Database 10g software. Dell recommends that you create a seed
database to verify that the cluster works correctly before you deploy it in a production environment.
Installing CRS
1 Log in as root on the first node
2
Start the X Window System by typing:
startx
3
Open a terminal window and type:
xhost +
4
Mount the
5
Ty p e :
su - oracle
Start the Oracle Universal Installer by typing:
6
unset ORACLE_HOME
If you are using a CD, type:
/media/cdrom/runInstaller
If you are using a DVD, type:
Oracle Cluster Ready Services
.
CD.
/media/cdrecorder/runInstaller
In the
7
8
9
10
11
24 Deployment Guide
Welc om e
In the
Specify File Locations
/opt/oracle/product/10.1.0/crs_1
In the
Language Selection
In the
Cluster Configuration
enter the public and private node names for each node, and click
The cluster name must be unique throughout the enterprise.
In the
Specify Network Interface Usage
Do not use
or
NOTE: The public and private NIC assignments that you select in this step must be identical and available
on all the nodes.
, and then click
window, click
window, select a language and click
Next
.
window, verify that the Oracle home path is
and click
window, enter a global cluster name or accept the default name
Next
.
Next
.
Next
.
Next
.
window, click each interface type and select
public, private
crs
,
,
Page 25

12
In the
Oracle Cluster Registry
/dev/raw/ocr.dbf
(
NOTE: If you have used a shared OCFS2 partition for the OCR and the Voting Disk, enter the appropriate path.
13
In the
Votin g Disk
(
/dev/raw/votingdisk
14
In the
Summary
) and click
window, enter a complete path for the partition to use for storing the Voting Disk
) and click
window, click
window, enter the complete path of the OCR disk location
Next
.
Next
.
Install
.
When the installation is completed, a message appears indicating that you must run the
on all the nodes. The
15
When prompted, open a new terminal window.
16
From the same terminal window in step 15, as the user
root.sh
script automatically configures the cluster.
root
, run the
root.sh
script on each node,
beginning with the local node.
17
18
Wait for
In the
In the
root.sh
to finish running on each node before you run it on the next node.
Setup Privileges
window, click OK.
End of Installation
window, click
Exit
and confirm by clicking
Yes
.
Installing the Oracle Database 10g Software
1 Log in as root on the first node
2
Mount the
3
Start the Oracle Universal Installer as the user
Oracle Database 10g CD 1
If you are using a CD, type:
.
.
oracle
:
root.sh
script
/media/cdrom/runInstaller
If you are using a DVD, type:
/media/cdrecorder/runInstaller
In the
4
5
Welc om e
In the
Specify File Locations
/opt/oracle/product/10.1.0/db_1
NOTE: The Oracle home in this step must be different from the Oracle home name that you identified during
the CRS installation. You cannot install the Oracle 10g Enterprise Edition with RAC into the same home that
you used for CRS
6
In the
Specify Hardware Cluster Installation Mode
7
In the
Select Installation Type
window, click
.
Next
.
window, verify that the complete Oracle home path is
and click
window, select
Next
.
window, click
Enterprise Edition
Select All
and click
and click
Next
.
The status of various prerequisite checks being performed are displayed. When the checks are
completed, you may receive a warning for version mismatch of
Wa rn ing
8
In the
option and click
Next
.
Select Database Configuration
window, select
Do not create a starter database
openmotif
package. Check the
Deployment Guide 25
Next
.
and click
Next
.
Page 26

9
In the
Summary
10
When prompted, open a new terminal window.
11
Run
root.sh
a
Press <Enter> to accept the default value for the local
window, click
on the
first node
Install
.
The Virtual Internet Protocol Configuration Assistant (VIPCA) starts.
b
On the first VIPCA window, click
c
In the
List of Available Network Interfaces
four NIC ports, the port reserved for the virtual IP address (see "Configuring the Public and
Private Networks"), and click
NOTE: The public and private NIC assignments that you select in this step must be identical and available
on all nodes.
In the
d
Virtual IPs for Cluster Nodes
Next
mask for each node displayed and click
The virtual IP address must be the same as you entered in the
mask must be the same as the public mask.
e
Click
Finish
in the summary window.
A progress window appears.
f
When the configuration is completed, click OK and click
g
Run
root.sh
on each of the other nodes in your cluster.
root.sh
Wait for
to finish running on
.
bin
directory.
Next
.
window, select your public NIC or, if you have
.
window, enter an unused public virtual IP address and subnet
Next
.
each node
/etc/hosts.equiv
Exit
to exit the VIPCA.
before you run it on the next node.
file, and the subnet
12
Click OK in the
13
Click
Exit
Setup Privileges
in the
End of Installation
window.
window and confirm by clicking
Applying the 10.1.0.5 Patchset
1
Download the 10.1.0.5 patchset (
2
Copy the patchset to the folder
3
Unzip the patchset by typing:
unzip p4505133_10105_LINUX.ZIP
Change the ownership of the
4
chown -R oracle.dba /oracle_cds/10.1.0.5
Run the installer from the
5
It patches all the nodes that are a part of the RAC cluster. The 10.1.0.5 patchset patches the CRS
as well as the database home.
NOTE: The 10.1.0.5 patchset supports rolling upgrades for the CRS of all the member nodes.
26 Deployment Guide
p4505133_10105_LINUX.ZIP
/oracle_cds/10.1.0.5
10.1.0.5
first node
directory by typing:
only.
on the
) from the Oracle MetaLink website.
first node
Yes
.
.
Page 27

Patching CRS to 10.1.0.5
1 Log in as oracle on the first node
2
Start the Oracle installer by typing:
.
/oracle_cds/10.1.0.5/Disk1/runInstaller
In the
3
4
Welc om e
In the
Specify File Locations
window, click
Next
.
window, ensure that the source path points to the
of the 10.1.0.5 staging area.
5
In the
Destination
the path points to the CRS home and click
6
In the
Selected Nodes
displayed and click
7
In the
Summary
section select the CRS home name from the drop-down menu. Ensure that
Next
.
window, ensure that all the member nodes of the 10.1.0.3 installation are
Next
.
window, click
Install
.
The installer will prompt you to stop the CRS services and run the
8
Log in as
9
Exit the installer after you run this script from all the nodes.
10
On
a
root
on
all the nodes
each node
, perform the following steps:
and run the
root10105.sh
script from the CRS home location.
Verify the CRS installation by typing the following command from the
/opt/oracle/product/10.1.0/crs_1/bin
directory:
olsnodes -n -v
root10105.sh
products.xml
script.
file
A list of the public node names of all nodes in the cluster appears.
b
List all the services that are running by typing:
crs_stat
Patching the Database to 10.1.0.5 Patchset
1 Log in as oracle on the first node.
Stop the Oracle Notification Services (ONS) before upgrading the patchset by typing:
2
onsctl stop
Start the Oracle installer by typing:
3
/oracle_cds/10.1.0.5/Disk1/runInstaller
In the
4
5
Welc om e
In the
Specify File Locations
window, click
Next
.
window, ensure that the source path points to the
of the 10.1.0.5 staging area.
6
In the
Destination
section, select the database home name from the drop-down menu. Make sure
that the path points to the database home of the 10.1.0.3 installation and click
products.xml
Next
.
Deployment Guide 27
file
Page 28

7
In the
Selected Nodes
displayed and click
8
In the
Summary
The installer prompts you to run the
9
Log in as
10
Exit the installer after running this script from all the nodes.
root
window, ensure that all the member nodes of the 10.1.0.3 installation are
Next
.
window, click
on
each node
Install
.
root.sh
and run the
script on all the nodes after the process is completed.
root.sh
script from the database home location.
Configuring the Listener
This section describes the steps to configure the listener, which is required for remote client connection
to a database.
On any one node, perform the following procedure:
Log in as
1
2
Start the X Window System by typing:
startx
3
Open a terminal window and type:
xhost +
root
.
As the user
4
source /home/oracle/.bash_profile
5
Start the Net Configuration Assistant by typing:
netca
6
Select
7
On the
8
On the
9
On the
10
On the
and click
11
On the
12
On the
and click
13
On the
14
On the
15
Click
oracle
Cluster Configuration
TOPSNodes
Welc om e
Listener Configuration, Listener
Listener Configuration, Listener Name
Next
Listener Configuration, Select Protocols
Listener Configuration, TCP/IP Protocol
Next
Listener Configuration, More Listeners?
Listener Configuration Done
Finish
.
, run:
window, click
window, select
.
.
and click
Select All Nodes
Listener Configuration
window, click
Next
.
window, select
window, type
window, select
window, select
window, select No and click
and click
and click
Add
Next
.
Next
.
Next
.
and click
LISTENER
Next
.
in the
Listener Name
TCP
and click
Use the standard port number of 1521
Next
Next
.
.
field
28 Deployment Guide
Page 29

Creating the Seed Database
This section contains procedures for creating the seed database using either OCFS2 or ASM and for
verifying the seed database.
Creating the Seed Database Using OCFS2
1
On the
the Database Configuration Assistant (DBCA).
2
In the
3
In the
4
In the
5
In the
6
In the
7
In the
8
In the
password selections and entries, and click
9
In the
10
In the
11
In the
specify the flash recovery size, and then click
12
In the
13
In the
14
In the
Pool
15
In the
16
In the
17
In the
first node
Welc om e
Operations
Node Selection
Database Templates
Database Identification
Management Options
Database Credentials
Storage Options
, as the user
oracle
window, select
window, click
window, click
window, click
window, click
window, click
window, select
window, enter a
Database File Locations
Recovery Configuration
Database Content
Database Services
window, click
window, click
window, click
Initialization Parameters
value to 500 MB, and click
Database Storage
Creation Options
Summary
window click OK to create the database.
window, click
window, check
, type
dbca -datafileDestination /u01
Oracle Real Application Cluster Database
Create a Database
Select All
Custom Database
Next
and click
and click
Next
Next
.
.
and click
Global Database Name
.
Next
such as
Use the Same Password for All Accounts
Next
.
Cluster File System
window, click
Next
Next
Next
.
Specify flash recovery area
Next
.
.
.
and click
Next
, click
and click
.
racdb
.
Browse
to start
Next
.
and click
, complete
and select
window, if your cluster has more than four nodes, change the
Next
.
Next
.
Create Database
and click
Finish
.
Shared
Next
/u02
.
,
NOTE: The creation of the seed database may take more than an hour.
NOTE: If you receive an Enterprise Manager Configuration Error during the seed database creation, click OK
to ignore the error.
When the database creation is completed, the
Password Management
window appears.
Deployment Guide 29
Page 30

18
Click
Exit
.
A message appears indicating that the cluster database is being started on all nodes.
19
On
each node
a
Determine which database instance exists on that node by typing:
srvctl status database -d <database name>
b
Add the ORACLE_SID environment variable entry in the
, perform the following steps:
oracle
user profile by typing:
echo "export ORACLE_SID=racdbx" >> /home/oracle/.bash_profile
source /home/oracle/.bash_profile
where
racdbx
This example assumes that
Creating the Seed Database Using ASM
is the database instance identifier assigned to the node.
racdb
is the global database name that you defined in DBCA.
Perform the following steps to create the seed database using Oracle ASM:
1
On the
first node
, start DBCA by typing the following as the user
oracle
:
dbca &
2
In the
Welc om e
3
In the
Operations
4
In the
Node Selection
5
In the
Database Templates
6
In the
Database Identification
7
In the
Management Options
8
In the
Database Credentials
password selections and entries, and click
9
In the
Storage Options
10
In the
Create ASM Instance
file
, change the location to
11
When a message appears indicating that DBCA is ready to create and start the ASM instance, click OK.
12
Under
Available Disk Groups
13
Enter the information in the
Enter a name for the disk group to be created, such as
and select the disks to include in the disk group (for example,
window, select
window, click
window, click
window, click
window, click
window, click
window, click
window, enter the password for user
/dev/raw/spfile+ASM.ora
Disk Group
Oracle Real Application Cluster Database
Create a Database
Select All
Custom Database
window, enter a
Next
and click
and click
Next
Next
.
.
and click
Global Database Name
.
Next
, such as
Use the Same Password for All Accounts
Next
.
ASM
, click
and click
Create New
Next
, and then click
.
.
SYS
, click
Next
window for the database files and click OK.
databaseDG
, select
/dev/raw/ASM1
and click
Next
.
racdb
, and click
, complete
Create server parameter
.
External Redundancy
).
.
Next
.
,
A window appears indicating that disk group creation is in progress.
14
Under
Available Disk Groups
30 Deployment Guide
, click
Create New
.
Page 31

15
Enter the information in the
Enter a name for the disk group to be created, such as
and select the disks to include in the disk group (for example,
Disk Group
window for the flashback recovery files and clickOK.
flashbackDG
, select
/dev/raw/ASM2
A window appears indicating that disk group creation is in progress.
16
In the
ASM Disk Groups
(for example,
17
In the
DataBase File Locations
18
In
Recovery Configuration
databaseDG
step 15 (for example,
19
In
Database Content
20
In
Database Services
21
In the
Initialization Parameters
to 500 MB, and click
22
In the
Database Storage
23
In the
Creation Options
24
In the
Confirmation
NOTE: The creation of the seed database may take more than an hour.
When the database creation is completed, the
25
Click
Exit
.
window, check the disk group that you would like to use for database storage
) and click
window, check
window, click
flashbackDG
window, click
window, click
Next
.
Use Common Location for All Database Files
Browse
), and click
Next
.
Next
.
, select the flashback group that you created in
Next
.
window, if your cluster has eight nodes, change the
Next
.
window, click
window, select
Next
.
Create Database
and click
Finish
window click OK to create the database.
Password Management
window appears.
A message appears indicating that the cluster database is being started on all nodes.
External Redundancy
).
, and click
Shared Pool
.
,
Next
value
.
26
Perform the following steps on
a
Determine the database instance that exists on that node by typing:
srvctl status database -d <database name>
b
Add the ORACLE_SID environment variable entry in the
the following:
echo "export ORACLE_SID=racdbx" >> /home/oracle/.bash_profile
source /home/oracle/.bash_profile
where
racdbx
is the database instance identifier assigned to the node.
This example assumes that
each node
racdb
:
oracle
user profile by typing
is the global database name that you defined in DBCA.
Deployment Guide 31
Page 32

27
On
any one node
srvctl status database -d dbname
where
dbname
If the database instances are running, confirmation appears on the screen.
If the database instances are
srvctl start database -d dbname
where
dbname
, type:
is the global identifier name that you defined for the database in DBCA.
not
running, type:
is the global identifier name that you defined for the database in DBCA.
RAC Post Deployment Fixes and Patches
This section provides the required fixes and patch information for deploying Oracle RAC 10g.
Reconfiguring the CSS Miscount for Proper EMC PowerPath Failover
When an HBA, switch, or EMC storage processor (SP) failure occurs, the total PowerPath failover time
to an alternate device may exceed 105 seconds. The default cluster synchronization service (CSS) disk
time-out for Oracle 10g R1 version 10.1.0.3 is 45 seconds. To ensure that the PowerPath failover procedure
functions correctly, increase the CSS time-out to 120 seconds.
To increase the CSS time-out:
1
Shut down the database and CRS on all the nodes except on one node.
2
On the running node, log in as the user
/opt/oracle/product/10.1.0/crs_1/bin/crsctl set css misscount 120
root
and type:
3
Reboot all nodes for the CSS setting to take effect.
For more information, see Oracle MetaLink Note 294430.1 on the Oracle MetaLink website at
metalink.oracle.com.
Setting the Password for the User oracle
Dell strongly recommends that you set a password for the user oracle to protect your system. Complete
the following steps to create the password for the user oracle:
1
Log in as
2
Create the password for the user
on the screen:
passwd oracle
32 Deployment Guide
root
.
oracle
by typing the following and performing the instructions
Page 33

Configuring and Deploying Oracle Database 10g (Single Node)
This section provides information about completing the initial setup or completing the reinstallation
procedures as described in "Installing and Configuring Red Hat Enterprise Linux." This section covers
the following topics:
• Configuring the Public Network
• Configuring Database Storage
• Installing Oracle Database 10g
• Configuring the Listener
• Creating the Seed Database
• Setting the Password for the User oracle
Configuring the Public Network
Ensure that your public network is functioning and that an IP address and host name are assigned
to your system.
Configuring Database Storage
Configuring Database Storage Using ext3 File System
If you have additional storage, perform the following steps:
1
Log in as
2
Ty p e :
cd /opt/oracle
root
.
Ty p e :
3
mkdir oradata recovery
Using
fdisk
4
if your storage device is
5
Using
if your storage device is
6
Verify the new partition by typing:
cat /proc/partitions
If you do not see the new partition, type:
sfdisk -R /dev/sdb
sfdisk -R /dev/sdc
, create a partition where you want to store your database files (for example,
sdb
).
fdisk
, create a partition where you want to store your recovery files (for example,
sdc
).
sdb1
sdc1
Deployment Guide 33
Page 34

7
Ty p e :
mke2fs -j /dev/sdb1
mke2fs -j /dev/sdc1
8
Modify the
9
Ty p e :
/etc/fstab
file by adding an entry for the newly created file system.
mount /dev/sdb1 /opt/oracle/oradata
mount /dev/sdc1 /opt/oracle/recovery
10
Ty p e :
chown oracle.dba oradata recovery
Configuring Shared Storage Using ASM
The partitions can be configured as raw devices or can be configured using the ASMLib software. It is
assumed that you have two storage devices (sdb and sdc) available to create a disk group for the database
files, and a disk group to be used for flashback recovery and archive log files, respectively.
Configuring Shared Storage Using ASMLib
1
To configure your cluster using ASM, perform the following steps on
a
Log in as
b
Configure the ASM kernel module by typing:
root
.
/etc/init.d/oracleasm configure
all the nodes
:
The following message appears on the screen:
Configuring the Oracle ASM library driver.
This will configure the on-boot properties of the Oracle ASM
library driver. The following questions will determine whether
the driver is loaded on boot and what permissions it will have.
The current values will be shown in brackets ('[]'). Hitting
<ENTER> without typing an answer will keep that current value.
Ctrl-C will abort.
A message appears prompting you to enter the default user owning the driver interface.
Ty p e
oracle
Default user to own the driver interface []: oracle
A message appears prompting you to enter the default group owning the driver interface.
Ty p e
dba
as mentioned below:
Default group to own the driver interface []: dba
34 Deployment Guide
as mentioned below:
Page 35

A message appears prompting you to load the oracleasm driver on boot. To load the driver, type y
as mentioned below:
Start Oracle ASM library driver on boot (y/n) [n]: y
A message appears prompting you to fix permissions of Oracle ASM disks on boot. Type y as
mentioned below:
Fix permissions of Oracle ASM disks on boot (y/n) [y]:y
The following messages appear on the screen:
Writing Oracle ASM library driver configuration: [ OK ]
Creating /dev/oracleasm mount point: [ OK ]
Loading module "oracleasm": [ OK ]
Mounting ASMlib driver filesystem: [ OK ]
Scanning system for ASM disks: [ OK ]
c
Label the partitions created earlier as ASM disks.
# /etc/init.d/oracleasm createdisk ASM1 /dev/emcpowerb1
Marking disk "/dev/emcpowerb1" as an ASM disk: [ OK ]
# /etc/init.d/oracleasm createdisk ASM2 /dev/emcpowerc1
Marking disk "/dev/emcpowerc1" as an ASM disk: [ OK ]
2
Scan the ASM disks on
all the other nodes
.
# /etc/init.d/oracleasm scandisks
Scanning system for ASM disks: [ OK ]
3
On
all the nodes
, verify that all the ASM disks are visible by typing:
# /etc/init.d/oracleasm listdisks
A list of all the configured ASM disks appears.
Configuring Shared Storage Using Raw Devices
1
Log in as
2
Type the following commands to change the names of the raw character devices to make them
root
.
identifiable:
mv /dev/raw/raw1 /dev/raw/ASM1
mv /dev/raw/raw2 /dev/raw/ASM2
chown oracle.dba /dev/raw/ASM1
chown oracle.dba /dev/raw/ASM2
3
Create a primary partition for the entire device by typing:
fdisk /dev/sdb
Deployment Guide 35
Page 36

4
Create a primary partition for the entire device by typing:
fdisk /dev/sdc
5
Edit the
/dev/raw/ASM1 /dev/sdb1
/dev/raw/ASM2 /dev/sdc1
6
Restart the Raw Devices Service by typing:
service rawdevices restart
/etc/sysconfig/rawdevices
file and add the following lines:
Installing Oracle Database 10g
Perform the following procedure to install Oracle Database 10g:
Log in as
1
2
Mount the CD
3
Start the X Window System by typing:
startx
4
Open a terminal window and type:
xhost +
5
Log in as
6
Start the Oracle Universal Installer as the user
If you are using a CD, type:
root
.
Oracle Database 10g CD 1
oracle
.
.
oracle
.
/media/cdrom/runInstaller
If you are using a DVD, type:
/media/cdrecorder/runInstaller
7
In the
Welc om e
8
In the
Specify File Locations
/opt/oracle/product/10.1.0/db_1
9
In the
Select a Product to Install
10
In the
Select Installation Type
11
In the
Select Database Configuration
12
Click
Install
in the
13
When prompted, open a terminal window and run
A brief progress window appears, followed by the
14
Click
Exit
and confirm by clicking
36 Deployment Guide
window, click
Summary
Next
.
window, verify that the complete Oracle home path is
and click
window, click
window, click
window.
Next
window, click
Yes
.
.
Oracle Database 10g 10.1.0.3.0
Enterprise Edition
Do not create a starter database
root.sh
End of Installation
and click
.
window.
Next
and click
.
Next
and click
.
Next
.
Page 37

Applying the 10.1.0.5 Patchset
1
Download the 10.1.0.5 patchset from Oracle MetaLink (p4505133_10105_LINUX.ZIP).
2
Copy the patchset to the folder
3
Unzip the patchset by typing:
unzip p4505133_10105_LINUX.ZIP
/oracle_cds/10.1.0.5
on
one of the nodes
.
Change the ownership of the
4
chown -R oracle.dba /oracle_cds/10.1.0.5
Patching the Database to 10.1.0.5 Patchset
1
Log in as
2
Start the Oracle installer by typing:
/oracle_cds/10.1.0.5/Disk1/runInstaller
3
In the
4
In the
of the 10.1.0.5 staging area.
5
In the
the path points to the database home of the 10.1.0.3 installation and click
6
In the
displayed and click
7
In the
8
In the
The installer prompts you to run the
9
Log in as
10
Exit the installer after this running this script from all the nodes.
oracle
Welc om e
Specify File Locations
Destination
Selected Nodes
Available Product Components
Summary
root
.
window, click
section, select the database name from the drop-down menu. Make sure that
Next
window, click
on
each node
10.1.0.5
window, ensure that the source path points to the
window, ensure that all the member nodes of the 10.1.0.3 installation are
.
and run the
directory by typing:
Next
.
window, click
Install
.
root.sh
root.sh
Next
.
script on all the nodes after the process is completed.
script from the database home location.
Configuring the Listener
1
Log in as
2
Start the X Window System by typing:
startx
3
Open a terminal window and type:
xhost +
4
Log in as
5
Start the Oracle Net Configuration Assistant by typing:
netca
6
Accept the default settings and click
root
.
oracle
.
Next
on all the screens to complete the listener configuration.
products.xml
Next
.
file
Deployment Guide 37
Page 38

Creating the Seed Database
Creating the Seed Database Using ext3 File System
Perform the following steps to create a seed database with the Oracle DBCA:
1
Log in as
2
Start the Oracle DBCA by typing:
dbca
3
In the
4
In the
5
In the
6
In the
the
7
In the
8
In the
9
In the
10
In the
11
In the
in "Configuring Database Storage Using ext3 File System" (for example,
/opt/oracle/recovery
12
In the
13
In the
14
In the
15
In the
16
In the
oracle
Welc om e
Operations
.
window, click
window, click
Database Templates
Database Identification
Global Database Name
Management Options
Database Credentials
Storage Options
window, select
Database File Locations
Recovery Configuration
Database Content
window, click
Initialization Parameters
Database Storage
Creation Options
Confirmation
window, click
window, click
window, click OK to create the database.
Next
.
Create a Database
window, click
Custom Database
and click
Next
.
and click
window, type the name of the database that you are creating in
and the
SID Prefix
window, click
fields, and click
Next
.
Next
.
window, complete password selections and entries and click
File System
window, click
window, click
), and click
window, click
Next
Create Database
Next
Next
Next
Browse
.
.
Next
.
and click
Next
.
.
, select the flashback recovery area that you created
.
and click
Finish
Next
.
.
Next
.
NOTE: The creation of the seed database may take more than an hour.
When the database creation is completed, the
17
Click
Exit
.
38 Deployment Guide
Password Management
window appears.
Page 39

18
Ty p e :
export ORACLE_SID=dbname
dbname
where
19
To verify that the database is operating, perform the following steps:
a
Display the
is the global identifier name that you defined for the database in DBCA.
SQL>
prompt by typing:
sqlplus "/ as sysdba"
b
Type the following query at the
SQL>
prompt:
SELECT * FROM v$instance;
c
If the database is not running and you receive an error message, start the database instance
on the node by typing the following at the
SQL>
prompt:
startup
Creating the Seed Database Using ASM
If you configured your storage using ASM, perform the following steps to create a seed database with
the Oracle DBCA:
1
Start DBCA by typing the following as the user
oracle
:
dbca &
2
In the
Welc om e
3
In the
Operations
4
In the
Database Templates
5
In the
Database Identification
6
In the
Management Options
7
In the
Database Credentials
password entries, and click
8
In the
Storage Options
9
In the
Create ASM Instance
10
When a message appears indicating that DBCA is ready to create and start the ASM instance, click OK.
11
In the
ASM Disk Groups
12
Enter the storage information in the
Enter a name for the disk group to be created, such as
and select the disks to include in the disk group (for example,
window, click
window, click
window, click
Next
window, click
window, under
Next
.
Create a Database
Custom Database
window, enter a
window, click
window, click
Next
Use the Same Password for All Accounts
and click
Next
and click
Global Database Name
.
.
ASM
and click
Next
.
window, enter the password for user
Available Disk Groups
Create Disk Group
window for the database files and click OK.
databaseDG
/dev/raw/ASM1
.
SYS
, click
Next
.
such as
and click
Create New
, select
External Redundancy
oradb
Next
).
and click
, complete
.
.
Next
.
,
A window appears indicating that disk group creation is in progress.
13
Under
Available Disk Groups
, click
Create New
.
Deployment Guide 39
Page 40

14
Enter the information in the
Enter a name for the disk group to be created, such as
and select the disks to include in the disk group (for example,
A window appears indicating that disk group creation is in progress.
15
In the
ASM Disk Groups
(for example,
16
In the
and click
17
In the
step 14 (for example,
18
In the
19
In the
20
In the
21
In the
22
In the
NOTE: Creating the seed database may take more than an hour.
When the database creation is completed, the
23
Click
Exit
24
Type the following commands to add the ORACLE_SID environment variable entry in the
profile:
echo "export ORACLE_SID=oradb" >> /home/oracle/.bash_profile
databaseDG
Database File Locations
Next
.
Recovery Configuration
flashbackDG
Database Content
Initialization Parameters
Database Storage
Creation Options
Confirmation
.
window click OK to create the database.
Disk Group
window, check the disk group that you would like to use for database storage
) and click
window, check
window, click
window, click
window, select
window, click
window, select
window for the flashback recovery files and clickOK.
Next
.
Browse
), and click
Next
.
Next
.
Create Database
flashbackDG
/dev/raw/ASM2
Use Common Location for All Database Files
, select the flashback group that you created in
Next
.
Typical
and click
and click
Password Management
, select
Next
.
Finish
.
window appears.
External Redundancy
).
,
oracle
,
user
source /home/oracle/.bash_profile
This example assumes that
oradb
is the global database name that you defined in DBCA.
Setting the Password for the User oracle
Dell strongly recommends that you set a password for the user oracle to protect your system. Complete
the following steps to create the password for the user oracle:
1
Log in as
2
Create the password for the user
appear on the screen:
passwd oracle
40 Deployment Guide
root
.
oracle
by typing the following and performing the instructions that
Page 41

Adding and Removing Nodes
This section describes the steps to add a node to an existing cluster and the steps to remove a node from
a cluster.
To add a node to an existing cluster:
• Add the node to the network layer.
• Configure shared storage.
• Add the node to the clusterware, database, and database instance layers.
To remove a node from an existing cluster, reverse the process by removing the node from the database
instance, the database, and the clusterware layers.
For more information about adding an additional node to an existing cluster, see the document titled
Oracle Real Application Clusters 10g Administration located on the Oracle website at www.oracle.com.
Adding a New Node to the Network Layer
To add a new node to the network layer:
Install the Red Hat Enterprise Linux operating system on the new node. See "Installing and Confi-
1
guring Red Hat Enterprise Linux."
2
Configure the public and private networks on the new node. See "Configuring the Public and Private
Networks."
3
Verify that each node can detect the storage LUNs or logical disks. See "Verifying the Storage
Configuration."
Configuring Shared Storage on the New Node
To extend an existing RAC database to your new nodes, configure storage for the new nodes so that the
storage is the same as on the existing nodes. This section provides the appropriate procedures for either
ASM or OCFS2.
Configuring Shared Storage With ASM
Configuring Shared Storage for CRS
To configure shared storage with ASM, perform the following steps:
On the new node, verify the new partitions by typing:
more /proc/partitions
Deployment Guide 41
Page 42

If the new partitions do not appear in the /proc/partitions file, type:
sfdisk -R /dev/<device name>
Start the raw devices by typing:
1
udevstart
2
Edit the
/etc/sysconfig/rawdevices
file and add the following lines for a Fibre Channel cluster:
/dev/raw/votingdisk /dev/emcpowera1
/dev/raw/ocr.dbf /dev/emcpowera2
/dev/raw/spfile+ASM.ora /dev/emcpowera3
3
Restart the Raw Devices Service by typing:
service rawdevices restart
Configuring Shared Storage for Database
The shared database partitions can either be configured as raw devices or can be configured using
the ASMLib software.
Configuring Shared Storage Using ASMLib
To configure your cluster using ASM, perform the following steps on the new node:
Log in as
1
2
Configure the ASM kernel module by typing:
root
.
/etc/init.d/oracleasm configure
The following message appears on the screen:
Configuring the Oracle ASM library driver.
This will configure the on-boot properties of the Oracle ASM library
driver. The following questions will determine whether the driver is
loaded on boot and what permissions it will have. The current values
will be shown in brackets ('[]'). Hitting <ENTER> without typing an
answer will keep that current value. Ctrl-C will abort.
A message appears prompting you to enter the default user owning the driver interface. Type
as mentioned below:
Default user to own the driver interface []: oracle
A message appears prompting you to enter the default group owning the driver interface. Type
as mentioned below:
Default group to own the driver interface []: dba
A message appears prompting you to load the oracleasm driver on boot. To load the driver, type y
as mentioned below:
42 Deployment Guide
oracle
dba
Page 43

Start Oracle ASM library driver on boot (y/n) [n]: y
A message appears prompting you to fix permissions of Oracle ASM disks on boot. Type y
as mentioned below:
Fix permissions of Oracle ASM disks on boot (y/n) [y]:y
The following messages appear on the screen:
Writing Oracle ASM library driver configuration: [ OK ]
Creating /dev/oracleasm mount point: [ OK ]
Loading module "oracleasm": [ OK ]
Mounting ASMlib driver filesystem: [ OK ]
Scanning system for ASM disks: [ OK ]
3
Scan the ASM disks by typing:
/etc/init.d/oracleasm scandisks
Scanning system for ASM disks: [ OK ]
Verify that all the ASM disks are visible by typing:
4
/etc/init.d/oracleasm listdisks
A list of all the configured ASM disks appears.
Configuring Shared Storage Using Raw Devices
Log in as root on the new node and perform the following procedure:
1
Edit the
/etc/sysconfig/rawdevices
file and add the following lines for a Fibre Channel cluster:
/dev/raw/ASM1 /dev/emcpowerb1
/dev/raw/ASM2 /dev/emcpowerc1
Restart the Raw Devices Service by typing:
2
service rawdevices restart
Configuring Shared Storage Using OCFS2
If you are using OCFS2 for either CRS, quorum, or database files, ensure that the new nodes can access
the cluster file systems in the same way as the existing nodes.
1
Edit the
/etc/fstab
file on the new node and add OCFS2 volume information exactly as it appears
on the existing nodes:
For example:
/dev/emcpowera1 /u01 ocfs2 _netdev,datavolume,nointr 0 0
/dev/emcpowerb1 /u02 ocfs2 _netdev,datavolume,nointr 0 0
2
Create OCFS2 mount points on the new node as they exist on the existing nodes
(for example, /u01, /u02, and /u03).
Deployment Guide 43
Page 44

3
Stop all the database instances by typing the following command as the user
the existing nodes:
srvctl stop database -d <database name>
oracle
on one of
Stop CRS and unmount all the OCFS2 partitions by typing the following command on
4
/etc/init.d/init.crs stop
umount -a -t ocfs2
To add the new node to the OCFS2 configuration file
5
steps on one of the
a
Start the X Window System by typing:
existing nodes
:
/etc/ocfs2/cluster.conf
, perform the following
startx
b
Generate the OCFS2 configuration file (
/etc/ocfs2/cluster.conf
) with a default cluster name
of ocfs2 by typing the following in a terminal window:
ocfs2console
c
From the menu, click
Cluster→ Configure Nodes
.
If the cluster is offline, the console will start it. A message window appears displaying that information. Close the message window.
The
Node Configuration Window
d
To add a node to the cluster, click
appears.
Add
. Enter the new node name (same as the host name) and the
private IP. Retain the default value of the port number. After entering all the details mentioned,
click
OK
.
e
Click
Apply
and then click
f
From the menu, click
Propagate Cluster Configuration Window
on the window and then click
Close
in the
Node Configuration Window
Cluster→ Propagate Configuration
appears. Wait until the message
Close
.
.
.
all the nodes
Finished
:
appears
g
Select
File→ Quit
6
On the
new node
/etc/init.d/o2cb enable
Change the O2CB_HEARTBEAT_THRESHOLD value on the
7
a
Stop the O2CB service on
/etc/init.d/o2cb stop
b
Edit the O2CB_HEARTBEAT_THRESHOLD value in
c
Start the O2CB service on
/etc/init.d/o2cb start
44 Deployment Guide
.
, enable the cluster stack on startup by typing:
all the nodes
by typing:
/etc/sysconfig/o2cb
all the nodes
by typing:
new node
using the following steps:
to 61 on
all the nodes
.
Page 45

8
Restart the O2CB service on
all the existing nodes
/etc/init.d/o2cb stop
/etc/init.d/o2cb start
On
9
all the nodes
, mount all the volumes listed in the
mount -a -t ocfs2
On
10
the new node
, add the following command to the
mount -a -t ocfs2
On
11
all the nodes
other than the newly added one, start CRS and the database by performing
the following steps:
a
As the user
/
etc/init.d/init.crs start
b
As the user
root
, type:
oracle
, type:
srvctl start database -d <database_name>
Adding a New Node to the Clusterware Layer
1 Log in as oracle on one of the existing nodes
2
Start the Oracle Universal Installer from the
addNode.sh
3
In the
Welc om e
4
In the
Specify Cluster Nodes for Node Addition
for the new node and click
window, click
Next
Next
.
.
If all the network and storage verification checks pass, the
/opt/oracle/product/10.1.0/crs_1/oui/bin
by typing:
/etc/fstab
/etc/rc.local
file by typing:
file:
.
directory by typing:
window, enter the public and private node names
Node Addition Summary
window appears.
5
Click
Next
.
The
Cluster Node Addition Progress
6
When prompted, run
When
rootaddnode.sh
7
When prompted, run
root.sh
When
8
In the
End of Cluster Node Addition
9
From the
/opt/oracle/product/10.1.0/crs_1/oui/bin
rootaddnode.sh
finishes running, click OK.
root.sh
on the
finishes running, click OK.
window displays the status of the cluster node addition process.
on the local node.
new node
window, click
(for example) the following line:
racgons add_config node3-pub:4948
In this example,
node3
is being added to an existing two-node cluster.
.
Exit
.
directory
on one of the existing nodes
Deployment Guide 45
, type
Page 46

Adding a New Node to the Database Layer
1 Log in as oracle on one of the existing nodes
2
Start the Oracle Universal Installer from the
addNode.sh
3
In the
Welc om e
4
In the
Specify Cluster Nodes for Node Addition
If all the verification checks pass, the
5
Click
Next
Cluster Node Addition Progress
The
6
When prompted, run
root.sh
When
7
In the
End of Cluster Node Addition
8
From the
the following command as the user
window, click
Next
.
Node Addition Summary
.
window displays the status of the cluster node addition process.
root.sh
on the new node.
finishes running, click OK.
window, click
/opt/oracle/product/10.1.0/db_1/bin
root
./vipca -nodelist node1-pub,node2-pub,node3-pub
.
/opt/oracle/product/10.1.0/db_1/oui/bin
window, click the new node and click
Exit
.
directory
on one of the existing nodes
:
window appears.
directory by typing:
Next
.
, type
In this example,
node3
is being added to an existing two-node cluster.
VIPCA starts.
a
On the first VIPCA window, click
b
In the
List of Available Network Interfaces
NOTE: The public and private NIC assignments that you select in this step must be identical and available
on all nodes.
In the
c
node and click
d
Click
IP Address
Finish
window, enter an unused public virtual IP address and subnet mask for the new
Next
.
in the summary window.
Next
.
window, select your public NIC and click
Next
A progress window appears.
e
When the configuration is completed, click OK and click
Exit
to exit the VIPCA.
.
46 Deployment Guide
Page 47

Adding a New Node to the Database Instance Layer
1
On
one of the existing nodes
, start DBCA as the user
oracle
by typing:
dbca
2
In the
3
4
5
Welc om e
In the
Operations
In the
Instance Management
In the
List of Cluster Databases
window, select
window, click
window, click
Oracle Real Application Cluster Database
Instance Management
Add Instance
and click
and click
Next
Next
.
.
window, select the existing database.
and click
Next
If your user name is not operating-system authenticated, the DBCA prompts you for a user name
and password for a database user with SYSDBA privileges.
6
Enter the user name
The
List of Cluster Database Instances
sys
and the password, and click
window appears, showing the instances associated with
Next
.
the RAC database that you selected and the status of each instance.
7
Click
Next
.
8
In the
Adding an Instance
select the new node name, and click
9
In the
10
11
Services
In the
Instance Storage
In the
Summary
window, click
window click OK to add the database instance.
window, enter the instance name at the top of the window,
Next
.
Next
.
window, click
Finish
.
A progress bar appears, followed by a message asking if you want to perform another operation.
.
12
Click No to exit DBCA.
13
On
any one node
, type the following to determine if the database instance has been successfully added:
srvctl status database -d <database name>
Removing a Node From the Cluster
Deleting a Node From the Database Instance Layer
Log in as oracle on the first node and perform the following procedure:
1
Ty p e :
dbca
In the
2
3
4
Welc om e
In the
Operations
In the
Instance Management
window, click
window, click
Next
.
Instance Management
window, click
Delete Instance
and click
and click
Next
.
Next
.
Deployment Guide 47
Page 48

5
In the
List of Cluster Databases
window, select a RAC database from which to delete an instance.
If your user name is not operating-system authenticated, DBCA prompts you for a user name and
password for a database user with SYSDBA privileges.
6
Enter the user name
The
List of Cluster Database Instances
sys
and the password, and click
window appears, showing the instances associated with
Next
.
the RAC database that you selected and the status of each instance.
7
Select the instance to delete and click
Finish
.
This instance cannot be the local instance from where you are running DBCA. If you select the local
instance, the DBCA displays an
click
Finish
.
Error
dialog. If this occurs, click OK, select another instance, and
If services are assigned to this instance, the
DBCA Services Management
window appears. Use this
window to reassign services to other instances in the cluster database.
8
Verify the information about the instance deletion operation and click OK.
A progress bar appears while DBCA removes the instance and its Oracle Net configuration. When
the operation is completed, a dialog asks whether you want to perform another operation.
9
Click No to exit.
10
Verify that the node was removed by typing:
srvctl config database -d <database name>
Deleting a Node From the Database Layer
1
On the node being deleted, log in as
2
Type the following command, using the public name of the node you are deleting
(
node3-pub
for example):
oracle
.
srvctl stop nodeapps -n node3-pub
On the node being deleted, log in as
3
4
Type the following command, using the public name of the node you are deleting
node3-pub
(
for example):
root
.
/opt/oracle/product/10.1.0/db_1/install/rootdeletenode.sh node3-pub
The CRS node applications are deleted. Ignore any warnings observed.
5
If you wish to remove the Oracle database software, type the following command:
rm -rf /opt/oracle/product/10.1.0/db_1/*
48 Deployment Guide
Page 49

Removing a Node From the Clusterware Layer
1
Disable CRS on the node that you are deleting by typing the following as the user
/opt/oracle/product/10.1.0/crs_1/install/rootdelete.sh remote
nosharedvar
root
:
On one of the remaining nodes, as the user
2
root
, type the following:
/opt/oracle/product/10.1.0/crs_1/install/rootdeletenode.sh
<public nodename>, <node-number>
To determine the node number of any node, type the following:
/opt/oracle/product/10.1.0/crs_1/bin/olsnodes -n
On the node that you are deleting, if you wish to remove the Oracle CRS software, type the following:
3
rm -rf /opt/oracle/product/10.1.0/crs_1/*
Removing a Node From the OCFS2 Cluster
1
Perform the following steps on the node to be deleted:
a
Log in as
b
Unmount the mounted OCFS2 volumes by typing:
root
.
umount –a –t ocfs2
c
Stop the O2CB service by typing:
/etc/init.d/o2cb stop
d
Disable the O2CB service by typing:
/etc/init.d/o2cb disable
e
Remove the OCFS2 entry from the
f
Remove the OCFS2 configuration file by typing:
/etc/fstab
file.
rm –f /etc/ocfs2/cluster.conf
Stop the database instances on all the nodes by typing the following command on any
2
of the existing nodes
as the user
oracle
:
srvctl stop database –d <database name>
Stop the CRS service and unmount the OCFS2 volumes by typing the following commands
3
all the nodes
on
:
/etc/init.d/init.crs stop
umount –a –t ocfs2
Deployment Guide 49
one
Page 50

4
On
one of the existing nodes
a
Delete the entry for the deleted node and update the nodecount parameter.
b
Start the X Window System by typing:
, update the OCFS2 cluster by performing the following steps:
startx
c
As the user
root
, type:
ocfs2console
d
From the menu, click
window appears. Wait until the message
e
Select
5
Reboot all the
File→ Quit
existing nodes
Cluster→ Propagate Configuration. Propagate Cluster Configuration
Finished
appears on the window and then click
.
.
Close
Reinstalling the Software
NOTICE: Reinstalling the software erases all data on the hard drives.
NOTICE: You must disconnect all external storage devices from the system before you reinstall the software.
NOTICE: Dell recommends that you perform regular backups of your database and individual nodes so that you do
not lose valuable data. Reinstall the node software only if you have no other options.
Installing the software using the Dell Deployment CD created a redeployment partition on your hard drive
that contains all of the software images that were installed on your system. The redeployment partition
allows for quick redeployment of the Oracle software.
Reinstalling the software through the redeployment partition requires that you boot the system to
the partition. When the system boots to this partition, it automatically reinstalls the Red Hat Linux
operating system.
To reinstall software from the redeployment partition, perform the following steps:
1
Disconnect the external storage.
2
Log in as
3
Edit the GRand Unified Bootloader (GRUB) configuration file by typing
and pressing <Enter>.
4
In the file, change the
5
Save the file and restart your system.
For information about configuring the system for use, see "Configuring Hugemem Kernel" and continue
through the remaining sections to reconfigure your system.
root
on the system on which you want to reinstall the software.
Default
to 3.
vi /etc/grub.conf
.
50 Deployment Guide
Page 51

Additional Information
Supported Software Versions
NOTE: For this release of Dell supported configurations for Oracle, Emulex HBAs are not supported.
Table 1-6 lists the supported software at the time of release. For the latest supported hardware and
software, see the Dell|Oracle Tested and Validated Configurations website at www.dell.com/10g and
download the Oracle Database 10g EM64T x86 Version 1.2 Solution Deliverable List for the latest
supported versions.
Table 1-6. Supported Software Versions
Software Component Supported Versions
Red Hat Enterprise Linux AS (Version 4) Quarterly
Update 3 for Intel x86 operating system
Oracle Patchset 10.1.0.5
OCFS2 ocfs2-2.6.9-34.EL-1.2.2-1; ocfs2-2.6.9-34.ELhugemem-
PowerPath for Linux 4.5.1
Qlogic HBA 2340 driver 8.01.02-d4
Qlogic HBA 2342 driver 8.01.02-d4
Qlogic HBA 2360 driver 8.01.02-d4
Qlogic HBA QLE2362 8.01.02-d4
Emulex HBA LP10000 8.0.16.18
Emulex HBA LP1150e 8.0.16.18
Qlogic HBA QLE2460 8.01.02-d4
Qlogic HBA QLE2462 8.01.02-d4
PERC 3/DC Driver 2.20.4.6
PERC 4/DC Driver 2.20.4.6
NIC Bonding 2.6.1
McDATA Fibre Channel Switch Firmware = 7.00.00 (Sphereon 4500; 4400; 4700)
Brocade Fibre Channel Switch Firmware = 3.1.3 (SW3800)
Brocade Fibre Channel Switch Firmware = 4.4.0b (SW3850, SW4100; SW200E)
A09/ aacraid 1.1.5-2412
PERC 4/DC, PERC 4/Di, PERC 4e/Di, PERC 4e/Si,
or PERC 4e/DC Driver (megaraid2)
2.6.9-34.EL
1.2.2-1; ocfs2-2.6.9-34.ELsmp-1.2.2-1
2.20.4.6
Deployment Guide 51
Page 52

Table 1-6. Supported Software Versions (continued)
Software Component Supported Versions
Intel PRO/100 S NIC drivers (e100) 6.1.16-k3-NAPI
Intel PRO/1000 MT NIC drivers (e1000) 6.1.16-k3-NAPI
Broadcom NetXtreme BCM5704 NIC drivers(5703,
5701)(tg3)
3.43-rh
Configuring Automatic Reboot for a Hung Operating System
Install managed system software for Red Hat Enterprise Linux by performing the following steps:
Log in with administrator privileges to the system where you want to install the managed
1
system components.
2
Exit any open application programs and disable any virus-scanning software.
3
Start the X Window System by typing:
startx
4
Open a terminal window and type:
xhost +
Insert the
5
6
Mount the CD by typing
mount /dev/cdrom
7
Click
8
Click
9
Read and accept the software license agreement to continue.
The setup program provides both an
Setup
manage your system. The
Dell PowerEdge Installation and Server Management
CD into the CD drive on the system.
start.sh
located in the root directory of the CD to start the setup program.
Next
on the
Welcome to Dell OpenManage Systems Management Installation
Express Setup
option and a
Custom Setup
option. The
option (recommended) automatically installs all of the software components necessary to
Custom Setup
option allows you to select which software components
you want to install.
The rest of this procedure is based on the
Administrator User's Guide
10
Click
Express Setup
11
Read the information on the
for information about the
.
Installation Summary
Express Setup
Custom Setup
screen, and then click
option. See the
option.
Dell OpenManage™ Server
Next
.
The setup program automatically installs all of the managed system software for your hardware
configuration.
12
When the installation is completed, click
Finish
.
window.
Express
52 Deployment Guide
Page 53

See the Dell OpenManage Server Administrator User's Guide for instructions about uninstalling
the managed system software.
To configure the automatic reboot option, perform the following steps:
1
Ty p e :
omconfig system recovery action=reboot
This command sets the automatic reboot timer to a default setting of 480 seconds—the time delay
before the timer automatically reboots an unresponsive system.
2
To change the timer setting to a different value, type:
omconfig system recovery timer=<seconds>
To verify the system reboot timer settings, type:
3
omreport system recovery
Determining the Private Network Interface
To determine which interface device name is assigned to each network interface, perform the following steps:
Determine which types of NICs are in your system.
1
See Table 1-7 to identify the integrated NICs that are present in your system. For add-in NICs,
you may have Intel PRO/100 family or PRO/1000 family cards or Broadcom NetXtreme Gigabit cards.
You may have to open your system and view the add-in cards to determine which you have.
Table 1-7. Integrated NICs
System Integrated NICs
PowerEdge 1750 Broadcom NetXtreme Gigabit (2)
PowerEdge 1850 Intel PRO/1000 (2)
PowerEdge 2600 Intel PRO/1000
PowerEdge 2650 Broadcom NetXtreme Gigabit (2)
PowerEdge 2800 Intel PRO/1000 (2)
PowerEdge 2850 Intel PRO/1000 (2)
PowerEdge 4600 Broadcom NetXtreme Gigabit (2)
PowerEdge 6600 Broadcom NetXtreme Gigabit (2)
PowerEdge 6650 Broadcom NetXtreme Gigabit (2)
PowerEdge 6800 Broadcom NetXtreme Gigabit (2)
PowerEdge 6850 Broadcom NetXtreme Gigabit (2)
2
Verify that a Broadcom NetXtreme Gigabit or Intel PRO/1000 family NIC is connected with a Cat 5e
cable to the Gigabit Ethernet switch. This is your private NIC.
Deployment Guide 53
Page 54

3
Determine which driver module your private NIC uses.
The Broadcom NetXtreme Gigabit uses
4
View the
/etc/modprobe.conf
file by typing:
tg3
, and the Intel PRO/1000 family uses
more /etc/modprobe.conf
e1000
.
Several lines appear with the format
interface number and
For example, the line
driver-module
alias eth1 tg3
alias ethX driver-module
, where X is the Ethernet
is the module you determined in step 3.
appears if your operating system assigned eth1
to a Broadcom NetXtreme Gigabit NIC.
5
Determine which Ethernet interfaces (ethX) have been assigned to the type of Gigabit NIC that is
connected to the Gigabit switch.
If there is only one entry in
modules.conf
for your driver module type, then you have successfully
identified the private network interface.
6
If you have more than one of the same type of NIC in your system, experiment to determine which
Ethernet interface is assigned to each NIC.
For each Ethernet interface, follow the steps in "Configuring the Private Network Using Bonding"
for the correct driver module until you have identified the correct Ethernet interface.
54 Deployment Guide
Page 55

Troubleshooting
Table 1-8 provides recommended actions for problems that you may encounter while deploying and
using your Red Hat Enterprise Linux and the Oracle software.
Table 1-8. Troubleshooting
Category Problem / Symptom Cause Recommended Corrective Action
Performance
and stability
Performance
and stability
Red Hat Enterprise
Linux exhibiting
poor performance
and instability.
Excessive use of
swap space.
Unknown interface
type warning
appears in Oracle
alert file.
Poor system
performance.
The Oracle System Global
Area (SGA) exceeds the
recommended size.
The public interface is
configured as cluster
communications (private
interface).
• Ensure that the SGA size does not exceed 65%
of total system RAM.
•Type
free
at a command prompt to determine
total RAM and reduce the values of
db_cache_size and shared_pool_size parameters
in the Oracle parameter file accordingly.
Force cluster communications to the private
interface by performing the following steps
one node
:
1
Log in as
2
Ty p e
at the command prompt.
The
3
Enter the following lines at the
alter system set
cluster_interconnects=’
<private IP address node1>’
scope=spfile sid=’<SID1>’
alter system set
cluster_interconnects=’
<private IP address node2>’
scope=spfile sid=’<SID2>’
Continue entering lines for each node in
the cluster.
4
Restart the database on all the nodes by typing:
srvctl stop database –d <dbname>
srvctl start database –d <dbname>
5
Open the
/opt/oracle/admin/<
alert_<
the private IP addresses are being used for
all instances.
oracle
sqlplus "/ as sysdba"
SQL>
dbname
.
prompt appears.
dbname
>.log
file and verify that
SQL>
>/bdump/
on
prompt:
Deployment Guide 55
Page 56

Table 1-8. Troubleshooting (continued)
Category Problem / Symptom Cause Recommended Corrective Action
Net
Configuratio
n Assistant
(NETCA)
NETCA NETCA cannot
CRS CRS fails to start
CRS When you run
CRS When you run
NETCA fails,
resulting in
database creation
errors.
configure remote
nodes or a raw
device validation
error occurs while
running DBCA.
when you reboot
the nodes or type:
/etc/init.d/
init.crs
start
root.sh, CRS fails
to start.
root.sh, CRS fails
to start.
The public network, host
name, or virtual IP is not
listed in the
/etc/hosts.equiv file.
The /etc/hosts.equiv file
either does not exist or
does not include the
assigned public or virtual
IP addresses.
The Cluster Ready Services
CSS daemon cannot write
to the quorum disk.
Check and make sure you
have public and private
node names defined and
that you can ping the node
names.
The OCR file and Voting
Disk are inaccessible.
Before launching netca, ensure that a host name is
assigned to the public network and that the public
and virtual IP addresses are listed in the
/etc/hosts.equiv file.
Verify that the /etc/hosts.equiv file on each node
contains the correct public and virtual IP address.
Try to rsh to other public names and virtual IP
addresses as oracle user.
• Attempt to start the service again by rebooting
the node or typing
/opt/oracle/product/10.1.0/crs_1/
• Verify that each node has access to the quorum
disk and the
• Check the last line in the file
$ORA_CRS_HOME/css/log/ocssd.log
• If you see
to flush writes to (votingdisk)
verify the following:
–The
– You can ping the public and private host
– The quorum disk is writable.
Attempt to start the service again by rebooting
the node or by running root.sh from
/opt/oracle/product/10.1.0/crs_1/ after correcting
the networking issues.
Correct the I/O problem and attempt to start the
service again by rebooting the node or by running
root.sh from /opt/oracle/product/10.1.0/crs_1/.
clssnmvWriteBlocks: Failed
/etc/hosts
correct IP addresses for host names of all
the nodes, including the virtual IP addresses.
names.
root.sh
root
user can write to the disk.
file on each node contains
from
.
.
,
56 Deployment Guide
Page 57

Table 1-8. Troubleshooting (continued)
Category Problem / Symptom Cause Recommended Corrective Action
CRS When you run
root.sh following
reinstallation,
CRS fails to start.
The OCR file and Voting
Disk have not been cleared
and contain old
information.
1
Clear the OCR and Voting Disks by typing
the following lines:
dd if=/dev/zero
of=/dev/raw/ocr.dbf bs=8192
count=12800
dd if=/dev/zero of=
/dev/raw/votingdisk bs=8192
count=2560
2
Attempt to start the service again by rebooting
the node or by running
root.sh
/opt/oracle/product/10.1.0/crs_1/
CRS When you run
root.sh, CRS fails
to start.
The oracle user does not
have permissions on
/var/tmp (specifically
/var/tmp/.oracle).
1
Make
oracle
by typing
user the owner of
chown oracle.oinstall
/var/tmp/.oracle
2
Attempt to start the service again by rebooting
the node or by running
root.sh
/opt/oracle/product/10.1.0/crs_1/
CRS When you run
root.sh, CRS fails
to start.
Other CRS
troubleshooting steps have
been attempted without
success.
1
Enable debugging by adding the following line
to
root.sh
:
set -x
2
Attempt to start the service again by running
root.sh
from:
/opt/oracle/product/10.1.0/crs_1/
3
Check log files in the following directories
to diagnose the issue:
$ORA_CRS_HOME/crs/log
$ORA_CRS_HOME/crs/init
$ORA_CRS_HOME/css/log
$ORA_CRS_HOME/css/init
$ORA_CRS_HOME/evm/log
$ORA_CRS_HOME/evm/init
$ORA_CRS_HOME/srvm/log
4
Check
/var/log/messages
for any error messages
regarding CRS init scripts.
5
Capture all log files for support diagnosis.
from
/var/tmp/.oracle
from:
Deployment Guide 57
Page 58

Table 1-8. Troubleshooting (continued)
Category Problem / Symptom Cause Recommended Corrective Action
CRS Node continually
reboots.
The node does not have
access to the quorum disk
on shared storage.
1
Start Linux in single user mode.
2
Ty p e :
/etc/init.d/init.crs disable
3
Verify that the quorum disk is available for read
and write. If it is not available, check hardware
connections and ensure that OCFS volumes are
mounted.
4
Reboot and type
/etc/init.d/init.crs
enable
DBCA There is no
response when you
Java Runtime Environment
timing issue.
Click again. If there is still no response,
restart DBCA.
click OK in the
DBCA Summary
window.
DBCA While creating the
seed database using
Known intermittent issue. Click Ignore; the seed database is created
normally.
DBCA on OCFS
volumes, you get
error ORA-60,
ORA-06512,
or ORA-34740.
Software
installation
You receive dd
failure error
Using copies, rather than
the original Red Hat CDs.
Use the original Red Hat CDs included with
your system.
messages while
installing the
software using
Dell Deployment
CD 1.
Software
installation
When connecting
to the database as
a user other than
Required permissions
are not set on the remote
node.
On all remote nodes, as the user root, type:
chmod 6751 $ORACLE_HOME
oracle, you
receive the error
messages:
ORA01034:
ORACLE not
available and
Linux Error
13:
Permission
denied.
58 Deployment Guide
Page 59

Table 1-8. Troubleshooting (continued)
Category Problem / Symptom Cause Recommended Corrective Action
Fibre
Channel
storage
8-node
OCFS2 setup
with DBCA
OCFS2 On reboot, an error
You receive I/O
errors and warnings
when you load the
Fibre Channel HBA
driver module.
You receive the
error message
ORA-04031
unable to
allocate
4180 bytes of
shared memory.
message appears:
mount.ocfs2:
Transport
endpoint is
not connected
while
mounting
/dev/emcpower
a1 on /u01/
The HBA driver, BIOS, or
firmware needs to be
updated.
The default memory
allocation for an 8-node
cluster is too small.
The private interconnect is
not up at the mount time.
Check the Solution Deliverable List for the
supported versions on the Dell|Oracle Tested and
Validated Configurations website at
www.dell.com/10g. Update as required the driver,
BIOS, and firmware for the Fibre Channel HBAs.
In the Initialization Parameters Window, change
the value of the Shared Pool to 500 MB from the
default value of 95 MB and click Next.
Ignore the error message. The mount problem is
handled in the deployment procedure.
Getting Help
Dell Support
For detailed information on the use of your system, see the documentation that came with your system
components.
For white papers, Dell supported configurations, and general information, visit the Dell and Oracle
website at www.dell.com/oracle.
For Dell technical support for your hardware and operating system software and to download the latest
updates for your system, visit the Dell Support website at support.dell.com. Information about
contacting Dell is provided in your system’s Installation and Troubleshooting Guide.
Dell Enterprise Training and Certification is now available; see www.dell.com/training for more
information. This training service may not be offered in all locations.
Deployment Guide 59
Page 60

Oracle Support
For training information for your Oracle software and application clusterware, see the Oracle website at
www.oracle.com or see your Oracle documentation for information on contacting Oracle.
Technical support, downloads, and other technical information are available on the Oracle MetaLink
website at metalink.oracle.com
.
Obtaining and Using Open Source Files
The software contained on the Dell Deployment CD is an aggregate of third-party programs as well as
Dell programs. Use of the software is subject to designated license terms. All software that is designated
as "under the terms of the GNU GPL" may be copied, distributed, and/or modified in accordance with
the terms and conditions of the GNU General Public License, Version 2, June 1991. All software that is
designated as "under the terms of the GNU LGPL" (or "Lesser GPL") may be copied, distributed, and/or
modified in accordance with the terms and conditions of the GNU Lesser General Public License,
Version 2.1, February 1999. Under these GNU licenses, you are also entitled to obtain the corresponding
source files by contacting Dell at 1-800-WWW-DELL. Please refer to SKU 420-4534 when making such
request. You may be charged a nominal fee for the physical act of transferring a copy.
60 Deployment Guide
Page 61

Index
A
adding and removing
nodes, 41
additional configuration
options
adding and removing
nodes, 41
additional information, 51
configuring automatic
reboot, 52
determining the private
network interface, 53
ASM
configuring database
storage, 34
ASM configuration, 21
B
bonding, 15
C
cluster
Fibre Channel hardware
connections, example, 11
cluster setup
Fibre Channel, 10
configuring
ASM, 21
database storage
(single node), 33
database storage (single node)
using ASM, 34
database storage (single node)
using ex3, 33
OCFS, 19
Oracle Database 10g
(single node), 33
Oracle RAC 10g, 13
Red Hat Enterprise Linux, 9
shared storage using ASM, 21
shared storage using OCFS, 19
configuring automatic
reboot, 52
configuring Oracle 10g, 10
verifying hardware
and software
configurations, 10
configuring Oracle Database
10g (single node), 33, 38
creating the seed database, 38
configuring Oracle RAC
10g, 13
creating the seed database, 29
configuring shared storage
ASM, 21
OCFS, 19
configuring the private
network, 15
configuring the public
network, 14
creating the seed
database, 29, 38
ASM, 30
OCFS, 29
CRS
installing, 24
D
deploying Oracle RAC 10g, 13
determining the private
network interface, 53
documentation, 7
E
examples
Fibre Channel cluster hardware
connections, 11
F
Fibre Channel cluster
setup, 10
configuring the private
and public networks, 13
Index 61
Page 62

G
getting help, 59
H
hardware
Fibre Channel cluster
minimum requirements, 6
Fibre Channel
interconnections, 12
single-node minimum
requirements, 7
hardware and software
configurations
Fibre Channel, 13
Hugemem, 9, 13
I
installing
CRS, 24
Oracle Database 10g, 25
Oracle Database 10g
(single node), 36
Oracle RAC 10g, 24
Red Hat Enterprise Linux, 8
using Dell Deployment CD, 8
integrated NICs, 53
L
license agreements, 7
listener configuration, 28, 37
N
node
adding and removing, 41
removing, 47
O
OCFS
configuring shared storage, 43
OCFS configuration, 19
Oracle Database 10g
installing, 25
installing (single node), 36
single node configuration, 33
Oracle RAC 10g
ASM configuration, 21
configuration, 13
installing, 24
OCFS configuration, 19
P
passwords
setting, 32, 40
private network
configuring, 13, 15
determining the interface, 53
public network
configuring, 13-14
R
Red Hat
updating system packages, 10
Red Hat Enterprise Linux
installing, 8
reinstalling
software, 50
remote shell (rsh)
disabling, 17
removing a node, 47
S
security, 17
seed database
creating, 29, 38
verifying, 32, 39
software
reinstalling, 50
requirements, 6, 51
software and hardware
requirements, 6
supported storage devices, 51
T
troubleshooting, 55
V
verifying
hardware configuration, 10
seed database, 32, 39
software configuration, 10
storage configuration, 17
62 Index
Page 63

Dell™ PowerEdge™ 系统
Oracle Database 10g
企业版 — 适用于 Intel
32 位技术 (x86) 的 Linux
部署指南 2.2 版
®
www.dell.com | support.dell.com
Page 64

注和注意
注:注表示可以帮助您更好地使用计算机的重要信息。
注意:注意表示可能会损坏硬件或导致数据丢失,并告诉您如何避免此类问题。
____________________
本说明文件中的信息如有更改,恕不另行通知。
© 2006 Dell Inc.
未经
Dell Inc.
本文中使用的商标:
Corporation
Red Hat 是 Red Hat, Inc.
本文件中述及的其它商标和产品名称是指拥有相应商标和名称的公司或其制造的产品。
的其它商标和产品名称不拥有任何专有权。
2006 年 8
版权所有,翻印必究。
书面许可,严禁以任何形式进行复制。
Dell、DELL
的注册商标;
月修订版
的注册商标。
A01
徽标、
Intel 和 Xeon 是 Intel Corporation
OpenManage 和 PowerEdge 是 Dell Inc.
的注册商标;
的商标;
EMC、Pow erPa th 和 Navisphere 是 EMC
Dell Inc.
对本公司的商标和产品名称之外
Page 65

目录
Oracle RAC 10g
软件和硬件要求
许可协议
重要说明文件
安装和配置
Red Hat Enterprise Linux
部署服务
. . . . . . . . . . . . . . . . . . . . . . . . . . . . . . . . .
. . . . . . . . . . . . . . . . . . . . . . . . . . . . . . . . . . 69
. . . . . . . . . . . . . . . . . . . . . . . . . . . .
. . . . . . . . . . . . . . . . . . . . . . . . . . . . . . . 69
. . . . . . . . . . . . . . . . . . . . .
使用 Deployment CD 安装 Red Hat Enterprise Linux
配置 Hugemem 内核
配置 Red Hat Enterprise Linux
. . . . . . . . . . . . . . . . . . . . . . . . . . . . 70
. . . . . . . . . . . . . . . . . . . . . . . 71
使用 Red Hat Network 对系统软件包进行更新
验证群集硬件与软件配置
光纤信道群集设置
为
Oracle RAC 10g
配置公共和专用网络
保护系统
. . . . . . . . . . . . . . . . . . . . . . . . . . . . . . . . . . 78
验证存储配置
使用 OCFS2 配置共享存储
使用 ASM 配置共享存储
安装
Oracle RAC 10g
安装 CRS
. . . . . . . . . . . . . . . . . . . . . . . . . . . . . . . . . . 85
安装 Oracle Database 10g 软件
应用 10.1.0.5 增补软件集
配置监听程序
创建基础数据库
RAC 部署后修复程序和增补软件
为 oracle 用户设置密码
. . . . . . . . . . . . . . . . . . . . . . . . . . .
. . . . . . . . . . . . . . . . . . . . . . . . . . . . . 72
配置网络和存储
. . . . . . . . . . . . . . . . . . . . . . . . . . . 75
. . . . . . . . . . . . . . . . . . . . . . . . . . . . . . . 79
. . . . . . . . . . . . . . . . . . . . . . . . . . . . . . .
. . . . . . . . . . . . . . . . . . . . . . . . . . . . . . . 89
. . . . . . . . . . . . . . . . . . . . . . . . . . . . . . 90
. . . . . . . . . . . . . . . . . . . . . .
. . . . . . . . . . . . . . . . . . . . . . . . 80
. . . . . . . . . . . . . . . . . . . . . . . . . 82
. . . . . . . . . . . . . . . . . . . . . . 86
. . . . . . . . . . . . . . . . . . . . . . . . . 87
. . . . . . . . . . . . . . . . . . . . 93
. . . . . . . . . . . . . . . . . . . . . . . . . . 94
67
68
70
. . . . . . . . . . . 70
. . . . . . . . . . . . . 72
72
75
85
配置和部署
Oracle
配置公共网络
配置数据库存储
使用 ASM 配置共享存储
安装 Oracle Database 10g
应用 10.1.0.5 增补软件集
配置监听程序
创建基础数据库
为 oracle 用户设置密码
数据库
. . . . . . . . . . . . . . . . . . . . . . . . . . . . . . . 94
. . . . . . . . . . . . . . . . . . . . . . . . . . . . . . 94
. . . . . . . . . . . . . . . . . . . . . . . . . . . . . . . 99
. . . . . . . . . . . . . . . . . . . . . . . . . . . . . . 99
(单个节点)
10g
. . . . . . . . . . . . . . . . . . . . . . . . . 95
. . . . . . . . . . . . . . . . . . . . . . . . . 97
. . . . . . . . . . . . . . . . . . . . . . . . . 98
. . . . . . . . . . . . . . . . . . . . . . . . . 102
. . . . . . . . . . . . . . . . .
94
目录 65
Page 66

添加和删除节点. . . . . . . . . . . . . . . . . . . . . . . . . . . . . . . .
将新节点添加到网络层
在新节点上配置共享存储
使用 ASM 配置共享存储
将新节点添加到群集件层
将新节点添加到数据库层
从群集中删除节点
. . . . . . . . . . . . . . . . . . . . . . . . . 102
. . . . . . . . . . . . . . . . . . . . . . . 103
. . . . . . . . . . . . . . . . . . . . . . . . 103
. . . . . . . . . . . . . . . . . . . . . . . 107
. . . . . . . . . . . . . . . . . . . . . . . 108
. . . . . . . . . . . . . . . . . . . . . . . . . . . . 109
102
重新安装软件
附加信息
支持的软件版本
配置暂挂操作系统的自动重新引导
确定专用网络接口
故障排除
获得帮助
Dell 支持
Oracle 支持
获取和使用开放源代码文件
. . . . . . . . . . . . . . . . . . . . . . . . . . . . . . . . .
. . . . . . . . . . . . . . . . . . . . . . . . . . . . . . . . . . . .
. . . . . . . . . . . . . . . . . . . . . . . . . . . . . 113
. . . . . . . . . . . . . . . . . . 114
. . . . . . . . . . . . . . . . . . . . . . . . . . . . 115
. . . . . . . . . . . . . . . . . . . . . . . . . . . . . . . . . . . .
. . . . . . . . . . . . . . . . . . . . . . . . . . . . . . . . . . . .
. . . . . . . . . . . . . . . . . . . . . . . . . . . . . . . . . 121
. . . . . . . . . . . . . . . . . . . . . . . . . . . . . . . . 121
. . . . . . . . . . . . . . . . . . . . . . . . .
112
113
117
121
122
索引 . . . . . . . . . . . . . . . . . . . . . . . . . . . . . . . . . . . . . . . . 123
66 目录
Page 67

本说明文件提供有关在
业版及
Real Application Clusters (RAC)
注:请将本说明文件与 Dell™ Deployment CD 配合使用来安装软件。如果您仅使用操作系统 CD 来安装操作
系统,则本说明文件中的说明可能不适用。
包括以下内容:
•
软件和硬件要求
•
安装和配置
验证群集硬件与软件配置
•
•
为
Oracle RAC 10g
•
在多个节点上部署
•
配置和部署
•
添加和删除节点
•
重新安装软件
•
附加信息
•
故障排除
•
获得帮助
•
获取和使用开放源代码文件
有关
www.dell.com/10g
Dell
支持的
Dell|Oracle
Red Hat® Enterprise Linux
配置网络和存储
Oracle RAC 10g
Oracle Database 10
Oracle Database 10g
。
支持的配置上安装、配置、重新安装和使用
软件的信息。
数据库和增补软件集并创建基础
(单个节点)
g
配置的详情,请参阅“经
Dell|Oracle
(seed)
测试和验证的配置”网站
Oracle Database 10g
数据库
企
Oracle RAC 10g
如果您购买了
•
验证群集硬件与软件配置
•
配置网络和存储
•
安装
Oracle RAC 10g
Oracle RAC 10g R1
部署服务
部署服务,
专业服务代表将为您提供以下帮助:
Dell
部署指南 67
Page 68

软件和硬件要求
在系统上安装
Oracle RAC
软件之前,请按照随套件提供的为
Oracle
数据库部署经
测试和验证的
Dell
配置说明文件中的说明操作,以便:
•
从
•
找到
•
从
然后使用这些
列出了
表
1-1
Red Hat 网站
Oracle CD
“经
Dell|Oracle
CD
支持的
Dell
rhn.redhat.com
套件,或从
下载 Red Hat CD
Oracle
网站
测试和验证的配置”网站
映像刻录
Oracle
Dell Deployment CD
配置的基本软件要求。表
www.oracle.com
。
下载 Oracle
www.dell.com/10g
。
1-2 和表 1-3
软件。
下载 Dell Deployment CD
列出了硬件要求。有关驱动程序
和应用程序最低软件版本的详情,请参阅“支持的软件版本”。
表
软件组件 配置
适用于
Enterprise Linux AS(第 4
适用于
EMC® PowerPath®
(仅限于光纤信道群集)
软件要求
1-1.
®
位技术
32
Intel
32 位 Linux 的 Oracle 10g R1 10.1.0.5
注:视用户数量、使用的应用程序、批处理进程以及其它因素而定,您可能需要一个超出最低硬件要求
的系统才能获得所需的性能。
注:所有群集节点的硬件配置必须完全相同。
(x86) 的 Red Hat
版)操作系统
季度更新
•
•
4.5.1
3
版
企业版,包括用于群集的
用于单个节点配置的企业版
版
RAC
选件
映像,
68 部署指南
Page 69

表
硬件组件 配置
Dell PowerEdge™ 1750、1850、2600
2650、2800、2850、4600、6600
6650、6800 和 6850
群集文件系统
[ASM]
Dell|EMC CX200、CX300、CX400
CX500 或 CX700
千兆位以太网交换机 (两个) 有关支持的配置信息,请访问 “经
Dell|EMC
最低硬件要求 — 光纤信道群集
1-2.
系统(使用
[OCFS2]
时为二至八个节点)
光纤信道交换机 (两个) 用于两个至六个节点的八个端口
或自动存储管理
光纤信道存储系统
、
Oracle
、
®
、
3-GHz Intel Xeon
随机存取存储器
1 GB
内部硬盘驱动器使用的
连接至一个
三个千兆位网络接口控制器
两个光学主机总线适配器
有关支持的配置信息,请访问 “经
网站
网站
用于七个或八个节点的十六个端口
PERC
www.dell.com/10g
www.dell.com/10g
处理器
(RAM)
PowerEdge
的两个
36 GB
(HBA)
(NIC)
可扩充
RAID
硬盘驱动器
端口
端口
Dell|Oracle
Dell|Oracle
控制器
(PERC)
(RAID 1)
测试和验证的配置”
测试和验证的配置”
表
硬件组件 配置
Dell PowerEdge 1750、1850、2600、2650、2800
2850、4600、6600、6650、6800 和 6850
Dell|EMC CX200、CX300、CX400、CX500 或
CX700
Dell|EMC
最低硬件要求 — 单个节点
1-3.
光纤信道存储系统 (可选)
光纤信道交换机 (可选) 八个端口
、
3-GHz Intel Xeon
系统
1 GB 的 RAM
连接至一个
两个
NIC
有关支持的配置信息,请访问 “经
的配置”网站
处理器
的两个
PERC
端口
www.dell.com/10g
36 GB
硬盘驱动器
Dell|Oracle
(RAID 1)
测试和验证
许可协议
注:您的 Dell 配置包含 30 天的 Oracle 软件试用许可。如果您没有此产品的许可证,请与 Dell 销售代表联系。
重要说明文件
有关特定硬件组件的详情,请参阅随系统附带的说明文件。
有关
Oracle
产品信息,请参阅
Oracle CD
套件中的《如何开始》指南。
部署指南 69
Page 70

安装和配置
注意:为确保正确地安装操作系统,在安装操作系统之前,应断开系统与所有外部存储设备的连接。
本节将向您介绍
Red Hat Enterprise Linux
Red Hat Enterprise Linux AS
操作系统的安装以及操作系统的配置以进行
Oracle
部署。
使用
Deployment CD
从系统中断开所有外部存储设备的连接。
1
找到您的
2
将
3
系统将引导至
当屏幕上提示选择经测试和验证的配置时,键入 4 并按
4
Red Hat Enterprise Linux 4 32bit Update 3
R1 EE
当屏幕上提示选择解决方案部署映像来源时,键入 1 以选择
5
(通过
出现提示时,将
6
系统将创建部署分区,并且将
一张
安装完成后,系统将自动重新引导并显示
在
7
配置操作系统设置。
屏幕上出现提示时,指定 root 用户密码。
8
当出现
9
绑定,所以稍后将配置网络设置。
当出现
10
启用防火墙。
作为 root 用户登录。
11
Dell Deployment CD
Dell Deployment CD 1
)。
Deployment CD
并引导至部署分区。
CD
Red Hat Setup Agent Welcome(Red Hat Setup Agent
Network Setup
Security Level
安装
Red Hat Enterprise Linux
以及带更新3的原始
插入
CD
Dell Deployment CD 1
复制解决方案),然后按
Dell Deployment CD 2
CD
(网络设置)窗口时,单击
(安全保护级别)窗口时,请禁用防火墙。在完成
驱动器,然后重新引导系统。
。
(
Red Hat Enterprise Linux 4 32
插入
CD
的内容复制到此分区。复制操作完成后,系统将自动弹出最后
Red Hat Setup Agent
Red Hat Enterprise Linux AS 4 CD
<Enter>
<Enter>
驱动器,随后插入
欢迎)窗口中,单击
(下一步)。因为在此窗口中不能配置网络
Next
键,以选择
Copy solution by Deployment CD
键。
Red Hat Installation CD
。
Oracle 10g R1 EE on
位更新
3 上的 Oracle 10g
(下一步)来
Next
Oracle
部署之后,您可以
。
。
配置
Hugemem
配置
Oracle
以便增加缓冲区高速缓存的大小,使之超过默认值
将安装
Red Hat Enterprise Linux 4 hugemem
引导参数,以启用此选项。
注:Dell 建议仅将 hugemem 内核用于 RAM 高于 16 GB 的系统。此内核具有一些额外开销,这些开销可能
会减少内存而降低系统性能。
70 部署指南
内核
关系型数据库管理系统
(RDBMS)
要求使用
内核。更改引导加载程序配置文件
Red Hat Enterprise Linux 4 hugemem
。使用
1.7 GB
Dell Deployment CD 1
时,默认情况下
/etc/grub.conf
内核,
中的默认
Page 71

配置
Red Hat Enterprise Linux
在所有节点上,作为 root 用户登录并执行以下过程:
将
Dell Deployment CD 2
1
如果您使用
,请键入:
CD
插入
CD
驱动器。
/media/cdrom/install.sh
如果您使用
DVD
,请键入:
/media/cdrecorder/install.sh
中的内容将被复制到
CD
/usr/lib/dell/dell-deploy-cd
复制过程完成后,请键入以下命令将
CD 从 CD
目录中。
驱动器中取出:
umount /dev/cdrom
键入以下命令,浏览至包含从
2
Dell Deployment CD
安装的脚本的目录:
cd /dell-oracle-deployment/scripts/standard
注:脚本将查找并验证安装的组件版本,并根据需要将组件更新为支持的级别。
键入以下命令,配置
3
Red Hat Enterprise Linux
以安装
Oracle
:
./005-oraclesetup.py
键入以下命令以启动环境变量:
4
source /root/.bash_profile
键入以下命令,验证处理器、
5
和磁盘大小符合
RAM
Oracle
最低安装要求:
./010-hwCheck.py
如果脚本报告参数错误,请更新硬件配置然后再次运行脚本。
如果使用
6
a
OCFS2
键入以下命令,安装
来部署群集,请执行以下步骤:
OCFS2 Red Hat Package Manager (RPM)
./340-rpms_ocfs.py
:
b
要确保顺利安装
./350-ocfs_networkwait.py
连接外部存储设备。
7
OCFS2
,请键入:
部署指南 71
Page 72

使用
Red Hat Network
Red Hat
(RHN)
试和验证的配置”网站
会定期发布软件更新来修正错误、解决安全问题以及添加新功能。您可以通过
服务下载这些更新。在使用
注:如果要在单个节点上部署 Oracle Database 10g,请跳过以下各节并参阅“配置和部署 Oracle 数据库
10g(单个节点)”。
对系统软件包进行更新
将系统软件更新为最新版本之前,请访问“经
RHN
www.dell.com/10g
,以获取支持的最新配置。
Red Hat Network
Dell|Oracle
测
验证群集硬件与软件配置
开始群集设置之前,请验证整个群集的硬件安装、通信互连和节点软件配置。以下各节提供了有关硬件
和软件光纤信道群集配置的设置信息。
光纤信道群集设置
专业服务代表已为您完成了光纤信道群集的设置。请根据本节所述的内容,验证硬件连接以及硬件
Dell
和软件配置。图
所示为群集要求的连接概览,表
1-1
概述了群集连接。
1-4
72 部署指南
Page 73

图
光纤信道群集的硬件连接
1-1.
千兆位以太网交换机 (专用网络)
HBA 0 HBA 1
公共网络
LAN/WAN
PowerEdge 系统
(Oracle 数据库)
交换机 0
100
SP-A
Dell|EMC 光纤信道存储系统
注:以上显示的存储处理器、HBA 和光纤信道交换机的排列只是用于举例说明,可能会
因网络配置不同而有所差异。
1
SP-B
交换机 1
Dell|EMC 光纤信道交换机 (SAN)
Cat 5e (集成 NIC)
Cat 5e (铜质千兆位 NIC)
光缆
附加光缆
部署指南 73
Page 74

表
群集组件 连接
每个
每个
存储系统
每个
交换机
每个千兆位以太网交换机 连接至每个
光纤信道硬件互连
1-4.
PowerEdge
Dell|EMC
Dell|EMC
系统节点 从公共
从专用千兆位
从冗余专用千兆位
从
HBA 0
从
HBA 1
光纤信道
光纤信道
连接至
连接至各个光纤信道交换机的一至四条光学连接;例如,对于四个端口的配置:
•
从
•
从
•
从
•
从
连接至
连接至每个
连接至另一个千兆位以太网交换机的一条
NIC
LAN
SPA 端口 0
SPA 端口 1
SPB 端口 0
SPB 端口 1
Dell|EMC
连接至局域网
NIC
NIC
连接至光纤信道交换机
连接至交换机
的两根
连接至光纤信道交换机
连接至光纤信道交换机
连接至光纤信道交换机
连接至光纤信道交换机
PowerEdge
PowerEdge
(LAN)
连接至千兆位以太网交换机的一根
连接至冗余千兆位以太网交换机的一根
的一根光缆
1
电缆
Cat 5e
光纤信道存储系统的一至四条光学连接
系统的
HBA
系统上的专用千兆位
的一根增强型
的一根光缆
0
的一根光缆
0
的一根光缆
1
的一根光缆
1
的一根光缆
0
的一条光学连接
NIC
Cat 5e
5 类 (Cat 5e)
Cat 5e
的一条
Cat 5e
连接
电缆
电缆
Cat 5e
连接
电缆
验证是否已为群集完成以下任务:
所有硬件均已安装在机架中。
•
•
所有硬件互连均已按照图
•
所有逻辑设备编号
(LUN)
1-1 和表 1-4
所示进行了安装。
、独立磁盘冗余阵列
(RAID)
分组和存储分组均已在
存储系统上创建。
•
存储分组已分配给群集中的节点。
注意:在执行以下各节中的步骤之前,请确保正确地安装系统硬件和连接电缆。
74 部署指南
Dell|EMC
光纤信道
Page 75

光纤信道硬件和软件配置
•
每个节点均必须包含满足以下最低要求的硬件外围组件:
–
内部硬盘驱动器托架中的一个或两个硬盘驱动器(最少
–
三个千兆位
–
两个光纤信道
•
每个节点均必须安装以下软件:
–
Red Hat Enterprise Linux
–
光纤信道
–
用于内核的
注:OCFS 支持两种内核,即 hugemem 和对称多处理 (SMP)。根据内核选择 OCFS 类型。
•
光纤信道存储设备必须具有以下配置:
–
创建并分配给群集至少三个
–
LUN
HBA
大小至少为
端口
NIC
HBA
驱动程序
OCFS2
5 GB
软件(请参阅表
模块和用于
LUN
OCFS2
1-1
的配置工具
)
36 GB
)
为
Oracle RAC 10g
本节介绍对运行基础
•
配置公共和专用网络
•
保护系统
•
验证存储配置
•
使用
OCFS2
•
使用
ASM
配置
Oracle RAC 10g
网络和存储设备,请按顺序执行以下过程。
(seed)
配置共享存储
配置共享存储
数据库的过程非常复杂,要求按顺序执行以下一系列步骤。要想用最少的时间配置
配置网络和存储
数据库的光纤信道群集进行设置的信息,其中包括以下过程:
配置公共和专用网络
本节将向您介绍配置公共和专用群集网络的步骤。
注:每个节点都需要一个唯一的公共和专用网际协议 (Internet Protocol, IP) 地址,以及一个附加公共 IP 地址,
该附加公共 IP 地址作为客户端连接和连接故障转移的虚拟 IP 地址。虚拟 IP 地址必须与公共 IP 属于同一个
子网。所有公共 IP 地址,包括虚拟 IP 地址,都必须向 DNS 注册。
部署指南 75
Page 76

根据可用的
端口的数目,按照表
NIC
中所示配置网络接口。
1-5
表
1-5. NIC
端口 三个可用端口 四个可用端口
NIC
1
2
3
4
注:Oracle 安装程序要求:在所有群集节点上,公共接口名称和用于专用接口的绑定名称都相同。如果
配置公共网络
端口分配
公共
专用
专用
无虚拟
公共接口不同,可以使用绑定来使网络接口抽象化并用于 Oracle 安装,以解决此问题。
和虚拟
IP
IP
IP
IP
(已绑定) 专用
(已绑定) 专用
公共
IP
(已绑定)
IP
(已绑定)
IP
IP
如果您尚未配置公共网络,请在每个节点上执行以下过程进行配置:
作为 root 用户登录。
1
编辑网络设备文件
2
/etc/sysconfig/network-scripts/ifcfg-eth#
,其中
是网络设备号,并按以下方式
#
配置文件:
DEVICE=eth0
ONBOOT=yes
IPADDR=< 公共 IP 地址 >
NETMASK=< 子网掩码 >
BOOTPROTO=static
HWADDR=<MAC 地址 >
SLAVE=no
编辑
3
/etc/sysconfig/network
localhost.localdomain
例如,第一个节点对应的行应该如下所示:
HOSTNAME=node1.domain.com
键入:
4
service network restart
键入以下命令验证
5
ifconfig
通过从群集外的某台
6
连接至每个节点以验证公共网络是否正常工作,然后键入以下命令以验证安全命令解释程序
7
是否发挥作用:
ssh <
公共
76 部署指南
IP>
文件,如果需要,用完全限定的公共节点名称替换
。
地址设置是否正确:
IP
客户机对每个公共
LAN
地址执行
IP
命令,检查网络配置是否正确。
ping
(ssh)
Page 77

利用绑定功能配置专用网络
在部署群集之前,应将专用群集网络设置为允许节点之间相互通信。此过程包括配置网络绑定以及为
群集中的每个节点分配专用
地址和主机名。要为
IP
Broadcom 或 Intel NIC
设置网络绑定并配置专用
网络,请在每个节点上执行以下过程:
作为 root 用户登录。
1
在
/etc/modprobe.conf
2
文件中添加以下行:
alias bond0 bonding
为了获得高可用性,请编辑
3
miimon
的默认值为 0,该值会禁用链接监测功能。开始时将该值更改为
/etc/modprobe.conf
文件并设置链接监测选项。
进行调整以便改善性能,如以下示例所示。键入:
options bonding miimon=100 mode=1
在
/etc/sysconfig/network-scripts/
4
目录中,创建或编辑
例如,使用样本网络参数时,该文件会显示如下:
DEVICE=bond0
IPADDR=192.168.0.1
NETMASK=255.255.255.0
NETWORK=192.168.0.0
BROADCAST=192.168.0.255
ONBOOT=yes
BOOTPROTO=none
USERCTL=no
NETMASK、NETWORK 和 BROADCAST 这些条目是可选的。
DEVICE=bondn 是必需的绑定名称,其中 n 指定了绑定号。
IPADDR 是专用
要使用
bond0
对于属于绑定成员的每个设备,执行以下步骤:
5
a
在目录
/etc/sysconfig/network-scripts/
地址。
IP
作为虚拟设备,您必须指定要作为从属设备绑定的设备。
中,编辑
ifcfg-ethn
DEVICE=ethn
HWADDR=<MAC 地址 >
ONBOOT=yes
TYPE=Ethernet
USERCTL=no
MASTER=bond0
SLAVE=yes
BOOTPROTO=none
ifcfg-bond0
配置文件。
文件,包括以下几行:
毫秒,然后根据需要
100
b
键入 service network restart 并忽略任何警告。
部署指南 77
Page 78

在每个节点上,键入以下命令以验证专用接口是否正常工作:
6
ifconfig
节点的专用
在每个节点上设置专用
7
连接至每个节点,并键入以下命令以验证专用网络和
8
ssh <
在每个节点上,添加以下行来修改
9
专用
地址应该分配给专用接口
IP
地址后,请从一个节点
IP
IP>
bond0
/etc/hosts
。
ping 每个 IP
文件:
正常工作:
ssh
127.0.0.1 localhost.localdomain localhost
< 专用 IP node1> < 专用主机名 node1>
< 专用 IP node2> < 专用主机名 node2>
< 公共 IP node1> < 公共主机名 node1>
< 公共 IP node2> < 公共主机名 node2 >
< 虚拟 IP node1> < 虚拟主机名 node1>
< 虚拟 IP node2> < 虚拟主机名 node2>
注:本步骤和以下步骤中的示例针对的是双节点配置;每个附加的群集节点应添加新的行。
在每个节点上,通过列出所有公共
10
如果对于每个节点来说,您有一个公共主机名、一个虚拟
地址或主机名来创建或修改
IP
IP
几行:
<
公共主机名
公共主机名
<
<
虚拟
<
虚拟
node1> oracle
node2> oracle
IP
IP
或主机名
或主机名
node1> oracle
node2> oracle
地址,以确保专用网络可以正常工作。
/etc/hosts.equiv
文件。例如,
地址和一个虚拟主机名,则添加下列
作为 oracle 登录并连接到每个节点,键入以下命令以验证远程命令解释程序
11
rsh <
其中,
公共主机名 nodex>
x 为节点号。
保护系统
为防止未经授权的用户访问系统,
chkconfig rsh off
78 部署指南
,
建议您在安装
Dell
Oracle
软件之后禁用
是否正常工作:
(
rsh
)
。键入以下命令禁用
rsh
rsh
:
Page 79

验证存储配置
配置群集时,在光纤信道存储设备上创建分区。要创建分区,所有群集节点均必须能够检测外部存储
设备。要验证是否每个节点都能检测各存储
对于
1
Dell|EMC
正确版本的
正确的存储组。有关说明,请参阅随
注:为您安装群集的 Dell 专业服务代表已执行此步骤。如果您在节点中重新安装软件,则必须完成
此步骤。
光纤信道存储系统,验证每个节点中是否均已安装了
PowerPath
(请参阅表
1-6
Dell|EMC
),以及是否已在
或逻辑磁盘,请执行以下步骤:
LUN
Navisphere
光纤信道存储设备附带的说明文件。
EMC Navisphere®
代理和
代理软件中将每个节点分配给
通过外观检查来验证存储设备和群集节点是否已正确连接至光纤信道交换机(请参阅图
2
)。
表
1-4
验证您是否已作为 root 用户登录。
3
在每个节点上,键入:
4
more /proc/partitions
节点将检测和显示
注:列出的设备可能有所不同,视存储设备的配置方法而定。
屏幕将显示一个列表,列出节点检测到的
列表中还将列出
在
/proc/partitions
5
•
出现在该文件中的所有
PowerPath
dev/emcpowerb
•
光纤信道
LUN
例如,如果对节点进行配置,使
存储设备,则
emcpowerc
可以识别
如果外部存储设备未出现在
在所有节点上键入以下命令,停止
1
或逻辑磁盘,以及在这些外部设备上创建的分区。
LUN
或逻辑磁盘以及在这些外部设备上创建的分区。
LUN
虚拟设备,如
文件中,确保:
PowerPath
和 /dev/emcpowerc
显示为小型计算机系统接口
可以识别节点的
sda
(或
LUN
/proc/partitions
/dev/emcpowera、/dev/emcpowerb
虚拟设备具有类似的设备路径。例如,
。
设备,每个群集节点均配置了相同数量的
(SCSI)
驱动器或
SCSI
RAID
PowerPath
文件中:
PowerPath
容器或内部驱动器,而
虚拟设备)。
设备:
容器连接到具有三个逻辑磁盘的光纤信道
RAID
和
emcpowera、emcpowerb
service naviagent stop
service PowerPath stop
1-1
/dev/emcpowerc
/dev/emcpowera
LUN
和
。
、
。
和
在所有节点上,键入以下命令,重新载入
2
•
对于
Qlogic HBA
:
rmmod qla2300
modprobe qla2300
对于
•
Emulex HBA
:
rmmod lpfc
modprobe lpfc
驱动程序以使内核分区表保持同步:
HBA
部署指南 79
Page 80

在所有节点上键入以下命令,重新启动
3
service PowerPath start
service naviagent start
PowerPath
服务:
键入以下命令,确认所有节点均能检测到外部存储设备:
4
more /proc/partitions
使用
OCFS2
可以使用
在第一个节点上,作为 root 用户登录。
1
请执行以下步骤:
2
a
配置共享存储
OCFS2 或 ASM
键入以下命令启动
配置共享存储。本节介绍使用
X Window
系统:
startx
b
在终端中键入以下命令,生成具有
的默认群集名的
ocfs2
ocfs2console
c
从菜单中,单击
Cluster
(群集)
→
Configure Nodes
如果群集处于脱机状态,控制台将启动该群集。屏幕将出现一个显示此信息的信息窗口。
关闭此信息窗口。
屏幕将显示
d
要向群集添加节点,请单击
Node Configuration
(节点配置)窗口。
(添加)。输入节点名称(与主机名相同)和专用
Add
端口号的默认值。输入所有提及的详细信息后,请单击
节点添加至群集。
e
添加所有节点后,请在
然后单击
f
从菜单中,单击
屏幕将显示
Close
Propagate Cluster Configuration Window
窗口中显示信息
Node Configuration Window
(关闭)。
Cluster
Finished(完成)
(群集)
→
Propagate Configuration
,然后单击
OCFS2
配置共享存储的过程。
OCFS2
配置文件
(
/etc/ocfs2/cluster.conf
(配置节点)。
(确定)。重复此步骤,将所有
OK
(节点配置窗口)中,单击
Apply
(传播配置)。
(传播群集配置窗口)。请等候,直到
(关闭)。
Close
:
)
。保留
IP
(应用),
g
选择
在所有节点上键入以下命令,以便在启动时启用群集堆栈:
3
/etc/init.d/o2cb enable
80 部署指南
File
(文件)
→
(退出)。
Quit
Page 81

使用以下步骤更改所有节点上的
4
a
键入以下命令,在所有节点上停止
/etc/init.d/o2cb stop
b
在所有节点上,将
c
键入以下命令,在所有节点上启动
/etc/sysconfig/o2cb
/etc/init.d/o2cb start
O2CB_HEARTBEAT_THRESHOLD
服务:
O2CB
中的 O2CB_HEARTBEAT_THRESHOLD
服务:
O2CB
值:
值编辑为 61
。
对于光纤信道群集,在第一个节点上,使用
5
a
键入以下命令,为整个设备创建主分区:
在另外两个外部存储设备上各创建一个分区:
fdisk
fdisk /dev/emcpowerx
键入 h
,获取
b
键入以下命令,验证新分区是否存在:
公用程序内的帮助。
fdisk
cat /proc/partitions
如果没有看到新分区,则键入:
sfdisk -R /dev/<
注:以下步骤使用样本值 /u01 和 /u02 作为安装点,并使用 u01 和 u02 作为标记。
在任意一个节点上,使用命令行公用程序
6
群集大小以及
128 K
设备名称
个节点插槽(节点插槽指群集节点的数量),如下所示:
4
>
mkfs.ocfs2
,将外部存储设备格式化为
mkfs.ocfs2 -b 4K -C 128K -N 4 -L u01 /dev/emcpowera1
mkfs.ocfs2 -b 4K -C 128K -N 4 -L u02 /dev/emcpowerb1
注:有关设置群集格式化参数的详情,请参阅
http://oss.oracle.com/projects/ocfs2/dist/documentation/ocfs2_faq.html
在每个节点上,执行以下步骤:
7
a
为每个
OCFS2
分区创建安装点。要执行此过程,请键入以下命令创建目标分区目录和设置
。
所有权:
mkdir -p /u01 /u02
chown -R oracle.dba /u01 /u02
区块大小、
4 K
b
在每个节点上,修改
/etc/fstab
文件,添加以下用于光纤信道存储系统的行:
/dev/emcpowera1 /u01 ocfs2 _netdev,datavolume,nointr 0 0
/dev/emcpowerb1 /u02 ocfs2 _netdev,datavolume,nointr 0 0
为所有
OCFS2
c
在每个节点上,键入以下命令以装入
卷创建相应的条目。
/etc/fstab
文件中列出的所有卷:
mount -a -t ocfs2
d
在各个节点上,将以下命令添加至
/etc/rc.local
文件中:
mount -a -t ocfs2
部署指南 81
Page 82

使用
配置共享存储
ASM
为群集就绪服务
要使用
在第一个节点上,使用
1
配置共享存储,请执行以下步骤:
ASM
键入以下命令,创建三个各为
另外一个用于
(CRS)
Oracle
配置共享存储
fdisk
系统参数文件:
在外部存储设备上创建三个分区。
150 MB
的分区,其中一个分区用于群集库,一个用于投票磁盘,
fdisk /dev/emcpowerx
在各个节点上,键入以下命令,验证这些新分区:
2
more /proc/partitions
如果
/proc/partitions
文件中未显示新分区,请键入:
sfdisk -R /dev/< 设备名称 >
a
键入以下命令以启动原始设备:
udevstart
b
编辑
/etc/sysconfig/rawdevices
文件,添加以下用于光纤信道群集的行:
/dev/raw/votingdisk /dev/emcpowera1
/dev/raw/ocr.dbf /dev/emcpowera2
/dev/raw/spfile+ASM.ora /dev/emcpowera3
c
键入以下命令,重新启动原始设备:
service rawdevices restart
为数据库配置共享存储
共享数据库分区可以配置为原始设备,也可以使用
使用
1
ASMLib
要使用
a
b
配置共享存储
配置群集,请在所有节点上执行以下步骤:
ASM
作为 root 用户登录。
键入以下命令,配置
ASM
内核模块:
/etc/init.d/oracleasm configure
屏幕上将显示以下信息:
Configuring the Oracle ASM library driver.(正在配置 Oracle ASM 库
驱动程序。)
82 部署指南
ASMLib
软件进行配置。
Page 83

This will configure the on-boot properties of the Oracle ASM library
driver.(这将配置 Oracle ASM 库驱动程序的引导时属性。) The following
questions will determine whether the driver is loaded on boot and
what permissions it will have.(以下问题将确定是否在引导时载入驱动程序,
且确定驱动程序具有何种权限。) The current values will be shown in
brackets ('[]').(方括号 ('[]') 中将显示当前值。) Hitting <ENTER>
without typing an answer will keep that current value.(不键入应答,
而点击 ENTER,将保持当前值。) Ctrl-C will abort.(按 Ctrl-C 组合键将中断
操作。)
屏幕将出现一条信息,提示您输入拥有驱动程序接口的默认用户。按以下所示键入 oracle
:
Default user to own the driver interface(拥有驱动程序接口的默认用户)
[]: oracle
屏幕将出现一条信息,提示您输入拥有驱动程序接口的默认组。按以下所示键入 dba
:
Default group to own the driver interface(拥有驱动程序接口的默认组)
[]: dba
屏幕将出现一条信息,提示您在引导时载入
所示键入
y:
oracleasm
驱动程序。要载入驱动程序,请按以下
Start Oracle ASM library driver on boot(引导时启动 Oracle ASM 库驱动
程序)(y/n) [n]: y
屏幕将出现一条信息,提示您在引导时修复
Oracle ASM
磁盘的权限。按以下所示键入 y
:
Fix permissions of Oracle ASM disks on boot(引导时修复 Oracle ASM
磁盘的权限)(y/n) [y]: y
屏幕显示以下信息:
Writing Oracle ASM library driver configuration:(正在写入 Oracle ASM
库驱动程序配置:) [ OK ](确定)
Creating /dev/oracleasm mount point:(正在创建 /dev/oracleasm 安装点:)
[ OK ](确定)
Loading module "oracleasm":(正在载入模块“oracleasm”:) [ OK ](确定)
Mounting ASMlib driver filesystem:(正在安装 ASMlib 驱动程序文件系统:)
[ OK ](确定)
Scanning system for ASM disks:(正在扫描系统中的 ASM 磁盘:)
[ OK ](确定)
部署指南 83
Page 84

在任意一个节点上,将先前创建的分区标记为
2
ASM
磁盘。
# /etc/init.d/oracleasm createdisk ASM1 /dev/emcpowerb1
Marking disk "/dev/emcpowerb1" as an ASM disk:(将磁盘
“/dev/emcpowerb1”标记为 ASM 磁盘:) [ OK ](确定)
# /etc/init.d/oracleasm createdisk ASM2 /dev/emcpowerc1
Marking disk "/dev/emcpowerc1" as an ASM disk:(将磁盘
“/dev/emcpowerc1”标记为 ASM 磁盘:) [ OK ](确定)
扫描所有节点上的
3
ASM
磁盘。
# /etc/init.d/oracleasm scandisks
Scanning system for ASM disks:(正在扫描系统中的 ASM 磁盘:)
[ OK ](确定)
在所有节点上,键入以下命令以验证所有
4
磁盘均可见:
ASM
# /etc/init.d/oracleasm listdisks
屏幕将显示所有配置的
要添加附加的
5
ASM
磁盘(例如,
ASM
磁盘列表。
ASM3
),请编辑所有节点上的
/etc/udev/scripts/raw-dev.sh
并按如下所示添加相应的条目:
MAKEDEV raw
mv /dev/raw/raw1 /dev/raw/votingdisk
mv /dev/raw/raw2 /dev/raw/ocr.dbf
mv /dev/raw/raw3 /dev/raw/spfile+ASM.ora
mv /dev/raw/raw4 /dev/raw/ASM1
mv /dev/raw/raw5 /dev/raw/ASM2
mv /dev/raw/raw6 /dev/raw/ASM3
chmod 660
/dev/raw/{votingdisk,ocr.dbf,spfile+ASM.ora,ASM1,ASM2,ASM3}
chown oracle.dba
/dev/raw/{votingdisk,ocr.dbf,spfile+ASM.ora,ASM1,ASM2,ASM3}
在所有节点上,键入:
udevstart
文件,
重复执行步骤 4。
使用原始设备配置共享存储
在所有节点上,作为 root 用户登录并执行以下过程:
编辑
1
/etc/sysconfig/rawdevices
文件,添加以下用于光纤信道群集的行:
/dev/raw/ASM1 /dev/emcpowerb1
/dev/raw/ASM2 /dev/emcpowerc1
键入以下命令,重新启动原始设备:
2
service rawdevices restart
84 部署指南
Page 85

安装
本节说明安装
软件。
安装
Oracle RAC 10g
Oracle RAC 10g 10.1.0.3
建议您创建基础
Dell
CRS
在第一个节点上,
1
键入以下命令启动
2
startx
打开终端窗口,然后键入:
3
xhost +
版所需的步骤,其中包括安装
数据库,以便在生产环境下部署群集之前先检查群集是否工作正常。
(seed)
作为 root 用户登录
X Window
系统:
。
CRS
和安装
Oracle Database 10g
装入
4
5
Oracle Cluster Ready Services
键入:
su - oracle
键入以下命令以启动
6
Oracle Universal Installer(Oracle
unset ORACLE_HOME
如果您使用
,请键入:
CD
/media/cdrom/runInstaller
如果您使用
DVD
,请键入:
/media/cdrecorder/runInstaller
在
Welc om e
7
在
Specify File Locations
8
/opt/oracle/product/10.1.0/crs_1
在
Language Selection
9
在
10
Cluster Configuration
(欢迎)窗口中单击
(指定文件位置)窗口中,验证
,然后单击
(语言选择)窗口中,选择一种语言并单击
(群集配置)窗口中,输入全局群集名称或接受默认名称
节点的公共和专用节点名称,然后单击
群集名称在整个企业中必须是唯一的。
在
Specify Network Interface Usage
11
(公共)、
注:在该步骤中选择的公共和专用 NIC 分配对于所有节点均必须可用且完全相同。
private
(专用)或
Do not use
。
CD
通用安装程序):
(下一步)。
Next
主目录路径是否为
(下一步)。
Next
,输入每个
crs
Next
(下一步)。
Next
Oracle
(下一步)。
(指定网络接口使用)窗口中,单击每个接口类型并选择
(不使用),然后单击
(下一步)。
Next
public
在
12
Oracle Cluster Registry(Oracle
(
/dev/raw/ocr.dbf
注:如果您已将共享的 OCFS2 分区用于 OCR 和投票磁盘,请输入相应的路径。
,然后单击
)
群集注册表)窗口中,输入
(下一步)。
Next
磁盘位置的完整路径
OCR
部署指南 85
Page 86

13
14
在
Voting Disk
然后单击
在
Summary
(投票磁盘)窗口中,输入用于存储投票磁盘的分区的完整路径
(下一步)。
Next
(摘要)窗口中,单击
Install
(安装)。
安装完成之后,屏幕上会显示一则信息,提示您必须在所有节点上运行
将自动配置群集。
出现提示后,打开新的终端窗口。
15
从步骤
16
在下一个节点上运行
中的同一终端窗口,作为 root 用户在每个节点上运行
15
root.sh
之前,要等到
root.sh
在当前节点上完成运行。
root.sh
(
/dev/raw/votingdisk
脚本。
root.sh
脚本,从本地节点开始。
root.sh
脚本
,
)
在
17
18
安装
Setup Privileges
在
End of Installation
Oracle Database 10g
在第一个节点上,
1
装入
2
3
Oracle Database 10g CD 1
作为 oracle 用户启动
如果您使用
(设置权限)窗口中,单击
(安装结束)窗口中,单击
软件
作为 root 用户登录
。
Oracle Universal Installer(Oracle
,请键入:
CD
。
(确定)。
OK
Exit
(退出),然后单击
通用安装程序):
/media/cdrom/runInstaller
如果您使用
DVD
,请键入:
/media/cdrecorder/runInstaller
在
Welc om e
4
在
Specify File Locations
5
/opt/oracle/product/10.1.0/db_1
注:该步骤中的 Oracle 主目录路径不得与 CRS 安装过程中标识的 Oracle 主目录路径名称相同。不能
将带有 RAC 的 Oracle 10g 企业版与 CRS 安装到相同的主目录路径中
在
Specify Hardware Cluster Installation Mode
6
(全选),然后单击
在
Select Installation Types
7
单击
(欢迎)窗口中单击
(下一步)。
Next
(下一步)。
Next
(指定文件位置)窗口中,验证完整的
,然后单击
(下一步)。
Next
(指定硬件群集安装模式)窗口中,单击
(下一步)。
Next
(选择安装类型)窗口中,选择
Oracle
。
Enterprise Edition
将显示正在进行的各种先决条件检查的状态。检查完成后,您可能会收到一则有关
包版本不匹配的警告。选中
Wa rn ing
(警告)选项,然后单击
(下一步)。
Next
(是)进行确认。
Yes
主目录路径是否为
(企业版),然后
openmotif
Select All
软件
在
Select Database Configuration
8
(不创建启动程序数据库),然后单击
在
Summary
9
出现提示后,打开新的终端窗口。
10
86 部署指南
(选择数据库配置)窗口中,选择
(摘要)窗口中,单击
Install
(下一步)。
Next
(安装)。
Do not create a starter database
Page 87

在第一个节点上,运行
11
a
按下
<Enter>
Virtual Internet Protocol Configuration Assistant(VIPCA
启动。
b
c
在第一个
在
VIPCA
List of Available Network Interfaces
您有四个
并单击
Next
注:在该步骤中选择的公共和专用 NIC 分配对于所有节点均必须可用且完全相同。
root.sh
键以接受本地
窗口上,单击
端口,选择保留给虚拟
NIC
(下一步)。
。
目录的默认值。
bin
Next
,虚拟
Internet
协议配置助手)将会
(下一步)。
(可用网络接口列表)窗口中,选择公共
地址使用的端口(请参阅“配置公共和专用网络”),
IP
,或者如果
NIC
在
d
Virtual IPs for Cluster Nodes
的公共虚拟
虚拟
地址必须与您在
IP
地址和子网掩码,并单击
IP
(群集节点的虚拟
/etc/hosts.equiv
文件中输入的地址相同,并且子网掩码必须与公共掩码
相同。
e
在摘要窗口中单击
Finish
(完成)。
屏幕将显示进度窗口。
f
配置完成后,单击
g
在群集中的其它各个节点上运行
在下一个节点上运行
在
12
13
应用
Setup Privileges
在
End of Installation
10.1.0.5
从
1
在第一个节点上,将增补软件集复制到文件夹
2
键入以下命令,将增补软件集解压:
3
增补软件集
Oracle Metalink
(设置权限)窗口中单击
网站下载
(确定),然后单击
OK
root.sh
。
OK
root.sh
之前,要等到
(安装结束)窗口中单击
10.1.0.5
增补软件集
unzip p4505133_10105_LINUX.ZIP
键入以下命令,更改
4
10.1.0.5
目录的所有权:
chown -R oracle.dba /oracle_cds/10.1.0.5
)窗口中,为显示的各个节点输入未使用
IP
(下一步)。
Next
(退出),以退出
Exit
root.sh
在当前节点上完成运行。
(确定)。
(退出),然后单击
Exit
(
p4505133_10105_LINUX.ZIP
/oracle_cds/10.1.0.5
。
VIPCA
。
(是)进行确认。
Yes
。
)
仅在第一个节点上运行安装程序。
5
该程序将修补所有作为
群集一部分的节点。
RAC
10.1.0.5
目录。
注:10.1.0.5 增补软件集支持为所有成员节点的 CRS 进行滚动升级。
增补软件集将修补
以及数据库主
CRS
部署指南 87
Page 88

将
修补至
CRS
在第一个节点上,
1
键入以下命令以启动
2
10.1.0.5
作为 oracle 用户登录
Oracle
安装程序:
。
/oracle_cds/10.1.0.5/Disk1/runInstaller
在
Welc om e
3
在
Specify File Locations
4
(欢迎)窗口中单击
(指定文件位置)窗口中,确保源路径指向
Next
文件。
在
Destination
5
主目录,然后单击
在
Selected Nodes
6
(目标)部分中,从下拉式菜单中选择
(下一步)。
Next
(所选节点)窗口中,确保显示安装了
(下一步)。
在
Summary
7
安装程序将提示您停止
在各个节点上,作为 root 登录,并从
8
从所有节点运行该脚本之后,退出安装程序。
9
在所有节点上,执行以下步骤:
10
a
从
(摘要)窗口中,单击
服务,并运行
CRS
/opt/oracle/product/10.1.0/crs_1/bin
olsnodes -n -v
此时将显示群集中所有节点的公共节点名称列表。
b
键入以下命令,列出所有正在运行的服务:
crs_stat
将数据库修补至
在第一个节点上,
1
在升级增补软件集之前,键入以下命令,停止
2
10.1.0.5
增补软件集
作为 oracle 用户登录。
onsctl stop
(下一步)。
CRS
(安装)。
Install
root10105.sh
主目录位置运行
CRS
目录中键入下列命令,验证
Oracle
通知服务
10.1.0.5
分级区域的
主目录名称。确保路径指向
10.1.0.3
脚本。
的所有成员节点,然后单击
CRS
:
脚本。
安装:
root10105.sh
(ONS)
products.xml
CRS
Next
键入以下命令以启动
3
/oracle_cds/10.1.0.5/Disk1/runInstaller
在
Welc om e
4
在
Specify File Locations
5
文件。
在
Destination
6
10.1.0.3
88 部署指南
Oracle
(欢迎)窗口中单击
安装程序:
(下一步)。
Next
(指定文件位置)窗口中,确保源路径指向
10.1.0.5
分级区域的
(目标)部分中,从下拉式菜单中选择数据库主目录名称。确保路径指向安装了
的数据库主目录,然后单击
(下一步)。
Next
products.xml
Page 89

在
Selected Nodes
7
(所选节点)窗口中,确保显示安装了
(下一步)。
8
在
Summary
(摘要)窗口中,单击
Install
(安装)。
完成此过程后,安装程序将提示您在所有节点上运行
10.1.0.3
root.sh
的所有成员节点,然后单击
脚本。
Next
在各个节点上,作为 root 登录,并从数据库主目录位置运行
9
从所有节点运行该脚本之后,退出安装程序。
10
root.sh
脚本。
配置监听程序
本节将介绍配置监听程序的步骤,与数据库建立远程客户机连接时需要使用此程序。
在任意一个节点上,执行以下过程:
作为 root 用户登录。
1
键入以下命令启动
2
X Window
startx
打开终端窗口,然后键入:
3
xhost +
作为 oracle 用户,运行:
4
source /home/oracle/.bash_profile
键入以下命令以启动网络配置助手:
5
netca
选择
6
7
8
Cluster Configuration
在
TOPSNodes
在
Welc om e
(欢迎)窗口中,选择
窗口中,单击
(下一步)。
在
Listener Configuration, Listener
9
然后单击
在
Listener Configuration, Listener Name
10
(下一步)。
Next
(监听程序名称)字段中键入 LISTENER
在
11
12
Listener Configuration, Select Protocols
单击
在
Listener Configuration, TCP/IP Protocol
(下一步)。
Next
standard port number of 1521
在
Listener Configuration, More Listeners?
13
(否),然后单击
No
在
14
15
Listener Configuration Done
单击
Finish
(完成)。
Next
系统:
(群集配置),然后单击
Select All Nodes
Listener Configuration
Next
(选择全部节点),然后单击
(监听程序配置,监听程序)窗口中,选择
(监听程序配置,监听程序名称)窗口中的
,然后单击
Next
(监听程序配置,选择协议)窗口中选择
(监听程序配置,
(使用标准端口号
),然后单击
1521
(监听程序配置,是否多个监听程序?)窗口中,选择
(下一步)。
(完成监听程序配置)窗口中,单击
(下一步)。
Next
(监听程序配置),然后单击
Add
(下一步)。
TCP/IP
协议)窗口中,选择
(下一步)。
Next
(下一步)。
Next
(下一步)。
Next
(添加),
Listener Name
,然后
TCP
Use the
部署指南 89
Page 90

创建基础数据库
本节包含利用
OCFS2 或 ASM
创建基础
(seed)
数据库和验证基础
数据库的步骤。
(seed)
使用
1
2
3
4
5
6
7
8
9
创建基础数据库
OCFS2
在第一个节点上,作为 oracle 用户,键入 dbca -datafileDestination /u01
Database Configuration Assistant
在
We lc om e
Cluster
在
Operations
在
Node Selection
在
Database Templates
单击
在
Database Identification
(如
在
Management Options
在
Database Credentials
(欢迎)窗口中,选择
数据库),然后单击
(操作)窗口中,单击
(节点选择)窗口中,单击
(下一步)。
Next
racdb
),然后单击
(数据库模板)窗口中,单击
(数据库标识)窗口中,输入
(管理选项)窗口中,单击
(数据库证书)窗口中,单击
(
Next
(下一步)。
Next
(下一步)。
(对所有帐户使用相同密码),完成密码选择和输入,然后单击
在
Storage Options
(存储选项)窗口中选择
,数据库配置助手)。
DBCA
Oracle Real Application Cluster Database(Oracle Real Application
Create a Database
Cluster File System
(创建数据库),然后单击
Select All
(全选),然后单击
Custom Database
Global Database Name
(下一步)。
Next
Use the Same Password for All Accounts
(群集文件系统),然后单击
(自定义数据库),然后
(下一步)。
Next
(下一步)。
在
10
11
Database File Locations
在
Recovery Configuration
区域),再单击
在
12
13
14
Database Content
在
Database Services
在
Initialization Parameters
(共享池)的值改为
在
15
16
Database Storage
在
Creation Options
Browse
(数据库文件位置)窗口中单击
(恢复配置)窗口中,单击
(浏览)并选择
,指定闪存恢复大小,然后单击
/
u02
(数据库内容)窗口中,单击
(数据库服务)窗口中,单击
Specify flash recovery area
(下一步)。
Next
(下一步)。
Next
(下一步)。
Next
(初始化参数)窗口中,如果您的群集有四个以上节点,请将
500 MB
,然后单击
(数据库存储)窗口中,单击
(创建选项)窗口中,选择
(下一步)。
Next
(下一步)。
Next
Create database
(创建数据库),然后单击
(完成)。
在
17
Summary
注:基础 (seed) 数据库的创建过程可能需要一个多小时。
注:如果在创建基础数据库的过程中收到信息
错误)
(摘要)窗口中,单击
,则单击 OK(确定)
以忽略此错误。
(确定)创建数据库。
OK
Enterprise Manager Configuration Error
,以启动
(下一步)。
Next
(下一步)。
Next
(全局数据库名称)
Next
(指定闪存恢复
(下一步)。
Next
Shared Pool
Finish
(企业管理器配置
数据库创建完成后,屏幕上将显示
90 部署指南
Password Management
(密码管理)窗口。
Page 91

单击
18
(退出)。
Exit
屏幕上会显示一则消息,提示正在所有节点上启动群集数据库。
在每个节点上,执行以下步骤:
19
a
键入以下命令,确定该节点上存在的数据库实例:
srvctl status database -d <
b
键入以下命令,在 oracle 用户配置文件中,添加
数据库名称
>
echo "export ORACLE_SID=racdbx" >> /home/oracle/.bash_profile
source /home/oracle/.bash_profile
其中,
racdbx 是分配给节点的数据库实例标识符。
ORACLE_SID
环境变量条目:
本例假设
使用
创建基础数据库
ASM
执行以下步骤,使用
在第一个节点上,作为 oracle 用户键入以下命令启动
1
racdb 是您在
Oracle ASM
DBCA
中定义的全局数据库名称。
创建基础数据库:
dbca &
在
We lc om e
2
Cluster
在
Operations
3
在
Node Selection
4
在
Database Templates
5
单击
在
Database Identification
6
racdb
如
在
Management Options
7
在
Database Credentials
8
(欢迎)窗口中,选择
数据库),然后单击
(操作)窗口中,单击
(节点选择)窗口中,单击
(下一步)。
Next
,然后单击
Oracle Real Application Cluster Database(Oracle Real Application
(下一步)。
Next
Create a Database
Select All
(数据库模板)窗口中,单击
(数据库标识)窗口中,输入
(下一步)。
Next
(管理选项)窗口中,单击
(数据库证书)窗口中,单击
(创建数据库),然后单击
(对所有帐户使用相同密码),完成密码选择和输入,然后单击
在
Storage Options
9
在
10
Create ASM Instance
parameter file
(存储选项)窗口中,单击
(创建
实例)窗口中,输入用户 SYS 的密码,单击
ASM
ASM
,然后单击
(创建服务器参数文件),将位置更改为
(下一步)。
当显示的消息表明
11
在
12
Available Disk Groups
DBCA
已就绪,可以创建和启动
(可用磁盘组)下,单击
ASM
Create New
:
DBCA
(下一步)。
Next
(全选),然后单击
Custom Database
Global Database Name
(下一步)。
Next
Use the Same Password for All Accounts
/dev/raw/spfile+ASM.ora
实例时,单击
(自定义数据库),然后
(下一步)。
Next
(下一步)。
Next
OK
(下一步)。
Next
(全局数据库名称),
Create server
,然后单击
(确定)。
(新建)。
Next
部署指南 91
Page 92

在
13
Disk Group
(磁盘组)窗口中输入数据库文件的相关信息,然后单击
为准备创建的磁盘组输入名称,例如
然后选择要包括在磁盘组(例如,
/dev/raw/ASM1
屏幕上显示一个窗口,提示正在创建磁盘组。
databaseDG
,选择
External Redundancy
)中的磁盘。
(确定)。
OK
(外部冗余),
在
14
15
Available Disk Groups
在
Disk Group
(磁盘组)窗口中输入回闪恢复文件的相关信息,然后单击
(可用磁盘组)下,单击
为准备创建的磁盘组输入名称,例如
然后选择要包括在磁盘组(例如,
/dev/raw/ASM2
屏幕上显示一个窗口,提示正在创建磁盘组。
在
ASM Disk Groups(ASM
16
17
18
然后单击
在
Files
在
Next
DataBase File Locations
(对所有数据库文件使用公用位置),然后单击
Recovery Configuration
的回闪组(例如,
在
19
20
21
Database Content
在
Database Services
在
Initialization Parameters
(共享池)的值改为
在
22
23
Database Storage
在
Creation Options
(下一步)。
flashbackDG
磁盘组)窗口中,选择要用于数据库存储的磁盘组(例如,
(数据库文件位置)窗口中,选中
(恢复配置)窗口中,单击
),然后单击
(数据库内容)窗口中,单击
(数据库服务)窗口中,单击
(初始化参数)窗口中,如果您的群集有八个节点,请将
500 MB
,然后单击
(数据库存储)窗口中,单击
(创建选项)窗口中,选择
(完成)。
在
24
Confirmation
注:基础 (seed) 数据库的创建过程可能需要一个多小时。
(确认)窗口中单击
Create New
flashbackDG
,选择
)中的磁盘。
Next
(下一步)。
Next
Next
Next
(下一步)。
Next
Next
Create database
(确定)创建数据库。
OK
(新建)。
(确定)。
OK
External Redundancy
(外部冗余),
databaseDG
Use Common Location for All Database
(下一步)。
(浏览),选择您在步骤
Browse
(下一步)。
(下一步)。
Shared Pool
(下一步)。
(创建数据库),然后单击
15
),
中创建
Finish
数据库创建完成后,屏幕上将显示
单击
25
Exit
屏幕上会显示一则消息,提示正在所有节点上启动群集数据库。
92 部署指南
(退出)。
Password Management
(密码管理)窗口。
Page 93

在每个节点上执行以下步骤:
26
a
键入以下命令,确定该节点上存在的数据库实例:
srvctl status database -d <
b
键入以下命令,在 oracle 用户配置文件中添加
echo "export ORACLE_SID=racdbx" >> /home/oracle/.bash_profile
source /home/oracle/.bash_profile
其中,
racdbx 是分配给节点的数据库实例标识符。
数据库名称
>
ORACLE_SID
环境变量条目:
本例假设
在任意一个节点上,键入:
27
racdb 是您在
中定义的全局数据库名称。
DBCA
srvctl status database -d dbname
其中,
dbname 是您在
DBCA
中为数据库定义的全局标识名称。
如果正在运行数据库实例,屏幕将显示确认信息。
如果未运行数据库实例,则键入:
srvctl start database -d dbname
其中,
dbname 是您在
部署后修复程序和增补软件
RAC
本节介绍部署
重新配置
当
HBA
时间可能会超过
为确保
要增加
在除一个节点之外的所有节点上关闭数据库和
1
在当前运行的节点上,作为 root 用户登录并键入:
2
Oracle RAC 10g
计数误差以进行正确的
CSS
、交换机或
EMC
105 秒。Oracle 10g R1 10.1.0.3
PowerPath
CSS
故障转移过程正常工作,请将
超时时间,请执行以下步骤:
DBCA
存储处理器
中为数据库定义的全局标识名称。
所需的修复程序和增补软件信息。
EMC PowerPath
发生故障时,切换到备用设备所需的总
(SP)
故障转移
版的默认群集同步服务
超时时间增加到
CSS
。
CRS
(CSS)
秒。
120
PowerPath
磁盘超时时间为
/opt/oracle/product/10.1.0/crs_1/bin/crsctl set css misscount 120
故障转移
秒。
45
重新引导所有节点以使
3
有关详情,请参阅
设置生效。
CSS
Oracle MetaLink 网站
metalink.oracle.com
上的 Oracle MetaLink Note 294430.1
部署指南 93
。
Page 94

为
oracle
Dell
1
2
用户设置密码
郑重建议您为
作为 root 用户登录。
通过键入以下命令并执行屏幕上的说明,创建
passwd oracle
用户设置密码,以便保护您的系统。完成以下步骤,以创建
oracle
oracle
用户的密码:
oracle
用户的密码:
配置和部署
本节介绍有关完成在“安装和配置
信息。本节包括以下主题:
•
配置公共网络
•
配置数据库存储
•
安装
Oracle Database 10g
配置监听程序
•
•
创建基础数据库
•
为
oracle
Oracle
用户设置密码
数据库
Red Hat Enterprise Linux
10g
(单个节点)
配置公共网络
请确保您的公共网络正常运行,并且已为您的系统分配了
配置数据库存储
使用
如果您具有附加存储设备,请执行以下步骤:
1
2
文件系统配置数据库存储
ext3
作为 root 用户登录。
键入:
cd /opt/oracle
”所述的初始设置或完成重新安装过程的
地址和主机名。
IP
键入:
3
mkdir oradata recovery
使用
为
使用
为
fdisk
sdb1
fdisk
sdc1
)。
)。
4
5
94 部署指南
,创建一个需要在其中存储数据库文件的分区(例如,如果存储设备为
,创建一个需要在其中存储恢复文件的分区(例如,如果存储设备为
sdc
,则该分区
sdb
,则该分区
Page 95

键入以下命令,验证新分区:
6
cat /proc/partitions
如果没有看到新分区,则键入:
sfdisk -R /dev/sdb
sfdisk -R /dev/sdc
键入:
7
mke2fs -j /dev/sdb1
mke2fs -j /dev/sdc1
为新创建的文件系统添加一个条目来修改
8
键入:
9
/etc/fstab
文件。
mount /dev/sdb1 /opt/oracle/oradata
mount /dev/sdc1 /opt/oracle/recovery
键入:
10
chown oracle.dba oradata recovery
使用
该分区可以配置为原始设备,也可以使用
配置共享存储
ASM
ASMLib
软件进行配置。假定您有两台存储设备(
sdb 和 sdc
),
可以分别使用它们创建一个用于存储数据库文件的磁盘组和一个用于存储回闪恢复文件和存档日志文件
的磁盘组。
使用
1
ASMLib
要使用
a
b
配置共享存储
配置群集,请在所有节点上执行以下步骤:
ASM
作为 root 用户登录。
键入以下命令,配置
ASM
内核模块:
/etc/init.d/oracleasm configure
屏幕上将显示以下信息:
Configuring the Oracle ASM library driver.(正在配置 Oracle ASM 库驱动
程序。)
This will configure the on-boot properties of the Oracle ASM library
driver.(这将配置 Oracle ASM 库驱动程序的引导时属性。) The following
questions will determine whether the driver is loaded on boot and
what permissions it will have.(以下问题将确定是否在引导时载入驱动程序,
且确定驱动程序具有何种权限。) The current values will be shown in
brackets ('[]').(方括号 ('[]') 中将显示当前值。) Hitting <ENTER>
without typing an answer will keep that current value.(不键入应答,
而点击 ENTER,将保持当前值。) Ctrl-C will abort.(按 Ctrl-C 组合键将中断
操作。)
部署指南 95
Page 96

屏幕将出现一条信息,提示您输入拥有驱动程序接口的默认用户。按以下所示键入 oracle
:
Default user to own the driver interface(拥有驱动程序接口的默认用户)
[]: oracle
屏幕将出现一条信息,提示您输入拥有驱动程序接口的默认组。按以下所示键入 dba
Default group to own the driver interface(拥有驱动程序接口的默认组)
[]: dba
屏幕将出现一条信息,提示您在引导时载入
y
所示键入
:
oracleasm
驱动程序。要载入驱动程序,请按以下
Start Oracle ASM library driver on boot(引导时启动 Oracle ASM 库驱动
程序)(y/n) [n]: y
屏幕将出现一条信息,提示您在引导时修复
Oracle ASM
磁盘的权限。按以下所示键入 y
Fix permissions of Oracle ASM disks on boot(引导时修复 Oracle ASM
磁盘的权限)(y/n) [y]: y
屏幕显示以下信息:
Writing Oracle ASM library driver configuration:(正在写入 Oracle ASM
库驱动程序配置:) [ OK ](确定)
Creating /dev/oracleasm mount point:(正在创建 /dev/oracleasm 安装点:)
[ OK ](确定)
Loading module "oracleasm":(正在载入模块“oracleasm”:) [ OK ](确定)
Mounting ASMlib driver filesystem:(正在安装 ASMlib 驱动程序文件系统:)
[ OK ](确定)
Scanning system for ASM disks:(正在扫描系统中的 ASM 磁盘:)
[ OK ](确定)
c
将先前创建的分区标记为
ASM
磁盘。
# /etc/init.d/oracleasm createdisk ASM1 /dev/emcpowerb1
Marking disk "/dev/emcpowerb1" as an ASM disk:(将磁盘
“/dev/emcpowerb1”标记为 ASM 磁盘:) [ OK ](确定)
# /etc/init.d/oracleasm createdisk ASM2 /dev/emcpowerc1
Marking disk "/dev/emcpowerc1" as an ASM disk:(将磁盘
“/dev/emcpowerc1”标记为 ASM 磁盘:) [ OK ](确定)
:
:
扫描所有节点上的
2
# /etc/init.d/oracleasm scandisks
Scanning system for ASM disks:(正在扫描系统中的 ASM 磁盘:)
[ OK ](确定)
在所有节点上,键入以下命令以验证所有
3
# /etc/init.d/oracleasm listdisks
屏幕将显示所有配置的
96 部署指南
ASM
磁盘。
ASM
磁盘列表。
磁盘均可见:
ASM
Page 97

使用原始设备配置共享存储
作为 root 用户登录。
1
键入下列命令,更改原始字符设备的名称,使设备能够被识别:
2
mv /dev/raw/raw1 /dev/raw/ASM1
mv /dev/raw/raw2 /dev/raw/ASM2
chown oracle.dba /dev/raw/ASM1
chown oracle.dba /dev/raw/ASM2
键入以下命令,为整个设备创建主分区:
3
fdisk /dev/sdb
键入以下命令,为整个设备创建主分区:
4
fdisk /dev/sdc
编辑
5
/etc/sysconfig/rawdevices
文件并添加以下行:
/dev/raw/ASM1 /dev/sdb1
/dev/raw/ASM2 /dev/sdc1
键入以下命令,重新启动原始设备:
6
service rawdevices restart
安装
Oracle Database 10g
要安装
Oracle Database 10
作为 root 用户登录。
1
装入
CD
2
键入以下命令启动
3
Oracle Database 10g CD 1
,请执行以下过程:
g
X Window
系统:
startx
打开终端窗口,然后键入:
4
xhost +
作为 oracle 用户登录。
5
作为 oracle 用户启动
6
如果您使用
CD
,请键入:
Oracle Universal Installer(Oracle
/media/cdrom/runInstaller
如果您使用
DVD
,请键入:
/media/cdrecorder/runInstaller
。
通用安装程序)。
7
在
Welc om e
(欢迎)窗口中单击
(下一步)。
Next
部署指南 97
Page 98

在
Specify File Locations
8
/opt/oracle/product/10.1.0/db_1
在
Select a Product to Install
9
然后单击
在
10
11
Select Installation Types
单击
Next
在
Select Database Configuration
(下一步)。
Next
(下一步)。
(指定文件位置)窗口中,验证完整的
,然后单击
(选择要安装的产品)窗口中,单击
(选择安装类型)窗口中,单击
(不创建启动程序数据库),然后单击
在
12
13
Summary
出现提示时,打开终端窗口并运行
(摘要)窗口中单击
将会出现一个简短的进度窗口,随后出现
Oracle
(下一步)。
Next
Enterprise Edition
(选择数据库配置)窗口中,单击
(下一步)。
Next
(安装)。
Install
。
root.sh
End of Installation
(安装结束)窗口。
主目录路径是否为
Oracle Database 10g 10.1.0.3.0
(企业版),然后
Do not create a starter database
,
单击
14
应用
10.1.0.5
从
1
在其中一个节点上,将增补软件集复制到文件夹
2
键入以下命令,将增补软件集解压:
3
(退出),然后单击
Exit
Yes
增补软件集
Oracle MetaLink 下载 10.1.0.5
(是)进行确认。
增补软件集
(p4505133_10105_LINUX.ZIP)
unzip p4505133_10105_LINUX.ZIP
键入以下命令,更改
4
10.1.0.5
目录的所有权:
chown -R oracle.dba /oracle_cds/10.1.0.5
将数据库修补至
作为 oracle 用户登录。
1
键入以下命令以启动
2
10.1.0.5
增补软件集
Oracle
安装程序:
/oracle_cds/10.1.0.5/Disk1/runInstaller
在
Welc om e
3
在
Specify File Locations
4
(欢迎)窗口中单击
(指定文件位置)窗口中,确保源路径指向
(下一步)。
Next
文件。
在
Destination
5
的数据库主目录,然后单击
在
Selected Nodes
6
(目标)部分中,从下拉式菜单中选择数据库名称。确保路径指向安装了
(下一步)。
Next
(所选节点)窗口中,确保显示安装了
(下一步)。
在
Available Product Components
7
(可用产品组件)窗口中,单击
/oracle_cds/10.1.0.5
10.1.0.5
10.1.0.3
的所有成员节点,然后单击
。
(下一步)。
Next
。
分级区域的
products.xml
10.1.0.3
Next
98 部署指南
Page 99

8
在
Summary
(摘要)窗口中,单击
Install
(安装)。
完成此过程后,安装程序将提示您在所有节点上运行
root.sh
脚本。
在各个节点上,作为 root 登录,并从数据库主目录位置运行
9
从所有节点运行该脚本之后,退出安装程序。
10
配置监听程序
作为 root 用户登录。
1
键入以下命令启动
2
X Window
系统:
startx
打开终端窗口,然后键入:
3
xhost +
作为 oracle 用户登录。
4
键入以下命令以启动
5
Oracle
网络配置助手:
netca
在所有屏幕上接受默认设置并单击
6
(下一步),完成监听程序的配置。
Next
创建基础数据库
使用
执行以下步骤,使用
1
2
文件系统创建基础
ext3
(seed)
Oracle DBCA
作为 oracle 用户登录。
键入以下命令以启动
Oracle DBCA
dbca
数据库
创建基础数据库:
:
root.sh
脚本。
在
Welc om e
3
在
Operations
4
在
Database Templates
5
单击
Next
在
Database Identification
6
SID Prefix(SID
在
Management Options
7
在
Database Credentials
8
在
Storage Options
9
在
10
Database File Locations
(欢迎)窗口中单击
(操作)窗口中,单击
(数据库模板)窗口中,单击
(下一步)。
(数据库标识)窗口的
前缀)字段中,键入要创建的数据库的名称,然后单击
(管理选项)窗口中,单击
(数据库证书)窗口中,完成密码选择和输入,然后单击
(存储选项)窗口中选择
(数据库文件位置)窗口中单击
(下一步)。
Next
Create a Database
File System
(创建数据库),然后单击
Custom Database
Global Database Name
(下一步)。
Next
(自定义数据库),然后
(文件系统),然后单击
(下一步)。
Next
(下一步)。
Next
(全局数据库名称)和
(下一步)。
Next
(下一步)。
Next
(下一步)。
Next
部署指南 99
Page 100

在
Recovery Configuration
11
(恢复配置)窗口中,单击
系统配置数据库存储”中创建的回闪恢复区域(例如,
(下一步)。
Next
在
12
13
14
15
Database Content
在
Initialization Parameters
在
Database Storage
在
Creation Options
(数据库内容)窗口中,单击
(初始化参数)窗口中,单击
(数据库存储)窗口中,单击
(创建选项)窗口中,单击
(完成)。
在
16
Confirmation
注:基础 (seed) 数据库的创建过程可能需要一个多小时。
(确认)窗口中,单击
(确定)以创建数据库。
OK
(浏览),选择您在“使用
Browse
/opt/oracle/recovery
(下一步)。
Next
Next
(下一步)。
Next
Create Database
),然后单击
(下一步)。
(创建数据库),然后单击
ext3
文件
Finish
数据库创建完成后,屏幕上将显示
17
18
单击
键入:
(退出)。
Exit
export ORACLE_SID=dbname
其中,
dbname 是您在
要验证数据库是否可以正常操作,请执行以下步骤:
19
a
键入以下命令,显示 SQL> 提示符:
DBCA
Password Management
中为数据库定义的全局标识名称。
sqlplus "/ as sysdba"
b
在 SQL> 提示符下,键入以下查询:
SELECT * FROM v$instance;
c
如果数据库未运行并且您收到错误消息,请在 SQL> 提示符下键入以下命令,在节点上启动
数据库实例:
startup
使用
如果您使用
1
创建基础数据库
ASM
配置了存储,请执行以下步骤,使用
ASM
作为 oracle 用户键入以下命令以启动
DBCA
dbca &
在
Welc om e
2
在
Operations
3
在
Database Templates
4
单击
在
Database Identification
5
(如
(欢迎)窗口中单击
(操作)窗口中,单击
(下一步)。
Next
oradb
),然后单击
(下一步)。
Next
Create a Database
(数据库模板)窗口中,单击
(数据库标识)窗口中,输入
(下一步)。
Next
(密码管理)窗口。
Oracle DBCA
创建一个基础数据库:
:
(创建数据库),然后单击
Custom Database
Global Database Name
(下一步)。
Next
(自定义数据库),然后
(全局数据库名称)
100 部署指南
 Loading...