

Page 1

Dell™ OptiPlex™ 170L
Quick Reference Guide
Models MTC2 and DHS
www.dell.com | support.dell.com
Page 2

Notes, Notices, and Cautions
NOTE: A NOTE indicates important information that helps you make better use of your computer.
NOTICE: A NOTICE indicates either potential damage to hardware or loss of data and tells you how to avoid
the problem.
CAUTION: A CAUTION indicates a potential for property damage, personal injury, or death.
If you purchased a Dell™ n Series computer, any references in this document to Microsoft® Windows®
operating systems are not applicable.
The
Drivers and Utilities
and may not ship with all computers.
CD (ResourceCD), operating system media, and
Quick Reference Guides
are optional
____________________
Information in this document is subject to change without notice.
© 2004 Dell Inc. All rights reserved.
Reproduction in any manner whatsoever without the written permission of Dell Inc. is strictly forbidden.
Trademarks used in this text: Dell, the DELL logo, and OptiPlex are trademarks of Dell Inc.; Microsoft and Windows are registered trademarks
of Microsoft Corporation.
Other trademarks and trade names may be used in this document to refer to either the entities claiming the marks and names or their products.
Dell Inc. disclaims any proprietary interest in trademarks and trade names other than its own.
Models MTC2 and DHS
September 2004 P/N W6987 Rev. A00
Page 3

Contents
Finding Information for Your Computer . . . . . . . . . . . . . . . . . . . 5
About Your Small Desktop Computer
Front and Back Views
Inside Your Computer
. . . . . . . . . . . . . . . . . . . . . . . . . 8
. . . . . . . . . . . . . . . . . . . . . . . . . 9
. . . . . . . . . . . . . . . . . . . . 8
Attaching and Removing the Computer Stand
About Your Mini-Tower Computer
Front and Back Views
Inside Your Computer
Setting Up Your Computer
. . . . . . . . . . . . . . . . . . . . . . . . . 12
. . . . . . . . . . . . . . . . . . . . . . . . . 13
Small Desktop Computer
Mini-tower Computer
Completed Setup
. . . . . . . . . . . . . . . . . . . . . . . . . . . . . 16
. . . . . . . . . . . . . . . . . . . . . . . . . 15
Small Desktop Computer
Mini-Tower Computer
Solving Problems
Dell Diagnostics
System Lights
Diagnostic Lights
Beep Codes
. . . . . . . . . . . . . . . . . . . . . . . . . . . . . 17
. . . . . . . . . . . . . . . . . . . . . . . . . . . . 17
. . . . . . . . . . . . . . . . . . . . . . . . . . . . . 19
. . . . . . . . . . . . . . . . . . . . . . . . . . . 20
. . . . . . . . . . . . . . . . . . . . . . . . . . . . . . 22
. . . . . . . . . . . . . . . . . . . . . 11
. . . . . . . . . . . . . . . . . . . . . . . . . 11
. . . . . . . . . . . . . . . . . . . . . . . 14
. . . . . . . . . . . . . . . . . . . . . . . 16
. . . . . . . . . . . . . . . . . . . . . . . . . 16
Running the Dell™ IDE Hard Drive Diagnostics
Resolving Software and Hardware Incompatibilities
®
Using Microsoft
Reinstalling Microsoft
Windows® XP System Restore . . . . . . . . . . . . 25
®
Windows® XP . . . . . . . . . . . . . . . . . 26
. . . . . . . . . . . . . . 10
. . . . . . . . . . . . . 23
. . . . . . . . . . 24
Using the Drivers and Utilities CD
Index . . . . . . . . . . . . . . . . . . . . . . . . . . . . . . . . . . . . 31
. . . . . . . . . . . . . . . . . . . . . 29
Contents 3
Page 4

4 Contents
Page 5
Finding Information for Your Computer
What Are You Looking For? Find It Here
• A diagnostic program for my computer
• Drivers for my computer
• My computer documentation
• My device documentation
• Desktop System Software (DSS)
• OS updates and patches
• Warranty information
• Safety instructions
• Regulatory information
• Ergonomics information
• End User License Agreement
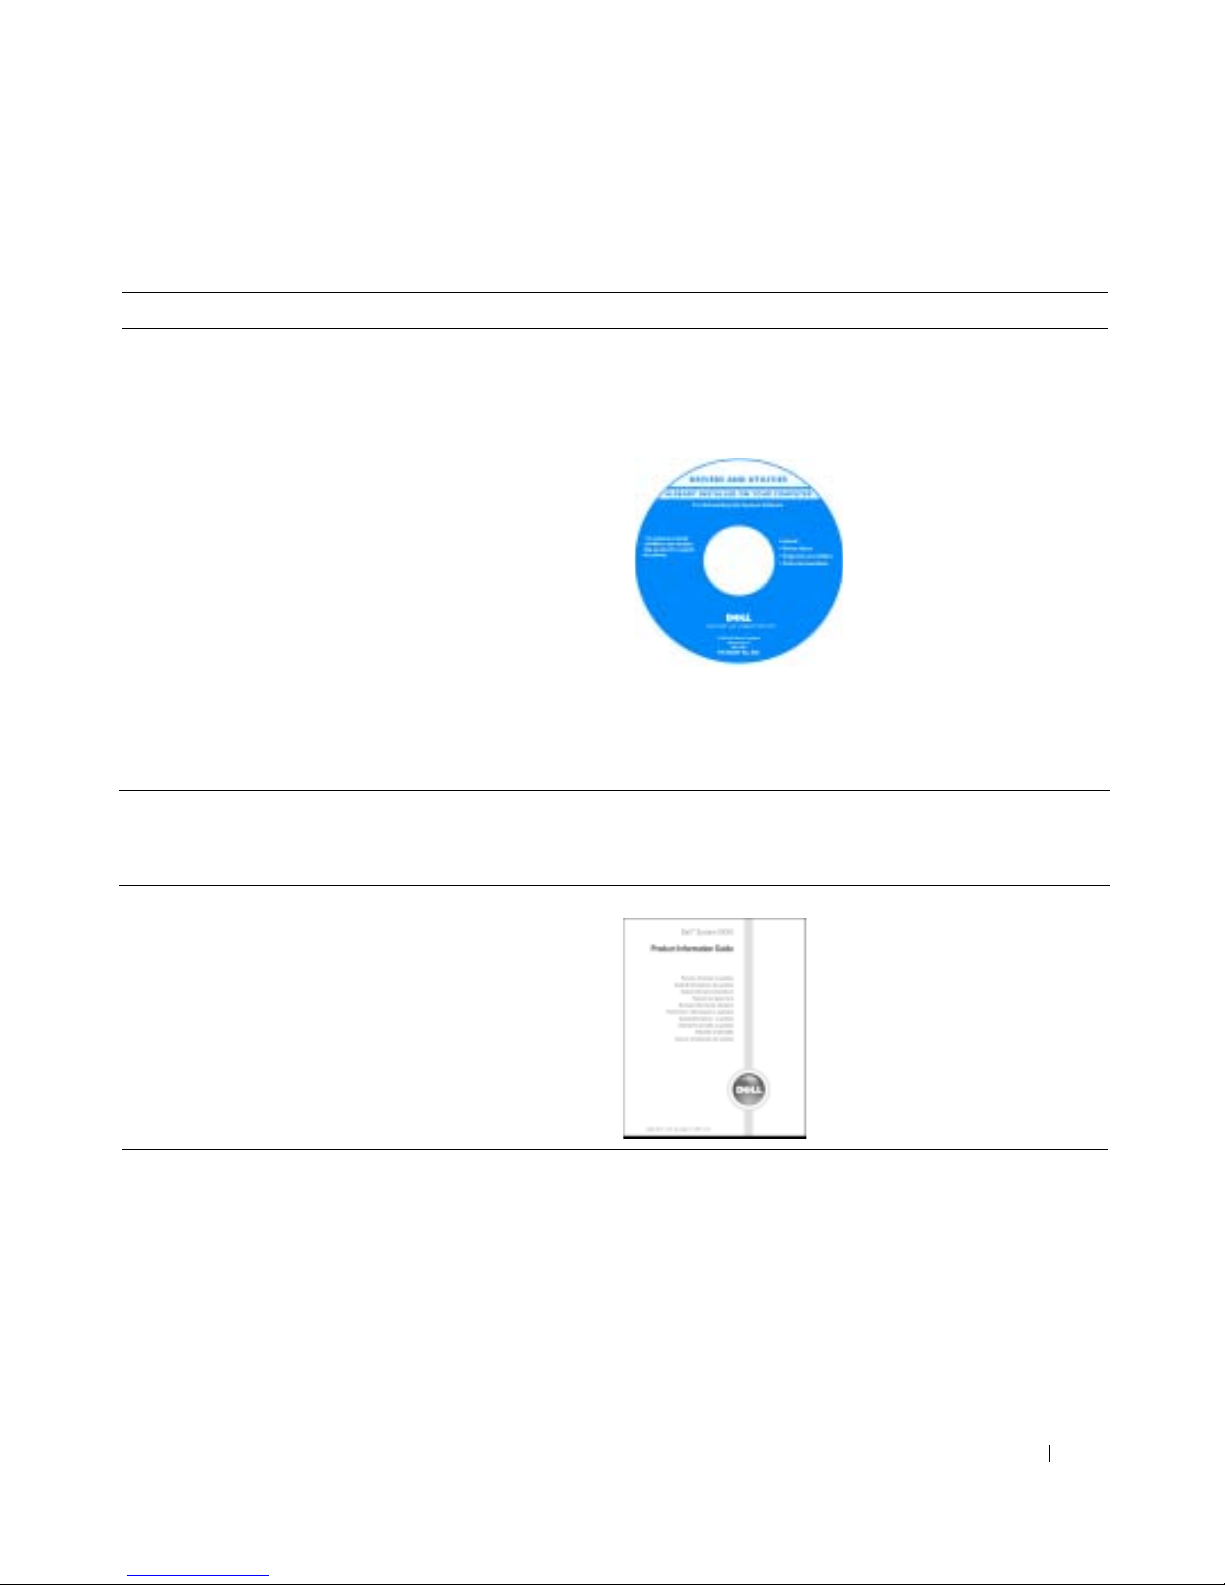
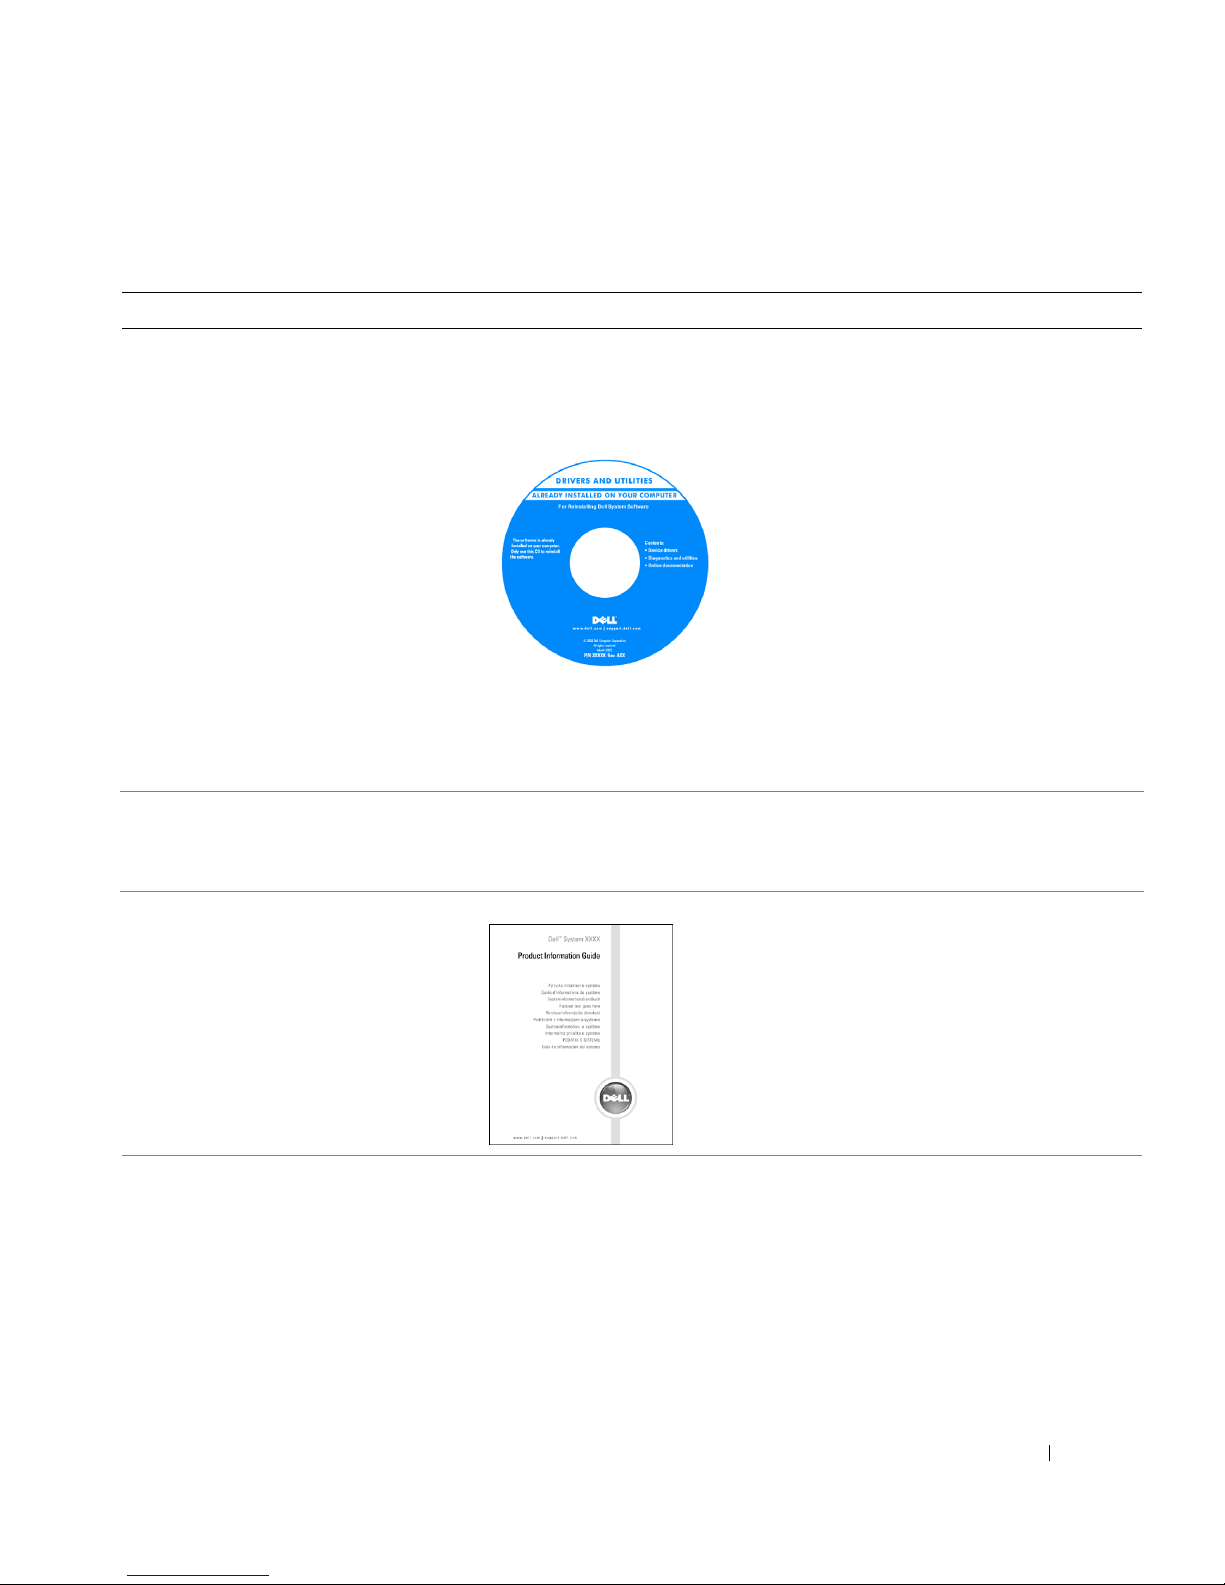
Drivers and Utilities CD (also known as the ResourceCD)
Documentation and drivers are already installed on your
computer. You can use the CD to reinstall drivers, run the
Dell Diagnostics, or access your documentation.
Readme files may be
included on your CD to
provide last-minute
updates about technical
changes to your
computer or advanced
technical-reference
material for technicians
or experienced users.
NOTE: The latest drivers and documentation updates can
be found at support.dell.com.
NOTE: The Drivers and Utilities CD is optional and may not
ship with all computers.
Desktop System Software
Located on the Drivers and Utilities CD and the Dell
Support website at support.dell.com.
Product Information Guide
• How to remove and replace parts
• Technical specifications
• How to configure system settings
• How to troubleshoot and solve problems
Dell™ OptiPlex™ User’s Guide
®
Microsoft
1
Click the
2
Click
The User’s Guide is also available on the
Utilities
Windows® XP Help and Support Center
Start
button and click
User’s and system guides
CD
.
Quick Reference Guide 5
Help and Support.
and click
User’s guides
Drivers and
.
Page 6
What Are You Looking For? Find It Here
• Service Tag and Express Service Code
• Microsoft Windows License Label
www.dell.com | support.dell.com
• Latest drivers for my computer
• Answers to technical service and support questions
• Online discussions with other users and technical
support
• Documentation for my computer
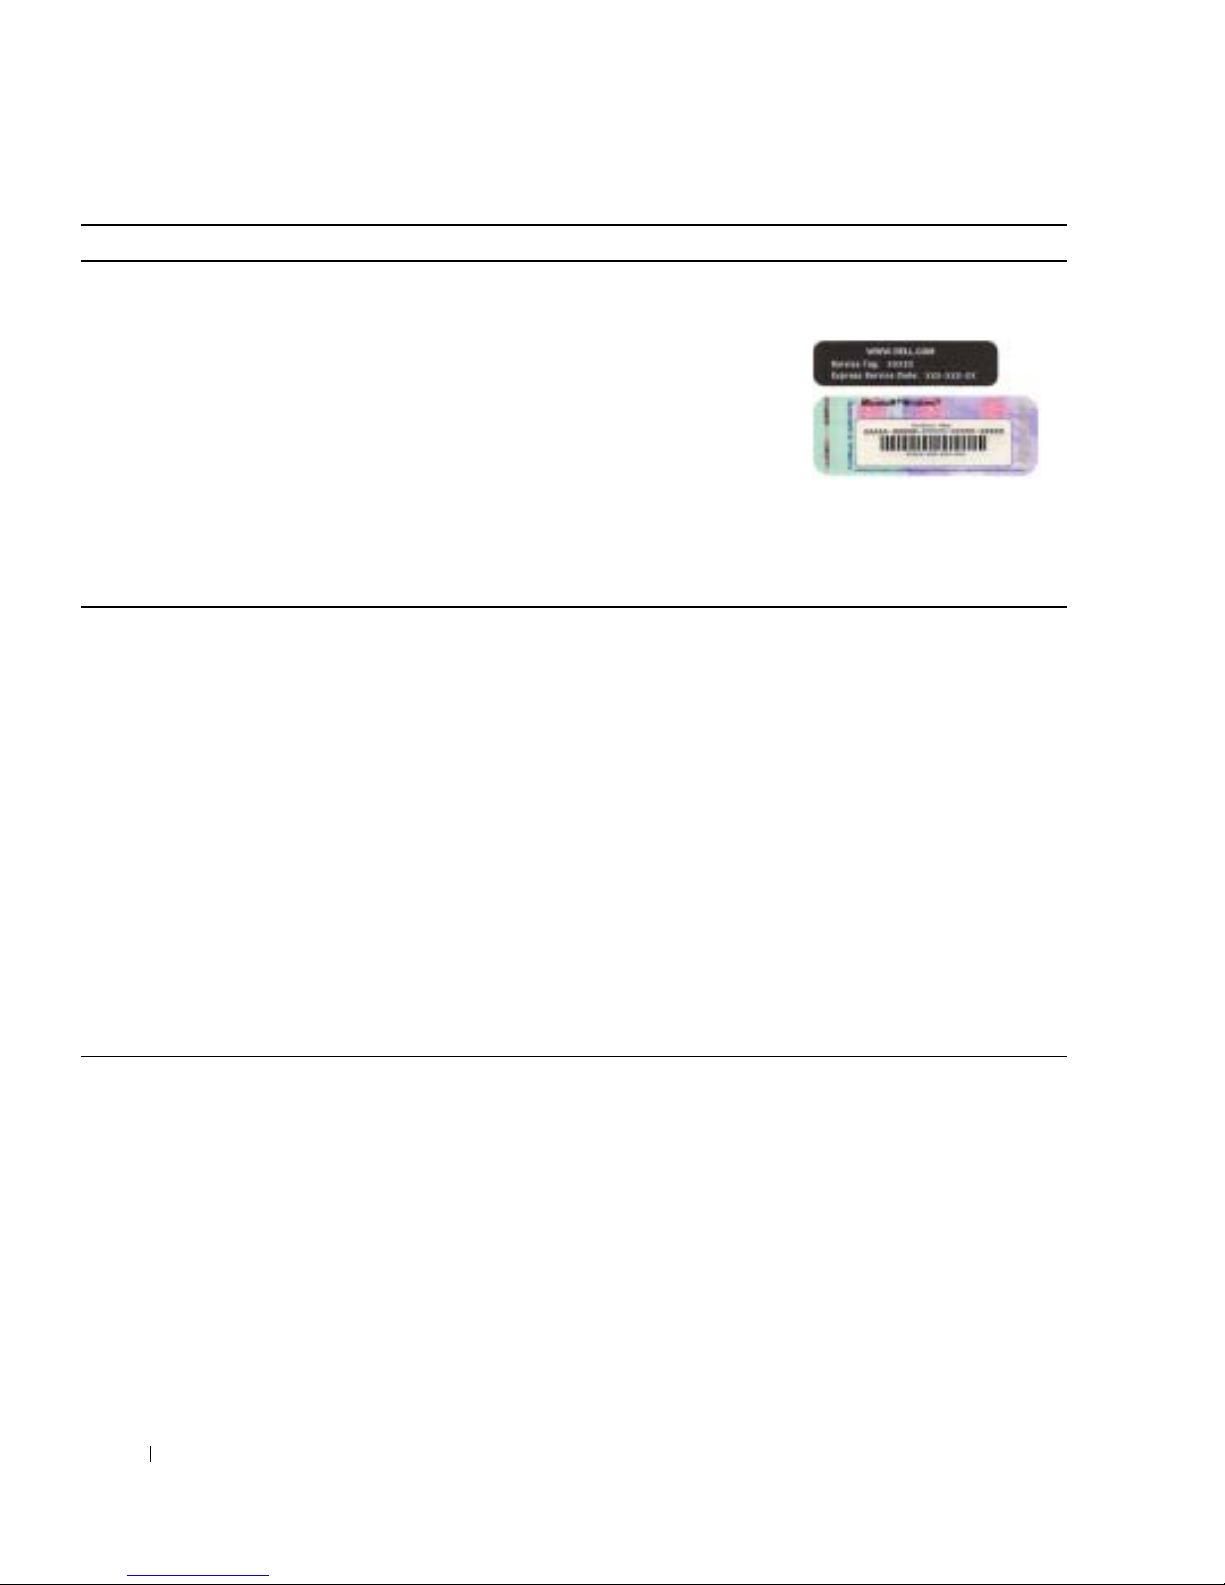
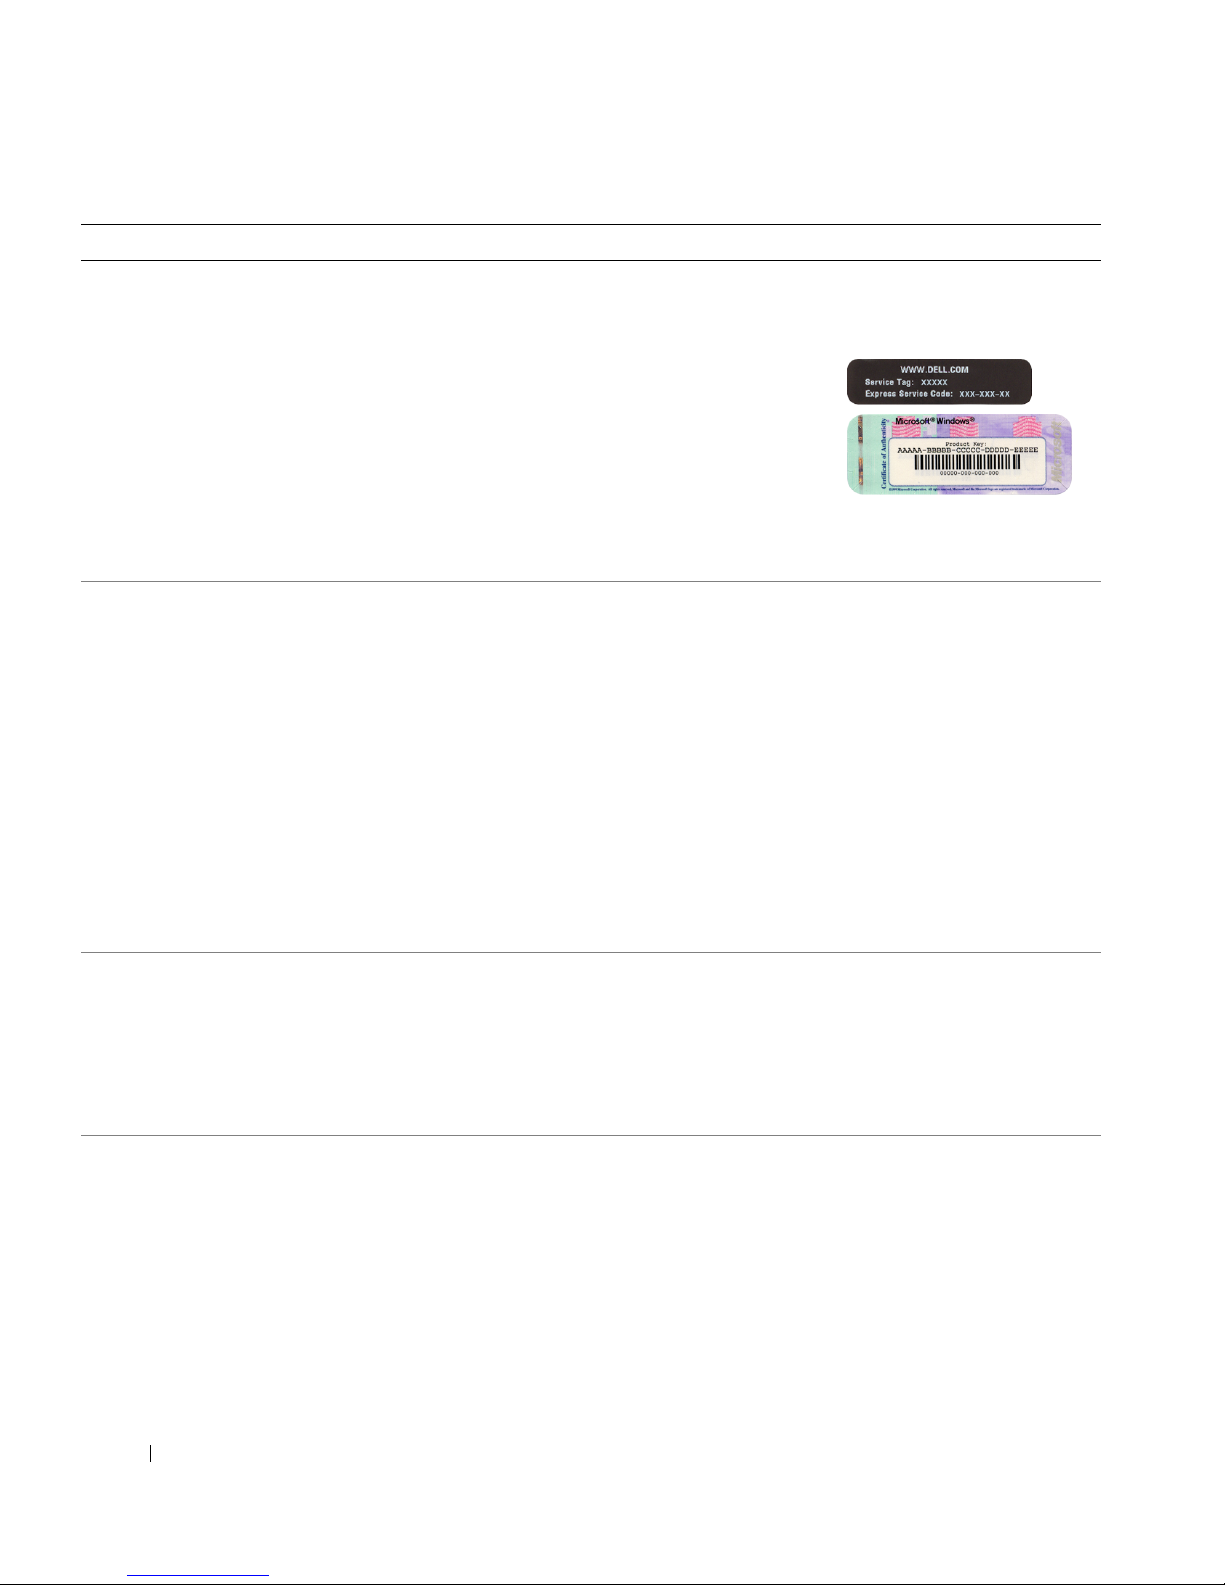
Service Tag and Microsoft Windows License
These labels are located on your computer.
• Use the Service Tag to
identify your
computer when you
support.dell.com
use
or contact technical
support.
• Enter the Express
Service Code to direct your call when contacting
technical support. The Express Service Code is not
available in all countries.
Dell Support Website — support.dell.com
NOTE: Select your region to view the appropriate support
site.
The Dell Support website provides several online tools,
including:
• Solutions — Troubleshooting hints and tips, articles
from technicians, and online courses
• Community — Online discussion with other Dell
customers
• Upgrades — Upgrade information for components, such
as memory, the hard drive, and the operating system
• Customer Care — Contact information, order status,
warranty, and repair information
• Downloads — Drivers, patches, and software updates
• Reference — Computer documentation, product
specifications, and white papers
• Service call status and support history
• Top technical issues for my computer
• Frequently asked questions
• File downloads
• Details on my computer configuration
• Service contract for my computer
6 Quick Reference Guide
Dell Premier Support Website — premiersupport.dell.com
The Dell Premier Support website is customized for
corporate, government, and education customers. This
website may not be available in all regions.
Page 7
What Are You Looking For? Find It Here
• How to use Windows XP
• Documentation for my computer
• Documentation for devices (such as a modem)
• How to reinstall my operating system
Windows Help and Support Center
1
Click the
2
Type a word or phrase that describes your problem and
Start
button and click
Help and Support
.
click the arrow icon.
3
Click the topic that describes your problem.
4
Follow the instructions on the screen.
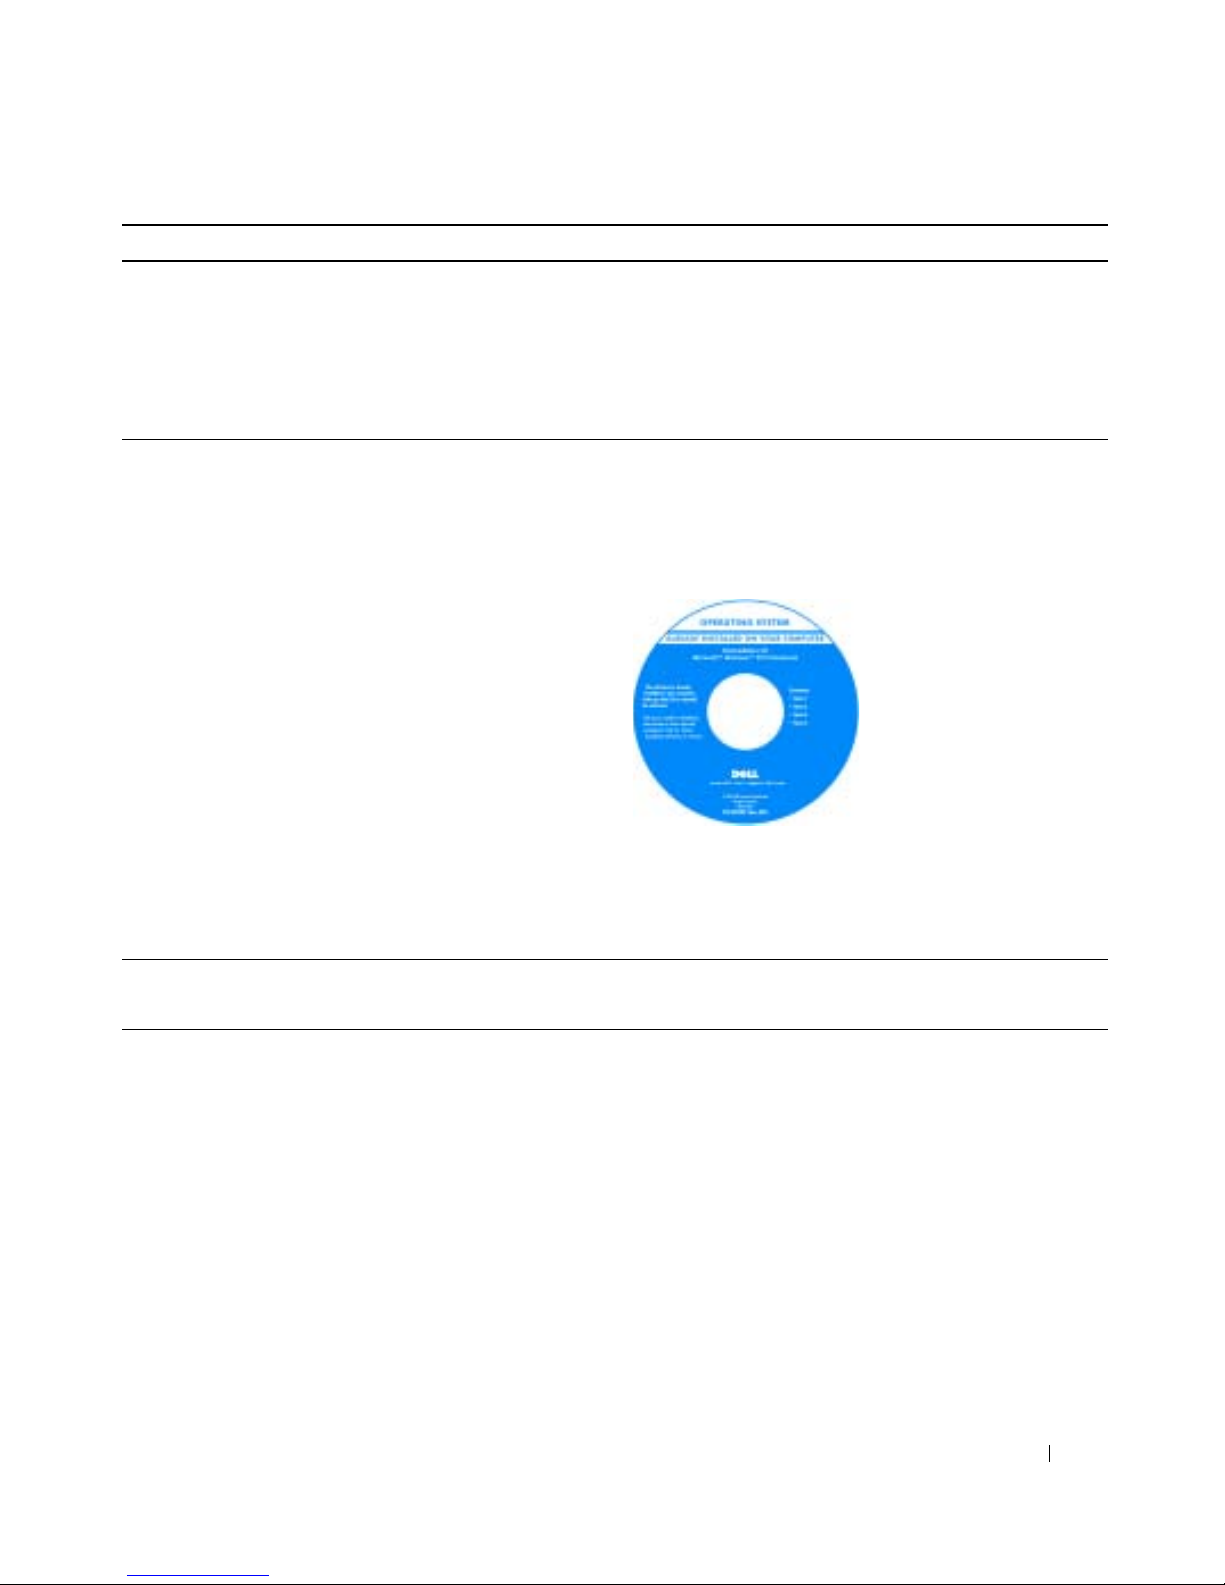
Operating System CD
The operating system is already installed on your
computer. To reinstall your operating system, use the
Operating System CD. See your OptiPlex User’s Guide for
instructions.
After you reinstall your
operating system, use the
Drivers and Utilities CD
to reinstall drivers for the
devices that came with
your computer.
Your operating system
product key
label is
located on your
computer.
NOTE: The color of your CD varies based on the operating
system you ordered.
NOTE: The operating system media are optional and may
not ship with all computers.
• Regulatory Model Information and Chassis Type
DHS—Small desktop chassis
MTC2
—
Mini-tower chassis
Quick Reference Guide 7
Page 8
About Your Small Desktop Computer
Front and Back Views
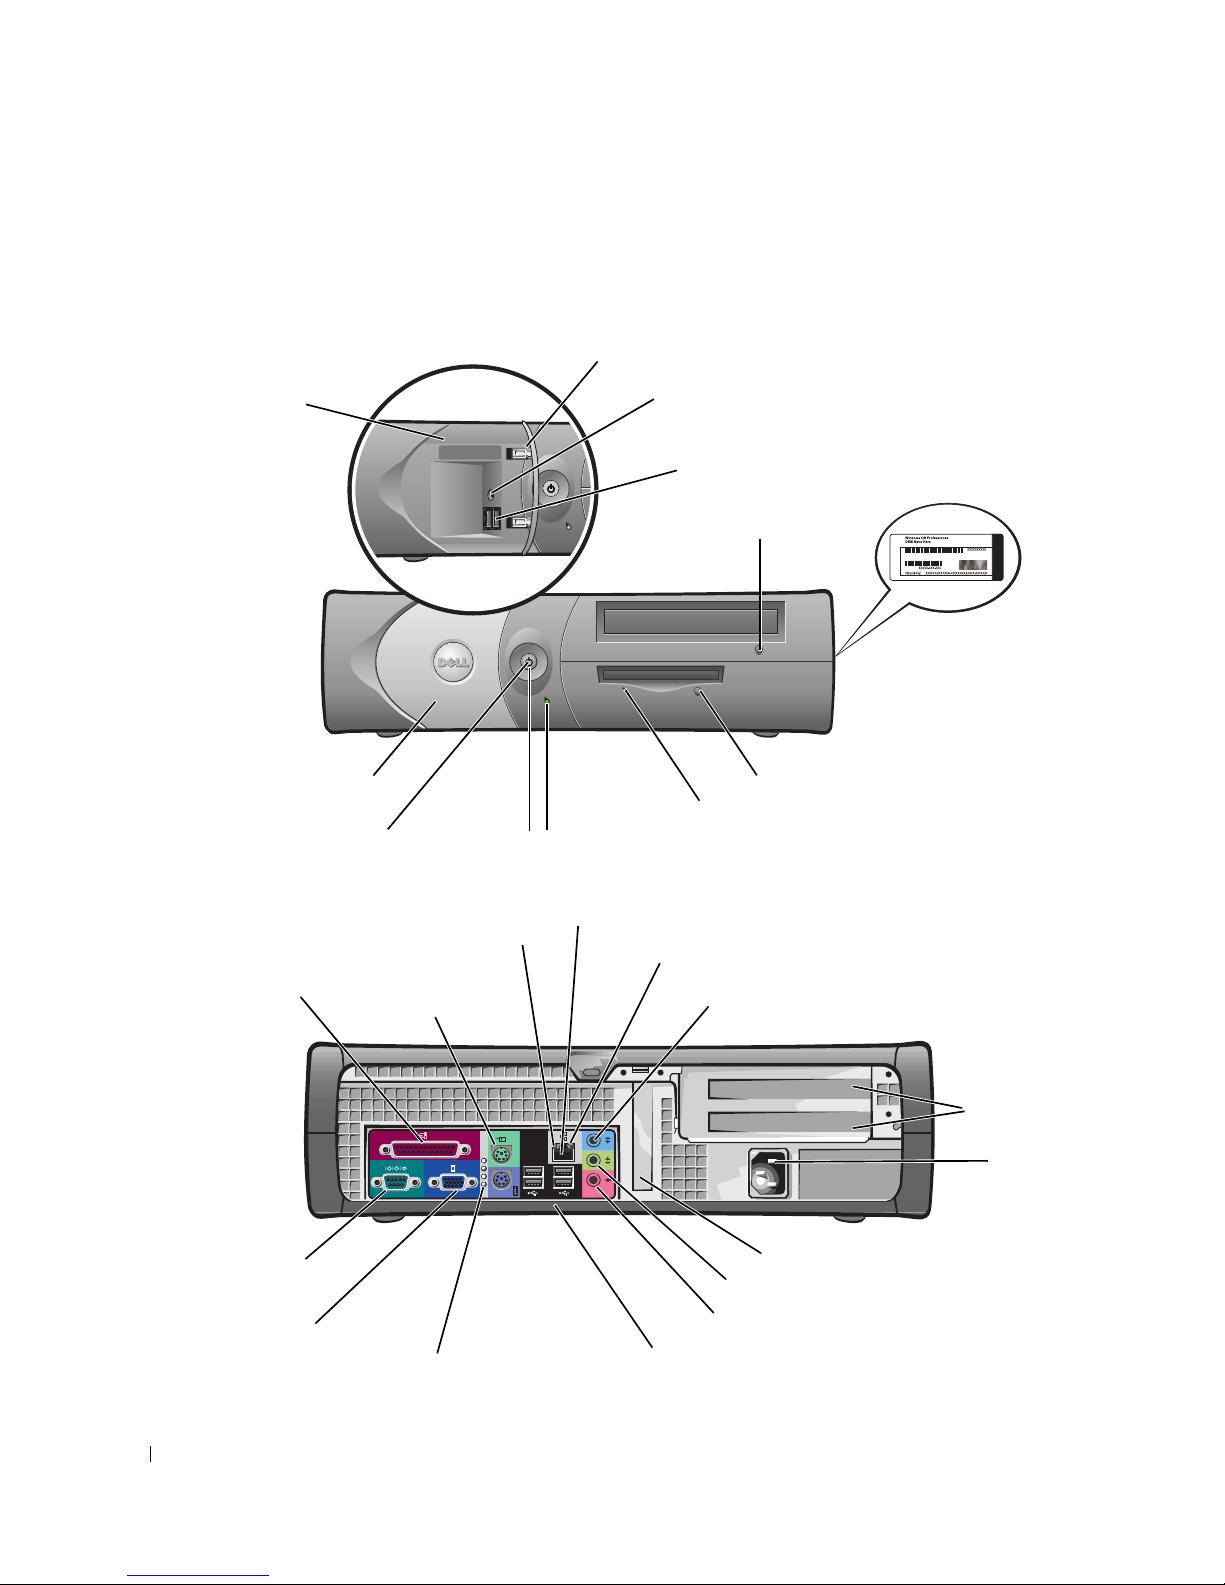
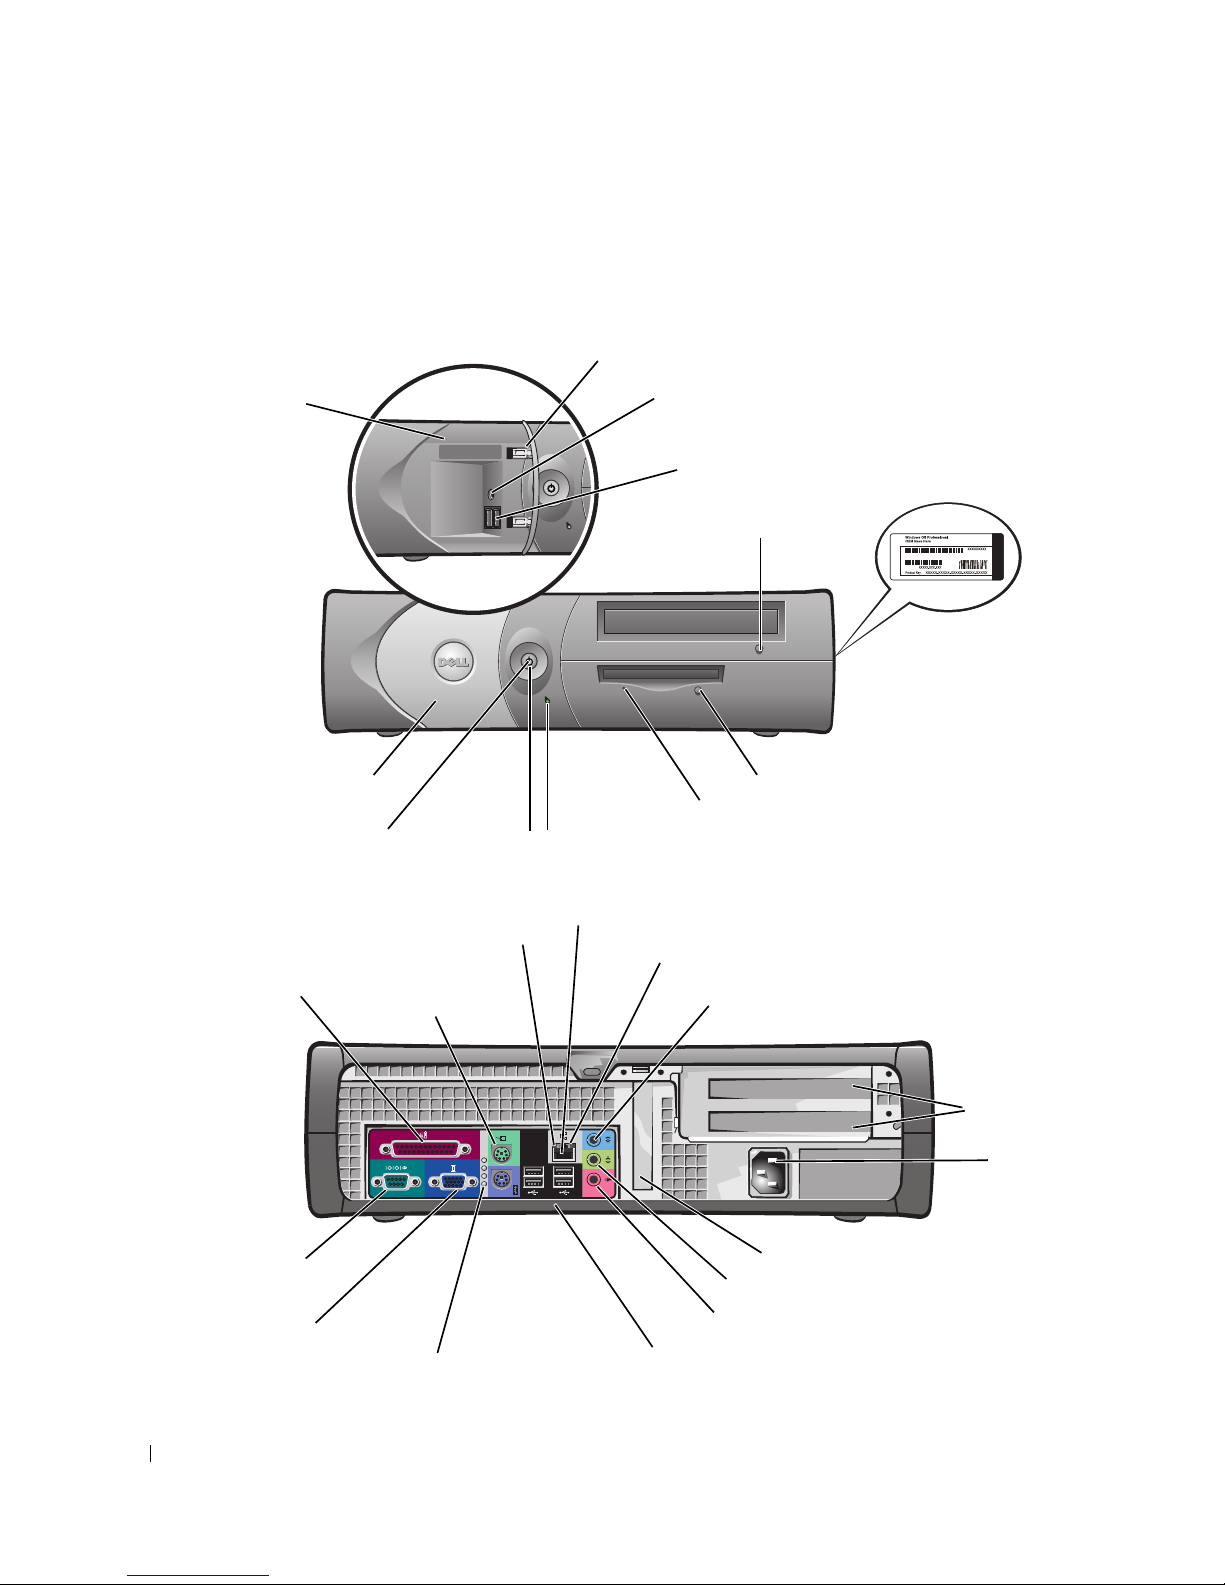
front panel door
service tag
www.dell.com | support.dell.com
front panel door
power light
parallel
connector
power button
link integrity light
mouse
connector
headphone connector
USB 2.0 connectors (2)
CD/DVD drive
eject button
floppy-drive activity light
hard-drive activity light
network adapter connector
network activity light
line-in connector
Microsoft
Windows
Product Key
CD/DVD-drive
eject button
floppy-drive eject button
serial
connector
video
connector
diagnostic lights
8 Quick Reference Guide
optional card
slots (2)
power
A B C D
connector
low-profile PCI card slot
line-out connector
microphone connector
USB 2.0 connectors (4)
Page 9
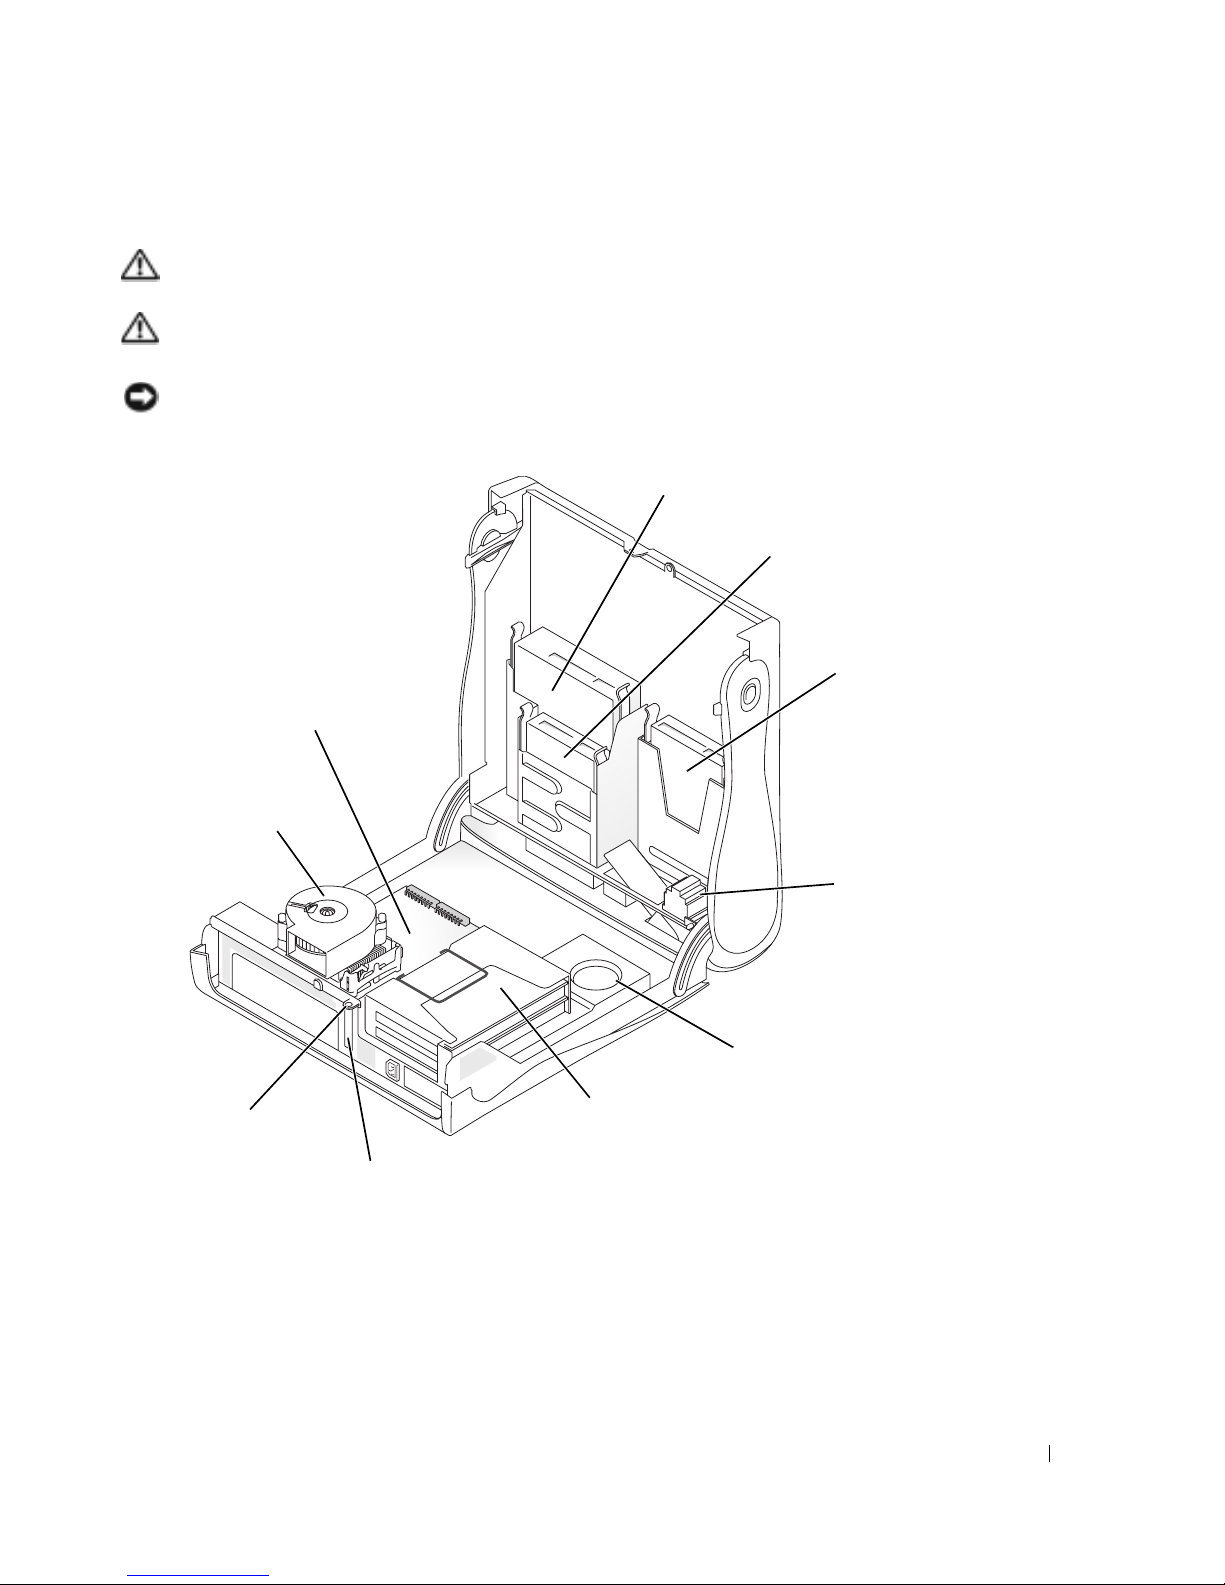
Inside Your Computer
CAUTION: Before you begin any of the procedures in this section, follow the safety instructions in the
Product Information Guide.
CAUTION: To avoid electrical shock, always unplug your computer from the electrical outlet before
opening the cover.
NOTICE: Be careful when opening the computer cover to ensure that you do not accidently disconnect
cables from the system board.
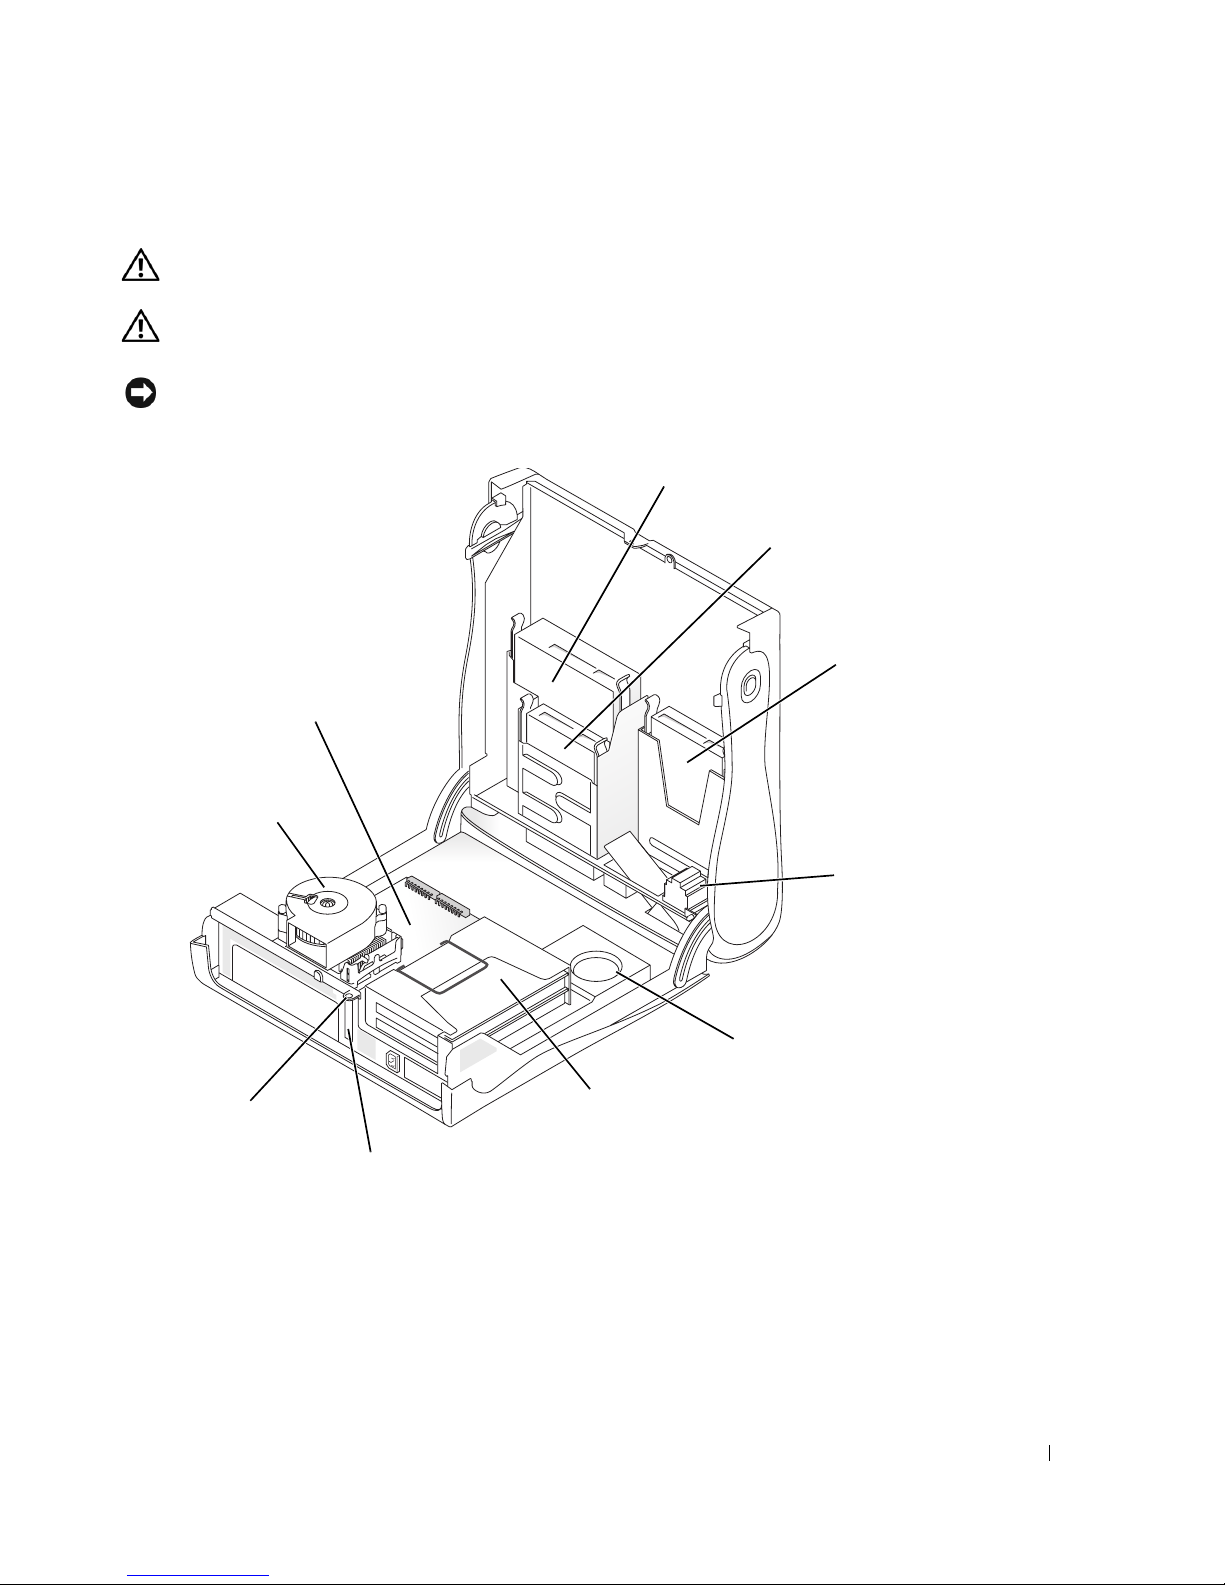
CD/DVD drive
floppy drive
hard drive
system board
heat sink and
blower assembly
padlock ring
low-profile
PCI card slot
optional internal
speaker
power supply
optional card cage
NOTE: Your computer may have a metal bracket
instead of a card cage
Quick Reference Guide 9
Page 10
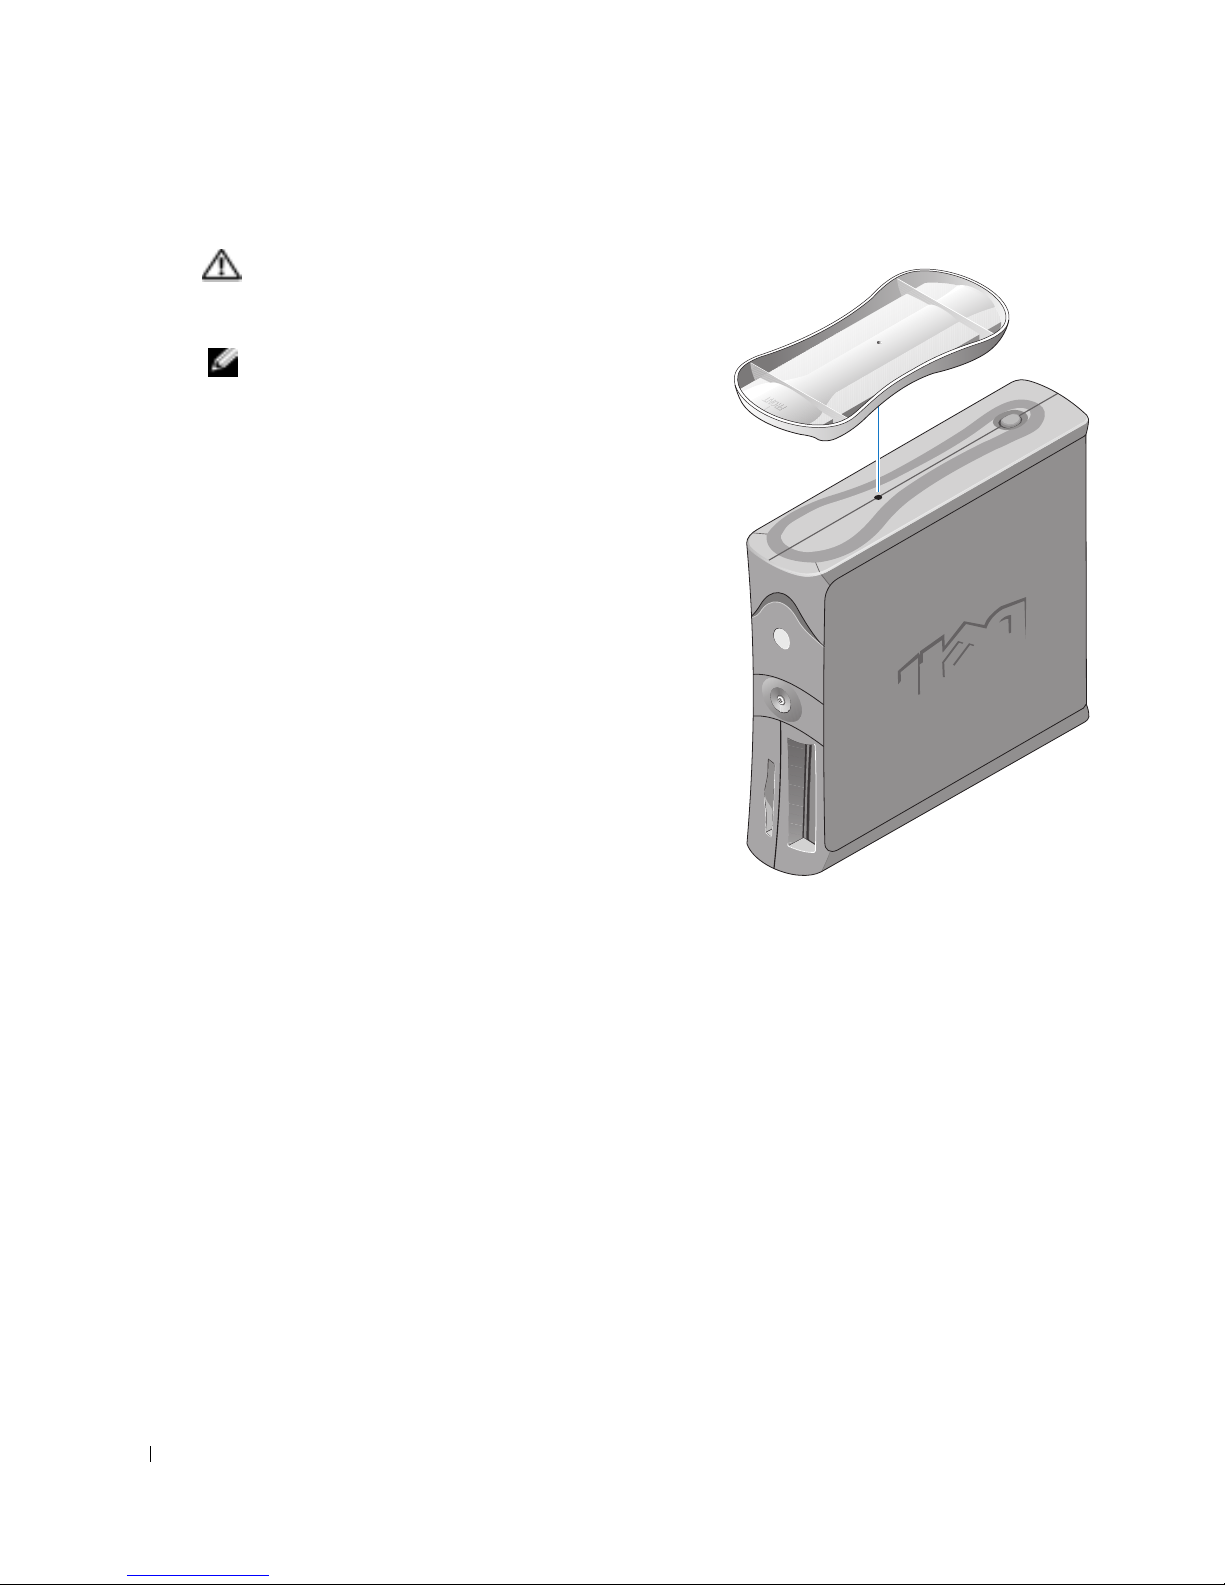
Attaching and Removing the Computer Stand
CAUTION: Before you begin any of the procedures in this
section, follow the safety instructions in the Product
Information Guide.
NOTE: Place your computer on a soft surface to prevent
scratching the top cover.
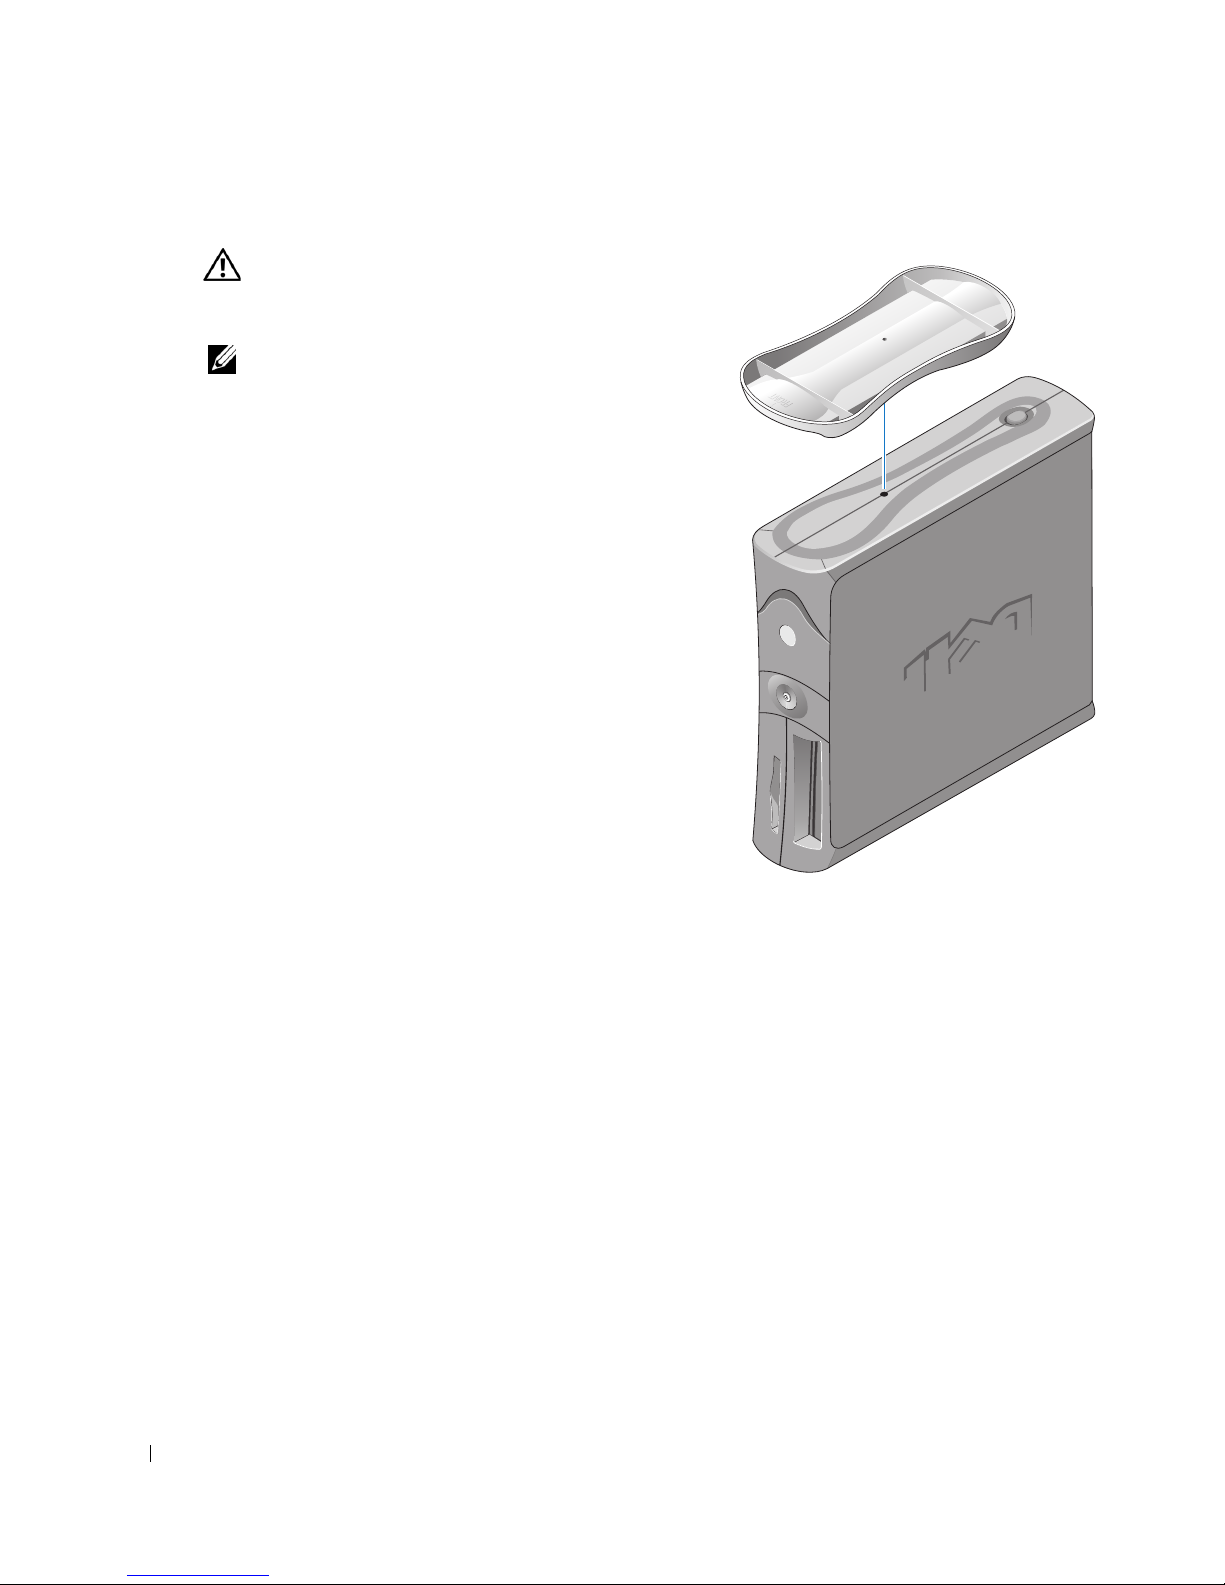
Your computer can be used in either a vertical or
horizontal position.
To use the computer in a vertical position, you must
attach the computer stand:
1
www.dell.com | support.dell.com
Place the computer on its right side so that the drive
bays are at the bottom and fit the stand onto what
was the left side of the computer:
a
Position the stand as shown in the following
figure by aligning the large round hole in the
stand with the securing button on the side of the
cover.
b
Align the captive screw in the stand with the
screw hole in the cover, and tighten the
thumbscrew.
2
Rotate the computer so that the stand is at the
bottom and the drives are at the top.
10 Quick Reference Guide
Page 11
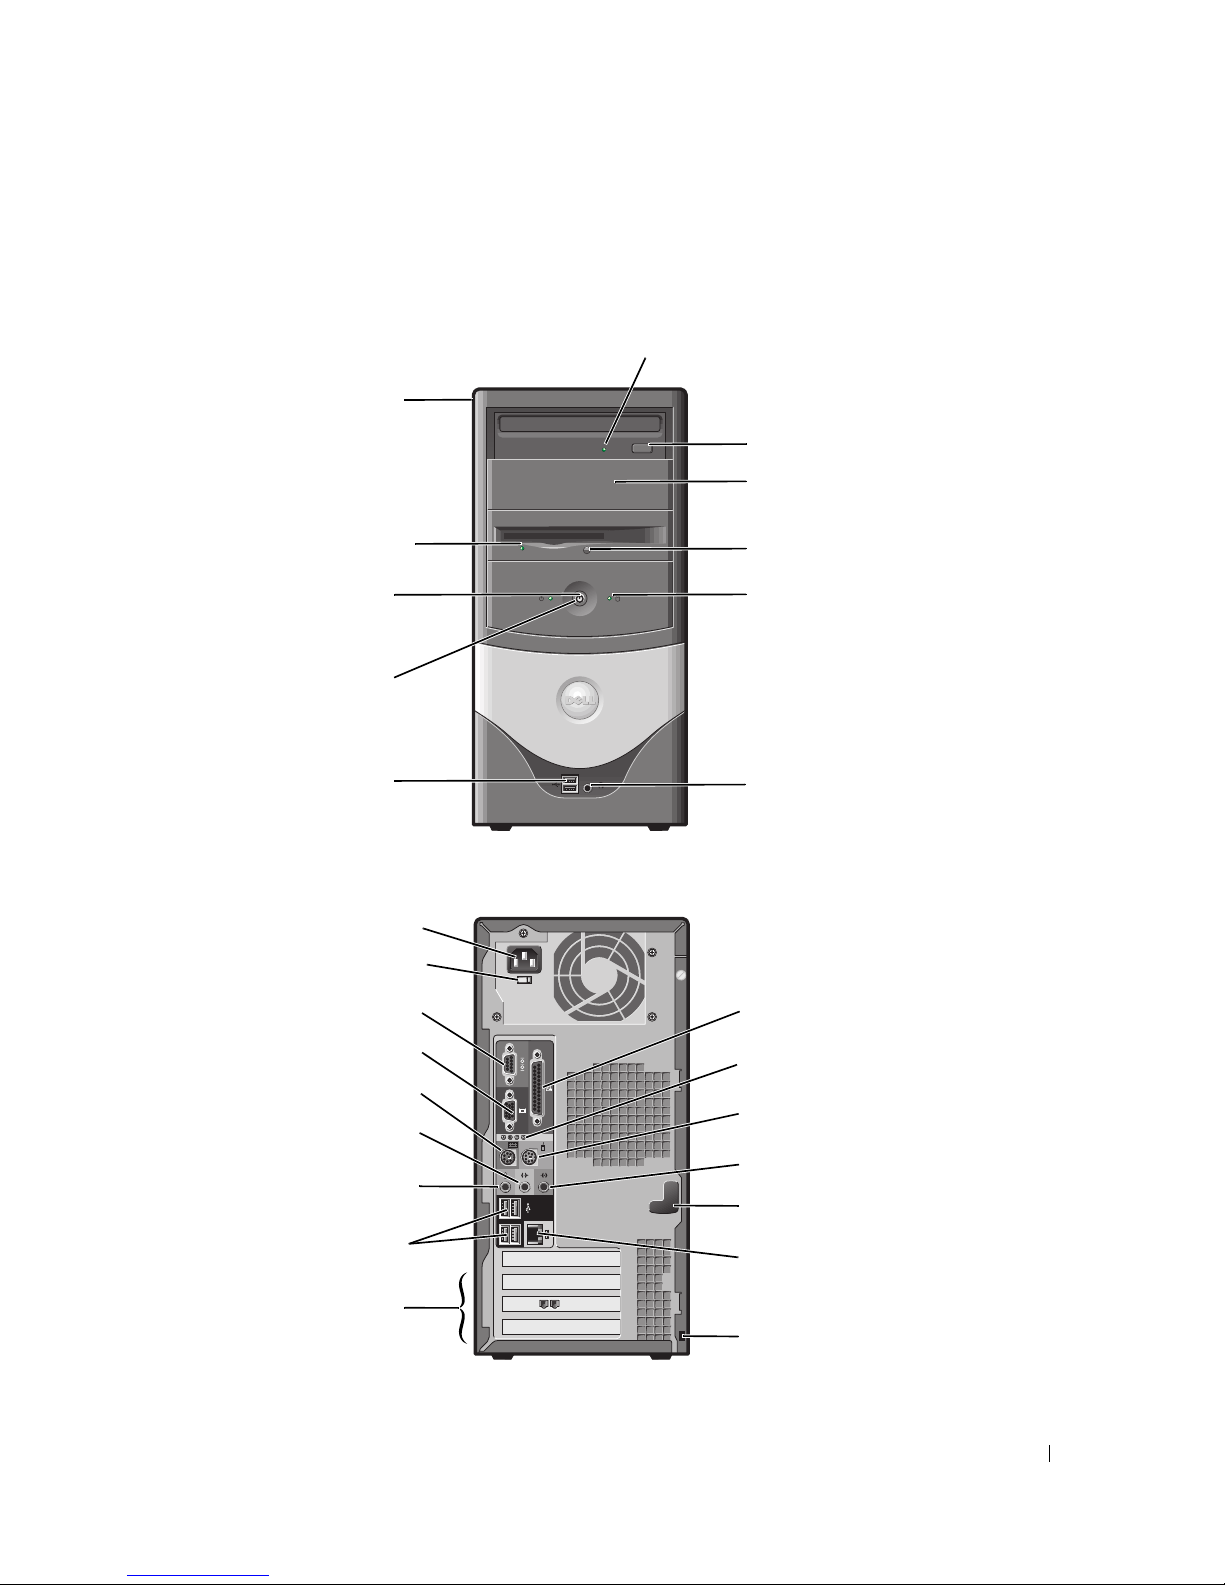
About Your Mini-Tower Computer
Front and Back Views
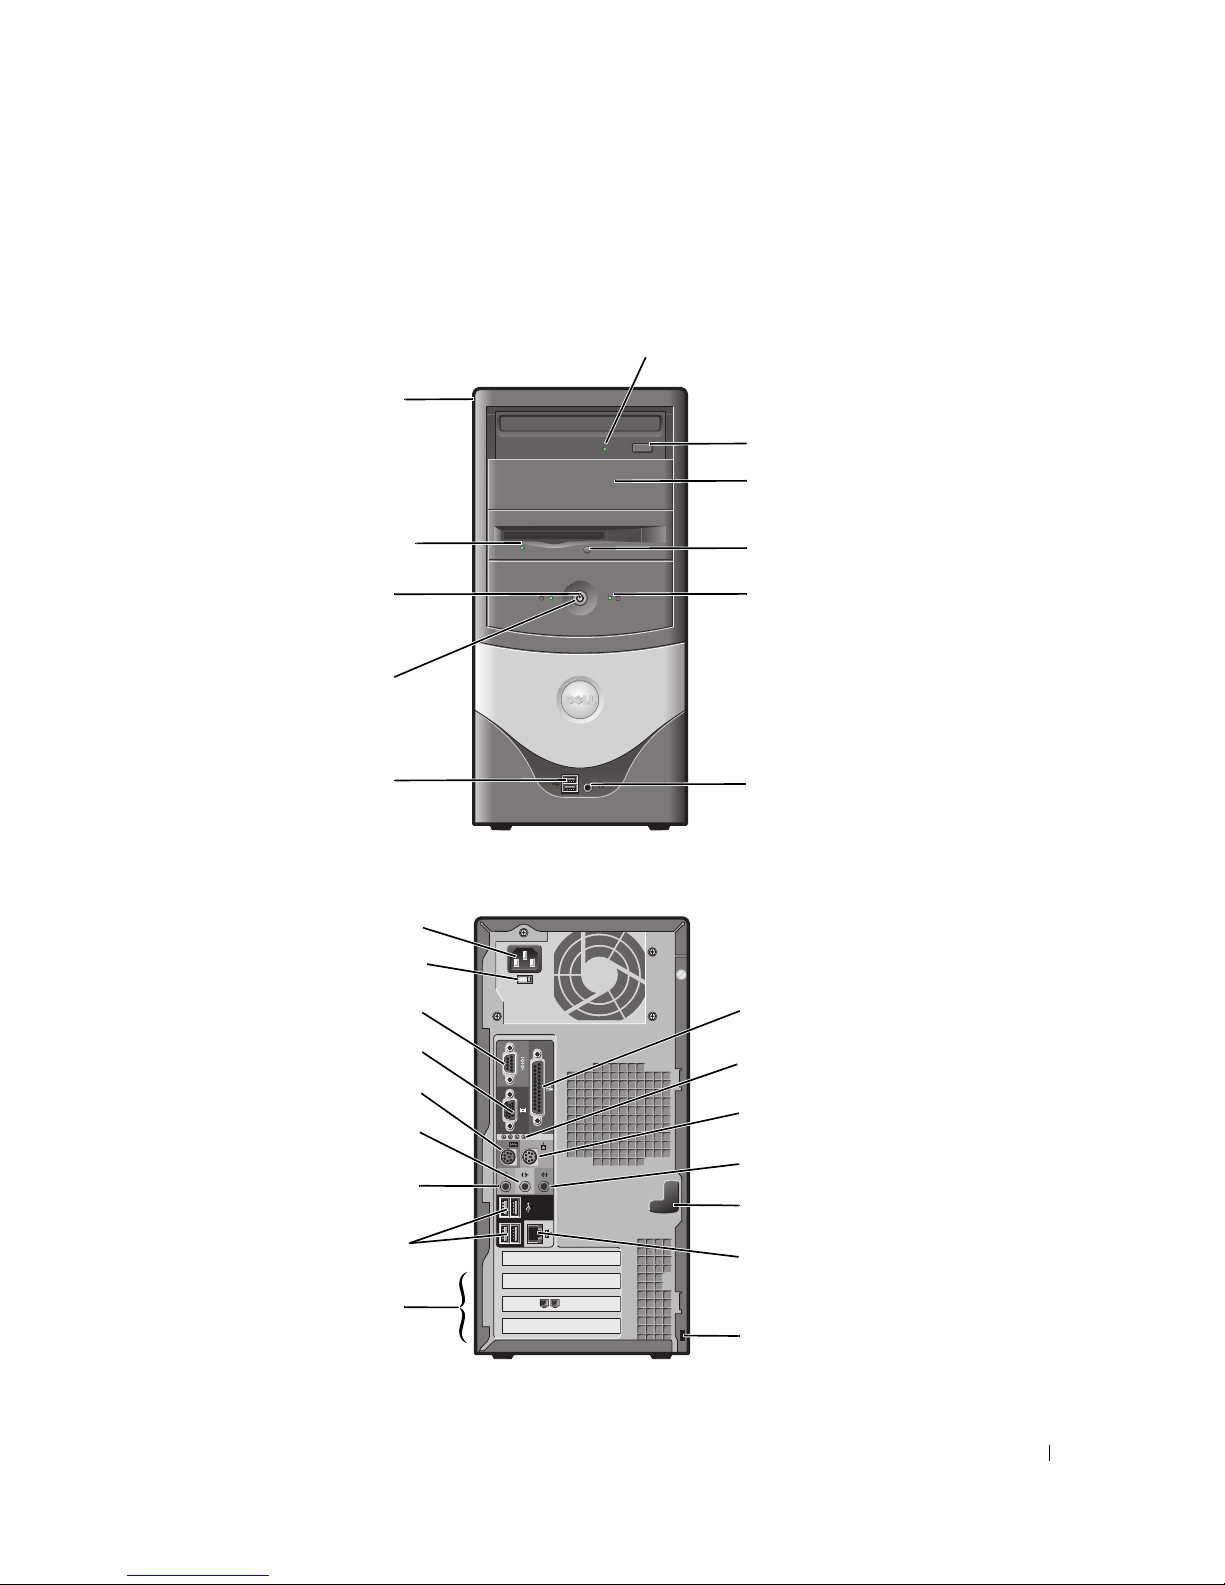
service tag
CD or DVD drive activity light
CD or DVD eject button
second drive bay
floppy drive light
power light
power button
USB 2.0 connectors (2)
power connector
voltage selection switch
serial connector
video connector
keyboard connector
line-out connector
microphone connector
floppy drive eject button
hard-drive activity light
headphone connector
parallel connector
diagnostic lights (4)
mouse connector
line-in connector
cover latch
USB 2.0 connectors (4)
PCI card slots (3)
network adapter connector
security cable slot
Quick Reference Guide 11
Page 12
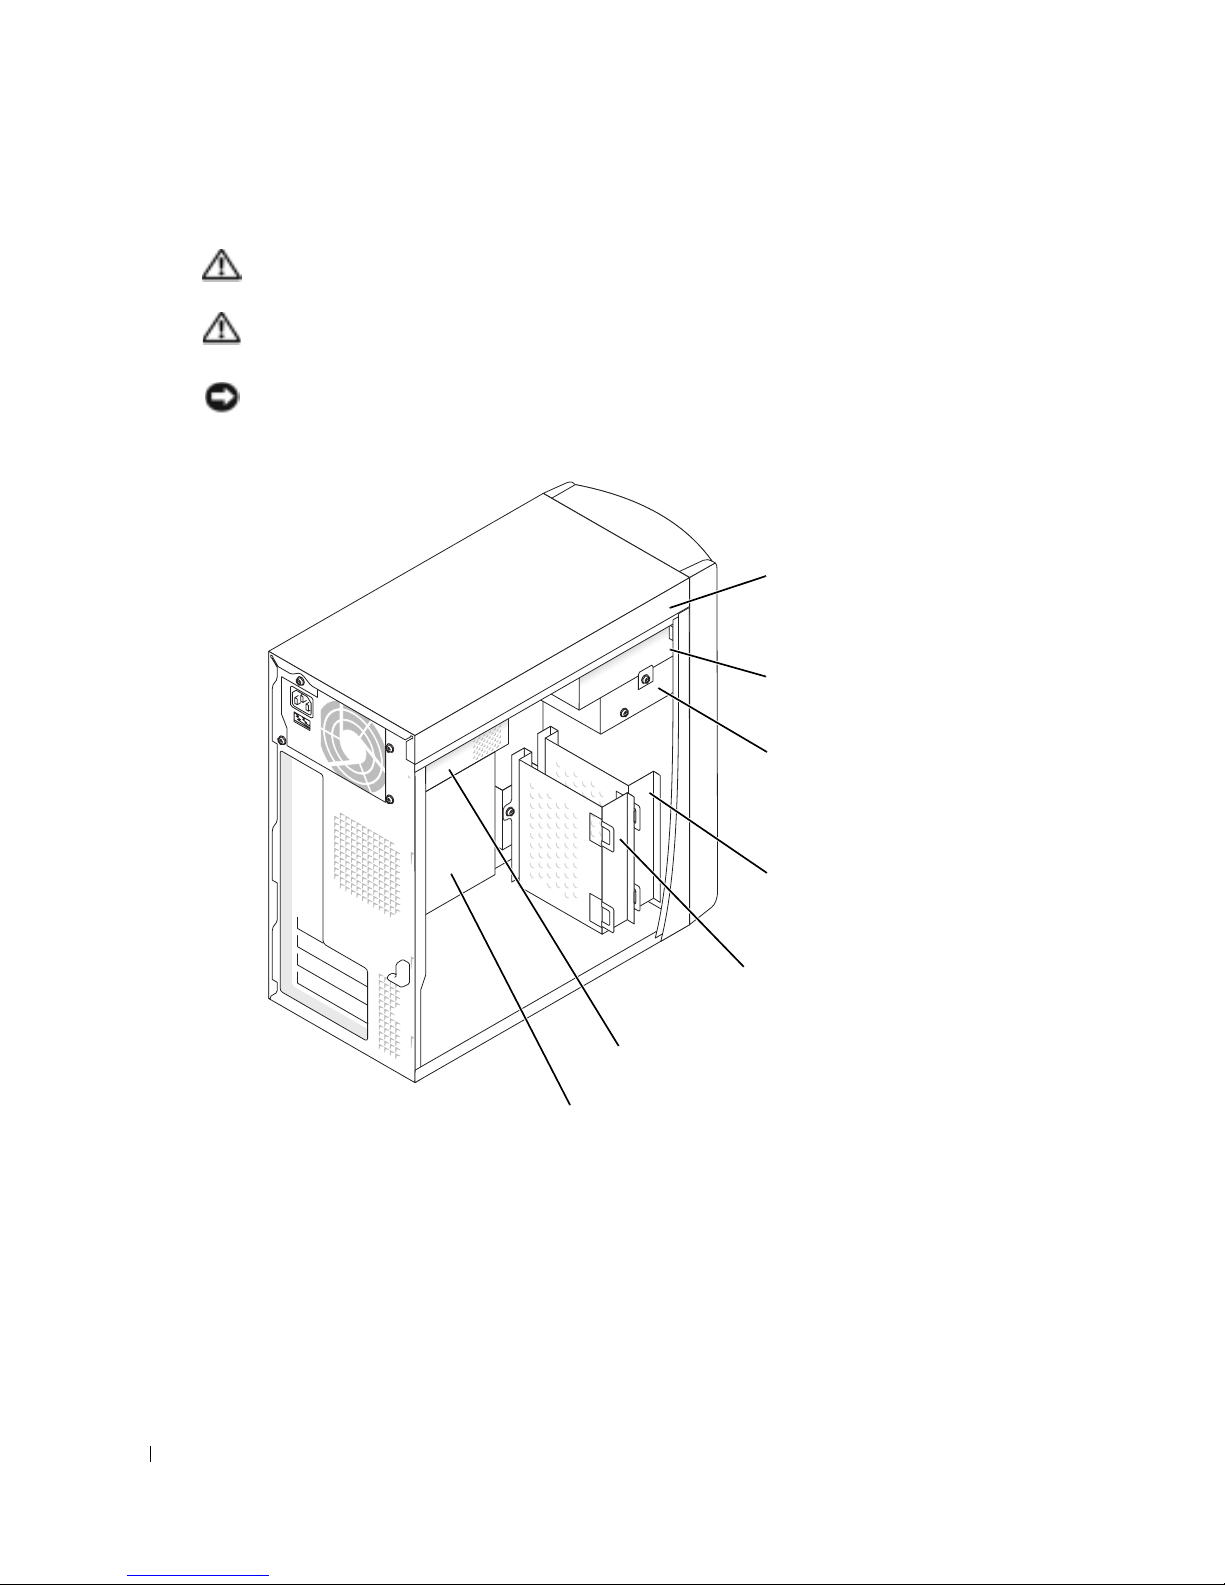
Inside Your Computer
CAUTION: Before you begin any of the procedures in this section, follow the safety instructions in the
Product Information Guide.
CAUTION: To avoid electrical shock, always unplug your computer from the electrical outlet before
opening the cover.
NOTICE: Be careful when opening the computer cover to ensure that you do not accidently disconnect
cables from the system board.
www.dell.com | support.dell.com
CD or DVD drive bay
secondary CD or DVD drive bay
floppy drive bay
12 Quick Reference Guide
secondary hard drive bay
primary hard drive bay
power supply
system board
Page 13

Setting Up Your Computer
CAUTION: Before performing any of the procedures in this section, follow the safety instructions in the
Product Information Guide.
NOTICE: If your computer has an expansion card installed (such as a modem card), connect the
appropriate cable to the card, not to the connector on the back panel.
You must complete all steps to properly set up your computer. See the appropriate illustrations that
follow the instructions.
1
Connect the keyboard and mouse.
NOTICE: Do not attempt to operate a PS/2 mouse and a USB mouse simultaneously.
NOTE: If you have a USB-compliant mouse or keyboard, use the USB connectors on the back of your
computer.
2
Connect the modem or network cable.
Insert the network cable, not the phone line, into the network connector. If you have an
optional modem, connect the phone line to the modem.
NOTICE: Do not connect a modem cable to the network adapter. Voltage from telephone
communications can cause damage to the network adapter.
3
Connect the monitor.
Align and gently insert the monitor cable to avoid bending connector pins. Tighten the
thumbscrews on the cable connectors.
NOTE: Some monitors have the video connector underneath the back of the screen. See the
documentation that came with your monitor for its connector locations.
4
Connect the speakers.
5
Connect power cables to the computer, monitor, and devices and insert the other ends of the
power cables to electrical outlets.
6
Verify that the voltage selection switch is set correctly for your location. Your computer has a
manual voltage selection switch. Computers with a voltage selection switch on the back panel
must be manually set to operate at the correct operating voltage.
NOTICE: To help avoid damaging a computer with a manual voltage selection switch, set the switch for
the voltage that most closely matches the AC power available in your location.
NOTE: Before you install any devices or software that did not ship with your computer, read the
documentation that came with the software or device, or contact the vendor to verify that the software or
device is compatible with your computer and operating system.
Quick Reference Guide 13
Page 14
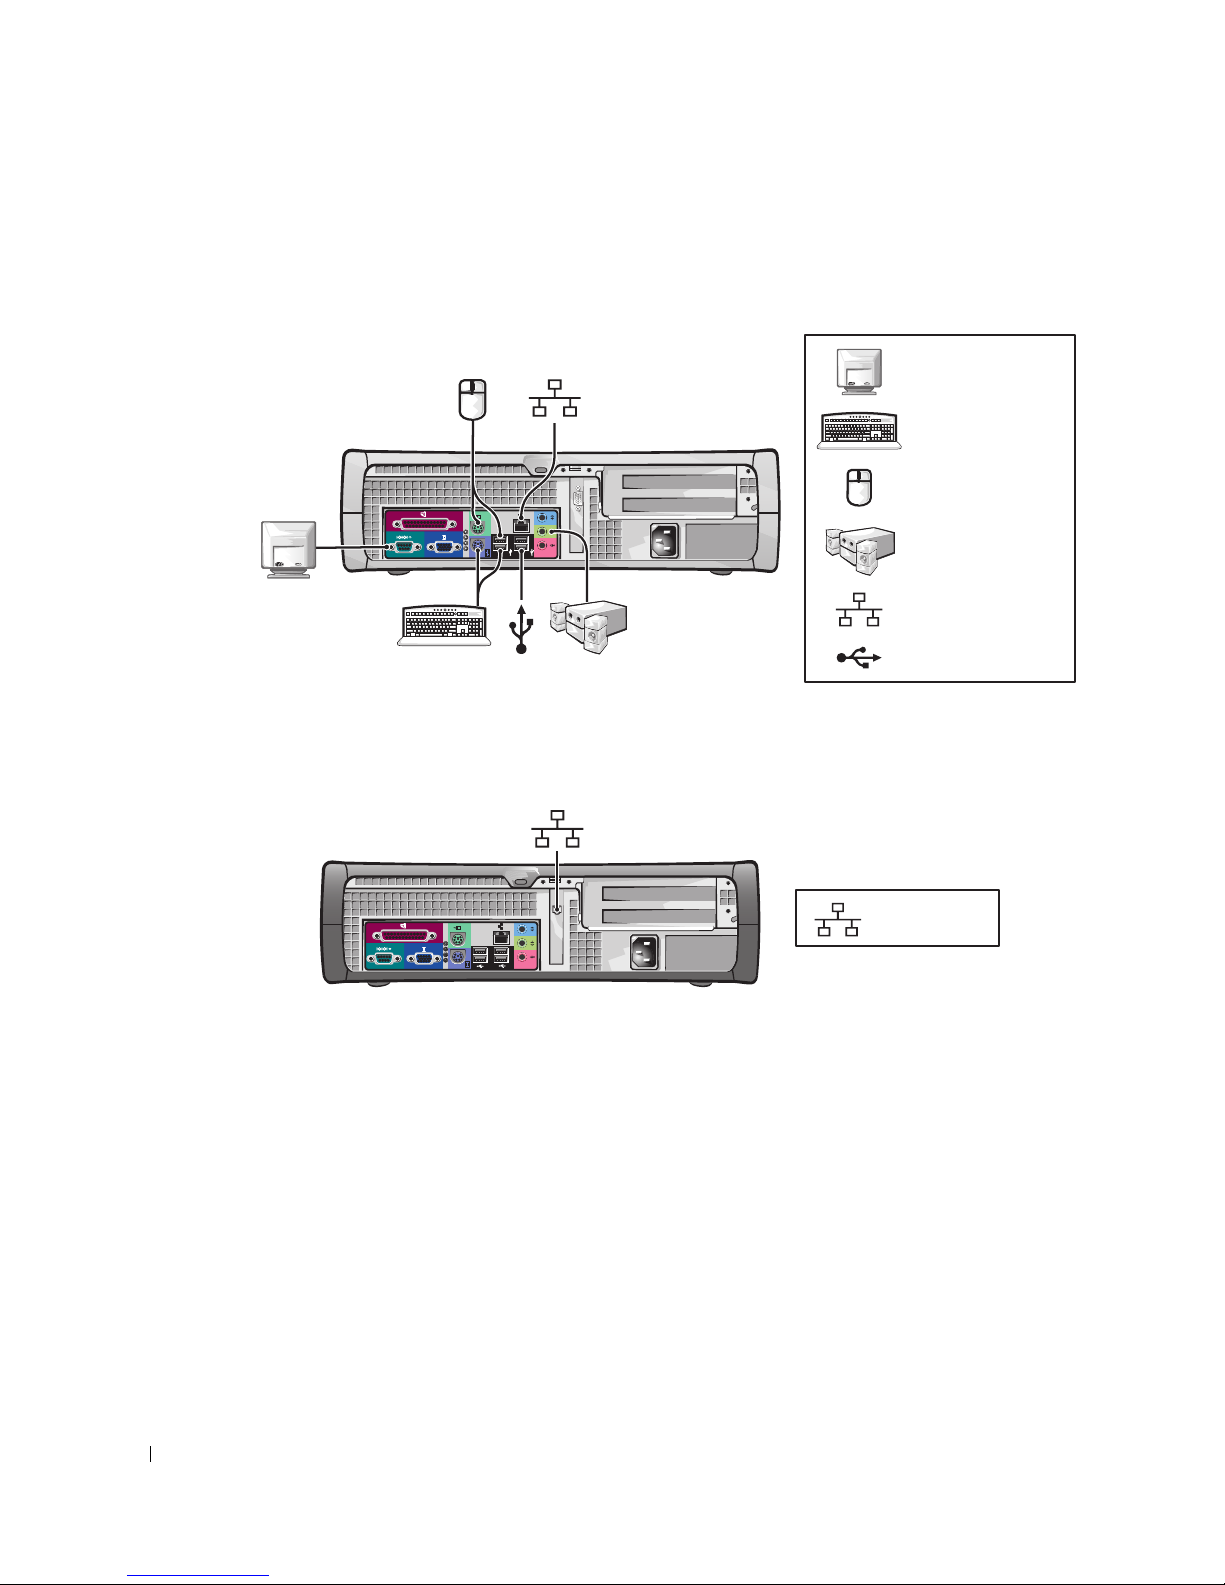
Small Desktop Computer
Setup Without Cards
www.dell.com | support.dell.com
Setup With Cards
monitor
keyboard
mouse
D
C
B
A
speakers
network
USB
14 Quick Reference Guide
network
Page 15
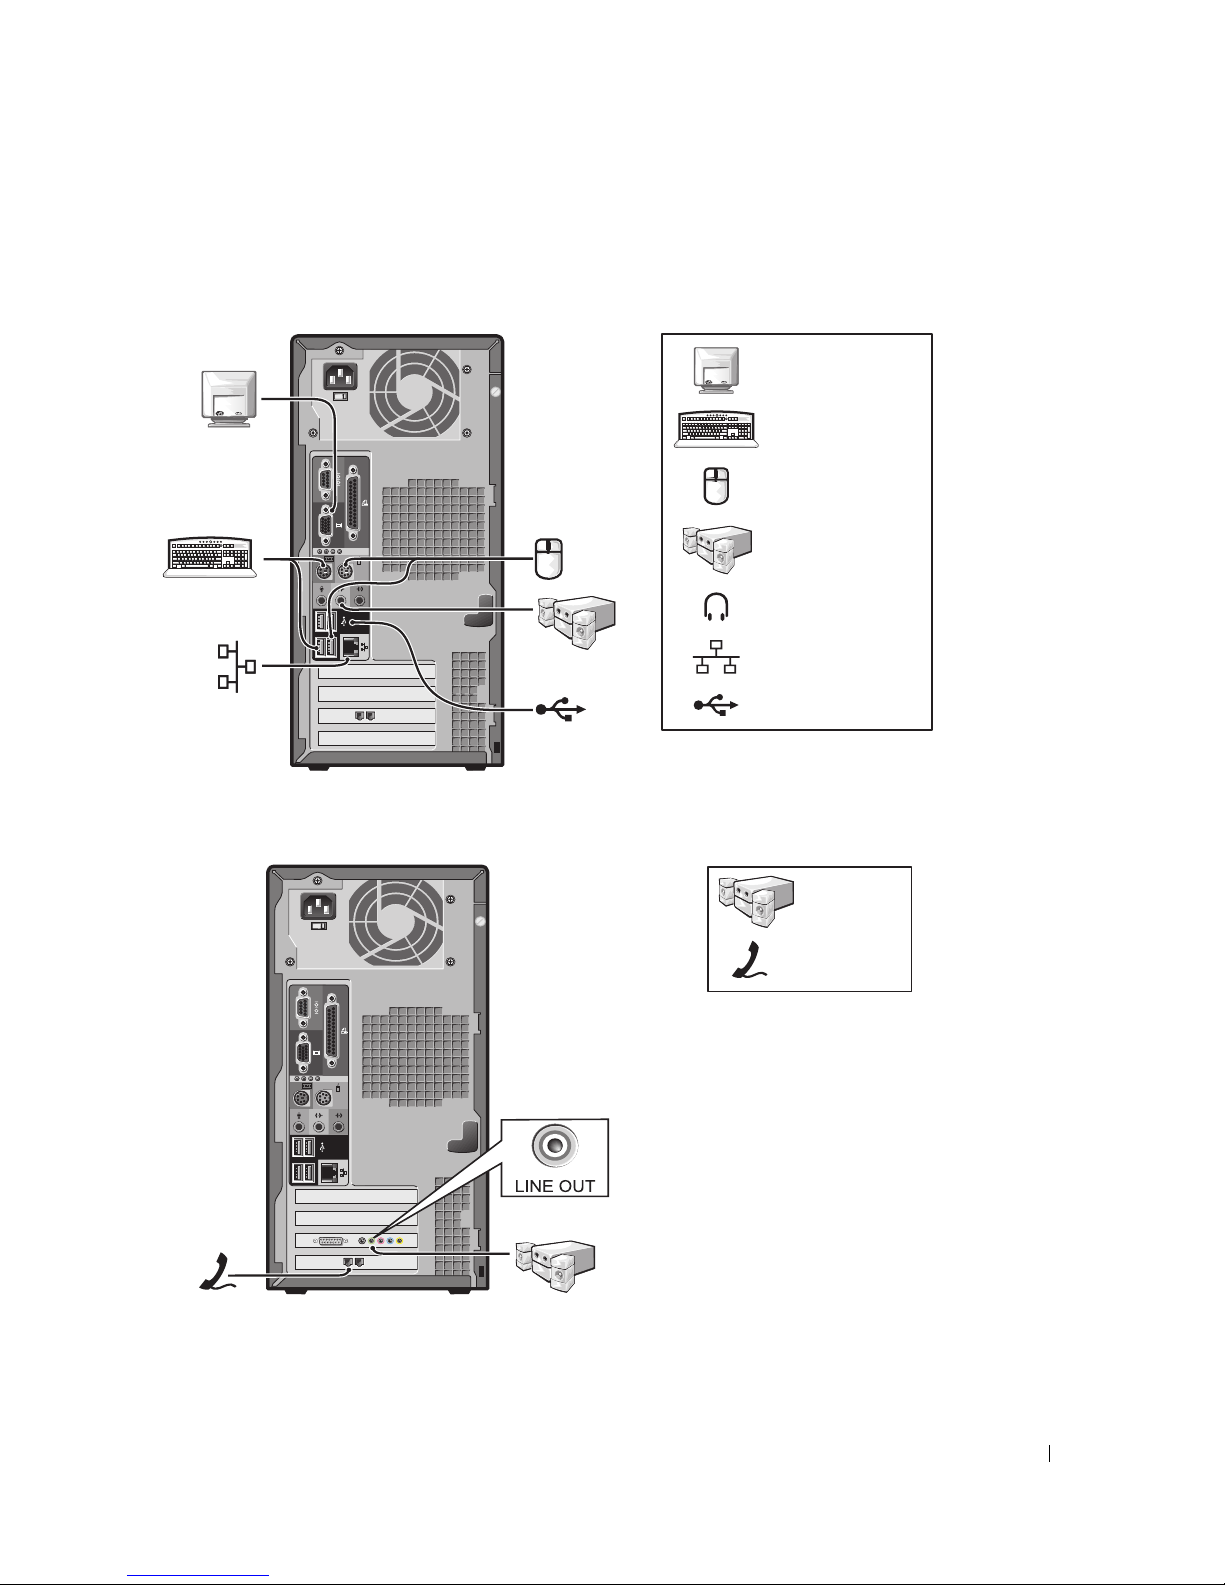
Mini-tower Computer
Setup Without Cards
monitor
keyboard
mouse
speakers
headphones
network
USB
Setup With Cards
speakers
telephony/
modem
Quick Reference Guide 15
Page 16
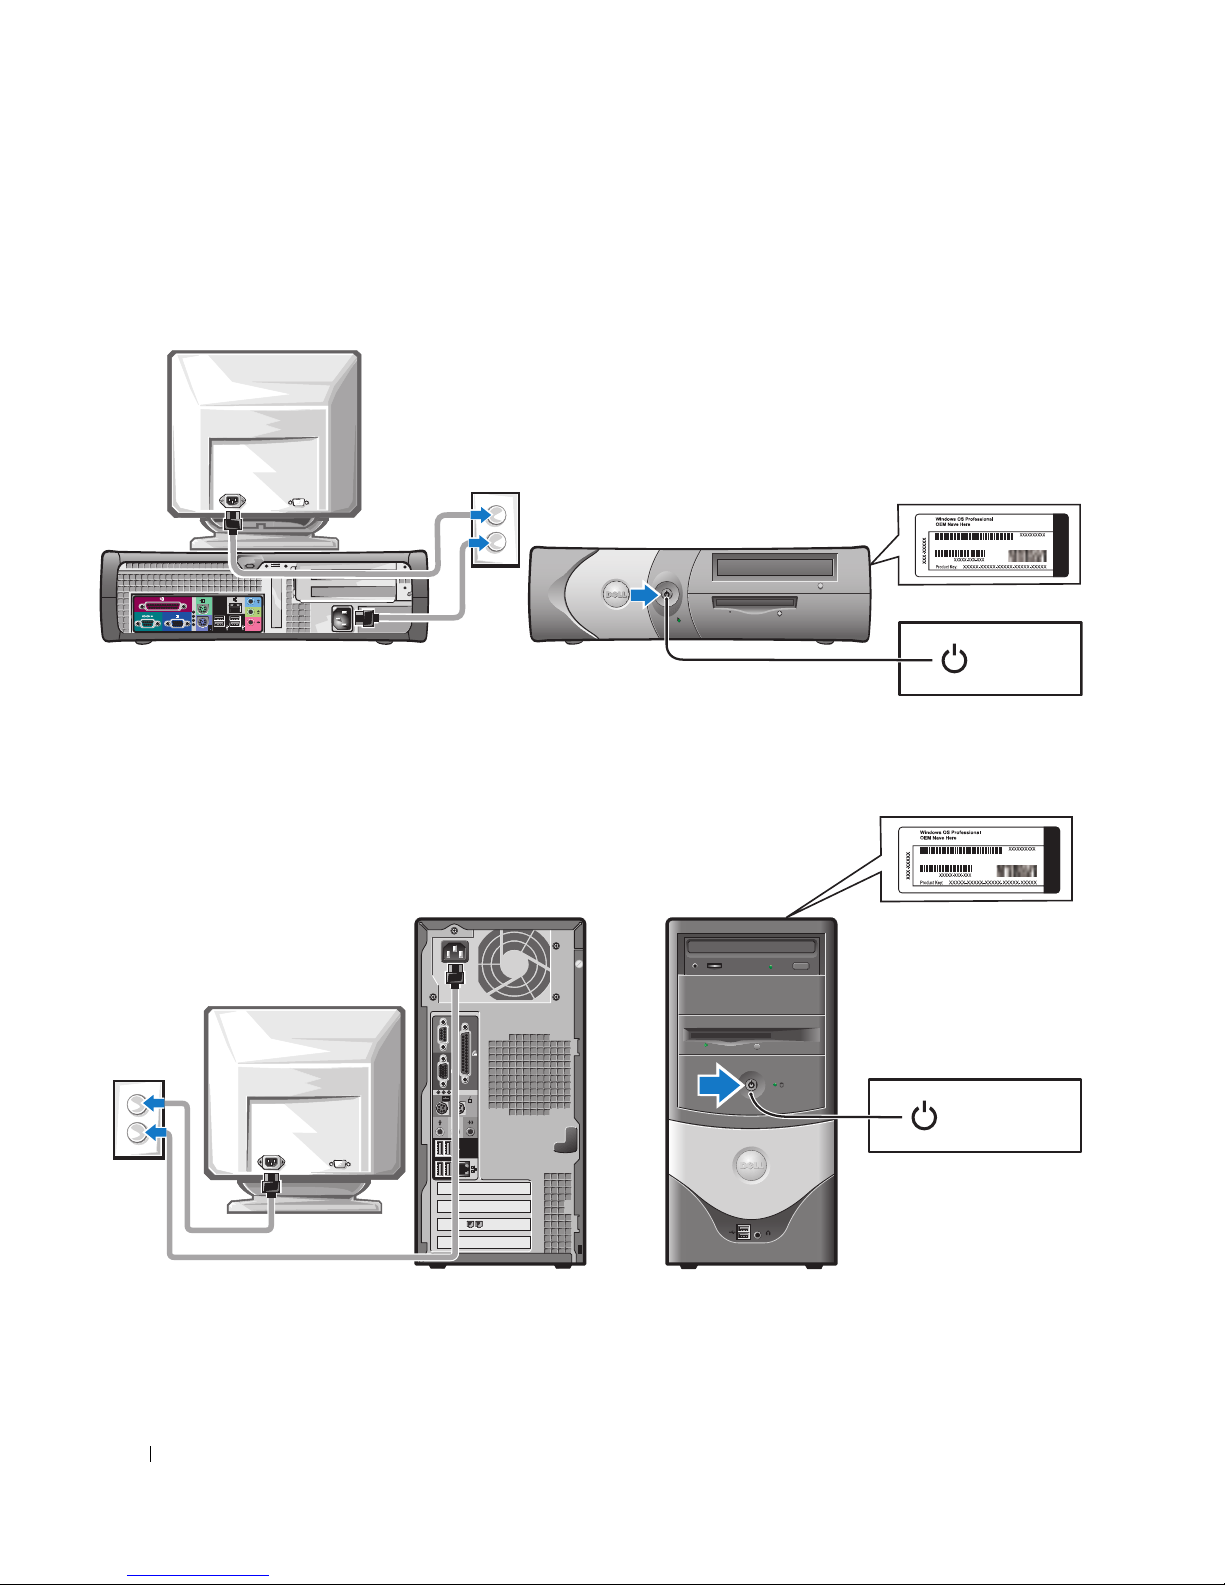
Completed Setup
Small Desktop Computer
www.dell.com | support.dell.com
Mini-Tower Computer
Microsoft Windows Product Key
power
Microsoft Windows Product Key
16 Quick Reference Guide
power
Page 17

Solving Problems
Dell provides a number of tools to help you if your computer does not perform as expected. For the
latest troubleshooting information available for your computer, see the Dell Support website at
support.dell.com
If computer problems occur that require help from Dell, write a detailed description of the error,
beep codes, or diagnostics light patterns; record your Express Service Code and Service Tag below;
and then contact Dell from the same location as your computer.
See "Finding Information for Your Computer" on page 5 for an example of the Express Service
Code and Service Tag.
Express Service Code:___________________________
Service Tag:___________________________
Dell Diagnostics
CAUTION: Before you begin any of the procedures in this section, follow the safety instructions
located in the Product Information Guide.
When to Use the Dell Diagnostics
If you experience a problem with your computer, perform the checks in "Solving Problems" of your
online
User’s Guide
.
and run the Dell Diagnostics before you contact Dell for technical assistance.
It is recommended that you print these procedures before you begin.
NOTICE: The Dell Diagnostics works only on Dell™ computers.
Enter system setup, review your computer’s configuration information, and ensure that the device
you want to test displays in system setup and is active.
Start the Dell Diagnostics from either your hard drive or from the optional
Drivers and Utilities
CD
(also known as the ResourceCD).
Starting the Dell Diagnostics From Your Hard Drive
1
Turn on (or restart) your computer.
2
When the DELL™ logo appears, press <F12> immediately.
NOTE: If you see a message stating that no diagnostics utility partition has been found, run the Dell
Diagnostics from your Drivers and Utilities CD.
If you wait too long and the operating system logo appears, continue to wait until you see the
®
Microsoft
3
When the boot device list appears, highlight
4
When the Dell Diagnostics
Windows® desktop. Then shut down your computer and try again.
Main Menu
Boot to Utility Partition
appears, select the test you want to run.
and press <Enter>.
Quick Reference Guide 17
Page 18

Starting the Dell Diagnostics From the Optional Drivers and Utilities CD
1
Insert the
2
Shut down and restart the computer.
Drivers and Utilities
CD.
When the DELL logo appears, press <F12> immediately.
If you wait too long and the Windows logo appears, continue to wait until you see the
Windows desktop. Then shut down your computer and try again.
NOTE: The next steps change the boot sequence for one time only. On the next start-up, the computer
boots according to the devices specified in system setup.
When the boot device list appears, highlight
3
4
www.dell.com | support.dell.com
Select the
5
Select the
6
Ty p e 1 to start the ResourceCD menu.
7
Ty p e 2 to start the Dell Diagnostics.
8
Select
Run the 32 Bit Dell Diagnostics
select the version appropriate for your computer.
9
When the Dell Diagnostics
Dell Diagnostics Main Menu
1
After the Dell Diagnostics loads and the
option you want.
Option Function
Express Test Performs a quick test of devices. This test typically takes 10 to 20 minutes and
Extended Test Performs a thorough check of devices. This test typically takes an hour or more
IDE CD-ROM Device
Boot from CD-ROM
option from the menu that appears.
Main Menu
requires no interaction on your part. Run Express Test first to increase the
possibility of tracing the problem quickly.
and requires you to answer questions periodically.
IDE CD-ROM Device
and press <Enter>.
option from the CD boot menu.
from the numbered list. If multiple versions are listed,
appears, select the test you want to run.
Main Menu
screen appears, click the button for the
Custom Test Tests a specific device. You can customize the tests you want to run.
Symptom Tree Lists the most common symptoms encountered and allows you to select a test
2
If a problem is encountered during a test, a message appears with an error code and a
description of the problem. Write down the error code and problem description and follow
the instructions on the screen.
If you cannot resolve the error condition, contact Dell.
NOTE: The Service Tag for your computer is located at the top of each test screen. If you contact Dell,
technical support will ask for your Service Tag.
18 Quick Reference Guide
based on the symptom of the problem you are having.
Page 19

3
If you run a test from the
Custom Test
or
Symptom Tree
option, click the applicable tab
described in the following table for more information.
Tab Function
Results Displays the results of the test and any error conditions encountered.
Errors Displays error conditions encountered, error codes, and the problem
description.
Help Describes the test and may indicate requirements for running the test.
Configuration Displays your hardware configuration for the selected device.
The Dell Diagnostics obtains configuration information for all devices from
system setup, memory, and various internal tests, and it displays the
information in the device list in the left pane of the screen. The device list may
not display the names of all the components installed on your computer or all
devices attached to your computer.
Parameters Allows you to customize the test by changing the test settings.
4
When the tests are completed, if you are running the Dell Diagnostics from the
Utilities
5
Close the test screen to return to the
restart the computer, close the
CD, remove the CD.
Main Menu
Main Menu
screen. To exit the Dell Diagnostics and
screen.
Drivers and
System Lights
Your power light may indicate a computer problem.
Power Light Problem Description Suggested Resolution
Solid green Power is on, and the computer is
operating normally.
Blinking green The computer is in the suspended
state (Microsoft
and Windows XP).
Blinks green several
times and then
turns off
Solid yellow The Dell Diagnostics is running a
A configuration error exists. Check "Diagnostic Lights" on page 20 to see
test, or a device on the system board
may be faulty or incorrectly installed.
®
Windows® 2000
No corrective action is required.
Press the power button, move the mouse, or
press a key on the keyboard to wake the
computer.
if the specific problem is identified.
If the Dell Diagnostics is running, allow the
testing to complete.
Check "Diagnostic Lights" on page 20 to see
if the specific problem is identified.
If the computer does not boot, contact Dell
for technical assistance.
Quick Reference Guide 19
Page 20
Power Light Problem Description Suggested Resolution
Blinking yellow A power supply or system board
Solid green and a
beep code during
POST
Solid green power
light, no beep code
www.dell.com | support.dell.com
and no video during
POST
Solid green power
light and no beep
code but the
computer locks up
during POST
Diagnostic Lights
CAUTION: Before you begin any of the procedures in this section, follow the safety instructions
located in the Product Information Guide.
failure has occurred.
A problem was detected while the
BIOS was executing.
The monitor or the graphics card may
be faulty or incorrectly installed.
An integrated system board device
may be faulty.
Check "Diagnostic Lights" on page 20 to see
if the specific problem is identified. See
"Power Problems" in your online User’s
Guide.
See "Beep Codes" on page 22 for instructions
on diagnosing the beep code. Also, check
"Diagnostic Lights" on page 20 to see if the
specific problem is identified.
Check "Diagnostic Lights" on page 20 to see
if the specific problem is identified.
Check "Diagnostic Lights" on page 20 to see
if the specific problem is identified. If the
problem is not identified, contact Dell for
technical assistance.
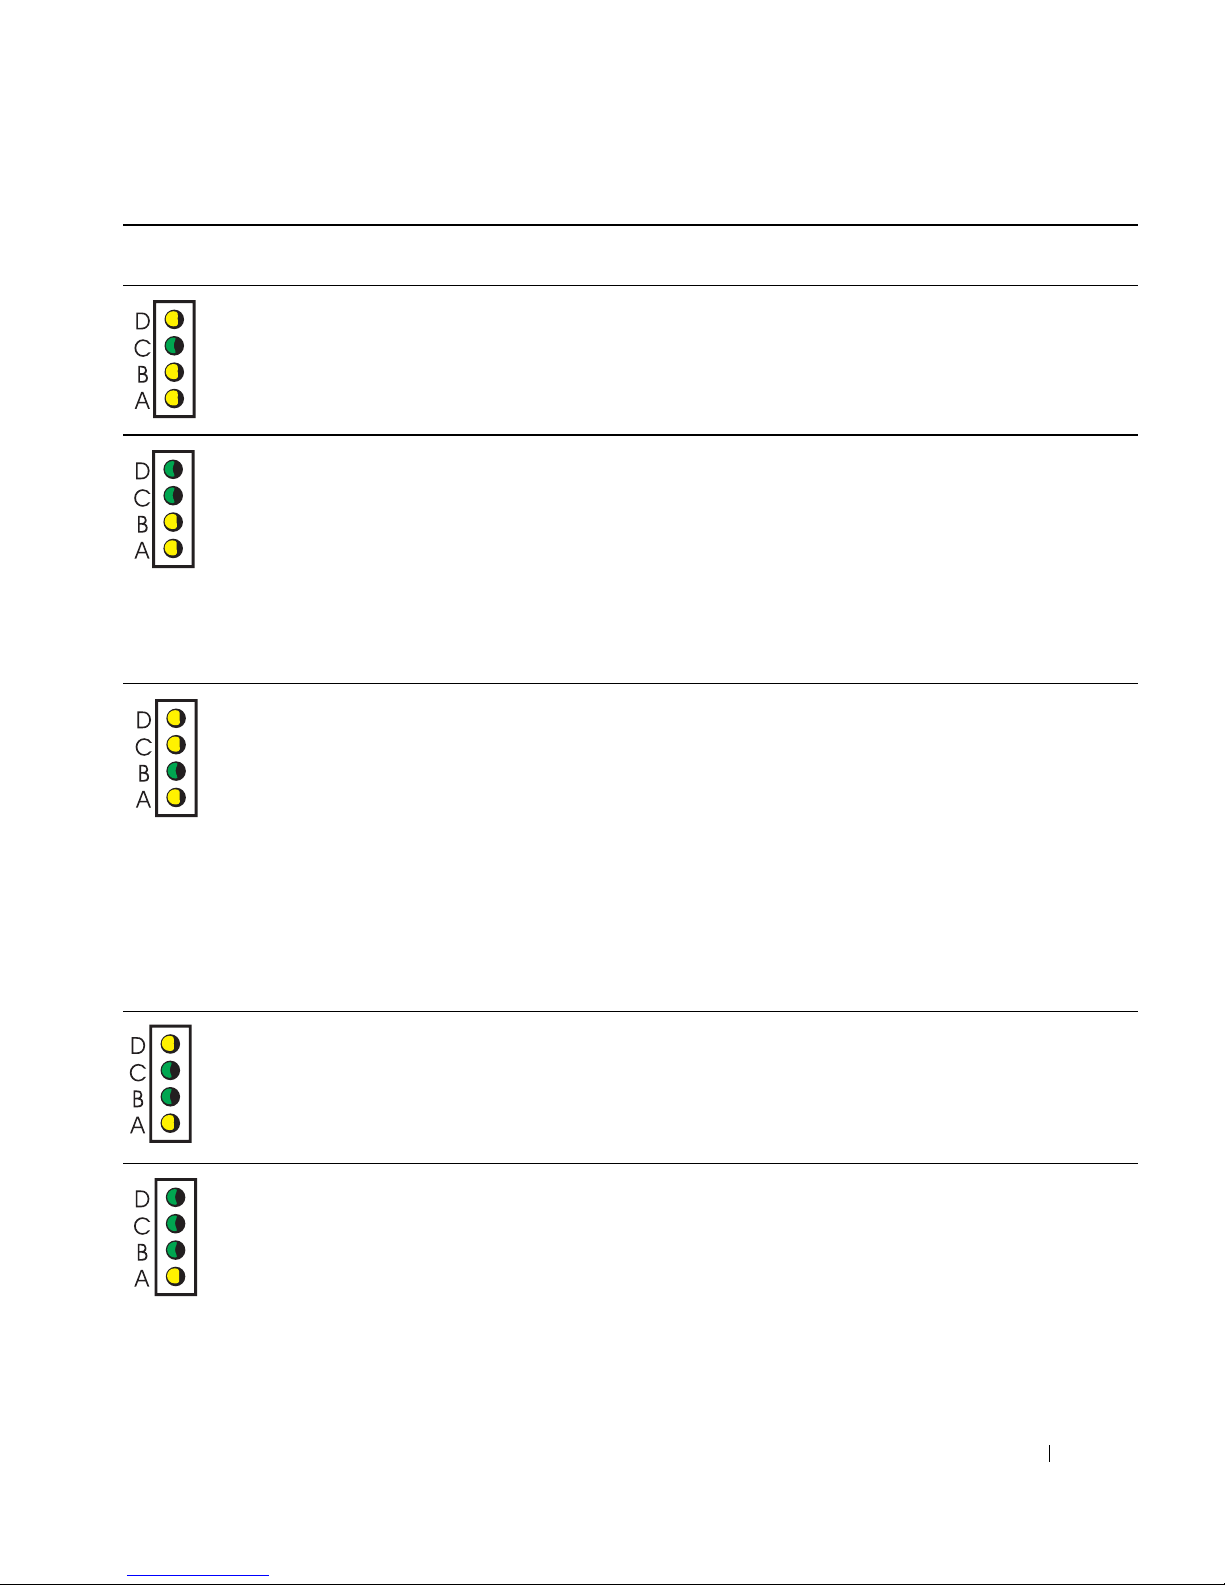
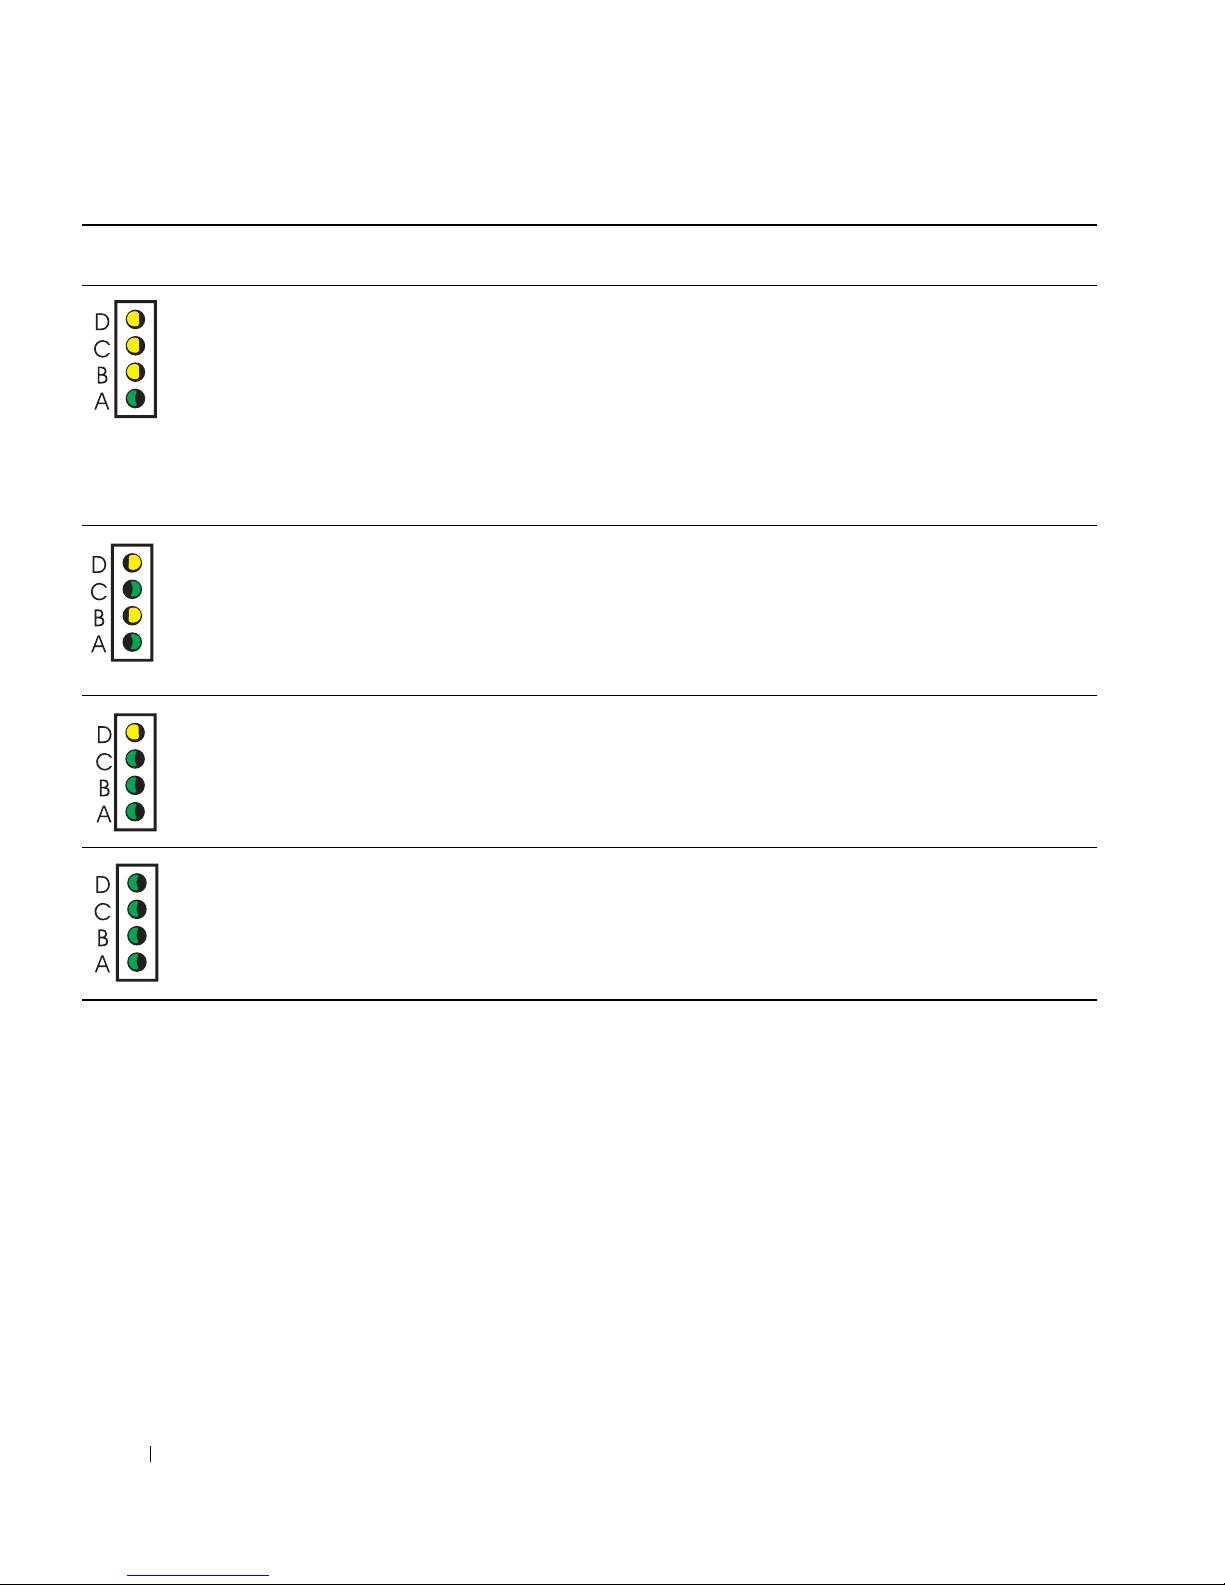
Light
Pattern
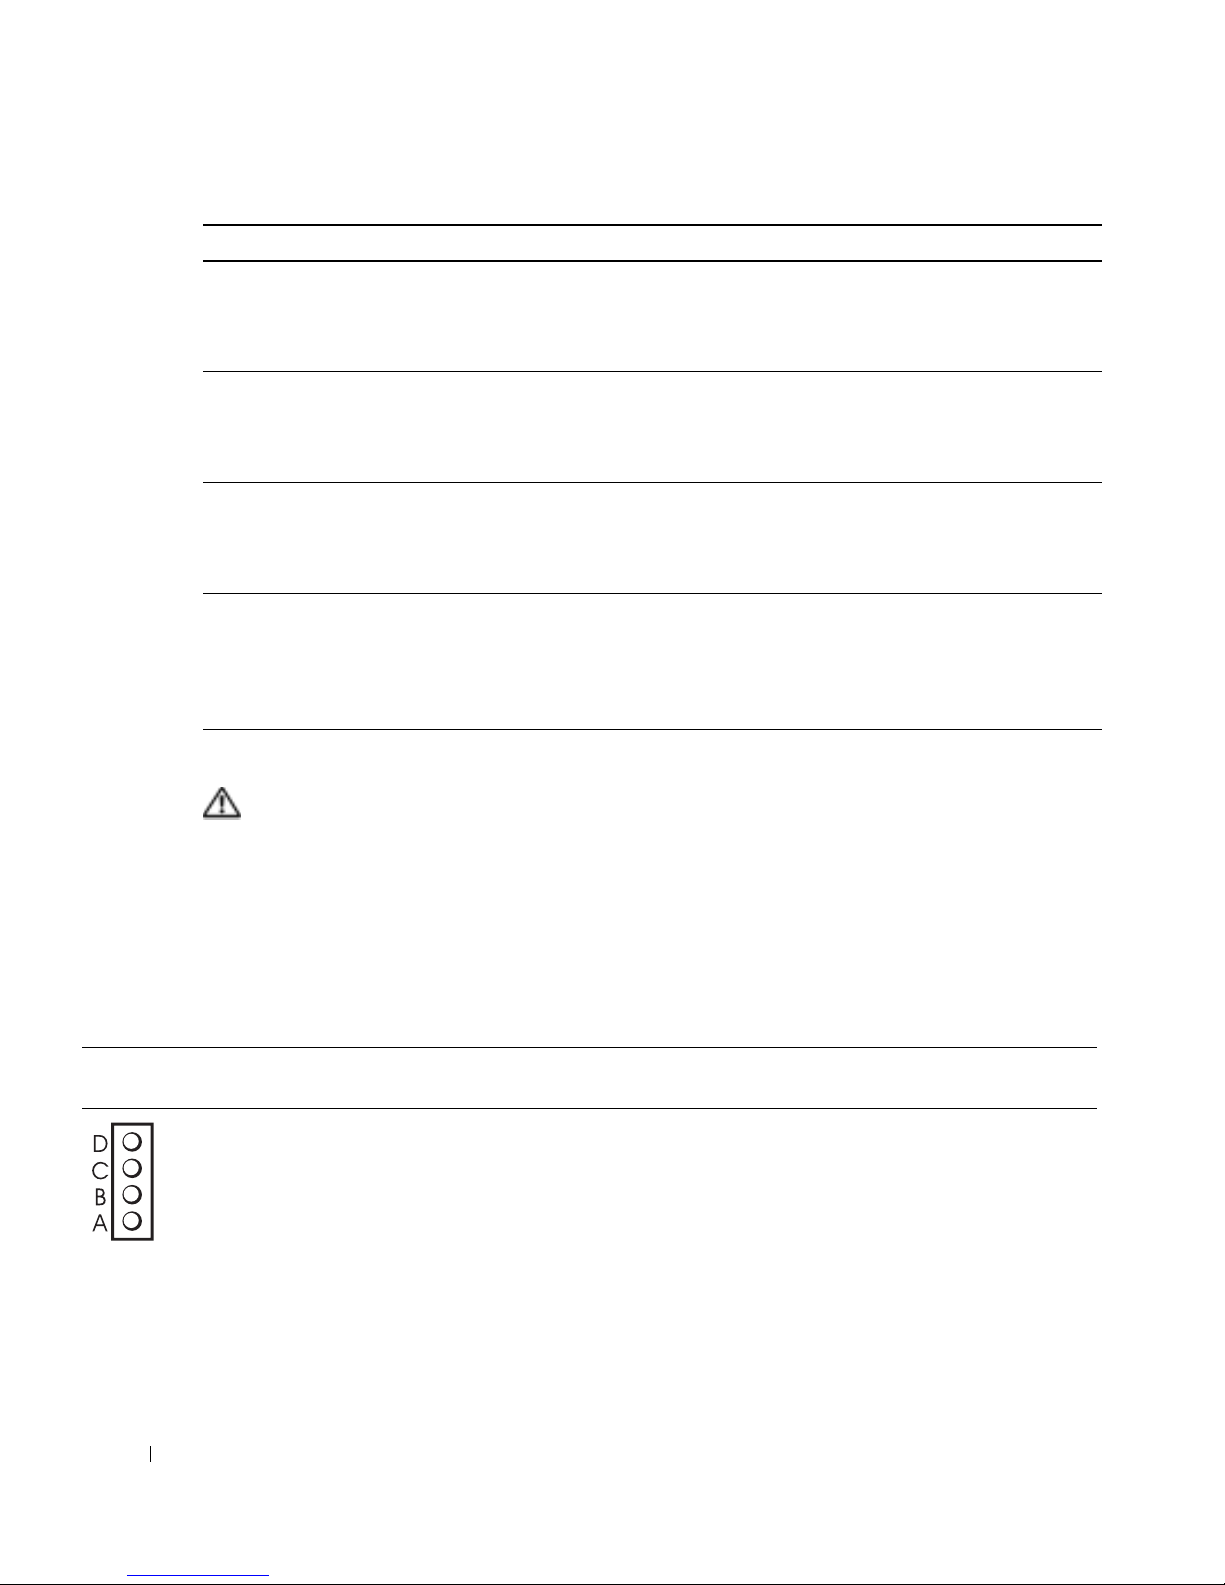
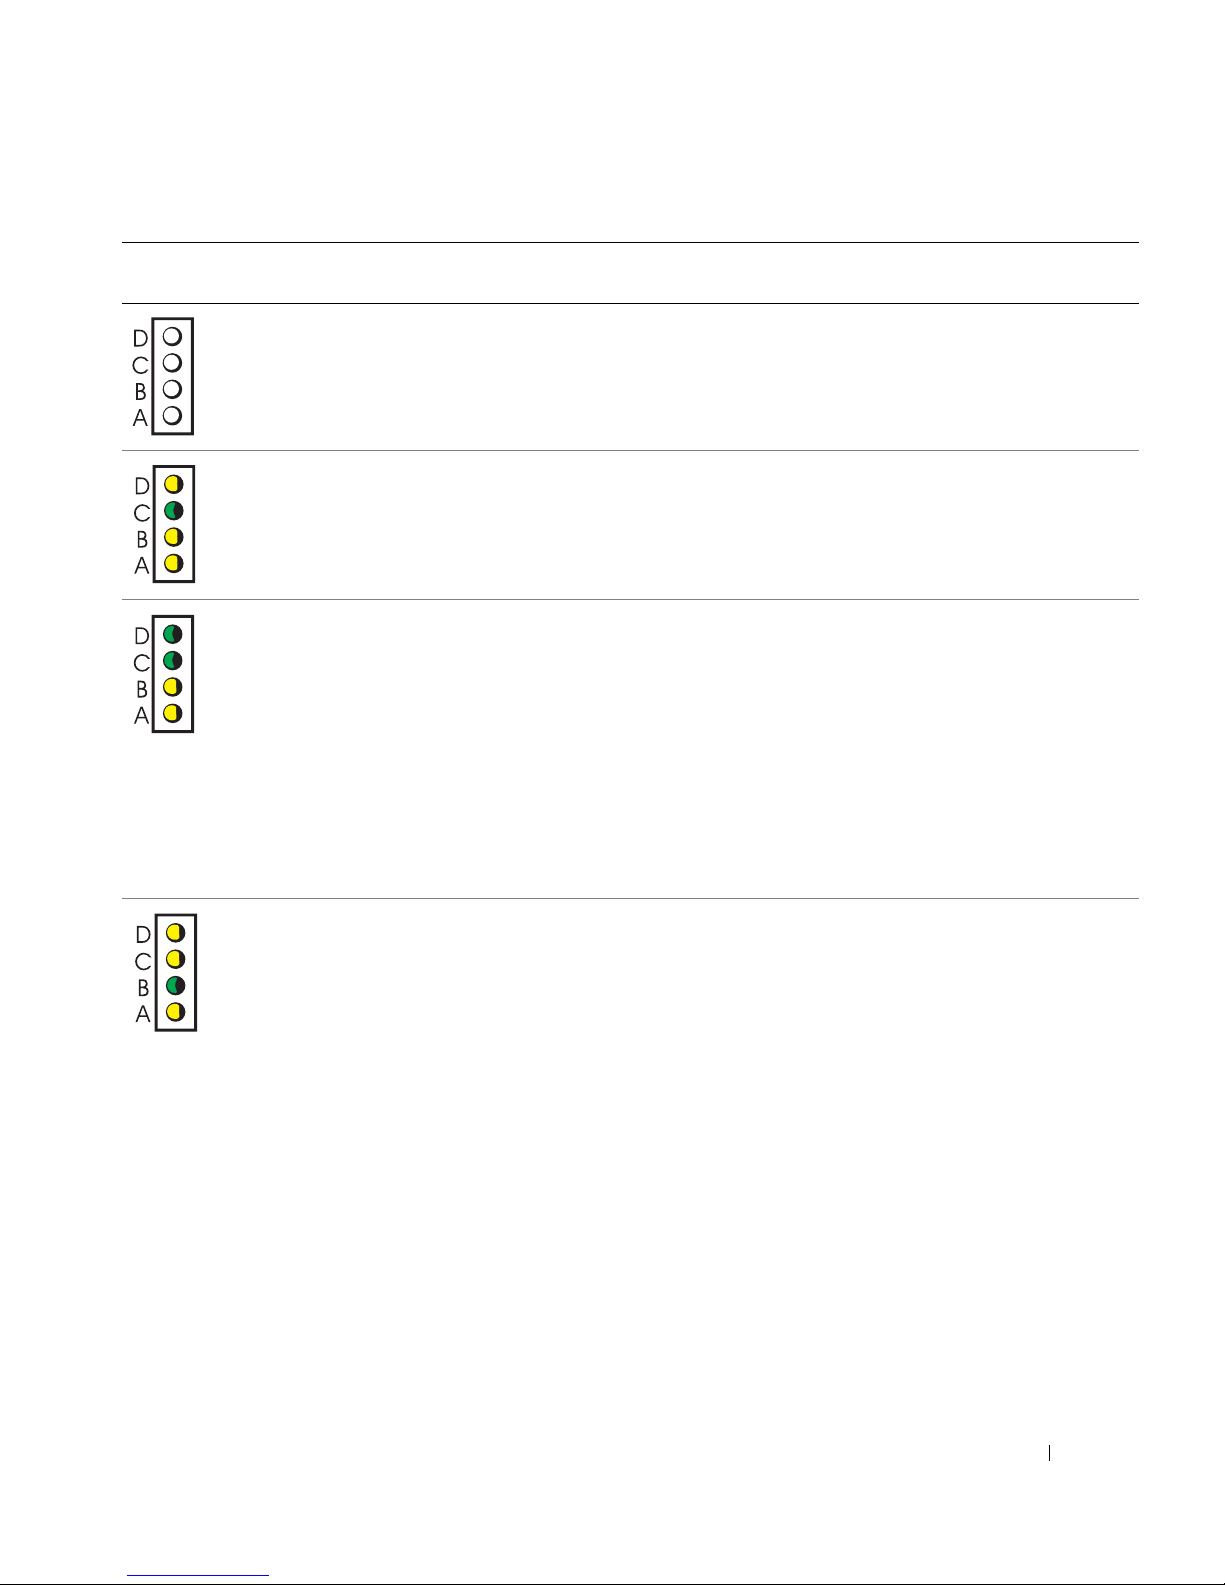
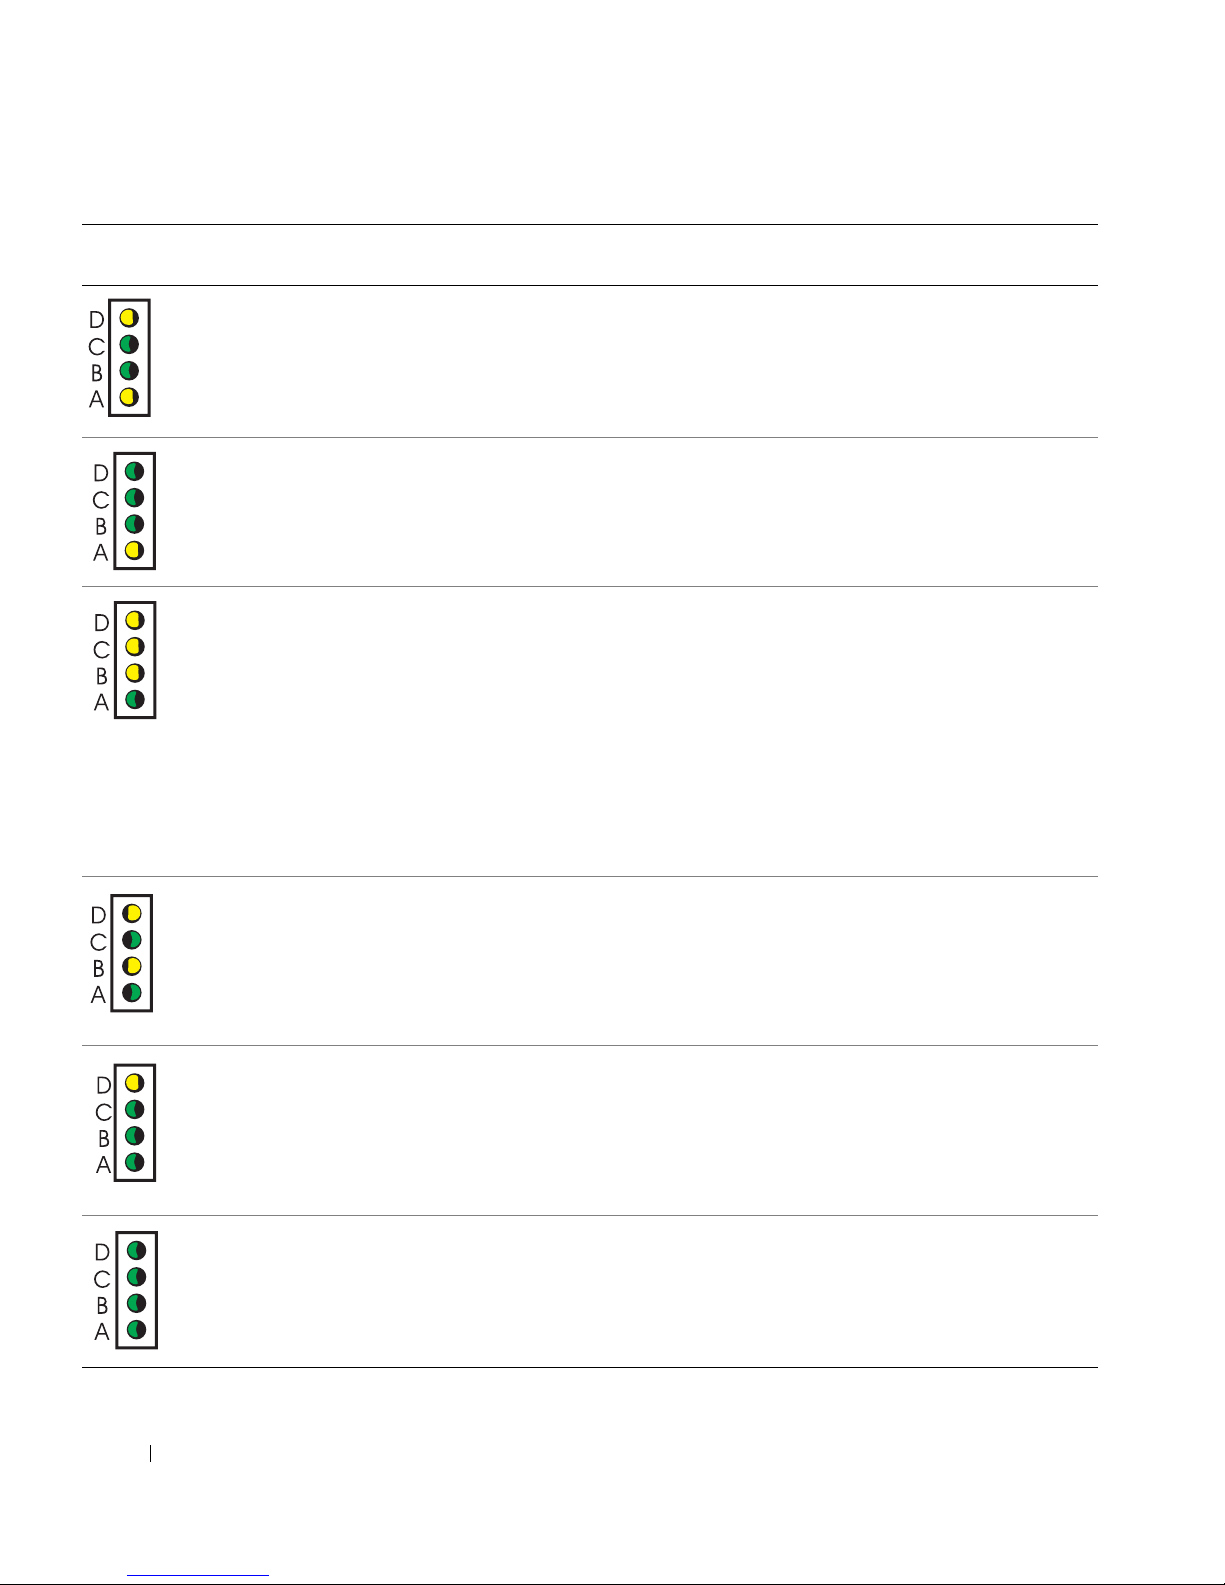
To help you troubleshoot a problem, your computer has four lights labeled "A," "B," "C," and "D" on
the back panel. The lights can be yellow or green. When the computer starts normally, the patterns
or codes on the lights change as the boot process completes. If the POST portion of system boot
completes successfully, all four lights display solid green. If the computer malfunctions during the
POST process, the pattern displayed on the lights may help identify where in the process the
computer halted.
Problem Description Suggested Resolution
off
off
off
off
The computer is in a normal off
condition or a possible pre-BIOS
failure has occurred.
• Verify that the computer is plugged into a working
electrical outlet and that you have pressed the power
button.
20 Quick Reference Guide
Page 21
Light
Pattern
Problem Description Suggested Resolution
yellow
green
yellow
yellow
green
green
yellow
yellow
yellow
yellow
green
yellow
A possible processor failure has
occurred.
Memory modules are detected, but a
memory failure has occurred.
A possible PCI expansion card failure
has occurred.
• Reinstall the processor and restart the computer.
• If you have one memory module installed, reinstall it and
restart the computer.
• If you have two memory modules installed, remove the
modules, reinstall one module, and then restart the
computer. If the computer starts normally, reinstall the
second module.
• If available, install properly working memory of the same
type into your computer.
• If the problem persists, contact Dell.
• Determine if a conflict exists by removing a card (not the
video card) and then restarting the computer.
• If the problem persists, reinstall the card that you
removed, remove a different card, and then restart the
computer.
• Repeat this process for each card. If the computer starts
normally, troubleshoot the last card removed from the
computer for resource conflicts (see ""Resolving Software
and Hardware Incompatibilities" on page 24").
• Move each card one at a time to a different PCI slot and
restart the computer after each move.
• If the problem persists, contact Dell.
yellow
green
A possible IDE drive failure has
occurred.
green
yellow
green
A possible USB failure has occurred.
green
green
yellow
• Reseat all IDE drive power and data cables and restart the
computer.
• Reinstall all USB devices, check cable connections, and
then restart the computer.
Quick Reference Guide 21
Page 22
Light
Pattern
Problem Description Suggested Resolution
yellow
yellow
yellow
green
www.dell.com | support.dell.com
yellow
green
yellow
green
yellow
green
green
green
green
green
green
green
No memory modules are detected.
Memory modules are detected, but a
memory configuration or
compatibility error exists.
Another failure has occurred.
The computer is in a normal
operating condition after POST.
• Reinstall all memory modules and restart the computer.
• To eliminate the possibility of a faulty memory connector,
remove all memory modules, reinstall one memory
module (if the computer supports a single module), and
then restart the computer. If the computer starts
normally, move the memory module to a different
connector and restart the computer. Continue until you
have identified a faulty connector or reinstalled all
modules without error.
• Ensure that no special memory module/memory
connector placement requirements exist (see "Memory"
in the online
• Verify that the memory modules that you are installing
are compatible with your computer.
• If the problem persists, contact Dell.
• Ensure that the cables are properly connected to the
system board from all installed hard drives.
• Check the computer message that appears on your
monitor screen.
• If the problem persists, contact Dell.
•None.
User’s Guide
for more information).
Beep Codes
Your computer might emit a series of beeps during start-up if the monitor cannot display errors or
problems. This series of beeps, called a beep code, identifies a problem. One possible beep code
(code 1-3-1) consists of one beep, a burst of three beeps, and then one beep. This beep code tells
you that the computer encountered a memory problem.
If your computer beeps during start-up:
1
Write down the beep code.
2
See "Dell Diagnostics" on page 17 to identify a more serious cause.
3
Contact Dell for technical assistance.
22 Quick Reference Guide
Page 23

Code Cause Code Cause
1-1-2 Microprocessor register failure 3-1-4 Slave interrupt mask register failure
1-1-3 NVRAM read/write failure 3-2-2 Interrupt vector loading failure
1-1-4 ROM BIOS checksum failure 3-2-4 Keyboard Controller Test failure
1-2-1 Programmable interval timer failure 3-3-1 NVRAM power loss
1-2-2 DMA initialization failure 3-3-2 Invalid NVRAM configuration
1-2-3 DMA page register read/write
failure
1-3 Video Memory Test failure 3-4-1 Screen initialization failure
1-3-1 through 2-4-4 Memory not being properly
identified or used
3-1-1 Slave DMA register failure 3-4-3 Search for video ROM failure
3-1-2 Master DMA register failure 4-2-1 No timer tick
3-1-3 Master interrupt mask register
failure
4-2-3 Gate A20 failure 4-4-1 Serial or parallel port test failure
4-2-4 Unexpected interrupt in protected
mode
4-3-1 Memory failure above address
0FFFFh
4-3-3 Timer-chip counter 2 failure 4-4-4 Cache test failure
4-3-4 Time-of-day clock stopped
3-3-4 Video Memory Test failure
3-4-2 Screen retrace failure
4-2-2 Shutdown failure
4-4-2 Failure to decompress code to
shadowed memory
4-4-3 Math-coprocessor test failure
Running the Dell™ IDE Hard Drive Diagnostics
The Dell IDE Hard Drive Diagnostics is a utility that tests the hard drive to troubleshoot or
confirm a hard drive failure.
1
Turn on your computer (if your computer is already on, restart it).
2
When F2= Setup appears in the upper-right corner of the screen, press <Ctr><Alt><D>.
3
Follow the instructions on the screen.
If a failure is reported, see "Hard Drive Problems" in the "Solving Problems" section of the online
User’s Guide
.
Quick Reference Guide 23
Page 24

Resolving Software and Hardware Incompatibilities
If a device is either not detected during the operating system setup or is detected but incorrectly
configured, you can use the Hardware Troubleshooter to resolve the incompatibility. In the
Microsoft
incompatibilities.
Windows XP
To resolve incompatibilities using the Hardware Troubleshooter:
1
2
www.dell.com | support.dell.com
3
4
Windows 2000
To resolve incompatibilities using Device Manager:
1
2
3
®
Windows® 2000 operating system, you can also use Device Manager to resolve
Click the
Ty p e
hardware troubleshooter
Click
Hardware Troubleshooter
In the
Hardware Troubleshooter
computer
Click the
In the
Control Panel
Click the
Start
button and click
, and click
Start
Hardware
Next
button, point to
tab.
Help and Support
in the
in the
Search Results
list, click
.
Settings
, and then click
window, double-click
.
Search
field and click the arrow to start the search.
list.
I need to resolve a hardware conflict on my
System
Control Panel
.
.
4
Click
5
Click
6
Double-click
Device Manager
View
and click
Interrupt request (IRQ)
.
Resources by connection
.
.
Incorrectly configured devices are indicated by a yellow exclamation point (
device has been disabled.
7
Double-click any device marked with an exclamation point to display the
The
Device
status area in the
Properties
window reports the cards or devices that need to be
reconfigured.
8
Reconfigure the devices or remove the devices from the Device Manager. See the
documentation that came with the device for information on configuring the device.
To resolve incompatibilities using the Hardware Troubleshooter:
1
Click the
2
Click
troubleshooters
In the
Hardware Troubleshooter
and click
Start
button and click
Help
Troubleshooting and Maintenance
Next
, and then click
.
Hardware
list, click
I need to resolve a hardware conflict on my computer
.
on the
.
Contents
tab, click
Windows 2000
!
) or a red X if the
Properties
window.
24 Quick Reference Guide
Page 25

Using Microsoft® Windows® XP System Restore
The Microsoft® Windows® XP operating system provides System Restore to allow you to return
your computer to an earlier operating state (without affecting data files) if changes to the
hardware, software, or other system settings have left the computer in an undesirable operating
state. See the Windows Help and Support Center for information on using System Restore.
NOTICE: Make regular backups of your data files. System Restore does not monitor your data files or
recover them.
Creating a Restore Point
1
Click the
2
Click
3
Follow the instructions on the screen.
Restoring the Computer to an Earlier Operating State
NOTICE: Before you restore the computer to an earlier operating state, save and close any open files
and exit any open programs. Do not alter, open, or delete any files or programs until the system
restoration is complete.
Start
button and click
System Restore
Help and Support
.
.
Click the
1
System Restore
2
Ensure that
3
Click a calendar date to which you want to restore your computer.
The
Start
button, point to
.
Restore my computer to an earlier time
Select a Restore Point
All Programs→
Accessories→
System Tools
is selected and click
, and then click
Next
.
screen provides a calendar that allows you to see and select restore
points. All calendar dates with available restore points appear in boldface type.
4
Select a restore point and click
Next
.
If a calendar date has only one restore point, then that restore point is automatically selected.
If two or more restore points are available, click the restore point that you prefer.
5
Click
Next
.
Restoration Complete
The
screen appears after System Restore finishes collecting data and
then the computer restarts.
6
After the computer restarts, click OK.
To change the restore point, you can either repeat the steps using a different restore point, or you
can undo the restoration.
Quick Reference Guide 25
Page 26

Undoing the Last System Restore
NOTICE: Before you undo the last system restore, save and close all open files and exit any open
programs. Do not alter, open, or delete any files or programs until the system restoration is complete.
Click the
1
System Restore
2
Click
Undo my last restoration
3
Click
Next
The
System Restore
4
After the computer restarts, click OK.
www.dell.com | support.dell.com
Enabling System Restore
If you reinstall Windows XP with less than 200 MB of free hard-disk space available, System
Restore is automatically disabled. To see if System Restore is enabled:
1
Click the
2
Click
Performance and Maintenance
3
Click
System
4
Click the
5
Ensure that
Reinstalling Microsoft® Windows® XP
Start
button, point to
.
.
screen appears and the computer restarts.
Start
button and click
.
System Restore
tab.
Turn off System Restore
All Programs→ Accessories→ System Tools
and click
Control Panel
Next
.
.
.
is unchecked.
, and then click
Before You Begin
If you are considering reinstalling the Windows XP operating system to correct a problem with a
newly installed driver, first try using Windows XP Device Driver Rollback. If Device Driver
Rollback does not resolve the problem, then use System Restore to return your operating system to
the operating state it was in before you installed the new device driver.
NOTICE: Before performing the installation, back up all data files on your primary hard drive. For
conventional hard drive configurations, the primary hard drive is the first drive detected by the computer.
To reinstall Windows XP, you need the following items:
• Dell™
•Dell
NOTE: The Drivers and Utilities CD contains drivers that were installed during assembly of the computer.
Use the Drivers and Utilities CD or go to the Dell support site to load any required drivers.
NOTE: The Operating System and Drivers and Utilities CDs are optional and may not ship with all
computers.
Operating System
Drivers and Utilities
26 Quick Reference Guide
CD
CD
Page 27

Reinstalling Windows XP
NOTICE: You must use Windows XP Service Pack 1 or later when you reinstall Windows XP.
To reinstall Windows XP, perform all the steps in the following sections in the order in which they
are listed.
The reinstallation process can take 1 to 2 hours to complete. After you reinstall the operating
system, you must also reinstall the device drivers, virus protection program, and other software.
NOTICE: The Operating System CD provides options for reinstalling Windows XP. The options can
overwrite files and possibly affect programs installed on your hard drive. Therefore, do not reinstall
Windows XP unless a Dell technical support representative instructs you to do so.
NOTICE: To prevent conflicts with Windows XP, disable any virus protection software installed on your
computer before you reinstall Windows XP. See the documentation that came with the software for
instructions.
Booting From the Operating System CD
1
Save and close any open files and exit any open programs.
2
Insert the
3
Restart the computer.
4
Press <F12> immediately after the DELL™ logo appears.
Operating System
CD. Click
Exit
if
Install Windows XP
message appears.
If the operating system logo appears, wait until you see the Windows desktop, and then shut
down the computer and try again.
5
Press the arrow keys to select
6
When the
Windows XP Setup
1
When the
Windows now
2
Read the information on the
Press any key to boot from CD
Windows XP Setup
.
CD-ROM
, and press <Enter>.
message appears, press any key.
screen appears, press <Enter> to select
Microsoft Windows Licensing Agreement
To set up
screen, and press
<F8> to accept the license agreement.
3
If your computer already has Windows XP installed and you want to recover your current
Windows XP data, type
4
If you want to install a new copy of Windows XP, press <Esc> to select that option.
5
Press <Enter> to select the highlighted partition (recommended), and follow the
r
to select the repair option, and remove the CD.
instructions on the screen.
The
Windows XP Setup
screen appears, and the operating system begins to copy files and
install the devices. The computer automatically restarts multiple times.
NOTE: The time required to complete the setup depends on the size of the hard drive and the speed of
your computer.
Quick Reference Guide 27
Page 28

NOTICE: Do not press any key when the following message appears: Press any key to boot
from the CD.
6
When the
location and click
7
Enter your name and organization (optional) in the
click
Next
8
At the
Computer Name and Administrator Password
computer (or accept the one provided) and a password, and click
9
If the
Modem Dialing Information
Next
.
10
www.dell.com | support.dell.com
Enter the date, time, and time zone in the
11
If the
Networking Settings
12
If you are reinstalling Windows XP Professional and you are prompted to provide further
information regarding your network configuration, enter your selections. If you are unsure of
your settings, accept the default selections.
Windows XP installs the operating system components and configures the computer. The
computer automatically restarts.
NOTICE: Do not press any key when the following message appears: Press any key to boot
from the CD.
Regional and Language Options
Next
.
.
screen appears, enter the requested information and click
screen appears, click
screen appears, select the settings for your
Personalize Your Software
screen, and
window, enter a name for your
Next
.
Date and Time Settings
Typical
and click
window, and click
Next
.
Next
.
When the
13
14
When the
click
15
When the
click
16
When the
17
Click
18
Click
19
Reinstall the appropriate drivers with the
20
Reinstall your virus protection software.
21
Reinstall your programs.
NOTE: To reinstall and activate your Microsoft Office or Microsoft Works Suite programs, you need the
Product Key number located on the back of the Microsoft Office or Microsoft Works Suite CD sleeve.
Welcome to Microsoft
How will this computer connect to the Internet?
Skip
.
Ready to register with Microsoft?
Next
.
Who will use this computer?
Next
.
Finish
to complete the setup, and remove the CD.
screen appears, click
Next
screen appears, select
screen appears, you can enter up to five users.
Drivers and Utilities
.
message appears,
No, not at this time
CD.
and
28 Quick Reference Guide
Page 29

Using the Drivers and Utilities CD
To us e th e
Drivers and Utilities
CD (also known as the ResourceCD) while you are running the
Windows operating system:
NOTE: To access device drivers and user documentation, you must use the Drivers and Utilities CD while
you are running Windows.
1
Turn on the computer and allow it to boot to the Windows desktop.
2
Insert the
If you are using the
ResourceCD Installation
Drivers and Utilities
Drivers and Utilities
window opens to inform you that the
CD into the CD drive.
CD for the first time on this computer, the
Drivers and Utilities
about to begin installation.
3
Click OK to continue.
To complete the installation, respond to the prompts offered by the installation program.
4
Click
Next
at the
5
Select the appropriate
Drivers for Your Computer
Welcome Dell System Owner
System Model, Operating System, Device Type,
screen.
and
To pi c
.
To display a list of device drivers for your computer:
1
Click
My Drivers
The
Drivers and Utilities
in the
To pi c
drop-down menu.
CD scans your computer’s hardware and operating system, and then
a list of device drivers for your system configuration is displayed on the screen.
CD is
2
Click the appropriate driver and follow the instructions to download the driver to your
computer.
To view all available drivers for your computer, click
Drivers
from the
To pi c
drop-down menu.
Quick Reference Guide 29
Page 30

www.dell.com | support.dell.com
30 Quick Reference Guide
Page 31

Index
B
beep codes, 22
C
CD
operating system, 7
computer
beep codes, 22
restore to previous state, 25
conflicts
software and hardware
incompatibilities, 24
D
Dell
premier support website, 6
support site, 6
Dell Diagnostics, 17
diagnostics
beep codes, 22
Dell, 17
Drivers and Utilities CD, 5
lights, 19-20
documentation
device, 5
online, 6
Quick Reference, 5
ResourceCD, 5
User’s Guide, 5
drivers
ResourceCD, 5
Drivers and Utilities CD, 5
E
error messages
beep codes, 22
diagnostic lights, 19-20
I
IRQ conflicts, 24
L
labels
Microsoft Windows, 6
Service Tag, 6
light, 19
lights
back of computer, 20
diagnostic, 19-20
front of computer, 19
power button, 19
system, 19
M
Microsoft Windows label, 6
Dell Premier Support
website, 6
Device Manager, 24
diagnostic lights, 19-20
H
hardware
beep codes, 22
conflicts, 24
Dell Diagnostics, 17
Hardware Troubleshooter, 24
Help and Support Center, 7
O
Operating System
CD, 7
Installation Guide, 7
operating system
reinstalling Windows XP, 26
Operating System CD, 7
Index 31
Page 32

32 Index
P
power light, 19
problems
beep codes, 22
conflicts, 24
Dell Diagnostics, 17
diagnostic lights, 19-20
restore to previous state, 25
R
reinstalling
Drivers and Utilities CD, 5
ResourceCD, 5
Windows XP, 26
ResourceCD
Dell Diagnostics, 17
S
Service Tag, 6
software
conflicts, 24
stand
attach, 10
remove, 10
system lights, 19
System Restore, 25
T
troubleshooting
conflicts, 24
Dell Diagnostics, 17
diagnostic lights, 19-20
Hardware Troubleshooter, 24
Help and Support Center, 7
restore to previous state, 25
U
User’s Guide, 5
W
Windows 2000
Device Manager, 24
Hardware Troubleshooter, 24
Windows XP
Hardware Troubleshooter, 24
Help and Support Center, 7
reinstalling, 26
System Restore, 25
32 Index
Page 33

www.dell.com | support.dell.com
Dell™ OptiPlex™ 170L
クイックリファレンスガイド
モデル MTC2 および DHS
Page 34

メモ、注意、および警告
メモ: 操作上、知っておくと便利な情報が記載されています。
注意: ハードウェアの破損またはデータの損失の可能性があることを示します。また、その問題を回避す
るための方法も記載されています。
警告: 物的損害、けが、または死亡の原因となる可能性があることを示します。
Dell™ n
シリーズコンピュータをご購入された場合、このマニュアル内の
Microsoft® Windows®
オペ
レーティングシステムに関する記述は適用されません。
『
Drivers and Utilities CD(Resource CD
)』、オペレーティングシステムのメディア、および『セットアッ
プおよびクイックリファレンスガイド』はオプションであり、すべてのコンピュータに付属しているも
のではありません。
____________________
この文書に含まれる情報は、予告なく変更されることがあります。
© 2004 Dell Inc. All rights reserved.
Dell Inc. の書面による許可なく、本書を無断で複写、複製、転載することを禁じます。
本書に使われている商標:Dell、DELL ロゴ、OptiPlex は、Dell Inc. の商標です。Microsoft および Windows は Microsoft
Corporation の登録商標です。
本書では、商標および商標名を主張する会社またはその製品を参照するのに、これ以外の商標および商標名が使用される場合
があります。Dell Inc. では、自社に属さない商標および商標名に関する、いかなる所有上の利益も放棄します。
モデル MTC2 および DHS
2004 年 9 月 P/N W6987 Rev. A00
Page 35

目次 35
目次
お使いのコンピュータに関する情報の検索 . . . . . . . . . . . . . . . 37
スモールデスクトップコンピュータについて
. . . . . . . . . . . . . . 40
正面と背面の図
. . . . . . . . . . . . . . . . . . . . . . . . . . . 40
コンピュータの内部
. . . . . . . . . . . . . . . . . . . . . . . . 41
コンピュータスタンドの取り付けと取り外し
. . . . . . . . . . . 42
ミニタワーコンピュータについて
. . . . . . . . . . . . . . . . . . . . 43
正面と背面の図
. . . . . . . . . . . . . . . . . . . . . . . . . . . 43
コンピュータの内部
. . . . . . . . . . . . . . . . . . . . . . . . 44
コンピュータのセットアップ
. . . . . . . . . . . . . . . . . . . . . . 45
スモールデスクトップコンピュータ
. . . . . . . . . . . . . . . . 46
ミニタワーコンピュータ
. . . . . . . . . . . . . . . . . . . . . . 47
セットアップ完了
. . . . . . . . . . . . . . . . . . . . . . . . . . . . 48
スモールデスクトップコンピュータ
. . . . . . . . . . . . . . . . 48
ミニタワーコンピュータ
. . . . . . . . . . . . . . . . . . . . . . 48
問題の解決
. . . . . . . . . . . . . . . . . . . . . . . . . . . . . . . . 49
Dell Diagnostics(診断)プログラム
. . . . . . . . . . . . . . . . 49
システムライト
. . . . . . . . . . . . . . . . . . . . . . . . . . . 51
診断ライト
. . . . . . . . . . . . . . . . . . . . . . . . . . . . . 52
ビープコード
. . . . . . . . . . . . . . . . . . . . . . . . . . . . 55
Dell™ IDE ハードドライブ診断プログラムの実行
. . . . . . . . . 56
ソフトウェアとハードウェアの非互換性の解決
. . . . . . . . . . 56
Microsoft
®
Windows® XP システムの復元の使い方 . . . . . . . . 57
Microsoft
®
Windows® XP の再インストール . . . . . . . . . . . 59
『Drivers and Utilities CD』の使い方
. . . . . . . . . . . . . . . . . . 62
Page 36

36 目次
Page 37
クイックリファレンスガイド 37
お使いのコンピュータに関する情報の検索
何をお探しですか ? こちらをご覧ください
•
コンピュータの診断プログラム
•
コンピュータのドライバ
•
コンピュータのマニュアル
•
デバイスのマニュアル
•
Desktop System Software(DSS
)
『Drivers and Utilities CD』(『ResourceCD』とも呼ばれます)
マニュアルおよびドライバは、コンピュータにプリインストールされて
います。この CD は、ドライバの再インストール、Dell Diagnostics(診
断)の実行、またはマニュアルのアクセスに使用します。
CD に収録されている Readme ファイルに
は、マニュアルの作成後にシステムに追加
された変更や、技術者や専門知識をお持ち
のユーザーを対象とするテクニカルリ
ファレンスなどが記載されています。
メモ: 最新のドライバとマニュアルのアップデートに関しては、
support.dell.com をご覧ください。
メモ: 『Drivers and Utilities CD』はオプションなので、同梱されていな
いコンピュータもあります。
•
OS
のアップデートとパッチ
Desktop System Software
『
Drivers and Utilities CD
』と
Dell Support
ウェブサイト
support.dell.com にあります。
•
保証に関する情報
•
安全にお使いいただくために
•
認可機関の情報
•
快適な使い方
•
エンドユーザーライセンス契約
製品情報ガイド
•
部品の取り外しおよび取り付け方法
•
仕様
•
システムの設定方法
•
トラブルシューティングおよび
問題解決の方法
Dell™ OptiPlex™ ユーザーズガイド
Microsoft
®
Windows® XP ヘルプとサポートセンター
1
スタート ボタンをクリックして、
ヘルプとサポート をクリックします。
2
ユーザーズガイドおよびシステムガイド をクリックして、
ユーザーズガ
イド
をクリックします。
ユーザーズガイドは、『Drivers and Utilities CD』にも含まれています。
Page 38
38 クイックリファレンスガイド
www.dell.com | support.dell.com
•
サービスタグとエクスプレス
サービスコード
•
Microsoft Windows
ライセンス
ラベル
サービスタグと Microsoft Windows ライセンス
ラベルはお使いのコンピュータに貼られています。
•
support.dell.com をご利用の場合や、
テクニカルサポートにお問い合わせに
なる場合には、サービスタグを使用して
お使いのコンピュータを識別します。
•
テクニカルサポートに連絡したときに
エクスプレスサービスコードを入力す
ると、通話が直接接続されます。エクス
プレスサービスコードは一部の国では
ご利用になれない場合があります。
•
コンピュータ用の最新ドライバ
•
テクニカルサービスおよび
サポートに関する質問の回答
•
コンピュータのマニュアル
デルサポートウェブサイト ― support.dell.com
メモ: お住まいの地域を選択し、お近くのサポートサイトを表示します。
デルサポートウェブサイトでは、以下のようなオンラインツールを提供
しています。
•
技術情報 ― Q&A 検索、トラブル解消ナビ、
Diagnostics
(診断)プロ
グラム、インストールガイドなど
•
アップグレード ― メモリ、ハードドライブ、オペレーティングシステ
ムなどのコンポーネントのアップグレード情報
•
各種サービスのご案内 ― サービスプラン、登録内容変更申込、リサイ
クル・買取サービス、引き取り修理状況確認など
•
ダウンロード ― ドライバ、パッチ、ソフトウェアのアップデート
•
テクニカルサポートへのお問い合わせ ―
E
メールサポート、購入時の
システム構成確認、テクニカル電話サポート
•
サービスコール状況とサポート履歴
•
コンピュータの重要テクニカル事項
•
お問い合わせの多い質問
•
ファイルのダウンロード
•
コンピュータの詳細設定
•
コンピュータのサービス規約
Dell Premier サポートウェブサイト ― premiersupport.dell.com
Dell Premier サポートウェブサイトは、企業、政府および教育カスタマ
用にカスタマイズされています。このサイトは一部の地域ではご利用で
きない場合があります。
•
Windows XP
の使い方
•
コンピュータのマニュアル
•
モデムなどのデバイスのマニュアル
Windows ヘルプとサポートセンター
1
スタート ボタンをクリックして、
ヘルプとサポート をクリックします。
2
問題に関連する用語やフレーズを 検索 ボックスに入力して、矢印アイ
コンをクリックします。
3
問題に関連するトピックをクリックします。
4
画面の指示に従います。
何をお探しですか ? こちらをご覧ください
Page 39

クイックリファレンスガイド 39
•
オペレーティングシステムの
再インストール方法
『オペレーティングシステム CD』
オペレーティングシステムは、コンピュータにプリインストールされて
います。オペレーティングシステムを再インストールする場合は、『オペ
レーティングシステム CD』を使用します。手順については、『OptiPlex
ユーザーズガイド』を参照してください。
オペレーティングシステムを再インストー
ルした後、『Drivers and Utilities CD』を使
用して、コンピュータに付属しているデバイ
ス用のドライバを再インストールします。
オペレーティングシステムの Product Key
(プロダクトキー)ラベルはコンピュータに
貼られています。
メモ: CD の色はご注文になったオペレーティングシステムによって異
なります。
メモ: オペレーティングシステムのメディアはオプションであり、同梱
されていないコンピュータもあります。
•
規格モデル情報とシャーシタイプ
DHS ―スモールデスクトップシャーシ
MTC2
―
ミニタワーシャーシ
何をお探しですか ? こちらをご覧ください
Page 40
40 クイックリファレンスガイド
www.dell.com | support.dell.com
スモールデスクトップコンピュータについて
正面と背面の図
CD/DVD
ÉhÉâÉCÉu
フロッピードライブ取り出しボタン
フロッピードライブ動作ライト
ハードドライブ動作ライト
電源ボタン
Microsoft
Windows
Product Key
(プロダクト
キー)
サービス
タグ
CD/DVD ドライブ
取り出しボタン
USB 2.0 コネクタ(2)
ヘッドフォンコネクタ
電源ライト
正面パネルドア
正面パネルドア
オプションの
カード
スロット(2)
電源
コネクタ
ネットワーク動作ライト
シリアル
コネクタ
パラレル
コネクタ
マイクコネクタ
ネットワークアダプタコネクタ
ライン入力コネクタ
ライン出力コネクタ
USB 2.0 コネクタ(4)
リンク保全ライト
ビデオ
コネクタ
診断ライト
A B C D
マウス
コネクタ
ロープロファイル
PCI カードスロット
Page 41
クイックリファレンスガイド 41
コンピュータの内部
警告: 『製品情報ガイド』の「安全にお使いいただくために」の注意事項に従い、この項の
手順を開始してください。
警告: 感電防止のため、カバーを開く前に必ず、コンピュータの電源プラグをコンセントか
ら抜いてください。
注意: コンピュータカバーを開く際には、システム基板から誤ってケーブルを抜かないよう
に注意してください。
ヒートシンク
および送風
アセンブリ
システム基板
パドロック
リング
電源装置
フロッピードライブ
CD/DVD ドライブ
オプションの
内蔵スピーカー
ハードドライブ
オプションのカードケージ
メモ:カードケージの代わりに金属製のブ
ラケットが装着されているコンピュータも
あります。
ロープロファイル
PCI カードスロット
Page 42
42 クイックリファレンスガイド
www.dell.com | support.dell.com
コンピュータスタンドの取り付けと取り外し
警告: 『製品情報ガイド』の「安全にお使いいただ
くために」の注意事項に従い、この項の手順を開始
してください。
メモ: 上部のカバーを傷つけないように、表面が滑
らかな場所にコンピュータを置いてください。
お使いのコンピュータは、縦置き、横置きのどちらで
も使用できます。
コンピュータを縦置きにする場合は、次の手順を実行
してコンピュータスタンドを取り付ける必要があり
ます。
1
ドライブベイが下になるように、右側を下にして
コンピュータを立て、左側面にスタンドを取り付
けます。
a
次の図に示すように、スタンドの大きな丸い
穴をカバー側面の固定ボタンに合わせます。
b
スタンドの拘束ネジをカバーのネジ穴に合
わせ、蝶ネジを締めます。
2
スタンドが下に、ドライブが上になるようにコン
ピュータの向きを変えます。
Page 43
クイックリファレンスガイド 43
ミニタワーコンピュータについて
正面と背面の図
USB 2.0 コネクタ(2)
CD または DVD ドライブ動作ライト
CD または DVD 取り出し
ボタン
フロッピードライブライト
フロッピードライブ
取り出しボタン
ハードドライブ動作ライト
電源ボタン
電源ライト
ヘッドフォンコネクタ
サービスタグ
セカンドドライブベイ
キーボードコネクタ
マウスコネクタ
シリアルコネクタ
USB 2.0 コネクタ(4)
マイクコネクタ
ライン入力コネクタ
ライン出力コネクタ
パラレルコネクタ
ビデオコネクタ
PCI カードスロット(3)
電圧選択スイッチ
電源コネクタ
ネットワークアダプタ
コネクタ
診断ライト(4)
カバーラッチ
セキュリティケーブル
スロット
Page 44
44 クイックリファレンスガイド
www.dell.com | support.dell.com
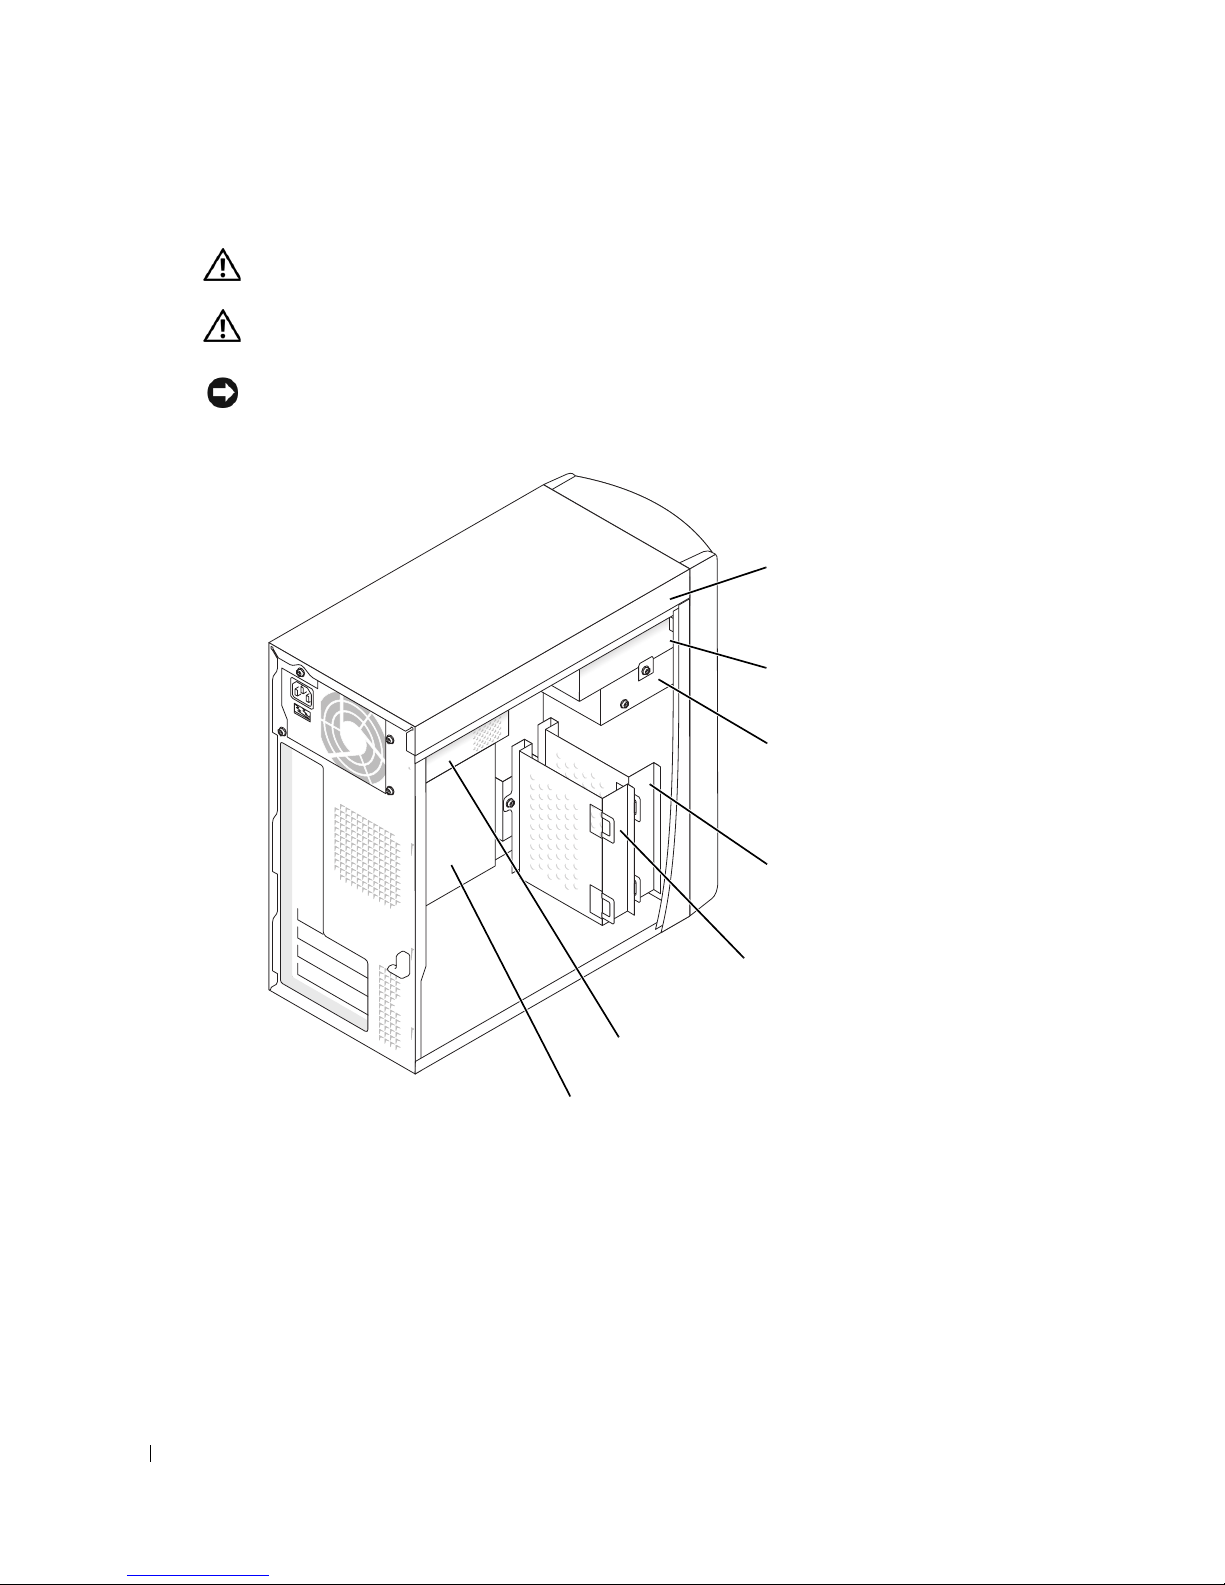
コンピュータの内部
警告: 『製品情報ガイド』の「安全にお使いいただくために」の注意事項に従い、この項の
手順を開始してください。
警告: 感電防止のため、カバーを開く前に必ず、コンピュータの電源プラグをコンセントか
ら抜いてください。
注意: コンピュータカバーを開く際には、システム基板から誤ってケーブルを抜かないよう
に注意してください。
プライマリハードドライブベイ
電源装置
システム基板
フロッピードライブベイ
セカンド CD または
DVD ドライブベイ
セカンドハードドライブベイ
CD または DVD ドライブ
ベイ
Page 45

クイックリファレンスガイド 45
コンピュータのセットアップ
警告: 『製品情報ガイド』の「安全にお使いいただくために」の注意事項に従い、この項の
手順を開始してください。
注意: お使いのコンピュータに拡張カード(モデムカードなど)が装着されている場合は、背
面パネルのコネクタではなく、拡張カードに該当のケーブルを接続します。
コンピュータを適切にセットアップするには、すべての手順を完了する必要があります。手
順別の指示を参照してください。
1
キーボードとマウスを接続します。
注意: PS/2 マウスと USB マウスを同時に動作させることはできません。
メモ: USB 対応のマウスまたはキーボードには、コンピュータの背面にある USB コネクタを
使用します。
2
モデムケーブルまたはネットワークケーブルを接続します。
電話回線ではなくネットワークケーブルをネットワークコネクタに挿入します。オプ
ションのモデムを使用する場合は、そのモデムに電話回線を接続します。
注意: モデムケーブルをネットワークアダプタに接続しないでください。電話回線からの電
圧でネットワークアダプタが損傷する場合があります。
3
モニタを接続します。
コネクタのピンを曲げないように注意しながら、モニタケーブルをコネクタに挿入しま
す。ケーブルコネクタの蝶ネジを締めます。
メモ: 画面背後の下にビデオコネクタが装着されているモニタもあります。コネクタの位置
については、モニタに付属しているマニュアルを参照してください。
4
スピーカーを接続します。
5
電源ケーブルをコンピュータ、モニタ、およびデバイスに接続し、電源ケーブルの他端
をコンセントに挿入します。
6
電圧選択スイッチがお住まいの地域に合わせて正しく設定されていることを確認して
ください。お使いのコンピュータには、手動の電圧選択スイッチが装着されています。
背面パネルに電圧選択スイッチが付いているコンピュータでは、正しい動作電圧を手動
で設定する必要があります。
注意: 手動電圧選択スイッチが付いているコンピュータへの損傷を防ぐため、スイッチはお
住まいの地域の AC 電源に最も近い電圧に設定してください。
メモ: コンピュータに同梱されていないデバイスやソフトウェアをインストールする場合は、
そのデバイスやソフトウェアがお使いのコンピュータおよびオペレーティングシステムに対
応していることを、デバイスやソフトウェアの付属マニュアルで事前に確認するか、ベンダー
に事前にお問い合わせください。
Page 46
46 クイックリファレンスガイド
www.dell.com | support.dell.com
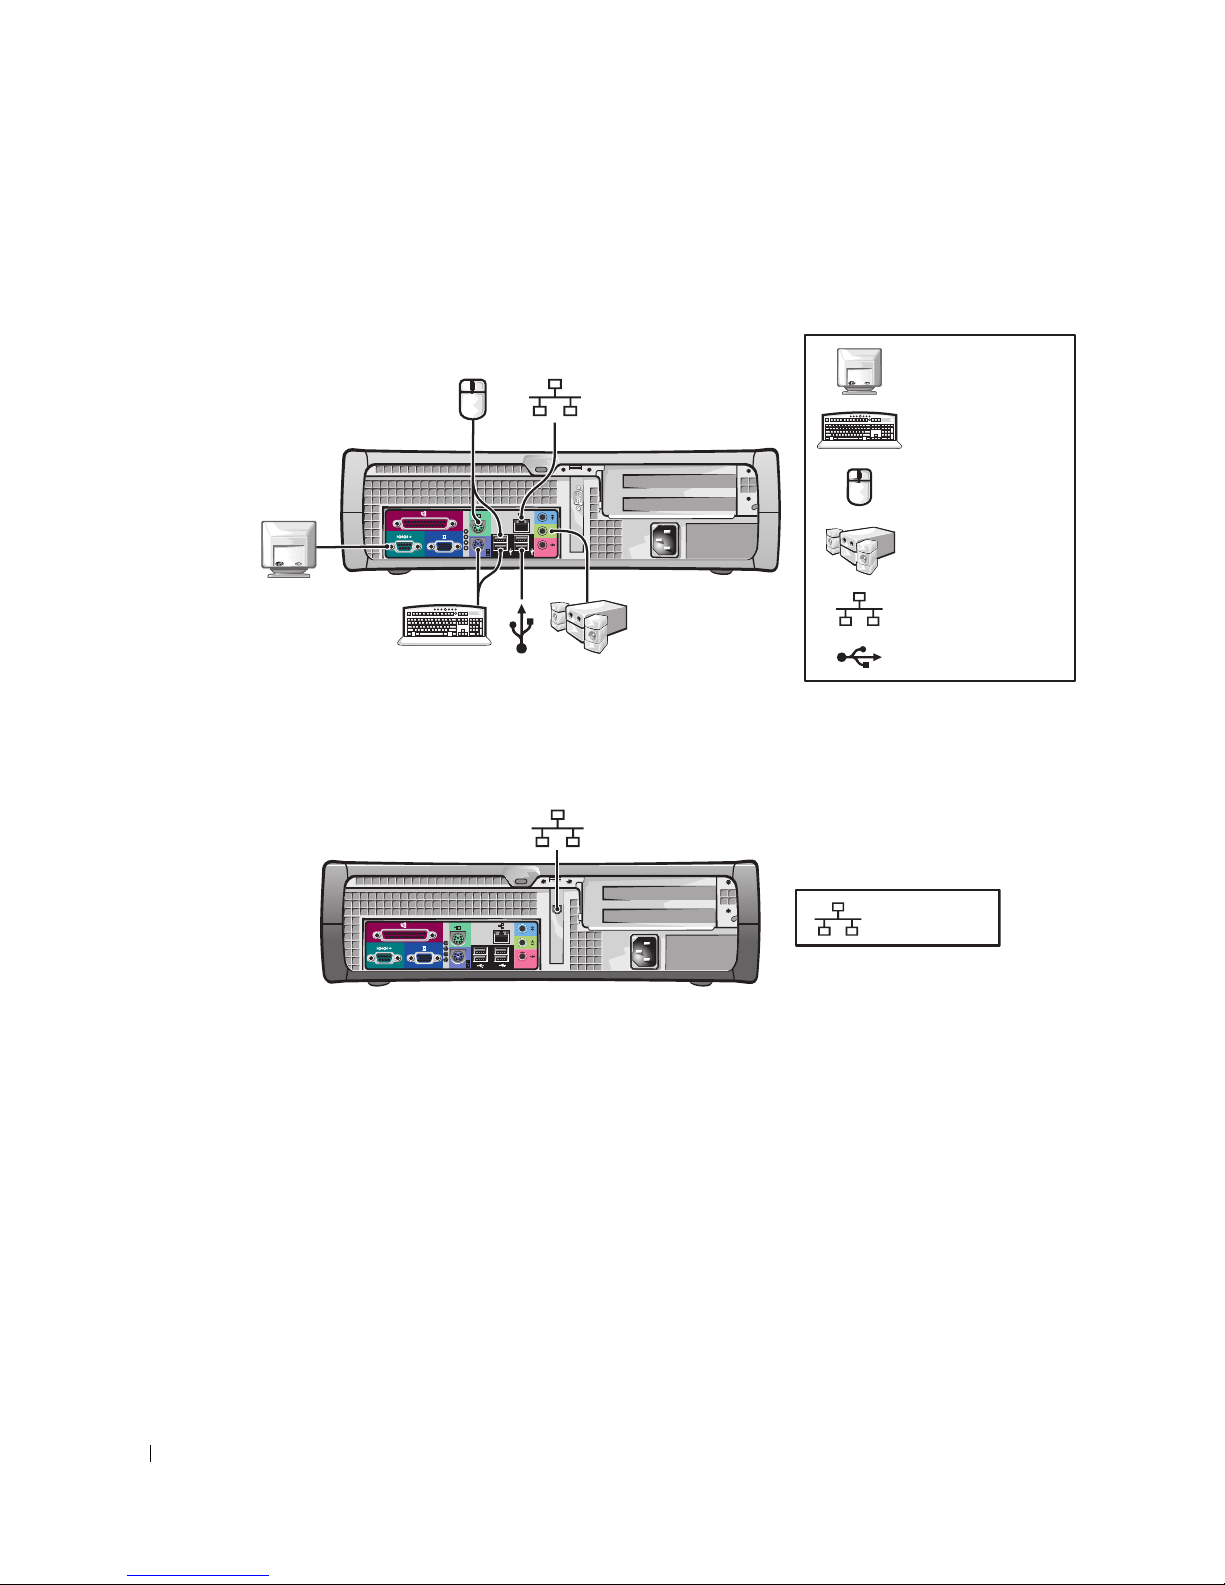
スモールデスクトップコンピュータ
カードを使用しない場合のセットアップ
カードを使用する場合のセットアップ
A
B
C
D
モニタ
キーボード
マウス
スピーカー
ネットワーク
USB
ネットワーク
Page 47
クイックリファレンスガイド 47
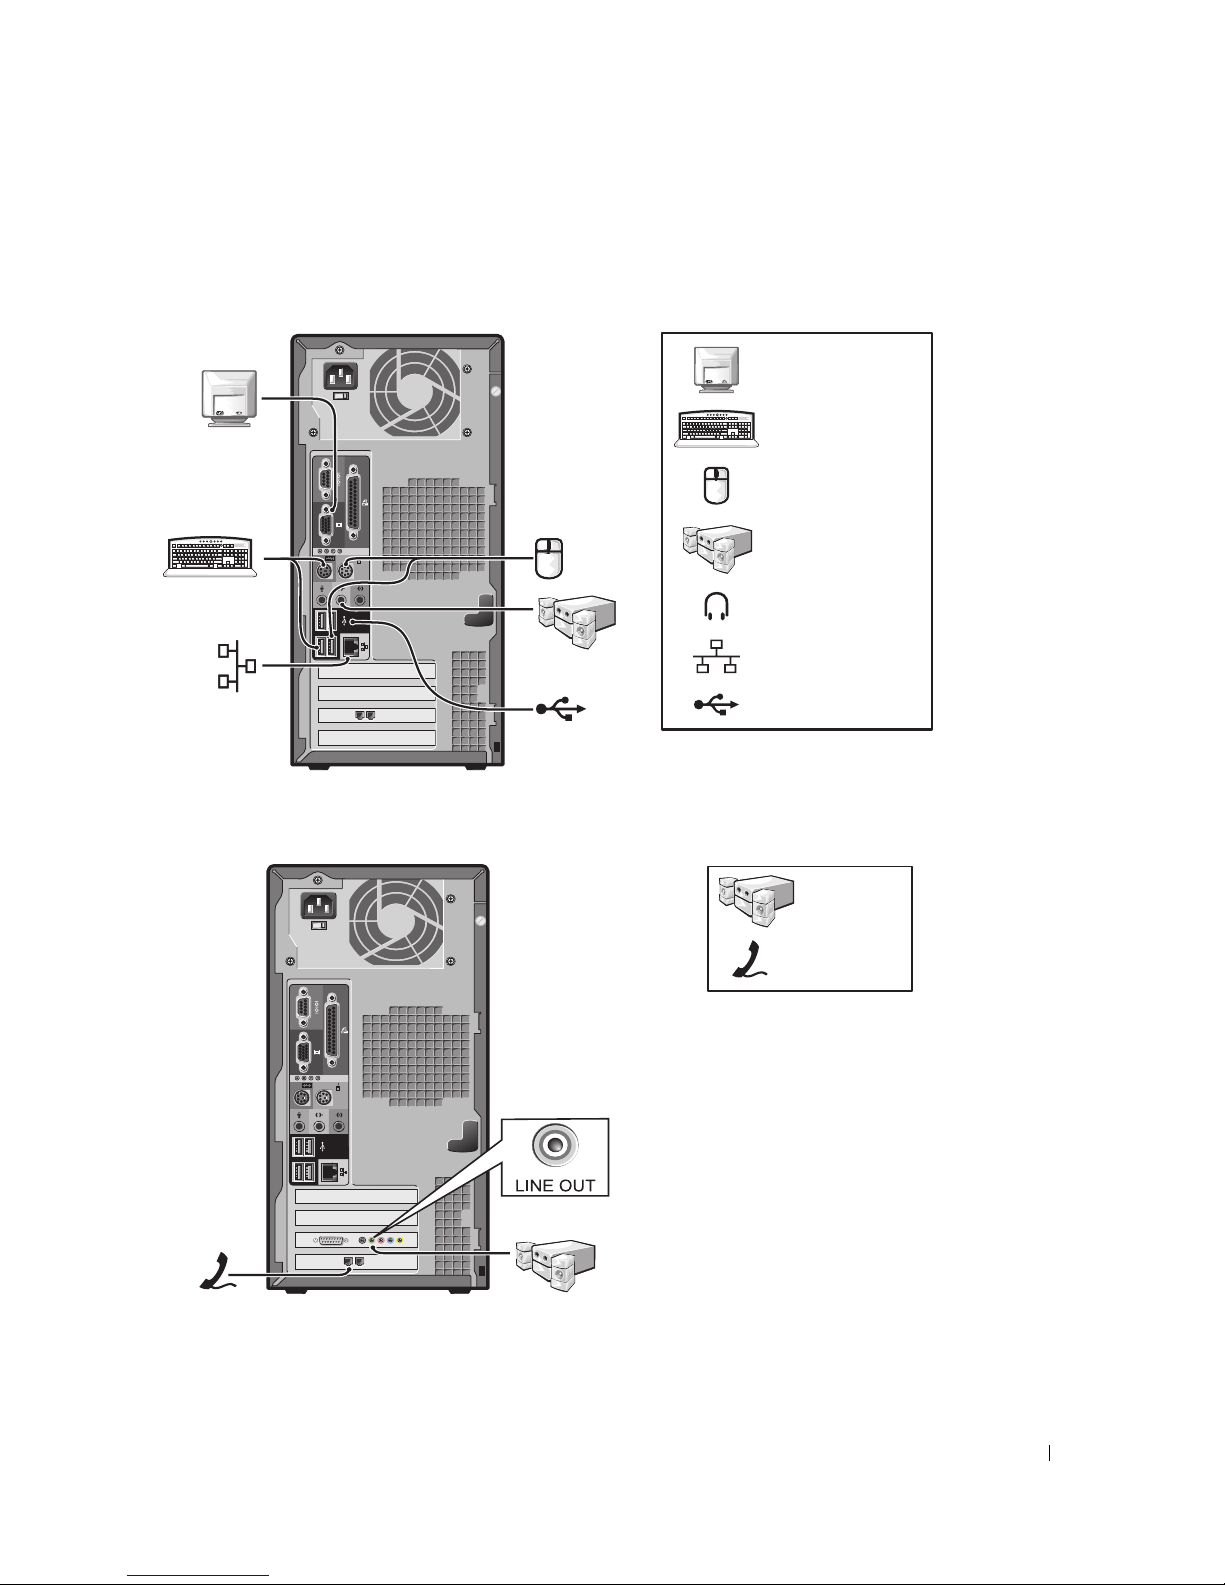
ミニタワーコンピュータ
カードを使用しない場合のセットアップ
カードを使用する場合のセットアップ
モニタ
キーボード
マウス
スピーカー
ヘッドフォン
ネットワーク
USB
スピーカー
テレフォニー
/
モデム
Page 48
48 クイックリファレンスガイド
www.dell.com | support.dell.com
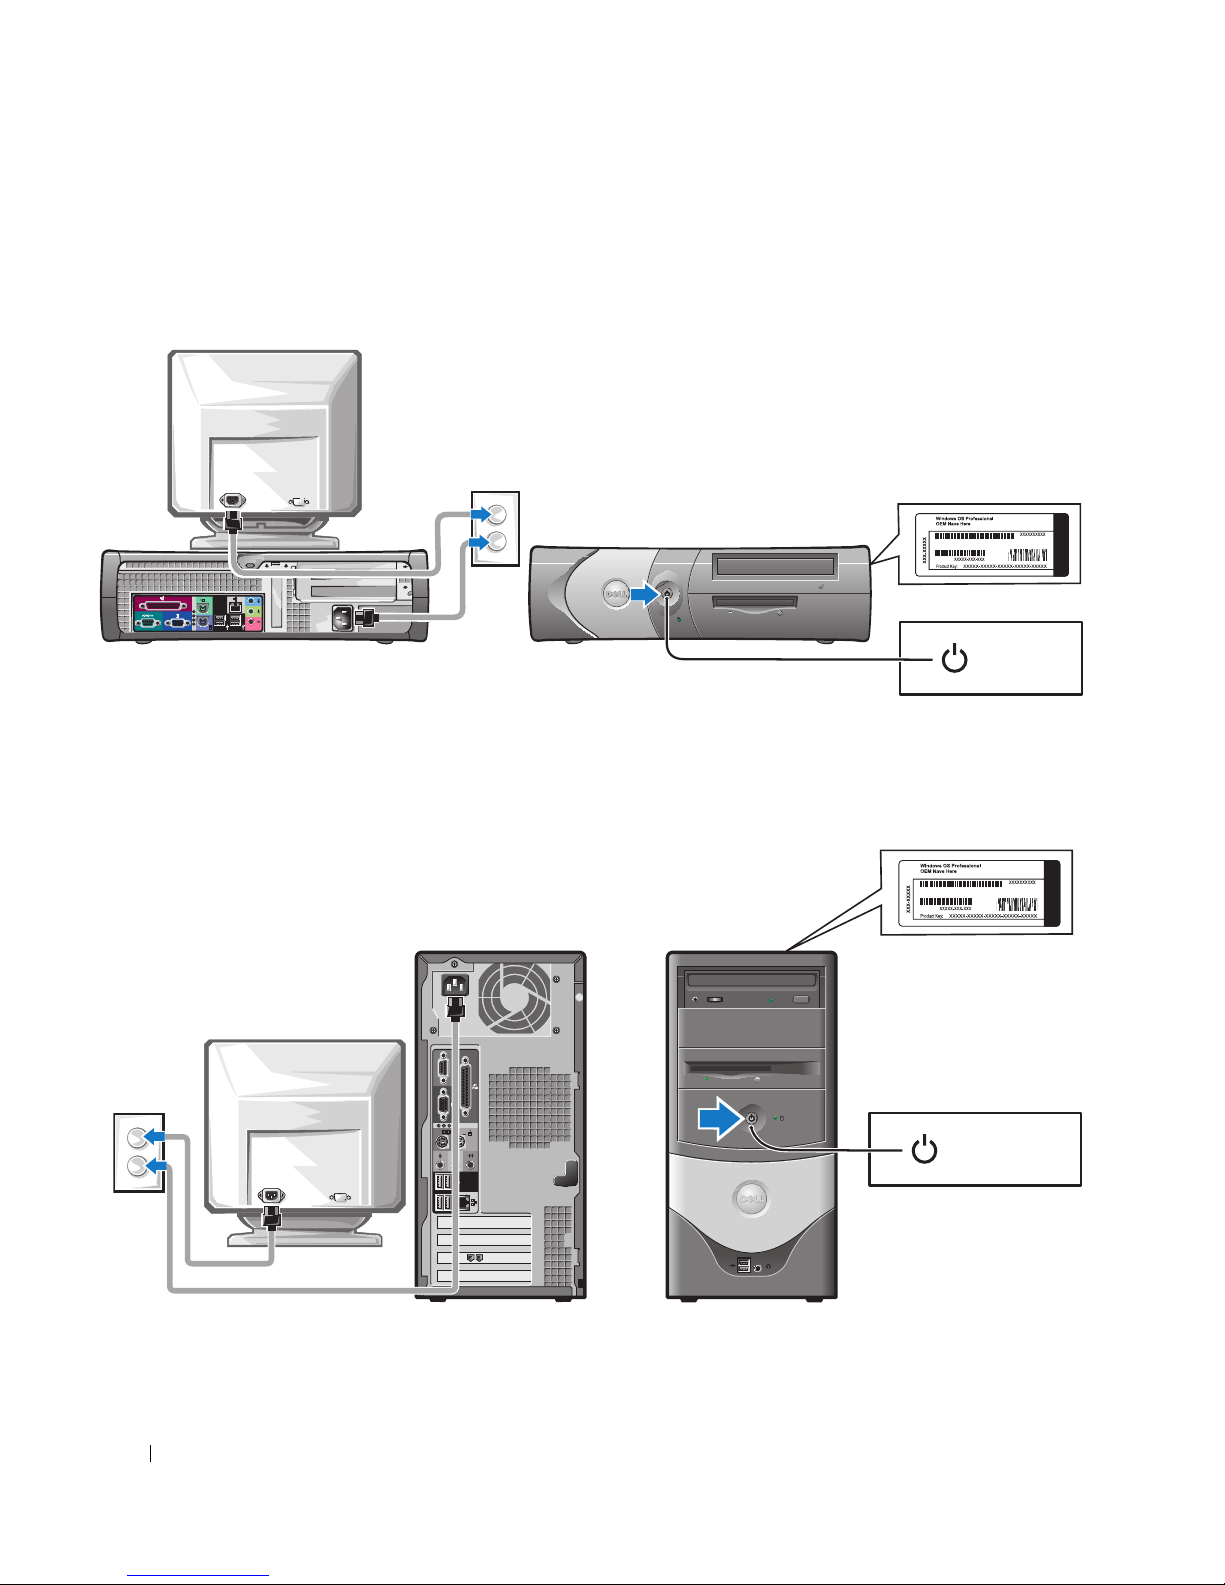
セットアップ完了
スモールデスクトップコンピュータ
ミニタワーコンピュータ
電源
Microsoft Windows
プロダクトキー
電源
Microsoft Windows
プロダクトキー
Page 49

クイックリファレンスガイド 49
問題の解決
デルは、コンピュータの使用中に発生した障害に対処するためのツールを用意しています。
コンピュータに関する最新のトラブルシューティング情報については、デルサポートウェブ
サイト
support.dell.com を参照してください。
デルの支援を必要とするようなコンピュータの障害が発生した場合は、障害の詳しい説明、
ビープコード、または診断ライトのパターン、および以下のエクスプレスサービスコードと
サービスタグを書き留め、コンピュータを使用している地域のデルにお問い合わせください。
エクスプレスコードとサービスタグの例については、
37
ページの「お使いのコンピュータ
に関する情報の検索」
を参照してください。
エクスプレスサービスコード
:___________________________
サービスタグ
:___________________________
Dell Diagnostics(診断)プログラム
警告: 『製品情報ガイド』の「安全にお使いいただくために」の注意事項に従い、この項の
手順を開始してください。
Dell Diagnostics(診断)プログラムを使用する場合
コンピュータに問題が発生した場合、デルテクニカルサポートにお問い合わせになる前に、
オンラインユーザーズガイドの「問題の解決」のチェック事項を実行してから、
Dell
Diagnostics
(診断)を実行してください。
作業を始める前に、これらの手順を印刷しておくことをお勧めします。
注意: Dell Diagnostics(診断)プログラムは Dell™ コンピュータでのみ機能します。
セットアップユーティリティを起動し、コンピュータの設定情報を閲覧して、テストするデ
バイスがセットアップユーティリティに表示され、アクティブであることを確認します。
ハードドライブまたはオプションの『
Drivers and Utilities CD
』(『
ResourceCD
』とも呼ばれ
ます)から
Dell Diagnostics
(診断)を起動します。
ハードドライブからの Dell Diagnostics(診断)プログラムの起動
1
コンピュータの電源を入れます(または再起動します)。
2
DELL™
ロゴが表示されたら、すぐに
<F12>
を押します。
メモ: Diagnostics(診断)ユーティリティパーティションが検出されなかったというメッセー
ジが表示された場合は、『Drivers and Utilities CD』から Dell Diagnostics(診断)プログラムを
実行します。
キーを押すタイミングが遅れて、オペレーティングシステムのロゴが表示されてしまっ
たら、
Microsoft® Windows®
デスクトップが表示されるまでそのまま待機します。デ
スクトップが表示されたら、コンピュータをシャットダウンして、操作をやり直してく
ださい。
3
起動デバイスの一覧が表示されたら、
Boot to Utility Partition をハイライト表示し
て、
<Enter>
を押します。
Page 50

50 クイックリファレンスガイド
www.dell.com | support.dell.com
4
Dell Diagnostics
(診断)プログラムの Main Menu
(メインメニュー) が表示された
ら、実行するテストを選びます。
オプションの『Drivers and Utilities CD』からの Dell Diagnostics(診断)プログラムの起動
1
『
Drivers and Utilities CD
』を挿入します。
2
コンピュータをシャットダウンして、再起動します。
DELL
ロゴが表示されたら、すぐに
<F12>
を押します。
ここで時間をおきすぎて
Windows
ロゴが表示された場合、
Windows
デスクトップが
表示されるまで待ちます。デスクトップが表示されたら、コンピュータをシャットダウ
ンして、操作をやり直してください。
メモ: 次の手順では、起動順序を 1 回だけ変更します。次回の起動時には、コンピュータは
セットアップユーティリティで指定したデバイスから起動します。
3
起動デバイスの一覧が表示されたら、
IDE CD-ROM Device をハイライト表示して、
<Enter>
を押します。
4
CD
の起動メニューから IDE CD-ROM Device オプションを選びます。
5
表示されたメニューから Boot from CD-ROM(CD-ROM
から起動)
オプションを選
びます。
6
1
と入力して、
ResourceCD
メニューを起動します。
7
2
と入力して、
Dell Diagnostics
(診断)プログラムを起動します。
8
番号の付いた一覧から Run the 32 Bit Dell Diagnostics(32
ビットのデル診断を実
行)
を選びます。複数のバージョンが表示されている場合、お使いのコンピュータに適
切なバージョンを選びます。
9
Dell Diagnostics
(診断)プログラムの Main Menu
(メインメニュー)
が表示された
ら、実行するテストを選びます。
Dell Diagnostics(診断)プログラムのメインメニュー
1
Dell Diagnostics
(診断)プログラムがロードされ Main Menu
(メインメニュー)
画
面が表示されたら、希望のオプションのボタンをクリックします。
オプション 機能
Express Test
デバイスのクイックテストを実行します。通常、このテストは 10 ~ 20 分かか
り、お客様の操作は必要ありません。最初に Express Test(エクスプレステ
スト)を実行すると、問題をさらにすばやく特定することができます。
Extended Test
デバイスの全体チェックを実行します。通常このテストには 1 時間以上かか
り、質問に定期的に応答する必要があります。
Custom Test
特定のデバイスをテストします。実行するテストをカスタマイズできます。
Symptom Tree
最も一般的な症状を一覧表示し、問題の症状に基づいたテストを選択できます。
Page 51

クイックリファレンスガイド 51
2
テスト中に問題を検出すると、エラーコードと問題の説明を示すメッセージが表示され
ます。エラーコードと問題の説明を記録し、画面の指示に従います。
エラーが解決できない場合、デルにお問い合わせください。
メモ: お使いのコンピュータのサービスタグは、各テスト画面の上部にあります。デルにお問
い合わせになると、テクニカルサポート担当者がお客様のサービスタグをお尋ねします。
3
Custom Test
(カスタムテスト)
または Symptom Tree
(症状ツリー)
オプションか
らテストを実行する場合は、該当するタブをクリックします(詳細については、以下の
表を参照してください)。
4
『
Drivers and Utilities CD
』から
Dell Diagnostics
(診断)プログラムを実行している場
合、テストが終了したら
CD
を取り出します。
5
テスト画面を閉じて、
Main Menu
(メインメニュー)
画面に戻ります。
Dell Diagnostics
(診断)プログラムを終了して、コンピュータを再起動するには、
Main Menu
(メイ
ンメニュー)
画面を閉じます。
システムライト
電源ライトはコンピュータの問題を示す場合があります。
タブ 機能
Results
テストの結果、および発生したすべてのエラーの状態を表示します。
Errors
発生したエラーの状態、エラーコード、および問題の説明を表示します。
Help
テストについて説明します。また、テストを実行するための要件を示す
場合もあります。
Configuration
選択したデバイスのハードウェア構成を表示します。
Dell Diagnostics(診断)プログラムは、セットアップユーティリティ、メ
モリ、および様々な内部テストからすべてのデバイスの設定情報を入手し
て、画面の左側ペインのデバイス一覧に表示します。デバイス一覧には、
コンピュータに取り付けられたすべてのコンポーネント名、またはコン
ピュータに接続されたすべてのデバイス名が表示されるとは限りません。
Parameters
テストの設定を変更して、テストをカスタマイズすることができます。
電源ライト 問題の説明 推奨される処置
緑色 電源がオンで、コンピュータは
正常に動作しています。
何の対策も必要ありません。
緑色の点滅 コンピュータはサスペンド状態
です(Microsoft
®
Windows®
2000 および Windows XP)。
電源ボタンを押すか、マウスを動かすか、
キーボードのキーを押して、通常の動作状
態に戻します。
Page 52

52 クイックリファレンスガイド
www.dell.com | support.dell.com
診断ライト
警告: 『製品情報ガイド』の「安全にお使いいただくために」の注意事項に従い、この項の
手順を開始してください。
問題のトラブルシューティングを容易にするため、お使いのコンピュータには背面パネルに
「
A
」、「B」、「C」、および「D」とラベルのついた
4
つのライトがあります。これらのライト
は、黄色または緑色です。コンピュータが正常に起動した場合、起動プロセスが完了すると
ライトのパターンとコードが変化します。システム起動プロセスの
POST
が正常に終了する
と、
4
つのライトはすべて緑色に点灯します。
POST
プロセス中にコンピュータが誤動作し
た場合、ライトに表示されるパターンで、プロセスのどこでコンピュータが停止したか識別
できる場合があります。
緑色が数回点滅
してオフになる
構成エラーが存在します。 53 ページの「診断ライト」 をチェックし
て、特定の問題が発生していないかどうか
を確認します。
黄色 Dell Diagnostics(診断)プログ
ラムによるテストの実行中です。
または、システム基板上のデバイ
スに障害があるか、正しく取り付
けられていません。
Dell Diagnostics(診断)プログラムが実
行している場合は、テストの完了まで待ち
ます。
53 ページの「診断ライト」 をチェックし
て、特定の問題が発生していないかどうか
を確認します。
コンピュータが起動しない場合は、デルに
お問い合わせになり、テクニカルサポート
を受けてください。
黄色の点滅 電源装置またはシステム基板で
障害が発生しました。
53 ページの「診断ライト」 をチェックし
て、特定の問題が発生していないかどうか
を確認します。オンラインユーザーズガイ
ドで「電源の問題」を参照してください。
POST 中の緑色と
ビープコード
BIOS の実行中に問題が検出され
ました。
ビープコードの診断方法については、
55 ページの「ビープコード」を参照して
ください。また、53 ページの「診断ライ
ト」 をチェックして、特定の問題が発生し
ていないかどうかを確認します。
POST 中の緑色の
電源ライト、
ビープコードな
し、ビデオなし
モニタまたはグラフィックスカー
ドで障害が発生したか、カードが
正しく取り付けられていません。
53 ページの「診断ライト」 をチェックし
て、特定の問題が発生していないかどうか
を確認します。
POST 中の電源
ライトが緑色で、
ビープコードはな
いが、コンピュー
タがロックアップ
される
システム基板に取り付けられた
デバイスで障害が発生した可能性
があります。
53 ページの「診断ライト」 をチェックし
て、特定の問題が発生していないかどうか
を確認します。問題を確認できない場合
は、デルにお問い合わせになり、テクニカ
ルサポートを受けてください。
電源ライト 問題の説明 推奨される処置
Page 53
クイックリファレンスガイド 53
ライト
パターン
問題の説明 推奨される処置
オフ
オフ
オフ
オフ
コンピュータが通常のオフの
状態、または BIOS に障害が
起こっている可能性があります。
•
コンピュータが機能しているコンセントに接続され、
電源ボタンを押していることを確認します。
黄色
緑色
黄色
黄色
プロセッサの障害が発生した
可能性があります。
•
プロセッサを取り付けなおして、コンピュータを再起
動します。
緑色
緑色
黄色
黄色
メモリモジュールが検出されま
したが、メモリに障害が発生して
います。
•
取り付けているメモリモジュールが
1
つの場合、その
モジュールを取り付けなおしてコンピュータを再起動
します。
•
取り付けているメモリモジュールが
2
つの場合、モ
ジュールを取り外し、
1
つのモジュールを取り付けな
おしてコンピュータを再起動します。コンピュータが
正常に起動するのであれば、もう
1
つのモジュールを
取り付けなおします。
•
同じ種類の正常に動作しているメモリがある場合、そ
のメモリをコンピュータに取り付けます。
•
問題が解決しない場合、デルにお問い合わせください。
黄色
黄色
緑色
黄色
PCI 拡張カードに障害が起こって
いる可能性があります。
•
カード(ビデオカードではない)を取り外し、コン
ピュータを再起動してコンフリクトが起きているか調
べます。
•
問題が解決しない場合は、取り外したカードを取り付
け、別のカードを取り外して、コンピュータを再起動
します。
•
各カードでこの手順を繰り返します。コンピュータが
正常に起動する場合は、コンピュータから取り外した
最後のカードのリソースコンフリクトのトラブル
シューティングを行います(
56
ページの「ソフトウェ
アとハードウェアの非互換性の解決」を参照してくだ
さい)。
•
各カードを
1
枚ずつ異なる
PCI
スロットに取り付けま
す。カードを取り付けるごとにコンピュータを再起動
します。
•
問題が解決しない場合、デルにお問い合わせください。
Page 54
54 クイックリファレンスガイド
www.dell.com | support.dell.com
黄色
緑色
緑色
黄色
IDE ドライブに障害が起こって
いる可能性があります。
•
すべての
IDE
ドライブ電源ケーブルおよびデータケー
ブルを接続しなおし、コンピュータを再起動します。
緑色
緑色
緑色
黄色
USB に障害が起こっている可能性
があります。
•
すべての
USB
デバイスを取り付けなおし、ケーブル接
続を確認して、コンピュータを再起動します。
黄色
黄色
黄色
緑色
メモリモジュールが検出されま
せんでした。
•
すべてのメモリモジュールを取り付けなおして、コン
ピュータを再起動します。
•
メモリコネクタの不良の可能性を排除するために、す
べてのメモリモジュールを取り外し、メモリモジュー
ルを
1
つ取り付け(コンピュータが単一モジュールに
対応している場合)、コンピュータを再起動します。コ
ンピュータが正常に起動する場合、メモリモジュール
を別のコネクタに移動して、コンピュータを再起動し
ます。障害のあるコネクタが見つかるまで、またはエ
ラーなしですべてのモジュールを取り付けなおすまで
続けます。
黄色
緑色
黄色
緑色
メモリモジュールは検出されまし
たが、メモリ構成または互換性エ
ラーが存在します。
•
特別なメモリモジュール
/
メモリコネクタ設置要件が
ないことを確認します。詳細については、オンライン
ユーザーズガイドの「メモリ」を参照してください。
•
取り付けるメモリモジュールがコンピュータと互換性
があるか確認します。
•
問題が解決しない場合、デルにお問い合わせください。
黄色
緑色
緑色
緑色
別の障害が発生しました。 •
取り付けられたすべてのハードドライブからシステ
ム基板へのケーブルが正しく接続されているか確認
します。
•
モニタ画面に表示されるコンピュータメッセージを確
認します。
•
問題が解決しない場合、デルにお問い合わせください。
緑色
緑色
緑色
緑色
POST 後、コンピュータは通常の
動作状態にあります。
•
特にありません。
ライト
パターン
問題の説明 推奨される処置
Page 55

クイックリファレンスガイド 55
ビープコード
お使いのコンピュータの起動時に、モニタにエラーメッセージまたは問題を表示できない場
合、ビープ音が連続して鳴ることがあります。この連続したビープ音はビープコードと呼ば
れ、問題を特定します。ビープコードには、ビープ音がまず
1
回鳴り、次に連続して
3
回
鳴ってから、
1
回鳴るものがあります(コード
1-3-1
)。このビープコードは、コンピュータ
にメモリの問題が発生していることを示します。
起動時にコンピュータがビープ音を発する場合、次の手順を実行します。
1
ビープコードを書き留めます。
2
より重大な原因を調べる方法については、49ページの「
Dell Diagnostics
(診断)プロ
グラム」を参照してください。
3
デルに連絡してテクニカルサポートを受けてください。
コード 原因 コード 原因
1-1-2
マイクロプロセッサレジスタ障害
3-1-4
スレーブ割り込みマスクレジスタ
障害
1-1-3
NVRAM 読み書き障害
3-2-2
割り込みベクタロード障害
1-1-4
ROM BIOS チェックサム障害
3-2-4
Keyboard Controller テスト障害
1-2-1
プログラム可能インターバルタイマ
障害
3-3-1
NVRAM 電力損失
1-2-2
DMA 初期化障害
3-3-2
無効な NVRAM 構成
1-2-3
DMA ページレジスタ読み書き障害
3-3-4
Video Memory テスト障害
1-3
Video Memory テスト障害
3-4-1
画面初期化障害
1-3-1 ~ 2-4-4 メモリが正しく認識されていないか
使用されていない
3-4-2
画面リトレース障害
3-1-1
スレーブ DMA レジスタ障害
3-4-3
ビデオ ROM の検索障害
3-1-2
マスタ DMA レジスタ障害
4-2-1
タイマチックなし
3-1-3
マスタ割り込みマスクレジスタ障害
4-2-2
シャットダウン障害
4-2-3
ゲート A20 障害
4-4-1
シリアルまたはパラレルポート
テスト障害
4-2-4
保護モードで予測外の中断が発生
4-4-2
シャドウメモリにコードを解凍で
きない
4-3-1
アドレス 0FFFFh 以上のメモリ障害
4-4-3
数値演算コプロセッサテスト障害
4-3-3
タイマ-チップカウンタ 2 の障害
4-4-4
キャッシュテスト障害
4-3-4
刻時機構が停止
Page 56

56 クイックリファレンスガイド
www.dell.com | support.dell.com
Dell™ IDE ハードドライブ診断プログラムの実行
Dell IDE
ハードドライブ診断プログラムは、ハードドライブをテストしてハードドライブの
障害をトラブルシューティングまたは確認するためのユーティリティです。
1
コンピュータの電源をオンにします(すでにオンになっている場合は、再起動します)。
2
画面の右上角に
F2 = Setup
と表示されたら、
<Ctr><Alt><D>
を押します。
3
画面の指示に従います。
障害がレポートされた場合は、オンラインユーザーズガイドで「問題の解決」の「ハードド
ライブの問題」を参照してください。
ソフトウェアとハードウェアの非互換性の解決
オペレーティングシステムのセットアップ中にデバイスが検知されないか、検知されたが正
しく設定されていない場合は、ハードウェアに関するトラブルシューティングを使って非互
換性を解決できます。
Microsoft® Windows® 2000
オペレーティングシステムで、デバイス
マネージャを使用して非互換性を解決することもできます。
Windows XP
ハードウェアに関するトラブルシューティングを使って非互換性を解決するには
1
スタート ボタンをクリックして、
ヘルプとサポート をクリックします。
2
検索 領域で、
ハードウェアに関するトラブルシューティング
と入力し、矢印をクリックし
て検索を開始します。
3
検索結果 一覧で、
ハードウェアに関するトラブルシューティング をクリックします。
4
ハードウェアに関するトラブルシューティング 一覧で、
コンピュータにあるハードウェ
アの競合を解決する必要があります
をクリックして、
次へ をクリックします。
Windows 2000
デバイスマネージャを使用して非互換性を解決するには
1
スタート ボタンをクリックし、
設定 をポイントして、
コントロール パネル をクリッ
クします。
2
コントロール パネル ウィンドウで、
システム をダブルクリックします。
3
ハードウェア タブをクリックします。
4
デバイスマネージャ をクリックします。
5
表示 をクリックして、
リソース(接続別)
をクリックします。
6
割り込み要求(
IRQ)をダブルクリックします。
正しく設定されていないデバイスの横には黄色の感嘆符(
!
)が付いています。赤色の
X
印が付いている場合、デバイスが無効になっています。
Page 57

クイックリファレンスガイド 57
7
感嘆符が付いているデバイスのいずれかをダブルクリックして、
プロパティ ウィンドウ
を表示します。
プロパティ ウィンドウの デバイスの状態 領域に、再設定が必要なカードまたはデバイ
スが表示されます。
8
デバイスを再設定するか、デバイスをデバイスマネージャから削除します。デバイスの
設定に関する情報については、デバイスに付属のマニュアルを参照してください。
ハードウェアに関するトラブルシューティングを使って非互換性を解決するには
1
スタート ボタンをクリックして、
ヘルプ をクリックします。
2
目次 タブで トラブルシューティングと保守 をクリックし、
Windows 2000
に関する
トラブルシューティング
をクリックして、
ハードウェア をクリックします。
ハードウェアに関するトラブルシューティング 一覧で、
コンピュータにあるハードウェアの
競合を解決する必要があります
をクリックして、
次へ をクリックします。
Microsoft® Windows® XP システムの復元の使い方
Microsoft® Windows® XP
オペレーティングシステムでは、ハードウェア、ソフトウェア、
またはその他のシステム設定を変更したために、コンピュータが正常に動作しなくなってし
まった場合、システムの復元を使用して、コンピュータを以前の動作状態に復元することが
できます(データファイルへの影響はありません)。システムの復元の使い方については、
Windows
ヘルプとサポートセンターを参照してください。
注意: データファイルのバックアップを定期的に作成してください。システムの復元は、デー
タファイルの変更を監視したり、データファイルを復元することはできません。
復元ポイントの作成
1
スタート ボタンをクリックして、
ヘルプとサポート をクリックします。
2
システムの復元 をクリックします。
3
画面の指示に従います。
コンピュータを以前の動作状態に復元する
注意: コンピュータを以前の動作状態に復元する前に、開いているファイルをすべて保存し
てから閉じ、実行中のプログラムをすべて終了します。システムの復元が完了するまで、いか
なるファイルまたはプログラムも変更したり、開いたり、削除しないでください。
1
スタート ボタンをクリックし、
すべてのプログラム
→
アクセサリ
→
システムツール
とポイントしてから、
システムの復元 をクリックします。
2
コンピュータを以前の状態に復元する
が選択されていることを確認して、
次へ
をク
リックします。
3
コンピュータを以前の状態に復元する時点の日付をクリックします。
復元ポイントの選択 画面に、復元ポイントが選べるカレンダーが表示されます。復元
ポイントが利用できる日付は太字で表示されます。
Page 58

58 クイックリファレンスガイド
www.dell.com | support.dell.com
4
復元ポイントを選んで、
次へ をクリックします。
日付に復元ポイントが
1
つしか表示されない場合、その復元ポイントが自動的に選ばれ
ます。複数の復元ポイントが利用できる場合、使用する復元ポイントをクリックします。
5
次へ をクリックします。
システムの復元がデータの収集を完了した後、
復元は完了しました 画面が表示され、コ
ンピュータは再起動します。
6
コンピュータが再起動したら、OK
をクリックします。
復元ポイントを変更するには、別の復元ポイントを使って手順を繰り返すか、または復元を
取り消すことができます。
最後のシステムの復元を元に戻す
注意: 最後のシステムの復元を元に戻す前に、開いているファイルをすべて保存してから閉
じ、実行中のプログラムをすべて終了します。システムの復元が完了するまで、いかなるファ
イルまたはプログラムも変更したり、開いたり、削除しないでください。
1
スタート ボタンをクリックし、
すべてのプログラム
→
アクセサリ
→
システムツール
とポイントしてから、
システムの復元 をクリックします。
2
以前の復元を取り消す をクリックして、
次へ をクリックします。
3
次へ をクリックします。
システムの復元 画面が表示されて、コンピュータが再起動します。
4
コンピュータが再起動したら、OK
をクリックします。
システムの復元を有効にする
空き容量が
200 MB
以下のハードディスクに
Windows XP
を再インストールした場合、シ
ステムの復元は自動的に無効に設定されています。システムの復元が有効になっているか確
認するには、次の手順を実行します。
1
スタート ボタンをクリックして、
コントロール パネル をクリックします。
2
パフォーマンスとメンテナンス をクリックします。
3
システム をクリックします。
4
システムの復元 タブをクリックします。
5
すべてのドライブでシステムの復元を無効にする にチェックマークが外されているか
確認します。
Page 59

クイックリファレンスガイド 59
Microsoft® Windows® XP の再インストール
はじめに
新しくインストールしたドライバの問題を解消するために
Windows XP
オペレーティング
システムを再インストールする場合、
Windows XP
のデバイスドライバのロールバックを試
してみます。デバイスドライバのロールバックを実行しても問題が解決されない場合、シス
テムの復元を使ってオペレーティングシステムを新しいデバイスドライバがインストール
される前の動作状態に戻します。
注意: この手順を実行する前に、お使いのプライマリハードドライブのすべてのデータファ
イルをバックアップします。ハードドライブ構成において、プライマリハードドライブはコン
ピュータによって 1 番目のドライブとして認識されます。
Windows XP
を再インストールするには、以下のアイテムが必要です。
•
Dell™
『オペレーティングシステム
CD
』
•
Dell『Drivers and Utilities CD
』
メモ: 『Drivers and Utilities CD』には、コンピュータの製造工程でプリインストールされたド
ライバが収録されています。『Drivers and Utilities CD』を使用するか、デルサポートウェブサ
イトにアクセスして必要なドライバをロードします。
メモ: 『オペレーティングシステム CD』と『Drivers and Utilities CD』はオプションなので、
同梱されていないコンピュータもあります。
Windows XP の再インストール
注意: Windows XP を再インストールするには、Windows XP Service Pack 1 以降を使用する必
要があります。
Windows XP
を再インストールするには、次項にあるすべての手順を記載されている順番に
実行します。
再インストール処理を完了するには、
1 ~ 2
時間かかることがあります。オペレーティング
システムを再インストールした後、デバイスドライバ、アンチウイルスプログラム、および
その他のソフトウェアを再インストールする必要があります。
注意: 『オペレーティングシステム CD』は、Windows XP の再インストール用のオプション
を提供します。オプションはファイルを上書きして、ハードドライブにインストールされてい
るプログラムに影響を与える可能性があります。このような理由から、デルのテクニカルサ
ポート担当者の指示がない限り Windows XP を再インストールしないでください。
注意: Windows XP とのコンフリクトを防ぐため、システムにインストールされているアンチ
ウイルスソフトを無効にしてから Windows XP を再インストールしてください。手順について
は、ソフトウェアに付属しているマニュアルを参照してください。
Page 60

60 クイックリファレンスガイド
www.dell.com | support.dell.com
オペレーティングシステム CD からの起動
1
開いているファイルをすべて保存してから閉じ、実行中のプログラムをすべて終了し
ます。
2
『オペレーティングシステム
CD
』を挿入します。
Install Windows XP(Windows
XP
のインストール)
というメッセージが表示された場合は、
Exit
(終了)
をクリック
します。
3
コンピュータを再起動します。
4
DELL™
ロゴが表示されたら、すぐに
<F12>
を押します。
オペレーティングシステムのロゴが表示された場合、
Windows
のデスクトップが表示
されるのを待って、コンピュータをシャットダウンして、再度試みます。
5
矢印キーを押して CD-ROM を選んでから、
<Enter>
を押します。
6
画面に
Press any key to boot from CD
というメッセ-ジが表示されたら、任意のキー
を押します。
Windows XP のセットアップ
1
セットアップの開始 画面が表示されたら、
<Enter>
を押して
Windows XP
のセット
アップを開始します。
2
Microsoft Windows
ライセンス契約 画面の内容を読み、キーボードの
<F8>
を押し
て、使用許諾契約書に同意します。
3
お使いのコンピュータに
Windows XP
がインストールされていて、現在の
Windows XP
データを復元したい場合は、r
と入力して修復オプションを選び、
CD
を取り出します。
4
新たに
Windows XP
をインストールする場合は、
<Esc>
を押して、オプションを選択
します。
5
<Enter>
を押してハイライト表示されたパーティション( 推奨)を選び、画面の指示に
従います。
Windows XP
セットアップ 画面が表示され、オペレーティングシステムは、ファイル
のコピーおよびデバイスのインストールを開始します。コンピュータは自動的に数回再
起動します。
メモ: ハードドライブの容量やコンピュータの速度によって、セットアップに要する時間は変
わります。
注意: 次のメッセージが表示された場合、どのキーも押さないでください。Press any key
to boot from the CD というメッセージが表示されます。このメッセージが表示された場
合、キーは押さないでください。
6
地域と言語のオプション 画面が表示されたら、お住まいの地域の設定を選び、
次へ を
クリックします。
7
ソフトウェアの個人用設定 画面で、お名前と会社名(オプション)を入力して、
次へ
をクリックします。
Page 61

クイックリファレンスガイド 61
8
コンピュータ名と
Administrator ウィンドウでコンピュータ名(または記載の名前を
承認)およびパスワードを入力して、
次へ をクリックします。
9
モデムのダイヤル情報 画面が表示された場合、必要な情報を入力して、
次へ をクリッ
クします。
10
日付と時間の設定 ウィンドウに日付と時間を入力して、
次へ をクリックします。
11
ネットワークの設定 画面が表示された場合、
標準設定 をクリックして、
次へ をクリッ
クします。
12
Windows XP Professional
を再インストールしている場合、ネットワーク設定に関する
情報が求められることがあります。該当するものを選びます。設定がわからない場合、
デフォルトの選択肢を選びます。
Windows XP
は、オペレーティングシステムのコンポーネントをインストールして、コ
ンピュータを設定します。コンピュータは自動的に再起動します。
注意: 次のメッセージが表示された場合、どのキーも押さないでください。Press any key
to boot from the CD というメッセージが表示されます。このメッセージが表示された場
合、キーは押さないでください。
13
Microsoft Windows
へようこそ 画面が表示されたら、
次へ をクリックします。
14
インターネットに接続する方法を指定してください
というメッセージが表示されたら、
省略
をクリックします。
15
Microsoft
にユーザー登録する準備はできましたか?
の画面が表示されたら、
いいえ、
今回はユーザー登録しません
を選び、
次へ をクリックします。
16
このコンピュータを使うユーザーを指定してください の画面が表示されたら、5 名ま
でユーザーを入力できます。
17
次へ をクリックします。
18
完了 をクリックしてセットアップを完了し、
CD
を取り出します。
19
『
Drivers and Utilities CD
』を使用して、適切なドライバを再インストールします。
20
アンチウイルスソフトウェアを再インストールします。
21
すべてのプログラムを再インストールします。
メモ: Microsoft Office または Microsoft Works Suite プログラムを再インストールしてアク
ティブにするには、Microsoft Office または Microsoft Works Suite CD スリーブの背面にあるプ
ロダクトキー番号が必要です。
Page 62

62 クイックリファレンスガイド
www.dell.com | support.dell.com
『Drivers and Utilities CD』の使い方
Windows
オペレーティングシステムの実行中に『
Drivers and Utilities CD
』(『
ResourceCD
』
とも呼ばれます)を使用するには
メモ: デバイスドライバとユーザーマニュアルにアクセスするには、Windows を実行中に
『Drivers and Utilities CD』を使用する必要があります。
1
コンピュータの電源をオンにして
Windows
デスクトップを起動します。
2
『
Drivers and Utilities CD
』を
CD
ドライブに挿入します。
初めて『
Drivers and Utilities CD
』をご 使用になる場合、
Dell ResourceCD
用の
InstallShield
ウィザードへようこそ ウィンドウが開き、『
Drivers and Utilities CD
』が
インストールを開始することを知らせます。
3
OK をクリックして続行します。
インストールを完了するには、インストールプログラムのプロンプトに従って操作し
ます。
4
Dell ResourceCD
用の
InstallShield
ウィザードへようこそ 画面で、
次へ をクリッ
クします。
5
システムモデル、オペレーティングシステム、デバイスの種類
、および
トピック の適
切な選択をおこないます。
お使いのコンピュータのドライバ
お使いのコンピュータ用のデバイスドライバを一覧表示するには
1
トピック ドロップダウンメニューで、
マイドライバ をクリックします。
『
Drivers and Utilities CD
』はコンピュータのハードウェアとオペレーティングシステ
ムをスキャンし、次にシステム設定用のデバイスドライバの一覧を表示します。
2
該当するドライバをクリックし、画面の指示に従ってお使いのコンピュータ用のドライ
バをダウンロードします。
お使いのコンピュータに利用できるすべてのドライバを一覧表示するには、
トピック ドロッ
プダウンメニューの
ドライバ をクリックします。
Page 63

索引 63
索引
C
CD
オペレーティングシステム
,39
D
Dell Diagnostics(診断)
プログラム ,49
Dell Premier サポートウェ
ブサイト ,38
Drivers and Utilities CD, 37
I
IRQ コンフリクト ,56
M
Microsoft Windows ラベル
,38
R
ResourceCD
Dell Diagnostics(診断)
プログラム ,49
W
Windows 2000
デバイスマネージャ ,56
ハードウェアに関するトラ
ブルシューティング ,56
Windows XP
再インストール ,59
システムの復元 ,57
ハードウェアに関するトラ
ブルシューティング ,56
ヘルプとサポートセンター
,38
え
エラーメッセージ
診断ライト , 51, 52
ビープコード ,55
お
オペレーティングシステム
CD, 39
Windows XP の再インス
トール ,59
取り付けガイド ,39
オペレーティングシステム
CD, 39
こ
コンピュータ
以前の状態の復元 ,57
ビープコード ,55
コンフリクト
ソフトウェアおよびハード
ウェアの非互換性 ,56
さ
サービスタグ ,38
再インストール
Drivers and Utilities CD, 37
ResourceCD, 37
Windows XP, 59
し
システムの復元 ,57
システムライト ,51
診断
Drivers and Utilities CD, 37
デル ,49
ビープコード ,55
ライト ,51, 52
診断ライト , 51, 52
Page 64

64 索引
す
スタンド
取り付け ,42
取り外し ,42
そ
ソフトウェア
コンフリクト ,56
て
デバイスマネージャ ,56
デル
Premier サポートウェブ
サイト ,38
サポートサイト ,38
電源 ,51
電源ライト ,51
と
ドライバ
ResourceCD, 37
トラブルシューティング
Dell Diagnostics(診断)
プログラム ,49
以前の状態の復元 ,57
コンフリクト ,56
診断ライト , 51, 52
ハードウェアに関するトラ
ブルシューティング ,56
ヘルプとサポートセンター
,38
は
ハードウェア
Dell Diagnostics(診断)
プログラム ,49
コンフリクト ,56
ビープコード ,55
ハードウェアに関するトラブ
ルシューティング ,56
ひ
ビープコード ,55
へ
ヘルプとサポートセンター
,38
ま
マニュアル
ResourceCD, 37
オンライン ,38
クイックリファレンス ,37
デバイス ,37
ユーザーズガイド ,37
も
問題
Dell Diagnostics(診断)
プログラム ,49
以前の状態の復元 ,57
コンフリクト ,56
診断ライト , 51, 52
ビープコード ,55
ゆ
ユーザーズガイド ,37
ら
ライト
コンピュータの正面 ,51
コンピュータの背面 ,52
システム ,51
診断 , 51, 52
電源ボタン ,51
ラベル
Microsoft Windows, 38
サービスタグ ,38
 Loading...